1
-
Océ
Posterizer™ Pro
Designer
POP into retail
o
User manual
Application guide
Copyright
© copyright-2010 Océ
All rights reserved. No part of this work may be reproduced, copied, adapted, or transmitted
in any form or by any means without written permission from Océ.
Océ makes no representation or warranties with respect to the contents hereof and specifically disclaims any implied warranties of merchantability or fitness for any particular purpose.
Further, Océ reserves the right to revise this publication and to make changes from time
to time in the content hereof without obligation to notify any person of such revision or
changes.
Edition: 2010-12
Contents
Contents
Chapter 1
Preface.................................................................................................................7
Trademarks.................................................................................................8
Notes for the reader...................................................................................9
Chapter 2
Océ Posterizer™ - Presentation ......................................................................11
Océ Posterizer Pro....................................................................................12
The Designer Module...............................................................................15
Chapter 3
Introduction to the Designer Module.............................................................17
Get to know the main concepts..............................................................18
Get to know the interface of Designer Module......................................21
Check the 'Application folders' ..............................................................24
Chapter 4
Configure the Designer Module......................................................................25
Configure the environment.....................................................................26
What is an environment.....................................................................26
Create or open an environment........................................................27
Modify or delete an environment.....................................................29
Log in as an Administrator......................................................................30
Configure the FTP connection.................................................................31
Define the FTP chart settings - Administrator only.........................31
Open the Chart FTP folder ................................................................33
Prepare the Designer Module for use.....................................................34
What is a chart....................................................................................34
Import a chart.....................................................................................36
Test the FTP connection.....................................................................37
Configure the local printer.......................................................................38
Configure the printer..........................................................................38
Configure the Designer Module preferences settings..........................40
Configure the design panel...............................................................40
Define the units of the Designer Module..........................................42
Define the language of the user interface........................................43
Configure the default settings of the objects...................................44
Define the Administrator password..................................................46
Chapter 5
Basic operations to create and upload your first template..........................47
3
Contents
Create your first template........................................................................48
Prepare your first template for use in the data entry module..............50
Chapter 6
Advanced settings to create templates..........................................................53
What is a template...................................................................................54
Create or open a template.......................................................................55
Template creation: overview.............................................................55
Create a template...............................................................................57
Open an existing template.................................................................58
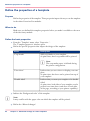
Define the template properties...............................................................60
Define the size of the template..........................................................60
Define the properties of a template..................................................62
Define the advanced properties of a template.................................64
Define the fonts for a template..........................................................65
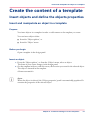
Create the content of a template.............................................................67
Insert objects and define the objects properties..............................67
Insert and manipulate an object in a template...........................67
Define the properties of an object...............................................69
Define the content source of an object.......................................75
Use the 'Text' object.....................................................................78
Use the 'Image' object..................................................................84
Use the 'Shape' object.................................................................88
Use the 'Barcode' object..............................................................90
Use the 'Price' object....................................................................91
Use the 'Formula' object..............................................................93
Arrange the objects in a template.....................................................97
Use the tools to position an object.............................................97
Group the objects.........................................................................99
Position the objects....................................................................101
Work with multiple objects........................................................104
Duplicate an object.....................................................................105
Lock the objects position...........................................................106
Delete elements of a template.........................................................107
Delete an element of the template............................................107
Undo an action............................................................................108
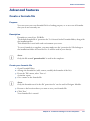
Advanced features............................................................................109
Create a 'Job Separator' template............................................109
Create associated templates......................................................110
Manipulate the images...............................................................112
Define custom colors..................................................................115
Prepare the template for use in the data entry module......................118
Allow design changes on a poster..................................................118
The 'Data entry' properties of an object.........................................121
Define the objects display order.....................................................123
4
Contents
Define the Data Entry settings of a database.................................127
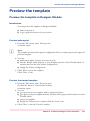
Preview the template.............................................................................129
Preview the template in Designer Module.....................................129
Preview the template in Data Entry................................................130
Create formulas in Formula Editor.......................................................131
What is a formula.............................................................................131
Open Formula Editor........................................................................132
Get to know Formula Editor............................................................133
Create a new formula.......................................................................135
Edit a formula...................................................................................138
Test a formula...................................................................................140
Advanced features............................................................................141
Create a formula file...................................................................141
Import formulas..........................................................................142
Chapter 7
Save and export a template...........................................................................143
Save a template......................................................................................144
Upload a chart to FTP............................................................................145
Advanced features.................................................................................146
Export a chart....................................................................................146
Add messages to a chart.................................................................147
Export a chart selection to zip.........................................................148
Chapter 8
Work with the Automation option................................................................151
Connect a database to the template.....................................................152
Connect to a database......................................................................152
Manage database connection.........................................................154
Connect the objects to the database fields....................................155
View the content of the connected database.................................157
Advanced features.................................................................................158
Create and manage layers...............................................................158
What is a layer............................................................................158
View the layers............................................................................159
Define the content of a layer......................................................160
Define the print behavior of the layers.....................................162
Define a condition on a layer.....................................................164
Define the background color of a layer.....................................167
Use a Layout template.....................................................................168
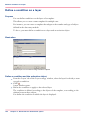
What is a layout template..........................................................168
Open a layout template..............................................................170
Create a layout template............................................................171
Chapter 9
Appendix..........................................................................................................173
5
Contents
About the 'Debug window' ...................................................................174
The supported file formats....................................................................175
Operators supported in Formula Editor...............................................176
6
Chapter 1
Preface
Trademarks
Trademarks
Océ, Posterizer Pro are registered trademarks of Océ.
Microsoft®, Windows®, Access ®, ActiveX ® Data Object, ODBC ™, Windows XP®,
Windows Server 2003®, Windows Vista® , Windows Server 2008® and Windows 7® are
either registered trademarks or trademarks of Microsoft® Corporation in the United States
and/or other countries.
Oracle ® and Oracle database are registered trademarks of Oracle and/or its affiliates.
BDE is a trademark or registered trademarks of Borland Software Corporation in the
United States and other countries.
DB2® is a trademark or registered trademark of IBM Corporation in the United States,
other countries, or both.
Products in this publication are referred to by their general trade names. In most, if not
all cases, these designations are claimed as trademarks or registered trademarks of their
respective companies.
8
Chapter 1 - Preface
Notes for the reader
Notes for the reader
Introduction
This manual helps you to use Posterizer Pro. The manual contains a description of the
product and guidelines to use and operate Posterizer Pro.
Definition
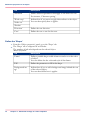
Attention-Getters
Parts of this user manual require your special attention. These parts can provide the following:
■ Additional general information, for example information that is useful when you
perform a task
■ Information to prevent property damage.
Note, Attention, and Caution
The words Note and Attention draw your attention to important information.
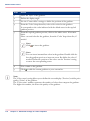
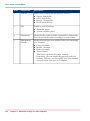
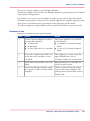
The attention-getters with the corresponding icons#
Word
Icon
Indicates
Note
Tips or additional information about the correct operation of the product.
Attention
Information to prevent property damage, for example
damage to the product or files.
Chapter 1 - Preface
9
Notes for the reader
10
Chapter 1 - Preface
Chapter 2
Océ Posterizer™ - Presentation
Océ Posterizer Pro
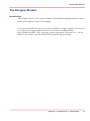
Océ Posterizer Pro
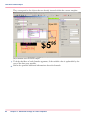
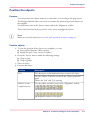
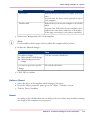
Introduction
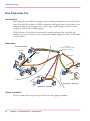
Introducing the most efficient signage software package designed for the retail environment. Posterizer Pro software is a fully integrated retail signage solution to produce everything from short-term pricing posters to price tags, window clings, banners or other
temporary POS (Point of Sales) signage.
With Posterizer Pro software, an internal or external print provider can easily and
quickly create just-in-time, low-cost, professional-looking signage for small - and medium
- sized retailers.
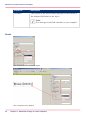
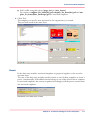
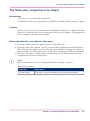
Illustration
Print Provider Shop
FTP server
(anywhere on the Internet, possibly
hosted by Print Provider)
Templates Customer 1
Templates Customer 2
late
rs
Tem
p
Pos
ters
ste
Po
Templates
Designer
Module
s
Data Entry
Module
Wide Format
s
er
st
Po
Print Manager
Jo Module
b
s
Small
Format
Client
module
Client
module
Posters
Products
database server
Retail Store – Customer 1
Products
table
Retail Store – Customer 2
Global workflow
There are three main steps in a typical Posterizer Pro signage workflow:
12
Chapter 2 - Océ Posterizer™ - Presentation
Océ Posterizer Pro
#
1. Design
Using the Designer module, define a customized template by implementing the enduser's graphical chart and by positioning and
configuring all necessary fields such as text,
price, images, price formula, etc.
2. Manual or Automated Data Entry
With the Data Entry module, automatically
populate the template to create a batch of
posters by linking to a database.
You can enter information manually, if desired, to create posters on the fly.
3. Automated Printing
The intelligent Print Manager module will:
- Screen the jobs depending on pre-set criteria
- Define the best nesting for optimal media
usage
- Send the job to the appropriate printer
Once your workflow is set up, Posterizer Pro
software can generate a complete new batch
of posters in minutes, with hardly any operator
intervention.
Chapter 2 - Océ Posterizer™ - Presentation
13
Océ Posterizer Pro
The Océ Posterizer Automation option
The Automation option is an option of Posterizer Pro.
It can help you dramatically improve your productivity by automating some routine tasks
and linking the system to complex databases for automated data entry and for batch
printing.
The Automation option activates the following functionalities:
■
■
■
■
Layers management: you can define powerful templates, with dynamic layout
Template connection to customers products databases: you can generate posters
from the records of a database (such as Access, SQL, Oracle...)
Layout templates: you can customize layouts for printing of multiple pages per sheet
Database requests: you can generate a batch of posters from a command file
The Océ Posterizer Multi Printers option
The Multi Printers option is an option of Posterizer Pro.
Océ Posterizer can be connected by default to any small format printer (with output
maximum of 12x18") and to certain large format printers (see your local sales representative
for more details).
The Multi Printers option allows you to connect Océ Posterizer to ANY large format
printer, driven with a Windows driver, on the market.
14
Chapter 2 - Océ Posterizer™ - Presentation
The Designer Module
The Designer Module
Introduction
This module is used to create a poster template, which includes all graphical chart requirements and the generic layout of the signage.
A set of retail-specific and easy-to-use tools is available to design a template from scratch
or to adjust an existing template from the Océ Posterizer template library.
Each variable data field - such as pricing, product description, discounts, etc. - can be
linked to the retailer's product database for automated sign processing.
Chapter 2 - Océ Posterizer™ - Presentation
15
The Designer Module
16
Chapter 2 - Océ Posterizer™ - Presentation
Chapter 3
Introduction to the Designer Module
Get to know the main concepts
Get to know the main concepts
Definition
To use the Designer Module, you must understand some basic concepts.
Customer
In the Designer Module, you design templates for your customers.
Your customers can be a specific retailer or a group of retailers that uses the same POS
(Point Of Sales) signage.
Once the templates are designed, you have two ways to interact with your customers:
■
■
You send the templates to your customers via FTP.
Your customers retrieve the templates with their Client module. Then, they can create
their own posters.
You use the templates in your Data Entry module.
You can create posters for your customers. Then, you deliver the printed posters to
those customers.
Client
Client refers to a specific module of Océ Posterizer. Posterizer Pro interacts with a Client
module.
The users of the Client module are your customers.
They cannot design template. They use the templates you design in order to create their
own posters.
The Client module is a data entry module.
'Environment'
An environment applies to one or several customers. It is linked with a chart.
In the Designer Module, you can have several environments. An environment is defined
by a name, a logo, and FTP parameters.
The environment is a concept you use in order to organize your work and to manage
your customers.
With different environments per customer, you can apply specific settings to their templates.
18
Chapter 3 - Introduction to the Designer Module
Get to know the main concepts
'Chart'
A chart gathers the main elements you need to design templates for a specific environment.
It is a repository of folders. In this repository, you store the elements that are used in the
templates.
Those elements are the templates themselves, the fonts, the formulas, the images, the
database -if any- and the posters.
From the Designer Module, you load the chart to an FTP server. The FTP server is used
to communicate with your customers.
You can also use the chart locally, in the Data Entry module.
FTP server
A FTP server is an online space where you exchange information with your customers.
You must link Posterizer Pro with an FTP server in order to communicate with your
customers.
On the FTP server, you load the chart(s) you create in order to make them available to
your customers. Then, each customer:
■
■
automatically retrieves the chart you created,
can send you its posters for print.
Note:
Make sure your system administrator knows the connection settings to the FTP server
you use. Those settings are requested for a complete configuration of Posterizer Pro.
Data entry module
In this manual, the expression 'data entry module' refers to the Data Entry module and
to the Client module.
Both are modules from which a user can insert data in a template in order to create posters.
'Template'
The template is the document you create in Designer Module. It is the basis for the creation of posters in the others Posterizer Pro modules.
A template is composed of several objects. It can also be linked with a database.
Chapter 3 - Introduction to the Designer Module
19
Get to know the main concepts
A template can be used to create associated templates within the Designer Module.
Associated templates all have the same objects structure. The objects all have the same
properties, and possibly, the same link to a database.
The associated templates are always proposed and presented together to the user of the
data entry module.
Note:
You can only open one template at a time.
'Object'
The objects compose a template. In the Designer Module, there are six objects categories:
■
■
■
■
■
■
'Text' objects
'Price' object
'Formula' object
'Image' objects
'Shape' objects
'Barcode' objects
You use them to design a template and to create content.
'Sleeve'
In a shop, a sleeve is a pouch, with transparent areas, used to display and protect a poster.
On a sleeve, there can be some fixed text or graphics that, then, do not need to be printed
on each poster.
In Posterizer Pro, a template can have the 'Sleeve' attribute. This means the template is
designed to prepare posters that will be displayed in a sleeve.
As a consequence, in such a poster, some objects will be marked as 'Sleeve' objects: they
have the 'Sleeve' attribute enabled. This means that these objects do not have to be
printed.
■
■
20
It is possible to preview the poster or to make a test print with it. You can see how the
poster will look like when displayed in its sleeve.
The 'Sleeve' attribute can also be used to print posters on preprinted material.
Chapter 3 - Introduction to the Designer Module
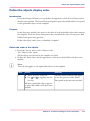
Get to know the interface of Designer Module
Get to know the interface of Designer Module
Introduction
Several areas and components can be found within the interface:
■
■
■
■
■
the top menu bar, located at the top of the interface.
It is always available.
the toolbars, located, by default, below the top menu bar.
They are composed of icons. Pass the mouse over an icon to know its function.
Icons are shortcuts for the features available in the menus.
the objects palette, located, by default, on the left-hand side of the interface.
Each object has properties that you can define.
the object properties panel, located, by default, on the right-hand side of the interface.
the design panel, which displays the current template and can contain the rulers, located in the center of the interface.
It is always available.
To view or hide those components, select or un-select them from the 'View' top menu.
Chapter 3 - Introduction to the Designer Module
21
Get to know the interface of Designer Module
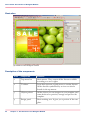
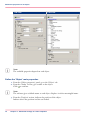
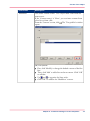
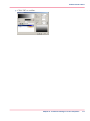
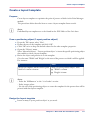
Illustration
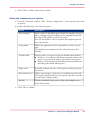
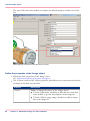
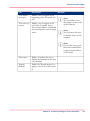
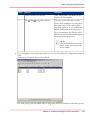
[7] Interface of the Designer module
Description of the components
#
22
Area
Component
Function
1
Top menu bar
Main menus. They contain all the features available
according to a user's rights.
2
'Toolbars'
Icons that represent a quick access to certain features.
All the features symbolized by an icon can also be
found via the top menus.
3
'Objects palette'
All the objects you can integrate in your template, and
some shortcuts to position, arrange and preview the
template.
4
Design panel
Main working area. It gives you a preview of the template.
Chapter 3 - Introduction to the Designer Module
Get to know the interface of Designer Module
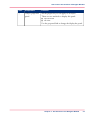
Area
Component
Function
5
'Object properties'
panel
All the properties you can apply to an object.
There are two methods to display this panel:
■ tree structure
■ tab view
Use the proposed link to change the display the panel.
Chapter 3 - Introduction to the Designer Module
23
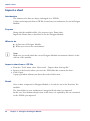
Check the 'Application folders'
Check the 'Application folders'
1. In the 'Configuration' menu, select 'Application folders'.
2. In the 'Application folders' window, you can check all the paths to the folders used by
the application.
These paths lead to the folders that compose the chart of the current environment.
When
you need to add extra content to a chart, follow these paths and add content in
3.
the dedicated folder.
24
Chapter 3 - Introduction to the Designer Module
Chapter 4
Configure the Designer
Module
What is an environment
Configure the environment
What is an environment
Definition
When you start the Designer Module, you must select the environment for which you
want to work.
The first time you start Designer Module, you must create an environment.
'Environment'
An environment applies to one or several customers. It is linked with a chart.
In the Designer Module, you can have several environments. An environment is defined
by a name, a logo, and FTP parameters.
The environment is a concept you use in order to organize your work and to manage
your customers.
With different environments per customer, you can apply specific settings to their templates.
■
■
26
An environment has a name and can have a logo.
An environment is associated to a graphical chart (and all its related resources) and to
an FTP configuration.
All your customers who use this FTP configuration will use the same chart and will
automatically get the chart updates. Then, they will be able to generate posters from
the templates contained in this chart.
Chapter 4 - Configure the Designer Module
Create or open an environment
Create or open an environment
When to do
You create a new environment
■
■
when you first use the Designer Module.
when you want to create a new chart.
Create a new environment
1. Double-click the Designer Module icon from your desktop to open it.
The 'Select environment folder' window pops-up.
2. Click 'New'.
3. Click 'Yes' to validate.
4. Enter the information related to this new environment.
■ Enter a name.
For instance, the activity or name of the customer.
■ Add a logo, if needed.
Note:
The image used for the logo must have the JPG format.
5. Click 'OK' to validate the information.
The new environment now appears in the 'Select environment folder' window.
Result
Automatically, when you create an environment, a chart is created.
This chart contains the needed folders to store all the elements of your environment.
Those folders are empty: you must populate them.
Open the environment in order to create a first template.
Open an environment
1. Double-click the Designer Module icon from your desktop to open it.
The 'Select environment folder' window pops-up.
2. Select an environment.
3. Click 'OK' to open it.
A welcome screen pops-up.
4. Select what you want to do.
Chapter 4 - Configure the Designer Module
27
Create or open an environment
Note:
If you select a newly created environment, you can 'Create a new template...'. You can
also import a chart from a ZIP file.
For instance, when you first use Designer Module, import the Demo chart.
Note:
You can navigate from one environment to another.
To do so, save and close the template you work on. Then, from the 'File' menu, select'Change environment...'. Select the environment you need. Click 'OK' to open it.
28
Chapter 4 - Configure the Designer Module
Modify or delete an environment
Modify or delete an environment
Introduction
You can always change the name or the logo of an environment.
Modify an environment
1.
2.
3.
4.
Open the Designer Module.
Select an environment.
Click 'Modify...'.
You can:
■ Change the name of the environment.
■ Change the logo of the environment.
5. Click 'OK' to validate.
You can now open the environment.
Delete an environment
Note:
To delete an environment, you must run the Designer Module on the workstation where
Posterizer Pro was installed.
1.
2.
3.
4.
Open the Designer Module.
Select an environment.
Click 'Delete...'.
Click 'Yes' to confirm.
The folder of that environment and the elements it contains are moved to the Recycle
Bin of your workstation.
Chapter 4 - Configure the Designer Module
29
Log in as an Administrator
Log in as an Administrator
Introduction
The administrator of the Posterizer Pro can configure advanced settings in the Designer
Module. For instance, the administrator can configure the FTP connection settings.
The login avoids that unexperienced users change the FTP configuration (which can lead
to unexpected connection issues while publishing the chart).
'Log in'
1. Open the Designer Module.
2. From the 'Configuration' menu, select 'Administrator login'.
3. Enter your password.
Click 'OK' to validate.
Note:
The default Administrator password is communicated by your Océ representative (see
also the Administrator manual).
Then, you can define a new one. See: ‘Define the Administrator password’ on page 46
Result
The menu entry changed into 'Administrator logout'. Use it to log out.
30
Chapter 4 - Configure the Designer Module
Define the FTP chart settings - Administrator only
Configure the FTP connection
Define the FTP chart settings - Administrator only
Introduction
You configure the FTP connection settings via the 'FTP chart settings' window.
To access the 'FTP chart settings' window, open the ' FTP ' menu - 'Chart' - 'Chart FTP
settings...'.
Purpose
You must define the FTP settings used to publish each chart you create. A best practice
is to request the Administrator of Designer Module to do so just after the creation of an
environment.
Each chart is linked with a single FTP configuration.
Before you begin
■
■
■
Make sure your FTP server is configured.
Make sure you have all the connectivity information to connect to the FTP server. If
not, contact your local system administrator.
Log in as Administrator.
Define the FTP connection
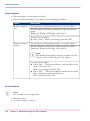
1. Open 'Chart FTP settings...' from the ' FTP ' - 'Chart' menu.
2. From the ' FTP connection' tab, enter:
#
Setting
Description
the host
IP address or hostname of the FTP server.
the port number
By default, the FTP port is the port 21.
the user name
Name of the user who uses the FTP server
the password
Associated with the user name, in order to connect to the FTP
server
Chapter 4 - Configure the Designer Module
31
Define the FTP chart settings - Administrator only
Setting
Description
the folder where
the chart will be
stored
By default, it has the name of the current environment you use.
3. From the 'Proxy' tab, select the 'Proxy' type.
If there is a proxy, then define the complementary information (contact your local system
administrator to get the details).
4. From the 'Zip file' tab, you can define a password to protect the chart.
Note:
If you define a password, communicate it to the users of the chart.
5. From the 'Advanced' tab, indicate if you want to use FTP in Passive mode.
This mode offers additional security.
6. Click 'Test connection'.
Pop-up windows inform you about the result of this action.
7. Click 'OK' to validate and exit the window.
Result
The chart can be uploaded to the FTP server for retrieval by your customers.
32
Chapter 4 - Configure the Designer Module
Open the Chart FTP folder
Open the Chart FTP folder
Purpose
You can open the FTP folder of the chart to check its content.
1. From the ' FTP ' menu, select 'Chart' - 'Open chart FTP folder...'
2. If the FTP server is configured, the FTP folder of the chart opens.
Else, you get an error message. In this case, follow this procedure: ‘Define the FTP chart
settings - Administrator only’ on page 31.
Chapter 4 - Configure the Designer Module
33
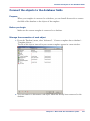
What is a chart
Prepare the Designer Module for use
What is a chart
Introduction
You must gather your templates in a chart. This action allows to use the templates for
posters creation in the Posterizer Pro modules.
Definition
A chart is specific to an environment. It gathers all the information you need to create
posters for that specific environment.
The chart is created by you, in the Designer Module. You place it on the FTP server, as
a .ZIP file, in order to push it to your customers.
The chart is used by your customers in the others Posterizer Pro modules.
A chart does not only gathers all your templates. It is composed of all the graphical element
you need to design the posters. It can also contains some content data.
The chart is a folder that contains the following sub-folders:
#
34
Folder
Description
ExtraDb
Contains the possible database files to be linked with the template objects.
Databases can be used in Designer Module and the data entry
modules.
Fonts
Contains the possible additional fonts to be used in the templates or the posters.
Fonts can be used in Designer Module and the data entry
modules.
Formula
Contains the formula files used in the chart.
Formulas can be used in Designer Module.
Images
Contains the images to be used in the templates or the posters.
Images can be used in Designer Module and the data entry
modules.
Chapter 4 - Configure the Designer Module
What is a chart
Folder
Description
Messages
Contains the possible messages to be exchanged between the
creator of the templates (or chart), the creator of the posters
and the print operator.
Messages can be viewed in the data entry modules and the Print
Manager module.
Posters
Contains the posters created from the templates of the chart.
Posters are used in the data entry modules and the Print Manager module.
Templates
Contains the templates created for the chart.
Templates are used in Designer Module and the data entry
modules.
Chapter 4 - Configure the Designer Module
35
Import a chart
Import a chart
Introduction
The elements of a chart are always exchanged via a .ZIP file.
A chart can be imported from a .ZIP file, located on your workstation, for use in Designer
Module.
Purpose
Along with the installation files, Océ proposes you a Demo chart.
Import the Demo chart to learn how to use the Designer Module.
When to do
■
■
At first start of Designer Module.
When you create a new environment.
Note:
Make sure you work within the correct Designer Module environment (check it in the
title bar of the module).
Import a chart from a .ZIP file
1. From the 'Tools' menu, select 'Chart tools' - 'Import chart from zip file...'
2. Browse to the location where you store the .ZIP folder that contains the chart.
3. Click 'Open'.
A pop-up window informs you about the result of this action.
Result
Once a chart is imported in Designer Module, it is ready for use in the Posterizer Pro
modules.
The chart folder on your workstation is merged with the chart you imported.
In this case, if an element already exists in the chart, it is replaced by the one contained
in the .ZIP file you imported.
36
Chapter 4 - Configure the Designer Module
Test the FTP connection
Test the FTP connection
Purpose
You can test the FTP connection to the FTP server.
1. From the ' FTP ' menu, select 'Graphical chart' - 'Chart FTP settings...'
2. Click 'Test connection'.
Pop-up windows inform you about the result of this action.
3. If the connection is successful, you can push information to the FTP server.
Else, contact your local system administrator.
Chapter 4 - Configure the Designer Module
37
Configure the printer
Configure the local printer
Configure the printer
Purpose
You must configure a printer in order to be able to print a template.
The printer you can configure is one of the printers that are installed on your workstation.
Before you begin
■
Make sure the printer you need is installed and active on your workstation (Printers
and Faxes window).
Note:
Correctly configure the printer. Else, an error message will pop-up when the user tries
to print a template.
Configure a printer
1. From the 'File' menu, select 'Printer configuration'.
The 'Select printer' window opens.
2. From the drop down list ('Printer' tab), select the printer you want to use with the Designer Module.
to access to the printer's properties.
3. Click
The printer driver opens. You can configure the default printer's properties.
Click 'OK' to validate.
4. From the 'Print options' tab of the 'Select printer' window, configure the options of your
printed content.
5. Define the basic 'Print options':
■ 'Automatic rotation and scale'
■ 'Center in page'
Tick the checkbox to allow this positioning of the template on the media at print time.
6. Click 'Advanced' to define more advanced 'Print options':
■ the size of the print margins.
■ the appearance of the crop marks (if crop marks are to be inserted).
■ the behavior of the double sided option.
■ the color of the paper on which you print.
■ ink saving option.
38
Chapter 4 - Configure the Designer Module
Configure the printer
7. Click 'OK' to validate and exit the window.
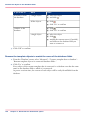
Define the 'Advanced' print options
1. From the 'Advanced' window ('File' - 'Printer configuration' - 'Print options' tab), select
an option.
2. Define the behavior for the selected option.
#
Option
Description
'Print margins'
Enter a value to add white space around the template. At print
time, a margin is preserved between the template border and
the edges of the media on which you print.
You can also define a value to separate the templates printed
on a same media.
'Crop marks'
Define the appearance of the crop marks you insert at print
time.
This definition is transmitted to the others Posterizer Pro
modules.
'Double sided'
Indicate where you want to apply the double sided attribute.
'Software': you will have to perform a manual action on the
posters once printed in order to get double sided posters.
■ 'Printer': the printer has double sided capacity and will automatically print double sided posters.
■
'Paper color'
If needed, indicate the color of the paper on which you print
the posters.
'Ink reduction (%)'
Define a percentage to reduce the use of black and color ink.
This is particularly useful if you use a printer that does not offer
several modes of print quality.
'Special'
Tick the checkbox if you want to print your templates on a
same roll of media.
3. Click 'OK' to validate.
Chapter 4 - Configure the Designer Module
39
Configure the design panel
Configure the Designer Module preferences settings
Configure the design panel
Purpose
From the 'Configuration' menu, select 'Customize...'.
You can configure your design panel.
We advise you to define your preferences for the design panel. Once done, you do not
have to configure them everytime you use the Designer Module.
Define the 'Grid settings'
1. From the 'Configuration' - 'Customize...' menu, select 'Grid settings'.
2. Define the appearance of the grid.
The grid helps you position the objects on a template.
3. Click 'OK' to validate.
Note:
You can also activate the grid from the 'View' top menu.
Define the 'Rulers settings'
1. From the 'Configuration' - 'Customize...' menu, select 'Rulers settings'.
2. Define the color of the rulers.
They are located on the left hand-side and at the top of your template in the design
panel.
3. Click 'OK' to validate.
Note:
You activate the rulers from the 'View' menu.
Define the 'Font settings'
1. From the 'Configuration' - 'Customize...' menu, select 'Font settings'.
40
Chapter 4 - Configure the Designer Module
Configure the design panel
2. Define the 'Font' and 'Charsets' settings.
■ 'Fonts': list of the fonts you can use for the content of your template (e.g.: text objects
can use Arial fonts)
■ 'Charsets': set of characters that is enabled on your operating system (e.g.: Arial fonts
can use Cyrillic characters)
3. If you want to restrict the set of fonts or charsets that will be available within Designer
Module:
■ Click 'Add' to create your own restricted list of fonts. You filter the fonts of your operating system in order to propose only a subset of fonts for use in Designer Module.
■ Click 'Delete' to remove a selected font.
■ Click 'Clear all' to reset the list.
4. Click 'OK' to validate.
Chapter 4 - Configure the Designer Module
41
Define the units of the Designer Module
Define the units of the Designer Module
Purpose
Define the units to use within the Designer Module.
Units are used in the design panel (rulers and coordinates). They are also used to define
the properties of each object.
Define the 'Units'
1. From the 'Configuration' - 'Customize...' menu, select 'Units'.
2. Indicate which unit you want to use.
3. If you want the font size to be expressed in points, tick the associated check box.
Else, the font size will be expressed in the unit you selected.
4. Click 'OK' to validate.
42
Chapter 4 - Configure the Designer Module
Define the language of the user interface
Define the language of the user interface
Purpose
You can change the language of the user interface without re-installing the whole application.
Define or change the 'Language'
1. From the 'Configuration' - 'Customize...' menu, select 'Language'.
2. Define the language to use for the user interface.
3. Click 'OK' to validate.
Click 'Default' to define the selected language as the default one everytime you start Designer Module.
Chapter 4 - Configure the Designer Module
43
Configure the default settings of the objects
Configure the default settings of the objects
Introduction
To configure the default values for each object, select 'Object default settings' from the
'Objects' top menu.
You can configure several sets of defaults for each object type. Then, you select the default
set to be active, per object type, per template.
Purpose
Once configured, these settings are used by default, in every environment, when you insert
an object.
Note:
Once an object is inserted into a template, you can always change its settings from the
'Object properties' area.
Configure the default settings of an object
1. From the left hand-side tabs of the 'Object default settings' window, select the object
type you want to configure.
2. Click 'New'.
An 'Object properties' area opens (tab view).
3. From the 'Object properties' - 'Object' tab, enter a name for the set of default settings
you define.
Validate with the green check-mark icon.
Note:
The name of the set of defaults is for your personal use. Give an explicit name. It is the
only object property that is not set as default.
4. Define the other properties you need for this object.
44
Chapter 4 - Configure the Designer Module
Configure the default settings of the objects
5. If you want to define this set as the default one, click the 'Default' icon (located at the
top of the window).
Chapter 4 - Configure the Designer Module
45
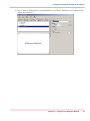
Define the Administrator password
Define the Administrator password
Introduction
Océ provides you with a default Administrator password. You can change it.
Before you begin
Make sure you are logged in as Administrator.
Note:
Only the Administrator of the Designer Module can change the Administrator password.
1.
2.
3.
4.
46
From the 'Configuration' menu, select 'Change administrator password'.
Enter the new password in the first field.
Confirm this new password in the second field.
Click 'OK' to validate.
Chapter 4 - Configure the Designer Module
Chapter 5
Basic operations to create
and upload your first template
Create your first template
Create your first template
Introduction
You can easily create a first template for use in the other Posterizer Pro modules.
Purpose
Use the Demo chart provided by default in Posterizer Pro.
Create your first template from the templates of the Demo chart.
When to do
After the installation of Posterizer Pro.
After the import of the Demo chart into Designer Module.
Note:
Several templates are available from the Demo chart. They are stored in the sub-folders
of the 'Templates' folder.
Open a template stored in a chart
1. From the 'File' menu, select 'Open'.
The 'Open template' window opens.
2. From the tree structure on the left-hand side, navigate to the folder where the template
is stored.
Thumbnails of the templates appear for the selected folder.
3. Select a template.
4. Click 'Open'.
Result
The template opens in the design panel of the Designer Module.
Insert an object
1. From the 'Objects palette', or from the 'Object' menu, select an object.
The form of your cursor changes in the design panel.
2. On the template indicate, with this cursor, the location you want for the selected object.
48
Chapter 5 - Basic operations to create and upload your first template
Create your first template
The object is inserted in the template.
A frame surrounds it.
Note:
When the object is selected, the 'Object properties' panel is automatically populated. It
contains the properties of the selected object.
Define the properties of an object
1. Select an object.
2. From the 'Object properties' panel, edit the properties of the selected object.
Define an explicit name for the object.
3. You can also define:
■ its format,
■ its content,
■ its appearance in the data entry module,
■ a possible link to a database.
4. Define the properties of all the objects of the template.
Chapter 5 - Basic operations to create and upload your first template
49
Prepare your first template for use in the data entry module
Prepare your first template for use in the data entry module
Introduction
You can easily create a first template for use in the other Posterizer Pro modules.
Purpose
Save the template for use in the data entry module.
When to do
After the creation of a template.
Save your template
1. Access to the 'Save template' window.
2. From the 'Save template' window, enter a name for your template in the 'File name' field.
Note:
If you created a template from the default templates proposed in the Demo chart, make
sure you do not erase that default template.
3. Verify, from the tree structure, that the storage folder is correct.
Change it if needed.
4. Click 'Save'.
Upload a chart to FTP
1. From the ' FTP ' menu, select 'Chart' - 'Upload chart to FTP folder...'.
2. Click 'Yes' to confirm.
The chart is uploaded to the FTP server.
A pop-up message gives you the status of the upload.
Result
When you upload a chart to the FTP server, the chart content (including the newly created templates) becomes available for the user of the data entry module.
50
Chapter 5 - Basic operations to create and upload your first template
Prepare your first template for use in the data entry module
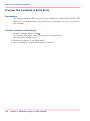
Preview a template in Data Entry
1. From the 'Objects palette', click .
Or, from the 'File' menu, select 'Execute Posterizer Data Entry'.
The Data Entry module opens.
2. Preview the template in the design panel.
3. You can change the content of the objects, if allowed.
Result
When you preview a template in the Data Entry module, you get the same view as the
user of the data entry module.
You can also use the Data Entry module to create posters.
Chapter 5 - Basic operations to create and upload your first template
51
Prepare your first template for use in the data entry module
52
Chapter 5 - Basic operations to create and upload your first template
Chapter 6
Advanced settings to create templates
What is a template
What is a template
Introduction
To access a template, select 'Open' from the 'File' menu.
Definition
A template has its own properties.
A template is composed of a collection of objects.
From the Designer Module, you can edit a template, whatever its properties are.
Note:
You can only open one template at a time.
Template properties
The template is the basis for the creation of posters.
According to what you define and allow in a template, the creator of a poster has more
or less flexibility when creating the posters
- from the Data Entry Module,
- from the Client module.
To know more, see: ‘Define the properties of a template’ on page 62.
Template objects
You can insert any of those objects in a template:
■
■
■
■
■
■
'Text'
'Image'
'Price'
'Barcode'
'Formula'
'Shape'
To know more, see: ‘Insert and manipulate an object in a template’ on page 67
54
Chapter 6 - Advanced settings to create templates
Template creation: overview
Create or open a template
Template creation: overview
Introduction
The creation of a template contains several steps. Here below is an overview of the template
creation.
Procedures are further detailed in the next sections.
Purpose
A template is part of a chart.
A template allows you to design and define the basis for the creation of multiple posters.
Create a new template
#
Step
Action
Detailed procedure
1
Define the size and properties of the
template.
‘Define the size of the template’ on
page 60
2
Define the content of the template.
‘Insert and manipulate an object in a
template’ on page 67
3
Connect the template to a database,
if needed.
‘Connect to a database’ on page 152
Note:
You must have the Automation option to do so.
4
Preview the template.
‘Preview the template in Data Entry’
on page 130
5
Save the template to the chart.
‘Save a template’ on page 144
6
You can now publish the chart in
order to make the template available
to the user of the data entry module.
‘Upload a chart to FTP’ on page 145
Chapter 6 - Advanced settings to create templates
55
Template creation: overview
Result
From a template created in the Designer Module, you can create several posters in the
data entry module.
56
Chapter 6 - Advanced settings to create templates
Create a template
Create a template
Purpose
This section describes you how to quickly create a template.
Find all the detailed procedures in the next sections.
Quickly create a template
1.
#
If
Then
you open the Designer Module
Select an environment.
Click 'OK'.
you are in the Designer Module
From the 'File' menu, select 'New'.
2. Select 'Create a new template...'.
3. Select a standard page size for your template.
Note:
You can change the template size later on. From the 'File' menu, select 'Resize page'.
Click 'OK'.
4. Accept the default values for the 'Template properties' (basic and advanced).
Note:
You can change the values of the 'Template properties' later on, from the 'Template'
menu.
Click 'OK'.
5. From the 'File' menu, select 'Save'.
The 'Save template' window opens.
Verify
that the selected storage folder is the one you want.
6.
Enter a name for your template in the 'File name' field.
7. Click 'Save'.
Result
You can now define the properties of your template and insert content.
Go to the 'File' menu - 'Template information' to get a summary of the characteristics
of your template.
Chapter 6 - Advanced settings to create templates
57
Open an existing template
Open an existing template
Introduction
Templates are stored into a chart. You must be able to retrieve them for use.
Posterizer Pro offers you some predefined templates. You can edit them as a start for using
the Designer Module.
You can also open a template that you created, or the very last one you edited.
This section describes you how to do.
Before you begin
Open the Designer Module with the environment you need to work in.
Note:
You can navigate from one environment to another.
To do so, save and close the template you work on. Then, from the 'File' menu, select'Change environment...'. Select the environment you need. Click 'OK' to open it.
Open a template stored in a chart
1. From the 'File' menu, select 'Open'.
The 'Open template' window opens.
2. From the tree structure on the left-hand side, navigate to the folder where the template
is stored.
Thumbnails of the templates appear for the selected folder.
3. Select a template.
4. Click 'Open'.
Open the last template you edited
#
58
Step
You are already working in the Designer Module
You are not yet working with the
Designer Module
1
From the 'View' menu, select 'Start
screen'.
Make a check mark in front of this
setting.
Open the Designer Module.
2
Save your current template.
Select the environment.
Chapter 6 - Advanced settings to create templates
Open an existing template
Step
You are already working in the Designer Module
You are not yet working with the
Designer Module
3
A welcome screen pops-up.
4
Click 'Open the last modified template'.
Result
You can now define the properties of your template and insert content.
Go to the 'File' menu - 'Template information' to get a summary of the characteristics
of your template.
Chapter 6 - Advanced settings to create templates
59
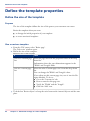
Define the size of the template
Define the template properties
Define the size of the template
Purpose
The size of the template defines the size of the posters your customers can create.
Resize the template when you want:
■
■
to change the initial properties of your template.
to create associated templates.
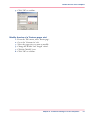
Size or resize a template
1. From the 'File' menu, select 'Resize page'.
The 'Select size' window opens.
2. Define the size of the template.
Define the size of the template#
If
Then
you use a standard page
size
select the page size from the proposed values in the drop
down list.
Information about the exact dimensions appears in the
'Width' and 'Length' fields.
you use a custom page
size
select the value 'Custom paper size' from the drop down
list.
You can change the'Width' and 'Length' values.
If you often use this custom page size, save it into the Designer Module. To do so:
■ Go to the 'Custom size' tab.
■ Enter a name for this page size.
■ Verify the 'Width' and the 'Length'.
■ Click the 'Add' icon.
3. Tick the box 'Resize objects' to keep the ratio between the inserted objects and the template.
60
Chapter 6 - Advanced settings to create templates
Define the size of the template
4. Click 'OK' to confirm.
Modify the size of a 'Custom paper size'
1.
2.
3.
4.
5.
6.
From the 'File' menu, select 'Resize page'.
Go to the 'Custom size' tab.
Select the paper size you want to modify.
Change the'Width' and 'Length' values.
Click the 'Modify' icon.
Click 'OK' to confirm.
Chapter 6 - Advanced settings to create templates
61
Define the properties of a template
Define the properties of a template
Purpose
Define the properties of the template. Those properties impact the way to use the template
in the others Posterizer Pro modules.
When to do
Make sure you defined the template properties before you make it available to the users
of the data entry module.
Define the basic properties
1. From the 'Template' menu, select 'Properties...'.
The 'Template properties' window opens.
2. Define the specific properties that impact the design of the template.
#
Value
Description
'Crop marks'
Add crop marks to your template.
At print time, those crop marks will be printed.
Note:
The crop marks aspect is defined during
the printer configuration.
'Print sleeve'
Indicate that you use a sleeve to display your template.
At print time, the sleeve can be printed on top of
your template.
'Double sided'
Indicate that you want your template to be double
sided.
At print time, both sides of your template can be
printed on a same sheet (same face or both sides
of the page, according to your printer capability).
3. Indicate the 'Background color' of the template.
Note:
It may conflict with the paper color on which the template will be printed.
4. Define the 'Allowed changes':
62
Chapter 6 - Advanced settings to create templates
Define the properties of a template
#
If
Then
you allow a change:
'Allow double sided change'
■ 'Allow background color
change'
Tick the associated check-box.
you want to prevent a specific
change
Un-tick the check-box.
■
5. Click 'OK' to confirm.
Result
You can also define advanced properties in order to control the use of the template in the
other Posterizer Pro modules.
Chapter 6 - Advanced settings to create templates
63
Define the advanced properties of a template
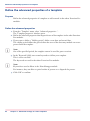
Define the advanced properties of a template
Purpose
Define the advanced properties of a template to add controls in the others Posterizer Pro
modules.
Define the advanced properties
1. From the 'Template' menu, select 'Advanced properties...'.
The 'Template properties' window opens.
2. Define the advanced properties that impact the use of the template in the other Posterizer
Pro modules.
3. If you want to define a 'Validity period', define a start date and an end date.
The validity period defines the period when the users of the data entry module can create
posters from the template.
Note:
Out of the specified period, the template cannot be used for poster creation.
4. In the 'Keywords' field, enter some keywords to define your template.
This is a free text field.
The keywords are used in the others Posterizer Pro modules.
Note:
Keywords are used as filters in the Print Manager module.
For instance, they can allow to print batches of posters or to dispatch the posters.
5. Click 'OK' to confirm.
64
Chapter 6 - Advanced settings to create templates
Define the fonts for a template
Define the fonts for a template
Purpose
The fonts you define for a template become a property of the template. You define a
subset of fonts that can be used to create posters from this current template.
The user of the data entry module can only select a font from this subset to create the
posters.
Note:
Only define a list of fonts if the users of the data entry module are allowed to change
the fonts when they create posters.
Define the template fonts
1. From the 'Template' menu, select 'Fonts'.
The 'Fonts selection' window opens.
2. From the 'System fonts', select the fonts you want to add to the 'Template fonts:' list.
The 'Sample text' area displays a preview of the selected font.
3. Add ( ) or remove ( ) fonts from each list.
Note:
Maintain the <Ctrl> key for a multiple selection.
4. Click 'OK' to confirm.
Customize the 'Fonts selection'
1. From the 'Fonts selection' window, click 'Font settings'.
Chapter 6 - Advanced settings to create templates
65
Define the fonts for a template
The 'Font settings' window opens.
2. From this window, you can customize the default settings for the fonts and the characters.
The customization applies to the chart you are using.
#
Area
Description
'Fonts'
■
■
'Charsets'
■
■
66
The default value displays all the fonts supported by your
operating system.
You can decide to show only a set of fonts: tick 'Show only
selected fonts'.
Then, click 'Add' to select the fonts you want to display.
This way, you restrict the list of fonts that can be used for
the creation of the templates within a chart.
The default value displays all the sets of characters supported
by your operating system.
You can decide to show only the set of characters you use:
tick 'Show only current character set'
Chapter 6 - Advanced settings to create templates
Insert and manipulate an object in a template
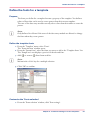
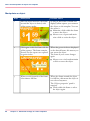
Create the content of a template
Insert objects and define the objects properties
Insert and manipulate an object in a template
Purpose
You insert objects in a template in order to add content to the template you create.
You can insert objects either:
■
■
from the 'Objects palette', or
from the 'Object' menu.
Before you begin
Open a template in the design panel.
Insert an object
1. From the 'Objects palette', or from the 'Object' menu, select an object.
The form of your cursor changes in the design panel.
On
the template indicate, with this cursor, the location you want for the selected object.
2.
The object is inserted in the template.
A frame surrounds it.
Note:
When the object is selected, the 'Object properties' panel is automatically populated. It
contains the properties of the selected object.
Chapter 6 - Advanced settings to create templates
67
Insert and manipulate an object in a template
Manipulate an object
#
68
Step
Description
Possible action
1
After an object insertion, the frame
around the object is dotted, with
yellow square marks.
As long as the frame is dotted and
displays yellow squares, you can move
the object on the template. You can
also resize it.
■ Maintain a click within the frame
to move the object.
■ Mouse-over a square and maintain a click to resize the object.
2
Click again within the frame with the
yellow squares. The frame remains
dotted, but the squares are replaced
by green circles.
When the green circles are displayed
on the dotted frame, this means you
can rotate the object.
The form of your cursor changes
again.
■ Mouse-over a circle and maintain
a click to rotate the object.
3
When you click outside of the frame,
it becomes a full line.
When the frame around the object
is a full line, this means the object is
not selected anymore.
The 'Object properties' panel is
emptied.
■ Click within the frame to select
the object again.
Chapter 6 - Advanced settings to create templates
Define the properties of an object
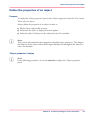
Define the properties of an object
Purpose
To display the 'Object properties' panel, select 'Object properties' from the 'View' menu.
Then, select an object.
Always define the properties of an object in order to:
■
■
■
fill the object with possible content.
define how the object is displayed in the template.
define the object's behavior in the others Posterizer Pro modules.
Note:
This section only details the most important identified object properties. They impact
the behavior of the objects within the Designer Module and throughout the other Posterizer Pro modules.
'Object properties' display
Note:
In the following procedures, we use the tab view to display the 'Object properties'
panel.
Chapter 6 - Advanced settings to create templates
69
Define the properties of an object
#
Tab view
Tree view
Note:
The available properties depend on each object.
Define the 'Object' main properties
1. From the 'Object properties' panel, go to the 'Object' tab.
2. From the 'Name' section, give a name to the object.
Click to confirm.
Note:
The software gives a default name to each object. Replace it with a meaningful name.
3. From the 'Position' section, indicate the position of the object.
Indicate also if the position and size are locked.
70
Chapter 6 - Advanced settings to create templates
Define the properties of an object
Note:
This information is replicated in the data entry module.
If you lock the position and size of an object, it is also locked in all the posters created
from this template.
4. From the 'Visibility' section, indicate the way to display the object in the template.
Note:
This information is replicated in the other Posterizer Pro modules.
'Object' properties#
Properties
Description
'Visible'
■
■
part of a 'Sleeve'
■
■
If yes, the object is part of the template and is displayed.
It will always be visible and it can be printed.
If not, the object is grayed out and appears only as a help to
draw the template. It is also useful to store the information
that is used by other objects of the template.
It will be hidden in the posters and will never be printed.
If yes, the object will be identified as a sleeve object.
A sleeve is intended to remain hidden at print time. It is
used to draw the template. It allows a more realistic preview
during the design.
This behavior is defined in the properties of the template.
If no, the object is part of the template design.
It will always be printed.
5. From the 'Others' section, indicate if the content of that object must be used to define
the poster name.
You can use up to 4 objects, per template, in order to create a poster name. Their value
is concatenated to form the poster name.
The value you define for this setting (between 1 and 4) determines the order in which
the objects value are concatenated.
Define the 'Content'
1. From the 'Object properties' panel, go to the 'Content' tab.
2. From the 'Content' section, define
■ the content of the object (if it is free text).
■ the maximum of characters allowed for the content of the selected object.
Chapter 6 - Advanced settings to create templates
71
Define the properties of an object
3. From the 'Content source' section, define the source of the content.
The content can come from:
■ 'None'
■ 'Another object'
■ 'Macro'
■ 'Database'
Note:
See: ‘Define the content source of an object’ on page 75
Define the behavior of an object in 'Data entry'
1. From the 'Object properties' panel, go to the 'Data entry' tab.
2. From the 'Data entry caption' section, you can define a caption for the selected object.
When defined, this caption is used in the data entry module to designate the object (it
appears in the Poster Data panel, instead of the object name given in Designer Module).
3. From the 'User input' section, indicate if the content of the selected object must be
completed by the creator of the poster.
Note:
Requested information vary according to the object type that is selected.
'Data entry' properties#
72
Properties
Description
'No user input'
The object cannot be modified in the data entry module.
Chapter 6 - Advanced settings to create templates
Define the properties of an object
Properties
Description
'User input'
The object can be completed by the creator of the posters, according to the value you define. (The availability of those values
depends on the object type that is selected.)
■ 'Required': the user of the data entry module must complete
the content of the object.
■ 'Forbidden': the user of the data entry module is not allowed
to enter any content for the object. The field must be cleared
before the poster can be printed.
■ 'Numeric': the user of the data entry module must enter a
numeric content (e.g.: numbers).
■ 'Data validation': the user of the data entry module must
respect the conditions you defined when he enters content
for the object.
■ 'Allow free text': the user of the data entry module can enter
free content for objects which normally have a fixed content
(e.g.: select another formula, change the content of a 'Text
pick list').
■ 'Data entry only as free text': the user of the data entry
module can modify the text of the formula.
Note:
If nothing is checked, the user of the data entry module
can edit the content of the object, even if does not have
to.
4. From the 'Updateable properties' tab, you can indicate the modifications you allow to
the user of the data entry module.
Tick a checkbox to define a property you allow to be updated.
Define the design and layout format
1. From the 'Object properties' panel, go to the 'Format' tab.
2. The 'Format' tab is composed of several tabs.
The number of sub-tabs depends on the selected object.
'Format' properties#
Tab
Description
'Font'
Define the text appearance.
Chapter 6 - Advanced settings to create templates
73
Define the properties of an object
Tab
Description
'Advanced'
Define advanced parameters that apply to the fonts of a text.
For instance, 'Character spacing'.
'Word wrap'
Indicate here if you want to apply this attribute to the object.
You can then specify how it applies.
'Strike out'
'Shadow'
'Direction'
Define the text direction.
'Case'
Define the case to use for the texts.
Define the 'Shape'
1. From the 'Object properties' panel, go to the 'Shape' tab.
2. The 'Shape' tab is composed of several tabs.
The number of sub-tabs depends on the selected object.
'Shape' properties#
74
Tab
Description
'Frame'
Define a possible shape to add a frame around or over the selected object.
You can define also the color and style of that frame.
'Fill'
Define the parameters to fill in the shape.
'Background image'
Indicate here if you to add a background image behind the text
of the selected object.
You can then define how it applies.
Chapter 6 - Advanced settings to create templates
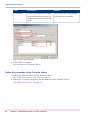
Define the content source of an object
Define the content source of an object
Purpose
You must define the content source of an object. This information will be passed to the
other Posterizer Pro modules.
The 'Content source' attribute also defines the way the content of the object can possibly
be modified by the user of the data entry module.
Define the content source
1. Select an object.
2. In the'Object properties' panel, open the 'Content' tab.
3. In the 'Content source' section, select the source of the content you want to use to fill
the object.
'Content' properties#
Properties
Description
'None'
Default value.
You can enter free content (for instance: text, numbers).
This free content can be edited by the user of the data entry
module.
Note:
The free content depends on the type of object you selected.
'Another object'
The content of the selected object is copied from the content
of another object.
Define which object is the source.
Note:
This enhances the importance of giving a meaningful
name to your objects.
'Macro'
The 'Macro' content depends on a variable of the current chart.
From the drop-down list, indicate which element (of the template or of the chart) must be used to define the content.
The 'Macro' variable is interpreted when a poster is generated
from this template.
Chapter 6 - Advanced settings to create templates
75
Define the content source of an object
Properties
Description
'Database'
The content of the selected object depends on the content of
the database field linked to the object.
Note:
You must previously link a database to your template.
Result
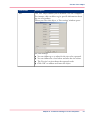
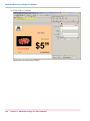
[16] 'Content source': 'Another object'
[17] 'Content source': 'Macro'
76
Chapter 6 - Advanced settings to create templates
Define the content source of an object
[18] 'Content source': 'Database'
Chapter 6 - Advanced settings to create templates
77
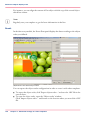
Use the 'Text' object
Use the 'Text' object
Purpose
A 'Text' object can have several formats. This section describes you these possible formats.
Add content to the 'Text' object
1. Select the 'Text' object you want to insert.
(if needed, see: ‘Insert and manipulate an object in a template’ on page 67)
2. Position it on your template.
3. From the 'Object properties' panel, go to the 'Content' tab.
4. Define the content of the text object.
Note:
According to the format of your text object, you may use different methods to insert your
content.
#
78
Text format
Description
'Simple text'
The 'Simple text' object represents a single line of text.
If the 'Content source' is 'None', you can enter free text in the
'Text' field.
The users of the data entry module can modify this content,
only if allowed. Else, the content of your 'Text' object must
comply with the source you defined (see: ‘Define the content
source of an object’ on page 75).
Chapter 6 - Advanced settings to create templates
Use the 'Text' object
Text format
Description
'Multilines'
The whole content of this 'Text' object must come from the
same source.
If the 'Content source' is 'None', you can insert content from
a free list or from a file.
From the 'Content' section, click . The 'Text pick list' window
opens.
[19] 'Text pick list'
■
■
■
■
First, click 'Modify' to change the default content of the first
line.
Then, click 'Add' to add a line and new content. Click 'OK'
to validate.
Use and to organize the lines order.
Click 'OK' to validate the 'Multilines' content.
Chapter 6 - Advanced settings to create templates
79
Use the 'Text' object
Text format
Description
'Choice list'
The 'Choice list' enables you to predefine multiple text content.
But you can only display one line of content at once.
Insert content the same way you do with the 'Multilines' object.
Then, from the 'Content' section, you can select the text to
display.
[20] Example of a 'Choice list'
For instance, create only one template for 'sales' and 'promotion'. In the 'Choice list', enter these 2 words. As a result, the
user of the data entry module can select the word to be displayed
on the poster. This way, the customer can create a 'sales' poster
or a 'promotion' poster from a same template.
80
Chapter 6 - Advanced settings to create templates
Use the 'Text' object
Text format
Description
'Size'
The 'Size' object enables you to mention a size on a template.
For instance, this can allow to give specific information about
the size of a product.
When you select this object, a 'Size settings' window opens.
[21] 'Size settings'
■
■
■
■
You can define up to 4 values for the size to be expressed.
You can define also a text before and after the size values.
The 'Preview' section shows the expected result.
Click 'OK' to validate and insert the object.
Chapter 6 - Advanced settings to create templates
81
Use the 'Text' object
Text format
Description
'Date period'
The 'Date period' object enables you to mention a date range
on your template.
For instance, this can allow the user of the data entry module
to define the dates of a promotion.
When you select this object, a 'Date period settings' window
opens.
[22] 'Date period settings'
■
■
■
■
Define the dates.
You can also define a text before and after the dates, and a
new date format.
The 'Preview' section shows the expected result.
Click 'OK' to validate and insert the object.
[23] Define a new date format
82
Chapter 6 - Advanced settings to create templates
Use the 'Text' object
(if needed, see: ‘Define the content source of an object’ on page 75)
[24] Result in the data entry module ('Choice list', 'Size' and 'Date period')
Give a name to the 'Text' object
Note:
Give a meaningful name to your objects in order to be able to make later references to
them. For instance:
- in the Designer Module, you can refer to an object in order to define the content of
another object.
- in the data entry module, you can also refer to a specific object. The name of the object
is transferred through all the Posterizer Pro modules.
1. From the 'Object properties' panel, go to the 'Object' tab.
2. In the 'Name' field, give a name to your object.
The text you enter is red.
3. Click to validate.
Click to reset the default name.
When registered, the text is black again.
Result
You can now define the other properties that apply to your object.
See: ‘Define the properties of an object’ on page 69.
Chapter 6 - Advanced settings to create templates
83
Use the 'Image' object
Use the 'Image' object
Purpose
You can insert a fixed 'Image' object in the template.
You can also allow the user of the data entry module to select an image when creating a
poster.
Select the 'Image' object
1. From the 'Objects' menu, or from the 'Objects palette', select 'Image'.
2. Select the type of image you need:
#
Image type
Description
'Empty image
block'
Insert an empty block where the user of the data entry module
can add an image.
'Image'
Insert an image from the chart or from your workstation.
'Folder images…'
Insert an image from a folder of the chart, and gives you the
possibility to allow the user of the data entry module to select
another image from that folder.
'Image list...'
Insert an image from a folder of the chart or from your workstation, and gives you the possibility to define a list of images that
can be used by the user of the data entry module if you allow
them to do so.
Create a list of images
1. Insert an 'Image list...' object.
2. Click
■
to add an image to the list of images.
■
if you want to add several images from the same folder to the list of images.
Note:
Maintain the <Ctrl> key to make a multiple selection.
3. Select an image from the chart.
84
Chapter 6 - Advanced settings to create templates
Use the 'Image' object
Note:
If you add only one image, you can click 'Browse' to search an image from your workstation.
4. Click 'Open' to add the selected image(s) to the list of images.
Note:
Once you open an image (wherever it comes from), it becomes part of the 'Images' folder
of the current chart.
5. Organize the list the way you want it to appear in the data entry module.
[25] Image list created in Designer
6. Click 'OK' to validate the list.
Chapter 6 - Advanced settings to create templates
85
Use the 'Image' object
The user of the data entry module can replace the default image by another one of the
list.
[26] Image list proposed in the data entry module
Define the properties of the 'Image' object
1. Define the basic properties of the 'Image' object.
See: ‘Define the properties of an object’ on page 69
2. The 'Content' section of the 'Object properties' panel allows you to customize the selection
of images in the data entry module.
#
Element
'Source'
Description
Define or change the source of the 'Image' object.
Tick the 'Updateable' checkbox to allow the user of the data
entry module to get the latest updates of the image list.
■ Tick the 'Add an empty image' checkbox to add an empty
line in the image list.
■
86
Chapter 6 - Advanced settings to create templates
Use the 'Image' object
Element
Description
'Selection list'
Define the appearance of the list of images in the data entry
module.
Chapter 6 - Advanced settings to create templates
87
Use the 'Shape' object
Use the 'Shape' object
Purpose
The 'Shape' object can have several formats. Most of them are very intuitive to define.
This section describes the specific properties that can be applied to a 'Shape' object.
Define the properties of a 'Shape' object
1. Define the basic properties of the 'Shape' object.
See: ‘Define the properties of an object’ on page 69
Define the appearance of the 'Shape'
1. From the 'Object properties' panel, go to the 'Shape' section.
2. From the 'Frame' tab, define the appearance of the shape.
For a table, you can also decide to hide or to show the vertical and horizontal lines.
3. From the 'Fill' tab, define the colors of the shape.
For a table, you can also define two colors in order to display alternate rows.
Define a 'Table'
1. Insert a 'Table'-'Shape' object.
2. From the 'Object properties' panel, go to the 'Table' section.
3. Define the content of the table. The content of a table must be an object of the current
template.
#
Section
Description
'Table properties'
Define the number of rows and columns of the table.
Indicate if there is a header.
Note:
The header is whole row of one column.
'Data entry'
88
Rows are assigned a growing number.
Indicate which row will be filled in by default in the data entry
module.
Indicate also the maximum number of rows that is accepted for
the creation of posters.
Chapter 6 - Advanced settings to create templates
Use the 'Shape' object
Section
Description
'Cell properties'
Define the size of each cell.
■ Select a cell of the table.
A black triangle appears in the bottom right corner of the
selected cell. The location of the selected cell is also indicated
at the top of the 'Cell properties' section.
■ Define the size of the cell.
■ Click
if you want to apply that same size to the other cells
(use or to refine the table definition).
■ From the 'Object' drop-down list, select the name of the
object you want to define as content of the cell.
'Design'
Tick the checkbox if you want to lock the content of the table.
Define the 'Shape' colors
1. You can select the color(s) of the 'Shape' object from the 'Object properties' panel, in the
'Shape' section.
2. You can also define your own custom colors.
For more information, see: ‘Define custom colors’ on page 115
Chapter 6 - Advanced settings to create templates
89
Use the 'Barcode' object
Use the 'Barcode' object
Purpose
There is no specific properties linked to the 'Barcode' object.
This object can be associated with a database content, or with a number.
Define the properties of the 'Barcode' object
1. Define the basic properties of the 'Barcode' object.
See: ‘Define the properties of an object’ on page 69
Make
sure the 'Object properties' - 'Content' - 'Max. characters' value is large enough to
2.
retrieve the data of the barcode. (It is the maximum number of characters allowed for the
content of this object.)
Define the style of the 'Barcode'
1. From the 'Object properties' panel, go to the 'Format' tab.
2. Open the 'Barcode' sub-section.
3. Define the type of barcode you want to use.
Select a value from the drop-down list.
4. Tick the 'Calculate checksum' checkbox if you want to add the checksum in the barcode.
5. Tick the 'Show barcode label' checkbox to display the label of the barcode.
Note:
Use the 'Font' sub-section to define the appearance of the label.
6. Indicate if you want to:
■ display the checksum number in the label of the barcode.
■ add characters to start and to stop the label of the barcode.
90
Chapter 6 - Advanced settings to create templates
Use the 'Price' object
Use the 'Price' object
Purpose
You can define the appearance of a 'Price' object. This section describes you how to do.
Define the properties of the 'Price' object
1. Define the basic properties of the 'Price' object.
See: ‘Define the properties of an object’ on page 69
Define the 'Currency'
1. Insert a 'Price' object.
2. From the 'Object properties' panel, go to the 'Currency' tab.
It is composed of 5 sub-sections.
3. Define the appearance of the elements that compose a 'Price' object:
Define the 'Currency' properties#
Element
Description
'Primary symbol'
Indicate if you want to display the currency symbol (for the
digit value).
Define the currency symbol to be displayed and the way to
display it.
Click to define a new currency symbol.
'Secondary symbol'
Indicate if you want to display a secondary currency symbol
(for the possible decimal value).
Define the currency symbol to be displayed and the way to
display it.
'Digits'
Define how to display the digit values.
You can edit the thousands separator and the zero display
symbol.
'Decimals'
Define how to display the decimal values.
You can edit the decimal symbol and the zero display symbol.
Chapter 6 - Advanced settings to create templates
91
Use the 'Price' object
Element
Description
'Extras'
You can define negative values and conditional format.
The conditional format allows you to link the 'Price' object to
another 'Price' object of the template.
You can, for instance, use a different display to show a price
that is higher than 1$ and to show a price that lower than 1$.
Note:
Using a conditional format often implies to use invisible
objects.
92
Chapter 6 - Advanced settings to create templates
Use the 'Formula' object
Use the 'Formula' object
Purpose
The 'Formula' object is different from the other objects of a template.
Its content depends on the objects of the template and on the formulas that have been
defined from the Formula Editor.
First, you define its content from a dedicated window.
Then, you can define its properties in the 'Object properties' panel.
Before you begin
■
■
■
Make sure the formula you need has been defined in Formula Editor.
Make sure the variables values of the formula are available from the template (e.g.:
'Text' or 'Price' objects, link to database).
Make sure you already saved the template with its objects.
Define the formula
1. Select the 'Formula' object to insert it in the template.
The 'Formula object' window opens.
2. Select a formula type if you need to restrict the formula list.
3. Select the name of the formula you need.
The units used in the formula appear in the gray frame of the same line.
Define
the value of the variables for the formula you selected.
4.
The variables values appear in a drop-down list.
Chapter 6 - Advanced settings to create templates
93
Use the 'Formula' object
They correspond to the objects that are already inserted within the current template.
[27] Variables of the 'Formula' object
5. Tick the checkbox of each formula argument, if the variable value is updateable by the
user of the data entry module.
Define
the possible additional information about the formula.
6.
94
Chapter 6 - Advanced settings to create templates
Use the 'Formula' object
#
Tab
Description
'Text before
operation'
Define a text to appear at the
beginning of the 'Formula' object.
'Text after operation'
Remark
Note:
You can define a text
that adapts to the result
of the formula.
Define a text to appear at the
end of the 'Formula' object.
You can also define a conditional
text that depends on the formula
result.
Note:
You can move this text
to another object of the
template.
Note:
If a text has been predefined in Formula Editor,
it appears in the dedicated text field.
'Data entry'
Define, if needed, the way to
display the formulas in the data
entry module.
-
'Round
method'
Define the 'Round method' to
apply to the result of the formula.
-
Chapter 6 - Advanced settings to create templates
95
Use the 'Formula' object
Tab
Description
Remark
'Advanced'
You can define additional conditions and links between the formula and the objects of the template.
You can also act on the display
in the data entry module.
[28] 'Formula' object defined
7. Click 'OK' to confirm.
You can insert the 'Formula' object.
Define the properties of the 'Formula' object
1. Define the basic properties of the 'Formula' object.
See: ‘Define the properties of an object’ on page 69
2. Define the 'Currency' properties for the elements of the 'Formula' object.
See: ‘Define the Currency ’ on page 91
96
Chapter 6 - Advanced settings to create templates
Use the tools to position an object
Arrange the objects in a template
Use the tools to position an object
Purpose
Several tools help you position your objects in a template.
Those tools are:
■
■
■
Rulers
They help you know the size of the template and of its objects.
Grid
It helps you arrange the objects in a template.
'Guide'
It helps you position and align the objects in a template.
Use the rulers
#
Action
Description
Display the rulers
■
■
Define the 'Rulers
settings'
From the 'View' menu, select 'Rulers'.
A check mark appears in front of this menu entry when the
rulers are displayed in the design panel.
You can define the appearance of the rulers.
See: ‘Define the Rulers settings ’ on page 40
[29] Example of a ruler
Use the grid
#
Action
Description
Display the grid
■
■
Define the 'Grid
settings'
From the 'View' menu, select 'Grid'.
A check mark appears in front of this menu entry when a
grid is displayed in the design panel.
You can define the appearance of the grid.
See: ‘Define the Grid settings ’ on page 40
Chapter 6 - Advanced settings to create templates
97
Use the tools to position an object
Action
Display the Grid
toolbar
Description
[30] Grid toolbar
■
■
From the 'View' menu, select 'Toolbars' - 'Grid'.
The toolbar appears in the interface.
From this toolbar, use the icons to:
- display or hide the grid
- define the grid appearance
- force the objects to snap to the grid
- display the 'Grid settings' window
Use the guides
1. From the 'Objects' menu, select 'Guide'.
Or use the 'Guide' icon from the 'Objects palette'.
2. Select if you want to use a 'Vertical guide' ( ) or a 'Horizontal guide' ( ).
3. On the template, click on the location where you want to position the guide.
The guide appears as a dotted line. You can move it as the other objects.
The other objects will snap to the guide. This way, you can align horizontally or vertically
your objects.
Note:
Guides are invisible at print time.
98
Chapter 6 - Advanced settings to create templates
Group the objects
Group the objects
Purpose
You can group objects to ease similar manipulations on those objects.
For instance, you can:
■
■
■
position the grouped objects
To do so, you can use the 'Alignment' toolbar or the 'Layout' menu.
resize and scale those objects
To do so, you can:
- use the mouse from the design panel,
- define specific properties in the 'Object properties' panel
- use the 'Layout' menu.
define similar objects properties
For instance, from the 'Object properties' panel, you can:
- add a shape,
- define identical rules for use in the data entry module,
- define a similar format
- ...
Group objects
1. Click on an object to select it.
2. Simultaneously, press the <Shift> key of your keyboard and select the other objects you
want to group.
3. Open the 'Layout' menu, or right-click on a selected object.
4. Select 'Group'.
The selected objects are grouped together. If you move one object, the others follow the
same movement.
Ungroup the objects
1. Select one of the grouped objects.
2. Open the 'Layout' menu, or right-click on a grouped object.
3. Select 'Ungroup'.
You can now manipulate each object separately.
Chapter 6 - Advanced settings to create templates
99
Group the objects
Regroup the objects
1. Select one of the objects that were grouped together.
2. Right-click on it.
3. Select 'Regroup'.
100
Chapter 6 - Advanced settings to create templates
Position the objects
Position the objects
Purpose
You can position the objects relatively to each other, or according to the page layout.
The Designer Module offers you tools to automate the positioning of your objects on
the template.
You find those tools in the 'Layout' menu and in the 'Alignment' toolbar.
This section describes how to position, resize, rotate and align the objects.
Note:
Make sure you also know how to use the tools to position an object on page 97.
Position objects
1. To ease the position of the objects on a template, you can:
■ insert guides from the 'Objects palette'
■ display the grid ('View' menu or toolbar)
2. From the 'Layout' menu, enable the following settings:
■ 'Snap to grid'
■ 'Snap to guides'
3. Select an object.
4. Position the object:
#
Position
Description
Free
Use the mouse or the keyboard arrows to move the object.
Use the 'Object'-'Position' section of the 'Object properties'
panel.
Define the 'Left' and 'Top' spacing.
Relative to the
template layout
Use the yellow and white icons of the 'Alignment' toolbar.
[31] Alignment relative to the template
[32] Alignment relative to the objects
Chapter 6 - Advanced settings to create templates
101
Position the objects
Resize objects
1. Select the object(s) or the group of objects.
2. Select a method according to your goal and your working preferences.
#
Action
Description
Resize a single object
Use the mouse or the keyboard arrows to resize the object.
Use the 'Object'-'Position' section of the 'Object properties'
panel.
Define the 'Width' and 'Height' of the object.
Use the 'Layout' menu:
■ Select 'Scale...'. Define a percentage and click 'OK'.
Resize a group of
objects
Use the mouse or the keyboard arrows to resize the objects.
Use the 'Position' section of the 'Object properties' panel.
Define the 'Width' and 'Height' of the objects.
Note:
This method only applies to objects of a same type. For
instance, resize at once all your 'Text' objects.
Use the 'Layout' menu:
Select 'Scale...'. This feature allows to resize the objects relatively to their own size.
Define a percentage and click 'OK'.
■ Select ''Size'...'. This feature allows to define the size of the
objects relatively to the selected objects.
Select a value and click 'OK'.
■
Rotate objects
Note:
You can only rotate a single object.
1. Select the object.
2. To rotate an object, you can:
102
Chapter 6 - Advanced settings to create templates
Position the objects
■
■
Click on the object to display the frame with the green circles. Mouse-over a green
circle and use the mouse to rotate the object.
From the 'Object' - 'Rotation' section of the 'Object properties' panel, define the rotation degree ('Angle') of the object.
Align objects
1. Select the object(s) or the group of objects.
2. Display the 'Alignment' toolbar (from the 'View'-'Toolbars' menu).
#
Action
Description
Align a single object
Use the yellow and white icons of the 'Alignment' toolbar.
They allow you to align the object relatively to the layout of
the template.
Align a group of
objects
Use the icons of the 'Alignment' toolbar.
Use the 'Layout' menu:
■ Select 'Align...'. This feature allows you to align the objects
relatively to each other.
Select a value and click 'OK'.
Chapter 6 - Advanced settings to create templates
103
Work with multiple objects
Work with multiple objects
Purpose
You can overlay several objects in a template. You must organize them according to the
final display you want to get.
Organize the objects display
1. Select an object or a group of objects.
2. From the 'Layout' menu, or from the 'Objects palette', use:
#
104
Setting
Description
'Forward'
To bring an object in front of another.
'Backward'
To send an object behind another.
'Bring to front'
To bring the selected object(s) at the front of all the other objects
of the template.
'Send to back'
To send the selected object(s) behind all the other objects of the
template.
Chapter 6 - Advanced settings to create templates
Duplicate an object
Duplicate an object
Purpose
You can repeat an object in a template.
You duplicate an object when you want to repeat the exact same object several time in
the template.
■
■
To repeat an object (or a group of objects) only once, you can copy and paste it.
To repeat an object several times, you duplicate the object.
Duplicate an object
1. Select the object you want to duplicate.
2. From the 'Objects' menu, select 'Duplicate objects...'.
The 'Duplicate objects' window opens.
3. The object will be duplicated as if it was to be placed in a table.
The object you duplicate is the starting point of the table (top left corner).
#
Step
Action
Remarks
1
Define a number of columns.
This corresponds to the horizontal
duplication of the object.
2
Define a number of rows.
This corresponds to the vertical duplication of the object.
3
Define the horizontal and vertical
spacing.
This corresponds to the space you
allow between the duplicated objects.
4. Click 'OK' to confirm.
Copy - Paste
1. Select the object or the group to copy.
2. To copy, you can:
■ right-right on the selection and select 'Copy'.
■ select 'Copy' from the 'Edit' menu.
3. To paste, you can:
■ right-click on the template and select 'Paste'.
■ select 'Paste' from the 'Edit' menu.
4. Position the copy on the template, where you need it.
Chapter 6 - Advanced settings to create templates
105
Lock the objects position
Lock the objects position
Purpose
Lock the position of all the objects of a template in order to:
■
■
■
avoid to move them inadvertently during the template creation.
avoid to move them inadvertently during the 'Object properties' definition.
create a new template from the current one, with the objects positioned in the same
place.
Lock the position of the objects
1. You lock the objects position:
■ From the 'Layout' menu, click 'Lock object positions'.
A check mark appears in front of this menu entry when the object(s) position is locked.
■ Click
from the toolbar.
2. A padlock is displayed when you mouse-over the locked objects.
Unlock the position of the objects
1. You unlock the objects position:
■ From the 'Layout' menu, click 'Lock object positions'.
The check mark disappears in front of this menu entry.
■ Click
from the toolbar.
2. A hand is displayed when you mouse-over the unlocked objects. You can move or resize
them.
Lock the position and size of a single object
1. Select the object.
2. From the 'Position' section of the 'Object properties' panel, tick the checkbox named
'Lock position/size'.
Note:
Un-tick this checkbox to unlock the position of the selected object.
106
Chapter 6 - Advanced settings to create templates
Delete an element of the template
Delete elements of a template
Delete an element of the template
Purpose
You can delete the objects or the guides you inserted in a template.
Delete objects
1. Select the object you want to delete.
Note:
You can make a multiple selection, if needed. Select additional objects and simultaneously
press the <Shift> key.
2. You can:
■ press the <Delete> key of your keyboard.
■ right-click the selected object(s) and select 'Delete'.
■ select 'Delete selected objects' from the 'Edit' menu.
■ use the 'Delete' icon from the 'Objects palette'.
Delete guides
1. From the 'Edit' menu, select 'Delete all guides'.
Note:
To delete only one guide:
- Make sure the 'Guide' tool in selected in the 'Objects palette' and select the guide to
be deleted
- Press the <Delete> key of your keyboard.
Chapter 6 - Advanced settings to create templates
107
Undo an action
Undo an action
Purpose
You can undo some of the changes applied to an object or to a group of objects.
Undo object changes
1. From the 'Edit' menu, select 'Undo object changes'.
You can also use simultaneously the keyboard keys <Ctrl> + <Z>.
2. Actions you can undo are:
■ resize, scale, align or move
■ cut, copy or paste
■ insert
■ delete
108
Chapter 6 - Advanced settings to create templates
Create a 'Job Separator' template
Advanced features
Create a 'Job Separator' template
Purpose
A 'Job Separator' template is used to create a document that will separate the posters at
print time.
It is created in Designer Module, and you use it in the Print Manager module ('Job Separator').
The user of Print Manager integrates a separator document in order to distinguish the
posters ordered per user. The goal is to identify the owner of the posters.
1. Create a template.
2. Insert the objects you need in order to identify the different posters print jobs.
Mainly, you insert 'Text' and 'Image' objects.
3. Define 'Macro' content for the objects.
For instance, insert 'Text' objects to define the user, the date, the poster width... with the
help of 'Macro' content.
4. From the 'File' menu, select 'Save as...'.
The 'Save template' window opens.
In
the 'File name' field, give an explicit name to your template.
5.
6. From the drop-down list, select the file format 'Job Separator' (*.btf).
7. Click 'Save'.
Result
In Print Manager module you can use this template as a 'Job Separator'.
Chapter 6 - Advanced settings to create templates
109
Create associated templates
Create associated templates
Purpose
Create associated templates when you want to provide a template into several sizes or into
several layouts.
To create associated templates, you must respect the same structure in all the templates.
You must keep:
■
■
■
a similar objects structure (objects types, objects order, layers)
the same name for each object that are common to the associated templates
the same link to a database, if any
Description
Associated templates are created from a template that is already stored in the current
chart. We call this template, the 'original template': you use it as a basis for the creation
of the associated templates.
Save all associated templates in the same folder of a chart.
Use this specific syntax to name the associated templates:
original_template_name[specificity_of_the_associated_template].ptf.
Associate templates together
1. Open a template (the one you want to use as the original template).
2. From the 'File' menu, select 'Resize page'.
3. Change the page size and click 'OK'.
Note:
Edit the template without changing its structure.
4. From the 'File' menu, select 'Save as'.
Note:
Make sure you are about to save the associated templates in the same folder as the original
template.
5. Give a name of associated template to that template:
■ Keep the same name
110
Chapter 6 - Advanced settings to create templates
Create associated templates
■
Add a suffix using this syntax: [page_size] or [new_layout]
For instance: template_for_bazar[A4].ptf, template_for_bazar[A0].ptf and template_for_bazar[blue_landscape].ptf are associated templates.
6. Click 'Save'.
The template you saved is now associated to the original one you created.
They are both saved in the same chart.
Result
In the data entry module, associated templates are proposed together to the user who
uses that chart.
The user of the data entry module can add content to one of those templates to create a
poster. Automatically, if the added content belongs to one of the objects that is common
to associated templates, the content is updated accordingly in all the posters created from
the associated templates.
[36] Result in the data entry module
Chapter 6 - Advanced settings to create templates
111
Manipulate the images
Manipulate the images
Purpose
Posterizer Pro offers advanced features to manipulate the images of a chart directly into
Designer Module.
This way, you avoid the need of a third-party application to manipulate the images of
your chart.
Those advanced features enable you to:
■
■
reduce the size of the images in order to preserve the performance of Posterizer Pro
in all the modules.
Create stamps from images when you propose a list of images to the user of the data
entry module.
resize the images in order to get an optimal printout of the posters.
Convert the format of your image to a format and a size that enhance the quality of
the poster (for instance, to avoid pixels on the printout).
Create stamps from images
1. You can create stamps from the images you want to display in the image list. This way,
the image list is loaded more rapidly in the data entry module.
Insert an 'Image' object.
2. From the 'Browser', browse to the chart folder that contains the images you want to
convert into stamps.
3. Right-click on one of the images.
4. Select 'Create image stamps...'.
5. From the 'Create image stamps' window:
#
Step
Action
1
Verify the source folder.
2
Indicate or create the destination folder.
Note:
The destination folder must belong to the current chart.
3
Define the stamp size and the expected format of the stamps.
6. Click 'Create image stamps' to validate.
112
Chapter 6 - Advanced settings to create templates
Manipulate the images
Result
#
Use the
stamps
Illustration
in Designer
Module
in the data entry module
Convert the images format
1. You can convert the images into another format for an optimized display in the Posterizer
Pro modules.
Insert an 'Image' object.
2. From the 'Browser', browse to the chart folder that contains the images you want to
convert.
3. Right-click on one of the images.
4. Select 'Image batch conversion...'.
Chapter 6 - Advanced settings to create templates
113
Manipulate the images
5. From the 'Batch conversion' window:
#
Step
Action
1
Browse to the destination folder and click 'OK'.
2
Select the 'Graphic format' to which you want to convert the images.
3
Indicate which image you want to convert.
6. Click 'OK' to confirm.
114
Chapter 6 - Advanced settings to create templates
Define custom colors
Define custom colors
Purpose
Posterizer Pro offers the possibility to define your own colors to create the objects of your
template.
You can define simple colors or gradients.
Define your own color list
1. From the 'Object properties' panel, go to the 'Shape' section.
2. From any setting where you can set a color, click the arrow to display the drop-down
palette.
3. Click 'More colors...'.
4. Define the custom color.
5. Give a name to the custom color.
6. Click to add the custom color to your own color list.
7. Click 'OK' to confirm.
Define a custom gradient
1. From the 'Object properties' panel, go to the 'Shape'-'Fill' section.
2. Select 'Gradient'.
3. Click 'Modify...'.
The 'Gradient settings' window opens.
4. Define a gradient.
Chapter 6 - Advanced settings to create templates
115
Define custom colors
#
Step
Action
1
Select the 'Style' of the gradient.
2
Define the display angle.
3
Use the 'Center offset' settings to define the position of the gradient.
4
From the 'Color' drop-down list, select a first color for the gradient.
It corresponds to the color indicated with the black arrow in the top-left
gradient preview.
5
From the top-left gradient preview, click on the white arrow. It becomes
black.
Select a second color for the gradient, from the 'Color' drop-down list, if
needed.
Note:
Click
to invert the gradient.
Note:
You can insert intermediate colors in the gradient. Double-click below the gradient preview to insert an arrow. Re-define the color if
needed. Define the position of the color: use the 'Position' setting
or move the corresponding arrow.
6
Give a name to the gradient.
7
Click
to add the custom gradient to your custom list.
Note:
The 'Color count' setting allows you to define the screen display ('Preview') and the print
quality ('Print') of the gradient.
The 'Color count' number represents the number of colors that compose the gradient.
The higher the number, the better the quality of the gradient.
116
Chapter 6 - Advanced settings to create templates
Define custom colors
5. Click 'OK' to confirm.
Chapter 6 - Advanced settings to create templates
117
Allow design changes on a poster
Prepare the template for use in the data
entry module
Allow design changes on a poster
Purpose
Some design elements of a template can be changed when creating posters. Those elements
are:
■
■
■
the double sided property
the background color
the sleeve
Within Designer Module, those design elements belong to the basic properties of a template.
When to do
You define the editable design elements when you create a new template, or before you
export the chart that contains the template.
Define the basic properties
1. From the 'Template' menu, select 'Properties...'.
The 'Template properties' window opens.
2. Define the specific properties that impact the design of the template.
#
Value
Description
'Crop marks'
Add crop marks to your template.
At print time, those crop marks will be printed.
Note:
The crop marks aspect is defined during
the printer configuration.
118
Chapter 6 - Advanced settings to create templates
Allow design changes on a poster
Value
Description
'Print sleeve'
Indicate that you use a sleeve to display your template.
At print time, the sleeve can be printed on top of
your template.
'Double sided'
Indicate that you want your template to be double
sided.
At print time, both sides of your template can be
printed on a same sheet (same face or both sides
of the page, according to your printer capability).
3. Indicate the 'Background color' of the template.
Note:
It may conflict with the paper color on which the template will be printed.
4. Define the 'Allowed changes':
#
If
Then
you allow a change:
'Allow double sided change'
■ 'Allow background color
change'
Tick the associated check-box.
you want to prevent a specific
change
Un-tick the check-box.
■
5. Click 'OK' to confirm.
Define a 'Sleeve'
1. Select the object of the template which belongs to the sleeve.
2. From the 'Object properties' panel, go to the 'Object'-'Visibility' section.
3. Tick the 'Sleeve' checkbox.
Result
According to the editable elements you defined, the user of data entry module can adapt
the design of this template to create posters.
Chapter 6 - Advanced settings to create templates
119
Allow design changes on a poster
[41] Result in the data entry module
120
Chapter 6 - Advanced settings to create templates
The 'Data entry' properties of an object
The 'Data entry' properties of an object
Introduction
'Data entry' is one of the object properties.
You define the 'Data entry' properties for each object, from the 'Object properties' panel.
Purpose
The 'Data entry' tab is very important in the definition of an object. It defines the modification you allow for the creator of the poster based on your template. These properties
have an impact on the data entry module.
Define the behavior of an object in 'Data entry'
1. From the 'Object properties' panel, go to the 'Data entry' tab.
2. From the 'Data entry caption' section, you can define a caption for the selected object.
When defined, this caption is used in the data entry module to designate the object (it
appears in the Poster Data panel, instead of the object name given in Designer Module).
3. From the 'User input' section, indicate if the content of the selected object must be
completed by the creator of the poster.
Note:
Requested information vary according to the object type that is selected.
'Data entry' properties#
Properties
Description
'No user input'
The object cannot be modified in the data entry module.
Chapter 6 - Advanced settings to create templates
121
The 'Data entry' properties of an object
Properties
Description
'User input'
The object can be completed by the creator of the posters, according to the value you define. (The availability of those values
depends on the object type that is selected.)
■ 'Required': the user of the data entry module must complete
the content of the object.
■ 'Forbidden': the user of the data entry module is not allowed
to enter any content for the object. The field must be cleared
before the poster can be printed.
■ 'Numeric': the user of the data entry module must enter a
numeric content (e.g.: numbers).
■ 'Data validation': the user of the data entry module must
respect the conditions you defined when he enters content
for the object.
■ 'Allow free text': the user of the data entry module can enter
free content for objects which normally have a fixed content
(e.g.: select another formula, change the content of a 'Text
pick list').
■ 'Data entry only as free text': the user of the data entry
module can modify the text of the formula.
Note:
If nothing is checked, the user of the data entry module
can edit the content of the object, even if does not have
to.
4. From the 'Updateable properties' tab, you can indicate the modifications you allow to
the user of the data entry module.
Tick a checkbox to define a property you allow to be updated.
Result
According to the rules you defined:
■
■
■
122
the object may be invisible in data entry module.
the entries of the 'Object' menu can be available in the data entry module. The user
of the data entry module can edit the object properties.
some of the object properties can be available in the Poster Data panel. The user of
the data entry module can select, among a restricted list of values, a new value for the
object properties.
Chapter 6 - Advanced settings to create templates
Define the objects display order
Define the objects display order
Introduction
From the Designer Module, you can define the appearance of the Poster Data panel in
the data entry module. The Poster Data panel gathers poster data fields which correspond
to the updateable objects of the template.
Purpose
In the data entry module, the users see the value of each updateable object that compose
the template. From the Poster Data panel, they can define the value of each poster data
field for each poster they generate.
Define the objects order once you finished a template.
Define the order of the objects
1. From the 'Layout' menu, select 'Objects order'.
The 'Objects order' opens.
All the objects you inserted in the template are listed.
2. Define the 'Input order' and the appearance of the poster data fields in the data entry
module.
Note:
This tab only applies to the updateable objects of the template.
#
Step
Action
1
■
■
Remarks
Select an object in the list.
Use and to organize the objects list.
The first object of the list will appear
in the first position of the Poster
Data panel in the data entry module.
All those updateable objects appear
as poster data fields in the data entry
module.
Chapter 6 - Advanced settings to create templates
123
Define the objects display order
Step
Action
Remarks
2
Tick the 'Display a separator' checkbox to insert a separator before the
poster data field.
A separator allows you to group
poster data fields.
Note:
The separator is highlighted
in the below illustrations.
3
Define the appearance of the separator:
■ give a name to the separator.
This name is similar to a legend
for the group of poster data fields.
■ define the position of the separator.
■ define the type of separator to use.
[42] Objects order definition in Designer
3. Define the 'Draw order', if needed.
124
Chapter 6 - Advanced settings to create templates
The separator can be a simple line or
a tab.
If you select a tab type, we strongly
advise you to give a name to the tab.
Note:
For a better visibility, define
only one type of tab -if any.
Define the objects display order
#
Step
Action
Remarks
1
Select an object in the list.
The 'Draw order' list shows all the
objects of the template.
2
Use
The first item of the list is at the
front of the template: it is on top of
the other objects. No other object
can hide a part of it: it is visible and
will be fully printed on the poster.
As a consequence, the 'Draw order'
defines the print order of the objects
that appear on the poster.
and
to organize the list.
Note:
Check which object is at the
back, it may not be printed
if not visible.
4. If your template contains grouped objects, you can also define the 'Alignement and text
scale'.
Each group of objects has its own sub-tab.
For each group, you can define rules to align one object on another in the same group.
Chapter 6 - Advanced settings to create templates
125
Define the objects display order
For instance, you can align the content of first object with the top of the second object
which has content.
Note:
Regularly save your template to get the latest information in the lists.
Result
In the data entry module, the Poster Data panel displays the data according to the objects
order you defined.
[44] Result in the data entry module
You can export the objects order configuration in order to reuse it with other templates.
■
■
126
To export the object order, click 'Export objects order...' and save the .OLF file in the
current chart.
To reuse the object order, open the 'Objects order' window.
Click 'Import objects order...' and browse to the location where you stored the .OLF
file.
Chapter 6 - Advanced settings to create templates
Define the Data Entry settings of a database
Define the Data Entry settings of a database
Purpose
You can define the content of the database navigator that will be visible in the data entry
module.
1. From the 'Database' top menu, select 'Advanced'.
2. Select 'Data entry properties...'.
The 'Template database properties' window opens.
Make
a selection from the drop-down list, or tick a checkbox in order to:
3.
#
Step
Action
1
Indicate the way you want to display the database navigator (toolbar).
2
Define the actions you allow for the database in the Designer Module.
3
Indicate if you allow
■ the advanced search (SQL search)
■ the Excel help screen
[45] Properties defined in Designer
Chapter 6 - Advanced settings to create templates
127
Define the Data Entry settings of a database
4. Click 'OK' to confirm.
[46] Result in the data entry module
128
Chapter 6 - Advanced settings to create templates
Preview the template in Designer Module
Preview the template
Preview the template in Designer Module
Introduction
You can preview the template in Designer Module:
■
■
before you print it
to get a general overview of your creation
Preview before print
1. From the 'File' menu, select 'Print preview'.
A window opens.
Note:
The template size must fit the printer configuration. Else, you cannot preview the expected
printout template.
2. You can:
■ define the number of copies you want to print
■ add the 'Double sided' property to your template (preview of the 'Double sided' orientation that best fits your printer configuration)
■ change the 'Printer configuration'
3. Click 'Print' to print the template.
Click 'Close' to exit.
Preview the created template
1. From the 'File' menu, select 'Poster preview'.
Or click the 'Preview' icon from the toolbars.
A window opens.
2. You can:
■ get a preview of your template with or without the sleeve
■ get a preview of your template with the 'Double sided' property (horizontal or vertical
'Double sided')
■ print your template
■ display the 'Print preview' window (click the 'Print' icon)
3. Click 'Close' to exit the 'Preview' window.
Chapter 6 - Advanced settings to create templates
129
Preview the template in Data Entry
Preview the template in Data Entry
Introduction
The Designer Module offers a preview of your template in the Data Entry module. This
allows you to understand how a user of the data entry module can create a poster from
your template.
Preview a template in Data Entry
1. From the 'Objects palette', click .
Or, from the 'File' menu, select 'Execute Posterizer Data Entry'.
The Data Entry module opens.
2. Preview the template in the design panel.
3. You can change the content of the objects, if allowed.
130
Chapter 6 - Advanced settings to create templates
What is a formula
Create formulas in Formula Editor
What is a formula
Definition
A formula is a type of object that you can insert in a template.
It is a mathematical operation.
The 'Formula' object allows you to automatically:
■
■
■
calculate prices,
apply discount,
calculate savings.
With the 'Formula' object, you avoid inconsistencies in the prices displayed on the posters.
Formulas are stored in the posterizer.for' file located in the Formulas folder.
This file is applies to all your charts. Once you defined a formula, you can use it in all
your templates.
Chapter 6 - Advanced settings to create templates
131
Open Formula Editor
Open Formula Editor
Introduction
The Formula Editor module allows you to define or customize the formulas for your
template.
Open Formula Editor
1. From the 'Tools' top menu of the Designer Module, select 'Formula editor'.
2. From the 'Tools' toolbar, click the 'Formula editor' icon.
Result
The Formula Editor is a module of Posterizer Pro. It opens as a new application.
132
Chapter 6 - Advanced settings to create templates
Get to know Formula Editor
Get to know Formula Editor
Introduction
The Formula Editor module enables you to create or modify formulas.
Illustration
[48] Interface of Formula Editor
Description of the Formula Editor interface
Interface of Formula Editor#
Area
Component
Description
1
top menu
■
■
Manage the formula files
Manage Formula Editor display
Chapter 6 - Advanced settings to create templates
133
Get to know Formula Editor
Area
Component
Description
2
icon bar
Name of the formula file and shortcut icons to:
Open a formula file
■ Save a formula file
■ Import a formula file
■ Exit Formula Editor
■
3
tabs
Enable to switch between:
'Formulas' panel
■ 'System variables' panel
■
134
4
formula list
Display the list of the formulas contained in a formula file.
You can sort the formulas according to several criteria.
5
management
buttons
All those buttons open new windows where you can manage
your formulas:
■ Create a formula
■ Modify a formula
■ Delete a formula
■ Test a formula
This button opens the 'Formula' window.
From there, you can display the expected result of a
formula. This way, you can rapidly view if the formula
is correct before you use it in a template.
Chapter 6 - Advanced settings to create templates
Create a new formula
Create a new formula
Purpose
You can create any formula to suit to your needs.
You use the formulas in the Posterizer Pro modules when you insert a 'Formula object'
in a template.
Create a new formula
1. Open the Formula Editor module.
2. Click the 'New...' button.
The 'New formula' window opens.
3. Fill in the fields:
#
Step
Action
Example
1
'Formula name'
Give a name to the formula you create.
'Formula name' = Price_per_item
2
'Formula type:'
From the drop-down list, indicate
the formula type.
The type of a formula gives an indication about what the formula does.
However, this classification is very
subjective.
■ 'Units'
For price definition.
■ 'Currency'
For price conversion.
■ 'Mathematical'
For a calculation.
■ 'Special offer'
To calculate a discount.
■ 'Reduction'
To apply a discount.
3
'Formula version:'
Give a version number.
'Formula version:' = 1
Chapter 6 - Advanced settings to create templates
135
Create a new formula
Step
Action
Example
4
'Formula'
Define the formula.
■ Use free parameters to represent
the values.
■ Use mathematical operators to
represent the needed calculation.
■
To know more, see: ‘Operators supported in Formula Editor’ on page 176
■
■
■
/ means 'divide'
* means 'multiply'
+ means 'add'
- means 'subtract'
For instance, 'Price / Quantity'
means we want to divide the price
(total amount paid) by a certain
quantity of items (bought products).
This formula will compute the price
per item.
5
'Text before' / 'Text after'
Define possible text before and after
the formula.
In our example, we could add: 'this
results in' in front of the formula;
and 'euro per item!' after the formula.
The result would be: 'this results in
2 euros per item!'
6
'Measurement unit'
Define the measurement units.
This information is useful when filtering the existing formulas.
4. Click 'OK' to confirm.
Without error message, the syntax of the formula is correct. The formula is added to the
formula list.
Create a new variable
1. From the Formula Editor module, go to the 'System variables' tab.
2. Click 'New...'.
The 'Add a variable' window opens.
3. Fill in the fields for the 'Variable name' and 'Variable value'.
Thos are free text fields.
4. Click 'OK' to confirm.
The new variable is created. You can use it to create formulas.
Save the new formula
1. From the 'File' menu, select 'Save'.
2. The new formula is added to the current formula file.
136
Chapter 6 - Advanced settings to create templates
Create a new formula
Result
You can use this new formula in the Designer Module.
Chapter 6 - Advanced settings to create templates
137
Edit a formula
Edit a formula
Purpose
You can edit a formula in order to adapt it for your needs.
1. From the formula list, select the formula you want to modify.
2. Click 'Modify...'.
The 'Modify the formula' window opens.
3. Change the criteria you want among the following:
#
138
Criteria
Description
Example
'Formula name'
Give a name to your formula.
This is a free text field.
Kilogram
'Formula type:'
Select among the proposed formula types.
This allows you to filter the formulas from the
main list.
Units
'Formula version:'
Enter a number to indicate the version of a
formula.
All versions always remain available (as long as
you do not delete them).
1
'Formula'
Enter the formula you want to create.
To know more, see: ‘Operators supported in
Formula Editor’ on page 176
Price/Capacity
'Text before'
Enter the text you want to display before the
formula.
This is a free text field.
Wonderful discount:
'Text after'
Enter the text you want to display after the formula.
This is a free text field.
per kilogram
'Measurement
unit'
Indicate the measurement unit you use in the
formula.
This allows you to sort the formulas from the
main list.
This is a free text field.
Kg
Chapter 6 - Advanced settings to create templates
Edit a formula
Note:
See also: ‘Create a new formula’ on page 135
4. Click 'OK' to confirm.
Result
The modified formula appears with the new criteria in the formula list.
Chapter 6 - Advanced settings to create templates
139
Test a formula
Test a formula
Purpose
Formula Editor offers you the possibility to preview the result of a formula. You can test
if the result of the formula corresponds to your needs. Then, you can insert that formula
within a template.
1. Select the formula from the formula list.
2. Click 'Test...'.
The 'Formula' window opens.
3. Adapt the 'Parameter value' to your needs.
The result of the formula appears in red in the 'Result' section.
140
Chapter 6 - Advanced settings to create templates
Create a formula file
Advanced features
Create a formula file
Purpose
You can create your own formula file for a backup purpose, or to save sets of formulas
that you do not currently use.
Description
Formulas are stored in a .FOR file.
The default formula file is 'posterizer.for'. It is located in the Formulas folder, along with
the installation files.
This default file is used with each environment you create.
To use a formula in a template, you must make sure the 'posterizer.for' file belongs to
the installation folder of Posterizer Pro. It will be used in your chart(s).
Note:
Only the file named 'posterizer.for' is used in the templates.
Create your formula file
1. Open Formula Editor.
2. Arrange the formula list (add, remove, modify the formulas of the list).
3. From the 'File' menu, select 'Save as'.
A window opens.
4. Give a name to the formula file.
Note:
Only the formulas saved in the file 'posterizer.for' can be used in Designer Module.
5. Browse to the location where you want to save your formula file.
6. Click 'Save'.
Your formula file is created.
Chapter 6 - Advanced settings to create templates
141
Import formulas
Import formulas
Purpose
I you have created or saved formulas in a .FOR file, you can import these formulas in
Formula Editor, in order to use them in Designer Module.
Note:
You do not need to export a formula.
Note:
If you want a clean formula file, you can clear it completely before you import news
formulas. To do so, select 'Clear all...' from the 'File' menu.
1. From the 'File' menu of Formula Editor, select:
■ 'Import': to import only a selection of formulas
■ 'Import all...': to import a complete formula file
2.
3.
4.
5.
6.
Click 'Yes' to confirm your action.
Browse to the location where your formula file is located (.FOR).
Select the file.
Click 'Open'.
If you chose 'Import', a list of the available formulas opens.
Select the formulas you want to import.
Note:
You can also import the variables that are used in the selected formulas. Go to the 'System
variables' tab to selected the needed variables.
7. Click 'OK' to confirm.
Result
The formulas and variables (all or your selection) are added to the formula file of every
chart you use.
Save the file as 'posterizer.for'. Your formulas are now available for use in the Formula
Editor module.
142
Chapter 6 - Advanced settings to create templates
Chapter 7
Save and export a template
Save a template
Save a template
Introduction
Save your template for a future usage.
It is also wise to regularly save your template during its creation, as a backup version.
Access to the 'Save' window
1. From the 'File' menu, select 'Save'.
2. From the top bar icons, select .
Save your template
1. Access to the 'Save template' window.
2. From the 'Save template' window, enter a name for your template in the 'File name' field.
Note:
If you created a template from the default templates proposed in the Demo chart, make
sure you do not erase that default template.
3. Verify, from the tree structure, that the storage folder is correct.
Change it if needed.
4. Click 'Save'.
Result
This action creates a file, with a .PTF extension, in the folder your indicated.
The template is stored in the Template folder of your chart.
144
Chapter 7 - Save and export a template
Upload a chart to FTP
Upload a chart to FTP
Purpose
Upload a chart to the FTP server. It can be retrieved by the users of the data entry module.
Upload a chart to FTP
1. From the ' FTP ' menu, select 'Chart' - 'Upload chart to FTP folder...'.
2. Click 'Yes' to confirm.
The chart is uploaded to the FTP server.
A pop-up message gives you the status of the upload.
Result
The users of the data entry module can benefit from your recent changes.
Chapter 7 - Save and export a template
145
Export a chart
Advanced features
Export a chart
Purpose
You can export a chart to a .ZIP file:
■
■
to create a local backup for your current chart (you can import it in Designer Module
at your convenience).
to exchange the chart with Océ (this way, you can send it by mail).
Export the full chart
1.
2.
3.
4.
From the 'Tools' menu, select 'Chart tools' - 'Export chart to zip file...'.
Give a name to the chart.
Browse to the directory where you want to store the chart.
Click 'Save'.
Result
The ZIP file of the chart is available for a future import and is ready to be sent by e-mail.
146
Chapter 7 - Save and export a template
Add messages to a chart
Add messages to a chart
Purpose
You can create messages for the user of the data entry module.
The message files are stored in the Messages folder of the chart. Message files are text
files, with the .MESS extension.
When to do
Add a message to the chart before you upload the chart to the FTP server.
Create messages to communicate with the users of the data entry module.
Create a message
1. Browse to the root folders of the chart.
Note:
Open the 'Configuration' - 'Application folders' menu to know the path to follow.
2.
3.
4.
5.
6.
If it does not exist yet at the root structure of the chart, create a folder named 'Messages'.
Open the 'Messages' folder.
Create a text file in which you type your message (a .TXT file for instance).
Save the file in the 'Messages' folder.
Replace the file extension from .TXT (for instance) to .MESS
Result
When the user of the data entry module opens the module, the message is retrieved. The
message appears in a dedicated panel of the interface.
Chapter 7 - Save and export a template
147
Export a chart selection to zip
Export a chart selection to zip
Purpose
You create a chart selection when you only want to export a subset of the chart (for instance, only few templates or images).
You export the chart selection the same way as you do for a full chart export: into a .ZIP
file.
This enables you to better control the items of the existing charts in the retailer stores.
You can export new items or you can delete the ones you previously exported.
Create a chart selection
1. From the 'Tools' menu, select 'Chart tools' - 'Export a chart selection to zip file...'.
2. Give a name to the chart root folder and click 'OK' to confirm.
The 'Chart export' window opens.
3. From the 'Graphical chart' frame (left column), expand the folders.
4. Select the files or folders you want to export.
#
If you want to export
Then
a folder
■
■
a file
■
■
■
■
Double-click on a folder name to move it to the export
list.
(or right-click on the folder)
Click 'Yes' to confirm.
Select the folder that contains the files.
The file list appears in the bottom of the left column.
Right-click on the file you want to export.
Select 'File -> export...'
Click 'Yes' to confirm.
Those items are listed in the 'Items to export' tab (right column).
5. Select the files or folders you want to remove from the chart existing in the retailer stores.
#
If you want to delete
Then
a folder
■
■
■
148
Right-click on the folder or the file you want to delete.
Select 'Folder -> add to delete list...'
Click 'Yes' to confirm.
Chapter 7 - Save and export a template
Export a chart selection to zip
If you want to delete
Then
a file
■
■
■
■
Select the folder that contains the files.
The file list appears in the bottom of the left column.
Right-click on the file you want to export.
Select 'File -> add to delete list...'
Click 'Yes' to confirm.
Those items are listed in the 'Items to delete' tab (right column).
Define advanced settings
1. You can restrict the chart update to certain retailer stores. To do so, indicate the store
codes of each retailer stores to which the chart update must apply.
From the 'Store codes' tab, define or import the list of store codes that will be able to retrieve the chart update.
2. From the 'Advanced' tab, you can also:
#
Step
Action
1
Define additional items to export, if needed.
2
Give additional information about the chart selection you create, if needed.
Note:
Make sure you ticked the 'Use information below' checkbox.
Add a message to the chart selection
1. Right-click anywhere in the 'Graphical chart' frame (top-left corner).
2. Select 'Create message file...'.
3. Give a name to the message file and click 'OK' to confirm.
Note:
Do not change the file extension .MESS.
4. Type in your message.
5. Click 'OK' twice to confirm the message and exit.
Chapter 7 - Save and export a template
149
Export a chart selection to zip
Export the chart selection
1. Click 'Export in a zip file...'.
2. Enter the 'Administrator login' password and confirm.
A pop-up message gives you the status of the export.
3. Click 'Close' to exit.
Result
The ZIP file of the chart selection is available for a future import. You can also send it
by mail to the user of the data entry module.
The user of the data entry module receives the chart selection which updates the chart
he uses.
150
Chapter 7 - Save and export a template
Chapter 8
Work with the Automation
option
Connect to a database
Connect a database to the template
Connect to a database
Introduction
To manage database content and connection in Posterizer Pro, use the 'Database' menu.
Note:
The use of a database requires the Automation option.
Purpose
The template is a collection of objects. Some of these objects hold information on a
product such as names, references, price, etc.
To ease the creation of posters, you can connect a template to a database of products.
The users of the data entry module will then be able to browse through the products and
see the resulting poster for each product of the database.
You will also be able to generate easily a set of posters that matches a certain database
query.
Before you begin
Open the template you want to connect to a database.
Connect the template to a database
1. From the 'Database' top menu, select 'Connect' - 'Connect...'.
Note:
If the chart you use contains a database with a CSV or an Excel format, select the appropriate proposed entry.
2. The 'Select database' window pops-up.
Select the format of the database you want to connect to.
3. Click 'Select' to indicate the file to use.
Indicate also the database connection information needed.
152
Chapter 8 - Work with the Automation option
Connect to a database
Note:
Ask your database administrator for this information, if needed.
4. If needed, click 'Select table' to select a specific table of the database file.
A windows pops-up. It lists all the available tables contained in the database file you selected.
5. Select the table to which you want to connect.
6. You can test the connection to the database file.
Click 'OK' to validate.
Result
The template currently opened in the design panel is now connected to the selected
database.
Chapter 8 - Work with the Automation option
153
Manage database connection
Manage database connection
Purpose
When you edit a template, you can disconnect from a database (in order to connect to
another database, for instance).
Disconnect from a database
1. From the 'Database' menu, select 'Disconnect'.
2. Click 'Yes' when proposed to keep the connection information.
This will allow you to reconnect to the database later on.
Reconnect to a database
1. From the 'Database' menu, select 'Reconnect'.
The template is now connected again with the database you previously selected.
154
Chapter 8 - Work with the Automation option
Connect the objects to the database fields
Connect the objects to the database fields
Purpose
When your template is connected to a database, you can benefit from tools to connect
the fields of the database to the objects of the template.
Before you begin
Make sure the current template is connected to a database.
Manage the connection of each object
1. From the 'Database' menu, select 'Advanced' - 'Connect template data to database' 'Template objects...'.
The list of the objects inserted in your current template appears in a new window.
2. You can connect or disconnect each object which has already been connected to the
database.
Chapter 8 - Work with the Automation option
155
Connect the objects to the database fields
#
If you want to
What
Then
disconnect from
the database
a single object
■
■
all the objects
■
■
connect to the
database
■
■
a single object
■
■
■
select the object
and click
click
click 'Yes' to confirm
click
click 'Yes' to confirm
select the object
click
modify the content source (if needed),
and indicate the database field you
want to connect to
3. Click 'OK' to confirm.
Rename the template objects to match the name of the database fields
1. From the 'Database' menu, select 'Advanced' - 'Connect template data to database' 'Rename template objects to connected database fields...'
2. Click 'Yes' to confirm.
Every object of the current template that is connected to a database now has the same
name as the database field to which it is connected.
At poster creation time, the content of each object will be easily identifiable from the
database.
156
Chapter 8 - Work with the Automation option
View the content of the connected database
View the content of the connected database
Purpose
Once your template is connected to a database, you can view the content of that database.
This can help you design the template and its objects.
1. From the 'Database' menu, select 'View data'.
A 'Data' floating window opens.
2. You can use its information to define the content of an object.
Chapter 8 - Work with the Automation option
157
What is a layer
Advanced features
Create and manage layers
What is a layer
Definition
A layer is a Designer Module concept that allows you to organize the data in a template.
A template is a superposition of layers: it can be composed of several layers. Those layers
can be turned on and off (visible or hidden).
In the Designer Module, a layer is a way to gather objects in order:
■
■
to make the objects visible or to hide them.
to adapt the layout of the template in a dynamic way, according to the data entered.
You can define up to 40 layers.
Layers properties
Layer content
The layers contain objects.
If a layer does not contain any object, it is not used.
Layer activation
To work on the objects of a layer, that layer must be active.
Only one layer is active at once.
Objective
You can use only one layer to create a full template.
However, in the Designer Module, you can also use multiple layers to create a more
powerful template:
■
■
158
that uses conditions.
that applies to multiple products.
Chapter 8 - Work with the Automation option
View the layers
View the layers
Purpose
To easily manage the layers configuration and settings, Designer Module proposes a
dedicated window.
1. From the 'View' menu, select 'Layers'. You can also use the 'Layers' icon from the 'Objects
palette'.
The 'Layer settings' window opens.
2. It is composed of 3 tabs:
#
Tab
Description
'Layers'
Manage the visibility of the layers in the design panel.
Define the active layer.
Manage the conditions on the layers.
Define the behavior of the layers at print time.
'Data entry'
Manage the behavior of the layers in the data entry module.
'Legend'
Get information about the icons of the 'Layer settings' window.
Define the visible layers
1. From the 'Layer settings' window, select the layer you want to see in the design panel.
2. Click .
3. Repeat this action for all the layers you want to see.
Note:
Click to make all layers visible at once. Click
the layers used in the template.
('Hide empty layers') to display only
Note:
The selected visible layer is also the active one.
Chapter 8 - Work with the Automation option
159
Define the content of a layer
Define the content of a layer
Purpose
It is recommended to work on identifiable layers.
The layers used in a template contain the objects of the template.
There are two ways to add objects to a layer:
■
■
The objects are already created: you can link together the layers and the objects of the
template (see the procedure below).
The layers are already created: you can create objects directly in the active layer (select
a layer and create your objects).
Note:
A layer must be active (selected) if you want to work on the objects it contains.
When to do
You define the layers after you inserted objects on the template.
Note:
If you know how to arrange the template, you can also start with the creation of the
layers.
Then, you create the object(s) for each layer. In this case, the link between the layer and
the object(s) is automatic. This method is not covered in the current section.
Name a layer
1.
2.
3.
4.
5.
From the 'View' menu, select 'Layers'.
From the 'Layers' tab of the 'Layer settings' window, select a layer.
Right-click on the layer and select 'Design' - 'Name...' (or click the 'Layer name' icon).
Give an explicit name to the layer.
Click 'OK'.
Add an object to a layer
1. From the design panel, select an object of the template.
2. In the 'Object properties' panel, go to the 'Layer' section ('Object' tab or 'Position and
size' entry).
160
Chapter 8 - Work with the Automation option
Define the content of a layer
3. Click the little arrow to fully display the 'Layer' section.
4. From the drop-down list, select the layer to which you want to link the object.
Note:
By default, when you create an object it is associated with the active layer.
Chapter 8 - Work with the Automation option
161
Define the print behavior of the layers
Define the print behavior of the layers
Purpose
You can define one print behavior per layer.
The print behavior has an impact on the data entry module.
You can:
■
■
force a layer to be printed.
In this case, you define the printable layers.
allow the user of the data entry module to select the layers to be printed.
In this case, you define a list of possible printable layers. The user of the data entry
module can turn on/off a selection of objects according to the layers that he decides
to print.
Define the printable layers
1. From the 'Layers' tab of the 'Layer settings' window, select the layer that must be printed.
2. Click .
Note:
You can define several printable layers.
All the objects of the printable layers will be printed, in the order defined by the 'Draw
order' (see: ‘Define the objects display order’ on page 123).
3. Save the template.
This layer will always be visible in the data entry module: it will always be printed.
Define possible printable layers
1. From the 'Data entry' tab of the 'Layer settings' window, tick the 'Create layer list box'
checkbox.
2. Give a meaningful name to the layer list.
The layer list will appear in the data entry module.
3. Tick the 'Multiple layer selection' checkbox if you allow the user of the data entry module
to select several layers.
Else, the user of the data entry module will have to select only one layer among the layer
list.
4. Go to the 'Layers' tab of the 'Layer settings' window.
5. The print behavior will be defined by the user of the data entry module.
162
Chapter 8 - Work with the Automation option
Define the print behavior of the layers
#
You can
How to do
suggest to print a
layer
■
■
Select the layer.
Click .
In the data entry module, the layer will be selected by default,
but the user can change this selection.
allow a selection of
layers to be printed
■
■
■
Select the layer.
Click .
Repeat for all the layers of the selection
6. Save the template.
Chapter 8 - Work with the Automation option
163
Define a condition on a layer
Define a condition on a layer
Purpose
You can define conditions on the layers of a template.
This allows you to create a same template for multiple uses.
For instance, you can create a template that adapts to the number and type of objects
defined in the data entry module.
To do so, you must define a condition on a layer and an activation object.
Illustration
[50] Example of a condition using activation objects
Define a condition and the activation object
1. From the 'Layers' tab of the 'Layer settings' window, select the layer for which yo want
to apply a condition.
2. Click .
A new window opens.
3. Define the condition to apply to the selected layer.
The condition is defined according to the objects of the template, or according to the
relation between those objects.
You define the condition in which the layer is displayed.
164
Chapter 8 - Work with the Automation option
Define a condition on a layer
#
Step
Action
Example
1
Select an object of the template.
For instance, on the selected layer,
you created a frame to display a
product description.
This frame contains:
■ 2 text objects:
- 'Title' that has 'Content Description' has a free text content
- 'ProductDescription' which
content is linked to a database and
that contains the description text
of the product
■ 1 image object:
- 'Info' which displays an image
of an information sign
Note:
Make sure you explicitly
named the objects of the
template.
2
Define the value of the object that
creates a condition.
Select the object named 'ProductDescription'.
Define the 'not empty value' value
for this object.
3
Click to add the object and its value to the condition list.
Add 'ProductDescription' with the
'not empty value' condition to the
condition list.
This means that when the 'ProductDescription' object value contains
some content, the layer to which this
object is linked is visible in the data
entry module.
4
Select an operator, if needed.
No need for an operator in our example.
5
Repeat this procedure with all the
conditional objects.
No need to repeat the procedure for
our example.
Note:
Use the proposed icons to modify, arrange or delete conditional objects from the list.
4. Click 'OK' to confirm.
5. Save the template.
Chapter 8 - Work with the Automation option
165
Define a condition on a layer
Note:
Click
to modify a condition.
Result
In our example:
■
■
166
If the object 'ProductDescription' is linked to an empty cell of the database, then, the
layer will not display. The other objects of the layer ('Info' and 'Title') will be invisible
on the poster (invisible also in the poster data panel of the data entry module). They
will not be printed at print time.
If the object 'ProductDescription' is linked to some content ('not empty value'), then,
the layer will display. The others objects are visible in the data entry module and everything can be printed.
Chapter 8 - Work with the Automation option
Define the background color of a layer
Define the background color of a layer
Purpose
You can define the color of the background on which the objects will be displayed on
the template.
Note:
The layer must contain objects.
1. From the 'Layers' tab of the 'Layer settings' window, select a layer.
2. Click on the selected row, under the 'Color' column.
A window opens.
3. Select the background color for the layer.
4. Click 'OK' to confirm.
Result
This feature helps you when you work on layers from the Designer Module.
It can also be used along with an 'Activation object'. The background of the poster, in
the data entry module, can change according to the layers you activate.
Chapter 8 - Work with the Automation option
167
What is a layout template
Use a Layout template
What is a layout template
Definition
A layout template is a specific type of template. It defines the way you want the posters
to be printed in the Print Manager module. It allows to control how several posters are
placed on a same page at print time.
It is a .PLF file.
Illustration
[51] Example of a layout template
Note:
A layout template is not essential to print posters. This feature allows additional control
in the Print Manager module.
168
Chapter 8 - Work with the Automation option
What is a layout template
You create a layout template in the Designer Module.
The layout template is used in the Print Manager module to print the posters. It is linked
with a printer configuration.
For instance, you create a layout template in order to print a sheet of product labels.
Each label is generated as one poster but, with the right layout template applied to print
those posters, each label poster is positioned at the right place on the media.
The layout templates are particularly useful to print several labels on a precut media.
Example of use
Example of a workflow using a layout template#
Step
Action
Result
1
Create a layout template in order to
print product labels of:
■ 100mm-wide
■ 60mm-high
■ on a A4 paper size (210*297mm)
The layout template can contain 8
product labels:
■ 2 columns of 100mm*600mm
labels
■ 4 rows of of 100mm*60mm of
labels
2
Create the template that will be used
in the data entry module to create
the labels.
The template you create in the Designer Module has a size of:
100mm x 60mm (it is a custom size).
3
In the data entry module, create the
labels.
Each product has its own label. Labels are ready for print.
4
In the Print Manager module, configure a printer so that it uses the layout
template.
Labels are printed with the printer
that uses the layout template. The
printer prints A4 sheets that contain
8 labels each.
Chapter 8 - Work with the Automation option
169
Open a layout template
Open a layout template
Purpose
The layout templates are stored into a chart. You must be able to retrieve them for
modification in Designer Module, or for use in Print Manager module.
Posterizer Pro offers you some predefined layout templates. You can edit them as a starting
point for using the Designer Module.
1. From the 'File' menu, select 'Open...'
2. Browse to the directory of the chart where you store the layout templates.
Note:
Predefined layout templates are to be found in the -PLF folder of the Océ chart.
3. Select a layout template.
4. Click 'Open'.
Result
Edit the layout template from the Designer Module. Save it.
It is ready for use in the Print Manager module.
170
Chapter 8 - Work with the Automation option
Create a layout template
Create a layout template
Purpose
Create layout templates to optimize the print of posters or labels in the Print Manager
module.
The procedures below describe how to create a layout template from scratch.
Note:
Predefined layout templates are to be found in the -PLF folder of the Océ chart.
Draw a positioning object ('Layout position object')
From the 'File' menu, select 'New'.
Define the size of the template and click 'OK'.
Click 'OK' twice to keep the default values for the other template properties.
Open the 'Objects' menu.
Select 'Advanced objects' - 'Layout position object' to insert the specific positioning object
that enables to draw a layout template.
5. Resize the object and position it on the template.
Give the same 'Width' and 'Height' as the ones of the posters to which it will be applied.
For instance:
1.
2.
3.
4.
#
If
Then
the layout template will be used to print
labels of 100mm x 60mm
draw a 'Layout position object' with:
■ 'Width'=100mm
■ 'Height'=60mm
Note:
- Prefer the 'Millimeters' or the '1/10 Inches' as units.
- Prefer integer values.
- Use the size of the positioning object to create the template for the posters that will be
printed with that layout template.
Design the layout template
1. Insert as many 'Layout position object' as you need:
Chapter 8 - Work with the Automation option
171
Create a layout template
#
If you want a 'Layout position object'
Then
with different sizes
Repeat the first procedure to create and
insert the positioning objects.
of a same size
Duplicate the current 'Layout position
object'.
('Objects' menu - 'Duplicate objects...';
see also: ‘Duplicate an object’ on page 105)
2. Position the objects on the template.
(See also: ‘Position the objects’ on page 101)
Note:
The objects must not overlap.
3. From the 'File' menu, select 'Layout template' - 'Number'.
A number automatically appears within the 'Layout position object'.
This number corresponds to the sequence order in which the posters will be placed on a
page (and printed). It is unique.
Note:
You can also define this number manually, in the 'Object properties'-'Content' section.
You can choose the print order. Make sure to give a unique number to each 'Layout position object'.
4.
5.
6.
7.
From the 'File' menu, select 'Save as...'.
In the 'File name' field, give an explicit name to your template.
From the drop-down list, select the file format 'Layout template' (*.plf).
Click 'Save'.
Result
You can now create a template that will generate the posters to be printed with the layout
template you created.
Note:
Make sure the template you create to generate the posters has the exact same size as the
size of the positioning object in which it should fit in at print time.
172
Chapter 8 - Work with the Automation option
Chapter 9
Appendix
About the 'Debug window'
About the 'Debug window'
Purpose
In order to efficiently support you, Océ provides you with a utility for service.
When to do
When you have an issue with the use of Posterizer Pro, upon request of your Océ representative only.
Use the 'Debug window'
1. From the 'View' menu, select 'Debug window'.
2. Follow the instructions given by your Océ representative.
#
Icon
and
Description
Create a separator line in the report, using one of those characters.
Clear the debug report.
Copy the debug report to your local Clipboard.
Save the debug report to a .txt file.
3. Click the 'Quit' icon to exit the window.
174
Chapter 9 - Appendix
The supported file formats
The supported file formats
Supported file formats
#
The database file formats
.db, .mdb, .csv, .xls
The image file formats
.bmp, .jpeg, .jpg, .psd, .tif, .tiff, .png
.emf, .wmf
Note:
When the application cannot process an image file, it displays a big 'X' instead of the
image. In that case, make sure that the file format is supported and that the file extension
is correct.
The Posterizer custom formats
#
File format for
Extension
Designer
Module
Job separator file
.btf
Formula
.for
Message file
.mess
x
Objects layout file
.olf
x
Saved poster
.ppf
Poster sent to spooler
.psf
Template
.ptf
x
Layout template
.plf
x
Saved queue settings
.qni
LogFile print report
.qrp
Formula
Editor
Data Entry Module
x
Print
Manager
Module
x
x
x
x
x
x
x
x
Chapter 9 - Appendix
175
Operators supported in Formula Editor
Operators supported in Formula Editor
Note:
For operators that take arguments between parenthesis, make sure that there is no space
between the operator name and the parenthesis.
#
176
Operator
Use
Example
Number of arguments
-
Subtraction
A-B
2
! or NOT
Negation
!A
1
1 if A=0, 0 if
A<>0
*
Multiplication
A*B
2
.
/
Division
A/B
2
.
^ or POW
Power of
A^B
POW(A,B)
2
.
+
Addition
A+B
2
<
Is less than
A<B
2
1 if A<B, 0 if
A>=B
<=
Is less than or
equal to
A<=B
2
1 if A<=B, 0 if
A>B
<>
Is different
from
A<>B
2
1 if A<>B, 0 if
A=B
>
Is bigger than
A>B
2
1 if A>B, 0 if
A<=B
>=
Is bigger than
or equal to
A>=B
2
1 if A>=B, 0 if
A<B
ABS
Absolute value
ABS(A)
1
A if A>=0, -A
if A<0
CHS
Change sign
CHS(A)
1
-A
FRAC
Fractional value
FRAC(A)
1
A-INT(A)
IIF
Condition
IIF(V,A,B)
3
A if V<0, B if
V>=0
INT
Integer value
INT(A)
1
.
Chapter 9 - Appendix
Result
Operators supported in Formula Editor
Operator
Use
Example
Number of arguments
Result
MAX
Maximum of
MAX(A, B,C)
n
.
MIN
Minimum of
MIN(A,B,C)
n
.
ONE
1 value (for
comparisons)
ONE
0
1
PROD
Product of
PROD(A,B,C)
n
A*B*C
ROUND
Round (to
closest integer)
ROUND(A)
1
.
SIGN
Sign of
SIGN(A)
1
1 if A>0, 0 if
A=0, -1 if A<0
SQR
Square of
SQR(A)
1
A2
SQRT
Square root of
SQRT(A)
1
√A
SUM
Sum of
SUM(A,B,C)
n
A+B+C
ZERO
0 value (for
comparisons)
ZERO
0
0
Chapter 9 - Appendix
177
Index
Index
Activation object
Activation object ..........................................164
Administrator
Password .........................................................30
Align
Align ............................................................101
Allowed changes
Allowed changes ....................................62, 118
Application folders
Application folders ..........................................24
Automation option
Automation option .........................................14
Color list
Color list ......................................................115
Configuration
Configuration .................................................40
Folders ............................................................24
Copy
Copy ............................................................105
Crop marks
Crop marks .....................................................62
Currency
Currency ........................................................91
Custom paper size
Custom paper size ..........................................60
Customer
Customer ........................................................18
D
B
Background
Change .........................................................118
Background color
Background color ...........................................62
Backward
Backward ......................................................104
Barcode
Label ...............................................................90
Type ...............................................................90
C
Caption
Caption ........................................................121
Chart
Chart ..............................................................18
Definition .......................................................34
Export ..........................................................146
Import ............................................................36
Message ...............................................147, 149
Selection .......................................................148
Upload ..................................................50, 145
Chart selection
Export .................................................148, 150
Client
Client .............................................................18
Client module
Client module .....................................121, 127
Color
Define ...................................................88, 115
178
Data Entry
Allowed changes ...........................................118
Data entry
Object properties ..........................................121
Data Entry module
Data Entry module ..............................121, 127
Data entry module
Data entry module .................................18, 121
Preview .........................................................130
Database
Database .......................................................127
Connect ..............................................152, 155
Disconnect ...................................................154
Reconnect ....................................................154
View .............................................................157
Database field
Connect .......................................................155
Default settings
Default settings ...............................................44
Delete
Guide ...........................................................107
Object ..........................................................107
Double sided
Double sided .........................................62, 118
Draw order
Draw order ...................................................123
Duplicate
Object ..........................................................105
E
Environment
Index
Environment ..................................................18
Change ...........................................................27
Create .............................................................27
Definition .......................................................26
Delete .............................................................29
Modify ...........................................................29
Open ..............................................................27
F
Fonts
Fonts ........................................................40, 65
System fonts ...................................................65
Formula
Formula ..........................................................93
Create ...........................................................135
Definition ....................................................131
Edit ..............................................................138
File ...............................................................141
Import ..........................................................142
Result ...........................................................140
Save ..............................................................135
Test ..............................................................140
Variables .......................................................142
Formula Editor
Description ..................................................133
Open ............................................................132
Operators .....................................................176
Forward
Forward ........................................................104
FTP
Configure .......................................................31
Connection ..............................................31, 37
Folder .............................................................33
Open ..............................................................33
Test ................................................................37
FTP server
FTP server ......................................................18
G
Gradient
Define ..........................................................115
Grid
Grid .........................................................40, 97
Group
Group .............................................................99
Guide
Guide .............................................................97
I
Image
Image .............................................................84
Batch conversion ..........................................112
Stamps .........................................................112
Image list
Image list ........................................................84
Input order
Input order ...................................................123
Interface
Description .....................................................21
J
Job separator template
Job separator template ..................................109
K
Keywords
Keywords ........................................................64
L
Language
Language ........................................................43
Layer
Layer ...................................................158, 160
Activation object ..........................................164
Condition .....................................................164
Name ...........................................................160
Printable .......................................................162
Selection .......................................................162
View .............................................................159
Visibility .......................................................159
Layer list
Layer list .......................................................162
Layout template
Layout template ............................................168
Create ...........................................................171
Layout position object ..................................171
Open ............................................................170
Workflow .....................................................168
Lock
Lock .............................................................106
Log in
Log in .............................................................30
179
Index
Log out
Log out ...........................................................30
Océ Posterizer Pro
Océ Posterizer Pro ..........................................12
M
P
Message
Create ...........................................................147
Multi-Printers option
Multi-Printers option .....................................14
Panel
Design panel ...................................................21
Object properties ............................................21
Password
Define ............................................................46
Paste
Paste .............................................................105
Position
Position ........................................................101
Lock .............................................................106
Poster data
Poster data ....................................................123
Preview
Data Entry ......................................................50
Print preview ................................................129
Price
Price ...............................................................91
Print
Preview .........................................................129
Print margins
Print margins ..................................................38
Print options
Print options ..................................................38
Printer
Configure .......................................................38
Proxy
Proxy ..............................................................31
N
Number
Number .......................................................171
O
Object
Object ............................................................18
Barcode ..........................................................90
Content ..........................................................75
Database field ...............................................155
Default ...........................................................44
Formula ..........................................................93
Image .............................................................84
Insert ..............................................................67
Layer ............................................................160
Lock position ...............................................106
Manipulate .....................................................67
Position ..........................................................97
Price ...............................................................91
Properties .......................................................69
Shape ..............................................................88
Source ............................................................75
Text ................................................................78
Object properties
Content ..........................................................69
Data entry .......................................69, 72, 121
Format ...........................................................69
Object ............................................................69
Shape ..............................................................69
Tab view .........................................................21
Tree structure .................................................21
Objects
Group .............................................................99
Regroup ..........................................................99
Ungroup .........................................................99
Objects order
Objects order ................................................123
180
R
Regroup
Regroup ..........................................................99
Resize
Resize ...........................................................101
Rotate
Rotate ...........................................................101
Rulers
Rulers ......................................................40, 97
S
Shape
Table ..............................................................88
Sleeve
Sleeve ..............................................18, 62, 118
Index
T
V
Template
Template ........................................................18
Advanced properties .......................................64
Associated template ........................................18
Associated templates ..............................60, 110
Characters ......................................................65
Create ...............................................48, 55, 57
Definition .......................................................54
Fonts ..............................................................65
Job separator template ..................................109
Layout template ............................................168
Open .......................................................48, 58
Prepare ...........................................................50
Preview ..................................................50, 130
Properties .......................................................62
Quick creation ................................................57
Resize .............................................................60
Save .......................................................50, 144
Size .................................................................60
Template creation
Summary ........................................................55
Template information
Template information ..............................57, 58
Text
Choice list ......................................................78
Date period ....................................................78
Multilines .......................................................78
Simple text .....................................................78
Size .................................................................78
Toolbar
Alignment ....................................................101
Validity period
Validity period ................................................64
Variables
Create ...........................................................135
U
Undo
Undo ............................................................108
Ungroup
Ungroup .........................................................99
Units
Units ..............................................................42
Unlock
Unlock .........................................................106
Updateable objects
Updateable objects .......................................123
181
+2
+2
-
Beyond the Ordinary
o
Printing for
Professionals
Professionals everywhere look to Océ for digital printing
and document management. In the office, Océ systems
keep the information of business and government
flowing. In manufacturing, architecture, engineering,
and construction, Océ wide-format printers set the
standard, while our display graphics systems help people
produce banners, billboards, and other large, colorful
applications. In corporate print facilities, marketing
service bureaus, and the graphic arts industry, Océ
systems print transaction documents, mailings,
newspapers, manuals, and books - on demand and at the
highest speeds. And Océ Business Services manages the
complete document workflows of customers around the
world. It all helps you go “Beyond the Ordinary” in
printing and document management.
Océ. Illustrations and specifications do not necessarily apply to products
and services offered in each local market. Technical specifications are
subject to change without prior notice. All other trademarks are the
property of their respective owners.
For more information visit us at:
2010-12
www.oce.com
US