1
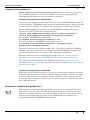
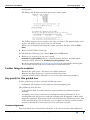
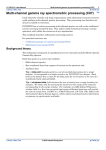
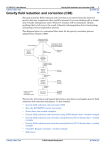
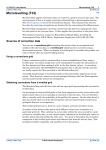
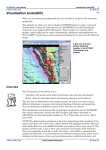
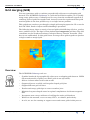
INTREPID User Manual
Library | Help | Top
Grid merging (G08)
1
| Back |
Grid merging (G08)
Top
You may sometimes wish to combine geographically adjacent or overlapping grid
datasets. The INTREPID Gridmerge is a powerful tool which enables you to quickly
merge many grids at once. Gridmerge moves away from the traditional approach of
‘stitching’ pairs of grid files together and, instead, treats the requirement that grids
match together in the best possible way as a single inverse problem.
This guided tour conducts you through a simple grid merging operation. We cover the
basic DC Shift, Surface Adjust and FeatherMerge operations.
The following image shows a mosaic of several grids with differing cell sizes, overlap
zones, and base levels. The data is West ArnhemLand magnetics grid data. The data
custodians are the Northern Territory Geological Survey, Darwin, Australia. (This
data is not confidential). In this guided tour we merge these grids together to produce
a single seamless merged grid.
Overview
The INTREPID Gridmerge tool can:
Library | Help | Top
•
Combine hundreds of geographically adjacent or overlapping grid datasets. GSWA
(Western Australia, regulary use 2500+ grids in one operation).
•
Achieve in hours what used to take weeks
•
Support adjacent, overlaid, and irregular shaped grid joins
•
Support different grid cell sizes
•
Feather and merge grid edges to create seamless joins
•
Minimise long wavelength errors in regional compilations of airborne magnetic
data
•
Incorporate new surveys without re-levelling the entire grid database
•
Work over the network, to access many CPU’s, to enhance productivity.
•
At v5.0, we are also starting to support vector and tensor grids in this process.
© 2012 Intrepid Geophysics
| Back |
INTREPID User Manual
Library | Help | Top
Grid merging (G08)
2
| Back |
Context of this guided tour
In the context of your data processing cycle, this tour represents a process of
data compilation that you may need to perform on a group of geographically
overlapping grids that have been processed to completion.
Location of sample data for Guided Tours
We provide two complete sets of sample datasets, one in INTREPID format and one
in Geosoft format. INTREPID works equally well with both formats. When you want
to open a dataset, navigate to the directory containing the required data format.
Where install_path is the path of your INTREPID installation, the project
directories for the Guided Tours sample data are
install_path\sample_data\guided_tours\intrepid_datasets and
install_path\sample_data\guided_tours\geosoft_datasets.
For example, if INTREPID is installed in
C:\Program Files\Intrepid\Intrepid4.5.nnn,
then you can find the INTREPID format sample data at
C:\Program Files\Intrepid\Intrepid4.5.nnn\sample_data\
guided_tours\intrepid_datasets
This is the default location for the sample data. If you have installed INTREPID
normally, the data resides there. If you have installed INTREPID elsewhere, the
exercises will work just as well. Just use the appropriate pathnames.
For more information about installing the sample data, see "Sample datasets—
installing, locating, naming" in INTREPID Guided Tours Introduction (G01)
For a more detailed description of INTREPID datasets, see Introduction to the
INTREPID database (G20). For even more detail, see INTREPID database, file and
data structures (R05).
Location of sample data for CookBooks
Right next to the Guided tours data, is a rich set of more exotic geophysics datasets
and grids, already prepared for the cookbook training sessions. A casual user might
also gain some trial and error insights into the capbilities of the software, just by
testing the Project Manger’s ability to preview and describe the attributes of each of
the cookbook datasets.
Should you complete this guided tour?
This guided tour is intended for introductory level users. It contains full detailed
instructions. If you are not currently interested in this process you can omit this
guided tour without affecting your understanding of other processes. If you need to
perform grid merging with your data we recommend that you complete this
demonstration of the INTREPID Gridmerge tool.
Library | Help | Top
© 2012 Intrepid Geophysics
| Back |
INTREPID User Manual
Library | Help | Top
Grid merging (G08)
3
| Back |
What you will do
Flowchart Summary
The flowchart summary (above) illustrates how Gridmerge works. Gridmerge starts
with a directory of grids. This means that you put all the grids that you want merged
into a single directory. We have created a directory called Raw, which contains all of
the grids we want to merge. This is the starting position, and all other intermediate
directories, you have to create as necessary.
Each Gridmerge process creates a new directory and writes a new set of adjusted
grids into the directory. The final FeatherMerge process create the final merged grid.
Library | Help | Top
© 2012 Intrepid Geophysics
| Back |
INTREPID User Manual
Library | Help | Top
Grid merging (G08)
4
| Back |
Steps to follow
1
Launch the Gridmerge tool.
Start the Project Manager. Navigate to the directory
install_path\sample_data\guided_tours\intrepid_datasets\Gridme
rge.
See Locating datasets, viewing, statistics, launching tools (G02) for instructions
about navigating to different directories.
From the Grid menu choose Grid Merge. INTREPID displays the Gridmerge Main
window.
2
Select the input grids and perform a DC shift operation.
This first exercise uses the 'raw' grid files (in the Raw directory) and writes DC
shifted output files into a new directory DC.
Note: Raw in this context simply means unprocessed by Gridmerge.
From the Grid Operation menu choose Level Grids, then DC shift grids.
INTREPID displays the Specify Input Image Directory dialog box. Select the
directory called Raw, choose Open, and then select any file in that directory.
Library | Help | Top
© 2012 Intrepid Geophysics
| Back |
INTREPID User Manual
Library | Help | Top
Grid merging (G08)
5
| Back |
Choose Open. INTREPID displays the Information about dialog box. Read the
information about creating a directory for the output DC shifted files and choose
OK.
Library | Help | Top
© 2012 Intrepid Geophysics
| Back |
INTREPID User Manual
Library | Help | Top
Grid merging (G08)
6
| Back |
Specify the output directory name DC. The tool will create this directory for you, if
it does not exist yet. Do not try to reuse the RAW directory, as this should just
contain the starting grids. You can always re-start again if you want too. Choose
Open. INTREPID displays the Select Base Grids dialog box.
In Select Base Grids, select WestArnhemSub_Mag and move into Selected Grids.
Choose OK. This is your Base grid, to which INTREPID adjusts all other grids.
This may well be your best effort previously at creating a regional grid of all these
surveys.
The High Rank Grid List dialog box appears.
In the High Rank Grid List dialog box, move Beatrice_Mag into High Ranked
Grids and choose OK. This is your High Ranked grid, which overlies all the other
grids in the final merged grid. What this actually means is that its high frequency
data at the edges will not be compromised. Typically, you select your highest
resolution grid for this.
The Low Rank Grid List dialog box appears. Move MilingimbiSub_Mag into the
list of Low Ranked Grids and choose OK. This is your Low Ranked grid. All of the
other grids in the final merged grid overlie it. Typically, select your lowest
resolution, oldest survey data grid for this. The frequencies we see in any
adjoining Higher ranked grid may bleed into this low rank grid, as the tool
attempts to make joins that are “fractal” without any hard lines visible.
INTREPID displays the Grid Shift/Scale Parameters dialog box. Set Overlap
Limit to 500 (default) and choose OK. This is the minimum number of grid cells in
an overlap between 2 grids required for statistical signifigance. Ignore the overlap
if less cells.
Library | Help | Top
© 2012 Intrepid Geophysics
| Back |
INTREPID User Manual
Library | Help | Top
Grid merging (G08)
7
| Back |
Do you want to proceed with the DC Shift? Choose Yes.
Optional: If you know how to launch a command.exe window, you can examine
the logfile to monitor progress. (Use the command tail -f nt.username.log)
The DC Shift operation is fast, and takes about half a minute or less for this small
test dataset.
GridMerge Processing Completed—Choose OK.
Library | Help | Top
© 2012 Intrepid Geophysics
| Back |
INTREPID User Manual
Library | Help | Top
Grid merging (G08)
8
| Back |
Review the gridMerge.rpt file which pops up in your preferred text editor (or
Notepad). Scroll down to the bottom of the report and read the Final grid
adjustment summaries. This shows you exactly what adjustments were made
to each grid during the DC Shift process. Note that the Base grid is unchanged by
the process.
In the above, there are 11 pairs of grids involved in the merge. Each pair is listed
in turn, with the DC adjustment of reater than 44000 nT being applied to most of
the pairs. This is the IGRF being removed in the DC sense. After this has
happened, the remianing average mis-fit for the overlap portion is reported,
typically around 1 or 2 nT ( mean2 - mean1). The report then ends with a Final
summary for each grid’s adjustment. There is no adjustment done to the Base
grid, as this is the nominated one to preserve.
Important Tip: Make a habit of reviewing the report file. If a particular grid is
not merging well with its neighbours, the report file may help you understand
why.
When you are finished reviewing the report, exit from Notepad.
(Choose File > Exit.)
Move to the next exercise (Surface Adjustment)
3
Select the input grids and perform a Surface Adjustment operation.
This second exercise carries on from step 2 above, where optimised DC shifts
were applied. This tutorial takes input from the directory of DC results, and
writes Surface-Adjusted files into a new directory SA.
From the Grid Operation menu choose Level Grids, then Surface Adjust grids.
INTREPID displays the Specify Input Image Directory dialog box. Select the
directory called DC, choose Open, and then select any filename in that directory.
Library | Help | Top
© 2012 Intrepid Geophysics
| Back |
INTREPID User Manual
Library | Help | Top
Grid merging (G08)
9
| Back |
This indicates you want to use this collection of grids for this part of the process.
Choose Open. INTREPID displays the Information about dialog box. Read the
information about creating a directory for the output Surface Adjusted files and
choose OK.
Specify the output directory name SA. Choose Open.
If you are new to this tool, you may get confused about the requirement to either
choose data within a current directory, or to create a new directory to receive data
as a result of running a process with this tool. So, to clarify what is required here,
you should have choosen the DC directory, created as a result of the shiftDC
process, and now specify a SA directory, ready to receive new output grids. Once
this is set up, the workflow is similar to what was explained previously. The
previous aswers to the grids choosen for ranking of grids is remembered.
INTREPID displays the Select Base Grids dialog box.
In Select Base Grids, accept WestArnhemSub_Mag in the list of Selected Grids
and choose OK.
In the High Rank Grid List dialog box, accept Beatrice_Mag in the list of High
Ranked Grids and choose OK.
In the Low Rank Grid List dialog box, accept MilingimbiSub_Mag in the list of
Low Ranked Grids and choose OK.
INTREPID displays the Surface Adjustment Parameters dialog box. Set the
following parameter values:
Allow DC shifts - No, do not check the box.
Min overlap Limit 500 (default)
Max overlap Limit 5000 (default)
Maximum Iterations 100 (default)
Maximum Residual 0.05 (default)
Surface Degree 1 <<< SET THIS to 1
Degree 1 Limit % 20 (default)
Degree N Limit % 90 (default)
Difference Limit 99 (default)
When you have finished adjusting the parameters
choose OK.
Do you want to proceed with the Surface Adjust?
Choose Yes.
Optional: 'Tail' the logfile to monitor progress
(Use the command tail -f nt.username.log)
The Surface Adjust process is also fast. It takes about half a minute or less for this
small grid set. Some explanation about these parameters, the 500 cells is the
minimum, the 5000 is the maximum cells to consider in the statistics of each
Library | Help | Top
© 2012 Intrepid Geophysics
| Back |
INTREPID User Manual
Library | Help | Top
Grid merging (G08)
10
| Back |
overlap, the resampling involves using the Minimum Curvature algorithm, so
residuals and iterations are for that process. A first order surface adjust is implied
by a Surface Degree 1. The rest are to do with ignoring outliers.
GridMerge Processing Completed—choose OK.
Review the gridMerge.rpt file which pops up in your preferred text-editor (or
Notepad).
Note that the log information is appended to the existing file, so you need to
scroll down to the end to read the most recent entry!
Observe the following in the report file:
•
In particular, examine the list of Maximum Adjustments performed with each
iteration.
•
Note that the mean adjustments being applied to the grids during this
operation are quite small...with an order of 1 nT or less.
When you have finished reviewing the report, exit from Notepad. (Choose File >
Exit.)
Now the grids are ready to be merged !
Move to the next and final exercise, the FeatherMerge.
Library | Help | Top
© 2012 Intrepid Geophysics
| Back |
INTREPID User Manual
Library | Help | Top
4
Grid merging (G08)
11
| Back |
Select the input grids and perform FeatherMerge to create the ouput merged grid.
This third exercise carries on from Step 3 above, where optimised Surface
Adjustments were applied. This exercise takes input from the directory of SA
results and generates the final feather-merged grid. This is easily the most time
consuming aspect of this tool, as we work hard on the joins.
From the Grid Operation menu choose Merge Grids, then Merge and Feather
Grids. INTREPID displays the Specify Input Image Directory dialog box. Select
the directory called SA, choose Open, and then select any filename in that
directory.
Choose Open. INTREPID displays the Specify Output Image dialog box.
We are now just going to create one final grid, so unlike before, we do not need to
create a new direcytory to receive all the adjusted grids. Specify the output grid
name ArnhemLand_MergedMag1.ers Choose Open/Accept.
In Select Base Grids, select WestArnhemSub_Mag and move into the list of
Selected Grids and choose OK.
In the High Rank Grid List dialog box, select Beatrice_Mag and move into the
list of High Ranked Grids and choose OK.
In the Low Rank Grid List dialog box, select MilingimbiSub_Mag and move into
the list of Low Ranked Grids and choose OK.
INTREPID displays the Grid Feathering Parameters dialog box.
Enter the following parameters:
Trim resampled grids - No check (default), you
trust your edge estimates are good.
Overlap Limit 500 (default)
Filter length (m) 5000 (default)
Smoothing Iterations 3 (default)
Smoothing Residual 0.00 (default)
When you have finished adjusting the parameters
choose OK.
INTREPID displays the Clip Merged Grid dialog
box. Select No Clipping and then choose OK.
Do you want to proceed with the Merge and
Feather? Choose Yes.
Optional: 'Tail' the logfile to monitor progress
(Use the command tail -f nt.username.log)
The Feather Merge process is slower, and takes some minutes even for this small
grid set.
GridMerge Processing Completed—choose OK.
Now review the gridMerge.rpt file which pops up in your preferred text-editor
Library | Help | Top
© 2012 Intrepid Geophysics
| Back |
INTREPID User Manual
Library | Help | Top
Grid merging (G08)
12
| Back |
(or Notepad).
The Merge and Feather operation has quite a short report.
The 6 filter lengths used to feather each edge are shown. The priority order used
to place the grids on top of each other is also shown.
When you are finished reviewing the report, exit from Notepad. (Choose File >
Exit.)
5
Exit from INTREPID Gridmerge.
To exit from the Gridmerge tool, choose Quit from the File menu.
6
Examine the merged grid you have created.
ArnhemLand_MergedMag.ers is a solution dataset we have provided which
should be nearly identical to ArnhemLand_MergedMag1.ers.
Recall the instructions in Visualisation tools(G05) for viewing the stitched grid.
You can task switch to the Project Manager to launch this tool.
Further things to consider
•
Examine the grid seams. Any there any visible artefacts?
•
Enhance the high-frequency to closely examine the seams
(compute a first vertical derivative or use a sun-angle enhancement filter)
Key points for this guided tour
In this guided tour you have used the Gridmerge tool to:
•
Seamlessly join a group of seven adjacent and overlapping grids.
The Gridmerge tool can also:
•
Scale and DC shift, to resolve variable ‘units’ problems in radiometrics data
merging
•
Incorporate new surveys without re-levelling the entire grid database, by rerunning shift and tilt processes with the existing grids designated as Base grids
•
Apply the computed adjustments back to the Line datasets (Gridmerge Pro). This
is like microlevelling, just on steroids, as it is capable of writing a microlevelled
channel to hundreds of survey datasets in a systematic manner.
Acknowledgements
Tony Luyendyk, late of Geoscience Australia, was a key developer and contributor,
Library | Help | Top
© 2012 Intrepid Geophysics
| Back |
INTREPID User Manual
Library | Help | Top
Grid merging (G08)
13
| Back |
building on the original vison of Brian Minty and Phil McFadden
Frequently Asked Questions
Q : Can I merge a small high definition ground survey into my master grid of
the African continent?
A : Yes, the tool supports input grids of different cell sizes. You can also control the
final output grid cell size.
Q : Can the tool deal with complex join shapes?
A : Yes, the tool has extensive support for variable shape joins. It is also designed to
cope with complex gradients around such joins.
Q : Can I merge grids which were flown at different heights?
A : Yes. The Gridmerge tool has a Scale and DC shift function which is especially
suited to this problem.
Q : Can I merge a pair of grids with no overlap?
A : No. INTREPID Gridmerge tool cannot interpolate across gaps between grids.
Q : Can I merge a FTG grids?
A: At V4.5 INTREPID Gridmerge tool cannot interpolate between FTG grids. Wait for
V5.0.
Q : Do 64 bit machine work better?
A : Due to the high workout INTREPID gives to swap/stack memory, as much useable
memory space as possible greatly helps, so yes.
Q : Is this the tool that maintains all the super grids of Australian
geophysics, especially the radiometrrics and magnetics grids?
A : Yes it is. A standard desktop workstation can be use this tool to produce super high
resolution and very large geophysical grids.
Library | Help | Top
© 2012 Intrepid Geophysics
| Back |