1
MacroView Navigator Manual
MacroView
Navigator
User Manual
Sentient Computing 2006 ©
1
MacroView Navigator Manual
Information in this document is subject to change without notice and does not represent a
Commitment on the part of Sentient Computing. The software described in this document
is furnished under a license agreement or nondisclosure agreement. The software may be
used or copied only in accordance with the terms in the license or nondisclosure agreement. The purchaser may make one copy of software for backup purposes. No part of this
manual may be reproduced or transmitted in any form or by any means, electronic or
mechanical, including photocopying, recording, or information storage and retrieval
systems, for any purpose other than the purchaser’s personal use, without the express written
permission of SentientComputing..
c
2006 Sentient Computing. All rights reserved.
Last Modification Date:September 2006
Yewpack, XL, Centum, YS80, DA2500 and YS100 are registered trademarks of Yokogawa Electric Corporation.
dBase is a registered trademark of Borland International.
DECnet, VAX, Ultrix, DECstation are registered trademarks of Digital Equipment Corporation.
Foxbase, MS-DOS and Windows 3 are registered trademark of Microsoft Corporation.
UNIX is a registered trademark of the X/Open Foundation.
SUN, NFS, SPARC and SparcStation are registered trademarks of Sun Microsystems Inc.
AutoCAD and AutoSketch are registered trademarks of Autodesk Inc.
PLC-2 and PLC-5 are registered trademarks of Allen-Bradley.
Sentient Computing 2006 ©
2
MacroView Navigator Manual
Table of Contents
1
Navigator Overview............................................................................................................ 6
1.1
What is the Navigator? ................................................................................................ 6
1.2
Reasons for Having the Navigator ............................................................................... 7
1.3
Documentation ............................................................................................................ 8
1.4
Further Reading ........................................................................................................... 8
1.5
Navigator Layout......................................................................................................... 9
1.6
How it works.............................................................................................................. 10
2
Navigator Modules ........................................................................................................... 11
2.1
Navigator Module Summary ..................................................................................... 11
2.2
Navigator Module ..................................................................................................... 12
Alarm Line......................................................................................................................... 13
Message Line..................................................................................................................... 14
Scratch Pad ........................................................................................................................ 15
Entity Information Area .................................................................................................... 16
Pop-up Line ....................................................................................................................... 17
Time Line .......................................................................................................................... 18
Page Line ........................................................................................................................... 19
Application Line and Application Matrix.......................................................................... 20
Common Functions & Soft Key Area................................................................................ 21
Navigator Pages - About the Navigator ............................................................................. 22
Key Table .......................................................................................................................... 24
User defined keys .............................................................................................................. 24
3
Pop-up Overview .............................................................................................................. 25
3.1
Summary of Pop-ups ................................................................................................. 25
3.2
Pop-up Features ......................................................................................................... 27
Alarm Pop-up .................................................................................................................... 27
Attribute Pop-up ................................................................................................................ 28
Note Pop-up....................................................................................................................... 29
Entity Pop-up ..................................................................................................................... 30
Group Pop-up .................................................................................................................... 31
Time Pop-up ...................................................................................................................... 32
Trend Pop-up ..................................................................................................................... 33
Pan & Zoom Pop-up .......................................................................................................... 34
4
Trend Application ............................................................................................................. 35
4.1
Overview ................................................................................................................... 35
Purpose .............................................................................................................................. 35
How Trend Groups are Displayed ..................................................................................... 36
Alternate Trend Display .................................................................................................... 37
4.2
Using the Trend Application...................................................................................... 38
Starting the Trend Application Package ............................................................................ 38
Selecting a Trend Page, Trend Chart and Sample Rate ..................................................... 39
Working with the Trends Navigation Menu ...................................................................... 40
Using the Search Window ................................................................................................. 41
4.3
Trend Charts .............................................................................................................. 42
Basic Trends ...................................................................................................................... 43
Sentient Computing 2006 ©
3
MacroView Navigator Manual
Banded Trends................................................................................................................... 44
Dual Chart Trends ............................................................................................................. 46
Print Screen ....................................................................................................................... 48
Historical Browse .............................................................................................................. 49
Trends Menu...................................................................................................................... 50
Operator Trends Editor...................................................................................................... 51
4.4
Trend Group Configuration Tasks............................................................................. 52
Adding a Trend Group ....................................................................................................... 52
Deleting a Trend Group ..................................................................................................... 52
Trend Group Pages Editor ................................................................................................. 53
4.5
Trend Application Reference..................................................................................... 54
Setting Up the Application in the Navigator...................................................................... 54
Going Directly to a Trend Application .............................................................................. 54
File Structure ..................................................................................................................... 54
Trend Application Database Structures ............................................................................. 55
Views used by the Trends Application .............................................................................. 56
Trend Application Graphic Metafiles ................................................................................ 56
Trend Application Chart Metafiles .................................................................................... 57
Trend Application meta scripts .......................................................................................... 57
5
Alarm Application............................................................................................................. 58
5.1
Overview ................................................................................................................... 58
Purpose .............................................................................................................................. 58
Main Screen....................................................................................................................... 58
How the Alarm List is Displayed ...................................................................................... 62
5.2
Using the Alarm Application ..................................................................................... 63
Starting the Alarm Application Package............................................................................ 63
Selecting the Alarm Display Page ..................................................................................... 64
Working with the Main Alarm Display ............................................................................. 65
Viewing Acknowledged Alarms ....................................................................................... 66
Filtering Areas ................................................................................................................... 66
Sorting the Alarms............................................................................................................. 67
Filtering the Alarms........................................................................................................... 68
Acknowledging and Deleting Alarms................................................................................ 69
Viewing an Alarm’s Associated Display (Super Find) ..................................................... 70
Alarms Priority Colors....................................................................................................... 71
Changing the Priority Color Scheme ................................................................................. 71
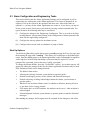
5.3
Alarm Configuration and Engineering Tasks............................................................. 72
Start Up Options ................................................................................................................ 72
Engineering Considerations............................................................................................... 73
File Structure ..................................................................................................................... 74
Alarm Application Database Structures............................................................................. 75
Alarm Application Entities ................................................................................................ 75
Alarm Application .dgt Files.............................................................................................. 76
Alarm Application Metascripts .......................................................................................... 77
6
Group Application............................................................................................................. 78
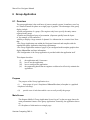
6.1
Overview ................................................................................................................... 78
Purpose .............................................................................................................................. 78
Sentient Computing 2006 ©
4
MacroView Navigator Manual
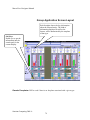
Main Screen....................................................................................................................... 78
6.2
Using the Group Application..................................................................................... 81
Starting the Group Application Package............................................................................ 81
Selecting a Group Page...................................................................................................... 81
Using the Generic Faceplate.............................................................................................. 82
Branching Up..................................................................................................................... 82
Using the Groups Application’s Menu Page ..................................................................... 83
6.3
Group Engineering and Configuration ...................................................................... 83
Adding a Group ................................................................................................................. 84
Editing a Group ................................................................................................................. 85
Deleting a Group ............................................................................................................... 85
Using the Generic Faceplate.............................................................................................. 85
Engineering Tips................................................................................................................ 86
7
Detail Application............................................................................................................. 86
7.1
Overview ................................................................................................................... 86
Purpose .............................................................................................................................. 87
Screen Layout.................................................................................................................... 87
Example of Custom Detail Page ....................................................................................... 89
How Entity Details are Displayed ..................................................................................... 90
7.2
Using the Detail Application ..................................................................................... 92
Starting the Detail Application Package. ........................................................................... 92
Selecting a Detail Page ...................................................................................................... 92
7.3
Engineering Considerations....................................................................................... 93
8
Documentation Revision Log........................................................................................... 94
Sentient Computing 2006 ©
5
MacroView Navigator Manual
1 Navigator Overview
The Navigator provides an easy-to-use framework to enable users to find their way
around the various applications in a typical process control or SCADA site. It is a true
application enabler. It responds to the various user keystrokes and mouse commands,
executing the selected applications in an easy-to-understand point and click
environment.
1.1 What is the Navigator?
The Navigator is:
•
A set of modules or tools designed to manage the flow of information between
the applications and the user. It is an intelligent graphical framework for running
applications.
Each tool or module:
•
Consists of a group of Meta scripts and display widgets.
•
Is represented graphically by a particular area of the screen.
•
Accepts its input from the mouse, keyboard (via a key table), Touch screen or
other applications.
•
Has clearly defined associated variables.
•
Can send messages to other Navigator tools or set Navigator variables.
•
May be used to launch applications and send messages to the applications.
Sentient Computing 2006 ©
6
MacroView Navigator Manual
1.2 Reasons for Having the Navigator
In a typical MacroView site, there is a vast amount of information that must be handled
and processed by a wide variety of personnel with differing backgrounds and skill’s.
It is the function of the Navigator to present the information to these users and provide
the users with the tools to efficiently move through this information. In summary, the
Navigator:
•
•
•
•
•
•
Presents the information in a clear graphical interface so that the user can
easily see and manipulate the data.
Presents the information in an organized structure. This helps users find
the information of interest quickly and enables it to be easily maintained.
Provides tools for the users to quickly locate the information for analysis
and also tools that can be used to manipulate the presentation of the
information to highlight process problem areas for example.
Organizes the windowing structure for the user. This means that the number
of windows and their placement is always under control and key
information is not hidden.
Provides a means of quickly and efficiently adding new applications and
covering more areas of the plant. This means that the system can grow as
the process becomes more and more under control.
Provides a means of adding optimization applications such as SPC, Log
Books, and Control Room Organizer. These types of applications can result
in significant improvements in efficiency, quality and production.
Sentient Computing 2006 ©
7
MacroView Navigator Manual
1.3 Documentation
This document is the Navigator User Manual. The sections of the manual are described
briefly below.
In summary, the chapters include:
Navigator Overview: Describes the general format of the Navigator Package and it also
describes functions of the various areas within the presentation.
What’s New: Describes the new features added since the 3.0.4 release.
Navigator Modules: Discusses the various modules such as the Scratch Pad that are
closely related to the Navigator.
Navigator Pop-ups: Describes the various kinds of Pop-ups that can be invoked from the
Navigator.
Standard Applications: There is a section for each of the standard MacroView
applications. These include:
•
Trends
•
Alarms
•
Groups
•
Details
Navigator Reference: This chapter documents the Navigator files and file structures.
1.4 Further Reading
Please see the Operator Reference for a concise summary of the operations of the
Navigator. This document is intended for users who do not need to know the
background details of the system and are only interested in using the system. For
engineers, the MacroView Engineering Manual details the MacroView system on top of
which the Navigator operates.
Sentient Computing 2006 ©
8
MacroView Navigator Manual
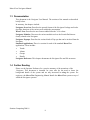
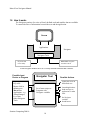
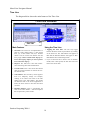
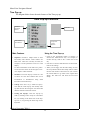
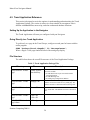
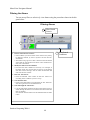
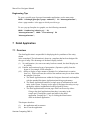
1.5 Navigator Layout
The diagram below indicates the Navigator layout.
Scratch Pad
Alarm Line
Message Line
Entity Information Area
Pop-up (see detail)
Application
Matrix
Common Functions
Soft Key Area
Pop-up Line
To display Group, Trend and
Attribute information. Of the Entity
in the Scratch Pad.
Also used for I/O pop for address
information.
Sentient Computing 2006 ©
9
MacroView Navigator Manual
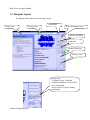
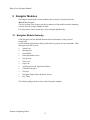
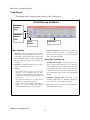
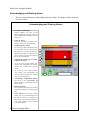
1.6 How it works
The Navigator consists of a series of clearly defined tools and modules that are available.
To control the flow of information between the user and the application.
Screen
Applications
Navigator Tools
Keyboard and
mouse Entry
S
c
S
e
e
n
S
c
rNavigator
e
e
n
MacroView Programs
and other sources
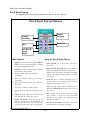
Each Navigator module has a set of clearly defined functions and variables.
Possible Input
Device or Program
Keyboard with
Key table
Mouse click in
definite area.
MacroView
Application - e.g.
Alarm Manager,
Live Data,
Other Navigator
Tools.
Navigator Tool
Possible Actions
Update the screen in
the defined area.
Set of meta scripts or
Programs with
Navigator variables
LaunchApplications.
Send messages to
applications or other
tools.
Set Navigator
variables.
Sound buzzer.
Sentient Computing 2006 ©
10
MacroView Navigator Manual
2 Navigator Modules
This chapter discusses the various modules that are closely associated with the
MacroView Navigator.
The first section of the chapter provides a summary of the modules and the remaining
sections describe a single module in detail.
For convenience, these sections have been arranged alphabetically.
2.1 Navigator Module Summary
Each Navigator tool has defined characteristics and functions. It may be used
strategically
by the selected application to display information or gather the user commands. These
Navigator tools are covered:
•
Alarm Line
•
Message line
•
Scratch Pad
•
Entity Information Area
•
Pop-up Line
•
Time Line
•
Page Line
•
Application Line & Application Matrix
•
Common Functions
•
Soft keys
•
Navigator Pages (About & Quick Access)
•
Key Table
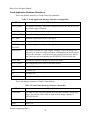
The following diagram shows most of the Navigator modules.
Sentient Computing 2006 ©
11
MacroView Navigator Manual
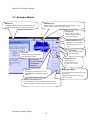
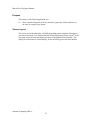
2.2 Navigator Module
Alarm Line
A Single line display shows most recent alarm. You
can delete alarms and call up alarm pop-up from
here.
Message Line
Various messages and prompts appear in this window. A color
change signifies a new message has arrived.
Scratch Pad
The Scratch Pad is the
primary means of inputting
data to the Navigator.
Entity Information Area
This shows key information
about the single selected
entity.
Pop-up Line
This controls the various
pop-up windows
Time Line
This shows the current Time and a
Time & Duration marker.
Application Line
Applications are
presented for selection
in a pull- down combo
box.
Page Line
The Page Line enables users to view
page numbers for applications, such as
trends etc.
Functions and Soft Key Area
Common Functions may be assigned to these soft keys,
which correspond to the func tion keys on the key board.
Sentient Computing 2006 ©
12
Application Matrix
An icon is associated with the most-used
applications
Launch the application by clicking
once on the icon .
MacroView Navigator Manual
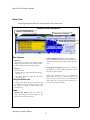
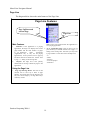
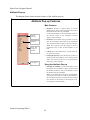
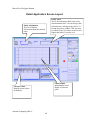
Alarm Line
The diagram below shows the main features of the Alarm Line.
Alarm Line Features
Activate Alarm Pop-up
Alarm Line Window
Alarm Pop-up Window
Main Features
1 Structure:
The Alarm Line consists of a single line which
displays the latest alarm in the system as well as
a button which pops up the Alarm Pop-up.
2 Purpose:
The Alarm Line:
• Informs the user of the latest alarm in the sy stem and
• Provides a means of calling up the Alarm
Pop-up window.
Using the Alarm Line
1 Calling up the Alarm Pop-up: You can do this
by clicking on the pop-up button. Please read
the section on pop-ups for more details of the
Alarm Pop-up.
2 Acknowledging an Alarm: To acknowledge an
alarm in the Alarm Pop-up, first select the alarm by
clicking on it in the pop-up, then click on the check
icon.
3
Clearing the Alarm Line: Pressing c or C will clear
the alarm line. It will not clear the alarm line of other
Navigators on the network.
Note: The Alarm Line does not perform any
prioritization of alarms or filtering of alarms for
that con- sole. For this reason, we recommend the
Alarm Pop- up for systems where alarms play a
key role in the control strategy.
Notes:
1 Silencing the Buzzer: You can silence the
buzzer by hitting the Z key or clicking on the
silence icon in the Alarm Pop-up.
Sentient Computing 2006 ©
13
MacroView Navigator Manual
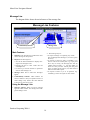
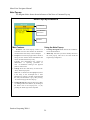
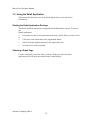
Message Line
The diagram below shows the main features of the message line.
Message Line Features
Confirm/Deny buttons
Message Line
Main Features:
2 The message may be:
1 Structure: The message line contains the most
recent message for the operator.
• A simple message not requiring any action.
You can disregard the message or, to clear it, press
the Y key.
• A request to select an entity or attribute, or to
enter a value in the scratch pad. E.g. if you press
the E key for entity, the message line will say
“Please enter an Entity -->”. You may either: (i)
Enter the entity into the scratch pad and press
enter, (ii) simply press enter or, (iii) click on the N
button to cancel the request.
• A request to answer a yes or no question. E.g.
confirming a value set request or other action.
2 Purpose: The message line:
• Acts as the main mechanism to display messages to the Navigator user.
• Prompts the user to enter values into the
scratchpad area.
• Is used to get Yes/No answers to questions
such as mode changes, etc.
3 Message Area: This is where the messages
appear.
4 Confirm/Deny buttons: These buttons are
used to confirm or deny an operation such as a
mode change. They achieve the same function
as the Yes (Y) and No (N) keys.
Using the Message Line:
1 Message appears: When an active message
appears in the window, the message line background changes color.
Sentient Computing 2006 ©
14
MacroView Navigator Manual
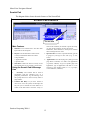
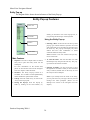
Scratch Pad
The diagram below shows the main features of the Scratch Pad.
Scratch Pad Features
Scratch Pad
Main Features
click on the Y button) to confirm or press the N key
(or click on the N button) to deny the request.
Sometimes, these buttons are used just to confirm
that a message has been read.
1 Structure: The Scratch Pad is the main data
input area for the Navigator.
2 Purpose: The Scratch Pad is used to enter:
• Entity and attribute names and values.
• Page numbers.
• Application names.
• Special codes.
3 Time Out: If there has been no activity in the
Scratch Pad area for 10 seconds, it clears itself.
Using the Scratch Pad & Message
Line
1
3 Special Codes: To select a special function, use the
P (page) key and type in the code (E.g. ?, exit,
zoom).
4 Applications: Press the P (Page) key and type in the
page name or number, or a name of an application
(e.g trends, schemat). To go to a specific page of an
application, type in application code then a “/” followed by a page number, name, or “?” (e.g. help/3,
overview/floor1, schemat/?).
Generally: The Scratch Pad is used in
conjunction with the Message Line as a
prompting mechanism. E.g the Message Line
will prompt the user to enter an entity name or
page number.
2 Confirm and Deny: If you have entered a
value to be set in the system, the message line
may ask you to confirm the value before it is
written to the field source. Press the Y key (or
Sentient Computing 2006 ©
15
MacroView Navigator Manual
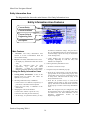
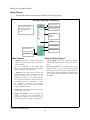
Entity Information Area
The diagram below shows the main features of the Entity Information Area.
Entity Information Area Features
Current Entity
Current Attribute
Current Value &
Engineering Units
Description
Main Features
1
be asked to confirm the change. Just press the Y
key (or acknowledge button on the message line)
to acknowledge or press the N key (or deny button
on the message line).
Structure: The Entity Information Area
consists of 4 lines of information about the
current selected entity.
• Some changes may be logged to historical
messages, depending on how the entity and
attribute are configured.
2 Purpose: The Entity Information Area is used:
• To display key information about the current
entity.
• As the “reference” entity for other
applications.
E.g.
when
the
Detail
application
is called up, it will display
detailed information about the selected entity.
4 Clearing the Entity Information Area:
• Press the Control and C keys.
5 Using the Entity and Attribute pop-ups:
Using the Entity Information Lines
• Press the ^E (Control E key) or click on the Entity
pop-up button to call up the Entity pop-up. Now
use the filter in the pop-up or just double-click on
an entity name. This will send the entity to the
Entity Information Area.
1 Viewing Entity Information: 4 lines of the
selected entity are shown. The values are
updated every 2 seconds.
2 Selecting a different Entity or attRibute:
• Press the ^R (Control R key) or click on the
Attribute pop-up button to call up the Attribute
pop-up. Just click on the attribute name of interest
in the pop-up to send it to the Entity Information
Area.
• Click on the E or R buttons (respectively) or
press the E or R button on the keyboard.
• Enter the new Entity or attRibute in the
Scratch Pad.
3 Changing the value of the attribute:
Note: The Navigator may be configured to omit
the engineering units for any attribute which does
not contain “PV”. For more information, see the
Navigator
configuration
section
of
the
Engineering chapter.
• Click on the = button or press the = key.
• Enter the value and press the return key.
• At this stage, for particular entities, you may
Sentient Computing 2006 ©
16
MacroView Navigator Manual
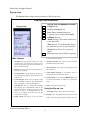
Pop-up Line
The diagram below shows the main features of the Pop-up Line.
Pop-up Line Features
Pop-up Line
Pop-up Line Components include:
Group pop-up.
Single pen trend pop-up.
Note: Entity information pop-up.
A pop-up used to search for an entity.
attRibute pop-up.
Alarm Pop-up: Click on the button next
to the alarm line.
Time Pop-up: To set the marker time in
the time-line, press I on your keyboard.
Zoom Pop-up: Press ^Z on your keyboard
Close pop-ups: closes all above pop-ups.
^G
^T
^N
^E
^R
-
Main Features
1 Structure: The pop-up line consists of a series
of small icons on a single line of the tool box.
Each pop-up button pops up the associated display in the defined area.
2 Purpose: A convenient way to bring up the various pop-up windows.
3 Group Pop-up: A group faceplate for the current selected entity appears in the left-most area
of the screen.
4 Trend Pop-ups: Same as for the group. If the
point is trended, the pop-up uses the historical
data. (*Otherwise, no pop-up will appear.)
5 Note Pop-up: This is a small yellow window
that displays the documentation field of the
entity (if it exists) in the lower left corner of the
window. If there is no documentation for the
entity, the ^N button will remain grey and the
pop-up will not appear.
6 Entity search: The pop-up is used to search
and select specific entities.
7 Attribute pop-up: The pop-up is used to select
attributes for the scratch pad.
8 Alarm Pop-up: The alarm pop-up appears below
the alarm line.
9 Time Marker Pop-up: A convenient means of
selecting the time for the time marker.
10 Zoom Pop-up: A way of using MacroView’s Pan
& Zoom functionality on almost any Application
Page.
11 Close: Closes all above pop-ups.
Using the Pop-up Line
1 Activating: Simply click on the relevant pop-up.
2 Closing: Close the pop-up with the pop-ups’s close
button. The close pop-ups button may also be used.
Sentient Computing 2006 ©
17
MacroView Navigator Manual
Time Line
The diagram below shows the main features of the Time Line.
Time Line Features
Time Line
Main Features
Using the Time Line
1 Structure: The Time Line is implemented as a
stack of 3 time related values. (i) The current
time, (ii) A time marker and (iii) a duration
marker. You can set the time marker with the
time pop-up. Please read the Time Pop-up section in the Pop-up chapter for more information on the Time Pop-up.
1 Toggling the Time Line: The user may toggle
between the three modes of presentation by clicking
on the Time Line. The Time Marker will appear in
Blue and the Duration Marker will appear in Red.
Both Markers have white backgrounds.
2 Purpose: The Time Line is the main mechanism of showing time-related information.
2 If you set the time line to show a time or duration
marker, after a short period, the time line will revert
back to the current time.
3 Current Time: This is the current time shown
with one second resolution. It reflects the servers internal clock.
4 Time Marker: This is used by various applications as a temporary storage. For example,
clicking on an alarm will result in the time
stamp going to the Time Marker. The marker
can then be used in the Trend Application to
locate the same instant in time that the alarm
occurred.
5 Duration Marker: This is conceptually the
same as the Time Marker - with the exception
that it represents a period of time.
Sentient Computing 2006 ©
18
MacroView Navigator Manual
Page Line
The diagram below shows the main features of the Page Line.
Page Line Features
Page Up/Down and
current Page.
Page Line
Main Features
1
2
Structure: If the application is a paging
application, the Page Line displays the current
page number and the total number of pages
in an application
where
appropriate
(Applications may or may not be paging
applications). It also provides icons to page up
and down and also to initiate the “Please enter
a page -->” dialog in the message line.
Purpose: The Page Line is the primary
mechanism for moving to different pages in the
application.
Note: These will be blank when the application is
not a paging application.
2 Go to a particular page: Click on the P icon (or
press the P key) to start the “Please enter a page -->”
dialog in the message line. Note that you may enter
a page number or a file name. Some examples are:
“1”
“tanks”
“trends/5”
“overview/pumps”
“schemat/?”
Using the Page Line
1
Page Up and Page Down: Just click on the
relevant icon to move up or down in page
number. Any blank pages will be skipped. You
may also use the Page Up or Page Down keys
on the key- board.
Sentient Computing 2006 ©
19
MacroView Navigator Manual
Application Line and Application Matrix
The diagram below shows the main features of the Application Line and Application
Matrix.
Application Line and Application Matrix Features
Application
Line
Application
Matrix
Main Features
Using the Application Line
1 Structure:
1 Starting an application:
• The Application Line is a pull down combo
box of all the applications available to the
user. Some of the applications in the pull
down list may also have icons in the application matrix.
• The Application Matrix is a matrix of icons,
each representing one of the applications
available to the Matrix.
2 Purpose:
• Click on the down arrow, the list of available
applications will appear.
• Click on the application to start the application
and leave the list in the “pulldown” position or
double click on the application to start the application and hide the list.
• To hide the list: Click on the arrow or click anywhere on the Application Line.
Note: Re-selecting the current application will not
cause the current application to be re-started.
• The Application Line provides a means of
starting applications. In particular, it includes Using the Application Matrix
applications that do not have associated icons
1 Starting an application:
in the Application Matrix.
• Simply click once on the relevant icon in the
• The Application Matrix provides a quick way
Application Matrix.
to launch frequently used applications.
Note: The Navigator may be configured to
replace the application matrix with a set of text
buttons or a blank area. This is usually done
where speed is a concern, e.g. a remote connection over a modem. For more information, see the
Navigator Engineering section.
Sentient Computing 2006 ©
20
MacroView Navigator Manual
Common Functions & Soft Key Area
The diagram below shows the main features of the Soft Key Area.
Common Functions
& Soft Key Area
Features
Main Features
1 Structure:
• The Six Common Function buttons are
located just above the Soft Keys.
• The Soft Keys are a block of keys at the
base of the tool bar. The function keys
may be invoked from the keyboard. Certain applications may change the soft key
colors or disable certain softkeys.
Common
Functions
Soft Key
Area
2 Purpose:
• The Common Function buttons allow one
click access to several commonly used
actions.
• The Soft Keys provide a flexible means of
invoking functions from an application
and under control of the application.
Using the Soft Keys
Using the Common Function
Buttons
1 Invoking the function: There are several
ways of selecting a softkey :
1 Menu: Pressing this button displays the current application’s menu page.
• Click on the relevant soft key button.
• Click on the soft key label button.
• Press the associated function key on your
keyboard.
2 Home: Pressing this button displays the
Navigator pages Quick Access screen.
3 More: If there are more application icons
installed than will fit in the Application
matrix, pressing this button will show more
icons. If there is sufficient space available,
this button will be unnecessary and disabled.
4 Print: Pressing this button will send a screen
dump of the entire navigator to a printer.
5 Custom: This button may be configured in
the Navgator Defaults to perform a commonly used function.
6
Exit: Pressing this button brings up the exit
screen. If so configured, a password may be
requested.
Sentient Computing 2006 ©
21
MacroView Navigator Manual
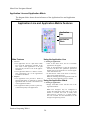
Navigator Pages - About the Navigator
The diagram below shows the main features of the Navigator Pages About the Navigator
screen.
About the Navigator Features
Welcome Message
Important
MacroView
information.
Main Features
• The Console name which is likewise used to
restrict unauthorized writing of set points, etc.
• The system ID of the MacroView server.
• Whether the buzzer has been disabled.
• The current server port being used.
1 Structure: The “About” (About Navigator)
screen consists of:
• A Welcome message
• The MacroView logo
• Important information relating to the
MacroView system which has been started
2 User Welcome: This screen offers information
for a first time user and provides a summary of
some of the installed applications.
3 Important Information: This window provides information for support and maintenance
people to trace versions, etc. The information
includes:
Using the About Navigator Screen
1 Calling Up the Screen: The screen is the first
screen to be displayed and may be called up at any
stage from the application line. Just click on the
application line and then double click on the “About
Navigator” line.
2 More Info: Click on the More Info button to get the
information that relates to the release of the package
and the ID number that was installed.
• The MACRODIR and NAVDIR environment
variables. These relate to some of the important MacroView configuration files.
• The version number, Release ID and Operating system as recognized by the Navigator.
• The Unix user name that will be used to
determine whether the user has sufficient
security to run certain applications.
Sentient Computing 2006 ©
22
MacroView Navigator Manual
Sentient Computing 2006 ©
23
MacroView Navigator Manual
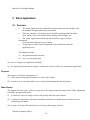
Key Table
The diagram below summarizes the allocation of functions to the keyboard keys. Some of
these allocations may be modified by changing the settings in the keys.ini file.
Key Table Assignments
System Keys
(Not configurable)
User defined keys
(keys.ini) and defaults
?
=
^a ^A
aA
bB
cC
^c ^C
dD
eE
^e ^E
^g ^G
kK
^k ^K
lL
^l ^L
mM
^m ^M
nN
(NO)
^n ^N
pP
rR
^r ^R
uU
xX
^x ^X
yY
zZ
Go to menu page
Close all Navigator Pop-Ups
Prompt user for value
Go to System Alarms page
Go to Alarms page
Screen Back
Clear Alarm Line
Clear Scratch Pad
Go to Detail pages
Prompt user for an entity
Display entity pop-up
Display faceplate pop-up
Ramp up value in scratch pad
Fast ramp up value in scratch pad
Ramp down value in scratch pad
Fast ramp down value in scratchpad
Go to Operator Guides page
Go to Internal Errors page
Deny current message in message area
Display entity notes pop-up
Prompt user for page
Prompt user for attribute
Display scratch pad entity’s attribute
pop-up
Branch Up (groups, trends)
Acknowledge (alarms)
Exit MacroView
Confirm current message in message area
(YES)
Silence beeping
!@#$%^&
*
RUN ../bin/prtscrn for screen dumps
()
^b ^B
^d ^D
fF
^f ^F
gG
Go to Groups pages
hH
Go to Help pages
^h ^H Go to online Help page
iI
Display time modification pop-up
jJ
^j ^J
oO
Go to Overview pages
^o ^O
^p ^P
qQ
^q ^Q
sS
Go to Schematics pages
^s ^S
tT
Go to Trends pages
^t ^T
Display Trends pop-up
^u ^U
vV
^v ^V
wW
^w ^W
F9
Set attribute to MV
F10
Set attribute to SV
F11
F12
F1 - F8 Soft Key 1 - Soft Key 8
Page Up Next Page
Page Down Previous Page
Home
Select Application Line
Sentient Computing 2006 ©
24
MacroView Navigator Manual
3 Pop-up Overview
This chapter discusses the functions of the various pop-ups. These pop-up windows are
designed to provide frequently needed information in a convenient format. The pop-ups
may be accessed directly by clicking on the pop-up icon (usually in the pop-up line) or by
pressing the associated hot key.
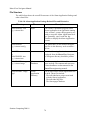
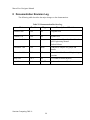
3.1 Summary of Pop-ups
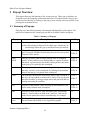
Each Pop-up is described separately (and arranged alphabetically) in this chapter. The
table below summarizes the various pop-ups that are available with the Navigator.
Table 1: Summary of Pop-ups
Pop-up
Description
Hot Key
Alarm
Provides a small window showing the top lines of the alarm page.
The filter and ordering is identical to the alarm page. Alarms may be
acknowledged from this pop-up and buzzers may be silenced.
Group
This provides a single group faceplate for the entity in the scratchpad. If a specific faceplate for that entity does not exist, the generic
faceplate will be shown.
CTRL-g,
CTRL-G
Entity
Search
This pop-up can be used to browse through a list of configured
entities. A filter enables you to find an entity or a group of entities
that satisfy a given criterion. By double clicking on the entity name
in the pop-up, it is placed in the scratchpad.
CTRL-e,
CTRL-E
Attribute
This pop-up can be used to browse through a list of attributes for
the entity currently in the scratchpad. By clicking on the attribute
name in the pop-up, it is placed in the scratchpad.
CTRL-r,
CTRL-R
Trend
The trend pop-up shows the trend for the entity in the scratchpad. If
the entity is not trended, no trend will be shown. The pop-up also
provides the ability to change sample times and pan back and forward in time using the scroll bar.
CTRL-t,
CTRL-T
Note
Provides a small window (Note) showing the documentation field
for the entity selected in the scratchpad.
CTRL-n,
CTRL-N
Time
Provides a simple means to enter and modify time and duration
markers. These markers are held in the “time line” and may be
used to locate particular events in a trend display, for example.
i, I
Pan &
Zoom
The Pan & Zoom pop-up provides the ability to use MacroView’s
Pan and Zoom functionality on any Application graphic.
CTRL-z
CTRL-Z
Sentient Computing 2006 ©
25
none
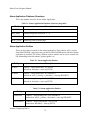
MacroView Navigator Manual
Pop-up
Application
Description
The application pop-up (actually, a pull down menu) provides a list
of applications available from the Navigator. It is activated from the
application line. You can get the list to appear by pressing the
HOME key and using the down arrow key (followed by the enter
key) to select the application.
Hot Key
Home
followed
by down
arrow
Table 1: Summary of Pop-ups
Most of the pop-ups are activated from the pop-up line. For more information, see the
Pop-up Line section in the Navigator Modules chapter.
Sentient Computing 2006 ©
26
MacroView Navigator Manual
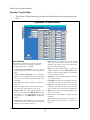
3.2 Pop-up Features
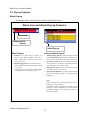
Alarm Pop-up
The diagram below shows the main features of the Alarm Pop-up.
Alarm Line and Alarm Pop-up Features
Alarm Line
Display Alarm
Pop-up
Alarm Pop-up
Main Features
Using the Alarm Pop-up
1 Structure: The Alarm Pop-up consists of a
browse on the alarms database and icons to
silence, acknowledge, and clear alarms. There
is also a close icon.
1 Acknowledging alarms: To acknowledge an alarm
in the Alarm pop-up, first select the alarm by clicking on it in the pop-up, then click on the check icon.
2
2 Alarm Pop-up purpose: The Alarm Pop-up:
• Allows alarms to be monitored while viewing
any screen.
• Allows alarms to be silenced, acknowledged,
and cleared while viewing any screen.
Clearing an alarm: If this functionality is enabled,
clear an alarm by selecting an acknowledged alarm,
and pressing the X icon in the pop-up.
3 Silencing the buzzer: Press the silence (musical
note) button to silence the buzzer.
4 Alarm Pop-up Filtering: The pop-up uses the same
filtering and ordering settings as the main alarm
application.
Note:
If the clear button is not visible, the ability to clear
alarms has not been enabled.
The default ordering and filtering settings may be
changed. For more information on the clear button
and default settings, see the engineering section of
the Alarms chapter.
Sentient Computing 2006 ©
27
MacroView Navigator Manual
Attribute Pop-up
The diagram below shows the main features of the Attribute pop-up.
Attribute Pop-up Features
Main Features
Selected
Attribute
Attributes
Scroll Bar
(Appears if
needed)
Close Button
1 Objective: Provides a simple means to find an
attribute of the entity in the scratchpad and to place
that attribute name into the scratchpad.
For more information on the Scratch Pad, please see
the relevant section in the Navigator Overview
chapter of this document.
2 Structure: The Attribute Pop-up consists of a scrollable list of attributes of the entity in the scratchpad.
The selected attribute is shown at the top of the list.
Note: The scroll bar will only appear if there is
insufficient room to show all the attributes at one
time.
3 Call-up: Press the CTRL-R key or click on the ^R
key in the Pop-up line.
4 Closing the pop-up: Close the Pop-up by either (i)
clicking on the Close Button, (ii) by clicking on the
minus icon in the Pop-up Line, or (iii) pressing the
minus sign on the keyboard.
Using the Attribute Pop-up
1
Sentient Computing 2006 ©
28
Selecting an attribute: Use the scroll bars to move
through the list of attributes. When you have found
the attribute of interest, click on the attribute to write
the attribute into the scratchpad.
Note: If you already know the name of the attribute,
you can press the R key (or click on the R button in
the scratchpad) and type it directly into the message
line. (Please see the section in the Navigator Overview chapter of this document.)
MacroView Navigator Manual
Note Pop-up
The diagram below shows the main features of the Note or Comment Pop-up.
Note Pop-up Features
Close Button
Documentation
Information.
Scrollbar
Main Features
Using the Note Pop-up
1
Structure: The Note Pop-up consists of a
scrollable text area that contains the document
comment field of the entity in the scratchpad.
1 Scrolling through the Text: Just use the scrollbar to
see the documentation.
2
Purpose: The Note Pop-up provides a means of
seeing the free format textual information that
can be associated with every entity.
Typically, this information may consist of
maintenance or operating procedures as
well as information relating to the physical
position of the sensor.
2 Read only: Note that you cannot modify the text in
the Note pop-up. This has to be done from the
engineering Configurator.
3 Call-up: Press the CTRL-N key or click on the
^N key in the Pop-up line.
Note: The ^N button will be highlighted yellow
if the entity in the scratchpad has a Note
attached to it. If there is no data associated with
the entity and the button is grey, then pressing
^N will not bring up the Note Pop-up.
4
Closing the pop-up: Close the Pop-up by either
(i) clicking on the Close Button, (ii) clicking on
the minus icon in the Pop-up Line, or (iii)
pressing the minus sign on the keyboard.
Sentient Computing 2006 ©
29
MacroView Navigator Manual
Entity Pop-up
The diagram below shows the main features of the Entity Pop-up.
Entity Pop-up Features
Filter Area
clicking on the minus icon in the Pop-up Line, or
(iii) pressing the minus sign on the keyboard.
Scroll Bar
Using the Entity Pop-up
Entities
Close Button
1 Entering a filter: In the Edit Area at the top of the
pop-up, type in those characters you know are in the
entity name that you are searching for and then press
the enter key. The pop-up will display only those
entities that have that combination of letters
contained within the entity name.
Note: The filter is not case sensitive and you may
not use wild cards.
Main Features
1 Objective: Provides a simple means to find an
entity and to place that entity name into the
scratchpad.
For more information on the Scratch Pad,
please see the relevant section in the Navigator
Overview chapter of this document.
2 Structure: The Entity Pop-up consists of a
scrollable list of entities sorted alphabetically
which satisfies the optional filter criteria.
2 To Clear the Filter: Just clear the filter area with
the backspace key and press the enter key. The popup will show the full list of entities.
3 Selecting an Entity: Use the scroll bars to move
through the list of entities. When you have found the
entity of interest, double click on the entity to write
the entity into the scratchpad.
Note: If you already know the name of the entity,
you can press the E key and type it directly into the
message line when prompted. (Please see the
Message Line section in the Navigator Overview
chapter.)
3 Call-up: Press the CTRL-E key or click on the
^E key in the Pop-up line.
4 Closing the Pop-up: Close the Pop-up by
either (i) clicking on the Close Button, (ii)
Sentient Computing 2006 ©
30
MacroView Navigator Manual
Group Pop-up
The diagram below shows the main features of the Group Pop-up.
Group Pop-up Features
Scratchpad Entity
Note features listed on
the right are specific to
the generic faceplate
shown.
Selected Attribute
Scroll Bar
(Appears if
needed)
Attributes
Selected Attribute
Scratchpad Entity
PV Bar indicator
Close Button
Main Features
Using the Group Pop-up
1
1 Type Faceplate: These are faceplates associated
with the type and source of the entity in the scratchpad.
2
Objective: Provides a means of showing a
single group style faceplate of the entity that is
in the scratchpad.
For more information on the Scratch Pad,
please see the relevant section in the Navigator
Overview chapter of this document.
Structure: The Group Pop-up will be the
standard group faceplate associated with the
type and source of the entity in the
scratchpad. If there is no group faceplate,
then the generic faceplate (shown above) will
be displayed. For more information on how
the faceplate is retrieved and associated
with the type, please see the Groups Chapter
in the engineering manual.
2 Generic Faceplate: The example shown is the
generic faceplate. To get more information on an
attribute, just click on the attribute name in the list.
At that point, the selected attribute will appear in the
lower window and it will also be reflected in the
scratchpad.
3 Call-up: Press the CTRL-G key or click on the
^G key in the Pop-up line.
4 Closing the Pop-up: Close the Pop-up by
either (i) clicking on the Close Button, (ii)
clicking on the minus icon in the Pop-up Line,
or (iii) pressing the minus sign on the keyboard.
Sentient Computing 2006 ©
31
MacroView Navigator Manual
Time Pop-up
The diagram below shows the main features of the Time pop-up.
Time Pop-up Features
Increment
Decrement
Buttons
Time Line
Use Current
Time Button
Accept and
Cancel
Buttons
Main Features
Using the Time Pop-up
1 Objective: Provides a simple means to enter
and modify time markers. These markers are
held in the “time line” and may be used (for
example) to locate particular events in a trend
display.
For more information on the Time Line, please
see the relevant section in the Navigator Overview chapter of this document.
1 Click on the appropriate button to increase or
decrease the selected time entry. For example, to
increase the day, click on the + button next to the
day.
2 Press the Use Current Time button to use the current
time for the settings.
3
1 Structure: The Time Pop-up consists of a list
of entries for each time element that can be
incremented or decremented using small
increment or decrement keys.
2 Call-up: Press the I key (I stands for Input).
Note that the Time Pop-up will initially come
up with the time the Navigator was started but
with the minutes and seconds zeroed.
3 Closing the Pop-up: Close the Pop-up by
either (i) clicking on the Accept or Cancel Button, (ii) clicking on the minus icon in the Popup Line, or (iii) pressing the minus sign on the
keyboard.
Sentient Computing 2006 ©
32
When you are happy with the time-stamp, click on
the accept button and the time stamp will be written
into the time marker of the Time Line. (Or click on
the Cancel Button to go back to the original time
stamp.) The Time Line will show the new Time
Stamp.
MacroView Navigator Manual
Trend Pop-up
The diagram below shows the main features of the Trend pop-up.
Trend Pop-up Features
Decrease
Sample
Time
Increase
Sample
Time
Close
Button
Main Features
1 Objective: The trend pop-up shows the trend
for the entity in the scratchpad. If the entity is
not trended, no trend will be shown. The pop-up
also provides the ability to change sample times
and pan back and forward in time using the
scroll bar.
2 Structure: The diagram above shows the main
elements of the trend pop-up.
3 Call-up:
• First ensure that you have an entity and
attribute in the scratchpad that has been
trended. I.e. historical data is being collected
on that entity. The entity must also appear in a
trend group.
• Now press the CTRL-T key or click on the
Trend icon (^T) in the Pop-up Line.
• If the entity is being trended, the pop-up will
appear. (If not, a message will appear
informing you that there is no trend data.)
Scroll Bar
4 Closing the pop-up: Close the Pop-up by either (i)
clicking on the close Button, (ii) clicking on the
minus icon in the Pop-up Line, or (iii) pressing the
minus sign on the keyboard.
Using the Trend Pop-up
1 Panning and Zooming: Use the scroll bar to Pan
back to earlier historical data. You can zoom by
either rubber-banding across the surface of the chart
or by dragging the scales. The function of the chart
is similar to the chart in the Trend Application. For
more information, please see the Trend Application
Chapter.
2 Changing sampling times: Just click on the
“increase sample time” or “decrease sample time”
icon to move up or down in the sample time.
3 Note: The trend pop-up can not be used while the
Trend application is active.
Sentient Computing 2006 ©
33
MacroView Navigator Manual
Pan & Zoom Pop-up
The diagram below shows the main features of the Pan & Zoom Pop-up.
Pan & Zoom Pop-up Features
Enable
Panning
Enable
Zooming
Zoom Out
Pan
Exit Pan &
Zoom
Mode
Main Features
Using the Pan & Zoom Pop-up
1 Objective: Provides a means of using MacroView’s pan and zoom functionality on almost
any Navigator Application screen.
1 Select Graphic: Go to the graphic you wish to
zoom in on.
2 Structure: The Pan & Zoom Pop-up consists of
several buttons. These include
•
Pan On: Enables panning on the current
Application.
•
Zoom On: Enables zooming on the current
Application.
•
Pan (arrow) Buttons: Pan in their respective
directions.
•
Zoom Out (+) Button: Zooms out 50%.
•
All Off: Exits pan and zoom mode, closes popup.
1 Call-up: Press the CTRL-Z key or press P and
when prompted for a page, enter “zoom”.
2 Closing the Pop-up: Close the Pop-up by
either (i) clicking on the All Off Button, (ii)
clicking on the minus icon in the Pop-up Line,
or (iii) pressing the minus sign on the keyboard.
2 Bring up Pan & Zoom Pop-up: Press the Zoom On
button, and optionally the Pan On button as well.
Note: Pressing just the Pan On button will enable
panning, but without zooming enabled, not much
can be done.
3 Zoom In: Draw a rectangle around the area you
wish to zoom in on by clicking at one corner, and
dragging to the opposite corner.
Note: The aspect ratio of the area defined is not
important, MacroView will maintain the correct
aspect ratio.
4 Pan: Panning may be done by pressing the Pan
arrow buttons, or using the scroll bars which
appeared on the edges of the Application when
panning was enabled.
5 Exit Pan & Zoom Mode: When done, click on the
All Off button to exit pan and zoom mode.
Sentient Computing 2006 ©
34
MacroView Navigator Manual
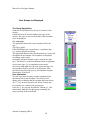
4 Trend Application
4.1 Overview
•
The Trend Application runs within the Navigator Application framework and
com- plies with the standard Navigator Application interfacing requirements.
•
The Trend Application consists of pages of pre-configured multi-pen charts that
may display MacroView historical data as well as database information.
•
The configuration of the Trend application is provided within the application
itself.
This chapter describes:
(i)
the application and it’s structure
(ii)
how to use the application
(iii) how to configure the application
(iv) the engineering details that an engineer would need to effectively maintain the
appli- cation
Purpose
The purpose of the Trend Application is to:
(i)
show historical and database information in a clear graphical format
(ii)
give the user a choice of presentation styles
(iii) provide a set of tools that enable a user to easily find the information of interest
Sentient Computing 2006 ©
35
MacroView Navigator Manual
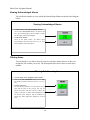
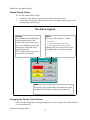
How Trend Groups are Displayed
The Trend Application:
Reads the Trend Group database and
chooses the historical files relating to the
pre-selected sampling period.
trndgrp3.dbf
Database
files
It also finds out from the file which
attributes and entities are to be displayed
and checks the hlist database to see if the
entity.attributes are historized.
hlist.dbf
Historical
view
Display the trend using the scaling information from either (i) the Trend Group database (if it is specified), (ii) the Entities
database, or (iii) the Type Attributes database.
Historical
files
Archived
files
User Interaction
The user may select the chart to use, the
sample rate, and the time to be viewed. Specific charts will provide additional functionality such as peak search and printing.
Charts
Sentient Computing 2006 ©
36
MacroView Navigator Manual
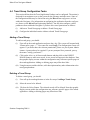
Alternate Trend Display
Sentient Computing 2006 ©
37
MacroView Navigator Manual
4.2 Using the Trend Application
This section describes how you use the Trend Application to view the historical and database information and how to manipulate its presentation.
With MacroView’s Trend Application, users can access any aspect of the Trend Application with any MacroView terminal that is connected to the network.
In a typical session, users may...
•
Call up the Trend Application from the Application matrix by clicking on the trend
icon
•
Choose which page of the Trend group they wish to View using the Navigator Page
Line. Alternatively, they may go directly to a specific page of the Trends by clicking
on a pre-configured Touch Panel
•
Find the area of information of interest using one of the following techniques:
(i)
Panning through the data using the scroll bars
(ii)
Going directly to a specific time using the Time/Date selection module
(iii) Finding a specific disturbance using the Search module
(iv) Using a known disturbance to find a time of interest using the Dual chart
trends
(v)
Using the Historical Browse screen to view tabular data
(vi) Changing sample times to a different rate so that a larger time span or a more
detailed view can be obtained
(vii) Viewing the data in a different way using the Banded trends
•
•
Print historical data using the Print screen
Configure the Trend application’s pages using the configuration screen
To make it easier to understand, the operations are shown in this document as a series of
diagrams as opposed to long textual descriptions.
Note that the functions covered by the normal MacroView system are not described in
detail here.
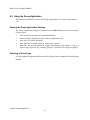
Starting the Trend Application Package
The Trend Application package is integrated into the MacroView system. To start up the
Trends, either:
•
Click once on the Trend Icon in the Application Matrix,
Sentient Computing 2006 ©
38
MacroView Navigator Manual
•
Double click on the Trend Application entry in the Application Line,
•
Press the T key on the keyboard
Alternatively, Touch Panels or Buttons may be engineered to start the Trend application
within a graphic display.
Selecting a Trend Page, Trend Chart and Sample Rate
Use the standard Navigator modules such as the Paging Line to change to the desired page
number. The Trend Chart and Sample Rate are selected using the navigation menu above
all trends charts.
Sentient Computing 2006 ©
39
MacroView Navigator Manual
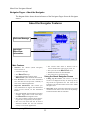
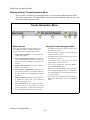
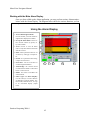
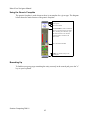
Working with the Trends Navigation Menu
Once you have called up the trend application, you will see the trends navigation menu
above the current chart. The diagram below shows the various functions you can carry out
using the trends navigation menu.
Trends Navigation Menu
1
2
3
4
6
5
Main Features
Using the Trends Navigation Menu
Every page of trends has a default Trends Chart
and sample rate. These may be overridden using the tools in the Trends Navigation Menu.
1 If a different trend chart is desired, select it with
the trend chart selector.
1 Trend Chart Selection: Lists the different
trend charts available.
2 Lock Current Chart Selection: Locks the currently selected trend chart so that no other trend
charts are shown. Clicking again unlocks the
selection.
3 Sample Rate Selection: Lists the different
sample rates available.
4 Lock Current Sample Rate: Locks the currently selected sample rate so that no other sample rates are shown. Clicking again unlocks the
selection.
5 Edit Time Marker: Drag the scales away from
or towards the origin so as to get a different
zoom or magnification area.
2 If this trend chart is desired over the trend pages
defaults, lock the selection.
3 If a different sample rate is desired, select it with
the sample rate selector.
4 If this sample rate is desired over the trends
pages defaults, lock the selection.
5 If you wish to edit the time in the Time Marker,
press the Edit Marker button.
Note: To see the Time Marker, click on the Time
Line to toggle the display. For more information
on the Time Marker, see the Time Pop-up page in
the Pop-up chapter.
6 If you wish to see the trend data for the time indicated in the Time Marker, press the Go Marker
button.
6 Go to Time Marker: At any point, click on the
“Current” Soft Key to get back to the latest
record in the history. At that moment, the trend
will start updating with the latest values again.
Sentient Computing 2006 ©
40
MacroView Navigator Manual
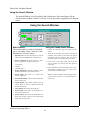
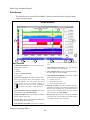
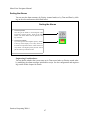
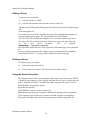
Using the Search Window
The Search Window is used to quickly find a disturbance. Most trend pages call the
Search window module with the F1 soft key. Use the procedures suggested in the diagram
below.
Using the Search Window
1
2
8
3
5
6
4
9
7
Main Features
The search window is used to find matching or exceeding values, which are often
disturbances, in a pen’s history.
1 Selected Pen: Lists the selected pen as well as
which entity and attribute this corresponds to.
2 Search Comparison: Press button to select
type of comparison. Comparison may be:
• Less than <
• Equal =
• Greater than >
3 Search Direction: Specifies whether search
should be backwards or forwards in time.
Using the Trends Search Window
1 Choose the direction, type and value for the
search.
2 Press the search button. The current view will be
searched. If the search is successful, the Search
Instructions will say “Found”, and you will be
given the option of searching again or closing.
3 If the value is not found, when the end of the
view is reached, you will be given the option of
continuing.
4 Each continuation searches another entire view.
The number of samples in a view varies, but is
usually between 400 and 1000.
4 Search Value: The value to be used in the
search comparison.
Note: The Search Window will not appear unless
a pen has been selected. Use the SP buttons to
select a pen.
5 Search Instructions: This area will instruct the
user on what to do.
6 Action Button: This button, which may have
various labels is used in conjunction with the
Search Instructions.
7 Close Button: Closes the search pop-up.
8 Search Span: This shows the time span covered in the search so far.
9
Search Values: This shows the maximum, minimum, and average values for the selected pen
found so far in the search.
Sentient Computing 2006 ©
41
MacroView Navigator Manual
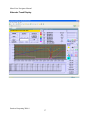
4.3 Trend Charts
The historical data presented in the Trends application may be viewed through several different interfaces. These interfaces are the Trends Charts. The standard Trends application
includes the following Trends Charts.
•
Basic Trends
•
Banded Trends
•
Dual Chart Trends
•
Print Screen
•
Historical Browse
•
Trends Menu
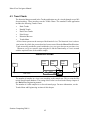
All the charts operate on the concept of the historical view. The historical view is a duration in time for which the process data has been accessed from the MacroView Historian.
Tools are usually provided to search within the view, or to go to the next or previous view.
Whenever you go to a specific time using the Go Marker functionality, a view is created
with the requested time as the middle sample.
Historical Views
View
Starts
Past
Visible
Data
View
Ends
Now
Time Line
The number of samples in a view is set according to the sample rate. This is set in the Historical Specification database. The setting of this value is covered in the History chapter of
the MacroView Engineering manual.
The number of visible samples is set for each trends page. For more information, see the
Trends Menu and Engineering sections of this chapter.
Sentient Computing 2006 ©
42
MacroView Navigator Manual
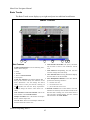
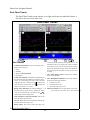
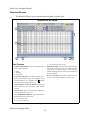
Basic Trends
The Basic Trends screen displays up to eight trend pens in a traditional trend format.
Basic Trends
2
1
2
3
1
4
10
6
9
5
7
8
5
9 9
Main Features
6 Time Selection Scroll Bar: The (lower) scroll bar
may be used to select a time within the current
1 Trend Pen Information: Lists the following inforview.
mation about each pen:
7 Time Selected: Manipulating the time selection
• Entity
scroll bar changes this time stamp.
• Attribute
8 Go to Selected Time: Pressing this button displays
• Value at selected location
the trend data for the selected data.
• Description
2 Trend Pen Selection: The buttons labeled SP1 - 9 View Manipulation Buttons: These three buttons
perform the following functions:
SP8 put the selected Entity and Attribute in the
Entity Information Area and change the chart’s
scales to those of the pen selected. Clicking on
the
symbol will clear the Entity Information
Area and change the chart’s scales back to 0 - 10
100%.
3 Time and Date of Current Selection: This is the
time and date of the selected location.
4 Samples and Rate: This is the number of samples
shown, and the sample rate.
5 Current View: These two timestamps indicate the
start and end of the current view.
Sentient Computing 2006 ©
43
• < Go back one view
• > Go forward one view
• >| Go to the most recent view
Selected Location: The vertical band or wire bar
indicates the currently selected date and time of the
historical data. Clicking once on the chart selects a
time and date. Double-clicking puts the selected
time and date in the Time Marker.
MacroView Navigator Manual
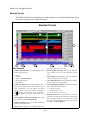
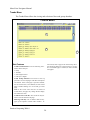
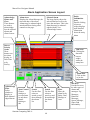
Banded Trends
The Banded Trends screen displays up to eight trend pens in a banded trend format where
each pen occupies its own range of the chart.
Banded Trends
3
4
2
1
10
6
9
5
8
7
Main Features
5
9 9
start and end of the current view.
1 Trend Pen Information: Lists the following infor- 6 Time Selection Scroll Bar: The (lower) scroll bar
may be used to select a time within the current
mation about each pen:
view.
• Entity
7 Time Selected: Manipulating the time selection
• Attribute
scroll bar changes this time stamp.
• Value at selected location
8 Go to Selected Time: Pressing this button displays
• Scale High and Low
the trend data for the selected data.
• Description
2 Trend Pen Selection: The buttons labeled SP1 - 9
SP8 put the selected Entity and Attribute in the
Entity Information Area and change the chart’s
scales to those of the pen selected. Clicking on
the
symbol will clear the Entity Information
Area and change the chart’s scales back to 0 10
100%.
3 Time and Date of Current Selection: This is the
time and date of the selected location.
4 Samples and Rate: This is the number of samples
shown, and the sample rate.
5 Current View: These two timestamps indicate the
Sentient Computing 2006 ©
44
View Manipulation Buttons: These three buttons
perform the following functions:
• < Go back one view
• > Go forward one view
• >| Go to the most recent view
Selected Location: The vertical band or wire bar
indicates the currently selected date and time of the
historical data. Clicking on the chart selects a time
and date. Double-clicking puts the selected time
and date in the Time Marker.
MacroView Navigator Manual
Sentient Computing 2006 ©
45
MacroView Navigator Manual
Dual Chart Trends
The Dual Chart Trends screen displays up to eight trend pens in a traditional format. It
also shows one pen for an entire view.
Dual Chart Trends
1
2
1
3
2 3
9
6
9
8
4
5
Main Features
7
5
8 8
can be useful by allowing the operator to see an
important trend for a long period of time. Features
in the pen’s history may be used to identify where
other pens should be viewed. When first displayed,
the range chart will be blank. Choose a pen to view
its range.
1 Trend Pen Information: Lists the following information about each pen:
• Entity
• Attribute
• Value at selected location
7 Turn OFF Range Chart: Pressing this button
• Description
clears the range chart.
2 Trend Pen Selection: The buttons labeled SP put
8 View Manipulation Buttons: These three buttons
the selected Entity and Attribute in the Entity Inforperform the following functions:
mation Area and change the chart’s scales to those
• < Go back one view
of the pen selected. Clicking on the
symbol will
• > Go forward one view
clear the Entity Information Area and change the
• >| Go to the most recent view
chart’s scales back to 0 - 100%.
3 Range Chart Selection: The buttons labeled 1 - 8 9 Selected Location: The vertical band or wire bar
pen’s data for the entire view. This functionality
cause the bottom range chart to display the entire
view for the selected pen. Clicking on the
symbol will clear the range chart.
4 Time and Date of Current Selection: This is the
time and date of the selection.
5 Current View: These two timestamps indicate the
start and end of the current view.
6 Range Chart: The (lower) chart may show one
Sentient Computing 2006 ©
46
MacroView Navigator Manual
indicates the currently selected date and time of the
historical data for both of the charts. Clicking on
the chart selects a time and date. Double-clicking
the Range Chart will cause the main chart to dis-
play the time and date selected. Double-clicking
the top chart puts the selected time and date in the
Time Marker.
Sentient Computing 2006 ©
47
MacroView Navigator Manual
Print Screen
The Print Screen is essentially the Banded Trends screen with colors which are more
suited to printer output.
Print Screen
3
4
2
1
10
11
6
9
5
8
7
5
9 9
may be used to select a time within the current
view.
Main Features
1 Trend Pen Information: Lists the following infor7 Time Selected: Manipulating the time selection
mation about each pen:
scroll bar changes this time stamp.
• Entity
8 Go to Selected Time: Pressing this button displays
• Attribute
the trend data for the selected data.
• Value at selected location
9 View Manipulation Buttons: These three buttons
• Description
perform the following functions:
2 Trend Pen Selection: The buttons labeled SP1 • < Go back one view
SP8 put the selected Entity and Attribute in the
Entity Information Area and change the chart’s
• > Go forward one view
scales to those of the pen selected. Clicking on
• >| Go to the most recent view
the
symbol will clear the Entity Information 10 Selected Location: The vertical band or wire bar
Area and change the chart’s scales back to 0 indicates the currently selected date and time of the
100%.
historical data. Clicking once on the chart selects a
time and date. Double-clicking puts the selected
3 Time and Date of Current Selection: This is the
time and date in the Time Marker.
time and date of the selected location.
4 Samples and Rate: This is the number of samples 11 Print Screen: The F2 softkey will use the standard
Navigator print screen method except that only the
shown, and the sample rate.
trend portion of the screen is printed.
5 Current View: These two timestamps indicate the
start and end of the current view.
6 Time Selection Scroll Bar: The (lower) scroll bar
Sentient Computing 2006 ©
48
MacroView Navigator Manual
Historical Browse
The Historical Browse screen presents historical data in tabular form.
Historical Browse
2
1
2
1
7
6
3
5
4
4
Main Features
5 5
• >| Go to the most recent view
6
Selected
Location: The horizontal band indicates
1 Trend Pen Information: Lists the following inforthe
currently
selected record of the historical data.
mation about each pen:
Clicking on the browse selects a time and date.
• Entity
Double-clicking puts the selected time and date in
• Attribute
the Time Marker
• Description
7 Browse Scroll Bar: The vertical scroll bar may be
2 Trend Pen Selection: The buttons labeled SP1 used to search for data within the current view.
SP8 put the selected Entity and Attribute in the
Entity Information Area. Clicking on the symbol
will clear the Entity Information Area.
3 Time and Date of Current Selection: These two
fields contain the time and date of the selected
location.
4 Current View: These two timestamps indicate the
start and end of the current view.
5 View Manipulation Buttons: These three buttons
perform the following functions:
• < Go back one view
• > Go forward one view
Sentient Computing 2006 ©
49
MacroView Navigator Manual
Trends Menu
The Trends Menu allows the viewing and selection of the trend groups database.
Trends Menu
2
3
1
4
Main Features
1 Trend Pen Information: Lists the following information about each pen:
• Entity
• Attribute
• Scale High and Low
• If the pen is digital
2 Trend Group Selection: The browse at the top
presents a list of trend pages with their descriptions
and entities. If the trend page is operator editable,
the text will be blue, if not editable, the text will be
black. Double-clicking on a record will go to that
page.
Note: If the Trends Chart Selection is locked on
Trends Menu, the page may change but the display
will remain the same.
3 Trend Browse Scroll Bar: This scroll bar may be
used to find the desired trend page.
4 Edit Page Soft Key: The F1 EDIT PAGE soft key
pops up the Operator Trends Editor window. To
Sentient Computing 2006 ©
50
edit a trend, select a page in the Trend Group selection which has Blue text, and press the F1 soft key.
If a non-editable page is selected, no editor window
will appear.
MacroView Navigator Manual
Operator Trends Editor
The Operator Trends Editor pop-up allows the limited editing of the trend groups database.
Operator Trends Editor
1
2
3
4
5
6
7
9
8
10
11
12
Main Features
The Operator Trends Editor pop-up may be used
by anyone to edit those trends pages which have
been configured as operator editable.
1 Current Page Information: Lists the current
page being edited as well as the total number of
pages.
2 Trend Group Description: The description
appears in the Navigator’s title bar when the page
is being viewed. The description may be up to 25
characters.
3 View Size: The number of samples to display in
the chart.
Note: The higher this value, the slower the operation of the page. Typical values are 30 or 60.
4 Sample Rate: The page’s default sample rate.
This list comes from the MacroView historical
specification. For more information see the History chapter of the MacroView Engineering
manual.
5 Menu Color: The background color of this page
in the Trends Menu page. Light Colors such as
White, Grey, and Yellow work best.
6 Chart: The Trends Chart to use for this Trends
Page. Note that if quicker operation is desired,
using the same chart for most pages reduces display time while changing pages.
7 Entity: The pen’s entity must have at least one
attribute historized. See the MacroView Engineering manual’s History chapter for information
on how to historize entities.
8 Attribute: The pen’s attribute must be historized
for the selected entity.
9 Scale High: The (optional) scale high for this pen.
If nothing is specified, the Entity’s scales are used.
10 Scale Low: The (optional) scale low for this pen.
If nothing is specified, the Entity’s scales are used.
Note: If either scale is entered, they both must be.
11 Digital: If the value to be trended is digital or discrete, set this option.
12 Close: Press to close window. Changes are made
as entered.
Note: Window must be closed to use Navigator. A
page change may be necessary for changes to be
effected.
Sentient Computing 2006 ©
51
MacroView Navigator Manual
4.4 Trend Group Configuration Tasks
This section defines how the Trend Application Package can be configured. The section is
designed for an engineer to set up the system for the operators and other users. Some of
the configuration tasks may be carried out using the MacroView configurator or from
within the Navigator. (For information on configuring the application from the configurator, please see the MacroView Engineering Manual.) You may also configure various
parameters from within the Navigator if you have the correct permissions as follows:
(i)
Add a new Trend Group page or delete a Trend Group page.
(ii)
Configure the individual entries within a selected Trend Group page.
Adding a Trend Group
To add a trend group, you should:
(i)
First call up the trend application and press the p key. The system will respond with
“Please enter a page -->”. Now enter the word config. The configuration screen will
appear. If you do not have the relevant permissions, please see your System Administrator. A password may be required. If you are prompted for a password, press p
then enter “config,<password>”.
(ii)
Click on the Above or At Bottom radio buttons and then click on the INSERT
BLANK button to add a new record. A new record will appear in the database. Note
that graphic display screens within the configuration may reference specific pages of
the trends application. Adding or deleting pages may affect these links.
(iii) Using the mouse and the edit line, add a description and any other information to the
trend group database.
Deleting a Trend Group
To delete a trend group, you should:
(i)
First call up the trend application as in the first step of Adding a Trend Group.
(ii)
Select the record to be deleted.
(iii) Click on the Delete Button. The selected record will be deleted. Note that graphic
display screens within the configuration may reference specific pages of the trends
application. Adding or deleting pages may affect these links.
Sentient Computing 2006 ©
52
MacroView Navigator Manual
Trend Group Pages Editor
The Trend Group Pages Editor is used to add records to, delete records from, and edit
records in the trend groups database.
Trend Group Pages Editor
2
9
10
1
3
6
4
5
8
7
11
Main Features
1 Trend Group Description: This description
appears in the Navigator’s title bar when the page
is being viewed. The description may be up to 25
characters.
2 Menu Color: The background color of this page
in the Trends Menu page. Light Colors such as
White, Grey, and Yellow work best.
3 Chart: The Trends Chart to use for this Trends
Page. Note that if quicker operation is desired,
using the same chart for most pages reduces display time.
4 View Size: The number of samples to display in
the chart.
Note: The higher this value, the slower the operation of the page. Typical settings are 30 or 60.
5 Sample Rate: The page’s default sample rate.
This list comes from the historical specification.
For more information see the MacroView Engineering manual.
6 Editable Status: Select to make page operator
editable.
7 Trend Group Page List: List of the pages in
Trends by description.
attribute historized. See the MacroView Engineering manual’s History chapter for information on how to historize entities.
• Attribute: The pen’s attribute must be historized for this pen’s selected entity.
• Scale High: The (optional) scale high for this
pen. If nothing is specified, the Entity’s scales
are used.
• Scale Low: The (optional) scale low for this
pen. If nothing is specified, the Entity’s scales
are used.
Note: If either scale is entered, they both must
be.
• Digital: If the value to be trended is digital, set
this option.
9 Insert Blank: Press to insert a new trend page.
Insertions may be either above currently selected
record or at bottom.
10 Delete Current: Press to delete the currently
selected record. There is no confirmation.
Note: Graphic display screens within the configuration may reference specific pages of the trends
application. Adding or deleting pages may affect
these links.
11 Edit Defaults (F1): Press to bring up a text editor
on the trends defaults file. This file controls:
• The pen colors
8 Pen Information: This includes
• Entity: The pen’s entity must have at least one
Sentient Computing 2006 ©
53
MacroView Navigator Manual
4.5 Trend Application Reference
This section is designed to assist the engineer in understanding and maintaining the Trend
Application Package. The section is written in a form suitable for an engineer who is
familiar with MacroView, meta script, and who understands database functions.
Setting Up the Application in the Navigator
The Trend Application will come pre-configured with your Navigator.
Going Directly to a Trend Application
To go directly to a page in the Trend Groups, configure a touch panel or button with the
action program:
SEND "SetPage(Trend,<Page#>)" TO "MessageCenter";
Where <Page#> is the page number desired of the trend group display.
File Structure
The table below shows the overall file structure of the Trend Application Package.
Table 2: Trend Application Package Files
Directory
Filename
Description
$MACRODIR/../trends/
app1
Trend Application directory
$MACRODIR/../trends/
app1
trndgrp3.dbf
$MACRODIR/../trends/
app1
charts.dbf
This is the Trend Charts database. It has one record for
every trend chart. The database structure is described
later.
$MACRODIR/../trends/
app1
<file>.dgt
<file>.ms
The metafiles that define the trend applica- tion
$MACRODIR/../trends/
app1/charts
<file>.dgt
The metafiles that define the trend charts
This is where all the Trend Application files are held.
These files include:
• the individual meta scripts associated with the
Trend Application.
• the individual dgt files.
• the trend group configuration database.
This is the Database Trend Application con- figuration
database. It has one record for every trend page. The
database structure is described in the following table.
Sentient Computing 2006 ©
54
MacroView Navigator Manual
Trend Application Database Structures
This is the database structure for Trend Group Pages database.
Table 3: Trend Application Database Structure (trndgrp3.dbf)
Field
Description
TREND_DESC
Description of the page. This will be displayed in the menu, and on the Title
bar when the page is selected
TAG1 - TAG8
The entity name for pen 1 through 8
ATTR1 - ATTR8
The attribute for pen 1 through 8
SH1 - SH8
Maximum visible point for pen 1 through 8
SL1 - SL8
Minimum visible point for pen 1 through 8
DIGITAL1 DIGITAL8
Indicates a digital trace for pen 1 through 8
REFERENCE
The sample reference for initial display. Example: If the current page has
reference of 0, when it is called it will draw with samples from the fist record
in hspec.dbf, reference 1 will draw with the second record in hspec.dbf. In
most cases, this will correspond to the REFERENCE field in hspec.dbf.
VIEW_SIZE
The number of points to display by default in a chart
DESC_COLR
The background color to show in the menu screen
EDIT_GRP
T, if editable by operators from the menu screen, F if not
TM
For future use
DT
For future use
METAFILE
Which Trends Chart to default to
This is the database structure for Trend Charts database.
Table 4: Trend Charts Database Structure (charts.dbf)
Field
Description
FILENAME
File name of chart. Files are assumed to be in $MACRODIR/../trends/app1/
charts. The contents of this field are used in the trendgrp3 database’s
METAFILE field.
DESCRIPT
The chart description
PENS
Future Use
Sentient Computing 2006 ©
55
MacroView Navigator Manual
Views used by the Trends Application
Table 5: Views in the Trends Application
Name
Data Type
Description
MV_TREND
Historical
View
The historical view used in the main trends package
MV_HSPEC
Database
View
$MACRODIR/hspec.dbf
MV_HLIST
Database
View
$MACRODIR/hlist.dbf
MV_TRNDGRP
Database
View
$MACRODIR/../trends/app1/trndgrp3.dbf
MV_CHARTS
Database
View
$MACRODIR/../trends/app1/charts.dbf
MV_FLT_TRNDGRP
Database
View
$MACRODIR/../trends/app1/trndgrp3.dbf
used by pop-up trend
MV_FLT_HSPEC
Database
View
$MACRODIR/../hspec.dbf
used by popup trend
MV_FLT_TREND
Historical
View
The historical view used in the pop-up trend window
Trend Application Graphic Metafiles
The .dgt files are used to display the Trend Application information. These files are
located in the $MACRODIR/../trends/app1 directory. The following table describes the
.dgt files and their functions:.
Table 6: Trend metafiles
Name
Description
flt_trnd.dgt
The popup window for the floating trend
tre_conf.dgt
Trend configuration screen
tre_page.dgt
Popup window, allows the user to continue or terminate a search
tre_srch.dgt
Allows the user to configure the settings for the current trend page
Sentient Computing 2006 ©
56
MacroView Navigator Manual
Trend Application Chart Metafiles
These .dgt files are used to display the Trend Application Charts. These files are located in
the $MACRODIR/../trends/app1/charts directory. The following table describes the .dgt
files.
Table 7: Trend Chart Metafiles
Name
Description
band1.dgt
Banded Trends Chart
brow1.dgt
Historical Browse
dual1.dgt
Dual Chart Trend
pop_edit.dgt
Pop-up Trend Group Page Editor.
print1.dgt
Print Screen Trends Chart
simp1.dgt
Simple Trends Chart
tre_menu.dgt
Trends Menu
Trend Application meta scripts
The .ms files are used to display the Trend Application information. These files are located
in the $MACRODIR/../trends/app1 directory. The following table describes the .dgt files and
their functions.
Table 8: Trend
Metafiles
Name
Description
flt_trnd.ms
Meta script used by the pop-up window for the floating trend
h_view1.ms
Part one of the historical view creation meta script
h_view2.ms
Part two of the historical view creation meta script
page_ch.ms
Page change meta script
tp_init.ms
Trend page initialization meta script
tre_init.ms
Trend application initialization meta script
trends.ini
Trend preferences
Sentient Computing 2006 ©
57
MacroView Navigator Manual
5 Alarm Application
5.1 Overview
•
The Alarm Application runs within the Navigator framework and complies with
the standard Navigator interfacing requirements.
•
There are a number of tools that are used to display and manipulate the alarm
infor- mation. These tools include filters, sorting, acknowledging, etc.
•
The Alarm Application is divided up into a number of pages of alarm
information.
Each page shows different types of alarms.
•
Various aspects of the alarm configuration are provided from within the
application itself.
This chapter describes:
(i)
the application and its structure.
(ii)
how to use the application.
(iii) how to configure the application and finally.
(iv) the engineering details that an engineer would need to know to effectively maintain the application.
Purpose
The purpose of the Alarm Application is to:
(i)
show alarm and message information in a clear usable format.
(ii)
provide a set of tools that enable a user to easily find and manipulate the information.
Main Screen
The diagram “Screen Layout” on the next page shows the main presentation features of the Alarm Application.
Essentially, the application shows:
(i)
a central list or browse widget of active and possibly filtered or sorted alarms.
(ii)
a number of manipulation tools that surround the central area to enable the user to filter, sort and
acknowledge the alarms.
(iii) a group of soft keys that enable the user to bring up other pages of alarms.
Sentient Computing 2006 ©
58
MacroView Navigator Manual
Sentient Computing 2006 ©
59
MacroView Navigator Manual
Alarm Application Screen Layout
Acknowledge,
Silence and
Clear
These buttons
are used to
acknowledge
lear the selected
alarms and
silence buzzer
Alarm Area
Displays the Alarm Message, the
time and date of the alarm.
Alarms may be acknowledged,
sorted and filtered using other
controls on the page.
Selected Alarm
The large display shows the
selected alarm as well as the
time, date and area. This is the
alarm that may be acknowledged with the X or
Acknowledge button.
Date or
Priority
Order.
These
buttons sort
the alarm
display in
Date Time
or by
Priority.
Entity
Information
Area
Double clicking
in browse
widget displays
more detailed
information
about the entity
alarm
Time Line
Clicking the
alarm the
browse
widget
writes the
stamp here
Acknowledge
Filter
Select
whether to
display or
hide acknowledged alarms.
Area Control
Choose
whether to
see all alarms
or only those
alarms
relating to
this
Search
Use the filter
critera to
search up and
down through
the alarms
list.
Search
Use the filter
critera to
search up and
down through
the alarms
list.
Sentient Computing 2006 ©
60
Filter
Filter the
alarm list by
Entity, Date,
Message or
Area.
Alarm Icon
Click on this
to inv the
Alarm
application
Soft Keys
Provide access to
the other types of
alarms and
messages. E.g.
Messages,
Historical
Messages,
System Message,
Super Find
functionality.
MacroView Navigator Manual
Sentient Computing 2006 ©
61
MacroView Navigator Manual
How the Alarm List is Displayed
The alarm package continually monitors and stores alarm information in various
databases
for analysis. The Engineering section of this manual and the Engineering manual
provide more details about the structure of these databases. The diagram below shows
how the alarms are displayed using the Alarm Application.
Alarm Application: How it works
$MACRODIR/../ms gs
Alarm Databases
histmsgs.dbf
sysalarm.dbf
alarms.dbf
guides.dbf
Acknowledge, Clear
Alarm View
Filters and sorts
the alarms.
Silence
Command
New Alarms
Alarm Manager
Continually
updates the alarm
databases.
Consoles & Areas
Databases
Used to set filters
and buzzer controls
Turns on the buzzers
Sentient Computing 2006 ©
62
Buzzer Controls
MacroView Navigator Manual
5.2 Using the Alarm Application
This section describes how you use the Alarm Application to view, filter and manipulate
the alarms.
With MacroView’s Alarm Application, users can access every aspect of the Alarm Application with any MacroView terminal that is connected to the network.
In a typical session, users may...
•
Call up the Alarm Application from the Navigator application matrix by clicking
once on the alarm icon.
•
Choose whether to view the Alarms, System Alarms, Historical Messages, Operator
Guide Messages, or Internal Errors.
•
Sort and filter the alarm list using the various filtering modules.
•
Silence the buzzer, and acknowledge alarms.
•
View associated displays (Super Find).
To make it easier to understand, the operations are shown in this document as a series of
diagrams as opposed to long textual descriptions.
Note that the functions covered by the normal MacroView system are not described in
detail here.
Starting the Alarm Application Package.
The Alarm Application package is integrated into the MacroView system. To start up the
Alarms Application, you may do one of the following:
•
Click once on the Alarm Icon in the Application Matrix. This will take you to the
main alarms page.
•
Click on the Alarm Application entry in the Application Line. This will take you to
the last alarms application viewed.
•
Press one of the alarm keys on the keyboard. (I.e A for alarms, M for messages or
Control-A for system alarms.)
Sentient Computing 2006 ©
63
MacroView Navigator Manual
Selecting the Alarm Display Page
The different kinds of alarms are arranged in pages of information. The table below shows
how to get to the various alarm pages. (Note that the function keys are only valid from
within the Alarms Application.) Each alarm page references a different alarm database.
Table 9: Going to the Alarm pages
Alarm
Type
Fast key
Function
Key
Default
Page
Icon
Database
Alarms
A
F2
2
Alarm Icon
alarms.dbf
Messages
M
F3
3
-
guides.dbf
System
Alarms
Control A
F4
4
-
sysalarm.dbf
Historical
Messages
-
F5
5
-
histmsgs.dbf
Internal
Errors
Control M
F6
6
-
None
Sentient Computing 2006 ©
64
MacroView Navigator Manual
Working with the Main Alarm Display
Once you have called up the Alarm application, you may perform various Alarm manipulations with the Alarm Display. The diagram below shows the various functions you can
carry out.
Using the Alarm Display
1 View Acknowledged Alarms:
Choose whether you want Acknowledged alarms displayed or hidden.
2 Set Up the Order Basis: Choose to
have alarms ordered by priority or
by time and date.
7
3 Areas: Choose to view all alarm
areas or only those alarms associated
with this console.
8
4 Filter: Find a particular alarm or set
of alarms by setting up a simple filter.
2
6
5 Search: for a particular alarm using
a simple search criteria.
6 Scroll bars: Use the scroll bars to
scroll through the database.
1
7 Acknowledge: the selected alarm
or all the filtered alarms or all alarms
below a certain record.
8 Silence the buzzer and clear the
selected alarm.
9 Other Types of Alarm Display:
Use the soft keys to look at Historical Messages, Operator Guides, Sy stem Alarms, Internal Errors, or to go
to an associated display (Super
Find).
Sentient Computing 2006 ©
65
3
5
4
9
MacroView Navigator Manual
Viewing Acknowledged Alarms
You can decide whether to view or hide the acknowledged alarms as shown in the diagram
below.
Viewing Acknowledged Alarms
1 To Show ONLY Non-Acknowledged Alarms:
Click on the NON ACKN button. All alarms that
have been acknowledged will be hidden. Alarms
will dissapear when acknowledged.
2 To Show All Alarms:
Click on the ALL button. All alarms (both
acknowledged and those that have not yet been
acknowledged) will be displayed.
Filtering Areas
You can decide to see alarms from all areas or only those alarms that are in the area
assigned to the console you are on. The description below shows how to select these
options.
Filtering Out Alarms by Area
3 To View Only Areas Assigned to this Console:
Click on the BY CONSOLE button to view only
the alarms associated with this console or no console.
4 To View All Areas:
Click on the ALL button to view the alarms associated with all areas of the process (not just the
alarms associated with this console). When this
option is selected, no alarms acknowledgment will
be allowed. This behavior may be modified by
editing the alarm application defaults as covered
later.
Sentient Computing 2006 ©
66
MacroView Navigator Manual
Sorting the Alarms
You can sort the alarm summary by Priority (normal mode) or by Time and Date by clicking on the relevant button as described below.
Sorting the Alarms
1 To Sort by Time:
You will get the alarms in chronological order
irrespective of their priority. Click on the Time
button. The latest alarms will be placed at the
top of the list.
2 To Sort by Priority:
Yyou will get the latest highest priority alarms
at the top of the display even if they came earlier than less important alarms. Click on the Priority button. The higher priority alarms will be
placed at the top of the alarm list.
Engineering Considerations:
You can decide whether the system starts up in Time-sorted order or Priority-sorted order
by modifying the alarm messages initialization script. See the configuration and engineering section of this chapter for details.
Sentient Computing 2006 ©
67
MacroView Navigator Manual
Filtering the Alarms
You can set up filters to selectively view alarms using the procedures shown in the diagram below.
Filtering Alarms
1
Filter/Search
Criteria
3
5
4
1 Choose a Filter/Search Criteria:
• Select whether you want to filter on the Alarm List by Entity,
by Message contents, by Area or by Date. Click on the relevant button.
• The button will go green to show it has been selected and the
value from the current alarm will show in the condition window next to the button.
2 Modify the Filter/Search Condition:
• Overwrite the filter condition if necessary. For example, if
the Entity name says FIC100 and you want to see all alarms
with FIC in their message, click on MSG CONTAINS and
enter FIC into the window.
3 Filter the Alarms List:
• Click the FILTER “ON” button to filter the Alarm List
according to the conditions you have set up.
4 Turn the Filter Off:
• Click on the OFF button to turn the filter off. The Alarm list
will once again return to its unfiltered state.
5 Search through the Alarm List:
• Use the same filter condition and the up and down arrows to
search through the alarm list to find the next alarm where the
filter is satisfied.
Note that the Search buttons will be disabled when the filter
is ON.
Sentient Computing 2006 ©
68
2 Filter/Search
Conditions
MacroView Navigator Manual
Acknowledging and Deleting Alarms
There are special buttons to acknowledge and clear alarms. The diagram below describes
how this is done.
Acknowledging and Clearing Alarms
1 Set up the Alarm Display:
Choose whether you want (a) the
alarms ordered by priority or time, (b)
acknowledged alarms displayed (c) all
alarms, etc.
2 Select an Alarm:
Using the scrollbars or Search tools,
select an alarm to be acknowledged.
3 Acknowledge the Alarm:
By clicking on the acknowledge button, the alarm will be removed from
the display (if you have the acknowledged alarms hidden or if the alarm is
“out of alarm”) and the next alarm in
the list will be displayed.
4 Acknowledge Alarms Up to a Time,
or Below a Priority:
•
If you have time ordered alarms, this
button will acknowledge all alarms
before and including the selected
alarm.
•
If you have priority ordered alarms,
this button will acknowledge all
alarms appearing below the selected
alarm in the list inclusive.
5
3
4
5
6
2
7
1a
1b
Acknowledge All Displayed Alarms:
Just click on the acknowledge all
alarms button to acknowledge all the
alarms shown.
6 Silence the Buzzer:
You can silence the buzzer by clicking
on the Silence Button or pressing the Z
Key.
7 Clear Alarms: You can clear alarms
which have been acknowledged but
are still “in alarm” by selecting the
alarm to be cleared and pressing the X
icon. (Only visible if you are allowed
to clear the alarms).
Sentient Computing 2006 ©
69
1c
MacroView Navigator Manual
Viewing an Alarm’s Associated Display (Super Find)
Every alarm may have an associated display. For example, a pump alarm might have as its
associated display, the page showing the pump. This functionality is called Super Find.
If an alarm has an associated display, the line above the browse area will include a string
such as "Associated Display: schemat/pumps". This example indicated that the selected
alarm is associated with the schematics page "pumps". To go to this page, press "^f" on the
keyboard, or the F7 soft key.
Sentient Computing 2006 ©
70
MacroView Navigator Manual
Alarms Priority Colors
To view the Alarm Priority Colors:
•
Just click on the Alarms Legend Icon or press the F8 function key.
•
At this point, the pop-up window shown below will appear showing the current
alarm priority color scheme.
The Alarm Legend
Priority:
The alarm priority is indicated by
the background color of the
record in the alarm browse summary. Note that Return to Normal
messages are displayed with a
green background.
Click on these buttons to see the
exact colors of the alarms.
Status:
The status of the alarm (i.e. whether
• In Alarm.
• Acknowledged (but still in alarm).
• Out of Alarm (but not acknowledged.)
is displayed by the color of the text (not
the background) in the alarm summary.
Note:
The priority color applies only if the alarms have been
configured with the priority based color option (0).
Changing the Priority Color Scheme
Please see the configuration and engineering section of this chapter. The alarm colors are
set in the defaults file.
Sentient Computing 2006 ©
71
MacroView Navigator Manual
5.3 Alarm Configuration and Engineering Tasks
This section defines how the Alarm Application Package can be configured as well as
engineering tips with regards to the alarms application. The section is designed for an
engineer to set up the system for the operators and other users. Most of the tasks are
optional. i.e, you may use the Alarm Application as it comes or, if you desire, you may tailor the system to more closely meet your needs by carrying out these optional tasks. In a
typical scenario, the following tasks may be carried out:
(i)
Configure the alarms in the Engineering Configurator. This is covered in the Engineering Manual. All operations relating to the configuration of alarms generation are
done with the engineering configurator.
(ii)
Configure the start up options for the alarms screens.
(iii) Configure other screens such as schematics to jump to alarms.
Start Up Options
You do this by first calling up the alarm screen, secondly pressing the P key (for page) and
then entering the page name “config”. This allows you to add pages to the alarms application. Note that adding pages to the alarms application is only recommended to engineers
with a high level of meta script knowledge.A password may be required. If you are
prompted for a password, press p then enter “config,<password>”.
To change the alarms defaults, press the "Set Defaults" soft key. A text editor pop-up will
appear. By editing the settings in this file, the Alarms application’s behavior may be modified. Parameters which can be changed include:
•
The default Alarm colors.
•
Allowing the clearing of alarms, system alarms or operator guides.
•
Default to ordering by priority or time (alarms and historical messages).
•
Default to showing or hiding acknowledged alarms for alarms, system alarms or
operator guides.
•
Whether to use area based alarms, and if so whether to default to showing all areas
or just those for the viewing console.
•
If all entities have an ACKN attribute, this attribute can be set to 1 when an alarm is
acknowledged.
•
Acknowledgment of alarms, system alarms, or operator guides recorded to historical
messages.
After making any changes, the Navigator must be restarted for the changes to take effect.
Sentient Computing 2006 ©
72
MacroView Navigator Manual
Engineering Considerations
The Alarm application may be started from a Button or Touch Panel from within a graphic
display with the command
SEND "SetPage(alarms)" TO "MessageCenter";
To go to the main alarms screen of the alarms application, use
SEND "SetPage(alarms/alarms)" TO "MessageCenter";
To go to the system alarms page, use
SEND "SetPage(alarms/sysalarm)" TO "MessageCenter";
To go to the operator guides page, use
SEND "SetPage(alarms/guides)" TO "MessageCenter";
To go to the historical messages page, use
SEND "SetPage(alarms/histmsgs)" TO "MessageCenter";.
Two useful functionalities are provided for use while engineering application pages. A
small "A" will appear on the Alarm Pop-up button when the internal error list contains any
records. Clearing the internal error list will clear the button’s label. In addition, if CTRLM is pressed while the Alarm Pop-up is selected, the pop-up’s display will change to a list
of internal errors. This list can be useful to de-bug metafiles and meta scripts.
Sentient Computing 2006 ©
73
MacroView Navigator Manual
File Structure
The table below shows the overall file structure of the Alarm Application Package and
other related files.
Table 10: Alarm Application Package Related Files and Directories
Directory
$MACRODIR/../bin
e.g. /u/macro/bin
Filename
xops3
Description
The version 3 operations program. Since
Alarm Application is an application running
in the version 3 system, this program is executed to create the Alarm Application Package. Essentially, xops3 reads the .dgt
metafiles to display the Alarm Application
Screens.
$MACRODIR
e.g. /u/macro/config
You should have all the normal configuration files in this directory such as entities.dbf etc.
$NAVDIR
or
$MACRODIR/../nav
e.g. /u/macro/nav
Since the Alarm Application is started and
displayed from the MacroView Navigator,
the Navigator directory should be present.
$MACRODIR/../msgs
e.g. /u/macro/msgs
Alarms
Databases
This directory is where all the Alarms Databases are kept. The contents and structures
of these databases are documented in the
MacroView engineering manual.
$MACRODIR/../msgs/
app1
Alarm
Application
Directory
This is where all the Alarm Application files
are held. These files include:
• The individual meta scripts associated
with the Alarm Application,
• The individual .dgt files.
• The Alarm pages database.
Sentient Computing 2006 ©
74
MacroView Navigator Manual
Alarm Application Database Structures
This is the database structure for the Alarm Application.
Table 11: Alarm Application Database Structure (msgs.dbf)
Field
Description
DESCRIPT
Alarm Page Description
DISP_DESC
Display Description in title bar .T. / .F.
FILENAME
Alarm Page file name
DESC_COLR
Alarm Page color in menu page
Alarm Application Entities
These are the entities required for the Alarm Application. These entities will be copied
from $MACRODIR/../msgs/app1/msg_ent.dbf to $MACRODIR/entities when the alarms
application is installed. The security attribute of these entities can be used to control who
can acknowledge and clear alarms, operator guides, etc.
Table 12: Alarm Application Entities
Entity
Description
ALMDT
Address: ../msgs/alarms.dbf TAG=DTTM
Indexed on: dtoc(date) + time tag DTTM
ALMPRI
Address: ../msgs/alarms.dbf TAG=PRIORITY
Indexed on: str(10 - priority) + dtoc(date) + time tag PRIORITY
HMSGDT
Address: ../msgs/histmsgs.dbf TAG=DTTM
Indexed on: dtoc(date) + time tag DTTM
Table 12: Alarm Application Entities
Entity
Description
HMSGPRI
Address: ../msgs/histmsgs.dbf TAG=PRIORITY
Indexed on: str(10 - priority) + dtoc(date) + time tag PRIORITY
SYSALMDT
Address: ../msgs/sysalarm.dbf TAG=DTTM
Indexed on: dtoc(date) + time tag DTTM
Sentient Computing 2006 ©
75
MacroView Navigator Manual
GUIDEDT
Address: ../msgs/guides.dbf TAG=DTTM
Indexed on: dtoc(date) + time tag DTTM
Alarm Application .dgt Files
The .dgt files are used to display the Alarm Application information. These files are
located in the $MACRODIR/../msgs/app1 directory. The following table describes the
.dgt
files and their functions.
Table 13: Alarm Application .dgt Files
Name
Description
alarms.dgt
Alarms Display Page (Emergency, Alarm, Warning)
errlog.dgt
Internal Errors Display Page
guides.dgt
Operator Guides Display Page
histmsgs.dgt
Historical Messages Display Page
mini_alm.dgt
Pop-Up Alarms Display
msg_conf.dgt
Alarms Application Configuration Page
msg_menu.dgt
Alarms Application Menu Page
msg_page.dgt
Part of the Alarms Application Internal Structure.
msg_leg.dgt
Alarms Color Legend Pop-up
sysalarm.dgt
System Alarms Display Page
Sentient Computing 2006 ©
76
MacroView Navigator Manual
Alarm Application Metascripts
The meta script files for the Alarms Application are located in the
$MACRODIR/../msgs/
app1 directory. The following table describes the metascripts and their functions.
Table 14: Alarms Application Metascripts
Name
Description
ackn_one.ms
Run when user wants to acknowledge on alarm from Alarms Page
almview.ms
Creates view on alarms.dbf based on Filter and Order settings
area_ack.ms
When acknowledging an alarms, this meta script checks the ACKN field
of areas.dbf and sets it to 1 if the acknowledged alarm’s area is in the
areas database.
cons_ack.ms
When acknowledging an alarm, this meta script checks the ACKN field
of consoles.dbf and sets it to 1 if the acknowledging console is in the consoles database and has an entry in the ACKN field.
ext_ent.ms
When acknowledging an alarm, this meta script attempts to extract an
entity from the message. If successful it checks if this entity has an
ACKN attribute. If so, it sets this attribute to 1.
guiview.ms
Creates view on guides.dbf based on Filter settings.
histview.ms
Creates view on histmsgs.dbf based on Filter and Order settings.
msg_init.ms
Run on Navigator start-up, creates all views, and declares all GLOBAL
variables used in Alarms Application
msgs.ini
User configurable Alarms Application preferences file. Run on navigator
start-up.
silence.ms
This meta script is run whenever the user wants to silence the console
beeper or an external beeper.
sysview.ms
Creates view on sysmsgs.dbf based on Filter settings
Sentient Computing 2006 ©
77
MacroView Navigator Manual
6 Group Application
6.1 Overview
The group application is the work horse of process control systems. It emulates a set of up
to 8 classical control faceplates on a single page of graphics. The advantages of the group
display include:
•Quick configuration of a group. (The engineer only has to specify the entity names
required in the group)
•Familiar and consistent layout of presentation. (Operators quickly learn the layout
of, for example, a PID controller.)
•Ability to display a large amount of dynamic live information in a concise form. Note
that:
•The Group Application runs within the Navigator framework and complies with the
standard Navigator Application interfacing requirements.
•The Group Application consists of pages of pre-configured multi-template graphics that
display MacroView real-time information.
•The configuration of the Group application is provided within the application itself.
This chapter describes:
(i)
(ii)
(iii)
(iv)
the application and it’s structure.
how to use the application.
how to configure the application.
the engineering details that an engineer would need to effectively maintain the
application.
Purpose
The purpose of the Group Application is to:
(i)
show pages of up to 8 faceplates of MacroView data (a faceplate is a graphical
template of an entity).
(ii)
provide a set of tools that enable a user to easily modify the groups.
Main Screen
The diagram labelled “Group Application Screen Layout” on the next page shows the
main presentation features of the group Application. Essentially, the application shows
up
to 8 faceplates of information on a single page.
Sentient Computing 2006 ©
78
MacroView Navigator Manual
Group Application Screen Layout
Each faceplate shows the key information
about the selected entity. The kind of
information displayed as well as the
format, will be determined by the template
of that type.
Soft Keys
Enable you to get the
information into the
scratch pad, for the
current display.
Generic Faceplates Will be used if there is no faceplate associated with a given type.
Sentient Computing 2006 ©
79
MacroView Navigator Manual
How Groups are Displayed
The Group Application:
Reads the Group database for the (up to 8) names of the
entities.
It finds out from the entities database the types of the
entities. The types are used to de termine which faceplates
are to be displayed.
For each entity:
The application locates the correct template file for the
type.
This file is called
$MACRODIR/groups/<sourceName>/<typeName>.dgt.
e.g. /u/macro/groups/uxl/pid.dgt.
The application then uses the data from the driver to provide
the updates in the template. The templates are displayed
in columns on the screen.
Optionally, alternate faceplates can be used for the same
type. This feature is used when different kinds of equipment
use the same type. E.g. a temperature sensor and a
flow meter might both have the same source and type, but
the faceplates could be specific to each function. Note
that when using the group pop -up, this alternate faceplate
functionality is not used.
User Interaction
The soft keys place the entity into the scratchpad as do
the buttons below each faceplate. The soft keys will
change color to indicate that the faceplate has been chosen.
The “?” key on the keyboard or the “Menu” button may
be pressed to see a menu of the group pag es.
Press the “u” key on your keyboard to “branch up”. This
functionality finds the next group page containing the
entity currently in the scratch pad.
Sentient Computing 2006 ©
80
MacroView Navigator Manual
6.2 Using the Group Application
This section describes how you use the Group Application to view the on-line information.
Starting the Group Application Package
The Group Application package is integrated into the MacroView system. To start up the
Groups, either:
•
Click on the Group Icon in the Application Matrix.
•
Select the Group Application entry from the Application Line.
•
Press the G key on the keyboard.
•
Press the P key and when asked for a page enter “groups”.
•
Press the P key and when asked for a page enter “groups/<page number>” to go to a
specific page of groups. E.g. entering “groups/4” will take you to page 4 of groups.
Selecting a Group Page
Use the standard Navigator modules such as the Paging Line to change to the desired page
number.
Sentient Computing 2006 ©
81
MacroView Navigator Manual
Using the Generic Faceplate
The generic faceplate is used whenever there is no template for a given type. The diagram
below shows the main features of the generic faceplate.
Entity Name
Descriptions
Selected Attribute
List of attributes (with a scrollbar if
the list is too large for the area available.) Clicking on an attribute, puts
the attribute name in the selected
attribute window and shows the
value below.
Valu e of selected attribute
Softkey to send the entity to the
scratch pad.
Branching Up
To find the next group page containing the entity currently in the scratch pad, press the "u"
key on your keyboard.
Sentient Computing 2006 ©
82
MacroView Navigator Manual
Using the Groups Application’s Menu Page
To go to the menu page of the groups application while viewing groups pages, press the
“?” key on your keyboard or click on the “Menu” button. To go to a specific page, doubleclick its entry in the list.
Groups Application Menu Page
Entries in the menu will have either blue or black text. Those with blue text are editable by
anyone with permissions to view the groups applications. Typically, several pages will be
made editable so that operators can set up screens to suit their preferences and temporary
needs.
To edit a tag, select the cell you want to edit, and make the changes in the edit line above
the browse. Only currently configured entities may be entered. The descriptions may also
be edited.
6.3 Group Engineering and Configuration
This section defines how the Group Application can be configured. The section is
designed for an engineer to set up the system for the operators and other users. The
configuration tasks may be carried out using MacroView Configurator or from within
the Navigator. (For information on configuring the application from the
Configurator, please see
the MacroView Engineering Manual.) You may also configure various parameters
Sentient Computing 2006 ©
83
MacroView Navigator Manual
from
within the Navigator if you have the correct permissions as
follows: (i)
(ii)
Add a new group page.
Edit an existing groups fields. Fields include
•
•
•
•
•
Description
Entity
Alternate Faceplate
User Editable
Menu Color
(iii) Delete a group page.
Adding a Group
To add a group, you should:
(i)
First call up the group application and hit the P key. The system will respond with
“Please enter a page -->”. Now enter the word config. The configuration screen
will appear. (Note if you do not have the relevant permissions, please see your
System Administrator.)
(ii)
Click on the Above or At Bottom radio buttons and then Click on the INSERT
BLANK button to add a new record. A new record will appear in the database
either
at the bottom of the list or above the currently selected entry. When adding
“Above”
please add one page at a time.
Sentient Computing 2006 ©
84
MacroView Navigator Manual
Editing a Group
To edit a group, you should:
(i)
Select the cell to be edited.
(ii)
Edit the cells contents in the edit line at the top of the list.
The entries in the Description field appear both in the title bar when viewing the page,
and
in the menu pages list.
If no entities are in any of the Tag fields, the page will be skipped when paging up or
down through the group pages. The Tag fields need not all be filled in.
The Face fields allow an alternate faceplate to be used rather than the type based
face plate. The file specified in the Face fields must exist in the same directory
as
the
type
based
faceplates.
This
is
typically
$MACRODIR/../groups/<source> .
The Color fields control the color of the pages entry on the menu page. This coloration
can
be used to identify page functions. Lighter colors are recommended for readability.
If the editable field is “T”, the page will be editable from the menu page.
Deleting a Group
To delete a group, you should:
(i)
Select the record to be deleted.
(ii)
Click on the Delete Button. The selected record will be deleted.
Using the Generic Faceplate
The Navigator comes with a group template which may be used for any type. While it
is usually a good practice to create a group faceplate for every type, in some cases the
generic faceplate will suffice. To enable the generic faceplate for a source, the file
$MACRODIR/../groups/app1/openerr.
dgt should be copied to
$MACRODIR/../groups/<source>/openerr.dgt
Note: When using the generic faceplates, internal error messages may be generated.
These messages will say that a file could not be found, and may be disregarded.
The generic faceplates will work for the group pop-up without copying this file.
Sentient Computing 2006 ©
85
MacroView Navigator Manual
Engineering Tips
To go to a specific page of groups from another application, use the meta script
SEND "SetPage(groups/<page number>)" TO "MessageCenter";
where <page number> is the page to which you wish to go.
To use a pop-up faceplate in a graphic, use the following commands:
SEND "SetEntity(<Entity>)" TO
"MessageCenter"; SEND "FloatGroup" TO
"MessageCenter";
7 Detail Application
7.1 Overview
The detail application is responsible for displaying the key attributes of the entity
shown
in the scratchpad. The information is shown in a template that has been designed for
the type of entity. The advantages of the detail display include:
(i)
No configuration. (As soon as an entity has been created, the detail display can
be viewed.)
(ii) Familiar and consistent layout of presentation. (Operators quickly learn the
layout of, for example, a PID controller.)
(iii) Ability to display a large amount of dynamic live information in a concise
form. (iv) Where relevant, the values of the attributes may be set from within
the template. Note that:
a. The Detail Application runs within the Navigator framework and complies
with the standard Navigator Application interfacing requirements.
b. The Detail Application consists of a single page of information for each
entity in the system. You may use the page-up and page-down keys to step
through the entities in alphabetical order grouped by source.
c. The detail application has a menu page which can be seen by either:
Going to the detail application when there is no entity in the
scratch pad. Clearing the scratch pad while in the detail
application. Pressing the “?” key or clicking the Menu button
while in the detail application.
This chapter describes:
(i)
(ii)
the application and its structure.
how to use the application.
Sentient Computing 2006 ©
86
MacroView Navigator Manual
Purpose
The purpose of the Detail Application is to:
(i)
show a detailed faceplate of the key attributes (generally all the attributes) of
an entity in a single page format.
Screen Layout
The layout of each detail display will differ depending on the template of the type or
structure of the entity. The diagram labeled “Detail Application Screen Layout” on the
next page shows the main presentation features of the generic Detail Display. This
display is used whenever a detail display for the selected type has not been defined.
Sentient Computing 2006 ©
87
MacroView Navigator Manual
Detail Application Screen Layout
Entity Notes
This is the information held in the entity
documentation field. You can also get this
information by clicking on the yellow ^N
button the pop-up window. This area may
be edited by any user whose access level is
higher than entity’s security level
Entity Information
This Area Displays
information about the selected
entity.
Chart Display
Instantaneous trend
display of selected
point.
Current Values
Display current values
of attributes.
Sentient Computing 2006 ©
88
MacroView Navigator Manual
Example of Custom Detail Page
Sentient Computing 2006 ©
89
MacroView Navigator Manual
How Entity Details are Displayed
The Detail Application:
Reads the entity name in the entity information
area.
It finds out from the entities database the type of
the entity. The type is used to determine which
template is to be displayed.
The application locates the correct template file
for the type. This file is called
$HOME/detail/<sourceName>/<typeName>.dg t
e.g. /u/macro/detail/uxl/pid.dg t for a pid type
entity of the uxl source.
If no template is found, the generic template is
used.
The application then uses the data from the driver
to provide the updates in the template.
User Interaction
Changing the entity in the scratch pad will
change the detail screen.
Clearing the scratch pad will display the menu
page which is a list of all entities.
If an entity is green in the menu list, the current
access level is higher than the entity’s security
level.
From the menu page, double clicking an entity in
the list displays the entity’s detail page.
Sentient Computing 2006 ©
90
MacroView Navigator Manual
Sentient Computing 2006 ©
91
MacroView Navigator Manual
7.2 Using the Detail Application
This section describes how you use the Detail Application to view the on-line
information.
Starting the Detail Application Package.
The Detail Application package is integrated into the MACROVIEW system. To start up
the
Detail Application:
•
First make sure the scratch pad contains the entity whose detail you want to look
at.
•
Click once on the Detail Icon in the Application Matrix.
•
Select the Detail Application entry in the Application Line.
•
Press the D key on the keyboard.
Selecting a Detail Page
Use the scratchpad to enter the entity of interest. When you select the detail
application, this will show the selected entity’s detail display.
Sentient Computing 2006 ©
92
MacroView Navigator Manual
7.3 Engineering Considerations
To go to an entity’s detail page from a graphic, the entity must first be put in the
scratch pad. This can be done with the following meta script.
SEND "SetEntity(<entity>)" TO "MessageCenter";
The detail application may then be displayed using the following meta script.
SEND "SetPage(detail)" TO "MessageCenter";
When engineering detail displays, the scratch pad messages should be used to set
values. E.g. to set a digital attribute STAT of the current entity to 1, the following meta
script
could be used
SEND
"SetEntityAttrVal({$.ENTITY},STAT,1)" TO "MessageCenter";
Note that the Navigator automatically substitutes the current entity for the "$" in all
detail
pages.
Sentient Computing 2006 ©
93
MacroView Navigator Manual
8 Documentation Revision Log
The following table describes the major changes to the documentation.
Table 25: Documentation Revision Log.
Date
Revision
Pages
Description of Revision
October 30th
3.04
All
Original Issue
October 31st
3.04
All
Syntax fixes
November 2nd
3.04
Many
Separated User Manual to User Manual
plus Engineering Manual
Solaris Release
December 14th
3.04
Many
Added new chapters for groups and
details.
December 14th
3.04
All
Re-combined the User and Engineering
sections.
July 12th.
3.0.5
All
3.0.5 final revisions (RyanN)
Sept 2006
3.0.6
MM, DB
Sentient Computing 2006 ©
94
Update and convert to Word