1
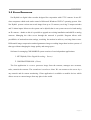
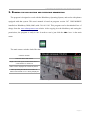
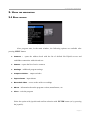
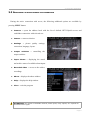
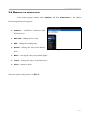
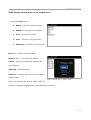
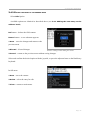
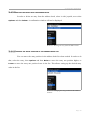
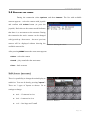
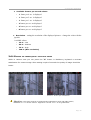
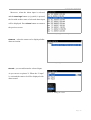
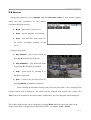
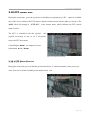
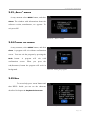
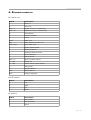
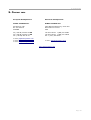
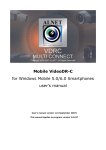
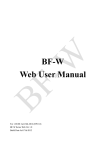
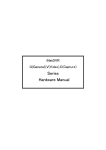
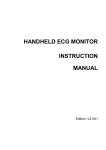
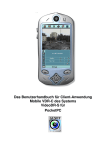
CMS Mobile
for Blackberry phones
user's manual
User's manual version 1.0 (December 2009)
This manual applies to program version 2.0.7
Table of contents
1. Introduction......................................................................................................................3
1.1 System Description
4
2. Running the application and interface description......................................................5
3. Using the application.......................................................................................................6
3.1 Basic options
3.2 Establishing the connection
3.3 Additional options during the connection
3.4 Managing the address book
3.4.1 Adding the new entry to the address book
3.4.2 Editing the entry in the address book
3.4.3 Deleting the entry from the address book
3.4.4 Changing the entry position in the address book list
3.5 Selecting the camera
3.6.1 Layout (multiview)
3.6 Picture quality and data transfer settings
3.6.1 Enhance the camera quality for static images
3.7 Controlling the output switches
3.8 Displaying the available alarm inputs
3.9 Archive
3.10 PTZ control mode
3.10.1 PTZ Preset Function
3.11 Zoom
3.13 „About” window
3.14 Closing the program
3.15 Help
6
7
8
9
10
11
12
12
13
13
14
15
16
16
18
19
19
20
22
22
22
4. Keyboard shortcuts.......................................................................................................23
5. Contact info....................................................................................................................24
Page 2
1. Introduction
1. INTRODUCTION
We present to you next version of CMS mobile system with many new functions and modules.
Many of these changes is the effect of our cooperation with You and our Partners. Part of them are
our ideas which extend capabilities of digital video recording. Please pay your attention to the
possibilities of simultaneous image recording from network cameras and, widely used so far, analog
cameras, developed archives and wider capabilities of controlling the whole system.
MENU
RETURN
ZOOM IN
PRESET
ZOOM OUT
ARCHIVE
MULTIVIEW
Page 3
1. Introduction
1.1 SYSTEM DESCRIPTION
Net Hybrid is a digital video recorder designed for cooperation with CCTV cameras. It uses PC
class computers which work under control of Microsoft Windows VISTA/7 operating system. New
Net Hybrid system version can record image from up to 32 cameras, servicing 32 output switches
and 32 alarm inputs. Moreover the system can be hybrid, that is one system can service both analog
an IP cameras – thanks to this it is possible to upgrade an existing installation and add IP or analog
cameras. Managing the video server through the network is possible. Program allows wide
possibilities of motion detection settings, searching the motion in archives, servicing alarm events.
Differential image-compression method guarantees image recording longer than in other systems of
that type without changing the image quality and storage space.
Software for managing CMS MOBILE system consists of two independent applications:
1. NET Hybrid (Video Digital Recording - Server)
2. CMS PROFFESIONAL (Client)
The first application is a server: processes image from the cameras, manages user accounts,
tasks, controls the cameras. The second one is used as a client. We can connect to the server by a
any network and do remote monitoring. Client application is available on mobile devices which
allows access to camera images from any place in the world.
Page 4
2. Running the application and interface description
2. RUNNING
THE APPLICATION AND INTERFACE DESCRIPTION
The program is designed to work with the Blackberry Operating System, and works with phones
equipped with that system. This user's manual is based on program version 2.0.7 CMS MOBILE
installed on Blackberry Bold (9000) with 5.0.0.411 OS. This program can be downloaded free of
charge from the www.alnetsystems.com website. After copying it to the blackberry and setting the
permissions, the program is ready to run. In order to run it, just click the CMS icon in the main
menu.
The main camera window looks like that.
Camera number
Camera name and model
Digit 4 and red figure means that there is
a movement in camera 4
Main screen displays the cameras picture.
After pressing T button the number of
frames and actual hour is being displayed
Picture 1: Program's main window
Page 5
3. Using the application
3. USING
THE APPLICATION
3.1 BASIC
OPTIONS
Picture2: Basic program options
After program start, in the main window, the following options are available after
pressing MENU button:
●
Connect –
opens the address book with the list of defined Net Hybrid servers and
establishes connection with selected one
opens the list of active cameras
●
Camera -
●
Settings
●
Output switches
●
Input alarms
●
Recorded video
●
About
●
Close
– additional program settings
– output switches
– input alarms
– access to the archive recordings
– information about the program version, manufacturer, etc.
– exits the program
Select the option with joystick and confirm selection with ENTER button (or by pressing
the joystick).
Page 6
3. Using the application
3.2 ESTABLISHING
THE CONNECTION
Selecting the Connections option opens the address book with the list of NET Hybrid
servers. Pressing the joystick in the main program window has the same effect.
Select the server with the joystick, and confirm the
selection by pressing the joystick (or selecting
Options
and then Connect)
The Internet connection should be configured
according to the information you have received from
your GSM provider.
After the connection is established, the picture from
the 1st camera will be shown.
Picture3: Establishing connection
Page 7
3. Using the application
3.3 ADDITIONAL
OPTIONS DURING THE CONNECTION
During the active connection with server, the following additional options are available by
pressing MENU button.
●
Connect –
opens the address book with the list of defined NET Hybrid servers and
establishes connection with selected one
●
Camera –
camera selection
●
Settings
–
picture quality settings,
connection, language, layout.
●
Output
switches
–
controlling the
output switches
●
Input alarms –
displaying the actual
Picture4: Connection established
and archive states of available alarm inputs
●
Recorded video –
access to the archive
recordings
●
About –
●
Help –
●
Close
displays the about window
displays the help window
– exits the program
Picture5: Additional options during connection
ATTENTION: the number of available cameras, alarm inputs, relay outputs, etc. depends on
connected user's rights.
Page 8
3. Using the application
3.4 MANAGING
THE ADDRESS BOOK
In the main program window select Options, and then Connections – the address
book management menu appears:
●
Connect
– establishes connection with
selected server
●
Add new
●
Edit
●
Delete
– adding the new entry
– editing the existing entry
– deleting the entry from address
Picture6: Managing the address book
book
– moving the entry one position higher
●
Raise
●
Lower
●
Close
– moving the entry one position lower
– returns to menu
Select the option with joystick or MENU.
Page 9
3. Using the application
3.4.1 ADDING
THE NEW ENTRY TO THE ADDRESS BOOK
Select the New Option
– enter the connection name
●
Name
●
Address
●
Port
●
User –
●
Password
– enter the server address
– enter the server port
enter the user's login name
– enter the user's password
Picture7: Adding the new entry to the address book
Del
button – deletes the field content
Return
button – a new submenu appears:
1 Save
– saves the changes and returns to the
previous menu
2 Discard
3 Cancel
– discard changes
– returns to the previous menu without
saving changes.
Picture8: Editing entry in address book
Select and confirm the desired option with the
joystick, or press the adjacent letter on the blackberry keyboard.
Page 10
3. Using the application
3.4.2 EDITING
THE ENTRY IN THE ADDRESS BOOK
Select Edit Option
Available options are identical as described above (see 3.4.1 Adding the new entry to the
address book).
Del
button – deletes the field content
Return
button – a new submenu appears:
1 Save
– saves the changes and returns to the
previous menu
2 Discard
3 Cancel
– discard changes
Picture9: Changes while editing the contact
– returns to the previous menu without saving changes.
Select and confirm the desired option with the joystick, or press the adjacent letter on the blackberry
keyboard.
In full menu
1 Save -
saves the contact
2 Select - select
7 Close –
the entry for edit
returns to main menu
Picture10: Editing the entry in the address book
Page 11
3. Using the application
3.4.3 DELETING
THE ENTRY FROM THE ADDRESS BOOK
In order to delete an entry from the address book, select it with joystick, next select
Options
and then Delete. A confirmation window will not be displayed.
Picture11: Deleting the entry from the address book
3.4.4 CHANGING
THE ENTRY POSITION IN THE ADDRESS BOOK LIST
You can move the entry position in the address book list when needed. In order to do
that, select the entry, then Options and then Raise to move the entry one position higher, or
Lower
to move the entry one position lower in the list. This allows setting up the desired entry
order in the list.
Picture12: Changing the entry position in the address
book list
Page 12
3. Using the application
3.5 SELECTING
THE CAMERA
During the connection select Options, and then Camera. The list with available
cameras appears – select the camera with joystick
and confirm with Select button (or press the
joystick). Red color on the camera model indicates
that there is a movement at the moment. During
the connection the active camera can be changed
with joystick up / down move – the next / previous
camera will be displayed without showing the
Picture13: Selecting the camera
available cameras list.
After pressing MENU button the extra menu appears.
Select –
Sound
Close
select the camera
– play sound after the movement
– back to menu
3.6.1 LAYOUT (MULTIVIEW)
There is a possibility to change the main display to
multiview. You can do that by pressing “space”.
There are 3 types of layouts to choose. Go to
settings to change.
●
4x3 –
12 cameras in view
●
3x3 –
9 cameras in view
●
1+5 –
One large and 5 small
Picture14: Multiview
Page 13
3. Using the application
3.6 PICTURE
QUALITY AND DATA TRANSFER SETTINGS
During the connection, select Options and then Settings.
A window with quality and data transfer
settings appears:
●
Frame per second
– setting up the
data transfer – change the value with the
joystick
●
Quality
Picture15: Picture quality and data transfer settings
– setting the displayed picture
quality – change the value with joystick.
●
●
●
Connection
○
Mobile Network – only mobile connection
○
Wi-Fi – only Wi-Fi connection
○
Wi-Fi or Mobile Network – both are available but Wi-Fi has priority
○
Mobile Network or Wi-Fi - both are available but mobile has priority
Language
○
English
○
Polski
○
Deutsch
○
Italiano
○
Czech
Select layout.
○
4x3 – 12 cameras in multivew
○
3x3 – 9 cameras in multiview
○
1+5 – 6 cameras in multiview, one large and 5 small.
Page 14
3. Using the application
●
●
Available Frames per second values:
○
1
frame per 4 sec. is displayed
○
1
frame per 2 sec. is displayed
○
1
frame per 1 sec. is displayed
○
2
frames per sec. are displayed
○
4
frames per sec. are displayed
○
8
frames per sec. are displayed
Resolution –
setting the resolution of the displayed pictures – change the value with the
joystick.
Available values:
○
10 % - Low
○
40 % - Medium
○
70 % - High
○
100 % (Max resolution)
3.6.1 ENHANCE
THE CAMERA QUALITY FOR STATIC IMAGES
While in camera view you can press the “S” button in blackberry keyboard to activate
stabilization for camera image. After waiting couple of seconds the quality of image should be
better.
Picture16: Picture without stabilization
Picture17: Picture after stabilization
Attention: This client program is developed and optimized to work with NET hybrid /
Netstation 3.x.x.x Version servers. Support for version 2.x.x.x is not guaranteed.
Page 15
3. Using the application
3.7 CONTROLLING
THE OUTPUT SWITCHES
During the connection, select Options, and then Output switches – the list with available
output switches appears.. The
icon describes
inactive output switch, while the
icon means,
that the output switch is active. To change
between active / inactive state of the output
switch, select it and press the Select button (after
change, it automatically returns to the previous
screen) or press the joystick (after change, the
Picture18: Controlling the output switches
output switches list remains open).
3.8 DISPLAYING
THE AVAILABLE ALARM INPUTS
During the connection, select Options, and then Input alarms – the list with available alarm
inputs appears:
– displays alarm data and time list
●
Select
●
Camera
– when this alarm is activated
selected camera will be displayed
●
Sound –
when this alarm is activated the
sound will be play
●
Close – back
Picture19: Displaying the available alarm inputs
to main menu
Page 16
3. Using the application
Moreover, when the alarm input is selected,
and the Last logs button (or joystick) is pressed,
the list with archive states of selected alarm input
will be displayed. Press Close button to return to
the previous screen.
Picture20: Displaying the alarm inputs list
– select the camera to be displayed after
alarm activation.
Camera
Picture21: Displaying the available cameras
Sound –
you can add sound to selected input
As you can see on picture 21 When the “2 input”
is activated the camera 9 will be displayed with
alarm sound.
Picture22: Adding the sound
Page 17
3. Using the application
3.9 ARCHIVE
During the connection, select Options, and then Recorded video. A new window appears,
where the time parameters of the archive
recordings should be entered.
●
Back
– goes back to camera view.
●
Stop
– stop the playback of recordings
●
Play
– date and time, from which are
the archive recordings available on the
Picture23: Archive recordings – time parameters
server
Setting in play mode:
●
Play forward
– play forward mode by
pressing M in blackberry keyboard
●
Play backward
– play backward mode
by pressing B in blackberry keyboard
●
Stop
– pause mode by pressing C in
blackberry keyboard
●
Quit
– return to the previous screen by
Picture24: Archive recordings - playing
pressing Return in blackberry keyboard
After selecting the date/time starting point, select the play mode – the recordings from
selected camera will be displayed. The camera can be changed with joystick (left / right). The
„Rec” label will be added to the camera name. Additionally, the recording time will be displayed.
The archive display mode can be changed by selecting Menu and the desired play mode. In the
archive mode there's a Digital Zoom function available – see chapter 3.11 – Zoom.
Page 18
3. Using the application
3.10 PTZ CONTROL
MODE
During the connection, press the joystick or in blackberry keyboard press “N” – option is available
only if the active camera is the PTZ camera, and the connected user has the rights to control it. The
„PTZ” label will change to “PTZ ON” in the camera name, which indicates the PTZ control
mode is active.
The PTZ is controlled with the joystick – the
joystick movement in any of it's 4 directions,
causes the PTZ movement.
Controlling the Zoom– see chapter for more
information. 3.11 – Zoom
Picture25: PTZ control mode
3.10.1 PTZ PRESET FUNCTION
During the connection, press in blackberry keyboard letter “e” and then number of the preset you
want. You can recall the available preset number from 1-99.
Picture26: PTZ presets
Page 19
3. Using the application
3.11 ZOOM
During the connection, press the i button to
Zoom-in, and the o button to Zoom-out.
The functionality of Zoom mode depends on the
type of active camera:
Zoom In
●
Cameras without the optical zoom
○
Zoom Out
Picture27: Zoom mode
Only digital Zoom is available –
controlled with i button (Zoom-in, up to
10 zoom-steps), and o button (Zoomout). In that case, only the data which
are needed to display the zoomed part
of the screen are sent from the server. If
the digital zoom mode is enabled,
Picture28: Digital zoom
there's a possibility to move the
zoomed part of the image with the
joystick. Small rectangle in the bottom
left side appears with the current screen
position.
Picture29: Digital zoom
Page 20
3. Using the application
●
Cameras with the optical zoom / PTZ cameras
Both digital and optical Zoom modes are available (also simultaneously).
○
Optical Zoom
– enter the PTZ control mode (see chapter 3.10 PTZ control mode)
by pressing the joystick middle button. In that mode, use the i and o buttons for optical
zoom-in and zoom-out (amount of zoom steps depends on the camera) – a „ PTZ” label
in camera name.
○
Irrespective of the digital zoom, you
can use the “Shift+i” and “Shift+o”
buttons for digital zoom-in and zoomout (up to 10 zoom-steps). In that case,
only the data which are needed to
display the zoomed part of the screen
Picture30: Digital zoom
are sent from the server. If the digital
zoom mode is enabled, there's a
possibility to move the zoomed part of
the image with the joystick . Pressing
the joystick does not activate digital
zoom mode (as it activates PTZ control
mode in that case), but if digital zoom Picture31: Digital zoom
mode is already activated, you can exit it by pressing the joystick.
Page 21
3. Using the application
3.13 „ABOUT” WINDOW
At any moment select MENU button, and then
About.
The window with informations about the
software version, manufacturer, etc. appears. To
exit press OK.
Picture32: „About” window
3.14 CLOSING
THE PROGRAM
At any moment, select MENU button, and then
Close.
A program will exit without confirmation
screen. You can exit the program by pressing the
Back
button.
confirmation
A
screen.
program
will
exit
with
When
you
press
the
red(disconnect) button the program will work in
background.
Picture33: Closing the program
3.15 HELP
To access help press “menu' button and
then HELP. Inside you can see the shortcuts
described in chapter 4. Keyboard shortcuts.
Picture34: Help window
Page 22
4. Keyboard shortcuts
4. KEYBOARD
SHORTCUTS
In Camera view
Button
Description
I
Zoom in
O
Zoom out
Shift + I
Digital zoom in ( in PTZ mode )
Shift + O
Digital zoom out ( in PTZ mode )
N
Next camera
P
Previous camera
S
sound
Space
multi view
Sym
Next cameras in multi view
Shift+space
Quick multi view
J
Quality improvement
H
Quality reduction
T
Displays frames and hour
Q
Next connection
A
Opens archive
Shift + A
Quick exit from archive
Y + 1-99
Switch out
E + 1-99
Preset control in PTZ camera
F
Make photo
S
Image stabilizer
1-99
Select camera
alt+L
Change languages
In PTZ control
Button
Description
L
Left
R
Right
U
Up
D
Down
In Archives
Button
Description
M
Play forward
B
Play backward
C
Pause
Page 23
5. Contact info
5. CONTACT
INFO
European Headquarters:
American Headquarters:
ALNET SYSTEMS Inc.
ALNET SYSTEMS Inc.
Skrzeszewo 148
83-330 Zukowo
POLAND
2200 North Federal Hwy, Suite 209
Boca Raton FL 33431
USA
tel (+48 58) 350 60 56 EN
tel (+48 58) 350 60 57 DE
fax (+48 58) 681 82 41
Toll Free Phone: 1 (866) 50 ALNET
Toll Free Phone: 1 (866) 50 25638
fax: 1 (561) 620 2633
e-mail: [email protected]
e-mail: [email protected]
e-mail: [email protected]
e-mail: [email protected]
www.alnetsystems.com
Page 24