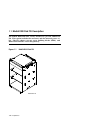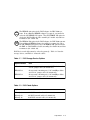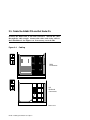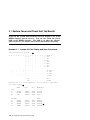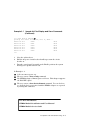
1
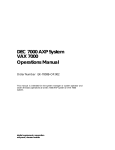
BA654 DSSI Disk PIU
Installation Guide
Order Number EK–BA654–IN.001
This manual is intended for Digital customer service engineers and selfmaintenance customers installing the BA654 disk PIU option.
digital equipment corporation
maynard, massachusetts
First Printing, December 1992
The information in this document is subject to change without notice and should
not be construed as a commitment by Digital Equipment Corporation.
Digital Equipment Corporation assumes no responsibility for any errors that may
appear in this document.
The software, if any, described in this document is furnished under a license and
may be used or copied only in accordance with the terms of such license. No responsibility is assumed for the use or reliability of software or equipment that is
not supplied by Digital Equipment Corporation or its affiliated companies.
Copyright © 1992 by Digital Equipment Corporation.
All Rights Reserved.
Printed in U.S.A.
The following are trademarks of Digital Equipment Corporation:
Alpha AXP
AXP
DEC
DECchip
DEC LANcontroller
DECnet
DECUS
DWMVA
OpenVMS
ULTRIX
UNIBUS
VAX
VAXBI
VAXELN
VMScluster
XMI
The AXP logo
OSF/1 is a registered trademark of the Open Software Foundation, Inc.
FCC NOTICE: The equipment described in this manual generates, uses, and may
emit radio frequency energy. The equipment has been type tested and found to
comply with the limits for a Class A computing device pursuant to Subpart J of
Part 15 of FCC Rules, which are designed to provide reasonable protection against
such radio frequency interference when operated in a commercial environment.
Operation of this equipment in a residential area may cause interference, in which
case the user at his own expense may be required to take measures to correct the
interference.
Contents
Preface ....................................................................................................... v
Chapter 1 Preparation
1.1
1.2
1.3
BA654 DSSI Disk PIU Description ....................................... 1-2
Prepare Area, Kit, and Tools ................................................. 1-4
Check PIU Enclosure for Proper Airflow .............................. 1-6
Chapter 2 Installing the BA654 PIU Option
2.1
2.2
2.3
2.4
2.5
Remove the Cabinet Airflow Plate ........................................ 2-2
Install the BA654 PIU ........................................................... 2-4
Install the Storage Array Building Blocks ........................... 2-6
Cable the Storage Array Building Blocks ............................. 2-8
Cable the BA654 PIU and Set Node IDs ............................ 2-10
Chapter 3 Acceptance and Troubleshooting
3.1
3.2
3.3
Restore Power and Check Self-Test Results ......................... 3-2
Testing the KFMSx Adapter and DSSI Devices ................... 3-4
DSSI Disk Drive LEDs .......................................................... 3-6
Examples
Example 3-1 Sample Self-Test Display and Show Commands ................. 3-2
Example 3-2 Testing the KFMSx and Devices .......................................... 3-4
Figures
Figure 1-1
BA654 DSSI Disk PIU ........................................................... 1-2
iii
Figure 1-2
Figure 1-3
Figure 2-1
Figure 2-2
Figure 2-3
Figure 2-4
Figure 2-5
Figure 2-6
Figure 2-7
Figure 3-1
PIU Rear Panel ...................................................................... 1-6
Rear Panel Removal ............................................................... 1-7
Airflow Plate ........................................................................... 2-2
Installing the BA654 PIU ...................................................... 2-4
Sample DSSI Configuration .................................................. 2-6
SBB Screws ............................................................................ 2-7
Cabling and Terminating the SBBs ...................................... 2-8
Cabling .................................................................................. 2-10
Setting the KFMSA-BA Node ID on the I/O Panel............ 2-11
DSSI Disk Drive LEDs .......................................................... 3-6
Tables
Table 1
Table 2
Table 1-1
Table 1-2
Table 1-3
Table 3-1
Table 3-2
iv
DEC 7000/VAX 7000 Documentation .................................... vii
Related Documents ................................................................ viii
DSSI Storage Device Options ................................................ 1-3
DSSI Cable Options ............................................................... 1-3
BA654 Option Kit ................................................................... 1-4
Indicator Switches on Disk Control Panel ............................ 3-7
DSSI Disk Drive Fault Diagnosis ......................................... 3-7
Preface
Intended Audience
This manual is written for Digital customer service engineers and selfmaintenance customers who install the BA654 option in an H9F00-Ax or
an H9F00-Bx cabinet.
Document Structure
This manual uses a structured documentation design. Topics are organized into small sections for efficient on-line and printed reference. Each
topic begins with an abstract. You can quickly gain a comprehensive overview by reading only the abstracts. Next is an illustration or example,
which also provides quick reference. Last in the structure are descriptive
text and syntax definitions.
This manual has three chapters as follows:
•
Chapter 1, Preparation, gives an overview of the option and tells
how to prepare for the installation.
•
Chapter 2, Installing the BA654 PIU Option, gives instructions on
how to install and cable the BA654 PIU.
•
Chapter 3, Acceptance and Troubleshooting, describes the acceptance procedure.
v
Conventions Used in This Document
Book titles. In text, if a book is cited without a product name, that book is
part of the hardware documentation. It is listed in Table 1 along with its
order number.
Icons. The icons shown below are used in illustrations for designating part
placement in the system described. A shaded area in the icon shows the
location of the component or part being discussed.
Front
Rear
Documentation Titles
Table 1 lists the books in the DEC 7000 and VAX 7000 documentation set.
Table 2 lists other documents that you may find useful.
vi
Table 1 DEC 7000/VAX 7000 Documentation
Title
Order Number
Installation Kit
EK–7000B–DK
Site Preparation Guide
EK–7000B–SP
Installation Guide
EK–700EB–IN
Hardware User Information Kit
EK–7001B–DK
Operations Manual
EK–7000B–OP
Basic Troubleshooting
EK–7000B–TS
Service Information Kit—VAX 7000
EK–7002A–DK
Platform Service Manual
EK–7000A–SV
System Service Manual
EK–7002B–SV
Pocket Service Guide
EK–7000A–PG
Advanced Troubleshooting
EK–7001A–TS
Service Information Kit—DEC 7000
EK–7002B–DK
Platform Service Manual
EK–7000A–SV
System Service Manual
EK–7002B–SV
Pocket Service Guide
EK–7700A–PG
Advanced Troubleshooting
EK–7701A–TS
Reference Manuals
Console Reference Manual
EK–70C0B–TM
KA7AA CPU Technical Manual
EK–KA7AA–TM
KN7AA CPU Technical Manual
EK–KN7AA–TM
MS7AA Memory Technical Manual
EK–MS7AA–TM
I/O System Technical Manual
EK–70I0A–TM
Platform Technical Manual
EK–7000A–TM
vii
Table 1 DEC 7000/VAX 7000 Documentation (Continued)
Title
Order Number
Upgrade Manuals
KA7AA CPU Installation Card
EK–KA7AA–IN
KN7AA CPU Installation Card
EK–KN7AA–IN
MS7AA Memory Installation Card
EK–MS7AA–IN
KZMSA Adapter Installation Guide
EK–KXMSX–IN
DWLMA XMI PIU Installation Guide
EK–DWLMA–IN
DWMBB VAXBI PIU Installation Guide
EK–DWMBB–IN
H7237 Battery PIU Installation Guide
EK–H7237–IN
H7263 Power Regulator Installation Card
EK–H7263–IN
BA654 DSSI Disk PIU Installation Guide
EK–BA654–IN
BA655 SCSI Disk and Tape PIU Installation
Guide
EK–BA655–IN
Removable Media Installation Guide
EK–TFRRD–IN
Table 2 Related Documents
Title
Order Number
DSSI VAXcluster Installation and Troubleshooting
Manual
EK–410AA–MG
KFMSA Module Installation and User Manual
EK–KFMSA–IM
KFMSA Module Service Guide
EK–KFMSA–SV
RF Series Integrated Storage Element User Guide
EK–RF72D–UG
TF85 Cartridge Tape Subsystem Owner’s Manual
EK–OTF85–OM
viii
Chapter 1
Preparation
This chapter describes the BA654 disk PIU option and gives preparation
guidelines for installing this option into an H9F00-Ax system cabinet or an
H9F00-Bx expander cabinet. Chapter 2 describes the installation. Sections in this chapter include:
•
BA654 DSSI Disk PIU Description
•
Prepare Area, Kit, and Tools
•
Check PIU Enclosure for Proper Airflow
Preparation 1-1
1.1 BA654 DSSI Disk PIU Description
The BA654 DSSI disk PIU can be installed to provide additional
I/O. This option includes the enclosure and the internal power cable. The I/O adapter, storage array building blocks (SBBs), and
DSSI cables must be ordered separately.
Figure 1-1
BA654 DSSI Disk PIU
BXB-0360A-92
1-2 Preparation
The KFMSB-AA option is the DSSI adapter for DEC 7000 sysDEC
7000 tems. If an additional KFMSB adapter is required, you must also
order the CK-KFMSB-LB option. The CK-KFMSB-LB option includes the DSSI bulkhead cable assembly (17-03451-01) and four
terminators (12-31281-01).
The KFMSA-BA option is the DSSI adapter for VAX 7000 systems.
VAX
7000 If an additional KFMSA adapter is required, you must also order
the CK-KFMSA-LN option. The CK-KFMSA-LN option includes
the XMI-to-DSSI bulkhead cable assembly (70-27661-04) and four
terminators (12-31281-01).
DSSI devices and cables must be ordered separately. Table 1-1 lists the
storage devices, and Table 1-2 lists the cables.
Table 1-1 DSSI Storage Device Options
Option Number
Item
SF73-LA
Storage unit containing two 5.25" RF73 disks and
one 12" jumper cable (17-02382-07)
EF51R-LA
Storage unit containing two 5.25" 100 Mbyte disks
and one 12" jumper cable (17-02382-07)
EF52R-LA
Storage unit containing two 5.25" 200 Mbyte disks
and one 12" jumper cable (17-02382-07)
Table 1-2 DSSI Cable Options
Option Number
Item
BC21Q-06
6 ft DSSI internal cable (17-02382-09)
BC21Q-09
9 ft DSSI external cable (17-02382-02)
BC21Q-16
16 ft DSSI external cable (17-02382-05)
Preparation 1-3
1.2 Prepare Area, Kit, and Tools
Set up a work space near the system where you can store components while you work on the BA654 option installation. Unpack
the BA654 option kit and check the contents against Table 1-3.
Prepare the system for shutdown. You will need a Phillips head
screwdriver.
Table 1-3 BA654 Option Kit
Part Number
Description
70-29936-01
DSSI PIU enclosure
17-03422-01
Power cable
74-44639-01
Rear panel
36-38666-01
Caution label
EK-BA654-IN
BA654 DSSI Disk PIU Installation Guide
1-4 Preparation
1.
Prepare an area near the system where you can place system components during the installation.
2.
Perform an orderly shutdown of the system.
3.
Turn the control panel keyswitch to the Disable position.
4.
Open the cabinet doors.
5.
Push the AC power circuit breaker handle down to shut the circuit
breaker off.
Preparation 1-5
1.3 Check PIU Enclosure for Proper Airflow
When installing a BA654 PIU in the cabinet, make sure that the
rear panel arrow points toward the blower to permit proper airflow. See Figure 1-2.
Figure 1-2
PIU Rear Panel
Arrow should point toward blower.
BXB-0360B-92
1-6 Preparation
The arrow on the rear panel of the PIU enclosure must point toward the
blower. That is, the arrow must point up when installing the PIU below
the blower; it must point down when installing the PIU above the blower.
If necessary, use the following procedure to reinstall the PIU rear panel:
1.
Using a Phillips screwdriver, remove the 12 screws on the rear panel
(see 1 in Figure 1-3).
2.
Remove and reposition the rear panel.
3.
Install the 12 Phillips screws.
Figure 1-3
Rear Panel Removal
1
1
1
BXB-0411-92
Preparation 1-7
Chapter 2
Installing the BA654 PIU Option
This chapter describes the installation of the BA654 PIU option into an
H9F00-Ax system cabinet or an H9F00-Bx expander cabinet. Sections include:
•
Remove the Cabinet Airflow Plate
•
Install the BA654 PIU
•
Install the Storage Array Building Blocks
•
Cable the Storage Array Building Blocks
•
Cable the BA654 PIU and Set Node IDs
Installing the BA654 PIU Option 2-1
2.1 Remove the Cabinet Airflow Plate
Remove the cabinet airflow plate located below the blower in the
disk PIU space. The plate blocks airflow when a PIU is not present.
Figure 2-1
Airflow Plate
1
Front
BXB-0412-92
2-2 Installing the BA654 PIU Option
1.
Open the front cabinet door.
2.
Using a Phillips screwdriver, remove the two screws (see
2-1) and slide the airflow plate out of the cabinet.
1
in Figure
Installing the BA654 PIU Option 2-3
2.2 Install the BA654 PIU
Insert the BA654 PIU into the cabinet.
Figure 2-2
Installing the BA654 PIU
2
1
2-4 Installing the BA654 PIU Option
BXB-0405A-92
1.
Line up the rollers at the top of each side of the PIU enclosure with
the slides in the cabinet. See Figure 2-2. Push the PIU enclosure
straight into the cabinet until it seats.
2.
Install the two Phillips screws at the bottom of the PIU enclosure
(see 1 ).
3.
Tighten the two captive screws (see
2
).
Installing the BA654 PIU Option 2-5
2.3 Install the Storage Array Building Blocks
Insert the storage array building blocks (SBBs) into the BA654
PIU.
Figure 2-3
Sample DSSI Configuration
Front
Rear
BXB-0045B-92
2-6 Installing the BA654 PIU Option
Figure 2-3 shows a DSSI PIU with three SBBs. Each SBB houses two
5.25" disks.
To install an SBB:
1.
Insert the SBB onto the shelf closest to the blower.
2.
Tighten the two large flathead screws (see
the SBB.
Figure 2-4
1
in Figure 2-4) to secure
SBB Screws
1
BXB-0045C-92
BA654 DSSI Disk PIU Configuration Rules
•
The DSSI disk PIU can occupy any quadrant in the cabinet.
•
In the system cabinet or in the bottom of the expander cabinet, SBBs
are installed starting closest to the blower and working down.
•
In the top of the expander cabinet, SBBs are installed starting closest
to the blower and working up.
•
The arrow on the rear panel of the PIU enclosure must point toward
the blower.
Installing the BA654 PIU Option 2-7
2.4 Cable the Storage Array Building Blocks
Connect the SBB jumper cables and terminators.
shows how to connect the DSSI cable.
Figure 2-5
Section 2.5
Cabling and Terminating the SBBs
One SBB
Single Channel
Two SBBs
Single Channel
Three SBBs
Single Channel
Jumper Cable
DSSI Cable
Terminator
BXB-0342A-92
2-8 Installing the BA654 PIU Option
1.
If only one SBB is present, attach a terminator (12-31281-01) to one
connector. Connect the DSSI cable to the other connector (see Figure
2-5).
2.
If two or more SBBs are present, use jumper cables (BC21Q-01) to
daisy-chain the SBBs. Attach a terminator to the connector that is not
cabled (see Figure 2-5).
Installing the BA654 PIU Option 2-9
2.5 Cable the BA654 PIU and Set Node IDs
Connect the DSSI cable to the disk connector. Thread the cable
through the cable trough. Connect the other end of the cable to
the I/O bulkhead. See Figure 2-6. If necessary, set node IDs.
Figure 2-6
Cabling
DSSI
Connectors
Front
2
1
0
Rear
3 4 5
6
7
Off
2
1
0
3 4 5
6
7
Off
I/O
Bulkhead
Connectors
BXB-0413-92
2-10 Installing the BA654 PIU Option
1.
Connect the BC21Q-xx cable to the DSSI connector that is closest to
the cable opening.
2.
Thread the cable through the cable trough at the side of the cabinet.
3.
Connect the other end of the cable to the I/O bulkhead reserved for
DSSI I/O.
Setting Node IDs
The node IDs for KFMSA-BA modules are factory set with both ports having the node ID of 7. KFMSA-BA nodes IDs for single-host systems do not
have to be changed. For a dual-host system, the second host system’s
KFMSA-BA node ID must be set to 6. On a tri-host system, the third host
system’s KFMSA-BA node ID must be set to 5. On a quad-host system, the
fourth host system’s KFMSA-BA node ID must be set to 4. For more information, see the KFMSA Module Installation and User Manual.
If the second and third hosts have multi-host I/O panels (as shown in Figure 2-7), use the KFMSA-BA select knob to change the KFMSA-BA node
ID.
If required, set the DSSI node IDs for the integrated storage elements
(ISEs) using the switches on the DSSI disk PIU.
Figure 2-7
2
1
0
Setting the KFMSA-BA Node ID on the I/O Panel
3 4 5
6
7
Off
KFMSA Node ID Select Knob
2
0
2
3 4 5
6
7
Off
2
1
0
2
1
3 4 5
6
7
Off
1
BXB-0073B-92
Installing the BA654 PIU Option 2-11
Chapter 3
Acceptance and Troubleshooting
This chapter discusses the acceptance procedure and troubleshooting
guidelines for the BA654 option. See the Advanced Troubleshooting manual for more information on troubleshooting. Sections include:
•
Restore Power and Check Self-Test Results
•
Testing the KFMSx Adapter and DSSI Devices
•
DSSI Disk Drive LEDs
Acceptance and Troubleshooting 3-1
3.1 Restore Power and Check Self-Test Results
Power up the system and check the self-test display to see if the
KFMSx adapter passed self-test. You can also check the yellow
LED on the KFMSx adapter. The LED is on when the adapter
passes self-test. See Section 3.2 for more information on testing.
Example 3-1 Sample Self-Test Display and Show Commands
Initializing the system...
1
F
E
D
C
B
A
9
8
A
o
.
o
.
+
.
7
M
+
.
+
.
+
.
6
.
.
.
.
.
.
.
5
.
.
.
.
.
.
.
4
.
.
.
.
.
.
.
3
.
.
.
.
.
.
.
2
.
.
.
.
.
.
.
1
.
.
.
.
.
.
.
+
.
.
.
.
.
.
.
.
.
.
.
.
.
.
.
.
.
.
.
+
.
.
.
+
.
.
.
.
.
.
.
.
.
.
.
+
.
.
.
.
.
.
.
.
.
.
.
.
.
.
.
.
.
.
.
. A0 .
. 128 .
.
.
.
.
.
.
.
.
.
.
0
P
+
B
+
B
+
B
NODE #
TYP
ST1
BPD
ST2
BPD
ST3
BPD
C0
C1
C2
C3
.
.
XMI +
XMI
XMI
XMI
ILV
128Mb
Firmware Rev = V1.0-1625 SROM Rev = V1.0-0 SYS SN = GAO1234567
>>> show config 2
Name
Type
Rev
Mnemonic
KA7AA
MS7AA
IOP
(8002)
(4000)
(2000)
0000
0000
0002
ka7aa0
ms7aa0
iop0
C0 XMI
5+
KDM70
8+
DWLMA
9+
KFMSA
E+
DEMNA
(0C22)
(102A)
(0810)
(0C03)
1E11
0104
A2A6
0802
xmi0
kdm700
dwlma0
kfmsa0
demna0
LSB
0+
7+
8+
3-2 Acceptance and Troubleshooting
3
Example 3-1 Sample Self-Test Display and Show Commands
(Continued)
>>> show device kfmsa0 4
polling for units on kfmsa0, slot 9, xmi0...
dua0.0.0.9.0
DUA0
RF73
dua1.0.0.9.0
DUA1
RF73
dua2.0.0.9.0
DUA2
RF73
dua3.0.0.9.0
DUA3
RF73
dua4.0.0.9.0
DUA4
RF73
dua5.0.0.9.0
DUA5
RF73
>>>
1.
Close the cabinet doors.
2.
Pull the AC power circuit breaker handle up to turn the circuit
breaker on.
3.
Turn the control panel keyswitch to the Enable position; the system
should power up and run self-test.
In Example 3-1:
1
Self-test runs at power-up.
2
The user enters a show config command.
3
4
The KFMSA adapter, kfmsa0, passes self-test. This adapter supports
the DSSI PIU option.
The user enters a show device kfmsa0 command. You can check to
see if all the devices associated with the KFMSA adapter are reported
by issuing this command.
For more information:
KFMSA Module Installation and User Manual
KFMSA Module Service Guide
Acceptance and Troubleshooting 3-3
3.2 Testing the KFMSx Adapter and DSSI Devices
Example 3-2 shows how to test a KFMSx adapter and associated
devices.
Example 3-2 Testing the KFMSx and Devices
>>> test kfmsa0 1
Device exerciser selected for run time of 120 seconds
Type Ctrl/C to abort...
Initializing kfmsa0
Self-test passed on device kfmsa0 2
Configuring kfmsa0
polling for units on kfmsa0, slot 9, xmi0...
dua3.3.1.9.0
DUA3
RF73 3
dkb4.4.1.9.0
DUA4
RF73
Starting device exerciser on dua3.3.1.9.0 (id #12d) in
Stopping device exerciser on dua3.3.1.9.0 (id #12d)
Starting device exerciser on dua4.4.1.9.0 (id #13e) in
Stopping device exerciser on dua4.4.1.9.0 (id #13e)
Starting device exerciser on dua3.3.1.9.0 (id #154) in
Stopping device exerciser on dua3.3.1.9.0 (id #154)
Starting device exerciser on dua4.4.1.9.0 (id #165) in
Stopping device exerciser on dua4.4.1.9.0 (id #165)
Starting device exerciser on dua3.3.1.9.0 (id #17b) in
Stopping device exerciser on dua3.3.1.9.0 (id #17b)
Starting device exerciser on dua4.4.1.9.0 (id #18d) in
Stopping device exerciser on dua4.4.1.9.0 (id #18d)
Done testing...
>>>
3-4 Acceptance and Troubleshooting
READ-ONLY mode
READ-ONLY mode
READ-ONLY mode
READ-ONLY mode
READ-ONLY mode
READ-ONLY mode
1
The user enters a test kfmsa0 command to test the KFMSA adapter
and devices associated with the adapter.
2
The KFMSA passes self-test.
3
The devices associated with kfmsa0 are polled. Two RF73 disk drives
are listed. Testing begins.
Acceptance and Troubleshooting 3-5
3.3 DSSI Disk Drive LEDs
Each DSSI disk drive in a storage array building block has a set of
LEDs. See Figure 3-1.
Figure 3-1
DSSI Disk Drive LEDs
Power
Ready
Write Protect
Fault
Ready
Write Protect
Fault
Power
Front
BXB-0045-92
3-6 Acceptance and Troubleshooting
Table 3-1 Indicator Switches on Disk Control Panel
Indicator
Switch
Pushbutton
Position
Light
Function
DC Pwr
(Green)
In
Out
On
Off
DC power present.
DC power not present.
Ready
(Green)
In
On
Out
Off
Integrated storage element is
on-line.
Integrated storage element is
off-line.
Wrt Prot
(Yellow)
In
Out
On
Off
Write-protect enabled.
Write-protect disabled.
Fault
(Red)
Momentary
Switch
On
Off
Fault condition.
Normal operation.
The Fault indicator switch goes on for approximately 10 seconds during
power-up, and then goes off. If the Fault indicator switch stays on, press
the switch to diagnose the problem (see Table 3-2). See the RF Series
Integrated Storage Element User Guide for more information.
Table 3-2 DSSI Disk Drive Fault Diagnosis
Fault Indicator
Switch
When
Pressed...
On
Slow Flash
Integrated storage element calibrations being performed.
On
Fast Flash
Disk control panel failure.
Acceptance and Troubleshooting 3-7
Index
B
S
BA654 option kit contents, 1-4
BA654 PIU
cabling, 2-10
installation, 2-4
Self-test results, 3-2
Storage array building blocks, 2-6
C
T
Tools required, 1-4
Cables, 1-3
D
Disk plug-in unit
fault indicator switch, 3-7
DSSI storage devices
configuration rules, 2-7
installing, 2-7
LEDs, 3-6
options, 1-3
testing, 3-4
K
KFMSA adapter
option, 1-3
self-test LED, 3-2
testing the, 3-4
KFMSB adapter, 1-3
N
Node IDs, 2-11
P
PIU rear panel
checking airflow, 1-6
reinstalling, 1-7
Index-1