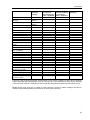
1
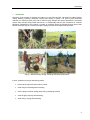
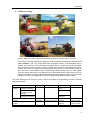
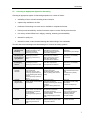
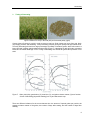
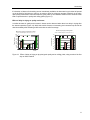
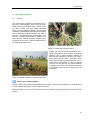
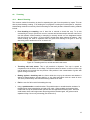
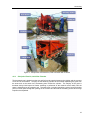
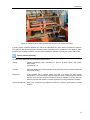
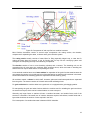
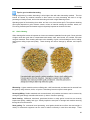
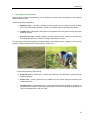
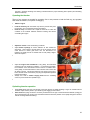
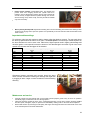
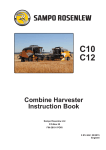
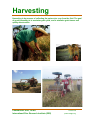
Harvesting Harvesting is he process of collecting the mature rice crop from the field. The goal of good harvesting is to maximize grain yield, and to minimize grain losses and quality deterioration. Postharvest Unit, CESD International Rice Research Institute (IRRI) October 2013 [email protected] Harvesting CONTENTS 1 INTRODUCTION....................................................................................................................... 2 2 HARVESTING SYSTEMS OVERVIEW .................................................................................... 3 3 2.1 Overview of Harvesting Operations .................................................................... 3 2.2 Harvesting Systems ........................................................................................... 3 2.3 Choosing an Appropriate System for Harvesting ................................................ 7 TIMING OF HARVESTING ....................................................................................................... 8 3.1 4 Timeliness of Harvesting Operations.................................................................. 9 HARVESTING OPERATIONS ................................................................................................ 12 4.1 Cutting ............................................................................................................. 12 4.2 Threshing ......................................................................................................... 13 4.2.1 4.2.2 4.2.3 Manual Threshing ..................................................................................................... 13 Machine Threshing ................................................................................................... 14 Principle of Feed-In, Axial-Flow Thresher ................................................................ 16 4.3 Combine Harvesting ........................................................................................ 18 4.4 Grain Cleaning ................................................................................................. 20 5 HEALTH AND SAFETY PRECAUTIONS DURING HARVESTING ...................................... 22 6 HARVESTING COSTS ........................................................................................................... 24 7 HARVESTING LOSS ASSESSMENT .................................................................................... 27 8 7.1 Shattering Loss Assessment in Harvesting ...................................................... 28 7.2 Separation Loss (Blower Loss or Cleaner Loss) Assessment .......................... 28 7.3 Scatter Loss Assessment in Threshing ............................................................ 28 7.4 Threshing Loss Assessment ............................................................................ 28 APPENDICES ......................................................................................................................... 29 1 Harvesting 1 Introduction Harvesting is the process of collecting the mature rice crop from the field. Harvesting of paddy includes cutting, stacking, handling, threshing, cleaning and hauling of paddy. The goal of good harvesting methods is to maximize grain yield, and to minimize grain damage and quality deterioration. Harvesting can be done manually using sickles and knives, or mechanically with the use of threshers or combine harvesters. Regardless of the method, a number of guidelines should be followed that will ensure that harvest losses are kept to a minimum and grain quality is preserved during harvest operations. Figure 1: Manual cutting, hauling, threshing and cleaning operations In short, guidelines for proper harvesting include: • harvest at the right time and moisture content • avoid delays in threshing after harvesting • use the proper machine settings when using a threshing machine • clean the grain properly after threshing • avoid delay in drying after threshing. 2 Harvesting 2 2.1 Harvesting Systems Overview Overview of Harvesting Operations Harvesting rice is at the beginning of the rice post-production chain and it consists of five basic operations and two optional operations: Basic harvesting operations Post Production System • Cutting: cutting the mature panicles and straw above-ground. • Threshing: separating the paddy grain from the rest of the cut crop. • Cleaning: removing immature, unfilled and non-grain materials. Harvesting Cutting Field drying Hauling Other harvesting operations Stacking/Piling • Field drying: (optional) leaving the cut crop in the field and exposing it to the sun for drying. • Hauling: moving the cut crop to the threshing location. • Stacking / Piling: (optional) temporarily storing the harvested crop in stacks or piles. • Bagging: bagging the threshed grain for transport and storage. Threshing Cleaning Bagging Drying Paddy Storage Milling Rice Storage Seeds Field drying and stacking/piling is not recommended because of the rapid quality deterioration and the increase of losses during these operations (see Section 3.1) Marketing Besides these, a variety of other activities can be included in harvesting such as gathering, reaping (gathering standing grain by cutting), bundling, and various forms of transporting the crop and grain. 2.2 Harvesting Systems Harvesting systems vary from region to region and include different methods for harvesting, hauling, threshing and cleaning. The goal of good harvesting is to ensure maximum grain yield through minimizing 3 Harvesting grain loss and the prevention of quality deterioration. 1 A wide variety of tools is used, such as knives, sickles, animals, stationary threshing machines, tractor2 mounted harvesters, and self-propelled combine harvesters. In Asia, the most common systems for paddy harvesting are: 1. Manual harvesting and handling, followed by threshing and cleaning by hand or using manually operated tools. Figure 2: Manual harvesting (left), manual threshing (center top), manual winnowing (right top), threshing using a pedal thresher (center bottom), and cleaning with a wooden winnower (bottom right). This includes use of traditional tools for threshing such as threshing racks, simple treadle threshers and animals for trampling. 1 Stationary = machine that does not move when it is used 2 Self-propelled = machine operation has its own power source-is independent of tractor 4 Harvesting 2. Manual harvesting, followed by machine threshing. Optional: Winnowing or cleaning Figure 3: Manual cutting (left) and threshing with a stationary axial flow thresher (right) This is the most common harvesting system in Southeast Asia. Depending on the system, cleaning is done either by the thresher or by hand. 3. Machine harvesting with a reaper followed by machine threshing. Optional: Winnowing or cleaning with machine Figure 4: Cutting with a reaper (left) and threshing with axial flow thresher (right). Cutting and laying the crop on a windrow is done using a reaper, threshing by a thresher and cleaning either manually or by machine. 5 Harvesting 4. Combine harvesting. Figure 5: Different combine harvesters that became popular in Asia over the last 10 years. The combine harvester combines all operations: cutting, handling, threshing and cleaning. Small “mini combines” with 1.2m cutting width were developed recently in the Philippines and in Vietnam (top left picture). They can harvest and thresh around 1 ha per day and are affordable. They need three people to operate, a driver, a bagger and one person who handles the bags in the field. Since they are light the three operators can drag them out of the field when they get stuck. As of 2011 most combines used in Southeast Asia have between 2 and 3 m cutting width. They have either rubber tracks (top right picture) or steel tracks (bottom right picture) to ensure mobility in wet fields. The bigger combine harvesters collect the threshed grains in a corn tank and unload into a trailer, thus supporting the shift from bag handling systems to bulk handling. The Table below gives an overview of tools used at each stage of the harvesting process in different harvesting systems: Harvesting system 1. Manual Manual harvest & systems threshing by beating Manual harvest & threshing by pedal thresher Manual harvest & threshing by trampling 2. Manual harvesting with machine threshing 3. Machine reaping with machine threshing 4. Combine harvest Cutting Sickle Cutting with sickle Reaper Hauling Threshing Threshing frame Pedal thresher Animal trampling Collecting and Feed-in hauling crop by hand thresher Hauling crop by hand Feed-in thresher Combine Cleaning Winnower Winnower, thresher, cleaner Winnower, thresher, cleaner 6 Harvesting 2.3 Choosing an Appropriate System for Harvesting Choosing an appropriate system for harvesting depends on a number of factors: • availability of labor: manual harvesting is labor intensive • capital outlay available to the farm • timeliness of harvesting: how much time is available to complete the harvest • field layout and accessibility: combine harvesters require a certain field layout and access • rice variety: varietal differences in lodging, maturing, shattering and threshability • demand for quality rice • demand for straw: certain threshers damage the straw making it less marketable. The table below lists advantages and disadvantages of common harvesting systems: Method 1. Manual harvesting and threshing 2. Manual harvesting and threshing/cleani ng by machine Description Cutting, stacking, bundling, handling and piling by hand Threshing by beating Cleaning by winnowing Cutting and stacking by hand Threshing by machine Cleaning by machine or by hand 3. Reaping and threshing by machine Reaping by machine Threshing by machine Cleaning by machine or hand 4. Combine harvesting Harvests, threshes and cleans Standard crop mechanically Combineharvester Cutter-bar cuts crop, while conveying system feeds crop into the threshing and cleaning systems Threshing drum tip speed 2025 m/s CombineSame as above except a harvester with stripper header is used instead stripper-header of a cutterbar Head-Feed Combine Cutterbar cuts crop, conveying system “holds” on to the straw and feeds only the panicles into the thresher Threshing drum tip speed 15 m/s Axial Flow combine Similar to Conventional combine harvester, except an axial flow type thresher is used. Advantages Efficient Most effective in lodged crop Winnowing/cleaning necessary Less weather dependent More effective in wet season harvest-wet crop conditions Higher capacity than manual Lower labor requirements Less dependent on field size Higher capacity than manual Lower labor requirements Less dependent on field size Disadvantages High labor cost Skill dependent Susceptible to grain damage High throughput; timeliness Produces Clean grain Spread straw back in the field Multi-crop ability (often used for wheat) Higher Cost More straw left behind in the field Less effective in partially lodged crop Highest throughput Less power required for subsequent threshing and cleaning operations Can start threshing earlier in the day High mobility Can operate in small fields Less power required for threshing/cleaning Ideal for hardto-thresh varieties Straw cutting/chopping is easier Lower High Throughput Axial-flow threshing system ideal for tropical conditions High Cost Not suited for small, muddy Asian fields Problems in lodged crop Higher capital cost Dependency on availability of contractor Higher capital cost Dependency on availability of contractor High Cost Low throughput Pick-up reel not suited for indica and other highshattering varieties Complex machine Lower cost than conventional combine harvesters 7 Harvesting 3 Timing of Harvesting Figure 6: Mature rice crop in the field (left) and harvested paddy (right) Correct timing of harvest is crucial in order to prevent crop loss. Grain losses may occur from rats, birds, crop lodging, insects, and shattering. Timely harvesting ensures good grain quality and high market value. Too early harvesting will result in a larger percentage of unfilled or immature grains, which will results in a lower yield and in higher grain breakage during milling (Figure 7). Harvesting too late will lead to excessive losses and increased breakage in rice. Timing of harvesting also affects the germination potential of rice seed. Figure 7: Grain yield (t/ha), germination (%), head rice (%), and grain moisture content (%) as a function of time of harvesting (days after heading) in a dry and wet season crop There are different indicators for the correct harvest time: the amount of ripened grains per panicle; the average moisture content of the grains; the number of days after sowing; and the number of days after heading. 8 Harvesting Figure 8: Determination of the proper harvesting time by assessing the color of the grains Ripe grains per panicle: The crop should be cut when 80-85% of the grains are straw (i.e. yellow) colored. For harvesting the grain moisture content ideally is between 20-25% w.b. If the crop is too dry, fissures will form in dry kernels when these are re-wetted and high shattering losses might occur. Fissured grains break when milled. If the grain is too wet, it is more difficult to remove grain from the panicle and some damage may occur during machine threshing. Farmers often determine the harvest timing by biting the grain which allows them to estimate the moisture content. Grains should be firm but not brittle when squeezed between the teeth. If the crop has a lot of surface moisture, e.g. from previous rainfall or early in the morning, it is advisable to wait to cut the crop until the surface moisture dried off. Field drying of the cut crop is not recommended because the grains dry slower when they are placed on the ground. If field drying cannot be avoided because a thresher is not available, the grains should be exposed to the sun and not placed inside straw bundles. During good weather non-threshed crops will normally dry at 1-2% moisture per day when spread in the field. Number of days after sowing: Generally the ideal harvest time lies between 130-136 days after sowing for late, 113-125 for medium, and 110 days for early maturing varieties. Number of days after heading: In dry season harvest, an optimum time of harvest is 28 to 35 days after heading which gives best grain yield (see shaded area in graph below), germination, and head rice. In wet season harvest, optimum time is 32 to 38 days after heading (Figure 7). Harvesting also needs to be timed in a way that threshing can be done as soon as possible after cutting to avoid re-wetting and reduce grain breakage. Re-wetting of dry kernels occurs naturally in the field before and after harvest as moisture transfers from either wet kernels, the soil or from the surrounding air to dry kernels. 3.1 Timeliness of Harvesting Operations Of equal importance to the proper time for harvesting is the timely conduction of the individual harvesting operations, including drying which follows harvest. Any delay between operations leads to rapid deterioration of grain quality and to increased shattering losses. Immediate threshing reduces the exposure of crop to insects, birds, rodents, disease, and molds. Crop that is piled over a period of time generates heat that will serve as an ideal medium for growth of molds, disease and pests. Piling wet rice crop for longer than one day will lead to grain discoloration, germinated grains, and spoilage (Figure 9). 9 Harvesting Figure 9: Piling wet rice crop for a longer period of time results in fermented / discolored grains Losses in field drying and stacking Grain Losses from Field Drying and Stacking IRRI farm; Dry season 1972; IR24; Maturity date: 125 days after seeding Field drying is an optional operation that is practiced if the crop is harvested at a moisture content too high for threshing or if either labor or threshing machines are not available. While there can be a moisture reduction of 1-2% per day in field drying, there are additional grain losses especially in matured crop that easily shatters (see Figure right). The same is true for stacking harvested crop in the field. 8 Grain Loss, % 6 Stacking (2 weeks) Bundling Field drying (1 week) 4 2 In addition to the physical losses in field drying, there is rapid quality deterioration during delays in the harvesting chain. 0 113 119 125 Days after Seeding Figure 10: Grain losses from field drying Effect of delay of threshing on losses and quality Ideally, machine threshing should begin immediately after cutting. Often these crops can be threshed in the field. Effect of Delay of Threshing on Physical Grain Quality Effect of Delay of Threshing on Milling Results Adapted from NAPHIRE, Philippines 1983; Paddy MC: 23.4% w b Adapted f rom NAPHIRE, Philippines 1983; Paddy MC: 23.4% w b -6.0 60 2nd day 2nd day 3rd day Percent decrease Percent increase 3rd day -5.0 50 40 30 20 -4.0 -3.0 -2.0 -1.0 10 0 0.0 Cracked kernels Yellow kernels Damaged kernels Head rice Milling recovery Whiteness Figure 11: Effect of delay of threshing on physical grain quality and on milling yields, using results of the first day as 100% baseline 10 Harvesting If a thresher or laborers for threshing are not immediately available, the harvested crop is either left spread out in the field for field drying or piled up in stacks or piles for temporary storage. Especially in the piles, rapid quality deterioration occurs because the grain heats up and adsorbs water from the wet straw. Both lead to rapid reduction in quality and milling yields (Figure 11). Effect of delay in drying on quality and losses Effect of Delay of Drying on Physical Grain Quality Effect of Delay of Drying on Milling Results Adapted from NAPHIRE, Philippines 1983; Paddy MC: 23.4% w b Adapted from NAPHIRE, Philippines 1983; Paddy MC: 23.4% w b 100 90 80 70 60 50 40 30 20 10 0 2nd day 3rd day -3.0 4th day 2nd day 3rd day 4th day -2.5 Percent decrease Percent increase A similar decrease in quality and increase in losses can be observed when there is a delay in drying after the harvest operation (Figure 12). While this module focuses on harvesting, the harvested crop should be dried immediately after threshing to MC levels that are safe for storage. -2.0 -1.5 -1.0 -0.5 Cracked kernels Yellow kernels Damaged kernels 0.0 Head rice Milling recovery Whiteness Figure 12: Effect of delay of drying on physical grain quality and on milling yields, using results of the first day as 100% baseline 11 Harvesting 4 4.1 Harvesting Operations Cutting The most common method for harvesting rice in Asia is the manual system. The rice crop is cut by simple hand tools including sickles cutting 15-25 cm above ground level, and simple hand-held knives to cut just below the panicle (e.g. ani ani in Indonesia). In Bangladesh and India, the harvested crop is bundled to improve handling, and dried in the field. The manual system of harvesting is very effective in lodged crop conditions, however it is labor intensive. Manual harvesting requires 40 to 80 person-hours per ha. It will take additional labor to collect the harvested crop. Figure 13: Cutting the crop with a sickle Cutting can also be done mechanically by a reaper, although the use of reapers is not widespread in Asia. In some countries, reapers are used that are mounted on the front of a tractor. Most reapers lay the crop in a windrow, which allows for easy pick up of the harvested crop. A reaper with a cutting-width of 1.5m can operate at a rate of 2-4 ha per day. For proper operation of reapers, fields need to be leveled and drained. It is difficult to reap crop that is lodged, lying on the ground. Figure 14: Reaper mounted on Chinese power tiller Tips for good cutting practices Drain the field 7-10 days before the expected harvest date or when the upper grains in most of the tillers are in the hard dough stage turning from green to yellow. When laying the cut crop in the field make sure that the panicles with the grains stay dry and are off the ground. 12 Harvesting 4.2 Threshing 4.2.1 Manual Threshing The common method for threshing by hand is separating the grain from the panicle by impact. This can done by hand beating, treading, or by holding the crop against a rotating drum with spikes or rasp bars. Hand beating methods are normally used for threshing rice that easily shatters. Manual threshing methods include: • Foot threshing or trampling: use of bare feet or animals to thresh the crop. To do this successfully, the crop is spread over a mat or canvass and workers trample with their own feet or use their animals. Animal treading or trampling is normally carried out at a designated location near the field or in the village. In some regions, animals have been replaced by tractors. After animal treading, the straw is separated from the grains and cleaning of the grain is done by winnowing, with or without the aid of an electric fan. Figure 15: Threshing with foot, animals and with hand tractor • Threshing with hand tractor: This is still practiced in Myanmar. The crop is spread on compacted soil in the field or in the village. The operator steers his tractor in circles over the crop until all grains are removed from the panicles. One problem is the contamination of grains with spores of fungi from the soil. • Beating against a threshing rack: the farmer holds the crop by the sheaves and thrashes it against a slatted bamboo, wooden platform, or any other hard object such as a steel oil drum. This is the predominantly used manual threshing method in SE Asia. • Flail: the use of a flail or stick for thrashing the crop. • Using a pedal thresher or treadle thresher: The pedal thresher or treadle thresher consists of a threshing drum, base, transmission unit and a foot crank. When pedaled, the threshing drum rotates and rice can be threshed when panicles are held against the threshing drum. Because small straws, chaff, and foreign matter drop along with the threshed grain, the grains must be separated using a sieve or by winnowing (see Section 4.4). 13 Harvesting Figure 16: Threshing with a Pedal Thresher Tips for good manual threshing practices For hand threshed crops, partial drying in the field for a couple of days may be necessary to lower the moisture content and make threshing easier. The highest milling yield will be attained for hand threshed, sun dried rice at a grain moisture content of 18-20%. Care must be taken not to over-dry the crop if it is to be transported any distance before threshing as excessive shattering will occur. While the crop may be dried before threshing, dried crop should not be subjected to re-wetting. Re-wetting causes grain fissures which lead to a high amount of broken grain in milling. In wet crop conditions, manual threshing is difficult if the crop is not sufficiently dried. 4.2.2 Machine Threshing Given the high labor requirements of manual threshing, in many countries threshing of paddy is now mechanized by use of small stationary machine threshers. Depending on farming systems, post-harvest practices and infrastructure, threshers come in different sizes and range from small portable units without cleaner (Iloilo, Philippines) to large, truck mounted units (Thailand). Threshing is either done in the field, near the field or at the nearest road. 14 Harvesting Threshers can be classified using different criteria such as feeding type, crop flow inside the machine, type of threshing elements: Criteria Feeding type Type Hold-on (or head feed) Feed-in Crop flow Description Only the panicle is fed into the machine The hole crop is fed into the machine Advantage Straw remains intact Higher throughput Disadvantage Lower throughput Complex machine Clogging with very wet or long straw. Higher power requirement Higher power requirement Whole crop moves axially around the drum periphery Low weight Does not need straw separators Good performance with wet crop Crop flows tangentially through gap between drum and concave Lower power requirement Concave clearance easy to set Rows of peg teeth attached to threshing drum Typical axial flow thresher drum Grinds up the straw Performs well with wet straw Simple design Cheap Rasp bars attached to threshing drum, usually used in tangential flow threshers Lower power requirement Problems with wet straw. Typically used in hold-on threshers and head feed combines Lowest power requirement Thin wire loops comb grain and thresh through impact Wears quicker Axial-flow Needs straw walker for separating grains from straw Problems in wet crop Conventional Threshing elements Pegteeth Rasp bar Wire loop Threshers can be classified as either feed-in type or hold-on type machines. Most threshers for paddy are of feed-in type, where the whole crop is fed through the thresher ensuring high throughput but also having a high power requirement. Hold-on threshers, in which only panicles are fed into the machine, generally have a lower capacity than feed-in threshers and are primarily used in areas where rice straw is bundled and stored for later use. Most threshers for paddy have peg-tooth threshing drums, however threshing drums fitted with wire-loops are used if power is limited or in hold-on threshers. Larger stationary threshers are fitted with additional cleaning devices such as an oscillating screen, centrifugal blower or wind-board, and threshed grain can be handled without further cleaning: 15 Harvesting Figure 17: Components of an axial-flow, feed-in thresher with a cleaner 4.2.3 Principle of Feed-In, Axial-Flow Thresher The harvested crop is loaded onto the tray and fed into the opening between the cylinder and the concave at one end of the machine. The pegs on the threshing cylinder hit the material separating the grain from the straw and, at the same time, accelerating them around the cylinder. The majority of the grain is threshed during initial impact but further threshing is performed as the material moves axially until the straw is discharged at the opposite end. Threshed grain, including impurities such as leaves and short pieces of straw, pass through the openings in the concave and fall onto the oscillating screen where large impurities are separated. 16 Harvesting Figure 18: Threshing drum with peg-teeth and concave of an axial-flow thresher In many regions, machine threshers are owned by individuals who offer custom operations to farmers. This requires that farmers schedule harvesting dates depending on the availability of the thresher. Many threshers are mounted on trailers or trucks which enables the operator to quickly move from field to field. Tips for machine threshing For best results follow the recommended practices below: Timing: Thresh immediately after harvesting to prevent physical losses and quality deterioration (see Section 3.1). Location: Place the thresher as close as possible to the harvested crop to minimize shattering loss during hauling. Placement: If the thresher has a cleaner make sure that it is leveled for best cleaner performance. Turn the thresher with the straw and chaff outlets facing the leeward direction to prevent the wind from blowing chaff at the operator. For very wet crop: Reduce feed rate and clean the concave regularly from sticky straw and impurities. Cleaner adjustment: Since crop conditions vary adjust the cleaner for optimum performance for each situation. 17 Harvesting Machine adjustments For minimum grain loss and maximum quality, always adjust the thresher correctly. For peg-tooth drums the drum tip speed should be about 12-16 m/sec. The drum speed in revolutions per minute depends on the drum diameter as it can be seen in Table 1. Higher speeds result in higher grain damage and de-hulled grains. Lower speeds increase the amount of nonthreshed grain and result in grain loss. Lower speeds also decrease the throughput of the thresher. Table 1: Drum tip-speed as a function of rotational speed for three threshing drum diameters RPM 400 450 500 550 600 650 700 750 800 850 900 Tip speed (m/s) for drum diameters of 30 cm 40 cm 50 cm 6.3 8.4 10.42 7.07 9.4 11.78 7.85 10.5 13.09 8.64 11.5 14.4 9.42 12.6 15.7 10.21 13.6 17.02 11 14.7 18.3 11.8 15.7 19.64 12.6 16.8 21 13.4 17.8 22.25 14.14 18.85 23.6 Clearances between peg-teeth and concave should be about 25mm. Smaller clearance increases grain damage and might lead to clogging of straw. Larger concave clearances reduce threshing efficiency. Figure 19: Checking the concave clearance 4.3 Combine Harvesting In India, China and Thailand the use of combine harvesters for paddy rice is increasing rapidly. Combine harvesters “combine” several operations into one: cutting, feeding into threshing mechanism, threshing, cleaning, and discharge of grain into a bulk wagon or directly into bags. Straw is usually discharged behind the combine in a windrow. 18 Harvesting Figure 20: Components of and crop flow in a combine harvester Most Combine harvesters consist of several major components: the cutting section, the thresher, components for separating the straw, a cleaner and a grain collection system. The cutting section usually consists of straw lifters for lifting especially lodged crop, a cutter bar for cutting the straw above the ground, a reel for feeding the cut crop into the conveying system and conveyors for transporting the crop to the threshing components. The thresher consists of one or more threshing cylinders and a concave. The threshing unit can be conventional but in most cases rice combines have axial-flow drums, which are better in handling wet straw and do not require straw walkers for separating the straw. A conventional combine has a set of straw walkers for separation of the grain from the straw because the crop passes the concave very quickly and a lot of threshed grains are therefore still contained in the straw. On the straw walkers the remaining grains are separated from the straw by gravity. All combines contain a cleaner in which chaff, immature grains and small straw particles are separated form the grains. The cleaner consists of a blower and several oscillating sieves. For grain collection the combine either has a grain tank or is equipped with a grain bagging station. For transporting the grain and other fractions inside the combine and for unloading the grain tank there are several conveyors, which can be bucket elevators or screw conveyors. Generally only larger farms or stations will own a combine harvester, and smaller farms avail of the services of contractors. Successful use of combine harvester requires well-drained, leveled fields with a layout that minimizes the number of turns required in the field. Fuel consumption of a combine harvester is between 20-30 l diesel/ha. 19 Harvesting Tips for good combine harvesting Cutting height during combine harvesting is often higher than with other harvesting methods. The time interval for harvest by combine harvester is often narrow: too early harvesting will result in a high percentage of chalky kernels, and too late harvesting will result in high shattering losses. Operating speed of the threshing drum either too fast or too slow reduces profit. The optimum threshing drum speed depends on grain moisture content, volume of material entering the combine, weeds, etc. Fine tuning forward speed and header height is especially important to minimize field loss. 4.4 Grain Cleaning Grain cleaning after harvest is important as it removes unwanted materials from the grain. Clean grain has a higher value than grain that is contaminated with straws, chaff, weed seeds, soil, rubbish, and other non-grain materials. Grain cleaning will improve the storability of grain, reduce dockage at time of milling, and improve milling output and quality. Seed cleaning will reduce damage by disease, and improve yields. Winnowing: Lighter materials such as unfilled grains, chaff, weed seeds, and straw can be removed from the grain by using a blower, air fan, or by wind. Winnowing recovers only the heavier grains. Screening/Sifting: Smaller materials such as weed seeds, soil particles and stones can be removed by sieving the grain through a smaller sized screen (1.4mm or less sieve opening). Seed cleaning: Malformed, discolored, germinated, broken or moldy grains in seed lots can severely impact seed quality, viability and vigor. Visually inspect the seed prior to storage and consider removing these grains from the seed lot. Seed grading: For commercial seed processing, seed grains should have uniform size and weight. A variety of commercial equipment can be used to achieve uniformity in seed size and shape. These 20 Harvesting include gravity tables, rotary screens, indented cylinders, and length graders. Seed purity: Maintain seed purity by preventing mixing with other varieties and contamination with other species. Procedure for good winnowing • Place grain on a winnowing tray • Place a net or mat on the ground • Tilt the tray against the wind • Pour grain slowly at a height of about 1m • Wind will separate light from heavy grains • Recover only the heavier grains • Repeat the procedure, if needed • Use a fan or blower if there is insufficient wind. 21 Harvesting 5 Health and Safety Precautions during Harvesting This chapter provides some general health and safety guidelines for harvesting and threshing of rice. Practicing safety precautions will save lives, maintain health and prevent suffering. Manual harvesting When cutting crop with a sickle, always hold the stems with thumb pointing upwards, away from the sickle. Machine threshing 1. Become familiar with the machine before the first operation. Read the manual that came with the machine. 2. Never leave the thresher unattended while the engine is running. Keep children away from the machine. Keep hands and feet away from moving parts. 3. Do not fill the tank while the engine is running. 4. Keep all flammable materials (including dry straw) away from the engine. 5. Do not oil, grease, or adjust the machine during operation. Wait until all moving parts have stopped before servicing. 6. Do not wear loose fitting clothing that may be picked up by moving parts. 7. While operating, keep all shields and guards in place. 8. Never extend hands or feet into the feed opening of the thresher. 9. Never operate your machine in a closed shed or garage. Exhaust fumes are dangerous to your health. 10. Do not operate machine with loose peg-teeth, bolts and nuts. Loose peg-teeth may be ejected at high speeds, causing injury to operators and damage to the thresher. 11. Never remove accumulated straw inside the machine during operation. 12. Keep a first-aid kit at hand. 13. Tie up long hair to prevent entangling. 14. Do not wear neckties or other garments that may be wrapped into moving parts of the machine. 22 Harvesting Combine harvesting 1. Never attempt to lubricate, clean, adjust, or unplug harvesters when the machine or engine is running. 2. Review the manuals that came with the harvester. Understand the controls before operating. 3. Do not allow anyone to climb onto the machine while it is in motion. 4. Keep children at a safe distance from the machine. 5. Do not operate when very tired. Change operators during the day. 6. Always have a fire-extinguisher at hand on engine-operated equipment. 7. Ensure that the fuel system has no leaks. 8. While refueling, stop the engine and do not smoke. 9. When operating around machinery, wear work clothes that fit snugly. 23 Harvesting 6 Harvesting Costs Costs for harvesting paddy can make up a significant portion of the production costs of rice; therefore it is useful to evaluate harvesting costs. Costs of harvesting rice are often (but not always) estimated in terms of percent of grain output, as in the following examples • Vietnam: harvesting costs are 8% for manual collection by a crew and stationary thresher • Philippines: harvesting costs are 15% for cutting by sickle and use of trailer mounted thresher • China: harvesting costs are 6% by tractor-mounted combine harvester The table below shows an example of costs in 2004 of the three systems: manual harvesting (including cutting, threshing, cleaning); manual cutting + machine threshing/cleaning by own labor and machine, and manual cutting + machine threshing by contracted labor and machine. Please note that the table is an entirely fictitious example and that actual costs are location and time specific, meaning that they can vary by region and season. By using a spreadsheet you can estimate harvesting costs for your own situation. 24 Harvesting Manual cutting, threshing, cleaning Manual cutting and machine threshing by own labor + equipment Manual cutting, machine threshing by contracted labor + equipment 25 Man-days/ha 0 2 Man-days/ha 0 Labor for cleaning + bagging Labor rate 25 Mandays/ha 15 Mandays/ha 8 Man-days/ha $ 3 /day/person 1 Man-hours/ha $3 /day/person 0 0 Total labor requirement Total labor cost/ha 48 man-days $144 /ha 28 man-days $84/ha 0 0 0 0 0 0 $1,000.00 2000 hr 1 ton/hr 400 hr 0 0 0 0 0 0 0 $200.--/yr $900/yr $150.--/yr 0 0 0 0 $12.50/ha 0 0 0 0 0 0 0 12% $150 $/ton $72/ha $144/ha 5% $96.50 2% $72/ha 3% 4 ton/ha $30/ha $176/ha 29 % 4 ton/ha $12/ha $108.50 18 % 4 ton/ha $18/ha $90/ha 15 % 1. LABOR Labor for cutting and gathering Labor for threshing 2. EQUIPMENT Purchase price thresher Life of thresher Capacity thresher Use per year (100 ha @ 4 ton/ha) Capital cost/yr (excl interest) Fuel (3 L/hr; 0.75 $/ltr) Repair and Maintenance (15% of capital/yr) Total equipment cost/ha 3. CONTRACTING Cost per ha (% of grain) Value of grain (4 ton/ha) Total contracting cost/ha TOTAL Labor+equip+contr Estimated threshing and handling loss (% grain) Expected grain yield Costs of lost grain ($/ha) Total harvesting cost Total Harvesting costsequivalent in grain Combine harvesting In general, costs of owning equipment are dependent on how often the machine is used. When comparing costs of ownership with contract hiring, there is a “break-even” point (expressed in terms of tons, hectares or hours that the machine is used) above which ownership becomes more attractive than contract hiring. Besides direct costs, there are a number of other factors the farmer or station manager will have to consider when deciding whether to purchase or to contract hire machinery: 25 Harvesting Timeliness of operation Repair, maintenance Quality of work Cost Skills required for operation Finance requirements Ownership Machine is ready when needed Own repair and maintenance needed to reduce downtime Quality of operation is under control of farmer Can be lower if there is sufficient work on the farm Operational skills required Capital outlay + financing needed Contract hiring Contractor may not be available when needed No expertise needed for repair, maintenance Quality of operation in control of contractor Costs not dependent of amount of work No skills required at the farm No large capital outlay needed 26 Harvesting 7 Harvesting Loss Assessment Physical grain Losses during harvesting can be divided into various types, depending on the operation and the machinery used. Losses during harvesting/cutting: a. Shattering loss = premature shedding of mature grains from the panicle caused by birds, wind, rats, and handling operations. Certain rice varieties shatter more easily than others. b. Lodging loss = plants with mature grains in the panicles fall on the ground making the grains difficult to recover. c. Standing crop loss = standing plants with mature grains are left standing in the field after harvesting operations as a result of oversight, carelessness or haste. For most manual harvesting operations, shattering losses are of main concern. Lodging can be a severe problem in specific situations such as tall varieties, or high wind. Losses during threshing and cleaning: d. Separation loss or “blower loss” = mature grains that are mixed with straw or chaff during the cleaning operation. e. Scatter loss = mature grains that are scattered on the ground during the threshing and cleaning operation. f. Threshing loss or unseparated loss = mature grains that remain attached to the panicle in the straw after completion of the threshing operation. Note that a high threshing efficiency will lead to low threshing loss, and vice versa. 27 Harvesting Losses during crop and grain handling: g. Handling loss = mature grain lost during lifting, hauling, stacking, pouring, and bagging of crop and paddy grain Following are recommended procedures to evaluate shattering loss during manual harvest (a), and separation loss (d), scatter loss (e) and threshing loss (f). 7.1 Shattering Loss Assessment in Harvesting In the field, a number of random quadrants are chosen of 1-2 square meters surface area each. After the harvesting procedure, all grains that are lying on the ground within the quadrants are collected. Following collection, the collected grain should be carefully weighed. The loss can be expressed as kg/ha if total field surface area is known, or as % of total yield, if yield is known. Report all losses on same moisture content basis, usually 14% MC. 7.2 Separation Loss (Blower Loss or Cleaner Loss) Assessment During the threshing/cleaning operation, wrap the blower exhaust in netting that will collect all chaff, straws, and grains but does not obstruct the air flow. Collect the grain by cleaning the material, and drying down to 14% MC. Blower loss can be expressed as kg/ha if total field surface area is known, or as % of threshed grain, if thresher throughput is known. Report all losses on same moisture content basis, usually 14% MC. 7.3 Scatter Loss Assessment in Threshing Place the thresher or cleaner on a large plastic tarp. After the threshing/cleaning operation, gently remove the machine and collect all grain from the tarp. Scatter loss can be expressed as kg/ha if total field surface area is known, or as % of threshed/cleaned grain, if thresher/cleaner throughput is known. Report all losses on same moisture content basis, usually 14% MC. 7.4 Threshing Loss Assessment Place a large tarp at the straw output of the threshers which will capture all straw. After threshing for a certain amount of time, examine all the output and manually remove all mature grains from panicles, straw, and tarp. Thresher loss can be expressed as kg/ha if total field surface area is known, or as % of threshed grain, if thresher throughput is known. Report all losses on same moisture content basis, usually 14% MC. 28 Harvesting 8 Appendices Appendix 1: Moisture Content Determination of Grain Appendix 2: Power Thresher Operation and Maintenance Appendix 3: Troubleshooting of a Rice Thresher 29 Harvesting Appendix 1: Moisture Content Determination of Grain The key to post-production is correct timing of operations, and knowledge of the grain moisture content (MC). Target MC for key post-production operations are shown in the table below: Operation Harvesting Threshing Desired Moisture Content (MC) 20-25 % 20-25% for mechanical threshing <20 % for hand threshing Final moisture content is 14% or lower Drying Storage Primary losses Shattering if grain is too dry Incomplete threshing Grain damage and cracking/breakage Spoilage, fungal damage Discoloration Fungal, insect & rat damage Loss of vigor Loss of vigor Grain cracking and breakage Over milling <14% for grain storage <13% for seed storage <9% for long term seed preservation 14% Milling Calculating Moisture Content The amount of water in rice grain is represented by the moisture content of the grain. In post-harvest handling, grain moisture content is generally stated on a wet weight basis (wb). Moisture content calculations MCwb MCdb MCi MCf EMC mi mf MR = = = = = = = = Definitions: Moisture content wet basis Moisture content dry basis Initial moisture content, w.b. Final moisture content, w.b. Equilibrium moisture content Initial weight Final weight Moisture ratio From MCdb to MCwb MC wb = 100 ∗ MC db 100 + MC db Formulas [%] [%] [%] [%] [%] [g] [g] MC wb = MC db = mi − m f mi mi − m f mf ∗ 100 (1) ∗ 100 (2) From MCwb to MCdb MC db = (3) 100 ∗ MC wb 100 − MC wb (4) Weight loss during drying m f = mi ⋅ Example: 100 − MCi 100 − MC f [5] 1000 kg of paddy is harvested at 25% MC, and dried down to 14% MC final weight of grain = 1000* (100-25)/(100-14) = 872 kg of paddy at 14 % MC Moisture content of grain can be measured by using a drying oven, or by using a commercial moisture meter. 30 Harvesting Measuring MC with a drying oven: 1. Pre-heat the oven at 130°C; 2. Weigh three paddy samples of 10 grams each and place them inside the oven; 3. Remove the samples after approximately 16 hours, and obtain the final weight of each sample; 4. Compute the MC for each sample : MC = (10 - Final weight of dried sample in grams)*100/(10); 5. Compute the average MC of three samples. Figure 21: Oven for determination of moisture content Measuring MC by using a commercial moisture meter There are many different types of grain moisture meters. Make sure your meter is suitable for paddy grain. Consult the manual to find out the correct procedure for measurement. Following is the procedure for the Kett Rice Tester. IRRI does not endorse any particular brand or type of moisture meter. 1. Turn on the moisture meter and make sure that button indicating "paddy” is on. 2. Fill the tray of the moisture tester with paddy to the required level. 3. Turn the knob until the moisture reading is displayed. 4. Take measurements of 3 to 5 samples and compute the average MC 31 Harvesting Appendix 2: Power Thresher Operation and Maintenance Introduction Following are some general guidelines for the operation and maintenance of a thresher or cleaner. At all times, consult the user’s manual that came with your equipment. Also, review the safety/health precautions for harvesting and threshing in the Harvesting Reference manual. Before operating a thresher • • • • Position the thresher on a level area close to the crop stack to minimize handling and shattering losses. Spread a canvas underneath the thresher to collect spilled grain. Assemble the thresher if it was dismantled during transport. Position the thresher so that the straw is thrown with the direction of the wind to eliminate the blowing of straw, chaff, and dust back toward the operator and the threshed grain. • To prevent premature belt failure check each belt’s alignment and tension. Adjust the idler pulley on the blower/cylinder belt to correct tension. • Check pulley surfaces. Rough grooves must be smoothened with a fine file if nicked. Cracked pulleys should be replaced immediately. • Check all pegs on the threshing cylinder for tightness. Loose pegs will damage the machine and can be dangerous to the operators. • Examine the peg-teeth for wear. Worn pegs must be rotated 180 degrees or interchanged with those less worn. Badly worn pegs must be replaced or rebuilt by welding • Rotate the threshing cylinder manually at least five revolutions to ensure that there are no obstructions or interferences. • Make sure there are no loose or missing bolts and set screws. Tighten or replace as necessary. • Lubricate all bearings with good quality grease. The belt idler and oscillating screen eccentric bearings are lubricated for life, thus require no lubrication. Check engine oil and fuel levels. Follow the engine manufacturer’s recommendations. Start the engine and allow it to warm up. Feed the thresher with the crop to be threshed for performance checking. Increase cylinder speed if excessive amounts of unthreshed and unseparated grain are observed with • • 32 Harvesting the straw. Optimum threshing and cleaning is obtained with the proper threshing drum speeds (see Harvesting Reference Manual). Operating the thresher Three to four persons are needed for operation: One or two persons to load the feed tray, one operator who feeds the machine, one person for bagging. • Start the engine. • Load the feed tray with harvested crop with the panicle away from the operator, so it is fed panicle first into the thresher. Feed the crop at a uniform rate. Adjust the feed rate to match the condition of the material. Maintain maximum feeding rate without overloading the engine. • • • Adjust the cleaner to suit the threshing conditions. Adjust blower openings to ensure sufficient air flow needed for winnowing. Open slowly to provide more air for the cleaner until a small amount of mature grain flows over the wind-board. For threshing dry paddy less air is needed while for wet paddy a higher airflow is required. • • • Adjust the angle of the wind-board. For dry paddy, the wind-board should be set at its maximum inclination. For threshing wet paddy, the inclination of the wind-board must be reduced. To obtain extraclean paddy, set the wind-board at a low inclination and increase the air shutter opening. This process will blow more grain over the windboard, but this can be recovered by recycling the separated impurities through the thresher. Always use a stick to remove clinging straw from the oscillating screen to protect hands from possible injury. • Optimizing thresher operation • • Long straw: briefly hold the crop bundles at the feed opening for partial threshing. Longer cut material reduces machine output and may result in poor threshing and clogging of the machine. Short straw: Recycling the straw if necessary unthreshed loss is high. Panicle-harvested materials (cutting just above the flag leaf) may result in high unthreshed losses because the panicles move rapidly through the thresher without receiving sufficient threshing. 33 Harvesting • Hard to thresh varieties: Install stripper bars. The stripper bars prevent straw from wrapping around the cylinder and aid in threshing. Use of stripper bars reduces capacity and increases the amount of finely chopped straw that passes through the concave when threshing overly mature crops, thus they should be installed only when necessary • . • Wet or partially decomposed crop: Reduce feeding rate to avoid overloading. Ensures that the cleaning screen is kept free of clinging straw. Open the cylinder cover periodically to remove straw and chaff accumulation at the lower concave Important machine settings For minimum grain loss and maximum quality, always adjust the thresher correctly. For peg-tooth drums the drum tip speed should be about 12-16 m/sec. The drum speed in revolutions per minute depends on the drum diameter as it can be seen in the Table below. Higher speeds result in higher grain damage and de-hulled grains. Lower speeds increase the amount of non-threshed grain and result in grain loss. Lower speeds also decrease the throughput of the thresher. RPM 400 450 500 550 600 650 700 750 800 850 900 30 cm 6.3 7.07 7.85 8.64 9.42 10.21 11 11.8 12.6 13.4 14.14 Tip speed (m/s) for drum diameters of 40 cm 8.4 9.4 10.5 11.5 12.6 13.6 14.7 15.7 16.8 17.8 18.85 50 cm 10.42 11.78 13.09 14.4 15.7 17.02 18.3 19.64 21 22.25 23.6 Clearances between peg-teeth and concave should be about 25mm. Smaller clearance increases grain damage and might lead to clogging of straw. Larger concave clearances reduce threshing efficiency. Maintenance and service • • • Lubricate cylinder and fan bearings with a good-quality general purpose grease every 25 hours of operation. Periodically apply a small amount of oil to all hinge points. Inspect the machine regularly for loose, worn, or damaged peg-teeth, concave bars, cylinder, discharge paddles and other parts, and tighten, repair, or replace them immediately. Missing bolts or nuts must also be replaced. Reduce belt tensions by loosening the idler pulley and engine mounting bolts when the machine will not be used for an extended period to minimize deterioration. 34 Harvesting • • Check engine crankcase oil level at least every 4 operating hours and follow the engine manufacturer’s recommendations for oil change intervals and oil grade. Be sure the recommended oil level is maintained. Service the air cleaner, fuel filter, fuel line, carburetor, and spark plug regularly according to engine manufacturer’s instructions. Storage of a thresher • • • • • • Clean the machine thoroughly. Remove belts and store in a dry place. Paint parts that need repainting. Clean and apply oil to exposed metal surfaces to prevent rusting. Store the machine in a clean, dry location and cover to reduce damage from dust accumulation. Follow the manufacturer’s recommendations on engine storage. 35 Harvesting Appendix 3: Troubleshooting of a Rice Thresher Problem Poor threshing Cause Low cylinder speed Cylinder drive belt slipping Worn pegteeth Too much broken straw on oscillating screen Grain being blown over the wind-board Threshing cylinder stops Defective engine Hard threshing variety Over threshing High engine speed Low wind-board inclination Wide blower shutter opening High blower speed Overfeeding Loose or damaged belt Loose or damaged belt Loose or damaged pulley Abnormal metallic chattering sound Engine trouble Machine stalls Broken peg-teeth or loose strawthrower bolts Refer to the engine manual Threshing cylinder clogged with straw Spark plug accidentally shorted with straw. Remedy Increase engine speed. For proper threshing drum speed see Table 1. If the pulley is warm immediately after stopping, the belt is slipping. Adjust belt tension. Rotate teeth half turn or build-up by welding or interchange or replace with new pegs. Service or replace engine. Use stripper bars. Remove stripper bars. If problem remains, remove some peg-teeth from cylinder. Reduce engine speed. Increase wind-board angle Reduce blower shutter opening. Reduce engine speed. Open cover and rotate cylinder in reverse by hand and remove clogged materials. (Warning: Ground engine spark plug). Check for damaged belt or idler defect. Change if necessary. Check for damaged belt or idler defect. Change if necessary. Check drive and driven pulley for defects, loose or lost screws. Inspect cylinder and remove any obstructions found. Remove clogged material after stopping engine. Reduce feed rate, especially when threshing wet paddy. Remove straw and make sure straw is being thrown in same direction as prevailing wind. 36 Harvesting Unless otherwise noted, the content of this course material is licensed under a Creative Commons Attribution – Non Commercial 3.0 License http://creativecommons.org/licenses/by-nc/3.0/ Copyright 2013, The International Rice Research institute You assume all responsibility for use and potential liability associated with any use of the course material. The course material may contain copyrighted content, and was developed for educational purposes only. Copyright holders of content included in this material should contact IRRI with any questions, corrections, or clarifications regarding the use of content. IRRI does not license the use of third party content included in this course material unless such a license is specifically granted in connection with particular content objects. Users of content are responsible for their compliance with applicable law. 37