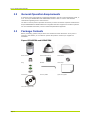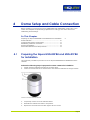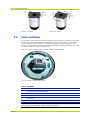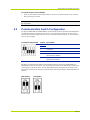
1
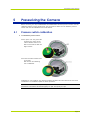
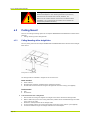
P R H Installation Manual Siqura HSD620PRH/621PRH Pressurized IP PTZ Camera with Day/Night, WDR Note: To ensure proper operation, please read this manual thoroughly before using the product and retain the information for future reference. Copyright © 2011 Siqura B.V. All rights reserved. Siqura HSD620PRH and HSD621PRH 1.0.0 Installation Manual v1.0 (113005-1) AIT5.4-MW07SP2 Nothing from this publication may be copied, translated, reproduced, and/or published by means of printing, photocopying, or by any other means without the prior written permission of Siqura. Siqura reserves the right to modify specifications stated in this manual. Brand names Any brand names mentioned in this manual are registered trademarks of their respective owners. Liability Siqura accepts no liability for claims from third parties arising from improper use other than that stated in this manual. Although considerable care has been taken to ensure a correct and suitably comprehensive description of all relevant components, the manual may nonetheless contain errors and inaccuracies. Should you detect any errors or inaccuracies in the manual, we would be grateful if you would inform us. This helps us to further improve our documentation. More information If you have any comments or queries concerning any aspect related to the product, please do not hesitate to contact: The Netherlands USA Corporate Headquarters Siqura B.V. Zuidelijk Halfrond 4 2801 DD Gouda, The Netherlands US Corporate Offices TKH Security Solutions USA, Inc. 12920 Cloverleaf Center Drive Germantown, Maryland 20874, USA General Fax E-mail WWW General Fax E-mail WWW : +31 182 592 333 : +31 182 592 123 : [email protected] : www.siqura.com : +1 301 444 2200 : +1 301 444 2299 : [email protected] : www.tkhsecurity-usa.com Contents 1 INTRODUCTION 1 2 SAFETY 3 2.1 2.2 2.3 3 SAFETY INFORMATION CAUTIONS REGULATIONS 3 4 5 PRODUCT DESCRIPTION 7 3.1 3.2 3.3 4 PRODUCT OVERVIEW GENERAL OPERATION REQUIREMENTS PACKAGE CONTENTS DOME SETUP AND CABLE CONNECTION 4.1 PREPARING THE SIQURA HSD620PRH AND HSD621PRH FOR INSTALLATION 4.2 SWITCH DEFINITION 4.3 COMMUNICATION SWITCH CONFIGURATION 4.4 ESTABLISHING A NETWORK CONNECTION 4.5 SYSTEM COMPATIBILITY 4.6 DOME CABLE DEFINITION AND REQUIREMENTS 4.6.1 Cable Requirements 4.6.2 Verifying Ethernet connectivity 4.6.3 Connecting, Aligning, and Mounting the Camera 5 PRESSURIZING THE CAMERA 5.1 5.2 6 PRESSURE SWITCH CALIBRATION PRESSURIZING DOME INSTALLATION 6.1 DOME DIMENSIONS 6.2 INSTALLATION SCENARIOS 6.3 CEILING MOUNT 6.3.1 Ceiling Mounting with a straight tube 6.4 WALL MOUNT 6.4.1 Mini wall mount 6.4.2 Wall mounting with gooseneck tube 6.4.3 Wall box mounting 6.5 CORNER MOUNT 6.6 POLE MOUNT 6.6.1 Pole thin/wide direct mounting 6.6.2 Pole thin/wide box mounting 7 APPENDIX A: CAMERA ACCESSORIES 7.1 7.2 8 MOUNTING ACCESSORIES SIQURA HSD620PRH AND HSD621PRH ACCESSORIES APPENDIX B: TECHNICAL SPECIFICATION 7 8 8 9 9 10 11 12 13 13 13 13 14 17 17 18 19 19 19 20 20 21 21 22 23 24 25 25 27 29 29 33 35 Page i C 1 h a p t e r 1 Introduction Document scope This manual applies to Siqura's pressurized IP PTZ dome cameras, the Siqura HSD620PRH and HSD621PRH. It describes how to install and connect the Siqura HSD620PRH and HSD621PRH cameras. Operation and configuration of the Siqura HSD620PRH and HSD621PRH cameras is covered in the user manual. Intended audience This manual is aimed at installers and technicians involved in the installation of network devices, such as the Siqura HSD620PRH and HSD621PRH. Assumed skills and know-how To work with the Siqura HSD620PRH and HSD621PRH camera, an installer or technician must have adequate knowledge and skills in the fields of: CCTV systems and components Electrical wiring and low-voltage electrical connections Ethernet network technologies and Internet Protocol (IP) Windows environments Web browsers Video, audio, data, and contact closure transmissions Video compression methods Specifications The information given in this manual was current when published. Siqura reserves the right to revise and improve its products. All specifications are subject to change without notice. Important information Before proceeding, please read and observe all instructions and warnings in this manual. Retain this manual with the original bill of sale for future reference and, if necessary, warranty service. When unpacking your product, check for missing or damaged items. If any item is missing, or if damage is evident, do not install or operate this product. Contact your supplier for assistance. Page 1 Siqura HSD620PRH/621PRH Typographical Conventions Before you start using this guide, it is important to understand the typographical conventions used in the documentation. The following kinds of formatting in the text identify special information. Page 2 Formatting convention Type of Information Numbered list Step-by-step procedures. You can follow these instructions to complete a specific task. Special Bold Items you must select, such as menu options, command buttons, or items in a list. Emphasis Used to emphasize the importance of a point or for variable expressions such as parameters. CAPITALS Names of keys on the keyboard. for example, SHIFT, CTRL, or ALT. KEY+KEY Key combinations for which the user must press and hold down one key and then press another, for example, CTRL+P, or ALT+F4. C 2 h a p t e r 2 Safety In This Chapter Safety Information ............................................................. 3 Cautions ........................................................................... 4 Regulations ....................................................................... 5 2.1 Safety Information Introduction The safety information contained in this section, and on other pages of this manual, must be observed whenever this unit is operated, serviced, or repaired. Failure to comply with any precaution, warning, or instruction noted in the manual is in violation of the standards of design, manufacture, and intended use of the module. Siqura assumes no liability for the customer's failure to comply with any of these safety requirements. Trained Personnel Installation, adjustment, maintenance, and repair of this equipment are to be performed by trained personnel aware of the hazards involved. For correct and safe use of the equipment and in order to keep the equipment in a safe condition, it is essential that both operating and servicing personnel follow standard safety procedures in addition to the safety precautions and warnings specified in this manual, and that this unit be installed in locations accessible to trained service personnel only. Safety Requirements The equipment described in this manual has been designed and tested according to the UL/IEC/EN 60950-1 safety requirements. Warning: If there is any doubt regarding the safety of the equipment, do not put it into operation. This might be the case when the equipment shows physical damage or is stressed beyond tolerable limits (for example, during storage and transportation). Important: Before opening the equipment, disconnect it from all power sources. The equipment must be powered by a SELV* power supply. This is equivalent to a Limited Power source (LPS, see UL/IEC/EN 60950-1 clause 2.5) or a "NEC Class 2" power supply. When this module is operated in extremely elevated temperature conditions, it is possible for internal and external metal surfaces to become extremely hot. * SELV: conforming to IEC 60950-1, <60VDC output, output voltage galvanically isolated from mains. All power supplies or power supply cabinets available from Siqura comply with these SELV requirements. Page 3 Siqura HSD620PRH/621PRH EMC The equipment has been tested and found to meet the CE-regulations relating to EMC, and complies with the limits for a Class B device, pursuant to Part 15 of the FCC rules. These limits are designed to provide reasonable protection against interference to radio communications in any installation. The equipment generates, uses, and can radiate radio frequency energy; improper use or special circumstances may cause interference to other equipment or a performance decrease due to interference radiated by other equipment. In such cases, the user will have to take appropriate measures to reduce such interactions between this and other equipment. Any interruption of the shielding inside or outside the equipment could make the equipment more prone to fail EMC requirements. Non-video signal lines must use appropriate shielded Cat 5 cabling (S-FTP), or at least an equivalent. Ensure that all electrically connected components are carefully earthed and protected against surges (high voltage transients caused by switching or lightning). ESD Electrostatic discharge (ESD) can damage or destroy electronic components. Proper precautions should be taken against ESD when opening the equipment. 2.2 Cautions Handle the camera carefully. Do not abuse the camera. Avoid striking, shaking, etc. as the camera can be damaged by improper handling or storage. Install electrical wiring carefully. Ask a qualified electrician to perform the wiring for the installation. Please note that input electricity to the unit is at a tolerance of 24VAC 50/60 Hz ± 10%. Ground the camera appropriately to prevent electric shock or damage. Power input: 3-pin terminal block Do not disassemble the camera. To prevent electric shock, do not remove screws or covers. There are no user serviceable parts inside. Please consult technical support if a camera is suspected of malfunctioning. Do not operate the camera beyond the specified temperature, humidity, and power source ratings Use the indoor camera under conditions where the temperature is between 0°C~40°C (32°F~104°F). Do not use strong or abrasive detergents when cleaning the camera. Use a dry cloth to clean the camera when it is dirty. If the dirt is hard to remove, use a mild detergent and wipe gently. To clean the lens, use lens tissue or a cotton tipped applicator and ethanol. DO NOT clean the lens with strong detergents. Page 4 Safety Never face the camera towards the sun. Do not aim the camera at bright objects. Whether the camera is in use or not, never aim it at the sun or other extremely bright objects, as this can damage the camera. 2.3 Regulations This device complies with Part 15 of the FCC Rules. Operation is subject to the following conditions. This device may not cause harmful interference. This device must accept any interference received, including interference that may cause undesired operation. This symbol on the product or on its packaging indicates that this product shall not be treated as household waste in accordance with Directive 2002/96/EC. Instead it shall be handed over to the applicable collection point for the recycling of electrical and electronic equipment. By proper waste handling of this product you ensure that it has no negative consequences for the environment and human health, which could otherwise be caused if this product is thrown into the garbage bin. The recycling of materials will help to conserve natural resources. For more information on how to recycle this product, please contact your local city office, your household waste disposal service or the seller of the product. Compliance is evidenced by written declaration from our suppliers, assuring that any potential trace contamination levels of restricted substances are below the maximum level set by EU Directive 2002/95/EC, or are exempted due to their application. Page 5 C 3 h a p t e r 3 Product Description The Siqura HSD620PRH and HSD621PRH high-speed pressurized IP dome cameras are designed to deliver superb performance and durability with a pressurized housing. Pressurization eliminates the effects of moisture, dirt, and pollution on valuable camera equipment. This manual covers the installation of both the Siqura HSD620PRH and HSD621PRH IP cameras. In This Chapter Product Overview ............................................................... 7 General Operation Requirements ......................................... 8 Package Contents .............................................................. 8 3.1 Product Overview Siqura HSD620PRH Features Outdoor High Speed Network PTZ dome Quad stream support: Dual H.264, MPEG-2, MPEG-4 and MJPEG 26x optical zoom/12x digital zoom Day/Night with IR-cut filter Back Light Compensation Wide Dynamic Range 400°/second preset targeting 360° endless panning 256 presets/8 programmable cruises 3 alarm in Two-way audio 24 privacy masks Pressurized to 7psi; able to hold pressure for up to 1 year Low pressure sensor, Shrader and pressure relief valves standard IP 67 ingress protection Siqura HSD621PRH Features Quad stream support Dual H.264, MPEG-2, MPEG-4 and MJPEG 35x optical zoom/12x digital zoom Day/Night with IR-cut filter Wide Dynamic Range Back Light Compensation Electronic Image Stabilization 400°/second preset targeting 360° endless panning 256 presets/8 programmable cruises 3 alarm in Two-way audio 8 privacy masks Page 7 Siqura HSD620PRH/621PRH 3.2 General Operation Requirements A minimum of one control device is required for operation, such as a control keyboard, a DVR, or a PC. The Siqura HSD620PRH and HSD621PRH contains a built-in receiver that decodes commands originating from a control device. The built-in Pelco D protocol provides connectivity to other surveillance systems and allows the Siqura HSD620PRH and HSD621PRH to be integrated with other suppliers' surveillance systems. For more detailed information, see the Technical Specifications appendix. 3.3 Package Contents Before proceeding, please verify that the box contains the items listed here. If any item is missing or has defects, do not install or operate the product. Contact your supplier for assistance. Siqura HSD620PRH and HSD621PRH Dome camera Pressurized housing Dome cover Ring Bracket Teflon tape Connectors Security TORX Quick start guide CD containing manuals Page 8 C 4 h a p t e r 4 Dome Setup and Cable Connection Before installing or connecting the Siqura HSD620PRH and HSD621PRH, please refer to this section and complete the preliminary preparations for setting up the dome camera and establishing switch settings. In This Chapter Preparing the Siqura HSD620PRH and HSD621PRH for Installation Switch Definition ................................................................ 10 Communication Switch Configuration .................................... 11 Establishing a Network Connection ....................................... 12 System Compatibility.......................................................... 13 Dome Cable Definition and Requirements .............................. 13 4.1 9 Preparing the Siqura HSD620PRH and HSD621PRH for Installation This preliminary installation procedure is for the Siqura HSD620PRH and HSD621PRH dome cameras. Perform the following steps to prepare the dome camera for installation 1. Unpack the dome package and take out the dome body. 2. Loosen the screws that secure the bracket to the camera as indicated in the figure below. Camera unit before bracket attached 3. 4. 5. Temporarily remove the screw indicated below. Assemble the bracket and rotate it into position. Replace the removed screw and then tighten all four screws. Page 9 Siqura HSD620PRH/621PRH Removing the bracket 4.2 Replacing the bracket Switch Definition It is necessary that the dome ID and communication protocol remain in the default modes when connecting the Siqura HSD620PRH and HSD621PRH cameras to other devices. The switches used for configuring these settings are located on the bottom of the dome camera. These settings are preset to operate the camera with the IP hardware. Changing the settings may make the camera inoperative using the IP connection. Refer to the figure and table below for switch location and definitions. Siqura HSD620PRH and HSD621PRH switches Switch Definition A Communication switch B ISP connector (for firmware upgrades) C RJ-45/SFP connector D SD card slot E Reset buttons F 22-pin connector Note: Switch E has two buttons. Only the button closest to the 22-pin connector is used to restore factory server defaults. The other button is reserved. Page 10 Dome Setup and Cable Connection To restore factory server defaults Power up the camera while holding button E. Continue to hold the button for 30 seconds after powering the camera. Note: The dome control protocol is set to Pelco-D. Do not change the dome control switches on the IP cameras. 4.3 Communication Switch Configuration The Siqura HSD620PRH and HSD621PRH's communication switch is specified in the table below. The default settings are depicted in the figure. You are advised to verify the accuracy of the communication switch configuration but do not change the default settings, or some functions may not work properly. Communication Switch Switch Description 1 RS-485 2 3 Termination 4 Line lock 5 System initialization. Switch 5 is mainly used to restore the camera's factory defaults. 6 Camera upgrade. Users must reset switch 6 after firmware upgrades are carried out. RS-485 is the interface that enables communication between the Siqura HSD620PRH and HSD621PRH and its control device. This means that the camera's RS-485 setup and that of the control device must be the same. The RS-485 default setting is half-duplex, as shown in the figure below. Please do not change the default setting without consulting a qualified specialist or supplier. Half duplex Full duplex RJ-485 settings Page 11 Siqura HSD620PRH/621PRH 4.4 Establishing a Network Connection To open communication with the Siqura HSD620PRH and HSD621PRH from a host PC and change the unit's network settings, perform the following steps. Step 1: Set the PC's network adapter to the unit's factory default subnet and connect the two devices. Step 2: Access the unit from a web browser or other tool installed on the PC. Step 3: Set the unit's IP address and subnet mask to the subnet it will be used in and reboot the unit. To address the unit from the same PC again, configure the PC's network adapter once more to assign the PC to the same subnet as the unit. Step 1: Setting the host PC to the factory default subnet of the unit To configure the network adapter on the host PC 1. In the Control Panel, open Network Connections. 2. 3. 4. 5. 6. Right-click the connection to be configured, and select Properties. In the items list, select Internet Protocol (TCP/IP). Click Properties. In the Internet Protocol (TCP/IP) Properties dialog, click Use the following IP address. Enter an IP address that will assign your PC to the same subnet as the unit (i.e., within the 10.x.x.x range). Use 255.0.0.0 as a subnet mask. Important: To prevent conflicts, be sure to choose a unique IP address. No two devices on a network can have the same IP address. 7. To apply the new settings, click OK, and then click Close. Opening IP settings on the host PC Changing host PC IP settings to the factory-default settings of the unit At this point, connect your PC to the Siqura HSD620PRH and HSD621PRH. You can connect them directly using a crossover cable, or connect both to a switch. Page 12 Dome Setup and Cable Connection Step 2: Accessing the unit Using a standard web browser you can now log on to the Siqura HSD620PRH and HSD621PRH's internal web server. Step 3: Changing the unit's network settings The Network web page enables you to make the unit's network addressing compatible with the network it will be hooked into. You can set a fixed IP address or have the IP address assigned by a DHCP server. In the latter case, open the Advanced Settings and enable DHCP. Do not forget to save and reboot the unit after changing the settings. 4.5 System Compatibility To ensure system compatibility, download the latest firmware from Support > Software on the Siqura web site at http://www.siqura.com/. Registration is required. 4.6 Dome Cable Definition and Requirements For operation, the Siqura HSD620PRH and HSD621PRH cameras require either an Ethernet cable or an appropriate fiber optic cable to carry the signals to a remote viewing site and a cable to power the dome. 4.6.1 Cable Requirements For operation, the camera requires a video and cable harness, as described below. A cable to provide a 24 VAC power supply to the dome. A Cat-5 Ethernet cable. Optional cable for alarms. Important: Ensure the power supply corresponds with the dome's power requirement, or damage will occur. If any mistake happens, contact a qualified technician. 4.6.2 Verifying Ethernet connectivity Refer to the following figure to determine whether you have established an Ethernet connection. Ethernet socket LEDs green/yellow Green on/off : 100/10 Mbit Yellow on/blink Yellow off/flash Page 13 Siqura HSD620PRH/621PRH 4.6.3 Connecting, Aligning, and Mounting the Camera Once you have configured the protocol and network switches, connect the main cable to the base of the camera and make the appropriate connections. To align mount the pressurized camera: 1. Attach the cable harness to the camera Attaching cable to the pressurized camera 2. Secure the camera to the housing Securing the camera to the housing Page 14 Dome Setup and Cable Connection 3. Attach the dome to the housing Align the dome 4. Secure the dome Connect the cable as follows: IP connection configuration Page 15 Siqura HSD620PRH/621PRH Cable connection in a mini wall mount Page 16 Pressurizing the Camera 5 Pressurizing the Camera Before mounting, the Siqura HSD620PRH and HSD621PRH camera's pressure sensor must be calibrated and the housing pressurized. The Low Pressure alarm uses an absolute pressure sensor and must be calibrated to the local altitude. 5.1 Pressure switch calibration To calibrate the pressure sensor. Power up the unit. The green LED located in the center of the camera bracket will turn on. After 30 seconds the LED will begin to blink. Press the red button located next to the LED. LED will turn off indicating unit is calibrated. Calibration is now complete. The camera will store this base value and should not need to be recalibrated. To recalibrate repeat the above procedure. Note: Alarm sensor contact is open when pressurized and closed when the enclosure is not pressurized. The Sensor will activate (open) at .5psi. and (close) at 1 psi. Page 17 Siqura HSD620PRH/621PRH 5.2 Pressurizing To pressurize the Siqura HSD620PRH and HSD621PRH camera Set the gauge or regulator from 10 to 20psi (.7 to 1.4bar). Place the air chuck on the tank valve and begin filling until pressure relief valve opens. Open the relief valve. Drain all air from the housing and 3 times to remove all moisture. After purging check the housing pressure. It should be around 5psi (.34bar). Page 18 C 6 h a p t e r 5 Dome Installation Based on the installation environment, the Siqura HSD620PRH and HSD621PRH cameras can be installed using a ceiling, wall, corner, or pole mount. In the following sections, various installation methods and installation procedures are described in detail. In This Chapter Dome Dimensions .............................................................. 19 Installation Scenarios ......................................................... 19 Ceiling Mount .................................................................... 20 Wall Mount ........................................................................ 21 Corner Mount .................................................................... 24 Pole Mount ........................................................................ 25 6.1 Dome Dimensions The Siqura HSD620PRH and HSD621PRH dome dimensions are 366 x 285 x Ø285 mm (14.4 x 11.2 x Ø11.2 in). 6.2 Installation Scenarios Choose your installation scenario from the list below for complete instructions for performing that installation. Important: Whatever your scenario, always use the safety line when attaching the dome. Ceiling mounts Ceiling mounting with a straight tube Wall mounts Mini wall mount Wall mounting with gooseneck tube Wall box mounting Corner mounts Corner Mount Pole mounts Pole thin/wide direct mounting Pole thin/wide box mounting For descriptions of the various accessories required for each installation, see Appendix A: Camera Accessories. Note: Some illustrations in this section use the term "plane washer". This is also known as a flat washer. Page 19 Siqura HSD620PRH/621PRH Warning: Fully torque down the mounting bolt that attaches the WM02 tube adapter to the mounting bracket to prevent any movement of the camera due to wind, vibration, etc. Make sure the camera cannot move at all in its bracket after installation. Any movement of the camera in its bracket can compromise positional accuracy. 6.3 Ceiling Mount There is one ceiling mounting option for the Siqura HSD620PRH and HSD621PRH outdoor dome cameras: Ceiling mounting with a straight tube 6.3.1 Ceiling Mounting with a straight tube The only ceiling mount for the Siqura HSD620PRH and HSD621PRH dome cameras is the straight tube mount. Ceiling Mount: straight tube The straight tube is available in lengths of 25 cm and 30 cm. Items needed 5. 6. 7. Dome camera Straight tube and other equipped items (optional accessory) Screws and screw anchors for fixing the straight tube onto the ceiling (not supplied) Tools needed 8. 9. To mount the dome with a straight tube 1. Ensure that the ceiling can support the weight of the dome camera and straight tube. 2. Make a cable entry hole in the ceiling. Otherwise, cables can be threaded through the cable entry hole on the tube. Attach the waterproof boot to the straight tube. Fix the straight tube to the ceiling with proper screws and screw anchors (not supplied). Thread the cables through the straight tube and the tube adaptor. 3. 4. 5. Page 20 Drill Screwdriver Dome Installation Note: After threading the cables, block the cable entry hole with the supplied sponge(s) to prevent insects from entering the tube. 6. 7. 6.4 Fix the outdoor tube adaptor to the straight tube with the supplied screws and washers. Then adjust the waterproof boot to the junction of the straight tube and the outdoor tube adaptor. Connect the cables to the dome camera. Then attach the dome to the outdoor tube adaptor and fix them with the supplied screw. Wall Mount There are three types of wall mounts for the Siqura HSD620PRH and HSD621PRH dome camera. 6.4.1 Mounting with a mini wall mount, as shown in the section Mini wall mount. Mounting with a gooseneck tube, as shown in the section Wall mounting with gooseneck tube. Mounting with a wall box, as shown in the section Wall box mounting. Mini wall mount Items Needed Dome camera Mini wall mount and other equipped items (optional accessory) Screws and screw anchors (not supplied) Indoor tube adaptor for the Siqura HSD620PRH and HSD621PRH (optional accessory) Waterproof boot (supplied with the indoor tube adaptor) Tools Needed Drill Screwdriver To mount the dome with the mini wall mount 1. Make a cable entry hole in the wall to recess the cables. Otherwise, cables can be threaded through the cable entry hole on the mount. 2. Thread the cables through the mini wall mount and out through either the cable entry hole in the wall or the hole in the mini wall mount. Fix the wall mount to the wall with proper screws and screw anchors. Attach the waterproof boot to the mini wall mount. Thread the cables through the tube adaptor and lock it to the mini wall mount with the supplied screws and washers. 3. 4. 5. At this point, the dome can be suspended from the mini wall mount using the safety wire. 6. Block the mount's cable entry hole. If the cable is threaded into the wall, block the hole in the mount with the supplied plate. If the cable is threaded through the neck of the wall mount, block the cable entry hole with the supplied sponge(s) to prevent insects from entering the tube. 7. 8. 9. Attach the lock screw plate to the dome plate with the supplied screw, as depicted in the section Ceiling mounting with a straight tube. Adjust the waterproof boot to the junction of the mini wall mount and the indoor tube adaptor. Connect the cables to the dome camera. Then attach the dome to the indoor tube adaptor and fasten them together with the supplied screw. Page 21 Siqura HSD620PRH/621PRH Mini wall mount 6.4.2 Mini wall mount with secured cable entry plate Wall mounting with gooseneck tube The following figure shows how cables run through the tube. Gooseneck with recessed (left) and exposed (right) cabling Items Needed Dome camera Gooseneck tube and other equipped items (optional accessory) Waterproof boot (standard accessory with the indoor tube adaptor) Screws and screw anchors (not supplied) Indoor tube adaptor for the Siqura HSD620PRH and HSD621PRH (optional accessory) Tools Needed Drill Screwdriver To mount the dome with the gooseneck tube 1. Make a cable entry hole in the wall to recess the cables. Otherwise, cables can be threaded through the cable entry hole on the mount. 2. Thread the cables through the mini wall mount and out through either the cable entry hole in the wall or the hole in the mini wall mount. Fix the gooseneck tube to the wall with proper screws and screw anchors. Attach the waterproof boot to the gooseneck tube. Thread the cables through the gooseneck tube and the tube adaptor and lock it to the mini wall mount with the supplied screws and washers. 3. 4. 5. At this point, the dome can be suspended from the mini wall mount using the safety wire. Page 22 Dome Installation 6. 7. 8. 9. Block the mount's cable entry hole with the supplied sponge(s) to prevent insects from entering the tube. Attach the lock screw plate to the back of the dome with supplied screw, as depicted in the section Ceiling mounting with a straight tube. Adjust the waterproof boot to the junction of the gooseneck tube and the tube adaptor. Connect the cables to the dome camera, attach the dome to the indoor tube adaptor, and fasten them together with the supplied screw. Wall mounting: gooseneck tube + indoor tube adaptor + waterproof boot 6.4.3 Wall box mounting Items Needed Dome camera Wall box mount and other equipped items (optional accessory) Gooseneck tube (optional accessory) Screws and screw anchors (not supplied) Indoor tube adaptor for the Siqura HSD620PRH and HSD621PRH (optional accessory) Waterproof boot (supplied with the indoor tube adaptor) Tools Needed Drill Screwdriver To mount the dome with the gooseneck tube and wall box 1. Fix the wall box to the wall with proper screws and screw anchors. 2. 3. 4. Fasten the gooseneck tube to the wall box with the supplied screws and washers. Attach the waterproof boot to the gooseneck tube. Thread the cables through the gooseneck tube and the tube adaptor. After threading the cables, block the cable entry hole with the supplied sponge(s) to prevent insects from entering the tube. 5. 6. Attach the lock screw plate to the back of the dome with the supplied screw, as depicted in the section Ceiling mounting with a straight tube. Adjust the waterproof boot to the junction of the gooseneck tube and the indoor tube adaptor. Page 23 Siqura HSD620PRH/621PRH Connect the cables to the dome camera. Then attach the dome to the indoor tube adaptor and fasten them together with the supplied screw. Wall box mounting: wall box mount + gooseneck tube + waterproof boot + indoor tube adaptor 6.5 Corner Mount With the corner standard mounting plate and gooseneck tube/mini wall mount, the Siqura HSD620PRH and HSD621PRH can be mounted onto the corner or a wall. Items Needed Dome camera Gooseneck tube/mini wall mount and other equipped items (optional accessory) Corner standard mounting plate (optional accessory) Indoor tube adaptor for the Siqura HSD620PRH and HSD621PRH (optional accessory) Waterproof boot (supplied with the indoor tube adaptor) Screws and screw anchors for fixing the corner standard mounting plate (not supplied) Tools Needed To mount the dome camera with the corner standard mounting plate and gooseneck tube/mini wall mount 1. Make a cable entry hole on the wall to recess the cables. Otherwise, cables can be threaded through the cable entry hole on the tube. 2. Fix the corner standard mounting plate on a corner with the proper screws and screw anchors. Attach the gooseneck tube/mini wall mount to the fixed mounting plate with the supplied screws and washers. Attach the waterproof boot to the gooseneck tube/mini wall mount. Attach the indoor tube adaptor to the gooseneck tube/mini wall mount. 3. 4. 5. Page 24 Drill Screwdriver Dome Installation 6. Thread the cables through the gooseneck tube/mini wall mount and the indoor tube adaptor. Note: After threading the cables, block the cable entry hole with the supplied sponge(s) to prevent insects from entering the tube. 7. 8. 9. Attach the fixing plate to the back of the dome with the supplied screw. Adjust the waterproof boot to the junction of the gooseneck tube and the indoor tube adaptor. Connect the cables to the dome camera. Then attach the dome to the indoor tube adaptor and fasten them together with the supplied screw. Corner wall mounting: corner standard mounting plate + gooseneck tube/mini wall mount + indoor tube adaptor + waterproof boot 6.6 Pole Mount There are two ways to mount the Siqura HSD620PRH and HSD621PRH cameras on a pole: 6.6.1 Using a thin/wide direct mount as described in the section Pole thin/wide direct mounting. Using a thin/wide box mount as described in the section Pole thin/wide box mounting. Pole thin/wide direct mounting The dome can be installed to a pole with a thin/wide direct mounting accessory and a gooseneck tube. Page 25 Siqura HSD620PRH/621PRH Items Needed Dome camera Gooseneck tube and other equipped items (optional accessory) Indoor tube adaptor for the Siqura HSD620PRH and HSD621PRH (optional accessory) Waterproof boot (supplied with the indoor tube adaptor) Pole thin direct mounting (optional accessory) Stainless steel straps (optional accessory) Tools Needed Stainless strap cutter (optional accessory) Screwdriver To mount the dome camera with the pole thin direct mounting and gooseneck 1. Fasten the pole thin direct mounting to a pole with the supplied stainless steel straps. 2. 3. 4. Fix the gooseneck tube to the pole direct mounting with the supplied screws and washers. Attach the waterproof boot to the gooseneck tube. Thread the cables through the gooseneck tube and the tube adaptor. After threading the cables, block the cable entry hole with the supplied sponge(s) to prevent insects from entering the tube. 5. 6. 7. Attach the lock screw plate to the back of the dome with the supplied screw, as depicted in the section Ceiling mounting with a straight tube. Adjust the waterproof boot to the junction of the gooseneck tube and the indoor tube adaptor. Connect the cables to the dome camera. Then attach the dome to the tube adaptor and fasten them together with the supplied screw. Pole direct mounting: pole thin direct mounting + gooseneck tube + indoor tube adaptor + waterproof boot Page 26 Dome Installation 6.6.2 Pole thin/wide box mounting Items Needed Dome camera Gooseneck tube and other equipped items (optional accessory) Indoor tube adaptor for the Siqura HSD620PRH and HSD621PRH (optional accessory) Waterproof boot (supplied with the indoor tube adaptor) Pole wide box (optional accessory) Stainless steel straps (optional accessory) Tools Needed Stainless strap cutter Screwdriver To mount the dome camera with the pole box and gooseneck tube 1. Fasten the pole wide box on a pole with equipped stainless steel straps. 2. 3. 4. Fix the gooseneck tube to the pole box with the supplied screws and washers. Attach the waterproof boot to the gooseneck tube. Thread the cables through the gooseneck tube and the tube adaptor. Note: After threading the cables, block the cable entry hole with the supplied sponge(s) to prevent insects from entering the tube. 5. Attach the lock screw plate to the back of the dome with the supplied screw, as depicted in the section Ceiling mounting with a straight tube. Adjust the waterproof boot to the junction of the gooseneck tube and the tube adaptor. Connect the cables to the dome camera, attach the dome to the tube adaptor, and fasten them together with the supplied screw. 6. 7. Pole box mounting: pole wide box + gooseneck tube + indoor tube adaptor + waterproof boot Page 27 C 7 h a p t e r 6 Appendix A: Camera Accessories Before installing the camera, compare your accessories to those listed in this section and ensure that you have all the parts you need for your installation. Important: If anything is missing, do not install the dome. Contact your supplier for assistance. In This Chapter Mounting Accessories ......................................................... 29 Siqura HSD620PRH and HSD621PRH Accessories ................... 33 7.1 Mounting Accessories All mounting accessories are optional. To secure the camera to the tube or wall mount, all tube mounts and the mini wall mount are supplied with the following. Cup washer (1) 8mm spring washer (1) 8mm rubber gasket (1) M8*12 screw (1) Waterproof boot (1) WM03A / Gooseneck Tube White Color; Iron, 298×385 mm (11.73×15.56 in.); 2.1 kg (4.6 lbs). (Gasket plate and cable gland for IP66 rated installations included) Page 29 Siqura HSD620PRH/621PRH WM01A / Mini Wall Mount White; 184×104×115.2 mm (7.24×4.09×4.54 in.); 0.6 kg (1.2 lbs). (Gasket plate and cable gland for IP66 rated installations included) PM05 / Swan-neck Mount White, Iron, Height: 250/500 mm (9.8/19.7 in.), Diameter: 50 mm (2 in.) 1 kg (2.2 lbs) / 1.8 kg (4 lbs). CM01 (250mm)/CM02 (500mm) / Straight Tube White, Iron, Height: 250/500 mm (9.8/19.7 in.), Diameter: 50 mm (2 in.) 1 kg (2.2 lbs) / 1.8 kg (4 lbs). Page 30 Appendix A: Camera Accessories WM05 / Corner Standard Mounting Plate White, 222×204×117 mm (8.7×8×4.6 in.); 2 kg (4.4 lbs); Supplied with 8mm washer ×4, spring washer×4, M8*16 screw×4, M8 nut×4. PM04 / Pole Wide Box White/Ivory, 270×166×155 mm (10.6×6.5×6.1 in.); 3.2 kg (7.1 lbs); Supplied with M8*16 screw×4, washer×4, spring washer×4, stainless steel straps×4. WM06 / Wall Box Mounting Ivory, 270(L)×166(W)×95(D) (10.6×6.5×3.7 in.); 2.2 kg (4.84 lbs); Supplied with M8*16 screw×4, washer×4, spring washer×4 Page 31 Siqura HSD620PRH/621PRH PM01 / Pole Thin Direct Mounting White/Ivory, 232×136×60 mm (9.1×5.4×2.4 in.); Diameter: 112~140 mm (4.4~5.5 in.); 0.7 kg (1.6 lbs); Supplied with stainless steel straps×4, M8*16 screw×4, washer×4. PM02 / Pole Wide Direct Mounting White/Ivory, 270×170×60 mm (10.6×6.7×2.4 in.); Diameter: 112~130 mm (4.4~5 in.); 1 kg (2.2 lbs); Supplied with stainless steel straps×4, M8*16 screw×4, washer×4. ST01 / Stainless Steel Straps For fixing Pole Direct Mounting/ Pole Box on the pole. Length: 700 mm (27.5 in.); Width: 0.63"; 0.02 kg (0.04 lbs) ST02 / Stainless Strap Cutter For tension, cut and crimp stainless steel straps. 1.4 kg (3.1 lbs) Suitable for straps width: 1/2", 5/8", 3/4" Page 32 Appendix A: Camera Accessories 7.2 Siqura HSD620PRH and HSD621PRH Accessories PA02 Power Adapter (optional) Input: 100~115VAC/Output: 24VAC 72VA (US) OR Input: 220~230VAC/Output: 24VAC 72VA (EU/UK) Note: When wiring, make sure the G/Y wire (Ground) is inserted into the mid-pin of the terminal block PA03 Power Adapter (optional) Input: 110~115VAC/Output: 24VAC 72VA (US) OR Input: 220~230VAC/Output: 24VAC 72VA (EU/UK) Note: When wiring, make sure the G/Y wire (Ground) is inserted into the mid-pin of the terminal block Page 33 C 8 h a p t e r 7 Appendix B: Technical Specification Item Siqura HSD620PRH Siqura HSD621PRH CAMERA Image Sensor 1/4" CCD Optical Zoom 26x 35x Digital Zoom Effective Pixels 12× NTSC 380k PAL 440k Horizontal Resolution Electronic Shutter 540 TVL 1~1/10 k s Synchronization Video Output Internal/Line Lock 1.0 Vpp/75Ω, RJ-45, SPF S/N Ratio Minimum Illumination Focal Length 1/30 k/s 1.0 Vpp/75Ω, BNC (gold-plated center pin) >50 dB (AGC off) 0.09 lux, 0.01 lux (B/W) 0.1 lux (color), 0.01 lux (B/W) 3.5 ~ 91 mm 3.4 ~ 119 mm Focus Mode Auto / Manual White Balance Auto / Manual Iris Control Auto / Manual AGC Control Auto / Manual Backlight Compensation On / Off VIDEO Number of video streams Frame rate Compression algorithm 2x H.264, 2x MPEG-4, MPEG-2, and/or MJPEG 1 to 30 fps H.264 BP (ISO/IEC H.264 BP (ISO/IEC 14496-10), MPEG-4 SP Layer 14496-10), MPEG-4 SP Layer 5 (ISO/IEC 14496-2), MJPEG 5 (ISO/IEC 14496-2), MPEG-2 (ISO/IEC 13818-2), MJPEG RESOLUTION Type of streaming Number of output streams Video Motion Detection Encoding latency GOP structure Frame rate UDP/IP (multi- and /or unicast), TCP/IP (RTP over RTSP) UDP/IP (multi- and /or unicast) Up to 20 Yes, user-defined masking <130 ms typ I, IP (selectable/ user profiles) 1 to 30 fps Page 35 Siqura HSD620PRH/621PRH Item Siqura HSD620PRH Siqura HSD621PRH Quad streaming D1@30fps H.264; +D1@30fps MPEG-4; +CIF@1fps MJPEG Output data rate Up to 20 Mb/s (CBR or VBR selectable/user profiles) Video settings User profiles, contrast, brightness, color saturation, hue, sharpness On Screen Display (OSD) 3x text lines (configurable: position, color, border/outline color, font size); 1x image in BMP, GIF, or JPEG format (configurable: position, scaling) OPERATION Built-in Protocol Pelco D Pan Travel 360° endless Tilt Travel -10°~190° Manual Speed 0.5° ~ 90°/s Presets 256 Preset Accuracy +/- 0.100° Preset Speed 400°/s Cruise 2 Sequence 8 Auto Pan 4 Privacy Mask 24 8 Black/White/Mosaic (3 levels) Proportional Pan & Tilt On/Off Resume after power loss Yes Zone Title Home Function 16 Preset, Sequence, Auto pan, Cruise Auto Flip Digital / Mechanical / Off FUNCTIONS Motion detection On/Off Day/Night: IR Cut Filter On/Off Digital slow shutter On/Off Stabilizer PTZ coordinate data N/A On/Off (5Hz/10Hz) Via API or Pelco-D (set/get) Directional OSD Compass direction, Azimuth, Elevation Wide Dynamic Range On/Off On/Off (Ratio/Shutter/Iris levels 0-128) CONTACTS Inputs Alarm Reaction 4 (3 general, 1 low pressure) Preset, Sequence, Auto pan, Cruise NETWORK Interface options Page 36 RJ-45 Appendix B: Technical Specification Item Siqura HSD620PRH Siqura HSD621PRH Protocol H.264, BP, MPEG-4 ES, RTP, UDP, IP, DHCP, IGMPv2, RTSP, (S)NTP, MX/IP, HTTP, SNMP v2, DiffServ, SAP, UPnP GENERAL Environment Operating Temperature Heater activation Ingress protection Regulatory Indoor/Outdoor Continuous -45°C to +50°C (-49°F to +122°F) 60° C. Max. N/A 15°C - 27°C (60°F - 80°F) IP67 CE, FCC, RoHS Housing Polycarbonate, glass-filled Bubble Clear, Polycarbonate 0.29cm (0.115 in) thick Dimension Weight 366 x 285 x Ø285 mm (14.4 x 11.2 x Ø11.2 in) 5 kg (11 lbs) POWER Power Power Consumption 24 VAC 80 W Note: Weight and dimensions are approximate. All specifications are subject to change without notice. Page 37