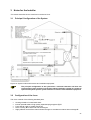
1
Device version:
LEFT
RIGHT
Please keep next to the MVHR unit!
focus (F) 200
Operating Instructions
Mechanical Ventilation Heat Recovery Unit
Status: 09.10
Components
suitable for
Passive
House
Dr. Wolfgang Feist
Paul Wärmerückgewinnung GmbH
August-Horch-Straße 7
08141 Reinsdorf
Germany
Tel.: +49(0)375 - 303505 - 0
Fax: +49(0)375 - 303505 - 55
Index
0
Preamble.................................................................................................................................... 3
1
Introduction............................................................................................................................... 3
1.1
CE Marking ................................................................................................................................. 3
1.2
1.2.1
1.2.2
1.2.3
Warranty and Liability ................................................................................................................. 4
General Information.................................................................................................................... 4
Warranty Terms.......................................................................................................................... 4
Liability........................................................................................................................................ 4
1.3
1.3.1
1.3.2
1.3.3
Safety.......................................................................................................................................... 4
Safety Instructions ...................................................................................................................... 4
Safety Appliances and Precautions............................................................................................ 5
Used Symbols ............................................................................................................................ 5
2
Notes for the User and the Installer........................................................................................ 5
2.1
2.1.1
2.1.2
2.1.3
2.1.4
2.1.5
2.1.6
2.1.7
Brief Description ......................................................................................................................... 5
Limitations of Use ....................................................................................................................... 5
Equipment Configuration ............................................................................................................ 5
Heat Exchanger.......................................................................................................................... 5
Fans............................................................................................................................................ 5
Filters .......................................................................................................................................... 6
Frost Protection .......................................................................................................................... 6
Common Operation with fireplaces ............................................................................................ 6
2.2
2.2.1
2.2.1.1
2.2.1.2
2.2.1.2.1
2.2.1.2.2
2.2.1.2.3
2.2.1.2.4
2.2.1.2.5
2.2.1.2.6
2.2.1.2.7
2.2.2
2.2.2.1
2.2.2.1.1
2.2.2.1.2
2.2.3
Available Control Units ............................................................................................................... 6
LED Control Panel...................................................................................................................... 6
Display of the Operation and Failure Conditions........................................................................ 7
Description of the Control Functions with the LED Control Panel.............................................. 8
Setup of the Operating Mode ..................................................................................................... 8
Fan Speeds ................................................................................................................................ 8
Boost ventilation Mode ............................................................................................................... 8
Filter Change .............................................................................................................................. 8
Configuration Mode for Joint Operation with a fire place ........................................................... 8
Configuration Mode Imbalance .................................................................................................. 9
Configuration of Frost Protection................................................................................................ 9
TFT Touchpanel ......................................................................................................................... 9
Description of the Operating Functions with the TFT Touchpanel ........................................... 10
Description of the Operating Functions of the Main Menu ....................................................... 10
Description of the Operating Functions of the Submenu ......................................................... 12
Boost ventilation switch ............................................................................................................ 17
2.3
2.3.1
2.3.1.1
2.3.2
Maintenance by the User.......................................................................................................... 17
Cleaning or Changing of the Filters.......................................................................................... 17
Changing of the Filters of the Device ....................................................................................... 17
What to Do in the Event of a Failure? ...................................................................................... 19
2.4
Proper Disposal ........................................................................................................................ 20
3
Notes for the Installer............................................................................................................. 21
3.1
Principal Configuration of the System ...................................................................................... 21
3.2
Configuration of the focus......................................................................................................... 21
3.3
Installation Requirements ......................................................................................................... 22
3.4
3.4.1
3.4.2
Installation of the focus............................................................................................................. 23
Transportation and Unpacking ................................................................................................. 23
Checking of the Scope of Delivery ........................................................................................... 23
3.5
Mounting of the focus ............................................................................................................... 23
1
3.5.1
3.5.2
3.5.3
3.5.4
3.5.5
3.5.5.1
3.5.5.2
Wall Mounting ........................................................................................................................... 23
Mounting on a Mounting Frame................................................................................................ 24
Connection of the Air Ducts ...................................................................................................... 25
Connection of the Condensate Drain ....................................................................................... 26
Electrical Connections .............................................................................................................. 27
Connection of the Adapter Board ............................................................................................. 27
Connection of the TFT Touchpanel .......................................................................................... 28
3.6
3.6.1
3.6.2
3.6.3
Commissioning of the focus ..................................................................................................... 28
Operational Readiness ............................................................................................................. 28
Adjustment of the Air Volume Flow .......................................................................................... 28
Adjustment of the Valves .......................................................................................................... 29
3.7
3.7.1
Menu Settings by the Installer / Service Staff........................................................................... 30
Setup Submenu ........................................................................................................................ 30
3.8
3.8.1
3.8.2
3.8.3
Maintenance and Repair by Qualified Personnel ..................................................................... 31
Inspection of the Condensate Drain ......................................................................................... 31
Cleaning of the Fans................................................................................................................. 32
Inspection and Cleaning of the Heat Exchanger ...................................................................... 32
3.9
Visualisation of Errors with the LED Control Panel .................................................................. 35
3.10
3.10.1
3.10.2
3.10.3
3.10.4
3.10.5
3.10.6
Visualisation of Errors with the TFT Touchpanel...................................................................... 35
Sensor Error of the Temperature Sensors T1…T4 .................................................................. 35
Threshold Error – Supply Air Temperature Too Low................................................................ 35
Threshold Error – Intake Air Temperature Too Low................................................................. 35
Fan Rotary Speed Error............................................................................................................ 36
Communication Error................................................................................................................ 36
Message – No External Release .............................................................................................. 36
Appendixes:
Appendix 1:
Circuit Diagram of the focus
Appendix 2:
Terminal Scheme of the Master Controller
Appendix 3:
Terminal Assignment of the Master Controller
Appendix 4:
Terminal Scheme of the Fan Slave Controller
Appendix 5:
Terminal Assignment of the Fan Slave Controller
Technical Data
Check List A Maintenance Works of the User
Check List B Maintenance Works of Qualified Personnel
Air Flow Report
Commissioning and Handover Certificate
EC Declaration of Conformity
2
0 Preamble
Thank you for deciding on the heat recovery unit focus 200.
The heat recovery unit focus 200 has been built according to the current state of the art and the
acknowledged rules on safety. The device is subject to permanent improvement and development.
Therefore, your device may differ slightly from the instructions.
In order to guarantee a safe, appropriate and economic operation of the heat recovery unit focus 200,
please observe and comply with all information and notes on safety in this operating manual.
Subject of this operating manual is the heat recovery unit focus 200 in different design variants. Possible
accessories are only described insofar as it is necessary for the appropriate operation. Please see the
particular manuals for further information on accessories.
The explanations in this operating manual are confined to the assembly, commissioning, operation,
maintenance and the repair of failures of the heat recovery unit focus 200 and are addressed to
appropriately trained personnel qualified for the particular work.
If you have any questions that have not been answered or have not been sufficiently answered in this
documentation, please contact the company PAUL Wärmerückgewinnung GmbH. We will be glad to help
you.
In addition to the general section, this manual consists of:
•
a section for the user and the installer;
•
a section especially for the installer.
PLEASE READ THIS MANUAL CAREFULLY BEFORE INASTALLATION AND COMMISSONING!
THIS MANUAL HAS BEEN MADE WITH GREATEST CARE.
HOWEVER, NO RIGHTS CAN BE DERIVED THEREFROM. WE RESERVE THE RIGHT AT ANY TIME
TO PARTIALLY OR ENTIRELY CHANGE THE CONTENT OF THIS MANUAL WITHOUT PRIOR
NOTICE.
1 Introduction
This section contains general information on the heat recovery unit focus 200.
1.1
CE Marking
The device is called focus 200, hereinafter referred to as the focus. Focus is a ventilation device with heat
recovery for a healthy, well-balanced and energy-saving ventilation of living spaces.
Figure 1: Identification plate of the focus
3
1.2
1.2.1
Warranty and Liability
General Information
Our “general terms and conditions“ apply for the focus in the currently valid version. The warranty is
aligned with the warranty terms of the manufacturer. This applies to mere replacement of the material and
does not include the services. They apply only in case of proof of the performed maintenance according
to our regulations by a skilled installer.
1.2.2
Warranty Terms
The warranty period for our MVHR devices is two years as of delivery from our factory. Warranty claims
can be asserted exclusively for material and/or construction defects, which occurred during the warranty
period. In the event of a warranty claim, the focus may not be demounted without prior permission of the
manufacturer in writing. The manufacturer grants the warranty for spare parts only when they were
installed by a skilled installer.
The warranty shall expire once/ when:
• the warranty period has elapsed;
• the device is operated without original PAUL filters;
• parts are installed which were not delivered by the manufacturer;
• the device is improperly used;
• the defects occur due to incorrect connection, improper use or soiling of the system;
• unauthorised changes or modifications on the plant are made.
1.2.3
Liability
The focus was developed and manufactured for use in so-called comfort ventilation systems. Any other
use is considered as “improper use” and can result in damages to the focus or in personal injuries, for
which the manufacturer cannot be made liable. The manufacturer is not liable for any damage, which is
due to the following causes:
• Non-observance of the notes on safety, operation and maintenance, stated in this manual;
• The installation was not performed according to the regulations;
• Mounting of the spare parts, which were not delivered and prescribed by the manufacturer;
• The defects occur due to incorrect connection, improper use or soiling of the system;
• The warranty period has elapsed;
• Normal wear.
1.3
1.3.1
Safety
Safety Instructions
Please always observe the safety instructions in this operating manual. The non-observance of the safety
instructions, warning notices, notes and instructions can lead to injuries or damages to the focus.
• Unless otherwise stated in this operating manual, only an authorised installer is entitled to install,
connect, put into operation and maintain the focus;
• The installation of the focus is to be performed according to the general local building, safety and
installation instructions of the corresponding local authorities, of the water works and electric
works and other official regulations and directives;
• Always follow the safety instructions, warning notices, notes and instructions described in this
operating manual;
• Please keep this manual during the complete life time of the focus in proximity to the device;
• The instructions for the regular replacement of the filters or the cleaning of the supply and exhaust
air valves are to be strictly followed;
• The specifications stated in this document may not be changed;
• Any modification of the focus is prohibited;
• In order to guarantee that the device will be regularly controlled, it is recommended to conclude a
maintenance contract. Your supplier can give you the addresses of authorised installers in your
area.
4
1.3.2
•
•
1.3.3
Safety Appliances and Precautions
The focus cannot be opened without tools;
It must be excluded that the fans can be contacted with the hand. Therefore, air ducts must be
connected to the focus. The minimum length of the pipelines is 900 mm.
Used Symbols
The following symbols are used in this manual:
Caution, special note!
Risk of:
- injury of the user or the installer
- damages to the device
- impairment of the operation of the device if the instructions are not
carried out properly
2 Notes for the User and the Installer
This section describes how to handle focus.
2.1
2.1.1
Brief Description
Limitations of Use
The device is applicable for the ventilation in the living and office area (with restrictions in the industrial
area) at air temperatures of -20°C to +40°C and normal air humidity. Any other type of use is considered
as use for purposes other than intended. It is especially prohibited to use the device for the exhaustion of
flammable and explosive gases. The installation is required in the frost-free area. For pre-heating of the
outside air (in winter), an applicable plant-specific frost protection equipment should be connected
upstream to the device.
2.1.2
Equipment Configuration
The focus is designed and manufactured for controlled home ventilation. The focus 200 in the standard
design has a patented reverse flow channel heat exchanger without moisture recovery. The device model
focus (F) 200 is equipped with a membrane moisture heat exchanger. The compact ventilation device is
designed for the wall fastening or on a mounting frame. The focus is delivered in the versions “RIGHT“ or
“LEFT“. The design type is specified at the identification plate on the device.
The housing consists of the coated sheet, the sidewalls in the colour anthracite, and the detachable hood
in aluminium white. The internal lining made of high-quality polypropylene provides the necessary
insulation and the device noise protection.
2.1.3
Heat Exchanger
The highly efficient reverse flow channel heat exchanger (German and European patent) made of plastic
is designed so that the exhaust air and supply air ducts are arranged in the chequer-board pattern and,
therefore, a duplication of the heat exchange surface can be achieved towards the plate heat
exchangers.
With the moisture heat exchanger also humidity is transmitted besides the heat due to the chemical and
physical properties of the heat exchanger membrane.
The air types that flow past each other are divided for both types of heat exchangers.
2.1.4
Fans
The focus includes two maintenance-free 230 VAC radial fans with the integrated power supply unit and
electronic commutation. The volume flow constant fans keep the air quantity at a constant speed for
each selected fan rotary speed. The air quantity is also not affected by soiled filters.
5
2.1.5
Filters
2 filters in Z design of the filter class G4 are installed in the device. They consist of a synthetic filter mat
in a polypropylene frame. A pollen filter of the filter class F7 can be used as supply air filter.
2.1.6
Frost Protection
The focus is equipped with automatic frost protection which prevents that the heat exchanger freezes at
very low outside air temperatures. The fans will be temporarily deactivated if the intake air temperature or
the supply air temperature of the device falls below the threshold value.
2.1.7
Common Operation with fireplaces
The installer has to comply with the corresponding standards and regulations in case of synchronous
operation with fireplaces, e.g. fireplace. The common operation of heat-producing appliances and
ventilation systems dependent on the indoor air requires a suitable safety device (differential pressure
switch) or a plant-specific device, when a dangerous negative pressure builds up in the installation room
of the heat-producing appliance during the operation. The focus is prepared for the common operation
with fireplaces.
2.2
Available Control Units
The focus can be equipped with the following control units:
• LED control panel
• TFT Touchpanel
• Boost ventilation switch
2.2.1
LED Control Panel
Key - supply air and extract air mode
Key – only extract air mode
Key – only supply air mode
Key – fan speed down
Key - fan speed up
Key - boost ventilation
Reset key – filter change period
Figure 2: Key assignment for LED control panel
6
2.2.1.1
Display of the Operation and Failure Conditions
Figure 3: LED-display of the LED control panel
Display
L1 ... L7 lamp display
L1 + L7 glow
L8
glow
L8
flashes
Function / Meaning
LED lamp display
no LED
= fan speed 0 (fan off, standby)
1 LED (L1)
= fan speed 1
2 LEDs (L1+L2) = fan speed 2
... etc.
7 LEDs (L1+…L7) = fan speed 7
L8 + L12 glow + L11 flashes
2x and then stays turned off
No external release: fan off
Supply air and extract air mode
Error (sensor or frost protection): fan off
Common error, the error number is displayed binary with the LEDs L1 to
L7, see
(Table 5 in chapter 3.9 Visualisation of Errors with the LED Control Panel)
Configuration mode for common operation with a fireplace
(Display only during the configuration phase)
L9
L10
L10
Boost ventilation mode
Pre-selected filter run-time has run out
Pre-selected filter run-time will run out in less than 10 days
L8 + L11 + L12 flash
glows
glows
flashes
L10 + L12 flashes
Configuration mode imbalance for the selected fan speed
(Display only during the configuration phase)
L11
L11
glows
flashes
Extract air mode
Extract air fan has failed: fan off
L11
briefly flashes 3x
Extract air mode deactivated (key “only extract air mode“ is blocked,
configuration for common operation with fireplace is active)
L12
L12
flashes
flashes
Supply air mode
Supply air fan has failed: fan off
Table 1: Assignment of functions of the LED displays
7
2.2.1.2
2.2.1.2.1
Description of the Control Functions with the LED Control Panel
Setup of the Operating Mode
The keys
,
,
permit to set up the operating mode. The active operating mode is
visualised by means of the respective LED of the operating mode key.
2.2.1.2.2
Fan Speeds
/
permit to select 7 fan speed. The current fan speed is displayed by means of a
The keys
LED lamp (L1 ... L7) up to selected speed inclusively.
2.2.1.2.3
Boost ventilation Mode
With the key
, the current ventilation mode is started with fan speed 7 for the duration of 15 minutes
in the operating mode supply air and extract air operation. After the time for boost ventilation has expired,
the control system activates the operating mode which has previously been preset. By means of the
actuation of another functional key, the boost ventilation mode can be terminated at any time. The
visualisation of the boost ventilation mode is realised by means of the flashing of the entire LED lamps
and the LED L9 of the key
.
2.2.1.2.4 Filter Change
For the cyclic checking of the filters, an operating hours counter is integrated in the control system. The
flashing LED L10 above the key
indicates that the remaining run-time of the filters has elapsed. In
case of a remaining run-time of the filters of less than 10 days, L10 briefly flashes at intervals of 3 sec.
After carried out filter check and filter change, if necessary, the run-time of the filters is reset by pressing
the key
2.2.1.2.5
for at least 3 sec. The LED L10 goes out.
Configuration Mode for Joint Operation with a fire place
and
for at least 3 sec, the key
and therewith
After the pressing of the key combination
also the operating mode „only extract air mode“ for the joint operation of the ventilation device with a fire
place is deactivated permanently. The modification is indicated by means of the LED’s L8+L11+L12,
whereas L8 and L12 are switched on and L11 flashes 2 times and then remains turned off. This indication
is only visible, if the key combination is held down. An actuation of the key
in the deactivated state
results in a short, 3fold flashing of the respective LED in order to indicate the suppressed condition.
and
for at least 3 sec results in the unlocking of
A repeated pressing of the key combination
the keys. The modification is again indicated by the LED’s L8+L11+L12, whereas L8 and L12 are
switched on and L11 flashes 2 times and then remains turned on. Also this indication is only visible, if the
key combination is held down. With this, the operating mode “only extract air mode” is enabled again.
Always push this button
first!
has to be deactivated permanently, if the ventilation device is
The button
operated by means of a fire place! The joint operation of the ventilation device and the
fire place makes heightened safety-related requirements necessary. For the
contemporaneous operation with fire place, there is an additional module for the
monitoring of the negative pressure with a switch-off function for the ventilation
device and/or the extractor hood with exhaust air connection.
8
2.2.1.2.6
Configuration Mode Imbalance
By pressing the key combination
and
for at least 3 sec, the configuration mode imbalance is
and
, the imbalance of the
activated, and the LED’s L10 and L12 are flashing. With the keys
fan speed which is active during the activation of the configuration mode can be adjusted in steps of 5%.
The adjustment of the imbalance of each fan speed is not effected separately, but in a combined manner
for groups of fan speeds: group fan speed <1+2>, group fan speed <3+4+5> and group fan speed <6+7>.
The LED’S L1 to L7 indicate the selected imbalance. The adjustable range is between -15 % (L1) and
+15 % (L7). In the central position (L4), the supply air fans and the exhaust air fans are running with the
same rotation speed. After the repeated actuation of the key combination
value is transferred and the configuration mode imbalance is closed.
Always push this button
and
, the adjusted
first!
2.2.1.2.7 Configuration of Frost Protection
The frost protection for devices with LED control panel complies with the frost protection mode “safe“ and
is configured in compliance with the type of the device. If the outside air temperature falls below < -0.5 °C
(type of device: focus 200) or < -7.5 °C (type of device: focus F 200), or if the supply air temperature falls
below < 4.5 °C (applies to both device types), the supply air fan and the exhaust air fan are switched off,
start again after one hour and run for 2 min. If one of the possible thresholds is still undershot after this,
the process is repeated.
2.2.2
TFT Touchpanel
Figure 4: TFT Touchpanel with stainless steel frame
The 3.5 inch TFT display of the Touchpanel comprises 320x240 pixels and can be operated by touching it
with the fingers (touch screen).
In the upper status line of the start screen, the time, the respective menu speed in the form of a headline,
as well as the remaining run-time of the filter, which is currently existent, are indicated. Directly below this
line, the eight basic functions of the ventilation device and the respective icons are represented in 2 lines.
On the left side of the footer, a help function is implemented, in the middle a so called short help text can
be found, and on the right side of the footer, a keypad lock is implemented.
9
2.2.2.1
Description of the Operating Functions with the TFT Touchpanel
2.2.2.1.1
Description of the Operating Functions of the Main Menu
Figure 5: Menu structure of the main menu
Figure 6: Start screen of the Touchpanel
Fan speed 1: Smallest permanent fan speed.
Fan speed 2: Intermediate permanent fan speed.
Fan speed 3: Biggest permanent fan speed.
10
Boost ventilation: The boost ventilation mode activates an automatic timing program, in which
the fan speed 3 is activated for a duration which can be preset (standard: 15 minutes). After this,
the device switches back to the previous ventilation state.
Un-occupied: When leaving the house, a reduced ventilation function can be adjusted by
activating the function “un-occupied“. When returning, a repeated actuation of the key switches
the ventilation device back to the previous ventilation state.
Automatic mode: The automatic mode describes a timing program which temporarily
deactivates the manual settings. Here, different fan speed (0, 1, 2 or 3) can be deposited for
each day of the week with a cancellation interval of 15 minutes. This “fan speed week profile”
can be individually configured and adjusted in the menu speed menu/settings.
Automatic sensor regulates the fans according to a linear characteristic curve which can be
preset in dependency on an analogue sensor indoor air quality sensor (also combined CO2,
humidity and temperature) which is connected to the master.
Menu: Via this key, the information, settings and setup menu is accessed.
Standby: With the standby function, the ventilation device is switched to an energy-saving
mode. The display turns dark, but the touch pad of the touch panel remains active in order to
“wake up“ the system. It is sufficient to simply touch the touch pad in order to terminate the
standby mode.
Enter: By means of the enter key, it is possible to navigate in the different submenus, and
changed data are transferred to the memory.
Termination/back: By means of the termination key, it is possible to change from one menu to
the next higher menu speed without transferring data which possibly have been changed.
Help: By means of the help key at the bottom left, it is possible to pass to a context-sensitive
help menu. If this key is grey, no help text is deposited.
Key button: If the key button is touched, the TFT touch pad is locked against touch, with the
exception of the area of this button. This function can be used for cleaning purposes. If the
button is pressed again and held down (approx. 2-3 sec), one passes back to the initial menu.
Calendar symbol: In the menu/settings/automatic timing, the calendar day or days for which
one wants to adjust the fan speeds can be selected by touching the calendar symbol. Just like in
the main menu, the fan speeds themselves are indicated in grey at the left margin, but at a
smaller scale. The fan speed to be adjusted is activated after being touched and can then be
transferred for the single ¼ hours by means of the enter key.
Error signal: A flashing yellow warning triangle at the right upper margin indicates an error.
Under menu/information/error indication, the error can be read in plain text.
Filter symbol: In the right upper corner of the main menu, a filter symbol is
indicated, and directly below it, the remaining run-time of the filter is indicated in
days. When the remaining run-time of the filters has expired (0 d), the colour of the
filter symbol changes from grey to yellow. If the remaining run-time of the filters is exceeded by
10 days without the filters being changed (-10 d), the colour of the filter symbol changes from
yellow to red.
Key +/-: With the keys +/- , values can be changed in the individual menus (e.g. fan
speeds in steps of 1%, or the time in minute or hour steps). Important: The data are only
transferred, if the enter key is pressed.
Navigation keys: The navigation keys left/right and up/down can be used to
navigate in the selection menus in order to reach the selected submenu by
pressing the enter key. If several values are adjustable (e.g. with date and
11
time: day, month, year, hours, minutes), individual values, which are to be adjusted, can be
reached and modified using +/-.
Modified data is no sooner applied as the enter key is pressed.
2.2.2.1.2 Description of the Operating Functions of the Submenu
Three submenus are available:
• Information
• Settings
• Setup
2.2.2.1.2.1 Information Submenu
The submenu information visualises various parameter of information and setup as well as chosen
factory presets (e.g. type of device).
Figure 7: Menu structure of information submenu
12
Operating Hours
Here, the total operating hours of the ventilation device and the fan operating hours (e.g. the hours,
during which the fans were actually running) are indicated.
Filter change period
Here, the preset filter run-time and the current remaining run-time of the filter are indicated.
Software versions
Here, the type of device, as well as the hardware and software status of the controllers are indicated
which are involved in the control process.
Thresholds of bypass
Focus disposes of no bypass, therefore, this menu is not feasible.
Current values
Here, the percentaged adjustments of the three fan speeds LS1...LS3 as well as the preset times for
absent and intermitting ventilation are indicated.
Reports
Here, a possibly occurring error is indicated in plain text. In case of various errors which occur at the
same time, it is always the one with the highest priority which is indicated.
In addition to this indication, a yellow warning triangle is flashing at the right upper margin of the screen.
2.2.2.1.2.2 Settings Submenu
The settings are intended for manipulation on the part of the user and mainly serve for the individual
adjustment to the own comfort.
13
Figure 8: Menu structure of settings Submenu
Key lock
The operation of the TFT Touchpanel can be locked with the help of a preset password menu. The device
can be operated no sooner with the help of the TFT Touchpanel as the password is entered again. The
password for the key lock is: <11111>
14
Choose language
Menu is currently not available.
Ground pipe diverter
A motor-controlled flap which is temperature-controlled closes an optionally existent geothermal heat
exchanger and opens the string of the direct outside air inlet. In this menu, the respective temperature
thresholds for the opening and closing of this flap are adjusted.
Supply heater
An optional universal thermostat can be used for the supplementary heating of the supply air which flows
out of the heat exchanger into the room. The supplementary heating device can be either released or
locked with the help of this menu.
Bypass
Focus disposes of no bypass, therefore, this menu is not feasible.
Date / Time
Date and time are adjusted in this menu.
Modified data / times have to be confirmed with
in order to be saved.
Automatic
Two automatic operating modes are designated:
• Automatic timing
• Automatic sensor
An individual fan speed for each quarter of an hour of each weekday is determined by the operating mode
automatic timing. A weekday (Monday…Sunday) or a group of weekdays is chosen by pressing the
calendar key.
This fan speed is preset by tapping a fan symbol at the left margin (recognisable by the fan speed symbol
changing to blue). The initially black cursor at the upper margin of this setting menu changes to orange
and assigns the preset fan speed to the next quarter of an hour.
Figure 9: Screen display of factory presets: group of weekdays Monday to Friday
By selecting a group of days (e.g. Monday-Friday), the modified data is assigned to each day of the
group. The settings for the group "Monday-Friday" are thus identical with the days "Monday", "Tuesday"...
"Friday" (and the group "Saturday-Sunday" is identical with the days "Saturday” and "Sunday"
respectively). The profile of the respective day (“Monday”…“Sunday“) has to be changed in order to use
other fan speeds and times for a single day! Subsequent modifications of "Monday-Friday" and
"Saturday-Sunday" respectively overwrite the previously made settings of a single day once again!
15
Figure 10: Screen display of factory presets, group of the weekdays Saturday-Sunday
The modified data can be saved with the help of the enter key. The screen is dark for a short time while
the modified data is saved.
Group of Weekdays
Monday-Friday
Saturday-Sunday
Time Slot
0.00 am 8.00 am 8.30 am 4.00 pm -
Fan Speed
8.00 am
8.30 am
4.00 pm
0.00 am
Fan speed 2
Fan speed 3
Fan speed 1
Fan speed 2
0.00 am - 8.30 am
8.30 am - 9.00 am
9.00 am - 0.00 am
Fan speed 2
Fan speed 3
Fan speed 2
Table 2: Overview of the automatic timing of the factory presets
The factory presets of the automatic timing can only be reactivated in the setup submenu.
The analogue signal of an air quality sensor, CO2 sensor or humidity sensor is interpreted as a control
signal for the fan rotary speed after a respective transformation in the operating mode automatic sensor
has taken place. First, it is set if the sensor has a current or a voltage output (current: 4…20 mA, voltage:
0…10 V).
Afterwards, the upper and the lower point of a characteristic curve, which is supposed to be linear, is
parameterised.
Frost protection
The temperature threshold of the active frost protection is selected here between “safe“ and “eco”. The
mode “safe” is able to safely prevent the freezing. However, more energy is spent than when using the
mode “eco“. The mode “eco“ is able to prevent freezing during almost the entire operation.
Filters
The filter run-time can be set here. An internal timer daily resets the remaining run-time of the filters by
one day. After a filter change has been carried out, the remaining run-time of the filters can be reset to the
value of the preset filter run-time.
Fan speed
The fan speed 1 and 3 can be set here in one percent steps between 17%...100%. Furthermore, the
times for the fan speeds “un-occupied“ and “boost ventilation” are preset here.
16
2.2.2.1.2.3 Setup Submenu
The setup is only carried out by the service technician. Therefore, it is protected by a password.
2.2.3
Boost ventilation switch
The boost ventilation mode can be activated by means of one or more external boost ventilation switch.
This boost ventilation switch is usually mounted in extract air rooms like bathrooms, toilets or kitchens in
order to drain excessive moisture and odours off as quick as possible. If this switch is activated, the
functional properties and visualising displays described in 2.2.1.2.3 Boost ventilation mode with the LED
Control Panel and 2.2.2.1.1 Boost ventilation with the TFT Touchpanel respectively are generated.
2.3
Maintenance by the User
Being the user, you have to maintain the ventilation system and especially the focus as follows:
• Cleaning or changing of the filters
• Cleaning of the valves (at home), cleaning of the header filter
If the maintenance works are not (regularly) performed, the functionality of the
comfort ventilation will be affected in the long term!
2.3.1
Cleaning or Changing of the Filters
The maintenance of the device and the system by the user is limited to a periodical change of the filters
and the cleaning of the supply air valves and the exhaust air valves. A filter change has to be carried out
every 3 to 6 months according to EN DIN 1946-10. The system may not be operated without filters. The
device has to be turned off if a filter change or maintenance works are performed!
Optionally check other filters of the ventilation device and change them if necessary. A change or
cleaning (warm water with dishwashing detergent) of the filter mats on the exhaust air valves (e.g.
bathroom, kitchen, toilet) should be carried out every 2 to 3 months or as one sees fit after checking the
degree of soiling.
2.3.1.1 Changing of the Filters of the Device
High-class original PAUL filters are installed in the focus, recognisable by the imprinted PAUL logo. The
filters can be directly ordered from the company Paul Wärmerückgewinnung GmbH or via www.paullueftung-shop.de. The filters of the focus have to be changed after a respective message is displayed on
the operator unit. Thereby, proceed as follows:
1. Disconnect the device from the power supply.
2. Press both spring locks A and unlock with it de front plate
Figure 11: Press of the spring locks
17
3. Open the front plate in a corner from maximally 15 °.
Figure 12: Opening the front plate
4. Push the front plate upwards and hang them from the tin fold of the housing.
5. Pull by means of pull band B the foam material cover C of the filters and the heat exchanger from
the foam material housing. Besides, take the pull band at one of the ends and go, besides,
counter hold the device with the other hand.
Figure 13: Dismantlement of the
foam material covert.
6. Pull the filters out of the filter slide-in compartments by means of the filter strap D.
18
Bild 14: Filter strap
7. Push the new filters in the filter slide-in compartments with regard to the flow direction E. The
filters are marked with an arrow according to the required flow direction.
Bild 15: Filter flow direction
8. Close the filter insertion fields and the heat exchanger with the foam material cover.
9. Hang the front plate in the tin fold of the housing., and press the front plate in the area of the
spring locks to the housing to this in the spring locks engages.
10. Restore the network connection.
Pollen filters are to be inserted in the filter slide-in compartment of the outside air
connection depending on the device version (see identification plate)!
(See tag for the connection of the air ducts, marked with the symbol
LEFT version
RIGHT version
2.3.2
)
- right filter slide-in compartment
- left filter slide-in compartment
What to Do in the Event of a Failure?
Please contact the installer immediately in the event of a failure. Make a note of the error display and the
failure code respectively. Also make a note of the type of your focus (see identification plate on the
surface of the device).
19
The network connection has to be present at all times except for the focus being shut down because of a
serious failure, the cleaning or changing of the filters or another compelling reason.
As soon as a power disconnection has been performed, the living space is not
mechanically ventilated anymore. This may cause moisture and mould problems in
the living space. Therefore, the long-term shutdown of the focus has to be avoided!
The ventilation system has to be operated continuously according to DIN 1946-6
except for the times of maintenance and repair works. The system should be operated
at the lowest speed during a period of absence!
2.4
Proper Disposal
Talk to your supplier about what to do with the focus at the end of its life time circle. If you cannot return
the focus, do not put it to the ordinary household garbage, but ask your local authorities for ways of a reuse of components or the environmentally friendly processing of the materials.
20
3 Notes for the Installer
This section describes how to install and commission focus.
3.1
Principal Configuration of the System
Figure 16: System outline with sensors and ventilation equipment
The principal configuration of the system has a universal character and does not
represent the system outline of the project-related ventilation system! It is meant to
represent the plant-specific system structure of sensors and ventilation equipment.
3.2
Configuration of the focus
The focus consists of the following standard parts:
•
•
•
•
•
Housing A made of coated steel sheet
Internal space B made of high-quality expanded polypropylene (E)PP
Front plate C made of coated steel sheet
Foam covering D for filters and heat exchangers
Highly efficient reverse flow channel heat exchanger or membrane moisture heat exchanger E
21
•
•
•
•
•
•
Two fan foam coverings F
Two high capacity constant speed fans G
Two filters H
Control boards I
Cover sheet control J
Mounting sheet for wall mounting K
Figure 17: Exploded view of the main components
3.3
Installation Requirements
In order to be able to judge if it is possible to install the focus in a certain room, the following points have
to be observed:
• Focus has to be installed in accordance with the general as well as the local safety and installation
instructions of the electric works and water works among others as well as according to the
instructions of this operating manual.
H
• The place of the installation has to be selected in such a way that there is enough space at the
sides of the focus for air connections and for performing maintenance works.
• The following equipment has to be available in the installation room:
- air duct connectors.
A
- 230 V power supply.
- connectivity for the condensate drain.
• Focus has to be installed in a frost protected room. The condensate has to be drained off frostfree, with a gradient and by using a siphon.
22
3.4
3.4.1
Installation of the focus
Transportation and Unpacking
Be careful when transporting and unpacking the focus.
The package has to be removed only immediately before the mounting of the
device!
The open ends (stubs) have to be protected against dust and moisture before and
during installation interruptions!
3.4.2
Checking of the Scope of Delivery
If you detect any damages or incompletion to/of the delivered product, please contact the supplier
immediately. The scope of delivery includes:
• focus; check the identification plate in order to make sure that it is the right device (type / version /
design)
• Mounting sheet with 2 pieces of self-adhesive rubber buffer
• 230 V power cable with IEC power connector
• Cat-5 cable
• Operating manual
3.5
Mounting of the focus
The focus has to be mounted horizontally. During the wall mounting check the required load capacity of
the wall construction (dead load of focus 25 kg) and the safe mounting option of the mounting sheet. For
inapplicable walls we recommend to apply the mounting frame for installation on the floor (available as an
option). In this way possible transmissions of structure-born noise are avoided as good as possible.
3.5.1
Wall Mounting
Ensure that a minimum clearance of 1 meter remains in front of the focus for
subsequent maintenance works.
Figure 18: Wall mounting (E.g. focus version LEFT)
•
Figure 19: Detail of wall mounting
Mount the delivered mounting sheet with the lugs, which point upwards, horizontally on the wall
considering the minimum distances.
23
•
3.5.2
Hang the focus on the mounting sheet by hooking the lugs into the slot openings of the fold of the
rear wall. The slot openings are situated at the top in each case.
Mounting on a Mounting Frame
Ensure that a minimum clearance of 1 meter remains in front of the focus for
subsequent maintenance works.
The area of the mounting frame has dimensions of 620 x 480 mm and a height of 255 mm. Individual
parts, which have to be put together on site, are delivered.
Mount the individual parts of the mounting frame in accordance with the figures. Thereby, proceed as
follows.
• The mounting frame consists of two long and two short side parts.
• Both of the long side parts have a nut which is situated at the corners of the side parts for
receiving the height adjustable feet.
• Connect the side parts of the mounting frame according Figure 20 and to the sectional view in
Figure 21 and Figure 22.
Figure 20: Side part of the mounting frame
•
The short side parts with the lugs D are to be hooked in the guiding slots A of the long side parts.
Figure 21: Detail of sectional drawing B-B
24
Figure 22: Detail of sectional drawing C-C
•
•
Thereby, the short side part has to be slid in the designated guiding from above perpendicular to
the long side part.
Mount the mounting sheet E with the lugs, which point upwards, to a long side part of the
mounting frame F. In doing so, screw both of the sheet metal screws in the designated bore holes
H of the side part.
Figure 23: Screwing of the mounting sheet to the mounting frame
•
•
3.5.3
Now adjust the completed mounting frame perpendicularly and stably to the designated floor
space via the height-adjustable feet of the mounting frame.
Put the focus on the mounting frame by hooking the lugs in the bottom slot openings of the rear
panel.
Connection of the Air Ducts
Observe the following points when mounting the air ducts:
Figure 24: Tag of the connection of the air ducts
•
•
•
•
•
Mount the air duct types of the ventilation device to the connector stubs in accordance with the
present LEFT or RIGHT device version (see tag next to the identification plate).
In order to ensure an easy maintenance, the air duct connections should be made directly at the
device with flexible air hoses. Flexible hose mufflers with a diameter of 160 mm are recommended
in order to grant a good sound absorption.
Mount the air ducts (minimum diameter of 160 mm), which have to be connected, with the least
possible air resistance and airtight.
The basic function of the comfort ventilation system is granted if only air duct material of the
company Paul Wärmerückgewinnung GmbH is used when using flexible air ducts.
The outside air ducts and the exhaust air ducts have to be insulated vapour-diffusion tightly. This
prevents the condensate formation at the outside of the air ducts.
25
•
•
•
•
3.5.4
If a low cannot be avoided when laying the exhaust air duct from the exhaust air stud of the device
to the wall outlet, another connector for the condensate conduction has to be connected because
the exhaust air is saturated with condensate when it is cold outside and droplets deposit at the
inner wall of the duct.
If a muffler is planned on the exhaust air stub, it has to arch upwards in order to be protected from
being wet by the condensate which returns from the exhaust air duct. The device should be
mounted in such a way that the condensate drain can be conducted over a longer distance at a
good gradient.
If conducting the exhaust air via the roof, it has to be equipped with a double-wall or insulated roof
penetration. This prevents the condensate formation between the roof boards.
We recommend a thermal and steam-tight insulation of the supply air ducts and the exhaust air
ducts in order to avoid unnecessary temperature losses during summer as well as during winter
time.
Connection of the Condensate Drain
The warm exhaust air is cooled by the outside air in the heat exchanger. Thus, the moisture of the room
air condenses in the heat exchanger. The condensate which forms in the heat exchanger is conducted to
the siphon. The connector of the condensate drain has an external thread of 1¼ inch. It is situated at the
bottom side of the focus in accordance with the respective device version.
Figure 25: Condensate connection (Example: LEFT version )
A siphon has to be mounted to the 1¼-inch external thread of the condensate connection stub in such a
way that the minimum requirements of the liquid gauge heights are met in accordance with the schematic
diagram. The condensate should be able to drain freely (in a second siphon which is connected to the
sewage system), so that a potentially laid drain hose (with a gradient of 5 percent) runs completely empty.
The hose has to be heated if a danger of frost exists (hose heat tracing can be delivered). If a vertical or
horizontal air duct is mounted to the exhaust air stub, it has to be supplied with a condensate drain at the
bottom end as well.
Siphons can dry up! Water has to be refilled if:
• The device is commissioned
• The siphon makes noises (slurping)
• Odours from the sewage system can be sensed in the building
• Air flows through the siphon
The condensate drain must not be directily connected to the sewage system (e.g.
finishing freely in a hopper with a siphon at the sewer).
A dry siphon is recommended! (no limitation of the functionality if drying up)
26
3.5.5
Electrical Connections
The electrical power supply of the focus is accomplished by a 3-pole plug connection of a low power
device with a 2-meter long power cable. The 1.5-meter long Cat-5 cable is connected to the RS485 plug
connection. Both plug connections are arranged on the surface of the device on an interface sheet
connected to the housing. The interface sheet is fastened with 4 screws. The circuit diagram of the focus
is represented in Appendix 1, Circuit Diagram of the focus.
Figure 26: Electrical Connections
Analogue and digital input / output signals of sensors (e.g. indoor air quality sensors) or actuators (e.g.
boost ventilation sensing devices) are connected to the terminal points of the master controller, which are
applied under the interface sheet. Thereby the cables are to be guided by means of cable grommets with
strain relief function, which are located at the left side next to the interface sheet. The terminal
assignment can be found in the appendix 2 „Terminal Scheme of the Master Controller“.
3.5.5.1 Connection of the Adapter Board
The adapter board, which has a dual RS485 jack and a 5-pole screw terminal, is meant to connect the
control and slave modules. The Cat5 power cable establishes the internal connection between the
RS485-BUS jack of the focus and any RS484-BUS jack of the adapter board.
The adapter board has to be located either close to the device or in the cable duct.
The RS485 jacks of the adapter board and of focus exclusively serve the
components of the internal RS485-BUS! Any other usage results in the damage of
the intrasystem modules!
Terminal
Conductor
Signal
1
2
3
4
red
white
yellow
black
aluminiumcoloured
24P
RX
TX
GND
5
Screen
Table 3: 5-pole terminal assignment of the adapter
board
Figure 27: Adapter board
27
3.5.5.2 Connection of the TFT Touchpanel
The comfort edition of the control unit, which is a TFT Touchpanel with a stainless steel frame, is
designed for an in-wall installation.
Figure 28: Control unit with stainless steel frame; in-wall base plate with control unit adapter; control unit
engaged in the in-wall base plate (from left to right)
The smaller side of the stainless steel frame of the ready-made TFT Touchpanel has to point upwards. In
doing so, the control unit adapter and the in-wall base plate have to be positioned in such a way that the
ribbon cable of the control unit adapter, which is arched downward, is plugged in the TFT Touchpanel.
The spring steel clips, which are mounted to the rear side of the control unit, grasp the in-wall base plate
and pull the stainless steel frame of the control unit tightly to the wall.
The screened 4-pole telephone cable is connected to the 5-pole screw terminal of the control unit
adapter. The usage of a cable of the type J-Y(ST)Y 2x2x0.6 LG indoor cable with a colour coding in
accordance with VDE0815 according to Table 3 is recommended.
3.6
3.6.1
Commissioning of the focus
Operational Readiness
The operational readiness is granted if the requirements according to VDI 6022
and DIN 1964/6 are met. The cleanness of the air duct material, the existence and
the proper installation of all filters, which are designated for the system, and the
operational readiness of the plant-specific components have to be especially
observed.
Check all security-relevant parts and perform a functional test!
3.6.2
Adjustment of the Air Volume Flow
The focus can be put into operation after the checking of the operational readiness as follows.
Make sure that the bypass is closed and all ventilation equipment is mounted.
The air volume flows of the system, which have been calculated according to DIN 1946-6, have to be
adjusted with speed 2 (TFT Touchpanel) or speed 4 (LED control panel) of the ventilation device. Use an
appropriate measuring device for measuring the volume flow.
Please observe that you generate via the installed valves as little pressure loss as possible, that is the
supply air valve and the exhaust air valve which is flown against in the worst manner has to be fully open!
The fan speed 2 can be adjusted with the help of the TFT Touchpanel as follows:
• Menu
28
•
Setup
•
Enter password -----
•
Fan speeds
•
Fan setup 2 of air filter 2
By means of pressing the buttons + or - , the set value of the system-related air volume flow is
adjusted in percent according to Chart 1. If an imbalance is desired, it can also be adjusted by
pressing the buttons + or - by means of the balance control fan speed 2
•
by
saving of the setting values
•
by
leaving of current menu speed
100
90
Setting of set value [%]
80
70
60
50
40
30
20
10
60
80
100
120
140
160
180
200
Air volume flow of system [m³/h]
Chart 1: Setting values of fan setup 2 LF2
3.6.3
•
•
•
•
•
•
Adjustment of the Valves
Positioning of the fans by means of the TFT Touchpanel on fan speed 2 and by means of the LED
control unit on fan speed 4 respectively
Adjustment of the air volume flows to the air valves by means of a volume flow hood and an
anemometer (see air volume log)
Adjustment of the air gap on the valve must not be too narrow – aerodynamic noises! Better:
Adjustment of a lower fan output or restriction of the volume flow in the pipeline (installation of a
throttle flap or throttle foam insert)
Readjustment of the valves
Locking of the adjusted positions of the valves and flaps
Recording of the adjusted air quantity and all further adjustments in the designated
documentations
29
3.7
3.7.1
Menu Settings by the Installer / Service Staff
Setup Submenu
The submenu setup is protected by a password. After entering the password <_ _ _ _ _>, adjustments to
the respective configuration of the system can be made in the setup submenu.
Figure 29: Menu structure of setup submenu
Sensor type
The sensor type of the operating mode automatic sensor can be determined in this menu.
Reset factory Data
30
Factory presets, which may have been partly overwritten by the service technician when commissioning
inputs can be reset in this menu. Afterwards the device has to be turned on and off.
Ground pipe diverter
The menu is not configurable at present.
Bypass
The focus is not provided with any bypass. Therefore, select no at „Bypass available“ in the setup mode.
Supply heater
The duct temperature of the universal thermostat slave can be device-specifically preset in this menu.
Furthermore, the service technician determines here if the element supplementary heating register is
available or not with regard to the configuration of the system.
Fan speed
The fan output can be individually parameterised in one percent steps for each fan speed 1-3 in this
menu. Thereby, the supply air fan and the extract air fan are separately adjusted. A varying fan output
(imbalance) is calibrated and determined by the service technician depending on the installation situation
of the ventilation device (supply air duct, extract air duct).
A change in the fan output in the setting submenu can result in a shift of the desired imbalance especially
at the upper and lower limits of the characteristic curves of the fans.
Frost protection
The respective type of defroster, electric powered defroster, PTC defroster or brine defroster, which is
used according to the configuration of the device is selected here.
The temperature thresholds of the frost protection operating modes “eco“ and “safe“ as well as the
minimum supply air temperature of the fan slave can be set. The values of the fan slave and the defroster
are deduced from the temperature thresholds “eco“ and “safe.“ The minimum intake air temperature of
the fan slave is the set threshold minus 0.5 K. The set value of the defroster is the set threshold plus 0.5
K.
Here, the frost protection thresholds for the minimum supply air and the minimum intake air are preset.
• Minimum supply air temperature (presetting of 5 °C)
• Minimum intake air temperature (for presetting see Table 4)
In the event that the threshold value falls below any of the frost protection thresholds, the fans will be
deactivated, the bypass flap will be closed and an error message occurs. The frost protection threshold of
the minimum intake air temperature depends on the frost protection operating mode and the type of
device.
Frost protection operating
mode
“safe“
“eco“
Frost protection threshold
focus 200
focus F 300
0 °C
-7 °C
-3 °C
-10 °C
Table 4: Frost protection threshold depending on frost protection operating mode and type of device
3.8
Maintenance and Repair by Qualified Personnel
If the maintenance works on the focus are not (regularly) carried out, the
functionality of the comfort ventilation will be affected in the long term.
In accordance with DIN1946/6 point 6, the maintenance service has to be performed at least every two
years and it contains the inspection and cleaning of the fans, the condensate drain and the heat
exchanger. The cleaning is carried out depending on the degree of soiling; the maintenance interval shall
not exceed two years (important in order to protect the five-year warranty claims referring to the patented
reverse flow channel heat exchanger).
3.8.1
Inspection of the Condensate Drain
Check the condensate drain to make sure that it is mechanically secured and that all parts that are
connected to the siphon are leak-proof. If a dry siphon is nonexistent, it has to be filled with water at all
times.
31
3.8.2
Cleaning of the Fans
The cleaning of the fan blades can be carried out via the supply air duct connections and the exhaust air
duct connections of the device. For this purpose, these air ducts have to be removed from the connection
stubs. The fan blades of the impellers can be carefully vacuumed with a vacuum cleaner, but must not be
touched with the suction nozzle.
Do not damage the fan blades!
3.8.3
Inspection and Cleaning of the Heat Exchanger
Hereby proceed as follows:
1. Disconnect the device from the power supply
2. Press both spring locks A and unlock with it the front plate.
Figure 30: Pressing the spring locks
3. Open the front plate in a corner from maximally 15° according to figure 30.
32
Figure 31: Opening the front plate
4. Push the front plate upwards and hang it from the sheet metal fold of the housing.
5. Pull by means of strap B the foam covering C of the filters and the heat exchanger from the foam
housing. Thereby, take and pull the strap at one of the ends and counter-hold the device with the
other hand at the same time.
Figure 32: Dismantlement of the foam
cover
6. Pull the filters on the strap D from the filter holder.
33
Figure 33: Pulling out the filters
7. Now pull the heat exchanger E by means of the strap F from the foam housing.
Figure 34: Pulling out the heat exchanger
8. Clean the heat exchanger if necessary.
Cleaning of the reverse flow channel heat exchanger:
• For this purpose immerse the heat exchanger several times in warm water (maximum 40
°C).
• Afterwards rinse the heat exchanger thoroughly with warm tap water (maximum 40°C).
• Hold the coloured sides of the heat exchanger with both hands and shake it out.
Cleaning of the membrane moisture heat exchanger (enthalpy exchanger):
• Vacuum the enthalpy exchanger with a vacuum cleaner. Use a soft brush if necessary.
Do not use water!
Do by no means use abrasive or solvent detergents!
9. Mount all parts in reversed order.
10. Restore the network connection.
34
3.9
Visualisation of Errors with the LED Control Panel
If an error occurs in the system, it is displayed by LEDs. The breakdown of the supply air fan or the
extract air fan, a sensor error and a fall below the frost protection threshold is displayed as shown in
Table 1.
In the event that another general error occurs, the LED’s <L8+L11+L12> flash and the LED’s L1..L7 show
a binary error number. The following combinations, marked with an “x“ in order to show the binary error
coding, are effective:
L1 L2 L3 L4 L5 L6 L7 Meaning
Error – supply air temperature too low
x
x
x
x
x
x
x Communication error of the fan slave
x
x
x
x
x
x Communication error of the defroster
x
x Communication error of the heater battery
x
x
x Communication error of the flap of the ground pipe diverter
x
x
x Communication error
Table 5: Binary error coding with the LED control panel
3.10 Visualisation of Errors with the TFT Touchpanel
A plain text visualisation of errors is only possible with the TFT Touchpanel.
3.10.1 Sensor Error of the Temperature Sensors T1…T4
Error-causing event: In the event of a broken sensor or a short circuit of a temperature sensor, a
warning triangle appears at the top right of the screen .
The error can be found in menu/ information/ error display:
•
•
•
•
Error sensor 1
Error sensor 2
Error sensor 3
Error sensor 4
Response: Supply air fan and extract air fan are deactivated.
Requirement for reset: As soon as the sensor is detected error-free, the fans start at the previously
activated speed.
3.10.2 Threshold Error – Supply Air Temperature Too Low
Error-causing event: In the event that the supply air temperature is too low, T_sup < x_sup_min
(standard temperature: 5°C), a warning triangle appears at the top right of the screen .
The plain text of the error can be found in menu/ information/ error display:
• Error – supply air temperature too low
Response: Supply air fan and extract air fan are deactivated.
Requirement for reset: As soon as the threshold x_sup_min is exceeded by a minimum of 1 Kelvin per
60 seconds, the fans will start at the previously activated speed.
3.10.3 Threshold Error – Intake Air Temperature Too Low
Error-causing event: In the event that the intake air temperature is too low, T_int < x_int_min
(Standard: -3°C), a warning triangle appears at the top right of the screen .
The plain text of the error can be found in menu/ information/ error display:
• Error – intake air temperature too low
Response: Supply air fan and extract air fan are deactivated.
Requirement for reset: As soon as the threshold x_int_min is exceeded by a minimum of 1 Kelvin per 60
seconds, the fans start at the previously activated speed.
35
3.10.4 Fan Rotary Speed Error
Error-causing event: In the event that the controller detects that the fan rotary speed of the supply air
fan and/or the extract air fan is lower than currently preset by the program, a warning triangle appears at
the top right of the screen. .
The plain text of the error can be found in menu/ information/ error display:
• Error fan 1 (Hall) or
• Error fan 2 (Hall)
Response: Supply air fan and extract air fan are deactivated.
Requirement for reset: By setting a fan speed manually, the supply air fan and the extract air fan start
again.
3.10.5 Communication Error
Error-causing event: In the event that the master controller detects that a slave controller does not
respond, a warning triangle appears at the top right of the screen .
The error can be found in menu/ information/ error display:
• Communication error
Response: Supply air fan and extract air fan are deactivated.
Requirement for reset: After turning the ventilation device off and on (restart), the supply air fan and the
extract air fan start again.
3.10.6 Message – No External Release
Message-causing event: In the event that the master controller detects that the contacts of the external
release contact are non-conductively connected to one another, a warning triangle appears at the top
right of the screen: .
The plain text of the message can be found in menu/ information/ messages:
• No external release
Response: Supply air fan and extract air fan are deactivated. All slaves are put in standby mode. The
control unit remains readable and operable.
Requirement for reset: As soon as the contacts of the external release contact are once again
conductively connected to one another, the slaves are activated and the state of things before the
shutdown is once again adopted.
As of September 27th 2010
36
Appendix 1 Circuit diagram of the focus
F1 315 mA
X1
4 x protection conductor
PE
1
2
3
4
4 x PE
F2 5A
mains supply
(230 VAC, 8 A)
L
N
5
6
power supply fan slave
N, 230 VAC connected
L’
N
7
8
230 VAC, 5 A
(geschaltet)
NO
CH
NC
9
10
11
230 VAC, 5 A
freely programmable
potential-free contact
(relay)
closer
changer
opener
0..10V oder
4..20mA
0..10V oder
4..20mA
12
13
14
15
Prog
X4
X3
1 2 3 4
5 6 7 8 9 10
BUS
BUS
BUS interface
BUS
RS485 Slave/Control panel
BUS interface
BUS
RS485 Slave/Control Panel
X2
freely programmable AO1
analogue output GND
freely programmable AI1
analogue input GND
freely programmable AI2
analogue input GND
ST
GND
ext. enable signal EN
GND
X5
freely programmable DIO1
digital input/output GND
freely programmable DIO2
digital input/output GND
boost ventilation switch
0..10V oder
4..20mA
DI: max. 24 VDC
high >3,5V, low <1V
Appendix 2: Terminal Scheme of the Master Controller
X1
1
2
3
4
PE
PE
PE
PE
voltage supply
PE through terminal
PE
PE
PE
5
6
L
N
230 VAC
0
7
8
L’
N’
230 VDC, relay-switched
230 VDC, relay-switched
X1
9
10
11
NO
CH
NC
signalling contact
normally open contact
change-over contact
normally closed contact
X1
12
13
14
15
DIO1
GND
DIO2
GND
digital interfaces 1 and 2
digital input/output 1
referential potential (ground)
digital input/output 2
referential potential (ground)
X2
1
2
3
4
DIO3
GND
DIO4
GND
digital interfaces 3 and 4
digital input/output 3
referential potential (ground)
digital input/output 4
referential potential (ground)
X2
5
6
7
8
9
10
AO1
GND
AI1
GND
AI2
GND
analog interfaces
analog output
referential potential (ground)
analog input 1
referential potential (ground)
analog input 2
referential potential (ground)
all 4 PE ducts are contacted among each other, VDE compliant
50...60 Hz
freely programmable, e.g. failure or MVHR on/off
250 VAC, 5 A
freely programmable as digital input or output
freely programmable as digital input or output
freely programmable as digital input or output
freely programmable as digital input or output
freely programmable as analog output 0...10 V or 4...20 mA
freely programmable as analog input 0...10 V or 4...20 mA
freely programmable as analog input 0...10 V or 4...20 mA
Appendix 3: Terminal Assignment of the Master Controller
230 VAC
tap 2
X4
1 2
X3
supply
456
S1
supply fan *
temperature sensors
GND
X8
BUS interface
RS485
C41
+5V DC
X9
programming interface
(internal:controller, EEPROM)
1 2 3 4 5 6 7 8 9 10 11 12 13 14 15 16 17 18 19
X1
4 x protection conductor PE
+ fan 1, +VDC
mass/GND
rotation speed1 (Hall)
fan control 1
X5
ext. Relais +24VDC
ext. Relais GND
230 VAC
tap 1
T1 (NTC, 10K)*
GND
X7
S2
zone selection
T2 (NTC, 10K)*
GND
X6
X2
selection
left/right
T3 (NTC, 10K)*
GND
1 2
1 2 3 4
+ fan 2, +VDC
mass/GND
rotation speed 2 (Hall)
fan control 2
extract fan *
T4 (NTC, 10K)*
GND
X6
230 VAC
supply
fan motors
operating voltage
for the fans
+ 24/48 VDC
mass/GND
ON
23
01
1 2
789
fan control: 0...10V
fan control: PWM open collector
S2-2 ON
S2-2 OFF
Appendix 4: Terminal Scheme of the Fan Slave Controller
extract-fan
supply-fan
supply-fan
extract-fan
fan 1
fan 2
S2-1 ON
T3 (red)
T4 (yellow)
T1 (green)
T2 (blue)
OFF
T1 (green)
T2 (blue)
T3 (red)
T4 (yellow)
version RIGHT
S2-1
Intake air
Supply air
Extract air
Exhaust air
* version LEFT
X1
fan 1 (LEFT: supply air,
RIGHT: extract air)
+ 48 VDC
referential potential (ground)
rotary speed (Hall)
0...10 VDC
not busy
not busy
not busy
not busy
not busy
external relay +24 VDC
external relay, ground
temperature sensor 1 (NTC,
10K)
1
2
3
4
5
6
7
8
9
10
11
48P
GND
DRZ 1
0-10 V 1
n.b.
n.b.
n.b.
n.b.
n.b.
24P_BYP
RL_EX
12
TMP 1
13
GND
14
TMP 2
15
GND
16
TMP 3
17
GND
18
TMP 4
19
GND
temperature sensor 2 (NTC,
10K)
ground
temperature sensor 3 (NTC,
10K)
ground
temperature sensor 4 (NTC,
10K)
ground
X7
1
2
3
4
PE
PE
PE
PE
PE through terminal
PE
PE
PE
X8
1
2
3
4
5
6
7
8
24P’
24P’
(24P’: BDE)
RS_B
RS_A
GND
GND
GND
BUS (RS 485)
+ 24 VDC
+ 24 VDC
not busy at slave
dataline B
dataline A
referential potential (ground)
referential potential (ground)
referential potential (ground)
1
2
3
4
48P
GND
DRZ 2
0-10 V 2
fan 2 (LEFT: extract air,
RIGHT: supply air)
+ 48 VDC
referential potential (ground)
rotary speed (Hall)
0...10 VDC
X3
1
2
48P
GND
feed of fan voltage
+ 48 VDC
referential potential (ground)
X4
1
N / GND
distribution of supply voltage
neutral / ground
2
L / 48P*
230 VAC, 50 Hz / 48 VDC*
X2
* via external switching power
supply
ground
X5
distribution of supply voltage
1
N / GND
neutral / ground
2
L / 48P
230 VAC, 50 Hz / 48 VDC*
X6
1
2
supply voltage of the master, input
N / GND
neutral / ground
L / 48P*
230 VAC, 50 Hz / 48 VDC*
* via external switching power
supply
X9
1
2
3
4
5
6
7
8
9
10
11
12
13
14
GND
24P’
RXD
n.b.
TXD
n.b.
TMS
5P_OGS
TDO
TDI
TCK
/ RES
GND
5P
programming interface
OGS
connected 24 VDC (by the master)
OGS
not busy
OGS
not busy
JTAG
OGS
JTAG
JTAG
JTAG
JTAG
JTAG
JTAG
Appendix 5: Terminal Assignment of the Fan Slave Controller
Date: 02.09.10
Technical Data
Subject to change in the
interest of technical
progress.
Mechanical Ventilation Heat Recovery Unit
focus (F) 200
View:
Versions:
extract air
exhaust air
intake air
supply air
Version LEFT
intake air
exhaust air
supply air
extract air
Version RIGHT
Position of condensate drain connections (View from below):
condensate drain
Version LEFT
condensate drain
Version RIGHT
Dimensional sketch:
Assembly lid for
control
Cable grommets for
sensors / actuators
RS 485-BUSconnections for control
panels /
external components
Mains cable connection
02.09.20101© Paul Wärmerückgewinnung GmbH • August-Horch-Straße 7 • 08141 Reinsdorf • Germany
Tel: +49(0)375-303505-0 • Fax: +49(0)375-303505-55 • E-Mail: [email protected] • Internet: www.paul-lueftung.de
MVHR (Mechanical Ventilation Heat Recovery) components:
Heat exchanger
Material:
Frost limit:
Plastics (Standard heat exchanger, PAUL patented)
-3 °C
Cellulose (membrane-moisture-heat exchanger)
-10 °C
Fans:
EC radial fans with integrated electronics, V-constant control
Filters:
Filter class: G4 (intake and extract air)
Option: pollen filter F7 (intake air) - increase of pressure loss
Housing:
Galvanized steel, powder coated
Duct connections:
DN 160 (sleeve dimension)
Condensate drain:
Valve AG 1¼“
Weight:
25 kg
Electrical connection:
230 V, 50 Hz, ready for connection, with mains plug
Schutzklasse (nach EN 60335): I
Schutzart (nach DIN 40050):
IP 30
Appplication limits:
-20 °C bis 40 °C
• horizontally wall hanging or on assembly frame (option) standing
Installation:
• Installation in a frost-protected room, preferably > 10 °C
Operating Data:
Power input:
Efficiency criterion:
Volume flow rate:
Heat recovery rate:
Sound pressure level:
(acc. to DIN EN ISO 3744,
distance: 3 m)
140 W
0,31 W/m³/h with 135 m³/h
max. 200 m³/h
90 % with 135 m³/h (acc. passive house-certificate)
Air flow rate [m³/h]
Sound pressure level [dB(A)]
at the moment not availably
at the moment not availably
Characteristic with selected performance data:
Please note:
The values in the text boxes show the power
consumption in the respective operating points.
Control unit:
• Ventilation steps: OFF, ABSENT, STEP 1, STEP 2, STEP 3*
• Ventilation steps: OFF, ABSENT, STEP 1 to STEP 7**
• "Supply air only" or "extract air only" ** ("extract air only" is locked when
using fireplace operating mode)
• Ventilation steps individually programmable in 1% increments (60-200
m³/h) for every ventilation step supply and extract air*
• Individually adjustable timed program for any day of the week
• Optional sensor automatic (CO2, moisture, air quality) with external
sensor*
• Digital I/O interface (e.g. external OFF-contact)
• Possibility to connect boost switches
• Filter runtime monitor
• Freeze protection for downstream hot water duct heater
• Simultaneous fireplace operation possible
• Power consumption in stand-by operation 1 W
Options (additional module necessary)
• Control of external defroster heater
• Control of a heating circuit or air backup duct heater
• Control of a motorized flap on ground heat exchanger
Additional information concerning control of MVHR unit
* Control function not available when using LED control panel
** Control function only with LED control panel
Control panels:
LED control panel
(WxHxD in mm: 80x80x12),
listed in PEHA switch range
Colored TFT
touchscreen panel
(WxHxD in mm: 102x78x14)
Information on control panels / external components
• 1,5 m CAT-5-Kabel plug connection between RJ-45-jack
heat recovery unit with RJ-45-wall mounted connector of
adapter board (scope of delivery)
• Installation of control panels in flush socket
• Control line: J-Y(St)Y 2x2x0,6, shielded, max. 25 m
• Connecting box close to MVHR unit required
(last 3 points components provided by customer)
© Paul Wärmerückgewinnung GmbH • August-Horch-Straße 7 • 08141 Reinsdorf • Germany
Tel: +49(0)375-303505-0 • Fax: +49(0)375-303505-55 • E-Mail: [email protected] • Internet: www.paul-lueftung.de
Date: 18.03.10
Checklist A
Maintenance by customer
Subject to change in the interest
of technical progress.
Maintenance Work
Enter date in the quarter
1. Change both filters in the MVHR unit (change every 90 days)
Quarter
Year
I
II
III
IV
201...
201...
201...
201...
201...
201...
201...
201...
201...
201...
2. Clean extract air prefilter / filter in extract air valves ( change approx. every 2 months)
Quarter
Year
I
II
III
IV
201...
201...
201...
201...
201...
201...
201...
201...
201...
201...
Change prefilter in fresh air line (outdoor air intake - also at ground heat exchanger)
Quarter
Year
I
II
III
IV
201...
201...
201...
201...
201...
201...
201...
201...
201...
201...
Simplified formula for determining the local heat recovery rate η
t −t
η = Zu Au
t Ab − t Au
Legend:
- intake air temperature
- extract air temperature
- supply air temperature
Note:
Air temperatures are to be measured in
nominal ventilation mode with volume
flow balance and sensor arrangement
acc. to DIN EN 308!
© Paul Wärmerückgewinnung GmbH • August-Horch-Straße 7 • 08141 Reinsdorf • Germany
Tel: +49(0)375-303505-0 • Fax: +49(0)375-303505-55 • E-Mail: [email protected] • Internet: www.paul-lueftung.de
Date: 18.03.10
Subject to change in the interest
of technical progress.
Checklist B
Maintenance by skilled personnel
Maintenance
−
−
−
−
No
.
1
Inspection of MVHR unit acc. to DIN 1946-6 appendix E (normative) and appendix F (informatory)
Hygiene check acc. to VDI 6022, Item 5.3.2
Informal report for comments on MVHR unit's condition
Use additional sheet of paper for adding reports of subsequent years
Device
Fan / MVHR unit
2
Condensate drain and siphon
3
Electronic controls
4
5
6
7
8
9
Enter result
Air ducts / heat insulation
Ground to air heat exchanger (if available)
Fan / MVHR unit and fireplace operating mode (if
available)
Fan, MVHR unit
Filter, filter condition
Extract air / supply air outlet
Overflow air ducts
check annually
Devices cleaned?
Frost protection / melting devices working?
Structure-borne-noise
transmission, fixings
are avoided?
Preheater / vaporizer /
heat exchanger are not
contaminated?
Status indicators are
working?
Working?
Condensate disposal
OK?
Cable connections and
clamp fixing secure?
Control units working?
Cleaning done?
Heat insulation and
vapor barrier OK?
Flexible connections
between MVHR and air
ducts OK?
Air ducts OK?
Changeover working?
Outdoor air intake free?
Condition of prefilter
OK?
Condensate drain OK?
Safety device with firing
installation
working?
Filters of correct filter
class installed?
Fit and lock OK?
Filters of correct filter
class installed?
Filter, filter condition
OK?
Free cross-section?
No structure-borne /
airborne noise transmission?
Result
201... 201... 201... 201... 201...
yes / no
yes / no
yes / no
yes / no
yes / no
yes / no
yes / no
yes / no
yes / no
yes / no
yes / no
yes / no
yes / no
yes / no
yes / no
yes / no
yes / no
yes / no
yes / no
yes / no
yes / no
yes / no
yes / no
© Paul Wärmerückgewinnung GmbH • August-Horch-Straße 7 • 08141 Reinsdorf • Germany
Tel: +49(0)375-303505-0 • Fax: +49(0)375-303505-55 • E-Mail: [email protected] • Internet: www.paul-lueftung.de
Air Flow Report
Date: 18.03.2010
Subject to change in the
interest of technical progress.
Operating condition, functional check1),
instruction
Customer data
Surname:
First name:
Tel:
Street:
ZIP:
Town:
Serial-No.:
Built:
Construction project:
MVHR-type:
Measured data
Measuring equipment used:
Fault descriptions during
measurement:
Indoor temperature2)
Outdoor temperature2)
Weather2)
Filter condition on calibration
clean
used for approx. ... days
very dirty
Supply
Extract air
Fan speed ratio
Extract air / Supply air
...........................
Supply air
No.
Room description
m³/s
Ventilation step:
%
Measured data
m³/h
m³/s
m³/s
Ventilation step:
%
Measured data
m³/h
m³/s
Project data
m³/h
Extract air
No.
Room description
Project data
m³/h
Pel =
W (2 fans)
1)
The volumetric air flow is measured during normal MVHR operation 3) as agreed.
2)
acc. to DIN EN 14134, Item 7.3.1.5.
3)
acc. to DIN EN 14134, Item 7.4.1. b) end
4)
acc. to DIN 1946-6 MVHR unit has to run continuously, except for times of maintenance or repair. Use lowest
ventilation step or intermittent holiday program in times of absence.
Ö The user has been instructed on the hygienic requirements 4) for the operation of the MVHR unit
Ö Customer has been advised that winter and summer operation influence the interior air humidity
Ö No parts other than genuine PAUL parts (e.g. filters) shall be used, otherwise the warranty will be void
Ö The warranty period starts with delivery ex works
Date: ...............................
Signatures: ...................................................................................................................
Startup personnel / Plumber
User
© Paul Wärmerückgewinnung GmbH • August-Horch-Straße 7 • 08141 Reinsdorf • Germany
Tel: +49(0)375-303505-0 • Fax: +49(0)375-303505-55 • E-Mail: [email protected] • Internet: www.paul-lueftung.de
Commissioning and handover
certificate
Date: 18.03.10
Subject to change in the
interest of technical progress.
Completeness and performance verifications
acc. to DIN 1946-6
Customer data
Surname:
First name:
Tel:
Street:
ZIP:
Town:
Serial-No.:
Built:
Construction project:
MVHR-type:
Completeness
No.
Device
Ausführung
Result
1
Supply air duct
- Version as planned
- Cleaning possible
yes / no
yes / no
2
Supply air outlets
- Configuration as planned
- Version as planned
- Cleaning possible
yes / no
yes / no
yes / no
3
Overflow air outlets
- Configuration as planned
- Version as planned
yes / no
yes / no
4
Extract air outlets
- Configuration as planned
- Version as planned
- Cleaning possible
yes / no
yes / no
yes / no
5
6
7
Extract air duct
Extract air fan
Control unit
- Cleaning possible
- Cleaning possible
- working?
yes / no
yes / no
yes / no
8
Filters, optional
- Possibility to change
- or clean
yes / no
9
Heat exchanger for heat recovery
- Cleaning possible
yes / no
10
11
12
13
14
15
Extract air heat pump, optional
Condensate drain, optional
Ground to air heat exchanger, optional
Duct heater, optional
Solar panel
Documentation / manual
- Cleaning possible
- working?
- Cleaning possible
- Cleaning possible
- Cleaning possible
- available
yes / no
yes / no
yes / no
yes / no
yes / no
yes / no
Function
1
Ready to use in standard mode (nominal
ventilation), as planned
Result OK
further steps necessary
yes / no
yes / no
2
Different modes possible, as planned
Result OK
further steps necessary
yes / no
yes / no
3
Power consumption
Result OK
further steps necessary
yes / no
yes / no
Confirmation
Date: ................................... Signature/Stamp:.......................................................................................
Startup personnel / Plumber
© Paul Wärmerückgewinnung GmbH • August-Horch-Straße 7 • 08141 Reinsdorf • Germany
Tel: +49(0)375-303505-0 • Fax: +49(0)375-303505-55 • E-Mail: [email protected] • Internet: www.paul-lueftung.de
EC Declaration of Conformity
Paul Wärmerückgewinnung GmbH
August-Horch-Straße 7
08141 Reinsdorf
Germany
phone: +49(0)375 - 303505 - 0
fax: +49(0)375 - 303505 -55
EC Declaration of Conformity
Name of the device
: Heat recovery units:
focus 200 product line
Complies with the directives
: Machinery Directive
Low Voltage Directive
EMC Directive
(2006/42/EC)
(93/68/EC)
(89/336/EC)
Reinsdorf, 04 May 2010
Paul Wärmerückgewinnung GmbH
Eberhard Paul
General Managing Director