1
Printer Protocol Interpreter IGL™
Programmer’s Reference Manual for IGL,
an Intermec® IPL® Printer Protocol Interpreter
Thermal Series Printers
Printer Protocol Interpreter IGL
Programmer’s Reference Manual for IGL,
an Intermec Printer Protocol Interpreter
Thermal Series Printers
Trademark Acknowledgments
Intermec is a registered trademark of the Intermec Technologies Corporation.
SL4M, T4M, SL5000r, T5000r, and SL/T5R Energy Star are trademarks of
Printronix, Inc.
Printronix and PSA are registered trademarks of Printronix, Inc.
PrintSet is a trademark of the Intermec Technologies Corporation.
COPYRIGHT 2006, 2010 PRINTRONIX, INC.
All rights reserved.
Table of Contents
1 Introduction ......................................................... 11
About This Manual............................................................................... 11
Upload And Download IPL3 Resident Bitmap Fonts ........................... 11
Upload And Download IPL3 Saved Formats In Flash ......................... 12
Save Format ........................................................................................ 12
DPI Compatibility ................................................................................. 12
Selecting Serial Protocols.................................................................... 13
Intermec Standard Protocol .......................................................... 13
XON/XOFF Protocol (With Status) ................................................ 14
XON/XOFF Protocol (Without Status) ........................................... 14
IGL SETUP Menu ................................................................................ 15
IGL SETUP Submenus ................................................................. 16
Active ...................................................................................... 16
Mode on Power Up ................................................................. 16
Print Language ....................................................................... 16
IBM Translation....................................................................... 16
Slash Zero .............................................................................. 16
EURO-Symbol ........................................................................ 16
Preparsing data ...................................................................... 17
Status on <ETX> .................................................................... 17
Cutter Cmd (c) ........................................................................ 17
PwrUpMod Cmd (C) ............................................................... 17
EOP Dist Cmd (D) .................................................................. 17
Intens. Cmd (d) ....................................................................... 17
TOF set Cmd (F)..................................................................... 18
LRP adj. Cmd (f) ..................................................................... 18
Speed Cmd (S) ....................................................................... 18
Stock Cmd (T)......................................................................... 18
Warm Bt Cmd (BS) ................................................................. 18
Vert. DPI Adjust ...................................................................... 19
Reported model ...................................................................... 19
Saving UDCs .......................................................................... 19
Save State .............................................................................. 20
Table of Contents
2 Fully Supported Commands................................ 21
; – Command Terminator........................................................ 21
<ACK> – First Data Entry Field, Select .................................. 21
<BS> – Warm Boot................................................................. 21
<CAN> – Clear All Data.......................................................... 21
<CR> – Next Data Entry Field, Select .................................... 21
<DEL> – Clear Data From Current Field ................................ 21
<ESC><SP> – Start and Stop Codes (Code 39), Print .......... 21
<ESC>Dn – Field Decrement, Set.......................................... 21
<ESC>En[,m] – Format, Select .............................................. 22
<ESC>Fn -or- <ESC>F“name” – Field, Select ....................... 22
<ESC>gm – Direct Graphics Mode, Select ............................ 22
<ESC>Gn – Page, Select ....................................................... 22
<ESC>In[,m] – Field Increment, Select .................................. 22
<ESC>Mn – Program Number, Transmit................................ 22
<ESC>N – Increment and Decrement, Disable ...................... 22
<ESC>P – Program Mode, Enter ........................................... 22
<ESC>T – Test and Service Mode, Enter .............................. 22
<ESC>Zt – User-Defined Tables, Transmit ............................ 22
<ETB> – Print ......................................................................... 22
<FF> – Form Feed.................................................................. 22
<FS>data<FS> – Numeric Field Separator ............................ 23
<GS>data<GS> – Alphanumeric Field Separator .................. 23
<LF> – Command Terminator 2 ............................................. 23
<NUL> – Command Terminator 1 .......................................... 23
<RS>n – Quantity Count, Set ................................................. 23
<SI>cn – Cutter, Enable or Disable*....................................... 23
<SI>Cn – Emulation or Advanced Mode on Power-Up .......... 23
<SI>dn – Dark Adjust, Set*..................................................... 23
<SI>D[n] – End-of-Print Skip Distance, Set*........................... 23
<SI>fn – Label Reset Point, Adjust* ....................................... 23
<SI>Fn – Top of Form, Set*.................................................... 24
<SI>in – IBM Language Translation, Enable or Disable......... 24
<SI>Sn – Print Speed, Set* .................................................... 24
<SI>tn – Self-Strip, Enable or Disable*................................... 24
<SI>Tn – Label Stock Type, Select*....................................... 24
<SI>Wn – Label Width, Set .................................................... 24
<SO> – Cut............................................................................. 24
<SUB> – Data Shift – International Characters ...................... 24
<US>n – Batch Count, Set ..................................................... 24
An[,name] – Format, Create or Edit........................................ 24
bn – Border Around Human-Readable Text, Define............... 25
Table of Contents
Bn[,name] – Bar Code Field, Create or Edit ........................... 25
cn – Graphic, Select ............................................................... 25
dn[,m1][,m2] – Field Data, Define Source............................... 25
Dn – Field, Delete ................................................................... 25
en[,m1][,m2] – Data Source for Format in a Page, Define...... 25
En – Format, Erase................................................................. 25
fn – Field Direction, Define ..................................................... 25
Fn[,name] – Format, Create or Edit ........................................ 25
gn – Pitch Size, Set ................................................................ 25
Gn[,name] – User-Defined Character, Clear or Create .......... 25
hn – Height Magnification of Bar, Box, or UDC, Define .......... 25
Hn[,name] – Human-Readable Field, Create or Edit .............. 26
in – Interpretive Field, Enable or Disable................................ 26
In – Interpretive Field, Edit...................................................... 26
kn – Point Size, Set ................................................................ 26
ln – Length of Line or Box Field, Define.................................. 26
Ln[,name] – Line Field, Create or Edit .................................... 26
mp – Format Position From Page, Delete .............................. 26
Mp,n – Format Position in a Page, Assign.............................. 26
on,m – Field Origin, Define ..................................................... 26
On,m – Format Offset Within a Page, Define ......................... 26
p[n1][n2][n3][n4]; – Code 39 Prefix Character, Define............ 26
qn – Format Direction in a Page, Define................................. 27
rn – Character Rotation or Bar Code Ratio, Define ................ 27
R – Program Mode, Exit -also- Test and Service Mode, Exit . 27
sn – Page, Delete ................................................................... 27
Sn – Page, Create or Edit....................................................... 27
tn – User-Defined Font Character, Create.............................. 27
Tn[,name] – Bitmap User-Defined Font, Clear or Define ........ 27
un,m...m – Graphic or UDC, Define........................................ 27
Un[,name] – User-Defined Character Field, Create or Edit .... 27
wn – Width of Line, Box, or Character, Define........................ 27
Wn[,name] – Box Field, Create or Edit ................................... 27
xn – Bitmap Cell Width for Graphic or UDF, Define................ 28
Xn – Character Bitmap Origin Offset, Define.......................... 28
yn – Bitmap Cell Height for Graphic or UDF, Define .............. 28
zn – Intercharacter Space for UDF, Define............................. 28
Table of Contents
3 Partially Supported Commands .......................... 29
<BEL> – Error Code, Request................................................ 29
<DLE> – Reset ....................................................................... 29
<ENQ> – Status Enquiry ........................................................ 29
<ESC>cn – Emulation Mode, Enter........................................ 29
<ESC>Cn – Advanced Mode, Select...................................... 29
<ESC>mn – Memory Usage, Transmit................................... 30
<ESC>O – Options Selected, Transmit .................................. 30
<ESC>p – Configuration Parameters, Transmit ..................... 30
<ESC>un – User-Defined Characters, Transmit .................... 30
<ESC>vn – Font, Transmit ..................................................... 30
<ESC>xn – Format, Transmit ................................................. 30
<ESC>yn – Page, Transmit .................................................... 30
cn[,m1][,m2][,m3] – Bar Code, Select Type............................ 31
cn[,m] – Font Type, Select...................................................... 32
<SI>hn[,m] – Printhead Loading Mode, Select ....................... 32
<SI>ln – Printer Language, Select.......................................... 32
<VT> – Status Dump .............................................................. 32
Zn – Font Character Width, Define ......................................... 32
4 Ignored Commands............................................. 33
<EM> – Abort Print Job .......................................................... 33
<EOT>n – Postamble, Set...................................................... 33
<ESC>d – Auto-Transmit 2, Enable ....................................... 33
<ESC>e – Auto-Transmit 3, Enable ....................................... 33
<ESC>H – Printhead Parameters, Transmit........................... 33
<ESC>j – Auto-Transmit 1, Enable......................................... 33
<ESC>k – Auto-Transmit 1, 2, and 3, Disable........................ 33
<ESC>L – Label and Gap Length, Transmit........................... 33
<ESC>Q – Remaining Quantity and Batch Count,
Transmit.................................................................................. 33
<ESC><SYN>n – Message Delay, Set .................................. 34
<SI>an – Audible Alarm, Enable or Disable ........................... 34
<SI>An – Control Panel Access Permission, Set ................... 34
<SI>bn – Takeup Motor Torque, Increase.............................. 34
<SI>en – Media Fault Recovery Mode, Set............................ 34
<SI>gn[,m] – Media Sensitivity, Select ................................... 34
<SI>Hn – Printhead Pressure, Select..................................... 34
<SI>In – Number of Image Bands, Select .............................. 34
<SI>Ln – Maximum Label Length, Set ................................... 34
<SI>Nn – Amount of Storage, Define ..................................... 34
<SI>On – Online or Offline on Power-Up ............................... 34
Table of Contents
<SI>pn[,m] – Pin 11/20 Protocol, Set ..................................... 34
<SI>P[n1][,n2][,n3][,n4][,n5][,n6] – Communication Port
Configuration, Set ................................................................... 35
<SI>rn – Label Retract Distance, Set ..................................... 35
<SI>Rn – Label Retract, Enable or Disable............................ 35
<SI>sn – Interlabel Ribbon Save, Enable or Disable.............. 35
<SI>Un[,m][,p][,q] – Printhead Test Parameters, Set ............. 35
<SI>Zn[,m] – Ribbon Save Zones, Set ................................... 35
<SOH>n – Preamble, Set ....................................................... 35
<SYN>n – Intercharacter Delay, Set ...................................... 35
A – Ambient Temperature, Transmit....................................... 35
B – Printhead Resistance Test, Begin .................................... 35
C – Pitch Label, Print .............................................................. 35
D – Factory Defaults, Reset.................................................... 35
f – Formats, Print .................................................................... 36
g – User-Defined Characters (UDC) and Graphics, Print ....... 36
G – Transmissive Sensor Value, Transmit ............................. 36
h – Hardware Configuration Label, Print................................. 36
jnn...nn – Outline Font, Download .......................................... 36
Jn[,name][,type][,size] – Outline Font, Clear or Create........... 36
K – Dark Adjust....................................................................... 36
L – Label Path Open Sensor Value, Transmit ........................ 36
M – Reflective Sensor Value, Transmit .................................. 36
N – Current Edit Session, Save .............................................. 36
p – Pages, Print ...................................................................... 36
P – Printhead Temperature Sensor Value, Transmit.............. 36
Q – Print Quality Label, Print .................................................. 37
s – Software Configuration Label, Print .................................. 37
S – Printhead Resistance Values, Transmit ........................... 37
t – User-Defined Fonts, Print .................................................. 37
T – Label Taken Sensor Value, Transmit ............................... 37
U – 12 Volt Supply Value, Transmit........................................ 37
V – Printhead Volt Supply Value, Transmit............................. 37
A ASCII Codes ....................................................... 39
B Error Codes......................................................... 41
C Contact Information............................................. 45
Printronix Customer Support Center.................................................... 45
Printronix Supplies Department ........................................................... 45
Corporate Offices................................................................................. 46
Table of Contents
1
Introduction
About This Manual
This manual explains the differences between Printer Protocol Interpreter
Intermec Graphic Language (IGL) Utility and the Intermec® Printer Language
(IPL). If you have a SL5000r/T5000r printer use this manual with your
SL5000r™/T5000r ™ User’s Manual for complete printer-protocol operation.
If you have a SL4M™/T4M™ printer use this manual with your SL4M/T4M
User’s Manual.
Since the SL5000r/T5000r or SL4M/T4M comes equipped with scalable fonts,
some fonts will be fully compatible in appearance only if you download bitmap
fonts into the printer. For most applications, scalable fonts have a better
appearance.
Upload And Download IPL3 Resident Bitmap Fonts
You can upload the resident bitmap fonts from different Intermec printers and
then download them to Printronix thermal printers that have IGL installed.
You can upload the fonts from Intermec printers in either Emulation or
Advanced mode. The resulting font data will describe the same fonts but in
different formats. In Emulation mode, one byte is used to describe each pixel.
In Advanced mode, one byte describes six pixels. Although Advanced mode
is more compact, you may have problems when you upload some of the
Intermec fonts using Advanced mode.
The Intermec printer will upload the font through the serial port. You can use a
terminal program to capture the data and download the uploaded data to a
Printronix printer with no change.
IGL allows downloading fonts to any of the font IDs, and IGL will replace the
scalable font by a downloaded bitmap font.
In the following examples, font number 12 will upload from the Intermec.
Emulation mode font upload:
<STX><ESC>c<ETX>
<STX><ESC>v12<ETX>
Advanced mode font upload:
<STX><ESC>C<ETX>
<STX><ESC>v12<ETX>
11
Chapter
1
Upload And Download IPL3 Saved Formats In Flash
Upload And Download IPL3 Saved Formats In Flash
If the Printronix thermal printer is replacing an Intermec printer, the customer
must transfer the saved formats on the Intermec printer to the new Printronix
printer.
When you send the <ESC>x command to the Intermec printer, all the saved
formats will upload from the flash memory. Use a serial terminal on the host to
capture these data, then download these saved formats directly to the
Printronix printer.
After downloading the data, use the Save state menu item to save these
formats to the flash memory.
Save Format
IGL allows you to edit the formats and save the results to the flash memory.
Use the Save state menu item to save the current state of the printer to the
flash memory. The pages, formats, and fields that currently exist in RAM
memory will save to the flash memory and restore at power up. This allows
you to send the format once, and make it resident in the printer.
DPI Compatibility
Intermec has printer models with print head resolutions of 203, 300 (older
models), and 406 dpi (dots per inch). The Printronix SL5000r/T5000r-IGL with
a 203 dpi printhead can replace an Intermec 203 dpi model. The Printronix
SL5000r/T5000r-IGL with a 300 dpi printhead can replace an Intermec 300
dpi model. The Printronix SL5000r/T5000r-IGL with a 203 dpi printhead can
replace an Intermec 406 dpi printer if the Intermec printer operates in
Advanced 5mil mode, but not if it operates in Advanced 2.5mil mode.
In IGL, the <ESC>Cn, <ESC>cn, and <SI>Cn have been implemented.
The n parameter in the <ESC>Cn command is ignored since Printronix
printers do not support the 2.5 mil dot size (only Intermec 406 dpi printers
support the n parameter). The dot size will always be set to 5 mil when this
command is received. The dot size can be set to 10 or 15 mil (bar codes only)
using the <ESC>cn command. Images, fonts, lines, bar codes, and boxes will
be scaled to the configured dot size. For example, if a label is printed in
Emulation 10mil mode, it will be twice the size of the same label printed in
Advanced 5mil mode.
The <SI>n command has been implemented, and it will change the Mode on
Power Up value on printers with a 203 dpi printhead. As on Intermec printers,
Printronix 203 dpi printers will ignore the Advanced 2.5mil mode, since these
printers cannot print a 2.5 mil dot size.
NOTE: The configured mode does not save automatically. You must save
the value in one of the user configurations and make it the Power-Up
Config. so that this mode is selected automatically on power up.
12
Intermec Standard Protocol
On printers with a 300 dpi printhead, the <ESC>Cn, <ESC>cn, and <SI>Cn
commands will not change the dot size. Printronix 300 dpi printers are
compatible with Intermec 300 dpi printers, and will always use a dot size of
3.3mil. Since the 300 dpi printers do not use the Mode on Power Up menu, it
will not appear when a 300 dpi printhead is installed.
Selecting Serial Protocols
You can access the serial interface by default (hot port) or by setting the
Interface to Serial.
The following three menus affect the serial protocol selection:
•
•
•
SERIAL PORT/Data Protocol
IGL SETUP/Preparsing data
IGL SETUP/Status on <ETX>
If you are not interested in Immediate commands or feedbacks sent back to
the host, set Preparsing data to Disable.
Intermec Standard Protocol
Intermec standard protocol is a block protocol. Each block begins with STX
and ends with ETX. After each block the host will wait for a status response
from the printer. Refer to Table 1 for a list of status responses in priority.
Table 1. Intermec Standard Protocol Status Responses
in Priority
Status Response
Description
NAK (0x15)
Serial interface transmission error
GS (0x1D)
Buffer already full
US (0x1F)
Ribbon Fault
EM (0x19)
No label
DC3 (0x13)
Buffer now full or offline
SI (0x0F)
DC1 (0x11)
Printhead hot
Skipping, printing, or ready/online
To select this protocol, set the menus as follows:
•
•
•
SERIAL PORT/Data Protocol
Set to DTR
IGL SETUP/Preparsing data
Set to Enable
IGL SETUP/Status on <ETX>
Set to Enable
13
Chapter
1
Selecting Serial Protocols
XON/XOFF Protocol (With Status)
XON/XOFF Protocol is the standard XON/XOFF serial protocol for flow
control. The data is sent in STX/ETX blocks and status must be sent when an
ETX is received. Refer to Table 2 for a list of status responses in priority.
Table 2. XON/XOFF Protocol Status Responses
in Priority
Status Response
Description
GS (0x1D)
Buffer already full
US (0x1F)
Ribbon Fault
EM (0x19)
No label
DC4 (0x14)
Buffer now full or offline
SI (0x0F)
DC2 (0x12)
Printhead hot
Skipping, printing, or ready/online
To select this protocol, set the menus as follows:
•
•
•
SERIAL PORT/Data Protocol
Set to XON/XOFF
IGL SETUP/Preparsing data
Set to Enable
IGL SETUP/Status on <ETX>
Set to Enable
XON/XOFF Protocol (Without Status)
XON/XOFF Protocol is the standard XON/XOFF serial protocol for flow
control. The data is sent in STX/ETX blocks, but no status is sent when an
ETX is received.
To select this protocol, set the menus as follows:
•
•
•
14
SERIAL PORT/Data Protocol
Set to XON/XOFF
IGL SETUP/Preparsing data
Set to Enable
IGL SETUP/Status on <ETX>
Set to Disable
XON/XOFF Protocol (Without Status)
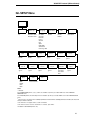
IGL SETUP Menu
IGL SETUP
Active
Yes*
No
Preparsing
Data
Disable*
Enable
TOF set
Cmd (F)
Process*
Ignore
Reported
Model
Auto Detect*
3600
4420E
4630
4830
Mode on
Power Up 1
Print
Language
Advanced 5mil*
Emulation 10mil
Emulation 15mil
US ASCII*
UK ASCII
Germany
Denmark
France
Sweden
Italy
Spain
8-Bit ASCII
Switzerland
Code Page 850
Status on
<ETX>
Disable*
Enable
Cutter
Cmd(c) 2
Process*
Ignore
LRP adj.
Cmd (f)
Process*
Ignore
Saving
UDCs
Speed
Cmd (S)
Process*
Ignore
IBM
Translation
Disable*
Enable
PowerUpMod
Cmd (C)
Process*
Ignore
Stock
Cmd (T)
Process*
Ignore
Slash
Zero
Font Based*
Disable
Enable
EOP Dist
Cmd (D)
Process*
Ignore
Warm Bt
Cmd (BS) 2
Ignore*
Soft Reset
Save State
Both
EURO-Symbol
0x0*
0x0 to 0xFF
Intens.
Cmd (d)
Process*
Ignore
Vert. DPI
Adjust 4
Process*
Ignore
Save
State 3
Automatic*
Use Save State
Notes:
* = Default.
For SL5000r/T5000r printers, italicized items are available only when you enable Admin User in the PRINTER
CONTROL menu.
For SL4M/T4M printers, the IGL Setup menu is available only when you enable Admin User in the PRINTER SETUP
menu.
1
This menu does not appear when a 300 dpi printhead is installed. When a 300 dpi printhead is installed, the mode will
always be Advanced 3.3mil.
2
This menu does not appear unless a cutter is installed.
3
This menu is used to save the current state. To activate, press Enter.
4
Available for SL4M/T4M printers only.
15
Chapter
1
IGL SETUP Menu
IGL SETUP Submenus
Active
If set to Yes, all data will be parsed by the IGL emulation. Non IGL data will be
absorbed. If set to No, non-IGL text data will print.
The default is Yes.
Mode on Power Up
This menu item defines the IGL mode on power up. You can select advanced
modes or one of the two emulation modes.
The default is Advanced 5mil.
NOTE: This menu does not appear when a 300 dpi printhead is installed.
When a 300 dpi printhead is installed, the mode will always be
Advanced 3.3mil.
Print Language
This menu item selects the character set.
The default is US ASCII.
IBM Translation
If set to Enable, the IBM version of the selected character set will be used.
The default is Disable.
Slash Zero
This menu item determines if the zero character gets printed as slash-zero (Ø).
If set to Font Based, the zero will only print as slash-zero if the selected font
contains the slash-zero character. This mimics the IPL3 printers, where not all
fonts contain a slash-zero.
If set to Disable, zero characters will never be printed as slash-zero.
If set to Enable, all zero characters will be printed as slash-zero, independent
of the selected font.
The default is Font Based.
EURO-Symbol
This menu item defines the code page position that contains the Euro symbol
(€
€ ).
The default is 0x0.
16
IGL SETUP Submenus
Preparsing data
This menu item enables or disables the data preparser (currently supported
on serial interface and TCP).
NOTE: When the preparser is enabled on TCP, the host should use the
Intermec standard protocol.
If set to Enable, the data received from the host is preprocessed to quickly
respond to the Immediate commands.
If set to Disable, the data is processed synchronously: commands are not
processed until all preceding commands have been processed. The default is
Disable.
When this menu item is enabled, Printronix PGL Windows Drivers cannot be
utilized. For SL5000r/T5000r printers, the TN Protocol cannot be utilized.
Status on <ETX>
This menu item determines if a printer status should be returned to the host
on receipt of the block terminator <ETX>. This has been implemented for
serial interface only, X-on, X-off, or Intermec protocol. See “Intermec
Standard Protocol” on page 13 for information on selecting these protocols.
The default is Disable.
Cutter Cmd (c)
This menu item defines if the <SI>c command (which enables or disables the
cutter) is processed or ignored.
The default is Process.
PwrUpMod Cmd (C)
This menu item defines if the <SI>C command (which selects the Emulation
or Advanced power up mode) is processed or ignored.
The default is Process.
EOP Dist Cmd (D)
This menu item is used to define if the <SI>D command (which sets the End
Of Print distance) is processed or ignored.
The default is Process.
Intens. Cmd (d)
This menu item is used to define if the <SI>d command (which sets the print
darkness) is processed or ignored.
If you adjust the print intensity using the control panel, host commands will not
override your control panel settings. If set to Ignore, the command will be
ignored, and the Print Intensity as configured in the MEDIA CONTROL menu
(SL5000r/T5000r) or MEDIA SETUP menu (SL4M/T4M) will be used.
The default is Process.
17
Chapter
1
IGL SETUP Menu
TOF set Cmd (F)
This menu item is used to define if the <SI>F command (which sets the Top
Of Form [start print point]) is processed or ignored.
The default is Process.
LRP adj. Cmd (f)
This menu item is used to define if the <SI>f command (which sets the Label
Rest Point [label position after printing]) is processed or ignored.
The default is Process.
Speed Cmd (S)
This menu item is used to define if the <SI>S command (which sets the print
speed) is processed or ignored.
If you adjust the print/feed speed using the control panel, host commands will
not override your control panel settings.
The default is Process.
Stock Cmd (T)
This menu item is used to define if the <SI>T command (which sets the media
handling) is processed or ignored. If set to Ignored, host commands will not
override the Media Handling as set by the MEDIA CONTROL menu or MEDIA
SETUP menu (SL4M/T4M).
The default is Process.
Warm Bt Cmd (BS)
This menu item defines the handling of the warm boot <BS> command. It has
four options: Ignore, Soft Reset, Save State, or Both. For backwards
compatibility the default setting is Ignore. When set to Save State, the printer
executes the save state action as if it was performed from the Save State
menu option
(see page 20). If Soft Reset is selected, the emulation will reset. In this case
the host needs to stop sending data for at least 1 second to give the system
time to perform the reset. When Both is selected, the printer performs the
Save State action first and then resets the emulation.
18
IGL SETUP Submenus
Vert. DPI Adjust
NOTE: Applies to SL4M/T4M printers only.
This menu item fine adjusts the resolution used to convert the coordinates of
page elements (bar codes, font fields, graphic images, lines and boxes). The
coordinates received from the host are converted to engine resolution (203 or
300 dpi).
In cases where the printed label length is incorrect, the vertical resolution
value IGL uses for calculations can be fine adjusted by this menu item
between –100 and +100. Negative values result in a lower DPI value and thus
a longer label. Positive values result in a higher DPI value and thus a shorter
label.
NOTE: This adjustment does not affect the size of fonts and bar codes.
It only affects the coordinates.
The default is 0.
Reported model
This menu item is used to define which printer model IGL reports on the
<ESC>M command. If set to “Auto detect” IGL will report a model that
corresponds with the actual width and resolution of the printer running
IGL. For example, IGL running on a 6 inch printer with 203 dpi head will report
model 3600.
Manual selection may be needed in cases where the auto-detected Intermec
model does not support a feature the user may want to use. For example,
TrueType font download is not supported on an Intermec 3600 printer.
IGL supports always supports this feature. To download TrueType fonts via
the Intermec utility, the user can set the model to 4420E (which does support
TrueType font download), and download the font.
NOTE: This setting only affects the model reported to the host. It does not
affect the IGL behavior in any other way.
The default is Auto detect.
Saving UDCs
This menu item is used to define if User Defined Characters (UDCs) are
saved to flash automatically or manually via the Save state menu. Manual
saving must be selected in cases where UDCs are sent over and over again
for each label. If the menu is set to Automatic in these cases, the file system
could run full, as it is not automatically optimized.
The default is Automatic.
19
Chapter
1
IGL SETUP Menu
Save State
This menu item saves the current state of the printer to flash memory. The
pages, formats, and fields that currently exist in RAM memory save to flash
memory and are restored at power up. This allows you to send the format
once and make it resident in the printer.
NOTE: Saving the state does not save general printer settings for which
configuration menus are provided. These settings are saved by
storing the configuration, and selecting that configuration as the
power up configuration. Examples of settings that can be configured
this way by host control are print speed, print density, and media
handling (continuous, tear-off, etc.).
20
2
Fully Supported
Commands
*These fully supported commands can be rendered ignored if set as ignored
in the IGL menu.
; – Command Terminator
This command terminator must end all commands in Test and Service mode,
except the last command in a message.
<ACK> – First Data Entry Field, Select
This command selects the first data entry field that can accept Print mode
data.
<BS> – Warm Boot
This command performs a warm boot that resets the printer. Handling of this
command depends on the setting under Warm Bt Cmd (BS) menu.
See “IGL SETUP Menu” on page 15.
<CAN> – Clear All Data
This command clears all host-entered data from the current format or page.
<CR> – Next Data Entry Field, Select
This command moves the field pointer to the next data entry field.
<DEL> – Clear Data From Current Field
This command erases data from the current field.
<ESC><SP> – Start and Stop Codes (Code 39), Print
This command prints the start and stop characters of the current Code 39
field.
<ESC>Dn – Field Decrement, Set
This command sets the field decrement value for the selected field.
21
Chapter
2
<ESC>En[,m] – Format, Select
This command selects the format for printing or data entry.
<ESC>Fn -or- <ESC>F“name” – Field, Select
This command selects field n or field name for entering or working with data.
<ESC>gm – Direct Graphics Mode, Select
This command selects Direct Graphics mode, which allows you to download
graphic images directly into image memory without storing them in the
printer’s nonvolatile RAM.
<ESC>Gn – Page, Select
This command selects page n for printing or data entry.
<ESC>In[,m] – Field Increment, Select
NOTE: The sixth character in this command is an uppercase “i”.
This command selects field increment n for the selected field.
<ESC>Mn – Program Number, Transmit
This command transmits the program and version numbers to the host.
<ESC>N – Increment and Decrement, Disable
This command resets increment or decrement flags for the current field.
<ESC>P – Program Mode, Enter
This command places the printer in Program mode, which allows you to
create or edit pages, formats, fonts, or graphics.
<ESC>T – Test and Service Mode, Enter
This command places the printer in Test and Service mode.
<ESC>Zt – User-Defined Tables, Transmit
This command transmits user-defined command and protocol tables (which
the printer receives to download a new command set) to the host.
<ETB> – Print
This command prints the current page or format that contains previously
entered data.
<FF> – Form Feed
This command performs a form feed, which feeds a label out to the next print
point.
22
<FS>data<FS> – Numeric Field Separator
This command indicates which numeric data within a field to increment or
decrement.
<GS>data<GS> – Alphanumeric Field Separator
This command increments or decrements alphanumeric characters within a
field-separated region.
<LF> – Command Terminator 2
The command terminates the current command.
<NUL> – Command Terminator 1
This command terminates the current command.
<RS>n – Quantity Count, Set
This command sets the quantity count, which is the quantity of label batches n
that will print with the next print command.
NOTE: The third character in the following 11 commands are uppercase “i”s.
<SI>cn – Cutter, Enable or Disable*
This command enables or disables the cutter feature (if installed).
n = 0 disables, n = 1 enables.
<SI>Cn – Emulation or Advanced Mode on Power-Up
This command specifies whether the printer will be in Emulation or Advanced
mode when powered on.
<SI>dn – Dark Adjust, Set*
This command sets the dark adjust command which determines the print
darkness on the labels.
This command supports a range of -10 to +10.
<SI>D[n] – End-of-Print Skip Distance, Set*
This command sets the end-of-print skip distance. This value, in 5 mil
increments, is the distance that the label advances after printing or when you
pause printing.
This command supports a range of 0” to 50”.
<SI>fn – Label Reset Point, Adjust*
This command adjusts the label reset point (the point where the labels stop
for removal) to n. This command is for self-strip applications.
This command supports a range of -0,15” to +0,15”.
23
Chapter
2
<SI>Fn – Top of Form, Set*
This command sets the top of form (left margin or start print point) to n.
n is the distance, in 5 mil increments, from the label origin to its leading edge.
This command supports a range of 0.05” to 4”.
<SI>in – IBM Language Translation, Enable or Disable
This command enables or disables the IBM language translation feature.
n = 0 disables, n = 1 enables.
This command overrides the control panel setting, but the value will not be
automatically saved in the configuration. You must save the configuration
manually.
<SI>Sn – Print Speed, Set*
This command sets the print speed to n.
This command supports a range of 20 to 100, which represents 2 to 10 ips.
<SI>tn – Self-Strip, Enable or Disable*
This command enables or disables the self-strip (label taken sensor).
n = 0 disables, n = 1 enables.
<SI>Tn – Label Stock Type, Select*
This command selects the type of label stock.
<SI>Wn – Label Width, Set
This command sets the label width to n, the number between the minimum
and maximum number of dots for your printer.
<SO> – Cut
This command cuts the label stock by advancing the label to the cutter.
<SUB> – Data Shift – International Characters
This command allows you to enter command characters as data.
<US>n – Batch Count, Set
This command sets the batch count, which is the number of labels n that will
print in the next batch.
An[,name] – Format, Create or Edit
This command creates or edits a format.
NOTE: This is the same command as the Fn[,name] – Format, Create or Edit
command.
24
bn – Border Around Human-Readable Text, Define
This command defines a border around a human-readable text field.
Bn[,name] – Bar Code Field, Create or Edit
This command creates or edits a bar code field.
cn – Graphic, Select
This command selects a graphic for graphic fields.
dn[,m1][,m2] – Field Data, Define Source
This command defines the current field’s data source and number of
characters in the field.
Dn – Field, Delete
This command deletes field n from the format.
en[,m1][,m2] – Data Source for Format in a Page, Define
This command defines a data source for a format assigned to a page position.
En – Format, Erase
This command erases the format ID number n.
fn – Field Direction, Define
This command defines the field rotation.
Fn[,name] – Format, Create or Edit
This command creates or edits a format.
NOTE: This is the same command as the An[,name] – Format, Create or Edit
command.
gn – Pitch Size, Set
This command sets the pitch size that defines the size of the characters in
human-readable fields. This command is available in Advanced mode only.
When you use the Pitch Size, Set command, the Height Magnification, Width
magnification, and Point Size, Set commands are disabled.
Gn[,name] – User-Defined Character, Clear or Create
This command clears or creates a graphic bitmap.
hn – Height Magnification of Bar, Box, or UDC, Define
This command defines the height magnification of bar, box, or UDC. It defines
the height n in number of dots for bar codes and box fields.
25
Chapter
2
Hn[,name] – Human-Readable Field, Create or Edit
This command creates or edits a human-readable field.
in – Interpretive Field, Enable or Disable
This command edits an interpretive field.
In – Interpretive Field, Edit
NOTE: The first character in this command is an uppercase “i”.
This command edits and interpretive field.
n = 0 disables, n = 1 enables with start or stop characters, n = 2 enables
without start or stop characters.
kn – Point Size, Set
This command sets the point size that defines the size of the characters in
human-readable fields. This command is available in Advanced mode only.
ln – Length of Line or Box Field, Define
NOTE: The first character in this command is a lowercase “L”.
This command defines the length of a line or box. n is the number of dots that
defines the length of a line or box field.
Ln[,name] – Line Field, Create or Edit
This command creates or edits a line field.
mp – Format Position From Page, Delete
This command deletes the page position p from a page.
Mp,n – Format Position in a Page, Assign
This command assigns the numeric format ID n to page position p.
on,m – Field Origin, Define
This command defines the field origin. Horizontal n and vertical m locations
define the number of dots from the label’s field origin. The upper-left corner of
the label is the field origin (0,0).
On,m – Format Offset Within a Page, Define
This command defines the format offsets within a page. This command also
creates new origins for fields within a format by adding the format offsets to
the original field offsets. m and n represent dot size increments.
p[n1][n2][n3][n4]; – Code 39 Prefix Character, Define
This command defines the Code 39 field’s prefix character. The prefix is valid
for Code 39 fields only.
26
qn – Format Direction in a Page, Define
This command defines the format directions within a page.
rn – Character Rotation or Bar Code Ratio, Define
This command defines the human-readable field’s character rotation, or the
bar code field’s bar code ratio.
R – Program Mode, Exit -also- Test and Service Mode, Exit
This command causes the printer to exit Program or Test and Service mode
and enter Print mode. This command also saves any current page or format
being edited.
sn – Page, Delete
This command deletes a page. n is the numeric page ID.
Sn – Page, Create or Edit
This command creates or edits a page. n is the numeric page ID.
tn – User-Defined Font Character, Create
This command indicates the font character you will define next.
Tn[,name] – Bitmap User-Defined Font, Clear or Define
This command clears or creates a user-defined bitmap font set. n is the font
ID number.
un,m...m – Graphic or UDC, Define
This command maps one column (n) of bitmap for a graphic or a font
character.
In Emulation mode, m...m is a string of 1s and 0s that defines the column and
specifies whether or not to print in that row element of the column (m = 1:
prints; m = 0: does not print). Unmapped columns or row elements default to
m = 0. In Advanced mode, each data byte m represents 6 bits of the bitmap.
Un[,name] – User-Defined Character Field, Create or Edit
This command creates or edits a user-defined character (graphic) field.
wn – Width of Line, Box, or Character, Define
This command defines width magnification of a line, box, or character. The
number of dots specified for n defines the width of line, box, or bar code fields.
n is the character width magnification for human-readable fields, graphics,
and the POSTNET symbology.
Wn[,name] – Box Field, Create or Edit
This command creates or edits a box field.
27
Chapter
2
xn – Bitmap Cell Width for Graphic or UDF, Define
This command defines the maximum width for a graphic or a character in a
font. Each character’s width is within this amount, and is at least as wide as
the font’s widest character. n is the number of columns for the UDC, bitmap,
or user-defined font. For outline fonts, n is the number of dots that defines the
width of the base character.
Xn – Character Bitmap Origin Offset, Define
This command defines the offset, to the right, of all the characters in a font.
If you define each character’s width in columns, with the first column
numbered 0, then the origin of each character is at the same column number
as n. For example, n = 2 shifts the character origin two columns to the right.
yn – Bitmap Cell Height for Graphic or UDF, Define
This command defines the height of a graphic or user-defined font.
zn – Intercharacter Space for UDF, Define
This command defines the intercharacter space, which is the amount of space
added to a bitmap font’s default intercharacter gap length. n is the number of
dots you select for the intercharacter gap length.
28
3
Partially Supported
Commands
<BEL> – Error Code, Request
The printer sends an ASCII number representing the most recent error code.
The are two types of errors: command syntax and printer RAM usage.
If there have been no errors since the printer was powered on, the printer
sends 00.
IGL will not detect all errors that IPL3 does. See Appendix B for a list of error
codes.
<DLE> – Reset
This command performs a printer power on reset immediately. All data and
commands in the input buffer erase when the printer resets.
<ENQ> – Status Enquiry
This command transmits the current printer status to the host.
IGL will not detect all errors that IPL3 does. See Appendix B for a list of error
codes.
The printer uploads the status in the following order of priority for Intermec
Standard Protocol. See Appendix A for an ASCII codes table.
<GS> Buffer already full
<BS> Takeup reel full
<SO> Printhead test fail
<SI> Printhead hot
<US> Label path open
<FS> Label at strip pin
<US> Ribbon fault
<DC1> Skipping
<EM> No label stock
<DC1> Printing
<DC3> Buffer now full
<DC1> Ready
<ESC>cn – Emulation Mode, Enter
This command places the printer in Emulation mode. n specifies the dot size.
Not all dot sizes are supported.
<ESC>Cn – Advanced Mode, Select
This command places the printer in Advanced mode, the default. n specifies
the dot size.
Not all dot sizes are supported.
29
Chapter
3
<ESC>mn – Memory Usage, Transmit
This command transmits memory usage information (memory installed or
allocated and memory not being used) to the host.
<ESC>O – Options Selected, Transmit
This command transmits a list of select options to the host.
This command transmits a hardcoded value that says no options are installed,
then a list of actual options installed.
<ESC>p – Configuration Parameters, Transmit
This command transmits the printer’s current configuration commands to the
host.
This command transmits hardcoded values as transmitted by an IPL3 4420,
then actual values where possible.
<ESC>un – User-Defined Characters, Transmit
This command transmits user-defined characters (graphic ID n), in the form of
commands and data, to the host.
This command transmits only the image directory part (required by the
PrintSet™ utility).
<ESC>vn – Font, Transmit
This command transmits font ID n, in the form of commands and data, to the
host.
This command transmits only the font directory part (required by the PrintSet
utility).
<ESC>xn – Format, Transmit
This command transmits format ID n, in the form of commands and data, to
the host.
This command transmits only the format directory part (required by the
PrintSet utility).
<ESC>yn – Page, Transmit
This command transmits page ID n, in the form of commands and data, to the
host. This command also transmits all the formats in the page.
This command transmits only the page directory part (required by the PrintSet
utility).
30
cn[,m1][,m2][,m3] – Bar Code, Select Type
Refer to Table 3 for a list of supported and non-supported bar codes.
Table 3. Supported and Non-Supported Bar Codes
Bar Code
Support
Code 39
Supported
Code 93
Supported
Interleaved 2 of 5
Supported
Code 2 of 5
Supported
Codabar
Supported
Code 11
Supported
Code 128
Supported
UPC/EAN Codes
HIBC Code 39
Supported, although versions D1, D2, D3, D4, and
D5 are obsolete and are not supported
Supported
Code 16K
Not supported – obsolete in industry
Code 49
Not supported – obsolete in industry
Postnet
Supported
PDF417
Supported
Code One
Not supported – obsolete in industry
Maxicode
Supported
JIS-ITF
Not supported
HIBC Code 128
Supported
Data Matrix
Supported
QR Code
Supported
NOTE: IPL3 supports Automatic Mask selection.
This is not supported on IGL emulation.
If Automatic Mask selection is specified in
the barcode command, IGL will use the No
Mask value for the Mask parameter.
MicroPDF417
Supported
RSS-14
Supported
31
Chapter
3
cn[,m] – Font Type, Select
This command selects a font type for human-readable fields.
This command does not support Asian TrueType, and does not support Kanji
and Katakana fonts.
<SI>hn[,m] – Printhead Loading Mode, Select
NOTE: The third character in this command is an uppercase “i”.
This command selects the printhead loading mode that determines how the
entire image prints on the label.
Mirror Printing mode reverses the order in which the data loads into the
printhead.
Inverse Printing mode, which causes all white pixels to invert to black and vice
versa, is not supported.
<SI>ln – Printer Language, Select
NOTE: The third character in this command is an uppercase “i” and the fifth
character is a lowercase “L”.
This command selects the printer language.
This command is fully implemented with the exception of CP850 (110), which
is not implemented for bitmap fonts in any font type.
This command overrides the control panel setting, but the value will not be
automatically saved in the configuration. You must save the configuration
manually.
<VT> – Status Dump
This command causes the printer to upload all current printer status.
IGL will not detect all errors that IPL3 does. See Appendix B for a list of error
codes.
The printer uploads the status in the following order of priority for Intermec
Standard Protocol. See Appendix A for an ASCII codes table.
<GS> Buffer already full
<BS> Takeup reel full
<SO> Printhead test fail
<SI> Printhead hot
<US> Label path open
<FS> Label at strip pin
<US> Ribbon fault
<DC1> Skipping
<EM> No label stock
<DC1> Printing
<DC3> Buffer now full
<DC1> Ready
Zn – Font Character Width, Define
This command defines the font character width, which is the amount of space
from the origin of one character to the origin of the next character. If you
define n too small, characters may overlap.
This command supports bitmap fonts only.
32
4
Ignored Commands
<EM> – Abort Print Job
This command stops the current batch print job, resets the batch quantity
count to the default value, and executes the commands remaining in the
buffer.
<EOT>n – Postamble, Set
This command sets the postamble character n.
<ESC>d – Auto-Transmit 2, Enable
This command enables auto-transmit level 2.
<ESC>e – Auto-Transmit 3, Enable
This command enables auto-transmit level 3.
<ESC>H – Printhead Parameters, Transmit
This command transmits the printhead parameters (number and size of dots
in the printhead) to the host.
<ESC>j – Auto-Transmit 1, Enable
This command enables auto-transmit level 1.
<ESC>k – Auto-Transmit 1, 2, and 3, Disable
This command disables auto-transmit levels 1, 2, and 3.
<ESC>L – Label and Gap Length, Transmit
This command transmits the label and gap length in 5 mil increments. Label
length is the length of the label being processed.
If the distance between the label sensor and the printhead is less than the
label length, the printer transmits the length of the previous label.
If continuous stock is selected, the printer transmits the length defined by the
Maximum Label Length, Set command.
<ESC>Q – Remaining Quantity and Batch Count, Transmit
This command transmits the remaining quantity and batch counts for the
current print job.
33
Chapter
4
<ESC><SYN>n – Message Delay, Set
This command sets the message delay in n milliseconds.
NOTE: The third character in the following 17 commands are uppercase “i”s.
<SI>an – Audible Alarm, Enable or Disable
This command enables or disables the audible alarm.
n = 0 disables, n = 1 enables.
<SI>An – Control Panel Access Permission, Set
This command restricts access to certain menus.
<SI>bn – Takeup Motor Torque, Increase
This command increases the takeup motor torque for 0% to 50% above the
default value.
<SI>en – Media Fault Recovery Mode, Set
This command sets the media fault recovery mode.
<SI>gn[,m] – Media Sensitivity, Select
This command selects the media sensitivity of the printer.
<SI>Hn – Printhead Pressure, Select
This command compensates for variations in the thickness of label stock.
<SI>In – Number of Image Bands, Select
NOTE: The fourth character in this command is an uppercase “i”.
This command selects the number of image bands.
<SI>Ln – Maximum Label Length, Set
This command sets the maximum label length.
<SI>Nn – Amount of Storage, Define
This command defines, in kilobytes, the amount of RAM you have allocated
for storage.
<SI>On – Online or Offline on Power-Up
This command specifies whether the printer will be online or offline when
powered on.
<SI>pn[,m] – Pin 11/20 Protocol, Set
This command sets the pin 11/20 protocol.
34
<SI>P[n1][,n2][,n3][,n4][,n5][,n6] – Communication Port
Configuration, Set
This command sets the communication (serial and parallel) port configuration.
<SI>rn – Label Retract Distance, Set
This command sets the label retract distance.
<SI>Rn – Label Retract, Enable or Disable
This command enables or disables the label retract option.
n = 0 disables, n = 1 enables.
<SI>sn – Interlabel Ribbon Save, Enable or Disable
This command enables or disables the interlabel ribbon save option.
n = 0 disables, n = 1 enables.
<SI>Un[,m][,p][,q] – Printhead Test Parameters, Set
This option sets the printhead test parameters.
<SI>Zn[,m] – Ribbon Save Zones, Set
This option sets the start and stop positions of a ribbon save zone within a
label.
<SOH>n – Preamble, Set
This command sets the preamble character.
<SYN>n – Intercharacter Delay, Set
This command sets the intercharacter delay, which is the time delay between
characters in a printer’s transmitted message.
A – Ambient Temperature, Transmit
This command transmits the ambient temperature sensor A/D output to the
host.
B – Printhead Resistance Test, Begin
This command begins the printhead resistance test.
C – Pitch Label, Print
The command prints the pitch label.
D – Factory Defaults, Reset
This command resets the printer configuration to the factory defaults.
35
Chapter
4
f – Formats, Print
This command prints all stored formats.
g – User-Defined Characters (UDC) and Graphics, Print
This command prints all stored user-defined characters and graphics.
G – Transmissive Sensor Value, Transmit
This command transmits the label gap transmissive sensor A/D output to the
host.
h – Hardware Configuration Label, Print
This command prints a label containing hardware configuration information.
jnn...nn – Outline Font, Download
This command downloads outline font descriptions.
Jn[,name][,type][,size] – Outline Font, Clear or Create
This command clears or creates an outline font or graphic. n is the font or
graphic ID.
K – Dark Adjust
This command adjusts the darkness of the print on the labels.
L – Label Path Open Sensor Value, Transmit
This command transmits the label path open sensor value to the host.
M – Reflective Sensor Value, Transmit
This command transmits the label mark reflective sensor A/D output to the
host.
N – Current Edit Session, Save
This command saves the current page, format, and UDC or UDF being
edited. The printer stays in Program mode.
NOTE: Current edit session is saved only by selecting Save state in the
IGL menu.
p – Pages, Print
This command prints all stored pages.
P – Printhead Temperature Sensor Value, Transmit
This command transmits the printhead thermistor A/D output to the host.
36
Q – Print Quality Label, Print
This command prints a label containing the print quality program and model
number.
s – Software Configuration Label, Print
This command prints a label containing software configuration information.
S – Printhead Resistance Values, Transmit
This command transmits the average, maximum, and minimum printhead dot
resistance values to the host.
t – User-Defined Fonts, Print
This command prints all stored user-defined fonts.
T – Label Taken Sensor Value, Transmit
This command transmits the label taken sensor A/D output to the host.
U – 12 Volt Supply Value, Transmit
This command transmits the 12 volt supply A/D output to the host.
V – Printhead Volt Supply Value, Transmit
This command transmits the printhead volt supply A/D output to the host.
37
Chapter
38
4
A
ASCII Codes
Char
Dec
Hex
Char
Dec
Hex
Char
Dec
Hex
Char
Dec
Hex
NUL
0
00
EM
25
19
2
50
32
K
75
4B
SOH
1
01
SUB
26
1A
3
51
33
L
76
4C
STX
2
02
ESC
27
1B
4
52
34
M
77
4D
EXT
3
03
FS
28
1C
5
53
35
N
78
4E
EOT
4
04
GS
29
1D
6
54
36
O
79
4F
ENQ
5
05
RS
30
1E
7
55
37
P
80
50
ACK
6
06
US
31
1F
8
56
38
Q
81
51
BEL
7
07
32
20
9
57
39
R
82
52
BS
8
08
!
33
21
:
58
3A
S
83
53
HT
9
09
+
34
22
;
59
3B
T
84
54
LF
10
0A
#
35
23
<
60
3C
U
85
55
VT
11
0B
$
36
24
=
61
3D
V
86
56
FF
12
0C
%
37
25
>
62
3E
W
87
57
CR
13
0D
&
38
26
?
63
3F
X
88
58
SO
14
0E
+
39
27
@
64
40
Y
89
59
SI
15
0F
(
40
28
A
65
41
Z
90
5A
DLE
16
10
)
41
29
B
66
42
[
91
5B
DC1
17
11
*
42
2A
C
67
43
\
92
5C
DC2
18
12
+
43
2B
D
68
44
]
93
5D
DC3
19
13
,
44
2C
E
69
45
^
94
5E
DC4
20
14
-
45
2D
F
70
46
_
95
5F
NAK
21
15
.
46
2E
G
71
47
`
96
60
SYN
22
16
/
47
2F
H
72
48
a
97
61
ETB
23
17
0
48
30
I
73
49
b
98
62
CAN
24
18
1
49
31
J
74
4A
c
99
63
39
Appendix A
Char
Dec
Hex
Char
Dec
Hex
Char
Dec
Hex
Char
Dec
Hex
d
100
64
k
107
6B
r
114
72
y
121
79
e
101
65
l
108
6C
s
115
73
z
122
7A
f
102
66
m
109
6D
t
116
74
{
123
7B
g
103
67
n
110
6E
u
117
75
|
124
7C
h
104
68
o
111
6F
v
118
76
}
125
7D
i
105
69
p
112
70
w
119
77
~
126
7E
j
106
6A
q
113
71
x
120
78
127
7F
40
B
#
Error Codes
Message
0
Explanation
Solution
No error (only reported via
interface in case of no error).
No action required.
1
Not supported
Invalid bar code check
character.
Verify that the host supplied
digit is correct.
2
Not supported
Invalid number of bar code
characters (Code UPC/EAN).
Verify the number of bar
code characters used in the
Bar Code, Select Type
command.
4
Not supported
Bar code check character
within numeric field marks.
5
Not supported
Supplemental delimiter within
numeric field marks (Code
UPC/EAN).
6
Not supported
Invalid supplemental
character count (Code UPC/
EAN).
Make sure that the
supplemental data consists
of either two or five
characters.
7
Not supported
More than one supplemental
delimiter (Code UPC/EAN).
Make sure that you have
only one supplemental
delimiter (“.”) between the
bar code data and the
supplemental data.
8
PARAMETER ERROR 08
Invalid start/stop characters
(Codabar).
11
PARAMETER ERROR 11
Invalid bar code data.
Verify data in the label
format.
12
RANGER ERROR 12
Data count exceeded.
Data count cannot exceed
what is specified for the
field.
13
Not supported
Data is being entered into a
non-data entry field.
Check the field for accuracy.
41
Appendix B
#
Message
Explanation
Solution
21
RANGE ERROR 21
Quantity or batch count out of
range.
Quantity of labels or number
of batches must be between
1 and 9999.
22
RANGE ERROR 22
Field increment or decrement
out of range.
Quantity must be between 1
and 9999.
23
RANGE ERROR 23
Intercharacter/message delay
out of range.
Delay must be between 0
and 9999.
24
SYNTAX ERROR 24
Missing preamble or
postamble data.
Change the configuration
command to no preamble/
postamble or include
preamble/postamble data.
25
Not supported
Invalid format transmission
syntax.
Check the Format, Transmit
command syntax. The
correct syntax is <ESC> xn
with n ranging from 0 to 19
on most printers. On some
printers, such as the 3440, n
ranges from 0 to 99. For
more information, see the
Format, Transmit command.
26
Not supported
Invalid page transmission
syntax.
Check the Page, Transmit
command syntax. The
correct syntax is <ESC> yn
with n ranging from 0 to 9.
27
Not supported
Invalid font transmission
syntax.
Check the Font, Transmit
command syntax. The
correct syntax is <ESC>vn.
Values for n vary depending
on your printer model. For
more information, see the
Font, Transmit command.
28
Not supported
Invalid UDC transmission
syntax.
Check the User-Defined
Characters, Transmit
command syntax. The
correct syntax is <ESC>un
with n ranging from 0 to 99.
32
OVERFLOW ERROR 32
Non-immediate command or
data received after buffer is
full.
Allow the printer to empty
the buffer contents before
sending commands or data.
33
SYNTAX ERROR 33
Invalid field marks.
Check for all pairs of field
delimiters and make sure
both are numeric or
alphanumeric.
42
#
Message
Explanation
Solution
34
SYNTAX ERROR 34
Invalid escape command.
Correct the escape
command syntax.
35
SYNTAX ERROR 35
Invalid data shift command.
Correct the shift command
syntax.
36
PARAMETER ERROR 36
Invalid or undefined format
number.
Verify that the format
numbers are between 0 and
19.
37
OVERFLOW ERROR 37
Insufficient room in RAM to
print format.
Reduce the number of data
fields in the format or add
more DRAM.
38
PARAMETER ERROR 38
Invalid or undefined field
number.
Verify the field number in
the label format.
41
SYNTAX ERROR 41
Syntax error for Program
Commands.
Check the Program
Command for proper
syntax.
42
OVERFLOW ERROR 42
Insufficient room in RAM to
store format.
1. Empty the buffer
contents.
2. If the format still does
not fit, delete some
fields or other data from
the format.
3. If necessary, remove or
reduce the UDCs,
formats, or fonts.
NOTE:
Entering <ESC>m tells the
host how much memory is
installed and how much is
available.
43
OVERFLOW ERROR 43
Too many fields.
You can use up to 200 fields
in a format and each field
can use up to 250
characters. Reduce field
size or delete some fields.
44
SYNTAX ERROR 44
No ; delimiter found after the
<ESC>P command.
Verify if all <ESC>P
commands are terminated
with a ; delimiter.
46
SYNTAX ERROR 46
Undefined statement.
Check the statement
syntax.
43
Appendix B
#
Message
Explanation
Solution
52
RANGE ERROR 52
Invalid UDC or UDF bitmap
cell height/width or intercharacter space.
Verify that the UDC/UDF
bitmap cell height/width or
intercharacter space is
within the specified values
for n. For more information,
see the Bitmap Cell Height/
Width for Graphic or UDF,
Define or the Intercharacter
Space for UDF, Define
command.
53
OVERFLOW ERROR
Insufficient room in RAM to
store UDC or UDF.
Remove or reduce formats,
fonts, or UDCs.
54
SYNTAX ERROR
Invalid UDC command
syntax.
Correct the UDC command
syntax.
44
C
Contact Information
Printronix Customer Support Center
IMPORTANT
Please have the following information available prior to calling the
Printronix Customer Support Center:
•
•
•
•
Model number
Serial number (located on the back of the printer)
Installed options (i.e., interface and host type if applicable to the problem)
Configuration printout:
Thermal Printer
See “Printing A Configuration” in the Quick Setup Guide.
Line Matrix Printer
Press PRT CONFIG on the control panel, then press Enter.
•
•
•
Is the problem with a new install or an existing printer?
Description of the problem (be specific)
Good and bad samples that clearly show the problem (faxing of these
samples may be required)
Americas
(714) 368-2686
Europe, Middle East, and Africa
(31) 24 6489 410
Asia Pacific
(65) 6548 4114
China
(86) 800-999-6836
http://www.printronix.com/support.aspx
Printronix Supplies Department
Contact the Printronix Supplies Department for genuine Printronix supplies.
Americas
(800) 733-1900
Europe, Middle East, and Africa
33 (0) 1 46 25 19 07
Asia Pacific
(65) 6548 4116
or (65) 6548 4182
China
(86) 400-886-5598
http://www.printronix.com/supplies-parts.aspx
45
Appendix C
Corporate Offices
Corporate Offices
Printronix, Inc.
14600 Myford Road
P.O. Box 19559
Irvine, CA 92623-9559
Phone: (714) 368-2300
Fax: (714) 368-2600
Printronix, Inc.
Nederland BV
P.O. Box 163, Nieuweweg 283
NL-6600 Ad Wijchen
The Netherlands
Phone: (31) 24 6489489
Fax: (31) 24 6489499
Printronix Schweiz GmbH
42 Changi South Street 1
Changi South Industrial Estate
Singapore 486763
Phone: (65) 6542 0110
Fax: (65) 6546 1588
Printronix Commercial (Shanghai) Co. Ltd
22F, Eton Building East
No.555, Pudong Av.
Shanghai City, 200120, P R China
Phone: (86) 400 886 5598
Fax: (86-21) 5138 0564
Visit the Printronix web site at www.printronix.com
46
*252546-001*
252546-001F