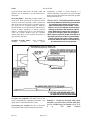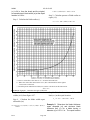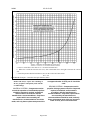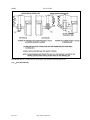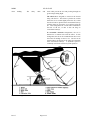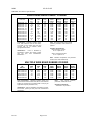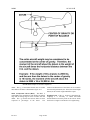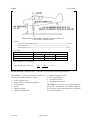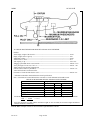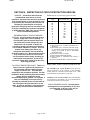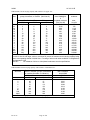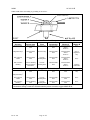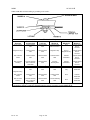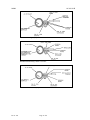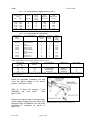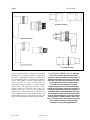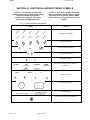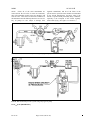
1
9/8/98 AC 43.13-1B FIGURE 8-24. Method of repairing surface cracks, nicks, etc., on aluminum-alloy propellers. FIGURE 8-25. Correct and incorrect method of reworking leading edge of aluminum-alloy propellers. Par 8-71 Page 8-396 9/8/98 AC 43.13-1B 90 percent blade radius point, the blade width and thickness may be modified as per the manufacturer’s instructions. Shortening Blades. Shortening propeller blades is a major repair. When the removal or treatment of defects on the tip necessitates shortening a blade, shorten each blade used with it and keep such sets of blades together. (See figure 8-26 for acceptable methods.) Mark the shortened blades to correspond with the manufacturer’s system of model designation to indicate propeller diameter. In making the repair, it is not permissible to reduce the propeller diameter below the minimum diameter limit shown on the pertinent specification or type certificate data sheet. Straighten Propeller Blades. damaged propeller. Never straighten a Even partial straightening of blades to permit shipment to a certificated propeller repair facility may result in hidden damage not being detected and an unairworthy propeller being returned to service. REPAIR LIMITS. The following limits are those listed in the blade manufacturing specification for aluminum-alloy blades and govern the width and thickness of new blades. These limits are to be used with the pertinent blade drawing to determine the minimum original blade dimensions to which the reduction of figure 8-27 and figure 8-28. may be applied. When repairs reduce the width or thickness of the blade below these limits, reject the blade. The face alignment or track of the propeller should fall within the limits recommended by the manufacturer for new propellers FIGURE 8-26. Method of repairing damaged tip of aluminum-alloy propellers. No repairs are permitted to the shanks (roots or hub ends) of aluminum-alloy, adjustable-pitch blades. The Example 1. Determine the blade width repair shanks must be within manufacturer’s limits. allowable (∆w) and minimum blade width limit, The following two examples show how to determine the allowable repair limits on aluminum alloy blades. Par 8-73 Page 8-397 (w1) for a blade having a diameter (d) of 10 ft. 6 in. The repair location 9/8/98 AC 43.13-1B (r1) is 24 in. from the shank and the original, as manufactured, blade width (w) at the repair location is 1.88 in. r = d/2 = (10 ft 6 in)/2 = 126/2 = 63 in. Step 2. Calculate percent of blade radius to repair (r%) Step 1. Calculate the blade radius (r) r% = r1/r x 100 = (24/63) x 100 = 38 a. Draw a vertical line at the value of r% = 38 on the horizontal axis. b. Where the vertical line intersects the curve, draw a horizontal line to the right to intersect the vertical axis. c. Read the percent reduction in width (∆w%) on the vertical axis at this intersection. ∆w% = 2.5 FIGURE 8-27. Example 1. Determine the repair width limits. Step 3. Determine percent reduction in width (∆w%) from figure 8-27. Step 4. Calculate the blade width repair allowable (∆w) ∆w =(∆w%) x (w) x(0.01) = (2.5) x (1.88) x (0.01) = 0.05 in. Par 8- Page 398 Step 5. Calculate the minimum blade width limit (w1) at the repair location w1 = w - ∆w = 1.88 - 0.05 = 1.83 in. Example 2. Determine the blade thickness repair allowable (∆t) and minimum blade thickness limit (t1) for a blade having a diameter (d) of 10 ft. 6 in. The repair location 9/8/98 AC 43.13-1B (r1) is 43 in. from the shank and the original, as manufactured, blade thickness (t) at the repair location is 0.07 in. Step 1. Calculate the blade radius (r) r = d/2 = (10 ft 6 in)/2 = 126/2 = 63 in. Step 2. Calculate percent of blade radius to repair (r%) r% = r/r x 100 = (43/63) x 100 = 68 Step 3. Determine percent reduction in thickness (∆t%) from figure 8-28. Step 4. Calculate the blade thickness repair allowable (∆t) ∆t = (∆t%) x (t) (0.01) = (4.0) x (0.07) x (0.01) = 0.003 in. Step 5. Calculate the minimum blade thickness limit (t1) at the repair location t1 = t - ∆t = 0.07 - 0.003 = 0.067 in. STEEL HUBS AND HUB PARTS. Repairs to steel hubs and parts must be accomplished only in accordance with the manufacturer’s recommendations. Welding and remachining is permissible only when covered by manufacturer’s service bulletins (SB). PROPELLER HUB AND FLANGE REPAIR. When the fixed-pitch propeller bolt holes in a hub or crankshaft become damaged or oversized, it is permissible to make repairs by using methods (A) or (B) in figure 8-29, or by use of aircraft standard bolts 1/16-inch larger than the original bolts. Make the repairs in accordance with the recommendations of the propeller metal hub manufacturer or the engine manufacturer, as applicable. Obtain from the engine or propeller hub manufacturer suitable flange bushings with threaded or smooth bores, as illustrated in methods (A) or (B) of figure 8-29. Drill the flange and insert the bushings as recommended by the propeller to accommodate the bushings, and protect the holes with 2 coats of aluminum paint or other high moisture-resistant coating. Use bolts of the same size as those originally used. Any of the following combinations may be used: Par 8-74 Page 8-399 (1) drilled head bolt and castellated nut, (2) drilled head bolt and threaded bushing, or (3) undrilled bolt and self-locking nut. Where it is desirable to use oversized bolts, obtain suitable aircraft-standard bolts 1/16-inch larger than the original bolts. Enlarge the crankshaft propeller flange holes and the propeller hub holes sufficiently to accommodate the new bolts without more than 0.005-inch clearance. Such reboring will be permitted only once. Further repairs of bolt holes may be in accordance with the methods listed in (A) or (B) of figure 8-29. NOTE: Method (A) or (B) is preferred over the oversized bolt method, because a propeller hub flange re-drilled in accordance with this latter 9/8/98 AC 43.13-1B a. Draw a vertical line at the value of r% = 68 on the horizontal axis. b. Where the vertical line intersects the curve, draw a horizontal line to the right to intersect the vertical axis. c. Read the percent reduction in thickness (∆t%) on the vertical axis intersection ∆t% = 4.0 FIGURE 8-28. Example 2. Determine the repair thickness limits. method will always require the re-drilling of all new propellers subsequently used with the re-drilled flange. CONTROL SYSTEMS. Components used to control the operation of certificated propellers should be inspected, repaired, assembled, and/or tested in accordance with the manufacturer’s recommendations. Only those repairs which are covered by the manufacturer’s recommendations should be made, and only those replacement parts which Par 8-74 Page 8-400 are approved under 14 CFR, part 21 should be used. DEICING SYSTEMS. Components used in propeller deicing systems should be inspected, repaired, assembled, and/or tested in accordance with the manufacturer’s recommendations. Only those repairs which are covered by the manufacturer’s recommendations should be made, and only those replacement parts which are approved under 14 CFR, part 21 should be used. 9/8/98 AC 43.13-1B FIGURE 8-29. Repair of fixed-pitch hub and propeller with elongated or damaged bolt holes. 8-79.8-90. [RESERVED.] Par 8-78 Page 8-401 (and 8-36) 9/8/98 AC 43.13-1B SECTION 5. INSPECTION OF PROPELLERS GENERAL. All propellers, regardless of the material from which they are made, should be regularly and carefully inspected for any possible defect. Any doubtful condition, such as looseness of parts, nicks, cracks, scratches, bruises, or loss of finish should be carefully investigated and the condition checked against repair and maintenance specifications for that particular type of propeller. Any propeller that has struck a foreign object during service should be promptly inspected for possible damage in accordance with the propeller manufacturer’s prescribed procedures and, if necessary, repaired according to the manufacturer’s instructions. If the propeller is damaged beyond the repair limits established by the propeller manufacturer, and a replacement is necessary, install the same make/model approved or alternate as specified in the equipment list, applicable FAA Aircraft Specification, Type Certificate Data Sheet (TCDS), or Supplemental Type Certificate (STC). A sample manufacturer’s propeller inspection checklist is shown in table 8-2. It shows the items to be inspected and the inspection intervals. WOOD OR COMPOSITION PROPELLERS AND BLADES. Wood propellers are usually found on low-power, reciprocating engines while composition (Carbon fiber, Kevlar) propellers are used on high horsepower reciprocating and turbine engines. Due to the nature of wood, these propellers should be inspected frequently to assure airworthiness. Inspect for defects such as cracks, dents, warpage, glue failure, delamination defects in the finish, and charring of the wood between the propeller and the flange due to loose propeller mounting bolts. Composition propellers should be inspected in accordance with the propeller manufacturer’s instructions. Par 8-91 Page 8-402 Fixed-pitch propellers are normally removed from the engine at engine overhaul periods. Whenever the propeller is removed, visually inspect the rear surface for any indication of cracks. When any defects are found, disassemble the metal hub from the propeller. Inspect the hub bolts for wear and cracks at the head and threads, and if cracked or worn, replace with new equivalent bolts. Inspect for elongated bolt holes, enlarged hub bore, and for cracks inside the bore or anywhere on the propeller. Repair propellers found with any of these defects. If no defects are found, the propeller may be reinstalled on the engine. Before installation, touch up with varnish all places where the finish is worn thin, scratched, or nicked. Track and balance the propeller, and coat the hub bore and bolt holes with some moisture preventive such as asphalt varnish. In case the hub flange is integral with the crankshaft of the engine, final track the propeller after it is installed on the engine. In all cases where a separate metal hub is used, make a final balance and track with the hub installed on the propeller. On new, fixed-pitch propeller installations, inspect the bolts for proper torque after the first flight and after the first 25 hours of flying. Thereafter, inspect and check the bolts for proper torque at least every 50 hours. No definite time interval can be specified, since a bolt’s proper torque is affected by changes in the wood caused by the moisture content of the air where the airplane is flown and stored. During wet weather, some moisture is apt to enter the propeller wood through the holes drilled in the hub. The wood then swells, and because expansion is limited by the bolts extending between the two flanges, some of the wood fibers become crushed. Later, when the propeller dries out during dry weather or due 9/8/98 AC 43.13-1B TABLE 8-2. Sample manufacturer’s propeller inspection checklist. Nature of Inspection Engine Operating Hours PROPELLER GROUP 1. Inspect spinner and back plate for cracks.................................................................................... 2. Inspect blades for nicks and cracks............................................................................................. 3. Check for grease and oil leaks..................................................................................................... 4. Lubricate propeller per Lubrication Chart..................................................................................... 5. Check spinner mounting Brackets for cracks............................................................................... 6. Check propeller mounting bolts and safety (Check torque if safety is broken)............................. 7. Inspect hub parts for cracks and corrosion.................................................................................. 8. Rotate blades of constant speed propeller and check for tightness in hub pilot tube.................... 9. Remove constant speed propeller; remove sludge from propeller and crankshaft........................ 10. Inspect complete propeller and spinner assembly for security, chafing, cracks, deterioration, wear and correct installation........................................................................................................ 11. Check propeller air pressure (at least once a month)................................................................... 12. Overhaul propeller....................................................................................................................... to heat from the engine, a certain amount of propeller hub shrinkage takes place, and the wood no longer completely fills the space between the two hub flanges. Consequently, the hub bolts become loose. In-flight tip failures may be avoided by frequent inspections of the metal cap, leading edge strip, and surrounding areas. Inspect for such defects as looseness or slipping, separation of soldered joints, loose screws, loose rivets, breaks, cracks, eroded sections, and corrosion. Inspect for separation between the metal leading edge and the cap, which would indicate the cap is moving outward in the direction of centrifugal force. This condition is often accompanied by discoloration and loose rivets. Inspect the tip for cracks by grasping it with the hand and slightly twisting about the longitudinal blade centerline and by slightly bending the tip backward and forward. If the leading edge and the cap have separated, carefully inspect for cracks at this point. Cracks usually start at the leading edge of the blade. A fine line appearing in the fabric or plastic may indicate a crack in the wood. Check the trailing edge of the propeller blades for bonding, separation, or damage. Examine the wood close to the metal sleeve of wood blades for cracks extending outward on the blade. These cracks sometimes Par 8-91 Page 8-403 50 100 500 1000 0 0 0 0 0 0 0 0 0 0 0 0 0 0 0 0 0 0 0 0 0 0 0 0 0 0 0 0 0 0 0 0 0 0 0 0 0 0 occur at the threaded ends of the lag screws and may be an indication of internal cracking of the wood. Check the tightness of the lag screws, which attach the metal sleeve to the wood blade, in accordance with the manufacturer’s instructions. Inspect and protect the shank areas of composition blades next to the metal sleeve in the same manner as that used for wood blades. METAL PROPELLERS AND BLADES. These propellers and blades are generally susceptible to fatigue failure resulting from the concentration of stresses at the bottoms of sharp nicks, cuts, and scratches. It is necessary, therefore, to frequently and carefully inspect them for such injuries. Propeller manufacturers publish SB’s and instructions which prescribe the manner in which these inspections are to be accomplished. Additional information is also available in AC 20-37D, Aircraft Metal Propeller Maintenance. Steel Blade Inspection. The inspection of steel blades may be accomplished by either visual, fluorescent penetrant (see chapter 5), or magnetic particle inspection. The visual inspection is easier if the steel blades are covered with engine oil or rust-preventive compound. The full length of the leading edge, especially near the tip, the full length of the trailing edge, the grooves and shoulders on the shank, and all 9/8/98 AC 43.13-1B dents and scars should be examined with a magnifying glass to decide whether defects are scratches or cracks. Aluminum Propellers and Blades. Carefully inspect aluminum propellers and blades for cracks and other flaws. A transverse crack or flaw of any size is cause for rejection. Multiple deep nicks and gouges on the leading edge and face of the blade is cause for rejection. Use dye penetrant or fluorescent dye penetrant to confirm suspected cracks found in the propeller. Refer any unusual condition or appearance revealed by these inspections to the manufacturer. Limitations. Corrosion may be present on propeller blades in varying amounts. Before performing any inspection process, maintenance personnel must examine the specific type and extent of the corrosion. (See chapter 6, and/or refer to AC 43-4A, Corrosion Control For Aircraft.) Corrosion, other than small areas (6 square inches or less) of light surface type corrosion, may require propeller removal and reconditioning by a qualified propeller repair facility. When intergranular corrosion is present, the repair can be properly accomplished only by an appropriately certificated propeller repair facility. Corrosion pitting under propeller blade decals should be removed as described in the propeller manufacturer’s SB’s and applicable airworthiness directives (AD). Unauthorized straightening of blade, following a ground strike or other damage, can create conditions that lead to immediate blade failure. These unapproved major repairs may sometimes be detected by careful inspection of the leading edges and the flat face portion of the blade. Any deviation of the flat portion, such as bows or kinks, may indicate unauthorized straightening of the blade. Sighting along the leading edge of a propeller blade for any signs of bending can provide evidence of unapproved blade straightening. Blades should be examined for any discoloration that would indicate unauthorized heating. Blades that have been heated for any repair must be rejected, since only cold straightening is authorized. All blades showing evidence of unapproved repairs should be rejected. When bent propellers are shipped to an approved repair facility for inspection and repair, the propeller should never be straightened by field service personnel to facilitate shipping, because this procedure can conceal damage. Propeller tip damage will sometimes lead maintenance personnel to consider removing damaged material from the blade tips. However, propellers are often manufactured with a particular diameter to minimize vibration. Unless the TCDS and both the engine and propeller manufacturers specifically permit shortening of the blades on a particular propeller, any shortening of the blades would probably create an unairworthy condition. When conditions warrant, inspect the blade tips for evidence of shortening and, if necessary, measure the propeller diameter to determine if it has been changed by an unauthorized repair. PROPELLER HUB. Fixed Pitch. Inspection procedures require removal of the propeller spinner for examination of the prop hub area. Cracks may be present in the hub area between or adjacent to bolt holes and along the hub pilot bore. Cracks in these areas cannot be repaired and require immediate scrapping of the propeller. Propeller attach bolts should be examined for looseness or an unsafetied or cracked condition. Cracked or broken bolts are usually the result of overtorquing. Correct Par 8-93 Page 8-404 9/8/98 AC 43.13-1B torquing procedures require all bolt threads to be dry, clean, and free of any lubrication before torquing. Controllable Pitch. Inspect controllable pitch propellers frequently to determine that all parts are lubricated properly. It is especially recommended that all lubrication be accomplished in accordance with the propeller manufacturer’s instructions. Complete inspection/servicing requires the removal of the spinner for examination and servicing of the propeller hub and blade clamp area. All inspections and servicing of the pitch control mechanism should follow the recommendations of the propeller, engine, and airframe manufacturers. Propellers must be in compliance with applicable AD’s and manufacturer’s SB’s. The hub, blade clamps, and pitch change mechanisms should be inspected for corrosion from all sources, including rain, snow, and bird droppings that may have entered through the spinner openings. Examine the hub area for oil and grease leaks, missing grease-fitting caps, and leaking or missing grease fittings. Propeller domes should be checked for leaks, both at the seals and on the fill valve (if so equipped). The dome valve may be leak-tested by applying soapy water over the fill valve end. Domes should be serviced only with nitrogen or dry air in accordance with the manufacturer’s recommendations. When propeller domes are inspected and found filled with oil, the propeller should be removed and inspected/repaired by an appropriately-rated repair facility. It is especially recommended that all lubrication be accomplished at the periods and Par 8-107 Page 8-405 9/8/98 AC 43.13-1B in the manner specified by the propeller manufacturer. On makes and models with a grease fitting on the hub, before greasing the hub remove the grease fitting opposite the one to which you are going to add grease. This will allow the excess grease and pressure to exit through the grease fitting hole rather than the hub seal. Fiber-block, pitch-change mechanisms should be inspected for deterioration, fit, and the security of the pitch-clamp forks. Certain models of full-feathering propellers use spring-loaded pins to retain the feathered blade position. Spring and pin units should be cleaned, inspected, and relubricated per the manufacturer’s recommendations and applicable AD’s. Pitch change counterweights on blade clamps should be inspected for security, safety, and to ensure that adequate counterweight clearance exists within the spinner. TACHOMETER INSPECTION. Due to the exceptionally high stresses that may be generated by particular propeller/engine combinations at certain engine revolutions per minute (RPM), many propeller and aircraft manufacturers have established areas of RPM restrictions and other restrictions on maximum RPM for some models. Some RPM limits do not exceed 3 percent of the maximum RPM permitted, and a slow-running tachometer can cause an engine to run past the maximum RPM limits. Since there are no post-manufacture accuracy requirements for engine tachometers, tachometer inaccuracy could lead to propeller failure, excessive vibration, or unscheduled maintenance. If the tachometer exceeds 2 percent (plus or minus) of the tested RPM, replace it. 8-96.8-106. [RESERVED.] Par 8-107 Page 8-406 9/8/98 AC 43.13-1B SECTION 6. PROPELLER TRACKING AND VIBRATION GENERAL. To ensure smooth powerplant operations, first start with a properly-installed propeller. Each propeller should be checked for proper tracking (blades rotating in the same plane of rotation). Manufacturer’s recommendations should in all cases be followed. PROPELLER TRACKING CHECK. The following is a simple procedure that can be accomplished in less than 30 minutes: VIBRATION. Although vibration can be caused by the propeller, there are numerous other possible sources of vibration which can make troubleshooting difficult. If a propeller vibrates, whether due to balance, angle, or track problems, it typically vibrates, throughout the entire RPM range, although the intensity of the vibration may vary with the RPM. If a vibration occurs only at one particular RPM or within a limited RPM range (e.g. 2200-2350 RPM), the vibration is not normally a propeller problem but a problem with a poor engine/propeller match. Chock the aircraft so it cannot be moved. Remove one spark plug from each cylinder. This will make the propeller easier and safer to turn. Rotate one of the blades so it is pointing down. Place a solid object (e.g. a heavy wooden block that is at least a couple of inches higher off the ground than the distance between the propeller tip and the ground) next to the propeller tip so that it just touches (see figure 8-30), or attach a pointer/indicator to the cowling itself. Rotate the propeller slowly to see if the next blade “tracks” through the same point (touches the block/pointer). Each blade track should be within 1/16-inch (plus or minus) from the opposite blade’s track. If the propeller is out of track, it may be due to one or more propeller blades being bent, a bent propeller flange, or propeller mounting bolts that are either over or under-torqued. An out-of-track propeller will cause vibration and stress to the airframe and engine, and may cause premature propeller failure. Par 8-107 Page 8-407 If a propeller vibration is suspected but cannot be positively determined, if possible, the ideal troubleshooting method is to temporarily replace the propeller with one which is known to be airworthy and test fly the aircraft. There are numerous allowable tolerances in blade angles, balance, track, and blade width and thickness dimensions. These tolerances have been established through many years of experience. The degree to which these factors affect vibration is sometimes disputed and can involve significant repair bills, which may or may not cure a vibration problem. Reliance upon experienced, reputable propeller repair stations is the owner’s best method of dealing with these problems. Blade shake is not the source of vibration problems. Once the engine is running, centrifugal force holds the blades firmly (approximately 30-40,000 lbs.) against blade bearings. Cabin vibration can sometimes be improved by reindexing the propeller to the crankshaft. The propeller can be removed, rotated 180º, and re-installed. 9/8/98 AC 43.13-1B The propeller spinner can be a contributing factor to an out-of-balance condition. An indication of this would be a noticeable spinner “wobble” while the engine is running. Par 8-109 Page 8-408 This condition is normally caused by inadequate shimming of the spinner front support or a cracked or deformed spinner. 9/8/98 AC 43.13-1B FIGURE 8-30. Propeller tracking (wood block or cowling fixture shown). 8-110.8-129. [RESERVED.] Par 9-1 Page 9-409 9/8/98 AC 43.13-1B CHAPTER 9. AIRCRAFT SYSTEMS AND COMPONENTS SECTION 1. INSPECTION AND MAINTENANCE OF LANDING GEAR GENERAL. The landing gear on aircraft may be fixed or retractable. A fixed gear may be wheels, floats, or skis; and for amphibians a combination of floats and wheels. Retractable gear on aircraft is usually operated with hydraulic or electric power, although some models of light general aviation aircraft have manual retract systems operated by a lever in the cockpit. In addition to the normal operating system, emergency systems are usually provided to ensure that the landing gear can be lowered in case of main-system failure. Emergency systems consist of backup hydraulic systems, or stored nitrogen gas bottles that can be directed into actuating cylinders, mechanical systems that can be operated manually, or free-fall gravity systems. GENERAL INSPECTION. A thorough inspection of the landing gear involves the entire structure of the gear, including attachments, struts, wheels, brakes, actuating mechanisms for retractable gears, gear hydraulic system and valves, gear doors, and all associated parts. The manufacturer’s inspection procedures should be followed where applicable. CLEANING AND LUBRICATING. It is recommended that only easily removable neutral solutions be used when cleaning landing gear components. Any advantage, such as speed or effectiveness, gained by using cleaners containing corrosive materials, can be quickly counteracted if these materials become trapped in close-fitting surfaces and crevices. Par 9-1 Page 9-410 Wear points, such as landing gear up-and-down latches, jack-screws, door hinges, pulleys, cables, bellcranks, and all pressure-type grease fittings, should be lubricated after every cleaning operation. To obtain proper lubrication of the main support bushings, it may be necessary to jack the aircraft. NOTE: Any time the aircraft is on jacks, check the landing gear main support bushings for wear. Consult the aircraft manufacturer’s overhaul manual for specific wear tolerances. During winter operation, excess grease may congeal and cause increased loads on the gear retraction system, electric motors, and hydraulic pumps. This condition can lead to component malfunctions; therefore, it is recommended that cleanliness be stressed during and after lubrication. FIXED-GEAR INSPECTION. Fixed landing gear should be examined regularly for wear, deterioration, corrosion, alignment, and other factors that may cause failure or unsatisfactory operation. During a 100-hour or annual inspection of the fixed gear, the aircraft should be jacked up to relieve the aircraft weight. The gear struts and wheels should be checked for abnormal play and corrected. Old aircraft landing gear that employs a rubber shock (bungee) cord for shock absorption must be inspected for age, fraying of the braided sheath, narrowing (necking) of the cord, and wear at points of contact with the structure and stretch. If the age of the shock cord is near 5 years or more, it is advisable to replace it with a new cord. A cord that shows other defects should be replaced, regardless of age. 9/8/98 AC 43.13-1B The cord is color-coded to indicate when it was manufactured and to determine the life of the shock cord. According to MIL-C-5651A, the color code for the year of manufacture is repeated in cycles of 5 years. Table 9-1 shows the color of the code thread for each year and quarter year. CAUTION: Before an air-oil strut is removed or disassembled, the air valve should be opened to make sure that all air pressure is removed. Severe injury and/or damage can occur as the result of disassembling a strut when even a small amount of air pressure is still in the air chamber. TABLE 9-1. Bungee cord color codes. YEARS ENDING WITH COLOR QUARTER COLOR 0 or 5 1 or 6 2 or 7 3 or 8 4 or 9 Black Green Red Blue Yellow 1st 2nd 3rd 4th 1st Red Blue Green Yellow Red The color coding is composed of threads interwoven in the cotton sheath that holds the strands of rubber cord together. Two spiral threads are used for the year coding and one thread is used for the quarter of the year sheath, e.g. yellow and blue would indicate that the cord was manufactured in 1994 during April, May, or June. Shock struts of the spring-oleo type should be examined for leakage, smoothness of operation, looseness between the moving parts, and play at the attaching points. The extension of the struts should be checked to make sure that the springs are not worn or broken. The piston section of the strut should be free of nicks, cuts, and rust. Air-oil struts should undergo an inspection similar to that recommended for spring-oleo struts. In addition, the extension of the strut should be checked to see that it conforms to the distance specified by the manufacturer. If an air-oil strut “bottoms”—that is, it is collapsed—the gas charge and hydraulic fluid has been lost from the air chamber. This is probably due to a loose or defective air valve or to defective O-ring seals. Par 9-1 Page 9-411 The method for checking the fluid level of an air-oil strut is given in the manufacturer’s maintenance manual. An alternate means of servicing an oil strut is to jack up the aircraft, remove the strut’s valve cap, release the air charge in the strut by depressing the valve core, remove the strut’s valve core, attach a clean two-foot rubber or plastic hose to the threaded portion that houses the valve core, and secure with a hose clamp. Put the other end of the hose into a clean two quart container filled with the correct hydraulic fluid for the strut. Cover the container with a clean rag to prevent spillage. Now, slowly raise the gear/strut assembly either manually or with another jack under the strut. This will drive the remaining air out of the strut into the container of hydraulic fluid. Once the gear is fully retracted, slowly lower the gear. The hydraulic fluid in the can will be sucked into the strut. Repeat this procedure until you cannot hear any more air bubbles in the container when the wheel strut is fully retracted. With the strut fully retracted, remove the hose, insert the valve core, lower the gear, and service the strut with nitrogen to get the proper strut extension. The entire structure of the landing gear should be closely examined for cracks, nicks, cuts, corrosion damage, or any other condition that can cause stress concentrations and eventual failure. The exposed lower end of the air-oleo piston is especially susceptible to damage and corrosion, which can lead to seal damage, because the strut is compressed 9/8/98 AC 43.13-1B and the piston moves past the strut lower seal, causing the seal to leak fluid and air. Small nicks or cuts can be filed and burnished to a smooth contour, eliminating the point of stress concentration. If a crack is found in a landing-gear member, the part must be replaced. All bolts and fittings should be checked for security and condition. Bolts in the torque links and shimmy damper tend to wear and become loose due to the operational loads placed on them. The nose-wheel shimmy damper should be checked for proper operation and any evidence of leaking. All required servicing should be performed in accordance with the aircraft service manual. INSPECTION OF RETRACTABLE LANDING GEAR. Inspection of the retractable landing gear should include all applicable items mentioned in the inspection for the fixed gear. In addition, the actuating mechanisms must be inspected for wear looseness in any joint, trunnion, or bearing; leakage of fluid from any hydraulic line or unit; and, smoothness of operation. The operational check is performed by jacking the aircraft according to the manufacturer’s instructions and then operating the gear retracting and extending system. During the operational test, the smoothness of operation, effectiveness of up-and-down locks, operation of the warning horn, operation of indicating systems, clearance of tires in wheel wells, and operation of landing-gear doors should be checked. Improper adjustment of sequence valves may cause doors to rub against gear structures or wheels. The manufacturer’s checklist should be followed to ensure that critical items are checked. While the aircraft is still on jacks, the gear can be tested for looseness of mounting points, play in torque links, condition of the inner strut cylinder, play in wheel bearings, and play in actuating linkages. Emergency blow down gear bottles should be inspected for Par 9-4 Page 9-412 damage and corrosion and weighed to see if the bottle is still retaining the charge. Mechanics should be aware that retread tires can be dimensionally bigger than a “new” tire. While this does not pose a problem on fixed landing gear aircraft, it may present a serious problem when installed on retractable landing gear aircraft. It is strongly recommended that if a retread tire is installed on a retractable landing gear aircraft, a retraction test be performed. With the gear in the up-and-lock position, the mechanic should determine that if the tire expands due to high ambient temperature, heat generated from taxi and take-off, repeated landings, or heavy braking, the tire will not expand to the point that it becomes wedged in the wheel well. The proper operation of the anti-retraction system should be checked in accordance with the manufacturer’s instructions. Where safety switches are actuated by the torque links, the actual time of switch closing or opening can be checked by removing all air from the strut and then collapsing the strut. In every case, the adjustment should be such that the gear control cannot be placed in the UP position or that the system cannot operate until the shock strut is at the full extended position. EMERGENCY SYSTEMS. Exercise emergency landing gear systems periodically to ensure proper operation and to prevent inactivity, dirt, and corrosion from rendering the system inoperative when needed. Most emergency systems employ either mechanical, pressurebottle, or free-fall extension capabilities. Check for the proper safeties on triggering mechanisms, and for the presence of required placards, and necessary accessories such as cranks, levers, handles, etc. Emergency blowdown bottles should be checked for corrosion damage, and then weighed to see if the bottle is still retaining the charge. 9/8/98 AC 43.13-1B LANDING GEAR COMPONENTS. The following items are susceptible to service difficulties and should be inspected. Shock Absorbers. Inspect the entire shock-strut for evidence of leaks, cracks, and possible bottoming of the piston, as this condition causes overloading of landinggear components and contributes to fatigue cracks. Check all bolts, bolt holes, pins, and bushings for condition, lubrication, and proper torque values. Grease fitting holes (pressure-type) are especially vulnerable to cracks and cross-threading damage. Check all safety wire and other locking devices, especially at the main packing gland nuts. When assembling shock-struts, use the correct type and number of new “O”-rings, Chevron seals, and backup rings. Use only the correct filler valve core assembly, and follow the manufacturer’s instructions when servicing with fluid and air. Either too much or too little air or oil will affect aircraft handling characteristics during taxi, takeoff, and landing, and can cause structural overloads. Shock cords and rubber discs deteriorate with age and exposure. When this type of shock absorber is used, inspect for general condition; i.e., cleanliness, stretching, fraying, and broken strands. These components should be kept free of petroleum products as they accelerate deterioration of the rubber. Nose Gear Assembly. Inspection of the steering mechanism should include torque-links (scissors), torque-tubes, control rods and rod-end bearings, shimmy dampers, cables, and turning stops. In addition, check all nose landing gear components, including mud scrapers and slush deflectors, for damage. Towing of some aircraft with the rudder locks installed, may cause damage to the steering linkage and rudder control system. Par 9-4 Page 9-413 Exceeding the steering or towing stop limits should be followed by a close inspection of the entire nose steering assembly. A broken steering stop will allow turning beyond the design limit, transmitting excessive loads to structures, and to the rudder control system. It is recommended that the nose steering arc limits be painted on the steering collar or fuselage. Inspect shimmy dampers for leakage around the piston shaft and at fluid line connections, and for abnormal wear or looseness around the pivot points. Also check for proper rigging, “bottoming” of the piston in the cylinder, and the condition of the external stops on the steering collar. Tail Wheels. Disassembly, cleaning, and re-rigging of tail wheels are periodically necessary. Inspect them for loose or broken bolts, broken springs, lack of lubrication, and general condition. Check steerable tail wheels for proper steering action, steering-horn wear, clearances, and for security and condition of steering springs and cables. Gear Doors. Inspect gear doors frequently for cracks, deformation, proper rigging, and general condition. Gear door hinges are especially susceptible to progressive cracking, which can ultimately result in complete failure, allowing the door to move and cause possible jamming of the gear. This condition could also result in the loss of the door during flight. In addition, check for proper safetying of the hinge pins and for distorted, sheared, loose, or cracked hinge rivets. Inspect the wheel wells for improper location or routing of components and related tubing or wiring. This could interfere with the travel of the gear door actuating mechanisms. Wheels. Inspect the wheels periodicsally for cracks, corrosion, dents, distortion, and faulty bearings in accordance with the manufacturer’s service information. In 9/8/98 AC 43.13-1B split-type wheels, recondition bolt holes which have become elongated due to some play in the through-bolt, by the use of inserts or other FAA-approved means. Pay particular attention to the condition of the throughbolts and nuts. Carefully inspect the wheels used with tubeless tires for damage to the wheel flange and for proper sealing of the valve. The sealing ring used between the wheel halves should be free of damage and deformation. When bolting wheel halves together, tighten the nuts to the proper torque value. Periodically accomplish an inspection to ensure the nuts are tight and that there is no movement between the two halves of the wheel. Maintain grease retaining felts in the wheel assembly in a soft, absorbent condition. If any have become hardened, wash them with a petroleumbase cleaning agent; if this fails to soften them, they should be replaced. Brakes. Disassemble and inspect the brakes periodically and examine the parts for wear, cracks, warpage, corrosion, elongated holes, etc. Discolored brake disks are an indication of overheated brakes and should be replaced. If any of these or other faults are indicated, repair, recondition, or replace the affected parts in accordance with the manufacturer’s recommendations. Corrosion of wheels. Remove all corrosion from the wheel half, and inspect it to ensure that the wheel halves are serviceable. Apply corrosion prevention treatments as applicable. Prime with a zinc chromate primer or equivalent, and apply at least two finish coats. Micro-Switches. Inspect micro-switches for security of attachment, cleanliness, general condition, and proper operation. Check the associated wiring for chafing, proper routing, and to determine that protective covers are installed on wiring terminals, if required. Check the condition of the rubber dust boots which protect the micro-switch plungers from dirt and corrosion. Dented or distorted wheels. Replace wheels which wobble excessively due to deformation resulting from a severe side-load impact. In questionable cases, consult the local representative of the FAA concerning the airworthiness of the wheels. Minor dents do not affect the serviceability of a wheel. Wheel bearings. When inspecting wheel bearings for condition, replace damaged or excessively worn parts. Maintain bearings and races as matched sets. Pack bearings only with the grease type called for in the manufacturer’s maintenance manual prior to their installation. Avoid pre-loading the wheel bearing when installing it on the aircraft by tightening the axle nut just enough to prevent wheel drag or side play. Hydraulic Brakes. For proper maintenance, periodically inspect the entire hydraulic system from the reservoir to the brakes. Maintain the fluid at the recommended level with proper brake fluid. When air is present in the brake system, bleed in accordance with the manufacturer’s instructions. Replace flexible hydraulic hoses which have deteriorated due to long periods of service and replace hydraulic piston seals when there is evidence of leakage. TIRE AND TUBE MAINTENANCE. A program of tire maintenance can minimize tire failures and increase tire service life. Correct balance is important as a heavy spot on an aircraft tire, tube, or wheel assembly causes that heavy spot to always hit the ground first upon landing. This results in excessive wear at one spot and an early failure at that part of the tire. A severe case of imbalance causes excessive vibration during take-off and landing, especially at high speed. A protective cover should be placed over a tire while servicing units that might drip fluid on the tire. FLOATS AND SKIS. Aircraft operated from water may be provided with either a single float or a double float, depending upon the design and construction; however, if an aircraft is an amphibian, it has a hull for flotation and then may need only wingtip floats. Amphibious aircraft have floats or a hull for operating on water and retractable wheels for land operation. Skis are used for operating on snow and ice. The skis may be made of wood, metal, or composite materials. There are three basic styles of skis. A conventional ski, shown in figure 9-1, replaces the wheel on the axle. The shock cord is used to hold the toe of the ski up Par 9-7 Page 9-414 9/8/98 when AC 43.13-1B landing. The safety cable and check cable prevent the ski from pivoting through too great an angle during flight. The wheel ski is designed to mount on the aircraft along with the tire. The ski has a portion cut out that allows the tire to extend slightly below the ski, so that the aircraft can be operated from conventional runways with the wheels or from snow or ice surfaces using the ski. This arrangement has a small wheel mounted on the heel of the ski, so that it does not drag on conventional runways. In retractable wheel-ski arrangements, the ski is mounted on a common axle with the wheel. In this arrangement, the ski can be extended below the level of the wheel for landing on snow or ice. The ski can be retracted above the bottom of the wheel for operations from conventional runways. A hydraulic system is commonly used for the retraction-system operation. FIGURE 9-1. A typical ski installation. Par 9-7 Page 9-415 9/8/98 AC 43.13-1B INSPECTION AND REPAIR OF FLOATS AND SKIS. Inspection of floats and skis involves examination for damage due to corrosion, collision with other objects, hard landings, and other conditions that may lead to failure. Tubular structures for such gear may be repaired as described in the section covering welded repairs of tubular structures. Floats. To maintain the float in an airworthy condition, periodic and frequent inspections should be made because of the rapidity of corrosion on metal parts, particularly when the aircraft is operated in salt water. Examine metal floats and all metal parts on wooden or fiberglass floats for corrosion, and take corrective action in accordance with the procedures described in Chapter 6, Corrosion, Inspection & Protection. Chapter 4, Metal Structure, Welding, and Brazing, outlines methods for repairing damage to metal floats of aluminum and aluminum alloy structures. In the case of wooden floats, make repairs in accordance with general procedures outlined in Chapter 1, Wood Structure. Repair fiberglass floats in accordance with the manufacturer’s instructions. If small blisters are noticed on the paint, either inside or outside the float, the paint should be removed and the area examined. If corrosion is found, the area should be cleaned thoroughly, and a coat of corrosion-inhibiting material applied. If the corrosion penetrates the metal to an appreciable depth, replace the metal. Special attention should be given to brace wire fittings and water rudder-control systems. If the hull or floats have retractable landing gear, a retraction check should be performed along with the other recommendations mentioned for retractable landing-gear systems. Sheet-metal floats should be repaired using approved practices; however, the seams Par 9-10 Page 9-416 between sections of sheet metal should be waterproofed with suitable fabric and sealing compound. A float that has undergone hull repairs should be tested by filling it with water and allowing it to stand for at least 24 hours to see if any leaks develop. Skis and Ski Installation. Skis should be inspected for general condition of the skis, cables, bungees, and fuselage attachments. If retractable skis are used, checks in accordance with the general practices for retractable gear should be followed. Ski manufacturers usually furnish acceptable repair procedures. It is advisable to examine ski installations frequently to keep them maintained in airworthy condition. If shock cord is used to keep the ski runner in proper trim, periodically examine to ensure that the cord has enough elasticity to keep the runner in its required attitude and the cord is not becoming loose or badly frayed. Replace old or weak shock cords. When other means of restraint are provided, examine for excessive wear and binding, and replace or repair as required. Examine the points of cable attachment, both on the ski and the aircraft structure, for bent lugs due to excessive loads that have been imposed while taxiing over rugged terrain or by trying to break loose frozen skis. If skis that permit attachment to the wheels and tires are used, maintain proper tire pressure as under-inflated tires may push off the wheels if appreciable side loads are developed in landing or taxiing. Repair of Ski Runners. Repair limits are found in the applicable manufacturer’s manual. Fractured wooden ski runners usually require replacement. If a split at the rear end of the runner does not exceed 10 percent of the ski length, it may be repaired by attaching one or more wooden crosspieces across the top of the runner using glue and bolts. Bent or torn metal runners may be straightened if minor bending has taken place and minor tears may 9/8/98 AC 43.13-1B be repaired in accordance with procedures recommended in Chapter 4, Metal Structure, Welding, and Brazing. undetected. Forces can be transmitted along the affected member to remote areas where subsequent normal loads can cause failure at a later date. Ski Pedestals. Prime locations for cracks on any landing gear are bolts, bolt holes, pins, rivets, and welds. The following are typical locations where cracks may develop. Tubular Pedestals. Damaged pedestals made of steel tubing may be repaired by using tube splices as shown in the chapter on welding. Most susceptible areas for bolts are at the radius between the head and the shank, and in the location where the threads join the shank, as shown in figure 9-2. Cast Pedestals. Consult a Federal Aviation Administration (FAA) representative on the repair of cast pedestals. Cracks primarily occur at the edge of bolt holes on the surface and down inside the bore. (See figures 9-3 and 9-4.) TYPES OF LANDING GEAR PROBLEMS. During inspection and before removing any accumulated dirt, closely observe the area being inspected while the wingtips are gently rocked up and down. Excessive motion between normally close-fitting landing gear components may indicate wear, cracks, or improper adjustment. If a crack exists, it will generally be indicated by dirt or metallic particles which tend to outline the fault. Seepage of rust inhibiting oils, used to coat internal surfaces of steel tubes, also assists in the early detection of cracks. In addition, a sooty, oily residue around bolts, rivets, and pins is a good indication of looseness or wear. FIGURE 9-2. Typical bolt cracks. Thoroughly clean and re-inspect the landing gear to determine the extent of any damage or wear. Some components may require removal and complete disassembly for detailed inspection. Others may require a specific check using an inspection process such as dye penetrant, magnetic particle, radiographic, ultrasonic, or eddy current. The frequency, degree of thoroughness, and selection of inspection methods are dependent upon the age, use, and general condition of the landing gear. Inspect the aircraft or landing gear structure surrounding any visible damage to ensure that no secondary damage remains FIGURE 9-3. Typical cracks near bolt holes. Par 9-10 Page 9-417 9/8/98 AC 43.13-1B Deformation is common in rods and tubes and usually is noticeable as stretched, bulged, or bent sections. As deformations of this type are difficult to see, feel along the tube for evidence of this discrepancy. Deformation of sheet-metal web sections, at landing-gear component attachment points, usually can be seen when the area is highlighted with oblique lighting. FIGURE 9-4. Typical bolt hole cracks. The usual types of failure in riveted joints or seams are deformation of the rivet heads and skin cracks originating at the rivets’ holes. Cracks and subsequent failures of rod ends usually begin at the thread end near the bearing and adjacent to or under the jam nut. (See figure 9-5.) FIGURE 9-5. Typical rod-end cracks. Cracks develop primarily along the edge of the weld adjacent to the base metal and along the centerline of the bead. Elongated holes are especially prevalent in taper-pin holes and bolt holes or at the riveted joints of torque tubes and push-pull rods. (See figure 9-6.) FIGURE 9-6. Typical torque tube bolt hole elongation. Par 9-11 Page 9-418 SPECIAL INSPECTIONS. Any time an aircraft has experienced a hard or overweight landing, it is recommended that a special structural inspection, which includes the landing gear, be performed. Typical areas which require special attention are landing gear support trusses for cracked welds, sheared bolts and rivets, and buckled structures; wheels and tires for cracks and cuts; and upper and lower wing surfaces for wrinkles, deformation, and loose or sheared rivets. If any damage is found, a detailed inspection is recommended. RETRACTION TESTS. Periodically, perform a complete operational check of the landing gear retraction system. Inspect the normal extension and retraction system, the emergency extension system, and the indicating and emergency warning system. Determine that the actuating cylinders, linkage, slide tubes, sprockets, chain or drive gears, gear doors, and the up-and-down locks are in good condition and properly adjusted and lubricated, and the wheels have adequate clearance in the wheel wells. In addition, an electrical continuity check of micro-switches and associated wiring is recommended. Only qualified personnel should attempt adjustments to the gear position and warning system micro-switches. Then closely follow the manufacturer’s recommendations. TIRE INSPECTION AND REPAIR. Tires should be inspected frequently for cuts, worn spots, bulges on the side walls, foreign bodies in the treads, and tread condition. 9/8/98 AC 43.13-1B Defective or worn tires may be repaired or retreaded. The term, retread, refers to several means of restoring a used tire, whether by applying a new tread alone or tread and side wall material in varying amounts. The following guidelines should be used for tire inspection: Tread Wear. Inspect the tires visually for remaining tread. Tires should be removed when tread has worn to the base of any groove at any spot, or to a minimum depth as specified by the tire or aircraft manufacturer. Tires worn to fabric in the tread area should be removed regardless of the amount of tread remaining. Uneven Wear. If tread wear is excessive on one side, the tire can be dismounted and turned around, providing there is no exposed fabric. Gear misalignment causing this condition should be corrected. WARNING: Do not probe cuts or embedded foreign objects while tire is inflated. Tread Cuts. Inspect tread for cuts and other foreign object damage, and mark with crayon or chalk. Remove tires that have the following: Cuts extending more than half of the width of a rib and deeper than 50 percent of the remaining groove depth. Weather checking, cracking, cuts, and snags extending down to the carcass ply in the sidewall and bead areas. Bulges in any part of tire tread, sidewall, or bead areas that indicate a separation or damaged tire. Cracking in a groove that exposes fabric or if cracking undercuts tread ribs. Flat Spots. Generally speaking, tires need not be removed because of flat spots due to skid or hydroplane burns unless fabric is exposed. If objectionable unbalance results, remove the tire from service. Beads. Inspect bead areas next to wheel flanges for damage due to excessive heat, especially if brake drag Par 9-11 or severe braking has been reported during taxi, takeoff or landing. Tire Clearance. Look for marks on tires, the gear, and in the wheel wells that might indicate rubbing due to inadequate clearance. Surface Condition. The surface condition of a tire can be inspected with the tire on the aircraft. The tread should be checked for abnormal wear. If the tread is worn in the center of the tire but not on the edges, this indicates that the tire is over-inflated and the operational air pressure should be reduced. On the other hand, a tire worn on the edges, but not in the center, indicates under-inflation. These indications are shown in figure 9-7. INFLATION OF TIRES. It is recommended that no person should stand directly in front of the wheel while it is being inflated, and that the tire not be inflated beyond recommended pressure (when it is not being installed in a safety cage). Over-inflation can cause damage to the aircraft, as well as personal injury. Under-inflation will cause excessive tire wear and imbalance. NOTE: The use of nitrogen to inflate tires is recommended. Do not use oxygen to inflate tires. Deflate tires Any cuts into the carcass ply. Page 9-419 9/8/98 AC 43.13-1B packed with approved grease. The wheel bearing and tire must be inspected and assembled. Many aircraft have specific torque requirements for the wheelretaining nuts. These torque requirements may have two values specified. The retaining nut is first tightened to the higher value to seat the bearing; then is backed off and tightened to the lower value specified. While tightening the wheel retaining nuts, the wheel should be rotated. Great care should be exercised to see that the wheelretaining nuts are not over-tightened. In the absence of specific instructions, the wheel-retaining nut is tightened until bearing drag is felt. The nut is then backed off about one serration (castellation) or one-sixth turn before bending up the tab on the tab-lock washer or installing the cotter pin. FIGURE 9-7. Examples of tread wear indicating overinflation and under-inflation. prior to removing them from the aircraft or when built-up tire assemblies are being shipped. The airframe manufacturer’s load and pressure chart should be consulted before inflating tires. Sufficiently inflate the tires to seat the tire beads; then deflate them to allow the tube to assume its position. Inflate to the recommended pressure with the tire in a horizontal position. WHEEL INSPECTION. Check wheels for damage. Wheels that are cracked or damaged must be taken out of service for repair or replacement in accordance with the manufacturer’s instruction manual. WHEEL INSTALLATION. There are various procedures used for the installation of wheel assemblies on an aircraft. The axle should first be cleaned and inspected for surface damage, damage to the axle threads, and the general condition and security of bolts holding the axle onto the landing-gear leg. The wheel bearings should be cleaned and Par 9-15 Page 9-420 The grease cover or wheel cover, if used, is then installed. During this installation any required brake, air-pressure sensors, and speed-sensor components should be installed and connected, as appropriate, for the specific aircraft. REASSEMBLING THE WHEEL. The correct assembly of the wheel affects the balance of the tire. After the wheel halves and bolts/nuts have been inspected and found serviceable, put a little talc on the tube and insert it in the tire. Align the heavy spot of the tube (usually marked with a yellow line) with the light spot of the tire (usually marked with a red dot). If the tube does not have a balance mark, align the valve of the tube with the balance mark on the line. Remove the valve core and inflate the tube momentarily to “seat” the tube and let the air run out. Put one wheel half in the tire and align the wheel half with the valve hole up with the valve on the tube. Insert the other wheel half in the tire and align the bolt holes. Insert the wheel bolts and torque to the manufacturer’s recommended value. 9/8/98 AC 43.13-1B NOTE: It is highly recommended that the tire be placed in a cage so that if the wheel fails, the mechanic is protected from injury. Again inflate the tube with 5 or 10 psi and let the air out to re-seat the tube. Install the valve core, and fill the tire to the recommended pressure. SLIPPAGE. To reduce the possibility of tire and tube failure due to slippage, and to provide a means of detecting tire slippage, tires should be marked and indexed with the wheel rim. Paint a mark one inch wide and two inches long across the tire side wall and wheel rim. Use a permanent type paint in a contrasting color, such as white, red, or orange. Pre-flight inspection must include a check of slippage marks for alignment. If the Par 9-25 Page 9-421 9/8/98 AC 43.13-1B slippage marks are not in alignment, a detailed inspection must be made, the reason determined, and if necessary, the condition corrected before the next flight. NOTE: Mechanics should be aware that retread tires can be diametrically bigger than a “new” tire. While this does not pose a problem on fixed landing gear aircraft, it may pose a problem on retractable gear aircraft. Due to a 5 to 8 percent expansion of the tire caused by the ambient temperature, if a retread tire is installed on a retractable gear aircraft, it is strongly recommended that a retraction test be performed. This is to ensure the tire will not become wedged in the wheel well during take-off and landing operation. 9-20.9.24. [RESERVED.] Par 9-25 Page 9-422 9/8/98 AC 43.13-1B SECTION 2. HYDRAULIC SYSTEMS GENERAL. Hydraulic systems in aircraft provide a means for the operation of aircraft components. The operation of landing gear, flaps, flight control surfaces and brakes is largely accomplished with hydraulic power systems. Hydraulic system complexity varies from small aircraft that require fluid only for manual operation of the wheel brakes to large transport aircraft where the systems are large and complex. To achieve the necessary redundancy and reliability, the system may consist of several subsystems. Each subsystem has a power generating device (pump) reservoir, accumulator, heat exchanger, filtering system, etc. System operating pressure may vary from a couple hundred psi in small aircraft and rotorcraft to several thousand psi in large transports. Generally, the larger the aircraft, the more mechanical work is required to control the aircraft’s various functions. Consequently, the system operating pressure increases accordingly. Primarily, hydraulic power is generated by either engine driven or electric motor driven pumps. The majority of hydraulic pumps are pressure compensated to provide a constant output pressure at a flow-rate demanded by the system. Some constant displacement pumps with a relief valve are used on the smaller aircraft. PURPOSES OF HYDRAULIC SYSTEMS. Hydraulic systems make possible the transmission of pressure and energy at the best weight per horsepower ratio. TYPES OF HYDRAULIC FLUID. There are three principal categories of hydraulic fluids; mineral base fluids, polyalphaolefin base, and phosphate ester base fluids. When servicing a hydraulic system, the technician must be certain to use the correct category of replacement fluid. Hydraulic fluids are not necessarily compatible. For example, contamination of the fire-resistant fluid MIL-H-83282 with MIL-H-5606 may render the MIL-H-83282 non fire-resistant. Mineral-Base Fluids. MIL-H-5606, mineral oil-based hydraulic fluid is the oldest, dating back to the 1940’s. It is used in many systems, especially where the fire hazard is comparatively low. MIL-H-6083 is simply a rust-inhibited version of MIL-H-5606. They are completely interchangeable. Suppliers generally ship hydraulic components with MIL-H-6083. Par 9-25 Page 9-423 Polyalphaolefin-Based Fluids. MIL-H-83282, is a fire-resistant hydrogenated polyalphaolefin-based fluid developed in the 1960’s to overcome the flammability characteristics of MIL-H-5606. MIL-H-83282 is significantly more flame resistant than MIL-H-5606, but a disadvantage is the high viscosity at low temperature. It is generally limited to -40 ºF. However, it can be used in the same system and with the same seals, gaskets, and hoses as MIL-H-5606. MIL-H-46170 is the rust-inhibited version of MIL-H-83282. Small aircraft predominantly use MIL-H-5606 but some have switched to MIL-H-83282, if they can accommodate the high viscosity at low temperature. Phosphate Ester-Based Fluid (Skydrol/Hyjet). These fluids are used in most commercial transport category aircraft, and are extremely fire-resistant. However, they are not fireproof and under certain conditions, they will burn. The earliest generation of these fluids was developed after World War II as a result of the growing number of aircraft hydraulic brake fires which drew the collective concern of the commercial aviation industry. Progressive development of these fluids occurred as a result of performance requirements of newer aircraft designs. The 9/8/98 AC 43.13-1B airframe manufacturers dubbed these new generations of hydraulic fluid as “types” based on their performance. Today, types IV and V fluids are used. Two distinct classes of type IV fluids exist based on their density: class I fluids are low density and class II are standard density. The class I fluids provide weight savings advantages versus class II. Monsanto and Exxon are the suppliers of the type IV phosphate esterbased aviation hydraulic fluids. In addition to the type IV fluids that are currently in use, type V fluids are being developed in response to industry demands for a more thermally stable fluid at higher operating temperatures. Type V fluids will be more resistant to hydrolytic and oxidative degradation at high temperature than the type IV fluids. Materials of Construction. Hydraulic systems require the use of special accessories that are compatible with the hydraulic fluid. Appropriate seals, gaskets, and hoses must be specifically designated for the type of fluid in use. Care must be taken to ensure that the components installed in the system are compatible with the fluid. When gaskets, seals, and hoses are replaced, positive identification should be made to ensure that they are made of the appropriate material. Phosphate ester-based hydraulic fluids have good solvency properties and may act as plasticizer for certain polymers. Care should be taken in handling to keep the fluid from spilling on plastic materials and paint finishes. If a small amount of the fluid is spilled during handling, it must be cleaned up immediately with a dry cloth. When larger quantities are spilled, an absorbent sweeping compound is recommended. A final cleaning with an approved solvent or detergent should remove any traces of fluid. HANDLING HYDRAULIC FLUID. In addition to any other instructions provided in the aircraft maintenance manual or by the fluid supplier, the following general precautions must be observed in the handling of hydraulic fluids: Ensure that each aircraft hydraulic system is properly identified to show the kind of fluid to be used in the Par 9-29 Page 9-424 system. Identification at the filler cap or valve must clearly show the type of fluid to be used or added. Never allow different categories of hydraulic fluids to become mixed. Chemical reactions may occur, fire resistant fluids may lose their fire resistance, seals may be damaged, etc. Never, under any circumstances, service an aircraft system with a fluid different from that shown on the instruction plate. Make certain that hydraulic fluids and fluid containers are protected from contamination of any kind. Dirt particles may cause hydraulic units to become inoperative, cause seal damage, etc. If there is any question regarding the cleanliness of the fluid, do not use it. Containers for hydraulic fluid must never be left open to air longer than necessary. Do not expose fluids to high temperature or open flames. Mineral-based fluids are highly flammable. The hydrocarbon-based hydraulic fluids are, in general, safe to handle. To work with Material Safety Data Sheets, reasonable handling procedures must always be followed. Take precaution to avoid fluid getting in the eyes. If fluid contacts the eye, wash immediately with water. 9/8/98 AC 43.13-1B When handling Skydrol/Hyjet hydraulic fluids, gloves that are impervious to the fluid must be worn. If skin contact occurs, wash with soap and water. When handling phosphate ester-based fluid use eye protection. If the eye is exposed to fluid, severe eye pain will occur. When Skydrol/Hyjet mist or vapor exposure is possible, a respirator capable of removing organic vapors and mists must be worn. Ingestion of any hydraulic fluid should be avoided. Although small amounts do not appear to be highly hazardous, any significant amount should be tested in accordance with manufacturer’s direction, followed with hospital supervised stomach treatment. HYDRAULIC SYSTEM MAINTENANCE PRACTICES. The maintenance of hydraulic and pneumatic systems should be performed in accordance with the aircraft manufacturer’s instructions. The following is a summary of general practices followed when dealing with hydraulic and pneumatic systems. Service. The servicing of hydraulic and pneumatic systems should be performed at the intervals specified by the manufacturer. Some components, such as hydraulic reservoirs, have servicing information adjacent to the component. When servicing a hydraulic reservoir, make certain to use the correct type of fluid. Hydraulic fluid type can be identified by color and smell; however, it is good practice to take fluid from the original marked container and then to check the fluid by color and smell for verification. Fluid containers should always be closed, except when fluid is being removed. Contamination Control. Contamination, both particulate and chemical, is detrimental to the performance and life of components in the aircraft hydraulic system. Contamination enters the system through normal wear of components, by ingestion through external seals, during servicing, or maintenance when the system is opened to replace/repair components, etc. To control the particulate contamination in the system, filters are installed in the pressure line, in the return line, and in the pump case drain line of each system. The filter rating is given in terms of “micron,” and is an indication of the particle size that will be filtered out. The replacement interval of these filters is established by the manufacturer and is included in the maintenance manual. However, in the absence of specific replacement instructions, a recommended service life of the filter elements is: Pressure filters3000 hrs. Par 9-28 Page 9-425 Return Filters1500 hrs. Case drain filters600 hrs. When replacing filter elements, be sure that there is no pressure on the filter bowl. Protective clothing and a face shield must be used to prevent fluid from contacting the eye. Replace the element with one that has the proper rating. After the filter element has been replaced, the system must be pressure tested to ensure that the sealing element in the filter assembly is intact. In the event of a major component failure, such as a pump, consideration must be given to replacing the system filter elements, as well as the failed component. System filters may also be equipped with differential pressure (∆P) indicators. These indicators are designed to “pop-up” when the pressure drop across the element reaches a predetermined value caused by contamination held by the element. The indicators are designed to prevent false indications due to cold start, pump ripple, and shock loads. Consequently, a filter whose indicator has been activated must be replaced. In fact, some indicator designs are 9/8/98 AC 43.13-1B such that the indicator cannot be reset, unless the filter bowl is removed and the element replaced. Flushing a Hydraulic System. When inspection of hydraulic filters or hydraulic fluid evaluation indicates that the fluid is contaminated, flushing the system may be necessary. This must be done according to the manufacturer’s instructions; however, a typical procedure for flushing is as follows: Connect a ground hydraulic test stand to the inlet and outlet test ports of the system. Verify that the ground unit fluid is clean and contains the same fluid as the aircraft. point, it is usually specified in the appropriate manual. Tubing should not be nicked, cut, dented, collapsed, or twisted beyond approved limits. The identification markings or lines on a flexible hose will show whether the hose has been twisted. (See figure 9.9.) All connections and fittings associated with moving units must be examined for play evidencing wear. Such units should be in an unpressurized condition when they are checked for wear. Change the system filters. Pump clean, filtered fluid through the system, and operate all subsystems until no obvious signs of contamination are found during inspection of the filters. Dispose of contaminated fluid and filter. (Note: A visual inspection of hydraulic filters is not always effective.) Disconnect the test stand and cap the ports. Ensure that the reservoir is filled to the FULL line or proper service level. Inspections. Hydraulic and pneumatic systems are inspected for leakage, worn or damaged tubing, worn or damaged hoses, wear of moving parts, security of mounting for all units, safetying, and any other condition specified by the maintenance manual. A complete inspection includes considering the age, cure date, stiffness of the hose, and an operational check of all subsystems. Leakage from any stationary connection in a system is not permitted, and if found, it should be repaired. A small amount of fluid seepage may be permitted on actuator piston rods and rotating shafts. In a hydraulic system, a thin film of fluid in these areas indicates that the seals are being properly lubricated. When a limited amount of leakage is allowed at any Par 9-28 Page 9-426 Accumulators must be checked for leakage, air or gas preload, and position. If the accumulator is equipped with a pressure gauge, the preload can be read directly. An operational check of the system can be performed using the engine-driven pump, an electrically-operated auxiliary pump (if such a pump is included in the system), or a ground test unit. The entire system and each subsystem should be checked for smooth operation, unusual noises, and speed of operation for each unit. The pressure section of the system should be checked with no subsystems to see that pressure holds for the required time without the pump supplying the system. System pressure should be observed during operation of each subsystem to ensure that the engine-driven pump maintains the required pressure. Troubleshooting. Hydraulic system troubleshooting varies according to the complexity of the system and the components in the system. It is, therefore, important that the 9/8/98 AC 43.13-1B technician refer to the troubleshooting information furnished by the manufacturer. installing fittings, valves, etc. always lubricate the threads with hydraulic fluid. Lack of pressure in a system can be caused by a sheared pump shaft, defective relief valve, the pressure regulator, an unloading valve stuck in the “kicked-out” position, lack of fluid in the system, the check valve installed backward, or any condition that permits free flow back to the reservoir or overboard. If a system operates satisfactorily with a ground test unit but not with the system pump, the pump should be examined. Overhaul of hydraulic and pneumatic units is usually accomplished in approved repair facilities; however, replacement of seals and packings may be done from time to time by technicians in the field. When a unit is disassembled, all O-ring and Chevron seals should be removed and replaced with new seals. The new seals must be of the same material as the original and must carry the correct manufacturer’s part number. No seal should be installed unless it is positively identified as the correct part and the shelf life has not expired. If a system fails to hold pressure in the pressure section, the likely cause is the pressure regulator, an unloading valve, a leaking relief valve, or a leaking check valve. If the pump fails to keep pressure up during operation of the subsystem, the pump may be worn or one of the pressure-control units may be leaking. High pressure in a system may be caused by a defective or improperly-adjusted pressure regulator, an unloading valve, or by an obstruction in a line or control unit. Unusual noise in a hydraulic system, such as banging and chattering, may be caused by air or contamination in the system. Such noises can also be caused by a faulty pressure regulator, another pressure-control unit, or a lack of proper accumulator action. Maintenance of hydraulic system components involves a number of standard practices together with specialized procedures set forth by manufacturers such as the replacement of valves, actuators, and other units, including tubing and hoses. Care should be exercised to prevent system contamination damage to seals, packings, and other parts, and to apply proper torque in connecting fittings. When Par 9-29 Page 9-427 When installing seals, care should be exercised to ensure that the seal is not scratched, cut, or otherwise damaged. When it is necessary to install a seal over sharp edges, the edges must be covered with shim stock, plastic sheet, or electrical tape. The replacement of hydraulic units and tubing usually involves the spillage of some hydraulic fluid. Care should be taken to ensure that the spillage of fluid is kept to a minimum by closing valves, if available, and by plugging lines immediately after they are disconnected. All openings in hydraulic systems should be capped or plugged to prevent contamination of the system. The importance of the proper torque applied to all nuts and fittings in a system cannot be over-emphasized. Too much torque will damage metal and seals, and too little torque will result in leaks and loose parts. The proper torque wrenches with the appropriate range should be used in assembling system units. Disposal of Used Hydraulic Fluids. In the absence of organizational guidelines, the 9/8/98 AC 43.13-1B technician should be guided by local, state, and federal regulations, with regard to means of disposal of used hydraulic fluid. Presently, the most universally accepted procedure for disposal of phosphate esterbased fluid is incineration. HYDRAULIC LINES AND FITTINGS. Carefully inspect all lines and fittings at regular intervals to ensure airworthiness. Investigate any evidence of fluid loss or leaks. Check metal lines for leaks, loose anchorage, scratches, kinks, or other damage. Inspect fittings and connections for leakage, looseness, cracks, burrs, or other damage. Replace or repair defective elements. Make sure the lines and hoses do not chafe against one another and are correctly secured and clamped. Replacement of Metal Lines. When inspection shows a line to be damaged or defective, replace the entire line or, if the damaged section is localized, a repair section may be inserted. In replacing lines, always use tubing of the same size and material as the original line. Use the old tubing as a template in bending the new line, unless it is too greatly damaged, in which case a template can be made from soft iron wire. Soft aluminum tubing (1100, 3003, or 5052) may also be used as a template. For forming of all tubing use an acceptable hand or power tube-bending tool. Bend tubing carefully to avoid excessive flattening, kinking, or wrinkling. Minimum bend radii values are shown in table 9-2. A small amount of flattening in bends is acceptable, but do not exceed 5 percent of the original outside diameter. Excessive flattening will cause fatigue failure of the tube. When installing the replacement tubing, line it up correctly with the mating part so that it is not forced into alignment by tightening of the coupling nuts. Tube Connections. Many tube connections are made using flared tube ends with Par 9-29 Page 9-428 standard connection fittings: AN-818 (MS 20818) nut and AN-819 (MS 20819) sleeve. In forming flares, cut the tube ends square, file smooth, remove all burrs and sharp edges, and thoroughly clean. The tubing is then flared using the correct 37-degree aviation flare forming tool for the size of tubing and type of fitting. A double flare is used on soft aluminum tubing 3/8-inch outside diameter and under, and a single flare on all other tubing. In making the connections, use hydraulic fluid as a lubricant and then tighten. Over-tightening will damage the tube or fitting, which may cause a failure. Under-tightening may cause leakage which could result in a system failure. CAUTION: Mistaken use of 45-degree automotive flare forming tools may result in improper tubing flare shape and angle; causing misfit, stress and strain, and probable system failure. Repair of Metal Tube Lines. Minor dents and scratches in tubing may be repaired. Scratches or nicks not deeper than 10 percent of the wall thickness in aluminum alloy tubing, that are not in the heel of a bend, may be repaired by burnishing with hand tools. Replace lines with severe die marks, seams, or splits in the tube. Any crack or deformity in a flare is unacceptable and cause for rejection. A dent less than 10 percent of the tube diameter is not objectionable unless it is in the heel of a bend. A severely-damaged line should be replaced; however, it may be repaired by cutting out the damaged section and inserting a tube section of the same size and material. Flare both ends of the undamaged and replacement tube sections and make the connection by using standard unions, sleeves, and tube nuts. If the damaged portion is short enough, omit the insert tube and repair by using one union and two sets of connection fittings. 9/8/98 AC 43.13-1B TABLE 9-2. Tube data. Dash Nos. Ref. Tubing OD inches -2 -3 -4 -5 -6 -8 -10 -12 -16 -20 -24 -28 -32 1/8 3/16 1/4 5/16 3/8 1/2 5/8 3/4 1 1-1/4 1-1/2 1-3/4 2 Wrench torque for tightening AN-818 Nut (pound inch) Aluminum-alloy tubing Steel tubing Aluminum-alloy tubing (Flare MS33583) for use Minimum Maximum Minimum Maximum on oxygen lines only Minimum Maximum 20 25 50 70 110 230 330 460 500 800 800 -1800 30 35 65 90 130 260 360 500 700 900 900 -2000 75 95 135 170 270 450 650 900 1200 1520 1900 -2660 Replacement of Flexible Lines. When replacement of a flexible line is necessary, use the same type, size, part number, and length of hose as the line to be replaced. Check TSO requirements. If the replacement of a hose with a swaged-end type fitting is necessary, obtain a new hose assembly of the correct size and composition. Certain synthetic oils require a specially compounded synthetic rubber hose, which is compatible. Refer to the aircraft manufacturer’s service information for the correct part number for the replacement hose. If the fittings on each end are of the correct type or sleeve type, a replacement may be fabricated as shown in figure 9-8. Before cutting new flexible wire braided hose to the proper size, tape the hose tightly with masking tape and cut in the center of the masking tape to prevent fraying. The use of a mandrel will prevent cutting the inside of the hose when inserting the fittings. Typical aircraft hose specifications and their uses are shown in table 9-3. Install hose assemblies without twisting. (See figure 9-9.) A hose should not be stretched tight between two fittings as this will result in overstressing and eventual failure. The length of hose should be sufficient to provide about 5 to 8 percent slack. Avoid tight bends in flex lines as they may result in 85 105 150 200 300 500 700 1000 1400 1680 2100 -2940 ---100 200 300 -------- ---125 250 400 -------- Minimum bend radii measured to tubing centerline. Dimension in inches. Alum. Steel Alloy 3/8 7/16 9/16 3/4 15/16 1-1/4 1-1/2 1-3/4 3 3-3/4 5 -8 -21/32 7/8 1-1/8 1-5/16 1-3/4 2-3/16 2-5/8 3-1/2 4-3/8 5-1/4 -7 failure. Never exceed the minimum bend radii as indicated in figure 9-10. Teflon hose is used in many aircraft systems because it has superior qualities for certain applications. Teflon is compounded from tetrafluoroethylene resin which is unaffected by fluids normally used in aircraft. It has an operating range of 65 to 450 °F. For these reasons, Teflon is used in hydraulic and engine lubricating systems where temperatures and pressures preclude the use of rubber hose. Although Teflon hose has excellent performance qualities, it also has peculiar characteristics that require extra care in handling. It tends to assume a permanent set when exposed to high pressure or temperature. Do not attempt to straighten a hose that has been in service. Any excessive bending or twisting may cause kinking or weakening of the tubing wall. Replace any hose that shows signs of leakage, abrasion, or kinking. Any hose suspected of kinking may be checked with a steel ball of proper size. Table 9-4 shows hose and ball sizes. The ball will not pass through if the hose is distorted beyond limits. If the hose fittings are of the reusable type, a replacement hose may be Par 9-30 Page 9-429 9/8/98 AC 43.13-1B fabricated as described in figure 9-8. When a hose assembly is removed, the ends should be tied as shown in figure 9-11, so that the preformed shape will be maintained. Refer to figure 9-10 for minimum bend radii. All flexible hose installations should be supported at least every 24 inches. Closer supports are preferred. They should be carefully routed and securely clamped to avoid abrasion, kinking, or excessive flexing. Excessive flexing may cause weakening of the hose or loosening at the fittings. O-Ring Seals. An understanding of O-ring seal applications is necessary to determine when replacement should be made. The simplest application is where the O-ring merely serves as a gasket when it is compressed within a recessed area by applying pressure with a packing nut or screw cap. Leakage is not normally acceptable in this type of installation. In other installations, the O-ring seals depend primarily upon their resiliency to accomplish their sealing action. When moving parts are involved, minor seepage may be normal and acceptable. A moist surface found on moving parts of hydraulic units is an indication the seal is being properly lubricated. When systems are static, seepage past the seals is not normally acceptable. Par 9-30 Page 9-430 During inspection, consider the following to determine whether seal replacement is necessary. How much fluid is permitted to seep past the seals? In some installations minor seepage is normal. Refer to the manufacturer’s maintenance information. What effect does the leak have on the operation of the system? Know the system. Does the leak of fluid create a hazard or affect surrounding installations? A check of the system fluid and a knowledge of previous fluid replenishment is helpful. Will the system function safely without depleting the reservoirs until the next inspection? Hydraulic System Pressure Test. When a flexible hose has been repaired or overhauled using existing hard worn and new hose material, before the hose is installed on the aircraft it is recommended that the hose is tested to at least 1.5 system pressure. A new hose can be operationally checked after it is installed in the aircraft using system pressure. 9/8/98 AC 43.13-1B FIGURE 9-8. Hose assembly instructions (can be used for low pressure hydraulic fluid, and oil line applications). Par 9-30 Page 9-431 9/8/98 AC 43.13-1B TABLE 9-3. Aircraft hose specifications. SINGLE WIRE BRAID FABRIC COVERED MIL. PART NO. MIL-H-8794- 3-L MIL-H-8794- 4-L MIL-H-8794- 5-L MIL-H-8794- 6-L MIL-H-8794- 8-L MIL-H-8794-10-L MIL-H-8794-12-L MIL-H-8794-16-L MIL-H-8794-20-L MIL-H-8794-24-L MIL-H-8794-32-L MIL-H-8794-40-L MIL-H-8794-48-L TUBE SIZE O.D. 3/16 1/4 5/16 38 1/2 5/8 3/4 1 1 1/4 1 1/2 2 2 1/2 3 HOSE SIZE I.D. 1/8 3/16 1/4 5/16 13/32 1/2 5/8 7/8 1 1/8 1 3/8 1 13/16 2 3/8 3 HOSE SIZE O.D. .45 .52 .58 .67 .77 .92 1.08 1.23 1.50 1.75 2.22 2.88 3.56 Construction: Seamless synthetic rubber inner tube reinforced with one fiber braid, one braid of high tensile steel wire and covered with an oil resistant rubber impregnated fiber braid. RECOMM. OPER. PRESS. 3,000 3,000 3,000 2,000 2,000 1,750 1,750 800 600 500 350 200 200 MIN. BURST PRESS. 12,000 12,000 10,000 9,000 8,000 7,000 6,000 3,200 2,500 2,000 1,400 1,000 800 MAX. PROOF PRESS. 6,000 6,000 5,000 4,500 4,000 3,500 3,000 1,600 1,250 1,000 700 300 300 MIN BEND RADIUS 3.00 3.00 3.38 4.00 4.63 5.50 6.50 7.38 9.00 11.00 13.25 24.00 33.00 Uses: Hose is approved for use in aircraft hydraulic, pneumatic, coolant, fuel and oil systems. Operating Temperatures: Sizes-3 through 12: Minus 65 °F. to plus 250 °F. Identification: Hose is identified by specification number, size number, quarter year and year, hose manufacturer’s identification. Sizes - 16 through 48: Minus 40 °F. to plus 275 °F. Note: Maximum temperatures and pressures should not be used simultaneously. MULTIPLE WIRE BRAID RUBBER COVERED MIL PAR NO. MIL-H-8788- 4-L MIL-H-8788- 5-L MIL-H-8788- 6-L MIL-H-8788- 8-L MIL-H-8788-10-L MIL-H-8788-12-L MIL-H-8788-16-L TUBE SIZE O.D. 1/4 5/16 3/8 1/2 5/8 3/4 1 HOSE SIZE I.D. 7/32 9/32 11/32 7/16 9/16 11/16 7/8 HOSE SIZE O.D. 0.63 0.70 0.77 0.86 1.03 1.22 1.50 Hose Construction: Seamless synthetic rubber inner tube reinforced with one fabric braid, two or more steel wire braids, and covered with a synthetic rubber cover (for gas applications request perforated cover). Identification: Hose is identified by specification number, size number, quarter year and year, hose manufacturer’s identification. Par 9-30 Page 9-432 RECOMM. OPER. PRESS. 3,000 3,000 3,000 3,000 3,000 3,000 3,000 MIN. BURST PRESS. 16,000 14,000 14,000 14,000 12,000 12,000 10,000 MIN. PROOF PRESS. 8,000 7,000 7,000 7,000 6,000 6,000 5,000 MIN. BEND RADIUS 3.00 3.38 5.00 5.75 6.50 7.75 9.63 Uses: High pressure hydraulic, pneumatic, coolant, fuel and oil. Operating Temperatures: Minus 65 °F. to plus 200 °F. 9/8/98 AC 43.13-1B RIGHT WAY WRONG WAY Do not bend or twist the hose as illustrated. Allow enough slack in the hose line to provide for changes in length when pressure is applied. The hose will change in length from + 2% to – 4%. Metal end fittings cannot be considered as part of the flexible portion of the assembly. The use of elbows and adapters will ensure easier installation and in many installations will remove the strain from the hose line and greatly increase service life. At all times keep the minimum bend radii of the hose as large as possible to avoid tube collapsing. FIGURE 9-9. Proper hose installations. Par 9-30 Page 9-433 9/8/98 AC 43.13-1B FIGURE 9-10. Minimum bend radii. Par 9-30 Page 9-434 9/8/98 AC 43.13-1B TABLE 9-4. Ball diameters for testing hose restrictions or kinking. HOSE SIZE BALL SIZE -4 5/64 -5 9/64 -6 13/64 -8 9/32 -10 3/8 -12 1/2 -16 47/64 -20 61/64 FIGURE 9-11. Suggested handling of preformed hose. 9-31.9-36. [RESERVED.] Par 9-30 Page 9-435 (and 9-26) 9/8/98 AC 43.13-1B SECTION 3. EMERGENCY EQUIPMENT LIFE RAFTS. Inflatable life rafts are subject to general deterioration due to aging. Experience has indicated that such equipment may be in need of replacement at the end of 5 years due to porosity of the rubber-coated material. Wear of such equipment is accelerated when stowed on board aircraft because of vibration which causes chafing of the rubberized fabric. This ultimately results in localized leakage. Leakage is also likely to occur where the fabric is folded because sharp corners are formed. When these corners are in contact with the carrying cases or with adjacent parts of the rubberized fabric, they tend to wear through due to vibration (Ref: TSO-C70a). When accomplishing maintenance, repair, and inspection of unpacked rafts, personnel should not step on any part of the raft or flotation tubes while wearing shoes. Rafts should not be thrown or dropped, since damage to the raft or accessories may result. Particular care should be exercised at all times to prevent snagging, cutting, and contact with gasoline, acids, oils, and grease. High standards of performance for proper maintenance, inspection, and repair cannot be overemphasized, since the lives of passengers could be involved. Inspection and inflation tests, when applicable, will be accomplished during storage and after installation in an aircraft in accordance with the manufacturer’s specifications and/or FAA-approved procedures. Accessory items will be installed during these inspections. A raft knife will be attached by a 24-inch nylon lanyard to the mooring eye located above the CO2 cylinder case to enable rapid cutting of the mooring line. LIFE RAFT INSPECTIONS. Inspection of life rafts should be performed in accordance with the manufacturer’s Par 9-37 Page 9-436 specifications. General inspection procedures to be performed on most life rafts are as follows. CAUTION: Areas where life rafts are inspected or tested must be smooth, free of splinters, sharp projections, and oil stains. Floors with abrasive characteristics, such as concrete or rough wood, will be covered with untreated tarpaulins or heavy clean paper. Inspect life rafts for cuts, tears, or other damage to the rubberized material. If the raft is found to be in good condition, remove the CO2 bottle(s) and inflate the raft with air to a pressure of 2 psi. The air should be introduced at the fitting normally connected to the CO2 bottle(s). After at least 1 hour, to allow for the air within the raft to adjust itself to the ambient temperature, check pressure and adjust, if necessary, to 2 psi and allow the raft to stand for 24 hours. If, after 24 hours, the pressure is less than 1 psi, examine the raft for leakage by using soapy water. In order to eliminate pressure variations due to temperature differences at the time the initial and final reading are taken, test the raft in a room where the temperature is fairly constant. If the pressure drop is satisfactory, the raft should be considered as being in an airworthy condition and returned to service after being fitted with correctly charged CO2 bottles as determined by weighing them. Rafts more than 5 years old are likely to be unairworthy due to deterioration. It is suggested that serviceable rafts be marked to indicate the date of inspection and that soapstone be used when folding them preparatory to insertion into the carrying case. Take care to see that all of the raft’s required equipment is on board and properly stowed. If the raft lanyard, used to prevent the raft from floating away from the airplane, is in need of 9/8/98 AC 43.13-1B replacement, use a lanyard not less than 20 feet long and having a breaking strength of about 75 pounds. It is recommended that the aforementioned procedure be repeated every 18 months using the CO2 bottle(s) for inflation. If a single bottle is used for inflating both compartments, it should be noted whether the inflation is proceeding equally to both compartments. Occasionally, the formation of “carbon-dioxide snow” may occur in one passage of the distribution manifold and divert a larger volume of gas to one compartment, which may burst if the mattress valve is not open to relieve the pressure. If the pressure is satisfactory, return the raft to service in accordance with the procedure outlined. Inspect the CO2 cylinder for evidence of crossthreading or stripping. Inspect the CO2 bottle inflation valve cable rigging as follows. Remove the screws that attach the cover plate to the valve and remove the cover plate. Inspect the firing line cable ball swage for engagement in the correct recess for either “Upward Pull” or “Downward Pull.” The cable will be wrapped around the sheave approximately 270 degrees. Reposition the cable ball swage as required. (See figure 9-12.) Replace the cover plate. The green dot on the sheave should be visible through the window in the cover plate, indicating a charged cylinder. Check the CO2 cylinder release cable and housing for condition and security. Par 9-37 Page 9-437 Make sure the safety deflector is removed from the cylinder outlet before connecting the cylinder to the raft. (See figure 9-12.) Stencil the life raft’s inspection date on the raft. SURVIVAL KIT INSPECTION. Survival Kit Contents. Each raft accommodating passengers or crew members should contain, as a minimum, the following: Hand Pump (if required) Desalting Kit, First-Aid Kit Mirror/Reflector Emergency Rations Tarpaulins Fishing Kit Raft Knife Compass Protective Ointment (Sunburn) Oars Emergency Water Containers Repair Kits Signal Flares Carrying Case Locator Beacon and Battery Lines and Anchor Police Whistle Flashlight Space Blankets (if required) Light-sticks Solar Still Kit Survival Manual Duct Tape Plastic Trash Bags Accessory Containers - Bailing Bucket - Sponge Dye Marker Shark Chaser 9/8/98 AC 43.13-1B FIGURE 9-12. Inflation valve. Exposure Suits. Quick-donning exposure suits should be provided in sufficient quantity to accommodate the passengers and crew on extended over-water missions whenever any of the following conditions exist. The water temperature is 59 ºF or below, or The Outside Air Temperature (OAT) is 32 ºF or below. Physical Inspection. Make a physical inspection of the life raft’s accessories and/or contents, in accordance with manufacturer’s specifications, to ascertain that all items required are in a serviceable condition. Close the outlet and check the seal of the piston. Blow into the outlet to determine if the pump check valve will seal. Desalting Kit. Check the desalting kit expiration date, if applicable. Replace the severely dented or punctured cans. Pumps and Hoses. Check the air pump for condition and security. Check the air pump hose and hose fittings for ease of attachment to the pump and mattress valves. Par 9-39 Operate the pump to ensure that it delivers air. Page 9-438 NOTE: Type MK-2 desalter kits have an indefinite shelf and service life and do not have to be age-controlled. First-Aid Kit. Inspect each kit prior to flight to ensure that the seal is intact; the kits have not been tampered with or opened; and check the date when the kit contents should be inspected (120-day interval), and containing the following: 9/8/98 1 Case First-Aid Kit, empty; 1 Bottle Benzalkonium Chloride Zinc; Tinted, 1:1000 2cc 1 Package Sodium Chloride; (Sodium Bicarbonate Mix) 4.5 gm; 1 Bandage each, Gauze, & Compress (2 inches x 6 yd); 2 Dressings, First-Aid, 4 inches x 7 inches; 1 Package Bandages; Absorbent & Adhesive, 3/4-inch x 3 inches; 3 Bottles, Snap-On Cap, Plastic Tablet and Capsule, Round, (issued empty; to used as needed by user); 1 Tube Lipstick, Anti-Chap; and 1 bottle Water Purification Tablets, Iodine 8 mg (50). AC 43.13-1B Tarpaulins. Spread out and check for tears, mildew, corroded grommets, and general condition. Fishing Kit. Check for damaged container or for tampering. Replace if damaged or incomplete. be Raft Knife. Check for corrosion and ease of opening and security of the knife lanyard to the raft. If the seal is found to be broken, or there is evidence of tampering, the kit should be opened and inspected to ensure that all components are included and undamaged. After such inspection, the kit should be resealed. To reseal the kit, use a wire and lead seal according to the manufacturer’s specifications. Pass the wire through grommets or opposite flaps, bend the wire back and force each end through the middle of the lacing cord on each side of the square knot. Pass the ends of the wire through the holes in the lead seal, draw the wire taut, and compress the seal. Compass. condition. Check for proper operation and Protective Ointment (Sunburn). Check the sunburn ointment containers for cracks or crushed condition. Install the ointment in a 6 inch mailing tube and tape the ends to prevent crushing. Stow it where it will be subjected to the least amount of pressure in the kit. Oars. Check for serviceability. Mirror/Reflector. Check the reflector for defective reflection surface and the reflector lanyard for defective conditions and security of attachment. Emergency Rations. Check the food ration cans for obvious damage, severe dents, and an expiration date. Replace items when severely damaged, dented, or when the date is expired. Ensure that the opening key is attached. Wrap the oars separately in craft paper and seal with tape. Stencil inspected in letters not less than 1/2-inch high on each package. Emergency Water Containers. Check for open seams, holes, etc. Replace defective containers. Repair Kit. Check for proper wrapping and missing items. Four plugs are wrapped in a single container. This container and the pliers are wrapped in waterproof paper and sealed Par 9-49 Page 9-439 9/8/98 AC 43.13-1B with waterproof tape. The package is stenciled repair plugs and pliers with letters not less than 1/2-inch high. Par 9-49 Page 9-440 9/8/98 AC 43.13-1B Signal Flares. Check the flares for obvious damage and suspended lot numbers. Replace if lot number is over-age or obvious damage exists. Carrying Case. Check for snags, abrasions, and defective snaps. Repair or replace as necessary. Locator Beacon and Battery. Check for corrosion and obvious damage per the manufacturer’s manual. Assemble as an operating unit. Perform an operational test, prepare the beacon for water activation by pulling out the battery switch plug from the end of the transmitter section, and package as instructed on the container. Lines and Anchor. Check all lines and sea anchors for conditions and security. Police Whistle. Inspect and test. Flashlight. Test the flashlight switch for operation; remove old batteries and inspect the case for corrosion and condition; and install new batteries and test momentarily for operation. Space Blankets. Check space blankets (if required) for rips, tears, and obvious damage. Light-sticks. Inspect light-sticks for condition and check expiration date. Solar Still Kit. condition. Par 9-39 Check the solar still kit for Page 9-441 Survival Manual. Inspect the survival manual for condition and completeness. 9/8/98 Duct Tape. deterioration. AC 43.13-1B Check the duct tape for Plastic Trash Bags. Assure that three (each) plastic trash bags are serviceable. Accessory Containers. Check the containers for condition and security. Repack the accessories, secure, and record the inspection data on data cards. Record the Inspection date. Dye Marker. condition. Check for dents and overall Shark Chaser. Check for dents and overall condition. After Inspection. Replace accessories in the container, close, and tie securely with tying tapes. Draw a 25-pound breaking strength cord tightly around the center and one approximately 5 inches from each end of the container, tie with square knots, and seal with a lead seal. Folding Life Rafts. Fold the life rafts per the manufacturer’s folding diagram using soapstone and secure the raft in its container. Check the container for obvious damage. SPECIAL INSPECTIONS. Life rafts in storage or in service shall be unpacked and thoroughly inspected for mildew whenever weather or other conditions warrant. The extent of a special inspection will be determined by the inspector or maintenance chief following a review of the circumstances or conditions to which the life rafts have been subjected. The inspector or maintenance chief may direct a complete overall inspection and inflation test Par 9-39 Page 9-442 9/8/98 AC 43.13-1B of the life rafts, regardless of the last date of inspection, if it is considered that another inspection is warranted. INSPECTION RECORD. The date the inspection was completed will be stenciled on the flotation tube at the left of the cylinder. The size of lettering will not be less than 1/4-inch or greater than 1/2-inch in height. Previous inspection dates will not be removed or obliterated, but will be arranged in columnar form with the latest date at the top. After the inspection is completed, fill out the raft’s inspection record in accordance with part 43 section 43.9, and attach the parts tag to the survival equipment. The date on the tag will reflect the same date as stenciled on the flotation tube and will be used to determine the next due date of inspection and test. RAFT REPAIRS. Repairs. The service life for flotation equipment will be determined by condition rather than age. Equipment passing tests and inspections may remain in service indefinitely since the inflation tests and material inspections will identify and condemn equipment having more than minor installation defects. However, the service life for life rafts operating under normal usage and environmental conditions is anticipated by the manufacturers to be 8 to 10 years, and it is appropriate to base life raft’s parts replacement programs upon this estimate. It is not considered advisable or economical to perform major repairs on life rafts. Life Rafts. Life rafts with any of the following conditions should be condemned rather than repaired: Life rafts over 3-1/2 years of age and requiring major repair or more than two minor repairs. A rip or tear across an air retaining seam. Rafts on which oil, grease, or any other foreign substance has caused a deterioration of the rubberized fabric. Rafts on which a heavy mildew condition has caused deterioration of the rubberized fabric. Rafts on which porous flotation tubes allow diffusion of air. A porous area is located by a soap test on the inflated raft. Higher diffusion is indicated by the excessive loss of pressure after a soap test has failed to locate a specific area of injury on the raft. Rafts requiring internal repair or opening of air retaining seams for repair. Rafts with an excessive number of injuries that would not, in the judgment of competent inspectors, justify repair. Patches. Holes or abrasions which are 2 inches or less, in diameter (in air retaining chambers) will be repaired by the application of an outside patch. Holes exceeding 2 inches in length or diameter, will require an inside patch as well as an outside patch. Inside and outside patches should be round or rectangular and manufactured of fabric (specification MIL-C-6819). Cement should conform to Class 1 of specification MIL-C-5539. Patch as follows: Outside patches. With a rubber solvent thoroughly clean the area to be patched. From the material referenced, fabricate a patch as shown in figure 9-13. Par 9-39 Page 9-443 9/8/98 AC 43.13-1B When two fabric surfaces are to be bonded, apply two coats of extra light cement, two coats of light cement, and three coats of heavy cement to each surface. Rubbercoated tape and seam crossover patches with protective backing do not require cement. Each coat of cement should be thoroughly dry to the touch before the next coat is applied. Start the bonding of fabric surfaces while the last coat of cement is slightly tacky. To ensure proper adhesion when bonding two cemented surfaces, the areas to be bonded should remain tacky during application. This is accomplished by brushing the cemented area with a cloth moistened with solvent. center line, and cross lines on the ends of the patch will coincide with the ends of the injury. To ensure that the inside surface of the raft is properly powdered in the area of repair, pass a small handful of talc through the opening in the raft and place it approximately 12 inches from the injury. This should be accomplished before the inside area is cemented, exercising care to prevent distribution of the talc prior to completion of the repair. NOTE: If difficulty in the drying of heavy cement is encountered due to atmospheric conditions, six additional coats of light cement may be substituted for the three coats of heavy cement. After applying the patch, thoroughly roll it with a hand roller, rolling from the center to the outer edge, to ensure that all air pockets are removed and a firm bond is secured. Thoroughly dust with talc. Allow to cure for 60 hours before performing leak tests and storing. Inside Patches. Cut a rectangular patch as shown in figure 9-13, allowing at least 1-1/2 inches to extend beyond the edge of the injury in all directions. Mark the center line on the side of the patch that is to be attached to the raft. Mark cross lines on each end of the patch 1-1/2 inches from the ends. When the patch is applied to the injury on the inside, the longitudinal edges of the injury will coincide with the Par 9-42 Page 9-444 FIGURE 9-13. Repair dimensions. Using cleaning solvent, cleanse an area on the inside surface of the fabric slightly larger than the patch to be applied. Ensure that the repaired area is thoroughly dry, both inside and outside; apply two coats of extra light cement, two coats of light cement, and three coats of heavy cement (or six additional coats of light cement in lieu of the heavy cement) to the cleansed area, allowing each coat to dry thoroughly before applying successive coats. NOTE: Since it is impossible for the repairman to visually observe the cementing that is being accomplished on the inside of the raft, exercise care to ensure that each coat of cement completely covers the area to be repaired. 9/8/98 AC 43.13-1B The inside patch should be cemented simultaneously with the application of cement to the inside of the raft. Apply the same number of coats as directed in paragraph 9 42b(2)(d) to the side of the patch that is applied to the injured fabric of the raft. Ensure that each coat is thoroughly dry before applying the next coat. To aid in adhesion, prior to applying the patch, the inside area to be repaired and cemented surface of the patch should be cleaned with a cloth moistened with rubber solvent. The cement will then become tacky. Apply the patch. Fold the patch lengthwise in the shape of the letter “U” and insert the patch between the torn edges of the injury on the life rafts. Position the patch so that the fabric at the end of the tear will coincide with a cross line and the center line on the patch follows one edge of the torn fabric. Attach one edge of the torn fabric along the center line on the patch. Inspect the repair for wrinkles. Working from the attached edge of the fabric to the edge of the patch, remove the wrinkles with a stitcher. Lay the opposite edge of the torn fabric on the patch so that it butts the edge of the torn fabric that has already been applied to the patch. Remove the wrinkles. Thoroughly roll the patch with a 2 inch rubber roller. NOTE: The surface under the patch should be as smooth as possible so that the torn edge of the fabric may be attached to the patch instead of attempting to attach the patch to the fabric. Scatter the handful of talc that was placed inside the tube by grasping the sides of the flotation tube and pulling them apart. Par 9-42 Page 9-445 Prepare and attach the outside patch as outlined in “OUTSIDE PATCHES,” sub paragraphs 9-42b(1)(a)-(e). Allow to cure for at least 60 hours before performing leak tests and storing. Seams and Tapes. Remove all old or dead cement from the area that will require recementing. Dampen the repair area with a solvent-moistened cloth; then roll or rub off the old cement. Apply cement to the surface as outlined in “OUTSIDE PATCHES,” sub-paragraph 9-42b(1)(a)-(e). Roll thoroughly with a roller to ensure that all air pockets are removed and a firm bond is secured. Allow to dry and apply talc over the seam as previously outlined. Allow to cure for at least 60 hours before performing leak tests and storing. LIFE PRESERVERS. Inflatable life preservers are subject to general deterioration due to aging. Experience has indicated that such equipment may be in need of replacement at the end of 5 years due to porosity of the rubber-coated material. Wear of such equipment is accelerated when stowed on board aircraft because of vibration which causes chafing of the rubberized fabric. This ultimately results in localized leakage. Leakage is also likely to occur where the fabric is folded because sharp corners are formed. When these corners are in contact with the carrying cases, or with adjacent parts of the rubberized fabric, they tend to wear through due to vibration. 9/8/98 AC 43.13-1B Life preservers should be inspected in accordance with the manufacturer’s specification, unless climate, storage, or operational conditions indicate the need for more frequent inspections (Ref: TSO-C13). LIFE PRESERVER INSPECTION. Life preservers should be inspected at 12-month intervals for cuts, tears, or other damage to the rubberized material. Check the mouth valves and tubing for leakage, corrosion, and deterioration. Remove the CO2 cylinder and check the discharge mechanism by operating the lever to ascertain that the pin operates freely. Check the gaskets and valve cores of the cylinder container and the pull cord for deterioration. If no defects are found, inflate the preserver with air to a 2 psi pressure and allow to stand for 12 hours. If the preserver still has adequate rigidity at the end of that time, deflate and fit with CO2 cylinders having weights not less than that indicated on them by the manufacturer. All cylinders made in accordance with joint Army/Navy Specification MIL-C-00601D are so stamped and have a minimum permissible weight stamped on them. The use of such CO2 cylinders is recommended. Having fitted the preserver with an adequately-charged cylinder, mark the preserver to indicate the date of inspection and patch it to the container. It is recommended that the aforementioned procedure be repeated every 12-month period, utilizing the CO2 cartridge for inflation. Carbon dioxide permeates the rubberized fabric at a faster rate than air and will indicate if the porosity of the material is excessive. The following checks and inspections should be completed: Check for separation of cell fabric and loose attachments along the edges of patches and sealing tapes. Repair if practicable. Check for deterioration in areas where oil and grease are noted. Condemn deteriorated cells. If deterioration is not noted, clean the areas with mild soap and water and rinse with clear water. Inspect the snaps and/or buckles to ensure proper operation. Inspect the instruction panel for readability. Inspect all stitching for gaps, pulls, and tears. Visually inspect the cell containers for snags, cuts, loose stitching, and oil and grease spots. Repair or replace as necessary. Inspect the hardware for rusted or broken parts and cotter pins for damage. Ensure that pins are smooth and free of burrs. Check the inflator discharge lever for proper operation. Move the inflator discharge lever slowly through a normal cycle of operation to ensure freedom of operation and to make certain that the piercing pin has sufficient movement to discharge the CO2 cylinder. The point of the pin should move past the surface of the gasket in the inflator. In the unoperated position, the end point should be slightly below the gasket surface. Check the installation of the inflator stem gaskets and check the stem caps for tightness. Ensure that the inflator is centered on the stem. Check rescue light. Inspect and test. Check for abrasions, chafing, and soiling across folded cell areas and around metal parts. Condemn the life preserver when unsuitable conditions are found. Par 9-43 Page 9-446 9/8/98 AC 43.13-1B Replace the battery if it shows any signs of encrustation. Inspect for proper installation and physical condition of the lamp, wire, and battery. Check the light assembly for proper operation and water insulation and flotation. Pull the sealing plug (where applicable) from the battery. Let water flow through the open ports. Make sure the battery is activated and power is supplied to the light. Fill out the inspection record and serviceable parts tag. Attach to the vest. Deflate the life preserver and repack in container and secure. The accessories listed below will be required for all life preservers: One Recognition Light: Remove when returning to serviceable or reparable storage. Remove for replacement of defective light, repair, or salvage of preserver. One Recognition Light Battery: Remove when returning to serviceable or reparable storage. Record the inspection data on data cards. Life preserver inspected and found sea worthy. Include the inspector’s signature. Inspection record. Upon completion of 12-month inspection and tests, each flotation cell will be marked to indicate the date the inspection was accomplished. The inspection stencil will consist of 1/8-inch letters and numerals and will be applied to the patches on the cells (example: 4/3/97). To facilitate Par 9-43 Page 9-447 determination of the next 12-month inspection period, enter the date it is due in the blank beside the word inspect on the inspection data card provided in the inspection data pocket on the cell container. Repack, close, and seal the container. REPAIR OF LIFE PRESERVERS. Leaks may be disclosed by immersion in soapy water. Repair leaks by the use of patches in accordance with the recommendations of the manufacturer. Clean corroded metal parts and replace missing or weakened lanyards. Life preservers which do not retain sufficient rigidity after the 12-hour period, because of general deterioration and porosity of the fabric, are beyond economical repair and should be replaced. MISCELLANEOUS EQUIPMENT. Parachutes. With reasonable care, parachutes can remain in service indefinitely. They should not be carelessly tossed about, left in aircraft to become wet, or left where someone may tamper with them. They should not be placed where they may fall on oily floors or be subject to acid fumes from adjacent battery chargers. When repacking is scheduled, to comply with the 120-day requirement in Title 14 of the Code of Federal Regulation (14 CFR) part 105 section 105.43 a careful inspection of the parachute shall be made by a qualified parachute technician (rigger). If repairs or replacements of parts are necessary to maintain the airworthiness of the parachute assembly, such work must be done by the original parachute manufacturer or by a qualified parachute rigger, certificated in accordance with 14 CFR, part 65. The lead seal should be inspected periodically to ensure the thread has not been broken. If broken, or broken and retied or 9/8/98 AC 43.13-1B appears to have been tampered with, the parachute must be repacked by a properly certified rigger. Safety Belts. All seat belts and restraint systems must conform to standards established by the FAA. These standards are contained in Technical Standard Order TSO C22 for seat belts and TSO C114 for restraint systems. Safety belts eligible for installation in aircraft must be identified by the proper TSO markings on the belt. Each safety belt must be equipped with an approved metal to metal latching device. Airworthy type-certificated safety belts currently in aircraft may be removed for cleaning and reinstalled. However, when a TSO safety belt is found unairworthy, replacement with a new TSO-approved belt or harness is required. The webbing of safety belts, even when mildew-proofed, is subject to deterioration due to constant use, cleaning, and the effects of aging. Fraying of belts is an indication of wear, and such belts are likely to be unairworthy because they can no longer hold the minimum required tensile load. OXYGEN SYSTEMS. The following instructions are to serve as a guide for the inspection and maintenance of aircraft oxygen systems. The information is applicable to both portable and permanently-installed equipment. Aircraft Gaseous Oxygen Systems. The oxygen in gaseous systems is supplied from one or more high- or low-pressure oxygen cylinders. Since the oxygen is compressed within the cylinder, the amount of pressure indicated on the system gauge bears a direct relationship to the amount of oxygen contained in the cylinder. The pressure-indicating line connection is normally located between the cylinder and a pressure-reducing valve. Par 9-46 Page 9-448 NOTE: Some of the gaseous oxygen systems do not use pressure-reducing valves. The high pressure is reduced to a useable pressure by a regulator. This regulator is located between the high- and low-pressure system. CAUTION: Oxygen rich environments are dangerous. Portable Oxygen Systems. The three basic types of portable oxygen systems are: demand, pressure demand, and continuous flow. The components of these systems are identical to those of a permanent installation with the exception that some parts are miniaturized as necessary. This is done in order that they may be contained in a case or strapped around a person’s shoulder. It is for this portability reason that special attention be given to assuring that any storage or security provision for portable oxygen equipment in the aircraft is adequate, in good condition, and accessible to the user. NOTE: Check portable equipment including its security provisions frequently, since it is more susceptible to personnel abuse than a permanently-installed system. INSPECTION. Hands, clothing, and tools must be free of oil, grease, and dirt when working with oxygen equipment. Traces of these organic materials near compressed oxygen may result in spontaneous combustion, explosions, and/or fire. Oxygen Tanks and Cylinders. Inspect the entire exterior surface of the cylinder for indication of abuse, dents, bulges, and strap chafing. Examine the neck of cylinder for cracks, distortion, or damaged threads. 9/8/98 AC 43.13-1B Check the cylinder to determine if the markings are legible. Check the date of the last hydrostatic test. If the periodic retest date is past, do not return the cylinder to service until the test has been accomplished. Inspect the cylinder mounting bracket, bracket hold-down bolts, and cylinder-holding straps for cracks, deformation, cleanliness, and security of attachment. In the immediate area where the cylinder is stored or secured, check for evidence of any types of interference, chafing, deformation, or deterioration. Lines and Fittings. Inspect oxygen lines for chafing, corrosion, flat spots and irregularities, i.e., sharp bends, kinks, and inadequate security. Check fittings for corrosion around the threaded area where lines are joined. Pressurize the system and check for leaks. (See paragraph 9-49b(2)(d).) CAUTION: In pressurizing the system, actuate the valve slowly to avoid surging which could rupture the line. Regulators, Valves, and Gauges. Examine all parts for cracks, nicks, damaged threads or other apparent damage. Actuate the regulator controls and the valve to check for ease of operation. Determine if the gauge is functioning properly by observing the pressure build-up and the Par 9-46 Page 9-449 return to zero when the system oxygen is bled off. 9/8/98 AC 43.13-1B Masks and Hoses. Check the oxygen mask for fabric cracks and rough face seals. If the mask is a full-face model, inspect the glass or plastic for cleanliness and state of repair. When appropriate, with due regard to hygienic considerations, the sealing qualities of an oxygen mask may be tested by placing a thumb over the connection at the end of the mask tube and inhaling very lightly. Remove the thumb from the disconnect after each continuous inhalation. If there is no leakage, the mask will adhere tightly to the face during inhalation, and definite resistance to inhalation will be noticeable. Flex the mask hose gently over its entirety and check for evidence of deterioration or dirt. Examine the mask and hose storage compartment for cleanliness and general condition. If the mask and hose storage compartment is provided with a cover or release mechanism, thoroughly check the operation of the mechanism. MAINTENANCE. Oxygen Tanks, Cylinders, and Hold-Down Brackets. Remove from service any cylinders that show signs of abuse, dents, bulges, cracks, distortion, damaged threads, or defects which might render them unsafe. Typical examples of oxygen cylinder damage are shown in figure 9-14. When replacing an oxygen cylinder, be certain that the replacement cylinder is of the same size and weight as the one removed. Par 9-46 Page 9-450 9/8/98 AC 43.13-1B Lines and Fittings. Replace any oxygen line that is chafed, rusted, corroded, dented, cracked, or kinked. FIGURE 9-14. Oxygen cylinder damage. NOTE: Cylinders having greater weight or size will require strengthened cylinder mounting brackets and a reevaluation to determine that the larger or heavier cylinder will not interfere with adjacent systems, components, or structural members, and that the strength of attaching structure is adequate and any additional weight will be computed into the aircraft’s weight and balance report. Replace or repair any cylinder mounting brackets that show signs of wear. Visible cracks may be welded in accordance with manufacturer’s standards. Replace the cylinder straps or clamps that show wear or abuse. For typical mounting bracket cracks and failure, see figure 9-15. FIGURE 9-15. Cylinder brackets and clamps. Par 9-49 Page 9-451 Clean oxygen system fittings showing signs of rusting or corrosion in the threaded area. To accomplish this, use a cleaner recommended by manufacturers of oxygen equipment. Replace lines and fittings that cannot be cleaned. The high-pressure lines which are located between the oxygen bottle (outside the oxygen service filler) and the regulator are normally fabricated from stainless steel or thick-wall, seamless copper alloy tubing. The fittings on high-pressure lines are normally silver brazed. NOTE: Use silver alloys free of cadmium when silver brazing. The use of silver brazing alloys, which contain cadmium, will emit a poisonous gas when heated to a molten state. This gas is extremely hazardous to health if inhaled. 9/8/98 AC 43.13-1B The low-pressure lines extend from the pressure regulator to each passenger and crew oxygen outlet. These lines are fabricated from seamless aluminum alloy, copper, or flexible hose. Normally, flare- or flange-type connections are used. ascertain if the threaded area is free of nicks, burrs, and contaminants that would prevent the connections from sealing properly. CAUTION: Do not use petroleum lubricants on these components. Masks and Hoses. CAUTION: Do not allow oil, grease, flammable solvent, or other combustibles such as lint or dust to come in contact with threads or any parts that will be exposed to pressurized oxygen. It is advisable to purge the oxygen system any time work has been accomplished on any of the lines and fittings. Use dry nitrogen or dry air for purging the system. All open lines should be capped immediately after purging. When oxygen is being lost from a system through leakage, a sequence of steps may be necessary to locate the opening. Leakage may often be detected by listening for the distinct hissing sound of escaping gas. If this check proves negative, it will be necessary to soap-test all lines and connections with a castile soap and water solution or specially compounded leak-test material. Make the solution thick enough to adhere to the contours of the fittings. At the completion of the leakage test, remove all traces of the soap and water. CAUTION: Do not attempt to tighten any connections while the system is charged. Regulators, Valves, and Gauges. Line maintenance of oxygen regulators, valves, and gauges does not include major repair. These components are precision made and their repair usually requires the attention of a repair station or the manufacturer. Care must be taken when reinstalling these components to Par 9-49 Page 9-452 Troubleshooting. If a mask assembly is defective (leaks, does not allow breathing, or contains a defective microphone), it is advisable to return the mask assembly to the manufacturer or a repair station. Maintenance Practice and Cleaning. Clean and disinfect the mask assemblies after use, as appropriate. NOTE: Use care to avoid damaging the microphone assembly while cleaning and sterilizing. Wash the mask with a mild soap solution and rinse it with clear water. To sterilize, swab the mask thoroughly with a gauze or sponge soaked in a water merthiolate solution. This solution should contain 1/5-teaspoon of merthiolate per 1 quart of water. Wipe the mask with a clean cloth and air dry. Replace the hose if it shows evidence of deterioration. Hoses may be cleaned in the same manner as the mask. Observe that each mask breathing tube end is free of nicks, and that the tube end will slip into the cabin oxygen receptacle with ease and not leak. 9/8/98 AC 43.13-1B FUNCTIONAL TESTING AFTER REPAIR. Following repair, and before inspection plates, cover plates, or upholstering are replaced, test the entire system. A maximum pressure drop of 100 psi is permissible. Open the cylinder valve slowly and observe the pressure gauge on a high-pressure system. A pressure of approximately 1,800 psi (at 70 °F) should be indicated on the gauge. (Cylinder pressure will vary considerably with radical temperature changes.) NOTE: Conduct the above tests in an area where changes of temperature will be less than 10 °F. If a leak occurs during the 1-hour period, suitable corrections would be required, or reconduct the test under conditions of unvarying temperatures. Check the system by installing one of the mask hose fittings (minus the mask) in each of the cabin wall outlets to determine whether there is a flow. If a demand mask is used, check by breathing through the mask and, if appropriate, clean the mask according to paragraph 9-49d. Check the complete system for leaks in accordance with the procedure outlined in paragraph 9-49b(2)(d). If leaks are found, close the cylinder valve and open an outlet to reduce the pressure in the system to zero. The following checks may be made for a pressure drop check of the system. Open the cylinder valve and pressurize the system. Observe the pressure gauge (a pressure of approximately 1,800 psi at 70 °F should be indicated). For the light weight ICC 3HT 1850 cylinders, pressurize the system to approximately 1,850 psi at 70 °F. Close the cylinder valve and wait approximately 5 minutes for temperatures to stabilize. Record the pressure gauge reading and temperature and after 1 hour, record the pressure gauge reading and temperature again. Par 9-50 Page 9-453 SERVICE REQUIREMENTS --OXYGEN CYLINDERS. Standard-weight cylinders must be hydrostatic tested at the end of each 5-year period. This is a Department of Transportation (DOT) requirement. These cylinders carry an ICC or DOT 3AA 1800 classification and are suitable for the use intended. The lightweight cylinders must be hydrostatic tested every 3 years, and must be retired from service after 24 years or 4,380 pressurizations, whichever occurs first. These cylinders carry an ICC or DOT 3 HT 1850 classification and must be stamped with the approval after being inspected. CAUTION: Use only aviation breathing oxygen when having the oxygen bottle charged. Charging High-Pressure Oxygen Cylinders. The following are recommended procedures for charging high-pressure oxygen cylinders from a manifold system, either permanently-installed or trailer-mounted. CAUTION: Never attempt to charge a lowpressure cylinder directly from a highpressure manifold system or cylinder. Inspection. Do not attempt to charge oxygen cylinders if any of the following discrepancies exist: 9/8/98 AC 43.13-1B Inspect for contaminated fittings on the manifold, cylinder, or outside filler valve. If cleaning is needed, wipe with stabilized trichlorethylene and let air dry. Do not permit the solvent to enter any internal parts. Check the hydrostatic test date of the cylinder. DOT regulations require ICC or DOT 3AA designation cylinders to be hydrostatic tested to 5/3 their working pressure, every 5 years. Cylinders bearing designation ICC or DOT 3HT must be hydrostatic tested to 5/3 their working pressure every 3 years, and retired from service 15 years or 4,380 filling cycles after the date of manufacture, whichever occurs first. If the cylinder is completely empty, do not charge. An empty cylinder must be removed, inspected, and cleaned before charging. Charging. Connect the cylinder valve outlet or the outside filler valve to the manifold. Slowly open the valve of the cylinder to be charged and observe the pressure on the gauge of the manifold system. Slowly open the valve of the cylinder on the manifold system having the lowest pressure and allow the pressure to equalize. Close the cylinder valve on the manifold system and slowly open the valve of the cylinder having the next highest pressure. Continue this procedure until the cylinder has been charged in accordance with table 9-5. Par 9-50 Page 9-454 Close all valves on the manifold system. Close the valve on the filled cylinder and remove the cylinder from the manifold. Using a leak detector, test for leakage around the cylinder valve threaded connections. (If leakage is present, discharge the oxygen and return the cylinder to the facility for repair.) Let the cylinder stabilize for a period of at least 1 hour, and then recheck the pressure. Make any necessary adjustments in the pressure. Charging of Low-Pressure Oxygen Systems and Portables. For recharging a low-pressure aircraft oxygen system, or portable cylinders, it is essential that the oxygen trailer or cart have a pressure-reducing regulator. Military types E-2 or C-1 reducing regulators are satisfactory. These types of regulators reduce the large cylinder pressure from 2,000 psi to a line pressure of 450 psi. (A welding pressure-reducing regulator is not satisfactory.) CAUTION: When refilling the low-pressure system or portable cylinders, open the oxygen filler tank valve slowly to allow the system or portable cylinders to be filled at a slow rate. After the refilling operation is completed, check for leaks with a leak detector. If a leak is detected, paragraph 9-49b(2)(d) should be referred to for corrective action. 9/8/98 AC 43.13-1B TABLE 9-5. Table of filling pressures. Initial Temp Filling Pressure (psi) (° F) 0 1,650 10 1,700 20 1,725 30 1,775 40 1,825 50 1,875 60 1,925 70 1,975 80 2,000 90 2,050 100 2,100 110 2,150 120 2,200 130 2,250 Initial Temperature-Refers to the ambient temperature in the filling room. Filling Pressure-Refers to the pressure to which aircraft cylinders should be filled. This table gives approximations only, and assumes a rise in temperature of approximately 25 °F. due to the heat of compression. This table also assumes the aircraft cylinders will be filled as quickly as possible and that they will only be cooled by ambient air, with no water bath or other means of cooling being used. Example: If ambient temperature is 70 °F, fill aircraft cylinders to approximately 1,975 psi-as close to this pressure as the gauge may be read. Upon cooling, cylinders should have approximately 1,850 psi pressure 9-52.9-59. [RESERVED.] Par 9-51 Page 9-455 (and 9-44) 9/8/98 AC 43.13-1B SECTION 4. CABIN INTERIOR GENERAL. Only materials that are flash-resistant should be used in cabin interiors. The requirements related to fire protection qualities of cabin interior materials are specified in CAR 3.388, fire precautions or 14 CFR part 23, section 23.853 compartment interiors CAR-3 AIRCRAFT INTERIOR. The requirement for an interior of a CAR-3 aircraft that is used only in 14 CFR, part 91 operations, where smoking is not permitted, is that the materials shall be flash-resistant. (Reference CAR-3.388.) For compartments in CAR-3 aircraft where smoking is permitted, the wall and ceiling linings, the covering of all upholstering, floors, and furnishings shall be flame-resistant. Such compartments should be equipped with an adequate number of self-contained ash trays. All other compartments shall be placarded against smoking. (Refer to CAR-3.388.) If fabric is bought in bulk to refurbish the interior, seats, and ceiling liners for a CAR-3 aircraft used in part 91 operations, a manufacturer’s statement, declaring that the material meets the American Society for Testing and Materials (ASTM) or similar national standard for either flash resistance or flame resistance, would be acceptable, but only for a CAR-3 aircraft installation. (Refer to 14 CFR part 43, section 43.13(a).) A manufacturer’s statement is acceptable due to neither the Civil Aeronautics Administration (CAA) nor the Federal Aviation Administration (FAA) having published an FAA fire standard for either flash or flame resistance for interior materials for CAR-3 aircraft. Since the FAA would accept and recognize a national Par 9-60 Page 9-456 standard, the mechanic would reference the manufacturer’s statement and the national standard that the material meets in the aircraft’s maintenance records. If an annual inspection is performed on a CAR-3 aircraft with a new interior and there is no mention of a manufacturer’s statement that the fabric is flash or flame resistant as applicable, the possibility exists that the fabric is an unapproved part. The mechanic should take the necessary steps to ensure that the fabric meets or exceeds the ASTM or national standards. (Refer to 14 CFR part 23, appendix F.) If an FAA-approved STC interior kit is installed in a CAR-3 aircraft, and the material and fabric in the kit are PMA or TSO approved, the mechanic should include the STC number in block 8 of FAA Form 337. It is recommended that for all CAR-3 interiors to use only fabric and materials that meets the more stringent requirements of part 23, appendix F. PART 23 AIRCRAFT INTERIOR. Materials used in part 23 aircraft interiors must meet the requirements of section 23.853, and the burn test requirements called out in part 23, appendix F. If the fabric is bought in bulk to refurbish a part 23 aircraft then the fabric must meet the part 23 burn requirements. A burn test would have to be done on samples of the material and fabrics by an approved and rated FAA Repair Station. That FAA Repair Station would certify that all the material and fabrics meet part 23, appendix F requirements. The mechanic would include that repair station’s statement in the aircraft’s records. 9/8/98 AC 43.13-1B SOURCE OF INFORMATION. If information regarding the original or properly altered fire protection qualities of certain cabin interior materials is not available, requests for this information should be made to the aircraft manufacturer or the local FAA regional office, specifying the model aircraft and the aircraft manufacturer. The date the aircraft was manufactured or the serial number, and the 14 CFR part under which the aircraft is operated (i.e., CAR-3, 14 CFR part 91, or part 121, etc.). If STC-approved interior kit with either PMA or TSO-approved materials for a part 23 aircraft is bought, the mechanic would only have to reference the STC number on FAA Form 337 and the aircraft’s records. Part 23, appendix F would not be required. If an annual inspection is to be performed on a part 23 aircraft in which a new interior was installed, but the aircraft’s records do not reflect that a burn test was performed on the interior’s materials and fabric by an FAA Approved Repair Station, or there is no mention of an STC or FAA Form 337 in the aircraft records, then a burn test that meets, part 23, appendix F must be accomplished before the aircraft is approved for return to service. UPHOLSTERY AND/OR BELTS. Upholstery and/or belts that have been washed may lose some or all of their fire-resistant qualities. Unless the soap is completely removed from the cloth, the strength of the material may be significantly reduced. Consult the manufacturer to determine how to maintain the fire-resistant qualities. 9-65.9-70. [RESERVED.] Chap 20 Sec 1 Page 20-457 9/8/98 AC 43.13-1B CHAPTER 10. WEIGHT AND BALANCE SECTION 1 TERMINOLOGY GENERAL. The removal or addition of equipment results in changes to the center of gravity (c.g.). The empty weight of the aircraft, and the permissible useful load are affected accordingly. Investigate the effects of these changes, since the aircraft flight characteristics may be adversely affected. Information on which to base the record of weight and balance changes to the aircraft may be obtained from the pertinent Aircraft Specifications, Type Certificate Data Sheet (TCDS), prescribed aircraft operating limitations, aircraft flight manual, aircraft weight and balance report, and maintenance manual. Removal or addition of minor items of equipment such as nuts, bolts, rivets, washers, and similar standard parts of negligible weight on fixed-wing aircraft do not require a weight and balance check. Rotorcraft are, in general, more critical with respect to control with changes in the c.g. position. The procedures and instructions in that particular model’s maintenance or flight manual should be followed. TERMINOLOGY. The following terminology is used in the practical application of weight and balance control. Maximum Weight. The maximum weight is the maximum authorized weight of the aircraft and its contents as listed in the specifications. Empty Weight. The empty weight of an aircraft includes all operating equipment that has a fixed location and is actually installed in the aircraft. It includes the weight of the airframe, powerplant, required equipment, optional and special equipment, fixed ballast, full engine coolant, hydraulic fluid, Par 10-1 Page 10-458 residual fuel, and oil. Additional information regarding fluids that may be contained in the aircraft systems and must be included in the empty weight will be indicated in the pertinent Aircraft Specifications or TCDS. Useful Load. The useful load is the empty weight subtracted from the maximum weight of the aircraft. This load consists of the pilot, crew (if applicable), maximum oil, fuel, passengers, and baggage unless otherwise noted. Weight Check. The weight check consists of checking the sum of the weights of all items of useful load against the authorized useful load (maximum weight less empty weight) of the aircraft. Datum. The datum is an imaginary vertical plane from which all horizontal measurements are taken for balance purposes with the aircraft in level flight attitude. The datum is indicated in most Aircraft Specifications or TCDS. On some of the older aircraft, when the datum is not indicated, any convenient datum may be selected. Once the datum is selected, all moment arms and the location of the permissible c.g. range must be taken with reference to it. Examples of typical locations of the datum are shown in figure 10-1. Arm (or Moment Arm). The arm (or moment arm) is the horizontal distance in inches from the datum to the c.g. of an item. The algebraic sign is plus ( + ) if measured aft of the datum, and minus ( - ) if measured forward of the datum. Examples of plus and minus arms are shown in figure 10-2. 9/8/98 AC 43.13-1B FIGURE 10-1. Typical datum locations. Par 10-2 Page 10-459 9/8/98 AC 43.13-1B FIGURE 10-2. Illustration of arm (or moment arm). Moment. The moment is the product of a weight multiplied by its arm. The moment of an item about the datum is obtained by multiplying the weight of the item by its horizontal distance from the datum. A typical moment calculation is given in figure 10-3. Center of Gravity. The c.g. is a point about which the nose-heavy and tail-heavy moments are exactly equal in magnitude. If the aircraft is suspended from the c.g., it will not have a tendency to pitch in either direction (nose up or down). The weight of the aircraft (or any object) may be assumed to be concentrated at its c.g. (See figure 10-3.) Empty Weight Center of Gravity. The empty weight c.g. is the c.g. of an aircraft in its empty weight condition, and is an essential part of the weight and balance record. Formulas for determining the c.g. for tail and nosewheel type aircraft are given in figure 10-4. Typical examples of computing the empty weight and empty weight c.g. for aircraft are shown in figures 10-5 and 10-6. Par 10-2 Empty Weight Center of Gravity Range. The empty weight c.g. range is determined so that the empty weight c.g. limits will not be exceeded under standard specifications loading arrangements. Calculations as outlined in paragraph 10-16 should be completed when it is possible to load an aircraft in a manner not covered in the Aircraft Specifications or TCDS (extra tanks, extra seats, etc.). The empty weight c.g. range, when applicable, is listed in the Aircraft Specifications or TCDS. Calculation of empty weight c.g. is shown in figures 10-5 and 10-6. Operating Center of Gravity Range. The operating c.g. range is the distance between the forward and rearward c.g. limits indicated in the pertinent Aircraft Specifications or TCDS. These limits are determined for the most forward and most rearward loaded c.g. positions at which the aircraft meets the requirements of Title 14 of the Code of Federal Regulation (14 CFR). The limits are indicated in the specifications in either percent of mean aerodynamic chord (MAC) or inches from the Page 10-460 9/8/98 AC 43.13-1B FIGURE 10-3. Example of moment computation. datum. The c.g. of the loaded aircraft must be within these limits at all times as illustrated in figure 10-7. Mean Aerodynamic Chord (MAC). The MAC is established by the manufacturer who defines its leading edge and its trailing edge in terms of inches from the datum. The c.g. location and various limits are then expressed in percentages of the chord. The Par 10-2 location and dimensions of the MAC can be found in the Aircraft Specifications, the TCDS, the aircraft flight manual, or the aircraft weight and balance report. Weighing Point. If the c.g. location is determined by weighing, it is necessary to obtain horizontal measurements between the points on the scale at which the aircraft’s weight is concentrated. If weighed using Page 10-461 9/8/98 AC 43.13-1B FIGURE 10-4. Empty weight center of gravity formulas. Par 10-2 Page 10-462 9/8/98 AC 43.13-1B FIGURE 10-5. Empty weight and empty center of gravity - tail-wheel type aircraft. Par 10-2 Page 10-463 9/8/98 AC 43.13-1B FIGURE 10-6. Empty weight and empty weight center of gravity - nosewheel type aircraft. Par 10-2 Page 10-464 9/8/98 AC 43.13-1B FIGURE 10-7. Operating center of gravity range. scales under the landing gear tires, a vertical line passing through the centerline of the axle will locate the point on the scale at which the weight is concentrated. This point is called the “weighing point.” Other structural locations capable of supporting the aircraft, such as jack pads on the main spar, may also be used if the aircraft weight is resting on the jack pads. Indicate these points clearly in the weight and balance report when used instead of the landing gear. Typical locations of the weighing points are shown in figure 10-8. except-take-off horsepower (METO). Minimum fuel is the maximum amount of fuel which can be used in weight and balance computations when low fuel might adversely affect the most critical balance conditions. To determine the weight of fuel in pounds divide the METO horsepower by two. Zero Fuel Weight. The maximum permissible weight of a loaded aircraft (passengers, crew, cargo, etc.) less its fuel is zero fuel weight. All weights in excess of maximum zero fuel weight must consist of usable fuel. Tare. The weight of chocks, blocks, stands, etc., used when weighing aircraft is called tare and is included in the scale readings. Tare is deducted from the scale reading at each respective weighing point when tare is involved, to obtain the actual aircraft weight. Minimum Fuel. purposes is Par 10-2 Full Oil. The full oil is the quantity of oil shown in the Aircraft Specifications or TCDS as oil capacity. Use full oil as the quantity of oil when making the loaded weight and balance computations. The minimum fuel for balance 1/12 gallon per maximum Page 10-465 9/8/98 AC 43.13-1B FIGURE 10-8. Weighing point centerline. 10-3.10-13. [RESERVED.] Par 10-2 Page 10-466 (and 10-10) 9/8/98 AC 43.13-1B SECTION 2 WEIGHING PROCEDURES GENERAL. Weighing procedures may vary with the aircraft and the type of weighing equipment employed. The weighing procedures contained in the manufacturer’s maintenance manual should be followed for each particular aircraft. PROCEDURES. Accepted procedures when weighing an aircraft are: Drain the fuel system until the quantity indicator reads zero or until the tanks are empty with the aircraft in level flight attitude, unless otherwise noted in the TCDS or Aircraft Specifications. The amount of fuel remaining in the tank, lines, and engine is termed residual fuel and is to be included in the empty weight. In special cases, the aircraft may be weighed with full fuel in tanks provided a definite means of determining the exact weight of the fuel is available. Remove excessive dirt, grease, moisture, etc., from the aircraft before weighing. The oil system should be filled to the quantity noted in the TCDS or Aircraft Specifications. Weigh the aircraft inside a closed building to prevent error in scale reading due to wind. NOTE: On Civil Aeronautics Regulations (CAR-3) Certified Aircraft, the weight of the oil was subtracted mathematically to get the empty weight. In 14 CFR, part 23 aircraft, the weight of the oil was included in the empty weight. Determine the c.g. by placing the aircraft in a level flight attitude. Have all items of equipment that are included in the certificated empty weight installed in the aircraft when weighing. These items of equipment are a part of the current weight and balance report. The scales should have a current calibration before weighing begins. Zero and use the scales in accordance with the scale manufacturer’s instructions. Platform scales and suitable support for the aircraft, if necessary, are usually placed under the wheels of a landplane, the keel of a seaplane float, or the skis of a skiplane. Other structural locations capable of supporting the aircraft, such as jack pads, may be used. Clearly indicate these points and the alternate equipment used in the weight and balance report. Par 10-14 Page 10-467 Do not set brakes while taking scale reading. Note any tare reading when the aircraft is removed from the scales. WEIGHT AND BALANCE COMPUTATIONS. It is often necessary after completing an extensive alteration to establish by computation that the authorized weight and c.g. limits as shown in the TCDS and Aircraft Specifications are not exceeded. Paragraph b(2) explains the significance of algebraic signs used in balance computations. 9/8/98 AC 43.13-1B EMPTY WEIGHT AND EMPTY WEIGHT CENTER OF GRAVITY (when aircraft is weighed with oil) GIVEN: Aircraft as weighed with full oil ------------------------------------------------------------1186 lbs. Center of gravity ------------------------------------------------------------------------------9.7” Full oil capacity 9 qts. ------------------------------------------------------------------------17 lbs. SOLVING: Aircraft as weighed Less oil Total Weight # + 1186 17 + 1169(A) x Arm” + 9.7 - 49.0 = Moment “# + 11504 + 833 + 12337(B) Empty Weight (A) = 1169 pounds Empty Weight Center of Gravity B A = 12337 1169 = + 10.6” FIGURE 10-9. Empty weight and empty weight center of gravity when aircraft is weighed with oil. The TCDS or Aircraft Specifications contain the following information relating to the subject: • • • • • • Center of gravity range. Empty weight c.g. range when applicable. Leveling means. Datum. Maximum weights. Number of seats and arm. Par 10-14 • • • • Maximum baggage and arm. Fuel capacity and arm. Oil capacity and arm. Equipment items and arm. The TCDS do not list the basic required equipment prescribed by the applicable airworthiness regulations for certification. Refer to the manufacturer’s equipment list for such information. Page 10-468 9/8/98 AC 43.13-1B Unit weight for weight and balance purposes. Gasoline ----------- 6 pounds per U.S. gal. Turbine Fuel ------ 6.7 pounds per U.S. gal. Lubricating oil ---- 7.5 pounds per U.S. gal. Crew and passengers ----- 170 pounds per person. It is important to retain the proper algebraic sign (+ or -) through all balance computations. For the sake of uniformity in these computations, visualize the aircraft with the nose to the left. In this position any arm to the left (forward) of the datum is “minus” and any arm to the right (rearward) of the datum is “plus.” Any item of weight added to the aircraft either side of the datum is plus weight, any weight item removed is a minus weight. When multiplying weights by arms, the answer is plus if the signs are the same, and minus if the signs are different. The following combinations are possible: Items added forward of the datum WEIGHT AND BALANCE EXTREME CONDITIONS. The weight and balance extreme conditions represent the maximum forward and rearward c.g. position for the aircraft. Include the weight and balance data information showing that the c.g. of the aircraft (usually in the fully loaded condition) falls between the extreme conditions. Forward Weight and Balance Check. When a forward weight and balance check is made, establish that neither the maximum weight nor the forward c.g. limit listed in the TCDS and Aircraft Specifications are exceeded. To make this check, the following information is needed: The weights, arms, and moment of the empty aircraft. The maximum weights, arms, and moments of the items of useful load that are located ahead of the forward c.g. limit. The minimum weights, arms, and moments of the items of useful load that are located aft of the forward c.g. limit. A typical example of the computation necessary to make this check, using this data, is shown in figure 10-10. ( + ) weight x ( - ) arm = ( - ) moment. Items added to the rear of the datum ( + ) weight x ( + ) arm = ( + ) moment. Items removed forward of the datum Rearward Weight and Balance Check. When a rearward weight and balance check is made, establish that neither the maximum weight nor the rearward c.g. limit listed in the TCDS and Aircraft Specifications are exceeded. To make this check, the following information is needed: ( - ) weight x ( - ) arm = ( + ) moment. Items removed rear of the datum ( - ) weight x ( + ) arm = ( - ) moment. The total weight of the airplane is equal to the weight of the empty aircraft plus the weight of the items added minus the weight of the items removed. The total moment of the aircraft is the algebraic sum of the empty weight moment of the aircraft and all of the individual moments of the items added and/or removed. Par 10-16 The weight, arms, and moments of the empty aircraft. The maximum weights, arms, and moments of the items of useful load that are located aft of the rearward c.g. limit. Page 10-469 9/8/98 AC 43.13-1B TO CHECK: MOST FORWARD WEIGHT AND BALANCE EXTREME. GIVEN: Actual empty weight of the aircraft----------------------------------------------------------------------- 1169# Empty weight center of gravity --------------------------------------------------------------------------- + 10.6” *Maximum weight ------------------------------------------------------------------------------------------ 2100# *Forward C.G.. limit---------------------------------------------------------------------------------------- + 8.5” *Oil capacity, 9 qts.----------------------------------------------------------------------------------------- 17# at -49” *Pilot in farthest forward seat equipped with controls (unless otherwise placarded) -------------------------------------------------------------------- 170# at +16” *Since the fuel tank is located to the rear of the forward C.G. limit, minimum fuel should be included. METO HP = 165 = 13.75 gal. x 6# ----------------------------------------------------------------------- 83# at +22” 12 12 * Information should be obtained from the aircraft specification. Note: Any items or passengers must be used if they are located ahead of the forward C.G. limit. Full fuel must be used if the tank is located ahead of the forward C.G. limit. CHECK OF FORWARD WEIGHT AND BALANCE EXTREME Weight (#) x Arm (“) = Moment (“#) Aircraft empty + 1169 + 10.6 + 12391 Oil + 17 - 49 833 Pilot + 170 + 16 + 2720 Fuel + 83 + 22 + 1826 Total + 1439 (TW) + 16104 (TM) Divide the TM (total moment) by the TW (total weight) to obtain the forward weight and balance extreme. TM = 16104 = + 11.2” TW 1439 Since the forward C.G. limit and the maximum weight are not exceeded, the forward weight and balance extreme condition is satisfactory. FIGURE 10-10. Example of check of most forward weight and balance extreme. Par 10-16 Page 10-470 9/8/98 AC 43.13-1B The minimum weights, arms, and moments of the items of useful load that are located ahead of the rearward c.g. limit. A typical example of the computation necessary to make this check, using this data, is shown in figure 10-11. LOADING CONDITIONS AND/OR PLACARDS. If the following items have not been covered in the weight and balance extreme condition checks and are not covered by suitable placards in the aircraft, additional computations are necessary. These computations should indicate the permissible distribution of fuel, passengers, and baggage that may be carried in the aircraft at any one time without exceeding either the maximum weight or c.g. range. The conditions to check are: With full fuel, determine the number of passengers and baggage permissible. With maximum passengers, determine the fuel and baggage permissible. With maximum baggage, determine the fuel and the number and location of passengers. report all required, optional, and special equipment installed in the aircraft at time of weighing and/or subsequent equipment changes. Required equipment items are listed in the pertinent Aircraft Specifications. Optional equipment items are listed in the pertinent Aircraft Specifications and may be installed in the aircraft at the option of the owner. Special equipment is any item not corresponding exactly to the descriptive information in the Aircraft Specifications. This includes items such as emergency locator transmitter (ELT), tail or logo lights, instruments, ashtrays, radios, navigation lights, and carpets. Required and optional equipment may be shown on the equipment list with reference to the pertinent item number listed in the applicable specifications only when they are identical to that number item with reference to description, weight, and arm given in the specifications. Show all special equipment items with reference to the item by name, make, model, weight, and arm. When the arm for such an item is not available, determine by actual measurement. Examples of the computations for the above items are given in figures 10-12, 10-13, and 10-14 respectively. The above cases are mainly applicable to the lighter type personal aircraft. In the case of the larger type transport aircraft, a variety of loading conditions is possible and it is necessary to have a loading schedule. EQUIPMENT LIST. A list of the equipment included in the certificated empty weight may be found in either the approved aircraft flight manual or the weight and balance report. Enter into the weight and balance Par 10-17 Page 10-471 EQUIPMENT CHANGE. The person making an equipment change is obligated to make an entry on the equipment list indicating items added, removed, or relocated with the date accomplished, and identify himself by name and certificate number in the aircraft records. Examples of items so affected are the installation of extra fuel tanks, seats, and baggage compartments. Figure 10-15 illustrates the effect on balance when equipment items are added within the acceptable c.g. limits and fore and aft of the established c.g. limits. 9/8/98 AC 43.13-1B TO CHECK: MOST REARWARD WEIGHT AND BALANCE EXTREME. GIVEN: Actual empty weight of the aircraft----------------------------------------------------------------------- 1169# Empty weight center of gravity --------------------------------------------------------------------------- 10.6” *Maximum weight ------------------------------------------------------------------------------------------ 2100# *Rearward C.G.. limit -------------------------------------------------------------------------------------- 21.9” *Oil capacity, 9 qts.----------------------------------------------------------------------------------------- 17# at -49” *Baggage, placarded do not exceed 100 lbs------------------------------------------------------------- 100# at +75.5” *Two passengers in rear seat, 170# x 2 ------------------------------------------------------------------ 340# at +48” *Pilot in most rearward seat equipped with controls (unless otherwise placarded) -------------------------------------------------------------------- 170# at +16” *Since the fuel tank is located aft of the rearward C.G. limit full fuel must be used--------------------------------------------------------------- 240# at +22” * Information should be obtained from the aircraft specification. Note: If fuel tanks are located ahead of the rearward C.G. limit minimum fuel should be used. CHECK OF REARWARD WEIGHT AND BALANCE EXTREME Weight (#) x Arm (“) = Moment (“#) Aircraft empty + 1169 + 10.6 + 12391 Oil + 17 - 49 833 Pilot (1) + 170 + 16 + 2720 Passenger (2) + 340 + 48 + 16320 Fuel (40 gals.) + 240 + 22 + 5280 Baggage + 100 + 75.5 + 7550 Total + 2036 (TW) + 43428 (TM) Divide the TM (total moment) by the TW (total weight) to obtain the rearward weight and balance extreme. TM = 43428 = + 21.3” TW 2036 Since the rearward C.G. limit and the maximum weight are not exceeded, the rearward weight and balance extreme condition is satisfactory. FIGURE 10-11. Example of check of most rearward weight and balance extreme. Par 10-17 Page 10-472 9/8/98 AC 43.13-1B EXAMPLE OF THE DETERMINATION OF THE NUMBER OF PASSENGERS AND BAGGAGE PERMISSIBLE WITH FULL FUEL GIVEN: Actual empty weight of the aircraft----------------------------------------------------------------------- 1169# Empty weight center of gravity --------------------------------------------------------------------------- 10.6” Maximum weight ------------------------------------------------------------------------------------------- 2100# Datum is leading edge of the wing Forward center of gravity limit---------------------------------------------------------------------------- 8.5” Rearward center of gravity limit -------------------------------------------------------------------------- 21.9” Oil capacity, 9 qts.; show full capacity------------------------------------------------------------------- 17# at -49” Baggage, maximum----------------------------------------------------------------------------------------- 100# at +75.5” Two passengers in rear seat, 170# x 2-------------------------------------------------------------------- 340# at +48” Pilot in most rearward seat equipped with controls (unless otherwise placarded) -------------------------------------------------------------------- 170# at +16” Full fuel, 40 gals. x 6#-------------------------------------------------------------------------------------- 240# at +22” Weight (#) x Arm (“) = Moment (“#) + 1169 + 10.6 + 12391 + 17 - 49 - 833 + 240 + 22 + 5280 + 340* + 48 +16320 + 170 + 16 + 2720 + 100 + 75.5 + 7550 + 2036 (TW) + 43428 (TM) Aircraft empty Oil Full Fuel Passengers 2 rear Pilot Baggage Total Divide the TM (total moment) by the TW (total weight) to obtain the loaded center of gravity. TM TW = 43428 2036 = + 21.3” The above computations show that with full fuel, 100 pounds of baggage and two passengers in the rear seat may be carried in this aircraft without exceeding either the maximum weight or the approved C. G. range. This condition may be entered in the loading schedule as follows: GALLONS OF FUEL Full NUMBER OF PASSENGERS 2 Rear POUNDS OF BAGGAGE 100 * Only two passengers are listed to prevent the maximum weight of 2100 lbs. from being exceeded. FIGURE 10-12. Loading conditions: determination of the number of passengers and baggage permissible with full fuel. Par 10-20 Page 10-473 9/8/98 AC 43.13-1B EXAMPLE OF THE DETERMINATION OF THE POUNDS OF FUEL AND BAGGAGE PERMISSIBLE WITH MAXIMUM PASSENGERS Weight (#) + 1169 + 17 + 170 + 170 + 340 + 234 ---+ 2100 Aircraft empty Oil Pilot Passenger (1) front Passenger (2) rear Fuel (39 gals.) Baggage Total x Arm (“) = Moment (“#) + 10.6 + 12391 - 49 - 833 + 16 + 2720 + 16 + 2720 + 48 +16320 + 22 + 5148 ------+ 38466 Divide the TM (total moment) by the TW (total weight) to obtain the loaded center of gravity. TM TW = 38466 2100 = + 18.6” The above computations show that with the maximum number of passengers, 39 gallons of fuel and zero pounds of baggage may be carried in this aircraft without exceeding either the maximum weight or the approved C. G. range. This condition may be entered in the loading schedule as follows: GALLONS OF FUEL *Full 39 NUMBER OF PASSENGERS *2 Rear 1(F) 2(R) POUNDS OF BAGGAGE * 100 None * Conditions as entered from Figure 10-12 (F) Front seat (R) Rear seat FIGURE 10-13. Loading conditions: determination of the fuel and baggage permissible with maximum passengers. Par 10-20 Page 10-474 9/8/98 AC 43.13-1B EXAMPLE OF THE DETERMINATION OF THE FUEL AND THE NUMBER AND LOCATION OF PASSENGERS PERMISSIBLE WITH MAXIMUM BAGGAGE Weight (#) x Arm (“) = Moment (“#) + 1169 + 10.6 + 12391 + 17 - 49 833 + 170 + 16 + 2720 + 170 + 48 + 8160 + 170 + 16 + 2720 + 240 + 22 + 5280 + 100 + 75.5 + 7550 + 2036 + 37988 Aircraft empty Oil Pilot Passenger (1) rear Passenger (1) front Fuel (40 gals.) Baggage Total Divide the TM (total moment) by the TW (total weight) to obtain the loaded center of gravity. TM TW = 37988 20366 = + 18.7 The above computations show that with maximum baggage, full fuel and 2 passengers (1 in the front seat and 1 in the rear seat) may be carried in this aircraft without exceeding either the maximum weight or the approved C. G. range. This condition may be entered in the loading schedule as follows: GALLONS OF FUEL *Full ** 39 Full NUMBER OF PASSENGERS *2 Rear *1(F) 2(R) 1(F) 1(R) POUNDS OF BAGGAGE * 100 **None Full * Conditions as entered from Figure 10-12 ** Conditions as entered from Figure 10-13 (F) Front seat (R) Rear seat FIGURE 10-14. Loading conditions: determination of the fuel and the number and location of passengers permissible with maximum baggage. Par 10-20 Page 10-475 9/8/98 AC 43.13-1B FIGURE 10-15. Effects of the addition of equipment items on balance. Moment computations for typical equipment changes are given in figure 10-16 and are also included in the sample weight and balance sheet in figure 10-18. SAMPLE WEIGHT AND BALANCE REPORT. Suggested methods of tabulating the various data and computations for determining the c.g., both in the empty weight condition and the fully loaded condition, are given in figures 10-17 and 10-18, respectively, and represent a suggested means of recording this information. The data presented in figure 10-17 have previously been computed in figures 10-10 and 10-11 for the extreme load conditions and figure 10-16 for equipment change, and represents suggested means of recording this information. Par 10-20 Page 10-476 INSTALLATION OF BALLAST. Ballast is sometimes permanently installed for c.g. balance purposes as a result of installation or removal of equipment items and is not used to correct a nose-up or nose-down tendency of an aircraft. It is usually located as far aft or as far forward as possible in order to bring the 9/8/98 AC 43.13-1B c.g. position within acceptable limits with a minimum of weight increase. Permanent ballast is often lead plate wrapped around and bolted to the fuselage primary structure (e.i., tail-post, longerons, or bulkhead members). Permanent ballast invariably constitutes a concentrated load; therefore, the strength of the local structure and the attachment of the ballast thereto should be investigated for the design loading conditions pertinent to that particular aircraft. Placard permanent ballast with Permanent ballast - do not remove. It is not desirable to install permanent ballast by pouring melted lead into the tail-post or longerons due to difficulties that may be encountered in subsequent welding repair operations. It should be noted that the installation of permanent ballast results in an increase of aircraft empty weight. See figure 10-19 for ballast computation. The local strength of the compartment in which the ballast is carried and the effect of the ballast on aircraft weight and balance should be investigated when disposable ballast is carried. FIGURE 10-16. Example of moment and weight changes resulting from equipment changes. MAKE MA-700 MODEL A SERIAL # DATUM IS leading edge of wing 0000 . REGISTRATION # COMPUTE AS FOLLOWS IF AIRCRAFT WEIGHED Par 10-22 Page 10-477 N1234 . 9/8/98 AC 43.13-1B 1. Leveling means: level top longeron between front and rear seats. 2. Main wheel weighing point is located ( “FORWARD) (+ 3 “ AFT) of datum. 3. Actual measured distance from the main weight point centerline to the tail (or nose) point centerline 222 “. 4. Oil over and above “ZERO” tank reading = (a. ---- Gals.) (b. ---- Lbs.) (c. ---- In.) 5. 6. 7. 8. 9. 10. ACTUAL EMPTY WEIGHT Scale Reading Tare 564 0 565 0 67 27 ------X X Weight Point Right Left Tail Nose Total Net Weight Net Weight 564 565 40 ----1169 CENTER OF GRAVITY AS WEIGHED C.G. relative to main wheel weighing point: (a) Tail wheel airc. (Item 3, 222) x (Item 7, 40 ) = + 7.6 (Item 9, 1169) (b) Nose wheel airc. 11. = (Item 3 ----) x (Item 8 ---- ) (Item 9 ---- ) C.G. relative to datum: (a) Tail wheel airc. (Item 10a, + 7.6) (b) Nose wheel airc. (Item 10b, ) Aircraft Less Oil Empty Totals added to added to = = C.G. = C.G. (Item 2, + 3) (Item 2, ) = = +10.6” = C.G. = C.G. COMPUTE IF AIRCRAFT WEIGHED WITH OIL (Item 4) Weight x Arm = Moment (9) (11) (4b) (4c) X (a) (b) (b) ------------------- = (c) ------------------“ = Empty weight C.G. 12. (a) REPAIR AGENCY DATE Name Number FIGURE 10-17. Sample weight and balance report to determine empty weight center of gravity. Par 10-22 Page 10-478 9/8/98 AC 43.13-1B EQUIPMENT LIST *Required or Optional Item Numbers as Shown in Aircraft Specification 1 2 101 102 103 104 106 201 202 203 301 302(a) 401(a) 402 ------------Special Equipment Item Make Model Weight 3 Flares 1-1/2 Min. XYZ 03 25# 105 303 ---Arm 105” Enter above those items included in the empty weight. WEIGHT AND BALANCE EXTREME CONDITIONS Approved fwd limit 8.5” Approved max. weight 2100# Approved aft limit 21.9” Item FORWARD CHECK REARWARD CHECK X Arm = Moment Weight X Arm = Moment Weight Airo. Empty + 1169 + 10.6 + 12391 + 1169 + 10.6 + 12391 (9 or 12a) (11 or 12c) (9 or 12a) (11 or 12c) Oil + 17 - 49 - 833 + 17 - 49 - 833 Pilot + 170 + 16 + 2720 + 170 + 16 + 2720 Fuel + 83 + 22 + 1826 + 240 + 22 + 5280 Passenger (s) + 340 + 48 + 16320 Baggage + 100 + 75.5 + 7550 + 16104 = TM + 2036 = TW +43428=TM TOTAL + 1439 = TW x x TM = 16104 = +11.2” = TW 1439 Most Forward C.G. location Gallons of Fuel 40 TM = 43428 = +21.3” = TW 2036 Most Rearward C.G. location LOADING SCHEDULE Number of Pounds of Passengers Baggage 2(R) 100 The above includes pilot and capacity oil. Item, Make, and Model* Airc. Empty 204 added 302(b) added 302(a) removed 303 removed NET TOTALS EQUIPMENT CHANGE Computing New C.G. Weight X + 1169 (9 or 12a) + 6 + 29 - 24 - 1 - 1179 = NW Arm + 10.6 (11 or 12c) - 1 + 13 + 29 + 4 x Moment + 12391 + + + 6 377 696 4 13454 = NM NM = 13454= +11.4” = New C.G. NW 1179 *ITEM NUMBERS WHEN LISTED IN PERTINENT AIRCRAFT SPECIFICATION MAY BE USED IN LIEU OF “ITEM, MAKE, AND MODEL”. PREPARED BY________________________________ DATE________________________ FIGURE 10-18. Sample weight and balance report including an equipment change for aircraft fully loaded. Par 10-22 Page 10-479 9/8/98 AC 43.13-1B FIGURE 10-19. Permanent ballast computation formula. Par 10-22 Page 10-480 9/8/98 AC 43.13-1B LOADING SCHEDULE. The loading schedule should be kept with the aircraft and form a part of the aircraft flight manual. It includes instructions on the proper load distribution such as filling of fuel and oil tanks, passenger seating, restrictions of passenger movement, and distribution of cargo. Other means of determining safe loading conditions such as the use of a graphical index and load adjuster are Par 11-1 Page 11-481 9/8/98 AC 43.13-1B acceptable and may be used in lieu of the information in paragraph 10-18. Compute a separate loading condition when the aircraft is to be loaded in other than the specified conditions shown in the loading schedule. 10-24.10-34. [RESERVED.] Par 11-1 Page 11-482 9/8/98 AC 43.13-1B CHAPTER 11. AIRCRAFT ELECTRICAL SYSTEMS SECTION 1. INSPECTION AND CARE OF ELECTRICAL SYSTEMS GENERAL. The term “electrical system” as used in this AC means those parts of the aircraft that generate, distribute, and use electrical energy, including their support and attachments. The satisfactory performance of an aircraft is dependent upon the continued reliability of the electrical system. Damaged wiring or equipment in an aircraft, regardless of how minor it may appear to be, cannot be tolerated. Reliability of the system is proportional to the amount of maintenance received and the knowledge of those who perform such maintenance. It is, therefore, important that maintenance be accomplished using the best techniques and practices to minimize the possibility of failure. This chapter is not intended to supersede or replace any government specification or specific manufacturer’s instruction regarding electrical system inspection and repair. INSPECTION AND OPERATION CHECKS. Frequently Innspect equipment, electrical assemblies, and wiring installations for damage, general condition, and proper functioning to ensure the continued satisfactory operation of the electrical system. Adjust, repair, overhaul, and test electrical equipment and systems in accordance with the recommendations and procedures in the aircraft and/or component manufacturer’s maintenance instructions. Replace components of the electrical system that are damaged or defective with identical parts, with aircraft manufacturer’s approved equipment, or its equivalent to the original in operating characteristics, mechanical strength, and environmental specifications. A list of suggested problems to look for and checks (Refer to the glossary for a description of the check types) to be performed are: Par 11-1 Page 11-483 Damaged, discolored, or overheated connections, wiring, and installations. equipment, Excessive heat or discoloration at high current carrying connections. Misalignment of electrically driven equipment. Poor electrical bonding (broken, disconnected or corroded bonding strap) and grounding, including evidence of corrosion. Dirty equipment and connections. Improper, broken, inadequately supported wiring and conduit, loose connections of terminals, and loose ferrules. Poor mechanical or cold solder joints. Condition of circuit breaker and fuses. Insufficient clearance between exposed current carrying parts and ground or poor insulation of exposed terminals. Broken or missing safety wire, broken bundle lacing, cotter pins, etc. Operational check of electrically operated equipment such as motors, inverters, generators, batteries, lights, protective devices, etc. Ensure that ventilation and cooling air passages are clear and unobstructed. 9/8/98 AC 43.13-1B Voltage check of electrical system with portable precision voltmeter. Condition of electric lamps. Missing safety shields on exposed high-voltage terminals (i.e., 115/200V ac). FUNCTIONAL CHECK OF STAND-BY OR EMERGENCY EQUIPMENT. An aircraft should have functional tests performed at regular intervals as prescribed by the manufacturer. The inspections or functional check periods should be clearly stated in the aircraft maintenance manual, along with the overhaul intervals. CLEANING AND PRESERVATION. Annual cleaning of electrical equipment to remove dust, dirt, and grime is recommended. Suitable solvents or fine abrasives that will not score the surface or remove the plating may be used to clean the terminals and mating surfaces if they are corroded or dirty. Only cleaning agents that do not leave any type of residue must be used. Components must be cleaned and preserved in accordance with the aircraft handbooks or manufacturer’s instructions. Avoid using emery cloth to polish commutators or slip rings because particles may cause shorting and burning. Be sure that protective finishes are not scored or damaged when cleaning. Ensure that metal-to-metal electrically bonded surfaces are treated at the interface with a suitable anti-corrosive conductive coating, and that the joint is sealed around the edges by restoring the original primer and paint finish. Connections that must withstand a highly corrosive environment may be encapsulated with an approved sealant in order to prevent corrosion. BATTERY ELECTROLYTE CORROSION. Corrosion found on or near lead-acid batteries can be removed mechanically with a stiff bristle brush and then chemically neutralized with a 10 percent sodium bicarbonate and water solution. For Nickel Cadmium (NiCad) batteries, a 3 percent solution of acetic acid can be used to neutralize the electrolyte. After neutralizing, the battery should be washed with clean water and thoroughly dried. ADJUSTMENT AND REPAIR. Accomplish adjustments to items of equipment such as regulators, alternators, generators, contactors, control devices, inverters, and relays at a location outside the aircraft, and on a test stand or test bench where all necessary instruments and test equipment are at hand. Follow the adjustment and repair procedures outlined by the equipment or aircraft manufacturer. Replacement or repair must be accomplished as a part of routine maintenance. Adjustment of a replacement voltage regulator is likely since there will always be a difference in impedance between the manufacturer’s test equipment and the aircraft’s electrical system. INSULATION OF ELECTRICAL EQUIPMENT. In some cases, electrical equipment is connected into a heavy current circuit, perhaps as a control device or relay. Such equipment is normally insulated from the mounting structure since grounding the frame of the equipment may result in a serious ground fault in the event of equipment internal failure. Stranded 18 or 20 AWG wire should be used as a grounding strap to avoid shock hazard to equipment and personnel. If the end connection is used for shock hazard, the ground wire must be large enough to carry the highest possible current (0.1 to 0.2 ohms max.). CAUTION: Turn power off before cleaning. Par 11-8 Page 11-484 (and 11-4) 9/8/98 AC 43.13-1B BUS BARS. Annually check bus bars for general condition, cleanliness, and security of all attachments and terminals. Grease, corrosion, or dirt on any electrical junction may cause the connections to overheat and eventually fail. Bus bars that exhibit corrosion, even in limited amounts, should be disassembled, cleaned and brightened, and reinstalled. 11-9.11-14. [RESERVED.] Par 11-8 Page 11-485 (and 11-4) 9/8/98 AC 43.13-1B SECTION 2. STORAGE BATTERIES GENERAL. Aircraft batteries may be used for many functions, e.g., ground power, emergency power, improving DC bus stability, and fault-clearing. Most small private aircraft use lead-acid batteries. Most commercial and military aircraft use NiCad batteries. However, other types are becoming available such as gel cell and sealed lead-acid batteries. The battery best suited for a particular application will depend on the relative importance of several characteristics, such as weight, cost, volume, service or shelf life, discharge rate, maintenance, and charging rate. Any change of battery type may be considered a major alteration. Storage batteries are usually identified by the material used for the plates. All battery types possess different characteristics and, therefore, must be maintained in accordance with the manufacturer’s recommendations.. WARNING: It is extremely dangerous to store or service lead-acid and NiCad batteries in the same area. Introduction of acid electrolytes into alkaline electrolyte will destroy the NiCad and vice-versa. BATTERY CHARGING. Operation of storage batteries beyond their ambient temperature or charging voltage limits can result in excessive cell temperatures leading to electrolyte boiling, rapid deterioration of the cells, and battery failure. The relationship between maximum charging voltage and the number of cells in the battery is also significant. This will determine (for a given ambient temperature and state of charge) the rate at which energy is absorbed as heat within the battery. For lead-acid batteries, the voltage per cell must not exceed 2.35 volts. In the case of NiCad batteries, the charging voltage limit varies with design and construction. Values of Par 11-15 Page 11-486 1.4 and 1.5 volts per cell are generally used. In all cases, follow the recommendations of the battery manufacturer. BATTERY FREEZING. Discharged lead-acid batteries exposed to cold temperatures are subject to plate damage due to freezing of the electrolyte. To prevent freezing damage, maintain each cell’s specific gravity at 1.275, or for sealed lead-acid batteries check “open” circuit voltage. (See table 11-1.) NiCad battery electrolyte is not as susceptible to freezing because no appreciable chemical change takes place between the charged and discharged states. However, the electrolyte will freeze at approximately minus 75 °F. NOTE: Only a load check will determine overall battery condition. TABLE 11-1. Lead-acid battery electrolyte freezing points. Specific Gravity 1.300 1.275 1.250 1.225 1.200 1.175 1.150 1.125 1.100 Freeze point C. F. -70 -95 -62 -80 -52 -62 -37 -35 -26 -16 -20 -4 -15 +5 -10 +13 -8 +19 State of Charge (SOC) for sealed lead-acid batteries at 70° SOC 12 volt 24 volt 100% 12.9 25.8 75% 12.7 25.4 50% 12.4 24.8 25% 12.0 24.0 TEMPERATURE CORRECTION. U.S. manufactured lead-acid batteries are considered fully charged when the specific gravity reading is between 1.275 and 1.300. A 1/3 discharged battery reads about 1.240 and a 2/3 discharged battery will show a specific gravity reading of about 1.200, when tested by a hydrometer and the electrolyte temperature is 80 ºF. However, to determine precise specific gravity readings, a temperature correction (see table 11-2) should be applied to the 9/8/98 AC 43.13-1B hydrometer indication. As an example, a hydrometer reading of 1.260 and the temperature of the electrolyte at 40 °F, the corrected specific gravity reading of the electrolyte is 1.244. wiring and connectors or accumulation of powdered salts). If the battery needs to be refilled often, with no evidence of external leakage, this may indicate a poor state of the battery, the battery charging system, or an over charge condition. TABLE 11-2. Sulfuric acid temperature correction. Electrolyte Temperature °C °F 60 55 49 43 38 33 27 23 15 10 5 -2 -7 -13 -18 -23 -28 -35 140 130 120 110 100 90 80 70 60 50 40 30 20 10 0 -10 -20 -30 Points to be subtracted or added to specific gravity readings +24 +20 +16 +12 +8 +4 0 -4 -8 -12 -16 -20 -24 -28 -32 -36 -40 -44 Take care to ensure the electrolyte is returned to the cell from which it was extracted. When a specific gravity difference of 0.050 or more exists between cells of a battery, the battery is approaching the end of its useful life and replacement should be considered. Electrolyte level may be adjusted by the addition of distilled water. BATTERY MAINTENANCE. Battery inspection and maintenance procedures vary with the type of chemical technology and the type of physical construction. Always follow the battery manufacturer’s approved procedures. Battery performance at any time in a given application will depend upon the battery’s age, state of health, state of charge, and mechanical integrity. Age. To determine the life and age of the battery, record the install date of the battery on the battery. During normal battery maintenance, battery age must be documented either in the aircraft maintenance log or in the shop maintenance log. State of Health. Lead-acid battery state of health may be determined by duration of service interval (in the case of vented batteries), by environmental factors (such as excessive heat or cold), and by observed electrolyte leakage (as evidenced by corrosion of Par 11-15 Use a hydrometer to determine the specific gravity of the battery electrolyte, which is the weight of the electrolyte compared to the weight of pure water. Page 11-487 State of Charge. Battery state of charge will be determined by the cumulative effect of charging and discharging the battery. In a normal electrical charging system the battery’s generator or alternator restores a battery to full charge during a flight of one hour to ninety minutes. Mechanical Integrity. Proper mechanical integrity involves the absence of any physical damage as well as assurance that hardware is correctly installed and the battery is properly connected. Battery and battery compartment venting system tubes, nipples and attachments, when required, provide a means of avoiding the potential buildup of explosive gases, and should be checked periodically to ensure that they are securely connected and oriented in accordance with the maintenance manual’s installation procedures. Always follow procedures approved for the specific aircraft and battery system to ensure that the battery system is capable of delivering specified performance. AC 43.13-1B 9/8/98 Battery and Charger Characteristics. The following information is provided to acquaint the user with characteristics of the more common aircraft battery and battery charger types. Products may vary from these descriptions due to different applications of available technology. Consult the manufacturer for specific performance data. NOTE: Under no circumstances connect a lead-acid battery to a charger, unless properly serviced. Lead-acid vented batteries have a two volt nominal cell voltage. Batteries are constructed so that individual cells cannot be removed. Occasional addition of water is required to replace water loss due to overcharging in normal service. Batteries that become fully discharged may not accept recharge. Lead-acid sealed batteries are similar in most respects to lead-acid vented batteries, but do not require the addition of water. The lead-acid battery is economical and has extensive application, but is heavier than an equivalent performance battery of another type. The battery is capable of a high rate of discharge and low temperature performance. However, maintaining a high rate of discharge for a period of time usually warps the cell plates, shorting out the battery. Its electrolyte has a moderate specific gravity, and state of charge can be checked with a hydrometer. Do not use high amperage automotive battery chargers to charge aircraft batteries. NiCad vented batteries have a 1.2 volt nominal cell voltage. Occasional addition of distilled water is required to replace water loss due to overcharging in normal service. Cause of failure is usually shorting or Par 11-19 Page 11-488 weakening of a cell. After replacing the bad cell with a good cell, the battery’s life can be extended for five or more years. Full discharge is not harmful to this type of battery. NiCad sealed batteries are similar in most respects to NiCad vented batteries, but do not normally require the addition of water. Fully discharging the battery (to zero volts) may cause irreversible damage to one or more cells, leading to eventual battery failure due to low capacity. The state of charge of a NiCad battery cannot be determined by measuring the specific gravity of the potassium hydroxide electrolyte. The electrolyte specific gravity does not change with the state of charge. The only accurate way to determine the state of charge of a NiCad battery is by a measured discharge with a NiCad battery charger and following the manufacturer’s instructions. After the battery has been fully charged and allowed to stand for at least two hours, the fluid level may be adjusted, if necessary, using distilled or demineralized water. Because the fluid level varies with the state of charge, water should never be added while the battery is installed in the aircraft. Overfilling the battery will result in electrolyte spewage during charging. This will cause corrosive effects on the cell links, selfdischarge of the battery, dilution of the electrolyte density, possible blockage of the cell vents, and eventual cell rupture. Lead-acid batteries are usually charged by regulated DC voltage sources. This allows maximum accumulation of charge in the early part of recharging. Constant-current battery chargers are usually provided for NiCad batteries because the NiCad cell voltage has a negative temperature coefficient. With a constant-voltage charging source, a NiCad battery 9/8/98 AC 43.13-1B having a shorted cell might overheat due to excessive overcharge and undergo a thermal runaway, destroying the battery and creating a possible safety hazard to the aircraft. DEFINITION: Thermal runaway can result in a chemical fire and/or explosion of the NiCad battery under recharge by a constant-voltage source, and is due to cyclical, ever-increasing temperature and charging current. One or more shorted cells or an existing high temperature and low charge can produce the cyclical sequence of events: (1) excessive current, (2) increased temperature, (3) decreased cell(s) resistance, (4) further increased current, and (5) further increased temperature. This will not become a self-sustaining thermal-chemical action if the constant-voltage charging source is removed before the battery temperature is in excess of 160 °F. Pulsed-current battery chargers sometimes provided for NiCad batteries. are CAUTION: It is important to use the proper charging procedures for batteries under test and maintenance. These charging regimes for reconditioning and charging cycles are defined by the aircraft manufacturer and should be closely followed. Shop-Level Maintenance Procedures. Shop procedures must follow the manufacturer’s recommendations. Careful examination of sealed batteries and proper reconditioning of vented batteries will ensure the longest possible service life. Par 11-19 Page 11-489 Aircraft Battery Inspection. Inspect battery sump jar and lines for condition and security. Inspect battery terminals and quick-disconnect plugs and pins for evidence of corrosion, pitting, arcing, and burns. Clean as required. Inspect battery drain and vent lines for restriction, deterioration, and security. Routine pre-flight and post-flight inspection procedures should include observation for evidence of physical damage, loose connections, and electrolyte loss. ELECTROLYTE SPILLAGE. Spillage or leakage of electrolyte may result in serious corrosion of the nearby structure or control elements as both sulfuric acid and potassium hydroxide are actively corrosive. Electrolyte may be spilled during ground servicing, leaked when cell case rupture occurs, or sprayed from cell vents due to excessive charging rates. If the battery is not case enclosed, properly treat structural parts near the battery that may be affected by acid fumes. Treat all case and drain surfaces, that have been affected by electrolyte, with a solution of sodium bicarbonate (for acid electrolyte) or boric acid, vinegar, or a 3 percent solution of acetic acid (for potassium hydroxide electrolyte). CAUTION: Serious burns will result if the electrolyte comes in contact with any part of the body. Use rubber gloves, rubber apron, and protective goggles when handling electrolyte. If sulfuric acid is splashed on the body, 9/8/98 AC 43.13-1B neutralize with a solution of baking soda and water, and shower or flush the affected area with water. For the eyes, use an eye fountain and flush with an abundance of water. If potassium hydroxide contacts the skin, neutralize with 9 percent acetic acid, vinegar, or lemon juice and wash with water. For the eyes, wash with a weak solution of boric acid or a weak solution of vinegar and flush with water. NOXIOUS FUMES. When charging rates are excessive, the electrolyte may boil to the extent that fumes containing droplets of the electrolyte are emitted through the cell vents. These fumes from lead-acid batteries may become noxious to the crew members and passengers; therefore, thoroughly check the venting system. NiCad batteries will emit gas near the end of the charging process and during overcharge. The battery vent system in the aircraft should have sufficient air flow to prevent this explosive mixture from accumulating. It is often advantageous to install a jar in the battery vent discharge system serviced with an agent to neutralize the corrosive effect of battery vapors. Battery Venting. Battery fumes and gases may cause an explosive mixture or contaminated compartments and should be dispersed by adequate ventilation. Venting systems often use ram pressure to flush fresh air through the battery case or enclosure to a safe overboard discharge point. The venting system pressure differential should always be positive, and remain between recommended minimum and maximum values. Line runs should not permit battery overflow fluids or condensation to be trapped and prevent free airflow. Battery Sump Jars. A battery sump jar installation may be incorporated in the venting system to dispose of battery electrolyte overflow. The sump jar should be of adequate design and the proper neutralizing agent used. The sump jar must be located only on the discharge side of the battery venting system. (See figure 11-1.) INSTALLATION PRACTICES. External Surface. Clean the external surface of the battery prior to installation in the aircraft. Replacing Lead-Acid Batteries. When replacing leadacid batteries with NiCad batteries, a battery temperature or current monitoring system must be installed. Neutralize the battery box or compartment and thoroughly flush with water and dry. A flight manual supplement must also be provided for the NiCad battery installation. Acid residue can be detrimental to the proper functioning of a NiCad battery, as alkaline will be to a lead-acid battery. Par 11-20 Page 11-490 FIGURE 11-1. Battery ventilating systems. Installing Batteries. When installing batteries in an aircraft, exercise care to prevent inadvertent shorting of the battery terminals. Serious damage to the aircraft structure (frame, skin and other subsystems, avionics, wire, fuel etc.) can be sustained by the resultant high discharge of electrical energy. This condition 9/8/98 AC 43.13-1B may normally be avoided by insulating the terminal posts during the installation process. Remove the grounding lead first for battery removal, then the positive lead. Connect the grounding lead of the battery last to minimize the risk of shorting the “hot terminal” of the battery during installation. Battery Hold Down Devices. Ensure that the battery hold down devices are secure, but not so tight as to exert excessive pressure that may cause the battery to buckle causing internal shorting of the battery. Par 11-30 Page 11-491 9/8/98 AC 43.13-1B Quick-Disconnect Type Battery. If a quick-disconnect type of battery connector, that prohibits crossing the battery lead is not employed, ensure that the aircraft wiring is connected to the proper battery terminal. Reverse polarity in an electrical system can seriously damage a battery and other electrical components. Ensure that the battery cable connections are tight to prevent arcing or a high resistance connection. 11-23.11-29. [RESERVED.] Par 11-30 Page 11-492 9/8/98 AC 43.13-1B SECTION 3. INSPECTION OF EQUIPMENT INSTALLATION GENERAL. When installing equipment which consumes electrical power in an aircraft, it should be determined that the total electrical load can be safely controlled or managed within the rated limits of the affected components of the aircraft’s electrical power supply system. Addition of most electrical utilization equipment is a major alteration and requires appropriate FAA approval. The electrical load analysis must be prepared in general accordance with good engineering practices. Additionally, an addendum to the flight manual is generally required. INSTALLATION CLEARANCE PROVISIONS. All electrical equipment should be installed so that inspection and maintenance may be performed and that the installation does not interfere with other systems, such as engine or flight controls. WIRES, WIRE BUNDLES, AND CIRCUIT PROTECTIVE DEVICES. Before any aircraft electrical load is increased, the new total electrical load (previous maximum load plus added load) must be checked to determine if the design levels are being exceeded. Where necessary, wires, wire bundles, and circuit protective devices having the correct ratings should be added or replaced. OUTPUT RATING. The generator or alternator output ratings and limits prescribed by the manufacturer must be checked against the electrical loads that can be imposed on the affected generator or alternator by installed equipment. When electrical load calculations show that the total continuous electrical load can exceed 80 percent output load limits of the generator or alternator, steps must be taken to reduce the electrical load or Par 11-30 Page 11-493 increase the generating capacity of the charging system. When a storage battery is part of the electrical power system, the battery will be continuously charged in flight. ALTERNATOR DIODES. Alternators employ diodes for the purpose of converting the alternating current to direct current. These diodes are solid-state electronic devices and are easily damaged by rough handling, abuse, over heating, or reversing the battery connections. A voltage surge in the line, if it exceeds the design value, may destroy the diode. The best protection against diode destruction by voltage surges is to make certain that the battery is never disconnected from the aircraft’s electrical system when the alternator is in operation. The battery acts as a large capacitor and tends to damp out voltage surges. The battery must never be connected with reversed polarity as this may subject the diodes to a forward bias condition allowing very high current conduction and will generally destroy them instantly. STATIC ELECTRICAL POWER CONVERTERS. Static power converters employ solid-state devices to convert the aircraft’s primary electrical source voltage to a different voltage or frequency for the operation of radio and electronic equipment. They contain no moving parts (with the exception of a cooling fan on some models) and are relatively maintenance free. Various types are available for AC to DC or AC to AC conversion. Location of static converters should be carefully chosen to ensure adequate ventilation for cooling purposes. Heat-radiating fins should be kept clean of dirt and other foreign matter that may impair their cooling properties. 9/8/98 AC 43.13-1B Static power converters often emit unacceptable levels of EMI that may disrupt communication equipment and navigation instruments. Properly shielded connectors, terminal blocks, and wires may be required, with all shields well grounded to the air frame. CAUTION: Do not load converters beyond their rated capacity. ACCEPTABLE MEANS OF CONTROLLING OR MONITORING THE ELECTRICAL LOAD. The use of placards is recommended to inform the pilot and/or crew members of the combination(s) of loads that may be connected to each power source. Installation of warning lights can be installed that will be triggered if the battery bus voltage drops below 13 volts on a 14 volt system or 26 volts on a 28 volt system. For installations where the ammeter is in the battery lead, and the regulator system limits the maximum current that the generator or alternator can deliver, a voltmeter can be installed on the system bus. As long as the ammeter never reads “discharge” (except for short intermittent loads such as operating the gear and flaps) and the voltmeter remains at “system voltage,” the generator or alternator will not be overloaded. In installations where the ammeter is in the generator or alternator lead, and the regulator system does not limit the maximum current that the generator or alternator can deliver, the ammeter can be redlined at 100 percent of the generator or alternator rating. If the ammeter reading is never allowed to exceed the red line, except for short intermittent loads, the generator or alternator will not be overloaded. Par 11-37 Where the use of placards or monitoring devices is not practical or desired, and where assurance is needed that the battery will be charged in flight, the total continuous connected electrical load should be held to approximately 80 percent of the total generator output capacity. When more than one generator is used in parallel, the total rated output is the combined output of the installed generators. When two or more generators and alternators are operated in parallel and the total connected system load can exceed the rated output of a single generator, a method should be provided for quickly coping with a sudden overload that can be caused by generator or engine failure. A quick load reduction system or procedure should be identified, whereby the total load can be reduced by the pilot to a quantity which is within the rated capacity of the remaining operable generator or generators. DETERMINATION OF ELECTRICAL LOAD. The connected load of an aircraft’s electrical system may be determined by any one or a combination of several acceptable methods, techniques, or practices. However, those with a need to know the status of a particular aircraft’s electrical system should have available accurate and up-to-date data concerning the capacity of the installed electrical power source(s) and the load(s) imposed by installed electrical powerconsuming devices. Such data should provide a true picture of the status of the electrical system. New or additional electrical devices should not be installed in an aircraft, nor the capacity changed of any power source, until the status of the electrical system in the aircraft has been determined accurately and found not to adversely affect the integrity of the electrical system. Page 11-494 (and 11-14) 9/8/98 AC 43.13-1B JUNCTION BOX CONSTRUCTION. Replacement junction boxes should be fabricated using the same material as the original or from a fire-resistant, nonabsorbent material, such as aluminum, or an acceptable plastic material. Where fire-proofing is necessary, a stainless steel junction box is recommended. Rigid construction will prevent “oil-canning” of the box sides that could result in internal short circuits. In all cases, drain holes should be provided in the lowest portion of the box. Cases of electrical power equipment must be insulated from metallic structure to avoid ground fault related fires. (See paragraph 11-7.) Internal Arrangement. The junction box arrangement should permit easy access to any installed items of equipment, terminals, and wires. Where marginal clearances are unavoidable, an insulating material should be inserted between current carrying parts and any grounded surface. It is not good practice to mount equipment on the covers or doors of Par 11-38 junction boxes, since inspection for internal clearance is impossible when the door or cover is in the closed position. Installation. Junction boxes should be securely mounted to the aircraft structure in such a manner that the contents are readily accessible for inspection. When possible, the open side should face downward or at an angle so that loose metallic objects, such as washers or nuts, will tend to fall out of the junction box rather than wedge between terminals. Wiring. Junction box layouts should take into consideration the necessity for adequate wiring space and possible future additions. Electrical wire bundles should be laced or clamped inside the box so that cables do not touch other components, prevent ready access, or obscure markings or labels. Cables at entrance openings should be protected against chafing by using grommets or other suitable means. 11-39.11-46. [RESERVED.] Page 11-495 (and 11-14) 9/8/98 AC 43.13-1B SECTION 4. INSPECTION OF CIRCUIT-PROTECTION DEVICES GENERAL. All electrical wires must be provided with some means of circuit protection. Electrical wire should be protected with circuit breakers or fuses located as close as possible to the electrical power source bus. Normally, the manufacturer of electrical equipment will specify the fuse or breaker to be used when installing the respective equipment, or SAE publication, ARP 1199, may be referred to for recommended practices. DETERMINATION OF CIRCUIT BREAKER RATINGS. Circuit protection devices must be sized to supply open circuit capability. A circuit breaker must be rated so that it will open before the current rating of the wire attached to it is exceeded, or before the cumulative rating of all loads connected to it are exceeded, whichever is lowest. A circuit breaker must always open before any component downstream can overheat and generate smoke or fire. Wires must be sized to carry continuous current in excess of the circuit protective device rating, including its time-current characteristics, and to avoid excessive voltage drop. Refer to section 5 for wire rating methods. DC CIRCUIT PROTECTOR CHART. Table 11-3 may be used as a guide for the selection of circuit breaker and fuse rating to protect copper conductor wire. This chart was prepared for the conditions specified. If actual conditions deviate materially from those stated, ratings above or below the values recommended may be justified. For example, a wire run individually in the open air may possibly be protected by the circuit breaker of the next higher rating to that shown on the chart. In general, the chart is conservative for all ordinary aircraft electrical installations. Par 11-47 Page 11-496 TABLE 11-3. DC wire and circuit protector chart. Wire AN gauge copper 22 20 18 16 14 12 10 8 6 4 2 1 0 Circuit breaker amp. 5 7.5 10 15 20 30 40 50 80 100 125 Fuse amp. 5 5 10 10 15 20 30 50 70 70 100 150 150 Basis of chart: (1) Wire bundles in 135 °F. ambient and altitudes up to 30,000 feet. (2) Wire bundles of 15 or more wires, with wires carrying no more than 20 percent of the total current carrying capacity of the bundle as given in Specification MIL-W-5088 (ASG). (3) Protectors in 75 to 85 °F. ambient. (4) Copper wire Specification MIL-W-5088. (5) Circuit breakers to Specification MIL-C-5809 or equivalent. (6) Fuses to Specification MIL-F-15160 or equivalent. RESETTABLE CIRCUIT PROTECTION DEVICES. All resettable type circuit breakers must open the circuit irrespective of the position of the operating control when an overload or circuit fault exists. Such circuit breakers are referred to as “trip free.” Automatic reset circuit breakers, that automatically reset themselves periodically, are not recommended as circuit protection devices for aircraft. CIRCUIT BREAKER USAGE. Circuit breakers are designed as circuit protection for the wire (see paragraph 11-48 and 11-49), not for protection of black boxes 9/8/98 AC 43.13-1B or components, and are not recommended for use as switches. Use of a circuit breaker as a switch will decrease the life of the circuit breaker. Electromechanical Switches. Switches have electrical contacts and various types of switch actuators (i.e., toggle, plunger, push-button, knob, rocker). CIRCUIT BREAKER MAINTENANCE. Circuit breakers should be periodically cycled with no load to enhance contact performance by cleaning contaminants from the contact surfaces. Contacts designed for high-level loads must not be subsequently used for low-level applications, unless testing has been performed to establish this capability. SWITCHES. In all circuits where a switch malfunction can be hazardous, a switch specifically designed for aircraft service should be used. These switches are of rugged construction and have sufficient contact capacity to break, make, and continuously carry the connected load current. The position of the switch should be checked with an electrical meter. Electrical Switch Inspection. Special attention should be given to electrical circuit switches, especially the spring-loaded type, during the course of normal airworthiness inspection. An internal failure of the spring-loaded type may allow the switch to remain closed even though the toggle or button returns to the “off” position. During inspection, attention should also be given to the possibility that improper switch substitution may have been made. Switches are specifically selected based on the design for the aircraft service current ratings for lamp loads, inductive loads, and motor loads and must be replaced with identical make and model switches. Proximity Switches. These switches are usually solidstate devices that detect the presence of a predetermined target without physical contact and are usually rated 0.5 amps or less. Switch Rating. The nominal current rating of the conventional aircraft switch is usually stamped on the switch housing and represents the continuous current rating with the contacts closed. Switches should be derated from their nominal current rating for the following types of circuits: With the power off suspect aircraft electrical switches should be checked in the on position for opens (high resistance) and in the off position for shorts (low resistance), with an ohmmeter. Circuits containing incandescent lamps can draw an initial current that is 15 times greater than the continuous current. Contact burning or welding may occur when the switch is closed. Any abnormal side to side movement of the switch should be an alert to imminent failure even if the switch tested was shown to be acceptable with an ohmmeter. Inductive circuits have magnetic energy stored in solenoid or relay coils that is released when the control switch is opened and may appear as an arc. Direct-current motors will draw several times their rated current during starting, and magnetic energy stored in their Par 11-47 Page 11-497 9/8/98 AC 43.13-1B armature and field coils is released when the control switch is opened. Switch Selection. Switches for aircraft use should be selected with extreme caution. The contact ratings should be adequate for all load conditions and applicable voltages, at both sea level and the operational altitude. Consideration should be given to the variation in the electrical power characteristics, using MIL-STD-704 as a guide. Derating Factors. Table 11-4 provides an approximate method for derating nominal ratings to obtain reasonable switch efficiency and service life under reactive load conditions. WARNING: Do not use AC derated switches in DC circuits. AC switches will not carry the same amperage as a DC switch. Type of Load Typical logic load devices have a voltage of 0.5 volts to 28 volts and a continuous current of less than 0.5 amps. A suitable method of rating switches for use on logic load devices is specified in ANSI/EIA 5200000. (General specification for special use electromechanical switches of certified quality.) TABLE 11-5. Selection of contact material. TABLE 11-4. Switch derating factors. Nominal System Voltage Low Energy Loads. Switches rated for use at 28 VDC or more, and at 1.0 amp or more, generally have silver contacts. In general, silver contacts should not be used to control devices which have either a voltage less than 8 volts or a continuous current less than 0.5 amps unless the switch is specifically rated for use with low-energy loads. Table 11-5 provides general guidelines for selecting contact materials for low-energy loads, but is not applicable to hermetically sealed switches. Derating Factor 28 VDC Lamp 8 28 VDC Inductive (relay-solenoid) 4 28 VDC Resistive (Heater) 2 28 VDC Motor 3 12 VDC Lamp 5 12 VDC Inductive (relay-solenoid) 2 12 VDC Resistive (Heater) 1 12 VDC Motor 2 NOTES: 1. To find the nominal rating of a switch required to operate a given device, multiply the continuous current rating of the device by the derating factor corresponding to the voltage and type of load. 2. To find the continuous rating that a switch of a given nominal rating will handle efficiently, divide the switch nominal rating by the derating factor corresponding to the voltage and type of load. NOTES: 1. If sulfide, moisture, or any form of contamination is present, a sealed switch should be used. The degree of sealing required (environmental or hermetic) is dependent upon the environment in which the switch is intended to be operated. 2. If particle contamination in any form is likely to reach the contacts, bifurcated contacts should be used. 3. Low-voltage high-current loads are difficult to predict and may result in a combined tendency of noncontact, sticking, and material transfer. 4. High-voltage high-current applications may require the use of Silver Nickel contacts. Par 11-53 Page 11-498 AC 43.13-1B 9/8/98 Typical low-level load devices have a voltage of less than 0.5 volts and a continuous current of less than 0.5 amps. A suitable method of rating switches for use on logic load devices is specified in ANSI/EIA 5200000. Shock and Vibration. Electromechanical switches (toggle switches) are most susceptible to shock and vibration in the plane that is parallel to contact motion. Under these conditions the switch contacts may momentarily separate. ANSI/EIA 5200000 specifies that contact separations greater than 10 microseconds and that closing of open contacts in excess of 1 microsecond are failures. Repeated contact separations during high levels of vibration or shock may cause excessive electrical degradation of the contacts. These separations can also cause false signals to be registered by electronic data processors without proper buffering. Although proximity switches do not have moving parts, the reliability of the internal electronic parts of the switch may be reduced. Reliability and mean time between-failure (MTBF) calculations should reflect the applicable environment. Note that the mounting of both the proximity sensor and its target must be rigid enough to withstand shock or vibration to avoid creating false responses. Electromagnetic/Radio (EMI/RFI). Frequency Interference DC operated electromechanical switches are usually not susceptible to EMI/RFI. Proximity switches are susceptible to an EMI/RFI environment and must be evaluated in the application. Twisting lead wires, metal overbraids, lead wire routing, and the design of the proximity switch can minimize susceptibility. Par 11-53 The arcing of electromechanical switch contacts generates short duration EMI/RFI when controlling highly inductive electrical loads. Twisting lead wires, metal overbraids, and lead wire routing can reduce or eliminate generation problems when dealing with arcing loads. Proximity sensors generally use a relatively low-energy electromagnetic field to sense the target. Adequate spacing is required to prevent interference between adjacent proximity sensors or other devices susceptible to EMI/RFI. Refer to manufacturer’s instructions. Temperature. Electromechanical switches can withstand wide temperature ranges and rapid gradient shifts without damage. Most aircraft switches operate between -55 °C and 85 °C with designs available from -185 °C to 260 °C or more. Higher temperatures require more exotic materials, which can increase costs and limit life. It should be noted that o-ring seals and elastomer boot seals tend to stiffen in extreme cold. This can increase operating forces and reduce release forces or stop the switch from releasing. Proximity sensors are normally designed for environments from -55 °C to 125 °C. During temperature excursions, the operating and release points may shift from 5 percent to 10 percent. Reliability of the proximity sensor will typically be highest at room temperature. The reliability and MTBF estimates should be reduced for use under high temperatures or high thermal gradients. Sealing. Page 11-499 NOTE: The materials used for sealing (o-rings, potting materials, etc.) should be compatible with any aircraft fluids to which the switch may be exposed. 9/8/98 AC 43.13-1B Electromechanical switches range in sealing from partially sealed to hermetically sealed. Use a sealed switch when the switch will be exposed to a dirty environment during storage, assembly, or operation. Use a higher level of sealing when the switch will not have an arcing load to self-clean the contacts. Low-energy loads tend to be more susceptible to contamination. Proximity switches for aircraft applications typically have a metal face and potting material surrounding any electronics and lead wire exits. The potting material should be compatible with the fluids the switch will be exposed to in the environment. The plastic sensing face of some proximity switches may be subject to absorption of water that may cause the operating point to shift should be protected. Switch Installation. Hazardous errors in switch operation may be avoided by logical and consistent installation. “On-off” two-position switches should be mounted so that the “on” position is reached by an upward or forward movement of the toggle. When the switch controls movable aircraft elements, such as landing gear or flaps, the toggle should move in the same direction as the desired motion. Inadvertent operation of switches can be prevented by mounting suitable guards over the switches. RELAYS. A relay is an electrically controlled device that opens and closes electrical contacts to effect the operation of other devices in the same or in another electrical circuit. The relay converts electrical energy into mechanical energy through various means, and through mechanical linkages, actuates electrical conductors (contacts) that control electrical circuits. Solid-state relays may also be used in electrical switching applications. Par 11-53 Use of Relays. Most relays are used as a switching device where a weight reduction can be achieved, or to simplify electrical controls. It should be remembered that the relay is an electrically operated switch, and therefore subject to dropout under low system voltage conditions. Types of Connections. Relays are manufactured with various connective means from mechanical to plug-in devices. Installation procedures vary by the type of connection and should be followed to ensure proper operation of the relay. Repair. Relays are complicated electromechanical assemblies and most are not repairable. Relay Selection. Contact ratings, as described on the relay case, describe the make, carry, and break capability for resistive currents only. Consult the appropriate specification to determine the derating factor to use for other types of current loads. (Ref. MIL-PRF-39016, MIL-PRF-5757, MIL-PRF-6016, MIL-PRF-835836.) Operating a relay at less than nominal coil voltage may compromise its performance and should never be done without written manufacturer approval. Relay Installation and Maintenance. For installation and maintenance, care should be taken to ensure proper placement of hardware, especially at electrical connections. The use of properly calibrated torque wrenches and following the manufacturer’s installation procedures is strongly recommended. This is especially important with hermetically sealed relays, since the glass-to-metal seal (used for Page 11-500 AC 43.13-1B 9/8/98 insulation of the electrically “live” components) is especially vulnerable to catastrophic failure as a result of overtorquing. When replacing relays in alternating current (ac) applications, it is essential to maintain proper phase sequencing. For any application involving plug-in relays, proper engagement of their retaining mechanism is vital. The proximity of certain magnetically permanent, magnet assisted, coil operated relays may cause them to have an impact on each other. Any manufacturer’s recommendations or precautions must be closely followed. Par 11-53 LOAD CONSIDERATIONS. When switches or relays are to be used in applications where current or voltage is substantially lower than rated conditions, additional intermediate testing should be performed to ensure reliable operation. Contact the manufacturer on applications different from the rated conditions. OPERATING CONDITIONS FOR SWITCHES AND RELAYS. Switches and relays should be compared to their specification rating to ensure that all contacts are made properly under all conditions of operation, including vibration equivalent to that in the area of the aircraft in which the switch or relay is to be installed. 11-57.11-65. [RESERVED.] Page 11-501 9/8/98 AC 43.13-1B SECTION 5. ELECTRICAL WIRE RATING GENERAL. Wires must be sized so that they: have sufficient mechanical strength to allow for service conditions; do not exceed allowable voltage drop levels; are protected by system circuit protection devices; and meet circuit current carrying requirements. Mechanical Strength of Wires. If it is desirable to use wire sizes smaller than #20, particular attention should be given to the mechanical strength and installation handling of these wires, e.g., vibration, flexing, and termination. Wire containing less than 19 strands must not be used. Consideration should be given to the use of high-strength alloy conductors in small gauge wires to increase mechanical strength. As a general practice, wires smaller than size #20 should be provided with additional clamps and be grouped with at least three other wires. They should also have additional support at terminations, such as connector grommets, strain relief clamps, shrinkable sleeving, or telescoping bushings. They should not be used in applications where they will be subjected to excessive vibration, repeated bending, or frequent disconnection from screw termination. Voltage Drop in Wires. The voltage drop in the main power wires from the generation source or the battery to the bus should not exceed 2 percent of the regulated voltage when the generator is carrying rated current or the battery is being discharged at the 5-minute rate. The tabulation shown in table 11-6 defines the maximum acceptable voltage drop in the load circuits between the bus and the utilization equipment ground. Resistance. The resistance of the current return path through the aircraft structure is generally considered negligible. However, this is based on the assumption that adequate TABLE 11-6. Tabulation chart (allowable voltage drop between bus and utilization equipment ground). Nominal system voltage Allowable voltage drop continuous operation Intermittent operation 12 28 115 200 0.5 1 4 7 1 2 8 14 bonding to the structure or a special electric current return path has been provided that is capable of carrying the required electric current with a negligible voltage drop. To determine circuit resistance check the voltage drop across the circuit. If the voltage drop does not exceed the limit established by the aircraft or product manufacturer, the resistance value for the circuit may be considered satisfactory. When checking a circuit, the input voltage should be maintained at a constant value. Tables 11-7 and 11-8 show formulas that may be used to determine electrical resistance in wires and some typical examples. Resistance Calculation Methods. Figures 11-2 and 11-3 provide a convenient means of calculating maximum wire length for the given circuit current. Values in tables 11-7 and 11-8 are for tinplated copper conductor wires. Because the resistance of tin-plated wire is slightly higher than that of nickel or silver-plated wire, maximum run lengths determined from these charts will be slightly less than the allowable limits for nickel or silver-plated copper wire and are therefore safe to use. Figures 11-2 and 11-3 can be used to derive slightly longer maximum run lengths for silver or nickelplated wires by multiplying the maximum run length by the ratio of resistance of tin-plated wire, divided by the resistance of silver or nickel-plated wire. TABLE 11-7. Examples of determining required wire size using figure 11-2. Voltage drop Run Lengths Circuit Current 1 volt 100 feet 20 amps Par 11-66 Wire size from chart Checkcalculated voltage drop = (Resistance /Ft) (Length) (Current) = No. 6 (.000445 ohms/ft) Page 11-502 (100 ft) (20 amps)= .89 volts 0.5 volt 50 feet 40 amps No. 2 (.000183 ohms/ft) (50 ft) (40 amps)= .366 volts 4 volt 100 feet 20 No. 12 (.00202 9/8/98 AC 43.13-1B ohms/ft) (100 ft) (20 amps)= 4.04 volts amps 7 volt 100 feet 20 amps No. 14 See Note 1 (.00304 ohms/ft) (100 ft) (20 amps)= 6.12 volts Note #1: #14 Wire should be routed separately for this current rating. TABLE 11-8. Examples of determining maximum run length using figure 11-3. Maximum Wire Run Length Check-calculated voltage drop = (Resistance/Ft) (Length)(Current)= 20 amps 39 feet (.00126 ohms/ft) (39 ft)(20 amps)= .98 volts ---- -- 19.5 feet (.00126 ohms/ft) (19.5 ft) (20 amps)= .366 volts ---- -- 156 feet (.00126 ohms/ft) (156 ft) (20 amps)= 3.93 volts Maximum Voltage drop Wire Size Circuit Current 1 volt No. 10 0.5 volt 4 volt 7 volt ---- -- 273 feet (.00126 ohms/ft) (273 ft) (20 amps)= 6.88 volts As an alternative method or a checking results from figure 11-2, for a given wire size can be table 11-9 and multiplied by wire and circuit current. means of resistance read from run length Voltage drop calculations for aluminum wires can be accomplished by multiplying the resistance for a given wire size, defined in table 11-10, by the wire run length and circuit current. When the estimated or measured conductor temperature (T2) exceeds 20 °C, such as in areas having elevated ambient temperatures or in fully loaded power-feed wires, the maximum allowable run length (L2), must be shortened from L1 (the 20 °C value) using the following formula for copper conductor wire: L2 = (254.5° C )( L1) (234.5° C) + (T 2 ) For aluminum conductor wire, the formula is: L2 = (258.1° C)( L1) (238.1° C) + (T 2 ) These formulas use the reciprocal of each material’s resistivity temperature coefficient to take into account increased conductor resistance resulting from operation at elevated temperatures. To determine T2 for wires carrying a high percentage of their current carrying capability at elevated temperatures, laboratory testing using a load bank and a high-temperature chamber is recommended. Such tests should be run at anticipated worse case ambient temperature and maximum current-loading combinations. Par 11-66 Page 11-503 9/8/98 AC 43.13-1B FIGURE 11-2. Conductor chart, continuous flow. Par 11-66 Page 11-504 9/8/98 AC 43.13-1B FIGURE 11-3. Conductor chart, intermittent flow. Par 11-66 Page 11-505 9/8/98 AC 43.13-1B TABLE 11-9. Current carrying capacity and resistance of copper wire. Wire Size Continuous duty current (amps)-Wires in bundles, groups, harnesses, or conduits. (See Note #1) Wire Conductor Temperature Rating 105°C 150°C 200°C 24 22 20 18 16 14 12 10 8 6 4 2 1 0 00 000 0000 2.5 3 4 6 7 10 13 17 38 50 68 95 113 128 147 172 204 4 5 7 9 11 14 19 26 57 76 103 141 166 192 222 262 310 Max. resistance ohms/1000ft@20° C tin plated conductor (See Note #2) Nominal conductor 28.40 16.20 9.88 6.23 4.81 3.06 2.02 1.26 0.70 0.44 0.28 0.18 0.15 0.12 0.09 0.07 0.06 475 755 1,216 1,900 2,426 3,831 5,874 9,354 16,983 26,818 42,615 66,500 81,700 104,500 133,000 166,500 210,900 5 6 9 12 14 18 25 32 71 97 133 179 210 243 285 335 395 area circ.mils Note #1: Rating is for 70°C ambient, 33 or more wires in the bundle for sizes 24 through 10, and 9 wires for size 8 and larger, with no more than 20 percent of harness current carrying capacity being used, at an operating altitude of 60,000 feet. For rating of wires under other conditions or configurations see paragraph 11-69. Note #2: For resistance of silver or nickel-plated conductors see wire specifications. TABLE 11-10. Current carrying capacity and resistance of aluminum wire. Continuous duty current (amps) Wires in bundles, groups or harnesses Max. resistance or conduits (See table 11-9 Note #1) ohms/1000ft Wire conductor temperature rating @20°C 105°C 150°C 8 30 45 1.093 6 40 61 0.641 4 54 82 0.427 2 76 113 0.268 1 90 133 0.214 0 102 153 0.169 00 117 178 0.133 000 138 209 0.109 0000 163 248 0.085 Note: Observe design practices described in paragraph 11-67 for aluminum conductor Wire Size Par 11-66 Page 11-506 9/8/98 AC 43.13-1B Approximate T2 can be estimated using the following formula: T2 = T1 + (TR − T1 )( I 2 / I max ) Where: T1 = Ambient Temperature T2 Temperature TR = Conductor = Conductor Temperature Rating I2 Imax Estimated = Circuit Current (A=Amps) = Maximum Allowable Current Effects of Heat Aging on Wire Insulation. Since electrical wire may be installed in areas where inspection is infrequent over extended periods of time, it is necessary to give special consideration to heataging characteristics in the selection of wire. Resistance to heat is of primary importance in the selection of wire for aircraft use, as it is the basic factor in wire rating. Where wire may be required to operate at higher temperatures due either to high ambient temperatures, high-current loading, or a combination of the two, selection should be made on the basis of satisfactory performance under the most severe operating conditions. Maximum Operating Temperature. The current that causes a temperature steady state condition equal to the rated temperature of the wire should not be exceeded. Rated temperature of the wire may be based upon the ability of either the conductor or the insulation to withstand continuous operation without degradation. (A=Amps) at TR This formula is quite conservative and will typically yield somewhat higher estimated temperatures than are likely to be encountered under actual operating conditions. METHODS FOR DETERMINING CURRENT CARRYING CAPACITY OF WIRES. This paragraph contains methods for determining the current carrying capacity of electrical wire, both as a single wire in free air and when bundled into a harness. It presents derating factors for altitude correction and examples showing how to use the graphical and tabular data provided for this purpose. In some instances, the wire may be capable of carrying more current than is recommended for the contacts of the related connector. In this instance, it is the contact rating that dictates the maximum current to be carried by a wire. Wires of larger gauge may need to be used to fit within the crimp range of connector contacts that are adequately rated for the current being carried. Figure 11-5 gives a family of curves whereby the bundle derating factor may be obtained. Par 11-66 Single Wire in Free Air. Determining a wiring system’s current carrying capacity begins with determining the maximum current that a given-sized wire can carry without exceeding the allowable temperature difference (wire rating minus ambient °C). The curves are based upon a single copper wire in free air. (See figures 11-4a and 11-4b.) Wires in a Harness. When wires are bundled into harnesses, the current derived for a single wire must be reduced as shown in figure 11-5. The amount of current derating is a function of the number of wires in the bundle and the percentage of the total wire bundle capacity that is being used. Page 11-507 AC 43.13-1B 9/8/98 Harness at Altitude. Since heat loss from the bundle is reduced with increased altitude, the amount of current should be de-rated. Figure 11-6 gives a curve whereby the altitude derating factor may be obtained. Aluminum Conductor Wire. When aluminum conductor wire is used, sizes should be selected on the basis of current ratings shown in table 11-10. The use of sizes smaller than #8 is discouraged. Aluminum wire should not be attached to engine mounted accessories or used in areas having corrosive fumes, severe vibration, mechanical stresses, or where there is a need for frequent disconnection. Use of aluminum wire is also discouraged for runs of less than three feet. Termination hardware should be of the type specifically designed for use with aluminum conductor wiring. INSTRUCTIONS FOR USE OF ELECTRICAL WIRE CHART. Correct Size. To select the correct size of electrical wire, two major requirements must be met: The wire size should be sufficient to prevent an excessive voltage drop while carrying the required current over the required distance. (See table 11-6, Tabulation Chart, for allowable voltage drops.) The size should be sufficient to prevent overheating of the wire carrying the required current. (See paragraph 11-69 for allowable current carrying calculation methods.) Two Requirements. To meet the two requirements (see paragraph 11-66b) in selecting the correct wire size using figure 11-2 or figure 11-3, the following must be known: The wire length in feet. The number of amperes of current to be carried. The required current. The estimated temperature. or or measured intermittent conductor Is the wire to be installed in conduit and/or bundle? Is the wire to be installed as a single wire in free air? Example No. 1. Find the wire size in figure 11-2 using the following known information: The wire run is 50 feet long, including the ground wire. Current load is 20 amps. The voltage source is 28 volts from bus to equipment. The circuit has continuous operation. Estimated conductor temperature is 20 °C or less. The scale on the left of the chart represents maximum wire length in feet to prevent an excessive voltage drop for a specified voltage source system (e.g., 12V, 28V, 115V, 200V). This voltage is identified at the top of scale and the corresponding voltage drop limit for continuous operation at the bottom. The scale (slant lines) on top of the chart represents amperes. The scale at the bottom of the chart represents wire gauge. The allowable voltage drop permitted. Par 11-67 continuous Page 11-508 9/8/98 STEP 1: From the left scale find the wire length, 50 feet under the 28V source column. STEP 2: Follow the corresponding horizontal line to the right until it intersects the slanted line for the 20-amp load. STEP 3: At this point, drop vertically to the bottom of the chart and select the next wire size to the right. This is the smallest size wire that can be used without exceeding the voltage drop limit expressed at the bottom of the left scale. This example is plotted on the wire chart, figure 11-2. Use figure 11-2 for continuous flow and figure 11-3 for intermittent flow. Procedures in Example No. 1. The procedures in example No. 1, paragraph 11-68c, can be used to find the wire size for any continuous or intermittent operation (maximum two minutes). Voltage (e.g. 12 volts, 28 volts, 115 volts, 200 volts) as indicated on the left scale of the wire chart in figure 11-2 and 11-3. Example No. 2. Find the wire size required to meet the allowable voltage drop in table 11-6 for a wire carrying current at an elevated conductor temperature using the following information: The wire run is 15 feet long, including the ground wire. AC 43.13-1B Ambient temperature is 50 °C under hottest operating conditions. STEP 1: Assuming that the recommended load bank testing described in paragraph 11-66d(5) is unable to be conducted, then the estimated calculation methods outlined in paragraph 11-66d(6) may be used to determine the estimated maximum current (Imax). The #14 gauge wire mentioned above can carry the required current at 50 °C ambient (allowing for altitude and bundle derating ). Use figure 11-4a to calculate the Imax a #14 gauge wire can carry. Find the temperature differences (Tr-Ta) = (200° C-50° C) = 150 °C. Follow the 150° C line to intersect with #14 wire size and reads 47 Amps at bottom of chart (current amperes). Use figure 11-6, left side of chart reads 0.91 for 20,000 feet, multiple 0.91 x 47 Amps = 42.77 Amps. Circuit current is 20 amps, continuous. The voltage source is 28 volts. The wire type used has a 200 °C conductor rating and it is intended to use this thermal rating to minimize the wire gauge. Assume that the method described in paragraph 11-66d(6) was used and the minimum wire size to carry the required current is #14. Use figure 11-5, find the derate factor for 8 wires in a bundle at 60 percent. First find the number of wires in the bundle (8) at bottom of graph and intersect with the 60 percent curve meet. Read derating factor, (left side of graph) which is 0.6. Multiply 0.6 x 42.77 Amps = 26 Amps. T2 = estimated conductor temperature T1 = 50 °C ambient temperature TR = 200 °C maximum conductor rated temperature I2 = 20 amps circuit current, continuous Par 11-68 Page 11-509 9/8/98 AC 43.13-1B FIGURE 11-4a. Single copper wire in free air. Imax = 26 amps (this is the maximum current the #14 gauge wire could carry at 50 °C ambient L1=15.5 feet maximum run length for size #14 wire carrying 20 amps from figure 11-2 STEP 2: From paragraph 11-66d (5) and (6), determine the T2 and the resultant maximum wire length when the increased resistance of the higher temperature conductor is taken into account. ( T2 = T1 + ( TR − T1 ) I 2 / I max ) T2 = 50 o C + (200 o C − 50 o C)( 20 A / 26 A = 50°C+(150°C)(.877) T2 = 182°C L2 = (254.5° C)(L1) (234.5° C) + (T2) (254.5° C)(15.5Ft) L2 = (234.5° C) + (182° C) L2 = 9.5 ft Par 11-68 Page 11-510 9/8/98 AC 43.13-1B FIGURE 11-4b. Single copper wire in free air. The size #14 wire selected using the methods outlined in paragraph 11-66d is too small to meet the voltage drop limits from figure 11-2 for a 15 feet long wire run. T2 = 50 o C + (200 o C - 50 o C) ( 20A / 34.4 = 50 o C + (150 oC)(.762) = 164.4 o C STEP 3: Select the next larger wire (size #12) and repeat the calculations as follows: 254.5o C(L 1 ) L2 = 234.5o C + (T2 ) L1=24 feet maximum run length for 12 gauge wire carrying 20 amps from figure 11-2 (254.5o C)(24ft) L2 = (234.5o C) + (164.4 o C) Imax = 34.4 amps (this is the maximum current the size #12 wire can carry at 50 °C ambient using calculation methods outlined in paragraph 11-69) (254.5o C)(24ft) L 2 = = 15.3ft 398.9 Par 11-68 Page 11-511 9/8/98 AC 43.13-1B FIGURE 11-5. Bundle derating curves. Par 11-68 Page 11-512 9/8/98 AC 43.13-1B FIGURE 11-6. Altitude derating curve. Par 11-68 Page 11-513 9/8/98 AC 43.13-1B The resultant maximum wire length, after adjusting downward for the added resistance associated with running the wire at a higher temperature, is 15.3 feet, which will meet the original 15-foot wire run length requirement without exceeding the voltage drop limit expressed in figure 11-2 the 20 percent harness capacity factor. Thus, the total harness capacity is (165.0 + 88.0) x 0.20 = 50.6 amps. It has been determined that the total harness current should not exceed 50.6 A, size #22 wire should not carry more than 6.6 amps and size #20 wire should not carry more than 8.8 amps. COMPUTING CURRENT CARRYING CAPACITY. STEP 6: Determine the actual circuit current for each wire in the bundle and for the whole bundle. If the values calculated in step #5 are exceeded, select the next larger size wire and repeat the calculations. Example 1. Assume a harness (open or braided), consisting of 10 wires, size #20, 200 °C rated copper and 25 wires, size #22, 200 °C rated copper, will be installed in an area where the ambient temperature is 60 °C and the vehicle is capable of operating at a 60,000-foot altitude. Circuit analysis reveals that 7 of the 35 wires in the bundle (7/35 = 20 percent) will be carrying power currents nearly at or up to capacity. Example 2. Assume a harness (open or braided), consisting of 12, size #12, 200 °C rated copper wires, will be operated in an ambient of 25 °C at sea level and 60 °C at a 20,000-foot altitude. All 12 wires will be operated at or near their maximum capacity. STEP 1: Refer to the “single wire in free air” curves in figure 11-4a. Determine the change of temperature of the wire to determine free air ratings. Since the wire will be in an ambient of 60° C and rated at 200° C, the change of to temperature is 200 °C - 60 °C = 140 °C. Follow the 140 °C temperature difference horizontally until it intersects with wire size line on figure 11-4a. The free air rating for size #20 is 21.5 amps, and the free air rating for size #22 is 16.2 amps. STEP 2: Refer to the “bundle derating curves” in figure 11-5, the 20 percent curve is selected since circuit analysis indicate that 20 percent or less of the wire in the harness would be carrying power currents and less than 20 percent of the bundle capacity would be used. Find 35 (on the abscissa) since there are 35 wires in the bundle and determine a derating factor of 0.52 (on the ordinate) from the 20 percent curve. STEP 3: Derate the size #22 free air rating by multiplying 16.2 by 0.52 to get 8.4 amps in-harness rating. Derate the size #20 free airrating by multiplying 21.5 by 0.52 to get 11.2 amps in-harness rating. STEP 4: Refer to the “altitude derating curve” of figure 11-6, look for 60,000 feet (on the abscissa) since that is the altitude at which the vehicle will be operating. Note that the wire must be derated by a factor of 0.79 (found on the ordinate). Derate the size #22 harness rating by multiplying 8.4 amps by 0.79 to get 6.6 amps. Derate the size #20 harness rating by multiplying 11.2 amps by 0.79 to get 8.8 amps. STEP 5: To find the total harness capacity, multiply the total number of size #22 wires by the derated capacity (25 x 6.6 = 165.0 amps) and add to that the number of size #20 wires multiplied by the derated capacity (10 x 8.8 = 88 amps) and multiply the sum by Par 11-68 Page 11-514 9/8/98 AC 43.13-1B STEP 1: Refer to the “single wire in free air” curve in figure 11-4a, determine the temperature difference of the wire to determine free air ratings. Since the wire will be in ambient of 25 °C and 60 °C and is rated at 200 °C, the temperature differences are 200 °C-25 °C = 175 °C and 200 °C-60 °C = 140 °C respectively. Follow the 175 °C and the 140 °C temperature difference lines on figure 11-4a until each intersects wire size line, the free air ratings of size #12 are 68 amps and 61 amps, respectively. STEP 2: Refer to the “bundling derating curves” in figure 11-5, the 100 percent curve is selected because we know all 12 wires will be carrying full load. Find 12 (on the abscissa) since there are 12 wires in the bundle and determine a derating factor of 0.43 (on the ordinate) from the 100 percent curve. STEP 3: Derate the size #12 free air ratings by multiplying 68 amps and 61 amps by 0.43 to get 29.2 amps and 26.2 amps, respectively. Par 11-76 Page 11-515 9/8/98 AC 43.13-1B STEP 4: Refer to the “altitude derating curve” of figure 11-6, look for sea level and 20,000 feet (on the abscissa) since these are the conditions at which the load will be carried. The wire must be derated by a factor of 1.0 and 0.91, respectively. STEP 5: Derate the size #12 in a bundle ratings by multiplying 29.2 amps at sea level and 26.6 amps at 20,000 feet by 1.0 and 0.91, respectively, to obtained 29.2 amps and 23.8 amps. The total bundle capacity at sea level and 25 °C ambient is 29.2x12=350.4 amps. At 20,000 feet and 60 °C ambient the bundle capacity is 23.8x12=285.6 amps. Each size #12 wire can carry 29.2 amps at sea level, 25 °C ambient or 23.8 amps at 20,000 feet, 60 °C ambient. STEP 6: Determine the actual circuit current for each wire in the bundle and for the bundle. If the values calculated in Step #5 are exceeded, select the next larger size wire and repeat the calculations. 11-70.11-75. [RESERVED.] Par 11-76 Page 11-516 9/8/98 AC 43.13-1B SECTION 6. AIRCRAFT ELECTRICAL WIRE SELECTION GENERAL. Aircraft service imposes severe environmental condition on electrical wire. To ensure satisfactory service, inspect wire annually for abrasions, defective insulation, condition of terminations, and potential corrosion. Grounding connections for power, distribution equipment, and electromagnetic shielding must be given particular attention to ensure that electrical bonding resistance has not been significantly increased by the loosening of connections or corrosion. Wire Size. Wires must have sufficient mechanical strength to allow for service conditions. Do not exceed allowable voltage drop levels. Ensure that the wires are protected by system circuit protection devices, and that they meet circuit current carrying requirements. If it is desirable to use wire sizes smaller than #20, particular attention should be given to the mechanical strength and installation handling of these wires, e.g. vibration, flexing, and termination. When used in interconnecting airframe application, #24 gauge wire must be made of high strength alloy. Installation Precautions for Small Wires. As a general practice, wires smaller than size #20 must be provided with additional clamps, grouped with at least three other wires, and have additional support at terminations, such as connector grommets, strain-relief clamps, shrinkable sleeving, or telescoping bushings. They should not be used in applications where they will be subjected to excessive vibration, repeated bending, or frequent disconnection from screw terminations. Identification. All wire used on aircraft must have its type identification imprinted along its length. It is common practice to follow this part number with the five digit/letter C.A.G.E. code identifying the wire manufacturer. Existing installed wire that needs replacement can thereby be identified as to its performance capabilities, and the inadvertent use of a lower performance and unsuitable replacement wire avoided. In addition to the type identification imprinted by the original wire manufacturer, aircraft wire also contains its unique circuit identification coding that is put on at the time of harness assembly. The traditional “Hot Stamp” method has not been totally satisfactory in recent years when used on modern, ultra-thin walled installations. Fracture of the insulation wall and penetration to the conductor of these materials by the stamping dies have occurred. Later in service, when these openings have been wetted by various fluids, serious arcing and surface tracking have damaged wire bundles. Extreme care must be taken during circuit identification by a hot stamp machine on wire with a 10 mil wall or thinner. Alternative identification methods, such as “Laser Printing” and “Ink Jet,” are coming into increasing use by the industry. When such modern equipment is not available, the use of stamped identification sleeving should be considered on thin-walled wire, especially when insulation wall thickness falls below 10 mils. AIRCRAFT WIRE MATERIALS. Only wire, specifically designed for airborne use, must be installed in aircraft. Authentic Aircraft Wire. Most aircraft wire designs are to specifications that require manufacturers to pass rigorous testing of wires before being added to a Qualified Products List (QPL) and being permitted to produce the wire. Aircraft manufacturers who maintain their own wire specifications invariably exercise close control on their approved Par 11-76 Page 11-517 AC 43.13-1B 9/8/98 sources. Such military or original equipment manufacturer (OEM) wire used on aircraft should only have originated from these defined wire mills. Aircraft wire from other unauthorized firms, and fraudulently marked with the specified identification, must be regarded as “unapproved wire,” and usually will be of inferior quality with little or no process control testing. Efforts must be taken to ensure obtaining authentic, fully tested aircraft wire. Platings. Bare copper develops a surface oxide coating at a rate dependent on temperature. This oxide film is a poor conductor of electricity and inhibits retermination of wire. Therefore, all aircraft wiring has a coating of either tin, silver, or nickel, that have far slower oxidation rates. Tin coated copper is a very common plating material. Its ability to be successfully soldered without highly active fluxes diminishes rapidly with time after manufacture. It can be used up to the limiting temperature of 150 °C. Silver-coated wire is used where temperatures do not exceed 200 °C (392 °F). Nickel coated wire retains its properties beyond 260 °C, but most aircraft wire using such coated strands have insulation systems that cannot exceed that temperature on longterm exposure. Soldered terminations of nickel-plated conductor require the use of different solder sleeves or flux than those used with tin or silver-plated conductor. selection of aircraft wire is properly matching the wire’s construction to the application environment. Wire construction that is suitable for the most severe environmental condition to be encountered should be selected. Wires are typically categorized as being suitable for either “open wiring” or “protected wiring” applications. MIL-W-5088L, Appendix A table A-I lists wires considered to have sufficient abrasion and cut-through resistance to be suitable for open-harness construction. MIL-W-5088L, Appendix A table A-II lists wires for protected applications. These wires are not recommended for aircraft interconnection wiring unless the subject harness is covered throughout its length by a protective jacket. The wire temperature rating is typically a measure of the insulation’s ability to withstand the combination of ambient temperature and current related conductor temperature rise. Insulations. There are many insulation materials and combinations used on aircraft electrical wire. An explanation of many of the abbreviations are identified in the glossary. SUBSTITUTIONS. In the repair and modification of existing aircraft, when a replacement wire is required, the maintenance manual for that aircraft must first be reviewed to determine if the original aircraft manufacturer (OAM) has approved any substitution. If not, then the OAM must be contacted for an acceptable replacement. MIL-W-5088L Wiring, Aerospace Vehicle, Appendix A lists wire types that have been approved for military aerospace applications in open and protected wiring applications. These wires could potentially be used for substitution when approved by the OAM. Areas designated as severe wind and moisture problem (SWAMP) areas differ Conductor Stranding. Because of flight vibration and flexing, conductor round wire should be stranded to minimize fatigue breakage. Wire Construction Versus Application. The most important consideration in the Par 11-78 Page 11-518 (and 11-38) 9/8/98 AC 43.13-1B from aircraft to aircraft but generally are considered to be areas such as wheel wells, near wing flaps, wing folds, pylons, and other exterior areas that may have a harsh environment. Wires for these applications often have design features incorporated into their construction that may make the wire unique; therefore an acceptable substitution may be difficult, if not impossible, to find. It is very important to use the wire type recommended in the aircraft manufacturer’s maintenance handbook. The use of current military specification, multiconductor cables in place of OEM installed constructions may create problems such as color sequence. Some civilian aircraft Par 11-78 are wired with the older color sequence employing “Red-Blue-Yellow” as the first three colors. Current military specification, multi-conductor cables, in accordance with MIL-C-27500, use “White-BlueOrange” for the initial three colors. Use of an alternative color code during modification without adequate notation on wiring diagrams could severely complicate subsequent servicing of the aircraft. At the time of this writing, MIL-C-27500 is being revised to include the older color sequence and could eliminate this problem in the future. 11-79.11-84. [RESERVED.] Page 11-519 (and 11-38) 9/8/98 AC 43.13-1B SECTION 7. TABLE OF ACCEPTABLE WIRES AIRCRAFT WIRE TABLE. Tables 11-11 and 11-12 list wires used for the transmission of signal and power currents in aircraft. It does not include special purpose wires such as thermocouple, engine vibration monitor wire, fiber optics, data bus, and other such wire designs. Fire resistant wire is included because it is experiencing a wider application in aircraft circuits beyond that of the fire detection systems. All wires in tables 11-11 and 11-12 have been determined to meet the flammability requirements of Title 14 of the Code of Federal Regulation (14 CFR) part 25, section 25.869(a)(4) and the applicable portion of part 1 of Appendix F of part 25. The absence of any wire from tables 11-11 and 11-12 are not to be construed as being unacceptable for use in aircraft. However, the listed wires have all been reviewed for such use and have been found suitable, or have a successful history of such usage. Explanations of the various insulation materials mentioned in table 11-11, by abbreviations, can be found in the glossary. OPEN AIRFRAME INTERCONNECTING WIRE. Interconnecting wire is used in point to point open harnesses, normally in the interior or pressurized fuselage, with each wire providing enough insulation to resist damage from handling and service exposure. (See table 11-11.) Electrical wiring is often installed in aircraft without special enclosing means. This practice is known as open wiring and offers the advantages of ease of maintenance and reduced weight. PROTECTED WIRE. Airborne wire that is used within equipment boxes, or has additional protection, such as an exterior jacket, conduit, tray, or other covering is known as protected wire. (See table 11-12.) SEVERE WIND AND MOISTURE PROBLEMS (SWAMP). Areas such as wheel wells, wing fold and pylons, flap areas, and those areas exposed to extended weather shall dictate selection and will require special consideration. Insulation or jacking will vary according to the environment. Suitable wire types selected from MIL-W-22759 shall be used in these applications. (See table 11-11.) Par 11-85 Page 11-520 Suitable wire types selected from MIL-W-22759 are preferred for areas that require repeated bending and flexing of the wire. Consideration should be made to areas that require frequent component removal or repair. (See table 11-11.) SHIELDED WIRE. With the increase in number of highly sensitive electronic devices found on modern aircraft, it has become very important to ensure proper shielding for many electric circuits. Shielding is the process of applying a metallic covering to wiring and equipment to eliminate interference caused by stray electromagnetic energy. Shielded wire or cable is typically connected to the aircraft’s ground at both ends of the wire, or at connectors in the cable. Electromagnetic Interference (EMI) is caused when electromagnetic fields (radio waves) induce high-frequency (HF) voltages in a wire or component. The induced voltage can cause system inaccuracies or even failure, therefore putting the aircraft and passengers at risk. Shielding helps to eliminate EMI by protecting the primary conductor with an outer conductor. Refer to MIL-DTL-27500, Cable, Power, Electrical and Cable Special Purpose, Electrical Shielded and Unshielded General Specifications. 9/8/98 AC 43.13-1B TABLE 11-11. Open Wiring. Document Voltage Rated wire temperature (°C) Insulation Type rating (maximum) Conductor type MIL-W-22759/1 600 200 Fluoropolymer insulated TFE and TFE coated glass Silver coated copper MIL-W-22759/2 600 260 Fluoropolymer insulated TFE and TFE coated glass Nickel coated copper MIL-W-22759/3 600 260 Fluoropolymer insulated TFE -glassTFE Nickel coated copper MIL-W-22759/4 600 200 Fluoropolymer insulated TFE -glassFEP Silver coated copper MIL-W-22759/5 600 200 Fluoropolymer insulated extruded TFE Silver coated copper MIL-W-22759/6 600 260 Fluoropolymer insulated extruded TFE Nickel coated copper MIL-W-22759/7 600 200 Fluoropolymer insulated extruded TFE Silver coated copper MIL-W-22759/8 600 260 Fluoropolymer insulated extruded TFE Nickel coated copper MIL-W-22759/9 1000 200 Fluoropolymer insulated extruded TFE Silver coated copper MIL-W-22759/10 1000 260 Fluoropolymer insulated extruded TFE Nickel coated copper MIL-W-22759/13 600 135 Fluoropolymer insulated FEP PVF2 Tin coated copper, MIL-W-22759/16 600 150 Fluoropolymer insulated extruded ETFE Tin coated copper, MIL-W-22759/17 600 150 Fluoropolymer insulated extruded ETFE Silver coated high strength copper alloy MIL-W-22759/20 1000 200 Fluoropolymer insulated extruded TFE Silver coated high strength copper alloy MIL-W-22759/21 1000 260 Fluoropolymer insulated extruded TFE Nickel coated high strength copper alloy MIL-W-22759/34 600 150 Fluoropolymer insulated crosslinked modified ETFE Tin coated copper MIL-W-22759/35 600 200 Fluoropolymer insulated crosslinked modified ETFE Silver coated high strength copper alloy MIL-W-22759/41 600 200 Fluoropolymer insulated crosslinked modified ETFE Nickel coated copper MIL-W-22759/42 600 200 Fluoropolymer insulated crosslinked modified ETFE Nickel coated high strength copper alloy MIL-W-22759/43 600 200 Fluoropolymer insulated crosslinked modified ETFE Silver coated copper MIL-W-25038/3/2/ 600 260 See specification sheet See specification sheet MIL-W-81044/6 600 150 Crosslinked polyalkene Tin coated copper MIL-W-81044/7 600 150 Crosslinked polyalkene Silver coated high strength copper alloy MIL-W-81044/9 600 150 Crosslinked polyalkene Tin coated copper MIL-W-81044/10 600 150 Crosslinked polyalkene Silver coated high strength copper alloy Par 11-85 Page 11-521 9/8/98 AC 43.13-1B TABLE 11-12. Protected wiring. Document MIL-W-22759/11 Voltage rating (maximum) Rated wire temperature (°C) 600 200 Insulation Type Fluoropolymer insulated extruded TFE Conductor type Silver coated copper MIL-W-22759/12 600 260 Fluoropolymer insulated extruded TFE Nickel coated copper MIL-W-22759/14 600 135 Fluoropolymer insulated FEP-PVF2 Tin coated copper MIL-W-22759/15 600 135 Fluoropolymer insulated FEP-PVF2 Silver plated high strength copper alloy MIL-W-22759/18 600 150 Fluoropolymer insulated extruded ETFE Tin coated copper MIL-W-22759/19 600 150 Fluoropolymer insulated extruded ETFE Silver coated high strength copper alloy MIL-W-22759/22 600 200 Fluoropolymer insulated extruded TFE Silver coated high strength copper alloy MIL-W-22759/23 600 260 Fluoropolymer insulated extruded TFE Nickel coated high strength copper alloy MIL-W-22759/32 600 150 Fluoropolymer insulated crosslinked modified ETFE Tin coated copper MIL-W-22759/33 600 200 Fluoropolymer insulated crosslinked modified ETFE Silver coated high strength copper alloy MIL-W-22759/44 600 200 Fluoropolymer insulated crosslinked modified ETFE Silver coated copper MIL-W-22759/45 600 200 Fluoropolymer insulated crosslinked modified ETFE Nickel coated copper MIL-W-22759/46 600 200 Fluoropolymer insulated crosslinked modified ETFE Nickel coated high strength copper alloy MIL-W-81044/12 600 150 Crosslinked polyalkene Tin coated copper MIL-W-81044/13 600 150 Crosslinked polyalkene Silver coated high strength copper alloy MIL-W-81381/17 600 200 Fluorocarbon polyimide Silver coated copper MIL-W-81381/18 600 200 Fluorocarbon polyimide Nickel coated copper MIL-W-81381/19 600 200 Fluorocarbon polyimide Silver coated high strength copper alloy MIL-W-81381/20 600 200 Fluorocarbon polyimide Nickel coated high strength copper alloy MIL-W-81381/21 600 150 Fluorocarbon polyimide Tin coated copper 11-90.11-95. [RESERVED.] Par 11-89 Page 11-522 (and 11-42) 9/8/98 AC 43.13-1B SECTION 8. WIRING INSTALLATION INSPECTION REQUIREMENTS GENERAL. Wires and cables should be inspected for adequacy of support, protection, and general condition throughout. The desirable and undesirable features in aircraft wiring installations are listed below and indicate conditions that may or may not exist. Accordingly, aircraft wiring must be visually inspected for the following requirements: CAUTION: For personal safety, and to avoid the possibility of fire, turn off all electrical power prior to starting an inspection of the aircraft electrical system or performing maintenance. Wires and cables are supported by suitable clamps, grommets, or other devices at intervals of not more than 24 inches, except when contained in troughs, ducts, or conduits. The supporting devices should be of a suitable size and type, with the wires and cables held securely in place without damage to the insulation. Metal stand-offs must be used to maintain clearance between wires and structure. Employing tape or tubing is not acceptable as an alternative to stand-offs for maintaining clearance. Phenolic blocks, plastic liners, or rubber grommets are installed in holes, bulkheads, floors, or structural members where it is impossible to install off-angle clamps to maintain wiring separation. In such cases, additional protection in the form of plastic or insulating tape may be used. Wires and cables in junction boxes, panels, and bundles are properly supported and laced to provide proper grouping and routing. Clamp retaining screws are properly secured so that the movement of wires and cables is restricted to the span between the points of support and not on soldered or mechanical connections at terminal posts or connectors. Wire and cables are properly supported and bound so that there is no interference with other wires, cables, and equipment. Wires and cables are adequately supported to prevent excessive movement in areas of high vibration. Insulating tubing is secured by tying, tie straps or with clamps. Continuous lacing (spaced 6 inches apart) is not used, except in panels and junction boxes where this practice is optional. When lacing is installed in this manner, outside junction boxes should be removed and replaced with individual loops. Do not use tapes (such as friction or plastic tape) which will dry out in service, produce chemical reactions with wire or cable insulation, or absorb moisture. Insulating tubing must be kept at a minimum and must be used to protect wire and cable from abrasion, chafing, exposure to fluid, and other conditions which could affect the cable insulation. However; the use of insulating tubing for support of wires and cable in lieu of stand-offs is prohibited. Do not use moisture-absorbent material as “fill” for clamps or adapters. Ensure that wires and cables are not tied or fastened together in conduit or insulating tubing. Ensure cable supports do not restrict the wires or cables in such a manner as to interfere with operation of equipment shock mounts. Do not use tape, tie straps, or cord for primary support. Make sure that drain holes are present in drip loops or in the lowest portion of tubing placed over the wiring. Ensure that wires and cables are routed in such a manner that chafing will not occur against the airframe or other components. Par 11-96 Page 11-523 9/8/98 AC 43.13-1B Ensure that wires and cables are positioned in such a manner that they are not likely to be used as handholds or as support for personal belongings and equipment. Ensure that wires and cables are routed, insofar as practicable, so that they are not exposed to damage by personnel moving within the aircraft. Ensure that wires and cables are located so as not to be susceptible to damage by the storage or shifting of cargo. Ensure that wires and cables are routed so that there is not a possibility of damage from battery electrolytes or other corrosive fluids. Ensure that wires and cables are adequately protected in wheel wells and other areas where they may be exposed to damage from impact of rocks, ice, mud, etc. (If re-routing of wires or cables is not practical, protective jacketing may be installed). This type of installation must be held to a minimum. Where practical, route wires and cables above fluid lines. Wires and cables routed within 6 inches of any flammable liquid, fuel, or oxygen line should be closely and rigidly supported. A minimum of 2 inches must be maintained between wiring and such lines or related equipment, except when the wiring is positively clamped to maintain at least 1/2-inch separation or when it must be connected directly to the fluid-carrying equipment. Ensure that a trap or drip loop is provided to prevent fluids or condensed moisture from running into wires and cables dressed downward to a connector, terminal block, panel, or junction box. Wires and cables installed in bilges and other locations where fluids may be trapped are routed as far from the lowest point as possible or otherwise provided with a moisture-proof covering. Separate wires from high-temperature equipment, such as resistors, exhaust stacks, heating ducts, etc., to prevent insulation breakdown. Insulate wires that must run through hot areas with a high-temperature insulation material such as fiberglass or PTFE. Avoid hightemperature areas when using cables having soft plastic insulation such as polyethylene, because these materials are subject to deterioration and deformation at elevated temperatures. Many coaxial cables have this type of insulation. The minimum radius of bends in wire groups or bundles must not be less than 10 times the outside diameter of the largest wire or cable, except that at the terminal strips where wires break out at terminations or reverse direction in a bundle. Where the wire is Par 11-105 Page 11-524 (and 11-48) 9/8/98 AC 43.13-1B suitably supported, the radius may be 3 times the diameter of the wire or cable. Where it is not practical to install wiring or cables within the radius requirements, the bend should be enclosed in insulating tubing. The radius for thermocouple wire is 20 times the diameter. Ensure that RF cables, e.g., coaxial and triaxial, are bent at a radius of no less than 6 times the outside diameter of the cable. Ensure that wires and cables, that are attached to assemblies where relative movement occurs (such as at hinges and rotating pieces; particularly doors, control sticks, control wheels, columns, and flight control surfaces), are installed or protected in such a manner as to prevent deterioration of the wires and cables caused by the relative movement of the assembled parts. Ensure that wires and electrical cables are separated from mechanical control cables. In no instance should wire be able to come closer than 1/2 inch to such controls when light hand pressure is applied to wires or controls. In cases where clearance is less than this, adequate support must be provided to prevent chafing. Ensure that wires and cables are provided with enough slack to meet the following requirements: Allow shifting of equipment, as necessary, to perform alignment, servicing, tuning, removal of dust covers, and changing of internal components while installed in aircraft. Ensure that unused wires are individually dead-ended, tied into a bundle, and secured to a permanent structure. Each wire should have strands cut even with the insulation and a pre-insulated closed end connector or a 1-inch piece of insulating tubing placed over the wire with its end folded back and tied. Ensure that all wires and cables are identified properly at intervals of not more than 15 inches. Coaxial cables are identified at both equipment ends. WIRING REPLACEMENT. Wiring must be replaced with equivalent wire (see paragraph 11-78) when found to have any of the following defects: Wiring that has been subjected to chafing or fraying, that has been severely damaged, or that primary insulation is suspected of being penetrated. Wiring on which the outer insulation is brittle to the point that slight flexing causes it to crack. Wiring having weather-cracked outer insulation. Permit ease of maintenance. Prevent mechanical strain on the wires, cables, junctions, and supports. Wiring that is known to have been exposed to electrolyte or on which the insulation appears to be, or is suspected of being, in an initial stage of deterioration due to the effects of electrolyte. Permit free movement of shock and vibration mounted equipment. Par 11-96 Page 11-525 9/8/98 AC 43.13-1B Check wiring that shows evidence of overheating (even if only to a minor degree) for the cause of the overheating. Wiring on which the insulation has become saturated with engine oil, hydraulic fluid, or another lubricant. Wiring that bears evidence of having been crushed or severely kinked. Shielded wiring on which the metallic shield is frayed and/or corroded. Cleaning agents or preservatives should not be used to minimize the effects of corrosion or deterioration of wire shields. Wiring showing evidence of breaks, cracks, dirt, or moisture in the plastic sleeves placed over wire splices or terminal lugs. Sections of wire in which splices occur at less than 10-foot intervals, unless specifically authorized, due to parallel connections, locations, or inaccessibility. When replacing wiring or coaxial cables, identify them properly at both equipment power source ends. Testing of the electrical and chemical integrity of the insulation of sample wires taken from areas of the aircraft that have experienced wiring problems in the past, can be used to supplement visual examination of the wire. The test for chemical integrity should be specific for the degradation mode of the insulation. If the samples fail either the electrical or chemical integrity tests, then the wiring in the area surrounding the sampling area is a candidate for replacement. TERMINALS AND TERMINAL BLOCKS. Inspect to ensure that the following installation requirements are met: Par 11-96 Insulating tubing is placed over terminals (except preinsulated types) to provide electrical protection and mechanical support and is secured to prevent slippage of the tubing from the terminal. Terminal module blocks are securely mounted and provided with adequate electrical clearances or insulation strips between mounting hardware and conductive parts, except when the terminal block is used for grounding purposes. Terminal connections to terminal module block studs and nuts on unused studs are tight. Evidence of overheating and corrosion is not present on connections to terminal module block studs. Physical damage to studs, stud threads, and terminal module blocks is not evident. Replace cracked terminal strips and those studs with stripped threads. The number of terminal connections to a terminal block stud does not exceed four, unless specifically authorized. Shielding should be dead-ended with suitable insulated terminals. All wires, terminal blocks, and individual studs are clearly identified to correspond to aircraft wiring manuals. Terminations should be made using terminals of the proper size and the appropriate terminal crimping tools. FUSES AND FUSE HOLDERS. Inspect as follows: Check security of connections to fuse holders. Page 11-526 9/8/98 AC 43.13-1B Inspect for exposed fuses susceptible to shorting. Install cover of nonconducting material if required. or composite dust caps attached by their normal mating method. Plugs may have a dust cap similar to above or have a piece of polyolefin shrink sleeving shrunk over the connector, starting from the backshell threads, with a tail sufficiently long enough to doubleback over the connector and be tied with polyester lacing tape behind the coupling nut. The cable identification label should be visible behind the connector or a tag should be attached identifying the associated circuit or attaching equipment. The connector should be attached to structure by its normal mounting means or by the use of appropriate clamps. CONNECTORS. Ensure reliability of connectors by verifying that the following conditions are met or that repairs are effected as required. Ensure that connectors are fully mated by checking position and tightness of coupling ring or its alignment with fully mated indicator line on receptacle, if applicable. Inspect connectors for security and evidence of overheating (cause of over-heating must be corrected), and exteriors for corrosion and cracks. Also, wires leading to connectors must be inspected for deterioration due to overheating. Replace corroded connections and overheated connectors. Ensure that the coupling nut of MS connectors is safetied, by wire or other mechanical locking means, as required by applicable aircraft instructional manuals. Ensure installation of cable clamp (reference MIL-C-85049) adapters on applicable MS connectors, except those that are moisture-proof. Ensure that there is no evidence of deterioration such as cracking, missing, or disintegration of the potting material. See that silicone tape is wrapped around wires in MS3057 cable clamp adapters so that tightening of the cable clamp adapter cap provides sufficient grip on the wires to keep tension from being applied to the connector pins. Identical connectors in adjacent locations can lead to incorrect connections. When such installations are unavoidable, the attached wiring must be clearly identified and must be routed and clamped so that it cannot be mismatched. Make sure unused plugs and receptacles are covered to prevent inclusion of dust and moisture. Receptacles should have metal Connectors in unpressurized areas should be positioned so that moisture will drain out of them when unmated. Wires exiting connectors must be routed so that moisture drains away from them. Inspect for the presence of corrosion and evidence of overheating on fuses and fuse holders. Replace corroded fuses and clean fuse holders. If evidence of overheating is found, check for correct rating of fuse. Check mounting security of fuse holder. Inspect for replenishment of spare fuses used in flight. Replace with fuses of appropriate current rating only. Par 11-99 Ensure that moisture-absorbent material is not used as “fill” for MS3057 clamps or adapters. Page 11-527 9/8/98 AC 43.13-1B JUNCTION BOXES, PANELS, SHIELDS, AND MICROSWITCH HOUSINGS. Examine housing assemblies to ascertain the following: Verify that one or more suitable holes, about 3/8-inch diameter, but not less than 1/8-inch diameter, are provided at the lowest point of the box, except vaportight boxes, to allow for drainage with the aircraft on the ground or in level flight. Verify that vapor tight or explosion proof boxes are externally labeled VAPOR-TIGHT or EXPLOSION PROOF. Verify that boxes are securely mounted. Conduits will not trap fluids or condensed moisture. Suitable drain holes should be provided at the low points. Bonding clamps do not cause damage to the conduit. Weatherproof shields on flexible conduits of the nose and main landing gear and in wheel wells are not broken; that metallic braid of weatherproof conduit is not exposed; and that conduit nuts, ferrules, and conduit fittings are installed securely. Ends of open conduits are flared or routed to avoid sharp edges that could chafe wires exiting from the conduit. JUNCTIONS. Ensure that only aircraft manufacturer approved devices, such as solderless type terminals, terminal blocks, connectors, disconnect splices, permanent splices, and feed-through bushings are used for cable junctions. Inspect for the provisions outlined below: Verify that boxes are clean internally and free of foreign objects. Verify that safety wiring is installed on all lid fasteners on J-boxes, panels, shields, or microswitch housings which are installed in areas not accessible for inspection in flight, unless the fasteners incorporate self-locking devices. Verify that box wiring is properly aligned. Verify that there are no unplugged, unused holes (except drainage holes) in boxes. CONDUIT - RIGID METALLIC, FLEXIBLE METALLIC AND RIGID NONMETALLIC. Inspection of conduit assemblies should ascertain that: Electrical junctions should be protected from short circuits resulting from movement of personnel, cargo, cases, and other loose or stored materials. Protection should be provided by covering the junction, installing them in junction boxes, or by locating them in such a manner that additional protection is not required, etc. Exposed junctions and buses should be protected with insulating materials. Junctions and buses located within enclosed areas containing only electrical and electronic equipment are not considered as exposed. Conduit is relieved of strain and flexing of ferrules. Conduit is not collapsed or flattened from excessive bending. Par 11-99 Electrical junctions should be mechanically and electrically secure. They should not be subject to mechanical strain or used as a support for insulating materials, except for insulation on terminals. Page 11-528 9/8/98 AC 43.13-1B CIRCUIT BREAKERS. Note those circuit breakers which have a tendency to open circuits frequently, require resetting more than normal, or are subject to nuisance tripping. Before considering their replacement, investigate the reason. SYSTEM SEPARATION. Wires of redundant aircraft systems should be routed in separate bundles and through separate connectors to prevent a single fault from disabling multiple systems. Wires not protected by a circuitprotective device, such as a circuit breaker or fuse, should be routed separately from all other wiring. Power feeders from separate sources should be routed in separate bundles from each other and from other aircraft wiring, in order to prevent a single fault from disabling more than one power source. The ground wires from aircraft power sources should be attached to the airframe at separate points so that a single failure will not disable multiple sources. Wiring that is part of electro explosive subsystems, such as cartridgeactuated fire extinguishers, rescue hoist shear, and emergency jettison devices, should be routed in shielded and jacketed twisted-pair cables, shielded without discontinuities, and kept separate from other wiring at connectors. To facilitate identification of specific separated system bundles, use of colored plastic cable ties or lacing tape is allowed. During aircraft maintenance, colored plastic cable straps or lacing tape should be replaced with the same type and color of tying materials. grounded structure may also be used as an EMI shield. INTERFERENCE TESTS. Perform an interference test for installed equipment and electrical connections as follow: The equipment must be installed in accordance with manufacturer’s installation instructions. Visually inspect all the installed equipment to determine that industry standard workmanship and engineering practices were used. Verify that all mechanical and electrical connections have been properly made and that the equipment has been located and installed in accordance with the manufacturer’s recommendations. The wire insulation temperature rating should also be considered. Power input tests must be conducted with the equipment powered by the airplane’s electrical power generating system, unless otherwise specified. All associated electrically operated equipment and systems on the airplane must be on and operating before conducting interference tests, unless otherwise specified. The effects on interference must be evaluated as follows: The equipment shall not be the source of harmful conducted or radiated interference or adversely affect other equipment or systems installed in the airplane. ELECTROMAGNETIC INTERFERENCE (EMI). Wiring of sensitive circuits that may be affected by EMI must be routed away from other wiring interference, or provided with sufficient shielding to avoid system malfunctions under operating conditions. EMI between susceptible wiring and wiring which is a source of EMI increases in proportion to the length of parallel runs and decreases with greater separation. EMI should be limited to negligible levels in wiring related to critical systems, that is, the function of the critical system should not be affected by the EMI generated by the adjacent wire. Use of shielding with 85 percent coverage or greater is recommended. Coaxial, triaxial, twinaxial, or quadraxial cables should be used, wherever appropriate, with their shields connected to ground at a single point or multiple points, depending upon the purpose of the shielding. The airframe Par 11-104 Page 11-529 9/8/98 43.13-1B AC With the equipment energized on the ground, individually operate other electrically operated equipment and systems on the airplane to determine that no significant conducted or radiated interference exists. Evaluate all reasonable combinations of control settings and operating modes. Operate communication and navigation equipment on at least one low, high and mid-band frequency. Make note of systems or modes of operation that should also be evaluated during flight. For airplane equipment and systems that can be checked only in flight, determine that no operationally significant conducted or radiated interference exists. Evaluate all reasonable combinations of control settings and operating modes. Operate communications and navigation equipment on at least one low, high and mid-band frequency. NOTE: Electromagnetic compatibility problems which develop after installation of this equipment may result from such factors as design characteristics of previously installed systems or equipment, and the physical installation itself. It is not intended that Par 11-115 Page 11-530 9/8/98 43.13-1B AC the equipment manufacturer should design for all installation environments. The installing facility will be responsible for resolving any incompatibility between this equipment and previously installed equipment in the airplane. The various factors contributing to the incompatibility should be considered. NOTE: Ground EMI test have consistently been found adequate for follow-on approvals of like or identical equipment types, irrespective of the airplane model used for the initial approval. Radio frequency transmission devices, such as wireless telephones, must also be tested with respect to their transmission frequencies and harmonics. IDENTIFICATION STENCILS AND PLACARDS ON ELECTRICAL EQUIPMENT. Replace worn stencils and missing placards. 11-109.11-114. [RESERVED.] Par 11-115 Page 11-531 9/8/98 43.13-1B AC SECTION 9. ENVIRONMENTAL PROTECTION AND INSPECTION MAINTENANCE AND OPERATIONS. Wire bundles must be routed in accessible areas that are protected from damage from personnel, cargo, and maintenance activity. They should not be routed in areas in where they are likely to be used as handholds or as support for personal equipment or where they could become damaged during removal of aircraft equipment. Wiring must be clamped so that contact with equipment and structure is avoided. Where this cannot be accomplished, extra protection, in the form of grommets, chafe strips, etc., should be provided. Protective grommets must be used, wherever wires cannot be clamped, in a way that ensures at least a 3/8-inch clearance from structure at penetrations. Wire must not have a preload against the corners or edges of chafing strips or grommets. Wiring must be routed away from high-temperature equipment and lines to prevent deterioration of insulation. Protective flexible conduits should be made of a material and design that eliminates the potential of chafing between their internal wiring and the conduit internal walls. Wiring that must be routed across hinged panels, must be routed and clamped so that the bundle will twist, rather than bend, when the panel is moved. GROUP AND BUNDLE TIES. A wire bundle consists of a quantity of wires fastened or secured together and all traveling in the same direction. Wire bundles may consist of two or more groups of wires. It is often advantageous to have a number of wire groups individually tied within the wire bundle for ease of identification at a later date. (See figure 11-7.) Comb the wire groups and bundles so that the wires will lie parallel to each other and minimize the possibility of insulation abrasion. A combing tool, similar to that shown in figure 11-8, may be made from any suitable insulating material, taking care to FIGURE 11-7. Group and bundle ties. FIGURE 11-8. Comb for straightening wires in bundles. ensure all edges are rounded to protect the wire insulation. MINIMUM WIRE BEND RADII. The minimum radii for bends in wire groups or bundles must not be less than 10 times the outside diameter of their largest wire; or they may be bent at 6 times their outside diameters at breakouts or where they must reverse direction in a bundle, provided that they are suitably supported. RF cables should not bend on a radius of less than 6 times the outside diameter of the cable. Par 11-115 Page 11-532 9/8/98 AC 43.13-1B RF CABLE. All wiring needs to be protected from damage. However, coaxial and triaxial cables are particularly vulnerable to certain types of damage. Personnel should exercise care while handling or working around coaxial. Coaxial damage can occur when clamped too tightly, or when they are bent sharply (normally at or near connectors). Damage can also be incurred during unrelated maintenance actions around the coaxial cable. Coaxial can be severely damaged on the inside without any evidence of damage on the outside. Coaxial cables with solid center conductors should not be used. Stranded center coaxial cables can be used as a direct replacement for solid center coaxial. Care should be taken to avoid sharp bends in wires that have been marked with the hot stamping process. SLACK. Wiring should be installed with sufficient slack so that bundles and individual wires are not under tension. Wires connected to movable or shock-mounted equipment should have sufficient length to allow full travel without tension on the bundle. Wiring at terminal lugs or connectors should have sufficient slack to allow two reterminations without replacement of wires. This slack should be in addition to the drip loop and the allowance for movable equipment. Normally, wire groups or bundles should not exceed 1/2-inch deflection between support points, as shown in figure 11-9. This measurement may be exceeded provided there is no possibility of the wire group or bundle touching a surface that may cause abrasion. Sufficient slack should be provided at each end to: PRECAUTIONS. Never kink coaxial cable. Never drop anything on coaxial cable. Permit replacement of terminals. Never step on coaxial cable. Prevent mechanical strain on wires. Never bend coaxial cable sharply. Permit shifting of equipment for maintenance purposes. POWER FEEDERS. The power feeder wires should be routed so that they can be easily inspected or replaced. They must be given special protection to prevent potential chafing against other wiring, aircraft structure, or components. Never loop coaxial cable tighter than the allowable bend radius. Never pull on coaxial cable except in a straight line. Never use coaxial cable for a handle, lean on it, or hang things on it (or any other wire). FIGURE 11-9. Slack between supports. MOISTURE PROTECTION, WHEEL WELLS, AND LANDING GEAR AREAS. inspected frequently and replaced at the first sign of wear. Wires located on landing gear and in the wheel well area can be exposed to many hazardous conditions if not suitably protected. Where wire bundles pass flex points, there must not be any strain on attachments or excessive slack when parts are fully extended or retracted. The wiring and protective tubing must be Wires should be routed so that fluids drain away from the connectors. When this is not practicable, connectors must be potted. Wiring which must be routed in wheel wells or other external areas must be given extra protection in the form of harness jacketing and connector strain relief. Conduits or flexible sleeving Par 11-115 Page 11-533 9/8/98 AC 43.13-1B used to protect wiring must be equipped with drain holes to prevent entrapment of moisture. PROTECTION AGAINST PERSONNEL AND CARGO. Wiring must be installed so the structure affords protection against its use as a handhold and damage from cargo. Where the structure does not afford adequate protection, conduit must be used, or a suitable mechanical guard must be provided. HEAT PRECAUTIONS. Wiring must be routed away from high-temperature equipment and lines to prevent deterioration of insulation. Wires must be rated (reference paragraph 11-66 and 11-67) so that the conductor temperature remains within the wire specification maximum when the ambient temperature, and heat rise, related to current carrying capacity are taken into account. The residual heating effects caused by exposure to sunlight when aircraft are parked for extended periods should also be taken into account. Wires such as in fire detection, fire extinguishing, fuel shutoff, and fly-by-wire flight control systems that must operate during and after a fire, must be selected from types that are qualified to provide circuit integrity after exposure to fire for a specified period. Wire insulation deteriorates rapidly when subjected to high temperatures. Do not use wire with soft polyethylene insulation in areas subject to high temperatures. Use only wires or cables with heat resistance shielding or insulation. MOVABLE CONTROLS WIRING PRECAUTIONS. Clamping of wires routed near movable flight controls must be attached with steel hardware and must be spaced so that failure of a single attachment point can not result in interference with controls. The minimum separation between wiring and movable controls must be at least 1/2 inch when the bundle is displaced by light hand pressure in the direction of the controls. FLAMMABLE FLUIDS AND GASES. An arcing fault between an electrical wire and a metallic flammable fluid line may puncture the line and result in a fire. Every effort must be made to avoid this hazard by physical separation of the wire from lines and equipment containing oxygen, oil, fuel, hydraulic fluid, or alcohol. Wiring must be routed above these lines and equipment with a minimum separation of 6 inches or more whenever possible. When such an arrangement is not practicable, wiring must be routed so that it does not run parallel to the fluid lines. A minimum of 2 inches must be maintained between wiring and such lines and equipment, except when the wiring is positively clamped to maintain at least 1/2-inch separation, or when it must be connected Par 11-122 Page 11-534 9/8/98 AC 43.13-1B directly to the fluid-carrying equipment. Install clamps as shown in figure 11-10. These clamps should not be used as a means of supporting the wire bundle. Additional clamps should be installed to support the wire bundle and the clamps fastened to the same structure used to support the fluid line(s) to prevent relative motion. FIGURE 11-10. Separation of wires from plumbing lines. 11-127.11-134. [RESERVED.] Par 11-135 Page 11-535 9/8/98 AC 43.13-1B SECTION 10. SERVICE LOOP HARNESSES (Plastic Tie Strips) GENERAL. The primary function of a service loop harness is to provide ease of maintenance. The components, mounted in the instrument panel and on the lower console and other equipment that must be moved to access electrical connectors, are connected to aircraft wiring through service loops. Chafing in service loop harnesses is controlled using the following techniques. SUPPORT. Only string ties or plastic cable straps in accordance with paragraph 11-158 should be used on service loop harnesses. A 90° or “Y” type spot tie should be installed at the harness breakout point on the harness bundle. Ties should be installed on service loop harnesses at 4 to 6-inch intervals. ANTI-CHAFING MATERIAL. When service loops are likely to be in contact with each other, expandable sleeving or equivalent chafe protection jacket material must be installed over service loop harnesses to prevent harness-to-harness chafing. The sleeve should be held in place with string ties at 6 to 8-inch intervals. Harness identification labels should be installed, with string tie, within 3 inches of the service loop harness installation. STRAIN RELIEF. The strain relief components may be installed to control routing where close clearance exists between termination and other components or bulkheads. Strain relief components provide support of the service loop harness at the termination point. Connector strain relief adapters, heat-shrinkable boot, or a length of heatshrinkable tubing should be installed. The heat-shrinkable boots will provide preselected angles of wire harness termination when heat is applied. Heat-shrinkable tubing should be held at the desired angle until cool. “SERVICE LOOP.” Primary support for service loop harness(es) should be a cushion clamp and a connector at the harness termination. Service loop harnesses should be inspected for the following: Adequate Length. Components should extend out from their mounting position a distance that permits rotating and unlocking (or locking) the electrical connector. Usually a distance of 3 to 6 inches, with all other components installed, should be sufficient. Bundle BreakOut Point. Bundle breakout point should be adequately supported with string tie. Service loop must maintain a minimum bend radius of 3 times the harness diameter. The breakout point should be located directly behind, beside, below, or above the component so that the service loop harness does not bind other components. Plastic ties should not be used between the service loop breakout and the electrical connector when they are likely to chafe against adjacent wire. Par 11-135 Page 11-536 9/8/98 AC 43.13-1B Service Loop Routing. The service loop harness should be routed directly from the breakout point to the component. The harness should not contact moving mechanical components or linkage, and should not be wrapped or tangled with other service loop harnesses. Service Loop Harness Termination. Strain relief should be provided at the service loop harness termination, and is normally provided by the connector manufacturer’s backshell, heat-shrinkable boot, or tubing. 11-140.11-145. [RESERVED.] Par 11-146 Page 11-537 9/8/98 AC 43.13-1B SECTION 11. CLAMPING GENERAL. Wires and wire bundles must be supported by using clamps meeting Specification MS-21919, or plastic cable straps in accessible areas if correctly applied within the restrictions of paragraph 11-158. Clamps and other primary support devices must be constructed of materials that are compatible with their installation and environment, in terms of temperature, fluid resistance, exposure to ultraviolet (UV) light, and wire bundle mechanical loads. They should be spaced at intervals not exceeding 24 inches. Clamps on wire bundles should be selected so that they have a snug fit without pinching wires, as shown in figure 11-11 through figure 11-13. CAUTION: The use of metal clamps on coaxial RF cables may cause problems if clamp fit is such that RF cable’s original cross-section is distorted. Clamps on wire bundles should not allow the bundle to move through the clamp when a slight axial pull is applied. Clamps on RF cables must fit without crushing and must be snug enough to prevent the cable from moving freely through the clamp, but may allow the cable to slide through the clamp when a light axial pull is applied. The cable or wire bundle may be wrapped with one or more turns of electrical tape when required to achieve this fit. Plastic clamps or cable ties must not be used where their failure could result in interference with movable controls, wire bundle contact with movable equipment, or chafing damage to essential or unprotected wiring. They must not be used on vertical runs where inadvertent slack migration could result in chafing or other damage. Clamps must be installed with their attachment hardware positioned above them, wherever practicable, so that they are unlikely to rotate Par 11-146 Page 11-538 as the result of wire bundle weight or wire bundle chafing. (See figure 11-11.) Clamps lined with nonmetallic material should be used to support the wire bundle along the run. Tying may be used between clamps, but should not be considered as a substitute for adequate clamping. Adhesive tapes are subject to age deterioration and, therefore, are not acceptable as a clamping means. The back of the clamp, whenever practical, should be rested against a structural member. Clamps must be installed in such a manner that the electrical wires do not come in contact with other parts of the aircraft when subjected to vibration. Sufficient slack should be left between the last clamp and the electrical equipment to prevent strain at the terminal and to minimize adverse effects on shock-mounted equipment. Where wires or wire bundles pass through bulkheads or other structural members, a grommet or suitable clamp should be provided to prevent abrasion. When wire bundle is clamped into position, if there is less than 3/8-inch clearance between the bulkhead cutout and the wire bundle, a suitable grommet should be installed as indicated in figure 11-14. The grommet may be cut at a 45 degree angle to facilitate installation, provided it is cemented in place and the slot is located at the top of the cutout. WIRE AND CABLE CLAMPS INSPECTION. Inspect wire and cable clamps for proper tightness. Where cables pass through structure or bulkheads, inspect for proper clamping and grommets. Inspect for sufficient slack between the last clamp and the electronic equipment to prevent strain at the cable terminals and to minimize adverse effects on shock-mounted equipment. 9/8/98 AC 43.13-1B FIGURE 11-11. Safe angle for cable clamps. FIGURE 11-12. Typical mounting hardware for MS-21919 cable clamps. Par 11-146 Page 11-539 9/8/98 AC 43.13-1B FIGURE 11-13. Installing cable clamp to structure. Par 11-147 Page 11-540 9/8/98 AC 43.13-1B FIGURE 11-14. Clamping at a bulkhead hole. 11-148.11-154. [RESERVED.] Par 11-155 Page 11-541 9/8/98 AC 43.13-1B SECTION 12. WIRE INSULATION AND LACING STRING TIE GENERAL. Insulation of wires should be appropriately chosen in accordance with the environmental characteristics of wire routing areas. Routing of wires with dissimilar insulation, within the same bundle, is not recommended, particularly when relative motion and abrasion between wires having dissimilar insulation can occur. Soft insulating tubing (spaghetti) cannot be considered as mechanical protection against external abrasion of wire; since at best, it provides only a delaying action. Conduit or ducting should be used when mechanical protection is needed. Special properties unique to the aircraft. INSULATION MATERIALS. Insulating materials should be selected for the best combination of characteristics in the following categories: Make sure all cutting tools used for stripping are sharp. For a more complete selection of insulated wires refer to SAE AS 4372 Aerospace Wire Performance Requirement and SAE AS 4373 Test Methods for Aerospace Wire. STRIPPING INSULATION. Attachment of wire, to connectors or terminals, requires the removal of insulation to expose the conductors. This practice is commonly known as stripping. Stripping may be accomplished in many ways; however, the following basic principles should be practiced. When using special wire stripping tools, adjust the tool to avoid nicking, cutting, or otherwise damaging the strands. Abrasion resistance. Arc resistance (noncarbon tracking). Damage to wires should not exceed the limits specified in table 11-13. Corrosion resistance. Cut-through strength. When performing the stripping operation, remove no more insulation than is necessary. Dielectric strength. LACING AND TIES. Ties, lacing, and straps are used to secure wire groups or bundles to provide ease of maintenance, inspection, and installation. Braided lacing tape per MIL-T-43435 is suitable for lacing and tying wires. In lieu of applying ties, straps meeting Specification MS17821 or MS17822 may be used in areas where the temperature does not exceed 120 ºC. Straps may not be used in areas of SWAMP such as wheel wells, near wing flaps or wing folds. They may not be used in high vibration areas, where failure Flame resistance. Heat distortion temperature. Impact strength. Mechanical strength. Resistance to fluids. Resistance to notch propagation. Smoke emission. Par 11-155 Page 11-542 9/8/98 AC 43.13-1B TABLE 11-13. Allowable nicked or broken strands. Maximum allowable nicked and broken strands Wire Size Conductor material Number of strands per conductor Total allowable nicked and broken strands 24-14 12-10 8-4 2-1 0-00 000 0000 Copper or Copper Alloy 19 37 133 665-817 1,045-1,330 1,6652,109- 2 nicked, none broken 4 nicked, none broken 6 nicked, 6 broken 6 nicked, 6 broken 6 nicked, 6 broken 6 nicked, 6 broken 6 nicked, 6 broken 8-000 Aluminum All numbers of strands None, None of the strap would permit wiring to move against parts which could damage the insulation and foul mechanical linkages or other moving mechanical parts. They also may not be used where they could be exposed to UV light, unless the straps are resistant to such exposure. 12 inches apart. A tie consists of a clove hitch, around the wire group or bundle, secured by a square knot as shown in figure 11-17. Plastic Ties. Refer to Paragraph 11-220 and table 11 21. Lacing. Lace wire groups or bundles inside junction boxes or other enclosures. Single cord-lacing method, shown in figure 11-15, and tying tape, meeting specification MIL-T-43435, may be used for wire groups of bundles 1-inch in diameter or less. The recommended knot for starting the single cord-lacing method is a clove hitch secured by a double-looped overhand knot as shown in figure 11-15, step a. Use the double cord-lacing method on wire bundles 1-inch in diameter or larger as shown in figure 11-16. When using the double cord-lacing method, employ a bowline on a bight as the starting knot. Tying. Use wire group or bundle ties where the supports for the wire are more than Par 11-155 Page 11-543 INSULATION TAPE. Insulation tape should be of a type suitable for the application, or as specified for that particular use. Insulation tape should be used primarily as a filler under clamps and as secondary support. Nonadhesive tape may be used to wrap around wiring for additional protection, such as in wheel wells. All tape should have the ends tied or otherwise suitably secured to prevent unwinding. Tape used for protection should be applied so that overlapping layers shed liquids. Drainage holes should be provided at all trap points and at each low point between clamps. Plastic tapes, that absorb moisture or have volatile plasticizers that produce chemical reactions with other wiring, should not be used. (Reference MIL-W-5088.) 9/8/98 AC 43.13-1B FIGURE 11-15. Single cord lacing. FIGURE 11-16. Double cord lacing. Par 11-167 Page 11-544 (and 11-66) 9/8/98 AC 43.13-1B FIGURE 11-17. Making ties. 11-160.11-166. [RESERVED.] Par 11-167 Page 11-545 (and 11-66) 9/8/98 AC 43.13-1B SECTION 13. SPLICING. GENERAL. Splicing is permitted on wiring as long as it does not affect the reliability and the electromechanical characteristics of the wiring. Splicing of power wires, coaxial cables, multiplex bus, and large gauge wire must have approved data. Splicing of electrical wire should be kept to a minimum and avoided entirely in locations subject to extreme vibrations. Splicing of individual wires in a group or bundle should have engineering approval and the splice(s) should be located to allow periodic inspection. Many types of aircraft splice connectors are available for use when splicing individual wires. Use of a selfinsulated splice connector is preferred; however, a noninsulated splice connector may be used provided the splice is covered with plastic sleeving that is secured at both ends. Environmentally sealed splices, that conform to MIL-T-7928, provide a reliable means of splicing in SWAMP areas. However, a noninsulated splice connector may be used, provided the splice is covered with dual wall shrink sleeving of a suitable material. There should not be more than one splice in any one wire segment between any two connectors or other disconnect points, except; when attaching to the spare pigtail lead of a potted connector, to splice multiple wires to a single wire, to adjust wire size to fit connector contact crimp barrel size, and to make an approved repair. (Reference MIL-W-5088 and NAVAIR 01-1A-505.) Splices in bundles must be staggered so as to minimize any increase in the size of the bundle, preventing the bundle from fitting into its designated space, or cause congestion that will adversely affect maintenance. (See figure 11-18.) Splices should not be used within 12 inches of a termination device, except for paragraph f below. Splices may be used within 12 inches of a termination device when attaching to the pigtail spare lead of a potted termination device, or to splice multiple wires to a single wire, or to adjust the wire sizes so that they are compatible with the contact crimp barrel sizes. Selection of proper crimping tool, refer to paragraph 11-178. FIGURE 11-18. Staggered splices in wire bundle. 11-168.11-173. [RESERVED.] Par 11-167 Page 11-546 (and 11-66) 9/8/98 AC 43.13-1B SECTION 14. TERMINAL REPAIRS GENERAL. Terminals are attached to the ends of electrical wires to facilitate connection of the wires to terminal strips or items of equipment. The tensile strength of the wire-to-terminal joint should be at least equivalent to the tensile strength of the wire itself, and its resistance negligible relative to the normal resistance of the wire. Selection of Wire Terminals. The following should be considered in the selection of wire terminals. Current rating. Wire size (gauge) and insulation diameter. Conductor material compatibility. Stud size. Insulation material compatibility. Application environment. Solder/solderless. Pre-insulated crimp-type ring-tongue terminals are preferred. The strength, size, and supporting means of studs and binding posts, as well as the wire size, should be considered when determining the number of terminals to be attached to any one post. In hightemperature applications, the terminal temperature rating must be greater than the ambient temperature plus current related temperature rise. Use of nickel-plated terminals and of uninsulated terminals with hightemperature insulating sleeves should be considered. Terminal blocks should be provided with adequate electrical clearance or insulation strips between mounting hardware and conductive parts. Par 11-174 Page 11-547 Terminal Strips. Wires are usually joined at terminal strips. A terminal strip fitted with barriers should be used to prevent the terminals on adjacent studs from contacting each other. Studs should be anchored against rotation. When more than four terminals are to be connected together, a small metal bus should be mounted across two or more adjacent studs. In all cases, the current should be carried by the terminal contact surfaces and not by the stud itself. Defective studs should be replaced with studs of the same size and material since terminal strip studs of the smaller sizes may shear due to overtightening the nut. The replacement stud should be securely mounted in the terminal strip and the terminal securing nut should be tight. Terminal strips should be mounted in such a manner that loose metallic objects cannot fall across the terminals or studs. It is good practice to provide at least one spare stud for future circuit expansion or in case a stud is broken. Terminal strips that provide connection of radio and electronic systems to the aircraft electrical system should be inspected for loose connections, metallic objects that may have fallen across the terminal strip, dirt and grease accumulation, etc. These type conditions can cause arcing which may result in a fire, or system failures. Terminal Lugs. Wire terminal lugs should be used to connect wiring to terminal block studs or equipment terminal studs. No more than four terminal lugs or three terminal lugs and a bus should be connected to any one stud. (Total number of terminal lugs per stud includes a common bus bar joining adjacent studs. Four terminal lugs plus a common bus bar thus are not permitted on one stud.) Terminal lugs should be selected with a stud hole diameter that matches the diameter of the stud. However, when the terminal lugs attached to a 9/8/98 AC 43.13-1B stud vary in diameter, the greatest diameter should be placed on the bottom and the smallest diameter on top. Tightening terminal connections should not deform the terminal lugs or the studs. Terminal lugs should be so positioned that bending of the terminal lug is not required to remove the fastening screw or nut, and movement of the terminal lugs will tend to tighten the connection. Parts’ lists should indicate the appropriate Class 1 terminal lugs to be used for service replacement of any Class 2 terminal lugs installed. Termination of Shielded Wire. For termination of shielded wire refer to MIL-DTL-27500. ATTACHMENT OF TERMINALS TO STUDS. Connectors and terminals in aircraft require special attention to ensure a safe and satisfactory installation. Every possibility of short circuits, due to misinstallation, poor maintenance, and service life, should be addressed in the design. Electrical equipment malfunction has frequently been traced to poor terminal connections at terminal boards. Loose, dirty, or corroded contact surfaces can produce localized heating that may ignite nearby combustible materials or overheat adjacent wire insulation. Copper Terminal Lugs. Solderless crimp style, copper wire, terminal lugs should be used and conform to MIL-T-7928. Spacers or washers should not be used between the tongues of terminal lugs. Aluminum Terminal Lugs. The aluminum terminal lugs conforming to MIL-T-7099 (MS-25435, MS-25436, MS-25437, and MS-25438) should be crimped to aluminum wire only. The tongue of the aluminum terminal lugs or the total number of tongues of aluminum terminal lugs when stacked, should be sandwiched between two MS-25440 flat washers when terminated on terminal studs. Spacers or washers should not be used between the tongues of terminal lugs. Special attention should be given to aluminum wire and cable installations to guard against conditions that would result in excessive voltage drop and high resistance at junctions that may ultimately lead to failure of the junction. Examples of such conditions are improper installation of terminals and washers, improper torsion (“torquing” of nuts), and inadequate terminal contact areas. Class 2 Terminal Lugs. The Class 2 terminal lugs conforming to MIL-T-7928 may be used for installation, provided that in such installations, Class 1 terminal lugs are adequate for replacement without rework of installation or terminal lugs. Class 2 terminal lugs should be the insulated type, unless the conductor temperature exceeds 105 °C. In that case uninsulated terminal lugs should be used. Par 11-176 STUDS AND INSULATORS. The following recommendations concerning studs also apply to other feed-through conductors. Current Carrying Stud Resistance. Due to heat loss arising from wire-to-lug and lug-to-stud voltage drop, the resistance per unit length of a current carrying stud should not be greater than that of the wire. Size of Studs. In designing the stud for a feed-through connection, attention should be given to the higher resistance of brass, as compared to copper. A suggested method of determining the size is to use a current density in the stud equivalent to that of the wire, compensating for the difference of resistance of the metals. Consideration should also be given to mechanical strength. Support for Studs. The main stud support in the feedthrough insulation should be independent of the attachment of the lugs to Page 11-548 9/8/98 AC 43.13-1B the stud. Therefore, loosening of the insulation support of the stud will not affect the electric contact efficiency. In other words, the contact pressure on the wire lugs should not in any way be affected by the loosening of the stud in the insulator. Support of Wire at Studs. Unless some other positive locking action is provided, the lug or wire should be supported next to the stud to prevent loosening the connection with a side pull on the wire. Torque recommendations for attaching electrical wiring devices to terminal boards or blocks, studs, posts, etc., are normally found in the manufacturer’s maintenance instruction manual. Feed-Through Insulator and Stud Design. Feedthrough insulator design should be such as to prevent a loose insulator from failing to provide circuit isolation. It should not be able to move from between the stud and the structure, thus allowing the two to come into contact. The assembly should be so designed that it is impossible to inadvertently misassemble the parts so that faults will result. Also, it is desirable to provide means to prevent the feed-through stud from turning while tightening the connection. WIRE TERMINALS AND BINDING POSTS. All wire terminals in or on electrical equipment, except case ground, must be firmly held together with two nuts or suitable locking provisions, or should be secured in a positive manner to equipment in such a way that no insulation material is involved in maintaining physical pressure between the various current carrying members of an electrical connection. Terminal studs or binding posts should be of a size that is entirely adequate for the current requirements of the equipment and have sufficient mechanical strength to withstand the torque required to attach the cable to the equipment. All terminals on equipment should have barriers and covers provided by equipment manufacturers. CRIMP ON TERMINAL LUGS AND SPLICES (Pre insulated crimp type). Must be installed using a high quality ratchet-type crimping tool. CRIMP ON TERMINAL LUGS AND SPLICES (pre-insulated crimp type). The crimp on terminal lugs and splices must be installed using a high quality ratchet-type crimping tool. Hand, portable, and stationary power tools are available for crimping terminal lugs. These tools crimp the barrel to the conductor, and simultaneously from the insulation support to the wire insulation. Crimp tools must be carefully inspected: Insure that the full cycle ratchet mechanism is tamper-proof so that it cannot be disengaged prior to or during the crimp cycle. If the tool does not function or faults are found, reject the tool and send the tool to be repaired. The tool calibration and adjustments are make only by the manufacturer or an approved calibration laboratory. Suitable gages of the Go/No Go type are available and shall be used prior to any crimping operation and whenever possible during operation to ensure crimp dimensions. For further information refer to MIL-C-22520 Crimping Tools, Hand or Power Actuated, Wire Termination, and Tool Kits. This specification covers in detail the general requirements for crimp tools, inspection gages and tool kits. Par 11-176 Page 11-549 9/8/98 AC 43.13-1B LOCK WASHERS FOR TERMINALS ON EQUIPMENT. Where locknuts are used to ensure binding and locking of electrical terminals, they should be of the all metal type. In addition, a spring lock washer of suitable thickness may be installed under the nut to ensure good contact pressure. A plain washer should be used between the spring washer and the terminal to prevent galling. A plain nut with a spring lock washer and a plain washer may be used to provide binding and contact pressure. 11-180.11-184. [RESERVED.] Par 11-185 Page 11-550 9/8/98 AC 43.13-1B SECTION 15. GROUNDING AND BONDING GENERAL. One of the more important factors in the design and maintenance of aircraft electrical systems is proper bonding and grounding. Inadequate bonding or grounding can lead to unreliable operation of systems, e.g., EMI, electrostatic discharge damage to sensitive electronics, personnel shock hazard, or damage from lightning strike. This section provides an overview of the principles involved in the design and maintenance of electrical bonding and grounding. SAE ARP-1870 provides for more complete detailed information on grounding and bonding, and the application of related hardware. GROUNDING. Grounding is the process of electrically connecting conductive objects to either a conductive structure or some other conductive return path for the purpose of safely completing either a normal or fault circuit. Types of Grounding. If wires carrying return currents from different types of sources, such as signals or DC and AC generators, are connected to the same ground point or have a common connection in the return paths, an interaction of the currents will occur. This interaction may not be a problem or it could be a major nonrepeatable anomaly. To minimize the interaction between various return currents, different types of grounds should be identified and used. As a minimum, the design should use three ground types: (1) AC returns, (2) DC returns, and (3) all others. For distributed power systems, the power return point for an alternative power source would be separated. For example, in a two-AC generator (one on the right side and the other on the left side) system, if the right AC generator were supplying backup power to equipment located in the left side, (left equipment rack) the backup AC ground return should be labeled “AC Right”. The return currents for the left Par 11-185 Page 11-551 generator should be connected to a ground point labeled “AC Left” NOTE: Mixing return currents from various sources should never be permitted to occur, because noise will be coupled from one source to another and can be a major problem in digital signaling. Current Return Paths. The design of the ground return circuit should be given as much attention as the other leads of a circuit. A requirement for proper ground connections is that they maintain an impedance that is essentially constant. Ground return circuits should have a current rating and voltage drop adequate for satisfactory operation of the connected electrical and electronic equipment. EMI problems, that can be caused by a system’s power wire, can be reduced substantially by locating the associated ground return near the origin of the power wiring (e.g. circuit breaker panel) and routing the power wire and its ground return in a twisted pair. Special care should be exercised to ensure replacement on ground return leads. The use of numbered insulated wire leads instead of bare grounding jumpers may aid in this respect. In general, equipment items should have an external ground connection, even when internally grounded. Direct connections to a magnesium (which may create a fire hazard) structure must not be used for ground return. Heavy-Current Grounds. Power ground connections, for generators, transformer rectifiers, batteries, external power receptacles, and other heavy-current, loads must be attached to individual grounding brackets that are attached to aircraft structure with a proper metal-to metal bonding attachment. This attachment and the surrounding structure must provide adequate conductivity to 9/8/98 AC 43.13-1B accommodate normal and fault currents of the system without creating excessive voltage drop or damage to the structure. At least three fasteners, located in a triangular or rectangular pattern, must be used to secure such brackets in order to minimize susceptibility to loosening under vibration. If the structure is fabricated of a material such as carbon fiber composite (CFC), which has a higher resistivity than aluminum or copper, it will be necessary to provide an alternative ground path(s) for power return current. Current Return Paths for Internally Grounded Equipment. Power return or fault current ground connections within flammable vapor areas must be avoided. If they must be made, make sure these connections will not arc, spark, or overheat under all possible current flow or mechanical failure conditions, including induced lightning currents. Criteria for inspection and maintenance to ensure continued airworthiness throughout the expected life of the aircraft should be established. Power return fault currents are normally the highest currents flowing in a structure. These can be the full generator current capacity. If full generator fault current flows through a localized region of the carbon fiber structure, major heating and failure can occur. CFC and other similar low-resistive materials must not be used in power return paths. Additional voltage drops in the return path can cause voltage regulation problems. Likewise, repeated localized material heating by current surges can cause material degradation. Both problems may occur without warning and cause nonrepeatable failures or anomalies. Common Ground Connections. The use of common ground connections for more than one circuit or function should be avoided except where it can be shown that related malfunctions that could affect more than one circuit will not result in a hazardous condition. Even when the loss of multiple systems does not, in itself, create a hazard, the effect of such failure can be quite distracting to the crew. Redundant systems are normally provided with the objective of assuring continued safe operation in the event of failure of a single channel and must therefore be grounded at well separated points. To avoid construction or maintenance errors that result in connecting such ground at a single point, wires that ground one channel of a redundant system should be incapable of reaching the ground attachment of the other channel. The use of loop type grounding systems (several ground leads connected in series with a ground to structure at each end) must be avoided on redundant systems, because the loss of either ground path will remain undetected, leaving both systems, with a potential single-point failure. Electrical power sources must be grounded at separate locations on the aircraft structure. The loss of multiple sources of electrical power, as the result of corrosion of a ground connection or failure of the related fasteners, may result in the loss of multiple systems and should be avoided by making the ground attachments at separate locations. Bonds to thermally or vibration-isolated structure require special consideration to avoid single ground return to primary structure. The effect of the interconnection of the circuits when ungrounded should be considered whenever a common ground connection is used. This is particularly important when employing terminal junction grounding modules or other types of gang grounds that have a single attachment point. Par 11-185 Page 11-552 9/8/98 AC 43.13-1B Grounds for Sensitive Circuits. Special consideration should be given to grounds for sensitive circuits. For example: Grounding of a signal circuit through a power current lead introduces power current return voltage drop into the signal circuit. Running power wires too close will cause signal interference. Separately grounding two components of a transducer system may introduce ground plane voltage variations into the system. be necessary for some objects such as antenna elements, whose function requires them to be electrically isolated from the airframe. Such items should be provided with an alternative means to conduct static charges and/or lightning currents, as appropriate. Static Bonds. All isolated conducting parts inside and outside the aircraft, having an area greater than 3 in2 and a linear dimension over 3 inches, that are subjected to appreciable electrostatic charging due to precipitation, fluid, or air in motion, should have a mechanically secure electrical connection to the aircraft structure of sufficient conductivity to dissipate possible static charges. A resistance of less than 1 ohm when clean and dry will generally ensure such dissipation on larger objects. Higher resistances are permissible in connecting smaller objects to airframe structure. BONDING INSPECTION. Inspect for the following: Single point grounds for signal circuits, with such grounds being at the signal source, are often a good way to minimize the effects of EMI, lightning, and other sources of interference. BONDING. The following bonding requirements must be considered: Equipment Bonding. Low-impedance paths to aircraft structure are normally required for electronic equipment to provide radio frequency return circuits and for most electrical equipment to facilitate reduction in EMI. The cases of components which produce electromagnetic energy should be grounded to structure. To ensure proper operation of electronic equipment, it is particularly important to conform the system’s installation specification when interconnections, bonding, and grounding are being accomplished. If there is evidence of electrical arcing, check for intermittent electrical contact between conducting surfaces, that may become a part of a ground plane or a current path. Arcing can be prevented either by bonding, or by insulation if bonding is not necessary. The metallic conduit should be bonded to the aircraft structure at each terminating and break point. The conduit bonding strap should be located ahead of the piece of equipment that is connected to the cable wire inside the conduit. Bond connections should be secure and free from corrosion. Bonding jumpers should be installed in such a manner as not to interfere in any way with the operation of movable components of the aircraft. Metallic Surface Bonding. All conducting objects on the exterior of the airframe must be electrically connected to the airframe through mechanical joints, conductive hinges, or bond straps capable of conducting static charges and lightning strikes. Exceptions may Par 11-186 Page 11-553 9/8/98 AC 43.13-1B Self-tapping screws should not be used for bonding purposes. Only standard threaded screws or bolts of appropriate size should be used. Exposed conducting frames or parts of electrical or electronic equipment should have a low resistance bond of less than 2.5 millohms to structure. If the equipment design includes a ground terminal or pin, which is internally connected to such exposed parts, a ground wire connection to such terminal will satisfy this requirement. Refer to manufacturer’s instructions. Bonds should be attached directly to the basic aircraft structure rather than through other bonded parts. Bonds must be installed to ensure that the structure and equipment are electrically stable and free from the hazards of lightning, static discharge, electrical shock, etc. To ensure proper operation and suppression of radio interference from hazards, electrical bonding of equipment must conform to the manufacturer’s specifications. Use of bonding testers is strongly recommended. Measurements should be performed after the grounding and bonding mechanical connections are complete to determine if the measured resistance values meet the basic requirements. A high quality test instrument (AN AN/USM-21A or equivalent) is required to accurately measure the very low resistance values specified in this document. Another method of measurement is the millivolt drop test as shown in figure 11-19. Use appropriate washers when bonding aluminum or copper to dissimilar metallic structures so that any corrosion that may occur will be on the washer. Figure 11-19. Millivolt drop test. Par 11-186 Page 11-554 9/8/98 AC 43.13-1B BONDING JUMPER INSTALLATIONS. Bonding jumpers should be made as short as practicable, and installed in such a manner that the resistance of each connection does not exceed .003 ohm. The jumper should not interfere with the operation of movable aircraft elements, such as surface controls, nor should normal movement of these elements result in damage to the bonding jumper. Bonding Connections. To ensure a low-resistance connection, nonconducting finishes, such as paint and anodizing films, should be removed from the attachment surface to be contacted by the bonding terminal. On aluminum surfaces, a suitable conductive chemical surface treatment, such as Alodine, should be applied to the surfaces within 24 hours of the removal of the original finish. Refer to SAE, ARP 1870 for detailed instructions. Electric wiring should not be grounded directly to magnesium parts. Corrosion Protection. One of the more frequent causes of failures in electrical system bonding and grounding is corrosion. Aircraft operating near salt water are particularly vulnerable to this failure mode. Because bonding and grounding connections may involve a variety of materials and finishes, it is important to protect completely against dissimilar metal corrosion. The areas around completed connections should be post-finished in accordance with the original finish requirements or with some other suitable protective finish within 24 hours of the cleaning process. In applications exposed to salt spray environment, a suitable noncorrosive sealant, such as one conforming to MIL-S-8802, should be used to seal dissimilar metals for protection from exposure to the atmosphere. Par 11-189 Corrosion Prevention. Electrolytic action may rapidly corrode a bonding connection if suitable precautions are not taken. Aluminum alloy jumpers are recommended for most cases; however, copper jumpers should be used to bond together parts made of stainless steel, cadmium plated steel, copper, brass, or bronze. Where contact between dissimilar metals cannot be avoided, the choice of jumper and hardware should be such that corrosion is minimized, and the part likely to corrode would be the jumper or associated hardware. Tables 11-14 through 11-16 and figures 11-20 through 11-22 show the proper hardware combinations for making a bond connection. At locations where finishes are removed, a protective finish should be applied to the completed connection to prevent subsequent corrosion. Bonding Jumper Attachment. The use of solder to attach bonding jumpers should be avoided. Tubular members should be bonded by means of clamps to which the jumper is attached. Proper choice of clamp material should minimize the probability of corrosion. Ground Return Connection. When bonding jumpers carry substantial ground return current, the current rating of the jumper should be determined to be adequate and that a negligible voltage drop is produced. Page 11-555 CREEPAGE DISTANCE. Care should be used in the selection of electrical components to ensure that electrical clearance and creepage distance along surfaces between adjacent terminals, at different potentials, and between these terminals and adjacent ground surfaces are adequate for the voltages involved. 9/8/98 AC 43.13-1B TABLE 11-14. Stud bonding or grounding to flat surface. Aluminum Terminal and Jumper Structure Screw or Bolt and Lock nut Plain nut Washer A Washer B Washer C&D Lock washer E Lock washer F Aluminum Alloys Cadmium Plated steel Cadmium Plated Steel Aluminum Alloy Aluminum Alloy Cadmium Plated Steel or Aluminum Cadmium Plated Steel Cadmium Plated Steel Magnesium Alloys Cadmium Plated Steel Cadmium Plated Steel Magnesium Alloy Magnesium Alloy Cadmium Plated Steel or Aluminum Cadmium Plated Steel Cadmium Plated Steel Steel, Cadmium Plated Cadmium Plated Steel Cadmium Plated Steel None None Cadmium Plated Steel or Aluminum Cadmium Plated Steel Cadmium Plated Steel Steel, Corrosion Resisting Corrosion Resisting Steel Cadmium Plated Steel None None Cadmium Plated Steel or Aluminum Corrosion Resist Steel Cadmium Plated Steel Aluminum Alloys Cadmium Plated Steel Cadmium Plated Steel Aluminum Alloy Aluminum Alloy Cadmium Plated Steel Cadmium Plated Steel Cadmium Plated Steel or Aluminum Steel, Cadmium Plated Cadmium Plated Steel Cadmium Plated Steel None None Cadmium Plated Steel Cadmium Plated Steel Cadmium Plated Steel Steel, Corrosion Resisting Corrosion Resisting Steel Corrosion Resisting Steel None None Cadmium Plated Steel Corrosion Resisting Steel Corrosion Resisting Steel Tinned Copper Terminal and Jumper Magnesium 1 Alloys 1 Avoid connecting copper to magnesium. Par 11-189 Page 11-556 9/8/98 AC 43.13-1B TABLE 11-15. Plate nut bonding or grounding to flat surface. Aluminum Terminal and Jumper Screw or bolt and nut plate Structure Rivet Lockwasher Washer A Washer B Aluminum Alloys Cadmium Plated Steel Aluminum Alloy Cadmium Plated Steel Cadmium Plated Steel or Aluminum None Magnesium Alloys Cadmium Plated Steel Aluminum Alloy Cadmium Plated Steel Cadmium Plated Steel or Aluminum None or Magnesium Alloy Steel, Cadmium Plated Cadmium Plated Steel Corrosion Resisting Steel Cadmium Plated Steel Cadmium Plated Steel or Aluminum None Steel, Corrosion Resisting Corrosion Resisting Steel or Cadmium Plated Steel Corrosion Resisting Steel Cadmium Plated Steel Cadmium Plated Steel or Aluminum Cadmium Plated Steel Aluminum Alloys Cadmium Plated Steel Aluminum Alloy Cadmium Plated Steel Cadmium Plated Steel Aluminum Alloy Steel, Cadmium Plated Cadmium Plated Steel Corrosion Resisting Steel Cadmium Plated Steel Cadmium Plated Steel None Steel, Corrosion Resisting Corrosion Resisting Steel Corrosion Resisting Steel Cadmium Plated Steel Cadmium Plated Steel None Tinned Copper Terminal and Jumper 2 1 Magnesium Alloys 1 Avoid connecting copper to magnesium. Use washers having a conductive finished treated to prevent corrosion, suggest AN960JD10L 2. Par 11-190 Page 11-557 9/8/98 AC 43.13-1B TABLE 11-16. Bolt and nut bonding or grounding to flat surface. Aluminum Terminal and Jumper Screw or bolt and nut plate Lock-nut Washer A Washer B Washer C Aluminum Alloys Cadmium Plated Steel Cadmium Plated Steel Cadmium Plated Steel or Aluminum None Cadmium Plated Steel or Aluminum Magnesium Alloys Cadmium Plated Steel Cadmium Plated Steel Magnesium Alloy None or Magnesium alloy Cadmium Plated Steel or Aluminum Steel, Cadmium Plated Cadmium Plated Steel Cadmium Plated Steel Cadmium Plated Steel Cadmium Plated Steel Cadmium Plated Steel or Aluminum Steel, Corrosion Resisting Corrosion Resisting Steel or Cadmium Plated Steel Cadmium Plated Steel Corrosion Resisting Steel Cadmium Plated Steel Cadmium Plated Steel or Aluminum Aluminum Alloy Cadmium Plated Steel Cadmium Plated Steel Cadmium Plated Steel Aluminum Alloy Cadmium Plated Steel Steel, Cadmium Plated Cadmium Plated Steel Cadmium Plated Steel Cadmium Plated Steel None Cadmium Plated Steel Steel, Corrosion Resisting Corrosion Resisting Steel or Cadmium Plated Steel Cadmium Plated Steel Corrosion Resisting Steel None Cadmium Plated Steel Structure Tinned Copper Terminal and Jumper 2 1 Magnesium Alloy 1 Avoid connecting copper to magnesium. Use washers having a conductive finished treated to prevent corrosion, suggest AN960JD10L 2. Par 11-191 Page 11-558 9/8/98 AC 43.13-1B FIGURE 11-20. Copper jumper connector to tubular structure. FIGURE 11-21. Bonding conduit to structure. FIGURE 11-22. Aluminum jumper connection to tubular structure. Par 11-190 Page 11-559 9/8/98 AC 43.13-1B FUEL SYSTEMS. Small metallic objects within an aircraft fuel tank, that are not part of the tank structure, should be electrically bonded to the structure so as to dissipate static charges that may otherwise accumulate on these objects. A practical bonding design would use a flexible braided jumper wire or riveted bracket. In such situations, a DC resistance of 1 ohm or less should indicate an adequate connection. Care should be taken, in designing such connections, to avoid creating continuous current paths that could allow lightning or power fault currents to pass through connections not designed to tolerate these higher amplitude currents without arcing. Simulated static charge, lightning, or fault current tests may be necessary to establish or verify specific designs. All other fuel system components, such as fuel line (line to line) access doors, fuel line supports, structural parts, fuel outlets, or brackets should have an electromechanical (bonding strap) secure connector that ensures 1 ohm or less resistance to the structure. Advisory Circular 20-53A Protection of Aircraft Fuel Systems Against Fuel Vapor Ignition Due to Lightning, and associate manual DOT/FAA/ CT-83/3, provide detailed information on necessary precautions. ELECTRIC SHOCK PREVENTION BONDING. Electric shock to personnel should be prevented by providing a low resistance path of 1/100 ohm or less between structure and metallic conduits or equipment. The allowable ground resistance should be such that the electric potential of the conduit or equipment housing does not reach a dangerous value under probable fault conditions. The current carrying capacity of all elements of the ground circuit should be such that, under the fault condition, no sparking, fusion, or dangerous heating will occur. Metallic supports usually provide adequate bonding if metal-to-metal contact is maintained. materials, cross-sections, physical configurations, tightness, and surface finishes. Care should be taken to minimize structural resistance, so as to control structural voltage rises to levels compatible with system protection design. This may require that metal surfaces be added to composite structures, or that tinned copper overbraid, conduits, or cable trays be provided for interconnecting wire harnesses within composite airframes. Also care must be taken to prevent hazardous lightning currents from entering the airframe via flight control cables, push rods, or other conducting objects that extend to airframe extremities. This may require that these conductors be electrically bonded to the airframe, or that electrical insulators be used to interrupt lightning currents. For additional information on lightning protection measures, refer to DOT/FAA/CT-89-22. Report DOT/FAA/ CT 86/8, April 1987, Determination of Electrical Properties of Bonding and Fastening Techniques may provide additional information for composite materials. Control Surface Lightning Protection Bonding. Control surface bonding is intended to prevent the burning of hinges on a surface that receives a lightning strike; thus causing possible loss of control. To accomplish this bonding, control surfaces and flaps should have at least one 6500 circular mil area copper (e.g. 7 by 37 AWG size 36 strands) jumper LIGHTNING PROTECTION BONDING. Electrical bonding is frequently required for lightning protection of aircraft and systems, especially to facilitate safe conduction of lightning currents through the airframe. Most of this bonding is achieved through normal airframe riveted or bolted joints but some externally mounted parts, such as control surfaces, engine nacelles, and antennas, may require additional bonding provisions. Generally, the adequacy of lightning current bonds depends on Par 11-190 Page 11-560 9/8/98 AC 43.13-1B across each hinge. In any case, not less than two 6500 circular mil jumpers should be used on each control surface. The installation location of these jumpers should be carefully chosen to provide a low-impedance shunt for lightning current across the hinge to the structure. When jumpers may be subjected to arcing, substantially larger wire sizes of 40,000 circular mils or a larger cross section are required to provide protection against multiple strikes. Sharp bends and loops in such jumpers can create susceptibility to breakage when subjected to the inductive forces created by lightning current, and should be avoided. Control Cable Lightning Protection Bonding. To prevent damage to the control system or injury to flight personnel due to lightning strike, cables and levers coming from each control surface should be protected by one or more bonding jumpers located as close to the control surface as possible. Metal pulleys are considered a satisfactory ground for control cables. LIGHTNING PROTECTION FOR ANTENNAS AND AIR DATA PROBES. Antenna and air data probes that are mounted on exterior surfaces within lightning strike zones should be provided with a means to safely transfer lightning currents to the airframe, and to prevent hazardous surges from being conducted into the airframe via antenna cables or wire harnesses. Usually, the antenna mounting bolts provide adequate lightning current paths. Surge protectors built into antennas or installed in coaxial antenna cables or probe wire harnesses will fulfill these requirements. Candidate designs should be verified by simulated lightning tests in accordance with RTCA DO-160C, Section 23. STATIC-DISCHARGE DEVICE. Means should be provided to bleed accumulated static charges from aircraft prior to ground personnel coming in contact with an aircraft after landing. Normally, there is adequate conductivity in the tires for this, but if not, a static ground should be applied before personnel come into contact with the aircraft. Fuel nozzle grounding receptacles should be installed in accordance with the manufacturer’s specifications. Grounding receptacles should provide a means to eliminate the static-induced voltage that might otherwise cause a spark between a fuel nozzle and fuel tank access covers and inlets. In addition, static discharging wicks are installed on wings and tail surfaces to discharge static changes while in flight. CLEANING. In order to ensure proper ground connection conductivity, all paint, primer, anodize coating, grease, and other foreign material must be carefully removed from areas that conduct electricity. On aluminum surfaces, apply chemical surface treatment to the cleaned bare metal surface in accordance with the manufacturer’s instructions within 4 8 hours, depending on ambient moisture/contaminate content. HARDWARE ASSEMBLY. Details of bonding connections must be described in maintenance manuals and adhered to carefully when connections are removed or replaced during maintenance operations. In order to avoid corrosion problems and ensure long-term integrity of the electrical connection, hardware used for this purpose must be as defined in these documents or at least be equivalent in material and surface. Installation of fasteners used in bonded or grounded connections should be made in accordance with SAE ARP-1870. Threaded fasteners must be torqued to the level required by SAE ARP-1928. 11-198.11-204. [RESERVED.] Par 11-193 Page 11-561 (and 11-82) 9/8/98 AC 43.13-1B SECTION 16. WIRE MARKING GENERAL. The proper identification of electrical wires and cables with their circuits and voltages is necessary to provide safety of operation, safety to maintenance personnel, and ease of maintenance. Each wire and cable should be marked with a part number. It is common practice for wire manufacturers to follow the wire material part number with the five digit/letter C.A.G.E. code identifying the wire manufacturer. Existing installed wire that needs replacement can thereby be identified as to its performance capabilities, and the inadvertent use of a lower performance and unsuitable replacement wire avoided. The method of identification should not impair the characteristics of the wiring. CAUTION: Do not use metallic bands in place of insulating sleeves. Exercise care when marking coaxial or data bus cable, as deforming the cable may change its electrical characteristics. WIRE IDENTIFICATION. To facilitate installation and maintenance, original wire-marking identification is to be retained. The wire identification marks should consist of a combination of letters and numbers that identify the wire, the circuit it belongs to, its gauge size, and any other information to relate the wire to a wiring diagram. All markings should be legible in size, type, and color. IDENTIFICATION AND INFORMATION RELATED TO THE WIRE AND WIRING DIAGRAMS. The wire identification marking should consist of similar information to relate the wire to a wiring diagram. Par 11-205 Page 11-562 PLACEMENT OF IDENTIFICATION MARKINGS. Identification markings should be placed at each end of the wire and at 15-inch maximum intervals along the length of the wire. Wires less than 3 inches long need not be identified. Wires 3 to 7 inches in length should be identified approximately at the center. Added identification marker sleeves should be so located that ties, clamps, or supporting devices need not be removed in order to read the identification. The wire identification code must be printed to read horizontally (from left to right) or vertically (from top to bottom). The two methods of marking wire or cable are as follows: Direct marking is accomplished by printing the cable’s outer covering. (See figure 11-23.) Indirect marking is accomplished by printing a heatshrinkable sleeve and installing the printed sleeve on the wire or cables outer covering. Indirect-marked wire or cable should be identified with printed sleeves at each end and at intervals not longer than 6 feet. The individual wires inside a cable should be identified within 3 inches of their termination. (See figure 11-24.) TYPES OF WIRE MARKINGS. The preferred method is to mark directly on the wire. Teflon coated wires, shielded wiring, multiconductor cable, and thermocouple wires usually require special sleeves to carry identification marks. Whatever method of marking is used, the marking should be legible and the color should contrast with the wire insulation or sleeve. Extreme care must, therefore, be taken during circuit identification by a hot stamp machine on insulation wall 10 mils or thinner. 9/8/98 AC 43.13-1B 3” 15” 15” 3” H215A20 H215A20 H215A20 (b) Single wire without sleeve FIGURE 11-23. Spacing of printed identification marks (direct marking). Par 11-205 Page 11-563 9/8/98 AC 43.13-1B Alternative identification methods such as “Laser Printing”, “Ink Jet”, and “Dot Matrix” are preferred. When such modern equipment is not available, the use of stamped identification sleeving should be considered on insulation wall thickness of 10 mils or less. HOT STAMP MARKING. This method imprints hot ink marks onto the wire. Caution must be exercised when using this method, as it has been shown to damage insulation when incorrectly applied. Type set characters, similar to that used in printing presses but shaped to the contour of the wire, are heated to the desired temperature. Wire is pulled through a channel directly underneath the characters. The heat, of the type set characters, transfers the ink from the marking foil onto the wire. Good marking is obtained only by the proper combination of temperature, pressure, and dwelling. Hot stamp will mark wire with an outside diameter of 0.038 to 0.25-inch. FIGURE 11-24. Spacing of printed identification marks (indirect marking). Par 11-205 Page 11-564 9/8/98 AC 43.13-1B Before producing hot stamp wire, it must be assured that the marking machine is properly adjusted to provide the best wire marking with the least wire insulation deterioration. The marking should never create an indent greater than 10 percent of the insulation wall. CAUTION: The traditional “Hot Stamp” method has not been totally satisfactory when used on ultra-thin walled insulation. Fracture of the insulation wall and penetration to the conductor of these materials by the stamping dies have occurred. Later in service, when these openings have been wetted by various fluids, serious arcing and surface tracking will have damaged wire bundles. DOT MATRIX MARKING. The dot matrix marking is imprinted onto the wire or cable very similar to that of a dot matrix computer printer. The wire must go through a cleaning process to make sure it is clean and dry for the ink to adhere. Wires marked with dot matrix equipment require a cure consisting of an UV curing process, which is normally applied by the marking equipment. This cure should normally be complete 16 to 24 hours after marking. Dot matrix makes a legible mark without damaging the insulation. Depending on equipment configuration, dot matrix can mark wire from 0.037 to 0.5-inch outside diameter. Multiconductor cable can also be marked. INK JET MARKING. This is a “nonimpact” marking method wherein ink droplets are electrically charged and then directed onto the moving wire to form the characters. Two basic ink types are available: thermal cure and UV cure. Thermal cure inks must generally be heated in an oven for a length of time after Par 11-210 marking to obtain their durability. UV cure inks are cured in line much like dot matrix. Ink jet marks the wire on the fly and makes a reasonably durable and legible mark without damaging the insulation. Ink jets normally mark wire from 0.030 to 0.25-inch outside diameter. Multiconductor cable can also be marked. LASER MARKING. Of the variety of laser marking machines, UV lasers are proving to be the best. This method marks into the surface of the wire’s insulation without degradation to its performance. One common type of UV laser is referred to as an excimer laser marker. UV laser produces the most durable marks because it marks into the insulation instead of on the surface. However, excimer laser will only mark insulation that contain appropriate percentages of titanium dioxide (TiO2). The wire can be marked on the fly. UV can mark from 0.030 to 0.25-inch outside diameter. The UV laser makes only gray marks and they appear more legible on white or pastel-colored insulation. IDENTIFICATION SLEEVES. Flexible sleeving, either clear or opaque, is satisfactory for general use. When color coded or striped component wire is used as part of a cable, the identification sleeve should specify which color is associated with each wire identification code. Identification sleeves are normally used for identifying the following types of wire or cable: Unjacketed shielded wire. Thermocouple wire identification is normally accomplished by means of identification sleeves. As the thermocouple wire is usually of the duplex type (two insulated wires within the same casing), each wire at the termination point bears the full name of the conductor. Thermocouple conductors are alumel, Page 11-565 9/8/98 AC 43.13-1B chromel, iron, constantan, and copper constantan. TABLE 11-17. Recommended size of identification sleeving. Wire Size Coaxial cable should not be hot stamped directly. When marking coaxial cable, care should be taken not to deform the cable as this may change the electrical characteristics of the cable. When cables cannot be printed directly, they should be identified by printing the identification code (and individual wire color, where applicable) on a nonmetallic material placed externally to the outer covering at the terminating end and at each junction or pressure bulkhead. Cables not enclosed in conduit or a common jacket should be identified with printed sleeves at each end and at intervals not longer than 3 feet. Individual wires within a cable should be identified within 3 inches from their termination. AN #24 #22 #20 #18 #16 #14 #12 #10 #8 #6 #4 #2 #1 #0 #00 #000 #0000 Multiconductor cable normally use identification sleeves for identifying unshielded, unjacketed cable. High-temperature wire with insulation is difficult to mark (such as Teflon and fiberglass). IDENTIFICATION TAPE. Identification tape can be used in place of sleeving, in most cases (i.e. polyvinylfluoride). Sleeving Size AL No. Nominal ID (inches) #8 #6 #4 #2 #1 #0 #00 #000 #0000 12 11 10 9 8 7 6 4 2 0 3/8 inch 1/2 inch 1/2 inch 5/8 inch 5/8 inch 3/4 inch 3/4 inch .085 .095 .106 .118 .113 .148 .166 .208 .263 .330 .375 .500 .500 .625 .625 .750 .750 IDENTIFICATION OF WIRE BUNDLES AND HARNESSES. The identification of wire bundles and harnesses is becoming a common practice and may be accomplished by the use of a marked sleeve tied in place or by the use of pressure-sensitive tape as indicated in figure 11-25. OPERATING CONDITIONS. For sleeving exposed to high temperatures (over 400 °F), materials such as silicone fiberglass should be used. INSTALLATION OF PRINTED SLEEVES. Polyolefin sleeving should be used in areas where resistance to solvent and synthetic hydraulic fluids is necessary. Sleeves may be secured in place with cable ties or by heat shrinking. The identification sleeving for various sizes of wire is shown in table 11-17. FIGURE 11-25. Identification of wire bundles and harnesses. Par 11-210 Page 11-566 9/8/98 AC 43.13-1B Wires for which identifications are reassigned after installation, may be remarked on sleeves at the termination of each wire segment. It may be necessary to reidentify such wires throughout their lengths to facilitate ease of maintenance. For high-density harnessed, shielded, and jacketed multiconductor cables and when using nonsignificant wire identification, color coding or its alphanumeric equivalent may be interchanged within the same harnesses. The alphanumeric equivalent of the color code should be as set forth in MIL-STD-681. TERMINAL MARKING SLEEVE AND TAGS. Typical cable markers are flat, nonheat shrinkable tags. Heat-shrinkable marking sleeves are available for marking wires and cables, and should be inserted over the proper wire or cable and heat-shrunk using the proper manufacturer recommended heating tool. (See figures 11-26 and 11-27.) FIGURE 11-27. Installation of heat-shrinkable insulation sleeves. SLEEVES AND CABLE MARKERS SELECTION. Sleeves and cable markers must be selected by cable size and operating conditions. (See tables 11-18 through 11-21). Markers are printed using a typewriter with a modified roller. Blank markers on a bandolier are fed into the typewriter, where they are marked in any desired combination of characters. The typed markers, still on bandoliers, are heated in an infrared heating tool that processes the markers for permanency. The typed and heat-treated markers remain on the bandolier until ready for installation. Markers are normally installed using the following procedure: Select the smallest tie-down strap that will accommodate the outside diameter of the cable. (See table 11-22.) Cut the marking plate from the bandolier. (See figure 11-28.) FIGURE 11-26. Standard sleeves (135 °C). Thread the tie-down straps through holes in marking plate and around cable. Thread tip of tie-down strap through slot in head. (See figure 11-29.) Pull tip until strap is snug around cable. Par 11-218 Page 11-567 9/8/98 AC 43.13-1B FIGURE 11-29. Tie-down strap installation. FIGURE 11-28. Cable markers. TABLE 11-18. Selection table for standard sleeves. Markable Wire or Cable Length * Diameter Range. (inches) Min Max (inches) 18 0.050 0.080 18 0.075 0.110 18 0.100 0.150 18 0.135 0.215 18 0.200 0.300 18 0.135 0.300 18 0.260 0.450 * Based on 12 characters per inch Installed Sleeve Length (nom) (inches) 1.5 1.5 1.5 1.5 1.5 1.5 1.5 Installed Wall Thickness (max inches) 0.026 0.026 0.028 0.028 0.028 0.028 0.028 As-supplied Inside Diameter (min inches) 0.093 0.125 0.187 0.250 0.375 0.375 0.475 TABLE 11-19. Selection table for thin-wall sleeves. Markable Wire or Cable Length * Diameter Range (inches) (inches) Min. Max. 22 0.035 0.080 22 0.075 0.110 21 0.100 0.150 21 0.135 0.225 * Based on 12 characters per inch Par 11-218 Installed Sleeve Length (nom) (inches) 1.75 1.75 1.75 1.75 Installed Wall Thickness (max inches) 0.020 0.020 0.021 0.021 Page 11-568 As-supplied Inside Diameter (min inches) 0.093 0.125 0.187 0.250 9/8/98 AC 43.13-1B TABLE 11-20. Selection table for high-temperature sleeves. Wire or Cable Diameter Range (inches) Min. Max. Markable Length * (inches) 18 0.035 0.080 18 0.075 0.110 18 0.100 0.150 18 0.135 0.215 18 0.200 0.300 18 0.260 0.450 * Based on 12 characters per inch Installed Sleeve Length (nom) (inches) 1.5 1.5 1.5 1.5 1.5 1.5 Installed Wall Thickness (max inches) As-supplied Inside Diameter (min inches) 0.019 0.016 0.018 0.018 0.018 0.018 0.093 0.125 0.187 0.250 0.375 0.475 TABLE 11-21. Selection table for cable markers. Cable Diameter Range (inches) 0.25-0.50 0.25-0.50 0.25-0.50 0.50-up 0.50-up 0.50-up 0.50-up 0.50-up 0.50-up Type of Cable Marker Standard, 135 °C High Temperature, 200 °C Nuclear, 135 °C Standard, 135 °C Standard, 135 °C High Temperature, 200 °C High Temperature, 200 °C Nuclear, 135 °C Nuclear, 135 °C Number of Attachment Holes Number of Lines of Type 4 4 2 2 Marker Thickness (nom) (inches) 0.025 0.020 4 4 6 4 2 3 3 3 0.025 0.025 0.025 0.020 6 3 0.020 4 6 3 3 0.025 0.025 TABLE 11-22. Plastic tie-down straps (MS3367, Type I, Class 1). Tie-down Strap Strap Identification * Installation Tool Tension Setting Cable Diameter MS3367(inches) Min Max 2 MS90387-1 Miniature (MIN) 4-9 1/16 5/8 4 MS90387-1 Intermediate (INT) 5-9 1/16 1¼ 6 MS90387-1 Standard (STD) 2-9 1/16 4 6 MS90387-2 Heavy (HVY) 6-9 3/16 8 * The specified tool tension settings are for typical cable application. Settings less than or greater than those specified may be required for special applications. Select the applicable installation tool and move the tension setting to the correct position. (See figure 11-30.) Slide tip of strap into opening in the installation tool nose piece. (See figure 11-30.) Keeping tool against head of tie-down strap, ensure gripper engages tie-down strap, and squeeze trigger of installation tool until strap installation is completed as shown in figure 11-31. Par 11-220 FIGURE 11-30. Tie-down strap installation tool. Page 11-569 9/8/98 AC 43.13-1B FIGURE 11-31. Completed installation. TEMPORARY WIRE AND CABLE MARKING PROCEDURE. A temporary wire marking procedure follows but should be used only with caution and with plans for future permanence. (See figure 11-32.) FIGURE 11-32. Temporary wire identification marker. With a pen or a typewriter, write wire number on good quality white split insulation sleeve. Trim excess white insulation sleeve, leaving just enough for one wrap around wire to be marked, with number fully visible. Position marked white insulation sleeve on wire so that shielding, ties, clamps, or supporting devices need not be removed to read the number. Obtain clear plastic sleeve that is long enough to extend 1/4 inch past white insulation sleeve marker edges and wide enough to overlap itself when wrapped around white insulation and wire. Slit clear sleeve lengthwise and place around marker and wire. Par 11-230 Page 11-570 9/8/98 AC 43.13-1B Secure each end of clear sleeve with lacing tape spot tie to prevent loosening of sleeve. MARKER SLEEVE INSTALLATION AFTER PRINTING. The following general procedures apply: Hold marker, printed side up, and press end of wire on lip of sleeve to open sleeve. (See figure 11-33.) FIGURE 11-33. Inserting wire into marker. If wire has been stripped, use a scrap piece of unstripped wire to open the end of the marker. Push sleeve onto wire with a gentle twisting motion. Shrink marker sleeve, using heat gun with shrink tubing attachment. (See figure 11-34.) FIGURE 11-34. Shrinking marker on wire. 11-223.11-229. [RESERVED.] Par 11-230 Page 11-571 9/8/98 AC 43.13-1B SECTION 17. CONNECTORS GENERAL. The number and complexity of wiring systems have resulted in an increased use of electrical connectors. The proper choice and application of connectors is a significant part of the aircraft wiring system. Connectors must be kept to a minimum, selected, and installed to provide the maximum degree of safety and reliability to the aircraft. For the installation of any particular connector assembly, the specification of the manufacturer or the appropriate governing agency must be followed. SELECTION. The connector used for each application should be selected only after a careful determination of the electrical and environmental requirements. Consider the size, weight, tooling, logistic, maintenance support, and compatibility with standardization programs. For ease of assembly and maintenance, connectors using crimped contacts are generally chosen for all applications except those requiring an hermetic seal. (Reference SAE ARP 1308, Preferred Electrical Connectors For Aerospace Vehicles and Associated Equipment.) A replacement connector of the same basic type and design as the connector it replaces should be used. With a crimp type connector for any electrical connection, the proper insertion, or extraction tool must be used to install or remove wires from such a connector. Refer to manufacturer or aircraft instruction manual. After the connector is disconnected, inspect it for loose soldered connections to prevent unintentional grounding. Connectors that are susceptible to corrosion difficulties may be treated with a chemically inert waterproof jelly. TYPES OF CONNECTORS. Connectors must be identified by an original identification number derived from MIL Specification (MS) or OAM specification. Figure 11-35 provides some examples of MS connector types. Par 11-230 Page 11-572 Several different types are shown in figures 11-36 and 11-37. Environmental Classes. Environment-resistant connectors are used in applications where they will probably be subjected to fluids, vibration, thermal, mechanical shock, corrosive elements, etc. Firewall class connectors incorporating these same features should, in addition, be able to prevent the penetration of the fire through the aircraft firewall connector opening and continue to function without failure for a specified period of time when exposed to fire. Hermetic connectors provide a pressure seal for maintaining pressurized areas. When EMI/RFI protection is required, special attention should be given to the termination of individual and overall shields. Backshell adapters designed for shield termination, connectors with conductive finishes, and EMI grounding fingers are available for this purpose. Rectangular Connectors. The rectangular connectors are typically used in applications where a very large number of circuits are accommodated in a single mated pair. They are available with a great variety of contacts, which can include a mix of standard, coaxial, and large power types. Coupling is accomplished by various means. Smaller types are secured with screws which hold their flanges together. Larger ones have integral guide pins that ensure correct alignment, or jackscrews that both align and lock the connectors. Rack and panel connectors use integral or rack-mounted pins for alignment and box mounting hardware for couplings. Module Blocks. These junctions accept crimped contacts similar to those on connectors. Some use internal busing to provide a variety of circuit arrangements. They are useful where a number of wires are connected for 9/8/98 AC 43.13-1B MS27472 WALL MOUNT RECEPTACLE MS27473 STRAIGHT PLUG MS27474 JAM NUT RECEPTACLE MS27475 HERMITIC WALL MOUNT RECEPTACLE MS27476 HERMETIC BOX MOUNT RECEPTACLE MS27477 HERMETIC JAM NUT RECEPTACLE MS27478 HERMETIC SOLDER MOUNT RECEPTACLE MS27479 WALL MOUNT RECEPTACLE (NOTE 1) MS27480 STRAIGHT PLUG (NOTE 1) MS27481 JAM NUT RECEPTACLE (NOTE 1) MS27482 HERMETIC WALL MOUNT RECEPTACLE (NOTE 1) MS27483 HERMETIC JAM NUT RECEPTACLE (NOTE 1) MS27484 STRAIGHT PLUG, EMI GROUNDING MS27497 WALL RECEPTACLE, BACK PANEL MOUNTING MS27499 BOX MOUNTING RECEPTACLE MS27500 90° PLUG (NOTE 1) MS27503 HERMETIC SOLDER MOUNT RECEPTACLE (NOTE 1) MS27504 BOX MOUNT RECEPTACLE (NOTE 1) MS27508 BOX MOUNT RECEPTACLE, BACK PANEL MOUNTING MS27513 BOX MOUNT RECEPTACLE, LONG GROMMET MS27664 WALL MOUNT RECEPTACLE, BACK PANEL MOUNTING (NOTE 1) MS27667 THRU-BULKHEAD RECEPTACLE NOTE 1. ACTIVE MS27472 MS27473 MS27474 MS27475 MS27477 MS27473 WITH MS27507 ELBOW MS27478 MS27499 MS27497 FINISH CONT’D B OLIVE DRAB CADMIUM PLATE OVER SUITABLE UNDERPLATE (CONDUCTIVE), -65°C TO +175°C C ANODIC (NONCONDUCTIVE), -65°C TO +175°C D FUSED TIN, CARBON STEEL (CONDUCTIVE), -65°C TO 150°C E CORROSION RESISTANT STEEL (CRES), PASSIVATED (CONDUCTIVE), -65°C TO +200°C F ELECTROLESS NICKEL COATING (CONDUCTIVE), -65°C TO +200°C N HERMETIC SEAL OR ENVIRONMENT RESISTING CRES (CONDUCTIVE PLATING), -65°C TO +200°C SUPERSEDES MS27479 MS27480 MS27481 MS27482 MS27483 MS27500 MS27503 MS27504 MS27664 CLASS E ENVIRONMENT RESISTING-BOX AND THRUBULKHEAD MOUNTING TYPES ONLY (SEE CLASS T) P POTTING-INCLUDES POTTING FORM AND SHORT REAR GROMMET T ENVIRONMENT RESISTING-WALL AND JAM-NUT MOUNTING RECEPTACLE AND PLUG TYPES: THREAD AND TEETH FOR ACCESSORY ATTACHMENT Y HERMETICALLY SEALED CONTACT STYLE A WITHOUT PIN CONTACTS B WITHOUT SOCKET CONTACTS C F EED THROUGH P PIN CONTACTS-INCLUDING HERMETICS WITH SOLDER CUPS S SOCKET CONTACTS-INCLUDING HERMETICS WITH SOLDER CUPS X PIN CONTACTS WITH EYELET (HERMETIC) Z SOCKET CONTACTS WITH EYELET (HERMETIC) FINISH A SILVER TO LIGHT IRIDESCENT YELLOW COLOR CADMIUM PLATE OVER NICKEL (CONDUCTIVE), 65°C TO +150C° (INACTIVE FOR NEW DESIGN) POLARIZATION A, B NORMAL-NO LETTER REQUIRED C, OR D FIGURE 11-35. Connector information example. Par 11-230 Page 11-573 9/8/98 AC 43.13-1B WALL CABLE BOX RECEPTACLE RECEPTACLE RECEPTACLE QUICK DISCONNECT PLUG STRAIGHT STRAIGHT PLUG PLUG ANGLE PLUG ANGLE PLUG TYPICAL RACK AND PANEL CONNECTORS MS CONNECTOR FIGURE 11-36. Different types of connectors. Par 11-232 Page 11-574 9/8/98 AC 43.13-1B BNC Series Connectors TNC Series Connectors N Series Connectors C Series Connectors FIGURE 11-37. Coax cable connectors. Par 11-232 Page 11-575 9/8/98 AC 43.13-1B SC Series Connectors SMA Series Connectors SMB Series Connectors SMC Series Connectors FIGURE 11-37. Coax cable connectors (continued). Par 11-232 Page 11-576 9/8/98 AC 43.13-1B FIGURE 11-37. Coax cable connectors (continued). power or signal distribution. When used as grounding modules, they save and reduce hardware installation on the aircraft. Standardized modules are available with wire end grommet seals for environmental applications and are track-mounted. Function module blocks are used to provide an easily wired package for environment-resistant mounting of small resistors, diodes, filters, and suppression networks. In-line terminal junctions are sometimes used in lieu of a connector when only a few wires are terminated and when the ability to disconnect the wires is desired. The in-line terminal junction is environment-resistant. The terminal junction splice is small and may be tied to the surface of a wire bundle when approved by the OAM. Par 11-232 Page 11-577 VOLTAGE AND CURRENT RATING. Selected connectors must be rated for continuous operation under the maximum combination of ambient temperature and circuit current load. Hermetic connectors and connectors used in circuit applications involving high-inrush currents should be derated. It is good engineering practice to conduct preliminary testing in any situation where the connector is to operate with most or all of its contacts at maximum rated current load. When wiring is operating with a high conductor temperature near its rated temperature, connector contact sizes should be suitably rated for the circuit load. This may require an increase in wire size also. Voltage derating is required when connectors are used at high altitude in 9/8/98 AC 43.13-1B nonpressurized areas. Derating of the connectors should be covered in the specifications. SPARE CONTACTS (Future Wiring). To accommodate future wiring additions, spare contacts are normally provided. Locating the unwired contacts along the outer part of the connector facilitates future access. A good practice is to provide: Two spares on connectors with 25 or less contacts; 4 spares on connectors with 26 to 100 contacts; and 6 spares on connectors with more than 100 contacts. Spare contacts are not normally provided on receptacles of components that are unlikely to have added wiring. Connectors must have all available contact cavities filled with wired or unwired contacts. Unwired contacts should be provided with a plastic grommet sealing plug. INSTALLATION. Redundancy. Wires that perform the same function in redundant systems must be routed through separate connectors. On systems critical to flight safety, system operation wiring should be routed through separate connectors from the wiring used for system failure warning. It is also good practice to route a system’s indication wiring in separate connectors from its failure warning circuits to the extent practicable. These steps can reduce an aircraft’s susceptibility to incidents that might result from connector failures. Adjacent Locations. Mating of adjacent connectors should not be possible. In order to ensure this, adjacent connector pairs must be different in shell size, coupling means, insert arrangement, or keying arrangement. When such means are impractical, wires should be routed and clamped so that incorrectly mated pairs cannot reach each other. Reliance on markings or color stripes is not recommended as they are likely to deteriorate with age. Par 11-233 Sealing. Connectors must be of a type that exclude moisture entry through the use of peripheral and interfacial seal that are compressed when the connector is mated. Moisture entry through the rear of the connector must be avoided by correctly matching the wire’s outside diameter with the connector’s rear grommet sealing range. It is recommended that no more than one wire be terminated in any crimp style contact. The use of heat-shrinkable tubing to build up the wire diameter, or the application of potting to the wire entry area as additional means of providing a rear compatibility with the rear grommet is recommended. These extra means have inherent penalties and should be considered only where other means cannot be used. Unwired spare contacts should have a correctly sized plastic plug installed. (See section 19.) Drainage. Connectors must be installed in a manner which ensures that moisture and fluids will drain out of and not into the connector when unmated. Wiring must be routed so that moisture accumulated on the bundle will drain away from connectors. When connectors must be mounted in a vertical position, as through a shelf or floor, the connectors must be potted or environmentally sealed. In this situation it is better to have the receptacle faced downward so that it will be less susceptible to collecting moisture when unmated. Wire Support. A rear accessory backshell must be used on connectors that are not enclosed. Connectors having very small size wiring, or are subject to frequent maintenance activity, or located in high-vibration areas must be provided with a strain-relief-type backshell. The wire bundle should be protected from mechanical damage with suitable cushion material where it is secured by the clamp. Connectors that are potted or have molded rear adapters do not normally use a Page 11-578 9/8/98 AC 43.13-1B separate strain relief accessory. Strain relief clamps should not impart tension on wires between the clamp and contact. Slack. Sufficient wire length must be provided at connectors to ensure a proper drip loop and that there is no strain on termination after a complete replacement of the connector and its contacts. Identification. Each connector should have a reference identification that is legible throughout the expected life of the aircraft. FEED-THROUGH BULKHEAD WIRE PROTECTION. Feed-through bushing protection should be given to wire bundles which pass through bulkheads, frames, and other similar structure. Feed-through bushings of hard dielectric material are satisfactory. The use of split plastic grommets (nylon) is recommended in lieu of rubber grommets in areas subject to fluids, since they eliminate the unsatisfactory features of rubber grommets and are resistant to fluids usually encountered in aircraft. compound. Preparation and storage of potting materials should receive special attention. Careful inspection and handling during all stages of the connector fabrication until the potting compound has fully cured is recommended. Potting compounds selected must not revert to liquid or become gummy or sticky due to high humidity or contact with chemical fluids. Potting compounds meeting Specification MIL-S-8516 are prepared in ready-to-use tube-type dispensers and in the unmixed state, consisting of the base compound and an accelerator packed in paired containers. To obtain the proper results, it is important that the manufacturer’s instructions be closely followed. Potting compounds normally cure at temperatures of 70 °F to 76 °F. If the mixed compound is not used at once, the working pot life (normally 90 minutes) can be prolonged by storing in a deep freeze at -20 °F for a maximum of 36 hours. The time factor starts from the instant the accelerator is added to the base compound and includes the time expended during the mixing and application processes. SPECIAL PURPOSE CONNECTOR. Many special-purpose connectors have been designed for use in aircraft applications, such as: subminiature connector, rectangular shell connector, connectors with short body shells, or connector of split-shell construction used in applications where potting is required. Make every attempt to identify the connector part number from the maintenance manual or actual part, and the manufacturer’s instruction used for servicing. Mixed compounds that are not to be used immediately should be cooled and thawed quickly to avoid wasting the short working life. Chilled compounds should be thawed by blowing compressed air over the outside of the container. Normally the compound will be ready for use in 5 to 10 minutes. POTTING COMPOUNDS. Many types of potting compounds, both commercial and per military specifications, are available and offer various characteristics for different applications. Carefully consider the characteristics desired to ensure the use of the proper POTTING CONNECTORS. Connectors that have been potted primarily offer protection against concentration of Par 11-239 CAUTION: Do not use heat or blow compressed air into the container when restoring the compound to the working temperature. Page 11-579 (and 11-96) 9/8/98 AC 43.13-1B moisture in the connectors. A secondary benefit of potting is the reduced possibility of breakage between the contact and wire due to vibration. Connectors specifically designed for potting compounds should be potted to provide environment resistance. An o-ring or sealed gasket should be included to seal the interface area of the mated connector. A plastic potting mold, that remains on the connector after the potting compounds have cured, should also be considered. To facilitate circuit changes, spare wires may be installed to all unused contacts prior to filling the connector with potting compound. Connect wires to all contacts of the connector prior to the application of the potting compound. Wires that are not to be used should be long enough to permit splicing at a later date. Unused wires should be as shown in figure 11-38 and the cut ends capped with heatshrinkable caps or crimped insulated end caps such as the MS 25274 prior to securing to Par 11-239 the wire bundle. Clean the areas to be potted with dry solvent and complete the potting operation within 2 hours after this cleaning. Allow the potting compound to cure for 24 hours at a room temperature of 70 °F to 75 °F or carefully placed in a drying oven at 100 °F for 3 to 4 hours. In all cases follow manufacturer’s instructions. THROUGH BOLTS. Through bolts are sometimes used to make feeder connections through bulkheads, fuselage skin, or firewalls. Mounting plates for through bolts must be a material that provides the necessary fire barrier, insulation, and thermal properties for the application. Sufficient cross section should be provided to ensure adequate conductivity against overheating. Secure through bolts mechanically and independently of the terminal mounting nuts, taking particular care to avoid dissimilar metals among the terminal hardware. During inspection, pay particular attention to the condition of the insulator plate or spacer and the insulating boot that covers the completed terminal assembly. Page 11-580 (and 11-100) 9/8/98 AC 43.13-1B FIGURE 11-38. Spare wires for potting connector. 11-241.11-247. [RESERVED.] Par 11-239 Page 11-581 (and 11-100) 9/8/98 AC 43.13-1B SECTION 18. CONDUITS GENERAL. Conduit is manufactured in metallic and nonmetallic materials and in both rigid and flexible forms. Primarily, its purpose is for mechanical protection of cables or wires. Conduit should be inspected for: proper end fittings; absence of abrasion at the end fittings; proper clamping; distortion; adequate drain points which are free of dirt, grease, or other obstructions; and freedom from abrasion or damage due to moving objects, such as aircraft control cables or shifting cargo. SIZE OF CONDUIT. Conduit size should be selected for a specific wire bundle application to allow for ease in maintenance, and possible future circuit expansion, by specifying the conduit inner diameter (I.D.) about 25 percent larger than the maximum diameter of the wire bundle. CONDUIT FITTINGS. Wire is vulnerable to abrasion at conduit ends. Suitable fittings should be affixed to conduit ends in such a manner that a smooth surface comes in contact with the wire. When fittings are not used, the end of the conduit should be flared to prevent wire insulation damage. Conduit should be supported by use of clamps along the conduit run. CONDUIT INSTALLATION. Conduit problems can be avoided by following these guidelines: Do not locate conduit where passengers or maintenance personnel might use it as a handhold or footstep. Par 11-248 Page 11-582 Provide drainholes at the lowest point in a conduit run. Drilling burrs should be carefully removed. Support conduit to prevent chafing against structure and to avoid stressing its end fittings. RIGID CONDUIT. Conduit sections that have been damaged should be repaired to preclude injury to the wires or wire bundle which may consume as much as 80 percent of the tube area. Minimum acceptable tube bend radii for rigid conduit are shown in table 11-23. Kinked or wrinkled bends in rigid conduits are not recommended and should be replaced. Tubing bends that have been flattened into an ellipse and the minor diameter is less than 75 percent of the nominal tubing diameter should be replaced because the tube area will have been reduced by at least 10 percent. Tubing that has been formed and cut to final length should be deburred to prevent wire insulation damage. When installing replacement tube sections with fittings at both ends, care should be taken to eliminate mechanical strain. TABLE 11-23. Bend radii for rigid conduit. Nominal Tube O.D. (inches) 1/8 3/16 1/4 3/8 1/2 5/8 3/4 1 1 1/4 1 1/2 1 3/4 2 Minimum Bend Radii (inches) 3/8 7/16 9/16 15/16 1 1/4 1 1/2 1 3/4 3 3 3/4 5 7 8 9/8/98 AC 43.13-1B FLEXIBLE CONDUIT. Flexible aluminum conduit conforming to Specification MIL-C-6136 is available in two types: Type I, Bare Flexible Conduit, and Type II, Rubber Covered Flexible Conduit. Flexible brass conduit conforming to Specification MIL-C-7931 is available and normally used instead of flexible aluminum where necessary to minimize radio interference. Also available is a plastic flexible tubing. (Reference MIL-T-8191A.) Flexible conduit may be used where it is impractical to use rigid conduit, such as areas that have motion between conduit ends or where complex bends are necessary. The use of transparent adhesive tape is recommended when cutting flexible tubing with a hacksaw to minimize fraying of the braid. The tape should be centered over the cutting reference mark with the saw cutting through the tape. After cutting the flexible conduit, the transparent tape should be removed, the frayed braid ends trimmed, burrs removed from inside the conduit, and coupling nut and ferrule installed. Minimum acceptable bending radii for flexible conduit are shown in table 11-24. TABLE 11-24. Minimum bending radii for flexible aluminum or brass conduit. Nominal I.D. of conduit (inches) Minimum bending radius inside (inches) 3/16 1/4 3/8 1/2 5/8 3/4 1 1 1/4 1 1/2 1 3/4 2 2 1/2 11-254.11-259. [RESERVED.] Par 11-253 Page 11-583 2 1/4 2 3/4 3 3/4 3 3/4 3 3/4 4 1/4 5 3/4 8 8 1/4 9 9 3/4 10 9/8/98 AC 43.13-1B SECTION 19. PROTECTION OF UNUSED CONNECTORS GENERAL. Connectors may have one or more contact cavities that are not used. Depending on the connector installation, unused connector contact cavities may need to be properly sealed to avoid damage to the connector, or have string wire installed. QUICK REFERENCE CHART. A quick reference chart of unused connector contact cavity requirements is given in table 11-25. These requirements apply to harness manufacturing or connector replacement only. UNPRESSURIZED AREA CONNECTORS. Connectors may be installed in unpressurized areas of the aircraft. Unused connector contact cavities installed in unpressurized areas should be properly sealed as follows: Firewall Connectors Installations. Firewall unused connector contact cavities should be filled with spare contacts and stub wires. (See figure 11-39.) Construct stub wires using high temperature wire (260 ºC). Ensure that stub wires are of the same type of wires in the bundle. Crimp the proper contact, for the connector and cavity being used, onto the wire. Install the crimped contact into the unused cavity. Extend stub wires beyond the back of the connector clamp from 1.5 to 6 inches. Feather trim stub wires to taper wire bundle. Secure wire ends with high temperature (greater than 250 ºC) lacing cord. Nylon cable ties are not allowed for this installation. Par 11-260 Page 11-584 NOTE: Both connectors mating through the engine fire-seal are considered firewall connectors. Connectors mounted on or near, but not through, the engine fire-seal are not considered firewall connectors Non-firewall Connector Installations. In this type of installation all unused connector cavities must also be filled with spare contacts. It is not required, however, to crimp stub wires on filling contacts. Fill unused contact cavities with spare contacts and Teflon sealing plugs or rods. (See figure 11-40.) Rods shall be cut so that they extend 1/8 to 1/4 inch beyond the surface of the grommet when bottomed against the end of the spare contact. (See table 11-26 for dimensions.) PRESSURIZED AREAS. Connectors installed in pressurized areas of the aircraft may be divided into two main installation categories, sealed and unsealed. Sealed connector installations. Sealed connectors installed in pressurized areas must have their unused contact cavities filled with Teflon sealing plugs or rods. (See figure 11-40.) Installation of spare contacts is optional, except for future wiring addition requirements. (See paragraph 11-234). No stub wires are required. Unsealed Connector Installations. It is not required to fill unused contact cavities of unsealed connectors installed in pressurized areas with Teflon sealing plugs or rods. Installation of spare contacts is optional, except for future wiring addition requirements. (See paragraph 11-234.) 9/8/98 AC 43.13-1B TABLE 11-25. Contact cavity sealing-quick reference. Connector Installation Types Unpressurized Area Sealing Means Firewall Non-Firewall Sealing Plugs or Teflon Sealing Rods No Yes Stub Wires (Note 2) Yes No Spare Contacts Yes Yes NOTE 1: Sealing plugs may be included with the spare connector and may be used for sealing unused contacts. Sealing rods are procured from stock by the foot. (See table 11-26 for sealing rod dimensions.) NOTE 2: Stub wires must be of the same type as the other wires of the bundle. FIGURE 11-39. Stub wire installation. TABLE 11-26. Sealing rod dimensions. CONTACT SIZE (AWG) 20 16 12 DIAMETER (INCHES) 1/16 3/32 1/8 ROD LENGTH (INCHES) MIN 5/8” 7/8” 7/8” FIGURE 11-40. Sealing unused contact cavities-unpressurized areas-(cut-away view). 11-264.11-270. [RESERVED.] Par 11-271 Page 11-585 MAX 3/4” 1” 1” 9/8/98 AC 43.13-1B SECTION 20. ELECTRICAL AND ELECTRONIC SYMBOLS GENERAL. The electrical and electronic symbols shown here are those that are likely to be encountered by the aviation maintenance technician. They are in accordance with ANSI-Y32.2-1975. SYMBOLS. Only those symbols associated with aircraft electrical and electronic wiring have been listed in general. Refer to ANSIY32.2-1975 for more specific detail on each symbol. TABLE 11-27. Electronic/Electrical Symbols. Symbol Meaning Adjustability Variability Radiation Indicators Physical State Recognition Test-Point Recognition Polarity Markings Direction of Flow of Power, Signal, or Information Kind of Current Envelope Enclosure Shield Shielding Special Connector or Cable Indicator Par 11-271 Page 11-586 9/8/98 AC 43.13-1B TABLE 11-27. Electronic/Electrical Symbols (continued). Symbol Meaning Resistor Capacitor Antenna Battery Thermal Element Thermomechanical Transducer Thermocouple Spark Gap Ignitor Gap Continuous Loop Fire Detector (Temperature Sensor) Ignitor Plug Par 11-271 Page 11-587 9/8/98 AC 43.13-1B TABLE 11-27. Electronic/Electrical Symbols (continued). Symbol Meaning Transmission Patch Conductor Cable Wiring Distribution Lines Transmission Lines Alternative or Conditioned Wiring Associated or Future Par 11-272 Page 11-588 9/8/98 AC 43.13-1B TABLE 11-27. Electronic/Electrical Symbols (continued). Symbol Meaning Intentional Isolation of Direct-Current Path in Coaxial or Waveguide Applications Waveguide Strip-Type Transmission Line Termination Circuit Return Pressure-Tight Bulkhead Cable Gland Cable Sealing End Switching Function Electrical Contact Par 11-272 Page 11-589 9/8/98 AC 43.13-1B TABLE 11-27. Electronic/Electrical Symbols (continued). Symbol Meaning Basic Contact Assemblies Magnetic Blowout Coil Operating Coil Relay Coil Switch Pushbutton, Momentary, or Spring-Return Par 11-272 Page 11-590 9/8/98 AC 43.13-1B TABLE 11-27. Electronic/Electrical Symbols (continued). Symbol Meaning Two-Circuit, Maintained, or Not Spring-Return Nonlocking Switching, Momentary, or SpringReturn Locking Switch Combination Locking and Nonlocking Switch Key-Type Switch Lever Switch Par 11-272 Page 11-591 9/8/98 AC 43.13-1B TABLE 11-27. Electronic/Electrical Symbols (continued). Symbol Meaning Selector or Multiposition Switch Safety Interlock Limit Switch Sensitive Switch Switches with Time-Delay Feature Flow-Actuated Switch Par 11-272 Page 11-592 9/8/98 AC 43.13-1B TABLE 11-27. Electronic/Electrical Symbols (continued). Symbol Meaning Liquid-Level Actuated Switch Pressure- or Vacuum-Actuated Switch Temperature-Actuated Switch Thermostat Flasher Self-Interrupting Switch Foot-Operated Switch Foot Switch Switch Operated by Shaft Rotation and Responsive to Speed or Direction Switches with Specific Features Par 11-272 Page 11-593 9/8/98 AC 43.13-1B TABLE 11-27. Electronic/Electrical Symbols (continued). Symbol Meaning Governor Speed Regulator Relay Inertia Switch Mercur Switch Terminals Par 11-272 Page 11-594 9/8/98 AC 43.13-1B TABLE 11-27. Electronic/Electrical Symbols (continued). Symbol Meaning Cable Termination Connector Disconnecting Device Connectors of the Type Commonly Used for Power-Supply Purposes Test Blocks Coaxial Connector Waveguide Flanges Waveguide Junction Par 11-272 Page 11-595 9/8/98 AC 43.13-1B TABLE 11-27. Electronic/Electrical Symbols (continued). Symbol Meaning Fuse Lightning Arrester Arrester Gap Circuit Breaker Protective Relay Audible-Signaling Device Microphone Par 11-272 Page 11-596 9/8/98 AC 43.13-1B TABLE 11-27. Electronic/Electrical Symbols (continued). Symbol Meaning Handset Operator’s Set Lamp Visual-Signaling Device Mechanical Connection Mechanical Interlock Mechanical Motion Clutch Brake Par 11-272 Page 11-597 9/8/98 AC 43.13-1B TABLE 11-27. Electronic/Electrical Symbols (continued). Symbol Meaning Manual Control Gyro Gyroscope Gyrocompass Position Indicator Fire Extinguisher Actuator Head Position Transmitter Radio Station Space Station Par 12-1 Page 12-598 (and 12-2) 9/8/98 AC 43.13-1B Integrated Circuit Amplifiers Logic Gates Diode Transistor Symbols 11-273.11-283. [RESERVED.] Par 12-1 Page 12-599 (and 12-2) 9/8/98 AC 43.13-1B CHAPTER 12. AIRCRAFT AVIONICS SYSTEMS SECTION 1. AVIONICS EQUIPMENT MAINTENANCE GENERAL. There are several methods of ground checking avionics systems. Electromagnetic Interference (EMI). For EMI tests, refer to chapter 11 paragraph 11-107 of this AC. Visual Check. Check for physical condition and safety of equipment and components. HANDLING OF COMPONENTS. Any unit containing electronic components such as transistors, diodes, integrated circuits, proms, roms, and memory devices should be protected from excessive shocks. Excessive shock can cause internal failures in an of these components. Most electronic devices are subject to damage by electrostatic discharges (ESD). Operation Check. This check is performed primary by the pilot, but may also be performed by the mechanics after annual and 100-hour inspections. The aircraft flight manual, the Airman’s Information Manual (AIM), and the manufacturer’s information are used as a reference when performing the check. CAUTION: To prevent damage due to excessive electrostatic discharge, proper gloves, finger cots, or grounding bracelets should be used. Observe the standard procedures for handling equipment containing electrostatic sensitive devices or assemblies in accordance with the recommendations and procedures set forth in the maintenance instructions set forth by the equipment manufacturers. Functional Test. This is performed by qualified mechanics and repair stations to check the calibration and accuracy of the avionics with the use of test equipment while they are still on the aircraft, such as the transponder and the static checks. The equipment manufacturer’s manuals and procedures are used as a reference. Bench Test. When using this method the unit or instrument is removed from the aircraft and inspected, repaired, and calibrated as required. 12-3.12-7. [RESERVED.] Par 12-1 Page 12-600 (and 12-2) 9/8/98 AC 43.13-1B SECTION 2. GROUND OPERATIONAL CHECKS FOR AVIONICS EQUIPMENT (ELECTRICAL) GENERAL. When the operating or airworthiness regulations require a system to perform its intended function, the use of the Technical Standard Order (TSO) equipment or the submission of data substantiating the equipment performance is strongly recommended. An operation check of avionics is the responsibility of the pilot in command. However, it is recommended that after replacement of equipment during 100 hour or annual inspections, an operational check of avionics equipment be performed. The accomplishments of these checks must be done in accordance with the recommendations and procedures set forth in the aircraft’s flight manual instructions published by the avionics equipment manufacturers. INSPECTION OF AVIONICS SYSTEMS. The inspection shall include the following: Check to assure that the radios and instruments are secured to the instrument panel. Check that all avionics are free of dust, dirt, lint, or any other airborne contaminates. If there is a forced air cooling system, it must be inspected for proper operation. Equipment ventilation openings must not be obstructed. Check the microphone headset plugs and connectors and all switches and controls for condition and operation. Check all avionics instruments for placards. Check lightening, annunciator lights, and cockpit interphone for proper operation. Inspect the condition and security of equipment including the proper security of wiring bundles. The circuit breaker panel must be inspected for the presence of placarding for each circuit breaker installed. Check for indications of overheating of the equipment and associated wiring. Check the electrical circuit switches, especially the spring-load type for proper operation. An internal failure in this type of switch may allow the switch to remain closed even though the toggle or button returns to the OFF position. During inspection, attention must be given to the possibility that improper switch substitution may have been made. Check for poor electrical bonding. The bonding requirements are specified by equipment manufacturers. Installation cabling should be kept as short as possible, except for antenna cables which are usually precut or have a specific length called out at installation. Proper bonding on the order of 0.003 ohms is very important to the performance of avionics equipment. Check antennas for: broken or missing antenna insulators lead through insulators springs Par 12-8 Page 12-601 9/8/98 AC 43.13-1B Check the static dischargers/wicks for: safety wires physical security of mounting attachments, wear or abrasion of wicks, missing wicks, etc., cracked antenna housings missing or poor sealant at base of antenna assurance that one inch of the inner braid of flexible vinyl cover wicks extends beyond the vinyl covering, correct installation assurance that all dischargers are present and securely mounted to their base, signs of corrosion, and the condition of paint/bonding and grounding. Check the bonding of each antenna from mounting base to the aircraft skin. Tolerance: .1 ohm, maximum. Test Equipment: 1502B Metallic Time Do Main Reflectometer or equivalent. assurance that all bases are securely bonded to skin of aircraft, in order to prevent the existence in voltage level differences between two surfaces, signs of excessive erosion or deterioration of discharger tip, lighting damage as evidenced by pitting of the metal base, and Thruline Wattmeter. Perform the antenna evaluation check using the domain reflectometer to determine the condition of the antenna and coax cables. Refer to manufacturer’s maintenance procedures. Use thruline wattmeter as needed for to Refer addition evaluation. manufacturer’s maintenance procedures. Check for the following: Resistance. Shorts. Opens. Par 12-12 megohm value of static wick itself as per manufacturer’s instructions. It should not be open. Subsequent inspection must be made after a maintenance action on a transponder. Refer to Title 14 of the Code of Federal Regulations (14 CFR) part 91, sections 91.411 and 91.413. Inspection of the emergency locator transmitter operation, condition and date of the battery. Perform a function check of the radio by transmitting a request for a radio check. Perform a function check on navigation equipment by moving the omni bearing selection (OBS) and noting the needle swing; and the TO/FROM flag movement. Page 12-602 9/8/98 AC 43.13-1B COMMUNICATION SYSTEMS. Ground operation of communication systems in aircraft may be accomplished in accordance with the procedures appropriate for the airport and area in which the test is made, and the manufacturer’s manuals and procedures. Check system(s) for side tone, clarity of transmission, squelch, operations using head phones, speaker(s), and hand microphone. If a receiver or transmitter is found to be defective, it should be removed from the aircraft and repaired. VHF OMNI-DIRECTIONAL RANGE (VOR). A VOR operates within the 108.0 to 117.9 MHz frequency band. The display usually consists of a deviation indicator and a TO/FROM indicator. The controls consist of a frequency selector for selecting the ground station and an OBS, which is used for course selection. An ON/OFF flag is used to determine adequate field strength and presence of a valid signal. There are numerous configurations when integrated into flight directors and/or when using a slaved compass system which uses an additional indicator that points continually to the selected omni station regardless of OBS selection. In order to determine the accuracy specified in a functional check, a ground test set must be used in accordance with the manufacturer’s specifications. For the purpose of this inspection/maintenance activity, the following operational check can be accomplished to determine if the equipment has the accuracy required for operation in instrument flight rules (IFR) environment. Verify audio identification, OBS operation, flag operation, radio magnetic indicator (RMI) interface, and applicable navigation (NAV) switching functions. The operational check is also published in the AIM, section 1-1-4. This check is required by 14 CFR part 91, section 91.171 before instrument flight operations. Par 12-10 Page 12-603 DISTANCE MEASURING EQUIP-MENT (DME). The operation of DME consists of paired pulses at a specific spacing, sent out from the aircraft (this is what is called interrogation), and are received by the ground station, which then responds with paired pulses at the specific spacing sent by the aircraft, but at a different frequency. The aircraft unit measures the time it takes to transmit and then receive the signal, which then is translated into distance. DME operates on frequencies from 962 MHz to 1213 MHz. Because of the curvature of earth, this line-of sight signal is reliable up to 199 nautical mile (NM) at the high end of the controlled airspace with an accuracy of 1/2 mile or 3 percent of the distance. DME inspection/maintenance on the aircraft is most commonly limited to a visual check of the installation, and if there have been previously reported problems, the antenna must be inspected for proper bonding and the absence of corrosion, both on the mounting surface, as well as the coax connector. Accuracy can be determined by evaluating performance during flight operations, as well as with ground test equipment. If a discrepancy is reported and corrected, it is good practice to make the accuracy determination before instrument flight. Tune the DME to a local station, or use the proper ground test equipment to check audio identification, and DME hold function verify correct display operation. AUTOMATIC DIRECTION FINDER (ADF). The ADF receivers are primarily designed to receive nondirectional beacons (NDB) in the 19 to 535 kHz amplitude modulation (AM) broadcast low band. The receivers will also operate in the commercial AM band. The ADF display pointer will indicate the relative bearing to a selected AM band transmitter that is in range. An ADF system must be checked by tuning to an adequate NDB or commercial AM station. Verify 9/8/98 AC 43.13-1B proper bearing to station, audio identification and tone/beat frequency oscillator (BFO), correct operation in closed circuit (LOOP) and sense modes. Note the orientation of the selected station to the aircraft using an appropriate chart. Observe the ADF relative bearing reading, and compare to the chart. Slew the needle and observe how fast (or slowly) it returns to the reading. ADF performance may be degraded by lightning activity, airframe charging, ignition noise and atmospheric phenomena. INSTRUMENT LANDING SYSTEMS (ILS). The ILS consist of several components, such as the localizer, glide slope, marker beacon, radio altimeter, and DME. Localizer and glide slope receivers and marker beacons will be discussed in this section. The glide slope receiver operates on one of 40 channels within the frequency range 329.15 MHz, to 335.00 MHz. The glide slope transmitter is located between 750 feet and 1250 feet from the approach end of the runway and offset 250 to 650 feet. In the absence of questionable performance, periodic functional flight checks of the glide slope system would be an acceptable way to ensure continued system performance. The functional flight test must be conducted under visual flight rules (VFR) conditions. A failed or misleading system must be serviced by an appropriately-rated repair station. Ground test equipment can be used to verify glide slope operation. Localizer/Glide Slope (LOC/GS) may have self test function, otherwise the proper ground test equipment must be used. Refer to manufacturer’s or aircraft instruction manual. Localizer receiver operates on one of 40 ILS channels within the frequency range of 108.10 to 111.95 MHz. These signals provide course guidance to the pilot to the runway centerline through the lateral displacement of the VOR/localizer (LOC) deviation indicator. The ground transmitter is sighted at the far end of the runway and provides a valid signal from a distance of 18 NM from the transmitter. The indication gives a full fly left/right deviation of 700 feet at the runway threshold. Identification of the transmitter is in International Morse Code and consists of a three letter identifier preceded by the Morse Code letter I (two dots). The localizer function is usually integral with the VOR system, and when maintenance is performed on the VOR unit, the localizer is also included. The accuracy of the system can be effectively evaluated through normal flight operations if evaluated during visual meteorological conditions. Any determination of airworthiness after reinstallation before instrument flight must be accomplished with ground test equipment. MARKER BEACON. Marker beacon receivers operate at 75 MHz and sense the audio signature of each of the three types of beacons. The marker beacon receiver is not tunable. The blue outer marker light illuminates when the receiver acquires a 75 MHz signal modulated with 400 Hz, an amber middle marker light for a 75 MHz signal modulated with 1300 Hz and, a white inner marker light for a 75 MHz signal modulated with 3000 Hz. The marker beacon system must be operationally evaluated in VFR when an ILS runway is available. The receiver sensitivity switch must be placed in LOW SENSE (the normal setting). Marker audio must be adequate. Ground test equipment must be used to verify marker beacon operation. Marker beacon with self test feature, verify lamps, audio and lamp dimming. LONG RANGE NAVIGATION (LORAN). The LORAN has been an effective alternative to Rho/Theta R-Nav systems. Par 12-10 Page 12-604 9/8/98 AC 43.13-1B with coupled approach capability. Attention must be given to the disconnect switch operation, aural and visual alerts of automatic and intentional autopilot disconnects, override forces and mode annunciation, servo operation, rigging and bridle cable tension, and condition. In all cases the manufacturer’s inspection and maintenance instructions must be followed. Hyperbolic systems require waypoint designation in terms of latitude and longitude, unlike original R-Nav (distance navigation) systems, which define waypoints in terms of distance (Rho) and angle (Theta) from established VOR or Tacan facilities. Accuracy is better than the VOR/Tacan system but LORAN is more prone to problems with precipitation static. Proper bonding of aircraft structure and the use of high-quality static wicks will not only produce improved LORAN system performance, but can also benefit the very high frequency (VHF) navigation and communications systems. This system has an automatic test equipment (ATE). ALTIMETERS. Aircraft conducting operations in controlled airspace under instrument flight rule (IFR) are required to have their static system(s) and each altimeter instrument inspected and tested within the previous 24 calendar months. Frequent functional checks of all altimeters and automatic pressure altitude reporting systems are recommended. NOTE: Aircraft must be outside of hangar for LORAN to operate. Normally self test check units, verification of position, and loading of flight plan will verify operation verification of proper flight manual supplements and operating handbooks on board, and proper software status can also be verified. GLOBAL POSITIONING SYSTEM (GPS). The GPS is at the forefront of present generation navigation systems. This space-based navigation system is based on a 24-satellite system and is highly accurate (within 100 meters) for establishing position. The system is unaffected by weather and provides a world-wide common grid reference system. Database updating and antenna maintenance are of primary concern to the GPS user. Examine the altimeter face for evidence of needle scrapes or other damage. Check smoothness of operation, with particular attention to altimeter performance during decent. Contact an appropriate air traffic facility for the pressure altitude displayed to the controller from your aircraft. Correct the reported altitude as needed, and compare to the reading on the altimeter instrument. The difference must not exceed 125 feet. TRANSPONDERS. There are three modes (types) of transponders that can be used on various aircraft. Mode A provides a (non altitude-reporting) four-digit coded reply; Mode C provides a code reply identical to Mode A with an altitude-reporting signal; and Mode S has the same capabilities as Mode A and Mode C and responds to traffic alert and collision avoidance system (TCAS)-Equipped Aircraft. NOTE: Aircraft must be outside of hangar for ground test of GPS. AUTOPILOT SYSTEMS. Automatic Flight Control Systems (AFCS) are the most efficient managers of aircraft performance and control. There are three kinds of autopilot; two axes, three axes, and three axes Par 12-16 Ground ramp equipment must be used to demonstrate proper operation. Enough codes must be selected so that each switch Page 12-605 9/8/98 AC 43.13-1B position is checked at least once. Low and high sensitivity operation must be checked. Identification operation must be checked. Altitude reporting mode must be demonstrated. Demonstrate that the transponder system does not interfere with other systems aboard the aircraft, and that other equipment does not interfere with transponder operation. Special consideration must be given to other pulse equipment, such as DME and weather radar. All transponders must be tested every 24-calendar months, or during an annual inspection, if requested by the owner. The test must be conducted by an authorized avionics repair facility. EMERGENCY LOCATOR TRANSMITTERS (ELT). The ELT must be evaluated in accordance with TSO-C91a, TSO-C126 for 406 MHz ELT’s, or later TSO’s issued for ELT’s. ELT installations must be examined for potential operational problems at least once a year (section 91.207(d)). There have been numerous instances of interaction between ELT and other VHF installations. Antenna location should be as far as possible from other antennas to prevent efficiency losses. Check ELT antenna installations in close proximity to other VHF antennas for suspected interference. Antenna patterns of previously installed VHF antennas could be measured after an ELT installation. Testing of an ELT must be performed within the first 5 minutes of an hour, and only three pulses of the transmitter should be activated. For example, a test could be conducted between 1:00 p.m. and 1:05 p.m., with a maximum of three beeps being heard on a frequency of 121.5 MHz. INSPECTION OF ELT. An inspection of the following must be accomplished by a properly certified person or repair station within 12 calendar months after the last inspection: Proper Installation. Remove all interconnections to the ELT unit and ELT antenna. Visually inspect and confirm proper seating of all connector pins. Special attention should be given to coaxial center conductor pins which are prone to retracting into the connector housing. Remove the ELT from the mount and inspect the mounting hardware for proper installation and security. Reinstall the ELT into its mount and verify the proper direction for crash activation. Reconnect all cables. They should have some slack at each end and should be properly secured to the airplane structure for support and protection. Battery Corrosion. Gain access to the ELT battery and inspect. No corrosion should be detectable. Verify the ELT battery is approved and check its expiration date. Operation of the Controls and Crash Sensor. Activate the ELT using an applied force. Consult the ELT manufacturer’s instructions before activation. The direction for mounting and force activation is indicated on the ELT. A TSO-C91 ELT can be activated by using a quick rap with the palm. A TSO-C91a ELT can be activated by using a rapid forward (throwing) motion coupled by a rapid reversing action. Verify that the ELT can be activated using a watt meter, the airplane’s VHF radio communications receiver tuned to 121.5 MHz, or other means (see NOTE 1). Insure that the “G” switch has been reset if applicable. For a Sufficient Signal Radiated From its Antenna. Activate the ELT using the ON or ELT TEST switch. A low-quality Par 12-16 Page 12-606 9/8/98 AC 43.13-1B AM broadcast radio receiver should be used to determine if energy is being transmitted from the antenna. When the antenna of the AM broadcast radio receiver (tuning dial on any setting) is held about 6 inches from the activated ELT antenna, the ELT aural tone will be heard (see NOTE 2 and 3). NOTE 3: Because the ELT radiates on the emergency frequency, the Federal Communications Commission allows these tests only to be conducted within the first five minutes after any hour and is limited in three sweeps of the transmitter audio modulation. Verify That All Switches are Properly Labeled and Positioned. FLIGHT DATA RECORDER. The flight data recorder is housed in a crush-proof container located near the tail section of the aircraft. The tape unit is fire resistant, and contains a radio transmitter to help crash investigators locate the unit under water. Inspection/Operational checks include: Record the Inspection. Record the inspection in the aircraft maintenance records according to 14 CFR part 43, section 43.9. We suggest the following: I inspected the Make/Model ______________ ELT system in this aircraft according to applicable Aircraft and ELT manufacturer’s instructions and applicable FAA guidance and found that it meets the requirements of section 91.207(d). Check special sticker on front of the flight data recorder for the date of the next tape replacement, if applicable. Remove recorder magazine and inspect tape for the following: Signed: ______________________ Certificate No. ______________________ Date: ______________________ NOTE 1: This is not a measured check; it only indicates that the G-switch is working. NOTE 2: This is not a measured check; but it does provide confidence that the antenna is radiating with sufficient power to aid search and rescue. The signal may be weak even if it is picked up by an aircraft VHF receiver located at a considerable distance from the radiating ELT. Therefore, this check does not check the integrity of the ELT system or provide the same level of confidence as does the AM radio check. broken or torn tape, proper feed of tape, and all scribes were recording properly approximately the last hour of flight. for Conditions for tape replacement (as applicable): There is less than 20 hours remaining in the magazine as read on the tape remaining indicator. Tape has run out. Broken tape. After hard landings and severe air turbulence have been encountered as reported by the pilots. Par 12-22 Page 12-607 9/8/98 AC 43.13-1B After the same tape has been in use 1 year (12 months), it must be replaced. Ensure that a correlation test has been performed and then recorded in the aircraft records. Refer to the specific equipment manufacturer’s manuals and procedures. The Solid State Cockpit Voice Recorder system is composed of three essential components a solid state recorder, a control unit (remote mic amplifier), and an area microphone. Also installed on one end of the recorder is an Under water Locator Beacon (ULB). The recorder accepts four separate audio inputs; pilot, copilot, public address/third crew member, and cockpit area microphone and where applicable, rotor speed input and flight data recorder synchronization tone input. For maintenance information refer to the equipment manufacturer’s maintenance manual. The state-of-the art Solid-State Flight Data Recorder (SSFDR) is a highly flexible model able to support a wide variety of aeronautical radio, incorporated (ARINC) configurations. It has a Built-In Test Equipment (BITE) that establishes and monitors the mission fitness of the hardware. BITE performs verification after storage (read after write) of flight data and status condition of the memory. These recorders have an underwater acoustic beacon mounted on its front panel which must be returned to their respective manufacturer’s for battery servicing. For maintenance information refer to the equipment or aircraft manufacture’s maintenance instruction manual. COCKPIT VOICE RECORDERS (CVR). CVR’s are very similar to flight data recorders. They look nearly identical and operate in almost the same way. CVR’s monitors the last 30 minutes of flight deck conversations and radio communications. The flight deck conversations are recorded via the microphone monitor panel located on the flight deck. This panel is also used to test the system and erase the tape, if so desired. Before operating the erase CVR mode, consult the operational manual of the manufacturer for the CVR. Playback is possible only after the recorder is removed from the aircraft. Refer to the specific equipment manufacturer’s manuals and procedures. Par 12-22 Page 12-608 WEATHER RADAR. Ground performance shall include antenna rotation, tilt, indicator brilliance, scan rotation, and indication of received echoes. It must be determined that no objectionable interference from other electrical/electronic equipment appears on the radar indicator, and that the radar system does not interfere with the operation of any of the aircraft’s communications or navigation systems. CAUTION: Do not turn radar on within 15 feet of ground personnel, or containers holding flammable or explosive materials. The radar should never operate during fueling operations. Do not operate radar system when beam may intercept larger metallic objects closer than 150 feet, as crystal damage might occur. Do not operate radar when cooling fans are inoperative. Refer to the specific Radar System equipment manufacturer’s manuals and procedures. RADOME INSPECTION. Inspection of aircraft having weather radar installations should include a visual check of the radome surface for signs of surface damage, 9/8/98 AC 43.13-1B holes, cracks, chipping, and peeling of paint, etc. Attach fittings and fastenings, neoprene erosion caps, and lightening strips, when installed, should also be inspected. DATA BUS. Data Buses provide the physical and functional partitioning needed to enable different companies to design different avionics boxes to be able to communicate information to each other. It defines the framework for system(s) intergration. There are several types of data bus analyzers used to Par 12-26 receive and review transmitted data or to transmit data to a bus user. Before using an analyzer, make sure that the bus language is compatible with the bus analyzer. For further information refer to ARINC specifications such as 429 Digital Information Transfer System, Mark 33 which offers simple and affordable answers t data communications on aircraft. 12-28.12-36. [RESERVED.] Page 12-609 (and 12-12) 9/8/98 AC 43.13-1B SECTION 3. GROUND OPERATIONAL CHECKS FOR AVIONICS EQUIPMENT (NON ELECTRICAL) COMPASS SWING must be performed whenever a new compass is installed. The magnetic compass can be checked for accuracy by using a compass rose located on an airport and by using a hand held master compass. The check swing is normally effected by placing the aircraft on various magnetic headings and comparing the deviations with those on the deviation cards. Refer to equipment or aircraft manufacture’s manual. A compass swing must be performed on the following occasions: When the accuracy of the compass is suspected. After any cockpit modification or replacement involving ferrous metal. major Whenever a compass has been subjected to a shock; for example, after a hard landing or turbulence. After aircraft has passed through a severe electrical storm. After lighting strike. Whenever a change is made to the electrical system. Whenever a change of cargo is likely to affect the compass. When an aircraft operation is changed to a different geographic location (e.g., Miami, Florida to Fairbanks, Alaska) with a major change in magnetic deviation. Par 12-37 Page 12-610 After aircraft has been parked on one heading for over a year. 9/8/98 AC 43.13-1B When flux valves are replaced. Compass Swing Procedures. The magnetic compass must be checked for accuracy in a location free of steel structures, underground pipes or cables, or equipment that produces magnetic fields. The master compass is a reverse reading compass with a gun-sight arrangement mounted on top of it. With the aircraft facing North and the person in the cockpit running the engine(s) at 1000 rpm, a mechanic standing approximately 30 feet in front of the aircraft, facing South, “shoots” or aligns the master compass with the aircraft center line. Using hand signals, the mechanic signals the person in the cockpit to make additional adjustments to align the aircraft with the master compass. Once aligned on the heading, the person in the cockpit runs the engine(s) to approximately 1,700 rpm to duplicate the aircraft’s magnetic field and then the person reads the compass. NOTE: For conventional gear aircraft, the mechanic will have to position the magnetic compass in the straight and level position or mount the tail of the aircraft on a moveable dolly to simulate a straight and level cruise configuration. If the aircraft compass is not in alignment with the magnetic North with the master compass, then the mechanic can correct the error by making small adjustments to the North-South brass adjustment screw with a nonmetallic screw driver. This screw driver can be made out of brass stock, or stainless steel welding rod. The aircraft should be positioned facing South and aligned with the Par 12-37 Page 12-611 9/8/98 AC 43.13-1B master compass. Using the same procedures, correct any error in the compass reading using the check for errors on the East/West heading using the same procedures for the North-South check, except the corrections should be made using the East-West correction brass screw. Check the compass reading on all cardinal headings. Record the last reading and prepare a compass correction card. The maximum deviation (plus or minus) is 10 degrees on any one heading. If the compass cannot be adjusted to meet the requirements, install another one. NOTE: A common error that affects the compass’s accuracy is the mounting of a compass on or in the instrument panel using steel machine screws/nuts rather than brass hardware. If the aircraft has an electrical system it is recommended that two complete compass checks be performed, one with minimum electrical equipment operating and the other with all electrical accessories on (e.g. radios, navigation radar, and lights). If the compass readings are not identical, then the mechanic should make up two separate compass correction cards. One with all the equipment on and one with the equipment off. PNEUMATIC GYROS. Venturi Systems. The early gyro instruments were all operated by air flowing out of a jet over buckets cut into the periphery of the gyro rotor. A venturi was mounted on the outside of the aircraft to produce a low pressure, or vacuum, which evacuated the instrument case, and air flowed into the instrument through a paper filter and then through a nozzle onto the rotor. Par 12-37 Venturi systems have the advantage of being extremely simple and requiring no power from the engine, nor from any of the other aircraft systems; but they do have the disadvantage of being susceptible to ice, and when they are most needed, they may become unusable. There are two sizes of venturi tubes: those which produce four inches of suction are used to drive the attitude gyros, and smaller tubes, which produce two inches of suction, are used for the turn and slip indicator. Some installations use two of the larger venturi tubes connected in parallel to the two attitude gyros, and the turn and slip indicator is connected to one of these instruments with a needle valve between them. A suction gage is temporarily connected to the turn and slip indicator, and the aircraft is flown so the needle valve can be adjusted to the required suction at the instrument when the aircraft is operated at its cruise speed. (See figure 12-1.) Vacuum Pump Systems. In order to overcome the major drawback of the venturi tube, that is, its susceptibility to ice, aircraft were equipped with engine driven vacuum pumps and the gyro instruments were driven by air pulled through the instrument by the suction produced by these pumps. A suction relief valve maintained the desired pressure (usually about four inches of mercury) on the attitude gyro instruments, and a needle valve between one of the attitude indicators and the turn and slip indicator restricted the airflow to maintain the desired 2 inches of suction in its case. Most of the early instruments used only paper filters in each of the instrument cases, but in some installations a central air filter was used to remove contaminants from the cabin air before it entered the instrument case. The early vacuum pumps were vane-type pumps of what is called the wet Page 12-612 9/8/98 AC 43.13-1B FIGURE 12-1. Venturi system for providing airflow through gyro instruments. type-one with a cast iron housing and steel vanes. Engine oil was metered into the pump to provide sealing, lubrication, and cooling, and then this oil, along with the air, was blown through an oil separator where the oil collected on baffles and was returned to the engine crankcase. The air was then exhausted overboard. Aircraft equipped with rubber deicer boots used this discharge air to inflate the boots. But before it could be used, this air was passed through a second stage of oil separation and then to the distributor valve and finally to the boots. (See figure 12-2.) The airflow through the instruments is controlled by maintaining the suction in the instrument case at the desired level with a suction relief valve mounted between the pump and the instruments. This valve has a Par 12-38 spring-loaded poppet that offsets to allow cabin air to enter the pump and maintain the correct negative pressure inside the instrument case. The more modern vacuum pumps are of the dry type. These pumps use carbon vanes and do not require any lubrication, as the vanes provide their own lubrication as they wear away at a carefully predetermined rate. Other than the fact that they do not require an oil separator, systems using dry air pumps are quite similar to those using a wet pump. One slight difference, however, is in the need for keeping the inside of the pump perfectly clean. Any solid particles drawn into the system through the suction relief valve can damage one of the carbon vanes, and this can lead to destruction of the pump, as the particles Page 12-613 9/8/98 AC 43.13-1B FIGURE 12-2. Instrument vacuum system using a wet-type vacuum pump. broken off of one vane will damage all of the other vanes. To prevent particles entering the relief valve, its air inlet is covered with a filter, and this must be cleaned or replaced at the interval recommended by the aircraft manufacturer. Positive Pressure Systems. Above about 18,000 feet there is not enough mass to the air drawn through the instruments to provide sufficient rotor speed, and, to remedy this problem, many aircraft that fly at high altitude use positive pressure systems to drive the gyros. These systems use the same type of air pump as is used for vacuum systems, but the discharged air from the pump is filtered and directed into the instrument case through the same fitting that receives the filtered air when the vacuum system is used. A filter is installed on the inlet of the pump, and then, before the air is directed into the instrument case, it is again filtered. A pressure regulator is located between the pump and the Par 12-38 in-line filter to control the air pressure so only the correct amount is directed into the instrument case. System Filters. The life of an air-driven gyro instrument is determined to a great extent by the cleanliness of the air that flows over the rotor. In vacuum systems, this air is taken from the cabin where there is usually a good deal of dust and very often tobacco Page 12-614 9/8/98 AC 43.13-1B smoke. Unless all of the solid contaminants are removed from the air before it enters the instrument, they will accumulate, usually in the rotor bearings, and slow the rotor. This causes an inaccurate indication of the instrument and will definitely shorten its service life. Dry air pumps are also subject to damage from ingested contaminants, and all of the filters in the system must be replaced on the schedule recommended by the aircraft manufacturer, and more often if the aircraft is operated under particularly dusty conditions, especially if the occupants of the aircraft regularly smoke while flying. (See figures 12-3 and 12-4.) FIGURE 12-3. Instrument vacuum system using a dry-type air pump. FIGURE 12-4. Instrument pressure system using a dry-type air pump. 12-39.12-50. [RESERVED.] Par 12-38 Page 12-615 (and 12-18) 9/8/98 AC 43.13-1B SECTION 4. AVIONICS TEST EQUIPMENT GENERAL. Certificated individuals who maintain airborne avionics equipment, must have test equipment suitable to perform that maintenance. TEST EQUIPMENT CALIBRATION. Test equipment such as meters, torque wrenches, static, and transponder test equipment should be checked at least once a year. TEST EQUIPMENT CALIBRATION STANDARDS. National Institute of Standards and Technology traceability can be verified by reviewing test equipment calibration records for references to National Institute of Standards and Technology test report numbers. These numbers certify traceability of the equipment used in calibration. The test equipment calibration standards must be derived from and traceable to one of the following: The National Institute of Standards and Technology. Standards established by the test equipment manufacturer. If foreign-manufactured test equipment, the standards of the country, where it was manufactured, if approved by the Administrator. The technician must make sure that the test equipment used for such maintenance is the equipment called for by the manufacturer or equivalent. Before acceptance, a comparison should be made between the specifications of the test equipment recommended by the manufacturer and those proposed by the repair facility. If the repair station uses a standard for performing calibration, that calibration standard cannot be used to perform maintenance. The calibration intervals for test equipment will vary with the type of equipment, environment, and use. The accepted industry practice for calibration intervals is usually one year. Considerations for acceptance of the intervals include the following: Manufacturer’s recommendation for the type of equipment. Repair facility’s past calibration history, as applicable. If the manufacturer’s manual does not describe a test procedure, the repair station must coordinate with the manufacturer to develop the necessary procedures, prior to any use of the equipment. 12-54.12-64. [RESERVED.] The test equipment must be capable of performing all normal tests and checking all parameters of the equipment under test. The level of accuracy should be equal to or better than that recommended by the manufacturer. For a description of avionics test equipment used for troubleshooting, refer to the equipment or aircraft manufacturing instruction manual. Par 12-51 Page 12-616 (and 12-20) 9/8/98 AC 43.13-1B Appendix 1 APPENDIX 1. GLOSSARY The following words and terms represent some of those that are often encountered in the field of aviation. For a more complete list of definitions, a mechanic or technician should consult an aviation dictionary. abrasion resistant PTFEa solid insulation wall of PTFE with hard, nonconductive grit positioned midway in the wall thickness, and significantly improves the resistance of the PTFE material to damage from wear. acetylene—gas composed of two parts of carbon and two parts of hydrogen. When burned in the atmosphere of oxygen, it produces one of the highest flame temperatures obtainable. acetylene regulator—manually adjustable device used to reduce cylinder pressure to torch pressure and to keep the pressure constant. They are never to be used as oxygen regulators. adherend—one of the members being bonded together by adhesive. Airworthiness Directivea regulation issued by the FAA that applies to aircraft, aircraft engines, propellers, or appliances, when an unsafe condition exists and that condition is likely to exist or develop in other products of the same type design. airworthy—is when an aircraft or one of its component parts meets its type design and is in a condition for safe operation. ambient light—the visible light level measured at the surface of the part. ampere (A)the basic unit of current flow. One A is the amount of current that flows when a difference of potential of 1 V is applied to a circuit with a resistance of 1 Ω. One coulomb per second. antennaa device designed to radiate or intercept electromagnetic waves. anti-tear strips—strips of fabric of the same material as the airplane is covered with, laid over the wing rib under the reinforcing tape. apparent power—the product of volts and amperes in AC circuits where the current and voltage are out of phase. applianceany instrument, mechanism, equipment, part, apparatus, appurtenance, or accessory, including communications equipment, that is used or intended to be used in operating or controlling an aircraft in flight, is installed in or attached to the aircraft, and is not part of an airframe, engine or propeller. arma measurement of distance, in inches, feet, etc., used in weight and balance calculations. Normally only the longitudinal arm is of practical importance. The three axial arms are longitudinal arm, lateral arm, and vertical arm. automatic direction finder (ADF)a radio receiver utilizing a directional loop antenna that enables the receiver to indicate the direction from which a radio signal is being received; also called a radio compass. automatic flight control system (AFCS)a flight control system incorporating an automatic pilot with additional systems such as a VOR coupler, an ILS approach coupler, and an internal navigation system that is fully automatic, so the aircraft can be flown in a completely automatic mode. avionicsthe science and technology of electronics as applied to aviation. azimuthangular distance measured on a horizontal circle in a clockwise direction from either north or south. balancethe condition of stability which exists in an aircraft when all weight and forces are acting in such a way as to prevent rotation about an axis or pivot point. base metal—the metal to soldered, or cut. be welded, brazed, black light—electromagnetic radiation in the near ultraviolet range of wavelength. 617 9/8/98 blade station—is a reference position on a blade that is a specified distance from the center of the hub. bond—the adhesion of one surface to another, with or without the use of an adhesive as a bonding agent. bonding—a general term applied to the process of electrically connecting two or more conductive objects. In aircraft, the purpose of bonding (except as applied to individual connections in the wiring and grounding systems) is to provide conductive paths for electric currents. This is accomplished by providing suitable low-impedance connections joining conductive aircraft components and the aircraft structure. Another purpose of bonding is to ensure the safe passage of current caused by lightning or static electricity through the aircraft structure. borescope—a long, tubular optical instrument designed for remote visual inspection of surfaces. brashness—a condition of wood characterized by low resistance to shock and by an abrupt failure across the grain without splintering. AC 43.13-1B Appendix 1 constructed as to permit use of conductors separately or in a group. center of gravitythat point about which the aircraft would balance if suspended. For field weight and balance purposes/control, the center of gravity is normally calculated only along its longitudinal axis (nose to tail), disregarding both the lateral and vertical location. certification—implies that a certificate is in existence which certifies or states a qualification. check—a lengthwise separation of the wood, the greater part of which occurs across the rings of annual growth. chemical conversion coating (Specification MIL-C-81706)—is a chemical surface treatment used on aluminum alloys to inhibit corrosion and to provide a proper surface for paint finishing. circuit—a closed path or mesh of closed paths usually including a source of EMF. circuit breakera protective device for opening a circuit automatically when excessive current is flowing through it. braze welding—a welding process variation in which a filler metal, having a liquidus above 450 °C (840 °F) and below the solidus of the base metal is used. Unlike brazing, in braze welding the filler metal is not distributed in the joint by capillary action. close-grained wood—wood with narrow and inconspicuous annual rings. The term is sometimes used to designate wood having small and closely-spaced pores, but in this sense the term “fine-textured” is more often used. brazing—the joining of two pieces of metal by wetting their surface with molten alloy of copper, zinc, or tin. coil shot—production of longitudinal magnetization accomplished by passing current through a coil encircling the part being inspected. bus or bus bar—solid copper strips to carry current between primary and secondary circuits; also used as jumpers. compassa device used to determine direction on the Earth’s surface. A magnetic compass utilizes the Earth’s magnetic field to establish direction. butt joint—a joint between two members aligned approximately in the same plane. compression wood—identified by its relatively wide annual rings, usually eccentric, and its relatively large amount of summer wood, usually more than 50 percent of the width of the annual rings in which it occurs. Compression wood shrinks excessively lengthwise as compared with normal wood. butyrate dope—a finish for aircraft fabric consisting of a film base of cellulose fibers dissolved in solvents with the necessary plasticizers, solvent, and thinners. cable—(electrical)assembly of one or more conductors within an enveloping protective sheath so conductora wire or other material suitable for conducting electricity. 618 9/8/98 conduita rigid metallic or nonmetallic casing, or a flexible metallic casing covered with a woven braid or synthetic rubber used to encase electrical cables. contactelectrical connectors in a switch, solenoid or relay that controls the flow of current. control panelan upright panel, open or closed, where switches, rheostats, meters, etc., are installed for the control and protection of electrical machinery. chordan imaginary straight line joining the leading and trailing edges of an airfoil. corrosion—the electrochemical deterioration of a metal resulting from chemical reaction to the surrounding environment. creepage—is the conducting of electrical current along a surface between two points at different potentials. The current’s ability to pass between two points increases with higher voltage and when deposits of moisture or other conductive materials exist on the surfaces. AC 43.13-1B Appendix 1 datainformation that supports and/or describes the original aircraft design, alteration or repair including the following: (1) drawings, sketches, and or photographs; (2) engineering analysis; (3) engineering orders; and (4) operating limitations. datumimaginary vertical plane from which all horizontal measurements are made or indicated when the aircraft is in level flight attitude. derating—is a technique whereby a part is stressed in actual usage at values well below the manufacturer’s rating for the part. By decreasing mechanical, thermal, and electrical stresses, the probability of degradation or catastrophic failure is lessened. direct current electrode negative—the arrangement of direct current arc welding leads in which the work is the positive pole and the electrode is the negative pole of the welding arc. direct current electrode positive—the arrangement of direct current arc welding leads in which the work is the negative pole and the electrode is the positive pole of the welding arc. cross grain—grain not parallel with the axis of a piece. It may be either diagonal or spiral grain or a combination of the two. discontinuity—an interruption in the normal physical structure or configuration of a part, such as a crack, lap, seam, inclusion, or porosity. cross coat—a double coat of dope or paint. It is sprayed on in one direction, and then immediately after the solvent flash-off, it is sprayed at right angles to the first coat. distal tip—the tip, lens end, of a borescope. cureto change the properties of a thermosetting resin irreversibly by vulcanization or chemical reaction. May be accomplished by the addition of curing (cross-linking) agents, with or without a catalyst, and with or without heat or pressure. curing temperaturetemperature to which a resin or an assembly is subjected in order to cure the resin. cutting torch—a device used in gas cutting of metals. dampinglimiting the duration of vibration by either electrical or mechanical means. dope—liquid applied to fabric to tauten it by shrinking, strengthen it, and render it airtight by acting as a filler. dopeproofing—protecting a surface from the chemicals and chafing qualities of dope and doped fabrics. drape—the ability of tape and broad goods to conform to a contoured shape. drip loopa bundle installation method used to prevent water or other fluid contaminants from running down the wiring into a connector. dry rot—a term loosely applied to many types of wood decay but especially to that which, when in an advanced stage, permits the wood to be easily crushed to a dry powder. The term is actually a misnomer for any decay, since all fungi require considerable moisture for growth. 619 9/8/98 AC 43.13-1B Appendix 1 dwell time—the total time that a penetrant, emulsifier (or remover), or developer remains on the surface of the test part. dye penetrant inspection—an inspection method for surface cracks in which a penetrating dye is allowed to enter any cracks present and is pulled out of the crack by an absorbent developer. A crack appears as a line on the surface of the developer. edge grain—edge-grain lumber has been sawed parallel with the pith of the log and approximately at right angles to the growth rings; that is, the rings form an angle of 45 degrees or more with the surface of the piece. electricity—one of the fundamental quantities in nature consisting of elementary particles, electrons and protons, which are manifested as a force of attraction or repulsion, and also in work that can be performed when electrons are caused to move; a material agency which, when in motion, exhibits magnetic, chemical, and thermal effects, and when at rest is accompanied by an interplay of forces between associated localities in which it is present. electromagnet—temporary magnet which is magnetized by sending current through a coil of wire wound around an iron core. Electromagnetic/Radio Frequency Interference (EMI/RFI)—frequency spectrum of electromagnetic radiation extending from subsonic frequency to X-rays. This term should not be used in place of the term Radio Frequency Interference (RFI). (See radio frequency interference.) Shielding materials for the entire EMI spectrum are not readily available. electromotive force (EMF)—difference electrical potential measured in volts. of electron—a negative charge that revolves around the nucleus of an atom; a unit of a negative electrical charge. electronics—general term that describes the branch of electrical science and technology that treats the behavior and effects of electron emission and transmission. electron Volt (eV)—a unit of energy equal to the energy aquired by an electron falling though potential differences of one volt, aproximately 1.602X 10⁻¹⁹ joule. emulsion-type cleaner—a chemical cleaner which mixes with water or petroleum solvent to form an emulsion (a mixture which will separate if allowed to stand). It is used to loosen dirt, soot, or oxide films from the surface of an aircraft. epoxy—one of various usually thermosetting resins capable of forming tight cross-linked polymer structures marked by toughness, strong adhesion, high corrosion, and chemical resistance, used especially in adhesives and surface coating. epoxy primer—a two-part catalyzed material used to provide a good bond between a surface and a surface coating. epoxy resin—a common thermosetting resin which exhibits exceptionally good adhesion, low cure shrinkage, and low water-absorption properties. erosion—loss of metal from metal surfaces by the action of small particles such as sand or water. ETFE(Frequently referred to by the trade name, TEFZEL) a copolymer of PTFE and polyethylene. exciter—small generator for supplying direct current to the alternator’s field windings. exfoliation corrosion—a form of intergranular corrosion that attacks extruded metals along their layer-like grain structure. expandable sleeving—open-weave braided sleeving used to protect wire and cables from abrasion and other hazards (commonly known by trade name EXPANDO). FEP—fluorinated ethylene propylene (commonly known by the trade name, TEFLON). A melt extrudable fluorocarbon resin, very similar in appearance and performance to PTFE, but with a maximum temperature rating of 200 °C. ferrous metal—iron, or any alloy containing iron. fiberglassthe most common material used to reinforce structures in home-built and experimental aircraft. Available as mat, roving, fabric, etc. It is 620 9/8/98 incorporated into both thermoset and thermoplastic resins. The glass fibers increase mechanical strength, impact resistance, stiffness, and dimensional stability of the matrix. fillthreads in a fabric that run crosswise of the woven material. filiform corrosion—a thread, or filament-like corrosion which forms on aluminum skins beneath the finish. finish—external coating or covering of an aircraft or part. flat grain—lumber has been sawed parallel with the pith of the log and approximately tangent to the growth rings; that is, the rings form an angle of less than 45 degrees with the surface of the piece. fluorescent—a substance is said to be fluorescent when it will glow or fluoresce when excited by ultraviolet light. Some types of dye-penetrant material use fluorescent dyes which are pulled from the cracks by a developer and observed under “black” ultraviolet light. flux—materials used to prevent, dissolve, or facilitate removal of oxides and other undesirable surface substances. Also, the name for magnetic fields. fretting corrosion—corrosion damage between close-fitting parts which are allowed to rub together. The rubbing prevents the formation of protective oxide films and allows the metals to corrode. fuse—a protective device containing a special wire that melts when current exceeds the rated value for a definite period. functional checkthis test may require the use of appropriate test equipment. AC 43.13-1B Appendix 1 gas tungsten arc welding—(GTAW) an arc welding process which produces coalescence of metals by heating them with an arc between a tungsten (nonconsumable) electrode and the work. Shielding is obtained from a gas or gas mixture. Pressure may or may not be used and filler metal may or may not be used. generator—a device for converting mechanical energy into electrical energy. global positioning system (GPS)a navigation system that employs satellite transmitted signals to determine the aircraft’s location. grain—the direction, size, arrangement, appearance, or quality of the fibers in wood or metal. grain - diagonal—annual rings in wood at an angle with the axis of a piece as a result of sawing at an angle with the bark of the tree. grommet—an insulating washer that protects the sides of holes through which wires must pass/or a metal or plastic drain attached to fabric on aircraft. gross weight the total weight of the aircraft including its contents. grounding—the term is usually applied to a particular form of bonding that is the process of electrically connecting conductive objects to either conductive structure or some other conductive return path for the purpose of safely completing either a normal or fault circuit. harness—a cable harness is a group of cables or wires securely tied as a unit. honeycombmanufactured product consisting of a resin-impregnated sheet or metal material which has been corrugated or expanded into hexagon-shaped and other structural-shaped cells. Primarily used as core material for sandwich constructions. galvanic corrosion—corrosion due to the presence of dissimilar metals in contact with each other. inductance (L)the ability of a coil or conductor to oppose a change in current flow. gas cylinder—a portable container used for transportation and storage of a compressed gas. insulatora material that will not conduct current to an appreciable degree. 621 9/8/98 integrated circuitsmall, complete circuit built up by vacuum deposition and other techniques, usually on a silicon chip, and mounted in a suitable package. intergranular corrosion—the formation of corrosion along the grain boundaries within a metal alloy. interlocked-grained wood—wood in which the fibers are inclined in one direction in a number of rings of annual growth, then gradually reverse and are inclined in an opposite direction in succeeding growth rings, then reverse again. laminatea product obtained by bonding two or more laminae of the same material or of different materials. laminated wood—a piece of wood built up of plies or laminations that have been joined either with glue or with mechanical fastenings. The term is most frequently applied where the plies are too thick to be classified as veneer and when the grain of all plies is parallel. leakage field—the magnetic field forced out into the air by the distortion of the field within a part, caused by the presence of a discontinuity or change in section configuration. linterthe short fiber left on the cotton seed after ginning. AC 43.13-1B Appendix 1 indication of the airplane’s distance from the runway through the medium of a flashing light and an aural signal. master switcha switch designed to control all electric power to all circuits in a system. moisture content of wood—weight of the water contained in the wood usually expressed in percentage of the weight of the kiln-dry wood. multiconductor cable—consists of two or more cables or wires, all of which are encased in an outer covering composed of synthetic rubber, fabric, or other material. nick—a sharp notch-like displacement of metal surface. nomex braidNOMEX is the trade name for a hightemperature polyamide thread that is braided over the larger sizes (# 8 gage and larger) of many of the military specification wires. It can be encountered in either an offwhite or black/green color. normalizing—reforming of the grain structure of a metal or alloy by proper heat treatment to relieve internal stresses. open circuitan incomplete or broken electrical circuit. localizerthat section of an ILS that produces the directional reference beam. open-grained wood—common classification of painters for woods with large pores, such as oak, ash, chestnut, and walnut. Also known as “coarse textured.” LORAN (Long-Range Navigation)a radio navigation system utilizing master and slave stations transmitting timed pulses. The time difference in reception of pulses from several stations establishes a hyperbolic line of position that may be identified on a LORAN chart. By utilizing signals from two pairs of stations, a fix in position is obtained. operational checkthis is an operational test to determine whether a system or component is functioning properly in all aspects in conformance with minimum acceptable manufacture design specifications. magnetic field—the space around a source of magnetic flux in which the effects of magnetism can be determined. marker beacona radio navigation aid used in an instrument approach to identify distance to the runway. As the aircraft crosses over the marker-beacon transmitter, the pilot receives an accurate optical fiberany filament or fiber made of dielectric materials that guides light whether or not it is used to transmit signals. orifice—opening through which gas or air flows. It is usually the final opening controlled by a valve. oxidizing—combining oxygen with any other substance. For example, a metal is oxidized when the metal is burned, i.e., oxygen is combined with all the metal or parts of it. 622 9/8/98 oxidizing flame—an oxy-fuel gas flame having an oxidizing effect due to excess oxygen. oxygen cutting—cutting metal using the oxygen jet which is added to an oxygen-acetylene flame. oxygen regulator—manually-adjustable device used to reduce cylinder pressure to torch pressure and to keep the pressure constant. They are never to be used as fuel gas regulators. AC 43.13-1B Appendix 1 polyimide varnisha liquid form of polyimide that is applied to the outer surface of a wire through the process of repeated dipping through the varnish bath with subsequent heat curing. The successive layers rarely reach a total buildup of 1 mil. polymerization—basic processes for making large (high-polymer) molecules from small ones, normally without chemical change; can be by addition, condensation, rearrangement, or other methods. peel ply—a layer of resin-free material used to protect a laminate for later secondary bonding (sometimes referred to as a release film). porosity—cavity-type discontinuities in metal formed by gas entrapment during solidification. pickling—the treatment of a metal surface by an acid to remove surface corrosion. prepreg—a mat, a fabric, or covering impregnated with resin that is ready for lay up and curing. pitch—is the distance, in inches, that a propeller section will move forward in one revolution, or the distance a nut will advance in one revolution of the screw in a single thread. propeller—is a rotating airfoil that consists of two or more blades attached to a central hub which is mounted on the engine crankshaft. protractor—is a device for measuring angles. pitch distribution—is the gradual twist in the propeller blade from shank to tip. pitted—small irregular shaped cavities in the surface of the parent material usually caused by corrosion, chipping, or heavy electrical discharge. pitting—the formation of pockets of corrosion products on the surface of a metal. plastican organic substance of large molecular weight which is solid in its finished state and, at some stage during its manufacture or its processing into a finished article, can be shaped by flow. polyester braida plastic braiding thread, when used as the outer surface of a wire, provides a cloth-like appearance. polyimide tapea plastic film (commonly referred to by the trade name, KAPTON). The tape has a dark brown color, and is frequently coated with a polyimide varnish that has a very distinct mustard yellow color. At times, the spiral edge of the outermost tape is apparent under the varnish topcoat. It may be used for wire insulation. Total polyimide tape insulated wire constructions are inactive for new design on military aircraft and are subject to the procedures defined in FAA Advisory Circular AC 29-2A Change 2 Paragraph 29.1359 in Civil Aircraft. PTFE Tape (Insulation)polytetrafluoroethylene tape (commonly known by the trade name, TEFLON), wrapped around a conductor and then centered with heat, fusing the layers into a virtually homogeneous mass. It is used both as a primary insulation against the conductor, and as an outer layer or jacket over a shield. Maximum temperature rating is 260 °C. PVF2 Polyvinylidine Fluoridea fluorocarbon plastic, that when used in aircraft wire, is invariably radiation cross-linked and employed as the outer layer. radar (radio detecting and ranging)radio equipment that utilizes reflected pulse signals to locate and determine the distance to any reflecting object within its range. radomea nonmetallic cover used to protect the antenna assembly of a radar system. reinforcing tape—a narrow woven cotton or polyester tape used over aircraft fabric to reinforce it at the stitching attachments. relayan electrically-operated remote-control switch. 623 9/8/98 resin—vast profusion of natural and increasingly, synthetic materials used as adhesives, fillers, binders and for insulation. resistancethe opposition a device or material offers to the flow or current. resonance method (ringing) of ultrasonic inspection—a method of detecting material thickness or indications of internal damage by injecting variable frequency ultrasonic energy into a material. A specific frequency of energy will produce the clearest indication of damage in a given thickness of material. When the equipment is calibrated for a specific thickness, and this thickness changes, an aural or visual alert is given. resonant frequency—the frequency of a source of vibration that is exactly the same as the natural vibration frequency of the structure. resonate—a mechanical system is said to resonate when its natural vibration frequency is exactly the same as the frequency of the force applied. When an object resonates at a particular frequency, the amplitude in its vibration will increase immensely as that frequency is reached and will be less on either side of that frequency. rib—part of primary structure, whose purpose is to maintain profile of airfoil and support fabric or thin wood covering. sacrificial corrosion—a method of corrosion protection in which a surface is plated with a metal less noble than itself. Any corrosion will attack the plating rather than the base metal. sandwich constructiona structural panel concept consisting in its simplest form of two relatively thin, parallel sheets (face sheets) of structural material bonded to and separated by a relatively thick, lightweight core. High strength-to weight ratios are obtained with sandwiched materials. scarf joint—a joint made by cutting away similar angular segments of two adherents and bonding the adherents with cut areas fitted together. score—a surface tear or break on a surface that has a depth and length ranging between a scratch and a gouge. scratch—a superficial small cut on a surface. AC 43.13-1B Appendix 1 semiconductor deviceany device based on either preferred conduction through a solid in one direction, as in rectifiers; or on a variation in conduction characteristics through a partially conductive material, as in a transistor. severe wind and moisture problem (SWAMP) areasareas such as wheel wells, wing folds, and near wing flaps, and areas directly exposed to extended weather conditions are considered SWAMP areas on aircraft. silicone rubbera high temperature (200 °C) plastic insulation that has a substantial silicone content. soldering—a group of welding processes that produces coalescence of materials by heating them to the soldering temperature and by using a filler metal having a liquidus not exceeding 450 °C (840 °F) and below the solidus of the base metals. The filler metal is distributed between the closelyfitted surfaces of the joint by capillary action. solenoida tubular coil for the production of a magnetic field; electromagnet with a core which is able to move in and out. spar—main spanwise structural member(s) of an aircraft wing or rotorcraft rotor. A wing may have one or two made into a single strong box to which secondary leading and trailing structures are added. spiral grain—a type of growth in wood which the fibers take a spiral course about the bole of a tree instead of the normal vertical course. The spiral may extend right-handed or left-handed around the tree trunk. statorthe part of an AC generator or motor which contains the stationary winding. stress corrosion—corrosion of the intergranular type that forms within metals subject to tensile stresses which tend to separate the grain boundaries. surface tape—pinked-edge strips of fabric doped over all seams, rib stitching, and edges of fabric covering (also called finishing tape). switcha device for opening or closing an electrical circuit. 624 9/8/98 tape—a tape or a “narrow fabric” is loosely defined as a material that ranges in width from 1/4 inch to 12 inches. TCAStraffic alert and collision avoidance system. An airborne system that interrogates mode A, C, and S transponders in nearby aircraft and uses the replies to identify and display potential and predicted collision threats. thermocoupledevice to convert heat energy into electrical energy. thermoplastic materiala material that can be repeatedly softened by an increase in the temperature and hardened by a decrease in the temperature with no accompanying chemical change. For example, a puddle of tar on the road in the summer during the heat of day: the tar is soft and fluid; however, when cooler in the evening, it becomes solid again. AC 43.13-1B Appendix 1 very high frequency (VHF)a frequency between 30 and 300 MHz VHF omnirange (VOR)an electronic air navigation system that provides accurate direction information in relation to a certain ground station. videoscope—a type of borescope. visible light—electromagnetic radiation that has a wavelength in the range from about 3,900 to 7,700 angstroms and that may be seen by the unaided human eye. visual checkutilizing acceptable methods, techniques, and practices to determine physical condition and safety item. voltunit of potential, potential difference, or electrical pressure. thermoset materiala material which becomes substantially infusible and insoluble when cured by the application of heat or by chemical means. A material that will undergo, or has undergone, a chemical reaction (different from a thermoplastics physical reaction) by the action of heat, catalysts, ultraviolet light, etc. Once the plastic becomes hard, additional heat will not change it back into a liquid as would be the case with a thermoplastic. voltage regulatordevice used in connection with generators to keep the voltage constant as load or speed is changed. tip—part of the torch at the end where the gas burns, producing the high-temperature flame. wattmeteran instrument for measuring electrical power. transceivera unit serving as both a receiver and a transmitter. waveguidea hollow, typically rectangular, metallic tube designed to carry electromagnetic energy at extremely high frequencies. transformera device for raising or lowering AC voltage. transmitteran electronic system designed to produce modulated RF carrier waves to be radiated by an antenna; also, an electric device used to collect quantitative information at one point and send it to a remote indicator electrically. transponderan airborne receiver-transmitter designed to aid air traffic control personnel in tracking aircraft during flight. unbonding—adhesive or cohesive failure between laminates. Compare definitions of adhesive, cohesive debond, and disbond. warpthreads in a fabric that run the length of the woven material as it comes from the mill. wattthe unit of power; equal to a joule per second. wavy-grained wood—wood in which the fibers collectively take the form of waves or undulations. welding—a materials-joining process used in making welds. welding rod—a form of welding filler metal, normally packaged in straight lengths. welding torch—the device used in gas welding. wood decay—disintegration of wood substance through the action of wood-destroying fungi. 625 9/8/98 AC 43.13-1B Appendix 1 wood decay - incipient—the early stage of decay in which the disintegration has not proceeded far enough to soften or otherwise perceptibly impair the hardness of the wood. XL-ETFEA process of radiation cross-linking the polymer chains is used to thermally set the plastic. This prevents the material from softening and melting at elevated temperature. wood decay - typical or advanced—the stage of decay in which the disintegration is readily recognized because the wood has become punky, soft and spongy, stringy, pitted, or crumbly. XL-Polyalkenean insulation material based on the polyolefin family that has its normally thermomelt characteristic altered by the radiation cross-linking process to that of a nonmelt, therm-set material. x-ray—a radiographic test method used to detect internal defects in a weld. 626 9/8/98 AC 43.13-1B Appendix 2 APPENDIX 2. ACRONYMS AND ABBREVIATIONS The acronyms and abbreviations listed are some of many that are likely to be encountered by the aviation mechanic or technician involved in the maintenance of aircraft. 429ARINC 429 data bus standard 629ARINC 629 data bus standard A/Danalog/digital; analog-to -digital A/D CONVanalog-to -digital converter A/Lautoland ACAdvisory Circular acalternating current ACARSARINC Communication Addressing and Reporting System ACOAircraft Certification Office ADAirworthiness Directive ADCair-data computer ADCPATC dual-control panel ADEDSadvanced electronic display system ADFautomatic direction finder ADIattitude-director indicator; air data instrument AFCautomatic frequency control AFCSautomatic flight control system AFDSautopilot flight detector system AIMAeronautical Information Manual AIRCOMair/ground communications AMamplitude modulation AMP or AMPLamplifier AMPamperes AMSAerospace Material Specification ANArmy/Navy ANDArmy Navy Design ANSIAmerican National Standards Institute ANTantenna APautopilot APBauxiliary power breaker APCUauxiliary power control unit APUauxiliary power unit ARINCAeronautical Radio Incorporated ARNC IOARINC I/O error ARNC STPARINC I/O UART data strip error ASTMAmerican Society for Testing Materials ATAAir Transport Association ATCair traffic control ATCTATC transponder ATCTSATC transponder system AUXauxiliary AVCautomatic volume control AWGAmerican Wire Gauge AWSAir Weather Service B/CUbattery/charger unit BAT or BATTbattery BCDbinary-coded decimal BITbinary digit; built-in test BITEbuilt-in test equipment BITSbus interconnect transfer switch BNRbinary numerical reference; binary BPband-pass BPCUbus power control unit BTbus tie BTBbus tie breaker BTCbefore top center BUSelectrical bus; 429 digital data bus C.G.Center of Gravity CACcaution advisory computer CAGEcommercial and government entity code CAWScentral aural warning system; caution and warning system CB, C/B, or CKT/BKRcircuit breaker CDIcourse-deviation indicator CDUcentral display unit CFCcarbon fiber composite CFDIUcentralized fault display interface unit CFDScentralized fault display system CH or CHANchannel CHGRcharger CKTcircuit CLKclock CLRclear CMCScentral maintenance computer system CMPTRcomputer COcarbon monoxide COAXcoaxial COPcopper CPcontrol panel CRTcathode-ray tube; circuit CSE or CSEU control system electronics unit CSEUPcontrol system electronics unit panel CTcomputed tomography CTcurrent transformer CTNcaution CUcontrol unit; copper CVRcockpit voice recorder CWcontinuous wave D/Adigital-to-analog DACdigital-to analog converter DADCdigital air-data computer DBTdead bus tie dcdirect current 1 9/8/98 DCDRdecoder DDBdigital data bus DEMODdemodulator DEMUXdemultiplexer DFDRdigital flight data recorder DGdirectional gyro DGTLdigital DHdecision height DISC SOLdisconnect solenoid DISCdisconnect DISTRdistribution DMAdirect memory access DMBdead main bus DMCdisplay management computer DMEdistance-measuring equipment DMEAdistance-measuring equipment antenna DNdown DUdisplay unit E/Eor E & E electrical/electronic E1-1first shelf, number 1 equipment rack E2-2second shelf, number 2 equipment rack EADFelectronic automatic direction finder EADIelectronic attitude-director indicator EAROMelectrically alterable read-only memory ECEICAS computer ECAMelectronic centralized aircraft monitoring EDSPEICAS display select panel EDUEICAS display unit EECelectronic engine control EFIelectronic flight instrument EFISelectronic flight instrument system EFISCPEFIS control panel EFISCUEFIS comparator unit EFISG EFISsymbol generator EFISRLS EFISremote light sensor EHSIelectronic horizontal-situation indicator EHSIDelectronic horizontal-situation indicator display EHSVelectrohydraulic servo value EICASengine indicating and crew alerting system ELCUelectrical load control unit ELECelectric; electronic ELECTelectrical ELEXelectronics; electrical ELTEmergency Locator Transmitter EMER GENemergency generator emfelectromotive force EMFIelectromechanical flight instrument EMIElectromagnetic interference EP AVAILexternal power available EPexternal power AC 43.13-1B Appendix 2 EPCexternal power contactor EPCSelectronic power control switch EPROMerasable programmable read-only memory eV—electron volt EXCTRexciter EXT PWRexternal power FAAFederal Aviation Administration FAA-PMAFederal Aviation Administration Parts Manufacturer Approval FMfrequency modulation FM/CWfrequency modulation continuous wave FMCflight management computer FMCDflight management computer control display unit FMCSflight management computer system FMSflight management system FODforeign object damage FREQfrequency FSEUflap/slat electronic unit FW or FWDforward G/Sglide slope GAL or GALYgalley GCRgenerator control relay auxiliary contact GCUgenerator control unit GEBgenerator circuit breaker GENgenerator GLRgalley load relay GMAWgas metal arc welding GMTGreenwich mean time; cordinated Universal time GND PWRground power GND RETground return GND SVCEground service GND or GRDground GPCUground power control unit GPSglobal positioning system GPSWgear opposition switch GPUground power unit GPWground proximity warning GPWSground proximity warning system GSRground service relay GSSRground service select relay GSTRground service transfer relay GTAWgas tungsten arc welding GWPCground proximity warning computer H/Lhigh/low HEAhigh-frequency radio antenna HF (hf) high frequency (3 to 30 MHz) HFCPhigh-frequency radio control panel HI Zhigh impedance HZhertz 2 9/8/98 I.D.inner diameter I/Oinput/output IAPSintegrated avionics processor system IASindicated airspeed IDGintegrated drive generator IFintermediate frequency IFRinstrument flight rules IGNignition IISintegrated instrument system ILSinstrument landing system INDLindicator light INSTinstrument INSTRinstrument INTCONinterconnect INTECinterface INTERinterrogation INTPHinterphone INVinverter IR ILSreceiver kHzkilohertz KSIthousands of pounds per square inch kVkilovolts kVAkilovoltamperes kVARkilovoltampere reactive L-Bandradio frequency band (390 to 1550 MHz) LCDliquid-crystal display LDload LEDlight-emitting diode LF (lf) low frequency (30 to 300 kHz) LO Zlow impedance LOClocalizer LRUline replaceable unit LSloudspeaker LSBlower sideband LSPTMlimit switch position transmitter module LTlight LTS lights MACmean aerodynamic chord MAN/ELECmanual/electric MBAmarker-beacon antenna MCDPmaintenance control and display panel MCDUmultipurpose control and display unit MDEmodern digital electronics MECmain equipment center; main engine control MEG or MEGAmillion MEKmethylethylketone MEMmemory METOMaximum except-take off MF(mf) medium frequency (300 kHz to 3 MHz) MHzmegahertz MICmicrophone AC 43.13-1B Appendix 2 MICRO-Pmicroprocessor MIGmetal inert gas MILLIone one-thousandth (0.001) MKR BCNmarker beacon MSmilitary standard MSDSMaterial Safety Data Sheets MSEC(ms) milliseconds MSGmessage MTBFmean time-between-failure MUXmultiplexer mVmillivolts NASNational Aerospace Standard NAVnavigation NCnormally closed; not connected; no connection NDBnondirectional beacon NDINondestructive Inspection NEGnegative NSEC (ns) nanoseconds NTSBNational Transportation Safety Board NVMnonvolatile memory OAMoriginal aircraft manufacturer OBSomni bearing selection OCovercurrent OEMoriginal equipment manufacturer OFover-frequency OVV or OVovervoltage OVVCO or OVCOovervoltage cutout P-Sparallel to series PApassenger address; power amplifier PARA/SERparallel to serial PCUpassenger control unit; power control unit PFDpermanent-magnet generator PMAParts Manufacturer Approval POSpositive POTpotentiometer; plan of test PRpower relay PRLparallel PROMprogrammable read-only memory PROXproximity PSEUproximity switch electronic unit PSIpounds per square inch PWRpower PWR SPLYpower supply QPLQualified Products List QTYquantity r-treceiver-transmitter RAradio altimeter; radio altitude RADradio RAIND radio altimeter indicator RAMrandom-access memory RARTradio altimeter receiver-transmitter 3 9/8/98 RATram air turbine RCCBremote-control circuit breaker RCLrecall RCVRreceiver RCVR/XMTRreceiver/transmitter RDMIradio distance magnetic indicator RF (rf) radio frequency RFIradio-frequency interference RLSremote light sensor RMIradio magnetic indicator rpmrevolution per minute RTVroom temperature vulcanizing SAESociety of Automotive Engineers SATstatic air temperature SATCOMsatellite communication SCRsilicon-controlled rectifier SDIsource destination identifier SELCALselective calling system SER DLserial data link SGsymbol generator SITASociété International de Telecommunications Aeronautiques SMAWshielded metal arc welding SMDsurface mounted device SNRsignal-to-noise ratio SOLsolenoid SOLVsolenoid valve SOMstart of message SOTstart of transmission SPKRspeaker SPRsoftware problem report SQLsquelch SSBsingle sideband SSIDSupplemental Structural Inspection Documents SSMsign status matrix STsynchro transmitter STAT INVstatic inverter STBYstandby STCSupplemental Type Certificate SWswitch SYM GENsymbol generator T-Rtransformer-rectifier TATtrue air temperature TBDPtie bus differential protection TCType Certificate TCAStraffic alert and collision avoidance system TCDSType Certificate Data Sheets AC 43.13-1B Appendix 2 TDCtop dead center TFRtransfer TIGtungsten inert gas TMCthrust management computer TMSterminal marking sleeve TMSthrust management system TMSPthrust mode select panel TRUtransformer-rectifier unit TSOTechnical Standard Order TXPDRtransponder µmicro UBRutility bus relay UFunderfrequency UHFultrahigh frequency (300 MHz to 3 GHz) UNDFunderfrequency UNDVundervoltage USunderspeed USB (us)upper sideband USECmicroseconds UVundervoltage UVutraviolet V ac, Vac, or VACvolts alternating current V dc, Vdc, or VDC volts direct current Vvolts; voltage; vertical; valve VAvolt-amperes VARvolt-ampere reactive VFRvisual flight rules VHF (vhf) very high frequency (30 TO 300 MHz) VLSIvery large-scale integration VORVHF omnirange; visual omnirange VORTACVOR tactical air navigation VRvoltage regulator VRMSvolts root means square Wwatts WARNwarning WCPweather radar control panel WEAweather WEUwarning electronics unit power supply WPTwaypoint WX (WXR)weather radar XCVRtransceiver XDCRtransducer XFMRtransformer XFRtransfer XMITtransmit XMTRtransmitter XPDRtransponder 4 9/8/98 AC 43.13-1B Appendix 3 APPENDIX 3. METRIC-BASED PREFIXES AND POWERS OF 10 Atto (a) Femto (f) Pico (p), or µµ Nano (n), or mµ Micro (µ) Milli (m) Centi (c) Deci (d) = = = = = = = = Deka (da) Hecto (h) Kilo (k) Mega (M) Giga (G), or kM Tera (T) = = = = = = quintillionth of quadrillionth of trillionth of billionth of millionth of thousandth of hundredth of tenth of unity ten times hundred times thousand times million times billion times trillion times = = = = = = = = = = = = = = = 10-18 times 10-15 times 10-12 times 10-9 times 10-6 times 10-3 times` 10-2 times 10-1 times 100 = 1 10 times 102 times 103 times 106 times 109 times 1012 times 1 9/8/98 AC 43.13-1B Appendix 3 2