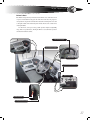
1
BBCV
BLUE BIRD VISION
4
00
10
7
17
2010
10004177
VISION
drivers handbook
© 2006, 2008 Blue Bird Corporation. All rights reserved.
All Blue Bird products sold for use in the United States of America and its insular areas comply with all applicable Federal Motor
Vehicle Safety Standards (FMVSS) adn applicable Federal ADA requirements.
Many of the components of Blue Bird buses are obtained from outside suppliers. Where maintenance and/or service information
conflicts with the component manufacturer’s documentation, the manufacturer’s documentation prevails.
In the event of any conflict between the requirements of this publication an dany applicable legal requirement, the legal requirement prevails. Technical requirements that exceed the legal requirements are not considered to conflict.
Blue Bird Corporation continually endeavors to improve its products and reserves the right to change without notice. Text, illustrations, and specifications in this manual are based on information available at the time of printing.
2
contents
Introduction / 5
Blue Bird Authorized Distributors / 6
Blue Bird School Bus Support / 6
Blue Bird School Bus Training / 6
Blue Bird Parts Sales / 6
Blue Bird Technical Publications / 6
Blue Bird Bus Warranty / 7
Contacts and Regulatory Matter / 7
Reporting Safety Defects / 7
Driver Certification / 7
About 2007 Emissions Standards / 8
Regarding Modifications / 9
About This Driver’s Handbook / 10
Safety Precautions / 10
Scope and Content / 10
General Specifications / 11
General Specification, Chassis / 11
Alternator / 11
Axle & Suspension, Front / 11
Axle & Suspension, Rear / 11
Batteries / 11
Braking System / 11
Bumpers / 12
Controls / 12
Cooling System / 12
Drive Line / 12
Engines / 12
Intake / 13
Exhaust / 13
Frame, Chassis / 13
Fuel System / 14
Horn / 14
Instruments / Gauges / 14
Steering / 14
Tires / 14
Tow Hooks / 14
Transmission / 15
Wheels / 15
Wiring / 15
General Specification, Body / 15
Panels & Compartments / 15
Emergency Doors / 15
Entrance Doors / 15
Electrical / 16
Fans (optional) / 16
Floor / 16
Heater/Defroster / 16
Insulation / 16
Lettering / 16
Lights / 16
Mirrors / 17
Paint / 17
Panels, Exterior / 18
Panels, Interior / 18
Reflectors / 18
Rubrails / 19
Safety Equipment / 19
Seats / 19
Stepwell / 19
Stop Arm, Crossing Arm / 19
Sun Visor / 19
Switch Panel / 19
Ventilation / 20
Windows / 20
Windshield / 20
Windshield Wipers / 20
Wiring / 20
Dimensions / 21
DRIVER ORIENTATION / 23
Driver Orientation / 23
Product Identification Information / 23
Federal Vehicle Certification Plate / 23
Axle Record and Chassis Service Number Plate / 23
Body Serial Number and Service Number Plate / 23
Data Plates Reference / 24
Emergency Equipment Locations / 25
First Aid Kit / 25
Body Fluids Clean-up Kit / 25
Fire Extinguisher / 25
Triangular Roadside Hazard Reflector Kit / 25
Flare Kit / 26
Fire Axe and Crowbar / 26
Driver’s Area / 27
Driver’s Instrument Panel / 28
Indicator Lights and Audible Alarm / 29
Front Switch Panels / 30
Left Front Panel / 30
Right Front Panel / 31
Side Console Switch Panels / 32
Side Console Upper Switch Panel / 32
Side Console Lower Switch Panel / 33
Forward Console Switch Panel / 34
3
VISION
drivers handbook
Heater Valve Lever / 35
Heater FIlter Panel / 35
Steering Column / 36
Steering Wheel Position / 36
Left Switch Stalk / 36
Right Switch Stalk / 36
Cruise Control / 36
Parking Brake, Units With Air Brakes / 38
Parking Brake, Units With Hydraulic Brakes / 39
Driver’s Seat, Standard / 40
Driver Lap & Shoulder Belt / 40
Driver’s Seat, Air / 42
Driver Lap & Shoulder Belt / 42
Interior Compartments / 44
Passenger Seats / 46
Passenger Area Heaters / 47
Passenger Windows / 48
Emergency Exits / 49
Rear Emergency Door / 49
Vandal Lock / 49
Emergency Pushout Windows / 50
Emergency Roof Hatch / 51
Entrance Door Emergency Release / 52
Exterior Compartments / 53
Engine Compartment / 53
Battery Compartment / 54
Fuel Filler / 54
Keeping Your Bus Looking New / 55
Pre-Trip Inspection / 57
Before Placing the Bus in Service / 57
Daily Pretrip Inspection / 57
Exterior Walkaround / 57
Entrance Area Inspection / 60
Engine Compartment Inspection / 61
Instrumentation & Driver’s Alert Checks / 63
Exterior Lights Check / 64
Passenger Area Inspection / 65
Emergency Equipment Check / 65
Prepare For Driveaway / 66
Mirrors and Mirrors Adjustment / 67
Routine Operation / 69
Routine Operation / 69
Maneuvering Safety / 69
4
Prior to Starting the Engine / 70
Starting the Engine / 70
High Idle Function / 71
Service Brakes / 72
About Hydraulic Brakes / 72
Parking Brake (With Hydraulic Brakes) / 73
About Air Brakes / 74
Parking Brakes (With Air Brakes) / 74
Transmission Control / 75
Range Inhibit Feature / 75
Allison Automatic Transmission Driving Tips / 77
Transmission Indicator Lights / 78
Exhaust System / 79
DPF Regeneration In Blue Bird Buses / 80
Aftertreatment Terms / 80
Levels of Notification / 81
High Exhaust Temperature Notification / 81
Level 1 Regeneration Notification: DPF Indicator Appears
/ 82
Level 2 Notification: DPF Indicator Blinks / 82
Level 3 Notification: Check Engine Indicator Appears / 83
Level 4 Notification: Stop Engine Indicator Appears / 83
Stationary Regeneration Precautions / 84
General Propane Tank Filling Procedures / 86
Propane Powered Motor Vehicle Filling Procedures / 87
Enroute Emergencies / 91
Enroute Emergencies / 91
Using Triangular Hazard Reflectors / 91
Using Booster Cables / 92
Starting Problems / 93
Jacking and Towing / 94
Jack Points / 94
Towing / 94
Air Tank Schrader Valve / 96
Scheduled Maintenance / 97
Scheduled Maintenance / 97
Maintenance Task Schedule / 99
Engine Cooling System / 113
Coolant Types / 113
Coolant Testing and Replacement / 114
Shutters / 114
Notes / 115
Introduction
Thank
You
…and Congratulations!
We at Blue Bird Corporation wish to thank you for your investment of trust
in Blue Bird quality, and congratulate you on being a Driver of one of the
most innovative vehicles in pupil transportation; the Blue Bird Vision.
Blue Bird Strength; Blue Bird Innovation
The Blue Bird Vision is the first C-Type (“conventional”) school bus built upon a chassis designed specifically for pupil transporation, rather than mounted upon a multipurpose truck chassis. The Vision’s chassis is purpose-built at Blue Bird’s Fort Valley,
Georgia plant, as are Blue Bird’s All American transit-type buses and the Vision’s CType “little brother,” the EC-72.
The Blue bird Vision, with its EC-72 and all american FE and RE siblings, comprise
a complete line of built-from-the-ground-up buses, providing an ideal fit for any
school route need.
Unlike most “conventional” type school buses, the Vision is anything but “ordinary.” The Vision is the result of Blue Bird’s steadily innovative engineering and over
80 years of school bus experience, applied to the C-Type category.
What kind of innovation? For 2008, the Vision receives a handsome new engine
hood mounted to a rugged torsion pivot mount. Opening and closing the hood is
a light-as-a-feather breeze. Yet this new engine hood sacrifices none of the Vision’s
legendary field-of-view.
The Driver’s area has received multiple improvements you are sure to enjoy. An
all new dash houses the new instrument cluster and also provides a built-in glove
box. The instrument cluster includes a major new feature: the Driver Information Display. This is a large LCD panel which provides you and your service technician access
to a wide array of system information. The infinitely-adjustable steering column is
also new, providing a foot release pedal for quick and easy adjustment.
Of course, there are myriad other technical technical refinements “under the
hood” with which the Driver may never interact directly; but which nonetheless contribute to an overall improved operating and ownership experience.
Built to purpose. Built to last. Built to bring to your operation a new level of value,
efficiency, and rugged reliability.
5
VISION
drivers handbook
Backed By Blue Bird
Blue Bird provides all the behind-the-scenes support you depend upon for success in
your school transportation operation:
Blue Bird Authorized Distributors
Blue Bird administers its full range of Customer Services through a nationwide
network of local or regional Blue Bird Authorized Distributors. The Distributor
through whom your bus was purchased should always be your first point of
contact for information and assistance. Contact information for your distributor
is located on the back cover of this manual.
Blue Bird School Bus Support
Your Blue Bird Distributor is equipped and staffed to handle your service-related issues, and also has immediate and direct access to Blue Bird’s own factory-based Customer Support. All Blue Bird Support Representatives are true
Blue Bird technical experts with long histories at the Blue Bird plants where
your buses are built.
Blue Bird School Bus Training
The Training staff of Blue Bird Customer Service conducts an ongoing program
of Field Service, Factory Service, and Focussed Training classes and seminars, to
ensure that service technicians of Distributors are always up-to-date on the latest service information and techniques. Some of these training classes are open
to the service personnel of customers.
Blue Bird Parts Sales
Blue Bird’s modern Service Parts facility ships parts directly from the home plant
in Fort Valley, Georgia to Blue Bird Authorized Distributors and Blue Bird Bus
Spec and Bus Care centers nationwide. Blue Bird Parts Sales consists of modern
warehousing facilities, efficient ordering and inventory control systems, and expert technical staff who know your bus inside and out. Service Parts also publishes its own parts catalogs, available for customer purchase.
Blue Bird Technical Publications
Blue Bird Driver’s Handbooks and Service Manuals are produced and continually updated by a full-time in-house staff with full access to manufacturing assembly lines and Blue Bird Engineering. Additional manuals are available for
purchase through your Blue Bird Authorized Distributor.
6
introduction
Blue Bird Bus Warranty
For your convenience and efficiency, warranty claims are handled at the local
Distributor level, as are all other Customer Services. Be assured that your Blue
Bird is backed by one of the strongest factory warranties in the industry, and
that factory-based Bus Warranty representatives are in constant contact with
your local distributor about your warranty issues.
Contacts and Regulatory Matter
Reporting Safety Defects
If you believe that your vehicle has a defect which could cause a crash or could cause
injury or death, you should immediately informthe National Highway Traffic Safety
Administration (NHTSA) in addition to notifying Blue Bird.
If NHTSA receives similar complaints, it may open an investigation and, if it finds
that a safety defect exists in a group of vehicles, it may order a recall and remedy
campaign. However, NHTSA cannot become involved in individual problems between you, your dealer, or Blue Bird Corporation.
To contact NHTSA, you may call the Vehicle Safety Hotline toll-free at:
1–888–327–4236 (TTY: 1–800–424–9153)
or go to:
http://www.safercar.gov
or write to:
Administrator, NHTSA,
400 Seventh
Street, SW., Washington, DC 20590
You can also obtain other information about motor vehicle safety from:
http://www.safercar.gov.
Driver Certification
US Federal regulations require that school bus Drivers posess a Commercial Driver’s
License (CDL). The purpose of this manual is to acquaint the Driver with the particular Blue Bird bus model it covers. Its information must be considered supplemental
to, not a replacement for, the specific requirements for Driver certification, testing,
and operational procedures.
For example, the Pre-trip inspection routine described in this manual may not
include all items or details of the Pre-trip inspection required by legally-mandated
inspections.
Contact the Pupil Transportation Director or similar office for your particular
state/district for more information.
7
VISION
drivers handbook
About 2007 Emissions Standards
Buses equipped with 2007 engines are designed to conform to new and stringent
federal emissions standards. These standards affect both the equipment installed at
the factory and the fuel at the pump.
Buses powered by 2007 emissions standards engines are equipped with special
exhaust systems to reduce emissions. The technical details of the systems employed
by various engine manufacturers differ, but share common general principles. The
exhaust muffler is a particulate filter which traps and burns microscopic particles
in a process referred to as “regeneration.” When heat in the exhaust is insufficient
to fully burn the particulates, the system enters an “active” regeneration mode so
the necessary catalytic reaction can take place. During active regeneration events,
exhaust temperatures are elevated, and an indicator light on the instrument panel
illuminates to notify the Driver that regeneration is active. This regeneration mode is
automatic and normal, and requires no special action on the part of the Driver.
As part of the 2007 emissions standards, effective October 15, 2006, the EPA has
required fuel retailers to sell lower-emission fuel, designated “ultra-low-sulfer diesel”.
After that date, all commercially-available number 1 and number 2 highway diesel
fuels are Ultra-low-sulfer diesel. This fuel must be used in all 2008 model buses powered by a 2007 emission standards diesel engine, as indicated by a decal located near
the fuel filler door, reading:
The engine in this vehicle must be operated only with low ash engine oil and
ultra low sulfur diesel fuel (meeting EPA specifications for highway diesel fuel,
including a 15 ppm sulfur cap).
For detailed information on recommended fuels and other fluids, always follow your
engine manufacturer’s guidlines.
8
introduction
Regarding Modifications
Blue Bird Corporation offers many items as standard and optional equipment to
meet federal, state, and local specifications and individual customer requirements.
Those interested in modification of thisvehicle should consult the Service Manual and Blue Bird Engineering Department for a more complete understanding of
the vehicle.
Vehicle modifications which may cause non-conformance with the emission
control and/or Federal Motor Vehicle Safety Standards ((FMVSS), are expressly not
authorized by Blue Bird Corporation.
It is the responsibility of the entity undertaking the modification to ascertain
compliance of the modified vehicle with any and all applicable regulations. The entity performing modification of this product must certify that all applicable regulations are met. In order to certify a modified vehicle, the upfitter or other entity performing the modification must be a licensed vehicle manufacturer or must objtain
the services of a licensed vehicle manufacturer for that purpose.
Specifically, Blue Bird Corporation does not authorize any modifications to or
such as the following:
•Front or rear suspension
•Wheelbase length
•Body or chassis crossmembers
•Frame rail flanges
•Welding on the engine, radiator, fuel tank(s), transmission or any component
of those items
•Cooling system
•Addition of any equipment or component nearer than 2 inches (51mm) to the
fuel tank(s), rotating components or “jounce” movement of driveline components
9
VISION
drivers handbook
About This Driver’s Handbook
Blue Bird Technical Communications endeavors to continuously improve the value of
its manuals. Your comments and suggestions are welcome, and we value the feedback we receive from our users. Send your comments to:
Blue Bird Body Company
Attn: Technical Communications
P.O. Box 937
Fort Valley, Georgia 31030
Safety Precautions
Throughout this manual are precautions labeled Warnings and Cautions, and set in
the style shown here:
[WARNING] The Warning designation is generally used for precautions
which, if not properly observed while performing the related procedures,
could result in serious personal injury or death.
[CAUTION] The Caution designation is generally used for precautions which,
if not properly observed, could result in damage to the bus or its equipment.
This manual is intended for use by qualified professional bus Drivers who understand
and observe all appropriate safety precautions and procedures associated with safe
driving in general, and pupil transportion in particular. The user of this manual must
read and abide by all safety warnings noted not only in this manual, but also on any
labels and documentation for vehicle equiment and devices.
Scope and Content
This handbook is intended to acquaint the bus Driver with the Blue Bird bus model
it describes. It is recommended that after being thoroughly read by the Driver, it be
stored in the bus. Although not a service manual, it contains general information that
may be of value in situations of roadside hazard assistance, such as the location of
jacking points, or the location of fuses.
Scheduled Maintenance tables are included as a convenience. These should be
regarded as the minimum maintenance procedures to keep the bus in proper operational condition. The service technician should refer to and become thorougly
acquainted with the separate Blue Bird Service Manual.
Please note that not all possible situations that may arise while operating the bus
are addressed. The exercise of caution, common sense, and good driving practices,
coupled with experience, are required for safe operation.
If questions arise that are not specifically covered in this manual, please contact
your Blue Bird Distributor. Your Distributor will either answer your questions or will
be able to assist in obtaining the needed information. To report a problem with your
bus, contact your Blue Bird distributor (or if you deal directly with Blue Bird, contact your Service Representative). If you are unsure of the identity of your Blue Bird
Service Representative, call the Blue Bird switchboard at 478.825.2021 and ask the
receptionist for the Blue Bird Service Department.
10
For replacement parts…
Contact your Blue Bird distributor or Parts Sales
at Blue Bird Body Company.
G e n e r a l S p e c i f i c at i o n s
General Specification, Chassis
Alternator
185 Amp Leece Neville, 12 Volt, High-Output.
Axle & Suspension, Front
Axle: Hendrickson SteerTek, 12,000 lb rating. Petroleum lubed bearings. 50 degree
wheel cut. Hubcaps with window seal included.
Suspensions: Hendrickson SofTek, 8,000 lb (standard) or 10,000 lb (optional) rating.
4” x 60”, Hendrickson variable rate, tapered springs with Anti-Wear liner. Maintenance
free rubber bushings.
Shock Absorbers: Sachs. direct acting, 1.42” diameter bore double-action piston
type with long life bushings.
Axle & Suspension, Rear
Axle: Meritor, RS21145, 21,000 lbs. capacity single speed with 5.29 ratio. Petroleum
lubed bearings.
Shock Absorbers: Sachs. direct acting, 1.42” diameter bore double-action piston
type with long life bushings.
Springs: 4” x 52” semi-elliptic, progressive, variable rate, 15-leaf slipper springs, 9,900
lbs. capacity each at the ground. Maintenance free, rubber bushed radius leaf permits axle adjustment for dog tracking.
Batteries
Two Group 31 batteries with 1125 CCA @ 0° F. 4/0 gauge battery cables. Heavy duty
slide out battery compartment tray.
Braking System
Service Brakes, Air (Standard). Meritor air-powered, cam-operated, 4” front; 7” rear
internal expanding, single leading shoe drum brakes. Meritor automatic slack adjusters. 4-channel Bendix ABS.
3-tank air system with combined capacity of 5,280 cu in. Moisture ejector on
each tank. Options available for Bendix AD-9 or AD-IP air dryer.
Emergency/Parking (units with standard air brakes). Captive spring actuators incorporated into rear air brake chambers. Release valve operation with control knob
at driver’s right.
Service Brakes, Hydraulic (Optional). Both front and rear systems have 15” diameter x 1.438” thick rotors. 64mm front; 70mm rear 4-piston, self adjusting Meritor
Quadraulic calipers. Meritor ABS.
Emergency/Parking ( units with optional hydraulic brakes). Internal expanding,
transmission mounted, 9” diameter x 3” wide. Mechanical cable operation with hand
control lever at driver’s left.
11
VISION
drivers handbook
Bumpers
Contoured front bumper die formed from 3/16” steel plate. Rear bumper smooth
profile, 12” high with 90° flanges, die formed from 3/16” steel plate, with 14” wraparound at corners and double “A” frame bracing.
Controls
Electronically operated throttle, air brake treadle, valve actuated parking brake (air
brakes) or cable-operated driveline shoe parking brake (hydraulic brakes) with warning light, transmission selector, dimmer switch, instrument panel rheostat-controlled
lighting, key-type starter switch. Electric dual horn. DID Panel controls on right steering column stalk. Cruise control on left steering column stalk. Manual outward-opening door control.
Cooling System
Charge air and down-flow radiator mounted in tandem at vehicle front. A 24” dia.
nylon cooling fan with nine blades equipped with a fully-on or fully-off electromagnetic fan clutch driven by polyvee fan belt with spring loaded tensioner. Fan controlled by Engine ECM.
Dextron III Transmission fluid cooled by heat exchanger in lower radiator tank.
Gates Blue Stripe hose with constant torque clamps.
Drive Line
Spicer SPL series 70 shafts with protective guards and lifetime lubrication.
Engines
CAT C-7 7.2 L;190 HP @ 2200 RPM; 520 ft lb @ 1440 RPM; 800 RPM Idle. DSL EPA Certified. Electronically controlled with an electronic throttle; turbo-charged, chargeair cooled, in-line six cylinder engine. Air intake equipped with intake manifold grid
heater. Thermostats begin opening at 190F; full open at 208F. Battery capacity: 1800
CCA min. @ temperatures below 0 F. Blue Bird diesel fuel systems are not compatible
with biodiesel. Engine manufacturer’s warranty regarding performance, emissions
and durability can be affected by using biodiesel.
CAT C-7 / 2007 Emission Standards Engines. Some Blue Bird 2008 Visions areequipped with Caterpillar C7 engines which are specially designed to meet 2007
emission standards. These engines incorporate a CAT Diesel Particulate Filter / Muffler, and use Clean Gas Induction in the CAT Regeneration System to reduce emissions. During normal use, the system automatically enters a particulate filter regeneration mode to oxidize soot collected in the particulate filter.
Cummins ISB-02 200 HP @ 2300 RPM; 520 ft lb torque @ 1600 RPM. Governed speed
2500 RPM. Certified for EPA and CARB at 2.5 grams of NOX and NMHC for 2004 EPA
standards. High pressure common rail fuel system. 15.2 CFM single cylinder air compressor. SAE #3 Flywheel housing. Holset turbochargers. Wastegated turbocharger.
The ISB-02 monitors key engine parameters and logs diagnostic faults when an ab-
12
general specifications
normal operating condition occurs. The engine de-rates available power and maximum vehicle speed when certain fluid parameters pass a limit threshold or a maximum coolant temperature of 225 F. The engine’s ECM keeps an electronic data log
of time of occurrence, elapsed times, extreme pressures and extreme temperatures
when the system detects an out-of-range condition. The following sensors mounted
on the engine provide input to the engine protection system: oil pressure, coolant
level sensor. Minimum pressure cap rating is 15 psi at sea level. Thermostats opening
temperature 190 F; fully open @ 205 F. Fan full-on at engine coolant temperature
of 210 F. Fuel/Water Seperator supplied with engine. Blue Bird diesel fuel systems
are not compatible with biodiesel. Engine manufacturer’s warranty regarding performance, emissions and durability can be affected by using biodiesel.
Cummins ISB / 2007 Emission Standards Engines. Some Blue Bird 2008 Visions are
equipped with Cummins ISB engines which are specially designed to meet 2007
emission standards. These engines incorporate a Cummins Particulate Filter / Muffler, and use cooled Exhaust Gas Recirculation to reduce emissions. During normal
use, the system automatically enters a particulate filter regeneration mode to oxidize
soot collected in the particulate filter.
General Motors Vortec 8.1 Litre Engine. If your 2009 model Vision is a propane fueled unit, it is equipped with the GM 8.1L Vortec engine. This engine is designed for
propane fuel and is equipped with a Liquid Propane Injection system.
Intake
High volume canister type air cleaner with replaceable pleated fiber cartridge.
Charge Air intake circuit by exhaust-driven turbocharger. Charge Air cooler mounted
in front of engine coolant radiator. Intake restriction indicator.
Exhaust
4” O.D. 16 Gauge aluminized steel tubing from engine turbo-charge to in line muffler. Stainless steel muffler with catalitic converter. 4” O.D. 16 gauge aluminized steel
tailpipe. Wide band exhaust clamps used at all joints. Tailpipe exits through bumper,
road side. Tailpipe is 0 to 1/2” beyond bumper.
Visions equipped with 2007 emissions standards engines use engine manufacturer-specific diesel particulate filter mufflers which integrate with an active regeneration system to oxodize particulate soot.
Frame, Chassis
Dual “C” channels, 10 1/8” high with 3” flanges made of 5/16” thick, 50,000 psi steel.
All permanent fixtures on frame are attached with hi-tensile strength Huck-Spin fasteners with swaged lock nuts.
13
VISION
drivers handbook
Fuel System
60 gallon capacity aluminized steel safety tank mounted between frame rails. Includes a sender inspection plate and right side fill opening with spring loaded locking door.
Spin-on fuel filter (standard). Racor 490R30 fuel filter with see-thru bowl, selfventing drain, integral check valve on inlet side, and 200 watt heater (optional). Secondary fuel filter mounted on engine is supplied by engine manufacturer.
Propane units have an 81 U.S. gallon tank capacity and are equipped with two
propane fuel filters.
Horn
Electrical dual horns.
Backing safety horn variable db. A Variable db, backing safety horn activated whenever the bus is shifted into reverse. Sounds between 87 and 112 db automatically
adjusting itself depending on the ambient noise level in the proximity of the alarm.
Instruments / Gauges
Gauges: Speedometer; Odometer; Oil Pressure; Fuel Level; Coolant Temperature;
Voltmeter; Transmission Temperature. Tachometer. Front Air Pressure; Rear Air Pressure on units equipped with air brakes; Driver Information Display.
LED Warnings / Telltale Indicators: Range Inhibit, Engine Oil Temperature, Brake
Failure, Wait To Start, ABS, Park Brake Applied, Check Transmission, Left Turn Signal,
High Beam, Right Turn Signal, Stop, Communication Failure, Check, Coolant Level,
Transmission Oil Temperature, Water In Fuel, Stop Light, Service Engine, Cruise Control, Coolant Temperature, Low Fuel, Low Secondary Brake PRessure, Low Primary
Brake Pressure, High Voltmeter.
Driver Information Display: Interactive LCD display provides system alerts such as
battery voltage, low air pressure, engine maintenance, J1939 communication failure,
vehicle speed, service engine, turn signal on; and also displays service diagnostic
features.
Steering
Full power Ross TAS-55 integral unit with 20.4 to 1 ratio; with TRW Power Steering
Pump.18” diameter, two-spoke, padded steering wheel with tilt steering column.
Tires
Michelin 10R 22.5 G tubeless XZE Highway Tread.
Tow Hooks
Two front frame mounted (standard). Two rear frame mounted (optional).
14
general specifications
Transmission
Allison 2500 PTS Series transmission, 5 Forward speeds- 1 reverse, with Gen 4 T-handle shifter mechanism. Dextron III fluid.
Wheels
Hub Piloted steel 10 stud disc wheels, single front, dual rear, 22.5 x 7.25 rims.
Wiring
Blue Bird single-zone Multiplex chassis circuit wiring system with MPX Module located in Power Distribution Unit compartment at front of bus below dash. Includes
diagnostic switch in driver’s switch panel for service diagnostics.
General Specification, Body
Panels & Compartments
Battery Compartment. Enclosed compartment 23.63”L x 24.00” D, has roll-out tray.
Includes retaining pins with cables to secure the tray in a closed position. Hinged
door with recessed locking “Paddle Handle” latch. Located on front of left side of
bus.
Exterior Electrical Compartment. Left front side of bus, below Driver’s window.
Power Distribution Unit. Inside the bus, centered on the front wall against the floor.
Cover removable with two thumbscrews. Houses the main Multiplex Main Bus Controller, battery power distribution connections, and other electrical connections.
Side Electrical Channels. Inside the bus above the side windows on both sides.
Houses the trunks of all body harnesses and other optional component wiring, such
as radio / PA speakers, if so equipped.
Emergency Doors
Rear center door with 37.7” wide x 52.5” high opening. Single-point bar lock latch
with inside handle and guard. 6” chrome-plated recessed exterior handle. Upper and
lower clear tempered. 5” black upholstered header pad.
Buzzers: Two buzzers—one located in the Driver’s area and one near the rear emergency door—sound when any emergency exit is engaged.
Entrance Doors
Standard: Blue Bird two-panel Outward Opening door with manual door control.
Optional: Bode electically-operated two panel outward opening door. Permanently
lubricated bearings and bushings. Mechanical clutching system in the gear case
disengages the worm drive to allow emergency manual opening of the door. Clear
(standard) or tinted (optional) glass. 5” black upholstered header pad.
15
VISION
drivers handbook
Electrical
Multiplex system incorporating chassis circuits. Power Distribution Unit under windshield near floor.
Fans (optional)
One 6” fan mounted left of the Driver seat, with or without a second 6” fan mounted
right of the Driver at body centerline. Controled by single switch.
Floor
Covering. 3/16” thick ribbed black rubber in aisles and at entrance aisle area. Aluminum aisle trim over join in floor covering, full lenght of body. 1/8” smooth black
rubber under seats. Molded black smooth rubber over wheelhousings.
Subfloor. 1/2” Fir plywood, secured to steel floor panels with screws.
Heater/Defroster
90,000 BTU front system on Driver’s side with continuous ducted defronsting of
windshield and Driver’s window. Washable filter. Driver selects recirculating of fresh
air into system as conditions require. Manual ball type water flow control valve on
heater next to driver, for temperature control. Goodyear Hi-Miler heater hose with
constant torque clamps at all joints.
Insulation
The roof, sides, front and rear (including corners and bow cavities) are insulated with
1 1/2” thick fiberglass providing an R-value of 5.75.
Lettering
SCHOOL BUS black vinyl lettering on front and rear caps. Yellow reflective background optional. Vinyl lettering on top of emergency windows and rear emergency
door on both interior and exterior of vehicle, according to federal regulations. Operation instructions decal on all emergency exits. French decals options available.
Lights
Backing: Two 5” clear incandescent right and left rear.
Clearance: Two amber front and two amber rear single. Switch operates clearance,
cluster, and side marker lights.
Daytime Running: Head lamps, tail, license plate, parking, clearance & marker lights
activated when engine is running.
Directional: Two 4” plain amber fender mounted. Two 7” amber lights mounted on
rear.
16
general specifications
Dome: 6 Candlepower single row equally spaced at center over aisle. Single control
switch.
Headlights: Dual element 65w high beam / 45w low beam 9004 halogen bulbs
mounted in contoured lens housings.
Stepwell: 14 candlepower. Wired to operate with ID lights with entrance door open.
Stop and Tail: Two combination lights, 4” right and left rear license panel in combination with 7” stop and tail lights with clear red lens.
Warning Lights: Weldon 8 light sequential system with dual hoods.
Mirrors
Exterior Crossview: A Rosco Mini-Hawkeye crossview mirror system allows a seated
driver to view pedestrians while the bus is stopped. The crossview mirror system is
comprised of a 10.8” x 12.5” elliptical mirror with tinted upper portion to reduce glare
supported by a center mounting post with ball stud mounted, on both left and right
sides of the bus. The mirror mounting posts are attached to the front cowls, and feature a breakaway pivot to minimize damage in the event of accidental contact. The
crossview mirror system allows for viewing all areas along the front and sides of the
bus which are not visible by direct view.
Exterior Rearview: Rosco Avia non-detend rearview mirror system. Provides view
of teh roadway to the rear, as well as a view of teh ground along both right and left
sides. Rearview mirror system is comprised of a 74 square inch flat and a 38 square
inch convex, 36” radius mirror on both right and left sides. Right rearview mirrors are
located so as to be visible through the wiped area of the windshield. Left rearview
mirrors are located so as to be viewed through the Driver’s window. Both right and
left rearview mirrors feature a breakaway indexed pivot and are adjustable without
tools.
Interior Rearview: 6” x 30” with 3/16” clear safety glass laminated to steel backing
plate. 1 3/4” radius rounded corners. Perimiter of mirror edged with 5/8 diameter
rubber padding. Interior rearview mirror is installed above the seated Driver on the
front upper inner panel, and provides a clear view of the vehicle interior and roadway
to the rear, through the windows of the rear emergency door.
Paint
Exterior: Heat cured polyurethane. National school bus yellow with black rub rails,
bumpers, and around Warning Lights.
Interior: Astro White, hot sprayed-on baked enamel, except aluminized inner side
panels. Seat frames, heaters and trim are black. Switch console and dash medium
gray.
Rust Proofing: Body parts thoroughly rust-proofed after fabrication and before assembly.
Undercoat: Underside of body floor, skirt and wheelhousings thoroughly undercoated prior to body mount on chassis to ensure best coverage and maximum corrosion
resistance.
17
VISION
drivers handbook
Panels, Exterior
16 1/4” skirt. Outside side panels are constructed of 20 gauge form fluted steel. Side
panels extend from below the side windows to a distance of 16 1/4” below the floor
(16 1/4” skirt). Rear corner panels are constructed of 20 gauge steel and include a
license plate emboss, both right and left. The left hand emboss includes nylon nuts
and slot-head screws for license plate mounting. The front roof cap is formed from
18-gauge steel. The rear roof cap is formed from 20 gauge steel. Roof sheets are constructed of 20 gauge steel and span the entire width of the bus (window header
to window header). Roof sheets include an embossed rain visor over side windows.
Front cowl panels are constructed of 11 gauge steel. Floor panels are constructed
of 14 gauge steel and are reinforced with full width “U” channel cross members. All
riveted floor joints are reinforced with full width 3/16” x 1 1/2” x 2” structural steel
angles and 1/8” flat bar.
Panels, Interior
A removable 18 gauge steel front upper inner panel is provided to allow access to the
front roof cap area. A removable 20 gauge steel rear upper inner panel is provided
to allow access to the rear roof cap area. Removable composite wire moldings, right
and left, are provided to allow access to body wiring harnesses. Wire moldings are
provided in sections. Textured aluminized fully hemmed steel inside side panels are
provided, extending from the window sill down to the floor gusset seat ledge, for the
entire length of the body on both left and right sides. Driver’s and first section are
acoustic headlining. Second section and rearward are solid headlining panels, spanning the entire width of the bus (window header to window header), constructed of
22 gauge steel, double-hemmed to provide additional joint strength.
Reflectors
Standard reflectors include:
• Two 3” red mounted on side of body near rear.
• Two 3” red, mounted on rear of body.
• Two 3” amber right and left intermediate side reflectors.
Reflective Tape: One-inch minimum width strip around each emergency exit (roof
hatch/pushout window when ordered). One-inch wide strip of yellow reflective vinyl
around the perimeter of the rear emergency door.
18
general specifications
Rubrails
Four double-ribbed 16 gauge steel applied rubrails are installed along both sides of
the body, as follows: One below side windows; one at seat (Passenger) level; one near
the floor level; one at the bottom of the skirt. The window rail extends from the front
bow on the right or the front cowl post on the left to the rear corner radius. The floor
rail extends from the front bow, both right & front, to the rear corner radius. The skirt
rail extends from the front bow on the right, or the front cowl post on the left, to the
rear bumper (interrupted at wheelhousing cutouts). The seat rail extends from the
front bow, both right and left around the rear corner radius.
Bumper rubrail installed below the rear emergency door immediately above the rear
bumper. Rail spans the full width of body and wraps around the rear corner panels
right and left.
Safety Equipment
Three reflectorized triangular roadside warning devices enclosed in a plastic storage
container, secured to the floor near Driver. 5 lb fire estinguisher in entrance door
area. Two roof escape hatches mounted above aisle.
Seats
Driver’s Seat. National NS2000 pedestal (standard) or air adjustable (optional). Seat
belt is three-point, floor mounted anti-cinch emergency locking retractor.
Passenger Seats. All Passenger seats and barriers are optional and are upholstered
in 42 oz polyester backed vinyl, solid gray.
Stepwell
Three-step riser, National Standard. 10” to 14” ground to lower step height. Stainless
steel. Step treads with non-abrasive black rubber with white nosing. Three inch wide
white ribbed rubber with metal backing wearplate is located at floor level step at the
entrance door. Includes stainless steel assist rail at rear of stepwell.
Stop Arm, Crossing Arm
One Specialty solid state electric operated high intesnity reflective octagonal stop
arm, red with a white border and 6” high lettering. “STOP” or “ARRETT” on both sides.
Includes red incandescent lights over and under the word “STOP” visible from both
sides.
Sun Visor
Transparent dark green tint 6.5” x 30” smooth edge plastic. Located in front of driver.
Adjustable vertically on two arms pivoted at ends of visor and at anchor points on
windshield header.
Switch Panel
Mounted on left of driver with rocker-type illuminated switches for electrical equipment. Brightness of illumination is controlled by headlight switch rheostat.
19
VISION
drivers handbook
Ventilation
Air Intake. Heater intake left front below windshield level provides up to 100% fresh
air through heater.
Roof Vent. Static non-closing vent in front roof.
Windows
Auxilliary Safety-View Vision Panel. Fresnel broad vision 7 1/2” x 13 1/2 in right front
cowl.
Driver’s. Spectal double sliding aluminum sash with security fastener for locking
both sash, laminated green tinted safety glass.
Side. Spectal 12” split sash with clear (standard) or tinted (optional) tempered glass.
Four vertically hinged push-out windows.
Rear Vision. Fixed clear tempered.
Windshield
The windshield consists of four separate pieces of flat shaded safety plate glass. Black
grip handles and fold-up step on right and left cowls to facillitate windshield cleaning.
Windshield Wipers
Electric, intermittent single switch, wet arm wipers. Electric windshield washer with
hard plastic one gallon capacity reservoir located under engine hood, washer outlets
mounted on wiper arms.
Wiring
Colored and continuously number coded in molding on top of side windows for access to harnesses. Body wiring protected by automatic resetting circuit breakers.
20
general specifications
Dimensions
The dimensions shown exclude exterior mirrors, marker and signal lights, bumpers,
fender skirts, washers, wipers, ad frames and rub rail; and are taken under static conditions at design height. Overall maximum height varies from 117” to 118” depending upon choice of tires, suspension system, and body model. Add 3” for roof vents
and 3” for 77” headroom. Rear bumper adds 1.25” to overall body length. Front bumper adds 2” to overall body length.
Length:
Width:
Interior Width:
Height:
Skirt Length:
Wheelbase:
Interior Headroom:
Front Door:
Rear Emergency Door:
Wheel Cut:
Tire Size:
GVWR:
Front Overhang:
FCA (Front Cowl to Axle):
CB (Cowl to Bumper):
CH (Cowl Height):
A:
B:
C:
D:
E:
289”- 471”
96”
90 3/4”
120”- 124”
16 3/4”
189” / 217” / 238” / 252” / 273”
74”- 77”
27” wide, 78” high
52.5” x 37.7”
50°
11R22.5 highway tread Michelin XZE
30,000 lbs.
36.5 (including bumper)
25”
64.5”
33”
21.17”
26.75”
9.5”
41.97”
18”
Dimensions & Payload Weight (standard equipment)
wheelbase
body
model
capacity
payload
curb
weight
total
weight
overall
length
rear
overhang
turn
radius
rca
cf
189”
217”
238”
252”
273”
273”
BBCV2311
BBCV2610
BBCV2807
BBCV3011
BBCV3303
BBCV3310
48
54
60
66
72
78
5910
6630
7350
8070
8790
9510
15,100
16,100
16,300
17,400
18,000
18,400
21,010
22,730
23,650
25,470
26,790
27,910
351
386
407
435
463
470
122.25
129.25
129.25
143.25
150.25
157.25
25.9’
28.9’
31.1’
32.6’
34.9’
34.9’
164
192
213
227
248
248
286.25
321.25
342.25
370.25
405.25
405.25
Pupil weight @ 120 lb each. Driver @ 150 lb.
Approximate curb & total weights are based on standard equipment units. Optional equipment may significantly increase these estimated weights.
21
VISION
22
drivers handbook
DR I V ER OR I ENT A T I ON
Driver Orientation
This chapter is a brief tour of the Vision’s features and equipment locations.
Product Identification Information
Federal Vehicle Certification Plate
This decal certifies that the vehicle complies with all applicable Federal Motor Vehicle Safety Standards (FMVSS) in
effect on the date of manufacture. Do not remove, deface
or cover this decal.
Axle Record and Chassis Service Number Plate
This plate is located inside the bus above the windshield
toward the right side. It contains the serial numbers of the
bus chassis and several major chassis components. These
numbers are important references when ordering parts or
seeking bus-specific service information from your Blue
Bird distributor.
Body Serial Number and Service Number Plate
Also located above the windshield on the front upper panel. This plate contains the
Body Number and several specifications pertaining to the body configuration. The
Body Number is a very important reference whenever ordering parts or seeking service information.
Axle Record & Chassis Service Plate
Body Serial & Service Number Plate
23
VISION
drivers handbook
Data Plates Reference
The illustrations below replicate the data fields on the Chassis and Body data plates.
To create a convenient reference, fill in the data from the plates of the bus in which
this manual is stored. This information is essential when ordering parts or obtaining
service information.
FURNISH INFORMATION BELOW WHEN ORDERING AXLE PARTS
CHASSIS
SERIAL
ENGINE
SERIAL
TRANSMISSION
CATALYST
NO. & DATEL
BRAKE
DRUM
FRONT
AXLE
REAR
AXLE
REAR AXLE
RATIO
BRAKE
DRUM
REAR AXLE
DIFFERENTIAL
CHASSIS SERVICE NO.
BLUE BIRD
FORT VALLEY
FORT VALLEY, GEORGIA
BODY NO.
MODEL YEAR
MFG. BODY DATE
STATE / PROVINCE
EQUIPPED CAPACITY
SPECIFICATION YEAR
MAX. DESIGN CAPACITY
BODY SERVICE NO.
24
driver orientation
Emergency Equipment Locations
Some emergency equipment is optional and differs between states. Generally, all
school buses have first aid kits, fire estinguishers, and trianguar roadside hazard reflector kits; however, the size of first aid kits and fire estinguishers vary. The bus may
also be equipped with a body fluid kit, fire axe, crowbar, or flare kit. All such devices
are generally located in the Driver’s area, but specific locations are also subject to
optional specifications.
Upon taking delivery of the bus, the Driver must locate all the emergency equipment purchased with the bus, and become fully acquainted with its mountings; able
to quickly remove the equipment in an emergency situtation and replace it securely.
Emergency equipment must never be left loose in the bus, but must always be securely stored in its factory-installed mountings during bus operation.
As part of a daily pre-trip inspection, the Driver must verify that all emergency
equipment is in place, fully stocked (First Aid Kit), up-to-date (Fire Extinguisher), and
in proper working condition.
The First Aid Kit is mounted on the interior header panel
above the windshield. Depending upon options or regulatory
requirements the bus may also be equipped with a Body Fluid
KIt in the same general location.
Fire Axe floor
mounted between
Driver’s seat and left
console
First Aid Kit
The first aid kit on most Vision buses is located over the windshield toward the curbside of the bus. Each state has a specific location and contents guide that must be
followed.
Body Fluids Clean-up Kit
The body fluids clean-up kit is located in the general area of the first aid kit. However,
each state has specific requirements for the location and labeling of this equipment.
Know your state’s requirements and maintain the kit accordingly.
Fire Extinguisher
The fire extinguisher on most Vision buses is located near the floor, forward of the
entrance door stepwell or mounted to the floor near the Driver’s seat. States requirements vary for the type and size of the fire extinguisher for school buses. The fire
extinguisher must be monitored to ensure the charge level is within the acceptable
range, and the expiration date current. It is the responsibility of the driver to ensure
compliance prior to each trip.
Triangular Roadside Hazard Reflector Kit
For those states requiring the triangular markers to be located in the driver’s compartment, this container is mounted on the floor immediately behind the driver’s
seat. In some states, it is mounted on the floor, under the rearmost left-hand seat or
under the second right hand seat. The contents of the triangular warning device kit
should be checked each month or as the regulations of your state dictate. See the
Enroute Emergencies chapter for instructions on deploying the refelectors.
Triangular Roadside
Hazard Reflector Kit
Fire Extinguisher size and
location varies according to
options and state specs.
Triangular Roadside Hazard Reflector kit may also be
mounted behind the Driver’s seat, or at the rear of the bus just
inside the Rear Emergency Door opening.
25
VISION
drivers handbook
Flare Kit
If the bus is equipped with a flare kit, on most Vision buses it is typically mounted on
the floor behind the Driver’s seat and left side seat barrier. The location may differ
according to state specs. The kit contents should be inventoried every 30 days, or
as required by your state and local regulations. The mounting fasteners should be
checked monthly to ensure security.
Fire Axe and Crowbar
If the bus is equipped with fire axe and/or crowbar options, on most Vision buses
they are typically mounted on the floor behind the Driver’s seat and left side seat
barrier. The location may differ according to state specs. The Fire axe cutting edge is
covered by a metal plate when mounted.
Crowbar mounting latch
26
driver orientation
Driver’s Area
Blue Bird has designed many new features into the Driver’s area of the Vision. A new
one-piece molded dash housing spans the entire front of the bus. All gauges are
incorporated in a single new main instrument cluster. New switch panels are located
to the right and left of the instrument panel. The left switch console contains three
switch panel banks.
An all-new tilt / telescope steering column provides improved adjustability
range, with a foot pedal release, allowing the Driver to use both hands to position
the wheel for maximum comfort.
Driver Information Display
Left Front Switch / Vent Panel
Left Switch Console
Instrument Cluster
Right Front Shifter / Vent Panel
Right Switch Panel
Heater Control Valve
Steering Column Release Pedal
27
VISION
drivers handbook
Driver’s Instrument Panel
The Vision’s instrument cluster is a single unit of all-electronic guages and warning lights, which receive both analog inputs from such components as the fuel tank
sender and instrument panel dimmer switch; and digital signals from components
such as the engine and transmission control modules. A centrally-located DID panel
displays the odometer reading, error alerts, and service technician diagnostic information. The buttons on the right steering column stalk are used to cycle the DID
through its various modes and menus. If the Vision is equipped with hydraulic brakes,
the instrument cluster contains 6 gauges. Buses equipped with air brakes have two
additional gauges indicating primary (front) and secondary (rear) air pressure.
GaugeData Source
Speedometer Engine ECU via J1939
Tachometer Engine ECU via J1939
Engine Oil Pressure Engine ECU via J1939
Engine Coolant Temperature Engine ECU via J1939
Fuel Level Analog Fuel Sender
Voltmeter Analog input key on
Primary Air Pressure Analog input
Secondary Air Pressure Analog input
Tachometer
Speedometer
Voltmeter
Secondary Air Pressure
Engine Oil Pressure
Primary Air Pressure
Engine Coolant Temp
28
Driver Information Display
Fuel Level
driver orientation
Indicator Lights and Audible Alarm
An arrangement of LED-illuminated warning lights provide feedback to the Driver
about various systems. These are located at the individual gauges, in a small cluster
between the speedometer and tachometer, and across the bottom of the panel, as
indicated below.
An audible sound speaker is incorporated into the back of the instrument cluster,
and sounds to accompany the indicator light warnings. The audible alarm also serves
to indicate turn signal blink and turn signal reminder.
1: Left Turn Signal
2: High Beam
3: Right Turn Signal
4: High Hydraulic Fluid Temperature
5: Hydraulic Brake Failure
6: Stop
7: Low or High Voltage
8: Low Engine Oil Pressure
9: High Engine Coolant Temperature
10: Low Secondary Brake Air Pressure
11: Low Fuel
12: Low Primary Brake Air Pressure
1
2
4
13:
14:
15:
16:
17:
18:
19:
20:
Service Brake Applied
Wait To Start; See “Starting the Engine“
Transmission Range Inhibit
Check Transmission
ABS Fault
Service Engine
Park Brake Applied
High Transmission Temperature
3
5 6
10
7
8
9
13 14
15 16
11
17 18
19 20
12
29
VISION
drivers handbook
Front Switch Panels
The exact arrangement of switches in the two front switch panels located on either
side of the instrument cluster is somewhat dependent upon specific state specifications. (For example, some states require additional switches for red and amber
Warning Light pilots.) Shown are the standard and most common configurations. If
your bus differs from the diagarms shown, check with your local specifications and
familiarize yourself with each switch function.
Left Front Panel
Headlights. This three-position switch turns headlights on (top)
and off (bottom), or turns on Parking Lights (middle). Because daytime running lights are required, the headlights shine at a lower
amperage during normal bus operation after the engine is running,
even when this switch is in the bottom position.
Instrument Dimmer. This slider switch is continuous, but has three
detents. It adjusts the brightness of the instrument cluster and
some of the backlighted switches.
Hazard Lights. This two-position switch turns on / off the front and
rear turn signals as blinking hazard flashers.
30
Headlights
3-position:
Headlights
Park Lights
Off
Instrument Dimmer
3-stop slider.
Slide to dim / brighten
instruments.
Hazard Switch
2-position on / off.
Turns on / off
exterior hazard blinkers.
driver orientation
Right Front Panel
High Idle. Increases engine idle speed from 800 to approximately 1200 RPM. Place
the transmission in Neutral and set the Parking Brake before switching the engine
to High Idle. This function is useful when the bus is parked and left running for long
periods of time or when electrical system demands are high such as running the AC
or operating a wheelchair lift.
Diagnostic Switch. Provides diagnostic functions for the IO Control Multiplex system
and the ABS system. For use by qualified personnel for diagnostic purposes only.
Exhaust Brake. Activates the exhaust brake to help slow the bus down during deceleration.
Exhaust Brake
2-position on / off.
Helps slow-down
during deceleration.
Diagnostic Switch
Momentary.
Used by service technicians to
cycle modes of diagnostic LEDs.
High Idle
2-position on / off.
Raise engine idle RPM & to
increase alternator output.
31
VISION
drivers handbook
Side Console Switch Panels
The exact arrangement of switches in the top switch panel of the side conslole may
vary depending upon optional equipment. Shown is the standard configuration.
Common options which may populate this panel include switches for mirror heaters,
auxilliary heaters, or additional dome lights.
Side Console Upper Switch Panel
Dome Lights. 2-position switch. Turns on / off the overhead lights in the passenger
area. Some Vision buses have two of these switches, one each for the dome lights in
the front half and rear half of the bus.
Driver Dome Lights. 2-position switch. Turns on / off the overhead light in the Driver
area.
Noise Supression. Momentary switch. When
pressed and held, certain noisy devices such as
auxilliary fans and heater blowers are momentarily turned off to enable the Driver to better
hear ambient sounds, such as railroad signals
and gate intercoms or personnel, etc.
Center Fan. 3-position (High, Off, Low) switch.
Controls the auxilliary fan mounted above the
center of the windshield. This fan is provided
for general air circulation, Driver comfort, and/
or to help accellerate windshield de-fogging
under certain conditions.
Driver’s Fan. 3-position (High, Off, Low) switch.
Controls the auxilliary fan mounted above the
windshield and to the left of the Driver.
Strobe Light. 2-Position on / off switch. Controls the roof-mounted strobe light.
Console Panel Dimmer. 3-stop slider switch.
Dims or brightens Console Panel switches.
Mirror Defrost. Momentary switch. Activates
defrosting system for exterior rearview mirrors.
32
Dome Lights
2-position on / off.
Turns on / off
passenger
compartment
dome lights.
Center Fan
3-position
High / Off / Low.
Driver’s Fan
3-position
High / Off / Low.
Mirror Defrost
Momentary.
Defrost exterior
rearview mirrors.
Driver’s Dome
2-position on / off.
Turns on / off
driver’s dome light.
Console Panel Dimmer
3-stop slider.
Slide to dim / brighten
console switches.
Noise Suppression
Momentary.
Turns off noise making
devices in driver’s area.
Strobe Light
2-position on / off.
Turns on / off
exterior strobe light.
driver orientation
Side Console Lower Switch Panel
The lower panel of the Side Console contains controls for the front heater unit which
is housed immedately below the Side Console left of the Driver seat. Ducts from this
unit also provide windshield defrosting.
Fresh / Recirculate. This knob controls the type air, which is circulated by the heater
system and fan. By turning clockwise, air is circulated from the interior of the vehicle.
This is desirable when trying to heat passenger compartment rapidly. By turning the
control knob counterclockwise air from outside the bus is used in the system. This is
helpful when trying to cool the vehicle.
Front Entry Heater
Underseat Heater Switches
Heater Fan. This knob adjusts the speed of the fan, which circulates the air in the
system. In the counter clockwise position, the blower is off. By turning clockwise, 3
speeds can be achieved — low, medium and high..
Defrost / Bus. This knob adjusts the air flow balance between the vehicle passenger
compartment and the windshield. By turning knob clockwise, a damper is moved
and air is diverted toward the windshield for defrosting.
Driver / Passenger. This knob Adjusts air flow balance in two directions. By turning
knob clockwise, a damper is moved and air is diverted toward the driver. By turning
counterclockwise, the air is diverted toward passengers. The amount of air diverted
is proportional to amount the knob is turned.
Front Entry Heater. 3-position (High, Off, Low). Controls heater blower at entrance
door stepwell area.
Underseat Heater Switches. 3-position (High,
Off, Low) . Additional 3-position heater switches
may be located in the side console upper panel if
the bus is equipped with optional passenger area
underseat heaters. These switches control the fan
speed of underseat heaters.
Perimeter Convection Heater Switch. 2-position
(On / Off). If the bus is equipped with optional
perimeter convection heaters in the passenger
area, a switch is provided to toggle these heaters
on and off. This switch operates an electric valve
which controls the flow of engine-heated water.
Heater Pump. This knob controls vents which
direct the distribution of heated air between the
Driver outlets and the windshield outlets.
Optional Underseat Heater
Fresh / Recirculate
2-position.
Front Entry Heater
3-position.
High / Off / Low.
Heater Fan
4-position.
Off / Low / Med / High.
Defrost / Bus
2-position.
Driver / Passenger
2-position.
Underseat Heaters
3-position.
High / Off / Low.
and/or
Convection Heaters
2-position.
On / Off.
Heater Pump
2-position.
On / Off.
33
VISION
drivers handbook
Forward Console Switch Panel
Warning Light Pilots. The amber pilot illuminates and blinks when the amber lights
of the Warning Light System operate. The red pilot illuminates and blinks when the
red lights of the Warning Light System operate.
Warning Light Master. This switch is a two-position on / off switch which controls
the Warning Light System. This switch must be on whenever the Warning Light System system is required. Specific requirements vary according to state specifications.
Generally, the use of the Warning Light System is required whenever picking up and
discharging students. The Master switch enables you to disable the Warning Light
System when stopping for other purposes such as fueling stops.
Warning Light Start. This switch is a momentary switch which activates the Warning Light System. Press this switch upon approach to each school bus stop. In most
Warning Light System configurations, this activates the amber warning light flashers.
When the door is then opened, the red warning lights are activated and the stop arm
and crossing arm extend.
Warning Light Emergency Switch. This momentary switch activates the red warning lights for use in the case of emergency, such as a roadside hazard.
Warning Light Master
2-position.
On / Off.
34
Warning Light Pilots
2-lights.
Amber & Red.
Warning Light Emergency
Momentary.
Activates red warning lights.
Warning Light Start
Momentary.
Press to activate when
approaching bus stop.
Activates amber lights.
driver orientation
Heater Valve Lever
A red lever on the front heater housing to the left of the Driver’s foot area controls
the rate of heated fluid flowing through the heater unit, providing a “temperature
control” for the heater.
Heater FIlter Panel
The filters in the heater system must be maintained and changed on a regular basis,
to maintain the airflow across the heater cores. The main heater filter is located behind a small panel at the driver’s left. This panel is held in place by luggage type over
the center clasps. To remove the filter, pull upward and outward. To replace the filter,
press it firmly into position and replace the cover panel. The cover panel must be in
place to maintain the airflow through the filter.
Heater Filter Access
35
VISION
drivers handbook
Steering Column
The Steering Column of the Vision is a design new to Blue Bird school buses, providing easy adjustment and greater range.
Steering Wheel Position
A foot pedal left of the service brake pedal releases the column so it can be adjusted with both hands on the wheel. The position is not limited to a small number of
detents. Releasing the pedal clamps the column securely at its position anywhere
within its travel range.
Left Switch Stalk
The left stalk controls turn signals, high / low beam, and also contains the cruise
control switches.
Right Switch Stalk
The right stalk controls windshield wipers and washers. It also contains switches
which are used to communicate with the DID (Driver Information Display) of the instrument panel. The DID provides graphic information to the driver as well as diagnostic information for qualified service technicians.
Cruise Control
The Cruise Control is provided to to improve fuel economy and lessen driver fatigue
during long periods of uniform speed travel. To operate the Cruise Control:
1. Attain the desired speed in the normal manner, with the foot-operated accelerator.
2. Press the “On-Off” slider switch toward the left (On) to activate the system at
the current speed.
3. Press the + or - buttons on the end of the stalk to incrementally adjust speed.
To make larger speed adjustments, release the cruise control by tapping the
brake, and then use the throttle to reach the desired speed. Then again press
the slider toward the left.
4. To momentarily deactivate the cruise feature, press the brake pedal. This will
disengage the cruise control and begin to apply brakes.
5. When you wish to again use the cruise control feature, press the slider switch
toward the left to Resume the previously set cruise speed.
If the ignition is switched off, or if the Cruise Control slider switch is pressed toward
the right (Off), the cruise control is deactivated.
36
DID Switch
On / Off / Select.
Displays DID graphics &
allows menu option selection.
Right Stalk
DID Escape
Press to return to
previous menu option.
DID Toggle
Allows scroll of
menu options.
driver orientation
Instrument Panel DID Controls
Cruise Controls
Set, +, -, Resume, On / Off
Left Stalk
Right Stalk
Turn Signals
Windshield Wipers
High / Low Beam
Cruise Controls
Right Turn
Windshield Washers
Wipers Intermittent
Washers
Toggle High / Low Beam
Wipers Low
Left Turn
Wipers High
Tilt / Telescope Release
37
VISION
drivers handbook
Parking Brake, Units With Air Brakes
On Blue Bird Vision buses equipped with air brakes, the rear wheel air chambers
also enclose powerful coil springs. These springs automatically apply the rear brakes
whenever air pressure is absent. These spring brakes also serve as the Driver-controlled parking brake.
The parking brake knob is an air valve which, when pulled outward, releases
air pressure from the rear wheel chambers. This allows the springs to apply the rear
brakes.
Pushing the parking brake knob inward allows air brake system air pressure to
retract (cage) the coil springs. If air pressure is insufficient for safe normal air brakes
operation, the air pressure is also insufficient to disengage the spring brakes. Thus,
it is not possible to release the parking brake until sufficient air pressure has built up
in the system.
38
driver orientation
Parking Brake, Units With Hydraulic Brakes
Blue Bird Vision buses equipped with hydraulic brakes are also equipped with a
drum/shoe-type brake mechanism mounted to the driveline at the rear of the transmission. When applied, the park brake prevents the driveshaft from turning.
A control cable leads from the parking brake mechanism to a lever mounted in
the Driver’s area immediately left of the foot pedals, just above the steering column
release pedal.
To apply the parking brake, grasp the grip handle of the lever and pull firmly
upward. When properly adjusted, a detent resistance is felt at the end of the lever’s
travel. The lever is designed to require 90-100 pounds of pressure to fully apply the
parking brake. Always apply the brake fully, pulling it upward to a horizontal position
at the full extend of its travel.
To release the parking brake, apply the service brake with the left foot to prevent
movement when the parking brake is released. Then grasp the parking brake lever
with the left hand, press the thumb release button on top of the grip and lower the
lever fully all the way against its lower stop.
[CAUTION] Always release the parking brake lever fully. Leaving it in a partially raised position can allow the shoes of the parking brake mechanism to
drag while the bus is operated, resulting in overheating and accelerated wear
of the parking brake shoes and drum.
When releasing the parking brake, always be sure to release it
fully, all the way to the stop of the lever’s travel.
The parking brake lever’s grip incorporates a threaded adjustment mechanism to
allow a service technician to make fine adjustments to the cable tension. The adjustment is made by loosening a set screw in the grip handle and then rotating the grip
on its shaft. This adjustment is designed to be performed in the service facility, not
during normal operation of the bus. During normal operation, the grip should not be
free to rotate. If the Driver ever finds the grip free to rotate when applying or releasing the lever, it should be taken as indication that the setscrew is not properly tightened. This condition should be reported to service personnel, and proper adjustment
and tightening should be performed.
Similarly, always apply the parking brake
fully to its upper stop.
A detent pressure should be felt toward the
end of the lever’s upward travel.
When releasing the brake, press the thumb
button to allow the lever to be lowered.
The grip of the lever should not turn during
normal operation.
39
VISION
drivers handbook
Driver’s Seat, Standard
The standard Driver’s seat in the Blue Bird Vision is mounted on a spring-loaded pedestal. Several manual adjustments are provided for maximum control, safety and
comfort:
Height Control. The telescoping cylindrical tubes of the seat base enclose a coil
spring which pushes the seat height upward when the seat is not loaded. A hand
operated lever on the right side of the seat mount latches the seat into one of several height increments, and tightening the adjacent hand-operated knob locks the
seat securely at the current height. To change the height, crouch beside the seat and
loosen (counterclockwise) the knob on the seat base. This allows the spring in the
seat base to raise the seat when the lever is raised. Raise the lever and hold it while
pushing the seat down to the desired height. Release the lever. Raise / lower the seat
to ensure it snaps into the nearest of the preset notches. Then tighten the locking
knob securely.
Back Tilt Control. Turn the large knob located at the bottom of the left side of the
seat back, where the seat back attaches to the seat bottom.
Lumbar Support. The knob located at mid height on the right side of the seat back
tightens / loosens a lumbar support built internally into the seat back.
Seat Bottom Fore / Aft Slide. A lever located under the front edge of the seat bottom
releases the seat track allowing the seat to be adjusted fore or aft. While seated, pull
the lever toward the left. Slide the seat fore or aft to the desired position and release
the lever. Slide the seat slightly to ensure the lever latches into one of its locking
notches.
Seat Bottom length. Under the front edge of the seat bottom, directly above the
slide release lever is a handle which allows the seat bottom to be pivoted forward,
effectively “lengthening” the seat bottom for Drivers with longer legs. To move the
seat base to the forward position, stand beside the seat. Grasp the front handle with
your right hand, and the side of the seat bottom with your left. Lift the seat slightly
and pivot it forward. Then press it down firmly into position.
Pivoting the seat bottom forward in this way also clears the seat bottom from
the seat back, allowing the bottom to be hinged forward to gain service access to
the seat pedestal mechanism.
Driver Lap & Shoulder Belt
To use the seat belt/shoulder harness, pull out an adequate amount of webbing and
engage the buckle. The retractors will pull the harness snugly into place. You may adjust the height of the shoulder harness by positioning the bracket to the most comfortable level. The buckle can be released by pressing on the button at the center.
[WARNING] The driver’s seat belt should be worn any time the bus is moving.
40
The upper mount of the shoulder harness is adjustable for
proper position across the Driver’s chest. Press down on
the release button and slide the strap mount to the desired
height. Release the button and ensure that the slide latches
into the nearest preset notch.
driver orientation
Back Tilt Adjustment
Lumbar Adjustment
Standard Driver Seat
Height Adjustment
Fore / Aft Slide Release
Rear Position
Front Position
Flipped Open
41
VISION
drivers handbook
Driver’s Seat, Air
The air ride Driver’s seat in the Blue Bird Vision is mounted on an air-powered scissor mechanism which houses its own electric air compressor. Several manual adjustments are provided for maximum control, safety and comfort:
Height Control. The front-most (red) switch located on the side of the seat bottom
adjusts seat height. Press the top or bottom side of the rocker switch to raise / lower
the seat.
Lumbar Support. The rear-most (white) switch located on the side of the seat bottom adjusts the lumbar support. Press the top or bottom side of the rocker switch to
increase / decrease lumbar support.
Back Tilt Control. To adjust the overall tilt of the seat back, turn the large knob located at the bottom of the left side of the seat back, where the seat back attaches to
the seat bottom.
Seat Bottom Fore / Aft Slide. A lever located under the front edge of the seat bottom
releases the seat track allowing the seat to be manually adjusted fore or aft. While
seated, pull the lever toward the left. Slide the seat fore or aft to the desired position
and release the lever. Slide the seat slightly to ensure the lever latches into one of its
locking notches.
Seat Bottom length. Under the front edge of the seat bottom, directly above the
slide release lever is a handle which allows the seat bottom to be pivoted forward,
effectively “lengthening” the seat bottom for Drivers with longer legs. To move the
seat base to the forward position, stand beside the seat. Grasp the front handle with
your right hand, and the side of the seat bottom with your left. Lift the seat slightly
and pivot it forward. Then press it down firmly into position.
Pivoting the seat bottom forward in this way also clears the seat bottom from
the seat back, allowing the bottom to be hinged forward to gain service access to
the seat pedestal mechanism.
Driver Lap & Shoulder Belt
To use the seat belt/shoulder harness, pull out an adequate amount of webbing and
engage the buckle. The retractors will pull the harness snugly into place. You may adjust the height of the shoulder harness by positioning the bracket to the most comfortable level. The buckle can be released by pressing on the button at the center.
[WARNING] The driver’s seat belt should be worn any time the bus is moving.
42
The upper mount of the shoulder harness is adjustable for
proper position across the Driver’s chest. Press down on
the release button and slide the strap mount to the desired
height. Release the button and ensure that the slide latches
into the nearest preset notch.
driver orientation
Back Tilt Adjustment
Air Ride Driver Seat
Lumbar & Height Adjustments
Fore / Aft Slide Release
43
VISION
drivers handbook
Interior Compartments
Several interior compartments provide convenient access to service-related components. These are not storage compartments, and should only be opened for service
purposes. Of these compartments, the one most applicable to the Driver is the PDU,
which contains the main fuse panel.
[CAUTION] The compartments described in this section are not storage
compartments. Do not place loose items in any of these compartments.
Power Distribution Unit (PDU). The large black cover below the center of the dash
is the main electrical panel for the Vision, and is an area of primary importance to
service technicians troubleshooting electrical and device communications systems.
The PDU is also referred to as Zone A of the Multiplex electrical system because it
contains the Main Bus Controller module. The PDU also contains the J-1939 data link
interface plug, a diagnostic interface connection used by service technicians.
The PDU contains all the fuses used in the Vision, except one which is located on
a stud in the Zone B compartment. A chart on the inside of the cover identifies the
individual fuses. The PDU cover is easily removable without tools, secured by two
thumbscrews, one on each side of the cover near the top.
Left Console Driver Storage Box. A hinged lid just rearward of the left console switch
panels provides access to a convenient storage compartment for Driver’s items. The
tray of this compartment is removable for service access to electric components underneath.
Right Glove Box. A large capacity glove box is molded into the right side of the dash
housing, near the entrance door.
Entrance Door Header. A removable panel above the entrance door provides service access to the door opening / closing mechanism when equipped with optional
electric Bode entrance door. This compartment is a service access and should not be
used for storage.
Wiring Channels. The molded housings which run the length of the bus above the
passenger area windows, are wiring channels which contain the harnesses for the
body. A service technician can remove the screws which retain the channels to gain
access to the harnesses.
44
driver orientation
Electric Entrance Door Header
Right Glove Box
Wiring Channels
Power Distribution Unit
Left Console Driver Compartment
45
VISION
drivers handbook
Passenger Seats
Blue Bird passenger seats are built to comply with Federal Motor Vehicle Safety Standards (FMVSS).
The Vision’s passenger seats are through-bolted to the floor of the passenger
compartment.
[WARNING] School bus seat spacing is strictly regulated. The seat dimensions and spacing are engineered to provide “compartmentalization” of the
passengers according to stringent safety requirements and testing. Do not
alter the pasenger seat spacing or configuration.
46
driver orientation
Passenger Area Heaters
Some Vision buses are equipped with optional passenger area heaters. The exact
placement and BTU rating of these heaters varies depending upon specific options
and seating configurations. Two types of passenger area heaters may be installed on
Vision buses:
Convection Perimeter Heaters. This type of heater system is fully enclosed within
the main floor-to-wall body frame members which run the length of the body on
each side. Engine coolant is circulated through finned heating tubes running inside
the C-channels. Heated air circulation relies upon natural convection, rather than
forced air.
Optional Convection Heaters
Underseat Heater Switches
Underseat Heaters. This type of heater system uses several individual heater units
mounted to the underside of strategically located seats in the passenger area. Engine
heated water reaches these heating assemblies via tubes running in the body at the
floor. Each underseat heater unit has its own electrically driven circulation fan. The
fans are controlled by 3 position (High / Off / Low) rocker switches mounted in the
upper panel of the Driver’s side console.
Heater Cut-off Valves. The Vision’s heaters operate by circulating engine coolant
which is heated by the normal operation of the engine. Red-painted handled valves
are provided in the engine compartment to isolate coolant flow to the engine, thereby removing all internal heaters from the circuit. Some bus operators choose to turn
these valves off during summer months.
Optional Underseat Heater
Heater Cutoff Valves
Top of engine toward firewall
Right side of engine near frame rail
47
VISION
drivers handbook
Passenger Windows
The opening split sash windows in the Passenger area are of a new design on the
Blue Bird Vision, but operate similarly to other windows familiar to school bus Drivers. To lower a window, place an index finger in both of the spring loaded sliding
latches and slide them inward away from the frame. Hold them inward as you slide
the window sash downward.
There are four intermediate opening positions between fully closed and fully
opened. When the sash is opened to the desired height, release the latch slides and
then push the top of the sash frame upward or downward to make sure the latches
on both sides engage one of the position notches. When the window is in one of the
intermediate positions, the sash can be pushed upward to close without first retracting the latches. However, the notches of the fully-opened positions are designed to
latch more securely. To close a window that is fully open, slide the latches inward and
then slide the sash.
The windows are designed for maintenance free operation. However, a light silicone spray lube may be applied to the slides and frames as needed to help ensure
smooth operation.
Damaged latches can be replaced without removal of the window or sash. Repair
technicians should refer to the Vision Service Manual for the procedure.
Push inward on both slide latches to lower window.
Each window has five open positions. When in any of the
top four positons, the window sash can be closed (raised)
without retracting the latches.
When the window is in its fully open (fully lowered) position,
the latches must be retracted to close the window.
48
driver orientation
Emergency Exits
All emergency exits on this Blue Bird bus meet FMVSS specifications.
In true emergency situations, every second counts. It is therefore essential that
every school bus Driver be completely familiar with the location and operation of
all emergency exits. Read the following descriptions thoroughly, but also practice
operating each of the exits to have not only a mental memorization, but also a tactile
familiarity with the amount of force required to operate the opening, the amount
of space available around the opening, etc. Checking for proper operation of each
emergency exit must be part of the daily pre-trip inspection regimen.
Emergency exits are clearly identified with the words “EMERGENCY EXIT.” Basic
operating instructions are also printed on labels affixed on or near each exit.
The bus is equipped with an audible alarm that sounds when an emergency exit
is unlatched. On the Vision, the DID screen also identifies the open exit(s).
Door hold-open strut
[WARNING] All “Emergency Exits” should be inspected and tested daily. The
labels and decals should be considered part of this inspection and should be
maintained in a clearly legible condition.
Rear Emergency Door
The rear emergency door is opened by lifting the long horizontal handle all the way
upward and pushing the door outward. The door is equipped with a hold-open telescoping strut at the top of the opening. When the door is fully opened, a pawl in this
strut rotates to prevent the door from falling shut. To close the door, push it outward
to the end of the strut’s travel. This causes the pawl to rotate again, allowing the door
to close. Close the door smoothly, push it against the frame firmly to compress its
seal, and close the handle latch fully.
Vandal Lock
The rear emergency door may be equipped with an optional vandal lock. This is a
sliding-bolt type latch with a sensor switch which detects when the vandal lock is
closed. If the vandal lock is closed, the engine cannot be started, and an audible alert
sounds. The vandal lock must be open during normal operation.
49
VISION
drivers handbook
Emergency Pushout Windows
Four of the windows in the passenger area are emergency pushout windows, two
located in the front half of the bus and two in the rear half. There are two variations,
the installation of which depend upon state specifications: vertically hinging and
horizontally hinging. Vertical hinging pushout windows are hinged at the front side
and swing outward like a gate. Horizontally hinged pushout windows are hinged at
the top and push outward and upward.
To open the pushout window, rotate the red handle parallel to the glass and
away from the window frame, as indicated by the nearby decal. Then push the window outward.
The emergency windows should be operated daily as part of the Driver’s pre-trip
inspection. A light spray lubicant may be used on the window latches and hinges to
keep them in smooth operating condition.
50
driver orientation
Emergency Roof Hatch
Depending upon options and/or regulation, the Vision may be equipped with one or
two roof-mounted emergency escape hatches.
To Open
To Close
Grasp the red knob.
Push the white bar upward with the heel of your hand, snapping it in
its upward position.
Rotate the red knob from the position marked “LATCHED” to the
position marked “TO EXIT.”
Pull the hatch downward, engaging its opening side with the white
bar.
Push sharply upward on the red knob.
Grasp the two handholds on the sides of the hatch and pull firmly
downward.
Push the hatch all the way open.
Turn the red knob to the positon labled “LATCHED.”
51
VISION
drivers handbook
Entrance Door Emergency Release
Depending upon purchase options, the entrance door may be manually-operated,
electrically operated, or air operated.
Manually operated doors employ a door control rod connected to a handle
mounted on the dash panel near the Driver. An over-center cam latching mechanism
is released by the driver’s thumb or palm when the handle is opened, and snaps back
into latched position when closed.
Electric or air-operated doors are equipped with emergency release levers so
that passengers can open the door even if the power is off or disabled.
The optional electrically-contolled entrance door is driven by a motor and gear
mechanism in the door header panel. A lever protruding from the header panel
serves to disengage the drive gear mechanism so that the door can be manually
pushed open or shut. This serves a dual purpose: To allow the driver to close the door
after parking and leaving the vehicle, and to serve as a quick door release in the case
of emergency.
To release the door, push the lever upward to rotate it 90° counterclockwise. The
door can then be pushed open or closed manually.
To re-engage the door drive mechanism, rotate the lever 90° clockwise.
Air-operated doors use system air pressure to open the door.
Air-operated doors are also equipped with an energency release
lever mounted above the door. In the case of air pressure failure,
the door closure can be released by flipping the lever toward the
Open direction indicated.
Electically Operated Door Emergency Release
Push upward to release the door mechanism so that the door
can be manually opened or closed.
Rotate the lever downward to engage the door mechanism
for normal control of the door by the switch panel.
Air Operated Door Emergency Release
52
driver orientation
To Open
Exterior Compartments
Engine Compartment
The engine compartment hood of the Vision is mounted on a torsion spring hinge
mechanism just above the front bumper, and is retained in its closed position by two
spring latches, one on each side of the hood near the body’s front cowl. The system is
designed for very easy unassisted one-person opening / closing, and unobstructed
access to engine compartment regular service components.
Release the hood hold-down latches.
To open the engine hood:
1. Unlatch the right side hood latch. Lift the latch handle and free the elastic
latch from the notches of the cowl-mounted bracket. Repeat this for the latch
on the left side of the bus.
2. At the front of the bus, grasp the handhold above the center of the grille.
Pull lightly backward. The torsion hinge is balanced in such a was as to require very little effort to lift the hood. Ad the hood raises, control it with the
free hand, especially in windy conditions. Open the hood fully until it stops
slightly beyond vertical. A spring-cushioned cable on the engine compartment side stops the hood at its open position. A latch strut on the right side
of the hood trips to prevent the hood from accidently falling shut after being
opened fully.
Pull forward lightly on the front handhold.
A spring-loaded cable limits the opening range and helps
support the hood in the open position.
To close the engine hood:
1. Standing just forward of the right front tire, grasp the engine hood overhead
with the right hand. With the left hand, rotate the release cam of the holdopen strut. Slowly lower the hood. The balance of the torsion spring hinge
allows the hood to be lowered in a slow and controlled fashion. There is no
need to suddenly drop the hood to engage a catch. Slowly lower the hood
onto its rear supports.
2. Grasp the handle of the hood hold-down latch and hook the end of the elastic strap into the notches of the cowl-mounted bracket. Then close the latch
handle fully. Similarly secure the latch on the left side of the vehicle.
The hold-open strut automatically trips to prevent accidental
closure.
To Close
Rotate the hold-open cam to release the strut.
Gently lower the hood into position and re-latch the holddown latches.
53
VISION
drivers handbook
Battery Compartment
A hinged door located on the left side of the Vision directly below the Driver’s window provides access to the vehicle’s batteries. The batteries are mounted on a metal
tray which is retained by a pin. To access the batteries, open the compartment door,
remove the retaining pin, and slide the tray outward.
The Vision’s battery compartment.
Fuel Filler
The fuel tank of the Vision is located between the chassis frame rails in the rear overhang portion of the vehicle. The fuel filler door is located on the right side of the
vehicle body, rearward of the rear axle. Read and abide by the warnings on the decal
on the inside of the filler door.
[WARNING] Remove the fuel cap slowly. Observe fueling instructions that
are printed on the inside of the fuel access door to avoid fire and/or explosion
that could result in serious bodily harm or death. Never fill to more than 95%
liquid capacity. 95% capacity is reached at the initial pump cut-off.
Remove the retaining pin…
…and slide the battery tray outward.
Fuel filler door
54
driver orientation
Keeping Your Bus Looking New
Generally speaking, common auto care and cleaning products and practices may be
used.
Washing Tips. Wash the bus frequently using cold water and mild soap. Do not wash
the bus in direct sunlight or use harsh or gritty cleaning compounds. Strong soap
and cleaning chemicals can harm automotive finishes. The soap should never be
allowed to dry on the surface of the paint. Rinse thoroughly and immediately to preserve the paint finish.
In colder climates, road salts and other ice melting chemicals will be deposited
on the painted surfaces, and frequent washing will help ensure the longevity of the
bus body. When cleaning, inspect the underside of the body skirts for collected debris.
Tree sap, pollution from industrial discharge, and bird droppings can damage automotive paint, and a school bus presents large areas for such airborne contaminates
to collect. Remember to include the roof in your vehicle cleaning regimen.
Paint removal in localized areas due to stone impact, deep scratches, or abrasive
chemicals should be repaired as soon as possible to prevent their developing into
more major corrosion problems and affecting the exterior finish warranty.
Remember that a school bus interior is much like a “high-traffic” area in a public
building. Tracked-in petroleum products and road salts can damage the floor and
interior surfaces.
The Vision’s floor covering is a dense, thick (approximately half-inch) and resilient
material, and will help minimize maintainence chores. Clean the floor with a damp
mop. However, never flood the floor, or use a hose to wash the interior. Water can accumulate between the floor covering and the steel floor underneath. Such trapped
moisture will lead to corrosion problems hidden from eyesight.
Hinges, Window Slides, Latches. Light household or automotive spray lubricants
such as WD-40 or silocone based lubricants may be applied as needed. Household
glass cleaners may be applied to window glass.
Seats and Upholstery. Mild soap and a damp rag may be used for routine cleaning.
Household or automotive cleaners formulated for automotive vinyls may be used
to clean stains from the passenger seat cushions. Avoid cleaners or coatings which
leave the surfaces slippery.
55
VISION
56
drivers handbook
Pre-Trip Inspection
Before Placing the Bus in Service
Upon taking delivery of any new school bus, Blue Bird recommends the following
items be double-checked by your service technician before placing the bus in routine pupil transportation service:
•Check the suspension U-bolt torque.
•Check the service brake adjustment.
•Check the park brake adjustment on units equipped with hydraulic brakes.
•Check the torque on all the body “tie-down” bolts.
•Check the torque on the driveline universal joint straps.
•Check all engine, transmission, and other running gear fluids.
•Check the condition and air pressure of all tires.
Daily Pretrip Inspection
A daily pre-trip Driver inspection is required for all school buses. The guidelines below are Blue Bird recommendations specific to the Vision. They neither supersede
nor replace pre-trip checklists provided by your pupil transportation administration
or CDL requirements.
[WARNING] Overnight parking of the school bus should always be on level
and secure ground. A thorough pre-trip exterior walkaround inspection
involves visual inspection of tires and areas under the bus. Do not perform an
exterior walk-around inspection unless it is certain that the bus is prevented
from movement. Before performing the exterior inspection, enter the bus and
make sure the transmission is in neutral, and that the parking brake is fully on.
Exterior Walkaround
1. Approach bus from the front, to begin general exterior inspection.
1.1 On approach, look for any sideways leaning or twisting of the
bus which may suggest tire problems, axle misalignment, or
structural damage.
1.2 Visually inspect the condition of front bus markings such as the
School Bus sign, and reflective markings. Note that the windshield is clean.
1.3 Note that the crossing arm is properly secure and unbroken.
1.4 Grasp mirror brackets to check them for secure mountings.
Check for broken or cracked mirrors, and clean the mirrors if
needed.
üMarkings in good condition.
üWindshield clean.
1.5 Look underneath the engine compartment for any unusual conditions such as dangling harness wires. Look at the ground underneath
for signs of fluid leakage, broken glass, or other debris.
üCrossing arm secure.
üMirror brackets tight.
üNo leaks, debris underneath
57
VISION
drivers handbook
2. Proceed around the left side (Driver’s side) of the bus.
2.1 Check the front left tire. Check for proper inflation pressure. Check
the tread depth, and look for any signs of physical damage. Normal
tread wear should be uniform across the width of the tread. Inspect
the rim for bends or other damage. Check that all lug nuts are in
place. If the bus is equipped with oil lubricated axles, check the sight
glass in the center of the hub for proper oil level.
[WARNING] Tire inflation pressure must not exceed the specifications of the
tire and/or wheel rim manufacturer for the application. The inflation pressure
embossed on the tire sidewall does not take the wheel or rim capacities into
consideration. Tires should not be inflated above the pressure listed on the
Federal Certification plate without consulting your tire/wheel distributor.
2.2 Check the Stop Arm for any signs of physical damage.
2.3 Open the battery compartment door and inspect the batteries.
Check for corrosion on the battery terminals and for loose connections. Close the compartment and make sure it is secure.
üStop Arm in good condition.
üTire condition & pressure.
üLug nuts, axle oil level.
3. Step back for an overall view of the left side.
3.1 Check that all markings are legible and in good condition, including
emergency exit signs and reflective tapes.
3.2 Check for broken windows and any other signs of vandalism.
3.3 Check that all windows are clean.
üBatteries secure.
üTerminals secure & corrosion free.
üMarkings in good condition.
üWindows clean & in good condition.
58
pretrip inspecttion
4. Approach the rear axle, at the front of the rear tire.
4.1 Look under the bus, and across to the other side of the axle. Visually
inspect for any missing suspension bolts, signs of cracks, misalignment, or other physical damage on the opposite side. View the shock
absorber for signs of oil seepage.
4.2 Inspect the left rear tires. Check for correct inflation pressure in both
the outer and inner tires. Check the tread depth, and look for any
signs of physical damage. Normal tread wear should be uniform
across the width of the tread. Inspect the rim for bends or other damage. Check that all lug nuts are in place. Look at the axle center caps
for missing nuts or signs of axle lubricant leakage.
4.3 Look under the bus, behind the rear tires, and view along the back
of the axle all the way across to the opposite side. Be watchful for
any signs of oil leakage on the rear side of the axle; missing, bent,
misaligned, or broken axle/suspension fasteners. Look on the ground
for any signs of leaking fuel, broken glass, or other debris.
üRear axle undercarriage, suspension normal.
üInner and outer tires pressure, condition.
üLug nuts, axle cap nuts in place.
üFree of leaks, seepage, debris.
5. Proceed around to the rear of the bus.
5.1 Inspect the tailpipe for general condition or blockage.
5.2 Step back for an overall view of the rear.Check that all markings are
legible and in good condition, including emergency exit signs and
reflective tapes. Check for broken windows and any other signs of
vandalism.
üTailpipe clear.
üMarkings in good condition.
üWindows clean & in good condition.
59
VISION
drivers handbook
6. Proceed around to the right side of the bus. Approach the rear axle, at the
rear of the rear tire.
6.1 Open the fuel filller door and ensure that the fuel cap is in place and
securely tightened.
6.2 Look under the bus, behind the rear tires, and view
along the back of the axle all the way across to the
opposite side. Be watchful for any signs of oil leakage on the rear side of the axle; missing, bent, misaligned, or broken axle/suspension fasteners. Look
on the ground for any signs of leaking fuel, broken
glass, or other debris.
6.3 Inspect the right rear tires. Check for correct inflation
pressure in both the outer and inner tires. Check the
tread depth, and look for any signs of physical damage. Normal tread
wear should be uniform across the width of the tread. Inspect the
rim for bends or other damage. Check that all lug nuts are in place.
Look at the axle center caps for missing bolts or signs of axle lubricant
leakage.
6.4 At the front of the rear tires, look under the bus, and across to the
other side of the axle. Visually inspect for any missing suspension
bolts, signs of cracks, misalignment, or other physical damage on the
opposite side. View the shock absorber for signs of oil seepage.
6.5 Step back for an overall view of the right side. Check that all markings
are legible and in good condition, including emergency exit signs
and reflective tapes. Check for broken windows and any other signs
of vandalism. Check that all windows are clean.
üFuel cap in place & secure.
üRear axle undercarriage, suspension normal.
üInner and outer tires pressure, condition.
üLug nuts, axle cap nuts in place.
üFree of leaks, seepage, debris.
üWindows clean & in good condition.
Entrance Area Inspection
7. Approach the entrance door. Visually inspect the entrance door glass for
cracks, the frame for structural damage and the closure seals for wear or
damage.
7.1 Open the door and inspect the stepwell for ice or debris that may be
hazardous to passengers. Ensure that the entire entrance area is free
of obstructions such as loose tools or cleaning equipment.
7.2 Grasp the entrance handrail and check it for secure mounting.
üDoor clean and in good condition.
üSteps clean; treads in good condition.
üFree of ice, oil, loose items.
üHandrail secure.
60
pretrip inspecttion
Engine Compartment Inspection
8. Step to the right side of the bus, just forward of the entrance door. Unlatch
the hood latch. Walk to the opposite side and release the other hood latch.
Step to the front of the hood, grasp the hood handhold and pull back to
raise the hood completely. Step to the left side (Driver’s side) front wheel to
proceed with the under-hood inspection.
8.1 Visually inspect the inner side of the wheel. If equipped with hydraulic brakes, inspect the calipers for any sign of brake fluid leakage. Inspect the front axle and suspension for missing, bent, misaligned, or
broken fasteners. Inspect the shocks for signs of oil leakage.
8.2 Visually inspect the steering gear mechanism. Look for signs of fluid
leakage.
8.3 Check the engine oil level.
8.4 Check the brake fluid level, if the bus is equipped with hydraulic
brakes.
8.5 Check the hydraulic fluid level.
8.6 Check the transmission fluid level.
üInner side of left front wheel.
üSteering gear.
üEngine oil.
üBrake fluid.
üHydraulic fluid.
üTransmission fluid.
61
VISION
drivers handbook
9 . Step to the right side of the engine compartment.
9.1 Visually inspect the inner side of the wheel. If equipped with hydraulic brakes, inspect the calipers for any sign of brake fluid leakage. Inspect the front axle and suspension for missing, bent, misaligned, or
broken fasteners. Inspect the shocks for signs of oil leakage.
9.2 Look at the air intake restriction indicator and ensure it is not indicating a restricted air intake.
9.3 Visually inspect the alternator and its connections for signs of corrosion, broken wires, or other physical damage.
9.4 Check the engine coolant reservoir fluid level.
9.5 Check the washer reservoir fluid level.
9.6 Inspect the engine fan / alternator belt for tightness and any signs of
excessive wear or damage.
9.7 Inspect both sides of the radiator for debris and signs of damage.
üInner side of right front wheel.
üSuspension, shock.
10. Turn the cam lever of the engine hood hold-open strut. Close and latch the
right side hood latch.
10.1 Reach up and inspect the condition of the right windshield wiper
blade.
10.2 Walk to the left side and latch the left side hood latch. Reach up and
inspect the condition of the left windshield wiper blade.
üIntake restriction
indicator.
üEngine coolant level.
üWasher fluid level.
üBelt condition.
üAlternator connections.
üRadiator clear of obstructions, debris.
üClose hood, latch right side. Check wiper blade.
üLatch left side. Check wiper blade.
62
pretrip inspecttion
Instrumentation & Driver’s Alert Checks
11. Enter the bus. If the bus is equipped with an electrically-operated or airoperated door, ensure that the emergency release is not tripped. Be seated
in the driver’s seat. Insert the ignition key and turn it to the first On position,
but do not start the engine. All the instrument panel lights and the Driver’s
Information Display illuminate.
11.1 Visually scan the lights, watching for any that do not illuminate. The
gauges sweep during their initialization process. Then the indicator
lights and DID module change to their normal monitoring mode.
Turning the ignition switch to On awakens the Multiplex system. Certain conditions, such as a locked vandal lock or unlatched emergency
exit, may cause audible alerts. Audible alerts may also be heard if the
DID has recorded error codes.
11.2 Note the condition of the battery charge as indicated by the instrument panel voltmeter. Fully charged batteries are necessary to complete the pre-trip inspection.
11.3 Turn on the interior dome lights. Walk toward the rear of the bus,
correcting any conditions (such as unlatched emergency windows,
roof hatches, or latched rear emergency door vandal lock) that were
alerted when the ignition switch was turned on.
11.4 Return to the Driver’s seat. Turn off the dome lights. Test other equipment switches in the upper panel of the side console (varies according to options).
üEngage door control.
üAll indicators & DID illuminate during initialization.
üAfter initialization, voltmeter indicates full battery
charge.
ü
If Vanal lock or other alerts are indicated, turn on dome
lights and correct the condition.
ü
Return to seat and check other left console devices.
63
VISION
drivers handbook
Exterior Lights Check
12. With the help of an assistant, operate all of the exterior lights and verify that
they are all working properly.
64
12.2 Note operation of all running lights, marker and clearance lights, and
warning lights on the front of the bus.
12.3 Note operation of all side marker and clearance lights on the left side
of the bus.
12.4 Note operation of all side marker and clearance lights on the right
side of the bus.
12.4 Note operation of all running lights, marker and clearance lights, and
warning lights on the rear of the bus.
üPerform visual inspection of all exterior lights.
pretrip inspecttion
Passenger Area Inspection
14. Perform a general inspection of the cleanliness of the passenger area, and a functional check of all emergency exits.
14.1 Open the Rear Emergency Door, checking it for proper
operation. Ensure that the audible alert sounds when
the door latch is opened. Close the door and ensure that
it latches securely and that the audible alarm goes off.
14.2 Slowly walk toward the front of the bus, inspecting the
condition of the interior as you go. Look for soiled or cut
seat upholstery. Grasp each seatback as you proceed, checking it for
secure mounting. Look for damaged or dirty windows. Watch for any
loose items such as cleaning supplies or tools.
14.3 Upon reaching the rearmost roof hatch, fully open it, ensuring proper
operation and that the audible alert sounds. Close it securely ensuring that the audible alert stops.
14.4 Similarly open and close the two rear emergency exit windows, ensuring proper operation and that the audible alert sounds when unlatched and stops when fully closed and latched.
14.5 Proceed forward, checking condition of each seat, window, and floor
area between seats.
14.6 Upon reaching the frontmost roof hatches and emergency windows,
test them as described above.
14.7 Proceed forward, checking condition of each remaining seat and seat
barrier, window, and floor area between seats.
üEmergency door & alert buzzer working.
üEmergency roof hatches & alerts working.
üEmergency windows & alerts working.
üSeat mountings secure.
üSeat upholstery clean & in good condition.
üWindows clean & in good condition.
üAisle clear; no loose items.
Emergency Equipment Check
15. Having reached the front of the bus again, check all emergency equipment.
65
VISION
drivers handbook
• Check the fire estinguisher charge and expiration date.
• Inspect the flare kit and / or roadside hazard triangular reflector kit for full
content and secure stowage.
• Inspect the fire axe and/or crowbar for secure mounting.
• Inspect the first aid kit and body fluid kit for fully-stocked content and secure mountings.
Prepare For Driveaway
16. Return to the Driver’s seat.
16.1 Adjust the seat height, back, and position.
16.2 Press the steering column release pedal and adjust the steering
wheel position.
16.3 Check the alignment and positioning of all rearview mirrors, interior
and exterior for optimum view. Adjust as necessary.
üFire estinguisher charged, securely stowed.
üFirst aid, body fluid kit(s) stocked, securely stowed.
üAxe, crowbar secured.
üHazard reflector, flare kit(s) stocked, secured..
üAll other emergency equipment in full working
condition.
üAdjust seat, steering wheel.
üCheck all mirrors adjustments.
66
pretrip inspecttion
Mirrors and Mirrors Adjustment
[WARNING] The mirror system on this Blue Bird bus has been designed to
meet all field-of-view regulations. However, it is the responsibility of the driver
to properly adjust the mirrors to provide adequate safety. Mirrors provide
additional visibility and they must be properly adjusted for each driver prior
to each trip. Mirrors are not a substitute for proper driver training and caution.
Never move the bus until each disembarking passenger is accounted for and
clear of the vehicle. Failure to strictly adhere to this procedure can result in
serious injury or death.
The Blue Bird Vision is equipped with four external rearview mirrors. The curbside
rearview flat mirror and convex mirrors are mounted from the top of the bus, near
the top right-hand corner of the windshield in a common housing. The driver’s side
rearview mirrors are mounted near the bottom left-hand corner of the windshield.
Two hood-mounted crossview mirrors provide view in front of the bus and along
each side. The hardware for the fender mounts must be maintained at 20 – 25 Ft lb.
torque to minimize vibration.
[CAUTION] Do not over-torque the mirror mounting hardware.
The outside rearview mirrors are designed to allow the seated driver a comprehensive view of the areas at each side of the bus and to the rear of the bus.
[WARNING] There is a “blind spot” directly behind the bus that extends
several feet to the rear of the vehicle.
Mirrors must be adjusted for each individual driver of the bus.
1. Ensure the driver’s seat is properly adjusted.
2. Adjust the right-hand flat mirror so that the tops of the right-hand windows
are visible in the upper edge of the mirror and the right-hand side of the bus
is visible along the vertical, inside edge.
3. Adjust the right-hand convex mirror so that the view in the convex mirror
overlaps the view provided by the flat mirror above it. The right-hand side of
the bus must be visible in this mirror as well.
67
VISION
drivers handbook
4. Adjust the left-hand flat mirror in
the same manner as described for
the right-hand flat mirror.
5. Adjust the left-hand convex mirror
in the same manner as described
for the right-hand convex mirror.
6. Adjust the elliptical cross-view mirrors by positioning each mirror so
the arrow embossed on the mirror
head points directly at the driver’s
eyes.
7. The final adjustment of the mirror
system must be accomplished to
provide the seated driver a view
consistent with the requirements
of FMVSS 111.
• The driver must be able to see
the entire test cylinder in each
location.
• The driver must be able to see
the entire top surface of cylinders “M” and “N”.
• The driver must have a view of at
least 200 feet from the surface of
the mirror.
• The elliptical cross-view mirrors should be adjusted so the seated
driver has a complete view of all cylinders “A” through “P”, when they
are positioned as shown in the illustration, and not directly visible.
• The view provided by the elliptical mirrors must overlap the view afforded by the rear view driving mirror system.
All mirrors must be cleaned and adjusted as necessary to provide a safe driving environment. The use of a mild ammonia/water solution is recommended to clean mirrors.
68
R o u t i n e O p e r at i o n
Routine Operation
In terms of vehicle controls, driving a modern school bus like the Vision is not radically different from driving a passenger car, truck, or van. Features like power assisted brakes and steering, and modern suspensions and transmissions have removed
much of the fatiguing aspects and “big truck” feeling of school buses in earlier decades. Therefore, becoming comfortable with operating the Vision will be easy.
However, the differences whcih do exist are extremely important and the dilligent pupil transportation Driver must be ever mindful to avoid being lulled into a
mental state of complacency. Despite the ease of operation, modern school buses
are still very large vehicles; and the cargo they carry is the most precious of all.
This chapter describes some of the general differences which a Driver new to
school bus operation may experience, and specific feature and equipment differences of the Vision in particular with which the Driver will interact every day.
Maneuvering Safety
School buses are operated in a wide variety of conditions ranging from Southwestern
desert roads to tight inner-city alleyways. Refer to the dimensions chart in the General Specifications chapter to understand some of the considerations imposed by the
physical size and geometry of the bus which may come into play in your school route
environment. The proportionally long wheelbase means that the height of rises and
humps which the bus can traverse without contacting the underskirt is dependent
not just upon their height, but on their length or duration of the hump.
The rear overhang of school buses is longer than other vehicles. This must be
borne in mind in situtations such as nearing curbs or embankments on sharply-rising grades, as well as in tight turns as the body overhang “swings around” behind
the rear wheels.
The Driver is responsible for determining that the loading area is clear before
stopping to load passengers, and must ensure that all unloaded passengers are clear
before moving the bus.
States and other regional school bus adminstration organizations sometimes
conduct training or practice seminars such as school bus “rodeos.” Blue Bird encourages participation in any program designed to increase the skill and safety of our
nation’s school bus force.
69
VISION
drivers handbook
Prior to Starting the Engine
For the most complete engine starting details, refer to the engine manufacturer’s
Operator’s Manual. A copy of this manual is provided in the material shipped with
your new Blue Bird bus. The information and/or instructions in the manufacturer’s
manual takes precedence over the more limited information in this manual.
Your Blue Bird bus is equipped with an engine alarm system, designed to help
prevent major damage due to high coolant temperature and/or low engine oil pressure. If so equipped, when the engine coolant temperature exceeds 210º F (99º C)
and/or the engine lubricating oil pressure falls below 6 psi, an alarm will sound.
[CAUTION] The engine must be shut down immediately when the alarm
sounds to avoid costly engine damage.
[WARNING] Engine exhaust contains products of combustion that may be
harmful to your health. Always start and operate the bus in a well-ventilated
area. If the engine must be operated in an enclosed area, vent the exhaust to
the outside.
Perform the required, daily, under-the-hood inspection and maintenance. Also perform any other periodic maintenance prior to starting the engine. This routine can
help avoid costly major repairs later.
Starting the Engine
[WARNING] Never use ether as an aid in trying to start the engine.
To start the engine normally:
1. Engage the parking brake and place the transmission in neutral.
2. Turn the keyed ignition switch to the “ON” position.
3. Once the “Wait to Start” light is no longer illuminated, turn the key to “START”,
to crank the engine.
• On diesel powered units, the air inlet heater will turn on if the sum
of the coolant temperature and the air inlet temperature is less than
109º F (25º C). The “Wait to Start” indicator time may vary somewhat
depending upon the temperature. Colder temperatures may increase
the time the “Wait to Start” indicator illuminates. Once the engine is
started, the Wait to Start indicator may cycle on/off as the engine
warms. It is okay to operate the bus after the first time the Wait to
Start indicator has gone off.
• On propane powered units there is a preset time of 20 seconds for
the “Wait to Start” indicator. This time is alotted for a purge cycle
of the liquid propane fuel system. Do not try to start the bus until
the “Wait to Start” indicator cyles off. When the light cycles off, start
70
routine operation
the engine. If the light starts flashing switch the ignition key off and
restart the process.
[CAUTION] Wait until the “Wait to Start” light is no longer illuminated
before turning the ignition to the “Start” position. Do not crank the engine
continuously for more than 30 seconds. If the engine has not started in 30
seconds, allow the starter motor to cool for at least 2 minutes. Do not engage
the starter when the engine is running. Do not attempt to start the engine
under load.
4. While the engine is cranking, the instrument panel lights will go off. After
the engine is running, the gauges will cycle through their startup sequence.
After the startup sequence, if any indicator lights remain on, take appropriate action according to the indicated condition.
[CAUTION] The oil pressure should rise within 15 seconds after the engine
starts. Do not increase engine speed until the oil pressure gauge indicates normal. If oil pressure is not indicated on the gauge in 15 seconds, do not operate
the bus. Stop the engine and refer to qualified service personnel.
5. Release the key switch and allow it to return to the “ON” (or run) position
immediately after the engine starts. After the engine starts, ensure that the
transmission is still in the neutral position. Once a normal engine oil pressure
and air pressure are established, the vehicle may be operated at a light load
and speed.
6. After the engine has started, the air inlet heater may continue to run in a
“continuous” mode or intermittently. The air inlet heater will automatically turn off when the sum of the engine coolant temperature
and the air inlet temperature exceeds 127º F (35º C).
7. If the engine is operated at a light load and low speed, it will reach
normal operating temperature more quickly than if it idles at no
load. When idling in cold weather, increase the engine idle speed to
a maximum of 1200 revolutions per minute (RPM); this is the “HIGH
IDLE” function. Do not exceed the no-load recommended RPM during the warm up process. Limit unnecessary idle time to 10 minutes.
High Idle Switch
High Idle Function
The high idle control positions the throttle at high idle. This allows the engine to
warm up faster than at the normal low idle position. High idle is limited to 1000 to
1200 revolutions per minute (RPM). High idle can be activated by a switch in the
driver’s area. With the transmission in the neutral position and the park brake set,
move the toggle switch to the “HIGH IDLE” position to maintain a constant engine
RPM above the normal idle speed.
[CAUTION] Do not move the toggle switch to the high idle position unless
the transmission is in Neutral and the park brake is engaged.
71
VISION
drivers handbook
Service Brakes
Your Blue Bird Vision may be fitted with hydraulic disc brakes or air-powered drum
type brakes, depending on the options chosen at the time of manufacture.
Although they perform the same task, hydraulic brakes and air brakes differ in
“feel.” Air brakes also may require additional wait time before driving the bus during
warmup, to allow air system pressure to build to normal operation levels. The type of
brakes installed also determines the type of parking brake installed.
[WARNING] The parking brakes are designed to hold a parked bus on an
incline not exceeding a 20% grade. If ever the bus must be parked on steeper
grades, use properly placed wheel chocks to ensure the bus does not move.
About Hydraulic Brakes
[WARNING] Hydraulic brakes are power assisted. The brakes will be noticeably less effective when the engine is not running. The bus should not be
moved without the engine running.
The hydraulic brakes are arranged in a dual system, whereby the front brakes and the
rear brakes operate independently of each other. The braking function is significantly
diminished by the loss of either the front or the rear brakes; however, it will be possible to stop the bus.
[WARNING] Do not continue to operate the bus with the loss of either the
front or the rear portion of the system. Stop the vehicle and obtain professional assistance immediately.
The hydraulic brake system includes an auxiliary electric pump which serves as a
backup for the hydraulic pressure supplied by the power steering pump. With the
engine not running and the key switch in the “ON” position, the electric pump will
come on. This will provide some assistance in the brake system, but it will be much
less effective than the power assist provided by the power steering pump.
[WARNING] Check the operation of this auxiliary pump before each trip. If it
fails to come on when the key is turned to the “ON” position, before the engine
starts do not operate the bus. Seek immediate professional assistance.
[WARNING] Inspect the level of the brake fluid in the reservoir on a regular basis. Too little fluid in the system will cause a malfunction. Be careful to put only
brake fluid in the brake system and power steering fluid in the steering system.
If the brake pedal depresses more than normal, or feels “mushy”, check the reservoir
level. If you need to add fluid (DOT–3) frequently, have the system checked out by a
professional mechanic.
72
routine operation
Parking Brake (With Hydraulic Brakes)
A Blue Bird Vision equipped with hydraulic brakes employs a hand-operated parking
brake lever, located to the Driver’s left. When the driver pulls this lever into the engaged position, a mechanical linkage causes a brake shoe assembly to close around
a brake drum attached to the driveshaft, preventing the bus from moving. (It should
be noted that this type parking brake becomes inoperative if the driveshaft is disconnected, as when the bus is being prepared for towing.) The mechanical parking brake
must be kept adjusted properly for maximum holding power.
When the parking brake is properly adjusted, the lever will snap firmly into place,
and lever effort will be 90-100 pounds. If the Driver finds that the lever force required
to apply the parking brake has lessened, he should notify service personnel, and
adjustment should be made. The cable is adjustable at both of its ends; and small
adjustments are possible at the handle. However, the handle adjustment should be
locked by its setscrew, and the handle should not turn during normal operation. If
the handle grip is found to turn during normal operation, notify a service technician
and have the parking brake adjusted and its handle tightened.
The parking brake should hold the fully loaded bus on a 20% incline on a dry
paved surface. If the incline is wet or covered with ice or snow, do not park on it. The
brake will hold, but the tires may not.
When releasing the parking brake, always be sure to release it
fully, all the way to the stop of the lever’s travel.
Similarly, always apply the parking brake
fully to its upper stop.
A detent pressure should be felt toward the
end of the lever’s upward travel.
When releasing the brake, press the thumb
button to allow the lever to be lowered.
The grip of the lever should not turn during
normal operation.
73
VISION
drivers handbook
About Air Brakes
The optional air brakes system on the Blue Bird Vision uses compressed air pressure
to operate drum brakes. The system is divided into two separate circuits; one for rear
brakes (primary) and one for front (secondary). The two circuits have their own air
supplies. However, the system is designed so that if pressure in either circuit drops to
certain levels, the other system can supplement the pressure.
An air compressor mounted on the engine operates whenever the engine is running and maintains a normal operating pressure range within the storage tanks. The
bus cannot be driven until air pressure is sufficient for normal operation. Therefore, if
the bus has been parked for an extend period, or if the tanks have been drained, as in
normal maintenance procedure to expel built-up moisture, it is normal for additional
time to be required for the air system to fully charge.
As air is compressed, moisture vapor tends to condense inside the storage tanks.
The tanks are equipped with bleeder valves to allow removal of this built-up moisture, and should be used daily, usually when the bus is parked for the night. Some
buses are equipped with an air dryer to assist collection and expulsion of the excess
moisture during operation. The storage tank is mounted under the bus, outboard the
frame rail on the driver’s side, and on buses equipped with an air dryer, the dryer is
mounted inboard of the frame rails just forward of the storage tank. During normal
operation, the compressor cycles between its load mode and unload mode. As this
occurs, the air dryer occasionally expells a blast of air (chuff) which can be heard by
the driver. This is a normal “backflush” behavior of the air dryer.
Parking Brakes (With Air Brakes)
On Blue Bird Vision buses equipped with air brakes, the parking brake function is
provided not by the air pressure, but by coil springs incorporated within the rear
wheel brake actuation chambers. When the parking brake valve on the dash is pulled
outward, air pressure is vented from the rear brake actuators, allowing the springs to
engage the rear brakes and locking the rear wheels. When the parking brake valve
is pushed in, it allows the air pressure in the rear brake actuators to overcome the
spring pressure, thereby releasing the rear spring brakes.
Therefore, although the parking brake control is an air valve, it is not air pressure
which applies the parking brake, but the absense of it. The parking brake is applied
by mechanical springs which are released (caged) when the air system pressure is
sufficient for normal brakes operation. Pushing in the parking brake valve to release
the parking brake does not release air pressure, it applies it to cage the spring brakes.
This is why the parking brake button automatically “pops out” if you try to release the
parking brake before sufficient air pressure has built up.
If for any reason the air reserve in both primary and secondary circuits brake
drops below a safe minimum, the spring brakes automatically engage and lock the
rear wheels. If this occurs enroute, the Driver should call for professional service assistance. Provisions are made for a qualified service technician to mechanically release
the spring brakes to allow the bus to be towed for repair.
74
Pull to apply parking brakes. Push to release.
The parking brake valve does not apply air brakes. It applies
air to release the mechanical spring brakes.
The park brake valve cannot release the spring brakes until
sufficent air is in the system for normal service air brakes
opeartion. If it is pushed in before system pressure is present,
it will automatically “pop out.”
routine operation
Transmission Control
The Vision is equipped with an Allison PTS 2500 5-speed automatic transmission
which uses Allison’s Gen 4 shifter mechanism. The T-lever shifter is located immediately to the right of the instrument cluster.
R. Reverse. Used to back the vehicle. Completely stop the vehicle and let the engine
return to idle before shifting from a forward range to a reverse, or from reverse to a
forward range.
N. Neutral. Note that there is no “park” position on the shifter. When parking the
bus, place the transmission in Neutral and apply the parking brake. The transmission
must be in Neutral in order to start the engine.
OD. OverDrive. Provides automatic upshifting and downshifting through all of the
transmission’s ranges. Use as the normal forward driving position.
D. Drive. Limits the automatic upshifting to the first four ranges. May be used as the
normal driving position when it is desired to prevent shifting to the highest gear, as
when not driving on highways, or when wishing to maintain slightly higher engine
RPM (and alternator output).
For more information on the
Allison transmission, read the
transmission operator’s manual
which was delivered with the
bus.
2. Limits the automatic upshifting to the second range. Use for heavy city traffic and/
or for increased engine braking effect on downgrades.
1. Limits the automatic upshifting to the first range. Provides the vehicle with its
maximum driving torque and maximum engine braking effect. Use when pulling
through mud or deep snow; when maneuvering in tight spaces; or when driving up
or down very steep grades.
Range Inhibit Feature
The transmission communicates with the engine to prevent over-rev conditions
which could otherwise result in transmission or engine damage. If one of the range
limiting transmission settings (D, 2 or 1) are selected, the transmission’s range inhibit
feature will take over and allow the transmission to shift to the next range if engine
RPM exceeds certain speeds. Therefore, although the use of a range inhibiting transmission setting to utilize engine braking is an acceptable practice, the Driver must
still control the downhill accelleration with brakes to be prepared for unexpected
upshifts. When the selected transmission range is being over-ridden, the Range Inhibit indicator light illuminates in the instrument panel.
75
VISION
drivers handbook
[WARNING] Each time you park the bus or leave the driver’s seat while the
engine is running:
1. Apply the service brakes to bring the vehicle to a complete stop, and
continue to hold the brake pedal.
2. Ensure the engine idle is in the “low” position (High Idle switch is off).
3. Shift the transmission to Neutral.
4. Apply the park brake. (On buses equipped with hydraulic brakes, fully
lift the park brake lever. On buses equipped with air brakes, Pull the Park
Brake valve.)
5. Release the service brake pedal, allowing the park brake to take on the
load of holding the bus.
6. If parked in any unusual situation, such as a severe incline, chock the
wheels and take any other precautionary measures necessary to ensure
the bus doesn’t move.
If this procedure is not followed, the bus could move unexpectedly and cause
serious injury or death and/or property damage.
[CAUTION] Do not allow the bus to coast in neutral. This practice can result
in transmission damage. Engine retard and braking assistance is not available
when the transmission is in neutral. It may not be possible to get the transmission back into gear while the bus is moving.
Do not idle in “R” (reverse) for more than five minutes. Extended idle time in
“R” (reverse) may cause transmission overheating and damage. Always select
“N” (neutral) whenever time at idle exceeds five minutes.
76
routine operation
Allison Automatic Transmission Driving Tips
Accelerator Control. The pressure of your foot on the accelerator pedal influences
the automatic shifting. An electronic signal tells the ECU how far the driver has depressed the pedal, and the transmission adjusts its shifting for maximum performance.
Cold Weather Starts. Most Allison transmissions are programmed to restrict operation until operating temperature is reached. When the transmission fluid temperature is below -25° F (-32° C), the transmission will not shift into an operating range,
and the “Check Transmission” light illuminates. When the transmission fluid temperature is between -24° F and 20° F (-31° C to -7° C), the transmission will operate
in 1st, 2nd, or Reverse only. If there is no other problem with the transmission, the
“Check Transmission” light will not be illuminated. For transmission fluid temperatures above 20° F (-7° C), the transmission shifts and operates normally. Read the cold
weather operation instructions in the Allison Transmission™ Operator’s Manual supplied with the bus.
Using the Engine to Slow the Vehicle. Engine braking helps maintain good down
grade control. To use the engine as a braking force, shift the range selector to the
next lower range. If the vehicle is exceeding the maximum speed for a lower gear,
use the service brakes to slow the vehicle to a speed at which the transmission can be
downshifted. After reaching the lower range, the ECU automatically downshifts the
transmission. If engine-governed speed is exceeded, the transmission will upshift
automatically to the next range.
[WARNING] Downshifting to a lower transmission range increases engine
braking and helps maintain control. The transmission normally prevents
automatic up shifting above the lower range selected. However, if the engine
governed speed is exceeded while in the lower range, the transmission is designed to upshift to the next higher range to prevent engine over-rev. This will
reduce braking force. Therefore, engine braking and service brakes should be
used in combination when descending long and/or steep grades. Use engine
braking to help reduce vehicle speed and to reduce the service brake pressure necessary to maintain control. But continue to use the service brakes to
prevent exceeding engine governed speed and to be prepared for unexpected
upshifts.
77
VISION
drivers handbook
Transmission Indicator Lights
The instrument panel contains three indicator lights associated with the transmission:
Range Inhibited. Under certain operating conditions, the Transmission Control
Module (TCM) may restrict gear selection to protect the engine / transmission from
damage. For example, if a downshift would cause the engine to over-rev, the transmission may not respond to a change at the shift lever until engine RPM decreases.
When this occurs, the RANGE INHIBITED warning light illuminates. See the Range Inhibited Light and Shift Inhibits section of the Allison Transmission operator’s manual
for more information.
Check Transmission. Indicates the transmission’s electronic Transmission Control
Module has detected that the transmission’s operating parameters have been exceeded. Shifts may be restricted. Drive to your service facility and notify your service
technician. A diagnostic code is registered in the TCM which a service technician can
retreive with diagnostic tools. See your Allison Transmission operator’s manual for
more details on how shifts may be inhibited.
Transmission Temperature. The transmission fluid cooling system is integrated with
the engine cooling system. Normal temperature is 160° to 200° F. If the transmission
oil temperature reaches 250° F, the TCM will inhibit operation in the higher gears and
cause the TRANS TEMP light to illuminate. If this occurs during normal operation,
note whether the engine coolant temperature gauge is also indicating excessive
temperature. If it is, stop the vehicle and notifiy service personnel.
If the engine cooling system temperature is within normal range, stop the bus in
a safe location and check the transmission level (refer to the Oil Check Procedure in
your Allison Transmission Operator’s Manual). If the transmission fluid level is normal, the Driver may start the engine, shift to neutral, and increase the engine speed
to 1,200–1,500 rpm. This may reduce the transmission temperature to operating
level within two or three minutes. If high temperature persists, stop the engine and
have the overheating condition investigated by a service technician.
[CAUTION] The engine should never be operated for more than 30 seconds
at full throttle with the transmission in gear and the vehicle not moving.
Prolonged operation of this type will cause the transmission oil temperature
to become excessively high and will result in damage to the transmission.
78
routine operation
Exhaust System
New federally mandated emission standards affect all buses equipped with 2007 or
newer diesel engines. The exhaust systems of both Caterpillar and Cummins engines
in Blue Bird buses are aftertreatment systems which incorporate Diesel Particulate Filters (DPF) instead of ordinary mufflers. These sophisticated exhaust systems reduce
emissions by trapping exhaust-borne particulates (soot) in a filter built into the DPF.
Over time, soot accumulates in the DPF, and must be removed by a process referred to as regeneration. Regeneration is conceptually similar to the cleaning mode
of a self-cleaning oven in that heat is required to remove the soot.
The rate at which soot accumulates is dependent upon multiple conditions including the quality of the diesel fuel, type of engine oil, and ambient temperature,
engine load, and other factors. Regeneration occurs in three ways:
• Some regeneration occurs “naturally” whenever operating conditions (speed,
engine load, etc.) result in exhaust system temperatures high enough to oxidize accumulated soot. This unassisted regeneration process can generically
be referred to as “passive” regeneration.
• Regeneration can be caused by raising the temperature of the exhaust system.
Both Caterpillar and Cummins engines are equipped with systems designed
to increase exhaust temperature when the ECM senses that regeneration is
needed, and when certain requirements, including a minimum travel speed,
are met. This automatic “heat assisted” mode can be generically referred to as
“active” regeneration.
• Regeneration can be manually activated by means of a switch. This procedure
is generically referred to as “stationary” regeneration, and should only
be performed by or under the direction of a qualified service technician, and in a controlled environment to avoid the potential for human injury or fire hazards.
[CAUTION] In 2007 diesel engines, use only diesel fuel labeled
Ultra Low Sulfer, per the engine
manufacturer’s specifications.
In Caterpillar, use oils meeting
API CJ-4 or Caterpillar ECF-3
compliant. See Caterpillar Operation and Maintenance Manual
SEBU8083-08 for details.
In Cummins, use oils meeting API
CJ-4/SL and Cummins Engine
Standard CES-20081. See Cummins Owners Manual ISB 6.7L
CM2150 for details.
The need for regeneration is communicated to the driver by a set of visual
and audible signals in the instrument panel. An additional alert, the High
Exhaust System Temperature (HEST) indicator, notifies the driver whenever exhaust system temperature is high due to recent regeneration.
Eventually, the normal ash accumulation which results from the regeneration process must be removed from the DPF, using equipment designed for
the purpose at qualified engine service facilities. Refer to the engine manufacturer’s
documentation for these service intervals. The engine operator’s manual provided
with your bus contains additional information about exhaust system regeneration,
and should be read and understood by the driver.
The exhaust systems of 2007 and newer engines incorporate
engine-specific Diesel Particulate Filters, which operate
at higher temperatures during their Regeneration cycles.
The front exhaust pipes are insulated, and heat shields are
installed at locations along the exhaust tubing. (Cummins
shown)
79
VISION
drivers handbook
DPF Regeneration In Blue Bird Buses
As with most new mechanical processes, the introduction of more sophisticated exhaust systems in 2007 emission standards-compliant engines has generated some
degree of initial confusion. Engine manufacturers have designed their own methods
to accomplish the regeneration (cleaning) of the DPF, and therefore describe the process in somewhat differing terms.
Whether your Blue Bird bus is equipped with a Caterpillar or Cummins engine,
neither system is complicated. Nor should the regeneration process be regarded with
alarm. Both Drivers and service technicians should be at least conceptually familiar
with the regeneration process.
As soot builds up in the DPF filter, the driver is notified in several stages by visual
and audible alerts. The alert system is designed to provide reasonable and comfortable fore-warning and adequate opportunity for the needed regeneration. As the
need for regeneration becomes more severe, the alerts become increasingly imperative; and the penalty for postponing the needed regeneration also increases.
When the earliest alerts occur, there is typically ample time to complete a route
and then have a Stationary Regeneration procedure performed at a proper facility. If
early alerts are ignored, and the condition is allowed to worsen, the engine will eventually de-rate automatically, and performance will reduce noticeably. If the condition
is allowed to become severe, a Stationary Regeneration may not be possible, and the
DPF may require removal and treatment using specialized equipment. Therefore, to
minimize disruption of your bus operation, the regeneration-related alerts should be
heeded and responded to at their early stages as a matter of routine.
Aftertreatment Terms
The following summarizes some of the terms associated with the exhaust systems of
Blue Bird buses equipped with 2007 emission standards compliant engines. Both the
driver and technician should become familiar with the following terms:
Aftertreatment. The process of highly filtering engine exhaust in order to reduce
emissions, and of purging the exhaust system of accumulated exhaust residue.
DPF (Diesel Particulate Filter). A component in the exhaust system which takes the
place of a traditional muffler. A DPF contains a special dissimilar metals filter which
traps particulate accumulation (soot), which is then converted to carbon dioxide by
the aftertreatment process. The Cummins DPF also contains a catalytic converter.
Regeneration. The process of cleaning accumulated soot from the filtering components inside the DPF. Regeneration occurs at high exhaust system temperatures to
turn the soot into carbon dioxide gas. Regeneration can be thought of as conceptually similar to the clean cycle of a self-cleaning oven.
ARD (Aftertreatment Regeneration Device). A component of the Caterpillar Regeneration System, located on the right side of the engine, at the outlet of the turbocharger. The ARD is controlled by the engine’s ECM and is activated when regenera-
80
[WARNING] Postponing
regeneration beyond the early
indications may result in the
engine being automatically
de-rated, and reduction of power
while driving.
[WARNING] The aftertreatment
regeneration process can cause
extremely high exhaust gas temperatures hot enough to ignite or
melt common materials, and to
burn people.
Carefully read, understand,
and abide by all instructions,
warnings, and cautions in the
engine manufacturer’s operator’s
manual (and other related
engine manufacturer’s literature)
regarding safe operation when
the HEST indicator is on.
Carefully read, understand,
and abide by all instructions,
warnings, and cautions in the
engine manufacturer’s operator’s
manual (and other engine manufacturer’s literature) regarding
safety conditions when performing Stationary regeneration.
routine operation
tion needs to occur and the necessary conditions are met. When not in regeneration
mode, the ARD is simply a chamber through which the exhaust flows. During regeneration, a charge of fuel and air is ignited in the ARD, and the resulting combustion
creates additional heat to facilitate regeneration.
HEST Indicator (High Exhaust System Temperature). An instrument panel indicator which appears when the exhaust temperature is unusually high due to recent
regeneration. This is a normal behavior of the aftertreatment system, intended to
notify the driver and technician that the exhaust system temperature is high and that
caution should be observed around the exhaust system.
DPF Indicator. An instrument panel indicator which displays when particulate accumulation has reached a preset level in the DPF, and regeneration is needed. The
bus should either be operated with a more demanding duty cycle until the indicator
goes off, or it should be scheduled for a Stationary Regeneration at a service facility.
Levels of Notification
Regeneration—the process which clears soot accumulation in the DPF—occurs automatically as the bus is operated, as long as certain operating conditions (such as
minimum speed thresholds) are met. When bus operating conditions do not provide
adequate opportunity for the regeneration system to keep the DPF clear, soot begins to accumulate. A system of driver alerts keeps the driver informed of when the
exhaust system is in need of regeneration, and of high exhaust temperature associated with regeneration. Several levels of regeneration alerts occur in sequence, each
indicating a more imperative warning.
High Exhaust Temperature Notification
The High Exhaust System Temperature (HEST) indicator appears to alert the driver
when exhaust temperature is unusually high and that prudent judgement should
be applied regarding the proximity of people or combustibles to the exhaust system. For example, the bus should not be parked on a surface of grass or weeds. The
conditions under which the HEST indicator appears differ between Caterpillar- and
Cummins-equipped buses:
With Caterpillar engine, the HEST indicator appears whenever the exhaust temperature is high (842°F or above), and the bus is either stopped or moving at a slow
speed (approximately 5 MPH).
With Cummins engine, the HEST indicator appears whenever the exhaust temperature is high (752°F or above), regardless of moving speed.
The driver should be familiar with and abide by all instructions, warnings, and
cautions in the engine manufacturer’s operator’s manual regarding safe operation
when the HEST indicator is on.
HEST Notification
The HEST alert appears in
the DID status window.
The audible alert
sounds one beep.
• The HEST alert appears in the instrument panel.
• The audible alarm sounds one beep.
81
VISION
drivers handbook
Level 1 Regeneration Notification: DPF Indicator Appears
In low-demand operating conditions, it is possible that the regeneration system does
not have sufficient opportunity to prevent particulate build-up in the DPF. The ECM
senses that accumulation is occurring and that regeneration is needed. The driver is
notified as follows:
Level 1
• The DPF Regeneration alert activates.
• The audible alert sounds one beep.
The above indicates that regeneration of the DPF is needed at the earliest convenience. The regeneration can be accomplished in either of two ways: If practical, the
bus could simply be operated for a while at a speed above the automatic regeneration threshold; or the bus could be taken to a suitable location to have a Stationary
Regeneration procedure performed.
If the bus is operated at a minimum highway driving speed (20 mph Caterpillar; 40 mph Cummins), the automatic regeneration system will activate. If minimum
speed is maintained long enough (usually 20-30 minutes), the automatic regeneration mode can likely reduce the soot sufficiently to cause the DPF Icon to go off.
Therefore, the first appearance of the DPF icon should be perceived by the driver
as a normal notification of action that needs to be taken, but not as an emergency
situation. Typically, even if the bus route does not afford immediate opportunity for
higher-speed operation, there is sufficient time to finish the bus route and return to
the bus maintenance shop before the higher level of notification occurs. Exactly how
much “warning time” the first appearance of the DPF indicator represents is dependant upon specific operating conditions. However, current data from Cummins suggest that, at this level of notification, the DPF needs to undergo regeneration within
the next two to six hours of bus operation. If regeneration does not begin, a more
imperative notification will activate.
Level 2 Notification: DPF Indicator Blinks
If the bus continues to be operated without taking the measures indicated by a Level
1 Notification (described above), particulate accumulation continues, and a more
imperative notification occurs:
The DPF Regeneration alert appears in the
DID status window.
The audible alert
sounds one beep.
Level 2
• The DPF Regeneration alert begins to flash.
• The audible alarm sounds continuously.
• The engine may be automatically de-rated.
The above indications should be interpreted as a more imperative alert that the exhaust system is in need of regeneration soon. As soon as practical, the bus should be
operated at or above the minimum speed needed to allow automatic regeneration to
activate, or a Stationary Regeneration must be performed. Again, situation-specific
variables apply. Current data from Cummins suggest that at this level of notification,
the DPF needs to be regenerated within the next one to two hours of bus operation.
Otherwise, the third level of notification will occur.
82
The DPF Regeneration alert flashes in the
DID status window.
The audible alert
sounds continuously.
routine operation
Level 3 Notification: Check Engine Indicator Appears
If the bus continues to be operated without taking the measures indicated by a Level
2 Notification, particulate accumulation worsens. These indicators are activated:
• The DPF Regeneration alert continues to flash.
• The audible alert sounds continuously.
• The engine is automatically de-rated.
• The Check Engine alert appears.
The above indicates that a Manual Regeneration must be performed as soon as possible. Because the engine is automatically de-rated it may not be possible to drive at
sufficient speed to cause active regeneration to occur.
With Cummins engine, depending upon the severity of the accumulation, the
regeneration switch may not be allowed to initiate a regeneration without use of
Cummins’s PC-based diagnostic software, Insite.
Level 4 Notification: Stop Engine Indicator Appears
If the bus continues to be operated without taking the measures indicated by a Level
3 Notification, particulate accumulation reaches a critical level. Engine power is automatically further de-rated by the ECM. The indicators differ slightly between Caterpillar- and Cummins-equipped buses:
Cummins:
• The DPF Regeneration alert deactivates.
• The audible alert sounds continuously.
• The engine is further de-rated.
• The Check Engine alert deactivates.
• The red Stop Engine alert appears.
Caterpillar:
• The DPF Regeneration alert continues to flash.
• The audible alert sounds continuously.
• The engine is further de-rated.
• The Check Engine alert remains on.
• The red Stop Engine alert appears.
The above indicates that accumulation has progressed to critical levels and the bus
should be stopped with the engine off as soon as it is safe to do so. The bus should
remain shut down until the aftertreatment system has been serviced.
With Cummins engine, the regeneration switch will not be allowed to initiate a
regeneration without use of Cummins’s PC-based diagnostic software, Insite.
With Caterpillar engine, depending upon the severity of the accumulation, the
regeneration switch may not be allowed to initiate a regeneration without the use of
Caterpillar’s PC-based diagnostic software, Electronic Technician.
With either Caterpillar or Cummins engine, removal and cleaning of the DPF using specialized equipment may be required.
Level 3
The DPF Regeneration alert flashes in the
DID status window.
The audible alert
sounds continuously.
The Check Engine
Icon appears in the
instrument panel’s right
warning bank..
Level 4, Cummins
The audible alert
sounds continuously.
The Stop Engine
alert appears in the
instrument panel’s top
warning bank.
Level 4, Caterpillar
The DPF Regeneration alert flashes in the
DID status window.
The audible alert
sounds continuously.
The Check Engine
alert appears in the
instrument panel’s right
warning bank..
The Stop Engine alert appears in the
instrument panel’s top warning bank.
83
VISION
drivers handbook
Stationary Regeneration Precautions
During active regeneration, the exhaust system can reach extremely high temperatures. Automatic active regeneration, which occurs while driving the bus, is programmed to occur only when the bus is moving at a minimum speed, and it stops
when the vehicle slows or stops.
With Caterpillar engine, if the exhaust is still unusually hot from recent regeneration when the bus slows or stops, the HEST indicator appears to remind the driver of
the high temperature condition.
With Cummins engine, the HEST indicator appears whenever the high temperature condition exists.
When performing a Stationary Regeneration, the entire process occurs for an
extended period while the bus is stopped. It is therefore critical that prudent human
safety and fire hazard precautions are followed. Those precautions include:
• Read, understand, and abide by all the precautions pertaining to regeneration
procedures in the engine manufacturer’s Operator’s Manual.
• If at all possible, the Stationary Regeneration procedure should be conducted
at a service facility by trained technicians.
• The Driver’s first priority is the safety of the passengers. If a Stationary Regeneration must unavoidably be done by the Driver under a qualified technician’s
direction, alternate transportation should be arranged first, or passengers
should be removed under proper supervision to a location away from the
bus.
• Select an appropriate location to park the vehicle.
• Choose a surface that will not burn or melt under high temperature,
such as clean concrete or gravel, not grass or asphalt.
• Ensure that nothing that can burn, melt, or explode (gasoline, wood,
paper, plastics, fabric, compressed gas containers, hydraulic lines) is
near the exhaust outlet. Abide by all instructions, warnings, and cautions in the engine manufacturer’s operator’s manual regarding safe
operation when performing a Stationary Regeneration.
• Park the bus securely.
84
• Set the parking brake. Put the transmission in Neutral. Chock the
wheels.
routine operation
• Secure the exhaust area.
• If bystanders might enter the area, set up barriers to keep people
safely away from the exhaust outlet.
• If the procedure is performed indoors at a service facility, attach an
exhaust discharge pipe rated for at least 1500°F.
• Keep a fire extinguisher nearby.
• Check exhaust system surfaces to confirm that no tools, rags, grease, debris or
any other objects are on or near the exhaust system.
• Start the engine.
• Operate the Regeneration Switch to begin the regeneration process.
• Monitor the process. If any unsafe condition occurs, shut off the engine immediately. During the regeneration process, the engine may change speed, and
the turbocharger may whistle. When the process is complete, the engine will
return to normal idle speed. Exhaust gas and exhaust surface temperatures
will remain elevated until they have had time to cool to normal levels.
85
VISION
drivers handbook
General Propane Tank Filling Procedures
The most important procedure of filling any propane tank is safety. Understanding
the properties & characteristics and safe handling practices of the fuel is required
before conducting any propane tank filling efforts.
A propane powered vehicle is equipped with a propane tank built to and certified to the regulations of the American Society of Mechanical Engineers (ASME)
These tanks have a data plate with pertinent information including the ASME stamp
and the plate must be securely attached and legible or the tank should be taken
out of service and replaced. There are no requirements for re-certifying ASME tanks
however inspection is required and maintenance is recommended if there are signs
of corrosion.
Propane tanks are filled to 80% capacity to allow for the liquid fuel to expand and
contract depending on ambient or other influent temperatures. All tanks built for
use on motor vehicles are equipped with overfilling prevention protection. The National Fire Protection Association (NFPA) have required motor vehicle propane tanks
be equipped with a stop filling device to automatically prevent overfilling or filling
the tank beyond the maximum recommended capacity of 80%. This automatic stop
fill system provides the primary method of preventing overfill of the fuel tanks. This
rule has been in effect since January 1, 1984.
As a secondary means of preventing an overfill condition of the fuel tanks and
a means of verifying the accuracy of the automatic stop fill device, the tanks are
equipped with an 80% fixed maximum liquid level outage valve (Manual bleeder
valve). The valve would be used to verify when the liquid fuel reaches the 80% level
at which point the fill process would be stopped. This valve can be used when filling
and releases fuel in a vapor phase until the fuel reaches the 80% level at which time a
stream of liquid will appear indicating the fuel level in the tank is 80%. Most propane
fueling stations will want to open this bleeder valve however since the propane motor vehicle tank is equipped with an overfill prevention device it is not necessarily
required and may be prohibited in certain municipalities where the release of hydrocarbons to the atmosphere is prohibited. The NFPA ruled that when the tank is
equipped with an overfill prevention device the use of the 80% bleeder valve is not
required.
86
[WARNING] Technicians working with, or around, fuel systems
should be properly trained to
utilize extreme care and caution
at all times. Failure to exercise
extreme caution and care may
lead to serious accidents which
can result in property damage,
personal injury and/or death.
routine operation
Propane Powered Motor Vehicle Filling Procedures
1. Entering the propane fueling station.
1.1 Park the vehicle in close proximity to the motor fuel dispensing station.
[WARNING] NO SMOKING ALLOWED.
2. Turn off and remove the vehicle ignition key.
3. Exit the vehicle and ask all passengers to step outside the vehicle.
3.1 Some stations may ask all passengers to stand outside the area where
the fill process is taking place.
3.2 Some stations could be self-service and the driver would perform the
filling process; however in this case the driver has to be trained and certified to obtain an authorized filling station dispenser access card.
[WARNING] For passenger
safety, Blue Bird recommends all
occupants disembark to a safety
zone before fuel filling procedures
take place.
[WARNING] Technicians working with, or around, fuel systems
should be properly trained to
utilize extreme care and caution
at all times. Failure to exercise
extreme caution and care may
lead to serious accidents which
can result in property damage,
personal injury and/or death.
4. The attendant may need to inspect the propane tank for corrosion, dents and
verify the data plate displays the ASME stamp and other pertinent information is correct. An attendant can refuse to fill your propane tank if it does not
pass this inspection. Regular inspection and maintenance of your tank will
prevent refusal to fill the tank.
5. Verify the meter is set to zero.
5.1 If the dispenser is an electronic dispenser it will set to zero automatically
once the transaction has been initiated.
87
VISION
drivers handbook
6. Connect the fuel nozzle to the vehicle fueling receptacle.
6.1 The propane fueling nozzle has to be screwed on securely.
A. Wear protective gloves while fueling a propane tank.
B. Remove the protective cap from the vehicle fueling receptacle.
C. Mate the nozzle coupling to the fueling receptacle.
D. Turn the nozzle coupling in a clockwise direction; two or three turns
until secure. A soft rubber washer or o-ring seals the connection so
over tightening is not required.
E. Most nozzles for motor vehicle fueling are much like a gasoline type
nozzle. The nozzles are also minimum bleed type for safety and to
meet hydrocarbon release requirements in certain jurisdictions.
7. Turn on the propane dispenser/pump and begin the filling process.
7.1 Open the nozzle to begin filling.
7.2 Do not fill the tank based on a mechanical float gauge reading or the
fuel level gauge on the dashboard.
7.3 Pay attention and never walk away from the filling process.
7.4 As a primary method of determining when the tanks are full (80% capacity) an 80% stop fill device will automatically stop the filling process
when the liquid propane reaches an 80% liquid level capacity in the
tanks.
7.5 As a secondary method of determining when the tanks are full (80%
capacity) an 80% fixed maximum liquid level outage valve (Manual
bleeder valve) can be used.
A. Open the 80% fixed liquid level valve (located at the fill port)
B. Vapor will be vented from the valve during the filling process
C. When liquid propane begins to vent the from the valve the tanks
have filled to 80% capacity
D. Immediately close the 80% fixed liquid level valve
88
routine operation
E. Immediately close the filling nozzle
NOTE: The 80% fixed liquid level valve can be used to verify the accuracy of the
automatic stop fill device
8. Release or close the fueling nozzle.
8.1 Turn off the fuel dispenser/pump.
8.2 Carefully and slowly unscrew the fueling nozzle (unscrew counter clockwise).
A. A minimum bleed nozzle should have released any pressure left in
the space between the nozzle and the receptacle when closed and
should not bleed any pressure when unscrewing the connection.
B. Some nozzles will have more pressure trapped between the nozzle
and the receptacle so it is necessary to slowly unscrew the connection to allow pressure to bleed off before removing the nozzle completely. Some nozzles will be equipped with a small bleeder valve to
release this trapped pressure before disconnecting the nozzle.
9. Replace the nozzle and fuel transfer hose on the dispenser.
10. Verify there are no leaks at the tank filling receptacle and replace the protective cap.
11. Document the amount of fuel received.
12. The fueling process is complete.
[WARNING] During a propane vehicle fueling process fuel may be emitted
to the immediate area. There could be a combustible fuel mixture around
this immediate area. The person performing the re-fueling process has total
responsibility for safety in the immediate area.
NOTES:
• It is unlawful to fill a non-compliant tank or a tank that posses a safety violation.
• Any person performing the re-fueling process must be trained and certified
in the procedures of filling propane tanks and in the procedures of safe handling.
89
VISION
90
drivers handbook
E n r o u t e Em e r g e n c i e s
Enroute Emergencies
In the case of any enroute emergency, the Driver must ensure the safety of the passengers before performing any procedure on the bus. Safely maneuver the bus to
the nearest safe location; a parking lot or emergency lane if possible, and take appropriate measures to arrange for pick up of the passengers and notify public safety
officials.
[WARNING] No one should attempt to transport passengers without thorough knowledge of the controls and safety equipment. See the Driver Orientation and Pretrip Inspection sections of this manual, and thoroughly familiarize
yourself with the locations of all emergency equipment.
It is assumed that the Driver will seek immediate assistance of qualified service technicians in the event of any mechanical failure. The information in this section is only
to provide some information which may be helpful to service technicians rendering
assistance.
Using Triangular Hazard Reflectors
In the event that the bus must be parked in an emergency lane or road shoulder,
deploy the triangular roadside hazard reflectors as follows:
On a two-lane roadway, place a triangular marker 100 feet (about 40 paces) to
the front of the vehicle, with reflective side facing oncoming traffic. Place another
triangular marker 100 feet (about 40 paces) to the rear of the vehicle, with the reflective side toward overtaking traffic.
On a four-lane roadway, place one triangular marker 100 feet (about 40 paces)
to the rear of the vehicle. Place another triangular marker 200 feet (about 80 paces)
from the first marker (300 feet behind
the vehicle). The reflective side should
be facing overtaking traffic.
91
VISION
drivers handbook
Using Booster Cables
[WARNING] Ensure that the ignition switch of the disabled vehicle is in the
“OFF” position. Always connect the POS (+) battery cable first. Connect the
NEG (-) cable to the chassis, away from the batteries. The batteries produce
a highly flammable gas. Do not smoke while working near batteries. Take all
precautions to prevent sparks from any source in the proximity of the batteries.
1. Ensure the posts on the jumper and bus batteries are clean.
2. Using the RED jumper cable, connect the POS (+) terminal of the bus battery
to the POS (+) terminal of the jumper battery.
3. Using the BLACK jumper cable, connect one end to the NEG (-) terminal of
the jumper battery.
4. Connect the other end of the BLACK jumper cable to a solid chassis ground
on the bus, such as the engine. Do not connect the black jumper cable to the
NEG (-) terminal of the bus battery.
[CAUTION] Do not crank the engine for more than 30 seconds. Allow the
cranking motor to cool at least 2 minutes between attempts to start the
engine.
5. Allow time for the jumper battery to boost the bus battery before attempting to start the engine.
6. After the engine starts, remove the NEG (-) BLACK booster cable from the
ground on the bus.
7. Remove the NEG (-) BLACK booster cable from the terminal of the booster
battery.
8. Remove the POS (+) RED booster cable from the POS (+) terminal of the bus
battery.
9. Remove the RED booster cable from the POS (+) terminal of the booster battery.
92
enroute emergencies
Starting Problems
For more detailed instructions, refer to the engine manufacturer’s Operator’s Manual.
One or more of the following items may cause an occasional starting problem:
• The Park Brake must be on to start the bus.
• The Transmission must be in Neutral.
• If the bus is equipped with Vandal Locks, the bus will not start unless the doors
or windows equipped with Vandal Locks are closed.
• Low battery charge.
• A malfunctioning starter.
• Problems with the wiring harness or connections.
• Out of fuel.
93
VISION
drivers handbook
Jacking and Towing
Jack Points
[WARNING] Proper jacking procedures and basic safety
measures must be observed to ensure the safety of personnel
while working under the bus. Always check the serviceability of
any lifting equipment prior to use. Ensure that the lifting device
is of sufficient strength to handle the bus, and that the surface
provides the necessary firmness to support the weight of the bus
concentrated on the footprint of the jack. Never move under a
bus supported only by a hydraulic jack.
1. Park the bus on a flat, level surface of sufficient firmness to support the jack.
2. Chock the wheels in both directions.
3. Use only jacks and jack stands of sufficient capacity to support
the bus. Following the jack manufacturer’s recommendations,
place the jack securely under the axle at the spring or suspension beam, nearest the tire/wheel to be repaired.
4. Jack the bus only to the height necessary to service.
5. Support the bus with blocks or jack stands under the frame
rails.
Towing
If the bus is towed with the rear wheels on the road, the driveshaft must be prevented from turning in order to avoid possible damage to the automatic transmission.
This is accomplished by removing the rear axle shafts, and covering their openings
with caps to prevent rear axle lubricant spillage.
Also, on Vision buses equipped with air brakes, if full normal air pressure cannot
be provided the air system, the spring brakes must be mechanically caged to prevent
their engagement.
1. Apply the parking brake and chock the wheels while preparing the vehicle
for towing.
2. Remove the stud nuts and washers from the center hub.
94
Front Jack Point
Rear Jack Point
enroute emergencies
3. To loosen the tapered dowels which surround each stud, use a 1.5” diameter
brass drift and 5-6 lb hammer. Hold the brass drift against the center of the
axle shaft flange, inside the round driving lugs. Firmly striking the end of the
brass drift with the hammer will dislodge the tapered dowels.
[CAUTION] Do not use a chisel or wedge to loosen the axle shaft and tapered
dowels. Doing so can damage the axle shaft, gasket, seal, or axle hub.
Brass Drift
4. Mark the axle shaft so that it can easily be identified for reinstallation on the
side of the axle from which it is removed. Carefully remove the axle shaft, taking measures to catch the axle lubricant which may spill. Install a cover plate
over the open end of the hub to prevent dirt contamination and lubricant
spillage during towing.
5. Repeat the above procedure to remove the other axle shaft.
6. If the bus is equipped with air brakes, and if full working air pressure is not
present in the system, the spring brakes must be mechanically caged before
the vehicle can be towed. Proceed as follows:
[WARNING] Caging the spring brakes disables the parking brake. Ensure
that the bus is completely secured against rolling by wheel chocks before caging the spring brakes.
6.1 On each of the rear combination brake chambers, a special release
stud tool is carried in a storage socket cast into the body of the chamber. Remove the nut and washer from the end of the release stud tool,
and remove the tool from its socket.
6.2 Remove the rubber dust cap from the access hole in the upper end of
the spring brake chamber. Insert the toggle end of the release stud
tool into the access hole. Be sure that the tapered end of the tool has
entered the hole in the piston inside the
chamber. Insert the tool until it bottoms.
6.3 Rotate the release stud tool a quarter turn
clockwise and pull outward, to engage the
toggle end with the piston. While holding
the bolt in its engaged position, install the
washer and nut onto the end of the tool.
Turn the nut down against the flat washer
until finger tight.
6.4 Using a 3/4” hand wrench, (do not use an
impact-type wrench), turn the release nut
clockwise until the internal spring is fully
caged.
95
VISION
drivers handbook
6.5 Repeat the procedure for the spring brake chamber on the opposite side of the bus. The spring brakes are now released, having their
springs compressed by the release bolts.
7. With the axle shafts removed and air spring brakes caged, the bus is prepared
for towing. The Vision may be equipped with optional tow hooks, located
just inside the access openings of the front and/or rear bumper. Appendix
1 of the Front Axle & Suspension chapter contains additional information
about towing procedure.
Front Tow Hooks
Air Tank Schrader Valve
The supply (wet tank), primary (rear brake reservoir), and secondary (front brake reservoir) air tanks are mounted under the bus, inboard of the chassis frame rails. The
supply tank is mounted toward the front of the bus on the left side.
The supply tankis fitted with a Schrader valve to allow manual pressurization of the
system for service or testing purposes by using a common air hose, without having
to charge the system by running the engine and compressor.
If a service truck rendering asistance is equipped with compressed air, the Scharader valve can be used to pressurize the air brake system of an inoperative Vision, so
that its spring brakes can be released in order to move the bus.
Rear Tow Hooks
[WARNING] The tow hooks are
designed for horizontal pulling only; not for lifting. Never
attempt to lift the bus by the tow
hooks.
Schrader Valve
96
S c h e d u l e d M ai n t e n a n c e
Scheduled Maintenance
A regularly-scheduled maintenance regimen will ensure that the bus(es) you operate are always ready for safe, reliable, and efficient duty. Although it is assumed that
maintenance tasks will be performed by your operation’s Service Technician(s,) not
by the Driver, the information in this chapter is provided for convenience, given that
the Drivers Handbook will usually reside with the bus.
The Driver, however, is the individual most intimately familiar with the normal
sounds, behaviors, and performance of the vehicle. The Driver should be alert to any
unusual or changing conditions and bring them to the attention of the service staff.
A few Notes pages are provided at the back of this handbook for that purpose.
For more comprehensive service and maintenance information, the Service Technician should obtain and become familiar with the current Blue Bird Service Manual
for the particular model(s) being serviced.
97
VISION
drivers handbook
Fluids & Filters (Diesel)
Fluid
Type
Engine Oil
Caterpillar DEO
Engine Coolant
John Deere Cool-Gard
50/50 premix
(standard only)
Capacity
Initial:
22 Quarts (21 Liters)
Refill:
19 Quarts (18 Liters)
Filter
Comments
SAE 10W-30 viscosity when ambient temperature is
above 0° F (-18° C) and below 104° F (40° C). See
Engine Oil Viscosity chart, below, for other temperature ranges.
Caterpillar and Cummins equipped buses may have
optional extended-life coolant installed. Never mix
7 1/2 Gallons
BB 00064641 different coolant colors, types, or brands. See Engine
(excluding heater system) Wix 24070 Cooling System section for details.
Transmission Fluid
Dextron III™
7.4 Quarts (7 liters)
Transmission refill capacity is substantially less than
the initial fill because some fluid remains in the
BB 00033381 transmission cavities after draining.
Rear Axle Oil
Hypoid Gear Oil
35 pints (16.9 liters)
See Rear Axle Viscosity Chart, below.
Front Axle Grease
Chevron Dura Lith Grease
EP NLGI 2
Front Axle Oil
Chevron RPM Synthetic Transmission Fluid SAE 50
If equipped with optional front oil lubricated bearings.
Brake Fluid
DOT 3
DOT 3 and DOT 5 must not be mixed. If brake system
becomes contaminated with DOT 5, the system must
be flushed, and major components may require reBB 00067254 placement.
Brake Interlock
DOT 5
On units with hydraulic brakes and brake interlock
BB 01940881 feature*
Hydraulic Steering
AD-9 Air Dryer Element
AD-IP Air Dryer Element
Dextron III™
3 Quarts (approximate)
BB 00020138 On units with air brakes.
BB 00066221 On units with air brakes.
Fuel Filter / Water Separator
Windshield Washer Fluid
Engine Oil Viscosity
Viscosity Grade
SAE 0W-20
SAE 0W-30
SAE 0W-40
SAE 5W-30
SAE 5W-40
SAE 10W-30
SAE 10W-40
SAE 15W-40
BB 01967009
1.05 Gallons
Minimum Ambient Temperature
-40° F (-40° C)
-40° F (-40° C)
-40° F (-40° C)
-22° F (-30° C)
-22° F (-30° C)
0° F (-18° C)
-0° F (-18° C)
15° F (-9.5° C)
MaximumAmbient Temperature
50° F (10° C)
86° F (30° C)
104° F (40° C)
86° F (30° C)
122° F (50° C)
104° F (40° C)
122° F (50° C)
122° F (50° C)
Rear Axle Viscosity /Temperature Chart
Meritor Lubricant Specification
Description
Cross Reference
Minimum Outside Temperature Maximum Outside Temperature
0-76-A
Hypoid Gear Oil
GL-5, S.A.E. 85W/140
+10° F (-12.2° C)
*
0-76-B
Hypoid Gear Oil
GL-5, S.A.E. 80W/140
-15° F (-26.1° C)
*
0-76-D
Hypoid Gear Oil
GL-5, S.A.E. 80W/90
-15° F (-26.1° C)
*
0-76-E
Hypoid Gear Oil
GL-5, S.A.E. 75W/90
-40° F (-40° C)
*
0-76-J
Hypoid Gear Oil
GL-5, S.A.E. 75W
-40° F (-40° C)
+35° F (+1.6° C)
0-76-L
Hypoid Gear Oil
GL-5, S.A.E. 75W/140
-40° F (-40° C)
*
* No upper limit on these temperatures. However, axle sump temperature must never exceed + 250° F (121° C ).
98
scheduled maintenance
Maintenance Task Schedule
Ensure that the Safety Information, warnings and instructions are read and understood before operation or maintenance procedures are performed. Use whichever interval listed (time, mileage, engine hours) occurs first. Engines operated in severe operating
conditions may require more frequent maintenance. See engine manufacturer’s specifications for more information.
First Month Then Every 3 Months or 3000 Miles
Cooling System
Inspect & Tighten Hose Clamps
Tighten radiator hose clamps to 90 in lb. Tighten heater
hose clamps to 45 in lb.
First 100 Miles Then Every 10,000 Miles
Tires & Wheels
Inspect & Tighten Lug Nuts
Torque to 450-500_ft lb with calibrated torque wrench. Do
not over-tighten. Do not lubricate nuts or studs. Operating
conditions may require more frequent checks.
First 1000 Miles Then Every 3 Months or 6000 Miles
Frame
Inspect & Tighten Body Tie Downs Body
Inspect for missing, damaged rubber pads. Tighten clamps
Tie Down Clamps
to 37–41 ft lb.
Inspect & Tighten Body Tie Downs Firewall
Inspect rubber discs for cracking or damage. Inspect spring
Box Isolator Mounts
& fastener for damage. Tighten to 52–56 ft lb.
Inspect & Tighten Body Tie Downs Front
Inspect rubber blocks for cracking or damage. Inspect
Isolator Mounts
spring & fastener for damage. Tighten to 52–56 ft lb.
Inspect & Tighten Body Tie Downs Rear
Inspect rubber discs for cracking or damage. Inspect spring
Isolator Mounts
& fastener for damage. Tighten bracket to 70–80 ft lb.
Tighten Isolator to 54–58 ft lb.
First 1000 Miles Then Every 6 Months or 6000 Miles
Axle & Suspension, Front
Inspect & Tighten SofTek Spring
Tighten to 285–305 ft lb.
Suspension U-Bolts
Axle & Suspension, Rear
Inspect Comfort Air Suspension Ride
Shock length, eye-to-eye: 22.68" +- .25"
Height
First 1000 Miles Then Every 6 Months or 10,000 Miles
Axle & Suspension, Rear
Inspect & Tighten Comfort Air Suspension
Tighten 7/8" U-Bolts to 400–450 ft lb. Tighten 3/4" U-Bolts
U-Bolts
to 260–320 ft lb.
99
VISION
drivers handbook
First 1000 Miles Then Every 12 Months or 12,000 Miles
Heaters & Defrosters
Inspect Front Heater Hoses & Clamps
Inspect for evidence of leaks or deterioration. replace with
proper parts.
Axle & Suspension, Front
Inspect & Tighten AirTek Suspension Axle
Tighten to 285–305 ft lb.
To Suspension Fasteners
First 5000 Miles Then Every 12 Months or 24,000 Miles
Transmission
Replace Transmission Sump Filter
First 5000 Miles Then Every 24 Months or 24,000 Miles
Transmission
Replace Transmission Main Fluid Filter
First 11,000 Miles Then Every 6 Months or 6000 Miles
Cooling System
Inspect Charge Air Cooler
100
Inspect for clogging debris.
scheduled maintenance
As Specified by Engine Manufacturer
Cooling System
Replace Coolant
See your Engine Ooperator's Manual. Use only premixed
coolant(s) approved by the engine manufacturer. Never
mix different types or brands of coolant.
Engine
Replace Oil & Filter
See Engine operators manual for oil and filter specifications
and maintenance interval.
Adjust Valves
See Engine manufacturer's Service Manual for interval.
As Specified by Transmission Manufacturer
Transmission
Adjust Transmission Shift Cable
See Transmission Chapter.
101
VISION
drivers handbook
Every Day
Doors
Test Wheelchair Lift
Follow the manufacturers recommendations.
Emergency Equipment
Inspect Fire Extinguisher Charge
Ensure that Extinguisher Charge is not expired.
Inspect Fire Extinguisher Mounting Bracket
Ensure that Extinguisher bracket is secure and operates
correctly.
Inspect First Aid Kit Contents
Ensure that kit supplies are fully replenished, clean, and
not expired.
Inspect First Aid Kit Mounting Bracket
Ensure that mounting bracket is secure and operates
correctly.
Emergency Exits
Inspect All Emergency Exits
Test all emergency exits for proper operation, including
warning buzzer.
Warning Devices & Signs
Test Stop Arms & Crossing Arms
Windows
Inspect All Mirrors
Clean, adjust mirrors.
Inspect All Windows
Clean Windshield, door glass, driver's window, rear vision
windows, rear door windows.
Brakes
Inspect Air Brakes Air Lines & Fittings
Inspect for leaks or physical damage.
Drain Air Brakes Air Tanks
Drain daily in cold weather; weekly in warm weather.
Inspect Air Brakes Brake Chambers
See Air Brakes Chapter for inspection criteria.
Inspect Air Brakes Brake Shoes
Wear depends upon application environment. See Meritor
Cam Brakes Appendix in Air Brakes Chapter for guidelines.
102
scheduled maintenance
Cooling System
Inspect Coolant Level
Top off with premixed coolant of same type as installed.
Never mix coolants of different colors, types, or brands.
See engine Operator's Manual for details.
Inspect Entire Cooling System
Visually inspect for any signs of leakage.
Electrical
Inspect All Lights
Check all running, stop, marker, hazard, and warning lights
for proper operation.
Engine
Inspect Oil Level
See Engine operators manual for oil specifications.
Fuel System
Inspect Fuel Cap
Inspect Water Separator Petcock Drain
Check for water contamination.
Intake System
Inspect Intake Tract Duct & Elbow
Visually inspect for proper fit and sealing, cuts, abarsions,
signs of dirt contamination.
Inspect Intake Tract Restriction Indicator
Replace filter element if indicator is red.
Steering
Inspect Power Steering Fluid Level
Replinish to full mark. Dextron III.
Tires & Wheels
Inspect All Tires & Wheels
Check air pressure. Visually inspect tires, tread wear, lug
nuts, including spare.
Transmission
Inspect Transmission Fluid Level
Check production order for proper type of fluid to be
added.
Every Week
Seats
Inspect & Tighten Passenger Seats Cusion
Inspect for loose cushions clips.
Screws
Inspect Passenger Seats Seat Belts
Lubricate buckles, clean webbing as required. Replace any
damaged webbing straps.
Inspect Passenger Seats Upholstery
Inspect for cuts, tears, wear and soiled areas.
Brakes
Inspect Hydraulic Brakes Pads
Replace if worn to within 1/8" lining remaining.
103
VISION
drivers handbook
Every Month or 3000 Miles
Doors
Lubricate All Doors Vandal Locks
Spray Apply lubricant into key locks. Use LPS #1 for sliding
bolt locks.
Adjust Jack Knife Door Air Pressure
See Body Construction / Doors / Jack Knife Door
Lubricate Jack Knife Door Hinge Pins
LPS 1
Adjust Jack Knife Door Roller Bracket
Adjust for proper open/closed position.
Adjust Jack Knife Door Switch
See Body Construction / Doors / Jack Knife Door
Adjust Outward Opening Door Control Rod
Adjust Outward Opening Door Control Rod
Adjust for full and secure closure without binding.
Bracket
Adjust & Lubricate Outward Opening Door
Adjust linkage for firm closure, and to ensure rear panel
Linkage
closes first.
Lubricate Outward Opening Door Pivots
Lubricate pivot pins with LPS 1.
Adjust Outward Opening Door Roller
Adjust for full and secure closure without binding.
Bracket
Lubricate Wheelchair Lift Lube Points
See model-specific literature provided with lift.
Emergency Exits
Lubricate All Emergency Exits Hinges
LPS #1
Lubricate Rear Emergency Door Hinges
Lubricate at hinge grease fittings.
Lubricate Rear Emergency Door Hold-Open
Apply ASTM D4950 GC-LB Grade 2
Lubricate Roof Hatch Hatch Seal and Latch
Silicone lubricant to prevent sticking of rubber seal.
Spray silicon lubricant into latch mechanism.
Floor
Inspect Floor Drains
Check drawin hole in each body section under window for
debris obstruction.
104
scheduled maintenance
Seats
Lubricate Driver's Seat
Lubricate per manufactuers recommendation.
Inspect & Tighten Passenger Seats
Use standard torque for bolt size , tread type and grade.
Mountings
Warning Devices & Signs
Lubricate Stop Arm, Electric 4-Point Pivot
Lubricate four hinge pivot ponts with Try-Flow lubricant
Inspect & Tighten Stop Arm, Electric
Check interior and exterior fasteners for loosening.
Fasteners
Windows
Lubricate Passenger Windows Latches &
Use silicone lubricant.
Slides
Electrical
Inspect Battery Electrolyte Level
Replenish with distilled water.
Every Month or 6000 Miles
Warning Devices & Signs
Adjust Stop Arm, Air Air Pressure
Adjust for full deployment and retraction
Every Month or 10,000 Miles
Axle & Suspension, Rear
Inspect Rear Axle Lubricant Level
If low, refil to bottom of filler opening. Use same lubricant
type as already installed.
Inspect Spring Suspension Whole
Visually inspect for damage.
Assembly
Every Month or 300,000 Miles
Brakes
Inspect Hydraulic Brakes Fluid
DOT-3 brake fluid.
Every 3 Months or 3000 Miles
Cooling System
Inspect Radiator Fins
Clean debris from fins.
Inspect Water Pump Belt
Inspect condition and tension of belt.
105
VISION
drivers handbook
Every 3 Months or 5000 Miles
Brakes
Lubricate Air Brakes S-Cam
See Meritor Cam Brakes Appendix in Air Brakes Chapter for
guidelines.
Lubricate Hydraulic Brakes Calipers
Lube per meritor specs.
Driveline
Lubricate Driveshafts Slip Joint
NLGI Grade #1 or #2 multipurpose grease.
Lubricate Driveshafts U-Joint Bolts
NLGI Grade #1 or #2 multipurpose grease.
Inspect & Tighten Driveshafts U-Joint Bolts
Tighten to 45–50 ft lb.
Electrical
Inspect Alternator Connections
Inspect for loose wires, damaged terminals, damaged
insulators.
Inspect Battery Ground Strap
Check for solid connection, tight fasteners and absense of
corrosion.
Fuel System
Inspect Fuel Lines
Inspect for leaks or signs of abrasion.
Inspect Fuel Tank Vent
Inspect for obstruction.
Intake System
Inspect Air Cleaner Filter Element
Inspect for proper seating, secure lid. Replace if soiled,
wet, or damaged.
Inspect Intake Tract All Fasteners
Inspect for signs of contaminate infiltration, loose clamps,
wear spots, holes in piping
Inspect Intake Tract Charged Air Tubing
Inspect for signs of contaminate infiltration, loose clamps,
wear spots, holes in piping
Inspect & Tighten Intake Tract Hose
Tighten to 10 in lb.
Clamps
Inspect & Tighten Intake Tract Spring
Tighten to near full spring compression.
Loaded Clamps
Inspect Intake Tract Support Bracket
106
Visual inspection. Repair damaged parts immediately.
scheduled maintenance
Inspect & Tighten Intake Tract T-Bolt
Tighten to 50 in lb.
Clamps
Inspect & Tighten Intake Tract Worm Gear
Tighten to 38–42 in lb.
Clamps
Steering
Lubricate Axle Steering Linkage Drag Link
NLGI #2 EP multipurpose grease rated GC-LB or
equivalent.
Lubricate Axle Steering Linkage King Pins
NLGI #2 EP multipurpose grease rated GC-LB or
equivalent.
Lubricate Axle Steering Linkage Tie Rod
NLGI #2 EP multipurpose grease rated GC-LB or
Ends
equivalent.
Lubricate Intermediate Steering Shaft Slip
Lubricate splines with multipurpose grease.
Joint
Every 3 Months or 24,000 Miles
Brakes
Inspect Air Brakes Air Dryer
See Bendix appendix for specific model in Air Brakes
Chapter.
Inspect Hydraulic Brakes Booster & Master
Inspect for signs of leakage or physical damage.
Cylinder
107
VISION
drivers handbook
Every 6 Months or 6000 Miles
Warning Devices & Signs
Lubricate Destination Sign Hinges
Lubricate Destination Sign Roller Gears
Lightweight grease such as White Lube.
Axle & Suspension, Front
Inspect AirTek Suspension Air Spring
Inspect for wear, abrasions, cuts, or other damage.
Inspect AirTek Suspension Ride Height
Shock length, eye-to-eye: 18.5" +-.25"
Inspect & Tighten AirTek Suspension Ride
Tighten to 8–10 ft lb.
Height Control Valve Bolts
Inspect & Tighten AirTek Suspension
Tighten to 300–325 ft lb.
Shackle Bracket Pivot Bolts
Inspect & Tighten AirTek Suspension
Inspect for signs of leakage, wear, or damage. Tighten
Shock Absorbers
mounting bolts to ( 125 ft.lbs - 135 ft,lbs )
Inspect AirTek Suspension Whole
Visually inspect for damage.
Assembly
Inspect & Tighten SofTek Spring
Tighten to 380–420 ft lb.
Suspension Shackle Bracket Pivot Bolts
Inspect & Tighten SofTek Spring
Inspect for signs of leakage, wear, or damage. Tighten
Suspension Shock Absorbers
mounting bolts to 215 ft lb.
Inspect & Tighten SofTek Spring
Tighten to 380–420 ft lb.
Suspension Spring Pin Lock Bolts
Inspect SofTek Spring Suspension Whole
Visually inspect for damage.
Assembly
Axle & Suspension, Rear
Inspect & Tighten Comfort Air Suspension
Inspect for signs of leakage, wear, or damage. Tighten
Shock Absorbers
upper shock mounts to 50–70 ft lb. Tighten lower shock
mounts to 150–180 ft lb.
Inspect Comfort Air Suspension Whole
Assmebly
108
Visually inspect for damage.
scheduled maintenance
Brakes
Replace Air Brakes Air Compressor Filter
Clean Air Brakes Check Valves
Clean & Lubricate Air Brakes Treadle Valve
See Bendix Treadle Valve Appendix in Air Brakes Chapter.
Clean Air Compressor Governor
Inspect Hydraulic Brakes Calipers
Inspect for signs of leakage or physical damage.
Adjust Hydraulic Brakes Park Brake Lever
Adjust engagement pressure at the lever to 90–100 lb.
Cooling System
Replace Coolant Filter
Electrical
Inspect Battery Battery Posts
Clean and apply anti corrosion agent.
Exhaust System
Inspect Exhaust Pipe Joints
Inspect for loose clamps, leaks, damage.
Fuel System
Replace Fuel Filter Filter Element
Clean Fuel Filter Inlet Screen
Clean. Replace if damaged.
Steering
Lubricate Steering Gear Pitman Arm Pivot
NLGI #2 EP multipurpose grease rated GC-LB or
equivalent. Use hand-operated grease gun.
109
VISION
drivers handbook
Every 6 Months or 10,000 Miles
Axle & Suspension, Rear
Inspect & Tighten Comfort Air Suspension
Tighten to 20–30 ft lb.
Air Spring Anchor Bolts
Inspect & Tighten Comfort Air Suspension
Torque to 30–35 ft lb.
Air Spring Fasteners
Inspect & Tighten Comfort Air Suspension
Tighten to 60–85 in lb.
Leveling Valve Mount Bolt
Inspect & Tighten Comfort Air Suspension
Tighten to 100–150 in lb.
Lever Linkage Locknut
Inspect & Tighten Comfort Air Suspension
Tighten to 260–320 ft lb.
Lower Shock Mount
Inspect & Tighten Comfort Air Suspension
Tighten to 525–575 ft lb.
Quick Align Bolts
Brakes
Lubricate Air Brakes Cam Shaft Housing
NLGI #2 EP multipurpose grease rated GC-LB or
equivalent. Use hand-operated grease gun.
Lubricate Air Brakes Haldex Slack
See Haldex lubricant specs in Air Brakes chapter.
Adjusters
Lubricate Air Brakes Meritor Slack
See Meritor lubricant specs in Air Brakes chapter.
Adjusters
Engine
Inspect Belt & Tensioner
Closely inspect Belt & Tensioner
Clean Crankcase Breather
Clear breather hose of debris or obstruction.
Test Engine Oil
Perform oil sample analysis per Caterpillar specifications.
Steering
Lubricate Steering Column
Vision manual says to lubricate steering column. Where?
With what? Check model applicability
Every 12 Months
Intake System
Test Intake Tract Restriction Indicator
110
Test indicator with vaccuum gauge and pump.
scheduled maintenance
Every 12 Months or 12,000 Miles
Heaters & Defrosters
Tighten Front Heater Fasteners
All fasteners holding such heaters in place in unit. For
details on fasteners check installation prints.
Clean Front Heater FIlter & Core
Clean dust from cores. Replace filter elements.
Axle & Suspension, Front
Inspect & Tighten AirTek Suspension Air
See a instl. diagram for torque spec's.
Spring Fasteners
Inspect & Tighten AirTek Suspension Pin
Tighten to 380–420 ft lb.
Lock Bolts
Axle & Suspension, Rear
Inspect Comfort Air Suspension Ride
Shock length, eye-to-eye: 24.68" +- .25"
Height
Inspect Comfort Air Suspension Ride
Shock length, eye-to-eye: 21.75" +- .25"
Height
Inspect & Tighten Comfort Air Suspension
Inspect for leakage or damage. Torque upper mount bolts
Shock Absorbers
to 50–70 ft lb. Torque lower mount bolts to 160–180 ft lb.
Inspect & Tighten Comfort Air Suspension
Torque to 150–205 ft lb.
Torque Arm Bolts
Inspect & Tighten Comfort Air Suspension
Torque 7/8" bolts to 400–450 ft lb. Torque 3/4" bolts to
U-Bolts
260–320 ft lb.
Inspect & Tighten Rear Axle U-Bolts
Tighten to 300–350 ft lb.
Inspect Spring Suspension Rebound Pins
Verify that cotter pins are installed.
Inspect & Tighten Spring Suspension
Inspect for signs of leakage, wear, or damage. Tighten
Shock Absorbers
locknuts to 75–100 ft lb.
Inspect & Tighten Spring Suspension
Tighten locknuts to 100–125 ft lb.
Spring Radius Fasteners
Cooling System
Test Entire Cooling System
Pressure Test Cooling system.
Steering
Inspect Hydraulic Pump Body & Seals
Inspect for leaks.
Inspect Steering Gear Body & Seals
Inspect for leaks.
111
VISION
drivers handbook
Every 12 Months or 24,000 Miles
Brakes
Clean Air Brakes Pop Off Valves
Steering
Replace Hydraulic Reservoir Filter Element
Replace element and fluid. Replace more frequently in
severe operating conditions. Dextron III.
Transmission
Inspect Transmission Vent
Clear vent hose of debris or obstruction.
Every 12 Months or 50,000 Miles
Axle & Suspension, Rear
Replace Rear Axle Petroleum Based
Hypoid Gear Oil. Viscosity depends upon operating climate.
Lubricant
See Viscosity/Temperature chart.
Every 12 Months or 100,000 Miles
Axle & Suspension, Rear
Replace Rear Axle Synthetic Lubricant
Viscosity depends upon operating climate. See
Viscosity/Temperature chart.
Every 18 Months or 20,000 Miles
Cooling System
Lubricate Shutters Pivots
Use Never Seize spray lubricant.
Every 24 Months or 24,000 Miles
Brakes
112
Clean Air Brakes Parking Brake Valve
See Bendix Appendixes in Air Brakes Chapter.
Clean Air Brakes Quick Release Valves
See Bendix Appendixes in Air Brakes Chapter.
Clean Air Brakes Relay Valves
See Bendix Appendixes in Air Brakes Chapter.
Clean Air Brakes Spring Brake Valve
See Bendix Appendixes in Air Brakes Chapter.
scheduled maintenance
Engine Cooling System
In today’s modern engine designs, accurate maintenance of the cooling system is
critically important to engine life. Simply maintaining coolant level and performing
occasional coolant changes does not adequately ensure that the cooling system is
healthy. The chemical balance of engine coolant must always be correct. This requires dilligent adherance to the engine manufacturer’s coolant specifications, maintenance schedules, and procedures. Accurate coolant system maintenance records
should be kept.
The engine coolant level in the reservoir should be checked daily as a part of
routine pre-trip inspection. But whenever the coolant level is low, it must be replenished with only pre-mixed coolant of the same type and brand installed. Never top
off coolant with plain water.
Careful pre-trip inspection and a program of routine maintenance checks of the
condition of the cooling system by service technicians should ensure against enroute
emergencies such as worn hoses or loose clamps resulting in coolant loss. In the case
of such an emergency, however, if anything other than original premixed coolant is
added in order to allow the bus to proceed to a service facility, the coolant system
must be completely drained, flushed, and properly refilled with approved coolant
before being returned to routine service. Any enroute event requiring topping off
of the coolant should be reported to service personnel responsible for maintenance
of the bus.
[WARNING] Exercise extreme care when removing the cap from the engine
coolant reservoir. Always allow time for the engine to cool before removing
the cap. The pressurized coolant may be very hot and can spray out, causing
serious burn injuries.
Coolant Types
Engine coolant is generically divided between two types; “standard” and “long-life”
(or “extended-life”). Extended-life coolants generally allow longer intervals between
coolant changes (sometimes requiring additives to be added near the midpoint of
their service life, and/or for special testing to be performed at certain intervals). Engine manufacturers, however, differ somewhat in regards to specificaitions for coolants which they recognize as “long-life” when used in their respective engines.
Blue Bird buses built as of August, 2006 come from the Blue Bird factory with one
of three types of coolant. The standard coolant is John Deere Cool-Gard 50/50 premix. This coolant is considered extended life when installed in John Deere engines.
It is to be considered standard-life coolant when installed in Caterpillar or Cummins
engines.
Caterpillar equipped buses purchased with a long-life coolant option have been
filled with Cat ELC premix.
Cummins equipped buses purchased with a long-life coolant option have been
filled with Fleetguard ES Optimax 60/40 premix.
113
VISION
drivers handbook
Blue Bird installs decals on or near the deairation tank filler which state the type
of coolant installed at the factory. The decal states the approved premixed coolant
and coolant manufacturer’s part number for one gallon quantities. The decal also
lists the manufacturer’s part number for the concentrate which is approved for mixing with the premix for stronger glycol concentration.
[CAUTION] When replenishing or replacing coolant, only use coolant of the
same type already installed. Never mix coolants of different color, type, or
brand. Plain water is corrosive at engine operating temperatures. Never add
plain water to the system. When using concentrated coolant to raise the glycol
concentration for extreme temperature environments, Blue Bird recommends
only mixing the concentrate with pre-mixed coolant of the same type; not
mixing with water.
Coolant Testing and Replacement
Each engine manufacturer has its own specific requirements for coolant testing and
maintenance. Therefore, refer to the engine Operator’s Manual for your bus and follow the engine manufacturer’s maintenance specifications.
Blue Bird recommends that Caterpillar cooling systems with Cat ELC premix
coolant should be tested according to the Caterpillar Operation and Maintenance
Manual.
Blue Bird recommends that Cummins cooling systems with extended life Fleetguard ES Optimax coolant should be tested by sending samples to a Fleetguard lab
for a monitor C test as specified in the Cummins Operator’s Manual.
The John Deere Cool-Gard coolant may be tested by sending a sample to John
Deere for a Cool Scan test, or may be manually tested by qualified service technicians
using a John Deere Three Way test strip, which is included in John Deere 3-Way Heavy
Duty Coolant Test Kit TY6175.
Follow the engine manufacturer’s procedure for draining, flushing, and refill.
Blue Bird buses equipped with Caterpillar or Cummins engines may also be
equipped with an optional coolant filter. The coolant filter element installed at the
Blue Bird factory is compatible with all three of the above-described coolants:
Blue Bird Number 00064641
Vendor (Wix) Part Number 24070
Shutters
Your Vision may be equipped with radiator shutters, a set of vanes designed to restrict airflow through the radiator, and thereby help control the engine operating
temperature in extremely cold weather. The shutters are automatically controlled by
the operating temperature of the engine, and are effective by controlling the amount
of air flowing through the radiator cooling fins.
The shutters must be maintained and kept free of foreign material that would
prevent them from operating. Inspect them for obstruction on a routine schedule,
such as when checking the engine oil level. Remove any debris. Service technicians
should lubricate the moving parts joints such as the vane pivots and tracks of the
shutters assembly regularly, using a light spray lubricant such as WD-40®.
114
Notes
115
VISION
116
drivers handbook
BBCV
BLUE BIRD VISION
4
00
10
7
17
2010