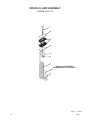
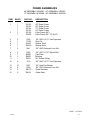
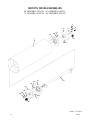
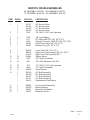
1
OPERATOR’S AND PARTS MANUAL
VIBRATORY ROLLER
SERIAL NUMBER: ___________________
MODEL NUMBER: ___________________
800-456-7100 I www.paladinattachments.com
Manual Number: OM695
Part Number: 75595
Rev. 4
503 Gay Street, Delhi, IA 52223, United States of America Copyright ©
10380
7-22-13-6
TABLE OF CONTENTS
PREFACE...........................................................................................................................................................3
SAFETY PRECAUTIONS
SAFETY STATEMENTS............................................................................................................................ 5
GENERAL SAFETY PRECAUTIONS.....................................................................................................5-7
EQUIPMENT SAFETY PRECAUTIONS................................................................................................... 8
DECALS
DECAL PLACEMENT................................................................................................................................ 9
DECALS............................................................................................................................................. 10-11
INSTALLATION
General information...................................................................................................................... 12
nomenclature................................................................................................................................... 12
attaching............................................................................................................................................12
detaching............................................................................................................................................13
operating instructions
general information...................................................................................................................... 14
OPERATING PROCEDURE.................................................................................................................... 14
maintenance AND SERVICE
GENERAL MAINTENANCE - every 8 / 100 / 500 hours ...........................................................15-16
cHANGING gEAR lUBE........................................................................................................................ 16
DRUM REMOVAL.................................................................................................................................... 16
DRUM INSTALLATION............................................................................................................................ 17
REPLACING VIBRATION ISOLATORS.............................................................................................17-18
REPLACING LEFT BEARINGS AND/OR HUBS................................................................................18-19
REPLACING RIGHT BEARINGS AND/OR HUBS.............................................................................20-21
HYDRAULIC MOTOR REPLACEMENT................................................................................................. 21
troubleshooting................................................................................................................................. 22
specifications
bolt torque specifications........................................................................................................ 23
VIBRATORY ROLLER specifications.............................................................................................. 24
limited warranty.................................................................................................................................. 25
PARTS
SMOOTH VIBRATORY ROLLER ASSEMBLIES...............................................................................26-27
pADDED VIBRATORY ROLLER ASSEMBLIES................................................................................28-29
sPRING CLAMP ASSEMBLY.............................................................................................................30-31
FRAME ASSEMBLIES.......................................................................................................................32-33
SMOOTH DRUM ASSEMBLIES........................................................................................................34-35
PADDED DRUM ASSEMBLIES.........................................................................................................36-37
hUB ASSEMBLIES............................................................................................................................38-39
HYDRAULIC ASSEMBLY...................................................................................................................40-41
10419
75595
9-28-05
1
THIS PAGE
IS INTENTIONALLY
BLANK
2
75595
PREFACE
GENERAL COMMENTS
Congratulations on the purchase of your new BRADCO product! This product was carefully
designed and manufactured to give you many years of dependable service. Only minor maintenance (such as cleaning and lubricating) is required to keep it in top working condition. Be sure
to observe all maintenance procedures and safety precautions in this manual and on any safety
decals located on the product and on any equipment on which the attachment is mounted.
This manual has been designed to help you do a better, safer job. Read this manual carefully and become familiar with its contents.
WARNING! Never let anyone operate this unit without reading the "Safety Precautions"
and "Operating Instructions" sections of this manual.
Always choose hard, level ground to park the vehicle on and set the brake
so the unit cannot roll.
Unless noted otherwise, right and left sides are determined from the operator’s control position when facing the attachment.
NOTE: The illustrations and data used in this manual were current (according to the information available to us) at the time of printing, however, we reserve the right to redesign and
change the attachment as may be necessary without notification.
BEFORE OPERATION
The primary responsibility for safety with this equipment falls to the operator. Make sure the
equipment is operated only by trained individuals that have read and understand this manual. If
there is any portion of this manual or function you do not understand, contact your local authorized
dealer or the manufacturer to obtain further assistance. Keep this manual available for reference.
Provide the manual to any new owners and/or operators.
SAFETY ALERT SYMBOL
This is the “Safety Alert Symbol” used by this industry. This symbol is used to warn
of possible injury. Be sure to read all warnings carefully. They are included for your
safety and for the safety of others working with you.
SERVICE
Use only manufacturer replacement parts. Substitute parts may not meet the required standards.
Record the model and serial number of your unit on the cover of this manual. The parts
department needs this information to insure that you receive the correct parts.
SOUND AND VIBRATION
Sound pressure levels and vibration data for this attachment are influenced by many different parameters: some items are listed below (not inclusive):
• prime mover type, age, condition, with or without cab enclosure and configuration
• operator training, behavior, stress level
• job site organization, working material condition, environment
Based on the uncertainty of the prime mover, operator, and job site, it is not possible to get precise machine and operator sound pressure levels or vibration levels for this attachment.
NOTE: A list of all Paladin Patents can be found at http://www.paladinattachments.com/patents.asp.
10344
75595
7-31-13-4
3
THIS PAGE
IS INTENTIONALLY
BLANK
4
75595
SAFETY STATEMENTS
THIS SYMBOL BY ITSELF OR WITH A WARNING WORD THROUGHOUT THIS MANUAL IS USED TO CALL YOUR ATTENTION TO INSTRUCTIONS INVOLVING YOUR
PERSONAL SAFETY OR THE SAFETY OF OTHERS. FAILURE TO FOLLOW THESE
INSTRUCTIONS CAN RESULT IN INJURY OR DEATH.
DANGER
THIS SIGNAL WORD IS USED WHERE SERIOUS INJURY OR DEATH
WILL RESULT IF THE INSTRUCTIONS ARE NOT FOLLOWED PROPERLY.
WARNING
THIS SIGNAL WORD IS USED WHERE SERIOUS INJURY OR DEATH
COULD RESULT IF THE INSTRUCTIONS ARE NOT FOLLOWED PROPERLY.
CAUTION
THIS SIGNAL WORD IS USED WHERE MINOR INJURY COULD RESULT IF
THE INSTRUCTIONS ARE NOT FOLLOWED PROPERLY.
NOTICE
NOTICE INDICATES A PROPERTY DAMAGE MESSAGE.
GENERAL SAFETY PRECAUTIONS
WARNING! READ MANUAL PRIOR TO INSTALLATION
Improper installation, operation, or maintenance of this equipment could result in
serious injury or death. Operators and maintenance personnel should read this manual, as well as all manuals related to this equipment and the prime mover thoroughly
before beginning installation, operation, or maintenance. FOLLOW ALL SAFETY
INSTRUCTIONS IN THIS MANUAL AND THE PRIME MOVER’S MANUAL(S).
READ AND UNDERSTAND ALL SAFETY STATEMENTS
Read all safety decals and safety statements in all manuals prior to operating or
working on this equipment. Know and obey all OSHA regulations, local laws, and
other professional guidelines for your operation. Know and follow good work
practices when assembling, maintaining, repairing, mounting, removing, or operating
this equipment.
KNOW YOUR EQUIPMENT
Know your equipment’s capabilities, dimensions, and operations before operating.
Visually inspect your equipment before you start, and never operate equipment that
is not in proper working order with all safety devices intact. Check all hardware to
ensure it is tight. Make certain that all locking pins, latches, and connection devices
are properly installed and secured. Remove and replace any damaged, fatigued, or
excessively worn parts. Make certain all safety decals are in place and are legible.
Keep decals clean, and replace them if they become worn or hard to read.
10338
75595
8-16-05
5
GENERAL SAFETY PRECAUTIONS
WARNING! PROTECT AGAINST FLYING DEBRIS
Always wear proper safety glasses, goggles, or a face shield when driving pins in or
out, or when any operation causes dust, flying debris, or any other hazardous material.
WARNING! LOWER OR SUPPORT RAISED EQUIPMENT
Do not work under raised booms without supporting them. Do not use support material made of concrete blocks, logs, buckets, barrels, or any other material that could
suddenly collapse or shift positions. Make sure support material is solid, not decayed, warped, twisted, or tapered. Lower booms to ground level or on blocks. Lower
booms and attachments to the ground before leaving the cab or operator’s station.
WARNING! USE CARE WITH HYDRAULIC FLUID PRESSURE
Hydraulic fluid under pressure can penetrate the skin and cause serious injury or
death. Hydraulic leaks under pressure may not be visible. Before connecting or disconnecting hydraulic hoses, read your prime mover’s operator’s manual for detailed
instructions on connecting and disconnecting hydraulic hoses or fittings.
• Keep unprotected body parts, such as face, eyes, and arms as far away as
possible from a suspected leak. Flesh injected with hydraulic fluid may develop
gangrene or other permanent disabilities.
• If injured by injected fluid, see a doctor at once. If your doctor is not familiar with
this type of injury, ask him to research it immediately to determine proper treatment.
• Wear safety glasses, protective clothing, and use a piece of cardboard or wood
when searching for hydraulic leaks. DO NOT USE YOUR HANDS!
SEE ILLUSTRATION.
CARDBOARD
HYDRAULIC HOSE
OR FITTING
MAGNIFYING GLASS
10339
6
8-16-05
75595
GENERAL SAFETY PRECAUTIONS
WARNING! DO NOT MODIFY MACHINE OR ATTACHMENTS
Modifications may weaken the integrity of the attachment and may impair the function, safety, life, and performance of the attachment. When making repairs, use only
the manufacturer’s genuine parts, following authorized instructions. Other parts may
be substandard in fit and quality. Never modify any ROPS (Roll Over Protection
Structure) or FOPS (Falling Object Protective Structure) equipment or device. Any
modifications must be authorized in writing by the manufacturer.
WARNING! SAFELY MAINTAIN AND REPAIR EQUIPMENT
• Do not wear loose clothing or any accessories that can catch in moving parts. If
you have long hair, cover or secure it so that it does not become entangled in the
equipment.
• Work on a level surface in a well-lit area.
• Use properly grounded electrical outlets and tools.
• Use the correct tools for the job at hand. Make sure they are in good condition for
the task required.
• Wear the protective equipment specified by the tool manufacturer.
SAFELY OPERATE EQUIPMENT
Do not operate equipment until you are completely trained by a qualified operator
in how to use the controls, know its capabilities, dimensions, and all safety requirements. See your machine’s manual for these instructions.
• Keep all step plates, grab bars, pedals, and controls free of dirt, grease, debris,
and oil.
• Never allow anyone to be around the equipment when it is operating.
• Do not allow riders on the attachment or the prime mover.
• Do not operate the equipment from anywhere other than the correct operator’s
position.
• Never leave equipment unattended with the engine running, or with this attachment in a raised position.
• Do not alter or remove any safety feature from the prime mover or this attachment.
• Know your work site safety rules as well as traffic rules and flow. When in doubt
on any safety issue, contact your supervisor or safety coordinator for an explanation.
10340
75595
8-16-05
7
EQUIPMENT SAFETY PRECAUTIONS
WARNING! KNOW WHERE UTILITIES ARE
Observe overhead electrical and other utility lines. Be sure equipment will clear
them. When digging, call your local utilities for location of buried utility lines, gas,
water, and sewer, as well as any other hazard you may encounter.
OPERATING THE VIBRATORY ROLLER
•
•
•
•
•
•
•
Block off work area from bystanders, livestock, etc.
Operate only from the operator’s station.
Do not lift loads in excess of the capacity of the prime mover.
When operating on slopes, drive up and down, not across. Avoid steep hillside
operation, which could cause the prime mover to overturn.
Reduce speed when driving over rough terrain, on a slope, or turning, to avoid
overturning the vehicle.
An operator must not use drugs or alcohol, which can change his or her alertness or coordination. An operator taking prescription or over-the-counter drugs
should seek medical advice on whether or not he or she can safely operate
equipment.
Before exiting the prime mover, lower the attachment to the ground, turn off the
prime mover’s engine, remove the key and apply the brakes.
TRANSPORTING THE VIBRATORY ROLLER
•
•
•
•
Travel only with the attachment in a safe transport position to prevent uncontrolled movement. Drive slowly over rough ground and on slopes.
When driving on public roads use safety lights, reflectors, Slow Moving Vehicle
signs etc., to prevent accidents. Check local government regulations that may
affect you.
Do not drive close to ditches, excavations, etc., cave in could result.
Do not smoke when refueling the prime mover. Allow room in the gas tank for
expansion. Wipe up any spilled fuel. Secure cap tightly when done.
MAINTAINING THE VIBRATORY ROLLER
•
•
•
•
•
Before performing maintenance, lower the attachment to the ground, turn off the
engine, remove the key and apply the brakes.
Never perform any work on the attachment unless you are authorized and qualified to do so. Always read the operator service manual’s before any repair is
made. After completing maintenance or repair, check for correct functioning of
the attachment. If not functioning properly, always tag “DO NOT OPERATE” until
all problems are corrected.
Worn, damaged, or illegible safety decals must be replaced. New safety decals
can be ordered from BRADCO.
Never make hydraulic repairs while the system is under pressure. Serious personal injury or death could result.
Never work under a raised attachment.
10381
8
9-12-05
75595
DECALS
DECAL PLACEMENT
GENERAL INFORMATION
The diagram on this page shows the location of the decals used on the BRADCO Vibratory Roller. The decals are identified by their part numbers, with reductions of he actual decals
located on the following pages. Use this information to order replacements for lost or damaged
decals. Be sure to read all decals before operating the attachment. They contain information
you need to know for both safety and longevity.
LOGO
#40149
#40678
#4468
#40150
#4338
serial
number tag
location
#40151
#40590
#40149
logo
MODEL NUMBER
#4468
IMPORTANT: Keep all safety signs clean and legible. Replace all missing, illegible, or damaged safety signs. When replacing parts with safety signs attached, the safety signs must also
be replaced.
REPLACING SAFETY SIGNS: Clean the area of application with nonflammable solvent, then
wash the same area with soap and water. Allow the surface to fully dry. Remove the backing from the safety sign, exposing the adhesive surface. Apply the safety sign to the position
shown in the diagram above and smooth out any bubbles.
10399
75595
9-16-05
9
DECALS
MADE IN U.S.A.
BRADCO LOGO
PART #40113 (SMALL - WHITE)
PART #40092 (LARGE - WHITE)
VRS48
MODEL NUMBER
PART #40892
VRS66
MODEL NUMBER
PART #40893
VRS73
MODEL NUMBER
PART #40894
VRS84
MODEL NUMBER
PART #40895
WARNING! BEFORE LEAVING SEAT
PART #40678
10
MADE IN U.S.A.
PART #4338
VRP48
MODEL NUMBER
PART #40896
VRP66
MODEL NUMBER
PART #40897
VRP73
MODEL NUMBER
PART #40898
VRP84
MODEL NUMBER
PART #40899
CAUTION! HIGH FLOW SYSTEMS
PART #40590
10400
9-16-05
75595
DECALS
WARNING! HIGH PRESSURE FLUID
PART #40151
WARNING! READ MANUAL
PART #40150
DANGER! PINCH POINT
PART #40149
WARNING! FOOT CRUSH
PART #4468
10401
75595
9-16-05
11
INSTALLATION
GENERAL INFORMATION
The BRADCO Vibratory Rollers were designed to be easy to use and maintain. They
are operated by the loaders auxiliary hydraulics. The Vibratory Rollers mount to the toolbar /
quick attach mechanism for easy mounting.
NOTICE:
DO NOT operate the Vibratory Rollers on a Hi-Flow hydraulic system (25
GPM Maximum). Damage to the hydraulic motor will occur.
NOMENCLATURE
Throughout this manual, reference is made to various Vibratory Roller components.
Study the following diagram to acquaint yourself with the various names of these components.
This knowledge will be helpful when reading through this manual or when ordering service
parts. There is a complete parts breakdown for each roller at the back of this manual.
HITCH FRAME
FRAME
DRUM
(SMOOTH SHOWN)
POWER & RETURN HOSES
SPRING CLAMP ASSEMBLY
RELIEF VALVE
MOTOR GUARD
SCRAPER PLATES
HYDRAULIC
MOTOR
attaching
Install the Vibratory Roller by following your power unit operator’s manual for proper
installion of an attachment. Connect the power and return hoses to the auxiliary hydraulic couplers on the loader. IMPORTANT: All hose routings should be check for kinks or pinching.
Reroute if necessary.
WARNING! To Avoid Serious Personal Injury, make sure the Vibratory Roller is securely
latched to the attachment mechanism of your unit. Failure to do so could
result in separation of the attachment from the unit.
10382
12
9-27-05
75595
INSTALLATION
detaching
On firm, level ground. Lower the lift arms against the frame and place the roller on the ground.
Move the control levers back and forth to relieve pressure in the line. Disconnect couplers.
NOTE: Connect couplers together or install dust caps and plugs to prevent contaminants from entering the hydraulic system.
Follow your power unit operator’s manual for detaching (removing) an attachment.
CAUTION! Block vibratory roller drum to prevent rolling when not attached to loader.
NOTE: Frequent lubrication of grease fittings with a multi-purpose grease will greatly
increase the life of the product.
IMPORTANT: DISENGAGE THE AUXILIARY HYDRAULICS, STOP THE ENGINE, ENGAGE
PARKING BRAKE AND REMOVE KEY BEFORE LEAVING THE OPERATOR’S STATION.
10383
75595
9-27-05
13
OPERATION
GENERAL INFORMATION
The BRADCO Vibratory Roller is a hydraulically powered attachment designed to compact soil, stone or fill material. Performance of the roller varies greatly depending on the operator and how the attachment is used.
WARNING! Read and understand the Safety Precautions section of this manual before
beginning operation.
Operate the attachment only from the operator’s station. Any other method
could result in serious personal injury or death.
Do not allow bystanders in the area when operating.
Go up and down slopes, not across them. Keep the heavy end of the machine uphill.
Follow mandatory safety shutdown procedures before cleaning, adjusting,
lubricating or servicing this attachment.
OPERATING PROCEDURE
1.
Position the Vibratory Roller in the desired starting location and lower the attachment to
the ground.
2.
Lower the loader arms and roll the toolbar out until the top of the roller frame is parallel to the ground and the front tires of the loader are approximately 1-3 inches off the
ground.
3.
Engage the auxiliary hydraulics on the loader and slowly drive forward.
4.
Once you have reached the end of the pass, reverse the skid steer and drive slowly
backwards to further pack the soil and cover any tire tracks. IMPORTANT: The drive circuit is bi-directional but, for the best results it is recommended that you reverse the auxiliary hydraulic flow when you reverse direction.
NOTICE:
DO NOT operate the Vibratory Roller on Hi-Flow hydraulic systems (25 GPM
maximum). Damage to the hydraulic motor will occur.
10384
14
9-250-05
75595
MAINTENANCE AND SERVICE
GENERAL INFORMATION
Regular maintenance and service is the key to long equipment life and safe operation.
Maintenance requirements have been kept to a minimum. However it is important that these
maintenance procedures be performed as described in this section.
WARNING! Read the Safety Precautions section of this manual before performing any
maintenance procedure.
Follow all mandatory safety shutdown procedures outlined in the loader
operator’s manual before adjusting, cleaning, lubricating or servicing this
attachment.
EVERY 8 HOURS
Lubricate all grease fittings. (One grease fitting located on the back of the hitch frame).
Check bolts for tightness.
Check hydraulic hoses for leaks, pinching or deterioration.
Check all safety signs are clean and legible.
Replace any damaged or worn parts.
WARNING! Escaping hydraulic fluid under pressure can have sufficient force to penetrate the skin causing serious personal injury. Fluid escaping from a very
small hole can be almost invisible. Use a piece of cardboard or wood rather
than your hands to search for suspected leaks.
Keep unprotected body parts, such as face, eyes, and arms as far away
as possible from a suspected leak. Flesh injected with hydraulic fluid may
develop gangrene or other permanent disabilities.
If injured by injected fluid see a doctor at once. If your doctor is not familiar with this type of injury, ask him to research it immediately to determine
proper treatment.
CARDBOARD
HYDRAULIC HOSE
OR FITTING
MAGNIFYING
GLASS
EVERY 100 HOURS
Check oil level in roller shaft. (Remove 90° elbow with fittings in the cover plate. Oil
level is sufficient if oil is up to the fill hole. If the unit is level and the oil is not visible, add as
required.)
NOTE: The Vibratory Roller is a sealed unit. If oil is low, service is required.
10385
75595
9-27-05
15
MAINTENANCE AND SERVICE
EVERY 500 HOURS
WARNING! Follow all mandatory safety shutdown procedures outlined in the loader
operator’s manual before adjusting, cleaning, lubricating or servicing this
attachment.
The gear oil in the drive circuit must be changed after every 500 hours of operation with
an 80-90 weight gear lube.
TO CHANGE GEAR LUBE:
1.
Raise the left side (motor side) of the vibratory roller using a hoist and place a 6” x 6”
block under the drum and lower the roller onto the block.
2.
On the right side of the vibratory roller, place a container (to catch the oil) under the
cover plate and remove the cover plate leaving all fittings in place.
3.
Once the oil has been completely drained from the roller shaft, remove the block from
the left side of the vibratory roller and place under the right side of the roller.
4.
Clean the existing silicone from the cover plate and reseal and replace using new adhesive sealant (100% Silicone Rubber). Check for leaks.
5.
Remove the breather plug from the cover plate and fill the roller shaft with the amount
of 80-90 weight gear lube recommended for your attachment. (See Oil Requirements
below.) Replace breather plug with breather pointing up.
OIL REQUIREMENTS (APPROXIMATE)
48” Vibratory Roller = 1.38 Quarts
66” Vibratory Roller = 2.00 Quarts
73” Vibratory Roller = 2.13 Quarts
84” Vibratory Roller = 2.50 Quarts
DRUM REMOVAL
NOTE: Removal of the isolator bolts will allow the vibratory roller frame to fall. Make
sure the frame is completely supported before removing.
WARNING! NEVER place hands or fingers between the frame and drum assemblies
during installation or removal. Severe personal injury could occur.
WARNING! Follow all mandatory safety shutdown procedures outlined in the loader
operator’s manual before adjusting, cleaning, lubricating or servicing this
attachment.
1.
Using a loader or hoist, position the unit with the drum on the ground and the frame
completely supported on blocks. Remove the motor guard and the motor bolts. Place a
container (to catch the oil from the roller shaft) under the motor and remove the motor
from the drum assembly. See Figure #1
10386
16
4-27-07-2
75595
MAINTENANCE AND SERVICE
FIGURE #1
REMOVE MOTOR FROM DRUM
ASSEMBLY
ROLLER FRAME
.50” UNC X 1.25 CAPSCREWS
(ISOLATOR BOLTS)
DRUM ASSEMBLY
MOTOR GUARD
ISOLATOR’S
(RUBBER MOUNTS)
2.
Remove the twelve (isolator) bolts securing the roller frame to the drum and isolators.
Using the loader or hoist, lift the frame assembly off of the drum assembly and set
aside. See Figure #1
3.
Use a hoist to finish draining the oil from the roller shaft. Drum removal is complete
DRUM INSTALLATION
1.
Lift the roller frame over the top of the drum assembly and into position. Reinstall the
twelve .50” UNC x 1.25” capscrews and hard flat washers (using loctite 271 or equivalent) securing the frame to the drum.
WARNING! NEVER place hands or fingers between the frame and drum assemblies
during installation or removal. Severe personal injury could occur.
2.
Reinstall the hydraulic motor, gasket and motor guard using the existing hardware (using loctite 271 or equivalent on motor mounting hardware).
3.
Fill the roller shaft with 80-90 weight gear lube by following the procedure listed in TO
CHANGE GEAR LUBE.
REPLACING VIBRATION ISOLATORS (RUBBER MOUNTS)
NOTE: Removal of the isolator bolts will allow the vibratory roller frame to fall. Make
sure the frame is completely supported before removing.
WARNING! Follow all mandatory safety shutdown procedures outlined in the loader
operator’s manual before adjusting, cleaning, lubricating or servicing this
attachment.
10387
75595
4-9-10-3
17
MAINTENANCE AND SERVICE
1.
Remove the drum by following the procedure listed for DRUM REMOVAL.
2.
Remove the .50” UNC deformed lock nuts securing the isolators to the left and right
hubs and install new isolators. Torque nuts to 55 ft. lbs.
NOTICE: Do NOT remove the hubs from the roller shaft. Removing the hubs without
first supporting the roller shaft will cause damage to the roller shaft seal sleeves.
Install the drum by following the procedure listed for DRUM INSTALLATION.
3.
WARNING! NEVER place hands or fingers between the frame and drum assemblies
during installation or removal. Severe personal injury could occur.
REPLACING LEFT BEARINGS AND/OR HUBS
WARNING! Follow all mandatory safety shutdown procedures outlined in the loader
operator’s manual before adjusting, cleaning, lubricating or servicing this
attachment.
1.
Remove the drum by following the procedure listed for DRUM REMOVAL.
2.
FIGURE #2
DRUM
Remove the bearing spacer, lock washer
and lock nut from the end of the roller
shaft by first bending back the engaged
tab on the lock washer.
3.
ROLLER SHAFT
REMOVE BOTH
HUBS TOGETHER
Insert a clean .62” rod into the motor end
of the roller shaft and support the shaft in
its current position.
NOTICE:
4.
Removing the hubs without first
supporting the roller shaft will
cause damage to the roller shaft
seal sleeves.
Remove the outer bearing hub mounting
bolts and slide both bearing hubs out and
over the end of the rod while keeping the
roller shaft firmly supported.
SUPPORT
.62” ROD
BEARING SPACER
LOCK WASHER
LOCK NUT
10388
18
9-21-05
75595
MAINTENANCE AND SERVICE
NOTICE: DO NOT LET THE ROLLER SHAFT DROP AND COME INTO CONTACT WITH
THE DRUM OR HUB. SEAL SLEEVE DAMAGE COULD OCCUR.
NOTICE: Shaft and bearing hubs are heavy. Be careful not to drop one on the other
as denting may occur.
5.
Pull the inner bearing hub out of the outer bearing
hub. Remove the oil seal and snap ring from the
end of the left inner hub. Tilt the housing to allow
each bearing cone to fall out. See Figure #3
6.
The bearing cup will need to be removed and replaced using an industrial press. Install new bearing cones. See Figure #3
7.
Reinstall the snap ring and press on the new oil
seal. See Figure #3
8.
Remove the bearing retainer from the outer hub
and using an industrial press, remove and replace
the outer bearing. See Figure #3
9.
Reinstall the bearing retainer using the existing
hardware. See Figure #3
10.
Apply a small amount of oil or grease to the outer
bearing hub and using an industrial press assemble the outer bearing hub to the inner bearing
hub.
11.
While maintaining support of the roller shaft, slide
the hub assemblies over the .62” rod and install
securely- to the drum using the existing .75” UNC
X 1.50” capscrews removed in step #5.
FIGURE #3
BEARING
RETAINER
BEARING
OUTER HUB AND BEARING
BEARING
CONE
BEARING
CUP
BEARING
CONE
OIL SEAL
LEFT INNER HUB AND BEARINGS
12.
Reinstall the bearing spacer, lock washer and lock nut onto the end of the roller shaft.
Torque the nut to 15 ft. lbs.. Be sure to fully engage the tab on the lock washer into the
slot on the shaft nut.
13.
Install the drum by following the procedure listed for DRUM INSTALLATION.
WARNING! NEVER place hands or fingers between the frame and drum assemblies
during installation or removal. Severe personal injury could occur.
10389
75595
4-9-10-2
19
MAINTENANCE AND SERVICE
REPLACING RIGHT BEARINGS AND/OR HUBS
WARNING! Follow all mandatory safety shutdown procedures outlined in the loader
operator’s manual before adjusting, cleaning, lubricating or servicing this
attachment.
1.
Remove the drum by following the procedure listed for DRUM REMOVAL.
2.
Remove the cover plate with fittings. See Figure #4
3.
Insert a clean .75” rod into the end of the roller shaft and support the shaft in its current
position. See Figure #4
NOTICE:
Removing the hubs without first supporting the roller shaft will cause damage to the roller shaft seal sleeves.
Remove the outer bearing hub mounting bolts and slide both bearing hubs out and over
the end of the rod while keeping the roller shaft firmly supported. See Figure #4
4.
NOTICE: DO NOT LET THE ROLLER SHAFT DROP AND COME INTO CONTACT WITH
THE DRUM OR HUB. SEAL SLEEVE DAMAGE COULD OCCUR.
NOTICE:
Shaft and bearing hubs are heavy. Be careful not to drop one on the other
as denting may occur.
DRUM
FIGURE #4
ROLLER SHAFT
REMOVE BOTH
HUBS TOGETHER
SUPPORT
.75” ROD
COVER PLATE
5.
Remove the oil seal and snap ring from the end of the right inner hub. See Figure #5
6.
Replacing Right Inner Hub Bearings:
a. If your unit is equipped with a spherical bearing, remove bearing and replace with
two #107605 bearings and one #107387 spacer using an industrial press. Install
new bearings. See Figure #5
b. If your unit is equipped with the two roller bearings and spacer, remove bearings and
spacer and replace using an industrial press. Install new bearings. See Figure #5
c. If your unit is equipped with two ball bearings (no spacer), replace the complete right
side inner hub assembly #104805.
7.
Reinstall the snap ring and press on the new oil seal. See Figure #5
10397
20
2-19-08-3
75595
MAINTENANCE AND SERVICE
8.
Remove the bearing retainer from the outer hub
and using an industrial press, remove and replace
the outer bearing. See Figure #5
9.
Reinstall the bearing retainer using the existing
hardware. See Figure #5
10.
Apply a small amount of oil or grease to the outer
bearing hub and using an industrial press assemble the outer bearing hub to the inner bearing
hub.
12.
While maintaining support of the roller shaft, slide
the hub assemblies over the .75” rod and secure
to the drum using the existing .75” UNC X 1.50”
capscrews removed in step #4.
13.
Reinstall the cover plate
14.
Install the drum by following the procedure listed
for DRUM INSTALLATION.
WARNING! NEVER place hands or fingers between
the frame and drum assemblies during
installation or removal. Severe personal injury could occur.
FIGURE #5
BEARING
RETAINER
BEARING
OUTER HUB AND BEARING
bearings
snap
ring
bearing
spacer
OIL SEAL
RIGHT INNER HUB AND BEARINGS
hydraulic motor replacement
WARNING! Follow all mandatory safety shutdown procedures outlined in the loader
operator’s manual before adjusting, cleaning, lubricating or servicing this
attachment.
1.
Place a block under the left side of the vibratory roller and disconnect the hydraulic couplers from the loader. Remove the motor guard and the motor bolts. Tag and disconnect
the hydraulic hoses from the hydraulic motor. Note the hose routing for re-installation.
NOTE: It is recommended that the motor gasket be replaced at the same
time as the hydraulic motor.
NOTE: The updated hydraulic motor has a cast housing instead of aluminum. If updating your unit you must also replace the 10MBo-8MJ elbow
with a 12MBo-8MJ elbow PART #3316 (GOING TO HOSE #38343).
2.
Remove the motor and gasket from the drum assembly and replace with the new hydraulic motor and gasket. Reconnect the hydraulic hoses and fittings to the new motor.
NOTE: Field replacement of the internal motor seals voids warranty.
3.
Check for leaks. Reinstall the motor bolts and the motor guard.
4.
Check oil level in roller shaft and fill as needed with 80-90 weight gear lube.
10398
75595
2-19-08-3
21
TROUBLESHOOTING
PROBLEM
POSSIBLE CAUSE
REMEDY
Insufficient compaction
Loader “down pressure” insufficient
Increase the “down pressure”
by raising the front wheels off
the ground (see Operation)
Operating RPM too slow
Increase RPM to half throttle
Does not vibrate
Hydraulic couplers mal-
functioning
Replace
Hydraulic couplers not
completely engaged
Check and tighten couplers
Hydraulic motor damaged
Replace motor
Relief Valve damaged
Replace Relief Valve
Roller shaft bearings damaged
Replace
Low oil supply
Check for oil leaks and
service as required
Excessive noise and/or
vibration
Isolator’s worn
Replace Isolators
Operating RPM too slow
Increase RPM to half throttle
Hydraulic motor damaged
Replace
Oil leaking
Oil seals damaged
Replace
Relief Valve damaged
Replace
Hydraulic motor damaged
Replace
Bearings damaged
Replace (replace oil seals at
the same time)
Check for leaks and repair
or replace
Broken or loose hydraulic
lines or fittings
Drum will not turn
Frame installed incorrectly
Check frame for correct
installation and all hardware
intact.
Bearings damaged
Replace
Vibratory roller not tilting
correctly
Binding between frame and drum.
Guide retainer on hitch too
loose or too tight
Remove
Add or remove shims from
hitch
10416
22
9-26-05
75595
BOLT TORQUE
BOLT TORQUE SPECIFICATIONS
GENERAL TORQUE SPECIFICATION TABLE
Use the following torques when special torques are not given. These values apply to fasteners as
received from suppliers, dry, or when lubricated with normal engine oil. They do not apply if special graphited or
moly disulphide greases or other extreme pressure lubricants are used. This applies to both UNF and UNC
threads. Remember to always use grade five or better when replacing bolts.
IMPORTANT: On all PLATED GRADE 8 bolts, reduce torque 15% from listed bolt torque specification.
SAE Grade No.
Bolt head identification
marks as per grade.
NOTE: Manufacturing
Marks Will Vary
2
5
TORQUE
Bolt Size
Inches
Millimeters
Pounds Feet
Min.
Max.
8*
TORQUE
Newton-Meters
Min.
Max.
Pounds Feet
Min.
Max.
TORQUE
Newton-Meters
Min.
Max.
Pounds Feet
Min.
Max.
Newton-Meters
Min.
Max.
1/4
6.35
5
6
7
8
9
11
12
15
12
15
16
20
5/16
7.94
10
12
14
16
17
20.5
23
28
24
29
33
39
3/8
9.53
20
23
27
31
35
42
48
57
45
54
61
73
7/16
11.11
30
35
41
47
54
64
73
87
70
84
95
114
1/2
12.70
45
52
61
70
80
96
109
130
110
132
149
179
9/16
14.29
65
75
88
102
110
132
149
179
160
192
217
260
5/8
15.88
95
105
129
142
150
180
203
244
220
264
298
358
3/4
19.05
150
185
203
251
270
324
366
439
380
456
515
618
7/8
22.23
160
200
217
271
400
480
542
651
600
720
814
976
1
25.40
250
300
339
406
580
696
787
944
900
1080
1220
1464
1-1/8
25.58
-
-
-
-
800
880
1085
1193
1280
1440
1736
1953
1-1/4
31.75
-
-
-
-
1120
1240
1519
1681
1820
2000
2468
2712
1-3/8
34.93
-
-
-
-
1460
1680
1980
2278
2380
2720
3227
3688
1-1/2
38.10
-
-
-
-
1940
2200
2631
2983
3160
3560
4285
4827
* Thick Nuts must be used with Grade 8 bolts
METRIC BOLT TORQUE SPECIFICATIONS
Coarse Thread
Size of Screw
Grade No.
Ptich (mm)
Newton-Meters
3.6-5.8
4.9-7.9
5.8-.4
7.9-12.7
10.9
7.2-10
9.8-13.6
-
-
5.6
7.2-14
9.8-19
12-17
16.3-23
19-27
25.7-36.6
5.6
M6
M8
M10
M12
M14
M16
8.8
8.8
1.0
-
-
-
23-29.8
27.1-35.2
22-31
29.8-42
5.6
20-25
27.1-33.9
20-29
27.1-39.3
34-40
46.1-54.2
35-47
47.4-63.7
10.9
38-46
51.5-62.3
40-52
54.2-70.5
5.6
28-34
37.9-46.1
31-41
42-55.6
51-59
69.1-79.9
56-68
75.9-92.1
10.9
57-66
77.2-89.4
62-75
84-101.6
5.6
49-56
66.4-75.9
52-64
70.5-86.7
90-106
122-143.6
8.8
8.8
1.5
1.0
Newton-Meters
-
20-26
1.75
1.25
81-93
109.8-126
96-109
130.1-147.7
107-124
145-168
5.6
67-77
90.8-104.3
69-83
93.5-112.5
116-130
157.2-176.2
129-145
174.8-196.5
8.8
2.0
1.25
10.9
2.0
5.6
M20
-
Pounds Feet
17-22
8.8
1.25
Pitch (mm)
10.9
10.9
M18
Fine Thread
Pounds Feet
8.8
2.0
88-100
119.2-136
150-168
203.3-227.6
1.5
1.5
1.5
120-138
162.6-187
140-158
189.7-214.1
100-117
136-158.5
177-199
239.8-269.6
10.9
175-194
237.1-262.9
202-231
273.7-313
5.6
108-130
146.3-176.2
132-150
178.9-203.3
206-242
279.1-327.9
246-289
333.3-391.6
8.8
10.9
2.5
186-205
252-277.8
213-249
288.6-337.4
1.5
10360
75595
6-8-95-2
23
SPECIFICATIONS
VIBRATORY ROLLER
d
c
a
e
b
SPECIFICATION AND DESIGN ARE SUBJECT TO CHANGE WITHOUT NOTICE AND WITHOUT LIABILITY THEREFORE.
SMOOTH VIBRATORY ROLLERS
VRS48
VRS66
VRS73
VRS84
A.
B.
C.
D.
E.
Overall Width............................................................. 61.00”
Drum Width................................................................ 48.00”
Overall Height............................................................ 31.00”
Overall Length........................................................... 39.00”
Drum Diameter.......................................................... 24.00”
72.00”
66.00”
31.00”
39.00”
24.00”
79.00”
73.00”
31.00”
39.00”
24.00”
90.00”
84.00”
31.00”
39.00”
24.00”
Operating Weight (lbs)............................................... 1680#
Dynamic Force (lbs).................................................. 5750#
Vibrating Speed (vpm)................................................ 2600
Vibrating Weight (lbs)................................................. 935#
Drum Oscillation/Tilt (degrees).....................................15°
Maximum Flow (gpm).................................................. 25
2150#
7800#
2600
1190#
15°
25
2300#
8550#
2600
1290#
15°
25
2530#
9370#
2600
1440#
15°
25
VRP66
VRP73
VRP84
PADDED VIBRATORY ROLLERS
VRP48
A.
B.
C.
D.
E.
Overall Width............................................................. 61.00”
Drum Width................................................................ 48.00”
Overall Height............................................................ 31.00”
Overall Length........................................................... 39.00”
Drum Diameter (Without Pads)................................. 20.00”
72.00”
66.00”
31.00”
39.00”
20.00”
79.00”
73.00”
31.00”
39.00”
20.00”
90.00”
84.00”
31.00”
39.00”
20.00”
Operating Weight (lbs)............................................... 1630#
Dynamic Force (lbs).................................................. 5750#
Vibrating Speed (vpm)................................................ 2600
Vibrating Weight (lbs)................................................. 890#
Drum Oscillation/Tilt (degrees).....................................15°
Maximum Flow (gpm).................................................. 25
2085#
7800#
2600
1130#
15°
25
2230#
8550#
2600
1225#
15°
25
2455#
9370#
2600
1370#
15°
25
NOTE: Specifications are based on 20 GPM hydraulic flow wherever applicable.
NOTE: VRS48 and VRP48 can be center mounted or offset 12.00” to the right.
10417
24
9-30-05
75595
Limited Warranty
Except for the Excluded Products as described below, all new products are warranted to be free from defects
in material and/or workmanship during the Warranty Period, in accordance with and subject to the terms and
conditions of this Limited Warranty.
1.
Excluded Products. The following products are excluded from this Limited Warranty:
(a) Any cable, part that engages with the ground (i.e. sprockets), digging chain, bearing, teeth, tamping
and/or demolition head, blade cutting edge, pilot bit, auger teeth and broom brush that either constitutes or is part
of a product.
(b) Any product, merchandise or component that, in the opinion of Paladin Light Construction1, has been
(i) misused; (ii) modified in any unauthorized manner; (iii) altered; (iv) damaged; (v) involved in an accident; or (vi)
repaired using parts not obtained through Paladin Light Construction.
2.
Warranty Period. The Limited Warranty is provided only to those defects that occur during the Warranty
Period, which is the period that begins on the first to occur of: (i) the date of initial purchase by an end-user, (ii) the
date the product is first leased or rented, or (iii) the date that is six (6) months after the date of shipment by Paladin
Light Construction as evidenced by the invoiced shipment date (the “Commencement Date”) and ends on the date
that is twelve (12) months after the Commencement Date.
3.
Terms and Conditions of Limited Warranty. The following terms and conditions apply to the Limited Warranty
hereby provided:
(a)
the product.
Option to Repair or Replace. Paladin Light Construction shall have the option to repair or replace
(b)
Timely Repair and Notice. In order to obtain the Limited Warranty, (i) the product must be repaired
within thirty (30) days from the date of failure, and (ii) a claim under the warranty must be submitted to Paladin Light
Construction in writing within thirty (30) days from the date of repair.
(c)
Return of Defective Part or Product. If requested by Paladin Light Construction, the alleged
defective part or product shall be shipped to Paladin Light Construction at its manufacturing facility or other location
specified by Paladin Light Construction, with freight PRE-PAID by the claimant, to allow Paladin Light Construction
to inspect the part or product.
Claims that fail to comply with any of the above terms and conditions shall be denied.
LIMITATIONS AND EXCLUSIONS.
THIS LIMITED WARRANTY IS IN LIEU OF ALL OTHER WARRANTIES, EXPRESS OR IMPLIED, INCLUDING
WITHOUT LIMITATION THE WARRANTIES OF MERCHANTABILITY, FITNESS FOR A PARTICULAR PURPOSE
AND ANY WARRANTY BASED ON A COURSE OF DEALING OR USAGE OF TRADE.
IN NO EVENT SHALL PALADIN LIGHT CONSTRUCTION BE LIABLE FOR CONSEQUENTIAL OR SPECIAL
DAMAGES.
IN NO EVENT SHALL PALADIN LIGHT CONSTRUCTION BE LIABLE FOR ANY LOSS OR CLAIM IN AN
AMOUNT IN EXCESS OF THE PURCHASE PRICE, OR, AT THE OPTION OF PALADIN LIGHT CONSTRUCTION,
THE REPAIR OR REPLACEMENT, OF THE PARTICULAR PRODUCT ON WHICH ANY CLAIM OF LOSS OR
DAMAGE IS BASED. THIS LIMITATION OF LIABILITY APPLIES IRRESPECTIVE OF WHETHER THE CLAIM
IS BASED ON BREACH OF CONTRACT, BREACH OF WARRANTY, NEGLIGENCE OR OTHER CAUSE AND
WHETHER THE ALLEGED DEFECT IS DISCOVERABLE OR LATENT.
Attachment Technologies Inc., a subsidiary of Paladin Brands Holding, Inc. (PBHI) is referred to herein as Paladin Light
Construction.
February 10, 2010
1
75595
25
SMOOTH VIBRATORY ROLLER ASSEMBLIES
48” ASSEMBLY #105085, 66” ASSEMBLY #105086,
73” ASSEMBLY #105087, 84” ASSEMBLY #105088
1
5 4
6
7
3
8
2
9
10
12
11
13
14
19
17
16
15
18
26
18
20
21
25
22
24
23
10402
26
2-19-08-3
75595
SMOOTH VIBRATORY ROLLER ASSEMBLIES
48” ASSEMBLY #105085, 66” ASSEMBLY #105086,
73” ASSEMBLY #105087, 84” ASSEMBLY #105088
REQ’D
PART NO.
1
2
3
4
5
1
1
1
1
1
1
1
1
1
1
1
105096
105097
105098
105099
105100
105101
105102
105103
1502
1023
103179
48” Frame Assembly
66” Frame Assembly
73” Frame Assembly
84” Frame Assembly
48” Smooth Drum Assembly
66” Smooth Drum Assembly
73” Smooth Drum Assembly
84” Smooth Drum Assembly
.31” Lock Washer
.31” UNC X 1.25” Hex Capscrew
Spring Clamp Assembly
6
7
8
9
10
6
8
12
16
6
8
2
2
2
2
1
1092
1092
1516
1516
1841
1841
105140
105141
105142
105143
101958
.50” UNC X 2.00” Hex Capscrew (48”)
.50” UNC X 2.00” Hex Capscrew (66’, 73” & 84”)
.50” Flat Washer (48”)
.50” Flat Washer (66”, 73” & 84”)
.50” UNC Deformed Lock Nut (48”)
.50” UNC Deformed Lock Nut (66”, 73” & 84”)
48” Scraper Plate
66” Scraper Plate
73” Scraper Plate
84” Scraper Plate
Motor Guard
4
4
12
12
1
2
2
2
1
1
1505
1088
1646
1089
11755
1501
1009
3316
35474
3102
.50” Lock Washer
.50” UNC X 1.00” Hex Capscrew
.50” Hard Flat Washer
.50” UNC X 1.25” Hex Capscrew
Cross Port Relief Valve
.50” Lock Washer
.25” UNC X 2.50” Hex Capscrew
90° Elbow 12MBo-8MJ
Hose Assembly .50” X 28” 8FJX-8FJX
Straight Connector 12MBo-8MJ
ITEM
11
12
13
14
15
16
17
18
19
20
21
1
22
1
23
1
1
1
24
1
25
2
26
2
38343
3316*
3283
110918*
110919*
110920*
22532
10093
1708
DESCRIPTION
Hose Assembly .50” X 28” 8FJX-8FJX 90° Long
90° Elbow 12MBO-8MJ
90° Elbow 10MBo-8MJ (Replacement for aluminum motors ONLY)
Hydraulic Motor (48” & 66” Vibratory Rollers)
Hydraulic Motor (73” Vibratory Rollers)
Hydarulic Motor (84” Vibratory Rollers)
Motor Gasket
.38” Special Lock Washer
.38” UNC X 1.00” Socket Head Capscrew
*NOTE: The hydraulic motors have been updated to a cast housing instead of aluminum. If ordering a
new cast housing motor you must also replace the #3283 elbow (#22) with a #3316 elbow.
10403
75595
2-19-08-3
27
PADDED VIBRATORY ROLLER ASSEMBLIES
48” ASSEMBLY #105089, 66” ASSEMBLY #105090,
73” ASSEMBLY #105091, 84” ASSEMBLY #105092
1
5
4
3
6
7
8
2
9
10
11
13
12
14
19
17
16
15
18
26
18
20
21
25
22
24
23
10404
28
2-19-08-3
75595
PADDED VIBRATORY ROLLER ASSEMBLIES
48” ASSEMBLY #105089, 66” ASSEMBLY #105090,
73” ASSEMBLY #105091, 84” ASSEMBLY #105092
REQ’D
PART NO.
1
2
3
4
5
1
1
1
1
1
1
1
1
1
1
1
105096
105097
105098
105099
105104
105105
105106
105107
1502
1023
103179
48” Frame Assembly
66” Frame Assembly
73” Frame Assembly
84” Frame Assembly
48” Padded Drum Assembly
66” Padded Drum Assembly
73” Padded Drum Assembly
84” Padded Drum Assembly
.31” Lock Washer
.31” UNC X 1.25” Hex Capscrew
Spring Clamp Assembly
6
7
8
9
10
6
8
12
16
6
8
2
2
2
2
1
1092
1092
1516
1516
1841
1841
105187
105188
105189
105190
101958
.50” UNC X 2.00” Hex Capscrew (48”)
.50” UNC X 2.00” Hex Capscrew (66’, 73” & 84”)
.50” Flat Washer (48”)
.50” Flat Washer (66”, 73” & 84”)
.50” UNC Deformed Lock Nut (48”)
.50” UNC Deformed Lock Nut (66”, 73” & 84”)
48” Scraper Plate
66” Scraper Plate
73” Scraper Plate
84” Scraper Plate
Motor Guard
4
4
12
12
1
2
2
2
1
1
1505
1088
1646
1089
11755
1501
1009
3316
35474
3102
.50” Lock Washer
.50” UNC X 1.00” Hex Capscrew
.50” Hard Flat Washer
.50” UNC X 1.25” Hex Capscrew
Cross Port Relief Valve
.50” Lock Washer
.25” UNC X 2.50” Hex Capscrew
90° Elbow 12MBo-8MJ
Hose Assembly .50” X 28” 8FJX-8FJX
Straight Connector 12MBo-8MJ
ITEM
11
12
13
14
15
16
17
18
19
20
21
1
22
1
23
1
1
1
24
1
25
2
26
2
38343
3316*
3283
110918*
110919*
110920*
22532
10093
1708
DESCRIPTION
Hose Assembly .50” X 28” 8FJX-8FJX 90° Long
90° Elbow 12MBO-8MJ
90° Elbow 10MBo-8MJ (Replacement for aluminum motors ONLY)
Hydraulic Motor (48” & 66” Vibratory Rollers)
Hydraulic Motor (73” Vibratory Rollers)
Hydarulic Motor (84” Vibratory Rollers)
Motor Gasket
.38” Special Lock Washer
.38” UNC X 1.00” Socket Head Capscrew
*NOTE: The hydraulic motors have been updated to a cast housing instead of aluminum. If ordering a
new cast housing motor you must also replace the #3283 elbow (#22) with a #3316 elbow.
10405
75595
2-19-08-3
29
SPRING CLAMP ASSEMBLY
ASSEMBLY #103179
1
2
3
2
4
5
6
MOUNTING HARDWARE
DETERMINED BY ATTACHMENT
4
10414
30
9-26-05
75595
SPRING CLAMP ASSEMBLY
ASSEMBLY #103179
REQ’D
PART NO.
1
2
3
4
5
1
2
1
2
1
1030
103184
103182
105840
1753
6
1
RHW8618
ITEM
DESCRIPTION
.31” UNC X 3.00” Hex Capscrew
Top Plate
Hose Clamp (.88” ID Hose)
Fender Washer
.31” UNC Nylock Nut
Mounting Spring
10415
75595
4-9-10-2
31
FRAME ASSEMBLIES
48” ASSEMBLY #105096, 66” ASSEMBLY #105097,
73” ASSEMBLY #105098, 84” ASSEMBLY #105099
1
7
14
2
6 5
4
13
11
13
16
10
9
8
12
15
10406
32
3
9-19-05
75595
FRAME ASSEMBLIES
48” ASSEMBLY #105096, 66” ASSEMBLY #105097,
73” ASSEMBLY #105098, 84” ASSEMBLY #105099
REQ’D
PART NO.
1
2
1
1
1
1
1
1
105112
105113
105114
105115
105116
101682
48” Roller Frame
66” Roller Frame
73” Roller Frame
84” Roller Frame
Hitch Frame (48”)
Hitch Frame (66”, 73” & 84”)
3
4
5
6
7
2
1
1
1
2
1095
17728
101467
104819
1841
.50” UNC X 2.75” Hex Capscrew
Stop Pin
Spacer Tube
Spacer Plate
.50” UNC Deformed Lock Nut
8
9
10
11
12
2
1
1
1
8
1548
88996
89436
53031
1119
.50” UNC X 1.25” Nylock Bolt
Cap Plate
Bushing
90° Grease Fitting
.62” UNC X 2.75” Hex Capscrew
13
14
15
16
16
8
2
6
1627
1839
104179
104181
.62” Hard Flat Washer
.62” UNC Deformed Lock Nut
Guide Retainer
Guide Shim
ITEM
DESCRIPTION
10407
75595
4-27-07-2
33
SMOOTH DRUM ASSEMBLIES
48” ASSEMBLY #105100, 66” ASSEMBLY #105101,
73” ASSEMBLY #105102, 84” ASSEMBLY #105103
9
15
14
8
13
10
1
12
13
14
7
6
53 2
4
15
11
16
17
20
19
18
11
12
10
10408
34
4-27-07-2
75595
SMOOTH DRUM ASSEMBLIES
48” ASSEMBLY #105100, 66” ASSEMBLY #105101,
73” ASSEMBLY #105102, 84” ASSEMBLY #105103
REQ’D
PART NO.
1
2
1
1
1
1
2
105117
105118
105119
105120
1043
48” Smooth Drum
66” Smooth Drum
73” Smooth Drum
84” Smooth Drum
.38” UNC X 1.00” Hex Capscrew
3
4
5
6
7
2
1
1
1
1
1503
3171
3356
30394
22588
.38” Lock Washer
90° Elbow 4MP-4FP (48”, 66” & 73”)
Straight Connector 4MP-4FP (48”, 66” & 73”)
Inline Check Valve (48”, 66” & 73”)
Breather Plug (48”, 66” & 73”)
8
9
10
11
12
1
1
1
12
12
12
104796
104805
111443
103044
1646
1841
Cover Plate (48”, 66” & 73”)
Right Inner Hub Assembly (48”, 66” & 73”)
Right Inner Hub Assembly (84”)
Rubber Mount
.50” Hard Flat Washer
.50” UNC Deformed Lock Nut
13
14
15
16
16
16
2
1
1
1
1
--
1137
1649
104803
105108
105109
105110
105111
104143
.75” UNC X 1.50” Hex Capscrew
.75” Hard Flat Washer
Outer Bearing
48” Shaft Assembly
66” Shaft Assembly
73” Shaft Assembly
84” Shaft Assembly
Replacement Seal Sleeve
1
1
1
1
104804
103369
22360
22359
Left Inner Hub Assembly
Bearing Spacer
Bearing Lock Washer
Bearing Lock Nut
ITEM
17
18
19
20
DESCRIPTION
10409
75595
4-9-10-4
35
PADDED DRUM ASSEMBLIES
48” ASSEMBLY #105104, 66” ASSEMBLY #105105,
73” ASSEMBLY #105106, 84” ASSEMBLY #105107
9
15
14
8
13
10
1
12
13
14
7
6
53 2
4
15
11
16
17
20
19
18
11
12
10
10410
36
4-27-07-2
75595
PADDED DRUM ASSEMBLIES
48” ASSEMBLY #105104, 66” ASSEMBLY #105105,
73” ASSEMBLY #105106, 84” ASSEMBLY #105107
REQ’D
PART NO.
1
2
1
1
1
1
2
105121
105122
105123
105124
1043
48” Padded Drum
66” Padded Drum
73” Padded Drum
84” Padded Drum
.38” UNC X 1.00” Hex Capscrew
3
4
5
6
7
2
1
1
1
1
1503
3171
3356
30394
22588
.38” Lock Washer
90° Elbow 4MP-4FP (48”, 66” & 73”)
Straight Connector 4MP-4FP (48”, 66” & 73”)
Inline Check Valve (48”, 66” & 73”)
Breather Plug (48”, 66” & 73”)
8
9
10
11
12
1
1
1
12
12
12
104796
104805
111443
103044
1646
1841
Cover Plate (48”, 66” & 73”)
Right Inner Hub Assembly (48”, 66” & 73”)
Right Inner Hub Assembly (84”)
Rubber Mount
.50” Hard Flat Washer
.50” UNC Deformed Lock Nut
13
14
15
16
16
16
2
1
1
1
1
--
1137
1649
104803
105108
105109
105110
105111
104143
.75” UNC X 1.50” Hex Capscrew
.75” Hard Flat Washer
Outer Bearing
48” Shaft Assembly
66” Shaft Assembly
73” Shaft Assembly
84” Shaft Assembly
Replacement Seal Sleeve
1
1
1
1
104804
103369
22360
22359
Left Inner Hub Assembly
Bearing Spacer
Bearing Lock Washer
Bearing Lock Nut
ITEM
17
18
19
20
DESCRIPTION
10411
75595
4-9-10-3
37
HUB ASSEMBLIES
REPLACEMENT PARTS
1
104803
OUTER HUB ASSEMBLY
2
3
4
5
6
7
104804
LEFT INNER HUB ASSEMBLY
8
6
9
10
11
104805 (48”, 66”, 73”)
12
RIGHT INNER HUB ASSEMBLY
111443 (84”)
14
RIGHT INNER HUB ASSEMBLY
15
13
10412
38
4-9-10-3
75595
HUB ASSEMBLIES
REPLACEMENT PARTS
ITEM
REQ’D
PART NO.
DESCRIPTION
1
2
3
4
5
1
1
4
4
1
104802
105578
1502
10066
104811
Outer Hub
Bearing Retainer
.31” Lock Washer
.31” UNC X 1.00” Socket Head Capscrew
Outer Bearing
6
7
8
9
10
2
1
1
1
1
104816
104813
104815
1681
105483
Bearing Cone
Left Inner Hub
Bearing Cup
Snap Ring 3.54”
Oil Seal
11
12
13
14
15
1
2
2
1
1
1
104814
107605
111442
107387
1681
105483
Right Inner Hub
Bearing (48”, 66” & 73”)
Bearing (84”)
Bearing Spacer
Snap Ring 4.33”
Oil Seal
10413
75595
4-9-10-3
39
HYDRAULIC ASSEMBLY
ASSEMBLY #105093
1
2
3
4
10395
40
9-15-05
75595
HYDRAULIC ASSEMBLY
ASSEMBLY #105093
ITEM
1
2
3
4
REQ’D
PART NO.
1
1
4
2
19632
22518
3102
35434
DESCRIPTION
Male Coupler 12FBo - Flat Face
Female Coupler 12FBo - Flat Face
Straight Connector 12MBo-8MJ
Hose Assembly .50” X 67” 8FJX-8FJX
10396
75595
9-15-05
41