1
Art-Net (Series 400)
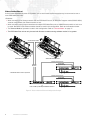
In the Art-Net (Series 400) configuration, an Art-Net compatible control console may be connected to one or more
PRG Node Plus units.
Guidelines:
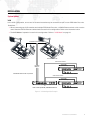
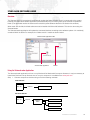
+ When connecting an Art-Net compatible console and multiple PRG Node Plus units, a 100Mb Ethernet switch or
hub must be used. Standard CAT5e Ethernet cables should be used in this configuration. Refer to the illustration
below.
+ The Series 400 Mode of operation should be used in this configuration. Refer to "Art-Net (Series 400) Mode" on
page 18.
+ When using a Node in this way, there are some important considerations that should be observed during setup
and operation. Refer to "Configuration" on page 11.
+ When using a Node as an Art-Net-to-DMX device, note that the Art-Net output does not pass data; it only mirrors
the DMX outputs. It is not possible to place the Art-Net output on the same network as the Art-Net input.
CAT5e Ethernet Cable *
* PRG Belden Ethernet cable or equivalent
PRG NODE PLUS
6x XLR DMX512 Data Cable
CAT5e
DMX512-OVER-ETHERNET
(ARTNET) CONSOLE
Art-Net Protocol
PRG 10-PORT (FIBER) ETHERNET SWITCH
PRG NODE PLUS
or
PRG 7-PORT (COPPER) ETHERNET SWITCH
6x XLR DMX512 Data Cable
Figure 6: Art-Net (Series 400) Configuration Example
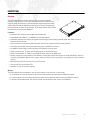
AC Input
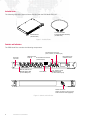
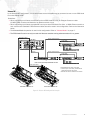
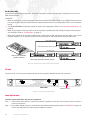
Connect the AC Line Cord power cable assembly to the rear panel Neutrik® PowerCon® connector.
MANUFACTURED BY:
THIS DEVICE COMPLIES WITH PART 15 OF THE FCC RULES. OPERATION IS SUBJECT TO
THE FOLLOWING TWO CONDITIONS: (1) THIS DEVICE MAY NOT CAUSE HARMFUL
CONFORMS TO
ANSI/UL STD 60950-1
R
INTERFERENCE, AND (2) THIS DEVICE MUST ACCEPT ANY INTERFERENCE RECEIVED,
INCLUDING INTERFERENCE THAT MAY CAUSE UNDESIRED OPERATION.
C
SUITABLE FOR DRY LOCATIONS ONLY
8617 AMBASSADOR ROW, DALLAS, TX 75247
Made in U.S.A.
INPUT RATING:
100-265VAC, 50/60 Hz, 1A MAX
0
0
OPERATING TEMPERATURE RANGE: -20 C to 50 C
LI
ST E D
3077774
US
CERTIFIED TO
CAN/CSA STD C22.2 NO. 60950-1
DENAN Category B
PS
E
JAPAN
REAR PANEL
Neutrik Connector
Figure 7: Connecting AC Input Cable
Power Up Procedure
To power up the Node Plus unit and set its address:
Step 1. Once the AC input cable is connected and power is applied, the unit will receive power. (It does not have a
power on/off switch.)
Step 2. Using Menu Display controls, set Node Plus thumbwheel starting address (refer to "Operation" on page 14).
Ensure that addresses are unique among all Nodes in system.
10
PRG NODE PLUS USER MANUAL