1
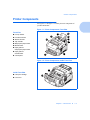
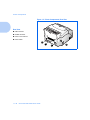
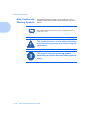
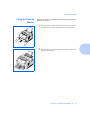
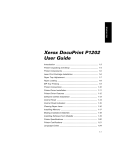
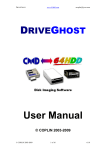
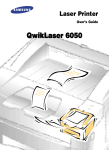
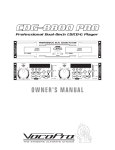
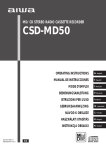
The Xerox
DocuPrint P8ex
Personal Laser Printer
Reference Guide
Copyright protection claimed includes all forms and matters of
copyrightable materials and information now allowed by statutory
or judicial law or hereinafter granted, including without limitation,
material generated from the software programs which are displayed
on the screen such as styles, templates, icons, screen displays,
looks, etc.
Printed in the United States of America.
XEROX® and all Xerox product names and product numbers
mentioned in this publication are registered trademarks of the
Xerox Corporation.
Other company trademarks are also acknowledged. PCL 5e and
PCL 6 are trademarks of the Hewlett Packard Company. MS-DOS,
Windows NT, Windows 95 and Windows 98 are trademarks of
Microsoft Corporation. Adobe and PostScript are trademarks of
Adobe Systems, Inc. Macintosh, LocalTalk and TrueType are
trademarks of Apple Computer, Inc.
This printer contains an emulation of the Hewlett Packard PCL 6
and PCL 5e command languages (recognizes HP PCL 6 and PCL
5e commands) and processes these commands in a manner
compatible with Hewlett Packard LaserJet printer products.
Changes are periodically made to this document. Technical updates
will be included in subsequent editions.
© 1999 by Xerox Corporation. All rights reserved.
Contents
i
Chapter 1 Introduction ........................................................... 1-1
Overview............................................................................ 1-2
Printer Components........................................................... 1-3
Printer Features ................................................................. 1-5
Printer Documentation ....................................................... 1-6
Using the CD-ROM......................................................... 1-7
Note, Caution and Warning Symbols ............................. 1-8
Chapter 2 Additional Printer Setup Information .................. 2-1
Installing Software ............................................................. 2-2
Installing the RCP and Status Monitor............................ 2-3
Installing the Xerox Font Manager.................................. 2-4
Chapter 3 Loading Print Media ............................................. 3-1
Selecting Print Media......................................................... 3-2
Media Selection .............................................................. 3-2
Media Guidelines............................................................ 3-3
Loading Print Media........................................................... 3-4
Using the Multipurpose Paper Feeder (MPF)................. 3-4
DocuPrint P8ex Reference Guide
Using the Manual Feeder ............................................... 3-6
Using the Face-up Stacker ............................................. 3-7
Loading Envelopes ......................................................... 3-8
Chapter 4 Printing .................................................................. 4-1
Printing a Document .......................................................... 4-2
Configuring the PCL Drivers .............................................. 4-3
Selecting Your Printer..................................................... 4-3
Setting Properties ........................................................... 4-4
Using Printer Utilities ......................................................... 4-6
Remote Control Panel .................................................... 4-6
Status Monitor .............................................................. 4-10
Xerox Font Manager..................................................... 4-10
Chapter 5 Maintenance .......................................................... 5-1
Cleaning the Printer ........................................................... 5-2
Cleaning the Outside ...................................................... 5-2
Cleaning the Inside......................................................... 5-3
Replacing the Laser Print Cartridge................................... 5-4
Chapter 6 Troubleshooting ................................................... 6-1
Printer Problems ................................................................ 6-2
Print Quality Problems ....................................................... 6-6
DocuPrint P8ex Reference Guide
Appendix A Printer Specifications ........................................... A-1
Appendix B Environmental and Safety Considerations ........ B-1
Introduction ........................................................................B-2
Laser Safety.......................................................................B-3
Laser Safety for the United States and Canada .............B-4
Laser Safety for Finland and Sweden ............................B-5
Laser Statement (Laserturvallisuus)...............................B-5
Ozone Safety .....................................................................B-6
Electrical Safety .................................................................B-7
Radio Frequency Emissions ............................................B-10
United States and Canada ...........................................B-10
Europe ..........................................................................B-12
Operational Safety ...........................................................B-14
Appendix C Certifications ......................................................... C-1
Quality Standards ..............................................................C-2
Energy Star........................................................................C-3
Appendix D Adding Memory ..................................................... D-1
Installing a SIMM ...............................................................D-2
Removing a SIMM .............................................................D-3
Appendix E Language Codes ................................................... E-1
DocuPrint P8ex Reference Guide
DocuPrint P8ex Reference Guide
Introduction
1 r e t pahC
Overview .......................................................................... 1-2
Printer Components ......................................................... 1-3
Printer Features ............................................................... 1-5
Printer Documentation ..................................................... 1-6
Using the CD-ROM ....................................................... 1-7
Note, Caution and Warning Symbols ........................... 1-8
Chapter 1: Introduction
1-1
Overview
Overview
In this chapter, you will become familiar with the features of your
printer and learn where to locate specific printer parts.
Before you use your printer, make sure that you perform all of the
setup steps outlined in the User Guide that came with your printer.
For installation options not covered in the User Guide, refer to
Chapter 2: Additional Printer Setup Information in this guide.
1-2
DocuPrint P8ex Reference Guide
Printer Components
Printer Components
Use Figures 1.1 through 1.3 to identify the main components of
your DocuPrint P8ex.
Figure 1.1 Printer Components, Front View
Front View
5
4
Face-up stacker
Face-down stacker
Stacker extender
Tray extender
Multipurpose paper feeder
Manual feeder
Paper guide for
3
6
7
2
8
multipurpose paper feeder
Paper guide for
manual feeder
Control panel
9
1
Figure 1.2 Printer Components, Inside Front View
1
Inside Front View
Laser print cartridge
Front cover
2
Chapter 1: Introduction
1-3
Printer Components
Figure 1.3 Printer Components, Rear View
Rear View
USB connector
Parallel connector
Power cord connector
Power switch
1
2
1-4
DocuPrint P8ex Reference Guide
3
4
Printer Features
Printer Features
Your Xerox DocuPrint P8ex is a compact, easy to use laser printer
designed for the small office environment. It is designed to provide
years of high quality, high performance printing.
This manual tells you how to operate and maintain your new
printer, and contains advice on how you can get the best
performance from it. Please use this manual together with the
documentation provided with your computer hardware and
software.
The maximum print speed for the DocuPrint P8ex is 8 pages per
minute, with true 600 x 600 dpi print resolution and 1200 dpi
quality. The printer features an input capacity of 150 sheets, and
single sheet feeding of transparencies, labels, envelopes, etc.). The
printer understands PCL 6 and PCL 5e printer languages. Standard
memory is 4MB, expandable to 36MB with easy SIMM
installation.
Chapter 1: Introduction
1-5
Printer Documentation
Printer Documentation
Your DocuPrint P8ex is packaged with the following
documentation and information:
•
User Guide, which shows you how to get your printer up and
running, and provides the basic information needed to use your
printer.
•
This Reference Guide (provided on in electronic form on the
CD-ROM), which provides you with all of the detailed
information you will need to use, maintain, upgrade and
troubleshoot your printer.
•
Warranty Card, which you should fill out and return in order
to receive all of the benefits of owning a Xerox laser printer.
•
The Xerox DocuPrint P8ex CD-ROM, which contains the
following:
— User Guide (electronic version)
— Reference Guide (electronic version of this book)
— Printer Drivers
— Remote Control Panel and Status Monitor
— Xerox Font Manager
— Adobe Acrobat Reader
For the printer drivers contained on the CD-ROM, the majority of
documentation is provided via the on-line Help files included with
the drivers. Features and functionality of the drivers are discussed
in Chapter 4: Printing.
Since the CD-ROM contains so much information of importance,
please ensure that you save it and keep it in a safe place, away from
direct heat or sunlight.
1-6
DocuPrint P8ex Reference Guide
Printer Documentation
Using the CD-ROM
The documentation on the CD-ROM is provided as a PDF file,
which is readable using Adobe Acrobat Reader (provided on the
CD-ROM if you do not already have it installed). This file contains
hypertext links that enable you to jump from the Table of Contents
or Index directly to the page where you are looking for information,
as well as from page to page where information is cross-referenced.
Simply move the cursor over a hypertext link and it changes to a
pointing finger. Then click on the link to jump to the link’s
destination.
The PDF files also enable you to print the specific pages you need,
rather than printing an entire chapter or manual.
The CD-ROM is provided with an installation booklet in its jewel
case. You can also refer to the ReadMe file on the CD-ROM for
more information.
Chapter 1: Introduction
1-7
Printer Documentation
Note, Caution and
Warning Symbols
Throughout this Reference Guide, several symbols are used to
emphasize useful, important and critical information. They are as
follows:
This symbol indicates particularly useful or helpful information
about your printer.
This symbol indicates a caution against performing
any action that may damage your printer or degrade
performance.
This symbol indicates a warning against
performing any action that may lead to physical
injury.
1-8
DocuPrint P8ex Reference Guide
Additional Printer
Setup Information
2 r e t pahC
Installing Software ........................................................... 2-2
Installing the RCP and Status Monitor .......................... 2-3
Windows 95/98/NT 4.0 Installation ............................ 2-3
Windows 3.1x Installation .......................................... 2-3
Installing the Xerox Font Manager ................................ 2-4
Windows 95/98/NT 4.0 Installation ............................ 2-4
Windows 3.1x Installation .......................................... 2-4
Chapter 2: Additional Printer Setup Information
2-1
Installing Software
Installing Software
Included with your printer is a CD-ROM containing printer drivers
for some of the most popular Windows software applications. To
operate your printer, you must install a printer driver, which
translates data from your application into data the printer
understands. (Installation procedures follow this section.)
The CD-ROM shipped with your printer contains the following
printer drivers and utilities.
2-2
•
PCL 6 printer driver for Windows 95/98, Windows 3.1x and
Windows NT 4.0.
•
PCL 5e printer driver for Windows 95/98, Windows 3.1x and
Windows NT 4.0
•
USB Port Driver (for Windows 98 only) is necessary for you to
use the USB interface on your DocuPrint P8ex.
•
Status Monitor enables you to monitor the status of print jobs.
•
Xerox Font Manager gives a quick and easy way to find fonts,
install the fonts, and print the font samples.
•
Remote Control Panel, which allows you to set up your printer
to work properly with DOS applications run inside Windows.
•
Adobe Acrobat Reader, which allows your computer to
display the electronic Xerox DocuPrint P8ex documentation.
DocuPrint P8ex Reference Guide
Installing Software
Installing the RCP
and Status Monitor
Windows 95/98/NT 4.0 Installation
1
Insert the Xerox DocuPrint P8ex CD-ROM into your CD-ROM
drive.
2
If the setup program runs automatically, skip to Step 5.
3
Select Run from the Start menu.
4
Type d:\setup.exe on the command line (where “d” is your
CD-ROM drive letter), then click OK.
5
Click on the appropriate language.
6
Windows 95/98: Click on RCP&SM.
Windows NT 4.0: Click on RCP.
7
Follow the instructions on the screen.
Windows 3.1x Installation
1
In the Program Manager window, select Run from the File menu.
The Run dialog box appears.
2
Type d:\setup16.exe on the command line (where “d” is your
CD-ROM drive letter), then click OK.
3
Click on the appropriate language.
4
Click on RCP&SM.
5
Follow the instructions on the screen.
Chapter 2: Additional Printer Setup Information
2-3
Installing Software
Installing the Xerox
Font Manager
Your printer includes 110 fonts for use on your computer and
printer. To install the fonts (which is a time-consuming procedure),
follow the instructions below:
Windows 95/98/NT 4.0 Installation
1
Insert the Xerox DocuPrint P8ex CD-ROM into your CD-ROM
drive.
2
If the setup program runs automatically, skip to Step 5.
3
Select Run from the Start menu.
4
Type d:\setup.exe on the command line (where “d” is your
CD-ROM drive letter), then click OK.
5
Click on the appropriate language.
6
Click on Font Manager.
7
Follow the instructions on the screen.
Windows 3.1x Installation
2-4
1
In the Program Manager window, select Run from the File menu.
The Run dialog box appears.
2
Type d:\setup16.exe on the command line (where “d” is your
CD-ROM drive letter), then click OK.
3
Click on the appropriate language.
4
Click on Font Manager.
5
Follow the instructions on the screen.
DocuPrint P8ex Reference Guide
Loading Print Media
3 r e t pahC
Selecting Print Media ....................................................... 3-2
Media Selection ............................................................ 3-2
Media Guidelines .......................................................... 3-3
Loading Print Media ......................................................... 3-4
Using the Multipurpose Paper Feeder (MPF) ............... 3-4
Using the Manual Feeder ............................................. 3-6
Using the Face-up Stacker ........................................... 3-7
Loading Envelopes ....................................................... 3-8
Chapter 3: Loading Print Media
3-1
Selecting Print Media
Selecting Print Media
Media Selection
1
Media
Sizes
Paper
Letter (8.5 x 11")
Legal (8.5 x 14")
Executive (7.25 x 10.5")
A4 (210 x 297 mm)
A5 (148 x 210 mm)
B5 (182 x 257 mm)
16-24 lb (60-90 g/m2)
MPF1: 150 (20 lb)
Manual Feeder: 1
Envelope
COM-10
Monarch
C5
DL
24-43 lb (90-163 g/m2)
MPF1: Up to 10
Manual Feeder2: 1
Transparency3
Labels
Card Stock
Letter
A4
24-43 lb (90-163 g/m2)
MPF1: Up to 10
Manual Feeder2: 1
Input Sheet Capacity
Multipurpose Paper Feeder
2 The
3
Weights
Manual Feeder is recommended for printing envelopes, transparencies, labels and card stock.
Transparencies with paper backings attached to the short edge are not recommended.
3-2
DocuPrint P8ex Reference Guide
Selecting Print Media
Media Guidelines
When selecting or loading paper, please remember the following:
•
Attempting to print on damp, curled, wrinkled, or torn paper can
cause paper jams and poor print quality.
•
Use cut-sheet paper only. You cannot use multi-part paper.
•
Always use paper and other media that conform with those
listed in the Media Selection table, above.
•
Do not use envelopes with thick or crooked edges, or envelopes
that are damaged, curled, wrinkled, or irregularly shaped.
Chapter 3: Loading Print Media
3-3
Loading Print Media
Loading Print Media
Using the
Multipurpose Paper
Feeder (MPF)
For best results, use high quality Xerox brand xerographic copier
paper.
1
Pull the extender on the MPF up until it stops
2
Before loading the paper, flex the sheets back and forth to loosen
them, then fan them. Tap the edges on a table top to straighten
them. Doing this before you load paper helps prevent paper jams.
Do not load too much. This feeder holds up to 150
sheets of plain paper (and the Face-down Stacker
holds up to 100 sheets.
3
Insert the paper in the MPF.
If the paper has a preferred print side, place the print side facing
you. If you use letterhead paper, load the paper with the letterhead
edge pointing down and the front facing toward you.
3-4
DocuPrint P8ex Reference Guide
Loading Print Media
4
Adjust the paper guides to the width of the paper.
5
Pull up the extender on the face-down stacker until it stops. The
face-down stacker can hold up to 100 printed pages.
6
Select the paper size from your software application and start your
print job.
Chapter 3: Loading Print Media
3-5
Loading Print Media
Using the
Manual Feeder
3-6
Use the manual feeder in order to feed paper one sheet at a time into
your printer.
1
Place the paper in the manual feeder and adjust the paper guides to
the width of the paper.
2
Make sure the paper is as far down as it will go.
3
Be sure that before starting your print job, you select the manual
feeding source and the correct paper size from your software
application.
4
Start your print job. When the printer’s PAPER light blinks, press
the On/Off-line button to feed paper from the manual feeder. You
will need to press the On/Off-line button for each page.
DocuPrint P8ex Reference Guide
Loading Print Media
Using the Face-up
Stacker
The face-up stacker is recommended for envelopes, transparencies
and thick stock paper.
1
Place your fingers on either side of the face-up stacker, press tabs
toward center of the printer, and pull the face-up stacker down.
2
If you use the face-up stacker, a single printed page is placed with
the printed side facing up.
Chapter 3: Loading Print Media
3-7
Loading Envelopes
3-8
Depending on the thickness of your envelopes, the multipurpose
paper feeder can hold up to 10 envelopes. If you experience
envelope feeding problems, try placing envelopes one at a time into
the manual feeder. It is also recommended that you use the face-up
stacker, as described in the section “Using the Face-up Stacker”
(page 3-7).
1
Insert the envelopes in the multipurpose paper feeder. The
envelopes should be loaded vertically with the face to be printed
toward the front, and the top edge of the envelope on the left.
2
Adjust the paper guides to the width of the envelopes.
3
Select the correct envelope size from your software application and
start your print job.
DocuPrint P8ex Reference Guide
Printing
4 r e t pahC
Printing a Document ........................................................ 4-2
Configuring the PCL Drivers ............................................ 4-3
Selecting Your Printer ................................................... 4-3
Setting Properties ......................................................... 4-4
Using Printer Utilities ....................................................... 4-6
Remote Control Panel .................................................. 4-6
Status Monitor ............................................................ 4-10
Xerox Font Manager ................................................... 4-10
Chapter 4: Printing
4-1
Printing a Document
Printing a Document
The following procedure describes the general steps required for
printing from various Windows applications. The exact steps for
printing a document may vary depending on the application
program you are using. Refer to your software application’s
documentation for the exact printing procedure.
To use your DocuPrint P8ex, you must install a printer driver,
described in the DocuPrint P8ex User Guide. The way you access
the printer driver varies depending on the software programs you
use.
1
Start the program you are using to create the document, and open
the document you want to print.
2
Select Print from the File menu.
The Print dialog box appears.
Most Windows applications allow you to make changes to
the print settings, such as number of copies, sequence of
the pages, paper orientation, and margins.
If you go to the FilePrintProperties dialog box, you’ll
access the printer driver’s Print Setup dialog box, in which
you can set other printer properties. For Windows 3.1x,
the equivalent command is FilePrintSetupOptions.
See the section “Setting Properties” (page 4-4). When
done, click OK to close the Print Setup dialog box.
3
4-2
DocuPrint P8ex Reference Guide
After making any necessary changes to the print settings, click OK
to start the print job.
Configuring the PCL Drivers
Configuring the PCL Drivers
Selecting Your
Printer
To use all of the features of your DocuPrint P8ex, make sure it is
selected as the default printer. When you install the printer driver,
DocuPrint P8ex is automatically set as the default printer. If you use
more than one printer, select DocuPrint P8ex as the default printer
as follows:
Windows 95/98/NT 4.0
1
Select Start, Settings, then Printers.
2
Double-click Xerox DocuPrint P8ex PCL 6.
3
Select Set As Default Printer from the Printer menu.
4
To set the printer’s properties, select Properties from the Printer
menu and change the settings as described in the section “Setting
Properties” (page 4-4).
Windows 3.1x
1
Double-click Main from the Program Manager. Then double-click
Control Panel, and Printers.
2
Select Xerox DocuPrint P8ex PCL 6.
3
Click Set As Default Printer, then click Close.
4
To set the printer’s properties, click Setup and change the settings
as described in the section “Setting Properties” (page 4-4).
Chapter 4: Printing
4-3
Configuring the PCL Drivers
Setting Properties
The DocuPrint P8ex printer driver’s Print Setup dialog box allows
you to set various printer properties.
Most Windows applications will override settings you specify in the
printer driver. Change all print settings available in the software
application first, and any remaining settings with the printer driver.
The DocuPrint P8ex PCL 6 Print Setup dialog box includes four
tabs:
•
Paper/Output
•
Image Quality
•
Overlays
•
Watermarks
•
About
To use the PCL 5e driver, follow the same instructions.
Overlays and Watermarks are not available in the PCL 5e driver
for Windows 95/98 and 3.1x.
Overlays is not available in the PCL 5e driver for Windows NT 4.0.
The basic capabilities of the printer driver are described here. For
detailed explanations and assistance with specific settings, use the
driver’s Help functionality, accessed by clicking the Help button in
the dialog box.
4-4
DocuPrint P8ex Reference Guide
Configuring the PCL Drivers
Paper/Output
Use this tab to change the number of copies, page orientation, paper
size, paper source and output format.
Source setting identifies the default paper source.
Manual Feed source is used when printing on special media, and
causes the printer to wait (up to 15 seconds) for you to press the
contol panel button before printing. Afterwards the printer will
attempt to print from whatever paper source is available, according
to the following priority: Manual Feed, then Tray 1.
Image Quality
Use this tab to change resolution and enhancement, graphic
settings, graphic mode, grayscale, and graphic quality. It also
includes settings that determine how the printer handles TrueType
fonts.
Overlays
Use this tab to create and use overlays. Please see the on-line help
in the PCL 6 driver.
Watermarks
Use this tab to create, modify and delete watermarks. You can
control the font size, font type and placement of watermarks. Please
refer to the on-line help in the PCL 6 driver.
About
This tab shows the software version and copyright information.
Chapter 4: Printing
4-5
Using Printer Utilities
Using Printer Utilities
Your Xerox DocuPrint P8ex CD-ROM contains the following
utilities, which can be installed when you install the printer drivers:
•
Remote Control Panel
•
Status Monitor
•
Xerox Font Manager
To access the RCP or SM programs, from Windows 95/98 or NT
4.0: Select StartProgramsXerox DocuPrint P8ex Utility.
To access the Xerox Font Manager, from Windows 95/98 or NT
4.0: Select StartProgramsXerox Font Manager.
Remote Control
Panel
The Remote Control Panel (RCP) is a program that allows you to
set printer-specific settings in the printer. It also allows you to
properly set up your printer to work with DOS applications run
inside the Windows MS-DOS Command Prompt window.
Any changes made must be sent to the printer by clicking on the
Send button.
4-6
DocuPrint P8ex Reference Guide
Using Printer Utilities
The screen includes the following tabs.
PRINTER
Use this tab to control the following printer features:
•
Power Save determines the length of time the printer waits after
a job is printed before it goes to a reduced power state. If the
printer is used frequently, select OFF which keeps the printer
ready to print with the minimum warm-up time. This uses more
electricity to keep the printer warm and ready to print.
•
Econo Mode determines the toner quantity the printer should
use when printing. If checked, the printer conserves toner when
printing. The default value is unchecked, which provides 100%
usage
•
Jam Recovery determines what action the printer should take
when a paper jam occurs. When unckecked, the printer does not
reprint a page that has jammed. When checked, the printer
keeps the image in memory for a printed page until the printer
signals that the page has successfully printed. The printer
reprints the jammed page.
PAGE SETUP
Use this tab to control the following printer features:
•
Paper Size sets the paper size.
•
Orientation determines how the printing is oriented on the
page.
•
Copies sets the number of copies printed for each page.
•
Lines Per Page determines how may lines per page a DOS
program will have when printing from Windows.
Chapter 4: Printing
4-7
Using Printer Utilities
FONT SETUP
4-8
•
Typeface allows you to select the desired typeface. This setting
is ignored when the software application specifies a font.
•
Symbol Set determines the symbol set. A symbol set is a set of
alphabetic and numeric characters, punctuation, and special
symbols used when printing with a selected font.
•
Pitch sets the font pitch (only if you have selected a scalable
monospaced font). Pitch refers to the number of fixed-space
characters in a horizontal inch of type.
•
Point Size sets the font point size (only if you have selected a
scalable typographic font). Point size refers to the height of the
characters in the font. One point equals approximately 1/72 of
an inch. You can select point sizes from 1 to 1008 in increments
of 0.25 points.
•
Font List prints the font list showing all the fonts available for
PCL emulation.
DocuPrint P8ex Reference Guide
Using Printer Utilities
QUALITY
Use this tab to control the following printer features:
•
Density determines the overall density of the printed image.
•
Memory Enhancement mode makes the printer process more
data by optimizing the memory. When set to ON, the complex
data can be processed.
•
Image Quality is a setting that tells the printer whether it
should enhance the print quality to 1200 dpi image quality.
Change this setting to reflect what kind of print job you have:
text, photos/graphics, or text and photo.
TEST
Use this tab to control the following printer features:
•
Configuration Page prints the configuration sheet. A list of the
user default settings, the installed options, and the amount of
printer memory available prints.
•
Demonstration Page prints the standard demonstration page.
ABOUT
This tab shows the software version and copyright information.
Chapter 4: Printing
4-9
Using Printer Utilities
Status Monitor
Xerox Font Manager
4-10
Status Monitor is a program that runs in the background and
automatically displays a message on your computer screen
whenever the printer status changes.
Xerox Font Manager is a font manager for Windows 95/98,
Windows NT 4.0 and Windows 3.1x. It gives a quick and easy way
to find fonts, install fonts, and print font samples.
DocuPrint P8ex Reference Guide
Maintenance
5 r e t pahC
Cleaning the Printer ......................................................... 5-2
Cleaning the Outside .................................................... 5-2
Cleaning the Inside ....................................................... 5-3
Replacing the Laser Print Cartridge ................................. 5-4
Chapter 5: Maintenance
5-1
Cleaning the Printer
Cleaning the Printer
Do not use ammonia-based sprays or volatile
solvents such as thinner to clean the printer, as
these can damage the printer surface.
Always unplug the power cord before cleaning
any part of the printer.
Cleaning the Outside
Clean the outside surfaces of the printer by wiping them with a soft,
clean, lint-free cloth.
Keep the front cover closed when cleaning the
outside of the printer.
You can dampen the cloth slightly with water, but
be careful not to let any water drip onto the printer
or inside it.
5-2
DocuPrint P8ex Reference Guide
Cleaning the Printer
Cleaning the Inside
When paper jams occur, unfused toner on the paper can fall off the
paper and build up inside the printer.
1
Unplug the power cord.
2
Remove the image cartridge (refer to “Replacing the Image
Cartridge” in section 4-2).
3
Use a soft cloth to wipe away any dust and spilled toner from the
image cartridge.
You can dampen the cloth slightly with water, but be
careful not to let any water drip onto the printer or inside
it.
4
Reinsert the image cartridge.
Chapter 5: Maintenance
5-3
Replacing the Laser Print Cartridge
Replacing the Laser Print
Cartridge
When ordering laser print cartridge, refer to part #113R00296.
1
2
Make sure the printer is turned OFF.
3
Lift the cartridge handle to disengage the cartridge, then pull the
cartridge out of the printer.
Open the front cover.
Follow the instructions on the cartridge box to recycle the
used cartridge.
5-4
4
Unpack the new laser print cartridge by tearing open its packaging
at the indicated notch, then shake it from side-to-side five or six
times to distribute the toner.
5
Carefully remove the sealing tape by pulling on the sealing tape tab.
DocuPrint P8ex Reference Guide
Replacing the Laser Print Cartridge
6
Locate the cartridge guide rails inside the printer (one on each side)
and locate the guide pins on each side of the cartridge.
7
Push the cartridge into place by pressing down on the handle. The
cartridge guide pins should slide along the guide rails.
8
Close the front cover gently. Do not force the cover closed in case
the cartridge is not seated properly.
Chapter 5: Maintenance
5-5
5-6
DocuPrint P8ex Reference Guide
Troubleshooting
6 r e t pahC
Printer Problems .............................................................. 6-2
Print Quality Problems ..................................................... 6-6
Chapter 6: Troubleshooting
6-1
Printer Problems
Printer Problems
If you have any problems with the operation of your DocuPrint
P8ex printer, refer to Table 6.1. If the problem cannot be solved by
carrying out the instructions in this table, call the Xerox Helpline.
Table 6.1
Solving Printer Problems
Problem
Possible Cause
Remedy
The printer does not
print.
The interface cable is not
connected properly.
Check the interface cable connection.
The interface cable is defective.
Swap the cable with one known to work.
If printing is now possible, replace the
defective interface cable.
The port setting is incorrect.
Check the Windows printer settings to
make sure that the print job is being sent
to the correct port (for example, LPT1).
The image cartridge is not installed
properly.
Remove and reinsert the image
cartridge.
A paper jam has occurred.
Clear the paper jam (refer to “Clearing
Paper Jams” in section 3-1).
The printer may be configured
incorrectly.
Check the application to make sure that
all print settings are correct.
The printer driver may be incorrectly
installed.
Remove the printer driver by deleting the
Xerox DocuPrint P8ex icon. Then
reinstall the printer driver as described in
section 1-4-1. Try printing a test page.
Printer is in manual feed mode
(PAPER light is blinking).
Push the On/Off-line button to print.
Table 6.1 Page 1 of 4
6-2
DocuPrint P8ex Reference Guide
Printer Problems
Table 6.1
Solving Printer Problems (continued)
Problem
Possible Cause
The paper is not fed into
the printer.
Paper has not been inserted
correctly.
Remove and reinsert the paper correctly
(refer to “Loading Print Media” in section
2-2).
There is too much paper in the
multipurpose paper feeder.
Remove some of the paper from the
multipurpose paper feeder.
The image cartridge is not installed
properly.
Remove and reinsert the image
cartridge.
The image cartridge is empty.
Replace the image cartridge (refer to
“Replacing the Image Cartridge” in
section 4-2).
The page layout is too complex.
Lower print resolution to 300 dpi.
The printer prints blank
pages.
Half of the page is blank.
Remedy
Simplify the page layout and remove any
unnecessary graphics from the
document if possible.
Install more memory (refer to “Installing
a SIMM” in section 5-1).
The page orientation setting may be
incorrect.
Change the page orientation in the
Printer Setup dialog box.
The physical paper size and the
size specified in your application do
not match.
Insert the correct paper into the printer
or change the software paper size
settings.
The interface cable specifications
may be incorrect.
Use the interface cable supplied with the
printer or replace the cable with an IEEE
1284-compliant cable.
Table 6.1 Page 2 of 4
Chapter 6: Troubleshooting
6-3
Printer Problems
Table 6.1
Solving Printer Problems (continued)
Problem
Possible Cause
The printer prints the
wrong data, or it prints
incorrect characters.
The interface cable might not be
connected properly.
Check the interface cable connection.
There may be a problem with the
printer driver software.
Exit Windows and reboot the computer.
Turn the printer off and then back on
again.
The interface cable specifications
may be incorrect.
Use the interface cable supplied with the
printer or replace the cable with an IEEE
1284-compliant cable.
There is too much paper in the
multipurpose paper feeder.
Remove some of the paper from the
multipurpose paper feeder.
(If printing onto envelopes,
transparencies or labels, insert them one
at a time in the manual feeder.
An incorrect type of paper is being
used.
Use only paper that meets the
specifications required by the printer
(refer to “Selecting Print Media” in
section 2-1-1).
An incorrect output stacker is being
used.
Items such as thick paper should not be
printed using the face-down stacker. Use
the face-up stacker instead.
The paper setting method may be
incorrect.
If printing onto envelopes, insert the
envelopes so that there is a gap of
approximately 1 mm
(1/32”) between the left edge of the
envelopes at the paper guide.
The paper keeps
jamming.
Remedy
Table 6.1 Page 3 of 4
6-4
DocuPrint P8ex Reference Guide
Printer Problems
Table 6.1
Solving Printer Problems (continued)
Problem
Possible Cause
Printing is too slow.
If using Windows 3.x, Print Manager
may be disabled.
From the Control Panel Printers menu,
check the Use Print Manager box.
If using Windows 3.x, the
Background Printing setting in the
Options menu of Print Manager
may be set to “Low.”
Go to the Print Manager, select
Background Printing from the Options
menu, and change the setting to “High.”
If using Windows 95, the Spooling
Setting may be set incorrectly.
From the Start menu, select Settings
and Printers. Click the DocuPrint P8ex
icon with the right mouse button, select
Properties, click the Details tab, and
then click the Spool Settings button.
Select the desired spool setting from the
available choices.
The computer may have insufficient
memory.
Install more memory in your computer.
Printer memory is insufficient for
print job.
Install more memory into the printer.
Printer failure.
Turn off power, wait for one minute, turn
on power.
ERROR light is blinking.
All lights are blinking.
Remedy
Reduce resolution to 300 dpi.
If problem persists, contact your Xerox
representative or dealer.
Table 6.1 Page 4 of 4
Chapter 6: Troubleshooting
6-5
Print Quality Problems
Print Quality Problems
The causes listed in Table 6.2 are probable causes only, and may
not represent all of the possible cases which may occur under actual
operating conditions. If you experience a problem which does not
seem to fall under any of the cases listed in this table, or if you are
concerned about any other aspect of printer operation, contact an
authorized service representative.
Table 6.2
Solving Print Quality Problems
Problem
Possible Cause
Irregular faded patches
of print
There is a paper quality problem.
Use only paper that meets the
specifications required by the printer
(refer to “Selecting Print Media” in
section 2-1-1).
Toner may be unevenly distributed.
Remove the image cartridge and shake
it gently to evenly distribute the toner.
Then replace the image cartridge.
Toner may be low.
Remove the image cartridge and shake
it gently to evenly distribute the toner.
Then replace the image cartridge. Have
a spare image cartridge in preparation
for the toner running out.
There is a paper quality problem.
Use only paper that meets printer
specifications (refer to “Selecting Print
Media” in section 2-1-1).
An image cartridge from another
Xerox printer has been installed.
Always use the same image cartridge
with the same printer. Using a cartridge
that has already been used in another
printer may not give satisfactory results.
Black staining
Remedy
Table 6.2 Page 1 of 2
6-6
DocuPrint P8ex Reference Guide
Print Quality Problems
Table 6.2
Solving Print Quality Problems (continued)
Problem
Possible Cause
Remedy
Character voids
The paper may be too dry.
Try printing with a different batch of
paper.
Background scatter
The paper may be too damp.
Try printing with a different batch of
paper. Do not open packages of paper
until necessary so that the paper does
not absorb too much moisture from the
air.
Printing over uneven surfaces.
If printing onto envelopes, change your
printing layout to avoid printing over
areas that have overlapping seams on
the reverse side.
Missing characters
The paper may be too damp.
Try printing with a different batch of
paper. Do not open packages of paper
until necessary so that the paper does
not absorb too much moisture from the
air.
Back of printout dirty
The transfer roller may be dirty.
Print a few blank pages to clean the
transfer roller.
Incorrect fonts
TrueType fonts may be disabled
(Windows 3.x).
Use the Fonts dialog box in the Control
Panel to enable TrueType fonts.
Faded graphics
Toner may be low.
Remove the image cartridge and shake
it gently to evenly distribute the toner.
Then replace the image cartridge. Have
a spare image cartridge in preparation
for the toner running out.
Table 6.2 Page 2 of 2
Chapter 6: Troubleshooting
6-7
6-8
DocuPrint P8ex Reference Guide
Printer Specifications
Appendix A: Printer Specifications
A x i dneppA
A-1
Printer Specifications
Item
Specification and Description
Speed
8 ppm
Resolution
600 x 600 dpi with 1200 dpi quality
Image cartridge
Part #113R00296
Image cartridge life
5,000 @ 5% coverage (A4) (Starter cartridge: 2,500)
Media types
Paper, transparencies, card stock, labels, envelopes
(Transparencies with paper backings attached to the short edge are not
recommended.)
Media sizes
Letter, Legal, Executive, Folio, Monarch, COM-10, DL, A4, A5, B5, C5
Minimum size: 3" x 5" (76 mm x 125 mm)
Maximum size: 8.5" x 14" (216 mm x 356 mm)
Media weight
Paper: 16 - 24 lb. (60 - 90 g/m2)
Other: up to 43 lb. (163 g/m2)
Input capacity
Paper: Up to 150 sheets (80 g/m2)
Other media (transparencies, envelopes, labels, etc.): Up to 10
Output capacity
Face-down: 100 sheets
Face-up: 1 sheet (thick paper)
Dimensions
W x D x H:
13.5" (345 mm) x 14.3" (365 mm) x 8.8" (224 mm) tray closed
Weight
16.5 lbs. (7.5 Kg)
Duty cycle
Up to 8,000 pages per month
Safety
USA - UL 1950
Europe -TUV(GS), CB, DEMKO (EN 60950, 73/23/EEC Directive),
EN5502 Class B
China - CCIB
Russia - GOST
India - ISI
Mexico - NOM
EMC
FCC Class B (no immunity)
CE (CISPR 22, No harmonics, Flicker) (Class B - 89/336/EEC
Directive)
Operating conditions
10o C / 32.5o C
20% / 80% relative humidity
Storage conditions
-20o C / 40o C
20% / 90% relative humidity
A-2
DocuPrint P8ex Reference Guide
Printer Specifications
Item
Specification and Description
Noise level
Power Saving Mode: < Background (35 dBA)
Operation: < 48dBA
Power rating
90 - 137 VAC, 50/60 Hz or 189 - 259 VAC, 50/60 Hz
(depending on model)
Power consumption
Power Saving Mode: 10 watts
Standby: 25 watts
Printing: < 450 watts
Printer Controller
KS32C6100-33MHz
Memory
4 MB standard, expandable to 36 MB
1 SIMM socket
SIMM type: EDO (Extended Data Out), 72 pin, 60 ns, 32 bit (no parity)
SIMM size: 4, 8, 16, 32 MB
Interface
Bidirectional Parallel Standard
- IEEE 1284 COMPATIBLE MODE
- IEEE 1284 NIBBLE MODE
- IEEE 1284 BYTE MODE
- IEEE 1284 ECP WITHOUT RLE
- IEEE 1284 ECP WITH RLE
USB Interface Standard (Windows 98 only)
- USB 1.0 compliant
- 12Mbps 1 port
Printer Description Language
PCL 5e, PCL 6
Fonts
45 internal scalable fonts, 1 bitmap font
Host environments
Microsoft Windows 3.x, Windows 95/98, Windows NT 4.0, DOS
Host drivers and utilities
PCL 6 (Windows 3.x, 95/98, NT 4.0)
PCL 5e (Windows 3.x, 95/98, NT 4.0)
RCP (Windows 3.x, 95/98, NT 4.0)
SM (WIndows 3.x, 95/98)
Install program (Windows 3.x, 95/98, NT 4.0)
Appendix A: Printer Specifications
A-3
A-4
DocuPrint P8ex Reference Guide
Environmental
and Safety
Considerations
B x i dneppA
Introduction ...................................................................... B-2
Laser Safety ..................................................................... B-3
Ozone Safety ................................................................... B-6
Electrical Safety ............................................................... B-7
Radio Frequency Emissions .......................................... B-10
Operational Safety ......................................................... B-14
Appendix B: Environmental and Safety Considerations
B-1
Introduction
Introduction
The Xerox DocuPrint P8ex and its supplies are designed and tested
to meet strict safety requirements. These include safety agency
examination and approval, and compliance to established
environmental standards. Please read the following instructions
carefully before operating the printer and refer to them as needed to
ensure the continued safe operation of your Xerox DocuPrint P8ex.
The safety testing and performance of this product have been
verified using Xerox materials only.
Follow all warnings and instructions marked on or supplied with
the product.
B-2
DocuPrint P8ex Reference Guide
Laser Safety
Laser Safety
The Xerox DocuPrint P8ex complies with laser product
performance standards set by governmental, national and
international agencies as a Class 1 Laser Product. It does not emit
hazardous radiation, as the beam is totally enclosed during all
phases of customer operation and maintenance.
The use of controls, adjustments, or procedure other than those
specified in the documentation might result in hazardous exposure
to laser light.
The laser beam inside the printer is completely confined within the
protective housings and external covers. The radiation emitted
cannot escape from the machine during any phase of user operation.
The Xerox DocuPrint P8ex contains laser danger labels. These
labels are intended for use by Xerox Service Representatives, and
are placed on or near panels or shields that require special tools for
removal. Do not remove any of these panels. There are no operator
serviceable areas inside these covers.
Appendix B: Environmental and Safety Considerations
B-3
Laser Safety
Laser Safety for the
United States and
Canada
The Xerox DocuPrint P8ex complies with safety standards, and is
certified as a Class 1 Laser product under the U.S. Department of
Health and Human Services (DHHS) Radiation Performance
Standard according to the Radiation Control for Health and Safety
Act of 1968. The printer does not emit hazardous laser radiation.
The use of controls, adjustments, or
procedures other than those specified in the
documentation might result in hazardous
exposure to laser light.
Since radiation emitted inside the printer is completely confined
within the protective housings and external covers, the laser beam
cannot escape from the machine during any phase of user operation.
The Center for Devices and Radiological Health (CDRH) of the
U.S. Food and Drug Administration implemented regulations for
laser products of August 1, 1976. These regulations apply to laser
products marketed in the United States. The label on the machine
indicates compliance with the CDRH regulations and must be
attached to laser products marketed in the United States.
The Xerox DocuPrint P8ex contains laser danger labels. These
labels are intended for use by Xerox Service Representatives, and
are placed on or near panels or shields that require special tools for
removal. Do not remove any of these panels or shields. There are
no operator serviceable areas inside these covers.
B-4
DocuPrint P8ex Reference Guide
Laser Safety
Laser Safety for
Finland and Sweden
Luokitus on on tehty standardin EN 60825 mukaisesti Klassningen
är gjord I enlighet met standarden EN 60825.
LUOKAN 1 LASERLAITE
KLASS 1 LASER APPARAT
VAROITUS!
Laitteen käyttaminene muulla kuin tässä käyttöohjessa mainitulla
tavalla saattaa alitstaa käyttäjän turvallisuusluokan 1 ylittävälle
näkymättömälle lasersäteiylle.
VARNING!
Om Apparaten används på annat sätt än I denna bruksanvisning
specficeratas, kan användaren utsättas för osynlig laserstrålning,
som överskrider gränsen för laserklass 1.
Laser Statement
(Laserturvallisuus)
Never operate and service the printer with the protective cover
removed from laser/scanner assembly. The reflected beam,
although invisible, can damage your eyes.
Class 1 laser product
Luokan 1 laserlaite
Klass 1 laswer apparat
Allonpituus 770-795 nm
Teho 0.40mw +/-0.04 mw
Appendix B: Environmental and Safety Considerations
B-5
Ozone Safety
Ozone Safety
During normal operation, the Xerox DocuPrint P8ex produces
ozone. The ozone produced does not present a hazard to the
operator. However, it is advisable that the machine be operated in a
well ventilated area.
If you need additional information about ozone, please request the
Xerox publication Ozone (part number 600E74140) by calling
1-800-828-6571 in the United States and Canada.
B-6
DocuPrint P8ex Reference Guide
Electrical Safety
Electrical Safety
Always follow a code of safe habits starting with the following:
•
Use only the power cord supplied with your Xerox DocuPrint
P8ex.
•
Do not use a ground adapter plug to connect the Xerox
DocuPrint P8ex to a power source receptacle that lacks a
ground connection terminal.
•
Plug the power cable directly into a properly grounded
electrical outlet. Do not use an extension cord. If you are not
sure whether or not an outlet is properly grounded, consult an
electrician.
•
This product is equipped with a 3-wire grounding type plug
(e.g., a plug having a third grounding pin). This plug will fit
only into a grounding-type power outlet. This is a safety feature.
To avoid risk of electrical shock, contact your electrician to
replace the receptacle if you are unable to insert the plug into
the outlet. Never use a grounding adapter plug to connect the
printer to a power source receptacle that lacks a ground
connection terminal.
•
This printer should be operated from the type of power source
indicated on the marking label. If you are not sure of the type of
power available, consult your local power company.
•
Your machine is equipped with an energy saving device to
conserve power when the machine is not in use. The machine
may be left on continuously.
Appendix B: Environmental and Safety Considerations
B-7
Electrical Safety
B-8
•
Do not place the Xerox DocuPrint P8ex where people might
step or trip on the power cable.
•
Do not place objects on the power cable.
•
Do not place the printer on an unstable cart, stand or table. The
printer may fall causing personal injury or serious damage to
the printer.
•
Do not override or disable electrical or mechanical interlocks.
•
Do not obstruct ventilation openings. These openings are
provided to prevent overheating of the machine.
•
Do not push objects into slots and openings on the Xerox
DocuPrint P8ex. Contacting a voltage point or shorting out a
part might result in electrical shock or fire.
•
Never remove covers or guards that require a tool for removal,
unless directed to do so in a Xerox approved maintenance kit.
•
Never defeat interlock switched. Machines are designed to
restrict operator access to unsafe areas. Covers, guards and
interlock switches are provided to ensure that the machine will
not operate with covers opened.
•
Unplug the printer from the wall outlet before cleaning. Always
use materials specifically designated for this printer. Use of
other materials may result in poor performance and could create
a hazardous situation.
DocuPrint P8ex Reference Guide
Electrical Safety
•
Do not use aerosol cleaners. Follow the instructions in this User
Guide for proper cleaning methods.
•
Never use supplies or cleaning materials for purposes other than
what they were intended. Keep all supplies and materials out of
reach of children.
•
Avoid exposing the drum cartridge to light for extended periods
of time.
•
Do not touch the photoreceptor. Scratches or smudges that
appear on the photoreceptor will result in poor print quality and
may shorten the service life.
•
Do not put your hands into the fuser are, located just inside the
exit tray area, as you may be burned.
•
Do not use this printer near water, wet locations, or outdoors.
•
If any of the following conditions occur, turn off the Xerox
DocuPrint P8ex power immediately. Disconnect the power
cable from the electrical outlet. Contact an authorized Xerox
Service Representative to correct the problem:
— The Xerox DocuPrint P8ex emits unusual odors, or makes
unusual noises.
— The power cord is damaged or frayed.
— Liquid is spilled into the Xerox DocuPrint P8ex.
— Any part of the Xerox DocuPrint P8ex is damaged.
— The Xerox DocuPrint P8ex is exposed to water.
Appendix B: Environmental and Safety Considerations
B-9
Radio Frequency Emissions
Radio Frequency Emissions
United States and
Canada
B-10
Note: This equipment has been tested and found to comply with the
limits for a Class B digital device, pursuant to Part 15 of the FCC
Rules. These limits are designed to provide reasonable protection
against harmful interference in a residential installation. This
equipment generates, uses and can radiate radio frequency energy
and, if not installed and used in accordance with the instructions,
may cause harmful interference to radio communications.
However, there is no guarantee that interference will not occur in a
particular installation. If this equipment does cause harmful
interference to radio or television reception, which can be
determined by turning the equipment off and on, the user is
encouraged to try to correct the interference by one or more of the
following measures:
•
Reorient or relocate the receiving antenna.
•
Increase the separation between the equipment and receiver.
•
Connect the equipment into an outlet on a circuit different from
that to which the receiver is connected.
•
Consult the dealer or an experienced radio/TV technician for
help.
DocuPrint P8ex Reference Guide
Radio Frequency Emissions
Changes or modifications to this equipment not specifically
approved by the Xerox Corporation may void the authority granted
by the FCC to operate this equipment.
Shielded cables must be used with this equipment to maintain
compliance with FCC regulations.
In order to allow this equipment to operate in
proximity to Industrial, Scientific and Medical
(ISM) equipment, the external radiation from
ISM equipment may have to be limited or
special mitigation measures taken.
Appendix B: Environmental and Safety Considerations
B-11
Radio Frequency Emissions
Europe
The CE marking applied to this product symbolizes Xerox Limited
Declaration of Conformity with the following applicable Directives
of the European Union as of the dates indicated.
January 1, 1995: Council Directive 73/23/EEC amended by
Council Directive 93/68/EEC, approximation of the laws of the
member states related to low voltage equipment.
January 1, 1996: Council Directive 89/336/EEC, approximation of
the laws of the member state related to electromagnetic
compatibility.
This equipment has been tested and found to comply with the limits
for a Class B digital device. These limits are designed to provide
reasonable protection against harmful interference in a residential
installation. This equipment generates, uses and can radiate radio
frequency energy and, if not installed and used in accordance with
the instructions, may cause harmful interference to radio
communications. However, there is no guarantee that interference
will not occur in a particular installation. If this equipment does
cause harmful interference to radio or television reception, which
can be determined by turning the equipment off and on, the user is
encouraged to try to correct the interference by one or more of the
following measures:
B-12
•
Reorient or relocate the receiving antenna.
•
Increase the separation between the equipment and receiver.
•
Connect the equipment into an outlet on a circuit different from
that to which the receiver is connected.
•
Consult the dealer or an experienced radio/TV technician for
help.
DocuPrint P8ex Reference Guide
Radio Frequency Emissions
A full declaration, defining the relevant directives and referenced
standards can be obtained from your Xerox Limited representative
or by contacting:
Xerox Limited Product Safety,
Xerox Limited Technical Centre,
PO Box 17,
Bessemer Road,
Welwyn Garden City,
Herts AL7 1HE, England
This system is certified manufactured and
tested in compliance with strict safety and
radio frequency interference regulations. Any
authorized alteration which includes the
addition of new functions or the connection of
external devices may impact this certification.
Please contact your local Xerox Limited
representative for a list of approval
accessories.
In order to allow this equipment to operate in
proximity to industrial, Scientific and medical
(ISM) equipment, the external radiation from
the ISM equipment may have to be limited or
special mitigation measures taken.
Appendix B: Environmental and Safety Considerations
B-13
Operational Safety
Operational Safety
The Xerox DocuPrint P8ex and its supplies were designed and
tested to meet strict safety requirements. These include safety
agency examination, approval, and compliance with established
environmental standards.
To ensure the continued safe operation of your Xerox DocuPrint
P8ex, follow these safety guidelines at all times.
B-14
•
Improper connection of the grounding conductor can result in
electrical shock.
•
Follow warnings and instructions marked on or supplied with
the equipment.
•
Locate the Xerox DocuPrint P8ex on a solid support surface
(not on plush carpet) that has adequate strength to support the
weight of the unit.
•
Locate the Xerox DocuPrint P8ex in an area that has adequate
ventilation and room for servicing.
•
Do not locate the Xerox DocuPrint P8ex near a radiator or any
other heat source.
•
Do not obstruct ventilation openings. They are provided to
prevent overheating.
•
Do not place or push objects of any kind into the ventilation
openings.
DocuPrint P8ex Reference Guide
Operational Safety
•
Do not attempt any maintenance function that is not specifically
described in the Xerox DocuPrint P8ex documentation.
•
Use materials and supplies specifically designed for your Xerox
DocuPrint P8ex. The use of unsuitable materials may result in
poor performance and possibly a hazardous situation.
•
Do not remove the covers or guards that are fastened with
screws.
•
Do not operate the Xerox DocuPrint P8ex if you notice unusual
noises or odors. Disconnect the power cord from the power
source receptacle, and contact your Xerox Service
Representative immediately.
Appendix B: Environmental and Safety Considerations
B-15
Operational Safety
B-16
DocuPrint P8ex Reference Guide
Certifications
C x i dneppA
Quality Standards ............................................................ C-2
Energy Star ...................................................................... C-3
Appendix C: Certifications
C-1
Quality Standards
Quality Standards
The Xerox DocuPrint P8ex is certified to EN60950. The equipment
is manufactured under a BS5750 Quality system accepted by the
British Standards Institution.
The Xerox DocuPrint P8ex is also certified in compliance with
applicable standards by various national bodies.
C-2
DocuPrint P8ex Reference Guide
Energy Star
Energy Star
This printer contains advanced energy conservation technology
which reduces power consumption when it is not in active use.
When the printer does not receive data for an extended period of
time, power consumption is automatically lowered.
The energy star emblem does not represent EPA endorsement of
any product or service.
Appendix C: Certifications
C-3
C-4
DocuPrint P8ex Reference Guide
Adding Memory
D x i dneppA
Installing a SIMM ............................................................. D-2
Removing a SIMM ........................................................... D-3
Appendix D: Adding Memory
D-1
Installing a SIMM
Installing a SIMM
1
Turn off the printer and unplug the power cord. Disconnect all
cables from the back of the printer.
2
Remove the two screws from the back of the control board, and pull
the control board out of the printer.
Be aware that the control board should be
connected to the inside of the printer by two
cables. Do not disconnect these cables.
D-2
3
Align the SIMM with its connection points at the control board’s
connectors at a 70o angle.
4
Rotate the SIMM downward into the connector until it snaps into
place. Make sure both metal clips on the connector are fastened and
the two pins on the connector are pushed through the holes in the
SIMM.
5
Slide the control board back into the printer and fasten it with the
screws you removed in Step 2.
6
Reattach cable(s) and the power cord and turn on the printer.
DocuPrint P8ex Reference Guide
Removing a SIMM
Removing a SIMM
1
Turn off the printer and unplug the power cord. Disconnect all
cables from the back of the printer.
2
Remove the two screws from the back of the control board, and pull
the control board out of the printer.
3
Push out on the metal clips at each end of the connector and rotate
upwards to pull the SIMM out of the connector.
4
Slide the control board back into the printer and fasten it with the
screws you removed in Step 2.
5
Reattach cable(s) and the power cord and turn on the printer.
Appendix D: Adding Memory
D-3
D-4
DocuPrint P8ex Reference Guide
Language Codes
Appendix E: Language Codes
E x i dneppA
E-1
Language Codes
E-2
Code
Language
BG
Bulgarian
CS
Czech
DA
Danish
DE
German
EL
Greek
EN
English
ES
Spanish
ET
Estonian
FI
Finnish
FR
French
HU
Hungarian
IT
Italian
LT
Lithuanian
LV
Latvian
NL
Dutch
NO
Norwegian
PL
Polish
PT
Portuguese
RO
Romanian
RU
Russian
SH
Croatian
SK
Slovak
SL
Slovenian
SV
Swedish
TR
Turkish
ZH
Chinese
DocuPrint P8ex Reference Guide
Index
XI
A
Adobe Acrobat Reader • 2-2
C
Card stock
Sizes and capacities • 3-2
CD-ROM • 1-6, 2-2
Cleaning the printer • 5-2 5-3
Inside surfaces • 5-3
Outside surfaces • 5-2
Face-up stacker
Location • 1-3
Using • 3-7
Front cover
Location • 1-3
L
Labels
See also Media
Sizes and capacities • 3-2
Control panel
Location • 1-3
Laser print cartridge
Location • 1-3
Replacing • 5-4
D
M
Documentation • 1-6
E
Manual feeder
Location • 1-3
Using • 3-6
Envelopes
Loading • 3-8
See also Media
Sizes and capacities • 3-2
Media
Loading • 3-4 3-8
Selection guidelines • 3-3
Sizes and capacities • 3-2
F
Memory
Installing • D-2
Face-down stacker
Location • 1-3
MPF
See Multipurpose Paper
Feeder
5-5
DocuPrint P8ex Reference Guide
P
Multipurpose paper feeder
Location • 1-3
Using • 3-4 3-5
P
Paper
See also Media
Sizes and capacities • 3-2
Paper guides
Location • 1-3
Using • 3-5
Parallel connector
Location • 1-4
PCL drivers
Configuring • 4-3
4-5
PCL 5e printer driver • 2-2
PCL 6 printer driver • 2-2
Power cord connector
Location • 1-4
Power switch
Location • 1-4
Print speed • 1-5
Printing
General procedure • 4-2
S
Safety issues • B-1
B-15
SIMMs
Installing • D-2
Removing • D-3
Specifications • A-2
A-3
Stacker extender
Location • 1-3
Status Monitor • 2-2, 4-10
Installing
Windows NT 4.0 • 2-3
Windows 3.1x • 2-3
Windows 95/98 • 2-3
T
Transparencies
See also Media
Sizes and capacities • 3-2
Tray extender
Location • 1-3
Troubleshooting
Operation problems • 6-2 6-5
Print quality problems • 6-6 6-7
U
USB connector
Location • 1-4
R
RCP
See Remote Control Panel
Remote Control Panel • 2-2
Installing
Windows NT 4.0 • 2-3
Windows 95/98 • 2-3
Windows3.1x • 2-3
Using • 4-6 4-9
ABOUT tab • 4-9
FONT SETUP tab • 4-8
PAGE SETUP tab • 4-7
PRINTER tab • 4-7
QUALITY tab • 4-9
TEST tab • 4-9
Resolution • 1-5
DocuPrint P8ex Reference Guide
W
Windows NT 4.0
Installing printer utilities • 2-3
Installing Xerox Font Manager • 2-4
Windows 3.1x
Installing printer utilities • 2-3
Installing Xerox Font Manager • 2-4
Windows 95/98
Installing printer utilities • 2-3
Installing Xerox Font Manager • 2-4
X
Xerox Font Manager • 2-2, 4-10
Installing
Windows NT 4.0 • 2-4
Windows 3.1x • 2-4
Windows 95/98 • 2-4