1
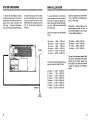
DX-440
OWNER'S MANUAL
AM/FM DIRECT ENTRY
COMMUNICATIONS RECEIVER
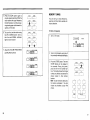
RADIO SHACK LIMITED WARRANTY
Please read before using this equipment
This product is warranted against defects for 90 days from date of purchase from Radio
Shack company-owned stores and authorized Radio Shack franchisees and dealers.
Within this period, we will repair it without charge for parts and labor. Simply bring your
Radio Shack sales slip as proof of purchase date to any Radio Shack store. Warranty
does not cover transportation costs. Nor does it cover a product subjected to misuse or
accidental damage.
EXCEPT AS PROVIDED HEREIN, RADIO SHACK MAKES NO WARRANTIES,
EXPRESS OR IMPLIED, INCLUDING WARRANTIES OF MERCHANTABILITY AND
FITNESS FOR A PARTICULAR PURPOSE. Some states do not permit limitation or
exclusion of implied warranties; therefore, the aforesaid limitation(s) or exclusion(s) may
not apply to the purchaser.
This warranty gives you specific legal rights and you may also have olher rights which vary from state to slals.
We Service What We Sell
------i
II
VOICE OF THE WDF!LP
RADIO SHACK
A Division of Tandy Corporation
Fort Worth, Texas 76102
Cat. No. 20·221A
~)
12A7
Printed in Taiwan
~EALIShc.:...
CONTENTS
Introduction
Features
Control Locations
Choosing a Power Supply...............
Preliminary Settings
Tuning the Radio
Clock Radio Operation
Special Tuning Techniques and Controls
Special SSB/CW Reception Techniques
Using the Shoulder Strap
Choosing an Antenna
System Grounding
Band Allocation
The Shortwave Hooby
Listening Notes
Frequency Conversion
~~~
.............................................•....................................
Troubleshooting Guide
Care and Maintenance
Specifications
INTRODUCTION
3
4
5
7
10
13
23
26
28
33
34
36
37
38
40
41
You now have the world at your fingertips.Just press the buttons of yourDX440 to listen to a variety of voices from
around the world. In addition to your
local AM and FM broadcast stations,
you can now enjoy broadcasts from
London, Tokyo, Paris, Berlin, and
Moscow.
This entertainment grade, general purpose, communications receiver covers
an extremely wide range of frequencies
that also include shortwave and special
services such as marine and navigation.
If you understand international Morse
code, you can listen in and decode a
wide variety of transmissions.
~
46
48
50
The radio uses the latest solid-state
technology to provide programming,
a large liquid crystal display (LCD),
and a host of other convenient .
features. Because this product is so
versatile, please take a few minutes
to review the material in this manual
before you proceed. You'll enjoy the
radio much more if you do.
Welcome to the world of the shortwave listener.
For your own protection, we urge you
to record the serial number of this unit
in the space provided below. The serial
number is located inside of the battery
compartment
Serial Numberr
©
~
1987 Tandy Corporation.
All Rights Reserved.
Realistic is a registered trademark of
Tandy Corporation.
2
3
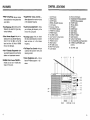
CONTROL LOCATIONS
FEATURES
• Wide Tuning Range_lets you receive
more stations from more places than
ever before.
• Supplemental Tuning Controlsallow adjustment for maximum clarity
of the selected frequency.
• Fast Response LCD-shows you the
frequency you select in large, easyto-read numbers.
• Dual Function Mode Switch-allows
you to display the frequency or the
time on the LCD panel.
• Direct Acc~ss Keypad-lets you instantly tune in any desired frequency
from 87.5 to 108 MHz on the FM
band and from 150 kHz to 29,999
kHz on the AM band.
• Scanning Control-lets you check
the various transmissions on a certain
band and lock on to the chosen
frequency.
• Up to 9 Storable Frequencies-give
you instant response for your favorite
stations or transmission sources.
.Multiple Power Source Operationmeans you can use it virtually anywhere in the world.
• Full Range Tone Controls-lets you
cuStomize the sound for clarity and
listening comfort.
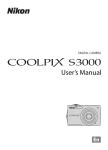
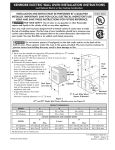
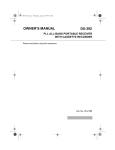
1. lIG HT Button
2. TIMER Button
3. SLEEP Button
4. SIGNAL Strength Indicators
5. LCD Display
6.Telescopic Antenna
7. FM STEREO Indicator
8. POWER On Indicator
9. POWER Switch
10. VOLUME Control
11. Dual-Function Tuning Control
12. BALANCE Control
13. TREBLE Control
14. BASS Control
15. RF GAIN Control
16. BFO PITCH Control
17. LOCK Switch
18. BFO OUT/IN Switch
19. FM/(MONO/STEREO)/AM(WIDE/
NARROW) Mode Selector
20. STORE Button
21. RECALL Button
22. UP Button
23. DOWN Button
24. SCAN Button
25. MODE Button
26. EXECUTE Button
27. Band Selectors
28. Number Entry Buttons
29. Time Mode/SEConds Reset button
30. STEREO headPHONES Jack
(3.5mm)
31. DC IN 9V Jack
• Stereo Headphones Jack - lets you
listen to FM Stereo programs in full
stereo.
.~ijJr---17
W--l--+---j--l-l--j~+---U
f---
rT
IT
20
2928
4
272625
2423 2221
19 18
5
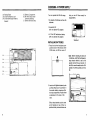
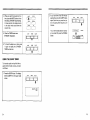
CHOOSING A POWER SUPPLY
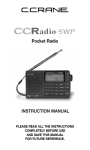
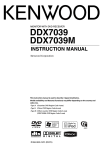
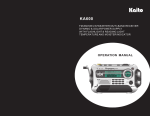
32. Folding Stand
33. EXTernal Antenna'Jack
34. EXTernal/INTernal Antenna
Selector
35. Battery Compartment
36. 9k/10kHz Step SWitch
(beneath batteries)
37. Battery Removal Strap
You can operate the DX-440 using:
that you can lift them easily for
replacement.)
• Six alkaline D batteries and two AA
batteries.
• Household AC
(with an optional AC adapter)
• A 12-Volt DC automotive battery
(with an optional DC adapter)
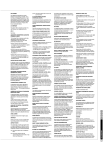
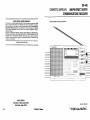
INSTALLING BATIERIES
1. Press the latch on the battery compartment cover in the direction of the
OPEN label, and lift the cover off.
32
Note: Before installing the next set
of batteries, verify that the frequency
step selector switch is set to the
position correct for your country. In
the USA, move the swifch to the 10K
position. In other countries, set it to
9K.
33
34
35
36
37
1
'"
2. Insert two AA alkaline batteries (such
as Radio ShackCat. No .23-552) in
the smaller battery chamber within
the main compartment. Position them
as illustrated on the back of the
radio.
(Place these batteries and the next
set of batteries on top of their respective battery removal ribbons so
6
7
3. Insert six D batteries in the main battery compartment. Position them as
shown in the illustration on the back
of the radio. For best results, use
alkaline batteries such as Radio
Shack® Cat. No. 23-550.
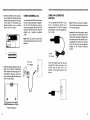
USING HOUSEHOLD AC
USING AN AUTOMOTIVE
BATIERY
You can power the DX-440 from household AC using an optional AC adapter,
Cat. No. 273-1455. Plug the small connector of the adapter into the DC IN 9V
socket on the side of the unit. Plug the
adapter into a standard household
outlet.
You can operate the DX-440 in a car,
boat, or recreational vehicle that is
equipped with a 12 Volt DC, negative
ground battery. Use a DC adapter (Cat.
No. 14-844).
Note: When you use AC, the DX-440
automatically disconnects the internal
batteries.
Note: When you connect the adapter,
the DX-440 automatically disconnects
the internal batteries.
Caution :Do not let the adapter's barrel
plug contact any metal parts of the
vehicle when the adapter is plugged into
the lighter socket of the vehicle but not
yet plugged into the DX-440. A harmful
short can occur that can damage the
adapter or the vehicle's electrical
system.
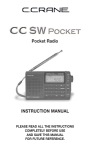
14-844
DC Adapter
273-1455
AC Adapter
4. Insert the bottom projections on the
edge of the battery compartment
cover inside the lower edge of the
compartment opening. Lower the
cover, and snap the top latch down
until it clicks closed.
Insert the adapter plug into the jack
marked DC IN 9V on the side of the
DX-440. Plug the other end of the
adapter into the lighter socket of the
vehicle.
=
PHON[
o
o
OCINg~
~
o
L.....l
L
8
L..-
Bottom prOjectionJ
9
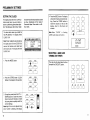
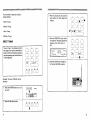
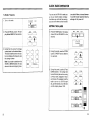
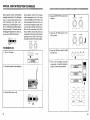
PRELIMINARY SETTINGS
SETTING THE CLOCK
The display shows the time in a 24-hour
mode except when you are tuning a
station or performing some other operation. The radio uses the 24-hour mode
The clock starts when you install the
two AA batteries. The display shows
CLOCK 0:00.
Note: If after installing the two AAbatteries
the display does not show CLOCK 0:00,
remove the batteries and install them
one minutes later. The display will show
CLOCK 0:00·
because mostshortwavestations schedule their broadcasts on the basis of
Greenwich Mean Time which is a 24hour clock.
Note: When "CLOCK' IS flashing,
a/SEC button does not function.
. ..
-,
~
2
3
4
5
6
7
8
9
CJ CJ D
CJ D CJ
CJ CJ CJ
-=--..r'
~
~
[
CiJ
'l
CLOCK
Jb"m~1
1
!~~~e~--]
['~"e:;J
sw _ _ _ _ _ _ _ _ _ _ _ _
~
EXECUTE
O/SEC
--
n,nn
L/I'_' LI
-=----r<
1IiI
~I~ ~ Ui81~~J~l~~~;~]lil~~~"'
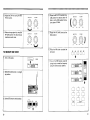
SELECTING A BAND AND
TURNING ON POWER
STORE
MODE
ct=J
SCAN
The radio has five band select buttons
beneath the EXECUTE button.
RECALL
)(
UP
DOWN
1[
MODE
2. Press the STORE button. CLOCK
flashes in the display for five seconds.
STORE
C~Lf=J
(
SCAN
)(
RECALL
DOWN
UP
~)LJ
10
1
I_ 8r5-,08MH.i 1.15()-281kH.! , _ ~2Q-",:m'H,II_'50 ·~ool){l.H.1
1. Press the MODE button.
3. During this period press the UP or
DOWN buttons to reach the correct
time in hours and minutes (or, rotate
the tuning knob to qUickly reach the
correct setting).
Note: digit of time can be adjusted only
when "CLOCK" is flashing in the display.
4. PresstheO/SEC button. The display
shows the minutes and seconds setting. Press the STORE button to
reset the seconds to 00 and the
display, return to the hours and
minutes.
MODE
STORE
,----,I (
SCAN
I
I
DOD
4
5
6
7
8
9
CJ CJ D
CJ CJ CJ
CJ (
)
O/SEC
FM
EXECUTE
AM
LW
MW
SW
00000
or
RECALL
~--') (~--'
W~
11
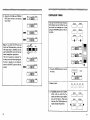
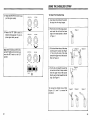
TUNING THE RADIO
ADJUSTING THE ANTENNA
Band
(Button)
Service
Frequency
Min
Max
Normal FM broadcasts
FM
87.5
108
MHz
AM
150
29999
kHz
Entire AM Band
LW
150
281
kHz
Longwave
MW
520
1620
kHz
Normal AM broadcasts
SW
2300
26100
kHz
Shortwave in 12 sub-bands
Note: Each time you select SW, the
radio steps through 12 sub-bands, each
band covering as little as 100 kHz to as
much as 500 kHz. The sub-bands cor-
respond to the wavelengths of each
band. Refer to "The Shortwave Hobby"
section for additional information.
1. Press the POWER button. The
POWER indicator lights. The display
shows the last band and frequency
you selected.
2. Press the band button of your choice.
The display shows the band you
selected and a random frequency
within that band.
12
I
I
POWER
Locate the band to which you want to
listen in the following chart. Adjust the
antenna as indicated.
BAND
FREQUENCY
RANGE
MW
520 - 1620 kHz Internal - Rotate radio
for best reception
LW
150 - 281 kHz
Internal - Rotate radio
for best reception
FM
87.5- 108 MHz
Telescopic - Extend fUlly
~
Swivel for best
reception
'*'
CEIIlIIIIlIlIC:
MINI
FM
I I I I I I I I
AM
I IMAX
LW
VOLUME
MW
sw
0 0 0 0 0
AM/SWj2300 - 26100
I
ANTENNA
kHzTel~scoPiC - Extend fUlly
Do not swivel
13
You can select a frequency using four
tuning methods:
3. Press [7], [3], [0], [5J. As you press
each button, the LCD shows the
number.
• Direct Tuning
1
2
QQ~Q,.
DOD
DOD
Dr
)
7
• Manual Tuning
~
• Scan Tuning
• Memory Tuning
4. Press the EXECUTE button within
five seconds. The display shows the
frequency and meter band of
SW.
DIRECT TUNING
ODD
You can "key in" any frequency within
the range of the radio by selecting the
band in which that frequency operates
and then pressing the number buttons
of that frequency.
4
5
DOD
DOD
7 ,
8
o
a/SEC
FM
r
AM
)
lW
MW
~
9
EXECUTE
0.00
4
5
6
DOD
DOD
o/sec
o (
9
EXECUTE
O/SEC
8
7
6
3
8
9
E'XECUTE
zt
1
5. Extend the antenna fully stranght up.
for the best AM (SW) reception.
SW
00000
L
Example: To tune to 7305 kHz on the
AM band
1. Press the POWER button to turn on
the radio.
I
I
POWER
'*'
~
MINI I I I I I I I I I IMAX
2. Press the AM band button.
FM
AM
LW
VOLUME
MW
SW
0 0 0 0 0
14
'*'
15
6. Adjust the VOLUME and TREBLE/
BASS tone controls for the desired
sound level.
Note: If you select the FM band and
tune to an FM stereo station, move the
FM mode switch to STEREO and adjust the BALANCE control for the best
stereo headphone reproduction.
The built in speaker is monaural. For
the best sound result when listening with
the built in speaker, do not forget to
return the BALANCE control to the mid
position.
...
......
MINI I I I I I I I I I lMAX
VOLUME
CONTINUOUS TUNING
~
LIIIIIIIIIIIR
BALANCE
~
LO I I I I I I I I I 11 HI
TREBLE
LO I I I I II I I I I t HI
BASS
~
If you do not know the exact frequency
of the station you want to listen to, you
can check the broadcasts on a band
using the UP/DOWN buttons or the tuning knob.
..
BFO
SCAN
LOCK
'------_~) [L_~
LIIIIIIIIIIIR
BALANCE
lOlll11111111H1
TREBLE
DDllllllIIlIII1
OUT IN
LAM-J
MINI I I I I I I I I I IMAX
c:::ElffiIII!ll
VOLUME
0DilllI!IIIIlIl
LIIII!111111R
BALANCE
LOIIIIIIIIIIIH!
TREBLE
~
LOIIIIIIIIIIIHI
BASS
c:::ElffiIII!ll
1. Press the POWER button to turn on
the radio.
•
POWER
c:::ElffiIII!ll
MINI I I I I I I I I I IMAX
LO I I
c:::ElffiIII!ll
j
I II I I I II HI
BASS
~
2. Select a band.
FM
button until you reach the frequency you want or reach a station
you want to listen to. Press and
hold the UP or DOWN buttons to
rapidly change frequencies.
or
AM
LW
VOLUME
MW
SW
00000
3. a. Repeatedly press the UP or DOWN
16
RECALL
OCJ
~
. . .'. . .
WIDE NARROW OUT IN
STORE
'-----_) [L_~
c:::ElffiIII!ll
,FM, ~
MONO STEREO
...
MODE
MODE
STORE
) (
SCAN
~
RECALL
)(
(
UP
DOWN
[
)
1[
1#
1
17
b. Rotate the tuning knob in either
direction until you reach a desired
frequency or station with all five
SIGNAL indicators light to obtain
best reception.
SCAN TUNING
LIIII111111IR
BALANCE
c:::E:IillIIIII
LOIIIIIIIIIII>!1
TREBLE
Use scan tuning to quickly locate a station or to monitor several stations within
a band.
c:::E:IillIIIII
LO I II I I I I I I I I HI
BASS
1. Turn on the radio.
POWER
c:::E:IillIIIII
Note:
When you repeatedly press an
UP or DOWN button, the frequency on the FM band changes by
.05 MHz each time you press a
button. On all other bands, the
frequency changes by 1 kHz.
When you press and hold an UP
or DOWN button, the frequency
on the FM band changes by
.50 MHz. On all other bands, it
changes by 10kHz.
When you turn the TUNING knob
slowly in the AM band, the display
changes in 1 kHz increments. Slightly
faster turning of the knob causes the
display to change in 10kHz and very
fast turning of the knob causes
changes in 100 kHz increments. Turn
the knob quickly until the display
nears the desired frequency. Then,
turn it slowly for precise tuning.
2. Select a band.
FM
AM
LW
MW
SW
00000
3. Adjust the antenna or radio position
according to the chosen band.
~
FM
4. Adjust the VOLUME,TREBlE,BASS
and BALANCE
MINI I I I I I I I I I IMAX
VOLUME
CTIlIIIIlllICJ
LIIIIIIIIIIIR
BALANCE
c:::E:IillIIIII
LOIIIIIIIIIIIHI
TREBLE
CTIlIIIIlllICJ
LOIIIIIIIIIIIHI
BASS
c:::E:IillIIIII
18
4. Press the SCAN button. The radio
begins to scan the frequencies in the
band, from lowest to highest. It stops
when it reaches a station. The signal
strength of the station registers on
the SIGNAL indicators.
When all five indicators light, SIGNAL
is the best.
STORE
SCAN
RECALL
-=--./5"
-=--./4
UP
~
CEJ
[
SIGNAL
MODE
DOWN
~
)r,---~
-=-./1
19
5. Press the SCAN button again to
resume upward scanning. When the
radio reaches the upper frequency
limit of the band, it continues scanning starting again at the lowest frequency on the band.
6. You can fine tune the station using
the UP or DOWN buttons. Tune so
that the most SIGNAL indicators
light for best reception.
7. Adjust the VOLUMEffREBLE/BASS
and BALANCE contorls.
I
MODE
MEMORY TUNING
STORE
IL(_ _I
SCAN
RECALL
DOWN
UP
L=t=J (L....._I
L~[
MODE
I
(
To Store a Frequency
STORE
LI_ _I(
SCAN
)(
You can store up to nine different frequencies and have them available for
instant selection.
)
RECALL
1. Turn on the radio.
I
I
QQ
MINI I I I I I I I I I IMAX
TREBLE
CElIIllIlIICJ
LOIIIIIIIIIIIHI
'*'
~
MINI I I I I I I I I I IMAX
BASS
~
2. Tune to any frequency using any of
the previously mentioned techniques.
,
3. Press the STORE button. The word
STORE flashes on the display for
five seconds. During this period,
press one of the nine number buttons. The display shows the storage
number you selected and stores the
chosen station in that memory
location.
Note: You do not have to store your
first station as location 1. You can
choose any location as your first
choice.
MODE
I
STORE
1ct=J
RECALL
SCAN
I L_=:J
I
DOWN
L~[
CJ
CJ
CJ
CJ
4
7
UP
I
2
1
O/SEC
20
VOLUME
BALANCE
o::illIlIIII!II
LOIIIIIIIIIIIHI
POWER
VOLUME
~
LIIIIIIIIIIIR
I
3
CJ c::::J
CJ c::::J
CJ c::::J
5
6
8
9
EXECUTE
L
)
21
CLOCK RADIO OPERATION
1. Turn on the radio.
I
I
'*'
POWER
_11111111111""'"
I I• mllllllllllill
...
) (
SCAN
RECALL
I
7
O/SEC
0
0
0
[
5
6
------------~~~-i----~~~~~~--~~~~_i
3
2
1
4
SLEEP
i
-~-'-
.~--
0
0
0
0
TIMER
UP
)[
I
LIGHT
1. Press the TIMER button. The display
shows 0:00 and STANDBY for five
seconds.
)
)L:4=J
DOWN
Note: If you make no selection while
STORE or MEMO flashes, the radio
returns to the normal playing mode.
SETIING THE ALARM
I
STORE
MODE
I
(
The radio instantly tunes to that station and displays the frequency and ,I
the storage number.
VOLUME
_-_.
2. Press the RECALL button. The display flashes MEMO for five seconds.
,,. number
D~""9 <";,button"me.for the, , desired
- "" ,,~"" I
station.
turns itself off after an interval between
10 and 90 minutes. Make the following
settings with the power off.
You can use the DX-440 to wake you
up to your favorite station everyday.
And before you retire for the evening,
you can set the timer so that the radio
To Recall a Frequency
0
0
0
2. During this period, press the STORE
button. STANDBY starts to flash for
five seconds.
6
I
I
j
MODE
STORE
SCAN
ct=J
C
)I
9
DOWN
RECALL
UP
L_J[~~
EXECUTE
1
3. During this period, use the UP and
DOWN buttons or the tuning knob
to reach the daily turn-on time, using
a 24 hour clock, displayed in hours
and minutes. For example, to set the
radio to turn on at 1:24 P. M. each
day, use the buttons or turn the knob
until the display shows 13:24.
MODE
STORE
'----~) (L.-_~
SCAN
RECALL
~~)(L.- _ _
WW
LIIIIIIIIIIIR
BALANCE
c:::E:mIIJllCJ
LOIIIIIIIIIIIHI
TREBLE
c:::E:mIIJllCJ
LOIIIIIIIIIIIHI
BASS
c:::E:mIIJllCJ
22
23
4. When you reach the desired turn on
time, press the MODE button to lock
the setting. STANDBY stops flashing.
In a few seconds, the display reverts
to the clock mode and shows the
current time.
MODE
L4=l (
)
RECALL
SCAN
L=:JI
)
UP
DOWN
Ir
r
5. Press the TIMER button once.
STANDBY disappears.
I
TIMER
LIGHT
2. If you want fewer than 90 minutes
playing time, press the SLEEP button
again. Each time you press the button, the playing time reduces by 10
minutes.
STORE
To turn off the radio before it normally turns itself off, press the POWER
button.
SLEEP
I[~::J]I
6. To check the daily turn on time, press
it again to display the STANDBY
TIMER all the time.
TIMER
UGHT
I[~
i'
LIGHT
TIMER
SLEEP
POWER
i'
MINI I I I I I I I I I jMAX
VOLUME
DDIIIllIlllIIlI
SLEEP
iD::-:JJ]
USING THE SLEEP TIMER
To have the radio turn itself off after a
period of 90 minutes or less, proceed
as follows:
1. Press the SLEEP button. The display
shows SLEEP 90 in the upper right
corner.
LIGHT
I[I
TIMER
SLEEP
m::XjUl
SLEEP
I
24
gO
1
Ii
25
SPECIAL TUNING TECHNIQUES AND CONTROLS
In addition to the standard tuning operations described previously, use the
following controls for special operations.
RF GAIN CONTROL
This control adjusts the receiver's sensitivity. For shortwave reception, rotate
the control to the MAX position. This
provides the maximum sensitivity. When
you listen to the MW, standard AM
band, or LW band, rotate the control
only as far as needed to obtain a good
signal. If you turn the knob further you
might hear a distorted signal. For weak
stations, rotate the control to the MAX
position.
RF GAIN
BFO PITCH
AM NARROW!WIDE
SELECTIVITY SWITCH
Some stations transmit their signal so
that very little space exists between
their airspace and the station next to
them on the band. If, while tuning, you
encounter interference, caused by the
signal from an adjacent station, press
the button for the band you are listening
to and select the NARROW position.
The interference is reduced or muted.
,FM-,
MONO STEREO
BFO
OUT IN
LAM~ ' "
For full reception, leave the switch in
the WIDE position.
r
USING THE LOCK CONTROL
While not a control, you might consider
using headphones to obtain the best
reception. Many stations broadcast
marginal signals. Only headphones can
capture the subtle difference between
the signal from such stations and the
surrounding noise often encountered at
night. Be sure that the headphones
terminate in a 1/8 inch plug, Insert the
plug into the PHONES jack on the side
of the radio. When you plug the headphones in, you silence the speaker.
Use this switch to prevent unauthorized
use of the radio or to ensure that any
station you might be monitoring remains
tuned in.
LOCK
ciIiII:I.m
.. .. ..
WIDE NARROW OUT IN
USING HEADPHONES
o
r
FM ,
MONO STEREO
'fH~
o
o
OCIN9i
••
••
BFO
••
WIDE NARROW OUT IN
LOCK
"-
••
OUT IN
LAM..J
~
FM ,
MONO STEREO
When you move the LOCK switch to the
IN position, you disable the POWER
button and the tuning controls. If the
radio is on when you use the LOCK
switch, you cannot turn off the radio or
change the current frequency.
To release the LOCK function, set LOCK
switch to out position
BFO
LOCK
ciIiII:I.m
.. .. ..
WIDE NARROW OUT IN
.,.
If you encounter interference, adjust
the control in both directions until you
obtain the best compromise between
your station and the interference.
BFO PITCH
RF GAIN
001
~SB
26
USB
MIN
MAX
OUT IN
LAM-J
If you plan to listen to Morse code,referred to as CW (continuous wave), set the
BFO switch to IN position. If you encounter too much noise as you tune,
set the AM NARROW/WIDE switch to
NARROW position.
r- FM -,
MONO STEREO
rFMi
BFO
LOCK
~
.. . . . .
WIDE NARROW OUT IN
LAM-.J
Because the radio can receive stereo
FM, when you listen to FM stereo
broadcasts, be sure your headphones
are designed for stereo operation so
that you can obtain the full benefit of
this feature.
OUT IN
MONO STEREO
BFO
LOCK
ciIiII:I.m
.. . . ..
WIDE NARROW OUT IN
OUT IN
LAM--.J
27
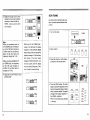
SPECIAL SSB/CW RECEPTION TECHNIQUES
Many stations transmit unmodulated
telegraph transmissions in the shortwave
band. To receive these special Morse
code characters, the radio uses a
special circuit, a beat-frequency oscill ator, to modify the transmitted signal so
that you can hear it. This particular type
of telegraph transmission is called Continuous wave (CW) transmission.
Many stations transmit voice signals
with a suppressed carrier in the single
side band.(SSB),part of the radio transmission spectrum that lies to the side
of the primary frequency signal. Amateurs tend who transmit voice below 10
MHz use the lower side band (LSB).
Above 10 MHz, they use the upper side
band (USB). Commercial utility stations
generally use the USB. A carrier has to
be added to make these signals audible.
BFO HTCH
TO RECIEVE CW
4. Rotate the BFO PITCH control to the
midpoint.
'"
RF GAIN
BFO PITCH
00
USB
5. Rotate the RF GAIN control to the
MAX position
MIN
RF GAIN
BFO PITCH
RF GAIN
00
use
M,..
..~x
1. Turn on the radio.
POWER
i'
MINI I I I I I I I [ I IMAX
6. Press the AM band button to select
the AM band.
FM
AM
2. Extend the antenna fUlly straight up.
MW
SW
00000
i'
VOLUME
~
LW
7. Tune in the CW station using the
tuning knob, or enter the frequency
using the direct access buttons.
LIIIIIIIIIIIR
BALANCE
LOIIIIIIIIIIIHI
TREBLE
~
~
i'
ODD
4
3. Set the BFO switch to IN.
iFMi
MONO STEREO
BFO
LOCK
!DIBmJ
. . .. ..
"*'
WIDE NARROW OUT IN
LAM-.J
28
OUT iN
5
6
CJ CJ CJ
CJ CJ CJ
CJ (
1
7
O/SEC
8
9
EXECUTE
29
8. Adjust the CW tone using the BFa
PITCH control.
BFO PITCH
0 0
0 0
'"....,
9. Reduce strong signals by using the
RF GAIN control. This also reduces
interference and noise.
RF GAIN
oe,
""
"f'
oe,
'"
5. Rotate the RF GAIN control to the
MAX position.
,""
""
"in
{OO
USB
MIN
BFO PITCH
MAX
RF GAIN
OOJ
USB
6. Press the AM button to select the
AM band.
TO RECEIVE SSB VOICE
RF GAIN
BFO PITCH
lSB
""
RF GAIN
BFO PITCH
4. Rotate the BFa PITCH control to the
LSB position for stations below 10
MHz or to the USB position for stations above 10M Hz.
FM
AM
MIN
LW
MW
SW
00000
i'
1. Turn on the radio.
POWER
i'
MINI I I I I I I I I I IMAX
VOLUME
c::EIDill1IIIII
7. Tune in the SSB station using the
tuning knob, or enter the frequency
using the direct access buttons.
LIIIIIIIIIIIR
BALANCE
0illIIIIIIIIlrr
LOIIII111111lHI
2. Extend the antenna fUlly, in a straight
up position.
TREBLE
0illIIIIIIIIlrr
DOD
DOD
7
3. Set the BFa switch to the IN position.
rFMr
MONO STEREO
BFO
LOCK
~
.. ..
WIDE NARROW OUT IN
LAM~
30
..
OUT
8
9
000
o (
O/SEC
EXECUTE
1
IN
•
31
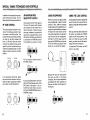
USING THE SHOULDER STRAP
8. Rotate the BFO PITCH control to adjust the signal quality.
To Attach The Shoulder Strap
0... 0
co,
9. Rotate the RF GAIN control to
dampen strong signals. This dm improve signal clarity as well.
, ""
1. Insert about five inches of the end of
the strap into the strap hanger.
."
."
BFC PITCH
RF GAIN
0 0
co,
Note: Before choosing another band.
set the RF GAIN control to MAX, and
move the BFO switch to the OUT
position.
RF GAIN
BFO PITCH
~
BFO PITCH
RF GAIN
0 OJ
co,
iFMi
""
MONO STEREO
MIN
BFO
LAM~
--t-
IN
3. Pull at least three inches of the strap
end through the buckle. See Figure
2. Then bring the end of the strap
beneath the upper end of the buckle.
Refer to Figure 3.
Figure 3
More than 3··
__ i
-T
More than 2'"
lock
OUT IN
4. Pull the free end taught. Be sure that
at least two inches of strap extend
from the upper end of the buckle.
Slip the extra strap beneath the belt
loop. See Figure 4.
To remove the shoulder strap, follow
Figures 5, 6, and 7 to reverse the
procedure.
32
------, Figure 2
MAX
~
.. .. . .
WIDE NARROW OUT
Figure 1
."
."
""
2. Pull the free end of the strap upward,
and insert the end into the lower
edge of the strap buckle as shown
in Figure 1.
Figure 5
Figure 6
Figure 7
33
CHOOSING AN ANTENNA
The radio uses a telescoping antenna
and an internal ferrite bar antenna for
reception of signals between 150 kHz
and 1620 kHz. These antennas provide
acceptable reception for most situations. However, if you use an external
antenna, you can receive more signals,
and the signals you receive will be
better.
FM BAND
• Use a set of VHF-TV rabbit ears.
Those made for TV/FM coverage can
help get better performance on the
FM band.
• Use a combination TV/FM antenna.
Note
eTo use an external antenna,
equipped with 300-ohm twinlead,
connect the twinlead's terminals
to a 300 to 75-ohm matching transformer, Cat. No. 15-1253.
Then insert the 75-ohm connector
of the transformer into an F-to-RCA
adapter, Cat. No. 278-252.
Finally, insert the RCA type plug
of the adapter into the RCA antenna
jack of the receiver. Be sure to move
the antenna switch to EXT.
• If your antenna uses 75 ohm coaxial
cable, attach the connector of the
cable to Cat. No. 278-252, which also
terminates in a RCA type plug. Insert the RCA plug into the ANT jack,
and move the switch next to the jack
to EXT.
Refer to the following charts. The first
chart indicates the length of wire required for optimum performance on the
Antenna Wire Length (feet)
Frequency
150
520
1600
4500
12000
kHz
kHz
kHz
kHz
kHz
specified band. The second chart gives
you the required length of wire to receive
the amateur radio operator's bands.
500
1600
4500
12000
29999
kHz
kHz
kHz
kHz
kHz
1440
441
153
57
22
Lengths generally
impractical to erect
Wave Length - Ham Band
Antenna Wire Length (feet)
160
80
40
20
15
246
117
66
33
22
meter
meter
meter
meter
meter
AM - SHORTWAVE BANDS
For AM reception, you can use many
different types of antennas. Unfortunately, no single antenna can effectively cover the entire frequency range
of the DX-440, from 150 kHz to 29999
kHz.
• Use an outdoor FM antenna. This
type, specially designed for optimum
FM performance, requires rooftop (or
similar location) mounting.
.}> .
n,,-.
~
A general purpose shortwave antenna,
such as Cat. No. 278-758, can provide
better reception than either of the builtin antennas. However, if you want the
best possible reception on one specific
band, your antenna must be a certain
length.
To calcuate antenna length for a
specific frequency
You can determine the exact length of
wire you need for a specific frequency
using the following information. Then,
obtain bare copper wire, stand-off insulators, and an appropriate length of
lead-in wire. Be sure to use a static
discharge unit to guard against lightning
damage. For complete information,
refer to The Radio Amateur Handbook,
published by the American Radio
Relay League.
This formula results in a half-wave
antenna.
Length of a 1/2 wave antenna =
468000
Desired Frequency (kHz)
For example, to pick up international
shortwave signals in the 19 meter band,
15100 to 15600 kHz, pick a representative frequency, such as 15350 kHz.
The formula then becomes:
468000
15350
= 30 1/2 feet
......-
34
35
SYSTEM GROUNDING
To ensure the best reception, always
connect a ground wire to the externai
antenna jack. Connect the single wire
lead-in to the center terminal of the
RCA plug. Connect.a suitable earth
ground to the outer terminal of the plug.
BAND ALLOCATION
A suitable earth ground can be a clamp
around a metal water pipe or a copper
rod driven several feet into the earth.
Radio Shack seils a copper ground rod
(Cal. No. 15-530) and the appropriate
hardware.
To avoid interference and confusion,
certain portions of the radio spectrum
have been set aside for specific purposes. Perhaps the most familiar example is 540 - 1600 kHz, the standard AM
broadcast band.
Ham radio operators use the foilowing
bands:
$1 I
EXT.ANT·
11
@I
~
GROUND
36
meters = 1,800 - 2,000
meters = 3,500 - 4,000
meters = 7,000 - 7,300
meters = 14,000 - 14,350
meters = 21,000 - 21,450
meters = 28,000 - 29,700
kHz
kHz
kHz
kHz
kHz
kHz
International broadcasting stations have
several bands set aside for them:
I
I
160
80
40
20
15
10
49
41
31
25
19
16
13
11
Note that broadcasts and hams share
7,100 -7,300 kHz, and interference is
heavy in that range.
Broadcasts in tropical regions have
special bands set aside for them. In
such areas shortwave is the only way
to reach isolated locations:
120
90
75
60
meters = 2,300 - 2,500
meters = 3,200 - 3,400
meters = 3,900 - 4,000
meters = 4,750 - 5,060
kHz
kHz
kHz
kHz
The rest of the shortwave range is filled
with marine, aeronautical and military
stations. Such stations usuaily use
either SSB or CW, and can be found
outside the amateur and broadcast
bands.
meters = 5,800 - 6,200 kHz
meters
7,100 - 7,500 kHz
meters = 9,500 - 9,900 kHz
meters = 11,650 - 12,050 kHz
meters = 15,100 - 15,600 kHz
meters = 17,550 - 17,900 kHz
meters = 21,450 - 21,850 kHz
meters = 25,600 - 26,100 kHz
37
THE SHORTWAVE HOBBY
Shortwave listening is a hobby with
thousands of participants worldwide.
While no special knowledge is required
for SWL, you will find your enjoyment
increases with experience and special
techniques for listening.
Random tuning on your DX-440 is a
good idea if you've never owned a
Communications Receiver before. In
this way you can get acquainted with
the various bands and the stations that
can be heard. But after you've been
listening for a while you'll discover that
you can get more enjoyment by organizing your listening efforts.
Doing a little bit of library research can
increase your skill as a SWL. Read up
on radio propagation and theory; try to
understand the conditions which make
long distance reception possible. In
your local library you can find such
valuable references as the World Radio
Television Handbook and the Radio
Amateur's Handbook. Current intormation can be found by consulting periodicals dealing with communications and
electronics.
Keep up to date on news events around
the world. There's much interesting
listening just tuning to the international
service of a nation where an important
event is taking place.
Ham radio operators can be found in
the bands listed in our Band Allocations
section. You'll find that hams mainly
38
use Morse code (or CW, as they refer
to it) and SSB. The ham bands are
divided up into CW and SSB sections
in the following manner:
3,500
3,800
7,000
7,150
14,000
14,200
21,000
21,250
28,000
28,500
- 3,800
- 4,000
- 7,150
- 7,300
- 14,200
- 14,350
- 21,250
- 21,450
- 28,500
- 29,700
kHz:
kHz:
kHz:
kHz:
kHz:
kHz:
kHz:
kHz:
kHz:
kHz:
CW
SSB
CW
SSB
CW
SSB
CW
SSB
CW
SSB
These boundaries are not precisely
observed everywhere in the world, so
don't be too surprised to find an SSB
signal in the CW portion of a band and
vice-versa.
Ships and coastal stations can also be
heard on shortwave. Most communications are in SSB and CWo One interesting range is 2,000 - 2,300 kHz,
where the Coast Guard and many small
boats can be heard. One frequency to
watch is 2,182 kHz, which is an international distress and emergency channel. Other bands in which to tune for
ships are:
4,063 4,361 8,195 12,330 13,107 16,460 -
4,139 kHz
4,438 kHz
8,181 kHz
12,420 KHz
13,200 kHz
16,565 kHz
Some of the ranges where aircraft may
be flying international routes use shortwave for their communications. Most
transmissions are in SSB, although
some AM is still heard. Some of the
ranges where aircraft can be heard
include:
4,650
6,545
8,815
10,000
11,175
13,200
15,010
17,900
-
4,750 kHz
6,765 kHz
9,040 kHz
10,100 kHz
11,400 kHz
13,360 kHz
15,100 kHz
18,030 kHz
39
FREQUENCY CONVERSION
LISTENING NOTES
If you have never tuned a shortwave
receiver before, you may be a bit confused by the wide variety of signals that
can be heard. To help you find your
way around the bands, here is a summary of what to expect.
respective countries. Among the stations
that are listener favorites worldwide are
Radio Japan, the British Broadcasting
Company, Israel Radio, Radio Nederland in Holland and Radio Australia.
You'll soon discover which stations will
be your personal favorites.
The 150 - 540 kHz range is known as
the long wave band. You'll find reception here best at night in your location.
The majority of stations use Morse
code, although you will hear AM used
for weather broadcasts. The largest
number of stations in this range are
beacons for aircraft and marine navigation. Beacons transmit their call letters
continuously in Morse code at a slow
speed.
In tropical areas of the world, static
makes reception on the standard AM
broadcasting band very difficult. This
has resulted in special Tropical Bands
set aside for nations located in tropics.
Programming here is intended for local
audiences and much of what can be
heard is a treat - exotic languages,
beautiful and unusual music, etc. Some
English can be heard, however, from
stations in Africa or the Pacific.
A manual on air or marine navigation,
available from your public library or a
marine supply store, will contain lists of
these beacons and their locations.
Weather broadcasts on AM often identify themselves by their location instead
of by call letters (such as "New Orleans
Radio"). Many ship stations also use
this range, with 500 kHz set aside by
international agreement for distress
and emergency calls.
You'll find time standard stations quite
useful. These stations give out the exact time of day at specified intervals.
The National Bureau of Standards
operates station WWV in Fort Collins,
Colorado on 2,500, 5,000, 10,000,
15,000, and 20,000 kHz. A man's voice
gives the time each minute along with
periodic reports on shortwave reception
conditions. The National Bureau of
Standards also operates another station, WWVH, on the same frequencies
as WWV, in Hawaii. WWVH uses a
woman's voice to give the time. Sometimes you can hear these two stations
simultaneously. Other time standard
stations are Canada's CHU on 3,330,
7,335 and 14,670 kHz and VNG in
Australia on 4,500 and 12,000kHz.
Several other nations have similar
stations.
International broadcast stations can be
found in the bands indicated in our section on Band Allocations. Many such
stations operate in English, and often
can be heard during the evening hours
(between 6:00PM and Midnight, your
local time). Programming usually consists of news, commentaries, local
music, and features on life in their
40
Your communications receiver is
calibrated in Megahertz (MHz) and
Kilohertz (kHz) . as most communications-type receivers are. You should
be familiar with these terms:
Example: What is the wavelength of 7.1
MHz?
-:::-,....30,....0"..,..._ = 42.25 meters
7.1 MHz
Megahertz: Millions-of-hertz (or cyclesper-second). A Megahertz is 1,000,000
hertz (Hz for short) or 1,000,000 cyclesper-second. Mega means million.
Kilohertz: Thousands-of-hertz·A kilohertz
is 1,000 hertz. We use the abbreviation
kHz. Kilo means thousand.
Meter: The term meter, as applied to
shortwave listening, refers to the
wavelength of a radio frequency. In
many parts fo the world, frequencies
are listed in meters, for example, international shortwave stations in the 19
Meter band. European radio equipment
and stations often refer to the wavelength of a station or band (in meters),
rather than frequency (in MHz or kHz).
The relationship of these three terms is:
1 MHz (million) = 1,000kHz (thousand)
To change 9.62 MHz to kHz. we multiply
by 1000.
9.62 x 1000 = 9620 kHz
To go the other way, from kHz to MHz,
divide by 1000, A station at 3780 kHz is
3780 = 3.780 MHz
1000
To convert MHz to meters, use this
formula:
300
Meters = - MHz
41
COUNTRY LOG
The following listing contains some of
the more frequently heard stations on
shortwave. The stations listed can be
heard throughout the North American
Continent. All stations operate in
English unless otherwise specified.
Most of these stations do not broadcast
continuously.
Obviously, reception will vary on the different frequencies according to the
time of day and season of the year.
Remember that reception from different
parts of the world varies with the time
of day and the frequency to which your
DX-440 is tuned. Consult the section on
Changes in Reception for a more detailed explanation of these variations.
Remember also that the 7,000 - 7,300
kHz range IS shared by hams and international broadcasts; consequently,
interference is severe in that range.
While every effort has been made to ensure the accuracy of this list, stations
can and do change frequencies. Check
periodicals on communications and
electronics for more current information
on station frequencies and schedules.
This list only contains broadcasting stations which operate on fixed frequencies
with regular schedules. Ham military,
marine and aeronautical stations operate
on varied frequencies with irregular
schedules.
These listings can change at any time
and are here for your reference only.
42
No attempt has been made to provide
an accurate up-to-date listing. For a
yearly up-to-date listing, check the
world radio television hand book.
kHz
3,223
3,265
3,300
3,380
3,385
3,396
4,750
4,755
4,777
4,795
4,820
4,832
4,855
4,890
4,915
4,920
4,945
4,965
4,980
4,990
5,020
5,057
5,950
5,954
5,960
5,980
6,005
6,025
6,045
6,055
REMARKS
LOCATION
Swaziland
Programs in Portuguese
Maputo, Mozambique
Religious Programs
Guatemala City,
Guatemala
Programs in Spanish
Esmeraldas, Ecuador
Radio Iris
Programs in French
Cayenne,
FR3
French Guiana
Radio Kaduna
Kaduna, Nigeria
Radio Bertoua
Bertoua, Cameroon
Imo Regional Radio
Imo, Nigeria
Programs in French
Radio-TV Gabon
Libreville, Gabon
Programs in Spanish
Radio Nueva America La Paz, Bolivia
Programs in Spanish
Radio Paz y Bien
Ambala, Equador
Programs in Spanish
Radio Reloj
San Jose, Costa Rica
Programs in Portuguese
Radio Clube do Para Belem, Brazil
National Broadcasting Port Moresby,
Commission
Papua New Guinea
Voice Kenya
Nairobi, Kenya
AustralianBroadcasting Brisbane, Australia
Commission
Neiva, Colombia
Programs in Spanish
Radio Colosal
Bogota, Colombia
Programs in Spanish
Radio Santa Fe
San Cristobal, Venezuela Programs in Sapnish
Ecos del Torbes
Barquisimeto, Venezuela Programs in Spanish
Radio Barquisimeto
Honiara,
.
Solomon Islands
Broadcasting Service Solomon- Islands
Programs in Albanian
Gjirokaster, Albania
Radio Gjirokaster
Guyana Broadcasting Georgetown, Guyana
Service
Puerto Limon, Costa Rica
Radio Casino
Montreal, Canada
Radio Canada
International
Johannesburg,
Radio RSA
South Africa
CFCX
Montreal, Canada
Radio Malaysia
Kuala Lumpur, Malaysia Programs in Chinese
Radio Australia
Lyndhurst, Australia
Programs in Japanese
Nihon Shortwave
Tokyo, Japan
Broadcasting Company
STATION
Radio SR
Radio Mozambique
Radio Cultural
43
Buenos Aires, Argentina Programs in spanish
Bogota, Colombia
Programs in Spanish
Ville Louvigny,
Luxembourg
Warsaw, Poland
6,095 Polskie Radio
Wellington, New Zealand
6,105 Radio New Zealand
Monte Carlo Monaco
7,140 Trans World Radio
Noumea, New Caledonia Programs in French
7,170 Radio Noumea
Tirana, Albania
7,300 Radio Tirana
Cairo, Egypt
9,475 Radio Cairo
Athens, Greece
9,515 Voice of Greece
Seoul, South Korea
9,525 Radio Korea
9,530 Spanish Foreign Radio Madrid, Spain
Berne, Switzerland
9,535 Swiss Radio
International
Prague, Czechoslovakia
9,540 Radio Prague
Bucharest, Rumania
9,570 Radio Bucharest
Rome, Italy
9,575 Italian Radio and
Television Service
Programs in Arabic
Algiers, Algeria
9,610 Radio-TV Algeria
Berlin, East Germany
9,620 Radio Berlin
International
Oslo, Norway
9,645 Radio Norway
Programs in Farsi
Tehran, Iran
9,720 Radio Iran
Quito, Equador
9,745 HCJB
Vienna, Austria
9,770 Austrian Radio
Kiev, USSR
9,800 Radio Kiev
Budapest, Hungary
9,835 Radio Budapest
Hanoi, Vietnam
10,040 Voice of Vietnam
Jerusalem, Israel
11,655 Israel Radio
Kuwait, Kuwait
11,690 Radio Kuwait
Stockholm, Sweden
11 ,705 Radio Sweden
Moscow, USSR
11,720 Radio Moscow
Sofia, Bulgaria
11,735 Radio Sofia
Taipei, China
11,745 Voice of Free China
Tokyo, Japan
11,815 Radio Japan
Programs in Tahitian
Papeete, Tahiti
11,825 Radio Tahiti
Cap Haitien, Haiti
11,835 4VEH
Montreal, Canada
11 ,845 Radio Canada
International
6,060 Radio Nacional
6,075 Radio Sutatenza
6,090 Radio Luxembourg
44
11 ,850
11,890
11,900
11,910
11 ,930
11,935
11,945
11,955
11,980
15,038
Deutsche Welle
Voice of Chile
Radio RSA
BBC
Radio Havana Cuba
Radio Portugal
Radio Peking
Voice of Turkey
Radio Moscow
Saudi Arabian
Broadcasting Service
15,084 Voice of Iran
15,135 Radio Moscow
15,165 HCJB
15,1900RU
15,205 All India Radio
15,260 BBC
15,265 Finnish Radio
15,275 Radio Sweden
15,305 Swiss Radio
International
15,310 Radio Japan
15,320 Radio Australia
15,400 BBC
15,430 Radio Mexico
15,465 Radio Pakistan
17,720 Radio France
International
17,825 Vatican Radio
17,860 Austrian Radio
21,495 Israel Radio
21,525 Radio Australia
21,625 Israel Radio
21,645 Radio France
International
21,735 Radio-TV Morocco
25,650 BBC
25,790 Radio RSA
Cologne, West Germany
Santiago, Chile
Johannesburg, South Africa
London, England
Havana, Cuba
Lisbon, Portugal
Peking, China
Ankara, Turkey
Moscow, USSR
Riyadh, Saudi Arabia
Programs in Arabic
Tehran, Iran
Moscow, USSR
Qiito, Ecuador
Brussels, Belgium
New Delhi, India
London, England
Helsinki, Finland
Stockholm, Sweden
Berne, Switzerland
Tokyo, Japan
Melbourne, Australia
London, England
Mexico City, Mexico
Islamad, Pakistan
Paris, France
Programs in Farsi
Programs in Spanish
Programs in Urdu
Vatican City
Vienna, Austria
Jerusalem, Israel
Melborne, Australia
Jerusalem, Israel
Paris, France
Rabat, Morocco
London, England
Johannesburg,
South Africa
Programs in Arabic
45
TROUBLESHOOTING
The DX-440 is a ruggedly built electronic unit with all parts conservatively
rated. However, you should treat it with
care; don't subject it to excessively
rough handling. You will find it will give
you long life enjoyment if kept free from
excessive humidity.
If you have problems-(we hope you
don't),-check the following:
FREQUENCY DISPLAY
No/incorrect display
• Weak microprocessor or radio
batteries.
• Microprocessor fails to initialize. This
may happen when you first install (or
replace) batteries. Remove the microprocessor batteries, wait for about
one minute, and re-install.
Display is dim
• Weak microprocessor or radio
batteries.
• Environment is inappropriate for
operation; temperature is too high
or too much humidity.
RADIO
No sound
• Check the VOLUME control setting.
• Headphone jack is plugged in.
• Weak radio batteries.
• AC adapter cord not firmly plugged.
• DC power cord is not correctly inserted into cigarette lighter socket in
vehicle operation.
• AC jack or external DC jack is plugged in when trying to operate on batteries.
46
Weak or intermittent sound
• Weak radio batteries.
• Antenna adjustment insufficient.
• Weak signal. Try moving the unit
near a window when operating inside
a vehicle or in a metal frame building.
• Tuning slightly off-frequency. Use UP
or DOWN key to fine tune.
Frequency cannot be keyed in when
direct tuning.
• EXECUTE was not pressed within 5
seconds.
• Microprocessor failed to initialize.
Remove the microprocessor batteries,
wait one minute and re-install.
Memorized frequency cannot be recalled
• Wrong band is set. Switch bands.
• Memory has been erased. Re-enter
the frequency.
SLEEP does not function
• The SLEEP button is not pressed
• The power switch is set to on
If none of the above suggested remedies
solves the problem, return your set to
your nearby Radio Shack store for
assistance.
Scanning or memory frequency cannot
be keyed in
• EXECUTE was not pressed after the
frequency was keyed in.
Will not scan on AM
• Limit frequencies are not keyed in.
Scanning stops where there is no clear
signal
·Birdies-the internally generated
signals mixed with external signals. A
telescopic antenna is likely to pick up
these undesirable signals; use an outdoor antenna.
A few of the most common birdies are:
455 kHz 3,844 kHz
9,000 kHz
10,245 kHz 18,000 k~z 20,490 kHz
21,835 kHz 21,868 kHz
Scanning does not stop automatically
• Weak signal.
• RF GAIN is not set to MAX
47
CARE AND MAINTENANCE
Your DX-440 is an example of
superior design and craftsmanship.
The following suggestions will help you
care for the DX-440 so that you
can enjoy it for years.
Keep the product dry. If it does get wet,
wipe it dry immediately. Liquids might
contain minerals that can corrode the
electron'lc circuits.
Use and store the product only in normal temperature environments. High
temperatures can shorten the life of
electronic devices, damage batteries,
and distort or melt plastic parts.
Handle the product gently and carefully. Dropping it can damage circuit
boards and cases and can cause the
product to work improperly.
Wipe the product with a dampened
cloth occasionally to keep it looking
new. Do not use harsh chemicals, cleaning solvents, or strong detergents to
clean the product.
Use only fresh batteries of the recommended size and type. Always remove
old or weak batteries. They can leak
chemicals that destroy electronic circuits.
Modifying or tampering with the product's internal components can cause
a malfunction and might invalidate the
product's warranty. If your product is
not performing as it should, take it to
your local Radio Shack store. Our personnel can assist you and arrange for
service if needed.
Keep the product away from dust and
dirt, which can cause premature wear
of parts.
48
49
SPECIFICATIONS
Semi conductors:
1
7
8
44
59
7
pc. LSI
pes. les
pes. FETs
pes. Transistors
pes. Diodes
pes. LEDs
Jacks:
1. DC jack for external power (9V)
2. Headphones Jack • 3.5~ for mini stereo headphones.
Power sources:
1. For Power when not playing radio:
(AA size) penlight battery such as Radio Shack 23-552
or 23-582 (not supplied) for memory/clock back-up (3V).
Circuit:
FM
AM(LW,MW,SW)
superheterodyne
Dual conversion superheterodyne
Frequency range:
FM:
87.5MHz - 108MHz
Dimension:
11.1-" x~" x 22." ( 292mm x 160mm x 60mm )
2
10
25
AM:
150 kHz - 29999 kHz
Weight:
1.7kg. (3.75 lbs or 60 oz) without batteries.
LW:
MW:
SW:
150kHz - 281 kHz
520kHz - 1620kHz
divided into 12 shortwave bands
120M 2300kHz - 2500kHz
90M 3200 kHz - 3400 kHz
75M 3900 kHz - 4000 kHz
60M 4750 khz - 5060 kHz
49M 5800 kHz - 6200 kHz
41M 7100kHz- 7500kHz
31M 9500kHz - 9900kHz
25M 11650kHz - 12050kHz
19M 15100kHz - 15600kHz
16M 17550kHz - 17900kHz
13M 21450kHz - 21850kHz
11 M 25600 kHz - 26100 kHz
Accessories:
Shoulder strap
Antennas:
LW/MW
SW
FM
Output:
50
2. For Power to play radio :
a. (D size) battery such as Radio Shack 23-550 or
23-580 (not supplied) x 6pcs. (9V)
b. AC adaptor 9V /400mA center negative
Built in ferrite bar antenna.
Swivel telescopic antenna.
External antenna terminal.
Swivel telescopic antenna.
External antenna terminal. (Not apply to W. Germany)
1200mW (10% THD)
51
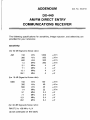
ADDENDUM
Cat. No. 20-221A
DX-440
AM/FM DIRECT ENTRY
COMMUNICATIONS RECEIVER
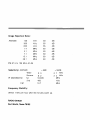
The following specifications for sensitivity, image rejection, and selectivity are
provided for your reference:
Sensitivity :
(for 20 dB Signal-to-Noise ratio):
AM
150
300
600
1.4
3.1
7.1
15.1
28.1
kHz
kHz
kHz
MHz
MHz
MHz
MHz
MHz
1260
560
320
280
4
4
4
4
MV/m
MV/m
MV/m
MV/m
100
40
25
22
0.4
0.4
0.4
0.4
MV/m
MV/m
MV/m
MV/m
MV
MV
MV
MV
(for 10 dB Signal-to-Noise ratio):
SSB
150
300
600
1.4
3.1
7.1
15.1
28.1
kHz
kHz
kHz
MHz
MHz
MHz
MHz
MHz
(for 30 dB Signal-to-Noise ratio):
FM 87.5 to 108 MHz 4 MV
(to be continued on the back)
MV
MV
MV
MV
Image Rejection Ratio:
AM/SSB
150
300
600
1.4
31
7.1
151
28.1
kHz
kHz
kHz
MHz
MHz
MHz
MHz
MHz
48
65
65
60
60
60
60
60
dB
dB
dB
dB
dB
dB
dB
dB
FM 875 to 108 MHz 40 dB
Selectivity: AM/SSB
Wide
Narrow
IF AM/SSB/CW
1st
2nd
FM
- 6dB
± 3
± 2
55.845
450
107
Frequency Stability:
Within 1 kHz per hour after 60 minutes warm up.
RADIO SHACK
Fort Worth, Texas 76102
- 50dB
kHz
kHz
MHz
kHz
MHz
± 7
± 4