1
home page
hp learning products
http://www.hp.com/support/tape may have a later version
data protection
contact hp
home page
before you start
operation
install
operate
cartridge care
cleaning
specifications
media compatibility
diagnostics
troubleshooting
FAQs
cartridges
SCSI configuration
UNIX configuration
troubleshoot
ordering supplies
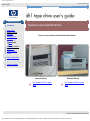
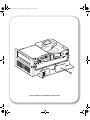
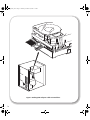
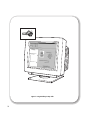
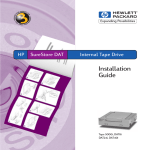
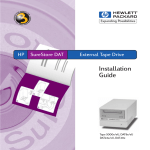
This is the User's Guide for HP Surestore DLT1 internal and external tape drives.
It describes how to use HP Surestore DLT1 drives.
To start, click on one of the above topics or select a topic from the navigation
pane on the left. For example, click on specifications for a detailed description of
the HP Surestore DLT1 internal and external drives.
Use the index of topics page to search for a particular topic.
Use the contact hp page to find out contact details for your nearest Customer
Care Center.
notice
The information contained in this document is subject to change without notice.
Hewlett-Packard makes no warranty of any kind with regard to the material,
including, but not limited to, the implied warranties of merchantability and
fitness for a particular purpose.
Hewlett-Packard shall not be liable for errors contained herein or direct, indirect,
special, incidental or consequential damages in connection with the furnishing,
performance, or use of this document.
This document contains propriety information which is protected by copyright. All
rights reserved. No part of this document may be photocopied, reproduced or
translated to another language without the prior written consent of HewlettPackard.
copyright
Copyright 2000 Hewlett-Packard. All rights reserved.
Windows and Windows NT are U.S. registered trademarks of Microsoft Corp.
UNIX is a registered trademark of X/Open Company in the U.S. and other
countries.
Adobe and Acrobat are trademarkes of Adobe Systems Incorporated.
revision history
Edition
1.0
Date
Comments
October 2000
© 2000, Hewlett-Packard Company
file:///C|/Documents%20and%20Settings/topher.COL-SPRINGS/Desktop/manual/document/dlt1/user/reseller/eng/home.htm [12/3/2001 7:50:17 AM]
how to contact hp
hp learning products
issued october 2000 : http://www.hp.com/go/support/tape may have a later version
data protection
contact hp
americas
europe
obtaining technical support
contents of this section
asia pacific
warranty
customer service form
before calling for service or support
obtaining service
contacting hp
hp service agreements
returning your tape drive for service
worldwide online services
before calling for service or support
If you need help, your dealer has the latest information regarding HP products and
services and can provide support under HP's comprehensive menu of reseller
services. If your dealer is not able to help, you can obtain support from HP directly
either through online services or by telephone.
Before calling for service or support, check that:
Check that your HP Surestore Tape Drive is installed correctly
Check the printed Getting Started Guide and the troubleshooting
advice in this online User's Guide
obtaining service
Please use the Customer Service Form to collect the details that our Customer
Service Representative will need to help solve your problem.
During the warranty period: HP provides a free telephone support service
during the warranty period. Contact your local HP dealer or the appropriate HP
technical support contact for your area, by selecting the region required from the
navigational buttons in the left hand pane. Obtain the telephone number from the
list of countries supplied. You will be connected to a responsive team waiting to
help you.
After the warranty period: If you require support after your warranty has expired,
you can receive support for a fee through the same telephone numbers. The fee is
charged on a per incident basis. Alternatively, you can contact your local HP
dealer who will be able to advise you and arrange for service.
contacting hp
A full listing of HP's service and support centres worldwide can be found at
http://www.hp.com/cposupport/mail_support.html
If you do not have internet access, click on the appropriate region from the side
navigation bars for a list of contact numbers correct at time of printing.
hp service agreements
HP offers a number of service agreements to meet your needs. Contact your local
dealer or nearest HP office for further information.
returning your tape drive for service
Your HP Surestore tape drive comes with a 24-hour Express Exchange warranty
(not available in all countries).
Before returning an HP Surestore tape drive, call the Customer Support Center for
your area. When you call, make sure that you have the following information
available:
The product name and serial number (see label on the back of the
appliance server)
Date of purchase
A description of the product fault
A contact name for details of the failure
A contact telephone number
Your shipping address
The telephone service agent will verify that the unit is faulty and will make sure
that a replacement unit is sent to you within 24 hours. When you receive the
replacement unit, remove it from the packaging and use the packaging material
for returning the faulty unit. All shipment costs are prepaid by HP.
When returning the drive to HP, any damage caused as a result of inadequate
packaging is your responsibility. Use the original packing materials whenever
possible.
worldwide online services
HP offers electronic services that give you a fast, interactive way to access
information and help on setup, configuration, installation and operation of your
product. The online services are available on the World Wide Web and FTP, as
well as the country-specific resources listed later in this section.
World Wide Web
Product and support information are available from HP's web site on the Internet
at http://www.hp.com/go/tape
FTP
Product and support information are available from our FTP site on the Internet at
ftp.hp.com/pub/information_storage/surestore
America Online
Download support documents and discuss issues in user forums. Find us with
keyword hpstor.
© 2000, Hewlett-Packard Company
file:///C|/Documents%20and%20Settings/topher.COL-SPRINGS/Desktop/manual/document/common/contact/eng/conhome.htm [12/3/2001 7:50:18 AM]
americas
hp learning products
issued october 2000 : http://www.hp.com/go/support/tape may have a later version
data protection
contact hp
americas
europe
north and south america
contents of this section
asia pacific
warranty
customer service form
check the web for up to date contact information
hp support in north america
canada
united states
hp support in south america
argentina
brazil
colombia
guatemala
chile
mexico
puerto rico
venezuela
check the web for up to date information
If you have internet access, click on the URL below:
http://www.hp.com/cposupport/mail_support.html
From time to time, telephone numbers and addresses may change; accessing
contact details over the web will ensure you have the latest information.
If you do not have internet access, refer below for a list of contact numbers correct
at time of printing:
hp support in north america
Customers in North America can contact HP on the telephone support lines listed,
by country, below.
Major Account Customers in the Enterprise Market
Tape drives shipped to major North American account customers carry one of the
following product numbers (as stated on the label on the base of your drive):
products for major account customers
tape drive
product number
ultrium 230, internal
C7400A
ultrium 230, external
C7401A
ultrium 230, rack mounted
C7470A
If your drive carries one of these product numbers, you should contact the US
Response Center on:
800-633-3600
canada
Telephone 905-206-4663
905-206-4663
Hours of operation: 8.00
a.m. to 8:00 p.m.
Monday through Friday
Horaires de disponibilité :
Lundi - Vendredi, 8 h 00 20 h 00
united states
Telephone (970) 635-1500
Hours of operation: 6.00
a.m. to 6:00 p.m. MST
Monday through Friday
hp support in south america
Customers in South America can contact HP on the telephone support lines listed,
by country, below.
Major Account Customers
Where a second number is listed under the sub-heading "Major Account
Customers", this number should be used by major account customers where the
product number (as stated on the label on the base of your drive) is as follows:
products for major account customers
tape drive
product number
ultrium 230, internal
C7400A
ultrium 230, external
C7401A
ultrium 230, rack mounted
C7470A
argentina
Telephone 0810 555 5520 (from
within Argentina)
(5411) 4778 8380
(outside Argentina)
Hours of operation: 8:30
a.m. to 7:30 p.m. Monday
through Friday
0810 555 5520
(5411) 4778 8380
Horas de atención: Lunes
a Viernes de 8:30 a
19:30 h
+54 1781 4061
Major Account Customers
Telephone +54 1781 4061
brazil
Telephone Great São Paulo: (11)
3747-7799
Other regions: 0800
157751
Hours of operation: 8:00
a.m. to 7:00 p.m. Monday
through Friday
Grande São Paulo: (11)
3747-7799
Demais regiões: 0800
157751
horãrio de
funcionamento: Prévendas Televendas : 2a
a 6a feira das 08 às 22h
Sábado das 09 às 18h
Pós-vendas: 2a a 6a feira
das 08 às 19h
Major Account Customers
Telephone +55 11 725 1588
+55 11 725 1588
chile
Telephone 800 22 5547
Hours of operation: 9:00
a.m. to 6:00 p.m. Monday
through Friday
800 22 5547
Horas de atención: Lunes
a Viernes de 9:00 a
18:00 h
colombia
Telephone 9 800 91477
Hours of operation: 9:00
a.m. to 6:00 p.m. Monday
through Friday
9 800 91477
Horas de atención: Lunes
a Viernes de 9:00 a
18:00 h
guatemala
Telephone 800 999 5305
Hours of operation: 9:00
a.m. to 6:00 p.m. Monday
through Friday
800 999 5305
Horas de atención: Lunes
a Viernes de 9:00 a
18:00 h
Saturdays from 9:00 a.m.
to 1.00 p.m.
mexico
Mexico City
Telephone 52-58-9922
Hours of operation: 8:30
a.m. to 22:00 p.m.
Monday through Friday
52-58-9922
Horas de atención: Lunes
a Viernes de 8:30 a
22:00 h
9:00 a.m. to 14:00 p.m.
on Saturday
Outside Mexico City
Telephone 01-800-472 6684
Hours of operation: 8:30
a.m. to 22:00 p.m.
Monday through Friday
01-800-472 6684
Horas de atención: Lunes
a Viernes de 8:30 a
22:00 h
9:00 a.m. to 14:00 p.m.
on Saturday
+52 5258 4500
Major Account Customers
Telephone +52 5258 4500
puerto rico
Telephone 1 877 2320 589
Hours of operation: 9:00
a.m. to 5:00 p.m. Monday
through Friday
1 877 2320 589
Horas de atención: Lunes
a Viernes de 9:00 a
17:00 h
venezuela
Telephone 800 47 777 (Caracas 207
8488)
800 47 777 (Caracas 207
8488)
Hours of operation: 8:00
a.m. to 5:00 p.m. Monday
through Friday
Horas de atención: Lunes
a Viernes de 8:00 a
19:00 h
+58 2 239 2423
Major Account Customers
Telephone +58 2 239 2423
© 2000, Hewlett-Packard Company
file:///C|/Documents%20and%20Settings/topher.COL-SPRINGS/Desktop/manual/document/common/contact/eng/americas.htm [12/3/2001 7:50:20 AM]
hp learning products
hp learning products
issued october 2000 : http://www.hp.com/go/support/tape may have a later version
data protection
contact hp
americas
europe
asia pacific
warranty
customer service form
europe, middle east and africa
contents of this section
check the web for up to date contact information
hp support in europe, middle east & africa
austria
norway
belgium (dutch)
poland
belgium (french)
portugal
czech republic
russian federation (moscow)
denmark
russian federation (st petersburg)
finland
russian federation (ukraine)
france
south africa (inside RSA)
germany
south africa (outside RSA)
greece
spain
hungary
sweden
ireland
switzerland
israel
turkey
italy
united arab emirates
netherlands
united kingdom
other european countries - english
check the web for up to date information
If you have internet access, click on the URL below:
http://www.hp.com/cposupport/mail_support.html
From time to time, telephone numbers and addresses may change; accessing
contact details over the web will ensure you have the latest information.
If you do not have internet access, refer below for a list of contact numbers correct
at time of printing:
hp support in europe, middle east & africa
There is no charge for technical support during the warranty period (unless
otherwise stated). A per-incident charge applies after the warranty period.
Customers in Europe, the Middle East and Africa can contact HP on the
telephone support lines listed, by country, below.
Major Account Customers
Where a second number is listed under the sub-heading "Major Account
Customers", this number should be used by major account customers where the
product number (as stated on the label on the base of your drive) is as follows:
products for major account customers
tape drive
product number
ultrium 230, internal
C7400A
ultrium 230, external
C7401A
ultrium 230, rack mounted
C7470A
or major account customers in Africa and the Middle East can call
+41 22 780 41 11
austria
Telephone +43 (0)810 00 6080
Hours of operation: 8:30
to 18:00
Monday through Friday
Major Account Customers
Telephone +43 (0)222 25000/250 or
+43 (0)125 0000
+43 (0)810 00 6080
Geschäftszeiten: Montag Freitag, 08.30 - 18.00
Uhr
+43 (0)222 25000/250 or
+43 (0)125 0000
belgium (dutch)
Telephone +32 (0)2 626 88 06
Hours of operation: 8:00
to 18:00
Monday through
Thursday
belgium (french)
Telephone +32 (0)2 626 88 07
Hours of operation: 8:30
to 18:00
Monday through Friday
Major Account Customers
Telephone +32 (0)2 778 38 00
+32 (0)2 626 88 07
Horaires de disponibilité:
Lundi - Vendredi , 8 h 30 18 h 00
+32 (0)2 778 38 00
czech republic
Telephone +42 (0)2 6130 7310
Hours of operation: 8:00
to 18:00
Monday to Thursday,
8.00 to 16:30
Friday
Major Account Customers
Telephone +42 (0)2 61 307 751 or
+42 (0)2 47 17 321
denmark
Telephone +45 39 29 4099
Hours of operation: 8:30
to 18:00
Monday through Friday
Major Account Customers
Telephone +45 99 19 19
or +45 4599 10 00
finland
Telephone +358 (0)203 47 288
Hours of operation: 8:30
to 18:00
Monday through Friday
Major Account Customers
Telephone +358 9 8872 2808 or
+358 0887 21
france
Telephone +33 (0)1 43 62 34 34
Hours of operation: 8:30
to 18:00
Monday through Friday
Major Account Customers
Telephone +33 (0)5 49 76 66 07 or
+33 1698 2 6060
+33 (0)1 43 62 34 34
Horaires de disponibilité:
Lundi - Vendredi , 8 h 30 18 h 00
+33 (0)5 49 76 66 07 or
+33 1698 2 6060
germany
Telephone +49 (0)180 52 58 143
Hours of operation: 8:30
to 18:00
Monday through Friday
Major Account Customers
Telephone +49 (0)180 53 53 539 or
+49 2102 441 133
+49 (0)180 52 58 143
Geschäftszeiten: Montag Freitag, 08.30 - 18.00
Uhr
+49 (0)180 53 53 539 or
+49 2102 441 133
greece
Telephone +30 (0)1 619 64 11
Hours of operation: 9:00
to 17:00
Monday through Friday
Major Account Customers
Telephone +30 (0)1 68 96 503/4 or
+30 1689 6411
hungary
Telephone +36 (0)1 382 1111
Hours of operation: 8:30
to 18:00
Monday through Friday
Major Account Customers
Telephone +36 (0)1 461 81 11 or
+36 (0)1 252 4505
ireland
Telephone +353 (0)1 662 5525
Hours of operation: 8:30
to 18:00
Monday through Friday
Major Account Customers
Telephone +353 (0)1 284 4560
israel
Telephone +972 (0)9 952 4848
Hours of operation: 9:00
to 18:00
Sunday through
Thursday
Major Account Customers
Telephone +972 (0)9 952 4848
italy
Telephone +39 (0)2 264 10350
Hours of operation: 8:30
to 18:00
Monday through Friday
Major Account Customers
Telephone +39 (0)2 9212 2779 or
+39 (0)2 9212 2778
+39 02 264 10350
Orario d'apertura: LunedìVenerdì, 8:30 - 18:00
+39 (0)2 9212 2779 or
+39 (0)2 9212 2778
netherlands
Telephone +31 (0)20 606 8751
Hours of operation: 8:30
to 18:00
Monday through Friday
Major Account Customers
Telephone +31 (0)20 547 7444 or
+31 (0)20 547 9666
norway
Telephone +47 22 11 6299
Hours of operation: 8:30
to 18:00
Monday through Friday
Major Account Customers
Telephone +47 22 73 5601 or
+47 22 735 600
poland
Telephone +48 22 519 06 00
Hours of operation: 8:00
to 17:00
Monday through Friday
Major Account Customers
Telephone +48 22 608 74 00 or +48
22 375 065
portugal
Telephone +351 21 317 6333
Hours of operation: 8:30
to 18:00
Monday through Friday
Major Account Customers
Telephone +351 482 8555 or +351
1301 7344
+351 21 317 6333
Horário de operação:
Segunda - Sexta, 8:30 17:00
+39 (0)2 9212 2779 or
+351 1301 7344
russian federation (moscow)
Telephone +7 095 797 3520
Hours of operation: 9:00
to 18:00
Monday through Friday
Major Account Customers
Telephone +7 095 797 3500 or
+7 095 938 6885
russian federation (st petersburg)
Telephone +7 812 346 7997
Hours of operation: 9:00
to 18:00
Monday through Friday
Major Account Customers
Telephone +7 812 259 3557 or
+7 095 938 6885
russian federation (ukraine)
Telephone +7 (380-44) 490-3520
Hours of operation: 9:00
to 18:00
Monday through Friday
south africa (inside RSA)
Telephone 086 000 1030
Hours of operation: 8:00
to 17:00
Monday through Friday
south africa (outside RSA)
Telephone +27-11 258 9301
Hours of operation: 8:00
to 17:00
Monday through Friday
Major Account Customers
Telephone +27 11 806 1010
spain
Telephone +34 902 321 123
Hours of operation: 8:30
to 18:00
Monday through Friday
Major Account Customers
Telephone +34 902 22 00 30 or +34
1631 1600
+34 902 321 123
Horas de atención: Lunes
a Viernes de 8:30 a
18:00 h
+34 902 22 00 30 or +34
1631 1600
sweden
Telephone +46 (0) 8 619 2170
Hours of operation: 8:30
to 18:00
Monday through Friday
Major Account Customers
Telephone +46 (0)8 444 23 83 or
+46 8750 2300
switzerland
Telephone +41 (0) 848 80 11 11
Hours of operation: 8:30
to 18:00
Monday through Friday
Major Account Customers
Telephone +41 (0)800 55 53 53 or
+41 31 980 3111
turkey
Telephone +90 (0)212 221 69 69
Hours of operation: 8:30
to 18:00
Monday through Friday
Major Account Customers
Telephone +90 (0)212 224 59 25 or
+90 (0)312 468 8770
united arab emirates
Telephone 971 4 883 8454
Hours of operation: 8:30
to 18:00
Monday through Friday
For customers in: UAE,
Bahrain, Qatar, Saudi
Arabia, Jordan,
Palestine, Egypt, Yemen,
Lebanon, Kuwait and
Oman (languages
supported - English and
Arabic)
Major Account Customers
Telephone +44 (0)1344 366 366
united kingdom
Telephone +44 (0)207 512 52 02
Hours of operation: 8:30
to 18:00
Monday through Friday
Major Account Customers
Telephone +44 (0)1344 366 366 or
+44 (0)1344 360 000
other european countries (english)
Telephone +44 (0)207 512 52 02
Hours of operation: 8:30
to 18:00
Monday through Friday
Major Account Customers
Telephone +41 22 780 81 11
© 2000, Hewlett-Packard Company
file:///C|/Documents%20and%20Settings/topher.COL-SPRINGS/Desktop/manual/document/common/contact/eng/europe.htm [12/3/2001 7:50:22 AM]
asia pacific
hp learning products
issued october 2000 : http://www.hp.com/go/support/tape may have a later version
data protection
contact hp
americas
europe
asia pacific
contents of this section
asia pacific
warranty
customer service form
check the web for up to date contact information
hp support in asia pacific
australia
malaysia
china (PRC)
new zealand
hong kong
philippines
india
singapore
indonesia
taiwan
japan
thailand
korea, republic of
vietnam
check the web for up to date information
If you have internet access, click on the URL below:
http://www.hp.com/cposupport/mail_support.html
From time to time, telephone numbers and addresses may change; accessing
contact details over the web will ensure you have the latest information.
If you do not have internet access, refer below for a list of contact numbers correct
at time of printing:
hp support in asia pacific
Customers in Asia Pacific region can contact HP on the telephone support lines
listed, by country, below.
Major Account Customers
Where a second number is listed under the sub-heading "Major Account
Customers", this number should be used by major account customers where the
product number (as stated on the label on the base of your drive) is as follows:
products for major account customers
tape drive
product number
ultrium 230, internal
C7400A
ultrium 230, external
C7401A
ultrium 230, rack mounted
C7470A
or call 852 599 700
australia
Telephone (03) 8877 8000
Hours of operation: 9.00
a.m. to 5:00 p.m.
Monday through Friday
Spare parts 1800 670 054
Hours of operation: 9:00
a.m. to 5:00 p.m.
Monday through Friday
Major Account Customers
Telephone 61 3272 2895
china (PRC)
Telephone +86 (0)10 6564 5959
+86 (0)10 6564 5959
Hours of operation: 8:30
to 17:30
Monday through Friday
+86 1505 3888
Major Account Customers
Telephone +86 1505 3888
hong kong
Telephone 800 96 7729
800 96 7729
Hours of operation: 8:30
to 17:30
Monday through Friday
852 599 7777
Major Account Customers
Telephone 852 599 7777
india
Telephone +91 11 682 6035
Hours of operation: 9:30
a.m to 5:30 p.m
Monday through Friday
indonesia
Telephone +62 (21) 350 3408
Hours of operation: 8:00
a.m to 5:00 p.m.
Monday through Friday
japan
Telephone +81 3 3335 8333
+81 3 3335 8333
Hours of operation: 9:00
to 12:00 and 13.00 to
17:00
Monday through Friday
+81 42 534 1831
Major Account Customers
Telephone +81 42 534 1831
korea, rupublic of
within Seoul only
Telephone +82 (2) 3270 0700
+82 (2) 3270 0700
Hours of operation: 9:00
a.m. to 6:00 p.m.
Monday through Friday.
9:00 a.m. to 1:00 p.m on
Saturdays
080 999 0700
outside Seoul only
Telephone 080 999 0700
Hours of operation: 9:00
a.m. to 6:00 p.m.
Monday through Friday.
9:00 a.m. to 1:00 p.m on
Saturdays
+81 42 534 1831
Major Account Customers
Telephone +81 42 534 1831
malaysia
Telephone +60 (3) 295 2566
Hours of operation: 8:30
a.m. to 5:30 p.m.
Monday through Friday
Major Account Customers
Telephone +60 (3) 298 6555
new zealand
Telephone +64 (9) 356 6640
Hours of operation: 9:00
a.m. to 5:30 p.m.
Monday through Friday
philippines
Telephone +63 (2) 867 3351
Hours of operation: 8:30
a.m. to 5:30 p.m.
Monday through Friday
singapore
Telephone +65 272 5300
Hours of operation: 8:30
a.m. to 5:30 p.m
Monday through Friday
Major Account Customers
Telephone +65 293 2911
taiwan
Telephone +886 (2) 2717 0055
+886 (2) 2717 0055
Hours of operation: 8:30
a.m. to 5:30 p.m.
Monday through Friday
+886 (2) 712 0404
Major Account Customers
Telephone +886 (2) 712 0404
thailand
Telephone +66 (2) 661 4000
Hours of operation: 8:30
a.m. to 5:30 p.m.
Monday through Friday
vietnam
Telephone +84 (0) 8823 4530
Hours of operation: 8:00
a.m. to 5:00 p.m.
Monday through Friday
8.00 a.m to 12:00 p.m on
Saturday
© 2000, Hewlett-Packard Company
file:///C|/Documents%20and%20Settings/topher.COL-SPRINGS/Desktop/manual/document/common/contact/eng/asiap.htm [12/3/2001 7:50:23 AM]
warranty
hp learning products
issued october 2000 : http://www.hp.com/go/support/tape may have a later version
data protection
contact hp
americas
europe
warranty
contents of this section
asia pacific
warranty
customer service form
warranty conditions
exclusions
limitations
limited warranty statement for USA, Canada, Australia and New Zealand
warranty conditions
This warranty gives you specific legal rights. You may also have other rights which
vary according to where you are located.
Hewlett-Packard warrants its Surestore tape drives against defects in materials
and workmanship for a period of three years, either from the date of delivery or,
where the purchase price includes installation by Hewlett-Packard, from the date
of installation. If a new HP Surestore tape drive is purchased as a component of
an HP computer system, the tape drive warranty is automatically upgraded to the
system warranty.
You are entitled to:
automatic three-year, next day unit exchange
system matching warranty on HP systems (internal and external
units), when purchased as a component of that system
free technical call center assistance during the product support
life (does not include telephone call cost)
Further information is available via the web at: www.hp.com/support/tapewarranty
During the first three years, the 24-hour Express Exchange program (not available
in all countries) allows you to receive a replacement unit by next-day delivery
upon verification of a faulty tape drive. Hewlett-Packard will, at its option, either
repair or replace products that prove to be defective. Should Hewlett-Packard be
unable to repair or replace the product within a reasonable period of time, a refund
of the purchase price may be given upon return of the product.
If you choose not to use Express Exchange, your HP Surestore tape drive must
be serviced by one of the authorized repair depots within the country in which it
was originally purchased. You must prepay shipping charges (together with all
duty and taxes) for products returned for service. Except for products returned to
you from another country, Hewlett-Packard will pay for return of products to you. If
the drive is repaired by an authorized dealer, you will need to negotiate the
method and cost of returning the drive with the dealer.
exclusions
The warranty on your HP SureStore tape drive does not apply to defects resulting
from:
improper or inadequate maintenance by the customer
Customer-supplied software or interfaces
Unauthorized modification or misuse
Use of unsupported media
Operation outside the environmental specifications for the product
Improper site preparation and maintenance
limitations
Any implied warranty of merchantability or fitness is limited to the three-year
duration of this written warranty. Some states or provinces do not allow limitations
on how long an implied warranty lasts, so limitations or exclusions may not apply
to you.
limited warranty statement for USA, Canada, Australia and New
Zealand
HP warrants to you, the end-user customer, that HP hardware, accessories and
supplies will be free from defects in materials and workmanship after the date of
purchase, for the period specified above. If HP receives notice of such defects
during the warranty period, HP will, at its option, either repair or replace products
which prove to be defective. Replacement products may be either new or likenew.
1. HP warrants to you that HP software will not fail to execute its programming
instructions after the date of purchase, for the period specified above, due
to defects in material and workmanship when properly installed and used. If
HP receives notice of such defects during the warranty period, HP will
replace software media which does not execute its programming
instructions due to such defects.
2. HP does not warrant that the operation of HP products will be uninterrupted
or error free. If HP is unable, within a reasonable time, to repair or replace
any product to a condition as warranted, you will be entitled to a refund of
the purchase price upon prompt return of the product.
3. HP products may contain remanufactured parts equivalent to new in
performance or may have been subject to incidental use.
4. Warranty does not apply to defects resulting from (a) improper or
inadequate maintenance or calibration, (b) software, interfacing, parts or
supplies not supplied by HP, (c) unauthorized modification or misuse, (d)
operation outside of the published environmental specifications for the
product, or (e) improper site preparation or maintenance.
5. HP MAKES NO OTHER EXPRESS WARRANTY OR CONDITION
WHETHER WRITTEN OR ORAL. TO THE EXTENT ALLOWED BY LOCAL
LAW, ANY IMPLIED WARRANTY OR CONDITION OF
MERCHANTABILITY, SATISFACTORY QUALITY, OR FITNESS FOR A
PARTICULAR PURPOSE IS LIMITED TO THE DURATION OF THE
EXPRESS WARRANTY SET FORTH ABOVE. Some countries, states or
provinces do not allow limitations on the duration of an implied warranty, so
the above limitation or exclusion might not apply to you. This warranty gives
you specific legal rights and you might also have other rights that vary from
country to country, state to state, or province to province.
6. TO THE EXTENT ALLOWED BY LOCAL LAW, THE REMEDIES IN THIS
WARRANTY STATEMENT ARE YOUR SOLE AND EXCLUSIVE
REMEDIES. EXCEPT AS INDICATED ABOVE, IN NO EVENT WILL HP
OR ITS SUPPLIERS BE LIABLE FOR LOSS OF DATA OR FOR DIRECT,
SPECIAL, INCIDENTAL, CONSEQUENTIAL (INCLUDING LOST PROFIT
OR DATA), OR OTHER DAMAGE, WHETHER BASED IN CONTRACT,
TORT, OR OTHERWISE. Some countries, states or provinces do not allow
the exclusion or limitation of incidental or consequential damages, so the
above limitation or exclusion may not apply to you.
FOR CONSUMER TRANSACTIONS IN AUSTRALIA AND NEW ZEALAND: THE
WARRANTY TERMS CONTAINED IN THIS STATEMENT, EXCEPT TO THE
EXTENT LAWFULLY PERMITTED, DO NOT EXCLUDE, RESTRICT OR
MODIFY AND ARE IN ADDITION TO THE MANDATORY STATUTORY RIGHTS
APPLICABLE TO THE SALE OF THIS PRODUCT TO YOU.
Consumer Warranty Sept 16/97
© 2000, Hewlett-Packard Company
file:///C|/Documents%20and%20Settings/topher.COL-SPRINGS/Desktop/manual/document/common/contact/eng/warranty.htm [12/3/2001 7:50:24 AM]
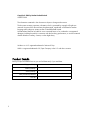
customer service form
hp learning products
issued october 2000 : http://www.hp.com/go/support/tape may have a later version
data protection
contact hp
americas
europe
customer service form
contents of this section
asia pacific
warranty
customer service form
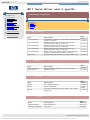
contact information
tape drive information
computer system information
SCSI bus configuration
backup information
information about the problem
Please complete the following information about your system and the problem you
are having before you call the HP Customer Support Center. You can print this
form and fill in the necessary information before you call, or you can print and fax
the completed form to the Customer Service Center.
contact information
Company or Organization:
Contact Person/Title:
(e.g., Mr. John Smith,
Network Administrator)
Contact Telephone Number:
Fax Number:
E-Mail Address:
Mailing Address:
tape drive information
Model Name:
(example:
HP Surestore Ultrium 230i)
Model Number:
(example: HP C1555B)
Serial Number:
Firmware Revision:
Date Purchased:
Date of Last Cleaning:
How many times has cleaning tape been used?
computer system information
Computer Make and Model:
(example:
HP NetServer E-series)
Processor and Clock Speed:
(example: Pentium 550)
Amount of RAM:
(example: 64 MB)
Number of SCSI Controllers:
Computer Operating System/Release
(example:
Novell NetWare 4.0, Windows NT 3.51, HP-UX 10.0)
Operating System Patches Installed:
(example: Service Pack 4)
Number of Hard Disks/Size/Partitions:
(example:
Disk 1: 1.2 GB, 1 partition
Disk 2: 1.8 GB, 2 partitions)
Logical or Physical Mapping of Disks:
(example:
Disk 1 = C:/, Disk 2 = S:/)
SCSI bus configuration
Host Adapter Make and Model
(example:
Adaptec AHA-2940)
SCSI bus
(narrow or wide)
Device
Termination
Internal /
External
Devices' Bus
Type
...............
.............
...............
...............
...............
.............
...............
...............
...............
.............
...............
...............
...............
.............
...............
...............
...............
.............
...............
...............
...............
.............
...............
...............
...............
.............
...............
...............
SCSI Controller
.............
...............
...............
SCSI ID
Device
Termination
Internal /
External
0
Hard disk
No
Internal
1
CD-ROM
No
Internal
No
Internal
Yes
External
Automatic
HBA
Devices' Bus
Type
Narrow /
Single-ended
Narrow /
Single-ended
Narrow /
Single-ended
Wide /
Single-ended
Wide /
Single-ended
SCSI ID
..
..
..
..
..
..
..
7
EXAMPLE
3
5
7
Tape Drive
(HP C1533A)
Tape Drive
(DLT7000)
SCSI Controller
backup information
Backup Application Name and Version or Release:
Are you using HP One
Button Disaster Recovery?
Do you back up user data only?
Do you back up system information separately?
(example:
Windows registry files,
NetWare NDS or bindery files)
information about the problem
Light Pattern During Problem:
Any Audible Signals:
Error Messages/Code Generated:
Does the problem occur every time you try the operation?
Does the problem occur if you use another backup device?
What type of media are you using?
(Brand, Capacity, Batch No.)
Can you read the problem tape cartridge on another drive?
What result do you get when you try a new cartridge?
If you have an autoloader, are all cartridges affected the same way?
Have you run any kind of diagnostics program, such as TapeAssure?
What result was reported?
Detailed Description of Problem:
© 2000, Hewlett-Packard Company
file:///C|/Documents%20and%20Settings/topher.COL-SPRINGS/Desktop/manual/document/common/contact/eng/csf.htm [12/3/2001 7:50:26 AM]
before you start
hp learning products
http://www.hp.com/support/tape may have a later version
data protection
before you start
contact hp
home page
before you start
operation
cartridge care
contents of this section
pre-installation check list
installation
how to identify your model
computer and backup software requirements
computer systems
backup software
cleaning
specifications
media compatibility
diagnostics
troubleshooting
FAQs
SCSI configuration
UNIX configuration
pre-installation check list
ordering supplies
Before you install your HP Surestore DLT1 tape drive:
1. Check that your computer meets the requirements for installation.
2. Make a note of the model name, product number, and serial number of your
tape drive.
3. Collect information about the SCSI configuration of your computer and any
other devices attached to it and decide how you are going to configure the
drive on the SCSI bus. If you are installing on a Windows NT 4, Windows
2000, or Novell NetWare system, you can use the HP Library & TapeTools
software. If you are not familiar with how to configure a SCSI bus, you may
also want to read the SCSI Background information provided in this guide.
4. Select a free bay for an internal or a removable drive
or
Select a site for an external drive.
installation
The Getting Started guide provides detailed installation instructions.
Click below for a PDF version of the appropriate guide:
●
HP Surestore DLT1 internal drives: Getting Started guide
●
HP Surestore DLT1 external drives: Getting Started guide
You need a copy of Adobe Acrobat Reader to read the PDF files. If you do not
have a copy of this software, you can link to Adobe's web site to download a free
copy.
.
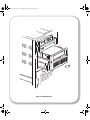
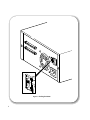
how to identify your model
For internal drives, the model name is on the front panel and the product and
serial numbers are on a label on the top of the drive.
For external drives, the model name is on the front panel and the product and
serial numbers are on a label on the bottom of the drive.
computer and backup software
The HP Surestore DLT1 tape drive has the following hardware and software
requirements:
computer systems
If you are installing the tape drive on a UNIX system, refer to the UNIX instructions
for further information about the systems supported and installation instructions.
For the latest list of operating systems that support HP Surestore DLT1 drives,
please consult our World Wide Web site (www.hp.com/go/connect).
HP Surestore DLT1 tape drives are Ultra SCSI-2 wide devices designed to
operate on a low voltage differential SCSI bus (LVDS) with a burst transfer rate of
40 MB/sec. Using the drive on a single-ended (SE) SCSI bus restricts
performance. Do not use on the same bus as other single-ended devices as this
will switch the LVDS host adapter into single-ended mode and restrict
performance. We recommend that a dedicated host bus adapter is used for the
tape drive. A suitable adapter is available from HP as an accessory (see Ordering
Information).
Your computer must have a properly installed and configured SCSI host adapter
or a SCSI controller on the motherboard (SCSI-2 or SCSI-3 compliant) with driver
software that supports the HP Surestore DLT1 drive. Check the server
documentation for the specification of any built-in SCSI channels. Do not connect
to a RAID controller channel; these are for disk drives only. Consult your supplier
for details.
For an internal drive, you will need:
●
●
●
●
●
A wide, Ultra SCSI-2 LVDS or SE SCSI bus
LVDS-compliant SCSI ribbon cable with termination (normally supplied with
the host bus adapter)
Available 5¼-inch, full-height mounting bay (or two adjacent, half-height
bays)
Mounting hardware, if required
Backup software that supports the tape drive
For external drives, the cable provided with HP Surestore DLT1 tape drives will
attach to a computer with a wide LVDS SCSI connector (68 pins). Connecting the
drive to an SE SCSI connector or a narrow SCSI host bus adapter will restrict
performance. HP recommends that a dedicated host bus adapter is used for the
tape drive. If your server or host bus adapter is equipped with a very high density
(VHD) wide SCSI connector, you will need to order a High-End Tape Connect Kit
(adapter with VHD-to-HD cable) or 68-pin VHD-to-HD cable. (See Ordering
Information.)
backup software
You need backup software that supports the HP Surestore DLT1 drive. A
TapeWare CD-ROM containing backup software by Yosemite Technologies is
supplied with your tape drive.
As a general rule, native backup applications (such as NTBackup and tar) do not
provide the required data streaming rate to get the full performance of your HP
Surestore DLT1 drive. We recommend using a backup application which provides
better memory management as well as other useful features, such as TapeAlert.
HP, Computer Associates, Veritas and Legato all provide suitable products that
have been tested with HP Surestore DLT1 drives. For the latest list of backup
packages that support HP Surestore DLT1 drives, please consult our World Wide
Web site (www.hp.com/go/connect).
Suitable backup applications will include driver software that establishes the
interface between the tape drive and the software. Applications usually recognize
tape drives by their manufacturers' ID string rather than their model number, so
check the table below for the appropriate reference.
Drive Model
ID String
HP Surestore DLT1 tape drive
BNCHMARKDLT1
© 2000, Hewlett-Packard Company
file:///C|/Documents%20and%20Settings/topher.COL-SPRINGS/Desktop/manual/document/dlt1/user/reseller/eng/getstart.htm [12/3/2001 7:50:27 AM]
operation
hp learning products
http://www.hp.com/support/tape may have a later version
data protection
contact hp
home page
before you start
operation
the front panel lights
loading & unloading
cartridge care
cleaning
specifications
media compatibility
diagnostics
troubleshooting
FAQs
SCSI configuration
UNIX configuration
operation
contents of this section
related topics
switching on the drive
if you have problems during self
test
resetting the drive
interpreting the front panel lights
cartridges
labeling and write-protecting
loading and unloading
caring for
switching on the drive
ordering supplies
Internal drives are powered on when you switch on your computer.
Switch on external drives using the power switch on the rear of the drive, and then
switch on the computer.
if you have problems during self test
If all the LED lights on the front panel are flashing at the end of the self-test, this
indicates a fault has occurred:
If you have just installed the drive, check the installation for loose
connections and repeat the self-test.
Try the troubleshooting procedures to determine what the problem
is.
If the fault condition persists, call for assistance.
resetting the drive
The drive can be reset without powering off the drive and computer, for example,
if the drive stops responding. To reset the drive, press and hold the eject button
until all three LEDs come on (which takes about 6 seconds), then release the
button.
If the eject button is held down until the LEDS come on (6 seconds) and is
continued to be held down, until the lights go off (another 4 seconds), no reset is
performed.
If you press and hold the eject button again until the first two LEDs flash, the
drive goes into a state ready for the firmware upgrade tape. The drive will
returns to its normal state after 30-45 seconds of inactivity.
© 2000, Hewlett-Packard Company
file:///C|/Documents%20and%20Settings/topher.COL-SPRINGS/Desktop/manual/document/dlt1/user/reseller/eng/operate.htm [12/3/2001 7:50:27 AM]
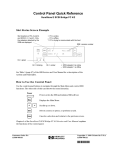
front panel lights
hp learning products
http://www.hp.com/support/tape may have a later version
data protection
contact hp
home page
before you start
operation
the front panel lights
loading & unloading
cartridge care
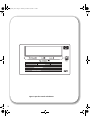
the front panel lights
contents of this section
front panel lights
cleaning
specifications
media compatibility
diagnostics
troubleshooting
FAQs
SCSI configuration
UNIX configuration
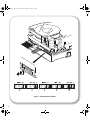
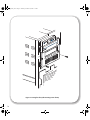
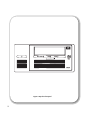
front panel lights
The front panel of your HP Surestore DLT1 tape drive has three lights (LEDs) as
shown below.
ordering supplies
Write Protected (first light)
This LED indicates if a cartridge is writeprotected.
On, steady: The DLTtape cartridge is
write-protected.
Off:
The DLTtape cartridge is
write-enabled.
Ready (second light)
This LED indicates when a cartridge is
loaded.
On, steady: The DLTtape cartridge is
loaded and ready to use.
On, flashing: The tape is in motion.
Off:
No cartridge is loaded.
Caution (third light)
This LED indicates when a cleaning
tape should be used. See also
"Cleaning".
On, steady: A calibration failure or hard
read/write error occurred.
Try cleaning the drive with
a tape approved for use in
the DLT1 drive.
If after cleaning, this
indicator is illuminated
again when you load a
DLTtape cartridge: it is
probable that the DLTtape
cartridge is causing
problems. Try a new
DLTtape cartridge. If this
condition persists with
other cartridges, use HP
Library and Tape Tools to
help you diagnose the
problem.
Off:
Cleaning is complete or
not needed.
All three LEDS
This indicates the status of the Power On Self Test (POST).
On, steady: POST is starting.
On, flashing: A POST error has occurred. For more information, see
Troubleshooting.
Note: LEDs during firmware update operation. See also Firmware Updates.
●
●
●
●
During the firmware update process DO NOT RESET OR POWER CYCLE
THE DRIVE.
When the drive is in firmware update mode, the Write Protected and Ready
LEDS flash.
If a corrupt or incompatible image is downloaded for a firmware update, the
Ready and Write Protected LEDs do not flash. The drive resets and leaves
the code update cartridge loaded to indicate that the code update was not
successful.
If a valid image is downloaded the Ready and Write Protected LEDs will flash
alternately during the update process. The code update cartridge is ejected
on successful completion.
© 2000, Hewlett-Packard Company
file:///C|/Documents%20and%20Settings/topher.COL-SPRINGS/Desktop/manual/document/dlt1/user/reseller/eng/lights.htm [12/3/2001 7:50:28 AM]
loading and unloading
hp learning products
http://www.hp.com/support/tape may have a later version
data protection
contact hp
home page
before you start
operation
the front panel lights
loading & unloading
cartridge care
cleaning
specifications
media compatibility
diagnostics
troubleshooting
FAQs
SCSI configuration
UNIX configuration
loading and unloading
contents of this section
to load a cartridge
to unload a cartridge
to label a cartridge
to write protect a cartridge
related topics
cartridge care
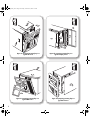
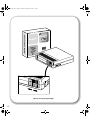
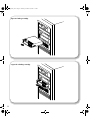
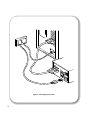
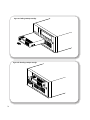
to load a cartridge
Use only DLTtape IV cartridges with your drive.
ordering supplies
Internal drives
External drives
1. Insert the cartridge into the slot in front of the drive, oriented as shown above.
2. Apply gentle pressure on the rear of the cartridge until the drive takes the
cartridge and loads it.
The Ready light flashes while the drive performs its load sequence. When the
cartridge is loaded, the Ready light is steady.
Do not try to force the cartridge if it does not load properly. The drive will eject the
cartridge after about 10 seconds so you can load it again.
Note: When you insert a new, unformatted cartridge into your HP Surestore DLT1
tape drive, the loading sequence takes longer because the drive is writing reference
tracks on the tape.
to unload a cartridge
Internal drives
External drives
1. Press the Eject button on the front panel or use your backup software.
During the unload sequence the Ready light flashes. The drive completes
any task it is currently performing, winds the tape to the beginning, and
ejects the cartridge. The eject cycle will take up to two minutes.
2. Remove the cartridge and store it in its plastic case in a cool, dry
atmosphere.
to label a cartridge
Use only DLTtape IV cartridges with
your drive. Ensure that only one label is
located in the label area of the
cartridge. Never use non-standard
labels, and never stick anything to the
cartridge.
The label area and write-protect switch
are on the front of the cartridge, as
illustrated.
to write-protect a cartridge
If you want to protect the data on a cartridge from being altered or overwritten,
you can write-protect the cartridge. Do this before you insert the cartridge by
sliding the write-protect switch on the front of the cartridge.
Caution: Write-protection will not prevent a cartridge being erased by bulkerasure or degaussing.
To write-protect a cartridge, slide the
write-protect switch to the left.
Note a small orange rectangle is visible
indicating that the cartridge is protected.
To write-enable a cartridge, slide the the
write-protect switch to the right.
© 2000, Hewlett-Packard Company
file:///C|/Documents%20and%20Settings/topher.COL-SPRINGS/Desktop/manual/document/dlt1/user/reseller/eng/load.htm [12/3/2001 7:50:29 AM]
cartridges
hp learning products
http://www.hp.com/support/tape may have a later version
data protection
contact hp
home page
before you start
operation
cartridge care
cleaning
specifications
media compatibility
diagnostics
troubleshooting
FAQs
cartridge care
contents of this section
choosing cartridges
caring for cartridges
using cartridges
related topics
write-protecting cartridges
labeling cartridges
loading and unloading cartridges
ordering cartridges
storing cartridges
maximizing tape life
SCSI configuration
UNIX configuration
avoiding condensation
ordering supplies
choosing cartridges
Only rely on the best media to protect your valuable data. Thanks to HP's rigorous
testing programs, HP Surestore DLT1 data and cleaning cartridges are the safest
investment you can make.
HP DLTtape IV cartridges are designed to meet the exacting mechanical,
environmental and durability specifications of data storage applications.
Order online at: www.hp.com/go/storagemedia.
Important: You must use only DLT1 cleaning cartridges with HP Surestore DLT1
tape drives. Be aware that cleaning cartridges that do not specify DLT1 on the
cartridge may be accepted by the drive but will not clean the drive. Use only DLT1
cleaning cartridges.
Your HP Surestore DLT1 tape drive
uses only DLTtape IV cartridges. Your
DLT1 tape drive can read but not write
DLTtape cartridges that use the
DLT4000 format.
Make sure all cartridges that you want
to use for writing are either unformatted
or have been formatted with your DLT1
tape drive before loading them. If you
want to reuse cartridges that have been
formatted by a drive other than DLT1,
use a magnetic bulk eraser to prepare
the cartridges for use with your DLT1
tape drive.
caring for cartridges
Under optimum environmental conditions, Hewlett-Packard DLTtape IV cartridges
are currently specified to 1,000,000 passes over any part of the tape. In
operational terms, this can be translated to about 2000 full backup or restore
operations. Under severe environmental conditions, particularly where the tape
drive is used at very low humidity or if certain areas of the tape are accessed
frequently, the number of backup operations should be limited even further.
Caution: Ensure that only one label is located in the label area of the cartridge.
Never use non-standard labels and never stick anything to the cartridge.
using cartridges
Only use DLTtape IV cartridges in temperatures in the tape drive's operating
range from 10C to 40C (50°F to 104°F) and 20 to 80% relative humidity
(noncondensing). If you expose cartridges to temperatures outside the operating
limits, stabilize them before you use them. To do this, leave the cartridges in the
operating environment for 24 hours.
storing cartridges
Store cartridges at temperatures between 16°C and 32°C (60°F
and 90°F ) with a relative humidity between 20% and 80%.
Always keep the cartridges in a dust-free environment.
Always store cartridges in their plastic cases when not in use.
maximizing tape life
Do not touch the tape surface.
Do not attempt to clean the tape path or tape guides inside the
cartridge.
Do not leave cartridge tapes in excessively dry or humid
conditions.
Do not leave cartridges in direct sunlight or near sources of heat
or in places where magnetic fields are present (for example,
under telephones, next to monitors or near transformers).
Do not drop cartridges or handle them roughly.
Do not locate more than one label onto cartridges; extra labels
can cause the cartridges to jam in the tape drive.
Place identification labels only in the slide-in slot on the front of
the cartridge.
Never use any type of adhesive labels on your DLTtape cartridge.
avoiding condensation
Condensation can be a problem for tape drives and cartridges. To minimize the
chance of condensation, stay within the specifications for using and storing
cartridges above and observe the following guidelines:
1. Position the drive where the temperature is relatively stable -- away from
open windows, heat sources and doors.
2. Avoid leaving cartridges in severe temperature conditions, for example, in a
car standing in bright sunlight.
3. Avoid transferring data (reading from and writing to cartridges) when the
temperature is changing by more than 10°C (18°F) per hour.
4. If you bring a cold tape drive or tape cartridge into a warm room, allow time
for it to warm to room temperature before using it. For example, if you have
moved the drive from a cold car to a warm room, allow time for the drive to
reach room temperature (up to 24 hours if the temperature change is
extreme).
© 2000, Hewlett-Packard Company
file:///C|/Documents%20and%20Settings/topher.COL-SPRINGS/Desktop/manual/document/dlt1/user/reseller/eng/cart.htm [12/3/2001 7:50:30 AM]
cleaning
hp learning products
http://www.hp.com/support/tape may have a later version
data protection
contact hp
home page
before you start
operation
cartridge care
cleaning
specifications
media compatibility
diagnostics
troubleshooting
media compatibility
FAQs
SCSI configuration
UNIX configuration
ordering supplies
cleaning
contents of this section
cleaning strategy
cleaning cartridge
cleaning the tape heads on a drive
cleaning strategy
HP Surestore DLT1 drives have been developed to have a minimal cleaning
requirement. The Caution LED on the tape drive will be on when the drive needs
cleaning. However, it is good practice that the drive is cleaned once every two
weeks to ensure optimal performance.
IMPORTANT: It is essential to use only DLT1 cleaning cartridges with HP
Surestore DLT1 tape drives. Cleaning cartridges from other media manufacturers
will not be accepted by the drive. Use of HP cleaning media will ensure your tape
drive is fully protected.
cleaning cartridge
You must use only DLT1 cleaning cartridges to clean the tape heads. A cleaning
cartridge is supplied with each tape drive.
Do not use swabs or other means of cleaning the heads. The cleaning cartridge
uses a special tape to clean the tape heads.
A cleaning cartridge can be used up to 20 times. The cleaning cartridge includes a
label with 20 small boxes printed on it. Always place a check mark in a box each
time you use the cartridge to clean the drive. Replace the cleaning cartridge when
all the boxes are checked.
Be aware that cleaning cartridges that do not specify DLT1 on the cartridge will be
accepted by the drive but will not clean the drive. Use only DLT1 cleaning
cartridges (see also Ordering Information).
cleaning the tape heads on a drive
The drive's TapeAlert feature sends a message to your backup application when
the tape heads need cleaning and the Caution LED illuminates. To clean the tape
heads:
1. Insert a DLT1 cleaning cartridge into the drive. The tape drive automatically
loads the cartridge and cleans the heads.
Note: If you insert another type of cleaning cartridge, the Caution LED turns
off. Ensure that cleaning is performed only with DLT1 cleaning cartridges.
During the cleaning cycle the Caution LED flashes. At the end of the
cleaning cycle, the Caution LED turns off to indicate that you should remove
the cleaning cartridge. The cleaning cycle can take several minutes.
2. Remove the cleaning cartridge from the drive.
If the Caution LED is illuminated when you insert a DLTtape cartridge
immediately after cleaning, try a new DLTtape cartridge. If this condition
persists with other cartridges, use HP Library and Tape Tools to help you
diagnose the problem.
© 2000, Hewlett-Packard Company
file:///C|/Documents%20and%20Settings/topher.COL-SPRINGS/Desktop/manual/document/dlt1/user/reseller/eng/clean.htm [12/3/2001 7:50:31 AM]
features and specifications
hp learning products
http://www.hp.com/support/tape may have a later version
data protection
contact hp
features and specifications
home page
before you start
operation
cartridge care
Choose your model from the bulleted list below
cleaning
specifications
dlt1i
dlt1e
media compatibility
diagnostics
troubleshooting
FAQs
SCSI configuration
UNIX configuration
ordering supplies
Internal Drives
HP Surestore DLT1i tape
drive
External Drives
HP Surestore DLT1e tape
drive
© 2000, Hewlett-Packard Company
file:///C|/Documents%20and%20Settings/topher.COL-SPRINGS/Desktop/manual/document/dlt1/user/reseller/eng/spec.htm [12/3/2001 7:50:32 AM]
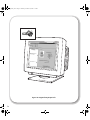
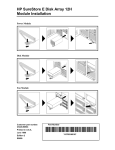
hp surestore DLT1i
hp learning products
http://www.hp.com/support/tape may have a later version
data protection
contact hp
home page
before you start
operation
cartridge care
cleaning
specifications
dlt1i
dlt1e
media compatibility
diagnostics
troubleshooting
FAQs
hp surestore dlt1i
contents of this section
features
specifications
physical specification
power requirements
performance
operating limits
non-operating limits
safety and electromagnetic compatibility
SCSI configuration
UNIX configuration
features
ordering supplies
The HP Surestore DLT1 tape drive provides affordable 80GB backup to IT
managers with mid-range servers. The 6MB/s compressed transfer rate provides
backup in under 4 hours. DLT technology appeals to customers looking for
reliable and scalable backup.
Your new tape drive provides the following key features:
●
●
●
●
●
●
●
●
●
●
●
●
Proven DLT technology
Up to 80GB (compressed) on a single tape cartridge
Transfer rate of 6MB/s (compressed)
Read compatible with DLT4000 data
Technology scalable to higher capacities and transfer rates
Compatibility with all key backup software applications
TapeSense System™ to improve reliability by rejecting damaged media
Roller design to minimize lateral tape movement
TapeAlert support for worry-free backup
HP Library & Tape Tools software to verify successful installation and
troubleshoot problems
Ultra wide SCSI-2 interface
3-year, next-day, unit exchange
Note: HP Surestore DLT1i does not currently support One-Button Disaster
Recovery (OBDR).
specifications
physical specification
dimensions 148.6 mm (5.9") W (with bezel)
86.36 mm (3.4") H (with bezel)
210.6 mm (8.29") D (with bezel)
weight 1.8 kg (3.9 lbs)
power requirements
power consumption +5V @ 1.5A steady state
+12V @ 0.33A steady state
+5V @ 1.75A (max)
+12V @ 1.75A (max)
performance
interface
recording format
media
capacity
sustained transfer rate
Ultra wide SCSI-2
DLT1
DLTtape IV
40 GB (native)
native 3 MB/sec
compressed 6 MB/sec (assumes 2:1
compression)
burst transfer rate 40 MB/sec (Ultra wide SCSI-2)
file access time (from BOT) 68 sec typical
135 sec maximum
load to BOT 59 sec (slightly longer for blank tapes)
unload from BOT 17 sec
68 sec typical
rewind time 135 sec maximum
rewind tape speed 4.1 m/sec (160 in/sec)
operating limits
temperature 10°C to 40°C (50°F to 104°F)
humidity 20% to 80% RH (non-condensing)
10%/hr maximum operating humidity rise
maximum wet bulb temperature 25°C
temperature gradient 11°C per hour (across range)
operating altitude -0.15 to 9 km (-500 to 30,000 ft)
vibration 0.25g 5-500 Hz
shock survival 3g 10ms (half sine)
non-operating limits
temperature -40°C to 66°C (-40°F to 151°F)
humidity 10% to 95% RH (non-condensing)
temperature rise 20°C per hour with 5 degree margin
(across range)
humidity rise 10%/hr
non-operating altitude N/A
vibration 1g 10-500 Hz
shock survival 40G 10ms (square wave)
140G 2ms (half sine)
safety and electromagnetic compatibility
UL 1950, 3rd edition Information Technology Equipment (ITE)
CSA-C22.2 No. 950-95 Safety of Information Technology Equipment
FCC Rules and Regulations, Part 15--Radio Frequency Devices,
Subpart B--Unintentional Radiators, Class B
Industry Canada (ICES), Radio Interference Regulation, Digital
Apparatus, Class B
C-TICK, AS/NZS A3548, Radio Frequency Devices Class B
CISPR Publication 22 (1985), Class B
EN 55022: 1998, CISPR Publication 22 (1997), CISPR Publication 22
(1993) (U.S.A.), Radiated and Conducted Emissions
EN55024: 1998, CISPR Publication 24 (1997), IEC61000-4-2: 1995,
IEC61000-4-3: 1995, IEC61000-4-5: 1995, IEC61000-4-6: 1996,
IEC61000-4-8: 1993, IEC61000-4-11: 1994, Immunities.
CE-Mark comprised of the following requirements:
EN60950/A11: 1997, IEC60950/A4: 1996, Safety of Information
Technology Equipment including Electrical Business Equipment
EN55082-1/IEC1000-4-2, 1000-4-3, 1000-4-4, Electromagnetic
Compatibility for Industrial-Process Measurement and Control
Equipment:
Part 2 - Electrostatic Discharge (ESD) Requirements
Part 3 - Radiated Electromagnetic Field Requirements
Part 4 - Electrical Fast Transient/Burst (EFT) Requirements
© 2000, Hewlett-Packard Company
file:///C|/Documents%20and%20Settings/topher.COL-SPRINGS/Desktop/manual/document/dlt1/user/reseller/eng/dlt1i.htm [12/3/2001 7:50:33 AM]
hp surestore DLT1e
hp learning products
http://www.hp.com/support/tape may have a later version
data protection
contact hp
home page
before you start
operation
hp surestore dlt1e
contents of this section
cartridge care
cleaning
specifications
dlt1i
dlt1e
media compatibility
diagnostics
troubleshooting
FAQs
features
specifications
physical specification
power requirements
performance
operating limits
non-operating limits
safety and electromagnetic compatibility
SCSI configuration
UNIX configuration
features
ordering supplies
The HP Surestore DLT1 tape drive provides affordable 80GB backup to IT
managers with mid-range servers. The 6MB/s compressed transfer rate provides
backup in under 4 hours. DLT technology appeals to customers looking for
reliable and scalable backup.
Your new tape drive provides the following key features:
●
●
●
●
●
●
●
●
●
●
●
●
Proven DLT technology
Up to 80GB (compressed) on a single tape cartridge
Transfer rate of 6MB/s (compressed)
Read compatible with DLT4000 data
Technology scalable to higher capacities and transfer rates
Compatibility with all key backup software applications
TapeSense System™ to improve reliability by rejecting damaged media
Roller design to minimize lateral tape movement
TapeAlert support for worry-free backup
HP Library & Tape Tools software to verify successful installation and
troubleshoot problems
Ultra wide SCSI-2 interface
3-year, next-day, unit exchange
Note: HP Surestore DLT1e does not currently support One-Button Disaster
Recovery (OBDR).
specifications
physical specification
dimensions 212.85 mm (8.38") W
100.08 mm (3.94") H
273.05 mm (10.75") D
weight 4.08 kg (9 lbs)
power requirements
power 100-254 VAC
44 W, 0.76A @ 110 VAC
Auto-ranging. Power connection IEC
CEE-22
performance
interface
recording format
media
capacity
transfer rate
Ultra wide SCSI-2
DLT1
DLTtape IV
40 GB (native)
native 3 MB/sec
compressed 6 MB/sec (assumes 2:1
compression)
burst transfer rate 40 MB/sec (Ultra wide SCSI-2)
file access time (from BOT) 68 sec typical
135 sec maximum
load to BOT 59sec (slightly longer for blank tapes)
unload from BOT 17 sec
rewind time 68 sec typical
135 sec maximum
rewind tape speed 4.1 m/sec (160 in/sec)
operating limits
temperature 10°C to 40°C (50°F to 104°F)
humidity 20% to 80% RH (non-condensing)
10%/hr maximum operating humidity
rise
maximum wet bulb temperature 25°C
temperature gradient 11°C per hour (across range)
operating altitude -0.15 to 9 km (-500 to 30,000 ft)
vibration 0.25g 5-500 Hz
shock survival 3g 10ms (half sine)
non-operating limits (storage ranges)
temperature -40°C to 66°C (-40°F to 151°F)
humidity 10% to 95% RH (non-condensing)
temperature rise 20°C per hour with 5 degree margin
(across range)
humidity rise 10%/hr
non-operating altitude N/A
vibration 1g 10-500 Hz
shock survival 40G 10ms (square wave)
140G 2ms (half sine)
safety and electromagnetic compatibility
UL 1950, 3rd edition Information Technology Equipment (ITE)
CSA-C22.2 No. 950-95 Safety of Information Technology Equipment
FCC Rules and Regulations, Part 15--Radio Frequency Devices,
Subpart B--Unintentional Radiators, Class B
Industry Canada (ICES), Radio Interference Regulation, Digital
Apparatus, Class B
C-TICK, AS/NZS A53548, Radio Frequency Devices Class B
CISPR Publication 22 (1985), Class B
EN55022: 1998, CISPR Publication 22 (1997), CISPR Publication 22
(1993) (U.S.A.), Radiated and Conducted Emissions
EN61000-3-2: 1995, +Amendment A1: 1998, +Amendment A2: 1998,
IEC 61000-3-2: 1995, +/A1: 1997, +/A2: 1998, Harmonic Current
Emissions
EN61000-3-3: 1995, IEC61000-3-3: 1994, Voltage Fluctuation and
Flicker
EN55024: 1998, CISPR Publication 24 (1997), IEC61000-4-2: 1995,
IEC61000-4-3: 1995, IEC61000-4-5: 1995, IEC61000-4-6: 1996,
IEC61000-4-8: 1993, IEC61000-4-11: 1994, Immunities
CE-Mark comprised of the following requirements:
EN60950/A11: 1997, IEC60950/A4: 1996, Safety of Information
Technology Equipment including Electrical Business Equipment
EN55082-1/IEC1000-4-2, 1000-4-3, 1000-4-4, Electromagnetic
Compatibility for Industrial-Process Measurement and Control
Equipment:
Part 2 - Electrostatic Discharge (ESD) Requirements
Part 3 - Radiated Electromagnetic Field Requirements
Part 4 - Electrical Fast Transient/Burst (EFT) Requirements
© 2000, Hewlett-Packard Company
file:///C|/Documents%20and%20Settings/topher.COL-SPRINGS/Desktop/manual/document/dlt1/user/reseller/eng/dlt1e.htm [12/3/2001 7:50:35 AM]
media compatibility
technical documentation
http://www.hp.com/support/tape may have a later version
data protection
contact hp
home page
before you start
operation
media compatibility
contents of this section
related topics
cartridge care
cleaning
specifications
dlt1 compatibility matrix
HP Library & Tape Tools
TapeAlert
media compatibility
diagnostics
troubleshooting
FAQs
DLT1 compatibility matrix
SCSI configuration
UNIX configuration
ordering supplies
Action
Drive
DLT1
DLT4000
DLT7000
DLT8000
Read DLT 4000 tape
Yes
Yes
Yes
Yes
Write DLT 4000 tape
No
Yes
Yes
Yes
Read DLT 8000 tape
No
No
No
Yes
Write DLT 8000 tape
No
No
No
Yes
Read DLT1
Yes
No*
No*
No*
Write DLT1
Yes
No
No
No
DLT1 cleaning tape
Yes
No#
No#
No#
DLT cleaning tape
No**
Yes
Yes
Yes
DLTtape IV media
Yes
Yes
Yes
Yes
* = Cartridge will not be overwritten
** = Cartridge will be ejected
# = Cartridge will not physically fit
●
●
HP Surestore DLT1 drive will write to:
❍ a new blank DLTtape IV cartridge.
❍ a DLTtape IV cartridge previously written in a DLT1 drive.
❍ a DLTtape IV that has been bulk erased or degaussed.
HP Surestore DLT1 will read a cartridge written in the DLT4000 format.
© 2000, Hewlett-Packard Company
file:///C|/Documents%20and%20Settings/topher.COL-SPRINGS/Desktop/manual/document/dlt1/user/reseller/eng/media.htm [12/3/2001 7:50:35 AM]
diagnostics
hp learning products
http://www.hp.com/support/tape may have a later version
data protection
contact hp
home page
before you start
operation
diagnostics
contents of this section
cartridge care
cleaning
specifications
media compatibility
diagnostics
troubleshooting
FAQs
SCSI configuration
UNIX configuration
ordering supplies
HP Library & Tape Tools diagnostic utility
installing
using
compatibility
firmware updates
using hp library and tape tools to update firmware
using a firmware update cartridge
TapeAlert
how it works
TapeAlert for OpenView
a new standard
summary
HP Library & Tape Tools diagnostic utility
The HP Library & Tape Tools software provides a number of utilities for getting
information about your tape drive and troubleshooting problems. It includes the
following functionality:
Installation help and advice to help you install your product and
operate it correctly
A Discovery utility to find out what devices are attached to your
SCSI bus
An Identity utility to find out detailed information about individual
devices, for example the firmware version.
Tests to check that your drive is operating correctly.
A Firmware Update Utility that helps you find update files for
your tape drive and performs the update
A Support Ticket that generates detailed troubleshooting
information for support calls (if you are connected to the Internet,
you will be able to e-mail this information directly to your Support
Center)
Comprehensive Help that is topic sensitive, should you need
additional information for the screen currently displayed
Updates and the latest versions of this software are available from our World Wide
Web site: www.hp.com/support/tapetools
installing HP Library & Tape Tools
You can install HP Library & Tape Tools from the web site:
www.hp.com/support/tapetools. The tool is distributed without firmware and
firmware files are downloaded separately. Installation is simply a question of
selecting the required option and following the instructions on the screen.
using HP Library & Tape Tools
HP Library and Tape Tools checks for
the presence of a SCSI controller and
its driver software and identifies the
SCSI IDs of existing SCSI devices.
You can then select the required
device from the device list and run one
of the diagnostic utilities for that device
by selecting the appropriate icon:
Identity, Firmware, Test or Support.
For ease of use, comprehensive online
help is built into the software.
compatibility
There are HP Library & Tape Tools versions for:
Windows NT 4.0 (workstation and server)
Windows 2000 (professional and server)
Novell NetWare 5 or 5.1
firmware updates
You can update the firmware in HP Surestore DLT1 tape drives either by
downloading over the SCSI bus or by loading a firmware update cartridge.
Caution: DO NOT RESET OR POWER CYCLE THE DRIVE during firmware
update. Doing so can damage the drive's controller hardware.
using HP Library & Tape Tools to update firmware
Use HP Library & Tape Tools to download via SCSI. Any tape in the drive will be
ejected automatically before update. The Write Protected and Ready LEDs flash
at the same time during firmware update for about two to three minutes.
Note: If a corrupt or incompatible image is downloaded for firmware update then
the Write Protected and Ready LEDs do not flash. The drive resets and leaves the
code update cartridge loaded to indicate that the code update was not successful.
using a firmware update cartridge
Firmware update tapes are only available from HP. Refer to the Hewlett-Packard
Support web site for update information (www.hp.com/support/dlt1).
To update the firmware from tape:
1. Locate the firmware update cartridge.
2. Remove all DLTtape cartridges from your DLT1 drive.
3. Press and hold the Eject button on your DLT1 drive's front panel until all
three LEDS illuminate (6 seconds) and continue to hold down until the lights
go off (4 seconds). Release the Eject button.
4. Press and hold the Eject button again (4 seconds) until the Write Protected
and Ready LEDs flash, then release the Eject button. The drive is now in
firmware update mode. If you decide not to perform a firmware update at
this point, no action is necessary. The drive returns to its normal operational
state after 30-45 seconds of inactivity. If the drive does not go into the
update mode, refer to the troubleshooting information on update mode.
5. Insert the code update cartridge into the drive. The drive temporarily turns
off the Write Protected and Ready LEDS while it reads the cartridge and
verifies that the firmware image file is valid. This process may take several
minutes to complete.
❍ If the drive's code is up-to-date, the drive cancels firmware update
mode, and the process is complete.
❍ If the drive's code is not up-to-date, the drive reads the code image
file from the cartridge. The Write Protected and Ready LEDs flash at
the same time during the update process which typically takes two to
three minutes.
When the drive finishes reading the code image file from the update
cartridge, the drive rewinds the cartridge to the beginning, resets, and
performs a Power-On Self-Test (POST). The drive then ensures that the
code image file is valid. If so, it updates the controller's flash EEPROM. The
Write Protected and Ready LEDs flash at the same time during theupdate
process.
6. The drive ejects the code update cartridge. Your DLT1 drive is now ready to
use with the new code.
Note: If the drive does not eject the code update cartridge, the firmware update
failed. For troubleshooting information, refer to code update failed.
TapeAlert
Tape storage systems have a vital role to play in backing up essential data safely
and securely. Yet until now, there has been no reliable way to identify errors and
potential problems that may compromise their effectiveness or reliability.
Thanks to a new industry standard developed by Hewlett-Packard, however, that
situation has changed. TapeAlert is a tape drive status monitoring and messaging
utility that makes it easy to detect problems which could have an impact on
backup quality. From the use of worn-out tapes to defects in the drive hardware
TapeAlert provides easy-to-understand warnings of errors as they arise, and
suggests a course of action to remedy the problem.
To take advantage of TapeAlert, you need:
TapeAlert-compatible tape drives
TapeAlert-compatible backup software
●
●
Network administrators will also find it extremely valuable to have TapeAlert for
OpenView, which extends the benefits of TapeAlert across the network.
how it works
TapeAlert compatible tape drives - such as the latest DLT1 drives from HewlettPackard - are delivered with TapeAlert features built in as standard. The internal
TapeAlert firmware constantly monitors the drive hardware and the media,
checking for errors and potential difficulties. Any problems identified are flagged
on a new SCSI log page, where 64 bytes have been reserved for use by
TapeAlert.
After a backup has been completed, the TapeAlert-compatible backup application
will automatically read the drive's TapeAlert SCSI log page to check for any
problems. If an error is flagged, the backup software displays a clear warning
message on the user's screen, and adds the TapeAlert messages to its logs.
These messages are standard across all applications that support TapeAlert, and
are designed to give clear explanation of the problem and suggested resolution.
For example, a user attempting to backup onto a worn-out tape would encounter
the message:
WARNING: The tape cartridge has reached the end of its useful life:
1. Copy and data you need to another tape
2. Discard the old tape
Errors Monitored
TapeAlert currently checks for errors occurring in the following main categories:
Drive recoverable read problems
Drive recoverable write problems
Drive unrecoverable read problems
Drive unrecoverable write problems
Drive hardware defects
Worn-out media
Expired cleaning tapes
Wrong media used
Abnormal error conditions
●
●
●
●
●
●
●
●
●
TapeAlert for OpenView
TapeAlert for OpenView allows you to bring all TapeAlert-compatible tape drives
on the network under the control of the network administrator. It integrates all the
features and functions of TapeAlert into HP's network management utility,
OpenView for Windows. As a result, tape drives can now be monitored and
controlled remotely in the same way as other network elements such as disk
drives and printers.
With TapeAlert for OpenView installed, error messages flagged by tape drives are
passed to the backup applications in the usual way. The software then forwards
the information to the network management console through the server's SNMP
interface.
An OpenView alarm is then activated on the management console, alerting the
network manager to the tape drives problem. The icon for the relevant server will
change color, with the color indicating the severity of the alarm as follows:
RED
YELLOW
BLUE
Critical
Warning
Information
TapeAlert for OpenView also provides a graphical view of the tape drives on the
selected server. Detailed configuration information is shown, together with a
history of previous errors recorded.
For each alarm, TapeAlert provides a brief description of the error, together with
the date and time of occurrence and an indication of severity. By clicking on the
"More Info" button, it is possible to drill down to details such as the device and
media involved, and suggestions for correcting the problem. For consistency and
convenience, the error messages are identical to those displayed locally by
TapeAlert.
As a result, it is easy for network managers to identify the source of problems
occurring on any TapeAlert-enabled drive on the network.
a new standard
TapeAlert has been developed by Hewlett-Packard as a proposed new
standard tape drive management. All new tape drives from Hewlett-Packard will
be fully compatible with TapeAlert, and many major manufacturers and software
companies are expected to adopt the standard. Software companies adopting
the standard currently include:
●
●
●
●
●
Computer Associates Software
Seagate Software
Stac
Legato
Novastor
The TapeAlert standard has been designed
to allow easy integration into backup
applications from any software vendor.
Applications which comply fully with the
requirements for TapeAlert will be awarded
the use of the TapeAlert logo.
Designed for the Future
TapeAlert is an advanced technological standard which provides a
comprehensive range of state-of-the-art features and functions. However, it has
also been designed to allow considerable expansion and development in the
future, as new possibilities and opportunities open up.
summary
Reliable, high-quality backups are essential to safeguard the vast amount of data
stored on computer systems today. TapeAlert is an innovative standard that
enhances reliability by monitoring tape drives and associated media during backup
procedures.
Offering clear warnings of problems as they arise, TapeAlert allows users and
network managers to eliminate unnecessary errors and ensure that data integrity
and security is never compromised. Already gaining substantial support across the
industry, TapeAlert is set to become the established standard for tape drive
management.
© 2000, Hewlett-Packard Company
file:///C|/Documents%20and%20Settings/topher.COL-SPRINGS/Desktop/manual/document/dlt1/user/reseller/eng/diag.htm [12/3/2001 7:50:37 AM]
troubleshooting
technical documentation
http://www.hp.com/support/tape may have a later version
data protection
contact hp
home page
before you start
operation
cartridge care
cleaning
specifications
media compatibility
diagnostics
troubleshooting
FAQs
SCSI configuration
UNIX configuration
ordering supplies
troubleshooting
contents of this section
related topics
help diagnosing the problem
general guidelines
troubleshooting
problems with the host
computer
computer does not boot up
computer boots, but does
not recognize drive
problems with the drive
the tape drive does not
power up
all the LEDs on the front
panel blink continually
errors for which you cannot
find the cause
problems during firmware
update
drive does not go into firmware
update mode
code update failed
interpreting the LEDs
HP Library & Tape Tools
TapeAlert
firmware upgrades
help diagnosing the problem
If you experience problems using your tape drive after installation, use HP Library
& Tape Tools to help you diagnose the problem. HP Library & Tape Tools is
provided free of charge and is invaluable for solving problems with both the SCSI
bus and its attached devices. It will help resolve SCSI ID numbers and also run
some tests that may help you isolate problems.
You will also find troubleshooting information on the HP Support web site.
The HP Support web site contains links to:
●
●
www.hp.com/support/dlt1 takes you to HP’s Customer Care web site for a
wide range of up-to-date information about your product
www.hp.com/cpso-support/guide/psd/cscinfo.htm takes you to HP's
worldwide call center numbers
general guidelines
If you experience problems when using the tape drive, you need to isolate the
cause of the problem. For example, if you have just installed a new SCSI host bus
adapter and your system will not start, the cause of the problem is likely to be the
adapter.
When installing multiple items of hardware and software, we recommend that you
install each in turn and restart the system each time. Similarly if you have already
installed multiple devices and software and you experience problems, remove or
uninstall each in turn to establish which one is causing the problem.
Remember that the system recognizes devices during boot-up. If you swap or
connect a product when your system is running, you will need to reboot the
system. Rebooting the system will reset devices and will often resolve problems. It
is good practice to reboot every time you add a driver or install firmware.
troubleshooting
The first step in problem-solving is establishing whether the problem lies with the
cartridge, the drive, the host computer and its connections, or with the way the
system is being operated. If none of the following advice helps you solve the
problem, refer to our World Wide Web Customer Care pages on
www.hp.com/support/dlt1 or call for assistance.
problems with the host computer
Most modern SCSI host bus adapters locate and display attached devices when
the system is booting up. If the device is not detected at this stage, there is
probably a problem with the physical hardware: cables, termination, connections,
power or the HBA itself. Refer to the SCSI topic for a detailed discussion of SCSI
IDs, termination and cabling.
If your drive is found on system boot up but cannot be found in the operating
system, this is more likely to be a software problem.
computer does not boot up
Possible cause
Potential solution
You have connected the tape drive
to an existing SCSI bus that has
other devices connected to it and
the SCSI address of your HP
Surestore DLT1 drive is identical to
the address used by another
device.
Make sure that each device on the SCSI
bus has a unique ID. We recommend that
the HP Surestore DLT1 tape drive is
connected to a dedicated host bus
adapter. Do not connect the drive to a disk
RAID controller as this is not supported.
You have installed an additional
SCSI host bus adapter and its
resources are clashing with an
existing adapter.
Remove the new host bus adapter and
check the server documentation
You have disconnected the power Check that the cables to all devices are
or SCSI cable from the computer’s firmly connected.
boot disk during the drive
installation process.
computer boots, but does not recognize the tape drive
Possible cause
Potential solution
The power or SCSI cable is not
connected properly.
Check that the cables to the tape drive are
firmly connected. Ensure that the SCSI
cable is LVDS-compliant and that it does
not have any bent pins. Replace, if
necessary. (See “Ordering Information”.)
The SCSI bus may not be
terminated correctly.
1. If your HP Surestore DLT1 drive is the
last or only device on the SCSI bus, make
sure the device is properly terminated.
2. If your HP Surestore DLT1 drive is not
the last or only device on the SCSI bus,
check all SCSI cable connections and
make sure the last device on the SCSI bus
is terminated.
The tape drive’s SCSI ID address
is not unique.
Identify the SCSI IDs of existing SCSI
devices by using HP Library & Tape Tools.
Change the drive's SCSI ID. Shut down
and turn off the host server or workstation;
turn off the desktop drive. Change the
drive's SCSI ID. Turn on the host server or
workstation and desktop drive.
External drives only: the tape drive Switch on the tape drive, then switch the
may have been switched on after
computer off and then on again.
the computer was booted up. The
computer checks for SCSI devices
only at power-on.
The SCSI adapter may be
incorrectly configured.
Check the SCSI host adapter
configuration. Refer to the SCSI host
adapter manuals for instructions.
The SCSI cable may be loose.
Check both ends of the SCSI cable, both
for the desktop and internal drives.
The SCSI terminator might be
loose or missing.
1. Make sure the terminator is properly
seated on the open SCSI connector on the
rear panel of the desktop drive or on the
last device on the SCSI bus.
2. Make sure an LVD or SE terminator is in
place on the end of the SCSI ribbon cable
for the internal drive.
The SCSI terminator might not be
at the end of the SCSI bus or more
than two terminators might be
present on the SCSI bus.
Make sure the terminators are placed only
at each end of the SCSI bus--one at the
host adapter and one on the last device on
the bus, both internal and external.
The SCSI host adapter might be in Move the SCSI host adapter to a different
a defective expansion slot.
expansion slot.
The SCSI bus might be too long.
Make sure the total length of the SCSI bus
does not exceed the ANSI SCSI standard
of 3 meters (10 feet) for an SE bus, 12
meters (40 feet) for an LVD SCSI bus with
multiple devices, or 25 meters (82 feet) for
an LVD SCSI bus with a single device.
problems with the drive
tape
drive does not power up
Possible cause
Potential solution
The power cable is not connected
properly.
Check that the cables to the tape drive are
firmly connected.
Make sure that the power cable is firmly
connected.
●
●
For internal drives, try another
power connector.
For external drives, the power on/off
switch incorporates a green LED. If
this is not on, check the power cable
connection and replace the cable if
necessary. You can use the power
cable from your monitor or another
device to check that the connection
is working.
If the power supply is present and all LEDs
remain off, call for assistance.
The self-test fails (All three LEDS
flashing.)
If there is a cartridge in the drive, remove
it. Power down the drive and power it up
again. If the self-test still fails, call for
assistance.
all the LEDs on the front panel blink continually
Possible cause
Potential solution
An internal drive fault has occurred. 1. Press and hold the Eject button for 6
seconds to reset the drive.
2. Turn the drive off and then on again. If
the drive is a HP Surestore DLT1 internal
drive, shut down and turn off the host
server or workstation, then turn it back on
and allow it to boot.
3. Call technical support if Power-On SelfTest (POST) continues to fail.
errors for which you cannot find the cause
Possible cause
Potential solution
The AC power source may not be
properly grounded.
(HP Surestore DLT1e desktop
drive only.)
1. Plug the HP Surestore DLT1e Desktop
drive's power cable into a power outlet on
the same circuit as the host server or
workstation.
2. Plug the HP Surestore DLT1e Desktop
Drive's power cable into a different power
outlet.
problems during firmware update
drive does not go into firmware update mode
Possible cause
Potential solution
There is a DLTtape cartridge in the Remove the cartridge from the drive and
drive.
repeat the update process.
The drive and its controller
hardware are not communicating
properly.
The drive's hardware may be damaged
and must be repaired. Refer to our World
Wide Web Customer Care pages on
www.hp.com/support/dlt1 or call for
assistance.
code update failed
Possible cause
Potential solution
1. The cartridge is not a valid code Obtain a valid code update cartridge and
update cartridge
repeat the update process.
2. The cartridge does not contain a
valid code update image file.
The cartridge contains a valid code
update image file, but the flash
EEPROM programming process
fails.
The drive's controller hardware is probably
damaged and must be replaced. The drive
resets and runs Power-On Self-Test
(POST) which fails if the flash EEPROM
does not contain a valid code image. If this
occurs, you must repair the drive before
using it.
Refer to our World Wide Web Customer
Care pages on www.hp.com/support/dlt1
or call for assistance.
interpreting the LEDs
The HP Surestore DLT1 tape drive has three LEDs (light emitting diodes) on the
front panel which indicate drive status. The Ready switch is illuminated when
power is switched on.
The tape drive performs a power on Power-On Self-Test (POST) whenever power is
applied or the drive is reset. The test takes several seconds to complete, after which
the drive is ready to use. The following takes place during POST:
1. The LEDS turn on all at once and then turn off.
2. If a cartridge is loaded, the Ready LED flashes during initialization and
remains illuminated after POST.
3. If there is no cartridge loaded, all LEDs turn off after POST.
Use the following table to interpret the LED sequences and the appropriate action to
take.
Symptom
Action
Drive fails to execute power-on
self-test. LEDs remain off.
Check power is being supplied to the drive.
For external drives, the power on/off switch
incorporates a green LED. If this is not on, check
the power cable connection and replace the cable
if necessary. You can use the power cable from
your monitor or another device to check that the
connection is working.
For internal drives try another power connector.
If the power supply is present and all LEDs
remain off, contact the HP Customer Care
Center.
The Caution LED is illuminated.
The drive may need cleaning. Load the DLT1
cleaning cartridge.
© 2000, Hewlett-Packard Company
file:///C|/Documents%20and%20Settings/topher.COL-SPRINGS/Desktop/manual/document/dlt1/user/reseller/eng/trouble.htm [12/3/2001 7:50:40 AM]
frequently asked questions
hp learning products
http://www.hp.com/support/tape may have a later version
data protection
contact hp
home page
before you start
operation
cartridge care
cleaning
specifications
media compatibility
diagnostics
troubleshooting
FAQs
frequently asked questions
For further troubleshooting information, refer also to our Customer Support web
site: http://www.hp.com/support/dlt1
How often should I
clean the tape drive
heads?
HP recommends that the drive is cleaned once every
two weeks to ensure optimum performance.
Use only DLT1 cleaning cartridges to clean the
heads. Refer to Cleaning for details.
SCSI configuration
UNIX configuration
ordering supplies
What should I avoid
when positioning the
tape drive?
For internal drives, the server must provide forced
cooling and be capable of drawing 2 cfm of air
through the tape drive. Avoid blocking air vents.
Ensure that empty bays have the appropriate
blanking plates installed so that airflow is maintained.
For external drives, do not place the drive in a dirty
environment, for example, on the floor, near a busy
walkway, or near a door. Avoid locations subject to
sudden temperature changes, such as near an
outside door or window.
For specific environmental limits, refer to the
specifications for your tape drive model.
How many times can I
use a DLTtape IV
cartridge?
The recommended maximum number of passes over
any single part of the tape is 1,000,000. In practical
terms, this is equivalent to about 2,000 backup
operations.
What types of tape
cartridges can I use
with my drive?
Only rely on the best media to protect your valuable
data. Thanks to HP's rigorous testing programs, HP
DLTtape IV data and DLT1 cleaning cartridges are
the safest investment you can make.
Order online at: www.hp.com/go/storagemedia.
Important: You must use DLT1 cleaning cartridges
with HP Surestore DLT1 tape drives.
How do I update the
firmware?
You can update the firmware in HP Surestore DLT1
tape drives either by downloading over the SCSI bus
or by loading a firmware update tape. See Firmware
Updates.
For how long can I
archive tapes?
DLTtape IV cartridges will preserve the integrity of
stored data for at least 30 years if proper storage
conditions are observed. See Storing Cartridges.
© 2000, Hewlett-Packard Company
file:///C|/Documents%20and%20Settings/topher.COL-SPRINGS/Desktop/manual/document/dlt1/user/reseller/eng/faq.htm [12/3/2001 7:50:41 AM]
SCSI configuration
hp learning products
http://www.hp.com/support/tape may have a later version
data protection
contact hp
home page
before you start
operation
SCSI configuration
contents of this section
cartridge care
cleaning
specifications
media compatibility
diagnostics
troubleshooting
FAQs
SCSI configuration
UNIX configuration
ordering supplies
summary of SCSI terminology
setting up the SCSI bus
SCSI ID numbers
identifying SCSI IDs
setting the SCSI ID
SCSI termination
termination power
plug and play adaptor cards
SCSI cables
cable length
cable quality
what is SCSI?
the standards
SCSI in hp surestore tape drives
using wide and narrow devices together
using SE and LVD, ultra and ultra 2 SCSI devices together
summary of SCSI terminology
Note: this section discusses SCSI tape drive devices in general, although specific
reference is made to the particular SCSI requirements of HP Surestore DLT1 tape
drives where appropriate.
Various terms are used when describing SCSI devices. This section provides a
brief summary. See What is SCSI for a more detailed discussion of the different
SCSI specifications.
There are three main factors that affect performance and cable length:
The speed of the data bus, which may be Fast, Ultra or Ultra 2.
The width of the data bus, which may be Narrow or Wide.
The voltage level of the interface, which may be single-ended (SE) or
low voltage differential (LVD).
HP Surestore DLT1 drives are Ultra SCSI-2 wide devices designed to operate on
a low voltage differential SCSI bus (LVDS) with a burst transfer rate of 40 MB/sec.
Using the drive on a single-ended SCSI bus restricts performance. Do not use on
the same bus as other single-ended devices as this will switch the LVDS host
adapter into single-ended mode and restrict performance.
See SCSI Cables for more information about cable lengths.
setting up the SCSI bus
Each device on a SCSI bus, including the SCSI host bus adapter (HBA), must be
configured with a unique ID (identifier).
Note: HP recommends that a dedicated host bus adapter is used for the tape
drive. A suitable adapter is available from HP as an accessory (see Ordering
Information).
SCSI ID numbers
SCSI IDs are numbered as follows:
For wide SCSI buses, the ID will be a number from 0 through 15, so
a typical wide SCSI HBA can accommodate up to fifteen other
devices.
For standard, narrow SCSI buses, the ID will be a number from 0
through 7, so a typical narrow SCSI HBA can accommodate up to
seven other devices.
SCSI IDs are usually set on the device itself (sometimes via configuration
software), but some newer devices are capable of selecting an unused ID
automatically when powered-up (these are known as "SCAM" devices). HP
Surestore drives are not SCAM compliant.
SCSI ID 7 is reserved for the HBA because it has the highest priority on the bus.
On wide buses, the priority runs from 7 (highest) to 0, then 15 down to 8 (lowest).
identifying SCSI IDs
If your computer already has devices connected to the SCSI bus, you will need to
know their IDs to avoid any conflict with the new tape drive. Here are some
methods of finding out the information:
The fastest and easiest way is to run HP Library & Tape Tools. HP
Library & Tape Tools will check your SCSI configuration, including
the SCSI controller itself and any devices currently attached to it.
Most computers display a list of SCSI devices and IDs during the
boot-up process. This usually scrolls past very fast. If you press the
[Pause] key, you should be able to halt the scrolling and view the list.
If you have an Adaptec host adapter in the computer, it may have
come with a Windows utility called SCSI Interrogator
(SHOWSCSI.EXE) which displays information about connected
devices.
If you have Windows NT installed, select SCSI Adapters from the
Control Panel, select a device in the Devices tab and click on
Properties to view information about the device, including its SCSI
ID.
If you have Novell NetWare installed, use its LIST DEVICES
command.
If none of these is available to you, try the following sources of information:
The details of all installed devices and settings may have been
written down and stored with your computer's documentation (for
new computers, this is often done by the supplier).
Your HBA's documentation should tell you which settings it uses.
Look at each device to find out its ID. This is usually easy with
external devices. With internal devices, you will probably need the
help of the device's documentation to identify the SCSI ID setting,
which is usually set with jumpers.
Setting the SCSI ID
On internal HP Surestore drives, set the SCSI ID by attaching or
removing jumpers at the rear of the drive.
On external HP Surestore DLT1 drives, the ID is displayed on the
rear panel and can be set by using a small screwdriver or a ball-point
pen to press the little buttons above and below the number.
In either case, see the Getting Started Guide for more details. Note that host
adapters check SCSI IDs only at power-on, so any changes will not take effect
until the host system is power-cycled.
SCSI termination
Terminators are essential, as they provide the correct voltages on the SCSI bus
and prevent unwanted signal reflections from interfering with data transfers. The
rule is:
There must be termination at both physical ends of the bus
and only at the ends.
There are two main types of termination, active and passive. Active terminators
reduce interference and allow faster data throughput. On devices with high
transfer speeds, such as HP Surestore DLT1 drives, active termination is
required.
Correct termination can be achieved in four ways:
Using the host bus adapter: Often the HBA forms one end of the
SCSI bus and provides termination.
If you have both internal and external devices attached to the same
SCSI bus, the HBA will be in the middle of the cable and thus its
termination must be disabled. See the host bus adapter's
documentation for details of how to do this.
Using a terminated SCSI cable: Usually the internal SCSI cable in
a PC-based server has a number of SCSI connectors along its length
and a terminator at the end farthest from the host bus adapter. In this
case, you must ensure that any devices attached to the cable have
termination removed or disabled.
Using a terminator attached to the last device on the bus: For
other external devices, the terminator simply attaches to the spare
SCSI connector of the last device.
termination power
SCSI terminators require power to function, which is supplied along the SCSI
cable from one or more of the connected devices. Most host adapters provide
power by default.
If you are using long SCSI cables and some of the devices do not provide
termination power, it is best to connect these to the middle of the cable, so that
devices which do provide termination power are nearer the ends of the cable, and
thus closest to the terminators themselves.
plug and play adaptor cards
Most plug-and-play adapter cards have an auto-termination feature which, when
the adapter is in the middle of the bus, can detect the terminators situated at
either end of the SCSI bus and automatically turn off the on-board termination.
SCSI cables
Cables matter in SCSI systems. There are two factors to consider:
cable length
For LVD SCSI there is a maximum permissible length of 25 meters
for a single device. With multiple devices the maximum combined
internal/external length is 12 meters.
For best performance, keep lengths to a minimum, but avoid very
short overall lengths (less than 0.5 meters).
cable quality
It is important to use good quality cables. Generally speaking, cable quality affects
performance and reliability. This is particularly true for external, shielded cables.
For HP Surestore DLT1 internal drives, you need a SCSI ribbon cable with the
correct termination. The drives have a 68-pin wide, high-density SCSI connector.
If you are using an HP Surestore DLT1 drive on an internal bus with other
peripherals that run at Ultra2 speeds, it is important that a 68-pin LVD-compatible
ribbon cable is used.
The cable provided with HP Surestore DLT1 external tape drives will attach to a
computer with a wide LVDS SCSI connector (68 pins). If your server or host bus
adapter is equipped with a very high density (VHD) wide SCSI connector, you will
need to order a 68-pin HD-to-VHD converter or 68-pin HD-to-VHD cable. See
Ordering Information.
Look after your SCSI cables. In particular, take care when connecting or
disconnecting not to damage the high-density connectors. Avoid putting excessive
twists in external shielded cables, as this can cause premature failure.
what is SCSI?
The Small Computer Systems Interface (SCSI) is popular because it offers a fast
and flexible method of connecting a variety of devices to a host computer. The
SCSI standards define both the physical connections between the devices (cables
and connectors) and the protocols devices use to communicate with each other.
the standards
There have been three general standards:
SCSI-1, which is now obsolete
SCSI-2, which is very common, and still a current standard
SCSI-3, which is an emerging set of linked standards that define
much more than the simple bus systems used by the earlier versions.
SCSI-3 includes Fibre Channel, Wide SCSI, FireWire (IEE 1398),
Low Voltage Differential (LVD or LVDS), and Fast Serial SCSI. Some
of these standards are now being used on PC platforms
Another variant is ATAPI, which uses an EIDE physical bus to pass SCSI
protocols to connected devices. Technically, this is not part of the SCSI-3
standards, although some operating systems (notably Windows NT) manage
ATAPI devices as if they were fully SCSI.
SCSI is a backward-compatible standard, so that SCSI-2 and SCSI-3 devices can
almost always be made to work together.
SCSI is a bus interface: all the devices are connected to a single cable (some of
this may be inside and some outside the host computer's case). The connection to
the host itself is known as the Host Bus Adapter (HBA). You can have several
HBAs in a single computer, each with its own SCSI bus: this is a common
arrangement in high-performance servers. Some host bus adapters (such as the
Adaptec 3940W) have more than one SCSI bus available on a single card.
SCSI in hp surestore tape drives
HP Surestore DLT1 drives are Ultra SCSI-2 wide devices designed to operate on
a low voltage differential SCSI bus (LVDS) with a burst transfer rate of 40 MB/sec.
using wide and narrow devices together
Narrow SCSI devices can transfer data one byte at-a-time (and are sometimes
called "8-bit SCSI" devices). They can conform to either the SCSI-2 or SCSI-3
protocols. They have a 50-pin connection to the SCSI bus.
Wide SCSI devices can transfer two bytes of data simultaneously ("16-bit SCSI").
They usually have a single, 68-pin connection to the SCSI bus. (This physical
arrangement is part of the SCSI-3 specification.) They may support either SCSI-2
or SCSI-3 protocols.
Wide and narrow devices can simultaneously be connected to the same bus
without problem, provided certain rules are followed.
Using HP Surestore DLT1 drives on a narrow bus will restrict performance.
Narrow devices used on a wide bus will not normally affect the performance of
any wide devices connected
using SE and LVD, ultra and ultra 2 devices together
SE and LVD define how the signals are transmitted along the cable.
With single-ended (SE) SCSI, each signal travels over a single wire and each
signal's value is determined by comparing the signal to a paired ground wire.
Signal quality tends to decrease over longer cable lengths or at increased signal
speed.
With low voltage differential (LVD) signaling, signals travel along two wires and
the difference in voltage between the wire pairs determines the signal value. This
enables faster data rates and longer cabling with less susceptibility to noise than
SE signaling and reduced power consumption.
Using HP Surestore DLT1 drives on a single-ended SCSI bus restricts
performance. Do not use on the same bus as other single-ended devices as this
will switch the LVDS host adapter into single-ended mode and restrict
performance to SE speeds and SE cable length.
If you connect only LVD devices, the bus will operate in low voltage differential
mode and Ultra2 speeds will be enabled. You can use a combination of Ultra and
Ultra2 devices. Each device will operate at its optimum speed.
© 2000, Hewlett-Packard Company
file:///C|/Documents%20and%20Settings/topher.COL-SPRINGS/Desktop/manual/document/dlt1/user/reseller/eng/scsi.htm [12/3/2001 7:50:43 AM]
unix configuration guide
hp learning products
http://www.hp.com/support/tape may have a later version
This topic is available in English only.
data protection
contact hp
home page
before you start
operation
hp
dec
ibm RS/6000
pc based UNIX
silicon graphics
sun
cartridge care
cleaning
specifications
media compatibility
diagnostics
troubleshooting
FAQs
SCSI configuration
UNIX configuration
hp systems
dec systems
ibm RS/6000
systems
pc based UNIX
systems
silicon graphics
sun systems
verify installation
UNIX glossary
This guide provides basic information on configuring HP Surestore DLT1 tape
drives with various operating systems. The table below lists the models for which
this information is appropriate.
ordering supplies
Model
HP Surestore
DLT1
Type
Capacity
DLT1 drives
80 GB
(assuming 2:1
compression)
Identifier String for
UNIX Configuration*
BNCHMARKDLT1
*Drive Identification in UNIX Configuration: These strings should be used in
UNIX scripts wherever the drive type has to be identified. There are no hardware
configuration switches.
© 2000, Hewlett-Packard Company
file:///C|/Documents%20and%20Settings/topher.COL-SPRINGS/Desktop/manual/document/dlt1/user/reseller/eng/c_intro.htm [12/3/2001 7:50:45 AM]
UNIX hp
hp learning products
http://www.hp.com/support/tape may have a later version
data protection
HP-UX systems (series 700 only)
contact hp
home page
before you start
operation
cartridge care
cleaning
specifications
media compatibility
diagnostics
troubleshooting
FAQs
SCSI configuration
UNIX configuration
hp systems
dec systems
ibm RS/6000
systems
pc based UNIX
systems
silicon graphics
sun systems
verify installation
UNIX glossary
ordering supplies
This topic is available in English only.
contents of this section
related topics
verifying installation
glossary
determining the SCSI ID
creating the device files
determining the SCSI id
Before you configure your system to support your new HP Surestore DLT1 drive, you
need to determine what SCSI ID to use. The SCSI ID must be unique for each device
attached to the SCSI bus. To list the existing devices, use the following command:
% /sbin/ioscan -f
The output of this should look similar to the following example:
Class
I H/W Path Driver
S/W State H/W Type
Description
=======================================================================================
bc
0
root
CLAIMED BUS_NEXUS
graphics 0 1
graph3
CLAIMED INTERFACE Graphics
ba
bus_adapter CLAIMED BUS_NEXUS Core I/O Adapter
0 2>
ext_bus 0 2/0/1
c700
CLAIMED INTERFACE Built-in SCSI
target
2 2/0/1.4
tgt
CLAIMED DEVICE
disk
0 2/0/1.4.0 sdisk
CLAIMED DEVICE
target
3 2/0/1.6
CLAIMED DEVICE
disk
1 2/0/1.6.0 sdisk
CLAIMED DEVICE
lan
0 2/0/2
lan2
CLAIMED INTERFACE Built-in LAN
:
: :
:
:
tgt
TOSHIBA CD-ROM XM34
HP C2490A
:
:
After you have installed the new tape drive, you can check that it has been attached
successfully. From a shell window (hpterm/xterm), execute ioscan to display the list of
attached devices.
For an HP Surestore DLT1, execute the following:
% /sbin/ioscan -f | grep "BNCHMARK"
The new lines should look similar to the following, where the 4 in the I field represents
the instance of the SCSI tape driver, not the SCSI ID:
Class I
tape
H/W Path
4 2/0/1.5.0
Driver S/W State
H/W Type
Description
stape CLAIMED
DEVICE
HP------BNCHMARK
creating the device files
Once you have verified the tape drive connection, you will need to create the
appropriate device files for the drive. Normally, you would have rebooted your
system after attaching the tape drive, and this process runs insf. However, if you
have not rebooted your system since attaching the drive, you should run insf as
follows before running mksf to create the device files:
% /sbin/insf -C tape
Create the device files for the devices using the mksf command as follows:
% /sbin/mksf -d stape -I <instance> [-n] [-u] /dev/rmt/X<name>
where:
Argument
-d stape
-I <instance>
[-n]
[-u]
Description
Specifies the SCSI tape driver
Specifies the tape drive’s hardware address via the
instance of the SCSI tape driver. The first instance is 0,
the second 1, and so on.
Specifies no rewind; absence of this parameter indicates
rewind mode
Specifies Berkeley mode; absence of this parameter
indicates AT&T mode. Berkeley and AT&T modes differ
in their read-only close behavior:
In Berkeley mode, the tape position will remain
unchanged by a device close operation.
In AT&T mode, a device close operation will cause
the tape to be repositioned just after the next tape
filemark (the start of the next file).
In most cases, Berkeley mode should be used.
/dev/rmt/X<name> Specifies the path of the device file, where:
X
Specifies the tape device identifier. Use the next
available identifier. You can examine the
contents of /dev/rmt using the ls command
to determine which identifiers have already
been used.
<name> Specifies the short name (in HP-UX 9.x-style) of
the device file:
mnb No rewind, compression disabled,
Berkeley-mode device
hnb No rewind, compression enabled,
Berkeley-mode device
mnb No rewind, compression disabled,
Berkeley-mode device
hnb No rewind, compression enabled,
Berkeley-mode device
See the man page (man 1m mksf) for other options of the mksf command. The
stape section covers the SCSI tape driver options. The man page man 7 mt
describes the long filenames used in HP-UX 10.x.
example:
To create a device file with the following characteristics:
A hardware address specified by instance 5 (-I 5)
No rewind (-n)
Berkeley mode tape positioning on close (-u)
A filename of 4mnb, where 4 is the tape device identifier (/dev/rmt/4mnb)
You would execute the following:
% /sbin/mksf -d stape -I 5 -n -u /dev/rmt/4mnb
You can check that the appropriate device file was created using the lssf
command as follows:
% /sbin/lssf /dev/rmt/4mnb
This should produce the following output to show that the device file now exists:
stape card instance 0 SCSI target 6 SCSI LUN 0 berkeley no
rewind
BEST density at address 2/0/1.6.0 /dev/rmt/4mnb
Once the device files have been created, you should confirm that your new tape
drive is working properly. See Verifying Installation.
© 2000, Hewlett-Packard Company
file:///C|/Documents%20and%20Settings/topher.COL-SPRINGS/Desktop/manual/document/dlt1/user/reseller/eng/c_hp.htm [12/3/2001 7:50:46 AM]
Unix - dec
hp learning products
http://www.hp.com/support/tape may have a later version
data protection
contact hp
home page
before you start
operation
cartridge care
cleaning
specifications
media compatibility
diagnostics
troubleshooting
FAQs
SCSI configuration
UNIX configuration
hp systems
dec systems
ibm RS/6000
systems
pc based UNIX
systems
silicon graphics
sun systems
verify installation
UNIX glossary
ordering supplies
DEC systems, Digital UNIX 4.x
This topic is available in English only.
contents of this section
related topics
configuring for Digital UNIX 4.x
verifying installation
glossary
configuring for Digital UNIX 4.x
1 Add the following entry to your /etc/ddr.dbase file:
SCSIDEVICE
Type = tape
Name = "BNCHMARK" "DLT1"
2 Set the following parameters in the file:
PARAMETERS:
MaxTransferSize = 0xffffff
ReadyTimeSeconds = 0x2d
InquiryLength = 0x20
DENSITY:
DensityNumber = 0
OneFileMarkOnClose = yes
DensityCode = 0x00
Blocking = 0
CompressionCode = 0x0
Buffered = 0x1
DENSITY:
DensityNumber = 1
OneFileMarkOnClose = yes
DensityCode = 0x00
Blocking = 0
CompressionCode = 0x1
Buffered = 0x1
3 Rebuild the kernel by running /sbin/ddr_config_c, then reboot the
system with the tape drive attached. The device files for the DLT1 drive will
be generated in /dev/rmt when you reboot.
4 The names of the device files can be interpreted as follows:
[n]rmtX D
where:
Code Meaning
n No rewind
X Instance number assigned to the drive by the operating system
(0 is the first, 1 is the second, and so on)
h Compression on (high density)
l Compression off (low density)
For example, /dev/rmt/nrmt0h is a device file for the first device, which
is a high-density, no-rewind device.
Once the device files have been created, you should confirm that your new tape
drive is working properly. See Verifying Installation.
© 2000, Hewlett-Packard Company
file:///C|/Documents%20and%20Settings/topher.COL-SPRINGS/Desktop/manual/document/dlt1/user/reseller/eng/c_dec.htm [12/3/2001 7:50:48 AM]
UNIX ibm
hp learning products
http://www.hp.com/support/tape may have a later version
data protection
contact hp
IBM RS/600 systems, AIX
home page
before you start
operation
cartridge care
cleaning
specifications
media compatibility
diagnostics
troubleshooting
FAQs
SCSI configuration
UNIX configuration
hp systems
dec systems
ibm RS/6000
systems
pc based UNIX
systems
silicon graphics
sun systems
verify installation
UNIX glossary
ordering supplies
This topic is available in English only.
contents of this section
related topics
verifying installation
glossary
determining the SCSI ID
configuring the device files
device file names under AIX
determining the SCSI id
Before you configure your system to support your new HP Surestore DLT1 drive,
you need to determine what SCSI ID to use. The SCSI ID must be unique for each
device attached to the SCSI bus. To list the existing devices, use the following
command:
% lsdev -C |grep SCSI
This will produce output that looks similar to:
scsi0 Available 00-00-0S Standard SCSI I/O Controller
hdisk0 Available 00-00-0S-0 1.0 GB SCSI Disk Drive
rmt1 Defined 00-00-0S-2,0 Other SCSI Tape Drive
The SCSI ID is in the series 00-00-0S-X,0 where X is the SCSI ID. Review the list
of existing SCSI IDs and choose an available ID to assign to your new tape drive.
configuring the device files
To install the HP Surestore DLT1 drive on an IBM workstation running AIX, you will
need to create the appropriate device files for the drive.
NOTE: Do not choose the smit option of "4mm2gb" as the Tape Device Type. This
is reserved for Connor drives. If you use it with HP drives, you will get the error
"Device to be configured does not match the physical device
at the specified connection location".
To change to variable block mode, use the following procedure:
1 If you are using a graphics terminal running X-Windows, then at a Windows
terminal, type: smit tape
If you are using a non-graphics terminal, at the command line type:
% smit -C tape
2 If no device has been configured at this address before, select "add a
tape drive" to set up the address. From the pop-up window, select "ost"
or "Other SCSI tape drive" as the tape drive you wish to change and
choose connection addresses as appropriate.
3 Select from the window: "change/show characteristics of a tape
drive"
4 From the pop-up window, select "ost" or "Other SCSI tape drive" as
the tape drive you wish to change. Do not choose "4mm2gb".
5 Change the block size field to 0, and click on the "DO" button or press [Enter]
to apply the change.
HP DLT1 drives will work with tar, cpio, backup, restore and dd. For systems
other than the 43P, the drive is also boot-capable, provided a boot tape is
generated using mkszfile and mksysb.
Once the device files have been created, you should confirm that your new tape
drive is working properly. See Verifying Installation.
device file names under AIX
Use device filenames as listed below for the combination of Rewind on Close,
Retension on Open, and Compression that you want:
Filename Rewind on Close Retension on Open Compression
/dev/rmtn
Yes
No
enabled
/dev/rmtn.1
No
No
enabled
/dev/rmtn.2
Yes
Yes
enabled
/dev/rmtn.3
No
Yes
enabled
/dev/rmtn.4
Yes
No
disabled
/dev/rmtn.5
No
No
disabled
/dev/rmtn.6
Yes
Yes
disabled
/dev/rmtn.7
No
Yes
disabled
The n in the filename is the instance number assigned to the drive by the
operating system, where 0 is the first device, 1 is the second and so on.
Rewind on Close
Normally, the drive repositions the tape to BOT (Beginning
of Tape) when the device file is closed. Using the no rewind
option is useful when creating and reading tapes that
contain multiple files.
Retension on Open Retensioning consists of winding to EOT (End of Tape) and
then rewinding to BOT, in order to reduce errors. If this
option is selected, the tape is positioned at BOT as part of
the open process. DLT1 drives do not require retensioning,
so you should not use device fields that send retensioning
commands.
Compression
Compression can be disabled or enabled.
© 2000, Hewlett-Packard Company
file:///C|/Documents%20and%20Settings/topher.COL-SPRINGS/Desktop/manual/document/dlt1/user/reseller/eng/c_ibm.htm [12/3/2001 7:50:49 AM]
UNIX pc
hp learning products
http://www.hp.com/support/tape may have a later version
data protection
contact hp
home page
before you start
operation
cartridge care
cleaning
specifications
media compatibility
diagnostics
troubleshooting
FAQs
SCSI configuration
UNIX configuration
hp systems
dec systems
ibm RS/6000
systems
pc based UNIX
systems
silicon graphics
sun systems
verify installation
UNIX glossary
ordering supplies
PC-based UNIX, SCO and Linux
This topic is available in English only.
contents of this section
related topics
verifying installation
glossary
determining the SCSI ID (Linux)
configuring for an SCO system
configuring for a Linux system
determining the SCSI id (Linux)
Look at the output of dmesg to find out what SCSI channel number is used for
each connection.
To find out the SCSI IDs in use on each channel:
run cat /proc/scsi/scsi
This will produce output similar to the following for each device:
Attached devices:
Host: SCSI0 Channel:00 Id:00 Lun:00
Vendor: HP Model -----------Type: Direct-Access ANSI SCSI Revision 02
Look at the Id information to establish which Ids are in use.
configuring for an SCO system
To install the appropriate driver and device files on a SCO system, perform the
following steps:
1 Run ‘mkdev tape’ as root.
2 Select ‘Configure SCSI tape drive’.
3 Select ‘Install tape drive’.
4 Select the appropriate SCSI adapter.
5 Select the appropriate SCSI bus.
6 Select the Target ID to match the SCSI ID set on the back of the drive.
7 Select the LUN to be 0.
8 Enter ‘y’ to update the SCSI configuration.
9 Enter the following details:
Vendor identification string:
BNCHMARKDLT1
SCSI version to which the drive conforms: 2
Response Data Format (SCSI-2):
2
Generic device:
1
This procedure will automatically make the drive the default device, even if
another device is already configured.
You may want to edit /etc/conf/pack.c/stp/space.c to change the
filemark handling on close. By default, it writes only one filemark for a write
filemark ioctl(). See the comments in the space.c file.
10 Enter ‘q’ to leave unchanged the boot string that is displayed when the
system is rebooted.
11 Enter ‘q’ to return to the Main Menu.
12 Enter ‘q’ to quit.
13 You are now prompted to rebuild the kernel and the kernel environment
(which includes the device files). Perform both steps by answering ‘y’ when
prompted, and select the new kernel to be booted by default.
You can now use one of the following files, as appropriate, for backup
operations:
/dev/nrStpX if you require a no-rewind device
/dev/rStpX if you require a rewind device
where X is the instance number as assigned to the drive by the operating
system (0 is the first device, 1 is the second, and so on).
controlling compression with SCO
Because SCO does not have any compression/no-compression device files, you
must use ‘tape setcomp’ to control the compression status of the drive as
follows:
Command
Compression
Decompression
tape -a 0 setcomp
tape -a 1 setcomp
tape -a 2 setcomp
tape -a 3 setcomp
disabled
enabled
disabled
enabled
disabled
disabled
enabled
enabled
If you have multiple drives, you must specify the appropriate device files in the
command. For example:
% tape -a 0 setcomp /dev/nrStp2
Use ‘tape getcomp’ to tell you the current status of the drive.
NOTE: Do not use the SCO ‘mt’ utility. This is obsolete, and does not perform the
same function as ‘mt’ on other platforms. Use ‘tape’ to achieve the same result.
improving performance through block size on SCO
In order to improve performance, specify larger blocking factors for cpio and
tar. Use the ‘b’ option of tar with an argument of 20 or use the ‘B’ option of
cpio. For example:
% tar cvbf 20 /dev/rStpY ./*
or
% find / -print | cpio -ocB > /dev/rStpY
or, if you have a version of SCO UNIX earlier than 5.x:
% find / -print | cpio -ocB > /dev/rStpY
In each case, Y is the instance number as assigned to the drive by the operating
system (0 is the first device, 1 is the second, and so on).
Alternatively, you can use the tape command as follows:
% tape -a 32768 setblk <device file>
This explicitly sets the block size used for the drive when you are using built-in
applications such as cpio and tar. The <device file> is either
/dev/nrStpY or /dev/rStpY as described above.
configuring for Linux systems
No changes are needed to support DLT1 on Linux platforms, however you should
ensure that you have the relevant drivers loaded.
To see the device drivers loaded currently, execute an lsmod command, this will
give output like:
Module Size Used by
sgm 4376 1
ide-scsi 7200 0
lockd 30792 1
sunrpc 53316 1
st 24656 0
ncr53c8xx 52096 1
aic7xxx 136184 2
The lines of interest here are:
st
This is the tape driver. Its presence in the output of the lsmod
command shows that the tape driver is loaded.
ncr53c8xx This is a SCSI chipset driver for the LSI Logic family of HBAs
(amongst others).
aix7xxx
This is a SCSI chipset driver for the Adaptec 7xxx chipset family (such
as Adaptec 2940UW).
In order to communicate with a tape device, the operating system needs to have
drivers for the tape and the underlying transport mechanism (the host bus
adaptor) loaded. Ensure that both are available as either loadable modules (for
example, usable with insmod and visible with lsmod) or are statically built into
your kernel.
In order to determine if the drive has been detected by the tape driver at module
load time, execute:
dmesg | grep "st"
This should find a number of lines. One should look like:
Detected SCSI tape st0 at scsi1, channel 0, id 5, lun 0
To load the tape driver module if it is not loaded as above, execute:
insmod st
to load it. This should happen naturally if your system is rebooted after attaching
the drive.
In order to enable large transfers under Linux (>64 KB per write), edit the file
/usr/src/linux/drivers/scsi/st_options.h and change the definition
of ST_BUFFER_BLOCKS.
If you want requests to space to end of data to be faster, you should also enable
ST_FAST_MTEOM in the same file. After changing this file, rebuild the modules and
install the new binary. At the very least, this requires:
make modules
make modules_install
from the /usr/src/linux directory. See your kernel documentation.
© 2000, Hewlett-Packard Company
file:///C|/Documents%20and%20Settings/topher.COL-SPRINGS/Desktop/manual/document/dlt1/user/reseller/eng/c_pc.htm [12/3/2001 7:50:51 AM]
UNIX sgi
hp learning products
http://www.hp.com/support/tape may have a later version
data protection
Silicon Graphics systems, IRIX
contact hp
home page
before you start
operation
cartridge care
This topic is available in English only.
contents of this section
cleaning
specifications
media compatibility
diagnostics
troubleshooting
FAQs
SCSI configuration
UNIX configuration
hp systems
dec systems
ibm RS/6000
systems
pc based UNIX
systems
silicon graphics
sun systems
verify installation
UNIX glossary
ordering supplies
related topics
verifying installation
glossary
determining the SCSI ID
configuring the device files
MTCAN and constants values
determining the SCSI id
Before you configure your system to support your new HP Surestore DLT1 drive,
you need to determine what SCSI ID to use. The SCSI ID must be unique for each
device attached to the SCSI bus. To list the existing devices, use the following
command:
% hinv -v | grep SCSI
This will produce output similar to the following:
Integral SCSI controller 0: Version WD33C93B, revision D
Disk drive: unit 1 in SCSI controller 0
In this, “unit X” indicates the SCSI ID. Review the list of existing SCSI IDs and
choose an available ID to assign to your new tape drive.
configuring the device files
To install the HP Surestore DLT1 drive on a Silicon Graphics system running IRIX,
you will need to modify the kernel configuration file.
1
If you want tar to default to short block transfers, change the 512*512 in
your tpsc or scsi HP entry to 128*512 (128-kilobyte blocks) or, better still,
64*512 (64-kilobyte blocks).
Select the name of the kernel configuration file for your version of IRIX from
the list below and open it with a text editor:
For IRIX 6.2 and later: /var/sysgen/master.d/scsi
2
Find the following entry in the kernel configuration file and copy it to a new
location in the file where you can edit it as appropriate for your tape drive:
For IRIX 6.2:
{DECDLT, TPDLT,8,4,"BNCHMARK","DLT1",0,0,{0},
MTCAN_BSF|MTCAN_BSR|MTCAN_APPEND|
MTCAN_PREV|MTCAN_SYNC|MTCAN_SPEOD|MTCAN_CHKRDY|MTCAN_VAR|
MTCAN_SETSZ|MTCAN_SILI|MTCAN_SEEK|MTCAN_COMPRESS,
/*minimum delay to I/O is 4 minutes, because when a retry
is *performed, the drive retries a number of times, and
then
*rewinds to BOT, repositions, and tries again.*/
40, 4*60, 20*60, 5*60, 512, 64*512, 0, (u_char*)0 },
For IRIX 6.4/6.5:
{ DATDLT, TPDLT, 8, 4, "BNCHMARK", "DLT1", 0, 0, {0},
MTCAN_BSF|MTCAN_BSR|MTCAN_APPEND|
MTCAN_PREV|MTCAN_SYNC|MTCAN_SPEOD|MTCAN_CHKRDY|MTCAN_VAR|
MTCAN_SETSZ|MTCAN_SILI|MTCAN_SEEK|MTCAN_COMPRESS,
/* minimum delay on i/o is 4 minutes, because when a
retry is
* performed, the drive retries a number of times, and
then
* rewinds to BOT, repositions, and tries again. */
40, 4*60, 4*60, 5*60, 3*3600, 512, 512*512,
tpsc_default_dens_count, tpsc_default_hwg_dens_names,
tpsc_default_alias_dens_names,
{0}, 0, 0, 0,
0, (u_char *)0 },
For an explanation of the functions of the MTCAN values and constants, see
"MTCAN and Constants Values".
3
Recompile the kernel by running autoconfig and then reboot the system.
When you reboot, the device files for the DLT1 drive will be created
automatically.
The following device files will be created in /dev/rmt:
tps0d3
tps0d3c
tps0d3cnr
tps0d3cnrns
tps0d3cnrnsv
tps0d3cnrs
tps0d3cnrsv
tps0d3cnrv
tps0d3cns
tps0d3cnsv
tps0d3cs
tps0d3csv
tps0d3cv
tps0d3nr
tps0d3nrns
tps0d3nrnsv
tps0d3nrs
tps0d3nrsv
tps0d3nrv
tps0d3ns
tps0d3nsv
tps0d3s
tps0d3sv
tps0d3v
tps0d3stat
These device file names can be interpreted as follows:
Device Name Function
c
Compression
nr
No rewind on close
v
Device supports variable block sizes
ns
Device does not byte-swap
s
Device does byte-swap
stat
Allows the device to be used when one of the other device
files specifying the same physical device is already opened
For example, the device file tps0d3 indicates a device on controller card 0 at
SCSI ID 3, and the device file tps0d3nrv indicates a device on controller card 0
at SCSI ID 3 that does not rewind on close and supports variable block sizes.
Once the device files have been created, you should confirm that your new tape
drive is working properly. See Verifying Installation.
MTCAN and constants values
The MTCAN values have the following functions:
MTCAN
value
Capability Enabled
APPEND
Append to existing tape data
BSF
Backspace file
BSR
Backspace record
CHKRDY
Determine if a tape cartridge is present
CHTYPEANY Change density and/or fixed to variable at points other than
beginning of tape
COMPRESS Compression
PREV
Prevent media removal
SEEK
Seek to a particular block
SETSZ
Fixed block size can be set
SILI
Suppress illegal length indicators
SPEOD
Space to EOD (end of data)
SYNC
Synchronous mode SCSI
VAR
Variable block sizes
The constants have the following functions:
Constant
Description
40
4*60
4*60
5*60
512
64*512 or
512*512
Transfer time-out in "inverse ticks"
Minimum time-out in seconds for any command
Space command time-out in seconds
Time-out in seconds for long operations (such as rewinds)
Default block size in bytes for fixed block size mode
Recommended blocking factor in bytes for the upper limit of
read/write commands
© 2000, Hewlett-Packard Company
file:///C|/Documents%20and%20Settings/topher.COL-SPRINGS/Desktop/manual/document/dlt1/user/reseller/eng/c_silcon.htm [12/3/2001 7:50:53 AM]
UNIX sun
hp learning products
http://www.hp.com/support/tape may have a later version
data protection
contact hp
Sun systems, Solaris 2 (SunOS 5.x)
home page
before you start
operation
cartridge care
cleaning
specifications
media compatibility
diagnostics
troubleshooting
FAQs
SCSI configuration
UNIX configuration
hp systems
dec systems
ibm RS/6000
systems
pc based UNIX
systems
silicon graphics
sun systems
verify installation
UNIX glossary
ordering supplies
This topic is available in English only.
contents of this section
related topics
determining the SCSI ID
configuring the device files
hp-data values
verifying installation
glossary
determining the SCSI id
Before you configure your system to support your new HP SureStore DLT1 drive,
you need to determine what SCSI ID to use. The SCSI ID must be unique for each
device attached to the SCSI bus.
1 Check for existing SCSI controllers using the following command:
% modinfo | grep "SCSI Host"
This will produce output similar to the following:
18 501a4000 c3b8 61 1 esp (ESP SCSI Host Bus Adapter Drive)
21 501c8000 9e70 6 1 fas (FAS SCSI Host Bus Adapter Drive)
This indicates that there are two SCSI controllers on the system, an ESPbased adapter and a FAS-based adapter. For the adapter to which the new
tape drive is attached, you will need to determine what SCSI IDs are already
used.
2 Determine the SCSI IDs of the existing devices attached to the SCSI
controller:
For all adapters:
% dmesg | egrep ".*xxx.*target" | sort | uniq
where xxx = the type of adapter (esp, glm, fas or isp), as appropriate.
For example, for an ESP-based adapter:
% dmesg | egrep ".*esp.*target" | sort | uniq
This produces a list similar to:
sd0 at esp0: target 0 lun 0 sd6 at esp0: target 6 lun 0
This indicates that SCSI IDs 0 and 6 are used for existing devices. SCSI ID
7 is generally used for the adapter itself. In this situation, you would use a
SCSI ID from 1 to 5 for the new tape drive.
configuring the device files
Only if necessary, make the following file modifications to enhance performance:
1 In the file /kernel/drv/st.conf, after these lines:
########
# Copyright (c) 1992, by Sun Microsystems, Inc.
#ident "@(#)st.conf 1.6 93/05/03 SMI"
add the following:
tape-config-list =
"BNCHMARKDLT1", "HP DLT1", "DLT1",
DLT1 = 1,0x36,0,0xd639,4,0x00,0x00,0x86,0x87,3;
name="st" class="scsi"
target=X lun=0;
where X is the SCSI target address of the device you have attached.
2 If you are replacing an existing tape device on the same SCSI ID, remove
the contents of the /dev/rmt directory as follows:
% cd /dev/rmt
% rm *
3 Do a reconfigure boot:
% cd /
% touch /reconfigure
% sync;halt
4 When the system is down, reboot:
% boot -r
Make sure you include the -r switch, so that the device directory is
reconfigured using the new data.
5 You should now be able to use the drive:
Use /dev/rmt/Xcb if you require a compression rewind device file,
where X is the relevant device address.
Use /dev/rmt/Xcbn when you require a compression non-rewind
device.
Once the device files have been created, you should confirm that your new tape
drive is working properly. See Verifying Installation.
hp-data values
The values for DLT1 and name, which provide normal DLT mode, have the
following meanings:
Value
1
Meaning
This value should be 1.
0x36
Value for a DLT drive in /usr/include/sys/mtio.h.
0 or
1024
Default block size. For variable block size, use 0 instead of 1024
(except with Solaris 2.3, where you should not use 0).
0xd639 A value is derived from constants provided in
/usr/include/sys/scsi/targets/stdef.h. The value
determines which operations the driver can perform with the
attached device by using a unique value for each feature and then
adding them together to form 0xd639. The features are as follows:
0x001 Device supports variable length records.
0x008 Device can backspace over files (as in the ‘mt bsf’
option).
0x010 Device supports backspace record (as in ‘mt bsr’).
0x020 Device requires a long time-out period for erase
functions.
0x0200 Device knows when end of data has been reached.
0x0400 Device driver is unloadable.
0x1000 Time-outs five times longer than normal.
0x4000 Driver buffers write requests and pre-acknowledges
success to application.
0x8000 Variable record size not limited to 64 KB.
0x00
Default density setting. Creates a device file with compression
disabled.
0x86
Density code specifying 40GB capacity (no compression).
0x87
The density code for data compression enabled by default (80GB).
target=X X specifies the SCSI ID (target) of the device.
lun=0
Specifies the LUN for the device.
© 2000, Hewlett-Packard Company
file:///C|/Documents%20and%20Settings/topher.COL-SPRINGS/Desktop/manual/document/dlt1/user/reseller/eng/c_sun.htm [12/3/2001 7:50:55 AM]
verify the installation
hp learning products
http://www.hp.com/support/tape may have a later version
data protection
contact hp
verify the installation
home page
before you start
operation
This topic is available in English only.
cartridge care
cleaning
specifications
media compatibility
diagnostics
troubleshooting
FAQs
SCSI configuration
UNIX configuration
hp systems
dec systems
ibm RS/6000
systems
pc based UNIX
systems
silicon graphics
sun systems
verify installation
UNIX glossary
ordering supplies
contents of this section
overview
verifying the installation
example
system-specific arguments
glossary
overview
As part of the installation process, you will have installed the appropriate device
driver for your UNIX system and created device files to communicate with the tape
drive. This section describes how you can verify that the installation has been
performed correctly.
In outline, the procedure is as follows:
1 Write test data to a tape.
2 Read the test data from the tape.
3 Compare the data read from the tape with the original data on disk.
verifying the installation
1
Test the SCSI connection to the tape drive by doing a rewind operation:
a If there is a tape cartridge already in the drive, remove it.
b Insert a tape cartridge.
c Rewind the tape using the command line:
% mt -t <archive name> rewind
or for SCO UNIX:
% tape -a /dev/rStpX rewind
If you do not see the Ready light flash as the tape rewinds, the
hardware installation may be faulty. Check the troubleshooting
section of the User’s Guide for help in identifying the problem.
2
Write a sample file to tape, using ‘tar’:
% cd /
% tar cvf <archive name> <file>
The options to tar have the following meanings:
c
v
f
Create a new archive (backup file) on the device.
Operate in verbose mode.
Specify the archive name explicitly.
The arguments follow the cvf options in the command line. Their values
depend on the operating system; suggested values are given in "SystemSpecific Arguments". The arguments are as follows:
<archive name>
<file>
The name of the archive name to be created.
Example: /dev/rmt/0m
The name of the file to archive, prefixed with ‘./’.
Example: ./stand/vmunix
NOTE Make sure you prefix the file name with ‘.’ when you back it up to tape. If
you do not, the restore operation in step 3 will overwrite the original copy
on disk.
3
Read the file back from tape:
% cd /tmp
% tar xvf <archive name>
The ‘x’ option to tar here means "extract from the archive".
Use the same value for the <archive name> argument as in step 2.
4
Compare the original with this retrieved file:
% cmp <original file> /tmp/<retrieved file>
This step compares the retrieved file and the original file byte by byte. If
they are the same, there should be no output, and this verifies that the
installation is correct. The arguments are as follows:
<original file>
<retrieved file>
The name of the original file, prefixed with ‘/’.
Example: /stand/vmunix
The name of the file retrieved from the archive.
Example: stand/vmunix
example
Suppose you are verifying the installation of an HP DLT1 tape drive on an HP-UX
10.X system. The procedure would be as follows. See "System-Specific
Arguments" below for the choice of <archive name> and <file> arguments:
1 Change directory to root:
% cd /
2 Back up /stand/vmunix to tape:
% tar cvf /dev/rmt/0m ./stand/vmunix
Note the prefix of ‘.’ to the filename.
3 Change to the temporary directory:
% cd /tmp
4 Extract the file from the tape:
% tar xvf /dev/rmt/0m
5 Compare the original with the restored version:
% cmp /stand/vmunix /tmp/stand/vmunix
Note that the original filename is not prefixed with ‘.’.
system-specific arguments
The following table lists suggested values for the arguments <archive name> and
<file> in the verification procedure described above. If any of the suggested files are
symbolic links on your system, choose another file appropriate for your system.
System
File Name
Description
Archive Name Notes
DEC OSF
vmunix
OSF kernel
/dev/rmt/Ym
Y is the instance
of the drive
HP-UX 10.x
stand/vmunix HP-UX kernel /dev/rmt/Ym
Y is the instance
of the drive
IBM AIX
unix
Y is the device
ID reported
back as
available when
you ran ‘smit C tape’ to
create the
device files.
AIX kernel
/dev/rmtY.1
/dev/rmtY.1
SCO
unix
SCO kernel
/dev/rmtY.1
Use the device
file created
during the
running of
‘mkdev tape’,
where Y is the
instance of the
tape drive.
Silicon Graphics unix
IRIX
IRIX kernel
/dev/rmt/tpsCdX C is the SCSI
card
X is the SCSI ID
of the drive
SUN Solaris 2
(SunOS 5.x)
bin/csh
C shell
Determine the archive name as
described below*.
Linux
bin/sh
Bourne shell /dev/stp
*For SUN Solaris 2, determine the archive name by typing:
% ls -l /dev/rmt/*m | grep "st@X"
where X is the SCSI ID. Identify the line for the tape drive. For example, if the drive was
at SCSI ID 2, look for the line containing "st@2,0". This might be as follows (but on a
single line):
lrwxrwxrwx 1 root root 63 Mar 1 00:00 /dev/rmt/0m
../../devices/sbus@1f,0/espdma@e,8400000/esp@e,8800000/st@2,0:m
Here you could use /dev/rmt/0m (shown underlined above) as the archive name.
© 2000, Hewlett-Packard Company
file:///C|/Documents%20and%20Settings/topher.COL-SPRINGS/Desktop/manual/document/dlt1/user/reseller/eng/c_verify.htm [12/3/2001 7:50:57 AM]
UNIX glossary
hp learning products
http://www.hp.com/support/tape may have a later version
data protection
contact hp
glossary
home page
before you start
operation
cartridge care
cleaning
specifications
media compatibility
diagnostics
troubleshooting
FAQs
SCSI configuration
UNIX configuration
hp systems
dec systems
ibm RS/6000
systems
pc based UNIX
systems
silicon graphics
sun systems
verify installation
UNIX glossary
This topic is available in English only.
AT&T mode
Berkeley and AT&T functional modes differ in "read only" close functionality. In
AT&T mode, a device close operation will cause the tape to be repositioned just
after next tape filemark (the start of the next file).
Berkeley mode
Berkeley and AT&T functional modes differ in "read only" close functionality. In
Berkeley mode the tape position will remain unchanged by a device close
operation.
Compression
A procedure in which data is transformed by the removal of redundant information
to reduce the number of bits required to represent the data. This is done by
substituting short codewords for strings of bytes.
Filemark
ordering supplies
A mark written by the host to the tape, which can be searched for, often using the
drive's fast-search capability. It does not necessarily separate files. It is up to the
host to assign a meaning to the mark.
Immediate mode
A mode of responding to SCSI commands where the drive or other peripheral does
not wait until the command has finished before returning status information back to
the host. When writing filemarks, Immediate mode can significantly improve the
performance of systems which do not set the Immediate bit when sending a SCSI
WRITE FILEMARKS command. On the other hand, data is not flushed to tape in
response to a filemark command.
Infinite flush
By default, the buffer in the drive is flushed every 5 seconds. Infinite flush avoids
frequent starting and stopping of the mechanism when using a very slow
application. It also avoids losing capacity through the flushing of partly written
groups. On the other hand, infinite flush means that data can remain in the buffer
for very long periods of time, and could be lost in the event of a power failure.
LUN
Logical Unit Number. A unique number by which a device is identified on the SCSI
bus. A tape drive has a fixed LUN of 0. In an autoloader, the changer mechanism is
LUN1.
© 2000, Hewlett-Packard Company
file:///C|/Documents%20and%20Settings/topher.COL-SPRINGS/Desktop/manual/document/dlt1/user/reseller/eng/c_gloss.htm [12/3/2001 7:50:58 AM]
ordering supplies
hp learning products
http://www.hp.com/support/tape may have a later version
data protection
contact hp
home page
before you start
operation
cartridge care
cleaning
specifications
media compatibility
diagnostics
troubleshooting
FAQs
ordering supplies
contents of this section
cables
adapters
rail kits
media
SCSI cables
SCSI configuration
UNIX configuration
ordering supplies
Part
Number
Item
Description
1.0 m internal
2 connector, 68-way, terminated, LVD/SE Ultra2
C7491A
quality conductor
0.9 m external
68-pin high density to 68-pin high density,
LVD/SE Ultra2 quality conductor
C5741A
1.5 m external
68-pin high density to 68-pin high density,
LVD/SE Ultra2 quality conductor
C5742A
2.5 m external
68-pin high density to 68-pin high density,
LVD/SE Ultra2 quality conductor
C5743A
1.5 m external
68-pin very high-density (VHD) to 68-pin highdensity LVD/SE Ultra2 quality conductor
C7482A
terminator
external SCSI terminator (LVD/SE multimode)
C5738A
Item
Description
Part
Number
High-End Tape
Connect Kit
Ultra2 host bus adapter kit for internal and
external drives
C7474A
Item
Description
Part
Number
rail kit
for Compaq servers
C7469A
rail kit
for HP Netserver
C739160002
rail kit
for Dell PowerEdge servers 2300, 4100, 4200,
and 6100
C5732A
adapters
rail kits
media
Item
Description
Part
Number
data cartridge
HP DLTtape IV
C5141F
cleaning cartridge
HP DLT1
C7998A
© 2000, Hewlett-Packard Company
file:///C|/Documents%20and%20Settings/topher.COL-SPRINGS/Desktop/manual/document/dlt1/user/reseller/eng/order.htm (1 of 2) [12/3/2001 7:51:00 AM]
ordering supplies
file:///C|/Documents%20and%20Settings/topher.COL-SPRINGS/Desktop/manual/document/dlt1/user/reseller/eng/order.htm (2 of 2) [12/3/2001 7:51:00 AM]
SS DLT1 Int Eng
21/11/00 4:17 pm
Page 2
hp surestore dlt1
internal tape drive
DLT1
getting started guide
Dlt1getstart_int.fm Page 1 Thursday, November 16, 2000 1:47 PM
For further
details, see:
see
Before you start
Check system prerequisites. (Always connect to a wide, Ultra SCSI-2 Low Voltage Differential (LVD)
or Single-Ended (SE) SCSI bus.) Visit the HP Surestore DLT1 web page: //www.hp.com/
support/dlt1. For example, you can use HP Library & Tape Tools to help you install your drive.
page 3
Step 1: Check the drive’s SCSI ID
Check the tape drive’s SCSI ID. If necessary, change it from the default of 5 by resetting the jumpers
on the back of the drive.
page 7
Step 2: Prepare the mounting bay
Switch off the computer and attached devices, remove all power cables, and remove the
computer’s outer casing. Remove the blanking plate(s) from a spare, full-height 5-¼ inch bay.
page 9
Step 3: Attach mounting hardware
If your computer requires special rails to install the tape drive, mount them on the drive now. In the
box, you will find a mounting tray for HP NetServer L-series.
page 11
Step 4: Install the drive
Install the drive. To make it easier to fit the cables, do not secure the drive with screws yet.
page 13
Step 5: Attach power and SCSI cables
Attach a spare power cable from the computer’s internal power supply. Attach a SCSI cable to the
drive and to the computer’s SCSI host adapter (which should be LVD or SE).
page 15
Step 6: Secure the drive
Secure the drive into place with screws. Replace the computer’s outer casing.
page 17
Your tape drive
Find out what the LEDs on your tape drive indicate and make sure you are using the correct type
of cartridge.
page 19
Use the correct media
Find out how to use and care for DLTtape IV cartridges and how to use DLT1 cleaning cartridges.
page 21
Operating the tape drive
Power on the system and check the tape drive is operational. Carry out a trial backup and restore.
page 23
HP Library & Tape Tools
Find out more about the free diagnostic and troubleshooting tool supplied with your tape drive.
page 25
Register your tape drive
Register your tape drive to ensure you receive up-to-date information about HP’s products, services
and support.
page 26
Troubleshooting
If you experience problems during installation, check this section first. For more detailed
troubleshooting information visit the web site: //www.hp.com/support/dlt1.
page 27
1
Dlt1getstart_int.fm Page 2 Thursday, November 16, 2000 1:47 PM
Copyright © 2000 by Hewlett-Packard Limited.
October 2000
The information contained in this document is subject to change without notice.
This document contains proprietary information which is protected by copyright. All rights are
reserved. No part of this document may be photocopied, reproduced or translated to another
language without the prior written consent of Hewlett-Packard Limited.
Hewlett-Packard shall not be liable for errors contained herein or for incidental or consequential
damages (including lost profits) in connection with the furnishing, performance, or use of this material
whether based on warranty, contract, or other legal theory.
Windows is a U.S. registered trademark of Microsoft Corp.
UNIX is a registered trademark of X/Open Company in the U.S. and other countries.
Write your tape drive details here so you can find them easily if you need them.
Model (type of drive):
Model (number):
Serial (number):
Date purchased/installed:
SCSI ID:
2
Dlt1getstart_int.fm Page 3 Thursday, November 16, 2000 1:47 PM
To install and use your new tape drive, you will need the following:
• A wide, Ultra SCSI-2 LVD or SE SCSI bus
• LVDS compliant SCSI ribbon cable with termination (normally supplied with the host bus adapter)
• Available 5¼-inch, full-height mounting bay (or two adjacent half-height bays)
• Mounting hardware, if required
• Backup software that supports the HP Surestore DLT1 tape drive
SCSI host bus adapter
You need a properly installed and configured SCSI host bus adapter or a built-in SCSI controller on
your computer’s motherboard (SCSI-2 or SCSI-3 compliant). Connectivity information can be found
on our World Wide Web site: //www.hp.com/go/connect. Check the server documentation for
the specification of any built-in SCSI channels. Do not connect to a RAID controller channel; these are
for disk drives only.
If you are installing on a Windows 98, Windows NT 4, Windows 2000 or Novell NetWare system,
you can use HP Library & Tape Tools to check your computer’s SCSI configuration, see page 23.
HP Surestore DLT1 drives are Ultra SCSI-2 wide SCSI devices designed to operate on an LVD-SCSI bus
with a burst transfer rate of 40 MB/sec. Using the drive on a single-ended SCSI bus restricts
performance. Do not use on the same bus as other single-ended devices as this will switch the LVDS
host adapter into single-ended mode and restrict performance. HP recommends that a dedicated host
bus adapter is used for the tape drive. A suitable adapter is available from HP as an accessory. For
ordering information, SCSI specifications, and information on how to configure your SCSI bus, refer
to the online User’s Guide on: //www.hp.com/support/dlt1.
SCSI ribbon cable
You need an Ultra SCSI-2 wide SCSI ribbon cable with the correct termination.
HP Surestore DLT1 drives have a 68-pin wide, high-density SCSI connector. If you are using an
HP Surestore DLT1 drive on an internal bus with other peripherals that run at Ultra SCSI-2 speeds, it
is important that a 68-pin LVD-compatible ribbon cable is used.
Mounting bay
You need one industry standard, 5¼-inch, full-height bay in which to install the HP Surestore DLT1
tape drive.
Mounting hardware
For many servers, no tray or rails are required. Devices simply slide into the computer’s chassis and
are fixed with screws. Other servers have built-in trays or rails.
Some servers require a special mounting tray or rails to fix the drive into the empty bay. The drive
comes with mounting hardware for HP NetServer L-series. (Not all HP servers require rails. Some have
a built-in mounting tray.) Some Compaq servers require rails which may be obtained separately by
ordering: HP accessory C7469A.
3
Dlt1getstart_int.fm Page 4 Thursday, November 16, 2000 1:47 PM
Rails for Dell servers may also be ordered separately. Different models of server require different rail
kits. For more details, refer to the HP support web site: //www.hp.com/support/dlt1
Other computers use non-standard mounting rails and do not include spares. If this is the case with
your system, you will have to order these accessories from the computer manufacturer before you can
install the tape drive.
Backup software
You need a backup application that supports the HP Surestore DLT1 drive. A TapeWare CD-ROM
containing backup software by Yosemite Technologies is supplied with your tape drive.
As a general rule, native backup applications (such as NTBackup and tar) do not provide the data
streaming rate required to support the full performance of your HP Surestore DLT1 tape drive. We
recommend using a backup application that can provide the required data streaming rate as well as
other useful features, such as TapeAlert. Computer Associates, HP, Veritas and Legato all provide
suitable products that have been tested with HP Surestore drives. For the latest list of backup
applications that support HP Surestore drives, please consult our World Wide Web site
(www.hp.com/go/connect).
Applications usually recognize tape drives by their manufacturers’ internal identifiers rather than their
model numbers, so check the table below for the appropriate reference for your model.
4
Drive Model
Internal Identifier
HP Surestore DLT1
BNCHMARKDLT1
Dlt1getstart_int.fm Page 5 Thursday, November 16, 2000 1:47 PM
The HP Surestore DLT1 web site: //www.hp.com/support/dlt1 contains drivers, useful utilities,
and information to help you install and use your tape drive.
HP product registration
To register your new tape drive electronically via the web, use the “Product Registration” link.
Drivers
For detailed information about drivers, refer to the “Drivers” link. There is a separate link for each
operating system. The tape drive must be installed before installing the driver.
User documentation
For more information about using your HP Surestore DLT1 tape drive, refer to the online User’s Guide.
Refer to your backup application’s documentation for instructions on how to back up and restore data.
HP Library & Tape Tools
HP Library & Tape Tools software provides diagnostic and troubleshooting utilities. It allows you to
identify your product correctly, check SCSI ID information on the SCSI bus, run tests, carry out
firmware updates and, if necessary, generate comprehensive troubleshooting information for support
calls. For further details see page 27.
TapeAlert plug-ins
TapeAlert is a tape drive status monitoring and messaging utility that makes it easy to detect problems
that could have an impact on backup quality. From the use of worn-out tapes to defects in the drive
hardware, TapeAlert provides easy-to-understand warnings of errors as they arise, and suggests a
course of action to remedy the problem.
To take advantage of TapeAlert, you need a TapeAlert-compatible tape drive, such as the
HP Surestore DLT1 drive, and TapeAlert-compatible backup software. The HP Surestore DLT1 web site
contains plug-ins for leading network management consoles, such as TapeAlert for OpenView, to
monitor your tape drive across the network.
5
Dlt1getstart_int.fm Page 6 Thursday, November 16, 2000 1:47 PM
Figure 1: checking the drive’s SCSI ID
6
Dlt1getstart_int.fm Page 7 Thursday, November 16, 2000 1:47 PM
Note
1
Your HP Surestore DLT1 drive is shipped with a default SCSI ID of 5, but it can be assigned any
unused ID between 0 and 15. Do not use SCSI ID 7, which is usually reserved for the SCSI controller,
or SCSI ID 0, which is typically assigned to the boot disk. We do not recommend installing the drive
onto a narrow SCSI bus, as this will restrict performance. (See “SCSI host bus adapter” on page 3.)
Determine whether you need to change the SCSI ID from the default of 5.
If you are installing on a Windows 98, Windows NT 4, Windows 2000 or NetWare system, you
can install HP Library & Tape Tools from the web site: //www.hp.com/support/tapetools and
run the “Install Check” to check your computer’s current SCSI configuration (see page 23).
If you are installing on a UNIX® system, check the online User’s Guide on our World Wide Web site
//www.hp.com/support/dlt1, for instructions on how to determine the SCSI IDs of existing
devices.
Caution
2
Static electricity can damage electronic components. Always wear an antistatic wriststrap if
possible. If not, to equalize the electromagnetic charges, touch a bare metal part of the computer
(such as the back plate) before you remove the tape drive from its bag.
Change the tape drive’s SCSI ID, if necessary.
The SCSI ID is set using jumpers on a set of pins at the rear of the drive. Use your fingers to move the
jumpers to the pattern corresponding to the ID you want, see figure 1.
Spare jumpers will either be on the pin array itself (but only attached to a single pin) or in the
accessories box.
7
Dlt1getstart_int.fm Page 8 Thursday, November 16, 2000 1:47 PM
Figure 2a: preparing mounting bay in a
typical HP server
Figure 2c: preparing mounting bay in a
typical IBM server
8
Figure 2b: preparing mounting bay in a
typical Compaq server
Figure 2d: preparing mounting bay in a
typical Dell server
Dlt1getstart_int.fm Page 9 Thursday, November 16, 2000 1:47 PM
Caution
To avoid personal injury or damage to the computer or tape drive, ensure that the computer is
disconnected from the mains while you install the drive.
Static electricity can damage electronic components. Always wear an antistatic wriststrap if one is
available. If not, after you have disconnected power from the computer and removed the cover,
touch a bare metal part of the chassis. Similarly, touch a bare metal part of the drive before
installing it.
1
Assemble the necessary tools and materials:
• Phillips screwdriver
• Flat-bladed screwdriver (if your computer uses slotted screws)
• Torx screwdriver (if your computer uses torx screws)
• Your computer manuals (for reference during installation)
2
Perform a normal system shutdown and turn off the computer and any connected peripherals.
3
Remove the computer’s cover (as shown in figures 2a to 2d) and front panel (as detailed in your
computer’s documentation).
As you work inside the computer, you may have to disconnect the SCSI cable or power cable from
other devices to maneuver the new drive into place. If you have to do this, make a note of their
position and connections so you can put them back correctly later.
4
Remove the front filler panel from a full-height, 5¼-inch bay of your computer, as described in your
computer’s documentation. Keep any screws for use in step 6 on page 17.
9
Dlt1getstart_int.fm Page 10 Thursday, November 16, 2000 1:47 PM
Figure 3: attaching tray for NetServer L-Series servers
10
Dlt1getstart_int.fm Page 11 Thursday, November 16, 2000 1:47 PM
If your computer requires special rails or other hardware to install the tape drive, mount them on the
tape drive in this step.
If your computer does not require special mounting hardware, proceed to step 1 on page 13 now.
1
Attach the appropriate rails:
• If you are installing in an HP NetServer L-series, place the tape drive in the mounting tray supplied,
as shown in figure 3.
• Some IBM servers have snap-on mounting rails attached to the filler panel. These can be removed
and attached to the tape drive with screws. Mounting hardware may be required for some other
servers such as DELL and Compaq servers. For more details, refer to the HP support web site:
//www.hp.com/support/dlt1
• If your computer uses other mounting hardware, attach it to the tape drive as directed in your
computer documentation.
2
Secure the tape drive in the mounting tray using the four screws supplied with your drive.
11
Dlt1getstart_int.fm Page 12 Thursday, November 16, 2000 1:47 PM
Figure 4: installing the drive
12
Dlt1getstart_int.fm Page 13 Thursday, November 16, 2000 1:47 PM
Note
Write the model name, product number, serial number, and SCSI ID of your drive somewhere safe
for future reference. The model name is on the front of the drive and the product and serial numbers
are on a label on the top of the drive.
1
Slide the tape drive into the open bay, aligning the tray or rails with the slots in the bay, as shown
in figure 4.
If your computer does not use mounting hardware, check that the holes in the chassis are aligned with
the holes in the side of the tape drive.
Do not secure the drive with screws at this point because you may have to move the drive to get the
cables into place.
2
Install a SCSI host adapter in the selected server or workstation now, if necessary. For information on
SCSI host requirements, see page 3.
13
Dlt1getstart_int.fm Page 14 Thursday, November 16, 2000 1:47 PM
Figure 5: attaching SCSI and power cables to internal drive
14
Dlt1getstart_int.fm Page 15 Thursday, November 16, 2000 1:47 PM
1
Attach a spare power cable from the computer's internal power supply to the power connector, as
shown in figure 5.
2
Attach a spare SCSI cable on the computer’s SCSI ribbon cable to the SCSI connector, as shown in
figure 5.
Note
If the drive is the last or only device on the SCSI chain, it must be terminated.
15
Dlt1getstart_int.fm Page 16 Thursday, November 16, 2000 1:47 PM
Figure 6: securing the drive (side mounting screws shown)
16
Dlt1getstart_int.fm Page 17 Thursday, November 16, 2000 1:47 PM
1
Secure the tape drive into place with screws.
If you used mounting hardware that screws to the front of the computer, use the screws you removed
in step 2 to fix the drive in place.
If your computer does not require mounting hardware, check that the holes in the chassis are aligned
with the holes in the sides of the drive and use the four screws provided with the rail kit to secure the
drive, as shown in figure 6.
2
Replace the cover on the computer.
17
Dlt1getstart_int.fm Page 18 Thursday, November 16, 2000 1:47 PM
Figure 7: tape drive controls and indicators
18
Dlt1getstart_int.fm Page 19 Thursday, November 16, 2000 1:47 PM
There are three LEDs and an eject button on the front panel of your tape drive, as shown in figure 7.
For more information about using the eject button, see “To unload a cartridge” on page 23.
Front panel LEDs
There are three LEDs as illustrated in figure 7.
Write Protected
• On: the DLTtape cartridge is write-protected.
• Off: the DLTtape cartridge is write-enabled.
Ready
• On: the DLTtape cartridge is loaded and ready to use.
• Off: no cartridge is loaded.
• Flashing: tape is in motion.
Caution
• On: A calibration failure or hard read/write error occurred. Try cleaning the drive with a tape
approved for use in the DLT1 drive.
• If after cleaning, this indicator is illuminated again when you load a DLTtape cartridge: it is
probably that the DLTtape cartridge is causing problems. Try a new DLTtape cartridge. If this
condition persists with other cartridges, you can use HP Library and Tape Tools (downloadable
from the web site: //www.hp.com/support/tapetools) to help you diagnose the problem.
If the condition still continues, contact Technical Support.
• Off: Cleaning is complete or not needed.
All three LEDs
• On: Power-On Self-Test (POST) is starting.
• Flashing: A POST error has occurred. For more information, see “Troubleshooting” on page 27.
19
Dlt1getstart_int.fm Page 20 Thursday, November 16, 2000 1:47 PM
Figure 8: write protecting cartridges
20
Dlt1getstart_int.fm Page 21 Thursday, November 16, 2000 1:47 PM
HP Surestore DLT1 drives use only DLTtape IV cartridges. Your HP Surestore DLT1 tape drive can read
but not write DLTtape IV cartridges that use the DLT 4000 format.
Note
Your HP Surestore DLT1 tape drive automatically ejects any other cartridge types and any cartridges
whose format it cannot read. If you want to reuse cartridges that have been formatted with a drive
other than DLT1, use a magnetic bulk eraser to prepare the cartridges for use with your
HP Surestore DLT1 tape drive.
Only rely on the best media to protect your valuable data. Thanks to HP's rigorous testing programs,
HP Surestore DLT1 data and cleaning cartridges are the safest investment you can make. Order
online at: //www.hp.com/go/storagemedia. If you do not have internet access, please contact
your local HP Customer Contact Center.
Write-protecting cartridges
If you want to protect the data on a cartridge from being altered or overwritten, you can write-protect
the cartridge. To write-protect a cartridge, slide the switch to the left to write-protect the cartridge.
Note a small orange rectangle is visible, indicating that the cartridge is write-protected. To writeenable a cartridge, slide the switch to the right to allow your HP Surestore DLT1 tape drive to write
data to the cartridge. Figure 8 illustrates the location of the write-protect switch.
Cleaning cartridges
When the Caution LED is on, your HP Surestore DLT1 tape drive’s read/write head may need to be
cleaned. It is good practise to clean the drive once every two weeks. Each cleaning cartridge can be
used up to 20 times. Always place a check mark in a box each time you use the cartridge to clean
the drive. Replace the cleaning cartridge when all the boxes are checked.
Caution
You must use only DLT1 cleaning cartridges with HP Surestore DLT1 tape drives. Be aware that
cleaning cartridges that do not specify DLT1 on the cartridge may be accepted by the drive but will
not clean the drive.
A cleaning cartridge is supplied with each tape drive. Insert the cleaning cartridge and the drive will
carry out its cleaning cycle. When the cleaning cartridge has cleaned the read/write head, the
Caution LED turns off to indicate that you should remove the cleaning cartridge.
Looking after cartridges
• Do not touch the tape media.
• Do not attempt to clean the tape path or tape guides inside the cartridge.
• Do not leave cartridge tapes in excessively dry or humid conditions. Do not leave cartridges in
direct sunlight or in places where magnetic fields are present (for example, under telephones, next
to monitors or near transformers).
• Do not drop cartridges or handle them roughly.
• Place identification labels only in the slide-in slot on the front of the cartridge.
• Store the cartridges in their storage cases in a dust-free environment in which temperatures are
always between 16oC and 32oC (60oF to 90oF).
21
Dlt1getstart_int.fm Page 22 Thursday, November 16, 2000 1:47 PM
Figure 9a: loading a cartridge
Figure 9b: unloading a cartridge
Figure 9b: unloading a cartridge
Eject button
22
Dlt1getstart_int.fm Page 23 Thursday, November 16, 2000 1:47 PM
Check operation
Once you have installed the drive hardware, you should verify that it is functioning properly before
you store your valuable data.
1
Switch on the drive and the computer. Every time you turn on the tape drive it runs a POST which
takes several seconds to complete. At the end of POST, all LEDs turn off. Read more about the selftest and front panel lights in “Troubleshooting” on page 27.
2
Verify that the tape drive installation was successful.
For Windows and NetWare systems, use HP Library & Tape Tools as described on page 25.
For UNIX systems, refer to the configuration instructions in the online User’s Guide on the web site: /
/www.hp.com/support/dlt1 which includes a verification procedure.
Note
If you encounter a problem during this verification procedure, turn to “Troubleshooting” on page 27
for help in diagnosing and fixing the problem.
3
You are now ready to install backup software, as required (see page 4), and carry out a backup and
restore test to check that the drive can write data to tape. Use a blank cartridge.
To load a cartridge
1
Insert the cartridge into the slot in front of the drive, oriented as shown in Figure 9a. Apply gentle
pressure until the drive takes the cartridge and loads it. (The label and write-protect switch are on
the rear face of the cartridge.)
2
The Ready LED flashes while the drive performs its load sequence. When the cartridge is loaded, the
Ready LED is steadily illuminated.
To unload a cartridge
Note
Remove the cartridge from your HP Surestore DLT1 tape drive before turning off the desktop drive.
Leaving a cartridge in the drive when power is off can result in cartridge and drive damage.
1
Press the Eject button on the front panel or use your backup software to eject the cartridge (see Figure
9b). The Ready LED flashes while the drive rewinds the tape.
2
The drive completes any task it is currently performing, winds the tape to the beginning, and ejects
the cartridge. The sequence can take up to two minutes.
23
Dlt1getstart_int.fm Page 24 Thursday, November 16, 2000 1:47 PM
Figure 10: using HP Library & Tape Tools
24
Dlt1getstart_int.fm Page 25 Thursday, November 16, 2000 1:47 PM
HP Library & Tape Tools software provides a number of utilities for getting information about your
tape drive and troubleshooting problems. It includes the following functions:
• Installation help and advice to help you install your product and operate it correctly
• Discovery to find out what devices are attached to your SCSI bus
• Identity to find out detailed information about individual devices, for example the firmware version
• Tests to check that your drive is operating correctly
• Firmware Update to help you find update files for your tape drive and allow you to perform the
update
• Support Ticket to generate detailed troubleshooting information for support calls (if you are
connected to the Internet, you will be able to email this information directly to your Support Center)
• Comprehensive Help that is context sensitive, if you need additional information for the screen
currently displayed
HP Library & Tape Tools does not work on all operating systems. For the latest compatibility
information, updates, and the latest versions of this software, refer to our World Wide Web site:
//www.hp.com/support/tapetools.
Installing HP Library & Tape Tools
You can install HP Library & Tape Tools from the web site: //www.hp.com/support/tapetools.
Installation is simply a question of selecting the required option and following the instructions on the
screen.
Using HP Library & Tape Tools
HP Library & Tape Tools checks for the presence of a SCSI controller and its driver software and
identifies the SCSI IDs of existing SCSI devices. You can then select the required device from the device
list and run one of the diagnostic utilities for that device by selecting the appropriate icon: Identity,
Firmware, Test or Support.
For ease of use, comprehensive online help is built into the software.
25
Dlt1getstart_int.fm Page 26 Thursday, November 16, 2000 1:47 PM
Once you have installed and tested your HP Surestore DLT1 tape drive, please take a few minutes to
register your product. This will give you the opportunity to receive up-to-date information about our
products, services and support.
Please register via the web (www.hp.com/go/tapereg) or by using the Customer Care card in the
box.
To ensure your registration is complete, there are a number of questions on the Customer Care card
and electronic form that are mandatory. Other questions are optional. However, the more you feel
able to complete, the better we can meet your needs.
Note
HP and its subsidiaries are committed to respecting and protecting your privacy. For further
information, please visit our World Wide Web site (www.hp.com) and click on Privacy Statement.
If you have Internet access, register electronically
1
Select the Product Registration web link on: //www.hp.com/support/dlt1. This links you to HP’s
Product Registration web site.
2
Complete the registration form. Mandatory questions are shown in red text.
3
Click on the Submit button to forward your registration immediately to HP.
If you do not have internet access
26
1
Complete the Customer Care card supplied with the drive. Mandatory questions are shown in black,
bold text.
2
Mail or fax the completed form to HP.
Dlt1getstart_int.fm Page 27 Thursday, November 16, 2000 1:47 PM
The first step in problem-solving is establishing whether the problem lies with the cartridge, the drive,
the host computer and its connections, or with the way the system is being operated. If none of the
following advice helps you solve the problem, refer to our World Wide Web Customer Care pages
on: //www.hp.com/support/dlt1 or call for assistance.
None of the drive’s LEDs illuminate
Possible reason
Recommended action
The drive is not receiving power.
Check the drive’s power cable.
All of the LEDs on the front panel blink continually
Possible reason
Recommended action
An internal drive fault has occurred.
1. Press and hold the Eject button for 6 seconds to
reset the drive.
2. Shut down and turn off the host server or
workstation, then turn it back on and allow it to
boot.
3. Call technical support if POST continues to fail.
The host server or workstation does not recognize the HP Surestore DLT1 tape drive
Possible reason
Recommended action
The drive’s SCSI ID might not be unique.
Identify the SCSI IDs of existing SCSI devices by
using HP Library & Tape Tools.
Change the drive’s SCSI ID. Shut down and turn
off the host server or workstation. Change the
drive’s SCSI ID. Turn on the host server or
workstation.
Ensure that all devices on the SCSI bus are SE or
LVD.
The SCSI host adapter might be incorrectly
configured.
Check the SCSI host adapter configuration. Refer
to the SCSI host adapter manuals for instructions.
The SCSI cable might be loose.
Check both ends of the SCSI cable.
The SCSI terminator might be loose or missing. Make sure an LVD/SE terminator is in place on the
end of the SCSI ribbon cable.
The SCSI bus might be improperly terminated.
If your HP Surestore DLT1 drive is not the last or
only device on the SCSI bus, check all SCSI cable
connections and make sure an LVD/SE terminator
is in place on the end of the SCSI ribbon cable.
The SCSI terminator might not be at the end of Make sure the terminators are placed only at each
the SCSI bus or more than two terminators
end of the SCSI bus--one at the host adapter and
might be present on the SCSI bus.
one on the end of the SCSI ribbon cable.
27
Dlt1getstart_int.fm Page 28 Thursday, November 16, 2000 1:47 PM
The SCSI host adapter might be in a defective
expansion slot.
Move the SCSI host adapter to a different
expansion slot.
The SCSI bus might be too long
Make sure the total length of the SCSI bus does not
exceed the ANSI SCSI standard of 3 meters (10
feet) for an SE bus, 12 meters (40 feet) for an LVD
SCSI bus with multiple devices, or 25 meters (82
feet) for an LVD SCSI bus with a single device.
There are fatal or non-fatal errors for which you cannot find the cause
Possible reason
Recommended action
The SCSI bus might be improperly terminated.
1. If your HP Surestore DLT1 drive is the last or
only device on the SCSI bus, make sure the drive is
properly terminated. Make sure only the last
device is terminated.
2. If your HP Surestore DLT1 drive is not the last or
only device on the SCSI bus, check all SCSI cable
connections and make sure the last device on the
SCSI bus is terminated.
Other sources of information
If you experience problems using your tape drive after installation, use HP Library & Tape Tools to
help you diagnose the problem (see page 25).
You will also find troubleshooting information on the HP support web site: //www.hp.com/
support/dlt1 that takes you to HP’s Customer Care web site for a wide range of up-to-date
information about your product.
28
SS DLT1 Int Eng
21/11/00 4:16 pm
Page 1
http://www.hp.com/go/storagemedia
http://www.hp.com/support/ultrium
SS DLT1 Ext Eng
21/11/00 2:11 pm
Page 2
hp surestore dlt1
external tape drive
DLT1
getting started guide
For further
details, see:
Before you start
Check system prerequisites. (Always connect to a wide, Ultra SCSI-2 Low-Voltage Differential (LVD)
or Single-Ended (SE) SCSI bus.) Visit the HP Surestore DLT1 web page:
//www.hp.com/support/dlt1. For example, you can use HP Library & Tape Tools to help
you install your drive.
page 3
Step 1: Check the drive’s SCSI ID
Check the tape drive’s SCSI ID on the SCSI ID switch on the rear panel of drive. If necessary,
change it from the default of 5 by pressing the + or - buttons above and below the SCSI ID number.
Use a ball-point pen or similar pointed object. To prevent particle contamination, do not use a
pencil.
page 7
Step 2: Connect the SCSI cable
Power off the computer. Attach one end of the SCSI cable (supplied with the drive) to the
computer’s external SCSI connector and connect the other end to the SCSI connector on the rear
of the tape drive.
page 9
Step 3: Connect the power cable
Plug the power cable securely into the socket on the rear panel of the drive. Plug the other end of
the power cable into the power outlet.
page 11
Your tape drive
Find out what the LEDs on your tape drive indicate and make sure you are using the correct type
of cartridge.
page 13
Use the correct media
Find out how to use and care for DLTtape IV cartridges and how to use DLT1 cleaning cartridges.
page 15
Operating the tape drive
Power on the drive, then the computer. Check operation and carry out a trial backup and restore.
page 17
HP Library & Tape Tools
Find out more about the free diagnostic and troubleshooting tool supplied with your tape drive.
page 19
Register your tape drive
Register your tape drive to ensure you receive up-to-date information about HP’s products, services
and support.
page 20
Troubleshooting
If you experience problems during installation, check this section first. For more detailed
troubleshooting information visit the web site: //www.hp.com/support/dlt1.
page 21
1
Copyright © 2000 by Hewlett-Packard Limited.
October 2000
The information contained in this document is subject to change without notice.
This document contains proprietary information which is protected by copyright. All rights are
reserved. No part of this document may be photocopied, reproduced or translated to another
language without the prior written consent of Hewlett-Packard Limited.
Hewlett-Packard shall not be liable for errors contained herein or for incidental or consequential
damages (including lost profits) in connection with the furnishing, performance, or use of this material
whether based on warranty, contract, or other legal theory.
Windows is a U.S. registered trademark of Microsoft Corp.
UNIX is a registered trademark of X/Open Company in the U.S. and other countries.
Write your tape drive details here so you can find them easily if you need them.
Model (type of drive):
Model (number):
Serial (number):
Date purchased/installed:
SCSI ID:
2
To install and use your new tape drive, you will need the following:
• A wide, Ultra SCSI-2 LVD or SE-SCSI bus
• LVDS compliant SCSI cable (supplied with the tape drive)
• Backup software that supports the HP Surestore DLT1 tape drive
SCSI host bus adapter
You need a properly installed and configured SCSI host bus adapter or a built-in SCSI controller on
your computer’s motherboard (SCSI-2 or SCSI-3 compliant). Check the server documentation for the
specification of any built-in SCSI channels. Do not connect to a RAID controller channel; these are for
disk drives only.
If you are installing on a Windows 98, Windows NT 4, Windows 2000 or Novell NetWare system,
you can use HP Library & Tape Tools to check your computer’s SCSI configuration, see page 19.
HP Surestore DLT1 drives are Ultra SCSI-2 wide SCSI devices designed to operate on an LVD-SCSI bus
with a burst transfer rate of 40 MB/sec. Using the drive on a single-ended SCSI bus restricts
performance. Do not use on the same bus as other single-ended devices as this will switch the LVDS
host adapter into single-ended mode and restrict performance. HP recommends that a dedicated host
bus adapter is used for the tape drive. A suitable adapter is available from HP as an accessory. For
ordering information, SCSI specifications, and information on how to configure your SCSI bus, refer
to the online User’s Guide on: //www.hp.com/support/dlt1.
SCSI cable
You need a SCSI cable that connects to your computer’s external connector. For optimum
performance, always use the cable supplied with the tape drive. The cable provided with
HP Surestore DLT1 tape drives will attach to a computer with a wide LVDS-SCSI connector (68 pins)
or a SE-SCSI connector. If your server or host bus adapter is equipped with a very high density (VHD)
wide SCSI connector, you will need to order a VHD-to-HD cable. For ordering information refer to:
//www.hp.com/support/dlt1.
3
Backup software
You need a backup application that supports the HP Surestore DLT1 drive. A TapeWare CD-ROM
containing backup software by Yosemite Technologies is supplied with your tape drive.
As a general rule, native backup applications (such as NTBackup and tar) do not provide the data
streaming rate required to support the full performance of your HP Surestore DLT1 tape drive. We
recommend using a backup application that can provide the required data streaming rate as well as
other useful features, such as TapeAlert. Computer Associates, HP, Veritas and Legato all provide
suitable products that have been tested with HP Surestore drives. For the latest list of backup
applications that support HP Surestore DLT1, please consult our World Wide Web site
(www.hp.com/go/connect).
Applications usually recognize tape drives by their manufacturers’ internal identifiers rather than their
model numbers, so check the table below for the appropriate reference for your model.
4
Drive Model
Internal Identifier
HP Surestore DLT1
BNCHMARKDLT1
The HP Surestore DLT1 web site: //www.hp.com/support/dlt1 contains drivers, useful utilities,
and information to help you install and use your tape drive.
HP product registration
To register your new tape drive electronically via the web, use the “Product Registration” link.
Drivers
For detailed information about drivers, refer to the “Drivers” link. There is a separate link for each
operating system. The tape drive must be installed before installing the driver.
User documentation
For more information about using your HP Surestore DLT1 tape drive, refer to the online User’s Guide.
Refer to your backup application’s documentation for instructions on how to back up and restore data.
HP Library & Tape Tools
HP Library & Tape Tools software provides diagnostic and troubleshooting utilities. It allows you to
identify your product correctly, check SCSI ID information on the SCSI bus, run tests, carry out
firmware updates and, if necessary, generate comprehensive troubleshooting information for support
calls. For further details see page 19.
TapeAlert plug-ins
TapeAlert is a tape drive status monitoring and messaging utility that makes it easy to detect problems
that could have an impact on backup quality. From the use of worn-out tapes to defects in the drive
hardware, TapeAlert provides easy-to-understand warnings of errors as they arise, and suggests a
course of action to remedy the problem.
To take advantage of TapeAlert, you need a TapeAlert-compatible tape drive, such as the
HP Surestore DLT1 drive, and TapeAlert-compatible backup software. The HP Surestore DLT1 web site
contains plug-ins for leading network management consoles, such as TapeAlert for OpenView, to
monitor your tape drive across the network.
5
Figure 1: checking the SCSI ID
6
Note
1
Your HP Surestore DLT1 drive is shipped with a default SCSI ID of 5, but it can be assigned any
unused ID between 0 and 15. Do not use SCSI ID 7, which is reserved for the SCSI controller, or
SCSI ID 0, which is typically assigned to the boot disk. We do not recommend installing the drive
onto a narrow SCSI bus, as this will restrict performance. (See “SCSI host bus adapter” on page 3.)
Determine whether you need to change the SCSI ID from the default of 5.
If you are installing on a Windows 98, Windows NT 4, Windows 2000 or NetWare system, you
can install HP Library & Tape Tools from the web site: //www.hp.com/support/tapetools and
run the “Install Check” to check your computer’s current SCSI configuration (see page 19).
If you are installing on a UNIX® system, check the online User’s Guide on our World Wide Web site
//www.hp.com/support/dlt1, for instructions on how to determine the SCSI IDs of existing
devices.
2
Change the tape drive’s SCSI ID, if necessary.
Use a small screwdriver or a ball-point pen to press the SCSI ID selector buttons on the rear panel
(see figure 1) until the required value is displayed. Do not use a pencil because small bits of lead
could contaminate the drive.
Note
The computer and the tape drive SCSI IDs are only checked at power-on. To change the SCSI ID
after installation, power down both the computer and the tape drive, change the drive’s SCSI ID,
power up the tape drive, and then power up the computer.
7
Figure 2: connecting the SCSI cable
8
Caution To avoid damaging the computer or tape drive, ensure that both are powered off while you attach
the SCSI cable.
For optimum performance, we recommend that your HP Surestore DLT1 drive is installed on a
dedicated SCSI bus.
1
Perform a normal system shutdown and turn off the computer and any connected peripherals.
A 68-pin wide LVDS SCSI cable is provided. Do not connect the cable to a VHD SCSI port.
If your computer’s SCSI connector does not match the cable supplied with your drive, you will need
to order the appropriate cable or adapter. See “SCSI cable” on page 2 for more details about SCSI
cabling. For ordering information, refer to our web site: //www.hp.com/support/dlt1.
2
Attach one end of the SCSI cable to the connector on the SCSI host adapter and secure it by
tightening the screws, as shown on figure 2.
3
Attach the other end of the SCSI cable to one of the connectors on the rear panel of the tape drive
and secure it by tightening the screws.
Note
If your HP Surestore DLT1 drive is the only SCSI device (other than the SCSI host adapter) or if it is
the last device on the selected computer’s bus, it must be terminated. If your HP Surestore DLT1 drive
is at the end of the SCSI cable, it is the last device on the SCSI bus.
9
Figure 3: connecting the power cable
10
An external HP Surestore DLT1 drive will operate using any voltage in the range 100–240 volts (5060 Hz). No adjustment is needed. To connect your drive to the power supply, proceed as follows:
1
Plug the power cable securely into the socket on the rear panel of the drive. (See figure 3.)
2
Plug the other end of the power cable into the power outlet.
Write the model name, product number, serial number, and SCSI ID of your drive at the back of this
guide for future reference. The model name is on the front of the drive and the product and serial
numbers are on a label on the bottom of the drive.
11
Figure 4: tape drive front panel
12
There are three LEDs and an eject button on the front panel of your tape drive. For more information
about using the eject button, see “To unload a cartridge” on page 17.
Front panel LEDs
There are three LEDs as illustrated in figure 4.
Write Protected
• On: the DLTtape cartridge is write-protected.
• Off: the DLTtape cartridge is write-enabled.
Ready
• On: the DLTtape cartridge is loaded and ready to use.
• Off: no cartridge is loaded.
• Flashing: tape is in motion.
Caution
• On: A calibration failure or hard read/write error occurred. Try cleaning the drive with a tape
approved for use in the HP Surestore DLT1 drive.
• If after cleaning, this indicator is illuminated again when you load a DLTtape cartridge: it is
probable that the DLTtape cartridge is causing problems. Try a new DLTtape cartridge. If this
condition persists with other clean cartridges, you can use HP Library and Tape Tools
(downloadable from the web site:
//www.hp.com/support/tapetools) to help you diagnose the problem. If the condition still
continues, contact Technical Support.
• Off: Cleaning is complete or not needed.
All three LEDs
• On: Power-On Self-Test (POST) is starting.
• Flashing: A POST error has occurred. For more information, see “Troubleshooting” on page 21.
13
Figure 5: write-protecting cartridges
14
HP Surestore DLT1 drives use only DLTtape IV cartridges. Your HP Surestore DLT1 tape drive can read
but not write DLTtape IV cartridges that use the DLT4000 format.
Note
Your HP Surestore DLT1 tape drive automatically ejects any other cartridge types and any cartridges
whose format it cannot read. If you want to reuse cartridges that have been formatted with a drive
other than DLT1, use a magnetic bulk eraser to prepare the cartridges for use with your
HP Surestore DLT1 tape drive.
Only rely on the best media to protect your valuable data. Thanks to HP's rigorous testing programs,
HP Surestore DLT1 data and cleaning cartridges are the safest investment you can make. Order
online at: //www.hp.com/go/storagemedia. If you do not have internet access, please contact
your local HP Customer Contact Center.
Write-protecting cartridges
If you want to protect the data on a cartridge from being altered or overwritten, you can write-protect
the cartridge. To write-protect a cartridge, slide the switch to the left to write-protect the cartridge.
Note a small orange rectangle is visible, indicating that the cartridge is write-protected. To writeenable a cartridge, slide the switch to the right
right to allow your HP Surestore DLT1 tape drive to write
data to the cartridge. Figure 5 illustrates the location of the write-protect switch.
Cleaning cartridges
When the Caution LED is on, your HP Surestore DLT1 tape drive’s read/write head may need to be
cleaned. It is good practise to clean the drive once every two weeks. Each cleaning cartridge can be
used up to 20 times. Always place a check mark in a box each time you use the cartridge to clean
the drive. Replace the cleaning cartridge when all the boxes are checked.
Caution You must use only DLT1 cleaning cartridges with HP Surestore DLT1 tape drives. Be aware that
cleaning cartridges that do not specify DLT1 on the cartridge may be accepted by the drive but will
not clean the drive.
A cleaning cartridge is supplied with each tape drive. Insert the cleaning cartridge and the drive will
carry out its cleaning cycle. When the cleaning cartridge has cleaned the read/write head, the
Caution LED turns off to indicate that you should remove the cleaning cartridge.
Looking after cartridges
• Do not touch the tape media.
• Do not attempt to clean the tape path or tape guides inside the cartridge.
• Do not leave cartridge tapes in excessively dry or humid conditions. Do not leave cartridges in
direct sunlight or in places where magnetic fields are present (for example, under telephones, next
to monitors or near transformers).
• Do not drop cartridges or handle them roughly.
• Place identification labels only in the slide-in slot on the front of the cartridge.
• Store the cartridges in their storage cases in a dust-free environment in which temperatures are
always between 16oC and 32oC (60oF to 90oF).
15
Figure 6a: loading a DLTtape cartridge
Figure 6b: unloading a DLTtape cartridge
16
Check operation
Once you have installed the drive hardware, you should verify that it is functioning properly before
you store your valuable data.
1
Switch on the drive and the computer. Every time you turn on the tape drive it runs a POST which
takes several seconds to complete. At the end of POST, all LEDs turn off. Read more about the selftest and front panel lights in “Troubleshooting” on page 21.
2
Verify that the tape drive installation was successful.
For Windows and NetWare systems, use HP Library & Tape Tools as described on page 19.
For UNIX systems, refer to the configuration instructions in the online User’s Guide on the web site: /
/www.hp.com/support/dlt1 which includes a verification procedure.
Note
3
If you encounter a problem during this verification procedure, turn to “Troubleshooting” on page 21
for help in diagnosing and fixing the problem.
You are now ready to install backup software, as required (see page 4), and carry out a backup and
restore test to check that the drive can write data to tape. Use a blank cartridge.
To load a cartridge
1
Insert the cartridge into the slot in front of the drive, oriented as shown in Figure 6a. Apply gentle
pressure until the drive takes the cartridge and loads it. (The label and write-protect switch are on
the rear face of the cartridge.)
2
The Ready LED flashes while the drive performs its load sequence. When the cartridge is loaded, the
Ready LED is steadily illuminated.
To unload a cartridge
Note
Remove the cartridge from your HP Surestore DLT1 tape drive before turning off the desktop drive.
Leaving a cartridge in the drive when power is off can result in cartridge and drive damage.
damage
1
Press the Eject button on the front panel or use your backup software to eject the cartridge (see Figure
6b). The Ready LED flashes while the drive rewinds the tape.
2
The drive completes any task it is currently performing, winds the tape to the beginning, and ejects
the cartridge. The sequence can take up to two minutes.
17
Figure 7: using HP Library & Tape Tools
18
HP Library & Tape Tools software provides a number of utilities for getting information about your
tape drive and troubleshooting problems. It includes the following functions:
• Installation help and advice to help you install your product and operate it correctly
• Discovery to find out what devices are attached to your SCSI bus
• Identity to find out detailed information about individual devices, for example the firmware version
• Tests to check that your drive is operating correctly
• Firmware Update to help you find update files for your tape drive and allow you to perform the
update
• Support Ticket to generate detailed troubleshooting information for support calls (if you are
connected to the Internet, you will be able to email this information directly to your Support Center)
• Comprehensive Help that is context sensitive, if you need additional information for the screen
currently displayed
HP Library & Tape Tools does not work on all operating systems. For the latest compatibility
information, updates and the latest versions of this software, refer to our World Wide Web site:
//www.hp.com/support/tapetools.
Installing HP Library & Tape Tools
You can install HP Library & Tape Tools from the web site://www.hp.com/support/tapetools.
Installation is simply a question of selecting the required option and following the instructions on the
screen.
Using HP Library & Tape Tools
HP Library & Tape Tools checks for the presence of a SCSI controller and its driver software and
identifies the SCSI IDs of existing SCSI devices. You can then select the required device from the device
list and run one of the diagnostic utilities for that device by selecting the appropriate icon: Identity,
Firmware, Test or Support.
For ease of use, comprehensive online help is built into the software.
19
Once you have installed and tested your HP Surestore DLT1 tape drive, please take a few minutes to
register your product. This will give you the opportunity to receive up-to-date information about our
products, services and support.
Please register via the web (www.hp.com/go/tapereg) or by using the Customer Care card in the
box.
To ensure your registration is complete, there are a number of questions on the Customer Care card
and electronic form that are mandatory. Other questions are optional. However, the more you feel
able to complete, the better we can meet your needs.
Note
HP and its subsidiaries are committed to respecting and protecting your privacy. For further
information, please visit our World Wide Web site (www.hp.com) and click on Privacy Statement.
If you have internet access, register electronically
1
Select the Product Registration web link on: //www.hp.com/support/dlt1. This links you to HP’s
Product Registration web site.
2
Complete the registration form. Mandatory questions are shown in red text.
3
Click on the Submit button to forward your registration immediately to HP.
If you do not have internet access
20
1
Complete the Customer Care card supplied with the drive. Mandatory questions are shown in black,
bold text.
2
Post or fax the completed form to HP.
The first step in problem-solving is establishing whether the problem lies with the cartridge, the drive,
the host computer and its connections, or with the way the system is being operated. If none of the
following advice helps you solve the problem, refer to our World Wide Web Customer Care pages
on: //www.hp.com/support/dlt1 or call for assistance.
None of the drive’s LEDs illuminate
Possible reason
Recommended action
The drive is not receiving power.
Check the drive’s power cable and power
connections. Plug the power cable into a different
power outlet.
All of the LEDs on the front panel blink continually
Possible reason
Recommended action
An internal drive fault has occurred.
1. Press and hold the Eject button for 6 seconds to
reset the drive.
2. Turn the drive off and then on again.
3. Call technical support if POST continues to fail.
The host server or workstation does not recognize the HP Surestore DLT1 tape drive
Possible reason
Recommended action
The drive’s SCSI ID might not be unique.
Identify the SCSI IDs of existing SCSI devices by
using HP Library & Tape Tools.
Change the drive’s SCSI ID. Shut down and turn
off the host server or workstation; turn off the
desktop drive. Change the drive’s SCSI ID. Turn on
the host server or workstation and desktop drive.
Ensure that all devices on the SCSI bus are SE or
LVD.
The SCSI host adapter might be incorrectly
configured.
Check the SCSI host adapter configuration. Refer
to the SCSI host adapter manuals for instructions.
The SCSI cable might be loose.
Check both ends of the SCSI cable.
The SCSI terminator might be loose or missing. Make sure the terminator is properly seated on the
open SCSI connector on the rear panel of the
desktop drive or on the last device on the SCSI
bus.
21
The SCSI bus might be improperly terminated.
1. If your HP Surestore DLT1 drive is the last or
only device on the SCSI bus, make sure the device
is properly terminated.
2. If your HP Surestore DLT1 drive is not the last or
only device on the SCSI bus, check all SCSI cable
connections and make sure the last device on the
SCSI bus is terminated.
The SCSI terminator might not be at the end of Make sure the terminators are placed only at each
the SCSI bus or more than two terminators
end of the SCSI bus--one at the host adapter and
might be present on the SCSI bus.
one on the last device on the bus, both internal
and external.
The SCSI host adapter might be in a defective
expansion slot.
Move the SCSI host adapter to a different
expansion slot.
The SCSI bus might be too long
Make sure the total length of the SCSI bus does not
exceed the ANSI SCSI standard of 3 meters (10
feet) for an SE bus, 12 meters (40 feet) for an LVD
SCSI bus with multiple devices, or 25 meters (82
feet) for an LVD SCSI bus with a single device.
There are fatal or non-fatal errors for which you cannot find the cause
Possible reason
Recommended action
The SCSI bus might be improperly terminated.
1. If your HP Surestore DLT1 drive is the last or
only device on the SCSI bus, make sure the drive is
properly terminated. Make sure only the last
device is terminated.
2. If your HP Surestore DLT1 drive is not the last or
only device on the SCSI bus, check all SCSI cable
connections and make sure the last device on the
SCSI bus is terminated.
The AC power source may not be properly
grounded (HP Surestore DLT1e desktop drive
only.)
1. Plug the HP Surestore DLT1e Desktop Drive’s
power cable into a power outlet on the same
circuit as the host server or workstation.
2. Plug the HP Surestore DLT1e Desktop Drive’s
power cable into a different power outlet.
Other sources of information
If you experience problems using your tape drive after installation, use HP Library & Tape Tools to
help you diagnose the problem (see page 19).
You will also find troubleshooting information on the HP support web site: //www.hp.com/
support/dlt1 that takes you to HP’s Customer Care web site for a wide range of up-to-date
information about your product.
22
SS DLT1 Ext Eng
21/11/00 2:11 pm
Page 1
http://www.hp.com/go/storagemedia
http://www.hp.com/support/ultrium