1
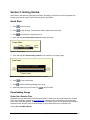
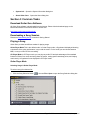
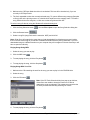
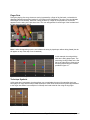
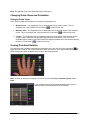
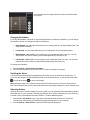
USER MANUAL
GUITAR GURU
Musicnotes, Incorporated 2004
Version 1.2.2
Contents
Section 1: Introduction to Guitar Guru .......................................................................................................... 3
Section 2: Getting Started ............................................................................................................................. 5
Quick Start................................................................................................................................................. 5
Downloading Songs................................................................................................................................... 5
The Musicnotes Player .............................................................................................................................. 6
Section 3: Guitar Guru User Interface........................................................................................................... 7
Player Panel .............................................................................................................................................. 7
Guitar Panel............................................................................................................................................... 8
Song Panel ................................................................................................................................................ 8
Menu Bar ................................................................................................................................................... 9
Section 4: Common Tasks .......................................................................................................................... 10
Download Guitar Guru Software ............................................................................................................. 10
Downloading a Song Session ................................................................................................................. 10
Playing a Song ........................................................................................................................................ 10
Selecting a Passage................................................................................................................................ 12
Setting Start and Stop Locations............................................................................................................. 13
Pausing and Resuming Songs ................................................................................................................ 13
Changing the Tempo ...............................................................................................................................13
Changing the Volume .............................................................................................................................. 14
Using the Metronome .............................................................................................................................. 14
Using the Tuner ....................................................................................................................................... 14
Reading Guitar Guru Notation................................................................................................................. 14
Changing Guitar Views and Orientation .................................................................................................. 16
Viewing Pick-Hand Notation .................................................................................................................... 16
Advanced Topics ..................................................................................................................................... 18
System Requirements ............................................................................................................................. 20
Troubleshooting....................................................................................................................................... 20
Section 5: Guitar Guru Product Architecture............................................................................................... 22
Guitar Guru Session ................................................................................................................................ 22
Guitar Guru Users Guide
Page 2 of 23
Musicnotes, Incorporated
Section 1: Introduction to Guitar Guru
Guitar Guru is a guitar performance simulation program that provides you with the most intuitive way to
learn your favorite songs. Using a unique approach that doesn’t rely on standard music notation or
traditional guitar tablature, Guitar Guru plays the original music and shows both the left and right hand
movements on a realistic guitar simultaneously. Guitar Guru accommodates all music genres and skill
levels. The music is sold separately, allowing you the flexibility to purchase only the titles you are
interested in.
Songs are precisely synchronized with the original recordings. You can insert your own CDs and Guitar
Guru will find the appropriate tracks and play them in sync with the visual notation. The option to play
computer generated (MIDI) audio is also included, where guitar techniques such as bends, slides,
vibratos and tremolos are accurately reproduced. In addition to the common CD player functions such as
Play, Pause, Stop, and Repeat, options are included to adjust the playback speed, set specific start/stop
points, loop continuously, and jump to specific passages such as choruses and solos.
Key Features of Guitar Guru:
•
Audio - Each session includes computer-generated (MIDI) audio of the song you choose. You
may also choose to use your own audio CD and Guitar Guru will synchronize its lesson with the
original recording
•
Visual Notation - Using our unique hands-on approach, Guitar Guru plays the music and shows
both the left and right hand movements on a realistic guitar display.
•
Rhythm - Created by professional programmers and guitarists, each song session is designed to
precisely match the original recording's rhythm.
•
Picking and Strumming - Guitar Guru shows the picking and/or strumming for all guitar parts,
ensuring you learn all aspects of the song faster than possible through tab alone.
•
Interactive Notation - Each session includes a copyrighted version of the actual written notation
(including lyrics, if applicable). The tablature and/or sheet music may be printed out or played with
our free interactive player.
Figure 1.1 – Guitar Guru Interface
Guitar Guru Users Guide
Page 3 of 23
Musicnotes, Incorporated
Guitar Guru Users Guide
Page 4 of 23
Musicnotes, Incorporated
Section 2: Getting Started
Guitar Guru is the definitive guitar player simulator, providing you with the most intuitive approach to
learning your favorite songs. Use the following links to get started:
Quick Start
1. Click
to select a song.
2. Click
to play the song. Press the space bar to pause and resume play.
3. Click
to maximize the fingerboard view.
4. Click and drag the tempo slider pointer to change the tempo.
Figure 2.1 – Tempo Slider
5. Click and drag the start and stop pointers to set a portion of the song to play.
Figure 2.2 – Song Gage
6. Click
7. Click
to loop continuously.
to select a different passage of the song.
8. Optionally insert your own CD and click
to use CD audio
Downloading Songs
Guitar Guru Session Files
Songs that you can download from the Internet and play in Guitar Guru are called Guitar Guru Session
Files. The song library, available at Musicnotes.com, contains music covering many genres and skill
levels and is constantly growing. Before you decide to purchase songs, you can play and print samples
straight from the Internet! There are several ways to get to Musicnotes.com from Guitar Guru:
Choose File > Get More Music!
Guitar Guru Users Guide
Page 5 of 23
Musicnotes, Incorporated
•
button, which is displayed whenever you open a product sample file
Click the
that is resident on your computer.
•
Click the
Guru sample.
button, which is displayed whenever you open a standard Guitar
•
Click the
from the Internet.
button, which is displayed whenever you open a product sample
Note: Once you purchase and download a new song, its name will appear in the Song Selection dialog
box automatically the next time you open it.
About the Songs
Guitar Guru song files are created by experienced guitarists to simulate guitar performances that very
closely match the original recordings. The songs are produced using existing transcriptions, and every
effort is made to ensure that the music contains all of the details necessary to show you how to play the
songs the way the artists did. Although there is no way to determine with 100% accuracy the exact
fingerings and positions used when the songs were written and recorded, you will be amazed how close
Guitar Guru gets you using your computer!
About MIDI
MIDI audio is generated by your computer, so what you hear is not a recorded performance but is
intended to be a close representation of a human performance. Even though we will never be able to
replace human performance we are constantly trying to make our renditions more musical - so come to
Musicnotes.com from time to time to download the latest version of Guitar Guru!
The Musicnotes Player
Musicnotes Player is a separate program that displays, plays and prints sheet music. Guitar Guru
interacts with Musicnotes Player to provide these services for songs that include sheet music notation.
Although Guitar Guru will operate normally without Musicnotes Player, you must install it in order to view,
play, and print the sheet music. Please refer to the online help in Musicnotes Player for detailed
information. You can download the latest Musicnotes Player at Musicnotes.com. Once you have
Musicnotes Player installed, the following functionality will be enabled:
•
Printing the sheet music. To print a copy of the sheet music, choose File > Print Sheet
Music.
•
Viewing and playing the sheet music. To view and play the sheet music notation, choose File
> View/Play Sheet Music.
Note: The above menu options will be disabled if the current song does not contain sheet music notation.
Guitar Guru Users Guide
Page 6 of 23
Musicnotes, Incorporated
Section 3: Guitar Guru User Interface
The Guitar Guru interface consists of three main components:
Player Panel: Controls the users audio experience: song, passage, tempo, volume, audio source
Guitar Panel: Controls and displays the visual experience: visual notation, strumming, guitar orientation
Song Panel: Displays information about the current Guitar Guru Session
Each of the main interfaces is discussed in detail below.
Player Panel
Figure 3.1 – Player Panel Control
1
Passage Info Text Box
Shows the current song name, voice and passage.
2
Song Gauge
3
4
5
6
Song Selection Button
Passage Selection Button
Play Button
Pause Button
7
8
9
10
11
12
13
14
Stop Button
Repeat Button
Metronome Button
Song Position LED
Tempo slider
Volume Slider
MIDI Button
CD Button
Establishes start and stop playing locations and indicates the
current song position. See Setting Start and Stop Locations.
Opens the Song Selection dialog box. See Selecting Songs
Opens the Passage Selection dialog box. See Selecting Passages
Starts playing the song. See Selecting and Playing Songs
Toggles between suspending play and resuming play. See Pausing
and Resuming Play.
Stops playing the song.
Toggles repeat on and off. See Repeating Songs
Toggles the metronome on and off. See Using the Metronome
Shows the current song position in minutes:seconds.
Adjusts the tempo. See Changing the Tempo
Adjusts the volume. See Changing the Volume
Sets the MIDI audio mode. See Playing Songs
Sets the audio mode to CD. See Playing Songs
Guitar Guru Users Guide
Page 7 of 23
Musicnotes, Incorporated
Guitar Panel
Figure 3.2 – Guitar Panel
1
2
3
4
Fingerboard View Window
Fret-hand View Window
Pick-hand View Button
Minimum View Button
5
Maximum View Button
6
Fit View Button
7
8
9
10
Fingerboard Slider
Tuner Button
Tuning Text Box
Chord Text Box
Shows the fingerboard and the activity of the fret-hand.
Shows the activity of the pick-hand. See Guitar Views
Toggles the pick-hand view on and off. See Changing Views
Displays a scrollable fingerboard within the confines of the Guitar
Guru window.
Displays a scrollable fingerboard within the confines of the
computer display screen.
Resizes the fingerboard to fit entirely within the confines of the
computer display screen.
Scrolls the fingerboard left and right. See Scrolling Views
Opens the Tuner dialog box. See Guitar Tuner
Shows the tuning used for the current song.
Shows the names of the chords being played.
Song Panel
Figure 3.3 – Song Panel
1
Song Picture
2
Song Info Summary
3
Song Info Button
Guitar Guru Users Guide
Shows a picture associated with the current song, such as an
album cover. The Guitar Guru default song picture is shown here.
Shows a summary of the current song including song name,
performer, and the recording that the song is synced with.
Opens the Song Information dialog box.
Page 8 of 23
Musicnotes, Incorporated
Menu Bar
The menu bar displays the menu headings File, Options and Help menus. To open a menu, click on the
menu heading, or press the <Alt> key followed by the underlined letter in the menu’s title.
File Menu Commands
The File menu consists of the following commands:
•
Open. Opens the Song Selection dialog box.
•
Print Sheet Music. Prints a copy of the sheet music notation for the current song.
•
View/Play Sheet Music. Loads the sheet music notation for the current song in the Musicnotes
Player program.
•
Get More Music! Opens the Guitar Guru song download page in your default web browser.
•
Get More Guitars! Opens the Guitar Guru supplemental guitar page in your default web
browser.
•
Exit. Closes the program.
Options Menu Commands
The Options menu consists of the following commands:
•
Switch to CD Player Mode. Shown when in Guitar Player mode. Switches to CD Player mode.
•
Switch to Guitar Player Mode. Shown when in CD Player mode. Switches to Guitar Player
mode.
•
Show Tooltips. When checked, a short description of the controls are displayed after the cursor
is moved into them.
•
Select Guitar... Opens the Guitar Selection dialog box.
•
Select Guitar Orientation. Opens the Guitar Orientation popup menu.
•
Enable CD Lookups. When checked, CDDB is enabled.
•
CD-ROM Drive Settings... Opens the CD-ROM Drive Settings dialog box.
•
CDDB Settings... Opens the CDDB Settings dialog box.
•
CD-ROM Drive Audio Extraction Test… Opens the CD-ROM Drive Settings dialog box.
Help Menu Commands
The Help menu consists of the following commands:
•
Contents. Opens the default help topic.
•
Notation Legend - Fret-Hand. Opens the fret-hand notation legend.
•
Notation Legend – Pick-Hand. Opens the pick-hand notation legend.
Guitar Guru Users Guide
Page 9 of 23
Musicnotes, Incorporated
•
System Info. Opens the System Information dialog box.
•
About Guitar Guru. Opens the About dialog box.
Section 4: Common Tasks
Download Guitar Guru Software
All Guitar Guru software is downloaded from the Internet. Please visit the download page on the
Musicnotes website for the latest version of Guitar Guru.
http://www.musicnotes.com/download/
Downloading a Song Session
Please see Downloading Songs in section 2 Getting Started
Playing a Song
Guitar Guru provides two different modes for playing songs:
Guitar Player Mode This is the default mode. In Guitar Player mode, a fingerboard is displayed showing
a simulation of the guitar performance in sync with the music. For the audio you can choose between
MIDI, or use your own CD of the recording.
CD Player Mode In CD Player mode you can play any audio CD and take advantage of the standard
features of Guitar Guru such as slowing down the tempo, setting specific start/stop points, and looping
continuously. A fingerboard is not displayed in CD Player mode.
Guitar Player Mode
Selecting Songs in Guitar Player Mode
To select a song from the tree list:
1. Click the Song Selection button
or choose File > Open to open the Song Selection dialog box.
Figure 4.1 – Song Selection Dialog
Guitar Guru Users Guide
Page 10 of 23
Musicnotes, Incorporated
2. Make sure the CD Player Mode check box is unchecked. This box will be checked only if you are
currently in CD Player mode.
3. The list is expanded to show the currently selected song. To open a different song category (Samples
or Song) click on the plus sign next to it, or double-click anywhere on the category name. To select a
song, double-click on the song title, or click once on the song title and click OK.
To select a song file directly using the Windows file selection dialog box:
or choose File > Open to open the Song Selection dialog box.
1. Click the Song Selection button
2. Click the Browse button
.
3. Select a song file (song files have the extension .MGT) and click OK.
Note: Guitar Guru will organize the songs that you had downloaded from Musicnotes.com and include
them in the tree list as long as you had not overridden the default directory during download. If you had
downloaded songs to a different location on your computer they will not appear in the tree list and you will
have to open them directly.
Playing Songs Using MIDI
1. Select the song you want to play.
2. Click the MIDI button
.
3. To start playing the song, click the Play button
.
4. To stop playing the song, click the Stop button
.
Playing Songs With Your CDs
1. Make sure the CD containing the track for the song you want to play is in the CD-ROM drive.
2. Select the song.
3. Click the CD button
.
Note: If the CD Track Selection dialog box pops up at this time,
Guitar Guru was unable to locate the track on the CD that
matches the song you selected. This means you must select the
CD track yourself. See Manually Selecting CD Tracks.
Figure 4.2 – CD Track Selection Dialog
4. To start playing the song, click the Play button
Guitar Guru Users Guide
.
Page 11 of 23
Musicnotes, Incorporated
5. To stop playing the song, click the Stop button
.
CD Player Mode
Playing CD Tracks
1. Make sure the CD is in the CD-ROM drive.
2. Switch to CD Player mode. You can do this in one of 2 ways:
•
Check the CD Player Mode checkbox in the Song Selection dialog box, or
•
Choose Options > CD Player Mode.
3. Click the CD button
to open the CD Track Selection dialog box.
4. Select the track to play.
5. To start playing the track, click the Play button
.
6. To stop playing the track, click the Stop button
.
Selecting CD Tracks
1. Make sure the CD is in the CD-ROM drive.
2. Click the CD button
to open the CD Track Selection dialog box.
3. To select a track from the CD tracks list click once on the track and click OK, or double-click on the
track.
Selecting a Passage
In Guitar Player mode, you can select different passages and voices of a song. To select a specific
passage and/or voice:
1. Click the Passage button
Guitar Guru Users Guide
to open the Passage dialog box.
Page 12 of 23
Musicnotes, Incorporated
Figure 4.3 – Passage Selection Dialog
2. The tree list is expanded to show the currently selected voice and passage. To expand a different
voice or passage click on the plus sign next to it. To select a passage, double-click on the passage
name, or click once on the passage name and click OK.
Note: Passages are distinct parts of songs such as choruses, interludes, and solos. Voices are the
individual vocal or instrumental parts or strands in a song, such as lead guitar 1, lead guitar 2, and rhythm
guitar.
Setting Start and Stop Locations
When you select a song, the song is queued to start at the beginning of the first passage. Similarly, when
you select a specific passage, the song is queued to start at the beginning of the passage you selected.
You can also set specific starting and stopping points within the passage. You set start and stop locations
by clicking and dragging the start and stop location pointers in the Song Gauge. The numbers appearing
below the start and stop pointers indicate the position from the beginning of the song in seconds.
Figure 4.4 – Custom Start and Stop Locations
Tip: Using this feature in conjunction with the Repeat feature provides a great way to learn difficult parts
of a song. For example, you can select a time slice as small as one second and repeat it continuously at
a slow tempo for as long as you need to learn it.
Pausing and Resuming Songs
When you pause the playing of a song, the audio will stop and the guitar notation will freeze in both the
. To resume
fingerboard view and the pick-hand view. To pause a song, click the Pause button
playing, click either the Pause button or the Play button. You can also use the space bar to pause and
resume play.
Tip: If you have problems capturing a particular fingering pattern try reducing the tempo. This will allow
more time for you to pause at the exact spot you want.
Changing the Tempo
When you select a song, the tempo is set to the default for the song. You can adjust the tempo by clicking
and dragging the pointer in the Tempo Slider. The number to the right of the slider indicates the tempo in
the number of quarter notes per minute. Click the reset button
to reset the default tempo.
Figure 4.5 – Tempo Slider
Note: You can change the tempo while the song is playing. However, when using CD audio the song will
start over from the beginning.
Guitar Guru Users Guide
Page 13 of 23
Musicnotes, Incorporated
Changing the Volume
When Guitar Guru is first started, the volume is set to the default, which is midway between zero and the
maximum volume. You can adjust the volume by clicking and dragging the pointer in the Volume Slider.
Click the reset button
to reset the default volume.
Note: The overall volume can usually be adjusted several different ways depending on your computer.
The volume control in Guitar Guru uses a minimum of zero and a maximum volume of whatever the
maximum volume is set in the Volume Control in Windows and the volume control of your speakers.
Using the Metronome
The metronome feature is useful for keeping track of the beat for passages that have long periods of
silence. To turn on the metronome click the Metronome button
. Click the button again to turn it off.
Note: The metronome feature is available only for MIDI audio.
Using the Tuner
The guitar tuner allows you to tune your guitar to the tuning used by the current song by providing a
constant tone of the correct pitch for each string. To tune your guitar:
1. Click the Tuner button
to open the Tuner Dialog box.
Figure 4.6 – Tuner Dialog
2. The notes for each string for the current tuning will be displayed. Clicking on the note buttons will
toggle the tone on and off.
3. If the current song uses a non-standard tuning, you can override it with the standard tuning by clicking
the Std button. The notes will be changed accordingly, and the song will be played using the standard
tuning if you are using MIDI audio.
Tip: Overriding the non-standard tuning with the standard tuning is convenient when all of the strings are
tuned an equal interval and you don’t want to retune your guitar to practice the song.
Reading Guitar Guru Notation
Guitar Guru uses a variety of symbols to simulate a real guitar performance. Complete references of
these symbols can be found in the Fret-Hand Notation Legend and the Pick-Hand Notation Legend.
Guitar Guru Users Guide
Page 14 of 23
Musicnotes, Incorporated
Finger Dots
During the playing of a song, whenever a string is pressed by a finger of the fret-hand, a colored dot is
displayed indicating the precise location for your finger on the fingerboard. The color of the dot indicates
which finger to use. Similarly, whenever a string is struck by a finger of the pick-hand, a colored dot
appears over the string in the pick-hand view. The color assignments for each finger of the fret-hand and
the pick-hand are shown below.
Figure 4.7 – Fret Hand Notation
Note: A white dot appearing over the nut indicates the string is played open without being fretted (the dot
will appear on top of the capo if one is attached).
In this example, the string with the
white dot is being played open. The
next string is being fretted on the first
fret by the index finger. Other strings
are being fretted using the notation
provided in figure 4.7.
Figure 4.8 – Fret Hand Example
Technique Symbols
Unlike most other instruments, the guitar allows you to manipulate the sound of notes after they have
been played in many different ways, called techniques. Guitar Guru shows these as yellow tags attached
to the finger dots. Below is an example of a full-step note bend at the 8th fret using the ring finger.
Figure 4.9 – Technique Example
Guitar Guru Users Guide
Page 15 of 23
Musicnotes, Incorporated
Note: See Appendix A for more details about guitar techniques
Changing Guitar Views and Orientation
Changing Guitar Views
Guitar Guru provides several options for viewing the fingerboard area:
•
Minimum View. The fingerboard view is contained within the program window. This is a
scrollable view. Click the Minimum View button
to switch to this view.
•
Maximum View. The fingerboard view is expanded to the left and right edges of the computer
to switch to this view.
screen. This is a scrollable view. Click the Maximum View button
•
Fit View. The fingerboard view is expanded to the left and right edges of the computer screen,
and the image is resized so that the entire fingerboard fits on the screen. This view is nonscrollable and the quality of the image will become slightly degraded due to the results of resizing.
to switch to this view.
Click the Fit View button
Viewing Pick-Hand Notation
The pick-hand view is displayed alongside the fingerboard view. Click the Pick-Hand View button
to
toggle the view on and off. For the figure below the guitar orientation is set to right-handed. More details
about changing the guitar orientation are provided in the following section.
Figure 4.10 – Pick-Hand Notation
Note: You can go directly to the legend in Guitar Guru by choosing Help > Notation Legend – PickHand.
In this example the two strings indicted would be struck upward
using the fingers indicated (middle finger and thumb).
Figure 4.11 – Pick-Hand Striking Example
Guitar Guru Users Guide
Page 16 of 23
Musicnotes, Incorporated
In this example the four strings indicted would be struck downward
using a pick.
Figure 4.12 – Pick-Hand Picking Example
Changing Orientation
If you play left-handed or just prefer to view the fingerboard from a different perspective, you can change
its orientation. Guitar Guru supports 4 different orientations:
•
Right-handed. You play right-handed and you are looking down at your right-handed guitar. This
is the default orientation.
•
Left-handed. You play left-handed and you are looking down at your left-handed guitar.
•
Right-handed - mirror view. You are looking at your right-handed guitar in a mirror. You can
also interpret this view as watching a left-handed guitarist play across from you.
•
Left-handed - mirror view. You are looking at your left-handed guitar in a mirror. You can also
interpret this view as watching a right-handed guitarist play across from you.
To change the orientation:
1. Choose Options > Select Guitar Orientation.
2. The current orientation will be checked. Click on another orientation to change it.
Scrolling the Views
You can scroll across the entire fingerboard when the guitar view is set to Minimum or Maximum. To
scroll, click and drag the Fingerboard Slider pointer in the desired direction, or click the left arrow button
and right arrow button
to scroll incrementally.
Note: During the playing of a song the left and right scroll arrows may turn to red for a short period of
time. This indicates that a portion of the guitar performance was played outside the current viewable area.
Selecting Guitars
Although Guitar Guru includes imagery for just one guitar, you can optionally download additional guitars
and install them on your computer. Choosing a guitar style which closely resembles your own allows you
to create a more personalized and intuitive interface. To select additional guitars:
1. Choose File > Get Guitars! to go to the guitar download site at Musicnotes.com. Follow the
instructions for downloading and installing the supplemental guitars on your computer.
2. Choose Options > Select Guitar to open the Guitar Selection dialog box.
Guitar Guru Users Guide
Page 17 of 23
Musicnotes, Incorporated
3. Select the guitar either by double-clicking on its picture, or clicking once and clicking OK.
Advanced Topics
Enabling CDDB Lookups
Guitar Guru can optionally use CDDB to retrieve the track listings for your CDs. When enabled, the
names of the songs will be displayed when the CD Track Selection dialog box is opened. To enable or
disable CDDB lookups, choose Options > Enable CDDB Lookups. A check mark appearing next to the
menu item indicates that CDDB lookups are enabled.
Note: CDDB (Compact Disc Database) is a central database stored on several computers around the
world that contains the track listings for CDs. You must have an active Internet connection to use CDDB.
Information for some CDs may be unavailable.
Checking System Information
The System Information dialog box shows information about your computer that is important to Guitar
Guru. To open the System Information dialog box, choose Help > System Information.
Changing CD-ROM Drive Parameters
You can view or change certain CD-ROM drive settings using the CD-ROM Drive Settings dialog box. To
open the CD-ROM Drive Settings dialog box, choose Options > CD-ROM Drive Settings. The following
parameters can be changed:
•
Drive. Shows the CD-ROM drive currently in use. To select a different drive, click the downarrow to expand the list, then click on another CD-ROM drive.
•
Read Type. Shows the current CD read algorithm. This setting should almost always be left on
Autodetect. However, if you experience problems reading the CD you can try using different
settings.
•
Jitter Correction. Enables/disables jitter correction. Try enabling jitter correction if you
experience pops or clicks in the audio.
•
Check Frames. When jitter correction is enabled, this is the number of frames the program
attempts to match between data blocks.
Guitar Guru Users Guide
Page 18 of 23
Musicnotes, Incorporated
•
Overlap Frames. When jitter correction is enabled, this is the number of frames to overlap
between data blocks.
•
Default. Resets all CD-ROM drive settings to their default values.
Note: When you enable jitter correction you may experience a reduction in accuracy in
synchronization between the audio and the graphics.
Changing CDDB Parameters
You can view or change certain CDDB settings using the CDDB Settings dialog box. To open the CDDB
Settings dialog box, choose Options > CDDB Settings. The following parameters can be changed:
•
Server. Shows a list of available CDDB servers. To select a different server, click the downarrow to expand the list, then click on another server.
•
Default. Resets the default CDDB server.
•
Use Proxy. Check this box if you must use a proxy server to access the Internet.
•
Proxy Server. When the proxy server is enabled, this is the address of the proxy server.
•
Proxy Server Port.
server.
When the proxy server is enabled, this is the port number of the proxy
Running DAE Test
In order to play CDs in Guitar Guru, your CD-ROM drive must be capable of Digital Audio Extraction
(DAE). All SCSI, CD-R and CD-RW drives and almost all CD-ROM drives made after 1998 are capable of
DAE. Unfortunately there is no sure way to determine if a CD-ROM is capable of DAE, and even if it is,
how well it performs it. The DAE test in Guitar Guru uses the same CD reading methods as the player.
Therefore if the DAE test succeeds you should be able to play your CDs without problems.
Note: When using MIDI audio, there are no dependencies on the CDROM drive, so you will be able to
use MIDI audio whether or not your CD-ROM drive supports DAE.
To run the DAE test:
1. Insert an audio CD containing at least 3 tracks into your CD-ROM drive. If you have more than one
drive, you can check which one Guitar Guru is currently using in the System Information dialog box.
2. Choose Options > CD-ROM Drive Audio Extraction Test…
3. Click Yes in the verification message box.
When the DAE is completed, the Status box will show the results. In most cases if the test passed and
the read rate is at least 4X, you should be able to play CDs without problems.
Guitar Guru Users Guide
Page 19 of 23
Musicnotes, Incorporated
Note: The results of the DAE test are saved and
can be viewed at any time in the System
Information dialog box.
System Requirements
Minimum System Requirements (v1.2.2):
Computer: IBM or compatible Pentium processor (200 MHz and above)
Operating System: Windows XP/Me/2000/98/95
Memory: 24 MB RAM available for program
CD-ROM Drive: 4X CD-ROM drive capable of DAE (not required for MIDI audio)
Hard Disk Space: 15 MB
Monitor: SVGA high-color 16-bit
Troubleshooting
This section contains solutions to problems you may encounter. Also see the file readme.txt in the
application directory for the most up to date information.
Display Problems
The colors appear to be incorrect.
Guitar Guru requires your display be set to 16 bit High Color (65536 colors) or greater. You can check the
current color resolution in the System Information dialog box. To change the color resolution:
1. Right-click anywhere on your desktop, then choose Properties to open the Display Properties dialog
box.
2. In the Colors list, click on a color setting that is 16 bit color or higher (usually listed as High Color or
True Color).
Audio Problems
There is no sound coming from the speakers.
If a song appears to be playing, but there is no sound coming from your speakers, try the following:
•
Increase the volume in Guitar Guru. See Changing the Volume.
•
In the Windows Volume Control, increase the volumes under Volume Control, Wave, and
Synthesizer, and make sure the Mute boxes are unchecked.
•
Increase the volume setting on your speakers.
•
Close other programs that may be using the CD player and/or MIDI system.
Guitar Guru Users Guide
Page 20 of 23
Musicnotes, Incorporated
•
Make sure you have a working sound card and compatible MIDI driver. Consult your computer’s
owner’s manual or the computer manufacturer.
CD Player Problems
Attempting to play a CD results in an application error or system error message.
If you are able to select a CD audio track but get an error when you try to play it, check the following:
•
Make sure your CD-ROM drive is capable of Digital Audio Extraction (DAE). To do this you
should run the Digital Audio Extraction Test.
•
Check your user privileges. Under Windows 2000 and XP you must have administrative rights to
read from the CD-ROM drive. You can check whether or not you have administrative rights in the
System Information dialog box.
The audio is not synchronized with the graphics.
Guitar Guru songs have been produced to be closely synchronized with the CD recordings. If the audio
and graphics are not in sync, check the following:
•
Close other applications that may be using the CPU.
•
Check the read rate of your CD-ROM drive. Generally, the read rate should be at least 4X for
Guitar Guru to work properly. See Checking System Information.
•
Check the speed of your microprocessor. Although the system requirements call for a CPU speed
of 200 MHz or greater, the throughput of some older systems may effect performance.
•
Check if jitter correction is enabled, and if so try disabling it. See Changing CD-ROM Drive
Parameters.
The tempo cannot be increased.
If Guitar Guru doesn’t allow you to increase the tempo past the default, the sound mapper device driver
on your computer does not support increasing the playback rate. See ReadMe.txt in the application
directory for the latest information.
Technical Support
Email: We welcome comments, compliments or concerns. We process our e-mail daily and will reply
promptly. For additional help, visit our Help Section on the Internet.
mailto:[email protected] - for questions about this program and other Musicnotes' technology.
mailto:[email protected] - for web-related questions or issues.
mailto:[email protected] - for questions regarding an order.
Internet: http://www.musicnotes.com
Write:
Musicnotes, Inc.
Attention: Customer Service
8020 Excelsior Drive, Suite 201
Madison, WI 53717
Guitar Guru Users Guide
Page 21 of 23
Musicnotes, Incorporated
Section 5: Guitar Guru Product Architecture
Below is a diagram of the Guitar Guru Product Architecture
Guitar Guru Session
Hotel California
by The Eagles
Digital Guitar Sheet Music
Visual Notation
Musicnotes Software
Results
Print Paper Copy of Sheet Music
Musicnotes Player
and Viewer
Guitar Guru Player
MIDI Song File
View and Listen to Digital Sheet Music
Play Your Favorite Song
• Visually study the exact chords, notes,
and advanced guitar techniques
• Adjust tempo to suit your ability
• Select specific specific guitar parts
• Repeat/Loop the tricky sections
Use your own CD to
synchronize the lesson
to the original recording
Guitar Guru Session
The Guitar Guru Session is the file that you download from Musicnotes.com when you purchase and
song for Guitar Guru. The song files have a file extension of *.mgt and are usually named with the format:
<Artist-Song.mgt>. An example of what the icon for Hotel California by Eagles is provided below.
Each Guitar Guru Session Contains:
1. The digital sheet music which may be displayed using the Musicnotes Viewer or Player
2. The information needed to display the digital notation in the Guitar panel of Guitar Guru
3. The MIDI song file
Note: Due to copyright restrictions the sheet music may only be printed one time. Musicnotes requires the
user to print the sheet music immediately after the Guitar Guru Session is downloaded.
Musicnotes Software
There are two different software applications you will need after downloading a Guitar Guru Session
Guitar Guru Player: This is the software discussed in this document
Musicnotes Player or View: Additional Software used to view and interact with digital sheet music.
Guitar Guru Users Guide
Page 22 of 23
Musicnotes, Incorporated
Appendix A - Musicnotes Guitar Techniques Guide
Bend
Strike the string and bend it the number of steps indicated. Each ½ step is the equivalent of 1 fret.
Bend and Release
Strike the string and bend it the number of steps indicated, then release it back to its normal
position.
Reverse Bend
Bend the string the number of steps indicated, strike it, then release it back to its normal position.
Pre-Bend
Bend the string the number of steps indicated, then strike it.
Vibrato
Rapidly bend and release the string to produce a vibrating effect. Another method is to shake the
fret-hand rapidly back and forth, parallel to the fingerboard.
Hammer-On
Strike the first note and hold it, then sound the second note by firmly fretting it with another finger.
Pull-Off
Place fingers on both notes to be sounded. Strike the first note, then sound the second note by
releasing the first note at about a 45 degree angle to the fingerboard.
Slide
Strike the first note and continue holding the string down while moving to the destination note. Only
the first note is struck.
Trill
Sound the two notes in rapid succession by alternating between hammer-ons and pull-offs.
Tapping
Firmly hammer the note with a finger of the pick-hand. A tap is usually followed by a pull-off, or
preceded with a hammer-on.
Natural Harmonic
With a finger of the fret-hand, lightly touch the string directly over the fret indicated, strike it, then
immediately remove the finger from the string.
Artificial Harmonic (Pinch Harmonic)
Immediately after striking the note, touch the string with the edge of the thumb or the tip of the index
finger of the pick-hand.
Pick Slide
Rub the edge of the pick up or down the string to produce a scraping sound.
Muffle
Place the fret-hand across the strings indicated without pressing them down, then strike the strings
all at once to produce a percussive sound.
Palm Mute
Partially mute the note by lightly holding the palm of the pick-hand against the string while striking it.
Rake - Place the fret-hand across the strings indicated without pressing them down, then strike the
strings one at a time to produce a percussive sound.
Tremolo Pick
Strike the string continuously very rapidly, alternating upstrokes and downstrokes.
Tremolo Bar
Strike the string, then alter the pitch of the note by pushing and/or pulling the tremolo bar.
Tap Slide
Firmly hammer the note with a finger of the pick-hand, and continue holding the string down while
moving to the destination note.
Bottleneck (Slide)
The note is struck with a slide placed over the finger indicated.
Guitar Guru Users Guide
Page 23 of 23
Musicnotes, Incorporated