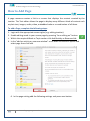
1
User Manual for Faculty Members Learning Management System Adding Course Materials (Resources) Manal Al Shehri 1/8/2014 Al Maarefa Colleges for Science and Technology User Manual-Resource Contents Resource.......................................................................................................... 2 How to add Book ........................................................................................... 3 How to add file .............................................................................................. 7 How to add Folder........................................................................................ 10 How to add Label ......................................................................................... 13 How to add Page .......................................................................................... 15 How to add URL ........................................................................................... 18 1 Email: [email protected] Al Maarefa Colleges for Science and Technology User Manual-Resource Resource A resource is an item that a teacher can use to support learning process, such as a file of lecture or web link. Moodle supports a range of resource types which teachers can add to their courses Description of Resources in Moodle Book Multi-page resources with a book-like format. File Instructor can share lectures with their students using this resource. File can be picture, pdf document, spreadsheet, sound or video files. Folder The folder module enables a teacher to display a number of related files inside a single folder. Label The label module enables text and multimedia to be inserted into the course page in between links to other resources and activities. Page This resource enables instructors to create a web page resource using the text editor. A page can display text, images, sound, and video. URL The URL module enables a teacher to provide a web link as a course resource. There are a number of display options for the URL, such as embedded or opening in a new window. General Steps to Add Resource to Moodle Course Page 1. Log in to Moodle, and then select the course. 2. Enable editing mode in your course page by pressing “turn editing on” button. 3. Within the required Week or Topic section click Add Activity or Resource link. 4. Select the resource from activity and resource list. 5. Enter the information needed and press save button. Next we explain each type of resources in Moodle. 2 Email: [email protected] Al Maarefa Colleges for Science and Technology User Manual-Resource How to Add Book Book is useful when you want to create a multi-page resource in a book-like format, with chapters and subchapters. To add a Book, complete the following steps: 1. Log in to Moodle, then select the course you want to add book to. 2. Enable editing mode in your course page by pressing “turn editing on” button. 3. Within the required Week or Topic section click Add Activity or Resource link. Click this link to add book resource. 4. In the “add an activity or resource window” scroll down to Resource option and select book then click add. 5. In the book setting page add needed settings and click “save and display” button to start adding the content of the book. Book settings explained next 3 Email: [email protected] Al Maarefa Colleges for Science and Technology 4 Email: [email protected] User Manual-Resource Al Maarefa Colleges for Science and Technology User Manual-Resource Enter a title for the book into the Name field and the summary of book into the Description field, both fields are required. Select how you want Chapter numbering to display. If you checked the “custom title” option, then the chapter title is NOT displayed as a heading above the content. A different title may be entered as part of the content. Select if this book will be visible to the students or not. If “available for group members only” checkbox is ticked, the book will only be available to students assigned to groups within the selected grouping. Note Setting an ID number provides a way of identifying the activity for grade calculation purposes. If the activity is not included in any grade calculation then the ID number field may be left blank. For all resources it better to leave it blank. Adding book will only create book activity , you have to start add the content of book by following the steps next. Adding Chapter after Creating Book 1. After creating book for first time, you will be directed to the Adding new chapter page, type a Chapter title, select whether it is a Subchapter and add Content in the text editing box and press “Save Changes” button Enter Name of chapter Check this box if you creating subchapter Add the chapter or subchapter content 5 Email: [email protected] User Manual-Resource Al Maarefa Colleges for Science and Technology 2. To add more chapters or subchapters later, in the course home page, click the new book link. Click the book link to start adding chapters. 3. In the Table of contents block, click the Add new chapter icon 6 Email: [email protected] and repeat step 1. Al Maarefa Colleges for Science and Technology User Manual-Resource How to Add File The file resource is used to share course material with your students. You can share a simple file such as a Word-processed document or slideshow. To add a File, complete the following steps: 1. Log in to Moodle and then select the course. 2. Press “turn editing on” button. There are 2 methods to add file First Method: Drag the file and drop it in the required week or section Second Method: 3. Within the required Week or Topic section click Add Activity or Resource link. 4. In the “add an activity or resource window” scroll down to Resource option and select file then click add. 5. In the file setting page add the file settings and press save button. See the following figure to explain the required settings and refer to table for what each number means. 7 Email: [email protected] Al Maarefa Colleges for Science and Technology 8 Email: [email protected] User Manual-Resource Al Maarefa Colleges for Science and Technology 9 User Manual-Resource General Setting: Enter a name for the file into the Name field and summary of file. The name will be the link that student will click to view/download the file. If “Display description on course page” enabled, the description above will be displayed on the course page just below the link to the file resource. Content: to upload the file, either drag and drop your file onto the arrow if you are using an appropriate browser, or click on "Add" and use the File picker to upload your file. Appearance: Display options determine how the file will be displayed to the students in course page. Options may include: Automatic - The best display option for the file type is selected automatically. Embed - The file is displayed within the page below the navigation bar together with the file description and any blocks. Force download: students are prompted to download the file. Show size and show type: If selected then, the size and type of file will be displayed beside link to the file. Common module settings: Visible: Select if this file will be visible to the students or not. If “available for group members only” checkbox is ticked, the file resource will only be available to students assigned to groups within the selected grouping. Email: [email protected] Al Maarefa Colleges for Science and Technology User Manual-Resource How to add Folder A folder allows a teacher to display several course resources together. The resources may be of different types and they may be uploaded in one go, as a zipped folder which is then unzipped, or they may be added one at a time to an empty folder on the course page. To add a Folder, complete the following steps: 1. Login with the appropriate access rights (e.g. editing teacher). 2. Enable editing mode in your course page by pressing “turn editing on” button. 3. Within the required Week or Topic section click Add Activity or Resource link. Click this link to add folder resource. 4. In the “add an activity or resource window” scroll down to Resource option and select folder then click add. 5. In the folder setting page add the following settings(see the next figure and table next) 10 Email: [email protected] Al Maarefa Colleges for Science and Technology 11 Email: [email protected] User Manual-Resource Al Maarefa Colleges for Science and Technology User Manual-Resource General Setting: Enter a name for the folder into the Name field. This name will be the link that student will click to view/download the folder. If “Display description on course page” enabled, the description above will be displayed on the course page just below the link to the folder resource. Content: To upload multiple files, either drag and drop your files onto the arrow if you are using an appropriate browser, or click on "Add" and use the File picker to upload your files. You can upload zipped files. Display folder contents: there are two options; either “on a separate page” When clicking on folder, its contents will be open in a separate page or “Inline on course page” which view the folder content in course page. 12 Show subfolders expanded: If set to 'yes', subfolders are shown expanded by default; otherwise they are shown collapsed. Appearance: Display options determine how the file will be displayed to the students in course page. Options may include: Automatic - The best display option for the file type is selected automatically. Embed - The file is displayed within the page below the navigation bar together with the file description and any blocks. Force download: students are prompted to download the file. Show size and show type: If selected then, the size and type of file will be displayed beside link to the file. Common module settings: Visible: Select if this folder will be visible to the students or not. If “available for group members only” checkbox is ticked, the folder resource will only be available to students assigned to groups within the selected grouping. Email: [email protected] Al Maarefa Colleges for Science and Technology User Manual-Resource How to add Label A label serves as a spacer on a Moodle course page. It can be used to add text, images, multimedia or code in between other resources in the different sections. It can help to improve the appearance of a course if used thoughtfully. Labels may be used To split up a long list of activities with a subheading or an image. To display an embedded sound file or video directly on the course page. To add a short description to a course section. On the other hand, over-use of multimedia (sound, video) in labels can slow down the loading of a course page. To add a Label, complete the following steps: 1. Login with the appropriate access rights (e.g. editing teacher). 2. Press “turn editing on” button in the course page. 3. Within the required Week or Topic section click Add Activity or Resource link. 4. In the “add an activity or resource window” scroll down to Resource option and select label then click add. 13 Email: [email protected] User Manual-Resource Al Maarefa Colleges for Science and Technology 5. In the label setting page add the following settings and then click “save and display” button. Type your chosen words or add your resources. Select if this label will be visible to the students or not. Check this box if you want the label to be available only to group of students. Note It is possible not just to type words but also to add images, links, media or code from within the labels' editor. ID number above provides a way of identifying the activity for grade calculation purposes. Since this resource is not used in calculating any grades, the ID number field may be left blank. 14 Email: [email protected] Al Maarefa Colleges for Science and Technology User Manual-Resource How to Add Page A page resource creates a link to a screen that displays the content created by the teacher. The Text editor allows the page to display many different kinds of content such as plain text, images, audio, video, embedded code or a combination of all these. To add a Page, complete the following steps: 1. Login with the appropriate access rights (e.g. editing teacher). 2. Enable editing mode in your course page by pressing “turn editing on” button. 3. Within the required Week or Topic section click Add Activity or Resource link. 4. In the “add an activity or resource window” scroll down to Resource option and select page then click add. 6. In the page setting add the following settings and press save button. 15 Email: [email protected] User Manual-Resource Al Maarefa Colleges for Science and Technology Click it to show more option in text editor . 16 Email: [email protected] Al Maarefa Colleges for Science and Technology User Manual-Resource General Setting: Name: This name will form the link student will click on to view the page so it is helpful to give it a name that suggests its purpose. 17 If “Display description on course page” enabled, the description above will be displayed on the course page just below the link to the page. Content: Add your page content here. You can use the features of the Text editor to add media, images, links and more Common module settings: Visible: Select if this folder will be visible to the students or not. If “available for group members only” checkbox is ticked, the folder resource will only be available to students assigned to groups within the selected grouping. Email: [email protected] Al Maarefa Colleges for Science and Technology User Manual-Resource How to add URL A URL (Uniform or Universal Resource Locator) is a link on the internet to a website or online file. Teachers can use the URL resource to provide their students with web links for research, saving the student time and effort in manually typing out the address. The URLS can be displayed in various ways. To add a URL, complete the following steps: 1. Login with the appropriate access rights (e.g. editing teacher) and select the course. 2. Enable editing mode in your course page by pressing “turn editing on” button. 3. Within the required Week or Topic section click Add Activity or Resource link. 4. Scroll down to Resource option and select URL then click add. 5. In the page setting add the following settings: 18 Email: [email protected] Al Maarefa Colleges for Science and Technology User Manual-Resource General: Add name for the link and Description. Note that this name will form the link student will click on to view the website so it is helpful to give it a name that suggests its purpose. Content: enter the URL in the external URL field or click the "Choose a link" button to open the file picker and choose a URL. Appearance: Display how the link will be displayed when clicking on it. Automatic – The best display option for the URL is selected automatically by the browser. Embed - The URL is displayed within the page below the navigation bar together with the URL description and any blocks. Common module settings Select if this link will be visible to the students or not. If “available for group members only” checkbox is ticked, the link will only be available to students assigned to groups within the selected grouping. 6. After adding all the settings, click “save and display” button. 19 Email: [email protected]