1
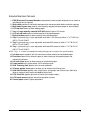
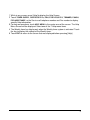
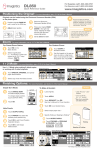
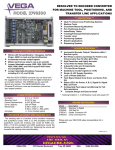
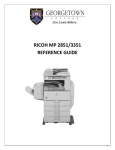
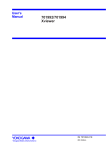
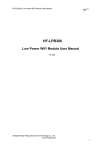
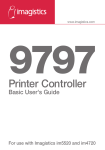
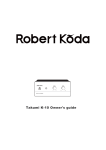
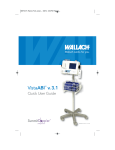
www.imagistics.com
DL750
Punch Kit User's Manual
For use with Imagistics and Pitney Bowes DL750 copier/printers.
This maunal explains the Punch Kit 9756.
Refer to the Copier Operator’s Manual for use and functions of the Copier.
Contents
1. Machine Configuration .......................................................... 2
2. Requirements for Safe Use ................................................... 5
3. Punching Mode .....................................................................6
4. Help Mode ............................................................................. 8
5. Finisher Adjustment [17] of Key Operator Mode ................. 10
6. Empty Trash Basket of Punch Kit 9756 .............................. 12
7. Clearing Mishandled Paper ................................................. 13
8. Specifications ...................................................................... 14
1
1. Machine Configuration
External Machine
LCD touch screen
Control panel
EDH
Work table
9846/9844
Finisher (option)
Multi-sheet
bypass tray
LCC top door
Power switch
Left side cover
(not shown)
Front door
Left door
Tray 1
Tray 2
Tray 3
Right side door (not shown)
9756 Punch Kit
LCC left
side door
Tray 4: Large
capacity cassette
9847(option)
9844 Finisher (option)
Trimmer
stacker cover
LCC top door
9849 Trimming unit
(option)
LCC left side door
2
Tray 4: Large
capacity cassette
9869 (option)
External Machine Call-outs
1 EDH (Electronic Document Handler) automatically feeds multiple originals one at a time to
the platen glass for copying.
2 Work table provides a convenient workspace for documents both before and after copying.
3 Multi-sheet bypass tray used for small quantity copying onto plain paper or special paper.
4 LCC top door opens to allow loading paper.
5 Tray 4: Large capacity cassette 9847/9869 option holds 4,000 sheets.
6 LCC left side door opens to allow removal of mishandled paper.
7 Right side door opens to allow removal of mishandled paper.
8 Tray 3 (universal tray) is user adjustable and holds 1,000 sheets of either 11"x17"/8.5"x14"/
8.5"x11"R or 5.5"x8.5".
9 Tray 2 (universal tray) is user adjustable and holds 500 sheets of either 11"x17"/8.5"x14"/
8.5"x11"R or 5.5"x8.5".
10 Tray 1 (universal tray) is user adjustable and holds 500 sheets of either 11"x17"/8.5"x14"/
8.5"x11"R or 5.5"x8.5".
NOTE: Tray 1, 2, 3, and 4 are available for loading wide types of the regular sizes specified above.
11 Left door opens together with the front door to allow removal of mishandled paper.
12 Front door opens to the internal copier to allow clearing of mishandled paper and
replenishing of toner.
13 Left side cover opens to allow removal of mishandled paper.
14 Power switch turns copier power On/Off when pressed.
15 9849 Trimming Unit (option) trims the end of booklet.
16 Trimmer stacker cover opens to allow you to take out the finished sets.
17 9846/9844 Finisher (option) sorts, staple-sorts, and groups into finished sets. 9844 also
folds or staples & folds copies into booklet-styled sets.
18 9756 Punch Kit (option) punches file holes in the output copies.
19 LCD touch screen displays interactive operation screens.
20 Control panel controls copier operations.
3
Punch Kit Details
Upper lever:
opens upward to allow
removal of mishandled
paper.
Punch Kit knob:
can be turned to ease
removal of mishandled
paper.
Left lever:
opens downward to
allow removal of
mishandled paper.
Finisher/Punch Kit
front door:
opens to remove mishandled
paper in Finisher or Punch
Kit, to change the staple
cartridge and to remove
paper punched out.
4
Right lever:
opens upward to allow
removal of mishandled
paper.
Trash basket:
holds waste paper punched
out.
2. Requirements for Safe Use
Site Requirements
Unit: inches (mm)
5.9
(150)
44.0
(1117)
21.6
(550)
6.65
(169)
34.95
(887)
24.6
(626)
3.9
(100) 15.7
(400)
37.4
(950)
30.5
(775)
4.7
(120)
63.1
(1603)
47.4
(1203)
111.4
(2829)
30.3
(770)
141.7
(3599)
72.6
(1845)
DL750 + 9844 + 9756 + 9849 + 9869
NOTES:
1 Dimensions are in inches with millimeters included in parentheses.
2 The Finisher main tray of the 9846/9844 Finisher gradually goes down while printed material is output.
DO NOT allow any object to interfere with the operation of the tray on the left side of the finisher, as any
interference may cause damage to the finisher.
Finisher Capacity Requirements
Primary (Main) tray: Punching mode (machine with 9756 only)
3,000 sheets (8.5"x11")
1,500 sheets (11"x17")
5
3. Punching Mode
The Punching mode is available only when the 9756 Punch Kit option is installed on the
9846/9844 finisher.
When the Punching mode is selected in combination with any of the Primary (Main) tray
output modes, each copied sheet is punched and output to the Primary tray according to
the selected output mode.
NOTE: Some staple positions previously selected may conflict with this function.
Copy paper size: 11"x17", 8.5"x11" (20 lb paper recommended)
Paper weight: 20 lb ~ 24 lb bond recommended
Thin paper; 16 lb ~ 19 lb
Thick paper; 25 lb ~ 45 lb
Number of holes: 3 holes
Hole diameter: 0.315" ± 0.020" (8 mm ± 0.5 mm)
Hole pitch: 4.252" ± 0.020" (108 mm ± 0.5 mm)
Incompatible Basic Copying Conditions: Output to Secondary (sub) tray, Rotation Sort,
Rotation Group, Folding/ Stapling & Folding/ Trimming mode
Incompatible Special Originals: Mixed Original (8.5"x11"R, 5.5"x8.5" mixed), Non STD Size
Incompatible Applications: Booklet, Transparency Interleave
Basic Screen
4.252"
(108mm)
Finisher Mode Selection Screen
6
Punch Position Selection Screen
1 Touch OUTPUT APPLI. on the Basic Screen to display the Finisher Mode Selection
Screen.
2 Touch PUNCH to display the Punch Position Selection Screen.
3 Touch the desired punch position key on the screen to highlight it.
4 Touch OK on the Punch Position Selection Screen to restore the Finisher Mode
Selection Screen.
5 Touch OK on the Finisher Mode Selection Screen to complete the setting and return to
the Basic Screen.
The selection made in punching position will be displayed in the OUTPUT icon area.
6 Select additional copying features, as required.
7 Enter the desired print quantity.
8 Position originals in the document handler. When using Store mode, see p. 6-27 to p.
6-29 of the Copier Operator’s Manual.
9 Press [Start].
CAUTION:
When the finisher capacity is exceeded due to the print quantity selected, remove the copied sets while
the paper is exiting; otherwise mishandled paper will occur.
7
4. Help Mode
Use the [Help] key to access information about the current screen mode and to learn
about setting procedures. The [Help] key can be pressed from any screen except
Program Memory and Key Operator Screens.
The Help Screen also includes the Help menu icon in the center. When the HELP MENU
key is touched, the Help Menu Screen displays a list of all of the copier functions. When a
function item is touched, the Help Screen displays information specific to that topic.
The KEY OPERATOR MODE key is also provided in the lower left position of the Help
Screen. When touched, the Key Operator Password Entry Screen will be displayed to
access the Key operator mode. See p. 14-2 of the Copier Operator’s Manual.
Control panel
contrast key
Help Screen
Mode Check Help
Program Memory
Panel Reset
Help Menu Screen
8
Weekly timer key
1 While in any screen, press [Help] to display the Help Screen.
2 Touch TONER SUPPLY, PAPER SUPPLYs, EDH, STAPLE SUPPLY, TRIMMER, PUNCH,
FOR ASSISTANCE, or the Service call telephone number and Fax number to display
specific Help information.
3 For help on operations, touch HELP MENU in the center area of the screen. The Help
Menu Screen will be displayed. Select one of the 7 Help menu items.
4 The Weekly timer key display only when the Weekly timer system is activated. Touch
the key to display the settings of the Weekly timer.
5 Touch EXIT to return to the screen that was displayed before pressing [Help].
9
5. Finisher Adjustment [17] of Key Operator Mode
Use this mode to make fine adjustments to each function of the finisher.
Key Operator Mode Screen 2
Finisher Adjustment Menu Screen
Stapling&Folding Stopper Position Adjustment Screen
Folding Stopper Position Adjustment Screen
Trimming Stopper Position Adjustment Screen
Punch Adjustment Mode Screen
Punch Vertical Position Adjustment Screen
Punch Horizontal Position Adjustment Screen
1 Press [Help] to display the Help Screen, then touch Key Operator Mode.
Enter a 4-digit key operator password, then touch OK to display the Key Operator
Mode Screen.
NOTE: If an invalid Key operator password is entered, continue by entering the valid 4-digit password.
2 To display menus [11] to [18] of the Key Operator Mode Screen, touch
Lower
arrow key.
3 Touch [17] Finisher adjustment to display the Finisher Adjustment Menu Screen.
4 Touch the desired menu key to display the adjustment screen for each function.
10
5 Make fine adjustment on the screen. To go on or back to another adjustment screen,
touch NEXT or PREVIOUS. Touching PREVIOUS SCREEN restores the Finisher
Adjustment Menu Screen.
6 Touch PREVIOUS SCREEN to restore the Key Operator Mode Screen. If other key
operator setting changes are required, select the desired menu item, from [1] to [18].
7 If no further changes are required, touch PREVIOUS SCREEN to restore the Basic
Screen to perform copying operations.
11
6. Empty Trash Basket of Punch Kit 9756
When the trash basket becomes full, “Trash basket of Punch Kit is full / Please empty
trash basket” message displays on the touch screen.
1 Open the Finisher/Punch Kit front door. Withdraw the trash basket.
2 Empty the trash basket.
3 Return the trash basket to its original position, then close the Finisher/Punch Kit front
door securely.
12
7. Clearing Mishandled Paper
CAUTION
When removing mishandled paper, be sure to leave no torn paper inside the machine, avoid touching
the drum or scratching it in any way, and keep all metal and magnetic objects, e.g., watches, jewelry,
etc. away from the drum area.
When a paper misfeed occurs, the copier stops making copies and mishandled paper codes display on
the screen to indicate misfeed area(s). A flashing code indicates the area that should be cleared first.
To view Help screen instructions, touch Illustration explanation when the flashing mishandled paper
code displays. Be sure to remove paper from each flashing location until all locations are cleared.
The following 19 mishandled paper codes display for specific areas of the machine.
Code
[1]
[2]
[3]
[4]
[5]
[6]
[7]
[8]
[9]
Location
Tray 1
Tray 2
Tray 3
Tray 4 (LCC)
Multi-sheet bypass tray
Right side cover of Main
body
: Tray 4 (LCC)
: Multi-sheet bypass tray and
Main body
: Main body
:
:
:
:
:
:
Code
[10]
[11]
[12]
[13]
[14]
[15]
[17]
[18]
[19]
[20]
Location
Main body
Main body
ADU or Main body
Finisher
EDH
EDH
Finisher (Cover Inserter)
Finisher (Book making
unit)
: Trimming Unit
: Punch Kit
:
:
:
:
:
:
:
:
13
8. Specifications
Function
Number of punch holes
Hole diameter
Hole pitch
Paper Size
Paper Weight
:
:
:
:
:
:
Punching file holes in copies
3
0.315" ± 0.020" (8.0 mm ± 0.5 mm)
4.252" ± 0.020" (108 mm ± 0.5 mm)
11"x17", 8.5"x11"
16 ~ 24 lb
Punching unit specified in Thick 1 ; 25 ~ 45 lb*
Punching unit specified in Thin
; 13 ~ 15 lb
*: Some 45 lb paper types may not be punched easily.
Dimensions
Weight
Power source
: Width: 6.7 in. (169mm)
Depth: 26.0 in. (660mm)
Height: 39.0 in. (990mm)
: Approx. 77 lb (35 kg)
: Supply from outlet
NOTE: Special paper (OHP film, labels, tabbed sheets) cannot be punched. Using special paper will cause
the machine trouble.
14
Notes:
Notes:
Supplies
The supplies listed below have all been designed especially for Imagistics copiers to ensure maximum
product performance and quality. Substituting other supplies may result in inferior copy quality and machine
malfunction. Ordering supplies is quick and easy.
To order Supplies: Call the Imagistics Copier/Printer Supply Line at 1-800-462-6797
To speak to a technical support representative: Call the Imagistics Digital Technical Support
Line at 1-800-991-9254
To request on-site maintenance or service: Call 1-800-243-5556
Description/Order Number
How much to
keep on hand
Description
Printpowder ® Toner
463-2
1 Carton
Contains 8 toner cartridges
Copier Paper (8 1/2" x 11")
471-1
10 Cartons
Contains 5,000 sheets
per carton (10 reams)
Copier Paper (8 1/2" x 14")
462-1
2 Cartons
Contains 3,000 sheets
per carton (6 reams)
Copier Paper (11" x 17")
479-1
2 Cartons
Contains 2,500 sheets
per carton (5 reams)
3-Hole Punched
Copy Paper (8 1/2" x 11")
471-9
2 Cartons
Contains 5,000 sheets
per carton (10 reams)
Transparencies
257-9
1 Box
Contains 100 sheets
per carton
Developer*
463-4
1 Carton
Contains 1 bag per carton
Staples for Folding Finisher
847-3
1 Carton
Contains (3) 5,000 staple
cartridges
Staples for Plain Finisher
847-3
1 Carton
Contains (3) 5,000 staple
cartridges
* Note: This item can only be installed by an Imagistics customer Service
Representative and should be kept on hand for preventative maintenance.
TM
www.imagistics.com
Imagistics International Inc.
100 Oakview Drive
Trumbull, CT 06611
©Imagistics International Inc. 2002
Printed in USA
Part Number DL7500200
www.imagistics.com
The information contained in this
manual is subject to change without
notice to incorporate improvements
made to the products listed in this
manual.