1
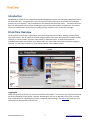
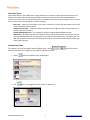
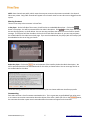
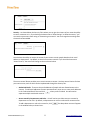
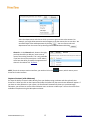
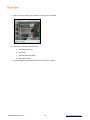
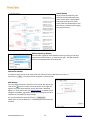
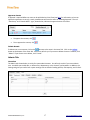
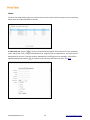
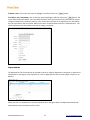
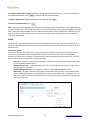
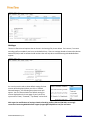
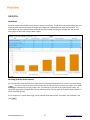
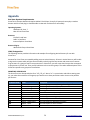
User Manual 8383 Wilshire Boulevard, Suite 750 Beverly Hills, CA 90211 www.mediaplatform.com [email protected] (310) 909-8410 Table of Contents Introduction ................................................................................................................................................. 2 PrimeTime Overview.................................................................................................................................... 2 Logging In ............................................................................................................................................................ 2 User Role Types.................................................................................................................................................... 3 Content list Views................................................................................................................................................ 3 Playing Content.................................................................................................................................................... 4 The Player ............................................................................................................................................................ 5 Searching ............................................................................................................................................................. 5 Channels .............................................................................................................................................................. 5 Sharing Content ................................................................................................................................................... 6 Commenting ........................................................................................................................................................ 6 Rating Content ............................................................................................................................................. 7 Creating Content .......................................................................................................................................... 7 Upload Content.................................................................................................................................................... 8 Capture Content (with Webcam)....................................................................................................................... 12 PrimeTime Administration ......................................................................................................................... 15 My Account........................................................................................................................................................ 15 Assets................................................................................................................................................................. 15 Asset Status .................................................................................................................................................. 16 Select Assets by Status ................................................................................................................................. 16 Search for Assets .......................................................................................................................................... 16 Edit Assets .................................................................................................................................................... 16 Approve Assets ............................................................................................................................................. 17 Delete Assets ................................................................................................................................................ 17 Admin Tab .......................................................................................................................................................... 17 Overview ...................................................................................................................................................... 17 Users ............................................................................................................................................................. 18 Departments................................................................................................................................................. 19 Roles ............................................................................................................................................................. 20 User Role Types.................................................................................................................................................. 20 Channels ....................................................................................................................................................... 21 Encoders ....................................................................................................................................................... 25 Settings ......................................................................................................................................................... 26 Analytics .................................................................................................................................................... 27 Overview............................................................................................................................................................ 27 Running Specific Asset Reports .................................................................................................................... 27 Appendix ................................................................................................................................................... 28 LDAP Integration ................................................................................................................................................ 28 Index ......................................................................................................................................................... 30 ©2010 MediaPlatform, Inc. 1 www.mediaplatform.com Introduction MediaPlatform PrimeTime is a browser-based media management solution and video portal designed primarily for online video files. Using PrimeTime, you can search for videos, watch them, share them with colleagues, comment on, and rate them. You can upload your own material and share with others. This manual will cover basic use and operation of PrimeTime, including the main interface and the basic configurations. The manual also covers administration of PrimeTime, including settings, workflows, users, and access privileges. PrimeTime Overview The PrimeTime user interface, shown below, gives you multiple options for finding, viewing, and interacting with video content. You can search for content using key words in the search box, select from multiple content channels, or view the newest, top-rated, most viewed, or featured content. The interface contains an embedded video player that enables you to watch videos you select from the content list without leaving the interface. You can share, comment on, rate, and tag material in the interface as well. Logging In When you log into PrimeTime, you will see the interface shown above. This is a basic user view, which does not permit the uploading of new content. However, depending on your role, as defined in PrimeTime, your view may include options for uploading new content or adjusting system settings. See Admin Tab section for more information on administration of PrimeTime. ©2010 MediaPlatform, Inc. 2 www.mediaplatform.com User Role Types Every PrimeTime user has a defined role, which describes the number of system features that the user can access. Your system administrator may give different names to roles than those that are standard with PrimeTime, so we will not list specific role names here. However, there are three core types of roles. You will have one of the three following levels of system privilege: - Basic User – A Basic User can browse, view, search, comment on, share, and rate content. Basic Users are not allowed to upload content. Content Creation User – A Content Creation User has the same rights as a Basic User, but can also to upload content to the system. Content Management User – Can manage all content, including add/edit/delete content. Admin User – An Admin User has all the rights of a Basic and Content Creation user, but also has the ability to add and delete users, change user roles, and create new Admin Users. The Admin User can add, edit, or delete content assets and channels. The Admin User also has control over encoding and other system settings. Content list Views The Content List can be arranged in several different ways. Use the above the Content List to change the way media is displayed in the list. Detail: Tile: buttons in the bar Detail is the default view, shown below. Items are arranged in a taller format, as shown here. ©2010 MediaPlatform, Inc. 3 www.mediaplatform.com Icon: Thumbnails: mouse-over. List: Condensed to thumbnails with the title and description. Thumbnail images only with the asset details (ratings, description, etc) overlaid on A simple list in a table. Playing Content If the user clicks on an item in the Content List, the content begins playing immediately in the player. If the content is something other than audio and video (e.g. webcast with slides) the information will be displayed on the left and the preview image will be a link to that content. ©2010 MediaPlatform, Inc. 4 www.mediaplatform.com The Player The user has the option to interact with the video while it is playing by rolling the mouse over the video player. A toolbar will appear with the following options: Pause/Play: Pause the video by clicking Scrub/Fast Forward: Drag the duration/total played, as in Resize: Click one of the 3 the screen), or full screen size. Volume: Adjust the volume using the Menu: The button will open an overlay that displays information about the content, as shown below, and gives the option to share this content with either a link or an embedded object for a blog or website. To close the Menu View, click . . This icon will turn to a Play icon for resuming. icon to scrub ahead or back in the video. This is accompanied by the . icons to display the playing video as the default, large (uses most of slider. To mute the sound, slide to the left to 0. Searching PrimeTime supports basic keyword searching. Enter a word or series of words into the search field and PrimeTime will search for assets with closely related terms. If a channel is selected the search will be restricted to that channel. To search for content, enter the keyword or phrase in the box shown above and click the button. Channels Channels are groups of content that are customized for each organization. As shown on the right, the Channel menu appears as a drop-down when you click on the . Selecting a channel will display all of the assets in that channel in the Content list. If a search is performed while a channel is selected the search will be restricted to that channel. Depending on the particular configuration, Channels can have different look and feels (skins). To learn how to create channels, see Channels. ©2010 MediaPlatform, Inc. 5 www.mediaplatform.com NOTE: Some channels are public, which means that anyone can access the content contained in the channel. Others are private. Only public channels will appear in the channel menu for users who are not logged into the system. Sharing Content There are two ways to share content in PrimeTime: In the player - On the left side of the screen, PrimeTime has an embedded video player. Click on the button in the player. You will be presented with the video's description. Click and the player will display the two sharing options, as shown below. You can now copy and paste the email link into an email or instant message. The recipient will then be able to click on the link and watch the video. Or, you can copy and paste the embed code for this video into an html page. If you use the embed code, this player (with the overlays) will be embedded on the site or blog you choose. Below the player - Click on the link at the bottom of the interface, below the video's description. You will be presented with the link and embed code for this video, as shown below. You can now copy the link or the embed code for this video. These two sharing interfaces are identical in functionality. You can choose whichever interface you prefer. Commenting Each video can have a list of comments associated with it. This is a great way to get feedback from other users or to create a constructive conversation about the subject of the video. When you click on the button, the comments that other system users have made about the content will appear on the interface. ©2010 MediaPlatform, Inc. 6 www.mediaplatform.com You can add your own comments, but you need to be logged in first. To comment on a video simply click the link below the video description and you will see the comment box, as shown below. After you have typed or pasted your comment into the comment box, click to. You can cancel the process by clicking . After you have posted your comment, it will appear below the content title, as shown below. Rating Content To rate content, click on the stars under the player, as shown below. You can click from one to five stars to give the content your rating. Creating Content Some PrimeTime users have the ability to create new content on the system. Not all users have this privilege. If your user profile allows you to create content, you will see a link at the top of the interface. If you don’t see that link, it means you cannot create content. However, your system administrator has the ability to give you content creation rights. NOTE: A PrimeTime asset can contain more than one content file. For example, an asset might include a video file, a thumbnail image for the preview, or a PowerPoint deck that accompanies the video. All of these content pieces will be grouped together under the asset. ©2010 MediaPlatform, Inc. 7 www.mediaplatform.com There are two ways to create content for the PrimeTime system: Upload – Adding previously recorded content files Capture – Using your webcam to create new video content and adding it to PrimeTime Upload Content Uploading is the primary method of creating an asset in PrimeTime. It is the process of uploading, or linking to, one or more types of media to create a PrimeTime asset. To upload content, click the link at the top of the interface. The screen shown below will appear: This is the content upload interface. Uploading content is a three step process: 1. Add the Asset (Content) metadata 2. Upload the content 3. Configure Advanced Options STEP 1: Enter the Asset (Content) Metadata Enter the following metadata: Name – This will be the name of the asset and will be displayed as the title of your asset in the PrimeTime interface. This does NOT have to be a unique name. Description – This is the description of the asset. It is optional but also highly recommended that a short and concise description is entered. This is a searchable field. STEP 2: Add Content You can have multiple pieces of content tied to each asset. For example you can have the main piece of video as well as a PowerPoint file that could be downloaded. In that case, the PowerPoint would be an attachment to the video file. (See “Asset Types” below.) ©2010 MediaPlatform, Inc. 8 www.mediaplatform.com - When you click the button, the “Asset Parameters” box shown below will appear. You can browse for the files you want to upload on your PC by clicking the button. Alternatively, you can type or paste the URL of the asset you want to add to PrimeTime in the URL box (this is relevant for situations where the content is located in a different repository and PrimeTime is simply pointing to it rather than replicating the asset). Select what type of content it is from the available options. If it is a video or audio file that you want to transcode to another format, select one of the transcoding options (these are not available unless you are uploading a file and have the correct permissions). Note - If no transcoding option is selected, the asset will bypass transcoding and will be uploaded in its current format. Repeat this process until all your pieces of content are included as a part of your asset. Asset Types: Audio/Video – This is the main video/audio content piece. There has to be exactly one of these types per asset. Thumbnail – This is the small thumbnail image associated with the asset. PrimeTime will automatically grab the first frame of your video and create a thumbnail from it. However, if you do not like this thumbnail, you can upload a new one with this content option. Thumbnail Large – This is a larger version of the Thumbnail image described above. It is the image you see for an asset when it is a Featured piece of content. Optimal size is 320x240 pixels. Attachment – You can upload other assets that will be available for download. The Label will be the text on the hyperlink that the end viewer will click to start the download. ©2010 MediaPlatform, Inc. 9 www.mediaplatform.com When you are finished, click advanced options. . You will be returned to the Upload Tab, where you can choose from the STEP 3: Configure the Advanced Options To configure advanced options, click in the Upload Tab. The Advanced Options box, shown at the right, will appear. There are three tabs in the Advanced Options dialogue (depending on permissions) – Info, Security, Channels. Info – Allows you to enable modification of asset information, such as name and description. Security – Allows the content creator to specify which users, roles, and departments can access the asset. Channels – Determines which channels will feature the asset. - Info – As shown below, the Info tab is where you can define the general information for the asset. First, you can define what tags you want to associate with this asset. Enter them in the Tags box (tags are an optional way of augmenting the discoverability of the asset on PrimeTime by describing key words as searchable tags). Then, select the asset type by accessing the drop-down menu as shown below. You can have PrimeTime automatically detect the duration of an audio or video file by checking the Auto Duration Determination box. Alternatively, you can manually enter the duration if desired, by unchecking the Duration box and entering the duration in the box below. You can also make the asset Featured by checking that box. Doing so will make the asset appear in the “Featured” section of the PrimeTime interface. ©2010 MediaPlatform, Inc. 10 www.mediaplatform.com - Security – As shown below, the Security Tab is where you can give the viewers of your asset the ability to rate or comment on it. By unchecking the boxes next to “Allow Ratings” or Allow Comments,” you can restrict system users from rating or commenting on material. You can change these settings after the asset has been added. You also have the ability to restrict the access of your asset to certain people based on their email address, or department. By default, an asset has no access controls. If you check the box next to “Access Control,” the screen will change to the one shown below. The access control feature enables you to restrict access to content. You have several choices for how you restrict access, each of which can be implemented through the Security Tab: o Authorized Emails - These are the email addresses of people who are allowed access to the content. To add email addresses of access-permitted users, enter one or more email addresses in the “Authorized Emails” box and click when you are finished. You will need to separate multiple emails with commas. o Access control by Departments and Roles – PrimeTime lets you allow access to content by department or user role. By default, no departments or roles are selected for content access. To add a department or role to the access list, click . Two drop-down menus will appear in the window below, as shown here: ©2010 MediaPlatform, Inc. 11 www.mediaplatform.com Select the departments and roles to which you want to grant access to the content. For example, you might allow executives and managers to see the content, but no one else. You can add multiple roles and departments by clicking . You can remove roles and departments from the access list by selecting them in this window and clicking . - Channels – In the Channels tab, shown at the right, you have the ability to add your asset to one or more of the existing channels. This is only available if you have the correct permissions. NOTE: Admin Users have the ability to modify the appearance of channels. See Admin Tab - Channels. NOTE: To exit the content creation interface, you need to click on the PrimeTime’s main interface. button, which returns you to Capture Content (with Webcam) You have the ability to record a video directly from your desktop using a webcam and then upload it into PrimeTime. When you click on the Capture Tab (under the Create link) the screen shown below will appear. If you have an active webcam on your system, the interface will automatically show you a preview image. Otherwise, you will have to use the Camera Selector menu to choose a video input. You can also select from available microphones using the Microphone selector. ©2010 MediaPlatform, Inc. 12 www.mediaplatform.com To capture a video for PrimeTime: 1. Enter a title and description in the boxes at the bottom of the interface. 2. Click either Record button (there are two – one on the video screen and one on the interface). 3. Depending on your setup, you may see a permission box, as shown below, asking if you want to connect your webcam to the PrimeTime backend. Choose “allow” so the camera can communicate with PrimeTime to capture your video. 4. When you are finished recording, click the ©2010 MediaPlatform, Inc. button. 13 www.mediaplatform.com 5. After you stop recording, the screen will change, as shown below. 6. At this point, you have several choices: a. Upload to PrimeTime b. Re-record c. Append (add more video) d. Preview the video 7. Click the button corresponding to the choice you want to make. ©2010 MediaPlatform, Inc. 14 www.mediaplatform.com PrimeTime Administration If you are not responsible for administering the PrimeTime system, the following section will not apply to you. Indeed, you may not have access to the features described in it. PrimeTime’s admin features are located in the section of the application. The settings area contains all of the important administration tools a user needs whether for an individual account or to manage how other users access PrimeTime. To access the admin features, click on the link at the top of the interface. The screen shown below will appear. My Account By default, the Settings screen opens on the “My Account” tab, as shown above. In this tab, you can change your password, the email associated with your account, and change the first and last name on the account. You cannot change your username on the PrimeTime system. If you want to change your username, you need to create a new username and delete your old one. See Users. Assets PrimeTime Admin users will see a list of all the assets in the system on the Asset Tab, as shown at the right. You can edit and delete assets or, if there is an asset approval workflow defined, mark them as “approved” or “rejected.” A Content Creating user who is not an Admin will only be able to view and have control over assets that they have submitted. ©2010 MediaPlatform, Inc. 15 www.mediaplatform.com Asset Status Assets can be searched for in the asset list as well as filtered by their status. At the left is a state diagram that shows the flow of an asset’s status. Note that, depending on user permissions, all states may not apply to a particular asset. Select Assets by Status You can select a group of assets based on status by clicking on the dropdown menu marked “Status,” as shown to the right. That will show the assets in the selected status of the Asset Tab. Search for Assets To locate an asset, you can enter a key word from the asset’s title or description into the box and click . The search results will appear in the Asset Tab. Edit Assets You can modify the assets in PrimeTime in the Asset Tab. When you click on the next to an asset, the screen shown to the right will appear. This is the same interface you will find under “Advanced Options” in the Create screen. See Upload Content. It enables you to change the metadata, tags, add or delete associated content such as attachments, and modify security settings. You can also delete the asset by clicking on . NOTE: Once an asset is deleted, it is completely gone and cannot be restored. ©2010 MediaPlatform, Inc. 16 www.mediaplatform.com Approve Assets If approval is required before an asset can be published on PrimeTime (see Roles for information on how an approval requirement is set up), a newly created asset will have the status of “Awaiting Approval.” The red “thumbs up” and “thumbs down” signs, shown below, indicate the approval status of an asset. To approve the content, click To un-approve the content, click . . Delete Assets To delete one or more assets, click on the box next to the asset in the Asset Tab. Click on the button at the bottom of the Asset Tab. PrimeTime will ask you if you want to delete the asset. To delete, click “Delete.” If you choose not to delete, click “Cancel.” Admin Tab Overview The Admin tab, shown below, is strictly for system administrators. You will only see this if you are an Admin user. It enables you to add, edit, or delete users, departments, roles, channels, and encoders. In addition, the Settings tab gives you control over system settings such as default encoding profiles, CDN capacity, and so forth. ©2010 MediaPlatform, Inc. 17 www.mediaplatform.com Users The Users Tab, shown below, gives you control over the users of your PrimeTime system. You can add users, delete them, or modify their Roles in this tab. To add a new user, click on . The form shown below will appear. Fill out the user’s name, password, email, and so forth. Then, using the drop down menu, assign the user to a department. You must choose a department for the user. If you do not select a department, you will get an error message. Check off the appropriate Role box and click to create the user. For more information on roles, see Roles. ©2010 MediaPlatform, Inc. 18 www.mediaplatform.com To delete a user, click on the user name to highlight it and then click on the button. To modify a user’s information, click on the user name to highlight it and then click on the button. The screen shown below will appear. You can modify the name, email, and role of the user. Note that you cannot change the department, password, and user name. Those values are fixed. To change those, you must delete the user and create a new user profile. NOTE: At this time, PrimeTime does not have a “password reset.” You need to delete the user and create a new user to change a password. Departments The Departments Tab, shown below, can be used to check on usage by department, set quotas, or determine if a department is nearing (or over) its quota limit. Select a Department to edit its name, adjust its quota, or to delete it. When you click on a department, as shown by the blue line in the figure above, the Department Details will automatically show at the bottom of the screen. ©2010 MediaPlatform, Inc. 19 www.mediaplatform.com To change a department’s settings, modify the storage quota, department name, or cross-reference name in the “Department Details” click to change and save the new settings. To delete a department, highlight the department name and click To create a new department, click . . Note – Departments are mapped directly from the Active Directory field “Department” in the Organization tab. If a user’s Department is not defined in PrimeTime, it will be automatically created and the department’s quota will be set to the default (100MB). If a user in Active Directory does not have “Department” defined, they will be put into the “Unknown” department in PrimeTime and will share the quota with all other people in the “Unknown” department. Roles The Roles Tab, shown below, gives you control over the different roles you can assign to your system users. A user’s role determines their level of access to content and their permissions to create new content or serve as administrators. User Role Types Every PrimeTime user has a defined role, which describes the number of system features that the user can access. Your system administrator may give different names to roles than those that are standard with PrimeTime, so we will not list specific role names here. However, there are three core types of role. You will have one of the three following levels of system privilege: - Basic User – A Basic User can browse, view, search, comment on, share, and rate content. Basic Users are not allowed to upload content. Content Creation User – A Content Creation User has the same rights as a Basic User, but can also to upload content to the system. Content Management User – Can manage all content, including add/edit/delete content. Admin User – An Admin User has all the rights of a Basic and Content Creation user, but also has the ability to add and delete users, change user roles, and create new Admin Users. The Admin User can add, edit, or delete content assets and channels. The Admin User also has control over encoding and other system settings. ©2010 MediaPlatform, Inc. 20 www.mediaplatform.com When you click on a Role, you will automatically see the Role Details on the right side of the screen, as shown above. You can change any role details in this interface. To change a Role’s settings, make the appropriate changes in the interface shown above, then click save the changes. PrimeTime gives you control over the following attributes of a Role: to Make the user a system administrator by checking the box next to “System Administration.” Give the user content management privileges by checking the box next to “Content Management.” Give the user access to reports by selecting from the drop-down menu, as shown to the right. The user can be given the option to view reports on all assets, only his or her own assets, departmental assets, or no assets at all. Give the user channel management capabilities by checking the box next to “Channel Management.” Select level of content creation permissions. Note, if you select “Approval Required” for a user, that user’s content will require approval from an administrator prior to being published on the system. To delete a Role, highlight the Role name and click . To create a new Role, click . A blank “Role Details” form will appear on the right side of the screen. Enter the information for the new role and click when you are done. Channels The Channel Tab, shown below, gives you the ability to add, edit, or delete channels. Channels are a way to easily group content by subject. Administrators can create channels as they are needed and they will show up in the Channel Selection box on the main PrimeTime interface. ©2010 MediaPlatform, Inc. 21 www.mediaplatform.com There are two types of channels that you can create in PrimeTime: Public Channels – Content published on a public channel is open to everyone, without login required or any access restrictions. Private Channels – Content published on a private channel is viewable only to people with login credentials for the PrimeTime system (including those on an integrated LDAP). Additional access restrictions can also be applied. PrimeTime channels can have sub-channels and even sub-sub-channels. One channel is the “Parent” while subchannels are the “Children.” This is important, as it has an impact on the public/private channel setting. In the examples below, the “Training” channel is a child of the “Employee” channel. You can modify the Parent-Child channel relationships in the Channel Edit screen, described below. NOTE – Channels that have “Children,” will display a drop-down menu arrow, as shown above. When you click on the arrow, the sub-channels, or “Children” will appear. NOTE – Public channels are indicated by the word “Public” in parenthesis next to the channel name. To Edit a Channel, click . The form shown below will appear on the Tab. You can change the name and description of the Channel. You can also make the channel public or private by selecting the appropriate box. By default, all channels are private unless you deliberately check the “public” box. Click OK when you are done. ©2010 MediaPlatform, Inc. 22 www.mediaplatform.com Public Channels - Making a channel public has an immediate effect on the availability of media assets that are in that channel. They can become viewed by anyone in the public. To make sure that you don’t select this option accidentally, PrimeTime will prompt you with the following message when you click the “Public” box: If you did not mean to make the channel public, you should click “Cancel.” Otherwise, click “Confirm.” Once you have confirmed that you are making a channel public, the word “Public” will appear next to it in the Channels Tab. And, of course, the channel will be public on the home page of the site. Some Important Notes About Public Channels There are two ways to make a public channel: o Create a public channel o Change a private channel to public You can add content to a public channel in the Asset Tab Public channels appear on the public home page. o PrimeTime site visitors who are not logged in will see public channels o The public channels drop-down menu on the home page will automatically populate with new public channels as they are created The hierarchy of the channels determines whether a channel can be public or not. o All sub-channels, or “children” of a public channel will automatically be public o Once a “Parent” channel is public, you cannot make it’s “Children” private. o However, you can make the “Child” channel of a private channel public. ©2010 MediaPlatform, Inc. 23 www.mediaplatform.com To summarize, the following options are possible with public channels: Private o Private o Private Private Public o Public o Public OR, Private o Private o Private Public Public o Public o Public Skins - You have the ability to create a “Skin,” or customized appearance, for each channel. To use a skin, check the “Use Skin” box. To edit a skin, click . The screen will change to the Skin Editor, shown below. Use the forms to change the colors used throughout the Channel interface. Note that you must use Hex colors. For information on how to use Hex colors, see the Hex Color Guide. ©2010 MediaPlatform, Inc. 24 www.mediaplatform.com You can reset, test, or save the work you have done in the Skin Editor by selecting a button on the “Command Bar,” which is on the upper right of the Skin Editor. You must click one of these buttons to return to the Admin Tab. More on Skins: Skins allow customization of the look of a channel in the PrimeTime interface. Channels can have different skins to give a visual cue to the user that the content available has changed. By clicking Edit next to “Skin”, widgets will appear that will allow you to customize the look of the Channel’s skin. This is shown in the image below. As you can see, there are 3 main areas that can be customized: 1. Title Bar (Logo) – Customizations include the banner graphic and the background color used at the top of the interface. 2. Main Window Background – Customizations include the background image used (none are used by default), the background colors, and the gradient between the two background colors. The gradients can also be oriented either vertically or horizontally. 3. Search Categories – This is where the colors of the sorting links are controlled (All, Featured, Top Rated, Most Viewed, and New). The command bar allows you to test the changes on the fly. Reset allows the user to revert back to the settings that were in place when the user initiated the current round of editing. After editing, the user can then save the configuration or cancel. To add a new Channel, click on it out and click . . The form that is used to Edit Channels (See above) will appear, blank. Fill To delete a Channel, highlight the Channel name and click . Encoders The Encoder Tab, shown below, enables Admin users to add, edit, or delete encoders used in the system. PrimeTime uses FFMPEG as its default encoder to transcode audio and video to Flash and mobile formats. Administrators can add customized commands for FFMPEG to suit their needs. Documentation for FFMPEG is readily available on the Internet. However we strongly recommend contacting MediaPlatform support ([email protected]) for assistance when creating or editing encoding profiles. ©2010 MediaPlatform, Inc. 25 www.mediaplatform.com Settings There are a few universal options that can be set in the Settings Tab, shown below. For instance, if a custom encoding profile was added it can be set as the default here. There are settings related to Content Distribution Networks (CDN) as well as software build numbers that will help when troubleshooting with MediaPlatform support. You can also use this tab to select default settings for how content will be displayed. When you click on “Default Selected Category,” the following drop-down menu will appear. You can choose whether the default setting for content displayed on the home page of your PrimeTime system will be “New,” “Featured,” “Top Rated,” and so forth. With regard to modifications of settings related to Encoding profiles, CDN and FMS URL, we strongly recommend contacting MediaPlatform support ([email protected]) for assistance. ©2010 MediaPlatform, Inc. 26 www.mediaplatform.com Analytics Overview PrimeTime keeps statistics about each piece of content in the library. The Analytics tab, shown below, gives you access to these stats and the ability to browse date ranges and compare different asset's performance. The report shows you the number of times each asset has been viewed, how long the average view was, and the total number of hours the asset has been viewed. Running Specific Asset Reports You can search for assets and view their usage report by entering a keyword into the “Criteria” box and clicking . You can sort the list by each of the columns and can also sort it by more than one column. The Y index of the graph is based on the primary column sort. For example, if you click on the column head “Views,” the report will dynamically change so that the Y axis measures views. You can then see how each asset compares in terms of number of views. To run a report for a specific date range, use the calendar drop-downs under “Start Date” and “End Date” and click . ©2010 MediaPlatform, Inc. 27 www.mediaplatform.com Appendix End User System Requirements PrimeTime is browser-based and requires Adobe's Flash Player. Virtually all systems that employ a modern browser with the Flash plug-in should be able to view and use PrimeTime successfully. Operating Systems: Windows: XP, Vista, 7 Mac OS X 10.3 and later Browsers: Firefox 2.0 and later Safari 3.0 and later Internet Explorer 6 and later Browser Plug-In: Adobe Flash Player 10 and later LDAP Integration The following section provides information and examples for configuring Active Directory for use with PrimeTime. Accounts for PrimeTime are created by adding users to Active Directory. All users in Active Directory will be able to log into the system which will give them the ability to do things like rate content and comment on content. To grant users or a group of users more permissions in PrimeTime, you will create User Groups that correspond to permissions in PrimeTime. Then you will add users to the new user groups. The codes and descriptions of the PrimeTime-specific user groups are listed below. PRIMETIME USER GROUPS The PrimeTime User Groups take the form “IVT_PTP_xx” where “xx” is a permission code. When setting users up, you make them members of the groups you want them to have permissions to do. Here are the possible permissions: Permission Code SA CM CHM CHP AR U BE RPS RPD RPU CC Name System Administrator Content Manager Channel Manager Channel Producer Approval Required Upload Bypass Encoding Report on all content Report – department Report – Users Can Contribute ©2010 MediaPlatform, Inc. Description Can manage Departments, Settings, Encoding Profiles Can manage all content in the system Can Manage Channels and Featured Content Can assign channels to an asset Submitted Content Requires Approval User can upload content User can bypass encoding for uploaded content Can view reports on all content Can view reports on department content Can view reports on user’s content Can create content 28 www.mediaplatform.com NOTE – CM and SA override AR. In other words, System Administrators and Content Managers do not require their content to be approved. In addition to the above permission codes, the following Active Directory fields are mapped to PrimeTime equivalents as follows: Active Directory Field “Department” from Organization tab “First Name” from General tab “Last Name” from General tab “Email” from General tab PrimeTime Field Department First name of PrimeTime user Last name of PrimeTime user Email of PrimeTime user NOTE – It is important to note that people who share Departments also share content and quota. By default, when a new Department is created in PrimeTime, it is allocated 100MB as a quota (this is a configurable setting). If Department is not supplied for a user, the user will be assigned to the department called “Unknown” and will share quota with all other users in the “Unknown” department. TYPICAL USER SCENARIOS System Administrator – This user can administer IVT PrimeTime. Specifically, the user has the ability to manage Departments, Channels (add/remove/edit), Encoding Profiles, and Settings for the PrimeTime site. The user can not manage content or create content. User Group = IVT_PTP_SA Super Administrator– This user can administer IVT PrimeTime and has all the permissions of a System Administrator. In addition, this user can upload content into the system, choose the encoding profile, manage all content, add content to Channels, and view reports on all content. User Groups = IVT_PTP_SA IVT_PTP_CC IVT_PTP_U IVT_PTP_BE IVT_PTP_CM IVT_PTP_CHM IVT_PTP_CHP IVT_PTP_RPS General User– This user can log into PrimeTime in order to rate and write comments User Group = None (All users defined in Active Directory) General User plus Upload – This user can log into PrimeTime in order to rate and write comments. In addition, this user can upload content into the system and edit their own content. User Groups = IVT_PTP_CC IVT_PTP_U ©2010 MediaPlatform, Inc. 29 www.mediaplatform.com Index access, 2, 3, 12, 16, 22, 23, 30 Access Control, 12 Access control - Authorized Emails, 12 Access control by Departments and Roles, 12 Account Controls, 15 Active Directory, 22 add a new Channel, 27 add a new user. See User, add new Add Content, 9 Adjust the volume, 5 Admin Tab, 18 Admin user, 18 Admin User, 3, 22 Administration, 16 administrators, 18 Advanced Options, 8, 10, 17 Allow Comments, 11 Allow Ratings, 11 Analytics - sort by columns, 30 Append, 14 Approval Required, 23 Approve Assets. See Assets, approve approve content, 18 Asset (Content) Metadata, 8 asset approval workflow, 16 Asset Parameters, 9 Asset Reports, 30 Asset Status, 17 Asset Types, 9 asset views, 30 Assets, 16 attachment, 9 Attachment, 10 attachments, 18 audio file, 9 Authorized Emails, 12 Auto Duration Determination, 11 average view, 30 Background, 27 Basic User, 3, 22 Basic User Account Controls, 15 Browsers, 31 Capture Content (with Webcam), 13 CDN, 18, 28, 29 Channel customization, 27 Channel menu, 5 Channel Tab, 23 Channel, add, 27 Channel, edit, 24 Channels, 5, 10, 13, 23, 27 Channels, Parent-Child hierarchy, 24 Channels, public vs private, 23 comment on a video, 7 ©2010 MediaPlatform, Inc. Commenting, 7 Comments, allow, 11 Configure the Advanced Options, 10 Content attachment, 9 Content Creating user, 16 content creation permissions, 23 Content Creation User, 3, 22 Content Description, 8 Content list Views, 3 Content Name, 8 create a new department, 21 create a new Role, 23 create a new user profile, 20 create channels, 23 create new content, 7 Creating Content, 7 delete a department, 21 delete a Role, 23 delete a user. See User, delete Delete Assets. See Assets, delete Department Details, 21 department, create new, 21 Departments, 21 Departments Tab, 21 description, 6 Detail Content List View, 3 Duration, 11 Edit a Channel, 24 edit a skin, 26 edit and delete assets, 16 Edit Assets. Assets, Edit embed, 6 embed code, 6 encoding profiles, 28 Encoding profiles, 29 Fast Forward, 5 Featured, 11, 27, 29 FFMPEG, 28 Firefox, 31 Flash, 28, 31 group content by subject, 23 Hex colors, 26 Icon Content List View, 4 Info, 10 Internet Explorer, 31 key word, 5, 17 LDAP Integration, 31 Linux, 31 List Content List View, 4 Mac OS, 31 Make a user a system administrator, 23 Menu, 5 metadata, 17 30 www.mediaplatform.com Microphone selector, 13 microphones, 13 mobile, 28 modify a user’s information. See User, modify modify the storage quota, 21 mute, 5 My Account, 16 Operating Systems, 31 Other content repository, 9 Pause, 5 Pause the video, 5 permissions, 17 Play, 5 Player, 4 Playing Content, 4 Preview, 15 Preview the video, 15 PrimeTime Administration, 16 public channel, create, 25 Public Channels, 25 public channels, hierarchy, 26 Quoate, adjust or delete, 21 quota, 21 Rating Content, 7 Ratings, allow, 11 Record, 14 record a video, 13 Report - date range, 30 repository - other content repositories, 9 Re-Record, 14 Resize Player, 5 restrict the access, 12 Role, 3, 22 Role Details, 22 Role, change settings, 22 Role, create new, 23 Role, delete, 23 Roles, 19, 22 Safari, 31 ©2010 MediaPlatform, Inc. Scrub, 5 Search Categories, 27 Search for Assets, 17 search for content, 2, 5 search for videos, 2 Searching, 5 Security, 10, 11, 12 Select Assets by Status, 17 Sharing - email link, 6 Sharing - html page, 6 Sharing - In the player, 6 Sharing Content, 6 sharing options, 6 Skin Editor, 27 Skin, edit, 26 skins, 6, 27 Skins, 26, 27 statistics, 30 System administrator, appoint, 23 System Requirements, 31 tags, 10, 17 Thumbnail, 4, 9 Thumbnail Large, 10 Thumbnails Content List View, 4 Tile Content List View, 3 Title Bar, 27 top-rated, 2 transcoding, 9 un-approve content, 18 Upload Content, 8 User profile, create new, 20 Users, 19 Users - add, delete, modify, 19 Users Tab, 19 Volume, 5 webcam, 8, 13, 14 Webcam, 13 Windows, 31 31 www.mediaplatform.com