1
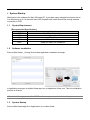
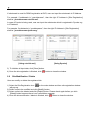
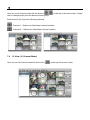
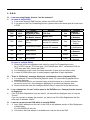
MacViewer
Remote Monitoring Software
for Mac OS
User Manual
※ Contents of this user manual are protected under copyrights and computer program laws.
※ Functions or configurations are subject to be changed or modified without prior notice.
Server
1st Edition
: H.264 DVR
: 21 Mar 2011
Thank You !
Before operating the system, please read this User Manual and retain it for future reference.
1
Contents
1.
SYSTEM STARTUP ..................................................................................................................................................................... 2
1.1
1.2
1.3
1.4
2.
SYSTEM REQUIREMENT ................................................................................................................................................................ 2
SOFTWARE INSTALLATION ............................................................................................................................................................ 2
SYSTEM STARTUP ......................................................................................................................................................................... 2
MAIN SCREEN ............................................................................................................................................................................... 4
SITE MANAGEMENT .................................................................................................................................................................. 6
2.1
2.2
SITE REGISTRATION ...................................................................................................................................................................... 6
SITE MODIFICATION / DELETE...................................................................................................................................................... 7
3.
LIVE MODE (LIVE MONITORING)............................................................................................................................................ 8
4.
PLAYBACK MODE (VOD PLAYBACK)................................................................................................................................... 9
5.
PTZ CONTROL ........................................................................................................................................................................... 10
6.
RELAY CONTROL...................................................................................................................................................................... 10
7.
DISPLAY MODE...........................................................................................................................................................................11
7.1
7.2
7.3
7.4
8.
1 VIEW (1 CHANNEL MODE) ...................................................................................................................................................... 12
4 VIEW (4 CHANNEL MODE) ...................................................................................................................................................... 12
9 VIEW (9 CHANNEL MODE) ...................................................................................................................................................... 12
16 VIEW (16 CHANNEL MODE) .................................................................................................................................................. 13
Q & A............................................................................................................................................................................................. 14
2
1. System Startup
MacViewer is the software for Mac OS based PC. It provides many essential functions such as
Live Monitoring up to 16 channels and VOD Playback with Intelli-Search Bar through network
connection to DVR.
1.1
System Requirement
[Recommended Specification]
Category
OS
CPU
RAM
VGA
HDD
1.2
Content
Mac OS X 10.6 or Higher
Intel x86 or x64 series
1GB or Over
1200×700 or Over
30MB free space for installation
Software Installation
Execute MacViewer_1.0.dmg file and start application installation manager.
In application manager, drag MacViewer.app icon to Application folder icon. Then the installation
process is finished.
Note It will be registered to MacAPP Store for easy download, installation & update.
1.3
System Startup
Execute MacViewer.app file in Applications to run MacViewer.
3
In case of the file which is downloaded from the internet(except MacAPP Store), warning
message might be appeared at the first running. Once click [Open] button, it runs.
4
1.4
Main Screen
1)
2)
3)
4)
5)
6)
7)
8)
9)
10) 11)
12)
15)
16)
17)
13)
18)
14)
19)
5
1) DVR Site Registration
2) Live Mode
3) VOD Playback Mode
4) Close All
5) Close One
6) 4View(A)
7) 4View(B)
8) 4View(C)
9) 4View(D)
10) 9View(A)
11) 9View(B)
12) 16View
13) DVR Site Panel
14) Display Screen
15) PTZ Control Panel
16) Relay Control Panel
17) Channel Information
: Register the DVR to be connected
: Monitoring Live image
: Playback recorded image
: Close the network connection for all channels
: Close the connection for currently selected channel
: Display in 4 channel mode (Channel 1~4)
: Display in 4 channel mode (Channel 5~8)
: Display in 4 channel mode (Channel 9~12)
: Display in 4 channel mode (Channel 13~16)
: Display in 9 channel mode (Channel 1~9)
: Display in 9 channel mode (Channel 8~16)
: Display in 16 channel mode
: Show registered site list
: Image Display
: Control camera PTZ & focus
: Control relay of the DVR
: Display registered DVR name and IP address of the
focused channel
18) VOD Time/Date Control : Control time and date for VOD connection
19) Intelligent Search
: Check recording status of the DVR in VOD mode
Move time bar to change time to playback
6
2. Site Management
2.1
Site Registration
This is to register the relevant products such as DVR, IP camera and IP server in this MacViewer
software, which is the 1st step to run the program.
1) Select the Site Registration icon
on the main window and then site registration window
will pop-up.
2) At [Site Registration] window, input site information such as DVR name, IP address, User ID,
Password, Port , number of channel and so on. And click [Add] button to register.
[Using Static IP]
[Using DDNS]
User has to input “Mac address + cctv-link.net” in IP Address for DDNS connection.
User can find the Mac Address in the menu of [System > System Info] of the DVR.
For example, if Mac address is “00:1C:84:01:00:02”, then the right IP Address in [Site
Registration] shall be “001c84010002.cctv-link.net”.
7
If subdomain is used for DDNS registration at DVR, user can input the subdomain in IP Address.
For example, if subdomain is “yourddnsname”, then the right IP Address in [Site Registration]
shall be “yourddnsname.cctv-link.net”.
In case of Dyndns is being used, user can input the subdomain which is registered in Dyndns.org
in IP Address.
For example, if subdomain is “yourddnsname”, then the right IP Address in [Site Registration]
shall be “yourddnsname.dyndns.org”.
[Using cctv-link.net]
[Using Dyndns]
3) To initialize all input data, click [Clear] button.
button to close the window.
4) Once the site registration is finished, click
2.2
Site Modification / Delete
User can modify or delete the registered site.
on the main window and then site registration window
1) Select the Site Registration icon
will pop-up.
2) Select a site to be modified and click [Modify] button.
3) Select a site to be deleted and click [Delete] button. Please check again before you click
[Delete] button because there is no confirmation message.
button to close the window.
4) Once the site modification / delete is finished, click
8
3. Live Mode (Live Monitoring)
User can get live monitoring window by a mouse click on Live Mode icon
.
User can select the target site from Site Panel on the left of the main screen and drag & drop it
into an empty channel screen that user wants to monitor.
When the connection is made, DVR name and IP Address for the focused channel are shown on
the right-bottom of the main screen.
button on the left of the DVR name at DVR site panel to
For one channel connection, click
display all cameras. And then, select a camera and drag & drop it into an empty channel screen.
9
4. Playback Mode (VOD Playback)
User can get playback window by a mouse click on Playback Mode icon
.
User can select the target site from Site Panel on the left of the main screen and drag & drop it
into an empty channel screen that user wants to playback.
Select the date on calendar and input the desired playback time. And then, drag & drop a site into
channel screen.
User can also search the recorded image by using Intelli-Search bar.
If user wants to move to a different time during playback, input time and click Go To
button.
10
Mark on date means as follows.
: Date which has recorded data. Dot
is shown below the date.
: Current Date.
: Date of currently displaying image.
Channel title, resolution and recorded time are displayed on each channel screen.
5. PTZ Control
In order to control PTZ, select a channel which is connected to a PTZ camera and control it with
PTZ Control panel on the right side of the main screen.
If the PTZ camera supports preset mode, user can control preset by the keys on the control
panel.
Select the preset position number and click [Run] button to move.
Note PTZ control is available in Live Monitoring only.
6.
Relay Control
Relay of DVR can be controlled during Live Monitoring.
11
Select a channel to control relay and click number button to control at Relay Control panel on the
left side of the main screen.
[No. 1 Relay is On]
[All Relays are Off]
The number of relay vary according to DVR model. MacViewer reflects it, automatically.
[In case of the DVR that has only 1 relay]
Note There might be delay in relay control according to network condition.
7. Display Mode
Display mode controls for both Live Monitoring & VOD Playback are the same.
12
7.1
1 View (1 Channel Mode)
In Multi-channel mode, double-click on a channel to display in 1 Channel mode.
If user double-clicks that channel again, display mode returns to multi-channel mode. Or, user
can change channel mode with the buttons on the top of the main screen.
7.2
4 View (4 Channel Mode)
User can see 4 Channel mode with the buttons
on the top of the main
screen. It helps user to change quickly into the desired channel group.
Each button(A, B, C, D) shows the following channels.
: Channel 1 ~ 4(based on MacViewer channel number).
: Channel 5 ~ 8(based on MacViewer channel number).
: Channel 9 ~12(based on MacViewer channel number).
: Channel 9 ~12(based on MacViewer channel number).
7.3
9 View (9 Channel Mode)
13
User can see 4 Channel mode with the buttons
user to change quickly into the desired channel group.
on the top of the main screen. It helps
Each button(A, B) shows the following channels.
: Channel 1 ~ 9(based on MacViewer channel number).
: Channel 8 ~ 16(based on MacViewer channel number).
7.4
16 View (16 Channel Mode)
User can see 16 Channel mode with the buttons
on the top of the main screen
14
8. Q & A
Q : I am now using Router. How do I set the network?
A : [In case of single DVR]
1) If the router supports DMZ function, please use DVR with DMZ.
2) If you want to use Port Forwarding function, please refer to the below port list to be used
in DVR.
Protocol
Port
Usage
Remark
DVR Data Port
TCP Port
(for Remote S/W)
DVR Mobile Port
Mobile Port
(for Mobile Viewer)
Editable
TCP
9010
TCP
9011
TCP
8002
DVR Time Sync
Service
Need port forward at
remote P/C network
Yes
TCP
8003
Event Notify Socket
Need port forward at
remote P/C network
Yes
TCP
80
Web Service
Yes
TCP
80,8245
DDNS Server
Select
TCP
123
NTP Server
Fixed
Yes
Yes
Location
Network
> Network
Network
> Network
System Info
> Date/Time
Setting
Network
> Notification
Network
> Network
Network
> DDNS
Network
> Network
[In case of multiple DVRs]
1) Please set not to be duplicated each other by using Port Forwarding function.
Ex) If a DVR is set as “TCP base port : 9010, Mobile port: 9011”, set another DVR as
“TCP base port 9012, Mobile port 9013”
2) Port duplication might cause functional restriction of time sync and event notify.
3) In case of DDNS server port, it works properly regardless of port duplication.
Q : There is “Buffering” message displayed, continuously, when I playback(VOD).
A : 1) It is displayed, in the multi-channel playback mode, for synchronizing playback time
between channels.
2) In the case that there is no recorded image at that time(due to no motion detection,
no sensor and so on), the message is displayed to synchronize playback time.
3) Please control the time with Intelligent Search Bar or reconnect at the desired time.
Q : I set a channel as “Covert” at the menu of the DVR(Device > Camera) but the channel
is displayed.
A : If the ID at Site Registration is set as “admin”, all channels are displayed even it is set as
“Covert”.
If you do not want to display the channel, you have to set ID at Site Registration with the
other user ID besides “admin”.
Q : I want to connect to the DVR which is set with DDNS.
A : 1) Input “MAC address.cctv-link.net” of the DVR on the address section of Site Registration
In MacViewer.
Ex) 001c84ffffff.cctv-link.net
2) Connection with Sub-domain is available and it can be set at the DVR.
15
Ex) MacViewer: test.cctv-link.net, WEB: http://test.cctv-link.net
3) Connection with DYNDNS is available and it requires registration at dyndns.com,
previously. And also, it should be set at the DVR to use dyndns.
Ex) RemoteManager: yourdomainname.dyndns.com,
WEB: http://yourdomainname.dyndns.com
Q : I want to connect with the other user ID besides “admin”.
A : User ID in Site Registration should be one of the registered IDs in DVR.
Please register new ID and Password in DVR and connect with them.
Q : I changed playback speed in VOD mode but it doesn’t work properly.
A : 1) Image data for VOD(playback) comes from the DVR through Network. Therefore, in the
case that the network condition is not good or the specification of the PC is not good
enough, it doesn’t work properly.
2) It can be incorrect depends on the recording condition(motion recording, etc.) at the
DVR.
3) When you change the speed, there might be “Buffering”.
Q : When I change mode to VOD while I am monitoring live image, live image connection
is disconnected.
A : The structure between Live and VOD(playback) is different and it causes initialization of the
software.
Please connect after changing into VOD(playback) mode.
>>>>>
The End
<<<<<