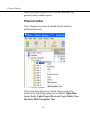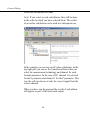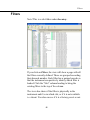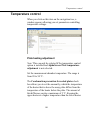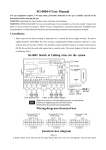
1
2104-9020-02
March 2008
Reference manual
EnVision™
Software version 1.12
PerkinElmer Life and Analytical Sciences, Wallac Oy, P.O. Box 10, FIN-20101 Turku, Finland.
Tel: 358-2-2678111. Fax: 358-2-2678357 Website: www.perkinelmer.com
Contents
Contents
Introduction to the Reference manual ........................................................ 3
Functional relationships in EnVision software............................................ 4
Editing parameters ....................................................................................... 5
Operating EnVision ..................................................................................... 5
Protocol editing ............................................................................................. 9
Protocols and general parameters ................................................................ 9
Protocols .................................................................................................... 10
Protocol folders ...................................................................................... 10
Protocol editor ........................................................................................... 12
Exiting from protocol editing ................................................................. 13
Protocol parameter editing......................................................................... 13
Protocol – General settings..................................................................... 15
Output settings........................................................................................ 19
Plate ........................................................................................................ 25
Group...................................................................................................... 27
Group – defining well types ................................................................... 28
Group – selecting the wells .................................................................... 29
Group – additional controls.................................................................... 32
Adding a measurement........................................................................... 33
Measurement methods............................................................................ 34
Measurement .......................................................................................... 36
On-the-fly measurement......................................................................... 37
Scan Measurement ................................................................................. 38
Wavelength scan..................................................................................... 40
Kinetic Measurement ............................................................................. 42
Dispense measurement ........................................................................... 43
Delay ...................................................................................................... 46
Shake ...................................................................................................... 48
Dispense ................................................................................................. 50
Order of dispensing and measurement ................................................... 52
i
Contents
Temperature control............................................................................... 57
Operation Block ..................................................................................... 58
Calculations............................................................................................ 59
Creating your own calculation ............................................................... 70
Mirrors ........................................................................................................ 75
Mirror toolbar ............................................................................................ 76
Mirror parameters...................................................................................... 77
Barcode (mirror) .................................................................................... 77
Name ...................................................................................................... 78
Description ............................................................................................. 78
Dual........................................................................................................ 78
Bias ........................................................................................................ 78
Slot ......................................................................................................... 78
Bottom mirror ........................................................................................ 78
Use with (measurement technology)...................................................... 79
Changed ................................................................................................. 79
Bottom mirror parameter........................................................................... 79
Bottom mirror ........................................................................................ 80
Filters ........................................................................................................... 85
Filter toolbar .............................................................................................. 86
Filter parameters........................................................................................ 87
Barcode .................................................................................................. 87
Name ...................................................................................................... 88
Description ............................................................................................. 88
Polarization (emission filters only) ........................................................ 88
Center wavelength.................................................................................. 89
Bandwidth .............................................................................................. 89
Transmittance value (%) ........................................................................ 89
Slot ......................................................................................................... 89
Use with (measurement technology)...................................................... 89
Changed ................................................................................................. 90
ii
Contents
Apertures ..................................................................................................... 93
Aperture toolbar......................................................................................... 94
Aperture parameters................................................................................... 95
ID............................................................................................................ 95
Name ...................................................................................................... 95
Description ............................................................................................. 95
Type........................................................................................................ 96
Height ..................................................................................................... 96
Diameter ................................................................................................. 96
In instrument .......................................................................................... 97
Changed.................................................................................................. 97
Temperature control................................................................................. 101
Plate heating adjustment....................................................................... 101
AlphaScreen plate temperature adjustment.......................................... 102
Measurement technologies ....................................................................... 105
Measurement technology toolbar ............................................................ 106
Exiting from a measurement technology.............................................. 107
Measurement Technologies ..................................................................... 109
Time-resolved fluorometry................................................................... 109
Enhanced Time-resolved fluorometry.................................................. 109
Fluorescence intensity .......................................................................... 110
Fluorescence polarization..................................................................... 110
Absorbance........................................................................................... 110
Luminometry ........................................................................................ 111
Enhanced Luminometry ....................................................................... 111
Ultra Sensitive Luminometry ............................................................... 111
AlphaScreen ......................................................................................... 111
HTS AlphaScreen................................................................................. 112
Monochromator .................................................................................... 112
Measurement technology parameters ...................................................... 113
Name .................................................................................................... 114
Excitation (only TRF or FI).................................................................. 114
iii
Contents
Monochomators (for Absorbance) ....................................................... 114
Wavelength (for Absorbance).............................................................. 114
Monochomators (for FI)....................................................................... 114
Emission (only TRF)............................................................................ 114
2nd emission (only TRF) ..................................................................... 115
Light source (only TRF) ...................................................................... 115
Top mirror (only TRF)......................................................................... 115
Bottom mirror (only TRF) ................................................................... 115
Mirror (only FI, FP, luminescence, AlphaScreen)............................... 116
Excitation filter (not for luminescence, AlphaScreen or TRF Laser) .. 116
Emission filter (not for absorbance or HTS AlphaScreen) .................. 116
2nd emission filter (not for absorbance nor AlphaScreen) .................. 117
Measurement height (not for AlphaScreen)......................................... 118
Excitation light % (not for lumin., AlphaScreen or TRF Laser).......... 119
Delay (only TRF) ................................................................................. 119
Window time (only TRF)..................................................................... 119
Number of sequential windows (only TRF) ........................................ 120
Time between flashes (only TRF)........................................................ 120
Detector gain (only FI and FP) ............................................................ 120
2nd detector gain (only FI and FP) ...................................................... 120
G-factor (only FP)................................................................................ 121
Number of flashes (not for luminescence or AlphaScreen)................. 121
No. of flashes per A/D conversion (only FI, FP and Absorbance) ...... 121
Number of flashes for 2nd detector (only LANCE) ............................ 122
Measurement time (only luminescence) .............................................. 122
Reference signal (not for luminescence).............................................. 122
Reference AD gain (not for luminescence).......................................... 123
Reference Ex. Light % (not for lumin., AlphaScreen or TRF Laser) .. 124
Changed ............................................................................................... 124
Optimizations ....................................................................................... 125
Typical settings for different measurement technologies ....................... 125
Fluorescence polarization - FITC ........................................................ 125
iv
Contents
Fluorescence polarization - BODIPY TMR......................................... 128
Time-resolved fluorescence - DELFIA................................................ 129
Time-resolved fluorescence - LANCE (APC 665) .............................. 130
Fluorescence intensity .......................................................................... 132
Absorbance........................................................................................... 134
Luminescence....................................................................................... 135
Special Luminescence options................................................................. 137
Special Luminescence parameters........................................................... 139
Name .................................................................................................... 139
Aperture................................................................................................ 139
Distance between plate and detector .................................................... 140
Measurement time ................................................................................ 141
Glow correction factor.......................................................................... 141
Changed................................................................................................ 142
Optimization......................................................................................... 142
Typical measurement technology settings............................................... 142
Enhanced Luminescence ...................................................................... 142
Ultra Sensitive Luminescence .............................................................. 143
AlphaScreen options................................................................................ 144
AlphaScreen parameters .......................................................................... 147
Name .................................................................................................... 147
Mirror (AlphaScreen only)................................................................... 147
Aperture (HTS AlphaScreen only)....................................................... 147
Distance between plate and detector (HTS AlphaScreen only) ........... 147
Emission filter (AlphaScreen only)...................................................... 148
Total measurement time ....................................................................... 148
Excitation time ..................................................................................... 148
Afterglow correction factor .................................................................. 148
Glow correction factor.......................................................................... 150
Bleach correction factor ....................................................................... 150
Reference signal ................................................................................... 151
Reference AD gain ............................................................................... 152
v
Contents
Changed ............................................................................................... 152
Optimization ........................................................................................ 152
Typical measurement technology settings .............................................. 152
AlphaScreen ......................................................................................... 153
HTS AlphaScreen ................................................................................ 154
Tip mounts................................................................................................. 157
Tip mount toolbar.................................................................................... 159
New ...................................................................................................... 159
Duplicate .............................................................................................. 159
Delete ................................................................................................... 159
Tip mount parameters.............................................................................. 160
Barcode ................................................................................................ 160
Name .................................................................................................... 160
Description ........................................................................................... 160
Exists.................................................................................................... 161
Offset X................................................................................................ 161
Offset Y................................................................................................ 161
Tube volume µl .................................................................................... 161
In Instrument ........................................................................................ 162
Changed ............................................................................................... 162
Plates .......................................................................................................... 165
Plate toolbar............................................................................................. 166
New ...................................................................................................... 166
Duplicate .............................................................................................. 166
Delete ................................................................................................... 166
Plate parameters ...................................................................................... 167
Name .................................................................................................... 167
Number of rows ................................................................................... 168
Number of columns.............................................................................. 168
Height................................................................................................... 168
Well diameter....................................................................................... 168
Well volume......................................................................................... 168
vi
Contents
Column coordinate of top left corner well ........................................... 168
Row coordinate of top left corner well................................................. 169
Column coordinate of top right corner well ......................................... 169
Row coordinate of top right corner well .............................................. 169
Column coordinate of bottom left corner well ..................................... 169
Row coordinate of bottom left corner well .......................................... 169
Column coordinate of bottom right corner well................................... 170
Row coordinate of bottom right corner well ........................................ 170
Optimizations ....................................................................................... 170
Samples ...................................................................................................... 173
Samples toolbar ....................................................................................... 173
New ...................................................................................................... 173
Delete.................................................................................................... 174
Sample parameters................................................................................... 174
Name .................................................................................................... 174
Abbreviation......................................................................................... 175
Color..................................................................................................... 175
Changed................................................................................................ 176
Barcode settings......................................................................................... 179
Barcode toolbar........................................................................................ 180
Delete.................................................................................................... 180
Barcode reading ....................................................................................... 180
Read barcode from the ......................................................................... 180
Protocol definition by barcodes............................................................ 180
Plates without ID barcodes................................................................... 181
Protocol starting....................................................................................... 182
Barcode parameters ................................................................................. 183
Type...................................................................................................... 183
Barcode................................................................................................. 183
Protocol ................................................................................................ 184
Add ....................................................................................................... 184
vii
Contents
Reader settings .......................................................................................... 187
Options .................................................................................................... 187
General .................................................................................................... 188
Plate settings ........................................................................................ 188
Delayed start ........................................................................................ 189
Reader control scale colors .................................................................. 189
Default export data folder .................................................................... 189
Suppress warning messages while starting assay ................................ 190
Show save confirmation message when leaving editor ....................... 190
Unload plate after instrument initialization ......................................... 190
Stacker ..................................................................................................... 190
Stacker parameters ............................................................................... 191
TRF Laser................................................................................................ 192
Database .................................................................................................. 194
Normalization.......................................................................................... 195
Frequently asked questions...................................................................... 199
What is EnVision?................................................................................... 199
What features does EnVision have?........................................................ 199
What does application specific mirror module mean? ............................ 200
Can EnVision be integrated with robotic systems?................................. 201
What measurement modes are used for different measurements? .......... 201
What does analogue measurement mode mean?..................................... 201
What does Photon counting mean? ......................................................... 202
Why use analogue measurement mode in FI, photometry and FP? ........ 202
Why use photon counting in TRF and Luminometry?............................ 203
What does the measurement height mean? ............................................. 203
What does excitation light % mean? ....................................................... 203
What are Reference value and Reference AD gain? ............................... 204
What is the No. of Flashes per A/D conversion? .................................... 205
How do "No. of Flashes" and "Excitation light %" differ?..................... 206
What is the Bias mirror module?............................................................. 207
What is a monochromator?...................................................................... 207
viii
Trademarks
Trademarks
Wallac, LANCE, FP2 and EnVision are trademarks and PerkinElmer,
DELFIA and AlphaScreen are registered trademarks of PerkinElmer, Inc.
Windows, Windows XP, Windows Vista and Excel are registered
trademarks of Microsoft Corp. in the U.S. and other countries.
ix
Chapter 1
Introduction
1
2
Introduction to the Reference manual
Introduction to the Reference manual
This manual describes the different features of the
EnVision software. If you want to edit parameters yourself
you will find each parameter described here.
If default parameters are adequate for you, use the Assay
Start Wizard as described in the User manual.
See the User manual for information on how to start up
EnVision and for conventions used in the documentation.
The term "AlphaScreen" refers to both standard
AlphaScreen and HTS AlphaScreen unless a distinction is
specifically made. The term "special luminescence" refers
to Enhanced luminescence and Ultra Sensitive
luminescence.
Note! Functions which use dual detectors, barcodes and
stackers are not available if you have the standard Xcite
model. Other features described in this manual, such as
dispensing or temperature control, are options. If a feature
is not in your instrument, please ignore the part of the
documentation describing it. See the Order guide for
options that can be installed in your instrument by a service
person.
The Instrument manual describes EnVision. It includes
routine maintenance e.g. how to change mirror modules or
tip mounts.
3
Introduction to the Reference manual
Functional relationships in EnVision
software
The flowchart shows the relationship between the various
functions of the EnVision software. These are the same
items you will find in the Navigation Tree.
Note! Mirror modules, Filters, Apertures and Tip mounts
are sub-folders under Inventory.
4
Introduction to the Reference manual
Editing parameters
There are two approaches to editing parameters:
1. Open the protocol editor (Protocols) and use this to edit
parameters. You will find links that allow you to
directly open other parameters editors e.g. to define a
new plate (Plates) or filter (Filters) and then return to
the protocol editor. You will be informed if there are
invalid parameters so that you can make sure all
necessary parameters are set before exiting from the
protocol editor.
2. You can select any one of these Navigation Tree items,
open it and edit the parameters. E.g. you can define a
new plate (Plates) or filter (Filters). These new settings
are then available for use whenever you open the
protocol editor to setup a new protocol.
3. You can also click the Edit button to edit the protocol
in the associated drop-down list box.
Operating EnVision
Once you have a protocol ready, you can start running
assays using that protocol in one of the following three
ways:
1. selecting it in the Assay Start Wizard
2. selecting it from the main window and clicking the
Run button
3. if you have protocol barcodes on your plates, pressing
the START button on the instrument.
These three methods are described in the User manual.
5
Introduction to the Reference manual
6
Chapter 2
Protocol Editing
7
8
Protocol Editing
Protocol editing
Before you can use Wallac EnVision to get results, you
must have a suitable protocol.
Protocols and general parameters
Some of the parameters used in a protocol are "general
parameters" i.e. Plates, Measurement technologies and
Samples. Measurement technologies in turn depend on
Filters, Mirrors, Tip mounts and Apertures. These are
found in the Navigation Tree as sub-folders of Inventory.
The flow-chart shows how general parameters are related
to each other and to the protocols.
In the protocol editor you will find links to Plates,
Measurement technologiesand Tip mounts so that you can
edit them if necessary. You then return to the protocol
editor by clicking the Back button.
In the Measurement technologieseditor there are similarly
links to Filters, Mirror, and Apertures.
Note! The system administrator will normally be the
person to set these general parameters since they may
affect all users and protocols.
When you have defined the parameters for a protocol and
want to save it, the software checks that the parameters are
valid. If they are not, it alerts you by means of a prompt.
9
Protocol Editing
Protocols
When you select Protocols, a view like that in the example
appears. All available protocols are shown.
Protocol folders
In the Navigation Tree, protocols are grouped under
various headings with the defaults being Wallac protocols
(containing factory preset protocols), Assay examples and
Users protocols. You can add more as you wish. Factory
preset protocols cannot be directly changed but can be
copied to other folders and changed there.
10
Protocol Editing
To open a folder, double-click on the folder name. You can
also click once on the + mark next to the name to see the
protocols contained in it.
To exit from a folder, either double-click on it or click the sign next to it.
When you select a folder or sub-folder that contains
protocols, the protocols will be listed in the view window.
If you select a folder other than the Wallac folder, you can
perform the following operations by means of the buttons
on the toolbar.
You can create a new folder (New group), create a new
protocol in a folder (New protocol), Rename, Import or
Delete a folder. Import requires that you have previously
exported a protocol. The Import button, which is visible
when a folder is selected, changes to Export when a
protocol is selected.
If you create a new folder you must give a name for it in
the prompt that appears; also if you create a new protocol.
11
Protocol Editing
When you create a protocol or click on a protocol, the
protocol editor window opens.
Protocol editor
Note! Changes to protocols should only be made by
authorized persons.
If you click the right mouse button when a protocol is
selected, the following options are available: Open, Run
Assay, Lock, Undo, Export Protocol, Copy, Delete, New
Shortcut, Hide Navigation Tree.
12
Protocol Editing
A copied protocol can be pasted. The pasted protocol is
given the name "Copy of" followed by the name of the
original protocol.
You can also Start run with the protocol or make a New
shortcut of the protocol in the Shortcuts bar.
You can lock a protocol by clicking the Lock button and
then giving a password.
Exiting from protocol editing
When you exit a protocol by selecting another item in the
Navigation Tree, the parameters are checked for validity
by the software and you are warned of invalid entries. The
protocol is saved automatically if there are no invalid
entries.
You can exit from a protocol without saving the changes if
you first click the Undo button. This returns the settings to
what they were when the protocol was opened.
Protocol parameter editing
13
Protocol Editing
You can access protocol parameters from branches in the
protocol definition tree. The branches are:
Protocol – General settings
Output settings
Plate
Group
Measurement
Calculation
You can see the parameters available for a branch from the
tool tip when you have the cursor on top of a branch. Select
a branch to edit the parameters.
If you select a user-made protocol then the toolbar gives
you the possibility to Export, Copy or Delete the protocol.
In the case of Export you can save the protocol as a file
with the extension “.evp”.
14
Protocol Editing
Protocol – General settings
Identification
The protocol name and any associated notes will appear.
Notes are optional. If you want notes, type the text in the
notes area.
General
Plate type - Select from the drop-down list the plate type
you want to use. If the type you want is not visible here
then you must go to the Plates view and make a suitable
plate type. To do this, click on the link at the end of the
field. The Plates editor will open. When you finish editing
the parameters, click the Back button to return to the
protocol editor.
15
Protocol Editing
Note! When you select another plate type, all the previous
plates for this protocol will be deleted and one plate of the
selected type will appear. Make sure you select the plate
type before defining the plate map to avoid losing your
settings.
Optimizations – This button associated with the Plate
type field allows you to see which plate types have been
optimized for a particular measurement technology.
Use rotated plate - If you check this, then measurement
will begin from the well in the right corner furthest from
the instrument. This will be treated as A1 when results are
displayed i.e. the plate is treated as if it has been rotated
through 180 degrees. This feature gives you the possibility
to load rotated plates with well A1 the last to enter the
instrument. This may be useful if your plates have
barcodes on the sides that would not be visible to the
barcode readers if the plate was loaded normally.
Note! Make sure the plate type you are using has a
symmetric base so that it fits correctly in the plate carrier.
Certain types will not fit in the plate carrier if they are
rotated.
Use general gripper height - If this is checked, the
following parameter is disabled and the current gripper
height will be used for lifting plates. If it is not checked
then you must enter the gripper height as the next
parameter.
Gripper height - Enter the gripper height.
16
Protocol Editing
Use measurement height defined in label - Check this
box if you want to use the measurement height defined in
the measurement technology. The Fixed measurement
height parameter in the protocol is disabled.
Fixed measurement height - You can give a focus height
for optics used in the measurement. The default focus
height is 6.5 mm above the bottom of the plate.
Note! This parameter is disabled if you have selected to
Use measurement height defined in label.
Note! For special luminescence the value set here is not
used. Instead the Measurement height set in the
measurement technology is always used.
Note! If you run a measurement height optimization, the
optimized measurement height will be used instead of the
value set for this parameter.
Measurement mode - You can select here how the plate
will be measured - by Rows or Columns. There is also a
bidirectional mode - instead of each row being measured
from left to right, every second row will be measured from
right to left. The bidirectional mode for columns follows
the same principle, measuring is from up to down then
down to up.
Note! For AlphaScreen the Measurement mode parameter
is fixed and even if you change it in the protocol editor it is
not changed for AlphaScreen. The reason this parameter is
not used is because the distance between the plate cooler
and the top of the plate is always 1 mm.
17
Protocol Editing
Number of plates – You can select either Fixed or
Unlimited. Fixed means that the instrument will only
measure the specified number of plates. Unlimited means
that the instrument will keep measuring plates until you
stop it. Use this latter option if you have a stacker and
barcoded plates otherwise the run will stop after one assay
has been run. If you want to use assay repeats, you must
also select End the assay when stacker is out of plates in
Reader settings.
If no plate map is defined for a plate, then the previous
plate map will be used to count all subsequent plates.
Repeats
Number Of Assay Repeats - Select here how many times
you want the assay to be run (maximum 99). If this is more
than 1, then the Start assay repeat each parameter is
enabled.
Note! Assay repeats are available only with the stacker
option. The stacker frame and both magazines must be
installed when running assay repeats.
Start assay repeat each - Set the time when you want the
assay repeat to start. The units are minutes or seconds. The
time is measured from the beginning of the whole assay. If
you set a time that is too short for the whole assay to be
completed before the next begins, a message will appear
telling that the estimated time for repeat duration is more
than the time reserved. Please increase the time reserved.
18
Protocol Editing
Statistics
These parameters cannot be changed. They show who
created the protocol and when, who edited it and when, the
date of the most recent run with this protocol and how
many runs have been made with it.
Protocol - General Settings Toolbar
The Plate button enables you to add a new plate to the
protocol. The Paste button is enabled if there is a plate
which has been copied. Clicking Paste enables you to add
the copied plate to the protocol.
Output settings
The Output setting branch allows you to select the output
devices to which results will be sent at the end of a run
19
Protocol Editing
(File and/or Printer). You can also start external software
if required (Event). Click the check box of the output
device(s) you want. The output selections will only be
activated if the box is checked.
File name (File only)
There is a default file name you can use or you can create
your own. Click on the ... button to get a menu from which
you can construct the File name e.g.
C:\data\<ProtocolName>_<AssayID>.csv. Many of the
menu items are placeholders. These are described
separately. See “Placeholders”.
Export format (File and Print)
Select the format you want from the drop down list. The
options are:
•
•
•
Plate - results are in plate format
Plate 2 – results are in plate format with columns and
rows labeled and an explanatory header
Plate 3 (MHT) this produces output in “mht” format.
This format is suitable for reading by a web browser
and includes pictures as well as text. If you select this
20
Protocol Editing
•
•
•
then Pictures is selected by default in the Columns
field. When you use this output type and you have a
kinetic measurement, a graph of the results will appear
as part of the output
List A - each individual result is output on a separate
row
List B - all the results for one well i.e. repeats, dual
measurement technology etc. are output on the same
row
List C - same as List B but you can select which items
are output on each row. These items can be selected
from the Columns field if List C has been selected, see
" Columns ".
Columns (File and Print)
If List A or List C is selected a list check boxes with
column names will appear. If you do not want a column,
de-select the appropriate check box. For other Export types
there are no selectable columns.
Assay information to include (File and Print)
In addition to the actual data you can choose:
•
•
Basic assay information
Notifications - these are any additional textual
information such as warnings
• Protocol information - you can select: Full, Reduced
or No protocol information.
For the Assay information you can choose whether you
want it at the beginning or end of the whole output.
21
Protocol Editing
Plate information to include (File and Print)
• Plate information
• Background information.
For the Plate information you can choose whether you
want it at the beginning or end of the plate output.
There are also Other options:
Show picture (File)
This can be selected for Plate and Plate 2 and is selected
by default for Plate 3. When this is selected, the file is
automatically exported in .mht format.
Results from each plate in a separate file (File)
Select this check box if you want to have results from each
plate in a separate file. The default is to have all results in
one file. You can also select to leave out the plate number
from the file name.
Field separator (File)
When results are output with more than one item in a row,
you can select how the results will be separated. You can
use a tab, or you can use the default separator for your PC
or select your own. In the latter case a field appears in
which you can type the separator you want. Use the default
separator if you are going to import results into a
spreadsheet and you want them arranged in columns.
22
Protocol Editing
Event (Event only)
Note! If you select this you must give a command.
If you want some external software to be started after the
output, e.g. a spreadsheet, you can select it in this field.
There is a browse button... to help you find the software
you want.
You can add additional information (arguments) to the
event and you can include the file name by clicking the
check box.
Placeholders
If you have selected File output, the File name field is
activated. You can click the ... button to see what
possibilities are available. These include placeholders
which can be appended to the file name. The placeholder
possibilities are:
•
•
•
Assay ID, a unique numeric identifier for the assay
run.
Protocol ID, a unique numeric identifier for the
protocol.
Protocol run ID, a numeric value identifying the
specific run of a certain protocol.
23
Protocol Editing
•
•
•
•
•
•
Protocol Name, the name of the protocol. Specified in
the ID tab in the protocol name edit box.
Plate barcode, the barcode on the plate.
Plate number, the numerical order of the plate in the
assay.
Date, date when the assay was run in the format
YYYYMMDD.
Time, the time when the assay was run in the format
hhmmss.
Default data folder, this allows files to be written to it
even if the user of the Windows operating system only
has read only rights. There is a shortcut to the Default
data folder on the Desktop. The exact location of this
folder depends on the operating system. E.g. in
Windows NT it is C:\WINNT\Profiles\All
Users\Application Data\PerkinElmer Life
Sciences\EnVision and for Windows XP and Windows
Vista it is C:\Documents and Settings\All
Users\Application Data\PerkinElmer Life
Sciences\Envision. If you select some other folder and
you do not have write rights to it an error message will
appear when you have clicked Next. You can create
sub-folders by putting backslashes (\) between place
holders. E.g. <DefaultDataFolder>\<Assay ID> means
that in the default data folder, sub-folders are created
each with an Assay ID. You can also connect
placeholders together e.g.
<DefaultDataFolder>\<Date>_<Time> would define a
sub-folder with a name combining date and time.
24
Protocol Editing
Example: Use of padding
In some cases the numeric value of one of these file
formats may not be suitable for the program handling the
file. You can add a function "pad" to allow you to decrease
or increase the number. Check Pad length then use the
scroll buttons to select the amount of the padding.
If Assay ID = 1234 and you add pad 2 you will get digits
34 only. This would be useful with MultiCalc which could
not accept an assay ID as large as 1234.
If Assay ID = 234 and you add pad 4 the result would be
0234. This would be useful if you needed a four digits
identifier.
Plate
You can set parameters for up to 50 plates in one protocol.
For each plate you can define the Repeats, Operation
groups and Calculations. The last two are sub-branches of
the tree.
Repeats
Number Of Assay Repeats - Select here how many times
you want the assay to be run (maximum 99). If this is more
25
Protocol Editing
than 1 then the Start assay repeat each parameter is
enabled.
Note! Assay repeats are available only with the stacker
option. The stacker frame and both magazines must be
installed when running assay repeats.
Start assay repeat each - Set the time when you want the
assay repeat to start. The units are minutes or seconds. The
time is measured from the beginning of the of the whole
assay. If you set a time that is too short for the whole assay
to be completed before the next begins, a message will
appear telling that the estimated time for repeat duration is
more than time reserved. Please increase the time reserved.
Number of plate repeats -Select here how many times
you want the whole plate to be measured (maximum 300).
If this is more than 1 then the Start plate repeat each
parameter is enabled.
Start plate repeat each - Set the time when you want the
plate repeat to start. The units are minutes or seconds. The
time is measured from the beginning of the beginning of
the whole assay. If you set a time that is too short for the
whole plate to be completed before the next begins, a
message will appear telling that the estimated time for
repeat duration is more than time reserved. Please increase
the time reserved.
Note! If you select Number of assay repeats to be more
than one, you cannot select Number of plate repeats to be
more than one, and vice versa.
26
Protocol Editing
Note! These same four parameters appear for all
Measurements but are not described separately in the
documentation.
Plate – Toolbar
You can create a new plate (Plate), or a new operation
group for the current plate (Group). You can Copy a plate
or Duplicate it. To paste a copied plate you must be on the
General settings level. You can Cut or Delete the selected
plate as long as it is not the only plate. You can Paste an
operation group if that has been previously copied.
Group
This branch of the protocol tree allows you to select groups
of wells and then choose what type of samples are in those
27
Protocol Editing
wells and which measurements are to be applied to them.
Group selection is done with the aid of a plate map and
various software controls. You can have several operation
groups.
Group – defining well types
The drop-down list shows you all the types that can be
assigned to wells. To open the list, click either the usual
down arrow or the figure of the well type. You can add
types to this list using the Samples editor to define them.
If you click the Autofill button then the selected type will
be applied to all empty wells on the plate.
If you click the Clear all button then all wells are defined
as empty. If you click the right mouse button then the
selected well will always be cleared.
To apply the type to some wells, you must first select them.
28
Protocol Editing
Group – selecting the wells
You can select:
Well(s)
Row(s)
Column(s)
A rectangular area
All the wells
Well(s)
An individual well can be selected by clicking on it.
Several wells can be selected by dragging the mouse
horizontally or vertically. See “Selecting a rectangular
area” below.
Row(s)
A row can be selected by clicking on the letter on the plate
frame corresponding to the row.
29
Protocol Editing
Column(s)
A column can be selected by clicking on the number on the
plate frame corresponding to the column.
More than one row/column can be selected by clicking the
mouse on a letter or number respectively and then dragging
the mouse to the next letter or number respectively.
30
Protocol Editing
A rectangular area
A rectangular area can be selected by clicking the well in
the left corner of the area and dragging the cursor to the
well in the right corner of the area. The area can also be
part of a single row or column.
The whole plate
31
Protocol Editing
The whole plate can be selected by clicking on the upper
left corner of the plate frame.
Group – additional controls
Replicates – select how many replicates you want for
those well types that use replicates i.e. Unknowns,
Standards and Controls.
Next index – select the first index number of the well types
which are to be defined. This only applies to those types
that use indexes i.e. Unknowns, Standards and Controls.
E.g. if you select Unknowns and index 9, then unknowns
will be added to the selected wells starting with UNK9.
Fill start – the defining of wells will start the selected
position in the marked area. There are four possibilities:
Top left, Top right, Bottom left, Bottom right.
Fill style – you can select rows or columns or bidirectional rows or columns.
Fill start and Fill style only make a difference if the well
type has an index e.g. UNK1 or CTL2.
Well size – you can make the well size bigger (up to
300%) so that you can see the well type more clearly, but
the plate will not necessarily fit within the field of view.
32
Protocol Editing
Group – Toolbar
You can create a new operation group for the current plate
(Group). You can Copy a group or Duplicate it. To paste
a copied group, you must be on the Plate level. You can
Cut or Delete the selected group as long as it is not the
only group. You can Paste a measurement if that has been
previously copied. You can add measurements (Meas) for
a group as described in what follows.
Note! The name on the measurement button depends on the
measurement method selected most recently. Meas is the
default.
Adding a measurement
When you add a measurement for an Group, then all the
wells selected for that group will be measured with the
method selected. Several measurements can be selected for
one group.
33
Protocol Editing
Measurement methods
You can select various operations to be added to the group
folder. There is a button on the toolbar the name of which
depends on the most recently selected operation but the
default name is Meas. If you want to add the operation
shown by the button name, just click the button. To select a
different operation, click the down arrow beside the button.
A menu will appear with all the available operations. Each
time you select one of these menu items the operation will
be added to the tree structure of the group. The new
operation will be added after the previously selected
operation in the tree. The Delete button allows you to
remove the selected operation or block of operations.
When you have selected an operation, the software
automatically disables any operation that cannot be used
with it in the same group.
34
Protocol Editing
Several operations include an Optimization button.
Clicking this button shows if the plate/measurement
technology combination has been optimized and, if it has,
which optimizations were run and when it happened.
If you have optimized the measurement technology for the
plate you chose, that measurement technology will appear
in the list and you can select it directly from there. This
helps to reduce the amount of available measurement
technologys on the list.
If there is no suitable optimization and if you decide you
want one, you must run the Assay Start Wizard.
Note! In many cases the default or manual settings may be
adequate and the optimization not needed, especially when
the plate is not a high density plate.
35
Protocol Editing
Measurement
When Measurement is selected from the menu, an
operation called Measurement technology is added to the
group.
You need to select the measurement measurement
technology type from the drop-down list box in the right
hand pane. When you do this, the measurement technology
name will be added to the operation name in the left pane.
If the type you want is not visible here then you must go to
36
Protocol Editing
the Measurement technologies view and make a suitable
measurement technology. To do this, click on the link at
the end of the field. The Measurement technologies editor
will open. When you finish editing the parameters, click
the Back button to return to the protocol editor.
Note! If the measurement technology has an asterisk it
means it is valid. This means that all filters, mirror
modules and apertures needed are installed in the
instrument and the measurement technology is ready to
use.
Note! If the operation selected is AlphaScreen, no other
operations can be added to the same group.
On-the-fly measurement
When On-the-fly measurement is selected from the
menu, an operation called On-the-fly measurement is
added to the group. You need to select the measurement
measurement technology type from the drop-down list box
in the right hand pane. When you do this the measurement
technology name will be added to the operation name in
the left pane. Use the link to define a measurement
technology if necessary.
37
Protocol Editing
With this option the plate does not stop at the measuring
position but is measured as it is moving past. Only one
flash is used. This speeds up the measuring process but
requires adequate signal from the sample. This method
cannot be used with measurement technologies with dual
excitation or dual emission with separate excitation.
Note! No other measurements can be added to a group
containing an On-the-fly measurement. The operations
Delay, Shake and Temperature control can be added.
Add a new group if you want other measurements to be
done for the same plate.
Scan Measurement
Scanning can be used for all cell-based assays. Especially
for those using adherent cells, for example Green
Fluorescent Protein (GFP) assays. Here you can define the
number of measurements from 1 to 100 per well. By
defining the distance between points you define the
scanning area. You can also define the shape of the
scanned area, which can be either round or rectangular.
38
Protocol Editing
The parameters are:
Label
You can select the type of measurement technology. Use
the link to define a measurement technology if necessary.
Number of horizontal points
Number of points in the X-direction (1-10).
Number of vertical points
Number of points in the Y-direction (1-10).
Distance between points
Distance between each point in the well where a
measurement is made. The distance between points can be:
0.1 - 7.15 mm and the maximum value depends on the total
number of points and the well size.
Scan Mode
This is the shape of the array of measurement points over
the well. It can be either a rectangle or circle.
39
Protocol Editing
Wavelength scan
This is available if you have the monochromator option.
Use excitation monochromator
Select this if you want use the excitation monochromator
for the wavelength scan. The emission monochromator is
set for one wavelength.
Excitation monochromator
Min wavelength (nm) -Give the starting wavelength for
the scan
Max wavelength (nm)- Give the ending wavelength for
the scan
Step - Give the increment for each step in nanometers.
40
Protocol Editing
Emission monochromator
You can choose to Use label parameters or Use
wavelength for the emission monochromator. In the latter
case, give the wavelength to be used. In the former case the
default wavelength for the measurement technology is
used.
Use emission monochromator
Select this if you want use the emission monochromator for
the wavelength scan. The excitation monochromator is set
for one wavelength
Excitation monochromator
You can choose to Use label parameters or Use
wavelength for the excitation monochromator. In the latter
case, give the wavelength to be used. In the former case the
default wavelength for the measurement technology is
used.
Emission monochromator
Min wavelength (nm) - Give the starting wavelength for
the scan
Max wavelength (nm)- Give the ending wavelength for
the scan
Step - Give the increment for each step in nanometers.
41
Protocol Editing
Kinetic Measurement
If you have a fast kinetic assay such as Ca2+ measurement,
flash luminescence etc, you should use the kinetic
measurement mode. In Kinetic measurement only one
well at the time is measured, for example 20 times with 3 s
delay between each measurement, then the next well is
measured etc. When the measurements have been done for
one well they are then done for the next well.
The kinetic measurement properties are:
Label
You can select the type of label. Use the link to define a
measurement technology if necessary.
Number of measurements
The number of times the measurement is to be repeated (up
to 300).
Measure each (0 – 5400 s)
The time between the end of one repeat measurement and
the beginning of the next (0 - 5400 s).
42
Protocol Editing
Dispense measurement
Dispense measurement is used when you want
measurements with dispensing.
Label
Select the type of label. Use the link to define a
measurement technology if necessary. A measurement
technology can be used for measurement if it is marked
with an asterisk.
Tip mount
You can select the type of tip mount. Use the link to define
a tip mount if necessary.
Note! You must have the selected tip mount installed in the
instrument before you can run the protocol. The one which
is installed is marked with an asterisk.
43
Protocol Editing
See “Routine maintenance” in the Instrument manual for
how to fit a tip into a tip mount and how to fit a tip mount
into EnVision.
Note! Before changing a tip mount the tubing should be
emptied. You can do this by selecting Retrieve liquid or
Rinse (with the aspiration tube in air).
Number of measurements
Define how many measurements you want to make on the
well where the dispensing occurs. Default is 10. The range
is 1 – 300.
Measure each (0-5400 s)
Define how often the measurement is to occur.
Used pump
Select the pump or pumps to be used for the measurement.
You can choose Pump1 or Pump2 or Both. Pump1 is
used first. The following table shows the ways in which the
pumps are connected.
Tip configuration
Pump1
Pump2
Real time
Real time
Not used
Pre
Pre
Not used
Real time and Pre
Real time
Pre
Pre and Post
Pre
Post
44
Protocol Editing
Dispensing speed (100 – 500 µl/s)
Define how fast you want the liquid to be dispensed.
Default is 200 µl/s. In general the smaller the volume to be
dispensed the faster the speed should be. Less than 100 µl/s
is not recommended. The higher the viscosity of the liquid
being dispensed, the higher the speed should be. However,
the speed should not be so great that the liquid splashes out
of the well.
Dispensing volume (2 µl – MAX µl)
Define how much liquid you want dispensed. MAX
depends on the well volume. The maximum for a syringe is
475 µl. If more is needed for a big well, several separate
dispense operations are needed. Default is MAX/2 µL.
Note: for volumes below 10 µl you should use the
Dispense volume setting for the Syringe filling volume
parameter.
Syringe filling volume
If you want the syringe to be full before dispensing, select
Full. In this case aliquots will be dispensed until the
syringe has less liquid in it than needed for an aliquot, then
the whole syringe will be refilled.
If you want to aspirate just the amount to be dispensed,
select Dispensing volume.
Note! This should be selected in the case of small volumes,
(below 10 µl) to ensure better accuracy. It should also be
used when dispensing cells to avoid sedimentation of the
cells.
45
Protocol Editing
Start dispensing at measurement number
Define at which measurement number you want the
dispensing to occur. This refers to the Number of
measurements parameter. Normally this would be 2 since
one measurement is needed to give you the background
value. If the background value is likely to be changing then
set this parameter to allow several measurements to be
made before dispensing. Make sure the Number of
measurements parameter is big enough also.
Affected assay/plate repeat
Define which Assay or Plate repeat is to be the one when
the dispensing occurs.
Delay
Delay can be used to produce a delay between
measurements. This option is different from Kinetic
Measurement operation.
You can use a delay to follow slow kinetic measurements.
This way you can measure a whole plate, have the delay
and measure again.
46
Protocol Editing
Duration
This is the length of the delay between the completion of
the preceding operation and the start of the one following
the delay operation. The range is 0.1 s to 6000 s.
Plate location
There are two positions for the plate: Inside or Outside.
The former means that the operation occurs when the plate
is at the measuring position. The latter when the plate
carrier is extended outside the instrument.
First plate repeat affected
Give the number of the first "plate repeat" for which you
want the operation to occur.
Last plate repeat affected
Give the number of the last "plate repeat" for which you
want the operation to occur.
For example if you have 99 plate repeats, you can select
the delay only for the first ten repeats, for the next 89
repeats there will be no delay. This can be selected by
entering 1 into First Plate Repeat Affected and 10 into
Last Plate Repeat Affected.
47
Protocol Editing
Shake
Shaking can be used to mix the solution in the wells. The
parameters associated with Shake are:
Duration
The duration of the operation in seconds (0.1 - 6000 s).
Speed
The speed is the number of revolutions per minute. The
range for this depends on the Shake mode and the
Diameter.
Diameter
This is the distance between the extremes of the movement
of the center of a well in the plate. The units are
millimeters (0.1 - 10 mm). The 0.1 in the example here
means that the shaking moves the center of the plate + or 0.05 mm. The setting for Diameter affects the range for
the Speed parameter.
48
Protocol Editing
Shake mode
The path of the shaker motion - straight line, circular or
figure of eight (linear, orbital or double orbital
respectively). The setting for Shake Mode affects the
range for the Speed parameter.
Plate location
There are two positions for the plate: Inside or Outside.
The former means that the operation occurs when the plate
is at the measuring position. The latter when the plate
carrier is extended outside the instrument.
First plate repeat affected
Give the number of the first "plate repeat" for which you
want the operation to occur.
Last plate repeat affected
Give the number of the last "plate repeat" for which you
want the operation to occur.
Note! To reduce wear, the shaking position will be slightly
changed once a minute, causing a temporary change in the
sound when it occurs.
Note! When using shake with HTS AlphaScreen or
Enhanced or UltraSensitive luminescence, the minimum
allowed value of the parameter Distance between plate
and detector is 0.2 mm.
49
Protocol Editing
Dispense
This is an operation that does not involve a measurement
(in contrast to Dispense measurement). It is used when
you want to dispense to selected wells or a whole plate
before starting to measure i.e. when the measurement is not
critically affected by the time. If you have a dual tip mount,
then both tips are used for dispensing to two wells at a
time.
Tip mount
You can select the type of tip mount. Use the link to define
a tip mount if necessary.
Note! You must have the selected tip mount installed in the
instrument before you can run the protocol. The one which
is installed (as determined by its barcode) is marked with
an asterisk.
Used pump
Select the pump or pumps to be used for the operation.
You can choose Pump1 or Pump2 or Both. Pump1 is
50
Protocol Editing
used first. The following table shows the ways in which the
pumps are connected.
Tip configuration
Pump1
Pump2
Real time
Real time
Not used
Pre
Pre
Not used
Real time and Pre
Real time
Pre
Pre and Post
Pre
Post
Dispensing speed (100 – 500 µl/s)
Define how fast you want the liquid to be dispensed.
Default is 200 µL/s. In general, the smaller the volume to
be dispensed the faster the speed should be. Less than 100
µl/s is not recommended. The higher the viscosity of the
liquid being dispensed, the higher the speed should be.
However, the speed should not be so great that the liquid
splashes out of the well.
Dispensing volume (2 µl – MAX µl)
Define how much liquid you want dispensed. MAX
depends on the well volume. The maximum for a syringe is
475 µl. If more is needed for a big well, several separate
dispense operations are needed. Default is MAX/2 µL.
Note: for volumes below 10 µl you should use the
Dispense volume setting for the Syringe filling volume
parameter.
51
Protocol Editing
Syringe filling volume
If you want the syringe to be full before dispensing, select
Full. In this case aliquots will be dispensed until the
syringe has less liquid in it than needed for an aliquot and
then the whole syringe will be refilled.
If you want to aspirate just the amount to be dispensed,
select Dispensing volume.
Note! This should be selected in the case of small volumes,
(below 10 µl) to ensure better accuracy. It should also be
used when dispensing cells to avoid sedimentation of the
cells.
Affected assay/plate repeat
Define which Assay or Plate repeat is to be the one when
the dispensing occurs.
Order of dispensing and measurement
When there are two pumps, dispensing is always in the
order Pump1 then Pump2.
Note! Dummy dispensing is done at the beginning of each
plate (repeat). This is to refresh the liquid at the end of the
tip. The liquid is dispensed to the waste container.
52
Protocol Editing
Dispensing measurement with a “Real time + Pre” tip
mount
No tip
Real time tip
Pre tip
Measurement
Dispensing
Moved under Pre
Dispensing
Moved under Real time
Measurement
Note! The Real time tip is the one under the standard
detector.
53
Protocol Editing
Dispensing measurement with a “Post + Pre” tip mount:
Post tip
No tip
Pre tip
Measurement
Moved under Pre
Dispensing
Moved under
Post
Dispensing
Moved under center
Measurement
Dispense with a “Real time + Pre” tip mount and 96 well
plate:
No tip
Real time tip
Pre tip
First well
Second well
Dispensing
Dispensing
Third well
Fourth well
Dispensing
Dispensing
54
Protocol Editing
Dispense with a “Post + Pre” tip mount and 96 well plate:
Post tip
No tip
Pre tip
First well
Second well
Third well
Dispensing
Dispensing
Second well
Third well
Dispensing
Fourth well
Dispensing
“Real time” measurement involves dispensing to the well
in the measurement position under the “Real time” tip and
simultaneous measurement. This is needed for fast
reactions. However, there is a slight reduction in signal
because the “Real time” tip is between the measuring head
and the well. It can be done for technologies using standard
detectors, LUM, TRF, LANCE, FI, FP and AlphaScreen.
Note! AlphaScreen cannot have kinetic measurement as the
selected measurement technology in Dispense
measurement.
If you use a “Post + Pre” tip mount or a “Pre” tip mount for
technologies using detectors other than the standard one
(Abs, EnhLum, US Lum and HTS AS), then there is no tip
between the measuring head and the well during
measurement. However, there is about a 1 second delay
between dispensing and measurement. This occurs while
the well is moved from the dispensing position to the
55
Protocol Editing
measurement position. This type of tip mount is thus not
suitable when you are measuring very fast reactions.
Note! In kinetic measurements in which dispensing is done
with a tip other than the “real time” tip, the measurement
intervals after dispensing are temporarily shortened. This is
to compensate for the time taken to move the well from
under the measuring head to the dispensing position and
back again. Once the cumulative measurement time has
caught up with what it would have been had it been done
with the real time tip, the measurement interval reverts to
the normal length. The final cumulative measurement time
is thus the same irrespective of which tip is used for
dispensing (providing there are enough measurements
made to allow the “catch up” to happen). E.g. if the
measurement interval is 200 ms and the extra time required
for dispensing is 1.5 s then about 11 measurement repeats
are needed before the system catches up.
Note! When a detector other than the standard detector is
used for measuring e.g. absorbance, enhanced or ultra
sensitive luminescence or HTS AlphaScreen there is no
“real time” measurement. In all of these cases, kinetic
measurements will use the “shortened interval”
arrangement to bring the cumulative measurement time
back to what it would have been with a “real time”
measurement.
56
Protocol Editing
Temperature control
Measurement chamber temperature, °C
Set the temperature of the measurement chamber. The
range is room temperature + 2 °C up to 50 °C. The heating
element will reach 37 °C from ambient in about 10
minutes. To reach 50 °C requires a further 10 minutes.
Cooling from 50 °C to ambient takes about one hour.
First plate repeat affected
Define which plate repeat is the first to be done with the
temperature at the value you selected. This plate repeat will
only occur when the temperature of the heating element
has stabilized at the selected temperature.
Last plate repeat affected
Define which plate repeat is the last to be done with the
temperature at the value you selected.
Note! The temperature will be maintained at the value you
have set until you change it. It does not return to ambient
just because the last plate repeat has been run. This
overrules settings in Reader Settings/Instrument
Temperature Adjustment.
57
Protocol Editing
Operation Block
Normally each operation is performed for the whole group
of wells before the next operation begins. However, you
can define a “Block” of operations to be applied to a subset
of the wells in a group. Select Operation block from the
menu. There can be only one block in a group.
Add operations after the block. They will belong to the
same block.
Note! Operations added after a block become part of it, so
add all the operations for the whole group before you add
the block and its operations.
Use the Number of wells in a block parameter to set how
many wells will be the subject of the operations belonging
to the block. If this parameter is 1, it means that all
operations in the block will be applied to each well in turn.
(Without a block normally each operation in turn would be
applied to all wells in the group.). The maximum number
of wells in a block is the number in the group.
Examples
If the group contains all wells on a 96-well plate and the
Number of wells in a block is 12, then all operation in the
block are done row by row.
58
Protocol Editing
If the group size is 10 and the block size 3, the operations
in the block will be applied four times: to 3 wells, then 3
wells, then 3 wells, then 1 well (3 x 3 + 1 = 10).
Calculations
You can select various calculations to be added to the
calculations folder. There is a button on the toolbar with a
name which depends on the most recently selected
calculation. If you want to add the calculation shown by
the button name, just click the button. To select a different
calculation, click the down arrow beside the button. A
menu will appear with all the available calculations. Only
those calculations that are valid for the measurement
technology selected and sample types marked for the group
folder are enabled.
59
Protocol Editing
Select the calculation you want.
Note! If you select several calculations, they will be done
in the order in which you have selected them. The results
of an earlier calculation can be used in a subsequent one.
In the example you can see an mP value calculation. In the
top right part you can see the formula and below that you
select the measurement technology and channel for each
formula parameter. In the case of FP, channel 2 is selected
for the S parameter and channel 1 for the P parameter. This
way the software knows to take the correct signal from the
correct channel.
When you have run the protocol the results of calculation
will appear as part of the total result output.
60
Protocol Editing
The following table describes the calculations available.
Calculations
Formula
Blank correction
(blanks on first
plate only)
X – B, where
X = Measured value
B = Average of blanks on first plate
Blank correction
(blanks on each
plate)
X – B, where
X = Measured value
B = Average of blanks on current
plate
Label addition
X+Y
Label subtraction X - Y
Label ratio
X/Y, where
61
Protocol Editing
X = Measured value 1
Y = Measured value 2
Requires at least two labels for
meaningful result
Millipolarization
(mP)
1000*(S - G*P)/(S + G*P), where
For FP Dual
S = Measured value in channel 2 (=
detector 2)
P = Measured value in channel 1 (=
detector 1)
For FP Single
S = Measured value from S
polarized label in channel 1 (=
detector 1)
P = Measured value from P
polarized label in channel 1 (=
detector 1)
G = G-factor
62
Protocol Editing
mP-value (blank
corrected, blanks
on first plate
only)
1000*[(S - Bs) - G*(P - Bp)]/[(S Bs) + G*(P - Bp)], where
S, P and G are as for
Millipolarization
Bs = Average of blanks of S-channel
on first plate
Bp = Average of blanks of Pchannel on first plate
mP-value (blank
corrected, blanks
on each plate)
1000*[(S - Bs) - G*(P - Bp)]/[(S Bs) + G*(P - Bp)], where
S, P and G are as for
Millipolarization
Bs = Average of blanks of S-channel
on current plate
Bp = Average of blanks of Pchannel on current plate
Fluorescence
anisotropy (FA)
(S - G*P)/(S + G*2*P), where
S, P and G are as for
Millipolarization
63
Protocol Editing
Total
fluorescence
intensity
S + 2*P, where
LANCE
LANCE correction where sample
quenching and crosstalk is corrected.
S and P are as for Millipolarization
For LANCE Dual
Acceptor = Measured value for
APC-label (with detector 1)
Donor = Measured value for Eulabel (with detector 2)
For LANCE Single
Acceptor = Measured value for
APC-label (with detector 1)
Donor = Measured value for Eulabel (with detector 1)
LANCE
(references on
first plate only)
Same as above but references are
only on the first plate. These are
then used for each plate.
Area under curve Area under curve drawn from points
obtained from kinetic measurement
64
Protocol Editing
Max slope
Maximum slope (overlapping) sets
of points on curve obtained from
kinetic measurement e.g. for sets of
3 points and 20 point curve the slope
would be measured for points
1,2,3;2,3,4;...;.;18,19,20 and
maximum slope determined
according to the absolute value of
the slope and shown with the current
sign.
Peak
Maximum of values obtained from
kinetic or scan measurement
Sum
Sum of the values obtained from
kinetic or scan measurement
Avg
Average of values obtained from
scan measurement
%CV
100*SD/AVG, where
SD = Standard deviation
AVG = Average of values obtained
from scan measurement
Standard
deviation
Standard deviation of values
obtained from scan measurement
Peak of type
Maximum values of the samples
65
Protocol Editing
Sum of type
Sum of the samples
Avg of type
Average of the samples
%CV of type
100*SD/AVG
Standard
deviation of type
Standard deviation of the samples
Copy
A copy of X (the measured value)
Crosstalk
correction
Measured crosstalk correction factor
General
Allows you to make your own
calculation. See the text for more
information.
Well time*
Time related first measurement of
well in kinetic and plate/assay repeat
Curve fitting
(standards on
each plate)
A curve is fitted to the results of the
measurements of standards on each
plate i.e. each plate has a separate
curve. This curve is used to evaluate
unknowns.
Curve fitting
(standards on
first plate only)
A curve is fitted to the results of the
measurements of standards on the
first plate. This curve is used to
evaluate unknowns for all plates.
66
Protocol Editing
Validation
Allows you to determine if a result
is inside or outside a selected range.
Flatfield
Well specific correction factors
obtained with Assay Wizard
optimization are applied to the
measured values. Correction is
label/plate pair specific.
Time from dispense. Values can be
positive or negative depending
whether they come after or before
the dispensing.
Same as ‘Curve fitting (standards of
each plate)’, with the difference that
the calculated results have been
blank corrected (subtracted) with a
value taken either from wells
marked as Blank in the plate map, or
Standard sample with 0
concentration (set in the calculation
settings).
Dispense time*
Curve fitting
(blank corrected,
standards on
each plate)
Curve fitting
(blank corrected,
standards on first
plate only)
Same as ‘Curve fitting (standards on
first plate only)’, with the difference
that the calculated results have been
blank corrected (subtracted) with a
value taken either from wells
marked as Blank in the plate map, or
Standard sample with 0
concentration (set in the calculation
settings).
67
Protocol Editing
Curve fitting
(PL)
A curve fitting calculation where the
results is the IC50/ED50
concentration (the half maximal
concentration). A single output
value is given for the curve and its
sample wells. In the plate map we
need to use S –sample type (S1.1,
S1.2, S2.1,…) to differentiate
between the replicate samples
(indicated by the last number in
S2.1) and different standard curves
(indicated by first number in S2.1).
Start point of
Max Slope
This calculation can only be used
when Max slope –calculation is
added first. The calculation reports
the starting point of the Max slope
calculation.
Slope for PL
curve
When curve fitting (PL) is added to
calculation, the slope value at the
halfway point of the curve (at the
IC50/EC50 concentration) is shown
as a result output.
Slope
Measures the slope between data
points in kinetic measurements ().
You can choose the calculation
window, unlike in the Max slope
calculation. Also the result is
according to linear fitting between
the selected data points
68
Protocol Editing
Slope goodness
By default this calculation comes
automatically when Slope
calculation is selected but you can
select that it does not come. The
result output is the R^2 (=R square)
that indicates how well the data
points and linear regression fitting
co-align (output values between 0
and 1).
Z’
Z’ determines the assay quality
using the standard deviation and
average of high and low (or positive
and negative) samples in the plate.
At least two replicates from both are
needed. The formula is:
Z’ = 1-((3*SD(high)+3*SD(Low))/
(Abs(Avg(High)-Avg(Low))))
Signal
Signal response from a user-defined
wavelength. This allows you to
select a wavelength and get the
signal as an output per well. The
wavelength has to be within the
range already measured with the
Wavelength scan operation.
*Well time values are given in milliseconds but MeasTime
is given in a time format having 1 second as a fraction of
seconds in 24 hours, 1/86400 = 1.15741E-05. Well time
has to be changed to the same time format for calculations
in Excel.
69
Protocol Editing
Creating your own calculation
Select the General calculation option. You can then create
a calculation involving up to three factors labeled X, Y and
Z.
The drop-down list boxes allow you to select one of the
four arithmetic operators +, -, *, /.
The three option buttons below allow you to choose the
order in which the operations happen.
70
Protocol Editing
The final three pairs of option buttons allow you to select
the value to be used for each of the three factors. Each
value can be a result or a number.
Note! If you only want two factors, set the third factor to be
1 and either multiply or divide by it.
Example: Ratio calculation
To calculate a simple ratio of two results select (X/Y)/Z.
Choose X and Y to be the results you want. Set Z to be 1.
Example: Mean calculation
To calculate a mean of two results select (X+Y)/Z. Choose
X and Y to be the results you want. Set Z to be 2.
71
Protocol Editing
72
Chapter 3
Mirrors
73
74
Mirrors
Mirrors
Note! This is a sub-folder under Inventory.
When you click this item on the Navigation Tree, a view
showing the mirrors currently defined will appear. They
are listed according to their barcode ID numbers. You can
also see the number of the slot where the mirror is
positioned in the carousel and whether or not it is a dual
mirror.
The descriptions of mirrors include the following
information:
75
Mirrors
•
•
•
•
•
•
D400, D = dichroic mirror, 400 = cut off wave length
BS50 = beamsplitter 50%
D505fp = single mirror module for fluorescence
polarization
D555fp/D595 = dual mirror module for fluorescence
polarization
LUM = single mirror for luminescence
Bias = for TRF LASER second light source
Mirror toolbar
There are three buttons on the toolbar:
New
You can add a new mirror to the list.
Duplicate
(Select a mirror to enable this). Make a copy of a mirror.
When you click the Duplicate button, a copy of the
parameters will appear and you can edit them as required.
The default name will be "Copy of" followed by the name
of the filter. You can give it a different name and edit other
parameters by selecting the parameters.
76
Mirrors
Note! To use a new or duplicated mirror you should have a
mirror block and a suitable barcode sticker. Such mirrors
must be numbered from 501 upwards.
Delete
Allows you to delete a user created mirror.
If you add a new mirror or copy an existing one then you
can edit the mirror parameters. If the mirror is factory
preset then you can view the parameters but not edit them.
Mirror parameters
When you select an individual mirror you get a further set
of parameters specific to that mirror.
Barcode (mirror)
This parameter is the number of the barcode used to
identify the mirror. Each mirror has a unique identification
barcode so that the instrument knows which mirror is being
used.
77
Mirrors
Name
Enter the name of the mirror. The name used is up to you
but it is recommended that you have a consistent system so
that you can easily recognize the purpose of mirrors since
they all appear together.
Description
The mirror is described briefly.
Dual
The mirror directs the light to two detectors. This requires
a dual detector instrument.
Bias
Select if you want to use a bias mirror module or not. This
is needed for measurements with the laser.
Slot
This is the position of the mirror in the top multiple mirror
module. This is detected automatically by the instrument
and added to the parameter list.
Bottom mirror
Tells whether or not the mirror is installed to allow reading
from below.
78
Mirrors
Note! There is no barcode reading for this mirror to
identify it, so you must specify it manually in the software
with the Bottom mirror parameter.
Use with (measurement technology)
These parameters allow you to specify the measurement
technology you want the mirror to be used with. Click the
appropriate check boxes.
Changed
This is the date and time when the parameters were last
changed. If they are factory preset then only the date is
shown. The name of the user who last changed a parameter
is also added. Changed itself is updated automatically by
the software.
Bottom mirror parameter
When you select a bottom mirror you get a parameter
specific to the bottom mirror.
79
Mirrors
Bottom mirror
If you are going to use a bottom mirror you must specify it.
This is done by selecting the special Bottom mirror icon
and then setting the Bottom mirror parameter using the
drop-down list of mirrors.
Note! A bottom mirror can only be used for time-resolved
fluorescence and fluorescence intensity measurements.
Physically install the appropriate mirror in the bottom
mirror holder. This is accessed from the right side of the
instrument. See the Routine maintenance chapter of the
Instrument manual for more details.
Note! Each time you remove the circular cover on the side
of the instrument and then put it back you will be prompted
to specify the state of the bottom mirror.
80
Mirrors
.
81
Mirrors
82
Chapter 4
Filters
83
84
Filters
Filters
Note! This is a sub-folder under Inventory.
If you click on Filters, the view will show a page with all
the filters currently defined. These are grouped according
their barcode number. Each filter has a unique barcode so
that the instrument can positively identify which filter is
loaded. Click the “Slot” column heading to bring the
existing filters to the top of the column.
The view also shows if the filter is physically in the
instrument and if so in which slot, or if it is not available
i.e. absent. You also can see if it is a factory preset or not.
85
Filters
Note! An excitation filter can be used as an emission filter
and vice versa.
Note! You can use the same barcode on filters on different
slides but you must not use a barcode more than once on
each slide.
Filter toolbar
There are three buttons on the toolbar:
New
This is only enabled if you have selected the filter type e.g.
excitation filter. You can add a new filter to the list.
Duplicate
(Select a filter to enable this). Make a copy of a filter.
When you click the Duplicate button, a copy of the
parameters will appear and you can edit them as required.
The default name will be "Copy of" followed by the name
of the filter. You can give it a different name and edit other
parameters by selecting the parameters.
Note! To use a new or duplicated filter you should have a
filter block and a suitable barcode sticker. Such filters must
be numbered from 501 upwards.
86
Filters
Delete
Allows you to delete a user-created filter.
If you add a new filter or copy an existing one then you can
edit the filter parameters. If the filter is factory preset then
you can view the parameters but not edit them.
Filter parameters
The filter parameters are the same for all filters.
Barcode
This barcode identifies the filter for the system. This is
supplied automatically and you cannot change it.
87
Filters
Name
Enter the name of the filter. The name used is up to you but
it is recommended that you have a consistent system so
that you can easily recognize the purpose of filters since
they all appear together e.g. include the wavelength of the
filter.
Description
The wavelength for the filter and its type:
•
•
•
excitation (prefix X)
emission (prefix M)
photometry (prefix P)
Center wavelength (CWL), bandwidth (BW), and the
minimum transmittance (Tmin) are also shown.
Note! The description is just a text field and does not
update automatically. If you change actual parameters such
as Center wavelength etc. be careful that you also type in
the correct description. If you do not do this, the
description could be showing different values from the
actual ones.
Polarization (emission filters only)
If the filter is to be used for polarization measurements
select from the drop-down list box whether the filter is for
S or P polarization. If the filter is not used for polarization
measurements this parameter should be set to None.
88
Filters
Center wavelength
The center wavelength is the middle wavelength of the
range of wavelengths that will pass through a filter. The
units are nanometers.
Bandwidth
This is the "Full width at half maximum" (FWHM): the
width of a bandpass filter between specific absolute
transmission points, i.e. 0.5 x peak transmission. The units
are nanometers.
Transmittance value (%)
This parameter tells what percentage of the incident light
passes through the filter.
Slot
This is not a parameter you can edit, so in the case of a
newly added filter it will show N/A, not available. When
the instrument detects a filter with the barcode given above
it will automatically fill in the value of the slot number.
Use with (measurement technology)
These parameters allow you to specify the measurement
technology you want the mirror to be used with. Click the
appropriate check boxes.
89
Filters
Changed
This is the date and time when the parameters were last
changed. If they are factory preset then only the date is
shown. The name of the user who last changed a parameter
is also added. Changed itself is updated automatically by
the software.
.
90
Chapter 5
Apertures
91
92
Apertures
Apertures
Note! This is a sub-folder under Inventory.
When you click on this item on the navigation tree, a view
showing the apertures currently defined will appear.
Apertures are used for special luminescence measurements
and HTS AlphaScreen. Apertures are not used for normal
AlphaScreen.
The aperture should be the same size or smaller than the
well. It ensures that light from the sample well is directed
into the detector and it prevents crosstalk from other wells.
The system checks that the selected aperture is in place and
gives a warning message if it is not. You can still continue
despite this warning if you choose to.
An aperture is loaded into the instrument as described in
the Routine maintenance section of the Instrument manual.
Note! If errors occur with the aperture, you should check
that the aperture is correctly installed. There is a possibility
that the aperture block did not go far enough into its place
when the screw was tightened.
93
Apertures
Aperture toolbar
There are three buttons on the toolbar:
New
You can add a new aperture to the list.
Duplicate
(Select an aperture to enable this). Make a copy of an
aperture. When you click the Duplicate button, a copy of
the parameters will appear and you can edit them as
required. The default name will be "Copy of" followed by
the name of the aperture. You can give it a different name
and edit other parameters by selecting the parameters.
Note! To use a new or duplicated aperture you should have
a suitable aperture loaded into the instrument. An aperture
is recognized automatically by its ID.
Delete
Allows you to delete a user created aperture.
94
Apertures
Aperture parameters
The aperture parameters are the same for all apertures.
ID
This identifies the aperture for the system. Any new
aperture must have a different ID from the default values
otherwise an error message will result.
Name
Enter the name of the aperture. The name used is up to you
but it is recommended that you have a consistent system so
that you can recognize the plate type the aperture is
intended for.
Description
Enter a description of the aperture.
95
Apertures
Note! The description of the default apertures tells that an
aperture smaller than the well size can be used. In this case
crosstalk will be prevented but the signal from the sample
well will be less than if the aperture diameter is the same
size as the well.
Type
Select the technology for which the aperture is to be used.
The drop-down list shows the possibilities available.
Height
This is the distance from the bottom to the top of the
aperture. The presence of an aperture, other than the
shutter, limits how close the detector can come to a plate.
With standard AlphaScreen measurements the plate cooler
must be 1 mm above the plate so only the shutter is
allowed. In this case the presence of an aperture will lead
to a warning message. With other technologies that do not
use an aperture, it can still be present but use of the shutter
is recommended. An error message will appear in the
results if a measurement could not be made at the correct
height due to the presence of an aperture.
Diameter
The size of the hole in the aperture. The shutter has no hole
so the diameter is zero.
96
Apertures
In instrument
If the aperture is in the instrument this parameter will be
Yes otherwise it will be No. Only one aperture or shutter
can be in at the same time.
Changed
This is the date and time when the parameters were last
changed. If they are factory preset then only the date is
shown. The name of the user who last changed a parameter
is also added. Changed itself is updated automatically by
the software.
97
Apertures
98
Chapter 6
Temperature control
99
100
Temperature control
Temperature control
When you click on this item on the navigation tree, a
window appears allowing you set parameters controlling
temperature settings.
Plate heating adjustment
Note! This can only be selected if the temperature control
option is installed and AlphaScreen Plate temperature
adjustment is not selected.
Set the measurement chamber temperature. The range is
from 20 to 50 °C.
The Condensation prevention for sealed plates check
box allows you to set the amount by which the temperature
of the heater that is above the assay plate differs from the
temperature of the heater below the plate. The amount of
this difference can be a maximum of 2 °C. Keeping the
upper heater at a higher temperature than the lower heater
101
Temperature control
avoids the formation of condensation droplets on the under
surface of the seal when using a sealed plate.
AlphaScreen plate temperature adjustment
Note! This parameter is only for AlphaScreen
measurement.
Note! This can only be selected if:
•
•
the temperature control option is not installed
or the temperature control option is installed but Plate
heating adjustment is not selected
Give the number of degrees the plate temperature is
different from ambient temperature. The maximum range
allowed is 2 °C colder or warmer than ambient
temperature. This parameter can be used in AlphaScreen
measurements to reduce temperature related trends.
102
Chapter 7
Measurement
technologies
103
104
Measurement technologies
Measurement technologies
If you click on Measurement technologies the view will
show a page with all the measurement technologies
currently defined. If the measurement technology is a
factory preset then it cannot be edited. The date when a
measurement technology was last edited and the name of
the editor are also given.
To define a new measurement technology or edit an
existing one, double-click Measurement technologies then
double-click the measurement technology type you want.
The existing measurement technologies of that type will
appear.
105
Measurement technologies
Measurement technologies toolbar
When you select a measurement technology the following
buttons appear.
To view or edit the parameters of an existing measurement
technology, just double-click the measurement technology
you want. The measurement technology parameters will
then appear in the view.
New
(Select a measurement technology type to enable this). You
can add a new measurement technology name to the list.
Duplicate
(Select a measurement technology to enable this). Make a
copy of a measurement technology. When you click the
Duplicate button, a copy of the measurement technology
will appear and you can edit the parameters as required.
The default name will be "Copy of" and then the name of
the measurement technology type. You can give it a
different name and edit other parameters by selecting the
parameters.
Delete
(Select a user created measurement technology to enable
this). Remove the selected measurement technology from
106
Measurement technologies
the list. Factory set measurement technologys cannot be
removed, nor can a user created measurement technology
that is used in a protocol.
Lock
When you have selected a measurement technology the
Lock icon also appears on the toolbar. Click this to lock
the measurement technology. When the measurement
technology is locked, it cannot be modified by anyone else.
It cannot be selected in the optimization wizard unless it is
unlocked. To lock a measurement technology, click the
Lock button, type and retype a password and click OK
button. To unlock a measurement technology select the
measurement technology, click Unlock button, type the
password and click OK button.
Undo
When you have selected a measurement technology and
made a change the Undo button is enabled on the toolbar.
Click this to undo all changes you have made since you
opened the measurement technology.
Exiting from a measurement technology
Before you exit from a protocol please note the following.
The message Filter is not in acceptance range of limits
of wavelength may appear if you try to exit an invalid
measurement technology. The ”Acceptance range” is the
range within which the excitation and emission
wavelengths are suitable for the filter and dichroic mirror
module combination being used.
107
Measurement technologies
In general, the excitation wavelength must be less than the
D-value of the mirror module and the emission wavelength
must be more than D-value. The D value is the wavelength
below which a dichroic mirror module reflects lights and
above which it transmits light.
The excitation and emission filters must be chosen to select
suitable wavelengths. If a filter is not in the acceptable
range, the error message shows where the acceptable range
is exceeded. You will see in the message that the formula
used to calculate which wavelengths are suitable and which
not includes an additional factor of half the filter
bandwidth plus 1 nm. The excitation wavelength must be
below the D value by at least this factor and the emission
wavelength above it by at least this factor.
E.g. If the dichroic mirror has a D value of 400, then a
filter with a central wavelength of 340 nm and a bandwidth
of 60 nm would be in the acceptable range because 340 +
(0.1 x 60) + 1 is 347 which is still below 400. A similar
filter with a central wavelength of 393 or above would not
be in the acceptable range. A suitable emission filter with
the same bandwidth would have to have a central
wavelength of more than 407 nm.
Note! With a dual mirror module e.g. D400/D630 and
simultaneous dual measurement technology measurements,
when you choose the emission filters you must take into
account the D value of the second mirror. The wavelength
for one channel must exceed the D value by more than the
factor (so that it will be transmitted and go to the first
detector) and the wavelength for the second channel must
108
Measurement technologies
be below the D value by more than the factor (so that it
will be reflected and go to the second detector).
Note! For standard AlphaScreen the mirror module works
the opposite way, reflecting wavelengths above the D value
and transmitting those above.
Measurement Technologies
The following technologies are available in EnVision.
Time-resolved fluorometry
In time-resolved fluorometry, lanthanides are used as
measurement technologies to give a long decay time and a
large Stokes shift. There are two types of time resolved
fluorescence - DELFIA, which involves enhancement and
washing steps, and LANCE a homogeneous assay. In the
most common form of LANCE the light excites the donor
molecule which, after a delay, transfers the energy to the
acceptor molecule which then emits light. Two labels must
be defined for LANCE, one for the donor and the other for
the acceptor. Alternatively, you can use dual measurement
technology (LANCE Eu/APC Dual).
Enhanced Time-resolved fluorometry
The excitation light comes from a 337.1 nm nitrogen laser.
This gives enhanced performance for homogenous timeresolved fluorescence measurements.
109
Measurement technologies
Fluorescence intensity
Light of a particular wavelength is selected with a filter
and used to excite the fluorochrome in the sample. This
produces prompt fluorescence at a different wavelength
which can be measured.
Fluorescence polarization
Light of a particular wavelength is selected with a filter
from the spectrum of the flash lamp. This light is then
polarized and used to excite the fluorochrome in the
sample. The emission light is then viewed through two
polarizers, one parallel to the incident polarization (Splane) and one perpendicular to it (P-plane). The ratio:
1000*(S -G*P) / (S +G*P)
is calculated to get the polarization in units of mP. G is a
correction factor (typically 0.8 to 1.2 for fluorescein, but
can be set in the range 0.01 to 10).
Absorbance
Light of a particular wavelength passes through the
contents of the well where part is absorbed. The ratio of the
transmitted light intensity to the reference intensity is
determined. A reference measurement is made before the
plate is moved to the measurement position. This enables
the absorbance to be calculated. The equation used is:
A = - log (I/I0)
110
Measurement technologies
Where I is the intensity of the light through the sample and
I0 is the intensity of the reference measurement.
Luminometry
Measurement is made of light produced in the sample as a
result of e.g. a chemical process instead of excitation by a
light source.
Enhanced Luminometry
Even higher sensitivity measurements are possible when
EnVision is equipped with a special luminescence detector.
This feature is described separately under the heading
"Special luminescence options".
Ultra Sensitive Luminometry
Ultra Sensitive Luminometry enables even more sensitive
measurements than other luminescence methods as well as
short measuring times. This feature is described separately
under the heading "Special luminescence options".
AlphaScreen
This is a very high sensitivity detection technology based
on the laser excitation of beads in the sample. This feature
is described separately under the heading "AlphaScreen
options".
Note! You cannot use other measurement modes for a
group at the same time as you use AlphaScreen. You can
111
Measurement technologies
however use other measurement modes in a different
group.
HTS AlphaScreen
This is a very high sensitivity, high speed detection
technology based on the laser excitation of beads in the
sample. This feature is described separately under the
heading "AlphaScreen options".
Note! You cannot use other measurement modes for a
group at the same time as you use HTS AlphaScreen. You
can however use other measurement modes in a different
group.
Monochromator
Using the quad monochromator option, excitation light
from the lamp is directed through the excitation double
monochromator into the sample. The emission light is then
directed through the emission double monochromator to
the detector.
Note! Although monochromators relieve you of the need to
have filters for every measurement technology, a broad
waveband cut-off filter is still required in order to block
harmonic multiple orders of the wavelength chosen. A total
of three cut-off filters covers the entire range of
wavelengths supported by the instrument.
112
Measurement technologies
Measurement technology parameters
When the measurement technologies editor opens there are
two tabs: General and Optimizations. On the General
page you can edit measurement technology parameters.
All the measurement technology parameters are described,
noting where relevant which measurement technology the
parameter is valid for. If no measurement technology is
mentioned it means the parameter is valid for all
measurement technologies. A time-resolved fluorescence
measurement technology is used as an example picture.
113
Measurement technologies
Name
This is the name by which the measurement technology is
identified.
Excitation (only TRF or FI)
Select either Top for excitation from above or Bottom for
excitation from below.
Monochomators (for Absorbance)
Select Use excitation monochromator.
Wavelength (for Absorbance)
Give the wavelength to be used for the excitation
monochromator
Monochomators (for FI)
Select Use monochromators, then select the excitation
and emission wavelengths.
Emission (only TRF)
Select either Top for measurements from above or Bottom
for measurements from below.
114
Measurement technologies
2nd emission (only TRF)
Select either Top for measurements from above or Bottom
for measurements from below.
Light source (only TRF)
Select either Light source 1 – Flash lamp or Light source 2
– TRF LASER, depending on whether you want to do
measurements using the normal flash lamp or with the
optional TRF LASER.
Note! Light source 2 – TRF Laser requires special mirrors
(Bias) 445 or 446.
Top mirror (only TRF)
Select the top mirror.
Note! All mirrors available for the technology used are
included in the drop-down list. They are defined in the
general parameter Mirrors.
Bottom mirror (only TRF)
Select the bottom mirror.
Note! All available mirrors are included in the drop-down
list. They are defined in the general parameter Mirrors.
The bottom mirror has to be defined manually in the mirror
page because there is no barcode reading.
115
Measurement technologies
Mirror (only FI, FP, luminescence, AlphaScreen)
Select the mirror.
Note! All mirrors available for the technology used are
included in the drop-down list. They are defined in the
general parameter Mirrors.
Note! If you use a second detector, for optimum speed use
a dual mirror in the light path from the sample to the
detector, see the examples in the instrument manual.
Excitation filter (not for luminescence,
AlphaScreen, TRF Laser)
The excitation filters in the light excitation path appear in
the drop-down list. Excitation filters have a common
fluorochrome name and the center wavelength of the filter
e.g. FITC 485, UV (TRF) 340, Absorbance 405 etc. The
name is preceded by X (P for absorbance) to show it is an
excitation filter. These are color glass filters.
Note! All available filters are included in the drop-down
list. Filters are defined using the general parameter Filters.
Emission filter (not for absorbance or HTS
AlphaScreen)
The emission filters in the emission light path appear in the
drop-down list. Emission filters have a common
fluorochrome name and the central wavelength of the filter
e.g. Europium 615, FITC 535, APC 665 etc. The name is
preceded by M to show it is an emission filter. You can
116
Measurement technologies
select any emission filter from the drop-down list of
available filters.
Note! All available filters are included in the drop-down
list. Filters are defined using the general parameter Filters.
Note! For fluorescence polarization dual measurement use
the "second emission filter" also. The P filter should be in
the normal emission filter position and the S filter in the
second emission filter position. The result in mP is
calculated with the equation 1000* (S-G*P)/(S+G*P)
where S and P are the signals from the parallel polarization
filter (S) and the perpendicular polarization filter (P)
respectively, and G is the G-factor.
Note! For LANCE dual use the "second emission filter"
also. The filter for the acceptor signal (APC 665) should be
in the normal emission filter position and the filter for the
donor signal (Europium 615) in the second emission filter
position.
2nd emission filter (not for absorbance or
AlphaScreen)
Used when you want to make measurements with two
filters, e.g. fluorescence polarization or LANCE. You can
select any emission filter from the drop-down list of
available filters. Two measurements are made, one with the
normal filter and one with the second filter. For
fluorescence polarization the second channel emission
filter should be the S filter. These measurements are
simultaneous except in the case of LANCE.
117
Measurement technologies
Note! For LANCE Dual the filter for the donor signal
(Europium 615) should be in the second channel emission
filter position.
Measurement height (not for AlphaScreen)
For most technologies this is the focus height (in
millimeters) for the optics and is measured from the bottom
of the plate. This parameter is only used if you select the
Use measurement height defined in label parameter in
the protocol. In that case it overrides the Fixed
measurement height parameter in the protocol.
For special luminescence and HTS AlphaScreen the
measurement height is the distance from the top of the
plate to the aperture. The value set here is always used
instead of the Fixed measurement height parameter in the
protocol.
For standard AlphaScreen this parameter is not used
because the distance between the plate cooler and the top
of the plate is always 1 mm. For HTS AlphaScreen the
distance between the plate and the detector is 0.
Note! If you run the measurement height wizard, the
optimized measurement height will be used instead of the
value set for this parameter.
118
Measurement technologies
Excitation light % (not for luminescence,
AlphaScreen, TRF Laser)
Allows you give the percentage of the excitation light to be
used. You can use this parameter to reduce the amount of
excitation light if the label concentration is high.
Delay (only TRF)
The time after the excitation flash at which measurement of
the emission signal begins. The unit is microseconds.
Note! When entering values for delay times less than 1000
µs give the values to the nearest 10 µs. Up to 2000 µs, to
the nearest 20 µs, up to 5 000 µs to the nearest 50 µs, up to
10 000 µs to the nearest 100 µs, up to 20 000 µs to the
nearest 200 µs, and up to 60 000 µs, (the maximum) to the
nearest 500 µs.
Window time (only TRF)
The duration of a measurement in one window. The unit is
microseconds.
Note! When entering values for window times less than
1000 µs give the values to the nearest 10 µs. Up to 2000
µs, to the nearest 20 µs, up to 5 000 µs to the nearest 50 µs,
up to 10 000 µs to the nearest 100 µs, up to 20 000 µs to
the nearest 200 µs, and up to 60 000 µs, (the maximum) to
the nearest 500 µs.
119
Measurement technologies
Number of sequential windows (only TRF)
This is the number of repetitions for a given window time.
Each sequential window leads to a separate result. The
time for each of these windows is set with the Window
time parameter.
E.g. if this parameter is 5 and the Window time 400 µs, the
total time is 2000 µs. If there is a delay of 400 µs then the
total time is 2400 µs.
Note! The software does not allow you to set a total time
longer than the time between flashes.
Time between flashes (only TRF)
This is the time between excitation flashes within a
measurement. For the flash lamp the minimum time
between flashes is 2000 µs (max. flash rate of 500 Hz) and
for the TRF Laser 16 600 µs (max. flash rate of 60 Hz).
Detector gain (only FI and FP)
This parameter affects the amount by which the detector
amplifies the signal from the sample.
2nd detector gain (only FI and FP)
This parameter affects the amount by which the second
detector amplifies the signal from the sample.
120
Measurement technologies
G-factor (only FP)
Give the value for the G-factor used in calculating
fluorescence polarization. The default is 1 and the range
from 0.01 to 10.
Note! For fluorescein the typical value is between 0.8 and
1.2.
Number of flashes (not for luminescence or
AlphaScreen)
The number of excitation flashes for one measurement of
the sample.
No. of flashes per A/D conversion (only FI, FP and
Absorbance)
The default for this parameter is 1 and it should not be
changed. This means that for each flash a number of counts
is obtained. If the Number of flashes parameter is greater
than 1 then the software adds the number of counts for
each flash to get the total counts. If, however, the Number
of flashes per A/D conversion parameter is greater than 1
then the hardware adds the signal from the detector
obtained for each flash until the number of flashes set by
this parameter has been reached. Only then does the
software register this as a number of counts and add it to
the total. E.g. if the Number of flashes is 10 and the
Number of flashes per A/D conversion is 5 then the
hardware accumulates the signal from five flashes,
transfers that to the software and repeats the process. The
121
Measurement technologies
final result from ten flashes is made up of the sum of two
numbers: the counts obtained for each of the two separate
measurements of five flashes. This may help when you
have a signal so low that it is hard to distinguish from the
average background. The cumulative signal obtained from
several flashes at a time will stand out more clearly from
the background.
Number of flashes for 2nd detector (only LANCE)
The number of excitation flashes for one measurement of
the sample measured with the second detector.
Measurement time (only luminescence)
The time during which the sample is measured. The unit is
seconds. When entering values for measurement times less
than 10s give the value to the nearest 0.01s. Above 10s
give the value to the nearest 0.1s.
Reference signal (not for luminescence)
This value is produced by the instrument after the first
measurement.
Note! When you copy a measurement technology, the
Reference signal will be set to be the same as in the
original. When any parameter concerning excitation
(excitation filter, mirror, direction or light) is changed, this
will not be available until the measurement technology has
been used in measurement for the first time.
122
Measurement technologies
Reference AD gain (not for luminescence)
This value is produced by the instrument after the first
measurement with the given excitation settings.
Reference AD gain is a parameter for the reference diode.
It shows the range of the excitation light to be measured.
The reference signal is dependent on the excitation filter
and the mirror module. The broader the bandwidth of the
filter, the higher the reference signal. The reference signal
is measured when the excitation light enters the mirror
module. A small mirror is used to reflect part of the light to
the reference diode. The Reference signal (Rf) is used to
correct minor fluctuations in the excitation light. During
measurement, the reference signal for each flash is
measured (Rfm). The raw signal from detector (Sraw) is
then corrected with Rf and Rfm to get the result signal (S).
The calculation is: S = Sraw * Rf / Rfm. The Rf is
measured with maximum light (Reference Excitation
Light %) but without saturating the reference diode.
Depending on the concentration of the sample there might
be a saturation of the detector due to the excitation light.
This has to be corrected by decreasing the Excitation light
(ExcL) in the measurement technology. This results in a
lower Rfm signal because there is less light for excitation,
but the signal from the detector is not so much different.
When measuring a reference signal, begin with Reference
AD gain set to 1. If the signal is less than 450 000, try the
next AD value. If with the next AD value the signal is
higher than 450 000, the previous AD value should be
123
Measurement technologies
chosen and the reference signal measured. The possible
AD values to be tried are 1, 2, 4 to 8.
If the signal from the excitation light is 100 000 with AD 1,
it is about 200 000 with AD 2 and about 400 000 with AD
4. But with AD 8 it cannot be measured because the diode
is saturates over 500 000. In each range the maximum is
500 000 and saturation must be avoided.
If the signal is bigger than 450 000 with AD 1, then
excitation light percentage must be changed to be below
100% to reach a reference signal below 450 000.
Note! When you copy a measurement technology the
Reference AD gain will be set to be the same as in the
original. When any parameter concerning excitation
(excitation filter, mirror, direction or light) is changed, this
will not be available until the measurement technology has
been used in measurement for the first time.
Reference Excitation Light % (not for
luminescence, AlphaScreen nor TRF Laser)
This value is produced by the instrument after the first
measurement with the given excitation settings.
Changed
This is the date and time when the parameters were last
changed. If they are factory preset then only the date is
shown. The name of the user who last changed a parameter
124
Measurement technologies
is also added. Changed itself is updated automatically by
the software.
Optimizations
The Optimizations page shows the results of any
optimizations done.
To remove an optimization or if valid, a crosstalk, select it
then click on the Delete button on the toolbar.
Typical settings for different measurement
technologies
Typical settings for different measurement technologies are
illustrated.
Fluorescence polarization - FITC
Typical protocol settings
96, 384, 1536-well plates
measurement height 9mm
Greiner low volume 384
well plate
measurement height 15mm
125
Measurement technologies
Typical measurement technology settings
Detector gain:
450 (range 150 - 750)
2nd detector gain:
650 (range 150 - 750)
Flashes:
100
The figure shows a typical FITC FP measurement
technology.
Set the 1st detector gain so that with 1 nM fluorescein you
get a result of about 27 mP (+/-5).
126
Measurement technologies
Typical RFU and mP values.
Detect
or
Gain
1nM FITC
m
in MQH 2 O P
1 nM FITC in
Pol. Buffer
mP
1st
515
560,000
RFU
14,500,000
RFU
387
2nd
650
590,000
RFU
1st
475
230,000
RFU
2nd
650
590,000
RFU
27
6,400,000
RFU
44
0
6,100,000
RFU
27
6,400,000
RFU
The values are obtained using the above measurement
technology and changing only the 1st detector gain.
Fluorescein was diluted with either MQ water or
polarization buffer. The use of polarization buffer is
recommended.
Suggestions
To decrease mP values increase the 1st detector gain.
Negative results can be changed to positive by decreasing
the 1st detector gain until results become positive.
Total measurement time is based on the number of flashes.
The flash rate can be changed to suit the assay.
P-and S-filters need to be placed next to each other in the
filter slide. The P-filter is for the 1st detector and the S-
127
Measurement technologies
filter for the 2nd detector. In the filter slide the S-filter
should come before the P-filter. For example, the S-filter
can be in position 5 and the P-filter in position 6.
Note! If saturation of the electronics occurs, you will see an
error message. Reduce the Gain or Excitation light (%).
The use of Black plates is recommended.
Fluorescence polarization - BODIPY TMR
Typical protocol settings
96, 384, 1536-well plates
measurement height 9mm
Typical measurement technology settings
Detector gain:
450 (range 150 - 750)
2nd detector gain:
650 (range 150 - 750)
Flashes:
100
Set the 1st detector gain so that with 1 nM BODIPY you
get a result between 20 and 100 mP.
Suggestions
Same as for FP FITC.
128
Measurement technologies
Time-resolved fluorescence - DELFIA
Typical protocol settings
96, 384, 1536-well plates
measurement height 6.5mm
Typical measurement technology settings
Delay:
400
Window:
400
Time between flashes:
2000 (minimum with flash
lamp at 500 Hz)
Number of flashes:
100
The figure shows a typical DELFIA (europium)
measurement technology.
129
Measurement technologies
Suggestions
Total measurement time is based on the number of flashes.
The flash rate can be changed to suit the assay.
The use of Yellow, Clear, Black/Clear or White plates is
recommended.
Time-resolved fluorescence - LANCE (APC 665)
Typical protocol settings
96, 384, 1536-well plates
measurement height 6.5mm
Typical measurement technology settings
Delay:
60 (90)
130
Measurement technologies
Window:
100 (300)
Time between flashes:
2000
Number of flashes:
200 or (50)
Number of 2nd detector
flashes:
200 or (25)
The figure shows a typical LANCE measurement
technology.
Suggestions
Total measurement time is based on the number of flashes.
The flash rate can be changed to suit the assay.
131
Measurement technologies
In LANCE assays the first and second detector can be used
with different flash rates. In this case it is better to have the
higher flash rate associated with the first detector.
The recommended delay time is 60 and window time 100.
For LANCE dual with the laser the corresponding values
are delay time 90 and window time 300.
615-and 665-filters need to be placed next to each other.
The 665-filter is for the 1st detector and the 615-filter for
the 2nd detector. In the slide this means that the 615-filter
should come before the 665-filter. For example the 615filter can be in position 2 and the 665-filter in position 3.
The use of Yellow, Clear, Black/Clear, White or Black
plates is recommended.
Fluorescence intensity
Typical protocol settings
96, 384, 1536-well plates
measurement height 6.5mm
Typical measurement technology settings
Detector gain:
250 (range 150 - 750)
Flashes:
25 (100)
132
Measurement technologies
The figure shows a typical Fluorescence Intensity (FITC)
measurement technology.
Suggestions
Detector gain can be smaller in assays that give a lot of
signal. The minimum is 150 and the maximum is 750.
Total measurement time is based on the number of flashes.
The flash rate can be changed to suit the assay.
Note! If saturation of the electronics occurs, you will see an
error message. Reduce the Gain or Excitation light (%).
The use of Black plates is recommended.
133
Measurement technologies
Absorbance
Typical protocol settings
96, 384, 1536-well plates
measurement height 6.5mm
Typical measurement technology settings
Flashes:
1-10 (100)
The figure shows a typical Absorbance (450 nm)
measurement technology.
Suggestions
Total measurement time is based on the number of flashes.
The flash rate can be changed to suit the assay.
The use of Black/Clear plate is recommended.
134
Measurement technologies
Luminescence
Typical protocol settings
96, 384, 1536-well plates
measurement height 6.5mm
Typical measurement technology settings
Measurement time:
0.1 - 1 s
The figure shows a typical Luminescence measurement
technology.
Suggestions
Use a 700nm low-pass luminescence filter with white
microplates. The use of White plates is recommended.
Results are shown as counts per second (CPS).
135
Measurement technologies
Absorbance and Fluorescence intensity with
monochromators
The monochromator option provides full flexibility in
wavelength selection to suit any chromophore or
fluorophore in photometric or fluorometric technologies.
There is one option for absorbance alone and one for both
absorbance and in fluorescence intensity technologies. Just
as when using filters, you can set the monochromators to
read single wavelength point measurements.
To verify the sample properties, EnVision with
monochromators can additionally be set to scan absorbance
or fluorescence excitation / emission spectra. This feature
is very useful when determining optimal peak wavelengths
or in verifying dye correctness.
In absorbance wavelength scan measurement a baseline
correction is used to provide accurate ABS-units over the
scanned wavelength range.
The first figure shows typical parameter values for
Absorbance with the excitation monochromator.
136
Measurement technologies
The figure shows typical parameter values for
Fluorescence intensity with the excitation and emission
monochromators.
Special luminescence options
There are two special luminescence options and you can
have one or other of them in your instrument. If you have
one of these options, then there is an additional detector
specifically for luminescence measurements. This is
located next to the other detector(s) in the instrument. The
detector for Ultra Sensitive Luminescence allows for
higher sensitivity and faster measurements than that for
Enhanced Luminescence.
This detector enables luminescence measurements e.g.
with the Image FlashPlate assay. This assay measures
radioactive samples. The radioactivity is detected using
137
Measurement technologies
energy transfer via a scintillant and a europium chelate
(emission at 615 nm).
The detector has no optical components and the emission
light is collected directly from the well. The detector can
be lowered so that it touches the plate thus reducing the
crosstalk between wells.
The detector has an aperture to define the area of the plate
it can view. Currently there are three different aperture
sizes: for 96, 384 and 1536-well plates. They are optimized
to give the highest possible signal and minimize crosstalk
between wells. This aperture can be changed by hand.
Note! You must physically install the appropriate aperture
in the aperture holder. This is accessed by lifting the
instrument lid. You can slide the aperture into its holder in
the right side of the top measuring head body. For more
details see "Routine maintenance" in the Instrument
manual.
If a special luminescence option is installed, an additional
measurement technology will appear in the Measurement
technologies list of the EnVision software.
If Enhanced Luminescence is installed, it enables
luminescence to be measured using the special Enhanced
Luminescence detector.
If Ultra Sensitive Luminescence is installed, it enables
luminescence to be measured using the Ultra Sensitive
Luminescence detector.
138
Measurement technologies
The optimizations (plate dimension and measurement
height) work the same way as with other technologies.
To further reduce the crosstalk you should run the
Crosstalk correction optimization. See "Assay Start
Wizard" in the User manual.
Special luminescence parameters
The Enhanced luminescence or Ultra Sensitive
luminescence parameters appear depending on which
option is installed.
There are two tabs in the special luminescence parameters
window General and Optimization. Under General you
will find the following parameters:
Name
This is the name by which the measurement technology is
identified.
Aperture
Select the aperture type used for special luminescence. The
aperture should be the same size as or smaller than the
well. It ensures that light from the sample well is directed
into the detector and it prevents crosstalk from other wells.
The system checks that the selected aperture is in place and
gives a warning message if it is not. You must fit the
correct aperture into the instrument as described in Routine
maintenance in the Instrument manual.
139
Measurement technologies
Note! This feature is an option in older instruments.
Select from the following aperture options:
•
•
•
None – there is no aperture
Shutter – this is used to protect the Enhanced
luminescence detector from e.g. dust, when you are
not going to use it for some days.
1536 (or 384 or 96) well plate aperture – select the
aperture corresponding to the well size. You can also
use an aperture smaller than the well size. This will
prevent crosstalk but it will reduce the signal from the
sample well.
If the aperture is physically loaded in the instrument then
the word ”In” will appear alongside the name of the
aperture. If you select a different aperture but do not load
it, then you will get an error message when you try to run
an assay.
Note! With most technologies an aperture can be present
but the shutter is recommended. An error message will
appear in the results if a measurement could not be made at
the correct height due to the presence of an aperture.
Distance between plate and detector
This parameter allows you to set the distance between the
plate and the detector. In order to avoid luminescence from
adjacent wells contributing to the measured signal for any
well, the detector should be as close to the plate as
possible. The range of the measurement height is from 0 to
140
Measurement technologies
15 mm. If you are going to use the Shake operation the
minimum allowed height is 0.2 mm.
Note! The system searches automatically for the plate
surface level using the height sensor in the aperture. It
touches the center of the plate. If the plate is slightly
concave then the edges of the plate may hinder the detector
movement and generate an error. In such a case the
detector should be set higher.
Measurement time
The time during which the sample is measured. The unit is
seconds. When entering values for measurement times less
than 10s give the value to the nearest 0.01s. Above 10s
give the value to the nearest 0.1s.
Glow correction factor
This parameter allows you to enter a value for the crosstalk
correction. Normally you will not need to do this if you
have already done the crosstalk correction optimization
because the result of the optimization will be used.
However if you already know the crosstalk correction
factor, e.g. from an optimization done on another EnVision
instrument, you can then type in the value here for this
parameter.
Note! This parameter value will only be used if there is no
crosstalk correction optimization for the measurement
technology.
141
Measurement technologies
Changed
This is the date and time when the parameters were last
changed. If they are factory preset then only the date is
shown. The name of the user who last changed a parameter
is also added. Changed itself is updated automatically by
the software.
Optimization
This tab shows the results of any optimizations done.
Typical measurement technology settings
Typical settings for special luminescence are illustrated.
Enhanced Luminescence
Typical protocol settings
96, 384, 1536-well plates
measurement height 0 - 0.5
mm
Typical measurement technology settings
Measurement time:
0.1 - 3 s
The figure shows a typical Enhanced Luminescence
measurement technology.
142
Measurement technologies
Suggestions
Results are shown as counts per second (CPS).
The use of White plates is recommended.
Ultra Sensitive Luminescence
Typical protocol settings
96, 384, 1536-well plates
measurement height 0 - 0.5
mm
Typical measurement technology settings
Measurement time:
0.1 - 3 s
The figure shows a typical Ultra Sensitive luminescence
measurement technology.
143
Measurement technologies
Suggestions
Results are shown as counts per second (CPS).
The use of White plates is recommended.
AlphaScreen options
The AlphaScreen technology provides a very high
sensitivity method of detecting molecular interactions. It is
based on the laser excitation of special AlphaScreen donor
beads and the detection of emission light from bound
acceptor beads.
The donor beads are generally coated with molecules
allowing capture of the sample. The acceptor beads are
coated with appropriate molecular binding partners. In the
direct method, addition of sample promotes binding of the
donor and acceptor beads. In competitive assays the sample
reduces the amount of binding.
EnVision with the AlphaScreen option has a plate cooler
and an additional laser light source specifically for
AlphaScreen measurements. The plate cooler is to maintain
the plate temperature at the value it had when loaded. The
laser illuminates the sample wells at a wavelength of 680
nm exciting molecules in the donor beads. The excitation
time is adjustable within limits of 1 s total measurement
time per well. This energy is then transferred to any bound
acceptor beads which then emit the energy in the range 520
to 620 nm. The emitted light is then detected by the
EnVision detector. The intensity of the signal allows
determination of the sample.
144
Measurement technologies
HTS AlphaScreen works in a similar way to normal
AlphaScreen but a more sensitive detector is used. This
enables a faster throughput.
When working with AlphaScreen the following points are
important:
Avoid an environment in which big temperature
fluctuations may occur. EnVision includes a device to
ensure the temperature of the plate in the instrument is the
same as before it was loaded but ambient temperature
fluctuations will reduce the reproducibility of your results.
Only use white opaque plates such as OptiPlate plates from
PerkinElmer.
Avoid bright light (especially red light) in the area of the
instrument and any other associated sample processing or
plate handling equipment. Green filters are recommended
for light fixtures.
Cover the sample plates with opaque plate covers (you can
use an opaque or black plate as a cover) at all times except
when dispensing or measuring.
In standard and HTS AlphaScreen, pipetting should be
started from the uppermost right corner (like measuring
does) and be done row by row. This permits the fastest
measurement performance.
Note! In old instruments without the cold plate, in standard
AlphaScreen, pipetting should be done column by column.
145
Measurement technologies
Note! If you have been previously measuring with an
aperture, you must remove the aperture before you can
make measurements with standard AlphaScreen. See
"Routine maintenance" in the Instrument manual for how
to do this. An aperture is used for HTS AlphaScreen.
Note! For HTS AlphaScreen in the case of 384-well and
1536-well plates, continuous excitation is used. It is
recommended that you only measure complete rows.
If the AlphaScreen option is installed, the AlphaScreen
measurement technology appears in the measurement
technologies list.
If the HTS AlphaScreen option is installed, the HTS
AlphaScreen measurement technology appears in the
measurement technologies list. This allows higher
throughput due use of a more sensitive detector and more
effective excitation.
In order to deal with the problem of crosstalk between
sample wells you should run the Crosstalk Correction
optimization before measuring sample plates. This is
described under "Optimizations".
Note! During standard AlphaScreen measurements you can
hear a clicking sound as the shutter opens and closes. The
shutter is closed during excitation. It opens to allow
detection of the emission light then it closes again.
146
Measurement technologies
AlphaScreen parameters
The AlphaScreen or HTS AlphaScreen parameters appear
if this option is installed.
There are two tabs in the AlphaScreen parameters window
General and Optimization. Under General you will find
the following parameters:
Name
This is the name by which the measurement technology is
identified.
Mirror (AlphaScreen only)
Select the AlphaScreen mirror module.
Aperture (HTS AlphaScreen only)
Select the aperture to be used. This must correspond with
the plate size you are using. It must be actually installed in
the instrument otherwise you will get a message telling that
it is not valid.
Distance between plate and detector (HTS
AlphaScreen only)
Select the distance to be used. Normally the default 0 is
suitable but you can change it. If you are going to use the
Shake operation the minimum allowed height is 0.2 mm.
147
Measurement technologies
Emission filter (AlphaScreen only)
The emission filters in the emission light path appear in the
drop-down list. Choose the AlphaScreen filter.
Total measurement time
The "total" measurement time comprises two parts: the
excitation time and the emission time. When you set the
total measurement time the software ensures that the
emission time is not shorter than 50 ms. For standard
AlphaScreen the range for the total measurement time is
200 ms to 1000 ms. The resolution is 10. For HTS
AlphaScreen the total measurement time is 10 -1000 ms.
The resolution is1 for 10 - 100 ms, 5 for 101 - 500 ms and
10 for 501 - 1000 ms.
Excitation time
This is the length of time the laser is used to excite the
sample. The software ensures that you cannot give a value
here that would reduce the emission time to less than 50
ms. The percentage value after the excitation time field
shows the percentage of the total measurement time used
for excitation. For standard AlphaScreen the minimum
excitation time is 100 ms. For HTS AlphaScreen the
excitation time is from 0 up to the Total.
Afterglow correction factor
Note! This factor and the following two are normally
obtained from the crosstalk correction optimization and do
148
Measurement technologies
not need entering here. However, the software allows you
to manually enter values if you have not made an
optimization but you have values from another source i.e.
from a crosstalk made on another EnVision. If no values
are entered and no optimization done a zero correction is
applied.
Afterglow is crosstalk from an excited sample well into an
adjacent well. This crosstalk decreases with time so there
are a number of values for this parameter to allow a decay
curve to be determined. When this crosstalk correction is
applied for a sample measurement the system calculates
how long since the adjacent sample was excited and
subtracts the appropriate crosstalk contribution from the
measured signal. This parameter allows you to enter a
value for the afterglow crosstalk correction. Normally you
will not need to do this if you have already done the
crosstalk correction optimization because the result of the
optimization will be used. However if you already know
the crosstalk correction factor, e.g. from an optimization
done on another EnVision instrument, you can then type in
the value here for this parameter. This is only valid if the
crosstalk correction factors are optimized for the same
plate type (i.e. the distance between wells is equal) and
with a measurement technology whose parameters are the
same for the Total measurement time and Excitation
time as you have in the current measurement technology.
Note! This parameter value will only be used if there is no
crosstalk correction optimization for the specified
measurement technology and plate combination.
149
Measurement technologies
Glow correction factor
When a sample is excited, adjacent wells will be affected
and make a contribution to the emission light entering the
detector. The amount of this contribution is determined in
the crosstalk correction optimization so that it can be
subtracted from the measured signal. This parameter
allows you to enter a value for the glow crosstalk
correction. Normally you will not need to do this if you
have already done the crosstalk correction optimization
because the result of the optimization will be used.
However if you already know the crosstalk correction
factor, e.g. from an optimization done on another EnVision
instrument, you can then type in the value here for this
parameter. This is only valid if the crosstalk correction
factors are optimized for the same plate type (i.e. the
distance between wells is equal) and with a measurement
technology whose parameters are the same for the Total
measurement time and Excitation time as you have in the
current measurement technology.
Note! This parameter value will only be used if there is no
crosstalk correction optimization for the specified
measurement technology and plate combination.
Bleach correction factor
When a sample is excited it degrades (bleaches) adjacent
samples thus reducing the emission from those samples
when they are actually measured. Depending on the
position of the sample well on the plate it may be subject to
bleaching due to the excitation of several adjacent samples.
150
Measurement technologies
Up to three levels of bleaching are calculated and the
appropriate correction is applied to the measured signal.
This parameter allows you to enter a value for the bleach
crosstalk correction. Normally you will not need to do this
if you have already done the crosstalk correction
optimization because the result of the optimization will be
used. However if you already know the crosstalk correction
factor, e.g. from an optimization done on another EnVision
instrument, you can then type in the value here for this
parameter. This is only valid if the crosstalk correction
factors are optimized for the same plate type (i.e. the
distance between wells is equal) and with a measurement
technology whose parameters are the same for the Total
measurement time and Excitation time as you have in the
current measurement technology.
Note! This parameter value will only be used if there is no
crosstalk correction optimization for the specified
measurement technology and plate combination.
Reference signal
This value is produced by the instrument after the first
measurement.
Note! When you copy a specified measurement
technology, the Reference signal will be set to be the same
as in the original. When any parameter concerning
excitation (excitation filter, mirror, direction or light) is
changed, this will not be available until the specified
measurement technology and plate combination has been
used in measurement for the first time.
151
Measurement technologies
Reference AD gain
This value is produced by the instrument after the first
measurement with the given excitation settings.
Note! When you copy a specified measurement
technology, the Reference AD gain will be set to be the
same as in the original. When any parameter concerning
excitation (excitation filter, mirror, direction or light) is
changed, this will not be available until the specified
measurement technology has been used in measurement for
the first time.
Changed
This is the date and time when the parameters were last
changed. If they are factory preset then only the date is
shown. The name of the user who last changed a parameter
is also added. Changed itself is updated automatically by
the software.
Optimization
This tab shows the results of any optimizations done.
Typical measurement technology settings
Typical settings for AlphaScreen are illustrated.
152
Measurement technologies
AlphaScreen
Typical measurement technology settings
Total measurement time:
550 ms
Excitation time:
180 ms
The figure shows a typical AlphaScreen measurement
technology.
Suggestions
The use of White plates is necessary. Use of OptiPlates
from PerkinElmer is recommended.
153
Measurement technologies
HTS AlphaScreen
Typical measurement technology settings
Plate size
Total measurement time
Excitation time
96-well
150 ms
70 ms
384-well*
100 ms
35 ms
1536-well*
240 ms
80 ms
* In the case of 384-well and 1536-well plates continuous
excitation is used. It is recommended that you only
measure complete rows.
The figure shows a typical HTS AlphaScreen label.
Suggestions
The use of White plates is necessary. Use of OptiPlates
from PerkinElmer is recommended.
154
Chapter 8
Tip mounts
155
156
Tip mounts
Tip mounts
Note! This is a sub-folder under Inventory.
A tip mount module comprises one or two tips, the
structure that holds them in place, and the tubing that
connects each tip to a pump. There are three positions in a
tip mount where tips can be fitted. A maximum of any two
of these positions can be occupied. The left position (when
viewed from the front of EnVision), is called the “Post tip”
position. The center is the “Real time tip” position. The
right is the “Pre tip” position. The normal configurations
are:
“Real time” tip
“Pre” tip
“Real time” tip and “Pre” tip
“Post” tip and “Pre” tip
but other configurations are possible.
157
Tip mounts
Pumps and tips are connected as shown in the table:
Tip configuration
Pump1
Pump2
Real time
Real time
Not used
Pre
Pre
Not used
Real time and Pre
Real time
Pre
Pre and Post
Pre
Post
See Routine maintenance in the Instrument manual for how
to fit a tip into a tip mount and how to fit a tip mount into
EnVision.
Note: before changing a tip mount the tubing should be
emptied. You can do this by selecting Retrieve liquid or
Rinse (with the aspiration tube in air).
If you click on Tip Mounts, a page with all the tip mounts
currently defined will be shown. These are grouped
according to their barcode numbers. Each tip mount has a
unique barcode so that the instrument can positively
identify which filter is loaded.
The “Instrument” column shows if the tip mount is
physically in the instrument. You can see the tip offset and
also whether or not it is a factory preset.
158
Tip mounts
Tip mount toolbar
New
Click this to add a new tip mount.
Duplicate
(Select a tip mount to enable this). When you click the
Duplicate button, a copy of the parameters will appear and
you can edit them as required. The default name will be
“Copy of” followed by the name of the tip mount. You can
give it another name if required.
Note! to use a new or duplicated tip mount you should have
a suitable tip mount and barcode sticker.
Delete
Allows you to delete a user created tip mount.
If you add a new tip mount or duplicate an existing one ,
you can edit the parameters. If the tip mount is factory
preset, you can view the parameters but not edit them.
159
Tip mounts
Tip mount parameters
The tip mount parameters are the same for all tip mounts.
Barcode
Each tip mount has a barcode. The barcode value for the
selected tip mount is displayed here. If the tip mount is
new, you can enter the barcode.
Name
Enter a name which clearly identifies the tip mount.
Description
You can write a description of the tip mount.
160
Tip mounts
Exists
Mark this check box if the tip in question (1 or 2) is in the
tip mount. E.g. for a dual tip mount both tips must exist.
Offset X
Give the offset in the X direction of the tip. This is
measured from the center of the measuring position in
millimeters.
- If the tip is below the measuring position (“Real time”
dispensing) the offset will be zero.
- If it is to the right, the measuring position (“Pre”) it will
be a positive value (typically 9 mm for a 96-well plate).
- If it is to the left of the measuring position (“Post”) it will
be a negative value (typically – 9 mm for a 96-well plate).
- For a higher density plate the offset will be smaller (e.g.
4.5 mm for a 384-well plate).
Offset Y
Give the tip offset in the Y direction. Typically this is zero.
Tube volume µl
Give the volume of the tube from the syringe to the end of
the tip.
161
Tip mounts
In Instrument
If the tip mount is installed in the instrument (i.e. the
system has read the tip mount barcode), this will be Yes
and the tip mount will be marked with an asterisk in the tip
mount selection list. If the tip mount is not installed, this
parameter will be No. This means that even though the tip
mount parameters are defined, you cannot run the protocol
until the tip mount has been installed. You will get an error
message when you try to run the protocol.
Changed
This is the date and time when the parameters were last
changed. The name of the user who changed a parameter is
also added. Change itself is updated automatically by the
software.
162
Chapter 9
Plates
163
164
Plates
Plates
When you click on this item in the Navigation Tree a view
showing the plate types appears.
Information is given about the plate including if the plate
type is or is not a factory preset. In the former case you
cannot edit its parameters.
165
Plates
Plate toolbar
There are three buttons on the toolbar:
New
This is only enabled if you have selected the plate type
item in the list bar. You can add a new plate type to the list.
Duplicate
(Select a plate to enable this). Make a copy of a plate type.
When you click the Duplicate button, a copy of the
parameters will appear and you can edit them as required.
The default name will be "Copy of" followed by the name
of the copied plate. You can give it a different name and
edit other parameters by selecting the parameters.
Delete
(Select a plate type to enable this). Remove the selected
plate type from the list.
Note! If the plate type is used in a protocol it cannot be
removed.
166
Plates
When you click on a specific plate type then the parameter
list appears.
Plate parameters
When the plate editor opens there are two tabs: General
and Optimizations. On the General page you can define
the following parameters for a plate:
Name
Type in the name of the plate. The name is up to you but it
is recommended that you have a consistent system so that
you can easily recognize the size of the plate since all the
names appear in a list, e.g. include the number of wells.
167
Plates
Number of rows
Select the number of rows e.g. 8 for a 96-well plate, 16 for
a 384-well plate and 32 for a 1536-well plate.
Number of columns
Select the number of columns e.g. 12 for a 96-well plate,
24 for a 384-well plate and 48 for a 1536-well plate.
Height
Give the height of the plate in units of mm.
Well diameter
Give the diameter of the well in units of mm.
Well volume
Give the volume of the well in micro liters.
Column coordinate of top left corner well
Give the X position of the top left corner well. This is the
distance of the center of the A1 well measured from the left
edge of the plate.
168
Plates
Row coordinate of top left corner well
Give the Y position of the top left corner well. This is the
distance of the center of the A1 well measured from the
edge of the plate that enters the instrument first.
Column coordinate of top right corner well
Give the X position of the top right corner well. This is the
distance of the center of the last well on the first row
measured from the left edge of the plate.
Row coordinate of top right corner well
Give the Y position of the top right corner well. This is the
distance of the center of the last well on the first row
measured from the edge of the plate that enters the
instrument first.
Column coordinate of bottom left corner well
Give the X position of the bottom left corner well. This is
the distance of the center of the first well in the last row of
the plate measured from the left edge of the plate.
Row coordinate of bottom left corner well
Give the Y position of the bottom left corner well. This is
the distance of the center of the first well in the last row of
the plate measured from the edge of the plate that enters
the instrument first.
169
Plates
Column coordinate of bottom right corner well
Give the X position of the bottom right corner well. This is
the distance of the center of the last well in the last row of
the plate measured from the left edge of the plate.
Row coordinate of bottom right corner well
Give the Y position of the bottom right corner well. This is
the distance of the center of the last well in the last row of
the plate measured from the edge of the plate that enters
the instrument first.
Note! If you want to define a new plate type, you may find
it quicker to copy an existing one and then edit those
parameters you need to change.
Optimizations
The Optimizations page shows the results of any
optimizations done for Plate dimension. To remove an
optimization, select it then click on the Delete button on
the toolbar.
170
Chapter 10
Samples
171
172
Samples
Samples
When you click this item on the list bar, information about
the existing sample types appears. In addition the colors
used to represent the types on the plate map are shown.
Two other fields describe the abbreviation used for the
sample type and tell if it is Factory preset.
Samples toolbar
There are two buttons on the toolbar:
New
This is only enabled if you have selected the sample type
item in the list bar. You can add a new sample type to the
list.
173
Samples
Delete
(Select a sample type to enable this). Remove the selected
sample type from the list. Note that factory preset types
cannot be deleted.
Sample parameters
When you click on a specific sample type, the following
parameters appear.
Name
This is the name for the sample type.
174
Samples
Abbreviation
Abbreviation can be 1 - 3 characters long. Factory set
sample types are:
Blank = "BL"
Control = “CTL”
LANCE_Blank = "LB"
LANCE_Crosstalk = "LC"
LANCE_High = "LH"
PL Sample = S
Standard = “STD”
Undefined = "."
Unknown = “UNK”
Z_High = “ZH”
Z_Low = “ZL”
When you are selecting sample types for calculation “All
with indexes” refers to UNK, STD and CTL. The PL
Sample is used in 4 and 5 Parameter Logistcs curve fitting.
The Z_High and Z_Low samples are used for Z’
optimization.
Color
You can also select the color. A color chart will appear so
that you can select the color you want. Click on the color
and then OK. The selected color will appear in the
parameter list.
175
Samples
Changed
This is the date and time when the parameters were last
changed. If they are factory preset then only the date is
shown. The name of the user who last changed a parameter
is also added. Changed itself is updated automatically by
the software.
176
Chapter 11
Barcode settings
177
178
Barcode settings
Barcode settings
The Barcode reading tab allows you to select if barcodes
are used as plate IDs and/or to select protocols. You can
also tell where the barcodes will be on the plates. The
Protocol starting tab allows you to define actual barcodes.
Note! If you are using simulation mode and you select
barcodes then you cannot simulate starting a run.
Note! In the case of EnVision Xcite the contents of the
barcodes table are disabled unless the Plate barcode reader
option is installed.
179
Barcode settings
Barcode toolbar
There is one button on the tool bar for this view:
Delete
Clicking this deletes the currently selected barcode.
Barcode reading
Read barcode from the
Specify where on the plate the barcodes are to be attached.
If you choose to use more than one barcode position then
you need to specify which barcode is to be the primary
one, which the secondary and, if you have three, which the
tertiary.
Protocol definition by barcodes
This field allows you to specify what the barcodes are to be
used for.
If you select Use barcodes as plate ID only the primary
barcode will be used for the plate ID.
If you select Define the protocol using then you can select
which barcode is used to select the protocol. In addition
180
Barcode settings
you can select if another barcode is to be used as a plate ID
and which position that barcode is in.
Split barcode - This allows you to have a single barcode
for both protocol selection and plate ID. Click this option
button if you require this feature.
You can select if the First or Last of the “number of digits
you set” define the Protocol or Plate ID barcode.
Then you need to tell what the other digits refer to. Use the
following parameters:
None of or All or Rest of the digits define the Plate ID or
Protocol barcode respectively.
Plates without ID barcodes
This field allows you to specify what happens if an plate
ID barcode is missing. You can either replace the plate ID
barcode with a time stamp or you can enter the text you
want to appear e.g. "Barcode is missing".
181
Barcode settings
Protocol starting
This allows you to load barcode labeled plates. The
barcode reader can determine from the barcode on the plate
which protocol is to be used to measure the plate.
Acceptable barcode types are listed in the Specifications in
the Instrument manual.
Note! You must have enabled Barcode setting in the
Reader settings Barcodes tab before barcodes can be used.
Click on the Barcode settings item in the Navigation Tree
to get the barcode selection view.
182
Barcode settings
Barcode parameters
There are three parameters that can be set for barcodes.
Type
Select the barcode type from the drop-down list. There are
three possibilities:
Fixed
Selecting Fixed means that this barcode always selects the
protocol defined for it.
Temporary
Selecting Temporary means that this barcode only once
selects the protocol defined for it. After this the definition
is deleted. You or some other user can then define a
different protocol to be linked with this barcode
End code
Selecting End code means that when this barcode is read
the assay will stop
Barcode
Type in the actual code to be used for the barcode
(maximum 30 characters).
Note! A manual barcode reader can be used to enter the
barcode.
183
Barcode settings
Protocol
From the drop-down list, select the protocol to be linked to
the barcode.
Add
When you have defined these three parameters, the Add
button will be activated. Click it to enter the definition. The
definition will appear in the table in the lower part of the
pane.
184
Chapter 12
Reader settings
185
186
Reader settings
Reader settings
Reader settings allows you to set some general parameters
and shows what options are installed. There are six tabs:
Options, General, Stacker, TRF Laser, Database and
Normalization.
Options
This page allows you to give a name for your instrument to
distinguish it from other EnVision instruments in the same
laboratory or network.
187
Reader settings
The instrument serial number will be shown. In simulation
mode this is not available (N/A).
A list of the options installed will appear. You can view
this information but not change it.
General
Plate settings
Soft plate movement – if you select this, plates will be
moved more slowly than normal in order to avoid spillage.
Automatically load plates into instrument after – if you
select this you can give the inactive time in minutes after
which you want a plate to be taken in to the instrument.
Always use plate height defined in the plate editor - check
this if you want the instrument to always use the plate
height defined in the plate editor, although the height
188
Reader settings
measured by instrument (plate checker) differs from this.
Normally, if the instrument measured height differs from
the height defined in the plate editor, the measured height
will be used to prevent the collision of measurement head
and plate.
Delayed start
Select this if you want the instrument to start after a preset
time. Give the time in hours and minutes.
Reader control scale colors
When a plate is measured the results are shown in the
Reader control display using colors to show the intensity
of the signal. The default color range is from red (strongest
signal) to blue (weakest signal). If you want to change the
color you can do it with this parameter. Click Clear colors
then click Add color. Select the color you want for the
weakest signal and click OK. Repeat this for the color for
the strongest signal. You must choose at least two colors
but you can have more than two.
Default export data folder
The current default export data folder is shown. You can
change this if needed. A browse button helps you define
the new folder.
Note! You must have rights to write to the folder otherwise
an error message will appear when you try to exit from
Reader settings.
189
Reader settings
Suppress warning messages while starting assay
Check this box to prevent warning messages appearing
when an assay is started
Show save confirmation message when leaving
editor
Check this box to cause a message to appear each time you
exit an editor. This will confirm that the changes have been
saved. Saving is automatic so this message is not necessary
but you may like to have the confirmation.
Unload plate after instrument initialization
Select this if you want to make sure that any plate left in
the instrument is unloaded after initialization. If you have a
robotic system you may not want a plate to be unloaded
after initialization, so leave the check box unselected.
Stacker
190
Reader settings
Stacker parameters
If you are using a plate stacker you can set the following
parameters:
•
•
•
Always start the new assay using the last protocol (no
barcode mode). This allows you to load a new
magazine of plates and measure them without
specifying the protocol to be used by means of a
barcode. The protocol used for the previous assay will
be used for this one.
You can specify that the assay will end when all the
plates in the stacker have been measured.
You can specify how far up the edge of the plate the
plate holder takes hold of the plate.
Note! The holder position should be at least 2.8 mm above
the ledge and not less than 0.7 mm below the base of the
next plate in the stack, if the plates are of the same type. If
you use mixed plates types, then these positions should be
from the highest ledge and lowest base respectively.
•
Two option buttons allow you to select if plates are to
be loaded from the right or left stacker.
191
Reader settings
Reset stacker – click this button to reset the stacker
without having to reset the whole software. This is useful if
there has been a plate jam and the stacker pins are still up
and need resetting.
TRF Laser
This tab is disabled if the Second light source option (i.e.
TRF LASER) is not installed. There are two fields: Basic
information and TRF Laser Lifetime Display. These are
updated automatically by the system.
Under Basic information you will find the type and
unique serial number of the laser and also the number of
flashes given. The Security dongle is a small plug-in
device used to enhance the safety of the laser. If it is not
plugged in to the laser then the laser is disabled even
though the instrument is on. If the dongle is plugged in
then the laser can be used. If the laser is in a standby state
and not being used, then the LED on the dongle will be
switched off. If the laser is warming up (this takes about
nine seconds) then the LED will flash slowly (about once
in two seconds). If the laser is operating during a
192
Reader settings
measurement then the LED will flash more quickly (a few
times a second). There is a period of about half a minute
after a measurement when the LED will still be flashing.
During this period the laser, which is on standby, can be
used for measurements without a warm up period. After
this time the LED goes off, the laser is on stand by and
warm up is necessary before it can be used again. The state
of the laser is displayed under Basic information.
Note! When the laser is active (LED is flashing) you will
hear a small sound from the laser.
TRF LASER Lifetime Display shows the where in its
lifetime the laser is. As long as some of the green part of
the lifetime bar is still visible, then the laser can be used.
When only the yellow part is visible, the laser will need
servicing soon. When only the red part is visible a warning
will appear telling that the laser needs service. This is
because the nitrogen in the laser gets used up after a certain
number of flashes. After maintenance, the lifetime bar will
be reset and the laser can be used again.
Note! The lifetime bar changes in simulation mode but gets
reset after about 60% of the life time has expired.
193
Reader settings
Database
EnVision can make a backup of all the results and
parameter settings. You can specify where this folder
should be stored if you want a different location from the
default. You can select if you want the backup file to be
compressed. You can also specify how often you want the
back up to be made.
The date of the most recent back up is given. If you want to
make another backup immediately, click the Create
Backup Now button.
194
Reader settings
Normalization
If you have several EnVision multilabel readers and you
want to eliminate the effect of differences between the
absolute value of results, you can normalize results using
this page. You do this by entering a normalization factor
for the technologies you are interested in. They will then
give the same results for the same samples.
To determine these factors, you must first choose one of
the readers as the reference instrument. Measure the same
samples in each reader. Compare the results obtained with
each of the readers with those obtained with the reference
instrument. Calculate the factor needed to multiply the
results for each reader to get the same results as with the
reference instrument. This is the factor you need to enter
here. Examples of these factors could be 1.05 or 0.97. All
results obtained with a reader will then be multiplied by the
factor entered under Normalization.
195
Reader settings
196
Chapter 13
Frequently Asked
Questions
197
198
Frequently asked questions
Frequently asked questions
What is EnVision?
EnVision is a multilabel reader that can measure the
following leading technologies: Time-resolved
fluorometry, Prompt fluorometry, Photometry,
Luminometry, Fluorescence polarization and AlphaScreen.
The Ultra Sensitive luminescence option provides high
performance luminometry detection (in older instruments
there was an Enhanced luminescence feature instead). The
HTS AlphaScreen option provides much higher throughput
AlphaScreen measurement.
What features does EnVision have?
There are two models: EnVision Xcite and EnVision HTS.
EnVision Xcite has one detector, a flash lamp, bottom
reading and the possibility to measure all leading
technologies. EnVision HTS has two detectors (which
enables simultaneous dual wavelength reading), a flash
lamp, bottom reading and barcode readers for plate
barcodes, as well as the possibility to measure all leading
technologies. Both models have barcode readers for the
filter and mirror module barcodes. Stackers (20 or 50 plate)
are an option for both models. Also a wide range of
application specific mirror modules and filters are available
as options that can be ordered according to your needs. The
standard AlphaScreen option and the HTS AlphaScreen
option include a laser and plate cooler. The Ultra Sensitive
Luminescence option includes a special luminescence
detector. The HTS AlphaScreen option uses the same
199
Frequently asked questions
detector as the Ultra Sensitive Luminescence option. You
can have the Ultra Sensitive Luminescence option or the
HTS AlphaScreen option or both installed. You cannot
have standard AlphaScreen with HTS AlphaScreen. The
TRF laser option includes a separate laser. The
monochromator option includes monochromators in the
excitation and emission paths.
What does application specific mirror
module mean?
EnVision uses a mirror module to direct the light into the
sample and then collect the light from the sample and pass
it to the detector. These modules contain a mirror or
mirrors depending on if they are single channel modules or
dual channel modules respectively. There are two types of
mirrors used: general 50 % beam splitters and wavelengthspecific dichroic mirrors. The 50 % beam splitter reflects
50 % of all light (at any wavelength) and passes 50 %. A
dichroic mirror is wavelength specific and reflects light
below a certain wavelength and passes light with a
wavelength above that. For example the FITC optical
module has a dichroic mirror D505 that reflects all light
below 505 nm and passes everything above 505 nm. This
means that the FITC excitation light (485 nm) is reflected
into the sample and then the emission light (535 nm)
passes through this mirror. By using this dichroic mirror
together with excitation and emission filters we can make
sure that we excite the sample with the right wavelength
and read the correct emission light.
200
Frequently asked questions
If the general 50 % beam splitter mirror module is used,
then only 25 % of the possible emission signal is collected.
First only 50 % of the excitation light is reflected into the
sample and then from this 50 % only 50 % is passed to the
detector. By using the optimized dichroic mirror module,
generally 90 % of the excitation light is reflected into the
sample and then 90 % of the emission signal passes to the
detector. 81 % of the possible signal is detected.
Can EnVision be integrated with robotic
systems?
EnVision can be integrated through a COM-interface.
Currently Zymark and Beckman have reported successful
integration. Further information and examples can be
found from the EnVision software CD.
What measurement modes does EnVision
use for different measurements?
EnVision uses an analogue measurement mode for Prompt
Fluorometry, Fluorescence Polarization and Photometry
measurements and photon counting for TRF, Luminometry
and AlphaScreen.
What does analogue measurement mode
mean?
In analogue measurement mode the photons from the
sample are detected and the photo current is amplified in
the detector (photomultiplier tube). The current from the
detector is then integrated and converted into a digital
201
Frequently asked questions
signal. The instrument does not count individual photons
but a current level caused by multiple photons. Results are
Relative Fluorescence Units (RFUs).
What does Photon counting mean?
In photon counting, when each photon hits a detector it
causes a current pulse. Photon counting electronics counts
individual pulses. In addition the counting electronics
includes a discriminator by which the so-called dark pulses
(noise) can be effectively eliminated. Results are Counts.
The difference between photon counting and analogue
measurement can be described as follows. If you want to
count the amount of dripping water then photon counting is
equivalent to counting each drop and analogue
measurement to counting the amount of water in the sink.
Why use analogue measurement mode in
FI, photometry and FP?
In these measurements the photons are emitted by the
sample almost instantly after the lamp has flashed a light
pulse into the sample. The photon rate is usually so high
that the photon counting mode would be saturated. By
using the analogue measurement mode, higher photon
levels can be measured from a sample.
202
Frequently asked questions
Why use photon counting in TRF and
Luminometry?
In these measurements the amount of photons collected is
significantly lower than, for example, in prompt
Fluorometry. The discriminator can differentiate the
individual photon pulses. The so-called dark pulses, pulses
originating from the PMT itself, can be effectively
separated out with a discriminator. Hence the background
level is lower using photon counting and therefore the
sensitivity is better.
What does the measurement height mean?
Measurement height is the distance of the light beam focus
point from the bottom of the plate (not from the bottom of
the well). There is a measurement height wizard which
automatically adjusts this value. In special luminescence
measurements and HTS AlphaScreen the measurement
height is the distance between the top of the plate and the
detector.
What does excitation light % mean?
Excitation light can be adjusted when saturation of the
electronics is a problem. There is an excitation light switch
which can be moved to block part of the light coming from
the lamp. The blocking is linear so if you reduce this value
10 % it will cause the raw signal to drop 10 % as well.
Usually this is used with prompt Fluorometry when the
fluorescent label concentration is high. The Gain wizard
(FI and FP) will automatically adjust this value.
203
Frequently asked questions
What are Reference value and Reference
AD gain?
Reference value is a mirror module and excitation filter
dependent value. In the mirror module there is a small
reference mirror right after the excitation aperture. This
mirror reflects part of the excitation light into the
photodiode. This is used to monitor lamp intensity
changes. When you create a new measurement technology
you select an excitation filter and mirror module. When
this measurement technology is used for the first time, a
separate reference signal measurement is done. The
instrument will flash light into the mirror for a period of
time and the average reference signal per flash is
calculated. This is the value shown for the measurement
technology.
Note! For AlphaScreen the value shown is the value for
one second not per flash.
The AD gain is just the A/D converter gain which was used
in this reference signal reading. The possible gains are 1, 2,
4 and 8. Example: the reference signal is 250000 and the
AD gain is 1. This is the same as if the AD gain would be 2
and the reference signal would be 500000 or the AD gain
would be 4 and the reference signal 1000000. But because
the signal limit for the A/D converter is only 500000 the
AD gain is automatically adjusted so that the converter will
not saturate.
This reference value is used to correct the results for
changes in the lamp intensity. If the lamp at the beginning
204
Frequently asked questions
gives higher intensity then the rest of the results will be
corrected to be higher so that they are comparable.
What is the No. of Flashes per A/D
conversion?
You can collect the data from multiple flashes. The normal
situation is that the signal from the PMT is converted into a
digital signal after each flash. If you set the # of flashes per
A/D conversion to 10 then the conversion is done every ten
flashes, i.e. the signal from PMT is buffered and after ten
flashes the signal is converted.
The effect on the results is that you can see the difference
from the background more clearly if your positive signal is
very close to the background. The CV% is lower since we
integrate the signal from several flashes before the A/D
conversion is done.
At the same time this reduces the saturation concentration.
The A/D converter has a limit for the signal it can convert.
It is around 500000 RFUs per A/D conversion. So if in the
normal situation you get 100000 RFUs (with 1 flash per
A/D conversion) from your sample and then you increase
the # flashes per A/D conversion to 10 then from the same
sample the PMT gives a signal equivalent to 1000000 to
the A/D converter. The A/D converter cannot deal with this
amount of signal and will saturate. You will get only
500000 RFUs as a result.
205
Frequently asked questions
This feature is usable when you get low signal levels from
your sample, for example when you do UV absorbance
measurements.
How do "No. of Flashes" and "Excitation
light %" differ?
When you increase the number of flashes you increase the
measurement time, which lowers the SD and increases the
signal. The signal is a sum of the signals for all flashes
used. If you get 100 counts or RFUs from a 1 flash
measurement then you will get 10000 if you use 100
flashes.If you increase the excitation light % the signal will
be higher but the SD and measurement time will stay the
same.
Excitation light % can be used to reduce the amount of
light coming from the lamp. Use this if you have a
saturation problem. The number of flashes does not affect
the saturation since it will multiply the signal from one
flash.
For example, if you measure FI and use 1 flash per A/D
conversion and 10 flashes, one sample will give a signal of
9000000 (900000/flash) which the A/D converter cannot
handle. You will get 5000000 RFUs as a result from ten
flashes.
If you then lower the number of flashes to 1, again you get
a signal of 900000 from the same sample and the A/D
converter cannot handle it. Then you change the excitation
light % to 50 % which cuts the light by 50 %. Now you
206
Frequently asked questions
will get 450000 and no saturation from the sample because
the excitation light was reduced. The reference correction
corrects the signal so that the result is 900000 RFUs from
that sample.
What is the Bias mirror module?
This is the mirror module is used with the second light
source (TRF-LASER). It has the aperture offset from the
center position (biased excitation aperture) whereas mirror
modules used with light source 1 have the aperture in the
center. This bias mirror module comes in a single mirror
module version and a dual mirror module version.
What is a monochromator?
Monochromator function relies on the direction of a beam
of polychromatic light onto a diffraction grating. The
grating separates the incident polychromatic beam into its
constituent wavelength components, sending each wavelength into a different direction so that a narrow band of
wavelengths can be collected. Double monochromators
contain two diffraction gratings. The use of monochromators provides the benefit that wavelength can be
selected steplessly through the workstation software.
Using the quad monochromator option, excitation light
from the lamp is directed through the excitation double
monochromator into the sample. The emission light is then
directed through the emission double monochromator to
the detector.
207
Frequently asked questions
Although monochromators relieve you of the need to have
filters for every measurement technology, a broad
waveband cut-off filter is still required in order to block
harmonic multiple orders of the wavelength chosen. Three
cut-off filters can cover the entire range of wavelengths
supported by the instrument.
208
Index
209
210
Index
Index
Duplicate, 94
New, 94
Apertures window buttons, 94
Assay Start Wizard, 3
Asterisk, 43, 50
Automatically load plates, 190
A
Abbreviation, 177
Absorbance, 110
Absorbance settings, 134
Add measurement
Measurement technologies, 36
Affected assay/plate repeat, 46, 52
AlphaScreen, 111, 145
AlphaScreen parameters, 148,
149, 151, 153
Reference AD gain, 153
Reference signal, 152
AlphaScreen plate temperature
adjustment, 102
AlphaScreen settings, 153
Aperture parameters, 95
Changed, 97
Description, 95
Diameter, 96
Height, 96
ID, 95
In instrument, 97
Name, 95
Type, 96
Apertures, 93
Delete, 94
B
Bandwidth, 89
Barcode, 77, 87, 162, 181
Protocol starting, 184
Split barcode, 183
Xcite usage, 181
Barcode parameters, 185, 186
Barcode selection, 182, 183
Barcode settings, 181
Delete, 182
Bias, 78
Bias mirror module, 209
Bidirectional mode, 17
Bottom mirror, 78, 79, 115
Installation, 80
Buttons in the Apertures window,
94
Buttons in the Filters window, 86
Buttons in the Measurement
technologies window, 106
211
Index
Buttons in the Mirrors window, 76
Buttons in the Plates window, 168
Buttons in the Samples window,
175
Delayed start, 191
Delete, 11, 176
DELFIA, 109, 129
Description, 78, 88, 95, 162
Detector gain, 120
Detector type and dispense, 56
Diameter, 96
Dispense, 50
Dual tip mount, 50
Order of operation, 55
Tip mount, 50
Dispense measurement, 43
Affected assay/plate repeat, 46
Dispensing speed, 45
Dispensing volume, 45
Label, 43
Measure each, 44
Number of measurements, 44
Start dispensing at measurement
number, 46
Syringe filling volume, 45
Tip mount, 43
Used pump, 44, 50
Dispense volume, 51
Dispensing
Dummy at beginning, 52
Dispensing speed, 45, 51
Dispensing volume, 45, 51, 52
Dongle (TRF laser), 194
Dual, 78
C
Calculation
General, 70
Calculation editor, 59
Calculations, 59, 61
Well time, 66
Center wavelength, 89
Changed, 79, 90, 97, 124, 178
Color, 177
Column coordinate bottom left
corner well, 171
Column coordinate bottom right
corner well, 172
Column coordinate top left corner
well, 170
Column coordinate top right
corner well, 171
Condensation prevention, 101
D
Database, 196
Default export data folder, 191
Delay, 46, 119
Duration, 47
First plate repeat affected, 47
Last plate repeat affected, 47
Plate location, 47
212
Index
Polarization, 88
Slot, 89
Transmittance value, 89
Filters, 85
Delete, 87
Duplicate, 86
New, 86
Filters window buttons, 86
First plate repeat affected, 57
Fixed (number of plates), 18
Fixed measurement height, 17
Fluorescence intensity, 110
Fluorescence intensity settings,
133
Fluorescence polarization, 110
G-factor, 110
Second emission filter, 117
Fluorescence polarization settings,
125, 128
Fluorometry, 109
E
Edit button, 5
Emission, 114
Emission filter, 116
Emission monochromator, 41
Emptying tubing, 44, 160
Enhanced Luminescence, 138
Enhanced luminescence
parameters, 141, 142, 143
Enhanced luminescence settings,
143
Enhanced Time-resolved
fluorometry, 109
Excitation, 114
Excitation filter, 116
Excitation light %, 119, 205, 208
Excitation monochromator, 40, 41
Exiting a protocol, 13
Export
Format, 14
G
F
Features, 201
Filter parameters, 87
Bandwidth, 89
Barcode, 87
Center wavelength, 89
Changed, 90
Description, 88
Measurement technology, 89
Name, 88
Unload plate, 192
General calculation, 70
General parameters, 75, 93, 167,
175
Filters, 85
General settings
Notes, 15
G-factor, 121
Gripper height, 16
213
Index
H
M
Height, 96, 170
HTS AlphaScreen, 112
HTS AlphaScreen settings, 154
Measure each, 44
Measurement, 36
Affected assay/plate repeat, 52
Dispensing speed, 51
Dispensing volume, 51
Methods, 34
Syringe filling volume, 52
Measurement chamber
temperature, 57
Measurement height, 118, 205
Measurement height of labels, 17
Measurement mode, 17
Analogue, 204
Bidirectional mode, 17
Photon counting, 205
Measurement modes, 203
Analogue, 203
Photon counting, 204
Measurement technologies, 9, 105,
109, 110, 111, 112
Monochromator, 112
Measurement technologies
parameters
Bottom mirror, 115
Changed, 124
Delay, 119
Detector gain, 120
Emission, 114
Emission filter, 116
Excitation, 114
Excitation filter, 116
I
ID, 95
In instrument, 97
Instrument, 164
Inventory, 9, 75, 85, 93, 159
K
Kinetic, 42
Delay, 42
Label, 42
Number of measurements, 42
Kinetic measurements, 56
Measurement interval
shortening, 56
L
Label, 43
Labels, 105
LANCE
Second emission filter, 117
Last plate repeat affected, 57
Light source, 115
Luminescence, 111
Luminescence settings, 136
214
Index
Measurement technologies
Exiting from a measurement
technology, 107
Measurement technology
parameters, 113
Measurement time, 122
Mirror, 116
Duplicate, 76
Mirror module, 202
Mirror parameters, 77
Barcode, 77
Bottom mirror, 78, 79
Changed, 79
Description, 78
Dual, 78
Measurement technology, 79
Name, 78
Slot, 78
Mirrors, 75
Delete, 77
Dual, 75
New, 76
Mirrors window buttons, 76
Monochromator, 112, 209
Filters – cut-off, 112
Options, 137
Excitation light %, 119
G-factor, 121
Light source, 115
maybe gain, 120
Measurement height, 118
Measurement time, 122
Mirror, 116
Name, 114
No. of flashes for second
detector, 122
No. of flashes per A/D conv.,
121
Number of flashes, 121
Number of sequential windows,
120
Optimizations, 125
Reference AD gain, 123
Reference Excitation Light %,
124
Reference signal, 122
Second emission, 115
Second emission filter, 117
Time between flashes, 120
Top mirror, 115
Window time, 119
Measurement technologies
window buttons, 106
Measurement technologies
Add, 106
Copy, 106
Measurement technologies
Delete, 107
N
Name, 78, 88, 95, 114, 162, 169,
176
Navigation Tree, 4
New group, 11
215
Index
New protocol, 11
No. flashes per A/D conversion,
207
No. of flashes, 208
No. of flashes for second detector,
122
No. of flashes per A/D conv., 121
Normalization, 197
Number of columns, 170
Number of flashes, 121
Number of measurements, 44, 46
Number of plates, 18
Fixed, 18
Unlimited, 18
Number of rows, 170
Number of sequential windows,
120
Scan measurement, 38
Start assay repeat each, 18
Temperature control, 57
Wavelength scan, 40
Operation block, 58
Number of wells in block, 58
Operation group
Adding measurement, 33
Optimizations, 16, 125, 172
Output, 19, 20, 21, 22, 23
Picture format, 20
Plate 3 (MHT), 20
Output tab
Columns, 21
Export format, 20
Field separator, 22
File name, 20
O
P
On-the-fly measurement, 37
Dual excitation, 38
Operation, 27, 28
Add shake, 48
Calculation editor, 59
Calculations, 59
Dispense, 50
Dispense measurement, 43
Kinetic measurement, 42
Measurement, 36
Number of Assay Repeats, 18
On-the-fly measurement, 37
Operation block, 58
Placeholders, 23
Plate
Number of Assay Repeats, 25
Number of Plate Repeats, 26
Repeats, 25
Start assay repeat each, 26
Start plate repeat each, 26
Plate heating adjustment, 101
Plate ID barcode, 183
Plate parameters, 169
Column coordinate bottom left
corner well, 171
216
Index
Pre tip, 44, 50, 159
Tip offset, 163
Protocol
Delete folder, 11
Exit, 13
Folders, 10
New group, 11
New Protocol, 11
Operation, 27, 28
Output, 19
Protocol editing, 13
Rename, 11
Users, 10
Wallac, 10
Protocol barcode, 183
Protocol definition by barcodes,
182
Protocol editing, 13
Export, 14
General settings, 15
Protocol editor, 12
Output, 20
Temperature control, 57
Protocols
Plate, 25
Related parameters, 9
Pump order, 52
Column coordinate bottom right
corner well, 172
Column coordinate top left
corner well, 170
Column coordinate top right
corner well, 171
Height, 170
Name, 169
Number of columns, 170
Number of rows, 170
Row coordinate bottom left
corner well, 171
Row coordinate bottom right
corner well, 172
Row coordinate top left corner
well, 171
Row coordinate top right corner
well, 171
Well diameter, 170
Well volume, 170
Plate settings, 190
Plate type, 15
Plates, 167
Copy, 168
Delete, 168
New, 168
Plates Buttons, 168
Plates without ID barcodes, 183
Polarization, 88
Post or Pre measurement, 55
Post tip, 44, 50, 159
Tip offset, 163
R
Read barcode from the, 182
Reader control scale colors, 191
Reader settings, 189
217
Index
Row coordinate bottom right
corner well, 172
Row coordinate top left corner
well, 171
Row coordinate top right corner
well, 171
Database, 196
Stacker, 193
Normalization, 197
Options, 189
Reset stacker, 194
Second light source, 194
TRF laser, 194
TRF Laser, 194
Reader settings General
Delayed start, 191
Unload plate, 192
Reader settings General
Show save confirmation, 192
Suppress warning messages,
192
Reader settings General , 190, 191
Real time, 159
Real time measurement, 55
Real time tip, 44, 50
Tip offset, 163
Reference AD gain, 123, 153, 206
Reference Excitation Light %, 124
Reference signal, 122, 152
Reference value, 206
Rename, 11
Reset stacker, 194
Robotic system
Plate unloading, 192
Robotic systems, 203
Row coordinate bottom left corner
well, 171
S
Sample parameters, 176
Abbreviation, 177
Changed, 178
Color, 177
Name, 176
Samples, 175
Delete, 176
New, 175
Samples window buttons, 175
Scan, 38
Distance between points, 39
Label, 39
Mode, 39
Number of horizontal points, 39
Number of vertical points, 39
Second detector gain, 120
Second emission, 115
Second emission filter, 117
Second light source, 194
Shake, 48
Diameter, 48
Duration, 48
First plate repeat affected, 49
Last place repeat affected, 49
218
Index
DELFIA, 109
LANCE, 109
Tip exists, 163
Tip mount, 43, 50, 159
Barcode, 162
Changing, 44, 160
Description, 162
Dual, 50
Instrument, 164
Name, 162
Tip exists, 163
Tip offset X, 163
Tip offset Y, 163
Tip tube volume, 163
Tip offset X, 163
Tip offset Y, 163
Tip tube volume, 163
Top mirror, 115
Transmittance value, 89
TRF laser, 109, 115, 194
Bias mirror module, 209
Dongle, 194
Time between flashes, 120
Type, 96
Plate location, 49
Shake mode, 49
Speed, 48
Show save confirmation message
when leaving editor, 192
Slot, 78, 89
Soft plate movement, 190
Special luminescence parameters,
140
Stacker, 193
Reset stacker, 194
Start dispensing at measurement
number, 46
Statistics, 19
Suppress warning messages while
starting assay, 192
Syringe filling volume, 45, 52
Dispensing volume, 52
Full, 52
T
Temperature control, 57, 101
First plate repeat affected, 57
Instrument Temperature
adjustment, 57
Last plate repeat affected, 57
Measurement chamber
temperature, 57
Time between flashes, 120
Time-resolved fluorescence
settings, 129, 130
Time-resolved fluorometry, 109
U
Ultra Sensitive Luminescence, 138
Unlimited (number of plates), 18
Unload plate after initilization,
192
Use emission monochromator, 41
Use excitation monochromator, 40
219
Index
Use general gripper height, 16
Use rotated plate, 16
Used pump, 44, 50
Well diameter, 170
Well time, 66
Well volume, 170
Window time, 119
W
Wavelength scan, 40
220