1
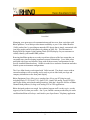
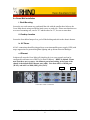
Ceros Mini Chassis with
OLED Graphical Display
User Manual
Rhino Equipment Corp. is proud to manufacture our products in the U.S.A.
Specifications are subject to change without notice.
© 2008 Rhino Equipment Corp. All rights reserved. Printed in U S America 1/2008 PN 031-00008
Rhino® is a registered trade mark of Rhino Equipment Corp.
* Asterisk is a registered trademark of Digium.
Rhino Equipment Corp. • 8240 S. Kyrene Rd. • Suite 107 • Tempe, AZ 85284 • (480) 621-4000
1
Ceros Mini
Managing your open source telecommunication needs has never been easier than with
Rhino products. Ceros Mini provides instant credibility to your Value Added Reseller
(VAR) product line, by providing an unmarked PC chassis that is simply customized with
your logo graphic and text information by editing an XML file. This information is
displayed on the Organic Light Emitting Diode (OLED) display for your customers to
visually identify your branded PBX product.
Knowing that Rhino products are ready to perform right out of the box means that you
can spend more time developing important customer relationships. Ceros Mini comes
preloaded with Linux and Asterisk, along with all the necessary configurations for the
specific installed Rhino hardware. All that is needed is to customize extensions and other
outside system environment configurations.
The Ceros Mini chassis was designed with VARs in mind. The chassis comes with no
external markings or silk screening, and is ready to private label with your logo and
company information on the front panel display.
Rhino Equipment Corp. offers you a complete line of low cost PCI plug-in cards
including Single T1/E1, Dual T1/E1, Quad T1/E1, Quad FXO analog, Octal FXS/FXO
and 24-port analog mixed mode analog interfaces. And don’t forget the full line of Rhino
Channel Bank products, for large scale analog FXS or FXO applications.
Rhino designed products are tough. Our technical support staff is ready to give you the
support you need, when you need it. Our 5-year, limited warranty means that you can be
confident that Rhino will always work hard in your Open Source Telephony application.
Rhino Equipment Corp. • 8240 S. Kyrene Rd. • Suite 107 • Tempe, AZ 85284 • (480) 621-4000
2
Table of Contents
1. PRE-INSTALLATION ............................................................................................ 4
1.a Warranty ................................................................................................................ 4
1.b Standards ............................................................................................................... 4
1.c Surge Protection..................................................................................................... 5
1.d Unpacking.............................................................................................................. 5
2. INSTALLATION ...................................................................................................... 5
2.a Ceros Mini Installation........................................................................................... 6
i. Rack Mounting ...................................................................................................... 6
ii. Desktop Location.................................................................................................. 6
iv. AC Power ............................................................................................................ 6
v. Ethernet ................................................................................................................ 6
vi. Monitor and Keyboard......................................................................................... 7
2.b Operating System Configuration ............................................................................ 7
2.c Setting Up the Network Connection to the Ceros Mini ........................................... 7
................................................................................................................................. 7
3. Rhino Front Panel OLED ......................................................................................... 7
3a. Statistics................................................................................................................. 8
3b. Span Status ............................................................................................................ 8
3c. Advanced ............................................................................................................... 8
4. Front Panel Splash Screen ........................................................................................ 9
4a. XML Tags.............................................................................................................. 9
4b. Graphics and Text Together ................................................................................. 10
5. trixbox (or others) Web UI ..................................................................................... 11
6. SSH .......................................................................................................................... 11
7. Upgrade / Reinstall.................................................................................................. 11
8. Support Options ...................................................................................................... 11
9. Default BIOS Settings for the Ceros Mini.............................................................. 12
10. Packing Instructions for the Ceros Mini .............................................................. 13
User Access Interface Quick Reference...................................................................... 14
Rhino Equipment Corp. • 8240 S. Kyrene Rd. • Suite 107 • Tempe, AZ 85284 • (480) 621-4000
3
1. PRE-INSTALLATION
Thank you for purchasing a Ceros Mini chassis and OLED Serial Interface (OSLI) front
panel. For unparalleled performance and years of operation please follow the instructions
provided in this user manual.
The Ceros Mini is easy to setup and use, which we hope will make your telephony life
easier! Please spend a few minutes reviewing these instructions to ensure a successful
installation.
1.a Warranty
The Ceros Mini cassis is covered by a 5 year limited factory warranty. The warranty
statement is available on the Rhino CD-ROM, the Rhino Public FTP, or by request.
Contact [email protected] to request a copy.
Please note that damage caused by improper installation or acts of nature are not
covered by this warranty. Tampering or breaking the warranty seal/label will also
be considered a violation of the warranty.
If trouble is experienced with this unit, please contact customer service at the address and
phone listed below. DO NOT DISASSEMBLE THIS EQUIPMENT.
Contact:
Attn:
Rhino Equipment Corp.
CUSTOMER SERVICE DEPT.
8240 S. Kyrene Rd. Suite 107
Tempe, AZ 85284
480-621-4002, Fax 480-961-1826
Email: [email protected]
Please contact the Rhino support team in case of trouble. If we find that a return is
necessary, you must receive an RMA (Return Material Authorization) number from us so
that your return is handled promptly. Failure to do so may result in a lost or delayed
replacement.
1.b Standards
This equipment complies with Part 15 and Part 68 of the FCC Rules. The number is
located on the back of the individual Rhino OST PCI Cards and equipment. The label
contains the FCC Registration Number for this equipment. If requested, this information
must be presented to your telephone company.
Rhino Equipment Corp. • 8240 S. Kyrene Rd. • Suite 107 • Tempe, AZ 85284 • (480) 621-4000
4
1.c Surge Protection
It is recommended that a surge protector or uninterruptible power supply (UPS) be
installed in conjunction with the Ceros Mini. This will help minimize damage as a result
of lightning strikes and other AC line surges. Failure to use a UPS could affect the 5 year
limited warranty.
1.d Unpacking
It is recommended that once you unpack your Ceros Mini you save the packaging. The
Ceros Mini packaging was designed to support and protect your purchase from
potentially harsh handling while in route. Please note that this packaging can be used
again to ship the Ceros Mini to another location.
The Ceros Mini is suspended in packaging to help protect it from an impact it may
receive during shipment or storage; however it is still a good idea to visually inspect the
box and its contents to see if anything has been damaged before activating the unit. It is
also a good idea to take this time and make sure all appropriate cables and accessories
have arrived with the unit. All units should have a power cable, mounting brackets and
hardware for rack mounting for the Ceros Mini.
The minimal contents that you should find in the Ceros Mini box is:
1) Ceros Mini chassis, with OLED display
2) 19” and 23” rack mount brackets and mounting hardware
3) Rubber bumper feet
4) AC power cord
5) 1GB Flash Restore Thumb Drive
Rhino cards are optional, and would be pre-installed at the Rhino factory.
2. INSTALLATION
Installing the Ceros Mini requires choosing a suitable long-term location for the unit.
The Ceros Mini has cooling fans on the left side of the chassis that allow for air to be
pulled in from the side and exhausted out the top side. Pick a location that is free from
dust and debris so that the inside of the chassis does not become contaminated over time.
Rhino Equipment Corp. • 8240 S. Kyrene Rd. • Suite 107 • Tempe, AZ 85284 • (480) 621-4000
5
2.a Ceros Mini Installation
i. Rack Mounting
Locate the two rack mount ears, and install the side with the smaller three holes to the
Ceros Mini chassis using two Philips head screws on each side. Please note that there are
two sets of mounting ears, one for 19” and the other for 23”, be sure to mate them.
ii. Desktop Location
Locate the four rubber bumper feet, peel off the backing and stick to the chassis bottom.
iv. AC Power
All AC connections should be plugged in to an un-interruptible power supply (UPS) with
surge suppression for protection against lighting and up stream electrical damages.
v. Ethernet
In almost all cases the Ceros Mini will plug directly in to your network and can be
configured in software to use DHCP or a static IP address. DHCP is default. Please
note that there are two ports: the leftmost port when looking at the front of the
chassis is the default first Ethernet port (eth0). Note that eth0 is a 10/100 port
(WAN), and eth1 is a 1000 (GbE) port (LAN).
eth1
eth0
Ceros Mini - Rear Connections
Rhino Equipment Corp. • 8240 S. Kyrene Rd. • Suite 107 • Tempe, AZ 85284 • (480) 621-4000
6
vi. Monitor and Keyboard
In almost all cases, a keyboard and mouse are unnecessary since you can either use the
OLED interface or SSH into the system for configuration. However, both can be
connected at any time.
2.b Operating System Configuration
Your Ceros Mini came preloaded with one of two configurations:
1) Rhino special Linux build
2) Third party distribution (trixbox, Elastix, PBX in a Flash, etc.)
All of these most likely have the customer Rhino Serial LED Interface (RSLI) software
with front panel Rhino OLED system preinstalled
Most of the configuration can be accomplished via SSH, web interface or from the Rhino
front panel OLED display interface.
2.c Setting Up the Network Connection to the Ceros Mini
The Ceros Mini ships with DHCP as a method for automatically setting the IP address of
the system (be sure to use the LEFT port as seen from the front of the Ceros Mini as the
WAN side). Simply look to the front OLED panel for the current IP address (unless of
course you have removed this from the XML file, read on). If a static IP address is
needed, you may use traditional Linux methods to change the IP address.
Ceros Mini OLED Display and 5-Button Keypad
3. Rhino Front Panel OLED
The Rhino front panel display is not only a display element, but also can be used to Reset
the Ceros Mini, and power on and off the Ceros Mini. The display has a “sleep mode”
that extends the life of the display; touch any red button to bring the display out of sleep
mode.
Rhino Equipment Corp. • 8240 S. Kyrene Rd. • Suite 107 • Tempe, AZ 85284 • (480) 621-4000
7
IN CASE OF A NON-RESPONSIVE SYSTEM: To reset the Ceros Mini, hold down
the left and top buttons (west and north buttons) for 4 seconds, and the Ceros Mini will
reset.
IN CASE THE CEROS MINI DOES NOT POWER ON: To power ON the Ceros
Mini, hold down the right and bottom buttons (east and south buttons) for 4 seconds, and
the Ceros Mini will power ON.
Most all pertinent system information can be viewed from the Rhino front panel OLED.
Unlock the OLED interface using the key press sequence top button, right button,
bottom button and then the left button. The display will change to the main menu,
indicating that the system is now unlocked. (In /etc/rhino.conf this key unlock sequence
can be customized for security reasons.)
You can navigate using the up and down buttons to point at different menus, and use the
center button to select or view the desired menu. To leave any menu, in most cases you
can use the left button to go back to the last menu, and if you are at the main menu this
will lock the keys.
3a. Statistics
View the up time, load and other run-time information of the system.
3b. Span Status
Lists the system configured Zaptel spans and presents information on them including
current ABCD signaling bits. Note that there is a secondary page for each span, use the
right arrow to show that page. Use the left arrow to go back out of the secondary page.
3c. Advanced
This menu has three submenus: Logs, Reboot, and Power Off. Logs has three log files;
System Boot Log (dmesg) will show you a log starting with Linux boot and all the way
through the ACPI and information that Linux collects on start up; System Log
(/var/log/messages) that shows information about updating patches and status during the
update; and the Asterisk Log (/var/log/Asterisk/full) log where a multitude of Asterisk
specific data is presented.
Reboot will first confirm that you want to restart the system and then perform a full
system restart. Power off will again confirm that you want to power down the system and
then perform a proper shutdown of the system.
Rhino Equipment Corp. • 8240 S. Kyrene Rd. • Suite 107 • Tempe, AZ 85284 • (480) 621-4000
8
4. Front Panel Splash Screen
Please note that the “splash screen” data can be changed by editing the text file located at
/etc/rsli_splash.xml. This is an XML text file, and follows standard XML programming
practices. Use a text editor such as “nano” (make sure to use the –w option!) to edit this
file to add whatever data you wish to display.
nano -w /etc/rsli_splash.xml
The OLED also includes a screen saver to keep the display from exhibiting “burn-in”.
Simply press any key to bring the display back to the splash screen.
4a. XML Tags
The OLED display uses XML programming keywords to allow the inclusion of graphics
as well as text on your splash, or “home” screen. The following is an example of a
typical XML file, including a graphic in BMP format, plus six lines of information.
Please note that the “none.bmp” file and this sample file are what come with the base
Ceros Mini build.
NOTE: There may be two sections to this XML file, one for the standard Rhino LCD
display, denoted by the <rsli> and </rsli> tags, and the <osli> and </osli> tags. You do
not need to worry about the information between the <rsli> and </rsli> sections. Your
specific installation may or may not have this section included.
Contents of /etc/rsli_splash.xml
<?xml version='1.0' encoding='UTF-8' ?>
<conf>
<osli>
<IMG value = '/etc/Rhino.bmp' inverse = '1' row = '0' col = '0'/>
<TXT value = 'Rhino Equipment Corp.' row = '1' col = '10'/>
<TXT value = '8240 S. Kyrene Rd. Ceros Mini' row = '2' col = '10'/>
<TXT value = 'Tempe, AZ 85284' row = '3' col = '10'/>
<TXT value = '(480) 621-4000 (877) RHINO-T1' row = '4' col = '10'/>
<TXT value = 'MAC:' row = '5' col = '10'/>
<MAC device = 'eth1' row = '5' col = '15'/>
<TXT value = 'eth0:' row = '6' col = '1'/>
<IP device = 'eth0' row = '6' col = '7'/>
<TXT value = 'eth1:' row = '6' col = '22'/>
<IP device = 'eth1' row = '6' col = '28'/>
</osli>
</conf>
Rhino Equipment Corp. • 8240 S. Kyrene Rd. • Suite 107 • Tempe, AZ 85284 • (480) 621-4000
9
The first line should be copied exactly as is; it is the definition of the file type and must
be present! The second and third, plus the last two lines define the sectioning of the file
where the actual data lives, these should also be left exactly as is.
There are five different and optional user “tags” associated with the OLED software
system, which are IMG, TXT, IP, MAC and EXTIP. These are the four categories of
items that can be placed on the OLED home screen. Note that all of these tags use a
“row” and “col” placement argument set to locate the items to the screen. “row” is the
vertical placement, and “col” is the horizontal, starting at location zero, zero (row = 0, col
= 0). Also note that all values are delimited with single quote characters, a must!
IMG = defines the bit mapped file that will be displayed to the OLED, up to a 64 tall X
256 wide graphic. The file is read the first time the software detects a new graphic file.
The bit map (BMP) file should be in 8-bit, gray scale to be displayed to the best
performance. Other formats however will be converted to the best of the system’s
display capability. The optimal size that fits into the first 9 characters by 6 lines is a 50
by 50 (or so) sized bmp graphic.
NOTE: If you do not want a graphic to display, we have included a one pixel BMP file
called “none.bmp” that should be used to replace the Rhino graphic that ships with the
OSLI.
TXT = defines text to be located on the display.
IP = displays the current IP address of the Ceros Mini box to the display in
XXX.XXX.XXX.XXX format.
MAC = displays the current MAC address of the Ceros Mini box to the display in
YY:YY:YY:YY:YY:YY format.
EXTIP = displays the external IP of the system.
4b. Graphics and Text Together
It is important to note that the display has the capability of 64 X 256 pixels of graphic
area. Any bit map file of this size will be converted and simply put to the display. If you
want to put a graphic with text overlaying the graphic, it is possible to completely write
the display with a graphic and then selectively place the text.
It is best to experiment with the graphic and text, to get the best looking presentation of
your data possible.
Rhino Equipment Corp. • 8240 S. Kyrene Rd. • Suite 107 • Tempe, AZ 85284 • (480) 621-4000
10
5. trixbox (or others) Web UI
trixbox uses multiple UI’s that are all centrally located on one web page that can be
accessed by using your web browser and going to the IP address of the Ceros Mini. Most
other UI’s also utilize the IP address of the Ceros Mini as the web address to the main
screen.
For more information on how to configure asterisk using this interface we suggest going
to: http://asterisktutorials.com/
6. SSH
You may SSH into the Ceros Mini operating system using a SSH client. For Windows, a
good choice is PuTTY, which can be downloaded from the PuTTY site at:
http://www.chiark.greenend.org.uk/~sgtatham/putty/
Use PuTTY to set up a SSH session using the IP address of the Ceros Mini system, and
be sure to use root and rhino as the login name and password.
7. Upgrade / Reinstall
For best results, please contact us at [email protected] if you need to reinstall or
upgrade your Ceros Mini operating system. Before performing the reinstall, locate the
USB stick that came with the system – this is the restore disk! To restore your Ceros
Mini, simply reboot the system with the USB thumb drive installed. When the init BIOS
screen is shown, press DEL and use the BIOS then choose to boot from the USB drive.
Follow the onscreen instructions from there.
8. Support Options
Use Rhino's self support system.
https://support.rhinoequipment.com/kb
https://support.rhinoequipment.com/blog
Community Support
http://trixbox.org/forum
http://voip-info.org
irc:irc.freenode.net
#asterisk
Rhino Trouble Tickets
You may create a trouble ticket through OTRS at
https://support.rhinoequipment.com/otrs/customer.pl
Rhino Equipment Corp. • 8240 S. Kyrene Rd. • Suite 107 • Tempe, AZ 85284 • (480) 621-4000
11
9. Default BIOS Settings for the Ceros Mini
These are the optimized BIOS settings for the Ceros-Mini. The BIOS screen can be
entered after powering on the system and pressing the DEL key on the keyboard. Both and
external monitor and keyboard are required for this operation.
Standard CMOS Features
>Set Drive A to None
Advanced BIOS Features
>First Boot Device Set to USB-ZIP
>Second Boot Device set to Hard Disk
>Third Boot Device set to Disabled
>Boot Other Device Set to Disabled
>Small Logo(EPA) Show set to Enabled
Advanced Chipset Features
>On-Chip Frame Buffer Size set to 1MB
Integrated Peripherals
>SuperIO Device press Enter
>>Onboard FDC Controller set to Disabled
>>Onboard Serial Port 1 set to Disabled
>>Onboard Serial Port 2 set to Disabled
>>Onboard Parallel Port set to Disabled
>>PWRON After PWR-Fail set to On
>Onboard UART3 set to Disabled
>Onboard UART4 set to Disabled
Power Management Setup
>HDD Power Down set to 15min
PnP/PCI Configurations
>DEFAULTS OK
PC Health Status
> Nothing to Edit
Frequency/Voltage Control
>Spread Spectrum set to Enabled
SAVE & EXIT
Rhino Equipment Corp. • 8240 S. Kyrene Rd. • Suite 107 • Tempe, AZ 85284 • (480) 621-4000
12
10. Packing Instructions for the Ceros Mini
The Ceros Mini is packaged in a special reusable suspension package. The Ceros Mini
can be repackaged in the same suspension package for shipment is special care is taken to
be certain that the package is sound.
1) Locate the Korvu suspension package insert. Korvue is a special plastic that does
not rip or tear when puncturing. Note that the Korvu sheet is glued to the
cardboard package – this is the top side.
2) Lay the Korvu suspension package insert flat on a table.
3) Remove the rack mount ears from the Ceros Mini.
4) Place the Ceros Mini into the protective plastic bag that originally shipped with
the Ceros Mini.
5) Slide the Ceros Mini between the Korvu sheet and the cardboard.
6) Fold the two long sides of cardboard underneath the suspension package, notice
that the Korevu sheet is stretched and that the Ceros Mini is captivated by the
Korvu sheet.
7) Fold the two shorter cardboard side up.
8) Slide the entire assembly into the outer cardboard box.
9) Add any other needed items to the package.
10) Close the flaps on the outer cardboard box.
11) Tape box shut.
Rhino Equipment Corp. • 8240 S. Kyrene Rd. • Suite 107 • Tempe, AZ 85284 • (480) 621-4000
13
User Access Interface Quick Reference
SSH: Use the IP address that is located on the front panel
System Console Login and Password Data
Login: root
Password: rhino
GUI User Accounts
maint (FreePBX)
Password: rhino
Front Panel OLED Key Unlock – press the red keys in this sequence: top, right, bottom,
left. Another way to remember this is 12 o’clock, 3 o’clock, 6 o’clock, and 9 o’clock.
Power ON – if the system is not ON, or the text “----- SYSTEM NOT READY ----“ is
displayed on the last line of the front panel for an extended time period, you can “Power
ON” the system by holding down the right and bottom keys AT THE SAME TIME for
more than five seconds.
Power OFF – the system can be powered down using the front panel by holding down
the right and botoom keys AT THE SAME TIME for more than five seconds as long as
“----- SYSTEM NOT READY ----“ is displayed on the last line. If “KEYS LOCKED…”
is shown, unlock the keys and use the Advanced menu to Reboot or Power Off the
system.
Hard Reset - the system can be hard reset down using the front panel by holding down
the left and top keys AT THE SAME TIME for more than five seconds. This is not
recommended unless the system has locked up and a reset is needed.
Rhino Equipment Corp. • 8240 S. Kyrene Rd. • Suite 107 • Tempe, AZ 85284 • (480) 621-4000
14
NOTES:
Rhino Equipment Corp. • 8240 S. Kyrene Rd. • Suite 107 • Tempe, AZ 85284 • (480) 621-4000
15
NOTES:
If you have any other questions regarding the configuration or operation of your
Rhino® Equipment please contact our support staff:
Email [email protected]
Phone (480) 621-4002 or (877) RHINO-T1, option 4002
Thank you for choosing Rhino Equipment.
Ceros Mini
Version 1.00
Rhino Equipment Corp. • 8240 S. Kyrene Rd. • Suite 107 • Tempe, AZ 85284 • (480) 621-4000
16