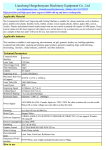
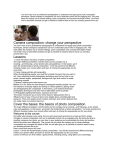
1
Mini Cutting Plotter
NODE 101/
Cutok
USER’S MANUAL
Thank you for purchasing cutter NODE 101 / Cutok. It can be used for
cutting vinyl, heavy-cardstock, paper and sticker film as well as pen plotting.
Please read this manual thoroughly and assure proper use of the equipment.
Warning
Only computers or peripherals (computer input/output devices, terminals, printers, etc.) certified
as complying with the limits for a Class B digital device, pursuant to Part 15 of the FCC Rules, may
be attached to this product when this product is operated in a residential environment. Operation
with non-certified peripherals is likely to result in interference to radio and TV.
CONTENTS
1 General Information-----------------------------------3
1.1 Introduction
1.2 General Precautions
1.3 Package Contents
1.4 Introduction
1.5 Control Panel
2 Connection to the computer------------------------6
2.1 Installation of power adapter
2.2 Setup of the driver and software
2.3 Connection to the Power
2.4 Loading Media
2.5 Useable size of material
2.6 How to use the cutting mat
3 Blade and Drawing pen------------------------------18
3.1 Introduction of Blade holder
3.2 How to fix and setup the blade
3.3 Drawing pen holder
3.4 How to fix the holder
3.5 testing
4 Working -------------------------------------------------20
4.1 Working state manner
4.2 Change the Speed
4.3 Change the Force
4.4 “Pause”State
4.5 “Orientation” state
4.6 Laser Orientation cutting and contour cutting
5 Specifications -------------------------------------------23
2
Section 1
1.1
General Information
Introduction
Thank you for purchasing the NODE 101 mini cutting plotter. NODE 101 is a plotter and
vinyl cutter that connects to your computer. It can also cut different kinds of paper
including sign paper enabling you to quickly and easily cut professional custom
design sign that you have created on your computer using our basic sign editing
software. In order to make full use of this machine, please be sure to read through this
user manual before commencing any work.
1.2
General Precautions
★Do not use damaged cord or plug.
★The top of blade should extend between 0.1—0.5mm, no less than 0.1
mm and no more than 0.5mm in order to work properly, If the blade
extends too much, it will damage the layering and affect the quality of the
cutting.
★Don’t move the tool carriage rapidly with hands.
★Don’t not expose the mini cutting plotter to direct sunlight
1.3
Package Contents
Check that the package contains the following items before using your mini
cutting plotter .If any item is missing or damaged, please contact with vendor
or distributor where the mini cutting plotter was purchased.
No.
Article
Quantity
1
2
3
4
5
6
AC adapter
AC adapter Power cable
Blade and Blade holder
Pen holder
USB cable
Software CD
1
1
1
1
1
1
7
Cutting Mat
2
3
1.4
Introduction of Components
4
1.5 Control Panel
Power on/off LED
Standby switch Turns the cutter on and off
STATUS LED
OFF
ON-LINE status = ready to receive data from host computer
ON
OFF-LINE status
FLASHING
Registration mark
Status button
Restart button
FORCE control button
F- = decreasing force on the tool
F+= increasing force on the tool
SPEED /Paper Move control button
5
Section 2
Connection to the computer
2.1 Installation of power adapter
The cutter uses a 16V/2.5A adapter.
Steps 1:
A. Plug power adapter into mini cutter.
B. Plug power lead from adapter to mains AC power. .
Steps 2:
A. Make sure the power is switched off.
B. Connect the USB cable supplied from the Mini cutter to your computer.
C. Turn on your computer and then turn on the Mini cutter. You should turn on
the computer first then turn on the Mini cutter. The blade carriage will return
to the original position.
2.2 Setup of the driver and software
Steps 1: Install the driver and check the parameters
If using a USB port,turn on the computer first, and insert CD into the computer,
then turn on the Mini cutter, t his program runs by itself and finish installing driver.
After installation, wait about 15 seconds the plotter will as a windows device
automatically add to the printer item.
6
7
8
Notes:
NODE 101 / CUTOK with a "real" USB interface (not USB-serial and parallel),
can achieve plug-and-pull,if pull (or shutdown) it the computer shows as
offline,plug in (or start) the system automatically loads device and appears as
online.
A. Before turn on the plotter,start the computer firstly.
B. In working, to avoid switching on or off frequently the cutting plotter,and a
short interval between switch on and off (plug and pull).
C. After turn on(plug) the plotter, wait 10 seconds, then send the data. You
would better check the equipment is online before using.If offline, shut down
or disconnect USB and start again later to automatically connect. Do not modify
the properties in computer system.
9
D. If it can not be online in using, you can delete the printer. Then insert CD to
re-install automatically. If you want to completely remove
NODE 101 / CUTOK driver, you should follow these steps:
10
Steps 2: Install CUTOK Master and use it
Click
in CD to install the software.You can also edit pictures in
other software, such as CorelDraw, Adobe Illustrator,etc. then send the data to
NODE 101 / CUTOK plotter for cutting.
11
12
13
14
15
16
2.3 Connection to the power
The indicator light will appear when press the
Then the carriage will
move to right, the pressing wheel will turn (from front) forward and back one
time. It shows that the cutter finishes restart automatically.
If the return is unsuccessful, please press the
button again.
2.4. Loading media
You could use the vinyl in roll or just a piece of A4 /A3 paper.
Steps:
① Turn on the Power
② Push the handle down
③ Put the paper in from back of the cutter.
④ Keep the paper with the Checking Line on the same line!
⑤ Up the handle, then the pressing wheel will push go down on the paper.
2.5. Useable size of material available for DC-330/DC240
model:
DC-330 model:
The material width is smaller than 330mm and bigger than 300mm.
The cutting width is smaller than 280 mm, length smaller than 2000mm.
DC-240 model:
The material width is smaller than 240mm and bigger than 210mm.
The cutting width is smaller than 190mm, length smaller than 2000mm.
It’s no limited minimum width if use the Cutting Mat.
2.6. How to use the cutting mat
To avoid the paper moving during work, it’s better to use the Cutting mat
when cut normal paper. And the paper should be sticking on the mat. The
paper size should be smaller than the Cutting mat.
17
Section 3 Blade and Drawing pen
3.1. Introduction of Blade holder
3.2. How to fix and setup the blade
A. You should keep the blade clean and don’t break the blade sharp.
B. The length out of the cover should be just a little bit,about 0.2mm around
over the paper thickness which you will cut !
3.3. Drawing pen holder
18
3.4. How to fix the blade holder or pen holder into the tool lamp
① Turn off the cutter.(It is very important)
② Loose the screw, fix the blade holder or pen holder, when the sharp of blade
or the pen touch the Plastic Pressing strip, all is ok.
③ Tighten the screw in clockwise.
④ Turn on, you can see the sharp of blade or pen will rise up 2-3mm.
3.5. Testing
After fix blade (or Drawing pen ) and paper well, you can try to “Testing” to
check the Force and the length of the blade ok or not
Steps:
①The STATUS LED will ON when Press
②Press
.
button, the blade (or the pen) will draw the picture above for itself
testing.
3.6 The life of Blade
The correct usage could prolong the life of blade.
① The more length the blade sharp extend out, the shorter life blade will work .
So you should avoid cut through the paper.
② The more Force , the blade life will get short
③ Trying to use small Force, when the blade edge is getting less sharp, you
could add the working force suitable.
④ Different brand blades will have different life.
⑤ You should change the blade when you find the old one has no tartness, to
avoid affecting the work badly.
19
Section 4
Working
4.1. Working state manner
The mini cutter has three Working state manners:
“Working”
“Pause”
“Orientation”
STATUS LED is OFF: You can receive the data. You could change the speed
and Force during working.
STATUS LED is ON: The cutter on Pause state, so you can’t receive the data.
When STATUS LED is ON
Press
the paper will move to back.
Press
the paper will move to front.
Press
to cut or draw testing picture.
Press
to Laser Orientation state. It will quit Orientation into Working
state when you keep
going press 5 seconds
The“Working” state
When press
or
STATUS LED is OFF ,
The cutter will be in working state, it can receive data from computer, .
When the cutter re-starts, t he setting in default is:
A .The Force at the smallest state.
B. Cutting speed=V4, that’s 98mm/s.
20
4.2. Change the speed
During Working or waiting computer sending data, you could press
or
to change the speed.
The speed won’t change when it arrive maximum or minimum.
The mini cutter has 7 speed levels.
mm/s
V1
V2
V3
V4
V5
V6
V7
30
60
82
98
125
200
300
4.3. Change the force
During Working or waiting computer sending data, you could
or
press
to change the Force.
The mini cutter has 7 speed levels. The Force won’t change when it arrives
maximum or minimum.
4.4. The“ Pause”state
During Working state or at other states, it will be at Pause state when you
press
,the STATUS LED is ON ,and the cutter stop working. But it won’t
affect receiving the data, in the same time, you can:
① Press
or
, to move the paper.
② Press
into Laser Orientation state.
③ Press
you could self testing.
④ Press
again, the STATUS LED is OFF, the cutter resume to work.
21
4.5. The “Orientation” state
The STATUS LED is ON, press
want to quit, just keep on press
at working state.
will at laser orientation state, and if you
in 3 seconds, then the mini cutter will be
4.6. Laser Orientation cutting and contour cutting
Take CorelDraw program as example:
① Please create more than two pictures layers in CorelDraw software, and
make the picture and the orientation sign at a layer, make contour in
another layer.
② Send the pictures and orientation sign layer to the printer for printing.
③ press
button, the STATUS LED will ON, then press
button,
now the cutter at Laser Orientation state. At this moment, the carriage will
move from right to left, and will have a laser dot shoot out on the paper from
right side to left, you need to move the paper by hand to check the original pot
④ Put down the handle to press on the paper, press
button in 5 seconds
in order to quit the orientation system, and get ready to receive the data
from computer.
⑤ Close the printing attribute for the image and sign in the CorelDraw
software, Send the vector contour layer to the mini cutter for cutting
Note:
1.The width of the curve must be very slim.(Even 1pt still can’t be output)
2.You must change the letter into curve when you want to cut letters, and make sure the
curve is slim enough!
3. Different cutters will have different orientation sign, so it needs to adjust.
4.CorelDraw is not special cutting software, have no sharp compensate function, so
maybe (there will ) not work well at the ling corner and the seal.
22
Section 5
Specifications
Item
Configuration
Drive system
Maximum cutting range
Effective sheet width
Cutting force
Cutting speed
No. of pens mountable
Media types
Software resolution
Motor
Interface
Language
NODE 101 / CUTOK
NODE 105 / CUTOK
Grit-rolling
Stepping moter
190X2000mm
290X2000mm
A3
size supported
A4 size supported
8.25 inch
11.75 inch
60g to 500g (7 levels selectable)
10 - 280 mm/s ( 7 levels selectable)
One
Film media 0.1 mm or less in thickness
Kent paper (inkjet or laser paper up to 300g/m2)
Drawing paper,Postcards, Scrapbooking paper,
Inkjet photo paper
(Not all types of media can be cut)
0.0254mm/step 1000DPI
Stepper
USB 2.0
DM/PL
HP/GL
Power supply
Dedicated adapter
OUTPUT:DC 16V 2.5A
INPUT:AC100V~240V ; 47Hz~66Hz
Working Temperature
5 to 30 ℃
Relative humidity
35% to 80%(Non-condensing)
Approx 380 x 170 x 165mm Approx 470 x 170 x 165mm
(15" x 6.7"x6.5")
(18.5"x 6.7"x 6.5")
Approx 470 x 360 x 270mm Approx 590 x 360 x 270mm
(18.5" x 14.2"x10.6")
(23.2"x 14.2"x 10.6")
External dimensions
(W x D x H)
Carton dimensions
(W x D x H)
Net Weight
Approx. 4.5kg (9.9Lb)
Approx. 5.5 kg (12.1Lb)
Gross weight
Approx. 5.4kg (11.9Lb)
Approx. 6.7kg (14.8Lb)
23