1
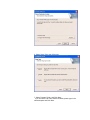
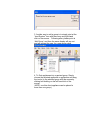
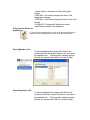
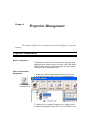
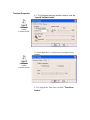
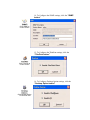
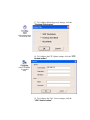
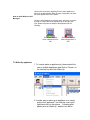
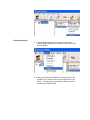
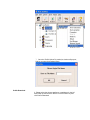
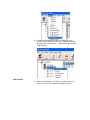
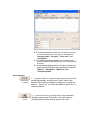
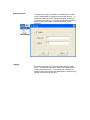
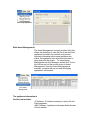
ePro Manager
ePro Manager version 1.1
USER MANUAL
© 2003
All rights are reserved.
Other trademarks used in this manual are the property of their respective owners.
Table of Content
Introduction
CHAPTER 1 Introduction
Introduction……………………….……1
What is ePro Manager………….…….1
Key Features…………………….……..2
Getting More Information…………..2
Technical support ……………….……2
CHAPTER 2
Installing ePro-Manager
System Requirement.………….……….3
Installing ePro Manager…………….….3
CHAPTER 3
Sorting Manager
Search & Locate Appliances…………7
Grouping Appliances………………….8
View List Information…………………9
Hide Power off Appliance List.…...10
Export Device List…………………….10
Import Device List……………………10
CHAPTER 4 Remote
Update Software
Update Requirements…………………11
Software Update………………………11
CHAPTER 5
Connection Manager
What Is Connection………….………..13
Utilize Connection Manager……..….13
CHAPTER 6
Properties Management
What Is “Properties”……………….…16
Utilize Property Management……….16
CHAPTER 7
Wake On LAN Manager
What Is “Wake On LAN”.…………….25
Utilize Wake On LAN Manager.………25
Wake Up Appliance…………………...26
Shut Down Appliance…………………26
Reboot Appliance………………………27
Firmware
Duplication Manager
CHAPTER 8
“Duplication Manager”……...28
Profile Upload………..……..28
Profile Download……………..30
Profile Modify……..………..31
CHAPTER 10 Security
& Logging
Enable Password………………….……….…….…36
Logging.……..…………………………….…………37
View Log………….……….………..……..…..37
Export Log………….…….…………..…..…..37
CHAPTER 11 Firmware
Recovery
What Is “Firmware Recovery”……….…..…38
CHAPTER 9
Scheduling Manager
“Scheduling Manager…………33
Add Schedule…….…….…34
Delete Schedule…………..35
Chapter 1
CHAPTER 12 Other
Introduction
Getting to know your ePro-Manager
Introduction
Utilities
What Is “Ping Application”……………..….…40
What Is “Asset Management”………….…..…41
What is in this Manual?
This Manual provides an overview of the ‘ePro-Manager’,
Remote Management Software with a brief description of each of
its Features. It also includes instructions on how to install
ePro-Manager products using the ePro-Manager CDs and how
to register, download, and install purchased products
What is ePro-Manager?
ePro-Manager solution is a product that address
technology management needs. The ePro-Manager product is a
server-based application, providing sophisticated centralized
administration capabilities for monitoring and managing the
business critical software, hardware and operations in your
environment, enabling you to proactively track and respond to
any changes. Software & Operations Management products
Key features
• Automatically locate and view the specifications of thin client
appliances on your network
• ePro-Manager allows the user to create, select, group, import and
export lists thin client appliances for easy remote management,
• Centrally manage security on thin client appliances anywhere on
your network, including remotely wake up, reboot, shutdown
appliances
• Selectively system software updates thin client appliances running
Microsoft® Windows® CE, Windows® XPe, or Linux,
• remotely create and modify server connections on thin client
appliances such as add, edit, and delete XDM, VNC, RDP and
ICA connections.
• copying or cloning the connections, appliance properties, and
security settings from one thin client appliance to other thin client
appliances,
•automatic updates of software, properties, and connections for thin
client appliances,
• (with ePro-Manager) remotely configure any appliance located
anywhere on your network, or shadow
•Monitor the progress of updates as they occur, and schedule your
updates for the most convenient date and time
•Scheduling Shuts down, wake up or reboot any thin client
appliances located in the network
•Allow authorize System Administrators to access with password to
the ePro-Manager
Chapter 2
Installing ePro-Manager
Know how to install your ePro-Manager
Installing ePro-Manager
System Requirement
ePro-Manager requires to be install on the Window based
Server running Windows NT Server 4.0, Windows 2000 Server,
Windows XP professional or Windows 2003 Server. Also,
13Mb of space must be available.
Installing ePro-Manager
1. Download ePro- ManagerV1.1.exe to your server’s hard disk drive.
2. Start the Installation and Setup Wizard,
3. Following the instructions on the setup wizard, and click next
4. System Requirement will be displayed, Click next
5. Select installation destination directory, the default is located
at C:\Program Files\eProManager, and Click Next.
If you choose to use another destination directory, click Browse
to select, and then Click Next.
6. Select Setup Type, then Click Next
7. Select Program Folder, and Click Next.
If you choose to use name other the Default, please type in the
selected space and Click Next.
8. To initial Copying file, Click Next.
9. To finish installation, Please Click Next.
Chapter 3
Sorting Manager
This chapter explains how to use ePro-Manager for Searching, adding,
viewing, grouping, safe, and group lists of appliances.
Sorting Manager
Search & locate Appliances
Once ePro-Manager is installed, it is very simple to locate and
view information about your thin client appliances.
1. Launch ePro-Manager by selecting ePro Manager in the
Windows Start>Programs menu, or the shortcut Icon on the
Desktop Screen.
2. On the Tool Bar, to locate or search thin client appliances in
the network, please Click ‘Search New’ bottom.
Click To locate thin
client Appliances
Grouping Appliances
1. To create or add a group name and to organize
your appliances into specific groups, please click
‘Add Group’ bottom.
Click add a
group
2. Once the “Add Group” Icon is clicked, a window will
pop up and you may key in the group name on the
space provided, and then Click OK.
3. Another way to add a group is to simply point at the
“local System” Icon with the cursor and right hand
click on the mouse. Following after, please point at
‘Add Group’, and then the same display will pop out
and will request the user for a new group name.
4. To Sort appliances into organized group, Simply
choose the selected appliance or appliances and drag
the icon(s) to the selected group with the mouse by
clicking and holding on the left hand click of the
mouse.
(NOTE: one thin client appliance can be placed in
more than one group.)
5. Viewing the list of the thin client appliances located
in the network is very humanized. It uses a tree/list
view, providing important information about each
appliance and status:
The appliance information in
the list view includes:
•IP Address - IP address currently in use by the thin
Client appliance.
•MAC Address - Appliance’s hardware Media Access
Control address
•Client Name - The appliance’s defined name.
•Model - A brief description of the appliance.
•Status – Displays the current activation mode of the
appliance.
• Software Version - A description of which appliance
software version
and release is currently running.
• OS Version - A description of the local Operating
System
• Agent Version –Indication of Terminal’s agent
version
• RAM Size - this column displays the size of the
temperately storage.
• ROM Size - this column displays the size of the local
storage.
• Product ID –This product display the unique
identification number of the appliance
Only view the Power on
Appliances:
To View only the appliances which are turn ON, please click Hide Icon;
this will then allow the application to hide the power off appliances.
Click Hide
list
Save Appliance List:
To Save appliances list, please click File on the
toolbar and click the “Export Device List”, and name
the appliance list. Following after, another window
will pop out, please select the list and click Export
Click Export Device list
Import Appliance List:
To Import appliances list, please click File on the
toolbar and click the “Import Device List”, and name
the appliance list. Following after, another window
will pop out, please select the list and click Export
Click Import Device
list
Chapter 4
Remote
Update
Software
This chapter explains how to update the system software.
Updating Software
Updates Requirement
To properly update your software, you must first have a Linux
Technology Ltd software package available on the server that is
running ePro-Manager.
Note: ePro-Manager allows you to update the Windows CE,
Linux, or XPe, but prohibits you to change its software from one
operating system to another.
software updates
1. Select one or more appliances from the View LIST
2. In the ePro-Manager toolbar, click the “Flash button” and
select the software package from the directory.
Click Flash to
Upgrade software
Version
3. After selecting the appropriate software package to
update, click OK and following status mode will initiate
Once the progress reach to 100%, Click’ OK’ button
Chapter 5
Connection Manager
This chapter explains how to Remotely Manage your thin clients connections
on to your Server and its applications.
Connection Management
What is “Connection”?
“Connection” is a way to access servers or applications through
predefined connections protocols. The predefined connections
protocols are primarily pre-defined as ICA, RDP, terminal
emulation, XDMP or Web browser connections.
How to utilize Connection
Manager?
Using the ePro-Manager to remotely add, edit, or delete the
client’s connections on a single or multiple thin client appliances
to the server is an easy process.
The process is located at the thin client itself.
1. To configure single connection, please highlight one appliance,
and then click on Device on the function key and click
connection.
2. Once the connection function appeared, please define the
desired connections. To add a new connection, please
click Add button, scroll down the connection menu, choose
the connection type, and then click OK to build a new
connection.
Click Add to
Create
a New
Connection
3. To edit, please highlight one appliance, and then click on
Edit button on the function key and click OK.
Click Edit to edit
a Connection
4. 4. To delete a connection, please highlight one appliance,
and then click on Delete button on the function key and
a confirmation screen will POP out
Click Delete to
Delete
a Connection
5. After all the connections have been configured, or
modified, please click the exit button. Once the exit
button is clicked, a system Change setting window will
appear and request for the appliance to be restarted
Chapter 6
Properties Management
This chapter explains how to Control your thin client appliances’ properties
remotely
Properties Management
What is “Properties”?
“Properties” are located in the control Panel of every thin client
appliances which contains “Input, Time Zone, LPD, RDP Setting,
SNMP, Display, Network, Thin Print, Update, Security, System,
Audi, VNC viewer, and Desktop Style.
How to use Properties
Management
1. Select one of the Thin client appliances from the View LIST
2. In the ePro-Manager toolbar, click the “Properties button
Click Properties
to control & View
3. Another way to manage Properties is to simply point at
the thin client appliance from the View List with the cursor
and right hand click on the mouse. Following after,
please point at ‘Device Properties’
4. Once the “Properties” is pushed, the property
management window will pop out., and let you configure
the terminal Properties.
Terminal Properties
5.1. To Configure the input and the volume, click the
“Input & Volume button”
Click Input &
Volume
to control & View
5.2. In the input device, click mouse to configure mouse
settings
Click Input &
Volume
to control & View
6. To Configure the Time Zone, click the “Time Zone
button”
Click Time
Zone
to control &
View
7. To Configure the Network settings, click the “Network
button”
Click Network to
control & View
8. To Configure the Security settings, click the “Security
button”
Click Security to
control & View
9. To Configure the system (General) settings, click the
“System button”
Click System to
control & View
10. To Configure the display settings, click the “Display
button”
Click Display to
control & View
11. To Configure the LPD (Printing) settings, click the
“LPD button”
Click LPD to
control & View
12. To Configure the Internet settings, click the “Internet
Option button”
Click Internet
Option
To control &
View
13.1. To Configure the RDP settings, click the “RDP
Setting button”
Click RDP
Setting
To control &
View
13.2. In the RDP settings, click ‘Experience’ for
customizing connection speed and configuration other
environment settings
Click Internet
Option
To control &
View
14. To Configure the SNMP settings, click the “SNMP
button”
Click SNMP to
control & View
15. To Configure the ThinPrint settings, click the
“ThinPrint button”
Click ThinPrint to
control & View
16. To Configure Desktop Option settings, click the
“Desktop Option button”
Click Desktop Option
To control & View
17. To Configure the Desktop style settings, click the
“Desktop Style button”
Click Desktop Style
To control & View
18. To Configure the FTP Update settings, click the “FTP
Update button”
Click FTP Update
To control &
View
19. To Configure the VNC Viewer settings, click the
“VNC Viewer button”
Click VNC Viewer
To control & View
Chapter 7
Wake On LAN Manager
This Chapter explains how to remotely wake up, Shut Down, and Reboot any thin
Client appliances in the Network.
Wake on LAN Manager
What is Wake on LAN?
Wake on LAN is a technology that allows an administrator
to remotely power on a thin client appliance or to wake it up from
sleep mode. By remotely triggering the thin client appliance to
wake up, the administrator does not have to physically visit each
thin client appliances on the network.
How to utilize Wake on LAN
Manager?
Using the ePro-Manager to remotely wake, shut down, or reboot
a single or multiple thin client appliances is an easy process.
First, please recognize the status of the appliances as the
following:
The monitor displays
Green indicates that it is
ON.
The monitor displays
Red indicates that it is
OFF.
To Wake Up appliance
1. To remote wake up appliance(s), please select the
one or multiple appliances and click on ‘Device’ on
the function key and click Wake Up.
2. Another way to wake up an appliance is to simply
point at the “appliance” Icon with the cursor and
right hand click on the mouse. Following after,
please point at ‘Wake Up’, and the unit will be
remotely turn on.
.
To Shut Down appliance
3. To remote Shut down appliance(s), please select the one or
multiple appliances and click on ‘Device’ on the function key
and click Shut Down.
4. Another way to shut down an appliance is to simply point at
the “appliance” Icon with the cursor and right hand click on
the mouse. Following after, please point at ‘Shut down’,
and the unit will be remotely turn off.
To Reboot appliance
5. To remote Reboot appliance(s), please select the one or
multiple appliances and click on ‘Device’ on the function key
and click Reboot.
6. Another way to Reboot an appliance is to simply point at the
“appliance” Icon with the cursor and right hand click on the
mouse. Following after, please point at ‘Reboot’, and the
unit will be remotely rebooted.
Chapter 8
Firmware Duplication Manager
This Chapter explains how to duplicate the flsh disk image of one thin client appliance
on to other thin Client appliances in the Network.
Firmware Duplication Manager
What is Duplication
Manager?
Duplication Manager allows you to duplicate Flash disk image
of the thin client appliances. The tool allows you to copy the
image to other same-OS appliances running on your network,
or store that image as backup.
Note 1: When you duplicate an image to update other
appliances running on your network, the duplicated image will
completely replace the contents of the appliances’ Flash.
Note 2: When you duplicate an image to update other
appliances running on your network, the duplicated image can
only be copied on the same OS thin client appliances
Profile Upload
Before one is able to duplicate any images, a template or
source for duplication is required; hence, it is critical that it
must be setup correctly.
Please make certain that all configuration changes are done
correctly on the chosen template thin client appliance.
1. To create a template, please select the template appliances
and click on ‘Device’ on the function key and click Profile
Upload
2. Another way to create a template is to simply point at the
“appliance” Icon with the cursor and right hand click on the
mouse. Following after, please point at ‘Profile Upload’,
and the unit will be remotely rebooted.
3. Once the “Profile Upload” is pushed, a window will pop out,
and let you save the template image.
Profile Download
1. Please select the chosen appliance or appliances in the left
hand View list, and click the ‘Device’ on the function key and
click Profile Download
2. Another way to duplicate is to simply point at the “appliance”
Icon with the cursor and right hand click on the mouse.
Following after, please point at ‘Profile download’, and the
unit will be remotely rebooted.
3. Once the “Profile download” had been pushed, please choose
the template image save in the directory, and click OK.;
following after, a window will pop out indicating download
status. Click Ok when process finishes.
Profile Modify
The utility of doing modification to a saved template is to change
the connection protocols and property settings such as “Input,
Time Zone, LPD, RDP Setting, SNMP, Display, Network, Thin
Print, Update, Security, System, Audi, VNC viewer, and Desktop
Style..
1. To modify a saved template image, Please click the ‘Device’
on the function key and click Profile Modify
2. Once the “Profile Modify” had been pushed, please choose a
template image, and click Modify to modify or click delete to
erase the template from the directory.
Click Modify
to modify
Click Delete
to delete
3. Following after choosing the selected template,
click on the select page scroll bar and choose the
requested settings for modification
Click to select and change
properties settings
Once the chosen modification had been done, please push
“Save” or “Save –As “icon
Note1: To initiate changes in a resource function, please check the box.
Note 2: To disable a resource function, please uncheck the box
Chapter 9
Scheduling
Manager
This chapter explains how to schedule a timely event to executed for all thin client
appliances
Scheduling Manager
What is Scheduling
Manager?
Scheduling Manager allows you to schedule a timely event
to "Power On", "Power Off", “Reboot”, or "Firmware
Update" of one appliance or a group of appliances. The
Scheduling manager is so flexible that allows the
technical personnel to schedule events from minutes to
years
1. To initiate the scheduling Manager on a single thin client
device, Please select the appliance on the view list, then
click the ‘Device’ on the function key and click Add Schedule
2. To initiate the scheduling Manager on multiple thin client
devices, Please point the cursor on the selected group and
then right click on the mouse. Following after, please select
“Add Schedule”.
Add Schedule
3. Once the “Add Schedule” is pushed, a window will pop out,
and let you initiate the scheduling Manager functions.
4. The scheduling Manager window box is divided into four type
of event scheduling. The event types are catalogued as
“Designated date”, “Everyday”, “Every week”, and
“Every Month”.
5. The scheduling Manager window box contains a time
box which allows the scheduling events to be done specified
to minutes.
6. The scheduling Manager window box also contains and
execution box which allow the administrator to perform
“Reboot”, “Shut Down”, “Wake Up”, and
“Firmware Update”
Delete Schedule
7. To perform deletion of a schedule event, select an event on the
Click Delete
To delete
scheduling Manager, and then press "Delete" button, then
there will be a confirm message box asking you to confirm the
deletion. Press "Yes" to confirm the deletion or press "No" to
cancel the deletion.
8. To perform an edit on an existing event on the scheduling
Click edit
To edit
Manager, please press "Edit" button. Once the button is
pressed, please edit the existing values in the event.
Chapter 10
Security & Logging
This Chapter explains how to enable security and logging of the e-Pro Manager
Security & Logging
Enable password:
The purpose of using a password to e-Pro Manager is to allow
only the administrator to maintain and control the network. To
enable the password function, please click Option and the pull
the mouse icon to security. Once the security bar is pressed, a
window will pop out and allow the administrator to set the
password.
Click Security
Logging:
The purpose of using a log is to track the activities previously
done. To enable the log function, please click Option and the
pull the mouse icon to Log. Once the log bar is pressed, a
window will pop out and allow the administrator to adjust the log
settings and to view and save logs
Click Log
1. To view the current logs, please click View Icon. Once the view Icon
is clicked, a window will pop out displaying the events which were
previously administered. The event Log will display the date,
time, action, and status.
Click View
Click save a
Log
2. To save the current logs, please click Export Icon. Once the view Icon is
clicked, please save the file in the directory of your choosing and name the log
file.
Chapter 11
Firmware
Recovery
This Chapter explains how to recover your firmware.
Firmware recovery
What is Firmware
Recovery?
Firmware Recovery allows you to recover your firmware to
factory default when your firmwares in your thin client
appliances are corrupted or incomplete. The application
removes the burden of having to physically remove the
flash and send back to the original vendor.
1. To initiate firmware recovery on ePro-Manager, please click
Tool on the tool bar and roll the mouse cursor to Firmware
Recovery. Once the Firmware Recovery is selected, a window
will pop out and will wait for the signal from the NeededRecovery thin client appliance in the network.
NOTE: The Recovery BIN file must be available in the same
directory as the ePro Manager. Example:
C:\Program\ePromanager
Click Firmware
Recovery
2. On the Needed-Recovery thin client appliance, please restart
the thin client appliance. When the appliance have been
restarted and after hearing the first “BEEP”, please press the
Left hand side “Ctrl” and the Two “SHIFT”s on the keyboard..
Chapter 12
Other Utilities
This Chapter explains other utilities such as asset management and Ping IP address
and web address
Other Utilities
What Ping application?
Ping application is an administrator friendly utility. Its basic
function is to assist the technician to locate the status of an IP
address. To initiate Ping utility on ePro-Manager, please click
Tool on the tool bar and roll the mouse cursor to Ping Application.
Once the Ping Application is selected, a window will pop out and
simply type the IP address and ping the status of the IP address.
Click Ping application
What Asset Management?
The Asset Management is simply another utility that
allows the technician to view the list of the thin client
appliances located in the network, and provide
important information about each appliance and
status; this application also allow the technician to
setup and print the Assets. To initiate Asset
Management on ePro-Manager, please click Tool on
the tool bar and roll the mouse cursor to Asset
Management. Once the Asset Management is
selected, a window will pop out and will display
appliances’ informations.
Click Asset
Management
The appliance information in
the list view includes:
•IP Address - IP address currently in use by the thin
Client appliance.
•MAC Address - Appliance’s hardware Media Access
Control address
•Client Name - The appliance’s defined name.
•Model - A brief description of the appliance.
•Status – Displays the current activation mode of the
appliance.
• Software Version - A description of which appliance
software version
and release is currently running.
• OS Version - A description of the local Operating
System
• Agent Version –Indication of Terminal’s agent
version
• RAM Size - this column displays the size of the
temperately storage.
• ROM Size - this column displays the size of the local
storage.
• Product ID –This product display the unique
identification number of the appliance