1
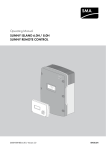
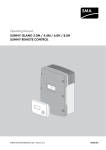
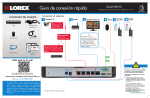
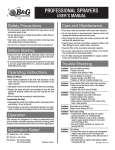
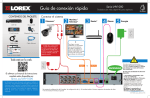
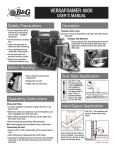
(Current Manual 06/08/10)
TERMITICIDE APPLICATION TOOLS
USER’S MANUAL
Safety Precautions
• Connect the tool to the supply hose and be certain the trigger
is in the off position before turning on the pump.
• Do not adjust the tip while depressing the valve trigger.
• Before removing the tool from the supply hose, be certain to
shut off pump and relieve pressure in the hose by depressing
the trigger.
• Do not leave the tool unattended when the valve is in the ON
position.
• Wear personal protection equipment that protects hands, face,
eyes, and mouth.
• Read and follow all label directions on liquid termiticides
before making an application.
Before Starting
• Inspect the hose, hose connections to the valve and the pump,
discharge pipes, and nozzle for signs of wear or damage. These
parts must be in full working condition for proper application.
• It is recommended that these tools are used at low (25 psi)
pressure, and that liquid termiticides are applied at low
pressure.
Operation
B&G termiticide application tools are designed to deliver liquid
to soil, and voids beneath concrete slabs, and into the cavities
in concrete block walls.
Application Tips*
7/16” and 360° spray = 2 gal/min
7/16” and 180° spray = 2 gal/min
7/16” and void spray = 2 gal/min
5/8” and 360° spray = 2 gal/min
* Tips are calibrated at 20 psi
The 180° tips are designed for directional application; align the
tip with the orientation of the valve so that liquid termiticide will
be directed at the foundation wall.
Application Pipes (Rods)
The Standard and Professional pipe sets include:
12” stainless steel, 7/16” diameter
40” stainless steel, 7/16” diameter
40” stainless steel, 5/8” diameter
or
40” galvanized steel, 5/8” diameter
Drill a 9/16” or larger hole for treating beneath concrete slabs
with 7/16” pipes, using smaller holes will damage the pipe
and/or the tip.
Care and Maintenance
• Flush the valve, application pipes (rods) and tip with clean
water regularly. Termiticide residue can reduce the operation
and accuracy of valves and tips.
• Soil tips should be replaced regularly (2-year cycle); insertion
into soil can abrade and increase the nozzle opening and the
threads on the rod and tip.
• Clean the adapters on the pipes that
hand-tighten to the valve; they can
wear when exposed to soil.
• Replace pipes (rods) that become
bent or otherwise damaged.
Trouble Shooting
Problem: VERSATOOL: Leaking around rod spring, where
trigger attaches to valve
Solution: • Replace both o-rings (#33000090) on the valve
rod; disassemble the trigger and push rod out
from above.
Problem: VERSATOOL: Leaking at pipe connection to valve
Solution: • Use hex wrench to tighten seat gasket holder, or
remove and replace seat gasket.
Problem: VERSAGUN: Leaking at pipe connection to valve
Solution: • Remove adapter at base of valve (pipe connection) and clean the tip of the shutoff stem and the
seat gasket.
• If leaking continues, slightly loosen (not tighten)
the lock nut at the top of the valve.
Problem: QCG GUN: Leaking from the tip, around the junction
of the nosepiece and the body of the gun
Solution: • Remove the nosepiece-adapter and inspect the
shut-off valve and the valve seat (gasket). Clean
the tip of the shut-off valve, and turn over and
replace the valve seat (gasket) in the gun.
• QCG Repair Kit - 34601-V.
Problem: QCG GUN: Leaking occurs at the back of the gun,
around the large brass nut
Solution: • Tighten the brass nut (gland nut) at the back of
the gun. If leaking continues, disassemble the gun
and replace the gasket and o-ring associated with
the gland nut.
95138232 Rev 5/10
1
2
3
4
STANDARD TIP KIT
#
1
2
3
4
Versatool
VERSATOOL VALVE
400 SERIES
#
Valve
1
2
3
4
5
6
7
8
9
10
11
12
13
14
15
16
17
Part #
11007407
22071644
22059700
33000090
22059800
22060000
22060100
22059000
22040500
22071038
22058800
22040500
22059100
22059400
22059500
22059600
22067518
95144402
Description
Valve assembly
Valve body
Spring rod
O-Ring
Valve rod
Seat gasket
Seat gasket holder
Valve trigger
Hex nut
Spacer
Trigger pin
Hex nut
Rod screw
Trigger lock
Trigger lock spring
Trigger lock screw
Adapter
Threaded washer
Part #
451
453
454
457
Comp #
11007451
11007453
11007454
11007457
Description
360° 2 gpm
180° 2 gpm
360° 2 gpm
void 2 gpm
Versagun
VERSAGUN VALVE
400 SERIES
#
Valve
1
2
3
4
5
6
7
8
9
10
11
12
13
14
Kit
Part #
11004706
29103309
22067513
22067512
22067511
22067510
22067508
22067509
22067575
22067515
22043200
22043000
22055447
22067522
22067521
22067554
Description
Valve assembly
#10-24 hex nut
Actuator block
Actuator pin
Packing screw
U-cup seal
Viton Seal
Spring spacer
Versagun body
Versagun trigger
Screw housing
Trigger screw
Compression spring
Shut-off assembly
Soft-seat adapter
Valve Rebuild Kit
B&G Help Line
800-544-8811
135 REGION SOUTH DRIVE
JACKSON, GA 30233
Toll Free 800-544-8811
Phone 678-688-5601
Fax 678-688-5633
www.bgequip.com
PARTS LIST FOR QCG GUNS
QCG Gun
#
10
11
12
13
14
15
16
17
18
19
20
21
Part #
34510
34511
34512
34513
34514
34515-N
34516-V
34517-V
34518
34519-S
34520
34521
Description
Valve seat
Shutoff valve
Shutoff spring
Trigger Asy (not shown)
Pivot bolt
Pivot bolt nut
Gasket
O-ring
Gland nut
Valve stem nut
Handle
Adapter
#
22
23
24
25
26
27
28
29
30
31
32
33
Part #
34522
34590-Q
34596
HWN
34519-N
34513-A
34513-B
34513-C
34513-D
34563
34606-6
34606-12
Description
Pivot bolt washer
Label
Trigger lock
Gasket
Lock nut, valve stem
Trigger piece
Valve yolk
Trigger hinge bolt
Hinge bolt nut
Adapter
Cone Jet Asy (not shown)
Cone Jet Asy (not shown)
(Expanded Manual and tools older than 2005)
USER &
MAINTENANCE
MANUAL
Termite Tools & Equipment
B&G Equipment Company
135 Region South Drive, Jackson, GA 30233
800.544.8811 Phone 678.688.5601 Fax 678.688.5633
Rev 1/05
User’s Manual: Termite Control Tools
SAFETY PRECAUTIONS
•
•
•
•
•
•
•
Connect the treating tool to the supply hose before turning on the pump.
Shut off pump and release pressure in tool before removing supply hose.
Protect face, eyes, and mouth during application of liquid under pressure.
Disconnect the tool from pump hose when changing tips.
Direct spray tip only at surfaces to be treated with liquid.
Do not leave the tool unattended with the locking mechanism engaged.
Follow manufacturer label directions when applying termiticides.
SUGGESTED USES
Models No. 410, 420, 430, 486: These treatment tools are intended for use in
the distribution of liquid termiticides in areas likely to allow entrance of
subterranean termites into a structure. They are suitable for treating soil beneath
outside concrete slabs (garages, porches, walkways) using the 7/16 inch pipes
and foot ram, and for treating soil around the perimeter of buildings using the 5/8
inch pipe. These models do not have the tip-shutoff feature, and use indoors may
result in drips on non-target surfaces. Refer to insecticide manufacturer labels for
end-use restrictions on termiticides.
Models # 415, 425, 435: These tools are intended for use in the distribution of
liquid termiticides in areas in areas likely to allow entrance of subterranean
termites into a structure. They are suitable for treating soil beneath inside or
outside concrete slabs using the 7/16 inch pipes and foot ram, and for treating
soil around the perimeter of buildings using the 5/8 inch pipe. The pipes for these
models have tip-shutoff and they are suitable for use indoors. Refer to insecticide
manufacturer labels for end-use restrictions.
Versatool (#410, 415). This tool can be used to inject termiticide into perimeter
soil, and into voids to treat soil beneath concrete slabs. It can be fitted with 5/8
and 7/16 pipes and with 1 or 2 gpm tips. Tip shut-off is a feature of Model #415.
VersaGun (#430, 435). This multiple-purpose gun can be used for broadcast
spraying, injecting termiticide into perimeter soil, and for treating voids and soil
beneath concrete slabs. It can be fitted with 5/8 and 7/16 pipes and 1 or 2 gpm
tips. Tip shut-off is a feature of Model #435.
Robco QCG (#420, 425). This multi-purpose gun can be used to broadcast
termiticide, for injecting termiticide into perimeter soil and into the voids and soil
beneath concrete slabs. It can be fitted with 5/8 and 7/16 inch pipes and 1 or 2
gpm tips. Tip shut-off is a feature of Model #425
Tips # 451, 453, 457: These 2-gallon per minute tips are intended for use in
applying liquid termiticides beneath concrete slabs using 7/16 inch pipes. At 25
psi the tip #451 dispenses liquid in a 360˚ pattern; tip #453 dispenses liquid in a
180˚ fan arc pattern; tip #457 delivers liquid in a straight, non-directional pattern.
Tip # 454: This 2-gallon per minute tip is intended for applying liquid termiticides
in soil around the outside perimeter of buildings using 5/8 inch pipe. At 25 psi this
tip dispenses liquid in a 360˚ pattern.
Tips # 450, 452: These 1-gallon per minute tips are intended for applying liquid
termiticides beneath inside or outside concrete slabs using 7/16 inch pipes. At 25
psi tip #450 dispenses liquid in a 360˚ pattern; tip #452 dispenses liquid in a 180˚
fan arc pattern.
Tip # 455: This 5-gallon per minute tip is intended for use with 5/8 inch pipe for
applying liquid fertilizer to to soil around landscape trees and shrubs, and for
treating the balled-root system of nursery-stock trees.
BEFORE STARTING
•
Inspect all hoses, and junctions of the hose to tool and to the pump to be
certain all connections are secure and not leaking.
•
These tools are not recommended for use above 25 psi.
OPERATING INSTRUCTIONS
Connecting tool to the pump. These tools can be connected to the hose from
the pump by using 1) a female quick-connect on the pump hose and a male
quick connect on the tool (supplied by operator), or 2) a hose connected directly
from the pump to the valve. The thread size of the input port in the valve is 3/8
inch female pipe thread (FPT).
Soil treatments. Manufacturer recommendations may include applying liquid
termiticide into a trench adjacent to the building foundation, and to the soil below
the trench adjacent to the foundation and footer. The 5/8 inch stainless or
galvanized pipe is best suited for soil injection. Estimate the depth of soil above
the footer to determine the distance the pipe will be inserted into the ground.
The pipe may easily enter and be removed from the soil while liquid is being
applied through the tip. Application techniques include treating the trench, then
pushing the pipe through the treated soil adjacent to the foundation.
Drill holes in concrete slabs. Use 9/16 inch or larger holes for sub-slab
application with the 7/16 inch pipes. Holes that are 1/2 inch may cause the pipe
to bind when small pieces of concrete lodge around the pipe. The pipe or valve
may be damage during removal from a 1/2 inch drill hole.
2
Application below concrete slabs. Drill 9/16 inch holes through slab, and
determine the thickness of the slab. Secure the Foot ram so that the bottom of
the cone seal is an additional 1 inch from the tip as the depth of the slab. This will
allow for the cone to seal the drill hole and for the tip of the pipe to extend into
the void between the concrete slab and soil.
Application to structural voids. The 12 inch long 7/16 inch pipe can be used
for treating in shallow voids. When the straight tip (void tip) is used, the splash
guard should be placed between the void tip adapter and the void tip.
Orientation of 180˚ and 360˚ tips. To orient tip #452 and #453, first tighten the
tip to the end of the pipe, then loosely tighten the pipe into the base of the valve.
Orient the tip in the desired position in relation to the valve so that the liquid
dispenses toward the treated surface (foundation wall), then finish tightening the
pipe to the valve. The 360˚ tip does not require orientation.
Application. Depress fully the valve trigger to release liquid through the pipe to
the tip. The trigger can be locked open on the Versatool (Model #410, #415, and
#486) and the Robco QCG (Model #420 and #425). Do not leave the tool
unattended with the locking mechanism engaged.
CARE AND MAINTENANCE
Routine cleaning. The tool should be flushed with clean water following every
use with liquid termiticides or fertilizer. All seat gaskets, washers, and O-rings
should be periodically inspected for wear, and replaced when necessary.
Versatool cleaning. The valve can be cleaned by using a 5/32 hex wrench and
removing the Valve seat gasket holder from the base of the valve. Clean any dirt
on the Teflon seat gasket in the Holder. Replace the gasket if it is worn or
damage. Depress the trigger on the valve then re-insert the gasket holder using
the hex wrench.
Robco QCG cleaning. This gun can be cleaned by unscrewing the Nosepiece
and removing the (black gasket) Valve seat. Use a soft brush or cloth to clean
any dirt on the rounded end of the shutoff valve, and clean the gasket. Depress
the trigger on the gun, then replace gasket and screw on the Nosepiece.
Versagun cleaning. This gun can be cleaned by removing the adapter tip, which
contains the Teflon gasket in the center. Inspect and clean the gasket, replace if
it is damaged or worn. Use a soft cloth or brush to clean the Shutoff stem.
Depress the trigger and screw the adapter tip in the body of the valve.
3
TROUBLE SHOOTING
PROBLEM
SOULTION
Versatool is leaking around the Rod
spring at the center of the valve handle
Replace O-rings on the Valve rod.
Disassemble the Trigger, then remove
the Seat gasket holder; push the Valve
rod out from above
Versatool is leaking from the tip
Remove the soil pipe and in the base
of the Valve tighten Seat gasket
holder with a 5/32 hex wrench. If leak
continues, remove the Seat gasket
holder and replace the (white) Seat
gasket. If tool continues to leak,
replace O-rings on the Valve rod.
Disassemble the Trigger, then remove
Seat gasket holder; push Valve rod out
from above
VersaGun leaking at the back of the
valve
Loosen the Lock nut (1/4 turn) at the
back of the gun – this will re-set the
Shutoff stem to the gasket in the tip.
If leak continues, the Packing screw
may have to be removed and the
packing replaced
VersaGun is leaking at the junction with Remove the tip and clean the exposed
the soil rod
end of the Shutoff stem and the white
gasket in the center of the tip. If leak
continues, replace the tip (the gasket
can not be replaced separately)
QCG Gun is leaking from around the
junction of the Nosepiece and the body
of the gun
Remove Nosepiece-adapter and
inspect Shutoff valve and Valve seat
(gasket). Clean the tip of the Shutoff
valve, and turn over the Valve seat
(gasket). If leaking continues, replace
the Valve seat (gasket).
4
VersaGun Valve
#
Order #
Description
Valve
1
2
3
4
5
6
7
8
9
10
11
12
13
14
15
16
17
18
19
20
21
Kit
22067500
Valve assembly
22067514
Locknut
22067513
Actuator block
22067511
Packing screw
22067517
Sealing washer
22067510
Packing gland
22067512
Actuator pin
22067509
Spring spacer
22067514
Locknut
22071285
Pipe plug 1/8 NPT
22067506
Versagun handle
22067516
Trigger pin
22067505
Versagun body
22067514
Locknut
22067515
Versagun trigger
22024410
Shutoff spring
22067507
Shutoff stem
22067503
Adapter ½
22067526
Hose fitting
22067527
Hose fitting washer
22070725
0-160 gauge
22067518
Adapter + washer
22067554
Valve rebuild kit
(Includes 1,4 17)
10
1
2
20
3
4
8
9
5
6
7
13
12
11
18
19
14
15
16
21
17
VersaGun
Versatool Valve
#
Part
Valve
1
2
3
4
5
6
7
8
9
10
11
12
13
14
15
16
Kit
1549
1544
VT-618
1-1964
VT-619
VT-621A
VT-622A
VT-611
TN-45
1138
VT-609
TN-45
VT-612
VT-615
VT-616
VT-617
---------
Order #
Description
22071649
Valve assembly
22071644
Valve body
22059700
Spring rod
33000090
O-Ring
22059800
Valve rod
22060000
Seat gasket
22060100
Seat gasket holder
22059000
Valve trigger
22040500
Hex nut
22071038
Spacer
22058800
Trigger pin
22040500
Hex nut
22059100
Rod screw
22059400
Trigger lock
22059500
Trigger lock spring
22059600
Trigger lock screw
22067518
Adapter + washer
22028910
Valve rebuild kit
(Includes 3,5,6,9,11,14)
1
10
11
9
8
12
13
15
14
4
7
3
Versatool
2
6
B&G Equipment Company 135 Region South Drive Jackson GA 30233 800-544-8811
5
16
27
26
QCG GUN
SRG GUN
19
22
17
22
18
22
20
23
29
12
11
15
10
29
27
18
19
16
22
20
29
12
15
24
29
11
10
21
24
17
23
21
27
25
9
25
6 7
31
4
8
1
2
5
3
SRG AND QCG GUNS
#
Part
Description
1
2
3
4
5
6
7
8
9
10
11
12
13
14
15
34501
34502-6
34503-V
34504
34505
34506-V
34507
34508
34509
34510
34511
34512
34513
34514
34515-N
Nozzle nut
Nozzle orifice
O-ring P-14
Adj. sleeve
Sleeve screw
O-ring P-18
Back-up O-ring
Pattern valve
Valve body
Valve seat
Shutoff valve
Shutoff valve spring
Trigger assembly*
Pivot bolt
Pivot bolt nut
16
17
18
19
20
21
22
23
24
25
26
27
28
29
30
31
28
14
28
30
16
14
26
30
34516-V
34517-V
34518
34519-S
34520
34521
34522
34590-S
34596
HWN
34519-N
34513-A
34513-B
34513-C
34513-D
34563
Gasket
O-ring
Gland nut
Valve stem nut
Handle
1/2 MPT adapter
Pivot bolt washer
Label
Trigger lock
Gasket for QCG gun
Lock nut, valve stem
Trigger piece
Valve yolk
Trigger hinge bolt
Hinge bolt nut
Nosepiece
* Trigger assembly = #s 27-30
Rev 1/05
B&G Equipment Company 135 Region South Drive Jackson GA 30233 800-544-8811
30
SERIES 400 TOOLS: PIPE SETS, EXTENSION PIPES, AND TIPS
7
6
7A
Standard Pipe Set
6
Professional Pipe Set
10A
10
Extension
Pipes
11
15
8
12
Splash
guard
14
13
9
Cone seal
1
2
3
4
5
7/16” 1 gpm Tips
#450 11007450
#453 11007452
Standard
Tip Set
360°
180°
For Cone Seal Parts see Page 14
Standard Pipe Set
Professional Pipe Set
#
Computer #
Description
#
Computer #
6
7
8
9
10
15
22067797
22067798
22067906
22067912
22067904
22060850
1/8” adapter
3/8” adapter
5/8” x 40” galvanized
7/16” x 40
7/16” x 12”
Splash guard
6 22067797
7A 22067798
10A 22071427
11 22071428
12 22071429
15 22060850
22071605
Description
1/8” adapter
3/8” adapter
7/16” x 12”
7/16” x 40
5/8” x 40”
Splash guard
Check Valve (not shown)
for 7/16 Pipes.
Standard Tip Kit
#
Part
Computer #
Description
1
2
3
4
5
457
455
454
453
451
11007457
11007455
11007454
11007453
11007451
void 2 gpm
360° 5 gpm
360° 2 gpm
180° 2 gpm
360° 2 gpm
Extension Pipes
#
Computer #
13
14
11007460
11007465
Description
7/16” x 40”
5/8” x 40”
484/486 Versatool
#
Part
Order #
1
2
3
4
5
6
7
8
9
10
11
12
13
14
15
16
17
17a
1549
1544
VT-618
1-1964
VT-619
VT-621A
VT-622A
VT-611
VT-609
TN-45
1138
VT-612
VT-615
VT-616
VT-617
18
18
1390
1542
Kit
Description
22071649
Valve assembly
22071644
Valve body
22059700
Spring rod
33000090
O-Ring
22059800
Valve rod
22060000
Seat gasket
22060100
Seat gasket holder
22059000
Valve trigger
22058800
Trigger pin
22040500
Hex nut
22071038
Spacer
22059100
Rod screw
22059400
Trigger lock
22059500
Trigger lock spring
22059600
Trigger lock screw
22070917
Adapter
1340
22071940
Pipe assembly
Not Shown
22071950
Check valve assm
Check valve fits between parts 17 & 18
22071390
Tip (6 hole)
22071642
Fan tip 2 gpm.
22028910
Valve rebuild kit
(Includes 4,6,7,10,11,14)
Adjustable Cone Seal
1
2
3
4
5
6
#
Part
1
2
3
4
5
6
ACS
1145
1380
ACS30
ACS25
1381
Order #
Description
22071775
22071045
22071380
22071776
22071771
22071381
Adj. Cone Seal
Retaining screw
Lock knob
Foot ram
Cone seal
Lock bolt
Rev 1/05
B&G Equipment Company 135 Region South Drive Jackson GA 30233 800-544-8811
Termite Tool Repair Kits
VERSAGUN REPAIR KIT (Order # 22067554)
1
1
1
----------------------
22067503
22067514
22067517
Adapter ½-20
Locknut, Versagun
Seal, Versagun
VERSATOOL REPAIR KIT (Order # 22028910)
2
1
1
1
1
1
1-1964
VT-622A
TN-45
VT-616
VT-621A
1138
33000090
22060100
22040500
22059500
22060000
22071038
O-Ring
Seat gasket holder
Hex nut
Trigger lock spring
Seat gasket
Spacer
SRG and QCG REPAIR KIT 1 34555-V
1
1
1
1
1
1
HWN
34516-V
34517-V
34503-V
34506-V
34507
22067536
22067714
22067715
22067740
22067743
22067744
Hose gasket
Gasket, Viton
O-ring PT-6
O-ring, Viton
O-ring, Viton
O-ring, back-up
SRG and QCG REPAIR KIT 2 34601-V
1
1
1
1
HWN
34516-V
34517-V
34510
22067536
22067714
22067715
22067728
(Order # 22067848)
(Order # 22067748)
Hose gasket
Gasket, Viton
O-ring PT-6
Valve seat
VERSAGUN PROBLEMS AND SOLUTIONS
P. Gun is leaking at the junction with the
soil rod.
Washer
Packing
screw
S. Remove the soil pipe and tighten the
tip to the gun.
Packing
gland
If leak continues, loosen and remove
the tip, clean the exposed end of
the Shutoff stem and the white
gasket in the center of the tip.
If leak continues, replace the tip, the
gasket can not be replaced
separately.
Shutoff
stem
Tip with
gasket
P. Leaking occurs at the back of the Valve.
Lock nut
S. Loosen the Lock nut (1/4 turn) at the
back of the gun – this will re-set the
Shutoff stem to the gasket in the tip.
If leak continues, the Packing screw
may have to be removed and the
packing replaced.
Packing
screw
Packing
Copper
washer
Rev 1/05
VERSATOOL PROBLEMS AND SOLUTIONS
P. Tool is leaking from the tip.
S. Remove the soil pipe and in the base of
the Valve tighten the Seat gasket
holder with a 5/32 hex wrench.
Trigger
If tool continues to leak, remove the
Seat gasket holder (5/32 hex wrench)
and replace the (white) Seat gasket.
If tool continues to leak, replace O-rings
on the Valve rod. Disassemble
the Trigger, then remove the Seat
gasket holder; push the Valve rod
out from above.
Rod spring
Valve rod
O-rings
Seat gasket
Valve rod
Seat gasket
holder
P. Leaking occurs around the soil pipe
connection to the Valve.
S. Remove the soil pipe and in the base of
the Valve tighten the Seat gasket
holder with a 5/32 hex wrench.
If leak continues, remove the Seat
gasket holder (5/32 hex wrench)
and replace the white seat gasket.
P. Leaking occurs around the Rod spring
at the center of the Valve handle.
S. Replace O-rings on the Valve rod.
Disassemble the Trigger, then
remove the Seat gasket holder;
push the Valve rod out from above.
O-rings
on Valve
rod
O-rings
may be
worn or
damaged
and be the
cause of a
leak
Rev 1/05
QCG AND SRG GUN PROBLEMS AND SOLUTIONS
P. Gun is leaking from the tip, around the
junction of the Nosepiece and the
body of the gun.
S. Remove Nosepiece-adapter and inspect
the Shutoff valve and the Valve seat
(gasket). Clean the tip of the
Shutoff valve, and turn over the
Valve seat (gasket).
QCG
S. Tighten the Gland nut at the back of the
gun. If leaking continues at this site,
disassemble the gun and replace
the gasket and O-ring associated
with the Gland nut.
P. Leaking occurs around the Pattern
adjust. sleeve of SRG gun.
S. Remove the Nozzle nut and inspect the
O-ring, remove dirt from around the
Nozzle.
Remove Pattern adjustment sleeve
and inspect Viton and Teflon O-rings.
Replace if damaged or worn.
Gland nut
Viton O-ring
Viton
Gasket
Valve
seat
If leaking continues, replace the
Valve seat (gasket).
P. Leaking occurs at the back of the gun
around the large brass nut.
Shutoff
valve
Nosepiece
adapter
SRG
Pattern
valve
Pattern adjust.
sleeve
Teflon
Viton O-ring
O-ring
Nozzle
Nozzle
nut
Viton O-ring
QCG REPACKING KIT – 34601-V:
1 Valve seat
1 Viton gasket
1 Viton O-ring
Note: Pattern valve has reversed thread to
open.
Rev 1/05
VERSAGUN GUN TOOLS (PRIOR TO 2005)
& Soil Rodder 488
TOOLS PRIOR TO 2005 (INCLUDES VT480, SLABJET 2000 & VT 2000)
ROBCO TOOLS (Prior to 2005)
Page 21