1
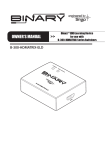
WPS-DVR Control4 Driver Installation and Setup Rev: 120627-1119 WPS-DVR Control4 Driver Setup and Configuration Table of Contents 1 Overview ............................................................................................................................. 3 1.1 Contacting Technical Support .....................................................................................................................3 2 Before Beginning................................................................................................................. 3 3 Software Version ................................................................................................................. 4 3.1 Updating DVR Software ................................................................................................................................4 4 DVR Setup ............................................................................................................................ 5 4.1 DVR Connections ...........................................................................................................................................5 4.2 DVR Network Settings ....................................................................................................................................5 4.2.1 4.2.2 4.2.3 Basic DVR Network Configuration ..................................................................................................................... 5 Advanced DVR Network Configuration .......................................................................................................... 5 User Access Setup ................................................................................................................................................ 6 5 Router Setup ........................................................................................................................ 7 6 Control4 System Programming .......................................................................................... 7 6.1 DVR Control (Control Driver) ........................................................................................................................7 6.2 Camera Viewing (Video Drivers) .................................................................................................................8 pg. 2 www.snapav.com Support: 866.838.5052 WPS-DVR Control4 Driver Setup and Configuration 1 Overview The following information will guide the installer through simple set up and programming a Control4 system to control the main display output of a Wirepath™ DVR and displaying cameras on a Control4 GUI. Please read through the entire document before performing any setup of the DVR or the Control4 system. Should you have any questions about Serial control after reading this document, please contact SnapAV: Technical Support. 1.1 Contacting Technical Support Phone: (866) 838-5052 (704) 909-5229 Email: [email protected] 2 Before Beginning Before you begin, have the following items at hand so that the installation can be performed quickly and accurately: Wirepath™ Surveillance DVR with the most recent software version. See Software Version section for details. Control4 System Control4 Composer software with the latest library and knowledge of the use of the software Network Router Software, Drivers, and Documents from the SnapAV Website o Owner’s Manual for the Wirepath™ DVR being installed o WPS-DVR Quick Start Guide o WPS-DVR Software Upgrade Instructions o Router Setup Document (Appropriate to the router being used) o Latest Version of WPS-DVR Software o Control4 DVR Control Driver o Control4 Camera Drivers Cables for Camera, Display, and Network Connections © 2012 Wirepath™ Surveillance pg. 3 WPS-DVR Control4 Driver Setup and Configuration 3 Software Version The information contained in this document is intended for DVRs with the latest version of software. Please verify that you have the latest version of software for each DVR in the system. If the software version of the DVR is below the version listed here, it is recommended that it be updated. Follow the Software Upgrade Instructions in this document. Applies to Software Version: 3.1 7.77.77.53 Updating DVR Software 1. Verify that the DVR to be installed has the latest version of software available on the SnapAV website. 2. If needed, upgrade the DVR to the latest version. Proceed to 4 DVR Setup If not needed. A. Update the Software via DVR Local Display A.1. Insert a USB Thumb Drive with the new software into the USB connector on the front or rear of the DVR. A.2. Bring up the menu by pressing MENU/ESC on the front panel or remote or by right clicking the mouse. A.3. Select the Software Update Icon from the Menu using the mouse, the remote or the front panel (Menu/ESC + Up/Down/Left/Right buttons). A.4. USB Thumb Drive contents will be displayed in the right hand window. A.5. Double click the appropriate new software file with the mouse or use Up/Down/Left/Right buttons and the Enter button on the front panel or remote. Use mouse to select the check mark or press Enter on remote or the front panel. Software upgrade is indicated on the bottom scroll line. During this process the DVR must remain powered ON or the DVR will become inoperable. Note: After the software is upgraded, the system will restart immediately. This process may take a few moments, after the DVR restarts login will be required. A.6. View the main Menu/Status menu to verify the Version and Build number has been updated. A.7. Remove the USB Thumb Drive from the DVR. ! Note: If updating from a software version below 7.75.53, the following steps must be performed before accessing the DVR from IE. B. Upgrade the Internet Explorer Plugin Interface The IE Plugin interface MUST be updated to ensure it can access the latest DVR software features. pg. 4 B.1. Update the DVR software following the instructions listed above. B.2. Download the Remove_WPS_IE_Plugin file from the SnapAV website. This file is also located in the software update zip file. B.3. Reboot each computer that will be used to access or configure the updated DVR. B.4. When the computer restarts, Do Not Open IE. Run the Remove_WPS_IE_Plugin file. B.5. Open IE and access the updated Wirepath DVR. Perform Step 2, 3and 4 for all computers that will be used to access the DVR. B.6. IE may initially block installation of the DVR Plugin. If so, review the prompt and allow the Plugin to be installed. B.7. If prompted, allow installation of the C++ Distributable Package and IEPlugin.cab packages. B.8. When Plugin installation is complete, log in to and configure the DVR as usual. www.snapav.com Support: 866.838.5052 WPS-DVR Control4 Driver Setup and Configuration 4 DVR Setup 4.1 DVR Connections 1. Connect all cameras 2. Connect all displays 3. Connect the DVR to a network (This is needed for the Control4 IP control and video streaming) WPS-300 Series DVR POWER VGA HDM I ESATA + - RS-232 Network Router Automation System Internet 4.2 DVR Network Settings 4.2.1 Basic DVR Network Configuration 1. From the main MENU select Setup then Network . 2. Set the Net Type to Static IP. 3. Enter the Static IP Address issued by the network admin. 4. Enter the Net Mask for the network (usually 255.255.255.0) 5. Enter the Default Gateway (Address used to access the router) 6. Enter the DNS Address (Usually same address as Default Gateway) 7. Select Advanced to enter port settings (if required) 4.2.2 Advanced DVR Network Configuration 1. Set Control Port (Default 67) 2. Set Data Port (Default 68) 3. Set HTTP Port (Default 80) 4. EXIT SETUP and save the settings. The ports listed are the default ports used by networks. Due to the routers configuration, these may need to be changed. Record all setting for network settings as they will be needed later. © 2012 Wirepath™ Surveillance pg. 5 WPS-DVR Control4 Driver Setup and Configuration 4.2.3 User Access Setup The Control4 DVR driver requires network access to the DVR to allow access and control at predetermined levels as established within the DVR. Setting up the DVRs Local Guest Level is required before access from Control4 can be established. It is recommended that Local Guest Level be set to the lowest level required to allow most Control4 users the desired level of access. User Login Names with Passwords can be used to accommodate users who require higher levels of access. 1. Setup users with Login Names and Passwords granting a specific level of access for each user. • Operator – The lowest level, an Operator can only view live video and audio • Supervisor – In addition to live video viewing, a Supervisor can review playback video and audio and has permission to archive files • Administrator – The highest level is Administrator and has access to all options. • “ – “- No remote access allowed • Customized – In addition to the three default levels, an administrator can also set Customized levels of access for each user. Refer to the DVR Installation and User’s Manual for details. The factory preset Administrator level login name is “user”, the password is “1234”. We recommend changing this to block unwanted access to the DVR. 2. Remove default login for extra security. The user marked with an asterisk before the user number is the Default Login, when selected, the DVR will always login to this account. This is attached to the User account by default which has Administrator access to the DVR. Press the Mode button on the DVR remote when User is selected to remove the Default Login. 3. Setup Local Guest Level to allow access to the DVR. Local Guest Level allows or restricts access to the DVR by Guests accessing the DVR through Local interfaces (DVR GUI via front panel buttons, IR remote control or home automation Ethernet or RS232 control) without a dedicated Login. The option selected determines the level of access a Guest will have. “-“ (Default) No Guest Access Allowed. Administrator Provides full access to the DVR allowing for viewing of all cameras and modification to all settings. Use this setting with caution. Supervisor Provides access to view and control all cameras, Search, Archive and modify basic settings. Operator Provides access to view and control all cameras. No access to Search or settings is provided. This setting should meet most user’s needs. UserName Provides access to the features as defined in the Advanced Settings for a particular user. See Adv: below for more information. Note: We recommend using the ”Operator” setting to allow the system to control the DVR, but prevent Guest access to advanced DVR features. Users would be required to enter a Login and Password to Search, Archive, modify Settings, etc. 4. Setup Auto Logout When a User has logged into the local video GUI and there is no User operation in the time selected (from 1 minute to 24 hours) the User will be automatically logged out. The local User must have exited all GUI menus, so that only Live video is being displayed. Select “-“ to disable this feature (default setting). Press +/- buttons on the front panel of the DVR or on the remote control to change this setting. Alternatively use the mouse to set this value. Note that Auto Logout has no effect on remote login or access (for example, remote IE sessions or streaming video to third-party systems or interfaces). pg. 6 www.snapav.com Support: 866.838.5052 WPS-DVR Control4 Driver Setup and Configuration 5 Router Setup After setting up the DVR(s) network settings, the router may need to be setup for port forwarding so that the DVR can be seen on the network. Download the Router Setup document appropriate for the brand of router being used from the SnapAV website. Should a document for the brand being used not appear in the list, refer to the routers owner’s manual for setting up port forwarding. 6 Control4 System Programming The following information outlines the basic steps for configuring Wirepath™ DVRs and Cameras on a Control4 system. A working knowledge of the Composer Software and experience configuring Control4 is required. Do not attempt these steps without first gaining a working knowledge of Control4 system configuration. 6.1 DVR Control (Control Driver) 1. Open the latest version of Composer. 2. Connect to Director on Local Network (Controller) 3. Select the desired room under System Design. 4. Select the driver under My Drivers / Audio/Video. 5. Select Cable, and then the Wirepath DVR IP Driver. 6. Driver can be renamed when it is added, or by right clicking and selecting Rename. Tip: Rename the DVR so that it can be found easily, using the room name or whatever works best. 7. Setup the properties to control the DVR. A. Enter the IP Address of the DVR. B. Enter Username and Password Username: user Password: 1234 These settings are the default access to the DVR for IP control and MUST be used for the system to operate the DVR. 8. Look in the driver information tab and verify that it indicates Logged In to DVR. © 2012 Wirepath™ Surveillance pg. 7 WPS-DVR Control4 Driver Setup and Configuration 9. Useful Defaults for remote buttons have already been programmed; these can be remapped if needed. 10. Go to the Connections tab and assign the output of the DVR to the desired display, switcher or receiver. Tip: If the output of the DVR is desired within multiple locations within the system, use of a Binary™ HD Matrix is recommended. Additional programming is required that is not defined within this document. 11. Refresh Navigators to update the user interfaces for the new device. 12. DVR is now available on Control4 interfaces under Watch. Once the source is selected the DVR video output and cameras can be viewed. Settings can be changed if the user can Login to the DVR with a correct user account. 13. Repeat steps 2 through 14 for each DVR in the system with unique IP. 6.2 1. Camera Viewing (Video Drivers) Download the Control4 Wirepath Cameras Driver from the SnapAV website 2. Extract the drivers to Documents>Control4>Drivers. This directory may be a different based on the version of Windows used or if it was changed. Note: There are 16 driver files (1 for each camera that can be viewed. This is the maximum number of cameras available on a single Wirepath™ DVR. Use only the amount of drivers that are required. 3. Open the latest version of Composer. 4. Connect to Director on Local Network (Controller). 5. Select the desired room under System Design. 6. Under My Drivers, Right Click the IP Cameras folder. 7. Select Add Driver. 8. In the Select the Driver window, select the manufacturer – Wirepath Surveillance. 9. Sort the list by name to add cameras in order. Important Note: the number in the driver name corresponds to the inputs on the DVR. Select the cameras in order starting with 1 to make sure that the correct camera will be viewed. 10. Double click to add – the camera will now appear in My Drivers under IP Cameras. 11. Select a room for the camera. 12. Under My Drivers/IP Cameras, double-click the desired camera driver to add it to the Room. Tip: Place the camera in the room that it is located, this will aid in identifying the camera later. Tip: Rename the cameras by Room and DVR input number to further aid in identification (for example, “Den Cam 01”. pg. 8 www.snapav.com Support: 866.838.5052 WPS-DVR Control4 Driver Setup and Configuration 13. Select the camera in the room A. Enter the IP address of the DVR. B. Enter the port for the camera – Default port on the DVR is 80, however this may have been changed in DVR setup. Refer to the network settings for the DVR to verify the correct port to use. C. Enter Username and Password Username: user Password: 1234 These settings are the default access to the DVR cameras and MUST be used for the system to receive camera snapshots and live video. D. Repeat this step for all cameras in the system. 14. Once completed Refresh Navigators to update the user interfaces for the new device(s). 15. From the control4 GUI, select the Security icon to view cameras. 16. Note: It may take up to 2 minutes for the cameras to display snapshots on the first viewing. Viewing live video will update the snapshot for the selected camera when the user exits live video. The Control4 system will update regularly thereafter. 17. The cameras are setup and can be viewed from the Control4 GUI. © 2012 Wirepath™ Surveillance pg. 9 120627-1119 © 2012 Wirepath™ Surveillance