1
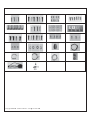
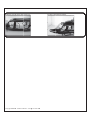
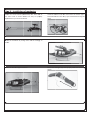
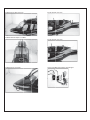
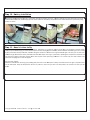
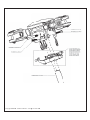
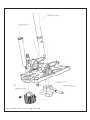
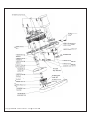
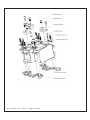
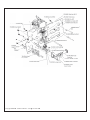
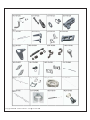
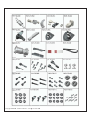
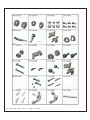
B
Belll 42
29™
™
Manual
Distributted by
CCPM SC
CALE RC HELICOPT
H
TER
ompactorr700Man
nual–Beell429™
Co
Reelease1.0ͲͲApril2013
3
Beell,emblem
ms,logos,aandbodydesignsaretrademarkksofTextro
onInnovattions
Incc.andareusedunderlicensebyRobanLttd.
Ro
obanLimiteed
DrryriverIndu
ustrialZonee,VentureCrossRd.
Jiaaolian,Wan
njiangCityDistrictofDongguan
n,
52
23046DonggguanCounty(GD)ͲͲPRC
Copyright@2013
3 - Roban Lim
mited – All rig
ghts reserved
d
SPECIFICATIONS
Bodylength:
1680mm
Lengthincl.rotors:
1850mm
Width: 655mm
Height: 465mm
Mainrotordiameter:
1560mm
Mainbladelength:
700mm
Tailrotordiameter:
280mm
Tailbladelength:
105mm
Mainshaftdiameter:
12mm
Tailshaftdiameter:
5mm
Spindlediameter:
8mm
Batterycompartment: 2x60x60x180mm
Motor:*
1x750MX450KVbrushlessoutrunner,12Scapable
Speedcontroller:*
1x120Abrushless,12Scapable
Servo:* 3xmetalgearcyclic,1x9gmetalgeartailservo
Battery:*
44.4V5000mAh35C+
Flighttime:
5minutes
Takeoffweight: 9000g
FlightStabilization:*
3axisflybarlessgyro
RadioControl:* min.6channelwithpitchandthrottlecurves
*)Optionallyavailableequipment
TheCompactorisahighperformanceradiocontrolledscalehelicopter.
Ourgoalwastocreateasimple,highperformancehelicopter,withaminimumofmechanicalcomponentsandsimplemaintenance.
Pleasereadthisusermanualcarefully,itcontainsinstructionsforthecorrectassemblyofthemodel.
Pleaserefertothewebsitewww.robanmodel.comforupdatesandotherimportantinformation.
Thankyouforyourpurchase,andhaveagreattimewithyourCompactor!
RobanLimited
Copyright@2013 - Roban Limited – All rights reserved
IMPORTANTNOTES
*Thisradiocontrolledhelicopterisnotatoy.
*Thisradiocontrolledhelicoptercanbeverydangerous.
*Thisradiocontrolledhelicopterisatechnicallycomplexdevicewhichhastobebuiltandhandledverycarefully.
*Thisradiocontrolledhelicoptermustbebuiltfollowingtheseinstructions.Thismanualprovidesthenecessaryinformation
tocorrectlyassemblethemodel.Itisnecessarytocarefullyfollowalltheinstructions.
*Inexperiencedpilotsmustbemonitoredbyexpertpilots.
*Alloperatorsmustwearsafetyglassesandtakeappropriatesafetyprecautions.
*Aradiocontrolledhelicoptermustonlybeusedinopenspaceswithoutobstacles,andfarenoughfrompeopletominimize
thepossibilityofaccidentsorofinjurytopropertyorpersons.
*Aradiocontrolledhelicoptercanbehaveinanunexpectedmanner,causinglossofcontrolofthemodel,makingitvery
dangerous.
*Lackofcarewithassemblyormaintenancecanresultinanunreliableanddangerousmodel.
*NeitherRobanLimitednoritsagentshaveanycontrolovertheassembly,maintenanceanduseofthisproduct.Therefore,no
responsibilitycanbetracedbacktothemanufacturer.YouherebyagreetoreleaseRobanLimitedfromanyresponsibilityor
liabilityarisingfromtheuseofthisproduct.
SAFETYGUIDELINES
*Flyonlyinareasdedicatedtotheuseofmodelhelicopters.
*Followallcontrolproceduresfortheradiofrequencysystem.
*Itisnecessarythatyouknowyourradiosystemwell.Checkallfunctionsofthetransmitterbeforeeveryflight.
*Thebladesofthemodelrotateataveryhighspeed;beawareofthedangertheyposeandthedamagetheymaycause.
*Neverflyinthevicinityofotherpeople.
NOTESFORASSEMBLY
Pleaserefertothismanualforassemblyinstructionsforthismodel.
Followtheorderofassemblyindicated.Theinstructionsaredividedintochapters,whicharestructuredinawaythat
eachstepisbasedontheworkdoneinthepreviousstep.Changingtheorderofassemblymayresultinadditionalor
unnecessarysteps.
Usethreadlockersandretainingcompoundsasindicated.Ingeneral,eachboltorscrewthatengageswithametalpart
requiresthreadlock.
FactorypreͲassembledcomponentshavebeenassembledwithalltherequiredthreadlockandlubricants,
andhavepassedqualitycontrol.ItisnotnecessarytodisassembleandreͲassemblethem.
Wedonotrecommendtheuseofthincyanoacrylateglueforsurfacemountofpaintedparts.Thefumesofthecuringglueleave
whitestainsontheclearcoat,whicharehardtoremove.
Copyright@2013 - Roban Limited – All rights reserved
CO
ONTENTS::
1 – Ball link
2 – Tail tube hollder
3 – Servo
o holder
M
belt pu
ulley
4 – Motor
5 – Tail rottor assy
9 – Tail serv
vo holder
6 – Main rotor assy
10 – Main frame assy
11 – Main ro
otor blades
ades
12 – Tail rotor bla
13 – Torqu
ue tube
1 – Tail tube
14
e
17 – Landiing gear
18 – Footsteps 2
2pcs
15 – Tail servo
s
rod
16 – Tail
T tube sup
pports
19 – Instrum
ment panel
20 – Cockpit
C
stow
waway
21 – Front seat
s
2pcs
8 – Tail servo rod holder
h
7 – Tail shafft bearings
22 – Back seat 5pcs
5
23 – Pitch llever 2pcs
24 – Control
C
leverr 2pcs
25 – Scale parts
p
4pcs
29 – Tail fins 2pcs
26 – Rudder pedals
s 2pcs
27 – Tail
T fin
28 – Tail fins 2p
pcs
30 – Front wind
dow
31 – Anten
nnas 2pcs
32 – Win
ndshield wipe
ers 2pcs
35 – Antenna 2pcs
33 – Anten
nna 2pcs
34 – Antenna 2p
pcs
Copyright@2013
3 - Roban Lim
mited – All rig
ghts reserved
d
36
6 – Tail suppo
ort
7 – Screws A3x24
A
4pcs
37
38 – S
Screw M3x16
6 6pcs
3 – Screw A1,7x6
39
A
9pcs
41 – Wodden washers
w
6pcs
s
40 – Screw
S
A2x8 6pcs
42 – Screw
S
A3x16
6 4pcs
43 – Washerr 3x8 10pcs
44 – L brackets 4pcs
4
46 – S
Screw M3x10
0 6pcs
45 – Screw M4x10
M
4pcs
47 – Nut M3 4pcs
49 – Nut M2
M 3pcs
53
3 – Green LED light 1pcs
57 – LED conttroller 1pcs
50
0 – Washer M
M4
54 – Green LED lig
ght 1pc
51 – EVA taail support
55 – Prolongin
ng wire 3pcs
s
58 – Decal set 1pcs
Copyright@2013
3 - Roban Lim
mited – All rig
ghts reserved
d
48 – Ball links 3pcs
52 – Red
R LED lightt 1pcs
56 – 8mm
8
LED cap 1pc
AD
DDITIONA
ALCOMPO
ONENTSR
REQUIRED
TOOLS,LLUBRICAN
NTS,ADH
HESIVES
*ElecctricMotor:
10SSͲ12S–400Ͳ6
600Kv,
pin
nionshaftdiam
meter6mm
*Spe
eedcontrollerr:
minimum120Atobesafe
*Battteries:10Ͳ12SS4000Ͳ5000m
mAh
*1flybarless3axiscontrolunit,suitableforscaleflying
diopowersysttem
*Rad
*3cyyclicservos
*1taailrotorservo
o
*6ch
hannelradioccontrolsystem
mon2.4GHz
*Genericplieers
*Hexagonald
driver,size1.5
5,2,2.5,3,4m
mm
*4mmTͲWreench
*5.5mmSockketwrench(fo
orM3nuts)
*8mmHexfo
orkwrench(fo
orM5nuts)
*Mediumthrreadlocker(egg.Loctite243))
*Strongretainingcompound(eg.Loctitee648)
*Spraylubricant(eg.TryͲFlowOil)
*Syntheticgrrease(eg.TriͲFFlowSyntheticGrease)
*Cyanoacrylaateadhesive
*PitchGaugee(forsetͲup)
*Solderingeq
quipment(forrmotorwiringg)
de the main
n box there are:
a
Insid
dethemainbox:
Insid
Box1:MainFrame/TailFrame//Rotorhead
des,Tailbladees,Rods
Box2:Boom,Blad
pit
Box3:ScaleCockp
Bag1:Tailfinrod
Bag2
2:Positionlightcontroller
Bag3
3:Scalefittinggs,screws
Bag4
4:Tailboomaaccessories
Bag5
5:Fuselagesccalefittings
Bag6
6:Mechanicalfittings,screws
Bag7
7:TailWings
Bag8
8:Beltdrivep
pulley
Bag9
9:Batterytrayy
Bag10:EVAtaildistancer
Bag11:Footrests
Bag12:Frontwindow(insideco
ockpit)
MastterPack4:Fro
ontscalefusee(Bag6insidee)
MastterPack5:Tailboom(allottherbags)
MastterPack6:Alu
uminumlandiinggear
AsssemblySccaleFuse
elage
Priorrtoinstallingthemechaniccsintothefuselage,pleasepreparetheffuselageaccorrdingtothefo
ollowingstepss.
instaallationintoth
hefuselagemostofthehelicoptermechanicbecomeinaccessible.
Removethehatch
hasshown.
Installthetaillandinggearr(17)asshow
wnusingscrew
ws(37).
Instaallthefootsteep(18)usingepoxyglueassshown.
Installcockpittasshownussingepoxyglue.
Instaalltherudderpedalsusingepoxyglue.
Installthefro
ontseatsassh
hownusingep
poxyglue.
Instaallthecockpitsleversusinggepoxyglue.
Installthesto
owawayassho
ownusingepo
oxyglue.
Copyright@2013
3 - Roban Lim
mited – All rig
ghts reserved
d
Instaalltheseatsassshownwithepoxyglue.
Copyright@2013
3 - Roban Lim
mited – All rig
ghts reserved
d
Installthewindshieldassh
hown.
AsssemblyM
Mechanicss
Themechanicsareealmostentirrelypreassem
mbledandsplittupintofoursections:roto
orhead,mainframe,tailfraameandtailtube.
Priorr to the instaallation into the
t scale fuseelage, the meechanics havee to be entireely assembled
d, electronic components installed,
adjustedandtesteed.Afterinstaallationintoth
hefuselagem
mostofthehelicoptermech
hanicbecomeinaccessible.
Ste
ep1–Rottorhead
Slidee the rotorheead onto thee main shaft. Use screw (70Ͳ
0000
06) and nylon
n nut (70Ͳ00007) to secure the rotorh
head
onto
o the main shaft. Use two screws (70Ͳ00008) to
addittionallyclamp
puptherotorrhubontotheeshaftasshow
wn.
Makesureth
hedistancebe
etweentheballlinkandth
heLlever
is equally at 24mm. Finallly snap on the ball links (7
70Ͳ00025)
hplate’supperrdiscuniͲlinkss(70Ͳ00030).
ontheswash
ep2–Tailboom
Ste
First of all install the center bearings (70
0Ͳ00100) with
h the
holders (02Ͳ02006
6) into the taail boom (70Ͳ0
00095). Distribute
the bearings even
nly in the tail boom. It is recommendeed to
applyy a bit of lubrificant on
nto the tubees inner surface,
elsew
wise the bearring is likely to
t get stuck b
before the correct
posittion is reach
hed. Then install the cen
nter support ring
(600
0UH1Ͳ007),theeservorodgu
uides(70Ͳ000
040)andthesservo
two tailservohollders(70Ͳ0009
98).Installthetailtorque tube
00096)intoth
hetailtube.
(70Ͳ0
m into the taail boom holders (70Ͳ
Then insert the tail boom
00093, 70Ͳ00
0094). Lock th
he tube in pllace with scre
ew M3x8
(70Ͳ00086) via
v the clamp
p up and ad
dditionally wiith screw
M3x6(70Ͳ000
053)asshown.Installthe carbonsuppo
ortbeams
(70Ͳ00104Ͳ70
0Ͳ00106) on the
t main fram
me and the tail
t boom
tailboomclamp(600UH1ͲͲ007).
Ste
ep3–TailServoIn
nstallation
First of all, mount the holde
er frame (70ͲͲ00097) onto
o the
mholders(70
0Ͳ00098)usinggscrewM3x8
8.Thenmounttthe
boom
tail servo of you
ur choice into
o the tail fraame using screws
uts as shown.. Install the sservo
M3x10, washers and nylon nu
nandthesupp
plieduniball.TThenslidetheetailrotorcontrol
horn
rod (70Ͳ00103)in
ntothe fourgguides.Install theballlink (70Ͳ)
on both end
ds of the taill rotor control rod. Distriibute the
guides evenlyy along the taail boom. Theen install the tail rotor
frame onto the
t tail boom
m. Lock it with the three screws
s
as
shown, but do
d not use th
hread lock yeet, as it has got
g to be
uninstalled aagain. Snap th
he servo control rod onto
o the ball
link.
Ste
ep4–CycclicServo
oInstallattion
Instaall the three ccyclic servos onto the servvo tray as sho
own.
Depeending on your servos, you may have to
t use washers to
adjusttheservoto
otheproperiinstallationheeight.Itisstro
ongly
recommended to
o use metal servo horns and only m
metal
gearred servos. The
T
multi blaade rotor heead can feedback
forceesthatmayleeadtofailureo
ofplasticcom
mponents.
Copyright@2013
3 - Roban Lim
mited – All rig
ghts reserved
d
After the servos are installed, you will have to adjust the
elow.The
linkagerods length’saccordingtothesschematicsbe
distancesareeuniballcenteertouniballceenter:
1=81mm
2=112mm
m
3=81
1mm
Ste
ep5–Adjjustswasshplatelin
nkages
The linkagesfrom
mtheLͲLeversstotheswash
hplatehavettobe
a correct len
ngth. Distancees are uniball center to un
niball
set at
center:1=35mm
Ste
ep6–Mo
otorandB
Beltinstaallation
Inorrdertoinstalllthemotor,yyoumustfirsttdisassembleeone
of th
he side framees in order to
o have accesss to the moun
nting
screw
ws and accesss to the belt drive. Hencee one side fraames
fasteeners are nott tightened upon delivery.. Before instaalling
thep
pinionpulley onthemotorr,youhaveto
oaddaflatto
othe
moto
orshaftinord
dertosecurethepulleyw
withthesetscrews
(70Ͳ)).
1
Mount the motor
m
as show
wn using wasshers and screws onto
the motor mount
m
(70Ͳ000
066). Make su
ure to have the motor
wireoutletfaacingintotherightdirectio
onforconnecttingthem
totheESC.Th
heninserttheebeltpulleyin
ntothebeltan
ndslideit
onto the mo
otor shaft. Beefore you tigghten the set screws,
make sure th
hat the pinion is installed leveled with
h the belt
pulley,thedistance(Fig.1))isat24.5mm
m.
Usebothtensioningscrew
wstotensiontthebeltdrive.Thebelt
mustn’tbeteensionedtoottighttoavoidunnecessarywear.
Afterinstallattionofthemo
otor,reassemblethesideframes.
Step7–ElectricalWiringandSetup
Themechanicshavetobefullyelectricallysetupandadjusted
prior to installation into the fuselage. As the use of a 12S
(44.4V)setupisnecessary,westronglyrecommendtorunthe
controlequipmentonaseparate2SLipobatteryandBECfor
securityreasons.
In scale configurations main battery power wires may be
longer than on comparable 3D helicopter equipment. As HV
ESCs do not necessarily have the main battery ground wire
connected to the servo signal ground wire, it may be
necessary to create an additional connection between the
BEC 2S batteries ground wire and the 12S main battery
ground wire. Certain configurations without this ground
interconnection have led to a loss of signal at the ESC from
thereceiverduetoEMCeffects.
The swash plate is a regular120deg CCPM type, please take
your time to adjust all servo travels, center positions – the
entire 3 axis gyro – servo – radio setup prior to the
installationintothefuselage.
A 450KV motor such as the Align 750MX run at app. 80%
throttle (hover) shows satisfying results. As space is limited,
pleasemakesure youcheckthe dimensions if youintend to
useotherbrandmotors.
In regards to the gyro setup, we recommend to start with
standardvaluesofthe3axisgyro.Makesureyouinstallthe
gyro in a way that provides easy access for connecting your
programming equipment. As the scale fuselage adds
additionalinertiatoeachaxis,gyrosarenormallytobesetat
alowergyrogain.Allinall,arigidgyroresponsedoesruinthe
scalelookinflight.
Beforeoperatingthemodelcheckthefollowingpoints:
ͲThe direction of servo rotation (including the throttle
function)andtravels.
ͲThedirectionofeffectofthegyro,andthetransmittermixer
functionsyouhaveprogrammed.
ͲCollectivepitchtravel(lineartravelͲ2/Ͳ3°to+9/+10°)
ATTENTION!
When using the a pitch gauge to adjust correct CP travels,
make sure that the gauge lines up with the flat surface of
therotorblade.Manypitchgaugesdonotshowthecorrect
!
anglewhensnappedontounsymmetricrotorblades Themainrotorbladesarenotsymmetrical.Donottryto fly
inverted.
ͲItispermissibletoreduceservotravels,butnotbelow60%
(inthiscaseadjustthemechanicallinkage);travelsshouldbe
primarilysymmetrical.
ͲApplycollectivepitchmin./collectivepitchmax.andfullroll
andpitchͲaxiscommandssimultaneouslyin
all directions; rotate the rotor head at the same time, and
checkthatattheextremesoftravelnopartoftherotor
headisobstructed.
ͲTheautoͲrotationswitchmustbeassigned,andwithineasy
reach!
Ͳ When autoͲrotation is selected: throttle position to off, all
directionsofcontrolandtravelsasinnormal
flight,tailrotorto0°=fixedvalue.
ͲThefirstfewbatteriesshouldbeflownwiththemodelclose
totheground,i.e.nomorethanabout1m
altitude,untilyouareconfidentthattherearenodefectsor
errors,andthateverythingisworkingfaultlessly:
ͲUseyourearscritically(!),listeningforunusualsoundsand
vibration,andseekouttheproblemifyouareinanydoubtat
all!
ͲDon’tlistentoanyonestandingclosebyiftheytrytohurry
youintoflyingthemodel.
ͲAvoidhoveringoutsidegroundeffect(hoveraltitudewitha
model:approx.1m,orhalftherotordiscdiameter):
ͲHoveringrequiresveryhighpower,andyouarecompletely
dependent on the motor: in contrast to most fullͲsize
helicopters,modelhelicoptershaveonlyone(!)powerplant.
Ste
ep8–Insttallationofmechaanics
Mou
unt the four LLͲbrackets (60
0UH1Ͳ003) on
nto both sidees of
the main frame as shown. Make
M
sure they are prop
perly
nedbeforeyoufastenthesscrews.
align
Instaall the mechaanics by sliding them into
o the fuselagge as
show
wn.
Mou
unttheEVAtaailsupportassshown.
Unmount thee entire tail ro
otor frame frromthe tail box
b again.
Dismantletheemainrotoraassyifyouinsstalledthemd
duringthe
setup.
Mount the LED
L light (54) and cap (55) inside the tail
t fin as
shown.
utintothetaillfinasshown.
Instaallthetailstru
Installtheafttcoverasshow
wn.
Installthetailassyonthettailboomassshown.
Instaallthetailfino
onthetailfusselageasshow
wn.
ndwashers(4
41)toinstallthetailtube.
Usescrews(40)an
Installtheverticalandhorizontaltailsw
withscrews(39
9)as
shown.
Copyright@2013
3 - Roban Lim
mited – All rig
ghts reserved
d
InstaalltheLED(52
2)ontherighttsidewing
Instaallthewingsu
usingepoxyglue
Instaallthetophattch.
InstalltheLED
D(53)ontheleftsidewingg.
Fixthemechaanicswithscrews(43)andbrackets(38) inside
thefuselage.
Installtherottorhead.
Copyright@2013
3 - Roban Lim
mited – All rig
ghts reserved
d
31)asshown.
Instaallantennas(3
naasshown
Installantenn
Instaallwindshieldwipersassho
own
Instaallantennasasshown.
ConnecttheLLEDcontrollerrtotheLEDlights.
naasshown.
Installantenn
Ste
ep10ͲBaatteryinstallation
Thebatterycomp
partmentconssistsofaconvenientandseecurewoodenstructure,ab
batterydraweer.Oventheh
hatchlockfirstt(move
thesstowawaybacckwards,then
nsimplyopenthehatchtoaaccessthebattterycomparttment.Secureethebatteriessinpositionb
byusing
velcrrosasshown.
Ste
ep11ͲNo
owitistimetoflyy
Fortthefirstfewccircuits:startingfromgrou
undeffect,accceleratetoa moderatespeeedinlevelfllight,andonlyytheninitiate
eaclimb,
alwaayskeepthem
modelflyingatabriskforwardspeed;on
nthelandingaapproachalwaaysdescendttowardsthelaandingareaattasteady
angle
e(around45°°)directlyinto
owind,anddo
on’tbringthemodeltoahaaltuntilitisin
ngroundeffecctagain.Thiswayyoucanssaveyour
mod
delthroughau
utorotation.Iffoneparticulaartechnicalfaaultkeepsrecurringinyourrmodel,replaacingthecom
mponentconce
ernedwill
notssolvetheproblemunlessyyouchangeso
omeotheraspectoftheoperatingcond
ditions.Itisashardtofly niceandsmo
oothscale
maneuversasflyin
ngF3Corexact3Dfigures.
Andonefinalrequ
uest:
Pleasseberealisticcwhenassessingyourpilottingskills,becauseascaleh
helicopterish
heavyandhen
ncemuchlessagileinrespo
onsethan
any 3D helicopterr. Keep this comparison
c
in
n mind: if you
u can’t swim and you dive into deep water,
w
the chaances are thatt you will
wn.
drow
Copyright@2013
3 - Roban Lim
mited – All rig
ghts reserved
d
AppendixA
A–ExplossionDraw
wings
Copyright@2013
3 - Roban Lim
mited – All rig
ghts reserved
d
Copyright@2013
3 - Roban Lim
mited – All rig
ghts reserved
d
Copyright@2013
3 - Roban Lim
mited – All rig
ghts reserved
d
Copyright@2013
3 - Roban Lim
mited – All rig
ghts reserved
d
Copyright@2013
3 - Roban Lim
mited – All rig
ghts reserved
d
Copyright@2013
3 - Roban Lim
mited – All rig
ghts reserved
d
Copyright@2013
3 - Roban Lim
mited – All rig
ghts reserved
d
Copyright@2013
3 - Roban Lim
mited – All rig
ghts reserved
d
Copyright@2013
3 - Roban Lim
mited – All rig
ghts reserved
d
AppendixB–Sparep
parts
Copyright@2013
3 - Roban Lim
mited – All rig
ghts reserved
d
Copyright@2013
3 - Roban Lim
mited – All rig
ghts reserved
d
Copyright@2013
3 - Roban Lim
mited – All rig
ghts reserved
d
Copyright@2013
3 - Roban Lim
mited – All rig
ghts reserved
d
Copyright@2013
3 - Roban Lim
mited – All rig
ghts reserved
d
AppendixC–SparepartList
RCHͲ70Ͳ001
RCHͲ70Ͳ002
RCHͲ70Ͳ003
RCHͲ70Ͳ004
RCHͲ70Ͳ005
RCHͲ70Ͳ006
RCHͲ70Ͳ007
RCHͲ70Ͳ008
RCHͲ70Ͳ009
RCHͲ70Ͳ010
RCHͲ70Ͳ011
RCHͲ70Ͳ012
RCHͲ70Ͳ013
RCHͲ70Ͳ014
RCHͲ70Ͳ015
RCHͲ70Ͳ016
RCHͲ70Ͳ017
RCHͲ70Ͳ018
RCHͲ70Ͳ019
RCHͲ70Ͳ020
RCHͲ70Ͳ021
RCHͲ70Ͳ022
RCHͲ70Ͳ023
RCHͲ70Ͳ024
1ͲJJͲ70Ͳ00147
1ͲJJͲ70Ͳ00148
1ͲJJͲ70Ͳ00149
1ͲJJͲ70Ͳ00150
1ͲJJͲ70Ͳ00099
11Ͳ600UH1Ͳ003
1ͲJJͲ70Ͳ00152
1ͲJJͲ70Ͳ00153
1ͲJJͲ70Ͳ00058
1ͲJJͲ70Ͳ00071
1ͲJJͲ70Ͳ00066
1ͲJJͲ70Ͳ00067
1ͲJJͲ70Ͳ00062
1ͲJJͲ70Ͳ00061
1ͲJJͲ70Ͳ00063
1ͲJJͲ70Ͳ00075
Sideframes
Aftframe
Bottomframe
Fwdframe
Distancer6x62
LͲBracket
LandingGear
Footrest
Upperbaseplate
Lowerbaseplate
Motorholder
ScrewM3x30
MainGear78T
Maingearhub
SpurGear20T
Washer10x12x0.5
1ͲJJͲ70Ͳ00076
1ͲJJͲ70Ͳ00077
1ͲJJͲ70Ͳ00078
1ͲJJͲ70Ͳ00079
1ͲJJͲ70Ͳ00080
1ͲJJͲ70Ͳ00082
1ͲJJͲ70Ͳ00083
1ͲJJͲ70Ͳ00073
1ͲJJͲ70Ͳ00037
1ͲJJͲ70Ͳ00038
1ͲJJͲ70Ͳ00039
Bearing10x15x5
Onewaybearing10x14x12
Beltpulley78T
Washer10x12x1
Gear1M36T
Gearhub36T
Gearholder30T
Beltpinion22T
Balllink5mm
Lever1
Flangedbearing3x7x3
1ͲJJͲ70Ͳ00060
1ͲJJͲ70Ͳ00074
1ͲJJͲ70Ͳ00033
1ͲJJͲ70Ͳ00057
1ͲJJͲ70Ͳ00026
1ͲJJͲ70Ͳ00027
1ͲJJͲ70Ͳ00028
1ͲJJͲ70Ͳ00029
Distancer10x25.1
Collar12mm
MainShaft12mm
Shaft10x76.1
Balljoint22mm
Swashupperring
Bearing30x42x7
Swashlowerring
1ͲJJͲ70Ͳ00030
1ͲJJͲ70Ͳ00031
1ͲJJͲ70Ͳ00032
1ͲJJͲ70Ͳ00003
1ͲJJͲ70Ͳ00004
1ͲJJͲ70Ͳ00001
1ͲJJͲ70Ͳ00017
Ballhead
Washer2x8x1
ScrewM2x6
Rotorheadtop
Rotorheadbottom
RotorheadCap
GripSpindle
Copyright@2013 - Roban Limited – All rights reserved
Seitenrahmen
hinterePlatte
Bodenplatte
vorderePlatte
Distanzstück6x62
LͲHalter
Fahrwerk
Trittleiste
ObereBasisplatte
UntereBasisplatte
Motorhalter
SchraubeM3x30
Hauptzahnrad78T
Hauptzahnradaufnahme
Ritzel20T
Beilagschreibe
10x12x0.5
Kugellager10x15x4
Kugellager10x14x12
Riemenrad78T
Beilagscheibe10x12x1
Zahnrad1M36T
Zahnradaufnahme36T
Zahnradaufname30T
Riemenscheibe22T
Kugelkopfrahmen5mm
Hebel1
KugellagerFlansch
3x7x3
Abstandshalter10x25.1
Hauptwelle12mm
Welle10x76.1
Kugelgelenk22mm
TaumelscheibeOberteil
Kugellager30x42x7
Taumelscheibe
Unterteil
Kugelkopf
Beilagscheibe2x8x1
SchraubeM2x6
Rotorkopfoben
Rotorkopfunten
Rotorkopfkappe
Blattlagerwelle
RCHͲ70Ͳ025
RCHͲ70Ͳ026
RCHͲ70Ͳ027
RCHͲ70Ͳ028
RCHͲ70Ͳ029
RCHͲ70Ͳ030
RCHͲ70Ͳ031
RCHͲ70Ͳ032
RCHͲ70Ͳ033
RCHͲ70Ͳ034
RCHͲ70Ͳ035
RCHͲ70Ͳ036
RCHͲ70Ͳ037
RCHͲ70Ͳ038
RCHͲ70Ͳ039
RCHͲ70Ͳ040
RCHͲ70Ͳ041
RCHͲ70Ͳ042
RCHͲ70Ͳ043
RCHͲ70Ͳ044
RCHͲ70Ͳ045
RCHͲ70Ͳ046
1ͲJJͲ70Ͳ00020
1ͲJJͲ70Ͳ00021
1ͲJJͲ70Ͳ00022
1ͲJJͲ70Ͳ00023
1ͲJJͲ70Ͳ00019
1ͲJJͲ70Ͳ00018
1ͲJJͲ70Ͳ00024
1ͲJJͲ70Ͳ00025
1ͲJJͲ70Ͳ00012
1ͲJJͲ70Ͳ00014
1ͲJJͲ70Ͳ00016
Washer3x9x1.5
Bearing3x7x3
Washer 3x4.5x1.1
LͲLever
ScrewM3x25
SelfLockingNutM3
ScrewM2.5x16
Balllink5mm
Washer4x8x1
Washer8x14x0.5
Washer8x11.5x1.3
1ͲJJͲ70Ͳ00009
1ͲJJͲ70Ͳ00034
1ͲJJͲ70Ͳ00035
1ͲJJͲ70Ͳ00036
1ͲJJͲ70Ͳ00046
1ͲJJͲ70Ͳ00047
1ͲJJͲ70Ͳ00050
1ͲJJͲ70Ͳ00041
1ͲJJͲ70Ͳ00042
1ͲJJͲ70Ͳ00044
1ͲJJͲ70Ͳ00049
1ͲJJͲ70Ͳ00051
1ͲJJͲ70Ͳ00064
1ͲJJͲ70Ͳ00065
1ͲJJͲ70Ͳ00068
1ͲJJͲ70Ͳ00088
1ͲJJͲ70Ͳ00087
1Ͳ60ͲWJͲ00003
1ͲJJͲ70Ͳ00092
1ͲJJͲ70Ͳ00093
1ͲJJͲ70Ͳ00094
1ͲJJͲ70Ͳ00095
1ͲJJͲ70Ͳ00096
12Ͳ02Ͳ02006
11Ͳ600jRCHͲ70Ͳ
002
1ͲJJͲ70Ͳ00097
1ͲJJͲ70Ͳ00098
1ͲJJͲ70Ͳ00102
1ͲJJͲ70Ͳ00103
1ͲJJͲ70Ͳ00104
1ͲJJͲ70Ͳ00105
1ͲJJͲ70Ͳ00106
11Ͳ600UH1Ͳ007
MainBladeGrip
Lever23mm
Lever67mm
Gestänge98mm
Rightservolever
Leftservolever
BearingBlock
Lever2
Lever3
Bushing5x7x7
Washer5x7x1.5
Shaft5x62
Servoholderfwd
Servoholderaft
Uniball5mm
Bearingblock
Tailshaft5x83
Tubebevelgear
Washer15x18x1
Tailboomholderfwd
Tailboomholderaft
Tailboom
Tailboomshaft
Bearingholder
XJunction
Beilagscheibe3x9x1.5
Kugellager3x7x3
Beilagscheibe3x4.5x1.1
LͲHebel
SchraubeM3x25
StoppmutterM3
SchraubeM2.5x16
Kugelkopf5mm
Beilagscheibe4x8x1
Beilagscheibe8x14x0.5
Beilagscheibe
8x11.5x1.3
Hauptrotorblatthalter
Gestänge23mm
Gestänge67mm
Gestänge98mm
RechterServohebel
LinkerServohebel
Lagerbock
Hebel2
Hebel3
Buchse5x7x7
Beilagschreibe5x7x1.5
Welle5x62
Servohaltervorne
Servohalterhinten
Uniball5mm
Lagerbock
Welle5x83
Kegelrad
Beilagscheibe15x18x1
Heckrohrhaltervorne
Heckrohrhalterhinten
Heckrohr
Heckrohrwelle
Kugellagerhalter
XͲVerbinder
Tailservoframe
Tailservoclamp
Gear1M30T
Tailpushrod702mm
Tailsupportholder
Bolt1.5x7.8
Tailsupportrod
Tailsupportclamp
Heckservorahmen
Heckservoklammer
Zahnrad1M30T
Gestänge702mm
Strebenaufnahme
Bolzen1.5x7.8
Heckstrebe
Heckstrebenklammer
Copyright@2013 - Roban Limited – All rights reserved
RCHͲ70Ͳ047
RCHͲ70Ͳ048
RCHͲ70Ͳ049
RCHͲ70Ͳ050
RCHͲ70Ͳ051
RCHͲ70Ͳ052
RCHͲ70Ͳ053
RCHͲ70Ͳ054
RCHͲ70Ͳ055
RCHͲ70Ͳ056
RCHͲ70Ͳ057
RCHͲ70Ͳ058
RCHͲ70Ͳ059
RCHͲ70Ͳ060
RCHͲ70Ͳ061
RCHͲ70Ͳ062
RCHͲ70Ͳ063
RCHͲ70Ͳ064
RCHͲ70Ͳ065
RCHͲ70Ͳ066
RCHͲ70Ͳ067
RCHͲ70Ͳ068
RCHͲ70Ͳ069
RCHͲ70Ͳ070
RCHͲ70Ͳ071
RCHͲ70Ͳ072
RCHͲ70Ͳ073
RCHͲ70Ͳ074
RCHͲ70Ͳ075
RCHͲ70Ͳ076
RCHͲ70Ͳ077
RCHͲ70Ͳ078
1Ͳ60ͲWJͲ00010
1Ͳ60ͲWJͲ00011
1Ͳ60ͲWJͲ00006
1ͲJJͲ70Ͳ00121
1Ͳ60ͲWJͲ00002
1ͲJJͲ70Ͳ00110
1ͲJJͲ70Ͳ00111
1ͲJJͲ70Ͳ00112
1ͲJJͲ70Ͳ00113
1ͲJJͲ70Ͳ00122
1ͲJJͲ70Ͳ00107
1ͲJJͲ70Ͳ00108
1ͲJJͲ70Ͳ00125
1ͲJJͲ70Ͳ00126
1ͲJJͲ70Ͳ00130
1ͲJJͲ70Ͳ00123
1ͲJJͲ70Ͳ00114
1ͲJJͲ70Ͳ00115
1ͲJJͲ70Ͳ00116
1ͲJJͲ70Ͳ00119
1ͲJJͲ70Ͳ00117
1ͲJJͲ70Ͳ00120
1ͲJJͲ70Ͳ00118
1ͲJJͲ70Ͳ00136
1ͲJJͲ70Ͳ00154
1ͲJJͲ70Ͳ00151
1ͲJJͲ70Ͳ00146
1ͲJJͲ70Ͳ00002
1ͲJJͲ70Ͳ00005
1ͲJJͲ70Ͳ00006
1ͲJJͲ70Ͳ00007
1ͲJJͲ70Ͳ00008
1ͲJJͲ70Ͳ00010
1ͲJJͲ70Ͳ00011
1ͲJJͲ70Ͳ00013
1ͲJJͲ70Ͳ00015
1ͲJJͲ70Ͳ00040
1ͲJJͲ70Ͳ00045
1ͲJJͲ70Ͳ00054
1ͲJJͲ70Ͳ00055
1ͲJJͲ70Ͳ00056
1ͲJJͲ70Ͳ00081
1ͲJJͲ70Ͳ00084
1ͲJJͲ70Ͳ00085
1ͲJJͲ70Ͳ00086
Copyright@2013 - Roban Limited – All rights reserved
Washer5x7x5.7
Washer5x7x2.1
Tailshaft2blade
Washer16x18x9.6
Tailframegear
Centerhub
Pitchlever
Pitchslider
Pitchsleeve
Washer7x8.5x4
Dogbone
Washer2x3x4
Sleeve2x5x9.5
Washer2x5x0.5
ScrewM2x17
Support
Washer3x4x0.5
LͲLever
Washer3x4x5
Framespacer
Tailframe1
Tailframe2
Tailrotorhub
Tailblade
Tailblade
MainBlade
MainBelt
ScrewM3x18
ScrewM2.5x12
ScrewM4x24Ͳ6.5
SelfLockingNutM4
ScrewM3x12
ScrewM4x26Ͳ7
ScrewM4x10
ThrustBearing6x14x5
Bearing8x14x4
Servorodguide
Bearing5x10x4
ScrewM2.5x8
Bearing12x24x6
Bearing10x19x5
NylonNutM2.5
Screw M2.5x8
ScrewM2.5x20
ScrewM3x8
Hülse5x7x5.7
Beilagscheibe5x7x2.1
Heckwelle2Blatt
Hülse16x18x9.6
KegelradHeck
Heckrotorkopf
Pitchhebel
Pitchschieber
Pitchhülse
Hülse7x8.5x4
Hundeknochen
Hülse2x3x4
Hülse2x5x9.5
Beilagscheibe2x5x0.5
SchraubeM2x17
Halterung
Beilagscheibe3x4x0.5
LͲHebel
Hülse3x4x5
Distanzstück
Heckrahmen1
Heckrahmen2
Heckhalter
Heckrotorblatt
Heckrotor
Hauptrotorblatt
Zahnriemen
SchraubeM3x18
SchraubeM2.5x12
PaßschraubeM4x24Ͳ6.5
StoppmutterM4
SchraubeM3x12
PaßschraubeM4x26Ͳ7#
SchraubeM4x10
Drucklager6x14x5
Kugellager8x14x4
Gestängeführung
Kugellager5x10x4
SchraubeM2.5x8
Kugellager12x24x6
Kugellager10x19x5
NylonMutterM2.5
SchraubeM2.5x8
SchraubeM2.5x20
SchraubeM3x8
RCHͲ70Ͳ079
1ͲJJͲ70Ͳ00090
1ͲJJͲ70Ͳ00133
1ͲJJͲ70Ͳ00100
1ͲJJͲ70Ͳ00101
1ͲJJͲ70Ͳ00109
1ͲJJͲ70Ͳ00124
1ͲJJͲ70Ͳ00127
1ͲJJͲ70Ͳ00128
1ͲJJͲ70Ͳ00131
1ͲJJͲ70Ͳ00132
1ͲJJͲ70Ͳ00134
1ͲJJͲ70Ͳ00135
rotorhead4bladetop
rotorhead4bladebottom
Bearing7x11x3
Bearing3x6x2.5
Bladegrip
Bearing5x10x4
ScrewM3x8
ScrewM3x20
ScrewM2x10
ScrewM2x5
rotorhead5 bladetop
rotorhead5 bladebottom
RCHͲ70Ͳ091
RCHͲ70Ͳ092
RCHͲ70Ͳ093
RCHͲ70Ͳ094
RCHͲ70Ͳ095
RCHͲ70Ͳ096
RCHͲ70Ͳ097
1ͲJJͲ70Ͳ00138
1ͲJJͲ70Ͳ00139
1ͲJJͲ70Ͳ00140
Sleeve2x5x6.5
BallLink
ScrewM2x14
1ͲJJͲ70Ͳ00142
1ͲJJͲ70Ͳ00143
1ͲJJͲ70Ͳ00144
1ͲJJͲ70Ͳ00145
1Ͳ60ͲWJͲ00015
Uniball5mm
Pitchlever4blade
Pitchlever3blade
Tailshaft3/4blade
Washer12x18x0.1
RCHͲ70Ͳ098
1ͲJJͲ70Ͳ00043
SetscrewM4x4
RCHͲ70Ͳ099
RCHͲ70Ͳ100
RCHͲ70Ͳ101
RCHͲ70Ͳ102
RCHͲ70Ͳ103
RCHͲ70Ͳ104
RCHͲ70Ͳ105
RCHͲ70Ͳ106
1ͲJJͲ70Ͳ00053
1ͲJJͲ70Ͳ00052
1ͲJJͲ70Ͳ00048
1ͲJJͲ70Ͳ00059
1ͲJJͲ70Ͳ00069
1ͲJJͲ70Ͳ00091
1Ͳ60ͲWJͲ00004
1ͲJJͲ70Ͳ00089
ScrewM3x6
Washer3x7x0.5
Balllink5mm
ScrewM3x10
NutM2
Bearing12x18x4
Shaftbevelgear
Washer10x13x0.1
RCHͲ70Ͳ107
RCHͲ70Ͳ108
RCHͲ70Ͳ109
RCHͲ70Ͳ110
1ͲJJͲ70Ͳ00129
1ͲJJͲ70Ͳ00141
1ͲJXͲ47Ͳ00115
1ͲJXͲ47Ͳ00103
NylonNutM2
Tailspindle
Rotorhub3blade
Rotorhub4blade
RCHͲ70Ͳ080
RCHͲ70Ͳ081
RCHͲ70Ͳ082
RCHͲ70Ͳ083
RCHͲ70Ͳ084
RCHͲ70Ͳ085
RCHͲ70Ͳ086
RCHͲ70Ͳ087
RCHͲ70Ͳ088
RCHͲ70Ͳ090
Rotorkopf4Blattoben
Rotorkopf4Blattunten
Kugellager7x11x3
Kugellager3x6x2.5
Rotorblatthalter
Kugellager5x10x4
SchraubeM3x8
SchraubeM3x20
SchraubeM2x10
SchraubeM2x5
Rotorkopf5Blattoben
Rotorkopf5Blattunten
Hülse2x5x6.5
Kugelkopfverbinder
SchraubeM2x14
Copyright@2013 - Roban Limited – All rights reserved
Uniball5mm
Pitchhebel4Blatt
Pitchhebel3Blatt
Heckwelle3/4Blatt
Beilagscheibe
12x18x0.1
MadenschraubeM4x4
SchraubeM3.6
Beilagscheibe3x7x0.5
Kugelkopf5mm
SchraubeM3x10
MutterM2
Kugellager12x18x4
Kegelrad20T
Beilagscheibe
10x13x0.1
NylonMutterM2
HeckrotorWelle
Rotorkopf3Blatt
Rotorkopf4Blatt
NOTES:
Copyright@2013 - Roban Limited – All rights reserved
Copyright@2013 - Roban Limited – All rights reserved