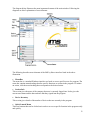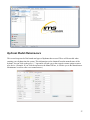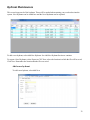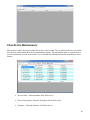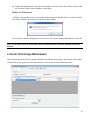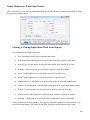
1
REFERENCE MANUAL Reference Manual and User’s Guide Version 2.0.1.2 www.GETHURCO.com 1-800-888-1436 • gethurco.com • [email protected] Welcome Welcome Thank you for purchasing Hurco’s Infrastructure Management System, IMS, software. IMS was developed to help you manage one of our most important infrastructures, water distribution. The IMS system was designed to be used with Hurco’s Fire Flow Pro for fire flow testing, unidirectional flushing, c-factor testing and Hurco’s Valve Star for valve exercising and management. This IMS software can also be used as a standalone system ready for you to enter data and create reports. This software has many user friendly features including drop down menus and data selection fields, report editing, security features and much more. This software will give you every function you need to manage your water distribution system including valves, hydrants and mains. IMS software modules include: Hydrant and Valve Maintenance, included with base package. Fire Flow Testing C-factor Testing Unidirectional Flushing Valve Exercising QSI Integration Module for Valve Star G4 and Fire Flow Pro QSI • • • • • • This manual will take you through the step by step procedures for using the IMS software. We use simple to understand instructions and photos to assist you in learning how to get the best results from your IMS software. Please follow each step completely to insure you will get the valuable data, management tools and reports you expect. The IMS system is designed for any size water distribution system and set up so you can generate your own custom reports using Crystal Reports. To get started, please read this manual front to back. If you need help getting started with your new IMS software, the staff at Hurco will be happy to assist you. We can set up training by Webex, telephone, fax, e-mail or even onsite training. Please call to learn more about our training programs. You will have unlimited Webex and telephone support for one year from your purchase date. In this IMS software program, we give you numerous fields to collect and record important data about your water distribution system. As a general rule, these features are based on the recommendations of the American Water Works Association, (AWWA) and the National Fire Protection Association, (NFPA). It will be your responsibility to read and understand these recommendations. Hurco Technologies, Inc. will not be responsible for the incorrect collection of data or for the failure to follow AWWA and NFPA recommendations. Assign a competent worker with knowledge of your distribution system and capabilities to manage data in a software program. Always verify that the equipment you are using to collect data in the field is properly calibrated and certified. To set up training or for general information regarding your new IMS software, call Hurco Technologies, Inc. at 1-800-888-1436. Sincerely, Lyndon J. Hurley President, Hurco Technologies, Inc. www.GETHURCO.com 1 Table of Contents Welcome ........................................................................................................................................1 Installation ....................................................................................................................................2 System Requirements ............................................................................................................................... 2 Installing the Program ............................................................................................................................... 3 Getting Started .............................................................................................................................7 Starting the Application ............................................................................................................................. 7 To Start the Application ................................................................................................................. 7 Activating Your Product ............................................................................................................................. 7 Logging into the Product ........................................................................................................................... 8 User Maintenance ..................................................................................................................................... 9 Creating a New User ...................................................................................................................... 9 Deleting a User ............................................................................................................................ 10 Editing a User............................................................................................................................... 11 Field Operator Maintenance ................................................................................................................... 11 Exiting the Application............................................................................................................................. 12 Getting Help............................................................................................................................................. 12 The Program Interface............................................................................................................................. 12 Add/Remove/Working with Dashlets ...................................................................................................... 15 Adding Dashlets ........................................................................................................................... 15 Removing Dashlets ...................................................................................................................... 15 Working with Dashlets................................................................................................................. 15 Creating/Editing a Company ....................................................................................................17 Creating a New Company ........................................................................................................................ 17 Editing a Current Company...................................................................................................................... 18 Close a Company ..................................................................................................................................... 18 Switching Companies............................................................................................................................... 19 Version 2.0 Editing Actions ...........................................................................................................................20 District Maintenance ............................................................................................................................... 20 Sub‐division Maintenance ....................................................................................................................... 21 Reoccurrence Period Maintenance ......................................................................................................... 22 Repair/Maint. Action Maintenance......................................................................................................................... 22 Hydrant Actions ........................................................................................................................... 23 Valve Actions ............................................................................................................................... 23 Main Actions ................................................................................................................................ 24 Creating/Editing/Deleting Devices............................................................................................25 Manufacturer Maintenance .................................................................................................................... 25 Adding a New Manufacturer ....................................................................................................... 26 Deleting a manufacturer.............................................................................................................. 26 Hydrant Maintenance.............................................................................................................................. 26 Hydrant Model Maintenance....................................................................................................... 27 Create a new model.............................................................................................................. 28 Delete current model ........................................................................................................... 28 Edit current model................................................................................................................ 28 Restraint Types Maintenance ...................................................................................................... 28 Hydrant Paint Color Maintenance............................................................................................... 29 NFPA Code Maintenance ............................................................................................................ 30 Vandal Proof Type Maintenance................................................................................................. 30 Hydrant Deficiency Maintenance................................................................................................ 31 Hydrant Maintenance ................................................................................................................. 32 Add a new hydrant............................................................................................................... 32 Valve Maintenance .................................................................................................................................. 36 Valve Type Maintenance ............................................................................................................. 36 Valve Drive Type Maintenance ................................................................................................... 37 Valve Function Maintenance ...................................................................................................... 38 Valve Access Type Maintenance ................................................................................................. 38 Valve Deficiency Maintenance .................................................................................................... 39 Valve Maintenance ..................................................................................................................... 40 Add a new valve ................................................................................................................... 40 Version 2.0 Flow Device Maintenance ....................................................................................................................... 44 Main Maintenance................................................................................................................................... 44 Connection Type Maintenance.................................................................................................... 45 Pipe Type Maintenance ............................................................................................................... 46 Fitting Maintenance..................................................................................................................... 46 Main Maintenance....................................................................................................................... 47 Add new main .................................................................................................................. 48 Creating Tests & Test Groups ...................................................................................................50 Fire Flow Testing...................................................................................................................................... 50 Fire Flow Test Maintenance......................................................................................................... 50 Add a new test...................................................................................................................... 51 Delete a test ......................................................................................................................... 52 Fire Flow Test Group Maintenance.............................................................................................. 53 Add a new Fire Flow test group............................................................................................ 53 Delete a Fire Flow test group................................................................................................ 54 Exercise Group Maintenance................................................................................................................... 54 Add a new Exercise group............................................................................................................ 54 Delete an Exercise group ............................................................................................................. 55 C‐Factor Testing ....................................................................................................................................... 55 C‐Factor Test Maintenance.......................................................................................................... 55 Add a new C‐Factor test ....................................................................................................... 56 Delete a C‐Factor test ........................................................................................................... 58 C‐Factor Test Group Maintenance............................................................................................... 58 Add a new C‐Factor test group............................................................................................. 59 Delete a C‐Factor test group ................................................................................................. 59 Uni‐directional Flushing........................................................................................................................... 59 Uni‐directional Flush Test Maintenance ...................................................................................... 59 Add a new Uni‐directional Flush test ................................................................................... 60 Delete a Uni‐directional Flush test ....................................................................................... 62 Uni‐directional Flush Test Group Maintenance........................................................................... 63 Add a new Uni‐directional Flush test group ......................................................................... 63 Delete a Uni‐directional Flush test group ............................................................................. 64 Version 2.0 Hydrant Flushing Group Maintenance..................................................................................................... 64 Add a new hydrant flushing group............................................................................................... 64 Delete a hydrant flushing group.................................................................................................................65 Creating/Submitting Fire Flow Work Order...........................................................................66 Fire Flow Work Order .............................................................................................................................. 66 Add new Fire Flow Work Order ................................................................................................... 67 To Export Fire Flow Work Order to QSI Handheld................................................................................... 69 To Import Fire Flow Work Order to QSI Handheld .................................................................................. 69 To Edit Results from the Fire Flow Work Order....................................................................................... 70 To Submit Results from the Fire Flow Work Order.................................................................................. 71 Creating/Submitting Valve Exercise Work Order ..................................................................72 Valve Exercise Work Order ...................................................................................................................... 72 Add a new Valve Exercise Work Order ........................................................................................ 73 To Export Valve Exercise Work Order to QSI Handheld........................................................................... 75 To Import Valve Exercise Work Order to QSI Handheld .......................................................................... 75 To Edit Results from the Valve Exercise Work Order............................................................................... 76 To Import Torque Log .............................................................................................................................. 76 To Submit Results from the Fire Flow Work Order.................................................................................. 77 Creating/Submitting Repair/Maintenance Work Order ........................................................78 Repair/Maintenance Work Order............................................................................................................ 78 Add a new Repair/Maintenance Work Order .............................................................................. 79 To Edit Results from the Repair/Maintenance Work Order .................................................................... 81 To Submit Results from the Repair/Maintenance Work Order ............................................................... 82 Creating/Submitting C-Factor Work Order............................................................................83 C‐Factor Work Order ............................................................................................................................... 83 Add a new C‐Factor Work Order.................................................................................................. 84 To Edit Results from the C‐Factor Work Order ........................................................................................ 86 To Submit Results from the C‐Factor Work Order................................................................................... 88 Creating/Submitting Uni-directional Flush Work Order.......................................................89 Uni‐directional Flush Work Order............................................................................................................ 89 Version 2.0 Add a new Uni‐directional Flush Work Order.............................................................................. 90 To Edit Results from the Uni‐directional Flush Work Order .................................................................... 92 To Submit Results from the Uni‐directional Flush Work Order ............................................................... 94 Creating/Submitting a Hydrant Flushing Work Order .........................................................95 Hydrant Flushing Work Order.................................................................................................................. 95 Add a new Hydrant Flushing Work Order.................................................................................... 90 To Edit Results from the Hydrant Flushing Work Order ......................................................................... 98 To Submit Results from the Hydrant Flushing Work Order .................................................................................99 Reports ......................................................................................................................................100 Fire Flow Work Order Results................................................................................................................ 100 Filtering & Viewing Fire Flow Work Order Results..................................................................... 101 Fire Flow History Comparison................................................................................................................ 102 Valve Exercise Work Order Results........................................................................................................ 103 Filtering & Viewing Valve Exercise Work Order Results ............................................................ 104 Valve Exercise History Comparison ....................................................................................................... 106 Repair/Maintenance Work Order Results ............................................................................................. 107 Filtering & Viewing Repair/Maintenance Work Order Results .................................................. 107 Repair/Maintenance by Priority Report ................................................................................................ 109 Uni‐directional Flush Work Order Results ............................................................................................. 110 Filtering & Viewing Uni‐directional Flush Work Order Results.................................................. 110 C‐Factor Work Order Results ................................................................................................................. 112 Filtering & Viewing C‐Factor Work Order Results ...................................................................... 113 Hydrant Flushing Work Order Results ................................................................................................... 114 Filtering & Viewing Hydrant Flushing Work Order Results ........................................................ 115 Water Usage Results.............................................................................................................................. 116 Filtering & Viewing Fire Flow Water Usage Results ................................................................... 116 Filtering & Viewing Uni‐directional Flush Water Usage Results ................................................ 118 Filtering & Viewing C‐Factor Water Usage Results .................................................................... 119 Filtering & Viewing Hydrant Flushing Water Usage Results ...................................................... 121 Master Device List Reports ................................................................................................................... 122 Filtering & Viewing Hydrant Master Reports............................................................................. 122 Filtering & Viewing Valve Master Reports................................................................................................ 124 Version 2.0 Filtering & Viewing Main Master Reports.................................................................................. 126 Hydrant Sticker Reports........................................................................................................................ 128 Custom Report Viewer........................................................................................................................... 129 Utilities ......................................................................................................................................131 Database Backup ................................................................................................................................... 131 Restore Database from Backup ............................................................................................................. 132 QSI Fire Flow Directory Export............................................................................................................... 132 QSI Valve Exercise Directory Export ...................................................................................................... 132 QSI New Valve Import............................................................................................................................ 133 QSI New Hydrant Import ....................................................................................................................... 133 Hydrant/Valve Import............................................................................................................................ 134 Export Hydrant Template File...................................................................................................................134 Export Valve Template File.......................................................................................................................134 Start Import Wizard..................................................................................................................................135 Help ...........................................................................................................................................138 Updates.................................................................................................................................................. 138 About IMS by Hurco............................................................................................................................... 139 Support .................................................................................................................................................. 139 IMS Video Users Guide .......................................................................................................................... 140 IMS Mobile Video Users Guide .............................................................................................................. 140 Version 2.0 Chapter 1 Installation System Requirements Minimum System Requirements • 1 gigahertz (GHz) or faster 32-bit (x86) or 64-bit (x64) processor • 512 megabyte (MB) RAM (1 gigabyte (GB) Recommended) • 1.5 gigabytes (GB) free hard disc space (application data entered by the user will take up additional space) • CD-ROM or DVD drive • 1024 x 768 or higher resolution monitor • .Net framework 2.0 • Internet Access (fees may apply) – Used only for google maps addon • Adobe Reader Supported Operating Systems • • • • • • • • • • • • • • • • XP Home SP2 XP Professional SP2 XP Media Center Vista Home Basic Vista Home Premium Vista Business Vista Ultimate Vista Enterprise Windows 7 Home Windows 7 Business Windows 7 Ultimate Server 2003 SP1 SBS 2003 Standard SBS 2003 Premium SBS 2003 R2 Standard SBS 2003 R2 Premium 2 Version 2.0 Installing the Program To begin the installation of IMS by Hurco, double click on the “setup.exe” file located on your installation CD (or inside your downloaded zip file).You must run the setup file with administrative privileges. Also temporarily shut down any antivirus programs to prevent interference during installation. When the installation begins, you will see the following screens. This screen will appear if you do not have the required pre-requisite programs loaded on your computer at the time of installation. Clicking “Install” will move the installation forward. 3 Version 2.0 After clicking “Install”, you will see a progress bar. Please be patient, this install may take several minutes depending on the speed of your PC. Once the pre-requisites have been installed, the following screen will appear to start the installation of IMS by Hurco. Click “Next” to proceed with the install. 4 Version 2.0 To proceed with the installation, click “Install” to continue. you will see a progress bar. Please be patient, this install may take several minutes depending on the speed of your PC. After clicking “Install” , you will see a progress bar. Please be patient, this install may take several minutes depending on the speed of your PC. 5 Version 2.0 Once the installation finishes, you will be asked to click “Finish”. Do so and you are all done! For network environments, IMS by Hurco can be set up to share its database with other installations. To learn more about this feature, contact Hurco Technologies Inc. 6 Version 2.0 Chapter 2 GETTING STARTED Starting the Application The IMS by Hurco software icon appears under the Hurco Technologies group by default and on the desktop as a shortcut. To start the application 1. Click the Start button on the Windows taskbar, and then select Programs from the Start menu. 2. Select Hurco Technologies from the Programs submenu, and then select the IMS by Hurco icon. OR 1. Select the IMS by Hurco software icon. We have provided demonstration data for a company called “Sample Company.” This demonstration data makes it much easier for new users to learn the application. Depending on whether you are a new user, or the first user of the application for your company, Sample Company might open automatically after startup. If not, you can open it as you would any other company. Activating Your Product Upon first opening your program, you will see the activation screen. If you have not purchased an activation ID, you will have 15 uses before you will be required to purchase one. To use your trial uses, click Cancel and you will be taken to the user login screen. After you have purchased your activation ID, you will need to enter it on the screen and click Activate. This screen will not appear again after activating your product. If you purchase additional modules at a later date, you will need to go to the Help menu to enter new activation ID. See “Help Section.” 7 Logging into the Program You must enter your user login name and password to access the application. The default user name is Admin. The default password is imsadmin. To enter a user login name and password 1. The User Login screen appears when the application is started. (It may be the second screen if the program has not been activated.) 2. Type your user name in the User Name and password. 3. Select the company under Connect To. You must choose a company to continue. 4. You now have access only to those functions as defined by program administrator. Note: User names and passwords are case-sensitive. That is, Admin and ADMIN are two different user names/passwords. User Maintenance 8 Select User Maint from the Edit menu to edit the permissions and options for each user. This is where password and user names for each user are created. Also access to certain parts of the program can be restricted here. Certain fields are automatically set to “Deny” when the program is installed. These items are denoted by two asterisks. These are pertinent fields that affect other parts of the program. Create new user 1. To create a new user, select Add New. 2. Enter User Name for new user. 3. Enter password for new user. 4. Select device rights for the new user. To change access for a field, select the drop down box and chose either Allow or Deny. Allow will grant the user access to that menu option. Deny will prevent that option from appearing in the users menu options. 5. Select work order rights for the new user. To change access for a field, select the drop down box and chose either Allow or Deny. Allow will grant the user access to that menu option. Deny will prevent that option from appearing in the users menu options. 9 6. Select other rights for the new user. To change access for a field, select the drop down box and chose either Allow or Deny. Allow will grant the user access to that menu option. Deny will prevent that option from appearing in the users menu options. 7. Select Save Data to save new user or Cancel to not save new user. Delete current user 1. To delete a user, select the user that needs to be deleted. 2. Click Delete. 10 3. Confirmation box will appear asking if you are sure you want to delete user. 4. Select yes to confirm deletion or no to cancel deletion. Edit current user 1. To edit a user, select the user that needs to be edited. 2. You can update the user name or password. 3. Select access level for new user. To change access for a field, select the drop down box and chose either Allow or Deny. Allow will grant the user access to that menu option. Deny will prevent that option from appearing in the users menu options. 4. Select Save Data to save updated information. Field Operator Maintenance Select Field Operator Maint from the Edit menu to add or edit the individuals who will be performing maintenance and tests. FullName – Enter the name of the field operator. PhoneNum – Enter the phone number of the field operator. EmailAdd – Enter the email address of the field operator. To create a new field operator, either click Add new or start entering the information in the first blank row. Select Save Data to save the new Field Operator. To delete a field operator, select the field operator to delete. Select Delete. 11 IMS Mobile LockOut Code Select Mobile Lock-Out Code from the Edit menu to change the password used on IMS Mobile to lock or unlock editing abilities on the handheld unit. Exiting the Application There are a couple of ways to exit IMS by Hurco. Once this is done, you will be taken to the Windows desktop. Do one of the following: Select File and Close Company from the menu bar. Click the “X” button in the upper right corner. Getting Help There are many ways to obtain help with this the application. Your options include: Using the online Help system Viewing the online user’s guide View the tutorial videos Contacting Hurco Technologies The Program Interface After starting the application, the main program window appears. The main window contains all the options that are needed to maneuver in IMS by Hurco. Elements of the Main Window 12 The diagram below illustrates the most important elements of the main window. Following the diagrams are brief explanations of most elements. The following describes most elements of the IMS by Hurco interface listed in the above illustration. Menu Bar The menu bar is a standard Windows interface tool used to access specific areas of a program. The menu bar contains menu headings that list specific functions or actions in the program. To initiate an action, click the menu heading that corresponds to the desired action. Session Info This section gives the name of the company that user is currently logged into. It also gives the current users name and the date and time that they signed into the program. Device Inventory This section gives details of the number of devices that are currently in the program. Quick Launch Menu These are buttons that can be clicked on in order to access a specific function in the program easily and quickly. 13 o Work Order – This will take you to a new menu where you can choose what type of work order you would like to create or view. Select a work order type and then click continue and you will be taken to the appropriate work order screen. o Hydrants – This will take you to the hydrant maintenance screen where you can view or create a new hydrant. o Valves – This will take you to the valve maintenance screen where you can view or create a new valve. o Mains– This will take you to the main maintenance screen where you can view or create a new main. o Flow Devices– This will take you to the flow device maintenance screen where you can view or create a new flow device. o Help– This will take you the user manual. Dashlets These areas give quick access to important functions in the program. o Active Work Orders – This lists all of the work orders that are active and have not been completed or closed. o Pending Work Orders –This lists all of the pending work orders that have been created by the system due to reoccurrence period being met on a past work order. o Recent Work Orders – This lists the 10 most recent work orders that have been completed. o Unhandled Deficiencies – This lists pending deficiencies that have been logged from work orders. Current Program Version This displays the current version of IMS by Hurco that is running. License Status This displays the status of you license. It will either be Registered or Trial. Trial means that you have not purchased and activated a license code. 14 Add/Remove/Working with Dashlets Adding dashlets To add dashlets, select Add/Remove Dashlets from the View menu. There are five dashlets that are available. You can select one, all or none. To add a dashlet, click inside the box next to the dashlet that is wanted. Removing dashlets There are two ways to remove a dashlet, you can uncheck the box in this screen or you click the Remove option that is next to each dashlet on the main window. Working with dashlets Each dashlet has a unique function. Below is how the dashlets work. 1) Active Work Orders- Double clicking on any work order in this dashlet will pull up the work order selected. 2) Pending Work Orders- Double clicking on any work order in this dashlet will pull up the following menu. 15 a) Activate the work order – This will create the work order and add it to the active work orders. b) Skip this reoccurrence of the work order – This will remove the selected pending work order and it will reoccur on the next scheduled date. c) Skip this reoccurrence and cancel the series – This will remove the selected pending work order and will also cancel any further reoccurrences. d) Do nothing – This will close the menu option and will not affect the selected pending work order. 3) Recent Work Orders – Double clicking on any work order in this dashlet will pull up the results report for the selected work order. 4) Unhandled Deficiencies – Double clicking on any deficiency listed in this dashlet will pull up the following menu. a) Create a work order – This will create a new work repair/maintenance work order. Once this is created, it will appear as an active work order. b) Delete this deficiency – This will remove the deficiency from the unhandled deficiencies and will require no additional procedures. c) Do nothing – This will close the menu option and will not affect the selected deficiency. 16 Chapter 3 Creating/Editing/Switching Companies In this chapter you’ll learn the creating and editing companies. These options are located under the File option on the Menu Bar. Creating a New Company To create a new company, enter the name of the company you want to create. This will create you new company. Once a new company is created, user will need to close program. Upon login, select newly created company from Connect To list. Note: Company names can only be letters. If the company name includes number, you will need to spell out the number words or exclude the characters that are not letters. 17 Edit a Current Company To edit company information Select Edit Company to enter or update company details. This will need to be done when a new company is created or the company information changes. Company name- Use this field to enter a unique name for the company you are creating. Enter Addr1/Addr2. Enter City. Enter State. Use two letter state code. Enter Zip Code. Enter Phone number. Use the following format (xxx) xxx-xxxx. Enter Fax Number. Use the following format (xxx) xxx-xxxx. Enter company email address. Chose the Upload Logo button and go to the location of you logo file. Select the file and chose Open. Select Remove Image if the logo isn’t needed. Close a company Select Close Company when you want to close the current company to access a new company or to stop using the program. 18 Switch companies Select switch company to move from one company to another. The login screen will appear. Enter login user name and password then select the new company that is desired. 19 Chapter 4 Editing Actions In this chapter, you will learn how to edit actions that are need in work orders. These options are located under the Edit option on the Menu Bar. District Maintenance Select District Maint to edit districts for devices. This is the screen that is used to set the districts for where the devices are located. By default, standard districts are included. DistName – Enter the name of the district. DistNotes – Enter any notes that are needed. To create a new district, either click Add new or start entering the district name and description in the first blank row. Select Save Data to save the new district. To delete a district, select the district to delete. Select Delete. A confirmation screen will appear to confirm the deletion. Select Yes to delete and No to not delete. 20 SubDivision Maintenance Select Sub-Division Maint to edit sub-divisions for devices. This is the screen that is used to set the subdivisions for where the devices are located. SubDivName – Enter the name of the district. SubDivNotes – Enter any notes that are needed. To create a new sub-division, either click Add new or start entering the sub-division name and description in the first blank row. Select Save Data to save the new sub-division. To delete a sub-division, select the sub-division to delete. Select Delete. A confirmation screen will appear to confirm the deletion. Select Yes to delete and No to not delete. 21 Reoccurrence Period Maintenance Select Reoccurrence Period Maint to edit the reoccurrence period for work orders. This is the screen that is used to set the number of days for each reoccurrence. For example, daily is 1 day and weekly is 7 days. These are used in calculating new work order dates for reoccurring work orders. By default, standard period are included. Reoccurrence Name – Enter the name for the reoccurrence period. Reoccurrence Period (In Days) – Enter the number of days for the reoccurrence period. This needs to be a number. To create a new period, either click Add new or start entering the reoccurrence name and description in the first blank row. Select Save Data to save the new reoccurrence period. To delete a period, select the period to delete. Select Delete. A confirmation screen will appear to confirm the deletion. Select Yes to delete and No to not delete. Repair/Maint Action Maintenance Select Repair/Maint Action Maint to edit actions that are available for work orders. Choose either Hydrant Actions, Valve Actions or Main Actions. These are the screens used to set up the actions that are available to be selected on any work order screen. 22 Hydrant Actions ActionName – Enter the name for the action that will be performed on the hydrant. ActionDesc– Enter the description of the action that will be performed on the hydrant. To create a new hydrant action, either click Add new or start entering the action name and description in the first blank row. Select Save Changes to save the new action. To edit a hydrant action, enter the changes that are needed and select Save Data. To remove an action, select the action to delete. Select Remove Selection. A confirmation screen will appear to confirm the deletion. Select Yes to delete and No to not delete. . Valve Actions ActionName – Enter the name for the action that will be performed on the valve. ActionDesc– Enter the description of the action that will be performed on the valve. To create a new valve action, either click Add new or start entering the action name and description in the first blank row. Select Save Changes to save the new action. To edit a valve action, enter the changes that are needed and select Save Data. To remove an action, select the action to delete. Select Remove Selection. A confirmation screen will appear to confirm the deletion. Select Yes to delete and No to not delete. 23 Main Actions ActionName – Enter the name for the action that will be performed on the main. ActionDesc– Enter the description of the action that will be performed on the main. To create a new main action, either click Add new or start entering the action name and description in the first blank row. Select Save Changes to save the new action. To edit a main action, enter the changes that are needed and select Save Data. To remove an action, select the action to delete. Select Remove Selection. A confirmation screen will appear to confirm the deletion. Select Yes to delete and No to not delete. 24 Chapter 5 Creating/Editing/Deleting Devices In this chapter, you’ll learn about creating, editing, and deleting hydrants, valves & mains. You will also be able to add manufacturers, models, and related details. These options are located under the Devices option on the Menu Bar. Manufacturer Maintenance This screen keeps track of the manufacturer of you products. Fill this out to keep track of all the manufacturers. These will be needed when entering your devices into the system. It is a quick way to access the manufacturer address & phone numbers if there are issues with you products. Add a new manufacturer 25 To add a new manufacturer, either click Add new or start entering the following information in the first blank row. 1. Manufacturers name. 2. Manufacturers address. a. Address b. City c. State d. Zip Code 3. Manufacturers contact numbers a. Direct phone number b. Mobile phone number c. Fax number 4. Contact name 5. Email address – double clicking on the email address after entering and saving it will give access to email the manufacturer. 6. Manufacturer’s web site address – double clicking on the web address after entering and saving it will take you to the manufacturer’s website. 7. Select Save Data to save the information that was entered. Delete a manufacturer To remove a manufacturer, select the manufacturer to delete. Select Delete. A confirmation screen will appear to confirm the deletion. Select Yes to delete and No to not delete. Hydrant Maintenance This section is where the aspects of the hydrants can be edited. You can add new hydrants, delete hydrants, and maintain hydrant maintenance options. 26 Hydrant Model Maintenance This screen keeps track of the brands and types of hydrants that are used. These will be needed when entering a new hydrant into the system. This information can be obtained from the manufacturer of the hydrant. You can click on the green “+” sign and it will take you to the respective menu option to enter a new device. (Example: If you click the one next to the Manuf ID box, it will take you to the Manufacturer Maintenance screen to enter a new manufacturer.) 27 Create a new model 1. To create a new model, select Add New. 2. Enter all pertinent information for the model. 3. Upload an image of the model number. (optional) 4. Select Save Data to save new model or Cancel to not save new model. Delete current model 1. To delete a model, select the model that needs to be deleted. 2. Click Delete. 3. Confirmation box will appear asking if you are sure you want to delete model. 4. Select yes to confirm deletion or no to cancel deletion. Edit current model 1. To edit a model, select the model that needs to be edited. 2. Change the information that requires change. 3. Select Save Data to save updated information. Restraint Types Maintenance This screen keeps track of the types of hydrants restraints that are used. These will be needed when entering a new hydrant into the system. 28 Name – Enter the name for the restraint. Description– Enter the description of the restraint. To create a new restraint type, either click Add new or start entering the restraint type name and description in the first blank row. Select Save Data to save the new restraint type. To edit a restraint type, enter the desired changes. Select Save Data to save the restraint type changes. To remove a restraint, select the restraint to delete. Select Delete. A confirmation screen will appear to confirm the deletion. Select Yes to delete and No to not delete. Hydrant Paint Color Maintenance This list the paint colors used to identify hydrants. These will be needed when entering a new hydrant into the system. Color Name – Enter the name for the color. Color Description– Enter the description of the color. To create a new paint color, either click Add new or start entering the color name and description in the first blank row. Select Save Data to save the new paint color. To edit a paint color, enter the desired changes. Select Save Data to save the new paint color. To remove a paint color, select the paint color to delete. Select Delete. A confirmation screen will appear to confirm the deletion. Select Yes to delete and No to not delete. 29 NFPA Code Maintenance This lists the requirements and codes for NFPA standards. This screen is informational only and cannot be changed. This information will be used in the work order reports and hydrant details. Vandal Proof Type Maintenance This screen keeps track of the types of vandal proofs that are used. These will be needed when entering a new hydrant into the system. Device Name – Enter the name for the vandal proof device. Device Description– Enter the description of the vandal proof device. 30 To create a new vandal proof type, either click Add new or start entering the device name and device description in the first blank row. Select Save Data to save the new vandal proof device To edit a vandal proof type, enter the desired changes. Select Save Data to save the vandal proof type. To remove a vandal proof type, select the vandal proof type to delete. Select Delete. A confirmation screen will appear to confirm the deletion. Select Yes to delete and No to not delete. Hydrant Deficiency Maintenance This screen keeps track of the types of maintenance that may be required on a hydrant. These will be needed when entering a new maintenance work order. Deficiency Name – Enter the name for the deficiency. Deficiency Description– Enter the description of the deficiency. To create a new deficiency, either click Add new or start entering the deficiency name and deficiency description in the first blank row. Select Save Data to save the deficiency. To edit a deficiency, enter the desired changes. Select Save Data to save deficiency. To remove a deficiency, select the deficiency to delete. Select Delete. A confirmation screen will appear to confirm the deletion. Select Yes to delete and No to not delete. 31 Hydrant Maintenance This screen keeps track of the hydrants. These will be needed when entering your work orders into the system. New Hydrants can be added here and the list of hydrants can be exported. To add a new hydrant, select Add New Hydrant. See Add New Hydrant Section to continue. To export a list of hydrants, select Export to CSV. Next, select the location in which the file will be saved. Click Save. Remember the location that the file was saved. Add a new hydrant To add a new hydrant, select Add New. 32 1. On the Hydrant Tab, enter the following information. a. Hydrant ID. This name will identify the hydrants in the work orders. b. Asset ID. This is optional. It can be used as an alternative way to identify a hydrant. c. Install Date. This is the date that the hydrant was installed in its location. d. Last Maintenance. This field will auto-populate from maintenance work orders. e. Description. A description of the hydrant. f. Comments. Any comments for the hydrant can be entered here. g. Map GPS button. This can be used once the longitude and latitude have been entered on the Location tab. h. Map Address. This can be used once the address has been entered on the Location tab. 2. On the Details Tab, enter the following information. You can click on the green “+” sign and it will take you to the respective menu option to enter a new device. (Example: If you click the one next to the Model ID box, it will take you to the Model ID screen to enter a new hydrant model.) a. Manuf ID. Manufacturer of the hydrant. b. Model ID. The model of the hydrant. c. Hydrant Paint Color. d. Vandal Proof Type. What type of equipment is installed for vandal proofing. 33 e. Restraint ID. f. Main Size. g. Bury Depth. How deep does the hydrant go? h. Control Valve ID. Select the type of control valve that is on the hydrant. i. Control Valv Direction. Select the direction that the control valve is located on. j. Control Val Dist. Enter the distance in feet of the control valve. k. NFPA Information. This information is auto populated after a flow test has been completed on the hydrant. It gives the NFPA color, NFPA description, rating minimum, rating maximum, and the last GPM reading on the hydrant. l. Upload Image/Remove Image. A picture of the hydrant can be uploaded or removed. 3. On the Location Tab, enter the following information. You can click on the green “+” sign and it will take you to the respective menu option to enter a new device. (Example: If you click the one next to the Model ID box, it will take you to the Model ID screen to enter a new hydrant model.) a. Latitude b. Longitude 34 c. Elevation d. VDOP-This information will come from a GPS unit. The lower the number the more accurate the GPS reading. e. HDOP-This information will come from a GPS unit. The lower the number the more accurate the GPS reading. f. Street Number & Name- Address of the hydrant g. Loc City- City in which the hydrant is located. h. Loc State- State in which the hydrant is located. i. Loc Zip- Zip code for the hydrant location. j. XStreet- The cross street for the hydrant location k. State X. l. State Y. m. District ID-Select the type of district that the hydrant is located in. n. SubDiv ID- Chose the subdivision for the hydrant. o. Location ID- This is optional. Use if there are alternate location references for the hydrant. 4. History Tab. This will list any work orders that have been opened that include the hydrant. Click on any work order and it will display the related report for that work order. 35 Valve Maintenance This section is where the aspects of the valve can be edited. You can add new valves, delete valves, and maintain valves maintenance options. Valve Type Maintenance This screen keeps track of the types of valves that are used. These will be needed when entering a new valve into the system. 36 Type Name – Enter the type of valve used. Type Description– Enter the description for the type of valve used. To create a new valve type, either click Add new or start entering the type name and type description in the first blank row. Select Save Data to save the valve type. To edit a valve type, enter the desired changes. Select Save Data to save valve type. To remove a valve type, select the valve type to delete. Select Delete. A confirmation screen will appear to confirm the deletion. Select Yes to delete and No to not delete. Valve Drive Type Maintenance This screen keeps track of the types of valve drives that are used. These will be needed when entering a new valve into the system. Drive Name – Enter the type of valve drive used. Drive Description– Enter the description for the type of valve drive used. To create a new valve drive type, either click Add new or start entering the type name and type description in the first blank row. Select Save Data to save the valve drive type. To edit a valve drive type, enter the desired changes. Select Save Data to save valve drive type. To remove a valve drive type, select the valve drive type to delete. Select Delete. A confirmation screen will appear to confirm the deletion. Select Yes to delete and No to not delete. 37 Valve Function Maintenance This screen keeps track of the different functions of valves that are used. These will be needed when entering a new valve into the system. Function Name – Enter the valve function used. Function Description– Enter the description for the valve function used. To create a new valve function, either click Add new or start entering the function name and function description in the first blank row. Select Save Data to save the valve function. To edit a valve drive type, enter the desired changes. Select Save Data to save valve drive type. To remove a valve function, select the valve function to delete. Select Delete. A confirmation screen will appear to confirm the deletion. Select Yes to delete and No to not delete. Valve Access Type Maintenance This screen keeps track of the types of valve accesses that are used. These will be needed when entering a new valve into the system. 38 Name – Enter the type of valve access used. Description– Enter the description for the type of valve access used. To create a new valve access type, either click Add new or start entering the type name and type description in the first blank row. Select Save Data to save the valve access type. To edit a valve access type, enter the desired changes. Select Save Data to save valve access type. To remove a valve access type, select the valve access type to delete. Select Delete. A confirmation screen will appear to confirm the deletion. Select Yes to delete and No to not delete. Valve Deficiency Maintenance This screen keeps track of the types of deficiencies that might need to be fixed on a valve. Deficiency Name – Enter the deficiency name. Deficiency Description– Enter the description for the deficiency. To create a new deficiency, either click Add new or start entering the type name and type description in the first blank row. Select Save Data to save the deficiency. To edit a deficiency, enter the desired changes. Select Save Data to save deficiency. To remove a deficiency, select the deficiency to delete. Select Delete. A confirmation screen will appear to confirm the deletion. Select Yes to delete and No to not delete. 39 Valve Maintenance This screen keeps track of the valves. These will be needed when entering your work orders into the system. New valves can be added here and the list of valves can be exported. To add a new valve, select Add New Valve. See Add New Valve Section to continue. To export a list of valves, select Export to CSV. Next, select the location in which the file will be saved. Click Save. Remember the location that the file was saved. Add a new valve To add a new valve, select Add New. 1. On the Valve Tab, enter the following information. You can click on the green “+” sign and it will take you to the respective menu option to enter a new device. (Example: If you click the one next to the Model ID box, it will take you to the Model ID screen to enter a new hydrant model.) a. Valve ID- This name will identify the valves in the work orders. b. Asset ID- This is optional. It can be used as an alternative way to identify a valve. c. Manuf ID- Select the manufacturer from the drop down list. If the manufacture is not listed, a new manufacturer will need to be entered in the Manufacturer Maintenance screen. d. Last Maintenance- This field will auto-populate from maintenance work orders. e. Install Date- This is the date that the valve was installed in its location. f. Val Pos- This acknowledges whether the valve is open or closed. g. Comments. Any comments for the valve can be entered here. 40 h. Map GPS button. This can be used once the longitude and latitude have been entered on the Location tab. i. Map Address. This can be used once the address has been entered on the Location tab. 2. On the Details Tab, enter the following information. Some of this information can be obtained from the manufacturer of the valve. You can click on the green “+” sign and it will take you to the respective menu option to enter a new device. (Example: If you click the one next to the Model ID box, it will take you to the Model ID screen to enter a new hydrant model.) a. Valve size b. Valve Box Size c. Valve type d. Valve function e. Valve Drive f. Valve Open Dir- This is the direction the valve opens. It will be either left of right. g. Access Type- This is how the valve is accessed. h. Box Depth i. Set Torque j. Set Rev k. Set Speed 41 l. Set Cycle 3. On the Location Tab, enter the following information. You can click on the green “+” sign and it will take you to the respective menu option to enter a new device. (Example: If you click the one next to the Model ID box, it will take you to the Model ID screen to enter a new hydrant model.) a. Latitude b. Longitude c. Elevation d. VDOP-This information will come from a GPS unit. The lower the number the more accurate the GPS reading e. HDOP-This information will come from a GPS unit. The lower the number the more accurate the GPS reading f. Street Number & Name- Address of the valve g. Loc City- City in which the valve is located h. Loc State- State in which the valve is located i. Loc Zip- Zip code for the valve location j. XStreet- The cross street for the valve location 42 k. State X l. State Y m. Loc notes n. District ID o. Sub Div ID p. Location ID 4. History Tab. This will list any work orders that have been opened that include the valve. Click on any work order and it will display the related report for that work order. 43 Flow Device Maintenance This section is where the aspects of the flow devices can be edited. You can add new flow devices, delete flow devices, and maintain flow devices maintenance options. This information must be accurate as it is used in calculations on work order results. You can obtain this information from the manufacturer if not known. Device Name – Enter the name of the flow device. Device Description– Enter the description for the flow device. Diameter – Enter the diameter of the flow device. 44 Coefficient – This number is used in formulas. To create a new flow device, either click Add new or start entering the device name in the first blank row. Select Save Data to save the flow device. To edit a flow device, enter the desired changes. Select Save Data to save flow device. To remove a flow device, select the flow device to delete. Select Delete. A confirmation screen will appear to confirm the deletion. Select Yes to delete and No to not delete. Main Maintenance This section is where the aspects of the mains can be edited. You can add new mains, delete mains, and maintain mains maintenance options. Connection Type Maintenance This screen keeps track of the types of connections that are used. These will be needed when entering a new main into the system. 45 Connection Name – Enter the name of the connection device. Connection Description– Enter the description for the connection device. To create a new connection device, either click Add new or start entering the device name in the first blank row. Select Save Data to save the connection device. To edit a connection device, enter the desired changes. Select Save Data to save connection device. To remove a connection device, select the connection device to delete. Select Delete. A confirmation screen will appear to confirm the deletion. Select Yes to delete and No to not delete. Pipe Type Maintenance This screen keeps track of the types of pipes that are used. These will be needed when entering a new main into the system. 46 Name – Enter the name of the type of pipe. Description– Enter the description for the type of pipe Coefic– Enter the coefficient for the selected type of pipe To create a new type of pipe, either click Add new or start entering the type of pipe in the first blank row. Select Save Data to save the pipe type. To edit a pipe type, enter the desired changes. Select Save Data to save the pipe type. To remove a pipe type, select the pipe type to delete. Select Delete. A confirmation screen will appear to confirm the deletion. Select Yes to delete and No to not delete. Fittings Maintenance This screen keeps track of the types of fittings that are used. These will be needed when entering a new main into the system. Fitting Name – Enter the name of the fitting. 47 Fitting Desc– Enter the description for the fitting. LngthAdj– Enter the length adjustment for the selected fitting. To create a new type of fitting, either click Add new or start entering the type of fitting in the first blank row. Select Save Data to save the pipe type. To edit a fitting, enter the desired changes. Select Save Data to save the fitting. To remove a fitting, select the fitting to delete. Select Delete. A confirmation screen will appear to confirm the deletion. Select Yes to delete and No to not delete. Main Maintenance This screen keeps track of the mains. These will be needed when entering your work orders into the system. New mains can be added here and the list of mains can be exported. To add a new main, select Add New Main. See Add New Main Section to continue. To export a list of main, select Export to CSV. Next, select the location in which the file will be saved. Click Save. Remember the location that the file was saved. Add a new main To add a new main, select Add New. 1. On the Mains Tab, enter the following information. You can click on the green “+” sign and it will take you to the respective menu option to enter a new device. (Example: If you click the one next to the Model ID box, it will take you to the Model ID screen to enter a new hydrant model.) 48 a. Main Name- This name will identify the main on the work orders. b. Asset ID- This is optional. It can be used as an alternative way to identify a main. c. Main Desc- Enter a description of the main. d. Install Date- This is the date that the main was installed in its location. e. Location Notes- Enter notes to help with the location of the main. f. Pipe Type- Select the type of pipe that the main is. g. Conn Type- Select the type of connection for the main. h. Main Lngth- Enter the length of the main. i. Min Pipe Size- Enter the minimum diameter of the main. j. Max Pipe Size- Enter the maximum diameter of the main. k. Devices on Main- Select options from the drop down menus. Then select Add to Main. If you added a device that needs to be removed. Highlight the device and select Remove Selected. i. Device Type- Select whether the device is a fitting, hydrant or valve. ii. Device- Select the appropriate device from the listing. 49 2. History Tab. This will list any work orders that have been opened that include the main. Click on any work order and it will display the related report for that work order. 50 Chapter 6 Creating Tests & Test Groups In this chapter, you’ll learn to create Tests and Test Groups for Fire Flow & Valve Exercises. These options are located under the Test/Group Maint. option on the Menu Bar. Fire Flow Testing This section gives details for editing the tests and the test groups for a Fire Flow Test. These will be needed when entering your work orders into the system. Fire Flow Test Maintenance This screen keeps track of the tests that are available to be added to a work order. New Tests can be added here and the list of tests can be exported. Test must be entered before a work order can entered into the system. 51 Add a new Fire Flow test To add a new test, select Add New Test. You can click on the green “+” sign and it will take you to the respective menu option to enter a new device. (Example: If you click the one next to the Model ID box, it will take you to the Model ID screen to enter a new hydrant model.) 1. Enter the name for the test. 2. Enter any notes that will be needed for the test. 3. Then select Save Data. You will then be able to add the required test and flow hydrants. 4. Next, the test hydrant(s) will need to be added. a. Select the test hydrant from the drop down menu. b. Once you have the test hydrant that is needed, click the Add Test Hydrant button. This will add the test hydrant to the Test Hydrants list. To see details of the flow hydrant added, double click on the line item. This will take you to the hydrant details. 5. Then flow hydrant(s) will need to be added. a. Select the proper direction from the Direction From Test Hyd drop down box. b. Select the hydrant that will be used as the Flow Hydrant from the drop down box. To see details of the test hydrant added, double click on the line item. This will take you to the hydrant details. c. Select the flow device from the drop down box. d. Once you have selected all of the above information, click the Add Flow Hydrant button. This will add the flow hydrant to the Flow Hydrants list. To see details of the flow hydrant added, double click on the line item. This will take you to the hydrant details 52 6. When all of the test hydrants and flow hydrants have been added, select Save Data. This will save the test into the Test lists so that it can be added to a work order. Delete a Fire Flow test To delete a test, use the arrows to select the test that needs to be deleted. Once it is on the selected test, click on Delete. You will receive the following warning: If you wish to continue deleting the test, select Yes. If you do not want to delete the test, select No. Note: If you delete a test, all work orders and test results that are associated with that test will be deleted. 53 Fire Flow Test Group Maintenance This screen keeps track of the test groups available to be added to work orders. Test Groups can be added or deleted here. Test groups must be entered before a work order can entered into the system. Add a new Fire Flow test group To add a new test group, select Add New. You can click on the green “+” sign and it will take you to the respective menu option to enter a new device. (Example: If you click the one next to the Model ID box, it will take you to the Model ID screen to enter a new hydrant model.) 1. Enter the name for the group. 2. Enter a group description. 3. Select Save Data to save the test group. Then the test can be added to the group. 4. Select the Fire Flow Test from the drop down menu that needs to be added. 5. Click the Add Test button. This will add the test to the test group. To see details of the test added, double click on the line item. This will take you to the test details. 6. If a test is added and needs to be removed from the group, click the Remove Selected Test button. A confirmation will appear asking if you are sure you want to remove the selected test. Click yes to continue with the removal or no to cancel the removal. 7. When all of the tests have been added, select Save Data. This will save the group. 54 Delete a Fire Flow test group To delete a test group, select the test group that needs to be deleted. Use the arrows to move between groups. Once you have the group that needs to be deleted, click delete. A confirmation will appear asking if you are sure you want to delete the group. Click yes to continue with the removal or no to cancel the removal. Exercise Group Maintenance This screen keeps track of the exercise test groups that are available to be added to work orders. Test Groups can be added or deleted here. Test groups must be entered before a work order can entered into the system. Add a new Exercise Group To add a new exercise group, select Add New. You can click on the green “+” sign and it will take you to the respective menu option to enter a new device. (Example: If you click the one next to the Model ID box, it will take you to the Model ID screen to enter a new hydrant model.) 1. Enter the name for the group. 2. Enter a group description. 3. Select Save Data to save the exercise group. 4. Select the Valve that needs to be added to the group. Click Add Valve. To see details of the valve added, double click on the line item. This will take you to the valve details. 55 5. Select the hydrant that needs to be added to the group. Click Add Hydrant. To see details of the hydrant added, double click on the line item. This will take you to the hydrant details. 6. If a valve or hydrant is added and needs to be removed from the group, click the Remove Selected button. A confirmation will appear asking if you are sure you want to remove the selected test. Click yes to continue with the removal or no to cancel the removal. 7. When all of the valves and hydrants have been added, select Save Data. This will save the group. Delete an Exercise group To delete an exercise group, select the group that needs to be deleted. Use the arrows to move between groups. Once you have the group that needs to be deleted, click Delete. A confirmation will appear asking if you are sure you want to remove the delete the group. Click yes to continue with the removal or no to cancel the removal. CFactor Testing This section gives details for editing the tests and the test groups for C-Factor Testing. These will be needed when entering your work orders into the system. CFactor Test Maintenance This screen keeps track of the tests that are available to be added to a work order. New Tests can be added here and the list of tests can be exported. Test must be entered before a work order can entered into the system. 56 Add a new C-Factor test To add a new test, select Add New Test. You can click on the green “+” sign and it will take you to the respective menu option to enter a new device. (Example: If you click the one next to the Model ID box, it will take you to the Model ID screen to enter a new hydrant model.) 1) Enter the name for the test. 2) Enter any notes that will be needed for the test. 3) Then select Save Data. You will then be able to add the required test main and hydrants. 4) Next, the main(s) will need to be added. a) Select the test main from the drop down menu. b) Once you have the test main that is needed, click the Add Test Main button. This will add the test main to the Main Being Flushed list. To see details of the flow main added, double click on the line item. This will take you to the main details. 5) Then flow hydrant(s) will need to be added. a) Select the Flow Hydrant from the drop down box. b) Select the flow device from the drop down box. c) Once those two items have been selected, click the Add Flow Hydrant. d) If additional flow hydrants are needed, select them from the drop down menu. 57 6) Then residual hydrant(s) will need to be added. There must be two residual hydrants added for a C-Factor test. a) Select the residual hydrant from the drop down list. Only the hydrants that were added to the main on the Main Maintenance will appear in this drop down. b) Click the Add Hydrant to add the hydrant to the Residual Hydrants list. 7) Then the isolation valve(s) will need to be added. a. Select the isolation valve from the drop down list. b. Click the Add Valve to add the valve to the Shut-Off Valves list. 58 8) When all of hydrants and valves have been added, select Save Data. This will save the test into the Test lists so that it can be added to a work order. Delete a C-Factor test To delete a test, use the arrows to select the test that needs to be deleted. Once it is on the selected test, click on Delete. You will receive the following warning: If you wish to continue deleting the test, select Yes. If you do not want to delete the test, select No. Note: If you delete a test, all work orders and test results that are associated with that test will be deleted. CFactor Test Group Maintenance This screen keeps track of the test groups available to be added to work orders. Test Groups can be added or deleted here. Test groups must be entered before a work order can entered into the system. 59 Add a new C-Factor test group To add a new test group, select Add New. You can click on the green “+” sign and it will take you to the respective menu option to enter a new device. (Example: If you click the one next to the Model ID box, it will take you to the Model ID screen to enter a new hydrant model.) 1. Enter the name for the group. 2. Enter a group description. 3. Select Save Data to save the test group. Then the tests can be added to the group. 4. Select the C-Factor test from the drop down menu that needs to be added. 5. Click the Add Test button. This will add the test to the test group. To see details of the test added, double click on the line item. This will take you to the test details. 6. If a test is added and needs to be removed from the group, click the Remove Selected Test button. A confirmation will appear asking if you are sure you want to remove the selected test. Click yes to continue with the removal or no to cancel the removal. 7. When all of the tests have been added, select Save Data. This will save the group. Delete a C-Factor test group To delete a test group, select the test group that needs to be deleted. Use the arrows to move between groups. Once you have the group that needs to be deleted, click delete. A confirmation will appear asking if you are sure you want to delete the group. Click yes to continue with the removal or no to cancel the removal. Unidirectional Flushing This section gives details for editing the tests and the test groups for Uni-directional Flushing. These will be needed when entering your work orders into the system. Unidirectional Flush Test Maintenance This screen keeps track of the tests that are available to be added to a work order. New Tests can be added here and the list of tests can be exported. Test must be entered before a work order can entered into the system. 60 Add a new Uni-directional Flush test To add a new test, select Add New Test. You can click on the green “+” sign and it will take you to the respective menu option to enter a new device. (Example: If you click the one next to the Model ID box, it will take you to the Model ID screen to enter a new hydrant model.) 9) Enter the name for the test. 10) Enter any notes that will be needed for the test. 11) Then select Save Data. You will then be able to add the required test main and flow hydrants. 12) Next, the main(s) will need to be added. a) Select the test main from the drop down menu. b) Once you have the test main that is needed, click the Add Test Main button. This will add the test main to the Main Being Flushed list. To see details of the flow main added, double click on the line item. This will take you to the main details. 13) Then flow hydrant(s) will need to be added. a) Select the Primary Flow Hydrant from the drop down box. Only the hydrants that were added to the main on the Main Maintenance will appear in this drop down. b) Select the flow device from the drop down box. c) Once those two items have been selected, click the Add Primary Hydrant. d) If additional flow hydrants are needed, select them from the drop down menu. Once the flow hydrant and flow device is selected, click the Add Additional Hydrant. 61 14) When all of hydrants and valves have been added, select Save Data. This will save the test into the Test lists so that it can be added to a work order. 15) Then residual hydrant(s) will need to be added. a) Select the residual hydrant from the drop down list. Only the hydrants that were added to the main on the Main Maintenance will appear in this drop down. b) Click the Add Hydrant to add the hydrant to the Residual Hydrants list. 62 16) Then the isolation valve(s) will need to be added. a. Select the isolation valve from the drop down list. b. Click the Add Valve to add the valve to the Shut-Off Valves list. 17) When all of hydrants and valves have been added, select Save Data. This will save the test into the Test lists so that it can be added to a work order. Delete a Uni-directional Flush test To delete a test, use the arrows to select the test that needs to be deleted. Once it is on the selected test, click on Delete. You will receive the following warning: If you wish to continue deleting the test, select Yes. If you do not want to delete the test, select No. Note: If you delete a test, all work orders and test results that are associated with that test will be deleted. Unidirectional Flush Test Group Maintenance 63 This screen keeps track of the test groups available to be added to work orders. Test Groups can be added or deleted here. Test groups must be entered before a work order can entered into the system. Add a new Uni-directional Flush test group To add a new test group, select Add New. You can click on the green “+” sign and it will take you to the respective menu option to enter a new device. (Example: If you click the one next to the Model ID box, it will take you to the Model ID screen to enter a new hydrant model.) 8. Enter the name for the group. 9. Enter a group description. 10. Select Save Data to save the test group. Then the test can be added to the group. 11. Select the Uni-directional Flush test from the drop down menu that needs to be added. 12. Click the Add Test button. This will add the test to the test group. To see details of the test added, double click on the line item. This will take you to the test details. 13. If a test is added and needs to be removed from the group, click the Remove Selected Test button. A confirmation will appear asking if you are sure you want to remove the selected test. Click yes to continue with the removal or no to cancel the removal. 14. When all of the tests have been added, select Save Data. This will save the group. Delete a Uni-directional Flush test group 64 To delete a test group, select the test group that needs to be deleted. Use the arrows to move between groups. Once you have the group that needs to be deleted, click delete. A confirmation will appear asking if you are sure you want to delete the group. Click yes to continue with the removal or no to cancel the removal. Hydrant Flushing Group Maintenance This screen keeps track of the hydrant flushing groups available to be added to work orders. Flushing Groups can be added or deleted here. Flushing groups must be entered before a work order can entered into the system. Add a new hydrant flushing group To add a new flushing group, select Add New. You can click on the green “+” sign and it will take you to the respective menu option to enter a new device. (Example: If you click the one next to the Hydrant box, it will take you to the Hydrant screen to enter a new hydrant.) 1. Enter the name for the group. 2. Enter a group description. 3. Select Save Data to save the test group. Then the hydrants can be added to the group. 4. Select the hydrant from the drop down menu that needs to be added. 5. Select the flow device that is attached to the hydrant. If you fail to select a flow device the following message will appear. You cannot add a hydrant to the group unless you add a flow device. 65 6. Once you have selected both a hydrant and flow device, click the Add Hydrant button. The following message will appear to confirm that you want to add the hydrant. 7. If hydrant is added and needs to be removed from the group, click the Remove Selected button. A confirmation will appear asking if you are sure you want to remove the selected device. Click yes to continue with the removal or no to cancel the removal. 8. When all of the hydrants have been added, select Save Data. This will save the group. Delete a Hydrant Flushing group To delete a flushing group, select the flushing group that needs to be deleted. Use the arrows to move between groups. Once you have the group that needs to be deleted, click delete. A confirmation will appear asking if you are sure you want to delete the group. Click yes to continue or no to cancel the removal. 66 Chapter 7 Creating/Submitting Fire Flow Work Order In this chapter, you’ll learn to create and submit Fire Flow work orders. These options are located under the Work Order option on the Menu Bar. Fire Flow Work Order This screen keeps track of the active work orders. New work orders can be added here. Test or test groups must be created before a work order can be created. 67 Add a new Fire Flow Work Order To add a new Fire Flow Work Order, select Add New Work Order. You can click on the green “+” sign and it will take you to the respective menu option to enter a new device. (Example: If you click the one next to the Model ID box, it will take you to the Model ID screen to enter a new hydrant model.) 1. A work order number will be generated automatically. 2. Select the date. 3. Enter any notes that are needed. 4. Created by will be generated by the user that is logged in. 5. WO Type will be generated automatically depending on which work order screen you are in. 6. Status will change depending on what is being done with the work order. 7. Work Order Schedule a. Select whether it is a reoccurring work order. b. If it is a reoccurring work order, select the reoccurrence period. c. Select whether or not the reoccurring event has an ending period. d. If it does have an ending, chose the date for the reoccurrence to end. 8. Select the test or test group to add to the work order. If a test or group is added and needs to be removed, select Remove Selected. A confirmation will appear asking if you are sure you want to remove the delete the group. Click yes to continue with the removal or no to cancel the removal. To see details of the line item added, double click on the line item. 9. Once all information has been entered into the work order, select Save Data. 68 10. To print the work order, click Print and the select from the following menu. a. Full Field Report- This report will be the full report that goes to the field with the tester. 69 b. Summary Field Report – This report will give a summary of the walking order. To Export Fire Flow Work Order to QSI Handheld Once the work order has been saved, it can be exported to the QSI handheld. Click the Export to QSI. The following warning will appear. If the QSI Handheld is plugged in, click Ok. If the QSI handheld is not plugged in, plug it in and click Ok. Select the location to save the Hydrant Directory file. Message will appear to alert if the export was successful. It will then be ready to take to the field and the tests on the work orders to be performed. To Import Fire Flow Work Order From QSI Handheld After the tests have been run and the results are ready to be added to the work order, go to the work order list and select the work order that has been completed. Click the QSI Import button. The same warning will appear as when the work order was exported. If the QSI Handheld is plugged in, click Ok. If the QSI handheld is not plugged in, plug it in and click Ok. Select the location where the Flow Results file is saved. Click Ok to import. Message will appear to alert if the import was successful. 70 To Edit Results from the Fire Flow Work Order After the tests have been run and the results are ready to be added to the work order, go to the work order list and select the work order that has been completed. Click the Edit Results button. There will be one screen for each test hydrant that was part of the test. You can click on the green “+” sign and it will take you to the respective menu option to enter a new device. (Example: If you click the one next to the Model ID box, it will take you to the Model ID screen to enter a new hydrant model.) 1. Completed- Enter the date that the test was completed. 2. Oper ID- Enter the person’s name that performed the test. 3. Elapsed time- Enter the amount of time that the test was run. 4. Test Notes- Enter any test notes that need to be recorded. 5. Pitot PSI- Enter the pitot PSI. 6. Static PSI- Enter the static PSI. 7. Residual PSI- Enter the residual PSI. 8. Devices Used a. Flow Hyd ID- Enter the flow hydrant that was used. b. Flow Dev ID- Enter the flow device that was used. c. Flow GPM & Gallons Used- Enter these two values that were obtained during the test. 71 If you didn’t calculate the gallons used during the test, click on the calculator icon. Enter the Pitot pressure and the flow time in minutes and seconds. Click the calculate button and this will fill in the values. 9. Deficiency- Use the drop down menu to select any deficiencies that were detected during the test. 10. When all results have been entered, select Save Data. This will save the test results. To Submit Results from the Fire Flow Work Order After the results have been entered or uploaded, the results will need to be submitted. The results must be submitted in order to view them in the Reports section. Click the Submit Results button. A warning will appear alerting to the fact that once the results are submitted the work order cannot be edited anymore. If you agree, select Yes. If you want to be able to edit the work order still, select No. 72 Chapter 8 Creating/Submitting Valve Exercise Work Order In this chapter, you’ll learn to create and submit Valve Exercise work orders. These options are located under the Work Order option on the Menu Bar. Valve Exercise Work Order This screen keeps track of the active valve exercise work orders. New valve exercise work orders can be added here. Exercise groups must be created before a work order can be created. 73 Add a new Valve Exercise Work Order To add a new Valve Exercise Work Order, select Add New Work Order. You can click on the green “+” sign and it will take you to the respective menu option to enter a new device. (Example: If you click the one next to the Model ID box, it will take you to the Model ID screen to enter a new hydrant model.) 1. A work order number will be generated automatically. 2. Select the date. 3. Enter any notes that are needed. 4. Created by will be generated by the user that is logged in. 5. Status will change depending on what is being done with the work order. 6. WO Type will be generated automatically depending on which work order screen you are in. 7. Work Order Schedule a. Select whether it is a reoccurring work order. b. If it is a reoccurring work order, select the reoccurrence period. c. Select whether or not the reoccurring event has an ending period. d. If it does have an ending, chose the date for the reoccurrence to end. 8. Select the Exercise Group(s) to add to the work order from the drop down box. 9. Select the valve(s) to add to the work order from the drop down box. 10. Select the hydrant(s) to add to the work order from the drop down box. 11. If an exercise group, valve or hydrant is added and needs to be removed, select Remove Selected. A confirmation will appear asking if you are sure you want to remove the delete the group. Click yes to continue with the removal or no to cancel the removal. To see details of the line item added, double click on the line item. 12. Once all information has been entered into the work order, select Save Data. 74 13. To print the work order, click Print and the select from the following menu. a. Full Field Report- This report will be the full report that goes to the field with the tester. 75 b. Summary Field Report – This report will give a summary of the walking order. To Export Valve Exercise Work Order to QSI Handheld Once the work order has been saved, it can be exported to the QSI handheld. Click the Export to QSI. The following warning will appear. If the QSI Handheld is plugged in, click Ok. If the QSI handheld is not plugged in, plug it in and click Ok. Select the location to save the Valve Directory file. Message will appear to alert if the export was successful. It will then be ready to be taken to the field and the tests on the work orders to be performed. To Import Valve Exercise Work Order to QSI Handheld After the tests have been run and the results are ready to be added to the work order, go to the work order list and select the work order that has been completed. Click the QSI Import button. The same warning will appear as when the work order was exported. If the QSI Handheld is plugged in, click Ok. If the QSI handheld is not plugged in, plug it in and click Ok. Select the location where the Exercise Results file is saved. Click Ok to import. Message will appear to alert if the import was successful. 76 To Edit Results from the Valve Exercise Work Order After the tests have been run and the results are ready to be added to the work order, go to the work order list and select the work order that has been completed. Click the Edit Results button. There will be one screen for each valve that was part of the test. You can click on the green “+” sign and it will take you to the respective menu option to enter a new device. (Example: If you click the one next to the Model ID box, it will take you to the Model ID screen to enter a new hydrant model.) 1. Oper ID- Enter the person’s name that performed the exercise. 2. Completed- Enter the date that the exercise was completed. 3. Total Revs- Enter the total revolutions during the exercise. 4. Cycle Count- Enter the number of cycles during the exercise. 5. Max Torque- Enter the maximum torque applied during the exercise. 6. Rev At Max Torque- Enter the revolutions at maximum torque. 7. Max Rev In Set Dir- Enter the maximum revolutions in one set direction. 8. Deficiency- Use the drop down menu to select any deficiencies that were detected during the exercise. 9. Field Notes- Enter any notes taken during in the field during the exercise. 10. When all results have been entered, select Save Data. This will save the exercise results. To Import Torque Log After the exercise has been run, a torque log obtained during the valve exercise may need to upload. While in the Edit Results Screen for the Valve Exercise, click on Import Torque Log. A warning will appear to alert the user that torque information is about to be imported. If user wishes to continue, select Yes. If user doesn’t want to import the file, select NO. Message will appear to alert if the import was successful. 77 To Submit Results from the Valve Exercise Work Order After the results have been entered or uploaded, the results will need to be submitted. The results must be submitted in order to view them in the Reports section. Click the Submit Results button. A warning will appear alerting to the fact that once the results are submitted the work order cannot be edited anymore. If you agree, select Yes. If you want to be able to edit the work order still, select No. The related Valve Exercise Work Order Report will appear. 78 Chapter 9 Creating/Submitting Repair/Maintenance Work Order In this chapter, you’ll learn to create and submit Repair/Maintenance work orders. These options are located under the Work Order option on the Menu Bar. Repair/Maintenance Work Order This screen keeps track of the active repair/maintenance work orders. New repair/maintenance work orders can be added here. Repair/Maintenance action items must be created before a work order can be created. 79 Add a new Repair/Maintenance Work Order To add a new Repair/Maint Work Order, select Add New Work Order. You can click on the green “+” sign and it will take you to the respective menu option to enter a new device. (Example: If you click the one next to the Model ID box, it will take you to the Model ID screen to enter a new hydrant model.) 1. A work order ID will be generated automatically 2. Select the date. 3. Enter any notes that are needed. 4. Created by will be generated by the user that is logged in. 5. WO Type will be generated automatically depending on which work order screen you are in. 6. Status will change depending on what is being done with the work order. 7. Work Order Schedule a. Select whether it is a reoccurring work order. b. If it is a reoccurring work order, select the reoccurrence period. c. Select whether or not the reoccurring event has an ending period. 80 d. If it does have an ending, chose the date for the reoccurrence to end. 8. Select Save Data to create work order. 9. Now that the work order has been created, chose the Device type that needs work. 10. Select the Device ID. 11. Select the action that needs to be performed on the device. If there are no actions to select, then actions need to be set up in the Repair/Maint Action Maint screen. 12. If an exercise group, valve or hydrant is added and needs to be removed, select Remove Selected. A confirmation will appear asking if you are sure you want to remove the delete the group. Click yes to continue with the removal or no to cancel the removal. 13. Select the priority of the repair or maintenance item. If no priority is selected, it will automatically default to LOW. 14. Double click on a line item to upload/remove image or to view the details of the selected line item. 15. To add or remove image, select Add Image to selected line item. Click upload to add picture or Remove to delete image. 16. To view device details, select View device details for selected line item. This will take you to the device details. 17. Once all information has been entered into the work order, select Save Data. 81 18. To print the work order, click Print. The following report will appear. To Edit Results from the Repair/Maintenance Work Order After the repair/maintenance item has been completed, the results must be entered into the work order so that it can be closed. Click the Edit Results button. There will be one screen for each item on the work order. 1. Work Order ID, Device Type and Device ID- These items are populated from the line items on the work order. 2. Oper ID- Enter the person’s name that performed the repair/maintenance. 3. Completed- Enter the date that the repair or maintenance was completed. 4. Action- This is auto populated with one of the line items on the work order. 82 5. Field Notes- Enter any notes taken during in the field during the repair/maintenance. 6. When all results have been entered, select Save Data. This will save the repair/maintenance results. To Submit Results from the Repair/Maintenance Work Order After the results have been entered or uploaded, the results will need to be submitted. The results must be submitted in order to view them in the Reports section. Click the Submit Results button. A warning will appear alerting to the fact that once the results are submitted the work order cannot be edited anymore. If you agree, select Yes. If you want to be able to edit the work order still, select No. 83 Chapter 10 Creating/Submitting CFactor Work Order In this chapter, you’ll learn to create and submit C-Factor work orders. These options are located under the Work Order option on the Menu Bar. C-Factor Work Order This screen keeps track of the active C-Factor work orders. New C-factor work orders can be added here. 9 84 Add a new C-Factor Work Order To add a new C-Factor Work Order, select Add New Work Order. You can click on the green “+” sign and it will take you to the respective menu option to enter a new device. (Example: If you click the one next to the Model ID box, it will take you to the Model ID screen to enter a new hydrant model.) 1. A work order number will be generated automatically . 2. Select the date. 3. Enter any notes that are needed. 4. Created by will be generated by the user that is logged in. 5. WO Type will be generated automatically depending on which work order screen you are in. 6. Status will change depending on what is being done with the work order. 7. Work Order Schedule a. Select whether it is a reoccurring work order. b. If it is a reoccurring work order, select the reoccurrence period. c. Select whether or not the reoccurring event has an ending period. d. If it does have an ending, chose the date for the reoccurrence to end. 8. Once all information has been entered into the work order, select Save Data. 9. Select the C-Factor test(s) to add to the work order from the drop down box. Click the Add Test button. 10. Select the C-Factor test group(s) to add to the work order from the drop down box. Click the Add Group button. 11. If a test or test group, is added and needs to be removed, select the appropriate item and click Remove Selected. A confirmation will appear asking if you are sure you want to remove the delete the test/group. Click yes to continue with the removal or no to cancel the removal. To see details of the line item added, double click on the line item. 12. Once all test/group(s) have been added, select Save Data. 85 14. To print the work order, click Print. 86 To Edit Results from the C-Factor Work Order After the tests have been run and the results are ready to be added to the work order, go to the work order list and select the work order that has been completed. Click the Edit Results button. You can click on the green “+” sign and it will take you to the respective menu option to enter a new device. (Example: If you click the one next to the Model ID box, it will take you to the Model ID screen to enter a new hydrant model.) 1. Oper ID- Enter the person’s name that performed the flush. 2. Completed- Enter the date that the flush was completed. 3. Main Diam- This field is auto-populated. 4. Main Lngth- This field is auto-populated. 5. Field Notes- Enter any notes taken during in the field during the flush. 6. Test Time Min/Test Time Sec- Enter the amount of time the test was run. 7. Pitot/Nozzle PSI- Enter the pitot or nozzle PSI. 8. Residual Hydrant 1- Enter the residual hydrant that was used. a. Static PSI- Enter the static PSI for this hydrant. b. Residual PSI- Enter the residual PSI for this hydrant. 9. Residual Hydrant 2- Enter the residual hydrant that was used. a. Static PSI- Enter the static PSI for this hydrant. 87 10. Residual PSI- Enter the residual PSI for this hydrant. 11. Devices Used a. Flow Hydrant- Enter the flow hydrant that was used. b. Flow Device- Enter the flow device that was used. c. Flow GPM & Gallons Used- Enter these two values that were obtained during the test. If you didn’t calculate the gallons used during the test, click on the calculator icon. Enter the Pitot pressure and the flow time in minutes and seconds. Click the calculate button and this will fill in the values. 88 To Submit Results from the C-Factor Work Order After the results have been entered or uploaded, the results will need to be submitted. The results must be submitted in order to view them in the Reports section. Click the Submit Results button. A warning will appear alerting to the fact that once the results are submitted the work order cannot be edited anymore. If you agree, select Yes. If you want to be able to edit the work order still, select No. The related C-Factor Work Order Report will appear. 89 Chapter 11 Creating/Submitting Unidirectional Flush Work Order In this chapter, you’ll learn to create and submit Valve Exercise work orders. These options are located under the Work Order option on the Menu Bar. Uni-directional Flush Work Order This screen keeps track of the active Uni-directional Flush work orders. New uni-directional flush work orders can be added here. 90 Add a new Uni-directional Flush Work Order To add a new Uni-directional Flush Work Order, select Add New Work Order. You can click on the green “+” sign and it will take you to the respective menu option to enter a new device. (Example: If you click the one next to the Model ID box, it will take you to the Model ID screen to enter a new hydrant model.) 1. A work order number will be generated automatically . 2. Select the date. 3. Enter any notes that are needed. 4. Created by will be generated by the user that is logged in. 5. WO Type will be generated automatically depending on which work order screen you are in. 6. Status will change depending on what is being done with the work order. 7. Work Order Schedule a. Select whether it is a reoccurring work order. b. If it is a reoccurring work order, select the reoccurrence period. c. Select whether or not the reoccurring event has an ending period. d. If it does have an ending, chose the date for the reoccurrence to end. 8. Once all information has been entered into the work order, select Save Data. 9. Select the Uni-directional test(s) to add to the work order from the drop down box. Click the Add Test button. 10. Select the Uni-directional test group(s) to add to the work order from the drop down box. Click the Add Group button. 11. If an test or test group, is added and needs to be removed, select the appropriate item and click Remove Selected. A confirmation will appear asking if you are sure you want to remove the delete the test/group. Click yes to continue with the removal or no to cancel the removal. To see details of the line item added, double click on the line item. 12. Once all test/group(s) have been added, select Save Data. 91 13. To print the work order, click Print. 92 To Edit Results from the Uni-directional Flush Work Order After the tests have been run and the results are ready to be added to the work order, go to the work order list and select the work order that has been completed. Click the Edit Results button. You can click on the green “+” sign and it will take you to the respective menu option to enter a new device. (Example: If you click the one next to the Model ID box, it will take you to the Model ID screen to enter a new hydrant model.) 1. Oper ID- Enter the person’s name that performed the flush. 2. Completed- Enter the date that the flush was completed. 3. Main Diam- This field is auto-populated. 4. Main Lngth- This field is auto-populated. 5. Field Notes- Enter any notes taken during in the field during the flush. 6. Desired Velocity- Enter the desired velocity. 7. Pitot/Nozzle PSI- Enter the pitot or nozzle PSI. 8. Test Time Min/Test Time Sec- Enter the amount of time the test was run. 9. Devices Used a. Flow Hydrant- Enter the flow hydrant that was used. b. Flow Device- Enter the flow device that was used. 93 c. Flow GPM & Gallons Used- Enter these two values that were obtained during the test. If you didn’t calculate the gallons used during the test, click on the calculator icon. Enter the Pitot pressure and the flow time in minutes and seconds. Click the calculate button and this will fill in the values. 10. Start Clarity- Use the drop down menu to select the quality of the water at the beginning of the test. 11. During Clarity- Use the drop down menu to select the quality of the water during the test. 12. Final Clarity- Use the drop down menu to select the quality of the water at the end of the test. 13. When all results have been entered, select Save Data. This will save the exercise results. 94 To Submit Results from the Uni-directional Flush Work Order After the results have been entered or uploaded, the results will need to be submitted. The results must be submitted in order to view them in the Reports section. Click the Submit Results button. A warning will appear alerting to the fact that once the results are submitted the work order cannot be edited anymore. If you agree, select Yes. If you want to be able to edit the work order still, select No. The related Uni-directional Flush Work Order Report will appear. 95 Chapter 12 Creating/Submitting a Hydrant Flushing Work Order In this chapter, you’ll learn to create and submit Hydrant Flushing work orders. These options are located under the Work Order option on the Menu Bar. Hydrant Flushing Work Order This screen keeps track of the active repair/maintenance work orders. New repair/maintenance work orders can be added here. Repair/Maintenance action items must be created before a work order can be created. 96 Add a new Hydrant Flushing Work Order To add a new Hydrant Flushing Work Order, select Add New Work Order. You can click on the green “+” sign and it will take you to the respective menu option to enter a new device. (Example: If you click the one next to the Hydrant box, it will take you to the Hydrant screen to enter a new hydrant.) 1. A work order ID will be generated automatically 2. Enter any notes that are needed. 3. Created by will be generated by the user that is logged in. 4. WO Type will be generated automatically depending on which work order screen you are in. 5. Status will change depending on what is being done with the work order. 6. Work Order Schedule a. Select whether it is a reoccurring work order. b. If it is a reoccurring work order, select the reoccurrence period. c. Select whether or not the reoccurring event has an ending period. d. If it does have an ending, chose the date for the reoccurrence to end. 7. Select Save Data to create work order. 97 8. Now that the work order has been created, chose hydrants and flow devices. Then click the Add Hydrant button. Or select a flushing group and click Add Group. 9. Select the action that needs to be performed on the device. If there are no actions to select, then actions need to be set up in the Repair/Maint Action Maint screen. 10. If a flushing group or hydrant is added and needs to be removed, select Remove Selected. A confirmation will appear asking if you are sure you want to remove the delete the group. Click yes to continue with the removal or no to cancel the removal. 11. Once all information has been entered into the work order, select Save Data. 12. To print the work order, click Print. You must choose which type of report to view. a. If you select Full Field Report the following report will appear. 98 b. If you select Summary Report, the following report will appear. To Edit Results from the Hydrant Flushing Work Order After the hydrant flushing has been completed, the results must be entered into the work order so that it can be closed. Click the Edit Results button. There will be one screen for each item on the work order. Use the arrows to go between items. 99 1. Work Order ID, Hydrant ID and Flow Device- These items are populated from the line items on the work order. 2. Oper ID- Enter the person’s name that performed the repair/maintenance. 3. Completed- Enter the date that the repair or maintenance was completed. 4. Flush Time Min & Flush Time Sec – Enter the time of the test. 5. Flow PSI- Enter the flow PSI. 6. Flow GPM & Gallons Used- Enter these two values that were obtained during the test. a. If you didn’t calculate the gallons used during the test, click on the calculator icon. Enter the Pitot pressure and the flow time in minutes and seconds. 7. Water Clarity – Enter the following items. a. Start Clarity – the clarity of the water at the beginning of the test. b. During Clarity – clarity of the water during the test. c. Final Clarity – clarity of the water at the end of the test. 8. Field Notes – enter any pertinent notes from the test. To Submit Results from the Hydrant Flushing Work Order After the results have been entered or uploaded, the results will need to be submitted. The results must be submitted in order to view them in the Reports section. Click the Submit Results button. A warning will appear alerting to the fact that once the results are submitted the work order cannot be edited anymore. If you agree, select Yes. If you want to be able to edit the work order still, select No. 100 Chapter 13 REPORTS In this chapter, you’ll learn to about reports. These options are located under the Reports option on the Menu Bar. Fire Flow Work Order Results This screen allows you to view & print Fire Flow Work Order Reports. Users have the ability to filter for reports by certain criteria. 101 Filtering & Viewing Fire Flow Work Order Reports User can filter by the following results: For a certain date period. Enter from date and to date. Work order ID-Use this option to see work order results for a specific work order. Hydrant- Use this option to see work order results for a specific hydrant. NFPA Rating- Use this option to see work orders results by NFPA ratings. District- Use this option to see all work order results for a specific divisions Sub-division-Use this option to see all work order results for a specific divisions. Operator – Use this option to see work orders completed by specific individuals. User can chose one or more options to filter by. Once the filter options have been selected, click the Filter Results button. The results for the filter will appear on the bottom of the screen. To view a report, double click on a work order. A confirmation will appear stating the work order ID that is being loaded. The report will show up in a new screen. 102 To view a summary of the filtered results, click on View full summary of selections. The report will appear in a new screen. Fire Flow History Comparison This screen allows you to view & print a Fire Flow History Comparison Report. Select they hydrant that you would like to see a comparison on and click View Report. 103 The report will appear showing a comparison of the fire flow tests for a certain hydrant. Valve Exercise Work Order Results This screen allows you to view & print Valve Exercise Work Order Reports. Users have the ability to filter for reports by certain criteria. 104 Filtering & Viewing Valve Exercise Work Order Reports User can filter by the following results: For a certain date period. Enter from date and to date. Work order ID-Use this option to see work order results for a specific work order. Device Type- Use this option to see work order results for a specific device type. Hydrant- Use this option to see work orders results for a specific hydrant. Valve- Use this option to see work orders results for a specific valve. Manufacturer- Use this option to see work orders for a specific manufacturer. Valve Size- Use this option to see work orders for specific valve sizes. District- Use this option to see all work order results for a specific divisions Sub-division-Use this option to see all work order results for a specific divisions. Operator – Use this option to see work orders completed by specific individuals. User can chose one or more options to filter by. Once the filter options have been selected, click the Filter Results button. The results for the filter will appear on the bottom of the screen. To view a report, double click on a work order. A confirmation will appear stating the work order ID that is being loaded. The report will show up in a new screen. 105 To view a summary of the filtered results, click on View full summary of selections. The report will appear in a new screen. 106 Valve Exercise History Comparison This screen allows you to view & print a Valve Exercise History Comparison Report. Select the type of device and then choose the Device ID that you would like to see a comparison on and click View Report. The report will appear showing a comparison of the valve excercises for a certain device. 107 Repair/Maintenance Work Order Results This screen allows you to view & print Repair/Maint Work Order Reports. Users have the ability to filter for reports by certain criteria. Filtering & Viewing Repair/Maint Work Order Reports User can filter by the following results: For a certain date period. Enter from date and to date. Work order ID-Use this option to see work order results for a specific work order. Device Type- Use this option to see work order results for a specific device type. Hydrant- Use this option to see work order results for a specific hydrant. Valve- Use this option to see work order results for a specific valve. Main- Use this option to see work order results for a specific main. Manufacturer- Use this option to see work order results for a specific manufacturer. Action- Use this option to see work order results for specific repair/maintenance action. District- Use this option to see all work order results for a specific divisions Sub-division-Use this option to see all work order results for a specific divisions. Operator – Use this option to see work orders completed by specific individuals. User can chose one or more options to filter by. Once the filter options have been selected, click the Filter Results button. The results for the filter will appear on the bottom of the screen. 108 To view a report, double click on a work order. A confirmation will appear stating the work order ID that is being loaded. The report will show up in a new screen. To view a summary of the filtered results, click on View full summary of selections. The report will appear in a new screen. 109 Repair/Maintenance by Priority Report This screen allows you to view & print a Repair/Maint by Priority Report. Select the priority that you would like to see and click View. The following report will display 110 Uni-directional Flush Work Order Results This screen allows you to view & print Uni-directional Flush Work Order Reports. Users have the ability to filter for reports by certain criteria. Filtering & Viewing Uni-directional Flush Work Order Reports User can filter by the following results: For a certain date period. Enter from date and to date. Work order ID-Use this option to see work order results for a specific work order. Hydrant- Use this option to see work order results for a specific hydrant. Main- Use this option to see work orders results for a specific main. Operator – Use this option to see work orders completed by specific individuals. User can chose one or more options to filter by. Once the filter options have been selected, click the Filter Results button. The results for the filter will appear on the bottom of the screen. To view a report, double click on a work order. A confirmation will appear stating the work order ID that is being loaded. The report will show up in a new screen. 111 To view a summary of the filtered results, click on View full summary of selections. The report will appear in a new screen. 112 C-Factor Work Order Results This screen allows you to view & print C-Factor Work Order Reports. Users have the ability to filter for reports by certain criteria. 113 Filtering & Viewing C-Factor Work Order Reports User can filter by the following results: For a certain date period. Enter from date and to date. Work order ID-Use this option to see work order results for a specific work order. Hydrant- Use this option to see work order results for a specific hydrant. Main- Use this option to see work orders results for a specific main. Operator – Use this option to see work orders completed by specific individuals. User can chose one or more options to filter by. Once the filter options have been selected, click the Filter Results button. The results for the filter will appear on the bottom of the screen. To view a report, double click on a work order. A confirmation will appear stating the work order ID that is being loaded. The report will show up in a new screen. 114 To view a summary of the filtered results, click on View full summary of selections. The report will appear in a new screen. Hydrant Flushing Work Order Results This screen allows you to view & print Hydrant Flushing Work Order Reports. Users have the ability to filter for reports by certain criteria. 115 Filtering & Viewing Hydrant Flushing Work Order Reports User can filter by the following results: For a certain date period. Enter from date and to date. Work order ID-Use this option to see work order results for a specific work order. Hydrant- Use this option to see work order results for a specific hydrant. NFPA Rating- Use this option to see work orders results by NFPA ratings. District- Use this option to see all work order results for a specific divisions Sub-division-Use this option to see all work order results for a specific divisions. Operator – Use this option to see work orders completed by specific individuals. User can chose one or more options to filter by. Once the filter options have been selected, click the Filter Results button. The results for the filter will appear on the bottom of the screen. To view a report, double click on a work order. A confirmation will appear stating the work order ID that is being loaded. The report will show up in a new screen. 116 To view a summary of the filtered results, click on View full summary of selections. The report will appear in a new screen. Water Usage Results There are three water usage reports that can be viewed. Choose Fire Flow, Uni-directional Flush or CFactor. Users have the ability to filter for reports by certain criteria. Filtering & Viewing Fire Flow Water Usage Reports 117 User can filter by the following results: For a certain date period. Enter from date and to date. Work order ID-Use this option to see water usage results for a specific work order. Hydrant- Use this option to see water usages results for a specific hydrant. Valve- Use this option to see water usages results for a specific valve. NFPA Rating- Use this option to see water usages results by NFPA ratings. District- Use this option to see all water usage results for a specific divisions Sub-division-Use this option to see all water usage results for a specific divisions. User can chose one or more options to filter by. Once the filter options have been selected, click the Filter Results button. The results for the filter will appear on the bottom of the screen. To view a report, click View Report. A confirmation will appear stating the selection is being loaded. The report will show up in a new screen. 118 The water usage list can also be exported to a CSV file. Click Export List to CSV. Select the destination for the file to be saved. Click Ok to save file. A confirmation will appear stating that file was successfully exported. Filtering & Viewing Uni-directional Flush Water Usage Reports User can filter by the following results: For a certain date period. Enter from date and to date. Work order ID-Use this option to see water usage results for a specific work order. Hydrant- Use this option to see water usages results for a specific hydrant. Main- Use this option to see water usages results for a specific main. Operator – Use this option to see work orders completed by specific individuals. User can chose one or more options to filter by. Once the filter options have been selected, click the Filter Results button. The results for the filter will appear on the bottom of the screen. To view a report, click View Report. A confirmation will appear stating the selection is being loaded. The report will show up in a new screen. 119 The water usage list can also be exported to a CSV file. Click Export List to CSV. Select the destination for the file to be saved. Click Ok to save file. A confirmation will appear stating that file was successfully exported. Filtering & Viewing C-Factor Water Usage Reports 120 User can filter by the following results: For a certain date period. Enter from date and to date. Work order ID-Use this option to see water usage results for a specific work order. Hydrant- Use this option to see water usages results for a specific hydrant. Main- Use this option to see water usages results for a specific main. Operator – Use this option to see work orders completed by specific individuals. User can chose one or more options to filter by. Once the filter options have been selected, click the Filter Results button. The results for the filter will appear on the bottom of the screen. To view a report, click View Report. A confirmation will appear stating the selection is being loaded. The report will show up in a new screen. 121 The water usage list can also be exported to a CSV file. Click Export List to CSV. Select the destination for the file to be saved. Click Ok to save file. A confirmation will appear stating that file was successfully exported. Filtering & Viewing Hydrant Flushing Water Usage Reports User can filter by the following results: For a certain date period. Enter from date and to date. Work order ID-Use this option to see work order results for a specific work order. Hydrant- Use this option to see work order results for a specific hydrant. NFPA Rating- Use this option to see work orders results by NFPA ratings. District- Use this option to see all work order results for a specific divisions Sub-division-Use this option to see all work order results for a specific divisions. Operator – Use this option to see work orders completed by specific individuals. User can chose one or more options to filter by. Once the filter options have been selected, click the Filter Results button. The results for the filter will appear on the bottom of the screen. To view a report, click View Report. A confirmation will appear stating the selection is being loaded. The report will show up in a new screen. 122 Master Device List Reports This screen allows you to view & print reports on devices. Users have the ability to filter for reports by certain criteria. Filtering & Viewing Hydrant Master Reports 123 User can filter by the following results: Install Date. Use this option to see hydrant details by date range of installation. Last Maint Date. Use this option to see hydrant details by date range of last maintenance. Hydrant- Use this option to see hydrant details results for a specific hydrant. NFPA Rating- Use this option to see hydrant details by NFPA ratings. Manufacturer- Use this option to see hydrant details by manufacturer. Vandal Proof- Use this option to see hydrant details by vandal proof types. District- Use this option to see hydrant details for a specific divisions. Status- Use this option to see hydrant details for a specific status. Color- Use this option to see hydrant details for a specific hydrant paint color. Model- Use this option to see hydrant details for a specific hydrant model. Restraint- Use this option to see hydrant details for a specific hydrant restraint type. Sub-division-Use this option to see hydrant details for a specific sub-divisions. User can chose one or more options to filter by. Once the filter options have been selected, click the Filter Results button. The results for the filter will appear on the bottom of the screen. To view a report, click View Report. A confirmation will appear stating the selection is being loaded. The report will show up in a new screen. 124 The hydrant master list can also be exported to a CSV file. Click Export List to CSV. Select the destination for the file to be saved. Click Ok to save file. A confirmation will appear stating that file was successfully exported. Filtering & Viewing Valve Master Reports 125 User can filter by the following results: Install Date. Use this option to see valve details by date range of installation. Last Maint Date. Use this option to see valve details by date range of last maintenance. Valve- Use this option to see valve details results for a specific valve. Manufacturer- Use this option to see valve details by manufacturer. Status- Use this option to see valve details for a specific status. District- Use this option to see valve details for a specific divisions. Sub-division-Use this option to see valve details for a specific sub-divisions. Valve function- Use this option to see valve details for a specific valve function. Drive Type- Use this option to see valve details for a specific drive type. Access Type- Use this option to see valve details for a specific access type. Valve Type- Use this option to see valve details for a specific valve type. User can chose one or more options to filter by. Once the filter options have been selected, click the Filter Results button. The results for the filter will appear on the bottom of the screen. To view a report, click View Report. A confirmation will appear stating the selection is being loaded. The report will show up in a new screen. 126 The valve master list can also be exported to a CSV file. Click Export List to CSV. Select the destination for the file to be saved. Click Ok to save file. A confirmation will appear stating that file was successfully exported. Filtering & Viewing Main Master Reports 127 User can filter by the following results: Install Date- Use this option to see main details by date range of installation. Last Maint Date- Use this option to see main details by date range of last maintenance. Max Size Between- Use this option to see main detail results for a max size range. Main Length Between- Use this option to see mains by a range in length. Main ID- Use this option to see main details for a specific main ID. Status- Use this option to see main details for a specific status. Pipe Type-Use this option to see main details for a specific type of pipe. Connection- Use this option to see main details for a specific main connection. User can chose one or more options to filter by. Once the filter options have been selected, click the Filter Results button. The results for the filter will appear on the bottom of the screen. To view a report, click View Report. A confirmation will appear stating the selection is being loaded. The report will show up in a new screen. 128 The main master list can also be exported to a CSV file. Click Export List to CSV. Select the destination for the file to be saved. Click Ok to save file. A confirmation will appear stating that file was successfully exported. Hydrant Sticker Report This screen allows you to view & print stickers for hydrants. 129 User can filter by the following results: For a certain date period. Enter from date and to date. Work order ID-Use this option to see work order results for a specific work order. Hydrant- Use this option to see work order results for a specific hydrant. NFPA Rating- Use this option to see work orders results by NFPA ratings. District- Use this option to see all work order results for a specific divisions Sub-division-Use this option to see all work order results for a specific divisions. Operator – Use this option to see work orders completed by specific individuals. User can chose one or more options to filter by. Once the filter options have been selected, click the Filter Results button. The results for the filter will appear on the bottom of the screen. To view a report, click View Report. A confirmation will appear stating the selection is being loaded. The report will show up in a new screen. Custom Report Viewer This screen allows you to view & print Custom Reports. These are custom reports that have been created by the user in Crystal Report Writer. No custom reports are included with the program. 130 To view reports in this selection, you must first set the report directory. This is where the custom reports that are created will be saved. Once you set the directory, all custom reports will need to be saved in that directory in order to be access by IMS by Hurco. For more information on the database structure and writing reports, contact Hurco Technologies. 131 Chapter 13 Utilities In this chapter, you’ll learn the utilities that are available for the program. These options are located under the Utilities option on the Menu Bar. Database Backup This option allows the user to save a backup of the database. To back up the database, chose Backup Database. A screen will appear asking for the location to save the backup file. Select a location or make a new folder to save it in. Once you have the location, select Ok. 132 Restore Database from Backup This option allows the user to restore a backup of the database. To restore the database, chose Restore Database from Backup. A screen will appear asking for the location of the backup file. Select the backup file and select Ok. Warning: Restoring a backup will overwrite all current data in your company. Please make sure that you are selecting the correct backup file for your company. QSI Fire Flow Directory Export This option allows the user export the Fire Flow Directory. You will get the following warning. If the QSI Device is pulled in, select Ok. If the QSI is not plugged in, plug it in and then select Ok. A screen will appear asking for the location to save the directory file. Select a location or make a new folder to save it in. Once you have the location, select Ok. QSI Valve Exercise Directory Export This option allows the user export the Valve Exercise Directory. You will get the following warning. If the QSI Device is pulled in, select Ok. If the QSI is not plugged in, plug it in and then select Ok. 133 A screen will appear asking for the location to save the directory file. Select a location or make a new folder to save it in. Once you have the location, select Ok. QSI New Valve Import This option allows the user to import the Valve Directory. You will get the following warning. If the QSI Device is pulled in, select Ok. If the QSI is not plugged in, plug it in and then select Ok. A screen will appear asking for the location to retrieve the file from. Select the file and click “Open”. A confirmation will appear to confirm the import. QSI New Hydrant Import This option allows the user to import the Hydrant Directory. You will get the following warning. If the QSI Device is pulled in, select Ok. If the QSI is not plugged in, plug it in and then select Ok. A screen will appear asking for the location to retrieve the file from. Select the file and click “Open”. A confirmation will appear to confirm the import. 134 Hydrant/Valve Import This option allows the user to import a list of hydrants or valves. The files that are used to import valves and hydrants must be in a certain format. Export Hydrant Template File This option allows you to export a file with the correct format for importing hydrants into IMS By Hurco. Once you click on this option, a screen will appear asking where you want to save your file. Select the location for your file and click OK. If your file was saved, it will give you a message confirming the export finished. The file will save as a .csv file. The file will be named “HydrantImportTemplate.” You can open the file and enter the information in a new row for each hydrant. Export Valve Template File This option allows you to export a file with the correct format for importing valves into IMS By Hurco. Once you click on this option, a screen will appear asking where you want to save your file. Select the location for your file and click OK. If your file was saved, it will give you a message confirming the export finished. The file will save as a .csv file. The file will be named “ValveImportTemplate.” You can open the file and enter the information in a new row for each valve. 135 Start Import Wizard This option allows you to import the hydrant and valve files into IMS by Hurco. To start click, Start Import Wizard. Click Next to continue. Select the type of devices you are importing. You may choose either Hydrants or Valves. Then select Browse to find the location of the file that is being imported. Once you found your file, click Next. 136 A confirmation screen will appear letting you know which type of devices you are importing. Click Finish to complete the import or click Cancel to stop the import. You can also click Back to change the file or type of devices you are importing. If a file is imported and the information in it is not valid, you will receive the above message. Check the information in your file and go back through the import procedures. If the file was successfully imported, you will receive a message informing you that the import is complete. Then the following report will appear showing what was successfully imported into IMS By Hurco. 137 138 Chapter 14 Help The options under this menu will help you through your IMS By Hurco experience. Updates This link takes you to a website to verify if you have the most current version of IMS By Hurco. 139 About IMS by Hurco This screen gives you details of the program. If you need to find the version of this program that is installed, it will be located on this screen. Support This screen gives you support details. This is pertinent information that is need if the user contacts product support for help. If additional modules are purchase, you will need to reactivate the software. Once you have you new activation code, click Enter New License Key. This will bring up the screen for you to enter the new activation ID. You will need to restart the program in order for the new changes to take effect. 140 This Screen gives details about the computer that the program is running on. IMS Video Users Guide This option will take you to our website to view videos on how to use this program. IMS Mobile Video Users Guide This option will take you to our website to view videos on how to use the IMS Mobile program. 141 1-800-888-1436 • gethurco.com • [email protected] Rev: 04-12-2012 Part No. IMS-RM