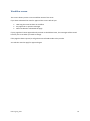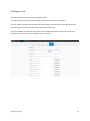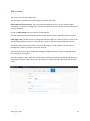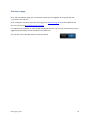
1
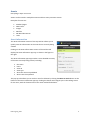
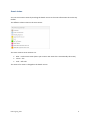
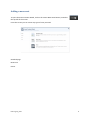
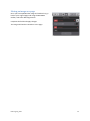
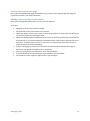
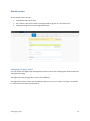
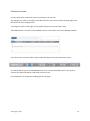
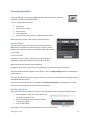
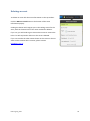
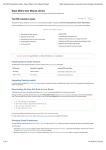
Squiz edit+
guide for
kelsi.org.uk
How to edit content
using /_edit
Digital Services
kelsi.org.uk/_edit
1
Contents
Before you start ...................................................................................................................................... 4
Logging in ............................................................................................................................................ 4
Edit + interface .................................................................................................................................... 4
Assets ...................................................................................................................................................... 5
Asset information................................................................................................................................ 5
Asset status ............................................................................................................................................. 6
Save your changes................................................................................................................................... 7
Finding an asset ...................................................................................................................................... 8
Adding a new asset ................................................................................................................................. 9
Adding an image ................................................................................................................................... 10
Upload an image ............................................................................................................................... 10
Placing an image on a page ............................................................................................................... 11
Adding a document ............................................................................................................................... 12
Upload a document .......................................................................................................................... 12
Link to a document on a page ........................................................................................................... 13
Adding a new version of a document ............................................................................................... 13
Details screen ........................................................................................................................................ 14
Changing the page name .................................................................................................................. 14
Naming and renaming assets ................................................................................................................ 15
Naming an asset ................................................................................................................................ 15
Renaming an asset ............................................................................................................................ 15
Changing the page name .............................................................................................................. 15
Contents screen .................................................................................................................................... 16
Inserting hyperlinks ............................................................................................................................... 17
External links ..................................................................................................................................... 17
Internal links...................................................................................................................................... 17
Editing hyperlinks .............................................................................................................................. 17
Metadata............................................................................................................................................... 18
Standard metadata ........................................................................................................................... 18
Has content? field ............................................................................................................................. 18
Workflow screen ................................................................................................................................... 19
Linking screen ....................................................................................................................................... 20
kelsi.org.uk/_edit
2
URLs screen ........................................................................................................................................... 21
Short URLs ......................................................................................................................................... 22
Preview a page ...................................................................................................................................... 23
Deleting an asset ................................................................................................................................... 24
Approval process................................................................................................................................... 25
Who to contact ..................................................................................................................................... 26
kelsi.org.uk/_edit
3
Before you start
Squiz Matrix is the content management system used to manage various KCC websites including
KELSI.
Logging in
To log in use the following url:
•
•
Squiz Edit interface for KELSI http://kelsi.org.uk/_edit
While we are in beta phase use http://beta.kelsi.org.uk/_edit
You can also log in by visiting any page on the site you would like to edit and putting /_edit
at the end of the url, for example:
http://beta.kelsi.org.uk/support-for-children-and-young-people/kent-parentingservice/_edit
Your log-in details are the same as the ones you use to log on to your computer. The password will
change each time you change your main log-in.
When you first log in, your browser may alert you that pop-ups are being blocked. Please enable
them for this site as Squiz may alert you to new messages.
Edit + interface
This is the main screen you will see once logging in with the _admin url.
Edit or preview the page
Current page
Account details, asset tree, search button
Change editing screen
kelsi.org.uk/_edit
Editing screen
4
Assets
Everything in Squiz is an asset.
Assets can be reused in multiple locations and have many common screens.
Examples of assets are:
•
•
•
•
•
•
Standard pages
News items
Images
PDF files
MS Word documents
Users
Asset information
The Asset Information section of the top tool bar allows you to
quickly view the information on the asset that is currently being
viewed.
Clicking on the Asset Information section of the tool bar will
display the Asset Information pop-up, as shown in the figure to
the right.
The Asset Information pop-up provides a more detailed summary
of the asset currently being viewed, including:
•
•
•
•
•
•
the status
name
asset ID
asset type
when the asset was published
when it was last updated.
This pop-up also allows you to mark an asset for deletion by clicking the Move to Trash button at the
bottom of the Asset Information pop-up. Clicking this button will navigate you to the Linking screen
for the asset, with the location links of the asset marked for deletion.
kelsi.org.uk/_edit
5
Asset status
You can see an assets status by checking the details screen or the asset information tab on the top
toolbar.
The different colours relate to the asset status:
The most common asset statuses are:
•
•
•
Blue – under construction (when you create a new asset this is automatically this status)
Green – live
Pink – safe edit
The status of an asset is changed on the details screen.
kelsi.org.uk/_edit
6
Save your changes
Once you have edited any asset and made changes, to save your changes you
must click the save button in the top right of the screen.
If you have not clicked save, and try to leave the screen, a warning message will appear to let you
know your changes have not been saved.
You can then choose to return to the screen to save your changes or discard the changes and move
away from the screen.
kelsi.org.uk/_edit
7
Finding an asset
The Asset Finder allows you to navigate the assets within your system,
locating and redirecting to assets you want to edit.
To open the Asset Finder, click on the asset finder button, located to
the right of the Current User button in the tool bar.
You can navigate through the asset tree to find the asset you wish to edit.
The colours on the side show the status of the asset.
The numbers after the name of the asset show how many assets are underneath it (children).
At the top of the asset tree is the breadcrumb, which shows you were you have navigated through
the tree.
To select an asset to edit, click on it so that is highlighted and press Select in the bottom right of the
screen.
kelsi.org.uk/_edit
8
Adding a new asset
To open the Asset Creation Wizard, click on the Create New Asset button, located to
the top left of the screen.
From this screen you can create any type of asset you need.
Standard page
News item
Events
kelsi.org.uk/_edit
9
Adding an image
Before adding an image to your page, you will need to upload it into Squiz.
Make sure the image is the correct size before uploading.
Upload an image
To upload an image:
•
•
•
•
•
•
•
•
•
•
Click New on the top toolbar
Select file on the left hand side
Select image
Browse to where the image is saved on your computer and select it
Complete the name field
Complete the alt text field (this is what will appear when you hover over the image)
Select the location where the image will be uploaded to. (all images will need to be
uploaded to the images folder which will appear on the far left of the tree)
Click create
Complete the mandatory metadata fields for the asset
Apply for approval on the details screen once you are happy.
It is important to apply for approval and have the image made live – otherwise members of the
public will not be able to view it and it will show as a blank space on the page.
kelsi.org.uk/_edit
10
Placing an image on a page
Once you have uploaded the image and made it live, go
back to your original page and using the WYSIWYG
toolbar, select the add image button.
Complete the fields and apply changes.
The image will then be inserted on to the page.
kelsi.org.uk/_edit
11
Adding a document
Before adding a document to your page, you will need to upload it into Squiz.
Make sure the document is no bigger than 3MB before uploading.
Upload a document
To upload a document:
•
•
•
•
•
•
•
•
•
Click New on the top toolbar
Select file on the left hand side
Select the type of document you are uploading (PDF, Word Doc etc)
Browse to where the document is saved on your computer and select it
Complete the friendly name field
Select the location where the document will be uploaded to. (upload documents underneath
the page it will be linked to.)
Click create
Complete the mandatory metadata fields for the asset
Apply for approval on the details screen once you are happy.
It is important to apply for approval and have the document made live – otherwise members of the
public will not be able to view it and it will take them to the Squiz login screen.
kelsi.org.uk/_edit
12
Link to a document on a page
Once you have uploaded the image and made it live, go back to your original page and using the
hyperlink instructions, link to the document.
Adding a new version of a document
Once you have uploaded a document, you may need to update it.
To do this:
•
•
•
•
•
•
•
•
Navigate to the asset you need to change
On the details screen put the asset into safe edit
Under the details section of this screen, use the browse button to choose the new document
you want to replace the existing one with.
Make sure the document is named exactly the same as the existing document and is also the
same file type. If you upload a different named document it will create a different link to the
document. The best way to ensure it is the same is to copy the File name and use this to
name the document before uploading.
If you are changing the name of the document it would be better to delete the original
document and upload the new document separately.
Once you have chosen your document, press the save button.
If you would like to view the document, click Preview in the top toolbar.
On the details screen, apply for approval once you are happy.
kelsi.org.uk/_edit
13
Details screen
On the details screen you can:
•
•
•
Change the status of an asset
Set a future status for the asset (if the page needs to go live at a particular time)
Change the Page name and the Page Short Name.
Changing the page name
You can rename the Page name and Page short name on this screen. Changing this doesn’t affect the
web path of the page.
The page name and the page short name can be different.
The page short name is used in the navigation of the site so try not to make it too long. It should be
no more than 2 lines when you preview it.
kelsi.org.uk/_edit
14
Naming and renaming assets
Naming an asset
When you created an asset you would have given it a name.
The name you enter is used for the Page name, Page short name and the Web path.
•
•
•
Page name is the full name of the page
Page short name is displayed in the asset map and in the navigation menu of the site
Web path is used in the URL of the asset. Where there is a space in the name there will be a
hyphen in the URL.
Renaming an asset
You can rename Page name, Page short name and web path.
You can rename them all the same or rename them differently.
Changing the page name
To rename the Page name or the Page short name go to the details screen of the asset, make sure
the page is in safe edit and under the names section change the Page name or Page Short Name.
kelsi.org.uk/_edit
15
Contents screen
To edit a page asset it should be under construction or in safe edit.
Any changes you make to the page in safe edit will not be live until it has been through approval or
the status has been changed to live.
To change the status of the page, use the yellow alert box at the top of the screen.
A WYSIWYG editor is used to create standard content. It has similar icons to the MS Word toolbar.
If you hover over each icon while in Squiz a label will appear to let you know what it does.
You will be able to type in the WYSIWYG field as if it is a normal Word document. If you paste in
content from Microsoft Word, it will clean the text for you.
Use the H button to change the heading types on the page.
kelsi.org.uk/_edit
16
Inserting hyperlinks
Create a hyperlink on a page by highlighting the words you want to make the
hyperlink, and then click the link button.
You can use hyperlinks to link to:
•
•
•
•
•
Documents
Other assets in Squiz
External sites
Email addresses
Anchors on the same asset or a different asset in Squiz.
When you click on insert a link a small screen will pop up.
External links
You can type the URL into the first box on the pop up screen.
Make sure you include the protocol (http:// or https://) when
typing a URL otherwise it won’t work and will make a broken link
on the page.
Internal links
To link to an asset in Squiz – whether this is another page or
document, use the grey button at the end of the URL box.
When you click this, the asset map will appear.
Navigate to the asset you want to use, and click select in the bottom right of the screen.
The asset number will then appear in the URL box. Click the apply changes button at the bottom to
create the link.
If you are inserting a document or a form, make sure it opens in a new window by sliding the Open a
New Window button across.
If you are inserting a document, you should also include the summary of the document. This will
show the file type and file size at the end of the document.
Editing hyperlinks
Once you have created a hyperlink, you can easily edit where it links to without breaking the link.
•
•
•
Click anywhere on the link in the editor and it
will bring up the link menu.
Click the link button and it will show you the
existing link options.
You can then edit it.
Remember to click the apply changes button once you have finished.
kelsi.org.uk/_edit
17
Metadata
Each asset in Squiz will have mandatory metadata that needs to be completed.
Depending on the type of the asset, different fields will need to be completed.
You can find the metadata on the metadata screen of each asset.
Mandatory metadata will need to be completed before you can make an asset live.
Some of the fields that display on the page will also be edited in this screen rather than the edit
contents screen. This depends on which paint layout is applied to the page.
Standard metadata
For standard pages, documents and images the main fields you will need to complete are listed
below. The rest of the metadata fields will be populated automatically.
The fields below with a * next to them will need to be completed to make the asset live.
Description*
This should be a sentence describing the purpose of the page and what people will expect to find on
it. It should end with a full stop.
Keywords*
Here any words people will use to search for the page need to be entered.
Each word or phrase needs to be entered into a separate box and more keyword boxes will appear
as you enter more words. The order of these does not matter. They are case sensitive.
Automatically included in the first keywords field is - %asset_name%. Do not delete this as it will
make the name of the asset one of the keywords.
Super keywords
This field will affect the search results of the page and help promote content. If you think your page
should be at the top of the search results email [email protected] and request for this field to be
completed. It needs to be managed centrally so that pages don’t counteract each other.
The information owner*
Enter the name of the person responsible for the content. It is better to have a named person rather
than a service, so that if there are any issues with content on this page you can immediately find
someone to contact.
For images the information owner field is called - Information about rights held in and over the
resource. Here you need to enter who provided you with the image and holds the copyright for it.
Has content? field
This field appears on page assets. For the navigation to work properly, pages without content need
to have this field listed as No. Pages with content need this field to say Yes.
kelsi.org.uk/_edit
18
Workflow screen
This screen shows you the current workflow status of the asset.
If you have submitted the asset for approval this screen will tell you:
•
•
•
How long the asset has been in workflow
Any approval or rejection messages
Who has edited or submitted the page
If your page hasn’t been approved and you think it should have been, the messages will be stored
here for you to see what you need to change.
If the page has been rejected, it will go back into Safe Edit mode to let you edit.
You will then need to apply for approval again.
kelsi.org.uk/_edit
19
Linking screen
This screen shows where the asset is located in Squiz.
You will be able to see all the direct children assets of the asset you are looking at.
You can reorder assets on this screen by selecting the grey arrow buttons on the right hand side.
You can also go to the linking screen of the child assets from here.
If you are deleting an asset from the system you will need to check the links on this screen and
remove any necessary ones to stop broken links on the site.
kelsi.org.uk/_edit
20
URLs screen
This screen lists the URLs of the asset.
The web path is automatically created when you create your asset .
If the page has never been live, you can amend the web path as much as you need to. When
amending it, remove the existing URL in the box and type the new one. Where there are spaces you
can type a hyphen.
Untick the add remaps tick box and click the save button.
The new URL you have typed will replace the old one and the old one is deleted from the system.
If the page is live, you don’t want to change the URL of the page very often (if at all) as users of the
site could bookmark it and link to it and you don’t want to stop them from finding the content.
The system will automatically create a remap for the page if you do change it, but for system
management reasons it’s easier to have less of these.
If the meaning of the page is completely changing, it might be better to create a new page rather
than change an existing one.
If you do change the URL, make sure you leave the automatically add remaps box ticked. Once you
have clicked commit, it will show you on the screen any remaps created in the bottom half of the
screen.
kelsi.org.uk/_edit
21
Short URLs
To create a short url for a page you will need to email [email protected] with the page you would
like the short url for and what you would like.
Things to consider:
•
•
•
•
•
•
Avoid using acronyms (they don’t mean anything out of context)
Check existing short urls and don’t duplicate – there may be a more appropriate one already
in existence
Create for offline campaigns e.g. if it is being printed on advertising / used for radio
campaigns etc
Make sure they use lower case letters (URLs are case-sensitive in Squiz and users tend to
type all urls lower case, so having capital letters would create a broken url)
The URL needs to be specific to the content and will make sense forever – make it specific.
Only have 1 short URL per page, otherwise users will get confused and think it is different
content.
kelsi.org.uk/_edit
22
Preview a page
Once you have edited a page, you can preview it when you are logged in by using the URL with
/_nocache at the end of it.
So for example to see the live version of this page use www.kelsi.org.uk to see the edited version
that isn’t yet live use www.kelsi.org.uk/_nocache
It is important to remember to make images and documents live. You can see them because you are
logged in but this doesn’t mean members of the public can.
You can also use the Preview button on the top toolbar.
kelsi.org.uk/_edit
23
Deleting an asset
To delete an asset click the asset information on the top toolbar.
Click the Move to Trash button at the bottom of the Asset
Information pop-up.
Clicking this button will navigate you to the Linking screen for the
asset, with the location links of the asset marked for deletion.
If you can, you will need to go to these other assets to remove the
links. This will stop broken links once this asset is deleted.
If you can not edit the other assets shown on this screen or do not
want to edit someone else’s content, please contact
[email protected]
kelsi.org.uk/_edit
24
Approval process
Once you have finished editing a page you will need to submit it for approval before it can go live.
This is done on the details screen.
Choose from the drop down menu Apply for approval and press the save button.
All approvals go to Victoria Fraser for checking against the standards and then will either be
approved and made live or if there is anything that isn’t quite right, you will receive an email with
the changes you need to make.
If you need to make changes to the page, Victoria will let you know what these are by email. The
page will be back in safe edit mode and you will be able to edit as normal.
Once you have made the amends you will need to apply for approval again.
kelsi.org.uk/_edit
25
Who to contact
If you need any help with editing or have any issues email [email protected]
kelsi.org.uk/_edit
26