1
xxx
Trams® Back Office
Manual
April, 2015
Table of Contents
Welcome to Trams Back Office ................................................................11
The Manual is in the Helpfiles..............................................................11
Trams On-line .......................................................................................11
Login .....................................................................................................12
Overview...............................................................................................12
Using Trams Back Office .....................................................................13
Starting Trams.......................................................................................16
Setting Up and Starting Trams..............................................................16
Learning the Trams Program ................................................................17
Setting Up Trams: Building the Foundation.........................................18
Establishing a Structured Routine.........................................................19
Installing Trams .........................................................................................20
Minimum Hardware Requirements.......................................................20
TBO Installation....................................................................................20
Multiuser Installation ............................................................................23
Auto-Update Feature.............................................................................24
For Agencies Using ClientBase and Adding Trams Back Office.........24
Program Components............................................................................24
Trams Alias Utility ...............................................................................25
Trams License Manager........................................................................26
Trams Back Office
4/7/15
1
Steps to Upgrade Interbase to XE3....................................................... 27
PCI Compliance.................................................................................... 27
Utilities ........................................................................................................ 34
User Profiles ......................................................................................... 34
Global Defaults..................................................................................... 42
Branches ............................................................................................... 61
Travel Types ......................................................................................... 63
Bank Accounts...................................................................................... 64
G/L Accounts........................................................................................ 66
Checks................................................................................................... 68
Conversion Rates .................................................................................. 71
Printer Defaults..................................................................................... 72
Report, Statement & Invoice Headers/Footers ..................................... 72
Fare Codes ............................................................................................ 74
City Codes ............................................................................................ 75
Groups................................................................................................... 76
IC/Host Codes....................................................................................... 77
CC Processors....................................................................................... 77
UDIDs................................................................................................... 82
Backup Overview ................................................................................. 83
Calculator............................................................................................ 100
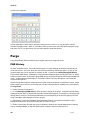
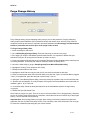
Purge ................................................................................................... 101
Enter Access Code.............................................................................. 105
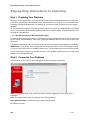
Importing Profiles From Other Sources................................................ 106
Importing Customer Profiles via ASCII (.txt) Files ........................... 106
Step-by-Step Instructions to Importing .............................................. 109
Interface Overview Download & Processing......................................... 124
Trams Back Office
4/7/15
2
Overview of Interface ........................................................................ 124
Introduction to Interface Download/Process...................................... 124
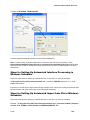
Set Up a Scheduled Task for Interface............................................... 125
Capturing Interface Records .............................................................. 131
Download Interface Records into TBO.............................................. 131
Process Interface Records .................................................................. 134
Vendor Profiles .................................................................................. 138
Sales Agent Profiles ........................................................................... 141
Processing Errors ............................................................................... 142
Interface Troubleshooting of Errors in Downloading ........................ 144
Automatic Interface Download & Processing Setup with Windows Task
Scheduler ....................................................................................... 145
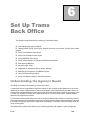
Set Up Trams Back Office ...................................................................... 150
Understanding the Agency’s Needs ................................................... 150
Getting Started ................................................................................... 151
Travel Types....................................................................................... 151
Set Up Chart of Accounts .................................................................. 152
General Ledger Accounts Setup......................................................... 157
Set Up Prompt Tab in Global Defaults .............................................. 159
Set Up Client/Vendor Balances Core Reports ................................... 160
Set Up the ARC/BSP Core Report..................................................... 166
Set Up the Check Register Core Report and Bank Reconciliation .... 167
Entering Opening Balances................................................................ 168
General Ledger Setup......................................................................... 168
Suggested General Ledger Procedures............................................... 170
Maintain the GL & Balancing Core Reports to Trial Balance Report175
GL Reconciliation Report .................................................................. 176
Canadian TBO Set Up and Special Usage ......................................... 177
Trams Back Office
4/7/15
3
Profiles ...................................................................................................... 188
Creating New Profiles in Trams Back Office..................................... 188
Leisure Client Profiles ........................................................................ 188
Entering Client Profiles ...................................................................... 194
Corporate Client Profiles .................................................................... 195
Entering Corporate Client Profiles ..................................................... 200
Vendor Profiles................................................................................... 202
Entering Vendor Profiles .................................................................... 207
Other Profiles...................................................................................... 207
Entering Other Profiles ....................................................................... 209
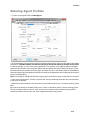
Agent Profiles ..................................................................................... 212
Entering Agent Profiles ...................................................................... 214
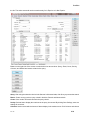
Profile Query ...................................................................................... 217
Invoices ..................................................................................................... 222
Enter New Invoices in TBO ............................................................... 222
General Invoice Information............................................................... 222
Booking Detail Screen........................................................................ 227
Add Another Booking to Existing Invoice ......................................... 240
Split Booking Option.......................................................................... 241
Void/Delete Booking(s) on Existing Invoice ..................................... 242
Enter Client Payment from Within Invoice ........................................ 242
Even Exchange ................................................................................... 242
Exchange on MCO ............................................................................. 243
Ticket Exchange with an “Add Collect” ............................................ 243
Ticket Exchange with a Refund.......................................................... 244
Invoice Query ..................................................................................... 245
Refund Invoices .................................................................................. 252
Trams Back Office
4/7/15
4
ARC/BSP Refund Invoice - Inv. Entered .......................................... 252
ARC/BSP Refund Invoice – Inv. Not Entered................................... 253
Debit/Credit Memos and TAAD’s/SSAN’s....................................... 255
Voiding Invoices ................................................................................ 257
Unvoiding Invoices ............................................................................ 258
Entering Spoiled Invoices/Tickets ..................................................... 258
Voided Invoices Retain Original Client & Vendor............................ 259
Transfer Invoice/Payment to Different Profile .................................. 260
Resubmit ARC/BSP Document ......................................................... 260
Account Net Remit Acct (Southwest Ticketless)............................... 261
Transactions with Deposits and Final Payments................................ 262
Split Forms of Payment for Client Invoices....................................... 263
Discounted Transaction — Paid By Cash/Check............................... 263
Discounted Transaction — Paid By Credit Card ............................... 264
Rebates ............................................................................................... 264
Handling Groups in Trams Back Office ............................................ 265
Payments/Adjustments ........................................................................... 268
Payments Received or Made .............................................................. 268
Payments Received From (or Made To) Clients................................ 273
Payments Received from Client (Steps) ............................................ 274
Overpayment From a Client............................................................... 281
Split Forms of Payment for Client Invoices....................................... 281
Partial Payment Received From Client .............................................. 282
Transfer Funds From One Client Account to Another....................... 283
Remove/Write Off Client Balance ..................................................... 284
Remove/Write Off Vendor Balance................................................... 284
Gift Certificate ................................................................................... 284
Trams Back Office
4/7/15
5
Petty Cash ........................................................................................... 285
Owner/Employee Travel Expenses Paid by Agency .......................... 286
Foreign Currency Payments ............................................................... 287
Payment Received for Commission Track ......................................... 288
Commtrack Vendor Pays the Commission Due Agency via the Agency's
Credit Card..................................................................................... 289
Commission Received - No Invoice ................................................... 289
Entering Commission Payments Received from a Clearing House ... 290
Agency Processed Credit Card aka CC Merchant.............................. 292
Payment Made to a Vendor ................................................................ 293
Payments Made To Agents................................................................. 294
Payments Made for Expenses............................................................. 295
Void or Spoiled Checks ...................................................................... 296
Bounced Checks ................................................................................. 296
Payroll Entry....................................................................................... 298
Payroll Tax Report and Payment........................................................ 298
Vouchers ............................................................................................. 300
Adjusting Client and Vendor Balances............................................... 301
Clear Balance-Acct Balance Zero w/Total Invoices & Total Unapplieds
Same............................................................................................... 303
Clear a Check That Will Never be Cashed......................................... 303
Interest Income ................................................................................... 303
Deposits and Withdrawals .................................................................. 304
Bank Transfers.................................................................................... 306
Bank Transfer by Issuing a Check...................................................... 307
Bank Transfer by Withdrawal ............................................................ 308
Bank Reconciliation............................................................................ 309
CC Merchant Reconciliation .............................................................. 313
Trams Back Office
4/7/15
6
Agent Reconciliation.......................................................................... 318
Bank Charges ..................................................................................... 323
Create Payables .................................................................................. 326
ARC/BSP Settlement ......................................................................... 331
Payroll Import .................................................................................... 334
Payments/Import ................................................................................ 337
Trams Host ......................................................................................... 346
Agent Adjustments............................................................................. 346
Payment Query................................................................................... 348
Payment Codes................................................................................... 353
Processing TAFP Service Fees - ARC Only...................................... 355
General Ledger ........................................................................................ 358
Maintaining a General Ledger in TBO .............................................. 358
Query - Retrieving an Existing JE ..................................................... 359
Journalized by Transaction vs. Journalized Through the End of Period362
Example Journal Entries by Transaction............................................ 364
Example Journal Entries by End of Period ........................................ 365
End of Period Journal Entry............................................................... 366
Journal Entry ...................................................................................... 368
Posting JEs to the General Ledger ..................................................... 370
Pseudo Posting Journal Entries .......................................................... 371
Budget Entry ...................................................................................... 372
Year–End Closing .............................................................................. 373
Void End of Period and Year End Entries ......................................... 374
Accounts (Chart of Accounts)............................................................ 374
Generate Budget................................................................................. 375
G/L Account Reconciliation .............................................................. 376
Trams Back Office
4/7/15
7
Suggested General Ledger Procedures ............................................... 377
Maintain the GL & Balancing Core Reports to Trial Balance Report382
GL Reconciliation Report................................................................... 383
Reports ...................................................................................................... 386
Introduction......................................................................................... 386
Printing TBO Predesigned Reports .................................................... 386
E-mail Reports in .pdf Format ............................................................ 387
Core Reports ....................................................................................... 387
Invoice Reports................................................................................... 393
Client Reports ..................................................................................... 412
Fare Savings 1..................................................................................... 416
Vendor Reports................................................................................... 418
Agent Reports ..................................................................................... 421
Payment Reports................................................................................. 427
General Ledger Reports...................................................................... 435
Interface .............................................................................................. 441
Profile ................................................................................................. 441
Mail Merge ......................................................................................... 444
Report Generator Reports ................................................................... 444
Financial Modeling............................................................................. 444
Export: Prism Handoff File ................................................................ 444
Export: Maritz Handoff File ............................................................... 445
Export: CWT Handoff File................................................................. 445
Batch Reporting .................................................................................. 445
Report Generator..................................................................................... 450
Classes of Reports............................................................................... 450
Using Report Generator Predesigned Reports.................................... 450
Trams Back Office
4/7/15
8
Summary Listing of Reports - Agent Reports.................................... 452
Summary of Airline Reports .............................................................. 453
Summary of Branch Reports .............................................................. 454
Summary of Client Reports................................................................ 455
Summary of Groups Reports.............................................................. 458
Summary of Sales Reports ................................................................. 458
Summary of Vendor Reports ............................................................. 460
Summary of Miscellaneous Reports .................................................. 461
Build Reports/Report Generator Overview.......................................... 464
What is a Report Generator? .............................................................. 464
What is a Report? ............................................................................... 464
Building Reports ................................................................................ 464
Report Generator Buttons .................................................................. 472
Navigation .......................................................................................... 472
Report Examples ................................................................................ 477
Mail Merge......................................................................................... 478
Backing Up Reports ........................................................................... 479
Tips and Tricks................................................................................... 480
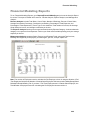
Financial Modeling.................................................................................. 482
Set Up Financial Modeling ................................................................ 482
Financial Modeling Reports ............................................................... 490
Trams Back Office
4/7/15
9
Trams Back Office
4/7/15
10
Welcome to Trams
Back Office
Welcome to Trams Back Office (TBO) -- the best back office system for travel agencies! We’re glad
your agency is part of the Sabre Travel Network family. We welcome your agency and agency feedback.
Through that feedback, we continue to improve our product, and when we say we listen, we really do.
The Manual is in the Helpfiles
The Trams Back Office manual is in the TBO help files and arranged in two parts - the Manual and the
Interface Guide. The manual is arranged in chapter order in the helpfile Contents tab to help implement the
Trams Back Office program. Each chapter link goes into detail about how to set up Trams Back Office,
Invoices, Payments, Reports, and all other main menu items. It also includes links to the front office format
requirements for a particular GDS in the Sabre, Amadeus, Worldspan, or Apollo/Galileo chapter links. Each
link also includes step-by-step instructions for the most frequently used bookkeeping procedures.
Everything to learn about Trams Back Office is found in the helpfiles. There is also other useful TBO
documentation on the Trams website at http://Sabretravelnetwork.com/trams.
Trams On-line
Have the resources available on the Trams website, at http://Sabretravelnetwork.com/trams been
reviewed? These include a full schedule of live WebEx classes on-line to supplement Trams Back Office
training. Also available are recorded WebEx classes that break down Trams Back Office into smaller
modules to learn or review one brief topic at a time. The latest updates of Trams Back Office are found in
the Support link, including downloading instructions.There are many useful and interesting documents and
pieces of information on the Trams website, so make sure to use it often as a valuable resource.
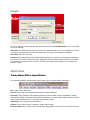
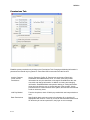
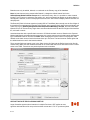
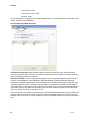
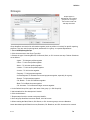
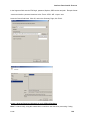
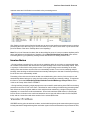
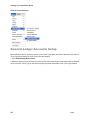
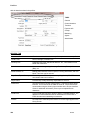
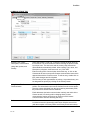
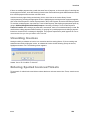
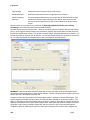
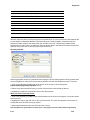
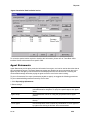
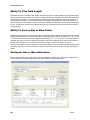
Login
To login to TBO, go to the program group in Windows and click on Trams Back Office or click on the TBO
icon on the desktop:
Alias Name: By default the alias (the short name to the path that leads to the Trams database), is Trams
or choose the database alias from the drop-down menu. The path to this database is displayed.
User Name: Enter the user name.
Password: Enter the password. Check Remember Password for the system to remember the password on
the next visit. Click OK to complete the login. Suggestion: Check the Remember Password for the system
to remember the password on the next visit. This also means that anyone sitting at your computer has
access to Trams.
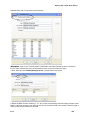
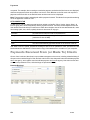
Overview
Trams Back Office Input Menus
The following Main Menu selections are used to enter ("input") and maintaining information:
File: Login, Printer Setup, Exit.
Invoices: Query, Sale, Refund, Adjustment, Spoiled, Finance Charges.
Payments: Query (Payment and Operating Payable), Received, Made, Deposit, Withdrawal, Transfer,
Reconciliation (Bank, CC Merchant and Agent Reconciliations), Create Payable, ARC Settlement, Payroll
Import (Import AssetHR Payroll + and Import Z-Pay Payroll, Import.
Adjustment: Query, Agent Comm Adjustment.
Profiles: Query, Client (Leisure, Corporate), Vendor, Other, Agent
General-Ledger: Query, End of Period, Journal Entry, Budget Entry, Year-End, Post, Void (End of Period,
Year-End, Accounts, Generate Budget, G/L Account Reconciliation.
Interface: Download, Process, Import from File
Query -- (A sub-menu of main menu)
Part of maintaining information in Trams includes retrieving entries to look at or change information. In the
Query Screen locate information with selected criteria. To retrieve a specific entry already been entered into
the system — think Query.
Record Numbers
All entries are assigned a sequential record number when being entered into the system. Trams does not
force the use of these numbers but does allow retrieval by these record numbers.
Trams Back Office Output Menu
To view information entered into Trams — think Reports. The menu items listed above are Trams “input.”
Reports are Trams “output.” Trams Reports are further separated into several areas within those categories.
Categories include Core, Invoice, Client, Vendor, Agent, Payment, General Ledger, Interface, Profile,
Report Generator, Financial Management, Export, Batch Reports and TCR Viewer. Within each category,
there are sub-categories.
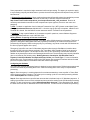
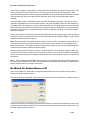
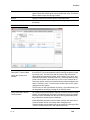
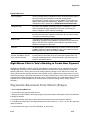
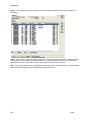
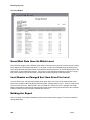
Using Trams Back Office
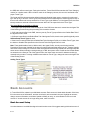
Trams Back Office is Menu (and Tab) Driven
Trams is menu and tab driven, so select a list of functions from a “menu.” The Trams main menu is shown
below.
Each of the main menu options has a sub-menu, laid out vertically rather than horizontally. A sub-option
followed by an arrow indicates there is yet another sub-menu for this sub-option.
Hot Keys
Hot keys have underlined letters, different from the rest of the letters in a menu option. When pressing a Hot
Key (the underlined letter), a shortcut is used to activate that menu option. Using Hot Keys, navigate through
Trams with single keystrokes. If just pressing the underlined key does not work, first press <Alt> and hold it
down while pressing the underlined key. Also use <CTRL/F1 through CTRL/F6> to hot-key to any of the 6
query screens.
Tabs
At the bottom of the Main Screen, see a series of tabs: Main, Invoice, Payments, Operating Payables,
Journal Entry, and Profiles. When clicking on any of these tabs, the Query screen is brought up. (Also
access the same screens through the Main Menu.) Use <CTRL/TAB> to move from one Query Tab to
another without using a mouse, or use <CTRL/F1 through CTRL/F6> to hot-key to any of the 6 query
screens. Query screens remain open at all times, so multiple screens can be accessed at one time. Click
the Main tab to get back to the main Trams Back Office menu.
Windows
Users may work in many areas of the TBO program at one time. To navigate to any one of these open
program areas, use Windows and select the desired program area to re-enter.
Help Menu
Online help is available throughout the entire Trams program by clicking on Help|Trams Help or pressing
F1. Under the Contents tab, select the topic to review (the entire TBO Manual has been converted into
online help). For example, if help is need in how to enter an invoice, click on the chapter in the Contents tab,
Invoices and then Entering New Invoices in Trams. Or click on the Index tab and type in Invoices. Then click
on the topics to review.
Under the Help menu there is also an About item which displays information on the Interbase and TBO
versions.
Entering Information
Each data entry screen contains one or more fields. A field is a position on the screen where we enter
specific information. There can be several fields on the screen at once. Each field has a prompt followed by
an empty box describing the type of information in the field. We enter the information for a field in the box.
Sometimes Trams expects information for a particular field to be in a certain format. For example, in a
numeric field, such as Ticket Number, enter only numeric characters. Other fields present several options.
Field Information
Date
Enter MMDDYY, ‘051814', or DDMMMYY, '18may14'. The system defaults to the
current month and year. Enter a date that is the 5th day of the current month and year,
by entering a '5'. The date format is determined by the Windows Region and
Languages setting on each computer.
Enter dates too by clicking inside the field. This displays a pop-up calendar to select
the date.
Red arrows are used to move backward and forward through the calendar months.
The up and the down arrows move through the years, with up increasing the year and
down decreasing the year. Double-click on the desired date.
Numbers
By default, Trams allows for free form numeric entry. For the value 500.00, type '500'
and tab. For decimal fields, Trams automatically adds the decimal point and the
proper number of zeros following it. To enter a negative number, enter the '-' sign
either at the beginning or at the end of the number.
Pull-down
menus
If the arrow appears on the right side of the field, it means there are multiple choices
for this field.
Look-up
Enter part or all of desired selection; Trams displays all potential matches and allows
for specific selection. Trams suggests using only the first three or four letters.
After entering information, an arrow appearing to the right of the box. Click the arrow,
to bring up everything starting with the letters entered. Highlight the entry, and click.
That name now appears in the name field. If there are duplicate profiles, this tactic
brings up everything beginning with those three or four letters.
Free Text
Enter any information up to the length of the field.
The fastest way to move from field to field is to press the <TAB> key. To quickly move backwards, hold down
the <Shift> key and press the <TAB> key. Also use the hot keys to navigate through the data entry screens.
Some of these hot keys are activated by holding down ALT and the underlined key letter. By keeping hands
down on the keyboard rather than grabbing for the mouse for every entry, hand fatigue is minimized.
Confirmation
Trams is designed to keep any accidental deletion or loss of data to a minimum. Whenever Trams detects
that data may be lost, the program displays a box in the center of the screen with a confirmation message:
Do You Want To Abandon Changes? Yes No
Why do Backup?
Because some day the computer holding the data WILL crash. Data files are stored on the hard disk
of a computer. Each time information is changed or added, those files are updated. If the computer holding
the data crashes, the data files can be damaged, and the agency might be unable to access them. While
there is no way to prevent an accident, potential loss can be minimized by doing a good backup every day!
IMPORTANT Note: Please see the chapter, Utilities and sections, Backup Overview and Restore for
complete details on doing a backup using the Trams backup utility.
Starting Trams
From Windows Desktop: Double-click the Trams icon to go to the main Trams screen. Do not turn the
computer while in Trams! Always Quit Trams first --- or data may be lost.
Setting Up and Starting Trams
Read through this section to know what to do after installing Trams. Although each agency is unique, there
are some procedures common to all travel agencies:
Maintaining Paper Documents
Most agencies agree that the following items should have a specific numbered “back-office” copy, for control
purposes, in addition to the Trams records:
1. Invoices (One copy, often a particular color, designated as the back office copy and filed numerically.)
2. Deposit Slips (One copy of any deposit slip maintained by the back office, usually by date.) With this, a
copy of each check and cash item received, or at least an accurate reconciled list of all checks and cash
items received.
3. Agency Checks (Two-part checks with one copy maintained numerically by the back office.)
4. Bank Statements (All bank statements, once reconciled.)
Invoices
Review how and when agents create invoices for the agency. An invoice is the sole source of notifying the
back office of sales in the front office. Are agents issuing invoices every time they sell something? How
about when they refund something?
What information are agents including on their invoices? Do they include all the information needed, not only
for bookkeeping, but also for management and marketing purposes? In the past, invoices may have only
been used for bookkeeping purposes; now those invoices can yield management and marketing
information. For example, client names and addresses on invoices are captured into Trams for marketing
purposes. Evaluate current invoices to see if more information needs to be included.
If planing to set up Interface to enter invoices, check out the Interface Guide!
Trams makes tracking the accountable documents, such as invoices and tickets, easy. Reports in Trams
will verify if either an invoice or ticket is missing.
Many agencies using Trams have described a method of using “invoice bins” in the back office. Invoices are
put into the bins, then gathered and entered into the Trams program. For both hand-entering agencies and
interfaced agencies, having three invoice bins often works well. Bin #1 holds all current invoices. Bin #2
contains any additional bookings (cars, hotels, etc.) ready to be added to an existing invoice in Trams. Bin
#3 has all ticket exchanges, refunds and voids.
Do Bank Deposits Daily
In preparing bank deposits, itemize each payment received on the Deposit Slip (even cash) and in place of
any bank numbers include the payer's name, along with any invoice numbers. TBO can create deposit slips.
See Deposits in the Payments Chapter.
Make a copy of the checks, plus any statements received with payments, and attach to the back office copy
of the deposit slip.
Agency Checks
Whether checks are handwritten or Trams prints them for the agency, we suggest keeping a copy in the
back office. Include a notation of its purpose on the check.
Learning the Trams Program
The following are suggested steps before starting Trams:
1. Install Trams software. A member of our implementation team will be calling to assist with installation,
setup and training.
2. Become comfortable with all the help tools available to Trams users: User Manual and Interface Guide
contained in TBO helpfiles, www.Sabretravelnetwork.com/Trams where there is a listing live TBO WebEx
classes, Recorded Trainings, and other useful documentation.
3. If the agency plans to interface, read through Interface Preparation for Sabre, Worldspan, Amadeus, or
Apollo/Galileo documents found at www.Sabretravelnetwork.com/Trams under Training|Getting
Started.
4. Need more help? E-mail [email protected]. Also one of the TCC’s (Trams Certified
Consultants) can be hired to come into the agency for training. A full listing of TCC’s is on our website at
www.Sabretravelnetwork/Trams under the Training link.
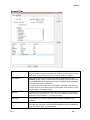
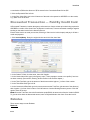
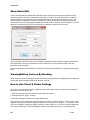
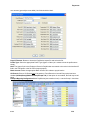
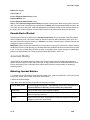
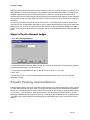
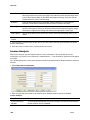
Setting Up Trams: Building the Foundation
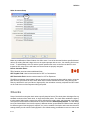
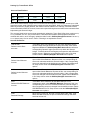
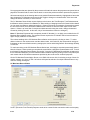
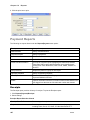
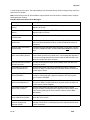
Now set up Trams Back Office Program using the chart below as a guide:
Completed
Task
Chapter Link in Helpfiles (Under
Content Tab)
o
Installation
Installation
o
Setting Up Security (User Profiles)
Utilities
o
Setting Up Global Defaults
Utilities
o
Setting Up Branch/s Information
Utilities
o
Setting Up Travel Types
Utilities
o
Setting Up Bank Accounts
Utilities
o
Setting Up Printer Defaults
Utilities
o
Setting Up Fare Codes
Utilities
o
How to Backup/Restore
Utilities
o
Setting Up City Codes
Utilities
o
Setting Up Groups
Utilities
o
Importing Profiles from Other Sources
Importing
o
Interface Overview
Interface Overview
o
Interface Download & Process
Interface Download & Process
o
Setting Up Travel Types, Chart of Accounts &
G/L Accounts
Setting Up Trams Back Office
o
Setting Up the 4 Core Reports
Setting Up Trams Back Office
o
Entering Opening Balances into GL
Setting Up Trams Back Office
o
G/L Setup
Setting Up Trams Back Office
o
Suggested G/L Procedures (Day,Week,Month)
Setting Up Trams Back Office
o
Profiles Menu (Includes how to’s)
Profiles
o
Invoices Menu (Includes how to’s)
Invoices
o
Payments/Adjust Menu (Includes how to’s)
Payments/Adjustments
o
General Ledger Menu
General Ledger
o
Reports Menu (Includes how to’s)
Reports
o
How to use Report Generator
Report Generator
o
How to Build Reports
Building Reports
o
How to Use the Financial Manager
Financial Manager
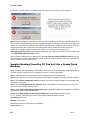
Establishing a Structured Routine
Once the Trams system is set up and the foundation is established (the four Core Reports), begin following
the checklist of suggested procedures as outlined in the General Ledger chapter for the Daily Routine,
Weekly Routine and the Monthly Routine.
2
Installing Trams
This chapter contains:
Minimum Hardware Requirements
Directions for Installation
For Agencies using ClientBase and Adding TBO
Trams License Manager
Alias Utility
PCI Compliance
Minimum Hardware Requirements
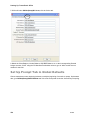
Trams Back Office requires minimum hardware requirements. Click here for the current requirements.
TBO Installation
For brand new installs: If installing TBO on a brand new computer that does not have ClientBase already
installed, use the InterBase XE listed below.
Trams Back Office Installation with InterBase XE3
Reminder before installing, a Trams Implementation rep will be calling
([email protected]) to assist with this process.
Step 1: Download the Program File. After selecting the computer that functions as the Trams Back Office
computer, download the Trams Back Office installation.exe file onto a folder on the computer’s hard drive.
(To network this program, make a shared folder that can be accessed from the workstations on the
network.) The file is quite large so this may take some time to download with a slow connection.
Trams Back Office Installation Files All Countries
Step 2: Run the setup.exe. Go to Start|Run to browse to the folder that holds the downloaded file.
Double-click the file to be launched into an installation wizard.
4/7/15
20
Installation
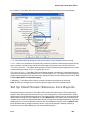
Step 3. Select Next at the Welcome Screen and Agree at the Software License Agreement form.
Step 4. Select the components to install (default selections are already checked for stand-alone
users and servers). Select Trams License Manager only when installing program on server (a single
computer is Interbase Client/Server. If ClientBase is already installed on the server, the selection is IB client
only.) The server installs Interbase Client & Server. If setting up multi-user workstations, select the
Interbase Client Only option for the workstations.
Step 5. Select the Destination folders (where Trams Back Office files are to loaded). We strongly
21
4/7/15
Installation
recommend using the default destination folder:
For XP/2003 Server, the path would be this:
C:\Documents and Settings\All Users\Application Data\Trams\Database\Trams.ib
For Vista, Windows 7 and Windows 2008 Server, the path would be:
C:\ProgramData\Trams\Database\Trams.ib
Click Next.
Step 6. Select the Country you wish to install.
Step 7. Enter the serial number and access code found in the welcome e-mail received from Trams.
Please contact the Trams Marketing Department at [email protected] or
4/7/15
22
Installation
[email protected] if it cannot be located. Click Next.
Step 6. Enter the serial number and access code for Interbase Server. Clicking Next verifies the access
code, and serial number for the number of users and computers for which Interbase has been purchased
(this serial number and access code are in the welcome e-mail). Click OK. Another screen pops up that says
requires that the Interbase Serial # and Access code now need to be entered as the system is now ready
to install Interbase.
Step 7. Select Next to install files.
Step 8. Restart the computer before continuing.
Step 9: Run the CBPlusup.exe file for encryption purposes by clicking here.
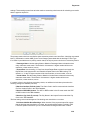
Step 10: After installation is complete, a blank database with the filename of TRAMS.ib is created.
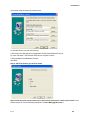
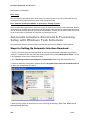
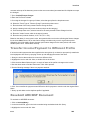
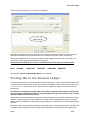
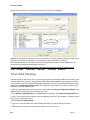
When launching Trams Back Office you see the screen, shown below, defaulting to your Trams alias, asking
for a User Name and Password. Your password was sent to you under separate cover.
This completes the installation of TBO. Now you need to update your program by going here and following
the directions to upgrade to any newer version.
Multiuser Installation
Go to each workstation and browse to the shared folder where the Trams Back Office installation setup.exe.
Use the install components of InterBase Client Only, Trams Back Office, and Trams Back Office
Documentation on each of the computers with access to Trams Back Office.
After each workstation has Trams Back Office, point the Alias to the correct database file. Go to Start|All
Programs|Trams Back Office Alias Utility. Go into the Trams Alias, change the path to point to the
Trams.ib, located on the server using the format required for the network:
Remote via TCP/IP
23
4/7/15
Installation
For XP/Windows 2003 Server, the default path is this:
Server Name: C:\Documents and Settings\All Users\Application Data\Trams\Database\Trams.ib
For Vista/Windows 7/2008 Server, the default path is this:
Server Name:C:\ProgramData\Trams\Database\Trams.ib
Auto-Update Feature
A new auto-update feature has been added starting in Trams Back Office 3.06.00 that will automatically
install updates for the tramswin and download executables. Auto-update greatly streamlines installing
updates on users' workstations and ensure fixes are being installed in a timely manner. It will only install
updates that match the current major version (3.06.01 or 3.06.02, for example).
When Trams Back Office (tramswin.exe) is launched, the auto-update feature will check to see if a newer
version is available, then automatically download and install the update on the users' workstation. The
automatic update works for tramswin, download, ibbackup, and the ibbackuplib files. The earlier versions of
the executables will be renamed by appending .old to the file name during the process, so they will still be
available for rollback purposes if necessary.
Users can cancel the auto-install routine and will be reminded 24 hours later upon the next login attempt. If
a user does not have administrative rights, the auto-update routine won't be able to install the new versions.
If download.exe is running while the update is being installed, it won't be interrupted. The download.exe file
will be renamed to download.exe.old while running, and the next time download.exe is launched, the new
version will run.
For Agencies Using ClientBase and Adding
Trams Back Office
If the agency has been using ClientBase and have decided to add Trams Back Office, follow these
instructions:
1. Upgrade the ClientBase program to latest version. The database update should be run with the update
to latest version.
2. On the Server, proceed with the Trams Back Office Installation as outlined above (make sure to install
correct latest version.
3. Proceed to install Trams Back Office as outlined above on all workstations.
For help, please e-mail [email protected].
Program Components
This program is made up of the following pieces: The InterBase Server; Trams.ib; ibbackup.exe; Tramswin.exe;
convert.exe; winint32.exe; download.exe, tfwhelp.hlp and tfwup.exe.
The InterBase Server: The database operating system behind Trams Back Office.
Trams.ib: The database backbone, holding all the data and tables where data resides.
Tramswin.exe: The actual program file that coordinates the InterBase server and the Trams.ib - what is seen
on the screens of Trams Back Office and data manipulation.
Wintint32.exe: The program receiving interface data from a GDS.
Download.exe: The program converting GDS interface data into the Trams format.
IBBackup.exe: The program used for backing up Trams Back Office.
4/7/15
24
Installation
index.html: The help files linked to screens.
TFWup.exe: Updates the database structure when needed for program enhancements.
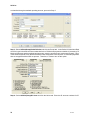
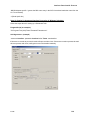
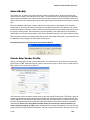
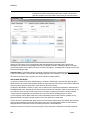
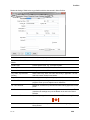
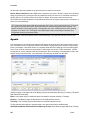
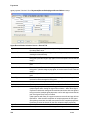
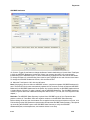
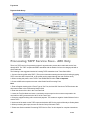
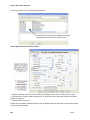
Trams Alias Utility
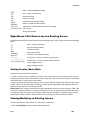
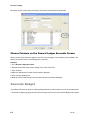
The Alias Utility manages the location of the Trams database/s. An alias is simply a shortcut name to the
long path which maps to the location of the database. By default there are probably two aliases set up,
Trams (the Trams database), and DemoData (a database with sample data in it that can be used to
experiment with the program). But there can be as many databases as desired. Access the Trams Alias
Utility in the program group by going to Start|Programs|Trams Back Office|Alias Utility.
Click Enable Global Aliases Updates to add, modify or delete an Alias.
Alias Name: The short name to long path to the database.
Path: The path that leads to the Alias’s database.
Test Path: When setting up a new Alias, Test Path, provides a test to verify the correct path.
25
4/7/15
Installation
Type: Select Global Alias On Local Machine: For multiple users on a machine (like in Terminal Server),
then each user needs to have a copy of the alias set up. With Global Alias, an administrator sets up one
global alias on the machine that is used by all users on that machine. The Local Alias is used on the Server
or on a single user computer.
Special Note: To initiate changes to the Alias Utility, make sure to log out of the Trams program and log
back in again.
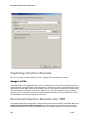
Changing the Trams Alias
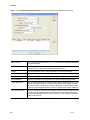
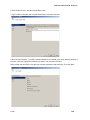
To make a change the database location, start the alias utility by going to Start|Program Files|Trams Back
Office and select Alias Utility. Add, Modify, or Delete Aliases from this screen.
Click Add or Modify to bring up the screen where the alias path is entered. The Alias Name is simply a name
used to recall the path to the database.
Note: Formats for the path to the database if on a network are:
TCP/IP Servername:drive:\directories\databasename.ib
Netbeui \\Servername\drive:directories\databasename.ib
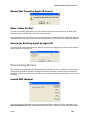
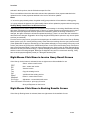
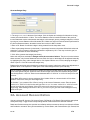
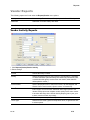
Trams License Manager
The software license manager monitors the number of users logged into the database, and compares it to
the agency Access Code which reflects the number of users the agency is licensed for with Trams and
ClientBase Products and Services. When accessing the Trams database using any of Trams applications,
the Trams License Manager verifies that connection can be made to the Trams database and that a current
version of the License Manager is enabled.
The Trams License Manager utilizes for communication Port 8090. This port must be opened on any firewall
that a company may be utilizing to filter traffic internally. It also must be opened externally, for remote users,
in their network configuration.
If the licensed number of users is exceeded, the system prompts:
Your Trams User License is currently set for X Users. You are the Xth User logging into your
database. Please contact Trams Marketing to modify your User Licenses and obtain a new Access
Code.
This means number of User Licenses have been exceeded and someone else needs to log out of the
program or contact Trams Billing at 310-641-8726 or [email protected] to obtain additional
licenses.
No Version of Trams License Manager
If the Trams License Manager is not running on the remote server, the following error screen is displayed.
The License Manager does not allow remote connection to the Trams database unless the Trams License
Manager is running. If the Trams License Manager is running, and this message is still appearing, check to
4/7/15
26
Installation
see that the Alias is mapped correctly. A firewall, too, may be blocking the License Manager as well. If
assistance is needed in troubleshooting this issue, e-mail [email protected] or call support
directly at 310-641-8726. option 1.
Steps to Upgrade Interbase to XE3
Upgrading your Interbase to XE will improve the performance of your database. Contact Trams Support at
[email protected] or 310-641-8726 to obtain the download file’s path, the Interbase serial
number and access code for the upgrade to Interbase XE.
Minimum Versions
TBO 3.02.02
CBW 3.06.01
IB 7.1 (do not upgrade if IB version is 6.X)
Recommended Versions
TBO 3.04
CBW 3.07
IB 7.1 or above
The download includes the ibxeserver.exe. This needs to be saved to your server on the desktop of the
server or somewhere else easily accessible.
1. Make sure all users are logged out of Trams Back Office and/or ClientBase Windows.
2. Do a full backup of the Trams database. You can store the backup either on the server or on external
media.
3. Rename the database file (i.e. add.old to the end of the filename). This will serve as a second backup
after the upgrade. Once you are satisfied that the system if functioning properly, the old database file can
be deleted.
4. Install ibxeserver.exe. Enter the Interbase serial number and access code you were given when
prompted
5. After installing, either reboot the server or manually start the XE service.
6. Launch IBBackup and restore the backup that you created in Step 2. Make sure you specify a page size
of 16K for optimal performance.
7. Log into the database with Trams Back Office and ClientBase Windows.
8. Install the XE client on the workstations. Use the same ibxeserver.exe but do a client-only install (leave
the serial number and access codes blank).
PCI Compliance
Credit Card Encryption Background
The payment card industry (PCI) compliance and validation regulations spells out what security measures
must be taken to protect the private information during any transaction occurring with the use of a paycard.
The PCI Data Security Standard is used by all card brands to assure the security of the data gathered when
transacting on behalf of a customer. There are numerous regulations including encrypting the credit card
numbers in the database.
Encrypting this data makes it virtually impossible to decipher a credit card number without a decryption key
27
4/7/15
Installation
which protects the credit card information in the database from fraudulent abuse. Future Trams Back Office
development will implement additional enhancements to help agencies further comply with the PCI
regulations.
How it Works
In Trams Back Office, credit card numbers will be encrypted in the database and masked throughout most
of the TBO application upon new installation of TBO 3.01 or higher.
For older TBO users, encryption and masking occurs when the 3.04 ClientBase database update
(CBPlusup) is run on the existing database, but will only encrypt if the Trams Back Office version is 3.01 or
higher. The CBPlusup.exe can be downloaded from the link on the TBO download page. A new field will be
added to the database to accommodate the encrypted credit card number the existing credit card field will
contain a masked version of the number. A cleaning and masking routine takes place during the database
update to standardize all of the credit card numbers so they can be properly masked for all applications
utilizing the masked Credit card field.
Masked Credit Card numbers are displayed in the payment query screen and on most reports.
Masked Exceptions:
- Payments|Reconciliation|CC Merchant Reconciliation query screen (Payments|Reconciliation|CC
Merchant Reconciliation)
- Reports|Payments|CC Merchant Reconciliation
- Reports|Payments||Credit Card Reconciliation
- IC Export Utility
Only valid credit card numbers will be cleaned and appear in the masked format.
Valid Credit Card Formats:
- Valid credit card numbers with spaces are considered valid
- Valid credit card numbers with letters (VI1234123412341234)
- Valid credit card numbers with expiration date after a slash (CA5458004519231383 /1109)
Valid credit cards are standardized using these rules:
- Any non-numeric text at the beginning of the string up to the first digit is stripped out. AX 3782 078 234
0834/1008 becomes 3782 078 234 0834/1008.
- All spaces are removed. 3782 078 234 0834/1008 becomes 37820782340834/1008.
- The credit card string is truncated starting at the first non-numeric character, usually a slash, leaving only
digits. 37820782340834/1008 becomes 37820782340834.
The new masking format used is:
- 2 letter card code + space + first 2 digits+ ?-XXXX-? + last 4 digits (i.e. MC 54-XXXX-2364).
- All credit card fields where a credit card number can be entered or modified will display the full credit card
number (unmasked).
- Mask credit card numbers in the Payment Query results screen. The full credit card number can still be
entered in the Payment Query Advanced tab to search for a specific card however; the masked version will
be displayed.
- The Report Generator Fixed CC No. field name has been changed to Full CC No. and will display the full
credit card number (unmasked).
- An indicator has been added to Help/Table Version to show if the database has been encrypted (Yes,No).
4/7/15
28
Installation
Technical Notes:
- The field name Credit Card Number will be renamed ?CCNUMBER?.
- Three changes to database fields takes place when the 3.04 CBPlusup has been run.
- Masked CC Number Field (CCNUMBER): Credit card number in masked format. Credit card numbers are
standardized and validated. Valid credit cards are saved in its masked format and invalid credit cards are
saved as is.
- Encrypted CC Number Field (NUMBERENCRYPT): Encrypted full credit card number entry (all numbers
whether valid or not are encrypted).
- Hash CC Number Field (NUMBERHASH): Credit card number in hash format. This field is used for faster
searching of credit card number?. Valid credit cards hash the standardized format. Invalid credit cards hash
the number as is.
Use of Encryption Keys for Third Party or Custom Development
A unique key will be generated for each agency that can be used in product development for applications
that will need to read the full credit card number. The key can be obtained by a SYSDBA log-in only by going
to Utilities|Credit Card Encryption Key and entering a password provided by the Trams Support desk.
Running the CBPlusup will also install a CCEncrypt.dll file that will allow access to the Trams database to
view un-encrypted Credit card numbers. The intended audience is for the designers and developers of
applications that reads credit card numbers from outside of the Trams database. Need information on how
to un-encrypt the credit cards? Send a fax asking for this information to 310-641-8726. The fax should be
on company letterhead and should have the signature of the manager or other higher up.
PCI Changes in TBO 3.03 Release
- A PCI requirement mandates logging when a full credit card number has been viewed. Therefore, new
functionality was added to allow users to view a full credit card number provided the user is logged in as
SYSDBA or the user profile has the permission to view full credit card numbers enabled.
Once enabled, in payments received and made, in the profile payment info tab and in the booking expanded
fare tab CC Commtrack field, right clicking on the credit card number field displays a menu option to view
the full credit card number. When the user selects it, the full credit card number is displayed in the payment
field and a log event is created including:
Date/Time
Username
Credit Card number
Screen or report they were in when the full cc number was viewed
Payment/invoice/profile number
- Added a new user permission under Utilities|User Profiles in the permissions tab Enable ability to run
reports and exports with full credit card numbers. By default, this new option is disabled (unchecked) and
can only be enabled when the option. Enable ability to view full credit card numbers is also enabled. Once
this user permission has been enabled, any time a report is run or an export is performed, a log event is
created.
- The permission setting Enable ability to run Report Generator Reports//Exports with full credit card number
allows users to run the Prism Handoff and the CC Merchant report.
- The CC Reconciliation report mail merge format now contains masked Credit Card numbers. Users must
have permission Enable Ability to run Reports/Exports with full Credit Card Numbers checked in order to
run this report.
- An option to encrypt the backup file has been added to Database Backup/Restore Utility. If a password is
specified during the backup and the backup is being compressed, the resulting zip file will be encrypted
using AES 256 encryption.
29
4/7/15
Installation
When restoring a compressed backup that is password-protected, if the user specifies the wrong password
(or leaves the password blank), then the restore will fail.
PLEASE NOTE: If the encryption password is lost, there is no method for recovering the password and the
encrypted backup cannot be restored.
- Created a User Permission setting to enable viewing the full version of the credit card number throughout
the application. The permission Enable ability to view full credit card numbers can be found under
Utilities|Setup|User Profiles under the Permissions tab and is unchecked for all users by default. The
credit card numbers are masked upon saving to the database. Users who have this permission enabled can
right-click to view the full credit card number and select Show Full Credit Card numbers in the following
areas:
On the Payment Screen - credit card number field
In Profiles - Payment Info Tab
In CC Merchant Reconciliation
Expanded Fare booking tab - Comm Track CC No field
Users with this permission can also run the CC Merchant report.
Users without this permission are unable to right-click to view the full credit card number in the above areas,
and cannot access the CC Merchant report.
Password Protection
User Permission Security Enhancements (only available with Interbase XE or higher):
- Enable User Authentication for login security settings for password management. EUA enabling the
database allows benefits from the new password management features of setting password strengths,
setting password expiration dates, as well as users being able to change their own passwords.
- All user login password security enhancements are strictly tied to EUA enabling the database. If a
database is not EUA enabled, Trams Back Office user login password management remains unchanged
and only SYSDBA can update User Login passwords.
EUA Requirements:
•IB Server and IB Client must be on IB version XE.
•The ClientBase/Trams Back Office database must be updated to IB XE or higher.
•Trams Back Office table version must be DB version 37 or higher (3.3)
•ClientBase Windows table version must be DB version 99 or higher (3.6)
EUA Enabling a Database:
To EUA enable the database a special command line prompt: cbplusup.exe –eua must be used when
running the CBPlusUP. When the command line prompt is used, if the above requirements are not met the
user is prompted,
The following requirements must be met to EUA enable the database:
-Database Server version must be upgraded to version “10” or greater. The current version is “X”.
-Database File version must be upgraded to version “15” or greater. The current version is “X”
-Database Client version must be upgraded to version “10” or greater. The current version is “X”
Please verify these requirements are met and try EUA enabling again.
If the requirements for EUA enabling the database are met the user is prompted, You have the option of
using Embedded User Authentication. Your user logins and passwords will now be directly tied to
your database file. Enable EUA?
4/7/15
30
Installation
- Help|About includes a new entry: EUA Enabled Yes|No
Upon EUA enabling a database all User Login passwords are converted and stored within the database,
rather than within InterBase. The SYSDBA password remains unchanged. Upon logging into Trams Back
Office as SYSDBA after EUA enabling the database, continue using the original SYSDBA password. If that
password was never changed from the generic "xxxxxxxxx" password, a prompt launches upon first login
to change the password.
All other User Logins have their current password converted to their login name (which is always Upper
Case). As each user first logs into Trams Back Office (or ClientBase) they will need to use their newly
converted password based on their login name. For example, if the User Login name is MARY, upon first
logging into Trams Back Office the user should enter MARY into the Login Name AND enter MARY into the
password. Upon successfully entering the User Login and Password the user is then prompted to enter a
new password, to ensure security going forward. This new password is then used each time the user logs
into Trams Back Office. Because the database is EUA enabled, all users can now update their own User
Login passwords by going to Utilities|Setup|User Profile and entering a new password.
A new setting was added to the Utilities menu called User Login Password Settings. When "Enable
Password Expiration" is checked, you can set up how often (number of days) a password should expire. If
a User Login password expires as a result of this setting, upon login the user will be prompted to enter the
current login and password and then enter (and re-enter) a new password. This setting must be turned on
by a user with manager authorization.
Password Expiration
Enter the number of days until password is expired (Example: 30, 60, 90, etc.). If you are also a CBO user,
the maximum time allowed for a password to be used before resetting is 90 days. Once password expires,
when user tries to login user is directed to a new page and asked to enter the old password and a new
password.
Password Strength
A setting was also added to assign password strength when creating a new password. If a chosen password
does not meet the rules, user must change password before allowed to continue.
Options are low, medium or high and are described as follows:
Low Strength - Passwords must contain:
- A minimum of one character
- A maximum of 8 characters
- Cannot be a repeat of last 4 passwords
Medium Strength - Passwords must contain:
- A minimum of 7 characters
- A maximum of 8 characters
- At least one alpha character (a-z, A-Z)
- At least one numeric character (0-9)
- Cannot be a repeat of last 4 passwords
High Strength - Passwords must contain:
- A minimum of 7 characters
- A maximum of 8 characters
- At least one lower case alpha character (a-z)
- At least one upper case alpha character (A-Z)
- At least one numeric character (0-9)
31
4/7/15
Installation
- At least one special character (!,@,#,$,%,^,&,*,_,-,+,= etc.)
- No character may be used more than once, regardless of case
- Cannot be a repeat of last 4 passwords
Blacklisted Passwords
For security purposes certain passwords are no longer allowed to be used in the database. The default that
came with the program is no longer allowed for use as a password for SYSDBA. After EUA enabling the
database, if the SYSDBA password is the default, or if at any point you are changing the SYSDBA password
and you try to use the default, you are prompted to select a different password.
For user logins, the user login name and the user password can no longer be the same. After EUA enabling
the database, if you try to create a password that matches the user login name, you are prompted to select
a different password.
Important Note about SYSDBA Password:
It is extremely important that you archive the SYSDBA password to a removable storage drive as a
source of password recovery. If the SYSDBA password is forgotten and was not archived, the
password cannot be recovered.
To archive, when changing the SYSDBA password enter the new password and check the box Archive
Password. Click OK to save and a popup screen is displayed to create a password recovery disk.
The prompt appears, Please insert your password recovery drive/disk and select the appropriate drive letter
to archive the password. To refresh the drive list, click the drop down arrow. Then press OK to continue or
Cancel to stop the process. Click the arrow and select the drive to save the password to and click OK.
Once the password is on the drive the prompt, Password successfully archived is displayed. Should the
need arise to recover the password from the removable device, in the login screen, click the Forgot
Password link (which is only visible with the SYSDBA Login), then insert the removable device and navigate
the removable device drive. Once logged in, the SYSDBA password should be changed and re-archived.
4/7/15
32
Installation
33
4/7/15
3
Utilities
This chapter contains directions on setting up defaults and configuring Trams Back Office for the
agency, as well as the use of other features listed under Utilities:
User Profile
Global Defaults
Branches
Travel Types
Bank Accounts
G/L Accounts
Checks
Conversion Rates
Printer Defaults
Headers/Footers
Fare Codes
City Codes
Groups
IC/Host Codes
CC Processors
UDIDs
Backup
Update Statistics
Calculator
Purge
Enter Access Code
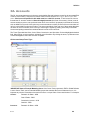
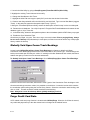
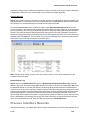
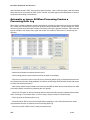
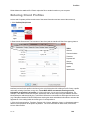
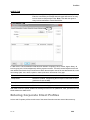
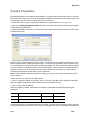
User Profiles
To protect the security of the Trams Back Office system for the agency, each person using Trams Back
Office is assigned a User Profile. Each User Profile in Trams Back Office can be unique, authorizing
different levels of access for each user. The user is prompted for a Login, and Password when launching
the Trams Back Office program. Trams Back Office assumes there is one person who acts as a gatekeeper
for access to all levels of Trams Back Office. Limit who can get into the agency’s financial records, payroll
4/7/15
34
Utilities
information, or commission amounts. Assigning passwords and login names are the way to accomplish
different levels of access.
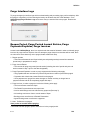
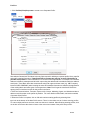
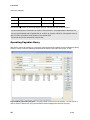
User Profile Authorization Levels - SYSDBA and User
There are two levels of User Profiles: SYSDBA (System Database Administrator) and User. The SYSDBA
creates, modifies or deletes other User Profiles. Only one User Profile can be established with an
authorization level of SYSDBA. Why? Trams Back Office assumes the System Database Administrator is
the only one that needs to know the passwords for all users, any sensitive payroll information, etc. The
SYSDBA sets accessibility levels for all users, preventing all or selected users access to any sensitive
agency information. Set all other User Profiles to User authorization. An unlimited number of User Profiles
can be set up and each can be tailored to authorize access to specific areas in Trams Back Office.
The Trams Back Office program comes with one Administrator Profile built with an Authorization level of
SYSDBA. By default, this User Profile's Login Code is SYSDBA and uses the password (must be changed)
which came in the welcome e-mail to the agency. The SYSDBA login name cannot be changed. A
password can be established and given to those in the agency who need access to Trams Back Office. If a
password is not assigned to the SYSDBA Profile and no additional User Profiles are created, anyone
entering into the Trams Back Office system is, by default, signed in as a Manager with full access to every
area of the program. Passwords provide security.
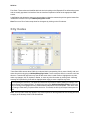
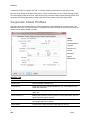
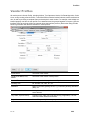
Changing the SYSDBA Password
To change the SYSDBA password in TBO, go to Utilities|Setup|User Profiles. Highlight the User Name,
SYSDBA, enter the new password and click Update. Warning: Take care when entering the password, as
there is not a prompt to repeat the password. Make sure to write the password down for reference.
Password Protection for TBO Users on InterBase XE or Higher
User Permission Security Enhancements (only available with Interbase XE or higher):
- Enable User Authentication for login security settings for password management. EUA enabling the
database allows benefits from the new password management features of setting password strengths,
setting password expiration dates, as well as users being able to change their own passwords.
- All user login password security enhancements are strictly tied to EUA enabling the database. If a
database is not EUA enabled, Trams Back Office user login password management remains unchanged
and only SYSDBA can update User Login passwords.
EUA Requirements:
•
•
•
•
IB Server and IB Client must be on IB version XE or higher.
The ClientBase/Trams Back Office database must be updated to IB XE or higher.
Trams Back Office table version must be DB version 37 or higher (3.3)
ClientBase Windows table version must be DB version 99 or higher (3.6)
EUA Enabling a Database:
To EUA enable the database a special command line prompt: cbplusup.exe –eua must be used when
running the CBPlusUP. When the command line prompt is used, if the above requirements are not met the
user is prompted,
The following requirements must be met to EUA enable the database:
- Database Server version must be upgraded to version “10” or greater. The current version is “X”.
- Database File version must be upgraded to version “15” or greater. The current version is “X”
35
4/7/15
Utilities
- Database Client version must be upgraded to version “10” or greater. The current version is “X”
Please verify these requirements are met and try EUA enabling again.
If the requirements for EUA enabling the database are met the user is prompted, You have the option of
using Embedded User Authentication. Your user logins and passwords will now be directly tied to
your database file. Enable EUA?
- Help|About includes a new entry: EUA Enabled Yes|No
Upon EUA enabling a database all User Login passwords are converted and stored within the database,
rather than within InterBase. The SYSDBA password remains unchanged. Upon logging into Trams Back
Office as SYSDBA after EUA enabling the database, continue using the original SYSDBA password. If that
password was never changed from the generic "xxxxxxxxx" password, a prompt launches upon first login
to change the password.
All other User Logins have their current password converted to their login name (which is always Upper
Case). As each user first logs into Trams Back Office (or ClientBase) they will need to use their newly
converted password based on their login name. For example, if the User Login name is MARY, upon first
logging into Trams Back Office the user should enter MARY into the Login Name AND enter MARY into the
password. Upon successfully entering the User Login and Password the user is then prompted to enter a
new password, to ensure security going forward. This new password is then used each time the user logs
into Trams Back Office. Because the database is EUA enabled, all users can now update their own User
Login passwords by going to Utilities|Setup|User Profile and entering a new password.
A new setting was added to the Utilities menu called User Login Password Settings. When "Enable
Password Expiration" is checked, you can set up how often (number of days) a password should expire. If
a User Login password expires as a result of this setting, upon login the user will be prompted to enter the
current login and password and then enter (and re-enter) a new password. This setting must be turned on
by a user with manager authorization.
Password Expiration
Enter the number of days until password is expired (Example: 30, 60, 90, etc.). If you are also a CBO user,
the maximum time allowed for a password to be used before resetting is 90 days. Once password expires,
when user tries to login user is directed to a new page and asked to enter the old password and a new
password.
Password Strength
A setting was also added to assign password strength when creating a new password. If a chosen password
does not meet the rules, user must change password before allowed to continue.
Options are low, medium or high and are described as follows:
Low Strength - Passwords must contain:
- A minimum of one character
- A maximum of 8 characters
- Cannot be a repeat of last 4 passwords
Medium Strength - Passwords must contain:
- A minimum of 7 characters
- A maximum of 8 characters
- At least one alpha character (a-z, A-Z)
- At least one numeric character (0-9)
- Cannot be a repeat of last 4 passwords
High Strength - Passwords must contain:
4/7/15
36
Utilities
- A minimum of 7 characters
- A maximum of 8 characters
- At least one lower case alpha character (a-z)
- At least one upper case alpha character (A-Z)
- At least one numeric character (0-9)
- At least one special character (!,@,#,$,%,^,&,*,_,-,+,= etc.)
- No character may be used more than once, regardless of case
- Cannot be a repeat of last 4 passwords
Blacklisted Passwords
For security purposes certain passwords are no longer allowed to be used in the database. The default that
came with the program is no longer allowed for use as a password for SYSDBA. After EUA enabling the
database, if the SYSDBA password is the default, or if at any point you are changing the SYSDBA password
and you try to use the default, you are prompted to select a different password.
For user logins, the user login name and the user password can no longer be the same. After EUA enabling
the database, if you try to create a password that matches the user login name, you are prompted to select
a different password.
Important Note about SYSDBA Password:
It is extremely important that you archive the SYSDBA password to a removable storage drive as a
source of password recovery. If the SYSDBA password is forgotten and was not archived, the
password cannot be recovered.
To archive, when changing the SYSDBA password enter the new password and check the box Archive
Password. Click OK to save and a popup screen is displayed to create a password recovery disk.
The prompt appears, Please insert your password recovery drive/disk and select the appropriate drive letter
to archive the password. To refresh the drive list, click the drop down arrow. Then press OK to continue or
Cancel to stop the process. Click the arrow and select the drive to save the password to and click OK.
Once the password is on the drive the prompt, Password successfully archived is displayed. Should the
need arise to recover the password from the removable device, in the login screen, click the Forgot
Password link (which is only visible with the SYSDBA Login), then insert the removable device and navigate
the removable device drive. Once logged in, the SYSDBA password should be changed and re-archived.
Creating a New User Profile
To create a new User Profile, sign in as SYSDBA. Enter into Utilities|Setup|User Profiles and the
following screen appears. From here Add, Modify, or Delete User Profiles and Grant or Revoke access to
certain areas of the program. Remember to record and store each user's password in a safe location.
If a user’s password is misplaced, login as the SYSDBA and setup a new one. But be very CAREFUL with
storing the SYSDBA password, as this is a master password.
37
4/7/15
Utilities
General Tab
Login
Assign a login code to this User Profile. When signing into the Trams Back Office
program, the system prompts for this login code, and access to various areas of Trams
Back Office is determined by how the rest of this User Profile is completed.
Authorization
There are two types of User Profiles. One has an Authorization level of
SYSDBA, (Create, modify, or delete other User Profiles. Only one User Profile
can be established with an Authorization level of SYSDBA, but several people
can be given the same permissions.)
The second type of User Profile has an Authorization level of User. There can be an
unlimited number of User Profiles with specific authorization levels tailored for access
to various areas in Trams Back Office.
Password
A password can be assigned to each User Profile. When signing into Trams Back
Office, the system first prompts for a login code, then the password. (When entering
passwords, the screen displays *** for security purposes.)
User Name
Enter the name or names for whom the User Profile is established (e.g.
Lee/Brian).
Disable Account
To disable a user account rather than delete it, check this box. ClientBase
users (who are sharing the Trams Back Office database) can be disabled from
using Trams Back Office by checking here.
4/7/15
38
Utilities
Menu Items
From the menu item "tree," enable/disable any file menu items for user. Use
the plus sign to enable/disable these items. (See Graphic Below.)
Add/Update/New
To add a new user, click New, fill out the required fields and click Add, then OK
to save. To revise a user permissions, click on the user name in the data entry
screen below, make all changes in fields above, and click Update, then OK to
save. Copy an existing user’s settings by clicking on the user to copy in the
data entry screen below, change the Login Name, Password and User Name
in the fields above, and click Add, then OK to save.
Delete
To delete a user, highlight the name in the data entry screen below, and click
Delete.
Menu Items
Check all the menu items for this user to access. Drill down into the menu items by clicking on the plus sign
to grant more targeted permissions.
39
4/7/15
Utilities
Permissions Tab
Establish system permissions by clicking on the Permissions Tab. Changing and deleting information is
permanent and should only be granted to Trams Back Office users who need this function.
Invoice, Payment,
Profile, and GL
Permissions
Invoice, Payment, Profile, GL Permissions can be set to Read Only,
Read/Write, Read/Write/Delete, None, or Create. Read Only means
information can only be viewed but not changed. Read/Write lets the user
view, add, and change information. In addition to viewing and changing
information, Read/Write/Delete also permits deleting or voiding information.
None does not allow the user to access that part of the program. Create
permits the user to create new items in the system, but user will not be allowed
to edit or delete any items.
Void Pay Method
From the drop-down, check off which pay method this user has permission to
void.
Bank Permissions
Specify which bank user has access to by selecting All, or checking off
appropriate bank number. If users try to view an item associated with a bank
for which they do not have permission, they’ll get an error message.
4/7/15
40
Utilities
Bank Group
Permissions
Select the group for the user to be a part of to access the same banks as other
group users. Go to Utilities|Setup|Groups. Select Bank as the Group Type,
and type in a default group label. When adding the entry, a Members area
becomes available to pick and choose banks.
Branch Permissions
Specify which branch user has access to by selecting All, or checking off
appropriate branch number (0 is main branch). If users try to view an item
associated with a branch for which they do not have permission, they’ll get an
error message.
Branch Group
Permissions
Select the group for the user to be a part of to access the same branches as
other group users. Go to Utilities|Setup|Groups. Select Branch as the Group
Type, and type in a default group label. When adding the entry, a Members
area becomes available to pick and choose Branches.
GL Branch Permissions
Specify which branch user has access to for GL permissions by selecting All,
or checking off appropriate branch number (0 is main branch).
GL Branch Group
Permissions
Select the group for the user to be a part of to access the same GL Branches
as other group users. Go to Utilities|Setup|Groups. Select GL Branch as the
Group Type, and type in a Default Group label. When adding the entry, a
Members area becomes available to pick and choose GL Branches.
Enable ability to view full
Credit Card Numbers
Check here for the user to view full cc #s. The credit card numbers are masked
upon saving to the database. Users who have this permission enabled can
right-click to view the full credit card number and select Show Full Credit Card
numbers in the following areas:
- on the Payment Screen - credit card number field
- in Profiles - Payment Info Tab
- in CC Merchant Reconciliation
- Expanded Fare booking tab - Comm Track CC No field
Users with this permission can also run the CC Merchant report. Users without
this permission are unable to right-click to view the full credit card number in
the above areas, and cannot access the CC Merchant report.
Enable ability to run
Reports/Exports with full
Credit Card Numbers
Check here for the user to have ability to run Reports/Exports showing full cc
#s. By default, this option is disabled (unchecked) and can only be enabled
when the option Enable ability to view full credit card numbers is also enabled.
Once this user permission has been enabled, any time a report is run or an
export is performed a log event is created. This allows users to run the Prism
Handoff and the CC Merchant report.
The CC Reconciliation report mail merge format contains masked Credit Card
numbers. Users must have permission in this area checked in order to run this
report.
Prohibit creating Journal
Entries in a closed
period
41
If the user permission is enabled and end of period posting is in place, if a user
attempts to save a journal entry (either from a payment or from general ledger
journal entry), the user will be prompted that an end of period is in effect,
permission to save is denied. If attempted from a payment screen, the
payment will be saved but the opportunity to create a journal entry will not be
allowed. When the user permission setting is disabled, permission to create a
journal entry in the closed period will be granted however a prompt is raised
to warn the user that they are making an entry in a closed period.
4/7/15
Utilities
Always track void
invoices
A void pay method is multi-selectable by a drop-down field which lists all of the
payment method options. By checking pay methods, the user will not be able
to void payments where the pay method is one that is checked in the user's
permissions. The default setting is none meaning users have permission to
void all pay methods. The void payment option will be dimmed if the
requirement to Always Track Payment Voids (under Utilities|Setup|Global
Defaults|Prompt tab) is enabled.
When the Global Default to track voided payments is not checked, users need
to go to each user profile and check the track voids option. Those that do not
have track voids enabled will get the prompt to track the void or not. Users that
do have the option checked won't get the option, it will always track the void.
PCI REQUIREMENTS
A PCI requirement mandates logging when a full credit card number has been viewed. Therefore, TBO
functionality allows users to view a full credit card number provided the user is logged in as SYSDBA or the
user profile has the permission to view full credit card numbers enabled. Once enabled, in payments
received and made, in the profile payment info tab and in the booking expanded fare tab CC Commtrack
field, right-clicking on the credit card number field displays a menu option to view the full credit card number.
When the user selects it, the full credit card number is displayed in the payment field and a log event is
created including: Date/Time; Username; Credit Card Number; Screen or report they were in when the
full cc number was viewed; and payment/invoice/profile number.
Global Defaults
Global Defaults lets the agency personalize certain aspects of the Trams Back Office system.
General Tab
Enter Agency address and phone information. These lines print on reports and on the Trams Back Office
4/7/15
42
Utilities
main menu.
43
4/7/15
Utilities
Prompt Tab
4/7/15
44
Utilities
Allow Branch Entries
None: Select None if there are not branch entries in Trams
Back Office.
STP: Select STP to set branches in the invoice entries
only. When the End Of Period is created, no JE’s will have
a branch on them.
Full Single Balance Sheet allows branch entries in the
Invoices and General Ledger revenue and expense
accounts. Reports are available by branch or
consolidated. (When creating invoices, there is the ability
to select multiple branches, however when the EOP is
created only payments and the parts of the invoice that
affect the Income Statement (4000, 5000, 6000, 7000,
8000 & 9000 series accounts numbers) will be journalized
by branch. The parts that affect the Balance Sheet (1000,
2000 & 3000 series of numbers) will not have a branch in
the journal entry.)
Full Multiple Balance Sheet allows branch entries in the
invoices, General Ledger revenue and expense accounts
and assets, liabilities and capital accounts. Reports are
available by branch or consolidated. (When creating
invoices, there is the ability select multiple branches and
every journal entry line where it affects the Income
Statement or the Balance Sheet will be journalized by
branch.)
Note: To activate the Multi Balance Sheet feature, e-mail
[email protected] to obtain a
password. (See complete directions for setup and use in
the Multiple Balance Sheet Setup section below.)
45
4/7/15
Utilities
Comm Track Payments in EOP
Use this setting to determine Commission Track
transactions will be accounted for as Sales and Cost of
Sales or as Commission Income. The End of Period
journal entry is changed accordingly. (See General Ledger
chapter.)
Trams Back Office has the ability to account for invoices
as Sales/Costs of Sales or Commission Income. Some
agencies have used Commission Income accounting with
previous back office systems and may want to consider
converting to Sales/Cost of Sales when converting to
Trams Back Office as nothing is lost, but much can be
gained.
Using Sales/Cost of Sales does allow for more flexibility
especially with regards to yield management information,
because we can track the sales/cost of sales for
Commtrack invoices, based on the actual commission
received. The cost of sales is determined by the difference
between the total fare and the commission of the invoices
that have a vendor payment. Converting from Commission
Income to Sales/Cost of Sales accounting takes place at
the time of loading beginning balances into Trams Back
Office. When using Commission Income method accounts
are "rolled up" into a Commission Income account based
on the actual commission received and the sales amount
is not tracked.
4/7/15
46
Utilities
Supplier C/C transactions in EOP
Allow a Supplier booking closed by Credit Card to act like
a Comm Track booking by modifying the End of Period so
the sale is deferred until commission is received. To set up
this feature:
Step 1: Select a start date at the beginning of an
accounting period (i.e., 1/1/2011)
Step 2: Verify that the accounting period prior to the start
date is in balance and that the period is posted (i.e.,
12/31/2011 must have the EOP and it must be posted as
there MUST be the period posted in General Ledger|
Posting. The user cannot re-open this period once it has
have changed the way to handle the EOP.
Step 3: Backup the database.
Step 4: In General Ledger|Accounts, create a GL
account named Supplier CC Receivable in the 1000 series
of accounts.
Step 5: In Utilities|Setup|GL Accts|Others, enter the GL
account number that was created in Step 3 for the Supplier
CC Receivable field.
Step 6: In Utilities|Setup|Global Defaults|Prompt,
change the Supplier C/C transaction in EOP field to Defer
Sales Until Commission Received.
Step 7: In Reports|Report Generator| Print Report,
print the Report Generator report, CL_TT_AS.RPT (Client
Activity by Travel Type) or S_TT_AD (Sales Activity by
Travel Type) with the following selection criteria:
Date Range: Issue Date Between: Leave blank
And: Enter the date one day prior to the start date
Invoice Type: All
Submit To: Supplier
Travel Type: All Invoice
Payment Status Client: Closed Payment Method: C/C
Invoice Payment Status Vendor: Open
Step 8: In General Ledger|Journal Entry, create a
journal entry dated one day prior to the start date. For each
Travel Type listed on the report printed in Step 7, debit the
appropriate Sales account for the Total Fare amount on
the report, credit the appropriate Cost of Sales account for
the Net Fare amount on the report, and credit the Supplier
CC Receivable account for the Commission amount on
the report.
Default Disbursements Bank Account
Sets the bank account in the Payments Made screen to
always go to this account.
Default Receipts Bank Account
Sets the bank account in the Payments Received screen
to always go to this account.
47
4/7/15
Utilities
Default CC Merchant Bank Account
Sets the bank account for the CC Merchant Reconciliation
feature.
Default EFT Bank Account (Electronic
Funds Transfer)
Sets the bank account for EFT’s.
Journal Entry Prompting
Select the level of Journal Entry prompting after payment
entries:
All: Trams Back Office prompts for a journal entry for all
payment entries.
None: No journal entry prompt is available after a
payment. In this case, the only way to create a journal
entry is to go to the General Ledger Menu Option and then
select Journal Entry.
Recommended Prompt: Trams Back Office prompts to
create a journal entry when payments are received or
made with a pay method of other or a profile type of other.
Recommended/Always: Trams Back Office
automatically displays a journal entry screen when
payments are received or made with a pay method of
Other or use a profile type of Other. This is the default
setting.
Mandatory: Trams Back Office requires a journal entry
before a payment with Pay Method of Other, and Profile
Type of Other, can be saved.
Default GL Branch
Multiple GL Branch agencies can select one of their GL
branches as the default GL Branch. An error message is
displayed if the default branch is set to an inactive branch.
G/L Branch defaults for journal entries: If a specific bank
account references a G/L Branch, then that is used;
otherwise, if the specified payment branch references a
G/L Branch, then that is used. If neither of these apply, the
default G/L branch is used.
Default Branch
Multiple branch agencies can select one of their branches
as the default branch.
4/7/15
48
Utilities
Interbranch G/L Transfer
The Inter-Branch Transfer GL Account is only used for
those agencies that are using the Multi-Balance Sheet
option. This field makes creating journal entries between
branches easier. In the past for example, to pay an
expense and show the money coming out of one branch to
pay for the expense of another branch, the following
journal entry needed to be created.
Branch Debit
1000 Cash in Bank
Credit
0
100.00
6999 Inter-Branch Clear Acct 0
100.00
6999 Inter-Branch Clear Acct 1
6105 Office Supplies
1
100.00
100.00
So this field Inter-Branch Transfer GL Account in
Utilities|Setup|Global Defaults was added so that if an
Inter-Branch Clearing Account is created (it should be a
6000 series number), and put it in Utilities, it automatically
creates the middle part of the above journal entry once OK
has been clicked.
Allow Cash Payments from Invoice
To allow Non-Credit card payments to be entered at the
end of an invoice entry, change this setting to Yes by
placing a checkmark in the box.
Allow Modifying Other Payments
Place a checkmark in the box to modify the amount or
bank account on payments made to Other profiles during
the automated Bank Reconciliation routine. This also
allows querying and modifying payments on an Other
profile, if it is not posted.
Allow Client Unapplieds
If checked, Trams Back Office allows a payment as an
unapplied balance on the Client’s account. If not checked,
there is a prompt to create a voucher.
Note: Unapplied balances are not advised when the Allow
Branch Options/Multiple Balance Sheet is selected.
Auto-Assign Invoice Numbers
Auto Assign invoice number will "prevent" users from
manually overriding the invoice number on a new invoice.
Always Track Voided Invoices
When this box is checked and upon voiding an invoice, a
single prompt window pops up with the Track Voided
Invoice box already checked. Confirm the voiding of the
invoice by clicking OK. To override the default setting in
Utilities, uncheck the box and not track the invoice and its
number.
49
4/7/15
Utilities
Allow Negative Client Vouchers
When checked this allows for creation of a Negative Client
Voucher that shows on the Client Statement as an amount
owed by the client for non-invoice items like NSF Checks,
and paying for use of Agency’s company credit card. This
allows for tracking a client NSF check until repayment has
been made, and for tracking client payments that may be
owed for use of the agency’s credit card to pay for an
invoice.
A Payment Made, Payment Method (Other), Profile Type
(Client), would allow a Client Voucher to be created
without an invoice.
Note: This feature cannot be used if the allow client and
vendor applied options are enabled (checked).
Default Refund/Adj Invoice No
Leave this set to Yes (the box is checked), any Refund or
Adjustment invoice uses the same number as the original
sales invoice.
Force Branch on Journal Entry
If this box is checked, a branch number needs to be added
on journal entries when using revenue or expense
accounts for Full Single Balance Sheet users, and for all
GL accounts for Multiple Balance Sheet users.
Assign Check #’s in Payments
When setting the Assign Check #'s in the Payments field
to No by leaving the box empty, there is now the freedom
of entering checks without knowing the next valid check
number.
By checking the box (Yes), TBO automatically assigns the
next available check number to each check payment.
This is helpful for printing checks from Trams Back Office
and want to have the check numbers automatically
assigned at the time the checks are printed.
Print Full Statement Header
With box checked, there will be a Header on all pages of
the statement. With the box unchecked, there will be a
Header on the first page with no header on remaining
pages, and the report information printing at the top of
each page.
Note: To print statements on pre-printed letterhead paper,
remove the Agency Name & Address Information Fields
under Utilities|Setup|Headers & Footers and adjust the
size of the blank space left to allow for printing on
pre-printed letterhead paper. Remember to have the Print
Full Statement Header box checked for space to be left on
each page for letterhead paper.
Validate CC Merchant Numbers
4/7/15
When checked, the credit card number on CC Merchant
payments will be validated and if an invalid card number or
format is used, a warning message will be displayed.
When unchecked, no validation will occur for CC Merchant
payments.
50
Utilities
Prompt When Exit Trams
With this box checked, receive a prompt when exiting the
program, “Are you sure you want to quit Trams?”
Allow Vendor Unapplieds
If checked, Trams Back Office allows a payment as an
unapplied balance on the Vendor’s account. If not
checked, there is a prompt to create a voucher.
Note: Unapplied balances are not allowed when the Allow
Branch Options/Multiple Balance Sheet is selected.
Add Newly Inserted Items to Query Screens
Check here to immediately display newly created Invoices
and Payments on the Query Screens when a new invoice
or payment is created from the query screen by selecting
"New" Default is set to not display.
Always Track Voided Payments
By default this is checked and allows users to track any
voided payment regardless of payment method (both
received and made, whether they directly affect a bank
account or not).
Require Unique, Non Blank I/F ID on New
Profiles
If checked, a new profile CANNOT be created if the
Interface ID of the profile being created is either blank or is
an Interface ID that has already been used in the system.
This applies whether the profile is being created through
interface, through ClientBase, or manually within TBO.
The I/F ID in existing profiles in TBO can be left blank or
have a duplicate Interface ID as before. This affects the
creation of new profiles.
Multiple Balance Sheet Setup
Most users have a single Balance Sheet and choose to have a single Income Statement or an Income
Statement per branch. Multiple Balance Sheets are available, but are generally only needed if there is a
need to print full financials - Balance Sheet and Income Statement - per branch or entity for tax reporting.
This is usually only needed if there are branches in separate states, or if for some other reason, separate
balance sheets are needed.
Warning! To activate the Multi Balance Sheet feature when switching from a single Balance Sheet to
Multiple Balance Sheets, e-mail Trams Support at [email protected] to activate the
Multi Balance Sheet feature and obtain a password. They will assist with the following steps:
1. Turn all unapplied balances on both Client and Vendor Balances reports into vouchers.
2. Select Utilities|Setup|Global Defaults and remove the check marks from Allow Client Unapplieds and
Allow Vendor Unapplieds.
3.Go through all of the month end procedures. (Create an End of Period, balance the Core Reports against
the General Ledger, Post, etc.) Posting must be completed before moving onto Step 4.
4. Select Utilities|Setup|Global Defaults and click the Prompt tab and change Allow Branch Entries to Full
Multiple Balance Sheet.
Note: There is a prompt to enter an Access Code” before proceeding. E-mail
[email protected] to receive this code and to be informed of the consequences of
changing the system to a “Multiple Balance Sheet” setup.
5. Also under Utilities|Setup|Global Defaults, enter a new 6000 series account set up under G/L
Accounts|Others called the Inter-Branch Transfer General Ledger account. This automatically creates a
51
4/7/15
Utilities
debit and credit to properly balance the Journal Entry when clicking OK while making Journal Entries among
branches:
Sample Journal Entry
Account
Description
Branch
1000
Cash in Back
0
6999
Inter-Branch Transfer
0
6999
Inter-Branch Transfer
1
6105
Office Supplies
1
Debit
Credit
100.00
100.00
100.00
100.00
Print a Balance Sheet and create a journal entry splitting the Balance Sheet items into branches. (See
4/7/15
52
Utilities
example below.)
Tax Related Tab
Designate which taxes go to which tax fields when interfacing from the reservations system. For each tax
field, specify the two-letter Tax Identifiers of the taxes wanted in this field. If there is more than one Tax ID,
separate them by a comma. If there are specified Tax ID’s in any tax fields, taxes not corresponding to the
Tax ID’s go to Tax 1. In order for multiple taxes to be separated, be sure to set Allow Multiple Taxes, found
in Utilities|Setup|Global Defaults, to Yes.
The commission rate for vendors used in reservations defaults to the vendor commission field in the TBO
vendor profile. If the vendor default commission in TBO is blank, then the commission defaults to the
53
4/7/15
Utilities
amount entered in the field called Comm Rate.
SPECIAL NOTE TO CANADIAN AGENCIES: Please see Canadian tax setup in chapter Setting Up Trams
Back Office in the section entitled, Canadian TBO Setup and Special Usage.
4/7/15
54
Utilities
Client/Vendor Statement Remarks Tab
Client Stmt Msg
Enter lines of text to print on all client statements.
Vendor Stmt Msg
Enter lines of text to print on all vendor statements.
Agent Stmt Msg
Enter lines of text to print on all agent statements.
Interface/Mail Merge Prompt Tab
55
4/7/15
Utilities
Default Area Code
Local area code used as a default when entering new phone numbers.
Default Country Code
Country Code (Defaults to 1 for US and BSP).
Local Currency Code
Make sure that this code matches the Currency Code in the Bank
Account Setup. In order to use the Foreign Currency on invoices, or to
use the conversion rates, this must contain the local currency.
Mail Merge Delimiter
When exporting information from Trams Back Office, enter the delimiter
that is compatible with the software receiving the file (i.e., tab, comma
etc.). Leaving this field blank defaults to tab. Enter a comma (,) for
comma delimited files.
Agency Mail Merge Identifier
Used to identify the agency number when sending a mail merge file to
be consolidated with other agencies' data for direct mail promotions.
Allow Cash/Ck Payments
Check this box to interface non-credit card payments through interface.
Not recommended - consult [email protected] before
implementing.
Check this too if a partial payment is being interfaced. Only one partial
payment is allowed per booking. This payment applies to invoices at the
invoice level and not the booking level.
The entry for the GDS:
Cash - *PP100.00*Cash
Check - *PP100.00*Check*5432
CC Merchant - *PP100.00*1888602388226584/0504
Read Multiple Taxes
By default, Trams Back Office maintains taxes in one lump sum. To
track multiple taxes, place a check in this box. If this is checked, go to
the Tax-Related tab and enter the tax rates and tax codes.
Allow Comm Track Hotel/Car
To allow interfacing of comm track bookings for Hotel/Cars, retain this
checkmark.
Allow New Client Profiles
To allow ability to create new client profiles during interface, retain this
checkmark. Processing stops so new client profiles can be created.
When unchecked, processing does not stop for new client profiles and
they are listed on the Processing Error Log to handle as an exception
after auto processing.
Read Booking Agent
If only Read Booking Agent is checked, the PNR booking agent is the
agent captured in the Agent Tab of the Booking. This is the default
setting and only captures the Booking Agent. If both Booking Agent and
Ticketing Agent boxes are checked, then two agents are captured in the
Agent Tab. If they are the same agent, that agent is listed twice in the
booking. If they are different agents, each agent is captured. The first
agent listed is the Booking Agent and second agent is the Ticketing
Agent. If no boxes are checked, NO AGENTS are captured. ALWAYS
have at least one agent type checked.
4/7/15
56
Utilities
Allow Multiple Agents Per
Booking
When checked, multiple agents are interfaced into a booking. When
unchecked, only the first agent listed in the interface record is captured.
If any agents are assigned to the client's profile, those agents still are
added to the booking. Any agents not processed from the record are
listed on the Processing Error Log.
Match Vendor Profiles by
State/Zip Code
During Interface Processing, check here to match vendor profiles by
State and Zip.
Ignore % For Int’l BSP Air
Some agencies do not have to pay GST on Intl Air, so this option allows
them to exclude GST on their Intl Air invoices during the interface
process, without adding additional commands in the PNR.
Allow Supplier Payments
To allow payments for supplier type transactions to be interfaced, check
this box. Recommend: Should Be Checked.
Read Branch ID From I/F ID
Applies to Sabre agencies converting from ADS or Travelbase. This
feature breaks the Interface ID into two fields. The first three characters
become the Branch ID and the remaining seven are used as the
customer number. To use this feature, the three-character Branch ID
must be in the Branch Table.
Allow Comm Track on
Exchanges
To allow interfacing of comm track on exchanges, retain this
checkmark.
Allow New Agent Profiles
To allow creating of new agent profiles during interfacing, retain this
checkmark. Processing stops so new agent profiles can be created.
When unchecked, processing does not stop, and new agents are listed
on the Processing Error Log to handle as exceptions after auto
processing.
Read Ticketing Agent
If the Read Ticketing Agent box is checked, then the PNR Ticketing
agent is captured in the Agent Tab of the Booking in place of the
Booking Agent. If both boxes are checked, then two agents are
captured in the Agent Tab. If they are the same agent, that agent is
listed twice in the booking. If they are different agents, each agent is
captured. The first agent listed is the Booking Agent and second agent
is the Ticketing Agent. If no boxes are checked then NO AGENTS are
be captured. ALWAYS have at least one agent type checked.
Auto-Create Hotel Vendor
Profiles
Checking here automatic creation of new hotel vendor profiles during
processing. In order for the hotel profile to be auto-created, the Interface
ID in the record received, must be more than 2 chars, i.e. Chain Code +
Property Code. A 2-char ID does not auto-process.
Default Invoice FOP on Neg
Booking
Check here where there is a discount line and it is desired that the
invoice payment apply it to the negative booking.
57
4/7/15
Utilities
Allow Voids
When Always is selected, invoices with voided tickets in them are
accepted. There is no other warning other than a message on the Error
Processing Log. For simple voids (single ticket, single payment), the
system does not prompt for tracking and defaults to Yes to track the
voided invoice.
When Never is selected, no voids are accepted. When Prompt is
selected (recommended setting), invoices with voided tickets in them
are accepted, but a warning is given to allow the user to manually
intervene and void the tickets. If multiple tickets are issued on an
invoice, and one ticket is voided, void is ignored.
Functionality has been extended to automatically void an interfaced
GDS Void record even if the invoice contains multiple tickets or a
service fee, if the client side of the booking to void is open. This would
be a void of a booking and not the total invoice. Make sure Allow Voids
is set to PROMPT.
Allow Duplicate Ticket
Numbers
There are 3 options for processing Duplicate Ticket Numbers: Always
(no prompt), Prompt, and Never. Always processes dupes with no
prompts and lists warning messages on Interface Processing Error Log.
Prompt gives typical prompt screens with chance to change ticket
number. When Never is selected, the invoice containing the duplicate
ARC/BSP ticket number booking (all travel types, MCO’s, etc.) would be
processed, minus the duplicate ticket number booking. Any ignored
duplicate bookings appear on the Processing Error Log to delete
manually. To process, the user needs to change the option from Never.
Allow Duplicate Confirmation
#’s
This gives the ability to NOT process duplicate Comm Track Car/Hotel
bookings where the Confirmation # is the same for the same vendor. Set
to Always to allow duplicate comm track car/hotel bookings; to Prompt
for duplicate comm track car/hotel bookings; or to Never allow duplicate
comm track car/hotel bookings. When Never is selected, the invoice
containing the duplicate Comm Track Car/Hotel booking would be
processed, minus the duplicate comm track booking. An ignored
duplicate bookings would appear on the Processing Error Log.
Allow Dupe Serv. Fee
Confirmation #’s
This gives the ability to NOT process duplicate service bookings where
the Confirmation # is the same for the same vendor. Set to Always to
allow duplicate service fee bookings; to Prompt for duplicate service fee
bookings; or to Never allow duplicate service bookings. When Never is
selected, the invoice containing the duplicate service fee booking would
be processed, minus the duplicate service fee booking. An ignored
duplicate bookings would appear on the Processing Error Log.
Prepend Worldspan Invoice
Numbers with
Pre-pending the invoice number will assist with a duplicate invoice
issue as a result of a Worldspan 5 digit invoice limitation.
4/7/15
58
Utilities
Financial Modeling Tab
To use the Financial Modeling feature in Trams Back Office, the first step is to set up Agency Information
in the Global Defaults. For full instructions on setting up Financial Modeling, please refer to the chapter
entitled, Financial Modeling.
Number of Full-Time
Employees
Enter the agency’s number of full-time employees.
Number of Full-Time Sales
Employees
Enter the agency’s number of full-time sales employees.
Number of Outside Sales
Employees
Enter the agency’s number of outside sales employees.
Number of CRT’s
Enter the number of Customer Reservation Terminals in the agency.
Number of Years In Business
Enter the number of years the agency has been in business.
Percentage of Corporate
Business
Enter the percentage of corporate business the agency performs.
Annual Gross Sales (in
Millions)
Enter the agency’s gross sales (in millions).
Geographic Classification
From the drop-down menu, select Rural, Urban or Metro for the
geographic classification for the agency.
59
4/7/15
Utilities
Payment Import Tab
Match on Interface ID (Chain
Code)
If Match on Interface ID (Chain Code) box is checked, then the Pegasus
Reconciliation using the electronic file only matches if the two letter hotel
chain code is present at the start of the Hotel Vendor Profile Interface ID
field, matching the two letter chain code in the Pegasus file. When the
box is unchecked, then the Interface ID is ignored and matches are
made using other criteria. If all hotel profiles have the letter chain code
in the Interface ID box, then this box should be checked.
Match on ARC Number
If this box is checked, the ARC numbers on the invoices in TBO match
up with the ARC numbers in the PayMode/Pegasus file. (If the invoice
in TBO does not have an ARC number, it still will match if other criteria
match.)
Match on City Code (if
present)
If this box is checked, the City Code on the invoices in TBO match with
the City Code in the PayMode/Pegasus file. (If the invoice in TBO does
not have a City Code, it still will match if other criteria match.)
Void Cancelled/No-Show
Bookings
When this box is checked, any Pegasus or PayMode bookings that are
identified as either Cancelled or No Show are voided in TBO with the
amounts for Total Fare and Commission remaining as originally
entered, even though the reconciliation file shows "0" amounts. Voiding
a Comm Track booking in this fashion operates as if the booking was
manually voided in Trams Back Office.
+/- Days from Actual Depart
Date
Input the number of days (plus or minus) from the actual depart date on
the invoice in TBO for PayMode/Pegasus to match.
Chars to Match on Passenger
Name
Input the number of first characters of Passenger Name on the invoice
in TBO for PayMode/Pegasus to match.
4/7/15
60
Utilities
Chars to Match on Vendor
Name
Input the number of first characters of Vendor Name on the invoice in
TBO for PayMode/Pegasus to match.
If Match on Interface ID (Chain Code) box is checked, then the Pegasus
Reconciliation using the electronic file only matches if the two letter hotel
chain code is present at the start of the Hotel Vendor Profile Interface ID
field, matching the two letter chain code in the Pegasus file.
When the box is unchecked, then the Interface ID is ignored and
matches are made using other criteria. If all the hotel profiles have the
letter chain code in the Interface ID box, then this box should be
checked.
Branches
Trams Back Office supports multiple branches. The number of branches available is 1000 (used to be
250).
Enter an ARC/BSP number for each branch. (If the agency is not using the branch capability, enter the
agency ARC/BSP information in Branch ’0’. Actually Trams regards the main branch as Branch 0, and
subsequent branches as Branch 1, 2, etc.) This information prints on the agency's ARC/BSP report. Fill in
agency data and select Update, which enters that information in the grid below. Click OK to save and exit
the screen.
Agencies using the multiple branch version of Trams Back Office have the option of separating financial
activity for each branch, or grouping them together. A branch can represent an STP location, a cost center,
or a different department. There can be multiple branches with the same ARC/BSP number, and/or
multiple ARC/BSP numbers with the same G/L branch. Each branch uses the same chart of
accounts. To make certain Trams Back Office is ready for multiple branches, check the setting in
the Utilities|Setup|Global Default section under the Prompt tab.
The Trams license manager tracks the number of active branches. A new branch CANNOT be created if it
exceeds the number of branches in the Software License Agreement.
Access the G/L branch field in many different reports. To set up the General Ledger structure for multiple
branches, go to Utilities|Setup|Branches, and select ARC/BSP Numbers. Click on the branch, bringing
information to the top of the ARC/BSP screen. Type in the full ARC/BSP number, agency name, and agency
address, and assign a number to each branch in the G/L Br field. Click Update to save. This allows grouping
of multiple branch locations to the same G/L account number for financial reporting purposes.
Branches can now be added and deleted. A branch cannot be deleted if there is a profile, invoice or payment record assigned to it. Branch numbers of deleted branches can be re-used. All newly added
branches are added to the end of the list of branches, even if they are reusing a number from a deleted
branch that used to be higher up.
The order of branches can be changed using the up and down arrows on the right side of the screen. This
sort order is shared by all Trams products.
Information from a copied Branch can be used to update an existing Branch or to create a new Branch.
61
4/7/15
Utilities
Branches can only be added, deleted, or re-ordered on the Primary copy of the database.
Note: As branches are being entered after Branch 0, change the default branch field in the
Utilities|Setup|Global Defaults Prompt tab for easier data entry. Also, it is possible to make a branch
inactive if it is no longer in existence, has activity on it, and is not wanted to appear on the drop-downs. It
does appear, however, on the invoice/payment screens since TBO needs to display inactive branches for
edit purposes.
The Branch ID field is for those agencies (usually ADS or TravelBase) that currently use the first 3 digits of
the Interface ID to separate their branches. If this field is used, insert the first 3 digits for branch identity, and
make sure to go to Utilities|Setup|Global Defaults|Interface/Mail Merge Prompt, and check the Read
Branch ID from I/F ID area. Every single client must have this branch ID as the first 3 digits of the Interface
ID, or this will not work.
Associate branches with a specific bank account or CC Merchant bank account. Based on the Payment
Method and Branch selected when doing payments, the correct bank account for that branch and payment
type is defaulted based on entries here. Note: When changing the branch number on a payment, TBO
defaults to the bank account lined to that branch set up in this area. The bank account should agree with
the default bank account for the branch selected.
There are also fields per branch to put in the Sales Invoice No Start and the Refund Invoice No Start for
manual entry. Make sure the numbers selected do not conflict with the invoice and refund invoice number
series in the GDS. Trams does not permit duplicate invoice numbers.
GST/HST TAX RATE FIELD in BRANCH SET-UP
Larger Canadian agencies have branches in multiple Provinces. GST applies to most
agencies with branches all in one province and the current rate is 7%. In 3 provinces (Nova
4/7/15
62
Utilities
Scotia, New Brunswick & Newfoundland) the GST is called HST and the current rate is 15%. In those
provinces agencies are dealing with a 15% HST tax and not the 7% GST. It's an either or situation. The
taxes are handled the same through the EOP.
An agency with branches with the same GST/HST rate would set this up under Utilities|Setup|Global
Defaults|Tax-Related Prompt, and leave this area blank. But an agency with branches with both GST and
HST provinces would leave the rate blank in Utilities|Setup|Global Defaults|Tax-Related Prompt and set
the rate either 7% or 15%, branch by branch under Utilities|Setup|Branches.
Travel Types
Travel Types in Trams Back Office are categories to organize bookings by the type of travel that they
represent. For example, it is often useful to see a breakdown of the agency business by travel type. The
travel types are initially set up as shown below. Modify any of the 50 available travel types to correspond to
a needed category.
Note: Trams still recommends that agencies not use travel types and purpose other than true types of
travel. Having 50 different travel types is unnecessary and not easily managed. Errors in capturing the
correct travel type are considerable amplified.
Remember that travel types correspond to certain General Ledger accounts (Sales, Cost of Sales,
Commission). If any of the travel types are changed, be sure to change the corresponding G/L accounts
(see below).
Rearrange the Travel Types order on drop-down menus by using the Move Up and Move Down buttons the number assigned to travel types does not change therefore, *TT descriptor code entries will not be
affected in either manual entries or scripted entries. However, if the agency plans to interface, we
recommend NOT changing or renaming DomAir, Hotel, Car, Rail, Int'l. In general, we recommend leaving
the first ten Travel Types alone, as changing them would affect interface, although the order in which they
appear on drop-downs in TBO can be customized, travel types do not save unless there is a travel type by
the name of Intl Air.
Travel types can be edited by going to Utilities|Setup|Travel Types. This screen has 5 columns. The first
column contains the travel type number. The second column contains the travel types to use in the invoice
booking screen. The third column contains pre-defined categories used to group travel types. Click on the
travel type. These categories are viewed by clicking on the arrow, then click on any type, make any
changes, and click Update to save those changes. Travel Categories are used to facilitate the Interface from
63
4/7/15
Utilities
the GDS with uniform travel types. During the Interface, Trams Back Office searches this Travel Category
column for a similar match. When it finds a match in the Category column, this record is interfaced to the
proper Travel Type.
The fourth and fifth columns contains default Inside and Outside Agent rates or amounts for each travel
type. Set up any or all of the Travel Types with a Rate/Amount for Inside Agents, Outside Agents or both. If
there is both a Rate and Amount entered for a Travel Type under Utilities, or in the Agent Profile, the Rate
takes precedence and both a Rate and an Amount WILL NOT be captured for that Travel Type.
The Agent Rates are applied as follows:
1. If an Agent Rate is specified at the booking level of the PNR, then that rate is entered into the Agent Tab
of the Booking Screen during the processing of the interface records.
2. If NO rate was specified in the PNR, then any rate by Travel Type specified on the Default Rate Tab of
the Agents Profile is used.
3. If NO rate is specified in the Default Rate Tab of the Agents Profile, then the rate specified globally under
Utilities/Setup/Travel Types is used.
4. If there are no rates specified in the Default Rate Tab of the Agent Profile or in Utilities Travel Types, then
the Inside or Outside Rate specified on the General Tab of the Agent Profile is used.
Note: These default tables, both in Utilities and in the Agent Profile, are only used during Interface
Processing. The amount is added for the agent for each booking with that travel type in it. If both a Supplier
and Comm Track booking for cruise/tour credit card transactions are being created, both bookings show the
same amount. When manually entering bookings in TBO, the system works if Inside and/or Outside Rates
are entered on the General Tab of the Agent Profile, then those rates are used for whatever booking is
manually being created. To assign a different rate based on Travel Type, change the rate on the Agent Tab
of the booking screen.
Adding Travel Types
Bank Accounts
In Trams Back Office, maintain up to 999 bank accounts. Each account is listed within this table. Click New,
fill in the new account information, and then click Add to add a new bank account. Highlight an account,
change account information, and select Update to Modify an entry, or select Delete to remove a bank
account. If a bank account is no longer being used, make it Inactive.
Bank Account Setup
A number between 1 and 999 is assigned to each bank account. We suggest starting with bank account 1.
4/7/15
64
Utilities
(Bank Account 0 is not accessible.) Click on the bank account number.
Bank Account Entry
Inactive
Once a bank account has activity on it, it cannot be deleted, but can be
made inactive if it is no longer being used. By marking it Inactive, this
bank account no longer appears in the drop-downs, except on the
invoice/payment screens where TBO needs to display inactive bank
accounts.
Account Number
Enter the Account number for this bank.
Routing Number
Enter the Routing number for this bank.
Description
Enter an alphanumeric description of the bank account to which this
number is being assigned.
Bank & Book Balances
There are TWO balances - one is the “bank” balance, and the other is
the “book” balance. The bank balance reflects items cleared through
the bank and is the ending balance of the last completed bank
reconciliation. The book balance is the ending balance showing in the
check register.
Currency Code
The 3 letter code of the country the bank account is in. The code is
entered only if the bank account is different than the local currency.
Conversion Rate
The current default rate from the bank is defaulted to 1.0000. If using
local currency, do not change this area. If a currency code is different
from the local currency above, it can be left as the default, and the rate
change when the payment is received, or put the current conversion
rate here.
Last Check
Most recent check number entered.
G/L Branch
Set this to the appropriate branch the account applies to if it is branch
specific. If a specific bank account references a G/L Branch, then that
branch is used; otherwise, if the specified payment branch references a
G/L Branch, then that branch is used. If neither of these apply, the
default G/L branch used is set up in Utilities|Setup|Global
Defaults|Prompt tab.
65
4/7/15
Utilities
G/L Accounts
The G/L Accounts setup screen is where to set the default General Ledger accounts for the automated End
of Period Journal Entry. This screen is broken down into three screens: Travel Type; Bank Account; and
Others. Each account specified in this table must be a valid G/L account. To add a new GL account,
first add the GL account number in General Ledger|Accounts (the Chart of Accounts). If there is not an
account number to point to, set-up what is known as an “error account” (suspense) in the Chart of Accounts,
such as 6666 Error Account. Next, point any account that does not have an Chart of Account number set
up for it to this 6666 Error Account number. If an amount accidently “falls” into one of these areas that does
not have an account number, there is a way of retrieving the figures by printing out activity in the 6666
Account and putting transactions contained therein into the correct account.
The Travel Type table lists Sales, Cost of Sales; Commission; and Overrides. Click and highlight the desired
field. When typing, an arrow appears, indicating more information. By clicking the arrow, a pull-down menu
of accounts appears. Select one and click to update.
G/L Account Setup/Travel Type
IMPORTANT Note to Financial Modeling Users: If the Comm Track payments in EOP in Global Defaults
is set to Comm Track, and a Financial Modeling report that matches the Income Statement is run, it is
important to point the Commission Income Accounts to a unique Chart of Accounts Number. For example:
Correct:
Domestic Air Sales - 4000
Cost of Sales - 5000
Commission Income - 4100
Override - 5500
Incorrect:
4/7/15
Domestic Air Sales - 4000
66
Utilities
Cost of Sales - 5000
Commission Income - 4000
Override - 5000
For full instructions on setting up the Financial Modeling feature in Trams Back Office, please refer to the
chapter entitled, Financial Modeling.
G/L Accounts Setup/Bank Accounts
The Bank Accounts tab assigns General Ledger accounts to the bank accounts. Divert all unused
accounts to the 6666 (error) account. If any activity is showing in this GL account, it is a flag, indicating a
need to investigate entries more carefully.
Other Accounts tab provides a mapping mechanism for Trams Back Office automatic End of Period. It
consists of Client Balances, Vendor Balances, ARC/BSP Balances, Retained Earnings, Operating
Payables, CC Merchant, Receivables, and ARC Adjustments. The Retained Earnings is used only in the
automated Year-End routine. This table is set up initially to correspond to the default General Ledger in
Trams Back Office. If changes are made to the General Ledger, be sure to make corresponding changes
in this table. Click on any of the other accounts, type a few of the numbers (or letters) to see that arrow.
Click on a valid GL account for a pull-down menu.
Also in this area are G/L defaults for CC Merchant Fee and CC Merchant Discount for those users who are
using the CC Merchant feature. Divert all unused accounts to the 6666 (error) account. If any activity is
showing in this GL account, it is a flag, indicating a need to investigate entries more carefully. Click OK to
save.
67
4/7/15
Utilities
Other Accounts Setup
Make any modifications. When finished, click OK to save. If one of the Account Numbers specified doesn’t
refer to an existing General Ledger account, the system prompts with an error, “No matching GL Account
found.” To acknowledge, click OK, and the system positions the cursor to the Account that is in error.
Inspect the G/L setup screen and make sure the accounts are properly assigned.
Note to Canadian Users:
TBO Canadian users have these additional fields:
GST Payable Field: Used to track amounts for GST on Commissions
GST Receivable Field: Used to track amounts for GST on Expenses.
The difference between the amounts of the two accounts is the net amount that would be owed to or be due
back from the government for GST taxes. When either of these identified accounts, along with the GST
Rate, are selected for use in an Other or Agent profile, the calculation correctly computes the GST based
on the Total Amount of the Payment utilizing the profile.
Checks
Setup Checks before using the check writer to specify the print format. The check printer is designed for any
standard continuous form check stock, or single check laser printer. The check writer enables the agency
to print lengthy fields inside a square box area by defining their height, width, and placement on the page.
The option to set the field's measurements are found in the main Utilities|Setup|Checks. The first dialog
box is the Check Writer List to list of the agency’s different checks’ general defaults. Different check settings
for different types of checks (payroll, expense, etc.) can be created. Click Add to add a new check and its
settings; Modify to edit a check’s settings (there is one default setting); and Delete to remove a check, and
4/7/15
68
Utilities
its settings. Get a ruler and several copies of the computer check. Use the copies to check the settings once
setup is complete. That way avoid wasting good checks when doing a test printing.
1. Highlight the Check Writer Default Setting and select Modify.
2. Next measure (all measurements are in inches) the length of one check from the top of the check
(including the vouchers) to the bottom. If this measurement is 11 inches, enter the number 11 in the Check
Length field. Measure the width of the check. If this measurement is 8 and 1/2 inches, enter 8.5 in the check
width field. Important: Specify in Trams Back Office the size of the check. If there are no values in
width and height, checks do not print.
3. Click Insert Field to select the first field to be used on the check. Notice each field is numbered. Measure
where on the check in inches this field to print, and use the four-directional arrow and the ruler to pull the
field on the screen where this field is to be located. Use the two-directional arrow to size the field either
vertically or horizonally. Also input dimensions, choose a font, justification, and do other formatting by
69
4/7/15
Utilities
double-clicking on the text box, or right-mouse clicking on the text box and selecting Properties.
Only set up the fields wanted to printed on the check. Add or modify this area at any time.
Attention Canadian Users: - Added 3 new Merge Fields to Utilities|Setup|Checks:
To accommodate the new banking check requirements that went into effect in Canada on 31
Dec, 2006. There are three merge fields:
Date Year (YYYY)
Date Month (MM)
Date Day (DD)
To add the Canadian required YYYY, MM, or DD under the appropriate component of the date fields, add
a text box with the appropriate identifier under each date field.
4. Any field to print on the check more than once, requires more than one setting. For example, if this is a a
two-voucher check and the date is required to print on the check and the two vouchers, there will be three
date settings, each with a different measurement from the top.
Example: Let’s assume this is a two-voucher check. The check information is printed on the first voucher.
Since some of the same fields are to be printed on the voucher, create duplicate fields and position them
on the voucher where they are to print. The confirmation number and remarks are to be printed on the
second voucher. In the check set-up, select Insert Field, and click Confirmation Number. Measure down
from the top of the check where the information is to be printed. Enter that number in the Properties area of
the field; or simply drag and drop the field where it is to be printed. Measure from the left of the check, and
enter that number in the Left field on the Properties screen. Continue with the Width and Height
measurements. To add remarks, click on Insert Field and select Remarks. (That field may have to be
re-sized quite a bit to get that to print on the check.)
Another Example: There is a three-part voucher check and all the information from Voucher 1 and Voucher
2 needs to be printed on Voucher 3 (the one to keep for office records). Create duplicate entries of each
field, changing the length from the Top by dragging and dropping the field or by using the Properties area.
4/7/15
70
Utilities
The following are sample setting for a three-part voucher check.
Check Example
Item Description
Left
Top
Width
Height
Alpha Amt
.78
1.25
5.62
.18
Amount
7.25
1.87
1.12
.18
Amount
7.25
7.50
1.12
.18
Amount
7.25
4.25
1.12
.18
Check #
5.0
7.25
.50
.18
Date
5.75
1.87
.84
.18
Date
5.75
4.25
.84
.18
Date
5.75
7.50
.84
.18
Payee Name &
Address
1.10
2.0
4.69
2.00
Payee Name &
Address
1.10
7.50
4.69
2.00
Remarks
1.25
5.75
7.00
1.00
Remarks
1.25
7.50
7.00
1.00
Journal Entry
1.25
8.50
7.00
2.00
5. Continue for each field desired to print on the check. Click OK to save.
To delete a field, highlight that field and click Delete. To print checks, go to Reports|Payments|Check
Writer. Complete the fields for the check numbers to print. To view the checks before printing, select View
Checks. Also print a single check from the Payment Query screen.
Troubleshooting in Check Writer
Questions to ask if there are difficulties printing checks.
- Did I indicate the correct size of my checks?
- Is the height set high enough to accommodate the printer font? The default is .18. If the settings all look
correct but nothing is printing on the checks, try resizing this text box or setting the height of the settings at
.25 in the Properties.
- Are the settings overlapping?
- Do I have the setting printing off the check -- too far to the right or off the bottom? (i.e.: the check width is
8.0 and it is set to begin printing at 8.5).
- If the last part of the entry doesn’t appear, resize the text box. It may not be set high enough to
accommodate the extra lines. Example: Only the first two lines of the Payee Name and Address appear.
- A payroll JE requires several lines. If the settings appear correct but the JE is not printing, check the height
of the setting. It may not be set high enough to accommodate the multiple entries.
Conversion Rates
Trams Back Office can convert foreign currency transactions to your agency's local currency.
71
4/7/15
Utilities
1. Enter your agency's' 3 character local currency code under Utilities|Setup|Global Defaults|Interface
Mailmerge Prompt tab
2. Manually load conversion codes and rates under Utilities|Setup|Conversion Rates. Since currency
rates fluctuate, the rates should be updated periodically.
a. Fill in the conversion rate for each currency and click Add to see it in the data entry box below. A
warning message of Duplicate Currency Code is displayed when trying to add a duplicate conversion
rate.
b. To edit a currency rate, select the entry and click Update.
c. To delete and entry, highlight it and click Delete. Click OK to save all.
If a hotel or car transaction is interfaced and no local currency equivalent has been loaded by a hotel vendor,
(hence the hotel’s currency is not shipped in the interface file) during the Interface/Download routine, a
look up on the conversion rate table will take place. If the currency code and rate are found in the conversion
rate table, the foreign currency amount is converted to your agency's local currency in the booking record.
The foreign currency tab in the booking displays the hotel currency code and rate used for the conversion
process.
Printer Defaults
Printer Defaults
From the pull-down menu, select the printer wanted to use for Reports and the Check Writer if this setting
differs from the printer default settings in Windows. The printer could be the same or different for each
setting.
Report, Statement & Invoice Headers/Footers
To add customized headers and/or footers to Trams Back Office Reports, Statements, or Invoices, go to
4/7/15
72
Utilities
Utilities|Setup|Headers/Footers.
There are default Header/Footers set up for both Reports, Invoices, and Statements, but these defaults
cannot be modified or deleted. To modify an existing default, click Copy, and then highlight the entry and
click Modify to change the setting. To add a brand new header/footer, click Add. Specify from the drop-down
menu whether the new entry is a Report, Statement or Invoice Header/Footer. Add a Description, Insert
Text or Insert Graphic per directions outlined below in Modifying a Default Header/Footer section below. To
delete a non-default header/footer, highlight the entry and click Delete. To set a header/footer as the default,
highlight the entry and click Default.
Note: To print statements on pre-printed letterhead paper, remove the Agency Name & Address
Information Fields, and adjust the size of the blank space left to allow for printing on pre-printed letterhead
paper. Remember to have the Print Full Statement Header box checked under Utilities|Setup|Global
Defaults|Prompt Tab for space to be left on each page for letterhead paper.
Modifying a Header/Footer
To modify headers or footers:
1) To modify a header/footer, go to Utilities|Setup|Headers/Footers, highlight the default entry to modify,
and click Copy (since the defaults cannot be deleted), or click on Add to add a brand new entry).
2) Choose the Header/Footer type - Report, Invoice, or Statement.
73
4/7/15
Utilities
3) Add a description line which acts as a "title" to identify different headers/footers.
4) Click the Page Header/Page Footer/Report Header/or Report Footer Tab. Click the desired tab to setup
the headers and footers. The report header and the report footer print ONLY on the first or last page. This
report footer can be used as an agency’s “Terms & Conditions” when running an invoice, since it’s on a
separate page when running an invoice. The page header prints on each page of the report, and the page
footer prints on each page of the report, except on the Report Footer page.
5) Use Add Text to insert text into the header or footer. A text box appears in the upper left corner. To type
and format text, double-click the text box. A screen appears to enter the desired text, align the text, and set
the font. Click OK to go back to the main screen. Highlight the text box to click and drag the text box and
position it. Click and drag the text box to size it properly. Movement and sizing can be done by either
double-clicking on the text boxes, or right mouse clicking on the text boxes and clicking Properties. Choose
Font, Page Alignment, Text Alignment, Insert Merge Fields or text, and more from this dialog box. Click OK
to save.
Moving can also be done by clicking on text or graphic boxes and moving them into any location by using
the 4-directional arrow. Size the default text boxes by using the 2-directional arrow.
6) Use Insert Graphic to add a graphic file. Use the browse feature to locate the graphic file on any
drive/directory and click Open once located. (Use *.jpg, *.jpeg, *.bmp, *.ico, and *.emf type graphic files
within headers and footers.) Double-click the graphic to access dialog box to set size and page alignment,
or highlight the graphic to click and drag, size, and position it properly. Double-click on graphic box, or right
mouse click on the box, and click Properties.
7) Click OK to save.
8) Print out a sample report and adjust settings accordingly.
Fare Codes
For generating Fare Saving Reports in Trams Back Office, this table represents fare codes and information
and is user definable. An unlimited number of two-character alphanumeric codes and their descriptions can
be entered. A warning message of Duplicate Fare Code will be displayed when trying to add a duplicate
4/7/15
74
Utilities
Fare Code. These codes are identified within the invoice booking on the Expanded Fare Information screen
and are usually populated via interface. See the Interface Preparation Guide for the appropriate PNR
entries.
A justification code allows the agency to communicate to clients the reasons they did not get the lowest fare.
Justification Codes are set up in Utilities|Setup|Fare Codes.
Hint: Print out a Fare Codes setup sheet for the agents by clicking on the Print button.
City Codes
Trams Back Office stores about 5000 city codes and their corresponding full city name. Modify, add, and
delete from this list by going to Utilities|Setup|City Codes. For the most part, there is no need to come into
this area. Trans-border agencies may want to add some cities, but with caution. Highlight the city code,
make any changes, click on Update or Delete, or enter any new information by clicking Add. A warning
message of Duplicate City Code will be displayed when trying to enter a duplicate city code.
You are printing an invoice for Tom Smith and notice the city name for ORD is printing as Chicago. You
want to change it to Chicago O'Hare. To edit this city code, go to Utilities|Setup|City Codes. Scroll to the
entry for Chicago and highlight the entry. Make desired modifications and click Update. Click OK to save
your changes. Now when you print another invoice for Tom Smith, the full city and airport name prints for
ORD.
Note: The City Code Table only applies to city codes captured on the Segments tab of a booking and does
not apply to the Itinerary fields on the General tab.
75
4/7/15
Utilities
Groups
Groups appear in
alphabetical order. Make a
group that is no longer in
use Inactive to take it off
TBO drop-down lists.
Group identifiers are used to link information together (such as profiles or invoices) for specific reporting
purposes. They are used for printing labels, statements for a group, or corporate departments.
1. Select Utilities|Setup|Groups.
2. Click the arrow next to the Group Type field.
3. Choose the type. If choosing Branch, G/L Branch, Bank, or G/L Accounts see step 7 below. Selections
are as follows:
− Agent – To link agent profiles together
− Client – To link client profiles together
− Other – To link other profiles together
− Vendor – To link vendor profiles together
− Invoice – To link invoices together
− Payment – To link payments together
− Invoice/Payment To link both invoices and payments together, especially for a group.
− Branch - To link branches together
− G/L Branch - To link G/L Branches together
− Bank -To link Bank Accounts together
− G/L Accounts - To link General Ledger accounts together.
4. In the Default Group field, type in the name of the group. (i.e. Ski Group’04).
5. Add a detailed free-flow description if desired.
6. Click the Add button.
7. Repeat steps 3 and 4 to create each group identifier.
8. Once all group identifiers have been added, click OK to save.
9. When creating the Bank, Branch, G/L Branch, or G/L Accounts groups, access a Members
button that allows specific Bank Accounts, Branches, G/L Branches, and G/L Accounts to be created.
4/7/15
76
Utilities
Simply move the items to be part of the group from the left side to the right side to include them in the Group.
Note: When entering a Group on a Create New Invoice or Payment Screen, a Group Button when click
displays descriptions of groups and permits adding a new group name/description from that same area.
IC/Host Codes
Agencies today are choosing to change the way they make their bookings. Many are dropping out of
ARC/BSP and booking air tickets through a Host Agency. They may also book some or all of their cruise
and tour business with a Host Agency, or continue doing those bookings as they always have. These
Independent Contractors (IC) agents working through a Host Agency, may still operate a store front
location, or move into a home-based environment.
Independent Contractors need a method to tag and transmit invoices to the Host Agency who have Trams
Back Office, and Host Agencies need a method to tag and transmit invoices to ICs who have TBO. Both ICs
and Host Agencies need a way to receive and differentiate invoices created from various ICs/Hosts from
their own. So the first step for both the ICs and the Host Agency is to setup IC/Host Codes to "turn on" the
Host or IC functions in TBO and ClientBase.
For complete instructions on how to do this setup, use the IC/Host functionality, as well as download an
Export Utility click here.
CC Processors
This is a setup area for those users who have signed up for the CC Merchant utility. The automated credit
card processing feature is designed to process credit card merchant payments, using the data already
entered into Trams Back Office. We have formed partnerships with credit card processing companies to
bring competitive rates and an easy-to-use interface to process credit card payments. Currently, we have
partnerships with Pinnacle Payment Solutions, and NTC (National Transaction Corporation) Ticketmaster
(although they are not taking any new customers) and Caledon.
77
4/7/15
Utilities
Some preparation is required to begin automated credit card processing. The agency is required to apply
to a processing company and allow them to process the credit card payments and deposit money into the
bank account.
1) Pinnacle Payment Solutions: Since credit card processing is financially related, the application process
includes completing a form that is submitted electronically to Pinnacle Payment Solutions at
http://www.Trams.com/home/products_services/products/credit_card_merchant/. Receive all
necessary authorization materials from the companies and upon approval; receive a user name and
password.
2) NTC: To obtain an application form for National Transaction Corp. (NTC) please contact Mark Fravel,
[email protected], 888.996-2273. Once the sign-up process is complete, a Bank ID and
Terminal ID is issued. Use the Bank ID as the username and the Terminal ID as the password.
3) Caldeon: To sign up with Caldeon or for answers to specific questions, contact Caldeon Support at
[email protected] or call 1-855-812-5191.
Getting Started - Preparing to Process Credit Cards
Automated credit card processing uses the Trams Back Office CC Merchant form of payment. This form of
payment is designed to distinguish credit card payments processed by the vendor from those that are
processed by the agency. When running a query for processing, only those records with CC Merchant as
the form of payment appear in the query.
The agency front office can enter CC Merchant payments either through ClientBase or interface them
through the GDS, using the formats outlined in the Trams Back Office Interface Guide for the agency’s
particular reservation system. The formats consist of one or two "accounting" lines that are entered in
addition to any descriptive entries in the Passenger Name Record. The accounting entry correctly identifies
(but is not limited to) the following data: Booking Amount, Commission, CC Merchant Form of
Payment, Credit Card Number and Expiration Date, Vendor, and Travel Type. For more information,
please refer to the Trams Interface Guide for the GDS system. Be prepared to interface and test formats
prior to the implementation of automated credit card merchant processing.
Configuring the Software
The credit card merchant processing feature is designed to query and process CC Merchant payments and
reconcile the results of processing back to the Trams accounting data. Some setup is required before
processing.
Step 1: Since the agency is receiving deposits for merchant transactions, create a profile in Trams Back
Office for the processing company. This is done prior to setting up the CC merchant processing defaults.
Select Profiles|Other and create the profile.
Step 2: Some agencies have a specific bank account that is dedicated only to CC Merchant payments. If
setting up a new bank account for this, add the bank account before setting up the CC Merchant processing
defaults. To add a bank account, select Utilities|Setup|Bank Accounts. In the Description field, identify
the bank account as the CC Merchant account and click Add. If funds from the CC Merchant processing
4/7/15
78
Utilities
are handled through a standard operating account, proceed to Step 3.
Step 3: Select Utilities|Setup|Global Defaults and click the Prompt tab. In the Default CC Merchant Bank
Acct field, type in the bank account number that for the CC Merchant payments to default. If processing CC
Merchant payments against multiple bank accounts, enter the account that is used most frequently. Next,
in the same Prompt tab, verify that the field Allow Client Unapplieds is not checked. CC Merchant payments
that are unapplied balances will not process. Therefore, it is best to turn off this option.
Step 4: Select Utilities|Setup|GL Accts and click the Others tab. Enter the GL account numbers for CC
79
4/7/15
Utilities
Merchant Receivables, CC Merchant Fees and CC Merchant Discount.
CC Merchant Receivables: When a CC Merchant payment is entered against a client's account, the client
balance is closed and is offset against the CC Merchant Receivables account, where the balance remains
until the credit card is processed. This account number should be in the asset series (1000 - 1999) of GL
account numbers.
CC Merchant Fees: Some processing companies charge a fee for each transaction processed. If the
processing company charges a fee per transaction, in the CC Merchant Fees field, type in the GL account
number assigned in Trams Back Office for the transaction fees. This number should be in the expense
series (6000 - 9999) of GL account numbers. If the processor does not charge a per transaction fee, enter
the same GL account number in the CC Merchant Fees field as entered in the CC Merchant Discount field.
CC Merchant Discount: This is the GL account number assigned in Trams Back Office, where the credit
card processing fees from the credit card companies are journalized. This number should be in the expense
series (6000 - 9999) of GL account numbers.
4/7/15
80
Utilities
Step 5: Select Utilities|Setup|CC Processors and setup defaults for CC Merchant Processing.
Bank Account
Enter the Bank Account number (i.e. 1, 2, 3, etc.) that CC Merchant payments
are entered against.
CC Processor
From the drop-down menu, select the vendor name of the credit card processor,
(Pinnacle or NTC -National Transactions Corporation, etc.)
Branch
From the drop-down menu, select the branch to set up for processing
CC Merchant Profile
Select the Other profile that was created for the credit card processing company.
User Name
Enter the Bank ID provided by the credit card processing vendor.
User Password
Enter the Terminal ID (TID) provided by the credit card processing vendor.
Trams Reference
Click the drop-down arrow and choose what reference number appears on the
client's credit card statement. Choose Invoice Number if the agency would like
the invoice number to appear on the client's statement. Choose Payment Number for the Trams assigned payment number to appear on the client's statement.
Processing Timeout
Enter the number of seconds for the program to wait to receive a response from
the credit card processing vendor as to whether the record was processed or
not, before the program moves on to the next record. The Trams recommended
setting is 45 seconds.
Click Add to add the Processor's information and then click Cards on the right to set up the credit card types
81
4/7/15
Utilities
that are being processed. Default settings are required for each type of card being processed.
Card Name
Click the arrow next to the field and choose the name of the credit card being set
up; i.e., American Express.
Processing Fee Rate
Enter the discount rate for the credit card chosen, as specified by the merchant
contract with the credit card processing company.
Transaction Fee
Enter the amount of the transaction fee that the processing company charges.
Click Add to add the card to the setup. Repeat the steps for each type of credit card that are being
processed. (Visa, MasterCard, Discover, etc.)
Step 6: Click the OK button to save credit card information. Click OK again to save the setup screen.
Note: If the agency has multiple branches, repeat step 5 for each branch, as the credit card processing
company provides a username and password per branch.
For directions on Processing CC Merchant Transactions, go to the chapter, Payments, CC Merchant
Reconciliation. For more information on signing up to use CC Merchant, go to
www.Trams.com|Products/Services.
UDIDs
This is a setup area for those users who choose to change the UDID 1-999 drop-down items to more
meaningful and descriptive terms. For example, a UDID #5 can be changed to Purchase Order Number.
The UDID drop-down field then displays the changed new description of Purchase Order Number instead
of the previous UDID #5. Go to Utilities|Setup|UDIDs. Highlight the UDID to edit. Type its new name in
4/7/15
82
Utilities
the Description and Update. To print a report of UDIDs and descriptions, click Print. Click OK to save.
This UDID Description can be used when printing invoices when user selects UDID's to be printed on the
invoice. For example, if the UDID #1 description is Purchase Order No. and 9587465 has been entered in
the UDID #1 field, it’ll print on the invoice like this:
Purchase Order No. 9587465
(This UDID Description is also available when printing out client and vendor statements when selecting
UDIDs to be printed on the statement.)
Backup Overview
Why do Backup?
Because some day the computer housing the Trams database WILL crash. Backup is the ONLY
insurance!
IMPORTANT Note: The TBO Backup Utility does not backup Reports. Also it does not backup the Spool
Directory/s. These must be backed up separately on a consistent basis. For information on how to backup
Reports/Spool Directory/s, see section below, Backing Up Reports/Spool Directory/s.
Preparing for Backup Tips
Use the Trams Backup Utility. Use the Trams Backup Utility (Ibbackup.exe) to create a Trams.gbk.zip file.
This file would be used to restore the database should the need arise. Backing up just the database file
(.gdb or .IB) would not provide the ability to restore a database, as it is not a restorable file. Restoring
a.gbk.zip backup file also re-indexes the database files.
Backup must be done regularly. Backup every day, prior to adding more data to the system,. Formatting
two sets of backup media (Flash drive, i.e.), and labeling them "A" and "B" is recommended. Rotate the
83
4/7/15
Utilities
media, using one, then the other. Suggestion to take an extra backup once a week and take it off-site. To
start the backup utility, go to Start|Programs|Trams Back Office|Database Backup.
Database Alias: Database Alias from the drop-down. This is the database which will be backed up.
Database Path: By default below the Database Alias is the path where the data currently resides that was
setup in the Alias Utility.
Username: By default the SYSDBA is the Username.
Password: Enter the password for the SYSDBA.
Server Username and Server Password: Are used when backing up an EUA enabled database. For EUA
databases, there's a server-wide SYSDBA user and a database SYSDBA user that are different. Both need
to be specified. For non-EUA databases, just the traditional username/password needs to be specified.
Backup Type: Choose Full Backup, Full Dump, or Incremental Dump. (For more details on the Full Dump
and Incremental Dump options, please refer to the Disaster Recovery section below.)
Backup To: Enter or search for the drive, medium, or directory to which to backup.
Compress Backup File: Place a checkmark in the Compress Backup File box to compress the backup file.
Encrypt Backup File/Password/Confirm: An option to encrypt and password protect the backup file. If a
password is specified during the backup and the backup is being compressed, the resulting zip file will be
encrypted using AES 256 encryption.
Note: When restoring a compressed backup that is password-protected, if the user specifies an invalid
password, then the restore will fail. If the encryption password is lost, there is currently no method for
recovering the password and the encrypted backup cannot be restored.
Validate DB prior To Backup: The validate option works with both backup and restore steps. Validating
on restore is a bit slower, but it ensures that the database is valid. Validating on the backup is much slower
4/7/15
84
Utilities
than a normal backup and the validation does not fix issues. A database that is restored and fails validation
will have the db fail flag set. Users cannot log in until the restore is complete, regardless of whether
validation is done.
Create a Shortcut: Once the backup utility is set up for the first time, clicking the button creates a shortcut
on the desktop that can be used every time backup is performed. All of the settings/options will be retained.
E-mail Notification on ibbackup
There is a backup e-mail notification feature that will send an e-mail to the specified user if a backup fails
with an option to send e-mails for completed backups as well.
Setup Process:
1. Go to the Trams program group under Start/All Programs/Trams Back Office/Database Backup and
open the backup utility.
2. Ensure the user name and password are filled in
3. Click the Create Shortcut button. The places a backup shortcut on the desktop.
4. Right-click on the backup shortcut on the desktop and select properties.
5. In the Target field right-arrow to the end of the existing information in the field.
6. Add the information in the example below replacing the generic -EMAILSERVER information with the
proper e-mail server address and also replace the -EMAILTOADDR information with the proper e-mail
address for the recipient.
7. Click OK to save the changes.
Note: If you currently have scheduled backup information in the backup shortcut, append this additional
information to the end of that command line.
New ibbackup command-line options:
EMAILSERVER <servername>
EMAILTOADDR <to-address>
EMAILNOTIFYALL
Example: "C:\Program Files\Trams\Common Files\ibbackup.exe" -EMAILSERVER mail.sabre.com
-EMAILTOADDR [email protected] -EMAILNOTIFYALL
The EMAILNOTIFYALL option sends an e-mail for completed backups. If only failed backup notifications
are required, eliminate this option.
This feature is only designed for simple SMTP.
- no authentication
- default port: 25
- no TLS/SSL
- no MAPI SUPPORT
Interbase XE or Higher Additional Backup Options
Interbase XE or higher adds some additional backup options for enabling very fast backups/restores.
Interbase now has an option for what is called an Online Dump. An online dump is an exact copy of the
database that can be created while the database is in use. The resulting dump file is a complete copy of
database at the point in time when the online dump is started, but is in read-only mode.
85
4/7/15
Utilities
The initial creation of the dump file can take a few minutes. Once created, incremental dumps can be
performed which only update those parts of the original database that have been modified and are typically
very fast.
Options for creating a backup via Online Dump:
Dump Copy: Similar to a full backup, creates a new Dump file, compresses it, then stores the file in the
target location. The resulting file will be larger than a normal full backup, but should get created faster.
Dump Full: Creates a new Dump file on the server, overwriting any existing dump file with the same name.
The target directory must be located on the server or be on a shared folder that the server can access.
Dump Incremental: Updates an existing Dump file on the server with any changes since the last update.
Dump Full or Dump Incremental. If the file doesn't already exist, then this works like a Dump Full and a
new Dump file is created. Dump Full/Incremental creates a file with the same name as the database but
ending in .DMP instead of .IB.
We have not automated the process of restoring a dump file, however for a manual restore:
Copy the .DMP file to the directory where the database is normally located and rename to .IB. Connect to
the database via IB Console and change the Read Only property under Options on the General tab of
Database Properties from TRUE to FALSE.
Considerations:
- The Dump file is an exact copy of the database, except in read-only mode. Any corruption present in the
original database will carry over to the Dump copy. It is still recommended to create periodic full backups
using the original method.
- The Dump file should be restored to the same version of Interbase where it was created. Moving to a newer
version of Interbase should be ok, but moving to an older version won't work.
- The Dump file is typically maintained on the same server as the database. Recommendation is that the
Dump file be stored on a separate volume on the server so that a disk failure won't affect both the database
and the dump file. It's possible to store the dump file on a separate server, but it requires additional
configuration.
- The Online Dump process can run while users are in the system and while a Full Backup is being run.
Example backup schedule for typical large agency:
Every 2 hours during business hours: Incremental Dump
Daily after hours: Full Backup to external media.
Weekly after hours: New Full Dump.
The Backup Utility contains additional options that pertain to an XE database version.
- New Server username and Server password fields have been added and are used when backing up an
EUA enabled database. For EUA databases, there's a server-wide SYSDBA user and a database SYSDBA
user that are different. Both need to be specified. For non-EUA databases, just the traditional
username/password needs to be specified.
The Backup Type drop down field contains the following options:
- Full Backup
- Full Dump
- Incremental Dump
Disaster Recovery
Interbase XE or higher adds some additional backup options for enabling very fast backups/restores.
4/7/15
86
Utilities
Interbase now has an option for what is called an Online Dump. An Online Dump is an exact copy of the
database that can be created while the database is in use. The resulting dump file is a complete copy of
database at the point in time when the online dump is started, but is in read-only mode.
The initial creation of the dump file can take a few minutes. Once created, we can perform incremental
dumps which only update those parts of the original database that have been modified and are typically very
fast.
Options for creating a backup via Online Dump:
--Dump Full: Creates a new Dump file on the server, overwriting any existing dump file with the
same name. The target directory must be located on the server or be on a shared folder that
the server can access.
--Dump Incremental: Updates an existing Dump file on the server with any changes since the
last Dump Full or Dump Incremental. If the file doesn't already exist, then this works like a
Dump Full and a new Dump file is created.
--Dump Full/Incremental creates a file with the same name as the database but ending in .DMP
instead of .IB.
We have not automated the process of restoring a dump file, but it's pretty simple:
--Copy the .DMP file to the directory where the database is normally located and rename to .IB.
--Connect to the database via IB Console and change the Read Only property under Options
on the General tab of Database Properties from TRUE to FALSE.
Considerations:
--The Dump file is an exact copy of the database, except in read-only mode. Any corruption
present in the original database, will carry over to the Dump copy. We still recommend creating
periodic full backups using the original method.
--The Dump file should be restored within the same version of Interbase that created it. Moving
to a newer version of Interbase should be ok, but moving to an older version won't work.
--The Dump file is typically maintained on the same server as the database. We recommend
that the Dump file be stored on a separate volume on the server so that a disk failure won't affect
both the database and the dump file. It's possible to store the dump file on a separate server,
but it requires additional configuration.
--The Online Dump process can run while users are in the system and while a Full Backup is
being run.
Example backup schedule for typical large agency:
--Every 2 hours during business hours: Incremental Dump
--Daily after hours: Full Backup to external media.
--Weekly after hours: New Full Dump.
The full dump only needs to be done one time. Specify the backup type as Full Dump. Identify
87
4/7/15
Utilities
where to store the DUMP file. Enter the path in the Backup To field.
The incremental backup would look almost the same except the Backup Type is set to Incremental:
Create a scheduled task for the incremental dump:
To create the command line to use in the scheduled task:
1. Click <Create Shortcut>
2. Go to the newly created shortcut, right click on the shortcut icon and select properties
3. Copy the information in the target field
4/7/15
88
Utilities
4. Paste the command line in the scheduled task.
In the event of a disaster:
1. If there are connections to the affected database, disconnect all connections by shutting down the
IBServer service.
2.Copy the .DMP file to the directory where the database is normally located and rename to .IB.
3.Connect to the database via IB Console (see detailed instructions below)
4.Change the Read Only property under Options on the General tab of Database Properties from TRUE to
FALSE. (see screen snap in detailed instructions below)
Using IBConsole:
IBConsole is a database management tool included with the Interbase Server installation. The
IBConsole.exe shortcut will normally be found in the Interbase XE or higher group in your Programs menu.
Double-click to launch IBConsole.
Double-click on the Interbase Servers item in the tree shown on the left side of the form. This will display
89
4/7/15
Utilities
the Register Server and Connect form.
Usually IBConsole is operated on the machine hosting the Interbase database so the default selection of
Local Server is typically used. If the database is hosted on a remote machine then select Remote Server,
enter the Server Name in DNS or IP format and select the Network Protocol (usually TCP/IP).
In this case it is preferable to use Remote Server, a Server Name of localhost, an appropriate Network
Protocol (usually TCP/IP) and an Alias Name to identify the server in the configuration.
Enter the User Name (default administrator User Name is shown, SYSDBA) and password. Press OK to
connect to the server using the configuration options shown.
If the connection was successful the configuration in IBConsole will update.
Double-click on Local Server to expand the connection options, shown below.
4/7/15
90
Utilities
Right-click on Databases to display the database registration menu.
Select Register to display the Register Database and Connect form.
The actual database file must be specified using this form. Press the file open button to the right of the
Database File edit to browse and select the IB file.
Note: When using Remote server connections the file browse button will be disabled, you must manually
type in the path and name of the Trams.ib file. Make sure Save Alias Information is checked. Enter the User
Name for the database server and the Password in the fields on the form.
Other options can be left at their defaults.
91
4/7/15
Utilities
Click OK to connect to the specified database.
Double-click Properties to display the database properties which are seen below.
Scheduled Backup on Vista/Windows 7/Server 2008/Server
2012
Getting the Parameters for the Automatic Backup
Create a shortcut for the backup process on the desktop.
1. Start the Trams Backup Utility. You can click on Start, (All) Programs, TRAMS, and Trams Backup
4/7/15
92
Utilities
Restore or Start, (All) Programs, Trams Back Office, then Database Backup.
2. Make sure the Username is SYSDBA. Enter the appropriate password.
3. Currently, nothing should be entered in Server Username or Server Password.
4. If the desired backup location is not already displayed next to "Backup to," click on the Folder icon to
browse to and select the path you wish to back up to.
5. Compress Backup File should normally be checked if you want the backup to be compressed to zip
format.
6.Click "Create Shortcut"
At this point, you will have an icon on the desktop named "Backup," plus your alias name. Usually it will be
named "Backup TRAMS." When double clicked, it will bring up the same parameters as entered when
Create Shortcut was clicked. For the purposes of creating the automatic backup, what we need are these
parameters.
1. Right click on this Backup TRAMS shortcut icon on the Desktop and select "Properties".
2. If the text in the Target box is already highlighted right click on the highlighted text and select "Copy."
3. If not, right click inside the Target box, choose "Select All" then follow step 2 to copy the text.
4. Close the Shortcut's properties.
The full copied text will look something like this: "C:\Program Files (x86)\Trams\Common
Files\ibbackup.exe" -UserName SYSDBA -EncPwd1 "696D28D2F51DB07CEF" -Alias "TRAMS"
"E:\TRAMSBCKUP"
Creating the Scheduled Task in Windows Vista/Windows 7/Server 2008/Server 2012
1. Open up Windows Task Scheduler
93
4/7/15
Utilities
Click Start, Programs - Accessories - System Tools - Task Scheduler. Also you can click Start, and type
"task" into the Start Menu Search box and Select Task Scheduler from the results, or open the Control Panel
- Administrative Tools - Task Scheduler.
2. Select 'Create Basic Task' from the right hand pane and the 'Create Basic Task Wizard' will open.
3. With the Wizard open, type a 'Name' (example TRAMS Backup) and 'Description' (optional) for this task.
4/7/15
94
Utilities
Click Next.
4. Select when you would like the event/task to run. Daily would be the most common and logical choice as
we recommend a backup be done every day. Click Next.
5. Select the exact time and date at which you wish the first task to start (each task afterward will run based
on your selection in step 4) then click Next. Automated backups are generally run in the evening, rather than
95
4/7/15
Utilities
during the work day. The computer must be on for the task to occur. Click Next.
6. Leave the action set to "Start a Program" and click Next.
* Note, this next part is a little tricky, please try to follow the steps carefully.
7. We copied the command line for the backup in the steps at the beginning of this document. Unfortunately,
we need to split it up into the two boxes on this next screen and make a slight change to the Additional
Arguments.
a. First, right click in the Program/script box and select paste.
4/7/15
96
Utilities
b. Press the End key on your keyboard.
c. Press the Backspace key to delete characters from the end of what you pasted, until you reach
ibbackup.exe" and do not delete the quote mark.
d. What you should have left is this (or something very similar):
e. Alternatively, at this step, you could have clicked Browse… and found the ibbackup.exe program under
the C drive, Program Files (x86)\Trams\Common Files.
8. Next, we need to get the correct portion of that command line into the "Add Arguments" box.
a. Right click in the "Add Arguments" box and select paste.
b. Press the Home key on your keyboard.
c. Press the Delete key (not Backspace) until you reach the first dash symbol, do not delete the dash.
Next to the dash should be "UserName."
d. With the cursor still at the left side of the box, type "-auto" and a space. What you should see is this:
e.Click Next.
9. Check the box that says "Open the Properties dialog for this task when I click Finish." Click Finish.
10. Check the box that says Run with Highest Privileges.
11. Under the Security options, you can have the task run if the Windows user that created the task is logged
on, but it would be more common to set it to "Run whether user is logged on or not." If you set this option,
when you click on Okay, it will prompt you to enter your Windows password for this user.
97
4/7/15
Utilities
Additional Scheduled backup command line options for EUA enabled databases:
-USERNAME <username>
-PASSWORD <password>
-ALIAS <database alias,database alias,...>
-DBPATH <database path>
-AUTO
-RESTORE
-COMPRESS
-VALIDATE
-DBUSERNAME <database username>
-DBPASSWORD <database password>
-ENCPWD <encrypted password>
-ENCDBPWD <encrypted password>
-DUMPFULL
-DUMPINCREMENTAL
-PAGESIZE <4096, 8192, 16384>
-LOGFILEPATH <path for log file>
-EMAILSERVER <email server name>
-EMAILTOADDR <recipient's email address>
-EMAILNOTIFYALL
Backing Up Reports/Spool Directory/s
When backing up the TBO database, the Report Directory or the Spool Directory/s are NOT backed up.
Make a separate backup for all TBO reports and the spool directory/s. The easiest way to do this is to use
the following instructions:
1. Select Start|Programs|Accessories|System Tools|Backup.
2. Follow the Backup Wizard, and place a checkmark in the Trams Reports folder found where the TRAMS
Reports where installed in the Trams program group.
3. Then, browse for the backup destination found on the bottom of the backup screen. (Some versions of
Windows may have the backup destination on the next screen.)
4. Click on Start Backup to start backing up, or Schedule Jobs. (If selecting Schedule Jobs, backup files
will be backed up as scheduled. Make sure that to backup to a CB-RW or a USB Drive, etc., and that the
system time and data are correct when using this option.)
5. Repeat the process for the Spool Directory/s.
Restore
NEVER restore the Trams.ib until the backup has been restored some place else by following the
procedures outlined below. The agency may be instructed by our support department to do a backup and
then restore the database. This could be to re-index certain database tables or to troubleshoot some other
4/7/15
98
Utilities
issue. In any event, following these steps will ensure the integrity of the database backup, and will alleviate
the possibility of restoring over an existing database. These steps should work for any version of Interbase,
but not for doing an upgrade of Interbase.
Close out of TBO (and ClientBase) to restore data.
Select the Restore Tab. The restore function recovers backup data saved on medium that used the Trams
backup function. Restore replaces current data files with those on the backup medium. This restore
program restores both Trams Back Office and ClientBase Data. Since the two programs share a
common database, restore cannot be done on one without affecting the other.
1) Make sure everyone is out of ClientBase, Trams Back Office and any other applications connecting to
the database.
2) If the database is a Sync database, please go to scheduled tasks in the Control Panel in Windows. If the
task that controls synchronization is currently running, please wait for it to finish (refresh the screen). Once
it is not running (status Ready), disable the task by double- clicking it and un-checking the box that says
Enabled and then clicking Apply/Okay.
3) Perform a backup of the database.
4) Shut down the Interbase Guardian service. Go to Control Panel|Administrative Tools|Services and
then highlighting Interbase Guardian and clicking Stop Service. This will automatically stop the Interbase
Server service as well.
5) In Windows Explorer go where the Trams.ib is located and rename it from Trams.ib to Trams.ib.old.
6) Start the Interbase Guardian Service (as before, the Interbase Server service will be updated
automatically).
7) Restore the backup that was done in Step 2. It should not prompt that it's overwriting an existing
database. Go to Start|Programs|Trams Back Office|Database Backup. Click on the Restore tab.
Database Alias: Database Alias from the drop-down. This is the database which will be backed up.
Database Path: By default below the Database Alias is the path where the data currently resides. This
was setup in the Alias Utility.
Username: By default the SYSDBA is the Username.
99
4/7/15
Utilities
Password: Enter the password for the SYSDBA.
Server Username/Server Password: In preparation for Password Management enhancements in
ClientBase Windows and Trams Back Office, there are new fields on the Backup Utility called Server
Username and Server Password. These fields should be left blank when performing a backup or
restore.
Restore From: Enter or search for the drive, medium, or directory to which the backup was performed
and find the Trams.gbk.zip file.
Page Size: The Page Size option with choices <default>, 4K, 8K and 16K (for Interbase 2007 and
higher) are for users who have Interbase 2007 installed. Restoring a database with a larger page size
results in a performance increase in the database. Typically the time needed for the database to send
data requested by the application has been decreased up to 10% (comparing 4kb to 16 kb page size).
Encrypt Password: Type the password used when backing up and encrypting the database. When
restoring a compressed backup that is password-protected, if the user specifies an invalid password,
then the restore will fail. Note: When restoring a compressed backup that is password-protected, if the
user specifies an invalid password, then the restore will fail. If the encryption password is lost, there
is currently no method for recovering the password and the encrypted backup cannot be
restored.
Validate DB prior To Backup/Restore: The validate option works with both backup and restore
steps. Validating on restore is a bit slower, but it ensures that the database is valid. Validating on the
backup is much slower than a normal backup and the validation does not fix issues. A database that
is restored and fails validation will have the db fail flag set. Users cannot log in until the restore is
complete, regardless of whether validation is done.Overwrite Existing Database: Check here to
overwrite the existing database.
8) Once verifying that the restore completed successfully, have everyone go back into TBO and/or
ClientBase. (Leave the renamed database and the backup in place until everyone is satisfied that the
system is working correctly).
9) If the Sync scheduled task was disabled in Step 2, go back into the sync task's properties and enable it.
If there are any questions about these steps or there is any difficulty in following them, don't hesitate to
contact our support department.
Calculator
Access the calculator from this menu. Many of our customers find it convenient to access the calculator
when they sign into Trams Back Office each day. By minimizing and sending it to the tool bar, there is quick
4/7/15
100
Utilities
access to the calculator.
Use the keyboard’s number pad to calculate numbers and do a <Ctrl C> to copy the figure from the
calculator’s display screen. When in Trams Back Office, put the cursor in the field where the figure will go,
and press <Ctrl V> (or right mouse click and select paste) to paste the amount.
Purge
Purge automatically deletes/voids files in the system that may no longer be of use.
PNR History
On each interfaced invoice, Trams Back Office keeps a "receipt" showing the interface formats used to
create that invoice. Over time, these files can build up and take up needed disk space, not only on the
computer hard drive, but on the back-up medium as well. Located under Utilities|Purge|PNR History,
Purge deletes PNR History. PNR History is the information displayed when selecting the "Rec Loc" button
at the top of each invoice. If choosing to purge PNR history, only purge through the last closed and balanced
month. If not keeping a general ledger in Trams Back Office, only purge through the last closed and
reconciled ARC period.
Once the purge has completed, a backup restore routine must be performed to complete the routine. Steps
below outline how to restore to a new alias (not over the current production database) as a precautionary
To Purge Data:
1. Create a backup file and store it.
2. Go to Utilities|Purge|PNR History. Enter the date to include in the purge. All interfaced PNR History
residing under the "Rec Loc" button prior to the date entered will be purged. For example, if entering a purge
through date of 01/01/12, all interfaced PNR history from the beginning of the time the agency has been
using Trams Back Office through 01/01/12 is purged.
3. If the agency is using the ClientBase Synchronization Routine, it is important to disable the Sync
Scheduled Task prior to running the second back up routine in step 3.
3. Create a new backup file (after the purge is complete). Because one should never restore a backup
over an existing database, a new alias path must be created to restore the backup file to.
101
4/7/15
Utilities
4. Launch the Alias Utility by going to Start|Programs|Trams Back Office|Alias Utility.
5. Highlight the existing Trams Alias and click modify.
6. Change the Alias Name to Old Trams.
7. Highlight the Alias Path and copy the path (Ctrl C) and close the window for that alias.
8. Create a new alias path while still in the Alias Utility, and click Add. Type in a new Alias Name (suggest
Trams). In the path field, paste the alias path copied in step 7 (Ctrl V).
9. Using the Trams Backup/Restore Utility, restore the backup file created in step 3 to the new alias path.
10. Rename the old database. Go to My Computer C:\Program files\Trams\database and rename the old
database (.gdb or .ib) to Trams.old.
11. In the Alias Utility, delete the alias path that points to the old database (with the PNR History un-purged.
12. Enable the Sync Scheduled Task.
Once history is purged, it is gone. There is no way to recover this data. Prior to purging history, always
be sure to do a backup. Keep this backup in a safe place, so if there is a need to retrieve any of the purged
history, restore the backup.
Globally Void Open Comm Track Bookings
Located under Utilities|Purge|Open Comm Track Bookings is a feature to globally void Open
Commission Track Bookings by Latest Invoice Issue Date, Branch, and Travel Type. These bookings can
build up and remain open until they are voided. If sending out Vendor Statements each month, this feature
enables the agency to send out more accurate statements.
To Globally Void Open Comm Track Bookings: Go to Utilities|Purge|Open Comm Track Bookings.
Enter the Latest Invoice Issue Date, Branch and Travel Type/s of the Commission Track bookings to void.
Once these bookings have been voided, it is possible to unvoid them. Locate the invoice which contains
the commission track booking using the Invoice Query feature. Select the commission track booking, and
click on “Void.” This will unvoid the voided commission track booking.
Note: Always be sure to do a backup before globally modifying invoices.
Purge Credit Card Data
A PCI related credit card purge function is located under Utilities|Purge. When the As Of date is entered,
any credit card payments up to the date entered can be changed to the masked format.
4/7/15
102
Utilities
Purge Change History
Purge Change History purges changelog history using a prior to date parameter. Purging changelog
history helps maintain database size to streamline backup and restore times. After the purge routine is
completed, a backup and restore is required to shrink the database size. We strongly recommend that a
backup is performed and archived prior to the purge routine as well.
To Purge Change History Data:
1. Create a backup file and store it.
2. Go to Utilities|Purge|Change History. Enter the date range to include in the purge.
3. If the agency is using the ClientBase Synchronization Routine, it is important to disable the Sync
Scheduled Task prior to running the second back up routine in step 3.
4. Create a new backup file (after the purge is complete). Because one should never restore a backup over
an existing database, a new alias path must be created to restore the backup file to.
5. Launch the Alias Utility by going to Start|Programs|Trams Back Office|Alias Utility.
6. Highlight the existing Trams Alias and click modify.
7. Change the Alias Name to Old Trams.
8. Highlight the Alias Path and copy the path (Ctrl C) and close the window for that alias.
9. Create a new alias path while still in the Alias Utility, and click Add. Type in a new Alias Name (suggest
Trams). In the path field, paste the alias path copied in step 7 (Ctrl V).
10. Using the Trams Backup/Restore Utility, restore the backup file created in step 3 to the new alias path.
11. Rename the old database. Go to My Computer C:\Program files\Trams\database and rename the old
database (.gdb or .ib) to Trams.old.
12. In the Alias Utility, delete the alias path that points to the old database (with the Change History
un-purged).
13. Enable the Sync Scheduled Task.
Once history is purged, it is gone. There is no way to recover this data. Prior to purging history, always be
sure to do a backup. Keep this backup in a safe place, should the need arise to retrieve any of the purged
history, it can be restored from the backup.
Important Note: Once change history is purged, when clicking on the history buttons throughout the
application the User ID, Date/Time stamp, Action, Field, Old Value, New Value information can no longer
be viewed for transactions preceding the prior to date entered.
103
4/7/15
Utilities
Purge Interface Logs
To purge the agency’s interface logs which are downloading and processing logs, perform a backup. After
this purge is completed, you’ll be restoring the backup to decrease the size of the database. Go to
Utilities|Purge|Purge Interface Logs and enter a date you want the files to be purged. Restore the
database.
Reopen Period, Purge Posted Journal Entries, Purge
Payments/Payables, Purge Invoices
Located under Utilities|Purge, there is a required order that must be followed in order to ultimately purge
invoices. All purge routines require a date. An attempt to purge data prior to that date will be made, there
are rules where some data may not be purged, details reside each step.
1. Reopen periods.
-- This routine reformats the end of period and year end postings so they become like a standard
journal entry in preparation for step 2.
2. Purge Journal Entries.
-- This routine will purge any posted journal entries (including the end of period and year end
entries created in step 1 prior to the date designated).
3. Purge Payments/Payables. In order to purge a payment the following rules apply:
-- Only payables that are not linked to a journal entry and have a status of paid will be purged.
-- Payments with a blank date cleared field will not be purged.
-- Once payments are 'purged' the status changes to 'closed' and they no longer have a
payment number and will be completely purged with step 4.
4. Purge Invoices. In order to purge an invoice the following rules apply:
-- The Invoice Status cannot be Open.
-- The Partial Payment Amount must equal zero.
-- Invoice and bookings must not reference any payments (See step 3).
-- No bookings can have a client or vendor status of Open.
-- Bookings must not reference a Rescard Reservation.
-- Agent Bookings must not reference a payment.
5. Note: Profiles are not purged
Some points to consider before purging:
* Once data has been purged, reports cannot be run in the purged period.
4/7/15
104
Utilities
* * The actual purging of the data may not affect the size of the backup, or the actual size of the database.
Steps for Purging
1) Backup the Trams database and store this backup in for archiving purposes.
2) Test the backup before starting the purge (see section, Procedure for Testing the Integrity of Daily
Backup in this chapter).
3) Run and print all General Ledger reports in detail before the purge.
4) Determine the Purge Date. Keep at least two years of data. The date is based on the End of Period date.
To purge all data prior to 01/01/2012, the Purge Date is 12/31/2011. All journal entries prior to the purge
date must be posted before purging.
Important NOTE: Use the same date for the next 5 steps.
5) Follow the Purging process in sequence starting with Reopen Period. The period to reopen is based on
the End of Period and Year End posting dates.
6) Purge the Posted Journal Entries.
7) Purge the Payments/Payables.
8) Purge the Invoices.
9) Before doing any work in the new database, compare the agency's printed reports to the reports in the
current database for accuracy.
Enter Access Code
Approximately three weeks before the TBO access code is about to expire, a message will be displayed
that the access code is about to expire when logging into TBO. By calling Trams Marketing at
310-641-8726, emailing [email protected], obtain the new access code for the existing serial number
to enter in this area:
Special Note: When a user’s access to TBO expires, by signing into TBO, have access only the reports
under the Reports Menu. There is also access to Utilities|User Access Code. Users should export profiles
and other data prior to license expiration. Reports can be mailmerged, printed or exported in a number of
formats.
105
4/7/15
4
Importing Profiles From
Other Sources
This section details the importing of Client, Vendor, Agent and Other profiles from other
software programs using ASCII (.txt) files. The routine of importing either appends one
database of profile information to an existing database (or an empty one) without checking
for duplicates, or updates existing profiles if certain parameters are setup.
Importing Customer Profiles via ASCII (.txt)
Files
Agencies may use many different software programs to maintain customer data such as names, addresses,
phone numbers and marketing information. Ideally, most agencies implementing Trams Back Office build
their database using the interface process, but they may prefer to electronically "import" customer
information to the Trams Back Office/ClientBase profiles rather than manually entering it. Later, when the
Trams database is up and running, agencies may want to import other miscellaneous electronic files as well,
such as a purchased mailing list. Although Trams can’t anticipate every possible program used, if your
agency has a database of customer information in a program that can put that information into an ASCII
(American Standard Code for Information Interchange) file (.txt), chances are an electronic “import” is
possible…and easy!
ASCII Delimited Text Files
Regardless of the specific program used to maintain your database, if the program can create an
ASCII-comma or tab delimited file (and most programs currently can using File|Save As or File|Export),
that file can be imported using the Trams Import/Update Utility. An ASCII format uses a standardized
coding scheme enabling different computer programs to exchange information.
Each record in the file includes information such as Name, Address 1, Address 2, City, etc. To recognize
when one field ends and another field begins, a delimiter is used, separating each field. This delimiter is a
character and the most commonly used are a tab or a comma.
If your existing database program can create an ASCII file, create your file and save it to a floppy disk or to
a drive accessible to a workstation that can run Trams Back Office/ClientBase. (The file must be created
prior to running the Trams Import program.) Find instructions on creating the file from the vendor
supporting that software program.
4/7/15
106
Importing Profiles From Other Sources
Using the Trams Import/Update Utility
The Trams Import/Update Utility is a separate program that is run from outside of Trams Back Office or
ClientBase. To access this utility, go to Start|Programs|Trams Back Office (or Trams)|Trams Profile
Import and make sure you have a current backup of the database before starting the import. Access the
program from your Trams program group or by going to Start|Run and browsing \Trams\common
files\profimp.exe file. Upon running, an import wizard appears.
The wizard guides you though importing different classifications of profile data: address, communication,
marketing and traveler. The basic steps to running the import are:
Step 1: Preparing your Database
Step 2: Connect to your Database
Step 3: Select Import File
Step 4: Import Data to Miscellaneous Profile Fields (in TBO Notes or Additional Notes)
Step 5: Import Data to Communications Fields
Step 6: Import Data to Address Fields
Step 7: Import Data to Marketing Fields (for ClientBase)
Step 8: Import Data to Travelers (formerly Passenger) Fields
Step 9: Import Data to Profile Groups
Step 10: Import Data to Special Dates (for ClientBase)
Step 11: Import Data to Profile Remarks (for ClientBase)
Step 12: View Profile Import/Update Summary Screen
Before giving details on each step, let’s review some basic concepts used through the Import Utility screens.
Updating Existing Profiles vs. Appending to Database
There are two methods of importing data - update or append. Update means you want to replace data that
is currently in your database with new data. An example is John Jones is currently in the Trams database.
He visits your website and updates his address, letting you know he moved. You import profiles from your
website every week into Trams. Since the profile already exists in the Trams database, you want the import
routine to find this profile and change the address instead of creating a new profile which would be a
duplicate. If the entire import was updates, then the number of profiles would not increase.
Important Note: As you map the fields from the import file to the fields in Trams Back Office/ClientBase,
it is important to remember that any fields that are being mapped to in the database will be replaced by the
value of the field in the import file, even if it is empty.
Using the append method means you are adding profiles to the database and the number of profiles in the
system increase after the import is complete. An example of this is if you purchase a mailing list and want
to load all the profiles into ClientBase so you can monitor responses and follow up on these profiles.
Three Ways to Import Data
Notice three buttons listed on many of the screens in the Import Utility that are used to describe how that
107
4/7/15
Importing Profiles From Other Sources
data should be imported.
Map
Mapping is used when a data field exists and is
populated in the file while importing. You want to
bring the data in “as is” to a field in the database.
Select the name of the field that exists in the
source file, and indicate in the import wizard into
which field you want the data to show in
ClientBase/Trams Back Office.
Constant
Use this feature when using same value for every
profile being imported. Going back to the mail list
example, you are importing data exclusively for
Leisure profiles. Set the Profile Type field as a
constant with a value of Leisure. Now all the
profiles imported from the mail list show as
Leisure profiles In ClientBase/Trams Back Office.
Rule
Creating a rule to import fields allows you to apply
some logic to the field being imported. Create
rules that if the data meets certain criteria, then
map to a certain field in the database, or set a
constant for the field. Let’s say the mail list you
have purchased has a field name type and the
value in the data source is either Home or
Business. You want to make the profiles that are
marked "business" as Corporate profiles in your
database. You create a rule that says if type is
equal to “business” then set the Profile type field
to Corporate when importing the profile into the
database. Another rule would be set where if the
type is equal to “home” then the set the profile type
to Leisure when importing.
Saving and Loading Mappings
If you plan to import profiles on a continual basis using a consistent source file structure, map settings at
the end of the import wizard. Also, if you start the mappings, but don’t have time to finish, use Save
Mappings to save what you’ve done so far. The next time you import a file, load the map which uses the
same settings from the saved import. Now you do not have to go through the wizard field by field. Only use
this feature when the files you are importing use the same files structure and fields in the same order.
Viewing the Data File
Once you have connected the import wizard with the source file to be imported, the wizard allows you to
view the data. Click View any time to refresh your memory about the fields or data listed in the source file.
ClientBase and Trams Back Office Field Legends
A legend is included on the screens of the import wizard to help you figure out where the data you map is
used. Each ClientBase field is color-coded so that you know which fields are Trams Back Office Only fields
(lavender); ClientBase only fields (royal blue); or shared TBO & ClientBase fields (black).
4/7/15
108
Importing Profiles From Other Sources
Step-by-Step Instructions to Importing
Step 1: Preparing Your Database
When you use the import utility, you make permanent and automatic changes and therefore, we suggest
you make a good backup of the database before using this feature. In doing so, you are covered in case
something is changed unintentionally. By backing up, you have the option to restore back your original
database.
Or, you may decide to setup a "test" Alias to test the import on a copy of your database before you import
it live. (This procedure serves another purpose as well as it checks the integrity of the latest backup.) Here
are steps to accomplish this:
1. Go to Start|Programs|Trams Back Office|Alias Utility.
2 Create an alias named Test and type: C:\Program Files\Trams\Database\test.ib (or use the same path
as your current Trams database). Do not click Test as this database does not exist until you restore your
backup to it.
3. Restore the last backup to the Test Alias (it creates the new test.ib [older versions.gdb] when it does this).
IMPORTANT: If you get any error message and cannot complete restore, call or e-mail support for help.
4. Log into Trams Back Office or ClientBase as this Alias, Test, and make sure all was restored correctly.
5. If you can look at the details of one profile, the copy of your database is viable and you are ready to do a
test import into this database copy.
Step 2: Connect to Your Database
The first screen in the Trams Profile import wizard requires the following information:
Alias: From the drop-down menu, choose the Alias used when logging into Trams Back Office or
ClientBase.
Path: The Alias selected above sets the path to the Trams database.
Login Name/Password: Indicate the Login In Name and Password.
Click Next to continue.
109
4/7/15
Importing Profiles From Other Sources
Step 3: Select Import File
Click here to
select the
location of the
file to import
into TBO or
ClientBase.
The delimiter
by default is set
to Tab.
Change this to
Comma from
drop-down.
From this screen, select the file that has the profile information to import.
Profile: Click the three dots to select the location on your computer or network of the .txt file to import.
Delimiter: The default is set to Tab. From the drop-down menu, indicate whether the file to import is
comma delimited.
First Line is Header: If the first line is a table header, check in this box to read the headers for the file.
One File for All Tables: If this box is checked, all of the data you are importing is in one file. The file
updates not only the profile table, but also the communication, address, marketing and traveler tables as
well. If this box is not checked, it opens up the ability to import multiple files, each a unique .txt file for each
table - profile, communication, address, marketing, and traveler. This setup would be used when the source
files are generated from a relational database which has separate tables in a program such as Access,
dBase, or Paradox. Notice that as the checkmark is removed, the communication, address, marketing and
traveler areas become active. For each selected .txt file for any table, specify a Delimiter from the
drop-down menu (either tab or comma); check the box First Line is Header to create a header for the file;
and select a File Structure.
File Structure: From the drop-down menu, designate if the .txt file that is being imported contains:
Multiple lines per Profile - This would be when the profile is listed in several rows with different information
attached on each row. For example:
1030 John
1030 Smith
1030 123 Main St.
1030 Los Angeles
1030 CA
4/7/15
110
Importing Profiles From Other Sources
1030 90045
Where 1030 is the profile number or identifier.
All records in one line - This would be a file where for each profile, the specifics are in columns, or separated
by comma which span a single line. For example: 1030,John,Smith,123 Main St.,Los Angeles,CA,90045.
Step 4: Importing Data for Miscellaneous Profile Fields
Once the file(s) you want to import is selected, click Next to get to the third screen in the import wizard,
Profile Fields. By clicking View, preview the file to import. Review the profile data to import for accuracy.
This is a very powerful part of the file import wizard. This area has the capability of stamping all records in
the file with an indicated value so that they all appear with that value in Trams Back Office/ClientBase. Map
a desired value using fields from the imported text file, assign a constant, or create rules to assign the
desired value. The only required field in this area, is the Profile Type.
Load Map: Click Load Map to retrieve a previously saved mapping session so as not to setup everything
all over again. What a time saver!
Primary Key Field: For those users who are bringing in multi-data import files, indicate the primary key
field. This is the field that is common to both files that creates a link and tells our utility how to match the
data for one profile.
Update Rules: This determines whether the information you are importing is appended to the database or
updating existing data. Select Insert All Profiles to bring new profiles. Select Update If InterfaceID Matches
to update existing profiles in Trams Back Office/ClientBase when data being imported has an Interface ID
that matches an existing profile in Trams database. Be sure to map all fields that you want updated and a
field must be mapped to the Interface ID.
111
4/7/15
Importing Profiles From Other Sources
Select Update If ProfileNO Matches to update existing profiles when data being imported has an Profile
Number that matches an existing Profile Number in Trams database. The only time to select the Update if
ProfileNO Matches option is if you are importing back into Trams database a .txt file that previously had
been exported from Trams database.
Interface ID Filter: From the drop-down menu, select Import as is (DO NOT FILTER) which brings over all
special characters such as dashes, parentheses, etc.; or Only Grab Alpha-Numeric Characters which strips
all special characters from Interface ID. by dropping dashes, brackets, etc.
Important Note: As you are mapping the fields from the import file to the fields, it is important to remember
that any fields that are being mapped to in Trams Back Office/ClientBase will be replaced by the value of
the field in the import file, even if it is empty.
Map: By clicking Map, link a selected Trams Back Office/ClientBase field with a Source Column from the
text file you are importing. Field name represents the name of the field in Trams database. Source Column
is the name of the data (or header) of the data being imported.
Fields which can be mapped include: Profile No, Profile Type, Name, Interface ID, AltInterface ID, Title,
Business Type, First Name, Last Name, MI, Courtesy Title, Modified By, Modified Date, Creation Date,
Preferred, Notes, Add’l Notes, Other, Statement Remarks, Active, Travel Pref, Salutation, Primary
Agent, Vendor ID, Referred By, Branch, Create By, Web ID, Web Password, and More Fields. (Please
note: Bolded field names are available only in Trams Back Office, not ClientBase.)
Constant: By clicking Constant after choosing a field from Trams Back Office/ClientBase, pick a value from
a drop-down menu (if available); or type in a value to use for the selected field. For Profile Type below, the
default Trams Back Office/ClientBase values are shown.
Reminder: If you have selected the Update If InterfaceID Matches above, be sure to map all fields that you
want updated. If using a phone number as the profile Interface ID, map it at this time.
Rule: By clicking Rule, setup a conditional “if...then” statement/s for the file being imported.
Example: You have included in your import file a header called, Profile Type. For each profile type marked
with an “A” in your import file, you want it to come into Trams database as an Agent profile. For each profile
type marked with a “C”, you want it to come into Trams database as a Corporate profile, and so on. By
setting up a Rule for each of these conditions, each record in the import file comes in correctly as the
appropriate Profile Type.
Field Name: This field is hard-coded and is displaying the selected Trams Back Office/ClientBase field on
which the rule is being written.
Default Value: Choose a value from a drop-down menu if this option is available. Otherwise, type in a value
4/7/15
112
Importing Profiles From Other Sources
to use by choosing Constant, or Map a value from the import file for the selected field. This value is used if
the data does not meet the condition you set up in the rule.
Add/Modify/Delete: To add a rule, click Add; to modify a rule, click Modify; to delete a rule, click Delete.
To add a rule:
If Source Field: The drop-down menu lists each column in the import file for selection. Choose the Source
Field. Using our example, select Profile Type.
Source Operation: Choose the Source Operation, =, “equals,” or <>, “not equal” from the drop-down
menu. Using our example, use =.
Source Test Value: Type a value from the file you are importing. In our example, we would insert an “A”
(for Agent) and add a new rule for “C” (for Corporate), etc.
Then set Database Field to: From the drop-down menu, choose what value to use in this field if the source
test value is met. If no drop-down menu is available, type out the value precisely as you want it in
ClientBase.
Reset: To clear all settings, click Reset.
Automap: If the column header labels are exactly the same as the fields in Trams Back Office/ClientBase
(this would happen if you previously exported out of Trams and now are importing), click Automap to have
113
4/7/15
Importing Profiles From Other Sources
the import utility map all the fields for you.
Step 5: Importing Data to Communication Fields
Click Next to get to the next screen in the import wizard, Communication Fields. Like the previous screen,
this area has the capability of stamping all records in the file with an indicated value so that they all appear
with that value in Trams Back Office/ClientBase. By clicking View, preview the file to import. Review the
communication data to import for accuracy.
The only required fields in this area, are the Default Country Code and Default Area Code. For the United
States and Canada, the country code is 1.
Map: By clicking Map, link a selected Trams Back Office/ClientBase field with a Source Column from the
text file being imported.
Field name represents the name of the field in Trams database. Source Column is the name of the data (or
header) of the data being imported. Fields to map include: Phone Number 1, Phone Description 1, Fax
Number 1, Fax Description 1, E-mail Address 1, E-mail Description 1, E-mail Permit Marketing 1, Web site
1, Web site Description 1, Phone Number 2, Phone Description 2, Fax Number 2, Fax Description 2, E-mail
Address 2, E-mail Description 2, E-mail Permit Marketing 2, Web site 2, Web site Description 2, Phone
Number 3, Phone Description 3, Fax Number 3, Fax Description 3, E-mail Address 3, E-mail Description 3,
E-mail Permit Marketing 3, Web site 3, Web site Description 3.
Constant: By clicking Constant after choosing a field from Trams Back Office/ClientBase, pick a value from
a drop-down menu (if available); or type in a value to use for the selected field.
Rule: By clicking Rule, setup a conditional “if...then” statement/s for the file being imported.
Field Name: This field is hard-coded and is displaying the selected Trams Back Office/ClientBase field on
which the rule is being written.
Default Value: Choose a value from a drop-down menu if this option is available. Otherwise, type in a value
to use by choosing Constant, or Map a value from the import file for the selected field. This value is used if
the data does not meet the condition set up in the rule.
Add/Modify/Delete: To add a rule, click Add; to modify a rule, click Modify; to delete a rule, click Delete.
If Source Field: The drop-down menu lists each column in the import file for selection. Choose the Source
Field.
Source Operation: Choose the Source Operation, = (equals), <>, (not equal), LEN= (Length equals), LEN<
(Length is less than), LEN> (Length is greater than), LEN<> (Length does not equal) from the drop-down
menu.
Source Test Value: Type a value from the file you are importing.
Then Set Database Field to: Type value you want to use if the source test value is met. If no drop-down
menu is available, type out the value precisely as you want it in Trams Back Office/ClientBase.
Reset: To clear all settings, click Reset.
Step 6: Importing Data to Address Fields
Click Next to get to the next screen in the import wizard, address fields. Like the previous screens, this
area has the capability of stamping all records in the file with an indicated value so that they all appear with
that value in Trams Back Office/ClientBase. By clicking View preview the file to import. Review the address
data for accuracy.
Map: By clicking Map, link a selected Trams Back Office/ClientBase field with a Source Column from the
text file being imported.
4/7/15
114
Importing Profiles From Other Sources
Field name represents the name of the field in Trams Back Office/ClientBase. Source Column is the name
of the data (or header) of the data being imported. Fields to map include: Primary Address Line 1, Primary
Address Line 2, Primary Apt/Suite, Primary City, Primary State, Primary Zip, Primary Country, Primary
Description, Secondary Address Line 1, Secondary Address Line 2, Secondary Apt/Suite, Secondary City,
Secondary State, Secondary Zip, Secondary Country, Secondary Description, Alternate Address Line 1,
Alternate Address Line 2, Alternate Apt/Suite, Alternate City, Alternate State, Alternate Zip, Alternate
Country, Alternate Description.
THESE FIELDS DO NOT PRESENTLY MAP: Bill To Address Line 1, Bill To Address Line 2, Bill To
Apt/Suite, Bill To City, Primary State, Bill To Zip, Bill To Country, Bill To Description, Ship To
Address Line 1, Ship To Address Line 2, Ship To Apt/Suite, Ship To City, Ship To State, Ship To Zip,
Ship To Country, Ship To Description.
Constant: By clicking Constant after choosing a field from Trams Back Office/ClientBase, pick a value from
a drop-down menu (if available); or type in a value to use for the selected field.
Rule: By clicking Rule, setup a conditional “if...then” statement/s for the file being imported.
Field Name: This field is hard-coded and is displaying the selected Trams Back Office or ClientBase field
on which the rule is being written.
Default Value: Choose a value from a drop-down menu if this option is available. Otherwise, type in a value
you want to use by choosing Constant, or Map a value from your import file for the selected field. This value
is used if the data does not meet the condition set up in the rule.
Add/Modify/Delete: To add a rule, click Add; to modify a rule, click Modify; to delete a rule, click Delete.
To add a rule:
If Source Field: The drop-down menu lists each column in the import file for selection. Choose the Source
Field.
Source Operation: Choose the Source Operation, = (equals), <>, (not equal), LEN= (Length equals), LEN<
(Length is less than), LEN> (Length is greater than), LEN<> (Length does not equal) from the drop-down
menu.
Source Test Value: Type a value from the file you are importing.
Then set Database Field to: Type value you want this field to be if the source test value is met. If no
drop-down menu is available, type out the value precisely as you want it in Trams Back Office or ClientBase.
Reset: To clear all settings, click Reset.
Step 7: Importing Data to Marketing Fields
Click Next to get to the next screen in the import wizard, Marketing Fields. Like the previous screens, this
area has the capability of stamping all records in the file with an indicated value so that they all appear with
that value in Trams database. By clicking View, preview the file to import. Review the marketing data for
accuracy.
Sub-delimiter: Insert a sub-delimiter separating the marketing codes. If no sub-delimiter has been used,
leave empty.
Add Map: By clicking Map, link a selected ClientBase field with a Source Column from the text file you are
importing. Field name represents the name of the field in ClientBase. Source Column is the name of the
data (or header) of the data being imported.
Add Constant: By clicking Constant after choosing a field from ClientBase, pick a value from a drop-down
115
4/7/15
Importing Profiles From Other Sources
menu (if available); or type in a value to use for the selected field.
Rule: By clicking Rule, setup a conditional “if...then” statement/s for the file being imported.
Field Name: This field is hard-coded and is displaying the selected ClientBase field on which the rule is
being written.
Default Value: Choose a value from a drop-down menu if this option is available. Otherwise, type in a value
to use by choosing Constant, or Map a value from the import file for the selected field. This value is used if
the data does not meet the condition you are set up in the rule.
Add/Modify/Delete: To add a rule, click Add; to modify a rule, click Modify; to delete a rule, click Delete. To
add a rule:
If Source Field: The drop-down menu lists each column in the import file for selection. Choose the Source
Field.
Source Operation: Choose the Source Operation, = (equals), <>, (not equal), LEN= (Length equals), LEN<
(Length is less than), LEN> (Length is greater than), LEN<> (Length does not equal) from the drop-down
menu.
Source Test Value: Type a value from the file you are importing.
Then set Database Field to: Type value you want this field to be if the source test value is met. If no
drop-down menu is available, type out the value precisely as you want it in ClientBase.
Reset: To clear all settings, click Reset.
Step 8: Importing Data to Traveler Fields
NOTE: The Profile Import now works with the new Traveler/Contact records. It does not yet
designate a Primary Traveler or Primary Communication entries, but it will do so in future release.
Click Next to get to the next screen in the import wizard, Traveler Fields. Like the previous screens, this
area has the capability of stamping all records in the file with an indicated value so that they all appear with
that value in Trams Back Office/ClientBase. By clicking View, preview the file to import and review the
traveler data.
Map: By clicking Map, link a selected Trams Back Office/ClientBase field with a Source Column from the
text file you are importing.
Field name represents the name of the field in Trams Back Office/ClientBase. Source Column is the name
of the data (or header) of the data being imported. Fields to map include: Primary Traveler Name, Primary
4/7/15
116
Importing Profiles From Other Sources
Traveler Dept, Primary Traveler Last Name, Primary Traveler First Name, Primary Traveler Middle Name,
Primary Traveler Relationship, Primary Traveler Gender, Primary Traveler Citizenship, Primary Traveler
Commun Type 1, Primary Traveler Commun Entry 1, Primary Traveler Commun Description 1, Primary
Traveler Commun Type 2, Primary Traveler Commun Entry 2, Primary Traveler Commun Description 2,
Primary Traveler Notes, Primary Traveler Passport No. 1, Primary Traveler Passport Expire Date 1, Primary
Traveler Passport Issue Date 1, Primary Traveler Passport Issuing City 1, Primary Traveler Passport
Issuing Country 1, Primary Traveler Passport No. 2, Primary Traveler Passport Expire Date 2, Primary
Traveler Passport Issue Date 2, Primary Traveler Passport Issuing City 2, Primary Traveler Passport
Issuing Country 2, Primary Traveler Courtesy Title, Spouse Traveler Name, Spouse Traveler Dept, Spouse
Traveler Last Name, Spouse Traveler First Name, Spouse Traveler Middle Name, Spouse Traveler
Relationship, Spouse Traveler Gender, Spouse Traveler Citizenship, Spouse Traveler Commun Type 1,
Spouse Traveler Commun Entry 1, Spouse Traveler Commun Description 1, Spouse Traveler Commun
Type 2, Spouse Traveler Commun Entry 2, Spouse Traveler Commun Description 2, Spouse Traveler
Notes, Spouse Traveler Passport No. 1, Spouse Traveler Passport Expire Date 1, Spouse Traveler
Passport Issue Date 1, Spouse Traveler Passport Issuing City 1, Spouse Traveler Passport Issuing Country
1, Spouse Traveler Passport No. 2, Spouse Traveler Passport Expire Date 2, Spouse Traveler Passport
Issue Date 2, Spouse Traveler Passport Issuing City 2, Spouse Traveler Passport Issuing Country 2,
Spouse Traveler Courtesy Title.
THESE FIELDS PRESENTLY DO NOT MAP: Primary Traveler Commun Description 1, Primary Traveler
Commun Type 2, Primary Traveler Commun Entry 2, Primary Traveler Commun Description 2, Spouse
Traveler Commun Type 1, Spouse Traveler Commun Entry 1, Spouse Traveler Commun Description 1,
Spouse Traveler Commun Type 2, Spouse Traveler Commun Entry 2, Spouse Traveler Commun
Description 2. Birthdays do not import at this time
Constant: By clicking Constant after choosing a field from Trams Back Office/ClientBase, choose a value
from a drop-down menu (if available); or type in a value to use for the selected field.
Rule: By clicking Rule, setup a conditional "if...then" statement/s for the file being imported.
Field Name: This field is hard-coded and is displaying the selected Trams Back Office/ClientBase field on
which the rule is being written.
Default Value: Choose a value from a drop-down menu if this option is available. Otherwise, type in a value
to use by choosing Constant, or Map a value from your import file for the selected field. This value is used
if the data does not meet the condition you set up in the rule.
Add/Modify/Delete: To add a rule, click Add; to modify a rule, click Modify; to delete a rule, click Delete. To
add a rule:
If Source Field: The drop-down menu lists each column in the import file for selection. Choose the Source
Field.
Source Operation: Choose the Source Operation, = (equals), <>, (not equal), LEN= (Length equals), LEN<
(Length is less than), LEN> (Length is greater than), LEN<> (Length does not equal) from the drop-down
menu.
Source Test Value: Type a value from the file you are importing.
Then set Database Field to: Type value to fill this field to be if the source test value is met. If no drop-down
menu is available, type out the value precisely as you want it in Trams Back Office/ClientBase.
Reset: To clear all settings, click Reset.
Step 9: Importing Data to TFW/CB Program Group Fields
Click Next to get to the next screen in the Import Wizard, TFW/CB Program Group Fields. Like the previous
screens, this area has the capability of stamping all records in the file with an indicated value so that they
all appear with that value in Trams Back Office/ClientBase. By clicking View, preview the file being
117
4/7/15
Importing Profiles From Other Sources
imported. Review the group data for accuracy.
Group delimiter: Insert a delimiter separating the groups. If delimiter has not been used, leave empty.
On Updates, Appends to Existing Groups: Check here to append to existing groups if you are updating.
Add Map: By clicking Map, link a selected Trams Back Office/ClientBase field with a Source Column from
the text file being imported.
Field name represents the name of the field in Trams Back Office/ClientBase. Source Column is the name
of the data (or header) of the data being imported.
Add Constant: By clicking Constant after choosing a field from Trams Back Office/ClientBase, pick a value
from a drop-down menu (if available); or type in a value to use for the selected field.
Rule: By clicking Rule, setup a conditional “if...then” statement/s for the file being imported.
Field Name: This field is hard-coded and is displaying the selected Trams Back Office/ClientBase field on
which the rule is being written.
Default Value: Choose a value from a drop-down menu if this option is available. Otherwise, type in a value
you want to use by choosing Constant, or Map a value from your import file for the selected field. This value
is used if the data does not meet the condition you are setting in your rule.
Add/Modify/Delete: To add a rule, click Add; to modify a rule, click Modify; to delete a rule, click Delete. To
add a rule:
If Source Field: The drop-down menu lists each column in the import file for selection. Choose the Source
Field.
Source Operation: Choose the Source Operation, = (equals), <>, (not equal), LEN= (Length equals), LEN<
(Length is less than), LEN> (Length is greater than), LEN<> (Length does not equal) from the drop-down
menu.
Source Test Value: Type a value from the file you are importing.
Then set Database Field to: Type value to land in this field if the source test value is met. If no drop-down
menu is available, type out the value precisely as you want it in Trams Back Office/ClientBase.
Reset: To clear all settings, click Reset.
Step 10: Importing Data to Special Dates Fields
Click Next to get to the next screen in the Import Wizard, Special Dates Fields. Like the previous screens,
this area has the capability of stamping all records in the file with an indicated value so that they all appear
with that value in ClientBase. By clicking View, preview the file being imported. Review the data for
4/7/15
118
Importing Profiles From Other Sources
accuracy.
Add Map: By clicking Map, link a selected ClientBase field:
Special Date Type: Select from the drop down list of Special Date Types created in your ClientBase
database (e.g. Wedding Anniversary). Please note if the desired Special Date Type is not included within
the drop down, you must first go to ClientBase, and from Global Defaults|General Setup|User Defined
Fields, select Special Date Types and add to the default drop-down list.
Source Column: Select the column within the file you are importing that represents the special date entries.
Source Date Separator: Select between /, -, or . to identify the format used within the date fields in your
source file.
Source Date Format: Select from the following to identify the format used within the date fields in your
source file.
mm/dd/yy
mm/dd/yyyy
dd/mm/yy
dd/mm/yyyy
yyyy/mm/dd
yy/mm/dd
yyyy/mm/dd
dd/mmm/yy
dd/mmm/yyyy
119
4/7/15
Importing Profiles From Other Sources
Based on these date settings the special date in your file is mapped to a separate Month, Day and Year field
within the ClientBase Special Dates record.
Add Constant: By clicking Constant after choosing a field from ClientBase, pick a value from a drop-down
menu (if available); or type in a value to use for the selected field.
Special Date Type: Select from the drop down list of Special Date Types created in your ClientBase
database (e.g. Wedding Anniversary). Please note if the desired Special Date Type is not included within
the drop down, you must first go to ClientBase, and from Global Defaults|General Setup|User Defined
Fields, select Special Date Types and add to the default drop-down list.
Field Value: Type the value you want used for this type.
Source Date Separator: Select between /, -, or . to identify the format used within the date fields in your
source file.
Source Date Format: Select from the following to identify the format used within the date fields in your
source file.
mm/dd/yy
mm/dd/yyyy
dd/mm/yy
dd/mm/yyyy
yyyy/mm/dd
yy/mm/dd
yyyy/mm/dd
dd/mmm/yy
dd/mmm/yyyy
Based on these date settings the special date in your file is mapped to a separate Month, Day and Year field
within the ClientBase Special Dates record.
Step 11: Importing Data to Profile Remarks
Click Next to get to the next screen in the import wizard, ClientBase Profile Remarks. Miscellaneous fields
in your text file can be stored in the remarks folder in ClientBase. By clicking View, preview the file to import
and review.
Add Map: By clicking Map, link a selected ClientBase field with a Source Column from the text file you are
importing. Field name represents the name of the field in ClientBase. Source Column is the name of the
data (or header) of the data being imported.
Add Constant: By clicking Constant after choosing a field from ClientBase, choose a value from a
drop-down menu (if available); or type in a value to use for the selected field.
Add Rule: By clicking Rule, setup a conditional "if...then" statement/s for the file being imported.
Field Name: This field is hard-coded and is displaying the selected ClientBase field on which the rule is
being written.
Default Value: Choose a value from a drop-down menu if this option is available. Otherwise, type in a value
to use by choosing Constant, or Map a value from the import file for the selected field. This value is used if
the data does not meet the condition you set up in the rule.
Add/Modify/Delete: To add a rule, click Add; to modify a rule, click Modify; to delete a rule, click Delete. To
add a rule:
4/7/15
120
Importing Profiles From Other Sources
If Source Field: The drop-down menu lists each column in the import file for selection. Choose the Source
Field.
Source Operation: Choose the Source Operation, = (equals), <>, (not equal), LEN= (Length equals), LEN<
(Length is less than), LEN> (Length is greater than), LEN<> (Length does not equal) from the drop-down
menu.
Source Test Value: Type a value from the file you are importing.
Then set Database Field to: Type value to fill this field if the source test value is met. If no drop-down menu
is available, type out the value precisely as you want it in ClientBase.
Reset: To clear all settings, click Reset.
Step 12: View Profile Import/Update Summary Screen
Once the remarks table value(s) have been selected, click Next to get to the last screen in the import wizard.
This screen provides a complete summary of all your import wizard selections.
Printer Setup: Click Printer Setup to select printer options for printing out the summary sheet.
Print: Click Print to print out the summary sheet.
Copy: Click here to copy the summary sheet to the Windows clipboard. Go to any other program to paste.
Save Map: Click Save Map to save the mappings. Browse to location to save the mapping. That way the
next time you import a similar file, load the saved map and save lots of time.
Cancel: Click Cancel to abort the import process.
Previous: Click Previous to go back one screen.
Finish: Click Finish to complete the import process.
Once the import is completed view a screen of statistics stating how many profiles were inserted, updated,
or skipped.
121
4/7/15
Importing Profiles From Other Sources
Check for Accuracy of Import
By using Level 2 Query in the Profile Manager, search for all profiles with a Create Date, From today and
To today, or stamp some other constant in records with which to Query. Review newly imported profile data
and verify that all information was imported properly.
4/7/15
122
Importing Profiles From Other Sources
123
4/7/15
5
Interface Overview
Download & Processing
This chapter contains:
Overview of Interface
Introduction to Interface Download & Processing
Directions for Download & Processing
Overview of Interface
The interface process between The Host Reservation System, or GDS, and Trams, is a means by which
invoice and ticketing data entered in the Passenger Name Record (PNR) is automatically transmitted to the
back office system. The interface commands used to control the interface between the GDS and Trams are
similar to the entries already used in the office to control the transmission of messages to various printers
(e.g., ticket, invoice/itinerary, boarding pass and hardcopy).
Once the interface option is enabled by the GDS, an interface record or image is created every time a sales
agent drives a ticket or an invoice. Specific accounting, client, vendor and booking information from the PNR
is downloaded to Trams Back Office and becomes available for accounting, tracking and reporting needs.
The interface record created by driving the invoice is stored by the Host GDS on an Interface Queue, much
like the ticketing queue. Instead of retrieving the data on queue back to the workstation to update, or to the
printer to print, the record is downloaded to Trams as a file for Trams to read.
Trams Back Office Interface Utilities Setup
Trams does not control what is included in the interface record. The data captured is directly related to how
it is entered in the PNR. What TBO does with the data can be controlled by default options established in
Utilities|Setup. These options determine how TBO handles the information received from the interface
record. Not all options in Utilities|Setup relate to interface. Please refer to the Utilities chapter in the manual
or the Helpfiles for directions on setting up the Trams Back Office program prior to commencing interface.
Introduction to Interface Download/Process
The accounting data being interfaced, the paper trail, the office work flow, and available personnel are all
important parts of successful interface. Interface is an interaction between the front and back office systems,
4/7/15
124
Interface Download and Process
including human resources. Follow the steps outlined until the staff is proficient with Interface. Develop a
daily routine, and teach at least one other person in the office how to handle Interface. Interface is an
interactive process that requires coordination between the Host Reservation System, the Windows Interface
program and Trams. Let's go over some terminology that we use at Trams for the different parts of the
Interface procedures.
Download involves Trams retrieving the interface records. In Trams Back Office this can be directly from
the interface cable or a file. As the records are downloaded, Trams reformats the records and places them
in a separate file for processing.
When records are retrieved from the source directory, the files are deleted and the directory is emptied. It's
important when reading across a network that full file permissions are enabled for the client workstation
downloading the records.
Process is a procedure that merges the Interface records into the Trams database. Each invoice is tracked
by Client, Vendor and Sales agent. Bookings within an invoice would all have the same client, but may have
different vendors or sales agents. The process procedure matches each invoice item to the proper client,
vendor and sales agent for reporting and accounting purposes. The procedure also generates any error
messages related to the new data being received, and allows operator intervention for undefined profiles.
You do not need to create Profiles prior to interface. Trams can create new profiles during the Interface
Process.
Capturing Interface Records involves the images to file option configured by the GDS Vendor. If interface
has been configured by the host in this manner, then be sure to ask them how to start, stop and review the
utility or print server software they use to capture the records. It's also important to know the EXACT path
and directory or file name for Trams to download the files.
Host Print Server, Pro Printer and Host Print Modules, are utility programs used by the GDS vendor to
enable the Host system to communicate with Host printers, including the interface device. If configured to
capture to file, there are formats for the file as well as a location or path and file name to the interface
records.
Network Access and File sharing is a feature of the local hardware network. This option must be enabled
in order for Trams to download records that are captured to a workstation on the network, versus Interface
Download and Process records captured to the local hard drive where the download is handled. For our
examples we'll assume the records are captured to the SAME workstation and hard drive where the Trams
download is handled.
Windows Interface Utility or Trams Interface Utility is the program that captures interface records via a
cable. The program is configured to match the serial port communication protocol configured at the GDS
controller. The program may launch at startup or can be controlled manually.
Set Up a Scheduled Task for Interface
Automated Task for Interface Download and Processing
Set up a user profile/login that will specifically be used for the automated download and processing routines.
For assistance with user profile set up see the help file section under Utilities|User Profile. The log in and
password will be used in subsequent steps.
1. From the Windows menu select Start|All Programs|Accessories|System Tools|Task Scheduler.
Note: You must be logged in as administrator to create a new task.
125
4/7/15
Interface Download & Process
2. Click the Action menu, and then Create Basic Task.
3. Type a name for the task and an optional description, and then click Next.
4. Do one of the following: To select a schedule based on the calendar, click Daily, Weekly, Monthly, or
One time, click Next; specify the schedule you want to use, and then click Next.
Select a Start date and enter a time that you want the download to start each day. Then click Next.
4/7/15
126
Interface Download and Process
5.Click Start a program, then Next.
6. For the program/script, Click Browse to find the program you want to start, enter the path for the
download.exe, example "C:\Program Files (x86)\Trams\Tramswin\download.exe" and then click Next.
127
4/7/15
Interface Download & Process
In the Argument field enter the TBO login, password, Options, GDS number and path. Example format:
-username interface -password download -alias Trams -CRS 2 -NE -c:\spool -auto
Leave the Start In field blank. Click OK, and on the Summary Page, click Finish.
Create a Separate Download Schedule for each CRS and Database
Note: To further clarify, using this method does not utilize a user license for processing. If using
4/7/15
128
Interface Download and Process
Interface|Download|Wait for New Records and Interface|Process|Automatic Process options within
TBO, then a user license is utilized which may become more of an issue if interfacing with all 4 GDS's
concurrently.
Important: All Program/Script parameters must have the quotes around it. "C:\Program Files
(x86)\Trams\Tramswin\download.exe" The Arguments must have a space followed by a - (dash) before the
option. -username Interface -password download -alias Trams -CRS 2 -NE -path c:\spool -auto
Explanation of Program/Script and Add Arguments parameters for example below:
Program/Script - "C:\Program Files (x86)\Trams\Tramswin\download.exe"
Add Arguments -username Interface -password download -alias Trams -CRS 2 -NE -path c:\spool -auto
"C:\Program Files\Trams\Tramswin\download.exe" - Path to where the download.exe resides
-username Interface - User log in name
-password ******** - User password
-alias Trams - Database Alias Name
-CRS 2 - GDS System
-crs <crs no>
0=Amadeus
1=Apollo/Galileo
2=Sabre
5=Worldspan
-path c:\spool - Path to where the interface records reside
-auto - Auto download
Download options available to use in the Add Arguments field.
Example -NU (Ignore Remarks UDIDs - all GDS)
-NG (Ignore CC guarantee - All GDS)
-NE (Ignore e-mail updates - Apollo Only)
-NC (No default comm. Track FOP - All GDS)
-RC (Ignore hotel rate code - All GDS)
-D (Dash optional on MS code entries - Worldspan related)
129
4/7/15
Interface Download & Process
-NM (Worldspan specific - ignores the NM- name entry in the WS H record and reads the name from the
A/1.1 level instead)
-J (Read Apollo Itin)
Steps for Setting Up Automated Interface Processing in Windows Scheduler
Follow the steps above for setting up a Scheduled Task.
Program/Script (an example):
"C:\Program Files (x86)\Trams\Tramswin\Tramswin.exe"
Add Arguments - (example)
-username interface -password download -alias Trams -autointerface
If there are no records to process, the task will open and then close. If there are records to process the task
will auto process and close, leaving the errors to be handled manually.
4/7/15
130
Interface Download and Process
Capturing Interface Records
There are two ways to capture Interface records - Images to File and Interface via Cable.
Images to File
If the GDS Vendor has configured interface to file, then capturing records to a file has already been set up.
It's still important to know the EXACT path and directory or file name for Trams to download the files. Please
check directly with the GDS Vendor for the location of the file, as well as the procedures for troubleshooting.
Standard settings are explained in the specific GDS section of the Trams Interface Guides. Check the
interface queue to verify that records are leaving the Host and available in the local interface file. Go to a
GDS workstation and start the transmission of records.
Download Interface Records into TBO
The download utility can be configured for multiple GDS systems and run outside of Trams Back Office from
Start|Programs|Trams Back Office|Download. High volume agencies can create shortcuts for each
download configuration and run them simultaneously, or as 'real-time' interface to the same or different
131
4/7/15
Interface Download & Process
workstations. Since all records are routed to a single log for processing, simultaneous downloads should
be tested and used only after processing procedures are well established in the agency.
Step 1: From Windows go to Start|Programs|Trams Back Office|Download.
Step 2: Select the correct database Alias - the default is Trams. The database Alias should NEVER be
blank. Refer to the specific GDS section of the Interface Guide for specifics about the screen options listed
here. Select the appropriate GDS. Scroll through a list of reservation systems with the down arrow.
Note: Sabre and Worldspan have 2 options for GDS field. Check the folder for the file structure captured
by the GDS. If multiple records exist, one per transaction, use Sabre or Worldspan as appropriate. If a single
logair.dat or pnrdata.txt file exist, use Sabre Net or Worldspan Images to Disk as appropriate.
Note: Any agency having a conflict with the Client Remarks field of a booking being interfaced to a UDID
field, can ignore UDID formats in the Client Remarks field of a booking by entering -NU in the Option field
on the Download Screen.
Note for Worldspan Agencies: There is a -D option to the Interface Download screen to make the dash
following the 5SA, 5OA, 5FJ, 5LF, and 5FF entries in Worldspan optional. If not wanting to specifically
identify an SA or OA entry as agent-related, then enter -D in the Options Field on the screen and the dash
(-) after the SA and OA entry will not be required. There is a chance, based on the entry made if no dash
(-) is present, that the name SANDY could be read as "SA", an override of the Original Sales Agent.
Note to Apollo Agencies: To ignore e-mail updates in Apollo interface, enter -NE (No E-mail).
Step 3: Click the PNR File Path button to locate the directory where the interface files reside. If using the
default settings when installing Trams, the path should read:
C:\Spool
If records are captured by the GDS vendor, or to a different workstation, then the PNR File Path may look
considerably different. (Refer to the GDS section of this interface guide for more information about settings
specific to the GDS platform.)
Note: Changes to the PNR File Path on the Interface/Download screen are now only saved if the user logs
4/7/15
132
Interface Download and Process
in as SYSDBA. A non-SYSDBA user can change the path when logged in, but when closing the
Interface/Download screen or logging out of TBO, those changes are not saved. All changes to the GDS
PNR File Path can only be done by the systems SYSDBA User.
Note: Do not check Process Res.txt or Lanyon Format. Wait for New Records is used by high volume
agencies to enable a 'real-time' interface. The download screen can be left open to read new messages
from the file path as soon as they are created.
If receiving the warning "Unprocessed Interface Records Exist," there are interface records from a previous
download session that have not been processed into TBO. If this is the first Interface Download and Process
time interfacing, these may have been test records generated by the GDS host or support desk.
Cancel = Escape and exit the interface program.
Append = Add the new records to the existing unprocessed records.
Overwrite = Overwrite the old records with the new.
If not sure about the unprocessed records, select cancel and return to the Interface processing screen to
view the unprocessed records. Once processing has been ended, (the remaining records may be duplicates
that need to be deleted), choose Overwrite to delete the records and continue with the new download. Once
selection has been made, Trams responds with the Interface Download Screen. See the invoice numbers
flash on the download screen.
Trams receives all records from the Destination directory and responds with a Record count of Received
133
4/7/15
Interface Download & Process
and Verified. There may be a difference between the number of records received and verified. Usually this
is attributed to invalid invoices or invoices that do not contain accountable segments.
Interface Reports
Step 4: Run Interface reports to use when reconciling invoices or investigating the download session. We
would advise this on every session until user is comfortable with the TBO interface and front office formats.
The reports are an excellent training tool for both front and back office staff.
First run the Invoice List. From the TBO main menu, select Reports|Interface|Invoice List. (A Print
Invoice List button is also located to the Interface Processing Screen so that the Invoice List can be printed
prior to processing.) The Invoice List shows the valid invoice data received by TBO during the download
process. The report shows how TBO interpreted the data entered in the PNR. Remember, how data is
entered and invoices are driven, is directly related to how TBO interprets the PNR. The invoices are not yet
available in the TBO database. This is a report of the invoices downloaded in to Trams during this session.
Select Print Log from the report menu bar to print this report.
Note: TBO shows the foreign currency value and currency code for comm track transactions on the
Interface Invoice List report.
Download Error Log
Step 5: Next run the Download Error Log. Go to Reports|Interface|Download Error Log. Enter the
date/s for the report. This report shows which interface records were received and rejected by TBO during
the download session. If a record was rejected, the booking agent should research the PNR formats to
correct and re-run the invoice. Agencies unable or who have a diverse sales staff may purchase or create
scripts to make interface more seamless to their sales agents. It's also possible that the rejected records
were boarding passes, or itineraries or PNRs that did not contain accounting information, and can be
ignored. High volume agencies may want to research quality control procedures to ensure 100% accuracy
prior to downloading or processing records into TBO. Select Print from the report menu bar to print this
report. Process the data received. From the TBO main menu go to Interface|Process.
Process Interface Records
During the processing, Trams Back Office tries to match up information received from the interface record
4/7/15
134
Interface Download and Process
with information stored in TBO. There are three types of profiles - client, vendor and agent - that must match
before the invoice is processed by TBO. Clients, vendors, and sales agent profile identification is critical to
the accurate accounting of a transaction.
Automatic or Ignore All When Processing Creates a
Processing Error Log
When there is a mature database, selecting Automatic for processing or Ignore All from the first error dialog
box, creates a Processing Error Log that can be printed and processed later. (The processing of E-Ticket
refunds is ignored during Automatic Interface Processing.) During the process procedure, TBO reads and
logs the records to the correct client, agent and vendor, as it creates a TBO invoice for accounting and
reporting.
- Delete Record deletes a selected interface record.
- Print Pending prints the unprocessed record list as shown in the display.
- Print Invoice List prints out the invoice list prior to processing without going to Reports|Interface|Invoice
List. (When there is a new or empty database, it's easier to work through each interfaced record with access
to invoice and ticket hard copies.)
- View Source views the native Interface record sent by the GDS. Be better able to make decisions on what
to do with a specific record that is generating the error prompt.
- Import from File option is used for importing data from other back office systems, website captured data,
when converting to Trams Back Office, or can be used to import records for a Host/IC setup.
- Print Log prints the Processing Error Log
- Automatic allows TBO to process all records without stopping for errors. Records with errors remain
unprocessed and errors are reported on the Processing Error Log.
- Print Invoice prints a TBO invoice of each processed record.
135
4/7/15
Interface Download & Process
Note: Trams recommends that the back office operator have access to the invoice, tickets and cash
receipts for proper accountability, and to maintain the integrity of the TBO. Go to
Reports|Interface|Processing Error Log to review reported processing errors.
Client Profiles
The reservation system has a client account number format that TBO reads as interface ID. The same client
number that printed on the invoice or ticket can interface to TBO as the account number. (See the GDS
specific guide for more information.) Each Interface ID must be unique to a single billing entity. A House
Account may be created to track "walk-in" clients, but this method cannot capture valuable marketing
information. TBO recommends a separate profile for every billing entity. While profiles serve as client ledger
cards, they also serve as reporting units and client mailing lists. Profiles don't need to be created in TBO
prior to the first interface, but spend some extra processing time as the database is being built. If the
message No Match on Client Interface ID during processing of new clients is received, TBO builds the
profile for each new client through processing the invoice.
If there is converted data from another back office system, then it's important to know the procedures
required to restore the converted data to TBO. Put off the first interface session until after the Interface
Download & Process converted data has been restored to create the TBO database.
No Match On Client ID
The message, No Match On Client ID prompts when TBO does not find an identical Client Interface ID to
the alphanumeric code that appears between the brackets [xxxxxxxxxx]. This occurs for various reasons.
If there is no code within the brackets, [] Trams did not detect a customer number in the Interface record.
For inactive Profiles a Warning Message appears: Matching xxxxx Profile is Marked Inactive - Continue?
Select OK to process the invoice to the inactive profile, and later, update the profile to active status. If
Cancel is selected, a prompt allows the operator to Modify by selecting a different Profile or create a new
Profile.
This screen shows an ID [1234567890] in brackets next to the name. This is the Customer ID the agent
entered in the PNR. TBO did not find an exact match. Select Modify to search for the client by Name.
Select Modify
By selecting Modify, Trams continues processing the Interface record, for input at each step of the
procedure. The client type and name are the only fields available to modify. TBO defaults to Leisure. To
modify the Client Type, click the drop-down key to see the choices. Click Corporate in the Client Type field.
By selecting Corporate without modifying the Client Name, TBO interprets the Client Name differently. This
is not an optional default. If the client's name or spelling is in question, enter a few letters of the client's last
name for a broader search. Next click the Client Name and move to the Profile query screen. From there,
4/7/15
136
Interface Download and Process
search for the correct profile.
No Matching Profiles Found During the Client Name Search
Create a New Client Profile
Click Yes and TBO to go to a new Client Profile screen. The information for the new client moves to the
profile screen in TBO. The No option returns to the previous screen. The information from the Interface
record moves to the New Client Profile screen. TBO does a good job at translating ALL CAPS GDS entries
into upper and lower case, but occasionally edit the information captured from the front office. Notice the
Interface ID and address information is entered automatically. This came directly from the address and
phone entries in the PNR. Click OK to save the profile to return to the Interface processing screen to
continue processing the rest of the record (s).
Query Client Profiles
Click Query to start the search for the correct client profile. Click the down arrow in the 'argument' field prior
to the name to select the name search criteria. If TBO does not find a match by Client type and name there
is a prompt, Create a New Profile? If TBO finds a probable match, there is a selection box. Highlight the
137
4/7/15
Interface Download & Process
customer name and click Select to move back to the processing screen.
Click Select to choose a name from the list and save to return to the Interface processing screen to continue
processing the rest of the record (s). If the correct name is not on the list, click Reset. Try the search with
just a few letters of the name. Perhaps there is a misspelling?
Note: Run a list of clients and vendors often as the mailing list grows. It is easy to create a duplicate profile
as the staff adjusts to the disciplines of interface. Go to Reports|Client|Lists and Labels. Also use the
Processing Error Log to update any existing Profiles with incorrect or missing Interface ID's.
Invoice Notes
-- During interface processing for a void record, we added the ability for an invoice to automatically show
as a voided invoice without user intervention if all other bookings in the invoice are already voided. There
is a prompt, Confirm Void Invoice prompt screen. For a single booking invoice containing an air ticket,
nothing more need be done and the invoice is automatically voided. For an invoice containing multiple
bookings, those booking would have had to been manually voided prior to the start of interface processing,
for the invoice to be automatically voided.
Processing of the void record must be the last non-voided booking in the invoice, for the invoice to void
automatically without having to re-query the invoice after processing and manually voiding. To implement
this feature, check that Utilities|Setup|Global Defaults/ Interface/Mailmerge Prompt Tab has Allow
Voids set to Prompt. Allow Voids = PROMPT.
-- During interface processing, single payments are now created for each booking in the PNR invoice being
processed even if the CC No. is the same. This allows for easier voiding of tickets during processing when
each ticket has its own payment attached. Also multiple tickets contained in a single invoice are listed
separately on a customer's credit card statement. So an invoice with two $500 tickets in it, $1000 total
invoice amount, is shown on the credit card statement as one item with ticket number for the first $500
ticket, and as a second item with ticket number for the second $500 ticket.
Vendor Profiles
ARC/BSP vendors, plus car and hotel vendors, are booked directly through the reservation system have an
industry standard ID assigned through the reservation system. As these transactions are processed in TBO,
4/7/15
138
Interface Download and Process
allow Trams to create the vendor profile. Group several vendors together through the Vendor profile, or the
invoice group field. (See the Profile section in the manual for a full description of field options.) TBO
recommends tracking these vendors by property. ARC/BSP vendor profiles build by TBO include the airline
code automatically. Include both the Interface ID and the airline code when building these vendors
manually.
Trams maintains a table of ARC/BSP vendors, complete with address information. This table is used to
create the ARC/BSP profile the first time the vendor is sold. Non-ARC/BSP vendors are also identified in
Trams by Interface ID, but there is no industry standard at this time. The GDS may have restrictions on how
these codes are entered within the booking or accounting line. (See the GDS section of this guide for more
information.) It is important to coordinate with the front office staff before deciding on how these vendors
should be identified.
Unlike Client Profiles, TBO searches for the Interface ID first and then the Vendor phone number and thirdly,
the Vendor name for an exact match. Due to the flexibility allowed in the building of PNRs, it is important to
establish standards used for the agency.
Note: TBO matches Vendor Profiles by phone number when the Vendor name and/or Interface ID do not
match during interface processing, because the Vendor name and/or Interface ID has changed but the
phone number hasn't. A message is added to the Error Processing Log during interface processing when
a Vendor Profile has been matched by phone number.
When the name and the Interface ID changes, it's usually because a hotel property changes chains, and
the name and ID would be changed but not the phone or address. Users need to be aware of the change
so they can decide if they want to change the name and ID of the existing profile or create a new profile for
the property.
Note: -- Trams matches Non-ARC/BSP airline bookings to any vendor profile with a matching interface ID.
So a ticket sold on United Airlines, but not processed through ARC/BSP can be added to a single United
Airlines vendor Profile if the Interface ID matches.
No Match On Vendor Name or ID
There is a No Match on Vendor Name or ID prompt when TBO cannot find a profile for this vendor by
Interface ID, phone number or name.
This screen shows an automated Vendor code received by the GDS at confirmation. If nothing is entered
between the [brackets], the booking may have been entered as a passive segment without a vendor code.
If there is an id between the brackets, but no name, the agent may not have entered a vendor name, just
the code. Select Modify and continue.
139
4/7/15
Interface Download & Process
Select Modify
The system now, by default, only shows matching vendors based on Name, State and Zip. Manually
uncheck either or both to see matches just on name. The check boxes are enabled if the corresponding
address field is populated in the Vendor Profile that is being processed from the GDS PNR. If there is no
State or Zip Code in the record being processed then those options are dimmed and the match is on Name
only.
When the database has multiple vendors with the same name such as "Southwest" and no location
identification in the name, the match can be based on the Name and a part of the address. This should
alleviate the problem of common vendor names being picked by name only and putting the booking under
the incorrect vendor profile. TBO searches for the exact spelling of the Vendor Name. If the spelling is
questionable, use only the first few letters of the name to broaden the search. Click OK to begin the search.
TBO may want to attach to an existing profile with a similar name when clicking OK. To prevent that, click
the New button to go straight to a new Vendor Profile screen.
No matching Profiles Found during the Vendor Name Search
Create New Vendor Profile
Clicking Yes navigates to a new Client Profile Screen. The information for the new vendor moves to the
profile screen in TBO. When selecting No, return to the previous screen. If there is not a vendor profile in
TBO, create a new one now by clicking OK.
The information from the Interface record moves to the new Vendor Profile screen. TBO does a good job
at capturing address and phone details from automated Car and Hotel Vendors. Passive segments may
require editing. The TBO operator would want to modify this record and assign an interface ID unique to
this hotel. Any future passive hotels with using this same Interface ID will also interface to that profile
automatically. (Refer to the Front Office formats used to account for the vendor transaction, to
ensure proper translation by TBO.) Notice the Interface ID is entered automatically. The next time this
property is booked using the same Interface ID, TBO will not require intervention. Using the mouse, click
4/7/15
140
Interface Download and Process
OK to save the profile.
Alternate Interface ID
Some agencies interface from multiple GDS systems. Add an alternate interface ID to a vendor profile by
selecting the Marketing Tab. By adding an alternate interface ID, TBO finds a match on either of the
Interface ID's attached to the profile.
Query Option
The Query option searches vendor profiles for a match. A query of Vendor profiles is also initiated by
changing the Vendor Name on this query screen or from the Modify screen. Click Query to begin. Because
of the spelling of the Vendor name, this sample shows [No Matching Profiles Found.] If the query is
successful, highlight the vendor and click with the mouse. If the query is too narrow or not successful, click
Reset to begin another search.
Sales Agent Profiles
Trams Back Office receives the original booking agent from the Interface Record and captures the agent as
the primary or inside agent on the invoice. The Agent ID as it is translated from the reservation system must
match the Agent Interface ID in TBO. This ID is often referred to as the "agent sine" and is defined in the
agencies GDS profile. To review these agent sines before beginning interface. TBO reads alphanumeric
sines. Non-booking agents that are tracked on an invoice can have an Interface ID unrelated to the
automatic agent id used to designate the booking agent. (See the GDS section of the addendum for
additional tracking options.) TBO allows up to 9 agents on a single booking. These are used to track inside
and outside agents, promotions and commission splits.
No Match On Agent ID
There is a No Match On Agent ID prompt when TBO has no record of this agent in a sales agent profile.
The Agent ID that Trams captured from the Interface record appears between the brackets. If there is not
an agent ID, Trams did not detect an agent in the record. This sometimes occurs when records are retrieved
from another agency or when bookings were created by the Airline Reservations Center and are taken over
by the agency. Click Modify to search by a different ID or to create a new Sales Agent profile.
Trams Back Office has no match on the Interface ID of the Agent displayed. This is probably a new agent
with GDS agent sine of TG. When selecting Modify, a prompt comes up to search for the agent by name.
Even though the Agent ID is displayed, enter the agent name to search for the agent.
If clicking the Agent ID button, query for agents. If the down arrow is clicked in the window, similar names
of agents appear. By default, TBO assumes the agent name and agent ID are the same. If profiles use first
names for agent names, or other criteria, add the first letter of the agent name and click the down arrow to
find an existing agent.
141
4/7/15
Interface Download & Process
Record Not Found by Agent ID Search
Enter a New Profile?
To create a new Sales Agent profile, click Yes. Edit the Sales Agent name at this time. All other profile
information can be modified later. Click OK to save the profile.
If the Agent profile exists in Trams but you are not sure what the correct Agent ID is, highlight the Agent ID
and press Delete. Click Agent ID and move to the Query screen. Click Query to see a list of Sales Agents.
Search for Existing Agent by Agent ID
To search for an existing agent profile by agent ID, right click in the Agent field. A drop down list displays.
Select search by ID and click OK.
Processing Errors
TBO accepts only valid invoices through the Interface Download (with a few exceptions). Invoices without
valid segment information, Itineraries, Voids and Full Invoice refunds are rejected during the download
procedure. Valid invoices with missing or duplicate information is available for modification in the Process
procedure.
Invalid ARC Number
This error means this ARC/BSP number is not setup in the Branch Utilities. From the main menu, go to
Utilities|Setup|Branches. Click the Add/Modify ARC/BSP button, and add the missing ARC/BSP number.
4/7/15
142
Interface Download and Process
Duplicate or Invalid Invoice Number
Trams Back Office does not allow duplicate invoice numbers within the same branch. A Duplicate Invoice
Number prompt may appear for various reasons. Trams does not allow duplicate invoice numbers.
1. The invoice may have been manually entered.
2. The invoice number was previously used in error.
3. The invoice was previously downloaded and resubmitted.
There are several options.
1. First, select View Source and note the details of the invoice such as passenger names and travel dates.
Then select Abort and go to the Invoice|Query tab and search for the invoice number. If the record to be
processed is a true duplicate invoice, and the user does not want to process the record, it can be deleted
during the next download.
2) Select Ignore to move to the next record. The Ignore and Ignore All option does not remove the record(s)
from the process log. The record remains and is reported on the Processing Log.
3) Modify proceeds with the processing of this record and permits the entry of a new Invoice number.
A Select Invoice Number prompt appears.
4) Enter the Invoice Number. By deleting the number in the Invoice No field, and clicking OK, TBO
automatically assigns the next invoice number in the system. Or keep the same invoice number and capture
the record to a different branch.
Duplicate Ticket Number
A Duplicate Ticket Number prompt appears for various reasons.
1. The ticket may have been manually entered.
2. The ticket was previously downloaded.
Click OK to accept the duplicate ticket number and continue processing records.
143
4/7/15
Interface Download & Process
Invalid Ticket Numbers
TBO displays a slightly different message if an invalid ticket numbers exist. Verify the correct ticket number
and select modify to input the appropriate number.
Processing Void Ticket
If Global Defaults is set to Prompt for void tickets, the ticket is voided without intervention if it's the only
booking on the invoice. If there are multiple bookings, then the user will be given the option to void manually.
Unable to Void Ticket when the form of payment isn't a CC is another void type that needs intervention when
the Global defaults is set to Prompt.
Select Modify to edit the Sale Invoice that contains the tickets to be voided.
Unprocessed Interface Records
If a download is attempted again, without processing all of the previous records, TBO responds with
Unprocessed Interface Records Exist.
If records were ignored during processing, they have not been removed from the Processing Log. They
remain available until the next time the download is started. They can be kept or deleted from this screen.
If choosing Append, add new records to the existing records in the processing log. If choosing Overwrite,
replace (delete) existing records in the processing log with new records. Choose Cancel to check the
Interface|Process Log to check before continuing with the new download.
Interface Troubleshooting of Errors in
Downloading
Clicking on download may result in an error message. Following each example are some common reasons
4/7/15
144
Interface Download and Process
and solutions to investigate:
Error: 32 (0)
This error often means that the spool file is empty; or rather there are no records to download. Be sure
records have left the GDS queue and reside in the appropriate folder.
Error: Path Not Found 3(0) FileName: C:\spool\;Proc: FOpen() C:\spool\
This error also often means that the spool file is empty; or rather there are no records to download. Be sure
records have left the GDS queue and reside in the appropriate folder. It does not mean that the spool folder
can't be found, but the file within the spool folder isn't available. If reading from a network folder, there may
not be a connection or permission to read, write and delete the records.
Automatic Interface Download & Processing
Setup with Windows Task Scheduler
Set up automatic interface download and processing procedures using Windows Task Scheduler:
Steps for Setting Up Automatic Interface Download
1. Set up a user profile/login that will specifically be used for the automated download and processing
routines. For assistance with user profile set see the help file section under Utilities|User Profile. The log
in and password will be used in subsequent steps.
2. Go to Start|Programs|Accessories|System Tools|Schedule Task. Click Add Scheduled Task.
3. Follow the Wizard by clicking Next, and then Browse to Program Files|Trams|Tramswin|download.exe
(or where the download.exe is located).
4. Next select how often the download is to run by selecting the following: Start Time, When task is
performed and Start Day.
145
4/7/15
Interface Download & Process
5. Enter the login for the computer (use the password entered when logging into the PC or to the network
in the office, and make sure the password is correct and leave blank if there is no password). Be sure to
check in the box next to Open Advanced Properties for this task when clicking Finish. A Task Tab window
opens for TBO.
6. Ensure the correct information is entered (see below) in both the RUN: and START IN: fields.
Run: Enter the Trams Interface Download command-line (here's an example):
"C:\Program Files\Trams\Tramswin\download.exe" -username Interface -password ********* -alias
Trams -CRS 2 -path c:\spool -auto
Command-line parameters for example above:
"C:\Program Files\Trams\Tramswin\download.exe" - Path to where the download.exe resides
-username Interface - User log in name
-password ******** - User password
-alias Trams - Database Alias Name
-CRS 2 - GDS System
-crs <crs no>
0=Amadeus
4/7/15
146
Interface Download and Process
1=Apollo/Galileo
2=Sabre
5=Worldspan
-path c:\spool - Path to where the interface records reside
-auto - Auto download 2 12/5/2005
Download options available to use in the command-line parameter
-J (Read Apollo Itin)
-NU (Ignore Remarks UDIDs - all GDS)
-D (Dash optional on MS code entries - Worldspan related)
-NG (Ignore CC guarantee - All GDS)
-NE (Ignore e-mail updates - All GDS)
-NC (No default comm. Track FOP - All GDS)
-RC (Ignore hotel rate code - All GDS)
-NM (Worldspan specific - ignores the NM- name entry in the WS H record and reads the name from the
A/1.1 level instead)
"C:\Program Files\Trams\Tramswin\download.exe -username JUDITH -password authorized -alias Trams
-CRS 1 -J -NG -path c:\MIR -auto"
Important: All command line parameters after C:\Program Files\Trams\Tramswin\download.exe must have
a space- (dash) before the option and "C:\Program Files\Trams\Tramswin\download.exe” must have the
quotes around it.
Additional Trams Interface Download command line EXAMPLES which can be entered in the
Scheduler Task screen:
"C:\Program Files\Trams\Tramswin\download.exe -username MIEKE -password mieke -alias Trams45
-CRS 2 -path c:\Sabre2\spool -auto"
"C:\Program Files\Trams\Tramswin\download.exe -username JUDITH -password authorized -alias Trams
-CRS 5 -path c:\wspan\tairs –auto
** auto download from file works only with folders containing individual records (multiple files)
Start In: This area is defaulted to the .exe file browsed to in Step 2. Make sure it is correct.
147
4/7/15
Interface Download & Process
7) Select the Schedule Tab|Advanced:
Create a separate Download Schedule for each CRS and database.
Note: To further clarify, using this method does not utilize a user license for processing. If using
Interface|Download|Wait for New Records and Interface|Process|Automatic Process options within
TBO, then a user license is utilized which may become more of an issue if interfacing with all 4 GDS's
concurrently.
Steps for Setting Up Automated Interface Processing in
Windows Scheduler
Follow the steps above for setting up a Scheduled Task. In the Run Line enter (an example):
"C:\Program Files\Trams\Tramswin\Tramswin.exe" -username SYSDBA -password ******* -alias
Trams -autointerface
If there are no records to process, the task will open and then close. If there are records to process the task
will auto process and close, leaving the errors to be handled manually.
Steps for Setting Up Automated Import from File in Windows
Scheduler
Follow the steps above for setting up a Scheduled Task. In the Run Line enter (an example):
Example: "C:\Program Files (x86)\Trams\Tramswin\tramswin.exe" -username SYSDBA -password
xxxxxxx -alias TRAMS -interfacefromfile C:\INTERFACE\IMPORT.TXT
4/7/15
148
Interface Download and Process
The parameter entry must specify the file path and file name. Example: -interfacefromfile
C:\INTERFACE\IMPORT.TXT and would be added to the standard, required parameters. The specified file
(import.txt in this example) will be deleted from the specified folder after importing it. Once the file has been
imported, it is ready to be processed (same processing routine used with download/process).
149
4/7/15
6
Set Up Trams
Back Office
This chapter contains directions for setting up Trams Back Office:
Understanding the Agency’s Needs
Getting Started: Set Up Travel Types, Chart of Accounts, G/L Accounts, Prompt Tab in Global
Defaults
Set Up Client Balance Core Report
Set Up Vendor Balance Core Report
Set Up ARC/BSP Core Report
Set Up Check Register Core Report and Bank Reconciliation
Enter Opening Balances
General Ledger Setup
Suggested GL Procedures (Daily, Weekly, Monthly)
Balancing Core Reports to Trial Balance Report
Use of GL Reconciliation Report
Set Up and Special Usage for Canadian Agencies
Understanding the Agency’s Needs
Two things to consider before setting up Trams Back Office:
1) Most users have a single Balance Sheet and choose to have a single Income Statement or an Income
Statement per branch. Multiple Balance Sheets are available, but are generally only needed if there is a
need to print full financials (Balance Sheet and Income Statement) per branch or entity for tax reporting. This
is usually only needed if branches are in separate states, or if for some other reason, separate balance
sheets for tax purposes are needed.
2) Trams Back Office has the ability to account for invoices as Sales/Costs of Sales or Commission Income.
Some agencies have used Commission Income accounting with previous back office systems and may want
to consider converting to Sales/Cost of Sales when converting to Trams Back Office as nothing is lost, but
much can be gained.
Using Sales/Cost of Sales does allow for more flexibility especially with regards to yield management
4/7/15
150
Setting Up Trams Back Office
information, because we can track the sales/cost of sales for Commtrack invoices, based on the actual
commission received. The cost of sales is determined by the difference between the total fare and the
commission of the invoices that have a vendor payment. Converting from Commission Income to
Sales/Cost of Sales accounting takes place at the time of loading beginning balances into Trams Back
Office. When using Commission Income method accounts are "rolled up" into a Commission Income
account based on the actual commission received and the sales amount is not tracked.
Getting Started
Here are the steps for setting up Trams Back Office:
Set Up Travel Types
Set Up Chart of Accounts
Set Up G/L Accounts
Set Up Prompt Tab in Global Defaults
Set Client Balance Core Report
Set Up Vendor Balance Core Report
Set Up ARC/BSP Core Report
Set Up Check Register Core Report and Bank Reconciliation
Enter Opening Balances
General Ledger Setup
Travel Types
Travel Types in Trams Back Office are categories to organize bookings by the type of travel that they
represent. For example, it is often useful to see a breakdown of the business by travel type. The travel types
are initially set up as shown below. Modify any of the 50 available travel types to correspond to a category
that are needed.
Remember that travel types define what Sales/Cost of Sales that will be updated during an EOP journal
entry. If adding a travel type, be sure to create a GL account for the Sales/Cost of Sales accounts under
General Ledger|Accounts and update the table under Utilities|GL Accts.
151
4/7/15
Setting Up Trams Back Office
Selecting Travel Categories
To setup Travel Types go to Utilities|Setup|Travel Types
Rearrange the Travel Types by using the Move Up and Move Down buttons. However, if the agency plans
to interface, we recommend NOT changing, moving or renaming DomAir, Hotel, Car, Rail, Int'l. In general,
we recommend leaving the first eight Travel Types alone. The first column contains the travel types used
in the invoice booking screen. The second column contains pre-defined categories used to group travel
types. These categories are edited by clicking on the travel type, making the changes at the top of the data
entry screen and then clicking on Update to save those changes. (If adding a new travel type, be sure to
choose the correct Travel Category from the drop-down menu.)
Travel Categories are used to facilitate the Interface from the GDS with uniform travel types. During the
Interface, Trams Back Office searches the Travel Category column for a similar match. When it finds a
match in the Category column, this record is interfaced to the proper Travel Type.
Set Up Chart of Accounts
Trams Back Office comes with default General Ledger Accounts which are easily revised. Although a
tremendous amount of flexibility is available in tailoring the Chart of Accounts, the following classification
rules must be followed:
Account Classifications
Acct #
Description
Natural Balance
Increase
Decrease
1000
Assets
Debit
Debit
Credit
2000
Liabilities
Credit
Credit
Debit
3000
Capital
Credit
Credit
Debit
4000
Sales
Credit
Credit
Debit
5000
Cost of Sales
Debit
Debit
Credit
6000
Expenses
Debit
Debit
Credit
4/7/15
152
Setting Up Trams Back Office
Account Classifications
7000
Expenses
Debit
Debit
Credit
8000
Expenses
Debit
Debit
Credit
9000
Expenses
Debit
Debit
Credit
Within these classifications, assign account numbers and descriptions. For example, include up to 4,000
expense accounts, each of which must be numbered in the range 6000...9999. It is important to understand
that every business is slightly different, with different assets, liabilities etc. Although Trams Back Office
comes with a default Chart of Accounts, time must be spent tailoring these accounts for the business before
implementing the General Ledger.
The accounts listed below are accounts automatically updated by Trams Back Office when creating End of
Period, standard, and Year End journal entries. These accounts numbers and descriptions should be
modified with caution, and if changed, update the table found in Utilities|Setup|Gl Accounts if the End of
Period journal entry is to be used in Trams. Following is an explanation of each:
Account Definitions
1000 & 1005
Default Cash In Bank
accounts.
1100
Default Client Balances
Account
2000
Default Vendor Balances
Account
2010
Default ARC/BSP Balances
Account
3200
Retained Earnings
153
Trams Back Office can integrate up to 100 Check Registers into the
General Ledger through the End of Period journal entry. Each Check
Register established in Utilities|Setup|Bank Accounts should have a
corresponding General Ledger account set up within the General
Ledger. To identify which Check Register corresponds to which General
Ledger account, update the area called Bank Accounts in GL setup
screen under the Utilities|Setup|G/L Accounts menu options.
Trams Back Office maintains all client balances in one management
report called Client Balances. Because of this, one corresponding GL
account is maintained within the General Ledger. If this corresponding
account is changed from the default account, update Client Balances in
GL Setup screen under the Utilities|Setup|G/L Accounts menu
options.
Trams Back Office maintains all vendor balances in one management
report called Vendor Balances. Because of this, one corresponding GL
account is maintained within the General Ledger. If this corresponding
account is changed from the default account, update Vendor Balances
in GL Setup screen under the Utilities|Setup|G/L Accounts menu
options.
Trams Back Office maintains all ARC/BSP balances in one
management report called ARC/BSP Balances. Because of this, one
corresponding GL account is maintained within the General Ledger. If
this corresponding account is changed from the default account, update
ARC/BSP Balances in GL Setup screen under the Utilities|Setup|G/L
Accounts menu options.
When doing a Year End, the total of all the 4000, 5000, 6000, 7000,
8000, and 9000 accounts are put into Retained Earnings and these
accounts are set to 0.
4/7/15
Setting Up Trams Back Office
Account Definitions
4000-4060
5000-5060
Default Sales and Cost of
Sales Accounts
A table located in Utilities|Setup|Travel Types allows users to classify
sales activities into categories. Each category established in the Travel
Type table should have a corresponding Sale and Cost of Sales account
within the General Ledger. If these Travel Types are modified, update
the General Ledger accounts so that each new Travel Type has a
corresponding GL account, and then update the GL setup.
Note: If the setting Commission Income is chosen under
Utilities|Setup|Global Defaults, the table must also have a
corresponding Commission Income account for each Travel Type.
Accounts are 4000 series account numbers.
.
Account Types
Detail Accounts
All Detail accounts are treated individually on the Detail General Ledger
reports. If a Detail account's number is within the range specified for a
Summary account, its balance can also be reflected as part of that
Summary's account balance on all Summary General Ledger reports.
Summary Accounts
Summary accounts are used for summarizing a range of Detail accounts
and cannot have balances posted to them. If a Summary General Ledger
report is selected, it summarizes any account balances numbered within
the Summary account's range.
Add to the General Ledger Chart of Accounts
To add a to the existing Chart of Accounts:
1. Click General Ledger|Accounts.
2. Click New then Account No field and type in the number of the General Ledger account being added.
When using all the General Ledger features in Trams, the following series must be followed:
1000 = Assets
2000 = Liabilities
3000 = Capital
4000 = Sales
5000 = Cost of Sales
6000 - 9999 = Expenses
3. Leave the Active GL Account field checked.
4. In the Account Name field, type in the name of the account.
5. Click the arrow to the right of the Account Type field and choose Detail or Summary.
If adding a summary account, click the From and To fields and type in the account numbers to be
summarized. Remember to include the summary General Ledger account in the range.
Note: There are two types of General Ledger accounts:
Detail: accounts to which Journal Entries are directed.
Summary: accounts used to total any detailed accounts falling under a designated range of account
numbers.
4/7/15
154
Setting Up Trams Back Office
For example:
6000 Telephone Summary Account
6005 Telephone - Local (Detail Account)
6010 Telephone - Long Distance (Detail Account)
6015 Telephone - Fax (Detail Account)
If there are multiple expenses for phone services, account numbers 6005, 6010, and 6015 are the detail
accounts to which journal entries are directed. Account number 6000 would be the Summary account which
totals the balances from the range of account numbers 6000 through 6015.
6. Click Add to add the account to the list.
7. Once all accounts are added, click OK to save.
Fly Away Travel wants to add an expense account for “Employee Fam Trips.” They create an account
6261 by Clicking New then entering the Account No. and the Account Name, then clicking on Add.
Note: The fields Category and Expense Type are used for Financial Modeling. Please refer to the Financial
Modeling chapter for more detail.
Account Status
Indicate a status of active or inactive on the general ledger accounts by selecting the main General Ledger
menu, then Accounts. Highlight the account and click the Active GL Account. When the checkmark is showing,
the account is active and can be updated with a journal entry. When the checkmark is not showing, the
account is dimmed and cannot be accessed or updated with a journal entry from a payment screen or
general ledger Journal Entry. This provides continuity in the General Ledger and avoids entries to old
accounts.
Aloha Travel Center set up a general ledger expense account for their tenth anniversary office party. After
the bills were reconciled, the account was marked inactive preventing any further journal entries to this
account.
Modifying General Ledger Chart of Accounts
General Ledger accounts can be renamed or they can be deleted if the account does not have activity
attached to it. If an account can not be deleted, deactivate by removing the check mark from the box, Active
GL Account.
To Delete a General Ledger Account
1. Click General Ledger|Accounts.
2. Click the account being deleted to highlight it and click Delete.
3. Trams Back Office prompts, “Delete Record? Click YES.
4. Once all accounts are deleted, click OK to save.
155
4/7/15
Setting Up Trams Back Office
To Rename a General Ledger Account
1. Click General Ledger|Accounts.
2. Click the account being modified to highlight it. Click the Account Name field and type in the new account
name. Click the Update button to store the change.
3. Once all accounts are updated, click OK to save.
To Deactivate a General Ledger Account
Deactivate an account when it is longer wanted, but there is journal entry history attached to the account
that is needed.
1. Click General Ledger|Accounts.
2. Click the account being deactivated to highlight it and the Active GL Account box to remove the check
mark. Click the Update button to store the change.
3. Once all accounts are updated, click OK to save.
Note: Inactive accounts maintain their balances and print on Financial Statements. It is suggested to zero
out the account balance before making the account inactive.
To Activate a General Ledger Account
1. Click General Ledger|Accounts.
2. Click on the account being activated to highlight it and click the Active GL Account box. This places a
check mark in the box. Click the Update button to store the change.
3. Once all modifications have been made, click OK.
Chart of Accounts Report
Click Reports|General Ledger|Chart of Accounts. Trams Back Office prompts, “Only Active GL
Accounts? Yes or No.” Choose YES to see only live accounts. Choose NO to see all accounts.
Once the report appears on the screen, click the printer icon.
4/7/15
156
Setting Up Trams Back Office
Chart of Accounts Report
General Ledger Accounts Setup
Before setting up the GL Accounts, first set up the Travel Types table and Chart of Accounts (see sections
Travel Types and Setting Up Chart of Accounts this Chapter).
1. Click Utilities|Setup|GL Accounts.
2. Match the Sales and Cost of Sales accounts from the Chart of Accounts to each Sales and Cost of Sales
account for each Travel Type on the General Ledger Accounts Setup table. Each Travel Type needs a
157
4/7/15
Setting Up Trams Back Office
separate Sales and Cost of Sales account number.
(Exception: If the Comm Track Payments in EOP field in the Global Defaults is set to Commission
Income, there will also have to be a Commission Income account for each travel type.)
3. Next, while still under Utilities|Setup|GL Accts, click the Bank Accounts tab.
4. Match the Bank Account numbers (1, 2, 3, etc.) to their corresponding General Ledger accounts (1000
series). If the bank account is not a foreign account, the conversion field is not needed. Therefore, type in
"6666" as the account number for this field.
4/7/15
158
Setting Up Trams Back Office
5. While still under Utilities|Setup|GL Accts, click the Others tab.
6. Match the Client Balance, Vendor Balance, ARC/BSP Balance, etc. to their corresponding General
Ledger accounts. If NOT using the CC Merchant Receivables account, type in “6666” as the account
number for this field.
Set Up Prompt Tab in Global Defaults
Choose a start date to enter beginning balances, usually the beginning of a month or quarter. On that start
date, go to Utilities|Setup|Global Defaults and click on the Prompt tab. Under the Journal Entry Prompting
159
4/7/15
Setting Up Trams Back Office
tab, indicate to Trams Back Office how interact with the program by selecting one of these settings.
1. All - Trams Back Office will prompt to create a journal entry for any payment received or made.
2. None - There are no prompts for the journal entry at the time of payment. While using this option, the only
way to journalize a payment is by selecting General Ledger, then journal entry from the main menu.
3. Recommended/Prompt - Trams Back Office prompts to create a journal entry when payments are received
or made with a pay method of Other or a profile type of Other.
4. Recommended/Always - Trams Back Office automatically displays a journal entry screen when payments
are received or made with a pay method of Other or a profile type of Other. This option enters the first general
ledger account necessary to fill in the journal entry. Supply the offset account to finish the journal entry. This
is Trams Back Office recommended setting.
5. Mandatory - Trams Back Office requires a journal entry before the payment can be saved.
NOTE: Do NOT use setting #1or #2 if using the General Ledger in the recommended manner.
Set Up Client/Vendor Balances Core Reports
Client Balances prior to the start of Trams Back Office need to be entered into the Trams Back Office
program. When client payments are received, an invoice will be present in Trams Back Office in order to
apply payments. Client Balances are entered in Trams Back Office by creating invoices. Agencies have two
choices when entering prior Client Balances. By using Method One, enter each invoice individually with
complete Client, Vendor and Agent details which ensure accurate Client and Agent Statements, and Vendor
detailed reports. Or create a separate invoice for each Client Balance using the “short cut” Method Two
below. Be aware that by using this method; however, may stop the program’s flexibility resulting in
inaccurate Client and Agent Statements, and Vendor detailed reports.
4/7/15
160
Setting Up Trams Back Office
From Previous Back Office System, run:
* Client Balance Report (Accounts Receivable)
* Vendor Balance Report (Accounts Payable)
* Income Statement (Profit/Loss Statement)
* Balance Sheet
* Trial Balance
Set Up Client Balance Report
* In Trams run Report/Core/Client Balances in detail using date one day prior to the start-up date
* Compare to previous system Client Report and note differences.
* Make any entries in Trams Back Office to correct report (see directions below). Remember to include
unapplied balances!
* Rerun Client Balance Report in detail using date one day prior to the start-up date. Verify that all balances
match the report from the previous system.
Set Up Vendor Balance Report
Vendor balances prior to the start of Trams Back Office need to be entered into the Trams Back Office
program. When payments are made to Vendors, an invoice will be present in Trams Back Office in order to
apply payments. First steps for setting up the Vendor Balances:
*In Trams run Report/Core/Vendor Balances in detail using date one day prior to the start-up date.
*Compare to previous system Vendor Balance Report and Note differences.
*Make any entries in Trams Back Office to correct report (see directions below). Remember to include
unapplied balances.!
*Rerun Vendor Balance Report in detail using date one day prior to the start-up date. Verify that all
balances are correct.
Creating Separate Invoices for Each Client/Vendor Balance Method One
1. Click on Invoices|Sale.
2. To create Client Balances - Enter all invoice details pointing to the correct client, agent and vendor profiles
for all client outstanding balances. Use the correct issue date of the invoice. Make sure the Submit To is
properly set to ensure Client Balances for invoices is correct.
3. To create Vendor Balances - Enter all invoice details, pointing to the correct client, agent and vendor
references for all vendor outstanding balances. Use the correct issue date of the invoice. Make sure the
Submit To is properly set to ensure Vendor Balances for invoices is correct.
4. Go to Reports|Core and run a Client Balance Report and a Vendor Balance Report with dates set one
day prior to the startup date.
5. Compare the Core Reports to the previous accounting system’s Account Receivable and Accounts
Payable.
6. Since creating an Invoice creates a Client balance and Vendor Payable which may have been paid prior
to starting Trams, write off any outstanding balances by using directions below.
7. Add any unapplied balances by following directions below.
8. WHEN COMPLETING ENTERING ALL INVOICES AND UNAPPLIED BALANCES (and have done
write-offs, if necessary), DON’T FORGET TO RERUN THE CLIENT BALANCE CORE REPORT WITH
161
4/7/15
Setting Up Trams Back Office
DATES SET ONE DAY PRIOR TO THE START-UP DATE TO MAKE SURE THE BALANCES ARE
ACCURATE.
Remove/Write Off a Previous Client Balance
When setting up the Core Report, remove/write off a previous Client Balance by:
1. Go to Payments|Received.
2. Enter the Amount of invoice to be removed/written off.
3. Use the Payment Date of one day prior to the start-up date.
4. Choose Payment Method of OTHER.
5. Under Remarks, type “Prior Receivable Write-off”.
6. In the Name field, enter the Client Name.
7. Toggle the invoice closed by clicking Toggle Close.
8. Do NOT create a Journal Entry when prompted. (When the GL is set up, create a JE and write it off to a
bad debt account which is usually a 6xxx account.)
Remove/Write Off an Old Vendor Balance
When setting up the Core Report, remove/write off a previous Vendor Balance by:
1. Go to Payments|Made.
2. Enter the Amount of Invoice to be removed/written off.
3. Use the Payment Date of one day prior to the start-up date.
4. Choose Payment Method of OTHER.
5. Under Remarks, type “Prior Payable Write-off”.
6. In the Name field, enter the Vendor Name.
7. Toggle the invoice closed by clicking Toggle Close.
8. Do NOT create a Journal Entry when prompted. (When the GL is set up, create a JE and write it off to a
bad debt account which is usually a 6xxx account.)
Set Up An Unapplied Client Balance
1. Go to Payments|Received.
2. Enter the Amount Client paid on account.
3. Use the Payment Date of one day prior to the start-up date.
4. Under Remarks, type “Prior Receivable”.
5. In the Name field, enter the Client Name. Trams prompts to build a new profile if it does not find a match.
Note: If creating a new Client Profile, make sure to add an Interface ID #.
6. TBO prompts to create a Voucher. Click Yes and Click OK.
Set Up An Unapplied Vendor Balance
1. Go to Payments|Made.
4/7/15
162
Setting Up Trams Back Office
2. Enter the Amount of the Vendor Balance on account.
3. Use the Payment Date of one day prior to the start-up date.
4. Under Remarks, type “Prior Payable”.
5. In the Name field, enter the Vendor Name. Trams prompts to build a new profile if it does not find a match.
Note: If creating a new Vendor Profile, make sure to add an Interface ID #.
6. Trams prompts to create a Voucher. Click Yes and Click OK.
Create Invoices in Detail w/Shortcut Method Two
Client Balances are entered in Trams by creating invoices. Create a separate invoice for each Client
Balance. Click on Invoices|Sale.
1. In the Invoice # field, type in the invoice number of the unpaid invoice.
2. The Issue Date is the date prior to the start-up date, e.g.12/31/xx if the start-up date is 01/01/xx.
3. In the Remarks field, type in Prior Receivable or any other free flow information.
4. In the Name field, enter the Client Name. Trams prompts to build a new profile if it does not find a match.
Note: If creating a new Client Profile, make sure to add an Interface ID #.
5. Click OK to process.
6. Change the Submit To field to Supplier.
7. In the Vendor Name field, type in Prior Client Balances. Trams prompts to create a new profile if it does
not find a match.
8. In the Total Fare field, type in the amount owed.
9. The Taxes/Rate and Commission/Rate fields are 0.00.
10. Click No on the prompt “Enter a payment for this invoice?”
Since creating a Receivable also creates a Payable, enter a Payment Made to close off all the Vendor
Balances now contained in the Profile, “Prior Client Balances.”
1. Click Reports|Core|Vendor Balances.
2. In the As Of field, enter the date. The date should be one day prior to the start date.
3. Change the Format field to Summary, then click OK to process.
4. Find the Balance Due total for the profile Prior Client Balances and make a Note of the balance.
5. Next, click Payments|Made.
6. In the Amount field, type in the total amount of the Prior Client Balances Noted from the Vendor Balance
report.
7. Change the Payment Method to Other.
8. The Pay Date is one day prior to the start date.
9. Leave the Check/CC No field blank.
10. Leave the Payment Code field blank.
11. Leave the Payment Group field blank.
12. In the Remark field, type “To Close Prior Payable.”
13. Change Profile Type to Vendor-Supplier.
14. In the Name field, type “Prior Client Balances.”
163
4/7/15
Setting Up Trams Back Office
15. Click OK to display open invoices. Click Close All. Click OK to save.
16. Trams prompts, “Create a Journal Entry? Click NO.
Set Up An Unapplied Client Balance
1) Go to Payments|Received.
2) Enter the Amount Client paid on account.
3) Use the Payment Date of one day prior to the start-up date.
4) Under Remarks, type “Prior Receivable”.
5) In the Name field, enter the Client Name. Trams prompts to build a new profile if it does not find a match.
Note: If creating a new Client Profile, make sure to add an Interface ID #.
6) TBO prompts to create a Voucher. Click Yes and OK.
Remove/Write Off a Prior Client Balance
1) Go to Payments|Received.
2) Enter the Amount of Invoice to be removed/written off.
3) Use the Payment Date of one day prior to the start-up date.
4) Choose Payment Method of OTHER.
5) Under Remarks, type “Prior Receivable Write-off”.
6) In the Name field, enter the Client Name.
7) Toggle the invoice closed by clicking Toggle Close.
8) Do NOT create a Journal Entry when prompted. (Note: After the GL has been set up, write off a client
balance using these directions with this current date, but you need to create a Journal Entry to credit Client
Balances and debit a bad debt, agent error, or misc. adjustment account setup in the 6000’s or expense
accounts.)
WHEN COMPLETING ENTERING ALL INVOICES AND UNAPPLIED BALANCES (and have done
write-offs, if necessary), DON’T FORGET TO RERUN THE CLIENT BALANCE CORE REPORT WITH
DATES SET ONE DAY PRIOR TO THE START-UP DATE TO MAKE SURE THE BALANCES ARE
ACCURATE.
Set Up Vendor Balances - w/Shortcut Method Two
Vendor balances are entered in Trams by creating invoices. Create a separate invoice for each vendor
balance.
Note: If creating a new vendor profile, make sure to add an Interface ID #.
1. Click Invoices|Sale.
2. In the Invoice # field, type in the invoice number of the unpaid invoice.
3. The Issue Date is the date prior to the start-up date, e.g. 12/31/11 if the start-up date is 01/01/12.
4. In the Remarks field, type in Prior Payable or any other free flow information.
5. In the Name field, type Prior Vendor Balances. Trams prompts to create a new profile. (Don’t forget
Interface ID!)
6. Click OK to process.
4/7/15
164
Setting Up Trams Back Office
7. Change the Submit To field to Supplier.
8. In the Vendor Name field, enter the name of the vendor to be paid.
9. In the Total Fare field, type in the amount owed.
10. Click No on the prompt “Enter a payment for this invoice?”
Since creating a Payable also creates a Receivable, enter a Payment Received to close off all the
Client Balances now contained in the Profile, “Prior Vendor Balances.”
1. Click Reports|Core|Client Balances.
2. In the As Of field, type in the date. The date should be one day prior to the start date.
3. Change the Format field to Summary, then click OK to process.
4. Find the Balance Due total for the profile Prior Vendor Balances and make a Note of the balance.
5. Next, click Payments|Received.
6. In the Amount field, type in the total amount for Prior Vendor Balances, Noted from the Client Balance
report.
7. Change the Payment Method to Other.
8. The Pay Date is one day prior to the start date.
9. Leave the Check/CC No field blank.
10. Leave the Payment Code field blank.
11. Leave the Payment Group field blank.
12. In the Remarks field, type “To Close Prior Receivable.”
13. Change Profile Type to Client.
14. In the Name field, type in Prior Vendor Balances.
15. Click OK to display open invoices. Click Close All. Click OK to save.
16. Trams prompts, “Create a Journal Entry?” Click NO.
Set Up An Unapplied Vendor Balance
1. Go to Payments|Made.
2. Enter the Amount of the Vendor Balance on account.
3. Use the Payment Date of one day prior to the start-up date.
4. Under Remarks, type “Prior Payable”.
5. In the Name field, enter the vendor Name. Trams prompts to build a new profile if it does not find a match.
Note: If creating a new Vendor Profile, make sure to add an Interface ID #.
6. Trams prompts to create a voucher. Click Yes and OK.
Remove/Write Off a Prior Payable Vendor Balance
1. Go to Payments|Made.
2. Enter the Amount of Invoice to be removed/written off.
3. Use the Payment Date of one day prior to the start-up date.
4. Choose Payment Method of OTHER.
165
4/7/15
Setting Up Trams Back Office
5. Under Remarks, type “Prior Payable Write-off”.
6. In the Name field, enter the Vendor Name.
7. Toggle the invoice closed by clicking Toggle Close.
8. Do NOT create a Journal Entry when prompted. (Note: After the GL has been setup, write off a vendor
balance using these directions with the current date, but you need to create a Journal Entry to debit Vendor
Balance account and credit a bad debt, agent error, or misc. adjustment account setup in the 6000’s or
expense accounts.)
Adding a Negative Payable or Vendor Receivable
To enter Cruises, Tours, etc. paid by credit card (where commission is due), a Sale Invoice is created:
1. Go to Invoice|Sale and enter invoices (using Method One as outlined in Setting Up Client Balances Core
Report).
2. Click Yes on the prompt “Enter a payment for this invoice?”
3. Enter credit card number.
4. Repeat for each Negative Payable.
WHEN COMPLETING ENTERING ALL INVOICES AND UNAPPLIED BALANCES (and have done
write-offs, if necessary), DON’T FORGET TO RERUN THE VENDOR BALANCE CORE REPORT WITH
DATES SET ONE DAY PRIOR TO THE START-UP DATE TO MAKE SURE THE BALANCES ARE
ACCURATE.
Set Up the ARC/BSP Core Report
ARC/BSP balances prior to the start of Trams, need to be calculated and entered into Trams Back Office.
Then when ARC/BSP withdrawals take place, the unsettled ARC/BSP Net Remits are present in the
ARC/BSP General Ledger Account.
ARC/BSP Settlement if there is Old Data or Converted Data in TBO
1. Select Payment|ARC(BSP) Settlement.
2. Leave the Amount field and Payment Type set at the default, but change the Payment Method to OTHER.
3. For the ARC/BSP Settlement Date, use date of Sunday prior to the cutover date.
4. Type in “To Start Trams” in Remarks field.
5. For the ARC/BSP Period, input the earliest possible date of invoices included in the settlement in first field
and use the date of the Sunday prior to the cutover date in the To field. Click OK.
6. Once inside the settlement feature, note the amount of the invoices at bottom of settlement screen and
input this into the Amount field on the top and indicate the Payment Type (Received From or Paid To) at this
time.
7. Click on Close All and click OK to process. DO NOT CREATE A JOURNAL ENTRY WHEN ASKED.
8. Now go to Reports|Core|ARC or BSP and run report with dates set one day prior to the startup date.
Make sure this total agrees with previous system’s total. Retain this amount to enter into General Ledger
(see next section, General Ledger Setup).
Only the interfacing of new records starts building the ARC/BSP Core Report for use after the StartUp Date.
Do the ARC/BSP Settlement when received to reconcile the bank account and close off items on ARC Core
Report.
4/7/15
166
Setting Up Trams Back Office
For Clients Who Do Not Have Old/Converted ARC/BSP Data
1. A different way to determine the ARC/BSP balance as of the end of that month is to determine the last
draft or deposit in that month from ARC/BSP and what ARC/BSP week that pertained to. The week following
that week is still open.
2. Total up ARC/BSP invoices that belong to the ARC/BSP week prior to the startup date. Retain this amount
to enter into the General Ledger (see next section, “General Ledger Setup”).
First ARC/BSP Settlement: If Payments were Made to ARC/BSP:
1. Select Payments|Made, choose Cash as the Payment Type, Type “First ARC/BSP Settlement” in the
Remarks field.
2. Choose profile type of “Other,” and the Name, “ARC/BSP Balances.”
3. If ARC/BSP was paid, when the journal entry comes up, Credit the correct Bank Account, and Debit the
ARC/BSP Balances account. Click OK.
First ARC/BSP Settlement: If Payments were Received from ARC/BSP:
1. Select Payments|Received, choose Cash as the Payment Type, Type “First ARC/BSP Settlement” in
the Remarks field.
2. Choose profile type of “Other,” and the Name, “ARC/BSP Balances.”
3. If the agency received money from ARC/BSP, Debit the correct Bank Account and Credit the ARC/BSP
Balances Account. Click OK to save.
Only the interfacing of new records starts building the ARC/BSP Core Report for use after the startup date.
From this point onward, do the ARC/BSP Settlement when received to reconcile the bank account and close
off items on ARC/BSP Core Report.
Set Up the Check Register Core Report and
Bank Reconciliation
To begin using the Check Register and to set up the Bank Reconciliation, prepare the following information:
• The check register balance from the checkbook as of one day prior to the start date. Example: If starting
the check register 1/1/12, the ending balance from 12/31/11.
• The ending balance from the prior month's Bank Statement. i.e.: The Bank Statement from 12/31/xx.
• A list of all outstanding items that have not cleared the bank as of the bank statement’s date. Include all
deposits, checks and withdrawals. Note: Deposits can include EFT (Electronic Fund Transfer) Deposits
not yet cleared the bank, including agency processed credit card transactions (CC Merchant).
Withdrawals can include EFT Withdrawals not yet cleared the bank, including scheduled EFT expense
withdrawals.
To help gather the information needed, complete the information below:
Bank Statement Ending Balance _____________________________
Total of Outstanding Checks - _____________________________
Total of Outstanding Withdrawals -_____________________________
Total of Outstanding Deposits + _____________________________
Ending Balance = _____________________________
1. Click Reports|Core|Check Register.
167
4/7/15
Setting Up Trams Back Office
2. In the From and To fields, enter the date one day prior to the start date. (e.g., From: 12/31/11, To:
12/31/11)
3. The Bank Acct field should be the corresponding bank account number (1, 2, 3, etc.). To change the
default, type in the new number, or click the arrow next to the field to see the list.
4. Leave Bank Reconciliation field to the default set to All. Click Preview to process. Note the Ending
Balance at the end of the report.
5. To zero out the Ending Balance enter a Withdrawal (Payments|Withdrawal) if the amount is positive or
enter a Deposit (Payments|Deposit) if the amount is negative.
Note: The date of the Deposit or Withdrawal is one day prior to the start date (or one day prior to the
statement end date). In the Remark field type, “To zero out acct.”
6. Enter the Ending Balance from the bank statement by creating a Deposit if the amount is positive or a
Withdrawal if the amount is negative. The date of the entry should be one day prior to the start date. In the
Remark field, type “Bank Statement Balance.”
7. Next, click Payment|Reconciliation|Bank Reconciliation.
8. Click Clearing Date and enter the date one day prior to the start date.
9. Leave Stmt Ending Balance blank.
10. Click OK to process.
11. Trams shows a list of payment items (Deposits, Withdrawals and Checks). Click Clear All to mark all
items as cleared. Click OK to save.
12. Trams prompts, “(Number) Payment(s) Will be Marked Cleared and (Number) Payment(s) Will be
Marked Uncleared. Continue? Yes or No.” Click YES.
13. Next, enter the list of all outstanding deposits, withdrawals and checks under Payments with actual
dates as long as they are at least one day prior to the start-up date. DO NOT CREATE A JOURNAL ENTRY
WHEN PROMPTED.
14. Once all outstanding items are entered, click Reports|Core|Check Register and print as of one day
prior to the start date, with Bank Reconciliation set to All. Verify that the checkbook balance is correct.
Entering Opening Balances
We recommend that Core Reports be set up in Trams Back Office prior to entering General Ledger opening
balances. Opening Balances reflect the current state of the agency’s financial position the day prior to the
General Ledger start date in Trams. Obtain opening balances from the agency’s accountant, or from the
Trial Balances from the prior bookkeeping system.
IMPORTANT! Opening Balances don’t have to be entered in Trams Back Office to use the General Ledger.
However, an end a period in Trams Back Office CANNOT BE CLOSED without the opening balances.
General Ledger Setup
The General Ledger does not need to be “turned on” because it is always active. Print monthly financial
reports at any time without putting in the beginning balances. However, if accurate financial reports are
wanted year-to-date, it is required that the General Ledger be set up with accurate beginning balances and
then balance the General Ledger on a monthly basis.
1. Before beginning, establish the Four Core reports as described in previous section. After establishing the
Core Reports, there is a solid foundation on which to build the General Ledger.
4/7/15
168
Setting Up Trams Back Office
2. Determine the General Ledger implementation date, e.g.01/01/xx.
3. Get the General Ledger ending balances from the previous accounting program, manual bookkeeping
records, or the agency accountant. The balances need to be from the day prior to the implementation date.
(e.g. if the implementation date is 01/01/12, balances are from 12/31/11.)
Note: It is not necessary to have the General Ledger ending balances to implement the General Ledger
as long as the Four Core reports are accurate.
4. The Travel Types table, General Ledger Accounts table, and the Chart of Accounts should all correspond.
The Chart of Accounts should have a Sales and Cost of Sales account for each travel type listed in the
Travel Type table. The General Ledger Accounts table should coincide with both the Chart of Accounts and
Travel Type table. (For additional information on setup procedures for these tables, see General Ledger
Accounts Setup below.)
5. Click Reports|General Ledger|Trial Balance and print the Trial Balance report. Enter the As Of date as
one day prior to the General Ledger start date, e.g. 12/31/xx. Verify that the Pseudo Post box is selected.
Click Preview to view to the screen (or click Print to send directly to the printer without viewing first). Once
the report is displayed on the screen, click the Printer icon to print. Check the report for any accounts with
balances. If there are accounts with balances, proceed to step 6 to zero out balances, in order to start with
a clean General Ledger. If the account balances on the Trial Balance are zero, skip to step 7.
6. To zero out account balances on the Trial Balance report, click General Ledger|Journal Entry and
create a journal entry to reverse them. Enter the Activity Date as the day prior to the implementation date.
In Remarks field, type in “To Zero Out General Ledger.” In the Account Name & Number field, enter the
Account Name or Number or click the arrow to choose from the list. Enter the amount as the opposite of
how it appears on the Trial Balance report. (e.g. Account 2000 shows a credit of $400.00 on the Trial
Balance. The journal entry will be a debit of $400.00 to account 2000.) Once all accounts are entered and
debits and credit equal, click OK to save. After reversing all balances, print a new Trial Balance, with Pseudo
Post selected. The report should now be zero. If it is not, repeat steps 4 and 5.
7. Print the Four Core Reports as of the day prior to the implementation date. Verify that the Core report
balances match the ending balances from the accountant or prior bookkeeping system.
8. Enter new beginning balances in the General Ledger by clicking General Ledger|Journal Entry. Enter
the Activity Date as the day prior to the implementation date. In the Remarks field, type in “Beginning
Balances.” In the Account Name & Number field, enter the Account Name or Number, or click the arrow to
select from the list. Enter the Amount in the Debit or Credit column. If entering balances from a previous
accounting system or from the accountant, copy the information line by line. If entering Core Report
balances only, see below.
9. From the Check Register report, enter the Ending Balance into the Cash in Bank account. (1000 series
number) If the ending balance on the Check Register report is positive, enter the amount in the debit column.
If the ending balance is negative, enter the amount in the credit column.
10. From the Client Balances report, enter the Balance Due total into the Client Balances account. (1000
series number) If the report total is a positive amount, enter in the amount in the debit column. If the report
total is negative, enter in the credit column.
11. From the Vendor Balances report, enter the Balance Due total into the Vendor Balances account. (2000
series number) If the total is a positive amount, enter in the amount in the debit column. If the total is
negative, enter in the amount in the credit column.
12. For the ARC/BSP Balances, enter the Net Remit balance into the ARC/BSP Balances account. (2000
series number) If the ARC/BSP Balance is positive, (ARC/BSP owes the agency) enter in the debit column.
If the ARC/BSP Balance is negative, (ARC/BSP is owed) enter in the credit column.
13. To balance the journal entry, put the difference between the debits and credits in the 3999 - Suspense
Account. Set this account up if it does not already exist. (See Add To the General Ledger Chart Of Accounts
in this chapter.)
169
4/7/15
Setting Up Trams Back Office
14. Once all accounts are entered and debits and credits equal, click OK to save. If debits and credits do
not balance, go back and check all the amounts in the journal entry against all the amounts from the
previous Balance sheet.
15. Now print the Trial Balance Report and compare against the Four Core reports and verify that they are
all in balance.
16. Finally, once having verified the General Ledger amounts are in balance, Post the journal entry to the
General Ledger. This makes it permanent. To post, click General Ledger|Posting. In the Latest Posting
Date field, enter date as the day prior to the implementation date. (i.e.12/31/04)
NOTE: Once the journal entry has been posted, print a final copy of the Four Core Reports and the Trial
Balance report to keep in the agency files.
From this point forward maintain the General Ledger on a monthly basis by balancing the General Ledger
to the Four Core reports. (See Maintaining the General Ledger below.)
Suggested General Ledger Procedures
1. ARC/BSP Balance Report
- Enter sales and payment information on a daily basis.
- Submit the report weekly to ARC/BSP.
- Reconcile the ARC/BSP Settlement each week.
2. Client Balances Report
- Enter sales and payment information on a daily basis.
- View on a regular basis and review for accuracy.
3. Vendor Balances Report
- Enter sales and payment information on a daily basis.
- View on a regular basis and review for accuracy.
4. Check Register Report
- Enter Deposits, Withdrawals and Checks on a daily basis.
- Balance and reconcile against the Bank Statement each month.
Daily Routine
1. Capture Sale and Refund Invoices (manual or interface). Enter all adjustment invoices such as
debit/credit memos.
2. Enter Receipts and balance the Bank Deposit:
a) Enter each separate receipt under Payments|Received. (If there is information available, consider
entering any EFT (Electronic Fund Transfer) or Direct Deposit receipts for the day. As these type
transactions hit the Check Register directly, these items are not included in the daily deposit to the bank.)
b) Under Payments|Deposits, verify the date for which the deposit is being done and Query for the
receipts to be included in the Deposit.
c) Verify the receipts that are included are receipts actually going to be deposited in the bank.
d) Print 2 deposit slips - one for the agency records and one for the bank.
3. Print a copy of a Receipts Report (Reports|Payments|Receipts) for all Cash/Check receipts for each
4/7/15
170
Setting Up Trams Back Office
bank account for the day. Balance the total on the report to the bank deposit slip. Attach the report to the
agency copy of the deposit slip and file.
4. Enter all agency disbursements in Payments|Made.
5. Run the Four Core Reports and review for errors: Client Balances, Vendor Balances, ARC/BSP
Reconciliation and Check Register.
6. Run the G/L Reconciliation Report to catch any G/L errors daily.
7. Backup files (Utilities|Backup)!
Weekly (ARC/IAR Sales Report/Reconciliation) Routine
Step 1. Check that the data in the IAR Sales Report matches data in Trams Back Office by one of three
methods:
a) Method One: Run a list of all invoices captured in Trams by going into Reports|Invoice|Analysis and
verifying that all invoices for the week are accounted for in Trams. Then, run a list of all tickets captured in
Trams by going into Reports|Invoice|ARC/BSP Reconciliation and verifying that all tickets issued for the
week are accounted for in Trams, and be sure to set ticket status to ALL.
b) Method Two: Download the IAR file from the IAR website. Go to Reports|Invoice|IAR Reconciliation
and click the IAR File button to point to the path of the downloaded .txt file obtained from the IAR website.
Print out an Exception Report which points out differences between what was submitted to IAR and Trams
Back Office.
c) Method Three: Download the IAR file from the IAR website.
-- Go to Payments|ARC Settlement.
-- Query for the week’s ARC tickets so they are displayed on the settlement screen.
-- Click IAR Reconciliation on the ARC Settlement screen.
-- Click IAR Filename and map to the weekly IAR file.
-- Click Query to see the standard IAR Reconciliation Report.
-- For tickets where Net Remit Do Not Match, Ticket Is Voided in IAR but Not in Trams, or Missing IAR Ticket,
click Find Ticket and the cursor lands on the appropriate ticket on the ARC Settlement screen so Edit Invoice
appears as normal.
-- For tickets that are Voided In Trams but Not In IAR, click Find Ticket to go to the booking containing that
voided ticket in TBO, so it can be unvoided, allowing the ticket to now show correctly on the ARC Settlement
Screen.
-- For any exceptions that are Missing Trams Ticket, click off the IAR Reconciliation screen, and manually
add the missing tickets. If doing this method, no need to do Steps 2 and 4 below.
Note: This is the same IAR Reconciliation exception report that was only available before under
Reports|Invoice|IAR Reconciliation. The IAR Reconciliation from the ARC Settlement screen works the
same way and provides that same exception report, but now has linking ability to the tickets displayed on
the ARC Settlement Screen.
Step 2. Enter any missing Refunds, Debit Memos, Voids, etc. so Trams Back Office agrees with IAR Sales
Report.
Step 3. Enter and balance the ARC/BSP Settlement for the week under Payments|ARC Settlement. Do
this by comparing the amount withdrawn to the amount Trams calculated as the Net Remittance amount for
that ARC/BSP week. If the two numbers do not balance exactly, review the ARC/BSP Settlement section of
this manual.
Step 4. Submit the IAR Sales Report.
171
4/7/15
Setting Up Trams Back Office
If processing through ARC/IAR, complete the ARC Settlement right after submitting the IAR Sales Report.
Weekly (BSP Sales Report/Reconciliation)
Complete the BSP Settlement after Weekly Sales Summary has been received from BSP as
amounts could be changed from what was submitted.
1. Print an Invoice Analysis Report (Reports|Invoice|Analysis) to verify all invoices issued during the week
are entered in Trams.
2. Print a BSP Reconciliation Report (Reports|Core|BSP Reconciliation). Set the ticket status to ALL to
verify all tickets issued for the week are entered in Trams.
3. Submit BSP Link report through the Internet. If necessary, print the BSP Report (Report|Invoice|BSP),
set the Included Items to Manual, and mail it to the area bank.
4. If not using the BSP Link, print the BSP Report (Reports/Invoice/BSP) and mail it to the area bank with
the auditors’ coupons from the tickets issued, or verify cash and credit card totals and period net remit if
submitting the report through BSP Link.
5. Reconcile BSP’s Weekly Sales Summary Report by entering the amount of the BSP Withdrawal in
Payments|BSP Settlement. Adjust each Trams entry to match BSP’s report and close all bookings paid
for in that BSP period.
Weekly BSP HOT Reconciliation Routine
A BSP HOT Reconciliation can be found under Reports|Invoice|BSP Reconciliation. To
receive a copy of the BSP Report in the HOT file format, contact:
www.IATA.org/customer
Trams Back Office compares the data in the HOT file to the information in Trams Back Office and generates
an exception report which lists all the differences between the Trams Back Office data and the HOT file.
Once the transactions on the exceptions reports have been addressed, the BSP Settlement routine can be
completed. The Submit to field in the TBO booking must be set to BSP (for both BSP and Web bookings
reported via BSP). For web booking exchange transactions, see additional information below.
Reconciliation Steps:
1. Download the HOT file from the IATA Web Site
2. In TBO, go to Reports/Invoice/HOT Reconciliation
3. Click the HOT File Button and browse to where the file was saved
4. Click the Preview Button
5. Reconcile the Exceptions that appear on the Exception Report
Sample Exceptions:
Ticket #
Inv #
Exception Reason
7771113333
5589
Missing HOT Ticket – Ticket is not listed in the HOT file
7771113358
5598
Missing TBO Ticket – Ticket is listed in the HOT file but cannot be found in
TBO
7771113362
5600
Remittance Amounts do not match – Commission amounts do not match
4/7/15
172
Setting Up Trams Back Office
7771113375
5612
Total Fares do not match – Ticket amount does not match total fare amount
in TBO
Non-automated air web booking exchanges (Air Canada, Westjet, etc.), must contain Trams Descriptor
codes to properly flag the transaction as an exchange. The original ticket number must also be added to
populate the original ticket field in the booking.
Examples (to be added in addition to other accounting line information):
*EXE – Even exchange
*EXA – Exchange with an add collect
*EXR – Exchange Refund
*OT – Original Ticket number
Sabre
ACOTH1/SUPPLY/DOC/P11/950.00/0/ALL/CK/*SBA*TT1*VCAC*EXE*OT7771113375
Worldspan
AC1-A*TT1*VCAC*EXE*OT7771113375
Apollo
T-MS9A*VCAC*TT1*CM10*CF123456*SG*EXE*OT7771113375
Amadeus
RM*9A*VCAC*TT1*CM10*CF123456*SG*EXE*OT7771113375
Monthly Checklist
1. Using Trams Back Office Bank Reconciliation routine under (Payments|Bank Reconciliation), balance
the bank statement to the Trams Back Office check register. Print a copy of the Check Register for the
month for ALL along with a second Check Register Report for Not Cleared, and staple it to the statement
from the bank and file.
2. Create an End of Period journal entry (General Ledger|End of Period) for the month.
3. Print a trial balance. Compare the Management Summary Report balances to their corresponding
General Ledger accounts and make sure they are the same. If not, print a GL Reconciliation
(Reports|General Ledger|GL Reconciliation) to locate any possible errors. Note: There is a Total Base
column on this report, The yield percentage is the commission divided by total base.
Optional: Run a Journal Entry Query with the Status set as Unposted. Run for an appropriate posted period,
year-to-date of last posted period, last-year-to date of last posted period, etc., to view any unposted items
that someone might have added or changed in a posted period. Verify or delete those items, post them, and
run new monthly financials to reflect the changes made.
4. When (and only when) everything is in balance, post the journal entries made and print Financial
Statements. Audit Trail reports could include Trial Balance, Income Statement, Balance Sheet, End of
Period Reports, Account History, or Journal Entry Analysis.
TBO End of Period Reports
End of Period reports can be found under Reports|Batch Reports|Load.
1. Sales Activity Report: Select Reports|Invoice|Activity. Set Format to “Summary”, set Submit To as
173
4/7/15
Setting Up Trams Back Office
“ARC or BSP/Supplier” and set Invoice Status to “All.”
Trams uses this report to show what has been updated in the GL by the End of Period in Sales, Cost of
Sales, Client Balances, Vendor Balances and ARC/BSP Balances. The ARC/BSP Adjustments account is
also updated for Debit/Credit Invoices.
2. Sales Activity Report: Select Reports|Invoice|Activity. Set Format to “Summary”, set Submit To as
“Comm Track” and set Invoice Status to “Closed.”
If Commission Track Payments in EOP under Utilities|Setup|Global Defaults is set to the Sales/Cost of
Sales option, Trams uses this report to show what has been updated in the GL by EOP in Sales, Cost of
Sales and Cash in Bank. If it is set to the Commission Income option, Trams updates Cash in Bank and
Commission Income.
3. Receipts Report: Select Reports|Payments|Receipts. Set the Pay Method as “Credit Card” and set
Received From as “Client.”
Trams uses this report to show what has been update by the EOP in Client Balances, Vendor Balances &
ARC/BSP Balances.
4. Disbursements Report: Select Reports|Payments|Disbursements. Set the Pay Method to “Credit Card”
and set Paid To as “Client.”
Trams uses this report to show what has been updated by EOP in Client Balances, Vendor Balances &
ARC/BSP Balances.
5. Receipts Report: Select Reports|Payments|Receipts. Set the Pay Method to “Cash/Check/EFT” and
set Received From as “Client.” Trams creates this report for each bank account. The system creates the
report a second time with Received From set to “Vendor.”
Trams uses this report to show what has been updated by EOP in Cash, Client Balances & Vendor
Balances. The Receipts Report also shows EOP updates in ARC/BSP Balances for EFT's from ARC/BSP.
6. Disbursements Report: Select Reports|Payments|Disbursements. Set the Pay Method to
“Cash/Check/EFT” and set Profile Type as “Client.” Trams creates this report for each bank account. The
system creates the report a second time with Paid To set to “Vendor.”
Trams uses this report to show EOP updates in Cash, Client Balances and Vendor Balances. The
Disbursements Report also updates ARC/BSP Balances for EFT's to ARC/BSP.
7. Receipts Report: Select Reports|Payments|Receipts. Set the Pay Method to “CC Merchant” and set
Received From as “Client.”
Trams uses this report to show EOP updates in Cash and the CC Merchant account.
8. Disbursements Report: Select Reports|Payments|Disbursements. Set the Pay Method to “CC
Merchant” and set Paid To as “Client.”
Trams uses this report to show EOP updates to Cash and the CC Merchant account.
Additional End of Period Reports for BSP Users
At the end of each month, run the following reports to verify the amount of TAX to be paid.
1) Run an Invoice Activity Report by going to Reports|Invoice|Activity.
2) Compare the tax amounts on this report with the amounts in the Balance Sheet accounts created for
these taxes (Reports|General Ledger|Account History).
3) When sending the quarterly check to pay the tax due, go to Payments|Made. Enter the amount of the
tax due. Use the profile type "Other" that was created for these taxes and create the following journal entry:
Debit
4/7/15
Credit
174
Setting Up Trams Back Office
Cash in Bank
GST Payable
500.00
500.00
Summary
If the Core Reports are being successfully maintained, financial statements are easily obtained through
Trams, provided opening balances have been correctly entered. It is important to provide these basic
financial statements, as well as a detailed audit trail, to the agency accountant for review. In addition to the
Income Statement and Balance Sheet reports, several audit trail reports, including the Account History
report, are also available.
Note: The recommendations contained in this application Note are designed to allow the Trams
Back Office system to produce information in a manner which Trams believes to be useful to a travel
agency; however, Trams makes no representation or warranty that the recommendations, if applied,
will conform to generally accepted accounting or auditing practices or principals or to any type of
financial reporting requirements. To the extent that any reports generated by Trams Back Office are
used for reporting purposes, including tax reporting, we strongly suggest to review these
recommendations either with a certified public accountant or tax advisor, as applicable.
Maintain the GL & Balancing Core Reports to
Trial Balance Report
Once the bank statement and all ARC/BSP reports for the month are reconciled:
1. Click General Ledger|End of Period and create the End of Period journal entry.
2. Print the Trial Balance Report. (Reports|General Ledger|Trial Balance)
3. Print the Management Summary Report and Note the balances for the following Core Report totals:
Client Balances
Vendor Balances
ARC Balances
Check Register
Note: There is a Total Base column on this report, The yield percentage is the commission divided by total
base.
5. Each month, compare the Ending Balances of all Core Reports against the Trial Balance Report. The
Core Reports and the Trial Balance Report should balance to the penny before posting occurs. If one or
more of the Core Reports does not balance to the Trial Balance, print the GL Reconciliation Report.
a. Click Reports|General Ledger|GL Reconciliation.
b. Although not every entry on this report needs to be cleared off, the report gives the best idea of why
the Trial Balance is out of balance. Check each item’s warning message. (For warning definitions see
the manual under Reports|General Ledger|GL Reconciliation Report.) To make corrections, Void the
End of Period first.
c. After making corrections, create the End of Period journal entry again.
d. Print the Core Reports again, along with the Trial Balance Report.
e. Verify that the Core Reports and the Trial Balance are now in sync.
6. When the Four Core Reports match the Trial Balance, go ahead and post. Posting to the General Ledger
is permanent. Changes can no longer be made to the journal entries; however, adjusting journal entries can
175
4/7/15
Setting Up Trams Back Office
always be added to the period if needed. Click General Ledger|Posting and Post to the General Ledger.
GL Reconciliation Report
The GL Reconciliation report is used to aid in reconciling financial reports at the end of the month. It flags
items that could possibly cause financials to be out of balance when compared against the Core reports.
1. Select Reports|General Ledger|GL Reconciliation.
2. Type in the From and To dates for the period being reconciled.
3. Click Preview to view on screen. (Or click Print to send report directly to the printer without viewing.)
4. The report displays a list of items that may need correcting. Query each item and correct it if needed.
Possible GL Reconciliation messages are listed below.
Message
Description
Payable is not Journalized and Should Be
Payment Is Journalized and Shouldn’t Be
Only Payments Received and Made where the Profile
Type is Other or where the Payment Method is Other,
or Bank Withdrawals should be journalized.
Payment Is Not Journalized and Should Be
Payments Received and Made where the Profile
Type is Other, or where the Payment Method is Other,
or Bank Withdrawals must have a journal entry.
Payment Amount Doesn’t Match Journal Entry
Amount
The amount of the payment does not match the
amount posted to the Cash in Bank account in the
journal entry. This message also appears if the
amount is being posted to the incorrect Cash in Bank
account or the debits and credits have been reversed.
Payment Date Doesn’t Match Journal Entry
Date
The date on the payment screen should always
match the date in the journal entry screen.
4/7/15
176
Setting Up Trams Back Office
Pymt Invalid For JE That Affects Client
Balances***
1) A journal entry should only affect Client Balances
when a Payment Received or Made is entered that
has a payment method of Other and a profile type of
Client.
2) A Pseudo EOP entry exists.
Pymt Invalid For JE That Affects ARC/BSP***
1) A journal entry should only affect ARC/BSP when
a Payment Received or Made is entered that has a
payment method of EFT and a profile type of
Vendor-ARC/BSP.
2) A Pseudo EOP entry exists.
Pymt Invalid For JE That Affects Vendor
Balances***
1) A journal entry should only affect Vendor Balances
when a Payment Received or Made is entered that
has a payment method of Other and a profile type of
Vendor-Supplier.
2) A Pseudo EOP entry exists.
Pymt Invalid For JE That Affects Cash In
Bank***
1) A journal entry should only affect Cash in Bank
when a Payment Received or Made is entered that
has a payment method of cash, check or EFT and a
profile type of Client, Vendor or Other. Also for Bank
Withdrawals.
2) A Pseudo EOP entry exists.
Credit Card Pymt Date Doesn’t Match Invoice
Date
A client payment with a payment method of Credit
Card should have the same date of the invoice.
Bank Account #1 Difference Between Receipts
And Deposits: 500.00
There should always be a receipts report to match
every deposit. The message means there is a
discrepancy and the deposit entered needs to be
re-reconciled.
Zero Dollar Client or Vendor Balance Journal
Entries Exist
User creates a payment received from a client with a
payment method of other, invoice appears and user
marks it closed. When the journal entry comes up
TBO shows credit to Client Balances (which is
correct), but the user then makes the Debit to Client
Balances also which throws off the GL.
*** When a Posted End of Period is voided, the entry is converted back into a normal journal entry and a
reversing journal entry is also created. This results in these messages seen here. If receiving these
messages as the result of a voided End of Period, ignore the message.
Canadian TBO Set Up and Special Usage
This section of the TBO manual is for Canadian setup and usage. Please read through this
section and mark it as a favorite in the help files for reference. Canadian agencies should follow the setup
as outlined for all users in this section with the following exceptions.
177
4/7/15
Setting Up Trams Back Office
BSP Taxes Initial Setup
Canadian taxes can get complicated. Here are the suggested steps to setting up the tax table in TBO. This
needs to be setup prior to interfacing. If working with GDS Integration, get help with this after filling out an
Interface Appointment sheet or set up an appointment by e-mailing [email protected].
1) Go to Utilities|Setup|Global Defaults|Tax Related Tab to designate which taxes go to which tax fields
when interfacing from the reservation system.
All Provinces Setup
BSP TAX 1: Leave Blank.
BSP TAX 2: Leave Blank, except Quebec, enter XQ.
BSP TAX 3: Leave Blank (if any other taxes need to be tracked, do so in this or TAX 4 box).
BSP TAX 4: Leave Blank.
Comm Rate: 5% or 10% (What is preference to use for interfacing?) The commission rate for vendors used
in reservations defaults to the vendor commission field in the TBO vendor profile. If the vendor default
commission in TBO is blank, then the commission defaults to the amount entered in the field called Comm
Rate.
HST/GST Rate: Enter the rate based on the province.
QST Rate: 7.5% subject to change by government regulation.
Tax 1 Codes: Leave Blank.
Tax 1 GST Applies: Leave Blank.
Tax 2 Codes - Taxes wanted to report for clients; i.e. a Quebec agency wants to report to their client how
much XQ Tax clients have paid, so they would put XQ in this field.)
Tax 2 GST Applies: Leave Blank.
Tax 3 Codes: Put code on any other tax to report.
4/7/15
178
Setting Up Trams Back Office
Tax 3 GST Applies: Leave Blank.
Tax 4 Codes: Put code on any other tax to report.
Tax 4 GST Applies: Leave Blank.
GST Codes - For Canada use XG,RC code only.
IMPORTANT CONSIDERATIONS:
Since the Client GST/HST is passed to Trams Back Office either via the GDS or the invoice generated from
a ClientBase Res Card, our focus in this update has been on implementing place of supply logic to better
default the percentage used to calculate the Commission GST/HST.
A hard coded table of Provinces and their applicable GST/HST rates has been added that will be referenced
during interface processing based on the rules of supply enhancement.
AB 5%
BC 12%
MB 5%
NB 13%
NL/NF 13%
NS 15%
NT 5%
NU 5%
ON 13%
PE 5%
QC 5%
SK 5%
YT 5%
To comply with the rules, a two prong approach was implemented.
1. Create logic to determine the place of supply based on the Travel Category.
2. Once the place of supply is determined, do a lookup of the Province GST/HST Rate associated with each
Province.
The new Commission GST/HST logic is only applied during interface processing. Invoices generated from
ClientBase contain the Commission GST/HST based on Agent input.
Using the Travel Category to Determine Place of Supply Logic
During interface processing, based on the travel category linked to the travel type, logic will be applied to
determine the Province of supply. Once the Province is identified, the Province rate will be determined
based on a hard coded rate table.
Travel Categories that use the Province in the Vendor Profile:
Air
Hotel
Cruise
Tour
Rail
179
4/7/15
Setting Up Trams Back Office
Transportation
Travel Category that Use the City in the Itinerary Field of the Booking Record:
Car
Travel Category that use the Province in the Client Profile:
Service Fees
Travel Categories that are HST Exempt:
Insurance
International
Zero Rated
Transborder 5% is applied to all Travel Categories
Setting Up Profiles and City Code Provinces
Since a large portion of the Commission GST/HST calculations will be based on the profile Province where
the client and vendor resides, it is ESSENTIAL to ensure the TBO client and vendor profiles contain a
Province and non-Canadian Vendor profiles contain a Country code. The province should use 2 letter codes
as follows: BC, AB, etc. (Please use drop-down menu to select province code.)
The lookup logic on the profile will first look for Canadian profiles by checking the country field. If the country
field contains CANADA or is blank, it will look in the Province field to determine if there's a match to one of
the Provinces in the rate table and if so, use the applicable rate to calculate the Commission GST/HST for
the booking.
For cars, we will look for the pickup city in the itinerary field of the TBO booking, and then use the city code
table to locate the province and lookup the province rate. Therefore, it is also important that the city code
table (Utilities|Setup|City Codes) has province codes for each applicable city and they match the province
codes listed above.
Processing Error Log Entries
It is important to review the log carefully for entries that pertain to HST.
Entries that are now logged to Reports|nterface|Processing Error Log include the following examples:
4/7/15
180
Setting Up Trams Back Office
HST Set to 12% for Car Booking Based on City=YVR, Province=BC
HST Province Lookup for Vendor Sheraton Failed; Province=
HST Set to 5% for Service Fee Booking Based On Client ABC Manufacturing/, Province=AB
Markups and Discounts and Commission GST/HST
Since the place of supply rules also apply to markups and discounts, when creating an additional booking
record in an invoice for the markup/discount, agencies will need to create a Markup/Discount Vendor for
each Province and link to the proper profile (containing the province code) accordingly so that the correct
percentage is used to make the calculation.
For transactions with discounts/markups, where users are creating a separate booking in the invoice, a
discount/markup vendor should be created for each Province with the Province field in the vendor profile
populated for each province and also Canada in the Country field. The correct HST on Commission can
then be calculated for these transactions.
Misc:
**BSP ticket data seems to be pretty straight forward as the HST is broken out in the Interface record via an
RC Code. This RC Code should be mapped in Trams Back Office to the GST Tax field (which again will
shortly be relabeled GST/HST). This is done by going to Utilities|Global Defaults|Tax Related and
ensuring both XG (GST) and RC (HST) codes are captured in the GST Codes field. Separate them with a
comma (XG,RC). Be sure the RC code is not also captured in any of the Tax 1 - 4 Codes.
**We now accept multiple TX entries for Client GST (i.e. XG and RC) on the same MS line as long as the
client GST was not already set from a previous line or some other non-MS entry.
**For Sabre, we read any accumulated Client GST,QST taxes from the AC line which means we won't have
a breakdown by tax code. GST/HST will go into Client GST, QST if present will go into the designated tax
field and everything else goes into the tax field designated for XT or Tax 1.
2) Next, Go to Utilities|Global Defaults|Interface/Mailmerge Prompt Tab.
3) Fill in the local currency with CAD - this interfaces the Total Fare in each booking made in Canadian
dollars.
181
4/7/15
Setting Up Trams Back Office
4) Check the box Read Multiple Taxes.
5) When all other setup has been completed, click OK to save.
Notes:
**Transborder Indicator is interfaced at the Invoice level and is defined by the CRS. An International override
can be triggered by placing a *IX in the remarks field of the PNR.
**RBC Insurance Scripts: If the agency books with RBC Insurance, inform them of the cutover date to Trams
Back Office. This prompts them to change the profile so that the correct scripts are being utilized.
BSP Bank Accounts Initial Setup
These are steps to setup bank accounts including use of Conversion Codes for different countries'
currencies.
1) Go to Utilities|Setup|Bank Accounts (make sure to enter the CAD currency code under
Utilities|Setup|Global Defaults|Interface|Mailmerge Prompt as outlined above).
2) Highlight "Bank Acct No 1" and change the Name and Description in the entry boxes above to the Name
of the primary bank account. Do not enter CAD in the Currency code because it was set up in the Global
Defaults (see above). The Conversion Rate is 1.0000. Assign a G/L Branch if using more than one Branch.
Click Update.
3) Click New on the right hand side of the screen and enter the second Bank Account Name and Description.
Leave the Currency code blank, Conversion rate 1.0000. Enter any other pertinent information and click
Add.
4) Proceed to enter all of bank accounts in the same manner. Make sure all is seen correctly in the data
entry screen below, and click OK to save.
Note: Entering the Account No. and Routing No. enables the printing of deposit slips to bring to the bank.
(See section Deposits in Payments Chapter.)
5) If there is a USD Bank account, enter the information about the account and also enter the USD Currency
code.
Currency Code
4/7/15
The 3-letter code of the country the bank account is in. The code is entered only if
the bank account is different than the local currency.
182
Setting Up Trams Back Office
Conversion Rate
The current default rate from the bank is defaulted to 1.0000. If using local currency,
do not change this area. If there is set up a Currency Code that is different from the
local currency above, leave the default, and change the rate when the payment is
received, or put the current conversion rate here.
6) When entering a Payment (Received, Made, Deposit, Withdrawal) using the USD Bank Account, a
Conversion Rate and Equivalent Amount Box appears on the Payment screen. Enter the day's rate on this
screen as each payment is entered, rather than going to Utilities|Setup to change it.
Canada General Ledger Accounts Initial Setup
If using Conversion Rates, set up special GL accounts in the Chart of Accounts.
1) Go to General-Ledger|Accounts to add and modify G/L accounts.
2) Add bank accounts by highlighting each bank account and changing the name to the name of the bank
account. If more than two bank accounts are needed, choose the next number in the series (1010) for the
third account and 1020 for a fourth account.
3) Add a conversion account to be used when converting CAD to USD and USD to CAD. This account is
usually set up as: 1001 Currency Conversion.
4) Add a Liability Account in the 2000 series for GST Payable and an Offset Account in the 2000 or 1000
series for GST Expense.
5) If paying the QST tax, create the Liability - QST Payable and QST Offset account also.
6) Add an Asset Account named "GST Receivable". (See G/L Accounts Setup below for more information.)
7) The Payroll Tax Liability accounts in the 2100 series and the Payroll Expense accounts in the 6000 series
should be renamed using the correct terminology for Canada. The FICA Payable tax, for example, is the
same as the Canada Pension, or Quebec Pension. State Withholding Payable should be changed to
Provincial Income Tax.
8) Make a note of the Account Numbers added or changed.
183
4/7/15
Setting Up Trams Back Office
9) When these accounts are set up in the General Ledger, click OK to save.
Canada G/L Accounts Initial Setup
Now we need to tell TBO where some of the GL accounts reside.
1) Go to the Utilities|Setup|G/L Accts. (This is also called the End of Period Table because it tells the
Trams Back Office program where to journalize the information in the Invoices and Payment entries when
the End of Period is created.)
2) Under the Bank Accounts Tab, highlight each Bank Account and enter the correct G/L account number
in the fields above.
3) Any Bank Accounts that are not CAD - set the Conversion G/L No to 1001.
4) Under the Others Tab make sure the GST Payable and QST Payable (if required) are set to the accounts
that were created in General-Ledger|Accounts.
5) In the GST Receivable account, enter the account that was created in General-Ledger|Accounts.
Note: When the "GST Receivable" Account is entered into the GL Acct #2 field of an "Other" Profile, the
same GST Calculation is performed as when the GST Payable account is entered.
Additional End of Period Reports for BSP Users
At the end of each month, run the following reports to verify the amount of TAX to be paid.
1) Run an Invoice Activity Report by going to Reports|Invoice|Activity.
2) Compare the tax amounts on this report with the amounts in the Balance Sheet accounts created for
these taxes (Reports|General Ledger|Account History).
3) When sending the quarterly check to pay the tax due, go to Payments|Made. Enter the amount of the
tax due. Use the profile type "Other" that created for these taxes and create the following journal entry:
Debit
4/7/15
Credit
184
Setting Up Trams Back Office
Cash in Bank
GST Payable
500.00
500.00
Quebec TAX - OPC - Consumer Protection Fund
The Quebec government has introduced a new Consumer Protection Fund, and the agency has to collect
the fees. The Consumer must pay 35% or $3.50 on every thousand dollars in Travel. This charge must be
represented as a separate line item on the client's invoice. For the first year the agency is allowed to keep
10% of the monies collected during the quarter and 3% after the first year. Setup and use for OPC:
1) Set up a new vendor. The name of the vendor optional, but one recommendation is OPC or OPC Fees.
Enter an Interface ID, which could be OPCFEES.
2) Go to General-Ledger|Accounts and create a new 4xxx Sales account and a new 5xxx Cost of Sales
account.
3) Go to Utilities|Setup|Travel Types and setup a new Travel Type, OPC Fees.
4) Go to Utilities|Setup|GL Accts and point this new travel type to the new Sales and Cost of Sales
accounts.
5) In order to create the new booking on the invoice, drive a manual accounting line for this fee at 0%
commission so that the vendor collects the entire amount payable and there is no income earned.
6) At the end of the quarter send a check, along with the form, to the government. Deduct 10% which can
then be taken as income.
(Please note that at this time BSP does not process these credit card charges for the agency. Since it has
to appear as a separate item on the client's invoice, it cannot be included in the existing service fees. One
option is to have each agent enter the charges to the point of sale machine for every invoice generated
which might work in a very small agency but not be effective in an agency with any kind of volume.)
Note: Both IATS (TicketMaster), CSI (Card Services International, and Pinnacle Payment Solutions
(formerly PRI) are willing to handle the OPC Fund charges provided the agency gives them their service fee
business as well. This charge must appear on the client original invoice, and it cannot be backdated.
Air Canada Credit Memos
As of April 2004, Air Canada began paying commissions via credit memos, which are processed through
BSP. These are the recommended steps agencies should follow to properly account for these transactions.
1) Create the invoice in Trams Back Office either via interface or manual entry. The issue date will reflect
the actual date of the sale:
* Submit to = Supplier (Comm Track invoices would not account for sales/cost of sales in the general
ledger)
*
Total Fare = Amount of ticket
*
Commission = Amount of commission earned on the ticket
*
Form of Payment = Credit card
*
Sales Agent(s) = Sales Agent(s) in PNR
2) On the Monday after the BSP Canada Web sale, BSP will e-mail the Web Cash Reward report and Web
Account file.
3) When receiving the BSP Report, it will list the credit memo, and at that time create an adjustment Invoice
in Trams Back Office (Invoices|Adjustments, or Debit/Credit Memo) - one booking record for each
185
4/7/15
Setting Up Trams Back Office
confirmation number.
*
Client name on the invoice = Air Canada
*
Vendor name on the invoice = Air Canada
*
Memo number in the invoice = Credit memo number
*
Original Ticket number in the invoice = Credit memo number
* Do not enter any Sales Agents to the credit memo as they were already tagged when the supplier
invoice was created in Step 1
4) Perform the BSP Settlement as usual.
5) Run a Vendor Statement Summary report (Reports|Vendor|Statement) and compare this to the Credit
Memo from Air Canada. This serves as a reconciliation process to ensure that the proper commissions were
received from Air Canada on the Credit Memo.
*
Report type = Summary
*
Vendor Name = Air Canada
*
From and To dates = BSP reporting period
6) Write off the Vendor Balance on the Vendor Balance Report created from Step 1. Go to
Payments|Received after determining the amount of write-off based on the reconciliation process in Step
5. Enter the amount in the amount field of the payment received screen with a Pay Method = Other; Payment
Date = BSP Settlement Date; Profile Type = Vendor Supplier; and Name = Air Canada. Toggle closed
invoices that were paid by the Credit Memo from Air Canada and journalize to BSP Adjustments.
Note: Agent Statements will be affected by the write-off of the Vendor Balance, as this is a Supplier CC
transaction and should be set to Vendor Payment Date.
4/7/15
186
Setting Up Trams Back Office
187
4/7/15
7
Profiles
This chapter contains:
Overview of Leisure or Corporate Client, Vendor, Other and Agent Profiles
Steps for creating Leisure or Corporate Client, Vendor, Other and Agent Profiles
Profile Query Overview
Creating New Profiles in Trams Back Office
Profiles are source records for statements and mailing lists for customer and vendors. Profiles store
information about individuals and companies with whom the agency does business and are generally
defined as “billing entities.” Think of the profile as ledger cards in a manual system. When entering invoices
or payments, Profiles eliminate the need to re-key data.
Create Profiles manually, or capture them via interface from the GDS. (See the Interface Section for GDS
entries required to capture profile information.) Trams Back Office recommends that if creating a new profile
manually, create it from the Query screen. This minimizes the possibility of having duplicate profiles in the
database. By using the first few letters of the last name in the query screen, any profiles beginning with
those letters are displayed. At a glance, determine if the profile already exists in the system. If the system
finds no match, click on the New tab and complete the fields for the new profile. The only mandatory field
for a profile is the last name field.
If certain the profile does not already exist in the system, create a new profile by going to the Profile main
menu. Select the type of profile to enter, Leisure, Corporate, Vendor, Agent or Other and complete the
information fields. The more fields completed, the greater the opportunities become for future target
marketing.
Tip: Although profiles can be created during Interface, they are NOT updated automatically. View any
changes received during Interface in the Processing Error Log.
Leisure Client Profiles
When creating a leisure profile, consider who is responsible for payment. (We recommend one profile per
paying party.) Build a profile for each billing party who purchases (or may purchase) travel from the agency.
Each invoice entered must link to an existing client profile. Review the listing of fields below to get familiar
4/7/15
188
Profiles
with the data that exists in the profiles.
TABS:
General
Communications
Travelers
Payment Info
Groups
Marketing
Agents
Attachments
GENERAL TAB
Last Name/First/Middle
Client's name. Last Name is the only field required to create a profile.
Contact Title
Owner, Manager, President, etc.
Courtesy Title
Suggested use is Mr. and Mrs./Mr./Mrs./Dr. etc., Field shows on mail
labels and statements.
Salutation
Name to use when greeting client, e.g. First Name (Robert), Nickname
(Bob), etc.
Street Address 1/2
Mailing Street Address used on reports, including statements, and mail
labels. Two lines can be entered.
City, State, Zip and Country
Client's city, state ZIP code (and country, if applicable). The ZIP code
can contain letters and numbers.
Payee Name
Person/Entity usually financially responsible for account.
Interface ID
This field is used to identify client profiles in Trams Back Office during
interface. This is entered in the PNR as Client ID. Trams Back Office
recommends using the client’s phone number as the ID (see Interface
Guide for additional information.) Enter up to ten alpha/numeric
characters.
Credit Limit
Type in credit limit amount for profile if desired. “Available Balance” line
appears on Client Statements and is calculated from Credit Limit in
Profile less amount outstanding on statement.
Inactive
Click this box to mark this profile Inactive. It will not longer appear in the
Query Screen.
189
4/7/15
Profiles
Primary Agent
To designate a primary agent for this client, type a few letters of the
agent’s name and choose agent from the drop-down menu. This field is
filled in with the agent sine during interface.
Branch
Specify a particular branch this profile is associated with.
Continue Entering Profiles
Click this box to continue entering profiles without getting “booted” out of
this screen.
COMMUNICATIONS TAB
Entering Type, Value,
Description, Traveler Name.
Using Add, Update, and
Primary.
Select type (phone, e-mail, fax, or web) by clicking the down arrow on
the scroll bar. The recommended format for entering the phone number
is nnn/nnn-nnnn. The area code and the country code entered into
Global Defaults automatically default. After entering Type, Value, and
Description (cell phone, business email, etc.), Click Add. Enter as many
profile communication entries this way or click on the Travelers tab to
enter more specific traveler communication items which will appear here
with the Traveler’s name. To edit an entry, double-click on item, make
changes and click Update.
The first entry of each type defaults as primary. Any selected entry can
be designated as primary by clicking on the Primary button.
Using Delete/Edit Traveler
Communication
All Travelers must be associated to a profile, but can be linked to multiple
profiles. The delete button removes the Traveler from the current profile.
Once the contact is deleted from the last remaining associated profile,
the profile will be deleted from the database.
Email addresses (and other communication entries) now reside in the
Traveler/Contact record, but viewing and/or changing those
Traveler/Contact communication entries can be done by clicking on Edit
Traveler Communications after first selecting the entry.
4/7/15
190
Profiles
Columns
The Columns can be sorted in ascending order when the column header
is clicked once and in descending order when clicked a second time
(with the exception of Primary Phone and Primary E-mail at this time).
TRAVELERS TAB
Starting in TBO version 3.05, the passenger table that associates a passenger with a profile was
redesigned. All references to passenger have been relabeled to traveler: Passenger name on booking
screen (drop down), Invoice Query Columns, Profiles, Profile Query, Passengers on existing invoices, and
Family and Employee tabs
Important Note: Functionality with the passenger (traveler) in the invoice booking record has not changed
in terms of functionality. The field label was simply changed from Passenger to Traveler.
All travelers must be a part of a profile, but can be linked to multiple profiles.
ADD A NEW TRAVELER:
1) Type the Traveler First Name, Middle Name, Last Name, Relationship, and click Add. Need to add a
phone number, fax, email or web address? Select the entry and click Comm Info to enter. Want to make this
entry the primary entry for the profile? Select the entry and click Primary.
2) When the Add button is clicked, a query runs to search for any travelers that match the data entered in
First/Middle/Last name. At least two of the three Name fields must be entered in order for the search to run.
If no match is found, a new Traveler record can be created. If match(es) are found, a window entitled
Traveler Search is displayed, from which the user can either link the existing traveler or cancel.
3) Click Payment Info to add a credit card or bank information linked to this Traveler. Updates for any
payments linked to a specific traveler must be done from within the Travelers tab.
4) If this traveler is associated with other profiles, the Associated Profiles button is available. When clicked,
a new window entitled Associated Profiles opens and a list of the associated profiles for that traveler is
displayed which includes the number of profiles the traveler is associated with.
Delete removes the Traveler from the current profile. Once a traveler is deleted from the last remaining
191
4/7/15
Profiles
Associated Profile, the traveler is then deleted from the database. If a traveler is linked to a booking and
deleted from a profile, they will no longer be linked. The name will still appear on the booking as if a free
flow name had been entered. Update is clicked when changes are made to the Traveler information.
PAYMENT INFO TAB
New cards can be added from within the payment info tab, however, they will not be linked to any specific
traveler. Cards that are linked to a traveler cannot be modified from this tab, but can be modified within the
Traveler tab by clicking on the Payment Info button.
Bank Account/Routing No.
This Payment Method can be used for handing off data from TBO to a
Payment Distribution Service or the local bank. For complete directions
on using this feature, please refer to the Payments section of this
manual.
Credit Card Number
Enter credit card number/expiration date. Number is automatically
retrieved for credit card payments. The first credit card entered is the
default credit card used, but any entered credit card can be selected
when a credit card payment is entered. Enter also in this area under
ACH (Automated Clearing House) Settings, Bank Account/Routing No.
for use if authorized.
Exp. Date
Click Exp.Date button and select date from calendar. Click OK. Click
Add.
Name on Account
Enter name of cardholder.
GROUPS TAB
Group/Batch
Any group(s) to which the client belongs. This field can be used as a
selection criteria for reports, or to print group statements and summary
reports. Set up new groups from here by clicking the Group/Batch
button, or from Utilities|Setup|Groups. Click on Add.
MARKETING TAB
Business Affiliation
Client's employer. Field is used as selection criteria for lists and labels.
Other
Any other marketing data important to particular client. Field is used as
selection criteria for lists and labels.
Notes
Any free-flow information about the client. Field is used as selection
criteria for lists and labels.
Additional Notes
Additional field for comments or Notes about the customer. Field is used
as selection criteria for lists and labels.
Statement Remark
IMPORTANT! Any remarks entered in this area of the client profile
appear on ALL statements generated for this profile.
Travel Preference
Any particular travel preference the client may have. Field is used as
selection criteria for lists and labels.
Check Remarks
Enter a specific profile remark that prints on the check for payments
made using the profile.
4/7/15
192
Profiles
Alt Interface ID
The interface process now checks both Interface ID and Alternate
Interface ID for a match on clients and vendors. This feature is used by
those agencies that are using multiple GDS interfaces where the
interface ID's for Hotel Codes are different for each GDS. Now use a
single vendor profile for both systems. Put one Interface ID in the
Interface ID field on the profile General Tab, and for a different GDS, the
other Interface ID in the Alt Interface ID field on the Marketing Tab. Enter
up to ten alpha/numeric characters.
AGENTS TAB
Agents
Enter the name(s) of the agent(s) that will be attached to this profile.
Enter the commission percentage that each agent will receive on every
invoice issued to this particular client. Note: This adds the agent to
every invoice interfaced to Trams Back Office.
ATTACHMENTS TAB
Starting with Trams Back Office version 3.05, an attachment tab was added to all profile (Client, Vendor,
Agent, Other), all invoice types (sale, refund, adjustment) and the payment screens. The tab is located
adjacent to the tab now named General at the top of each screen. Within the workspace area of the new
attachment tab, users can manage (add, view, delete, update) electronic documents of any type.
Filename
Click the browse button to locate to the desired file.
Compressed
Defaults to enabled. Compressing the file helps to reduce the file size
(maximum file size is 8MB).
Description
Enter a user-defined description.
Path
This field is automatically populated based on the location of the file.
Add, adds a new file; Update, updates the existing file with a new or updated file; View, opens the file; and
193
4/7/15
Profiles
Delete deletes the attached file. Extract copies the file to another location on your computer.
Entering Client Profiles
Leisure and Corporate profiles contain most of the same information and are entered the same way.
1. Click Profiles|Client|Leisure
2. Start with the General tab. The last name of the client (and the Interface ID field if the agency plans to
TABS:
General
Communications
Travelers
Payment Info
Groups
Marketing
Agents
Attachments
interface invoices for this profile in the future) is the only field required for building a Profile. Query a profile
and modify existing information at any time. Trams Back Office recommends entering as much
information as possible in all profiles. If a field is left blank, it is not used in future applications. For
example, if the address fields are left blank, statements and all other output using the address will have
blanks where the address would print. Trams Back Office also recommends use both upper and lower case
(e.g. Palley/Dan instead of PALLEY/DAN) when entering the name and address information to enhance the
appearance of the mailing labels and other types of correspondence.
2. Click the Communications, Travelers, Payment Info, Groups, Marketing, Agent, or Attachments tabs to
add as much information to the profile as possible. For more information on these area, read section,
Leisure Client Profiles.
4/7/15
194
Profiles
3. When the Profile is complete, click OK. To continue entering, select New from the query screen.
Tip: Look at the bottom of the New Profile screen. There is a checkbox next to Continue entering profiles.
To enter multiple profiles at one time, make sure the box is checked. When finished entering profiles, click
on the box and remove the check to return to the main menu instead of the profile entry screen.
Corporate Client Profiles
Corporate clients are business accounts. Their information is kept separately from Leisure clients. The
business name is the only required field for a corporate client profile. Review the list of fields below to get
familiar with the data available in profiles.
TABS:
General
Communications
Travelers
Payment Info
Groups
Marketing
Agents
Attachments
GENERAL TAB
Last Name/First/Middle
Client's name. Last Name is the only field required to create a profile.
Contact Title
Owner, Manager, President, etc.
Courtesy Title
Suggested use is Mr. and Mrs./Mr./Mrs./Dr. etc., Field shows on mail
labels and statements.
Salutation
Name to use when greeting client, e.g. First Name (Robert), Nickname
(Bob), etc.
Street Address 1/2
Mailing Street Address used on reports, including statements, and mail
labels. Two lines can be entered.
City, State, Zip and Country
Client's city, state ZIP code (and country, if applicable). The ZIP code
can contain letters and numbers.
Payee Name
Person/Entity usually financially responsible for account.
195
4/7/15
Profiles
Interface ID
This field is used to identify client profiles in Trams Back Office during
interface. This is entered in the PNR as Client ID. Trams Back Office
recommends using the client’s phone number as the ID (see Interface
Guide for additional information.) Enter up to ten alpha/numeric
characters.
Credit Limit
Type in credit limit amount for profile if desired. “Available Balance” line
appears on Client Statements and is calculated from Credit Limit in
Profile less amount outstanding on statement.
Inactive
Click this box to mark this profile Inactive. It will not longer appear in the
Query Screen.
Primary Agent
To designate a primary agent for this client, type a few letters of the
agent’s name and choose agent from the drop-down menu. This field is
filled in with the agent sine during interface.
Branch
Specify a particular branch this profile is associated with.
Continue Entering Profiles
Click this box to continue entering profiles without getting “booted” out of
this screen.
4/7/15
196
Profiles
COMMUNICATIONS TAB
Entering Type, Value,
Description, Traveler Name.
Using Add, Update, and
Primary.
Select type (phone, e-mail, fax, or web) by clicking the down arrow on
the scroll bar. The recommended format for entering the phone number
is nnn/nnn-nnnn. The area code and the country code entered into
Global Defaults automatically default. After entering Type, Value, and
Description (cell phone, business email, etc.), Click Add.
Enter as many profile communication entries this way, or click on the
Travelers tab to enter more specific traveler communication items which
will appear here with the Traveler’s name. To edit an entry, double-click
on item, make changes and click Update.
The first entry of each type defaults as primary. Any selected entry can
be designated as primary by clicking on the Primary button.
Using Delete/Edit Traveler
Communication
All Travelers must be associated to a profile, but can be linked to multiple
profiles. The delete button removes the Traveler from the current profile.
Once the contact is deleted from the last remaining associated profile,
the profile will be deleted from the database.
Email addresses (and other communication entries) now reside in the
Traveler/Contact record, but viewing and/or changing those
Traveler/Contact communication entries can be done by clicking on Edit
Traveler Communications after first selecting the entry.
Columns
197
The Columns can be sorted in ascending order when the column header
is clicked once and in descending order when clicked a second time
(with the exception of Primary Phone and Primary E-mail at this time).
4/7/15
Profiles
TRAVELERS TAB
Starting in TBO version 3.05, the passenger table that associates a passenger with a profile was
redesigned. All references to passenger have been relabeled to traveler: Passenger name on booking
screen (drop down), Invoice Query Columns, Profiles, Profile Query, Passengers on existing invoices, and
Family and Employee tabs
Important Note: Functionality with the passenger (traveler) in the invoice booking record has not changed
in terms of functionality. The field label was simply changed from Passenger to Traveler.
All travelers must be a part of a profile, but can be linked to multiple profiles.
ADD A NEW TRAVELER:
1) Type the Traveler First Name, Middle Name, Last Name, Position, Department, and click Add. Need to
add a phone number, fax, email or web address? Select the entry and click Comm Info to enter. Want to
make this entry the primary entry for the profile? Select the entry and click Primary.
2) When the Add button is clicked, a query runs to search for any travelers that match the data entered in
First/Middle/Last name. At least two of the three Name fields must be entered in order for the search to run.
If no match is found, a new Traveler record can be created. If match(es) are found, a window entitled
Traveler Search is displayed, from which the user can either link the existing traveler or cancel.
3) Click Payment Info to add a credit card or bank information linked to this Traveler. Updates for any
payments linked to a specific traveler must be done from within the Travelers tab.
4) If this traveler is associated with other profiles, the Associated Profiles button is available. When clicked,
a new window entitled Associated Profiles opens and a list of the associated profiles for that traveler is
displayed which includes the number of profiles the traveler is associated with.
Delete removes the Traveler from the current profile. Once a traveler is deleted from the last remaining
Associated Profile, the traveler is then deleted from the database. If a traveler is linked to a booking and
deleted from a profile, they will no longer be linked. The name will still appear on the booking as if a free
flow name had been entered. Update is clicked when changes are made to the Traveler information.
PAYMENT INFO TAB
New cards can be added from within the payment info tab, however, they will not be linked to any specific
4/7/15
198
Profiles
traveler. Cards that are linked to a traveler cannot be modified from this tab, but can be modified within the
Traveler tab by clicking on the Payment Info button.
Bank Account/Routing No.
This Payment Method can be used for handing off data from TBO to a
Payment Distribution Service or the local bank. For complete directions
on using this feature, please refer to the Payments section of this
manual.
Credit Card Number
Enter credit card number/expiration date. Number is automatically
retrieved for credit card payments. The first credit card entered is the
default credit card used, but any entered credit card can be selected
when a credit card payment is entered. Enter also in this area under
ACH (Automated Clearing House) Settings, Bank Account/Routing No.
for use if authorized.
Exp. Date
Click Exp.Date button and select date from calendar. Click OK. Click
Add.
Name on Account
Enter name of cardholder.
GROUPS TAB
Group/Batch
Any group(s) to which the client belongs. This field can be used as a
selection criteria for reports, or to print group statements and summary
reports. Set up new groups from here by clicking the Group/Batch
button, or from Utilities|Setup|Groups. Click on Add.
MARKETING TAB
Business Affiliation
Client's employer. Field is used as selection criteria for lists and labels.
Other
Any other marketing data important to particular client. Field is used as
selection criteria for lists and labels.
Notes
Any free-flow information about the client. Field is used as selection
criteria for lists and labels.
Additional Notes
Additional field for comments or Notes about the customer. Field is used
as selection criteria for lists and labels.
Statement Remark
IMPORTANT! Any remarks entered in this area of the client profile
appear on ALL statements generated for this profile.
Travel Preference
Any particular travel preference the client may have. Field is used as
selection criteria for lists and labels.
Check Remarks
Enter a specific profile remark that prints on the check for payments
made using the profile.
Alt Interface ID
The interface process now checks both Interface ID and Alternate
Interface ID for a match on clients and vendors. This feature is used by
those agencies that are using multiple GDS interfaces where the
interface ID's for Hotel Codes are different for each GDS. Now use a
single vendor profile for both systems. Put one Interface ID in the
Interface ID field on the profile General Tab, and for a different GDS, the
other Interface ID in the Alt Interface ID field on the Marketing Tab. Enter
up to ten alpha/numeric characters.
199
4/7/15
Profiles
AGENTS TAB
Agents
Enter the name(s) of the agent(s) that will be attached to this profile.
Enter the commission percentage that each agent will receive on every
invoice issued to this particular client. Note: This adds the agent to
every invoice interfaced to Trams Back Office.
ATTACHMENTS TAB
In TBO version 3.05, an attachment tab has been added to all profile (Client, Vendor, Agent, Other), all
invoice types (sale, refund, adjustment) and the payment screens. The tab is located adjacent to the tab
now named General at the top of each screen. Within the workspace area of the new attachment tab, users
can manage (add, view, delete, update or extract) electronic documents of any type.
Filename
Click the browse button to locate to the desired file.
Compressed
Defaults to enabled. Compressing the file helps to reduce the file size
(maximum file size is 8MB).
Description
Enter a user-defined description.
Path
This field is automatically populated based on the location of the file.
Add, adds a new file; Update, updates the existing file with a new or updated file; View, opens the file; and
Delete deletes the attached file.
Entering Corporate Client Profiles
Leisure and Corporate profiles contain most of the same information and are entered the same way.
4/7/15
200
Profiles
1. Click Profiles|Client|Corporate to create a new Corporate Profile.
Start with the General tab. The Name is the only field required for building a corporate profile. Query a profile
and modify existing information. Trams Back Office recommends entering as much information as
possible in all profiles. If a field is left blank, it is not used in future applications. For example, if the address
fields are left blank, statements and all other output using the address will have blanks where the address
would print. Trams Back Office also recommends using both upper and lower case (e.g. ABC Company
instead of ABC COMPANY) when entering the name and address information to enhance the appearance
of the mailing labels and other types of correspondence. Note: Don’t forget the Interface ID field if the
agency plans to interface invoices for this profile in the future.
4. Click the Communications, Travelers, Payment Info, Groups, Marketing, Agent, and Attachment tabs to
add as much information to the profile as possible. For more details on these tabs, read section entitled,
Corporate Client Profiles.
5. When the Profile is complete, click on OK and continue entering profiles by selecting New.
Tip: Look at the bottom of the New Profile screen. There is a checkbox next to Continue entering profiles.
To enter multiple profiles at one time, make sure the box is checked. When finishing entering profiles, click
on the box and remove the check to return to the main menu instead of the profile entry screen.
201
4/7/15
Profiles
Vendor Profiles
All vendors need a Vendor Profile, including Airlines, Tour Operators, Hotels, Car Rental Agencies, Cruise
Lines, etc. By creating a Vendor Profile, Trams Back Office maintains vendor balances, tracks commissions
due, as well as providing a complete history and analysis for each vendor. For example, each Holiday Inn
location/property can have its own profile to run statements and be grouped together for reports. (See the
Interface Guide to see how profiles are entered during the interface process.) Review the listing of fields
below to get familiar with the data available in vendor profiles.
Profile Name
The name of the Vendor.
Contact Last Name, First,
Middle
The name of the Vendor contact person.
Contact Title
Contact person's title, e.g., Accounts Payable.
Courtesy Title
Mr. and Mrs., Mr., Mrs., Dr., etc.
Salutation
Name to use when greeting vendor, e.g. First Name (Robert), Nickname
(Bob), etc.
Street Address1: and 2:
Mailing Street address of the company. There are two lines available for
street address.
City, State, Zip and Country
Company's city, state, ZIP code and country (if applicable). The ZIP
code can contain letters and numbers.
Payee Name
Person/Entity usually financially responsible for account.
4/7/15
202
Profiles
Interface ID
Allowing Trams Back Office to create vendor profiles during interface is
recommended. Each CRS has a unique code for the vendor. Avoid
using only character codes, such as HI or HH. This prevents the tracking
of individual properties. We recommend using the chain code with the
property code from your GDS.
Airline No.
For use with the res system interface: Enter corresponding airline
number.
% Commission
This rate is used when manually adding a booking to an invoice. This
rate defaults, but can be changed at the booking level. A blank field
indicates there’s no default for the profile, so TBO uses the global
vendor default percentages entered under Utilities. A vendor profile
entered with a 0.00% commission indicates that the default commission
rate should be zero. Vendor commissions are applied as follows: If a
vendor commission is specified at the booking level of the PNR, that rate
is entered in the Comm/Rate field of the booking screen during the
processing of the interface records. If NO commission amount or rate
was specified in the PNR, then the rate entered in the Vendor Profile,%
Commission field is used. A vendor profile entered with a 0.00%
commission indicates that the default commission rate should be zero.
A blank field indicates there's no default for the profile. If NO rate was
specified in the Vendor Profile, then the rate entered under
Utilities|Setup|Global Defaults|Tax-Related Tab in the Comm Rate
field is used. This rate is also used when manually adding a booking to
an invoice. This rate defaults, but can be changed at the booking level.
Preferred
Identify vendors as preferred by checking the Preferred box.
Preferred versus non-preferred performance is compared in the Vendor
Activity Report. Also print customized reports for preferred vendors in
the Report Generator.
This helps identify the preferred vendors and to produce valuable
reports.
Inactive
Click this box to mark this profile Inactive. It will not longer appear in the
Query Screen.
Continue Entering Profiles
Click this box to continue entering profiles without getting “booted” out
of this screen.
Example:
Budget Car Rental is a preferred vendor for your agency. You want to
change their profile to show their new status. Go to the main Profiles
menu, then to Query. Select Vendor as the Profile Type. Click on the
Name field and type in “Bud.” Click on Query. Highlight the correct
profile. Click on View to see the screen for this vendor, then click the
Preferred box. Click OK to save your changes.
203
4/7/15
Profiles
COMMUNICATIONS TAB
Entering Type, Value,
Description, Contact Name.
Using Add, Update, and
Primary.
Select type (phone, e-mail, fax, or web) by clicking the down arrow on
the scroll bar. The recommended format for entering the phone number
is nnn/nnn-nnnn. The area code and the country code entered into
Global Defaults automatically default. After entering Type, Value, and
Description (cell phone, business email, etc.), Click Add.
Enter as many profile communication entries this way, or click on the
Contacts tab to enter more specific Contact communication items which
appears here with the Contact’s name. To edit an entry, double-click on
item, make changes and click Update.
The first entry of each type defaults as primary. Any selected entry can
be designated as primary by clicking on the Primary button.
Using Delete/Edit Contact
Communication
All Contacts must be associated to a profile, but can be linked to multiple
profiles. The delete button removes the Contact from the current profile.
Once the contact is deleted from the last remaining associated profile,
the profile will be deleted from the database.
Email addresses (and other communication entries) now reside in the
Contact record, but viewing and/or changing those Contact
communication entries can be done by clicking on Edit Contact
Communications after first selecting the entry.
Columns
4/7/15
The Columns can be sorted in ascending order when the column header
is clicked once and in descending order when clicked a second time
(with the exception of Primary Phone and Primary E-mail at this time).
204
Profiles
CONTACT TAB
All Contacts must be a part of a profile, but can be linked to multiple profiles.
ADD A NEW CONTACT:
1) Type the Contact First Name, Middle Name, Last Name, Position, Department, and click Add. Need to
add a phone number, fax, email or web address? Select the entry and click Comm Info to enter. Want to
make this entry the primary entry for the profile? Select the entry and click Primary.
2) When the Add button is clicked, a query runs to search for any contacts that match the data entered in
First/Middle/Last name. At least two of the three Name fields must be entered in order for the search to run.
If no match is found, a new Contact record can be created. If match(es) are found, a window entitled
Traveler/Contact Search is displayed, from which the user can either link the existing traveler/contact or
cancel.
3) Click Payment Info to add a credit card or bank information linked to this contact. Updates for any
payments linked to a specific contact must be done from within the Travelers tab.
4) If this contact/traveler is associated with other profiles, the Associated Profiles button is available. When
clicked, a new window entitled Associated Profiles opens and a list of the associated profiles for that
traveler/contact is displayed which includes the number of profiles the traveler/contact is associated with.
Delete removes the Contact from the current profile. Once a Contact/Traveler is deleted from the last
remaining Associated Profile, the Contact is then deleted from the database. If a traveler/contact is linked
to a booking and deleted from a profile, they will no longer be linked. The name will still appear on the
booking as if a free flow name had been entered. Update is clicked when changes are made to the contact
information.
PAYMENT TAB
Account Type
Select Credit Card or Bank Account from drop-down menu.
Account Number
Enter the Account Number for the credit card selection.
C/C Exp Date/Name on
Account
Enter the last day of the month the cc expires and Name of the Account.
205
4/7/15
Profiles
Bank Routing No.
This Payment Method can be used for handing off data from TBO to a
Payment Distribution Service or the local bank. For complete directions
on using this feature, please refer to the Payments section of this
manual.
GROUP TAB
Group/Batch
Any group(s) to which the vendor belongs. This field can be used as a
selection criteria for reports, or to run group statements and summary
reports. Click on Add. Type the first few letters of the group name, then
click on the arrow to see the choices, and click on the group to close the
menu. Set up new groups from here, or from Utilities|Setup|Groups.
MARKETING TAB
Business Type
Type of vendor, e.g. Hotel, Cruise, Tour, etc.
Other
Marketing data important to particular vendor. Field is used as selection
criteria for lists and labels.
Notes
Any free flow information about the vendor. Field is used as selection
criteria for lists and labels.
Additional Notes
Miscellaneous information relating to this vendor. Field is used as
selection criteria for lists and labels.
Statement Remarks
IMPORTANT! Any remark entered in this area of the vendor profile
appears on all statements generated for this profile, if Include Profile
Remarks has been checked.
Travel Preference
Additional field to keep information.
Travel Categories
Eliminate mismatches between Car and Hotel profiles with the same 2
letter Interface ID code. Interface Record now looks at Interface ID and
Travel Category contained in profile for a correct match.
Check Remarks
Enter a specific profile “Account Number” or remark that will print on the
check for payments made using the profile.
Alt Interface ID
The interface process now checks both Interface ID and Alternate
Interface ID for a match on clients and vendors. This feature is used by
those agencies that are using multiple GDS interfaces where the
interface ID's for Hotel Codes are different for each GDS. Now use a
single vendor profile for both systems. Put one Interface ID in the
Interface ID field on the profile General Tab, and for a different GDS, the
other Interface ID in the Alt Interface ID field on the Marketing Tab. Enter
up to ten alpha/numeric characters.
ATTACHMENTS TAB
In TBO version 3.05, an attachment tab has been added to all profile (Client, Vendor, Agent, Other), all
invoice types (sale, refund, adjustment) and the payment screens. The tab is located adjacent to the tab
now named General at the top of each screen. Within the workspace area of the new attachment tab, users
can manage (add, view, delete, update) electronic documents of any type.
Filename
4/7/15
Click the browse button to locate to the desired file.
206
Profiles
Compressed
Defaults to enabled. Compressing the file helps to reduce the file size
(maximum file size is 8MB).
Description
Enter a user-defined description.
Path
This field is automatically populated based on the location of the file.
Add, adds a new file; Update, updates the existing file with a new or updated file; View, opens the file; and
Delete deletes the attached file.
Entering Vendor Profiles
1. To enter a new Vendor Profile click Profiles|Vendor.
Start with the General Information tab. The Name is the only field required for building a vendor profile.
Query a profile and modify existing information. Trams Back Office recommends entering as much
information as possible in all profiles. If a field is left blank, it is not used in future applications. For
example, if the address fields are left blank, statements and all other output using the address will have
blanks where the address would print. Trams Back Office also recommends that use of both upper and
lower case (e.g. Holiday Inn instead of HOLIDAY INN) when entering the name and address information to
enhance the appearance of the mailing labels and other types of correspondence. Note: Don’t forget the
Interface ID field if the agency plans to interface invoices for this profile in the future.
2. Click the Communications, Contacts, Payment Info, Groups, Marketing, or Attachment tabs to add as
much information to the profile as possible. For more details are these areas, read Vendor Profiles in this
chapter.
3. When the profile is complete, click OK and continue entering a profile by selecting New.
Tip: Look at the bottom of the New Profile screen. There is a checkbox next to Continue entering profiles.
To enter multiple profiles at one time, make sure the box is checked. When finished entering profiles, click
on the box and remove the check to return to the main menu instead of the profile entry screen.
A Vendor Profile should be built for each vendor the agency wants to track. (See the Interface Download
chapter about creating the Interface ID through the Interface process.) For commission tracking purposes,
“Hotel” profiles should be built for each hotel location.
Other Profiles
Other profiles are used in the Payments section and allow for maintaining “other” histories on other
individuals and companies with whom the agency does business. For example, a company to which
expenses are paid is entered as an Other profile. Utility companies (gas, electric, phone), landlord, etc. are
entered as Other profiles. Name and address information for Other profiles is included on
computer-generated checks.
207
4/7/15
Profiles
Review the listing of fields below to get familiar with the data stored in Other Profiles.
Profile Name
Name of the company or individual.
Contact Last Name, First,
Middle
Name of the contact person.
Contact Title
Contact person's title, e.g., Accounts Payable.
Courtesy Title
Such as: Mr. and Mrs., Mr., Mrs., Dr., etc.
Street Address 1: and 2:
Mailing street address. There are two lines available.
City, State, Zip Code and
Country
Other Profile's city, state, ZIP code and country if applicable. The ZIP
code can contain numbers and letters.
Payee Name
Name of person/entity financially responsible for account.
Interface ID
Only used for transmitting data from certain programs, such as a payroll
program. Enter up to ten alpha/numeric characters.
G/L 1 & 2 Account
Default GL accounts for journal entries when making payments for this
profile.
G/L Branch
Associate a particular branch to this profile whenever it is used. This
overwrites the settings set up at the Branch level and in the Global
Defaults.
G/L Account Rate
Specifically designed to calculate Canadian GST taxes during G/L entry.
Inactive
Click this box mark this profile Inactive. It will not longer appear in the
Query Screen.
4/7/15
208
Profiles
Continue Entering Profiles
Click this box to continue entering profiles without getting “booted” out
of this screen.
Entering Other Profiles
To build an Other profile, the only field required is Name.
1. Click Profiles|Other to create a new Other Profile.
2. Start with the General Information tab. The Name is the only field required for building an Other profile.
Query a profile and modify existing information. Trams Back Office recommends entering as much
information as possible in all profiles. If a field is left blank, it is not used in future applications. For
example, if the address fields are left blank, statements and all other output using the address will have
blanks where the address would print. Trams Back Office also recommends to use both upper and lower
case (e.g. Gas Company instead of GAS COMPANY) when entering the name and address information to
enhance the appearance of the mailing labels and other types of correspondence.
3. Click the Communications, Contacts, Payment Info, Groups, Marketing, or Attachments to add as much
information to the profile as possible.
4. When the profile is complete, click OK and continue entering profiles by selecting New.
Tip: Look at the bottom of the New Profile screen. There is a checkbox next to Continue entering profiles.
To enter multiple profiles at one time, make sure the box is checked. When profiles have been entered, click
on the box and remove the check to return to the main menu instead of the profile entry screen.
209
4/7/15
Profiles
COMMUNICATIONS TAB
Entering Type, Value,
Description, Contact Name.
Using Add, Update, and
Primary.
Select type (phone, e-mail, fax, or web) by clicking the down arrow on
the scroll bar. The recommended format for entering the phone number
is nnn/nnn-nnnn. The area code and the country code entered into
Global Defaults automatically default. After entering Type, Value, and
Description (cell phone, business email, etc.), Click Add.
Enter as many profile communication entries this way, or click on the
Contacts tab to enter more specific Contact communication items which
appears here with the Contact’s name. To edit an entry, double-click on
item, make changes and click Update.
The first entry of each type defaults as primary. Any selected entry can
be designated as primary by clicking on the Primary button.
Using Delete/Edit Contact
Communication
All Contacts must be associated to a profile, but can be linked to multiple
profiles. The delete button removes the Contact from the current profile.
Once the contact is deleted from the last remaining associated profile,
the profile will be deleted from the database.
Email addresses (and other communication entries) now reside in the
Contact record, but viewing and/or changing those Contact
communication entries can be done by clicking on Edit Contact
Communications after first selecting the entry.
Columns
The Columns can be sorted in ascending order when the column header
is clicked once and in descending order when clicked a second time
(with the exception of Primary Phone and Primary E-mail at this time).
CONTACTS TAB
All Contacts must be a part of a profile, but can be linked to multiple profiles.
ADD A NEW CONTACT:
1) Type the Contact First Name, Middle Name, Last Name, Position, Department, and click Add. Need to
add a phone number, fax, email or web address? Select the entry and click Comm Info to enter. Want to
make this entry the primary entry for the profile? Select the entry and click Primary.
2) When the Add button is clicked, a query runs to search for any contacts that match the data entered in
First/Middle/Last name. At least two of the three Name fields must be entered in order for the search to run.
If no match is found, a new Contact record can be created. If match(es) are found, a window entitled
Traveler/Contact Search is displayed, from which the user can either link the existing traveler/contact or
cancel.
3) Click Payment Info to add a credit card or bank information linked to this contact. Updates for any
payments linked to a specific contact must be done from within the Travelers tab.
4) If this contact is associated with other profiles, the Associated Profiles button is available. When clicked,
a new window entitled Associated Profiles opens and a list of the associated profiles for that traveler/contact
is displayed which includes the number of profiles the traveler/contact is associated with.
Delete removes the Contact from the current profile. Once a Contact/Traveler is deleted from the last
remaining Associated Profile, the Contact is then deleted from the database. If a traveler/contact is linked
to a booking and deleted from a profile, they will no longer be linked. The name will still appear on the
booking as if a free flow name had been entered. Update is clicked when changes are made to the contact
information.
4/7/15
210
Profiles
PAYMENT TAB
Account Type
Select Credit Card or Bank Account from drop-down menu.
Account Number
Enter the Account Number for the credit card selection.
C/C Exp Date/Name on
Account
Enter the last day of the month the cc expires and Name of the Account.
Bank Routing No.
This Payment Method can be used for handing off data from TBO to a
Payment Distribution Service or the local bank. For complete directions
on using this feature, please refer to the Payments section of this
manual.
GROUP TAB
Group/Batch
Any group(s) to which the other profile belongs. This field can be used
as a selection criteria for reports, or to run group statements and
summary reports. Click on Add. Type the first few letters of the group
name, then click on the arrow to see the choices, and click on the group
to close the menu. Set up new groups from here, or from
Utilities|Setup|Groups.
MARKETING TAB
Business Type
Type of other profile, e.g. Utilities, Publications, etc.
Other
Marketing data important to particular profile. Field is used as selection
criteria for lists and labels.
Notes
Any free flow information about the profile. Field is used as selection
criteria for lists and labels.
Additional Notes
Miscellaneous information relating to this profile. Field is used as
selection criteria for lists and labels.
Statement Remarks
IMPORTANT! Any remark entered in this area of the profile appears on
all statements generated for this profile, if Include Profile Remarks has
been checked.
Travel Preference
Additional field to keep information.
Travel Categories
Eliminate mismatches between profiles with the same 2 letter Interface
ID code. Interface Record now looks at Interface ID and Travel Category
contained in profile for a correct match.
Check Remarks
Enter a specific profile “Account Number” or remark that will print on the
check for payments made using the profile.
Alt Interface ID
The interface process now checks both Interface ID and Alternate
Interface ID for a match on clients and vendors. This feature is used by
those agencies that are using multiple GDS interfaces where the
interface ID's for Hotel Codes are different for each GDS. Now use a
single vendor profile for both systems. Put one Interface ID in the
Interface ID field on the profile General Tab, and for a different GDS, the
other Interface ID in the Alt Interface ID field on the Marketing Tab. Enter
up to ten alpha/numeric characters.
ATTACHMENTS TAB
In TBO version 3.05, an attachment tab has been added to all profile (Client, Vendor, Agent, Other), all
211
4/7/15
Profiles
invoice types (sale, refund, adjustment) and the payment screens. The tab is located adjacent to the tab
now named General at the top of each screen. Within the workspace area of the new attachment tab, users
can manage (add, view, delete, update) electronic documents of any type.
Filename
Click the browse button to locate to the desired file.
Compressed
Defaults to enabled. Compressing the file helps to reduce the file size
(maximum file size is 8MB).
Description
Enter a user-defined description.
Path
This field is automatically populated based on the location of the file.
Add, adds a new file; Update, updates the existing file with a new or updated file; View, opens the file; and
Delete deletes the attached file.
Agent Profiles
Agents are employees or outside agents. Profiles for agents are similar to other profiles. The Interface ID
must match the agent sine entered in the PNR. By default, Trams Back Office picks up the booking agent
of record, usually a two-character alphanumeric sine of the agent that created the PNR. Enter up to ten
characters in the Interface ID to accommodate additional agents or agent overrides. Agent Interface ID’s
can be up to ten alphanumeric characters (letters or numbers). If the agency already uses codes or initials
for identification, continue using them in Trams Back Office. By creating an agent profile, inside and outside
agents are identified in each invoice and that information is available in the Reports section.
Review the listing of fields below to get familiar with the data available in an Agent Profile.
Profile Name
4/7/15
The name or code used to identify this agent. Use any combination of
letters and numbers. If created by Interface, Trams Back Office uses the
same code as the Interface ID.
212
Profiles
Last Name, First, Middle
The name of the agent.
Contact Title
Employee’s job title.
Courtesy Title
Suggested use is Mr./Mrs./Ms. etc.
Salutation
Name to use when greeting agent, e.g. First Name (Robert), Nickname
(Bob), etc.
Street Address 1: and 2:
Agent's mailing street address, up to two lines. Information is used for
agent's statements.
City, State, Zip, Country
Agent's city, state, ZIP code, and country.
Payee Name
Name of person/entity paying on the account.
Interface ID
For use with reservation system interface; enter corresponding agent
code/ID. See Interface Section for additional agents. Enter up to ten
alpha/numeric characters.
Inside/Outside Rates
Default commission rates that the agent earn for both Inside and Outside sales. These defaults carry over to the Invoice screen when this
Agent is selected. Important: See Agent’s Rates and Default Rates
Below.*
G/L Account 1 and 2
Two default GL accounts for this agent are available when a journal
entry is needed for a payment to/from this agent.
G/L Account Rate
Specifically designed to calculate Canadian GST taxes during G/L entry.
Inactive
Click this box to mark this profile Inactive. It will not longer appear in the
Query Screen.
Continue Entering Profiles
Click this box to continue entering profiles without getting “booted” out
of this screen.
Mary, whose agent sine is 33, is a salaried employee. You want to track
her productivity as an inside agent. Sometimes Mary works on special
promotions for a 50% commission, plus a referral commission of 10%
for her special corporate clients.
Her profile shows NO commission defaults on inside or outside agents.
By using the additional commission feature in the invoice, you can track
her occasional 50% commission. For her referral clients, you can list the
10% on this profile.
213
4/7/15
Profiles
Entering Agent Profiles
1. To enter a new Agent Profile, Profiles|Agent.
2. The Profile Name is the only field required for building an Agent profile. Query a profile and modify existing
information. Trams Back Office recommends entering as much information as possible in all profiles.
If a field is left blank, it is not used in future applications. For example, if the address fields are left blank,
statements and all other output using the address will have blanks where the address would print. Trams
Back Office also recommends use of both upper and lower case (e.g. John Smith instead of JOHN SMITH)
when entering the name and address information to enhance the appearance of the mailing labels and other
types of correspondence.
Note: Don’t forget the Interface ID field if the agency plans to interface invoices for this profile in the future.
3. Click the Communications, Contacts, Payment Info, Groups, Marketing tab to add as much information
to the profile as possible.
4. When the Profile is complete, click OK to return to the Profile Query Screen. To continue entering, select
New.
Tip: Look at the bottom of the New Profile screen. There is a checkbox next to Continue entering profiles.
To enter multiple profiles at one time, make sure the box is checked. When finished entering profiles,
remove the check to return to the main menu instead of the profile entry screen.
4/7/15
214
Profiles
COMMUNICATIONS TAB
Entering Type, Value,
Description, Contact Name.
Using Add, Update, and
Primary.
Select type (phone, e-mail, fax, or web) by clicking the down arrow on
the scroll bar. The recommended format for entering the phone number
is nnn/nnn-nnnn. The area code and the country code entered into
Global Defaults automatically default. After entering Type, Value, and
Description (cell phone, business email, etc.), Click Add.
Enter as many profile communication entries this way, or click on the
Contacts tab to enter more specific Contact communication items which
appears here with the Contact’s name. To edit an entry, double-click on
item, make changes and click Update.
The first entry of each type defaults as primary. Any selected entry can
be designated as primary by clicking on the Primary button.
Using Delete/Edit Contact
Communication
All Contacts must be associated to a profile, but can be linked to multiple
profiles. The delete button removes the Contact from the current profile.
Once the contact is deleted from the last remaining associated profile,
the profile will be deleted from the database.
Email addresses (and other communication entries) now reside in the
Contact record, but viewing and/or changing those Contact
communication entries can be done by clicking on Edit Contact
Communications after first selecting the entry.
Columns
The Columns can be sorted in ascending order when the column header
is clicked once and in descending order when clicked a second time
(with the exception of Primary Phone and Primary E-mail at this time).
CONTACT TAB
All Contacts must be a part of a profile, but can be linked to multiple profiles.
ADD A NEW CONTACT:
1) Type the Contact First Name, Middle Name, Last Name, Position, Department, and click Add. Need to
add a phone number, fax, email or web address? Select the entry and click Comm Info to enter. Want to
make this entry the primary entry for the profile? Select the entry and click Primary.
2) When the Add button is clicked, a query runs to search for any contacts that match the data entered in
First/Middle/Last name. At least two of the three Name fields must be entered in order for the search to run.
If no match is found, a new Contact record can be created. If match(es) are found, a window entitled
Traveler/Contact Search is displayed, from which the user can either link the existing traveler/contact or
cancel.
3) Click Payment Info to add a credit card or bank information linked to this contact. Updates for any
payments linked to a specific contact must be done from within the Travelers tab.
4) If this contact/traveler is associated with other profiles, the Associated Profiles button is available. When
clicked, a new window entitled Associated Profiles opens and a list of the associated profiles for that
traveler/contact is displayed which includes the number of profiles the traveler/contact is associated with.
Delete removes the Contact from the current profile. Once a Contact/Traveler is deleted from the last
remaining Associated Profile, the Contact is then deleted from the database. If a traveler/contact is linked
to a booking and deleted from a profile, they will no longer be linked. The name will still appear on the
booking as if a free flow name had been entered. Update is clicked when changes are made to the contact
information.
215
4/7/15
Profiles
PAYMENT TAB
Account Type
Select Credit Card or Bank Account from drop-down menu.
Account Number
Enter the Account Number for the credit card selection.
C/C Exp Date/Name on
Account
Enter the last day of the month the cc expires and Name of the Account.
Bank Routing No.
This Payment Method can be used for handing off data from TBO to a
Payment Distribution Service or the local bank. For complete directions
on using this feature, please refer to the Payments section of this
manual.
GROUP TAB
Group/Batch
Any group(s) to which the agent belongs. This field can be used as a
selection criteria for reports, or to run group statements and summary
reports. Click on Add. Type the first few letters of the group name, then
click on the arrow to see the choices, and click on the group to close the
menu. Set up new groups from here, or from Utilities|Setup|Groups.
MARKETING TAB
Business Type
Type of agent, e.g. Inside, Outside, etc.
Other
Marketing data important to particular profile. Field is used as selection
criteria for lists and labels.
Notes
Any free flow information about the profile. Field is used as selection
criteria for lists and labels.
Additional Notes
Miscellaneous information relating to this profile. Field is used as
selection criteria for lists and labels.
Statement Remarks
IMPORTANT! Any remark entered in this area of the profile appears on
all statements generated for this profile, if Include Profile Remarks has
been checked.
Travel Preference
Additional field to keep information.
Travel Categories
Eliminate mismatches with the same 2 letter Interface ID code. Interface
Record now looks at Interface ID and Travel Category contained in
profile for a correct match. In the case of an agent profile, probably the
Travel Category is None.
Check Remarks
Enter a specific profile “Account Number” or remark that will print on the
check for payments made using the profile.
Alt Interface ID
The interface process now checks both Interface ID and Alternate
Interface ID for a match on clients and vendors. This feature is used by
those agencies that are using multiple GDS interfaces where the
interface ID's for Hotel Codes are different for each GDS. Now use a
single vendor profile for both systems. Put one Interface ID in the
Interface ID field on the profile General Tab, and for a different GDS, the
other Interface ID in the Alt Interface ID field on the Marketing Tab. Enter
up to ten alpha/numeric characters.
ATTACHMENTS TAB
4/7/15
216
Profiles
In TBO version 3.05, an attachment tab has been added to all profile (Client, Vendor, Agent, Other), all
invoice types (sale, refund, adjustment) and the payment screens. The tab is located adjacent to the tab
now named General at the top of each screen. Within the workspace area of the new attachment tab, users
can manage (add, view, delete, update) electronic documents of any type.
Filename
Click the browse button to locate to the desired file.
Compressed
Defaults to enabled. Compressing the file helps to reduce the file size
(maximum file size is 8MB).
Description
Enter a user-defined description.
Path
This field is automatically populated based on the location of the file.
Add, adds a new file; Update, updates the existing file with a new or updated file; View, opens the file; and
Delete deletes the attached file.
Profile Query
Query retrieves an existing (or a previously entered) profile. Enter the query screen by either selecting
Profile|Query from the main menu or using the Profile tab at the bottom of the screen. The query screen is
broken into two sections. The top section is used to enter the data for the query and the bottom section
displays the results of the query. The fields displayed in the top section show how a profile/s can be found.
Each of these fields are fields within a profile and can be used to locate that profile again. As few as none
and as many as all can be completed to retrieve a profile.
The more criteria entered in a query, the more selective the search for matching invoices. The most frequently used query fields show on the General tab and additional fields are found in the Advanced tab.
Enter the criteria available (or applicable) and the system brings up a complete listing of profiles matching
that criteria.
To the right of some of the fields are drop-downs with selection options or operators. These operators help
to more narrowly define the search. (When doing searches on fields containing “wildcard” search criteria
using the selections of “IN” and “NOT IN," the field must contain the complete string entered between the
delimiters or the exact match). In other words, In and Not In works like Is Equal to or Is Not Equal to except
that the list of values when using In and Not in when separated by a comma will search for each value in
217
4/7/15
Profiles
the list. The entire text would need to match exactly for Is Equal to or Is Not Equal to.
Buttons on the right side of the screen are also broken into two sections. Query, Reset, Count, Sort by,
Columns, and Default are buttons related to the query:
Query: After using the selection criteria in the General or Advanced tabs, click Query to process the search.
Reset: Clears out any previous query criteria in both the General and Advanced tab.
Count: Get a number of items that match the query criteria.
Sort by: Selects how to display the results once the query is executed. By clicking Save Settings, save sort
settings for next time.
Columns: Used to select which columns of data to display in the results screen. Click Columns and choose
4/7/15
218
Profiles
the columns to display by highlighting the column in the Available Fields and clicking on the left arrow to
move it over to Displayed Fields. Using the red up and down arrows, put the column in the order to appear
on the results screen. Click OK. Now go to the results screen and resize the columns. Go back into
Columns, click Save Settings and OK to save.
Drag and drop the columns to re-position them on the results screen if desired. Do this by clicking on the
column to move, holding down the left mouse button, and sliding the column to any position on the query
screen. To place a column to the right or left of any existing column, stop on the column to the right or left
and release the mouse. The moved column is inserted in the correct place.
Default: Saves the filters in a query.
Follow these directions to create a new Saved Query:
1. Change the selection criteria on the results screen for the new query to save.
2. Click Default.
3. Type in the new query name in the Setting Name field.
4. If this saved query is the default, at the top of the drop-down window, check Set As Default.
5. Select Per User (on this workstation only) or Global (on everyone’s sets).
6. Click OK to save.
To remove a saved query from the list, check the Remove the Current Named Setting box, click OK and the
saved query is no longer available for use in the drop down field.
Once the listing of matching profiles is displayed through Query, any profile can be added (New), viewed
(View), copied (Copy), or deleted (Delete - only delete profiles that do not have invoices or payments
attached.) Highlight an entry (or multiple entries by using SHIFT or CTR keys), and print a label or labels
(Print Label) from this menu. By clicking Print Query, print out the results screen for all items or selected
items.
Global Modify adds a profile Group value to any profiles to more quickly and easily modify queried profiles
with a Group Code. This is especially helpful for adding the hotel chain code to the Group Tab of a vendor
profile. If the query screen has some profiles with a Group Code and others without one, selecting Add For
All Query Results adds the Group Code to all profiles without one and NOT add the code again to all profiles
that have it. This adds the Group Code to all profiles in a query without having to specifically select individual
profiles using the Ctrl or Shift keys.
Profile Help screens are easily accessed within the Profile’s Menu by simply clicking on the Help button or
F1.
219
4/7/15
Profiles
Right-Mouse Click Menu in Profile Query
New creates a new profile - Leisure, Corporate, Vendor, Agent, or Other.
View the profile.
Delete the profile.
Copy the profile to create new profile.
Print Label prints a single label or an envelope for the profile.
Sorting Profile Data
Sort data in all query screens in two ways:
1. Quick sort by one field by clicking on a column in the results screen. The first click sorts the column in
ascending order (first to last or earlier date to more current date), and clicking on the same column a second
time sorts in descending order (last to first or current date to earlier date).
2. Sort in Ascending or Descending order by up to 3 columns. When clicking Sort By, select the first, second
or third column sort and what order (ascending or descending) to display the data. Enter the selection
criteria and click Save Settings and OK.
New Profile
To create a new profile from the query screen, click on the New button and complete the information fields.
(See detailed information on entering each type of profile in sections in this chapter.)
Selecting Profiles/Viewing Existing Profiles
To select a profile to view or modify (once the listing of matching profiles is displayed on the screen) highlight
the appropriate profile and select View. The creation date is located at the bottom together with a “Modified
At” date and time and a “By” if the profile was modified.
Deleting Profiles
Profiles may only be deleted if there is not activity pointing to them. If any activity is pointing to a profile,
Trams Back Office prompts “Cannot Delete Profile with Payments/Invoices Attached,” and will not delete
the profile.
1. Click Profiles|Query.
2. In the Name field, type in the name (or a portion of the name) of the profile to delete.
3. Click the arrow to the right of the Profile Type field and select the appropriate profile type. Click Query to
process.
4. Trams Back Office displays a profile list. Click the desired profile, then click Delete.
5. Trams Back Office prompts, “Delete Profile (Name)?” Click YES.
6. To delete another profile, click Reset and repeat steps 2 – 5.
4/7/15
220
Profiles
Transfer Invoice/Payment to Different Profile
If an invoice and/or payment has been applied to the wrong client (in a closed or open period), transfer the
invoice/payment all at once by querying invoice up and changing the name of the client.
1. Query the invoice that needs to be moved to a different client.
2. Highlight the invoice and click View; or double-click the invoice.
3. Click the Client Name field and type in a couple letters of the profile to change the name on the invoice.
4. Use the down arrow to find the exact match.
5. Get the following message if there is a payment attached:
6. Click Yes to transfer the payment as well OR select No for payment to remain under the original Client
Name.
7. Query up and delete out the duplicate profile if applicable.
Copying Profiles
To copy information from an existing profile as defaults into a new profile, highlight the appropriate profile
to be copied and click Copy. The system displays a new profile record with all defaults completed from the
copied profile, except for the Date Created, which defaults to the system date. Any of these defaults can be
changed or deleted and more information entered before saving the new profile. When the profile is
complete, select OK.
221
4/7/15
8
Invoices
This chapter contains:
Invoice Overview
Invoice Query, including Refunds and Adjustments, and Voiding
How to enter Spoiled Tickets and enter Finance Charges
Additional miscellaneous Invoice features
Enter New Invoices in TBO
Invoices are the daily records of sales and refunds, and are the main source of information for the system.
Sales, Refund, Vouchers and Adjustment invoices are entered, queried, retrieved, modified and voided in
the Invoice section of Trams Back Office. Invoices are entered into Trams Back Office either through the
interface process, by entering them into ClientBase, or by manual entry. If the agency interfaces, an
interface record is created each time an agent drives a ticket or an invoice.
Specific accounting, client, vendor and booking information from the interface record is downloaded to
Trams Back Office and becomes available for accounting, tracking and reporting needs. Once the
downloaded invoices have been received and processed by Trams Back Office, modifications can be made
manually to all of the fields except the Record Number which is computer assigned. (For more information
on interfacing, see the Interface Guide located at Start|Programs|Trams Back Office|TFW Interface.)
Important Note: Trams accepts an invoice number range of 0 to 2147483647. Anything higher will NOT be
accepted either manually or via the Interface.
Invoices in Trams Back Office are made up of three parts: The General Invoice Information, the Individual
Booking Details, and the Booking Summary Screen. General invoice information includes information
pertaining to the entire invoice, such as Invoice Number, Client Name, and Issue Date. Booking Details
contain specific details of a booking, such as Airline or Vendor, Ticket or Confirmation Number, Fares and
Commissions. The Booking Summary screen includes a list of all bookings entered along with Invoice
Totals.
When manually building an invoice in Trams Back Office, first enter the general invoice information, then
enter each booking.
General Invoice Information
The Sale, Refund and Adjustment (Debit/Credit Memos) screens are combined into one screen that can be
accessed by clicking Invoice|Sale or Refund or Adjustment. When the New Button is selected from the
Invoice Query Screen, access the “all-in-one” invoice screen, as well. The screen is defaulted for a Sale
4/7/15
222
Invoices
Invoice. From this single screen change the Invoice Type to a “Refund Invoice” or “Adjustment Invoice”
(Debit/Credit Memos).
All the invoice screens are non-modal, meaning that one can click off the screens and go do another task
in the program without closing the invoice screen. It is saved in the File Menu under Window, and can be
reopened to the same invoice screen.
GENERAL TAB - Invoice Header
Invoice Type
Choose the invoice type from the drop-down menu. Types include Sale,
Refund, or Adjustment (Debit and Credit Memos).
Invoice Number
The invoice number is left blank until clicking OK to save. This is because the
invoice screens are non-modal and multiple invoice screens could be open
at any time. As soon as OK is clicked to save the invoice the first time, the
invoice number is filled in, and Enter a payment for this Invoice? message
appears. Either accept the invoice number being defaulted, or change to
another unused number in the system.
Branch
Duplicate invoice numbers are not allowed within the same branch. If
branching ability is turned on in Utilities|Setup|Global Defaults, enter a
branch number from 0-249 from drop-down menu.
Issue Date
The date of the transaction. The default date is the system date. To change
the date manually, enter it in mm/dd/yy format, or double-click on date from
calendar.
223
4/7/15
Invoices
GENERAL TAB - Invoice Header
Group
An alphanumeric group field (up to 15 characters can be used) is used to link
invoices together for reporting purposes. Reports can be printed for an
individual, identifying groups travelled with in the past, or printed for the
entire group, to view the overall status of a group. To enter an invoice group
from this screen, click the Group button to add a new group. Individual
travelers maintain their own profiles thus eliminating the need for separate
group travel profiles.
Lisa is a member of her college ski club. During the winter season, she
travels with the club at least four times. In the spring, Lisa's family is having
a big reunion on a weekend cruise to Ensenada. Lisa has her own profile in
Trams Back Office.
If the group name appears in the Group field on Lisa's invoices, you can see
all the trips she made this year by herself or with a group.
The information used in this feature can be entered from the Trams Back
Office keyboard or by using the interface from the GDS.
IC Code
Enter the IC identifier if using the IC/Host feature. This field is only available
for use when the Host has created an IC Code in Utilities|Setup|IC-Host
Codes.
Marketing Code
(Marketing ID)
Invoices created with the field populated in a Host database (adding
*MIXXXX in the PNR) will include this field in the IC/Host Export Utility
created by a Host (Host to IC) when passing GDS created invoices back to
the IC for import into their Trams database.
The Marketing Code matches to the Client Profile Interface ID codes in the
IC database and captures the invoices under the correct profile even though
the invoices were created by the IC in the Host GDS under a single House
Account client profile.
This field is only available for use when the Host has created an IC Code in
Utilities|Setup|IC-Host Codes.
ARC/BSP No.
This field shows only on multi-branch versions of Trams Back Office to report
the travel by ARC/BSP number for weekly reporting, but still give credit to the
branch that booked the travel.
Record Locator
Enter the record locator number in the Invoice screen. It is located next to the
invoice number and is available as a selection in the Invoice Query screen.
If the invoice was interfaced, this locator number is filled in automatically and
is used for retrieving or referring to an interface record by record locator
number.
By clicking on this button, review the interface record and Print, Copy to
ClipBoard, or Save to File. Our support and interface desks use this to help
troubleshoot any interface format issues.
4/7/15
224
Invoices
GENERAL TAB - Invoice Header
The Smith family purchased tickets for their summer vacation and had to
change the travel dates twice. When the tickets are re-issued and the
exchange transactions are interfaced to Trams Back Office, the record
locator is added automatically.
Use Invoice Query to search for Record Locator QP35YR and locate all of
the Smith family transactions using this record locator. The invoice for the
original tickets and the invoices for the exchanged tickets appear on the
screen.
Invoice Remarks
Click to enter remarks to print on the invoice. The remarks are specific to this
invoice such as “This flight is full, please be sure to arrive early for check-in.”
The remarks print at the bottom of the invoice when the Print Invoice
Remarks checkbox is checked.
Accounting Remarks
These remarks can only be inserted manually in TBO (no updating via
interface or ClientBase). This field and the Invoice Remarks field display as
one line due to space limitations; clicking the Invoice Remarks or
Accounting Remarks button (to the left of the field) brings up a new window
to view and edit the remarks.
Client Name
To identify a client by Name, enter a portion of the client name in the Client
Name field. Once some letters are entered, a pull-down menu appears, with
a list of all matching profiles. Click on the desired name and move the client
name into the invoice. Right-click in the Name field and choose Search by ID
Create a new profile by clicking the Client Name button, to launch the Profile
Query screen.
Warning: Any variation in the way the client name was entered here versus
how the name was entered into the Profile causes the system to prompt with
no match, and wants to build another profile. Avoid building duplicate
profiles by being diligent about typing as few letters as possible into
the Name field during query, and selecting from the results.
Print Invoice After Saving
Check Print Invoice After Saving to print another copy of the invoice. Remove
the check from the box if a printed copy of the invoice is no longer required.
Continue entering
invoices
To enter multiple invoices at one time, make sure the Continue entering
invoices box is checked. When entering the last invoice, uncheck this box to
return to the main menu instead of the next invoice header screen. The issue
date, branch, and ARC/BSP No. are carried through to the next invoice.
History
To view when or who (for separate log-ins) has entered or modified an
invoice, click the history button.
ATTACHMENTS TAB
In TBO version 3.05, an attachment tab has been added to all profile (Client, Vendor, Agent, Other), all
invoice types (sale, refund, adjustment) and the payment screens. The tab is located adjacent to the tab
now named General at the top of each screen. Within the workspace area of the new attachment tab, users
can manage (add, view, delete, update) electronic documents of any type.
Filename
Click the browse button to locate to the desired file.
Compressed
Defaults to enabled. Compressing the file helps to reduce the file size
(maximum file size is 8MB).
225
4/7/15
Invoices
Description
Enter a user-defined description.
Path
This field is automatically populated based on the location of the file.
Add, adds a new file; Update, updates the existing file with a new or updated file; View, opens the file; and
Delete deletes the attached file.
The Client and Vendor Payment Buttons have two selections that can be made from each
button, View and Void. View opens full Payment Query Screen to make changes to the
payment. Delete permits deleting a booking without any tracking. Cleaner looking invoices
are created by not having Voided Booking items shown. If a void is desired to be shown
as in the past, that option is available. There is also a Columns Button to customize, order,
and size any columns that are available. Select the desired columns, rearrange them by
using the up and down arrows and click OK to save. Lengthen or shorten the fields, go
back into Columns and check the Save Settings box.
Note: The first agent and his/her status is part of the columns displayed in the bottom half
of the new screen. Instead of only being able to see the first agent in any given booking,
choose to see up to 4 agents for each booking in the invoice. Go to Columns and select
any number of agent columns, up to four, to display on the results screen. The column
shows both the Agent ID and the Agent Type. To display only the 1st and 2nd agent in a
booking, move agents 3 and 4 from the Displayed Fields side of Columns to the Available
Fields side. Remember to check the Save Settings box before clicking OK.
Applying Payments When Saving an Invoice
When clicking "Yes” to Enter a payment for this Invoice?, a full Payment Query Screen is displayed to make
one or more payments to the invoice. Notice that the Total Invoice Amount Open is defaulted in the Amount
field and the invoice is already Toggled Closed with the Form of Payment of Check. Enter a check number
or change the Form of Payment and click OK to complete the payment.
In addition to applying a single payment to the single invoice being saved, apply any previous vouchers
4/7/15
226
Invoices
created against the invoice being saved. Even apply a payment to more than one invoice for the client.
When the above screen is displayed, click on Reset and then Query, and all unapplied vouchers and open
invoices for the client are displayed. By changing the defaulted amount to the correct payment amount,
apply previous vouchers and a current payment to close off the invoice being saved. Attachments can be
added to payments. (See above for more details on adding attachments.)
Booking Detail Screen
Each invoice has at least one booking detail screen. An invoice with an airline ticket and a hotel has two
booking detail screens. (Not interfacing? See sections Adding a Second Booking to a New Invoice or Adding
a Second Booking to an Existing Invoice, later in this chapter.) Enter sales information from the hard copy
invoices, including total fares, commissions, airline codes, vendor names, and ticket numbers. The booking
information screen is used for any type of sale, including airline tickets, tours, cruises, car rentals, etc.
The booking screen is also non-modal, meaning that a user can click off the screen and go do another task
in the program without closing the booking screen. It is saved on the File Menu item, Window, and can be
reopened to the same booking screen. Identify the Booking Screen to re-display by looking at the top of the
screen and noting the Invoice Number of the Booking, and if more than one booking is open, the Travel Type
of the Booking, “Air”, “Car”, “Tour” etc.
Use hot keys to move from tab to tab in the booking screen, by holding down <ALT>, and pressing the
specific tab number. Also use hot keys in the various booking screens, by holding down <ALT>, and
pressing the underlined letter before the field.
After ending the general sales invoice entry, Trams Back Office prompts for specific booking details.
227
4/7/15
Invoices
ARC/BSP Booking Detail
Supplier Detail Booking
4/7/15
228
Invoices
Invoice Fields
Submit To
Submit To defines how payment for an invoice is processed. There are three
choices: ARC/BSP, for any ARC/BSP accountable document (Air Tickets,
MCO’s, AmTrack, etc.); Supplier, for non-ARC/BSP transactions in which a
client payment is submitted to the agency and a payment is issued to the
vendor or can be used for invoices client paid by C/C and track commission
creating a vendor balance and accounted for at time of sale. Commission
Tracking, which does not create balances but creates commission ticklers.
Most frequently used for car/hotel booking or when client payment is made
directly to the vendor by client C/C, allowing agencies to track commissions
due without accounting for them until payment is received. See
Utilites|Setup|Global Defaults
Use the mouse, TAB, or hot keys to move among selections.
Flown Carriers
Displayed for ARC/BSP transactions only. Breaks out the carrier over each
segment of the itinerary. The two-letter airline code is recommended because
that is what is received through the interface; however, Trams Back Office
accepts any three-character alphanumeric entry. Or click on the Segments tab
and enter the airline with the itinerary. Be consistent because future reporting
applications require exact matches.
Travel Type
Trams Back Office can generate histories and sales volume by travel type.
Travel types also define which sales and cost of sales GL accounts will be
updated in the EOP journal entry. This table is user-definable and can be
modified in Utilities|Setup|Travel Types.
Itinerary
Enter airport codes in the Itinerary field, or click on Segments tab and enter
passenger itinerary, moving to the itinerary field. The first city is considered the
city of origin; any additional cities are considered destinations for reporting
purposes.
Passenger Name
The passenger name defaults to the Client name. Statement and summary
reports may be broken down either by invoice or by passenger. If specific
passenger data is not required, either leave the passenger name as is, or
enter the correct passenger name without moving to the client profile.
Passenger names and clients names are often different when the traveler is
part of a corporate profile. To select a default passenger name from the profile,
enter a portion of the passenger's name and click on the down arrow for a list
of passengers. If a match is found, click it to move to the passenger field. If a
match is not found, create a new passenger. When there is no profile for that
passenger, click the Passenger button to create a new passenger which is
stored in Client Profiles.
Default Passenger Names are for convenience only; they are not necessary
to run Reports by Passenger.
229
4/7/15
Invoices
Invoice Fields
Department
This field holds 25 alphanumeric characters.
There is also a department field in the corporate profile under the Employee
Information field. Use the Department field if the traveler is a permanent
member of one department and this information is desired to be saved instead
of entering it with every booking. The department field in the invoice booking
screen overrides the department name in the profile screen for reporting
purposes.
Reports detail corporate clients' travel by department affiliation which can be
edited with each booking. The information used in this feature can be entered
from Trams Back Office or by using the interface from the GDS
John, an accounting employee of JCT Corporation, is traveling to the plant in
Newark to troubleshoot production cost problems. They are charging this trip
to their Production Department. Your agency issues a ticket for John and the
word Production is entered in the department field in the booking screen.
Three weeks later, John goes to Atlanta for an accounting seminar. Since this
is John's normal department, you have the word Accounting stored next to his
name in the corporate profile for JCT. Therefore, there is no reason to enter it
again in this booking. The Atlanta trip automatically links to John's stored
department name.
When you print JCT's travel report for the month, John's trip to Newark
appears in the activity for the Production Department and his trip to Atlanta
appears in the activity for the Accounting Department. JCT Corporation is
impressed with the flexibility of your agency's reports. They now can allocate
their total travel expenses to the proper departments.
Airline
This field is used in ARC/BSP transactions only. Type the two-letter code of
the airline the passenger is flying.
If a profile does not already exist for that airline, a prompt appears: Airline
Code Does Not Exist. Add Vendor Profile? Click yes and the airline falls into
the fields automatically. (Most major airline profiles have already been entered
into Trams Back Office!) Then add other pertinent information for that
particular airline.
Ticket Number
Displayed for ARC/BSP transactions only. The default is the last entered ticket
number, plus one. Modify by either correcting individual numbers, or if a new
number is entered, the default is erased. Note that <Ctrl-Right Arrow> moves
cursor to end of field. By tabbing, entry can be made of conjunctive tickets.
Note: Do not enter the 3 digit airline code or check digit number.
The information used in this feature can be entered from the Trams Back
Office keyboard or by using the interface from the GDS.
4/7/15
230
Invoices
Invoice Fields
Vendor
Vendor must be identified. Enter all or a portion of the Vendor Name, and
Trams Back Office displays a list of matching vendors. (Remember to enter as
few letters as possible, reducing the chance of duplicate profiles!)
To select the vendor from the list, click the arrow (right of Vendor field) and
select a vendor name from the list. If no match is found, Trams Back Office
notifies user of no match and gives the option of creating a new vendor profile,
or returning to the invoice. OR, click Vendor Name button (left of field) and find
the Profile Query screen.
When creating a new vendor profile from the invoice, enter the information and
click on OK to save. The new profile automatically moves to the invoice.
Confirmation Number
Enter the confirmation number given by the vendor. Up to 25 alphanumeric
characters can be entered. (Not required on ARC/BSP bookings.) This field is
very important to fill in if the agency is using the PayMode/Pegasus
Reconciliation feature. The confirmation number can be entered via interface.
Note: Paymode is formerly GCP and NPC. Pegasus is now called Onyx.
Depart Date & Return
Date
Enter the depart and return travel dates by either double-clicking the
Depart/Return field and bringing up the calendar, or by manually entering the
dates in mm/dd/yy format.
Total Fare
Enter the total amount for this booking which is the amount being charged to
the client. The Total Fare is accounted for as the gross sales figure and is used
to create the Client Balance amount for Accounts Receivable.
Base Fare
Base Fare is a calculated field, Total Fare - Taxes. This field is only modified
by changing one of the components of this equation.
Tax Amount/Rate
The default Tax Rate for ARC/BSP transactions is the one set up in
Utilities|Setup|Global Defaults|Tax Rates. If a flat amount applies, enter the
proper flat tax amount in Tax Amount and the system ignores the tax %. (See
More Taxes, below.)
Commission/Rate
The default Commission Rate is the one set up in Utilities|Setup|Global
Defaults or a vendor specific commission can be defaulted within the Vendor
Profile. If a flat commission amount applies, enter the amount in Commission
Amount and the system ignores the Commission %.
ARC|BSP Ticket
Type|Original Ticket #
There are two fields in the sale and refund invoice booking screens relating to
exchange transactions in an invoice with the Submit To: set to ARC/BSP. The
first is the ARC/BSP Ticket Type field, and the second is the Orig Ticket field.
When entering an exchange transaction with an add-collect or even-exchange
amount, select Ex-Add Coll. Once this field is selected, the original ticket
number field will be displayed.
To enter an exchange with a refund, while in the refund invoice, select
Ex-Refund, then enter the original ticket number.
Capturing the original ticket number generates an audit trail which aids in
reviewing the number of exchange transactions for any given client,
determining profitability and/or need for service fees.
231
4/7/15
Invoices
Invoice Fields
A client purchases a ticket from LAX to JFK for $450 on a 21-day advance
purchase. You generate ticket # 1677 890 194. The client calls a week later
and needs to change the outbound flight. The fare basis has changed and the
fare has gone up to $550 including a $75.00 penalty. A new ticket is issued as
an add/collect.
Whether you are interfaced or entering the invoice manually in Trams Back
Office, a new invoice for an exchange transaction is generated with ticket
number 1677 890 194 in the Orig Ticket field and EX-Add Coll in the ARC/BSP
Ticket Type field. The Total Fare is the additional amount collected ($175.00
including penalty).
The information used in this feature can be entered from the Trams Back
Office keyboard or by using the interface from the GDS.
Resubmit Date
This field permits moving a booking into a future ARC/BSP period for
resubmission. This overrides the invoice issue date when printing the
ARC/BSP report, the ARC/BSP Reconciliation, and ARC/BSP Settlement. To
resubmit an invoice that has already been listed on the ARC/BSP report, move
the cursor to the Resubmit field and click on the resubmit date, bringing up the
calendar and select a date, or enter it manually, that falls within the start and
end date of a future ARC/BSP week. If dimmed, the ARC Settlement or EOP
must be reopened. When running ARC/BSP for the future period, this booking
appears on the report. A list of all resubmitted tickets for the week prints at the
bottom of the ARC/BSP Reconciliation report.
Using these fields saves time and improves efficiency. ARC/BSP bookings
can be resubmitted in a future period without affecting invoice issue dates.
Anita Jones books a ticket on Tuesday, February 6, from Los Angeles to
Chicago with April 4 as a travel date. This ticket is submitted on the ARC/BSP
report for period ending February 11. ARC/BSP returns the ticket that needs
to be resubmitted on the report for period ending March 3.
Query for the original invoice dated February 6, select the invoice, go to the
booking screen and enter March 3 in the Resubmit Date field. When the
ARC/BSP report is printed for period ending March 3, Anita Jones' ticket is
included.
Date Payable
In Supplier and Comm Track bookings, Date Payable replaces the Resubmit
field. For Supplier bookings, use this field for creating a future payable to the
vendor (e.g. Final Payment Due 10/01/xx). This appears as an item to be paid
when the Issue Payable Checks option from the main Payments menu has
been entered.
The Date Payable field can also be used to charge Service Fees (TAFP) in the
report week of the booking.
In a Commission Tracking booking, the Date Payable field is used as the date
to send a statement to the vendor. Perhaps the booking is for a hotel with a
depart date of 9/1/xx and a return date of 10/01/xx. The Date Payable field
would have 10/15/xx as the date for sending a statement to the hotel.
4/7/15
232
Invoices
Invoice Fields
You are booking a cruise for Jan and Jack Jones. Today is September 1. They
are at your desk and as you enter the booking, you also enter the interface
codes creating a vendor payable date of October 15 for final payment. By
doing this, the final payment check to the cruise line appears when your Trams
Back Office operator uses the Issue Payable Checks Option on October 15.
International Field
In addition to the travel type of International, there is an indicator in the invoice
booking screen to mark a booking as International. To use this field, select the
appropriate category, Domestic, International or Transborder, from the
drop-down menu.
Track revenue by both domestic and international travel and print reports
showing all international bookings, including tours, cruises, cars, and hotels.
The Miller family is taking a tour to Israel on Tauck Tours. You enter this
booking in Trams Back Office, and select International. This helps you identify
the revenue you receive from international sales versus domestic sales.
Client Payment
View a client payment by clicking on this raised button. If the payment is
closed, this is indicated with the payment number.
Vendor Payment
View a vendor payment by clicking on this raised button. If the payment is
closed, this is indicated with the payment number.
History
Track changes to Client and Vendor Payment Status via the history button. (O)
= Open and (C) = Closed.
The information used in this feature can be entered from the Trams keyboard
or by using the interface from the GDS.
Remarks
Client Remarks
Access the Client Remarks field by clicking on the Remarks tab.
Miscellaneous client remarks appear on all Client Statements and Fare
Savings Reports, and can be used as selection criteria in the Report
Generator. These remarks can be entered via interface.
Vendor Remarks
Access the Vendor Remarks field by clicking on the Remarks tab.
Miscellaneous vendor remarks, appearing on all Vendor Statements, are used
as selection criteria in the Report Generator. These remarks can be entered
via interface.
Expanded Fare Information
Additional information about the booking are entered on an Expanded Booking Information screen. To get
233
4/7/15
Invoices
to this screen click the Expanded Fare Information tab at the top of the booking screen.
Face Value
Works in conjunction with fields in the General Booking screen, when discounting
or markup is involved. In these cases, enter the actual fare the ticket is sold for
as the Total Fare (amount receivable from the client). Then, enter the actual
commission or income earned after discounting into Commission Amount in the
General Booking Info. Click on the expanded fare screen, and enter the fare to
be shown on the ARC/BSP report as the Face Value. Trams accounts correctly
for the agency records, and generates the proper report to ARC/BSP
specifications.
Net Remit
The read-only Net Remit field indicates the net remit amount for ARC/BSP tickets
as they would appear on the ARC/BSP reconciliation report. To calculate the true
net remit amount, the commission amount field is reduced by the amount of the
discount, and if the commission rate field is populated, the rate is removed and
the commission amount is reduced by the amount of the discount. This reflects
the correct net remit on the Expanded Fare Tab and on the Vendor Balance
report. It also correctly reflects the revenue earned on the booking as part of the
commission is given back to the customer through the discount.
Markup +/Discount -
The discount is automatically calculated as the difference between the “Face
Value” and the “Total Fare”. This area can be modified - when a discounted or
minus value is entered, the Total Fare field is reduced by the same amount, along
with the Commission field. When a marked up or plus value is entered, the Total
Fare field is increased by the same amount, along with the Commission field. If
the Face Value is zero, then the Face Value is set to the old Total Fare value.
and %
The Markup/Discount Rate % field is only an aid to calculating a markup or
discount when a rate is known but not the amount. The field allows entry of the
rate to do the calculation, but the rate will not be saved after the booking is saved.
Any additional changes made to the amounts in either the TF or Comm fields
directly affects the amounts for the FV and Markup/Discount fields. Entering a
rate in the rate field only calculates the initial settings for those fields.
4/7/15
234
Invoices
Entering a 10% discount as -10.00 decreases the TF & Comm fields, while
capturing the original TF in the FV field. This would be the same as entering
-100.00 in the Discount Amount field.
Original Gross TF = 1000.00
Original Comm
= 200.00
Rate of Discount = 10% of Gross or 100.00
New TF
New Comm
= 900.00
= 100.00
High Fare
The full coach fare of current itinerary appearing on the Fare Savings Reports.
Low Fare
A lower, denied fare of current itinerary that can appear on the Fare Exception
Report.
Fare Code
The two-character (alphanumeric) justification code which can appear on the
Fare Savings Report. These codes are maintained under Utilities|Setup and
Fare Codes and should be set up prior to interface.
Orig Comm
When discounts or markups are applied, the original commission for the booking
is shown and does not have to be mentally calculated as the difference between
Face Value and Net Remit. (Face Value +/- the Original Commission equals the
Net Remit.)
Final Payment Information
The Final Payment Information is used for reporting purposes only of future payments and commission due
to the agency.
Due Date
If entered, the system can run final payment reports sorted by final payment due
dates (e.g., all final payments due this week, or in October, etc.). Find these
reports in the Report Generator.
Amount
Enter the anticipated final payment amount to obtain final payment reporting.
Commission Amount
Enter the anticipated commission payment amount to obtain final payment
reporting.
Hotel Information
Number in Party
Used for additional reporting available in the Report Generator.
Number of
Rooms/Cars
Used for additional reporting available in the Report Generator.
Description
Any 10-character miscellaneous description.
Comm Track CC No.
Enter Comm Track credit card number. (When an invoice is driven in
ClientBase, the credit card number appears here.)
Ticket Information
Ticket Designator
235
The ticket designator is captured through interface or manual entry and is used
for advanced reporting capabilities with software such as Crystal Reports.
4/7/15
Invoices
Tour Code
The tour code is captured through interface or manual entry and is available for
use through reporting software such as Crystal Reports.
E-Ticket
The check mark for this box is captured through interface or manually checked
and allows reports showing the number of E-tickets run by the agency.
Booking Record
Locator
Capture a booking level Record Locator number for those non-ARC/BSP air
bookings in a separate field and capture any ticket/confirmation number for that
booking in the Confirmation Number field. A new interface descriptor code entry
of *RL specifies a booking-level Record Locator on an MS line.
Host Code:
A drop-down field to capture the Host Code is only visible or available for entries
until an appropriate IC or Host Code is created under Utilities|Setup|IC/Host
Codes.
More Taxes
The more taxes tab in
the invoice booking
record now contains
two sub-tabs, Tax
Amounts where taxes
1-4 are still displayed
and a Tax Detail tab
where all of the
captured taxes are
displayed.
The default for GST and QST and other Canadian taxes is entered under Utilities|Global Defaults|Tax
Related. All tax allocations can be changed under the Utilities Menu then under the Global Defaults. Look
for BSP Tax Rates 1-4, GST and QST and other Canadian taxes. Attach up to a 30-character identifier to
each tax field by going to Utilities| SetUp|Global Defaults|Tax Related. Enter the name or code for each
tax. Tax codes and amounts can be grouped together by entering the codes with a comma separator. Click
OK to save.
A tax table has been added to the database to allow for additional taxes to be captured. The interface
parsers were also enhanced to read any taxes delivered via the GDS interface records. To expedite deleting
tax details a Delete All button has been added. In order to change the tax amount in the general tab, the
detail tax information needs to be cleared. Now all taxes can be cleared by clicking the delete all button,
4/7/15
236
Invoices
the tax total is then also updated in the general screen to show zero amounts.
Note to Sabre subscribers: Sabre GDS sends a maximum of 3 taxes in the IUR. If there are more than 3
taxes, tax amounts tax 3 and beyond are all combined in the XT tax amount. For Canadian customers, if
the RC (HST) or XG (GST) tax falls into tax field 3 or higher, the amounts cannot be broken out.
These fields can show a breakdown of miscellaneous taxes such as airport improvements, security tax, or
port tax on cruise bookings.
JCT Corporation has a contract with the government and is doing a lot of international travel. They want
your agency to provide them with a report that details the airfare and separates the taxes paid. You
capture the airfare in the booking screen, and separate each tax in a different field for their reporting
purposes. You create a JCT Tax Report in the Build Report section of the Report Generator that
incorporates each one of these tax fields.
The information used in this feature can be entered manually or by using the interface from the GDS.
Agents
Link sales agents to a booking by accessing the tab Agents found at the top of the invoice booking screen.
This commission screen is extremely flexible. The number of agents that can be added is 9 per booking.
Enter a percentage, a flat dollar amount, or a negative dollar amount if charging a fee to the sales agent.
There is not a limit to commission percentages. A sales agent can receive a 30% commission, a $5.00
booking bonus, and be charged a $10.00 processing fee, all in one booking. The information used in this
feature can be entered from the Trams keyboard or by using the interface from the GDS.
Identify an agent on the Agent Tab of the Booking Screen as either Blank, Booking or Ticketing. The Action
field indicates the following:
Blank = An Outside Agent or Additional Agent not identified as either Booking or Ticketing.
Booking = The Booking Agent as identified from the GDS Interface Record.
Ticketing = The Ticketing Agent as identified from the GDS Interface Record.
To flag bookings with booking or ticketing actions, the option must first be enabled under
Utilities|Setup|Global Defaults|Interface Mailmerge Prompt, Read Booking Agent OR Read Ticketing
237
4/7/15
Invoices
Agent. Recommendation is to only select booking or only select ticketing (not both as duplicate agent
transactions will be created if the agent is both the booking and ticketing agent). The option to read the
Booking Agent is set as the default. The Action field is set from a flag in the interface record.
The Action field will only be automatically completed for future bookings created through Interface.
Mary Smith, an outside agent, sold a $3000 cruise. Her booking shows her 50% commission, but she
sold a preferred supplier so she is eligible for your $10 preferred supplier bonus.
You add another line to the sales agent commission box for $10 and enter Pref Sup Bonus in the
commission remarks. Mary receives her commission report and is happy to see each amount separated
on her monthly statement, including your remarks.
Note: Agent Payments are now linked to the Agent Bookings Cleared when using the Agent Reconciliation.
The Date Paid field is filled in at the end of the reconciliation process, and the View Pymt button links to the
Agent Payment.
UDID’S
UDID’s (User Definable Interface Data) are pieces of information attached to a booking for reporting
purposes. They are stored in the invoice booking screen and accessed through the UDID’s tab at the top of
the screen. Click on UDID’s to display the table. There are 999 UDID fields. Each field has capacity for 128
alphanumeric characters (if using the GDS, the capacity is 60 alphanumeric characters).
For reporting purposes, UDID’s can define categories for each booking, giving access to information which
may be important for clients and to customer service — as well as, the agency database. By listing the
UDID’s in a table, they are easier to read and input and they are separated from the client remarks field.
UDID’s can contain both negative and positive dollar values which are added together in the report
generator.
To de-activate a UDID, go to Utilities|Setup|UDIDS, click on the UDID and the Inactive button at the top of
the screen.
4/7/15
238
Invoices
Segments
Airline segment information should be added to ARC|BSP supplier and commission tracking bookings. This
information is used to calculate accurate segment counts in the City Pair Report under
Reports|Invoice|CityPair. If segment mileage is present in the interfaced PNR from Sabre, Apollo, and
Worldspan, Trams captures that mileage in the mileage field. The mileage can also be manually entered.
To find segment information in the invoice booking screen, click Segments. Airline segment information is
linked to tour and cruise bookings and to non–ARC/BSP carriers such as Southwest Airlines.
Your client, Jeff, books a Caribbean cruise. When you enter this booking in TRAMS, you include his arrival
and departure time, flight number, and date in the Segments screen. You print Jeff an invoice (found in the
main Reports menu, under Invoice|Invoice Printing) for the cruise booking that also includes his flight
information and schedule.
The information used in this feature is entered from the Trams keyboard or by using the interface from the
GDS.
239
4/7/15
Invoices
Foreign Currency
TBO now captures Foreign Currency and Local Currency for each booking where both are present. The
local currency populates the General Tab Total Fare, while the Foreign Currency populates the Total Fare
on the Foreign Currency Tab.
Note: TBO reads automated HK segments when both local property currency and local agency currency
are included in the TAIR. TBO captures Foreign Currency and Local Currency for each booking where both
are present.
Add Another Booking to Existing Invoice
To add another ticket, hotel, car booking, etc., to an invoice previously entered into Trams, create a separate
booking.
1. Click Invoices|Query.
2. In the Invoice Number field, type the number of the invoice to which the booking is being added. Click
Query to process.
3. To view the invoice, highlight it and click the View button.
4. Once the invoice is displayed, click the New button and enter the booking information, as usual.
5. After entering the booking information, click OK to see the list of bookings. Click OK again to save the
4/7/15
240
Invoices
invoice and prompt for a payment.
Attachments can be added to this Invoice record.
Click New to add a new
booking.
History provides a record of previous edits.
Split Booking Option
There is a Split Booking option in the Invoice Screen (via the right-click menu on the booking list). Bookings
can be split if Submit To is Supplier and both Client and Vendor status are open. This means a single
booking can more easily be split into multiple bookings for applying partial Credit Card payments on an
invoice or creating a CC discount. By using the Split Booking option instead of the Copy button, the total
value of the invoice and total commission on the invoice is not allowed to be changed.
The Split Booking option also works on invoices in a closed period. When initiating the Split Booking option,
only a TF field is available for entry. The TF for the booking being added to the invoice will reduce the
amount of the TF in the original booking. Any commission on the booking to be split would remain with the
original booking, and only a TF will be in the new split booking.
Example:
- Invoice Total for single booking invoice with Carnival is $2000.00 with a commission of $200.00
- Customer makes a $500.00 CC payment on the invoice.
- Right-click to select Split Booking and enter in the TF field $500.00.
- Save the split 2nd booking and the invoice now contains 2 bookings.
1st booking - TF $1500.00 with commission of $200.00
2nd booking - TF $500.00 with zero commission. On saving, the 2nd booking for $500.00 is closed by
CC for the $500.00 payment.
- Invoice total remains at $2000.00 with $200.00 commission.
Multiple splits could be done on the same open original booking for any subsequent CC payments made.
241
4/7/15
Invoices
Void/Delete Booking(s) on Existing Invoice
To void a booking(s) on an invoice previously entered into Trams, do so under Query.
1. Select Invoices|Query.
2. Type in the number of the invoice with the booking being voided. If the invoice number is unknown, query
by any one or more of the fields shown. (It is best not to fill in all the fields. Usually two or three fields are
sufficient.) Click Query to process.
3. Click the invoice with the booking(s) being voided, in order to highlight it and click the View button.
4. If the Cli Pymt and the Ven Pymt fields show payment numbers, the payment(s) must be voided in order
to void the booking. Void the payment(s) by clicking the Client Payment or Vendor Payment buttons, then
clicking Void on the next screen. Trams prompts, Void Payment. Click OK to void.
5. Click the booking being voided in order to highlight it, then click the Void button. Repeat for any other
bookings being voided. Note: (The Delete Button permits complete deletion of a booking without any
tracking for that booking.)
6. Click OK to save.
If a payment was voided in order to void the booking, re-enter the payment under Payments|Received.
Enter Client Payment from Within Invoice
Client payments are entered either after entering an invoice, or in the payments menu. Credit card payments
are usually entered when completing an invoice. To allow cash or check payments to be entered upon
completing an invoice, set Utilities|Setup|Global Defaults|Allow Cash Payments From Invoice to Yes.
After entering a new Sale or Refund Invoice, or modifying an existing open invoice, answer the Trams
prompts.
1. To enter a payment to close the Client Balance generated by the invoice, select Yes when Trams prompts
for payment information.
2. If default credit card information was entered in the Client Profile, Trams displays the first default credit
card. Select a different credit card from the profile by clicking on the down-arrow. Highlight the entry, moving
the number into the field. If there’s no default credit card information, the field is blank. Enter credit card
information here.
3. If global defaults are set to allow invoice payment by check or cash, change Payment Method by clicking
on the down-arrow. Highlight the method and click, moving the choice into the Payment Method field.
4. Enter check number, bank account (if different from the default), and any associated remarks.
If cash and check payment entries have been set up in the Utilities menu, change Payment Method by
clicking on the box next to “Allow Cash Payment From Invoice.” Once the payment has been stored, the
Client Balance created by entering the invoice is offset and the client's account balance is reflected
accordingly. The Receipts report (in the case of Sales Invoices), and the Disbursements report (in the case
of Refund Invoices) is also updated accordingly. Partial or Split Client payments and all Vendor payments
may be entered from within this Payments screen as well, after toggle the invoice open.
Even Exchange
1. Click Invoices|Sales.
2. Enter the Sales invoice as usual.
3. In the Ticket No field, enter the new ticket number issued.
4/7/15
242
Invoices
4. Total Fare is zero.
5. Commission/Rate is zero.
6. In the Ticket Type field, click the arrow to the right of the field and choose Ex-Add Coll.
7. In the Orig Ticket No field, enter the ticket number that was originally issued.
8. Complete the rest of the invoice.
9. Click OK to save.
Exchange on MCO
1. Click on Invoices|Sales.
2. Enter the Sales invoice as usual.
3. In the Ticket No field, enter the new ticket number issued.
4. Total Fare is zero.
5. Commission/Rate is zero.
6. In the Ticket Type field, click the arrow and choose Ex-Add-Coll.
7. In Orig Ticket, enter the original ticket number issued.
8. Complete the rest of the booking.
9. Click New Booking to get to a new page.
10. Enter a second booking for the MCO.
11. In the Ticket No field, type the MCO number issued.
12. Total Fare is zero.
13. Commission/Rate is zero.
14. The Ticket Type field is Normal.
15. Click OK to see a summary of all booking on the invoice.
16. Click OK again save.
Ticket Exchange with an “Add Collect”
1. Click Invoices|Sale.
2. Enter the Sales invoice as usual.
3. In the Ticket No field, type the new ticket number issued.
4. In the Total Fare field, fill in the additional collection amount.
5. In the Commission/Rate field, enter the commission earned off of the additional collection amount.
6. In the Ticket Type field, click the arrow and choose Ex-Add-Coll.
7. In Orig Ticket No field, enter the original ticket number issued.
8. Complete the rest of the invoice.
9. Click OK to save.
243
4/7/15
Invoices
Ticket Exchange with a Refund
1. Click Invoices|Query.
2. Query the invoice that has the original ticket on it by typing in the invoice number, the ticket number, or
any other piece of selection criteria that is known. Click Query to process.
3. When the invoice appears, highlight it and then click Refund. This copies the sales invoice information
into a refund invoice screen.
4. Change the Invoice Number to the refund invoice number. If Default Refund/Adj Invoice No has been
selected under Utilities/Setup/Global Defaults/Prompt the refund invoice number will default to the same as
the original sales invoice number.
5. Enter the Issue Date as the date the invoice is being refunded.
6. Trams displays all bookings that were on the original sales invoice. If multiple bookings are appearing
and only one booking is being refunded, click on the record(s) not to include, then click the Void button to
void from the refund invoice. The only records that remain should be the records to refund.
7. Next, highlight the remaining booking by clicking it and then click Modify.
8. In the Ticket No field, type the new ticket number issued.
9. In the Total Fare field, type in amount being refunded to the client.
10. In the Commission/Rate field, type in the amount of commission the agency is losing.
11. In the Ticket Type field, click the arrow and choose Ex-Refund.
12. In Orig Ticket No field, type the original ticket number that was issued.
13. Complete the rest of the invoice as usual.
14. Click OK to display the booking summary screen. Click OK again to save the invoice.
15. TRAMS prompts, “Enter a Credit Card Refund Payment for this Invoice?” If refunding to credit card, click
YES. If refunding by check, click NO and enter check payment under Payments|Made.
4/7/15
244
Invoices
Invoice Query
Two tabs to input search criteria
With Query, retrieve an existing (or a previously entered) invoice. The query screen is broken into two
sections. The top section is used to enter the data for the query and the bottom section displays the results
of the query. The fields displayed in the top section show how an invoice/s can be found. Each of these fields
are fields within the invoice and can be used to locate that invoice again. As few as none and as many as
all can be completed to retrieve an invoice.
The more criteria entered in Query, the more selective the search for matching invoices. The most
frequently used query fields show on the General tab and additional fields are found in the advanced tab.
Enter the selection criteria, click Query, and the system brings up a complete listing of invoices matching
that criteria.
To the right of the Invoice, Acctg, Client and Vendor Remarks fields is a separate
field with selection options or operators, Is Equal To, Is Not Equal To, Is Blank, Is
Not Blank, Starting With, Contains, In, and Not In. These operators can more
narrowly define the search. (When doing searches on fields containing “wildcard”
search criteria using the selections of “IN” and “NOT IN," this is a search for the
field to contain the complete string entered between the delimiters or the exact
match). In other words, In and Not In works like Is Equal to or Is Not Equal to
except that the list of values when using In and Not In when separated by a comma
will search for each value in the list. The entire text would need to match exactly for Is Equal to or Is Not
Equal to.
For example, if the only criteria entered into the Query screen is the Invoice Type of Sale, a listing of all
Sales Invoices is displayed, in issue-date order. If, in addition to the Invoice Type, a portion of the Ticket
Number is entered into the Query fields, the list is narrowed further and only Sales Invoices with Ticket
Numbers matching that criteria are included. This allows for quick retrieval by Invoice Number or by Issue
245
4/7/15
Invoices
Date.
Note: The Payment No field on the Invoice Query window only applies to Client and Vendor Payments.
ADVANCED TAB:
The Invoice query advanced tab provides even more fields for searches. For example, there is check box
entitled Invoiced in ClientBase. When checked, invoices generated in ClientBase would be displayed on the
query screen. There is also a Department field (can be added to query columns) and Depart City Arrive City
fields for search capabilities. (Note: To avoid performance issues (especially with large databases), the
recommendation is to include additional query parameters (such as Issue or Depart date ranges or a Client
Name, etc.). The itinerary field was added to the query results column options when in view by booking
mode. If using the origin/destination fields in conjunction with Depart dates, recommendation is to leave the
Depart date to field blank as adding the Depart to date may cause no results to be returned.)
Buttons on the right side of the query screen are also broken into two sections. Query,
Reset, Count, Sort by, Columns,View by Booking/View by Invoice, and Default, are
buttons related to the query. Use the Reset button to clear away any previous query
criteria. This clears both the General and Advanced tab. Count is used to give the
number of items that match the query criteria. Sort By tells the query screen how to
display the results once the query is executed.
Columns is used to select which columns of data are displayed in the results screen.
Click Columns and choose the columns to display by highlighting the column in the
Available Fields and clicking on the left arrow to move it over to Displayed Fields.
Using the red up and down arrows, put the column in the order to appear on the results
screen. Go out to the results screen and size the columns. Go back into Columns and
click Save Settings and OK to save. Next sort the columns by 3 sorts in ascending and
descending order. When completed, make sure to click Save Settings.
Drag and drop the columns to re-position them on the results screen if desired. Do this
by clicking on the column to move, holding down the left mouse button, and sliding the
column to any position on the query screen. To place a column to the right or left of any existing column,
stop on the column to the right or left and release the mouse. The moved column is inserted in the correct
place. Click Columns and click Save Settings and OK to save.
View by Invoice/View by Booking is a toggle button. When View by Invoice is clicked, invoices are displayed,
but clicking it again changes this to View by Booking. This displays bookings only, and the Columns button
has many new booking level fields for display that are not under the Column button when View by Invoice
is selected.
When View By Booking is shown on the button, the view is at the Invoice Level, but if View By Invoice is
shown on the button, the view is at the Booking Level.
4/7/15
246
Invoices
To save the filters in the query, use Default and follow these directions to create a new Saved Query:
1. Change the selection criteria on the results screen for the new query to save.
2. Click Default.
3. Type in the new query name in the Setting Name field.
4. If this saved query is the default, at the top of the drop-down window, check Set As Default.
5. Select Per User (on the user’s own workstation only) or Global (on everyone’s sets).
6. Click OK to save.
To remove a saved query from the list, check the Remove the Current Named Setting box, click OK and the
saved query is no longer available for use in the drop down field.
On the Invoice Query Screen, use <Shift>, left-mouse click for selecting a range of items for closing,
deleting, or printing, etc. Using <CTRL>, left-mouse click selects multiple individual items in any order for
closing, deleting, etc.
Once the listing of matching invoices is displayed through Query, any invoice
appearing can be added (New), viewed (View), copied (Copy), voided (Void), refunded
(Refund), or adjusted (Adjustment - debit or credit memos).
Create Adjustment invoices for Supplier and Comm Track Invoices by changing the
Submit To field from ARC/BSP to Supplier or Comm Track. Write off revenue
(commission) on a booking through the End of Period without having to do a Journal
Entry. Create a Supplier Adjustment by selecting Adjustment for a queried
non-ARC/BSP invoice from the Invoice Query Screen.
Print Invoice - To print an invoice "on the fly", select Use Default Criteria or Use Print
Dialog Screen. If Use Print Dialog Screen is selected, the user is presented with the
Print Invoice Screen found under Reports|Invoice|Invoice Print. Changes can then
be made for that specific print job. Once the Print Job in the invoice query has been
completed, the settings revert back to the default settings as they were before. If the
Use Default Criteria is selected, no dialog screen is presented and the invoice options
used are the default settings as they exist.
Print Query - Print All Items or Selected Items (by holding down the CTRL key and
picking entries). To create a .txt file for export, select Export All Items, or Export Selected Items.
247
4/7/15
Invoices
Invoice Query Global Modify
The Invoice Query Global Modify feature enables changes to the agent on queried invoices, modifies
UDID’s on queried invoices or updates invoice and payment groups en mass.
Globally Modify an Agent on Queried Invoices
First from the query results screen, multiple invoices can be selected (Shift Click/Control Click) and only the
agent on those will be updated. If no selection is made, all invoices in the query results screen will receive
the update. Type in a few letters of the Old Agent’s name and select Inside or Outside, Inside or Outside
from the drop-down. Repeat for the New Agent area. The Agent ID is all that is changed. Any commission
rate or amount is not pulled from the Agent Profile and would need to be manually adjusted. To modify an
agent whose profiles are marked inactive, first make the profile active, make the changes, and then make
the profile inactive once again.
Note: When changing an agent, if the Date Paid field is populated in the Agent Tab in the booking, the
invoice cannot be modified.
Globally Modify UDIDs on Queried Invoices
First from the query results screen, multiple invoices can be selected (Shift Click/Control Click) and only
those invoice UDIDS will be updated. If no selection is made, all invoices in the query results screen will
receive the update. Select the UDID to add or modify and in the To field enter the information that should
appear. Any invoices containing bookings with data for that selected UDID field, will be updated with new
information. Any bookings in the query where the UDID is not specified would have the UDID field added.
Globally Modify Invoice/Payment Groups on Queried Invoices
First from the query results screen multiple invoices can be selected (Shift Click/Control Click) and only
those invoice and payment group fields will be updated. If no selection is made, all invoices in the query
results screen will receive the update. When clicking in the Set Group To field an invoice group can be
4/7/15
248
Invoices
selected in the drop-down, but the field also accepts free flow.
There is an additional check box that when selected also updates the client payment attached to the
updated invoice. Vendor payments attached to the invoice will not be updated.
Notes:
* If an invoice group already exists, the global modify group selection will overwrite the existing group.
* If a group exists in the payment, the global modify feature will not update the payment with the new group.
Globally Modify Commissions on Queried Invoices
Global modify can be used to update the commission rate percentage in a booking. Modifications will only
take place if the booking is commission track, if there is no vendor payment on the booking and no agent
date paid exists (the agent has not been paid for the transaction). When the booking commission is
changed, the agent commission will also be updated accordingly. There is no undo after the commission
rates have been changed. Suggestion: when using the global modify feature options to only use one option
at a time (uncombined).
From the invoice query screen, query the invoice bookings to be modified and click on the View by Booking
button (so the query is in view by booking mode). Either select the bookings from the query results screen
(if the updates will not apply to all bookings) or if the updates will apply to every booking in the query result
screen, don't select any and click the Global Modify button. In the comm track booking area, click the box
next to Set Commission Rate To and enter the percentage amount. Set the option for either Selected Query
Results or All Query Results accordingly. A prompt is displayed outlining the number of bookings changed
and the number of bookings skipped. Bookings are skipped if they are not a comm track booking, if they
have a vendor payment applied (closed) or if the agent has been paid.
Right-Mouse Click Menu in Invoice Query Result Screen
If the View by Invoice button is activated, these are right-mouse clicks available for use.
Select - select current invoice.
New - create new invoice.
View the invoice.
Copy the existing invoice.
Void/Unvoid the existing invoice.
Refund - create refund invoice.
Adjustment - create debit/credit memo.
Print invoice - print copy of invoice.
Query all Payments on the invoice.
Right-Mouse Click Menu in Booking Results Screen
If the View by Booking button is activated, these are right-mouse clicks available for use.
249
4/7/15
Invoices
Select - select highlighted booking
New - create a new booking
View the booking
Copy the booking
Void/Unvoid the existing booking
Refund - Create refund for booking.
Adjustment - Create debit/credit memo for booking
Print Invoice.
Query All Payments.
Right-Mouse Click Menu in Invoice Booking Screen
Having double-clicked on an invoice and to see the bookings therein, right- mouse click to see the following
items:
New - create new booking.
Copy the existing booking.
View the booking.
Delete the booking
Void/Unvoid the existing booking.
Client Pymt - To void or see the client payment.
Vendor Pymt -To void or see the vendor payment.
Query Original Invoice.
Query Exchange Invoice.
Sorting Invoice Query Data
Sort data in all query screens in two ways:
1. “Quick” sort by one field by clicking on a column in the results screen. The first click sorts the column in
ascending order (first to last or earlier date to more current date), and the second click sorts in descending
order (last to first or current date to earlier date).
2. Sort in Ascending or Descending order by up to 3 columns. When clicking Sort By, select the first, second
or third column sort and what order (ascending or descending) want the data will be displayed. Enter the
selection criteria and click Save Settings and OK.
Helpful Hints: Don’t forget to use hotkeys to quickly navigate into an invoice area or any area in TBO. If the
item has an underlined character in its title, hold down the ALT key on the keyboard, and press the hotkey
to navigate into this area. Also to view a history of what has been changed in a queried invoice, click the
History button. There is a field in the Advanced Tab for querying for invoices Invoiced in CBPlus.
Viewing/Modifying an Existing Invoice
To edit an invoice previously entered into Trams, do so under Query.
1. Click Invoices|Query or click on Invoice Query tab below.
4/7/15
250
Invoices
2. Query by any one or more of the fields shown. It is best not to fill in all the fields since two or three fields
are sufficient. Click Query to process.
3. Click to highlight the desired invoice and click View. (Or double-click the selected invoice.)
4. To modify the invoice, first check the client payment and the vendor payment. If the Client Pymt and
Vendor Pymt buttons are dimmed for the selected booking proceed to Step 6. Dimmed Client Pymt and
Vendor Pymt buttons indicate that no payment exist.
5. Darkened Client Pymt and Vendor Pymt buttons indicate a Client or Vendor payment is in place. These
payments must be voided before bookings can be modified. Click the down arrow on Vendor Pymt or Client
Pymt to view or void the payment(s). Click View to view the payment and to print the payment before voiding.
Void the payment(s) by clicking Void. Trams prompts, Void Payment. Click OK to void, then click View to
modify the highlighted booking.
6. Enter all necessary changes.
7. Once the changes have been entered, click OK to display the Booking Summary screen. Click OK again
to save the invoice.
8. Trams prompts, Enter A Payment For This Invoice? If payment was voided in order to modify the invoice,
click OK and enter the payment information. Click OK again to save.
(Tip: Use Ctrl-PgDn/Ctrl-PgUp to access next or previous invoice or booking.)
251
4/7/15
Invoices
Move from One Invoice to Another in Query
Move easily from one invoice in a query to another or from one booking in an invoice to another by using
the left and right arrow buttons located at the bottom of the open invoice or booking screen:
Copying Queried Invoices
To copy information from an existing Invoice into a new Invoice, highlight the appropriate Invoice and click
Copy. The system displays a new invoice record with all defaults completed from the copied invoice.
Note: The Issue Date defaults to the system date, the Invoice Number defaults to the last entered invoice
number plus one upon saving, and the Ticket Number, if applicable, defaults to the last entered ticket
number plus one, instead of using the copied invoice's defaults.
Any of these defaults can be changed or deleted and additional information can be entered before saving
the new Invoice. This shortcut comes in handy when dealing with groups and large numbers of invoices to
be hand-entered containing similar information.
Refund Invoices
Refund invoices look and act exactly like Sales invoices, except they are deducted from the Sales figures
and they reduce Client, Vendor, and ARC/BSP Balances. Anything that can be entered in a Sales invoice
can also be entered to a Refund invoice.
Note: All sales and refunds should be accounted for by an invoice.
Capture refund Invoices either by entering all new refund information under Invoices|Refund (like a new
sales invoice entry), or by using an existing sales invoice called up in query screen and clicking Refund to
default information into a Refund Invoice entry screen.
ARC/BSP Refund Invoice - Inv. Entered
To enter a refund invoice when the original sales invoice has been entered into Trams:
1. Click Invoices|Query.
2. Query the original sales invoice by invoice number, or any one or more of the fields shown. It is best not
to fill in all the fields; two or three fields are sufficient. Click the Query button to process.
3. Highlight the invoice to be refunded by clicking on it and then click the Refund button. This copies the
4/7/15
252
Invoices
sales invoice information into a refund invoice screen.
4. Type in the Refund Invoice number.
5. The Issue Date field defaults to the current date. If the date of the invoice is different than the date shown,
type in the desired date. Invoice Number and Issued Date reflect the current defaults. Default the refund
invoice to have the same invoice number as the original Sales Invoice by setting this option up in
Utilities|Global Defaults|Prompt|Default Refund/Adj Invoice No.
6. All bookings from the original invoice are displayed. If there are any bookings appearing are not being
refunded, click them to highlight and press delete to remove.
7. To modify the invoice booking information, click the booking to highlight it and then click Modify.
8. To make any changes to the Total Fare, Commission/Rate, etc., highlight that field and type in the correct
information.
9. Complete the invoice as normal. Click OK to store the information and return to the booking summary
screen. Click OK a second time save.
10. Trams prompts, “Enter a payment for this invoice?” If the invoice is being paid by credit card, click Yes.
If the invoice is being paid by Cash, Check, EFT or CC Merchant, click the NO button and enter the payment
under the Payments menu. (See Payments Received in Payments chapter.)
ARC/BSP Refund Invoice – Inv. Not Entered
To enter a refund invoice when the original sales invoice was not entered into Trams:
1. Click Invoices|Refund.
2. Type in the refund invoice number to create. Trams automatically defaults to one number greater than
the last invoice number created upon clicking OK.
3. If the agency has multiple branches, enter the appropriate branch number for the invoice in the Branch
253
4/7/15
Invoices
field.
4. In the Issue Date field, type in the date the invoice was driven.
5. If the invoice belongs to a group, enter the group designator in the Group field.
6. In the Remarks field, type in free flow information.
7. In the ARC/BSP No field, click the arrow and choose the appropriate branch.
8. In the Client Name field, type in a few letters of the client’s name. Trams displays any matching profiles.
Click on the correct profile. If a match can’t be found, Trams prompts to create a new profile.
9. Trams displays the General Info screen.
10. Leave the Submit To field as ARC/BSP.
11. In the Flown Carrier field, type the two-letter code of each carrier on the ticket.
12. The Travel Type field defaults to Air. For a list of other Travel Types, click the arrow.
13. In the Itinerary field, type in the City Pairs. Include the Departure City, connecting cities, and the Arrival
City.
14. If the name of the person traveling is different than the profile name, enter the correct name in the
Passenger field, or click on the arrow.
15. In the Department field, type in the name or number of the department, or leave blank.
16. In the Airline field, type in the two-letter Airline Code.
17. The Ticket No defaults to the next available number. If it isn't correct, type in the 10-digit number. (Do
not include the 3-digit airline code or the check digit.)
18. The Vendor Name field is automatically filled in when the Airline Code is entered. For an MCO, type in
the Vendor Name, if different than the Airline.
19. Leave the Confirm No field blank for an airline ticket. In the case of an MCO for a tour, type in the
confirmation number.
20. Enter the Depart Date and the Return Date or leave blank.
21. Type in the amount being refunded in the Total Fare field.
22. The Base Fare field is calculated automatically after the taxes are filled in.
23. Enter the amount of tax in the Taxes/Rate field. (A default percentage can be set up in the Utilities menu.
See Utilities chapter.)
24. The Commission/Rate field defaults to 10%. If the commission amount differs, type in that amount,
including the decimal point. In some cases commission would not be lost. So if earning commission, type a
hyphen (-) and the dollar amount.
25. Leave the Ticket Type set to Normal.
26. Leave the Resubmit Date field blank.
27. In the Ind field, click the arrow and select from Domestic, International or Transborder.
28. Click the Remarks tab. Remember! Information entered in the client remarks box prints on a client
statement. Information entered in the vendor remarks box prints on a vendor statement. Type in free
flow information.
29. To enter additional information, such as fare savings information, click the Expanded Fare Info tab.
30. In the case of multiple taxes, click the More Taxes tab.
4/7/15
254
Invoices
Debit/Credit Memos and TAAD’s/SSAN’s
Enter an adjustment invoice for Debit/Credit memos or TAAD’s under the invoice query screen, in
Adjustment. SSAN’s are the BSP equivalent of TAAD’s.
Invoices|Adjustments
Track Debit/Credit memos and TAADs and link them to client and vendor profiles for reporting purposes. In
the booking screen there is a field called Ticket Type. Change this field to read either Debit Memo, Credit
Memo or TAADs clicking on the arrow and highlighting the section.
Invoices|Adjustment Invoice
Special Note: Agent commissions are automatically adjusted with each Debit/Credit memo entered if the
Percent field of the Agent Tab of the original invoice booking has a value in it. If only the Amount field has
a value in it, that field will be blank in the Adjustment Invoice, so enter the correct amount on the Agent Tab
of the Adjustment Invoice.
Air Canada Credit Memos
Air Canada pays commissions via credit memos, which are processed through BSP. These
are the recommended steps agencies should follow to properly account for these
transactions.
1) Create the invoice in Trams Back Office either via interface or manual entry. The issue date will reflect
the actual date of the sale:
*
255
Submit to = Supplier (Comm Track invoices would not account for sales/cost of sales in the general
4/7/15
Invoices
ledger)
*
Total Fare = Amount of ticket
*
Commission = Amount of commission earned on the ticket
*
Form of Payment = Credit card
*
Sales Agent(s) = Sales Agent(s) in PNR
2) On the Monday after the BSP Canada Web sale, BSP will e-mail a Web Cash Reward report and Web
Account file.
3) Upon receiving the BSP Report, it will list the credit memo, and at that time be sure to create an
Adjustment Invoice in Trams Back Office (Invoices|Adjustments, or Debit/Credit Memo) - one booking
record for each confirmation number.
*
Client name on the invoice = Air Canada
*
Vendor name on the invoice = Air Canada
*
Memo number in the invoice = Credit memo number
*
Original Ticket number in the invoice = Credit memo number
* Do not enter any Sales Agents to the credit memo as they were already tagged when the supplier
invoice was created in Step 1
4) Perform the BSP Settlement as usual.
5) Run a Vendor Statement Summary report (Reports|Vendor|Statement) and compare this to the Credit
Memo from Air Canada. This serves as a reconciliation process to ensure that the proper commissions were
received from Air Canada on the Credit Memo.
*
Report type = Summary
*
Vendor Name = Air Canada
*
From and To dates = BSP reporting period
6) Write off the Vendor Balance on the Vendor Balance Report created from Step 1. Go to
Payments|Received after determining the amount of write-off based on the reconciliation process in Step
5. Enter the amount in the amount field of the payment received screen with a Pay Method = Other; Payment
Date = BSP Settlement Date; Profile Type = Vendor Supplier; and Name = Air Canada. Toggle closed
invoices that were paid by the Credit Memo from Air Canada and journalize to BSP Adjustments.
Note: Agent Statements will be affected by the write-off of the Vendor Balance, as this is a Supplier CC
transaction and should be set to Vendor Payment Date.
4/7/15
256
Invoices
Voiding Invoices
Go to Invoice|Query to bring up the following screen:
To void an invoice, query the invoice, click to highlight and then select the Void button. The system
prompts, “ Vo i d S al e x xx x? (xxxx is the invoice #). To track the Invoice Number and any
corresponding ticket numbers in Trams as void, check Track Voided Invoice. (To be able to Unvoid in future,
this area must be checked off.) To erase the invoice entirely from the system, uncheck Track Voided
Invoice.Select Cancel to leave area without voiding.
If any payments have been applied to an invoice, those payments must be voided prior to voiding the
invoice. If the only payments (single or multiple) applied to the invoice are credit card payments, the system
automatically voids the credit card payments while voiding the invoice. The credit card number does not
have to be the same as long as those payments only apply to the invoice being voided.
257
4/7/15
Invoices
If there are multiple payments but not with the same form of payment, or the vendor side of a booking has
its own payment number, as an ARC booking closed on the vendor side through the ARC Settlement would,
then void the payments first and then void the invoice.
Void the invoice by right-clicking and selecting Void or click Void on the Invoice Query Screen.
Void payments by selecting the appropriate invoice, highlighting the booking that has a payment applied,
click on the Client Payment or Vendor Payment button, then Void Payment, and select OK when prompted.
To track the voided payment, check the box Track Voided Payment. Set tracking as permanent option by
going to Utilities|Setup|Global Defaults|Prompt and checking off Always Track Voided Payments.
A word of caution: After voiding a payment that is not tracked, there is no maintained history on that. Be
careful about voiding payments without tracking. If querying for a partial payment and voiding a payment
linked to a closed invoice, a message is displayed: This payment represents a partial payment for one or
more invoices. Are you sure you want to void? Yes. No.
Unvoiding Invoices
Having the ability to reinstate an invoice is a convenient and time saving feature. If Yes to tracking was
selected when initially voiding the invoice, to reinstate the invoice do the following: Query the invoice,
highlight and select Void. The following screen appears.
Answer Yes to “Do You Wish To Unvoid?”
Entering Spoiled Invoices/Tickets
To keep track of voided invoice and ticket numbers that have not been entered into Trams, enter them as
Spoiled.
4/7/15
258
Invoices
1. Click Invoices|Spoiled.
2. In the Invoice Number field, type the invoice number to be tracked as voided.
3. The Branch field defaults to 0. To change the branch number, type in the number or click the arrow to
select from the list.
4. In the Issue Date field, enter the date the invoice was printed. For an ARC/BSP document, type in the
ARC/BSP week during which it would have appeared.
5. In the Ticket No field, type the ticket number(s) to be tracked as voided. Click OK to save.
Voided Invoices Retain Original Client & Vendor
Voided invoices retain the booking details if Yes was selected to tracking when voiding an invoice. Search
for voided invoices by going to the Invoice Query screen, then to Invoice Status. Click on the down arrow to
see the option list. Click on Voided and process. Note: Print voided ticket reports from the Report Generator
screen. This enables the agency to keep track of voided invoices by name and yields more flexibility when printing
Finance Charges.
If adding a finance charge for any invoices remaining open longer than, perhaps, 30 days, there is now a
way of keeping the finance charge portion of open invoices separate from the original invoice. Create a
separate finance charge invoice for any money owed by, effectively separating the original charge from the
finance charge. This feature adds finance charges to any client's account that appears on the Client Balance
Core Report.
1. First, go to Utilities|SetUp|Travel Types.
2. Highlight a User Defined field and name it “Finance Charge”.
3. Under Travel Category, Select “Other”.
4. Click Update and OK to save.
5. Go the General Ledger|Accounts and create accounts for finance charges. Set-up an account in the
4000 series for Sales and one in the 5000 series for Cost of Sales.
6. Go to Utilities|Setup|GL Accts and select the Finance Charge Travel Type by clicking that line. Edit the
259
4/7/15
Invoices
accounts at the top of the data entry screen to the account numbers just created and click Update to accept
the changes.
7. Go to Invoice|Finance Charges.
8. Enter the From and To dates.
9. If running the charges for a group of clients, select that group from the drop-down menu.
10. Select the Travel Type of “Finance Charge” from the drop-down menu.
11. Enter the date of the newly created Finance Charge Invoices.
12. Assign a starting invoice # (choose numbers unique to this category).
13. From the drop-down menu, select a branch for the newly created Finance Charge Invoices.
14. Enter the “Vendor” name, which is the agency’s name.
15. Enter the rate (in whole numbers, 10.0 = 10%; 5.0 = 5%).
Based on the dates, for every open invoice, the system builds a new invoice reflecting the finance charges
for the client. Note: Be sure to run this finance charge calculation only once for a given time period.
Otherwise, this will be adding finance charges upon finance charges for the same period, and create
another open invoice. Check dates carefully.
Transfer Invoice/Payment to Different Profile
If an invoice and/or payment has been applied to the wrong client (in a closed or open period), transfer the
invoice/payment all at once by querying invoice up and changing the name of the client.
1. Query the invoice that needs to be moved to a different client.
2. Highlight the invoice and click View; or double click on the invoice.
3. Click the client Name field and type in a couple of letters of the profile to change on the invoice.
4. Use the down arrow to find the exact match. Click OK to process.
5. Get the following message if there is a payment attached:
6. Click Yes to transfer the payment as well OR select No for payment to remain under the original Client
Name.
7. Query up and delete out the duplicate profile if applicable.
Resubmit ARC/BSP Document
To resubmit an ARC/BSP document:
1. Click on Invoices|Query.
2. In the Invoice # field, type in the invoice number being resubmitted and click Query.
3. Highlight the invoice and click View.
4/7/15
260
Invoices
4. Once the invoice booking(s) are displayed, highlight the appropriate booking and click Modify.
5. Click the Resubmit Date field and enter a date that falls into the ARC/BSP week in which this ticket is to
be included. Click the OK button to view the booking summary screen.
6. If submitting more than one booking on the invoice, repeat steps 4 and 5.
7. Click OK to save the changes.
Account Net Remit Acct (Southwest Ticketless)
1. Enter a Sales Invoice as usual.
2. In the Submit To field, select Supplier.
3. In the Vendor Name field, enter the vendor’s name.
4. Fill in the Total Fare, Taxes/Rate and Commission/Rate fields.
5. Enter a Payment Received (Cash, Check, Credit Card, or CC Merchant) from the client, as usual, and
close the invoice.
6. Print a Vendor Statement with the dates of the billing period (e.g. monthly/weekly/biweekly).
7. Click Reports|Vendor|Statement and complete the information, as usual.
8. In the Submit To field, select Supplier.
9. In the Vendor Name field, type in the vendor’s name.
10. In the Issue Date field, enter the date range of the billing period (e.g. monthly/weekly/biweekly).
11. Click Preview to view the report on screen. (Or click Print to send the report directly to the printer without
viewing first.)
12. Once the report is on the screen, click the printer icon.
13. The Account Balance on the report shows how much the agency owes to the vendor, or how much the
vendor owes the agency. If the Account Balance is negative, the vendor is owed money. If the Account
Balance is positive, the vendor owes commission for the period (if there are more Credit Card sales than
Cash, Check, CC Merchant sales).
261
4/7/15
Invoices
14. To pay the amount labeled Account Balance from the statement, if the statement is negative, create a
Payment Made to the vendor. (See section, Payment to a Vendor in the Payments chapter.) If the amount
on the statement is positive, create a Payment Received from the vendor, once payment is actually
received.
When entering either a Payment Received or Payment Made, enter information as usual. When the list of
invoices is displayed, close all invoices shown with positive and negative amounts as listed on the Vendor
statement for the period.
Transactions with Deposits and Final Payments
Option One - (Recommended)
Create two separate invoices; one invoice at the time the Deposit is collected, and the other at the time of
the Final Payment.
1. Click Invoices|Sale. Enter the invoice for the Deposit as usual. (See Entering a Sales Invoice in this
chapter.)
2. In the Submit To field, choose Supplier.
3. In the Total Fare field, enter the amount of the Deposit collected from the client that will be sent to the
vendor.
4. The Commission/Rate field is zero since this is a Deposit only.
5. To track the final payment due date, click the Expanded Fare Info tab.
6. In the Due Date field, type the Final Payment due date.
7. In the Amount field, type in the Final Payment amount.
8. In the Comm Amount field, type in the commission earned on the entire sale amount.
9. Complete the rest of invoice as usual.
10. Click OK to display the Booking Summary screen. Click OK again to save the invoice.
Print a Final Payment report once a week to track final payments due:
1. Click Reports|Report Generator|Print Report.
2. In the Report field, type FINL_PAY.
3. Click the Advanced Tab and in the Final Payment Date From and To fields, type in the due dates.
4. Click Preview to view the report. (Or click Print to send the report directly to the printer without viewing
first.)
5. Once the report is displayed, click the printer icon to print.
From this report, create final invoices to generate client statements.
Trams recommends this option because it keeps accurate client and vendor histories without having to
account for the income until the final payment is received. Therefore, there are no client or vendor balances
to pay taxes on before actual income is received.
Option Two
One invoice is created for the entire sale at the time the deposit is collected, with two booking records. The
first booking is for the deposit amount with commission as zero. The second booking is for the final payment
amount with the full commission amount.
1. Click Invoices|Sale. Enter the invoice as usual. (See section, Entering a Sales Invoice in this chapter.)
2. In the Submit To field, choose Supplier.
4/7/15
262
Invoices
3. In the Total Fare field, enter the amount of the Deposit collected from the client that will be sent to the
vendor.
4. The Commission/Rate field is zero since this booking is for the Deposit only.
5. Complete the rest of the booking as usual.
6. Click the New Booking button to enter the second booking.
7. In the Submit To field, choose Supplier.
8. In the Total Fare field, enter the amount of the Final Payment.
9. In the Commission/Rate field, type in the commission earned on the entire sale amount.
10. Complete the rest of the booking as usual.
11. Click OK to display the Booking Summary screen. Click OK again to save the invoice.
Use Option Two to account for the entire sale at the time of booking. This creates a Client Balance and a
Vendor Balance for the final payment amount due.
Split Forms of Payment for Client Invoices
When one booking on an invoice is paid by credit card and another booking is paid by cash/check, separate
payments are required. If invoice has already been entered please refer to the section entitled Split Forms
of Payment for Client Invoices in the next chapter, Payments.
If the invoice has not yet been entered:
1. Click Invoices|Sale. Create the invoice, as usual, for the booking record Paid by Credit Card only. (See
section, Entering a Sales Invoice in this chapter.)
2. Click OK to save the invoice. Trams prompts, “Enter a Payment for this Invoice?” Click YES. Enter Credit
Card information. Click OK to save.
3. Click Invoices|Query.
4. In the Invoice # field, enter the newly created invoice number. Click Query to process.
5. Once Trams displays the invoice on the screen, click View, then click New to add the second booking
record.
6. Once all the information is entered for the second booking, click OK to view the booking summary screen.
Click OK again to save the invoice and prompt for a payment.
7. If there is the ability to enter cash payments from the invoice, enter the payment now. (See Global
Defaults in Utilities chapter.) If not, answer “No” to payment and enter the cash/check payment under the
payments menu. (See section, Payments Received from Client in the Payment chapter.)
Discounted Transaction — Paid By Cash/Check
A Discounted Transaction is when the agency sells travel to a client at a lower price than reported to
ARC/BSP or to a vendor. To account for the Client Receivable and the Vendor Payable correctly, enter a
sales invoice (see Entering A Sales Invoice in this chapter) with the following adjustments:
1. Click Invoices|Sale.
2. In the Total Fare field, type in the actual amount the client is paying. For example: a $200 ticket with a
discount of $5 is entered as a total fare of $195.
3. In the Taxes/Rate field, type in the exact amount of tax as it appears on the ticket.
4. In the Commission/Rate field, type in the amount of commission earned. For example: a $200 ticket with
263
4/7/15
Invoices
a commission of $20 and a discount of $5 is entered in the Commission/Rate field as $15.
5. Click the Expanded Fare Info tab.
6. In the Face Value field, type in the full amount of the sale to be reported to ARC/BSP or to the vendor;
e.g., $200. Click OK to save.
Discounted Transaction — Paid By Credit Card
A Discounted Transaction is when the agency sells travel to a client at a lower price than being reported to
ARC/BSP or a vendor. If the client’s form of payment is credit card, Trams recommends creating a negative
booking on the sales invoice for the discount amount.
Enter a Sales Invoice as usual (see section, Entering a Sales Invoice in this chapter) and pay it off with a
credit card payment.
1. Click Invoices|Query. Query the original invoice and click View, then New.
2. In the Submit To field, click the arrow, then click Supplier.
3. In the Vendor Name field, type in the Agency name. Trams prompts to create a new profile (if one has
not been created). (See section, Entering Vendor Profiles in the Profiles chapter.)
4. In the Total Fare field, type in the amount of the discount with a hyphen (-) in front of the number.
5. In the Taxes/Rate field, type in 0.00.
6. In the Commission/Rate field, type in the same amount as the Total Fare, (the amount of the discount)
with a hyphen (-) in front of the number. Click OK button to view the Booking Summary screen. Click OK
again to save the invoice.
Note: Since the Total Fare minus the Commission equals $0.00, the amount due from the Vendor is $0.00.
To give the client back the discounted amount, enter a Payment Made to the client. Close the invoice.
Rebates
There are two ways to enter Rebates.
Method A:
4/7/15
264
Invoices
1. Enter a Sales Invoice as usual. (See section, Entering a Sales Invoice in this chapter.)
2. Change the Submit To field to Supplier.
3. Type in the travel agency’s name in the Vendor Name field.
4. Both the Total Fare and the Commission/Rate fields are the amount of the rebate. Enter both amounts
as a negative (-) number.
5. Click OK to save.
6. Enter a payment to the client under the Payments menu, as usual.
Method B:
1. Click General Ledger|Accounts.
2. Create a General Ledger account called Client Rebates as a Cost of Sale account (5XXX) or an Expense
account (6XXX). (See section, Add To The General Ledger Chart of Accounts in General Ledger chapter.)
Is this a possible discussion with the agency’s accountant?
3. Next, click Payments|Made.
4. Enter the payment made, as usual, for the rebate amount.
5. Profile Type is Other.
6. In the Name field, enter the client’s name. If there is no match, Trams prompts to build a new profile. (See
section, Entering Client Profiles in the Profile chapter.) Click OK to save.
7. Trams prompts, “Create a Journal Entry?” If maintaining the General Ledger click YES.
Example Journal Entry
Acct #
Name
1000
Cash in Bank
XXXX
Client Rebates
Debit
Credit
XX.XX
XX.XX
8. Click OK to save.
Handling Groups in Trams Back Office
Managing groups and keeping the accounting organized can be challenging, due to the number of
transactions taking place, and more importantly, due to the lack of a relationship between the amounts
collected and amounts paid out. Although each group is different, here is an example of handling a group
situation. Most agencies, when dealing with a group, account for Sales or Income once the entire group is
complete or the group has departed.
The simplest way to determine the profit earned on a group is to calculate the difference between what is
collected from client for the group and what is paid out to vendors for the group. Keeping this concept in
mind, here is a way of handling groups in Trams.
1. Although the profit is calculated for the group as a whole, the payments need to be tracked for each client.
Thus, each client traveling in the group must have a separate Client Profile in Trams. First create a Client
Group (i.e. SKI’12) under Utilities|Setup|Groups. (See Creating Group Identifiers in the Profile chapter.)
2. Next, in each client’s profile click the Groups tab, then select the client group created in step 1. This ties
265
4/7/15
Invoices
all of these profiles together for reporting purposes later, such as printing mailing labels for the group.
3. Even if the vendor is already set up in Trams, or there are multiple vendors involved, build a single Vendor
Profile for the group. Make the vendor name descriptive e.g. Ski Group-Winter 12.
4. Next, create an Invoice|Payment Group (i.e. SKI’12) under Utilities|Setup|Groups. (See Creating
Group Identifiers in Profile chapter.)
5. When any group payments are received from clients, enter the Payment Received as usual. Make sure
to click the arrow next to the Payment Group field and select the Invoice/Payment Group name that was
created in Step 4. When prompted, create a voucher for the payment.
6. To see how much has been collected so far, print a Group Client Statement, in
Reports|Client|Statement. In the report screen change Report Type to Summary. Change the Format to
Group. Click the Invoice Group field and select the Invoice|Payment Group name for the group. Also look
at the Group Revenue Report under Report|Payments|Group Revenue. No invoices have been created
at this point.
7. When any group payments are made to vendors, enter the Payment Made to Vendor-Supplier and point
to the Vendor profile name for the group. (Enter the actual Payee in the Name on Check field.) Make sure
to click the arrow next to the Payment Group field and select the Invoice|Payment Group name that was
created in Step 4. When prompted, create a voucher for the payment.
8. At any time see how much has been paid out to vendors for the group, by printing a Vendor Statement in
Reports|Vendor|Statement for the Vendor profile name for the group. Also look at the Group Revenue
Report under Report|Payments|Group Revenue. Note: When viewing the Current Group Profit amount
on the Group Revenue report, the cost of any tickets (amount that passed on to ARC/BSP for the tickets)
needs to be subtracted from this total.
9. Issue invoices for any ARC documents for the group as is done for individual business, so they will appear
on the ARC report. Make sure to click the arrow next to the Group field on the invoice screen and select the
Invoice|Payment Group name that was created in Step 4.
10. Next, Query the ARC invoices and click the Refund button to refund. Change the Submit To field to
4/7/15
266
Invoices
Supplier and Vendor to the vendor profile name for the group. Then enter a zero payment received from the
client and close the ARC invoice and the refund invoice. Make sure to click the arrow next to the Payment
Group field and select the Invoice|Payment Group name that was created in Step 4.
11. Wait to issue any non-ARC invoices until the group is completed and the sales and income are to be
accounted for.
12. When the group is completed, enter a separate invoice for each client for the total amount collected from
that client. Set the Submit To field (on the invoice) to Supplier and specify the vendor profile for this group.
Enter the total amount collected as the Total Fare and set the Commission/Rate field to zero.
13. After all invoices are entered, the client balances are zero and the profit on the group is available in the
vendor account on the Vendor Balances report or Vendor Statement. The invoice total reflects the difference
between what has been collected and what has been paid out. Therefore, the balance reflects the profit for
the group.
14. The last step is to transfer the profit amount from the vendor's balance to Income. Enter a Sales Invoice
date as the date on which to account for the income. Point to the appropriate Sales Agent, if applicable.
Enter the client name. Set the Submit To field to Supplier and specify the Vendor profile for this group. The
Total Fare is left at zero. Enter the profit amount determined in Step 13 as the Commission/Rate and click
the OK button to save the invoice. This entry increases the income by the amount entered, zeros the vendor
balance and updates sales agent's statement.
Note: All client and vendor balances are now zero, but vouchers and open invoices still appear. To apply
these balances and clear the accounts, enter a payment for each with the amount set to zero and close all
invoices and vouchers. Click here for a Handling Groups document. (For agencies with ClientBase, use this
document.
267
4/7/15
9
Payments/
Adjustments
This chapter contains:
Overview of Payment Query feature
Overview Receipts and Payments
How to make Bank Deposits, Withdrawals, Transfers
How to do a Bank Reconciliation, CC Merchant Reconciliation and Agent Reconciliation
Overview of Payable Functions, ARC/BSP Settlement, Payroll Import, and Import
Overview of the Adjustments Menu
Payments Received or Made
These are the payments received from or made to Clients (Leisure or Corporate), Vendors (Supplier, or
Commission Tracking), ARC (ARC/BSP Settlement), Agent, or Other. Payments Received or Made with a
Profile Type of Client, Vendor or ARC/BSP are connected to an invoice. Payments Received or Made with
a Profile Type of Other and Agent are not linked to an invoice and prompts for a journal entry.
There are five profile types for payments received and payments made - Client, Vendor, Agent, Other, and
ARC/BSP.
4/7/15
268
Payments
Payments Received|Made|Deposit|Withdrawal
Client
Entering client payments update specific client account balances and
are either applied to specific ARC/BSP and Supplier type invoices
entered into the system, left unapplied or turned into a voucher, crediting
the client’s account. Any pending client balances appear on the report
called Client Balances found in Reports|Core. To maintain accurate
client balances (one of the Core Reports of the system) all invoices and
client payments received and made must be entered into Trams Back
Office.
Vendor
Entering Vendor (Submit to of) Supplier payments received and made
update specific vendor account balances and are usually applied to
specific Supplier type invoices entered into the system. Any pending
vendor balances appear on the report called Vendor Balances found in
Reports|Core. To maintain accurate vendor balances (one of the Core
Reports of the system) all Supplier type invoices, as well as all
Vendor-Supplier payments received and made, must be entered into
Trams Back Office.
Entering Vendor (Submit to of) Comm Track payments clears any tickler
files created by Commission Tracking type transactions entered into the
system. Comm Track-type bookings do not update the General Ledger
until they have been closed with a Vendor payment.
269
4/7/15
Payments
Agent
Payments can be received from agents for reimbursing the agency for
expenses such as a special gift sent to a customer which was
purchased with agency money. Payments can be made to agents for
expense reimbursement. These transactions do not apply to an invoice
and would require a journal entry to update the general ledger.
Other
Other payments are entered when money is received or made which
does not pertain to a client balance, a vendor balance, or any Comm
Track type bookings. Examples are agency expenses and
miscellaneous receipts.
ARC/BSP
Approximately five days after submitting the ARC/BSP report, ARC/BSP
either deposits or withdraws payment to/from the agency’s bank
account. By performing an ARC/BSP Settlement in TBO (see section
below), Core Reports of ARC/BSP Balances and Check Register are
updated.
Payment Received/Payment Made
Amount
Enter the Payment amount received/made from client or vendor, deposit or withdrawal
amount.
Payment
Type
Select Received, Made, Deposit, Withdrawal. Important Note: Enter Payments
Received, Made, Deposits, Withdrawal and perform an ARC/BSP Settlement from the
same screen without having to return to the Main Menu.
Payment
Date
Enter the payment date manually or by clicking the mouse on the date field to display a
calendar. Note that the default date is the date entered for the most recently entered
payment. The default date for the first entered payment is the system date.
Bank Acct
A number is assigned to each Bank Account. Enter appropriate Bank Account number
for the payment or select from pull-down menu. A default bank account can be set up in
Utilities|Setup|Global Defaults|Prompt.
Branch
Associate a branch from the drop-down menu with this payment if desired. This can be
used for query and sort purposes in Payments, Bank Rec, Receipts, Payment Analysis,
Client Statements, Vendor Statements, etc. Assign a branch to a payment if desired and
still close out invoices created in more than one branch.
Invoice
Reference
Enter an invoice reference when applicable. A warning comes up when saving a
payment to the same profile where this Invoice Reference is the same as another
existing payment under that profile. (This is an aid in not paying the same expense
vendor twice for the same invoice or statement.)
Date Cleared
Date payment is cleared in the bank or credit card reconciliation process
Remark
500 spaces are allocated for free flow alphanumeric remarks. Click the scroll button at
the end of the Remarks field to view multiple lines of remarks. These Remarks can also
be used as criteria in a query screen. When checks are printed by Trams Back Office, if
desired, these remarks appear on the check.
Payment
Method
Click the down-arrow and highlight Cash, Check, Credit Card, Other, CC Merchant,
EFT - stands for Electronic Funds Transfer, or ACH - Automated Clearing House. The
system defaults to a payment method of Check. Use CC Merchant when the agency is
processing a credit card. (See section of this chapter entitled Pay Method for Agency
Processed Credit Cards for more details. See section of this chapter entitled Electronic
Funds Transfer for further details about EFT payment methods, and Automated Clearing
House about ACH payment method.)
4/7/15
270
Payments
Payment Received/Payment Made
Credit
Card/Check
Number
If the Payment Method is Check, enter the check number. If the payment method is
Credit Card, enter the credit card number. If the payment method is CC Merchant,
enter the credit card number\expiration date and the slash (\) is important. If the credit
card is listed in the client profile, click the down arrow and select the credit card. A credit
card can be added directly to the client profile from the payment screen by clicking the
Check/CC no. button on the payment screen.
Payment
Group
This field assigns a unique group name to a group of invoices for selecting in a query or
filtering for reports. To create a new payment group from the payment screen, click the
Payment Group button.
Profile Type
Click on the down-arrow to select among Client, Vendor, Agent, Other, or ARC. (See
section Payment Profile Types above.)
Name
Enter name or a portion of the profile name. Click the down-arrow and Trams Back Office
displays a list of all potential names. To select a name from the list, highlight and click on
the correct name. If there is no match, there is a TBO message, No matching Profiles
found. Do you wish to create a new Profile? Click No and re-try the search, or enter an
entire name and select Yes to create a new profile. When finished with the new profile,
click OK and return to payment input. Also search by ID by a right click of the mouse in
the name field. Query for a name by clicking the mouse on the “Name” field.
Name (and/or
Address) on
Check
If the name (and/or address) on the check differs from the name (and/or address) of the
client, enter this information here for reference. (The profile name and/or address does
not change as a result of entering the check name/address here.)
Payment
Code
For recurring payments, assign a unique payment code for later selecting in a query and
for easy duplication.
Client
Settings/
Vendor
Settings Tab
With a Profile Type of Client, select invoices for A Different Client, A Group of Clients, or
All Clients. For example, a corporate account has a separate profile for each division.
Each of the profiles has the same Client group code in the groups tab of the profile. By
selecting A Group of Clients, the invoice listing screen reflects any open invoices from
all profiles in the group. The receipts report shows a single payment that matches the
amount of the check received. With a Profile Type of Vendor, select a Submit To of All,
Supplier, Comm Track and/or a Date Payable, A Different Vendor, A Group of Vendors,
Vendors by Interface ID, or All.
For example, a hotel franchise may have multiple vendor profiles. Each of these profiles
has the same Vendor group code in the groups tab of the profile. By selecting A Group
of Vendors, the invoice listing screen displays any open invoices from all profiles in the
group. This can be used if only one payment is needed to be assigned to the payment
received.
Multiple vendors can also be displayed by selecting Vendors by Interface ID and entering
a hotel chain code such as HI. This displays all invoices from all vendor profiles that start
with HI.
271
4/7/15
Payments
Payment Received/Payment Made
Global
Settings Tab
Select invoices by Invoice # or range, Branch, Passenger, Ticket No.,Confirmation No.,
Issue Date or Depart Date From/To, Invoice Group, UDID criteria and more. The invoice
listing reflects the narrowed down results of the entered filter information. (The branch
field on the Global Settings tab of the payment screen defaults to the branch specified at
the payment level; if no branch is specified, then all branches are selected.)
Click Locate Invoice to find invoice in the invoice query screen. This is used when the
invoice number is known or other information about the invoice for the payment being
received, but are not sure which Client Name the invoice is under. Once the invoice is
located from the Query Screen and selected, the payment screen is populated with the
correct Client Name. Only the invoice selected is displayed.
Records
Select All, Invoice Only, or Bookings Only.
Continue
entering
payments
To enter multiple payments at one time, make sure Continue Entering Payments is
checked. When entering the last payment, remove the check to return to the main menu
instead of the payment entry screen.
Create Agent
Adjustment
When the profile type is Agent or Other, a window appears from which an agent
commission or payment adjustment can be made.
Display
Pymt# After
Saving
If checked, the system prompts with the payment number when saving a payment so that
number can be recorded.
Print Check
After Saving
When creating a Payment Made, the Print Check after Saving check box is located in the
lower right-hand corner of the payment screen. Once the option is enabled it will stick
until the check mark is removed. When the payment (and journal entry) has been saved,
the Check Writer dialogue box is launched and behaves in the same manner as when
used from the Reports|Payments|Check Writer area.
After entering a payment to or from a client or vendor, the system displays open invoices and any account
balances applicable to the source of the payment when clicking Query.
Columns is used to select columns of data to display in the results screen. Click Columns and choose the
columns by highlighting the column in the Available Fields and clicking the right arrow to move it over to
Displayed Fields. Using the red up and down arrows, put the columns in the order to appear. Click OK.
Return to the results screen and size the columns as desired, go back into Columns and click Save Settings
and OK to save. Column settings can also be saved in the Edit Payments screen. Next click Sort to sort the
columns of data displayed by up to 3 different fields in ascending or descending order. Click Save Settings.
Note: The column Net Due changes depending on how the invoices and bookings are viewed from the
Client side, or bookings from the Vendor side:
From the Client Side: Net Due is “0” when looking at Supplier Invoices unless Partial Payments have been
entered against the invoice. When looking at supplier bookings, Net Due equals the amount owed by the
client for the booking and is the same as Total Fare.
From the Vendor Side: Only bookings are displayed and Net Due is the amount of the Total Fare less any
Commission on a supplier booking and the amount of Commission due on a comm track booking.
All the payment screens are non-modal, meaning that screens can be clicked off while open so another task
can be performed in the program. The payment screen is saved on the file menu under Window and can be
4/7/15
272
Payments
re-opened. For example, when entering a commission payment received and all invoices are not displayed,
minimize the payment screen and create a new invoice. Click /Window on the file menu and reopen the
payment screen and click on the Refresh button and the new invoice is displayed.
Note: The payment number is not assigned until the payment is saved. This allows for sequential numbering
for all the payments created in TBO.
ATTACHMENTS TAB
In TBO version 3.05, an attachment tab has been added to all profile (Client, Vendor, Agent, Other), all
invoice types (sale, refund, adjustment) and the payment screens. The tab is located adjacent to the tab
now named General at the top of each screen. Within the workspace area of the new attachment tab, users
can manage (add, view, delete, update) electronic documents of any type.
Filename
Click the browse button to locate to the desired file.
Compressed
Defaults to enabled. Compressing the file helps to reduce the file size
(maximum file size is 8MB).
Description
Enter a user-defined description.
Path
This field is automatically populated based on the location of the file.
Add, adds a new file; Update, updates the existing file with a new or updated file; View, opens the file; and
Delete deletes the attached file. Extract sends a copy of the attachment to a location on your computer.
Payments Received From (or Made To) Clients
Once a client is selected, that client's account balances appear on the screen, including a detailed listing of
all open invoices and bookings for Sale, Refund, and Voucher. Note that positive amounts indicate payment
due to the agency, and negative amounts indicate payment due from the agency. Note also invoices and
vouchers are presented in blue, while bookings are presented in black.
Payment Received
273
4/7/15
Payments
Payment Received
Prior Unapplied
The accumulated total of unapplied funds the client had with the agency
prior to this payment. Examples include past overpayments,
pre-payments, or simply credits on account. Note: This area does not
appear unless there are unapplieds in database, or if the Allow Client
Unapplieds is NOT checked off in Utilities|Global Defaults|Prompt.
Unapplied Total
The total of the payment amount plus any prior unapplied; e.g., the
amount available to apply towards open invoices. As invoices are
closed, Unapplied Total is reduced accordingly.
Total Open
The amount due for all open invoices displayed. Sales invoices add to
this total; refund invoices subtract from this total. As invoices are closed,
Total Open is reduced accordingly.
Balance Due
Total Open less Unapplied Total. Amount owed or balances
outstanding. A positive Account Balance represents money owed to the
agency from the client; negative Account Balance represents money
owed from the agency to the client.
Records
All displays both Invoices and Bookings on screen. Invoices are shown
in blue; bookings are shown in black. Invoices Only shows invoices in
blue. Bookings Only show the bookings in black.
Invoice Number, Issue Date,
Amount, and Status, and all
other selected columns.
A list of open invoices and/or vouchers for the identified client where the
Invoice|Voucher Issue Date does not exceed the Payment Date. The
information displayed are the columns selected in the order they were
selected. (See details above.)
Right-Mouse Click to Void a Booking in Create New Payment
Highlight any ARC/BSP, Supplier or Comm Track Booking in the results screen, and right-click to select
Void Booking. A booking can be voided without having to use Edit Invoice. (Using Edit Invoice requires
selecting that button, clicking OK to close the booking window, clicking Void on the invoice screen, and
clicking OK to save the edit and get back to the Payment screen.) Right-mouse clicking saves over 4 key
strokes/mouse-clicks! (All present requirements for voiding a booking are in effect. Can't void if a payment
is attached until voiding the payment, and can't void in a closed period. The Void Booking feature from the
Payment Screen will be disabled for non-booking items (invoices) including client & vendor voucher
bookings.)
Payments Received from Client (Steps)
1. Select Payments|Received.
2. In the Amount field, type the dollar amount.
3. Change the Payment Date if necessary by typing in the proper date or clicking the mouse in the date field
to display a calendar.
4. In the Branch field, associate a branch from the drop-down menu to the payment if desired.
5. In the Bank Acct field, type in the appropriate bank account number (1, 2, 3, etc.), or click the arrow and
select from the list.
6. In the Remark field, type in free flow information, or leave blank.
4/7/15
274
Payments
7. Click the arrow by Payment Method field to choose the form of payment (Cash, Check, Credit Card, etc.)
8. If the payment method is Check or Credit Card, type in the check number or credit card number in the
Check/CC No field.
9. If this payment is associated with a group, select the group name from the drop-down menu of the
Payment Group field.
10. Change the Profile Type to Client.
11. In the Name field, type in the client’s name or a portion of the profile name and select name from the
drop down menu. If there is no match, Trams Back Office prompts to build a new profile. (See section,
Entering Client Profiles in the Profiles chapter.)
12. To narrow the list of open invoices, click on Client Settings and/or Global Settings. Use any or all of these
fields or, skip this portion altogether. Click Query to display the open invoice(s) and booking(s).
13. To apply the payment, highlight the invoice|voucher to which the payment applies and click Toggle
Closed, closing the invoice|voucher. Note that when closing the booking, both Unapplied Total and Total Open
are reduced accordingly. Continue closing invoices|vouchers until all Invoices|Vouchers attached to the
payment have been closed.
Warning: Do not close invoices unless Unapplied Total is at least as much as the invoice|voucher total to be
closed. If the invoice|voucher is closed, and the client is left with a balance due, there is no invoice data to
support the balance. The system does not allow a negative unapplied balance. Also, note that an unapplied
balance is not allowed when the form of payment is credit card.
Applying Payments to Specific Invoice Bookings
Toggle between three views of the displayed invoices in a payment screen. The default view is All where
each invoice and booking is represented by one line in the list (invoices and vouchers are in blue, and
bookings are in black). The alternate views are Invoices Only or Bookings Only where each invoice or
booking on an invoice is represented by one line in the list. To toggle between the three views, select All,
Invoices Only or Bookings Only. When viewing by booking, Individual bookings can be closed without
closing an entire invoice. If individual bookings are closed on an invoice, only open bookings show when
later payments are entered. Individual bookings on the same invoice can be closed with different payments.
Payment Received Using Invoice/Payment Group
If Invoice/Payment groups have been created in Utilities|Setup|Groups or by clicking on Payment Group
raised button in the payment screen, this table can be used in the Payment Group field pull-down menu and
also the Invoice Group field under Global Settings.
By using the Global Settings Tab and selecting an invoice/payment group, filter and display only those
invoices for the selected group. The invoice remarks and group fields, which are entered on the invoice
header when first entering the invoice screen, can also be displayed if selected as displayed fields under
Columns. This assists in applying a payment to the proper invoice(s)/voucher(s), based on the information
entered in the Global Settings Tab and Invoice Group field.
You have received a payment from Bob Jones for his trip with the Hughes Cruise Group. Bob is a frequent
traveler and has several open invoices. When you enter his payment, click on the Global Settings Tab and
select the invoice group by clicking the down arrow in the Invoice Group field. Click "Query" and only the
invoices that are associated with the Cruise Group will be displayed. You then can apply the payment to
the proper group invoice.
275
4/7/15
Payments
Payment Received Group
The Group Codes used in this feature can be entered from the Trams Back Office keyboard or by using the
interface from the GDS.
Modifying Pymt Amt Once Account Balances Appear
Modify the payment amount entered while viewing account balances by changing the amount at the top of
the screen.
Partial Payments
To apply a partial payment, click Partial Payment. Enter the amount of the partial payment and click OK.
G/L Branch Defaults
If a specific bank account references a G/L Branch, then that branch is used; otherwise, if the specified
payment branch references a G/L Branch, then that branch is used. If neither of these apply, the default
G/L branch is used set up in Utilities|Setup|Global Defaults|Prompt tab.
Close All/Invert All
To close all invoices at one time, click Close All. To invert (make closed payments open or vice versa), click
Invert All.
4/7/15
276
Payments
Show Quick Edit
A Show Quick Edit button assists with streamlining when entering commission track payments. When
entering a payment received or made with a profile type of Vendor, the Quick Edit button is enabled. A
floating window is launched which users can position anywhere on the payment received screen. The
window displays the passenger name and confirmation number which are non-editable as well as the
commission amount and booking dates (depart/return dates) that are editable. By modifying the Total Fare
totals here, the total fare field in the actual booking is changed to reflect the new amount.
Once information has been edited, upon clicking the update button the booking is toggled closed and the
next transaction in the grid is displayed in the quick edit screen. The next button moves to the next
transaction in the query grid.
The quick edit button allows editing for commission track items where there are no agent payment dates in
place.
Viewing/Editing Invoices By Booking
While viewing invoices by booking, access and modify the original booking by highlighting the booking and
clicking Edit. When finished modifying the booking, click OK.
How to Use Client & Global Settings
To receive a commission check from a payment source that covers multiple vendors such as PayMode,
Marriott Hotels, Hilton Hotels, etc.:
1. Enter the payment received information for the check as normal.
2. Change the Profile Type to “Vendor”.
3. Change the Submit To field on the Vendor Settings tab.
If only “Comm Track” bookings are needed to apply the check to, select Submit To, “Comm Track”. If only
“Supplier” bookings are desired to apply the check to, select Submit To of “Supplier”. To see both “Comm
Track” and “Supplier” bookings to apply the check to, select Submit To of “All” on the Vendor Settings tab.
This will close both Comm Track and Supplier bookings using the same check on a single payment.
277
4/7/15
Payments
4. Select A Group of Vendors field on the Vendor Settings tab and enter the appropriate “Group” in the field
(PayMode, MC, HILTON etc.) These vendor groups are created under Utilities|Setup|Groups.
5. Add a Profile Name for the Group Vendor in the Name field - PayMode, Marriott Hotels, Hilton Hotels etc.
Important: Each single payment source - PayMode, Marriott Hotels, Hilton Hotels, etc. needs a vendor
profile even if no invoices will be created under that profile. The profile is only used to reflect the centralized
payments received from this single payment source.
6. Click Query and close off the appropriate queried bookings, and save the payment as normal.
Note: The same procedure would apply for receiving a single check paying for invoices under two or more
Grouped client profiles. Just enter client group name in the Group of Clients field instead of vendor
information.
Hint: Notice the field Vendors by Interface ID. This field searches for the first two characters of the Vendor
Interface ID. This is an alternative time saver for finding multiple hotels in a single chain without having to
link them all together using the Groups field in each Vendor profile. For example, by entering HI in the
Vendors by Interface ID field, all vendors that have an interface ID beginning with HI will be displayed.
Automated Clearing House (ACH)
Automated Clearing House (ACH) is a system set up by the Federal Reserve Banks in the United States for
standardizing the transfer of electronic payments between banking institutions. This Payment Method can
be used for handing off data from Trams Back Office to a Payment Distribution Service or the agency’s bank.
(This is like a PayMode settlement using EFT, but in reverse.) Instead of the agency receiving a file to
reconcile payments being received, the agency sends a file, so that expense payments or payments to a
vendor can be made from the file by a bank or Payment Distribution Service. Using a Payment Method of
ACH acts like an EFT payment and appears directly on the Check Register and on the Bank Reconciliation.
Both Payments Received and Payments Made can be created, however only Payments Made can be
exported to a file. The file output conforms to the NACHA format.
Payment Made - The payment can be included in the ACH Export file sent to a bank or Payment Distribution
Service for processing. These payments when processed by the agency’s bank or Payment Distribution
Service would appear on the bank statement as an EFT payment and would be cleared when doing a Bank
Reconciliation.
An ACH Payment Made could be used to electronically pay Vendors that would allow for an electronic
payment to them, and to make expense payments for goods and services the agency purchases, like the
4/7/15
278
Payments
electric or gas bill.
Payment Received - Not Currently Implemented. Create a payment received using ACH, but the payment
cannot currently be included in the ACH Export file sent to a bank or Payment Distribution Service for
processing. Therefore the amount of the payment would not show on any bank statement and could not be
cleared when doing a Bank Reconciliation. When implemented, an ACH Payment Received could be used
by an agency to collect fees from another entity, or for a larger agency chain to collect monthly licensing
fees.
Profiles - New fields have been added under Bank Account Settings, on the Payment Info tab of all profile
types for Bank Account and Routing No. The Routing Number field is composed of both the Bank Code and
the Bank Branch. The first four (4) digits are for the Bank Code and the last five (5) digits are for the Bank
Branch. In the US those two numbers are usually combined into one nine (9) digit Routing Number. In other
countries the Bank Code and Bank Branch may be separate numbers. If so, enter both in the Routing
Number field with no spaces or dashes. Enter all nine (9) digits including any 'leading' zeros if present.
279
4/7/15
Payments
From/To
Enter a date range for export file.
Bank Acct.
From the drop-down menu, select the appropriate bank account.
Payment Type
By default, the Payment Type is hard-coded as Made.
Format
From the drop-down select report or file.
Client Number
Enter a the client number (this is the client account number issued by the
bank.
File Descriptor
Type the file name format supplied by the bank.
Workflow scenario:
1. Agency creates a payment made in Trams Back Office
2. Agency creates an ACH export to send to the Agency's Bank.
3. Agency Bank processes the file which updates the bank account for the Payee in the payment made.
Detailed Steps:
1. Create or Query a Profile for the Payee
a. Enter the Payee's Bank information into the Payment Info tab of the profile in the Account Number field
2. Create a payment made as usual
a. Payment Method = ACH
b. Click on the CK/CC/ACH button to access the ACH Account Number information in the Payee profile
c. In the Payee profile, copy and paste the Account Number into the CK/CC/ACH field of the payment made
3. Obtain the Agency client account number from the Agency bank. (This information will be used when
performing the Reports|Payment|ACH Export in the Client Number field)
4. Obtain file descriptor (file name format supplied by Agency bank, if they require it). (This information will
be used when performing the Reports|Payment|ACH Export in the File Descriptor field)
5. Go to Reports|Payment|ACH Export
6. Enter the date range for the ACH payments created to be included in the Export
7. Select the appropriate Bank Account from which the funds will be withdrawn
4/7/15
280
Payments
8. Select the Format option: File
9. Enter the Client Number from step 3
10.Enter the File Descriptor from step 4
11.Click on preview which will display the save in dialogue box
12.Select where to save the file and enter a file name in the file name field
13.The Save as Type field will be text (.txt)
Electronic Funds Transfer
Record payments made or payments received for EFT’s, or for electronic withdrawals. Select
Payments/Received or Made from the main menu. Enter the amount and click the down arrow next in the
Payment Method field to select the option for EFT. Enter the Pay Date, Remarks, Profile Type and Name.
A Payment Received with a Pay Method of EFT, does not require a deposit entry. These items are
automatically added to the check register. A Payment Made with a Pay Method of EFT, does not require a
withdrawal entry. These items are automatically deducted from the check register. Use the Remark line in
the payment screen, to identify each EFT payment. The Remark field prints on the check register, making
reconciling the bank statement easier. ARC/BSP Settlement, Bank Transfers, and Vendor withdrawals, use
the Pay Method EFT. Note: Bank transfers can also be done using the Form of Payment, Check.
Your agency subscribes to Trams Back Office and pays monthly with an EFT. You have recorded this
payment as a Payment Made in the amount of $90 with a Pay Method of EFT and a Profile Type of Other.
The profile Name is Trams Back Office. Because the profile type is Other, you are prompted for a journal
entry. Enter the off-setting expense account, add a debit for $90, and click on OK. This EFT entry appears
on your check register as an EFT W/D.
Overpayment From a Client
When a payment is received from a client for more than the amount owed, the overpayment is left on the
client’s account as a voucher. (See voucher section also in this chapter.)
1. Click Payments|Received. Enter the payment received as usual.
2. When the invoice(s) appear, close them as usual.
3. Trams Back Office prompts, “Unapplied Payment Option. Create Voucher, Leave Unapplied, or Cancel.”
Click the Create Voucher button.
4. Enter the voucher information as usual. (See Entering a Voucher in this chapter.)
5. Click OK to save.
Split Forms of Payment for Client Invoices
When one booking on an invoice is paid by credit card and another booking is paid by cash/check, separate
payments are required. If invoice has already been entered. Select All or Bookings Only for the records.All
displays both Invoices and Bookings on screen. Bookings Only show the bookings in black.
1. Select Payments|Received from the Main Menu.
2. In the Amount field, type in the dollar amount.
3. Change the Payment Date if necessary by typing in the proper date or clicking the mouse in the date field
to display a calendar.
281
4/7/15
Payments
4. In the Branch field, associate a branch from the drop-down menu to the payment if desired.
5. In the Bank Acct field, type in the appropriate bank account number (1, 2, 3, etc.), or click the arrow and
select from the list.
6. In the Remark field, type in free flow information, or leave blank.
7. Click the arrow by Payment Method field to choose the form of payment Credit Card.
8. Enter the credit card number in the Check/CC No field.
9. Enter Payment Group if applicable. (See Payment Group section of this chapter.)
10. Select Profile Type of Client.
12. In the Name field, type in a portion of the client's name.
13. To narrow the list of open invoices, use the Client Settings and Global Settings tabs. Use any or all of
these fields or skip this portion altogether. Click Query to display the open invoice(s) and bookings.
14. Click the booking being paid by credit card and click Toggle Closed. Click OK to save.
15. Repeat the steps for the Cash/Check payment.
Partial Payment Received From Client
A partial payment in Trams Back Office is a payment received from a client that is less than the amount of
the invoice.
1. Select Payments|Received from the Main Menu.
2. In the Amount field, type in the exact amount for that Form of Payment.
3. Change the Payment Date if necessary by typing in the proper date or clicking the mouse in the date
field to display a calendar.
4. In the Branch field, associate a branch from the drop-down menu to the payment if desired.
5. In the Bank Acct field, type in the appropriate bank account number (1, 2, 3, etc.), or click the arrow and
select from the list.
6. In the Remark field, type in free flow information, or leave blank.
7. Change the Payment Method field to Cash or Check.
8. If Payment Method is check, enter the Check number in the Check/CC No field.
Note: The Credit Card form of payment cannot be used for partial payments.
9. Enter the Payment Group if applicable. (See also Payment Group section of this chapter.)
10. Profile Type is Client.
11. In the Name field, type a portion of the client’s name.
12. Enter the Payment Code if applicable. (See also Payment Code section of this chapter.)
13. If there is more than one invoice listed, click the desired invoice want and click Partial Payment.
14. The Partial Payment Box appears. Type in the amount to apply towards the invoice and click OK.
15. Partial payments can be applied to more than one invoice by repeating Step 13 and Step 14.
16. Click OK to save.
Note: Partial payments can be created against an invoice, but no the booking.
4/7/15
282
Payments
Transfer Funds From One Client Account to
Another
Method A: This method can only be used if the payment is in an accounting period that has not been
closed. If an End of Period has been created and posted, proceed to Method B. Example: Transferring
$50.00 from Jon Smith to Clara Williams:
1. Select Payments|Query|Payment and query the payment that needs to be transferred. (i.e. payment for
Jon Smith.)
2. Once the payment is displayed, highlight it and right mouse click. When the menu choices appear, click
Re-Apply.
3. Trams Back Office prompts, “Re-apply payment number xx” and click Yes. This voids the original
payment and copies the information into a new payment screen.
4. Change the date to the date the payment was originally deposited. The Payment Date defaults to
the current date.
5. Click the name field and change the name to the person the money is to be transferred to. (i.e. Clara
Williams.)
6. Click OK to save the payment.
Note: If the invoice is also applied to the profile, transfer the Invoice first and the payment automatically
comes along with it--that way voucher does not have to be created!
Method B: This method is used if the payment is in an accounting period that was already closed and
posted. To transfer money from one client’s account to another, enter a Payment Made from the client’s
account from which the money is being taken and a Payment Received to the client’s account to which the
money is being given. Example: Transferring $50.00 from Jon Smith to Clara Williams:
1. Click Payment|Made. Enter the payment as usual.
2. In the Amount field, type the amount being transferred (e.g. $50.00).
3. Payment Method is Other.
4. In the Remark field, type To Transfer Balance.
5. Profile Type is Client.
6. In the Name field, type in the client’s name (e.g. Jon Smith).
7. Click OK to save.
8. Trams Back Office prompts, “Create A Journal Entry?” Click YES.
9. Trams Back Office automatically displays a debit to Client Balances. Enter a credit against account
6900-Temporary Holding as the offsetting account. (Is this account created? See section, Add To The
General Ledger Chart of Accounts in the Setting Up Trams Back Office chapter.)
10. Click OK to save.
11. Click Payments|Received. Enter the payment as usual. (See Payments Received From Client section
283
4/7/15
Payments
in this chapter.)
12. In the Amount field, type the amount being transferred (e.g. $50.00).
13. Payment Method is Other.
14. In the Remark field, type “To Transfer Balance.”
15. Profile Type is Client.
16. In the Name field, type in the client’s name. (e.g. Clara Williams)
17. Click OK to save.
18. Trams Back Office prompts, “Create A Journal Entry?” Click YES.
19. Trams Back Office automatically displays a credit to Client Balances. Enter a debit against account
6900-Temporary Holding as the offsetting account.
20. Click OK to save.
Remove/Write Off Client Balance
1. Go to Payments|Received.
2. Enter the Amount of invoice to be removed/written off.
3. Use date of report run to detect balance.
4. Choose Payment Method of OTHER.
5. Under Remarks, type "Write-off” with additional explanation.
6. In the Name field, enter the Client Name.
7. Toggle the invoice closed by clicking Toggle Close.
8. If the GL is set up, create a JE which credits Client Balances and write it off as a debit to a bad debt
account (usually a 6xxx account).
Remove/Write Off Vendor Balance
1. Go to Payments|Made.
2. Enter the Amount of Invoice to be removed/written off.
3. Use date of report run to detect balance.
4. Choose Payment Method of OTHER.
5. Under Remarks, type “Write-off” with additional explanation.
6. In the Name field, enter the Vendor Name.
7. Toggle the invoice closed by clicking Toggle Close.
8. If the GL is set up, create a JE which debits Vendor Balances and write it off as a credit to a bad debt
account (usually a 6xxx account).
Gift Certificate
To record the purchase of a gift certificate:
1. Click Payments|Received.
2. In the Amount field, type in the amount of the payment received to purchase the gift certificate.
4/7/15
284
Payments
3. In the Payment Date field, type in the date the payment is being deposited.
4. In the Bank Acct field, type in the appropriate bank account number (1,2, 3, etc.), or click the arrow to
select from list.
5. In the Remark field, type Gift Certificate and if available the Gift Certificate number. These remarks can
be used as criteria in a query screen.
6. In the Payment Method field, click the arrow to choose cash or check.
7. If the Payment Method was Check, type in the check number in the Check/CC No field.
8. Enter Payment Group if applicable. (See also Payment Group section of this chapter.)
9. Enter the Payment Code if applicable. (See also Payment Code section of this chapter.)
10. Profile Type is Client.
11. In the Name field, type in the name of the client. Click OK (not Query).
12. If there are no open invoices for the client, proceed to step #13. If there are open invoices click OK again,
then proceed to step #14.
13. TBO prompts Profile Has No Open Invoices Prior to Payment Date. Create Voucher, Leave Unapplied,
Cancel. Choose Create Voucher.
14. Fill in Voucher information and click OK to save.
Note: If one person is purchasing the gift certificate for another person, Trams Back Office recommends
that the payment be recorded under the name of the person doing the traveling. This establishes a credit
balance for the correct client account. If the name of the person traveling is unknown, record the payment
under the name of the person who purchased the gift certificate. When the gift certificate is redeemed, the
balance may be transferred from one account to the other or choose All Clients from the Client Settings in
payment screen and close voucher and invoice from the two different client profiles.
Petty Cash
Giving Change from Petty Cash
When a client pays for an invoice and change is given out of Petty Cash:
1. Click Payments|Received and enter the payment from the client, as usual, for the actual amount
received. (If the invoice is $75.00 and the client pays $80.00, enter the payment received as $80.00.)
2. When Trams Back Office displays the open invoice(s), click Toggle Closed to change the status of the
invoice(s) to closed. Click OK to save.
3. Trams Back Office prompts, “Total Unapplied is (whatever the amount is). Create Voucher, Leave
Unapplied, Cancel.” Click Create Voucher. (If the invoice is $75.00 and the client pays $80.00, once the
invoice is closed the extra $5.00 shows as unapplied. This amount goes on the voucher.)
4. Enter a Payment Made to the client, as usual, for the voucher amount ($5.00). Payment Method is Other.
Trams Back Office displays the voucher. Highlight it and click Toggle Closed. Click OK to save.
5. Trams Back Office prompts, “Create A Journal Entry?" Click YES.
6. Trams Back Office automatically displays a debit to Client Balances. Choose the Over/Short account as
the offsetting entry. It may be necessary to create this account. (See Adding to the General Ledger Chart
of Accounts section in the General Ledger chapter.)
Example Journal Entry
Acct #
285
Name
Debit
Credit
4/7/15
Payments
1100
6XXX
7. Click OK to save.
Client Balances
Over/Short
5.00
5.00
The Over/Short account is cleared when petty cash is reimbursed. (See Reimbursing Petty Cash section in
this chapter.)
Note: Make sure to put a receipt in the petty cash drawer to account for the money that was taken out for
the change.
Reimbursing Petty Cash
To replace the money taken from petty cash:
1. Click on Payments|Made.
2. In the Amount field, type in the dollar amount.
3. In the Bank Acct field, type in the appropriate bank account number (1, 2, 3, etc.), or click the arrow to
select from the list.
4. Change the Payment Date (if it is not the current date) by typing in the proper date.
5. Click the arrow to choose the Payment Method of Check.
6. Type the Check number in the Check/CC No field.
7. Leave the Payment Group field blank.
8. Leave the Payment Code field blank. (See Payment Code section in this chapter for more information.)
9. In the Remark field, type in Petty Cash Reimbursement.
10. Change the Profile Type to Other.
11. In the Name field type in Petty Cash. If there is no match, Trams Back Office prompts to build a new
profile. (See Other Profiles section in the Profiles chapter.) Click OK to save.
12. Trams Back Office prompts, “Create a Journal Entry?” Click YES.
13. Trams Back Office automatically displays a credit to the Cash in Bank account. Offset this against the
appropriate expense account(s) that represent the various items for which petty cash was used.
Example Journal Entry
Acct #
Name
Br
Debit
1000
Cash in Bank
6150
Office Expense
90.00
6180
Postage
10.00
Credit
100.00
14. Click OK to save.
Note: Journal Entries created directly against the General Ledger account for Petty Cash are done only to
set up Petty Cash, or increase/decrease the overall Petty Cash balance carried. Journal Entries are never
entered against this account when reimbursing.
Owner/Employee Travel Expenses Paid by
Agency
For travel expenses absorbed by the agency, such as FAM trips, seminars, or special classes, enter an
4/7/15
286
Payments
invoice as usual.
1. Click Invoices|Sale. Complete the invoice as usual. (See Entering a Sales Invoice section in Invoice
chapter.)
2. Once the invoice is complete, click Payments|Received.
3. In the Amount field, type in the dollar amount of the invoice.
4. Change the Payment Method field to Other.
5. Change the Payment Date field (if it is not the current date) by entering the correct date.
6. Since the Payment Method is Other, it is not necessary to modify the Bank Acct field. Skip this field.
7. Enter the Payment Group if applicable. (See also Payment Group section of this chapter.)
8. Enter the Payment Code if applicable. (See also Payment Code section of this chapter.)
9. In the Remark field, type a brief description of what the payment is for. (e.g. FAM Trip, seminar, etc.).
Profile Type is Client.
10. In the Name field, enter the name of the person or entity as recorded on the invoice. (Owner or
Employee’s name, Travel Agency’s name, etc.)
11. Click OK to process.
12. Trams Back Office displays all open invoices for the client. Click the invoice to close and click Toggle
Closed. Repeat if there are multiple invoices to close.
13. Click OK to save.
14. Trams Back Office prompts, Create Journal Entry? Click YES.
15. Trams Back Office displays a credit to Client Balances. Fill in the offsetting GL account.
Example Journal Entry
Acct #
Name
1100
Client Balances
6xxx
Education & Seminars
Debit
Credit
xx.xx
xx.xx
16. Click OK to save.
Foreign Currency Payments
A Canadian agency has Bank Account 2 set up in US Dollars. A customer calls and is paying for a ticket
with US Dollars. The price for the travel is $200.00 Canadian Dollars. The exchange rate in the
conversion field is .800. Enter the invoice in local currency. The client is quoted $160.00 in US dollars.
When setting up Bank Accounts, only use a currency code (like USD) on the bank account that there is
going to be foreign exchange issued on, and it is recommended to leave the rate at 1.000 so that there is
control of the equivalency based on the day’s rate. Add an asset account for Foreign Exchange to the Chart
of Accounts and go to Utilities|Setup|GL Accounts to enter the new Foreign Exchange chart number in
the Conversion Column for the agency bank account.
Trams Back Office automatically generates the journal entry if the G/L Prompt default settings are set to
Recommended|Always (Refer to Utilities|Setup|Global Defaults).
287
4/7/15
Payments
This transaction creates the following EOP entry:
EOP Entry
Acct
Account Name
Debit
4000
Sales - Domestic Air
1100
Client Balances
200.00
5000
Cost of Sales Domestic Air
181.82
2010
ARC/BSP Balances
1000
Cash In Bank-US Dollars
160.00
1001
Foreign Exchange
40.00
1100
Client Balances
Credit
200.00
181.82
200.00
If a payment is made to a vendor for $160.00 on a $200.00 Canadian net remit, the journal entry should
read:
Acct
Account Name
Debit
Credit
1000
Cash In Bank-US Dollars
160.00
1001
Foreign Exchange
40.00
1100
Vendor Balances
200.00
Payment Received for Commission Track
To record a payment for commission received from a Vendor (hotel, car, tours, etc.):
1. Click Payments|Received.
2. In the Amount field, type in the amount of the commission check received.
3. In the Payment Date field, type in the date the payment is being deposited.
4. The Bank Acct field should be the appropriate bank account number (1,2,3, etc.). To change the default,
type in the new number, or click the arrow to see the list.
5. In the Remark field, enter free flow information.
6. Change the Payment Method to Check.
7. Type the Check number in the Check/CC No field.
8. If this payment is associated with a group, type the group name in the Payment Group field.
9. Enter Payment Code if applicable. (See also Payment Code section of this chapter.)
10. Change the Profile Type field to Vendor and in the Vendor Settings Tab select Submit To to CommTrack.
11. In the Name field, type in the name of the Vendor from whom the check was received.
12. To narrow the list of open invoices, select from the Vendor Settings and/or Global Settings tabs. Use
any or all of these fields to locate an invoice(s), or skip this field entirely. If the payment is for a group of
vendors select A Group of Vendors and select the group name. Click Query to display open invoice(s).
13. If there is more than one invoice listed, click the first invoice to close, then click Toggle Closed. Repeat
4/7/15
288
Payments
until all appropriate invoices are closed.
Note: Sometimes the payment received from the Vendor differs from the amount invoiced. For
Commission Track bookings, the amounts can be edited in the payment screen. Click the invoice to close,
then click Edit Invoice. Change both the Commission amount and the Total Fare. If the exact amount of the
Total Fare is not shown on the receipt, estimate (e.g. the commission check was $10.00 and earn 10%
commission, the total fare is $100.00).
14. Click OK to save the changes to the booking.
15. Click OK to save the payment.
Commtrack Vendor Pays the Commission Due
Agency via the Agency's Credit Card
If the vendor on a Commtrack invoice indicates that they want to pay the commission they owe by crediting
the agency credit card, use the following steps:
1) Query the Commtrack invoice and view the booking. Change the total fare and commission to $0. Enter
a payment received of $0 from the vendor with a payment method of Cash, and close the booking. If the
Commtrack booking is voided, this may affect reports and the ability to track the booking activity with that
particular vendor.
2) Enter a second payment received for the amount of the commission with a pay method of CC Merchant
and a Profile Type of Other.
Debit 1150 - the CC Merchant Receivable account
Credit 4xxx Sales for gross amount
Debit 5xxx Cost of Sales for the net amount
3) When money is actually deposited into the bank account, enter payment received with pay method of and
a Profile Type of Other.
Debit 1xxx for amount in bank
Credit 1150 full amount charge to cards
Debit 6xxx Credit Card fees or Bank fees for the processing fee amount
Commission Received - No Invoice
When a commission check is received and there is not a commission tracking booking in Trams Back Office
(this usually happens with commissions coming in on bookings made prior to implementing Trams Back
Office), there are two ways that the check can be recorded.
Option One: This option is the Trams Back Office recommended method, since it can track the history for
the vendor.
1. Click Invoices|Sale.
2. Create a sales invoice as usual with the Submit To field as Comm Track. (See Entering a Sales Invoice
in Invoices chapter.)
3. Next, click Payments|Received.
4. Enter the commission check as usual.
Note: Remember payment screens are non-modal. If in a payment screen and an invoice needs to be
entered, minimize the payment screen, create an Invoice|Sale as above, click Window from main menu
and reopen the payment screen. Refresh displays the newly entered invoice.
289
4/7/15
Payments
Option Two: With this option, no sales information is available for the management reports, nor will
production volume be reported by Vendor or Client.
1. Click Payments|Received.
2. In the Amount field, type in the amount of the commission check.
3. Leave the Payment Method as Check.
4. In the Payment Date field, type in the date the payment is being deposited.
5. In the Bank Acct field, type in the appropriate bank account number (1, 2, 3, etc.) or click the arrow to the
right of the field to select from list.
6. Leave the Name on Check field blank.
7. Type in the check number in the Check/CC No field.
8. Enter the Payment Group if applicable. (See also Payment Groups section of this chapter.)
9. Enter the Payment Code if applicable. (See also Payment Code section of this chapter.)
10. In the Remark field, type Commission Received.
11. The Profile Type is Other.
12. In the Name field, type in the name of the Vendor from whom the check was received. Click OK.
13. Trams Back Office prompts, Create A Journal Entry? Click Yes.
14. Trams Back Office displays a debit to Cash in Bank for the amount of the check.
The first offsetting account number should be the Sales account being affected. Credit that account for the
gross sale amount. The next journal entry line is the account number for the Cost of Sales account being
affected. Debit that account for the gross sale amount less the amount of commission received.
15. Click OK to save.
Note: When using this option, it may be necessary to estimate what the gross sale amount is. If a
commission check of $10 is received from Alamo Car Rental and 10% commission is usually earned, the
journal entry is as follows:
Debit
Cash Account
$10.00 (commission received)
Credit
Sales-Car
$100.00
Debit
Cost of Sales-Car
$90.00
Entering Commission Payments Received from
a Clearing House
Some hotels such as Marriott Hotels, Courtyard by Marriott, Fairmont Hotels, etc., belong to a clearing
house such as Pegasus. These clearing houses issue commission checks for all hotels using their services.
Therefore, one commission check is issued for all bookings to these hotels. Use the steps below to manually
enter the payment. Pegasus, PayMode, and TACS (Perot Systems) offer files that Trams Back Office uses
to automate this process. (See the Pegasus/PayMode/CommTrak/TACS Reconciliation section of this
chapter.) To link the profiles:
1. Click Profiles|Query.
2. In the Vendor Name field, type in the name of the hotel belonging to the clearing house, (e.g., Marriott,
Hilton, etc.).
3. Change Profile Type to Vendor. Click Query to see all hotels matching the name.
4/7/15
290
Payments
4. Highlight the profile and click View.
5. Click the Group tab. In the Group/Batch field, select a vendor group that has been created in
Utilities|Setup|Groups (e.g, PayMode, Pegasus, TACS). Click Add to add it to the group list. Click the OK
to save.
6. Repeat Steps 2 through 6 until all profiles are edited.
Sales Invoice for Processing Fee
Create a Negative Sales Invoice for the Processing Fee:
1. Click Invoices|Sale. Enter the invoice as usual (see Entering a Sales Invoice section in the Invoice
chapter.)
2. In the Client Name field, type in the name of the agency. Submit To is Comm Track.
3. In the Vendor Name field, type in Pegasus. (If there is not a Vendor Profile, create one. Make sure to put
Pegasus in the Group/Batch field of the profile.)
4. In the Commission/Rate field, type in the service fee amount as a negative number.
5. Click OK to save.
To receipt the payment:
1. Click Payments|Received.
2. In the Amount field type in the amount of the check received.
3. Change Profile Type to Vendor.
4. In the Name field, type Pegasus
5. Under vendor settings select a Group of Vendors and from the drop down menu select Pegasus.
Note: Sometimes the payment received from the vendor differs from the amount invoiced. For Commission
Track bookings, edit the amounts in the Payment screen. Highlight the invoice to close and click Edit
Invoice. Change both the Commission/Rate amount and the Total Fare. If the exact amount of the Total
Fare is not shown on the receipt, estimate (e.g., the commission check is $10.00 and 10% commission was
earned, the total fare is $100.00). Click OK to save the changes made to the booking.
6. Highlight the invoice to close and click the Toggle Closed button. Repeat for all invoices being paid. Make
sure to also close the service fee invoice. Click OK to save.
Note to Canadian Agencies: On the Pegasus Payment Import routine, the GST Amount
and rate included in the Pegasus import file is read and altered in the more taxes tab to match
the amount in the file. There is also a column for the Commission on GST on the Payment
Import screen. The Pegasus Payment Import subtracts the GST Amount from the Commission Amount
column. When the payment is closed, the Commission on GST field is updated.
291
4/7/15
Payments
Agency Processed Credit Card aka CC
Merchant
There are two methods with which to account for Agency Processed Credit cards, also known as CC
Merchant transactions: CC Merchant Vendor Bills for Service Charge and CC Merchant Vendor Deducts
Service Charge at Time of Deposit. For both methods the End of Period journal entry summarizes all
invoices with a pay method of CC Merchant and debits the default account 1105. Both methods reduce the
total amount back to zero. Note: There is also a CC Merchant Automated CC Service Fee Processing
utility (agencies that are processing credit cards with Pinnacle Payment Solutions, NTC (National
Transactions Corporation), Caledon, or Ticketmaster (no longer taking new customers), can process
directly into TBO).
Account for CC Merchant Vendor Bills For Service Fee
The credit card charges are deposited directly into the bank account. The credit card company withdraws
a processing fee periodically (Visa, MasterCard, Diners, etc.).
1. Enter the invoice bookings with submit to set to Supplier and record all pertinent information (travel type,
vendor name, etc.)
2. Enter a payment received from the client with pay method set to CC Merchant. Enter the full amount of
the payment, recording the credit card number and all pertinent information (date, client, etc.), and close the
applicable invoice.
Note: This can also be accomplished through the Interface process from the GDS with a *CP4 code in the
accounting line.
3. Print a Credit Card Merchant Report (Reports|Payments|CC Merchant) for the day, with Included CC’s
set to Visa, MasterCard & Diners. Verify that the report matches the amount of the deposit.
4. Enter a payment received with a payment method of EFT for the deposit amount. Set profile type to
other. A profile should be created for use specifically for this type of deposit. The journal entry is a debit
to Cash in Bank and a credit to the Credit Card Merchant receivables account. (Create this account under
General Ledger|Accounts in the 1000 series, if not already done.)
5. When the service charge from the credit card company is deducted from the bank account, enter that
amount as a payment made with a payment method of EFT and profile type of other. The journal entry is
a credit to Cash in Bank and a debit to Bank Fees.
Account for CC Merchant Vendor Deducts Service Charge at
Time of Deposit
In this method, the credit card charges are reported to the credit card company. The credit card company
then makes a deposit into the agency’s bank account, less any service fees (American Express).
1. Enter the invoice bookings with submit to set to Supplier and record all pertinent information (travel
type, vendor name, etc.).
2. Enter a payment received from the client with payment method set to CC Merchant. Enter the full amount
of the payment, recording the credit card number and all pertinent information (date, client, etc.) and close
the applicable invoice.
Note: This can also be accomplished through the Interface process from the GDS with a *CP4 code in the
accounting line.
3. Print a Credit Card Merchant Report (Reports|Payments|CC Merchant) with Included CC’s set to
4/7/15
292
Payments
American Express. Verify that the report matches the amount of the credit cards that were processed.
4. When the credit card company sends a reconciliation report of the charges, enter a payment received
with a payment method of EFT for the deposit amount. Set profile type to Other. A profile should be created
for use specifically for this type of deposit. The journal entry will be a debit to Cash in Bank, a credit to the
Credit Card Merchant receivables account (create this account under General Ledger|Accounts in the
1000 series if not already done) and a debit to Bank Fees.
Bob and Mary Jones are booking a tour with your agency. The total cost is $1000. They want to pay with
their VISA Credit Card. This vendor does not take credit cards, so you process it directly, and pay the
vendor with an agency check.
To record this transaction, go to the main Payments menu, then to Received. Enter the $1000 in the
Amount field. Fill in the date and change the Pay Method to CC Merch. Be sure to include the client credit
card number because this lets you use the CC Reconciliation to clear the CC Merch payments. Fill in
any necessary remarks, change the Profile Type to Client, and type Jones in the name field. When the
$1000 tour invoice appears, press <Enter> to close it, and click on OK.
When VISA deposits this money in your bank account, go to the main Payments menu, then to Received.
Enter the amount, and select EFT in the Pay Method field. Select a Profile Type of Other, and enter VISA
in the Name field. Click on OK. To complete your journal entry, debit your Cash In Bank Account, and
credit your CC Merchant Receivables Account. This offsets the End Of Period journal entry made for the
original booking and sets your CC Merchant Receivables account back to zero. The EFT entry appears
on your check register as an EFT Dep.
EFT Payment Received
There is no need to do a Deposit entry, the Payment Received EFT automatically updates the check
register.
Payment Made to a Vendor
To account for a payment made to a vendor for a tour, cruise, etc., enter a Payment Made. This closes the
payable created by the sales invoice entered.
1. Click on Payments|Made from main menu.
2. In the Amount field, type in the dollar amount.
3. Change the Payment Date (if it is not the current date) by typing in the proper date.
4. In the Branch field, associate a branch from the drop-down menu to the payment if desired.
5. In the Bank Acct field, type in the appropriate bank account number (1, 2, 3, etc.), or click the arrow to
select from the list.
6. In the Remark field, type in free flow information, or leave blank.
7. Click the arrow next to the Payment Method field and choose Check.
8. Type the check number in the Check/CC No field.
9. If this payment is associated with a group, type in the group name in the Payment Group field.
10 To make the payment recurring, type in a Payment Code. (See Payment Codes section in this chapter.)
11. Change the Profile Type to Vendor and Submit to, to Supplier.
11. In the Name field, type in a portion of the vendor’s name.
12. To narrow the list of open invoices, select Vendor Settings and/or Global Settings Tabs. Use any or all
of these fields or skip this portion altogether. Click Query to display the open invoice(s).
293
4/7/15
Payments
13. If there is more than one invoice listed, click the first one being closed to highlight it and click Toggle
Closed. Repeat for each invoice to close. Click OK to save.
Note: If you add a checkmark to the box next to Agent Adjustment, you will automatically go to a Create
Agent Adjustment screen.
Payments Made To Agents
To account for a check written to the agent enter a Payment Made. This payment affects the bank account
and updates the General Ledger.
1. Click on Payments|Made.
2. In the Amount field, type in the dollar amount.
3. Change the Payment Date (if it is not the current date) by typing in the proper date.
4. In the Branch field, associate a branch from the drop-down menu to the payment if desired.
5. In the Bank Acct field, type in the appropriate bank account number (1, 2, 3, etc.), or click the arrow to
select from the list.
6. In the Remark field, type in a description of the payment. (Client Gift, Overnight Fee, etc.).
7. Click the arrow next to the Payment Method field and choose Check.
8. Type in the check number in the Check/CC no field.
9. To make this payment to be recurring, type in a Payment Code. (See Payment Code section in this
chapter.)
10. Enter the Payment Group if applicable. (See Payment Group in this chapter).
11. Change the Profile Type to Agent.
12. In the Name field, type in the name of the agent. Click OK to save.
13. If you would like to show this amount on the agent statement, add a checkmark to Agent Adjustment
and create an agent adjustment
14. Trams prompts, "Create a Journal Entry?" (This prompt is determined by how the set up was completed
in the Global Defaults Prompt Tab in Utilities.) If maintaining the General Ledger in Trams, click YES.
15. Trams automatically displays a credit to the Cash in Bank account. Choose the appropriate expense
account as the offsetting account.
Example Journal Entry
Acct #
Name
1000
Cash in Bank
6010
Agent Commissions
Br
Debit
Credit
XX.XX
XX.XX
16. Click OK to save.
17. If you checked the box next to agent adjustment, you will now have a Create Agent Adjustment screen.
In the Amount field, type in the adjustment amount. If the adjustment amount is being added to the amount
owed to the Agent, enter a positive (+) amount. If the adjustment amount is being subtracted from the
amount owed to the Agent, enter a negative (-) amount.
18. The Adjustment Date is the statement date that the adjustment affects. Type the correct date in this field.
19. Click the Agent Name field and type in the agent name.
4/7/15
294
Payments
20. Click the Remark field, and type a brief description about why the adjustment is being made. (e.g.,
Overnight Fee, Client Gift, etc.)
Payments Made for Expenses
To account for a check written for rent, utilities, or any other office expenses, enter a Payment Made. This
payment affects the bank account and updates the General Ledger.
1. Click on Payments|Made.
2. In the Amount field, type in the dollar amount.
3. Change the Payment Date (if it is not the current date) by typing in the proper date.
4. In the Branch field, associate a branch from the drop-down menu to the payment if desired.
5. In the Bank Acct field, type in the appropriate bank account number (1, 2, 3, etc.), or click the arrow to
select from the list.
6. In the Remark field, type in a description of the payment. (Rent, Utilities, etc.).
7. Click the arrow next to the Payment Method field and choose Check.
8. Type in the check number in the Check/CC no field.
9. To make this payment to be recurring, type in a Payment Code. (See Payment Code section in chapter.)
10. Enter the Payment Group if applicable. (See Payment Group in this chapter).
11. Change the Profile Type to Other.
12. In the Name field, type in the name of the Payee. If there is no match, Trams prompts to build a new
profile. (See Other Profiles in the Profiles chapter.) Click OK to save.
13. If this payment affects an agent, add a check mark to Agent Adjustment.
14. Trams prompts, “Create a Journal Entry?” (This prompt is determined by how the set up was completed
in the Global Defaults Prompt Tab in Utilities.) If maintaining the General Ledger in Trams, click YES.
15. Trams automatically displays a credit to the Cash in Bank account. Choose the appropriate expense
account as the offsetting account.
Example Journal Entry
Acct #
Name
1000
Cash in Bank
6150
Office Expense
Br
Debit
Credit
XX.XX
XX.XX
16. Click OK to save.
17. If you checked the box next to agent adjustment, you will now have a Create Agent Adjustment screen.
In the Amount field, type in the adjustment amount. If the adjustment amount is being added to the amount
owed to the Agent, enter a positive (+) amount. If the adjustment amount is being subtracted from the
amount owed to the Agent, enter a negative (-) amount.
18. The Adjustment Date is the statement date that the adjustment affects. Type the correct date in this field.
19. Click the Agent Name field and type in the Agent Name.
20. Click the Remark field, and type a brief description about why the adjustment is being made. (e.g.,
Overnight Fee, Client Gift, etc.)
Note: Recurring Expense Payments can be copied from previous payments made from prior months. See
295
4/7/15
Payments
Payment Codes section of this chapter to see how to set up and use Payment Codes so as not to have to
re-enter payment information. If Payment Codes have not been previously entered, query by a date range
by profile name for the previous month’s expense and copy and adjust it as above.
Void or Spoiled Checks
To enter a void or spoiled check:
1. Click Payments Query Screen and click New, and pick Payment Type, Made.
2. Leave the Amount field at zero.
3. Click the arrow to choose the Payment Method of Check.
4. Change the Payment Date to the date the check was voided.
5. In the Bank Acct field, type in the appropriate bank account number (1, 2, 3, etc.), or click the arrow to
select from the list.
6. Type the voided check number in the Check/CC No field.
7. Leave the Payment Group field blank.
8. Leave the Payment Code field blank.
9. In the Remark field, type To Account For Voided Check.
10. Change the Profile Type to Other.
11. In the Name field, type any Other Profile Name or create a profile named Void Check. If there is no
match, Trams prompts to build a new profile. (See Other Profiles in the profile chapter.) Click OK to save.
12. Trams prompts, “Create a Journal Entry?” Click NO.
13. Now if that payment appears on the query results screen and is highlighted, click on Void and say Yes
to Track Voided Payment.
14. If the payment does not appear on the query results, query the payment and click on Void and say Yes
to Track Voided Payment.
Bounced Checks
When a check deposited and entered in Trams has bounced, there are three options to account for it.
OPTION ONE:
Use this option when the bounced check is in an accounting period already ended and posted.
1. Click Payments|Withdrawal.
2. In the Amount field, type in the amount of the bounced check.
3. In the Withdrawal Date field, type in the date of the banks notice.
4. Change the bank account number to the account number into which the check was originally deposited
(1,2, 3, etc.) by typing in the appropriate account number, or click the arrow to select from the list.
5. Leave the Payment Group field blank.
6. Leave the Payment Code field blank.
7. In the Remark field, type any free-flow information. It is recommended to record the name of the client
whose check bounced, plus the check number.
8. Click OK to save. Trams prompts, “Create A Journal Entry?” Click YES.
4/7/15
296
Payments
9. Trams displays a credit to Cash in Bank. In the Account Name & Number field, type in the account
number for Bounced Checks and debit that account. (Was this account created already? See Adding To the
General Ledger Chart of Accounts.) Click on Add to add the entry to the journal entry box. Click OK.
10. When the payment is deposited again (or replaced) enter a Payment/Received with a profile type of
Other. In the Name field, type in the client’s name.
11. Click OK to save. Trams prompts, “Create A Journal Entry?” Click YES.
12. Trams shows a debit to Cash in Bank. In the Account Name & Number field, type in the account number
for Bounced Checks and credit that account. This clears the balance on the Bounced Checks account.
OPTION TWO:
Use this option to keep client statements accurate, and when the bounced check is in an open accounting
period.
1. Click Payments|Query|Payment.
2. Query the payment for the check that bounced. Right click on the payment and if "Query Bank Deposit"
is not grayed out, select it and 'Void' the Bank Deposit. After voiding the Bank Deposit, close that screen to
be back on the Payment that was part of the voided deposit. Click Void. Trams prompts, "Void Payment
Number xxx? Yes or No." Click YES to void. This opens up the client balance again and shows it on the
Client Balance Report.
3. Enter a payment received with the payment date of the original date of the receipt. Select the Profile Type
of Other and Payment Method of EFT. Enter the name of the client in the Name field. Create an Other
profile for the client when prompted. Click Yes to create a journal entry. Debit Cash in Bank and credit a
6000 account.
4. Click Payments|Withdrawal and enter a withdrawal for the amount of the bounced check to reduce the
bank balance. When prompted, "Create A Journal Entry?" Click Yes. Credit Cash in Bank and debit the
6000 account utilized in Step 3.
5. When the payment is deposited again or replaced, enter a Payment/Received as normal and close the
invoice again. Include as part of a new Bank Deposit.
OPTION THREE: (To keep original receipt and deposit in place and show that client still owes money.)
1. Click Payments|Made.
2. Enter the amount of the check. Use the Pay Method of EFT and the Profile Type of Client.
3. Enter the name of the client in the Name field.
4. Create a negative voucher.
5. When the payment is deposited again or replaced, enter a Payment/Received as normal and close the
client's voucher. Include as part of a new Bank Deposit.
297
4/7/15
Payments
Payroll Entry
To enter payroll checks and journalize the expense:
1. Click on Payments|Made.
2. In the Amount field, type in the amount of the payroll check.
3. Click the arrow to choose the Payment Method of Check.
4. Change the Payment Date (if it is not the current date) by typing in the proper date.
5. In the Bank Acct field, type in the appropriate bank account number (1, 2, 3, etc.), or click the arrow to
select from the list.
6. Type the Check number in the Check/CC No field.
7. Leave the Payment Group field blank.
8. To create a recurring payment, type in a Payment Code. (See Payment Codes section in this chapter.)
9. In the Remark field, type in free flow information, e.g. Payroll Ending 1/31/xx.
10. Change the Profile Type to Other, or Agent.
11. In the Name field, type in the name of the Employee. If there is no match, Trams prompts to build a new
profile.
12. Click OK to save. Note: In the Group/Batch field in the Employee’s profile, type in “Payroll.”
13. Trams prompts, “Create a Journal Entry?” If a General Ledger is being maintained in Trams, click YES.
14. Trams automatically displays a credit to the Cash in Bank account. Choose the appropriate expense
and liability accounts as the offsetting accounts. Example journal entry:
Amount
G/L Account
Debit
Credit
Net Check
(1XXX) Cash in Bank
Gross Pay
(6XXX) Salaries Expense*
Withheld Fed.Tax
(2XXX) Federal Withholding
45.00
Employer FICA
(2XXX) Federal Withholding
24.00
Employee FICA
(2XXX) Federal Withholding
24.00
FICA Expense
(6XXX) Tax Expense
Withheld State (if
applicable)
Withheld City (if
applicable)
TOTAL
(2XXX) State Withholding
15.00
(2XXX) City Withholding
5.00
411.00
500.00
24.00
524.00
524.00
Payroll Tax Report and Payment
To show the amount owed for payroll taxes, print these reports:
1. Click Reports|General Ledger|Account History.
4/7/15
298
Payments
2. Type in the G/L Acct No or the G/L Account Name of the tax account. (2000 series account)
3. In the From and To date fields, type in the desired dates.
4. If paying taxes for one of multiple branches, enter the appropriate branch in the Branch field. Otherwise,
leave it blank.
5. The Format defaults to Detail.
6. Leave the Pseudo Post box checked.
7. Leave the Active Accts Only box checked.
8. Click Preview to view on the screen. (Or click Print to send the report directly to the printer without viewing
first.)
9. The Ending Balance shown is the amount owed.
Note: Repeat these steps for each General Ledger tax account. The accounts match the journal entry
accounts of the employees check. (See Payroll Entry section in this chapter.)
To enter the payroll tax payment:
1. Click Payments|Made.
2. In the Amount field, type in the dollar amount.
3. Change the Payment Date (if it is not today) by typing in the proper date.
4. In the Bank Acct field, type in the appropriate bank account number (1, 2, 3, etc.), or click the arrow to
select from the list.
5. Payment Method is Check.
6. Type in the Check number in the Check/CC No field.
7. Enter the Payment Group if applicable.
8. To create a recurring payment, type in a Payment Code. (See Payment Codes section in this manual.)
9. In the Remark field, type a description of the payment. e.g. 1/31/03 Tax Payment.
10. Change the Profile Type to Other.
11. In the Name field, type in the name of the Payee. If there is no match, Trams prompts to build a new
profile. Click OK to save.
12. Trams prompts, “Create a Journal Entry?” If a GL is being maintained in Trams, click YES.
13. Trams automatically displays a credit to the Cash in Bank account. Choose the appropriate 2000 series
accounts as the offsets.
Example Journal Entry
Acct #
1XXX
2XXX
Name
Cash in Bank
Payroll Tax Account
Br
Debit
Credit
XX.XX
XX.XX
14. Click OK to save.
To View Individual Employee Payroll Information:
1. Go to Reports|Payments|Payment Analysis.
2. Change Payment Type to Made.
3. Enter desired dates.
4. Select Profile Type of Other or Agent.
5. Check Print J/E box.
299
4/7/15
Payments
6. Click Preview.
Vouchers
A voucher acts as a container for money received and held on account, or money sent to vendors for items
not yet invoiced. This feature is particularly useful when selling group travel. (See Handling Groups in TBO
section of invoice chapter.) Voucher is not a main menu option. Create a voucher by going to
Payments|Received or Payments|Made and entering a payment that does not apply to an invoice.
If there are no open invoices for a client or vendor, when clicking on OK to save the payment, a message
will be received, Profile has no open invoices prior to payment date. This presents three unapplied payment
options: Create Voucher, Leave Unapplied, and Cancel. The system does not allow closing vouchers or
creating new vouchers on a credit card payment.
No Open Invoices Message/Create Voucher
1. Create voucher allows voucher creation. Click on Create Voucher to enter a group name and add
remarks. (When creating a client or vendor voucher, the branch entered into the Payment Screen defaults
to the voucher screen, so the branch for the payment and the voucher are the same. If there is no branch
entry on the Payment screen, then the default branch setup in Utilities|Setup|Global Defaults|Prompt
Tab is used when creating a voucher. A voucher cannot be saved without a branch entry.) Click OK to
save. Vouchers reduce the Invoices Total due on the Client and Vendor Balances Summary Report. They
show up as an invoice number followed by a “V” in the Client Balances or Vendor Balances Detail Report
Client vouchers also show on Client Statements. Vendor vouchers show on Vendor Statements. There will
be a line item for each voucher created on a Client or Vendor account. They reduce the Vendors Total Open
Balance to provide a net amount due from the agency. They reduce the client's Total Open Balance to
provide a net amount due.
To close a voucher, enter a payment of the final balance due. Close any open invoices and vouchers that
close this open balance. Click Close All to close the vouchers and invoices on this accounts. This closes
the balance on the Client Balances Report and the Client Statement or the Vendor Balance Report and the
Vendor Statement.
Query for a voucher in the Invoice Query menu. Vouchers have the letter “V” after their number when
searching for them in the invoice screen, or choose Invoice Type Voucher.
2. Leave unapplied - Saves the payment without applying the payment to an invoice and without creating
a voucher. Note: Unapplied balances appear as one lump sum on the reports, so there is not payment
details. This is not recommended. The system does not allow an unapplied CC payment. The unapplied
option can be turned off under Utilities|Setup|Global Defaults|Prompt. Query for unapplied payment
detail in the Payment Query menu. Select the Advanced Tab and change the Only Unapplied field to Yes.
3. Cancel - Goes back to the payment to make any changes, apply the payment to an invoice, or cancel the
payment.
Note: A confirmation number field in a vendor voucher allows users to enter confirmation numbers in the
Payments Received/Made|Global Settings tab to find both the invoice and the voucher by confirmation
number and close both.
Track Voucher Payments Allocated Across Multiple Invoices
To track how voucher payments have been allocated across multiple invoices, follow the steps below.
1. Go to Payments|Received and create the voucher as usual. Note: To partially apply a voucher,
consider creating a Payment Group for the original payment that created the Voucher and use that Payment
Group for all subsequent partial payments for the voucher. Example: Voucher 142 would be the Payment
4/7/15
300
Payments
Group name for the original payment that created Voucher 142 and is then added to all subsequent partial
payments of Voucher 142.
2. To partially apply a voucher to close an existing invoice or invoices, create a Payments|Received. The
Payment Amount is $0. The Payment Method is either Cash or Other. Close each of the sales invoices,
but do not close the voucher. The amount of the sales invoices closed is in the Unapplied Balance area at
bottom of screen.
3. Next, select the voucher, right-click, select Partial Payment, and enter the amount of the unapplied
balance (total amount of invoices closed) as a negative amount. Since the amount of the voucher is being
reduced, the partial payment must be entered as a negative amount equal to the amount of the invoice(s)
being closed. When saving the zero payment, do not create a Journal Entry.
4. This process of partially using the balance of a voucher to close more invoices can be repeated as
needed. Only close the voucher when applying the final amount of the voucher against the final invoice.
5. To see the pay down of the original voucher, query for the voucher in the Invoice Query Screen, then
right-click on the voucher, and select Query All Payments, and print if desired. All payments are attached
to the original voucher. To see the invoices paid by the voucher, right-mouse click on any payment and
select Query All Invoices, and print if desired.
6. To close out multiple invoices attached to a single vouchers by multiple payments, run a Payment
Analysis Report using the Payment Group assigned to the original Voucher and the Voucher Partial
Payments, to see the complete history of the voucher from initial creation to final closing.
Adjusting Client and Vendor Balances
(Bad Debts, Over/Underpayments, Travel Expenses, Errors)
When Client Balances or Vendor Balances need adjusting or “writing off,” enter a payment to adjust the
balance. Print the Client Balance report (Reports/Core/Client Balances) or the Vendor Balance report
(Reports/Core/Vendor Balances), with format set to detail, as of the date to correct the balance.
To Zero Out Account Balance:
301
4/7/15
Payments
If the Balance Due amount (column on the right) on the Client Balance or Vendor Balance report is a positive
amount, enter a payment received.
1. Click Payments|Received.
2. In the Amount field, type in the amount of the balance being zeroed out.
3. Click the arrow to the right of the Payment Method field and select Other.
4. In the Pay Date field, enter the same date the report was printed.
5. In the Remark field, type a brief description as to why the balance is being zeroed out. (i.e. Bad Debt,
Under Payment, etc.)
6. Click the arrow to the right of the Profile Type field and choose Client (or Vendor-Supplier).
7. In the Name field, type in the name of the client (or vendor). Click OK to process.
8. Trams displays the open invoice(s) for the client (or vendor). Highlight the invoice(s) being closed and
click Toggle Closed. Click Query to process.
9. Trams prompts, “Create A Journal Entry? Yes or No.” If The GL is NOT maintained, click NO. If the GL
is maintained, click YES.:
Example Journal Entry
Credit
Client Balance account or Vendor Balance account (depending on
what profile type entered.)
Debit
Offset with an account that best describes the reason for the
adjustment (i.e. Bad Debt Expense, Accounting Adjustments, etc.)
10. Click OK.
If the Balance Due amount (column on the right) on the Client Balance or Vendor Balance report is negative
(-), enter a payment made.
1. Click Payments|Made.
2. Repeat step #2 through step #8 above.
3. Trams prompts, “Create A Journal Entry? Yes or No.” If the GL is NOT maintained, click NO. If the GL
is maintained, click YES.
Example Journal Entry
Debit
Client Balance account or Vendor Balance account (depending
on what profile type entered.)
Credit
Offset with an account that best describes the reason for the
adjustment (i.e. Bad Debt Expense, Accounting Adjustments,
etc.)
4. Click OK.
4/7/15
302
Payments
Clear Balance-Acct Balance Zero w/Total
Invoices & Total Unapplieds Same
If the Balance Due (column on the right) on the Client Balance report or Vendor Balance report is zero and
Total Invoices and Total Unapplied are the same amounts, this was probably caused by entering a payment
before an invoice was created. Therefore, apply the unapplied payment to the invoice.
1. Click Payments|Received.
2. Leave the Amount field as zero.
3. In the Pay Date field, enter the same date the report was printed.
4. In the Remark field, type To Apply Unapplied Balance.
5. Click the arrow to the right of the Payment Method field and select Other. Note: If the bookings being
closed with a Voucher or Unapplied amount are COMM TRACK bookings, use Payment Method of Check,
so that both the bookings and the payments are correctly reflected on financial statements through the End
of Period close.
6. Click the arrow to the right of the Profile Type field and choose Client (or Vendor-Supplier).
7. In the Name field, type the name of the client (or vendor). Click OK to process.
8. Trams displays the open invoice(s) for the client (or vendor). Highlight the invoice(s) being closed and
click Toggle Closed. Click OK to process.
9. Trams prompts, “Create A Journal Entry? Yes or No.” Click NO. (Since the payment amount is zero, a
journal entry is not necessary.)
Clear a Check That Will Never be Cashed
1. Click Payments|Received.
2. Enter the payment received as usual for the amount of the check that was never cashed.
3. Enter a remark such as, “Check Was Never Cashed.”
4. Using a profile type of Other, fill in the name with the entity to which the check was originally written.
5. Click OK and Trams Back Office prompts, “Create a Journal Entry?” Click YES.
6. Trams Back Office displays a debit to Cash in Bank. For the offsetting account, choose the account
number affected when the payment was originally recorded and credit that account. Click OK to save.
7. Next, click Payments|Deposit.
8. Enter a deposit for the amount of the payment entered in Step 2, entering the same date.
9. In the Remark field, Note the check number that was NOT cashed. Click OK to save.
10. When the Bank Reconciliation is done at the end of the month, clear both the check that was written
and the deposit offsetting it.
Interest Income
1. Click Payments|Received.
2. Enter payment.
3. In the Payment Method field, change the method to EFT by clicking the arrow to the right of the field.
303
4/7/15
Payments
4. In the Remark field, type Interest.
5. Profile Type is Other.
6. In the Name field, enter the name of the bank from which the interest was received.
7. Click OK to process.
8. Trams Back Office prompts, “Create A Journal Entry?” Click YES.
9. Trams Back Office displays a Debit to Cash in Bank. Enter the account number for Interest Income (4000
series account) as the offsetting account as a Credit.
10. Click OK to save.
Deposits and Withdrawals
Keep an updated bank reconciliation and check register by entering all deposits and withdrawals on a daily
basis. Deposits should always represent the sum of cash and check Payments Received entered for that
period. A receipts report for the day for the specific bank account should match the actual deposit amount
(it is always a good idea to run a tape of the checks and make sure it matches what was entered into TBO).
Trams Back Office suggests printing the receipts report and attaching it to the deposit slip.
Deposits
(Please see the Daily Routine in the Setting Up Trams Back Office chapter for proper procedure for entering
deposits and coordinating them with receipts). Entering the total amount of the deposit in Trams updates
the Check Register Core Report--entering each individual receipt that makes up the deposit updates the
general ledger cash in bank accounts during an EOP. To enter a new deposit, select Payments|Deposit
and the system prompts for the following information:
Notice the new deposit screen. Continue to enter deposits the old way, by just not querying for or including
any receipts in the deposit. Complete the fields at the top of the deposit and a deposit entry will be created
without receipts being linked to the deposit.
Bank Deposit
Amount
The amount of the deposit.
Payment Type
Select Deposit.
Payment Date
The date of the deposit.
Branch
If on multi-branch version, enter a branch number from the drop-down menu.
Bank Acct
Select the bank account to be affected from drop-down.
Invoice Reference
Enter an invoice reference which can be used as a search parameter.
Remarks
Remarks allow alphanumeric free-flow characters and are used for reference.
Payment Group
For group payments, choose from the drop-down menu the group name
assigned for future reference in queries and for easy duplication. To create a
group, click on the raised Payment Group button.
Payment Code
For recurring payments, assign a unique payment code for future reference in
queries and for easy duplication.
Receipt Date
Enter the date of the receipts that are to be linked to the deposit.
4/7/15
304
Payments
Total Receipts
Reflects the actual amount of the queried receipts.
Included Receipts
Reflects the total amount of the receipts linked to the deposit.
Continue entering
payments
To enter multiple deposits at one time, make sure the Continue entering Payments box is checked. After entering the last deposit, click on the box and
remove the check. Returned to the main menu instead of the payment entry
screen.
Deposit entries do not prompt for a journal entry if Utilities|Setup|Global Defaults|Journal Entry
Prompting is set to Recommended or Recommended Always.
Receipts can be linked to a deposit entry. Query for receipts by entering a specific date rate and clicking
Query. Click Toggle Included receipts to be included for a specific deposit and when included, these are
linked to the deposit entry created. (The Include in Deposit column indicates what has been included.) To
include all receipts at one time, click Include All. To invert any receipts selected or not selected, click Invert
All. To make any changes to receipts that are linked to the deposit, use Edit Receipt.
WARNING: A deposit that links receipts for more than one day, will make the GL Reconciliation report
reflect that receipts and deposits for each day are different. This may cause the check register to be out of
balance with the Trial Balance at month’s end.
A deposit slip can also be printed from the new deposit screen, if receipts are linked to the deposit. The
deposit slip printed contains the bank name, the routing number, followed by the account number. (The
Name on Check also prints on the Deposit Slip as the Payor, if present.) The totals for cash and checks are
displayed at the bottom of the report with the deposit total. Most banks will accept this deposit slip report
along with a copy of the normal bank deposit slip, with only totals for cash, checks and total deposit
completed. Since the TBO deposit slip does not have the routing/account numbers in the magnetic ink
305
4/7/15
Payments
required for bank scanners, the original slip still is required. Save considerable time by entering receipts
into TBO before making bank deposits.
Notice the Columns, Sort By and Refresh buttons. The Columns button is used to select which columns of
data is displayed in the results screen. Click Columns and choose the columns to be displayed in the results
screen by highlighting the column in the Available Fields and clicking the right arrow to move it over to
Displayed Fields. Using the red up and down arrows, put the column in the order to appear. Click OK. Go
out to the results screen and size the columns as desired, go back into Columns and click Save Settings
and OK to save. Next click Sort to get up to 3 sorts in ascending or descending order of selected columns
and click Save Settings. Note: There is a Name On Check field under Columns. If a Name on Check is
present on a payment it will be displayed in the column on the Receipts List portion of the Deposit Screen.
Withdrawals
To enter a Withdrawal, select Payments|Withdrawal and the system prompts for:
Bank Withdrawal
Payment Type
Select Withdrawal.
Payment Date
The date of the Withdrawal.
Branch
If on multi-branch version enter a branch number from the drop-down menu
Remarks
Remarks allow alphanumeric free-flow characters and are used for reference.
Bank Acct No
Select the bank account to be affected.
Amount
The amount of the withdrawal.
Payment Group
For group payments, choose from the drop-down menu the group name assigned
for future reference in queries and for easy duplication. To create a group, click on
the Payment Group raised button.
Payment Code
For recurring payments, assign a unique payment code for future reference in
Query and for easy duplication.
Continue entering
payments
To enter multiple withdrawals at one time, make sure the Continue entering Payments box is checked. When finished entering the last withdrawal, click on the box
and remove the check to return to the main menu instead of the payment entry
screen.
Any time the bank balance is reduced and no check was written, account for that transaction as a withdrawal
or EFT.
10. Trams Back Office prompts for a journal entry upon completion of a withdrawal entry. This should
always be entered if using the general ledger
Bank Transfers
To accommodate the transfer of money between bank accounts, there is a Transfer option in the main
Payments menu. This creates a Payment Made and a Payment Received and creates the journal entries
automatically.
1. Before starting a bank transfer, set up a new general ledger account in the asset series (1000 accounts),
and call it Bank Transfers.
2. Then set up an Other profile called Bank Transfer. The profile screen has a Default G/L Account field under
4/7/15
306
Payments
the General Info tab. Enter new Bank Transfers account number here.
3. Once this is set up, begin recording the transfer of money between bank accounts. Select the main
Payments menu, then Transfer.
4. Enter the amount to be transferred, the date of transfer, the bank account number to transfer from, and
the bank account number receiving the money.
5. Enter Bank Transfer in the profile name to access the new profile just created. Verify the accuracy of each
account number, adding any remarks (Payment Group and Remarks appear in the journal entries).
6. Click OK. All entries to the general ledger and check register are automatically processed.
Trams Back Office generates a Payment Made EFT from the account the money is coming out of, and a
Payment Received EFT to the account the money is going in, and creates the journal entries for both. Both
check registers are updated and the remarks on each payment indicate the transfer. All entries to the
general ledger and check register are processed in one step.
Bank Transfer
The agency is transferring $1,000 from the checking account to the savings account. The checking
account is Bank Account 1. The savings account is Bank Account 2.
There is a Bank Transfer general ledger account number 1025 and an Other profile called Bank Transfers
with 1025 in the Default G/L Acct field.
Select the main Payments menu, then Transfer. Enter $1,000.00 in the amount field, using the current
date, then enter “1” in the From Bank Account field, and “2” in the To Bank Account field. Bank Transfer
is entered in the Transfer Profile field, and add the Note “To cover the ARC/BSP withdrawal” in the
Remarks field.
Bank Transfer by Issuing a Check
(An Alternate Method of Transferring)
To record the check being written:
1. Click Payments|Made.
2. In the Amount field, type in the amount being transferred.
307
4/7/15
Payments
3. In the Payment Date field, enter the date of the transfer.
4. The Bank Acct field should be the corresponding bank account number. To change the default, type in
the new number or click the arrow to the right of the field.
5. Payment Method is Check.
6. Leave the Name on Check field blank.
7. Enter the check number in the Check/CC No field.
8. Leave the Payment Group field blank.
9. Leave the Payment Code field blank.
10. In the Remark field, type “Bank Transfer.”
11. Click the arrow to the right of the Profile Type field and change Profile Type to Other.
12. In the Name field, enter the name (or part of the name) on the check.
13. Click OK and TBO prompts, Create a Journal Entry? Yes or No.
If maintaining the General Ledger in TBO, click Yes and journalize to the Bank Transfer Account (1000
series).
To record receipt of the check:
1. Click Payments|Received.
2. Repeat steps 2 - 13 from above.
3. Next, click Payments|Deposit.
4. In the Amount field, enter the amount of the transfer.
5. In the Deposit Date field, enter the date of the transfer.
6. The Bank Acct field should be the corresponding bank account number. To change the default, type in
the new number or click the arrow to the right of the field.
7. Leave the Payment Group field blank.
8. Leave the Payment Code field blank.
9. In the Remark field, type in “Bank Transfer”.
10. Click OK to save.
Bank Transfer by Withdrawal
(This is an alternate method of transferring funds between different accounts in the same bank, but using
the Payments|Transfer [see above] is recommended since it saves time and effort).
1. Click Payments|Withdrawal.
2. In the Amount field, type in the amount of the withdrawal.
3. In the Withdrawal Date field, type in the date the transfer took place.
4. In the Bank Acct field, type in the appropriate bank account number or click the arrow to see the list.
5. Leave the Payment Group field blank.
6. Leave the Payment Code field blank.
7. In the Remark field, type Bank Transfer.
8. Click OK to process.
4/7/15
308
Payments
9. Trams Back Office prompts, “Create a Journal Entry?” If maintaining the General Ledger in Trams Back
Office, click Yes and journalize to the Bank Transfer Account (1000 series).
10. Click OK to save.
To record receipt of the check:
1. Click Payments|Received.
2. In the Amount field, type in the amount of the transfer.
3. In the Payment Date field, enter the date of the transfer.
4. The Bank Acct field should be the corresponding bank account number. To change the default, type in
the new number or click the arrow.
5. Payment Method is Cash.
6. Leave the Check/CC No field blank.
7. Leave the Payment Code field blank.
8. Leave the Payment Group field blank.
9. In the Remark field, type in “Bank Transfer”
10. Click the arrow and change Profile Type to Other.
11. In the Name field, enter the name (or part of the name) of the account from which the money came.
12. Click OK and Trams Back Office prompts, “Create a Journal Entry? Yes or No.”
13. If maintaining the General Ledger in Trams Back Office, click Yes and journalize to the Bank Transfer
Account (1000 series).
14. Next, click Payments|Deposit.
15. In the Amount field, enter the amount of the transfer.
16. In the Deposit Date field, enter the date of the transfer.
17. The Bank Acct field should be the corresponding bank account number. To change the default, type in
the new number or click the arrow.
18. Leave the Payment Group field blank.
19. Leave the Payment Code field blank.
20. In the Remark field, type in “Bank Transfer”.
21. Click OK to save.
Bank Reconciliation
To use the Bank Reconciliation, the Check Register Core Report and Bank Reconciliation feature need to
be setup (please see chapter entitled, Setting Up Trams Back Office). Bank Reconciliation is a tool to help
reconcile the monthly bank statement.
1. Click Payments|Reconciliation|Bank Reconciliation.
2. In the Bank Acct field, enter the appropriate bank account number (1, 2, 3, etc.). To change the default,
type in the new number, or click the arrow to the right of the field to see the list.
3. In the Clearing Date field, type in a date range From and To.
4. In the Stmt Ending Balance field, type in the ending balance on the bank statement and click OK to
process.
5. Verify that the Beginning Balance on the Bank Statement and the Beginning Balance on the Trams Back
309
4/7/15
Payments
Office screen match. If the balances are different, go to the previous month and correct.
Note: It may be necessary to keep going back, month by month to find a month in balance — and begin
there.
Apply is always active on the Bank Reconciliation screen so the user can save any cleared or uncleared
items without closing the Bank Reconciliation window. Refresh presents any changes or additions made
when outside the Bank Reconciliation window (but while it was still open). New allows entering new
transactions that automatically appear on the Bank Reconciliation Screen without clicking Refresh. On the
bank reconciliation screen, use <Shift> left-mouse click for selecting a range of items for closing, deleting
etc. Using <Ctrl> left-mouse click allows for selection of multiple individual items in any order for closing,
deleting etc.
Trams Back Office displays a list of items (deposits, withdrawals & checks) that have never been marked
cleared. If there is heavier concentration of bank transactions toward the end of the month, leave the status
to Not Cleared, to not have to change as many transactions to mark them cleared. If there is an even flow
of checks, withdrawals, and deposits during the month, change the status to cleared by clicking on Clear
All. In this case, only a few transactions need to be changed.
6. Next, match the items on the screen against the bank statement. Highlight any item appearing on the
screen that is not on the bank statement, and click the Toggle button (or use <ALT T>) or double-click on
the entry to revise the status. Also use the space bar to clear or unclear multiple items.
7. If there is an item on the bank statement that is not on the screen, add it by clicking New.
8. Trams Back Office gives the option of adding a new Deposit, EFT Received, Withdrawal, or Check. Click
one, then OK and enter the item. Once complete, click OK again to return to the Bank Reconciliation screen.
9. Once all the appropriate items have been “uncleared,” verify that the total Deposits and
Withdrawals/Checks match the Bank Statement. The Ending Balance on the Trams Back Office screen
should now match the Ending Balance on the Bank Statement. To print the Bank Reconciliation Report,
click the Print button to display the report on the screen. Then click on the printer icon to print to the printer.
When the report is in balance, click the OK button to save.
10. Trams Back Office prompts, “(xxx) Payment(s) Will Be Marked Cleared and (xxx) Payment(s) Will Be
Marked Uncleared. Continue? Yes or No.” Click YES.
11. Print a Report./Core/Check Register with Bank Reconciliation as NOT Cleared, along with a Check
4/7/15
310
Payments
Register Report for the month with Bank Reconciliation as All.
Notes: Clear or unclear items by using the space bar. This works well with clearing multiple, consecutive
items. Also, column headings in the Bank Reconciliation can be sorted by clicking on them. Select the
columns to display in the reconciliation screen by clicking Columns, choosing the columns in the desired by
using the up and down arrows, adjust column widths and return to columns to Save Settings.
The Bank Reconciliation now includes un-cleared checks, deposits, withdrawals, and the book balance
(check register balance less total of un-cleared items).
Also, changes to the Bank Reconciliation can be “Applied” to save an incomplete reconciliation. Re-enter
the Bank Reconciliation for the same Clearing Date. A prompt warns of cleared items - click OK to continue.
All the items previously cleared or left uncleared are displayed as they were saved. Continue the
reconciliation routine until completed.
You own a small agency and plan to go on vacation for two weeks. Julie, the manager has access to the
checkbook, but only for emergencies. She does a weekly deposit while you are gone, but you paid all the
bills before you left. Julie wrote five “emergency” checks in your absence.
When you receive your bank statement and use the Bank Reconciliation routine, you notice 20 out of 25
checks have cleared the bank. Instead of changing the status on all these checks one at a time, you
choose Clear All and only change the status on the five cleared checks by highlighting each and clicking
on Toggle.
Making Additional Payment Entries Through Bank
Reconciliation
To make additional payment entries, click the New button. This launches a Payment screen to enter a new
Check|Deposit|Withdrawal|EFT Transaction. Trams Back Office updates the item list and the balance,
and returns to the Bank Reconciliation screen. Hint: Make sure the date is correct!
311
4/7/15
Payments
Modifying Payment Entries from Bank Reconciliation
To modify an entry, highlight it and click on Edit. Only “Other” payments can be modified as long as this
function was enabled in the Utilities|Setup|Global Defaults Prompt Tab.
Bank Reconciliation from File
A reconciliation can be aided by using a file downloaded from the bank’s web site. (The only bank file
formats that can currently be used is the .CSV format which is pretty standard) Both checks and deposits
can reconciled. Any transactions where a check number is present is reconciled to, and if not an exact
match, an error notation appears under the Error column on the screen. Any deposit or non-check
transactions that doesn’t have identifying numbers attached to them, is matched by the Amount and Date.
The amount must match exactly and the date must be either the same date or one day later. There is no
Error listed for non-check items that do not match.
1. Set up the bank reconciliation as usual as outlined above and click Reconcile on the Bank Rec Screen.
2. On the Bank Rec From File screen, browse for the location of the file downloaded from the bank's web
site, and click Next.
3. Select the File Type from the drop down. Any CSV type file is acceptable.
4. 'Map' fields 1 - 6 to the correct field information as displayed on the query screen below the fields, based
on the bank’s file.
Example: The Query Screen for a CSV file shows this information:
Field 1 to be the "Date" of the check.
Field 2 to be the "Amount" of the check.
Field 3 to be "Unknown/Not Used"
Field 4 to be the "Check Number" of the check
Field 5 to be the "Remarks" on the check
Field 6 to be blank or "Unknown/Not Used"
Ensure that the correct description for each field appears in the drop down field based on the example
4/7/15
312
Payments
above. Click Next to continue.
5. All checks and non-check items from the file are displayed on the screen with an indication on whether
they Match to an existing check or non-check item in TBO, along with the TBO Payment Number. If an exact
amount match was not found for a check that shows 'Yes' under the Matched column, an Error
message is displayed, Amount is Different.
6. For those checks that have been found to be in TBO and are Matched, or Matched and have an "Error"
message, click Find Payment to be brought back to that specific payment on the primary Bank
Reconciliation Screen, where the payment can be viewed or made corrections to. After a
correction is completed, click Reconcile again to go directly back to the Bank Rec From File screen where
the Refresh button updates the screen.
7. After correcting any found payments with errors, click Next, to return to the standard Bank Reconciliation
Screen and all Matched checks and non-check items from the previous screen are as Cleared on the Bank
Reconciliation Screen. Complete the rest of the bank reconciliation as normal.
CC Merchant Reconciliation
The CC Merchant Reconciliation function designates items that have cleared the CC Merchant credit card
account. Go to Payments|Reconciliation|CC Merchant Reconciliation. Before querying the CC
Merchant payments, select the included CCs from the drop-down list, the bank account, the clearing date
(ending date on the statement received from the credit card company), and the statement's ending balance.
Leave CC Processor set to All. To make a Payment Received or EFT from this area, click Enter CC
Merchant Receipt. To continue making another CC Merchant Reconciliation, click Continue Entering CC
Merchant Reconciliations.
The system lists all items not previously marked cleared showing the credit card code, credit card number,
date, amount, payee, remark, and status. (Any Reject Code or Message that is captured in the Auth Msg
field on the CC Merchant Reconciliation Screen is stamped in the Remarks field of the payment.)
313
4/7/15
Payments
So any payments that are rejected by the processor will retain the reason the payment was rejected in that
payments' 'Remarks' field so action can be taken to correct the problem and then reprocess the payment.
All items entered prior to the clearing date are not marked Cleared automatically. Highlight those items that
have cleared the CC Merchant account and click Toggle to change to a cleared status. Click Invert and
change the status of all items, or click Clear All.
The CC Merchant Reconciliation screen displays at the bottom, the Total Receipts, Total Disbursements,
the Balance and the Variance from Statement. When adding or changing items from Cleared to Not cleared
(or vice versa), the Balance updates accordingly. (If there is a heavier concentration of transactions toward
the end of the month, leave the Cleared Status to Not Cleared, so there are fewer steps to mark them
cleared. If there is an even flow of receipts and disbursements during the month, change the status to
Cleared by clicking Clear All. In this case, only a few transactions need to be changed.)
Note: CC Merchant Payments with a completely invalid CC Number (i.e. no digits), are excluded in the CC
Merchant Reconciliation screen. The payment screen requires the CC Number field to have at least one
digit if the pay method is CC Merchant.
The column headings in the CC Merchant Reconciliation can be sorted by clicking on them. To select
desired columns in the results screen and the desired order, click Columns. Also select which card types
first appear on the reconciliation screen by setting up the screen and clicking Default. Save settings Globally
or Per User.
To continue working on the CC Merchant Reconciliation later, click Apply to save the items already cleared,
Next click Cancel. When returning to complete the reconciliation, change the Cleared Status to All. To save
the finished CC Merchant Reconciliation, choose OK. Once the CC Merchant Reconciliation is balanced to
the CC Merchant statement, print a CC Merchant Reconciliation Report by clicking on Print. Keep this report
each month with the CC Merchant statement provided by the credit card for audit trail purposes.
On the CC Merchant Reconciliation Screen, use <Shift> left-mouse click for selecting a range of items for
closing, deleting, etc. Using <CTRL> left-mouse click permits selection of multiple individual items in any
order for closing, deleting etc.
CC Merchant Reconciliation
An EFT (Electronic Fund Transfer) Payment needs to be entered for the amount the credit card company
4/7/15
314
Payments
deposits and the fees charged to the bank account. This whole process can be automated using the Trams
Back Office CC Merchant Program with Ticketmaster (no longer taking new customers), Caledon, NTC
(National Transactions Corporation), or Pinnacle Payment Solutions. See section below on Automatic CC
Merchant Reconciliation, or visit Sabretravelnetwork.com/trams and select Products/Services to learn
more!
Modifying Payment Entries from CC Merchant Reconciliation
To modify an entry, highlight it and click Edit.
Printing the CC Merchant Reconciliation
To print the CC Merchant Reconciliation in its current status, click Print, and once the report is displayed,
click the printer icon at the top of the screen.
CC Merchant Automated CC Service Fee Processing
Agencies that are processing credit cards with Pinnacle Payment Solutions, Caledon, NTC (National
Transactions Corporation), or Ticketmaster (currently not taking on any new customers), can process
directly into TBO using these directions. CC Merchant for Trams Back Office Automated Service Fee
Processing program takes the payments from TBO, double checks them and sends them electronically to
Ticketmaster, Pinnacle Payment Solutions, NTC (National Transactions Corporation), or Caledon.
Credit card transactions are then processed and sent back to TBO, where the system clears the payments,
and creates the journal entry to record the activity in the General Ledger. Setup needs to be completed
before processing the payments. For complete setup instructions, go to the chapter Utilities and the section
CC Processors or, Print out this document.
For more information on these processors, go here. Contact info:
**NTC (National Transactions Corporation), contact Jerry Miller ([email protected]).
**Pinnacle including enrollment, click here.
**Caledon Marcus Dagenais, 647-258-9725 or [email protected].
315
4/7/15
Payments
Step 1: Select Payments| Reconciliation| CC Merchant Reconciliation and enter the selection criteria.
Bank Acct: Select the bank account number the CC Merchant payments were created under.
Branch: If processing items for a specific branch, select the appropriate branch number. Leave the field
blank to process all branches.
Note: Process multiple branches all at once as long as the CC Merchant fee is not being processed by
branch (i.e. payments were entered under different management branches, but are all tied together under
the same GL branch.) If the CC Merchant fee needs to be expensed by branch then process each branch
separately.
CC Processor: Select the credit card processing vendor that is processing the cards.
Clearing Date: The Clearing Date field defaults to the current date. This date is stamped into the CC
Merchant payment record once the record is processed. Once a CC Merchant payment has a clearing date,
it always shows a cleared status and therefore will not be selected for processing again.
Stmt Balance: Leave this field blank. It is not needed for CC Merchant processing.
Max Charge Amt: To process transactions up to and including a certain amount, enter the amount in this
field.
Example: Agency has a certain employee that is responsible for processing service fee transactions only.
Service fees for the agency are $20.00. The employee enters $20.00 as the Max Charge Amt so that only
transactions of $20.00 or less appear in the query for processing.
After entering the appropriate selection criteria, click Query.
Note: UATP cards can be used for Pinnacle Payment Solutions. Add UATP as a new card if processed
through Pinnacle, under Utilities|Setup|CC Processors. The UATP CC Merchant Payment is created the
same as any other CC processed. When going to the CC Merchant Reconciliation Screen, select only UATP
as the Included Card and process those transactions, but the processor selected must be Pinnacle. Both
charges and refunds may be processed.
Note: NTC CC Merchant Processing now allows users to send multiple batches within the same day without
being rejected as duplicate submissions.
4/7/15
316
Payments
Step 2: Trams displays the query results for the CC Merchant transactions that will be submitted for
processing.
Step 3: Click Process. Select the option All Items if processing everything in the query. Select the option
Selected Items if processing certain transactions only. Once a selection is chosen, the CC Merchant
transactions are sent to the credit card processing vendor via the internet connection.
Note: If processing Selected Items, highlight those transactions prior to clicking Process. Select multiple
transactions by holding the Ctrl button and doing a right-mouse click.
317
4/7/15
Payments
Step 4: Trams displays a status message box on the CC Merchant reconciliation screen that gives the user
feedback about the charges currently being processed.
Step 5: Once all cards are sent to the credit card processor, the status message box clears the screen.
Each record processed shows as "Charged" in the column labeled "Status". Also, an authorization code, a
decline code, or an error code appears in the column labeled "Auth Msg". If the record is approved, Trams
Back Office updates the payment record with a "Date Cleared" of the date the transaction was processed.
Once the "Date Cleared" is entered, those records will not be processed again. Records that are declined
or are in error are not marked cleared. The "Date Cleared" field for those payment records is left blank. The
decline code or error code, however, is appended to the remarks field of the payment record for future
reference.
If the processor is Ticketmaster, updated descriptions for the decline codes and error codes are available
on their web site at: https://www.iats.ticketmaster.com/english/help/rejects.html.
If the processor is Pinnacle Payment Solutions, please call Merchant Services at 800 228-0210 and ask for
customer support for the meaning of the code(s).
Click OK to continue.
Step 6: Trams prompts, "XX Payment(s) Will Be Marked Cleared and XX Will Be Marked Uncleared.
Continue?" Click Yes.
Step 7: The payment screen is displayed to create the EFT payment for the amount being deposited into
a bank account (card amounts processed less fees).
The payment screen defaults to a Payment Method of EFT, Profile Type of Other, and Name as the name
of the credit card processing vendor, based on the profile selected when setting up Utility defaults. Click
OK to save the payment information. Trams prompts, "Create a journal entry?" Click Yes.
Step 8: Trams defaults the journal entry as follows:
Cash in Bank
(1000 series)
Debit
CC Merchant Receivable
(1000 series)
Credit
Credit Card Processing Fees
(6000 - 9000 series)
Debit
Transaction Fees
(6000 - 9000 series)
Debit
Click OK to save the journal entry.
Agent Reconciliation
The Agent Reconciliation function displays invoices for which agents are being paid and then creates an
4/7/15
318
Payments
agent payment if desired. Go to Payments|Reconciliation|Agent Reconciliation to setup.
Agent Reconciliation Selection Screen - General Tab
Agent
Enter the appropriate Agent Name by entering a few letters and selecting
from drop-down menu.
Payment Date
Enter the date the Agent is being paid by clicking on drop-down arrow or
entering the date manually.
Issue Date From
Enter the issue From date of the range of invoices for which the agent is
being paid. (Use this range to pay agent, or Invoice Depart From/To Date as
range.)
To
Enter the issue To date of the range of invoices for which the agent is being
paid.
Depart Date From
Enter the depart From date of the range of invoices for which the agent is
being paid. (Use this range to pay agent, or Invoice Issue From/To date as
range.)
To
Enter the depart To date of the range of invoices for which the agent is being
paid.
Travel Types
From the drop-down menu, designate the travel types for the range of
invoices for which the agent is being paid.
Branches
Designate branch/es by checking/unchecking branch locations.
Preferred Vendor Status
From drop-down menu, indicate All, Preferred, or Non-Preferred.
Agent Group
Select agent group from drop-down if applicable to create payments for
multiple agents when saving the Agent Reconciliation. When Enter Agent
Payment is checked on the Agent Reconciliation and more than one agent is
being reconciled, multiple agent payments, one for each agent reconciled as
part of an Agent Group can be created.
(Host agencies with many IC's agent accounts to reconcile and pay will use
this feature. After the auto-completion of multiple payments for the Agent
Group being reconciled, the Host user queries for the completed payments
for the day to issue the checks for the auto-created multiple payments.)
Agent Status
From drop-down menu, indicate All, Inside, or Outside.
Agent Action
From drop-down menu, select Ticketing or Booking.
319
4/7/15
Payments
Agent Payment Status
From drop-down menu, indicate All, Open, or Closed. Note: Agent items
that are linked to a payment never appear again on the Agent Reconciliation
Screen, since they are already reconciled and can only be unreconciled by
voiding the payment. The Agent Payment Status of Closed setting only
applies to items that are cleared but not linked to a payment.
This aids users in finding reconciliations where a payment was not created,
and they now want to complete that payment and have Closed items
attached to the payment for future reference.
Include Agent Adjustments Check here to make Agent Adjustments while in the reconciliation.
Print Selection Criteria
When unchecked, will not print a separate selection criteria page when
printing out the agent reconciliation report.
Toggle - Open or close item. Close many items at once by using <Ctrl> Toggle.
Invert - Select one item of a group of items and invert selection.
Clear All - Clears all amounts.
Refresh - Changes can be seen by clicking here.
Edit - Edit the invoice.
Print - Used to print out an agent reconciliation report.
Columns - Used to select which columns of data to display in the results screen. Click Columns and choose
the columns to display by highlighting the column in the Available Fields and clicking on the left arrow to
move it over to Displayed Fields. Using the red up and down arrows, put the column in the order it will
appear on the results screen. Click Save Settings and OK to save. To save the filters in the query, set up
the selection criteria and click Default. Save the filters on a Personal or Global level, so settings are
retained. To alter the settings, click Default, remove the defaults and re-do.
Available columns are: Issue Date, Invoice No, Branch, Ticket/Confirm No, Passenger Name, Client Name,
Vendor Name, Total Fare, Commission, Agent Commission, I/O, Remarks, Status, Depart Date, Agent
Name, RecNo, Travel Type. (A user running a query for an agent for all travel types and then sorting by
Travel Type can easily use Global Modify to adjust commission rates & amounts for a specific travel type.)
Global Modify - Globally modify an agent’s Commission Rate Percentage % or amount to all bookings or
bookings selected by travel type in the query screen, for a specific agent. This globally applied percentage
can be used by agencies that are wanting to pay agents a base salary plus a commission bonus based on
exceeding an identified commission 'threshold'. The Total Commission field should be used as an aid to
easily see whether an agent has exceeded the threshold and then calculate the percentage to be used for
the Global Modify of the agent commission rate, without running an additional report.
Example: Agent salary $1500.00 per month 4/7/15
Commission Revenue Threshold - 5000.00/month
320
Payments
Any Commission Revenue exceeding 5000.00/month is paid to the agent at 30% of the excess. Agent
books 6000.00 of commission revenue exceeding the threshold by 1000.00 or 300.00 extra compensation
to the agent.
Agent Total Compensation for the month = 1800.00 (1500.00 + 300.00)
Calculation of percentage to apply to all this agents bookings across the board for the month:
300.00 / 6000.00 = .05% (.05% X 6000.00 = 300.00 of extra commission revenue from
all bookings during the month to be added to the base salary of 1500.00)
The Global Modify feature for agent commission percentage % would be 5% applied to all the booked
commissions for the agent for the month and display as 5.00% in the 'Rate' Field for the agent on the Agent
Tab of the Booking Screen.
Note: Agent Payments are linked to the Cleared Agent Bookings when using the Agent Reconciliation. If
a query for the payment made to the agent is performed on the Payment Query Screen, right-click to Query
All Invoices, the invoices cleared and paid to the agent when using the Agent Reconciliation, are displayed.
A View Pymt button has also been added to the Agent Tab of the Booking Screen that also links to the Agent
Payment.
321
4/7/15
Payments
The Advanced Tab contains the same selection criteria we use to set up our Agent Statement.
Recommended settings are listed below:
Agent Reconciliation Selection Screen - Advanced Tab
ARC Non CC
From drop-down menu, select Issue Date, Client Pymt Date, Vendor Pymt
Date or Exclude. (Recommend Client Pymt Date.)
ARC CC
From drop-down menu, select Issue Date, Client Pymt Date, Vendor Pymt
Date or Exclude. (Recommend Issue Date or Vendor Pymt Date.)
ARC Debit/Credit Memos
From drop-down menu, select Issue Date, Client Pymt Date, Vendor Pymt
Date or Exclude. (Recommend Issue Date.)
Supplier Non CC
From drop-down menu, select Issue Date, Client Pymt Date, Vendor Pymt
Date or Exclude. (Recommend Client Pymt Date.)
Supplier CC
From drop-down menu, select Issue Date, Client Pymt Date, Vendor Pymt
Date or Exclude. (Recommend Vendor Pymt Date.)
Comm Track
From drop-down menu, select Issue Date, Client Pymt Date, Vendor Pymt
Date or Exclude. (Recommend Vendor Pymt Date.)
ARC Client Status
From drop-down menu, indicate All, Open, or Closed.
ARC Vendor Status
From drop-down menu, indicate All, Open, or Closed.
Supplier Client Status
From drop-down menu, indicate All, Open, or Closed.
Supplier Vendor Status
From drop-down menu, indicate All, Open, or Closed.
Comm Track Vendor Status From drop-down menu, indicate All, Open, or Closed.
Enter Agent Payment
To issue a check for this agent, check here.
After entering selection criteria on the General and/or Advanced Tabs, click Query. Toggle for individual
items in results screen to pay the agent for, or Clear All. This reconciliation ensures an agent is not paid
again for the same transactions, as it marks the booking paid with a Date Paid inside the agent tab. The
total amount open for the agent selected is displayed in the Total Commission Amount field, the amount
cleared is displayed in the Cleared Amount field, and the amount not yet cleared is displayed in the
Uncleared Amount field. As items are added or changed from “cleared” to “not cleared” (or vice versa), the
cleared balance updates accordingly.
4/7/15
322
Payments
Quick tips: Use <Shift> and left-mouse click to select a range of items for closing, or deleting, etc. Use
<CTRL> left-mouse click to select multiple individual items in any order for closing, deleting, etc. If the
reconciliation has not been completed, use Apply to save the items marked Cleared. Items marked Cleared
are redisplayed when next entering Agent Reconciliation. Items stamped Paid are not redisplayed. Once
all desired items are marked cleared, click OK to save.
If the Enter Agent Payment box is checked, a Payment Made screen is displayed to enter a payment to the
agent just reconciled. To keep Cleared items from re-appearing on the screen after saving an Agent
Reconciliation, enter a payment to the agent through the Agent Reconciliation Screen. Entering the
payment to the agent through the Payments|Made screen does not remove Cleared items from the
Reconciliation screen.
Modifying Entries from Agent Reconciliation Screen
To modify an entry, highlight it and click Edit.
Printing the Agent Reconciliation
To print the Agent Reconciliation in its current status, click Print, or once the report is displayed, click the
printer icon at the top of the screen. Once the Agent Reconciliation is complete, click OK to enter the
Payment Made feature and issue a check: To view Cleared Agent Invoices that an agent has been paid
for using the Agent Reconciliation routine, go to Reports|Agents|Statement. Change the “Agent Payment
Status” to Closed to view all invoiced cleared and paid for the period specified.
Go to the Agents Tab on the invoice booking screen to view a selected invoice and note the date the agent
was paid under the Date Paid field. The Agent Reconciliation routine automatically stamps this with the date
paid.
Bank Charges
To account for Bank service fees, charges, etc., create an EFT payment.
Note: Bank charges can also be entered by using Payment|Withdrawal (see Bank Transfer by
Withdrawal) section above.
1. Click Payment|Made.
2. In the Amount field, type in the amount of the bank fee.
3. In the Payment Date field, enter the date of the bank charge.
4. In the Branch field, enter a branch or click the down arrow to select a branch.
5. In the Bank Acct field, enter the appropriate bank account number (1, 2, 3, etc.), or click the arrow to
select from the list.
6. Enter free flow information in the Remark field. (e.g. bank charge, etc.)
7. Payment Method is EFT.
8. Leave the Name on Check field blank.
9. Leave the Check/CC No field blank.
10. Leave the Payment Group field blank.
11. Leave the Payment Code field blank (see Payment Code in this chapter).
12. Click the arrow to the right of the Profile Type field and change Profile Type to Other.
323
4/7/15
Payments
13. In the Name field, enter the name (or part of the name) on the check.
14. Click OK and Trams Back Office prompts, “Create A Journal Entry? Yes or No.” If the General Ledger
is NOT being maintained, click NO. If the General Ledger is being maintained, click YES.
15. Trams Back Office displays one-half of the journal entry, Cash in Bank. Enter the appropriate offsetting
General Ledger account. (i.e. Bank Fees.) Click the Add button.
16. Click OK to save.
4/7/15
324
Payments
325
4/7/15
Payments
Create Payables
By setting up payables, this creates accrued liabilities. This means expensing the item when it is received,
rather than when it is paid. If there is not an Operating Payables account set up in the general ledger, add
one by going to the main General Ledger Menu, then to Accounts.
1. Add a new account, using a number in the 2000 series. Call this account Operating Payables.
2. Next, go to Utilities|Setup|GL Accounts and click on the Others tab. Enter the same account number
in the Operating Payables field.
3. Operating payables can be set up in Trams Back Office under the main Payments menu, in the Create
Payable menu option.
Enter the amount of the payable and click on Status. The status can be changed by clicking on the down
arrow to toggle between To Be Paid and Recurring. For a non-recurring payment, select To Be Paid. Date
Entered field defaults to current date, and enter the date payable. The Invoice Reference field can capture
the Invoice Number or Statement Number of the bills being paid. Trams prompts if a duplicate invoice or
statement number exists for the same profile, but will let it save to be saved any way. This will alert to
possible double payments for the same invoice or statement
Note: Create a Negative Operating Payable if the agency is paying more to the account than the actual
invoice requires.
4. Enter the name, or create the new Other profile.
5. There is a prompt to Create Journal Entry. Click on Yes and Trams Back Office credits the Operating
Expense Payable automatically. Add the debit to the correct expense account.
6. Click on OK to save the payable.
When the payable is created, the following Journal Entry is automatically generated expensing the
transaction.
Acct
Acct name
Debit
6xxx
Expense Account
124.51
2xxx
Operating Payables
Credit
124.51
A second journal entry is created when the check is issued. (Please note when issuing a payable check for
an Operating Payable, the Amount, Profile Type, Profile Name, and Payment Type fields are disabled and
4/7/15
326
Payments
cannot be changed.)
Acct
Acct name
Debit
2xxx
Operating Payables
124.51
1000
Cash in Bank
Credit
124.51
This journal entry clears the operating payable account, reducing the cash in bank account.
You receive the phone bill from MCI on October 17th for $124.51. The payable date is November 30.
You set up this Payable with a Payable Date of 11/30/xx, an amount of $124.51, and a profile name of
MCI. You enter your MCI account number in the remarks field.
The journal entry for this transaction looks like this:
Operating Payables Query
With Query, retrieve an existing (or a previously entered) Operating Payable. Access the Operating Query
screen in 2 ways: Click the Operating Payables tab at bottom of the main TBO screen, or click
Payment|Query|Operating Payables. The query screen is broken into two sections. The top section is
used to enter the data for the query and the bottom section displays the results of the query.
327
4/7/15
Payments
The fields displayed in the top section show how an Operating Payable can be found.
Each of these fields are fields within the Operating Payable and can be used to locate
that Operating Payable again. As few as none and as many as all can be completed
to retrieve an Operating Payable.
Buttons on the right side of the screen are also broken into two sections. Query,
Reset, Count, Sort by, Columns and Default are buttons related to the query. Use
Reset to clear away any previous query criteria. Count is used to give the number of
items that match the query criteria. Sort By customizes how the query screen displays
the results once the query is executed.
Columns is used to select which columns of data to be display in the results screen.
Click Columns and choose the columns to display by highlighting the column in the
Available Fields and clicking on the left arrow to move it over to Displayed Fields.
Using the red up and down arrows, put the column in the order to appear on the
results screen. Click OK. Go out to the results screen and size the columns, and then
back into Columns and click Save Settings and OK. Click Sort to get up to 3 sorts in
ascending or descending order of selected columns, and click Save Settings.
Also drag and drop the columns to re-position them on the results screen if desired.
Do this by clicking on the column to move, holding down the left mouse button, and
sliding the column to any position on the query screen.
To place a column to the right or left of any existing column, stop on the column to
the right or left, drag and release the mouse. The moved column is inserted in the
correct place. Click Columns, Save Settings, and OK.
Default saves the filters in the query. Follow these directions to create a new Saved
Query:
1. Change the selection criteria on the results screen for the new query to save.
2. Click Default.
3. Type in the new query name in the Setting Name field.
4. If this saved query is the default, at the top of the drop-down window, check Set As
Default.
5. Select Per User (on this one workstation only) or Global (on everyone’s sets).
6. Click OK to save.
To remove a saved query from the list, check the Remove the Current Named Setting
box, click OK and the saved query is no longer available for use in the drop down
field.
To the right of the Remarks field is a separate field with selection options or
operators, Is Equal To, Is Not Equal To, Is Blank, Is Not Blank, Starting With,
Contains, In, and Not In. These operators help to more narrowly define the search.
(When doing searches on fields containing “wildcard” search criteria using the
selections of “IN” and “NOT IN," look for the field to contain the complete string
entered between the delimiters or the exact match).
If the remarks field contains the word ONE, and a search is initiated for IN
ONE,TWO,THREE then there should be a result. If a search is initiated for NOT IN ONE,TWO,THREE then
there should be no results. Basically using IN "ONE,TWO,THREE" is like doing: (IS EQUAL TO "ONE") OR
(IS EQUAL TO "TWO") OR (IS EQUAL TO "THREE"). Using NOT IN "ONE,TWO,THREE" is like doing: (IS
NOT EQUAL TO "ONE") AND (IS NOT EQUAL TO "TWO") AND (IS NOT EQUAL TO
"THREE").
4/7/15
328
Payments
The second section includes New to create a new payable; View to open an existing
payable entry; Void to delete a payable; and Copy to clone a payable so the basic
information doesn’t have to be re-entered, but the dates, etc. of the payable can be
changed. Issue Check launches a Payment Made screen to create the payment for an
payable To Be Paid. Only one entry can be selected at a time to Issue Check.
To generate a payable from a recurring payable, change the Payable Status to Recurring
and click Generate. By changing the Payable Status to To Be Paid, these recurring
payables are ready to Print Check. To print a hard copy of the highlighted payable, click
Print Payable. (To print more than one entry, hold down the CTRL key and select those
entries to include). To print the entire contents of the results screen, or selected entries
(using CTRL key), click Print Query. Help accesses the on-line help files.
Note: By right-mouse clicking in the results screen, create a New operating payable,
View, View Payment (without leaving the operating payment screen), Query Payment
(without leaving the operating payment query screen).
Right-Mouse Click Menu in Payables Query
New - create a new payable.
View the payable.
View Payments related to this payable.
Query Payments related to this payable.
Sorting Payment Data
Sort data in all query screens in two ways:
1. “Quick” sort by one field by clicking on a column in the results screen. The first click sorts the column in
ascending order (first to last or earlier date to more current date), and clicking on the same column a second
time sorts in descending order (last to first or current date to earlier date).
2. Sort in Ascending or Descending order by up to 3 columns. When clicking Sort By, select the first, second
or third column sort and what order (ascending or descending) to display. Enter the selection criteria and
click Save Settings and OK.
Recurring Payables
Recurring is used for payments made on a consistent time increment for the same payment amount. The
Date Entered field and the Date Payable field must be entered as formulas rather than dates.
Note: Pay special attention to that little “=” sign. You can’t get the right date without it! If the Date Entered is the
formula =1,0,0 this payable appears on the general ledger the first of every month. If the Date Payable
formula is =10,0,0 this payable shows in the Issue Payable Checks screen the 10th of every month.
To create the recurring payable toward the end of the month, to be payable after the first of the next month,
here’s what to do; for example, if the date entered is the 15th of the month, enter =15,0,0 in the Date Entered
field, and the payment date is the first of the next month, enter =1,+1,0 in the Date Payable field.
Examples of Date Formulas
=1,0,0
1st day of this month
=31,0,0
Last day of this month
329
4/7/15
Payments
=1,1,0
1st day of this year
=31,12,0
Last day of this year
=+7,0,0
Seven days from now
=Mon
Last Monday (will show today if today is Monday)
=Mon+1
Next Monday
=Mon-1
A week from last Monday
=0,+3,0
Three months from now
=0,-6,0
Six months ago
=0,0,+1
One year from now
=0,0,0
Today
Remarks, Payment codes, and Payment group are optional fields. The Invoice Reference field captures the
Invoice Number or Statement Number of the bills being paid. Trams prompts if a duplicate invoice or
statement number exists for the same profile, but will save it any way. This alerts to possible double
payments for the same invoice or statement. Enter the profile name in the Name field. When prompted for
a journal entry, select Yes to enter the proper expense account.
Operating Payable
Recurring payables need to be generated before issuing the checks. Many agencies like to generate their
recurring payables on the first of every month for payment at a later date during that month. To do this:
1. Click on the Operating Payables tab at the bottom of the screen (or enter through the
Payments|Query|Operating Payables menu).
2. Select Query and complete as many or as few of the selection criteria fields as desired.
3. Highlight the payable to generate and click on the Generate tab.
When it is time to issue the check:
1. Click on the Operating Payables Query tab at the bottom of the screen and bring the “to be paid” entries
onto the screen.
2. Highlight the entry to pay and click on the Issue Check tab. The check now appears on the screen to
modify fields such as amount and pay method.
3. When satisfied with the data, click OK to launch the check.
Note: If payables are generated for the whole year, a new payable cannot be added without regenerating
4/7/15
330
Payments
(duplicating) the original recurring payables.
ARC/BSP Settlement
Approximately ten days after submitting the ARC/BSP report, ARC/BSP either deposits or withdraws
payment to/from the bank account.
1. Click Payments|ARC or BSP Settlement. Also access the settlement screen from the payment
made/received by selecting ARC/BSP from the Profile Type drop down menu.
2. In the Amount field, type in the amount received from or paid to ARC/BSP.
3. The Payment Type field defaults to: Made. If owed money from ARC/BSP, (Credit Card Sales totaled
more than the Cash Sales), click the arrow to the right and select Received.
4. Click the Payment Date and select a date for the ARC/BSP Settlement Date. The ARC/BSP Settlement
Date is the date the money was deposited or withdrawn from the bank account.
5. If on the Multi-Branch version of Trams, select a branch from the drop down menu.
6. Click on the Bank Acct field and enter the appropriate bank account number, or click the arrow to the right
to select the number from the list of the bank accounts.
7. In the Remark field, clicking inside the Remark box to enter free flow information.
8. The Payment Method field defaults to EFT. If payment is made to ARC/BSP or payment is received from
ARC/BSP in a different manner, click the arrow and choose the correct payment method.
9. If payment is received or made by check, enter the check number in the Check/CC No field.
10. If the ARC/BSP number in the ARC/BSP Number Field differs from the default, type in the ARC/BSP
number, or click the arrow to the right of the field and select the appropriate one.
11. If the dates in the ARC/BSP Period fields differs from the default, type in the appropriate dates.
12. If an ARC/BSP Settlement, then click the arrow to the right of the Included Items field to choose All,
Non-IAR Only or IAR Only.
13. In the ARC/BSP Vendor field, type in the name of the ARC/BSP profile.
14. Click the Query button and Trams Back Office displays all unsettled ARC/BSP bookings in ticket number
order for that period.
331
4/7/15
Payments
ARC/BSP Settlement
15. Click the Toggle Closed button to change the Status of each ticket/booking to Closed. When Total Open
is 0.00, the ARC/BSP Settlement is balanced. If there is an amount other than 0.00, compare each
ticket/booking to the ARC/BSP report. To edit a ticket/booking, highlight the line and click the Edit button.
To change the Status of a ticket/booking from closed to open, highlight the line and click the Invert button.
To change the ARC/BSP Settlement Amount, click the Amount field.
16. When the Total Open is 0.00, click the OK button.
Note: If the agency has more than one ARC/BSP number, complete a separate ARC/BSP Settlement for
each. The End-Of-Period routine automatically updates the GL Accounts for Cash in Bank and ARC/BSP
Balances for all ARC/BSP Settlements for the period. Any invoices closed by an ARC/BSP Settlement have
a Vendor Status of Closed. To make a change, void the ARC/BSP Settlement. The ARC/BSP Settlement
creates a Payment Received or Made with a Payment method of EFT. (To void, see Void a Payment in this
chapter.)
Reminder: The ARC/BSP Sales Summary is printed from ARC/BSP's point of view. Remember that
positive numbers in Trams Back Office are negative numbers on the ARC/BSP Sales Summary.
Before clicking OK to save the closed status once unapplied total and total open balance out to zero, click
Print and bring up the ARC Settlement report that should match the ARC/BSP Sales Summary. This speeds
up reconciling the ARC/BSP report to the ARC/BSP Sales Summary to verify the ARC/BSP
withdrawal/deposit, make adjustments, and resubmit tickets in one step.
4/7/15
332
Payments
You have just received your ARC/BSP Sales Summary Report for week ending July 12. You complete
the ARC/BSP Settlement routine.
Go to the main Payments menu, then to ARC/BSP Settlement. Enter the withdrawal amount as indicated
on your Sales Summary Report. The Pay Date is the date on the statement, July 22nd.
You selected the Payment Type as Paid To ARC/BSP, and entered the ARC/BSP period From and To
dates. Click on Close All to mark each booking as Closed. You notice an error in the commission amount
on one ticket. You highlight the ticket that needs adjusting and click on Edit to go to the invoice. You make
the necessary change to the commission amount, click on OK, and return to the ARC/BSP Settlement
screen.
As you scroll down the list, you notice a ticket that needs to be resubmitted. You click on Edit to enter the
invoice, click on the Resubmit Date field and enter today's date, putting this ticket into your current
ARC/BSP report. Click on OK, saving your changes. This brings you back to the ARC/BSP settlement
screen. You now click on OK saving the ARC/BSP Settlement and the corrected withdrawal amount. Once
the settlement is saved, each ARC/BSP booking shows a vendor payment status of closed with a payment
number.
Note: Any edited items not adjusted correctly will need to be followed up either through the next ARC/BSP
Report using a Travel Agency Automatic Deduction form (TAAD), or directly with the airlines using a Sales
Summary Adjustment Request form.
Reconciling IAR Using the ARC Settlement Feature
After receiving the Weekly Sales Summary from ARC, follow these steps for reconciliation:
1. Go to Payments|ARC Settlement.
2. Query for the weeks ARC tickets so they are displayed on the settlement screen.
3. Click IAR Reconciliation on the ARC Settlement screen.
4. Click IAR Filename and map to the weekly IAR file.
5. Click Query to see the standard IAR Reconciliation Report.
6. For tickets where Net Remit Do Not Match, Ticket Is Voided in IAR but Not in Trams, or Missing IAR
Ticket, click Find Ticket and the cursor lands on the appropriate ticket on the ARC Settlement screen to Edit
Invoice as normal.
7. For tickets that are Voided In Trams but Not In IAR, click Find Ticket to go to the booking containing that
voided ticket in TBO, to Unvoid it, allowing the ticket to now show correctly on the ARC Settlement Screen.
8. For any exceptions that are Missing Trams Ticket, click off the IAR Reconciliation screen and manually
add the missing tickets.
Accounting for An ARC/BSP Settlement When Authorization
Amount Not Enough
If the amount authorized for ARC/BSP was not enough (i.e. the ARC/BSP draft should have been $3000
but only $2800 was authorized), follow these steps.
1. Select Payment|ARC or BSP Settlement.
2. Enter the ARC/BSP Settlement for the full $3000 and reconcile as normal. (See section ARC/BSP
Settlement in this chapter.)
3. Enter a payment received for the $200 difference, with payment method as EFT and profile type as other.
333
4/7/15
Payments
Date the payment the same date as the ARC/BSP Settlement. When prompted, create a journal entry as a
debit to Cash in Bank and a credit to ARC/BSP Balances. This accounts for the incorrect amount that was
entered when the ARC Settlement was done. This also creates a message on the GL Reconciliation report
(Payment Invalid That Affects ARC Balances). Ignore this message.
4. When sending ARC/BSP the check for the shortage amount (or if they are going to do another draft from
the account), enter a payment made for $200, with a profile type of Other. Create a journal entry as a credit
to Cash in Bank and a debit to ARC Balances.
Payroll Import
There are two payroll import programs for Trams Back Office.
Import AssetHR Payroll+
Oryel Payroll + is now AssetHR Payroll +. AssetHR is a leading provider of the industry's most robust and
sophisticated web-based HR technology solutions. AssetHR Payroll+ is a web-based payroll solution that
fully integrates with the Trams financial package, providing a smarter, more straightforward, and more
malleable system than other outsourced offerings or installed off-the-shelf packages. Payroll+ is also
distinctive in that, as a web-based application, it allows Trams affiliates to easily and securely complete
payroll transactions from anywhere at any time.
Visit AssetHR on the Web: http://www.assethr.com
Call Us: 952-746-9508
E-mail Us: [email protected]
Note: Import KIS Payroll
KIS Payroll is no longer TBO vendor, hence, the menu selection was removed from Payments|Payroll
Import; however, the KIS import can still be accomplished using the AssetHR Payroll + import routine.
Z-Pay PayWindow
Trams Back Office (TBO) offers an import routine for customers using the Z-Pay PayWindow Payroll
application. Users perform the payroll functions to calculate payroll information in PayWindow, then, by way
of the export routine within PayWindow, can export the information to a text delimited file.
Upon importing that file into TBO, the import routine creates a payment made with the corresponding journal
entries for each payroll check for the applicable pay period that was entered in PayWindow. Check numbers
can be generated in PayWindow and shipped via the export file to populate the check number in the TBO
check number field, or check numbers can be assigned by TBO after the import routine is completed by
issuing the check from within TBO.
ACH direct deposit payroll payments can also be imported into TBO however, no check numbers apply so
the check number field will be blank.
Either Agent or Other profiles must exist in TBO with an Interface ID that matches the Employee ID in
PayWindow. The file will not import if an Employee ID exists in the export file where no match in an Agent
or Other interface ID field can be found during the import routine in TBO. The Employee ID field in
PayWindow is alpha numeric and accepts up to 10 characters. Suggestion when setting up is to make
the Employee ID match the Interface ID in TBO.
Questions regarding exporting from PayWindow should be directed to Z-Pay ([email protected]).
4/7/15
334
Payments
To Export the Trams file from PayWindow:
1. Go to Payroll/Report Center/Misc. Reports/GL Export Tab.
2. Select Trams Format.
3. Check the box for Check Printed by Accounting System to print the checks from Trams Back Office.
Leave the box ‘unchecked’ if the checks were printed from PayWindow.
4. Select the payroll Period Date which is the date paid the employees.
5. Click on the Export Button.
Note: On saving the file, PayWindow will create a short filename using tx for Trams export and the pay date
with a .txt file extension. Example – tx031512.txt. Select the location to save the file in this File Save Window
for the import into Trams.
To Import the PayWindow Export file into TBO:
Map the TBO general ledger account to the file.
Add any general ledger accounts in TBO necessary to accommodate all of the payroll details being
populated in PayWindow (federal taxes, state taxes, salaries, etc.) under General Ledger|Accounts.
In TBO, go to Payments|Payroll Import|Import Z-Pay Payroll to map the general ledger accounts to the
appropriate fields in the mapping grid. Ensure that any fields in the grid not being utilized are mapped to an
335
4/7/15
Payments
error account (generally account 6666). No fields should be blank.
Payroll Filename: Browse to locate the PayWindow export file and select the file.
Profile Type: Select the appropriate Profile Type (Agent or Other) as it relates to how the profiles were
setup).
Note: The Agent Code in the Employee Record in PayWindow must match to the code in the Interface ID
field in the TBO profile or the file will not import properly.
Bank Account: Select the appropriate Bank Account as it relates to payroll entries.
G/L Branch: Enter a G/L Branch only if the option to Force Branch on Journal Entry option has been
enabled (Utilities|Setup|Global Defaults|Prompt Tab). If that option is not enabled, the field may be left
blank.
Example Mapping Configuration Within PayWindow (see notations in red) – note the Comp 1-4 and misc.
4/7/15
336
Payments
deductions 1-6 line up with the mapping screen in TBO Comp1 G/L – Comp4 G/W and Misc Deduct 1 G/L
– 6: GL.
Note: SUTA, FUTA and SDI information is not exported from PayWindow. This information can be obtained
from Z-Pay reports and manually entered into TBO at the time payment is being made with the
corresponding journal entries to update the general ledger. The reports in PayWindow are found under
Report Center/Pay Periods/Employer Totals Tab.
To accrue SUTA or FUTA liabilities, enter an Operating Payable in TBO. At the time a payment is made to
pay the expense, the journal entry will reduce the liability.
Payments/Import
The Payment Import feature provides the ability to import a file containing payment information and match
the payments with invoices in TBO. Invoices that are paid by that provider can be modified if information
differs between the imported file and the existing TBO bookings. Once the Payment Import process is
completed, reconciled bookings will be closed with the payments from the file.
The payment import feature can be used with the following providers. Please see the section Payment
Import Provider Details for specifics on how to sign up with these processors and obtain Trams-compatible
import files.
* Paymode (formerly GCP and NPC)
* Commtrak
* Onyx (formerly called Pegasus)
* Onyx II (formerly called Pegasus II)
* Trams Host
* Sabre Card Services
* WPS
* TACS -- Perot Systems
The following are the fields in a TBO booking that can be modified using this feature:
* Commission Amount
* Agent Commission Amount (provided the agent has not been paid)
* Gross Fare Amount
* Vendor GST/QST
* Vendor Remarks
* Start Date/End Date
Special Note: Any Payment Import item (WPS, TACS, etc.) that has a total fare of zero in the file will not
update the total fare to zero in TBO, although the commission amount will be updated to reflect the amount
in the payment file.
Payment/Import Setup
1. Create a vendor profile for the desired provider (Paymode, Onyx (formerly called Pegasus), CommTrak,
Onyx II (formerly called Pegasus II), Trams Host, Sabre Card Services, WPS Hotel Commission, and/or
TACS - Perot Systems). This vendor profile will be the payee for the invoice created at the end of the
payment import process.
2. Go to Utilities|Setup|Global Defaults|Payment Import Options to set up the secondary match default
337
4/7/15
Payments
settings. These settings control how strict the match on secondary criteria must be for a booking to reconcile
with the payment import file.
The primary match criteria are used before these secondary criteria come into effect. A booking must match
both (1) Confirmation number AND (2) the Travel Category associated with the booking's Travel Type.
If no match is possible based on primary match criteria, the import process looks to the secondary criteria:
* Passenger Name. Use the setting Chars to Match on Passenger Name to determine how
many characters must match. The default is 4 characters. A higher number will be more
restrictive; a lower number, less so.
* Depart Date. Use the setting +/- Days from Actual Depart Date to control how closely the
Depart Date in the payment file must match the Depart Date in the TBO booking. The
default is +/- 3 days. A higher number will be less restrictive; a lower number, more so.
* Vendor Name. Use the setting Chars to Match on Vendor Name to determine how many
characters must match. The default is 4 characters. A higher number will be more
restrictive; a lower number, less so.
If a match is found using the three secondary criteria, an additional check takes place when the
following settings are enabled (checked):
* Match on Interface ID/Chain Code. The Chain Code in the file must match the Interface
ID of the Vendor Profile in the TBO Database.
* Match on BSP/ARC Number. The ARC or BSP number in the file must match the ARC
or BSP number in the TBO database.
* Match on City Code (if present). The City Name in the import file must match the City
Code in the TBO database.
The final setting controls what happens if the booking was cancelled or a no-show.
*Void Cancelled/No-Show Bookings. When checked, if the payment import file reports
that the booking was cancelled or a no-show, the corresponding booking is voided in TBO.
Leave this option unchecked if you do not want these bookings voided. Note: Voided
4/7/15
338
Payments
bookings will not be included in most reports.
Payment/Import Run the Import and Reconciliation
To import the file and begin the reconciliation process.
1. Select the payment import provider name for the file being imported from the drop-down.
Note: For WPS Hotel Commission, select Trams Host.
2. For Payee Name, enter the vendor profile you created for the payment import provider.
3. Select the bank account you wish to use.
4. For Payment Date, enter the date the money is actually deposited into the bank account.
5. For Pay Method, select either EFT or Check.
6. Enter the ACH or Check Number.
7. Leave the Service Fee field blank. Paymode and Onyx files include this fee and will populate this field
once the file is imported. The fee is also displayed in the Totals box at the bottom of the screen.
8. Click Import Filename to browse to the downloaded payment import file. Once selected, click Import. The
reconciliation process will now begin. TBO compares the data in the file with the bookings in the database,
using the hierarchy explained in the setup section above.
9. When all possible matches have been made, click OK. This closes all invoices that have found a match.
339
4/7/15
Payments
See the section on Manual Reconciliation Options below for further information on manually reconciling
bookings that were not automatically matched.
10. If there is an unmatched balance remaining (Onyx and Paymode service fees are considered
unmatched balances), a prompt appears to create an invoice or voucher with the remaining balance. See
below for more details on creating the invoice.
Reconciliation Codes
R= Reconciled. When a match is found, it is marked with a status of R for Reconciled.
M= Multiple TBO bookings match a single record in the payment import file. This indicates the booking was
interfaced or entered more than once. One of the bookings should be marked with zero total fare and
commission in TBO or should be deleted altogether.
D= Multiple records in the payment import file match a single Trams Back Office booking. When saving the
reconciliation, the commission amount applied to the booking is the sum of all the corresponding "D" and
"R" items. There should be at most one "R" item for each booking, but there can be multiple "D" items for
each booking.
Unreconcile
Change the status from R, D, or M to blank. If a payment has been reconciled
to an incorrect booking, use this option to unreconcile that item.
Reconcile
Use this option to manually match an imported transaction with a TBO
booking. Clicking this button brings up an Invoice Query Screen pre-populated
with the data from the import file. If, when pressing query, no results are
returned, broaden the search by removing some of the selection criteria, then
re-query. Tip: Removing everything except the confirmation number, then
re-querying, is often the best option here.
Delete
Use this option to delete transactions that have zero amounts that are not to
be recorded, or items that have a status of D that should be removed in order
to make the correct items match.
Print
Print a report of the transactions for the period being reconciled. Different
views of this data can be shown by changing the options in the Hide Items
field: None, All Reconciled, 0 Unreconciled, or All Reconciled. Columns on the
report include Vendor, Chain Code, Customer, Confirmation Number, Total
Fare, Commission, Start Date, Status, Invoice Number and Notes (for Vendor
Remarks such as "No Show").
Refresh
If there were unreconciled items or newly added invoices for TBO to reconcile,
using the Refresh button reruns the query and displays the new results on the
screen.
Create Invoice
In an open period, create a Supplier or Comm Track booking for a commission
received that had not been invoiced. (In a closed period, only Comm Track
bookings can be created.)
Save
Click Save if the reconciliation is not finished to complete it at a later time. After
saving the reconciliation, click Cancel (not OK) to exit the Payment Import
screen. Upon returning to the reconciliation, click the drop-down arrow in the
Saved Reconciliations field to select the desired file, then click Load.
4/7/15
340
Payments
Invoice
Once the reconciliation process is complete, any difference between the total fare of the TBO bookings and
the payment import file that were not marked as reconciled (R) is adjusted to the Total Fare field:
1. Click OK to create the invoice.
2. Select the Invoice radio button.
3. Enter a Client name (TBO recommends that the agency create a client profile for itself and use it here.)
4. Select a Travel Type from the drop-down.
All other fields are optional.
Click OK to create the invoice. A Comm Track invoice is created for the vendor profile entered in the Payee
Name field. This invoice is incorporated into the End of Period and the journal entry as a Credit to the Sales
account of the selected Travel Type and a debit to the Cost of Sales for the same travel type.
The option to print the report or save to a file is presented. Select Yes to view the report, then print or save.
Voucher
Click OK to create a voucher in the amount of the fees being charged for the Vendor Profile specified in the
Payee Name field.
1) Select the Voucher radio button.
2) Enter a Client name (TBO recommends that the agency create a client profile for itself and use it here.)
All other fields are optional.
Click OK to create the voucher. Once the voucher is created, create a Payment Received using Pay
Method of Other, and close off the vendor voucher. Journalize to an expense or cost of sales account
named Commission Processing Fees.
After clicking OK, the option to print the report or save to a file is presented. Select Yes to view the report,
then print or save.
341
4/7/15
Payments
Payments/Import Participants
To receive the Trams-compatible payment import file, the agency needs to contact the company for enrollment.
Files that may be obtained from a third party's website are: Paymode, Sabre Card Services, and WPS Hotel
Commissions. Files that may be e-mailed to the agency are Onyx, Onyx II, and TACS.
1. Onyx at http://www.comminfo.pegs.com/enrollment.asp
2. Paymode at https://secure.Paymode.com/Paymode/login.jsp
Customers settling Paymode Commission Payments manually in TBO, or wanting a printed report to go with
the electronic file provided by Paymode, go to https://secure.Paymode.com/Paymode/login.jsp to sign in,
query for, and print weekly reports.
3. TACS at http://www.TACSNet.com. In the free-form field request that the electronic payment and data files
be sent to the agency. The Trams-compatible file e-mailed from TACS will be a .txt file.
4. WPS Network - Address an e-mail to: [email protected] with Trams File in the subject line.
Subsequent WPS uploads to the download area on the WPS website will be populated with the properly
formatted .tsv file extension.
5. CommTrak - CommTrak provides Hotel commission recovery services to travel agencies. Typically, an
agency uses CommTrak to chase unpaid hotel commissions over 16 to 18 months old. These are commissions
that have never been successfully obtained through the Onyx, TACS, or Paymode process. CommTrak splits
the recovered commissions with the agency. Contact CommTrak Corp to set up an account [email protected].
After establishing an account with CommTrak Corp, send CommTrak a data file (extract) containing aged,
unresolved records. This CommTrak Export file is a Crystal Export and can be found at
http://static.Trams.com/Tramslibrary/reports/tbotcr.html. (Click on TBO: Vendor Reports.)
Download the "CommTrak Export" under "Vendor Reports" and save to the desktop. Run the export and
forward the results to CommTrak. When CommTrak has reconciled the export sent to them, they forward a
file back that can then be reconciled to the open Back Office Hotel bookings.
6. Onyx II - This Onyx II fee-based option gives TBO customers another solution for reconciling hotel
bookings with a Submit To of Comm Track. A file is exported from a TBO Database to Onyx II, using a TBO
Crystal Export found at http://static.Trams.com/Tramslibrary/reports/tbotcr.html. (Click on TBO:
Vendor Reports.)
Download the Onyx II Export report under Vendor Reports and save to the desktop. Run the export and
forward the results to Onyx II. Onyx II performs the reconciliation on their servers. They then send the TBO
user an externally reconciled file. The settled file returned to the Trams user is already matched and paid.
This reconciled file can now be read by TBO as a Onyx II (formerly called Pegasus II) reconciliation and will
close off the original TBO bookings that were exported to Onyx II for reconciliation. (The Back Office Export
file sent to Onyx II contained the Trams Booking Number and that same Booking Number is also included
in the returned file from Onyx II. There should be close to a 100% match on bookings.)
Onyx II may include in its reconciled file bookings that were not in the TBO database at the time the export file
was created sent to Onyx II. These bookings do not show as an "R" on the screen. Click off the Reconciliation
Screen and manually add these non "R" bookings to TBO. Click back on the Reconciliation Screen and
manually reconcile the added bookings by clicking the Reconcile. When finished reconciling all items, click OK.
Sabre Card Services
The Sabre Card Services reconciliation option allows TBO users to daily close individual items in TBO that
reconcile to the customer's Sabre Card Services' file by transaction, and to enter a payment for the daily
Sabre Card Services deposit to the user's bank account. Monthly they will record an additional processing
Sabre Card Services Fees.
4/7/15
342
Payments
Notes:
1) All invoices should be entered for the vendor that is designated for capturing the service fee bookings in
TBO.
2) All Service Fee bookings MUST be Supplier in TBO.
3) The client side of the Service Fee Bookings MUST be closed with FOP of CC (Not CC Merchant)
4) Insure that the correct Travel Category of Service Fee is indicated for the Service Fee Travel Type being
used in the TBO booking, under Utilities|Setup|Travel Types.
5) In General Ledger|Accounts, set up a new 5000 series chart of account for Cost of Sales - Sabre Card
Services or use an existing Cost of Sale account. In General Ledger|Accounts, set up a new Expense
chart of account for Sabre Card Services CC Processing Fees or use an existing processing fee expense
account. In Utilities|Setup|Travel Types, set up a new Travel Type for Sabre Card Services CC
Processing Fees or use an existing fee travel type. Insure that the correct Travel Category of Service Fee
is indicated. In Utilities|Setup|GL Accounts, link the Sabre Card Services CC Processing Fees Travel
Type to the Cost of Sales - Sabre Card Services GL Account, so the EOP will correctly handle the
processing fee invoice created when saving the Sabre Card Services reconciliation.
6) Agency will contact Sabre Card Services and request Sabre Back Office report be added to the agency's
list of Merchant Reports.
7) Refunds are not currently reconciled. Refunds do not reconcile because the client payment is closed to
CC.
Daily:
Step 1) The Sabre Card Services users log in to the Sabre Card Services website with their user name and
password:
https://www.merchante-solutions.com/jsp/secure/b2f/b2flogin.jsp
Once logged in, click Merchant Reports from the Main Menu, and on the Merchant Reports screen, click
Sabre Back Office Report.
343
4/7/15
Payments
Set the Date Range on the Sabre Back Office Report to include the transactions to download and click
Select.
When the page refreshes a dollar amount link will be on the right hand side of the table displayed below the
Date Range. Click on the dollar amount link for the Net Amount of the transactions to download. Once the
dollar amount link has been clicked, a window appears prompting to save the file to the computer. Be sure
to click Download all Details. This is the file to import into the Trams Back Office Program for
reconciliation.
Step 2) The TBO user reconciles via the Payments|Import Reconciliation using the option that reads the
Sabre Card Services file. TBO also reads the amount of Sabre Card Services fees that apply to the file and
adjusts each booking by the amount of the fees involved. This insures that when agents are paid for any
portion of the service fees, they are paid on only the net portion after processing fees that the agency
actually received. Upon saving the Reconciliation an Invoice is created for the remaining amount of the
processing fees to be charged by Sabre.
Saving the reconciliation closes off the vendor side of the bookings, so nothing more needs to be done with
the bookings.
a. Open the Payment Import Reconciliation screen in TBO.
b. Select Sabre Card Services as the Payment Source.
c. Select Payee Name for the vendor profile. This may be the same as what is assigned on the client invoice.
Payee Name chosen will be viewed on the Check Register and Bank Reconciliation.
d. Select the Bank Acct the Sabre Card Services will be deposited into.
e. Payment Date is when the gross charges for the file being reconciled will be deposited in the bank which
is usually 8 business days from the date of the transaction. (Fees created and included in the daily file for
June 9, 2012 would be deposited into the bank on June 17, 2012.)
f. Select a Pay Method of EFT so the payment created on saving will appear on the Check Register and
Bank Reconciliation.
g. Click Import Filename and locate the file downloaded from the Sabre Card Services website.
h. Click Import and reconcile the file.
4/7/15
344
Payments
i. When reconciled, click OK to save the reconciliation.
j. When prompted for creating an Invoice or Voucher for the left over amount of the fees charged, select
Invoice. Enter a Client, usually the agency, and enter an Agent if desired. Select a Travel Type for the Sabre
Card Services CC Processing Fees travel type created in Utilities|Setup|Travel Types.
k. Click OK to save the fee invoice and the reconciliation.
Monthly:
Enter a Payments|Withdrawal for the monthly amount of the Sabre Card Services CC Processing Fees
deducted from the bank account. Journalize to Sabre Card Services CC Processing Fees expense GL
345
4/7/15
Payments
account to reflect the expense for the fees charged.
Trams Host
The Trams Host option to Payments/Onyx-PayMode Import is used by an IC (Independent Contractor) to
reconcile the file received from the HOST agency for CC and Cash/Check Commissions due from the Host.
The Reconciliation is for the Total Fare & Total Comm from the Host bookings. A final Voucher may need
to be created for any Transaction Fees that may be included.
Trams Host is also used for importing files from WPS Network to reconcile hotel commissions.
Agent Adjustments
Agent Commission Adjustments are used to adjust an agent’s commission as it appears on an Agent
Statement. These adjustments print on Agent Statements and increase or decrease the amount owed to
the Agent.
4/7/15
346
Payments
1. Click Adjustment|Agent Comm Adjustment.
2. In the Amount field, type in the adjustment amount. If the adjustment amount is being added to the amount
owed to the Agent, enter a positive (+) amount. If the adjustment amount is being subtracted from the
amount owed to the Agent, enter a negative (-) amount.
3. The Adjustment Date is the statement date that the adjustment affects. Type the correct date in this field.
4. Click the Agent Name field and type in the Agent Name.
5. Click the Remark field, and type a brief description about why the adjustment is being made. (e.g.,
Overnight Fee, Client Gift, etc.)
6. Click OK to save. (If creating more than one adjustment, click Continue Entering Adjustments before
clicking OK.
Agent adjustments can also be entered at the time of entering both Payments|Received and
Payments|Made.
Special Note to IC/Host Agencies: Capture IC and Host fees split among agents on this screen. If the
agency is a Host Agency, enter one lump fee charge for the specific IC Agency using the IC’s code selected
from the drop-down menu. Enter a Generic Agent name for the IC Agency, as an agent is needed to save
an adjustment.
If the agency is an IC Agency, enter one or more fee charge adjustments, depending on how costs of the
Host’s fees are going to be split among agents. Enter the agent’s name and the Host Code from the
drop-down menu.
These Host Fees are displayed on the Agent’s individual statements, reducing the commission owed to
them, and on the appropriate IC or Host Net Remit reports to increase or decrease the “net remit” owed.
Note: You can also create an agent adjustment from a payment screen, if the profile type is Vendor, Agent
or Other.
Void Agent Adjustment
1. Click Adjustments|Query|Agent Adjustment.
2. Enter the adjustment number being voided. If the adjustment number is unknown, query by any one or
more of the fields shown. (It is best not to fill in all of the fields. Usually two or three are sufficient.) Click
Query to process.
3. When the adjustment(s) appear, click and highlight the correct entry and click Void.
4. Trams Back Office prompts, “Void adjustment number X”
347
4/7/15
Payments
5. Click Yes.
Payment Query
Query can retrieve an existing (or a previously entered) payment. Enter the query screen by either selecting
Payments|Query|Payments from the main menu or using the Payment tab at the bottom of the screen.
The query screen is broken into two sections. The top section is used to enter the data for the query and
the bottom section displays the results of the query.
Two Tabs of Query Criteria
The fields displayed in the top section show how a payment/s can be found. Each of these fields are fields
within a payment to locate an existing payment. As few as none and as many as all can be completed to
retrieve a payment. The more criteria entered in query, the more selective the search for matching
payments.
The most frequently used query fields show on the General tab and additional fields are found in the
Advanced tab. Enter the criteria available (or applicable) and the system brings up a complete listing of
payments matching that criteria.
To the right of the Name field is a separate field with selection options or operators: Is Equal To, Is Not Equal
To, Is Blank, Is Not Blank, Starting With, Contains, In, and Not In. These operators help to more narrowly
define the search. (When doing searches on fields containing “wildcard” search criteria using the selections
of “IN” and “NOT IN," it is desired for the field to contain the complete string entered between the delimiters
or the exact match). In other words, In and Not In works like Is Equal to or Is Not Equal to except that the
list of values when using In and Not In when separated by a comma will search for each value in the list.
4/7/15
348
Payments
The entire text would need to match exactly for Is Equal to or Is Not Equal to.
For example, if the only criteria entered into the Query screen is the Payment Type of Made, then all
disbursements ever entered are displayed in date order for you. If, in addition to the Payment Type, a
range of Check Numbers is entered into the Query fields, the list is narrowed and only disbursements with
Check Numbers matching your criteria are included. To select a specific Payment Type or Pay Method,
click on an item to select (or de-select). That action places a checkmark next to the selected item.
Note: You can also select or de-select by right mouse clicking in the field.
Buttons on the right side of the screen are also broken into two sections. Query, Reset,
Count, Sort by, Columns and Default are buttons related to the query, while the bottom
buttons are related to do with the query results. Use Reset to clear away any previous
query criteria in both the General and Advanced tab. Count is used to give the number
of items that match the query criteria. Sort by customizes how to display the results once
the query is executed.
Columns is used to select which columns of data to display in the results screen. Click
Columns and choose the columns to display by highlighting the column in the Available
Fields and clicking on the left arrow to move it over to Displayed Fields. Using the red up
and down arrows, put the column in the order to appear on the results screen. Click OK.
Go out to the results screen and size the columns, and go back into Columns and click
Save Settings and OK. Next, click Sort to get up to 3 sorts in ascending or descending
order of selected columns and click Save Settings.
Drag and drop the columns to re-position them on the results screen if desired. Do this
by clicking on the column to move, holding down the left mouse button, and sliding the
column to any position on the query screen. To place a column to the right or left of any
existing column, stop on the column to the right or left and release the mouse. The
moved column is inserted in the correct place. Click Columns, Save Settings, and OK to
save.
Default is an area to save the filters in the query by following these directions to create
a new Saved Query:
1. Change the selection criteria on the results screen for the new query to save.
2. Click Default.
3. Type in the new query name in the Setting Name field.
4. If this saved query is the default, at the top of the drop-down window, check Set As
Default.
5. Select Per User (on this one workstation only) or Global (on everyone’s sets).
6. Click OK to save.
To remove a saved query from the list, check the Remove the Current Named Setting
box, click OK and the saved query is no longer available for use in the drop down field.
Once the listing of matching payments is displayed through query, any payment can be
created (New), viewed (View), copied (Copy), or voided (Void). Highlight an entry and
print a check directly from this menu (Print Check), or print a copy of a payment (Print
Payment). Help screens are easily accessed by clicking Help or F1. To view a history of
what has been changed in a queried payment, click History.
If querying for a payment made to the agent, and then right-click the payment to Query
All Invoices, invoices that have been cleared and paid to the agent when using the Agent
Reconciliation, are displayed.
Helpful Tips: On the Payment Query Screen, use <Shift> left-mouse click for selecting
349
4/7/15
Payments
a range of items for closing, deleting, etc. Use <CTRL> left-mouse click to select multiple individual items
in any order for closing, deleting, etc. By right-mouse clicking in the results screen, create a New payment,
View, Void, Copy, Print a Check, Print a Payment, Re-Apply a Payment, Query All Invoices (without leaving
the payment query screen, or Query All Payments (without leaving the payment query screen).
Sorting Payment Data
Sort data in all query screens in two ways:
1. “Quick” sort by one field by clicking on a column in the results screen. The first time click sorts the column
in ascending order (first to last or earlier date to more current date), and clicking on the same column a
second time sorts in descending order (last to first or current date to earlier date).
2. Sort in Ascending or Descending order by up to 3 columns. When clicking Sort By, select the first, second
or third column sort and what order (ascending or descending) the data displayed is to be displayed. Enter
the selection criteria and click Save Settings and OK.
Create New Payment, Deposit, Withdrawal & ARC/BSP
Settlement From Payment Query
Click New to access the payment screen. Although this screen defaults for a Payment Received with a
Payment Method Check from a Client, change the payment type to do a Payment Made, Deposit,
Withdrawal or ARC/BSP Settlement. After completing the new payment from the query screen, it is
displayed in the query screen, if the “Add Newly Inserted Items To Query Screens” box has been checked
under Utilities/Setup/Global Defaults/Prompt.
Note: Also access the payment screen by going to Payments in the file menu and clicking on Received,
Made, Deposit, Withdraw or ARC/BSP Settlement.
View & Void Invoices from Payment Query
View and void invoices from the payment query screen. Highlight any queried payment and right mouse
click to Query All Invoices. This navigates to an invoice query screen that displays all invoices to which this
payment is attached. View, Modify, Delete, or Create new invoices.
Changing Existing Payments
1. Click Payments|Query|Payment or click on Payment Query tab on the bottom of the screen.
2 Query by any one (or more) of the fields shown. Fill in two or three fields and click Query.
2. Click to highlight the payment and click View. Or double-click the desired payment.
3. Enter all necessary changes.
4. Once the changes have been entered, click OK.
Tip: Use Ctrl-PgDn/Ctrl-PgUp to access next or previous payment.
Copying Payments
To copy information from an existing Payment as defaults into a new Payment, highlight the appropriate
Payment and click Copy. The system displays a new Payment record with all defaults completed from the
copied Payment.
4/7/15
350
Payments
Note: The date and check number do not default to the copied payment's information. Instead, it defaults to
the system date and the last check number entered, plus one. Any of these defaults can be changed or
deleted and additional information can be entered before clicking on OK to save. Expense items such as
Salaries and Rent are commonly copied and revised each month.
Void a Payment
To void Payments Received, Made, Deposits, and Withdrawals:
1. Click Payments|Query|Payment or click on Payment Query tab on the bottom of the screen
2. Query by any one (or more) of the fields shown. Fill in two or three fields and click Query.
3. Click and highlight the payment and click Void.
4. The payment information is displayed and Trams Back Office prompts, “Void Payment (xxxx). Make sure
it is the correct payment. Make a Note of date; check number, etc.or print the payment if it is to be re-entered.
A dialog box now appears that asks Track Voided Payment. Click Yes if this is a spoiled check that is
needed to appear on the Bank Reconciliation, and click No if there is no tracking because the payment is
being re-entered. If Always Track Voided Payments is checked in Utilities|SetUp|Global
Defaults|Prompt Tab, there is no option track a payment.
5. Click YES.
Note: When a payment is voided in Trams Back Office, and No to tracking is selected, There is no history
of that payment the payment record is erased from the system. Voiding undoes any effects of that payment,
therefore, voiding a payment received reopens any invoices closed by that payment.
Voiding a payment also removes any record of the transaction. Voided payments cannot be retrieved but
can be reentered. To void a bank transaction, such as a check, and still be able to track the check, enter
the amount as 0 and Note in the remarks that the item has been voided. For payments being voided but
later re-entered, Trams Back Office recommends printing the payment by clicking Print Payment before
voiding the payment.
Also void a payment from within an Invoice Query by highlighting a booking line. Look at the right-hand side
of the screen. There is a prompt, Void Client Payment (or Void Vendor Payment). Select the payment to
void and click on it. This voids the payment and opens the invoice for modification.
351
4/7/15
Payments
Void Payment
Note: Selecting cancel after voiding a payment from within a booking only cancels changes made to the
invoice after the void. If querying for a partial payment and voiding a payment linked to a closed invoice,
there is this prompt: This payment represents a partial payment for one or more invoices. Are you sure
you want to void? Yes. No.
Donna wants to edit a cruise booking that has already been closed with a payment. First, Donna queries
for the payment by clicking on Print Payment, she will have a copy of the payment to reenter. When she
tries to void the vendor payment, she gets a warning message that reads: Warning: Void payment number
xxx. OK Cancel
Although Donna is thankful for the reminder, she selects Yes. She uses the information from her print out
to immediately reapply and clear the payment when she is done with her invoice edits.
Print Check from Query
Using Print Check brings up the check writer screen and defaults to the check number selected. Use this
option if only printing one check or printing a duplicate check for the agency’s records. (For more information
on Printing Check see Check Writer in the Reports chapter of the manual.)
Use <Shift> left-mouse click for selecting a range of items. Use <CTRL> left-mouse click to select multiple
individual items in any order. When selecting multiple items to Print Checks for on the Payment Query
Screen, these only print if there are NOT assigned check numbers in Payments. Ensure that in
Utilities|Setup|Global Defaults|Prompt, the Assign Ck #'s in Payments box is UNCHECKED. If checked
multiple checks cannot be printed at one time from the Payment Query Screen.
Print Payment
To void and reenter a payment, use the Print Payment button to take a snap shot of the payment to use as
4/7/15
352
Payments
a reference for data entry.
1. Query the payment.
2. Click the payment to highlight the selection.
3. Click Print Payment.
Receive a payment report for the selected payment. A confirmation warning message prevents the Trams
Back Office operator from inadvertently voiding a payment.
Print Query
Use Print Query to print out the isolated list created in the payment query screen. The report shows the
payment number, Date, Payee name, Payment Type, Payment Method, Amount, Check or Credit Card
Number, and Bank account.
Tip: Print selected payments by using SHIFT or CTRL and the mouse.
Re-apply a Payment
To reapply a payment highlight the payment in the results screen, right mouse click and select Re-apply
Payment. When re-applying a payment, the new payment screen Date field will default to the current system
date. Re-apply the payment by changing the Name of the payment and toggle the payment closed as usual.
Note: As soon as the Create New Payment screen is displayed, the original payment is deleted. Be aware
that if canceling from this screen and not completing the Re-apply process, that original payment is still
deleted and must be re-entered again.
Right-Mouse Click Menu in Payment Query
New - create new payment.
View the payment.
Void the existing payment.
Copy the existing payment.
Print check for the payment.
Print payment the payment.
Re-apply payment - voids exiting payment, create new payment with different payment
information.
Query all Invoices related to this payment.
Query all payables related to this payment.
Query for the Bank Deposit so it can be voided in addition to just viewing it.
Payment Codes
Payment Codes are used for recurring payments such as rent and payroll. This code is used to Query the
payment later, so the payment can be easily duplicated. All Payment Types can be set up for Payment
Codes. For example all payments made at the beginning of the month could be coded beginning with the
letter "B". All payroll entries could be coded beginning with the letter "P." All payments made automatically
through the bank accounted could be coded beginning with the letter "E."
1. Click Payments|Made.
2. In the Amount field, type in the dollar amount.
353
4/7/15
Payments
3. Change the Payment Date (if it is not the current date) by typing in the proper date.
4. The Bank Acct field should be the bank account number (1, 2, 3, etc.). To change the default, type in the
new number, or click the arrow.
5. In the Remark field, enter free flow information.
6. Select the Payment Method.
7. If Payment Method is check, type in the check number in the Check/CC No field. Otherwise, leave blank.
8. If this payment is also associated with a group, type the group name in the Payment Group field.
9. Type in the Payment Code, such as BRent, BPhone, etc. for payments paid the beginning of the month.
10. Click the Profile Type field and change it to Other by clicking the arrow.
11. In the Name field, type in the name of the person (or company) being paid. Trams Back Office displays
any matching profiles. Click the profile of choice. If there is no match, Trams Back Office prompts to build a
new profile. (See Other Profiles in Profiles chapter.) Click OK to process.
12. Trams Back Office prompts, “Create a Journal Entry? Yes or No.”
13. If maintaining the General Ledger in Trams Back Office, click YES. (See Journal Entry in General Ledger
chapter) Click OK to save.
To create a new payment using the Payment Code:
1. Click Payments|Query|Payment.
2. Click on the Advanced Tab.
3. In the Payment Code field type in the letter "B" to query all payments to be paid the beginning of the
month.
4. Click Query to process.
5. Click on the desired payment, then click Copy. Make the necessary changes (Date, Check #, and
Amount). Click OK to save. Trams Back Office prompts, “Is Payment Information Correct?” Click YES.
6. Trams Back Office prompts, “Create a Journal Entry?” Click YES if maintaining the General Ledger. Make
the necessary changes (Remarks and Amount). Click OK to save.
You always pay your rent and gas bill the beginning of each month. Last month you put a Payment Code
called Brent in the Payment Code field for the rent check and a Payment code called Bgas in the Payment
code field for gas company check. You can query for both of last month’s payment by entering "B" in the
Payment Code field (under Payments|Query|Payments) and clicking on OK. When you see the payment
in the query box you can click on the Copy button and make a copy of the original payment. The new
payment has today’s date and you can adjust the rest of the fields if needed. Click on OK to save.
4/7/15
354
Payments
Payment Code Query
Processing TAFP Service Fees - ARC Only
There is a TAFP service fee processing report for agencies who process their credit card service fees
through ARC. The TAFP complies with ARC standards with the details of all service charges paid with a
client credit card.
The following is the suggested method of entering TAFP transactions into Trams Back Office:
1. Create a Vendor profile called TAFP. (This can be done when entering the service fee booking by typing
TAFP in the Non ARC Vendor field, or the profile can be created through the main Profiles menu.)
2. When creating this profile, enter TAFP in the GROUP/BATCH field. This is important.
3. Create a 6000 series expense account called Credit Card Processing Fees.
Now:
1. Enter a Supplier booking with a Travel Type of Svc Fee, the Non-ARC Vendor as TAFP and enter the
document number in the Confirmation Number field.
2. Enter the amount of the fee in the Total Fare field.
3. Leave the Tax field blank and enter a commission amount equal to the net amount expected to be
received from ARC (presumed to be 96.5% of the Total Fare).
4. Close the supplier booking with a credit card payment. This creates a negative Vendor Balance for the
vendor TAFP.
5. At the end of the week run the TAFP report and submit to ARC for the previous Monday to Sunday dates.
6. When processing this report, be sure the Vendor Group field reads TAFP.
7. Please see Section entitled “Processing TAFP Service Fees” in this chapter for complete instructions.
355
4/7/15
Payments
8. When money is received from ARC, enter a payment received with profile type of Vendor Supplier and a
name of TAFP, and close the booking(s) to which it applies.
In certain cases:
1. If, in the invoice commission field, there was entered the net amount less the fee ARC/BSP charges, close
the booking.
2. If a commission amount entered on the invoice equaled the total fare, close the booking and leave the
balance unapplied. This is the 3.5% ARC/BSP fee.
3. Enter a second payment received for this ARC/BSP fee amount, with a Pay Method of Other, Profile Type
of Vendor/Supplier and Name of TAFP.
4. This clears the unapplied balance. When prompted for the debit side of the journal entry, enter the 6000
series Credit Card Processing Fees expense account created in Step 3.
4/7/15
356
Payments
357
4/7/15
General Ledger
10
This chapter contains the following sections:
Maintaining a GL in Trams Back Office
General Ledger Query Feature
Journalized by Transaction vs. Through End of Period
End of Period Journal Entry (Full and Pseudo)
Journal Entry
Budget Entry
Year End
Voiding End of Period and Year End
Accounts
Generate Budget
G/L Account Reconciliation
Maintaining a General Ledger in TBO
The Trams Back Office system includes a fully integrated General Ledger. Because the General Ledger is
a direct by-product of the Four Core Reports, its successful implementation in Trams Back Office is key.
This chapter outlines using the General Ledger in Trams Back Office.
The General Ledger is active the day the first invoice or payment is entered in Trams Back Office. The
system makes it easy by automatically recording all the journal entries associated with every invoice, refund,
client payment made or received, vendor payments made or received, and ARC/BSP settlement payments.
Trams Back Office sends these journal entries to the general ledger with one routine called “End of
Period.” Learn more about the End of Period journal entries in this chapter. The only journal entries not
included in the End of Period routine are those associated with bank withdrawals, and payments received
or made using a Profile Type or Pay Method of “Other.” These types of transactions require journal entries
transaction by transaction.
What follows is a basic overview on integrating the invoice and payment entries into the General Ledger.
These procedures are only recommendations, and are designed to be simple and basic. An accountant is
still recommended for review, adjustments, taxes and year-end closings. Any variations (and the level of
detail) are entirely up to each agency and the user’s level of experience with accounting. It’s a good idea
to confirm decisions with the agency’s accountant.
4/7/15
358
General Ledger
Query - Retrieving an Existing JE
Using Query, retrieve a previously entered journal entry. The fields displayed above identify the criteria by
which a journal entry can be located. Use each of these fields captured within a journal entry to locate a
journal entry. The more criteria entered in Query, the more selective the search for matching journal entries
becomes. Enter the criteria available or applicable and the system provides a complete listing of journal
entries matching that criteria.
For example, if the only criteria entered into the Query screen is the Journal Entry Type of End of Period, a
listing of all End of Period journal entries ever created is displayed in the order they were created by JE
number for selecting. If, in addition to the Journal Entry Type, an Activity Date is completed, then the list is
narrowed and only includes End of Period journal entries created within that time frame.
Note: Activity Date and Posting Date automatically default the To field to whatever is entered into the From
field. This allows for quick retrieval by Date, or enter ranges.
To the right of the Remarks field is a separate field with selection options or operators: Is Equal To, Is Not
Equal To, Is Blank, Is Not Blank, Starting With, Contains, In, and Not In. These operators help to more
narrowly define the search. (When doing searches on fields containing “wildcard” search criteria using the
selections of “IN” and “NOT IN," it is desired for the field to contain the complete string entered between the
delimiters or the exact match). In other words, In and Not In works like Is Equal to or Is Not Equal to except
that the list of values when using In and Not In when separated by a comma will search for each value in
the list. The entire text would need to match exactly for Is Equal to or Is Not Equal to.
359
4/7/15
General Ledger
Buttons on the right side of the screen are also broken into two sections. Query, Reset,
Count, Sort by, Columns, View Detail and Default are
• Reset clears away any previous query criteria in the General and Advanced tab.
• Count gives the number of items that match the query criteria.
• Sort by displays the results once the query is executed.
• Columns is used to select which columns of data to display in the results screen.
Click Columns and choose the columns displayed by highlighting the column in the
Available Fields and clicking the left arrow to move it over to Displayed Fields. Using
the red up and down arrows, put the column in the order wanted to appear on the
results screen. Click Save Settings and OK. Go to the results screen and size the
columns. Go back into Columns, click Save Settings and OK to save (make sure to
select sorts before saving).
•
Drag and drop the columns to re-position them on the results screen if desired. Do this by clicking on
the column to move, holding down the left mouse button, and sliding the column to any position on the
query screen. To place a column to the right or left of any existing column, stop on the column to the
right or left and release the mouse. The moved column is inserted in the correct place. Go into
Columns, click Save Settings and OK to save.
•
View Detail is similar to how the button works in the invoice query screen, when View Detail is
selected, the details of each journal entry screen are now displayed in the query results grid. The
query results default to the traditional summary view, when the view detail button is clicked the results
changes to list each item in journal entry separately.
•
Default is where to save queries and filters in the query following these directions:
1. Change the selection criteria on the results screen for the new query to save.
2. Click Default.
3. Type in the new query name in the Setting Name field.
4. If this saved query is the default, at the top of the drop-down window, check Set As Default.
5. Select Per User (on this one workstation only) or Global (on everyone’s sets).
6. Click OK to save.
To remove a saved query from the list, check the Remove the Current Named Setting box, click OK and the
saved query is no longer available for use in the drop down field.
Once the listing of matching journal entries is displayed through Query, any journal entry can be added
(New), viewed (View), copied (Copy), printed (Print JE) or (Print Query) or voided (Void).
Selecting Queried Journal Entries
To select a Journal Entry to view or modify, once the listing of matching journal entries is displayed on the
screen, either double click the item or highlight the appropriate journal entry and click View. Note: If the
journal entry was created from within a payment entry, Trams Back Office suggests retrieving the payment
to view the journal entry.
Tip: Use Ctrl-PgDn/Ctrl-PgUp to access next or previous payment.
4/7/15
360
General Ledger
Copying Queried Journal Entries
To copy information from an existing journal entry as defaults into a new journal entry, highlight the
appropriate journal entry to be copied, and click Copy. The system displays a new journal entry record with
all defaults completed from the copied journal entry.
Tip: The date does not default to the copied journal entry's date but instead defaults to the system date.
Add, change or delete any of the journal entry lines by highlighting the line, making the change, and electing
Add, Update, or Delete. This shortcut may come in handy for quickly entering recurring journal entries, such
as depreciation tables and budgets. If combined with the ability to Query by Journal Entry code, recurring
journal entries are quickly captured into Trams Back Office.
Print Journal Entry
To void and reenter a Journal Entry, use the Print JE button to take a snap shot of the entry to use as a
reference for data entry.
1. Query the Journal Entry.
2. Click the Journal Entry to highlight the selection.
3. Click Print JE.
Print Query
Use Print Query to print out the isolated list created in the Journal Entry query screen. Select what Journal
Entries are to be printed by using SHIFT and CTRL.
Right-Mouse Click Menu in Journal Entry Query
New - create a new journal entry.
View the journal entry.
Void the journal entry.
Copy the journal entry.
Print JE - prints the journal entry.
Sorting Journal Entry Data
Sort data in all query screens in two ways:
1. “Quick” sort by one field by clicking on a column in the results screen. The first time click sorts the column
in ascending order (first to last or earlier date to more current date), and clicking on the same column a
second time sorts in descending order (last to first or current date to earlier date).
2. Sort in Ascending or Descending order by up to 3 columns. When clicking Sort By, select the first, second
or third column sort and what order (ascending or descending) the data is to be displayed. Enter the
361
4/7/15
General Ledger
selection criteria and click Save Settings and OK.
Voiding a JE- If the Record Number is Known
1. Click General Ledger|Query.
2. Type in the record number of the journal entry being voided. Click Query to process.
3. Click and highlight the journal entry and click Void.
4. Trams Back Office prompts, Void This Journal Entry? Click YES.
Void if the JE’s Record Number is Not Known
1. Click General Ledger|Query.
2. Query by any one (or more) of the fields shown. (It is best not to fill in all of the fields. Usually two or three
are sufficient.)
3. In the Journal Entry Type field, click the arrow to see a list of types of journal entries to void. Choices are
Normal, End-of-Period, Year-End, Recurring, Budget, or choose All.
4. In the Status field, change the status to read Unposted.
5. In the Activity Date field, enter the date or a date range in From and To, that the journal was dated.
6. Click Query to process.
7. Trams Back Office displays all matches. Click the correct journal entry, highlight it, and then click Void.
Note: End of Period and Year End entries cannot be voided from this screen. See “Void End of Period and
Year End Entries” section of this chapter.
8. Trams Back Office prompts, Void This Journal Entry? Click YES.
Note: When a journal entry is voided in Trams Back Office, no history of that journal entry is maintained.
The journal entry record is erased from the system. If the journal entry was created from within a payment,
also void the payment. Trams Back Office suggests in this situation to void the payment and the system
automatically voids the journal entry.
Journalized by Transaction vs. Journalized
Through the End of Period
Invoices
One purpose for entering invoices into Trams Back Office is to maintain sales figures which are reflected in
a report called the Invoice Activity Report. Sales and Cost of Sales (or Gross and Net) are reflected on the
Invoice Activity Report and are printed for any specified period. Another reason for entering Invoices into
Trams Back Office is to create the Client, Vendor and ARC/BSP Balances passed through the agency as a
result of these Sales and Cost of Sales. The Client Balances are created from the Total Fare or Sales figure
and the vendor and/or ARC/BSP Balances are created from the Net Fare or Cost of Sale.
Instead of updating Sales, Cost of Sales, Client, Vendor and ARC/BSP Balance accounts within the General
Ledger each time an invoice is entered, Trams Back Office updates these accounts once through the “End
of Period” journal entry. Therefore, during the period, invoices can be entered, modified, and voided with no
effect on the General Ledger until the End of Period journal entry is created.
In the world of accounting, there are always at least two GL Accounts to every journal entry. In the case of
4/7/15
362
General Ledger
Invoices, the Total Fare updates the Sales accounts and Accounts Receivable (Client Balances) and the
Net Fare updates the Cost of Sales accounts and the Accounts Payable (Vendor and/or ARC/BSP
Balances). In the case of payments affecting the bank account, one side updates the bank balance and the
other side is a General Ledger account which indicates the description of the payment itself (what it was for).
Payments
In Trams Back Office, there are five types of payments received and made. Selecting the Profile Type when
entering a payment determines which reports will be affected.
Profile Type
Report Affected
Client
Core/Client Balances
Vendor
Core/Vendor Balances
Agent
Prompts user to enter a Journal Entry
Other
Prompts user to enter a Journal Entry
Each of these payments also update the bank balance.
Payment Types
Client
Entering client payments updates specific client account balances and
are either applied to specific ARC/BSP and Supplier type invoices or
turned into a voucher, as a credit on the client's account. To maintain
accurate client balances, all invoices and client payments received and
made must be entered into Trams Back Office.
Vendor
Entering vendor payments updates specific vendor account balances
and are usually applied to invoices containing a Submit to of Supplier.
To maintain accurate vendor balances, all Supplier type invoices, as well
as all Vendor payments received and made, must be entered into Trams
Back Office.
Entering Vendor payments received where the Submit To field in an
invoice contains Comm Track, clears any commission tracking
bookings. Vendor Statements (Reports|Vendor|Statements) are
maintained by applying vendor payments to open Comm Track
bookings. Comm Track-type bookings do not update the General Ledger
until a Vendor-Comm Track payment has been applied to a booking.
Agent
Payments Received and Made with a Profile Type of Agent do not link
to a Sale or Refund invoice, hence, the user is prompted to create a
journal entry.
Other
Payments Received or Made with a Profile Type of Other do not relate
to Sale or Refund invoices, hence the user is prompted to create a
journal entry; i.e., agency expenses and uninvoiced receipts.
ARC
Approximately ten days after submitting the ARC/BSP report, ARC/BSP
either deposits or withdraws payment to/from the bank account. See the
section ARC/BSP Settlement. Upon completing the ARC/BSP
Settlement, all airline vendor account balances are updated, bank
balances are automatically updated accordingly.
363
4/7/15
General Ledger
All Invoices and any payments attached to invoices update the General Ledger when an End of Period
posting is performed (General Ledger|End of Period). Trams Back Office recommends creating an End of
Period for each month or each accounting period, if using 13-period accounting.
Any payments entered with a Profile Type of Other or Pay Method of Other triggers a prompt to complete
the journal entry (journalized by transaction). The payment type of Withdrawal is also journalized by
transaction. Journal Prompting Options can be found under the Utilities|Setup|Global Defaults/Prompt
tab. The prompting option choices are: Always, Recommended, Never.
IMPORTANT! Because the End of Period journal entry is a summarized posting of the total balance from
the Four Core Reports (Client Balances, Vendor Balances, ARC/BSP Balances and Check Register), the
key to creating an accurate End of Period journal entry is to first verify that the detail contained on each of
the Core Reports are accurate. If any of the four Core reports is not accurate, the End of Period Journal
entry will also be inaccurate.
Example Journal Entries by Transaction
All Payments Made To Other entries should include:
Amount of check
Cash in bank 1000 series
Credit
Amount of check
Proper offsetting acct
Debit
Amount of check
Cash in bank 1000 series
Debit
Amount of check
Proper offsetting acct
Credit
All Payments Received From Other should include:
All Bank Withdrawals entered entries should include:
Amt of withdrawal
Cash In Bank 1000 series
Credit
Amt of withdrawal
Proper Offsetting Account
Debit
All Payments Made to Clients with Pay Method of Other entries should include:
Amt of payment
Client Balances 1100
Debit
Amt of payment
Proper Offsetting Account
Credit
All Payments Received from Clients with Pay Method of Other entries should include:
Amt of payment
Client Balances 1100
Credit
Amt of payment
Proper Offsetting Account
Debit
All Payments Made to Vendors with Pay Method of Other entries should include:
Amt of payment
Vendor Balances 2000
Debit
Amt of payment
Proper Offsetting Account
Credit
All Payments Received from Vendors with Pay Method of Other entries should include:
Amt of payment
4/7/15
Vendor Balances 2000
Credit
364
General Ledger
Amt of payment
Proper Offsetting Account
Debit
Example Journal Entries by End of Period
Invoices affect Sales/Cost of sales in the Income Statement. The submit to field and travel type fields in each
invoice determine what effect will take place through an End of Period posting. Payments received and
made (for all profile types except Other and Payment Methods of Other) affect Accounts Receivables (Client
Balances) and Accounts Payables (Vendor Balances) through the End of Period posting. Profile type of
Other and Pay method of Other prompt for a journal entry and hit the General Ledger automatically.
Submit to ARC Invoices journal entries created by End of Period:
Total fare amount in the invoice for the appropriate travel type
for the date of issuance.
Sales 4000’s
Credit
Difference of the total fare less commission with appropriate
travel type for the date of issuance.
Cost of Sales 5000’s
Debit
Amount of the total fare in the invoice.
Client Balances 1100
(A/R)
Debit
Difference between the total fare and commission amounts.
ARC Balances 2010
Credit
Submit to Supplier Invoices journal entries created by End of Period:
Total fare amount in the invoice for the appropriate travel type Sales 4000’s
with the date of issuance.
Credit
Difference of the total fare less commission for the same travel Cost of Sales 5000’s
type with the data of issuance.
Debit
Amount of the total fare in the invoice.
Client Balances 1100
(A/R)
Debit
Difference between the total fare and commission amounts.
Vendor Balances 2000 Credit
(A/P)
Submit to Commission Track Invoices journal entries created by End of Period:
Total fare amount in the invoice for the appropriate travel type
with the date of vendor payment (the date payment was
received).
Sales 4000’s
Credit
Difference of the total fare and commission for the appropriate
travel type with the data of the vendor payment.
Cost of Sales 5000’s
Debit
Payment Received with profile type of Client and pay method of cash or check journal entries
created by End of Period:
Payment amount entered.
Client Balances 1100 (A/R)
Credit
Payment amount entered.
Cash in Bank 1000 Series
Debit
Payment Received with profile type of Vendor Supplier and pay method of cash or check journal
entries created by End of Period:
Payment amount entered.
Cash in Bank 1000 Series
Debit
Payment amount entered
Vendor Balances 2000 (A/P)
Credit
Payment Received with profile type of Vendor Comm Track and pay method of cash or check journal
entries created by End of Period:
Total fare in the invoice (i.e. $400.00)
Sales 4000’s
Credit
365
4/7/15
General Ledger
Difference between the total fare and commission Vendor Balances 2000 (A/P)
for the appropriate travel type (i.e. $360.00)
Credit
Amount of payment received.
Debit
Cash in Bank 1000 Series
Payment Received with profile type of Client and pay method of CC Merchant journal entries created
by End of Period:
Payment Amount
Client Balances 1100 (A/R)
Credit
Payment Amount
CC Merchant 1150
Debit
Payment Made with profile type of Supplier and pay method of cash or check journal entries created
by End of Period:
Payment Amount
Client Balances 1100 (A/R)
Credit
Payment Amount
Vendor Balances 2000 (A/P)
Debit
End of Period Journal Entry
The End of Period journal entry is created automatically when the user decides it’s time to create it by
selecting General Ledger|End of Period. The system checks various management reports and takes the
totals from those reports to create one large journal entry. This Journal Entry summarizes Sales, Client and
Vendor Receipts and Disbursements, and ARC/BSP payments for the period. This journal entry eliminates
the need to create separate journal entries for Invoices, Client and Vendor Payments, and ARC/BSP
payments.
An End of Period creates a single journal entry updating all Sales, Cost of Sales, Commission Income, Client
Balances, Vendor Balances, ARC/BSP Balances and Cash in Bank General Ledger accounts based on
invoice, client and vendor payments, and ARC/BSP payments created during the period. The first time the
End of Period is created, the system prompts for both From and To dates. All future End of Period entries
prompt only for a To date, because the From date is one day greater than the prior period's To date.
Important Note: Although the End of Period creates a journal entry, as with any other journal entry
entered into Trams Back Office, it is not posted to the General Ledger until the Posting routine is
processed. See the section on Posting.
Once creating an End of Period for a given month or accounting period, Trams Back Office prohibits invoice
or payment inputs or modifications within that period. As a result, any report can be printed, at any time,
providing a detailed history (or audit trail) of figures used to create any End of Period Journal Entry. Journal
Entries, Bank Deposits, and Bank Withdrawals can still be entered within the period.
To see a list of End of Period entries, print a Journal Entry Analysis report for End of Period entries.
If an End of Period entry is created in error or if corrections need to be made to invoices or payments, the
End of Period can be voided. (See Voiding an End of Period.)
Full End of Period
There are two types of End of Period entries, Full End of Period and Pseudo EOP. Access the Full End
of Period option by going to General Ledger|End of Period.
4/7/15
366
General Ledger
By default a Full End of Period is created, unless checking Pseudo EOP, see section below.)
Note: Everyone is logged in automatically as Exclusive Access. Multiusers who are using TBO while a Full
End of Period is being performed, receive a message warning them that they are locked out of the payment,
invoice, etc. until the Full End of Period is completed. For this reason, multiusers may only want to use the
Pseudo EOP option when doing some accounting tasks, until a final End of Period is performed.
Another error message received is Invalid G/L Number: 0. If receiving this message, go to
Utilities|Setup|GL Accounts and check the current setup. This error means that one or more of the fields
in the Utilities|Setup|GL Accounts is blank.
The Full End of Period can be run and reversed, using the General Ledger|Void|End of Period, as many
times as necessary until journal entries are posted. A full End of Period must be created for each period in
order to create a year end Journal Entry.
Supplier Booking Closed by CC Can Act Like a Comm Track
Booking
Allow a Supplier booking closed by Credit Card to act like a Comm Track booking by modifying the End of
Period so the sale is deferred until commission is received. To set up this feature:
Step 1: Select a start date which should be at the beginning of an accounting period.
Step 2: Verify that the accounting period prior to the start date is in balance and that the period is posted.
Step 3: Select General Ledger|Accounts and create a GL account named Supplier CC Receivable in the
1000 series of accounts.
Step 4: Select Utilities|Setup|GL Accts|Others. Next to the Supplier CC Receivable field, enter the GL
account number that was created in Step 3.
Step 5: Select Utilities|Setup|Global Defaults|Prompt. Change the Supplier C/C transaction in EOP field
to Defer Sales Until Commission Received.
Step 6: Select Reports|Report Generator| Print Report. Print the Report Generator report,
CL_TT_AS.RPT (Client Activity by Travel Type) with the following selection criteria.
Date Range: Issue Date
Between: Leave blank
And: Enter the date one day prior to the start date
Invoice Type: All
367
4/7/15
General Ledger
Submit To: Supplier
Travel Type: All
Invoice Payment Status Client: Closed
Payment Method: C/C
Invoice Payment Status Vendor: Open
Step 7: Select General Ledger|Journal Entry and create a journal entry dated one day prior to the start
date. For each Travel Type listed on the report printed in Step 6, debit the appropriate Sales account for the
Total Fare amount on the report, credit the appropriate Cost of Sales account for the Net Fare amount on
the report, and credit the Supplier CC Receivable account for the Commission amount on the report.
Pseudo End of Period
The other type of End of Period Entry is a Pseudo End of Period. This is used when using Trams Back
Office in Multiuser mode. This option creates an End of Period entry without disturbing other users. The
entry the Pseudo End of Period creates is a “Normal” journal entry. Use this entry to view the financial and
managerial reports in pseudo post.
IMPORTANT! When creating the Pseudo End of Period, there is a prompt to void the entry before creating
another End of Period. Void this entry or it will distort the financial statements the next time an End of Period
is run. To void out a Pseudo End of Period, go to the Journal Entry query screen and type ps (standing for
pseudo) into the Remarks field. This bring ups all Pseudo EOP Entries. Click Void.
Journal Entry
Journal Entries are created and then posted to the General Ledger, thereby updating the balances in
specific General Ledger accounts. Since most day–to–day journal entries are created automatically from
invoice and payment input, individual journal entries entered here are used primarily for adjusting or
correcting entries.
Entering Journal Entries
1. To create new journal entries from the General Ledger menu, select Journal Entries, or from the Journal
Entry Query screen, click on New, then select Journal Entry:
2. Select the desired settings.
Trams Back Office also prompts for specific Journal Entry line items:
Journal Entry Code
For recurring journal entries a Journal Entry Code can be assigned here
for future selection in the Query screen and for easy duplication.
Activity Date
Type in the date of the financial period to appear.
Group
A GL Group created in Utilities|Setup|Groups can lump together multiple JE
entries for reporting purposes.
Remark
Remarks are for reference. They appear on all General Ledger historical reports
and apply to this entire Journal Entry.
4/7/15
368
General Ledger
Table 1: Journal Entry line items
Account Name/Number
A specific G.L. account can be identified by either Account #, or
Name. Enter all or part of either # or name and Trams Back Office
presents a pull-down list of all matches, and allows for selection
from that list. If Account Number is entered completely, Trams Back
Office selects the specified account without prompting for Name.
Branch
Trams Back Office allows a branch specifier on journal entry lines where
the account number is in the 4000-9999 range. This branch specifier is
used when printing an Income Statement for a particular GL branch. Any
GL branches are shown under Utilities|Branch Numbers. (Note: Under
Utilities|Global Defaults, remember to set the Branch option to FULL.)If
the system is set up for Multiple Balance Sheets, enter a specified branch
for accounts in the 1000-3999 range also. This branch specifier is used
when printing a Balance Sheet.
Debits
Enter the debit amount to be applied to the specific General Ledger
account. If entry is to be a credit amount, leave field blank and click
the Credit column.
Credits
Enter the credit amount to be applied to the specific General Ledger
account. If entry is to be a debit amount, leave field blank.
Detail Group
Tag a Debit or Credit entry with a Detail Group for reporting purposes.
This group can be set up under Utilities|Setup|Groups.
Remark
Enter a specific remark for this Debit or Credit Entry for reporting
purposes.
Note that at the bottom of the column for both debits and credits, Trams Back Office maintains a running
total balance for each. For the journal entry to be accepted, debits must equal credits. Most daily journal
entries are entered from within the Payments menu when prompted, except for the End of Period journal
entry (which the system creates) and any correcting or adjusting entries made from within the General
Ledger menu. If journal entries are entered directly from Payments, the Activity Date is set to the Payment
Date, and the remarks are filled in, followed by the Profile Name.
On Payments Made, Payments Received and Withdrawals, Trams Back Office automatically completes the
first journal entry line (adding or subtracting from the appropriate bank account) and only the offsetting
journal entry lines need to be completed. Be sure that bank accounts are assigned to proper General Ledger
accounts under Utilities|Setup|GL Accts.
3. Click OK to Save.
Please also review our General Ledger recorded trainings at select Training, TBO, and Recorded Trainings.
JE Import From File
If the agency has very large recurring periodic Journal Entries that would normally be entered by hand or
copied and then modified manually there is an option to import an external JE from another source.
When creating a new Journal Entry, right-click anywhere in the JE line-by-line creation window at the bottom
369
4/7/15
General Ledger
of the screen and an Import From File option is displayed.
Highlight the displayed box and left- click on it for an Import Journal Entry Details From Files window to
open, then browse and select a tab delimited .txt file created for a specific normal Journal Entry.
When that tab delimited .txt file has been created using the proper format, then the Journal Entry, GL
Account lines will be populated automatically from the file.
Column Headers that Must be Present in Tab Delimited .txt File for Import to be Successful:
GLNO
GLNAME
BRANCHNO
DEBITAMT
CREDITAMT
REMARKS
See Help files, General Ledger|Budget Entry for more details.
Posting JEs to the General Ledger
In order to maintain an accurate audit trail within the General Ledger, a routine is performed monthly to lock
in any journal entries made to date so they can no longer be changed or voided. This routine is called Posting
your Journal Entries. Until a journal entry is posted it can be changed or voided, even the End of Period
journal entry.
Note: Because of posting's permanent effect, this routine is performed with caution, and only after
all Core reports are balanced and their corresponding General Ledger accounts are in sync; usually
about the middle of the following month.
Once posted, all invoices, payments and journal entries for that period can no longer be changed or voided.
However, journal entries can always be added to a posted period if an adjustment needs to be entered.
Always process a Trial Balance report before posting, saying yes to Pseudo Post to see the effects Posting
will have.
Much time is spent recording daily activities and balancing them. To protect from any future changes once
everything is reflecting what it should, posting should be performed. Posting protects the agency from
4/7/15
370
General Ledger
changes that may affect the financials and tax reporting. It does not, however prevent a journal entry from
being added to a closed and posted period. We therefore recommend that the creation of journal entries
(General ledger/Journal entry) be limited to the person or persons in charge of the financials and be
regulated by the use of individual logins. We would also recommend that printed copies of monthly financials
be kept on file so that if changes have been made to closed periods they can be identified more easily for
verification.
It is also recommended that at the end of each month, run a Journal Entry Query with the Status set as
Unposted. Run for an appropriate posted period, year-to-date of last posted period, last-year-to date of last
posted period, etc., to view any unposted items that someone might have added or changed in a posted
period. Then verify or delete those items, post them, and run new monthly financials to reflect the changes
made.
Steps to Post to General Ledger
1. Click General Ledger|Posting.
2. In the Latest Posting Date field, type in the last day of the period being posted. All entries are posted up
to and including this date. Click OK to process.
3. Trams Back Office prompts: XX Item (s) Will Be Posted? Continue? Yes or No
4. Click YES.
5. Please also review our General Ledger Recorded Trainings at www.Trams.com, select Support,
Recorded Trainings.
Pseudo Posting Journal Entries
Posting journal entries is not just a Trams Back Office function, but a general accounting function. Unique
to Trams Back Office though, is the ability to print financial statements (Income Statements and Balance
Sheets) before Posting the journal entries. Trams Back Office does this through a reporting feature called
“Pseudo Posting.” This means that, as long as all Invoices and Payments have been turned into journal
entries (by transaction and through End of Period), preliminary financial statements can be gathered from
Trams Back Office while waiting for bank statements and ARC/BSP reports to be reconciled by Pseudo
Posting.
371
4/7/15
General Ledger
Pseudo Post/Trial Balance
Budget Entry
Budget Entries provide the ability to estimate Sales, Cost of Sales, and Expenses and compare Actual to Budget
in the Income Statement.
Entering a Budget Entry is exactly the same as entering a Journal Entry, except that with a Budget Entry, only
specify General Ledger accounts in the 4000-9999 range, and the entry doesn’t have to balance - the debits
and credits don't have to match. There is also an automatic Budget Entry option (see Generate Budget
below). This saves all the work of putting in the budget entries one at a time.
Budget Entries don’t affect the Trial Balance or Balance Sheet. The only report they affect is the Income
Statement, when choosing to print Budget Entries. They are not posted to the General Ledger as part of the
normal posting routine.
See a list of Budget Entries, by printing a Journal Entry Analysis report for Budget Entries.
Creating a Budget Using JE Import From File
A Budget Journal Entry can also be created from a budget that has been created outside of Trams Back
Office, in say Excel. When creating a new Budget Entry, right-click anywhere in the JE line-by-line creation
4/7/15
372
General Ledger
window at the bottom of the screen and an Import From File option is displayed.
Highlight the displayed box and left-click on it and an Import Journal Entry Details From Files window opens
to browse and select a tab-delimited .txt file created for a specific Budget Journal Entry.
When that tab-delimited .txt file has been created using the proper format, then the Budget Entry, GL
Account lines are populated automatically from the file.
Column Headers that Must be Present in Tab Delimited .txt File for Import to be Successful:
GLNO
GLNAME
BRANCHNO
DEBITAMT
CREDITAMT
REMARKS
Year–End Closing
Year-End closing is done once a year. The year-end entry zeros out all Sales (4000 series accounts), Cost
of Sales (5000 series accounts), and Expenses (6000, 7000, 8000, and 9000 series accounts), and rolls
over the profit or loss into the Retained Earnings (3000 series account).The Retained Earnings account is
designated in Utilities|Setup|GL Accounts. The Year-End routine creates a journal entry, which is then
posted by the regular posting routine.
1. Enter any adjusting journal entries given by the accountant under General Ledger|Journal Entry. Date
adjusting entries with the date the accounting year ends.
2. Go to General Ledger|Posting to post the adjusting Journal Entry. Click General Ledger|Year-End.
3. In the To field, enter the year-end date. Click the OK button to process. This creates the Year-End Journal
Entry. Click the OK button to save.
4. Select General Ledger|Posting.
5. Type in the Year-End date in the Latest Posting Date field. Click the OK button to process.
6. TBO prompts, "xxxx items will be Posted. Continue? Yes, No” Click Yes.
373
4/7/15
General Ledger
Notes: ***If maintaining and balancing the GL in Trams, do an End of Period and balance the last month of
the year, and post it before doing the Year-End function.
***When a year-end posting has been performed, modifying, adding or voiding journal entries is prohibited
if the entry falls within the year end range. If entering a payment or operating payable with a journal entry
within the year end period, the payment will be saved but the user will not be able to finish the journal entry
portion of the payment process hence users should void the payment. If trying to enter an operating
payable since the journal entry cannot be saved, the entire entry is aborted.
Void End of Period and Year End Entries
Voiding an End of Period
To Void an End of Period from the general ledger menu, click Void, then End of Period. When voiding an
End of Period Journal Entry, the system prompts with the last entered End of Period time frame. If this End
of Period Journal Entry has not been posted (a “pencil” posting in effect), the system voids the Journal Entry,
deleting any history of it and erasing the End of Period restrictions, once again allowing for invoice or
payment entries or modifications.
If the End of Period Journal Entry has been Posted (a “pen and ink” version in effect), a warning appears
and if OK'd, a similar routine occurs. Instead of voiding the Journal Entry and deleting the history, because
it was posted, a reversing entry is created and posted in one step. The reversing Journal Entry created is
dated the same date as the original End of Period entry. Please also review our General Ledger recorded
trainings at www.Trams.com, select Training, Trams Back Office, and Recorded Trainings.
Voiding a Year-End
To void a Year End from the General Ledger menu, click Void, then Year End. When voiding a Year End
journal entry, the system prompts with the last entered Year End's To Date. If this Year End journal entry
has not been posted, the system voids the Journal Entry, deleting any history of it.
If the Year End journal entry has been Posted, a warning appears and if OK'd, a similar routine occurs.
Instead of voiding the Journal Entry and deleting the history, the system creates a reversing entry. The
reversing Journal Entry created is dated the same date as the original Year End entry.
Accounts (Chart of Accounts)
Please refer to chapter Setting Up Trams Back Office, and the section, "Setting Up the Chart of Accounts."
4/7/15
374
General Ledger
Directions on how to add, delete, and modify an account are discussed in great detail.
Choose Columns on the General Ledger Accounts Screen
Users can select the columns to appear in the G/L accounts display. Also adjusting column widths in the
display are saved when the save settings box is checked.
Example:
1. Go to General Ledger|Accounts.
2. Expand the Account Name field to display more of the name field.
3. Click Columns.
4. Make any adjustments to which columns will be displayed
5. Click the Save Settings box.
6. Both the column width and the column selections will be saved and displayed.
Generate Budget
Trams Back Office has an option of creating a budget based on actual numbers from an income statement.
1. Generate a budget by going to the main General Ledger menu, then to the Generate Budget menu option.
375
4/7/15
General Ledger
Generate Budget Entry
2. The Budget Entry Date is the date of the budget. If this is October and a budget for November is being
created, this date would be 11/30/xx. The Income Statement Period contain the dates of the previous
Income Statement used to calculate this new budget. In this example, we are creating a budget for 11/30/12
by using our Income Statement from November 2011. Make sure an End of Period has been performed for
the Income Statement dates, otherwise income from invoices is NOT included.
3. Enter a G/L Branch for which a budget is being created from the drop-down menu.
4. Enter a percentage increase (or decrease). A percentage increase or decrease affects both sales and
expenses. A 10% increase in sales also increases the expenses by 10%. This may not be the goal, so
increase or decrease the items individually.
5. Click OK to generate the budget journal entry.
Notice this entry does not balance. Budget entries do not need to balance. They do not involve balance
sheet accounts, only Income Statement accounts. Each line item on the budget can be adjusted manually
by highlighting the entry, make changes above, click Update. Edit the Remark field, clarifying the budget
name or period. Click OK to save this budget entry.
Budgets allow analyzing and evaluating the progress of the agency’s business, making any adjustments to
generate sales or cut expenses to reach goals. This makes budget creation quick and easy.
You are creating a budget for the month of October and want this budget based on the income statement
for the same period last year. Select the main General Ledger menu, then the Generate Budget option.
Your Activity Date is “10/31/14.” Enter income statement dates of “10/01/14” to “10/31/14” and put in a 10%
increase.
Trams Back Office uses the income statement from October 2014 as a base and adds 10% to these
numbers. Click OK to save your new budget entry.
On October 7, you create an End of Period, and go to the Income Statement screen. Enter the dates
“10/01/14” to “10/07/14” in the first line with type set to Actual. You enter “10/01/14” to “10/31/14” on the
second line with type set to Budget. Click OK to process this report and see how your agency is
progressing. After realizing how much fun this is, you focus on your goal and create a budget for every
month of the year.
G/L Account Reconciliation
View any selected GL Account, GL Account Group, GL Branch or GL Branch Group with the appropriate
activity date range. Toggle closed corresponding debit & credit items that are deemed matches.
Debits and Credits must equal to save the reconciliation and the amounts are shown in red when the Debits
and Credits do not match. Query GL transactions by Posted Status, and Cleared Status (All, Cleared, Not
4/7/15
376
General Ledger
Cleared) which is very much like only looking at cleared or uncleared in the bank account reconciliation, only
it can be done for any GL account.
This reconciliation does not affect any accounting data and the status of any reconciled items is only
reflected on the G/L Reconciliation screen itself.
This feature is very useful for 'slush' accounts where items go in and out all the time and the agency just
needs to know what items are not yet offset or OPEN. Use it for both company credit card charges to keep
track of what has been charged but not yet billed/paid and also for a payroll account that lists advances to
employees which need to 'clear' or 'close' after entering the payroll deduction.
Suggested General Ledger Procedures
1. ARC/BSP Balance Report
- Enter sales and payment information on a daily basis.
- Submit the report weekly to ARC/BSP.
- Reconcile the ARC/BSP Settlement each week.
2. Client Balances Report
- Enter sales and payment information on a daily basis.
- View on a regular basis and review for accuracy.
3. Vendor Balances Report
- Enter sales and payment information on a daily basis.
- View on a regular basis and review for accuracy.
4. Check Register Report
- Enter Deposits, Withdrawals and Checks on a daily basis.
- Balance and reconcile against the Bank Statement each month.
Daily Routine
1. Capture Sale and Refund Invoices (manual or interface). Enter all adjustment invoices such as
debit/credit memos.
2. Enter Receipts and balance the Bank Deposit:
a) Enter each separate receipt under Payments|Received. (If there is information available, consider
entering any EFT (Electronic Fund Transfer) or Direct Deposit receipts for the day. As these type
transactions hit the Check Register directly, these items are not included in the daily deposit to the bank.)
b) Under Payments|Deposits, verify the date for which the deposit is being done and Query for the
receipts to be included in the Deposit.
c) Verify the receipts that are included are receipts actually going to be deposited in the bank.
d) Print 2 deposit slips - one for the agency records and one for the bank.
3. Print a copy of a Receipts Report (Reports|Payments|Receipts) for all Cash/Check receipts for each
bank account for the day. Balance the total on the report to the bank deposit slip. Attach the report to the
agency copy of the deposit slip and file.
4. Enter all agency disbursements in Payments|Made.
5. Run the Four Core Reports and review for errors: Client Balances, Vendor Balances, ARC/BSP
377
4/7/15
General Ledger
Reconciliation and Check Register.
6. Run the G/L Reconciliation Report to catch any G/L errors daily.
7. Backup files (Utilities|Backup)!
Weekly (ARC/IAR Sales Report/Reconciliation) Routine
Step 1. Check that the data in the IAR Sales Report matches data in Trams Back Office by one of three
methods:
a) Method One: Run a list of all invoices captured in Trams by going into Reports|Invoice|Analysis and
verifying that all invoices for the week are accounted for in Trams. Then, run a list of all tickets captured in
Trams by going into Reports|Invoice|ARC/BSP Reconciliation and verifying that all tickets issued for the
week are accounted for in Trams, and be sure to set ticket status to ALL.
b) Method Two: Download the IAR file from the IAR website. Go to Reports|Invoice|IAR Reconciliation
and click the IAR File button to point to the path of the downloaded .txt file obtained from the IAR website.
Print out an Exception Report which points out differences between what was submitted to IAR and Trams
Back Office.
c) Method Three: Download the IAR file from the IAR website.
-- Go to Payments|ARC Settlement.
-- Query for the week’s ARC tickets so they are displayed on the settlement screen.
-- Click IAR Reconciliation on the ARC Settlement screen.
-- Click IAR Filename and map to the weekly IAR file.
-- Click Query to see the standard IAR Reconciliation Report.
-- For tickets where Net Remit Do Not Match, Ticket Is Voided in IAR but Not in Trams, or Missing IAR Ticket,
click Find Ticket and the cursor lands on the appropriate ticket on the ARC Settlement screen so Edit Invoice
appears as normal.
-- For tickets that are Voided In Trams but Not In IAR, click Find Ticket to go to the booking containing that
voided ticket in TBO, so it can be unvoided, allowing the ticket to now show correctly on the ARC Settlement
Screen.
-- For any exceptions that are Missing Trams Ticket, click off the IAR Reconciliation screen, and manually
add the missing tickets. If doing this method, no need to do Steps 2 and 4 below.
Note: This is the same IAR Reconciliation exception report that was only available before under
Reports|Invoice|IAR Reconciliation. The IAR Reconciliation from the ARC Settlement screen works the
same way and provides that same exception report, but now has linking ability to the tickets displayed on
the ARC Settlement Screen.
Step 2. Enter any missing Refunds, Debit Memos, Voids, etc. so Trams Back Office agrees with IAR Sales
Report.
Step 3. Enter and balance the ARC/BSP Settlement for the week under Payments|ARC Settlement. Do
this by comparing the amount withdrawn to the amount Trams calculated as the Net Remittance amount for
that ARC/BSP week. If the two numbers do not balance exactly, review the ARC/BSP Settlement section of
this manual.
Step 4. Submit the IAR Sales Report.
If processing through ARC/IAR, complete the ARC Settlement right after submitting the IAR Sales Report.
4/7/15
378
General Ledger
Weekly (BSP Sales Report/Reconciliation)
Complete the BSP Settlement after Weekly Sales Summary has been received from BSP as
amounts could be changed from what was submitted.
1. Print an Invoice Analysis Report (Reports|Invoice|Analysis) to verify all invoices issued during the week
are entered in Trams.
2. Print a BSP Reconciliation Report (Reports|Core|BSP Reconciliation). Set the ticket status to ALL to
verify all tickets issued for the week are entered in Trams.
3. Submit BSP Link report through the Internet. If necessary, print the BSP Report (Report|Invoice|BSP),
set the Included Items to Manual, and mail it to the area bank.
4. If not using the BSP Link, print the BSP Report (Reports/Invoice/BSP) and mail it to the area bank with
the auditors’ coupons from the tickets issued, or verify cash and credit card totals and period net remit if
submitting the report through BSP Link.
5. Reconcile BSP’s Weekly Sales Summary Report by entering the amount of the BSP Withdrawal in
Payments|BSP Settlement. Adjust each Trams entry to match BSP’s report and close all bookings paid
for in that BSP period.
Weekly BSP HOT Reconciliation Routine
A BSP HOT Reconciliation can be found under Reports|Invoice|BSP Reconciliation. To
receive a copy of the BSP Report in the HOT file format, contact:
www.IATA.org/customer
Trams Back Office compares the data in the HOT file to the information in Trams Back Office and generates
an exception report which lists all the differences between the Trams Back Office data and the HOT file.
Once the transactions on the exceptions reports have been addressed, the BSP Settlement routine can be
completed. The Submit to field in the TBO booking must be set to BSP (for both BSP and Web bookings
reported via BSP). For web booking exchange transactions, see additional information below.
Reconciliation Steps:
1. Download the HOT file from the IATA Web Site
2. In TBO, go to Reports/Invoice/HOT Reconciliation
3. Click the HOT File Button and browse to where the file was saved
4. Click the Preview Button
5. Reconcile the Exceptions that appear on the Exception Report
Sample Exceptions:
Ticket #
Inv #
Exception Reason
7771113333
5589
Missing HOT Ticket – Ticket is not listed in the HOT file
7771113358
5598
Missing TBO Ticket – Ticket is listed in the HOT file but cannot be found in
TBO
7771113362
5600
Remittance Amounts do not match – Commission amounts do not match
7771113375
5612
Total Fares do not match – Ticket amount does not match total fare amount
in TBO
379
4/7/15
General Ledger
Non-automated air web booking exchanges (Air Canada, Westjet, etc.), must contain Trams Descriptor
codes to properly flag the transaction as an exchange. The original ticket number must also be added to
populate the original ticket field in the booking.
Examples (to be added in addition to other accounting line information):
*EXE – Even exchange
*EXA – Exchange with an add collect
*EXR – Exchange Refund
*OT – Original Ticket number
Sabre
ACOTH1/SUPPLY/DOC/P11/950.00/0/ALL/CK/*SBA*TT1*VCAC*EXE*OT7771113375
Worldspan
AC1-A*TT1*VCAC*EXE*OT7771113375
Apollo
T-MS9A*VCAC*TT1*CM10*CF123456*SG*EXE*OT7771113375
Amadeus
RM*9A*VCAC*TT1*CM10*CF123456*SG*EXE*OT7771113375
Monthly Checklist
1. Using Trams Back Office Bank Reconciliation routine under (Payments|Bank Reconciliation), balance
the bank statement to the Trams Back Office check register. Print a copy of the Check Register for the
month for ALL along with a second Check Register Report for Not Cleared, and staple it to the statement
from the bank and file.
2. Create an End of Period journal entry (General Ledger|End of Period) for the month.
3. Print a trial balance. Compare the Management Summary Report balances to their corresponding
General Ledger accounts and make sure they are the same. If not, print a GL Reconciliation
(Reports|General Ledger|GL Reconciliation) to locate any possible errors. Note: There is a Total Base
column on this report, The yield percentage is the commission divided by total base.
Optional: Run a Journal Entry Query with the Status set as Unposted. Run for an appropriate posted period,
year-to-date of last posted period, last-year-to date of last posted period, etc., to view any unposted items
that someone might have added or changed in a posted period. Verify or delete those items, post them, and
run new monthly financials to reflect the changes made.
4. When (and only when) everything is in balance, post the journal entries made and print Financial
Statements. Audit Trail reports could include Trial Balance, Income Statement, Balance Sheet, End of
Period Reports, Account History, or Journal Entry Analysis.
TBO End of Period Reports
End of Period reports can be found under Reports|Batch Reports|Load.
1. Sales Activity Report: Select Reports|Invoice|Activity. Set Format to “Summary”, set Submit To as
“ARC or BSP/Supplier” and set Invoice Status to “All.”
Trams uses this report to show what has been updated in the GL by the End of Period in Sales, Cost of
Sales, Client Balances, Vendor Balances and ARC/BSP Balances. The ARC/BSP Adjustments account is
4/7/15
380
General Ledger
also updated for Debit/Credit Invoices.
2. Sales Activity Report: Select Reports|Invoice|Activity. Set Format to “Summary”, set Submit To as
“Comm Track” and set Invoice Status to “Closed.”
If Commission Track Payments in EOP under Utilities|Setup|Global Defaults is set to the Sales/Cost of
Sales option, Trams uses this report to show what has been updated in the GL by EOP in Sales, Cost of
Sales and Cash in Bank. If it is set to the Commission Income option, Trams updates Cash in Bank and
Commission Income.
3. Receipts Report: Select Reports|Payments|Receipts. Set the Pay Method as “Credit Card” and set
Received From as “Client.”
Trams uses this report to show what has been update by the EOP in Client Balances, Vendor Balances &
ARC/BSP Balances.
4. Disbursements Report: Select Reports|Payments|Disbursements. Set the Pay Method to “Credit Card”
and set Paid To as “Client.”
Trams uses this report to show what has been updated by EOP in Client Balances, Vendor Balances &
ARC/BSP Balances.
5. Receipts Report: Select Reports|Payments|Receipts. Set the Pay Method to “Cash/Check/EFT” and
set Received From as “Client.” Trams creates this report for each bank account. The system creates the
report a second time with Received From set to “Vendor.”
Trams uses this report to show what has been updated by EOP in Cash, Client Balances & Vendor
Balances. The Receipts Report also shows EOP updates in ARC/BSP Balances for EFT's from ARC/BSP.
6. Disbursements Report: Select Reports|Payments|Disbursements. Set the Pay Method to
“Cash/Check/EFT” and set Profile Type as “Client.” Trams creates this report for each bank account. The
system creates the report a second time with Paid To set to “Vendor.”
Trams uses this report to show EOP updates in Cash, Client Balances and Vendor Balances. The
Disbursements Report also updates ARC/BSP Balances for EFT's to ARC/BSP.
7. Receipts Report: Select Reports|Payments|Receipts. Set the Pay Method to “CC Merchant” and set
Received From as “Client.”
Trams uses this report to show EOP updates in Cash and the CC Merchant account.
8. Disbursements Report: Select Reports|Payments|Disbursements. Set the Pay Method to “CC
Merchant” and set Paid To as “Client.”
Trams uses this report to show EOP updates to Cash and the CC Merchant account.
Additional End of Period Reports for BSP Users
At the end of each month, run the following reports to verify the amount of TAX to be paid.
1) Run an Invoice Activity Report by going to Reports|Invoice|Activity.
2) Compare the tax amounts on this report with the amounts in the Balance Sheet accounts created for
these taxes (Reports|General Ledger|Account History).
3) When sending the quarterly check to pay the tax due, go to Payments|Made. Enter the amount of the
tax due. Use the profile type "Other" that was created for these taxes and create the following journal entry:
Debit
Cash in Bank
GST Payable
381
Credit
500.00
500.00
4/7/15
General Ledger
Summary
If the Core Reports are being successfully maintained, financial statements are easily obtained through
Trams, provided opening balances have been correctly entered. It is important to provide these basic
financial statements, as well as a detailed audit trail, to the agency accountant for review. In addition to the
Income Statement and Balance Sheet reports, several audit trail reports, including the Account History
report, are also available.
Note: The recommendations contained in this application Note are designed to allow the Trams
Back Office system to produce information in a manner which Trams believes to be useful to a travel
agency; however, Trams makes no representation or warranty that the recommendations, if applied,
will conform to generally accepted accounting or auditing practices or principals or to any type of
financial reporting requirements. To the extent that any reports generated by Trams Back Office are
used for reporting purposes, including tax reporting, we strongly suggest to review these
recommendations either with a certified public accountant or tax advisor, as applicable.
Maintain the GL & Balancing Core Reports to
Trial Balance Report
Once the bank statement and all ARC/BSP reports for the month are reconciled:
1. Click General Ledger|End of Period and create the End of Period journal entry.
2. Print the Trial Balance Report. (Reports|General Ledger|Trial Balance)
3. Print the Management Summary Report and Note the balances for the following Core Report totals:
Client Balances
Vendor Balances
ARC Balances
Check Register
Note: There is a Total Base column on this report, The yield percentage is the commission divided by total
base.
5. Each month, compare the Ending Balances of all Core Reports against the Trial Balance Report. The
Core Reports and the Trial Balance Report should balance to the penny before posting occurs. If one or
more of the Core Reports does not balance to the Trial Balance, print the GL Reconciliation Report.
a. Click Reports|General Ledger|GL Reconciliation.
b. Although not every entry on this report needs to be cleared off, the report gives the best idea of why
the Trial Balance is out of balance. Check each item’s warning message. (For warning definitions see
the manual under Reports|General Ledger|GL Reconciliation Report.) To make corrections, Void the
End of Period first.
c. After making corrections, create the End of Period journal entry again.
d. Print the Core Reports again, along with the Trial Balance Report.
e. Verify that the Core Reports and the Trial Balance are now in sync.
6. When the Four Core Reports match the Trial Balance, go ahead and post. Posting to the General Ledger
is permanent. Changes can no longer be made to the journal entries; however, adjusting journal entries can
always be added to the period if needed. Click General Ledger|Posting and Post to the General Ledger.
4/7/15
382
General Ledger
GL Reconciliation Report
The GL Reconciliation report is used to aid in reconciling financial reports at the end of the month. It flags
items that could possibly cause financials to be out of balance when compared against the Core reports.
1. Select Reports|General Ledger|GL Reconciliation.
2. Type in the From and To dates for the period being reconciled.
3. Click Preview to view on screen. (Or click Print to send report directly to the printer without viewing.)
4. The report displays a list of items that may need correcting. Query each item and correct it if needed.
Possible GL Reconciliation messages are listed below.
Message
Description
Payable is not Journalized and Should Be
Payment Is Journalized and Shouldn’t Be
Only Payments Received and Made where the Profile
Type is Other or where the Payment Method is Other,
or Bank Withdrawals should be journalized.
Payment Is Not Journalized and Should Be
Payments Received and Made where the Profile
Type is Other, or where the Payment Method is Other,
or Bank Withdrawals must have a journal entry.
Payment Amount Doesn’t Match Journal Entry
Amount
The amount of the payment does not match the
amount posted to the Cash in Bank account in the
journal entry. This message also appears if the
amount is being posted to the incorrect Cash in Bank
account or the debits and credits have been reversed.
Payment Date Doesn’t Match Journal Entry
Date
The date on the payment screen should always
match the date in the journal entry screen.
Pymt Invalid For JE That Affects Client
Balances***
1) A journal entry should only affect Client Balances
when a Payment Received or Made is entered that
has a payment method of Other and a profile type of
Client.
2) A Pseudo EOP entry exists.
383
4/7/15
General Ledger
Pymt Invalid For JE That Affects ARC/BSP***
1) A journal entry should only affect ARC/BSP when
a Payment Received or Made is entered that has a
payment method of EFT and a profile type of
Vendor-ARC/BSP.
2) A Pseudo EOP entry exists.
Pymt Invalid For JE That Affects Vendor
Balances***
1) A journal entry should only affect Vendor Balances
when a Payment Received or Made is entered that
has a payment method of Other and a profile type of
Vendor-Supplier.
2) A Pseudo EOP entry exists.
Pymt Invalid For JE That Affects Cash In
Bank***
1) A journal entry should only affect Cash in Bank
when a Payment Received or Made is entered that
has a payment method of cash, check or EFT and a
profile type of Client, Vendor or Other. Also for Bank
Withdrawals.
2) A Pseudo EOP entry exists.
Credit Card Pymt Date Doesn’t Match Invoice
Date
A client payment with a payment method of Credit
Card should have the same date of the invoice.
Bank Account #1 Difference Between Receipts
And Deposits: 500.00
There should always be a receipts report to match
every deposit. The message means there is a
discrepancy and the deposit entered needs to be
re-reconciled.
Zero Dollar Client or Vendor Balance Journal
Entries Exist
User creates a payment received from a client with a
payment method of other, invoice appears and user
marks it closed. When the journal entry comes up
TBO shows credit to Client Balances (which is
correct), but the user then makes the Debit to Client
Balances also which throws off the GL.
*** When a Posted End of Period is voided, the entry is converted back into a normal journal entry and a
reversing journal entry is also created. This results in these messages seen here. If receiving these
messages as the result of a voided End of Period, ignore the message.
4/7/15
384
General Ledger
385
4/7/15
11
Reports
This chapter contains:
Definition of Print Options
How to E-mail TBO Reports in .pdf Format
Report Descriptions & Directions for Printing
Introduction
Trams Back Office reports are designed to be extremely flexible and complete. By understanding the report
categories and specific selection criteria, much information can be accessed. In addition to industry specific
reports, activity reports, and statements, sections of Trams Back Office reports also contain analysis
capabilities. The Invoice, Client and Vendor Activity Report results are displayed graphically with color
charts options.
Printing TBO Predesigned Reports
Each report has a selection criteria screen when the parameters of the report are requested. At the bottom
of each select criteria screen, see the following options:
Print Options
Preview
Use this option to view the report on the computer screen. On any report Preview
screen, move from page to page using the icons at the top of the screen. To view
the first page Click the first icon. To view the Previous Page, Click the second icon.
To view the next page Click the third icon.Click the fourth icon to go the last page
of the report.
Reports can also be saved from the preview screen in different formats, for
example .pdf or .xls (Excel)
Print
Print the results of the report to the printer and create a hard copy.
Printer Setup
For multiple printers connected to the computer, use this button to select the
correct printer for output. After selecting the printer, click the print button to send
the report to the printer. Note: To change the default printer on-the-fly, go to
File|Printer Setup.
4/7/15
386
Reports
Reset
Erase any changes made and bring the report back to default settings.
Help
Access Help Files.
Default
After setting up the report, click Default. Settings are saved. To return the
Selection criteria Screen back to original database defaults, click Default and
select “Remove the Current Default Settings.”
Close
Close the screen to go back to the main menu.
Special Note: Zoom in and out using the mouse wheel when over a previewed report. After running any
report to the Preview Screen, move mouse over the previewed report, and while holding <Ctrl> down, scroll
the mouse wheel up and down to zoom in or zoom out making the report view larger or smaller for easier
viewing.
E-mail Reports in .pdf Format
E-mail any report in Trams Back Office in .pdf format. The advantage of formatting reports in this format is
that the report data is always perfectly printed out by anyone who has the Adobe Acrobat Reader. This free
reader is obtained by going to www.adobe.com.
E-mail Reports for MAPI Compatible Users
MAPI (Messaging Application Protocol Interface) requires use with compatible e-mail programs such as
Microsoft Outlook.
Note: A direct Outlook integration by default is in place in TBO in addition to MAPI. If Outlook is not open
e-mail will revert to MAPI.
1) Run the report as “Preview” to screen.
2) Click the “E-mail” Icon.
3) Complete the e-mail.
E-mail Reports for Non-MAPI Compatible Users
If the e-mail system is non-MAPI compatible (such as AOL), follow these steps to send reports:
1) Run the report as “Preview” to screen.
2) Click the “Save to File” Icon.
3) Click “Save as type” and select “PDF”.
4) Add a file name in the “File name” field. Make sure to add the extension .pdf after naming the file.
5) In the “Save in” field, map to the location to save the file. Click Save.
6) From the e-mail program, proceed to attach document by going to the folder where the report was saved.
Core Reports
The Reports menu is organized by type of report. The following reports are listed under Core and are
considered the foundation of Trams Back Office. Once these reports are up and running, the integrity of the
information appearing on all other reports is verified. For more information on setting up these reports,
387
4/7/15
Reports
please see the chapter entitled, Setting Up Trams Back Office.
Type of Reports
Client Balances
A complete listing of any pending client balances (Accounts Receivables).
Vendor Balances
A complete listing of any pending vendor balances (Vendor Accounts Payable).
ARC Balances
List of unpaid ARC transactions. Must use ARC Settlement for accurate data.
Check Register
Automated bank account, including all bank activities and balances.
Management
Summary
Captures the status of the business at a glance. All of the vital agency statistics
are included in one report.
Client Balances
The Client Balance report is a complete listing of all pending client balances. This includes all unpaid
invoices (Accounts Receivable) as well as unapplied payments and vouchers (Gift certificates,
overpayments, etc.).
1) Click Reports|Core|Client Balances.
2) Select settings.
As Of
When an As Of date is specified, the system provides client balances as of the
specified date by backing out all entries before that date. (Double click on the field for
a calendar menu.) If the As Of date is left blank, the system generates a current listing
of client balances including all invoices and payments entered regardless of date.
Format
Summary lists Client Name, Invoices Total, Total Unapplied and Balance Due. Detail
also lists each open invoice for each client including the Invoice #, Branch, Issue Date,
Agent and Invoice Amount.
Branch
Allows the report to be processed by branch or branches.
4/7/15
388
Reports
Aging
Breaks down balances into these categories:30/60/90; 15/30/45; 7/14/21 days; and
End-of-Month from the As Of date entered. In Summary, the aged Client Balance
Report correctly highlights in red any clients that are over their credit limit. Note: Use
of End of Month Aging field on Client Balance Report: If credit terms are given by the
end of the month, there is flexible date system for aging the Client Balance Report
when run in Summary.
LT 30 Days.............31-61 Days.............62-89 Days...........Over 89 Days TO
Current Month. .....Current Month -1.....Current Month -2.......Current Month - 3 Plus
APR........................MAR......................FEB.....................JAN & OLDER
Sort By
Determines the way the report is sorted when displayed or printed. The default is
Client Name. To track its clients by Client (or Interface/DK Number) ID, use the
drop-down menu to select Client ID. There is also an Agent sort by, and a Credit Limit
Proximity which lists first clients who are closest to, or over their credit limit.
Output Format
From the drop-down menu, select Report or Mail Merge. The mail merge format
generates the report in a tab delimited mail merge format for use in third party
software.
Client Name
To run this report for just one client, type in a few letters of the client’s last name and
choose name from the drop-down menu.
Client Group
Select a client group that has been created in Utilities|Setup|Groups from the
drop-down menu to create a report for a group of clients.
Branch Group
Select a branch group that has been created in Utilities|Setup|Groups from the
drop-down menu to create a report for a group of branches.
3) Click Preview to view the report on the screen. (Or click Print to send the report directly to the printer
without viewing first.)
4) Once the report is displayed, click the printer icon to print.
Note: A positive balance due represents money the client owes the agency. A negative balance due
represents money the agency owes to the client.
There is an unusually high balance for the JCT Corporation this week. To determine the circumstances,
you view the report in detail format and look at each passenger's name. You see John Smith and are
instantly reminded of his two first-class tickets to London. You now understand the reason for the high
amount.
JCT Corporation wants to be notified when their balance reaches $10,000. You print the Client Balance
Report and see they are dangerously close to their limit. You give them a call to determine a course of
action.
Tip for Group Reporting: (There is an Invoice Group column on the Client Balances Detail report. If a client
has both Group Vouchers and Individual invoices showing on the Client Balance Report, don’t go back and
look at each invoice and voucher. Determine what the client really owes in total for the open invoice,
because the Voucher receipts are going toward their Group trip. This should significantly cut research time.)
Vendor Balances
The Vendor Balance report provides a listing of all Vendor-Supplier account balances. (When printing the
Vendor Balance reports in detail format, the passenger name from the first booking is included. This aids in
remembering the circumstances when seeing a client's name on the vendor balances reports.) Also in detail
format, the client name and invoice remarks for vouchers will print.
389
4/7/15
Reports
1. Click Reports|Core|Vendor Balances.
2. Select settings.
As Of
An As Of date may be specified when the report is generated and the system provides
vendor balances as of the specified date by backing out all entries after that date. If the
As Of date is left blank, the system generates a current listing of vendor balances
including all invoices and payments entered, regardless of date. Double click on the field
for a calendar menu.
Format
Summary lists Vendor Name, Invoices Total, Total Unapplied and Balance Due. Detail
lists each open invoice for each vendor, including the Invoice #, Branch, Issue Date, and
Invoice Amount, Foreign Currency Amount and its code.
Branch
Allows the report to be processed by branch or branches.
Aging
Breaks down balances into four categories: None, 30/60/90; 15/30/45; and 7/14/21 days
from the As Of date entered.
Sort By
Sort report by Vendor Name, Vendor ID, or Agent.
Output Format
From the drop-down menu, select Report or Mail Merge. The mail merge format
generates the report in a tab delimited mail merge format for use in third party software.
Print Foreign
Currency
Values
In detailed mode, print out values of foreign currency.
Branch Group
If a branch group has been added under Utilities|Setup|Groups and would like to see
all the vendor balances just for that branch group, select appropriate branch group from
drop-down menu.
Vendor Name
To run this report for all vendors, leave blank. To run for a specific vendor, type a few
letters of the vendor’s name, and choose from the drop-down menu.
Vendor Group
To run this report for a specific vendor group, select group from the drop-down menu.
3. Click Preview to view the report on the screen. (Or click Print to send the report directly to the printer
without viewing first.)
4. Once the report is displayed, click the printer icon to print.
Note: A positive balance due represents money the vendor owes the agency. A negative balance due
4/7/15
390
Reports
represents money the agency owes to the vendor.
ARC/BSP Balances
The ARC/BSP Balances core report searches the system for ARC/BSP invoices open on the Vendor side.
These are invoices not yet settled with ARC/BSP. It is designed to include all open invoices including
resubmits. This report balances with the ARC Balances account in the General Ledger.
Use the ARC/BSP settlement feature to receive an accurate ARC/BSP Balance Report. The report is only
accurate if all of the ARC report net remits have been settled under Payments|ARC/BSP Settlement. (We
highly recommend that when entering the ARC/BSP payment, use the ARC/BSP settlement to close the
ARC/BSP invoices. If not using the ARC/BSP settlement feature, please continue using the ARC/BSP
Reconciliation under the Reports|Invoices|ARC/BSP Reconciliation menu option. The ARC/BSP
Balances Report will not be accurate if using this alternative.) Trams Back Office looks for the start date of
the first ARC/BSP settlement and includes any open invoices with a resubmit date or issue date prior to the
as of date specified.
Check Register
The Check Register provides a listing of checkbook information in a similar format to the statement received
from the bank. Report includes the check number, date, Record Number, payee, amount, and remarks
recorded within the specified date range. Also included are deposits, EFT Payment Received and Made,
and withdrawals.
1. Click Reports|Core|Check Register.
2. Select settings.
From/To
Specify the period for which data will be included in the report. Double click on
the field for a calendar menu.
Bank Account
To select data for a particular bank account, enter that bank account number.
Bank Reconciliation
All includes all bank items regardless of their cleared status. Cleared includes
only cleared items and should match the corresponding Bank Statement. Not
Cleared includes only non-cleared items and is the difference between the
bank's balance and the book balance.
Start/End Check No
To see a specific range of checks, enter the starting and ending check numbers
here.
Payment Status
Select All, Valid, or Voided from the drop-down menu.
Output Format
From the drop-down menu, select Report or Mail Merge. The mail merge format
generates the report in a tab delimited mail merge format for use in third party
software.
3. Click Preview to view the report to the screen. (Or click Print to send the report directly to the printer
without viewing first.)
4. Click the print icon to print.
Management Summary Report
This report is designed to capture the status of the agency’s business at a glance. All of the vital agency
statistics are included in one report.
1. Click Reports|Core|Management Summary.
391
4/7/15
Reports
2. Select settings.
From/To
Specify the period for which data is included in the report. Double click
on the field for a calendar menu.
Booking Activity
Summary by travel type of all the bookings made during the requested
time frame. This includes all transactions, such as Commission Track
items where the commission has not yet been received.
Income Statement Activity
Summary by travel type of the revenue realized (received) during the
requested time frame.
Client Balances
Summary of all the money due the agency by its clients, and any money
due client by agency in form of Unapplieds or Vouchers.
Vendor Balances
Summary of all the money due from the agency to its vendors and any
refunds due from vendors (accounts payable).
ARC Balances
Summary of all invoices not yet settled with ARC, ARC payable or
received.
Operating Payables
Summary of all pending operating payables.
Check Register Balances
Ending balances in the bank accounts. The money on hand.
3. Click Preview to view the report to the screen. (Or click Print to send the report directly to the printer
without viewing first.)
4. Click the print icon to print.
Note: Here are how the percentages are determined on this report:
Yield - This percentage is calculated by dividing the commission by the base fare.
Pref. Commission - This is the actual commission earned by the preferred vendors for each travel type.
% Pref. - This percentage is the total commission for each travel type divided by the commission for the
preferred vendors.
Pref Yield - This percentage is the commission for preferred vendors divided by the base fare.
Note: There is a Total Base column on this report, The yield percentage is the commission divided by total
base.
4/7/15
392
Reports
Invoice Reports
The following list shows all the reports related to invoices for ARC/BSP and Management reporting:
ARC/BSP
Weekly ARC/BSP report, arranged to meet ARC/BSP specifications and
designed to submit to ARC/BSP along with Auditor coupons (for those not
using the option.)
Activity
Sales activity by travel type in Summary format or by invoice in Detail format
for a defined period, including percentages. Results are depicted graphically
with optional color charts.
Analysis
Numerically sorted invoice listing and in-depth analysis of accumulated sales
data.
City Pair
Analysis of Airline Segments by Origin/Destination.
Depart/Arrive Manifest
Departure and Arrival Manifests.
Invoice Printing
Print Invoices From Trams Back Office.
TAFP Service Fee
Print the ARC/BSP TAFP report for Service Fees.
IAR Reconciliation
Compare Data in Trams Back Office to ARC’s IAR summary file.
ARC/BSP
Reconciliation
Numerically sorted ticket listing.
ARC/BSP Report
The ARC/BSP Report generates a report conforming to ARC/BSP standards.
1. Click on Reports|Invoice/ARC or BSP.
2. Select settings.
From/To
Enter the date parameters for the ARC/BSP report. If generating to submit to
ARC/BSP, dates should be for the appropriate Monday-to-Sunday time frame.
Authorization No
Enter authorization number to be used on ARC/BSP report. If field is left blank,
Trams Back Office defaults to the recommended procedure of re-arranging the To
date by moving the year digits to the front. If the date entered is 6/12/02 and there
is no authorization number entered, Trams Back Office defaults to an
authorization number of '020612'.
393
4/7/15
Reports
ARC/BSP Number
Enter the appropriate ARC/BSP Number.
Note: Most reports in Trams Back Office have a field for Branch to print reports
for any one branch. The ARC/BSP Sales Reports has a field for ARC/BSP
number. This provides greater flexibility to group branches using the same
ARC/BSP number.
Branch numbers are set up in Utilities|Setup, then ARC/BSP Numbers. To
access the ARC/BSP Sales Report, go to Reports|Invoice. Highlight ARC/BSP
and click on the arrow for a list of ARC/BSP numbers, or enter the eight-digit
ARC/BSP number. A report can then be printed for all branches using the same
ARC/BSP number.
Included Items (US)
This field is used for U.S. agencies using Interactive Reporting (IAR). Not using
IAR, leave this set to the default of ALL. Click on the arrow to select from IAR
Only, Non-IAR only and ALL. IAR Only is the settlement for transactions that are
sent to ARC electronically. Non-IAR only is the settlements transactions that are
mailed to ARC.
UDID Selection (US)
From the drop-down menu, Include or Exclude Tickets, then select a UDID from
the drop-down, and enter a value to complete the report selection criteria.
BSP Report Selection Criteria:
Included Items
(BSP)
For BSP Agencies in Canada, choices for including or excluding Auto or Manual
Tickets, Refunds, and Refund Exchanges on a report for BSP Canada are All,
Automated Only (No Refunds)[Auto Tickets/No Refunds] - for agencies that
cannot 'Auto Refund' tickets through their GDS (Galileo);Manual Only (All
Refunds/Exchanges)[Manual Tickets/All Refunds + All Exchanges] - for
agencies that CANNOT 'Auto Refund' tickets through their GDS (Galileo);
Automated Only (Including Refunds)[Auto Tickets + Auto Refunds] - for
agencies that CAN 'Auto Refund' tickets through their GDS (Sabre, Amadeus &
Worldspan); Manual Only (Including Manual Refunds& All Exchanges)
[Manual Tickets/Manual Refunds + All Exchanges] - for agencies that CAN
'Auto Refund' tickets through their GDS (Sabre, Amadeus & Worldspan).
Any Auto Refund tickets that must be 'Manually' submitted to BSP, has to be
manually lined out of the Automated Only (Including Refunds) Report, and
manually 'Added' to the Manual Only (Including Manual Refunds & All
Exchanges) Report. This would be for tickets that for whatever reason are not in
either the airlines database or the GDS database.
UDID and UDID
Value selection field
for BSP
4/7/15
Use these features for any Auto Refund tickets, that for whatever reason, are not
in either the airlines database or the GDS database and must be manually
submitted to BSP. As these UDID features are primarily designed for identifying
Auto Refund tickets that must be manually submitted to BSP, they do not need to
be used by a Galileo Agency that would be using the first two report selections for
Automated Only (No Refunds) & Manual Only (All Refunds/Exchanges). For
Sabre, Worldspan and Amadeus agencies, make a UDID selection for any auto
refund ticket that would normally be included on the Automated Only (Including
Refunds) report, but because of special conditions must be processed manually
to BSP. This type of refunded ticket can be marked using any UDID # and Value.
394
Reports
UDID and UDID
Value selection field
for BSP (cont’d)
Example: UDID 10 with a value of Manual. Exclude Tickets, UDID 10 and Manual
should be selected before running the Automated Only (Including Refunds)
report. The refund tickets that either are not in the GDS database or the airline
database would NOT show on this Automated Only Report. They would be
'moved' to the Manual Only Report for manual submission to BSP.
Include Tickets, UDID 10 and Manual should be selected before running the
Manual Only (including Manual Refunds& All Exchanges) report. These refund
tickets that either are not in the GDS database or the airline database WOULD
show on this Manual Only Report for manual submission to BSP.
3. Click Preview to view the report on the screen. (Or click Print to send the report directly to the printer
without viewing first.) Once the report is on the screen, click the printer icon to print.
Note for all users: Cash adjustments should be entered in Invoice|Adjustments.
Weekly (ARC/IAR Sales Report/Reconciliation) Routine
Step 1. Check that the data in the IAR Sales Report matches data in Trams Back Office by one of three
methods:
a) Method One: Run a list of all invoices captured in Trams by going into Reports|Invoice|Analysis and
verifying that all invoices for the week are accounted for in Trams. Then, run a list of all tickets captured in
Trams by going into Reports|Invoice|ARC/BSP Reconciliation and verifying that all tickets issued for the
week are accounted for in Trams, and be sure to set ticket status to ALL.
b) Method Two: Download the IAR file from the IAR website. Go to Reports|Invoice|IAR Reconciliation
and click the IAR File button to point to the path of the downloaded .txt file obtained from the IAR website.
Print out an Exception Report which points out differences between what was submitted to IAR and Trams
Back Office.
c) Method Three: Download the IAR file from the IAR website.
-- Go to Payments|ARC Settlement.
-- Query for the week’s ARC tickets so they are displayed on the settlement screen.
-- Click IAR Reconciliation on the ARC Settlement screen.
-- Click IAR Filename and map to the weekly IAR file.
-- Click Query to see the standard IAR Reconciliation Report.
-- For tickets where Net Remit Do Not Match, Ticket Is Voided in IAR but Not in Trams, or Missing IAR Ticket,
click Find Ticket and the cursor lands on the appropriate ticket on the ARC Settlement screen to Edit Invoice
as normal.
-- For tickets that are Voided In Trams but Not In IAR, click Find Ticket to go to the booking containing that
voided ticket in TBO, to Unvoid it, allowing the ticket to now show correctly on the ARC Settlement Screen.
-- For any exceptions that are Missing Trams Ticket, click off the IAR Reconciliation screen, and manually
add the missing tickets. If doing this method, no need to do Steps 3 and 4 below.
Note: This is the same IAR Reconciliation exception report that was only available before under
Reports|Invoice|IAR Reconciliation. The IAR Reconciliation from the ARC Settlement screen works the
same way and provides that same exception report, but now has linking ability to the tickets displayed on
the ARC Settlement Screen.
Step 2. Enter any missing Refunds, Debit Memos, Voids, etc. so Trams Back Office agrees with IAR Sales
Report.
Step 3. Submit the IAR Sales Report.
395
4/7/15
Reports
Step 4. Enter and balance the ARC/BSP Settlement for the week under Payments|ARC Settlement. Do
this by comparing the amount withdrawn to the amount Trams calculated as the Net Remittance amount for
that ARC/BSP week. If the two numbers do not balance exactly, review the ARC/BSP Settlement section of
this manual.
If processing through ARC/IAR, complete the ARC Settlement right after submitting the IAR Sales Report.
There is no need to wait to receive a Weekly Sales Summary from ARC as the amount submitted to ARC
through IAR will not change from what was submitted.
Weekly BSP HOT Reconciliation Routine
A BSP HOT Reconciliation can be found under Reports|Invoice|BSP Reconciliation. To receive a copy of
the BSP Report in the HOT file format, contact:
www.IATA.org/customer.
Trams Back Office compares the data in the HOT file to the information in Trams Back Office and generates
an exception report which lists all the differences between the Trams Back Office data and the HOT file.
Once the transactions on the exceptions reports have been addressed, the BSP Settlement routine can be
completed. The Submit to field in the TBO booking must be set to BSP (for both BSP and Web bookings
reported via BSP). For web booking exchange transactions, see additional information below.
Reconciliation Steps:
1. Download the HOT file from the IATA Web Site
2. In TBO, go to Reports/Invoice/HOT Reconciliation
3. Click the HOT File Button and browse to where the file was saved
4. Click the Preview Button
5. Reconcile the Exceptions that appear on the Exception Report
Sample Exceptions:
Ticket #
Inv #
Exception Reason
7771113333
5589
Missing HOT Ticket – Ticket is not listed in the HOT file
7771113358
5598
Missing TBO Ticket – Ticket is listed in the HOT file but cannot be found in
TBO
7771113362
5600
Remittance Amounts do not match – Commission amounts do not match
7771113375
5612
Total Fares do not match – Ticket amount does not match total fare amount
in TBO
Non automated air web booking exchanges (Air Canada, Westjet, etc.), must contain Trams Descriptor
codes to properly flag the transaction as an exchange. The original ticket number must also be added to
populate the original ticket field in the booking.
Examples (to be added in addition to other accounting line information):
*EXE – Even exchange
*EXA – Exchange with an add collect
4/7/15
396
Reports
*EXR – Exchange Refund
*OT – Original Ticket number
Sabre
ACOTH1/SUPPLY/DOC/P11/950.00/0/ALL/CK/*SBA*TT1*VCAC*EXE*OT7771113375
Worldspan
AC1-A*TT1*VCAC*EXE*OT7771113375
Apollo
T-MS9A*VCAC*TT1*CM10*CF123456*SG*EXE*OT7771113375
Amadeus
RM*9A*VCAC*TT1*CM10*CF123456*SG*EXE*OT7771113375
Weekly (BSP Sales Report/Reconciliation)
Complete the BSP Settlement after receiving the Weekly Sales Summary from BSP as amounts could be
changed from what was submitted.
1. Print an Invoice Analysis Report (Reports|Invoice|Analysis) to verify all invoices issued during the week
are entered in Trams.
2. Print a BSP Reconciliation Report (Reports|Core|BSP Reconciliation). Set the ticket status to ALL to
verify all tickets issued for the week are entered in Trams.
3. Submit BSP Link report through the Internet. If necessary, print the BSP Report (Report|Invoice|BSP),
set the Included Items to Manual, and mail it to the bank.
4. If not using the BSP Link, print the BSP Report (Reports/Invoice/BSP) and mail it to the area bank with
the auditors’ coupons from the tickets issued, or verify the cash and credit card totals and period net remit
if submitting the report through BSP Link.
5. Reconcile BSP’s Weekly Sales Summary Report by entering the amount of the BSP Withdrawal in
Payments|BSP Settlement. Adjust each Trams entry to match BSP’s report and close all bookings paid for
in that BSP period.
Sabre Canada BSP Report - Auto Refunds (QREX)
For the BSP Canada version, two more options have been added to BSP Report to allow for Automated
Sabre Refunds using the QREX product. BSP Sabre Agencies only, should run the "Automated With
Refunds" Report for their Automated BSP transactions submitted to BSP through Sabre and the "Manual
Without Refunds" Report for all their Manual BSP transactions sent directly to BSP.
This will be implemented in stages for Sabre users beginning 01 Mar 2004. Sabre will stagger training over
a period of 2 to 4 months. Sabre will communicate their training schedule and implementation plan to all their
subscribers. IMPORTANT NOTE: Please DO NOT use the Sabre automated refund functionality until
receiving the appropriate training from Sabre. Until then, please continue to complete manual Refund
notices and submit them to BSP as part of the manual CASH or manual CREDIT CARD sales batch of the
weekly report.
397
4/7/15
Reports
All other Non-Sabre agencies using the BSP Canada version should continue using the original "Automated
Only" & "Manual Only" Reports. Sabre BSP customers should also use these reports, until they have been
trained by Sabre in the use of the QREX product.
"Exceptions" To The REFUND On The "Automated With Refunds" Report
NOTE: Trams has no way of determining this and it is up to the Sabre User to know which tickets can be
Auto Refunded through Sabre QREX and which tickets must be Manually submitted to BSP Canada.
All tickets to be Auto Refunded must be in Sabre's database, and for an E-Ticket, it must also be available
in the airline's E-Ticket database.
1. Exchanged Ticket:
If a paper ticket, and it is an "Exchange", it CANNOT be Auto Refunded and should be submitted Manually
to BSP using our standard "Manual" Report. If the ticket is an E-Ticket and is an "Exchange," it CAN be Auto
Refunded and should be submitted using Sabre QREX and our "Automated with Refunds" Report.
2. Partially Refunded Ticket:
If it is 2nd or greater time that the same ticket number has been refunded, it CANNOT be Auto Refunded
and should be submitted Manually to BSP using our Standard "Manual" Report.
Sunshine Travel Agency has six branches throughout Southern Florida. Mary, the owner, wants to print an
ARC/BSP Reconciliation report for her main branch and the three local locations using her same ARC/BSP
number.
Mary goes to the main Reports menu, then to Invoice, then ARC/BSP Reconciliation. From the ARC/BSP
# field, she enters the ARC/BSP number shared by all four locations. This produces the report she needs.
Invoice Sales Activity Report
The Invoice Activity Report is used to identify sales information by invoice for a defined date range. The
report also breaks down sales and commission by Travel Type and by Submit To.
1. Select Reports|Invoice|Activity.
2. Select settings.
Format
Select either Detail or Summary. Detail lists each invoice, with one line per invoice
including Invoice #, Issue Date, Client #, Gross Fare, Net Fare and Commission.
Summary just shows Total Fare, Net Fares, Commissions and percentages by Travel
Type and by Submit To.
Submit To
Any or All can be selected by putting a check next to the Submit desired. ARC or BSP
includes only ARC/BSP transactions. Supplier includes only Supplier transactions.
Comm Track includes only Comm Track transactions.
Invoice Status
Select All, All/ARC/BSP/Supplier/Closed Comtrack, Open, or Closed. By selecting a
different Invoice Status, this report can be used for either a Gross Sales Report (All), an
Accounts Receivable Report by invoice (Open), or a Receipts Report by invoice
(Closed). Note that Invoice Status refers directly to the Submit To field. If Submit To is
ARC or BSP/Supplier, Invoice Status refers to whether or not the payment is received
from the client. If Submit To is Comm Track, Invoice Status refers to whether or not the
commission is received from the vendor. If Submit To is All, Invoice Status refers to
both: For ARC or BSP/Supplier bookings whether or not the payment is received from
the client, and for Comm Track bookings whether or not the commission is received
from the vendor.
4/7/15
398
Reports
From/To
Enter the date parameters for the sales report. If the Invoice Status is All or Open, this
date range refers to the Invoice Issue Date; if the status is Closed, then this range refers
to the Client Payment Date for ARC/BSP and Supplier bookings, and to the Vendor
Payment Date for Comm Track bookings.
Branches
Enter the appropriate branch if applicable. Select a branch or a combination of
branches. A checkmark indicates the branch will be included in the report.
Travel Types
Defaults to All Travel Types, but may be changed to process report by one or more
specific travel types by clicking on the down arrow and selecting travel type by using a
checkmark, or right-mouse clicking and choosing the appropriate Travel Type.
Chart Options
Use the drop-down menu to select color charts, black and white (B/W) charts, or no
charts.
Print Selection
Criteria
Choose to print the selection criteria used to setup this report by checking here.
3. Click Preview to view the report on the screen. (Or click Print to send the report directly to the printer
without viewing first.)
4. Once the report is on the screen, click the printer icon to print.
Invoice Analysis
With Invoice Analysis, process reports based on invoice information. This report lists all invoices
numerically. Any Invoice # out of sequence is marked with an “*”, and all voided or spoiled invoices appear
as Voided.
As in all analysis reports, enter only the selection criteria for the desired report. Multiple selection criteria are
allowed.
1. Select Reports|Invoice|Analysis.
2. Enter only the selection criteria for the desired report. Multiple selection criteria are allowed.
Invoice Analysis
From/To
To select data for a particular period, enter the dates.
Invoice Record No
Min/Max
To select data for a particular invoice record range, enter the lowest and highest
record numbers, from 0 to 999999.
399
4/7/15
Reports
Invoice Analysis
Invoice Number
Min/Max
To select data for a particular invoice number range, enter the lowest and
highest invoice numbers, from 0 to 999999.
Invoice Total
To select data based on a range of total fare from the invoices.
Min/Max
Commission Total
Min/Max
To select data for a particular invoice commission total, enter the lowest and
highest commission amounts, from -999,999.99 to +999,999.00. Note that
invoice commission amount includes only ARC/BSP and Supplier bookings on
the invoice.
Invoice Valid/Voided
All (includes all invoices, including voided invoices); Valid excludes voids, Void
includes only void.
Branch
Enter the appropriate branch if applicable.
Branch Group
Enter the appropriate branch group if applicable.
3. Click Preview to view the report on the screen. (Or click Print to send the report directly to the printer
without viewing first.)
4. Once the report is on the screen, click the printer icon to print.
City Pair Report
The City Pair report allows for analysis of Airline business for a specific origin and destination city. This report
and the Departure/Arrival report (Reports|Invoice|Depart Arrive Manifest) now better handle refunds and
exchanges with duplicate confirmation and ticket numbers. Prior, if there were duplicates, both transactions
would be excluded from the report. The logic now works this way:
**For ARC/BSP tickets, the report uses logic to look for a newer booking (later issue date) that references
the ticket number as an original ticket. This would indicate that the ticket has been exchanged and is no
longer valid.
**It then checks to see if there's either a refund booking (same ticket number, same depart date) or a
duplicate sale booking with a later departure date.
**For non-ARC, it checks to see if there's a refund booking with the same confirmation number, depart date,
passenger name and vendor name or another sale booking with the same confirmation number, passenger
name and vendor name and a later depart date.
4/7/15
400
Reports
1. Select Reports|Invoice|City Pair.
2. Select settings.
Issue Date From/To
Enter the date range of the Invoice Issue Date to include on the report.
Print Criteria
Place a checkmark in the box to see the selection criteria on the printed
report.
Depart Date From/To
Enter the date range of the Booking Departure Date to include on the
report. Depart From/To dates can be used in combination with Issue
From/To dates to further narrow down the report results.
Validating Carrier
To include activity for a specific validating airline, enter the airline code.
A Validating Carrier Code must be used for either market share analysis
formats.
Invoice Type
Select Invoice Type: All, Sale or Refund.
Fare Basis
Enter a Fare Basis Code to limit the report to city pairs flown with a
specific fare basis.
Travel Type
Check the travel types to include on the report.
Depart/Destination City
Depart City is the city that the flight originates from; Destination City is
the final city of the flight. Specify just depart or destination, or both.
Leave both blank to see a report showing all city pairs.
Submit To
Check the Submit To(s) to include on the report.
Branch
To specify a specific branch, enter the branch number or leave blank for
all.
401
4/7/15
Reports
Format
Summary lists one line per city pair, showing the total number of
bookings, total fare, etc. Detail shows each booking within a city pair and
then sub-total each city pair. Market Share Analysis (must use validating
carrier) displays city pairs excluding connections and compares the
Validating Carrier segments to all other Carriers. Market Share Analysis
by segment includes connections and does not print the total fare
values.
Output Format
Select from a drop-down menu report for a printable version or mail
merge to export a delimited file format of the report.
Flown Carrier
Enter an airline code to include only activity that was flown on a specific
airline.
Sort By
City Pair sorts the report data alphabetically by city pairs. Segment
Count or Total Fare selection sorts the report data in descending order
on each of those fields. The Market Share Analysis By Segment Report
can be run sorted by either City Pair or Segment Count, or Total Fare.
Client Type/Name
To see a report for a particular Client Type and/or a specific client, select
the specific Client Type and/or Client Name.
Profile Group
Enter a Profile Group name to limit the report to a specific Client group.
Destination Indicators
Domestic, International, or Transborder indicators are flagged in the
invoice booking screen. Check or uncheck any to include or not include
on the City Pair Report.
The City Pair report uses the segment information captured in the Segment Tab within an invoice booking
to accurately determine which segment of a flight is the origin, destination, and which is a connection. (In
the Segment Screen, the Connection Field is set to 'O' or blank for Origin, and 'X' for Connecting for each
segment.) Internal logic is used when running the City Pair report which excludes any tickets that have been
fully exchanged or refunded AND/OR partially exchanged or refunded.
3. Click Preview to view the report on the screen. (Or click Print to send the report directly to the printer
without viewing first.)
4. The report is displayed on the screen, click the printer icon to send to the printer.
Depart/Arrive Manifest
The departure and arrival manifest is found in the main Reports menu, under Invoices. Select Depart/Arrive
Manifest and then Report Type. The Arrival Manifest and the Depart Manifest are two separate reports and
cannot be combined. The flight information on these reports is obtained from the Segments section of the
Invoice booking screen. If there is no information in the Segments section of the invoice, the arrival and
departure does not show on the report.
This report and the City Pair Report (Reports|Invoice|City Pair Report) now better handle refunds and
exchanges with duplicate confirmation and ticket numbers. Prior, if there were duplicates, both transactions
would be excluded from the report. The logic now works this way:
**For ARC/BSP tickets, the report uses logic to look for a newer booking (later issue date) that references
the ticket number as an original ticket. This would indicate that the ticket has been exchanged and is no
longer valid.
**It then checks to see if there's either a refund booking (same ticket number, same depart date) or a
duplicate sale booking with a later departure date.
**For non-ARC, it checks to see if there's a refund booking with the same confirmation number, depart date,
passenger name and vendor name or another sale booking with the same confirmation number, passenger
4/7/15
402
Reports
name and vendor name and a later depart date.
1) Select Reports|Invoice|Depart/Arrive Manifest.
2) Select settings.
Report Type
Use the drop-down menu to choose either Arrival Manifest (default) or
Departure Manifest.
Arrival Date From/To
Departure Date From/To
The date range the group is expected to depart or arrive depending on
the report being used.
Issue Date From/To
The range of dates the tickets were issued for the group.
Arrival/Departure Airline
Select a specific airline to create the manifests by entering the airline’s
2 letter code.
Arrival/Departure City
The city the group is departing from if using the Departure Manifest, or
the city where the group is arriving for the Arrival Manifest.
Arrival/Departure Flight
Number
Enter the flight number to provide an Arrival or Departure Manifest for
only the passengers in the group that are traveling on the same flight.
Format
Select Summary for the Depart or Arrive date and time, Airline, Flight
Number, Itin, and number of passengers. Select Detail to include the
passenger names and any remarks.
Client Name
To see the report for the passengers booked under a specific client,
enter the first few letters of the client’s name and select him from the
drop-down menu.
Profile Group
Run the report by Profile group if profile group field was used in each of
the profiles for the group. The group name must match the way it was
entered in the profile in order for the detail to show on these reports.
Invoice Group
Run the report by invoice group if the invoice group field was used in the
invoice summary for the group. The group name must match the way it
was entered in the Invoice summary in order for the detail to show on
these reports.
403
4/7/15
Reports
UDID Selection/Value
Pull information already written. User Definable Interface Data (UDID)
are pieces of information attached to a booking for reporting purposes
and to help sort or further define the report. Use this information in the
Arrival and Departure manifest.
UDID’s may be helpful in selecting a report for a specific flight or group
if the time is entered as AM/PM. UDID’s allow an agency to add
information to a manifest which may be useful for such things as Porter
Bag Pulls, Bus Pick-ups, or VIP treatment.
Use the UDID Selection field to merely filter the manifest to print only
those with the same value in the selected UDID. Use the Print UDID field
to print the contents of the UDID on the manifest. To select the VIPs and
include the contents of UDID #2 on the arrival manifest, go to the main
Reports menu, then to Invoice, then Arrive/Depart Manifest. Enter UDID
#1 in the UDID Selection field, and enter VIP in the Value field. This
includes only those passengers who are have VIP entered in UDID #1.
Enter UDID#2 in the Print UDID field. This prints the contents of this field
Print UDID
Pull information already written.
Output Format
Select from a drop-down menu, report for a printable version or mail
merge for a delimited file format of the data.
3) Click Preview to view the report on the screen. (Or click Print to send the report directly to the printer
without viewing first.)
4) Once the report is on the screen, click the printer icon to print.
Currently, the manifest reports sort on date, flight, city, and time - if time is entered in Marine Time (e.g.
1:00PM is entered as 13:00).
You are sending the Valley High School group to Disney World this summer and want a manifest for your
group leader. Access your UDID window clicking on Modify from the booking screen. You want to separate
your VIPs, so you use UDID #1 for VIP, and UDID #2 for all special instructions.
5) To select the VIPs and include the contents of UDID #2 on the arrival manifest, go to the main Reports
menu, then to Invoice, then Arrive/Depart Manifest.
6) Enter UDID #1 in the UDID Selection field, and enter VIP in the Value field. This includes only those
passengers who are have VIP entered in UDID #1.
7) Enter UDID#2 in the Print UDID field. This prints the contents of this field as entered in the invoice booking
screen.
8) Check include connecting cities to run arrival/departure manifest for connecting cities.
9) Click Preview to view the report on the screen. (Or click Print to send the report directly to the printer
without viewing first.)
10) Once the report is on the screen, click the printer icon to print.
The information used in this feature can be entered from Trams Back Office or by using the interface from
the GDS. To review the special entries required to interface this information, please refer to the Trams Back
Office Interface Guide for a specific CRS.
Invoice Printing
With Invoice Printing, print invoices based on invoice information.
Enter only the selection criteria for the desired invoices. Multiple selection criteria are allowed.
4/7/15
404
Reports
1. Select Reports|Invoice|Invoice Printing.
2. Enter only the selection criteria for the desired report. Multiple selection criteria are allowed.
Issue Date From/To
To select data for a particular period, enter the dates.
Invoice Record No
Min/Max
To select data for a particular invoice record range, enter the lowest and highest
record numbers, from 0 to 999999.
Invoice Number
Min/Max
To select data for a particular invoice number range, enter the lowest and
highest invoice numbers, from 0 to 999999.
Invoice Group
Enter the full Invoice Group name to print invoices for a particular Invoice Group
set up in Utilities|Setup|Groups.
Invoice Valid/Voided
All includes all invoices, including voided invoices; Valid excludes voids, Void
includes only void.
Branch
Enter the appropriate branch if applicable.
Invoice Type
Pick and choose what Invoice Types to include in the invoice printing. All
includes all invoice types, including Sales, Refund, Voucher and Adjustment.
Sales includes all sales invoices only. Refund includes all refund invoices only.
Voucher includes all vouchers only. To show partial payments on an invoice,
include Voucher as an Invoice Type selection. Adjustment includes all debit
and credit memos only.
Client Name
To print an invoice for a specific client, type in a few letters of the client name
and choose client from the drop-down menu which appears.
Client Group
To print an invoice for a specific client group that was set up in
Utilities|Setup|Groups, click the group from the drop-down menu.
UDID’s
Select one or more of the UDID’s in the system to print on under invoice booking
as a one-line entry.
405
4/7/15
Reports
Headers/Footers
Select from the drop-down menu, a header or footer that has been created in
Utilities|Setup|Headers/Footers, to create a “Report Footer” that always
prints on a separate page, for example print “Terms & Conditions” as a separate
Report Footer on a separate page when running an invoice.
3. Check the following options to include on invoice: Client Remarks, Invoice Remarks, Voided Bookings,
Only Print Open Invoices, Air Segment Information, Print Hotel Address, Print Comm Track Pricing, Print
Multiple Invoices as One Job, or Print Discount Total. When Print Multiple Invoices as One Job is checked,
all invoices displayed are part of a single file for either printing, e-mailing, faxing, or saving. If e-mailing, a
single file is created and the recipient only needs to click open the single pdf file and then scroll through or
print the multiple invoices contained in the file, instead of having to open multiple pdf files.
When the Print Discount Total is checked, the Gross Fare Total and Discount Total are printed on the invoice
using the Face Value and Discount fields from the Expanded Fare Tab of the Booking Screen, if present.
Gross Fare Total: 150.00
Discount Total:
Invoice Total:
Payment Total:
Balance Due:
-10.00
140.00
0.00
140.00
4. Click Preview to view the report on the screen. (Or click Print to send the report directly to the printer
without viewing first.) Once the report is on the screen, click the printer icon to print. Or e-mail this invoice
by holding down the CTRL key and selecting all the invoice/s to e-mail to send to one client. The selected
invoices become highlighted. Click the e-mail icon (envelope) to send.
TAFP Service Fee Report - ARC Only
The TAFP report is found in the main Reports menu, under Invoice. This is the service fee processing report
for agencies who process their credit card service fees through ARC.
The TAFP complies with ARC standards, providing details of all service charges paid with a client credit
card.
The following is the suggested method of entering TAFP transactions into Trams Back Office:
1. Create a Vendor profile called TAFP. (This can be done when entering the service fee booking by typing
TAFP in the Non ARC Vendor field, or the profile can be created through the main Profiles menu.)
2. When creating this profile, enter TAFP in the GROUP/BATCH field. This is important.
3. Create a 6000 series expense account called Credit Card Processing Fees.
Now:
4. Enter a Supplier booking with a Travel Type of Svc Fee, the Non-ARC Vendor as TAFP and enter the
document number in the Confirmation Number field.
5. Enter the amount of the fee in the Total Fare field.
6. Leave the Tax field blank and enter a commission amount equal to the net amount expected to be
received from ARC (presumed to be 96.5% of the Total Fare).
7. Close the supplier booking with a credit card payment. This creates a negative Vendor Balance for the
vendor TAFP.
8. At the end of the week run the TAFP report and submit to ARC for the previous Monday to Sunday dates.
4/7/15
406
Reports
9. When processing this report, be sure the Vendor Group field reads TAFP.
Please see Section entitled “Processing TAFP Service Fees” in the Payments chapter for complete
instructions.
IAR Reconciliation, Method 1
This feature is for U.S. agencies only. The IAR Reconciliation is under Reports in the main menu. Select
Reports|Invoice|IAR Reconciliation.
Trams Back Office compares the data in the Sales Summary Report file from ARC to the information in
Trams Back Office and generates an exception report which lists all the differences between Trams Back
Office data and ARC's data. Once the items that need to be adjusted are known, use that report to make
the necessary adjustments before completing the ARC settlement routine.
1. Edit data in IAR.
a) Put tickets in numerical order.
b) Add any debit memos or refunds to IAR.
c) In IAR do a LT - List Transaction and compare each ticket to the LT screen.
d) If modifications are necessary, commission adjustments, adding voids, correction of errors, this can
be done from this list.
2. When all tickets have been accounted for, do a LF - List Financial and an IL - to request the data be sent
to the www.arccorp.com web site. Copy down the file name from the IL request.
3. Go to Trams Back Office. Reports|Invoice|ARC. Page down to the last page. Compare to the LF screen
printed. If everything matches, the report is reconciled and can be submitted. If there is not a match, do
an IAR Reconciliation. Here are the procedures.
4. Go to the ARC Web site, www.arccorp.com, click on Back Office Data, continue, insert ARC number and
click continue, click on HERE, insert the User Name and Password. This is case sensitive and the
information is on the letter received the Friday prior to activation.
5. See the file name when the IL was done in IAR. Right click on the file number. Select, Save Target As. In
the Save As dialogue box, select the folder to save the file in. Change the File Name to one that can be
found later by date. Give it a file extension of .txt - example 013112.txt.
6. In Trams Back Office, go to Reports|Invoice|IAR Reconciliation. (See alternate method for Reconciling
407
4/7/15
Reports
IAR below.
Trams Back Office prompts for a file name. Enter the drive, directory and extension of the file that gets
downloaded from the ARC website. If Trams Back Office is having difficulty reading the file name, try
renaming the file with an eight-character file name and three-character extension. For example, use the
download date or date of the ARC report as a code for the branch with which the file is associated:
ar101912.txt.
IAR Reconciliation Report
Click here to browse
for the IAR File and
enter the date range.
After loading the file, leave blank Ignore Trams Voids That Are Valid in IAR (Dupes), AND Ignore Trams
Voids That Are Missing in IAR (Spoiled) if:
- NOT entering IAR (CN) Ghost/Skipped Tickets into TBO as 'Spoiled'.
- NOT interfacing or entering the same ticket number more then once. Some agencies allow for both a
non-void and a void instance of the same ticket number, in two invoices on different dates.
Ignore Trams Voids That Are
Valid In IAR (Dupes)
4/7/15
Check here if interfacing or entering the same ticket number more then
once. Some agencies allow for both a non-void and a void instance of
the same ticket number, in two invoices on different dates.
408
Reports
Ignore Trams Voids That Are
Missing In IAR (Spoiled)
Check here if entering IAR (CN) Ghost/Skipped Tickets into TBO as
'Spoiled'.
Note: If user chooses to enter IAR voided ghost or skipped tickets into TBO as spoiled, those spoiled tickets
must be entered on a date that is in the reporting period for the IAR file being reconciled.
Click OK to start the reconciliation. If Trams Back Office returns a blank screen, no changes need to be
made and complete the ARC settlement without any corrections. Possible messages generated on the
exception report:
Error Messages
Message:
Means:
Missing Trams Back Office
Ticket
The Sales Summary reported a ticket entered in IAR and not entered in
Trams Back Office. The Ticket is Voided in IAR, but is not recorded in
Trams.
Missing IAR Ticket
Trams Back Office shows a ticket that does not show on the Sales
Summary Report. The Ticket is Voided in IAR, but although the ticket is
recorded in Trams, it is not listed as a void.
Net remits do not match
The ticket shows up in Trams Back Office and in the Sales Summary
Report but the Net Remit amounts are not the same amount. Change the
Trams Back Office commission amount to equal the Sales Summary
Report before completing the ARC Settlement routine.
Ticket is Voided in Trams, but
not in IAR
Single TBO Ticket is voided in TBO, but not in IAR
Ticket is Voided in IAR but not
in Trams
Single TBO Ticket is voided in IAR, but not in TBO
This is a sample of the Trams Back Office IAR Reconciliation Report:
IAR Reconciliation Report
ARC # 123456
Travel Agency From: 03JULxx
Anytown, IL. 11111
To: 09JULxx
Ticket No
Invoice No
Exception Reason
7771113333
5589
Missing IAR Ticket - Is voided
in IAR, but not in Trams.
7771113358
5598
Missing IAR Ticket - Is voided
in IAR, but not in Trams.
7771113362
7771113375
Missing Trams Back Office
Ticket. Ticket is Voided in
IAR, But not in Trams.
5612
Net remits do not match
Once these discrepancies are corrected, the LF and Trams Back Office ARC Report should match exactly.
Submit the report and know that IAR and Trams Back Office match.
409
4/7/15
Reports
IAR Reconciliation Method 2
Interactive Agent Reporting (IAR) provides a way for agencies to submit their ARC Sales Reports
electronically.
This feature is for U.S. agencies only. The IAR Reconciliation is under Reports in the main menu. Select
Reports|Invoice|IAR Reconciliation.
Trams Back Office compares the data in the Sales Summary Report file from ARC to the information in
Trams Back Office and generates an exception report which lists all the differences between the Trams Back
Office data and ARC's data. Once the items need to be adjusted are known, use that report to make the
necessary adjustments before completing the ARC settlement routine.
1. Edit data in IAR.
a) Put tickets in numerical order.
b) Add any debit memos or refunds to IAR.
c) In IAR do a LT - List Transaction and compare each ticket to the LT screen.
d) If modifications are necessary, commission adjustments, adding voids, correction of errors, this can
be done from this list.
2. When all tickets have been accounted for, do a LF - List Financial and an IL - to request the data be sent
to the www.arccorp.com web site. Copy down the file name from the IL request.
3. Go to Trams Back Office. Reports|Invoice|ARC. Page down to the last page. Compare to the LF screen
printed. If everything matches, the report is reconciled and it can be submitted. If not matching, do an IAR
Reconciliation. Here are the procedures.
4. Go to the ARC Web site, www.arccorp.com, click on Back Office Data, continue, insert ARC number and
click continue, click on HERE, insert the User Name and Password. This is case sensitive and the
information is on the letter received the Friday prior to activation.
5. See the file name from when the IL was done in IAR. Right click on the file number. Select, Save Target
As. In the Save As dialogue box, select the folder to save the file in. Change the File Name to one that can
be found later by date. Give it a file extension of .txt - example 013112.txt.
6. Then go to Payments|ARC Settlement.
a. Query for the week’s ARC tickets so they are displayed on the settlement screen.
b. Click IAR Reconciliation on the ARC Settlement screen.
c. Click IAR Filename and map to the weekly IAR file.
d. Click Query to see the standard IAR Reconciliation Report.
- For tickets where Net Remit Do Not Match, Ticket Is Voided in IAR but Not in Trams, or Missing IAR
Ticket, click Find Ticket and the cursor lands on the appropriate ticket on the ARC Settlement screen to Edit
Invoice as normal.
- For tickets that are Voided In Trams but Not In IAR, click Find Ticket to go to the booking containing
that voided ticket in TBO, to Unvoid it, allowing the ticket to now show correctly on the ARC Settlement
Screen.
- For any exceptions that are Missing Trams Ticket, click off the IAR Reconciliation screen and manually
add the missing tickets.
IAR Reconciliation Method 3
Download the IAR file from the IAR website.
4/7/15
410
Reports
1. Go to Payments|ARC Settlement.
2. Query for the week’s ARC tickets so they are displayed on the settlement screen.
3. Click IAR Reconciliation on the ARC Settlement screen.
4. Click IAR Filename and map to the weekly IAR file.
5. Click Query to see the standard IAR Reconciliation Report.
a. For tickets where Net Remit Do Not Match, Ticket Is Voided in IAR but Not in Trams, or Missing IAR
Ticket, click Find Ticket and the cursor lands on the appropriate ticket on the ARC Settlement screen to Edit
Invoice as normal.
b. For tickets that are Voided In Trams but Not In IAR, click Find Ticket to go to the booking containing
that voided ticket in TBO, to Unvoid it, allowing the ticket to now show correctly on the ARC Settlement
Screen.
c. For any exceptions that are Missing Trams Ticket, click off the IAR Reconciliation screen, and manually
add the missing tickets.
Note: This is the same IAR Reconciliation exception report that was only available before under
Reports|Invoice|IAR Reconciliation. The IAR Reconciliation from the ARC Settlement screen works the
same way and provides that same exception report, but now has linking ability to the tickets displayed on
the ARC Settlement Screen.
ARC/BSP Reconciliation
With ARC/BSP Reconciliation, process reports based on ticket information. This report lists all tickets
411
4/7/15
Reports
numerically. Any ticket number which is out of sequence is marked with an “*”. Duplicate ticket numbers are
marked with a "#" if they are on different invoices. If there is a duplicate ticket on the same invoice, this is
indicated with a "+".
Columns displayed on report are: Ticket No, Invoice Number, Branch, Airline Code, Gross Fare,
Commission, Rate and Net Remit and FOP.
1. Click Reports|Invoice|ARC/BSP Reconciliation.
2. Select settings.
ARC/BSP Reconciliation Report
From/To
Specify the period for which data is included in the report. Double click
on the field for a calendar menu.
ARC/BSP No
Choose appropriate ARC/BSP number from the drop-down menu.
Ticket Status
From drop-down menu choose, Valid Only, Voided Only, or All.
Report Type
Specify a Standard Report or a report By Airline from the drop-down
menu.
Format
Select from a drop-down menu, a normal or expanded report format
(which includes passenger information, as well as Gross Fare,
Commission Amount and Remit Amount).
Included Items
From drop-down menu, include All items, IAR Only items, or Non-IAR
Only items.
3. Click Preview to view the report to the screen. (Or click Print to send the report directly to the printer
without viewing first.)
4. Click the print icon to print.
Client Reports
The following reports are found under Reports|Client menu items:
Activity
Sales Activity, Receivables, or Receipts by client for a defined period.
Statement
Statement, Client History, or Group reporting with detail.
Lists and Labels
Client profile data that can be used for creating lists and labels.
4/7/15
412
Reports
Client Activity Report
1. Click Reports|Client|Client Activity.
2. Select settings.
Format
Choose Summary or Detail.
Sort By
Use the drop-down menu to select a sort by Client Name, Total Sales, Total
Sales by Client Type, Total Commission, or Total Commission by Client Type.
Invoice Status
Use the drop-down menu to select All invoices, All ARC/Supplier and Closed
Comm Track Invoices, Open Invoices, or Closed only.
From/To
Enter up to 3 ranges of Invoice Dates.
Branch
Allows the report to be processed by branch
Travel Type
Select from 25 Travel Types from drop-down menu, or right mouse click to
select options.
Submit To
Use the drop-down menu to indicate ARC, Supplier, and/or Commission Track.
Client Total Min/Max
Indicate a Minimum/Maximum Invoice Total range.
Color Charts
Check here if colored charts are desired at the end of the report.
Print Selection Criteria
Check here to obtain a listing of the filters used to run report.
3. Click Preview to view the report to the screen. (Or click Print to send the report directly to the printer
without viewing first.)
4. Click the print icon to print.
Client Statements
Statements are for billing Clients. A statement shows open invoices. To print a standard billing statement:
413
4/7/15
Reports
1. Click Reports|Client|Statement.
2. Select settings.
Report Type
Choose Statement, Statement Wide (includes Arrival and Depart
Dates), Summary (invoices for designated period with a payment
summary), Summary Wide (includes remarks), and Fare Savings
#1(includes fare code fields) from drop-down menu. There is also an
option for Statement-Summary which shows a one-line summary for
each invoice. With this feature the details for markup lines and service
fees are displayed as part of a total invoice amount and not as individual
bookings within an invoice.
Format
Select Single, Group, or Batch (see Group/Batch Name below).
Client Type
Choose Leisure or Corporate. To print statements for all clients, leave as
All.
Client Name
In the Client Name field, type in a specific client name or leave blank to
print for all clients. Query for a desired client by clicking on Client Name.
If a single profile is indicated, one report is run.
Group/Batch Name
If a Group or Batch in Format field has been selected, type in the specific
group or batch name for which the statements are being printed.
Selecting Group provides one report for all profiles in the group,
whereas selecting Batch provides a separate report for each profile in
the group.
4/7/15
414
Reports
Passenger Name
Statements can be run in Summary format for specific passengers with
segments.
Department
To print this statement for a specific department for a corporate client,
type in the department name/number in the Department field.
Issue Date
Enter up range of invoice dates to include on statement.
Invoice Group
Use the drop-down menu to indicate a specific Invoice Group.
Statement Print Order
From the drop-down menu, select the sort for the printed statement - by
Client Name or Client ID.
Header/Footer
Select a header/footer for report from the drop-down menu.
Submit To
From drop-down menu, indicate ARC, Supplier, and/or Commission
Track invoices.
Minimum Total Open
Enter minimum invoice total here; only statements where the total
exceeds the amount set in the field is displayed. (The field is intended to
sort through ALL clients and only display those client statements that
"exceeds" the minimum amount entered into this field. The field has no
effect on a query for a single client or a group of clients. The field is used
by agencies to filter our statements when the amount owed is too small
to justify processing the statement. Sending a client a statement for
$1.45, is not, in the minds of many agencies, worth the effort or possible
postage costs.)
Orientation
Select from Portrait or Landscape from drop-down menu.
Include Profile Remarks
Check Include Profile Remarks if remarks are desired.
Prompt for Stmt Remarks
Check here to modify any Statement Remarks on statement. A change
here does not change master remarks set up in Global Defaults.
Print Segments
Check Print Segments field is wanted on document.
Use Primary Agent’s E-mail
Instead of Client E-mail
This option to allow users to e-mail client statements to the Primary
agent's e-mail address. A look-up is performed to identify the primary
agent in the client profile, then another look-up to that agent's profile to
obtain the agent's e-mail address.
Optional Print Fields
By selecting the items in the optional print fields, there’s flexibility in what
gets printed on the Client Statement. Select the landscape mode in the
Page Setup to print these additional fields. Warning: Be careful not to
check too many fields as 132 characters cannot be exceeded. If the field
does not print in landscape mode, it means it has exceeded its printing
limit.
Print UDIDS
Agencies that use UDID's for things that need to appear on a customer
statement, like Purchase Order # can add that UDID captured item by
clicking on the drop-down menu to select.
Invoice Group
Check here to include the Invoice Group on the Client Statement.
Invoice Remarks
Check here to include Invoice Remarks on the client Statement.
3. Click Preview to view the report to the screen. (Or click Print to send the report directly to the printer
without viewing first.)
415
4/7/15
Reports
4. Click the print icon to print.
Mary Jones wants you to fax her statements every month. You enter her fax number in her profile. This
number appears on Mary's printed statement and is readily available to the person who faxes statements.
Notes: An Available Balance Line appears on the Client Statement and is calculated from the Credit Limit
field (if it has been entered in the profile) less the amount outstanding on the statement.
Save one or multiple reports to a file or send one or multiple reports via e-mail from the preview screen:
Use the control key and mouse to select the files on the left to save to file, and click the floppy disk icon on
the tool bar to save, or send selected files using the e-mail icon. An e-mail address in profile is needed to
send an e-mail. If the e-mail program can insert a fax number into the e-mail To field in place of a normal
e-mail address, enable the Use Fax option when e-mailing multiple statements.
Fare Savings 1
To produce Fare Savings 1 report set up the Fare Code Table:
1. Click Utilities|Setup|Fare Codes.
2. Click the Fare Code box and type in the Fare Code. (Fare Codes are two-character alphanumeric codes,
such as UG, 01, S4, etc.)
3. In the Fare Desc field, type in the description that will correspond to the Fare Code entered (e.g. Upgrade).
The description is the fare justification information.
4. Click Add to add the Fare Code to the list.
5. Once all Fare Codes have been added, print the list by clicking Print.
6. When the Fare Codes and Descriptions have been entered, click OK to save.
Example Codes:
01 - Saturday Night Stay
06 - 14-Day Advance required
02- Connecting flight
07 - 07-Day Advance required
03 - First Class
08 - Minimum Stay
04 - Business Class
09 - Season Fare
05 - Coach
10 - Time of Day Travel
Now identify the codes within the invoice booking in the Expanded Fare Information screen.
1. Create sales invoice as usual.
2. Click the Expanded Fare Info tab.
3. In the Fare Savings Info section of the screen, type in the High Fare or Low Fare (or both if applicable).
4. Click Fare Code to view the Fare Code Table and select the appropriate code.
Note: If interfacing, enter the fare savings amounts and codes in accounting lines in the PNR on the CRS.
(See the Interface Guide for formats.)
To Print Fare Savings Reports:
1. Click Reports|Client|Statement.
2. In the Report Type field, click the arrow and choose Fare Savings 1.
3. Complete the rest of the fields as usual.
4. Click Preview to view the report on screen. (Or click Print to send the report directly to the printer without
viewing first.)
4/7/15
416
Reports
After viewing the report on the screen, click the printer icon to print.
Note: There is also a Fare Savings Report in Report Generator that can be modified. To view this report,
click Reports|Report Generator|Print Report. The report is called Client Fare Savings (CL_FS_D).
Client Lists and Labels
(See Lists and Labels under Reports|Profile.)
417
4/7/15
Reports
Vendor Reports
The following reports are found under the Reports|Vendor menu options:
Activity
Sales Activity, Receivables, or Receipts by vendor for a defined period.
Statement
Statement or Vendor History with detail.
Lists & Labels
Vendor profile data that can be used for lists and labels.
Vendor Activity Reports
1. Click Reports|Vendor|Vendor Activity.
2. Select settings.
Format
Choose Summary or Detail.
Sort By
Use the drop-down menu to select a sort by Vendor Name, Total Sales,
or Total Commission (this last readily rank vendors by commission yield,
or total dollars the agency received from the vendor, rather than the
dollars paid the vendor.)
Invoice Status
Use the drop-down menu to select All invoices, All ARC/Supplier and
Closed Comm Track Invoices, Open Invoices, or Closed only.
From/To
Enter range/s of Invoice Dates. Additional date range options to the
Vendor Activity report can compare vendor activity for the same vendor
to another date range in the Vendor Activity Report (year to year, year
to date, month to month, day to day).
Branch
Allows the report to be processed by branch
Travel Type
Select from 25 Travel Types from drop-down menu, or right mouse click
to select options.
4/7/15
418
Chapter 12
Reports
Submit To
The Vendor Activity report includes ARC/BSP as well as supplier and
commission tracking type bookings. Choose any combination of these
from the drop-down menu.
You want to see the commission earned on your tour business for
Preferred vs. Non-preferred. Print a Vendor Activity report, set the
Submit To field to Supplier, and the Travel Types field to both tour-dpst
and tour-finl.
Vendor Total Min/Max
Indicate a Minimum/Maximum Invoice Total range.
Color Charts
Check here for color charts at the end of the report.
Print Selection Criteria
Check here for a record of filters used to run report.
Only Preferred Vendors
When placing a check mark in the option, the report returns results only
for Vendors that have the preferred vendor box checked in the profile.
The preferred vendors are indicated with an asterisk in both the
standard and wide formats of the report, parallel to how preferred clients
look on the Client Activity reports.
Generate Cross Ref
By checking this box, Trams Back Office retains the vendor information
for use when printing out labels. Go to Reports|Vendor|Lists and
Labels, choose labels as Report Type, and check the box Use Cross
Reference. The labels printed are the names selected when the Vendor
Activity report was set up.
3. Click Preview to view the report to the screen. (Or click Print to send the report directly to the printer
without viewing first.)
4. Click the print icon to print.
Note: The asterisk on the Vendor Activity Reports indicates Preferred Vendors.
Vendor Statements
Statements are for billing Vendors. A statement shows open invoices.
Your agency has just signed a commission override plan with American Airlines. Since this plan is based
on productivity, you print a weekly Vendor Analysis report and change the Submit To field to ARC/BSP.
This report provides you with total number of invoices per air carrier, the gross amount, the commission
amount, and the net remit amount.
To print a standard billing statement:
1. Click Reports|Vendor|Statement.
2. Select settings.
Report Type
Choose Statement, Statement Wide (includes Arrival and Depart
Dates), Summary, and Summary Wide (includes Arrival and Depart
Dates) from drop-down menu.
Vendor Name
In the Vendor Name field, type in a specific name or leave blank to print
for all vendors. Query for a desired vendor by clicking on Vendor Name.
If a single vendor is indicated, one report is run.
Group/Batch Name
Having selected Group or Batch in Format field, type in the specific
group or batch name for which the statements are printing. One report
is run for each vendor in the group.
419
4/7/15
Reports
Issue Date
Enter up range of invoice dates to include on statement.
Invoice Group
Use the drop-down menu to indicate a specific Invoice Group.
Latest Depart Date
Enter the latest depart date to use for the invoice selection.
Invoice Type
Select All, Incoming or Outgoing from drop-down. (Separate invoices by
those that the agency owes to the Vendor, a true payable, vs.
receivables the agency is owed by the Vendor.
Branch
From drop-down menu, choose the appropriate branch/s for which to
print statements.
Travel Type
From drop-down menu, choose the travel type for which to run these
statements. Run unpaid commission statements without having to
group all hotel profiles together.
Submit To
From drop-down menu, indicate ARC, Supplier, and/or Commission
Track invoices.
Minimum Total Open
Enter minimum invoice amount - only statements where the total
exceeds the amount set in the field is displayed. (The field is intended
to sort through ALL vendor profiles and only display those vendor
statements that "exceeds" the minimum amount entered into this field.
The field has no effect on a query for a single vendor or a group of
vendors. The field is used by agencies to filter our statements when the
amount owed is too small to justify processing the statement. Sending a
vendor a statement for $1.45 commission due, is not, in the minds of
many agencies, worth the effort or possible postage costs.)
Header/Footer
Put the default header/footer on the vendor statements, select it from
drop-down menu, otherwise leave blank to print nothing.
Orientation
A Statement defaults to Portrait orientation, while a statement-wide
format defaults to Portrait, but select Landscape from the drop-down
menu if desired.
Optional Print Fields
Check any of the options to print on the statements: Invoice Number,
Itinerary, Vendor Remarks, ARC No., or Return Date.
Print UDIDS
If UDIDS are used such as vendor codes specific to the agency, choose
a UDID from the drop-down menu for this to appear on statement.
Prompt for Stmt Remarks
Check here to modify any Statement Remarks on statement. A change
here does not change master remarks set up in Global Defaults.
Include Profile Remarks
Specific profile remarks from the Profile Marketing Tab can be printed
on statements.
Print Foreign Currency Values
Check here to print out foreign currency amounts and codes for those
items automatically populated through GDS interface, like foreign hotels
booked through the GDS.
3. Click Preview to view the report to the screen. (Or click Print to send the report directly to the printer
without viewing first.)
4. Click the print icon to print.
Note: Save one or multiple reports to a file or send one or multiple reports via e-mail from the preview
4/7/15
420
Chapter 12
Reports
e-mailscreen:
Use the control key and mouse to select the files on the left, and click the floppy disk icon on the tool bar to
save, or send selected files using the e-mail icon. The profile must have an e-mail address in it to send it via
e-mail.
Vendor Lists and Labels
(See Lists and Labels under Reports|Profile.)
Agent Reports
The following reports are found under the Reports|Agent menu option:
Activity
Sales Activity, Receivables, or Receipts by agent for the period defined.
Statement
Detailed statement for selected agent for the period defined.
IC Export
Used by HOST agency to create a mailmerge file that can be used by IC with
TBO to reconcile Host Commissions.
Agent Activity Report
1. Click Reports|Agent|Agent Activity.
421
4/7/15
Reports
2. Select settings.
Format
Choose Summary or Detail. When printed in Summary format, the Agent
Activity Report lists the total number of invoices, number of bookings,
total fare on those invoices, the agency's commission, the agent's
commission, and the agent's “share” of the total fare, and total agency
commission in the last two Productivity columns. If two agents work on
a cruise booking together, their “share” of this booking, or productivity is
split 50/50. This may not be their agent commission percentage. Agent
#1 may be an inside agent making 0% commission, and Agent #2 may
be an outside agent making a 25% commission. These amounts appear
in the Agent Commission Column. More data helps to better analyze
agents' performance.
Travel Type
Use the drop-down menu to select any combination of Travel Types or
by right mouse clicking in this field.
ARC Non-CC
From drop-down menu, select Issue Date, Client Pymt Date, Vendor
Pymt Date or Exclude. (Recommend Client Pymt Date.)
ARC Client Status
From drop-down menu, select All, Open or Closed.
ARC CC
From drop-down menu, select Issue Date, Client Pymt Date, Vendor
Pymt Date or Exclude. (Recommend Issue Date or Vendor Pymt Date.)
ARC Vendor Status
From drop-down menu, select All, Open or Closed.
ARC Debit/Credit Memos
From drop-down menu, select Issue Date, Client Pymt Date, Vendor
Pymt Date or Exclude. (Recommend Issue Date.)
Supplier Non-CC
From drop-down menu, select Issue Date, Client Pymt Date, Vendor
Pymt Date or Exclude. (Recommend Vendor Pymt Date.)
Supplier Client Status
From drop-down menu, select All, Open or Closed.
Supplier CC
From drop-down menu, select Issue Date, Client Pymt Date, Vendor
Pymt Date or Exclude. (Recommend Vendor Pymt Date.)
Supplier CC No Remit
From drop-down menu, select Issue Date, Client Pymt Date, or Exclude.
(Recommend Client Pymt Date.)
Supplier Vendor Status
From drop-down menu, select All, Open or Closed.
Comm Track
From drop-down menu, select Issue Date, Client Pymt Date, Vendor
Pymt Date or Exclude. (Recommend Vendor Pymt Date.)
Comm Track Vendor Status
From drop-down menu, select All, Open or Closed.
From/To Dates
Enter date range of invoices to use in report.
Branch
Allows the report to be processed by branch.
Branch Group
Allows the report to be processed by branch group.
Agent Status
Select All, Inside, or Outside.
Agent Recon Status
Select All, Not Cleared or Cleared (used with Agent Reconciliation
feature).
Agent Action
Select Is Blank, Booking or Ticketing.
Preferred Vendor Status
From drop-down menu, select All, Preferred, or Non-Preferred.
4/7/15
422
Chapter 12
Reports
Agent Name
To run report for just one agent, type in a few letters of agent name and
choose off the drop-down menu.
Agent Group
Select the Agent group from the drop-down menu.
Print Selection Criteria
Check here to print out the report selections.
Output Format
Select Report or Mailmerge from the drop-down menu.
3. Click Preview to view the report to the screen. (Or click Print to send the report directly to the printer
without viewing first.)
4. Click the print icon to print.
Note: When looking at the actual Agent Activity Report, the Fare Productivity Column is the total fare divided
by the number of agents on the invoice. The Commission Productivity Column is the total commission
divided by the number of agents on the invoice.
Mary Smith, your outside agent, did a cruise booking for $1000 in the month of April. Mary earns a 35%
commission on her bookings. She called the reservation in to your office. It was entered into the GDS by
your inside agent, Susan. Susan is paid a salary and makes 0% commission on her bookings.
When you print the Salesagent Activity report for all of your agents (both inside and outside) you notice that
the $1000 fare appears for both of them in the Total Fare column, the $100 commission appears for both
of them in the Commission column. Mary's 35% commission ($35.00) appears in the Agent Commission
column, Susan has a zero amount in the Agent Commission column because she is paid a salary. But,
because they both worked on the same booking, the productivity columns divides the full fare and the full
commission by the number of agents, giving each of them a $500 full fare productivity credit, and a $50
commission productivity credit.
Jay Jackson, an outside agent, orders champagne for his client's honeymoon cruise. When entering the
cruise in Trams Back Office, go the top of the booking screen to the field called Agents. Click and open the
commission box.
After entering Jay's 35% commission for the cruise booking, you make another entry for a negative $-25.00
and use the remarks field, letting Jay know you are charging him for the champagne. You notice Jay used
a preferred vendor, so you added a $10 bonus.
423
4/7/15
Reports
Agent Commission Detail on Sales Invoice
To review the special entries required to interface this information, please refer to Trams Back Office
Interface Guides in this manual for a specific GDS.
Agent Statements
Agent Statements provide sales production information for an agent, and can be used to determine what to
pay commissioned agents. The Agent Statement settings are designed to report commission due to the
agent only after the agency has received and recorded payment from the client/vendor. Following the
recommended settings eliminates paying an agent more than once for the same booking.
To print a Commission Due report (commission payable to agent), we suggest the following procedures:
To print a standard billing statement sorted by invoice date:
1. Click Reports|Agent|Statement.
2. Select settings.
Agent Name
In the Agent Name field, type in the agent’s name/code or leave blank to
print statements for all agents. To query for a specific agent, click Agent
Name.
Agent Group
Group statements can be run using the group/batch field on agent
profiles.
Format
From drop-down menu select summary or detail (which is suggested
format).
Travel Types
Use the drop-down menu to select any combination of Travel Types or
by right mouse clicking in this field. All is recommended.
4/7/15
424
Chapter 12
Reports
ARC Non-CC
From drop-down menu, select Issue Date, Client Pymt Date, Vendor
Pymt Date or Exclude. (Recommend Client Pymt Date.)
ARC Client Status
From drop-down menu, select All, Open or Closed.
ARC CC
From drop-down menu, select Issue Date, Client Pymt Date, Vendor
Pymt Date or Exclude. (Recommend Issue Date or Vendor Pymt Date.)
ARC Vendor Status
From drop-down menu, select All, Open or Closed.
ARC Debit/Credit Memos
From drop-down menu, select Issue Date, Client Pymt Date, Vendor
Pymt Date or Exclude. (Recommend Issue Date.)
Supplier Non-CC
From drop-down menu, select Issue Date, Client Pymt Date, Vendor
Pymt Date or Exclude. (Recommend Client Pymt Date.) Service fees
and any zero net remit invoices are not displayed on the statement with
Vendor Payment Date selected.
Supplier Client Status
From drop-down menu, select All, Open or Closed.
Supplier CC
From drop-down menu, select Issue Date, Client Pymt Date, Vendor
Pymt Date or Exclude. (Recommend Vendor Pymt Date.)
Supplier Vendor Status
From drop-down menu, select All, Open or Closed.
Supplier CC No Remit
From drop-down menu, select Issue Date, Client Pymt Date, or Exclude.
(Recommend Client Pymt Date.)
Comm Track
From drop-down menu, select Issue Date, Client Pymt Date, Vendor
Pymt Date or Exclude. (Recommend Vendor Pymt Date.)
Comm Track Vendor Status
From drop-down menu, select All, Open or Closed.
From/To Dates
Enter date range of invoices to use in report. Note: If using departure
dates, Debit Memos will not be included.
Branch
Allows the report to be processed by branch
Branch Group
Select a Branch Group from the drop-down menu.
Agent Status
From drop-down menu, select All, Inside, or Outside.
Agent Recon Status
Select All, Not Cleared or Cleared (coming from the Agent
Reconciliation feature.
Include Agent Adjustments
From drop-down menu, select YES or NO.
Preferred Vendor Status
From drop-down menu, select All, Preferred, or Non-Preferred.
Depart Date From/To
Enter date range of invoices to include in statement.
Agent Action
From the drop-down menu, select Ticketing or Booking Agent.
Header/Footer
Select a customized header/footer from the drop-down or leave blank.
Print Selection Criteria
Check here to print out report selections.
Include Profile Remarks
Check here to print profile remarks on statement.
Include Travel Type Summary
Check here to print Travel Type Summary on statement.
3. Click Preview to view the report to the screen. (Or click Print to send the report directly to the printer
without viewing first.)
4. Click the print icon to print.
425
4/7/15
Reports
Notes:
a) Although Trams Back Office provides the ability to print Agent Statements by Departure and Arrival Dates,
we do not recommend this method for the following reasons:
•
Client and Vendor Payment Dates are reconciled against bank statements or ARC/BSP reports
or both. Departure and Arrival Dates are never reconciled which means they can be fictitious or
altered.
•
Travelers can request refunds after the departure date.
•
Client and Vendor Payments can (and do) occur after departure dates.
b) By selecting the option Closed in the ARC/BSP Vendor Status field, it is likely to get a blank report, but
there is an not an error. Why? Because an ARC/BSP Vendor Status field of Closed, means the bookings
were marked closed using the ARC/BSP Settlement routine.
c) Save one or multiple reports to a file or send one or multiple reports via e-mail from the preview screen.
Use the control key and mouse to select the files on the left, and click the floppy disk icon on the tool bar to
save, or send selected files using the e-mail icon. The profile must have an e-mail address in it to send it via
e-mail.
d) Notice the Summary by Travel Type at the end of this report. Agents can see a summary of their activity
by Travel Type like it is displayed in the Sales Activity Report.
IC Export
The IC Export is used by a HOST agency and contains CC and any possible Cash/Check Commissions due
to the IC, along with any Fee Invoice charged the IC. This export creates a report or a mailmerge file which
can be used by an IC with TBO to reconcile its Host Commissions as it would do for PayMode/Pegasus
Commissions. The Host should include this file with a copy of the Crystal Report for Host Commissions Paid
less any fees charged, along with the IC's Payment Check.To print a standard billing statement:
1. Click Reports|Agent|IC Export.
2. Select settings.
IC Code
Select the IC Code from the drop-down menu for the IC for which this file
is being produced.
ARC/Supplier Non-CC
From drop-down menu, select Issue Date, Client Payment Date, Vendor
Payment Date, or Exclude.
ARC/Supplier CC
From drop-down menu, select Issue Date, Client Payment Date, Vendor
Payment Date, or Exclude.
Comm Track
From drop-down menu, select Issue Date, Vendor Payment Date, or
Exclude.
From/To Dates
Enter a date range for which to run this report/file.
Output Format
Select Report or Mail Merge from the drop-down menu.
3. Click Preview to view the report to the screen. (Or click Print to send the report directly to the printer
without viewing first or to name or direct the path for the Mail Merge file.)
4/7/15
426
Chapter 12
Reports
4. Click the print icon to print.
Payment Reports
The following are reports listed under the Reports|Payment menu option:
Receipts
History of receipts.
Disbursements
History of disbursements.
Payment Analysis
History of payments.
Check Writer
Print Checks.
CC Merchant
List CC Merchant Transactions.
Credit Card Reconciliation
Print out an exception report highlighting the differences between
Trams Back Office credit card transactions and a data file that is
received from Visa, MasterCard, Diner’s Club, AMEX, AAUATP or
DLUATP.
Group Revenue
Analyze the profit for a group on one report.
Operating Payables
History of Operating Payables.
ACH Export
Create a file for handing off ACH payment data to a bank or other
Payment Distribution Service.
Audits
Captures information when the full credit card was viewed based on the
user logged in at the time the full credit card number was viewed.
Receipts
The Receipts report provides a history of receipts. To print the Receipts report:
1. Click Reports|Payment|Receipts.
2. Select settings.
Receipts Report Selection Criteria
Receipts From/To Date
Enter a range of receipt dates.
Payment Method
From drop-down menu select any combination of payment methods
including Cash, Check, CC, Other, CC Merchant and/or EFT.
427
4/7/15
Reports
Received From
From drop-down menu select any combination of received from including
All, Client, Vendor - ARC, Vendor - Supplier, Vendor - Commission
Track, Agent and/or Other.
Bank Account No.
From drop-down menu, select a bank account for the Receipts report.
Remarks
Input remark from a specific receipt/s to call up those receipts in report.
Sort by
Sort the report by either Payment Date or Profile ID.
Output
Select from drop-down menu, Report or Mailmerge format. The
mailmerge format can be used with MS Excel or similar software.
Orientation
From the drop-down, select Portrait or Landscape.
3. Click Preview to view the report to the screen. (Or click Print to send the report directly to the printer
without viewing first.)
4. Click the print icon to print.
Disbursements
The Disbursements report provides a history of disbursements.
To print the Disbursement report:
1. Click Reports|Payment|Disbursements.
2. Select settings.
Payment From/To Date
Enter a range of payment dates.
Payment Method
From drop-down menu select any combination of payment methods
including Cash, Check, CC, Other, CC Merchant and/or EFT.
Paid To
Check or uncheck from the drop-down menu: Client, Vendor - ARC,
Vendor - Supplier, Vendor - CommTrack, Agent, Other (default is All).
Bank Account No.
From drop-down menu, select a bank account for the Receipts report.
Remarks
Input remarks from a specific disbursement/s to call up those
disbursements in report.
Sort by
Sort the report by either Payment Date or Profile ID, or Check/CC #.
Output
Select from drop-down menu, Report or Mailmerge format. The
mailmerge format can be used with MS Excel or similar software.
Orientation
Select Portrait or Landscape from the drop-down.
3. Click Preview to view the report to the screen. (Or click Print to send the report directly to the printer
without viewing first.)
4. Click the print icon to print.
Payment Analysis
The Payment Analysis report provides a history of payments.
To print the Payment Analysis report:
1. Click Reports|Payment|Payment Analysis.
4/7/15
428
Chapter 12
Reports
2. Select settings.
Payment Type
From drop-down menu select any combination of payment types
including Received, Made, Deposit, and/or Withdrawal.
Payment Method
From drop-down menu select any combination of payment methods
including Cash, Check, CC, Other, CC Merchant and/or EFT.
Payment From/To Date
Enter a range of payment dates.
Payment Rec No
Enter a specific payment record number to call up that in report.
Invoice Rec No
Enter a specific invoice record number to call up that in report.
Remarks
Input remark from a specific payment/s to call up those payments in
report.
Profile Type
From drop-down menu select any combination of profile types including
All Clients, All, Leisure, Corporate, Vendor, Agent and/or Other.
Profile Name
In the Profile Name field, type in a specific name or leave blank to print
for all profiles. Query for a desired client by clicking on Profile Name.
Profile Group
Enter a specific profile group, selecting from the drop-down menu.
Payment Group
Enter a specific payment group, selecting from the drop-down menu.
Bank Acct
Select a specific bank account for which to run this report, or leave blank
to run for all.
Branch
Select a specific branch for which to run this report, or leave blank to run
for all.
CC/Check #
To run the report for a specific credit card or check number, input number
here.
Payment Status
From the drop-down menu, select All, Valid, or Voided.
Name on Check
Query for a check based on the Name on Check rather than the Profile
Name.
Sort by
Determine the sort of the report by choosing Date, Name or Ck/CC No.
from drop-down menu. When sorted by name items are subtotaled.
Subtitle
Add more description to this report for handoff.
Output format
Select report or mailmerge from the drop-down.
Only Unapplied
Check this box if to select Only Unapplied payments.
Print Journal Entries
Check this box if to print journal entries.
3. Click Preview to view the report to the screen. (Or click Print to send the report directly to the printer
without viewing first.)
4. Click the print icon to print.
Check Writer
Print out checks using the check writer.
To print checks:
1.Click Reports|Payment|Check Writer.
429
4/7/15
Reports
2. Select settings.
Check Writer Name
From the drop-down menu select which check writer setting to use.
When setting up the check writer in Utilities|Setup|Checks, set up as
many check settings as are needed. For example, one for payroll
checks, one for normal disbursements, etc.
Print Pre-Numbered Check
From drop-down menu select Yes or No.
Pause after first Check
From drop-down menu select Yes or No.
Bank Account
From drop-down menu select bank account these checks are written
from.
Starting/Ending Check No
This field is defaulted to the next check number available; or enter a
range of checks to print.
Number of Copies
Enter number of copies of check to be printed.
Check Printer
From drop-down menu, select printer.
Print Continuous Feed
Check this box for continuous feed checks.
Print Preview
Check this box to preview checks before printing.
3. Click Preview to view the report to the screen. (Or click Print to send the report directly to the printer
without viewing first.)
4. Click the print icon to print.
Note: The starting check number does not default if Print Pre-Numbered Checks is set to YES. If printing
multiple checks, we would not know which check number to default to. If printing one check at a time, it is
easier and quicker to print those checks from the Payment Query screen.
CC Merchant Report
The CC merchant report summarizes the credit card transactions to view the impact those transactions have
on the bank account
CC Merchant Report is under the Reports|Payment|CC Merchant menu options. This report currently
supports American Express, Diner’s Club, MasterCard, Discover, and Visa. Click the drop-down arrow on
Included CC’s and select the credit card(s) to include. Click OK.
To print the CC Merchant Report:
1. Click Reports|Payment|CC Merchant.
2. Select settings.
4/7/15
430
Chapter 12
Reports
CC Merchant Report Selection Criteria
From/To Date
Enter a date range for this report.
Bank Account
From the drop-down menu, select bank account these checks are
written from.
Included CC’s
Use the drop-down menu to select any combination of credit cards:
American Express, Diner’s Club, Discover, MasterCard, Visa and/or
Other.
Format
From drop-down menu, select Report or Mail Merge.
Status
From drop-down menu, select All, Cleared or Not Cleared.
Branch
Select the branch from the drop-down menu.
3. Click Preview to view the report to the screen. (Or click Print to send the report directly to the printer
without viewing first.)
4. Click the print icon to print.
The Upper Peninsula Travel Agency has Credit Card Merchant Accounts with Visa and MasterCard. At the
end of each day the bookkeeper, Lars, runs a CC Merchant report showing the total activity affecting the
bank account. Lars makes a payment received from the CC company via EFT, and it is journalized as a
debit to Cash in Bank and a credit to CC Merchant receivables accounts.
At the end of the month, Lars runs the End of Period, which clears out the CC Merchant receivables
account by debiting the account and crediting the client balances. When the agency reconciles their bank
statement, they enter any CC service charge as payments made to the CC company, with a pay method
of EFT, and journalize the payment as a debit to CC Service Fees and a credit to Cash in Bank.
Credit Card Reconciliation
The Credit Card Reconciliation report is an exception report that compares a data file provided by a credit
card company for Visa, MasterCard, Diner’s Club, AMEX, AAUATP or DLUATP with transactions that exist
in Trams Back Office. Look on the credit card website to learn how to obtain the data file.
For American Express, this feature is used to highlight the differences between files that are received from
American Express about a specific agency corporate client and its travel charges made with American
Express. The transactions are Airline tickets processed through ARC with a payment type of CC and a Amex
card number. American Express has several file types and several delivery methods. The file received from
American Express must be the dtail3a.prn file which American Express may also refer to it as a Recon D
(KR1002) in ASCII format.
To obtain this file, contact the American Express MIS Department at 800-542-0995. Request the CSV format
using a delivery method of diskette. The diskette ordered in the CSV format should be a dtail3a.prn file.
Some agencies have larger files that cannot be put on a single diskette. Ask about downloading this
dtail3a.prn file for use in TBO.
Special Note to Worldspan Users: The Credit Card Reconciliation functionality has changed for
Worldspan users, so that Service Fee tickets (Airline=XD) where the ticket number is not starting with 81 or
19 are handled differently. ARC recently made a change to Travel Agency Service Fee (TASF) transactions
submitted through the Worldspan GDS. The agencies client credit card statements show the same
document number for the TASF charge as for the airline ticket number, when the TASF is issued at the same
time the airline ticket is purchased. If the TASF is not related to an airline ticket purchase the credit card
statement will continue to show an MCO number.
This change was made in response to numerous requests from travel agencies, especially those that
service corporate accounts, to match the TASF transaction with the corresponding air ticket on the client's
431
4/7/15
Reports
credit card statement thereby helping them with their corporate accounting and allocation function. When
Worldspan agencies use the Credit Card Reconciliation function in TBO, the CC Company file that is used
for the reconciliation contains the associated airline ticket number and we will now match to that ticket
number in the CC file and not the MCO ticket number as we previously did. We also display the MCO ticket
number in the "Exception" Column on the "Valid" Report.
Steps for Running the Credit Card Reconciliation:
1. Go to Reports|Payments|Credit Card Reconciliation.
2. From drop-down menu by Credit Card Type, select the credit card for which to run the exception report-American Express Disk, American Express File, Diner’s Club 14-Digit, DL UATP, Diner’s Club 16-Digit,
American Express KR-1022, Visa, or Mastercard.
3. Enter the path to the credit card file--drive:\path\filename.prn or txt.
4. Under Included Items select All (to include all items), Exceptions Only (current default), or Valid Only.
5. Add a Report Subtitle to identify the report for a specific customer.
6. Select a Report or Mail Merge Format
7. Click Preview or Print to get an exception list of the differences between the data file from the credit card
company and the Trams Back Office database.
Error Messages
Message:
Means:
Ticket Not Found
Ticket is listed in the credit card data file but does not show in Trams Back
Office.
Different CC Number
Credit card file and the Trams Back Office database are showing different
CC card numbers.
4/7/15
432
Chapter 12
Reports
Different Form-Of-Payment
Trams Back Office is showing a form of payment other than credit card.
Different Ticket Amount
The total fare in Trams Back Office and the amount in the credit card file
differ.
Group Revenue
This report produces an analysis of profits for a particular travel group, provided the invoices for the travel
group have been tagged with a Invoice/Payment Group (created in Utilities|Setup|Groups). Columns of
the report include: Invoice No, Name, Payment Date, Payment No, Revenue, Expenses and Current Group
Profit.
1. Go to Reports|Payments|Group Revenue.
2. Select settings.
Group Revenue Report Selection Criteria
From/To Date
Enter a date range for this report.
Invoice/Payment Group
From the drop-down menu, select the name of the group for which the
report is being run.
3. Click Preview to view the report to the screen. (Or click Print to send the report directly to the printer
without viewing first.)
4. Click the print icon to print.
Note: Payments Made for Profile Type of “Other” with a Payment Group selected, show up on the Group
Revenue Report. Group Expenses that are to be paid out of Group Revenue show as an “Expense” for the
Group and reduce Group Profit accordingly.
Operating Payables
This report lists operating payables which can be selected in a variety of ways:
1. Go to Reports|Payments|Operating Payables.
2. Select settings.
Date Entered
Enter a date range when these payables were created.
Payable Status
From the drop-down menu, select All, To be Paid, Paid and Recurring.
Date Payable
Enter a payable date range for this report.
Payable Code
Enter a payable code if applicable.
Profile
Enter a few letters of the profile name or click Profile to query for a
particular client profile.
433
4/7/15
Reports
Remarks
First select an operator (Is Equal To, Is Not Equal To, Is Blank, Is Not
Blank, Starting With, Contains, In, Not In) from the drop-down menu and
match it up with specific criteria typed into field on the right. (When doing
searches on fields containing “wildcard” search criteria using the selections of “IN” and “NOT IN," it’s looking for the field to contain the complete string entered between the delimiters or the exact match). If the
remarks field contains the word ONE, and a search is done for IN
ONE,TWO,THREE then there should be a result. If a search is completed for NOT IN ONE,TWO,THREE, then there should be no results.
Basically using IN "ONE,TWO,THREE" is like doing: (IS EQUAL TO
"ONE") OR (IS EQUAL TO "TWO") OR (IS EQUAL TO "THREE").
Using NOT IN "ONE,TWO,THREE" is like doing: (IS NOT EQUAL
TO "ONE") AND (IS NOT EQUAL TO "TWO") AND (IS NOT
EQUAL TO "THREE").
Payable Group
From the drop-down menu, choose a payable group for which to run this
report (set up in Utilities|Setup|Groups).
Print Journal Entry
Defaulted to checked. Unchecking the box does not print the JE's on the
report, and can cut down the length of the report significantly.
3. Click Preview to view the report to the screen. (Or click Print to send the report directly to the printer
without viewing first.)
4. Click the print icon to print.
ACH Export
Create a file for handing off ACH payment data to a bank or other Payment Distribution Service. The file
output conforms to the NACHA format.
1. Go to Reports|Payments|ACH Export.
2. Select settings to create a file.
From/To
Enter a date range for export file.
Bank Acct.
From the drop-down menu, select the appropriate bank account.
Payment Type
By default, the Payment Type is hard-coded as Made.
Format
From the drop-down select report or file.
Client Number
Enter a the client number (this is the client account number issued by the
bank.
File Descriptor
Type the file name format supplied by the bank.
Audits
The credit card or name on check audit reports capture information when the full credit card number was
viewed based on the user that was logged in at the time or displays the payee name on the check with old
4/7/15
434
Chapter 12
Reports
and new values.
1. Go to Reports|Payments|Audits.
2. Select settings to run the report.
Audit Type
Select Invoice or Check from the drop-down.
Date Change From/To
Enter a date range for the report.
Client Name
Enter the Client’s Name or leave blank for all.
Login Name
From the drop-down select the name of the login user or leave blank for
all.
Sort by
Select the sort from Date Changed, Client Name, Login, or Payment
Number.
General Ledger Reports
The following reports are listed under the Reports|General Ledger menu option:
Journal Entry Analysis
Detailed history of Journal Entries.
Account History
Detailed history on specific G/L account with a running balance for each
account item.
Trial Balance
General Ledger Trial Balance.
Income Statement
Defined period Income Statement. (Profit & Loss Sheet). For directions on
how to print out this report, see General Ledger chapter.
Balance Sheet
Current financial position. To print out Multiple Balance Sheets by Branch
Numbers, set this up in Utilities|Setup|Global Defaults|Prompt. A password
is required to turn on this option. Moving from a Single Balance Sheet to
Multiple Balance Sheets cannot be reversed easily.
Chart of Accounts
Listing of all General Ledger accounts and types. (See Chart of Accounts
Report in General Ledger chapter.)
GL Reconciliation
Assists in reconciling an accounting period.
435
4/7/15
Reports
Journal Entry Analysis Report
The Journal Entry Analysis report provides a detailed history of Journal Entries.
To print the Journal Entry Analysis Report:
1. Click Reports|General Ledger|Journal Entry Analysis.
2. Select settings.
From/To Date
Enter a date range for this report.
Journal Entry Number
Enter a specific Journal Entry number of the entry for which to print the
report.
Type
Use the drop-down menu to select: All, Standard, End-of-Period,
Year-End, Reoccurring, or Budget.
Status
From drop-down menu, select All, Unposted or Posted.
Format
Select from a drop-down menu report for a printable version or mail
merge to create a delimited file format of the report.
3. Click Preview to view the report to the screen. (Or click Print to send the report directly to the printer
without viewing first.)
4. Click the print icon to print.
Account History
The Account History report provides a detailed history of specific G/L account/s with a running balance for
each account item.
To print the Account History:
1. Click Reports|General Ledger|Account History.
2. Select settings.
G/L Account
Enter a specific G/L Account for this report (or find the account from the
drop-down menu). Leave blank for all accounts.
G/L Account Group
After setting up an account grouping under General Ledger|Account
Groups, select that group of accounts from drop-down menu. Details of
each account in the grouping and a total for all the debits and credits in
the grouping are displayed.
From/To Date
Enter a date range for this report.
G/L Branch
Use the drop-down menu to select specific branch numbers.
G/L Branch Group
Select a branch group if set up from the drop-down.
JE Group
Select a JE group if set up from the drop-down.
Format
From drop-down menu, select Summary or Detail.
Summary Remarks
From the drop-down menu, select a qualifier, Is Equal to, Is Not Equal
to, Is Blank, Is Not Blank, Starting With, Contains, In, Not In, and enter
matching criteria (can be wildcard) to pull up JE’s which meet said
criteria. (Data is pulled from Journal Entry Remarks.)
4/7/15
436
Chapter 12
Reports
Detail Remarks
From the drop-down menu, select a qualifier, Is Equal to, Is Not Equal
to, Is Blank, Is Not Blank, Starting With, Contains, In, Not In, and enter
matching criteria (can be wildcard) to pull up JE’s which meet said
criteria. (Data is pulled from Journal Entry Remarks.)
Output Format
Select Report or Mailmerge from the drop-down.
Pseudo Post
Check here if the report is Pseudo Post (the End of Period and posting
have not been done).
Active Accts Only
Check here for active accounts only.
Running Balance
Check here to run a balance for each account item.
3. Click Preview to view the report to the screen. (Or click Print to send the report directly to the printer
without viewing first.)
4. Click the print icon to print.
Trial Balance
The Trial Balance shows the totals debit balances and total credit balances in the General Ledger to confirm
that the total debits equal the total credits. This report used as part of the Monthly Routine to verify that Core
Report totals shown in the G/L actually match Core Report totals (see Suggested General Ledger
Procedures in the chapter entitled, Setting Up Trams Back Office.)
To print the Trial Balance report:
1. Go to Reports|General Ledger|Trial Balance.
2. Select settings.
As Of
Enter an As Of date for this report.
G/L Branch
Use the drop-down menu to select a specific G/L branch number.
G/L Branch Group
From the drop-down select a G/L branch group if one has been set up.
Output Format
Select from a drop-down menu report for a printable version or mail
merge to create a delimited file format of the report.
Include Zero Accts
To include zero accounts, check here.
Print Balance
To include balances on report, check here.
Pseudo Post
To print report in Pseudo Post (the End of Period and posting have not
been done), check here.
3. Click Preview to view the report to the screen. (Or click Print to send the report directly to the printer
without viewing first.)
4. Click the print icon to print.
Income Statement
The Income Statement displays the profit or loss of all business activities during a specific period of time.
Before an accurate Income Statement can be printed, the End of Period journal entry must be created first.
(See Maintaining the General Ledger in the General Ledger chapter.) An Income Statement shows
balances for Sales, Cost of Sales and Expense accounts (4000, 5000, 6000, 7000, 8000, 9000 series
General Ledger accounts.) To print the Income Statement or Profit and Loss Sheet (Sales minus Cost of
Sales minus Expenses equals the Profit for the period):
437
4/7/15
Reports
1. Click Reports|General Ledger|Income Statement.
2. Select settings.
Column 1 From/To Dates
Enter a date range for this report.
G/L Branch
Use the drop-down menu to select a specific branch number or leave
default for all.
G/L Branch Group
If a specific branch groups were set up, select the one for which to run
an income statement from the drop-down menu.
Type
From drop-down menu, select Actual or Budget. Actual shows the
income based on standard journal entries for the period. Budget is based
on Budget journal entries.
Columns 2, From/To Dates
Enter a date range of other columns if running a comparison report.
Column 3/4 From/To Dates
A total of 4 columns are available for printed reports in addition to
mailmege. The report automatically suppresses the printing of ALL
percentage columns when a 3rd or 4th date range field is selected and
the report automatically prints in landscape like it now does when portrait
won't fit all the columns.
Suppressing the percentage columns only when selecting a 3rd or 4th
date range allows the report to show the percentage columns for those
agencies wanting and needing to see that data as is currently shown.
When the report is run for 3 columns of data, a 4th blank column also is
displayed by design.
Pseudo Post
Use drop-down menu to select Yes or No (the End of Period and posting
have not been done).
Format
From drop-down menu, select Summary, Detail, Summary by Revenue,
Detail by Revenue, or Mail Merge.
Summary shows each summary general ledger accounts with a
balance, as well as detail accounts that do not have a summary account.
Detail shows each individual general ledger account with a balance.
Summary by Revenue shows each summary general ledger accounts
with a balance, as well as detail accounts that do not have a summary
account and also total revenue per Travel Type.
Detail by Revenue shows each individual general ledger account with a
balance and also total revenue per Travel Type.
Mail Merge gives the ability to output the report to other programs. (Excel
for example using comma delimiter.)
3. Click Preview to view the report to the screen. (Or click Print to send the report directly to the printer
without viewing first.)
4. Click the print icon to print.
Balance Sheet
To get an accurate Balance Sheet, an End of Period journal entry must be done. (See Maintaining the
General Ledger in the General Ledger chapter.) A Balance Sheet describes the financial condition of a
business at a precise point in time. The Balance Sheet shows balances for Assets, Liabilities and Capital
4/7/15
438
Chapter 12
Reports
accounts in the 1000, 2000, and 3000 series General Ledger accounts (Assets minus Liabilities equal
Capital plus Profit for the period):
1. Click Reports|General Ledger|Balance Sheet.
2. Select settings.
As Of Date
Enter as of date for this report.
Pseudo Post
Check here if this is Pseudo Post report (the End of Period and posting
have not been done).
Format
From drop-down menu, select Summary or Detail. A Summary shows
Summary general ledger accounts and Detail general ledger accounts
that don't refer to a summary account. A Detail prints every general
ledger account with a balance. Mail Merge gives the ability to output the
report to other programs.
G/L Branch
If using the Multiple Balance Sheet option, in the Branch field, click the
arrow to choose a branch.
G/L Branch Group
From the drop-down, select a G/L branch group if one has been set up.
3. Click Preview to view the report to the screen. (Or click Print to send the report directly to the printer
without viewing first.)
4. Click the print icon to print.
Chart of Accounts
To get an listing of all General Ledger accounts:
1. Go to Reports|General Ledger|Chart of Accounts.
2. Select settings.
Chart of Accounts Selection Criteria
Only Include Active G/L
Accounts
Check here to include only active General Ledger accounts.
3. Click Preview to view the report to the screen. (Or click Print to send the report directly to the printer
without viewing first.)
4. Click the print icon to print.
GL Reconciliation
The GL Reconciliation report is used to aid in reconciling financial reports at the end of the month. It flags
items that could possibly cause financial to be out of balance when compared against the Core Reports.
1. Go to Reports|General Ledger|GL Reconciliation.
2. Select settings.
GL Reconciliation Selection Screen
From/To Dates
Enter date range for report.
3. Click Preview to view the report to the screen. (Or click Print to send the report directly to the printer
without viewing first.)
439
4/7/15
Reports
4. Click the print icon to print. The report displays a list of items that may need correcting. Query each item
and correct it if needed.
Note: Notice a flag on the GL Reconciliation report per bank account when the monthly totals of receipts
and deposits don’t match.
Possible GL Reconciliation Error Messages
Message
Description
Invoice: Client Payment is
Missing
An invoice (listed by Invoice RECORD number) shows the client
payment as Closed.
Invoice: Vendor Payment is
Missing
An invoice (listed by Invoice RECORD number) shows the vendor
payment status as Closed.
Payable is not Journalized
and Should Be
A Payable exists without a Journal Entry.
Payment Is Journalized And
Shouldn’t Be
Only Payments Received and Made where the Profile Type is Other or
where the Payment Method is Other, or Bank Withdrawals should be
journalized.
Payment Is Not Journalized
And Should Be
Payments Received and Made where the Profile Type is Other, or where
the Payment Method is Other, or Bank Withdrawals must have a journal
entry.
Payment Amount Doesn’t
Match Journal Entry Amount
The amount of the payment does not match the amount posted to the
Cash in Bank account in the journal entry. This message also appears if
the amount is being posted to the incorrect Cash in Bank account or the
debits and credits have been reversed.
Payment Date Doesn’t Match
Journal Entry Date
The date on the payment screen should always match the date in the
journal entry screen.
Pymt Invalid For JE That
Affects Client Balances***
A journal entry should only affect Client Balances when a Payment
Received or Made is entered that has a payment method of Other and
a profile type of Client.
Pymt Invalid For JE That
Affects ARC/BSP***
A journal entry should only affect ARC/BSP when a Payment Received
or Made is entered that has a payment method of EFT and a profile
type of Vendor-ARC/BSP.
Pymt Invalid For JE That
Affects Vendor Balances***
A journal entry should only affect Vendor Balances when a Payment
Received or Made is entered that has a payment method of Other and
a profile type of Vendor-Supplier.
Pymt Invalid For JE That
Affects Cash In Bank***
A journal entry should only affect Cash in Bank when a Payment
Received or Made is entered that has a payment method of cash, check
or EFT and a profile type of Client, Vendor or Other. Also for Bank
Withdrawals.
Credit Card Pymt Date
Doesn’t Match Invoice Date
A client payment with a payment method of Credit Card should have the
same date of the invoice.
Bank Account #1 Difference
Between Receipts And
Deposits: 500.00
There should always be a receipts report to match every deposit. The
message means there is a discrepancy and the deposit entered needs
to be re-reconciled.
4/7/15
440
Chapter 12
Reports
Payment Out of Balance
Summary and detail amounts of the payments do not match. This entry
should be voided and reentered. It may cause an out of balance
between debits and credits in the End of Period which would prohibit
completion of the month-end process.
*** When a Posted End of Period is voided, the entry is converted back into a normal journal entry and a
reversing journal entry is also created. This results in these messages seen here. If these messages are
received as the result of a voided End of Period, ignore the message.
*** If a Pseudo End of Period is in the system, see “Payment Invalid for JE” messages for Client Balances,
ARC Balances, Vendor Balances and Cash in Bank.” These messages are just warning that one or more
Pseudo EOP's are in place. These messages can be ignored, since there are prompts to void all Pseudo
EOP's before performing a Full EOP or when Pseudo EOP's exist prior to Posting.
Interface
The following reports are listed under the Reports|Interface menu option:
Invoice List
Lists downloaded invoices waiting to be processed. Note: TBO shows
the foreign currency value and currency code for comm track
transactions on the Interface Invoice List report.
Record List
All the information behind each Rec Loc Button for every invoice where
the information has not been purged under Utilities|Purge|PNR
History. Hint: Before printing out this report, save this res.txt file
somewhere on the hard drive by clicking Save As FIRST. Regenerate
the interface files using this file if there are any problems. Call support
for help with this.
Downloading/Processing
Error Log
Log of errors found during Download or Processing. These logs are
automatically purged in conjunction with the PNR history purge routine
(Utilities|Purge|PNR History.
For complete instructions on how to use these reports, please refer to the Interface Download and
Processing section of this manual.
Profile
Trams Back Office provides the ability to create lists and labels from the database. Customize the mailing
list for target marketing opportunities by filtering the results through the selection criteria fields. The more
fields completed, the narrower the results.
To the right of each selection field is a separate field with selection options or operators: Is Equal To, Is Not
Equal To, Is Blank, Is Not Blank, Starting With, Contains, In, and Not In. These operators help to more
narrowly define the search. (When doing searches on fields containing “wildcard” search criteria using the
selections of “IN” and “NOT IN," the system looks for the field to contain the complete string entered between
the delimiters or the exact match). If the remarks field contains the word ONE, and a search is performed
for IN ONE,TWO,THREE then there will be a result. If a search is completed for NOT IN ONE,TWO,THREE
then there be no results. Basically using IN "ONE,TWO,THREE" is like doing: (IS EQUAL TO "ONE") OR
(IS EQUAL TO "TWO") OR (IS EQUAL TO "THREE"). Using NOT IN "ONE,TWO,THREE" is like doing: (IS
NOT EQUAL TO "ONE") AND (IS NOT EQUAL TO "TWO") AND (IS NOT EQUAL TO
"THREE").
For example, if entering “golf” into the Travel Preference field, the query searches for all profiles in the
database that have a travel preference of golf. If, however, the search is further limited by entering 90045
441
4/7/15
Reports
in the zip code field, the search is now limited to those with a travel preference of golf within the 90045 zip
code area.
In addition to creating labels and mailing lists, running a weekly list of profiles provides an opportunity to
eliminate duplicates and update information. Maintaining a clean database gets date sensitive travel
opportunities to the right customers on time.
Note: ClientBase prints out mailing lists and handles duplicate profiles at a much higher level of proficiency.
Use the Profile Dupe Checker to merge invoices and payments from one profile to another and automatically
delete out profiles no longer wanted.
1. Click Reports|Profile.
2. Select settings.
Name
Enter the name or portion of name depending on the operator selected.
Profile Type
Select one or more of the following: Leisure, Corporate, Vendor, Agent,
Other or All.
City
Enter the city or portion of the city depending on the operator selected.
Report Type
Select Report, Label or Mail Merge (for ASCII export format).
State
Enter the state or portion of the state depending on the operator
selected.
Sort By
Select Name, Zip & Name or Interface ID.
Zip
Enter the zip code or portion of the zip code depending on the operator
selected.
Format
Select Summary or Detail as applicable.
Phone
Enter the phone number or portion of the phone number depending on
the operator selected.
Print Passengers
From drop-down menu, choose No, Yes, Not Alphabetized, or Yes,
Alphabetized to print passengers. If set to yes, must have names listed
in the profile under the Employee|Family tab.
Group/Batch
Enter the group/batch name or portion of name depending on the
operator selected.
Print Labels in Caps
As requested by the United States Post Office, there is an option to print
labels in all capital letters. All capital letters on labels complies with
USPS requests.
Travel Pref
Enter the travel preference or portion of the travel preference depending
on the operator selected.
Use Cross Reference
If a ross reference is generated when printing out Vendor Activity
Reports or some Report Generator reports, check Use Cross
Reference. The labels printed are the names selected when the report
was set up.
Business Affil/Type
Enter the business affiliation/type or a portion of it depending on the
operator selected.
Show Inactive Profiles
Click here to print out Inactive Profiles.
Other
Enter the Other entry or portion of Other entry depending on the
operator selected.
Notes
Enter the note or portion of note depending on the operator selected.
4/7/15
442
Chapter 12
Reports
Add’l Notes
Enter the note or portion of note depending on the operator selected.
Interface ID
Enter the Interface ID or portion of Interface ID depending on the
operator selected.
Date Created From/To
Double-click in field to double-click on date on calendar, or enter the
date in this format, MM/DD/YY.
Client Invoices/From/To
From the drop-down, select All, With, or Without, and the appropriate
date range.
3. Click Preview to view the report to the screen. (Or click Print to send the report directly to the printer
without viewing first.) To print a full page of labels check Print full Page of Labels for Each Address.
Your profiles in Trams Back Office are entered in upper and lower case for easy readability. However, since
you are doing a big mailing this month, you choose to print labels in all capital letters assisting your local
post office and their electronic reading machines.
Go to Reports|Profiles, which takes you to Lists and Labels. Change the Report Type to Labels. After
completing the appropriate selection criteria, and you’re ready to print your labels, you are presented with
a Label Setup box.
If a slash or comma exists in the passenger name field in the profile, Trams Back Office takes everything
before the slash or comma and prints it as the last name, and everything after the slash or commas is printed
as the first name.
Use Cross Reference to Generate Labels
The agency is preparing a master letter to everyone who has taken a cruise within this past year, notifying
them of the agency's discount plan for repeat cruisers. First find out who the clients are who have taken a
cruise this past year.
1) Go to Reports|Report Generator|Print Reports and select a Client Activity Report (such as CL_AS.rpt).
2) Enter the selection criteria for Submit To "Supplier/Comm Track", with a Travel Type of "Ship Final" and
run the report for the last year to find all the clients who have taken cruises.
3) Select "Client Only" or "Client & Vendor" under the Cross Reference field on the Advanced Tab.
4) Preview the report. No need to print it.
5) To print labels or to merge the names from this "Ship Final" query in Report Generator from Trams Back
Office to a word processor, go to Reports|Client|Lists & Labels, or Reports|Profile.
6) Select "Label" in the Report Type field, if to print labels, or "Mail Merge" to export a file to a word
processor.
7) Check Use Cross Reference Data.
8) Make sure the Zip Field IS NOT BLANK, so that any client name without an address/zip code are not
printed.
9) Click Preview and select the label type. Print labels.
For Mail merge, click Print and map to the directory and folder in the Save To field (usually
C:\Programs\Tramswin\Reports). Enter the name of the file (repeat cruisers.txt in the File name field and
save as a .txt file, and Click Save. Merge all selected client names and addresses into the master letter by
accessing this saved file through a word processing software using its instructions.
443
4/7/15
Reports
Mail Merge
Mail Merge is an option that takes the information stored in Reports and puts it into a format accepted by
other software applications. To activate this option when printing lists, select the desired selection criteria,
and click on the down-arrow on the Report Type field to select the option for Mail Merge. Click O.K. to
process the report. Next, decide where to save the file and enter the full path, including the directory and a
file name (with the extension) in the File Name field. The file has a .txt extension. Click on Save.
The mail merge file is a tab-delimited file. Change this delimiter in the Utilities menu, under Setup, then
Global Defaults.
Report Generator Reports
Please see chapters referenced below for complete overview of Report Generator Reports:
Print Report
See chapter entitled, Report Generator Reports.
Build Report
See chapter entitled, Building Reports with the Report Generator
Overview.
Financial Modeling
Financial Modeling Sections
Analysis
For complete instructions on
setting up Financial Modeling,
see Chapter entitled, Financial
Modeling,
This report has 3 sections:
Revenue Analysis includes Total Sales, Cost of Sales, Number of
Bookings, Percent of Gross Sales, Average Commission Percentage,
Commission per Booking, Percentage of Total Expenses, and
Percentage of Fixed Expenses by Travel Type. It also shows the Total
number of invoices, the Average Gross Sales per invoice, and average
commission per invoice.
The Expense Analysis section gives an expense break down by
Expense Category. It shows what each category is as a percent of total
expenses. Find out fixed versus variable spending, and average expense
per invoice.
Management Analysis compares Sales, Revenue, and Expense Totals,
along with Total Invoices, Bookings and Segments per Employee, per
Sales Agent, per CRT, and per square foot.
Export: Prism Handoff File
The Prism Hand-off file is a data export program designed and used by agency and agency corporate clients
who are working with British Airways and other various airlines. Find this under Reports|Export|Prism
Hand-off. Fill in the selection criteria and click OK. A series of 8 export files with the extension .inp are
created in a specified directory specify. Include or exclude a UDID from the report, and Service Fee
Bookings. Notice the Don’t Include Commission Amounts checkbox when if checked, the commission
amount fields in the exported files show as $.0.00. So if the party receiving the exported files does not require
commission information, there is a way to prevent that information from being shipped.
4/7/15
444
Chapter 12
Reports
Export: Maritz Handoff File
The Maritz Hand-off file is a data export program designed and used by agency and agency corporate
clients who are working with Maritz. Find this under Reports|Export|Maritz Hand-off. Fill in the selection
criteria and click OK.
Export: CWT Handoff File
The CWT Hand-off file is a data export program designed and used by agency and agency corporate clients
who are working with CWT. Find this under Reports|Export|CWT Hand-off. Fill in the selection criteria and
click OK.
Batch Reporting
Since batched reports can be saved and retrieved for frequent processing, the date fields in all reports also
allow for date formulas. This means any report field that has a date, can also contain a formula for that date.
The date formula function submits a report for batch processing without identifying a specific month, day
and year in the From and To date fields. Instead, the report is submitted with a formula for the month, day,
day of the week, and year based upon the date the report is processed.
Remember: Batch reports are all date sensitive. Make sure the system date and time are correct.
Batch reports adhere to User Permission settings. If a user does not have permission to preview or print a
specific report, they are prompted as such. The report can be temporarily deleted from the batch so that
other reports that the user does have permission to run can be generated.
Benefit: When entering a date formula, the system converts it to the intended time period and allows for
batching reports and saving the batch for future use without the need to modify dates.
Example: The following tables contain sample formulas for specifying dates. Mix and match the absolute
and relative parameters in the function. The first number specifies the day of the month, the second number
specifies the month, and the third number specifies the year. So if the first number filled in, this means this
report is wanted to reoccur on this day every month, in every year.
Batch Reporting Date Formulas
Example Scenarios
Enter This
On the 31st of each month here is how to provide a batch of corporate clients
with various Summaries and Fare Savings reports for that month.
From: =1,0,0
At any point an Income Statement can be run, a Sales Activity summary and a
Financial Modeling Analysis report for year-to-date.
From: =1,1,0
On the 15th of each month here is how to generate statements for all clients
that have a pending balance from the beginning of time to the 31st of the
previous month.
From: =1,1,0
Throughout the month to see a check register for each bank account from the
beginning of the month to the current date.
From: =1,0,0
445
To: =31,0,0
To: =0,0,0
To: =31,-1,0
To: =0,0,0
4/7/15
Reports
Daily Reports
Client Balances
=0,0,0
Vendor Balances
=0,0,0
ARC Reconciliation
=0,0,0
Check Register
=1,0,0 to =0,0,0
Invoice/Analysis
=0,0,0
Payments/Received
=0,0,0
Weekly Reports (these are set for printing on a Monday)
ARC Reconciliation
=-7 to -1
=Mon-1 to =Sun
Invoice/ARC
=-7 to -1
=Mon-1 to =Sun
Invoice Analysis
=-7 to -1
=Mon-1 to =Sun
Invoice/Activity
=-7 to -1
=Mon-1 to =Sun
Sales Agent Activity
=-7 to -1
=Mon-1 to =Sun
Monthly Reports
Balance Sheet (as of last day of last month)
=31,-1,0
Income Statement – Month
=1,-1,0 to =31,-1,0
Income Statement –Year-to-Date (year to end of last
month)
=1,1,0 to =31,-1,0
Account History (for last month)
=1,-1,0 to =31,-1,0
Client Balance (as of last day of last month)
=31,-1,0
Vendor Balances (as of last day of last month)
=31,-1,0
Check Register (for last month)
=1,-1,0 to =31,-1,0
Batch Reports Load and Save Option
To load or save a group or batch of reports, select the Reports|Batch Reports menu. This displays a Batch
Report Window. Leave this window open.
To prepare a report for batch printing and processing later, select the Reports menu and then select a report
to include in the batch. Type in the parameters and enter the date formulas and then click the Batch button.
Repeat for each report included in the batch. Next, go back into the Batch Report Window and save these
reports with a specific name by clicking the Batch Name field and typing in a Batch Name. Then click the
Description field and type a description of the batch and click the Save button.
Note: Did you know you could e-mail a batch report as a .pdf file type? Only one report or batch of reports
can be e-mailed at a time from this screen by clicking E-mail.
To print a batch of reports, select the Reports|Batch Reports menu. Click Load. Trams Back Office
displays a second window with the list of report batches. Highlight the batch or batches to print and click
4/7/15
446
Chapter 12
Reports
Print. To move a report to a different print position, click on the report and use the Move Up and Move Down
buttons to re-position the report in the listing. To email a batch of reports in .pdf format, click E-mail to be
launched into an email screen with the batch reports listed as attachments.
To delete a report or batch of reports, click Reports|Batch Reports and Load. Highlight the report to delete
and click Delete. If it is a batch to delete, highlight the batch name and click Delete.
Print a Batch Report Using the Windows Task Schedule
The following are the steps for a doing a scheduled printing for batch/s in Trams Back Office:
1. Schedule the batch printing or emailing by clicking on Start|Programs|Accessories|System
Tools|Schedule Task. Click Add Schedule Task.
2. Follow the Wizard by clicking Next, and then Browse. Map to the TBO icon on the desktop, or to the
Program Files|Trams|Tramswin|Tramswin.exe.
3. Next select how often to run the backup by selecting the following Start Time, When task is performed
and Start Day.
4. Enter the login for the computer (use the password entered when logging into the PC or to the network in
the office, and make sure the password is correct and leave blank if there is no password). Be sure to check
in the box next to Open Advanced Properties for this task and click Finish. A Task Tab window opens for
Trams Back Office.
5. Ensure the correct information is entered (see below) in both the RUN: and START IN: fields.
Multiple Batches are separated by a comma. There is a space before all the dashes and between username
and the value, password and the value etc.
To PRINT A BATCH report to the default printer via the command line:
RUN: field add - TramsWIN.EXE -username sysdba -password ******** -alias Trams -printbatch
SAMPLE:
RUN: "C:\Program Files\Trams\Tramswin\Tramswin.exe" -username sysdba -password ****** -alias
Trams -printbatch 4,5
START IN : "C:\Program Files\Trams\Tramswin\Tramswin.exe"
Where the batch numbers are 4 and 5 (Use the Batch Number from the Batch Report Screen in TBO).
6. Make sure the computer is on when the process is scheduled.
Scheduled E-mailing
1. Follow the steps in Scheduled Reporting above.
2. Command line entry format in Schedule Task should follow the example in step 3 below (insert the proper
variables to reflect your real information)
3. C:\PROGRA~1\Trams\Tramswin\Tramswin.exe -username SYSDBA -password your password
here -alias demodata -emailbatch 1 [email protected]
TCR Viewer
Trams Crystal Reports (TCR) give the agency the ability to run predesigned Crystal Reports as an
alternative to those offered within the Trams Back Office product. It is a free add-on Trams Back Office. To
download a Crystal Report Viewer and view and download reports to use in the agency, go to
http://static.Trams.com/Tramslibrary/reports/index.html. Once the viewer has been installed and
reports have been downloaded, run the reports from inside TBO by going to Reports|TCR Viewer.
447
4/7/15
Reports
ODBC DSN: By default the database is defaulted to the Trams database. (But choose from the drop-down,
dBase Files, Excel Files, or MS Access Database.)
User Name/Password: Enter the User Name (default is SYSDBA), and Password for the Trams database.
Report Name/Browser: Select the report to run by browsing to it on the computer. (These reports were
downloaded by the agency.)
View Report: By clicking View Report, the user is launched into a screen to setup the parameters (dates,
etc.) with which to run report.
4/7/15
448
Chapter 12
449
Reports
4/7/15
Report Generator
12
This chapter contains:
Description of Predesigned Reports
How to Use Report Generator Predesigned Reports
Special Canadian Report Generator Reports
Classes of Reports
There are eight classes of pre-defined Report Generator reports that are included with Trams Back Office.
These are listed below with their abbreviations. The abbreviations form the first part of each report name.
Report names comprise the Report Class Abbreviation (AG {Agent}, BR {Branch}, etc.) combined with a "By
Type" (Client, Vendor, etc.) abbreviation, and whether it is a "Summary" Report (AS) or a "Detail" Report
(AD). Thus, the Client Activity Summary Report is called CL_AS. Below is a summary listing of the reports,
with their names, and a brief description of the application of each.
Print, modify, or build new reports. From the Report Generator|Print Report option, click the report name
field or press Enter to display a full list of available reports.
Using Report Generator Predesigned Reports
To use the TBO Report Generator predesigned reports, click the report button to go to the Select Report
Screen where the path can be entered where the canned reports are stored. Click the desired report, and
choose Select. Then, at the Report Generator selection criteria screen, use the fields on the General and
Advanced tabs to further define the report.
1) Select Reports|Report Generator|Print Reports.
4/7/15
450
Report Generator Reports
2) Select the Report run by clicking the Report button.
If the width of the columns are adjusted, the column
settings are saved when users press <select>.
Invoice Report Selection Criteria Screen
3. Using the selection criteria under the General and Advanced Tabs, choose settings for the report.
4. Click Preview to view the report to the screen. (Or click Print to send the report directly to the printer
without viewing first.)
5. Click the print icon to print.
Please see next chapter, Building Reports Using the Report Generator Overview, to learn how to modify
any of the following reports.
451
4/7/15
Report Generator Reports
Useful Hints:
1) Enter either a check number or credit card number in the CK/CC No field to display only the invoices
where the client paid with the entered number. If a credit card number was the form of payment, only items
using that credit card number appear in the report. For example, the CK/CC No field reads from left to right,
so that entering a "4" queries all credit card numbers beginning with 4. This will product a report for all
invoices where the client used Visa as the form of payment.
Narrow the search by Payment Method to display those items where the client has paid by that selected
Payment Method. This field coupled with the Ck/CC No field will run a report for all Invoices where the Client
form of payment was by Credit Card for either a specific credit card or for all credit cards beginning with a
"4" (all Visa transactions).
2) Multiple Forms of Payments can be selected to view all credit card payments and CC Merchant
payments on one report.
3) City & Origin/Destination Fields: Enter a city code in either field, but not both. The fields are used for
filtering different city code data based on where the city code resides in the booking. City field is reading the
first Itinerary field from the General Tab of the booking. All city codes appearing in the first Itinerary field are
displayed on the report, based on the other selection criteria, such as Issue Date, Depart Date, Travel Type,
etc. The City field in Report Generator displays ARC, Supplier or Comm Track bookings on the report.
Segment level booking details don’t have to be present for bookings to show on the report.
Origin/Destination fields are reading the Origin or Destination fields from the Segment Tab of the booking,
so if a booking does not have any segment level detail in the tab, like for hotels and cars, they would not
appear on the report since the Segment Tab is blank for those type of bookings.
4) Exclude the clients that do not belong to other specific groups: Under Advanced tab, select Not In
and entered the Invoice Group IDs separated by a comma no spaces.
Summary Listing of Reports - Agent Reports
This section lists all the predesigned agent reports installed with the program, and includes a description of
each.
Agent Activity Summary (AG_AS)
Use this report when for a quick summary of each agent’s productivity at a glance. This report summarizes
Number of Bookings, the Total, Fare, Commission, and Agent Commission. Set the date range for a weekly
or monthly productivity report.
Agent Activity By Client (AG_CL_AS)
This report may helps plan for client meetings. If an agent is spending more time with one customer than
another, it may be beneficial for the agent to attend future face-to-face meetings. Or, if an agent is spending
too much time with one client, make changes to correct any imbalance. For each Agent and Client, this
report summarizes the Number of Bookings, Total Fare, Commission, and Agent Commission only.
Agent Activity By Departure Date (AG_DD_AS)
For each Agent and Departure Date, this report summarizes Number of Bookings, Total Fare, Commission,
and Agent Commission.
4/7/15
452
Report Generator Reports
Agent Activity By Departure Point (AG_DP_AS)
For each Agent and Departure Point, this report summarizes Number of Bookings, Total Invoices,
Commission, and Agent Commission.
Agent Final Payment (AG_PAY_D)
Use the Final Pay Date From and To fields to narrow the criteria and view only those final payments due
this week, or this month. For this report to work properly, agents must be completing the Final Payment Info
box found in the invoice booking screen under the <Exp Fare Info> field. For each Agent and Invoice, this
report lists Vendor, Pay Amount, and Pay Commission. Select Date Range and change Submit To field to
Supplier for final payment due date report by agent.
Agent Activity By Travel Type (AG_TT_AS)
For each Agent and Travel Type, this report lists the Number of Bookings, the Total Fare, Commission, and
Agent Commission. Use as a management report to analyze agent productivity and product mix.
Agent Activity By Vendor (AG_VN_AS)
For each Agent and Vendor, this report lists the Number of Bookings, the Total Fare, Commission, and
Agent Commission. Select the Date Range and change the Preferred field for a report of agent activity by
preferred or non-preferred vendor.
Summary of Airline Reports
This section lists all the predesigned airline reports installed with the program, and includes a description of
each.
Airline Commission Report (AIR_COM)
Detailed listing of ARC transactions by Airline, including Base Fare, Commission, Issue Date, Itinerary, and
number of bookings for each airline.
TIP: Run the AIR_COM (Commission Cap) report in the Report Generator for all ARC bookings with TT of
Air, Domestic/International set to domestic, and Fare Type=Commision. The minimum should be one cent
and the maximum should be 49.99. The results of this report show the domestic fares that were not capped
and received 10% commission. Multiply the commission amount by 20%. This equals the commission that
would be lost at an 8% rate.
Run the same report with Domestic/International set to International and the minimum set to one cent and
the maximum commission left blank. Reduce this by 20 %. This gives the agency a “ballpark/worst case”
scenario since some carriers have not reduced their commission percentage and some have not capped
International commissions. If the agency has special agreements with certain airlines, enter the name of the
airline into the vendor field and the terms of the agreement into the appropriate fields to get the commissions
report for a specific airline.
Airline Commission Report Summary (AIR_COMS)
This report displays a total Base Fare and Commission of ARC transactions by airline.
453
4/7/15
Report Generator Reports
Airline Activity Detail (AL_AD)
This Airline Activity report is similar to the Airline Activity Summary, above, but gives a detailed listing of
activities by airline. Change the Submit To field to ARC/BSP and Travel Type to Air.
Airline Activity Summary (AL_AS)
The Airline Activity Summary report summarizes sales report by Airline. This report summarizes total
number of Tickets by Airline, Total Gross Sales, Total Commission and Total number of Segments. (It may
be helpful when negotiating override commissions!) To run this report, set Submit To to ARC/BSP and
Travel Type to Air.
Airline Usage for Client by Invoice (AL_CLI_U)
If using the AL_AS report for override negotiations, be sure to run this report too. It is important to
understand which customers contribute to the volume needed for maintaining successful override
programs. For each Airline, and the client chosen, this report lists the Invoice Number, Departure Point,
Check-In/CheckOut Dates, Passenger Name, and the Total Fare. To run this report, set Submit To to
ARC/BSP and Travel Type to Air.
Airline Usage for Client by Passenger (AL_CLP_U)
For each Airline, and the client chosen, this report lists the Passenger Name, Departure Point, the Check-In
and Check-Out Dates, and the Total Fare.
If booking all cars and hotels through the GDS, also run this report for Travel Type of Car and Hotel,
including them in the segment count analysis. For each Airline, this report lists the Departure Date,
Passenger Name, and the Segment Count. To run this report set the Travel Type to Air.
Airline Segment Count (AL-SEG)
For each airline, this report lists the Departure Date, Passenger Name, the Itinerary and the Segment count.
To run this report, set the Travel Type to Air. If booking all cars and hotels through the GDS, also run this
report for Travel Type of Car and Hotel, including them in the segment count analysis.
Summary of Branch Reports
This section lists all the predesigned branch reports installed with the program, and includes a description
of each.
Branch Activity by Salesagent (BR_AG_AS)
For each Branch, the Number of Bookings, Total Fare, and Commission are listed for each Agent. A subtotal
of the Number of Bookings, the Total Fare and Commission is given by Branch. The report can be run for a
single branch or all branches.
Branch Activity by Client (BR_CL_AS)
For each Branch, the Number of Bookings, Total Fare, and Commission are listed for each Client. A subtotal
4/7/15
454
Report Generator Reports
of the Number of Bookings, the Total Fare and Commission is given by Branch. The report can be run for
a single branch or all branches.
Branch Productivity Detail (BR_PD)
For each Branch, the Issue Date, Itinerary, Passenger Name, Total Fare, and Commission are listed. A
subtotal of the Total Fare and Commission is given for each Branch.
Branch Productivity Summary (BR_PS)
For each Branch, a subtotal of the Number of Bookings, Total Fare and Commission is given by Branch.
Branch Activity by Travel Type (BR_TT_AS)
For each Branch, the Number of Bookings, Total Fare, and Commission are listed by Travel Type. A
subtotal of the Number of Bookings, the Total Fare and Commission is given by Branch.
Branch Activity by Vendor (BR_VN_AS)
For each Branch, the Number of Bookings, Total Fare, and Commission are listed by Vendor. A subtotal of
the Number of Bookings, the Total Fare and Commission is given for each Branch. Select Preferred to view
activity by vendor.
Summary of Client Reports
This section lists all the predesigned client reports installed with the program, and includes a description of
each.
Client Activity Detail (CL_AD)
For each Client, the Issue Date, Invoice Number, Confirmation, Agent Id, Total Fare, and Commission are
listed by Client. Total Fare and Commission is subtotaled for each Client.
Client Activity By Salesagent (CL_AG_AS)
This report is helpful in determining which clients talk to which agents. For each Client, the Number of
Bookings, Total Fare, and Commission are summarized by Agent. A total of the Number of Bookings, the
Total Fare and Commission is given for all Clients.
Client Activity Summary (CL_AS)
For each Client, the Number of Bookings, Total Fare, and Commission are summarized. A total of the
Number of Bookings, Total Fare and Commission is given for all Clients.
Client Car Sales Report (CL_CARSA)
A detailed report showing the car rentals for all clients or for an individual client. Selection criteria includes
455
4/7/15
Report Generator Reports
vendor, passenger, city, pick-up and drop-off date, confirmation # and total fare.
Client Car Sales Summary Report (CL_CARSU
Car sales activity summary sorted by Car Vendor, Total Number of Bookings, and Gross Fares.
Client Activity By Departure Date (CL_DD_AS)
For each Client, the Number of Bookings, Total Fare, and Commission are summarized by Departure Date.
A total of the Number of Bookings, the Total Fare and Commission is given for all Clients.
Client Activity By Departure Point (CL_DP_AS)
For each Client, the Number of Bookings, the Total Fare, and Commission are summarized by Departure
Point. A total of the Number of Bookings, the Total Fare and Commission is given for all Clients.
Frequent Flyer Reconciliation for Specified Travelers
(CL_FREQF)
This report gives Issue Date, Ticket Number, Depart Date, Arrival Date, Itinerary, and Total Fare. It sorts by
each airline and gives a subtotal and a grand total. Run this report for keeping track of clients frequent flyer
mileage.
Client Fare Savings Report (CL_FS_D)
This is a simplified fare savings report that can be used as is or customized to suit a particular client. To run
the report, enter the time frame, and include the client name, and the passenger name. Also specify
Payment Status (Open, Closed or All).
Client Hotel Sales Report (CL_HOTSA)
The Hotel Sales Report prints the name of the Vendor, Traveler’s Name, Invoice Number, City of
Destination, Confirmation Number, Check-In, Check-Out Dates, Nightly Rate, and Total Rate/Fare.
Client Hotel Summary Sales Report (CL_HOTSU)
This report summarizes the hotel sales by showing the Vendor, # of bookings and Total Fare.
Lost Fare Report by Passenger (CL_LOSFA)
Use this report to verify that the client has always paid the lowest fare available or to provide an explanation
if a higher fare was paid. Find data for this report in the invoice Expanded Fare fields. Ticket Number, Airline,
Depart Date, Itinerary, Fare Paid, Low Fare, Total Fare Lost, and the Fare Codes are found in this report.
Client Final Payment (CL_PAY_D)
For each Client, the Invoice Number, Vendor Name, Agent, Total Fare, and Commission are listed by
4/7/15
456
Report Generator Reports
Invoice.
Project Number Report (CL_PROJ)
Use this report when a project number has been entered into one of the UDID fields. Invoice number,
Passenger, Itinerary, and Fare by project are displayed.
Routing and Fare Comparison (CL_ROUTF)
For each passenger Issue Date, Invoice Number, Depart Date, Airline Code, and Fare Paid. This report
shows Routing and Total Fare.
Client Activity By Travel Type (CL_TT_AS)
For each Client, the Number of Bookings, Total Fare, and Commission are summarized by Travel Type. A
total of the Number of Bookings, the Total Fare and Commission is given for all Clients.
Client Activity By Vendor (CL_VN_AS)
For each Client, the Number of Bookings, Total Fare, and Commission are summarized by Vendor. A total
of the Number of Bookings, the Total Fare and Commission is given for all Clients.
Client Department Activity Summary (CLDPT_AS)
For each Client, the Number of Bookings, Total Fare, and Commission are listed by Department. A total of
the Number of Bookings, the Total Fare and Commission is given for all Clients.
Commission Caps By Client (CL_CAPS)
Use this report to analyze tickets based on the total commission or total fare. This report also assists in
analyzing the impact of commission caps. Passenger Name, Issue Date, Invoice, Ticket#, Flown Carrier,
Total Fare, Base Fare, Commission, Commission Rate, and Count are fields found in this report.
Client Passenger Activity Summary By Travel Type
(CLPTT_AS)
This report is particularly helpful to determine which clients only book airline tickets and might need to be
targeted to get their future hotel and car bookings. For each Client and Passenger, the Number of Bookings,
the Total Fare, and Commission are listed by Travel Type. A total of the Number of Bookings, the Total Fare
and Commission is given for all Clients.
Car Usage for Client by Invoice (CR_CLI_U)
Use this report when negotiating with one particular car vendor, to tell which car vendor may work best with
for the client needs. For each car, and the selected client, this report lists the Invoice Number, Passenger,
Departure Point, Departure Date, Confirmation, Car Type, and the Total Fare. To run this report, set Travel
Type to Car.
457
4/7/15
Report Generator Reports
Car Usage for Client by Passenger (CR_CLP_U)
For each car, and the selected client, this report lists the Passenger, Departure Point, Departure Date,
Confirmation, Car Type, and the Total Fare. To run this report, set Travel Type to Car.
Travel Detail by Department (DEP_TRVL)
If the agency’s commercial accounts are departmentalized, this report is useful in showing travel activity
within the departments. The Passenger, Invoice #, Issue Date, Ticket or Confirmation number, Airline and
Vendor are listed.
Summary of Groups Reports
This section lists all the predesigned group reports installed with the program, and includes a description of
each.
Group Client Statement (GR_CLI)
At a glance, this report prints all travel by client for a specified period of time. The report shows Issue Date,
Invoice#, Confirmation#, Vendor Name, and Total Fare spent on travel.
Special Assistance/Meet & Greet (GR_MTGT)
For each Vendor, this report lists Passenger, Invoice Number, Check-In, Check-Out dates, and any special
need specified in UDID#2.
Group Rooming List (GR_RL)
Useful for group leaders and vendors, this report gives the name of the Hotel/Vendor, Passenger, Invoice
#, Check-In, Check-Out Times, and a list of Roommates. UDID#1 for Roommate.
Summary of Sales Reports
This section lists all the predesigned sales reports installed with the program, and includes a description of
each.
Hotel Usage for Client By Invoice (HT_CLI_U)
Use this report when negotiating with one particular hotel vendor. It reports which hotel vendor may work
best for the client needs. To run this report, set Travel Type to Hotel. For each Hotel, the Departure Point,
Check-In and Check-Out date, Passenger, and Total Fare are listed by Invoice. A subtotal of the Total Fare
is given for each Hotel.
Hotel Usage for Client By Passenger (HT_CLP_U)
To run this report, set Travel Type to Hotel. For each Hotel, the Departure Point, Check-In and Check-Out
date, and Total Fare are listed by Passenger. A subtotal of the Total Fare is given for each Hotel.
4/7/15
458
Report Generator Reports
Routing and Fare Comparison (RT_FA_C)
For each Itinerary, Passenger Name, Issue Date, Invoice, Depart Date, Airline, and, Total Fare are listed.
A subtotal of the Total Fare is given for each Itinerary. For best results, set the travel type to Air. For detailed
city-pair analyses, see Reports|Invoice|CityPair.
Sales Activity By Departure Dates Detail (S_DD_AD)
For each Departure Date, the Issue Date, Confirmation Number, Itinerary, Passenger, Total Fare, and
Commission are listed. A subtotal of the Total Fare and the Commission is given for each Departure Date.
Sales Activity by Departure Date Summary (S_DD_AS)
For each Departure Date, the Number of Bookings, the Total Fare, and Commission are summarized. A
total of the Number of Bookings, the Total Fare and Commission is given for each Departure Date.
Sales Activity By Invoice (S_IN_AD)
For each issue date, Invoice number and Client Ticket Number, Itinerary, Passenger, Vendor, Total Fare,
and Commission are listed. A total of the Total Fare and the Commission is given for each Invoice.
Sales Activity By Itinerary Detail (S_IT_AD)
For each Itinerary, the Issue Date, Depart Date, Passenger, the Total Fare, and the Commission are listed
for each Invoice. A total of the Total Fare and the Commission is given for each Itinerary. This report can
be run by origin and destination city.
Sales Activity By Itinerary Summary (S_IT_AS)
For each Itinerary, the Number of Bookings, the Total Fare, and Commission are summarized. A total of the
Number of Bookings, the Total Fare and Commission is given for each Itinerary. The report can be run by
origin and by destination city.
Passengers Total Activity by Travel Type (S_PASTOT)
This report shows passenger activity by type of travel. The passenger, travel type, total fare and number of
bookings are listed.
Sales Activity By Travel Type Detail (S_TT_AD)
For each Travel Type, the Issue Date, Ticket Number, Itinerary, Passenger, Total Fare, and Commission
are listed. A subtotal of the Total Fare and the Commission is given for each Travel Type.
Sales Activity By Travel Type Summary (S_TT_AS)
For each Travel Type, the Number of Bookings, Total Fare, and Commission are summarized. A total of the
Number of Bookings, the Total Fare and Commission is given for each Travel Type.
459
4/7/15
Report Generator Reports
Vendor Usage By Travel Type (S_TTVAS)
This report is designed to show the relationship between vendors and travel types. Travel Type,
Airline/Vendor, #of Bookings, Total Fare and Commission are listed.
Summary of Travel by Type of Travel (SUMTRAV)
This report summarizes travel by type of travel and provides a count for each travel type. Vendor and total
fare are included in the report.
Ticket List (TKT_LIST)
Ticket list report prints all tickets in chronological order. Set the time period desired (From and To) and
Submit To to ARC/BSP. Included in the report are Ticket Number, Invoice Number, Client, Passenger,
Airline, Total Fare, Tax and Commission.
Travel Detail by Department (DEP_TRVL)
This report gives detailed travel information for corporate clients by department. It displays the total number
of Passengers by Department, Invoice Number, Issue Date, Ticket/Conf Number, Airline/Vendor Name,
Itinerary, Depart Date, and Total Fare.
Travel Detail by Type of Travel (TRDETRAV)
For each travel type, this report shows Passenger, Invoice Number, Ticket/Conf Number, Airline/ Vendor
Name, Itinerary, Depart Date, High Fare, Total Fare, and Fare Savings. Use for corporate clients travel
budget, showing how their travel transactions fit with their budgeting.
Summary of Vendor Reports
This section lists all the predesigned vendor reports installed with the program, and includes a description
of each.
Vendor Activity By Salesagent (VN_AG_AD)
For each Vendor, the Invoice Number, Passenger, Confirmation Number, Total Fare, and Commission are
listed by Agent. A subtotal of the Total Fare and the Commission is given for each Vendor.
Vendor Activity By Client (VN_CL_AD)
For each Vendor, the Invoice Number, Departure Point, and Total Fare are listed. A subtotal of the Total
Fare and the Commission is given for each Vendor.
Vendor Activity By Departure Date (VN_DD_AD)
For each Vendor, the Depart Date, Invoice Number, Inside Agent, Outside Agent, Passenger Name,
Confirmation Number, Total Fare and Commission are listed by Departure Date. A total of the Total Fare
and the Commission is given for each Vendor. This report is wider than 80 cols and requires either a
4/7/15
460
Report Generator Reports
wide-carriage printer or a printer that is capable of printing condensed print.
Vendor Activity By Departure Point (VN_DP_AD)
For each Vendor, the Invoice number, Passenger, Confirmation Number, Total Fare, and Commission are
listed by Departure Point. A subtotal of the Total Fare and the Commission is given for each Vendor.
Vendor Activity by Passenger (VN_PA_AD)
For each Vendor, Passengers, Invoice Numbers, Departure Point, Depart and Return Dates, and Total Fare
are listed.
Vendor Activity Summary (VN_AS)
For each Vendor, the Number of Bookings, Total Fare, and Commission are listed. A total of the Number of
Bookings, the Total Fare and commission is given for all Vendors.
Vendor Final Payment Report (VN_PAY_D)
The Vendor Final Payment report is designed to aid in the tracking of Final Payments. This report is sorted
by Agent and includes Due Date, Vendor, Final Payment Amount, Final Payment Commission Amount,
Passenger Name, Depart Date, and Confirmation Number. The Final Payment commission information is
entered in the expanded booking screen manually, or via interface.
Vendor Activity By Travel Type (VN_TT_AD)
For each Vendor, the Invoice number, Passenger, Total Fare, and Commission are listed by Travel Type.
A subtotal of the Total Fare and the Commission is given for each Vendor.
Vendor Usage by Travel Type (S_TTVAS)
For each Travel Type, the Vendor Name, Number of Bookings, Total Fare, and Commission are
summarized. A subtotal of the Number of Bookings, the Total Fare and Commission is given for each Travel
Type.
Summary of Miscellaneous Reports
This section lists all the predesigned miscellaneous reports installed with the program, and includes a
description of each.
Credit Card Reconciliation (CC_RECON)
For each Credit Card Account (or Check Number), the Invoice, Passenger Name, Payment type, Depart
Date, Itinerary, Total Fare, and Payment Date are listed. A subtotal of Total Fare is given for each Travel
Type.
461
4/7/15
Report Generator Reports
Final Payment Report (FINL_PAY)
Final payment information is available from this report if the final payment date has been inserted in the
Expanded Fare field in the invoice. The report identifies the Agent, Payment Due Date, Vendor, Final
Payment Amount, Commission, Passenger, Depart Date, and Ticket/Confirmation Number.
Passengers Total Activity by Travel Type (S_PASTOT)
This report is broken down by passenger. It lists each different type of travel this passenger has booked. It
also shows the total spending and number of bookings.
4/7/15
462
Report Generator Reports
463
4/7/15
13
Build Reports/Report
Generator Overview
This chapter contains:
Directions on Building Reports
Listing of Report Generator Fields
Practical Examples
Backing Up Reports
Mail Merge
What is a Report Generator?
The Trams Back Office Report Generator provides the option of designing and printing custom reports
tailored to the agency’s specific (and unique) needs. Trams Back Office comes with a number of "canned"
reports for ARC/BSP reporting, Vendor Balances, Client Balances, Statements, etc.; however, the variety
of reports possible from the data in Trams Back Office is virtually infinite. If Trams Back Office were to build
every possible report, the program would become so large that it would be unstable. Instead, the program
has the capability to design unique reports for the agency’s needs. For example, perhaps a corporate
customer needs a summary of travel business in a particular format, by Travel Type (Hotel, Car). Use an
existing “canned” report, or use the Report Generator to tailor a report precisely to the client's needs.
What is a Report?
A report is a collection of data arranged in a format understandable -- and wanted-- by the reader. When
creating a report, ask two questions:
1. What data does the reader want to see?
2. What is the best way to arrange that data so it is understandable?
Building Reports
When creating an original report, select Reports|Report Generator|Build Report. TBO defaults to a blank
4/7/15
464
Building Reports
canvas.
Click File: The following options appear: New, Open, Save As, and Exit.
New: For a blank canvas on which to build a report, choose New. This option is usually selected to capture
data from Trams Back Office and export to another program such as Excel.
Open: Choose a report already put together and modify it to meet the agency’s specifications. No need to
reinvent the wheel when the major part of the report is already designed. Reports are found in the
C:\Program Files\Trams\Tramswin\Reports directory by default.
Save As: After the report meets the design specifications, select Save As. Each report must have a unique
name. The name assigned to a report is how to refer to the report when printing. It is advantageous to use
descriptive names, such as AIR_PROD (for Airline Productivity).
Important: Before modifying, rename the report -- carefully! When using a Report Generator Report,
rename it FIRST, so not to lose the canned report to changes forever.
By putting a "1" in front of the new report (1AIR_PROD), it appears at the top of the reports listing and it is
the newly created one.
Exit: When the report specifications are completed, Exit.
465
4/7/15
Building Reports
Designing a Report - Definition
When a new report is created, the Description field will be the title on the new report. By clicking the Print
Report Definition button, see what criteria was used to set up the report.
Specify What Data Appears on Report
The Invoice Booking (the source of the data) is the detailed part of an invoice, with information such as ticket
number, passenger name, start/end dates, and fare amounts. When printing a report using the Report
Generator, select a set of Invoice bookings, based on some criteria, and the computer shows information
from those selected bookings in a particular order and format.
Selection of Data Fields for Report
The data in an invoice is available for use in the Report Generator. Choose only those items desired from
a list of fields. In addition, there are certain calculated fields, such as Fare Savings. In the process of building
a report, create a list of fields that make up the report.
Specify the Order and Field Format
Each field is printed on the report in a format dependent on the nature of the data. For example, numeric
fields such as Invoice Number print as a series of digits (123456); Decimal Fields, such as Total Fare print
with commas separating the digits and a decimal point (10,000.00); Text fields print as text; Date fields print
in MM/DD/YY format.
4/7/15
466
Building Reports
Ability To Trim Field Length
Each data item has a maximum field length. The field only holds so many characters in the printed report,
without condensing the print size of the field. To reduce the size of a selected field is especially useful to fit
many fields on a single line. For example, the Client Name field has a maximum size of 40 characters. If
including the name field in a report and leaving the field length at the default (the maximum length), the
amount of space the name field occupies in the report is always 40 characters. If shortening the name field
to, say, 25 characters, and the field contains more than 25 characters, the report shows the entire field in
condensed print.
Ability To Sort on One or More Fields
With the report generator, sort and arrange data by telling the program what to do. What is Sorting? Sorting
means putting a list of items in a particular order. For example, there is a list of numbers: 45, 17, 81, 27, and
6. This list of numbers, sorted lowest to highest (ascending) is: 6, 17, 27, 45, and 81. The numbers haven't
changed; they have just been rearranged. By sorting, easily find a particular item. In the list of numbers, if
looking for the number 25, only look at the first three numbers, since 25 is between 17 and 27.
The other advantage of sorting is grouping similar items together. Sorting is a powerful aspect of the Report
Generator, allowing us to see, for instance, a report in Issue-Date order or to look at a report grouped by
Airline.
Sorting On One or More Data Items
When selecting fields in the report, decide if a field should be a sorting key. A sorting key means that the
sorting sequence is directly dependent on the value of that field. Report Definition
467
4/7/15
Building Reports
Select as many fields for sorting as fields in the report. Generally, though, sort on two or three fields. When
selecting multiple sort keys, the sort gives precedence to the initial sort keys. For example, if sorting by
Invoice Number and Ticket Number, the sort sequence is based primarily on Invoice Number; within records
having the same Invoice Number, the sequence is in Ticket Number order. Thus, sorting by Invoice Number
and Ticket Number, means sorting by Invoice Number and when there are two or more records with the
same Invoice number, putting them in Ticket Number order. The precedence of each sort item corresponds
directly to the item's position in the report.
Sort Keys Correspond to Sequence of Fields Displayed
It is a good idea to ensure that the sequence of sorting fields corresponds to the sequence of the items in
the report. For example, if the report prints Issue Date, Invoice Number, Passenger Name, and Total Fare,
sort by Issue Date, Invoice Number, and Passenger Name, in that order. Doing otherwise, makes the report
more difficult to follow. In general, sorted fields appear before the non-sorting fields.
Single vs. Multiple Level Reports
Reports are either one level or two levels allowing for the data to be arranged in a hierarchical manner. A
single level report looks like this:
Single Level Report
Multiple Levels Present Information More Clearly and Avoid Redundant Data
The multiple level report conveys more information because it shows patterns in the data. Note that the
invoice number and date appear only once for each invoice thus avoiding redundancy.
4/7/15
468
Building Reports
Two-Level Report
Know What Data Goes On Which Level
Don't arbitrarily assign items to different levels. Keep in mind that for a given list of sorted records, certain
items change more frequently than others. Try to get an overall view of the data being presenting in the
report. Want the data grouped by Carrier for an Airline Productivity Report? The Invoice Booking level? By
Agent ID for an Agent Summary Report? The Invoice Level? Sometimes designing a report for a single
level, then breaking it up into two levels, is easier than initially designing a multi-level report.
Level Breaks on Changed Sort Item From Prior Level
In a multi-level report, the report level breaks at the point when one or more of the sorting fields in the
primary level changes. When the Report Generator prints, printing starts on Level 1. Then, for each record,
a line is printed at Level 2. When a field in the record that is a sort key for Level 1 changes, two things
happen: subtotals are printed for the selected items at the current level (2), and a new Level 1 line is printed.
Printing continues at Level 2 and the subtotals are reset to 0.
Building the Report
Here is a picture of the Report Generator screen used to create custom reports. This screen is where to
arrange data fields.
469
4/7/15
Building Reports
Report Generator Build Report
Level 1 Fields
Level 2 Fields
These two Report Field Boxes are where to specify the data items and the order, format, and positioning of
those items in the report. Notice there two levels of data items included in a report. Level 1 is completed for
all reports; Level 2 is completed for those reports requiring two levels of information.
Click on the first line in either box to toggle between field levels. Each Report Fields Box corresponds to a
level in the report. For a single-level report, Report Fields Level 2 is empty. The total of the widths of each
field, including the spacing between fields, must not exceed 132 characters.
Report Definition Table
Report Name
The Report Name field is where to decide the name of a Report
Generator report. There is no limit to the number of reports possible
with the Report Generator, each report, however, must have a unique
name. The report name can be any number of characters including
spaces. Be careful not to use non-alpha characters such as asterisks
('*') or periods ('.') as part of the report name. The name assigned to
a report is the name used to find it when ready to print. Use
descriptive names for the reports, such as AIR_PROD for Airline
Productivity.
Report Title/Description
The Report Title or Description is centered on the top of every page
of the report. The title also appears next to the report name when
selecting an existing report. Make the title descriptive of the report,
e.g., Client Fare Savings Report.
4/7/15
470
Building Reports
Report Definition Table
Format: Detail
The Format can be either Detail or Summary. If Format is set to
Summary, all records at the lowest level with identical sorting keys
are printed as one summary record.
Print Report Definition
To print a hard copy of a report setup format, click on the Print Report
Definition button and then the printer icon.
In the Report Fields Box, each row represents a data item on the report. There are six criteria for each data
item:
Report Fields Box
Criteria
Description
Field Name
The name of the data field. Select a field by clicking the down arrow.
Field Size
The size, in characters, of the data field
Gap
The number of blank characters between the previous field (or the left margin, if first)
and the current field. There is no explicit positioning information entered: each field is
positioned relative to the previous field; thus, if a field is deleted, all successive fields
move over automatically. (0=default)
Caption
The text that should appear in the Report Header above this field. The caption defaults
to "left". The data is always left justified while the dollar amount field is right justified.
Sort
The sort option defaults to None. Set this field to Ascending if the output is desired from
"A - Z", or 1-10. Set to Descending if the output is desired from "Z-A", or 10-1. If there
are multiple items, precedence proceeds from left to right as printed on the report or
from top to bottom in the Report Fields Box.
Subtotal
Subtotal is local to current level break and prints when Level drops back to 1 or report
ends. (Does not apply to fields at Level 1. Also DO NOT use for Name Fields which are
identified by a dash line on the report.)
Total
If the field is at Level 2, then the total includes all of this field and prints once at the end
of the report in BOLD print. (DO NOT use for Name Fields.)
The caption is printed at the top of page one, just below the Title and Agency Name (starting on page two,
the agency name and title are not printed). The caption is generally made up of a description of different
data items appearing on the report. The description of a data item should be positioned in the report so it is
above the same column as the data item itself. Someone looking at the report can look at the header and
scan straight down the page for the information.
There are two lines for the Caption. For a two-level report, then the header for the first level goes on the first
line and the header for the second level goes on the second line.
Delete a Report
To delete a report, use Windows Explorer or My Computer to go an unwanted report in the reports directory
and click Delete to remove.
471
4/7/15
Building Reports
Report Generator Buttons
The Move Up and Move Down buttons are used to rearrange the order of the fields on the report. Notice
the fields from top to bottom on the field box. They appear in the same order on the report and they’ll be in
left-to-right order. Highlight the field to move. By pressing Move Up, this line switches places with the field
currently above it. By selecting Move Down, the highlighted item switches places with the field below the
line.
Using the Insert button, a new line opens, adding a field above the highlighted line. To insert a line below
the current line, use the down-arrow key on the keyboard, and move down to the item below where to insert
and click Insert. The Delete button deletes the highlighted field.
Navigation
List of Data Items and Maximum Field Sizes
The data source used in Trams Back Office Report Generator is an Invoice Booking. Each Invoice Booking
record contains many fields which may be used as data to be printed on a report. The table has a listing of
all fields in the Report Generator.
Report Generator Fields
Field Name
4/7/15
Max
Size
Description
Agent
10
ID of Agent for current Invoice
Agent Commission
13
Agent Rate x Total commission for current
booking
472
Building Reports
Report Generator Fields
473
Agent Name
30
Full Name of Agent for current Invoice
Agent Rate
6
Inside Agent Commission Rate
Airline No
3
Airline number - i.e, 006.
Airline/Vendor Name
40
'UA' or 'Hertz Rent-a-Car'
Airline/Vendor Interface ID
10
The Code used to identify the Airline, for
ARC/BSP, or the Interface ID from the
Vendor Profile for Supplier/Comm-Track.
ARC No
10
ARC number
Base Fare
13
Booking Base Fare
Booking Agent
10
Booking Agent ID
Booking Agent Commission
10
Commission amount for booking agent
Booking Agent Name
10
Booking Agent Name
Booking Count
5
Number of bookings
Booking Record Locator
5
Booking Record Locator
Branch
3
Invoice Branch
Branch Name
50
The Agency name for specified branch
City Names
25
City Names
Class Of Service
2
The Class of Service for the first segment
on the ticket is used by default.
Client Acct No
8
'1234' or '23'
Client Address 1
40
First line of Client Address
Client Address 2
40
Second line of Client Address
Client City
40
Client City
Client Country
40
Client Country
Client GST Amount
13
Client GST Amount
Client Interface ID
10
Interface ID From Client Profile
Client Name
40
LastName/FirstName or CompanyName
Client Pay Status
6
Payment status
Client Phone
20
Client phone number
Client Pymt Ck/CC No
30
Displays either the Check Number or the
Masked CC Number
Client Pymt Date
8
Date of Client Payment for this booking
Client Pymt Method
9
Cash, Check etc.
Client Remarks
30
Booking Client Remarks
Client State
5
Client State
Client Type
10
'Leisure' or 'Corporate'
4/7/15
Building Reports
Report Generator Fields
Client Zip
15
Client Zip Code
Combined CC No
30
Displays the Credit Card number for ARC,
or Supplier, or Comm Track
Commission GST Amount
13
Commission GST Amount
Commission QST Amount
13
Commission QST Amount
Comm Track CC No
25
Displays only the Comm Track CC
Number if it is in the expanded Info Tab
Commission Amt
13
Booking Commission Amount
Commission Rate
7
Booking Commission Percent
Confirm No
20
Alphanumeric
Daily Rate
13
For Supplier/Comm-Track Bookings, the
Total Fare divided by the Number Of Days.
Date Payable
8
Date Payable
Depart Date
8
Start/Depart Date
Discount
13
Difference between Actual Fare and Face
Value
Dom/Intl Indicator
12
Dom/Intl Indicator
E-Ticket Indicator
1
A 1 in this column indicates it’s an e-ticket.
Nothing in this column indicates it’s not an
e-ticket.
Face Value
13
ARC/BSP Booking Face Value
Fare Basis
8
Fare Justification
Fare Justification Code
2
Fare Justification Text
Booking Fare Code
Fare Lost
13
Booking Total Fare - Booking Low Fare
Fare Savings
13
Booking High Fare - Booking Total Fare
Final Pay Amount
13
Booking Final Payment Amount
Final Pay Commission
13
Booking Final Payment Commission
Amount
Final Pay Date
4/7/15
60
The first Fare Basis indicator on an
ARC/BSP booking (from the segment
information)
8
Booking Final Payment Date
Fixed CC No
35
Displays the entire cc number without the
Prefix and expiration date
Flown Carrier
15
Flown Carriers for Booking
Full CC No
35
Displays the prefix credit card number and
expiration date
High Fare
13
Booking High (Full) Fare
474
Building Reports
Report Generator Fields
Host Agency Code
10
Host Agency Code
Hotel/Car Description
10
'ICAR', etc.
IC Code
10
Independent Contractor Code
Invoice Count
5
Invoice Group
15
Invoice Group
Invoice Number
7
Numeric Invoice Number
Invoice Pay Status
6
Invoice Payment Status
Invoice Remarks
80
Remarks
Invoice Type
10
Sort by the Invoice Type to get a
transaction count based on the type of
invoice (i.e., number of refunds,
exchanges, sales)
Issue Date
8
Invoice Issue Date
Itinerary
19
ORG/DST
Low Fare
13
Booking Low Fare
Masked CC No
20
Only prints last 4 characters of cc #
Net Fare
13
Total Fare - Commission Amount
Number In Party
2
For Supplier/Comm Track bookings
Number Of Days
3
For Supplier/Comm Track bookings
Number of Rooms/Nights
2
For Supplier/Comm Track bookings
Number Of Rooms/Cars
2
For Supplier/Comm Track bookings
Original Ticket Number
10
Original Ticket Number
Outside Agent
10
ID of Outside Agent for current Invoice
Outside Agent Commission
13
Outside Agent Rate x Total Commission
for current booking
Outside Agent Name
30
Full Name of Outside Agent for current
Invoice
Outside Agent Rate
6
Outside Agent Commission Rate
Passenger Department
20
From Invoice or Profile if box is checked
Passenger Name
25
LastName/FirstName
Record Locator
10
PNR Locator
Return Date
8
End/Return Date
Segment Count
5
The # of city pairs in the current booking
Submit To
3
Submit To: ARC/BSP, SUP or COMM
Summary Count
5
Used in Summary Reports. Shows count
of items at current level.
Tax 1 Amount
475
Number of Invoices
13
Booking Tax 1 Amount
4/7/15
Building Reports
Report Generator Fields
Tax 2 Amount
13
Booking Tax 2 Amount
Tax 3 Amount
13
Booking Tax 3 Amount
Tax 4 Amount
13
Booking Tax 4 Amount
Tax Amount
13
Booking Total Tax Amt
Ticket Designator
25
Indicates domestic or international ticket
Ticket No
10
Ticket Number
Ticket Type
11
Normal, Ex-Add Collect, Ex-Refund
Ticket/Conf No
15
Alphanumeric
Ticketing Agent
10
Ticketing Agent ID
Ticketing Agent Name
10
Ticketing Agent Name
Ticketing Agent Commission
10
Ticketing Agent Commission amount
Total Fare
13
Booking Total Fare
Tour Code
25
Indicated code for specific tour
Travel Type
9
Air, Car, Hotel, etc.
UDID #xx
60
UDID’s #1 to #999
Validating Carrier
3
Validating Carrier
Vendor Acct No.
6
12345
Vendor Address 1
40
First line of Vendor address
Vendor Address 2
40
Second line of Vendor address
Vendor City
40
Vendor City
Vendor Country
40
Vendor Country
Vendor Name
40
Name of Vendor
Vendor Pay Status
6
Vendor Payment Status
Vendor Phone
20
Vendor Phone Number
Vendor Pymt Ck/CC No
30
Vendor Payment Check or Credit Card
Number
Vendor Pymt Date
8
Date of Vendor Payment for this booking
Vendor Pymt Method
9
Cash, Check, etc.
Vendor Remarks
30
Booking Vendor Remarks
Vendor Remit Amount
13
Vendor Net Remit Amount
Vendor State
5
Vendor State
Vendor Zip
15
Vendor Zip Code
Printing the Report
To print the report, go to Report Generator|Print Report and select the name assigned to the Report. Do
4/7/15
476
Building Reports
this by clicking the Report Button. Complete the desired selection criteria in the General and/or Advanced
Tab and process the report by clicking Print.
Report Examples
Creating and/or Modifying a Report
To help understand the information presented here, let's go through an example of building and printing a
report using the Report Generator. The report we are building is called an Airline Productivity report showing
activity grouped by Airline. This example covers the major aspects of Report Generator Programming.
Go to Reports|Report Generator|Build Report screen. Click File, then Open and select the name of an
existing report to modify. Give the report a new name (see box below), a title that is descriptive of the report
and then insert or delete to make changes. The possibilities are many.
Reminder: Rename the report before modifying
when using a Report Generator Report so not to lose the canned report
to the changes forever.
Report Fields
Here is a list of the data items we want included in the Airline Productivity Report:
Issue Date
Invoice Number
Ticket Number
Itinerary
Passenger Name
Airline/Vendor Name
Total Fare
Commission
For this example, we go to Reports|Report Generator|Build Reports. Click File|Open and select the
canned Air_com.rpt from the reports menu. Next, click File|Save As and rename the report Al-prod.rpt. In
the Description field, type Airline Productivity Report. Next, open the new renamed Airline Productivity report
(Al-prod.rpt). Now begin to modify the report.
On Field Level 1 we want the Airline/Vendor name. The field size of 20 characters can be adjusted to
accommodate longer names if necessary. Since this is the only field that will be on Level 1, we do not need
a gap between fields. We select Ascending to sort the airline by name and No for subtotal and total.
Report Fields Level 1
Field Name
Field
Size
Airline/Vendor
Name
20
Gap
0
Caption
Sort
Subtot
al
Total
Airline
Ascending
No
No
Note: In the printout, the column header "Airline" is left justified, as are all the airline codes.
477
4/7/15
Building Reports
The remaining fields that we want to see on the report are on Level 2.
Report Fields Level 2
Field Name
Size
Gap
Caption
Sort
Subtotal
Total
Issue Date
8
3
Issue Dt
Ascending
No
No
Ticket/Conf No.
10
2
Ticket No.
Ascending
No
No
Itinerary
11
2
Itinerary
No
No
No
Passenger Name
15
2
Passenger
Name
No
No
No
Total Fare
11
2
Total Fare
No
Yes
Yes
Commission
Amount
11
2
Commission
No
Yes
Yes
Sample Report Output
Airline Productivity Report
Save the created report by clicking File|Save As and checking to see if the name of the report appears
correctly. If it does, click Save. In the above example, the report name would appear as Al-prod.rpt. To
modify the report, select Report Generator|Build Report. Click File|Open and select Al prod.rpt, and
modify the report. Remember to save the changes.
Mail Merge
Mail Merge is an option that takes the information stored in Reports and puts it into a format accepted by
other software applications. To activate this option, go to the main Reports menu, then to Report Generator
and to Print Report. Click Report and Select the desired report from the report menu. Click on the
down-arrow on the Format field to select the option for Mail Merge. Complete the desired selection criteria
fields and click Preview to process the report. Next, decide where to save the file and enter the folder in the
Save In field. Enter the file name File Name field with a .txt extension. Click on Save.
Ben is using Microsoft Word to accept a mail merge from Trams Back Office. He is creating welcome home
letters for all clients returning from their trip next week. He goes to the main Reports menu, then to Report
Generator, and to Print Report. He selects one of his Client reports, and completes the Booking
Dates/Return selection criteria from the drop-down menu and the Between and To fields to reflect next
week's dates. He clicks Preview. and enters the path, directory and file name ((C:\Import\welcome.txt).
Ben opens Microsoft Word and finds his letter. He uses the C:\Import\welcome.txt as the data source for
the mail merge.
Create a mail merge file from Reports|Clients|Lists and Labels and Reports|Vendor|Lists and Labels.
To create a mail merge file, go to either the Client or Vendor subheading under the Reports menu and
choose the Lists and Labels option. Select Mail Merge for Report Type and complete the desired selection
criteria fields. Enter the file name for the data source for the mail merge.
4/7/15
478
Building Reports
The mail merge file is a tab-delimited file. Change this delimiter in Utilities|Setup|Global Defaults. Having
access to all customer names in mail merge format means the agency can print letters to all its travelers.
Your agency uses MicrosoftWord to create and print letters. You are preparing a master letter to everyone
who has taken a cruise with you this past year, notifying them of your agency's discount plan for repeat
cruisers.
First you need to find out who your clients are who have taken a cruise this past year. Go to
Reports|Report Generator|Print Reports and select a Client Activity Report (such as CL_AS.rpt). Enter
the selection criteria for Submit To "Supplier/Comm Track", with a Travel Type of "Ship Final" and run the
report for the last year to find all the clients who have taken cruises. Ensure that you select "Client Only"
or "Client & Vendor" under the Cross Reference field on the Advanced Tab. Preview the report. No need
to print it.
To merge the names from this "Ship Final" query in Report Generator from Trams Back Office to your work
processor, go to Reports|Client|Lists & Labels. Select "Mail Merge" in the for Format field, and check the
Use Cross Reference Data box. Click Print and map to directory and folder in the Save To field (usually
C:\Folder). Enter the name of the file cruise.txt in the File name field and save as a .txt file Click Save.
You can now merge all selected client names and addresses into the master letter by accessing that saved
file through your word processing software using their instructions.
Backing Up Reports
When backing up the TBO database, Report Directory is not backed up. Make a separate backup for all
the reports. Use the following instructions:
1. Select Start|Programs|Accessories|System Tools|Backup.
2. Follow the Backup Wizard, and place a checkmark in the Trams Reports folder found at C:\Program
Files\Trams\Tramswin\Reports.
3. Then, browse for the backup destination found on the bottom of the backup screen. (Some versions of
Windows may have the backup destination on the next screen.) Since reports fit nicely on a flashdrive,
select this drive as the backup destination.
4. Click on Start Backup to start backing up, or Schedule Jobs. (If you select Schedule Jobs, backup files
will be backed up as scheduled. Make sure that you have a diskette in the diskette reader and that the
479
4/7/15
Building Reports
system time and data are correct when using this option.)
Tips and Tricks
Try breaking the report into multiple levels for easier reading. When designing a report, keep each line clear
and simple. At a given level, move any constant information, such as Invoice Number or Issue Date, to a
lower level.
Use UDID’s as a forced "field" to collect data not normally included in an invoice booking but wanted for
reporting purposes. UDID’s (pronounced "U-DID's") are user-defined interface data entries captured in the
UDID’s tab portion of an invoice booking. The format for entering UDID lines is as follows:
Un-Freeflow Text, (the "UDID" is the UDID field, and the "n" represents the UDID number). Where n=
a UDID number (1 to 999) and free flow text is whatever text desired to associate with that UDID.
These UDID’s can be included as a data field when building a report and as selection criteria when printing
a report. If you want a report from the Report Generator to be printed in Portrait mode (standard format),
keep the number of characters on one line of the report to be 80 characters or less. (Eighty characters is
an average and not a exact number. Some reports will convert to landscape mode (wide format) any where
from 77 characters to 89 characters.)
4/7/15
480
Building Reports
481
4/7/15
14
Financial Modeling
This chapter contains:
Directions for Setting Up Financial Modeling
How to Run Financial Modeling Reports
Set Up Financial Modeling
To provide you with a tool to increase your agency's profit, there is a feature in Trams Back Office called
Financial Modeling. It summarizes your agency's statistics on one piece of paper and allows you to analyze
them to establish goals for your business.
Financial Modeling can be used after Bank Reconciliation, ARC/BSP Reconciliation, EOP Core Report
Balancing, and the Month End routine are complete. After the monthly Income Statement and Balance
Sheet, Financial Modeling is the final step of monthly analysis of your business.
To set up the Financial Modeling feature do the following:
1. Click Utilities|Setup|Global Defaults and click on the Financial Modeling tab.
4/7/15
482
Financial Modeling
2. Enter your Agency Information:
Financial Modeling Entry Fields
Number of Full-Time
Employees
Enter your agency’s number of full-time employees.
Number of Full-Time
Sales Employees
Enter your agency’s number of full-time sales employees.
Number of Outside
Sales Employees
Enter your agency’s number of outside sales employees.
Number of CRT’s
Enter the number of Customer Reservation Terminals in your agency.
Office Square Footage
Enter the square footage of the agency.
Number of Years In
Business
Enter the number of years your agency has been in business. (Used for
external peer comparisons.)
Percentage of
Corporate Business
Enter the percentage of corporate business your agency performs. (Used for
external peer comparisons.)
Annual Gross Sales (in
Millions)
Enter your agency’s gross sales (in millions). (Used for external peer
comparisons.)
Geographic
Classification
From the drop-down menu, select Rural, Urban or Metro for the geographic
classification for your agency. (Used for external peer comparisons.)
3. Click OK to save.
4. Next, click on General Ledger|Accounts (this is the area where you set up the Chart of Accounts). If you
are setting up the Chart of Accounts to allow your Agency to do Financial Modeling, you need to set up Sales
(4000 series); Cost of Sales (5000 series); and Expenses (6000, 7000, 8000 & 9000 series) in the following
483
4/7/15
Financial Modeling
manner:
5. For every Sales (4000 series) and Cost of Sales (5000 series) account, choose a Category Type from
the drop-down menu. Choices include: Air, Hotel, Car, Ship, Tour, Insurance, Other, International Air,
Service Fees, or Unrelated Income or Rail.This is a suggested setup for your chart of Accounts for use of
the Financial Modeling Module. (Please contact your accountant for any changes that they may want you
to consider for your final setup).
Sample Financial Modeling Set Up (4000’s, 5000’s)
Acct #
Acct Name
Category Name
4000
Sales - Domestic Air
Air
4005
Sales - Int’l Air
Int’l Air
4010
Sales - Hotel
Hotel
4015
Sales - Car
Car
4020
Sales - Cruise Deposit
Ship
4025
Sales - Cruise Final
Ship
4030
Sales - Tour Deposit
Tour
4035
Sales - Tour Final
Tour
4040
Sales - Rail
Other
4045
Sales - Insurance
Insurance
4050
Sales - Miscellaneous
Other
4055
Sales - Service Fees
Serv Fee
4060
Sales - User Definable
Other
4100
Interest Income
Unrelated Income
4200
Other Income
Other
4/7/15
484
Financial Modeling
Sample Financial Modeling Set Up (4000’s, 5000’s)
Acct #
Acct Name
Category Name
Acct #
Acct Name
Category Name
5000
Cost of Sales - Domestic Air
Air
5005
Cost of Sales - Int’l Air
Int’l Air
5010
Cost of Sales - Hotel
Hotel
5015
Cost of Sales - Car
Car
5020
Cost of Sales - Cruise Deposit
Ship
5025
Cost of Sales - Cruise Final
Ship
5030
Cost of Sales - Tour Deposit
Tour
5035
Cost of Sales - Tour Final
Tour
5040
Cost of Sales - Rail
Rail
5045
Cost of Sales - Insurance
Insurance
5050
Cost of Sales - Misc.
Other
5055
Cost of Sales - Service Fees
Serv Fee
5060
Cost of Sales - User Definable
Other
5100
ARC Adjustments
Air
5500
Overrides Air
Air
5505
Overrides Car
Car
5510
Overrides Hotel
Hotel
5515
Overrides Cruise
Ship
5520
Overrides Tour
Tour
5525
Overrides Rail
Rail
6. For every Expense (6000 series) account, choose a Category type (Compensation; Operations,
Marketing, Occupancy; Travel/Entertain/Travel; Communication; Other; Allocated Profit), and an Expense
Type. Choices include Fixed or Variable (see below for details).
This is a suggested setup for your Chart of Accounts for use of the Financial Modeling Module. (Please
contact your accountant for any changes that they may want you to consider for your final setup):
Sample Financial Modeling Set Up (6000’s)
Acct #
Acct Name
Category Name
Type
6000
Salaries - Employees
Compensation
Fixed
6005
Salaries - Officers
Compensation
Fixed
6010
Agent Commissions
Compensation
Variable
485
4/7/15
Financial Modeling
Sample Financial Modeling Set Up (6000’s)
Acct #
Acct Name
Category Name
Type
6015
Incentives/Bonuses
Compensation
Variable
6020
Temp Services/Contract Labor
Compensation
Variable
6025
Health Insurance - Employees
Compensation
Fixed
6030
Health Insurance - Officers
Compensation
Fixed
6035
Other Benefits
Compensation
Fixed
6040
Employer’s FICA
Compensation
Fixed
6045
Employer’s FUTA
Compensation
Fixed
6050
Employer’s SUTA
Compensation
Fixed
6055
Other Payroll Taxes
Compensation
Fixed
6060
Workers Comp Insurance
Compensation
Fixed
6100
Dues & Subscriptions
Operations
Variable
6105
Office Supplies
Operations
Variable
6110
Furniture & Fixtures
Operations
Variable
6115
Printing Expense
Operations
Variable
6120
Computer Expense
Operations
Variable
6125
Equipment Rental
Operations
Variable
6130
Equipment Repairs
Operations
Variable
6135
Consortium/Franchise Fees
Operations
Fixed
6140
Payroll Services
Operations
Fixed
6145
Bank Fees
Other
Fixed
6146
CC Merchant Processing Fees
Other
Fixed
6150
Bad Debts
Other
Fixed
6151
Bounced Checks
Other
Fixed
6155
Depreciation
Other
Fixed
6160
Errors & Omissions Insurance
Operations
Fixed
6165
Business License & Fees
Operations
Fixed
6170
Agent Errors
Other
Variable
6175
ARC Ticket Stock
Operations
Variable
6200
Advertising
Marketing
Fixed
6201
Advertising Radio
Other
Variable
6205
Promotions
Marketing
Fixed
Direct Marketing
Marketing
Fixed 486
6215
4/7/15
Financial Modeling
Sample Financial Modeling Set Up (6000’s)
Acct #
Acct Name
Category Name
Type
6220
Newsletters
Marketing
Fixed
6225
Video Tapes
Marketing
Variable
6230
Window Displays
Marketing
Fixed
6235
Market Research
Marketing
Variable
6240
Rebates & Dissents
Marketing
Variable
6245
Client Gifts
Marketing
Variable
6250
Flight Insurance
Operations
Variable
6300
Rent
Occupancy
Fixed
6305
Utilities
Occupancy
Fixed
6310
Cleaning & Maintenance
Occupancy
Fixed
6315
Building Insurance
Occupancy
Fixed
6320
Kitchen Supplies
Occupancy
Fixed
6325
Property Taxes
Occupancy
Fixed
6330
Security Systems
Occupancy
Fixed
6400
Fam Trips
Travel/Entertain/Training
Fixed
6405
Education & Seminars
Travel/Entertain/Training
Fixed
6410
Meals & Entertainment
Travel/Entertain/Training
Fixed
6415
Parking
Travel/Entertain/Training
Fixed
6420
Gas/Mileage Reimbursements
Travel/Entertain/Training
Fixed
6425
Misc. Travel Expenses
Travel/Entertain/Training
Fixed
6430
Client Gifts
Marketing
Variable
6500
CRS Expense
Communication
Fixed
6505
Telephone Local
Communication
Fixed
6510
Telephone Long Distance
Communication
Variable
6515
Telephone 800#
Communication
Variable
6520
Fax Expense
Communication
Variable
6525
Postage
Communication
Variable
6530
Overnight Services
Communication
Variable
6535
Delivery Expense
Communication
Variable
6540
After Hour Services
Communication
Fixed
487
4/7/15
Financial Modeling
Sample Financial Modeling Set Up (6000’s)
Acct #
Acct Name
Category Name
Type
6600
Attorney Fees
Other
Fixed
6605
Accounting Fees
Other
Fixed
6610
Consulting Fees
Other
Fixed
6615
Interest Expense
Other
Fixed
6620
Penalties
Other
Fixed
6625
Contributions
Other
Fixed
6630
Other Expenses
Other
Fixed
6666
Error Account
Other
Fixed
6700
CC Wash Account
Other
Fixed
6900
Temporary Holding Account
Other
Fixed
Fixed Costs
Fixed costs are those expense items, which generally do not change, in the short run, regardless of how
much you sell. They are not influenced by the hours the business operates or the level of its sales. (Leases,
rent, wages to a certain extent, insurance, maintenance, utilities, automobile, and advertising are examples
of Fixed Costs).
Wages have the characteristics of fixed and variable costs. Wages can be fixed or variable depending on
the particular circumstances of the business. If an employee is a permanent full time employee, the cost of
ordinary hours and associated costs and annual vacation, etc. could be construed as fixed. If you employ
casual employees, ones paid on commission, these would be variable costs.
Variable Costs
Variable costs are costs that increase and decrease with the activity of the business. Generally, these costs
increase with increased sales because they are directly involved in making the sale. Examples of variable
costs include Cost of Sales, sales commissions, and billing costs. If you are not sure which list is right for a
particular expense item, use this test to determine if it is fixed or variable. Ask yourself: “If I did not have any
sales during the next month, would I still have to pay this expense?” If the answer is yes, that item is a fixed
cost. If you aren't sure which they are consider them fixed.
Above (under Step 5. and Step 6. is a suggested setup for your chart of Accounts for use of the Financial
Modeling Module. (Please contact your accountant for any changes that they may want you to consider for
your final setup)
4/7/15
488
Financial Modeling
7. Next go to Utilities|Setup|GL Accounts:
To run a Financial Modeling Report that matches your Income Statement, it is important for you point the
Commission Income Accounts under the 4000 and 5000 series to a unique Chart of Accounts Number. If
not using Commission Income accounts, these can be set to the error account 6666. For example:
Correct: Domestic Air Sales - 4000
Cost of Sales - 5000
Commission Income - 4100
Override - 5500
Incorrect: Domestic Air Sales - 4000
Cost of Sales - 5000
Commission Income - 4000
Override - 4000
If you have changed the Comm Track Payment in EOP setting under Utilities|Setup|Global
Defaults|Prompt to Commission Income, set-up a unique account number (i.e. 4100 series) in the Chart
of Accounts for the Commission Income accounts for each travel type. Then come back into this section and
“point” the Commission Income section to the new accounts you have set up. Now your reporting will be
accurate.
Important Note: If you have not used all of the Travel Type slots, use what is known as an “error account”
as the account number for the unused slots. If an amount accidently “falls” into one of these areas that does
not have an account number, you now have a way of retrieving the figures by printing out activity in the 6666
Account and putting transactions contained therein into the correct account.
489
4/7/15
Financial Modeling
Financial Modeling Reports
To run Financial Modeling Reports, go to Reports|Financial Modeling and print out the Analysis Report
for review. This report is divided into 3 sections - Review Analysis; Expense Analysis; and Management
Analysis:
Revenue Analysis includes Total Sales, Cost of Sales, Number of Bookings, Percent of Gross Sales,
Average Commission Percentage, Commission per Booking, Percentage of Total Expenses, and
Percentage of Fixed Expenses by Travel Type. It also shows the Total number of invoices, the Average
Gross Sales per invoice, and average commission per invoice.
The Expense Analysis section gives an expense break down by Expense Category. It shows what each
category is as a percent of total expenses. Find out your fixed versus variable spending, and your average
expense per invoice.
Management Analysis compares Sales, Revenue, and Expense Totals, along with Total Invoices,
Bookings and Segments per Employee, per Sales Agent, per CRT, and per square foot.
Note: The number of Employees used to calculate the Per Employee column is using the Number of Full
Time Employees field plus the Number of Outside Sales Employees field set up under Utilities|Setup|Global
Defaults|Financial Modeling Tab. If you have 7 Full Time Employees and 1 Outside Sales Employee, the
Total Number of Employees used for calculating the Per Employee column would be 8.
4/7/15
490
Financial Modeling
491
4/7/15
INDEX
A
Access Code, Enter 105
Account History Report 436
Account Status 155
Accounting for ARC/BSP Settlement
When Authorization Amount
Was Not Enough 333
Accrued liabilities, how to create 326
ACH 278
ACH Export 434
Action field, in Agent Tab of Booking
238
Add Newly Inserted Items to Query
Screens 51
Adding Another Booking to An Existing
Invoice 240
Agency 292
Agency Mail Merge Identifier 56
Agency Processed Credit Card aka CC
Merchant 292
Agent Activity By Departure Date 452
Agent Activity By Vendor 453
Agent Activity Reports 421
Agent Activity Summary 452
Agent Adjustment, Void 347
1
Agent Adjustments 346
Agent Adjustments for IC/Host Agencies
347
Agent Commission Rates 64
Agent Payments 270
Agent Profiles 212
Agent Reconciliation 318
Printing the 323
View Closed Invoices 323
Agent Reconciliation Screen, Modifying
Entries from 323
Agent Reports 421
Agent Statements, Printing 424
Agent Stmt Msg 55
Agents 237
Airline Productivity Report, Creating
477
Alias Utility Overview & Configuration
25
Alias, Changing 26
All Payments Made To Other entries
should include 364
All Payments Received From Other
should include 364
Allow Branch Entries 45
Allow Cash Payments from Invoice 49
Manual Index
4/7/15
Allow Cash/Ck Payments 56
Allow Client Negative Voucher 50
Allow Client Unapplieds 49
Allow Comm Track Hotel/Car 56
Allow Comm Track on Exchanges 57
Allow Dupe Serv. Fee Confirmation #’s
58
Allow Duplicate Confirmation #’s 58
Allow Duplicate Ticket Numbers 58
Allow Modifying Other Payments 49
Allow Multiple Agents Per Booking 57
Allow New Agent Profiles 57
Allow New Client Profiles 56
Allow Supplier Payments 57
Allow Vendor Unapplieds 51
Allow Voids 58
Alternate Interface ID 141
Always track void invoices 42
Always Track Voided Invoices 49
Always Track Voided Payments 51
American Express (Amex)
Reconciliation 431
ARC/BSP Balances Report 391
ARC/BSP Core Report, Set Up 166
ARC/BSP No. in Invoice 224
ARC/BSP Payments 270
ARC/BSP Reconciliation Report 411
ARC/BSP Refund Invoice - Invoice
Entered 252
ARC/BSP Sales Report 393
ARC/BSP Settlement 331
ARC/IAR Sales Report/Reconciliation
171, 378
2
Arrival/departure manifest 402
ASCII Delimited Text Files, Importing
106
Assign Check #’s in Payments 50
ATTACHMENTS TAB, payments 273
Audits, credit card change or name on
check change history 434
Auto Update Feature 24
Auto-Assign Invoice Numbers 49
Auto-Create Hotel Vendor Profiles 57
Automap 113
Automated Check Clearing (ACH) 278
Automated Interface 145
Automated Task for Interface Download/
Processing 125
Automatic Interface Download 145
B
Back Up Reports/Spool Directory/s 98
Backing Up Your Reports 479
Backup
Why do Backup 83
Backup Overview 83
Backup Tips 83
Balance 435
Balance Sheet 45, 435, 438
Bank & Book Balances 65
Bank Account
GL accounts 153
Bank Accounts tab 67
Bank Accounts, Set Up 64
Bank Charges 323
Manual Index
4/7/15
Bank Group Permissions 41
Bank Permissions 40
Bank Reconciliation 309
from a file 312
Making Additional Payment Entries
Through 311
modify an entry 312
Modifying Payment Entries from
BSP Sales Report/Reconciliation 172,
379, 397
Budget Entry 372
Budget, Create Using JE Import From
File 372
Budget, Generate 375
C
312
Printing the 313
Bank Reconciliation, Set Up 167
Bank Transfer by Issuing a Check 307
Bank Transfers 306
Bank Withdrawals entered entries should
include 364
BankTransfer & Bank Transfer by
Withdrawal 308
Batch Reporting 445
Batch Reports Load and Save Option
446
Blacklisted Passwords 32
Booking Detail Screen 227
Booking Record Locator 236
Bounced Checks 296
Branch Activity by Agent 454
Branch Group Permissions 41
Branch in Invoice 223
Branch Permissions 41
Branch Reports 454
Branch Setup 62
Branches 61
BSP HOT Reconciliation 172, 379, 396
BSP Report Selection Criteria for BSP
Report 394
3
Manual Index
Calculator 100
Caledon 77
Canada
AC Line Override Descriptor Codes
182
Additional End of Period Reports
184
Air Canada Credit Memos 185, 255
BSP Bank Accounts Initial Setup
182
BSP Taxes Initial Setup 178
End of Period Reports for BSP Users
174, 381
G/L Accounts Initial Setup 184
General Ledger Accounts Initial Setup 183
Quebec TAX - OPC - Consumer Protection Fund 185
Report Generator Reports 185
TBO Initial Set Up and Special Usage 177
Canada BSP Report, Sabre Auto Refunds
(QREX) 397
CC Merchant Automated CC Service Fee
Processing 315
CC Merchant Discount 80
CC Merchant Fees 80
CC Merchant Receivables 80
4/7/15
CC Merchant Reconcilation
modify an entry 315
CC Merchant Reconciliation 313
Modifying Payment Entries from
Checks, how to enter Void or Spoiled
296
315
Printing the 315
CC Merchant Report 430
CC Merchant Utility
Configuring the Software 78
CC Merchant Vendor Bills For Service
Fee, Account for 292
CC Merchant Vendor Deducts Service
Charge at Time of Deposit,
Account for 292
CC Processors 77
Getting Started 78
Chars to Match on Passenger Name 60
Chars to Match on Vendor Name 61
Chart of Accounts 374
Add 154
Modifying 154
Report 156
Chart of Accounts Report 439
Chart of Accounts, Set Up 152
Check from Query, Print 352
Check Register
Corresponding GL Account 153
Check Register Core Report, Set Up 167
Check Register Report 391
Check That Will Never Be Cashed, Clear
a 303
Check Writer 429
Check Writer Troubleshooting 71
Checks, Format 68
4
City Codes, Set Up 75
City Pair Report 400
Clear Balance When Account Balance Is
Zero w/Total Invoices and Total
Unapplieds are Same 303
Clearing House, Commission Payments
Received from a 290
Client Account to Another, Transfer
Funds 283
Client Activity Report 413
Client Balance
Directions for Removing/Writing
Off 284
Directions for Removing/Writing
Off Previous when setting up
Core Reports 162
Directions for Removing/Writing
Off Prior 164
Client Balances
GL account 153
Client Balances Core Report, Set Up 160
Client Balances Report 388
Client Balances, Adjusting 301
Client Fare Savings Report 456
Client Lists and Labels 417
Client Payment From Within An Invoice
242
Client Payments 269
Client Profiles, Interfacing 136
Client Reports 412
Client Statements 413
Client Statements, Printing 413
Client Stmt Msg 55
Manual Index
4/7/15
Client/Vendor Statement Remarks Tab
54
Close All/Invert All 276
Columns button in Query Screen 272,
306
Comm Track Payments in EOP 46
Commercial Profiles Creating 195
Commission Income 46
Commission Payments Received from a
Clearing House, Manually
Entering 290
Commission Received - No Invoice 289
Commission Track, Payment Received
for 288
Commtrack Vendor Pays the
Commission Due Agency via the
Agency's Credit Card 289
CommTrak
Import Setup
CommTrak 337
Constant 112
Continue entering payments, Payment/
Receipts Input Screen 272
Conversion Rate 65
Conversion Rates 71
Copy
Import summary to Windows clipboard. 121
Copying Queried Invoices 252
Core Reports 387
Balancing to Trial Balance Report
175, 382
Corporate Profile Entring 200
Create a User Profile 37
5
Manual Index
Create Agent Adjustment, Payment/
Receipts Input Screen 272
Credit Card Reconciliation Report, How
to run 431
Cross Reference to Generate Labels,
How to use 443
CSV format 312
Currency Code 65
CWT Handoff File, Export 445
D
Daily Checklist 170, 377
Date Formulas for use in Batch Reporting
445
Debit and Credit Memos 255
Default Branch 48
Default CC Merchant Bank Account 48
Default Country Code 56
Default Disburse Bank Account 47
Default EFT Bank Account 48
Default GL Branch 48
Default Invoice FOP on Neg Booking 57
Default Receipts Bank Account 47
Default Refund/Adj Invoice No 50
Default Value 112
Depart/Arrive Manifest 402
Deposit, How to enter 304
Deposits 304
Deposits and Final Payments, How to
Handle Transactions with 262
Deposits, How to handle transactions
with Deposits and Final Payment
262
4/7/15
Detail Accounts GL 154
Detail Group 369
Disable a user account 38
Disbursements Reports 428
Discounted Transaction, Paid By Cash/
Check 263
Discounted Transaction, Paid By Credit
Card 264
Display Pymt# After Saving, Payment/
Receipts Input Screen 272
Download 125, 145
Download Interface Records 131
Download, Automatic setup 145
Duplicate or Invalid Invoice Number 143
Duplicate Ticket Number 143
E
E 236
EFT 170, 174, 377, 381
Electronic Fund Transfer 167, 170, 377
Electronic Funds Transfer 48, 281
E-mailing, Scheduled 447
Enable ability to run Reports/Exports
with full Credit Card Numbers
41
Enable ability to view full Credit Card
Numbers 41
End of Period Journal Entry 366
End of Period Reports 173, 380
Error
32 (0) 145
Path Not Found 3(0) FileName
145
6
Exchange with a refund 231
Exchange, Even 242
Expanded Fare Information 233
Expenses Paid by Agency, Owner/
Employee Travel 286
F
Face Value 234
Fare Codes, Set Up 74
Fare Savings #1, Client Statement 414
Fare Savings 1 Report 416
Field Name 112
Final Payments, How to handle
transaction with Deposit and
Final Payment 262
Finance Charge Calculation 259
Finance Charge, How to add to Invoices
259
Financial Modeling
Expense Analysis Report 490
Fixed Costs 488
Management Analysis Reports 490
Revenue Analysis Report 490
Set Up 482
Setting Up Commission Income Accounts 66
Variable Costs 488
Financial Modeling Reports 444, 490
Financial Modeling Tab 56
Financial Modeling, Setting Up & Using
482
Flown Carrier 229
Force Branch on Journal Entry 50
Foreign Currency 240
Manual Index
4/7/15
Foreign Currency Payments 287
Full End of Period 366
Full Multiple Balance Sheet 45
Full Single Balance Sheet 45
G
G/L Account Reconciliation 376
G/L Accounts Setup/Bank Accounts 67
G/L Accounts, Set Up 66
G/L Branch Defaults 276
General Invoice Information 222
General Ledger 358
Entering Opening Balances 168
Payment Received Types 363
Suggested Procedures 170, 377
General Ledger Accounts, Setup 157
General Ledger Reports 435
General Ledger Setup 168
General Ledger, Maintaining 175, 382
General Ledger, Maintaining a 358
General Ledger|Posting 371
Getting Started in TBO 151
Gift Certificate 284
GL Branch Group Permissions 41
GL Permissions 41
GL Reconciliation Report 176, 383, 439
Global Defaults, Set Up 159
Global Defaults, Setting Up 42
Global Modify, invoice 248
Globally Modify an Agent 248
Globally Modify Commissions on
Queried Invoices 249
7
Manual Index
Globally Modify Invoice/Payment
Groups on Queried Invoices 248
Globally Modify UDIDs on Queried
Invoices 248
Globally Void Open Comm Track
Bookings 102
Group Code, Globally adding to profiles
219
Group delimiter 118
Group Identifiers, Set Up 76
Group Revenue Report 433
Groups, Handling in TBO 265
GST Receivable Account 184
GST/HST Tax Rate Field in Branch 62
H
Handling Groups document 267
Hardware Requirements 20
Header/Footer, Modify 73
Headers/Footers in Reports, Statements
& Invoices, Setting Up 72
Help 15
History, button in booking screen 233
Hot Keys 14
Hotkeys in Booking Screen 227
I
IAR Reconciliation Report Sample 409
IAR Settlement, USA only 333
IAR Submission/reconciliation, Method
1 407
IAR Sumission/Reconciliation Method 2
4/7/15
85
410
IAR Sumission/Reconciliation Method 3
410
IAR/ARC Sales Report/Reconciliation
395
IC Code in invoice 224
IC Export Report 426
IC/Host Codes 77
If Source Field 113
Ignore %1 For Int’l BSP Air 57
Import from File, Setup to Automate 148
Import/Update Utility 107
Importing
ClientBase Plus and TRAMS Back
Office Field Legends 108
Saving and Loading Mappings 108
Step-by-Step Instructions to 109
Three Ways to Import your Data 107
Updating Existing Profiles vs. Appending to Your Database
107
Viewing your data file 108
Importing Customer Profiles via ASCII,
Paradox or dBase files 106
Importing Profiles From Other Sources
106
Income Statement Report 437
Input Menus in TBO 12
Installation with InterBase XE 20
Installing Trams 20
Interactive Active Agent Reporting
(IAR) 333
InterBase Server 24
Interbase to XE, Upgrade Steps 27
Interbase XE Additional Backup Options
8
Interbranch G/L Transfer 49
Inter-Branch Transfer 51
Interest Income 303
Interface 125
Download & Processing 124
Interface Utilities Setup 124
Interface Download & Processing Setup
with Windows Task Scheduler,
Automatic 145
Interface Records, capturing 131
Interface Reports 134, 441
Interface, Scheduled Task 125
Interface/Mailmerge Prompt Tab 55
International Field 233
Invalid ARC Number 142
Invalid G/L Number
0 367
Invalid Ticket Numbers 144
Invert All 276
Invoice
printing 404
Invoice Analysis Report 399
Invoice Query 245
Invoice Query Global Modify 248
Invoice Query, Right-Mouse Click Menu
in 249
Invoice Remarks 225
Invoice Reports 393
Invoice Sales Activity Report 398
Invoice, Viewing or Modifying an
Existing 250
Invoice, Void/Delete booking(s) on an
existing 242
Manual Index
4/7/15
Invoices Entering 222
Invoices Overview 222
Invoices, Unvoiding 258
J
JE Import From File 369
Journal Entries
Copying Queried Journal Entries
L
Last Check 65
Learning TBO 17
License Manager 26
Load Map 111
Local Currency Code 56
Login to TBO 12
361
Invoices 362
Payments 363
Voiding If You Know the Journal
Entry’s Record Number 362
What is Journalized by Transaction
and What is Journalized
Through the End of Period
362
Journal Entries by End Of Period 365
Journal Entries by Transaction, Example
364
Journal Entry 368
Query, Sorting 361
Journal Entry Analysis Report 436
Journal Entry Code 368
Journal Entry line items 369
Journal Entry Prompting 48
Journal Entry Query 359
Journal Entry Query, Right-Mouse Click
Menu in 361
Journalized by Transaction 362
Journalized Through the End of Period
362
9
Manual Index
M
Mail Merge 444
Mail Merge Delimiter 56
Mailmerge 478
Management Summary Report 391
Manual, How to Use 11
Map 112
Maritz Handoff File, Export 445
Marketing Code in Invoice 224
Marketing ID 224
Match on ARC Number 60
Match on City Code (if present) 60
Match on Interface ID (Chain Code) 60
Match Vendor Profiles by State/Zip Code
57
MCO, Exchange on 243
Menu Items, grant user permission 39
Missing IAR Ticket 409
Missing Trams ticket 409
Modifying Payment Amount Once
Account Balances Appear 276
Monthly Routine 173, 380
More Taxes 236
4/7/15
Multiple Balance Sheet 45
Multiple Balance Sheet Setup 51
Multiple Branch Locations 61
P
Paper Documents, Maintaining 16
Partial Payment Received From Client
282
N
National Transactions Corporation 315
Negative Operating Payable 326
Negative Payable or Vendor Receivable,
Directions for Adding 166
Negative Sales Invoice for the Processing
Fee 291
New User Profile, create 37
No Match On Vendor Name or ID 139
NTC 315
O
Onyx
Import Setup 337
Onyx II
Import Setup 337
Operating Payables
Query, Sorting 329
Operating Payables Report 433
Operating Payables, setting up 326
Other Accounts tab 67
Other Payments 270
Other Profiles 207
Overpayment from a Client 281
Overview, Program 12
10
Partial Payments 276
Password Expiration 31
Password Strength 31
Password, Changing the SYSDBA 35
Passwords Provide Security 35
Pay Method of Other entries should
include 364
Payables, Create 326
Payment
ARC 363
Changing Existing Payments 350
Copying 350, 361
Create New Payment, Deposit, Withdrawal & ARC/BSP Settlement from Payment Query
350
EFT 307
How to Use Invoice Selection (Client
& Global Settings) 277
Print 352
Receiving a single check paying for
invoices under two or more
Grouped client profiles 278
To receive a commission check from
a payment source that covers
multiple vendors such as
NPC, 277
Vendors by Interface ID 278
View & Void invoices 350
View & Void Invoices from Payment
Query 350
Void 351
Manual Index
4/7/15
Payment Analysis Report 428
Payment Codes 351, 353
Payment for Client Invoices, Split Forms
of 263
Payment Made to a Vendor 293
Payment Made with profile type of
Supplier and pay method of cash
or check journal entries created
by End of Period 366
Payment Query 348
Payment Query, Right-Mouse Click
Menu in 353
Payment Received for Commission
Track 288
Payment Received Using Invoice/
Payment Group 275
Payment Received with profile type of
Client and pay method of cash or
check journal entries created by
End of Period 365
Payment Received with profile type of
Client and pay method of CC
Merchant journal entries created
by End of Period 366
Payment Received with profile type of
Vendor Comm Track and pay
method of cash or check journal
entries created by End of Period
365
Payment Received with profile type of
Vendor Supplier and pay method
of cash or check journal entries
created by End of Period 365
Payment Reports 427
Payment/Import Run the Import and
Reconciliation 339
11
Manual Index
Payment/Import Setup 337
Payments Made for Expenses 295
Payments Made to Vendors with Pay
Method of Other entries should
include 364
Payments Received from Client 273
Payments Received from Client, Steps
274
Payments Received from Clients with
Pay Method of Other entries
should include 364
Payments Received from Vendors with
Pay Method of Other entries
should include 364
Payments to Specific Invoice Bookings,
Applying 275
Payments, Applying when saving an
invoice 226
Payments, Foreign Currency 287
Payments/Adjustments Overview 268
Payments/Import 337
Payments/Import Participants 342
Paymode
Import Setup 337
Payroll Entry 298
Payroll Import 334
Payroll Information, To View Individual
Employee 299
Payroll Tax Report & Payment 298
PCi Requirements 42
Pegasus
Payment Import, GST Amount and
Rate 291
Pegasus Payment routine (Canada) 291
4/7/15
Permissions
Invoice, Payment, Profile, GL Permissions 40
Permissions Tab 40
Permissions, Invoice, Payment, GL 40
Petty Cash 285
Petty Cash, Giving Change from 285
Petty Cash, Reimbursing 286
Pinnacle Payment Solutions 77, 315
Post to General Ledger 371
Posting Journal Entries to GL 370
Prepend Worldspan Invoice Numbers
with 58
Primary Key Field 111
Print a Batch Report Using the Windows
Task Schedule 447
Print Check After Saving 272
Print Full Statement Header 50
Print Invoice After Saving 225
Print Query 353
Printer Defaults 72
Prism Handoff File, Export 444
Process 125
Process Interface Records 134
Processing Errors, Interface 142
Processing Void Ticket 144
Processing, Automated Interface 148
Profile Data, Sorting 220
Profile Query 217
Profile Query, Right-Mouse Click Menu
in 220
Profile Reports 441
Profile, Create new from Query Screen
12
220
Profiles
Copying 221
Deleting 220
Selecting 220
Profiles Creating 194
Profiles Creating New 188
Profiles Overview 188
Prohibit creating Journal Entries in a
closed period 41
Prompt Tab 44
Prompt Tab in Global Defaults 159
Pseudo End of Period 368
Pseudo Posting Journal Entries in Trams
371
Pull-down menus 15
Purge 101
Purge Change History 103
Purge Credit Card Data 102
Purge Interface Logs 104
Purge PNR History 101
Q
QREX 397
Quebec TAX - OPC - Consumer
Protection Fund 185
Query 13
Operating Payables 327
Print 353
Retrieving an Existing Journal Entry
359
Query, Move from One Invoice to
Another in Query or from one
Booking to Another in Invoice
Manual Index
4/7/15
252
Agent Activity By Departure Point
453
R
RBC Insurance Scripts 182
Read Booking Agent 56
Read Branch ID From I/F ID 57
Read Multiple Taxes 56
Read Ticketing Agent 57
Reapply a Payment 353
Rebates 264
Receipt Date 304
Receipts Report 427
Reconciliation Codes for Payment
Import 340
Record Locator in Invoice 224
Record Not Found by Agent ID Search
142
Recurring Payables 329
Recurring Payables, Generate & Issue
Checks 330
Refund Invoice, ARC/BSP - Invoice not
entered 253
Refund Invoices 252
Remarks Tab, Client/Vendor Statement
55
Remarks, Invoice 233
Removing/Writing Off A Vendor
Balance 284
Reopen Period 104
Report
Agent Activity By Client 452
Agent Activity By Departure Date
452
13
Manual Index
Agent Activity By Travel Type 453
Agent Activity By Vendor 453
Agent Activity Summary 452
Agent Final Payment 453
Airline Activity Detail 454
Airline Activity Summary 454
Airline Commission 453
Airline Commission Report Summary 453
Airline Reports 453
Airline Segment Count 454
Airline Usage for Client by Invoice
454
Airline Usage for Client by Passenger 454
Branch Activity by Agent 454
Branch Activity by Client 454
Branch Activity by Travel Type 455
Branch Activity by Vendor 455
Branch Productivity Detail 455
Branch Productivity Summary 455
Branch Reports 454
Car Usage for Client by Passenger
458
Client Activity By Departure Date
456
Client Activity By Departure Point
456
Client Activity By Travel Type 457
Client Activity By Vendor 457
Client Activity Detail 455
Client Activity Summary 455
Client Car Sales Report 455
Client Car Sales Summary Report
456
Client Final Payment 456
Client Hotel Sales Report 456
Client Reports 455
4/7/15
Commission Caps By Client 457
Credit Card Reconciliation 461
Final Payment Report 462
Frequent Flyer Reconciliation for
Specified Travelers 456
Group Client Statement 458
Hotel Sales Activity By Client 458
Hotel Sales Activity By Passenger
458
Lost Fare Report by Passenger 456
Miscellaneous Reports 461
Passengers Total Activity by Travel
Type 459, 462
Project Number Report 457
Routing and Fare Comparison 457,
459
Sales Activity by Departure Date
Summary 459
Sales Activity By Departure Dates
459
461
Vendor Activity by Passenger 461
Vendor Activity By Travel Type 461
Vendor Activity Summary 461
Vendor Final Payment Report 461
Vendor Reports 460
Vendor Usage By Travel Type 460
Vendor Usage by Travel Type 461
What is a? 464
Report Generator 450
Ability To Sort on One or More
Fields 467
Ability To Trim Field Length 467
Building Reports 464
Building the Report 469
Buttons 472
Classes of Report Generator Reports
450
Sales Activity By Invoice 459
Sales Activity By Itinerary Detail
459
Sales Activity By Itinerary Summary
459
Sales Activity By Travel Type Detail
459
Sales Activity By Travel Type Summary 459
Special Assistance/Meet & Greet
458
Summary of Travel by Type of Travel 460
Ticket List 460
Travel Detail by Department 458,
460
Travel Detail by Type of Travel 460
Vendor Activity By Agent 460
Vendor Activity By Client 460
Vendor Activity By Departure Date
14
460
Vendor Activity By Departure Point
Creating and/or Modifying a Report
(Airline Productivity) 477
Designing a Report 466
Fields 472
Know What Data Goes On Which
Level 469
Level Breaks on Changed Sort Item
From Prior Level 469
Navigation 472
Predesigned Reports 450
Report Examples 477
Report Fields 477
Sample Report Output 478
Selection of Data Fields for Report
466
Single vs. Multiple Level Reports
468
Sort Keys Should Correspond to Sequence of Fields Displayed
Manual Index
4/7/15
468
Sorting On One or More Data Items
467
Specify the Order and Field Format
Format 466
Specify What Data Appears on Report 466
Tips and Tricks 480
UDID’s 480
What is a? 464
Report Generator Predesigned Reports
450
Report Generator Reports 444
Reports 386
Email Reports in .pdf Format 387
Print Options 386
Printing Predesigned TBO Reports
386
Require Unique, Non Blank I/F ID on
New Profiles 51
Restore the TBO Database 98
Restoring a Dump File 86
Resubmit ARC/BSP Document 260
Right-Mouse Click Menu in Booking on
Invoice Query 249
Right-Mouse Click Menu in Invoice
Booking Screen 250
Right-Mouse Click Menu in Payables
329
Rule 112, 114
S
Sabre Canada BSP Report - Auto
Refunds (QREX) 397
Sabre Card Services 342
15
Manual Index
Sales and Cost of Sales or as Commission
Income 46
Sales Reports 458
Salesagent Profiles, Interfacing 141
Scheduled Task for Interface 125
Security 34
Security, Setting Up 34
Segments 239
Setting Up
Unapplied Vendor Balance 165
Setting Up and Starting TBO 16
Setting Up TBO 18, 150
Show Quick Edit 277
Sorting Invoice Query Data 250
Source Operation 113
Source Test Value 113
Split Booking Option on Invoice Screen
241
Split Forms of Payment for Client
Invoices 281
Spoiled Checks 296
Spoiled Invoices 258
Statement Wide 414
Statement, Client 414
Statement-Summary, Client Statement
414
STP 45
Submit to ARC Invoices journal entries
created by End of Period 365
Submit to Commission Track Invoices
journal entries created by End of
Period 365
Submit to Supplier Invoices journal
entries created by End of Period
4/7/15
365
Summary Accounts GL 154
Summary Wide, Client Statement 414
Summary, Client Statement 414
Supplier Booking Closed by CC Can Act
Like a Comm Track Booking
367
Supplier C/C Transactions in EOP 47
System permissions 40
T
Tabs in TBO 14
TACS - Perot Systems
Import Setup 337
TAFP report 406
TAFP service fee 355
TAFP Service Fee Report - ARC Only
Transfer Invoice to Different Profile 260
Transfer Invoice/Payment to Different
Profile 221
Travel Expenses, Owner/Employee Paid
by Agency 286
Travel Types 63
Travel Types, Adding 64
Travel Types, Set Up 151
Travel Types, Setting Up 63
Traveler, Add new 191, 198
TRAVELERS TAB 198
TRAVELERS TAB, Leisure Profile 191
Trial Balance
Balancing to Core Reports 175, 382
Trial Balance Report 437
Troubleshooting of Errors in
Downloading during interface
144
406
TAFP Service Fees - ARC Only,
Processing 355
Tax Related Tab 53
Then set Database Field to 113
Ticket Exchange with a Refund 244
Ticket Exchange with an "Add Collect"
243
Ticketmaster 77, 315
Total Invoices and Total Unapplieds are
Same, clear balance when
account bal is zero 303
Track Voided Payments 51
Trams Host 346
Import Setup 337
Transborder Indicator 182
16
U
UDID, include/exclude in Prism Handoff
444
UDID’S 238
UDIDS 82
Unapplied Client Balance 162
Directions for Setting Up 164
Unapplied Vendor Balance 162
Unapplied Vendor Balance, Directions
for Setting Up 165
Unprocessed Interface Records 144
Update Rules 111
User Profile Authorization Levels,
Setting Up 35
Manual Index
4/7/15
User Profiles, Setting Up 34
Utilities, Setting up 34
Utilities|Global Defaults|Interface/
Mailmerge Prompt Tab 181
V
Validate CC Merchant Numbers 50
Vendor
Accounting for Vendor Sale as Net
Remit Account 261
Vendor Activity Reports 418
Vendor Balance
Directions for Removing/Writing
Off 162, 165, 284
Vendor Balances
GL account 153
report 153
Vendor Balances Report 389
Vendor Balances, Adjusting 301
Vendor Lists and Labels 421
Vendor Payments 269
Vendor Profiles 207
Vendor Profiles Entering 202
Vendor Profiles, Creating During
Interface 138
Vendor Receivable, Adding 166
Vendor Reports 418
Vendor Sale as Net Remit Account,
Accounting for 261
Vendor Statements, Printing 419
Vendor Stmt Msg 55
Vendor, Payment Made to a 293
Viewing/Editing Invoices By Booking
17
Manual Index
277
Void a Booking in Create New Payment,
by right mouse clicking 274
Void Cancelled/No-Show Bookings 60
Void Pay Method 40
Voided Invoices Retain Original Client
& Vendor 259
Voiding a Journal Entry - If the Journal
Entry’s Record Number is
known 362
Voiding A Year-End 374
Voiding an End of Period 374
Voiding End of Period and Year End
Entries 374
Voiding Invoices 257
Vouchers, How to Track Voucher
Payments Allocated Across
Multiple Invoices 300
Vouchers, What are? 300
W
Weekly Routine, ARC/IAR 171, 378,
395
Wildcard in queries 217, 245
Windows Menu in TBO 15
Windows Task Schedule, print a Batch
Report 447
Windows Task Scheduler
Automatic Interface Download &
Processing Setup with 145
Withdrawal, entering 306
Withdrawals 304
Worldspan Agencies, downloading
interface records 132
4/7/15
Worldspan, using the Credit Card
Reconcilation for MCO’s 431
WPS Hotel Commission
Import Setup 337
Writing Off A Client Balance 284
Writing Off a Client Balance 162
Writing Off a Vendor Balance 162
Y
Year End Closing 373
Year-end Journal Entry 367
Z
Z-Pay PayWindow 334
18
Manual Index
4/7/15