1
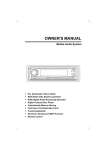
SimpleUpdates.com
Website Management Made Easy
User Manual
Table of Contents
Introduction...................................................................................................1
Getting Started.............................................................................................2
Logging into Your Website................................................................2
Welcome Menu.................................................................................3
Using the Sitemap.............................................................................3
Site Setup and Configuration............................................................4
Email Setup.......................................................................................4
The Editor and Editing Content....................................................................6
Adding, Editing and Deleting Content Pages....................................6
The Graphical Editor Toolbar............................................................7
Typing and Pasting Text..................................................................13
Inserting Images..............................................................................13
Creating Links.................................................................................16
Save and Publish vs. Save As Draft...............................................17
Tokens.............................................................................................18
Forms..............................................................................................21
Site Management Functions......................................................................23
User Management...........................................................................23
Image and File Management..........................................................23
Approve Submissions.....................................................................27
Site Search and Replace................................................................28
Link Verifier......................................................................................28
Article Status Management.............................................................29
Backup Management......................................................................29
Help & User Guides........................................................................30
Stats................................................................................................30
Administration Functions............................................................................32
Site Configuration and Navigation..................................................32
Module Configuration......................................................................33
Email & Server Setup......................................................................33
Notices............................................................................................33
Messages........................................................................................33
Google Setup..................................................................................33
Templates........................................................................................34
Global CSS......................................................................................35
Your Account..............................................................................................36
Accounting & Payment Options......................................................36
Support and Package Plans...........................................................37
Technical Support for Your Website...........................................................38
SimpleUpdates.com, Inc.
P.O. Box 271
100 W. Ferry St.
Berrien Springs, MI 49103
Web: www.SimpleUpdates.com
Email: [email protected]
Phone: 269-473-3687
© 2010, SimpleUpdates.com, Training Book Version 8.0.1204, printed on Apr 8, 2010.
Introduction
The SimpleUpdates website Content Management System (CMS) was developed so that you
can maintain your own website. The same knowledge that enables you to use word processor
software, makes learning to create and maintain your website possible. One of the most
frequent comments we hear when training a new SimpleUpdates customer is “Oh! I can do
that?!!”
SimpleUpdates listens to the feedback from website managers. We keep an eye on Internet
communications trends, and we are constantly updating our service based on this
information.
Our goal is to keep website updating so simple that you can focus on your message rather
than how you're going to get your message on the web.
Using this User Guide
We have worked hard to make this User Guide a useful reference. The table of contents can
lead you directly to an area of interest, or you can follow the progression of the document
from start to finish. Topics will build on each other leading to a good review of the entire
system as you complete the contents of this user guide.
There are also additional materials online including online videos at:
http://help.simpleupdates.com
We welcome your feedback, as our system and documentation get better with each user
comment. Thank you in advance for being a part of the SimpleUpdates family of websites.
Computer and Browser Requirements
Most any current web connected computer will be able to edit a SimpleUpdates site easily. If
you have an older browser, it may be possible to update it, and improve the ease with which
you can access the Internet and update your site.
With SimpleUpdates you have many options for your favorite browser. We recommend the
latest version of any browser software you can obtain, but the following would be a list of
minimum versions that work with SimpleUpdates:
Firefox 2.0 +
Internet Explorer 7.0 +
Safari 3.0 +
Opera 9.5 +
Google Chrome 1.0 +
Camino 1.0 +
Page 1 of 38
User Manual, Apr 8, 2010
Getting Started
Logging into Your Website
When you are ready to start working on your site, you will first login. At the bottom right of any
screen, look for the link “Login / Customize.” Click this link, and enter your user name (your
email address) and your password.
1. Go to your site, and scroll down to the bottom of the page.
2. Then click on the link that says User Login/Customize, at the bottom right of the page.
Note this link is present on all pages of your site.
3. After clicking this link, you will be asked to enter your User name and password. You
will need to enter your full email address into the box labeled “User name”. An example
of a full email address is: [email protected]. Next enter your password in the
password field.
4. Once you have entered your user name and password, you can Login.
If you ever forget your password, click on the link Lost Password, and a new password will be
sent to your email address.
Once you complete the login, you will be taken to the Welcome Menu, where you can begin
editing your site. We will talk more about this in the next section.
When you have finished your site edits, you can click the Logout link at the bottom of the
page. This will close out your editing session.
Page 2 of 38
User Manual, Apr 8, 2010
Welcome Menu
Each time you login, you will see the Welcome Menu. From here you can publish new
content, or browse your site and from any page edit its content. All of the administrative
functions are close to your fingertips. The Welcome Menu has three tabs with functions
organized in each tab: Main, Management and Administration.
After logging in, there are several ways to begin updating your site:
• Visit a page on your site, and click Add or Edit
• View the sitemap, and click Add or Edit
• Click into a module from the Welcome Menu
For articles or site pages, you can browse to the page and click the Add or Edit link at the
bottom of the page. Add will create a new child page of the page you are on, and Edit would
edit the page you currently see.
To add or edit content in a module, (for example, the photo gallery), click on the module icon
from the Welcome Menu. Inside the module, you will be able to configure it.
Using the Sitemap
Your website structure is like an outline, and is shown on the sitemap. The Home page is the
starting point of your site. The main navigation pages are the main titles of your outline.
Indented pages, or subpages under the main navigation links, are sub titles of your outline.
You can have as many webpages as you want however, we suggest that your website outline
only go 3 to 4 levels deep.
SimpleUpdates automatically links to the sitemap at the bottom of every page in the footer
links area. When logged in, you will have additional functionality available to you. Place your
mouse pointer on a page title, and you will notice editing links appear. Here you can click on
Add, Edit or Delete. You can use the sitemap page as a launching point for all of your article
edits.
You may also notice some icons printing after the page titles. There is a lock icon showing
that the page is protected. A time icon for pages that are expired, and another icon for pages
that need editor or administrator approval. These icons can assist you to know what pages
may need your attention.
The sitemap is a great place to focus your site edits and maintain its structure.
Page 3 of 38
User Manual, Apr 8, 2010
Site Setup and Configuration
When you ordered your SimpleUpdates site, you had opportunity to set up your main
navigation links. Once your site is live on the web, you can edit these at any time. To see the
list of the main navigation pages, go to the Welcome Menu, Administration tab, and click on
Edit Site Information & Navigation.
Inside Edit Site Information module, you can see the contact information on the main tab, and
then the “Nav” tab contains the main branches of your website tree. You can add or remove
main navigation pages here. Notice the columns: Nav Title, Nav Link, and Browser Window.
You can drag and drop the navigating items to reorder them.
Add a New Main Navigation Link
• Find an empty field and type in your new main navigation name.
• The next column displays the actual page or module that a main navigation link is
connected to in your article database, which can also be defined as, “article.php?id=#”.
• The last column, Browser Window, handles how the link opens when it is clicked. If
you have the Target set to Same, than when the link is clicked, the new web page will
open up in the same window. If the Target is set to popup, a new window will open,
when the link is clicked.
Once you have finished making your updates, be sure you click on the Save & Exit button to
apply your changes.
Remove a Main Navigation Link
To remove a main navigation link return to the Site Configuration & Navigation page, and click
on the Nav Links tab. In the Nav Title column find the main navigation link you want to
remove, highlight it with your mouse, and press the delete button on your keyboard.
Remember to click on the Save & Exit button.
Email Setup
Email is a fundamental Internet communication tool. We want to be sure your email is set up
correctly and performs well. Each domain name has at least two DNS pointers. One pointer
directs the web browser traffic to your website IP address. The second pointer directs the
flow of email to your email provider.
Most SimpleUpdates sites are launched with a contact form, and this form when completed
will go to “[email protected]” so you will want to test this form and verify that you
are getting the form contact appropriately.
Page 4 of 38
User Manual, Apr 8, 2010
There are at least three email configurations available for your website:
1. You can host your email on the same server as your SimpleUpdates website. Each
website account includes 10 free email accounts, which you can configure as you
would like. Examples: [email protected], [email protected],
etc. You are able to setup and maintain your email accounts via the Email and Server
Configuration icon on the Administration tab of the Welcome Menu.
2. Another option is that SimpleUpdates sites support Google email using your own
domain name. Many of our sites who want more advanced webmail and spam filtering
have been pleased with Google Applications email. The first step is to go to
www.google.com and sign up for a Google Apps account. Next you will create the
email accounts that you would like to have. Then you will need to provide us with the
information for verifying your domain name and we will point the email pointer
associated with your domain name to Google.
3. Your email can be hosted by a third party provider or a local to your office email server.
We can work with you so that your email remains with that provider and we would only
host your website.
For both the Google Apps Email and the third party email option there is a one-time setup fee
of $32.50. Please contact us for option 2 or 3 to complete domain name pointing via our
name servers.
Page 5 of 38
User Manual, Apr 8, 2010
The Editor and Editing Content
Adding, Editing and Deleting Content Pages
Sub pages can be used to help you organize the structure of your website. What are subpages? They are web pages that are below another page. For example, the link “About Us” is
a main navigation page and “Location” is a sub page of “About Us”.
Adding a Sub page:
There are two ways to add sub pages to your website. The first way is add a new page while
you are on a web page. To do this, go to the footer links area at the bottom of the web site
and click on the Add link.
The second way is to add it from the site map. To do this, go to the footer links area at the
bottom of the web site and click on the site map link. On the site map, locate the web page
you want to add a sub page to. As you move your mouse over the web page title, three links
will appear: Add, Edit, and Delete. Select the Add link to add a sub page.
On the Add page you'll need to enter a title for the new page. The show title check box has
been selected by default. If you don't want the title of this page displayed, unselect the check
box. After you have finished adding content in the editor window on the Main tab, click on the
Save and Publish button.
Now go back to your site map and look below the About Us web page. Here you will see the
name of your new page displayed.
Deleting a Sub page:
There may be times when you will want to remove a page from your web site.
There are two ways to delete a sub page. The first way is removing the page via the site
map. On the site map find the page you want to remove. Move your mouse over the sub
page title, three links will appear: Add, Edit, and Delete. Click on the Delete link.
The second way to delete a page is in edit mode. Go to the page you want to delete, scroll
down to footer links area near the bottom of the page, and click on the Edit link. Once the
page has loaded up in edit mode scroll down below the content area. Here you will find four
buttons: Save and Publish, Save as Draft, Delete, and Exit. Click the Delete button.
To prevent an accidental deletion the system displays a warning page. All the information
stored on this page will be permanently removed from your web site. If you need it restored
you must contact customer service.
Once you are sure that you want to delete this page, click on the Delete button.
Page 6 of 38
User Manual, Apr 8, 2010
The Graphical Editor Toolbar
This is our graphical editor toolbar which is a "word processor" for creating and editing web
pages.
Your site administrator can customize the look of the toolbar to the more compact two line
toolbar as below. It only shows styles, keeping text formatting more consistent.
If you have worked with word processor programs, there will be quite a few buttons that will
be familiar to you - such as Bold or Italics. Other buttons will be new and will take a bit of
learning to understand how to use them. The next few pages will be an excellent resource to
help you familiarize yourself with the features of the graphical editor toolbar.
Each icon in the toolbar is explained below:
Icon
Name
Detailed Description
Collapse/Expa This icon allows you to easily collapse or expand the
nd Toolbar
WYSIWYG editor toolbar.
Page 7 of 38
Maximize the
Editor Size
This icon allows you to increase the size of your editing area.
If you need more space in your editor window, click the
"Maximize the Editor Size" icon to expand the view. Click the
icon again to return to the original display view.
Preview
This icon allows you to preview your edits before you save
and publish them on your web page. When the preview icon
is clicked it will open a new browser window displaying your
unsaved modified content. To close the preview window, click
on the "X" icon in the upper right corner of the browser
window.
Select All
This icon allows you to select all of the content on a page. To
unselect your selected content, place your mouse cursor in
the editing area and click once with the left mouse button.
The keyboard shortcut is [CTRL + A]
User Manual, Apr 8, 2010
Cut
This icon allows you to delete or remove unwanted text,
pictures, and tables, from your web page. This command will
keep the data that was removed from your webpage in the
clipboard so you can paste it again in another location on
your web site.
The keyboard shortcut is [CTRL + X]
Copy
This icon allows you to duplicate text, pictures, and tables,
currently present on your web page. This command will keep
the data that was copied from your webpage in the clipboard
so you can paste it again in another location on your web
site.
The keyboard shortcut is [CTRL + C]
Paste
This icon allows you to paste text, pictures, and/or other
content you have copied from another source, (i.e. text
document or a web site), into your web page.
The keyboard shortcut is [CTRL + V]
Paste as Text
This icon allows you to paste text you have copied from
another source into your web site. When text is pasted with
this option it will take on the font style and attributes, (i.e.
size, color, bold, italic, etc.) of the surrounding text. It will also
maintain the paragraphs returns.
Paste from MS This icon allows you to paste text you have copied from
Word
Microsoft® Word into your web site. This option will strip
unnecessary code added by Word from the text and if so
desired, will also remove style definitions. This is a good
option to use if you want to maintain the structure of your
text, (i.e. paragraphs, indents, etc…).
Page 8 of 38
Undo
This icon allows you to undo the last unsaved change you
made to your web site.
The keyboard shortcut is [CTRL + Z]
Redo
This icon allows you to redo the last unsaved change you
made to your web site.
The keyboard shortcut is [CTRL + Y]
Bold
This icon allows you to bold text that is currently present on
your web page.
The keyboard shortcut is [CTRL + B]
Italics
This icon allows you to italicize selected text that is currently
present on your web page.
The keyboard shortcut is [CTRL + I]
Underline
This icon allows you to underline selected text that is
currently present on your web page.
The keyboard shortcut is [CTRL + U]
User Manual, Apr 8, 2010
Strike Through This icon allows you to draw a line through the middle of your
selected text currently present on your web page.
Page 9 of 38
Superscript
This icon allows you to create small letters above the
baseline of text, from selected text, currently present on your
web page.
Subscript
This icon allows you to create small letters below the
baseline of text, from selected text, currently present on your
web page.
Find
This icon allows you to quickly search your entire web page
for words, phrases, and HTML code. You have two available
options; “Match whole word only” and/or “Match case”. You
also can search your web page in two directions, up or down.
Find and
Replace
This icon allows you to quickly find and replace words,
phrases, and HTML code, on your web page.
There are two input boxes “Find what:” and “Replace with:”.
Type in the word, phrase, or code you want to find and
replace in the corresponding input box, respectively. Then
click on either the “Replace” button or the “Replace All”
button.
You also have two other available options; “Match whole
word only” and/or “Match case”.
Remove
Formatting
This icon allows you to remove formatting, (i.e. bold, italic,
underline, and font color) that has been applied to text on
your web page. This icon allows you to remove formatting
from text that has been saved or unsaved.
To remove unwanted formatting simply highlight the text you
want to remove it from and click on the Remove Formatting
button.
Spell Checker
This icon allows you to activate our sever based spell
checking program. The spell check program will check your
entire web page.
Just press the icon, and a window will popup giving you
suggestions for any word not in the dictionary.
Page Layout
This icon allows you to insert predesigned layouts. The Page
Layout option makes it easy to set your page up in one of
several ways. With space for images, columns and tables.
Snippets
This icon allows you to streamline the process of inserting
commonly used text and/or HTML content into your web
page, (i.e. address, Yahoo Map link, Image and Caption,
etc…). Snippets are bits of code that make complex things
easy and automatic.
User Manual, Apr 8, 2010
Ŝpĕcial
Chara©ters
This icon allows you to insert special characters, (i.e. ©, ®,™,
€, Æ, ¼, ¾, etc.) into your web page. These characters are
not standard keys on your keyboard.
Text Color
This icon allows you manually control your text font colors.
You can choose from 220 predefined colors or you can input
a hexadecimal code to control the color, (i.e. #FF0000 = red).
Background
color
This icon allows you to control the immediate background
color around text. You can choose from 220 predefined
colors or you can input a hexadecimal code to control the
color, (i.e. #00FF00 = green).
Left Justify
This icon allows you to align selected text to the left side of
your web page.
Center
This icon allows you to align selected text to the center of
your web page.
Right Justify
This icon allows you to align selected text to the right side of
your web page.
Block Justify
This icon allows you to align selected text to both, the right
and left side, creating a clean consistent look along the right
and left side of the web page.
Numbered List This icon allows you insert or remove a numbered list on your
web page. To end the list simply hit enter twice.
Bulleted List
This icon allows you insert or remove a bulleted list on your
web page.
Decrease
Indent
This icon allows you remove indents from your web page.
This action moves the text to the left.
Increase Indent This icon allows you add indents to your web page. This
action moves the text to the right.
Insert Link
This icon allows you insert and edit links, i.e.(URL, Link to an
anchor in text, E-mail, Link to Article, link to file, etc.) on your
webpage.
The keyboard shortcut is [CTRL + L]
Remove Link
This icon allows you remove active links. To clear or remove
a link, select the picture and/or text, and click this icon.
Anchor
This icon allows you to insert and edit anchors on your web
page. If you set the anchor in the middle of a page, then you
could link directly to that specific location by linking to the
anchor.
Insert Image
This icon allows you to insert and edit images on your web
page. In this dialog, click “browse server” to see the images
and files on the server and available for you to place in your
page.
Page 10 of 38
User Manual, Apr 8, 2010
Insert / Edit
Flash
This icon allows you to insert and edit Flash movies on your
web page. Easily upload and add a flash feature to the page.
You will need to have already prepared and uploaded it to
your web site via the Image and File Management module.
Table
This icon allows you to insert and edit tables on your web
page. Tables allow you to have more control of where content
is placed on a website page. You can easily add a table of
any number of columns and rows.
Horizontal Rule This icon allows you to insert multiple horizontal lines on your
web page. A horizontal rule is a way to place a divider
between content on a page.
Insert Page
Break
This icon allows you to insert multiple print page breaks on
your web page. This feature is useful for long pages that may
be printed out. When you want a page to break at a certain
place when the page is printed, insert a page break. The text
following the page break will print on a new sheet of paper.
Note, these breaks are not visible when the page is being
read on the screen.
Form
Container
This icon allows you to insert a form into your web page.
Forms are used when you want a reader's feedback, i.e. the
"Contact Us" form.
Check box
Field
This icon allows you to insert a check box into your web
page. Check boxes allow an “on / off” or “yes / no” selection.
Radio Button
Field
This icon allows you to insert single or multiple radio buttons
into your web page. The radio button allows the site viewer to
select one item from a list of several items.
Text Field
This icon allows you to insert single or multiple text fields into
your web page. The text field allows the site viewer to type
information into an area (e.g. name, address, phone
number.)
Text Area Field This icon allows you to insert a text area field into your form.
The text area is a larger text input box, often is multiple lines
high.
Selection Field This icon allows you to insert single or multiple selection
fields into your web page. A selection field creates a dropdown select box with multiple options to choose from.
Submit Button
Page 11 of 38
This icon allows you to insert single or multiple buttons into
your web page. When buttons are clicked on, i.e. Submit and
Reset, they enable the form to be submitted or reset.
User Manual, Apr 8, 2010
Style
Submit Image
Button
This icon allows you to insert single or multiple image buttons
into your web page. This allows you to upload a graphical
button into your form. (Submit, reset, etc.) The button would
need to be created in a photo editing program and uploaded
to your web site, via the "Image and File Management"
module.
Hidden Field
This icon allows you to insert single or multiple hidden fields
into your web page. Hidden Fields are used to place content
into a page, such as the email address that the form will be
submitted to.
Style Selector
This selector allows you to apply pre-designed styles to
selected text on your web page. Style Sheets are very useful
for helping to keep the fonts, sizes and colors consistent
throughout the site. Style Sheets are set-up in the templates
and global CSS.
Format Format
Selector
This function allows you to apply font formats, (i.e. Normal,
Formatted, Heading 1, Heading 2, etc...) to selected text on
your web page. Use styles rather than format when possible.
Font
Font Selector
This selector allows you to apply fonts, (i.e. Ariel, Courier
New, Tahoma, etc...) to selected text on your web page. Use
styles rather than font when possible.
Size
Size Selector
This selector allows you to apply pre-formatted font sizes,
(i.e. xx-small, x-small, medium, X-large, etc.) to selected text
on your web page. Use styles rather than size when possible.
About
This icon links you to the about area that gives you the build
and version information of the toolbar editor.
Insert HTML
code
This icon allows you to insert HTML code into your web page
from your clipboard. If you paste as text, the HTML code will
show on the page, while using this icon will embed the code
into your page.
Source Editor
This icon allows you to switch between the two editing
functions; the WYSIWYG graphical viewer and the HTML
code viewer. The Source button allows a person with more
technical knowledge of HTML code to adjust the HTML
source code. In general though, it is not necessary to update
the site this way.
Page 12 of 38
User Manual, Apr 8, 2010
Typing and Pasting Text
Adding text is as simple as typing directly into the graphical editor just like a word processor.
Text can be copied and pasted into your website editor. Most often you will work with existing
content from your local computer. You can copy this and paste it into your site.
When copying from another source, it is best to paste as “plain text”. You can easily paste as
plain text by clicking the “Paste as Text” icon. This will strip out any word processing
formatting codes before insertion into your website.
Keyboard shortcuts work in the graphical editor just like in word processors.
• Copy: Ctrl + C will copy the selected text to the clipboard.
• Paste: Ctrl + V will insert the clipboard text at the cursor.
• Cut: Ctrl + X will cut the selected text and put it in the clipboard.
• Undo: Ctrl + Z will undo the last step.
Inserting Images
There are folders available to store your images, documents, and media files. Each folder has
a special purpose. For example the Thumbnails Folder is used by the Calendar when setting
categories. The Flash folder is automatically opened for you to choose a file when adding
Flash content from the editor toolbar. This pattern holds true of all of the folders. This also
helps to keep your site well organized.
Uploading Images to the Website
To start uploading your files, you need be logged in. From the Welcome Menu, click the
Image and File Management link. Note: Make sure that you don’t have any spaces or special
characters in the names of your files. You can avoid this by using the underscore in the name.
1. On this new page, make sure that the correct folder is selected from the drop down
menu at the beginning of the page that is labeled Switch to a specific folder.
2. Click the browse button to find the file on your computer. A new popup window will be
displayed with the files from your computer in it. Locate the file and "open" it. The
popup window will close automatically.
3. Now click the Upload button to place the photo on the web server.
4. You also have the option of uploading several files at one time. Select the correct
folder first then select the Multiple file upload link.
5. On the multiple file upload you can select up to 100 megabytes from your computer to
be transferred to the selected folder. Simply click the Browse button to find the files on
your computer. In the new popup window find the file and "open" it. The popup
window will close automatically.
Page 13 of 38
User Manual, Apr 8, 2010
6. Now click the Upload button to transfer all the selected files to the selected folder of
your website.
Now you are ready to use your uploaded file!
Resizing Your Uploaded Image
The size of each image on your website will make a significant difference in how fast your
pages are displayed. We will show you how to resize an image that has already been
uploaded to your website. You will need to be logged in to complete the following steps.
On the Welcome Menu you will see a link for Image & File Management. Click this link.
1. Now make sure you are in the Images Folder or in the folder where the image to be
resized is located (this should be the Images Folder or Photos Folder).
2. Locate the image by name in the list and click the edit button to the right of the image
name. Once you have completed resizing an image it will be listed along with all your
other images.
3. This will start the image editor. If your image is large enough the editor will scale it
down to fit on the screen and you will see a message to let you know it is not full
sized. If you see this message, your image is larger than it needs to be and should be
resized smaller.
The easiest way to resize an image is to change the percentage. Changing to 50% will
give you an image that is half of the original size. You may also change the width and
height.
You can also crop your image by moving the grips in the editor. Grips are located at
each corner and in the middle of each side. Click and drag these grips to push or pull
the crop box (dotted lined box) inside your image. Form a box around the area you
want to capture as your final image.
4. Once your settings are made, click the Preview and Confirm button. You will want to
notice the change in your image. Does it look good and more importantly will it look
good on a web page?
5. You can place the edited image in any of the main folders. Use the drop-down list to
choose the folder you want.
6. You may also choose the name of your image or use the suggested name.
7. It is possible to remove the original image by clicking the check box.
8. Click the Finalize and Save button to make the changes to the new image and if
selected, remove the original image.
At any time you can click the Cancel and Return button to return to the previous screen and
be able to adjust the size settings again.
Once you have completed resizing an image it will be listed along with all your other images.
Page 14 of 38
User Manual, Apr 8, 2010
Inserting an Image onto the Page
1. Navigate to the page where you want to display the image. Because you are logged in
you will see an Edit link at the bottom of the page. Click the Edit link at the bottom of
the page. When the page refreshes and the toolbar is loaded, find the place in the
page where you want to place the image and click there. Now, on the toolbar, find and
click the “Insert/Edit Image” icon (
in the middle of the center row.) This will bring up
the Image Properties dialog box.
2. In the upper right side of this dialog box click the Browse Server button. This will open
the Resource Browser window with all the folders and their contents. Be sure the
correct folder is selected in the left panel.
3. Now locate and click the image in the list in the right panel. The Resource Browser
window will close and take you back to the Image Properties dialog box. You will now
see that the URL text box is filled in.
Note: Typing in a description of your image here will help visually impaired visitors
navigate your web page.
4. You can adjust the height and width of your image here by using the boxes to the left of
the Preview box in the Image Properties dialog box. If the lock icon is closed ( ),
changing the height will also change the width. Click the lock icon ( ) to change
either the width or the height. You can also reset the image to full unchanged size by
clicking the Reset Size icon ( ) Note: We recommend that you work with the lock icon
closed because this will maintain the proportions of the image.
5. You can also add a border to your image, adjust the space around your image, and
change its alignment by using the other boxes to the left of the Preview box.
Note: To add a border or space you will enter numbers that are usually small, because
these are measured in pixels.
6. Click the OK button at the bottom to save your settings and insert the image into the
page.
Don’t forget to click the Save and Publish button to complete your work. You may want
to Save as Draft instead if you want to continue working on the page before it is made
public.
Page 15 of 38
User Manual, Apr 8, 2010
Creating Links
Adding/Editing Links to your website can make it easier for your website visitors to more
easily navigate to the information they are looking for. Links can entice them to look at
information they may not have been looking for too. Links – especially between websites –
can also attract more attention from search engines.
Creating a link is simple. Select the text or graphic you would like to make into a link. Click the
Add/Edit Link Icon.
Notice the “Link to Article” select field. This field contains all of the articles in your sitemap.
Selecting any page will make a link to that page directly.
Verify the action of all your links. After saving the page, click the link to make sure it works
like you want it to. Links can be modified or removed as needed without affecting the text or
graphic used for the link.
Page 16 of 38
User Manual, Apr 8, 2010
Save and Publish vs. Save As Draft
When you create a page on your site, and you are ready to save the page into the system,
you have two options for saving your file:
Save and Publish - This option is available to administrators, and editors who have been
given access to this article. Pressing this "Save and Publish" button will publish the changes
you have made live to the website, for the public to view.
Save as Draft - This option is available as a shadow copy of the webpage. It is available to
site administrators and editors who want to work on a page but not display the work in
progress to the public via the website. When you have an article as a draft, the editor
remembers this alternate version (or shadow copy). When you edit this page at a later date,
the draft "text" will be loaded into the editor window. At the top of the window, you will be
alerted of this with this text:
Now editing the DRAFT version.
The compare link will popup a window that loads both the "published" version and the "draft"
version side-by-side in the same window. You can easily compare the content from each page
this way.
Note: Save as Draft is the only option that Authors have. When they are finished they will
click the Save as Draft button and their changes will go to the admin or editor for approval.
Load Published - Once you edit a page that has a draft version, you will see a new button at
the bottom of the page: "Load Published". Pressing this button will refresh the screen with the
version of this page that the public is now able to view. Clicking this option, and then Save
and Publish will remove the draft version. In Published mode, the button becomes "Load
Draft" which will reload the draft version. These buttons do not save your pages, but simply
refresh the screen with the other version that was not active on the screen.
Page 17 of 38
User Manual, Apr 8, 2010
Tokens
Tokens are bits of coded text you can add on any page that will be dynamically changed to
something more complex when viewed. An example is the ##time## token. This token
causes the current time to be displayed in place of the ##time## token. Tokens can be
formatted (look and feel) with CSS classes as listed below.
Here are some of the many tokens you can use:
##adlinkstext1##
Include a text ad for a specific zone
##adlinkspanel1##
Include a panel ad for a specific zone
##adminlinks##
Administrative links
CSS: bottom_links
##breadcrumbs##
Prints a list of pages back to the home page with links.
CSS: breadcrumbs, breadcrumbs_separator,
breadcrumbs_current
##childarticles##
List of child articles of a specific article id
CSS: childpages
##content##
The text of the page content
##custom1##
Custom template area 1
##custom2##
Custom template area 2
##custom3##
Custom template area 3
##custom4##
Custom template area 4
##date##
02/18/20
##eventsnew##
Listing of calendar's upcoming events
CSS: eventsnew, eventsnew-title, eventsnew-description
##eventsnew1##
Listing of calendar's upcoming events in a specific calendar
category. You can define these categories in Calendar Configure.
CSS: eventsnew, eventsnew-title, eventsnew-description
##featureimage1##
The image file name of the randomly selected feature
##featureimageshow1## The html code for image file of the randomly selected feature
##featuretitle1##
The title of the randomly selected feature
##featuretitletext1##
The title of the randomly selected feature, without span class
##featuretext1##
The text of the randomly selected feature
##featureurl1##
The URL of the randomly selected feature
##footerlinks##
Footer links (sitemap line)
CSS: footer
Page 18 of 38
User Manual, Apr 8, 2010
##googlemap##
The token to display a Google map. It must be configured in
Admin Management -> Site Configuration and Navigation.
##login##
Link to members login page
##meta-description##
The token to display the automatic website meta-description when
you use a custom DOCTYPE.
##meta-keywords##
The token to display the automatic website meta-keywords when
you use a custom DOCTYPE.
##menu-vertical##
Dynamic subpage flyout menu token.
CSS: See menu config
##menu-horizontal##
Dynamic subpage dropdown menu token.
CSS: See menu config
##nav-vertical##
Vertical text navigation links
CSS: vertical-links
##nav-horizontal##
Horizontal text navigation links
CSS: navlinks
##nav-horizontal2##
A second horizontal text navigation set of links
CSS: navlinks2
##navigation##
Displays the main navigation items in a LI list
CSS: .navigation, .navigation_separator
##newswhatsnew##
Listing of most recent news texts
CSS: whatsnew, whatsnew-title, whatsnew-description
##noticelink1##,
##noticelink2##
Privacy and legal notices links, used with the Notice module
CSS: footer
##poll1##
Display a poll item for a specific poll id
CSS: pollquestion, polltotals, pollarchive
##rssdigest1##
Build a RSS digest for a specific RSS feed
##search##
Website search box
CSS: search_field
##siblingarticles##
List of articles that share the same parent page
CSS: siblingpages, siblingpages_current
##signup##
Link to members signup page
##sunset##
Sunset Schedule
For: Berrien Springs, MI
6:37 pm Mar 3, 2006 (Sabbath Starts)
6:39 pm Mar 4, 2006 (Sabbath Ends)
CSS: sunset-title, sunset-description
##sharelinks##
Displays the "Print | Email | Post" links
CSS: .printlink
##time##
09:30:00 AM
Page 19 of 38
User Manual, Apr 8, 2010
##whatsnew##
Listing of what's new
CSS: whatsnew, whatsnew-title, whatsnew-description
##whatsnewcart##
Listing of most recent shopping cart items
##whatsnewsite##
Listing of what's new from whole site, where "show in what's new"
box is checked on the details tab.
CSS: whatsnew, whatsnew-title, whatsnew-description
##whatsnewsiteall##
Listing of most recent articles from whole site, regardless if the
"show in what's new" box is checked on the details tab.
CSS: whatsnew, whatsnew-title, whatsnew-description
Page 20 of 38
User Manual, Apr 8, 2010
Forms
A website form contains a list of input fields where your website visitors could complete and
send you information. A common application is a contact form. When a visitor fills in such a
form, it sends the information in an email to you.
There are editor icons available to allow you to create form text fields, check boxes, radio
buttons, etc. There are several components to make a working form. Note that creating forms
does involve HTML code, and understanding how forms work. One of the best ways to make
a form is to modify or copy an existing form and working form.
Components of a working form:
1. Form action containers – This opens the form with the <FORM> field. In the graphical
editor, the form container will show as a red dashed line around all of the form fields.
The action of the form must point toward a processing script which will handle the
submitted data.
Example: <form action="sucontact.php" method="post">
2. Hidden fields – These can inform the processing script with information needed to
process the data. If as in our example you are working with a contact form, the hidden
fields could tell the script what email address to send the data to. Since these are
hidden in the html source code, the public never see them. In the graphical editor, you
can see them by the icon display in the form area. If you select a hidden field, you can
then edit it with the hidden field icon in the editor.
Example: <input type="hidden" name="recipient" value="support" />
<input type="hidden" name="subject" value="Contact" />
<input type="hidden" name="required" value="name,email" />
3. Input fields – These display the fields for the data you want to collect in the form. There
are a variety of types of fields: text, radio buttons, check boxes, select boxes, etc.
There is an icon for each of these in the graphical editor.
Example: <input name="name" type="text" />
<input name="email" type="text" />
<textarea name="comment" rows="6" cols="35" wrap="hard"></textarea>
4. Submit button – This will activate the form action and send the data to the processing
script.
Example: <input type="submit" value=" Send " />
5. End form code – This closes the form, and the </form> code should be after the submit
buttons. The end form code is automatically entered when you use the graphical editor
to make the form container.
Example: </Form>
Once you have created a form, it is important to test the form to verify that it works as you
expected. This would also apply each time you edit a form as well.
Page 21 of 38
User Manual, Apr 8, 2010
Contact forms that send to an email address will require that you send to an email address.
This is configured in a hidden field. SimpleUpdates sites launch with a contact form set to
send email from the form to [email protected]. Verify that you have setup this
email address, or have changed the hidden field to point to a valid email address on the site.
This section on forms can only scratch the surface of what is available with forms. Check out
our help site at help.simpleupdates.com for more information.
Page 22 of 38
User Manual, Apr 8, 2010
Site Management Functions
User Management
Your SimpleUpdates website is secure, and requires a login to access the editor and make
updates to your site. You may add as many user logins as you need to manage and share
your website efficiently. To do this, you will use User Management. This module is accessible
on the Management tab of the Welcome Menu.
Adding a new user and editing a current user are the same process. To add a new user, click
the Add button. To edit a current user, click the name of the user you with to edit. From that
point on, the screen contents are the same.
Once you have clicked either the Add button or the current user name, an Edit My Profile
screen will appear. The Main tab has the primary under information you will want to set for
each user.
• First/Last Names - Required
• Address – optional but valuable
• Phone – optional but valuable
• Email – Required
• Password – create your own or let the computer generate one. Either way, the user
should change their password when they first log on to the system. Passwords are
case sensitive.
Note: Click the “Send Email” box to send an email to the new user letting them know of their
new login information and how to use it. – optional – but an especially good idea if the
password has been computer generated.
On the top right are two more options that need your consideration.
•
User Level: SimpleUpdates has created a hierarchy of user levels
•
•
•
•
Admin – can perform all functions, and access all areas of the website
Editor – can add/edit/publish article pages and modify modules as specifically
allowed (see Access Tab info in this User Management section)
Author – can add/edit article pages and modify modules as specifically allowed
(see Access Tab info in this User Management section) but cannot publish to the
website. Approvals are needed to make Author edits public.
Member – no add/edit ability, but can access specific article pages and modules
marked for Members Only.
Note: Authors and Editors can also access Members Only areas of the website,
but cannot edit them unless given editing access.
Page 23 of 38
User Manual, Apr 8, 2010
•
Status: when adding a new user, they will be marked as active by default.
•
•
To temporarily cancel a user's access, change the status to inactive
To permanently cancel a user's access, delete the user record.
An option to user management is to allow Website visitors to create their own Member login.
This login is subject to the approval of an Admin level user. Until such time as they are
approved, they will be listed on the User Management list as “unapproved” and their login will
NOT allow them access to Member Only areas of the site
Clicking Save and Submit will create/modify the user login.
Tabs in User Management:
Some tabs may appear in User Management depending on the modules you may have
installed. The Directory and Newsletters are such examples:
Directory Tab: visible when the Member Directory module is activated. All information on this
tab directly influences information available in the Directory. It includes optional fields that are
defined in the Member Directory module.
Newsletters Tab: visible when the Email Newsletters module is activated. When you add a
newsletter list, it will become an option on the newsletter tab of User Management. New users
can be added to each newsletter list by checking the box(es) as desired.
The access and preferences tabs are always available.
Access Tab: This is where you give Editors and Authors access to the areas of the website
you wish them to manage.
The main navigation pages are listed with check boxes beside them, check each box you
want your Editor and/or Author to manage.
You may specify child pages by finding the page in the drop down box. Click Add to give
access to additional child pages.
Remember - add/edit access is automatically granted to all child pages of whatever parent
page is marked.
You may grant access to specific modules as well. In order to give this access, the module
must be setup to allow admin access to lower level site managers. (see specific module
addendum activation instructions)
Page 24 of 38
User Manual, Apr 8, 2010
System access:
You may ask an Editor to manage users. Keep in mind that management of users includes
the ability to change all access options for new and current users.
Uploading images and documents is an all or nothing option. It is not possible to allow
uploading to a choice of folders.
Preferences Tab:
Choose a language for your site. Default is English
Choose an editor height. When an article is edited the height of your workspace will be
determined by the editor height (in pixels) as recorded here.
Image and File Management
The Image and File Management module is a way of getting graphic files and document files
uploaded to your website server where they are available to be used online. In addition to
uploading files, you have the option of modifying the images online with the image editor.
After logging in to your website, from the Welcome Menu, the Management tab, click Image
and File Management.
The Images Folder is the default folder because it is the most commonly used folder. Most of
the images you insert on your article pages will be stored here.
There are several other folders to choose from:
• Directory Folder – Sores images for the member directoty.
• Docs Folder – PDF documents are the best choice for your website because links to
PDF's will open the document on your website and allow the viewer to save it to their
computer if they want to. Other types of document can be uploaded here and linked to,
but the links will only allow download. They will not open.
• Feature Folder – graphics used in the Feature Module will be stored in this folder
• Flash Folder – a handy place to keep any flash files you may use
• Gallery Folder – graphics used in the Gallery will be stored here
• Images Folder – Default – for images and graphics used on article pages
• Media Folder – for small media files not already stored on a media server account
• Photos Folder – another place to keep pictures
• Podcast Folder – for use with the Podcast Module – again, a media server account
may be a better option
• Template Folder – for graphics used in templates
• Thumbnails Folder – store the thumbnails you create here. They will show on the list
when selecting thumbnails in various places on your website
Page 25 of 38
User Manual, Apr 8, 2010
•
Transaction Folder – used by the Shopping Cart module. Pix in this folder have been
coded to specific products in the cart. File names in this folder will not match your file
names. This is NOT a good folder to use independently of the Shopping Cart.
Uploading files:
1. Choose the folder in which you want to keep your file.
2. Click the Browse button to find the file on your computer
3. Click the Upload button to copy the file from your computer to the server where your
website is located.
4. The upload button will change, asking you to please wait. The time it takes to upload a
file depends on the size of the file and the speed of your Internet connection.
5. When the upload is complete, the name of your file will be listed at the top, left under
the “File Management” heading. It will also be in the list below the “Upload new file”
field.
6. You may now insert or link to this file(s) from your article pages.
The Multiple file uploader allows you to choose several files and upload them all at the same
time.
Using uploaded files:
When inserting a graphic or creating a link to a document on an article page, the Browse
Server button will generate a list of the Image and File Management folders.
1. Choose the folder where you stored the file you are inserting or linking to; a list of the
files in that folder will appear.
2. Choose the file you want and click OK.
(More information regarding inserting and linking is in Using the Editor)
In a few circumstances you may need to use HTML to identify the file you want.
Add or Replace the current code with the following HTML path for your uploaded file: site/1/
[folder name]/[file name] The path is case sensitive. When coding, all folder names are lower
case. If working within the editor, switch to Source mode before adding HTML code
Deleting files:
Maintaining your image and document files to keep your lists manageable is recommended.
Storing unused files on your site is an unnecessary use of website space. Simply click the
Delete button next to the file you wish to remove it from storage.
Keep in mind that:
• As your lists become longer, the delete buttons may not appear until you click the
“Search for Database Usage/Delete” link at the top right of each folder page.
Page 26 of 38
User Manual, Apr 8, 2010
•
•
An image or document file that is being used on an article page will not have a delete
button. The article(s) where the file is used will be listed.
Verifying that a file is not being used anywhere on your website, before clicking the
Delete button, is expedient! An image or document file that is being used in a template
may have a delete button but it would be a mistake to click it.
Editing Graphic files:
Both the size and the resolution of a graphic file will affect the way it displays on your website.
Websites display graphics at a resolution of 72 pixels per inch. So a graphic that is one inch
square will be 72px by 72px.
The content area of most articles has a set width. If your graphic is wider than the set width,
your template will be distorted and your images will need to be resized. Recommended
graphic width is in the 200px to 350px range. Graphic height is not as crucial in most cases.
Ideally your graphics are cropped and sized prior to uploading, but for a variety of reasons
this may not be possible. You may crop and resize graphics directly on your website through
Image and File Management:
1. Choose the folder where your file is stored
2. Click the Edit button next to the file name. The graphic will load and the stored size will
be listed in the crop width and crop height fields
3. To Crop, Click, hold and drag the edges of the graphic to crop the image. Chosen area
will remain full color, discarded area will gray out. Crop width and height size will adjust
to your selection.
4. To Resize, enter the new desired width in pixels in the “Resize width” field. The Resize
Height will automatically enter a number that maintains the proportions of the graphic.
5. You may alternatively resize by reducing the percent size.
6. Click Preview and Confirm
7. You may change the file name
8. It is recommended that you keep the original until you are sure your new graphic will
work.
9. If all looks good, Finalize and Save. If not, Cancel and Return to try again.
The resolution of website graphics is low, increasing the size of an image saved for website
use will distort and pixelate the image. If you need a larger image, start with a larger/higher
resolution original.
Approve Submissions
Keeping your site updated can be a huge task. That's why SimpleUpdates has created
options for delegating various site maintenance tasks to other people.
Author level logins can edit their assigned pages, then save their work as a draft. It does not
publish until an editor or admin approves the new content.
Page 27 of 38
User Manual, Apr 8, 2010
Calendar events can be added by several people, and an admin approves them for public
viewing.
Visitors to your site may be signup to become a site member, but their member login will not
work properly until they are approved by an admin.
Approve Submissions allows you to maintain the integrity of your website without having to do
all the work yourself. It is once place to collect all of these different page and item approvals
into one convenient location.
Site Search and Replace
Search and Replace allows you to locate some text within your site and replace it with some
other text. This automation is very handy if you have a specific edit that you want to make on
all pages of your site at once.
• Enter the text you want to search for
• Enter the text you want the searched for text replaced with
• Check mark the box if you want to search through templates as well as articles
• Check mark the next box if the search is case sensitive
• Click the Next button
A list will be generated as links to all the pages where your searched for text shows up. At the
end of the list is a total number of matches.
• You may use these links to manually change a specific occurrence
• You can click the Confirm Replacement button to change them all
• You can exit and change nothing
Link Verifier
The Link Verifier searches the article pages you specify for links and then follows them to
determine if they actually go to a real place, or if the address they describe is no longer valid.
1. Choose the page you wish to verify
2. Indicate how many levels of child pages you would like to include
Note: If your site is large, it may take too long to verify all pages, and the program may
time out. If this happens, scan one part of your site at a time.
3. Click the Verify Links button
A list will be generated that includes:
• The name of the article
• The links that were found OR a note that no links were found
• The status of the link – OK or Bad
Page 28 of 38
User Manual, Apr 8, 2010
This is an excellent maintenance tool to run periodically, especially if you use off site links.
You do not want to link to broken locations, and this tool allows you to maintain your links so
you only keep OK links on your site. Keeping your links in verified condition improves the
usability and value of your website.
Article Status Management
Article Status Management is a tool allowing the administrator to easily see and manage
article activation dates. This management tool was made for one specific website, which had
hundreds of articles that were constantly needing to be date activated or deactivated. We
decided that other sites may also like this birds eye view of their site content, for staging
content in advance.
You can select any part of your site to be the basis of the tree display. Once you select the
branch you want to inspect, press "Display Child Pages", and the page will refresh showing
the thumbnail, the title & author, the Active date, the Expire date and the articles Status. Note
that you can sort on any of these columns up or down by clicking on the column title link.
This tool makes it easy to keep track of what pages are ready for publishing, and clarifies the
upcoming schedule of "releases" that are in place. You can make changes to the dates and
status fields, and set them all with the submit button at the bottom of the page.
Backup Management
SimpleUpdates runs backups of your entire site database and all files on a daily basis. If
anything should happen to your data, we can restore your website. Generally you do not need
to worry with backups at all. If, however, you are in the middle of a major project and want
extra backup points, you can run your own backups as frequently as you wish.
Backup Management offers you two backup options.
• Backup the Database – includes your content and the configuration information and
details for your modules
• Backup the files provides the contents of the Image and File Management folders
Note: If you have individual files over 50 megs on your site, these files will be listed so
you can download them one at a time for file backup.
If you ever wanted a restore based on your backup point, we can work with you to restore the
files or data to your site. The backups are free and available at any time. Restore work is
billed at our hourly rate for the time needed for your restore. Restoring all articles is easier
and faster than only one article from the backup, but we can accommodate your specific
needs.
Page 29 of 38
User Manual, Apr 8, 2010
Help and User Guides
Getting help on your website is easy. At the top right of any admin page you will notice the
help link. The Help link provides three different ways to help you successfully manage and
update your web site.
•
•
•
The documentation link provides a link to our help web site related to the page you are
on. From the help link, you can easily explore all of our help topics and videos.
The Create Ticket link opens a dialog box that lets you create and submit a help
request. The ticket area shows any open tickets as well as an archive of all your past
requests that you have submitted through our help system.
The last link, Video Tutorial, provides you training 24/7 via our on line help videos. If
there is a help video on the page or module you are on, you will see that video related
to the page or topic you are working on.
If you still cannot find the answers to your questions then please email us at,
[email protected] or call us at 269-473-3687.
Stats
Web site statistics give you a picture of who is visiting the site, and what areas of your
website are more or least popular.
We have a variety of ways to show website statistics. You can view your site statistics area
following the steps below:
1. Login to your website with your user name and password
2. At the Welcome Menu click on the Management tab, and look for the statistics icon.
There will be one or more links to your site statistics.
Page stats
The “Page” link will take you to a counter of every article page on your site. Each article page
of the site list listed in outline/indented format and has a number of times each page was
viewed since the time the stats were last manually reset.
You can reset the stats as often as you want, and each time you reset the page views to zero,
the previous stats are archived in a snap-shot that you can review at a later date. We also list
the top 10 pages and 10 least visited pages of your site in their own tables in this report.
This data is instantly up-to-date at the time you view the stats. It is a complete page counter
for every page on your site, and this method is preferred over a page counters that were
popular on web sites several years ago.
Page 30 of 38
User Manual, Apr 8, 2010
This data will tell you in a snap shot view, what specific pages are "hot" and what pages are
being ignored. The goal is to make sure your "hot" pages have fresh information, and to edit
the pages that are being ignored so that they also have more appealing information for your
visitors.
Website Stats
This is a server based website stats package, giving historical data by month, and shows
graphics of traffic trends. The first page shows the previous 12 months of activity, and each
month can be viewed for more detailed statistics.
It is possible to use Google Analytics, and if this has been activated on your site, then the
“Website” link will point you directly to your Google Analytics account.
Media Stats
For websites that have a streaming media account as a part of their package, we offer a
statistics package summarizing the views of your online media as well. Text and visual graphs
of usage are available.
For more information and a breakdown and more explanation of what the various statistics
terms mean, visit our help website: help.SimpleUpdates.com, and search for Stats.
Page 31 of 38
User Manual, Apr 8, 2010
Administration Functions
Site Configuration and Navigation
This area was discussed in the getting started section about the initial setup of your website.
The Main tab holds your website address and contact information.
The Navigation tab holds the main pages of your website. The title, links and listing order is
coded here and then the content is edited separately on each page. You will notice there are
15 placeholders for main pages. We suggest you use no more than 8 for an acceptable
website design and for ease of navigation. This may mean combining several areas under
one heading as would be done in an outline.
The other tabs have configuration options, and if you are unsure of their action, we suggest
you leave all of the options at their default settings.
Module Configuration
In this area, you can activate and deactivate modules for your website. A module is an
optional program that can be turned on, or activated for your site. Examples of modules
include the calendar, and the photo gallery.
Activating Modules:
To activate new modules, click on the Administration tab, then click on the Module
Configuration link.
The Modules Configuration page displays two lists, the active modules and the inactive
modules.
To activate a module, scroll down to the inactive modules list. Find the module you want to
activate and click on either the icon or the title. Find the status drop down menu and select
active. To complete the activation process, click on the Save & Exit button. The module will
now be displayed on the Main tab in the Welcome Menu.
Inactivating Modules:
To inactivate a module, click on the Administration tab, then click on the Module Configuration
link.
The Modules Configuration page displays two lists, the active modules and the inactive
modules.
Page 32 of 38
User Manual, Apr 8, 2010
To deactivate a module, go to the active modules list. Find the module you want to deactivate
and click on either the icon or the title. Find the status drop down menu and select inactive.
To complete the deactivation process, click on the Save & Exit button. The module will no
longer be displayed on the Main tab on the Welcome Menu, and all the information within the
module will be lost.
Email and Server Setup
This area links to the cPanel server interface, and allows you to set up and manage email on
the server, if you choose this route for your website email. Generally, this is all you will need
to work on inside this module, and if you notice other areas in this interface, we suggest you
leave all of the options at their default settings.
For instructions on setting up email, look in the getting started section of this guide.
Notices
The Notices area allows you to edit the content in one editing location, and easily display links
to this content on all pages of your site. The most common application is a Privacy Notice,
and the link can be automatically added to the bottom of the screen on all pages.
You have the option of creating two separate notices, and linking to them individually, such as
a Privacy Notice, and a Legal Notice.
Messages
This area allows you to configure the messages displayed or emailed to users of your site.
You can customize the message shown to a new user signup is complete, etc.
The various options are explained inside this module.
Google Setup
Within this module, you can configure Google Maps, Google Email, and Google Analytics. For
each of these functions, you will need a Google account, and a registration number from
Google. These options are explained more within this module.
Page 33 of 38
User Manual, Apr 8, 2010
Templates
What your site looks like is as important as what it says. If it is not inviting, visitors won't stay
long enough to read the content you've worked hard to add to your site.
Each SimpleUpdates site comes with a standard template. There are several of these
standard templates to choose from and they can be changed at any time.
You can customize a standard template. You can also create new templates using your own
artwork and coding skills. Each article page and module allows you to choose the template
you want to use with that particular page/module. Keep in mind that while variety is good,
creating pages that look so different that they aren't recognized as being part of the same
website is not so good.
To work with template design and modifications, you will need to be logged in using an admin
level login. From the Welcome Menu, click the Administration tab, then Template
Customization. This is the hub of your website identity; the look and feel of your site.
Available Templates link allows you to view the standard templates that are currently available
and choose a different one for your site if you like. When you change templates, they will
replace your current ones. If you have made modifications to your current templates, you may
want to use the optional save feature by giving a name to your current template set before
applying the new template set because the current template set will be overwritten.
If you are interested in using the dropdown or flyout menus using Menu Configuration, please
contact the SimpleUpdates office for more information.
There are a number of system pages – like the login page, the search results page, the
sitemap page, etc. - that you cannot edit to change the template that is used for that page. By
clicking the System Page Templates link, you will have to opportunity to choose the templates
that will apply to these pages.
To make changes/customizations to a template you will need some basic understanding of
HTML and CSS. We suggest that before modifying you create a copy of the template. This
can be done by copying the code and pasting it to a text editor (DO NOT USE A WORD
PROSESSOR).
Modification steps:
Click Add Template link and set a unique page type for the template. This is usually a
descriptive name that reminds you of what it is. It will save as a single word all lower case and
cannot be changed. Add the template content in the editor, and when you are ready, you can
Submit Edits to save the new template.
Copy templates:
If you have an existing template that you would like to replicate and customize further, you
can copy the template to another. Just be sure you make your edits to the proper template.
Choose the template that is closest to what you want your finished template to look like.
Page 34 of 38
User Manual, Apr 8, 2010
Click the Copy to tab, and check the box next to the new template to overwrite. When ready,
click Submit Edits.
You may now edit the new template without affecting anything on your site. It is a good idea to
change the Template name. The name will have copied, along with the code, from your
original template. The Template name can be more descriptive than the page type. When
saved, it will be the part of the link that shows in parenthesis.
To test a new template, create a new article page and set the status of the page to inactive.
The inactive status page(es) will only display to a logged in user with admin rights to the
page.
When you are ready to change the look of your website pages, you may edit the article pages
where you want the new template applied and choose the new template (use the Template
data tab). If you are changing all pages that use a particular template, use the copy to tab of
your new template to overwrite the current(old) template. It is a good idea to save a copy of
your new template to a text file and, if you are overwriting, be sure you are copying from the
new template to the old one! It would be sad to copy the wrong direction and lose all your
hard work!
There is a safeguard built in to the system. This works for both templates and the Main tab
content of article pages. If you Submit edits (save and publish) and discover you've made a
mistake that you're not sure how to fix. Edit again, click the History tab, and Rollback to
previous settings. Article pages allow you to compare and revert to previous version.
Templates have no compare option. This works only one version back. If you try to fix it and
save again, the pre-error version will be gone.
SimpleUpdates backs up your site information on a daily basis. If you discover you have lost
a template that you need, and the history tab is no longer an option, we can recover it for you.
It will be a day old though and will not contain the modifications you made a few hours ago.
Backup fees are charged at our normal hourly rate. (See also Backup Management)
When making changes that will affect all pages, you may need to edit all your active
templates. (See Global CSS)
Global CSS
Most template elements are stored in a CSS file. This stands for Cascading Style Sheets.
Since each template will need CSS code, you can place the CSS code in once location rather
than putting in this text into each template separately. Not only it is easier to put the CSS in
once place, but if you need to edit the CSS at a later time, having the code in once location
will be a great advantage.
A practical advantage of using Global CSS is that this file is cached by the browser. This
speeds up the load of your website.
Page 35 of 38
User Manual, Apr 8, 2010
Your Account
Accounting & Payment Options
We appreciate your partnership with SimpleUpdates.com. We have automated credit card or
bank account billing for your convenience. If you move or change your billing email address,
please let us know so we can keep in contact.
The SimpleUpdates subscription with hosting is paid via automated recurring billing via Visa,
Mastercard, Discover, American Express or eCheck. The term for automatic recurring
payments can be: Monthly, Quarterly, Semi-Annually or Annually.
Note: All electronic transactions are non-refundable and final. Rejected credit cards and
checks will be subject to a $25 fee plus all directly related overdraft or processing fees
charged to SimpleUpdates by the bank.
Past Due Time Line and Late Fees:
All invoices are due and payable within 30 days of the invoice date.
1. At 30 days from the invoice date, the invoice becomes past due and finance charges of
1.5% per month will begin to accrue. There is a minimum finance fee of $5.00 per
month for any past due balance.
2. At 40 days (10 days past due) we will mail a reminder letter that your account is past
due, and provide options for payment. It is important that any past due account
immediately communicate with us so we can assure your site stays active on the web.
3. At 60 days (30 days past due) the website will be suspended. This keeps all of the text
and images of the website ready for immediate reactivation upon payment of all
account invoices plus a $50 reactivation fee.
4. At 90 days (60 days past due) and if no contact with the client has been established,
the website will be removed from our servers. After removal, there is a $200
reactivation fee. We do not guarantee archiving of text or images of sites that have
been removed from our servers.
For Quarterly invoicing, the following quarters would apply:
1. Dec. 1 will cover hosting for the months of January, February and March
2. Mar. 1 will cover hosting for the months of April, May and June
3. Jun. 1 will cover hosting for the months of July, August and September
4. Sep. 1 will cover hosting for the months of October, November and December
Page 36 of 38
User Manual, Apr 8, 2010
Support and Package Plans
Support is defined as anything you need our help with; training, module setup, coding,
replacing lost files from backup, and much more. Several payment options are available,
designed to mesh with your specific support needs.
Payment Plan
Discount
Hourly Rate
Total
Pay as you go
none
$65.00
Total hours X $65
4 hours prepaid
15%
$55.00
$220.00
8 hours prepaid
20%
$52.50
$420.00
16 hours prepaid
25%
$50.00
$800.00
All Support is billed in 15 minute increments. You can pay for prepaid support plans by
entering the desired dollar value into our on-line invoice payment form. You may also pay
invoices at: http://www.SimpleUpdates.com/invoice.html
Media Account Fees
A media account is separate from your website and designed to store and stream your media
files more smoothly. It is recommended for sites with multiple audio and/or video files and for
single media files that are time intensive. (see Media Info, page ___ for more information)
•
Live Media Streaming – real time streaming, with no archived storage.
One time setup fee: $250 plus $10 per month
•
Archived Media Streaming – stored files that can be accessed at will.
One time setup fee: $50 plus $10 per month for the first 500MB of storage
Additional storage fees for Archived media:
Amount of Space
Additional Monthly Fee
Total Monthly Fee
500 MB
$10.00
$10.00
1000MB (1Gig)
$10.00
$20.00
1500MB
$10.00
$30.00
2000MB (2 Gig)
$5.00
$35.00
3 Gig
$5.00
$40.00
4 Gig
$5.00
$45.00
5 Gig
$5.00
$50.00
Each additional Gig
$5.00
$5.00
Page 37 of 38
User Manual, Apr 8, 2010
Third Party Software Assistance
Third Party Software are programs that can be very helpful and work seamlessly with your
website but are not supported by SimpleUpdates.com.
The following are one time setup fees. There are no monthly fees.
Google Apps – an email management system for your website
Complete (standard version) setup: $65
Partial setup (verification file and DNS changes only): $32.50
Forum – MyBB: $65
Blog – WordPress (includes your website template): $65
Technical Support for Your Website
We look forward to helping you with your website. We want the process to be simple and
intuitive. If you need help, we have several resources for you:
•
Help website – You can get your questions answered fast at our help website just go to
help.simpleupdates.com.
•
On line Training Videos – Watch and learn how to perform a myriad of tasks from
logging into your web site to adding pod casts to your web site.
If you need more help, we have interactive support available. Simple questions can be
answered free via email, more involved setup issues may be billable or covered under your
prepaid support package plans. Contact us via:
•
Online ticket – go to the Welcome Menu, and select the Help icon. Here you will be
able to open a help ticket and track its progress. Try help tickets first, as it is the most
efficient way to get help.
•
Email – [email protected] is our support email, and multiple of our support
team regularly check our support email.
•
Phone – You can call us at 269-473-3687, Monday through Thursday - 9 am to 6:30
pm ET, and Friday - 9 am to 4 pm ET.
Page 38 of 38
User Manual, Apr 8, 2010