1
High Performance Digital Imaging System
VK-2
User’s Guide
Ver2.15
(VK23E for WindowsXP)
031223 Ver215
CONTENTS
Preliminary Documentation
1.Introduction
2.Staring and Exiting VK-2
3.Basic operation
4.Operation of Command Toolbar Function
<Operation of Button>
4-1.Command Toolbar
4-2.Input Data
4-2-1.ID Type
4-2-2.Name Type
4-3.Search ID
4-3-1.ID Type
4-3-2.Name Type
4-4.Previous Image and Next Image
4-5.Multiple Image
4-5-1. 36 multiple image
4-5-2. Make the quality of thumbnail image better
4-6.Frame Size
4-7.Image Process
4-8.Edit Data
4-9.Advanced Search List
4-9-1.Advanced Search ID List
4-9-2. Advanced Search Name List
4-9-3.Display Multiple Patient Image
4-9-4. Diagnoses in Database List
4-10.Capture Image
4-11.Save Image
4-12.Print Out
<Operation of Menu Function>
4-13.Select Print Out
4-14.Delete Image
4-15.Delete Image of the same ID
4-16.Save Edited Image
4-17.Copy Image to Other Media
4-18.Open Previous Komit Image
4-19.Open Previous Komit Database
4-20.Open from Archived Media
4-21.Copy to Clipboard
4-22.Input Text
4-23.Check Disk Space
4-24.Show Square(2 Images)
4-25.Compare two images
4-26.Prohibit No ID Images
4-27.Choose Input Data Type
4-28.Set display mode after searching
4-29.Header and Footer for Printing
4-30.Send Image by E-Mail
4-31.Drag image
2
4-32.Print out at White Mask
4-33.Show the date list
4-34.Stereo assist
4-35.Link to Perimeter
5.Image Processing
<Image Processing Toolbar>
5-1.Sharpen Image
5-2.Gamma Process
5-3.Enhance Image
5-4.Contrast
5-5.Brightness
5-6.Analysis of RGB color
5-7.Negative Image
5-8.Flip Image
5-9.Zoom Image
5-10.Measure Length
5-11.Measure Cupdisk Rate
5-12.Measure Angle
5-13.Loop
5-14.Undo
5-15.Origin Image
5-16.Reference(Template) Image
<Image Processing Menu Function>
5-17.Merge and Subtract
5-18.Noise Reduction
5-19.PDT Function
5-20.Enhance part of the Image
5-21.Analisys of gray level
5-22.Magnifying Glass
5-23.Auto Enhance(Multiple display)
5-24.Each Enhance Function
<Special Function>
5-25.Stereo Viewer
5-26.Red Free Filter Processing
5-27.Electronic 30 degree image capturing
6.View Database
6-1.List of Patient ID
6-2.Patient Data Card
6-3.List of All Patients
6-4.Filter
7.Opening and Saving Images from other Devices
7-1.Opening and Saving other Image File Format
7-2.Scanning an Image into VK-2
7-3.Dropoing and saving Image into VK-2
3
8.Archiving Data
8-1.Archiving to a removable media
8-2.Check the setting(CD-R,RW)
8-3.Format Blank CD-R
8-4.Start Archive
8-5.Eject CD-R
8-6.Delete Archived Image from Hard Disk
(cf. Delete Image and Database at a time)
8-7.Read Image data from Archived Media
8-8.Copy Archive Media
9.System Setting
4
Preliminary Documentation
The information in this document is subject to change without notice.
Kowa Company, Ltd assumes no responsibility for any errors in this document or the software described in this
document.
Kowa Company, Ltd also assumes no responsibility for any troubles including data damage caused by hardware
accident, disk crash, windows system disorder, or wrong operation.
Use the UPS(Uninterruptible Power Supplies), and backup data.
The software described in this document is furnished under license. The software may only be used by one user at
a time.
Copyright 2000,2001,2002 Kowa Company, Ltd.
All rights reserved.
1.Introduction
Kowa VK-2 is a professional digital imaging system for ophthalmology and optometry. VK-2 offers the features
you need to acquire, analyze, and store your patient image data. And because the tools you use the most are
available right on the desktop, you’ll get superior results quickly and easily.
This high-resolution system supports images captured by a fundus camera and slit lamp. VK-2 also makes it
possible to view images captured by other video equipment.
The VK-2 User Guide provides information about the VK-2 operations and functions. It is designed to be used as
a quick reference guide. This manual assumes you are proficient in the use of a fundus camera and/or slit lamp.
You should also be familiar with how to use the mouse, menus and dialog boxes, and how to open and close files.
This user’s manual describes the details to operate. But to capture and check the captured image, you
only use 3 buttons [Input ID, Prev, View] (see 3.Basic Operation). That is all. It is simple to use.
1
2.Starting and Exiting VK-2
1. Turn on your PC to automatically launch VK-2. The Start-Up dialog window appears. Then the VK-2
application windows are displayed.
2. To close the application, click the Exit button.
3. Double-click the icon “VK-2” on the desktop to start the application.
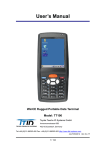
Start Up Dialog
Disk Free Space
VK-2 Application Windows
Image frame window
Image process toolbar
Video input select toolbar
Command toolbar
The VK-2 work area includes: an image frame window containing an image and a menu bar at the top of the
window, and various toolbars available to provide easy access to the tools used for viewing and editing images.
Don’t put the toolbar or dialog window on Image frame window, when capturing image. (The image will
be captured with the toolbar or the dialog window)
This Mark on the dialog window means the image is not captured correctly,
when capturing an image.
(Only for Nonmyd Alfa-D connection:
* When Nonmyd Alfa-D is power- on before VK2 application starts, press the button of joystick trigger on
Nonmyd Alfa-D in order to initialize the camera as the message shows.
)
2
3.Basic Operation.
FUNDUS CAMERA
SLIT LAMP
1.From the video input select toolbar,
Click on button #.
1. From the video input select toolbar,
Click on button #.
2.From the command toolbar,
Click the Input Data button.
2. From the command toolbar,
Click the Input Data button.
3.The Patient Dialog window appears
3. The Patient Dialog window appears
Type in Patient ID and Click Ok.
The system is ready to capture an image.
Type in Patient ID(see Input Data section) and Click Ok.
The system is ready to capture an image.
4.Capturing images using the Joystick on the Fundus
Camera, The captured image appears in the window.
VK-2 automatically saves the image.
4.The window displays a live video image.
Push the foot-switch to freeze the image.
Push the foot-switch a second time to release and
view the live image.
Additional frequently used functions:
5. Change to maximum window size.
5. To save an image, Click the SAVE button on
the command toolbar while the live image is frozen.
6.View the previous image.
Additional frequently used functions:
7. View the previous image.
7.Print out the image
8.Print out the image
3
4.Operation of Command Toolbar Function
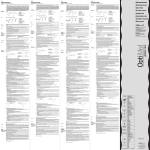
4-1.Command Toolbar
Shown here is the Command Toolbar. Details on the operation of each function is shown on the
following pages.
Input Data: Open the dialog window to input Patient ID, Name, Sex, Birth-date
and Doctor.
Search ID: Open the dialog window to search a patient’s images by Patient ID
number(see Input Data section).
Id List: Search the Patient ID list.
Previous Image: View the previous image
Next Image: View the next image.
Multiple Image: Switch to 1,2,4,6,9,16 multiple images on display.
Frame Size: Switch the image viewing size from standard to maximum size.
Image Process: Show the Image Processing toolbar.
Edit Data: Open the dialog box to edit patient information.
Capture: Freeze the live video image.
Save Image: Save the captured image.
Print Out: Print out the displayed image directly.
Exit: Exit VK-2 application.
4
4-2. Input Data
4-2-1. <ID TYPE>
1.Click the INPUT DATA button to enter patient information.
The patient information dialog window for ID appears.
2.Input the Patient ID number by clicking the figures on the display or by typing on the keyboard.
Patient ID may consist of a combination of numbers, letters and symbols. For example: 108-1.
3.Type in patient name.
Note: Patient name may be changed at a later time using the Edit Data button.
4. Enter other information, if you need.
Doctor and Diagnosis name are automatically saved in a pull down list for easy access.
4-2-2. <NAME TYPE>
1.Click the INPUT DATA button to enter patient information.
The patient information dialog window for Name appears.
2.Input the Patient Name by typing on the keyboard.
3.Enter other information, if you need.
When you don’t enter Patient ID, ID is assigned automatically.
Note: You can choose either type, <ID MODE> or <NAME TYPE>. See [4-27. Choose Input Data
5
4-3.Search ID
4-3-1. <ID TYPE>
1. Click the SEARCH ID button to search images from the database.
2. Enter the Patient ID and click Ok. A list of sessions associated with the Patient ID is displayed.
4-3-2. <NAME TYPE>
1. Click the SEARCH ID button to search images from the database.
2. Enter the Patient Name or Patient ID, and click Ok.
(You just input either one)
----------------------------------------------------------------------------------------------------------· Click Advanced Search to jump to Id List Command window (see4-9.Advanced Search Id List).
· When image data does not exist, the below message appears.
Back Again: Show Search ID dialog again and Retry Search ID
Jump to Advanced Search: Advanced Search Id List appears
Note: If your VK-2 system has a magnetic card reader or bar code reader, you may use these
devices to input patient data only while the Input Data and Search Id windows are open.
Note: You can choose either type, <ID MODE> or <NAME TYPE>. See [4-27. Choose Input Data Type]
6
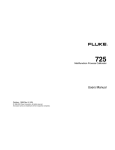
4-4.Previous Image and Next Image
1. Click the PREV button to display the image previous to the current image.
2. Click the NEXT button to display the image following the current image.
Current image
Total number
of images for
the patient
Patient name
Patient Id
Captured date and time
Enlarged view of the window bar.
To hide patient text information:
Do one of the following:
• Choose [View]>[Show Text Info] from the menu, Click on the check mark to deselect.
This change applies to current session only. System will return to default setting at the
next start-up.
Or
• Choose [View]>[Setting Text Info]>[Show Date,Time] ,[Show ID, Name],
Click on the check mark to deselect.
This method changes the default setting.
7
4-5.Multiple Image
Select the MULTI button to change the display from one image to up to16 images from a patient’s file.
To change the display from one image to sixteen images:
1. Click the MULTI button.
2. Click PREV or NEXT button to view other images in the file.
3. Double-click on any image to return the display to a single image.
To display two images side-by-side from a patient’s file:
1. From the sixteen multiple image display, select two images of interest by clicking on each. The word “Select
#” appears on each image.
2. Click the Multi button. The selected images are shown in the display window.
3. Click the Multi button to return to the sixteen-image display, or double-click on an image to view a single
image.
To display four images in the window:
1. From the sixteen multiple image, select four images of interest by clicking on each. The word “Select #”
appears on each image.
2. Repeat steps 2 and 3 above.
To display six or sixteen images:
1. In the menu, choose [Setting] > [Multi-Select Image Number] > [4] [6] [9] or [16].
2. Repeat the steps as shown above, except select six or nine images to display.
View the previous or
Following pages.
Click and select images
2,4,6,or 9 images
Back to the 16 multiple images
Double click to 1 image
8
4-5-1. 36 multiple image
Checked the mark in “multiple-display 36 image”,
the number of the multiple image change from 16 to 36.
In Menu [Setting]>>[Option Setting]
Check the
Clicking [NEGA] button in Image Process Bar,
Multiple image is changed to B/W image.
4-5-2. Make the quality of thumbnail image better
Checked the mark in “Use original image in thumbnail”,
the thumbnail image uses original image.
(Usually thumbnail image uses thumbnail files those are the reference files to show the image quickly though the
image quality is not good)
9
4-6.Frame Size
The frame size button allows you to increase or reduce your view of the image.
To change the frame size, click on the frame size button.
For an image from a digital camera, the view changes from fit-to-screen to actual size.
To scroll the image, do one of the following:
·Use the scroll bars to view portions of the image that do not fit in the screen.
Or
·Position the pointer over the image. Then hold down the left mouse button as you move the pointer. The image
moves with the pointer
4-7.Image Process
Click on the Image Process button to display the image processing bar as shown.
Non-Check
->Horizontal
You can choose horizontal or vertical type of imaging processing var.
Choose [Setting]>>[Other Setting]>>[Vertical type image controlbar]
Check->Vertical
When you change this setting, need to exit and re-start VK-2 application.
Refer to the Image Processing parts section for further details. -> [5.Image Processing]
10
4-8.Edit Data
The Edit Data button allows you to view and change patient information.
Click Edit Data to display Patient Information dialog window.
Enter information in the
dialog box
• Changes to name, sex
and birth-date will
appear on all the images
for that patient ID.
• Changes to eye
direction, and comment
will only appear on
current image.
When you only change Diagnosis or Doctor, the below message appears.
Note: “Original ID” entered in the Patient Dialog before capturing cannot be changed permanently.
11
4-9.Advanced Search List
4-9-1. Advanced Search ID List
The ID list allows you to perform a search for patient records by using patient ID and name, or by date. The
Database List dialog window displays a list of all patient records sorted by ID number.
To open the database:
1. Click the Open List button from the Command toolbar. Database List dialog appears.
2. Or click on the Advanced Search button in the Search ID dialog window (see Search ID section).
3. Scroll through the list to locate a specific patient ID.
To display a list of records associated with a specific patient ID:
1. Enter patient ID or name (or only beginning characters) in dialog box.
With Using ‘*’, you can see the candidate of the list (ex. *Barker Æ Bob Barker)
2. Click Start Search. A list of patients that match the search entered in the ID or Name field are displayed in the
list window and sorted by the ID or Name.
3. Click on any field to select a patient record. A list of all records associated with the patient ID is displayed in
the lower window. The patient records are grouped by date and archived disk number. If the patient has
multiple data sets with the same date and disk number, they will be grouped together in one line in the lower
window.
4. Double Click on any field in the lower window to select a specific patient record to view. The last image of
the record is displayed.
5. Click on the Multi button to display multiple images on the screen.
To display a list of all patient sessions performed on the current day:
1. Click Today button. A list of all sessions taken on the current date is displayed.
[ID TYPE]
Search from Patient Id and Name
(Only beginning characters)
Reset to complete patient ID list
Display list of sessions taken on the current day
• Enter Patient Id or name to display
A list of images.
• Click Start Search button,
• Or click on Today button
To show all images captured today
Click to show the details
Sorted by date and
Archived disk #.
Double click to display images
In order by ID #
Open image from archived media
[See 4-20.Open from Archived Media]
Note: You can choose either type, <ID MODE> or <NAME TYPE>. See [4-27. Choose Input Data Type]
12
4-9-1. Advanced Search Name List
[Name TYPE]
Search from Patient Id and Name
(Only beginning characters)
Reset to complete patient ID list
Display list of sessions taken on the current day
• Enter Patient Id or name to display
A list of images.
• Click Start Search button,
• Or click on Today button
to show all images captured today
Click to show the details
Sorted by date and
Archived disk #.
Double click to display images
In order by Name #
Open image from archived media
[See 4-20.Open from Archived Media]
Click [DATE] Æ
Recommend inputting less than one or two weeks
for quick response.
4-9-3. Display Multiple Patient Image
Check the different patient image in one frame.
1.
Right
Mouse
Button
2.
1.Select some patients by Right Clicking.
The selected patients are shown on the lower window.
2.Click Multi-View button.
You can see the different patient image in one frame.
13
4-9-4. Diagnoses in Database List
In menu, [Setting]>>[Option Setting]
If checked mark in “Show all diagnoses in Database List”, all diagnoses you edited would be shown in the
database list, though the opening list speed becomes slow.
Not checked, the common diagnosis edited in all images is shown.
14
4-10.Capture Image
The Capture button can be used instead of the foot-switch to freeze and resume the live video.
Capture button is “out” when a live patient video is displayed in the capture window.
The button is “pushed” in when the capture window is displaying an image from
memory or a frozen live image.
4-11.Save Image
Click Save to save a captured image to memory when using the Capture Image button as described above. (Note:
images are automatically saved in the Fundus Capture mode.)
4-12.Print Out
Print out image or images shown in the capture window to the specified printer.
Print out 1 image
Or print out 2,4,6,9 or 16 multiple images on a single page
15
Operation of Menu Functions
The following functions are located from a pull-down list in the menu bar.
4-13.Select Print Out
The Select Print Out command allows you to print a selected set of images from the multiple image display.
Important: the printer settings must be set to “bi-directional support” and the “time-out” to maximum time
allowed.
1. Choose from the menu [Setting] > [Set Right Click Mode] > [Select Print].
2. From the multiple image display, select the images to be printed by right clicking on each.
3. Click Print Out button from Command toolbar.
4-14.Delete Images
To delete a single image:
1. Display the image to be deleted.
2. Choose [File]>[Delete Image] from the menu. A warning message appears.
3. Click Ok.
Delete one image.
Click OK and the image will be deleted.
To delete several images or a single image from a multiple display:
1. From the multiple display, right click on images to be deleted.
2. Choose [File]>[Delete Image] from menu.
Delete several images at the same time.
16
4-15.Delete Image of the same ID
To delete a series of image of the same ID at a time, click the Open List button from the Command toolbar.
Select the record to delete on the left click. (With pushing “Ctrl” key on the left click, you can select several
records)
After select records, push “Delete” key. The message appears and input the Password “vk” to delete.
Delete key
Delete the selected ID data at a time
4-16.Save Edited Image
To save an image after editing, choose [File] > [Save Edited Image]. A yellow marker is added to the upper left
corner of the edited image. The date and time of the original image is also added.
Yellow marker signifies that the image has been edited.
17
4-17.Copy Image to Other Media
1.Copy to the floppy disk.
View the image to copy, and Choose [File]>[Copy Image to Floppy].
The image data is copied to a floppy disk in a Jpeg file format of: Id number+Serial number.jpg
2.Copy Selected Images to Folder
1. Chose from the menu [Setting]>[Set Right Click Mode]>[Select Copy].
In Menu [Setting]>>[Option Setting]
Check the mark in “Export BMP file”, and the image is
exported as BMP format
2.Use the Multi button to view multiple images (see Multiple Image section). Select the images to
copy by a right-click of the mouse. “COPY” appears on the image.
3.Choose from the menu [File]> [Copy Selected images to Folder].
Copy dialog box appears.
4.Select the folder to copy and Click OK.
The selected images will be copied to the folder.
4-18.Open Previous Komit Image
VK-2 supports files saved under previous versions of KOMIT software.
Insert the previous version CD into the appropriate drive before you open the image.
1. Choose [File]>[Open KOMIT Image]. Open dialog window lists the files in the current folder.
2. Select the drive and folder where is image is located. Select the image you want to open.
4-19.Open Previous Komit Database
VK-2 supports the database saved using a previous version of Komit software.
Insert the previous version CD into the appropriate drive before you begin your search.
1. Choose [File] > [Open KOMIT Database].
2. Select the drive where the database is located. select the database you want to open.
18
4-20.Open from Archived Media
VK-2 supports to read the image data from the Archived Media that other VK-2 system captured.
Insert the Archived Media into the appropriate drive before you begin your search.
1. Choose [File] > [Open from Archived Media],
Or Click [Open Archived Media] on Advanced Search List.
2. Double Click the Patient ID on the list to read and display the image.
4-21.Copy to Clipboard
You can copy an image to the Clipboard in the Windows operating system. The image becomes available to paste
into other applications.
4-22.Input Text
The Input Text command lets you to annotate your images. To input text on an image:
1. Choose [Edit] > [Input Text].
2. Click in the image where you want the type to appear. The type dialog box appears.
3. Choose [File]>[Save Edited Image] to save the text information on the image.
Input Text with line
After drawing line, insert text on an image.
1.Cose [Edit] > [Input Text with line
2.Draw line, moving mouse while holding down left button
3.After drawing line, the type dialog box appears, and type text.
3.Choose [File]>[Save Edited Image] to save the text information on the image.
4-23.Check Disk Space
To view the amount of disk space available on your hard drive, choose from the menu [View ]> [Show Space of
Disk]. The dialog box appears.
Capacity of Disk
Available disk space
19
Percent empty
4-24.Show Square (2 images)
When displaying two images side by side, the Show Square function lets you crop the right and left side from
each image to provide a better view for comparison.
1. Display two images of interest in the window (see Multiple Image section).
2. Choose [View] > [Show Square (2 images)]. Check mark appears to show it has been selected.
Original view(images are square)
Show rectangular selected
4-25. Compare two images
Another method to compare two images with using Multi- method.
1.Display the first image and modify in the image processing.
2.Choose [Edit]>[Copy to Image Memory1] to copy
to the temporary memory.
3.Display the second image and modify in the image processing.
4.Choose [Edit]>[Show Image Memory1 & This]
Two images appear on the display.
5.Double click on the image to show back to the second image.
4-26. Prohibit No ID Images
• Choose [Setting]>[Other Setting]>[Prohibit No Patient ID]
from the menu, Click on the check mark to select or deselect.
Checking mark onÆ invalid to capture image
without Patient ID
No mark ÆAvailable to capture image without Patient ID
20
4-27. Choose Input Data Type
• Choose [Setting]>[Option Setting] from menu.
Check mark on [ListÆ Name Mode], Name Type.
List Name orders list.
Take off mark on [ListÆ Name Mode], ID Type.
Patient ID orders list.
4-28. Set display mode after searching
• Choose [Setting]>[Option Setting] from menu.
Check mark on [SearchÆMultiple View]
After searching data, 16 multiple images are shown from the first one.
Take off mark on [SearchÆMultiple View].
After searching data, the last image is shown.
4-29. Footer and Header for Printing
When printing, print out the information
with images.
• Choose [Setting]>[Header & Footer]
from menu.
Check mark [Print out Header & Footer], and
printing style is changed.
Take off mark on [Print out Header & Footer]
21
4-30.Send Image by E-Mail
You can send selected image by E-Mail[Outlook Express] quickly and easily.
To use this function, need to set up Outlook Express beforehand (Refer to the Windows Manual).
1. Use the Multi button to view multiple images (see Multiple Image section).
2. Choose [File]>[Send Selected Image be <E-Mail>].
3. The message “Select Images” appears.
4. Select the images to copy by a right-click of the mouse. “MAIL” appears on the image.
5.Choose [File]>[Send Selected Image be <E-Mail>], and Outlook Express starts up.
In Subject and Attach item,
The data are set automatically.
!! If the image is Delta Format, the image is changed to Jpeg Format in order
to open image by standard PC viewer.
File “inf.txt” including patient information of attached image files is automatically attached.
6.Type or select mail address, and click [Send] button to send the images.
22
4-31.Drag image
Drag one image on the multiple 16 image mode and move mouse while holding down left button, and drop to
other application, folder , Floppy disk, or other removable media.
You can copy one image to other media easily.
Drag and copy to Floppy disk
.
If the image format is Delta format, the image would be automatically changed to Jpeg format, so drag function
speed is a little delay to transfer image.
4-32.Print out at White Mask
When printing out, change black mask image to white color for fundus mask image.
Choose [Setting]>[Printing Header&Footer].
Check <Mask of background from black to white>
This white mask process sometimes fails, when image quality is bad, too dark, or when black level is floating.
When some character information is on the black mask, this process does not work correctly.
23
4-33.Show the date list
You can export the patient list of the specified date as text file.
Choose [Database]>[Show print list each day].
Select the date you want to get, and click OK, the date list including patient information would be shown as text
file.
So you can print out, and if the array is disorder, you can save this file to the floppy and carry to other PC
installed Excel application, and at the Excel application, open this file as delimiters—TAB.
4-34.Stereo assist
You can get the stereo image easily following the message of stereo assist.
This function is good to check the depth of the optical nerve head at 20 degree angle of fundus camera as the
stereo image.
Choose [Capture]>>[Stereo Assist].
Set alignment and adjust focus. Change the setting of fundus camera to 20 degree.
Move the joystick of the fundus camera slightly to the left as the assist image is shown, and push joystick button
to capture image. If the captured image is good, click [Yes] to save the image. If the image is not good, click [No]
and try again. After capturing one image, the next assist view to get right direction image would appear.
After getting two image of left and right direction, the stereo viewer application “Para” would appear.
Refer to the explanation of stereo view. (See “5.25 Stereo Viewer”)
24
4-35.Link to Perimeter
As one of the options of our Imaging system, you install the Perimeter application “FT8” AP-5000C, and you can
startup and call the Perimeter application from VK2 application.
In Menu [File]>>[Startup AP5000C] is active after installing application “FT8” AP-5000C.
From FT8 application, each results after measuring could be saved into VK2E database.
25
5.Image Processing
VK-2 offers a variety of tools for helping you analyze and edit your images. You access these tools
though the Image Processing toolbar or through the menu in the capture window.
Image Processing Toolbar
Most of the tools you need are located on the Image Processing toolbar for easy access.
To display the toolbar, click on the Image Process button in the Command toolbar.
Each button on this toolbar will modify the displayed image only. The original patient image will not be modified.
5-1.Sharpen Image
The Sharp tool improves the clarity and definition of the edges of the image.
Click the sharp button to sharpen the image.
You can change the level of sharpening applied to an image by choosing from the menu
bar [Image Proc] > [Sharp] > [Light | Medium | Strong].
5-2.Gamma Process
Change the Gamma curve of the image.
You can set the gamma curve as you like, selecting the curve and move on left click of mouse.
<Clear Point>:Clear all set point
<End Point>: after [Clear Point],
and right click on the chart
to set new points.
After setting new all points,
click [End Point]
to show a new graph.
<Save Point>: Save the current curve setting.
<Load Point>: Load the saved curve setting.
In menu there are three fixed types of Gamma curve preparing from the menu.
+ Æ Expand the black level
- ÆExpand the white level
26
5-3.Enhance Image
Use the Enhance button to better visualize subtle gray level changes in the image.
1. Click Enhanc. The Enhance window appears.
2. Do one of the following:
• Slide the bar to set the window levels. Click Ok.
• Click on a desired point in the image to automatically adjust the tonal range based on that point.
Slide the bar
Click on a point in the image
Other options for enhancement are available in the menu. Choose [Image Proc] > [Enhance] > [Enhance2]
27
5-4.Contrast
When working with an image that is dark or has poor contrast click the Contst button to
automatically adjust the contrast.
5-5.Brightness
To change the brightness of an image:
1. Click on the Bright button. The Bright dialog box appears.
2. Move the mouse over the image to display the gray level at that point in the image.
3. Do one of the following:
• Adjust the level by clicking on the Dark and Brt buttons in the dialog window.
• Click the RGB button in the Bright dialog window to display the RGB sliders. Use the sliders to
independently adjust the red, green, and blue levels of the image.
Shows the gray level at mouse position
Adjust the level of brightness
Display the RGB bar
Adjust the RGB levels
5-6.Analysis of RGB color
You can view the individual color components in the image with the Red, Green, and Blue buttons.
• Click the Red button to view only the red color component in the image.
• Similarly, click the Green or Blue button to individually display the respective color components.
5-7.Negative Image
Click on the Nega button to view a negative of the image.
5-8.Flip Image
To flip the image in the vertical or horizontal direction:
1. Click on U/D to flip the image vertically (top to bottom) along the horizontal axis.
2. Click on L/R to flip the image horizontally (left to right) along the vertical axis.
5-9.Zoom Image
The Zoom tool magnifies the image view.
Click the Zoom button. Cursor will change to a ⊕.
2. Click on point of interest in the image to magnify to twice the size.
28
5-10.Measure Length
To measure the relative length between two points:
1. Click the Length button. The Length dialog box appears.
2. Click on one endpoint of a segment of interest, and move mouse while holding down left button.
The length of the segment is displayed in the dialog window in the Length box. To measure another segment,
click on two more points.
3. Click the End button in the dialog box. The value of the last segment measured is automatically
displayed on the image.
If checked the mark in <Disk Off>,
The circle as reference disk size is not shown
[Setting]>>[Other Setting]>>[Set Length]
You can change the basic length of Disk.
Default disk size is 1.6mm
You can measure the length between two images in order to compare.
But cannot record the value of length on the image. (To record the value, select one image)
Show two images, and Click the Length button.
5-11.Measure Cupdisk Rate
There are two methods to measure the cupdisk rate.
One is to use area, the other is to use length.
You can set this method in menu [Setting]>[Option Setting]
Check mark “Use length when measuring cup disk” -> Length method
Not check -> Area method
29
5-11-1.Area method
To measure the cup-to-disk ratio:
1. Click the Cup tool. The Cup Area dialog box appears
2. Move the mouse around the cup area, clicking 12 points to define the edge. The area of the cup is displayed.
Maximum points are 12 points. By clicking [End] button, you can select less than 12.
3. Move the mouse around the disk area, again clicking 12 points to define the edge. The area of the disk is
displayed. The cup-to-disk ratio is displayed in the dialog window.
4. Click the Ok button to finish. The ratio is automatically displayed on the image.
5-11-2.Length method
To measure the cup-to-disk ratio:
1. Click the Cup tool. The Cup Area dialog box appears
Click on one endpoint of a segment of interest, and move mouse while holding down left button.
Click on another endpoint, and move mouse while holding down left button.
4. Click the Ok button to finish. The ratio is automatically displayed on the image.
30
5-12.Measure Angle
To measure an angle in a region of interest:
1. Click on the Angle button. The Angle dialog window appears.
2. Define an angle by clicking on three points in the image. The angle value appears in the dialog box.
3. Click the End button when finished. The value is automatically displayed on the image.
5-13.Loop
You can use the Loop tool automatically view a patient’s images in succession.
1. Display a single image from a patient’s file.
2. Click the Loop button. The movie is displayed.
3. Click on the image or push any key on the keyboard to stop.
You may change the speed of the movie. From the menu choose [Setting] > [Other Setting] > [Speed of
Slideshow] > [Fast | Slow].
5-14.Undo Image
Back to the previous image.
In menu [Setting]>>[Option Setting..]
Set the UNDO count
Default is 3.
If Physical Memory of PC is
Set the value more than 3
5-15.Origin Image
Restore and view the original image before image processing.
31
over 512Mbyte,
5-16.Reference(Template) Image
You can compare a patient image with a reference image you’ve saved. VK-2 allows you to store up to
64(multiply 8 by 8 items) reference images.
To display the reference image for comparison:
1. Display patient image.
2. Click Temp button. Reference image is displayed beside patient image.
3. Double click on patient image to close reference image.
Double click here
to change the reference image.
Double click here
to close reference image.
Double click here
to change the reference item.
Note: Change the content in
‘VK-2 Temp’ on the desktop to show
the text under the number
Click this button to compare
the image with the reference.
To add a new reference image:
Display the image you want to use as a reference. From the menu choose [Capture] > [Register
Reference]>[Reference *].
To delete a reference image:
Select the image to delete with a right click of the mouse, and choose [File] > [Delete Image].
32
Image Processing Menu Functions
5-17.Merge and Subtract
You can merge two images together, and then subtract one image from another using the merge function. VK-2
will align and merge two images based on reference points you’ve chosen.
1. Display two image and choose from the menu Image Proc > Merge.
2. Click two points on the left image. (Which can easily be remembered).
3. Click near the same corresponding points on the right image. VK-2 locates the point in the right image that
most closely matches the point in the left image. The merged images are displayed.
1
3
2
4
4. Click Subtraction button to subtract between two images.
5. Allows you to change the rate of each image with the slide bar.
Note: With certain images, VK-2 may not be able to find a corresponding point in the designated region in the
second image. In this case, the merge function cannot perform properly, and the resulting merged images will be
of poor quality. You may select the exact points on which to align the images by repeating the above steps, except
hold down Adjust button or Manual Position button.
Move, Rotate, Magnify manually
33
5-18.Noise Reduction
The Median or Average filter allows you to reduce the noise in the image.
You can apply a Median filter by choosing from the menu [Image Proc] > [Noise Reduction] > [Median]
You can also apply an Average filter by choosing from the menu [Image Proc] > [Noise Reduction] > [Average]
5-19.PDT Function
You can select and draw the part of PDT.
1.Display one image and choose PDT function from menu [Image Proc]>[PDT]
2.PDT dialog appears.
3.Draw the line on the image while holding left button of mouse.
4.If failed to draw, try to draw again
5.Click Calculate button, and circle is drawn.
6.Click OK button, and new outer circle outside of about 1000um of the circle is drawn.
34
Image Processing Mouse Functions
5-20. Enhance part of the image
Double click in an area of interest on the image.
A section of the image is enhanced.
5-21.Analisys of gray level
You can view the change in gray level along a horizontal line across the image.
Gray levels range from black to white, with black being the top values on the graph.
To temporarily display the gray level:
1. Right-click and hold on a selected point in the image to display the gray level along a horizontal line, enabling
you to see the change in levels across the image.
2. Release the mouse to remove.
To permanently display the gray level:
Repeat step one above, but left-click on mouse before releasing.
5-22.Magnifying Glass
Left-Click and Move mouse on the image.
The Magnifying Glass with auto-bright processing is shown.
Release the mouse to remove.
To permanently display Magnifying Glass:
Right-click on mouse before releasing.
35
5-23.Auto Enhance (Multiple Display)
After showing multiple images on display, Push <F12> key.
The image would be adjusted to proper contrast.
The message “Auto-Enhance ON [slow to view]” appears on the taskbar.
When this auto-enhance function is on, the processing speed would become slow.
Before capturing image, Push <F12> key again to set back to default.
5-24.Each Enhance Function
After showing multiple images(2,4,6,9 multiple mode) on the display, select the image to be modified at right
click on the image. The selected image is surrounded by the blue rectangle.
Click image processing toolbar, you can modify the selected image.
This function is available at Sharpen, Gamma, Enhance, Contrast, Brightness, R-G-B free, Nega, Up-Down, and
Right-Left process.
36
Special Functions
5-25.Stereo Viewer
The stereo viewer button would appear only when the patient data has the stereo image.
(How to get the stereo image, refer to “4-34.Stereo assist”)
Click stereo button, and the stereo viewer “3D Para” would appear.
1) Click one point on the almost the center of the optical nerve head.
1
3
2
2) Click [VIEW] button to change to the next image,
3) Click one point on the same position of the previous image.
4) Click [STEREO] button to show the stereo image.
When the positioning is not good, click [CLEAR POSITION] and try to set the point again.
When click [ZOOM STEREO] button, the image size gets big.
Push the arrow key such as ‘Å ‘ in the keyboard to change the position of the center.
Push the ‘PageUp’ or ‘PageDown’ key to magnify or reduce the image.
Click [BRIGHT] button to make the image brighter.
Recommended position of the click point
Optic nerve head picture
The crossing blood vessel around oblique line
(About positioning between each image:
In menu [View]>>[Setting]>>[Invalidate Auto Position], get rid of the check mark [Invalidate Auto Position], the
positioning process is half automatic to shift the best position between each image after pointing roughly.
Usually need to set the exact points between each image.)
37
5) Click [3D Model], you can see the virtual 3D model.
While holding right-click button of the mouse, move the mouse, and you can revolute the model of the image
as you like.
While holding left-click button of the mouse, move the mouse, you can move the position of the image.
Addition:
When you use the stereo assist function (refer to 4.34 Stereo assist) of VK2E, the shift direction of the
stereo information is saved automatically.
You can input this shift direction manually as follows.
1) Show the stereo image on the display and click [Edit Data] button.
2) In the ‘Patient Information’ box, there is the item “Comment”.
3) Type “stereo_l/” or “stereo_r/” in the comment, and click [APPLY]
4) After inputting both “stereo_l/” and “stereo_r/” in each stereo image.
5) Read the patient data again by [Search ID].
6) You would confirm the button [STEREO] at left side.
38
5-26.Red Free Filter Processing
When you use Kowa fundus camera with Digital Camera(KD211C, KD630, D2H), ‘Red Free Filter” is
inserted, the image would be changed from green color image to B/W image automatically with
software red free reorganization algorism .
5-27.Electronic 30 degree image capturing (available for VX-10)
KD211C, KD630 supports 30° degree function for capturing macular
When selected 30 °, the original image is saved in 30 degree size.
In order to show this 30°-50° button, check the mark in menu [Setting]>>[Input&Trigger Setting]>>[Permit
Setting] ,and select [Setting]>>[Input&Trigger Setting]>>[Edit Setting]
Check the mark <Show 30 deg{VX-10)>
39
6.View Database
The List of Patient ID window allows you to access patient data cards and images.
Note!!!:Only English character is available to read and write in this part.
6-1.List of Patient ID
Open Database Window:
From the menu choose [Database ]> [Switch to Detail Database].
The List of Patient ID window appears.
To return to the Capture window:
Click Back to CAPTURE Mode button in the List of
Patient ID window. The Capture window appears.
Note: If you displayed a Patient ID card or a patient image
while viewing the database, the capture window
will display an image of that patient
To sort the database:
1.In the List of Patient ID window, right-click
on Last Visit Field
2.Click on the Sort Descending or Sort Ascending button.
Click here to open the search dialog
Click here to open [All Lists of Patient]
Click here to open [Patient Data Card]
40
6-2.Patient Data Card
The Patient Data Card window provides patient information and comments, and a list of all the images associated
with that patient ID. You can review and compare images to monitor changes.
To open a patient data card:
From the List of Patient ID window, click on a patient ID to view that patient’s data card.
To view an image:
1. In the patient data card, click in the date field of a specific image to see a preview of that image.
2. Double-click on the preview image to display it in the capture window.
To view a thumbnail of all the patient’s images:
Click on the Thumbnail button to display thumbnails in the Multi display window.
Note: Images can only be loaded from the hard disk or CD-R. They cannot be loaded from the CD-ROM.
Double click
Click
41
6-3. Lists of All Patients
Click on the All button in the List of Patient ID window to open the All Lists of Patients window.
Find or Replace the information
6-4.FILTER
Click on the Filter button in the List of Patient ID window to open the search dialog.
Input the information to extract the data.
42
7.Opening and Saving Images from other Devices
7-1. Opening and Saving other Image File Formats
VK-2 allows you to import any JPEG, BMP, or TIFF image into a patient file.
1.Click the ‘VK_Scan’ application on the desktop to start. Scan dialog box appears.
2.Click [OPEN FILE]
3.Select Image File to open.
Full color format of JPEG ,BMP ,TIFF file can be opened.
4.Click [INPUT DATA] to open input data dialog. Input Patient ID.
5.Click Save to save the image. You can now view and edit the image in VK-2. When viewing the image in the
Capture window, a green mark is added at the left edge of the image to indicate that the image was imported from
another application.
The green mark from Open File is added at the left edge of the image.
43
7-2.Scanning an Image into VK-2
VK-2 support 3rd party scanners with Twain drivers.
1.Install Image Scanner software.
2.Click Scan application on the desktop to start.
3.Click Setting and select Twain source.
4.Click [SCAN]
Select the resolution and set the mode “Full Color” image.
5.After the image is scanned, the image is shown in the frame window.
6.Click [INPUT DATA] to open input data dialog. Enter Patient ID.
7. Click [SAVE] to save the image. You can now view and edit the image in VK-2.
The green mark from Scanner File is added at the left edge of the image
44
7-3.Dropoing and saving Image into VK-2
VK-2 allows you to import any JPEG, BMP, or TIFF image into a patient file with using Drop function
at the same time.
Select some images imported from other application or folder, and move mouse while holding down left
button, and drop on the Scan application.
After dropping image, the message “Do you want to save the dropped image as ID=*** ” appears. If
select “NO”, after inputting new Patient Name and ID, the image would be saved.
45
8.Arhciving Data
8-1.Archiving to a removable media
You can make a back up of your patient records on the hard disk to a CD-R, CD-RW, DVD-RAM.
8-2.Check the settings (CD-R, RW)
Open the Settings dialog window and check the Archive Drive number. Make sure the Archive Drive letter shown
is the same as the CD-R to be used for archive. Look in the My Computer window to see the drive letters for all
drives on your system.
CD-R drive
[E:]
Look in the Taskbar in the lower right corner of your screen
to verify the DirectCD software is running.
The DirectCD icon is shown.
(Note:When starting-up VK-2, the program to check archiving will work. It will take several seconds.
And when need to archive, the message box to archive the data to CD-R appears.)
When you use the CD-RW media (not CD-R), you can archive the data at any time
(after a medical examination every day) as data backup.
46
8-3. Format Blank CD-R
<roxio Drag-to-Disc>
1. Insert blank CD-R media into CD-R drive.
Click on the menu icon
Drop down list appear
Select format disk
Type the disk no on the volume label
Wait until format is complete
47
<DirectCD>
1. Insert blank CD-R media into CD-R drive.
2. Select Direct CD icon.
The DirectCD software will appear.
Follow the instructions to format a CD.
48
8-4. Start Archive
From the menu choose [Archive] > [Start Archive] and click OK. Depending on the amount of data to be
archived, CD-R may have remaining space that can be used on a future archive.
The timing to start Archive depends on the media.
CD-RW, DVD-RAM: You can archive data at any time (after a medical examination every day) as data backup.
CD-R: When the message appears at the time when data exceed the capacity of CD-R media, you need to
archive data only once.
(Press [End] key, you can stop archiving)
CD-R is Full
Need to change CD-R
\
Archive Finished. (Space is available on the disk for future archive)
The VK-2 software uses the disk number to identify each disk. Make a note of the disk number shown in
the in Information window, so that you may write the number on the CD-R after it is ejected.
49
8-5.Eject CD-R
<roxio Drag-to-Disc>
1. Click on the Eject icon
When the CD-R disk becomes full, check the
checkbox that say “ Protect disk so that it cannot
be written to again”
Important: Perform this step only if the CD is full
2. Click on the Eject button
3. Write the disk no on the CD-R media
50
NO ***
<Direct CD>
Eject CD_R or click the DirectCD icon in taskbar and follow the instructions. Using a soft tip marker, write the
disk number onto the CD-R.
Next
Next
When the CD-R disk becomes full, check “Close
to read…” checkbox. This changes the CD to
that it can be read on most standard CD-ROM
drives.
Important: Perform this step only on a full CD-R
disk. Once the disk is “Organized” it cannot be
written to again.
Finish
OK
Disk will be Ejected.
Write the DISK NO on the CD-R media!
NO ***
51
8-6.Delete Archived Image from Hard disk
As you save patient information, the space on your hard drive becomes full. After the information is archived to a
CD-R , you can delete the archived information to make disk space available for new patient data.
When the available disk space is less than 15%, a dialog window will appear prompting you to delete archived
data. Enter the percentage of archived data that you would like to delete from the hard disk. You can also initiate
the delete process manually by choosing from the menu [Archive] > [Delete Archived Data f/Hard Disk].
Note: This will not delete data that has not been archived to CD-R.
Structure of this Archive method
Hard Disk
Hard Disk
Hard Disk
Free Space
Free Space
after Delete
Data
Require to Delete Archived Data,
when the free space is less than 15%.
Archived Media
Disk 1
Disk 2
Or Choose [Archive]>[Delete Archived Data/Hard Disk]
52
(Cf. Delete Image and Database at a time)
“8-6.Delete Archived Image from Hard disk” is the delete way after archiving to the backup media.
But the system does not archived drive, and user does not have to stock old data.
When data disk is full, you can delete old data from the first to the middle point, and maintain the empty area. But
the deleted data would be diminishing permanently and never come back.
Choose [Database]>[Delete Database&Image Data]>Delete Database&Image]
Pass two messages “YES” and input password “vk”.
Select rate(%) to delete from old data. The deleted data never come back.
Be careful!!
The deleted data never restore.
Note: Do not use this method, Usually use “8-6.Delete Archived Image from Hard disk” method
53
8-7.Read image data from Archived Media
When you perform a search for patient information that is not on the hard disk - or is located on both the hard disk
and on archived media - a dialog window appears requesting where to access the information. Select one of the
following options to indicate where you want to access image data.
► Read from Only Hard Disk [not Read from Archived Media]
Select this option if you want to display information from the hard disk only. If none of the image data is actually
located on the hard disk, an image will not be displayed in the Capture window.
► Read from Archived Media and Hard Disk
Select this option to read information from both the hard disk and from archive media. Insert the archived media
as indicated in the message window into the appropriate drive. The Capture window will display images from the
hard disk and from the archive media. If VK-2 does not find the requested information on the archived media, the
system will use images from the hard disk only.
► Restore the Archived Data back to Hard Disk
You may need to copy patient data from the archive media that has been deleted from the hard drive. Insert the
Archived Media indicated in the disk No. ** and click Ok.
If the patient data is located on separate media, you must first copy the information from each media to the hard
disk to read the information. Follow instructions that appear on the screen.
54
Check the Archive Disk No in the Database List
8-8.Copy Archive Media
You can make a duplicate copy of archived media. This process is only available when the data has not been
deleted from hard disk. If the data is not in the hard disk, copy the data directly in Windows File Copy method.
1.From the menu choose [Archive] > [Maintenance] > [Make the Same Archive Media].
The dialog window Make the Same Archive Media appears.
2. Input the disk NO to archive again, and click Ok
Under DirectCD software, it is possible to copy the data from CD-R in CD-ROM drive to new empty
CD-R in CD-R drive.
8-9. Restore Patient Data from Archived Media
When a hard disk crash occurs, patient data may no longer be available on the hard disk. You can restore patient
information from your archive media.
1. After repairing or changing your data drive, insert the last archived media and copy all the data in the archived
media to your hard disk. You may copy other archived media as needed from older media(small number media).
55
9. System Setting
Video input setting, disk setting and figures of hardware connection.
Refer to another “INSTRUCTION MANUAL (Connection Manual)”
Kowa Company,Ltd.
Life Science Division
Kowa Optimed.Inc
Kowa Europe GmbH
No.4-14, 3-chome, Nihonbashi-Honcho, Chuo-ku, Tokyo 103-8433, Japan
Cable Adress:”MOUNDKANEKA” TOKYO
Phone: (3) 3279-7312 Telex:KANEKA J22938
Fax: (3)3245-1109
20001 Si. Vermont Ave. Torrance,
CA 90502, U.S.A.
Phone : (310) 327-1913
Fax: (310) 327-4177
e-mail:[email protected]
Immermannstrasse 65A (Einhelt 1)
4000 Dusseldorf F.R. Germany
Phone: (211) 35-3444/45/46
Telex: 8587029 KOWA D
Fax: (211) 161952
56