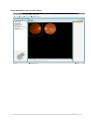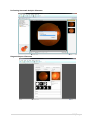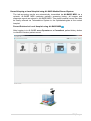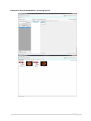
1
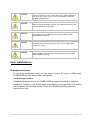
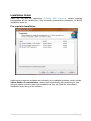
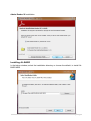
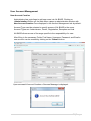
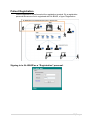
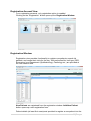
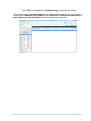
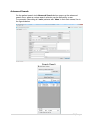
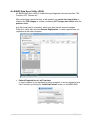
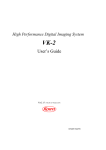
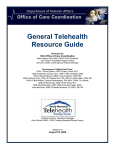
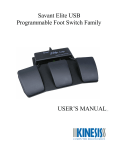
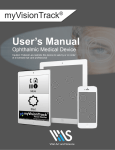
AL-BASR MEDICAL RECORD SYSTEM (MRS) USER MANUAL Version 1.0 March 27, 2015 Confidentiality Statement This document is produced by CARE Pvt.Ltd. and SirSyed CASE Institute, for Government and Private Health Solutions and its State clients and cannot be reproduced or distributed to any third party without prior written consent. No part of this document may be modified, deleted, or expanded by any process or means without prior written permission from CARE/CASE. All rights reserved. 1|Page 2|Page Contents Preface ............................................................................................................................. 5 Intended use ................................................................................................................. 5 Displays for safe use..................................................................................................... 6 Safety Cautions............................................................................................................. 6 User maintenance ............................................................................................................ 7 Unexpected events ....................................................................................................... 7 System Requirements: ..................................................................................................... 8 Hardware Requirements ............................................................................................... 8 Software Requirements................................................................................................. 8 Additional Components (If Not Already Included in OS) ............................................... 8 Installation Guide .............................................................................................................. 9 Pre-requisite Installation................................................................................................ 9 Installing AL-BASR ..................................................................................................... 11 User Authentication: Login.............................................................................................. 12 Administration Account View .......................................................................................... 12 User Account Management......................................................................................... 13 New Account Creation ............................................................................................. 13 Managing Existing Accounts ................................................................................... 14 Patient Registration .......................................................................................................... 7 Signing in to AL-BASR as a “Registration” personal. .................................................... 7 Registration Account View ............................................................................................ 8 Registration Window. .................................................................................................... 8 Creating A New Visit.................................................................................................. 9 Patient Search ................................................................................................................ 11 Patient Search Tool .................................................................................................... 11 Advanced Search:....................................................................................................... 12 Medical Record Keeping (Laboratory Diagnosis Data Keeping) ..................................... 13 3|Page AL-BASR Data Sync Utility (DSU) .............................................................................. 14 Consultation by Doctors ................................................................................................. 19 Automatic Eye Diagnostic Capabilities ........................................................................... 27 4|Page Preface Intended use AL-BASR is designed to represent data that accurately captures the state of patient at all times. It is an Electronic Patient Health Record System. Allows an entire patient history to be viewed; without the need to track down the patient‟s previous medical record. Assists in ensuring that data is accurate, appropriate and legible. By maintaining one modifiable file, that is updated constantly, it reduces data replication. Supported data includes images and refraction data, multimedia. AL-BASR MRS also allows the user to do measurements and enhancements on ophthalmology images. The figure below summarizes the complete scope of AL-BASR MRS. From patient‟s registration till its departure AL-BASR keeps track of all the activity that is associated with a patient‟s visit. 5|Page Displays for safe use To encourage safe and proper use and to prevent loss of data, important messages are inserted in the User Manual. Presentation of notes and cautions in this manual are done confirm the following table: Icon Meaning NOTE CAUTION This symbol indicates that the message has special interest or importance to the reader. Failure to read the note will not result in physical harm to the reader, equipment or data. This symbol indicates that if this information is ignored, data loss or material damage may occur. Safety Cautions CAUTION CAUTION NOTE NOTE NOTE Database folder „AL_BASR _DATA‟ contained in allocated Hard Drive Partition, must not be deleted manually, this will result in permanent data loss. Please read the user manual carefully before using AL-BASR MRS Software. We strive for a manual with screenshots of the first version of AL-BASR MRS. This user manual is written on the assumption that the user already has knowledge of the personal computer (PC) and Microsoft Windows operating systems. This user manual does not describe the use of a PC or Microsoft Windows. Should you have unexpected problems, please contact to AL-BASR Support and Services team. 6|Page CAUTION CAUTION CAUTION CAUTION CAUTION Do not use AL-BASR when there is visible damage to cables connecting the PC to the instrument or visible damage to any other part of your set up. In such event please contact to AL-BASR representative. Make sure that you always have an up to date virus scanner and firewall installed on your system. Avoid disconnecting cables from the PC when the AL-BASR MRS software is running. Avoid resetting or turning off the PC when the AL-BASR MRS software is running. Avoid resetting or turning off the instrument when the AL-BASR MRS software is running. User maintenance Unexpected events In case of an unexpected event, such as a power failure, PC crash or MRS crash, AL-BASR MRS is shut down without saving data. Local Storage location Database storage location C:\AL_BASR_DATA is created by default on software installation. Though in case of disk space in-availability or user preference its location can be updated by choosing another „Drive‟ from Database Settings options in Options menu tab. 7|Page System Requirements: Hardware Requirements RAM CPU hard disk space Screen resolution Minimum 2 GB Modern multicore architecture 40 GB 1024x768 pixels Recommended 4 GB Modern multicore architecture 100 GB and above 1280x800 pixels or more Note: Depending on the user role and data volume to be handled, the hardware requirements may exceed the minimum requirements. Software Requirements Across Windows Clients Supported Operating Systems MS Windows XP MS Windows 7 SP1 MS Windows 8 MS Windows 8.1 Additional Components (If Not Already Included in OS) MS .NET Framework 4 (included in the installation packages) Adobe Reader 11 8|Page Installation Guide Insert the CD and run application AL-BASR MRS Setup.exe, default selected prerequisites will be installed first. After successful prerequisites installation, AL-BASR installation starts up. Pre-requisite Installation Additional pre-requisite softwares are included in the installation package, which include Adobe Reader XI and wkhtmltox, these install automatically after prompting for user aproval, please ensure to allow their installation as they are critcal for a successful installation and running of the software. 9|Page Wkhtmltox Installation: 10 | P a g e Adobe Reader XI Installation: Installing AL-BASR In the below window, select the installation directory or choose the default, to install ALBASR MRS 11 | P a g e User Authentication: Login AL-BASR asks for user authentication, before allowing access. The default user is added into the system with administrative rights of access. Its credentials are: Username: admin Password: admin1 Use them to log in to the system for the first time. Administration Account View The administration account, gives right for system administration( like managing user accounts i.e. creating new user accounts, updating/editing existing accounts, deleting accounts) and to generate statistical reports based on the system usage. 12 | P a g e User Account Management New Account Creation Administrator has a privilege to add new users into AL-BASR. Clicking on „Administration‟ Button on the Main Menu opens up administration window with New Account Creation Form displayed in the Account Management tab by default. Account Type must be selected to specify access of AL-BASR to the users. Account Types are: Administrator, Doctor, Registration, Reception and Lab. AL-BASR allows access of its usage specific to the responsibility of a user. After filling in the necessary Fields: First Name, Username, Password, and Email a new account can be created by clicking on the „Submit‟ button. Upon successful Account Creation a Success Message is displayed: 13 | P a g e Managing Existing Accounts Clicking on the Users tab at the Account Management Window a list of all users of AL-BASR is displayed. An administrator can search and view all users of AL-BASR. View, edit/update and delete their accounts, using the toolbar options right above the user list. 1. Edit/Update Existing Account. An existing account‟s information can be edited by clicking on the „Edit/Update Account‟ button. 14 | P a g e After updating required fields, clicking on the „Update‟ button updates the account information and a success message is displayed. 15 | P a g e Patient Registration Patient registration is performed at the registration terminal. By a registration personal whose account is registered with AL-BASR, of type: Registration. Signing in to AL-BASR as a “Registration” personal. 7|Page Registration Account View For a registration personal, only registration option is enabled. Clicking on the “Registration” button opens up the Registration Window. Registration Window. Registration view provides functionality to register new patients, search old patients, and create their visits for the day. Visit particulars like visit type (OPD, Emergency) and Department (Ophthalmology, Cardiology etc.) are provided at the visit creation time. New Patients are registered from the registration window. Add New Patient button opens up a new registration form. Patient details (at least first name)must provided to register a new patient into the 8|Page system. A unique ID.Code is allotted to the patient at this time, using which a patient can be identified easily. A success message is displayed upon successful registration of the patient. Creating A New Visit After patient‟s registration its new visit has to be created. Clicking on „Start A New Visit‟ button, a new visit for the day can be created. Visit Particulars: 1. Visit Type (OPD, Emergency) 2. Concerned Department, must be selected before a visit is generated. 9|Page Type: OPD and Department: Ophthalmology is selected by default. The created visit is now associated with the patient and displayed in a list of visits a patient had, it behaves like a folder and all activities like test results and doctor‟s prescriptions can be attached to it, as the patient get diagnosed. 10 | P a g e Patient Search Patient Search Tool Some Search Results: 11 | P a g e Advanced Search: On the patient search tool Advanced Search button opens up the advanced search form, where a custom search criterion can be defined by a user. For example: Searching all „male‟ patients with „khan‟ in their last names, like in the figures below. Search Result: 12 | P a g e Medical Record Keeping (Laboratory Diagnosis Data Keeping) Diagnostic software like Fundus Imaging & Diagnostic System installed with Fundus Cameras, and Hesschart Diagnostic System automatically attaches investigation results with the patient‟s visit in an integrated fashion. For the rest of the Laboratory Investigations, utility software with the name of ALBASR Data Sync Utility is used to attach the investigation results with the patient‟s visit. 13 | P a g e AL-BASR Data Sync Utility (DSU) AL-BASR Data Sync Utility is installed at eye diagnostic lab terminals like; FFA Camera, OCT Camera etc… After performing a particular test, a lab operator can attach the output files or folders, like FFA images or a folder containing OCT images and videos with the patient‟s visit. Any file format can be uploaded, which may also include scanned images. Data Sync Utility also provides Patient Registration, in case a patient was not registered at the main reception. Patient Registration at Lab Terminals In case a patient is not registered at main reception; it can be registered at a Lab Terminal, by clicking on „Add New Patient‟ button on AL-BASR DSU. 14 | P a g e A similar registration form is displayed for patient registration. A newly registered patient is selected automatically (gray bar at the bottom displays ID & Name of the selected Patient) and is also displayed at the top of the list of patients in patient search tool. 15 | P a g e 1. Searching For Existing Patient: Hammad Ali Khan Window in the figure below is showing the search results when a patient is searched by the name „hammad‟. Since Hammad Ali Khan is the most recent patient with that name, he is displayed at the top of the list and is selected automatically. 2. Attaching test results with a Patient‟s Visit After a patient is selected, „Add New Data‟ button show Attach Files or Attach Folder option buttons, which allow user to add multiple files or a single folder having a subfolder hierarchy, with the selected patient‟s visit. 16 | P a g e 3. Attaching test results with Patient‟s Visit The window shown below displays a list of files that are going to be attached with the patient‟s visit, more files can be attached here, or any unnecessary file can be removed by clicking the cross „X‟ button. Once all files are attached clicking on „Done‟ button begins the uploading process… Before uploading takes place AL-BASR DSU prompts user to create a New Visit(If a visit is not already created) or Modify the Last Created Visit(when a visit is already created e.g. at the time of Registration), so the files can be attached to the visit that is the most latest/current visit. 17 | P a g e AL-BASR DSU asks for the type of contents/files that are being uploaded, the types can be selected from the dropdown list, or typed in Select Content Type Window, which opens up by itself. 4. Attached files are being uploaded… The „new‟ files are listed down and are being uploaded… Patient can now be sent to the consulting doctor. 18 | P a g e Consultation by Doctors After performing the designated laboratory investigations a patient is sent to the consulting doctor for the consultation based on the findings. All investigative reports were attached with the patient‟s visit as the patient was being diagnosed. Now a doctor would see all these reports from his/her terminal using AL-BASR MRS, and would conclude a visit by writing a prescription. 1. Signing in AL-BASR as a Doctor 19 | P a g e 2. Doctor‟s Account View: Consultation Doctor will open up patient history by clicking on the „Patient History‟ button on the Home Page. 3. Searching for Patient: Hammad Ali Khan; A doctor searches by patient‟s ID „201505051‟, in the Patient Search Tool. The search result list now shows patient „Hammad Ali Khan‟. Clicking on that name in the list opens up patient‟s visit history Patient‟s visit history can now viewed in the „Visit History‟ window right below where the patient‟s id & name is being displayed. A folder with date & time can be seen, this is actually a visit that was created at the time of registration, it now contains the OCT images & Videos uploaded at the lab by a Lab Operator. 20 | P a g e Clicking on the visit folder opens up its contents/files that were attached during the patient‟s diagnosis. Visit Content Tiles can be seen in the window below 4. Downloading Files… Content tiles behave like subfolders, containing one or more contents/files inside, the heading shows the description and a number of items inside. Clicking on a tile opens up the contained contents in another tab, if the contents are not yet downloaded, the downloading automatically initiates. Contents being downloaded… 21 | P a g e 5. Visit contents can be further examined. Click opening a content tile, downloads (if necessary) all files contained in it. Each file can further examined or viewed by double clicking on it. The file is opened inside a File Viewer window tab. Some example files opened in the File Viewer are shown in the figure below: 22 | P a g e File Viewer Window Image Processing Toolbar contained in the File Viewer helps in examination of images. Some examples of using the toolbar options: 6. Digital Prescription Doctor can add prescription after viewing the test results, by clicking on the „Add Prescription Button‟ at the bottom, a prescription window is opened. 23 | P a g e 1. Digital Prescription: Prescription Window A digital prescription window contains, Remarks, Treatment & Follow Up fields which can be added like in the example below. Clicking on the „Save‟ button the prescription is saved & attached to the visit in PDF format, a print can also be taken and handed over to patient. 24 | P a g e 2. Prescription Attached With the Visit: 3. Visit Content Export, Import & Deletion. a. File Export Contents contained in visit can be exported to a drive on disk for the purpose of make a CD for a patient. The contents to be exported must be checked like in the below window and the „Export‟ button can be clicked to export them to the destination at disk. 25 | P a g e b. File Import Any file can also be imported into the visit, by clicking on „Import‟ button and selecting a File to import; this action attaches the imported file with the visit. c. File Deletion To delete a file, it must first be checked/selected, after selection a „Delete‟ button deletes the content after asking confirmation. 26 | P a g e Automatic Eye Diagnostic Capabilities AL-BASR provides the capability of automatic diagnosis on Fundus Images. Glaucoma & Diabetic Retinopathy Analysis are currently available 1. Image Automatic Analysis: Image analysis can be performed by clicking on Perform Image Analysis Button located in the toolbar in the File/Image viewer. At Analysis Selection Window(showed after button click), a user can select one or all available Analysis, proceeding from there the analysis procedure starts up. 27 | P a g e 2. Glaucoma Report After a successful analysis, the analysis report is generated like the one below. 3. Diabetic Retinopathy Report After a successful analysis, the analysis report is generated like the one below. 28 | P a g e Telemedicine incorporated Remote Tele-Screening and Referral System Constituents: 1. Medical Record System for Hospitals. 2. Fundus Imaging & Diagnostic System for Remote Tele-Screening. 3. Telemedicine System for case referral to major/central hospitals. Medical Record System (AL-BASR MRS) AL-BASR Deployed at Local Hospitals is designed to represent data that accurately captures the state of patient at all times. It is an Electronic Patient Health Record System. A step towards a paper-less, and an efficient health care solution. Allows for an entire patient history to be stored and viewed without the need to track down patient‟s previous medical records. It assists in ensuring that data is Accurate, Appropriate and Legible. By maintaining one modifiable file, that is updated constantly, it reduces data replication. Eliminates the issue of lost paperwork It is capable of being shared across different health care settings, through a networkconnected information system. Figure 1 The Tele-Screening Process 1. A local hospital conducts tele-screening in adjoining areas, by dispatching medical vans with diagnostic and screening capabilities. Patients are registered on the spot and their Funduscopy Imagery is taken. Upon which 29 | P a g e automatic diagnosis is applied to find out major symptoms that contribute towards a serious vision impairment and blindness. The acquired data from the screening process is communicated automatically to the local hospitals‟ Medical Record Systems (AL-BASR MRS), which maintain the medical history, and therefore allow referral of serious cases to the Central Hospitals (Using Telemedicine System) where senior or experienced ophthalmologists can give their valuable consultations remotely. 2. Remote Tele-Screening A medical van equipped with Fundus Imaging and diagnostic capabilities is sent to rural areas to conduct tele-screening exercise. The operators use specialized software designed specifically for the telescreening purpose. The software (AL-BASR Diagnostic System) is capable for acquiring images from a fundus camera and has automatic diagnostic capability to determine different stages of Diabetic Retinopathy and Glaucoma. The diagnostic reports and the images acquired during the process in communicated automatically to the local hospital via a network established between the vehicle and the hospital‟s Medical Record System (AL-BASR MRS). Figure.2 showing a step-wise flow of the complete tele-screening process Figure 2 30 | P a g e Patient Registration and Medical Diagnosis at Tele-Screening: AL-BASR Diagnostic System Patient Name: Jameel Ahmad Khan 31 | P a g e Image Acquisition from a Fundus Camera 32 | P a g e Performing Automatic Diagnosis: Diabetic Retinopathy Diagnosis Report: Diabetic Retinopathy 33 | P a g e Performing Automatic Analysis: Glaucoma Diagnosis Report: Glaucoma 34 | P a g e Record Keeping at Local Hospital using AL-BASR Medical Record System The tele-screening results are automatically transmitted to AL-BASR MRS via a network. AL-BASR MRS maintains patient‟s screening history, all images and diagnosis reports are stored in AL-BASR MRS. This stored medical record can then be easily referred via Telemedicine System to the Ophthalmologists at the central hospital. Record Retrieval at Local Hospital using AL-BASR MRS After logging in to AL-BASR as an Operator or a Consultant, patient history button is clicked to retrieve patient record. 35 | P a g e Retrieval of Jameel Ahmad Khan’s Screening Record. 36 | P a g e Referral of Jameel Ahmad Khan‟s Case to a Consultant at the Central Hospital Exporting Records for Referral 37 | P a g e The Telemedicine System: Getting Medical Consultation from the Ophthalmologists at the Central Hospitals An operator or a consultant at local hospital logs in to the Telemedicine System and attaches the medical record that needs to shared with the consulting consultant with the patient‟s case and dispatches it to the concerned consultant from the list of available consultants. Uploading Patient‟s Medical Record on telemedicine system for consultation Patient: Jameel Ahmad Khan Records exported from AL-BASR MRS are attached with the patient‟s consultation. 38 | P a g e Selection of Consulting Ophthalmologist in the Telemedicine System From the list of available consultants Dr. Sana is selected for the consultation. From a List of available consultants, an operator can select any consultant for consultation based upon their area of speciality; the consultants in the telemedicine system may belong to many different hospitals that are subscribed to telemedicine system. 39 | P a g e Patient: Jameel Ahmad Khan is now referred to Dr. Sana at the Central Hospital and is now appearing in the list of patients who have their referrals busy with the assigned consultants. 40 | P a g e Consultation by Ophthalmologists at the Central Hospital Consultants from hospitals across the globe can register themselves on the telemedicine system for providing consultation services. A member consultant can log in to telemedicine system by entering the required credentials. Dr. Sana (to whom Patient: Jameel Ahmad Khan was consulted to) logs in to telemedicine system to see if any consultations were requested of her. 41 | P a g e List of Pending Consultations A list of pending consultations referred to a consultant is displayed at the left of the screen, so he/she can easily determine how many consultations are there to give. Dr. Sana can see Patient: Jameel in her pending list. Patient‟s medical diagnosis record attached at the local hospital can be viewed by the consultant by clicking on the patient‟s name. The consultation form is opened having fields for Complaints, Examination and Plan, which a consultant fills to give the consultation. 42 | P a g e Examining patient‟s Medical Diagnosis Reports by a consultant. Section of labs, at the bottom of the form contains the list of all files (images and reports etc) attached with consultation. A consultant can easily examine the contents by click opening them. 43 | P a g e Completing a Consultation and dispatching it back. After examining the diagnostic reports a consultant can complete the consultation by filling in the consultation fields i.e. writing the examination details and the plan of medicine prescribed, clicking on the „Dispatch‟ button dispatches the consultation back to the consulting authority (Local Hospital). After the dispatch a success message is displayed and the patient is removed from the pending consultations list of that consultant. 44 | P a g e Receiving back the Consultation results at the Local Hospital (Consulting Terminal) At the local hospital the operator who consulted the case to Dr. Sana can now see the Patient‟s Completed Consultation in the Completed Consultations list. Clicking on the patient‟s name in the list opens up the consultation given by the consulting Ophthalmologist, and thereby completes the telemedicine exercise. 45 | P a g e 46 | P a g e Contact us Feel free to contact us for any complaint/suggestion/help, Ali Zohair Shah [email protected] (92)302-8968075 Muhammad Furqan Masood [email protected] (92)334-5307661 About CARE: (for more software diagnostic tools) www.carepvtltd.com About CASE: www.case.edu.pk 47 | P a g e