1
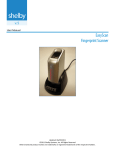
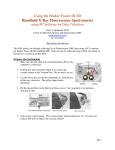
User Manual 656 Mamaroneck Ave. White Plains NY 10605 (800)454-9244 914-682-6600 U.SA 1 Content 1. Introduction 2. Overview 3. Hardware installation 4. Software installation. 5. Using of EasyScan 6. Troubleshooting 1. Introduction. Dear Customer, Thank you for choosing our – EasyScan HD. We are sure you will be fully satisfied with your purchase. This user guide will help you become familiar with EasyScan HD. 2. Overview EasyScan HD is small and easy-to-use device intended for the fast scanning of dental XRay films and saving its into computer images. This procedure allow following advantages: 1. Enlarging of image to easier viewing and option for computer analyzing. 2. Saving images for computer archiving. 3. Easy communicating with patient or insurance company. 4. Storing X-Ray images directly into dental practice management software.* EasyScan HD supports following OS – Windows XP, Windows Vista and Windows 7. *Available only in case of specific software support TWAIN interface. 2 3. Hardware installation. Picture below explains important points of the EasyScan HD device: 1. X-Ray film tray. 2. USB connection and Power ON indicator (blue light). 3. Output USB connector. Hardware installation is very simple. Just put the device into place easy to use and connect it to USB plug of computer by cable supplied with EasyScan HD device. Important Notice: For the stable functioning device must be attached every time to same USB plug of the computer. Replacing of cable to another plug will require running driver repairing (see troubleshooting section of this manual). 3 4. Software installation Before software installation ensure that EasyScan HD device is connected to computer and "Power ON" LED is light on. Put installation CD into CD drive. Following menu will appear: I n case of specific computer does not auto run CD, open CD-ROM drive in the browser and run "Autorun.exe" file. Step1. Press on "Install Driver" row. EasyScan HD driver installation will start. Follow installation instruction to continue and finish this procedure. 4 Important: during installation following massage will appear: Choose "Continue Anyway". Step2. Press "Install Resolution Saver" row to install vMicroMan utility. Follow installation instructions to finish installation. Step3. Press "Install Viewing Software" to install "Zoner Media Explorer 5". This software is useful if you don't use any special dental management software. It does allow capturing, store and viewing X-Ray images. Follow installation instructions to finish installation. 5 4. Using of EasyScan EasyScan HD is very friendly and easy-to-use device. In order to scan you just press on the tray, open it, put film into appropriative window and close tray back. Depends of the software used for scanning there are possible two different ways. 1. Using EasyScan HD with supplied software Run Zoner Media Explorer 5 installed in previous step. Choose or create new folder where images will be stored. In upper menu choose Acquire From twain device 6 Following window will appear Choose “VUMVC Twain Driver V” in Source row and press OK. Driver interface window will appear. 7 Press “Capture” and image will be saved into folder. Software make automatically name to images. You can rename it according to patient name. Using EasyScan HD with user specific dental management software. Find twain settings in your software*. Point your software to use “VUMVC Twain Driver V”. You’re ready to capture picture into your management software* * Use your software support to learn how to make settings and capturing Using of vMicroMan Util. 8 Default scanner resolution is 640x480 pix. It may be changed with button but resolution will be reset every time with new driver call. vMicroMan utility allow to preset wished resolution and use it every time when scanner been used. 9 5. Troubleshooting EasyScan HD is reliable device and working in different environments and with different Microsoft operation systems. In case of defects it may be repaired by manufacture. In the same time there are some situations, when customer can define and fix problem by himself. Below listed few common situations and repairing methods. Problem Reason Solution # description 1 Scanner does not work, USB cable does not blue light on the right sideattached or defective does not lights. 2 Blue light is lights but when trying to run capture, following massage appear When trying to capture image, bottom light does not lights. Detach and attach again USB cable plugs on both sides – device and computer. If does not help, replace cable. Obviously device has 1 way – detach USB plug from been detached from computer and put it in previous input. computer and 2 way – reinstall driver. Run Driver attached to another Installation from the disk and choose USB input. “Repair” option from the first options menu. Finnish installation and try to use EasyScan HD again Tray does not closed good. 10 Open tray and close it again. Pay attention to whit bottom light. It has to turn on when tray been closed. Notes: For any software problem or help with installation please contact Our software eng. Mr. Vladimir Katz at [email protected] 11 Distributed By: 12