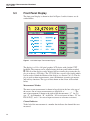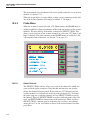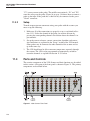
1
Hart Scientific
1575/1590
Thermometer Readout
User’s Guide
Rev. 5B2802
Fluke Corporation, Hart Scientific Division
799 E. Utah Valley Drive • American Fork, UT 84003-9775 • USA
Phone: +1.801.763.1600 • Telefax: +1.801.763.1010
E-mail: [email protected]
www.hartscientific.com
Subject to change without notice. • Copyright © 2005 • Printed in USA
Rev. 5B2802
Table of Contents
1 Before You Start . . . . . . . . . . . . . . . . . . . . . . . . . . 1
1.1
1.2
Symbols Used . . . . . . . . . . . . . . . . . . . . . . . . . . . . 1
Safety Information . . . . . . . . . . . . . . . . . . . . . . . . . . 2
1.2.1
1.2.2
1.3
WARNINGS . . . . . . . . . . . . . . . . . . . . . . . . . . . . . . . . . . . 2
CAUTIONS . . . . . . . . . . . . . . . . . . . . . . . . . . . . . . . . . . . 3
Authorized Service Centers. . . . . . . . . . . . . . . . . . . . . . 3
2 Introduction . . . . . . . . . . . . . . . . . . . . . . . . . . . . 5
2.1
2.2
General Description . . . . . . . . . . . . . . . . . . . . . . . . . 5
Theory of Operation . . . . . . . . . . . . . . . . . . . . . . . . . 5
2.2.1
2.2.2
Measurement Technique . . . . . . . . . . . . . . . . . . . . . . . . . . . . . 6
Performance Issues . . . . . . . . . . . . . . . . . . . . . . . . . . . . . . . . 7
2.2.2.1
2.2.2.2
2.2.2.3
2.2.2.4
2.2.2.5
2.2.2.6
2.2.2.7
2.2.2.8
2.2.2.9
2.2.2.10
Lead Resistance . . . . . . . . . . . . . . . . . . . . . . . . . . . . . . . . . . . . . 8
Thermoelectric EMF . . . . . . . . . . . . . . . . . . . . . . . . . . . . . . . . . . . 8
Reactance. . . . . . . . . . . . . . . . . . . . . . . . . . . . . . . . . . . . . . . . . 9
Leakage. . . . . . . . . . . . . . . . . . . . . . . . . . . . . . . . . . . . . . . . . . 9
Self-heating. . . . . . . . . . . . . . . . . . . . . . . . . . . . . . . . . . . . . . . . 9
Component Drift . . . . . . . . . . . . . . . . . . . . . . . . . . . . . . . . . . . . . 9
Noise and Resolution. . . . . . . . . . . . . . . . . . . . . . . . . . . . . . . . . . . 9
Nonlinearity. . . . . . . . . . . . . . . . . . . . . . . . . . . . . . . . . . . . . . . 10
Measurement Speed . . . . . . . . . . . . . . . . . . . . . . . . . . . . . . . . . . 10
Solid-State Design . . . . . . . . . . . . . . . . . . . . . . . . . . . . . . . . . . . 11
3 Specifications and Environmental Conditions . . . . . . . . . 13
3.1
3.2
Specifications . . . . . . . . . . . . . . . . . . . . . . . . . . . . 13
Environmental Conditions. . . . . . . . . . . . . . . . . . . . . . 15
3.3
Warranty . . . . . . . . . . . . . . . . . . . . . . . . . . . . . . . 15
4 Quick Start . . . . . . . . . . . . . . . . . . . . . . . . . . . . 17
4.1
4.2
Unpacking . . . . . . . . . . . . . . . . . . . . . . . . . . . . . . 17
Learn About the Features and Components . . . . . . . . . . . . . 17
4.3
4.4
4.5
4.6
4.7
2575/2590 Scanner Setup .
Power Source . . . . . . .
Probe Connection . . . . .
Switch the Power On . . .
Measure Temperature . . .
.
.
.
.
.
.
.
.
.
.
.
.
.
.
.
.
.
.
.
.
.
.
.
.
.
.
.
.
.
.
.
.
.
.
.
.
.
.
.
.
.
.
.
.
.
.
.
.
.
.
.
.
.
.
.
.
.
.
.
.
.
.
.
.
.
.
.
.
.
.
.
.
.
.
.
.
.
.
.
.
.
.
.
.
.
.
.
.
.
.
.
.
.
.
.
.
.
.
.
.
.
.
.
.
.
17
17
17
18
18
5 Parts and Controls . . . . . . . . . . . . . . . . . . . . . . . . 21
5.1
5.2
Front Panel . . . . . . . . . . . . . . . . . . . . . . . . . . . . . 21
Back Panel. . . . . . . . . . . . . . . . . . . . . . . . . . . . . . 22
i
5.3
Front Panel Display . . . . . . . . . . . . . . . . . . . . . . . . . 24
5.4
Front Panel Buttons . . . . . . . . . . . . . . . . . . . . . . . . . 25
6 General Operation . . . . . . . . . . . . . . . . . . . . . . . . 29
6.1
6.2
Applications . . . . . . . . . . . . . . . . . . . . . . . . . . . . . 29
Suggestions for Best Results . . . . . . . . . . . . . . . . . . . . 30
6.2.1
6.2.2
6.3
Maintaining Accuracy. . . . . . . . . . . . . . . . . . . . . . . . . . . . . . 31
Evaluating Temperature Uncertainty . . . . . . . . . . . . . . . . . . . . . . 32
Answers to Some Common Questions . . . . . . . . . . . . . . . 33
7 Front Panel Operation . . . . . . . . . . . . . . . . . . . . . . 37
7.1
Channel Menu . . . . . . . . . . . . . . . . . . . . . . . . . . . . 37
7.1.1
7.1.2
7.1.3
7.2
Sample Menu . . . . . . . . . . . . . . . . . . . . . . . . . . . . 39
7.2.1
7.2.2
7.2.3
7.2.4
7.2.5
7.3
Sampling Run/Stop
Sample N . . . . .
Sample Timing . .
Digital Filter. . . .
Reset Statistics . .
.
.
.
.
.
.
.
.
.
.
.
.
.
.
.
.
.
.
.
.
.
.
.
.
.
.
.
.
.
.
.
.
.
.
.
.
.
.
.
.
.
.
.
.
.
.
.
.
.
.
.
.
.
.
.
.
.
.
.
.
.
.
.
.
.
.
.
.
.
.
.
.
.
.
.
.
.
.
.
.
.
.
.
.
.
.
.
.
.
.
.
.
.
.
.
.
.
.
.
.
.
.
.
.
.
.
.
.
.
.
.
.
.
.
.
.
.
.
.
.
.
.
.
.
.
.
.
.
.
.
.
.
.
.
.
.
.
.
.
.
.
.
.
.
.
. 40
. 40
. 40
. 41
. 43
Store Sample . . . .
Write Value . . . . .
View Memory . . . .
Clear Memory. . . .
Run/Pause Sampling
.
.
.
.
.
.
.
.
.
.
.
.
.
.
.
.
.
.
.
.
.
.
.
.
.
.
.
.
.
.
.
.
.
.
.
.
.
.
.
.
.
.
.
.
.
.
.
.
.
.
.
.
.
.
.
.
.
.
.
.
.
.
.
.
.
.
.
.
.
.
.
.
.
.
.
.
.
.
.
.
.
.
.
.
.
.
.
.
.
.
.
.
.
.
.
.
.
.
.
.
.
.
.
.
.
.
.
.
.
.
.
.
.
.
.
.
.
.
.
.
.
.
.
.
.
.
.
.
.
.
.
.
.
.
.
.
.
.
.
.
.
.
.
.
.
.
.
.
.
.
44
44
44
45
45
Probe Menu . . . . . . . . . . . . . . . . . . . . . . . . . . . . . 45
7.4.1
7.4.2
7.4.3
Select Channel . . . . . . . . . . . . . . . . . . . . . . . . . . . . . . . . . 46
Select Probe . . . . . . . . . . . . . . . . . . . . . . . . . . . . . . . . . . . 46
Edit Probe . . . . . . . . . . . . . . . . . . . . . . . . . . . . . . . . . . . . 46
7.4.3.1
7.4.3.2
7.4.3.3
7.4.3.4
7.4.3.5
7.4.3.6
7.4.4
Serial Number. . . . . . . . . . . . . . . . . . . . . . . . . . . . . . . . . . . . . . 47
Temperature Conversion . . . . . . . . . . . . . . . . . . . . . . . . . . . . . . . . 47
7.4.3.2.1
7.4.3.2.2
7.4.3.2.3
7.4.3.2.4
ITS-90 . . . . . . . .
IPTS-68 . . . . . . .
Callendar-Van Dusen
Polynomial . . . . .
.
.
.
.
.
.
.
.
.
.
.
.
.
.
.
.
.
.
.
.
.
.
.
.
.
.
.
.
.
.
.
.
.
.
.
.
.
.
.
.
.
.
.
.
.
.
.
.
.
.
.
.
.
.
.
.
.
.
.
.
.
.
.
.
.
.
.
.
.
.
.
.
.
.
.
.
.
.
.
.
.
.
.
.
.
.
.
.
.
.
.
.
.
.
.
.
.
.
.
.
.
.
.
.
.
.
.
.
.
.
.
.
.
.
.
.
.
.
.
.
.
.
.
.
.
.
.
.
.
.
.
.
.
.
.
.
.
.
.
.
.
.
.
.
47
48
48
49
7.4.3.2.5
7.4.3.2.6
7.4.3.2.7
7.4.3.2.8
Thermistor .
Resistance . . . .
W(T ) . . . . . .
Ratio. . . . . . .
.
.
.
.
.
.
.
.
.
.
.
.
.
.
.
.
.
.
.
.
.
.
.
.
.
.
.
.
.
.
.
.
.
.
.
.
.
.
.
.
.
.
.
.
.
.
.
.
.
.
.
.
.
.
.
.
.
.
.
.
.
.
.
.
.
.
.
.
.
.
.
.
.
.
.
.
.
.
.
.
.
.
.
.
.
.
.
.
.
.
.
.
.
.
.
.
.
.
.
.
.
.
.
.
.
.
.
.
.
.
.
.
.
.
.
.
.
.
.
.
.
.
.
.
.
.
.
.
.
.
.
.
49
49
49
50
.
.
.
.
.
.
.
.
.
.
.
.
.
.
.
.
.
.
.
.
.
.
.
.
.
.
.
.
.
.
.
.
.
.
.
.
.
.
.
.
.
.
.
.
.
.
.
.
.
.
.
.
.
.
.
.
.
.
.
.
.
.
.
.
.
.
.
.
.
.
.
.
.
.
.
.
.
.
.
.
.
.
.
.
.
.
.
.
. 50
. 50
. 51
. 51
90
Reference . . . . .
Current . . . . . .
Standby Current. .
Three-wire Offset .
.
.
.
.
.
.
.
.
.
.
.
.
.
.
.
.
.
.
.
.
.
.
.
.
.
.
.
.
.
.
.
.
.
.
.
.
.
.
.
.
.
.
.
.
.
.
.
.
.
.
.
.
.
.
.
.
.
.
.
.
.
.
.
.
.
.
.
.
Calibrate Probe . . . . . . . . . . . . . . . . . . . . . . . . . . . . . . . . . 52
7.4.4.1
7.4.4.2
Calibrate TPW . . . . . . . . . . . . . . . . . . . . . . . . . . . . . . . . . . . . . 52
Calibrate ITS-90 . . . . . . . . . . . . . . . . . . . . . . . . . . . . . . . . . . . . 54
7.4.4.2.1
7.4.4.2.2
7.4.4.2.3
7.4.4.2.4
7.4.4.2.5
ii
.
.
.
.
.
Memory Menu. . . . . . . . . . . . . . . . . . . . . . . . . . . . 43
7.3.1
7.3.2
7.3.3
7.3.4
7.3.5
7.4
Measure Input 1 . . . . . . . . . . . . . . . . . . . . . . . . . . . . . . . . . 37
Measure Input 2 . . . . . . . . . . . . . . . . . . . . . . . . . . . . . . . . . 39
Alternate Channels . . . . . . . . . . . . . . . . . . . . . . . . . . . . . . . 39
Calibration Using Only Fixed Points . . . . . . . . .
Comparison Calibration With Manual Sequencing . .
Comparison Calibration With Automatic Sequencing
Calibration Using SPRT Resistance Comparison . . .
Calibration With W Values . . . . . . . . . . . . . .
.
.
.
.
.
.
.
.
.
.
.
.
.
.
.
.
.
.
.
.
.
.
.
.
.
.
.
.
.
.
.
.
.
.
.
.
.
.
.
.
.
.
.
.
.
.
.
.
.
.
.
.
.
.
.
.
.
.
.
.
.
.
.
.
.
.
.
.
.
.
.
.
.
.
.
.
.
.
.
.
.
.
.
.
.
.
.
.
.
.
.
.
.
.
.
55
56
56
57
58
7.4.4.2.6
7.4.4.2.7
7.4.4.2.8
7.4.4.2.9
7.4.4.2.10
7.4.4.3
7.4.4.4
7.4.4.5
7.4.5
.
.
.
.
.
.
.
.
.
.
.
.
.
.
.
.
.
.
.
.
.
.
.
.
.
.
.
.
.
.
.
.
.
.
.
.
.
.
.
.
.
.
.
.
.
.
.
.
.
.
.
.
.
.
.
.
.
.
.
.
.
.
.
.
.
.
.
.
.
.
.
.
.
.
.
.
.
.
.
.
.
.
.
.
.
.
.
.
.
.
.
.
.
.
.
.
.
.
.
.
.
.
.
.
.
.
.
.
.
.
.
.
.
.
.
.
.
.
.
.
.
.
.
.
.
.
.
.
.
.
.
.
.
.
.
.
.
.
.
.
.
.
.
.
.
.
.
.
.
.
.
.
.
.
.
.
.
.
.
.
.
.
.
.
.
.
.
.
.
.
.
.
.
.
.
.
.
.
.
.
.
.
.
.
.
.
.
.
.
.
.
.
.
.
.
.
.
.
.
.
59
60
66
67
68
1.414 x Current . . . . . . . . . . . . . . . . . . . . . . . . . . . . . . . . . . . . . 69
0.707 x Current . . . . . . . . . . . . . . . . . . . . . . . . . . . . . . . . . . . . . 69
Conversion Test . . . . . . . . . . . . . . . . . . . . . . . . . . . . . . . . . . . . . 69
Save Probe .
Read Probe .
Save All . . .
Read All. . .
Format Disk .
.
.
.
.
.
.
.
.
.
.
.
.
.
.
.
.
.
.
.
.
.
.
.
.
.
.
.
.
.
.
.
.
.
.
.
.
.
.
.
.
.
.
.
.
.
.
.
.
.
.
.
.
.
.
.
.
.
.
.
.
.
.
.
.
.
.
.
.
.
.
.
.
.
.
.
.
.
.
.
.
.
.
.
.
.
.
.
.
.
.
.
.
.
.
.
.
.
.
.
.
.
.
.
.
.
.
.
.
.
.
.
.
.
.
.
.
.
.
.
.
.
.
.
.
.
.
.
.
.
.
.
.
.
.
.
.
.
.
.
.
.
.
.
.
.
.
.
.
.
.
.
.
.
.
.
.
.
.
.
.
.
.
.
.
.
.
.
.
.
.
.
.
.
.
.
.
.
.
.
.
.
.
.
.
.
. 69
. 70
. 70
. 71
. 71
Display Menu . . . . . . . . . . . . . . . . . . . . . . . . . . . . 71
7.5.1
7.5.2
7.5.3
7.5.4
7.5.5
7.5.6
7.6
.
.
.
.
.
Probe Disk. . . . . . . . . . . . . . . . . . . . . . . . . . . . . . . . . . . . 69
7.4.5.1
7.4.5.2
7.4.5.3
7.4.5.4
7.4.5.5
7.5
Setup . . .
Measure . .
Data . . . .
Calculate .
Print Report
Data/Graph . . . . .
Select Display . . . .
Edit Display - Data .
Edit Display - Graph
Display Resolution .
Clear Graph . . . . .
.
.
.
.
.
.
.
.
.
.
.
.
.
.
.
.
.
.
.
.
.
.
.
.
.
.
.
.
.
.
.
.
.
.
.
.
.
.
.
.
.
.
.
.
.
.
.
.
.
.
.
.
.
.
.
.
.
.
.
.
.
.
.
.
.
.
.
.
.
.
.
.
.
.
.
.
.
.
.
.
.
.
.
.
.
.
.
.
.
.
.
.
.
.
.
.
.
.
.
.
.
.
.
.
.
.
.
.
.
.
.
.
.
.
.
.
.
.
.
.
.
.
.
.
.
.
.
.
.
.
.
.
.
.
.
.
.
.
.
.
.
.
.
.
.
.
.
.
.
.
.
.
.
.
.
.
.
.
.
.
.
.
.
.
.
.
.
.
.
.
.
.
.
.
.
.
.
.
.
.
74
77
77
81
81
82
System Menu . . . . . . . . . . . . . . . . . . . . . . . . . . . . 83
7.6.1
7.6.2
Unit Menu . . . . . . . . . . . . . . . . . . . . . . . . . . . . . . . . . . . . 83
Parameter Menu. . . . . . . . . . . . . . . . . . . . . . . . . . . . . . . . . 84
7.6.2.1
7.6.2.2
7.6.2.3
7.6.2.4
7.6.2.5
7.6.3
.
.
.
.
.
.
.
.
.
.
.
.
.
.
.
.
.
.
.
.
.
.
.
.
.
.
.
.
.
.
.
.
.
.
.
.
.
.
.
.
.
.
.
.
.
.
.
.
.
.
.
.
.
.
.
.
.
.
.
.
.
.
.
.
.
.
.
.
.
.
.
.
.
.
.
.
.
.
.
.
.
.
.
.
.
.
.
.
.
.
.
.
.
.
.
.
.
.
.
.
.
.
.
.
.
.
.
.
.
.
.
.
.
.
.
.
.
.
.
.
.
.
.
.
.
.
.
.
.
.
.
.
.
.
.
.
.
.
.
.
.
.
.
.
.
.
.
.
.
.
.
.
.
.
.
.
.
.
.
.
.
.
.
.
.
. 84
. 84
. 85
. 85
. 85
Setup . . . . . .
Record/Stop . . .
Record N . . . .
Format Disk . . .
Run Application.
.
.
.
.
.
.
.
.
.
.
.
.
.
.
.
.
.
.
.
.
.
.
.
.
.
.
.
.
.
.
.
.
.
.
.
.
.
.
.
.
.
.
.
.
.
.
.
.
.
.
.
.
.
.
.
.
.
.
.
.
.
.
.
.
.
.
.
.
.
.
.
.
.
.
.
.
.
.
.
.
.
.
.
.
.
.
.
.
.
.
.
.
.
.
.
.
.
.
.
.
.
.
.
.
.
.
.
.
.
.
.
.
.
.
.
.
.
.
.
.
.
.
.
.
.
.
.
.
.
.
.
.
.
.
.
.
.
.
.
.
.
.
.
.
.
.
.
.
.
.
.
.
.
.
.
.
.
.
.
.
.
.
.
.
.
.
.
.
.
.
.
.
.
.
.
. 86
. 87
. 87
. 87
. 87
Communications Menu . . . . . . . . . . . . . . . . . . . . . . . . . . . . . 88
7.6.4.1
7.6.4.2
7.6.4.3
7.6.4.4
Serial . . . . .
IEEE-488 . . .
Printer . . . . .
Analog Output
7.6.4.4.1
7.6.4.4.2
7.6.4.4.3
7.6.4.4.4
7.6.4.4.5
7.6.5
.
.
.
.
.
Disk Menu. . . . . . . . . . . . . . . . . . . . . . . . . . . . . . . . . . . . 85
7.6.3.1
7.6.3.2
7.6.3.3
7.6.3.4
7.6.3.5
7.6.4
Time . . . . . . . .
Save Parameters. .
Load Parameters .
Reset Parameters .
Screen Parameters
.
.
.
.
.
.
.
.
Parameter .
Resolution .
Offset . . .
Center . . .
Cal . . . . .
.
.
.
.
.
.
.
.
.
.
.
.
.
.
.
.
.
.
.
.
.
.
.
.
.
.
.
.
.
.
.
.
.
.
.
.
.
.
.
.
.
.
.
.
.
.
.
.
.
.
.
.
.
.
.
.
.
.
.
.
.
.
.
.
.
.
.
.
.
.
.
.
.
.
.
.
.
.
.
.
.
.
.
.
.
.
.
.
.
.
.
.
.
.
.
.
.
.
.
.
.
.
.
.
.
.
.
.
.
.
.
.
.
.
.
.
.
.
.
.
.
.
.
.
.
.
.
.
.
.
.
.
.
.
.
.
.
.
.
.
.
.
.
.
.
.
.
.
.
.
.
.
.
.
.
.
.
.
.
.
.
.
.
.
.
.
.
.
.
.
.
.
.
.
.
.
.
.
.
.
.
.
.
.
.
.
.
.
.
.
.
.
.
.
.
.
.
.
.
.
.
.
.
.
.
.
.
.
.
.
.
.
.
.
.
.
.
.
.
.
.
.
.
.
.
.
.
.
.
.
.
.
.
.
.
.
.
.
.
.
.
.
.
.
.
.
.
.
.
.
.
.
.
.
.
.
.
.
.
.
.
.
.
.
.
.
.
.
.
.
.
.
.
.
.
.
.
.
.
.
.
.
.
.
.
.
.
.
.
.
.
.
.
.
.
.
.
.
.
.
.
.
.
.
.
.
.
.
.
.
.
.
.
.
.
.
.
.
.
.
.
.
.
.
.
.
. 88
. 89
. 90
. 91
.
.
.
.
.
.
.
.
.
.
.
.
.
.
.
92
92
92
92
92
System Calibration Menu . . . . . . . . . . . . . . . . . . . . . . . . . . . . 93
7.6.5.1
7.6.5.2
7.6.5.3
7.6.5.4
7.6.5.5
Set External . . . . .
Set Internal . . . . .
Calibrate Reference .
Security Lock-out . .
Information . . . . .
.
.
.
.
.
.
.
.
.
.
.
.
.
.
.
.
.
.
.
.
.
.
.
.
.
.
.
.
.
.
.
.
.
.
.
.
.
.
.
.
.
.
.
.
.
.
.
.
.
.
.
.
.
.
.
.
.
.
.
.
.
.
.
.
.
.
.
.
.
.
.
.
.
.
.
.
.
.
.
.
.
.
.
.
.
.
.
.
.
.
.
.
.
.
.
.
.
.
.
.
.
.
.
.
.
.
.
.
.
.
.
.
.
.
.
.
.
.
.
.
.
.
.
.
.
.
.
.
.
.
.
.
.
.
.
.
.
.
.
.
.
.
.
.
.
.
.
.
.
.
.
.
.
.
.
.
.
.
.
.
.
.
.
.
.
. 94
. 95
. 95
. 95
. 97
8 Communications Interface. . . . . . . . . . . . . . . . . . . . 99
8.1
Serial Communications . . . . . . . . . . . . . . . . . . . . . . . 99
8.1.1
8.1.2
8.1.3
8.2
Wiring . . . . . . . . . . . . . . . . . . . . . . . . . . . . . . . . . . . . . . 99
Setup . . . . . . . . . . . . . . . . . . . . . . . . . . . . . . . . . . . . . . 100
Serial Communication Example Program. . . . . . . . . . . . . . . . . . . 100
IEEE-488 Communications . . . . . . . . . . . . . . . . . . . . 101
iii
8.2.1
8.2.2
Setup . . . . . . . . . . . . . . . . . . . . . . . . . . . . . . . . . . . . . . 101
IEEE-488 Interface Functions . . . . . . . . . . . . . . . . . . . . . . . . . 101
8.2.2.1
8.2.2.2
8.2.2.3
8.2.2.4
8.2.3
8.3
Local Lockout . . . .
Trigger . . . . . . . .
Serial or Parallel Poll
Device Clear . . . . .
.
.
.
.
.
.
.
.
.
.
.
.
.
.
.
.
.
.
.
.
.
.
.
.
.
.
.
.
.
.
.
.
.
.
.
.
.
.
.
.
.
.
.
.
.
.
.
.
.
.
.
.
.
.
.
.
.
.
.
.
.
.
.
.
.
.
.
.
.
.
.
.
.
.
.
.
.
.
.
.
.
.
.
.
.
.
.
.
.
.
.
.
.
.
.
.
.
.
.
.
.
.
.
.
.
.
.
.
.
.
.
.
.
.
.
.
.
.
.
.
.
.
.
.
.
.
.
.
. 101
. 101
. 102
. 102
IEEE-488 Communication Example Program . . . . . . . . . . . . . . . . 102
Digital Interface Commands . . . . . . . . . . . . . . . . . . . . 103
9 Calibration. . . . . . . . . . . . . . . . . . . . . . . . . . . . 109
9.1
9.2
Setup . . . . . . . . . . . . . . . . . . . . . . . . . . . . . . . . 109
Resistance Ratio Calibration . . . . . . . . . . . . . . . . . . . . 110
9.3
Reference Resistor Calibration. . . . . . . . . . . . . . . . . . . 110
10 2575 Scanner (optional). . . . . . . . . . . . . . . . . . . . . 113
10.1
10.2
10.3
Introduction . . . . . . . . . . . . . . . . . . . . . . . . . . . . 113
Specifications . . . . . . . . . . . . . . . . . . . . . . . . . . . 113
Quick Start . . . . . . . . . . . . . . . . . . . . . . . . . . . . 114
10.3.1
Connections . . . . . . . . . . . . . . . . . . . . . . . . . . . . . . . . . . 114
10.3.1.1
10.3.1.2
10.3.1.3
10.3.2
10.4
10.5
Resistance Output . . . . . . . . . . . . . . . . . . . . . . . . . . . . . . . . . . . 114
Control Cable . . . . . . . . . . . . . . . . . . . . . . . . . . . . . . . . . . . . . 114
Resistance Inputs . . . . . . . . . . . . . . . . . . . . . . . . . . . . . . . . . . . 115
Setup . . . . . . . . . . . . . . . . . . . . . . . . . . . . . . . . . . . . . . 116
Parts and Controls . . . . . . . . . . . . . . . . . . . . . . . . . 116
Scanner Operation . . . . . . . . . . . . . . . . . . . . . . . . . 119
10.5.1
10.5.2
Soft-key Menus . . . . . . . . . . . . . . . . . . . . . . . . . . . . . . . . 119
Channel Menu . . . . . . . . . . . . . . . . . . . . . . . . . . . . . . . . . 119
10.5.2.1
10.5.2.2
10.5.3
Probe Menu . . . . . . . . . . . . . . . . . . . . . . . . . . . . . . . . . . 122
10.5.3.1
10.5.4
Scanner Channel . . . . . . . . . . . . . . . . . . . . . . . . . . . . . . . . . . . 120
Scanner Sequence . . . . . . . . . . . . . . . . . . . . . . . . . . . . . . . . . . . 120
Select Channel . . . . . . . . . . . . . . . . . . . . . . . . . . . . . . . . . . . . . 122
Digital Interface Commands. . . . . . . . . . . . . . . . . . . . . . . . . . 123
11 2590 Scanner (optional) . . . . . . . . . . . . . . . . . . . . 125
11.1
11.2
Introduction . . . . . . . . . . . . . . . . . . . . . . . . . . . . 125
Specifications . . . . . . . . . . . . . . . . . . . . . . . . . . . 125
11.2.1
11.3
Specifications . . . . . . . . . . . . . . . . . . . . . . . . . . . . . . . . . 125
Quick Start . . . . . . . . . . . . . . . . . . . . . . . . . . . . . 126
11.3.1
Connections . . . . . . . . . . . . . . . . . . . . . . . . . . . . . . . . . . 126
11.3.1.1
11.3.1.2
11.3.1.3
11.3.2
11.4
11.5
Setup . . . . . . . . . . . . . . . . . . . . . . . . . . . . . . . . . . . . . . 128
Parts and Controls . . . . . . . . . . . . . . . . . . . . . . . . . 128
Scanner Operation . . . . . . . . . . . . . . . . . . . . . . . . . 129
11.5.1
Channel Menu . . . . . . . . . . . . . . . . . . . . . . . . . . . . . . . . . 130
11.5.1.1
iv
Resistance Output . . . . . . . . . . . . . . . . . . . . . . . . . . . . . . . . . . . 126
Control Cable . . . . . . . . . . . . . . . . . . . . . . . . . . . . . . . . . . . . . 126
Resistance Inputs . . . . . . . . . . . . . . . . . . . . . . . . . . . . . . . . . . . 127
Scanner Channel . . . . . . . . . . . . . . . . . . . . . . . . . . . . . . . . . . . 130
11.5.1.2
11.5.2
11.5.2.1
11.5.2.2
11.5.3
Scanner Sequence . . . . . . . . . . . . . . . . . . . . . . . . . . . . . . . . . . . 130
Probe Menu . . . . . . . . . . . . . . . . . . . . . . . . . . . . . . . . . . 132
Select Channel . . . . . . . . . . . . . . . . . . . . . . . . . . . . . . . . . . . . . 132
Standby Current . . . . . . . . . . . . . . . . . . . . . . . . . . . . . . . . . . . . 133
Digital Interface Commands. . . . . . . . . . . . . . . . . . . . . . . . . . 133
12 Maintenance . . . . . . . . . . . . . . . . . . . . . . . . . . . 135
13 Troubleshooting . . . . . . . . . . . . . . . . . . . . . . . . . 137
13.1
13.2
Troubleshooting . . . . . . . . . . . . . . . . . . . . . . . . . . 137
CE Comments (1590 Only) . . . . . . . . . . . . . . . . . . . . 140
13.2.1
EMC Directive . . . . . . . . . . . . . . . . . . . . . . . . . . . . . . . . . 140
13.2.1.1
13.2.1.2
13.2.2
Immunity Testing . . . . . . . . . . . . . . . . . . . . . . . . . . . . . . . . . . . 141
Emission Testing . . . . . . . . . . . . . . . . . . . . . . . . . . . . . . . . . . . 141
Low Voltage Directive (Safety) . . . . . . . . . . . . . . . . . . . . . . . . 141
v
Figures
Figure 1
Figure 2
Figure 3
Figure 4
Figure 5
Figure 6
Figure 7
Figure 8
Figure 9
Figure 10
Figure 11
Figure 12
Figure 13
Figure 14
Figure 15
Figure 16
Figure 17
Figure 18
Figure 19
Figure 20
Figure 21
vi
Simplified Schematic Diagram of the Measurement Circuit . . . . . . . 6
Measurement Processing Operations . . . . . . . . . . . . . . . . . . . 7
1575/1590 Super-Thermometer Display . . . . . . . . . . . . . . . . . 24
Menu Tree . . . . . . . . . . . . . . . . . . . . . . . . . . . . . . . . 38
Sample Timing . . . . . . . . . . . . . . . . . . . . . . . . . . . . . . 40
Smoothing Effect of the Digital Filter . . . . . . . . . . . . . . . . . . 41
Effect of Automatic Reset on Filtered Measurements . . . . . . . . . . 42
Example Calibration Report . . . . . . . . . . . . . . . . . . . . . . . 72
Example Calibration Table Page . . . . . . . . . . . . . . . . . . . . . 73
Data Type Display . . . . . . . . . . . . . . . . . . . . . . . . . . . . 75
Graph Type Display . . . . . . . . . . . . . . . . . . . . . . . . . . . 76
Example of Data Recorded to Disk or Output Via the Digital Interface . 86
Serial Cable Wiring . . . . . . . . . . . . . . . . . . . . . . . . . . . 99
Scanner Output Connection. . . . . . . . . . . . . . . . . . . . . . . 114
1575 to 2575 Control Cable Connection . . . . . . . . . . . . . . . . 115
Probe Input Connection. . . . . . . . . . . . . . . . . . . . . . . . . 116
2575 Scanner Front Panel. . . . . . . . . . . . . . . . . . . . . . . . 117
Menu Tree of the 1575 (2575 Scanner Attached) . . . . . . . . . . . 118
2590 to 1590 Front Panel Connections . . . . . . . . . . . . . . . . . 126
2590 To 1590 Control Cable Connection . . . . . . . . . . . . . . . 127
2590 Scanner Front Panel. . . . . . . . . . . . . . . . . . . . . . . . 128
Tables
Table1
Table 2
Table 3
Table 4
Table 5
Table 6
Table 7
Table 8
Table 9
Table 10
Table 11
Table 12
Table 13
Table 14
Table 15
Table 16
Table 17
Table 18
International Electrical Symbols . . . . . . . . . . . . . . . . . . . . . 1
ITS-90 Subranges and Coefficients . . . . . . . . . . . . . . . . . . . 48
DIN-43760/IEC-751/ASTM E1137 Callendar-Van Dusen Coefficients. 49
Reference Resistor Selection. . . . . . . . . . . . . . . . . . . . . . . 50
ITS-90 Calibration Points . . . . . . . . . . . . . . . . . . . . . . . . 54
Fixed-point Calibration Setup . . . . . . . . . . . . . . . . . . . . . . 56
Manual Comparison Setup . . . . . . . . . . . . . . . . . . . . . . . . 56
Automatic Sequencing Calibration Setup . . . . . . . . . . . . . . . . 57
SPRT Resistance Comparison Calibration Setup . . . . . . . . . . . . 58
Units of Measure . . . . . . . . . . . . . . . . . . . . . . . . . . . . . 83
Interface Commands . . . . . . . . . . . . . . . . . . . . . . . . . . 105
Interface Commands continued. . . . . . . . . . . . . . . . . . . . . 106
Interface Commands continued. . . . . . . . . . . . . . . . . . . . . 107
Interface Commands continued. . . . . . . . . . . . . . . . . . . . . 108
Standard Resistors Used for Calibration of the Reference Resistors . . 109
Standard Resistors Used for Calibration of the Ratio Measurement . . 109
2575 Interface Commands . . . . . . . . . . . . . . . . . . . . . . . 123
2590 Interface Commands . . . . . . . . . . . . . . . . . . . . . . . 133
vii
1 Before You Start
Symbols Used
1
1.1
Before You Start
Symbols Used
Table 1 lists the symbols that may be used on the instrument or in this manual
and the meaning of each symbol.
Table1 International Electrical Symbols
Symbol
Description
AC (Alternating Current)
AC-DC
Battery
Complies with European Union Directives
DC (Direct Current)
Double Insulated
Electric Shock
Fuse
PE Ground
Hot Surface (Burn Hazard)
Read the User’s Manual (Important Information)
Off
On
1
1575/1590 Thermometer Readout
User’s Guide
Symbol
Description
Canadian Standards Association
OVERVOLTAGE (Installation) CATEGORY II, Pollution Degree 2 per IEC1010-1 refers to the level of Impulse Withstand Voltage protection provided. Equipment of
OVERVOLTAGE CATEGORY II is energy-consuming equipment to be supplied from
the fixed installation. Examples include household, office, and laboratory appliances.
C-TIC Australian EMC mark
The European Waste Electrical and Electronic Equipment (WEEE) Directive
(2002/96/EC) mark.
1.2
Safety Information
Use this instrument only as specified in this manual. Otherwise, the protection
provided by the instrument may be impaired. Refer to the safety information in
Sections 1.2.1 and 1.2.2.
The following definitions apply to the terms “Warning” and “Caution”.
• “WARNING” identifies conditions and actions that may pose hazards to
the user.
• “CAUTION” identifies conditions and actions that may damage the instrument being used.
1.2.1
WARNINGS
• DO NOT use this unit in environments other than those listed in the
User’s Guide.
• Follow all safety guidelines listed in the User’s Guide.
• Calibration equipment should only be used by trained personnel.
• This instrument can measure extreme temperatures. Precautions must be
taken to prevent personal injury or damage to objects. Probes may be extremely hot or cold. Cautiously handle probes to prevent personal injury.
Carefully place probes on a heat/cold resistant surface or rack until they
reach room temperature.
• DO NOT operate near flammable materials.
• Use only a grounded AC mains supply of the appropriate voltage to
power the instrument.
• DO NOT connect an AC mains supply that does not match the voltage
setting on the back of the unit.
• DO NOT use this instrument in combination with any probe ( PRT,
thermistor, or thermocouple) to measure the temperature or resistance of
any device where the probe might come in contact with a conductor that
2
1 Before You Start
Authorized Service Centers
is electrically energized. Severe electric shock, personal injury, or death
may occur.
1.2.2
CAUTIONS
• If the instrument is dropped, struck, or handled in a way that causes internal or external physical damage, immediately unplug the instrument, discontinue use, and contact a Hart Scientific Authorized Service Center for
repair. Do not attempt to disassemble or repair the instrument, batteries,
or AC adapter. Refer repairs or replacement components to a Hart Scientific Authorized Service Center.
• The instrument and thermometer probes are sensitive and can be easily
damaged. Always handle these devices with care. DO NOT allow them to
be dropped, struck, stressed, or overheated.
• Probes are fragile devices which can be damaged by mechanical shock,
overheating, and absorption of moisture or fluids in the wires or hub.
Damage may not be visibly apparent but nevertheless can cause drift, instability, and loss of accuracy. Observe the following precautions:
• DO NOT allow probes to be dropped, struck, bent, or stressed.
• DO NOT overheat probes beyond their recommended temperature range.
• DO NOT allow any part of the probe other than the sheath to be immersed in fluid.
• DO NOT allow the probe hub or wires to be exposed to excessive temperatures.
• Keep the probe wires clean and away from fluids.
1.3
Authorized Service Centers
Please contact one of the following authorized Service Centers to coordinate
service on your Hart product:
Fluke Corporation, Hart Scientific Division
799 E. Utah Valley Drive
American Fork, UT 84003-9775
USA
Phone: +1.801.763.1600
Telefax: +1.801.763.1010
E-mail: [email protected]
Fluke Nederland B.V.
Customer Support Services
3
1575/1590 Thermometer Readout
User’s Guide
Science Park Eindhoven 5108
5692 EC Son
NETHERLANDS
Phone: +31-402-675300
Telefax: +31-402-675321
E-mail: [email protected]
Fluke Int'l Corporation
Service Center - Instrimpex
Room 2301 Sciteck Tower
22 Jianguomenwai Dajie
Chao Yang District
Beijing 100004, PRC
CHINA
Phone: +86-10-6-512-3436
Telefax: +86-10-6-512-3437
E-mail: [email protected]
Fluke South East Asia Pte Ltd.
Fluke ASEAN Regional Office
Service Center
60 Alexandra Terrace #03-16
The Comtech (Lobby D)
118502
SINGAPORE
Phone: +65 6799-5588
Telefax: +65 6799-5588
E-mail: [email protected]
When contacting these Service Centers for support, please have the following
information available:
• Model Number
• Serial Number
• Voltage
• Complete description of the problem
4
2 Introduction
General Description
2
2.1
Introduction
General Description
The 1575 “Super-Thermometer” and 1590 “Super-Thermometer II” are two of
the most accurate resistance and temperature readout instruments available. The
1575 can deliver resistance measurements with up to 4 ppm accuracy while the
1590 can achieve 1 ppm accuracy. In terms of temperature, 1 ppm is equivalent
to 0.00025°C with an SPRT at 0°C. When using the 1590 with a standards-quality thermistor it’s possible to achieve measurements as accurate as
0.000125°C.
In addition to accuracy, the 1575 or 1590 has a variety of features and functions
that make it an indispensable tool in a precision temperature calibration laboratory. With a wide input range of 0 to 500kΩ it can be used with just about any
type of resistance sensor including RTDs, PRTs, SPRTs, HTPRTs, and thermistors. The driving current is programmable to best suit the sensor. Resistance to
temperature calculations are performed automatically using any of a variety of
algorithms including the International Temperature Scale of 1990 (ITS-90),
IPTS-68, Callendar-Van Dusen, Steinhart-Hart and polynomial equations. The
1575/1590 can even calculate ITS-90 coefficients and generate a report based
on resistance and temperature measurements.
The 1575/1590 features an LCD graphics display that shows in a clear and
easy-to-read manner a variety of information such as present and past measurements, statistical results, and instrument settings. Measurements can be viewed
in numeric and graphic plot form. The display is easily configured by the user
for various applications. Contrast, brightness, and colors (1590 only) can be adjusted. Even the tilt of the display on the 1590 can be set as desired. Operation
of the 1575/1590 is made simple and convenient with the use of soft-keys.
These are buttons having associated labels on the display. The functions of the
soft-keys can change between various contexts.
The 1575/1590 features exclusive gold-plated patented DWF connectors (U.S.
Patent No. 5,965,625) that are specially designed for this product. Operated
with a quick, easy push, the patented DWF connector accepts bare wires, spade
terminals, and banana plugs.
The 1575/1590 is able to communicate with computer systems through a variety of interfaces. RS-232, IEEE-488, and parallel printer interfaces are all built
in. The convenient 31/2" disk drive allows temporary or permanent storage of
measurement data, probe coefficients, and instrument settings.
2.2
Theory of Operation
The 1575 “Super-Thermometer” and 1590 “Super-Thermometer II” require a
unique electronic design to achieve the necessary accuracy while meeting size,
weight, cost, and speed constraints. This section explains the measurement
5
1575/1590 Thermometer Readout
User’s Guide
technique used by these instruments and discusses issues related to
performance.
2.2.1
Measurement Technique
Fundamentally, the 1575/1590 measures the resistance ratio between two resistors by comparing their voltages when equal currents are applied. The simplified schematic in Figure 1 shows the basic components of the measurement
circuitry. These include the current source, sensor, reference resistor, relay
switch, amplifier, analog-to-digital converter (ADC), and central processing
unit (CPU). The reference resistor and sensor are connected in series and the
current flows through both simultaneously. The current produces a voltage on
each that is proportional to their respective resistances. The voltages are measured with the amplifier and ADC. Since only one of the voltages can be measured at a time, the relay must be used to switch between them.
SENSOR
SWITCH
CURRENT
SOURCE
AMPLIFIER
CONVERTER
CPU
REFERENCE
Figure 1 Simplified Schematic Diagram of the Measurement Circuit
The voltage on each resistor is measured twice: once with the current in one direction and again with the current in the opposite direction. Subtracting the two
voltage measurements eliminates offset voltages (including those arising from
thermoelectric EMF) since they are constant. In summary, one ratio measurement requires four voltage samples:
1. Sensor, forward current (VX1)
2. Sensor, reverse current (VX2)
3. Reference, forward current (VR1)
4. Reference, reverse current (VR2)
The voltage samples are subtracted and divided to produce a ratio of sensor resistance to reference resistance:
r=
6
VX 1 − VX 2 RX
=
VR 1 − VR 2 RR
2 Introduction
Theory of Operation
Using this approach, errors from driving current imprecision, voltage offsets,
and amplifier and ADC inaccuracies are avoided because these all affect the
voltage samples equally.
Each voltage sample requires 0.5s. It takes 0.15s to set the current and relay
and allow time for the voltages to settle and 0.35s for the ADC to make a measurement and send it to the CPU. Since four samples are required, the entire ratio measurement takes two seconds.
Depending on how the measurement timing is set up, more than one raw ratio
sample may be integrated into one raw measurement. Digital filtering is also
applied to reduce noise in the measurements. The CPU then calculates the resistance of the sensor by multiplying the measured resistance ratio by the
known resistance of the reference resistor. Temperature is calculated from resistance using one of the built-in conversion algorithms. Finally, statistical values
are recalculated to incorporate the latest measurement. Figure 2 below shows
this sequence of operations.
Voltage
Samples
Raw
Ratio
Integration
Voltage
Samples
Digital
Filter
Resistance
Temperature
Display
Statistics
Display
Raw
Ratio
Figure 2 Measurement Processing Operations
SPRTs and PRTs generally require temperature to be calculated according to
the International Temperature Scale of 1990 (ITS-90) by applying coefficients
unique to the SPRT or PRT. The 1575/1590 does these calculations automatically. The sensor coefficients are entered into the 1575/1590 by the user and
stored in non-volatile memory. Temperature is calculated in any of a variety of
units including degrees Celsius (°C), degrees Fahrenheit (°F), or Kelvin (K).
Once the temperature reading is obtained it is sent to the display, stored in
memory, and, if necessary, written to disk or any of the output ports.
2.2.2
Performance Issues
Measurement of temperature with uncertainty approaching 0.001°C or better
can be a significant challenge. Various sources of error inherent in resistance
thermometry make it difficult to achieve this level of accuracy. For instance,
lead resistance in some cases can cause errors of several tenths of a degree.
Problems also arise from sources such as thermoelectric EMF, reactance, and
leakage. The accuracy the 1575/1590 achieves is only possible because these
effects have been carefully studied and dealt with. The design of this instrument reduces or eliminates most of the errors that often plague resistance and
7
1575/1590 Thermometer Readout
User’s Guide
temperature measurements. It also offers other advantages that contribute to the
value of this instrument. Consider the following issues.
2.2.2.1
Lead Resistance
Measurements using an electrical sensor can be affected by the resistance in the
connecting wires or leads. Resistance also exists in the patented DWF connectors and the junction between the wires and patented DWF connectors. In commonly used two or three-wire measurement circuits these resistances and their
variability causes errors of 0.1 to 1.0°C.
The 1575/1590 uses a four-wire circuit that completely eliminates the effects of
lead resistance. In this scheme, often referred to as a Kelvin circuit, the sensor
is driven with current from one set of wires and the resulting EMF is sensed
with a different set of wires. The signal is passed to an amplifier with a very
high input impedance that draws negligible current from the sensor. As a result,
no measurable voltage develops along the EMF sensing wires. The 1575/1590
will accurately measure the resistance of sensors even in the presence of lead
resistance that can be as high as 10Ω.
2.2.2.2
Thermoelectric EMF
A resistance sensor such as a PRT contains several junctions between wires of
different metals. These act like thermocouples generating small electric potentials called thermoelectric EMFs. Unless rejected in some way, the thermoelectric EMFs can interfere with the sensor EMF and degrade the accuracy of the
measurement. There are three different techniques that can be used to cancel
thermoelectric EMF.
Some resistance bridges apply AC driving current and use sensing circuits that
detect only the AC signal, rejecting the DC EMFs. This technique is very effective at eliminating thermoelectric EMF errors but can lead to other errors.
Reactance, leakage, and eddy currents become much more significant with AC.
A different technique sometimes used in DMMs is to periodically switch off
current to the sensor and measure the thermoelectric EMF directly. The problem with this is it leads to self-heating errors as the sensor warms and cools
from the varying current.
The 1575/1590 uses a third technique. Two separate measurements are made
and the driving current is simply reversed for the second measurement. Thermoelectric EMF causes errors that are opposite in the two measurements. In essence, averaging the two measurements cancels the errors. This technique is
very effective at eliminating errors from thermoelectric EMF while avoiding
the AC related errors and self-heating problems of the other methods. In fact,
it’s so effective in the 1575/1590 that the instrument is able to achieve an uncertainty of 0.00025°C or better with no observable error caused by thermoelectric EMF.
8
2 Introduction
Theory of Operation
2.2.2.3
Reactance
The use of AC driving current can cause errors in resistance thermometry because sensors often exhibit significant inductance and capacitance. The
1575/1590 uses DC circuitry that is much less susceptible to these effects. It allows plenty of time for currents and voltages to settle before it begins a sample.
If necessary, the delay time can be increased even further to ensure accuracy.
The 1575/1590 is well suited for any type and quality of resistance sensor.
2.2.2.4
Leakage
Resistance sensors can be susceptible to electrical leakage through the insulation material surrounding the lead wires and sensing element. Leakage is often
significant at low temperatures where the insulation absorbs moisture from the
air or at high temperatures where the electrical conductivity of the insulating
material is relatively high. Leakage and some other effects, such as dielectric
absorption and eddy currents, are much more significant with AC than with
DC. By operating with DC driving current the 1575/1590 can achieve excellent
accuracy with a large variety of sensors and over a wide range of conditions.
2.2.2.5
Self-heating
Another source of trouble in resistance thermometry is self-heating. This results from power being dissipated in the sensor by the driving current. It causes
the temperature of the sensor to be higher than it should be. The 1575/1590 is
able to achieve full accuracy with small currents that minimize self-heating (1
mA for PRTs and 10 μA for thermistors). The current can be set within a wide
range and with excellent resolution. Being able to set the current to precise arbitrary values allows self-heating errors to be controlled, measured, and
canceled.
2.2.2.6
Component Drift
The accuracy of a typical resistance measuring instrument is seriously limited
by the stability, or lack thereof, of its electrical components. The design of the
1575/1590 eliminates sensitivity to variations of the components due to aging
or temperature. This is because, in effect, the instrument recalibrates itself during every measurement. Drift of the driving current, amplifier bias current, amplifier offset voltage, amplifier gain, ADC offset, and ADC scale have no effect
on the measurement. The accuracy to which the instrument measures resistance
is only affected by the drift of one component-the reference resistor. The four
resistors built into the 1575/1590 are high-quality, hermetically sealed, low
temperature coefficient, metal film resistors that are temperature controlled for
excellent stability. Even better stability can be achieved if external standard resistors are used and they are immersed in a precisely-controlled oil bath.
2.2.2.7
Noise and Resolution
There will always be electrical noise in any measurement circuit; it’s unavoidable. Excessive noise causes measurements to appear to vary randomly over
9
1575/1590 Thermometer Readout
User’s Guide
time. This makes it impossible to detect small real changes in the parameter being measured. In effect, it limits the resolution of the measuring instrument.
Electrical noise in the 1575/1590 comes from a variety of sources. A small
amount of noise is generated by the resistors and semiconductor devices in the
measurement circuitry. Some noise (quantization noise) results from the limited
resolution of the ADC. Electrical interference or EMI from internal or external
sources can also be a source of noise. Although it is impossible to completely
eliminate all noise, some steps can be and are taken to reduce it. Components
were selected for their low-noise qualities. The ADC was chosen, in part, for its
excellent resolution (24 bits). Shielding is used to block EMI from reaching the
sensitive circuits. To further reduce noise the 1575/1590 uses filtering and EMI
suppression devices throughout the circuit. (Since the 1575/1590 operates with
DC driving current, it can effectively reject interference coming from the 50/60
Hz. mains supply. AC instruments are more susceptible to this interference.) Finally, the CPU applies digital filtering to remove much of the remaining noise.
The end result is the capability of making measurements with effective resolution as good as 0.25 PPM.
One drawback of digital filtering is that it might make the instrument react
more slowly to changes in the resistance or temperature being measured. The
1575/1590 allows the user to adjust the digital filter to achieve the right balance
between resolution and response.
2.2.2.8
Nonlinearity
Having taken care of all the other sources of error explained above, all that’s
left is nonlinearity. Consider nonlinearity to be curvature in the graph of the relationship between the actual resistance ratio and the resistance ratio measured
by the 1575/1590. It is a result of imperfections in the analog-to-digital converter and also, to a smaller degree, the power supply and amplifier.
To minimize nonlinearity in the 1575/1590 three steps have been taken. First,
the best available components have been selected. For instance, the ADC is a
dual-slope integrating type that has linearity that’s at least ten times better than
other precision integrating or sigma-delta ADCs. Second, the measurement
technique that’s used inherently rejects much of the nonlinearity. Because samples of opposite polarity are subtracted, zeroth-order errors (offsets), second-order errors, and all higher even-order components of the nonlinearity are
canceled. What’s left are third-order and higher odd-order components that diminish greatly in magnitude the higher the order. The third step is to mathematically correct for the third-order nonlinearity. This is the purpose of the “ADC”
calibration parameter. This parameter is adjusted during calibration to achieve
the best possible linearity.
2.2.2.9
Measurement Speed
The measurement scheme used by the 1575/1590 offers other advantages in addition to accuracy. One of these is speed. The 1575/1590 is capable of completing a new measurement in only two seconds. Even if multiple sensors are being
measured in turn, the measurement time per sensor is still only two seconds.
10
2 Introduction
Theory of Operation
Compare this to a typical resistance bridge that takes 30 to 60 seconds to make
the first measurement after a sensor is connected. The speed of the 1575/1590
gives it the advantage of allowing greater efficiency as well as better accuracy
during a batch calibration process involving a large number of sensors. Integrating the 1575/1590 with the 2575/2590 multiplexer enhances its capability
even more, giving it 10 input channels (or up to 50 for the 1590 with multiple
2590s). The measurement speed of the 1575/1590 makes other applications
possible such as tracking fast-changing temperatures, measuring temperature
differences, or evaluating thermal response times.
2.2.2.10
Solid-State Design
Unlike a bridge that requires a large, heavy precision ratio transformer and dozens of relays, the 1575/1590 uses semiconductor circuits and only a few relays
to switch between resistors. This gives it better reliability, smaller size, lighter
weight, and lower cost. By keeping the size and cost of the measuring circuit
small, more space and expense can be dedicated to other important features
such as intelligent system control electronics, a convenient user interface, a
graphic display, and a built-in disk drive, all contributing to making the
1575/1590 so versatile and useful.
11
3 Specifications and Environmental Conditions
Specifications
3
3.1
Specifications and Environmental
Conditions
Specifications
Specification
1575
Resistance Measurement Range
1590
0 to 500 kΩ
Resistance Ratio Accuracy
0 to .25Ω input (1Ω refr, 10 mA)
0.00001Ω
0.000005Ω
0.25 to 4Ω input (1Ω refr, 10 mA)
40 ppm
20 ppm
2.5 to 40Ω input (10Ω refr, 3 mA)
20 ppm
5 ppm
0 to 25Ω input (100Ω refr, 1 mA)
0.0001Ω
0.000025Ω
25 to 400Ω input (100Ω refr, 1 mA)
4 ppm
1 ppm
400 to 1000Ω input (100Ω refr, 0.1 mA)
20 ppm
4 ppm
0 to 2.5 kΩ input (10 kΩ refr, 0.01 mA)
0.025Ω
0.012Ω
2.5 to 40 kΩ input (10 kΩ refr, 0.01 mA)
10 ppm
5 ppm
40 to 100 kΩ input (10 kΩ refr, 0.005 mA)
50 ppm
25 ppm
100 to 500 kΩ input (10 kΩ refr, 0.002 mA)
200 ppm
120 ppm
Resistance Accuracy
0 to .25Ω input (1Ω refr, 10 mA)
0.000025Ω
0.00001Ω
0.25 to 4Ω input (1Ω refr, 10 mA)
100 ppm
40 ppm
2.5 to 40Ω input 10Ω refr, 3 mA)
40 ppm
20 ppm
0 to 25Ω input (100Ω refr, 1 mA)
0.0002Ω
0.00015Ω
25 to 400Ω input (100Ω refr, 1 mA)
8 ppm
6 ppm
400 to 1000Ω input (100Ω refr, 0.1 mA)
25 ppm
10 ppm
0 to 2.5 kΩ input (10 kΩ refr, 0.01 mA)
0.05Ω
0.025Ω
2.5 to 40 kΩ input (10 kΩ refr, 0.01 mA)
20 ppm
10 ppm
40 to 100 kΩ input (10 kΩ refr, 0.005 mA)
60 ppm
30 ppm
100 to 500 kΩ input (10 kΩ refr, 0.002 mA)
200 ppm
120 ppm
Typical Temperature Accuracy, External Reference
0.25Ω SPRT (0°C, 1Ω refr, 10 mA)
0.01°C
0.005°C
2.5Ω SPRT (0°C, 10Ω refr, 3 mA)
0.005°C
0.0013°C
25Ω SPRT (0°C, 100Ω refr, 1 mA)
0.001°C
0.00025°C
100Ω SPRT (0°C, 100Ω refr, 1 mA)
0.001°C
0.00025°C
0.00025°C
0.00013°C
0.025°C
0.01°C
10 kΩ thermistor (25°C, 10 kΩ refr, 0.01 mA)
Typical Temperature Accuracy, Internal Reference
0.25Ω SPRT (0°C, 1Ω refr, 10 mA)
2.5Ω SPRT (0°C, 10Ω refr, 3 mA)
0.01°C
0.005°C
25Ω SPRT (0°C, 100Ω refr, 1 mA)
0.002°C
0.0015°C
13
1575/1590 Thermometer Readout
User’s Guide
Specification
1575
1590
100Ω SPRT (0°C, 100Ω refr, 1 mA)
0.002°C
0.0015°C
10 kΩ thermistor (25°C, 10 kΩ refr, 0.01 mA)
0.0005°C
0.00025°C
Typical RMS Measurement Noise
No Filter
20 Second Filter
25 ppm
8 ppm
2.5Ω input (10Ω refr, 3 mA)
8 ppm
2.5 ppm
25Ω input (100Ω refr, 1 mA)
2.5 ppm
0.8 ppm
100Ω input (100Ω refr, 1 mA)
1 ppm
0.3 ppm
400Ω input (100Ω refr, 1 mA)
2.5 ppm
0.8 ppm
6 ppm
2 ppm
0.25Ω input (1Ω refr, 10 mA)
10 kΩ input (10 kΩ refr, 0.01 mA)
Minimum Sample Period
2 seconds
Maximum Current
1Ω reference, 1Ω input
20 mA
10Ω reference, 10Ω input
15 mA
100Ω reference, 100Ω input
5 mA
10 kΩ reference, 10 kΩ input
Typical Current Accuracy
Power
Specified Operating Temperature
0.1 mA
2% or 0.0002 mA
100–125/200–250 VAC (user-switchable), 50-60
Hz, 1A max
20 to 27°C (68 to 81°F)
Operating Temperature Limits
10 to 40°C (50 to 104°F)
Storage Temperature
–10 to 50°C (14 to 122°F)
Safety
Size
Weight
OVER VOLTAGE (Installation) CATEGORY 11,
Pollution Degree 2 per IEC1010-1
516 mm x 320 mm x 178 mm
(20.3" W x 12.6" D x 7.0" H)
16 kg (35 lb)
Notes:
• Specifications stated in ppm are relative to the reading.
• Accuracy specifications are applicable for a one-year calibration interval. In line with
normal prudent metrology practices, Hart recommends a short-cycle calibration interval
of six months for new units during the first year to ensure that all components are as
stable as expected.
• Accuracy specifications do not include noise which is stated separately and depends on
the digital filter settings.
• For measurements above 100kΩ the conversion time should be set to 4 seconds.
• The specifications are applicable within the specified operating temperature range. Resistance accuracy is derated 10 ppm if using the 1 ohm resistor, 5 ppm if using the 10Ω
or 10 kΩ resistors, and 2 ppm if using the 100Ω resistor for every degree Celsius outside the specified operating temperature range.
• Temperature accuracy specifications do not include sensor errors or external resistor
uncertainty.
14
3 Specifications and Environmental Conditions
Environmental Conditions
3.2
Environmental Conditions
Although the instrument has been designed for optimum durability and trouble-free operation, it must be handled with care. The instrument should not be
operated in an excessively dusty, dirty, or wet environment. Maintenance and
cleaning recommentdations can be found in the Maintenacne section of this
manual.
For full accuracy, operate the instrument in ambient temperatures between
20–27°C (68-81°F). Do not operate the instrument in an environment colder
than 10°C (50°F) or warmer than 40°C(104°F).
The instrument operates safely under the following conditions:
• Temperature range: 10 to 40°C
• Ambient relative humidity: 15 to 50%
• Pressure: 75 to 106 kPa
• Vibrations should be minimized
• Altitude less than 2,000 meters
3.3
Warranty
Fluke Corporation, Hart Scientific Division (Hart) warrants this product to be
free from defects in material and workmanship under normal use and service
for a period as stated in our current product catalog from the date of shipment.
This warranty extends only to the original purchaser and shall not apply to any
product which, in Hart’s sole opinion, has been subject to misuse, alteration,
abuse or abnormal conditions of operation or handling.
Software is warranted to operate in accordance with its programmed instructions on appropriate Hart products. It is not warranted to be error free.
Hart’s obligation under this warranty is limited to repair or replacement of a
product which is returned to Hart within the warranty period and is determined,
upon examination by Hart, to be defective. If Hart determines that the defect or
malfunction has been caused by misuse, alteration, abuse or abnormal conditions or operation or handling, Hart will repair the product and bill the purchaser for the reasonable cost of repair.
To exercise this warranty, the purchaser must forward the product after calling
or writing to an Authorized Service Center (see Section 1.3 on page 3) for authorization. The Service Centers assume NO risk for in-transit damage.
THE FOREGOING WARRANTY IS PURCHASER’S SOLE AND EXCLUSIVE REMEDY AND IS IN LIEU OF ALL OTHER WARRANTIES, EXPRESS OR IMPLIED, INCLUDING BUT NOT LIMITED TO ANY
IMPLIED WARRANTY OR MERCHANTABILITY, OR FITNESS FOR ANY
PARTICULAR PURPOSE OR USE. HART SHALL NOT BE LIABLE FOR
ANY SPECIAL, INDIRECT, INCIDENTAL, OR CONSEQUENTIAL DAMAGES OR LOSS WHETHER IN CONTRACT, TORT, OR OTHERWISE.
15
4 Quick Start
Unpacking
4
Quick Start
This section briefly explains the basics of setting up and operating your 1575 or
1590 thermometer readout.
4.1
Unpacking
Carefully unpack the 1575 or 1590 thermometer readout and inspect it to make
sure all components are present and in satisfactory condition. Verify that the
following items are present:
• 1575 or 1590 Thermometer Readout
• Serial Cable
• Manual
• Report of Calibration
• Calibration Label
If all items are not present, call a Hart Scientific Authorized Service Center.
4.2
Learn About the Features and Components
Familiarize yourself with the features and components of the 1575 or 1590 by
reading Section 5.
4.3
2575/2590 Scanner Setup
If a 2575 or 2590 scanner was purchased, refer to Section 10, 2575 Scanner or
Section 11, 2590 Scanner concerning specifics to each scanner.
4.4
Power Source
The 1575/1590 is normally configured to use 100–125 VAC, 50-60Hz. It may
optionally be switched to use 200–250 VAC, 50-60Hz. The switch on the back
of the instrument is used for switching the voltage. Make sure the voltage
switch is always set correctly!
4.5
Probe Connection
Your SPRT or thermistor probe connects to the 1575/1590 using the patented
DWF connector posts of Input 1. The input accepts a four-wire probe. The C1
and C2 patented DWF connectors source current to the probe and P1 and P2
measure the voltage on the probe. A resistor used for a reference should be
connected to Input 2 in the same fashion.
17
1575/1590 Thermometer Readout
User’s Guide
There are also ‘Guard’ patented DWF connectors for each channel and a ‘Chassis’ patented DWF connector that can be used for attaching guard wires and for
grounding. Probes that have shielded cables will be less susceptible to electromagnetic interference (EMI). Best results may be obtained if the guard wire is
attached to the ‘Guard’ patented DWF connector, the ‘Chassis’ patented DWF
connector, or both. This depends on environmental conditions and placement of
the probe. If the probe has no shield or guard try simply connecting a wire between the ‘Guard’ and ‘Chassis’ patented DWF connectors. Experiment with
each scheme to find what works best in your application.
The probe patented DWF connectors are operated by simply pressing on them.
Pressing on a patented DWF connector opens it allowing you to insert wires
with or without spade terminals. When the patented DWF connector is released
it will clamp down on the wire. Banana plugs can also be inserted into the hole
in the top of the patented DWF connectors.
4.6
Switch the Power On
Power is switched on and off with the power button located on the front panel,
lower left corner. The instrument will take one or two minutes to power up, initialize itself, and begin normal operation. During initialization the display remains dark.
4.7
Measure Temperature
To make temperature measurements using your probe you must set up the
following:
18
1.
Select the channel to which your probe is connected. To do this enter
the CHANNEL MENU and press the INPUT 1 soft-key if the probe is
connected to Input 1 or press the INPUT 2 soft-key if it is connected to
the Input 2 (Section 7.1). If you are using the 2575 or 2590 Scanner,
press the appropriate channel button on the 2575/2590 front panel or use
the SELECT CHANNEL soft-key to select the channel as explained in
the scanner’s manual. Use the RETURN soft-key to exit the menu.
2.
Set up the reference for the probe. To do this enter the PROBE
MENU, select EDIT PROBE (Section 7.4.3), and press Enter to select
the probe number. In the EDIT PROBE window, move the cursor down
to the REFERENCE selection using the U and D keys. Use the L and
R keys and Enter to select the appropriate reference for your probe
(Section 7.4.3.3). For example, a 25Ω SPRT may use the 100Ω reference. Be sure to always press Enter after making any selection.
3.
Set the current for the probe. This is also done in the EDIT PROBE
function. Move the cursor to CURRENT using the U and D keys. Use
the numeric keys and Enter to enter the appropriate current for your particular probe. Your probe specifications should state the required current.
For example, a 25Ω SPRT may use 1 mA.
4 Quick Start
Measure Temperature
4.
Set the temperature conversion type. Move the cursor to the CONVERSION selection. Use the L and R keys and Enter to select
ITS-90 or whatever conversion is appropriate for your probe (Section
7.4.3.2). Refer to the calibration report or specifications for your probe.
Most SPRTs and RTDs use the ITS-90.
5.
Enter the characterization coefficients for your probe. Use the numeric keys and Enter to enter each coefficient. The coefficients are determined when the probe is calibrated. Refer to the calibration report or
specifications for your probe. When finished exit out to the main menu
using the RETURN soft-key or Exit.
6.
Begin sampling. If the 1575/1590 is not now sampling press the RUN
soft-key in the SAMPLE MENU to begin sampling (Section 7.2.1).
The 1575/1590 should now be able to measure temperature accurately. If desired, you can modify the filter settings in the SAMPLE MENU to minimize
noise (Section 7.2.4). You may change the units from °C to any other desired
units such as °F or K using the UNIT soft-key in the SYSTEM menu (Section
7.6.1). You can set up the display to show statistical data or graph measurements in the DISPLAY MENU (Section 7.5).
19
5 Parts and Controls
Front Panel
5
Parts and Controls
This section describes the exterior features of the 1575/1590.
5.1
Front Panel
The following are found on the front of the 1575/1590.
Display
The display is a 320 x 240 pixel color graphics LCD device with a bright CCFT
backlight. The contrast can be adjusted using the front panel buttons. The angle
of the display can be adjusted for best viewing by pushing it in at the top (1590
only). The display is used to show measurements, status information, operating
parameters, and soft-key functions. Details of the display are explained in Section 5.3.
Soft-keys
The soft-keys are the six buttons to the immediate right of the display. The
functions of the soft-keys are indicated on the display to the left of the buttons.
They may change depending on the menu or function that’s selected.
Buttons
The front panel buttons allow you to enter numeric data for operating parameters, move the cursor on the display, and adjust the brightness and contrast of
the display. The functions of the buttons are further explained in Section 5.4.
Patented DWF Connector Posts
The input patented DWF connector posts are located on the right side of the
front panel. Thermometer probes can be connected to the patented DWF connectors with spade lugs, banana plugs, or bare wires. There are two channel inputs. These are labeled Input 1 and Input 2 on the front panel. Input 1 is usually
used when measuring with only one resistance thermometer. Input 2 can be
used with a second probe for comparative temperature measurements. It can
also be used to connect an external reference resistor (see Section 7.6.5.1 on
page 94) for use when measuring with Input 1. Each input has five patented
DWF connectors for four-wire (Kelvin) resistance measurements. The C1 and
C2 patented DWF connectors supply current to the probe. The P1 and P2 patented DWF connectors are used to sense the voltage potential on the probe. The
guard or shield of the probe cable can be connected to the “Guard” patented
DWF connector. This connects to the ADC circuit common which is isolated
from chassis ground. The “Chassis” patented DWF connector connects directly
to the chassis and is grounded to earth through the power cable. This can be
used as a convenient grounding point if needed.
21
1575/1590 Thermometer Readout
User’s Guide
Disk Drive
The 3.5" floppy disk drive is located at the left side of the front panel. The disk
drive can be used to store probe data and operating parameters and to log measurement data. The drive is MS-DOS compatible allowing data to be transferred between the 1590 and PC-compatible computers. The drive can read,
write, and format with either 720 kb or 1.44 Mb disks. The disk drive has an
LED indicator at the top that illuminates when the drive is in use, and an eject
button at the bottom for removing disks. Disks are inserted into the drive with
the top side to the right.
CAUTION: Be careful not to accidentally push the power switch when attempting to remove disks from the drive.
Power Switch
The power switch is located at the bottom left of the front panel. It is illuminated when power is on.
Rack Mounting Screws
The 1575/1590 can be removed from the outer cabinet for installation into a
rack system. It is removed by first removing the four front panel screws and the
four back panel screws. (It may be easier to take out if the top of the box is
removed.)
5.2
Back Panel
The following are found on the back of the 1575/1590.
Power Cord
The power supply cord attaches to the rear panel next to the fan. Plug the cord
into an AC mains supply appropriate for the voltage switch setting. Above the
power connector is an auxiliary power output that can supply up to 1A of
current.
Voltage Switch
The 1590 can be used with either 115 or 230V AC nominal voltages. The voltage is selected with the red slide switch located directly above the power
connector.
WARNING: Make sure the voltage switch is always set correctly. Setting
the switch incorrectly may damage the instrument.
22
5 Parts and Controls
Back Panel
Fan
The fan is necessary to keep the internal components cool. Always make sure
air can flow freely behind and around the instrument.
Serial Connector
The serial connector is a 9-pin subminiature D type located on the back panel.
The serial (RS-232) interface can be used to transmit measurements and control
the operation of the 1575/1590.
Printer Connector
The 25-pin subminiature D parallel connector can be used to connect the
1575/1590 to a printer to record measurements or print calibration reports.
IEEE-488 Connector
The 1575/1590 can be connected to an IEEE-488 bus (GPIB) through this connector on the back panel. The IEEE-488 bus can be used to read measurements
and control the operation of the instrument.
Analog Output
The two binding posts on the back panel are used for the analog output. This
provides a DC potential between +5V and -5V that indicates the value of
measurements.
Scanner Connector
The 15-pin connector on the back panel can be used to interface with the Hart
2575 or 2590 Scanner. It provides power and digital control signals for the
scanner. Operation of the 1575/1590 with the 2575 or 2590 Scanner is explained in Section 10, 2575 Scanner or Section 11, 2590 Scanner respectively.
23
1575/1590 Thermometer Readout
User’s Guide
5.3
Front Panel Display
The front panel display is shown in detail in Figure 3 and its features are described below.
Figure 3 1575/1590 Super-Thermometer Display
The display is a 320 x 240 pixel graphics LCD device with a bright CCFT
backlight. The contrast can be adjusted using the front panel buttons marked
C. The tilt of the display can be adjusted for best viewing by pressing the display in at the top (1590 only). The 1575/1590 has a screen saver feature which
can be used to extend the lifetime of the display (see Section 7.6.2.5). The display is used to show measurements, status information, operating parameters,
and soft-key functions. The types of data shown on the screen are described
below.
Measurement Window
The most recent measurement is shown in large digits in the box at the top of
the screen. Out-of-range measurements are displayed as “. . . . . . . . . .”. The
unit of measurement is shown to the right of the measurement (“C” for Celsius, “F” for Fahrenheit, “K” for Kelvin, “Ω” for resistance in ohms, “W” for
ITS-90 W(T), and “r” for ratio of input resistance to reference resistance).
Channel Indicator
To the left of the measurement is a number that indicates the channel that was
measured.
24
5 Parts and Controls
Front Panel Buttons
Warning Messages
From time-to-time important warning messages may appear immediately below
the measurement. “FILTER RESET” indicates the filter has been reset (see Section 7.2.4). “WARNING: SUBRANGE EXCEEDED” indicates the measurement is outside the ITS-90 subrange (see Section 7.4.3.2.1).
Sampling Status
Below the measurement window is a box where the sampling status and messages are displayed. The status window indicates which channel is being measured or else shows that sampling is suspended. The sliding bar in the status
window shows the progress of the sampling process.
Data Fields
Each of the five data fields can be set up to display any of a variety of values
such as previous measurements, maximum and minimum measurements and
deviations from a reference value (see Section 7.5.4). Alternately, this area may
be used to show measurements graphically.
Oven Indicator
This indicator shows whether the oven is on or off. If it was recently turned on,
the time remaining until the oven is warmed up and stabilized is shown. The
oven regulates the temperature of the internal reference resistors to minimize
drift (see Section 7.6.5.2).
Date and Time
The date is shown at the bottom of the screen in the order of month, day, and
year. The time of day is shown at the bottom of the display in either 12-hour
mode (12:00 a.m. to 11:59 p.m.) or 24-hour mode (0:00 to 23:59).
Soft-key Functions
The six boxes on the right side of the display indicate the functions of the
soft-keys. These functions change with each menu.
Editing Windows
While setting up and operating the 1575/1590, you are often required to enter
or select parameters. Editing windows appear on the screen when necessary to
show the values of parameters and allow you to change them.
5.4
Front Panel Buttons
The functions of the front panel buttons are described below.
25
1575/1590 Thermometer Readout
User’s Guide
Soft-keys
The six soft-keys to the right of the display are used to select menus or menu
functions. The functions of the soft-keys are indicated in the small boxes on the
display just to the left of the soft-keys. The functions of the soft-keys change
depending on the selected menu. The bottom soft-key is usually RETURN.
Pressing this key exits from a sub-menu or window and returns to the previous
menu. (For an outline of the menu structure, see Section 7.)
Numeric Keys
The ten digit keys, the decimal point, +/-, and EXP keys are used to type numeric data or make numbered selections.
Enter
The Enter key is used to enter a new parameter value or option. When the value
of any parameter is changed Enter must be pressed to accept the new value. If
Exit, Home, U, or D, are pressed before Enter, the cursor will leave the parameter and any changes made to it will be canceled. Within a window with a
list of parameters, pressing Enter will also move the cursor down to the next
parameter. If the cursor is at the bottom of the list, pressing Enter without
changing the parameter will exit the window. The Enter button may also be
used during some operations to affirm or continue with an action or choice.
NOTE: The Enter button must always be pressed after changing a parameter to accept the new value or option.
Del
When entering or editing a numeric parameter the Del (delete) key is used to
delete a digit that is underscored by the cursor.
Exit
The Exit key is used to cancel an operation, exit a window, or return from a
lower menu to a higher menu. In any window, pressing Exit will immediately
exit the window and skip to the next window or return to the menu. If a parameter is entered or changed and Exit is pressed before Enter, the change will be
canceled. During some operations the Exit button may be used to cancel the
operation.
Home
The Home key is used to return from any sub-menu, window or entry to the
main menu. If a parameter is entered or changed and Home is pressed before
Enter, the change will be canceled. Home may also be used to refresh the
screen if it happens to become corrupted for some reason.
26
5 Parts and Controls
Front Panel Buttons
The up and down arrow keys are used to move the cursor through a list of parameters in a window. Note that parameter entry will not be accepted if the up
or down button was pressed before Enter. Thus these keys can also be used to
intentionally cancel a change to a parameter. If the list is longer than can be displayed in a window, U and D can be used to scroll the list.
The left and right arrow keys have two functions. When entering or editing a
numeric parameter these can be used to move from digit to digit. When setting
some parameters these are used to change the option. Remember, you must always press Enter to save a new value or option.
These are the display contrast adjustment buttons. They can be used at any time
to increase or decrease the contrast of the display.
27
6 General Operation
Applications
6
General Operation
This section provides applications, suggestions for best results, and answers to
some common questions concerning operating the 1575/1590
Super-Thermometer.
6.1
Applications
Listed here are some of the applications for which the 1575/1590 Thermometer
is well suited.
• High-precision temperature measurement using SPRTs. The excellent
accuracy of the 1575/1590 makes it ideal for high-precision temperature
measurement using SPRTs. The 1575/1590 accepts ITS-90 characterization coefficients (see Section 7.4.3.2) for direct temperature readout. The
1575/1590 can measure using a wide range of SPRTs - capsule SPRTs, 25
and 100( midrange SPRTs, and 2.5Ω and 0.25Ω high-temperature SPRTs
(see Section 7.4.3.3 and 7.4.3.4). You have the option of using the
high-precision internal resistors or your own standard resistor as a reference (see Section 7.4.3.3). The 1575/1590 makes it convenient to use
your SPRT in conjunction with a triple point of water cell to eliminate error due to SPRT and reference resistor drift (see Section 7.4.4.1).
• High-resolution temperature measurement using thermistors. The
1575/1590 can also read sensors with resistances of 10 kΩ and greater
(see Section 7.4.3.3 and 7.4.3.4). This makes the 1575/1590 an excellent
readout for thermistor temperature sensors. The superb accuracy and resolution of the 1575/1590 along with the extra sensitivity of thermistors
gives you the capability of measuring temperature with remarkable resolution and accuracy. The 1575/1590 will accept Steinhart-Hart thermistor
characterization coefficients for direct readout of temperature (see Section
7.4.3.2.5).
• Resistance measurement and calibration. The 1575/1590 can be used
to measure and compare fixed resistances with great precision. Since it is
based on DC measurement technology it can be used with both AC and
DC resistors (see Section 7.4.3.2.6, Section 7.6.1, and Section 9).
• Calibration of PRTs. The 1575/1590 is able to calculate ITS-90 characterization coefficients. The CAL ITS-90 function directs the user through
a step-by-step procedure for measuring temperatures and corresponding
resistances and calculating the coefficients (see Section 7.4.4.2). The
1575/1590 will even create a calibration report and table that can be
printed or written to disk.
• Temperature comparison. The 1575/1590 allows you to connect and
measure two probes simultaneously. You can compare two temperatures
and display the difference automatically (see Section 7.1.3). With the
2575 or 2590 Scanner added to the system you can automatically measure
up to 50 probes (10 with the 2575).
29
1575/1590 Thermometer Readout
User’s Guide
• Self-heating tests. The 1575/1590 offers very flexible control of the excitation current used in measuring sensors and resistors. The current can be
finely adjusted to provide the optimum resolution and accuracy with minimum self-heating error (see Section 7.4.3.4). Easy-to-use controls enable
you to double or halve the power to the sensor for quick self-heating tests
(see Section 7.4.4.3 and 7.4.4.4).
• Observing the melt-freeze cycle of a metal freeze-point cell. The
1575/1590 allows on-screen graphing of measurements (see Section
7.5.1). One convenient application for this is to visually follow the
melt-freeze cycle of a metal freeze-point cell.
• Testing baths, dry-wells, furnaces, and ovens. The excellent resolution
and accuracy of the 1575/1590 makes it very useful as a temperature reference for constant-temperature baths, dry-wells, furnaces, and ovens.
The graphing feature (see Section 7.5.1) or statistical standard deviation
calculation (see Section 7.5.3) can be used to evaluate the temperature stability of these devices.
• Recording temperature measurements on disk. The internal disk drive
gives you the capability of conveniently transferring data from the
1575/1590 to your computer (see Section 7.6.3). The 1575/1590 can record on disk a series of measurements taken over a long period of time.
You can use this to observe long-term fluctuations of temperature. The
data can be downloaded to a computer for analysis, graphing, and printing.
• Recording temperature with a strip-chart recorder. The 1575/1590 analog output allows you to connect the 1575/1590 to a strip-chart recorder
and graph measurements directly on paper (see Section 7.6.4.4. You can
easily program the analog output for any desired relationship between the
measured value and the output voltage.
• Using other types resistance sensors. The 1575/1590 can calculate temperature using an arbitrary polynomial instead of the standard algorithms
(see Section 7.4.3.2.4). This makes it possible to use the 1575/1590 with
practically any type of resistance sensor.
• Remote communications. The 1575/1590 is equipped with a variety of
communications interfaces. With the parallel printer interface you can
connect the Super-Thermometer directly to a printer and record measurements or print calibration reports (see Section 7.6.4.3). The serial RS-232
interface and IEEE-488 GPIB interface allow you to connect the
Super-Thermometer with a computer in an automated system capable of
monitoring or controlling processes (see Section 7.6.4.1 and Section
7.6.4.2).
6.2
Suggestions for Best Results
This section provides some suggestions to help you get the best results from the
1575/1590 Super-Thermometer.
30
6 General Operation
Suggestions for Best Results
6.2.1
Maintaining Accuracy
There are many potential problems that can lead to inaccurate results when using the 1575/1590. Some of these are: improper calibration of the 1575/1590,
incorrect setup of the 1575/1590 parameters, wrong probe characterization coefficients, a damaged probe or sensor, poor connection of the probe wires, or
misuse of the 1575/1590. Always be alert to anything that may be wrong and
always try to verify your results. When possible, perform regular checks to verify the accuracy of your measurements. Consider the following suggestions:
1.
Maintain calibration of the 1575/1590. It is recommended that the
1575/1590 be calibrated at intervals no greater than one year. For new
units the calibration interval should be six months for the first year. On a
more frequent basis, you can verify the resistance accuracy using standard calibrated resistors. This is most important when the 1575/1590 is
used in applications where accuracy is especially critical. (Section 9 explains how to calibrate or verify the accuracy of the 1575/1590.)
2.
Double-check the reference resistor and current. Proper selection of
the reference resistor and driving current is very important to achieve full
accuracy. You should always verify the reference resistor and current selection before making measurements. Consider displaying the reference
resistance and current in the programmable data fields so that they can be
readily checked (see Section 7.5.3).
3.
Set the digital filter correctly. The digital filter helps to improve resolution and accuracy. If it not set up properly the filter can be ineffective. A
common mistake is to set the filter threshold too low. This can cause the
filter to reset too often allowing excessive noise to pass through (see Section 7.2.4). The message “FILTER RESET” helps alert you if this is a
problem.
4.
Check the probe coefficients carefully. Using the wrong probe coefficients can cause significant error with temperature measurements. Always verify that the correct characterization coefficients are being used.
It is good practice to display the probe serial number in one of the programmable data fields to help you verify that the correct parameters are
associated with the probe being measured (see Section 7.5.3). You can
use the CONV TEST function to test calculations of temperature with
the probe coefficients (see Section 7.4.4.5).
5.
Use the parameter lock-out feature to protect critical parameters.
Set up the parameter safety lock-out to prevent access to critical parameters such as the reference resistor calibration values (see Section 7.6.5.4).
This will help protect these parameters from being inadvertently
changed.
6.
Compare measurements of your working SPRT to a backup SPRT.
Resistance thermometers, especially SPRTs are very fragile and can easily be damaged or lose accuracy if mishandled. They are susceptible to
thermal shock and contamination. Periodically check your working
31
1575/1590 Thermometer Readout
User’s Guide
SPRT to make sure it is accurate. One way to do this is to compare its
measurements to those of a second SPRT.
6.2.2
7.
Check system accuracy with a fixed-point cell. An excellent way to
verify the accuracy of the entire system, including the 1575/1590, reference resistors, and SPRT, is to check measurements using a fixed-point
cell. The most accurate, useful, and economical fixed point is the triple
point of water. Other fixed points such as the gallium melting point, mercury triple point, and tin freezing point can also be used for verification.
8.
Check accuracy after calibrating a PRT. After calibrating a PRT compare measurements using the PRT and its new characterization coefficients with your reference SPRT at each calibration point.
9.
Be aware of other problems that can affect accuracy. Be careful of
other potential problems that can affect accuracy. When using baths
make sure probes are immersed adequately to prevent stem conduction
error. When comparing or calibrating one probe against another it is important that the bath have good temperature stability and uniformity.
Make sure probe wires have good low-resistance electrical connections.
Avoid excessive electromagnetic interference. Keep leads as short as
possible and use shielding if necessary. Prevent abrupt or extreme
changes in ambient temperature around the 1575/1590 and wire connections. Operate the 1575/1590 in a stable environment free from significant drafts.
Evaluating Temperature Uncertainty
The 1575/1590 Thermometer Readout is often used for calibrating PRTs and in
other applications where precision temperature measurements are critical. It is
important to know how much uncertainty the 1575/1590 contributes to total
system uncertainty. The specification section of this manual (Section 3.1) provides typical temperature uncertainty figures for some particular conditions.
The actual uncertainty of your measurements may differ. A significant factor
that affects uncertainty is the sensitivity of the probe. The greater the sensitivity, the lower the uncertainty. For SPRTs sensitivity generally decreases as temperature increases. As a result, uncertainty will be greater at higher
temperatures. To determine the exact uncertainty at a given temperature take
the uncertainty of the resistance measurement (ohms) and divide by the slope
of the resistance-temperature curve (ohms per degree) at that temperature. As
an example, suppose the 1590 and a 25.5Ω SPRT are used to measure a temperature of 419°C. The SPRT’s resistance at this temperature is about 65.45Ω
and its slope is 0.08916 Ω/°C. The resistance measurement uncertainty is 6
ppm x 65.45Ω = 0.00039Ω so the temperature uncertainty of the 1590 is
0.00039Ω / 0.08916 Ω/°C = 0.0044°C.
Realize that this is only the contribution of the 1590 to total uncertainty. The
SPRT or sensor contributes additional uncertainty. External reference resistors,
if used, must also be considered. With comparison calibrations using baths or
dry-wells you must take into account uncertainty caused by temperature varia-
32
6 General Operation
Answers to Some Common Questions
tions and uniformity. Carefully consider all sources of uncertainty when evaluating total system uncertainty.
6.3
Answers to Some Common Questions
Following are answers to some often-asked questions.
Can the 1575/1590 be used with thermocouples?
No. The 1575/1590 makes precision resistance ratio measurements and is not
capable of making voltage measurements which are required with
thermocouples.
Is the 1575/1590 an AC or DC device?
The 1575/1590 is considered a DC measuring device in that the driving current
remains constant for the duration of each sample. The current is reversed in-between samples so that offsets can be canceled. This occurs at a very low rate
(with a period of one second or greater) and plenty of time is allowed for settling before sampling the voltage. With AC bridges the current alternates at a
rate of 25 Hz or more in a sinusoidal fashion. They require specially-certified
AC standard resistors. The 1575/1590 operates just as well with AC or DC
standards.
What is the uncertainty of temperature measurements using the 1575/1590?
The specification section of this manual provides typical temperature uncertainty figures for some particular conditions. The actual uncertainty of your
measurements may vary depending on the resistance of your sensor. Uncertainty also depends significantly on the quality of the SPRT or sensor and its
calibration. Section 6.2.2 provides some suggestions for evaluating uncertainty.
How can I verify the accuracy of the measurements?
There are many methods you can use to verify that measurements you make
with the 1575/1590 are accurate. Some of these methods are explained in Section 6.2.1. It is important that the resistance accuracy of the 1575/1590 be regularly calibrated and verified. This can be done easily by the user with one or
more standard resistors (see Section 9). Temperature measurement can also be
verified using fixed points as explained in Section 6.2.1.
Can I calibrate the 1575/1590 myself?
Yes, if you have the necessary standard resistors. These resistors must have adequate certifiable uncertainty. The calibration procedure is explained in Section
9.
33
1575/1590 Thermometer Readout
User’s Guide
If I only use the internal 100Ω reference resistor, do I need to maintain calibration of the other reference resistors?
If you only use certain internal reference resistors it is not necessary to calibrate the unused resistors. For example, if you only use the 1575/1590 for measuring 10 kΩ thermistors there may be no need to calibrate the 1Ω, 10Ω, and
100Ω internal reference resistors. Likewise, if the 1575/1590 will only be used
with external reference resistors you do not need to calibrate any of the internal
reference resistors. Nevertheless, you should still periodically verify the resistance ratio accuracy of the 1575/1590. If you choose to maintain only a limited
calibration take necessary precautions to ensure that the instrument will not be
used outside its calibrated ranges.
If two probes are connected to the 1575/1590, is current supplied to both at the
same time?
During a measurement, the 1575/1590 drives only the probe and reference resistor with current. If two probes are connected and measured alternately while
using one of the internal reference resistors, the current will alternate between
the two probes. It is possible that this could cause slight error in the measurement if self-heating is significant. Self-heating error can be evaluated with simple tests (see Section 7.4.4.3). When using the 2590 Scanner with the 1590 this
problem can be avoided since the 2590 incorporates an independent standby
current source for each channel.
Can the 1575/1590 calculate ITS-90 coefficients?
Yes. The ITS-90 calibration feature allows you either measure resistance data
or enter previously obtained values to calculate ITS-90 coefficients (see Section
7.4.4.2.8).
Can the 1575/1590 generate Callendar-Van Dusen, IPTS-68, or thermistor
coefficients?
The 1575/1590 is not able to calculate coefficients for characterizations other
than ITS-90. The 1575/1590 can be used to obtain resistance and temperature
measurements for calibration, but calculation of coefficients for Callendar-Van
Dusen, IPTS-68, or thermistor sensors must be done with external software.
Can the 1575/1590 convert IPTS-68 or Callendar-Van Dusen coefficients to
ITS-90 coefficients?
The 1575/1590 can be used to calculate ITS-90 coefficients from IPTS-68 or
Callendar-Van Dusen coefficients using the following procedure: First, you
must set up a probe record with your IPTS-68 or Callendar-Van Dusen coefficients (use EDIT PROBE, see Section 7.4.3.2.2). Second, use the CONV TEST
function to enter resistances and obtain temperatures near each of the required
ITS-90 calibration points for Range 4 and Range 7 or 8 (Section 7.4.4.2 and
7.4.4.5). Carefully note the resistances and corresponding temperatures. Third,
use EDIT PROBE to select ITS-90 and the appropriate subranges (Section
7.4.3.2.1) for one probe record (there’s no need to enter values for A[4], B[4],
34
6 General Operation
Answers to Some Common Questions
etc.). Fourth, select the probe for ITS-90 calibration using SETUP in CAL
ITS-90 (Section 7.4.4.2.6). Fifth, enter the resistance and temperatures using
DATA (Section 7.4.4.2.8). Sixth, calculate the ITS-90 coefficients using CALCULATE (Section 7.4.4.2.9).
Can the 1575/1590 directly control a bath or other device using digital communications?
No. The 1575/1590 is intended to be used only as a measuring device. The
1575/1590 has no means of sending controlling commands to other equipment.
A separate computer must be used for this purpose.
Can I connect any multi-channel scanner to the 1575/1590?
The Hart 2590 Scanner is specially designed to be used with the 1590 and likewise, the 2575 with the 1575. The inputs of the 1575/1590 can be connected to
third-party scanners but the 1575/1590 will not be able to control the scanner
directly. You would have to select channels manually or use a computer to control the scanner.
What has been done to verify and validate the accuracy of the 1575/1590 and
its internal software?
Hart Scientific makes every effort to ensure that your 1575/1590 Super-Thermometer operates reliably and accurately. It is put through an extensive validation procedure. Each function and calculation is tested and verified. Each of the
temperature conversion algorithms are tested over the full temperature range
and the results are compared to established data. Each unit that is shipped out is
tested to make sure that it meets accuracy specifications and that each component functions properly.
35
7 Front Panel Operation
Channel Menu
7
Front Panel Operation
This chapter explains operation of the 1575/1590 thermometer in detail using
the front panel buttons and soft-keys. Aside from the display contrast adjustment which is controlled by dedicated buttons on the front panel, all instrument
functions are controlled using the soft-key menu system. This menu system is
outlined in the Figure 4 on page 38. In each sub-menu the RETURN soft-key
(not shown) returns to the next higher menu.
7.1
Channel Menu
The CHANNEL menu contains functions that control the input channels. You
can select either channel or you can have the Super-Thermometer alternate between them. Within the channel menu there are three soft-keys: INPUT 1, INPUT 2, and ALT N. If the 2575 or 2590 Scanner is connected to the
thermometer, two additional soft-key functions, SCANNER and SCANNER
SEQ, appear in this menu (refer to the 2575 and 2590 Scanner Sections).
7.1.1
Measure Input 1
Press the INPUT 1 soft-key to select Input 1 for measurement. Measurements
made with this channel will use the probe setup parameters specified for Input
1 (refer to Section 7.4, “Probe Menu”).
37
1575/1590 Thermometer Readout
User’s Guide
MAIN MENU
CHANNEL MENU *
INPUT 1
INPUT 2
ALT N
Select Input 1 for measurement
Select Input 2 for measurement
Alternate between Input 1 and Input 2
SAMPLE MENU
RUN/STOP
SAMPLE N
SAMPLE TIMING
DIGITAL FILTER
RESET STATS
Start or stop continuous sampling
Start sampling for N measurements
Set conversion time, sample interval, and integration period
Select digital filter, response time, and reset threshold
Reset maximum, minimum, average, spread, standard deviation
MEMORY MENU
STORE SAMPLE
WRITE VALUE
VIEW MEMORY
CLEAR MEMORY
RUN/PAUSE
Store present measurement into a memory register
Enter a value into a memory register
View memory register contents
Clear all memory registers
Pause sampling temporarily or resume sampling
PROBE MENU
INP 1/INP 2 *
SELECT PROBE
EDIT PROBE
CAL PROBE
CAL TPW
CAL ITS-90
1.414xCURRENT
0.707xCURRENT
CONV TEST
Select channel for probe editing
Select probe setup for channel
Edit parameters for selected probe
Calibrate probe water triple point resistance
Calibrate probe ITS-90 coefficients
Multiply current by 1.414
Multiply current by 0.707
Test probe characterization coefficients
PROBE DISK
SAVE PROBE
READ PROBE
SAVE ALL
READ ALL
FORMAT DISK
DISPLAY MENU
DATA/GRAPH
SELECT DISPLAY
EDIT DISPLAY
DISPLAY RESOL
CLEAR GRAPH
Save probe setup to disk
Read probe setup from disk
Save all probes to disk
Read all probes from disk
Format disk
Select type of display
Select display setup
Edit display setup
Set display resolution
Clear data from graph (graph type display only)
SYSTEM MENU
UNITS
PARAM MENU
TIME
SAVE PARAMS
LOAD PARAMS
RESET PARAMS
SCREEN PARAMS
Select units - C, K, F, ohms, ratio, W
Set date and time
Save all parameters to disk
Read all parameters from disk
Reset all parameters to factory defaults
Set up screen saver, brightness, color†
DISK MENU
SETUP
RECORD/STOP
RECORD N
FORMAT DISK
RUN APP
Setup disk sampling parameters
Start or stop data logging to disk
Record a number of measurements to disk
Format disk
Run application program on disk
COMMUNICATIONS MENU
SERIAL
IEEE488
PRINTER
ANALOG OUTPUT
Set serial setup and sampling parameters
Set IEEE-488 setup and sampling parameters
Set parallel interface sampling parameters
Set analog output parameters
SYSTEM CAL
SET EXT
SET INT
CAL REFER
SECURITY
INFO
Set external reference resistance
Set internal reference resistances
Calibrate reference resistor
Set security lockout for parameters
Show system information
*These menus and soft-keys change when the 2575 or 2590 scanner is connected.
†
1590 only
Figure 4 Menu Tree
38
7 Front Panel Operation
Sample Menu
7.1.2
Measure Input 2
Press the INPUT 2 soft-key to select Input 2 for measurement. Measurements
made with this channel will use the probe setup parameters specified for Input
2.
7.1.3
Alternate Channels
Press the ALT N soft-key to select the alternating measurement mode. With this
mode the channels are automatically switched after a certain number of measurements are made on each. For example, if n is set to 5 then five measurements will be taken with Input 1, the next five will be taken with Input 2, and
the sequence repeats.
The alternate mode works with either of the sampling modes described below
in Section 5.2. If continuous sampling is selected, the channels will alternate
indefinitely while measurements are made. If SAMPLE N is selected, the channels will be switched alternately until the total number of measurements
reaches the number specified with SAMPLE N.
7.2
Sample Menu
The SAMPLE MENU contains functions that allow you to control the measurement process including timing, digital filter, and statistics. The soft-keys within
the sampling menu are RUN/STOP, SAMPLE N, SAMPLE TIMING, DIGITAL FILTER, and RESET STATS.
39
1575/1590 Thermometer Readout
User’s Guide
7.2.1
Sampling Run/Stop
The RUN/STOP soft-key is used to start and stop sampling. The soft-key label
will indicate the present status by graying RUN or STOP.
The run/stop sampling function overrides any of the or disk sampling functions
(see Section 7.6.3 and 7.6.4). As long as sampling is inhibited with the STOP
soft-key, no new measurements will be transmitted via the communications interfaces or written to disk.
7.2.2
Sample N
The SAMPLE N soft-key programs the Super-Thermometer to make a certain
number of measurements then stop. You will be prompted to enter the desired
number of measurements. Press Enter after setting the number.
The 1575/1590 will begin making measurements and then stop after the specified number of measurements has been obtained. The SAMPLE N soft-key will
indicate the number of samples remaining. The RUN/STOP soft-key will indicate (by graying) RUN while the samples are being taken and STOP when finished. Channels may be switching manually or automatically without affecting
the total number of measurements made.
7.2.3
Sample Timing
The SAMPLE TIMING soft-key allows the user to set any of the sample timing
parameters which include conversion time, sample interval, and integration period. (Access to the sample timing parameters can be locked out as explained in
Section 7.6.5.4.) Figure 5 below shows how these parameters affect the measurement process.
new measurement
new measurement
conversion time
samples
averaged
integration
period
time
sample interval
Figure 5 Sample Timing
The conversion time is the time in seconds required for the thermometer to
make a single unprocessed (raw) measurement. Normally this is set to two seconds. It can be increased if more settling time is needed after the current is reversed (see Section ). In some cases a PRT may have excessive reactance,
leakage, or dielectric absorption and a longer than normal delay may be neces40
7 Front Panel Operation
Sample Menu
sary. Four seconds is recommended when measuring resistance above 100kΩ.
To determine if there is error in the measurement due to inadequate delay, compare measurements using the normal conversion time with measurements using
twice the normal conversion time. The range of the conversion time is 2 to 10
seconds.
The sample interval is the time in seconds required to process and display a
new measurement on the screen. For example, if you are interested in making a
measurement once every hour, you can set the sample interval to 3600s. Normally the sample interval will be set to two seconds so measurements are displayed as often as possible. The range of the sample interval is 2 to 32000
seconds but must be equal to or greater than the conversion time. The sample
interval affects the time scale of the graph display (see Section 7.5.1).
The integration period is the length of time in seconds over which one or more
raw samples are averaged to obtain one measurement for display. For example,
suppose you want to make a measurement once every hour. If you want the
measurement to be the average of only the last one minute you would set the
integration time to 60 seconds. If you want the measurement to be the average
of all raw samples during the hour you would set the integration period to 3600
seconds. The range of the integration period is 2 to 32000 but must be between
the conversion time and sample interval inclusive.
7.2.4
Digital Filter
The digital filter helps eliminate noise in the measurements and improves resolution. It does this by averaging, in effect, the present measurement with past
measurements. The result of the digital filtering on a series of measurements is
illustrated in Figure 6 below.
Without Filter
With Filter
Figure 6 Smoothing Effect of the Digital Filter
The DIGITAL FILTER soft-key configures the digital filter, selecting the type
of filter, response time, and reset threshold. (Access to the digital filter parameters can be locked out as explained in Section 7.6.5.4.)
The filter type is selected with FILTER TYPE. Two types of digital are available: moving average (AVERAGE) and exponential (EXP). The moving average filter, also called a sliding average filter, averages all of the past
41
1575/1590 Thermometer Readout
User’s Guide
measurements taken within the time specified by the response time. The exponential filter simulates a 1-pole analog filter where more recent measurements
are given more weight than earlier measurements. The filter can also be disabled by selecting NONE.
The response time of the filter is adjusted with RESPONSE TIME. For the
moving average filter the response time is the length of time in seconds over
which measurements are averaged. For the exponential filter the response time
is the time required for the output to reach 63% of its final value with a step
change in the input. There is a tradeoff between response time and smoothing
effectiveness. Increasing the response time smooths the measurements and improves the effective resolution. However, if the response time is too long you
will not be able to accurately measure changing temperatures. The response
time of the filter should be set to the smallest value that achieves the desired
resolution and accuracy.
To help allow the filter to track changing temperatures while still removing
noise, the digital filter has an automatic reset feature. The filter will reset if the
difference between the raw measurement and the previous filtered measurement
exceeds a specified reset threshold. This limits the amount of error the filter can
cause. When the filter resets its memory of past measurements is erased. The
effect of automatic reset is illustrated in Figure 7. Notice that with reset the
measurement follows more closely the actual temperature during a sudden large
change in temperature. If the input changes continuously the output may appear
to stair-step as the filter attempts to track the input.
reset threshold
filter with reset
without filter
filter without reset
Figure 7 Effect of Automatic Reset on Filtered Measurements
The reset threshold can be adjusted within the DIGITAL FILTER window. The
smaller the threshold the closer the measurements will be to the actual tempera42
7 Front Panel Operation
Memory Menu
ture during sudden large temperature changes. However, the threshold should
not be too small or the reset may be triggered by ordinary noise making the filter ineffective. The message “FILTER RESET” appears below the temperature
display whenever the filter resets to help alert you if there is a problem. The
threshold should be set so it is just larger than the maximum deviation caused
by noise. For many applications a threshold value of 0.01 to 0.1 is ideal. In
cases where the temperature variations are greater, the threshold value should
be increased. For temperature units (°C, K, °F) the threshold value is the deviation in temperature that will cause reset. For resistance measurements the
threshold is given as a percentage of the measured resistance or reference resistance, whichever is greater. For ratio measurements the threshold is given as a
percentage of the measured ratio or one, whichever is greater.
NOTE: The filter threshold value must be greater than the noise in the
measurement or the filter will be ineffective.
The digital filter can also be reset manually at any time by pressing the DIGITAL FILTER soft-key and then pressing Exit. The filter resets whenever the filter window is exited. The filter will also be reset if the system units are changed
unless the units are only changed from one type of temperature units to another,
e.g., °C to °F.
7.2.5
Reset Statistics
Pressing the RESET STATS soft-key causes the statistical registers to be
cleared. Any subsequent statistical calculations comprise only measurements
obtained from that time forward. Separate statistical registers and calculations
are used for each channel. The reset function resets the statistics of both channels simultaneously.
A variety of statistical functions can be applied to the measurements and the results displayed in various fields on the display. The available statistical functions are maximum, minimum, spread, average, and standard deviation. (For
more information on setting up the display to show statistical calculations, see
Section 7.5).
7.3
Memory Menu
The MEMORY menu allows you to store measurements or arbitrary values in
memory. The numbers can then be displayed on the screen or used as references for difference measurements (refer to Section 7.5.3). There are 100 available memory locations.
43
1575/1590 Thermometer Readout
User’s Guide
The memory menu includes the soft-keys STORE SAMPLE, WRITE VALUE,
VIEW MEMORY, CLEAR MEMORY, and RUN/PAUSE.
7.3.1
Store Sample
The STORE SAMPLE soft-key places the most recent measurement in a memory location you specify. Since the measurement may be updated while you are
trying to store it in memory, you may first want to pause sampling temporarily
using the RUN/PAUSE soft-key. When you press the STORE SAMPLE
soft-key, a small window appears requesting you to enter a location number.
Enter a number between 1 and 100. The measurement displayed at the top of
the screen will be stored in memory along with its units.
7.3.2
Write Value
With WRITE VALUE you can enter any number into any memory location.
This may be useful if you want to display the differences between measurements and a particular value (see Section 7.5.3). When you press this key a
small window appears that allows you to enter the memory location you want,
the value, and the units. The value will stay in memory until you overwrite it or
clear it.
7.3.3
View Memory
The VIEW MEMORY function allows you to scan the memory to view the data
it contains. This is useful for finding specific data or unused locations. When
you press the key a small window appears requesting you to enter the beginning location. A larger window then appears showing the contents of that loca-
44
7 Front Panel Operation
Probe Menu
tion and the next four. You can use the or scroll buttons to scroll the list. Press
Exit when you are finished viewing.
7.3.4
Clear Memory
The CLEAR MEMORY soft-key clears the contents of memory, setting all the
values to 0.0°C. When you press the key you will be prompted to confirm.
Press Enter to clear the memory or press Exit to cancel.
7.3.5
Run/Pause Sampling
When the RUN/PAUSE soft-key is pressed, the instrument will temporarily
stop taking measurements. This is useful for holding the last measurement until
it can be stored in memory as explained in Section 7.3.1. Measuring will resume when the key is pressed again or the memory menu is exited. The word
RUN or PAUSE is grayed out to indicate the current status.
7.4
Probe Menu
The PROBE menu includes functions for specifying probe characterization coefficients and measuring parameters. It also includes functions for calibrating
PRTs according to ITS-90. Access to the probe menu can be locked out as explained in Section 7.6.5.4.
Probe parameters are defined and stored in memory together as a set. Up to 50
probe definitions can be stored in memory. These are referred to by number,
e.g., “PROBE 1". Any input channel can use any of the probe definitions.
45
1575/1590 Thermometer Readout
User’s Guide
The probe menu includes INP 1/INP 2, SELECT PROBE, EDIT PROBE, CAL
PROBE, and PROBE DISK soft-keys. If the 2590 Scanner is connected to the
1575/1590, the first soft-key will appear as SELECT CHAN instead. To change
the probe definition for a particular channel, first use INP 1/INP 2 to select the
channel to edit then use SELECT PROBE to assign a different probe number or
EDIT PROBE to change the parameters.
7.4.1
Select Channel
The INP 1/INP 2 soft-key allows you to select the channel for which you want
to edit the probe parameters. This function does not select a channel to measure. When you first enter the probe menu, the channel that is currently being
measured is selected. An asterisk (*) appears next to INP 1 or INP 2 to indicate
the selected channel. Press this soft-key to select the other channel for editing.
Note that this soft-key does not actually change the channel being measured.
7.4.2
Select Probe
The SELECT PROBE soft-key allows you to choose which probe definition to
use with the selected channel. When you press this soft-key a list of probe definitions appears with the serial numbers of the probes. Use the U and D buttons to move to the desired probe number and press Enter. The probe window
will be updated to show the parameters for the selected probe. One restriction is
you can not select a probe for INPUT 2 that has EXTERNAL selected as the
reference.
7.4.3
Edit Probe
The EDIT PROBE soft-key is used to set the parameters included in a probe
definition. You will be prompted to enter the probe number to edit. Enter two
digits for the probe number (enter 01 for probe number 1, 20 for probe number
20). Then press the Enter button twice. After a probe is selected a new window
will appear showing the probe parameters. Use the U and D buttons to move
up and down the list. The window will scroll if needed. You can edit any or all
of the parameters in any order. When you are finished, press Exit to return to
the menu.
NOTE: Be sure to press Enter after changing a parameter to store the
new value.
These parameters, described in the following sections, can be specified for the
probe:
• Serial number
• Conversion type (ITS-90, Callendar-Van Dusen, etc.)
• Reference resistor
• Current
46
7 Front Panel Operation
Probe Menu
• Standby current (1590 with 2590 only)
• Three-wire offset
• Sub-range (ITS-90 only)
• Characterization coefficients applicable to conversion type and selected
subrange
7.4.3.1
Serial Number
For SERIAL NO. you can enter up to ten characters that consist of digits from
0 to 9, upper case letters from “A” to “Z”, “.” and “-”. To enter a letter, repeatedly press the Exp button until the desired letter appears.
7.4.3.2
Temperature Conversion
CONVERSION specifies what algorithm is used to calculate temperature from
the measured resistance of the probe. Options include ITS-90, IPTS-68,
Callendar-Van Dusen (CVD), POLYNOMIAL, and thermistor. You can also
choose to display resistance R(Ω), ITS-90 ratio W(T90), or resistance ratio,
overriding the system units (see Section 7.6.1). Each of the conversion options
is explained in more detail below. The probe characterization parameters that
appear below CONVERSION in the edit list will depend on the type of conversion you select.
NOTE: The unit in which a measurement is displayed can be affected by
both the conversion type and the System Units settings. Ratio or ohms settings will override temperature units.
7.4.3.2.1
ITS-90
Most PRTs and SPRTs are characterized according to the International Temperature Scale of 1990 (ITS-90). If you select ITS-90 for CONVERSION, you
must then select one or two sub-ranges then enter the coefficients for the
sub-ranges. You may select both a low temperature sub-range and a high temperature sub-range. At temperatures where the high and low ranges overlap, the
low range takes precedence. If the probe is calibrated for only one range, set
the unused high or low range to NONE. If both sub-ranges are set to NONE the
temperature will be calculated using the ITS-90 reference function.
If the temperature falls outside the selected sub-range or if no sub-ranges are
selected a warning message will appear: “WARNING: SUBRANGE EXCEEDED”. This indicates that the calibration of the probe does not apply at
this temperature and it may not be accurate. If the 1575/1590 is unable to calculate temperature because the measured resistance is too low or too high or
there is an error with the coefficients “..........” will be displayed indicating the
measurement is out-of-range.
47
1575/1590 Thermometer Readout
User’s Guide
Table 2 shows the various ITS-90 subranges with the temperature range and coefficients. All subranges also include R(TPW) (the resistance at 273.16K) as a
coefficient. For details about the ITS-90 see NIST Technical Note 1265, Guidelines for Realizing the International Temperature Scale of 1990.
Table 2 ITS-90 Subranges and Coefficients
Subrange
Number
Temperature Range
Coefficients
1
13.8033 to 273.16K
a1, b1, c1-c5
2
24.5561 to 273.16K
a2, b2, c1-c3
3
54.3584 to 273.16K
a3, b3, c1
4
83.8058 to 273.16K
a4, b4
5
234.3156 to 302.9146K
a5, b5
6
273.15 to 1234.93K
a6, b6, c6, d6
7
273.15 to 933.473K
a7, b7, c7
8
273.15 to 692.677K
a8, b8
9
273.15 to 505.078K
a9, b9
10
273.15 to 429.7485K
a10
11
273.15 to 302.9146K
a11
Low Range
High Range
7.4.3.2.2
IPTS-68
The IPTS-68 option is for probes calibrated to the International Practical Temperature Scale of 1968. IPTS-68 probes are often only calibrated over a limited
temperature range and some of the coefficients may not be available (e.g. a3,
b3). Enter 0.0 for unused coefficients. You can select the ITS-90 scale conversion by setting the SCALE parameter to T90. This causes the temperature to be
adjusted by an amount equal to the difference between the IPTS-68 and ITS-90
temperatures. (The accuracy of the scale conversion is ±0.001°C between 0 and
630°C, ±0.002°C between –200 and 0°C, and ±0.003°C between –259 and
–200°C.)
7.4.3.2.3
Callendar-Van Dusen
The Callendar-Van Dusen (CVD) conversion can be used with some industrial
probes such as those that conform to the DIN-43760, IEC-751, or ASTM
E1137 standards. The Callendar-Van Dusen equation is shown below. The standard coefficients for DIN-43760, IEC-751, or ASTM E1137 are shown in Table
3.
48
7 Front Panel Operation
Probe Menu
⎧ ⎧
⎡
1 ⎛ t
⎞ ⎤⎫
− 1⎟ ⎥⎬
t≥0
⎜
⎪R0 ⎨1 + α ⎢t − δ
⎝
⎠ ⎦⎭
100
100
⎣
⎪ ⎩
r( t[ °C ]) = ⎨
3
⎧
⎡
⎤⎫
⎪R ⎨1 + α ⎢t − δ t ⎛⎜ t − 1⎞⎟ − β ⎛⎜ t − 1⎞⎟ ⎛⎜ t ⎞⎟ ⎥⎬ t < 0
0
⎝100 ⎠ ⎝100 ⎠ ⎥
⎪ ⎪
100 ⎝100 ⎠
⎢⎣
⎦⎭
⎩ ⎩
Table 3 DIN-43760/IEC-751/ASTM
E1137 Callendar-Van Dusen
Coefficients
7.4.3.2.4
Coefficients
Coefficient
Values
R0
100.0
α
0.00385055
δ
1.4998
β
0.109
Polynomial
The POLYNOMIAL conversion can be used with non-standard temperature
sensors that you fit to a polynomial equation. The equation has the form,
t( R )[ °C ] = A0 + A1 R + A2 R 3 + A3 R 3 + K A10 R 10
If the desired polynomial equation is less than order ten, set the unnecessary
higher order coefficients to 0.
7.4.3.2.5
Thermistor
The thermistor conversions use the Steinhart-Hart equation or its inverse as
shown below. The 1575/1590 can use coefficients for either of the two equations. If your probe has coefficients for temperature as a function of resistance,
select THRM-T(R). If the coefficients are for resistance as a function of temperature equation, select THRM-R(T). If there is no coefficient for the second
order term set A2 or B2 to 0.
T( R )[ K ] = [ A0 + A1 InR + A2 ( InR )2 + A3 ( InR )3 ]−1
R( T[ K ]) = exp[ B0 + B1 T −1 + B2 T −2 + B3 T −3 ]
7.4.3.2.6
Resistance
The R(Ω) option causes the measurement to be displayed as a resistance in
ohms rather than temperature. The resistance is displayed for the probe regardless of the selected system units. There are no coefficients for this conversion
option.
7.4.3.2.7
W(T90)
The W(T90) option causes the measurement to be displayed as an ITS-90 resistance ratio rather than temperature. The ratio is displayed for the probe regard49
1575/1590 Thermometer Readout
User’s Guide
less of the selected system units. For the ratio to be displayed properly, the
R(TPW) value must be accurate. You may use the CAL TPW soft-key to calibrate this parameter (see Section 7.4.4.1).
7.4.3.2.8
Ratio
The RATIO option causes the measurement to be displayed as resistance ratio
rather than temperature. The ratio is the measured resistance divided by the reference resistance. There are no coefficients for this conversion option.
7.4.3.3
Reference
REFERENCE specifies which reference resistor to use with the probe. You can
select among the four internal reference resistors or you can select an external
resistor. You should choose the reference resistor closest to the resistance to be
measured (see Table 4). Using the wrong reference resistor can result in excessive noise in the measurement and poor accuracy. For 25 ohm and 100 ohm
PRTs and SPRTs the 100 ohm internal reference resistor or a 100 ohm external
reference resistor is recommended.
TIP: Program the data window to show the reference resistor so you can
easily see that it’s set correctly (see Section 7.5.3).
Table 4 Reference Resistor Selection
Input
Resistance
Internal Reference
0 to 1
1
1 to 10
10
10 to 1000
100
1 k to 500 k
10 k
If you use an external standard resistor as the reference, be sure you have entered its correct resistance with the SET EXT function in the SYSTEM - REFERENCE menu (see Section 7.6.5.1). An external reference resistor must be
connected to Input 2 (see Section 5.1).
NOTE: When using an external reference resistor, you must enter its precise value with the SET EXT function in order for the current and the measured resistance to be accurate.
7.4.3.4
Current
The driving current for the probe should be optimized to achieve the most accurate measurement possible. If the current is too high there may be too much error in the measurement because of self-heating. If the current is too low noise,
drift in the measurements may be excessive and accuracy will be poorer. The
50
7 Front Panel Operation
Probe Menu
optimum current depends on the probe. Most 25Ω SPRTs and 100Ω PRTs and
RTDs work well with 1.0 mA. High-temperature 0.25Ω SPRTs may require 10
mA. Thermistor probes use a much smaller current, typically 0.01 mA. Consult
the specifications for your probe for the recommended driving current.
TIP: Program the data window to show the current so you can easily see
that it’s set correctly (see Section 7.5.3).
The range and resolution with which the current can be set will depend on the
reference resistance and the input resistance. The actual current may differ
slightly from the setting because of limited resolution and accuracy of the current source. Current may also be limited if the resistance is large.
7.4.3.5
Standby Current
This option is only enabled when the 1590 is used with the 2590 Scanner. It
sets the standby current applied to the probe while another is being measured.
Refer to Section 11, 2590 Scanner, for instructions on using the standby current feature of the scanner.
7.4.3.6
Three-wire Offset
The three-wire offset (3W OFFSET) parameter is used when measuring temperature using two-wire or three-wire RTDs. It adjusts the measured resistance
to compensate for lead resistance. This is not necessary with four-wire probes
since the lead resistance is canceled automatically.
CAUTION: When using four-wire probes the 3W OFFSET value must be
set to zero or the measurement may not be accurate.
When using three-wire or two-wire probes, the 1575/1590 is unable to directly
cancel the lead resistance. The measured resistance will be too high by the
amount of resistance of one lead if it’s three-wire or two leads if it’s two-wire.
The true resistance can only be calculated by subtracting the lead resistance error from the measurement. The exact amount of resistance to subtract must be
entered for the 3W OFFSET parameter.
The lead resistance error of a three-wire probe can be determined by measuring
the resistance between the two common leads and dividing by two. Connect the
probe to the input with one of the matched wires connect to C1 and P1 and the
other connected to C2 and P2. Set up the measurement to measure resistance
(you may use the 100Ω reference and 1 mA of current).
NOTE: Be sure to divide the measured lead resistance by two to obtain
the correct 3W OFFSET value for a three-wire probe.
51
1575/1590 Thermometer Readout
User’s Guide
7.4.4
Calibrate Probe
The probe calibration (CAL PROBE) sub-menu contains functions for calibrating probes with the triple point of water, calibrating ITS-90 coefficients, measuring self-heating error, and testing the temperature conversion. These are
CAL TPW, CAL ITS-90, 1.414 x CURRENT, 0.707 x CURRENT, and CONV
TEST.
7.4.4.1
Calibrate TPW
The CAL TPW calibration function allows you to easily calibrate a probe at the
triple point of water. It adjusts the ITS-90 R(TPW) value. The calibration will
be performed on the probe being measured. The input channel must be set on
one channel (not alternating or scanning). The probe must be using the ITS-90
conversion.
Obtaining a precise measurement is very important when calibrating the probe.
It is recommended that you use filtering with a time constant of 20 to 60 seconds. Be sure the filter threshold is high enough.
To begin the calibration, place the probe in the triple point of water cell and allow the temperature to equilibrate. Press the CAL TPW soft-key. A window appears asking for the immersion depth in millimeters, of the probe in the triple
point of water cell. If you enter the value for the depth, the thermometer will
compensate for the error in temperature caused by the hydrostatic pressure of
the water. This error amounts to approximately 0.0002°C at a depth of 250 mm.
If you do not care to correct for this small error, enter 0.
The Super-Thermometer will begin to measure the resistance of the probe. You
may graph the measurements by pressing the GRAPH soft-key. When you are
52
7 Front Panel Operation
Probe Menu
satisfied that the measurement is stable and accurate, press the STOP soft-key
(or Enter).
When STOP is pressed, the final value of the measurement will be shown.
Press the STORE soft-key (or Enter) to save the new value. The measured resistance will replace the previous value for the water triple point resistance
R(TPW) for the given probe.
53
1575/1590 Thermometer Readout
User’s Guide
7.4.4.2
Calibrate ITS-90
The CAL ITS-90 function facilitates the calibration of probes to the ITS-90. It
aids you in collecting the necessary resistance and temperature data and calculating the ITS-90 deviation function coefficients. Calibration can be performed
over any of the ITS-90 subranges between Range 4 and Range 11 inclusive.
The resistance-temperature data can be measured or entered using the front
panel keys. Once the calibration coefficients are calculated, the 1575/1590 can
print the results with a list of the derived coefficients and a resistance versus
temperature table.
Calibration of an SPRT to the ITS-90 requires measuring the resistance of the
probe at various fixed points for primary calibrations, or at known temperatures
near the fixed-point temperatures for comparison calibrations. The fixed points
required for the various subranges are listed in Table 5. Also shown is the recommended range for each point for comparison calibrations. For details on the
fixed points and the ITS-90 in general, refer to NIST Technical Note 1265,
Guidelines for Realizing the International Temperature Scale of 1990.
Table 5 ITS-90 Calibration Points
Subrange
Number
Temperature Range
Fixed Points
Comparison
Temperature Range
4
83.8058 to 273.16K
Argon (Ar), 83.8058K
Mercury (Hg), 234.3156K
Water (TPW), 273.16K
65 to 210K
225 to 250K
263 to 283K
5
234.3156 to 302.9146K
Mercury (Hg), 234.3156K
Water (TPW), 273.16K
Gallium (Ga), 302.9146K
225 to 250K
263 to 283K
290 to 325K
6
273.15 to 1234.93K
Water (TPW), 273.16K
Tin (Sn), 505.078K
Zinc (Zn), 692.677K
Aluminum (Al), 933.473K
Silver (Ag), 1234.93K
263 to 283K
470 to 550K
600 to 800K
850 to 1050K
1100 to 1400K
7
273.15 to 933.473K
Water (TPW), 273.16K
Tin (Sn), 505.078K
Zinc (Zn), 692.677K
Aluminum (Al), 933.473K
263 to 283K
470 to 550K
600 to 800K
850 to 1050K
8
273.15 to 692.677K
Water (TPW), 273.16K
Tin (Sn), 505.078K
Zinc (Zn), 692.677K
263 to 283K
470 to 550K
600 to 800K
9
273.15 to 505.078K
Water (TPW), 273.16K
Indium (In), 429.7485K
Tin (Sn), 505.078K
263 to 283K
350 to 450K
470 to 550K
Low Range
High Range
54
7 Front Panel Operation
Probe Menu
Subrange
Number
Temperature Range
Fixed Points
Comparison
Temperature Range
10
273.15 to 429.7485K
Water (TPW), 273.16K
Indium (In), 429.7485K
263 to 283K
350 to 450K
11
273.15 to 302.9146K
Water (TPW), 273.16K
Gallium (Ga), 302.9146K
263 to 283K
290 to 325K
The CAL ITS-90 sub-menu has individual soft-keys for each of the various
steps for calibrating an SPRT. The soft-keys are SETUP, MEASURE, DATA,
CALCULATE, and PRINT REPORT. The steps to an ITS-90 calibration are
summarized here.
1.
Set up the options for the probes to be calibrated using the SETUP
soft-key. This includes stating which probes and channels to use for the
probes to be calibrated and the reference SPRT. You also specify the sequencing parameters. The probe specific parameters such as the serial
number, subrange, current, and reference resistor must be set up previously using EDIT PROBE in the PROBE MENU.
2.
Measure the resistance of the probes at each calibration temperature using the MEASURE soft-key. The temperature may be measured using a
reference SPRT or specified as a fixed-point temperature.
3.
After obtaining the resistance and temperature measurements you may
examine the data using the DATA soft-key.
4.
The ITS-90 coefficients are calculated from the resistance-temperature
data using the CALCULATE soft-key.
5.
A report is generated for the probe using the PRINT REPORT soft-key.
The report shows the new ITS-90 coefficients along with applicable data.
The report may optionally include a table of resistances for various
temperatures.
The ITS-90 calibration program is designed to be flexible enough to allow for a
variety of calibration methods. The calibration setup options will depend on the
method to be used. The next sections will describe five possible methods. Following that the calibration steps and their corresponding soft-keys will be explained. The five calibration methods to be described are as follows:
1. Calibration using only fixed points
2. Comparison calibration with manual sequencing
3. Comparison calibration with automatic sequencing
4. Calibration using SPRT resistance comparison
5. Calibration with W values using fixed points
7.4.4.2.1
Calibration Using Only Fixed Points
In this method of calibration, the resistances of the probe or probes being calibrated are measured at known fixed-point temperatures. The temperatures are
55
1575/1590 Thermometer Readout
User’s Guide
entered, not measured. Normally, the fixed points that are used will be the standard specified fixed points for the ITS-90 such as the triple point of water, the
freezing point of tin, etc.
Table 6 Fixed-point Calibration Setup
REFR: FIXED POINTS
TEMP: ONCE
MEAS: PROMPT
The setup options for the fixed-point calibration are shown in Table 5. Options
not indicated are irrelevant. The calibration may done for just one probe, for
multiple probes using just one channel, or multiple probes using multiple
channels.
7.4.4.2.2
Comparison Calibration With Manual Sequencing
With this method of calibration, the probes are calibrated in baths or other stable temperature sources and the temperatures are measured with a reference
SPRT. Fixed points may be used for one or more of the calibration points. User
input will be required to initiate the resistance measurement at each point. The
calibration may be done either for just one probe, for multiple probes using just
one channel, or multiple probes using multiple channels.
The setup parameters for the comparison calibration method are shown in Table
7. Options not indicated are irrelevant. In the table, PROBE 2 is shown set up
as the reference SPRT on INPUT 2 as an example. A different probe and channel may be used instead. For best accuracy, the temperature measurement
should be repeated between each probe’s resistance measurement (TEMP set to
REPEAT).
Table 7 Manual Comparison
Setup
REFR: PROBE 2
CHANNEL: INPUT 2
TEMP: REPEAT
MEAS: PROMPT
RREF: NORM
7.4.4.2.3
Comparison Calibration With Automatic Sequencing
With this method of calibration, the probes are calibrated in a bath or other stable temperature source and the temperatures are measured with a reference
SPRT. Fixed points may be used for one or more calibration points. All the
measurements at each calibration point are made automatically with a specified
amount of delay between each. This method is useful when using the
1575/1590 in conjunction with the 2590 Scanner for calibrating a large number
of probes simultaneously.
56
7 Front Panel Operation
Probe Menu
The setup parameters for the automatic sequencing calibration method are
shown in Table 8. Options not indicated are irrelevant. In the table, PROBE 2 is
shown set up as the reference SPRT on INPUT 2 as an example. A different
probe and channel may be used if desired. For best accuracy, the temperature
measurement should be repeated between each resistance measurement (TEMP
set to REPEAT).
Table 8 Automatic
Sequencing Calibration
Setup
REFR: PROBE 2
CHANNEL: INPUT 2
TEMP: REPEAT
MEAS: TIMED
DELAY: 4.0
RREF: NORM
7.4.4.2.4
Calibration Using SPRT Resistance Comparison
With this method of comparison calibration, the resistances of the probes are
measured using the reference SPRT as the reference resistor. This can result in
improved accuracy when the temperature of the bath is drifting. The calibration
proceeds as follows: First, the resistance of the reference SPRT is measured and
its temperature is calculated. Then, the resistance of the probe to be calibrated
(UUT) is measured using the SPRT as the reference resistor. The resistance of
the UUT is calculated by multiplying the measured ratio by the previously
measured SPRT resistance. If the bath is drifting, the resistances of the probe
and SPRT will change in the same proportion so the ratio, and thus the measured resistance, will remain constant. Likewise, any error in measuring the
bath temperature has little effect on the results since the recorded SPRT resistance will reflect the same error. One further advantage of this method is that if
the reference SPRT and UUT have similar nominal resistances the resistance
measurements at each calibration point will be made with a resistance ratio
close to 1:1. The 1575/1590 is most accurate at ratios near 1:1.
The setup parameters for the SPRT resistance comparison method are shown in
Table 8. Options not indicated are irrelevant. PROBE 2 is shown set up as the
reference SPRT but any other probe may be used instead. The channel of the
reference SPRT must be INPUT 2 since it will also be used as the reference re-
57
1575/1590 Thermometer Readout
User’s Guide
sistor for the UUT. The temperature measurement need not be repeated between resistance measurements so TEMP is set to ONCE.
Table 9 SPRT Resistance
Comparison Calibration
Setup
REFR: PROBE 2
CHANNEL: INPUT 2
TEMP: ONCE
MEAS: PROMPT
RREF: SPRT
7.4.4.2.5
Calibration With W Values
Calibration of an SPRT can also be performed using fixed points by obtaining
the W value at each point. The W value is obtained by measuring the resistance
of the SPRT at the fixed point and at the triple point of water at each point and
then computing the ratio. This process is more time consuming but may give
greater precision. It helps to reduce error caused by the SPRT drifting during
the calibration process. The effect of self-heating can also be observed during
calibration and zero-power coefficients produced.
For this calibration process, the W values must be obtained outside of the CAL
ITS-90 function instead of using the MEASURE soft-key. The steps are as
follows:
1.
At each calibration point, you measure the resistance of the probe at the
fixed point and again at the triple point of water. W is calculated by dividing the fixed-point resistance by the triple point of water resistance,
W (T ) =
R( T )
R( TPW )
The self-heating can be determined while measuring resistance by increasing the current by a factor of 1.414 and noting the increase in the
measurement (see Section 7.4.4.3). Subtract the difference from the measured value (with normal current) to obtain the zero-power resistance.
2.
You must now calculate resistances again to provide the necessary data
for the 1575/1590 to calculate the coefficients. The resistances are calculated using the formula,
R( T ) = R( TPW )W ( T )
The R(TPW) value used for these calculations is not to critical as long as
the same value is used for each point. You may use the most recent water
triple point resistance measurement.
3.
58
Set up the probe definition in preparation for calculation of coefficients.
Select the ITS-90 conversion and select the ranges you want to calibrate
(see Section 7.4.3.2.1).
7 Front Panel Operation
Probe Menu
7.4.4.2.6
4.
Enter the CAL ITS-90 function and use SETUP. You must specify that
you want to calibrate the probe by selecting a channel for it (see Section
7.4.4.2.6). Since you will not actually be measuring the data, you may
select any arbitrary channel as long as the probe is not set to NO CAL.
You may ignore the other setup parameters since they pertain only to the
measurement process.
5.
Enter the DATA function in CAL ITS-90. Select your probe number. Enter the resistances (from Step 2) and temperatures for each calibration
point (see Section 7.4.4.2.8). For the water triple point, enter the same
resistance that was used to calculate the resistances in Step 2.
6.
Now you are ready to calculate coefficients. Enter the CALCULATE
function. Select your probe number and press CALCULATE (see Section 7.4.4.2.9).
Setup
The SETUP function is used to select options for the calibration process. Before beginning the setup, you must properly set up the probe definitions for
each probe to be calibrated as well as the reference SPRT. You should set the
serial number, conversion (ITS-90), reference resistor, current, and subranges.
For the probe that will be used as the reference SPRT, you must also enter the
correct characterization coefficients. Use the EDIT PROBE function in the
PROBE MENU to set these parameters. Also, make sure that the sample timing
and digital filter parameters are set appropriately in the SAMPLE MENU. To
remind you that the probe parameters must be set before beginning the calibration, a message appears when you begin SETUP. Press the NEXT soft-key (also
Enter or Exit) to continue.
The setup parameters are grouped in four screens. The first screen sets up the
temperature reference. You must specify the type of reference. If only fixed
points will be used, select FIXED POINTS. If an SPRT will be used to measure
the temperature at any or all of the points, select the probe number of the reference SPRT.
If an SPRT was selected as the temperature reference, specify the channel to
use with the SPRT. It is often most convenient to use Input 2 unless the SPRT
or other probes will be using an external reference resistor. Note: For an SPRT
resistance comparison type calibration, you must select Input 2 for the reference SPRT. Press the NEXT soft-key (or Exit) to continue.
The next screen selects the calibration probes and their channels. For each
probe to be calibrated, select the channel to use. If the 2590 scanner is connected to the 1575/1590 Thermometer, the channels SCANNER 1 through
SCANNER 10 will also be available along with INPUT 1 and INPUT 2. Do not
choose INPUT 2 for any probe set up to use an external reference resistor. Select NO CAL for all probe numbers that will not be used. You will not be allowed to set the channel for a probe number that is designated as the reference
SPRT or one that does not have the conversion set to ITS-90 with a valid
subrange. Press the NEXT soft-key (or Exit) to continue.
59
1575/1590 Thermometer Readout
User’s Guide
The next screen sets the parameters relating to the measurement sequence. The
user can specify whether the temperature is to be measured only once (ONCE)
at the beginning for each calibration point or measured just prior to every resistance measurement (REPEAT). Repeating the temperature measurement for
each probe may give better accuracy if the temperature is drifting.
You can select the measurement mode as TIMED or PROMPT. The TIMED
mode is useful when calibrating multiple probes simultaneously using the 2575
or 2590 Scanner. If TIMED is selected then the user must specify the DELAY
time in minutes between measurements. After switching to the next probe, the
1575/1590 will measure for this amount of time before automatically recording
the reading. The delay time should be at least five times the digital filter time
constant to allow enough time for transients to settle. With the PROMPT mode,
the thermometer will wait for you to press the STOP and STORE soft-keys to
record the next measurement. After setting these parameters, press the NEXT
soft-key (or Exit) to continue.
The last setup screen is used to set up SPRT resistance comparison calibrations.
This screen only appears if a reference SPRT was specified in the first screen
and its channel was set to INPUT 2. You specify whether to use the normal reference resistor (determined by REFERENCE in EDIT PROBE) or the SPRT
connected to Input 2 when measuring the resistances of the calibration probes.
Select NORM if the resistances are to be measured in ratio to the normal reference resistor (e.g. 100( internal resistor). Select SPRT if you desire to measure
the resistances in direct ratio with the SPRT. This mode may help improve the
accuracy when the temperature of the bath is drifting. If a fixed point is used
for a calibration point, such as the triple point of water, the resistance measurements for that point will use the normal reference resistor rather than the SPRT.
After setting this parameter press the RETURN soft-key (or Exit) to go back to
the ITS-90 calibration menu. You are now ready to begin measuring using the
MEASURE function.
7.4.4.2.7
Measure
The MEASURE function is used to collect the temperature and resistance measurements for the calibration. This requires that the setup step be performed
previously. The measurement process involves measuring the temperature and
then the probe resistances at each of the calibration points. You may measure
the calibration points in any order. The calibration point selection screen lists
the points required for the subranges you selected and allows you to select
60
7 Front Panel Operation
Probe Menu
which one you want to measure next. Press the SELECT soft-key (or Enter) to
begin measuring at the indicated point.
If a reference SPRT was specified in the setup, the next screen will prompt to
begin the temperature measurement. Press the START soft-key (or Enter) to begin measuring with the SPRT or press FIXED POINT if a fixed point is to be
used or the temperature is already known. This screen will not appear if the
TIMED mode was selected in the setup.
61
1575/1590 Thermometer Readout
User’s Guide
When START is pressed the Super-Thermometer will begin measuring the temperature. The temperature (in Kelvin) will appear in the window. You may
graph the measurements by pressing the GRAPH soft-key. After allowing adequate time for the measurement to stabilize, press the STOP soft-key (or Enter)
to stop measuring. If the TIMED measurement mode was selected in the setup,
measuring will stop automatically and the value stored after the specified
length of time has elapsed.
If the thermometer detects that the noise of the measurements exceeds the filter
threshold, a warning message will appear. To fix this, return, go into the FILTER parameter window in the SAMPLING MENU, and increase the filter
threshold value. Start over with the calibration.
When STOP is pressed the final value of the measurement will be shown. Press
the STORE soft-key (or Enter) to save the value. The temperature measurement
will be stored with the calibration data for the given probe or for all probes depending on the TEMP setting in the setup. If the SPRT is on INPUT 2 and the
62
7 Front Panel Operation
Probe Menu
SPRT was selected as the reference resistor, the resistance of the SPRT will be
stored internally for use during the calibration probe resistance measurement.
If you want to use a fixed-point cell for the calibration point, press FIXED
POINT instead of START. You will be requested to store the fixed temperature
value. You may change the temperature if necessary using the numeric keys
and Enter. Press the STORE soft-key (or Enter) to accept the value.
63
1575/1590 Thermometer Readout
User’s Guide
If the temperature, whether measured or specified, is outside the recommended
range, a message will appear to warn you. The range for each calibration point
is listed in Table 4. Press the NEXT soft-key (or Enter) to accept the temperature or REDO to go back and measure or enter the temperature again.
The next step is to measure the resistance of the calibration probe or probes.
The screen will show the probe number, serial number and channel for the first
calibration probe. Make sure the probe is connected properly. Press the START
soft-key (or Enter) to begin the measurement. This screen will not appear if the
TIMED mode was selected in the setup.
The thermometer will begin measuring the resistance of the probe. If the RREF
mode was set to SPRT, the resistance will be obtained by measuring the ratio of
the probe resistance to the SPRT on INPUT 2 and multiplying by the SPRT resistance measured in the temperature step. If the reference type was specified as
NORM or if a fixed point is being used, the resistance will be measured with
the reference resistor specified with REFERENCE in EDIT PROBE. You may
graph the measurements by pressing the GRAPH soft-key. Press the STOP
64
7 Front Panel Operation
Probe Menu
soft-key (or Enter) to stop measuring, or if TIMED mode was selected, wait for
the measurement to be recorded automatically.
When STOP is pressed, the final value of the measurement will be shown.
Press the STORE soft-key (or Enter) to save the value. The measurement will
be stored with the calibration data as the resistance value of the given probe.
65
1575/1590 Thermometer Readout
User’s Guide
If more than one probe was selected for calibration, the others will also be measured in the same way. If the REPEAT measurement mode was selected, the
temperature measurement step will be repeated prior to the resistance measurement for each probe.
Once all the probes are measured at this calibration point, the procedure will return to the calibration point selection screen. You may select the next point and
continue with the measurements.
When all the measurements have been made at each calibration point, press the
RETURN soft-key (or Exit) to return to the menu. At this point, you may examine the measurement data with the DATA function and calculate the ITS-90
coefficients using the CALCULATE function.
7.4.4.2.8
Data
The DATA soft-key can be used to examine the calibration data obtained in the
measurement step. You may also enter resistance-temperature data obtained
previously and use it to calculate coefficients. When you press this soft-key, a
window appears showing the data for the first probe.
You may select any of the calibration probes using the LR buttons. Use the
UD buttons to scroll down through the list. Data may be entered using the
numeric buttons. To exit the window, press the RETURN soft-key (or Exit).
Only data for those probes assigned a channel in SETUP can be viewed here.
Also, only the points included in the selected ranges of the probes will be
shown. If you intend to calculate coefficients using existing data, you must first
select a probe number and set the probe parameters to specify ITS-90 conversion and select the ranges you want to calibrate (use EDIT PROBE in the
66
7 Front Panel Operation
Probe Menu
PROBE MENU). You must also specify that you want to calibrate the probe in
the SETUP function by selecting a channel. Since you will not actually be measuring the data, you may select any arbitrary channel as long as the probe is not
set to NO CAL. You may ignore the other setup parameters since they pertain
to the measurement step.
7.4.4.2.9
Calculate
The CALCULATE soft-key allows you to calculate ITS-90 coefficients for a
probe using the measured or entered resistance-temperature data. When you
press the soft-key, a window appears to warn you that this step will change the
coefficients of the calibration probes. This is a precaution against inadvertently
changing the coefficients. Press NEXT (or Enter) to continue. Press RETURN
(or Exit) to cancel and return to the menu.
Next, a window will show the first probe in the set and ask if you want to proceed with calculating the coefficients. You can select any probe in the set using
the LR buttons. Only those probes assigned a channel in the setup can be
selected. Press the CALCULATE soft-key (or Enter) to continue with the calculation. If the calculations are successful, the old probe coefficients will be replaced with new ones. To view the new coefficients, use EDIT PROBE in the
PROBE MENU.
If there is an error with the data that causes the calculation to fail, or if the
probe does not conform to the ITS-90 specifications for W(302.9146K),
W(234.3156K), or W(1234.93K), a warning message will appear, “WARNING: THIS PROBE DOES NOT MEET ITS-90 SPECIFICATIONS”. When
finished, press the RETURN soft-key (or Exit) to return to the menu. If desired
67
1575/1590 Thermometer Readout
User’s Guide
you may print a report for each of the probes calibrated using the PRINT REPORT function.
It should be noted that the particular values for coefficients the 1575/1590 calculates are very sensitive to slight variations in the temperatures and resistances
used. You may obtain different values for the coefficients each time you calibrate a probe even if the calibration is correct and accurate. The 1575/1590
may also produce coefficients that differ slightly from values calculated using
other software because of differences in mathematical precision, matrix solution approaches, and recursion methods. You may test the validity of the calculated coefficients using the CONV TEST function (see Section 7.4.4.5). You
should also compare measurements with the probe to those of a known accurate
SPRT to verify that it’s properly calibrated.
7.4.4.2.10
Print Report
The PRINT REPORT soft-key can be used to print a calibration report for any
of the probes that were calibrated. The report will show the probe serial number, the date, the current that was used, and the coefficients that were produced.
The table can also include the measured resistance and temperature data and a
resistance-temperature table. The report can be printed from the printer port,
serial interface, IEEE-488 interface, or written to disk.
The first window that appears allows you to select the probe and output port for
the report. You may use the LR buttons to select the probe. Only the probes
assigned channels in SETUP can be selected. Press Enter after changing the
probe number.
For the output port, you may select among the printer parallel port, serial port,
IEEE-488 port, or disk. Printing to disk may be useful if you want to customize
the report using a word processor. When printing to disk, the filename of the report will be PROBEn.RPT where n is the probe number. If you print the report
from the serial or IEEE-488 port, you should first check that the interface parameters (baud rate, address, etc.) are set correctly using the SERIAL or
IEEE488 soft-keys in the SYSTEM - COMM MENU. Press Enter after changing the port.
If the parameters do not need to be changed, you may simply press the NEXT
soft-key to go to the next screen. You may also press the RETURN soft-key
from this screen to return to the menu after printing the reports.
The next window that appears asks whether or not you want to include the measured data with the report and allows you to select the units for this data. If the
parameters do not need to be changed, you may simply press the NEXT
soft-key to go to the next screen.
The next window asks whether or not you want to include the resistance-temperature table with the report. You can also specify the units to use in the table,
the minimum and maximum temperatures, and the temperature interval. If the
parameters do not need to be changed, you may simply press the NEXT
soft-key to go to the next screen.
68
7 Front Panel Operation
Probe Menu
At this point, all the options are set and you may now print the report. Press the
PRINT soft-key (or Enter) to print the report. Figures 8 and 9 show an example
of a printed report and a page of the resistance versus temperature table. After
the report is printed, the first screen will reappear allowing you to select another probe to print.
7.4.4.3
1.414 x Current
This function in the CAL PROBE menu is useful for measuring the self-heating
error with a probe. When the 1.414 x CURRENT soft-key is pressed the driving current will be increased by a factor of 2. This increases the power dissipated in the sensor by a factor of two and doubles the self-heating error. By
observing the change in measured temperature with twice the power, you can
determine the amount of self-heating error present with the original driving
current. When increasing the current, be careful to observe the limits of the current. It is useful to program one of the display fields to show the actual current
(see Section 7.5.3).
7.4.4.4
0.707 x Current
The 0.707 x CURRENT soft-key can be used to restore the original current after checking the self-heating. It reduces the driving current by a factor of 2.
7.4.4.5
Conversion Test
The CONV TEST soft-key can be used to test the accuracy of the resistance-to-temperature conversion calculations and probe characterization coefficients. It allows you to enter a resistance value and then it will display the
corresponding temperature values in (C, K, and if ITS-90 or IPTS-68 is used,
W values. You can compare the resistance and temperature to values given in a
calibration report table for the probe to verify that the conversion parameters
are set up properly. The CONV TEST function tests the probe parameters of
the channel currently selected for measurement.
7.4.5
Probe Disk
The PROBE DISK sub-menu contains functions for writing and reading probe
configuration data to and from the floppy disk. You can also format a new disk.
The disk can be used to exchange information between the 1575/1590 thermometer and PC compatible computers or it can be used to backup operating
parameters for later use. The functions in the PROBE DISK menu are described below.
7.4.5.1
Save Probe
The SAVE PROBE soft-key allows you to save a set of probe parameters to
disk. When the key is pressed you will be prompted to enter the probe number
(1 to 16). After you press Enter the parameters will be saved to a file with the
name “PROBEn.CFG” where n is the probe number. If a file with this name already exists on the disk, you will be asked if you want to overwrite it. The
69
1575/1590 Thermometer Readout
User’s Guide
probe parameter files are in ASCII text format so they can be easily read or
written by other software applications.
7.4.5.2
Read Probe
The READ PROBE soft-key allows you to read a set of probe parameters from
a disk. When the key is pressed, the disk will be read and a window will appear
showing the probe files found on the disk. Use the buttons to select a file and
press Enter.
A new window appears prompting you to confirm to replace the current parameters with those in the file. You may set a different probe with the parameters in
the file by changing the probe number using the (( buttons. Press Enter to proceed or Exit to abort.
CAUTION: Using the READ PROBE or READ ALL functions will overwrite current probe parameters.
7.4.5.3
Save All
You can use the SAVE ALL soft-key to save the parameters for all of the
probes at once. Each probe will be given a different file with the name
“PROBEn.CFG” where n is the probe number. Any probe parameter files saved
previously will be overwritten.
70
7 Front Panel Operation
Display Menu
7.4.5.4
Read All
You can use the READ ALL soft-key to read all available probe parameter files
from disk replacing the current parameters. The parameters will be assigned to
the probes according to the filenames. Be careful with the READ ALL function; you will lose all of the current probe parameters and characterization
coefficients.
7.4.5.5
Format Disk
Before a floppy disk can be used to store information, it must be formatted.
You can format the disk on a PC-compatible computer or you can use the
1575/1590 FORMAT DISK function. The 1575/1590 can use 3.5" disks of either 720 kb (double density) or 1.44 Mb (high density) format. Generally, disks
of one type cannot be formatted to the opposite density. When you begin the
format operation, you must specify the density by using the LR buttons and
pressing Enter.
The 1575/1590 will try to format the disk at the density you select. If the disk
cannot be formatted at this density, a message will appear to tell you so. If this
happens, select the other density and try again. Be careful with the format command - any data previously stored on the disk will be erased.
7.5
Display Menu
Within the DISPLAY menu you can set up the display to show data in which
you are interested. You can have the display show past measurements, memory
data, differences between measurements, or the results of any of a variety of
71
1575/1590 Thermometer Readout
User’s Guide
REPORT OF CALIBRATION
International Temperature Scale of 1990
Platinum Resistance Thermometer
Serial Number: 2
20 March 1995
Current: 1.0 mA
Temperature(K)
83.8071
234.3141
273.16
505.0759
692.6744
W(T90)
0.21586101
0.84415349
1.00000000
1.89270529
2.56876956
Coefficients
a4: -1.26508267E-04
b4: -8.61659096E-05
a8: -1.03200171E-04
b8: 9.448039801E-06
Resistance at 273.16 K: 25.57249 ohms
Figure 8 Example Calibration Report
72
7 Front Panel Operation
Display Menu
PROBE CALIBRATION TABLE
Serial No: 2
T(C)
W(T90)
W(T90)
-190.0
-189.0
-188.0
-187.0
-186.0
-185.0
-184.0
-183.0
-182.0
-181.0
-180.0
-179.0
-178.0
-177.0
-176.0
-175.0
-174.0
-173.0
-172.0
-171.0
-170.0
-169.0
-168.0
-167.0
-166.0
-165.0
-164.0
-163.0
-162.0
-161.0
-160.0
-159.0
-158.0
-157.0
-156.0
-155.0
-154.0
-153.0
-152.0
-151.0
-150.0
-149.0
-148.0
-147.0
-146.0
-145.0
-144.0
-143.0
-142.0
-141.0
0.21300745
0.21735026
0.22169381
0.22603772
0.23038161
0.23472518
0.23906813
0.24341017
0.24775107
0.25209058
0.25642851
0.26076466
0.26509886
0.26943095
0.27376080
0.27808826
0.28241324
0.28673562
0.29105531
0.29537223
0.29968632
0.30399751
0.30830574
0.31261096
0.31691315
0.32121225
0.32550826
0.32980114
0.33409087
0.33837745
0.34266087
0.34694113
0.35121822
0.35549214
0.35976290
0.36403052
0.36829500
0.37255635
0.37681460
0.38106975
0.38532183
0.38957085
0.39381684
0.39805983
0.40229983
0.40653686
0.41077097
0.41500216
0.41923047
0.42345593
T(C)
-140.0
-139.0
-138.0
-137.0
-136.0
-135.0
-134.0
-133.0
-132.0
-131.0
-130.0
-129.0
-128.0
-127.0
-126.0
-125.0
-124.0
-123.0
-122.0
-121.0
-120.0
-119.0
-118.0
-117.0
-116.0
-115.0
-114.0
-113.0
-112.0
-111.0
-110.0
-109.0
-108.0
-107.0
-106.0
-105.0
-104.0
-103.0
-102.0
-101.0
-100.0
-99.0
-98.0
-97.0
-96.0
-95.0
-94.0
-93.0
-92.0
-91.0
0.42767855
0.43189838
0.43611544
0.44032975
0.44454135
0.44875026
0.45295651
0.45716013
0.46136114
0.46555959
0.46975548
0.47394886
0.47813975
0.48232817
0.48651416
0.49069773
0.49487893
0.49905776
0.50323426
0.50740846
0.51158037
0.51590002
0.51991744
0.52408265
0.52824567
0.53240653
0.53656525
0.54072184
0.54487634
0.54902876
0.55317913
0.55732746
0.56147377
0.56561809
0.56976043
0.57390081
0.57803925
0.58217576
0.58631037
0.59044309
0.59457394
0.59870294
0.60283009
0.60695542
0.61107895
0.61520067
0.61932062
0.62343881
0.62755524
0.63166993
Figure 9 Example Calibration Table Page
73
1575/1590 Thermometer Readout
User’s Guide
statistical calculations. You can also set up the display to graph measurements
over time. Sixteen different display setups can be stored in memory.
The display menu includes the soft-keys DATA/GRAPH, SELECT DISPLAY,
EDIT DISPLAY, DISPLAY RESOL and CLEAR GRAPH (graph display
only).
7.5.1
Data/Graph
The DATA/GRAPH soft-key allows you to select between two types of displays: data type and graph type. The data type display shows five lines of nu-
74
7 Front Panel Operation
Display Menu
meric information (see Figure 10). Each line can be programmed to show a
specific type of information such as a statistical calculation or probe parameter.
Figure 10 Data Type Display
The graph type display shows a plot of past measurements (see Figure 11). You
can set the upper and lower bounds of the graph. The time scale of the graph is
75
1575/1590 Thermometer Readout
User’s Guide
determined by the sample interval set with the SAMPLE TIMING soft-key in
the SAMPLE MENU.
Figure 11 Graph Type Display
76
7 Front Panel Operation
Display Menu
7.5.2
Select Display
The SELECT DISPLAY soft-key allows you to choose which display configuration to use.
There are 16 display configurations each for both the data and graph type display. The display configuration determines the type of data shown for the data
display or the scale limits for the graph display. You select the display using the
LR buttons. After you press Enter, the display will change to the configuration you selected.
7.5.3
Edit Display - Data
Press the EDIT DISPLAY soft-key to edit a display configuration. For the data
type display, you can program the five data fields to show any of a variety of
77
1575/1590 Thermometer Readout
User’s Guide
parameters. Use the U and D buttons to move the highlight to any field. Press
Enter to change the parameter for the field.
A new window will appear showing the available parameters. Move the cursor
to the parameter you want. The window will scroll if you move past the top or
bottom of the screen.
78
7 Front Panel Operation
Display Menu
Press Enter to select the desired parameter for the specified field. For some parameters, such as history, you may have to specify additional information, like
the location number, in another window that appears. The data display parameter options are described below.
(1) HISTORY
This option will show past measurements. You can select which history measurement to display. HISTORY(1) refers to the last measurement, HISTORY(2)
refers to the measurement before that and so on. Up to 100 past measurements
are available for viewing. As new measurements are made, past measurements
will be shifted down in the history buffer and the history field will be updated
accordingly.
(2) MEMORY
This option will show data that is stored in a specified memory location. For
storing data in memory, refer back to Section 7.3.1. When you select this option, you will be prompted to enter a memory number. Up to 100 memory locations are available.
(3) T-MEMORY
This option displays the difference between the present measurement and the
value stored in a specific memory location. This is useful for comparing measurements to a reference temperature. For storing data in memory, refer back to
Section 7.3.1. When you select this option, you will be prompted to enter a
memory number. There are 100 memory locations. If there is a conflict between the units of the T value and the MEMORY value, “..........” will be
displayed.
(4) T-HISTORY
This option displays the difference between the present measurement and a previous measurement in the history buffer. This can be used to calculate the rate
at which the temperature is changing. When you select this option, you will be
prompted to enter the history number. HISTORY(1) refers to the last measurement, HISTORY(2) refers to the measurement before that and so on. Up to 100
past measurements are available for viewing. If there is a conflict between the
unitsof the T value and the HISTORY value, “..........” will be displayed.
(5) T(1)-T(2)
This option displays the difference between Input 1 and Input 2. This is useful
when measuring the accuracy of one probe against another. It will use the most
recent measurements made on the two channels regardless of how long ago
they were made. To keep the measurements accurate, you should sample both
channels periodically. To do this automatically, use the alternating channel
mode as explained in Section 7.1.3.
(6) T(2)-T(1)
This option displays the difference between Input 2 and Input 1. This is just the
reverse of the above option.
79
1575/1590 Thermometer Readout
User’s Guide
(7) MAXIMUM
This displays the maximum of all measurements made on the channel since the
statistics were reset (see Section 7.2.5).
(8) MINIMUM
This displays the minimum of all measurements made on the channel since the
statistics were reset.
(9) SPREAD
This displays the difference between the maximum and minimum of all measurements made on the channel since the statistics were reset.
(10) AVERAGE
This displays the average of all measurements made on the channel since the
statistics were reset.
(11) STD DEV
This displays the sample standard deviation of all measurements made on the
channel since the statistics were reset. This function can be used to measure
temperature stability or noise in the measurement system.
(12) T(C)
This displays the most recent temperature measurement in degrees Celsius.
(13) T(K)
This displays the most recent temperature measurement in Kelvin.
(14) T(F)
This displays the most recent temperature measurement in degrees Fahrenheit.
(15) T( )
This displays the resistance of the most recent measurement in ohms.
(16) T(r)
This displays the most recent measurement as a resistance ratio.
(17) T(W)
This displays the most recent measurement as an ITS-90 or IPTS-68 W ratio.
(18) CURRENT
This option displays the actual current. The actual current may differ from the
programmed value depending on the resolution and voltage limitation with the
given input resistance.
(19) CONVERSION
This displays the type of temperature conversion algorithm such as ITS-90.
80
7 Front Panel Operation
Display Menu
(20) REFERENCE
This displays the resistance of the reference resistor used to make the measurement. It also indicates whether the reference was one of the internal resistors or
an external resistor connected to Input 2.
(21) PROBE SER#
This displays the serial number of the probe used to make the measurement.
7.5.4
Edit Display - Graph
For the graph type display, you can program the upper and lower limits of the
graph with the EDIT DISPLAY. Selecting AUTO causes the graph to be scaled
automatically. If you select SET and press Enter, a you will be prompted to enter the limit.
The horizontal time scale of the graph cannot be set directly. It depends on the
sample interval specified with the SAMPLE TIMING soft-key in the SAMPLE
MENU. The scale of the horizontal axis is the length of time required to make
216 measurements.
This function also allows you to select the graph style between POINTS or
LINES . POINTS causes temperature measurements to be represented as separate points on the display. LINES causes lines to be drawn that connect the
measurement points.
7.5.5
Display Resolution
The DISPLAY RESOL soft-key allows you to select the resolution with which
measurements are displayed on the screen. There are settings for the different
units. You can select resolutions of between 1 and 0.00000001. The specified
resolution is used for displaying the present measurement as well as any values
shown in the data fields. Data written to disk or transmitted via the communica-
81
1575/1590 Thermometer Readout
User’s Guide
tions ports will also use this resolution. Use the (( buttons and then press Enter
to set the resolution.
7.5.6
Clear Graph
The CLEAR GRAPH soft-key is only available when the graph type display is
selected. It clears all of the past data from the graph. If the limits are set to
AUTO, the graph will automatically rescale to the new measurements.
82
7 Front Panel Operation
System Menu
7.6
System Menu
The SYSTEM menu contains various functions that control settings such as the
temperature units, time, reference resistor calibration values, and communications parameters. The functions and sub-menus in the system menu are UNIT,
PARAM MENU, DISK MENU, COMM MENU, and SYSTEM CAL menu.
7.6.1
Unit Menu
The UNIT soft-key allows you to select the units with which measurements are
displayed, saved to disk, and transmitted over the communications channels.
You can choose any the units shown in Table 10. Access to the UNIT function
can be locked out as explained in Section 7.6.5.4.
Table 10 Units of Measure
Units
Description
C
Temperature in degrees Celsius
F
Temperature in degrees Fahrenheit
K
Temperature in degrees Kelvin
Ω
Resistance in ohms
r
Ratio of resistance to reference resistance
W
Ratio of resistance to characteristic resistance (ITS-90 and
IPTS-68 only)
83
1575/1590 Thermometer Readout
User’s Guide
W values are only meaningful with ITS-90 and IPTS-68 conversions. For
ITS-90, W refers to the ratio of measured resistance to the resistance at the triple point of water. For IPTS-68, W refers to the ratio of measured resistance to
the resistance at 0°C.
Measurement with a particular probe can be forced to be displayed in Ω, W, or
ratio using CONVERSION in EDIT PROBE (see Section 7.4.3.2).
7.6.2
Parameter Menu
The PARAM MENU contains functions for saving or loading all of the operating parameters to or from the disk and for setting the date and time. The parameter sub-menu includes the functions TIME, SAVE PARAMS, LOAD
PARAMS, RESET PARAMS and SCREEN PARAMS.
7.6.2.1
Time
The current time is always shown at the bottom of the data type screen. The
time can also be recorded with measurements that are transmitted over the communications channels or saved to disk. Access to the TIME function can be
locked out as explained in Section 7.6.5.4.
The TIME soft-key lets you set the time and date. A window appears showing
the hour, minute, month and so on. You can move to any item and change it.
You can set the clock to one of two modes: 12-hour mode (12:00 a.m. to 11:59
p.m.) and 24-hour mode (0:00 to 23:59). If you will be transmitting
time-stamped measurements to a computer it may be more convenient to use
the 24-hour format. Press Enter after you make any changes to a parameter.
NOTE: You may need to set the date again after January 1, 2000.
7.6.2.2
Save Parameters
With the SAVE PARAMS soft-key you can save all of the operating parameters
to disk. It is a good idea to keep a backup of the parameters in case they are lost
or inadvertently changed. You can also keep different sets of parameters on
disk for different applications. All of the instrument’s parameters are saved to
one file on the disk. These include all sampling variables, probe data, display
configurations, communications parameters, and reference resistor calibration
values. The file is in a special binary format for efficient storage. As a result it
cannot be easily edited on a computer.
When you use the SAVE PARAMS function, a window will appear requesting
you to enter a file number between 0 and 9. Data will be saved to a file named
“SETUPn.CFG” where n is the number you specify. Press Enter twice to save
the parameters. If a file with this name already exists on the disk, you will be
asked if you want to overwrite it.
84
7 Front Panel Operation
System Menu
7.6.2.3
Load Parameters
With the LOAD PARAMS soft-key you can load all of the operating parameters from disk. This is useful for restoring previous parameters if they have
been lost or changed. To save parameters to disk, see Section 7.6.2.2 above.
Access to the LOAD PARAMS function may be locked out if any parameters
are protected as explained in Section 7.6.5.4.
After you select this function, a window appears asking you to select a file. Select a number and then press Enter twice. If you load a parameter file, all of the
current operating parameters will be overwritten. You will be asked to confirm
by pressing Enter.
CAUTION: Using the LOAD PARAMS or RESET PARAMS functions affects instrument settings which can affect accuracy.
7.6.2.4
Reset Parameters
The RESET PARAMS function causes all of the operating parameters to be reset to the factory default values. Use this function only when necessary. Access
to the RESET PARAMS function may be locked out if any parameters are protected as explained in Section 7.6.5.4.
7.6.2.5
Screen Parameters
The SCREEN PARAMS function lets you set some of the display options
which are COLORS (1590 only), BRIGHTNESS, and SCREEN SAVER.
COLORS lets you select one of various color schemes. BRIGHTNESS lets you
adjust the brightness of the display backlight. SCREEN SAVER lets you enable, disable, or set the DELAY TIME for the screen saver. The screen saver
can help extend the lifetime of the display. The screen saver shuts off the display when the instrument is left unattended for a long period of time. After the
display shuts off, pressing any button will reactivate it.
7.6.3
Disk Menu
The disk sub-menu contains functions for setting up disk data logging and for
formatting new disks. Data logging allows you to record measurements in a file
on a disk. Figure 20 shows an example of recorded data. This example is with
PERIOD set to AUTO and TIME and DATE ON (see Section 7.6.3.1 below.)
85
1575/1590 Thermometer Readout
User’s Guide
The channel mode is set to ALT N with N=1 (see Section 7.1.3.) Note that each
measurement is preceded by the channel number.
1:
0.0103 C
13:06:47
3-22-95
2:
232.3503 C
13:06:49
3-22-95
1:
0.0104 C
13:06:51
3-22-95
2:
232.3502 C
13:06:54
3-22-95
1:
0.0104 C
13:06:56
3-22-95
2:
232.3503 C
13:06:58
3-22-95
Figure 12 Example of Data Recorded to Disk or Output Via the Digital Interface
7.6.3.1
Setup
With the SETUP soft-key you can program the disk sampling parameters. You
can specify the file number, the sample period (in seconds), and whether to record the time or date with the measurements. When you press the key, a window appears allowing you to set these parameters.
PERIOD is the interval, in seconds, between recorded measurements. You may
set it to a specific value or you can set it to AUTO. If you set the period to
AUTO, each new measurement will be recorded as soon as it is available. The
period will be the same as the sample interval set in SAMPLE TIMING (see
Section 7.2.3). Using AUTO will insure that you record every measurement and
will record samples with a more precise interval.
86
7 Front Panel Operation
System Menu
The TIME and DATE parameters determine whether the current time and date
are recorded along with measurements. It may be more convenient to use the
24-hour time format (Section 7.6.2.1).
The FILENAME is the name of the file to which the data will be recorded. You
can select from “SAMPLE0.DAT” to “SAMPLE9.DAT” using the numeric
keys 0 through 9. If the file does not yet exist on the disk, a new file will be
created. If the file already exists, it will overwrite the data in the file. A message will warn you if data will be overwritten.
7.6.3.2
Record/Stop
The RECORD/STOP soft-key is used to enable or disable disk sampling. The
word RECORD or STOP is grayed out to indicate the current status. Before
starting disk sampling, make sure the disk sampling parameters are set correctly with the SETUP soft-key.
7.6.3.3
Record N
The RECORD N soft-key allows you to record a specified number of measurements to disk. When this soft-key is pressed, a window will appear prompting
you to enter a number. Set the number of measurements you want and then
press Enter.
The 1575/1590 will begin recording measurements to disk and then stop after
the specified number of measurements has been obtained. The RECORD N
soft-key will be highlighted while recording and it will indicate the number of
samples remaining. The RECORD/ STOP soft-key will indicate RECORD
while the samples are being recorded and then STOP when finished. Before
starting disk sampling, make sure the disk sampling parameters are set correctly with the SETUP soft-key.
7.6.3.4
Format Disk
Before a floppy disk can be used to store information, it must be formatted.
You can format the disk on a PC- compatible computer or you can use the
1575/1590 FORMAT DISK function. The 1575/1590 can use 3.5" disks of either 720 kb (double density) or 1.44 Mb (high density) format. Generally, disks
of one type cannot be formatted to the other. When you begin the format operation, you must specify the density by using the (( buttons and pressing Enter.
The 1575/1590 will try to format the disk at the density you select. If the disk
cannot be formatted at this density, a message will appear to tell you so. If this
happens, select the other density and try again. Be careful with the format command; any data previously stored on the disk will be erased.
7.6.3.5
Run Application
The RUN APP soft-key is for running software on disk such as specialized applications or upgrade installation software.
87
1575/1590 Thermometer Readout
User’s Guide
7.6.4
Communications Menu
The communications sub-menu, accessed with the COMM MENU soft-key,
contains functions for setting up the serial, IEEE-488, and printer interfaces
and the analog output. The next sections describe the soft-key functions for setting the communications parameters. (For specifics on operating the 1575/1590
through the digital communications channels, see Section 8).
7.6.4.1
Serial
The serial RS-232 interface is useful for communications between the
1575/1590 and a remote device such as a computer. It allows the remote device
to receive measurement data from the thermometer or send commands to control the operation of the thermometer. (For a list of commands and other details
related to the serial communications, see Section 8). Parameters that control the
action of the serial interface are set with the SERIAL soft-key. These include
the baud rate, sample period, duplex mode, linefeed, and time and date stamp.
Pressing this soft-key brings up a window as shown below.
BAUDRATE determines the rate at which data is transferred. You must set the
baud rate of the thermometer to be the same as that of the equipment it will be
communicating with. The options are: 110, 150, 300, 600, 1200, 2400, 4800,
9600, and 19200. Use the arrow buttons to change the setting and then press
Enter to save the setting.
By setting PERIOD, you can have the thermometer automatically transmit measurements over the serial channel. The period is the interval, in seconds, between transmitted measurements. If you set the period to AUTO, each new
measurement will be transmitted as soon as it is available. The period will be
88
7 Front Panel Operation
System Menu
the same as the sample interval set in SAMPLE TIMING (see Section 7.2.3.
Using AUTO will insure that you read every measurement and will read samples with a more precise interval. If the period is set to SET, the user must enter
a value, in seconds, that will be used to transmit measurements. If the period is
set to OFF, measurements will not be transmitted (unless requested using the
“tem” command, see Section 8.3). Data sampled to the serial port is formatted
the same as data recorded to disk. Figure 12 shows an example of how the data
might look. The example is with the PERIOD set to AUTO and TIME and
DATE ON (see below). The channel mode is set to ALT N with N=1 (see Section 7.1.3). Each measurement value is preceded by the channel number.
DUPLEX determines whether commands received by the 1575/1590 will be
echoed back. If duplex is FULL, commands will be echoed back. If it is HALF
they will not.
LINEFEED determines whether a linefeed character will be transmitted at the
end of a line of data. Data transmitted from the serial port is always followed
by a carriage return. If you set the linefeed ON, a linefeed will also be transmitted immediately after the carriage return.
The TIME and DATE parameters determine whether the current time and date
are transmitted along with measurements. The time can be set to 12-hour or
24-hour time format (Section 7.6.2.1).
The serial interface is configured for eight data bits, one stop bit, and no parity.
The PC or instrument connected to the serial port must have these same
settings.
7.6.4.2
IEEE-488
The IEEE-488 (GPIB) interface works very much like the serial communications. One advantage of the IEEE-488 bus over serial is that many devices can
be connected to a single cable. It is also faster than serial communications.
With IEEE-488, as with serial, the remote device can request measurement data
from the thermometer and can send commands to control its operation. (For a
list of commands and other details related to IEEE-488 communications, see
Section 8.) Parameters that control the action of the interface are set with the
89
1575/1590 Thermometer Readout
User’s Guide
IEEE488 soft-key. These include the address, termination character, and time
and date stamp. Pressing this soft-key brings up a window as shown below.
DEVICE ADDRESS sets the IEEE-488 address of the 1575/1590 Super-Thermometer. To be used as a device on an IEEE-488 bus the thermometer must be
given a unique address. It can be any number from 0 to 30. It must be different
from any address used by any other devices also connected to the bus.
TERM determines the character or characters that are sent after each line of
data. You can select linefeed, carriage return, or both as the termination.
The TIME and DATE parameters determine whether the current time and date
are transmitted along with measurements (in response to the “tem” command,
see Section 8.3). The time can be set in 12-hour or 24-hour time format (Section 7.6.2.1).
7.6.4.3
Printer
With the printer (parallel) interface, you can connect a printer to the thermometer and have it record measurements on paper. Data sampled to the printer port
is formatted the same as data recorded to disk. Figure 20 shows an example of
how the data might look. The example is with the PERIOD set to AUTO and
TIME and DATE ON (see below). The channel mode is set to ALT N with N=1
(see Section 7.2.3). Each measurement value is preceded by the channel
number.
To transmit data to a printer, you must set the period. You can also set the line-
90
7 Front Panel Operation
System Menu
feed and the time and date stamp. Pressing the PRINTER soft-key brings up a
window as shown below.
PERIOD is the interval, in seconds, between recorded measurements. If you set
the period to AUTO, each new measurement will be recorded as soon as it is
available. The period will be the same as the sample interval set in SAMPLE
TIMING (see Section 7.2.3). Using AUTO will insure that you print every
measurement and will print samples with a more precise interval. If the period
is set to SET, the user must enter a value, in seconds, that will be used to transmit measurements. If the period is set to OFF, measurements will not be
printed.
LINEFEED determines whether a linefeed character will be transmitted at the
end of a line of data. Data transmitted from the thermometer is always followed
by a carriage return. If you set linefeed ON, a linefeed will also be transmitted
immediately after the carriage return.
The TIME and DATE parameters determine whether the current time and date
are recorded along with measurements. It may be more convenient to use the
24-hour time format (Section 7.6.2.1).
7.6.4.4
Analog Output
The analog output provides a DC potential at the rear panel binding posts, the
voltage of which shows the value of measurements. The parameters for the analog output are set in the ANALOG OUTPUT menu.
91
1575/1590 Thermometer Readout
User’s Guide
7.6.4.4.1
Parameter
The PARAMETERS soft-key allows you to specify the channel and the type of
measurement to output. When you press the soft-key, a window appears allowing you to specify the channel. If you select 1, the output will show only the
most recent measurement on Input 1. Likewise, 2 will show Input 2. If you select DEF (default) then the most recent measurement will be output regardless
of which channel was measured.
Next, a window will appear requesting you to specify a parameter to output.
For a complete description of the options, refer to Section 7.5.3.
7.6.4.4.2
Resolution
The RESOL soft-key allows you to set the resolution of the analog output. The
resolution is set in units per volt where the units depend on the specified parameter and system units. For example, if the resolution is 100, the parameter is
T (temperature in the current units), and the system units are set for °C, for every 100°C increase in the measurement, the analog output will increase 1 volt.
The smaller the resolution, the smaller the range of measurements that can be
output.
7.6.4.4.3
Offset
The OFFSET soft-key allows you to set the offset of the analog output. The offset is the measurement value, in the appropriate units, which will output 0V.
For example, if the offset is set to 25, the output will be 0V when 25°C is measured. The following formulas show the relationship between the output voltage and the measurement and how RESOL and OFFSET affect it.
Output[volts ] =
( Measurement − OFFSET )
RESOL
Measurement = RESOLxOutput[volts ] + OFFSET
7.6.4.4.4
Center
The CENTER button is used to quickly set the offset value to the most recent
measurement value. The display does not change.
7.6.4.4.5
Cal
The accuracy of the analog output can be improved by calibration. This can be
92
7 Front Panel Operation
System Menu
done with the CAL soft-key. You can also set the limits of the output. When
you press the soft-key, a window appears as follows.
Vos is the actual voltage of the output when the output value is 0. To calibrate
this, measure the actual voltage at the output using a precision voltmeter when
the output is 0. (The output will automatically be set to 0 whenever the cursor
is on the Vos parameter for convenience in calibration.) Enter the measured offset for Vos.
VSCALE is the actual voltage of the output when the output value is 5. Before
calibrating VSCALE, calibrate Vos accurately. To calibrate VSCALE, measure
the actual voltage at the output using a precision voltmeter when the output is
5. (The output will automatically be set to 5 whenever the cursor is on the
VSCALE parameter for convenience in calibration.) Enter the measured voltage for VSCALE.
HIGH LIMIT sets the maximum voltage that can be output. Normally, this is
set to the maximum which is about 5V.
LOW LIMIT sets the minimum voltage that can be output. Normally, this is set
to the minimum which is about -5V.
7.6.5
System Calibration Menu
The SYSTEM CAL menu contains functions for setting or calibrating the reference resistors and setting the security lock-out options.
93
1575/1590 Thermometer Readout
User’s Guide
7.6.5.1
Set External
When using an external reference resistor, you must specify its resistance using
this SET EXT soft-key. Access to the SET EXT function may be locked out as
explained in Section 7.6.5.4.
NOTE: When using an external reference resistor, you must enter the precise value of the resistance with the SET EXT function for the driving current and the measured resistance to be accurate.
The following steps explain how to setup an external reference resistor:
1.
Connect the reference resistor to Input 2 on the 1575/1590. It is important to use the proper reference resistor for the probe being used. For
lowest noise, a 100 ohm resistor should be used with 25 ohm and 100
ohm SPRTs (see Table 5, Reference Resistor Selection, for more
information).
2.
The external reference needs to be properly configured in order to obtain
proper measurements and driving current. To set the value of the reference resistor use System Menu|System Cal|Set Ext and enter the resistance of the external resistor attached to Input 2 and press "Enter".
Example: If your reference resistor is 99.99985 ohms, enter 99.99985
into the "External" field.
3.
Use Probe Menu|Select Channel|Input 2 to see which probe is assigned
to Input 2. Firmware will not allow you to use a probe with an external
reference if it is assigned to Input 2. If a probes is assigned to Input 2
and attempted to be used with an external reference, the error "INPUT 2
CANNOT USE EXTERNAL REFERENCE! PLEASE WAIT . . ." will
appear when trying to set the probe reference to external.
4.
If the probe to be used with an external reference is assigned to Input 2,
use the following instructions to remedy the problem:
• Use Probe Menu|Select Channel and select Input 2
• Next use Probe Menu|Select Probe and select a probe number that is not
used or a probe number that will not be used with an external reference.
94
5.
To set up a probe to use an external reference, use Probe Menu|Edit
Probe and set the Reference parameter to "External" (see Section 8.4.3
for more details).
6.
If an error is given while trying to set up a probe to use external, use
steps 3 through 5 to verify that all settings have been properly set and applied. NOTE: "Enter" has to be pressed to apply any changes made to
any field.
7 Front Panel Operation
System Menu
7.6.5.2
Set Internal
The SET INT soft-key is used to set the calibration values of the internal reference resistors when the 1575/1590 is calibrated. This function also allows you
to enable or disable the temperature stabilization oven for the reference resistors. These settings are critical to the accuracy of the instrument so they should
not be changed except when necessary to calibrate the 1575/1590. (For an explanation of the calibration procedure, see Section 9.) Access to the SET INT
function may be locked out as explained in Section 7.6.5.4.
Normally, the oven should be left on since it helps to maintain the accuracy of
the internal reference resistors. The thermometer is calibrated with the oven on.
The oven may be turned off if the absolute accuracy of the reference resistors is
not critical and the warm-up time after power on must be minimized.
CAUTION: Do not arbitrarily change the calibration values of the reference resistors as this may affect the accuracy of the instrument.
7.6.5.3
Calibrate Reference
The CAL REFR soft-key is used to calibrate the values of the internal reference
resistors. Correct calibration of the reference resistors is critical to the accuracy
of the instrument so this should not be done except by a qualified technician.
(For an explanation of the calibration procedure see Section 9.) Access to the
CAL REFR function may be locked out as explained in Section 7.6.5.4.
7.6.5.4
Security Lock-out
The SECURITY function in the SYSTEM CAL menu will allow you lock-out
access to certain parameters, menus, and functions. This provides protection so
that critical settings that may affect the accuracy and proper operation of the
1575/1590 cannot be inadvertently changed. The following groups of settings
can be independently locked out.
1.
Reference resistor calibration values (SET INT) and calibration procedure (CAL REFR).
2.
Probe characterization and setup parameters and probe calibration functions (PROBE MENU).
3.
Filter and sampling parameters (DIGITAL FILTER and SAMPLE
TIMING).
4.
System units and time and date (UNITS and TIME).
Any menu or function that is locked out cannot be accessed without providing
the correct four-digit password. The user can specify the password. The default
is “1575" or ”1590". The security option window itself cannot be accessed
without entering the password. When access to any locked-out screen is attempted, a message will appear and prompt the user to enter the password. If
the password is entered correctly access will be allowed.
95
1575/1590 Thermometer Readout
User’s Guide
The SECURITY soft-key allows the user to select which parameters and functions are locked out. The security window appears as follows.
The INT REFR lock-out controls access to the SET INT and the CAL REFR
functions in the SYSTEM CAL menu. This locks out the internal reference resistor calibration values, the oven, and the reference calibration procedure. This
group is locked out (ON) by default.
The PROBE,EXT lock-out controls access to the EDIT PROBE function in the
PROBE MENU and the SET EXT function in the SYSTEM CAL menu. This
locks out the probe selection, probe characterization and measurement parameters, probe calibration functions, and the external reference value. This parameter group is not locked out by default (OFF).
The SAMPLING lock-out controls access to the SAMPLE TIMING and the
DIGITAL FILTER functions in the SAMPLING MENU. This locks out the
sample timing parameters and the digital filter parameters. This parameter
group is not locked out by default (OFF).
The UNITS,TIME lock-out controls access to the UNITS and TIME functions
in the PARAM MENU. This locks out the units, time, and date settings. This
parameter group is not locked out by default (OFF).
The lock-out screen also allows the user to change the user password. The user
can enter a new password by typing a four-digit number in its place and pressing Enter. The number must be exactly four digits using the digits 0 through 9.
The decimal point, sign, and other keys cannot be used in the password. If the
password is changed, a message will appear and the user will be asked to confirm the operation.
96
7 Front Panel Operation
System Menu
CAUTION: If you change the password, be sure to make a note of it and
keep it in a safe place so it will not be forgotten or lost.
7.6.5.5
Information
The INFO soft-key displays the software version number.
97
8 Communications Interface
Serial Communications
8
Communications Interface
The 1575/1590 Super-Thermometer is capable of exchanging data with other
equipment using the digital communications interfaces. There are two types of
digital interfaces. The serial interface is useful for reading temperature or controlling the thermometer remotely from a terminal or computer. The IEEE-488
interface is useful for using the thermometer with other instruments in a calibration or control system.
8.1
Serial Communications
The 1575/1590 Super-Thermometer comes with a built in RS-232 serial interface that allows the operator to use a computer or terminal to remotely read the
temperature and also program any of the parameters and settings.
8.1.1
Wiring
The serial communications cable attaches to the thermometer through the D9
connector at the back of the instrument. Figure 13 shows the pin-out of this
connector and suggested cable wiring.
Figure 13 Serial Cable Wiring
99
1575/1590 Thermometer Readout
User’s Guide
8.1.2
Setup
Before operation, the serial interface of the thermometer must be set up by programming the baud rate and other configuration parameters. These parameters
are programmed with the SERIAL soft-key in the SYSTEM - COMM MENU
(see Section 7.6.4.1). You must set the baud rate to match the equipment that
will be communicating with the 1575/1590. You may also specify the duplex
mode, linefeed option, automatic sampling period, and time and date stamp options. The byte format used is 8 data bits, 1 stop bit, and no parity. Once the cable has been attached and the interface has been set up properly the
thermometer will immediately begin sending temperature readings at the programmed sample period. Commands may also be sent to the 1575/1590 to set
the various parameters. The interface commands are listed in Section 8.3 below.
8.1.3
Serial Communication Example Program
Here is a listing of an example program used to read measurements from the
1575/1590. This example runs on a PC-compatible computer using GWBasic
or QBasic. You must set the baud rate of the 1575/1590 to be the same as the
computer (1200 in this example).
’ SERIAL.BAS
’ THIS EXAMPLE USES COM PORT 2
’ This example continually reads temperature from the Hart 1590.
’ Connect the 1590 serial port to the COM2 port of the computer.
’ open COM2 port, 2400 baud, no parity, 8 data bits, 1 stop bit,
’ disable handshaking.
10 OPEN "COM2:2400,N,8,1,CD0,DS0,CS0" FOR RANDOM AS #1
20 PRINT #1, "DUPLEX=HALF & SERL=OFF & SERS=OFF"
30 PRINT #1, "SACT=R"
100
’MAIN LOOP
110 K$ = INKEY$: IF K$ > CHR$(34) GOTO 300 ’QUIT IF ANY KEY
PRESSED
120 PRINT #1, "NEW"
130 LINE INPUT #1, A$
140 IF LEFT$(A$, 6) = "NEW: 0" GOTO 100
210 PRINT #1, "TEM"
100
8 Communications Interface
IEEE-488 Communications
220 LINE INPUT #1, A$
230 PRINT A$
240 K$ = INKEY$: IF K$ > CHR$(34) GOTO 300 ’QUIT IF ANY KEY
PRESSED
250 GOTO 100
300 ’END PROGRAM
310 CLOSE
320 END
8.2
IEEE-488 Communications
The IEEE-488 (GPIB) interface works similarly to the serial interface. One advantage of the IEEE-488 over serial is that many devices can be connected to a
single bus. Also, it is faster than serial communications.
8.2.1
Setup
To set up the IEEE-488 communications, first connect an IEEE-488 standard
cable to the back of the 1575/1590. Next, set the device address and, if necessary, the termination character. These parameters are programmed with the
IEEE488 soft-key in the SYSTEM - COMM MENU (see Section 7.6.4.2). You
can also set the time or date stamp option for transmitted measurements. Commands can be sent from the bus controller to read the temperature or program
parameters. The same commands are used with IEEE-488 that are used with serial communications. These are listed in Section 8.3.
8.2.2
IEEE-488 Interface Functions
Specific IEEE-488 interface features and commands that are implemented with
the 1575/1590 are described below. The codes that describe the GPIB functionality of the 1575/1590 are: SH1, AH1, T6, L4, SR1, RL1, PP1, DC1, DT1, C0,
and E2.
8.2.2.1
Local Lockout
You can use the local lockout (LLO) GPIB command to disable the front panel
buttons while remotely controlling the 1575/1590. When the 1575/1590 receives the LLO command, the soft-key menu will disappear and the message
“LOCAL LOCKOUT” will appear in the upper right corner of the display. Local mode can be restored by sending the go-to-local (GTL) command. The
1575/1590 will always power up in local mode.
8.2.2.2
Trigger
You can use the trigger (GET) GPIB command to start a new measurement cycle. If the 1575/1590 is in the process of measuring when it receives the GET
101
1575/1590 Thermometer Readout
User’s Guide
command, the cycle will be aborted and a new measurement will begin immediately. Regardless of the previous mode, the GET command will set sampling
to run continuously.
8.2.2.3
Serial or Parallel Poll
You can use the serial or parallel poll to determine if a new measurement is
available. The 1575/1590 will set bit 4 (MAV) of the serial response byte to 1
whenever a new measurement has been completed. The MAV bit is reset when
the serial byte is polled. The parallel poll bit is also set whenever a new measurement has been completed. It is cleared when the new measurement is read
using the “tem” command (see Section 8.3). You can also use the 1575/1590
“new” command to determine if new data is available.
8.2.2.4
Device Clear
The 1575/1590 responds to the device clear (DCL) or selected device clear
(SDC) GPIB commands by clearing any data pending in the output buffer.
8.2.3
IEEE-488 Communication Example Program
Here is a listing of an example program used to control the 1575/1590 and read
measurements from it. This example program is written for a PC-compatible
computer using GWBasic with the National Instruments GPIB-PC controller.
The address of the 1575/1590 must be set to the same device address specified
in the controller configuration. This program assumes that the configuration is
set up with the 1575/1590 given the device name “1590.” This program must be
merged with “DECL.BAS” that comes with the National Instruments GPIB-PC
Card. This program declares specific constants and functions and includes necessary initialization code.
100
IEEE488.BAS
110 This example continually reads temperature from the Hart
1590.
111
120 This is intended to use National Instruments GPIB-PC
controller.
130
You must merge this code with DECL.BAS
140
500 PRINT
600
Press ESC key to quit
set up GPIB stuff
610 BDNAME$ =
GPIB0"
620 CALL IBFIND(BDNAME$, BRD0%)
102
8 Communications Interface
Digital Interface Commands
630 DEVNAME$ =
1590"
640 CALL IBFIND(DEVNAME$, DEV1%)
650 CALL IBSIC(BRD0%):
660 CMD$ = CHR$(LLO):
send interface clear, IFC
set local lockout, LLO
670 CALL IBCMD(BRD0%, CMD$)
679
set termination to linefeed, time on, date off
680 WRT$ =
term=lf & ieet=on & ieed=off\n
690 CALL IBWRT(DEV1%, WRT$)
699
command 1590 to make measurements
700 WRT$ =
sact=run\n
710 CALL IBWRT(DEV1%, WRT$)
1000
Main loop
1010 A$ = INKEY$:
check if a key was pressed
1020 IF A$ = CHR$(27) GOTO 1500
1030 CALL IBRSP(DEV1%, SPR%)
test for ESC key, end
read serial poll
1040 IF (SPR% AND &H10)=0 GOTO 1000 loop back if MAV bit not set
1050 WRT$ =
tem\n
request measurement data
1060 CALL IBWRT(DEV1%, WRT$)
1070 RD$ = SPACE$(80)
1080 CALL IBRD(DEV1%, RD$)
read measurement data
1090 PRINT LEFT$(RD$,IBCNT%-1)
1100 GOTO 1000
1500
print measurement data
loop back
End
1510 CALL IBCLR(DEV1%)
send device clear, SDC
1520 CALL IBLOC(DEV1%)
set local mode, GTL
1530 END
8.3
Digital Interface Commands
The various commands for reading or programming the 1575/1590 parameters
via the digital interfaces are listed on the following pages. These commands are
used with both the serial interface and the IEEE-488 interface. Multiple commands can be sent in one string using the “&” character in between commands.
A command or string of commands must be terminated with a carriage-return
or linefeed character. The 1575/1590 makes no distinction between upper and
103
1575/1590 Thermometer Readout
User’s Guide
lower case letters. A command may be used to either set a parameter or display
a parameter. If a command is sent with no right-side value, the current parameter value will be returned. If the command is sent followed by an “=” character
and a valid value, the parameter will be set to that value.
The “tem” command is used to read the most recent measurement. It will return the channel from which the measurement was made immediately followed
by the “:” character and a space, the value of the measurement, which is 10
characters wide padded with spaces on the left and with the same resolution as
the displayed measurement, followed by a space, the unit character, and optionally, the time and date. The time and date options are set in the serial or
IEEE-488 setup screens or by using the appropriate interface commands.
The “new” command can be used to determine if a new measurement is available since the last one was read. The “new” command returns “NEW: 1” if a
new measurement is available and “NEW: 0” otherwise. This or any other command should not be sent at a rate higher than about five per second.
In the following list of commands, characters or data within brackets “[ ]” are
optional. A slash “/” denotes alternative characters or data. Numeric data, denoted by n, may be entered in decimal or exponential notation. Characters are
shown in lower case, however upper case may also be used. Spaces may be
added within command strings and will simply be ignored. A terminating carriage return or linefeed is implied with all commands. Each command description below is followed by an example of a command string the computer might
send to the 1575/1590.
104
8 Communications Interface
Digital Interface Commands
Table 11 Interface Commands
Command
Description
Example
Measurement Commands
tem[perature]
read most recent temperature measurement
tem
new
read new data status (0: no new data, 1: new data)
new
tc[hannel](c)
read most recent measurement on specified channel
tc(2)
cma[ximum](c)
read maximum measurement for specified channel
cmax(2)
cmi[nimum](c)
read minimum measurement for specified channel
cmin(2)
csp[read](c)
read measurement spread for specified channel
cspr(2)
cav[erage](c)
read average measurement for specified channel
cave(2)
cst[ddev](c)
read standard deviation for specified channel
cstd(2)
hv(n)
read nth measurement from history log
hv(100)
ch[anmode][=n]
read or set sampling channel mode; n=1: channel 1, 2: channel 2, 0:
alternate
ch=2
rep[etitions][=n]
read or set number of samples in alternate mode
rep=5
sact[=st[op]/r[un]/sn]
read or select action of sampling (“sn”=sample n)
sact=r
san[=n]
read or set number of samples in “sample n” mode
san=100
ct[ime][=n]
read or set conversion time for each sample
ct=2
si[nterval][=n]
read or set sample interval
si=10
st[ime][=n]
read or set integration time for each sample
sti=10
fty[pe][=n[one]/a[verage]/
s[ingle-pole]/w[indow]]/e[xp]
read or select filter type (the exp setting is for the 1590 only)
fty=s
fr[eset][=n]
read or set filter reset threshold
fr=0.01
fti[me][=n]
read or set filter response time
fti=20
rf
reset filter
rf
rst
reset statistics
rst
read or set memory value and unit, i=1,2...100
mv(100)=0.01 c
cp[robe](c)[=p]
read or set probe selection for channel
cp(2)=16
ps[erial](p)[=n]
read or set serial number for probe
ps(16)=163997
pco[nversion](p)[=90/68/
cvd/poly/tr/tt/o/w]
/r[atio]
read or select temperature conversion algorithm
pco(16)=90
pre[ference](p)[=e[xt]/1/
10/100/10k]
read or select reference resistor for probe
pre(16)=100
pcu[rrent](p)[=n]
read or set current in milliamperes for probe
pcu(16)=1.0
Sampling Commands
Memory Commands
mv(i)[=n c/f/k/o/r/w]
Probe Commands
105
1575/1590 Thermometer Readout
User’s Guide
Table 12 Interface Commands continued
Command
Description
Example
po[ffset](p)[=n]
read or set three-wire lead offset for probe
po(16)=0.2857
rl[90](p)[=n]
read or set ITS-90 low range selection
rl90(16)=4
rh[90](p)[=n]
read or set ITS-90 high range selection
rh90(16)=7
r9[0](p)[=n]
read or set ITS-90 R(TPW) probe constant
r90(16)=25.48635
a9[0](p,r)[=n]
read or set ITS-90 a probe constants for range
a90(16,7)=-3.4837E-4
b9[0](p,r)[=n]
read or set ITS-90 b probe constants for range
b90(16,7)=1.5385E-5
c9[0](p,r[,i])[=n]
read or set ITS-90 c or ci probe constants for range
c90(16,7)=1.3820E-6
d9[0](p)[=n]
read or set ITS-90 d constant
d90(16)=4.876534E-9
r6[8](p)[=n]
read or set IPTS-68 R(0) constant
r68(16)=100.037465
al6[8](p)[=n]
read or set IPTS-68 alpha constant
al68(16)=0.00392583
de6[8](p)[=n]
read or set IPTS-68 delta constant
de68(16)=1.495873
a6[8](p,r)[=n]
read or set IPTS-68 a constant for range
a68(16,4)=-3.8765E-6
b6[8](p,r)[=n]
read or set IPTS-68 b constant for range
b68(16,3)=8.2094E-8
c6[8](p,r)[=n]
read or set IPTS-68 c constant for range
c68(16,4)=1.4930E-7
d6[8](p,r)[=n]
read or set IPTS-68 d constant for range
d68(16,2)=-3.3654E-6
scal[e](p)[=9[0]/6[8]]
read or select scale conversion, ITS-90 or IPTS-68
scale(16)=68
rc[vd](p)[=n]
read or set Callendar Van-Dusen R(0) constant
rcvd(16)=100.0
alc[vd](p)[=n]
read or set Callendar Van-Dusen alpha constant
alcvd(16)=0.00385
dec[vd](p)[=n]
read or set Callendar Van-Dusen delta constant
decvd(16)=1.507
bec[vd](p)[=n]
read or set Callendar Van-Dusen beta constant
becvd(16)=0.111
ap[oly](p,i)[=n]
read or set polynomial coefficients
ap(16,0)=31.9438576
at[herm](p,i)[=n]
read or set thermistor coefficients ai [T(R)]
at(16,0)=0.00368732
bt[herm](p,i)[=n]
read or set thermistor coefficients bi [R(T)]
bt(16,0)=-4.4728857
drt[emperature][=n]
read or set digits of resolution for temperature (C, K, F)
drt=4
dro[hms][=n]
read or set digits of resolution for resistance (W)
dro=6
drr[atio][=n]
read or set digits of resolution for ratio (r, W)
drr=8
Display Commands
dn[umber][=n]
read or set display number
dn=16
dt[ype][=d[ata]/g[raph]]
read or set display type
dt=g
dfp[arameter](d,f)[=n]
read or set display field parameter (see Section 5.6.3)
dfp(16,5)=3
dfi[ndex](d,i)[=n]
read or set display field memory/history index
dfi(16,5)=100
grhm[ode](d)[=a[uto]/ s[et]]
read or set mode of high limit for graph display
grhm(16)=s
grlm[ode](d)[=a[uto]/s[et]]
read or set mode of low limit for graph display
grlm(16)=s
grhv[alue](d)[=n]
read or set value of high limit for graph display
grhv(16)=100
grlv[alue](d)[=n]
read or set value of low limit for graph display
grlv(16)=0
106
8 Communications Interface
Digital Interface Commands
Table 13 Interface Commands continued
Command
Description
Example
sers[ample][=o[ff]/s[et]/
a[uto]]
read or set serial sampling mode
sers=auto
serp[eriod][=n]
read or set serial sample period (for set mode)
serp=60
du[plex][=f[ull]/h[alf]]
read or set duplex mode
dup=f
serl[inefeed][=on/of[f]]
read or set serial linefeed
serl=on
sert[ime][=on/of[f]]
read or set serial time transmission enable
sert=off
serd[ate][=on/of[f]]
read or set serial date transmission enable
serd=off
Serial Commands
IEEE-488 Commands
ieea[ddress][=n]
read or set IEEE-488 address
ieea=22
ter[mination][=cr/lf/cl]
read or set IEEE termination as CR, LF or CR&LF
term=lf
ieet[ime][=on/of[f]]
read or set IEEE time transmission enable
ieet=off
ieed[ate][=on/of[f]]
read or set IEEE date transmission enable
ieed=off
pris[ample][=o[ff]/s[et]/
a[uto]] prip[eriod][=n]
pril[inefeed][=on/of[f]]
prit[ime][=on/of[f]] Command
read or set printer sampling mode read or set printer sample period (for set
mode) read or set printer linefeed read or set printer time transmission
enable
pris=set
prip=60
pril=on
prit=off
prid[ate][=on/of[f]]
read or set printer date transmission enable
prid=off
anch[annel][=d[efault]/1/ 2]
anp[arameter][=n]
ani[ndex][=n]
ance[nter]
anr[esolution][=n]
ano[ffset][=n]
anvo[=n]
read or set analog output channel read or set analog output parameter (see
Sec. 5.6.3, n=0: temperature in current units) read or set index for history or
memory p arameters center analog output offset read or set analog output
resolution in units/volt read or set analog output offset read or set analog
output calibration offset
anch=2
anp=0
ani=100
ance
anr=100.0
ano=0.0 anvo=0.0014
anvs[=n]
read or set analog output calibration scale
anvs=4.9763
anvh[=n]
anvl [=n]
read or set analog output voltage high limit read or set analog output voltage low limit
anvh=5.0
anvl=-5.0
Printer Commands
Analog Output Commands
Disk Commands
dskf[ile][=n]
read or set disk recording file number; n=0...9
dskf=9
dska[ction][=st[op]/
r[ecord]/sn] dskn[=n]
read or set disk recording mode (sn: record n sa mples) read or set number
of records for “sn” mode
dska=r
dskn=100
dsks[ample][=s[et]/a[uto]]
read or set disk sample period mode
dskp=set
dskp[eriod][=n]
dskt[ime][=on/of[f]]
read or set disk sample period (for set mode) read or set disk time transmis- dskp=60
sion enable
dskt=off
dskd[ate][=on/of[f]]
read or set disk date transmission enable
dskd=off
107
1575/1590 Thermometer Readout
User’s Guide
Table 14 Interface Commands continued
Command
Description
Example
rr[ef](r)[=n]
read or set reference resistor calibration value; r=0: external,
rref(0)=25.000132
ov[en][=on/of[f]]
read or set reference resistor oven enable 1: 1 Ω, 2: 10 Ω, 3: 100 Ω, 4: 10
kΩ
ov=on
dep[th][=n]
read or set TPW cell immersion depth in mm.
dep=300
Calibration Commands
Clock Commands
ti[me][=hh:mm:ss[a[m]/ p[m]]] read or set time read or set date
dat[e][=mm-dd-yy[yy]]
time=2:43:15pm date=4-9-93
System Commands
u[nits][=c/k/f/o[hm]/r[atio]/w]
read or select temperature units
un=c
v[ersion]
read firmware version
ver
scrb[rightness][=n]
read or set screen brightness in percent; n=40...100
scrb=85
scrc[ontrast][=n]
read or set screen contrast in percent; n=40...100
scrc=65
scrs[aver][=on/of[f]]
read or set screen saver on or off
scrs=on
scrt[ime][=n]
read or set screen saver delay time in minutes
scrt=30
Note: For 2575 scanner commands see Section 10.5.4 on page 123. For 2590 scanner commands see Section 11.5.3 on page 133.
108
9 Calibration
Setup
9
Calibration
This chapter explains the step-by-step procedure for calibrating and verifying
the 1575/1590 Thermometer to ensure that the instrument meets its published
specifications. The calibration should be performed at least once per year. In
line with normal prudent metrology practices, Hart recommends a short-cycle
calibration interval of six months for new units during the first year to ensure
that all components are as stable as expected.
9.1
Setup
The following standard resistors are recommended for calibrating and verifying
the resistance accuracy of the thermometer:
Table 15 Standard Resistors Used for
Calibration of the Reference Resistors
Standard Resistor
Uncertainty
1Ω
10 ppm
10Ω
5 ppm
100Ω
1.5 ppm
10 kΩ
2.5 ppm
Table 16 Standard Resistors Used for
Calibration of the Ratio Measurement
Standard Resistors
Ratio Uncertainty
25Ω/100Ω
0.25 ppm
100Ω/100Ω
0.25 ppm
400Ω/100Ω
0.25 ppm
The 1575/1590 must be turned on and allowed to warm up for at least one hour
before proceeding with the calibration. The resistor oven should also be on and
warmed up for at least one hour. (See Section 7.6.5.2 to operate the resistor
oven.)
109
1575/1590 Thermometer Readout
User’s Guide
9.2
Resistance Ratio Calibration
This section describes the procedure for calibrating the resistance ratio of the
1575/1590. This requires 25, 100, and 400Ω resistors, the ratios of which are
known precisely relative to another 100Ω reference resistor.
9.3
1.
Connect the 100Ω reference resistor to Input 2.
2.
Connect the other 100Ω resistor to Input 1. Measure the ratio of Input 1
to Input 2 and verify that it is accurate within the specifications.
3.
Connect the 400Ω resistor to Input 1. Measure the ratio of Input 1 to Input 2. Adjust the ADC calibration parameter if necessary to bring the
measurement to within the specifications (adjust by the amount of the error in ppm).
4.
Connect the 25Ω resistor to Input 1. Measure the ratio of Input 1 to Input
2 and verify that it is accurate within the specifications.
Reference Resistor Calibration
This procedure can be used to calibrate the 1575/1590 by setting the calibration
values of the internal reference resistors. This requires a set of standard resistors of approximately the same resistances as the internal references.
110
1.
Connect the 100Ω standard resistor to Input 2.
2.
To properly verify the resistance in step 7, the internal reference resistor
for the probe assigned to Input 2 needs to be set to 100Ω. To verify the
internal reference resistor setting for the probe assigned to Input 2, from
the main menu select PROBE MENU|EDIT PROBE, select the probe
number assigned to Input 2, and verify that the internal REFERENCE is
set to 100Ω. If not, set it to 100Ω and then verify the resistance attached
to Input 2. For further information on probe selection and setup, see sections 4.7, Measure Temperature, and 7.4.3, Edit Probe.
3.
Begin the automated calibration procedure by pressing the CAL REFR
soft-key in the SYSTEM MENU|SYSTEM CAL menu.
4.
You will be asked to select the reference to calibrate. Select the 100Ω
reference.
5.
You will then be asked to enter the value of the external standard resistor.
The accuracy of this value is critical to the calibration.
6.
The resistance of the standard resistor will be measured as compared to
the current value of the internal reference. for at least three times the filter time constant.
7.
Allow the measurement to stabilize then press Enter to accept. The new
calibration value of the internal reference will be calculated and displayed. Press Enter to save this value as the new calibration constant. If
9 Calibration
Reference Resistor Calibration
you press Exit the procedure will resume measuring resistance as in Step
5 above.
8.
Verify the calibration by having the 1575/1590 measure the resistance attached to Input 2 using the 100Ω internal reference resistor. It should be
accurate within the specifications.
Repeat the procedure for each of the other reference resistors: 1Ω, 10Ω,
and 10 kΩ. When calibrating the 1Ω, 10Ω, or 10 kΩ reference resistors,
replace 100Ω in steps 1, 2, 4, and 8 with the respective reference resistor
value.
111
10 2575 Scanner (optional)
Introduction
10
10.1
2575 Scanner (optional)
Introduction
The Hart Scientific Model 2575 is a ten-channel scanner intended to complement the 1575 Super-Thermometer. The 2575 allows up to eleven probes to be
connected to the 1575 at once. You can switch between probes with a quick
press of the appropriate channel button. The 1575 can also be programmed to
automatically measure each channel in turn.
The scanner requires two connections to the 1575, one for the resistance output
and another for power and control signals from the 1575. The channel of the
scanner is controlled directly by the 1575. The 1575 changes the channel in response to the user pressing a channel button on the scanner, selecting or sequencing the channel with the 1575 soft-key functions, or issuing a command
to the 1575 via the communications interfaces.
Each of the ten inputs has four terminals. The terminals are gold plated for low
contact resistance and excellent durability. The selected channel input is routed
to the output by a four-pole relay. Only one input is connected to the output at
any time. LED indicators on the front panel show which channel, if any, is
switched on. The high-quality relays have low contact resistance, low thermal
EMF, and high isolation resistance. The guard on each channel is wired directly
to the guard on the output and is isolated from chassis ground.
10.2
Specifications
Input Channels
10 inputs, four-wire
Output
1 output, four-wire
Terminals
Patented DWF connectors
Maximum Circuit Resistance (each line)
0.5 Ω
Isolation Between Channels, Between Channels
and Ground
1012 Ω
Maximum Current (each line)
50 mA
Control Cable
15-pin D-subminiature cable
Size
20.3" W x 12.6" D x 7.0" H (515 mm x 320 mm x 178
mm)
Weight
27 lb (12 kg)
113
1575/1590 Thermometer Readout
User’s Guide
10.3
Quick Start
This section explains the basics of setting up and operating the 2575 Scanner
with the 1575 Thermometer. For more details on setting up the 1575, see Section 4 starting on page 17.
10.3.1
Connections
The first step in operating the scanner with the 1575 Thermometer is to make
sure all the proper connections are made. Before connecting the cables between
the scanner and the 1575 Thermometer, switch the power off to the 1575.
10.3.1.1
Resistance Output
The output of the scanner must be properly connected to the input of the 1575.
The arrangement of the scanner Output terminals corresponds to that of the
1575 Probe 1 input terminals and should be connected accordingly as shown in
Figure 14 below.
Figure 14 Scanner Output Connection
10.3.1.2
Control Cable
Before connecting the control cable between the scanner and the 1575 Thermometer, switch the power off to the 1575. The control input of the scanner
must be connected to the control output of the 1575 (see Figure 15). A 15-conductor cable is provided for this. To ensure that the cable stays tightly connected, fasten down the screws on the connectors.
114
10 2575 Scanner (optional)
Quick Start
Figure 15 1575 to 2575 Control Cable Connection
10.3.1.3
Resistance Inputs
Your SPRT or thermistor probe connects to a channel on the scanner using the
four-terminal binding posts. The top red and bottom black terminals (“C+” and
“C-”) source current to the probe. The middle two terminals (“P+” and “P-”)
sense the voltage on the probe. Figure 16 below shows how to connect a probe
115
1575/1590 Thermometer Readout
User’s Guide
to the input. If the probe has a shield it may be connected to the green “Guard”
connector.
Figure 16 Probe Input Connection
10.3.2
Setup
To make temperature measurements using your probe with the scanner you
must set up the following:
10.4
1.
Make sure all of the connections are properly set up as explained in Section 10.3.1. Select the channel of the probe you want to measure by
pressing the corresponding channel select button above the input
terminals.
2.
Set up the correct reference, current, conversion algorithm, and conversion coefficients as explained in the “Setup” section of the 1575 manual
(Section 10.3.1.3). Other probes may be connected to other channels of
the scanner and set up in the same way.
3.
The 1575 should now be able to measure temperature accurately through
the scanner. The 1575 can be programmed to automatically switch between the channels as explained in Section 10.5.2 below.
Parts and Controls
This chapter describes the exterior components of the 2575 Scanner and their
116
10 2575 Scanner (optional)
Parts and Controls
functions. A diagram of the front panel is shown in Figure 17. The primary
components are described below.
Figure 17 2575 Scanner Front Panel
Output
The rightmost terminals are used to connect the scanner to the Probe 1 measurement input of the 1575 Thermometer. The arrangement of the four Output
terminals on the scanner corresponds to that of the Probe 1 input terminals and
should be connected accordingly (see Section 10.3.1.1).
Channel Inputs
Each of the ten channels has four terminal posts with which a probe is connected. The red and black current terminals (“C+” and “C-”) supply current to
the probe. The “+” and “-” indications are only for reference; the polarity is actually periodically reversed. The red and black potential terminals (“P+” and
“P-”) are used to sense the voltage on the probe.
Guard Connector
The guard or shield of the probe cable can be connected to the “Guard” terminal. If the guard is used, the Output guard terminal of the scanner should be
connected to the Probe 1 guard terminal of the 1575. All of the guard terminals
of the inputs are wired to the output guard terminal; they are not switched. Using a guard may help to reduce the effects of interference in electrically noisy
environments.
Channel Select
The ten front panel buttons allow you to select the channel for measurement.
The channel can also be selected by the 1575 Thermometer.
117
1575/1590 Thermometer Readout
User’s Guide
MAIN MENU
CHANNEL MENU *
INPUT 1
INPUT 2
ALT N
SCANNER CHANNEL
SCANNER SEQ
Select Input 1 for measurement
Select Input 2 for measurement
Alternate between Input 1 and Input 2
Select a scanner channel for measurement
Sequence through scanner channels
SAMPLE MENU
RUN/STOP
SAMPLE N
SAMPLE TIMING
DIGITAL FILTER
RESET STATS
Start or stop continuous sampling
Start sampling for N measurements
Set conversion time, sample interval, and integration period
Select digital filter, response time, and reset threshold
Reset maximum, minimum, average, spread, standard deviation
MEMORY MENU
STORE SAMPLE
WRITE VALUE
VIEW MEMORY
CLEAR MEMORY
RUN/PAUSE
Store present measurement into a memory register
Enter a value into a memory register
View memory register contents
Clear all memory registers
Pause sampling temporarily or resume sampling
PROBE MENU
SELECT CHANNEL *
SELECT PROBE
EDIT PROBE
CAL PROBE
CAL TPW
CAL ITS-90
1.414xCURRENT
0.707xCURRENT
CONV TEST
Select channel for probe editing
Select probe setup for channel
Edit parameters for selected probe
Calibrate probe water triple point resistance
Calibrate probe ITS-90 coefficients
Multiply current by 1.414
Multiply current by 0.707
Test probe characterization coefficients
PROBE DISK
SAVE PROBE
READ PROBE
SAVE ALL
READ ALL
FORMAT DISK
DISPLAY MENU
DATA/GRAPH
SELECT DISPLAY
EDIT DISPLAY
DISPLAY RESOL
CLEAR GRAPH
Save probe setup to disk
Read probe setup from disk
Save all probes to disk
Read all probes from disk
Format disk
Select type of display
Select display setup
Edit display setup
Set display resolution
Clear data from graph (graph type display only)
SYSTEM MENU
UNITS
PARAM MENU
TIME
SAVE PARAMS
LOAD PARAMS
RESET PARAMS
SCREEN PARAMS
Select units - C, K, F, ohms, ratio, W
Set date and time
Save all parameters to disk
Read all parameters from disk
Reset all parameters to factory defaults
Set up screen saver, brightness, color†
DISK MENU
SETUP
RECORD/STOP
RECORD N
FORMAT DISK
RUN APP
Setup disk sampling parameters
Start or stop data logging to disk
Record a number of measurements to disk
Format disk
Run application program on disk
COMMUNICATIONS MENU
SERIAL
IEEE488
PRINTER
ANALOG OUTPUT
Set serial setup and sampling parameters
Set IEEE-488 setup and sampling parameters
Set parallel interface sampling parameters
Set analog output parameters
SYSTEM CAL
SET EXT
SET INT
CAL REFER
SECURITY
INFO
Set external reference resistance
Set internal reference resistances
Calibrate reference resistor
Set security lockout for parameters
Show system information
*These menus and soft-keys change when the 2575 or 2590 scanner is connected.
†
1590 only
Figure 18 Menu Tree of the 1575 (2575 Scanner Attached)
118
10 2575 Scanner (optional)
Scanner Operation
Channel Indicator
The channel indicator is shows which of the scanner channels, if any, is selected for measurement.
Control input (rear panel)
The control input is located on the rear panel of the scanner. The control cable
provided with the scanner connects the control input of the scanner to the control output of 1575. The control interface provides the control signals and the
power necessary to operate the scanner. The scanner will not operate without
being properly connected to the 1575.
10.5
Scanner Operation
This section explains operation of the 1575 Thermometer with the 2575 Scanner using the front panel buttons and soft-keys.
10.5.1
Soft-key Menus
Besides the display brightness and contrast controls, all instrument functions
are controlled using the soft-key menu system. This menu system is outlined in
the diagram below. In each sub-menu the RETURN soft-key (not shown below)
returns to the next higher menu.
10.5.2
Channel Menu
When the scanner is used with the 1575 Thermometer, the CHANNEL menu of
the 1575 includes additional functions for selecting or automatically sequencing the channels on the scanner. These functions are SCANNER CHANNEL
and SCANNER SEQ. These soft-keys appear only when the control cable is
119
1575/1590 Thermometer Readout
User’s Guide
connected between the scanner and the 1575. (For a description of the other
CHANNEL menu functions, see Section 7.1 on page 37.)
10.5.2.1
Scanner Channel
The SCANNER CHANNEL soft-key can be used to select the channel of the
scanner. This is equivalent to pressing the appropriate channel button on the
scanner. The light for that channel on the scanner will turn on and the 1575 will
begin measuring the channel. The 1575 will use the probe parameters set up for
that scanner channel (see Section 10.5.3).
10.5.2.2
Scanner Sequence
The SCANNER SEQ soft-key can be used to program the 1575 to automatically measure a sequence of channels. A window allows you to select the type
120
10 2575 Scanner (optional)
Scanner Operation
of sequence, the number of channels in the sequence, and the number of measurements to make on each channel in the sequence.
The mode determines the type of sequence to use. You can select among the
following modes.
Mode
Channels
SCAN
scanner 1 - scanner 2 - scanner 3 ... scanner 10
IN2+SCAN
input 2 - scanner 1 - scanner 2 ... scanner 10
ALT IN2/SCAN
input 2 - scanner 1 - input 2 - scanner 2 ... scanner 10
ALT SC1/SCAN
scanner 1 - scanner 2 - scanner 1 - scanner 3 ... scanner 10
USER-DEFINE
arbitrary sequence
For the four pre-defined sequences, the CHANNELS parameter sets the number of scanner channels, or in other words, the last scanner channel number in
the sequence. For the user defined sequence, CHANNELS sets the total number
of steps in the sequence. After the thermometer measures the last channel, the
sequence repeats starting again at the beginning.
The NUMBER OF SAMPLES parameter specifies the number of measurements to make on each channel before advancing to the next.
The scanner sequence mode works with either of the sampling modes described
in Section 7.2. If continuous sampling is selected, the channels will sequence
indefinitely. If SAMPLE N is selected, the channels will be sequenced until the
total number of measurements reaches the number specified with SAMPLE N.
121
1575/1590 Thermometer Readout
User’s Guide
The measurement for each channel will use the probe parameters set up for that
channel (see Section 7.2).
When the graph display is used with the scanner, any measurements made with
any of the scanner channels will simply be labeled “1" for Input 1.
10.5.3
Probe Menu
When the scanner is connected to the 1575 Thermometer, the PROBE menu is
slightly modified to allow programming of the probe parameters for the scanner
channels. The first soft-key in the menu is changed to SELECT CHAN. This
allows you to select any of the scanner channels as well as the 1575 Input 1 and
Input 2 channels. The other functions in the PROBE menu are unaffected. (For
a description of these functions, see Section 7.4 on page 45.)
10.5.3.1
Select Channel
The SELECT CHAN soft-key allows you to select the channel for which you
want to edit the probe parameters. Note that this function does not actually
change the channel being measured. Each of the two 1575 channels and ten
scanner channels are assigned one of the 16 probe parameter sets. To change
the probe setup for a particular channel, first use SELECT CHAN to specify
the channel. Then use SELECT PROBE to assign a different probe setup if desired, and EDIT PROBE to change some of the parameters. When you press
SELECT CHAN, a window appears requesting you to select a new channel
among the list. Use the and buttons to move to the desired channel and then
press Enter.
122
10 2575 Scanner (optional)
Scanner Operation
10.5.4
Digital Interface Commands
Besides the interface commands listed in the 1575 manual, there are additional
commands for operating the 1575 with the scanner. These commands are only
available when the scanner is connected to the 1575 Thermometer. The scanner
commands are listed in Table 17.
Table 17 2575 Interface Commands
Command
Description
Example
ts[canner](c)
read measurement on specified scanner channel
ts(10)
scma[ximum](c)
read maximum for specified scanner channel
scmax(10)
scmi[nimum](c)
read minimum for specified scanner channel
scmin(10)
scsp[read](c)
read spread for specified scanner channel
scspr(10)
Scanner Commands
scav[erage](c)
read average for specified scanner channel
scave(10)
scst[ddev](c)
read standard deviation for specified scanner channel
scstd(10)
ch[anmode][=n]
read or set sampling channel mode; n=1: Input 1, 2: Input 2, 0: ch=5
alternate, 3: scanner channel, 4: scanner sequence
scc[hannel][=c]
read or set scanner channel
scc=10
scp[robe](c)[=p]
read or set probe selection for scanner channel
scp(10)=16
scmo[de][=n]
read or set scanner sequence mode; n=1: SCAN, 2:
IN2+SCAN, 3: ALT IN2/SCAN, 4: ALT SC1/SCAN, 5: USER
DEFINE
scmo=1
scn[umber][=n]
read or set number of scanner channels in sequence for modes scn=10
1 to 4; n=1...10
scun[umber][=n]
read or set number of steps in user defined sequence;
n=1...100
scun=20
scuc[hannel](n)[=c] read or set channel in user defined sequence for given step;
n=1...100; c=0: input 2, 1...10: scanner 1...10
scuc(1)=0
rep[etitions][=n]
rep=5
read or set the number of samples to measure at each step in
the sequence
123
11 2590 Scanner (optional)
Introduction
11
11.1
2590 Scanner (optional)
Introduction
The Hart Scientific Model 2590 is a ten-channel scanner intended to complement the 1590 Super-Thermometer. The 2590 allows up to ten probes to be
connected to the 1590 at once. Up to five scanners can be connected to the
1590 at once to provide up to 50 channels. You can switch between probes with
a quick press of the appropriate channel button. The 1590 can also be programmed to automatically measure each channel in turn.
The scanner requires two connections to the 1590-one for the resistance output
and another for power and control signals from the 1590. The channel of the
scanner is controlled directly by the 1590. The 1590 changes the channel in response to the user pressing a channel button on the scanner, selecting or sequencing the channel with the 1590 soft-key functions, or issuing a command
to the 1590 via the communications interfaces.
Each of the ten inputs has four terminals. The terminals are gold plated for low
contact resistance and excellent durability. The selected channel input is routed
to the output by a four-pole relay. Only one input is connected to the output at
any time. LED indicators on the front panel show which channel, if any, is
switched on. The high-quality relays have low contact resistance, low thermal
EMF, and high isolation resistance. The guard on each channel is wired directly
to the guard on the output and is isolated from chassis ground. Each channel
has an independent standby current source to eliminate self-heating transients.
When enabled the standby current source will drive the PRT or thermistor with
current while it is not being used.
11.2
Specifications
11.2.1
Specifications
Input Channels
10 inputs, four-wire
Output
1 output, four-wire
Terminals
Patented DWF connectors
Maximum Circuit Resistance (each line)
0.5 Ω
Isolation Between Channels, Between Channels
and Ground
1012 Ω
Standby Current Settings
1 mA, 0.5 mA, 10 μA, disabled
Control Cable
15-pin D-subminiature cable
Maximum Number of Scanners
5 (per 1590)
Size
20.3" W x 12.6" D x 7.0" H (515 mm x 320 mm x 178
mm)
Weight
27 lb (12 kg)
125
1575/1590 Thermometer Readout
User’s Guide
11.3
Quick Start
This section explains the basics of setting up and operating the 2590 Scanner
with the 1590 Thermometer. For more details on setting up the 1590 , see
Chap. 4 of the 1590 manual.
11.3.1
Connections
The first step in operating the scanner with the 1590 Thermometer is to make
sure all the proper connections are made. Before connecting the cables between
the scanner and the 1590 Thermometer, switch the power off to the 1590.
11.3.1.1
Resistance Output
The output of the scanner must be properly connected to the input of the 1590.
Each output terminal of the 2590 connects to the Input 1 terminal with the same
designation (C1 to C1, P1 to P1, etc.). To cascade additional scanner connect
the output terminals of the second scanner to the corresponding output terminals of the first scanner. Up to five scanners can be chained together in this
way.
Figure 19 2590 to 1590 Front Panel Connections
11.3.1.2
Control Cable
Before connecting the control cable between the scanner and the 1590 Thermometer, switch the power off to the 1590. The control input of the scanner
must be connected to the control output of the 1590 as shown in Figure 20. A
15-conductor cable is provided for this. To ensure that the cable stays tightly
connected, fasten down the screws on the connectors. The control output from
126
11 2590 Scanner (optional)
Quick Start
the scanner can be connected to a second scanner. Up to five scanners can be
chained together in this way.
Figure 20 2590 To 1590 Control Cable Connection
11.3.1.3
Resistance Inputs
Your SPRT or thermistor probe connects to a channel on the scanner using the
four-terminal binding posts. The top red and bottom black terminals (“C1" and
127
1575/1590 Thermometer Readout
User’s Guide
”C2") source current to the probe. The middle two terminals (“P1" and ”P2")
sense the voltage on the probe. Figure 16 on page 116 shows how to connect a
probe to the input. If the probe has a shield it may be connected to the green
“Guard” connector..
11.3.2
Setup
To make temperature measurements using your probe with the scanner you
must set up the following:
1. Make sure all of the connections are properly set up as explained in Section 11.3.1. Select the channel of the probe you want to measure by
pressing the corresponding channel select button above the channel’s input terminals.
11.4
2.
Set up the correct reference, current, conversion algorithm, and conversion coefficients as explained in the “Setup” section of the 1590 manual.
Other probes may be connected to other channels of the scanner and set
up in the same way.
3.
The 1590 should now be able to measure temperature accurately through
the scanner. The 1590 can be programmed to automatically switch between the channels as explained in Section 11.5.1 below.
Parts and Controls
The exterior components of the 2590 Scanner and their functions are described
in this section. A diagram of the front panel is shown in Figure 21. The primary
components are described below.
Figure 21 2590 Scanner Front Panel
128
11 2590 Scanner (optional)
Scanner Operation
Output
The rightmost terminals are used to connect the scanner to the Input 1 measurement input of the 1590 Thermometer.
Channel Inputs
Each of the ten channels has four terminal posts with which a probe is connected. The red and black current terminals (“C1" and ”C2") supply current to
the probe. The red and black potential terminals (“P1" and ”P1") are used to
sense the voltage on the probe. Guard connector
The guard or shield of the probe cable can be connected to the “Guard” terminal. If the guard is used, the Output guard terminal of the scanner should be
connected to the Input 1 guard terminal of the 1590. All of the guard terminals
of the inputs are wired to the output guard terminal; they are not switched. Using a guard may help to reduce the effects of interference in electrically noisy
environments.
Channel Select
The ten front panel buttons allow you to select the channel for measurement.
The channel can also be selected by the 1590 Thermometer.
Channel indicator
The channel indicator is shows which of the scanner channels, if any, is selected for measurement.
Control Input (Rear Panel)
The control input is located on the rear panel of the scanner (see Figure 20).
The control cable provided with the scanner connects the control input of the
scanner to the control output of 1590. The control interface provides the control
signals and the power necessary to operate the scanner. The scanner will not
operate without being properly connected to the 1590.
11.5
Scanner Operation
This section explains operation of the 1590 Thermometer with the 2590 Scanner using the front panel buttons and soft-keys.
129
1575/1590 Thermometer Readout
User’s Guide
11.5.1
Channel Menu
When the scanner is used with the 1590 Thermometer, the CHANNEL menu of
the 1590 includes additional functions for selecting or automatically sequencing the channels on the scanner.
These functions are SCANNER CHANNEL and SCANNER SEQ. These
soft-keys appear only when the control cable is connected between the scanner
and the 1590. (For a description of the other CHANNEL menu functions, see
Section 7.1.)
11.5.1.1
Scanner Channel
The SCANNER CHANNEL soft-key can be used to select the channel of the
scanner. This is equivalent to pressing the appropriate channel button on the
scanner. The light for that channel on the scanner will turn on and the 1590 will
begin measuring the channel. The 1590 will use the probe parameters set up for
that scanner channel (see Section 7.4).
11.5.1.2
Scanner Sequence
The SCANNER SEQ soft-key can be used to program the 1590 to automatically measure a sequence of channels. A window allows you to select the type
130
11 2590 Scanner (optional)
Scanner Operation
of sequence, the number of channels in the sequence, and the number of measurements to make on each channel in the sequence.
The mode determines the type of sequence to use. You can select among the
following modes.
Mode
Channels
SCAN
scanner 1 - scanner 2 - scanner 3 ... scanner 10
IN2+SCAN
input 2 - scanner 1 - scanner 2 ... scanner 10
ALT IN2/SCAN
input 2 - scanner 1 - input 2 - scanner 2 ... scanner 10
ALT SC1/SCAN
scanner 1 - scanner 2 - scanner 1 - scanner 3 ... scanner 10
USER-DEFINE
arbitrary sequence
For the four pre-defined sequences, the CHANNELS parameter sets the number of scanner channels, or in other words, the last scanner channel number in
the sequence. For the user defined sequence, CHANNELS sets the total number
of steps in the sequence. After the thermometer measures the last channel, the
sequence repeats starting again at the beginning.
The NUMBER OF SAMPLES parameter specifies the number of measurements to make on each channel before advancing to the next.
The scanner sequence mode works with either of the sampling modes described
in Section 7.2. If continuous sampling is selected, the channels will sequence
indefinitely. If SAMPLE N is selected, the channels will be sequenced until the
total number of measurements reaches the number specified with SAMPLE N.
131
1575/1590 Thermometer Readout
User’s Guide
The measurement for each channel will use the probe parameters set up for that
channel (see Section 11.5.2).
When the graph display is used with the scanner, any measurements made with
any of the scanner channels will simply be labeled “1" for Input 1.
11.5.2
Probe Menu
When the scanner is connected to the 1590 Thermometer, the PROBE menu is
slightly modified to allow programming of the probe parameters for the scanner
channels. The first soft-key in the menu is changed to SELECT CHAN. This
allows you to select any of the scanner channels as well as the 1590 Input 1 and
Input 2 channels. The other functions in the PROBE menu are unaffected. (For
a description of these functions, see Section 7.4.)
11.5.2.1
Select Channel
The SELECT CHAN soft-key allows you to select the channel for which you
want to edit the probe parameters. Note that this function does not actually
change the channel being measured. Each of the two 1590 channels and ten
scanner channels are assigned one of the 16 probe parameter sets. To change
the probe setup for a particular channel, first use SELECT CHAN to specify
the channel. Then use SELECT PROBE to assign a different probe setup if desired, and EDIT PROBE to change some of the parameters. When you press
SELECT CHAN, a window appears requesting you to select a new channel
among the list. Use the and buttons to move to the desired channel and then
press Enter.\
132
11 2590 Scanner (optional)
Scanner Operation
11.5.2.2
Standby Current
The 2590 scanner has independent standby current sources for each channel.
This drives current through the PRT or thermistor while it is not being measured thus eliminating self-heating transients that may occur when the 1590 begins to measure it. The 2590 has four standby current settings for each channel:
1 mA, 0.5 mA, 10 μA, and OFF. The EDIT PROBE soft-key allows you to select one of these settings for the channel the probe is assigned to with the
STANDBY CURRENT parameter. This parameter has three options: 1000/10
μA, 500/10 μA, and NONE. When 1000/10 is selected the current source will
apply 1 mA to PRTs (resistance less than about 600Ω resistance) and 10 μA to
thermistors (resistance greater than about 600Ω). When 500/10 is selected the
current source will apply 0.5 mA to PRTs (resistance less than about 600Ω resistance) and 10 μA to thermistors (resistance greater than about 600Ω). Selecting NONE disables the standby current.
11.5.3
Digital Interface Commands
Besides the interface commands listed in the 1590 manual, there are additional
commands for operating the 1590 with the scanner. These commands are only
available when the scanner is connected to the 1590 Thermometer. The scanner
commands are listed below.
Table 18 2590 Interface Commands
Command
Description
Example
read measurement on specified scanner channel
ts(10)
Scanner Commands
ts[canner](c)
scma[ximum](c)
read maximum for specified scanner channel
scmax(10)
scmi[nimum](c)
read minimum for specified scanner channel
scmin(10)
scsp[read](c)
read spread for specified scanner channel
scspr(10)
scav[erage](c)
read average for specified scanner channel
scave(10)
scst[ddev](c)
read standard deviation for specified scanner
channel
scstd(10)
ch[anmode][=n]
read or set sampling channel mode; n=1: Input 1, 2: ch=5
Input 2, 0: alternate, 3: scanner channel, 4: scanner
sequence
scc[hannel][=c]
read or set scanner channel
scc=10
scp[robe](c)[=p]
read or set probe selection for scanner channel
scp(10)=16
scsc(p)[=n]
read or set standby current for probe; n=0: off, 10 or scsc(1)=1000
500: 500/10 μA, 1000: 1000/10 μA
scmo[de][=n]
read or set scanner sequence mode; n=1: SCAN, 2: scmo=1
IN2+SCAN, 3: ALT IN2/SCAN, 4: ALT SC1/SCAN,
5: USER DEFINE
133
1575/1590 Thermometer Readout
User’s Guide
Command
Description
scn[umber][=n]
read or set number of scanner channels in sequence scn=10
for modes 1 to 4; n=1...10
scun[umber][=n]
read or set number of steps in user defined sequence; n=1...100
scun=20
scuc[hannel](n)[=c]
read or set channel in user defined sequence for
given step; n=1...100; c=0: input 2, 1...10: scanner
1...10
scuc(1)=0
rep[etitions][=n]
read or set the number of samples to measure at
each step in the sequence
rep=5
scsc(ch)
read scanner channel stand by current
scsc(1)
scsc[urrent](ch)=[n]
set scanner channel stand by current
no standby current
0.5 mA standby current
0.5 mA standby current
1 mA standby current
scsc(1)=500
0
10
500
1000
134
Example
12 Maintenance
12
Maintenance
• Avoid operating the instrument in excessively wet, oily, dusty, or dirty environments. If the outside of the instrument becomes soiled it may be
wiped clean with a damp cloth and mild detergent. DO NOT use harsh
chemicals on the surface that may damage the paint.
• The instrument should be handled with care. Avoid knocking, dropping,
or vibrating the instrument.
• This instrument is tested and calibrated at the factory. Continued regular
testing and calibration is recommended.
135
13 Troubleshooting
Troubleshooting
13
13.1
Troubleshooting
Troubleshooting
If you run into difficulty while operating the 1575/1590, this chapter may help
you resolve the problem. Some possible problems are listed below along with
likely causes.
Problem
Solution
Failure to produce valid
measurements
The display does not seem to be showing any new measurements or
only shows the out-of-range message,
“. . . . . . . . . . .” Possible causes of this are the following:
• If the sampling status box shows “SAMPLING SUSPENDED”, the problem is the sampling function has
been stopped. Press RUN in the SAMPLING MENU to
resume sampling (see Section 7.2.1).
• If the sampling status box shows “SAMPLING INPUT 1”
or similarly indicates sampling is in process but the bar
does not appear to be moving, the problem may be the
sample interval is set to a large value. Check the sample
timing parameters with the SAMPLE TIMING soft-key in
the SAMPLE MENU (see Section 7.2.3).
• If the sample bar indicates the 1575/1590 is actively
sampling but the display shows “. . . . . . . . . .” when
measuring temperature or resistance, the input may not
be connected properly. Check to make sure your probe
is connected as described in Section 4.5. Try connecting
a resistor or shorting the input to see if it measures.
Make sure the probe or resistor is connected to the
same channel indicated in the sampling status box.
Check to make sure the correct reference resistor is selected (see Section 7.4.3.3). If the external reference is
selected, you must have the proper standard resistor
connected to the Input 2 and you must specify its value.
• If the 1575/1590 is able to measure resistance correctly
but displays “. . . . . . . . . .” for temperature, there may be
an error with the conversion type or characterization coefficients (see Section 7.4.3.2). Check these carefully.
The resistance of the probe may be outside the useful
range of the selected conversion type and coefficients.
137
1575/1590 Thermometer Readout
User’s Guide
138
Problem
Solution
Excessive variation from one
measurement to the next
The variation from one measurement to the next (noise) appears to be
greater than normal. Possible causes of this are the following:
• The current may be too low. Check the current by displaying its value in one of the programmable data fields
(see Section 7.5.3). (See the suggested current settings
for various types of sensors in Section 7.4.3.4.)
• The reference resistor selection may be incorrect. Check
the reference by displaying its value in one of the programmable data fields (see Section 7.5.3). (See the suggested reference selections for various types of sensors
in Section 7.4.3.3.)
• The filter may not be set correctly (see Section 7.2.4).
Use the exponential or moving average filter with an adequate time constant (20 to 60 seconds). Make sure the
filter threshold is greater than the normal variations in
the measurement (the message “FILTER RESET” will
be displayed if this is a problem).
• You might be experiencing electromagnetic interference
(EMI). Make sure there are no strong sources of electromagnetic interference near the 1575/1590 or other devices connected to it. Use a probe that has shielded
cable and attach the guard wire of the cable to the
‘Guard’ patented DWF connector, the ‘Chassis’ patented
DWF connector, or both (see Section 4.5). Try attaching
a ground wire between the ‘Chassis’ patented DWF connector on the 1575/1590 and the chassis of the temperature source. If the probe has no shield or guard try
simply connecting a wire between the ‘Guard’ and
‘Chassis’ patented DWF connectors.
• Room temperature variations or air drafts near the
1575/1590 can be a problem. Make sure the instrument
is operated in a stable environment.
13 Troubleshooting
Troubleshooting
Problem
Solution
Poor accuracy
The measurements do not seem to be as accurate as you expect.
Possible causes are the following:
• The current may be too low. Check the current by displaying its value in one of the programmable data fields
(see Section 7.5.3). (See the suggested current settings
for various types of sensors in Section 7.4.3.4)
• The current may be too high leading to self-heating error. Check the current by displaying its value in one of
the programmable data fields (see Section 7.5.3). (See
the suggested current settings for various types of sensors in Section 7.4.3.4.)
• The reference resistor selection may be incorrect. Check
the reference by displaying its value in one of the programmable data fields (see Section 7.5.3). (See the suggested reference selections for various types of sensors
in Section 7.4.3.3.)
• The filter may not be set correctly (see Section 7.2.4).
Use the exponential or moving average filter with an adequate time constant (20 to 60 seconds). Make sure the
filter threshold is greater than the normal variations in
the measurement (the message “FILTER RESET” will
be displayed if this is a problem).
• The temperature conversion type or probe characterization coefficients may be in error (see Section 7.4.3.2).
Check each of the probe parameters carefully. Make
sure the 3W OFFSET parameter is 0 unless you are using a three-wire or two-wire probe (see Section 7.4.3.5).
Make sure the correct probe setup is being used with the
measurements. Check the resistance-temperature conversion calculations using the CONV TEST function and
compare with the calibration report table for your probe
(see Section 7.4.4.5).
• Check to make sure the internal reference resistor calibration values are correct (see Section 7.6.5.2). Compare them with the 1575/1590 calibration report. Check
the calibration by checking the measured resistance of a
calibrated standard resistor.
• Make sure the probe wires are properly and tightly connected to the input patented DWF connectors.
• Check the accuracy of your probe against measurements of another probe or SPRT.
• Room temperature variations or air drafts near the
1575/1590 can be a problem. Make sure the instrument
is operated in a stable environment. Also make sure
there are no strong electromagnetic interference near
the 1575/1590 or devices connected to it.
• You may be expecting better accuracy than the specifications suggest. Review the specifications (Section 3.1)
and the discussion on evaluating uncertainty (Section
6.2.2).
139
1575/1590 Thermometer Readout
User’s Guide
Problem
Solution
Graph of measurements shows
jumps or stair-steps and “FILTER
RESET” is displayed
This is normal if the temperature you are measuring is increasing or
decreasing faster than the filter is able to track. To eliminate this effect
you can temporarily disable the filter by setting it to NONE (see Section 7.2.4). If this problem occurs when the temperature is reasonably
constant, the filter threshold may be set too low.
Message displayed, “WARNING:
SUBRANGE EXCEEDED”
This message indicates that the measured temperature is outside the
specified ITS-90 subrange (see Section 7.4.3.2.1). This is to warn you
that the temperature is outside the calibrated range, and thus may not
be accurate. This also serves to warn you that damage to your probe
may occur by operating it at extreme temperatures.
When calculating ITS-90 coefficients, the message “WARNING:
THIS PROBE DOES NOT MEET
ITS-90 SPECIFICATIONS” is
displayed
This message warns you that the probe does not completely conform
to the ITS-90 requirements for an SPRT. In order to be used as a precision temperature reference, an SPRT must be constructed of very
pure platinum wire. The ITS-90 standard requires that the W value for
the SPRT at certain temperatures be within acceptable limits (see
NIST Technical Note 1265, p. 12). When the coefficients are calculated, the W values are tested and the message is displayed if the
probe does not appear acceptable as an SPRT. This message should
be expected if your probe is an industrial or secondary standards
type. If the probe is a high-quality SPRT and this message appears, it
may indicate there is some error in the data used to calculate the
coefficients.
The display shows negative resis- Though you may expect the reading to be exactly 0Ω when the input
tance when the input is shorted
is shorted, electrical noise and limited linearity may cause the reading
to be slightly greater or less than 0. Negative resistance readings can
also be caused by an incorrectly connected probe.
Units displayed
The units displayed can be selected in the Units menu (see Section
7.6.1). If units to be displayed are correct in the Units menu, then the
probe conversion might be set improperly. See section 7.4.3, Edit
Probe, on setting the conversion for a probe that appears to be improperly displaying units.
NOTE: The unit in which a measurement is displayed can be affected
by both the conversion type and the System Units settings. Ratio or
ohms settings will override temperature units.
Paramater values entered are not ENTER has to be pressed for all fields to “Enter” the data and commit
it to memory.
changing or nothing appears to
happen when pressing ENTER
Press ENTER twice. Some features require ENTER to be pressed
twice, once to commit the value to memory, and a second time to start
the function/feature being used. Example: When entering a new sample N value press enter once to accept the new value and then press
enter again to start the sample N countdown.
13.2
CE Comments (1590 Only)
13.2.1
EMC Directive
Hart Scientific’s equipment has been tested to meet the European Electromagnetic Compatibility Directive (EMC Directive, 89/336/EEC). The Declaration
140
13 Troubleshooting
CE Comments (1590 Only)
of Conformity for your instrument lists the specific standards to which the unit
was tested.
The instrument was designed specifically as a test and measuring device. Compliance to the EMC directive is through IEC 61326-1 Electrical equipment for
measurement, control and laboratory use – EMC requirements (1998).
As noted in the IEC 61326-1, the instrument can have varying configurations.
The instrument was tested in a typical configuration with shielded and
grounded probe and RS232 cables. Emissions may, in non-typical applications,
exceed the levels required by the standard. It is not practical to test all configurations, as the manufacturer has no control over the probes the user may connect to the instrument.
13.2.1.1
Immunity Testing
The instrument was tested to the immunity requirements of the IEC 61326-1
according to Table 1 – Minimum immunity test requirements. Criterion B was
used for Conducted RF (IEC 61000-4-6) and Electric Fast Transit (EFT, Burst,
IEC 61000-4-4). Therefore, the operation of the instrument may be affected by
excessive electromagnetic interference and may not perform within the normal
specification limits under these conditions.
13.2.1.2
Emission Testing
The instrument fulfills the limit requirements for Class A equipment but does
not fulfill the limit requirements for Class B equipment. The instrument was
not designed to be used in domestic establishments.
13.2.2
Low Voltage Directive (Safety)
In order to comply with the European Low Voltage Directive (73/23/EEC),
Hart Scientific equipment has been designed to meet the IEC 1010-1 (EN
61010-1) and the IEC 1010-2-010 (EN 61010-2-010) standards.
141
Index
Index
!
probe 45, 47 - 48, 54
“. . . . . . . . . . .” 47, 137
0.707 x CURRENT 69
1.414 x CURRENT 69
3W OFFSET 51
A
accuracy 7, 13, 31 - 32, 139
ADC 6, 10
ADC calibration 10, 110
ALT N 39
alternate channels 39
analog output 23, 91
applications 29
average 41, 80
B
brightness 85
buttons 21, 25, 117, 129
C
CAL ITS-90 54
CAL PROBE 52
CAL TPW 52
calibration 31, 33, 95, 109
probe 52
Callendar-Van Dusen 48
CHANNEL MENU 37, 119, 130
chassis connector 18, 21, 138
CLEAR GRAPH 82
CLEAR MEMORY 45
coefficients
color 85
COMM MENU 88
commands 103, 123, 133
communications 88, 99
connector 17, 21
contrast 27
control cable 114, 126
CONV TEST 69
conversion
probe 47, 80
conversion time 40
current 31, 33 - 34, 50, 69, 80
D
data type display 74
DATA/GRAPH 74
date 25, 84
dielectric absorption 40
difference 79
digital filter 7, 31, 41, 138
DIGITAL FILTER 41
disk drive 22, 69, 84 - 85
DISK MENU 85
display 21, 24, 85
DISPLAY MENU 71
DISPLAY RESOL 81
drift 9, 50
E
EDIT DISPLAY 77, 81
EDIT PROBE 46
environmental conditions 15
143
Index
external reference resistor 21, 50, 94
M
fan 23
FILTER RESET 43, 140
filter type 41
Format disk 87
FORMAT DISK 71, 87
maintenance 135
maximum 80
measurement circuitry 6
memory 43, 79
MEMORY MENU 43
menu system 37
minimum 80
G
N
GPIB 23, 89, 101
graph type display 75
guard 18, 21, 117, 129, 138
noise
F
H
history 79
I
IEEE-488 23, 89, 101
INFO 97
initialization 18
INP 1/INP 2 46
INPUT 1 37
INPUT 2 39
inputs 21, 37, 117, 129
integration 7
integration period 41
IPTS-68 48
ITS-90 54
L
lead resistance 8, 51
leakage 9, 40
LOAD PARAMS 85
144
electrical 9, 138
measurement 50, 138
nonlinearity 10
O
oven 25, 95
P
PARAM MENU 84
parts and controls 21, 23, 25, 27, 116 - 117, 128
password 95
polynomial 49
power 17, 22
printer 23, 68, 90
probe connection 17
PROBE DISK 69
PROBE MENU 45, 122, 132
PRT 47
Q
questions 33
Index
R
rack mounting 22
ratio 50, 80, 84, 110
reactance 9, 40
READ ALL 71
READ PROBE 70
reference resistor 9, 31, 50, 81, 95, 110, 138
RESET PARAMS 85
RESET STATS 43
reset threshold 42
resistance 49, 80
resolution 10, 81
response time 42
RS-232 23, 88, 99
RUN APP 87
RUN/PAUSE 45
RUN/STOP 40
S
sample interval 41
SAMPLE MENU 39
SAMPLE N 40
SAMPLE TIMING 40
SAVE ALL 70
SAVE PARAMS 84
SAVE PROBE 69
scanner 23, 113, 125
SCANNER CHANNEL 120, 130
SCANNER SEQ 120, 130
SCREEN PARAMS 85
screen saver 85
SECURITY 95
SELECT CHAN 122, 132
SELECT DISPLAY 77
SELECT PROBE 46
self-heating 9, 50, 69
serial 23, 88, 99
serial number 47, 81
SET EXT 94
SET INT 95
shield 21, 117, 129
soft-keys 21, 25 - 26, 37
specifications 13, 113
speed 10
spread 80
SPRT 29, 47
standard deviation 80
standby current 51, 133
start 40
statistics 7, 43, 80
stem conduction 32
stop 40
STORE SAMPLE 44
subrange 48, 54
SYSTEM CAL 93
SYSTEM MENU 83
T
thermistor 29, 49
thermocouple 33
thermoelectric EMF 6, 8
three-wire offset 51
time 84
time scale 41
triple point of water 52
troubleshooting 137, 139, 141
U
uncertainty 32
unit 80, 83
UNIT 83
145
Index
V
validation 35
version 97
VIEW MEMORY 44
voltage switch 22
W
W(T90) 49, 80, 84
WARNING: SUBRANGE EXCEEDED 47, 140
WARNING: THIS PROBE... 67, 140
warranty 15
WRITE VALUE 44
146