1
FREE UNITS SWITCHEDON Computing TAKE YOUR FIRST EASY STEPS WITH MICROSOFT ✔ Easy-to-follow mini projects for Key Stages 1 and 2 ✔ For the new National Curriculum for computing Recommended by COMPUTING AT SCHOOL E D U C AT E E N G A G E E N C O U R A G E • • In collaboration with BCS, The Chartered Institute for IT COMPUTING AT SCHOOL E D U C AT E E N G A G E E N C O U R A G E • • In collaboration with BCS, The Chartered Institute for IT Microsoft has been supporting the education community for over a decade and is committed to helping every student and educator realise their full potential. We are passionate about the need to inspire and excite students of all ages about computer science. We want to play our part, working alongside others in the industry, to ensure teachers are equipped to teach it and that students are eager to learn about it. That’s why we’re proud to support these resources, which will make computer science approachable for all primary school teachers and great fun for primaryage children right across the UK. Computing at School (CAS) endorses this product because it meets the aims of supporting the teaching of computer science within computing to all pupils of all ages. This book supports good practice in teaching the computing curriculum, which will help develop computational thinking. It describes good pedagogical strategies and offers progression throughout. Further teaching resources are available through the CAS Community website at www.computingatschool.org.uk/primary SWITCHEDON Computing Now you’ve tried these activities, get complete coverage for the new Programme of Study for computing from Switched on Computing Switched on Computing will help you deliver the new Programme of Study for computing with creative units using the latest free software in a format that is designed for teachers of all levels of experience to pick up and use. Visit www.switchedoncomputing.co.uk to find out more and download a sample unit. 6 units for each year group covering: •Programming •Computational thinking •Creativity •Computer networks •Communication and collaboration •Productivity Order now and get 25% off using code SOC2a Order at www.risingstars-uk.com/computing or call 0800 091 1602. Code valid until 31st May 2014 SWITCHEDON Computing Rising Stars UK Ltd. 7 Hatchers Mews, Bermondsey Street, London, SE1 3GS www.risingstars-uk.com Every effort has been made to trace copyright holders and obtain their permission for the use of copyright materials. The authors and publisher will gladly receive information enabling them to rectify any error or omission in subsequent editions. All facts are correct at time of going to press. All referenced websites were correct at the time this book went to press. Text, design and layout © Rising Stars UK Ltd. The right of Claire Lotriet to be identified as the author of this work has been asserted by her in accordance with the Copyright, Design and Patents Act 1998. Published 2014 Author: Claire Lotriet Text design: Words & Pictures Ltd Logo design: Words & Pictures Ltd/Burville-Riley Partnership Typesetting: Words & Pictures Ltd Cover design: Burville-Riley Partnership Project managers: Emma Davis and Hilary Beaton Editor: Jennie Clifford All rights reserved. No part of this publication may be reproduced, stored in a retrieval system, or transmitted, in any form by any means, electronic, mechanical, photocopying, recording or otherwise, without the prior permission of Rising Stars UK Ltd. British Library Cataloguing in Publication Data. A CIP record for this book is available from the British Library. ISBN: 978-1-78339-144-8 Printed by Newnorth Print Ltd, Bedford. 2 Contents Introduction . . . . . . . . . . . . . . . . . . . . . . . . . . . . . . . . . . . . 4 Curriculum links . . . . . . . . . . . . . . . . . . . . . . . . . . . . . . . . 5 Planning – overview of units . . . . . . . . . . . . . . . . . . 6 Units for Key Stage 1 Unit 1: We are sharing Creating a collage all about you . . . . . . . . . . . . . . . . . . . . . . 7 Unit 2: We are cooking Producing an interactive recipe book . . . . . . . . . . . . . . . . 13 Units for Lower Key Stage 2 Unit 3: We are tour guides 3D virtual tours and interactive maps . . . . . . . . . . . . . . . . 21 Unit 4: We are botanists Sorting and identifying plants . . . . . . . . . . . . . . . . . . . . . . 28 Units for Upper Key Stage 2 Unit 5: We are film-makers Researching and filming a documentary . . . . . . . . . . . . 34 Unit 6: We are game designers Creating and advertising a computer game . . . . . . . . . . 41 3 Introduction OVERVIEW Switched on Computing: Take Your First Easy Steps with Microsoft has been written to help schools to get started with computing at Key Stages 1 and 2. Each unit has clear guidance for teachers and plenty of creative ideas for bringing each project alive in the classroom. More information on the aims and purpose of the curriculum for computing, and details of what must be taught at each key stage, can be found at www. gov.uk/government/publications/national-curriculumin-england-computing-programmes-of-study. Computing at School have produced a very useful free guide for primary schools which explains the programme of study and will help schools with their planning. It provides useful background for schools using the Switched on Computing resources. A copy of the guide is provided on the accompanying CD-ROM or can be downloaded from www. computingatschool.org.uk. WHAT DO YOU GET? Switched on Computing comprises a Teacher’s Guide covering all six units, each including comprehensive, step-by-step instructions, ideas for extension activities, and assessment guidance. There is also an accompanying CD-ROM, which contains all the Teacher’s Guide content in PDF, software demos and other resources to help deliver each unit. The Teacher’s Guide 1 About this unit This section includes: any software, hardware or apps that are needed an introduction to the unit need-to-know terminology curriculum and subject links learning expectations other variations to try. 4 2 Getting ready This section includes: things to do things you need inclusion and safe and responsible use information useful links. Use this section to find out about the practicalities of the unit and things you will need to prepare beforehand. 3 Running the task This section provides step-by-step guidance for running the task. Use the extensions as options to challenge more able children. Homework options are also included. 4 Assessment guidance This section suggests skills that should be achievable by all, many or some children. You may wish to use them in conjunction with your school’s assessment policy. 5 Classroom ideas This section provides various ways to bring the unit alive, including ideas for classroom displays, relevant weblinks, visits and books. 6 Taking it further This section suggests ways in which you could extend the unit, once it is finished. The CD-ROM The CD-ROM includes demos for software and specific tools within the software. The demos do not cover every aspect of each program, but may help increase your confidence and allow you to explore programs independently. It also contains downloads of four of the free Microsoft programs needed for some of our units: AutoCollage, Photosynth, Image Composite Editor and Movie Maker 2.6. You will also find some extra resources mentioned in some of the units to help you deliver certain steps or tasks, such as templates or examples. 5 6. We are game designers: Creating and advertising a computer game 5. We are film-makers: Researching and filming a documentary 4. We are botanists: Sorting and identifying plants 3. We are tour guides: 3D virtual tours and interactive maps nglish E Developing positive attitudes towards, and stamina for, writing by writing for different purposes. Reading aloud using intonation to make meaning clear. Learning how to use sentences with different forms: commands. D&T Selecting and using ingredients. Geography Using digital/computer mapping to locate countries. Using fieldwork to observe/record human and physical features in the local area. Science Identifying a variety of living things. Classifying data to help in answering questions. English Distinguishing between fact and opinion. Retrieving, recording and presenting information from nonfiction. Drawing on reading and research. English Considering how authors develop characters and settings. cience S Identifying, naming and labelling parts of the human body. Maths 1. We are sharing: Creating a collage all about you 2. We are cooking: Producing an interactive recipe book Eng National Curriculum (2014) Unit Curriculum links Sci PE Art and design D&T Geog Subject links His Music PSHE RE MFL 6 6. We are game designers: Creating and advertising a computer game 5. We are film-makers: Researching and filming a documentary Programming, game design, testing and refining, advertising Image searching, intellectual property, hyperlinking, non-linear presentations, testing and refining Research, organising information, intellectual property, video recording, video editing 4. We are botanists: Sorting and identifying plants nderstand computer networks, including the Internet; how they can provide U multiple services, such as the world wide web, and the opportunities they offer for communication. Use search technologies effectively, appreciate and be discerning in evaluating digital content. Use technology safely, respectfully and responsibly. Select, use and combine a variety of software (including Internet services) on a range of digital devices to accomplish given goals, including collecting, analysing, evaluating and presenting information. Design, write and debug programs that accomplish specific goals; solve problems by decomposing them into smaller parts. Use logical reasoning to detect and correct errors in algorithms and programs. Use sequence in programs; work with various forms of input and output. Be discerning in evaluating digital content. nderstand the opportunities computer networks (including Internet services) U can offer for collaboration. Use technology respectfully and responsibly. Use and combine a variety of software (including Internet services) on a range of digital devices to accomplish given goals, including collecting, evaluating and presenting information. Use technology safely and respectfully. Use and combine a variety of software (including Internet services) on a range of digital devices to accomplish given goals, including analysing information. nderstand what algorithms are. U Use technology purposefully to create, organise, store, manipulate and retrieve digital content. Digital photography, combining a variety of media, writing for an audience, intellectual property Digital photography, photo editing, collaboration, digital mapping se technology purposefully to create, organise, store, manipulate and U retrieve digital content. Computing programmes of study Digital photography, photo editing, presentation Target skills 3. We are tour guides: 3D virtual tours and interactive maps 1. We are sharing: Creating a collage all about you 2. We are cooking: Producing an interactive recipe book Unit Planning - overview of units Kodu, Word Movie Maker 2.6, Word, OneNote (app), OneNote PowerPoint Photosynth, Image Composite Editor, Bing Maps PowerPoint AutoCollage, Word, PowerPoint Suggested software Digital video cameras, microphones, tablets, tripods Colour printer Digital cameras, USB microphones/ in-built computer microphones, tripods Digital cameras, tripods Digital cameras, scanners Suggested equipment Unit 1: We are sharing We are sharing: Creating a collage all about you Unit 1 1 About this unit Software: AutoCollage, Word, PowerPoint Hardware: Digital cameras, scanners Outcome: A photo collage documenting different aspects of the children’s lives INTRODUCTION In this unit, the children will think about what makes them individuals, such as their hobbies, interests, likes and dislikes. They will create, organise, store and retrieve data in the form of digital images, and will manipulate and combine them to create a collage about themselves. TRANSLATING THE COMPUTING POS Algorithm An algorithm is a set of instructions designed to solve a problem or perform a specific task. Computer programs use algorithms to carry out different functions. Face detection his is a tool that can identify a face in a T photographic image. ASSESSMENT or a detailed analysis of the assessment criteria and F suggestions for progression, please see pages 11–12. CURRICULUM LINKS Computing PoS se technology purposefully to create, organise, U store, manipulate and retrieve digital content. Science PoS Identify, name and label the basic parts of the human body. Suggested subject links Art and design: This unit works well if the children have the opportunity to create collages using traditional, non-digital methods in art and design. The children could think about the differences, similarities, and pros and cons of both techniques. Numeracy: The children have the opportunity to explore how many images they want to include in their collage, and how using different numbers of images changes the size of each image. Science: Use AutoCollage to categorise objects. You could also do this in other subjects, such as RE and history. LEARNING EXPECTATIONS This unit will enable the children to: understand similarities and differences between themselves and their peers use a digital camera to capture images combine images explore and experiment with the tools available and identify how these can change their work. VARIATIONS TO TRY Work in groups to photograph and label different parts of the human body. Create a visual report of a school trip or visit. Take photos of different parts of the school or classroom. Source images on a particular topic on the Internet. Use photographs to summarise and document work done as part of any topic. 7 Unit 1: We are sharing 2 Getting ready THINGS TO DO Read the Core steps sections of Running the task. Choose which software/tools are most accessible/ appropriate for use with your class. Download your chosen software/tools (see Useful links). Look at appropriate software tutorials (see Useful links). Spend 60 minutes familiarising yourself with your chosen software/tools. Read the Extensions sections of Running the task. Do you want to use any of the extras provided? If the children are to go off site for this work, make the necessary arrangements. Ensure you have sufficient computers/laptops/ tablets booked in advance. CD RESOURCES Photographs of different faces Microsoft AutoCollage download Software in 60 Seconds: AutoCollage SAFE AND RESPONSIBLE USE If you plan to upload the collages to a school blog or virtual learning environment, take precautions to protect the children’s identities, such as not linking names to images of individuals. Ultimately, any decisions you make should be in line with your school’s e-safety policy. If the children bring in photos to scan or items from home to photograph, ensure appropriate permission has been sought. INCLUSION Using a digital camera requires well-developed fine motor skills. Some children may benefit from using a camera designed specifically for children, together with a tripod to keep the camera steady. Children with visual impairment may need additional assistive technology (see www. abilitynet.org.uk). 8 THINGS YOU NEED A collage about yourself embedded into a PowerPoint presentation or interactive whiteboard file Photographs of different faces (see CD-ROM) Digital cameras Scanners (if the children are going to be drawing pictures as well as taking photographs) Places, items and people for the children to take photos of (possibly including items from home, such as favourite games or toys) Computers/laptops WWW USEFUL LINKS Software and tools AutoCollage is software that is free for teachers. Install it from the accompanying Switched on Computing CD-ROM. PowerPoint is pay-for software or you can use the free Web app in SkyDrive or Office 365; see http:// office.microsoft.com/en-gb/powerpoint/. Word is pay-for software or you can use the free Web app in SkyDrive or Office 365; see http:// office.microsoft.com/en-gb/word/. Online tutorials How to use AutoCollage: www.pil-network.com/ Resources/Tutorials/Details/c68263c6-44f0-4b7182dd-a61fb5c35f09 Useful hints and tips on creating larger pictures in AutoCollage: www.youtube.com/ watch?v=4C34mQW0NpA A PDF AutoCollage user manual: http:// mikemcsharry.files.wordpress.com/2009/11/ autocollage-user-manual.pdf www.youtube.com/watch?v=HX_jppZ4yN4 shows you how to use interactive text boxes in PowerPoint – useful for making notes on a live presentation. Information and ideas General AutoCollage information and ideas from Microsoft Partners in Learning: www.pil-network. com/Resources/Tools/Details/1d1fb292-d2514d52-9fbd-9dd9cc45a076 Information about, and examples of, collages at The Museum of Modern Art in New York: www. moma.org/collection/theme.php?theme_id=10064 Examples of AutoCollages others have made: www.flickr.com/groups/autocollage/ Running the task – We are sharing xamples of collages at The Museum of E Modern Art in New York Examples of AutoCollages others have made Show the children how to download their images and save them in their folder. Model how to take photos using one of the digital cameras. The children will need a minimum of seven images each for their photo collage. Allow the children plenty of time to take photos. Ask the children what sort of pictures they might like to include in their collage, e.g. a piece of work they are proud of or covers of books they like. How to use AutoCollage Explain that AutoCollage has a tool that detects faces in photographs to make sure no faces are covered up by another photograph. Demonstrate WWW Images of different faces AutoCollage download YOU WILL NEED Display images of faces and ask the children to suggest face detection rules. Test out the children’s rules on various photographs of faces to see if they work. Establish that AutoCollage follows sets of instructions called ‘algorithms’. What instructions might AutoCollage be following to detect faces? by creating a collage with face detection enabled and point out the square frames that show the program has detected a face. Step 2: How does AutoCollage recognise faces? Show the children some examples of collages and introduce the task. Share an AutoCollage you have made about yourself. WWW YOU WILL NEED Step 1: Thinking about what makes you unique Core steps Challenge the children to draw faces of two different people and think about how they are similar and how they are different. HOME The children could label photographs of each other’s faces and make posters that show what makes a face a face. SCHOOL Challenge the children to draw a selfportrait that could be scanned and included in their collage. HOME The children could create their own images using a paint program and insert these into their collage. SCHOOL Extensions Software: AutoCollage, Word, PowerPoint Hardware: Digital cameras, scanners Outcome: A photo collage documenting different aspects of the children’s lives 3 Unit 1: We are sharing 9 10 How to use AutoCollage Show the children how to change the number of photographs they want to include in their collage Look at the collage that has been made. Make a point of showing that you are not quite happy with it yet and would like to include more/fewer photos. In AutoCollage, model how to select a folder of saved images and click on the ‘Create’ button. Watch as AutoCollage moves and sorts the images and turns them into a photo collage. WWW YOU WILL NEED Step 3: Creating the collages Allow time for the children to present their collages to the rest of the class, talking about the different images they used, and what the images mean to them. Allow the children time to experiment with AutoCollage, creating collages using different numbers of images. The children should save their favourite version of the collage in their folder. using the slider (the minimum is seven). Challenge the children to write a short description of their collage and the pictures they have included. HOME Some children could add labels to their collage. Insert the finished collage into PowerPoint, and then place text boxes over different parts of the image. SCHOOL Unit 1: We are sharing Unit 1: We are sharing 4 Assessment guidance Use this page to assess the children’s computing knowledge and skills. You may wish to use these statements in conjunction with your own school policy for levelling work. ALL CHILDREN SHOULD BE ABLE TO: decide what they want to include in their collage take photos of objects, people and places, with support COMPUTING POS REFERENCE Use technology purposefully to create, organise, store, manipulate and retrieve digital content create a collage using AutoCollage. MOST CHILDREN WILL BE ABLE TO: take photos of objects, people and places modify an AutoCollage by changing the number of photos that are included. Use technology purposefully to create, organise, store, manipulate and retrieve digital content SOME CHILDREN WILL BE ABLE TO: use a paint program to create their own images to include in their collage add labels to their collage. Use technology purposefully to create, organise, store, manipulate and retrieve digital content 11 Unit 1: We are sharing 5 Classroom ideas Practical suggestions to bring this unit alive! DISPLAYS AND ACTIVITIES Posters and large images of collages by various artists would provide further inspiration. Provide a variety of materials and cuttings from magazines with which the children can experiment creating collages. Printouts of the children’s collages would make a fantastic display – you could leave them unnamed and challenge people to guess who made each collage. You could take this even further by creating an exhibition of the collages and inviting parents and carers in to view them. WWW WEBLINKS VISITS Find out if any art galleries close to you have collages in their collections. Bring the project to life by inviting a collage artist to come into school and talk about their work. BOOKS Brereton, R. and Roberts, C. Cut And Paste: 21st Century Collage. (Laurence King, 2011) Lark Books. Masters: Collage. (Lark, 2010) Oldham, T. All About Collage. (AMMO Books, 2012) Plowman, R. The Collage Workbook. (Lark, 2012) WikiHow has some ideas about how to make a collage at www.wikihow.com/Make-a-Collage. The website http://gomakesomething.com/ category/print/printcollage/ contains sheets of images that can be downloaded, printed out and used to make collages using traditional techniques. For a wide variety of photo collage techniques that will intrigue and inspire, visit http://graphicalerts. com/collage-artwork-collection/. 6 Taking it further When you’ve finished, you might want to extend the project in the following ways. Use the collages as a basis for a class assembly and share them with parents, carers and the rest of the school. Challenge the children to write about themselves, then combine this with the collages to create a class book. Some children might like to write instructions to explain how to use AutoCollage. 12 Create a class collage that includes a photo of everybody in the class. The children could also make photo collages for other classes in the school as part of a bigger project. Some children might like to document their work in other projects by taking photos of the process and creating a photo collage at the end. Create photo collages of life at school and laminate them to sell at a school fair. Unit 2: We are cooking We are cooking: Producing an interactive recipe book Unit 2 1 About this unit Software: PowerPoint Hardware: Digital cameras, USB microphones/in-built computer microphones, tripods Outcome: An electronic recipe book containing text, photos and audio instructions INTRODUCTION In this unit, the children will relate algorithms to recipes. They will write a recipe for a healthy sandwich and use this to create an electronic recipe book, which will also include photos and audio instructions. TRANSLATING THE COMPUTING POS Algorithm An algorithm is a set of instructions designed to solve a problem or perform a specific task. Computer programs use algorithms to carry out different functions. Program A program is a series of instructions, written in code, which controls the operation of a computer. ASSESSMENT For a detailed analysis of the assessment criteria and suggestions for progression, please see pages 19-20. CURRICULUM LINKS Computing PoS Understand what algorithms are. Use technology purposefully to create, organise, store, manipulate and retrieve digital content. English PoS Develop positive attitudes towards, and stamina for, writing by writing for different purposes. Read aloud what they have written with appropriate intonation to make the meaning clear. Learn how to use sentences with different forms: commands. Design and technology PoS Suggested subject links Science: This unit works well if the children know about healthy eating, and can use this knowledge to inform their recipe choices. Literacy: The work in this unit draws on the children’s experience of, and familiarity with, instructional writing. Numeracy: There are opportunities to read measurements from scales, convert between units of measure, and explore simple scaling problems. Geography: When designing their sandwich, the children could get ideas for sandwich fillings by investigating food from around the world. LEARNING EXPECTATIONS This unit will enable the children to: develop an understanding of algorithms write instructions for others to follow take photos to support written instructions record audio to support written instructions explore how various media can be combined evaluate how successful a set of instructions is. VARIATIONS TO TRY Recipes for other meals or dishes, including seasonal dishes. Instructions that explain how to carry out a mathematical operation or solve a problem. Instructions that explain the rules of a game or sport the children are familiar with. Instructions that explain how to make something the children have already worked on in school, such as a Christmas decoration or a model aeroplane. Fantasy instructions, such as how to make your own version of ‘George’s Marvellous Medicine’ (based on the book by Roald Dahl) or your own potion that does something magical. Select from and use a wide range of materials and components, including ingredients, according to their characteristics. 13 Unit 2: We are cooking 2 Getting ready THINGS TO DO Read the Core steps sections of Running the task. Choose which software/tools are most accessible/ appropriate for use with your class. Download your chosen software/tools (see Useful links). Look at appropriate software tutorials (see Useful links). Spend 60 minutes familiarising yourself with your chosen software/tools. Read the Extensions sections of Running the task. Do you want to use any of the extras provided? If the children are to go off site for this work, make the necessary arrangements. Ensure you have sufficient computers/laptops/ tablets booked in advance. CD RESOURCES PowerPoint recipe template, Office 365 guides and resources Software in 60 Seconds: PowerPoint SAFE AND RESPONSIBLE USE Make sure you are fully aware of any known allergies when planning which ingredients to provide. Think carefully when selecting kitchen equipment for the children to use, and carry out an appropriate risk assessment. If you plan to upload any work to a school blog or virtual learning environment, take precautions to protect the children’s identities, such as not linking names to images of individuals. Ultimately, any decisions you make should be in line with your school’s e-safety policy. INCLUSION Using a digital camera requires well-developed fine motor skills. Some children may benefit from using a camera designed specifically for children, together with a tripod to keep the camera steady. Children with visual impairment may need additional assistive technology (see www. abilitynet.org.uk). Some children may need additional support to write the text for their recipe. If so, think about setting up a PowerPoint template containing sentence starters that they can edit. 14 THINGS YOU NEED An example set of instructions Various ingredients to make a sandwich Equipment needed for sandwich-making Digital cameras (and tripods, if necessary) USB microphones/in-built computer microphones When considering which ingredients to provide, be aware that some children may be unable to eat certain foods because of religious practices followed at home. WWW USEFUL LINKS Software and tools PowerPoint is pay-for software or you can use the free Web app in SkyDrive or Office 365; see http:// office.microsoft.com/en-gb/powerpoint/. Online tutorials PowerPoint training videos from Microsoft: www. youtube.com/playlist?list=PLXPr7gfUMmKxj9Nhp BCQtULSkfnS1tcXU How to add pictures or clip art to a PowerPoint presentation: www.youtube.com/watch?v=c_qIuCPXrQk How to insert sound into a PowerPoint presentation: www.youtube.com/watch?v=sNxJQa51D9A Information and ideas See how one teacher, Philip Bagge, got his class to ‘program’ him to make a jam sandwich: www. youtube.com/watch?v=leBEFaVHllE What’s an algorithm?: http://ed.ted.com/lessons/ your-brain-can-solve-algorithms-david-j-malan Cooking with kids – an interactive guide: www. theguardian.com/lifeandstyle/interactive/2013/ jul/30/cooking-with-kids-interactive-recipes-videos Sandwiches for kids – easy sandwich recipes: www.parenting.com/tags/sandwiches A selection of primary school recipes in various formats, including PowerPoint: www. foodafactoflife.org.uk/sheet.aspx?siteId=20§io nId=82&contentId=276 A variety of film clips of children’s cookery TV shows can be found at www.youtube.com/user/ CookingKidsShows. Running the task – We are cooking Software: PowerPoint ‘Programming’ a teacher to make a jam sandwich Share some examples of simple recipes on the interactive whiteboard. Ask the children to share any recipes they know. WWW YOU WILL NEED Step 2: Programming the teacher Explain that computers are also able to carry out tasks by following sets of instructions called ‘algorithms’. We can tell a computer what we want it to do, and a related algorithm will tell the computer how to do it. Model how to carry out some tasks within programs on the interactive whiteboard, such as opening a document. Share an example of some instructions that helped you to carry out a task. Step 1: What is an algorithm? Establish some rules about how to write clear instructions in recipes. Collect sandwich-making tools and ingredients. Ask your class to give you an algorithm for making a sandwich. Each time an instruction is given to you, repeat it back before carrying it out precisely. Watch a clip of some children programming their teacher to make a jam sandwich. Discuss whether the children always gave their teacher the right instructions. Explain to the children that they are going to become chefs and create algorithms that tell someone how to make a healthy sandwich. Tell the children you are going to write an algorithm that shows how you get to school. Model how to number each step and use imperative verbs at the beginning of each sentence. Challenge them to create their own algorithms for getting to school. Core steps Challenge the children to ‘program’ a member of the family to carry out a simple task at home and note down what they told them to do. HOME The children could ‘program’ each other to carry out simple tasks, such as putting on shoes or sharpening a pencil. SCHOOL The children could write an algorithm that explains how to play their favourite playground game. HOME The children could create a variety of algorithms for different everyday classroom tasks, such as getting changed for PE. SCHOOL Extensions Hardware: Digital cameras, USB microphones/in-built computer microphones Outcome: An electronic recipe book containing text, photos and audio instructions 3 Unit 2: We are cooking 15 16 ‘Sandwiches for kids’ website Film clips of children’s cookery TV shows Show the children how to use a digital camera to take photos, including how to hold it steady (or how to use a tripod, if you have them). Ensure that all children have the opportunity to explore using the cameras and get to grips with the different functions. Tell the children that today they will be working in small groups to make a sandwich. WWW YOU WILL NEED Step 4: Making sandwiches Encourage children to make the poster ‘their own’ by experimenting with colours, font choices and other formatting options. Children should also name their work. Share the ‘Sandwiches for kids’ website. Model how to copy and paste text and images from the website into a blank Word document. Ask the children to select a recipe to make into a poster, experimenting with colours, font choices and other formatting options. WWW YOU WILL NEED Step 3: Thinking about copyright After each group has made their sandwich, ensure that the children know what to do with the photographs they have taken. This could be an opportunity to get the children thinking about good practice by showing them how to save their photos in folders. Split the class into groups of four or five (depending on the size of your class and equipment available). It may be worth allocating roles within each group, such as cooks, photographer and note-takers. The children should swap roles so everyone gets to experience each one. Together agree on a set of rules to follow when using copyright material; for example, including a statement that explains the work is not all their own, or copying and pasting the Web address from where the material was taken. Share posters. Ask the children whether it is acceptable to make it look as if the recipe was theirs. Encourage the children to relate this to their own work and how they would feel if someone copied it, put their name to it and made it look like their own. Explain that the person who created the work owns the copyright to it. The children could watch someone at home preparing a simple meal, and then create instructions on how to do it. HOME You could also watch a clip of a chef cooking on TV to further familiarise pupils with typical vocabulary used in recipes and cooking. The children could research sandwiches from around the world and the different breads that are used. SCHOOL The children could make posters explaining the class copyright rules. HOME You could give the children time to edit their work according to the new class copyright rules. SCHOOL Unit 2: We are cooking How to insert pictures and clip art into PowerPoint Demonstrate how to open the PowerPoint file they have saved containing the text for their recipe. Point out the space for images on each slide. Remind the children that they took photographs when they made their sandwiches. Suggest that they include these photos in their recipe books. Ask: Why is it useful to have photographs in recipe books? WWW YOU WILL NEED Step 6: Adding images Demonstrate how to open the PowerPoint recipe template from the CD-ROM, which has all the slides set up in the right order. Use the ‘Save as’ command to save it to an appropriate place. This Explain to the children that they are going to create a recipe book on the computer. Show the children an example of a PowerPoint recipe book. WWW Selection of primary school recipes in various formats PowerPoint recipe template YOU WILL NEED Step 5: Creating text for the recipe book Allow the children time to insert an appropriate image on to each slide, giving them frequent reminders to save their work. Demonstrate where to find the ‘Insert picture’ button. Model how to navigate the menus to find the folder of photos they saved previously and to select the one they want to insert. Model how to type text into the text box on the title slide, and then how to move to the next slide and type text into the text boxes there. Ask the children to type their sandwich recipes into their recipe books, referring to the notes they made during the previous lesson’s sandwich-making activity. is a good opportunity to discuss the difference between ‘Save’ and ‘Save as’. (‘Save’ saves over the top of any work done and ‘Save as’ saves work as a new file). The children could explore the idea of visual instructions and draw a series of images that explain how to carry out a task without any accompanying text. HOME Some children could explore different image formatting options in PowerPoint, such as frames and shadow effects. SCHOOL The children could draw a picture of their sandwich and label its ingredients. HOME Some children could format the text in their recipe books and explore different fonts and sizes. SCHOOL Unit 2: We are cooking 17 18 How to insert sound into a PowerPoint presentation Discuss what worked well in each other’s recipe books, and what could be improved. Ask the children whether they prefer following an interactive book or a traditional recipe book, and why. Share the assessment statements, encouraging the children to review what they have learned and self-assess against them. Arrange for the necessary equipment to be available, as well as some computers displaying some of the children’s recipe books. In small groups, challenge the children to follow the instructions in each other’s books to see whether they work. Remind them they must do exactly what the recipe book says, not what they think they should be doing. Allow time for the children to try out each other’s recipes. Alternatively, the children could record sound directly into PowerPoint. Instructions on how to do this are provided on the Switched on Computing CD-ROM. Show the children how to embed their sound files into their PowerPoint slideshow. The Switched on Computing CD-ROM explains how to do this. Model how to save the audio files to an appropriate place. Allow the children time to record and save audio files of the steps of their recipe. Each step will need to be recorded separately so they can be inserted into separate slides. Once the recipe books are complete, it is a great opportunity for the children to evaluate their own and each other’s work. Explain that they are going to try to follow each other’s recipes. Step 8: Testing each other’s algorithms Demonstrate how to use a device such as a USB microphone to record audio files. The children should record themselves reading out the text from each step of their recipe. Tell the children they will be adding sound to their recipe books. Ask: Why might it be useful to have sound as well as text and images in your recipe book? WWW YOU WILL NEED Step 7: Adding sound Ask the children to create an advert for their interactive book, persuading readers that it is better than a traditional recipe book. HOME Some children could refine their recipe book based on the feedback they receive and their self-assessment. SCHOOL Challenge the children to plan another interactive instruction book that explains how to carry out a familiar task, such as playing a game or making a craft project. HOME Some children might want to write and record a theme tune for their book that can be inserted into the title page. SCHOOL Unit 2: We are cooking Unit 2: We are cooking 4 Assessment guidance Use this page to assess the children’s computing knowledge and skills. You may wish to use these statements in conjunction with your own school policy for levelling work. ALL CHILDREN SHOULD BE ABLE TO: understand that an algorithm is a series of instructions designed to solve a problem write instructions for a simple recipe in the correct order COMPUTING POS REFERENCE Understand what algorithms are Use technology purposefully to create digital content take photos with support record themselves speaking with support. MOST CHILDREN WILL BE ABLE TO: understand that computers work by following algorithms write their own instructions for a simple recipe Understand what algorithms are Use technology purposefully to create digital content take photos record themselves reading their work. SOME CHILDREN WILL BE ABLE TO: consider different tasks computers have to carry out format their photos by exploring different effects available Understand what algorithms are Use technology purposefully to organise, store, manipulate and retrieve digital content explore different formatting options, such as font size and colour, and background colour. 19 Unit 2: We are cooking 5 Classroom ideas Practical suggestions to bring this unit alive! DISPLAYS AND ACTIVITIES A kitchen role-play area in your classroom would give the children the opportunity to ‘practise’ and to talk about their cooking skills. A display about healthy foods can be bought at the local supermarket or on the local high street. A fruit and vegetable tasting session would give the children the opportunity to try fruits and vegetables they might not have eaten before. A display of recipes in the school dining area could inspire other children during lunchtimes. WWW WEBLINKS For free online games based around following recipes, visit www.cookinggames.com/. View a collection of online activities about healthy eating at http://resources.woodlands-junior.kent. sch.uk/revision/science/living/humanbody.html. For food safety activities for Key Stage 1 go to http://school.asda.com/teachers/foodsafety/ks1. aspx. VISITS Arrange for a chef from a local restaurant or the produce manager from a local supermarket to talk about their experiences of working with food. Invite parents, carers and other family members to share and talk about their favourite dishes. Visit a local supermarket, greengrocer or market to explore the different foods available and their prices. The children could be challenged to see what they could buy with a given budget. BOOKS Butterworth, C. Lunchbox: The Story Of Your Food. (Walker, 2013) Edwards, G. The Disgusting Sandwich. (Alison Green Books, 2013) Herman, D. Carla’s Sandwich (Flashlight Press, 2004) Lord, J. and Burroway, J. The Giant Jam Sandwich. (Red Fox Picture Books, 2010) Pelham, D. Sam’s Sandwich. (Penguin Books, 1991) 6 Taking it further When you’ve finished, you might want to extend the project in the following ways. Invite parents and carers in to try out the children’s recipe books and make some sandwiches. Set up a class café and invite other classes to taste the children’s creations. The children could film themselves making their recipes in the style of TV chefs. 20 Explore, make and try traditional sandwiches from different countries around the world. Create recipe books for other healthy creations such as fruit smoothies or milkshakes. Investigate the cost of ingredients and compare how much everyone’s sandwiches cost to make. Unit 3: We are tour guides We are tour guides: 3D virtual tours and interactive maps Unit 3 1 About this unit Software: Photosynth, Image Composite Editor, Bing Maps App: Use the Photosynth app on mobile devices such as tablets and smart phones Hardware: Digital cameras, tripods Outcome: An electronic map that links to immersive 3D images of a local area INTRODUCTION In this unit, the children will visit a local area and take photographs of key places. They will ‘stitch’ these images together electronically to create panoramic views. Finally, they will link these to the corresponding location on an electronic map, creating a virtual tour of the local area. TRANSLATING THE COMPUTING POS Synth This is one type of 3D image that can be created in Photosynth – you will need a Microsoft Live ID to do this. A synth is good for capturing different sides of an object. The photos overlap to reconstruct a 3D model of the space. Panorama This is another type of 3D image, created in Image Composite Editor and shared via Photosynth. A panorama can be shot when you can capture everything from a single location. Panoramas are created by stitching together a set of photos taken from the same spot with the same focal length. Virtual Simulated by a computer. ASSESSMENT For a detailed analysis of the assessment criteria and suggestions for progression, please see pages 26–27. CURRICULUM LINKS Computing PoS Understand the opportunities computer networks can offer for collaboration. Use technology respectfully and responsibly. Use and combine a variety of software (including Internet services) on a range of digital devices to accomplish given goals, including collecting, evaluating and presenting information. Geography PoS Use digital/computer mapping to locate countries. Use fieldwork to observe and record the human and physical features in the local area using a range of methods including digital technologies. Suggested subject links Geography: There are strong geography links throughout this unit, and it would work well as part of a wider topic on the local area. The children could make and use their own maps. Numeracy: Using maps can be linked with topics such as movement, direction, rotation and angles. Maps also provide a real life context for the ideas of scaling and ratio, and there is scope to link to work involving coordinates. Literacy: The children can explore and compare written descriptions of their local area. Art and design: Sketch work of the local area can provide an interesting comparison to photography. LEARNING EXPECTATIONS This unit will enable the children to: develop their ability to take photographs on location explore ways in which several images can be combined to create a new image develop collaboration skills, including creating a shared project evaluate and review their own and each other’s work. VARIATIONS TO TRY Create a 3D virtual tour of the school instead of the local area. Use photographs taken on a school trip to create 3D images that record the day. Put up an art exhibition of the children’s work and create a 3D tour of it. 21 Unit 3: We are tour guides 2 Getting ready THINGS TO DO Read the Core steps sections of Running the task. Choose which software/tools are most accessible/ appropriate for use with your class. Download your chosen software/tools (see Useful links). Look at appropriate software tutorials (see Useful links). Spend 60 minutes familiarising yourself with your chosen software/tools. Read the Extensions sections of Running the task. Do you want to use any of the extras provided? If the children are to go off site for this work, make the necessary arrangements. Ensure you have sufficient computers/laptops/ tablets booked in advance. CD RESOURCES Panoramic images Software in 60 Seconds: Photosynth, Image Composite Editor and Bing Maps SAFE AND RESPONSIBLE USE When on location, obtain permission before taking photographs on private property, or of members of the public. INCLUSION Some children may find it easier to take photographs and keep the camera steady using a tripod. A visit to the local area will be the focus of the project. When planning the visit, ensure that it is accessible to all children, and make any necessary adjustments for children with special needs. 22 THINGS YOU NEED Digital cameras Tripods (optional, but may be useful when taking photographs on location) Examples of various panoramic shots Large prints of landscape photographs that can be cut up and pieced back together like a jigsaw puzzle WWW USEFUL LINKS Software and tools Photosynth is a free Web 2.0 tool. Download it from http://photosynth.net/create.aspx or install it from the Switched on Computing CD-ROM. Image Composite Editor is free software. Download it from http://research.microsoft.com/ en-us/um/redmond/groups/ivm/ice/ or install it from the Switched on Computing CD-ROM. Find Bing Maps at www.bing.com/maps/. Online tutorials How to use Photosynth to generate panoramic images with 360° views: www.youtube.com/ watch?v=-cAf6m6YZU4 A short tutorial that explains how to view Photosynth panoramas on Bing Maps: www. youtube.com/watch?v=DmQdRX91xUk Getting to grips with the terminology used in Photosynth: www.pil-network.com/Resources/ Tutorials/Details/fefe0c58-2567-4f59-961044d4d8973015 How to make a myriorama (a moving panorama): www.mediatinker.com/blog/upload/2007/04/ myriorama-tutorial.pdf Information and ideas The Photosynth website is good place to learn more about the program and explore synths created by others: http://photosynth.net Photosynth information and ideas from Microsoft Partners in Learning: www.pil-network.com/ Resources/Tools/Details/bfb692e8-fc57-4568b209-b5dc4f83389b A TED talk from the co-creator of Photosynth: www.ted.com/talks/blaise_aguera_y_arcas_ demos_photosynth.html An introduction to Bing Maps: www.youtube.com/ watch?v=cIJ_8Ofvtd4 Running the task – We are tour guides Software: Photosynth, ICE, Bing Maps Hardware: Digital cameras, tripods hotosynth panoramas from around the P world Bing Maps and ‘Streetside’, tool to explore in 3D Bing Maps Display a ‘Streetside’ image of a location. Explain that it is made up of lots of images of the same location, and that computer software ‘stitches’ them together to make an image called a ‘panorama’. WWW YOU WILL NEED Step 2: Planning the virtual tour Introduce the term ‘tour guide’ to the children and ask them if they know what a tour guide does. Explain that they are going to become virtual tour guides. WWW YOU WILL NEED Step 1: Exploring 3D images Split up the class into groups of about four and share the postcode of the area you are going to visit. Allow each group time to locate the area on Bing Maps and to use the ‘Streetside’ tool to decide where they would like to take photos for their virtual 3D image. Provide the children with photos that have been cut up into smaller pieces and challenge them to put them back together again. Ask if they can come up with a set of instructions (an algorithm) to make this work every time. Explain that they are going to create some 3D images so that people from all over the world can pay a virtual visit to their local area. Locate a place and model how to use the ‘Streetside’ tool to ‘step into’ that area. Demonstrate how to use the mouse to turn and move around within the image. Allow plenty of time for the children to explore. Display Bing Maps. Ask the children where they would like to go on their virtual tour. Core steps Challenge the children to draw a landscape using traditional methods. HOME The children could search for landscape images online, print them, cut them up, and challenge a partner to put them back together. SCHOOL Challenge the children to research a famous landmark they would like to visit, and explain why they want to go there. HOME Provide the children with a range of traditional maps and atlases and challenge them to think about the strengths and weaknesses of each. SCHOOL Extensions App: Use the Photosynth app on mobile devices such as tablets and smart phones Outcome: An electronic map that links to immersive 3D images of a local area 3 Unit 3: We are tour guides 23 24 How to make a myriorama Show the children how to create a panorama by selecting a set of overlapping photos from a folder and dragging them into the ICE main window. Press the ‘Ctrl’ key and ‘A’ key at the same time to select all the photos in a folder. Demonstrate how to launch the Image Composite Editor and Photosynth software and explain the difference between a panorama and a synth. Software in 60 Seconds: Creating a panorama YOU WILL NEED Step 4: Creating the panoramas The children may also need reminding that to make their 360° panorama they need to take a series of images from the same spot while making a full turn. The more images, the better the panorama will be. Before you go out on location talk about the number of images it might be practical for each child to take. Before going out on location, ensure that the children know how to use the digital cameras. WWW YOU WILL NEED Step 3: Taking photos on location To capture and share panoramas directly on a smart phone or tablet device download the Photosynth app from the relevant app store. Click ‘Upload’ to complete the publishing process. Then click to view the panorama in a web browser. Show the children how to access the URL (Web address) for their panorama under the ‘Share’ option. Wait while ICE joins the photos together to create a panorama. Publish to Web to upload to www.photosynth.net and share with friends. In Photosynth give the panorama an appropriate title. You can also add tags to help people search for it. This is a good opportunity to introduce the idea of tagging and how searching online works. Allow groups of children plenty of time to take a series of images that will later be used to create 3D images. Once back at school, ensure that each group’s photos are saved in an appropriate place. A tripod might be useful to help children keep the camera at the same height as they turn. Creating a myriorama beforehand can give the children a practical understanding of horizon lines and how panoramas are made by fitting smaller photos together. Ask the children to decide on another place for which they would like to create a panorama, and explain why. HOME The children could create panoramas or synths of the classroom to embed in a class blog so they can access the classroom’s visual resources (such as posters) wherever they are. SCHOOL The children could draw the location they photographed from memory, and later compare this to the panorama they create. HOME Some children could take photos of a specific landmark from different angles in order to create a synth, as opposed to a panorama. SCHOOL Unit 3: We are tour guides Bing Maps Prior to the lesson, save the Bing Map where you want the children to add their panoramas. Enter the name of the local area or postcode you visited, save the map and then click on ‘Share’ to get the web address for your map. The children will need this web address to access the map. WWW Software in 60 Seconds: Bing Maps YOU WILL NEED Step 5: Linking it all to Bing Maps Zoom in and examine how well Image Composite Editor has stitched the photos together. Allow children time to explore each other’s panoramas. Demonstrate how to click on ‘My places’ and the ‘Add a pushpin’ button. The children should click the location of where they took their photos to insert the pushpin there. They are now able to give their pushpin a name, add some notes and add the URL (Web address) of their panorama. You will need to sign in to save their pushpins to the map. Encourage the children to think of other information and media they could link to their pushpin for a virtual visitor. HOME Some children may be able to add paths to the map; for example, they could draw a path to show the route they took around the local area during their visit. SCHOOL Unit 3: We are tour guides 25 Unit 3: We are tour guides 4 Assessment guidance Use this page to assess the children’s computing knowledge and skills. You may wish to use these statements in conjunction with your own school policy for levelling work. ALL CHILDREN SHOULD BE ABLE TO: COMPUTING POS REFERENCE use software to digitally combine a number of images to make a 3D image Use software to accomplish given goals, including presenting information locate different places on an electronic map Use software (including Internet services) to accomplish given goals, including collecting information explore locations using 3D images. MOST CHILDREN WILL BE ABLE TO: Use software (including Internet services) to accomplish given goals, including analysing information consider how software can piece together images electronically and compare it to doing the same task manually Use software to accomplish given goals, including presenting information evaluate how successfully their images have combined to create a 3D image Use software to accomplish given goals, including evaluating information add markers and links to different locations on an electronic map. Understand the opportunities computer networks (including Internet services) can offer for collaboration SOME CHILDREN WILL BE ABLE TO: review and alter their 3D image as a result of their evaluation draw paths and areas on an electronic map. Use software to accomplish given goals, including presenting and evaluating information Use software (including Internet services) to accomplish given goals, including presenting information 26 Unit 3: We are tour guides 5 Classroom ideas Practical suggestions to bring this unit alive! DISPLAYS AND ACTIVITIES Create an interactive display that links to the children’s panoramas and synths by using QR codes. Displaying the original photos alongside a way to access the 3D versions provides an interesting comparison of the two. Use the panoramas as the basis for an assembly on the local area, and take the rest of the school on a virtual trip there. Film video of the children using their panoramas to talk about the local area and share them with other children from around the world via Skype In The Classroom. Investigate how compasses are used, and arrange for the children to try out orienteering. WWW WEBLINKS Find out about Skype In The Classroom at https:// education.skype.com/. The Living Maps Project aims to help children develop essential questions about geographic locations and learn from one another. Visit https:// education.skype.com/projects/1173-living-mapsproject. MapZone resources from Ordnance Survey. Visit http://mapzone.ordnancesurvey.co.uk/mapzone/ competitions.html. For instructions on how to make a compass, visit http://sciencewithkids.com/Experiments/Physicsexperiments/how-to-make-compass.html. VISITS A local town planner could pay a visit to the school to discuss his/her work and experiences. You could arrange for a cartographer to give a talk about how maps are made. A photographer might be willing to share some tips on taking landscape photos. BOOKS Chancellor, D. Discover Science: Maps And Mapping. (Kingfisher, 2010) Denton, M. England: The Panoramas. (Constable, 2010) Gaines, T. Digital Photo Madness! (Lark, 2012) Hennessy, B. G. The Once Upon A Time Map Book. (Candlewick Press, 2010) Spilsbury, L. Our Local Area: Ways Into Geography. (Franklin Watts, 2012) 6 Taking it further When you’ve finished, you might want to extend the project in the following ways. Create a leaflet or written guide to the local area and include QR codes to link to the children’s panoramas and synths of related places. QR (Quick Response) codes are a type of bar code that can be scanned and read with a QR code reader app on a mobile device. You can choose to link a QR code to a variety of different media, including Web addresses. QR codes can be created for free on QR code generator websites (such as http://qrcode.kaywa.com) and printed out on a normal printer. The children could create their own maps of part of the local area, either by hand or using computer software, and include QR codes to link to their panoramas or synths of places on their maps. You could arrange to run this project with another class, elsewhere in the UK or overseas, and compare the two locations through each other’s 3D images. Construct 3D models of some of the places visited using papier mâché or ‘junk modelling’ materials. Create some large-scale floor maps and investigate programming toys such as Floor Robots to move around them along a given route. Write and record an audio guide to accompany the panoramas. Create and build a landscape in Kodu (see Unit 6) as an introduction to the software. 27 Unit 4: We are botanists We are botanists: Sorting and identifying plants Unit 4 1 About this unit Software: PowerPoint Outcome: An interactive PowerPoint slideshow that uses hyperlinks to sort and identify plants INTRODUCTION In this unit, the children will use algorithms to sort and identify a group of plants based on their similarities and differences. They will then present their work in the form of a tree diagram. Finally, they will use hyperlinks to recreate this tree diagram structure in PowerPoint. TRANSLATING THE COMPUTING POS Algorithm A set of instructions designed to solve a problem or perform a specific task. Computer programs use algorithms to carry out different functions. Tree diagram A diagram in which lines branch out from a single starting point to show all the possible outcomes of an event, depending on subsequent events or decisions. A diagram that uses lines and a conventional set of symbols to represent a sequence of steps or operations. Hyperlink Text, images or other objects that open another page or document when clicked. ASSESSMENT or a detailed analysis of the assessment criteria and F suggestions for progression, please see pages 32-33. CURRICULUM LINKS Computing PoS Use technology safely and respectfully. Use and combine a variety of software (including Internet services) on a range of digital devices to accomplish given goals, including analysing information. 28 Science PoS Identify and name a variety of living things (plants and animals), in the local and wider environment, using classification keys to assign them to groups. Gather, record, classify and present data in a variety of ways to help in answering questions. Suggested subject links Science: There are close links here, as the children are comparing characteristics of plants. This unit would work well as part of a wider topic on plants and plant growth. Numeracy: There are opportunities for the children to relate the work in this unit to sorting numbers and shapes based on their similarities and differences. Art and design: The children could use their artistic skills to create their own images of plants and flowers to embed in their PowerPoint file. LEARNING EXPECTATIONS This unit will enable the children to: develop their research skills to locate and save images consider how to acknowledge the work of others in their own work draw and construct tree diagrams to sort and classify objects use hyperlinks to create a non-linear PowerPoint presentation. VARIATIONS TO TRY Sort and classify a group of animals instead of plants. Minibeasts work particularly well for this sort of task. Create a PowerPoint presentation that classifies numbers or shapes. You could make a shapesorter activity for younger children, to help them learn the names of shapes. Use hyperlinks to create an electronic storybook in which the reader can choose what happens next. Unit 4: We are botanists 2 Getting ready THINGS TO DO Read the Core steps sections of Running the task. Choose which software/tools are most accessible/ appropriate for use with your class. Download your chosen software/tools (see Useful links). Look at appropriate software tutorials (see Useful links). Spend 60 minutes familiarising yourself with your chosen software/tools. Read the Extensions sections of Running the task. Do you want to use any of the extras provided? If the children are to go off site for this work, make the necessary arrangements. Ensure you have sufficient computers/laptops/ tablets booked in advance. CD RESOURCES Branching tree diagram and PowerPoint slideshow for sorting 2D shapes, Diagrams of groups, e.g. types of food, Images of plants, Software in 60 Seconds: PowerPoint SAFE AND RESPONSIBLE USE The children will be using the Internet, and should know what do if they encounter any material that makes them feel uncomfortable. It is advisable to have a discussion beforehand about this, and ask the children to switch off the screen and tell an adult if this happens. The children will be using images sourced from the Internet. They need to appreciate they don’t own those images, and to think about ways of acknowledging where they came from. (See Step 2). INCLUSION Children with visual impairment may need additional assistive technology (see www. abilitynet.org.uk). Children who find sequencing difficult may need some assistance organising their slides. You might consider providing them with a tree diagram template or helping them to construct one as part of a group. THINGS YOU NEED An example of a tree diagram Examples of other electronic tree diagrams for the children to try out (see Information and ideas) A colour printer WWW USEFUL LINKS Software and tools PowerPoint is pay-for software or you can use the free Web app in SkyDrive or Office 365; see http:// office.microsoft.com/en-gb/powerpoint/. Online tutorials PowerPoint training videos from Microsoft: www. youtube.com/playlist?list=PLXPr7gfUMmKxj9Nhp BCQtULSkfnS1tcXU How to add pictures or clip art to a PowerPoint presentation: www.youtube.com/watch?v=c_ qIuCPXrQk Information and ideas Create a minibeast sorting tree: www.iboard.co.uk/ iwb/Minibeast-Sorting-Tree-111 A range of sorting and classifying games can be found at the following website: www.iboard. co.uk/activities/path/handling-data_sorting-andclassifying/subject/maths Sort a group of six minibeasts using the ‘Minibeast Classification’ interactive branching tree: www. crickweb.co.uk/ks2science.html Search for Creative Commons images on Flickr: http://johnjohnston.info/flickrCC/ Flow chart symbols: www.buzzle.com/articles/ flowchart-symbols.html Plant cultures resources are available from Kew Gardens: www.kew.org/plant-cultures/schools/ schools_landing.html Plant-based learning resources can be found on the United States Botanic Garden website, including a plant family tree: www.usbg.gov/ classroom-resources-plant-based-learning 29 30 Running the task – We are botanists inibeast classification M Range of sorting and classifying games Explain to the children that they will be creating their own tree diagram to sort and identify a group of plants. Give the children time to explore and use a range of interactive sorting activities. Display the example tree diagram from the CDROM. Explain that algorithms do not always have to be a list of steps; they can also be diagrams. Pick one of the shapes, and answer the questions in the tree diagram to find out its name. Creative Commons Flickr image search Adding pictures to a PowerPoint file Tell the children they will be searching for images of plants. Demonstrate how to access the Creative Commons image search on Flickr. Discuss the WWW oftware in 60 Seconds: creating S branching hyperlinks in Powerpoint YOU WILL NEED Give the children time to search for images of six plants they know the names of, insert them into a single slide in their PowerPoint file, and print the slide out for later use. Show the children how to open a PowerPoint file and save it. Model how to search for an image, save it and insert it into the first slide. Copy and paste the name of the owner of the image underneath it. importance of crediting the creators of images you use. Step 2: Finding images for the branching tree diagrams Recap what the children know about algorithms. Explain to the children that they are going to design algorithms to sort and identify plants. WWW Branching tree diagram example YOU WILL NEED Step 1: What is a branching tree diagram? Core steps Ask the children to create posters explaining why it is important to credit the work of others when using material you have found online. HOME The children could take their own photos of plants for use in their PowerPoint file. SCHOOL Challenge the children to construct a list of yes/no questions and use them to interview someone at home. HOME Give the children a selection of questions, some of them yes/no questions, and challenge them to identify the yes/no questions. SCHOOL Extensions Software: PowerPoint Hardware: Colour printer Outcome: An interactive PowerPoint slideshow that uses hyperlinks to sort and identify plants 3 Unit 4: We are botanists Challenge the children to create tree diagrams based on their six plants. Explain that you need to add questions that split the groups until each plant is left on its own. Ask the children to suggest another two yes/ no questions to divide the two new groups of images. Write each new question at the end of the appropriate branch, and then draw another pair of yes/no branches from it. Sort the images based on the new questions. PowerPoint tutorials Explain that PowerPoint slideshows are usually linear, which means each slide follows the last one. In non-linear slideshows, the order the slides are shown in depends on the options the user chooses. Show the children the example of a nonlinear PowerPoint slideshow from the CD-ROM. WWW Non-linear PowerPoint example Software in 60 Seconds: creating branching hyperlinks in PowerPoint YOU WILL NEED Allow the children plenty of time to create their slideshow, test their own and each other’s slideshows, and provide feedback. Follow the tree diagram to link the ‘yes’ and ‘no’ buttons in each slide to the correct following slide. Demonstrate how to turn text into a hyperlink and how to select the slide to which it should link. Using one of the children’s tree diagrams, create a slide for each question that includes the answers ‘yes’ and ‘no’ in separate text boxes. For each of the six plants, create a slide containing an image of the plant and its name. Step 4: Building the PowerPoint slideshow Show the children images of six plants. Ask them to suggest a yes/no question that will divide the group of images roughly in half. Write the chosen question on the interactive whiteboard at the top, in the centre. Draw two branches from it, one labelled ‘yes’, and the other labelled ‘no’. Sort the images into two groups based on the question, and place them at the end of the appropriate branch. Example tree diagram Selection of plant images YOU WILL NEED Step 3: Designing a tree diagram Challenge the children to create another tree diagram for any six objects of their choice. HOME Give the children an image of a seventh plant and ask them to incorporate it into their current branching tree structure. SCHOOL Give the children a tree diagram that sorts a group of unfamiliar objects (e.g. unusual fruits or vegetables), and challenge them to use it to identify the objects. HOME Some children may want to investigate creating flow charts using traditional symbols (see Information and ideas). SCHOOL Unit 4: We are botanists 31 Unit 4: We are botanists 4 Assessment guidance Use this page to assess the children’s computing knowledge and skills. You may wish to use these statements in conjunction with your own school policy for levelling work. ALL CHILDREN SHOULD BE ABLE TO: COMPUTING POS REFERENCE search for appropriate images online and save them Use technology safely and respectfully understand that images they find on the Internet do not belong to them Use technology respectfully create hyperlinks that link to another slide. Use software to accomplish given goals MOST CHILDREN WILL BE ABLE TO: use search criteria and tools to find more specific images online Use technology safely and respectfully acknowledge in their work that they do not own the rights to the images they have used Use technology respectfully create a series of hyperlinked slides that mirror the structure of a tree diagram. Use software to accomplish given goals, including analysing information SOME CHILDREN WILL BE ABLE TO: 32 evaluate the success of their search criteria and amend them accordingly when searching online Use software to accomplish given goals acknowledge the source of each image they use in their work Use technology respectfully alter a tree diagram they have constructed to incorporate new objects. Use software to accomplish given goals, including analysing information Unit 4: We are botanists 5 Classroom ideas Practical suggestions to bring this unit alive! DISPLAYS AND ACTIVITIES Create an interactive display of the tree diagrams and the related plant images so other children can try identifying the plants. You could hide the final answers on the tree diagrams under flaps, so that the children can check whether they got them right. Set up a garden centre role-play area containing plants and flowers, real and/or fake, to give the children the opportunity to become familiar with their different characteristics. Invite children from other classes to try out the slideshows and give feedback to your class. WWW WEBLINKS A variety of ideas for indoor and outdoor gardening projects can be found at www.bbc. co.uk/gardening/gardening_with_children/. Find information about gardens to visit across the country at http://kidsinthegarden.co.uk/gardensto-visit-with-children/. There are ideas for school gardening projects, organised on a month-by-month basis, at www. gardeningwithchildren.co.uk/school-zone/. A range of flower-based craft activities can be found at www.notimeforflashcards. com/2012/04/21-flower-crafts-for-kids.html. VISITS You could arrange a trip to a local garden centre to investigate different types of plants and flowers. Alternatively, an employee of a local garden centre, or a gardener, could visit the school to share his/ her knowledge of plants and flowers. The children could look for plants and flowers on a trip to a local park or public garden. BOOKS Bergin, M. How To Draw Flowers And Plants. (Book House, 2013) Jennings, T. Plants (Wildlife Watchers). (QED Publishing, 2010) Kubica, J. Computational Fairy Tales. (CreateSpace Independent Publishing Platform, 2012) Royal Horticultural Society, RHS Garden Projects. (Dorling Kindersley, 2013) Russell, T. and Cutler, C. The World Encyclopedia Of Trees. (Armadillo Books, 2011) 6 Taking it further When you’ve finished, you might want to extend the project in the following ways. The children could grow a variety of plants and flowers in a dedicated school garden, or in pots in appropriate places within the school grounds. Any flowers grown at school could be pressed and used to create beautiful artwork and cards. The children could observe and sketch plants and create images of them using paint or painting software on a computer or tablet. The children could design their own flowers or plants, create models of them and write fact files about their distinguishing features. Investigate the ideal conditions a plant or flower needs to grow. Record plant growth using digital photography, which could then be used to create a time-lapse video. Set up a school garden centre where the children can grow plants from seeds or cuttings. The children could design maps of an ideal school garden and decide which plants they would include, and why. 33 Unit 5: We are film-makers We are film-makers: Researching and filming a documentary Unit 5 1 About this unit Software: Movie Maker 2.6, Word, OneNote App: OneNote Hardware: Digital video cameras, microphones, tablets Outcome: A short documentary film that discusses the issue of school uniforms INTRODUCTION In this unit, the children will investigate the topic of wearing uniforms to school. Using online searches, they will consider the reliability of various sources and how to credit them appropriately. They will collate their evidence using OneNote, and will use this as a basis for writing a short film script on the topic. Finally, they will film, edit and share their short documentaries. TRANSLATING THE COMPUTING POS Transition A term used in film editing to describe the style in which one scene moves onto the next. Creative Commons A licensing scheme in which the creator of an original work allows others to use it without seeking further permission, subject to a number of agreed conditions. For further information, visit http://creativecommons. org. English PoS Distinguish between statements of fact and opinion. Retrieve, record and present information from non-fiction. Note and develop initial ideas, drawing on reading and research where necessary. Suggested subject links Literacy: Creating a documentary film on a topical subject provides an excellent opportunity for the children to extend discussion work on persuasive texts as well as journalistic writing. PSHE: This unit works well if the children have the opportunity to explore the idea of human rights and are able to engage in debate with their peers. Numeracy: The children could use their datahandling skills to collect and analyse data on others’ opinions of school uniforms. Music: The children might enjoy using their musical knowledge and skills to compose and record title music for their films. ASSESSMENT LEARNING EXPECTATIONS For a detailed analysis of the assessment criteria and suggestions for progression, please see pages 39–40. This unit will enable the children to: develop their research skills to select information that is useful and reliable organise and collate information appropriately gain skills in recording video, such as using different camera angles gain skills in editing video, including inserting appropriate transitions and segues. CURRICULUM LINKS Computing PoS U nderstand computer networks, including the Internet; how they can provide multiple services, such as the World Wide Web, and the opportunities they offer for communication. U se search technologies effectively, appreciate and be discerning in evaluating digital content. U se technology safely, respectfully and responsibly. S elect, use and combine a variety of software (including Internet services) on a range of digital devices to accomplish given goals, including 34 collecting, analysing, evaluating and presenting information. VARIATIONS TO TRY Rather than creating a film about school uniforms, use another current issue that is meaningful to the children and also elicits varying points of view, such as the use of mobile phones in school. Research and create films on topics from other curriculum areas, such as a particular period or event in history, or the life and work of a famous person. Unit 5: We are film-makers 2 Getting ready THINGS TO DO Read the Core steps sections of Running the task. Choose which software/tools are most accessible/ appropriate for use with your class. Download your chosen software/tools (see Useful links). Look at appropriate software tutorials (see Useful links). Spend 60 minutes familiarising yourself with your chosen software/tools. Read the Extensions sections of Running the task. Do you want to use any of the extras provided? If the children are to go off site for this work, make the necessary arrangements. Ensure you have sufficient computers/laptops/ tablets booked in advance. CD RESOURCES Microsoft Movie Maker 2.6 download Software in 60 Seconds: MovieMaker 2.6, Word, OneNote and OneNote app SAFE AND RESPONSIBLE USE Before embarking on any online research, ensure the children know what to do if they come across anything that makes them feel uncomfortable in any way – do not panic, and inform a member of staff as soon as possible. Be open about any potential issues in class discussions and plenaries, and encourage the children to talk about their experiences of being safe and responsible online. If the children upload films they create to a school blog or virtual learning environment, make sure precautions are in place to protect their identities and contact details. Ultimately, any decisions you make should be in line with your school’s e-safety policy. It is advisable to seek explicit parental consent for any work involving video footage. INCLUSION Some children may find it difficult to hold the tablet steady while filming. Setting up tripods may help with this. Some children may feel uncomfortable being filmed. It may help to offer a role-play area where they can practise these skills. THINGS YOU NEED Tablets running the OneNote app – or you can use the free Web app in SkyDrive or Office 365 Film clips showing facts and opinions (see Information and ideas) Materials for storyboarding (e.g. paper and pencils) You might consider having a selection of reports and relevant documents available for the children to use as resources when carrying out their research. WWW USEFUL LINKS Software and tools Find out more about OneNote at http://office. microsoft.com/en-gb/onenote/ and http://apps. microsoft.com/windows/en-gb/app/onenote/ f022389f-f3a6-417e-ad23-704fbdf57117. The OneNote app is a free download. Find it in the relevant app store. Movie Maker 2.6 is free software. Download it from www.microsoft.com/en-gb/download/details. aspx?id=34 or install it from the Switched on Computing CD-ROM. Word is pay-for software or you can use the free Web app in SkyDrive or Office 365. See http:// office.microsoft.com/en-gb/word/. Online tutorials Tour of OneNote for Windows 8: www.youtube. com/watch?v=hTOkeH5VZXQ Getting started with Office 2013 – Using OneNote 2013: www.youtube.com/watch?v=-uUqO91_c0M Getting started with Windows Movie Maker: http:// windows.microsoft.com/en-gb/windows-vista/ getting-started-with-windows-movie-maker Information and ideas Teaching the difference between fact and opinion: http://news.bbc.co.uk/cbbcnews/hi/teachers/ literacy_7_11/text/newsid_1697000/1697456.stm Links to past BBC Newsround stories about school uniforms and dress codes: http://news. bbc.co.uk/cbbcnews/hi/newsid_3820000/ newsid_3825700/3825767.stm An American news report on the introduction of a new uniform: www.youtube.com/watch?v=0OQTKQ2gNI School Uniform – Good Or Bad? A short film about the pros and cons of school uniform, including interviews with students, teachers and MPs: www. youtube.com/watch?v=dNvjAJTt2IM 35 36 Running the task – We are film-makers Software: Movie Maker 2.6, Word, OneNote App: OneNote BC Newsround stories B US news report The documentary School Uniform – Good Or Bad? Watch some clips of films about school uniforms and think about the different opinions they present. Use the examples to come up with a list of statements about what makes a good film documentary. Revise the difference between a fact and an opinion. Explain that documentaries concentrate on facts, and should aim for a balance of opinions. our of OneNote for Windows 8 T Getting started with Office 2013 – Using OneNote 2013 Explain to the children that they are going to find out some more about school uniforms. Introduce the OneNote app. WWW YOU WILL NEED Allow the children time to set up their notebooks, organise the sections, and explore the tools. Suggest having sections for facts and figures, quotes, images and video clips. Demonstrate how to use the ‘Insert’ menu to insert a variety of media. Point out the drawing tool. Demonstrate how to create and name a new notebook. Show the children how to add sections to the notebook to keep their research organised. Step 2: Exploring OneNote and setting up the notebooks Explain what a documentary is and tell the children they will be creating a documentary about the issue of whether they should have to wear school uniforms. WWW YOU WILL NEED Step 1: Thinking about opinion and fact Core steps Challenge the children to compare digital notebooks and traditional scrapbooks, and to think about the differences and similarities between them. HOME Some children could share their OneNote notebooks with each other, or with you. SCHOOL The children could interview friends and family about their opinions of school uniforms. HOME The children could have a class debate about the pros and cons of school uniforms. SCHOOL Extensions Hardware: Digital video cameras, microphones, tripods, tablets Outcome: A short documentary film that discusses the issue of school uniforms 3 Unit 5: We are film-makers The children should prepare some interview questions before filming in order to get the best out of their interviews. Divide the class into groups of two or three children, depending on the equipment you have available. Encourage them to think about keeping a balanced view when deciding who they might like to interview. It would be wise to interview both children and teachers, and some parents or carers too, if that can be arranged. Explain to the children that they will be recording interviews to include in their documentaries. Step 4: Filming interviews Remind the children that it is also important to acknowledge where any material has come from because they do not own it. This is a good opportunity to have a discussion about intellectual property and Creative Commons licensing if the children are not familiar with these ideas. Ask the children to include in their notebooks details about where they found each piece of information, such Ask the children how they know whether a piece of information they find on the Internet is reliable. Establish that two ways to help with this are using trusted sources they recognise, and trying to find the same piece of information in a few different places. Encourage the children to use these checks when searching online. Step 3: Collecting evidence Allow the children time to film interviews with a selection of people about their views on school uniforms. They could record the interviews on digital cameras or tablets. Ensure video files are saved to an appropriate central location for easy access when editing. Encourage the children to experiment with different camera angles to see what different effects they can create. Allow time for the children to research the topic of school uniforms online and populate their notebooks with information and resources. as its Web address or who created it. Ask the children to write about their own views of school uniforms and whether they are for or against them. HOME Some children could use Skype to interview children from another country about their experiences of school uniforms. SCHOOL The children could create leaflets about the importance of crediting material they find and use online. These could be displayed around the school or in a dedicated ICT suite. HOME Ask the children to share information and update their notebooks with anything they find interesting and did not already have. SCHOOL Unit 5: We are film-makers 37 38 etting started with Windows Movie G Maker They should evaluate each film in terms of its content – is the film factual and unbiased? – as well as in terms of its editing – do the clips and images work well together? Have they been sequenced in an appropriate order? Ask the children what they might change the next time they create a film. Allow the children time to watch and review each other’s films. Encourage the children to use the storyboard they created as a guide when putting together their documentary. Model how to import clips and images and how to split and combine clips. Demonstrate how to add a transition, such as a fade, by clicking on ‘Tools’ and then ‘Video Transitions’. Show Movie Maker’s two editing views: the storyboard (default) and the timeline. The storyboard can be used to sequence the clips by dragging and dropping. You can also edit any transitions or effects. Note that audio clips can only be seen in timeline view. next. When the children have finished editing their films, show them how to save their Movie Maker projects, and how to publish the films to a computer or other device so that they can be played back later. Step 6: Presenting the films Explain that Movie Maker enables users to create and edit movies and slideshows by combining video clips and images. Transitions control how the movie moves from one clip or image to the Using one group’s clips and images, model how to plan the sequence in which you want them to appear in as a storyboard. WWW YOU WILL NEED Step 5: Storyboarding and editing Write reviews of each other’s films based on ‘two stars and a wish’. HOME Ask the children to suggest other topics where making and editing films might be useful. SCHOOL Ask the children to compile ending credits for their film. Who did what? Who would they like to thank? HOME Some children may want to record narration. Show them how to use the timeline view to add it to their film. SCHOOL Unit 5: We are film-makers Unit 5: We are film-makers 4 Assessment guidance Use this page to assess the children’s computing knowledge and skills. You may wish to use these statements in conjunction with your own school policy for levelling work. ALL CHILDREN SHOULD BE ABLE TO: COMPUTING POS REFERENCE find relevant information from the Internet about a particular topic Use search technologies effectively capture the information they have found, and organise it sensibly Use and combine a variety of software (including Internet services) to accomplish given goals, including collecting information record video of another person talking to the camera Use and combine a variety of software to accomplish given goals, including collecting information arrange their film clips in a sequence on a computer. Use and combine a variety of software on a range of digital devices to accomplish given goals, including presenting information MOST CHILDREN WILL BE ABLE TO: plan how they are going to search for information on the Internet and consider using a range of tools Use search technologies effectively evaluate the usefulness of the information they have found and be selective about information they choose to save Be discerning in evaluating digital content plan how they will shoot and edit their video, and record footage accordingly Use and combine a variety of software on a range of digital devices to accomplish given goals, including presenting information use transitions carefully to join clips when editing their film. Use and combine a variety of software on a range of digital devices to accomplish given goals, including analysing and presenting information SOME CHILDREN WILL BE ABLE TO: consider possible bias and issues with accuracy when selecting information from the Internet Be discerning in evaluating digital content credit any sources of information they choose to save Use technology respectfully plan and use different camera angles to create different effects Use software to accomplish given goals, including presenting information include text in transitions that act as segues to the next clip. Use and combine a variety of software on a range of digital devices to accomplish given goals, including analysing and presenting information 39 Unit 5: We are film-makers 5 Classroom ideas Practical suggestions to bring this unit alive! DISPLAYS AND ACTIVITIES Set up a role-play area with props such as microphones and video cameras for the children to practise their interviewing technique. The children could document the making of their film by taking photographs and creating a ‘behind the scenes’ display, which also features their scripts. Organise a ‘premiere’ and invite parents and carers in to watch the documentaries. Use a projector and whiteboard to create a cinema-style experience. WWW WEBLINKS For information on how to use green screen with Windows Movie Maker, visit www.wikihow.com/ Use-Greenscreen-on-Windows-Movie-Maker. Connect your classroom to the world with Skype. Visit https://education.skype.com/. VISITS A local journalist could come in to talk about his/ her experiences and give advice on issues such as creating a report and interviewing techniques. You could use Skype to interview children from other schools – both national and international – about their thoughts on school uniforms. As part of this unit, you could link up with other local schools to find out about their school dress codes. BOOKS Braun, E. Trust Me, Jack’s Beanstalk Stinks!: The Story Of Jack And The Beanstalk as Told By The Giant. (Picture Window Books, 2011) Downing, T. Film Making (Master This). (Wayland, 2012) Forward, T. The Wolf’s Story. (Walker Books, 2006) Hawkins, C. and Hawkins, J. Fairytale News. (Walker Books, 2005) Scieszka, J. The True Story Of The Three Little Pigs. (Puffin, 1991) 6 Taking it further When you’ve finished, you might want to extend the project in the following ways. Investigate other issues that affect the children, and begin to create a bank of topical short documentaries. Explore different ways of using video to support and log learning throughout the curriculum. Short films could be made of any number of events, including assemblies, performances, trips and specific lessons. Use video to create ‘how to’ guides for any subject – from how to use a particular calculation strategy to how to make a paper aeroplane. The children could make these videos for younger children as part of an ongoing project. 40 Take video-editing skills even further; create films that involve recording in front of a ‘green screen’ and inserting different backgrounds afterwards using Movie Maker. Design and produce posters and advertising for the documentary films. Write, film and edit short trailers for films based on books and stories the children have read or studied. Unit 6: We are game designers We are game designers: Creating and advertising a computer game Unit 6 1 About this unit Software: Kodu, Word Outcome: A computer game set in another world, and a design for its packaging INTRODUCTION In this unit, the children will become familiar with Kodu, a visual programming language made specifically for creating games. They will have the opportunity to run their own games studio – designing and creating their own game aimed at younger children – as well as designing packaging to advertise it. TRANSLATING THE COMPUTING POS Programming The process of developing and implementing a set of instructions that enables a computer to carry out a certain task. Algorithm A set of instructions designed to solve a problem or perform a specific task. Computer programs use algorithms to carry out different functions. ASSESSMENT For a detailed analysis of the assessment criteria and suggestions for progression, please see pages 46–47. CURRICULUM LINKS Computing PoS Design, write and debug programs that accomplish specific goals; solve problems by decomposing them into smaller parts. Use sequence in programs; work with various forms of input and output. Use logical reasoning to detect and correct errors in algorithms and programs. Be discerning in evaluating digital content. English PoS In writing narratives, consider how authors have developed characters and settings in what they have read, listened to or seen performed. Suggested subject links Literacy: This unit works particularly well when linked with work on stories set in imaginary or fantasy worlds. Art and design: The children can use their artistic skills to further develop and explore the setting of the game and the characters within it. Design and technology: The children could build 3D models of their game’s landscape. Numeracy: There are opportunities to make links with work on direction, movement, logic and sequencing. LEARNING EXPECTATIONS This unit will enable the children to: consider their audience when planning to use computer software to solve a problem use computer software to build a 3D world create a sequence of instructions that produces a specific outcome develop understanding through testing, evaluation and refining their work. VARIATIONS TO TRY Change the context of the game to link it with another area of the curriculum, such as geography (e.g. create a world within Kodu that is modelled on the landscape of an area the children have been studying). Create different types of games with Kodu, from 2D side-scrolling games to 3D racing games. 41 Unit 6: We are game designers 2 Getting ready THINGS TO DO Read the Core steps sections of Running the task. Choose which software/tools are most accessible/ appropriate for use with your class. Download your chosen software/tools (see Useful links). Look at appropriate software tutorials (see Useful links). Spend 60 minutes familiarising yourself with your chosen software/tools. Read the Extensions sections of Running the task. Do you want to use any of the extras provided? If the children are to go off site for this work, make the necessary arrangements. Ensure you have sufficient computers/laptops/ tablets booked in advance. CD RESOURCES Kodu in the classroom and videos, Kodu lesson plans and getting started documents, Cover design template, Kinect Adventures, Kinect Sport Software in 60 Seconds: Kodu SAFE AND RESPONSIBLE USE When exploring Kodu games made by others, assess their suitability beforehand. As with any online exploration, make sure the children know what to do if they come across any material that makes them feel uncomfortable. If the children upload the games they create for others to see and play, make sure precautions are in place to protect their identities and contact details. Ultimately, any decisions you make should be in line with your school’s e-safety policy. INCLUSION This project could be completed with the children working collaboratively in teams or pairs. Children with visual impairments may need adjustments made to their computer (see www. abilitynet.org.uk). Kodu can be used with an Xbox controller as well as a keyboard, and this may be a better option for any children who struggle to use keyboards effectively. 42 THINGS YOU NEED Relevant resources and tutorials downloaded from the Internet (see Useful links) Computers running Kodu software WWW USEFUL LINKS Software and tools Kodu is free software. Download it from www. kodugamelab.com. Word is pay-for software or you can use the free Web app in SkyDrive or Office 365; see http:// office.microsoft.com/en-gb/word/. Online tutorials Kodu classroom kit for educators: http://download. microsoft.com/download/2/6/0/26005079-7F7A4D09-9FC4-F0EDB0CA8138/Kodu_Classroom_Kit. zip General introductory tutorials on installing and getting started with Kodu: http://fuse.microsoft. com/projects/kodu ‘Queen of Kodu’ video guides: www.youtube.com/ watch?v=YpO281wd9T4&list=PLDBB610D8324D 9C73 Information and ideas Find out more about Kodu, and download related teaching resources and tutorial videos: http://fuse. microsoft.com/projects/kodu Information about Kodu from Microsoft Partners in Learning: www.pil-network.com/Resources/Tools/ Details/ca1b56f2-9382-4d0e-bc9c-ffa54632ba6f Running the task – We are game designers Allow the children time to ‘program’ each other to move around the classroom and collect objects. Discuss the sorts of commands you could give (e.g. move forwards/backwards a certain number of steps, turn left/right through a quarter/half turn). Ask a volunteer to be a Kodu character. Blindfold him/her and give other children objects, such as beanbags, to place around the classroom. Can they ‘program’ their classmate to collect the objects? odu tutorials K ‘Queen of Kodu’ video guides Watch the ‘Programming Kodu to eat Apples Tutorial’. Ask the children to describe what Kodu does with the apples. Show the children the code WWW Kodu lesson plans and getting started documents YOU WILL NEED Allow time for the children to practise moving Kodu around, adding objects to the world, altering their appearance, and changing the code to make Kodu behave differently when he encounters them. Choose ‘Kodu’ from the toolbar and click in the landscape to add an object. Choose an apple tile from the object selection ring. Turn the apple green by hovering over it so the colour palette appears. Demonstrate how to edit the code to change what Kodu does with the apple. these actions are based on. Step 2: Navigating Kodu and adding objects to a world Tell the children that they will be running their own computer games studio. They are going to use Kodu to create a computer game for children in Year 3 or Year 4. Show them an example of a Kodu game and give them time to play it. odu lesson plans and getting started K documents YOU WILL NEED Step 1: ‘Programming’ each other to move around a Kodu world Core steps Software: Kodu, Word Outcome: A computer game set in another world, and a design for its packaging 3 Challenge the children to create an imaginary world for their game, making notes about the world, the main character, and the items the character needs to collect or avoid. HOME Challenge some children to edit the code so that if Kodu does not find any apples, he continuously searches for more. SCHOOL Ask the children to write a series of commands that would enable someone who was blindfolded to get from one room in their house to another. HOME The children could ‘program’ one another to carry out conditional tasks (e.g. ‘If you collect a green beanbag, throw it up in the air’). SCHOOL Extensions Unit 6: We are game designers 43 44 Kodu tutorials ‘Queen of Kodu’ video guides Kodu tutorials ‘Queen of Kodu’ video guides Put the cursor over the Kodu avatar, right-click the mouse and select ‘program’. Demonstrate The children now have to decide how Kodu will move. Demonstrate how to load a game. Use the ‘Esc’ key to view the code, and then click on the Kodu icon in the toolbar. WWW Kodu lesson plans and getting started documents YOU WILL NEED Step 4: Moving characters Explain to the children that they are going to create a game world that will set the mood and tone for their game. Relate this to familiar stories set in imaginary worlds. WWW Kodu lesson plans and getting started documents YOU WILL NEED Step 3: Creating a landscape Give the children plenty of time to write sequences of code that make Kodu move. Encourage them to test out their codes regularly and edit them. Once you have written the sequence, run the game and see what happens. Ask the children to suggest improvements or further sequences. This is a good opportunity to discuss the idea of continual testing and refinement. how to create a sequence that will make Kodu move towards a certain object when he sees it. Your sequence might use general terms such as ‘forwards’ and ‘backwards’, or specific directions such as ‘north’, ‘south’, etc. Give the children plenty of time to explore and to develop a detailed landscape for their game. Draw children’s attention to the settings menu. It contains powerful tools for adjusting landscape features, e.g. you can add glass walls to the edges of the world and experiment with lighting effects. Show the children how to open an empty world in Kodu. Demonstrate how to add and delete land as well as give it colour and texture. Use different brushes to create appropriate edges, and use the smoothing tool to create hills and valleys. Use the water tool to add islands and/or lakes. Ask the children to reflect on their game so far and think of two or three things they would like to do when they work on it next. HOME Some children may want to explore moving their characters by using the path feature (see Online tutorials). SCHOOL Ask the children to create two landscape images – one peaceful and one threatening. Ask them to consider how landscapes can create different moods. HOME The children could paint a picture or draw a map of their game world before they begin creating it in Kodu. SCHOOL Unit 6: We are game designers Explain that, as game designers, they also need to design packaging for their game that will encourage as many people as possible to buy it. Show the children a selection of game packaging. Ask: Why is packaging important? Why should games studios concern themselves with advertising their games? Ask the children to evaluate cover designs, sorting them into those they like and dislike, and sharing the reasons why. Cover design template YOU WILL NEED Step 6: Advertising the games It is valuable for the children not only to test out their own games, but also to play and review each other’s. Ask them to think about the kind of feedback they would like to get from each other. Ask: What would be useful? Is telling someone their game is ‘good’ useful for them? Kodu lesson plans and getting started documents YOU WILL NEED Step 5: Testing and refining Give the children time to develop their cover design, including a short blurb giving an overview of the game. Ask: Does it appeal to the younger audience your game is aimed at? Does it reflect the game well? Demonstrate how to open the cover design template in Word (from the CD-ROM) and save it with an appropriate name in an appropriate place. Remind them which age group the designs need to appeal to. It would be useful for the reviewer(s) to play the refined game again to see if the issue they highlighted has been resolved or improved. Give the children time to act on any feedback they receive in order to refine their game. Allow time for each child to play several games created by others. Encourage them to give each other specific feedback about what works well and what could be improved. Remind the children that the more useful the feedback they give each other, the better the product their games studio will produce. Ask the children to reflect on their gamedesigning experience so far and write about what they would like to learn to do next in Kodu. HOME Some children could write and record TV or radio adverts for their games. SCHOOL Ask the children to create a name for their game and write a blurb of about 100 words describing it to potential customers. HOME Invite a group of younger children to test out the games and give their feedback, maybe using simple feedback sheets. SCHOOL Unit 6: We are game designers 45 Unit 6: We are game designers 4 Assessment guidance Use this page to assess the children’s computing knowledge and skills. You may wish to use these statements in conjunction with your own school policy for levelling work. ALL CHILDREN SHOULD BE ABLE TO: COMPUTING POS REFERENCE explore existing Kodu worlds Be discerning in evaluating digital content access the programming mode of Kodu Design programs that accomplish specific goals change the appearance of objects within their game. Work with various forms of input and output MOST CHILDREN WILL BE ABLE TO: create a landscape Design and write programs that accomplish specific goals adjust simple code for a specific purpose Design and write programs that accomplish specific goals refine their game based on their own evaluation. Debug programs that accomplish specific goals SOME CHILDREN WILL BE ABLE TO: 46 use paths to program their character’s movements Use sequence in programs use a variety of setting tools to create a landscape of a particular mood and tone Design and write programs that accomplish specific goals refine their game based on feedback from others. Debug programs that accomplish specific goals Unit 6: We are game designers 5 Classroom ideas Practical suggestions to bring this unit alive! DISPLAYS AND ACTIVITIES Screenshots of all the landscapes created by the children would make a striking display and show the versatility of the software. Invite children from other classes to come and play the games your class have created. Upload the games to the Kodu Game Lab Community website so people from around the world can play them. WWW WEBLINKS Don’t buy it! Discover advertising tricks at http:// pbskids.org/dontbuyit/advertisingtricks/. Try the interactive advertising game at www. funenglishgames.com/writinggames/advertising. html. Watch a persuasive advert for Key Stage 2 at www.youtube.com/watch?v=8H_ttecXHkQ. VISITS Arrange an interview via Skype with a journalist who works for a gaming magazine. Ask him/her about the elements of a successful computer game. An employee from a games retailer may be able to come in to talk about popular games. Speaking to a game designer about the process they go through when creating games could be invaluable. BOOKS Abbott, T. The Hidden Stairs And The Magic Carpet (The Secrets of Droon). (Scholastic, 1999) Carroll, L. Alice’s Adventures In Wonderland. (Usborne Publishing Ltd, 2013) Kelly, J. F. Kodu For Kids: The Official Guide To Creating Your Own Video Games. (QUE, 2013) Tolkien, J.R.R. The Fellowship Of The Ring: The Lord Of The Rings, Part 1. (HarperCollins, 2012) 6 Taking it further When you’ve finished, you might want to extend the project in the following ways. Explore other types of games that can be made using Kodu. The children could refine their games and begin to explore more advanced ideas such as clones, power up, health, and timers. The children could write instructions for how to play their games. Design, write and produce TV commercials to advertise the games. Design poster advertisements for the games. Write scripts for radio adverts and record them. 47 48 SWITCHEDON Computing TAKE YOUR FIRST EASY STEPS WITH MICROSOFT Switched on Computing: Take Your First Easy Steps with Microsoft has been written to help schools to get started with computing at Key Stages 1 and 2. Each unit has clear guidance for teachers and plenty of creative ideas for bringing each project alive in the classroom. This free taster pack is part of the full Switched on Computing range which gives schools all they need to deliver the national curriculum from year 1 to year 6. For more information please visit www.risingstars-uk.com/computing. ALSO AVAILABLE: www.risingstars-uk.com/computing I S B N 978-1-78339-144-8 For more information, please call 0800 091 1602 www.risingstars-uk.com 9 781783 391448


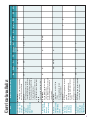
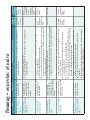
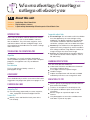
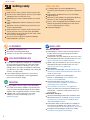


![[l] STORAGE](http://vs1.manualzilla.com/store/data/005949981_1-aa131963b29a7cfe7d43fe9de2ac578c-150x150.png)