1
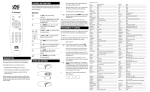
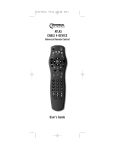
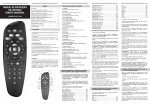
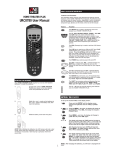
VIZIO Universal Remote Control User Guide
Table of Contents
Chapter 1 - Introduction
2
Chapter 2 - Remote Control Button Description
3
2.1 - Key Remote Control Functions
3
2.2 - Insertion of Batteries in the Remote Control
6
2.3 - Remote Control Range
7
Chapter 3 - Remote Control Operation
8
3.1 - Programming the VIZIO Universal Remote Control
8
3.2 - Searching for Component Codes
11
3.3 - Reassigning Component Buttons
11
3.4 - Changing Volume Lock
12
3.5 - Teaching the Remote Control New Functions
12
Chapter 4 - Troubleshooting
13
4.1 - Common Concerns
13
4.2 - Telephone & Technical Support
14
Appendix A: Warranty Information
15
Appendix B: Component Codes
16
Version 8/6/2004
1
VIZIO Universal Remote Control User Guide
Chapter 1 - Introduction
Congratulations on your recent VIZIO Universal Remote Control purchase. The
VIZIO Universal Remote Control is the complete solution for all of your remote
control requirements. It is designed to operate up to 8 different devices with the
emphasis on features and functions of your dedicated components.
The VIZIO Universal Remote Control is also customizable so that you can
configure key buttons to control specific home theater components. It is also
packed with these features for you to choose from:
•
Preprogrammed technology for easy setup
•
Inclusive Audio library
•
Upgradeability
•
Choice of dedicated device(s)
•
Custom silk screening
•
Backlighting
•
Learning capability
•
Custom color system and key definitions
On the following pages, you will receive a basic overview on how to set up and
operate the VIZIO Universal Remote Control.
Version 8/6/2004
2
VIZIO Universal Remote Control User Guide
Chapter 2 - Remote Control Button Description
The VIZIO Universal Remote Control is a comprehensive remote that can be
used to control up to eight different components. For ease of use with minimal
room lighting, the VIZIO Universal Remote Control has a back light that
illuminates all of the buttons when any button is pressed. The light will
automatically go off a few seconds after the last button is pressed. The remote
control button functions are explained on the following pages.
2.1 - Key Remote Control Functions
1.
SETUP – This button starts all
programming sequences.
2.
Remote LED – Blinks when the
remote is being programmed or is
sending a signal to your plasma display.
3.
POWER – Press this key to turn the plasma display on from standby mode.
Press it again to return to the standby mode.
4.
TV – This button selects a
programmed TV.
5.
DVD – This button selects a
programmed DVD player.
6.
VCR – This button selects a
programmed VCR.
7.
TV2 – This button selects a second programmed TV.
8.
CBL/SAT – This button selects a programmed cable TV set-top box or
selects a programmed satellite TV set-top box.
9.
AMP – This button selects a programmed amplifier.
10. CD – This button selects a programmed CD player.
11. AUX – This button selects a programmed component.
12. Number Button Pad – These
buttons select a channel or
password.
13. MUTE – This button turns the
sound on and off.
14. 100/Enter – This button enters a
channel number greater than 100 in
TV mode. This button works as an
ENTER button in other video
modes.
Version 8/6/2004
3
VIZIO Universal Remote Control User Guide
15. VOL – These buttons turn volume up or down.
16. LAST – This button recalls the previously
viewed channel.
17. SLEEP – This button turns on the sleep
timer for other V, Inc. devices. NOTE: This
button is NOT active for the VIZIO P46
model.
18. INPUT – This button changes the input source.
19. CH – These buttons change the channels up or down.
20. WIDE/GUIDE – This button cycles through standard and widescreen
viewing modes or accesses programming
guides, such as the one that comes with a
satellite dish. GUIDE does not work in TV
mode.
21. EXIT – This button exits the component,
guide or on-screen display (OSD) menus.
fedc – These buttons navigate the
OSD menus.
22. OK – This button works as the
“programmed device” button.
23. INFO – This button turns the image and system information display on or
off.
24. MENU – This button is used to select the OSD menu pages.
25. Reverse – This button rewinds the CD, DVD or VCR when the component
is activated with the remote control.
26. Play – This button plays the CD, DVD or
VCR when the component is activated
with the remote control.
27. Forward – This button forwards the CD,
DVD or VCR when the component is
activated with the remote control.
28. Record – This button records the CD, DVD or VCR when the component is
activated with the remote control.
29. Stop – This button stops the CD, DVD or VCR when the component is
activated with the remote control.
30. Pause – This button pauses the CD, DVD or VCR when the component is
activated with the remote control.
Version 8/6/2004
4
VIZIO Universal Remote Control User Guide
31. + ZOOM - – Use these keys to zoom the
image in or out.
32. eMENU f – These buttons are used
to select the OSD menu pages.
33. PIP – Use this key to activate and adjust
the size of the picture-in-picture.
34. FREEZE – Press this key to "FreezeFrame" the current screen. You may
press this key again to continue playing or play will resume automatically
after one minute.
35. FULL WHITE – This button displays a full white screen. This can be used
to reduce image sticking after displaying a static picture for an extended
period.
36. AUDIO (MTS) – Press this key to select Stereo, SAP (separate audio
program) or Mono audio. This function is available in the TV mode.
37. AUTO – This button adjusts the vertical and horizontal position
automatically when pressing this key in the PC mode.
38. WOW – Press this key to turn the SRS Surround Sound feature on or off.
39. PC – This button switches between the components connected to the back
RGB, front RGB or DVI connector as the input source.
40. VIDEO – Press this key to switch the video input.
Note:
The Remote Control layout is for reference only.
Version 8/6/2004
5
VIZIO Universal Remote Control User Guide
2.2 - Insertion of Batteries in the Remote Control
Insert two AA batteries into the remote control. Make sure that you match the (+)
and (-) symbols on the batteries with the (+) and (-) symbols inside the battery
compartment. Re-attach the battery cover.
Precautionary Tips for Inserting the Batteries:
•
Only use the specified AA batteries.
•
Do not mix new and old batteries. This may result in cracking or leakage
that may pose a fire risk or lead to personal injury.
•
Inserting the batteries incorrectly may result in cracking or leakage that may
pose a fire risk or lead to personal injury.
•
Dispose of the batteries in accordance with local laws and regulations.
•
Keep the batteries away from children and pets.
Version 8/6/2004
6
VIZIO Universal Remote Control User Guide
2.3 - Remote Control Range
•
Point the remote control at the remote control sensor (the window through
which the power LED is illuminating) to transmit the commands.
•
Do not place any obstacles between the remote control and the receiver
window.
•
The effective range of the remote control is approximately 32 feet (10
meters) from the front of the receiver window, 30º to the left and right, 20º
up and down.
Precautionary Tips for the VIZIO Universal Remote Control:
•
The remote control should be kept dry and away from heat sources. Avoid
humidity.
•
If the display responds erratically to the remote control or does not respond
at all, check the batteries. If the batteries are low or exhausted, replace
them with fresh batteries.
•
When not using the remote control for a long period of time, remove the
batteries.
•
Do not take apart the batteries, heat them, or throw them into a fire.
•
Do not subject the remote control to undue physical stress, such as striking
or dropping it.
•
Do not attempt to clean the remote control with a volatile solvent. Wipe it
with a clean, damp cloth.
30°
30°
20°
10 m front
Version 8/6/2004
20°
7
VIZIO Universal Remote Control User Guide
Chapter 3 - Remote Control Operation
3.1 - Programming the VIZIO Universal Remote Control
You can program the remote control to work with up to eight different
components. Listed below are the steps for programming select components:
TV, VCR, Cable Box and DVD Player.
3.1.1 - Programming for TV
For your convenience, the primary TV button has been preprogrammed with all
the existing VIZIO TV products.
If you are using a TV from another manufacturer, you will need to follow the
instructions below to program the TV2 button to control the device.
1.
Manually turn on the TV.
2.
Press the TV2 button on the remote
control.
3.
Press and hold the SETUP button
until the LED LIGHT flashes twice.
4.
Find the programming code for your TV in the code list in the back of this
book and enter it using the number buttons. If the code is accepted, the
LED flashes twice after the last digit is entered.
If the LED does not flash twice, repeat Steps 2 through 4 with the next code
listed for the component and manufacturer.
5.
Point the remote control at the TV and press the POWER button. The TV
will turn off.
Note: If your TV does not respond, try all the codes for your brand. If the
codes do not work, or your brand is not listed, see “Searching for
Component Codes”, page 11. Sometimes a code listed will only
include limited functions. Try other codes that may include more
functionality.
Version 8/6/2004
8
VIZIO Universal Remote Control User Guide
3.1.2.1 - Programming for DVD Player
1.
Manually turn on the DVD player.
2.
Press the DVD button on the remote
control.
3.
Press and hold the SETUP button
until the LED LIGHT flashes twice.
4.
Find the programming code for your DVD player in the code list in the back
of this book and enter it using the number buttons. If the code is accepted,
the LED flashes twice after the last digit is entered.
If the LED does not flash twice, repeat Steps 2 through 4 with the next code
listed for the component and manufacturer.
5.
Point the remote control at the DVD player and press the POWER button.
The DVD Player will turn off.
Note: If your DVD player does not respond, try all the codes for your brand.
If the codes do not work, or your brand is not listed, see “Searching for
Component Codes”, page 11. Sometimes a code listed will only
include limited functions. Try other codes that may include more
functionality.
3.1.2.2 - Programming for the BRAVO DVD Players
1.
Press the DVD button on the
remote.
2.
Press and hold the SETUP button
until the LED LIGHT flashes twice.
3.
Press 9 8 7. The LED flashes
twice.
4.
Enter the appropriate program code for the BRAVO D1 (0116) or the
BRAVO D2 (0117) DVD Player.
5.
Point the remote control at the DVD player and press the POWER button.
The DVD Player will turn off.
If the code was entered incorrectly, follow the following steps to reprogram the
DVD button for the BRAVO DVD players.
1.
Press and hold the SETUP button until the LED LIGHT flashes twice.
2.
Press 9 8 2. The LED LIGHT will flash four times.
3.
Then repeat steps 1 through 5 in the above section.
The remote control should now recognize the BRAVO DVD players.
Version 8/6/2004
9
VIZIO Universal Remote Control User Guide
3.1.3 - Programming for VCR
1.
Manually turn on the VCR.
2.
Press the VCR button on the
remote control.
3.
Press and hold the SETUP button
until the LED LIGHT flashes twice.
4.
Find the programming code for your VCR in the code list in the back of this
book and enter it using the number buttons. If the code is accepted, the
LED flashes twice after the last digit is entered.
If the LED does not flash twice, repeat Steps 2 through 4 with the next code
listed for the component and manufacturer.
5.
Point the remote control at the VCR and press the POWER button. The
VCR will turn off.
Note: If your VCR does not respond, try all the codes for your brand. If the
codes do not work, or your brand is not listed, see “Searching for
Component Codes”, page 11. Sometimes a code listed will only
include limited functions. Try other codes that may include more
functionality.
3.1.4 - Programming for Cable Box
1.
Manually turn on the Cable Box.
2.
Press the CBL button on the remote
control.
3.
Press and hold the SETUP button
until the LED LIGHT flashes twice.
4.
Find the programming code for your Cable Box in the code list in the back of
this book and enter it using the number buttons. If the code is accepted, the
LED flashes twice after the last digit is entered.
If the LED does not flash twice, repeat Steps 2 through 4 with the next code
listed for the component and manufacturer.
5.
Point the remote control at the Cable Box and press the POWER button.
The Cable Box will turn off.
Note: If your Cable Box does not respond, try all the codes for your brand. If
the codes do not work, or your brand is not listed, see “Searching for
Component Codes”, page 11. Sometimes a code listed will only
include limited functions. Try other codes that may include more
functionality.
Version 8/6/2004
10
VIZIO Universal Remote Control User Guide
3.2 - Searching for Component Codes
If the user cannot find the manufacturer in the component list or the program
code does not work, the user can use the remote control to search for the correct
component code.
To search for a component code:
1.
Turn on the component.
2.
Press the matching component button on the remote control.
3.
Press and hold the SETUP button until the LED flashes twice.
4.
Press 9 9 1. The LED flashes twice.
5.
Point the remote control at the component and then alternate between
pressing the POWER button and the component button on the remote
control until the component turns off.
If the component still does not respond, clear the component button, then repeat
the search procedure.
To clear the component button:
1.
Make sure that the component is turned on.
2.
Press and hold the SETUP button on the remote control until the LED
flashes twice.
3.
Press 9 9 2, then press the component button on the remote control twice.
3.3 - Reassigning Component Buttons
You can reassign the component buttons on the remote control if you have more
than one of the same types of component. For example, if you are using the
remote to control the cable (CBL), CD, DVD, VCR and two TVs, you can
reassign the TV2 button as a second TV button.
To reassign component buttons:
1.
Press and hold the SETUP button until the LED flashes twice.
2.
Press 9 9 2. The LED flashes twice.
3.
Press the component button that you want (TV) once, and then press the
component button that you are reassigning (TV2) once. The TV2 button is
now reassigned and can be programmed as a TV component button. See
“Programming the VIZIO Universal Remote Control”, page 9.
Version 8/6/2004
11
VIZIO Universal Remote Control User Guide
3.4 - Changing Volume Lock
The remote control is set to control volume through your TV while in cable (CBL),
DVD, satellite (SAT) and VCR component modes. Use the volume lock if you
want to control the volume for all components through a specific component. For
example, you want to control volume for all components through the tuner (TNR).
To change the volume lock:
1.
Press and hold the SETUP button until the LED flashes twice.
2.
Press 9 9 3. The LED flashes twice.
3.
Press the component button that you want (TNR) once. The LED flashes
twice. Volume will now be controlled through the tuner for all components.
3.5 - Teaching the Remote Control New Functions
The VIZIO Universal Remote Control can learn up to 25 additional functions from
the component’s original remote control. For example, your DVD player remote
control has a scan function that you may use frequently. Since there is not a
scan button on the VIZIO Universal Remote Control, you can assign a button and
use the remote to teach the remote control the scan function.
Note: Make sure that you have already programmed the remote control for
the component. See “Programming the VIZIO Universal Remote
Control” on page 8. Make sure that area lighting is not too bright or it
will interfere with the learning process.
To teach the remote control a new function:
1.
Press and hold the SETUP button on the remote control until the LED
flashes twice.
2.
Press 9 7 5. The LED flashes twice.
3.
Press the component button that you want (DVD) once.
4.
Press the button that you are assigning the new function to. The LED
flashes quickly while it is waiting to receive the signal from the teaching
remote.
5.
Hold the teaching remote control approximately 1-inch (2.54 cm) from the
remote control making sure that the infrared ports are lined up. Then press
the button on the teaching remote that you want the remote to learn. The
LED flashes twice.
6.
Press the SETUP button to exit learning mode.
Version 8/6/2004
12
VIZIO Universal Remote Control User Guide
Chapter 4 - Troubleshooting
4.1 - Common Concerns
Use the following information to solve common issues.
Problem:
The LED doesn’t blink when a button is pressed.
Solution:
Replace the batteries. See “Insertion of Batteries in the Remote
Control” on page 6.
Problem:
The LED blinks when a component mode is pressed, but the
component does not respond.
Solution:
Make sure that you are less than 15 feet (4.57 meters) from the
infrared remote sensors on the component.
Make sure that nothing is blocking the infrared remote sensors on
the remote control or the component.
Make sure that you have selected the correct component mode.
Make sure that the remote is programmed for that component.
See “Programming the VIZIO Universal Remote Control” on page
8.
Problem:
The remote control will not accept the component program code.
Solution:
Make sure that you followed all the steps in the programming
procedure. See “Programming the VIZIO Universal Remote
Control” on page 8.
Make sure that you tried all the program codes listed for the
component manufacturer. See “Component Program Codes” In
Appendix B.
Search for the component code. See “Searching for Component
Codes” on page 11.
Version 8/6/2004
13
VIZIO Universal Remote Control User Guide
4.2 - Telephone & Technical Support
Products are often returned due to a technical problem rather than a defective
product which may result in unnecessary shipping charges billed to you. Our
trained support personnel can often resolve the problem over the phone. For
more information on warranty service or repair, after the warranty period, please
contact our Support Department at the number below.
Quality service and consistent technical support are integral parts of V's
commitment to service excellence. V's service representatives are dedicated to
assist you with the utmost in customer satisfaction. To better assist you, please
contact via email or phone.
Email: [email protected] or Tel: (714) 668.0588, 7am-4pm PST
Corporate Contact Information
V Incorporated
320A Kalmus Drive
Costa Mesa, CA 92626
Tel: (714) 668.0588
Fax: (714) 668.9099
Web: www.VINC.com
Version 8/6/2004
14
VIZIO Universal Remote Control User Guide
Appendix A: Warranty Information
V, Inc. Limited Warranty
Welcome to the V, Inc. Digital Family. Please read this warranty carefully, it is a “90-Day Limited Warranty” on parts and labor.
V, Inc.’s Responsibility
V, Inc. Universal Remote Controls purchased in the United States are warranted to be free from defects in materials or workmanship
for a period of 90 days from the date of their original purchase. If the unit fails to conform to this warranty, we will service the
product using new or refurbished parts.
Service Labor
During a period of 90 days from the effective warranty date, V, Inc. will provide when needed, service labor to repair a
manufacturing defect at its designated Service Center. To obtain warranty service in the United States, you must first call our
Customer Support at (714) 668-0588, 9:00 am – 5:00 pm PST. The determination of service will be made by V, Inc. Customer
Support. PLEASE DO NOT RETURN YOUR UNIT TO V, INC. WITHOUT PRIOR AUTHORIZATION.
Parts
New or remanufactured replacements for defective parts will be used for repairs by V, Inc. at its designated Service Center for 90
days from the effective warranty date. Such replacement parts are warranted for the remaining portion of the original warranty
period.
Service
During the 90 day warranty period, V, Inc. will, at its option and sole discretion, repair or replace defective parts, including the
replacement of the entire product. The Customer will be required to ship the unit to the Service Center indicated at the time
Customer Support is contacted to make the necessary repairs. You are responsible for all transportation charges to and from the
service facility. V, Inc. is not responsible for the de-installation or re-installation of the unit.
Packaging and Shipping Instructions
When you send the product to an authorized V, Inc. service facility, you must use the original carton box and packing material or an
equivalent as approved by V, Inc.
Not Covered
This warranty does not cover defects, malfunctions or failures resulting from shipping or transit accidents, abuse, misuse, operation
contrary to furnished instructions, operation on incorrect power supplies, operation with faulty associated equipment, modification,
alteration, improper servicing, tampering or normal wear and tear or remotes on which the serial number has been removed or
defaced.
ANY IMPLIED WARRANTIES, INCLUDING ANY IMPLIED WARRANTY OF MERCHANTABILITY AND FITNESS FOR A
PARTICULAR PURPOSE SHALL BE LIMITED IN DURATION TO THE PERIOD OF TIME SET FORTH ABOVE. OUR LIABILITY
FOR ANY AND ALL LOSSES AND DAMAGES RESULTING FROM ANY CAUSE WATSOEVER, INCLUDING OUR NEGLIGNECE,
ALLEGED DAMAGE OR DEFECTIVE GOODS, WHEATHER SUCH DEFECTS ARE DISCOVERABLE OR LATENT SHALL IN NO
EVENT EXCEED THE PURCHASE PRICE OF THE UNIT. WE SHALL NOT BE RESPONSIBLE FOR LOSS OF USE,
COMMERCIAL LOSS OR OTHER INCIDENTAL OR CONSEQUENTIAL DAMAGES. SOME STATES DO NOT ALLOW
LIMITATIONS ON HOW LONG AN IMPLIED WARRANTY LASTS OR THE EXCLUSION OR LIMITATION OF INCIDENTAL OR
CONSEQUENTIAL DAMAGES, SO THE ABOVE LIMITATIONS OR EXCLUSIONS MAY NOT APPLY TO YOU. This warranty
gives you specific legal rights, and you may also have other rights which vary from state to state. This is the only warranty
applicable; no one is authorized to extend or modify it or to grant any other warranty.
V, Inc. retains the right to assess all warranty claims and to determine if damages are covered by warranty. In case of a claim that
is not covered by the warranty, you will be contacted to determine whether V, Inc. should repair the damage for a fee or whether the
product should be returned to you as received by the repair center.
Owner’s responsibility
Effective Warranty Date
Warranty begins on the date of sale to the end user. To ensure warranty service, keep the dated bill or sale receipt as evidence of
the purchase date.
User Manual
Read you user manual carefully so that you will understand the operation of your remote control and how to adjust the user controls.
Warranty Service
For warranty service information, contact V, Inc. Customer Support at (714) 668-0588, 9:00 am – 5:00 pm PST. Parts and service
labor that are V, Inc’s responsibility (see above) will be provided without charge. Other service is at the owner’s expense. You must
provide the model, serial number and date of purchase. Before you ask for warranty service, read your user manual. You might
avoid a service call.
Version 8/6/2004
15
VIZIO Universal Remote Control User Guide
Appendix B: Component Codes
Setup Codes for V, Inc. Products
Product
Program Code
BRAVO D1 DVD
0116
BRAVO D2 DVD
0117
BRAVO HD1
1126
VIZIO P4
0113
VIZIO L6
0115
VIZIO L13
0114
VIZIO RP56
0
Setup Codes for Amplifier and Tuner Codes
Manufacturer
Program Codes
Manufacturer
Program Code
Bose
0674
Polk Audio
0892
GE
0078
Realistic
0395
Harman/Kardon
0892
Sony
0689
JVC
0331
Sounddesign
0078
Marantz
0892
Victor
0331
Optimus
0395
Wards
0078
Philips
0892
Yamaha
0354
Setup Codes for Cable Set-Top Box Codes
Manufacturer
Program Codes
Manufacturer
Program Code
ABC
0003, 0017
Philips
0305, 0317
Americast
0899
Pioneer
0144, 0533, 0877
Bell South
0899
Pulsar
0000
General
Instrument
0276, 0476, 0810
Quasar
0000
Goldstar
0144
Regal
0273, 0279
Hamlin
0009, 0273
Runco
0000
Jerrold
0003, 0276, 0476,
0810
Samsung
0144
Memorex
0000
Scientific Atlanta
0017, 0477, 0877
Motorola
1106
Starcom
0003
Pace
0237
Toshiba
0000
Panasonic
0107, 0000
Zenith
0000, 0525, 0899
Paragon
0000
Version 8/6/2004
16
VIZIO Universal Remote Control User Guide
Setup Codes for CD Player Codes
Manufacturer
Program Codes
Manufacturer
Program Code
Aiwa
0157
Parasound
0420
Burmester
0420
Philips
0157, 0626
California Audio
Labs
0029
Pioneer
0032, 0468, 0305,
1062, 1063
Carver
0157, 0179
Polk Audio
0157
DKK
0000
Proton
0157
Denon
0003, 0873
QED
0157
Emerson
0305
Quasar
0029
Fisher
0179
RCA
0053, 0032, 1062,
0468, 0305, 0179
Garrard
0420
Realistic
0179, 0420
Genexxa
0032, 0305
Rotel
0157, 0420
Harman/Kardon
0157, 0173
SAE
0157
Hitachi
0032
Sansui
0157, 0305
JVC
0072
Sanyo
0179
Kenwood
0028, 0190, 0826,
0037, 0626, 0681
Scott
0305
Krell
0157
Sears
0305
LXI
0305
Sharp
0037, 0861
Linn
0157
Sherwood
1067
MCS
0029
Sonic Frontiers
0157
MTC
0420
Sony
0000, 0490
Magnavox
0157, 0305
Soundesign
0145
Marantz
0157, 0626, 0029
Tascam
0420
Mission
0157
Teac
0420
NSM
0157
Technics
0029
Version 8/6/2004
17
VIZIO Universal Remote Control User Guide
Setup Codes for DVD Players Codes
Manufacturer
Program Codes
Manufacturer
Program Code
Apex
0672
Optimus
0571
Denon
0490
Oritron
0651
Fisher
0670
Panasonic
0490, 0677, 0362
Gateway
0081
Philips
0539, 0503
0571, 0525, 0632
GE
0522
Pioneer
Gradiente
0651
Proscan
0522
Hitachi
0573, 0664
RCA
0522, 0571
0573
Hiteker
0672
Samsung
JVC
0623, 0558
Sharp
0630
Kenwood
0682, 0534
Sony
0533
Konka
0719, 0711, 0720,
0721
Technics
0490
Magnavox
0503, 0675
Theta Digital
0571
Marantz
0539
Toshiba
0503
Mitsubishi
0521
Yamaha
0490, 0545
Onkyo
0503
Zenith
0591, 0503
Setup Codes for Computer and Home Automation Codes
Manufacturer
Program Codes
Manufacturer
Program Code
Gateway
1272
Security System
0167
GE
0240
Universal X10
0167
One For All
0167
X10
0167
Radio Shack
0240
Version 8/6/2004
18
VIZIO Universal Remote Control User Guide
Setup Codes for Receiver Codes
Manufacturer
Program Codes
Manufacturer
Program Code
ADC
0531
Panasonic
0039, 1518
Aiwa
0121, 1405, 1089
Philips
1089, 1189, 1269
Bose
0238, 0639, 1229,
1253, 1355, 1356,
1357
Pioneer
0150, 0531, 0630,
1023
Capetronic
0531
Proscan
1254
Carver
1089, 1189
Quasar
0039
Denon
1160, 1104
RCA
1254, 0531, 1023
Harman/Kardon
0110
Sansui
1089
JBL
0110
Sharp
0186
JVC
0074
Sony
1158, 1058, 1258
Kenwood
1027, 0186, 1313,
1569, 1570
Soundesign
0670
MCS
0039
Sunfire
1313
Magnavox
1089, 0531, 1189
Technics
0039, 1308, 1518,
1309
Marantz
1189, 1089, 0039
Thorens
1189
Onkyo
0135
Victor
0074
Optimus
1023, 0186, 0531,
0670
Yamaha
0176, 0186, 1176
Setup Codes for Satellite Set-Top Box Codes
Manufacturer
Program Codes
Manufacturer
Program Code
AlphaStar
0772
Next Level
0869
Chaparral
0216
Panasonic
0247, 0701
Echostar
0775, 1005
Philips
1076, 1142, 0722,
0724, 0749
Expressvu
0775
Proscan
0392
GE
0566
RCA
0566, 0392, 0143,
0855
General
Instrument
0869
Radio Shack
0869
HTS
0775
Samsung
1109
Hitachi
0819
Sony
0639
Hughes Network
Systems
0749, 1142, 1749
Star Choice
0869
JVC
0775
Toshiba
0749, 0790
Magnavox
0722, 0724
Uniden
0724, d0722
Memorex
0724
Zenith
0856
Mitsubishi
0749
Version 8/6/2004
19
VIZIO Universal Remote Control User Guide
Setup Codes for TV Codes
Manufacturer
Program Codes
Manufacturer
Program Code
AOC
0019, 0030
Memorex
0179, 0463, 0178,
0016, 0056, 0150,
0154, 0250
Admiral
0093, 0463
Midland
0017, 0047, 0051
Aiko
0092
Mitsubishi
0150, 0178, 0019,
0093
Aiwa
0701
Motorola
0093
Akai
0030
Multitech
0180
Alaron
0179
NAD
0156, 0166, 0178
American Action
0180
NEC
0030, 0019, 0056
Anam
0180
NTC
0092
Audiovox
0092, 0180, 0451,
0623
Nikko
0178, 0030, 0092
Baysonic
0180
Onwa
0180
Belcor
0019
Optimus
0250, 0166, 0154
Bell and Howell
0016, 0154
Optonica
0093
Bradford
0180
Orion
0463, 0179, 0236
Brockwood
0019
Panasonic
0051, 0250
Broksonic
0263, 0463
Penney
0047, 1347, 0060,
0030, 0178, 0051,
0019, 0056, 0156
CXC
0180
Philco
0145, 0019, 0030,
0054, 0463
Candle
0030, 0056
Philips
0054
Carnivale
0030
Pilot
0013, 0030
Carver
0054
Pioneer
0166, 0679
Celebrity
0000
Portland
0019, 0092
Cineral
0451, 0092
Princeton
0717
Citizen
0056, 0030, 0060,
0092
Prism
0051
Concerto
0056
Proscan
0047
Contec
0180
Proton
0178
Craig
0180
Pulsar
0017, 0019
Crosley
0054
Quasar
0051, 0250
RCA
0047, 1347, 1147,
0679, 1247, 0019,
0051, 0090, 0093,
1047, 1447
Radio Shack
0180, 0030, 0178,
0154, 0019, 0047,
0056
Realistic
0180, 0154, 0030,
0178, 0019, 0056
Runco
0017, 0030
Crown
Curtis Mathes
Daewoo
Daytron
Version 8/6/2004
0180
0060, 0030, 0016,
0047, 0051, 0054,
0056, 0093, 0145,
0154, 0166, 0451,
1147, 1347
0092, 0623, 0019,
0624, 0451
0019
20
VIZIO Universal Remote Control User Guide
Denon
0145
SSS
Dumont
0017, 0019
Sampo
0019, 0180
0030
Electroband
0000
Samsung
0060, 0019, 0078,
0030, 0056
Emerson
0236, 0180, 0178,
0179, 0463, 0624,
0623, 0019, 0154
Sansei
0451
Envision
0030
Sansui
0463
Fisher
0154
Sanyo
0154
Fujitsu
0179, 0683
Scimitsu
0019
Funai
0180, 0171, 0179
Scotch
0178
0236, 0019, 0178,
0179, 0180
0154, 0056, 0156,
0047, 0054, 0171,
0178, 0179
Futuretech
0180
Scott
Gateway
0072, 0080
Sears
GE
0047, 1347, 0051,
0178, 0451, 1147,
0093
Semivox
0180
Gibralter
0017, 0019, 0030
Semp
0156
GoldStar
0178, 0019, 0030,
0056
Sharp
0093, 0688
Gradiente
0056, 0053
Shogun
0019
Grunpy
0179, 0180
Signature
0016
Hallmark
0178
Sony
0000
Harley Davidson
0179
Soundesign
0178, 0179, 0180
0171
Harman/Kardon
0054
Squareview
Harvard
0180
Starlite
0180
Hitachi
0145, 0056, 0016
Supreme
0000
Infinity
0054
Sylvania
0054, 0030
Inteq
0017
Symphonic
0171, 0180
JBL
0054
TMK
0056, 0178
JCB
0000
TNCi
0017
JVC
0053
Tandy
0093
KEC
0180
Technics
0051, 0056
KTV
0180, 0030
Technol Ace
0179
Kenwood
0030, 0019
Techwood
0051, 0056
Konka
0707, 0632, 0628,
0638, 0703
Teknika
0016, 0054, 0179,
0180, 0019, 0092,
0056, 0060, 0150
LG
0056
Telefunken
0056
LXI
0154, 0047, 0054,
0156, 0178
Toshiba
0156, 0060, 0154,
1256
Logik
0016
Vector Research
0030
Luxman
0056
Victor
0053
MGA
0150, 0019, 0030,
0178
Vidikron
0054
Version 8/6/2004
21
VIZIO Universal Remote Control User Guide
MTC
0060, 0030, 0019,
0056
Vidtech
0019, 0178
Magnavox
0054, 0030, 0179,
1254
Wards
0054, 0178, 0016,
0019, 0030, 0056,
0179
Majestic
0016
White
Westinghouse
0624, 0623, 0463
Marantz
0054, 0030
Yamaha
0019, 0030
Matsushita
0250
Zenith
0017, 0624, 0016,
0092, 0463
Magatron
0145, 0178
Version 8/6/2004
22
VIZIO Universal Remote Control User Guide
Setup Codes for VCR Codes
Manufacturer
Program Codes
Manufacturer
Program Code
Admiral
0048, 0209
Mitsubishi
0043, 0048, 0067
Adventura
0000
Motorola
0035, 0048
Aiko
0278
Multitech
0000, 0072
Aiwa
0000, 0037
NEC
0038, 0067, 0104
America Action
0278
Nikko
0037
American High
0035
Noblex
0240
Asha
0240
Olympus
0035
0162, 1062, 1162,
0048, 1262, 0037,
1048, 0104, 0432
Audiovox
0037
Optimus
Beaumark
0240
Orion
Bell & Howell
0104
Panasonic
Broksonic
0121, 0184, 0001,
0209, 0479
Penney
CCE
0072, 0278
Pentax
0042
Calix
0037
Philco
0035, 0209, 0479
Canon
0035
Philips
0081, 0035, 0618,
1081, 1181
0479, 0002, 0184,
0209
0035, 0162, 1162,
1262, 1362, 0616,
1062
0035, 0240, 0037,
0042, 0038
Carver
0081
Pilot
0037
Cineral
0278
Pioneer
0067
Citizen
0278, 0037
Polk Audio
0081
Colt
0072
Profitronic
0240
Craig
0037, 0072, 0047,
0240
Proscan
0060
Curtis Mathes
0035, 0060, 0162
Protec
0072
Cybernex
0240
Pulsar
0039
Daewoo
0278, 0045
Quasar
0035, 0162, 1162
Denon
0042
RCA
0060, 0149, 0042,
0035, 0048, 0240
Dynatech
0000
Radio Shack
0000, 1037
Electrohome
0037
Radix
0037
Electrophonic
0032
Randex
0037
Emerex
0032
Realistic
0000, 0104, 0047,
0048, 0037, 0035
Emerson
0184, 0002, 0209,
0278, 0121, 0479,
0000, 0037, 0043
Replay TV
0614, 0616
Fisher
0047, 0104
Runco
0039
Fuji
0033, 0035
STS
0042
Funai
0000
Samsung
0045, 0240
Version 8/6/2004
23
VIZIO Universal Remote Control User Guide
GE
0035, 0060, 0048,
0240
Sanky
0039, 0048
Garrard
0000
Sansui
0479, 0000, 0067,
0209
Go Video
0432
Sanyo
0047, 0104, 0240
GoldStar
0037, 0038
Scott
Gradiente
0000
Sears
HI-Q
0047
Semp
0045
Harley Davidson
0000
Sharp
0048
0184, 0121, 0043,
0045
0037, 0042, 0000,
0035, 0047, 0104
Harman/Kardon
0038, 0081
Shintom
0072
Harwood
0072
Shogun
0240
Hitachi
0042, 0000
Singer
0072
Hughes Network
Systems
0042
Sony
0033, 0035, 0000,
0035, 0636, 1032
JVC
0067
Sylvania
0035, 0081, 0000,
0043
KEC
0037, 0278
Symphonic
0000
KLH
0072
TMK
0240
Kenwood
0067, 0038
Teac
0000
Kodak
0035, 0037
Technics
0035, 0162
LXI
0037
Teknika
0000, 0035, 0037
Lloyd's
0000
Thomas
0000
Logik
0072
Tivo
0618, 0636
MEI
0035
Toshiba
0045, 0043
MGA
0043, 0240
Totevision
0037, 0240
MGN Technology
0240
Unitech
0240
MTC
0000, 0240
Vector
0045
Magnasonic
0278
Vector Research
0038
Magnavox
0035, 0081, 0563,
0000, 0039, 0149
Video Concepts
0045
Magnin
0240
Videosonic
0240
Marantz
0081, 0035
Wards
0035, 0060, 0000,
0047, 0240, 0042,
0048, 0072, 0081,
0149
Marta
0037
White
Westinghouse
0072, 0278, 0209
Matsushita
0035, 0162
XR-1000
0072, 0000, 0035
Memorex
0104, 0047, 0479,
0000, 0037, 0048,
0035, 0240, 1037,
0039, 0162, 0209,
1162, 1262
Yamaha
0038
Minolta
0042
Zenith
0039, 0000, 0033,
0209, 0479
Version 8/6/2004
24