Download User Manual
Transcript
Auto Audio DenoiZer (AAD) AAD Contents Introduction Quick Start 2 _ 3 System Requirements 4 Beginners Guide 5 Input/output and Profiles 6 Preset Profiles 7 User defined Profiles/custom profiles__________________ 9 Display Screen 9 Tuning Guide 10 User Interface 13 Page 1 AAD AAD Introduction: Auto Audio Denoizer(AAD) incorporates five different tool sets: Wideband Automatic Noise Removal (WANR), Voice Enhancement (VE), Incoherent Component Suppression (ICS), Dynamic Listening Fatigue Reduction (DLFR) and Hum Removal. These five different tools managed judiciously can provide crystal clear, pleasant, noise free high quality audio and offer the user flexibility for creating a customize signature sound. However, an expert’s work is not required to handle the product satisfactorily. The product is designed with a simple and easy to use interface and it should not take more than few minutes for one to master the essential controls after the software installation. The main function of the AAD, as the name suggests, is to clean-up any noisy audio and to make it free from many kind of distortions like a scratch or a hiss or a hum. Apart from its prime functionality, i.e., noise removal, the product comes with other audio conditioning tools, like ICS and DLFR; to enhance and enrich the listener’s experience of the audio. ICS and DLFR are complex signal processing algorithms based on psychoacoustic principles which smoothen the audio to better a listeners overall experience. More information regarding these tools may be found in the Tuning Guide section. Page 2 AAD Quick Start: The quickest way to getting started with AAD is: 1. 2. Run the AAD exe to start the application. Select the input/output devices using the drop down menus (the default devices are already shown selected). If the selected input is an audio device, you will be prompted for an additional selection of sampling rate (currently AAD supports sampling rates: 8kHz,16kHz,24kHz,32kHz,44.1 kHz and 48 kHz, Also supports mono and stereo type of wav file input). 3. Select the Profile from the drop down menu (Default is shown selected). 4. Press the Play button. Important Note for Windows Vista Users: Vista users may need to go to Control Panel->Sound->Playback, select the device and click on Properties->Advanced and select the sample rate and bit depth. While the bit depth should be chosen as 16 bits, the selected rate should match rate of input as selected above. The same steps should be repeated for recording devices. Distortions in audio, like clicks and pops may be heard if this step is not performed. In case of any lingering performance issues like clicking, distortion etc. please contact: [email protected] Page 3 AAD System Requirements: Operating System: AAD is currently available for Windows XP, Windows Vista and Windows7 operating systems. Hardware: Because of high processing requirement we recommend a high end PC/Server for running the AAD. For example, a Dual/Quad Core processor with clock speed of 2.2 GHz (or higher) or a single core Pentium with a clock speed of 3.6 GHz (or higher) is recommended. System RAM of at least 1 GB is recommended. Audio Hardware: AAD has been tested with a variety of professional and consumer grade sound cards with both digital and analog inputs. As described in other sections of the user manual, it automatically detects all available sound input/output options present in the system and lets the user select from the available options. Page 4 AAD Beginners Guide: AAD incorporates different tool sets: Wideband Automatic Noise Removal (WANR), Voice/Vocal Enhancement (VE), Incoherent Component Suppression (ICS), Dynamic Listening Fatigue Reduction (DLFR), Hum Removal. These different tools when managed judiciously can provide crystal clear, pleasant, noise free high quality audio and offer the user flexibility for creating a customize signature sound. However, an expert’s work is not required to handle the product satisfactorily. The product is designed with a simple and easy to use interface and it should not take more than few minutes for one to master the essential controls after the software installation. The main function of the AAD, as the name suggests, is to clean-up any noisy audio and to make it free from many kind of distortions like a scratch or a hiss or a hum. Apart from its prime functionality, i.e., noise removal, the product comes with other audio conditioning tools, like VE, Hum removal, ICS and DLFR; to enhance and enrich the listener’s experience of the audio. ICS and DLFR are complex signal processing algorithms based on psychoacoustic principles which smoothens the audio to better a listener’s overall experience. Page 5 AAD Input/output Profiles: Input: There are two methods to feed an input. Input could either be from a stored file from a storage disk or could be fed in live from an audio card. The supported sampling rates for the input are 32 KHz stereo, 44.1 KHz and 48 KHz stereo. a) File Based Input: Only Wave format (.wav) files are supported in this mode. At this time mono files are not supported (please convert mono files into stereo before processing). Which you can click in AAD-GUI (Input -> File) b) Audio Card Input: The software automatically detects and lists a set of sound cards installed in PC. On choosing a desired sound card the audio could be fed-in directly from the input and be processed real time. Which you can click in AAD-GUI (Input -> Microphone(Realtec High definition)) Output: The output of a processed audio could be stored in a file or could be fed-out in real time to an audio card. a) File Based Output: Only wave format (.wav) files are supported in this mode. b) Audio Card Output: The software automatically detects and lists a set of sound cards installed in PC. On choosing a desired sound card the processed audio is fed-out real time. Profile : Profile options allow users to save a specific set of parameters to customize the AAD for their own specific usage. Save a Profile: Save a profile after customizing the parameters of AAD, i.e., after setting the required parameter value for WANR, VE, ICS and DLFR. The profile could be saved under a profile name. Remove a Profile: A saved profile can be deleted by using remove profile option. Page 6 AAD Preset and Custom Profiles: Description of Preset Profiles Preset Name Preset Description Pure MusicVery Light General purpose very light noise removal/conditioning for music. Attempts to improve coherence and reduce listener fatigue. Relies primarily on ICS and DLFR tools. Pure MusicLight General purpose light noise removal and conditioning for music. Attempts to reduce noisiness improve coherence and reduce listener fatigue. Relies on light level of AWNR, ICS and DLFR tools. Vocal MusicVery Light Similar to Pure Music- Very Light preset but with special conditioning of Vocal tones. Vocal MusicLight Similar to Pure Music-Light preset but with special conditioning of Vocal tones. Music-Oldies Light noise removal targeted towards 60s/70s music or similar recordings with noise. Talk-News Radio-Light Light noise removal for talk, news, vocal type material with more musical content. Talk-News Radio-Medium Medium noise removal for talk, news, vocal type material with less musical content. Talk-News Radio-Heavy Heavy noise removal for commentary, talk, news type material with occasional music. Focused towards cleaning up voice material. Pure-WANRHeavy High grade noise removal using the WANR wide-band noise removal algorithm. Page 7 AAD Pure-WANRColor Light Light noise removal using the Color Model of WANR wide-band noise removal algorithm. Pure-WANRColor Heavy Heavy Non-stationary noise removal using the Color Model of WANR wide-band noise removal algorithm. Pure-WANRWhite Light Light stationary background noise removal using the white Model of WANR wide-band noise removal algorithm. Pure-WANRWhite Heavy Heavy noise removal using the white Model of WANR wide-band noise removal algorithm for very noisy background. Custom Preset Name Custom Preset Description TALK-COLOR Light color-noise removal using the WANR wide-band noise removal algorithm. This preset is preferred in colored speech noise scenarios. NEWS-WHITE Light noise removal for news and vocal type material with more musical content. This preset is preferred in white noise scenarios. NEWS-COLOR Light noise removal for news and vocal type material with more musical content. This preset is preferred in colored noise scenarios. HEAVY-NOISE Heavy Non-stationary noise removal using WANR wide-band noise removal algorithm. This preset is preferred in very low SNR noise scenarios. HEAVYCOLOR Heavy Non-stationary noise removal using the Color/White Model of WANR wide-band noise removal algorithm. This preset is preferred in high colored/white noise scenarios. TALK-WHITE Light White-noise removal using the WANR wide-band noise removal algorithm. This preset is preferred in White speech noise scenarios. Page 8 
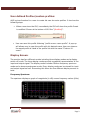
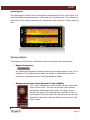
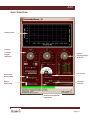
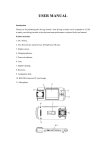
AAD User defined Profiles/custom profiles: AAD is given freedom for a user to create his own de-nosier profiles. It involves the following steps When a user tune the GUI, immediately the GUI will show the profile Preset is modified. Shown at the bottom of GUI like “(Modified)”. User can save this profile following “profile menu->save profile”. A pop-up will allows user to save the profile with his desired name. User can observe the saved profile is listed in the profile list with the name “Custom-10xxxxx”. Display Screen: The monitor has four different modes including three display modes and a display switch off mode. The three display modes provide a graphical representation of the input and output signal. The display modes include a Stereo frequency spectrum mode and a stereo spectrogram mode. Every display mode can be viewed for input and output signal as well. Accounting this there are five different display screens in total. Frequency Spectrum: The spectrum displays a graph of magnitude (in dB) versus frequency values (KHz). Page 9 AAD Spectrogram: The spectrogram shows a three dimensional representation of the input signal. The graph is plotted between frequency (KHz) and time (milliseconds). The intensity of each point in the image represents the amplitude of the spectrum at that instant of time. Tuning Guide: This chapter briefs the use of different tools by explaining their functionality. Bypass Processing: By checking the bypass processing button the processing done in the AAD is bypassed. This helps the user judge the quality of audio before and after processing instantaneously by switching between modes. Wideband Automatic Noise Removal Toolkit (WANR): AAD comes bundled with a world class real-time automatic noise control block. The user can choose a few optional parameters and background noises, including dynamic background noises, are automatically identified on the fly and removed from the audio. At a broad level the user can operate the algorithm with two different structures for the noise model: Page 10 AAD White Model: For general noise types. Color Model: For heavy noise reduction of a particular environment such as machine and instruments noise type. Profile: There are four different preset profiles inside this WANR, which are specially designed for music, vocal, talk and general purpose. WANR-Custom profile: User can design his own de-noisier profiles in side WANR using learn, save, load buttons. These profiles are useful during random noise signals. Learn, save and load: Learn button: This is a noise estimator tool. It records the ergodicity of an unknown noise signal for 5 seconds. Save button: After recording when users press this save button. A window pop-up and user can save profile with his desired name. This will be added to the list in the profile menu of WANR. Technically this is used to save recorded noise signal ergodicity. This help to AAD to attenuate the noise signal in more efficiently. Load button: User can load the saved profiles from other WANR profiles by using the “lode profiles” in the menu. Voice/Vocal Enhancement (VE): This module enhances the speech/vocal content of an audio file if the corresponding box is checked. The slider is used to adjust the level of enhancement for the vocal portion of the audio. A novice user can set safely a value of 0.4 to 0.7 for speech files and 0.2 to 0.4 for music files. For high energy audio files, a lower value is preferable. Dynamic Listening Fatigue Reduction (DLFR): This module conditions temporal envelope in multiple frequency bands. To smooth the audio the dial value should be at high end and to let in more dynamics dial value should be at lower end. The 6 vertical bars below the dial provide finer control over envelope conditioning in individual frequency bands (with indicated center frequency values). The higher the sliders the smoother is the audio in that band. There are two associated slider controls which control respectively the tonal Page 11 AAD characteristics of overall audio and the refinement level of envelope conditioning. Incoherent Component Suppression (ICS): This module detects the Sibilant/Fricative sections of the input audio and smoothes the corresponding audio section. The slider read the Start frequency, which specifies the frequency threshold above which the spectral tapering begins. The dial controls the intensity of tapering done by the algorithm. The frequency scale is divided between 3 and 15 KHz in steps of 1.33 KHz. A novice user can set safely set the dial at 0.6 and the start frequency at about 6-9 kHz. HUM REMOVAL: This module filters any hum at 50Hz/60Hz and optionally a first harmonic. To filter the first harmonic the controls 50Hz+Har and 60Hz+Har should be enabled. Page 12 AAD User Interface: Display Screen Dynamic Listening Fatigue Reduction Dynamic Listening Fatigue Reduction Hum removal Voice/Vocal Enhancement Bypass Processing Standard Controls Incoherent Component Suppression Page 13