1
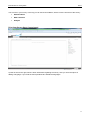
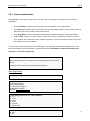
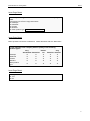
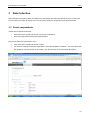
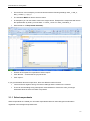
Introduction to SurveyXact Gitte Damgaard Business Academy Aarhus, 2014 Table of Contents 1 INTRODUCTION 1 1.1 Log on to SurveyXact and create your own survey 2 2 CREATE THE QUESTIONNAIRE 4 2.1 Edit questionnaire header 4 2.2 Edit/create questionnaire in Smart Designer 2.2.1 Create questionnaire 2.2.2 Edit background questionnaire 4 5 8 2.3 Finish the questionnaire in the Advanced Designer 9 2.4 Test the questionnaire 9 2.5 Change layout of the questionnaire 9 3 DATA COLLECTION 10 3.1 Create respondents 3.1.1 Select respondents 3.1.2 Edit selected 3.1.3 Distribution 3.1.4 Send e-mail 3.1.5 Export Background data 10 11 12 12 13 13 3.2 Status 13 3.3 Return mails 13 4 ANALYSIS 14 5 HELP??? 15 Introduction to SurveyXact 1 2014 Introduction SurveyXact is a tool, which makes it easier to carry out a questionnaire survey. SurveyXact can make the whole process more effective, pass on results, structure the working process, share experiences with others in the organization, make it easier to make replicate surveys and follow the development. It still requires knowledge to carry out a good survey – but with the use of templates and the SurveyXact portal this knowledge is passed on. 1 Introduction to SurveyXact 2014 1.1 Log on to SurveyXact and create your own survey When you need a login for the program SurveyXact contact your tutor/teacher. Today I will handout a login for practice – but only use the login today. Enter this web address in your internet browser: www.survey-xact.dk/Login. Provide user name: X Provide password: X You are now at the organization’s control panel. You start to create your own survey: Click at the arrow and choose ”Create survey”. You can select amongst a number of templates. Choose “Empty template”, which does not contain anything. Provide a Survey name. 2 Introduction to SurveyXact 2014 You are now in your survey. In the top you can see three headlines, which cover the structure of the survey: Questionnaires Data Collection Analysis Print from Survey-Xact: Control panel A panel is seen to the right, which is basic information regarding the survey. Here you have the option of adding a language, if you need the same questionnaire at different languages. 3 Introduction to SurveyXact 2 2014 Create the questionnaire A questionnaire consists of: A questionnaire which the respondent needs to fill out. A background questionnaire which contains information of the respondent known in advance (eg. name, address, e-mail, and customer type). Questions that the respondent will NOT answer. The background questionnaire is not the same as background information the respondent needs to fill out in the questionnaire. A questionnaire header which is equivalent to a header in word. It is visible on all pages. Eg. a logo. 2.1 Edit questionnaire header You need to start your survey by: Click the arrow “Questionnaires”. Choose “Edit questionnaire header”. The editor is like word (you can paste section directly from word, frontpage etc.). Write a text or insert a company logo. Remember to save before closing the browser. 2.2 Edit/create questionnaire in Smart Designer Now the questionnaire has to be created according to the instructions in the following. Remember that you can always save the questionnaire and test if everything works as intended. The questions in this course are primarily constructed in order to work around the different types of questions. The questionnaire is therefore not necessarily an example of “The good questionnaire”. We will start by creating the whole questionnaire in the smartdesigner (requires Java Web Start). To start create a questionnaire you must do the following: Click at the arrow ”Questionnaire”. Choose ”Edit using Smart Designer”. 4 Introduction to SurveyXact 2014 2.2.1 Create questionnaire Smart Designer is very easy to work with. If you click ”Insert” in the upper bar it gives you the following possibilities: Insert Text/image: Could be your introduction text or headlines in the questionnaire Insert Question: Different types of questions can be found (single question, matrix question with one Dimension and matrix question with two dimensions). Insert Page Break: To have divided the questionnaire in different pages you insert page breaks. Create Jump: A jump is created if there is at least one question, a respondent should not answer given he/she have answered no/yes in a different question. Then the respondent needs to jump over the questions not to be answered. Try to set up the following questions in Smart Designer. It is important you follow the guide due to you will practice the different types of questions, jump and page break. Remember to read the text between the questions – it is small assignments! Welcome to the survey! We are pleased that you would take the time to participate in the customer survey. It will take about 10 minutes to answer the questionnaire. Insert Page Break About your company O 1. What is your job title? Managing director Financial manager Purchasing manager Marketing manager Other 2. How many employees are in the company? 0-9 10-19 20-49 50-99 100-199 200 or more 3. Does the company have exports? Yes No 5 Introduction to SurveyXact 2014 Insert Page Break 4. How large a part of the turnover comes from exports? (%) Before the respondent can continue to page 4, you need to check that he has provided a reasonable answer in question 4, i.e. you need to validate that he provides a number between 0 and 100. Insert Page Break Note this question should be created as a “matrix question with one Dimension”. 5. How is the company’s turnover distributed between the following commodity groups? (%) Hardware Software DVDs CDs As in question 4 you need to validate question 5 before the respondent can continue to the next page. The individual numbers must lie between 0 and 100 and the sum of the numbers must be 100. Insert a jump (activation) When you have created question 5 - select question 3. You now have to insert a jump from question 3 to question 5 if question 3 is answered with a “No” (Insert => create jump). IMPORTANT: Remember it is only possible to jump from one question to another if they are on different pages. And you can only activate a question on the basis of answers/information from previous pages. 6 Introduction to SurveyXact 2014 Insert Page Break 6. Which product types from Hard Business Inc. does the company use? If necessary tick off more reply alternatives Desktops Notebook Printers Monitors Other product type: border Insert Page Break Below questions should be created as a “Matrix Question with One Dimension”. 7. How satisfied is the company with the quality of the following product types? Very Neither Very dissatisfied Disatisfied nor Satisfied satisfied Desktops Notebook Printers Monitors Other product type Insert Page Break 8. Do you read our newsletter “Hard Business Inc. on the move”? Yes No 7 Introduction to SurveyXact 2014 Insert Page Break 9. Additional comments: Insert Page Break Thank you for your participation! You have now completed the questionnaire. You can print your answers by clicking the printer-icon: The questionnaire has been saved and you can close your internet browser. 2.2.2 Edit background questionnaire In the Smart Designer choose “View” > “Background questionnaire”. Two boxes are shown with the questions Distribution Form and E-mail. These two questions always have to be there and cannot be deleted. You decide how the respondent will receive the questionnaire. Therefore it does not mean that you always need the email address of the respondent. You now have to insert two questions on a new page. In Smart Designer insert a new page after “Email” and afterwards insert the questions below. Name: Region: Jutland Funen Sealand Save the questionnaire in the Smart Designer and close it. 8 Introduction to SurveyXact 2014 2.3 Finish the questionnaire in the Advanced Designer The Advanced Designer is a bit different from the Smart Designer. Questions are put in tables which are grouped on different pages. It is only for very advanced questionnaires you need the Advanced Designer. But if you would like a printer icon at the bottom of the page, so the respondents have the option of printing the filled out questionnaire, you will have to open the Advance Designer (“Edit questionnaire”). Page 9 Choose “Insert” => "Insert printer icon” from the menu. You do not include the background questionnaire. 2.4 Test the questionnaire You have now finished creating the questionnaire. You can see the created questionnaire in the “Questionnaire” window. Try to test the questionnaire. You can test it directly in the window or choose one of the buttons in the bottom where you can select to “Restart test data entry” or “Test data entry in a new window”. You can test the questionnaire with and without the background questionnaire When you test the questionnaire and find an error, it is not necessary to close the test window. Just correct the error in the designer and save. Afterwards go to the test window and refresh page. The changes can now be seen. 2.5 Change layout of the questionnaire To change the overall layout of your questionnaire you should do the following: Click the arrow ”Questionnaire”. Choose ”Layout and appearance”. Examples of layout theme are : Current theme: Box Navigation Buttons: Buttons Progress bar: Colored bar Progress text: Page Number Progress Bar Placement: Bottom Language Selection: Flags Test the questionnaire again to see the changes. Make a layout you think is the right one for your survey. 9 Introduction to SurveyXact 3 2014 Data Collection Data collection is the place where you create your respondents (if known beforehand) and you choose how you will collect your data. Obviously it is not in all surveys where the respondent is known beforehand. 3.1 Create respondents Create each respondent manually: Click at the arrow create and choose “create new respondent”. Fill out the respondent’s background questionnaire. Import more than one respondent at once: Click at the arrow create and choose “import”. You need to create a file with the respondents. Click “Get template for CSV file”. This excel file shows the number of columns the file must include. It can also be seen in the “Structural description”. 10 Introduction to SurveyXact 2014 Go into Excel. In this example you need 6 columns with the following headings: distr_1, distr_2, distr_3, email, b_1 og b_2. The headlines MUST be like the above mention. In description you can see what to write in the single column. Example if the respondent will receive the questionnaire by email, you must write “1” in distr_1 and “0” in distr_2 and distr_3. Save the file as: ”CSV (Comma delimited)” Go back to SurveyXact in respondents. Select “Import”. Click ”Browse...” and find the file you just saved. Click ”Import”. If you get information about an import error, there are different reasons for that: Your list in Excel might be wrong. Check the headings and the criteria in the columns. There can be something wrong with specific email addresses. If that is the case you will get information about in which row there is a problem. 3.1.1 Select respondents When respondents are created you can select respondents based on their background information registered in the background questionnaire. 11 Introduction to SurveyXact 2014 3.1.2 Edit selected It can be used to select respondents that need to be deleted or distribute e-mail to a certain group. 3.1.3 Distribution Next step is to distribute the questionnaire to the respondents and there are different ways to do that: Send email (beforehand you must have created the “email templates” otherwise the email send out will be totally blank). See next section. Email templates (have to be filled out before sending the questionnaire out by email) Export background Data (If you need to send out a letter to the respondent with the specific code for each respondent). Pop-in on homepage (use self-creation by hyperlink – very easy to use) Self-creation by hyperlink (Here you have a link for the survey which you either can enter into a homepage or you can send out by email and then the single respondent will create itself. Can be used in the cases where the responsible for the survey do not have access to at database with the respondents due to they are unknown). Enter answers (use this possibility if you have collected your data on the street by a paper questionnaire and then you need to enter the answers into the system). 12 Introduction to SurveyXact 2014 3.1.4 Send e-mail To send out email to your respondents you have to create your email template. Chose “Email templates”. Here you can define: o Distribution email: The first e-mail sent to the respondents. o Reminder email: E-mail sent to the respondents who yet have not completed the questionnaire. o Information email: E-mail used to e.g. send information on the results to the respondents. This e-mail type does, as the only one, not include the 12 digit respondent key. It is always a good idea to create yourself as respondent and at first send the e-mail only to you. Then you can check if everything is settled correct. When the distribution email is created you can now chose “Send email” Choose the first option and send the e-mails 3.1.5 Export Background data If you only have the respondents physical address and not the email you will have to send out a letter. You use mail merge in word then you have to export “background data” so you can use the data in word. Here the individual respondent is giving a unique code you should use in each respondents individual letter. Important to know that the way to go into the questionnaire when using the code and not a direct link is to go to the following internet address: www.datafabrikken.dk. Important to include in the letter. 3.2 Status When the survey is running you can get a status of your survey. You can see distribution status and collection status. The status can be split on background variables. 3.3 Return mails If you have sent out email to your respondents and they return your email you can find the email here . 13 Introduction to SurveyXact 4 2014 Analysis In the top choose “Analysis”. The analysis will always use the newest data, if you do not specific save your data and set it up to use the specific dataset. Experiment with the different kinds of statistics / analysis opportunities: Frequency (you can choose “collection overview” to have an overview of the answers of the respondents answers for all the questions) Frequency split (very relevant if you want to analyse the dependency between two variables. Select the question you want to investigate and then the split variable (e.g. gender)) Average. Split according to average Observations You also have the possibilities to export the data to Excel. 14 Introduction to SurveyXact 5 2014 Help??? What should you do if you need help with SurveyXact? Take a look in this folder and see if you can find the answer On the bottom on all pages in SurveXact you can find a link to a “SurveyXact User Manual”. There is a online service and hotline – but this hotline is for the teachers NOT the students. Therefore you cannot use the number. Contact your teacher/tutor if you can find out about your problem yourself. When you need to do your own survey you have to get your teacher/tutor to create you as a user of SurveyXact so you get your own login. The login used for today is just for the course today and to test how it works. GOOD LUCK WITH YOUR SURVEY! 15