1
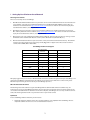
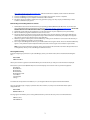
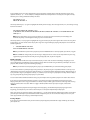
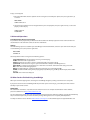
SoundBridge Helpful Tips
For customers who want to use Roku SoundBridge
with the SlimServer music server
Revision 1.2 | October 25, 2004
1
I. Setting Up Your SlimServer-based Network
Choosing Your Software
There are several ways to use SoundBridge:
1.
With Microsoft’s Windows Media Connect as your music server. You’ll need Windows XP Service Pack 2 installed on
your computer, and you’ll also need Windows Media Connect and Windows Media DRM 10 installed. They are
available as free downloads from http://www.microsoft.com . This choice is best for users who wish to play most
standard formats of music, excluding AAC files.
2.
With Apple’s iTunes as your music server. You’ll need iTunes software to be installed and running on your PC or
Mac. You may find the free iTunes software at http://www.apple.com/itunes/. This choice is best for users who wish
to play most standard formats of music, excluding WMA files.
3.
With a music server such as Musicmatch Jukebox running UPnP Av. This is best for users who are running a version
of Windows earlier than Windows XP/Service Pack 2 (such as Windows 2000, Windows Me, etc.).
4.
With the downloadable SlimServer open source music server (see below for download instructions). This software
is best for users who already have a large library of FLAC, Ogg-Vorbis or Apple Lossless files and do not wish to
convert them to WMA, MP3 or AAC format.
SoundBridge Audio Format Support:
WMA
Windows Media
Connect
X
Windows Media DRM 10
X
AAC
iTunes
SlimServer
X
X
X
X
X
X
X
DRM AAC
MP3
X
AIFF
WAV
X
X
X
AIFF
X
X
X
Ogg-Vorbis
X
FLAC
X
We highly suggest that you use iTunes or Windows Media Connect for seamless integration with your SoundBridge, and
support for SoundBridge’s complete feature set. However, if you choose to use SlimServer as a music client, please
follow the steps below to get the most out of your SoundBridge experience.
Who Should Use this Document
The following instructions address using the SoundBridge with the downloadable SlimServer software only. For
instructions on using your SoundBridge with iTunes, please refer to the user manual, which is enclosed separately. You
can install and run both SlimServer and iTunes on the same computer; SoundBridge can access only one music server at
a time, but switching between them is easy with a few clicks on your remote control.
Quick Start
To use SoundBridge with the SlimServer you will need to:
1. Download SlimServer software. Please note, the latest software is not compatible with SoundBridge. The last
compatible software version is 5.2.1. You can download this version at
2
http://www.rokulabs.com/support/slimtips.php . After the download is complete, install and run the SlimServer
application on your computer.
2. Connect SoundBridge to powered speakers or to your home stereo system’s receiver or amplifier.
3. Connect SoundBridge to your computer via Ethernet or Wi-Fi network.
4. Play music: Using your remote control, find a song you want to play, press “Play” to play it immediately or “Add”
to add it to SlimServer’s play queue.
Downloading and installing SlimServer software
1. Download the latest version of SlimServer for your operating platform (Windows, Mac OS, Linux, etc.) A link to the
latest compatible SlimServer download can be found at http://www.rokulabs.com/support/slimtips.php . Please note
that the latest version of the SlimServer that is compatible with SoundBridge is 5.2.1.
2. Download and decompress the installer file to a convenient location on your computer (such as your desktop).
3. Run the installation program and follow directions on the screen.
4. You will be asked to specify the location of your audio files; please select the directory in which your audio files are
stored. Also, when asked, please specify the directory in which SlimServer should store your playlists. Your playlists
may easily be stored in the same directory as your audio files.
5. After the program is installed, please run the software by clicking on the “SlimServer” icon located in the directory in
which you installed the program or on your desktop.
6. Turn on your SoundBridge and browse to your installed SlimServer using the remote. The server should automatically
appear as “Play SlimServer (Your Computer’s Name).”Select the server using the “Select” button on your remote.
Hint: You can run the SlimServer and iTunes on the same machine at the same time. Your iTunes library will be listed
as “Play (Name)’s Library” in the SoundBridge list of Music Libraries.
Choosing Music to Play
To begin navigating to your music on your SoundBridge, start on your “Home” menu, which should look something like
this:
ROKU HOME
NOW PLAYING ‡
Hint: If you ever want to get back to the Home Menu, press the left arrow (3) until you see the menu above displayed.
The first line is your location (Roku Home). The second line displays one of several choices you have for playback:
Now Playing
Browse Genres
Browse Artists
Browse Albums
Browse Music Folder
Search Music
Saved Playlists
Settings
You should use the up/down arrow buttons (56) to navigate between these options from the Home Menu.
Let’s say you’d like to play a song by a particular artist. Press “Down” (6) until you see the “Browse Artists” option
displayed like this:
ROKU HOME
BROWSE ARTISTS ‡
Pressing right arrow will take you to a listing of Artists found in your music directory. The screen will look like this:
ARTISTS (1 of 6)
LED ZEPPELIN ‡
3
In this example, there are 6 artists total found in your music library. Navigate to the artist that you want to hear using
up/down arrows (56) — in our example, Led Zeppelin. When the artist you want is selected, press the right arrow (4)
will take you to a listing of Albums found by this artist:
LED ZEPPELIN (1 of 2)
HOUSES OF THE HOLY ‡
Use the up/down keys (56) again to highlight the album you want to play. Press the right arrow (34) for a listing of songs
found on this album:
LED ZEPPELIN/HOUSES OF THE HOLY (1 of 8)
C: DOCUMENTS AND SETTINGS/MY DOCUMENTS/MY MUSIC/HOUSES OF THE HOLY/01-THE SONG REMAINS THE
SAME.mp3 ‡
Hint: If the location of the song is too long to display on one line, please wait a moment, and the display will
automatically slowly scroll through the listing so you can read the name.
Use the up/down (56) keys again to highlight the song you want to play. Press the right arrow to select this song. Then
press PLAY (4) on your remote control to play this song. Your song should begin playing. The playback screen will look
something like this:
1. THE SONG REMAINS THE SAME
TITLE: THE SONG REMAINS THE SAME
Hint: If you would like to pause music playback, press the PAUSE button. To resume playback, press PLAY (4) again.
Hint: Press MENU to change how your current song is displayed. You can choose to see elapsed time on your song,
a graphical progress bar (how much of your song has played), both, or just the song title.
Building a Playlist
Let’s say you would now like to line up several tracks to play in order. You can do this manually by navigating to each
song or album that you would like to play and then pressing “ADD” to add the song or album to your Playlist. As soon as
you press ADD, the first song in the list will begin playing.
Hint: If you don’t want to start playing music just yet, press PAUSE while you continue building your playlist.
You can review what’s in your Playlist by pressing the left (3) key until you get to “Squeezebox Home.” Scroll up (5) to
“Now Playing” and select by pressing the right arrow key (4). Your playlist will be displayed showing: “Now playing (1 of
6)” if you have 6 songs in your playlist. Scroll up (5) or down (6) to see songs in your playlist. You may choose to skip to
any song at any time by pressing the play key on your remote.
You can add an almost unlimited number of songs to your Playlist. Each song will be played in the order it was entered.
If you change your mind and would like to remove a song from your newly created Playlist, navigate to the “Now
Playing” menu, then to the song you would like to remove, and press “ADD” again. You will see a message that the song
has been removed. This is because “ADD” is a toggle command, which means if you press it again, it will act like
“REMOVE.”
When the Playlist has played all the way through, it will stop playing. To automatically start playing it again at the
beginning, press Repeat on your remote control until you see the option “Repeat Playlist” displayed.
Note: You cannot save a Playlist created as described here — it’s only held in memory temporarily and then erased when
you build your next Playlist. If you would like to build a Playlist that you can save and recall at will, please do so in your
music player software (see “Playing a Saved Playlist” below).
Erasing a Playlist
If you change your mind and decide you don’t want to play this playlist, but would like to play something else instead,
your options are:
4
Erase each song in the playlist one by one. Press “Add” while the playlist is playing, and you will see a message
confirming the song has been removed. (Remember what we said before about “Add” being a toggle command.)
When all songs are removed, you will see this screen:
NOW PLAYING
NOTHING
Browse Genres
From the Home Menu, use the down (v) arrow to highlight “Browse Genres” and then press the “Right” (4) arrow to select it.
You will see an alphabetical listing of genres that are available in the music files that you are browsing. To select a genre,
press “Right” (4) again. You will see your available music options. Press PLAY or ADD to play the track or to add it to a playlist.
Browse Artists, Albums
From the Home Menu, use the down (6) arrow to highlight Browse Artists (or Browse Albums) and then press the right (4)
arrow to select Browse Artists (or Albums). You will see an alphabetical listing of Artists (or Albums) that are available among
the music files that you are browsing. To play an entire album, highlight your desired album and press PLAY (or ADD to add
to your playlist). To select all songs available from an artist, highlight that artist and press PLAY (or Add to add to your
playlist).
Browse Music Folder
From the Home Menu, use the Down (6) arrow to highlight Browse Music Folder and then press the right (4) arrow. You
will see a listing of folders that exist on your computer’s hard drive. To select a song, navigate to it by pressing the Up/Down
arrows (56) and press Play (or Add to add to your playlist).
Hint: Information about your music, including Song Name, Artist, Album, and Genre is usually created automatically by
the software you used to save your audio CD files on your computer’s hard drive (a.k.a. ripping). This process creates data
called “ID3 tags” to describe each track. If you are not satisfied with the description of genres (or other data) assigned to
your music file, it is possible to use a third party utility to edit that data.
Shuffle
Pressing SHUFFLE while playing a playlist will give you the following options: shuffle by song; shuffle by album; don’t shuffle
playlist.
Hint: To stop shuffling during playback, press Shuffle button repeatedly until the option “Don’t Shuffle Playlist” is
displayed.
Repeat
If you want to hear a song or playlist play over and over, press REPEAT once or twice to toggle through the following options:
Repeat Current Song
Repeat Playlist
Repeat Off
To remove the Repeat command, simply press REPEAT until you see “Repeat Off” displayed.
Search
To search for a very specific selection by spelling it out, you can press the SEARCH button on your remote control, or navigate
down to the “Search Music” option from the Home Menu. Either way, you will have the following three options:
Search by Artist ‡
Search by Album ‡
Search by Song ‡
Press the Right arrow (4) to select the option you would like to search with. Then, use your remote control to enter
characters for spelling your selection. If an exact match is not found, your results will show items containing the characters
you entered. When you find the music you like, use the PLAY button to play the selection or ADD to add it to your Playlist.
Playing a Saved Playlist
You can play a saved playlist already created and saved on your computer from your third-party music player software.
5
To play a saved playlist:
1. Go to the Home Menu. Use the up/down arrow to navigate to “Saved Playlist” option, then press right arrow (4)
to select it.
ROKU HOME
SAVED PLAYLISTS ‡
2. Use the Use the up/down arrow to navigate between your saved playlists, then press right arrow (4) to select the
playlist you want to play.
SAVED PLAYLISTS
DISCO PARTY
II. Advanced Operations
Controlling Playback From Your Computer
It’s possible to control playback of your music files from the SlimServer desktop application. Please refer to SlimServer’s
documentation on the Slim Devices web site for more information.
Settings
Use the following options to customize your SoundBridge. From the Home Menu, select the up or down arrows until you
see the following screen, the press the right arrow:
ROKU HOME
SETTINGS ‡
Use the Up/Down arrows to navigate to the following options:
Song Title Format: Data used to display your song in “Now Playing”
Treble: How much treble is played back
Volume: Volume level (can more easily be controlled through your remote control)
Synchronize: Stream the same song in a synchronized manner to multiple SoundBridge devices.
Alarm Clock: Set a playlist to begin playing at a certain time. Set volume. Turn Alarm Clock setting on and off.
Bass: Level of bass audio during playback
Repeat: Set default “Repeat” command setting (repeat Current song, Current Playlist, Off)
Shuffle: Set default shuffle setting when playing a playlist (Shuffle by song, Shuffle by Album Playlist, Don’t Shuffle
Playlist)
Text Size: Size of characters displayed
III. When You Are Finished Using SoundBridge
When you are finished playing music and using the SoundBridge altogether you may press Exit to leave at any time.
If you plan to disconnect the SoundBridge from AC power after you are done using it, you should press “Exit” and then
Standby on your remote control.
Getting Help
This document is intended as a quick reference for SlimServer users. For complete documentation on the software,
please visit Slim Devices at http://www.slimdevices.com
For more information, please refer to the documentation that came with your SlimServer software. You may find additionally
help in the left-hand pane of your server window by clicking “Getting Started” or “Frequently Asked Questions.”
You may also browse our user forum at www.rokulabs.com/support or contact Roku support at [email protected].
6