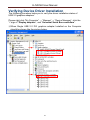
1
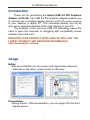
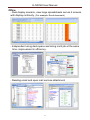
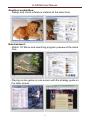
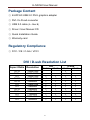
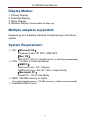
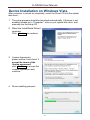
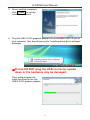
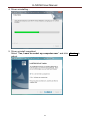
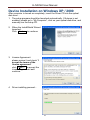
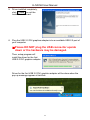
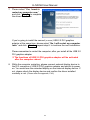
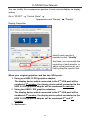
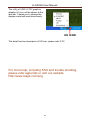
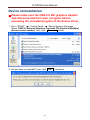
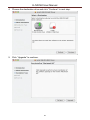
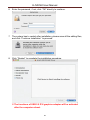
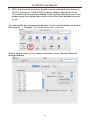
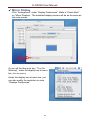
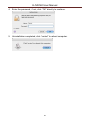
KJVD160 User Manual 1 KJVD160 User Manual Contents Introduction ........................................................ P. 1 Install USB 2.0 Graphics Adapter ..................... P. 7 Device Installation On Windows Vista .............. P. 8 Uninstallation ............... P. 13 Device Installation On Windows XP / 2000 ...... P. 16 Uninstallation ............... P. 21 Device Installation On Mac OS .......................... P. 23 Uninstallation ............... P. 30 Function Description ......................................... P. 32 FAQ ..................................................................... P. 38 Trouble Shooting ............................................... P. 41 Verifying Device Driver Installation .................. P. 42 2 KJVD160 User Manual Introduction Thank you for purchasing the KaiJet USB 2.0 DVI Graphics Adapter (KJVD160). The USB 2.0 DVI graphics adapter enables you to connect one or multiple display devices (CRT/LCD monitor, projector) to your desktop or laptop PC. The connected display can act as mirrored or extended desktop of the main display on your PC. The flexibility of the common USB 2.0 technology saves the need to open the computer or struggling with compatibility issues related to the VGA card. REGISTER YOUR PRODUCT NOW! AND YOU WILL GET THE LATEST PRODUCT AND UPDATING INFORMATION. http://www.kaijet.com/eng Usage Editor: - Edit documentation on one screen and researching reference materials on the other- improvement in efficiency. Presentation: - During school / office presentation, you can apply it for the third display device. 1 KJVD160 User Manual Office: - Dual display scenario, view large spreadsheets across 2 screens with display continuity. (For example: Excel document) - Independent using desk space and doing multi-job at the same time- improvement in efficiency. - Reading email and open mail enclose attachment 2 KJVD160 User Manual Graphics workstation: - Design and check reference material at the same time. Entertainment: - Watch TV/ Movie and searching program preview at the same time. - Playing on-line game on one screen with the strategy guide on the other screen. 3 KJVD160 User Manual Stock Marketers: - Simultaneously monitor multiple stock markets and market news. Coding Programmer: - Allow effective code programming- great companion for software programmers To know more application of USB 2.0 graphics adapter, please visit our website. http://www.kaijet.com/eng 4 KJVD160 User Manual Package Content ◎ KJVD160 USB 2.0 DVI-I graphics adapter ◎ DVI-I to D-sub converter ◎ USB 2.0 cable (A - Mini B) ◎ Driver / User Manual CD ◎ Quick Installation Guide ◎ Warranty card Regulatory Compliance ◎ FCC / CE / C-tick / VCCI DVI / D-sub Resolution List Aspect Ratio Resolution 16:10 16:9 4:3 16:10 16:10 5:4 4:3 16:10 15:9 4:3 4:3 4:3 1920x1200 1920x1080 1600x1200 1680x1050 1440x900 1280x1024 1280x960 1280x800 1280x768 1152x864 1024x768 800x600 DVI D-sub 16 bits 32 bits 5 16 bits 32 bits KJVD160 User Manual Display Modes: 1. Primary Display 2. Extended Display 3. Mirror Display 4. Rotation Display (Not available for Mac yet) Multiple adapters supported: Supports up to 6 adapters attached simultaneously in Windows system. System Requirement: ◎ OS :【Microsoft OS】 Windows Vista / XP SP2 / 2000 SP4 【Mac OS】 Mac OS X v10.4 or greater (10.4.11 or 10.5.2 is recommended) ◎ CPU : 1.5 GHz or faster processor 【IBM PC】 Intel multi-core / P4 / Celeron; AMD multi-core / K8 / K7 / K6 or newer family 【Macintosh PC】 Power PC - G5 or Intel family ◎ RAM : 256 MB memory or higher (For optimal performance , 512 MB memory or higher recommended) ◎ Available USB 2.0 port 6 KJVD160 User Manual Install USB 2.0 DVI Graphics Adapter BEFORE YOU START ※Please DO NOT plug the USB 2.0 DVI graphics adapter into computer before the driver was installed completely. ※Please remove the previous version before you install the newer one. ※The screen of display device will flash during the installation. ※For multi-display attaching structure use: AC power adapter is required for external USB Hub. 7 KJVD160 User Manual Device Installation on Windows Vista After computer is turned on completely, insert the Driver CD into the optical disk drive… 1. The setup program should be launched automatically. If Autorun is not enabled, please go to “Computer”, click on your optical disk drive, and manually run the setup CD. 2. When the InstallShield Wizard launched. Click Next > to continue. 3. License Agreement: please review it and check “I accept the terms of the license agreement”. click Next > to accept the License Agreement and continue. 4. Driver installing proceed… 8 KJVD160 User Manual 5. Driver installed completely, click Finish to exit the InstallShield Wizard. 6. Plug the USB 2.0 DVI graphics adapter into an available USB 2.0 port of your computer. Task bar will pop up the “Installing device driver software” message. ※Please DO NOT plug the USB connector upside down or the hardware may be damaged. Then, setup program will install the driver for the first USB 2.0 DVI graphics adapter. 9 KJVD160 User Manual 7. Please select “Yes, I want to restart my computer now.” and click Finish to complete the driver installation. If you’re going to install the second (or more) USB 2.0 DVI graphics adapter at the same time, please select “No, I will restart my computer later.” and click Finish ,repeat step 6. to continue the next installation. Please remember to restart the computer, after you install all the USB 2.0 DVI graphics adapter ※ The functions of USB 2.0 DVI graphics adapter will be activated after the computer reboot. 8. While the computer restarting, please connect external display device to the DVI connector of USB 2.0 DVI graphics adapter and switch its power on. You would see the extended display on the external display device. If not, please check the display device and confirm the driver installed correctly or not. (Please refer the appendix, P.42) 10 KJVD160 User Manual You can modify the corresponsive position of each extend display via display setting. Go to “START” → “Control Panel” → Appearance and Personalization “Adjust screen resolution” Display Settings Identify each monitor’s number by click “Identify Monitors” And then, you can modify the resolution of each monitor, or adjust virtual position as you like by drag the monitor icon. When your original graphics card has two VGA ports… 1. Using one USB 2.0 DVI graphics adapter: The display device which connected to the 2nd VGA port will be numbered 3rd monitor, the display device which connected to the USB 2.0 DVI graphics adapter will be numbered 2nd monitor. 2. Using two USB 2. DVI graphics adapters: The display device which connected to the 2nd VGA port will be numbered 4th monitor, the display device which connected to the USB 2.0 DVI graphics adapter will be numbered 2nd and 3rd monitor. 3. And so on… 11 KJVD160 User Manual The utility of USB 2.0 DVI graphics adapter (UD icon) will be shown at the task bar. It helps you to change the display mode and resolutions easily. UD ICON The detail function description of UD icon, please refer P.32 For more help, including FAQ and trouble shooting, please refer appendix or visit our website. http://www.kaijet.com/eng 12 KJVD160 User Manual Device uninstallation ※Please make sure the USB 2.0 DVI graphics adapter was disconnected from your computer before executing the uninstall program of the device driver. 1. Go to “START” → “Control Panel” → “Programs” → “Uninstall a program” Select “USB 2.0 External Graphics Card with DVI Interface (Multiple) (driver version number)” item, click Uninstall button. 2. Are you sure to uninstall? If yes, click 13 OK to continue. KJVD160 User Manual 3. If the message below appears, it means you did not disconnect the USB 2.0 DVI graphics adapter from computer yet. Please disconnect it and click OK to continue. If the message below appears, please re-execute the uninstall proceed. 14 KJVD160 User Manual 4. Driver uninstalling… 5. Driver uninstall completed. Select “Yes, I want to restart my computer now.” and click reboot. 15 Finish to KJVD160 User Manual Device Installation on Windows XP / 2000 After computer is turned on completely, insert the Driver CD into the optical disk drive… 1. The setup program should be launched automatically. If Autorun is not enabled, please go to “My Computer”, click on your optical disk drive, and manually run the setup CD. 2. When the InstallShield Wizard launched. Click Next > to continue. 3. License Agreement: please review it and check “I accept the terms of the license agreement”. click Next > to accept the License Agreement and continue. 4. Driver installing proceed… 16 KJVD160 User Manual 5. Driver installed completely, click Finish to exit the InstallShield Wizard. 6. Plug the USB 2.0 DVI graphics adapter into an available USB 2.0 port of your computer. ※Please DO NOT plug the USB connector upside down or the hardware may be damaged. Then, setup program will install the driver for the first USB 2.0 DVI graphics adapter. Driver for the first USB 2.0 DVI graphics adapter will be done when the pop up message appear at task bar. 17 KJVD160 User Manual 7. Please select “Yes, I want to restart my computer now.” and click Finish to complete the driver installation. If you’re going to install the second (or more) USB 2.0 DVI graphics adapter at the same time, please select “No, I will restart my computer later.” and click Finish ,repeat step 6. to continue the next installation. Please remember to restart the computer, after you install all the USB 2.0 DVI graphics adapter ※ The functions of USB 2.0 DVI graphics adapter will be activated after the computer reboot. 8. While the computer restarting, please connect external display device to the DVI connector of USB 2.0 DVI graphics adapter and switch its power on. You would see the extended display on the external display device. If not, please check the display device and confirm the driver installed correctly or not. (Please refer the appendix, P.42) 18 KJVD160 User Manual You can modify the corresponsive position of each extend display via display setting. Go to “START” → “Control Panel” → “Appearance and Themes” → “Display” Display Properties Identify each monitor’s number by click “Identify” And then, you can modify the resolution of each monitor, or adjust virtual position as you like by drag the monitor icon. When your original graphics card has two VGA ports… 1. Using one USB 2.0 DVI graphics adapter: The display device which connected to the 2nd VGA port will be numbered 3rd monitor, the display device which connected to the USB 2.0 DVI graphics adapter will be numbered 2nd monitor. 2. Using two USB 2. DVI graphics adapters: The display device which connected to the 2nd VGA port will be numbered 4th monitor, the display device which connected to the USB 2.0 DVI graphics adapter will be numbered 2nd and 3rd monitor. 3. And so on… 19 KJVD160 User Manual The utility of USB 2.0 DVI graphics adapter (UD icon) will be shown at the task bar. It helps you to change the display mode and resolutions easily. UD ICON The detail function description of UD icon, please refer P.32 For more help, including FAQ and trouble shooting, please refer appendix or visit our website. http://www.kaijet.com/eng 20 KJVD160 User Manual Device uninstallation ※Please make sure the USB 2.0 DVI graphics adapter was disconnected from your computer before executing the uninstall program of the device driver. 1. Go to “START” → “Control Panel” → “Add or Remove Programs” Select “USB 2.0 External Graphics Card with DVI Interface (Multiple) (driver version number)” item, click Remove button. 2. Are you sure to uninstall? If yes, click 21 OK to continue. KJVD160 User Manual 3. If the message below appears, it means you did not disconnect the USB 2.0 DVI graphics adapter from computer yet. Please disconnect it and click OK to continue. If the message below appears, please re-execute the uninstall procedure. 4. Driver uninstall completed. Select “Yes, I want to restart my computer now” and click reboot. 22 Finish to KJVD160 User Manual Device Installation on Macintosh OS X After computer is turned on completely, insert the Driver CD into the optical disk drive… 1. Find the .dmg file (For ex.: USB_DVI_MAC_******.dmg), double click to start the install procedure. 2. System will run the disk image and open it automatically, double click USB_DVI_MAC_v_1_0_0 to install device driver. 3. Please review the introduction and click “Continue” to proceed. 23 KJVD160 User Manual 4. Choose the destination drive and click “Continue” to next step. 5. Click “Upgarde” to continue. 24 KJVD160 User Manual 6. Enter the password, if not; click “OK” directly to continue. 7. The system has to restart after installation, please save all the editing files, and click “Continue Installation” to proceed. 8. Click “Restart” to complete the installation procedure. ※ The functions of USB 2.0 DVI graphics adapter will be activated after the computer reboot. 25 KJVD160 User Manual 9. While the computer restarting, please connect external display device to the DVI connector of USB 2.0 DVI graphics adapter and switch its on. You would see the extended display on the external display device. If not, please check the display device and confirm the driver installed correctly or not. You can modify the corresponsive position of each extend display via System Preferences → Displays. (Or click the display icon in menu bar.) Display setting allows you to change resolution, colors, Refresh Rate and arrange displays. 26 KJVD160 User Manual Display Function Modes (Macintosh) Primary Display Click “Arrangement” under “Display”, dragging the white menu bar to the primary display screen you want it to be. On the contrary, the screen without the white bar will become the extended display screen. ※You can also rearrange the displays as you like. Extended Display (Default) By default, after USB 2.0 DVI graphics adapter installation completed and connected, the external display device will be shown the wallpaper same as the primary display without any icon. Primary Monitor Extended Monitor 27 KJVD160 User Manual Mirror Display Click “Arrangement” under “Display Preferences”. Make a “Check Mark” on “Mirror Displays”. The extended display screens will be as the same as the main screen. Or you will find the quick key, “Turn On Mirroring”, under the display icon at menu bar. (See the picture) Under the display icon at menu bar, you can also modify the resolution or enter “Displays Preferences”. 28 KJVD160 User Manual Device uninstallation ※Please make sure the USB 2.0 DVI graphics adapter was disconnected from your computer before executing the uninstall of the device driver. After computer is turned on completely, insert the Driver CD into the optical disk drive… 1. Find the .dmg file (For ex.: USB_DVI_MAC_******.dmg), double click to start the uninstall procedure. 2. System will run the disk image and open it automatically, double click USB_DVI_MAC Uninstaller to uninstall device driver. 3. Are you sure to uninstall? If yes, click “uninstall” to continue. 29 KJVD160 User Manual 4. Enter the password, if not; click “OK” directly to continue. 5. Uninstallation completed, click “restart” to reboot computer. 30 KJVD160 User Manual Display Function Modes (Windows) Primary Mode Select the Primary mode for setting up the graphics adapter as the primary in the system- The system main display will automatically switch the on-board monitor to be the secondary display and act as extended desktop ※Task bar will be switched on the primary display desktop. 31 KJVD160 User Manual Extended Display (Default) Select the Extended mode for the display device, connected to USB 2.0 graphics adapter, will extend the primary desktop space. (You can extend all application windows to the secondary monitor) ※After installation, the default display mode is Extended. 32 KJVD160 User Manual Mirror Display Select the Mirror mode for the secondary display to be the same screen as the main desktop. ※Both display devices must support the resolution you have selected, otherwise, the one connect to the DVI graphics adapter will show “Out of Range”. 33 KJVD160 User Manual Off To disable the graphics adapter function. 34 KJVD160 User Manual Rotate The Rotate Mode allows you to turn the secondary display to be 4 kinds of degree position. 0 degrees:Normal display (Default) 90 degrees:Screen turns right 180 degrees:Screen upside down 270 degrees:Screen turns left ※Rotate Display will be disable when Mirror Display acitivated. ※Not available for Mac yet. 35 KJVD160 User Manual Resolutions The list of the standard resolution will be shown when moving the cursor on Resolutions Mode. For the list of the high resolution, please move the cursor to high resolution and choose the resolution you want it to be on the extended display. 36 KJVD160 User Manual Appendix Frequency Asked Questions Q:Why can't I choose the Primary Mode of the USB 2.0 graphics adapter? A:The utilities of some display devices override other display devices from being set as main display device. Please check the toolbar in the lower right corner of your desktop, if the program of another display device is already running (usually the other display device's utility icon will be showed together with USB 2.0 graphics adapter’s icon among the icons of the toolbar in the lower right corner), please close down this other display device before you turn on the USB 2.0 graphics adapter’s Primary mode. Q:When I choose the Primary mode of the USB 2.0 graphics adapter, why is my screen turned off? A:When the USB 2.0 graphics adapter turns on the Primary mode, some Intel-chipset based motherboards or display device systems will turn off the original screen, please manually turn the screen back on. Q:Why can my DVD-playing program not run on the second (or third) extended desktop? A:Some DVD-playing software does not support second or third extended desktop playing well, you will experience only hearing sound and seeing no image. Moreover, at the time of writing, except Media Player Classic, most media playing software cannot display DVD content in Windows Vista. *The list of compatible DVD playing programs is shown on the web page of this product's system specification requirements and will be updated continually. 37 KJVD160 User Manual Q:Why can't I see what the video is playing when I move the media player window to the extended desktop? A:It might be because some part of the media player window is still not moved onto the other desktop, please make sure that you have moved the entire media player window all the way across to the other desktop. Q:Why can't my mouse move over to the extended desktop on the right hand side when I use the extended mode? A:Please check your display settings. If your second display equipment is on the right hand side of the first one, please make sure that the opposite position of the extended desktop corresponds with the actual screen arrangement; the second extended desktop should be placed on the right hand side of the original desktop. You can adjust the opposite position of the extended desktop in the display settings to correspond with the actual screen arrangement at any time. Q:Why is there a horizontal disturbance on the screen? A:This is because of the screen refresh frequency is too low. Please go to Windows display settings (click the connection that the USB 2.0 graphics adapter is connected to) and make appropriate changes on the second display settings. Please do not set the screen refresh frequency above the limit that your display equipment can support, it might damage your display equipment (for information on the supported refresh frequency of your display equipment, please contact the manufacturer of the display equipment). You can also try to use automatic adjustment or reboot your display equipment. Q:Does Direct 3D work with the USB 2.0 graphics adapter? A:USB 2.0 graphics adapter does not support Direct 3D at the moment, but you are welcome to visit our website at any time to check for the http://www.kaijet.com/eng/support0.php. If your application needs this function, please run it via the connection of the main display device. 38 KJVD160 User Manual Q:Can the USB 2.0 graphics adapter be used in 64-bit Windows environment? A:At the moment, the drivers of USB 2.0 graphics adapter are only compatible with the 32-bit OS. You are welcome to check our website for the http://www.kaijet.com/eng/support0.php Q:After driver installed, the color depth of my original VGA card became only 4 bit? A:Please try to remove the USB 2.0 graphics adapter driver first, and upgrade the driver of your original VGA to the latest version, then reinstall USB 2.0 graphics adapter driver again. More help and FAQ, please visit our website. http://www.kaijet.com/eng 39 KJVD160 User Manual Trouble Shooting If you have any question in use, please follow and check the instruction below, any further assistance needed, please visit our website or call +886-2-82265058 Make sure all the connectors are connect correctly and secured. Make sure you’re USB host is Spec. 2.0 Is the external display device power on, and connect to the USB 2.0 graphics adapter correctly? Try to connect USB 2.0 graphics adapter to computer directly, don’t connect to USB HUB. Remove all USB devices besides USB 2.0 graphics adapter. Make sure to reboot the computer after installation completed. Try to unplug USB 2.0 graphics adapter from USB port and plug again. Try to install on another USB port or computer. Make sure the driver you installed is the latest version. When the screen shows abnormal, try to synchronizing, enable auto adjust or power on again to calibrate display devices. If you cannot login windows after driver installed, please restart the computer by safe mode, remove previous driver and reinstall driver again. 40 KJVD160 User Manual Verifying Device Driver Installation The following procedure helps you to verify the driver installation status of USB 2.0 graphics adapters. Please right click “My Computer” → “Manage” → “Device Manager”, click the “+”sign of “Display adapters”, and “Universal Serial Bus controllers”. ※When Single USB 2.0 DVI graphics adapter Installed on the Computer should be shown like the picture below. 41 KJVD160 User Manual ※When multiple USB 2.0 DVI graphics adapter Installed on the Computer should be shown like the picture below. Copyright© 2008 KaiJet Technology International Limited. All Rights Reserved. All trade names are registered trademarks of their respective owners. Features and specifications are subject to change without notice. Product may not be exactly as shown in the diagrams. KJVD160-PA004TC-A1 42 KJVD160 User Manual KaiJet Technology International Limited Address:8F-5, No.16, Jian 8th Rd., Jhonghe City, Taipei 235, Taiwan. R.O.C. Tel:+886-2-8226-5058 Fax:+886-2-8226-5050 website:www.kaijet.com/eng e-mail:[email protected] 43