1
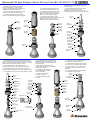
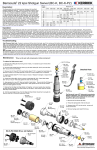
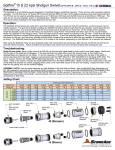
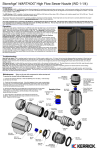
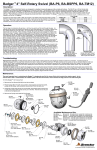
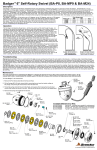
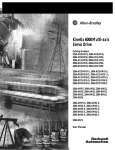
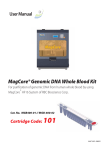
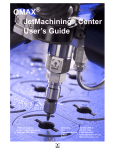
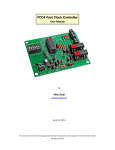
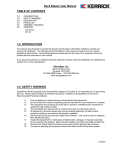
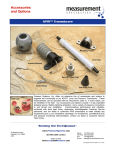
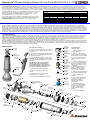
®
Barracuda 40 kpsi Shotgun Swivel XX Low Flow (BC-H9-XXLF-C-TI)
Description:
The Barracuda® BC-H9-XXLF-C-TI is a self-rotating swivel designed for handheld shotgun waterblast cleaning. It has a 9/16 high pressure cone and thread inlet port,
with an easily replaced seal cartridge assembly. One head is available; refer to the charts for flow ranges and the correct nozzle sizes if using four jets. The head has
7/16-20 nozzle ports for sapphire nozzle assemblies. Two ports may be plugged if desired, but larger nozzles need to be used to maintain the same flow rate. It is best
to use two larger jets for thick deposits such as concrete removal, and four jets for thin coatings or scale, as it allows the tool to be moved faster over the surface.
The Barracuda® BC-H9-XXLF-C-TI uses automatic transmission fluid (ATF)
as a lubricant for the bearings and speed control components. It can be
flushed / refilled with ATF through the fill port using a syringe. This is
recommended after every 20 to 40 hours of operation.
Pressure
The cartidge assembly can be rebuilt by replacing the high pressure seal;
it is recommended to have at least one spare cartridge assembly on hand
to quickly exchange, and keeping the operator from having to rebuild
cartridges in the field.
32 kpsi
2200 bar
36 kpsi
2500 bar
40 kpsi
2800 bar
Flow for Extra Extra Low Flow (BC-H9-XXLF-C-TI)
0.011
1.68 gpm
6.3 lpm
1.78 gpm
6.7 lpm
1.88 gpm
7.1 lpm
0.012
2.00 gpm
7.6 lpm
2.12 gpm
8.0 lpm
2.24 gpm
8.5 lpm
Nozzle ID, in.
0.013
2.35 gpm
8.9 lpm
2.49 gpm
9.4 lpm
2.63 gpm
10.0 lpm
0.014
2.72 gpm
10.3 lpm
2.89 gpm
10.9 lpm
3.04 gpm
11.5 lpm
0.015
3.12 gpm
11.8 lpm
Operation:
The Barracuda® should always be used with a gun that includes a dump or pressure shut-off mechanism, so that pressure can be rapidly released. The gun barrel
length including the Barracuda® should be long enough that the gun operator cannot pass the jets over his feet or legs. It is recommended that the thrust produced by
the jets be no more than 1/3 the weight of the operator. Install the desired nozzle size into the head; we recommend using Blue Goop on the nozzle threads. Attach the
Barracuda® to the shotgun barrel. Flush the high pressure hose before connecting to the gun inlet. Check that the dump mechanism functions correctly before going to
operating pressure. The Barracuda® high pressure seal may initially leak at lower pressure, but the seal should pop shut as pressure is increased. To set the operating
pressure, the gun operator should close the dump on the gun, and the pump operator should slowly increase the pressure to allow the gun operator to compensate for
the jet thrust. The Barracuda® head should be within 2 to 8 inches of the surface, depending on how difficult it is to remove the material.
Troubleshooting:
High Pressure Seal Leak: if water is coming out of the single round hole in the body, it is the inlet connection that is leaking. If water is coming out of the slots in the
body, it is the high pressure seal that is leaking. Remove the tool from the gun and remove the O-Ring (BJ 417) that holds in the cartridge. Replace the cartridge.
Seals wear out quickly: Remove and inspect the cartridge parts. The carbide seat should be checked for chips or erosion marks on it. When the life of the high
pressure seal becomes noticeably less, the seal retainer needs to be replaced. Also replace the carbide seat if it has not been replaced with each seal change. Very
rarely, the spring that controls the speed of the tool will break, allowing the tool to spin too fast and quickly wear out the seal.
Will not rotate: Check the nozzles to see if they are plugged or partially plugged. To clean them, they must be removed from the head; it does not do any good to poke
the material plugging the nozzle back into the head. Check that the nozzles are the correct size based on the chart above. If all of thsese things appear to be correct,
the tool may need to be disassembled and repaired. If the tool has just been rebuilt, and the tool starts to spin but stops as pressure is increased, the bearings (RJ 007)
are installed backwards and the tool must be disassembled and fixed.
Maintenance:
BC 407
Cartridge
Housing
BC 506
Seat Face
To replace the cartridge:
BJ 417
O-Ring
1. Remove the O-Ring (BJ 417) from inlet port.
It is easiest to push it upward from the round
weep hole.
3. Turn the swivel inlet end up; insert a fresh
Cartridge Assy into the inlet port and re-insert
the O-ring behind the Cartridge Assy to secure
it in place.
BC 410
Syringe
®
The Barracuda uses ATF (automatic
transmission fluid) for lubrication. It
is recommended that a full syringe of
fresh fluid be added to the swivel after
every 20 to 40 hours of operation.
BJ 026
Port
Screw
1. Remove the Port Screw (BJ 026)
2. Thread the Syringe (BC 410) into
the port.
3. Squeeze fresh ATF into the swivel;
excess will come out the slots.
4. Remove Syringe and install Port Screw.
BC 352-24
Shield
OS7-xxx
Nozzle (4)
TB 044
SHCS, SS
1. Place Mandrel (BC 414)
on a flat surface.
BC 520
2. Stack the Inlet Seat (BC
Seal Retainer 522-001) with the internal cone
at the bottom onto the Mandrel.
BC 511
Carbide
3. Insert Compression Spring
Seat
(BC 524) into bore of Inlet
Seat.
BC 512-O
H.P. Seal
4. Insert H.P. Seal (BC 512-O)
BC 524
into bore of Inlet Seat making
Compression sure the end with the O-Ring
Spring
and seal support goes in first.
BC 522-001 (see detail)
Inlet Seat
5. Stack the Carbide Seat
internal
(BC 511) making sure the
cone end
chamfered end is against
the H.P. Seal. (see detail)
BJ 072
O-Ring
6. Stack the Seal Retainer (BC
520)
around the Carbide Seat.
BC 414
Mandrel
7. Stack the Seat Face
(BC 506).
2. If necessary, use two picks inserted through
the slots to pry the Cartridge Assy (BC 505-S)
up and out of the Body.
BC 505-S
Cartridge Assy
To assemble the
Cartridge Assy:
BC 511
Carbide
Seat
8. Slip the Cartridge Housing
(BC 407) over entire stack
and pick up the whole
assembly with mandrel
still inserted.
chamfer
BC 351-XXLF-TI
(extra extra low flow)
BC 512-O
Head
H.P. Seal
BC 401-XXLF
Seal & Seat Detail
Stub Shaft
BC 040
O-Ring (2)
BC 031
BJ 026
Backup Ring (2)
Port Screw
9. Insert O-Ring (BJ 072)
into slot in Cartridge Housing
to capture the components.
Be sure to check that the
entire O-Ring is seated
properly.
10. Remove the Mandrel.
BC 302
Cap
SL 010
Shaft Seal
RJ 007
Bearing (2)
BC 315
Spring
BC 220
Weights
BC 225
Garter Spring (2)
BC 401
Shaft
BC 230
Sleeve
BC 222
Washer
BC 009
Bearing
MT 010
Shaft Seal
BC 008
O-Ring
BJ 417
O-Ring
BC 403
Body
BC 505-S
Cartridge Assy
© 03/07/2014 StoneAge®, All Rights Reserved
Barracuda ® 40 kpsi Shotgun Swivel XX Low Flow (BC-H9-XXLF-C-TI)
Disassembly:
7. If the Shaft Seal (SL 010) is damaged,
remove it from the Cap. Remove the Port
Screw (BJ 026).
1. Remove the O-Ring (BJ 417) from the
inlet port of the Body. Pry out the high
pressure seal Cartridge Assy (BC 505-S) as
explained in the Maintenance Section.
2. Unscrew the Body (BC 403) from the Cap
(BC 302); remove the Sleeve (BC 230).
5. Unhook the Spring (BC 315) from the
hole in the Shaft; remove the Weights
(BC 220) and Spring (BC 315) from the
Shaft. Leave the Weights together.
3. If the Shaft Seal (MT 010) is damaged,
remove it from the Body using snap ring pliers.
6. Unscrew the Shaft (BC 401) from
the Stub Shaft (BC 401-XXLF) and pull up on the
Cap (BC 302) to remove it and the
Bearings (RJ 007) from the Stub Shaft.
BC 403
Body
BJ 417
O-Ring
8. Unscrew the Head from the Stub Shaft.
Inspect the O-Rings (BC 040) and
Backup Rings (BC 031) on the ends of the
Stub Shaft. Remove them if they are damaged.
4. Pull the Bearing (BC 009) from the
Shaft. Remove the Washer (BC 222).
BC 401
Shaft
BC 009
Bearing
MT 010
Shaft Seal
BC 505-S
Cartridge
Assy
RJ 007
Bearing (2)
BC 222
Washer
SL 010
Shaft Seal
BC 220
Weights
BC 230
Sleeve
BJ 026
Port Screw
BC 315
Spring
BC 040
O-Ring
BC 031
Backup Ring
BC 401-XXLF
Stub Shaft
BC 031
Backup Ring
BC 302
Cap
BC 040
O-Ring
BC 351-XXLF-TI
Head
Assembly:
1. Install Backup Rings (BC 031) and O-Rings (BC 040)
on both ends of the Stub Shaft (BC 401-XXLF). Note order
they sit. Apply anti-seize to threads and grease to O-Rings.
Install Head onto Stub Shaft, tighten to 30 ft-lb.
5. Insert Spring (BC 315) end into hole in
Weights (BC 220), then slide Weights and
Spring onto Shaft; insert other spring end
into hole in Shaft.
2. Install Shaft Seal (SL 010) in Cap (BC 302).
Apply Armour-All to lips of seal; slide Cap onto Head.
6. Place Washer (BC 222) on top of
Weights, with chamfered face of washer
facing toward Weights.
3. Install Bearings (RJ 007) on Stub Shaft. These are
angular contact bearings and need to be installed as shown.
4. Thread Shaft (BC 401) onto Stub Shaft; tighten to 30 ft-lb.
7. Slide Bearing (BC 009) onto
Shaft. Slide Sleeve (BC 230)
over the assembly.
10. Apply anti-seize to threads of Body;
thread into Cap. Tighten to 45 ft-lb.
11. Install the high pressure seal Cartridge
Assy as shown in the Maintenance Section.
12. Fill the tool with ATF as shown in the
Maintenance Section. Install Port Screw
(BJ 026).
13. Install Shield (BC 352-24) and tighten
onto head with SHCS (TB 044).
BJ 417
O-Ring
8. Install O-Ring (BC 008)
onto Body (BC 403).
BC 401
Shaft
BC 505-S
Cartridge Assy
9. Install Shaft Seal (MT 010)
into Body.
wide inner race
BC 009
Bearing
BC 222
Washer
RJ 007
Bearing (2)
wide inner race
lip with spring
facing up
SL 010
Shaft Seal
chamfered
side down
BC 220
Weights
BC 302
Cap
BC 040
O-Ring
BC 315
Spring
lip with spring
MT 010
Shaft Seal
BC 008
O-Ring
BC 230
Sleeve
wide inner race
BC 031
Backup Ring
BC 401-XXLF
Stub Shaft
BC 403
Body
BJ 026
Port Screw
wide outer race
RJ 007 Bearing Detail
BC 031
Backup Ring
BC 040
O-Ring
BC 351-XXLF-TI
Head
BC 352-24
Shield
hole in shaft
for spring end
TB 044
SHCS, SS
© 03/07/2014 StoneAge®, All Rights Reserved