1
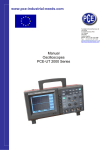
www.pce-industrial-needs.com
Tursdale Technical Services Ltd
Unit N12B
Tursdale Business Park
Co. Durham
DH6 5PG
United Kingdom
Phone: +44 ( 0 ) 191 377 3398
Fax: +44 ( 0 ) 191 377 3357
[email protected]
http://www.industrial-needs.com/
INSTRUCTION MANUAL
PCE-JR 911
[email protected]
INSTRUCTION MANUAL .................................................................................................... 1
1.Introduction ..................................................................................................................... 3
2.Material Supplied ............................................................................................................ 3
3.Features ........................................................................................................................... 3
3.1 IR thermometer with laser targeting ..................................................................................................... 3
3.2 Procedure Programming Function ....................................................................................................... 4
3.3Datalogger Function .................................................................................................................................. 5
4.Comparison Table ........................................................................................................... 5
5.Front View ........................................................................................................................ 6
6.Paper Replacement ......................................................................................................... 7
7.Battery Replacement ...................................................................................................... 7
8.FUNCTION-IR thermometer with laser targeting.......................................................... 9
9. FUNCTION-Procedure programming ........................................................................... 9
10. FUNCTION-Data logger ............................................................................................. 10
11.FUNCTION-Setting Parameters ................................................................................. 14
12.FUNCTION-Link with PC ............................................................................................. 15
2
[email protected]
1.Introduction
Thank you for purchasing this IR Meter Printer This unit has been developed to meet
your maximum satisfaction with its user-friendly design.Please review the entire
manual for a complete overview of how to operate this new IR Meter Printer
2.Material Supplied
Check for damaged or missing parts in your IR Meter Printer before starting.
The IR Meter Printer Set should contain
1. Meter
2. 4pcs AA batteries 3. Printing Paper
4. Operation manual
3.Features
This IR Meter Printer equipped with three functions:
•
IR thermometer with laser targeting.
•
Procedure programming function.
•
Data logger function.
Please refer to below features of each function for clear understanding.
3.1 IR thermometer with laser targeting
3
[email protected]
Temperature Range
Resolution
-40 ~ 500
0.1 unit (<100 ) or
1 unit; Unit is or .
Accuracy
+/- 3% or 3
(Whichever is greater)
Repeatability
+/- 1
Emissivity
Adjustable from
0.3 ~ 1.0
Response time
0.2 seconds
Backlight / Laser sighting
Yes / Yes
Distance Ratio
8:1
Printer
38 mm Thermal-Printer
(30mm x 30 thermal
paper)
Interface with PC
RS-232C (TTL level) *
Power supply
AA x4 Battery or DC
9V, 1000mA adaptor,
w/ 5.5 x 2.0mm Center
plug Center is positiv
500mA(Printing),
6mA(IR active),
2mA(IR standby)
Operating current
Auto. Power off
No operation for 10
seconds at normal mod
60 seconds for others
mode.
Operation temperature
0 - 50
Operation humidity
Less then 90%RH
Dimension
208 x 70 x 53 mm
Remarks:
* Software for downloading data to PC is optional.
3.2 Procedure Programming Function
4
[email protected]
Procedure capacity: 4 procedures in total. Indicated as #1 to #4 with procedure name.
Measure point: 99 measure points in each procedure.
Measure point content Each measure point consists of point number point name and
temperature value.
3.3Datalogger Function
Data logger capacity 4 data logger settings. Indicated by #5 to #8
Data logger setting Setting by Begin Date End Date Start Time Suspend Time Rate
**.99 measure points in each data logger setting
Measure point Each measure point consists of point number point title and
temperature value.***
Remarks:
**Rate means the time period to get the temp. Value.For example "20" means getting
temp. value every 20 seconds during "Start Time" and " Suspend Time".
***Point name consisted by logging's date & time automatically.
4.Comparison Table
Function
Procedure
Logger
Number
#1 to #4
#5 to #8
User defined or automatic
(Note 1)
Automatic
(Note 2)
Name
Measuring/
Sampling
Max point
User pressed
Automatic measure and store
by specified setting by user(Note 3).
99
ON key to measure,
then press enter key
to confirm/store.
99
Note 1: Meter automatic defines title
5
[email protected]
if user doesn't key-in any. The name is consisted by current date and time. For
example if point name is "05-06 09:21:51" means the date is 6th May and the time is
09:21:51.
Note 2: Meter automatic defines the name of the measured point by current date and
time.
Note 3: Logger setting defined by Start-Date, Begin-time, Suspend-time, End-Date,
and sample rate. Each logger starts from Start-Date & time, sampling by specified
rate until Suspend-time. Start again next day until End-Date.
Logger is stopped by reaching End-Date or 99 points or press "0" key twice.
5.Front View
6
[email protected]
6.Paper Replacement
For feed paper and confirming setting. Feed the paper when it's held down except
printing. Please follow the pictures to scissor out a paragraph from supplied printing
paper To make easier feeding the paper insert the sharp-cut to the cartidge of the
printer. Keep the matt surface of the paper upward when inserting the paper
7.Battery
7
[email protected]
Replacement
When seeing the battery symbol flashing on the right-up corner of the LCD means the
batteries are weak.
If the power is too low to operate the IR printer, printer will reset with below indication
on LCD monitor.
Follow the steps to remove and replace batteries
1. Open the batteries set cover on the rear side.
2. Remove the expired batteries.
3. Insert new 4pcs AA batteries and make sure the batteries are inserted with correct
polarity.
4. Put on the cover.
8
[email protected]
8.FUNCTION-IR thermometer with laser targeting
1.Press "ON" key to enter IR mode. LCD will display real-time target temperature until
"ON" key released. After releasing the "ON" key, LCD will hold the last value for 10
seconds and then auto power off.
2.Press "ON" key and " " key at the same to in-active the laser targeting while
measure the temperature. Once releasing the " " key, laser targeting function
activated again.
3.Press "PRINT" key to print out current value date and time.
9. FUNCTION-Procedure programming
1. Press "PROC" key to enter procedure mode.
2. There are #1to #4 procedures included in this function.Press "SET" key to select
the procedure number you want.If selecting #3 LCD will display as below
3.How to name the procedure?
Make sure the procedure number you choose has been highlight.Press "ENTER"
key one time and the highlight will start flashing Editing function is valid only when
above highlight is flashing.Pressing alphanumeric keys to edit the name release the
alphanumeric keys when you select the word you need.Press "0" key for a space or
press" " for forward " " for backward.Press "ENTER" key to finish and store the
editing.
4.How to name the measured point? First of all press" " or " " to find the point you
need Press"1" to quickly skip to 10 11 or press "2" to skip to 20 21.... Or press"9" to
skip to 90 91 etc.
The point naming procedure is the same as "How to name the procedure" section.
Meter will also automatic store current date and time as point name if user didn't edit
any.
5.Press "ON" to get the current temperature and then press "ENTER" to save the
value User will see the LCD shown as below
9
[email protected]
6.Press "PRINT" to print out
procedure saved data "Print?" will appear on LCD If OK press "PRINT" again to
continue If NO press "PROC" to back to procedure function. Please refer to below for
the printed out data.
7.How to delete data
Press "PROC" key at least 2 seconds to clear procedure name point name or
temperature value
10. FUNCTION-Data logger
1.Press "LOG" key to enter data logger mode.
2.There are #5to #8 loggers included in this function Press "SET" key to select the
data logger number you want. If selecting #7 LCD will display as below
3.How to set the data logger parameters?
Press " " for forward and " " for backward to choose the parameters. Pressing
alphanumeric keys to modify the parameters one by one.Press "ENTER" key to start
the data logger.
10
[email protected]
Begin means begin date MM-DD-YY or DD-MM-YY or YY-MM-DD it depended on
what is the date mode set in "SET" function.
End means end date,same as above.
Start means start time,HH/MM/SS Suspend means stop time,HH/MM/SS
Rate means the time period to get the data.For example "60" means to get the value
every 60 seconds.The rate could be from 1 to 9999.
5. Meter will record date time and value when the data logger is activated.Please
refer to below figure
6.How to stop data logger
Press "0" twice to stop the data logger or the data logger will automatically stop
after sampling 99 points
11
[email protected]
7.Press "PRINT" to print out data logger data "Print?" will appear on LCD If OK
press "PRINT" again to continue If NO press "LOG" to back to data logger function
Press "0" to stop printing Please be reminded that while data logger is still in
recording status all the other functions of the meter could not be activated.
Please refer to below printed data
Single print
Procedure / Table print
12
[email protected]
Logger / Table print
13
[email protected]
8.Press "LOG" key at least 2 seconds to clear data logger data
11.FUNCTION-Setting Parameters
14
[email protected]
1.Press "SET" key to enter setting mode while meter is at IR mode.
2.Parameters could be set by users including LCD contrast( 1to 9 bright to dark)
Print contrast(1to 9 light to heavy ) Emissivity Unit( or ) Date mode(MM-DD-YY or
DD-MM-YY or YY-MM-DD pressing "ENTER" to select the preferred mode)
Date and time.Please see below figure.
3.Press "SET" twice at IR mode to
enter ID setting Press "Enter" to enter modification mode ID parameter will be
highlight and flashing Choose the desired characters and then toggle "enable" or
disable by pressing "ENTER" key The desired character will appear on printing
data when it is in "enable" mode
12.FUNCTION-Link with PC
Please be reminded that the software & cable for this function is optional and
please consult with your supplier if you would like to order this optional item.
1. Plug the cable to your computer and follow up the software install operation
procedure indicated in software manual.
2.The software could be used for below functions
Upload and Download #1 to #4 procedure data including updating procedure
name and point name.
Download #5 to #8 data logger data
15
[email protected]
In this direction will find a vision of the measurement technique:
http://www.industrial-needs.com/measuring-instruments.htm
NOTE: "This instrument doesn’t have ATEX protection, so it should not be used in potentially explosive
atmospheres (powder, flammable gases)."
16