1
Oracle® Hospitality Suite8
Rooms Management User Manual
Release 8.9
July 2015
Copyright © 1987, 2015, Oracle and/or its affiliates. All rights reserved.
This software and related documentation are provided under a license agreement containing
restrictions on use and disclosure and are protected by intellectual property laws. Except as
expressly permitted in your license agreement or allowed by law, you may not use, copy,
reproduce, translate, broadcast, modify, license, transmit, distribute, exhibit, perform, publish, or
display any part, in any form, or by any means. Reverse engineering, disassembly, or
decompilation of this software, unless required by law for interoperability, is prohibited.
The information contained herein is subject to change without notice and is not warranted to be
error-free. If you find any errors, please report them to us in writing.
If this software or related documentation is delivered to the U.S. Government or anyone licensing it
on behalf of the U.S. Government, then the following notice is applicable:
U.S. GOVERNMENT END USERS: Oracle programs, including any operating system, integrated
software, any programs installed on the hardware, and/or documentation, delivered to U.S.
Government end users are "commercial computer software" pursuant to the applicable Federal
Acquisition Regulation and agency-specific supplemental regulations. As such, use, duplication,
disclosure, modification, and adaptation of the programs, including any operating system,
integrated software, any programs installed on the hardware, and/or documentation, shall be
subject to license terms and license restrictions applicable to the programs. No other rights are
granted to the U.S. Government.
This software or hardware is developed for general use in a variety of information management
applications. It is not developed or intended for use in any inherently dangerous applications,
including applications that may create a risk of personal injury. If you use this software or
hardware in dangerous applications, then you shall be responsible to take all appropriate fail-safe,
backup, redundancy, and other measures to ensure its safe use. Oracle Corporation and its
affiliates disclaim any liability for any damages caused by use of this software or hardware in
dangerous applications.
Oracle and Java are registered trademarks of Oracle and/or its affiliates. Other names may be
trademarks of their respective owners.
Intel and Intel Xeon are trademarks or registered trademarks of Intel Corporation. All SPARC
trademarks are used under license and are trademarks or registered trademarks of SPARC
International, Inc. AMD, Opteron, the AMD logo, and the AMD Opteron logo are trademarks or
registered trademarks of Advanced Micro Devices. UNIX is a registered trademark of The Open
Group.
This software or hardware and documentation may provide access to or information on content,
products, and services from third parties. Oracle Corporation and its affiliates are not responsible
for and expressly disclaim all warranties of any kind with respect to third-party content, products,
and services. Oracle Corporation and its affiliates will not be responsible for any loss, costs, or
damages incurred due to your access to or use of third-party content, products, or services.
Contents
Preface ........................................................................................................................... 6
Audience ............................................................................................................................ 6
Customer Support ............................................................................................................. 6
Documentation .................................................................................................................. 6
Revision History ................................................................................................................ 6
1 Introduction ............................................................................................................. 7
Logging In .......................................................................................................................... 7
Rooms Management Shortcut Bar .................................................................................... 8
Navigation Keys ................................................................................................................ 9
The Quick Keys ................................................................................................................ 10
Using the blue drill down arrow .................................................................................... 12
HTML View ..................................................................................................................... 12
The Date Box .................................................................................................................... 16
Changing the date............................................................................................................ 16
Customising Fidelio Suite8 Grids ................................................................................... 17
Customising the HTML display ..................................................................................... 22
Manager on Duty ............................................................................................................. 23
Favourites ......................................................................................................................... 24
Check PA-DSS Compliance............................................................................................. 25
Security ............................................................................................................................. 26
Logging off, Exiting Fidelio Suite8 and Locking the Station......................................... 27
2 Housekeeping ........................................................................................................ 29
Viewing all rooms ............................................................................................................ 30
Finding a specific room ................................................................................................... 31
Search Definitions ............................................................................................................ 31
Viewing rooms by search definition ........................................................................ 31
Adding a search definition ....................................................................................... 32
Changing a search definition ................................................................................... 33
Changing room status ..................................................................................................... 34
Change Guest Service ...................................................................................................... 35
Viewing room information ............................................................................................. 36
Viewing maintenance guest service tasks ...................................................................... 36
Viewing housekeeping statistics ..................................................................................... 37
Viewing out of order information .................................................................................. 38
Printing housekeeping search results ............................................................................. 39
Room Assignment ........................................................................................................... 40
Assigning a room ...................................................................................................... 40
Removing a room assignment.................................................................................. 41
Discrepant Rooms ............................................................................................................ 41
View Room Discrepancies ........................................................................................ 42
Clearing Room Discrepancies .................................................................................. 42
View Person Discrepancies ...................................................................................... 43
3
Q Rooms ........................................................................................................................... 43
3 Out of Order ........................................................................................................... 45
Placing a room out of order ............................................................................................ 45
Placing a room out of order block using the copy feature ............................................ 47
Modifying out of order records ...................................................................................... 47
Deleting out of order records .......................................................................................... 48
4 Room History ......................................................................................................... 51
Display room history ....................................................................................................... 51
Viewing guest history...................................................................................................... 51
Viewing or printing a guest's invoice ............................................................................. 51
Viewing profiles............................................................................................................... 52
5 House Status .......................................................................................................... 53
6 Attendants .............................................................................................................. 59
Allocating rooms assignments ........................................................................................ 61
Assigning rooms using the defined attendants listing .................................................. 62
Assigning rooms using pre-defined attendants and defined rooms ............................ 63
Adding a new attendant to the listing ............................................................................ 64
Adding a note to an attendant ........................................................................................ 65
Editing a reservation........................................................................................................ 67
Printing the Attendant Assignments .............................................................................. 67
7 Overbooking .......................................................................................................... 69
Changing the dates on the overbooking screen ............................................................. 69
House Overbooking......................................................................................................... 70
Overbooking by room type ............................................................................................. 71
Setting both house and room type overbooking............................................................ 71
Deleting overbooking levels ........................................................................................... 71
Customising Overbooking Levels .................................................................................. 72
8 Maintenance ........................................................................................................... 73
Entering a new maintenance guest service task ............................................................ 77
Resolving a maintenance guest service task .................................................................. 82
Maintenance Notes .......................................................................................................... 82
Linking a picture to a task ............................................................................................... 83
Setting a room status to OOO or OOS ............................................................................ 86
Marking a resolved maintenance guest service task as unresolved ............................. 87
Deleting a maintenance guest service task ..................................................................... 88
Print, Email, SMS or Fax a maintenance guest service task .......................................... 88
SMS Log............................................................................................................................ 98
Email Log ....................................................................................................................... 100
User Log ......................................................................................................................... 101
9 Kiosk Room Management .................................................................................... 105
Kiosk Room Management ............................................................................................. 105
10 Index .................................................................................................................... 107
4
5
Preface
Audience
This user manual is intended for system users and system administrators.
Customer Support
To contact Oracle Customer Support, access My Oracle Support at the following URL:
https://support.oracle.com
When contacting Customer Support, please provide the following:
Product version and program/module name
Functional and technical description of the problem (include business impact)
Detailed step-by-step instructions to re-create
Exact error message received
Screen shots of each step you take
Documentation
Oracle Hospitality product documentation is available on the Oracle Help Center at
http://docs.oracle.com
Revision History
Date
6
Description of Change
July, 2005
8.5.0.0 - First Issue Small Business
Edition
May, 2008
8.7 - Updated for Version 8.7
June, 2008
8.7.3.1 - Updated for Version 8.7.3.1
May, 2009
8.8 - Updates for Version 8.8
Sept, 2010
8.8 - Updates for Oracle 11gR1
Jan, 2012
8.9 - Updated for Version 8.9
Nov, 2012
8.9 - New cover page
July, 2015
8.9 – Oracle template applied
Preface
1
Introduction
Logging In
To use Fidelio Suite8 you must first log into the system with a user identification and
password.
Logging into Fidelio Suite8
1. From the desktop, click the Fidelio Suite8 icon.
The Suite8 Splash screen is displayed for several seconds with the Payment
Application Data Security Standard (PA-DSS) disclaimer
The Fidelio Suite8 Login screen is then displayed.
Introduction
7
2. Enter your user identification (case sensitive) in the LOGIN NAME box.
3. Tab to the PASSWORD box and enter your password (case sensitive).
4. Click LOGIN, the Suite8 main menu screen is displayed.
You are now logged into the system.
Note: If one of the following tables: WMLG, WLOG, ZPOS, WDAT,
SHIS, SRPD, WRPD has no indices or a missing index, an alert is
displayed when starting Fidelio Suite8 with a message to contact
support. It could happen that a table has no indices in the event that a
table was renamed for support purpose. Renaming a table carries the
indices to the renamed table. If an index is missing of one of the above
mentioned tables, the alert is displayed when starting Suite8.
Note: Date formats with a space as a separator such as DD MM YYYY,
are not supported by Delphi. Suite8 will displays the following
message upon start up if the date format is defined with a space as a
separator in Windows Regional and Language settings: "Date separator
is space character. Application will be closed. Please change windows
environment settings."
Rooms Management Shortcut Bar
The Fidelio Suite8 main menu screen has nine coloured tabs located on the left of the
screen. Each coloured tab represents one of the main user modules.
8
Introduction
To open the Rooms Management shortcut bar
1. Click ROOMS MAN. from the coloured shortcut bar.
The Rooms Management shortcut bar opens.
2. Alternatively you can click ROOMS MANAGEMENT on the menu bar.
The Rooms Management menu screen appears.
Navigation Keys
Accelerator keys
Accelerator keys are used for fast access to a box on a screen or dialog box. When a letter
is underlined you can press the Alt + letter keys and the cursor moves into the
appropriate box. For example, on the Profile Search screen the letter “A” is underlined in
the Name box. By pressing the Alt + A keys, the cursor moves into the Name box.
Introduction
9
To use the accelerator keys:
From the screen or dialog box, press Alt + letter to move the cursor into the appropriate
box.
Shortcut keys
Fidelio Suite8 has shortcut keys that allow you to perform actions directly from the
keyboard without having to use the mouse. Using these keys saves you time.
Fidelio Suite8 Shortcut keys
Shortcut
Key
Description
F1
Displays the help.
Alt + F4
Closes the active window.
F8
Closes all open screens and dialog boxes and the Login screen appears.
A new user can now login.
F10
Closes all active windows.
F12
Moves the cursor from a data box to the first record on the grid.
Down
arrow
Displays a selection list box or a selection dialog box.
Tab
Moves forward through the boxes/options.
Moves to the next box and confirms the entry.
Shift + Tab
Moves backward through the boxes/options.
Ctrl + Tab
Moves forward through tabs.
Ctrl + Shift
+ Tab
Moves backward through tabs.
Escape
In general cancels the current action. However, in some screens, such
as Customer Profiles, CCM Booking and Events a message is displayed
"xxx was modified. Do you want to cancel?" if there are changes which
have not yet been saved.
Removes a Combo box before a selection has been made.
Home
Moves the cursor to the beginning of a box.
End
Moves the cursor to the end of a box.
The Quick Keys
Fidelio Suite8 allows you to select the Quick Keys main menu from any screen. The quick
keys are shortcuts to screens, searches, and desktop tools. Using these keys allows rapid
access to information without having to leave the section that you are currently working
on. For example, a customer is making a new reservation while at the same time asking
questions about restaurants in the area. You can use the Telephone Book quick key for
restaurant information instead of aborting the new reservation screen, looking up the
10
Introduction
restaurant information, closing the Telephone Book, and reopening the new reservation
screen.
To access the Quick Keys main menu
Click the QUICK KEYS menu option.
The Quick Keys menu is displayed.
Introduction
11
Using the blue drill down arrow
Many boxes have a blue drill down arrow
next them indicating that there is
additional information that can be displayed.
For example, on the House Status screen clicking the blue drill down arrow on the Out of
Order line displays the Out of Order Rooms screen.
HTML View
Fidelio Suite8 offers the possibility to view information in HTML format. HTML is the
abbreviation for "Hypertext Markup Language." This is the system of marking a
document so it can be published on the World Wide Web and viewed with a browser.
The main areas where information can be viewed in HTML format are as follows:
12
Reservation Navigator
Blocks
Profiles
Cashiering
Tasks and Activities
Introduction
Events
Conference Reservation
The HTML display on the reservation navigator can be hidden so that the reservation
grid is expanded. Double-click in the blue reservation header bar or right-click and
select/deselect LOWER PART OF THE SCREEN from the short-cut menu to view or hide the
HTML display. This setting is stored per user and remains until the next time it is
changed.
Expand the HTML tree
Click the expand icon
to show all available folders.
Collapse the HTML tree
Introduction
Click the collapse icon
to collapse all folders to the uppermost level.
13
Refresh the HTML View
Click the refresh icon
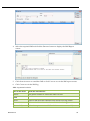
View information in HTML format
In this example we will display information in HTML format on the profile screen.
1. Click the CUSTOMER RELATION menu and select PROFILES to display the customer
profile screen.
This main customer profile screen is called the Navigator and is divided into 3 distinct
areas:
Query - basic and advance profile search criteria
Query Results - the results of the query shown in a grid format
Tree Listing and HTML Page
A tree listing of all the details associated with this profile including address,
communications, links, reservations or history
A freely definable HTML display which by default has a 'big' format where
the details are displayed in a non-grid style format or a list format. The
HTML display can be printed by using the right mouse click.
2. Enter the name to search for in the NAME box and click SEARCH.
3. The query results are shown in grid format in the middle section of the screen and the
tree and HTML formats are shown in the lower section of the screen.
14
Introduction
4. In this instance the HTML view displays a summary of the profile details. The tree
listing is displayed by default expanded by one level. A plus sign next to a folder
indicates that it can be expanded to show more folders; a minus sign indicates that it
can be collapsed.
Change the display of the HTML
Two additional buttons on the html display allow you to change whether certain details
are displayed in a non-grid style or in a list format. By default the 'big' view is displayed.
1. To view in list format click the
2. To view in a non-grid style, click the
button.
button.
Copy to clipboard
It is possible to copy information from the HTML files to clipboard by selecting items
from HTML, using right mouse short cut menu and selecting COPY TO CLIPBOARD or short
cut key CTRL + C. This information can then be pasted to any open file by using right
mouse menu option PASTE or short cut key CTRL + V.
Introduction
15
The menu option COPY TO CLIPBOARD is controlled by the user right COPY TO
CLIPBOARD FROM HTML under Users → User Definition → Rights →
Miscellaneous
The Date Box
The format of the dates and the separators between the dates may vary from one hotel to
another. The date format is defined in the Control Panel Windows Regional
Settings/Options.
Typical date formats include the following:
dd/yy
MM/dd/yyyy
yy/MM/dd
yyyy-MM-dd
dd-MMM-YY
You can type the date directly in the date box; however it must be typed exactly as per the
pre-defined format.
There are many date boxes in the system, for example, Arrival Date or From Date. The
date can be either a specific date or an as of date.
A specific date is when you need to see what happened on that day. For example, you
need to see which guests have departed 01/01/03.
An 'as of date' is when you need to find out information starting from that date. For
example, you need to read the room rack starting from 09/09/03 through 12/09/03.
Changing the date
The date can be changed by typing a new date or with the use of the calendar.
To type a new date
1. Place the cursor in the Date box.
2. Type the new date in the Date box, in the defined format including separators.
3. Press the Tab key, the date is changed.
To change a date using the calendar
1. Click the drop down arrow
next to the Date box.
The calendar appears.
16
Introduction
2. Change the month to a previous month or future month by clicking the horizontal
arrows located on the top of the calendar or by pressing the Ctrl + Page Up or Ctrl +
Page Down key.
3. Place the cursor on the date and click the left mouse button or move the keyboard
arrow keys to locate the date and press Enter, the date is changed.
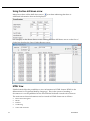
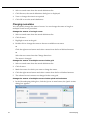
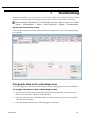
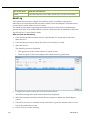
Customising Fidelio Suite8 Grids
Many of the grids in Fidelio Suite8 may be customized according to the needs of the
property.
The customization options available are:
DISPLAY FIELD NAMES - displays a list if the grid column names with their field name and type.
CUSTOMIZE - opens the customize dialog box so that columns on the grid can be added,
changed or removed.
RESTORE DEFAULTS - applies the default settings for this grid.
SHOW DEFAULTS - applies the default settings to the current grid view, however, any
customized settings are used the next time the grid is displayed.
Select PRINT to print or export the existing grid layout, the possible export formats are ASCII
File, CSV Format, HTML Document or an Excel Document.
Note: The print or export function should be used before changes to
the grid will be saved.
How to display field names
1. Place the cursor in the grid and right-click to display the short-cut menu.
2. Select DISPLAY FIELD NAMES .
Introduction
17
A list of the column names with their field name and field type is listed.
The list can be copied to the clipboard or saved to a file.
3. Click OK to close the list.
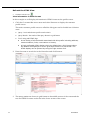
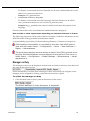
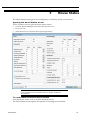
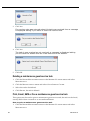
How to customize a grid
1. Place the cursor in the grid and right-click to display the short-cut menu.
2. Select CUSTOMIZE to open the customize screen.
18
Introduction
The fields already used are marked with a green check mark.
3. Click the PENCIL button to view or change the column properties.
4. To move a field to the grid, select the field and drag it to the required position.
5. Click the
in the top right-hand corner to close the customize screen.
6. A message is displayed asking if you want to store the grid layout.
7. Select YES to save the changes or NO not to save any changes.
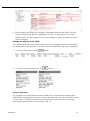
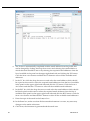
How to remove a column from a customized grid
1. Place the cursor in the grid and right-click to display the short-cut menu.
2. Select CUSTOMIZE to open the customize screen.
The fields already used are marked with a green check mark.
3. On the grid point to the column to be removed and drag it to the customize screen;
yellow arrows are displayed at each end of the column name.
Introduction
19
Once the column has been removed the green check mark is removed from the field
name on the customize screen.
4. Click the
in the top right-hand corner to close the customize screen.
5. A message is displayed asking if you want to store the grid layout.
6. Select YES to save the changes or NO not to save any changes.
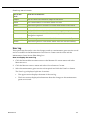
Column Properties
Field
Description
Field name
The field name as it is defined in the database table.
Caption
The field caption.
Fixed
Defines if the column will be fixed to the left side, when
scrolling to the right to view additional fields of the grid.
Columns marked as fixed are highlighted grey.
How to create a customised grid view for profile search
Users familiar with the Fidelio Suite8 table structure and fields can create a customised
grid view for the profile search.
This functionality is controlled by the parameter CUSTOM VIEW IN PROFILE
SEARCH under Setup → Configuration → Global Settings → Miscellaneous →
Search Screens 2 tab.
To add fields to the Grid Customization dialog box, the view
V8_SYS_CUSTOMXCMSSEARCH has to be amended.
Example: "Adding the financial account long description to the profile navigator"
The view has to be changed as follows:
CREATE OR REPLACE FORCE VIEW v8_sys_customxcmssearch
(customxcmssearch_xcms_id, zfac_longdesc)
AS SELECT xcms_id customxcmssearch_xcms_id,
(select zfac_longdesc from zfac where zfac_actvalidfrom is not null and zfac_actvaliduntil is null
and xcms.xcms_id=zfac.zfac_xcms_id and rownum=1)
zfac_longdesc
from xcms;
The fields from the custom view are automatically added to the grid.
How to create a customised grid view for reservation search
Users familiar with the Fidelio Suite8 table structure and fields can create a customised
grid view for the reservation navigator.
20
Introduction
This functionality is controlled by the parameter CUSTOM VIEW IN RES.
NAVIGATOR under Setup → Configuration → Global Settings → Miscellaneous
→ Search Screens 2 tab.
To add fields to the Grid Customization dialog box, the view
V8_SYS_CUSTOMXCMSSEARCH has to be amended.
Example: Adding the housekeeping status to the reservation navigator
The view has to be changed as follows:
CREATE OR REPLACE VIEW v8_sys_customressearch
AS SELECT yres_id customressearch_yres_id, yhks_shortdesc HSK_Status
FROM yhks, yrms, ydet,yres
WHERE yhks_id = yrms_yhks_id
AND yrms_id= ydet_yrms_id
and yres_current_ydet_id=ydet_id;
The fields from the custom view are automatically added to the grid.
How to create a customised grid view for booking search
Users familiar with the Fidelio Suite8 table structure and fields can create a customised
grid view for the event booking search.
This functionality is controlled by the parameter CUSTOM VIEW IN BOOKING
SEARCH under Setup → Configuration → Global Settings → Miscellaneous →
Search Screens 2 tab.
To add fields to the Grid Customization dialog box, the view
V8_SYS_CUSTOMYBOMSEARCH has to be amended, however it must contain the
field customybomsearch_ybom_id.
Example: "How to display the function type description"
The view has to be changed as follows:
CREATE OR REPLACE FORCE VIEW V8_SYS_CUSTOMYBOMSEARCH
AS
SELECT
ybom_id customybomsearch_ybom_id,
yfty_longdesc
from
ybom, yfty
where
ybom_yfty_id=yfty_id(+);
Customization functionality is controlled by the user right EDIT under Setup
→ Configuration → Users → User Definition → Rights → Miscellaneous →
Grid layout Customization.
Introduction
21
Print functionality is controlled by the user right PRINT GRID under Setup →
Configuration → Users → User Definition → Rights → Miscellaneous.
Customising the HTML display
The HTML display may be customized according to the requirements of the property.
The customization options available when placing the cursor on the HTML display and
right-clicking are:
PRINT - prints an exact copy of the HTML display. The print page margins and the actions to
take if the HTML printout is too large for the defined paper size can be defined in the
configuration.
PRINT WITH SETUP - displays the printer options and then print the HTML display.
VIEW SOURCE - displays the HTML code; no changes can be made.
EDIT TEMPLATE WITH NOTEPAD - opens the relevant *.htm and *.qry in notepad. Users with
HTML programming knowledge can edit these files to meet the requirements of the property.
EDIT TEMPLATE WITH ASSOCIATED APPLICATION - opens the relevant *.htm and *.qry with the
program associated with these file types. Users with HTML programming knowledge can edit
these files to meet the requirements of the property.
How to use HTML Expressions to customize the HTML display
Properties can configure and store customised html files in the Version 8 directory for
htm files. The files are displayed in Suite8 either by logged in user, user language,
customised htm files for all users or language specific htm files for all users.
The priority Suite8 uses to determine which file to use is in the sequence as listed:
Customised htm file by user initials
To display a customised htm file by user initials, the htm file has to be called
USR_USERINTIALS_HTMFILENAME.HTM.
Example: For a user with the initials DS the file has to be called
usr_ds_quickinfo.htm.
Customised htm file by user language
To display a customised htm file by user language, the htm file has to be called
CUST_LANG_LANGUAGE SHORT DESCRIPTION_QUICKINFO.HTM.
22
Example: If the language short description is F for French, the user has to select
this language under User Settings → Startup → Language and the file, such as
quickinfo.htm has to be called cust_lang_f_quickinfo.htm.
Customised version for all users
Introduction
To display a customised version of htm files for all users, the html files have to be
called CUST_HTMLFILENAME.HTM.
Example: cust_quickinfo.htm.
Customised version by language
To display a customised version by language, the html files have to be called
LANG_SHORT DESCRIPTION OF THE LANGUAGE_HTMLFILE.HTM.
Example: lang_f_quickinfo.htm, where f stands for the short description of the
language.
If none of these files can be found then the standard htm file is displayed
How to hide or show expressions depending on activated features or license
The following expression can be used to hide for example, Conference Information on the
HTM file when working with the small business edition:
if ({const isBnB})=(1)}{/if}{else} {if {feature Meeting Planner}} Conference {runquery 2}
Customization functionality is controlled by the user right HTML source
view and edit under Setup → Configuration → Users → User Definition →
Rights → Miscellaneous.
The print page margins and the actions to take if the HTML printout is too
large for the defined paper size are defined via the option HTML PRINTOUT
under Setup → Configuration → Global Settings → Miscellaneous → Visual
Appearance 4.
Manager on Duty
The manager on duty can be displayed at the bottom of Suite8 screen next to the date and
the name of the logged in user.
If this functionality is activate then a manager on duty must always be assigned; a new
manager can be assigned by clicking on the MANAGER ON DUTY panel.
To select the manager on duty
1. Click the MANAGER ON DUTY panel at the bottom of the screen.
The Select Manager on Duty dialog box is displayed.
Introduction
23
2. Select the required MANAGER ON DUTY from the list and click OK.
Note: Only logged in users who are designated as a MANAGER ON
DUTY can assign a new manager on duty.
The manager on duty functionality is controlled by the parameter ASSIGN
MANAGER ON DUTY under Setup → Configuration → Global Settings →
Generic → Generic 3 tab.
All relevant users can be designated as a 'Manager on Duty' via the option
MANAGER ON DUTY under Setup → Configuration → Users → User Definition.
Favourites
The Favourites shortcut toolbar allows you to keep your most frequently used options
right where you can find them. Your most used options can be added to the Favourites
shortcut toolbar where they are more noticeable and more easily organized to suit your
purposes.
To make the most of the Favourites shortcut toolbar, you need to organize the options in
it; this can be done using drag and drop.
In user settings the Favourites shortcut toolbar can be set to be listed first and will then be
the default shortcut toolbar opened when logging on to Fidelio.
Note: The Favourites shortcut toolbar cannot be removed from the
toolbar.
How to add an option to the Favourites shortcut bar
1. Click one of the coloured shortcut toolbars on the left to list the options on that
toolbar.
2. Right-click the option that you want to add, and then click ADD TO FAVOURITES on the
shortcut menu.
The option is now listed on the Favourites shortcut toolbar.
3. Repeat Steps 1 and 2 for each option that you want to add.
Note: Options from Web Services cannot be added to the Favourites
shortcut toolbar.
How to delete an option from the Favourites shortcut bar
1. Click the FAVOURITES shortcut toolbar on the left to list the options.
2. Right-click the option that you want to remove, and then click DELETE BUTTON on the
shortcut menu.
The option is removed from the Favourites shortcut toolbar.
3. Repeat Steps 1 and 2 for each option that you want to remove.
How to reorganise the options on the Favourites shortcut bar
1. Click the FAVOURITES shortcut toolbar on the left to list the options.
2. Select the option to be moved and then left-click and hold the mouse button while you
drag the option to its new location on the toolbar.
24
Introduction
3. Repeat Steps 1 and 2 for each option that you want to move.
On the toolbar the Favourites shortcut bar can be listed first by selecting
the option FAVOURITE BUTTONS ON TOP under Miscellaneous → User Settings →
Appearance Tab.
Check PA-DSS Compliance
This option may be used to check that the Fidelio Suite8 Installation has been configured
according to the Payment Application Data Security Standard (PA-DSS). A Fidelio Suite8
installation may be deemed as 'non PA-DSS compliant' if any issues are listed when
running this option.
The program 'Cardholder Information Security Program (CISP)' was introduced by Visa
USA and Visa Europe, to make sure that when customers offer their bankcard at the point
of sale, over the Internet, on the phone or via mail, their account information is safe.
The program is designed to protect Visa cardholder data wherever it resides ensuring that
members, merchants and service providers maintain the highest information security
standard.
How to check PA-DSS Compliance
1. Click the HELP menu and select CHECK PA-DSS COMPLIANCE to display the PA-DSS
Non-Compilance Issues dialog box.
Any non-compliant configuration issues are listed.
2. Click CLOSE.
Once any non-compliant issues have been fixed the PA-DSS Compliance
check must be run again.
3. Click the HELP menu and select CHECK PA-DSS COMPLIANCE.
Introduction
25
4. If no issues are listed then the Fidelio Suite8 installation can be deemed as PA-DSS
Compliant.
5. Click CLOSE.
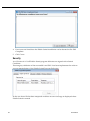
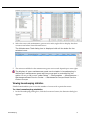
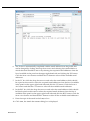
Security
As of Version 8.9.5.1 all Fidelio Suite8 program deliveries are signed with a Suite8
Certificate.
This integrity validation of the executable's and DLL's has been implemented in order to
prevent manipulation of the Fidelio Suite8 Program Deliveries.
In the case that a file has been tampered with then an error message is displayed when
Fidelio Suite8 is started:
26
Introduction
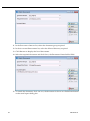
Logging off, Exiting Fidelio Suite8 and Locking the Station
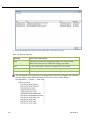
The windows menu consists of the following options:
Close All - closes all open screens and dialog boxes
Lock Station - locks the workstation
Logout - closes all open screens and logs off Fidelio Suite8
Exit Application - closes all open screens and exits the application
Options
Description
Close All
Click the WINDOWS menu and the option CLOSE ALL.
All open screens and dialog boxes are closed.
Lock Station
Click the WINDOWS menu and the option LOCK STATION.
All open screens and dialog boxes are closed and the
Login screen appears. A new user can now login.
Logout
1. Click the WINDOWS menu and the option LOGOUT
All open screens and dialog boxes are closed and the
Login screen appears. A new user can now login.
2. To close the application completely click CANCEL.
Fidelio Suite8 is closed and the desktop appears.
Exit
Application
Click the WINDOWS menu and the option EXIT APPLICATION.
Fidelio Suite8 is closed and the desktop appears.
Lock Station - the open screens and dialog boxes from the user who locked
the station will not be closed if the parameter LEAVE OPENED SCREEN ON
SWITCH USER is selected under Setup → Configuration → Global Settings →
Generic → Generic 3 tab.
Introduction
27
2
Housekeeping
The housekeeping option enables you to record and view the status of rooms for
housekeeping purposes. Status information includes data such as whether the rooms are
clean or dirty, occupied or vacant.
Fidelio Suite8 allows you to view and change the status of all rooms or selected rooms.
You can view the status of all rooms, or select a particular category of rooms to view, such
as occupied or checked out. You can also display the number of rooms with a particular
status.
You can keep track of which rooms are unavailable or out of order and depending on the
configuration the number of open maintenance guest service tasks may also be indicated
for each room.
How to access Housekeeping
Click the ROOMS MANAGEMENT menu and select HOUSEKEEPING.
The Housekeeping dialog box appears.
Note: The LAST CHANGED BY HSK column is updated with the
computer date/time the room status was changed manually, either
directly on the housekeeping form or via the quick keys room rack
and floor plan.
Hotel Segmentation functionality is controlled by the parameter HOTEL
SEGMENTATION under Setup → Configuration → Global Settings →
Reservations → Reservation 4 tab. In addition Hotel Segments must be
configured under Setup → Reservations → Room Management → Hotel
Segments and Hotel Segment Link.
Housekeeping
29
The display of open maintenance guest service tasks in housekeeping is
defined per maintenance guest service group and is controlled by the
option NOTIFY IN HK SCREEN under Setup → Configuration → Miscellaneous →
MaintenanceGuest Service Center → Maintenance Groups.Guest Service
Center Groups.
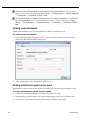
Viewing all rooms
To view a listing of all rooms
1. In the Housekeeping dialog box, click the HOUSEKEEPING tab.
2. In the listing on the left side of the Housekeeping page, click the ALL ROOMS line.
3. Click SEARCH, all rooms are listed in the display window to the right.
Room Conditions
30
Condition
Room Status
Vacant
The room is vacant
In house
The room is occupied.
Expected today
The room has been blocked for a guest who is expected to check
in today.
Exp. dep. today
The guest occupying this room is expected to depart today.
Checked in
today
A guest checked in to this room today.
Departed today
A guest checked out of this room today.
Moving Out
The guest is scheduled to move out of this room today (scheduled
room move).
Housekeeping
Condition
Room Status
Moving In
A guest is scheduled to move in to this room today (scheduled
room move).
Room in Queue
This room is assigned to a reservation in the check-in queue.
Finding a specific room
From the rooms listing, you can quickly select a particular room. The listing indicates the
room status.
You can select a room in several ways from the housekeeping dialog box.
To select a single room via the grid
In the Housekeeping screen, select (highlight) the room number in the grid you wish to
view, or scroll down until you arrive at the required room number.
To select a single room using the search criteria
1. Click in the Room No(s) box and type in a single room number or multiple room
numbers separated by a space or a comma.
2. Click SEARCH, the selected room or rooms are displayed in the grid.
3. In the grid, select a room number.
To select a room from a specific section
1. Click in the Sections box and select the desired sections from the select sections dialog
box.
2. Click CLOSE, the select sections dialog box closes.
3. Click SEARCH, all rooms within the selected sections are displayed in the grid.
4. In the grid, select a room number.
To select a room by room type
1. Click in the Room Types box, and select the desired room type(s) from the select room
types dialog box.
2. Click CLOSE, the select room types dialog box closes.
3. Click SEARCH, all rooms of the selected room types are displayed in the grid.
4. In the grid, select a room number.
Search Definitions
Viewing rooms by search definition
You can view rooms by a pre-defined search definition, such as checked out rooms, or
vacant dirty rooms. You may also create your own search definition to meet the needs of
your site.
To display rooms by search definition
1. Select the desired definition from the listing.
Housekeeping
31
2. Click SEARCH, only rooms from the selected category appear on the display grid.
Note: The display order of the search criteria list can be changed using
drag & drop.
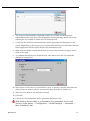
Adding a search definition
1. In the Housekeeping dialog box, click the HOUSEKEEPING tab.
2. The search definitions are displayed on the lower left hand side of the housekeeping
dialog box.
3. Click NEW, the search definitions dialog box appears.
32
Housekeeping
4. Check the required criteria to be included in the search definition:
Room Types
Housekeeping Statuses
Vacant
Occupied
Blocked Statuses
Rooms in Queue - displays only rooms which are assigned to reservations
5. Assign a number and title to the report. The number controls the display order.
6. Click OK to save the definition.
Changing a search definition
1. In the Housekeeping dialog box, click the HOUSEKEEPING tab.
Housekeeping
33
2. Select a search name from the search definitions list.
3. Click DETAILS, the search definitions dialog box is displayed.
4. View or change the criteria as required
5. Click OK to save the search definition.
Changing room status
You can quickly change the status of rooms. You can change the status of single or
multiple rooms in one procedure.
Change the status of a single room
1. Select a search name from the search definitions list.
2. Click SEARCH.
3. Highlight a room in the grid.
4. Double click to change the status to the next available room status.
or
Click the right mouse button and select a status from the list of defined statuses.
or
Select the new status from the Change Status box.
The status is changed.
Change the status of multiple rooms via the grid
1. Select a search name from the search definitions list.
2. Click SEARCH.
3. Mark the rooms for which you want to change the status.
4. Click the right mouse button and select a status from the list of defined statuses.
5. The selected rooms' statuses are changed in the room grid.
Change the status of multiple rooms via the quick action button
1. In the Housekeeping dialog box, click the QUICK ACTION button, the Quick Action
dialog box appears.
34
Housekeeping
2. In the Room No(s) box, type the room numbers for which you want to change the
status or click the drop-down arrow and mark the rooms required. You can change
the status of several rooms by separating them with a comma or a space.
or
Select to enter a range of rooms and enter the room number from which the range
should start and the room number where the range should finish.
or
Select a SECTION from the list of available sections.
3. Select the required CHANGE TO STATUS from the drop-down list.
4. Click OK.
The status of the selected rooms is updated in the room grid.
The display order of the housekeeping statuses is defined via the option
HOUSEKEEPING under Setup → Configuration → Reservations → Room
Management.
The changing of the status of a room is controlled by the user right
HOUSEKEEPING STATUS under Setup → Configuration → Users → User
Definition → Rights → Housekeeping.
Change Guest Service
Guest service status allows guests to set their room status to DO NOT DISTURB, MAKE UP
MY ROOM or RESET STATUS.
The guest service status values are conveyed to housekeeping via the telephone interface
and are hard coded as follows:
1. Make up Room
2. Do not Disturb
3. Reset Status
During night audit the guest service status is reset for all rooms except those with the
status DO NOT DISTURB.
The guest service status is also reset when performing a room move and when the room is
checked out.
A guest service status can be changed manually on the housekeeping dialog box if the
parameter ALLOW TO CHANGE GUEST SERVICE STATUS MANUALLY is active.
How to change the guest service status
1. Select a search name from the search definitions list.
2. Click SEARCH.
3. Highlight a room in the grid.
4. Select a status from the Change Guest Service box.
The status is displayed on the grid under the guest service column.
Housekeeping
35
Guest service functionality is controlled by the parameter ACTIVATE GUEST
SERVICE STATUS FUNCTIONALITY under Setup → Configuration → Global Settings
→ Interfaces → Interface (IFC8) 1 tab.
The functionality to change the guest service status manually is controlled
by the parameter ALLOW TO CHANGE GUEST SERVICE STATUS MANUALLY under
Setup → Configuration → Global Settings → Interfaces → Interface (IFC8) 1
tab.
Viewing room information
Fidelio Suite8 enables you to view information about a particular room.
To view room information
1. In the Housekeeping dialog box, select a room and click the ROOM INFO button to
display the Room Information dialog box.
2. After viewing the room information, click CLOSE.
Viewing maintenance guest service tasks
Maintenance Guest Service tasks can be viewed directly from the housekeeping screen.
To view maintenance guest service tasks
1. In the Housekeeping dialog box, click the HOUSEKEEPING tab.
2. In the listing on the left side of the Housekeeping page, click the ALL ROOMS line.
3. Click SEARCH, all rooms are listed in the display window to the right.
36
Housekeeping
4. Select the room with maintenance guest service tasks, right-click to display the shortcut menu and select SHOW MAINTENANCE.
The Maintenance Task dialog box is displayed with all the tasks for the
selected room.
5. The actions available for the maintenance guest service task depend upon user rights.
The display of open maintenance guest service tasks in housekeeping is
defined per maintenance guest service group and is controlled by the
option NOTIFY IN HK SCREEN under Setup → Configuration → Miscellaneous →
MaintenanceGuest Service Center → Maintenance Groups.Guest Service
Center Groups.
Viewing housekeeping statistics
Fidelio Suite8 enables you to view the number of rooms with a particular status.
To view housekeeping statistics
1. In the Housekeeping dialog box, click the STATISTICS button, the Statistics dialog box
appears.
Housekeeping
37
2. The number of rooms in each status category is displayed.
3. After viewing the statistics, click CLOSE.
Viewing out of order information
Fidelio Suite8 enables you to view information about a particular room.
To view out of order/service details
1. In the Housekeeping dialog box, click the OO-OS button, the Out of Order Rooms
dialog box appears.
38
Housekeeping
2. Click CLOSE to close the out of order dialog box.
Printing housekeeping search results
The housekeeping search results can be printed by running the required search definition
and then pressing the print button.
How to print the housekeeping search results report
1. In the Housekeeping dialog box, click the HOUSEKEEPING tab.
2. In the listing on the left side of the Housekeeping page, click the required search
definition.
3. Click SEARCH, all rooms meeting the search definition are listed in the display
window to the right.
4. Click the PRINT button.
5. The Printing Records dialog box appears indicating that the report is being printed.
6. To cancel the report, click the CANCEL PRINTING button.
The report to be used for printing the search results is defined via the
option DEFAULT REPORT FOR HOUSEKEEPING SCREEN under Setup → Configuration
→ Global Settings → Reports. The default number of copies to be printed is
defined in the report setup under the option Miscellaneous → Reports. The
report: FCR_PMS_4415_HSK_ROOMS_PER_SEARCH.rpt is now part of the
standard reports and has to be implemented in the housekeeping section
of the reports before it can be selected.
Housekeeping
39
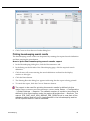
Room Assignment
Fidelio Suite8 lets you view assigned and unassigned rooms. You can record whether a
room is assigned, change the reasons for its assignment, or remove a room assignment.
You can also list rooms according to assignment criteria.
Access room assignment
1. Click the ROOMS MANAGEMENT menu and select HOUSEKEEPING, the Housekeeping
dialog box appears.
2. Click the ROOM ASSIGNMENT tab, the Room Assignment dialog box appears.
List rooms according to assignment criteria
1. Click the ROOM ASSIGNMENT tab, the Room Assignment dialog box appears.
2. In the SHOW list, click ASSIGNED, UNASSIGNED, or ALL ROOMS.
A list of rooms appears according to the selected criteria.
View a particular room
1. Click the ROOM ASSIGNMENT tab, the Room Assignment dialog box appears.
2. In the Room No(s) box, type the number of the room you want to view.
3. Click REFRESH LIST, the room or rooms are displayed in the grid.
Note: You can enter several rooms separated by a space or a comma.
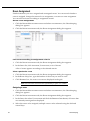
Assigning a room
1. Click the ROOMS MANAGEMENT menu and select HOUSEKEEPING, the Housekeeping
dialog box appears.
2. Click the ROOM ASSIGNMENT tab, the Room Assignment dialog box appears.
3. In the SHOW box select UNASSIGNED and click the REFRESH GRID button; all rooms that
are currently unassigned are displayed.
4. Select the rooms to be assigned; multiple rooms can be selected using the shift and
control keys.
40
Housekeeping
5. Click ASSIGN, the Change assignment dialog box is now active.
6. In the ASSIGNMENT box select the type of assignment.
7. In the REASON box select a reason for the assignment.
8. Click OK, the room is now assigned.
Removing a room assignment
1. Click the ROOMS MANAGEMENT menu and select HOUSEKEEPING, the Housekeeping
dialog box appears.
2. Click the ROOM ASSIGNMENT tab, the Room Assignment dialog box appears.
3. In the Show box, select ASSIGNED, the grid displays all rooms that are currently
assigned.
4. On the grid highlight the room to be unassigned, click UNASSIGN.
The room is now unassigned and the grid is updated
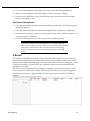
Discrepant Rooms
There may be discrepancies between the room status and/or the number of persons in the
room in Fidelio Suite8 and the actual status and/or number of persons as reported by the
housekeeping personnel. This option may be used to enter, view and resolve both room
and person discrepancies. Person discrepancies can be entered for both occupied and
unoccupied rooms; entering discrepant persons for a vacant room marks the room with
the status 'sleep'.
Access room discrepancies
1. Click the ROOMS MANAGEMENT menu and select HOUSEKEEPING, the Housekeeping
dialog box appears.
2. Click the DISCREPANT ROOMS tab, the Discrepant Rooms dialog box appears.
Housekeeping
41
The type of discrepancy and when it is cleared are controlled by the
parameters CLEAR DISCREPANCIES AFTER CHECK-IN, CLEAR DISCREPANCIES AFTER
CHECK-OUT and CLEAR DISCREPANCIES IN NIGHT AUDIT under Setup →
Configuration → Global Settings → Generic → Generic 3 tab. Each option
can be set so that all discrepancies are cleared, only room discrepancies,
only person discrepancies or no discrepancies.
Discrepant Persons functionality is controlled by the user right DISCREPANT
PERSONS under Setup → Configuration → Users → User Definition → Rights →
Housekeeping.
Changes are displayed in the user log if the option HSK ROOM PERSONS COUNT
CHANGE is selected in Setup → Configuration → Users → User Log → Room.
View Room Discrepancies
1. Click the ROOMS MANAGEMENT menu and select HOUSEKEEPING, the Housekeeping
dialog box appears.
2. Click the DISCREPANT ROOMS tab, the Discrepant Rooms dialog box is displayed.
3. In the Discrepancy box, select a viewing option; Sleeps only, Skips only, All
discrepant rooms or All rooms.
4. To view all discrepant rooms (skips, and sleeps), select All Discrepant Rooms.
5. To select a room in the list for viewing, click the room.
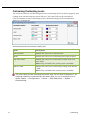
What is a Skip, Sleep or Discrepant Room?
SLEEPS - rooms that are reported to be occupied by the housekeeping personnel but are listed
as vacant by Fidelio Suite8.
SKIPS - rooms that are reported to be vacant by the housekeeping personnel, but are listed as
occupied by Fidelio Suite8.
DISCREPANT - rooms that show a discrepancy type of skip or sleep.
Clearing Room Discrepancies
Room Discrepancies may be cleared manually or via the interface.
How to clear room discrepancies:
If the room has the status skip; meaning that the housekeeping personnel reports that it is
vacant, clear the discrepancy status by either, checking the guest out or changing the
housekeeping status to Clear via the CHANGE HSK STATUS box.
If the room has the status sleep; meaning that the housekeeping personnel reports that it is
occupied, clear the discrepancy status by either, checking the guest in to that room or changing
the housekeeping status to CLear via the CHANGE HSK STATUS box.
How to modify the status of discrepant rooms
1. Click the ROOMS MANAGEMENT menu and select HOUSEKEEPING, the Housekeeping
dialog box appears.
2. Click the DISCREPANT ROOMS tab, the Discrepant Room dialog box is displayed.
3. In the Discrepancy box, select a viewing option, Sleeps only, Skips only, All
discrepant rooms or All rooms.
42
Housekeeping
4. To view all discrepant rooms (skips, and sleeps), select All Discrepant Rooms.
5. Select a room in the grid whose discrepancy status you want to change.
6. In the CHANGE HSK STATUS box click the drop-down arrow and select the status;
Vacant, Occupied or Clear.
View Person Discrepancies
1. Click the ROOMS MANAGEMENT menu and select HOUSEKEEPING, the Housekeeping
dialog box appears.
2. Click the DISCREPANT ROOMS tab, the Discrepant Rooms dialog box is displayed.
3. In the Persons Count box, select a viewing option, Only rooms with discrepancy, All
occupied rooms or All Rooms.
4. To view all discrepant rooms, select Only rooms with discrepancy.
Note: The number of housekeeping persons is set to 0 during the night
audit. If the number of housekeeping persons is changed after the
night audit and the reservation for this room checked out and another
reservation is checked in to this room, the entered housekeeping
persons will show for the new reservation up until the next night
audit.
Q Rooms
The Q Rooms tab displays all reservations which have been allocated a room and and
placed on the check-in queue because there was no room available at the time of arrival.
Queue rooms enables housekeeping to see the reservations which are waiting for a room
so that the cleaning of rooms can be more efficient. Queue rooms functionality tab is
parameter controlled.
The VIP STATUS is displayed and the length of time that a reservation has been on the
check in queue is listed in the column TIME ON Q. The room STATUS can be changed by
selecting the reservation, right-clicking and selecting a status from the list of defined
statuses.
Housekeeping
43
Queue rooms functionality is controlled by the parameter QUEUE ROOMS
HANDLING under Setup → Configuration → Global Settings → Reservation →
Reservation 1 tab.
Q room move details are displayed in the user log if the options
RESERVATION IS MOVED TO Q ROOMS and RESERVATION IS MOVED FROM Q ROOMS are
selected in Setup → Configuration → Users → User Log → Reservations.
44
Housekeeping
3
Out of Order
Rooms may be unavailable, or not in use, for various reasons. Fidelio Suite8 lets you
define rooms that were removed from use according to the room status codes defined by
your property. These room status codes prevent you from assigning these rooms to
reservations and depending on the setup may deduct the rooms from availability.
The two most common room status codes are Out of Order and Out of Service. Out of
Order generally means that the room is not for sale because it needs repairs. Out of
Service means that the room is temporarily not in use; for example, if it is located on a
floor that was closed off during low season. An Out of Service room can usually be sold if
the need arises.
It is possible to place an out of order block for any given date or period in the future. It is
not possible to take an occupied or reserved room to a status of Out of Order. If a room
status is defined with a RETURN TIME REQUIRED, the status of the room is changed on the
entered return time.
Out of order and out of service statuses are defined via the option Room
Status under Configuration → Reservations → Rooms Management.
Out of Order functionality is controlled by the user rights VIEW, EDIT, INSERT
and DELETE under Setup → Configuration → Users → User Definition →
Rights → Housekeeping → Out of Order.
Out of Service functionality is controlled by the user rights VIEW, EDIT,
INSERT and DELETE under Setup → Configuration → Users → User Definition
→ Rights → Housekeeping → Out of Service.
Placing a room out of order
1. Click the ROOMS MANAGEMENT menu and select OUT OF ORDER, the Out of Order
Rooms dialog appears.
2. Select a date range for the display.
3. Select the status TYPE; Out of Order, Out of Service or Both.
Out of Order
45
4. In the Out of Order Rooms dialog box, click NEW, the New Out of Order Rooms
dialog box appears.
5. In the ROOMS box, type in the number of the room you want to place out of order or
click the drop-down arrow and mark the rooms required.
You can place several rooms out of order by separating them with a
comma.
or
Select to enter a range of rooms and enter the room number from which
the range should start and the room number where the range should
finish.
6. Type the starting date for the out of order block in the DATE RANGE box or click the
drop-down arrow and select a date from the calendar.
46
Out of Order
7. Type the end date in the TO box or click the drop-down arrow and select a date from
the calendar.
8. In the STATUS box, click on the down arrow to open the drop-down list, and select the
room blocking status.
9. In the REASON box, click on the down arrow to open the drop-down list, and select the
reason for blocking the room.
10. In the REMARKS box, you can enter relevant comments.
11. The default RETURN STATUS to which the room will revert when the Out of Order
status is removed is automatically selected, but may be changed as required. Selecting
the status 'Current Status' sets the room to the status it was before being placed out of
order.
12. Click OK, the new out of order record is displayed in Out of Order Rooms list.
Placing a room out of order block using the copy feature
Fidelio Suite8 lets you create a new out of order block using the copy feature. All settings
for a selected room are copied to the new record.
To place a room out of order using the copy feature:
1. Click the ROOMS MANAGEMENT menu and select OUT OF ORDER.
The Out of Order Rooms dialog box is displayed.
2. Select a date range for the display and click the REFRESH button.
3. Select the room whose settings you want to copy to a new record.
4. Click COPY, the Out of Order Rooms dialog box is displayed.
5. In the Room(s) field, enter the room numbers whose settings will be copied from the
selected room's record or click the drop-down arrow and mark the rooms required.
You can copy the settings to several rooms by separating them with a
comma.
or
Select to enter a range of rooms and enter the room number from which
the range should start and the room number where the range should
finish.
6. Change any other settings as required.
7. Click SAVE to save the new record.
The new out of order record is displayed in Out of Order Rooms list.
Modifying out of order records
To modify an existing record
1. Click the ROOMS MANAGEMENT menu and select OUT OF ORDER.
The Out of Order Rooms dialog box is displayed.
Out of Order
47
2. Select a date range for the display and click the REFRESH button.
3. Select the room whose out of order block you want to modify.
4. Click EDIT, the Out of Order Room dialog box is displayed.
5. Edit the out of order block settings.
6. Click SAVE, to save changes.
The edited record appears in the rooms list in the Out of Order Rooms
dialog box.
Note: You cannot edit the actual room number.
Deleting out of order records
To delete an out of order block
1. Click the ROOMS MANAGEMENT menu and select OUT OF ORDER.
2. In the Out of Order Rooms dialog box, select the room whose out of order block you
want to delete.
3. Click the DELETE button, the Delete Out of Order Rooms dialog box appears.
4. To delete several rooms, click the drop-down arrow and mark the additional rooms to
be deleted.
5. Click DELETE to delete the out of order block.
A message is displayed "Do you want to update current housekeeping
status with defined return status?"
48
Out of Order
4. Click YES to update the room status with the defined return status or NO to keep the
current status.
The deleted out of order block disappears from the Out of Order Rooms
list.
Out of Order
49
4
Room History
Room History is helpful in tracing the occupants of a room which is damaged or in which
a lost article is found. The Room History tool lets you view a list of guests who used a
particular room. You can also display profile data about the guests who occupied the
room.
Display room history
To display the history of a room
1. Click the ROOMS MANAGEMENT menu and select ROOM HISTORY.
The Reservation dialog box is displayed defaulted to the ALL tab with the
SELECTION criteria 'History' selected.
2. In the ROOM NO box type the room number whose history you want to view.
3. Click SEARCH to display a list of all the guests who have stayed in the specified room.
Note: To limit the search by departure date select DEPARTURE from the
Adv. Qry. box and the required operator from the Operator box, e.g.
FROM, then type the date and click SEARCH, to display a list of guests
from the date specified.
Viewing guest history
Fidelio Suite8 lets you view reservation history details of selected guests who occupied a
particular room. This information is view-only and cannot be modified.
To view a guest's history details
1. Click the ROOMS MANAGEMENT menu and select ROOM HISTORY. The Reservation
dialog box appears defaulted to the all tab with the selection criteria History selected.
2. Click in the Room No field, and type the room number whose history you want to
view.
3. Click SEARCH, a list of all the guests who have stayed in the specified room is
displayed.
4. Select a guest from the guest list.
5. Click EDIT, the guest's reservation history screen appears.
6. After viewing the selected guest's details, click OK to close the screen.
Viewing or printing a guest's invoice
You may view or reprint the details of the guests' invoice.
To view or reprint a guest invoice
1. Click the ROOMS MANAGEMENT menu and select ROOM HISTORY. The Reservation
dialog box appears defaulted to the all tab with the selection criteria History selected.
Room History
51
2. Click in the Room No field, and type the room number whose history you want to
view.
3. Click SEARCH. A list of all the guests who have stayed in the specified room is
displayed.
4. Select a guest from the guest list.
5. Click OPTIONS and select BILLING.
6. Enter your CASHIER NUMBER and PASSWORD.
7. Click LOGIN, the cashiering dialog box is displayed.
8. Click OPTIONS and select INVOICE REPRINT.
9. Select the Invoice to be printed from the drop-down list and click PRINT. The invoice
is displayed in preview mode.
10. Click PRINT to reprint the invoice or CANCEL to return to the cashiering screen.
11. Click CLOSE to close the cashiering dialog box.
Viewing profiles
You can view the guest's history details by clicking EDIT. You may also select the EDIT
button from within the guest history details to view the guest's profile.
To view a guest's profile
1. Click the ROOMS MANAGEMENT menu and select ROOM HISTORY.
The Reservation dialog box appears defaulted to the all tab, with the
selection criteria History selected.
2. Click in the Room No field, and type the room number whose history you want to
view.
3. Click SEARCH, a list of all the guests who have stayed in the specified room is
displayed.
4. Select a guest and click EDIT, the reservation history of the selected guest is displayed.
5. Click the EDIT button on the profile section of the screen, the profile of the selected
guest is displayed.
6. To view additional data, click the tabs at the top of the Profile dialog box.
7. Click OK to close the profile dialog box.
8. Click OK to close the reservation dialog box.
Note: For detailed information on how to edit and manage profiles,
refer to the Fidelio Suite8 Customer Relationship Management
manual.
52
Room History
5
House Status
The House Status screen gives an overall picture of the hotel at that very moment.
Opening the House Status screen
There are three ways to open the house status screen:
From the Rooms Management toolbar click HOUSE STATUS.
Press CTRL +H.
Select HOUSE STATUS from the menu option Quick Keys.
Note: The blue arrow next to a field indicates a link to a
corresponding screen. Click the arrow to display additional
information.
To recalculate the House Status screen
From the House Status screen, click the REFRESH button.
The House Status screen figures are updated in all categories and fields.
House Status
53
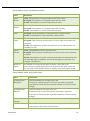
House Status screen total terms
Term
Definition
Total
Number of
Rooms
The total number of rooms in the property. This is the number of
rooms the license is provided for.
Total Rooms
to Sell
The number of rooms available for sale.
Total number of rooms less all rooms marked with the status ‘Deduct
from availability’. This usually includes out of order rooms but may
include other statuses. For more details see the Version 8 Setup
Manual.
House Status screen movement terms
Term
Definition
Expected
Arrivals
The number of rooms/pax/children that are due to arrive that
day.
Actual Arrivals
The number of rooms/pax/children that arrived that day.
Arrival Rooms
Assigned
The number of rooms/pax/children that are due to arrive that day
that have room numbers assigned to them.
Expected
Departures
The number of rooms/pax/children that are due to depart that
day.
Actual
Departures
The number of rooms/pax/children that have departed that day.
Day Rooms
The number of rooms occupied and the number of pax and
children that occupied rooms during the day that did not stay
overnight.
Walk Ins
The number of rooms/pax/children that did not have prior
reservations, walked into the hotel, and were checked in via the
walk in button on the reservation navigator.
Same Day
Reservations
The number of rooms/pax/children that checked in and made the
reservation the same day.
Room moves to
perform
The number of rooms/pax/children which are scheduled for a
room move.
Early
Departures
The number of rooms/pax/children that departed earlier than
expected.
Current
Occupancy
The number of rooms occupied and the number of pax and
children occupying rooms at this moment.
The % of rooms occupied at this moment.
Note: To display total persons (pax and children) click the option ADD
CHILDREN TO PAX, the pax column then displays the total figure.
54
House Status
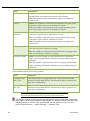
House Status screen housekeeping terms
Term
Definition
Clean
Rooms
Total: Total number of occupied and vacant clean rooms.
Occupied: The number of occupied rooms that are clean.
Vacant: The number of vacant rooms that are clean.
Dirty
Rooms
Total: Total number of occupied and vacant dirty rooms.
Occupied: The number of occupied rooms that are dirty.
Vacant: The number of vacant rooms that are dirty.
Total
Occupied: The total number of clean and dirty occupied rooms.
Vacant: Total number of clean and dirty vacant rooms.
Out of
Order
Total: Total number of out of order rooms.
Out of
Service
Total: Total number of out of service rooms
Occupied: This is always zero because an out of service room cannot be
occupied.
Vacant: The number of vacant rooms that are taken out temporarily but
are included in the availability and can be brought in at any time. For
example: Closed Floor.
Rooms in
Queue
The number of rooms on the check-in queue. These are room
reservations for which the guests have checked-in but their rooms are
not yet ready. Click the blue arrow to display a list of the queue rooms.
Occupied: This is always zero because an out of order room cannot be
occupied.
Vacant: The number of vacant rooms that are out of order and are not
available for sale.
House Status screen end of day terms
Term
Definition
Average Room
Rate gross
The forecasted gross average room rate.
Average Room
Rate net
The forecasted net average room rate.
Total net room revenue for in house and today's expected
reservations divided by the expected number of rooms in house
tonight.
Available
Tonight
The number of rooms that will be available for sale that night.
Allotments
Room: The number of rooms that are occupied by individual
reservations with a block code attached.
House Status
Total gross room revenue for in house and today's expected
reservations divided by the expected number of rooms in house
tonight.
55
Term
Definition
Pax: The number of persons that are occupying rooms and have
an individual reservation with a block code attached.
Note: Block Reservation functionality requires an additional
license code.
Groups
Room: The number of rooms that were entered using the group
reservation option, but are not attached to a block.
Pax: The number of persons that were entered using the group
reservation option, but are not attached to a block.
Group and
allotment
Room: The number of rooms that were entered using the group
reservation option and are attached to a block.
Pax: The number of persons that were entered using the group
reservation option and are attached to a block.
Note: Block Reservation functionality requires an additional
license code.
Individuals
Room: The number of rooms that are occupied by individuals
who are not part of a block or a group.
Pax: The number of individual persons that are occupying rooms
and do not belong to a block or a group.
In-house tonight
Room: The total number of rooms that will be occupied that
night, including individuals, allotments, groups, and group and
allotment.
Pax: The number of persons that will be occupying the hotel that
night, including individuals, allotments, groups, and group and
allotment.
House Status screen end of day revenue
Term
Definition
Average Room
Rev. gross
Calculates the gross average end of day room revenue from the
Revenue Forecast table (YPOS). Forecasted package revenue is not
taken into consideration.
Average Room
Rev. net
Calculates the net average end of day room revenue from the
Revenue Forecast table (YPOS). Forecasted package revenue is not
taken into consideration.
Note: Rooms and persons on blocks that have not been picked up will
not be shown on the House Status regardless of the block status.
The House Status can be set as the startup screen, so that each time this
user logs on the House Status is displayed. To enable this functionality the
required start up screen can be selected via the option STARTUP SCREEN
under Miscellaneous → User Settings → Startup Tab.
56
House Status
The storing of hotel segmentation preferences by user is controlled by the
option STORE HOTEL SEGMENTATION PREFERENCES under Miscellaneous → User
Settings → Appearance Tab. If the option STORE HOTEL SEGMENTATION
PREFERENCES is selected then each time this user opens the House Status
the selected hotel segment view is displayed.
House Status
57
6
Attendants
The Attendants screen gives you quick and easy access to complete information about
attendants including:
Attendant Name
Total number of credits, both room and amenity
Specific room assignment information
It is a convenient tool for managing attendant room assignments; you can not only view
all room assignments, but can also reassign rooms as needed. Rooms can be assigned by
either specifying the number of available attendants or by using the active pre-defined
attendants list. The type of attendant group can be selected and calculated when using the
option USE DEFINED ATTENDANTS. Rooms can be selected and dragged to another room
attendant or to and from the Not assigned rooms column. You can print an attendants
report listing information about each room assigned to the attendants, or save the report
for reprinting later in the day. An attendant report can also be created for a future date; all
details are the same with the exception of the room status which as it is not yet known
then it is not displayed.
If a room status such as out of order or out of service is defined with a RETURN TIME
REQUIRED, the actual status of the room on the entered return time is considered when
calculating attendants.
Additional credits can be assigned to attendants cleaning rooms occupied by guests with
special housekeeping amenities such as changing linen or towels. The amenity credits are
added when the attendant plan is calculated and are displayed next to the room credits.
Access the attendants screen
1. Click the ROOMS MANAGEMENT menu and select ATTENDANTS; the Attendants screen
is displayed.
or
Click the ROOMS MANAGEMENT menu and select HOUSEKEEPING; the Housekeeping
screen is displayed.
2. In the Housekeeping screen, click the ATTENDANTS tab; the Attendants screen is
displayed.
Attendants
59
Attendants display
Column
Information displayed
Attendants
The name of the attendant, the maximum number of credits that can be
assigned to this attendant and the number of credits which are
currently available to be assigned.
Info
The status of the reservation:
I for in house
D for departure
A for arrival
Status
The room status, the name of the reservation and the detailed
reservation status.
Date
Range
The arrival and departure dates of the reservation occupying this
room.
Arrival
The name of the reservation due to arrive.
Share
Indicates if room is being shared.
Amenity functionality is controlled by the parameter AMENITY FUNCTIONALITY
under Setup → Configuration → Global Settings → Reservation →
Reservation 2 tab.
Amenities are defined via the option AMENITIES under Setup →
Configuration → Reservations.
Housekeeping amenity credit functionality requires that the department
'Housekeeping' is assigned the role 'Housekeeping' via the option
RESPONSIBLE DEPARTMENTS under Setup → Configuration → Conference
Management.
60
Attendants
Allocating rooms assignments
To allocate room assignments
1. Click the ROOMS MANAGEMENT menu and select ATTENDANTS.
2. To create a room assignment plan for a date other than today's date select ATTENDANT
PLAN DATE and select the required date.
3. Click the NUMBER OF ATTENDANTS options button.
4. Enter desired number of attendants or click the up and down arrow to choose the
number of attendants.
5. Mark the DEFAULT CREDITS check box and enter the desired number of credits per
attendant or click the up and down arrow to choose the number of credits.
Note: If the default credits check box is not selected then the credits
will be divided between the attendants up to a maximum of 999
credits.
5. Select the ALLOW AUTO-EXTEND MAXCREDITS check box to allow the allocation of
unassigned rooms to an attendant even if that attendant has already been allocated
the maximum number of credits.
The maximum credits of an attendant automatically increase if more rooms
are moved to the attendant than originally planned (overbooking).
The display of an attendant will display 5 values: Cap: 220 (200) / Used:
220 / Rem: 0 (-20).
Cap: Displays the capacity of the attendant, the first value is the actual
credit and the second one is the original value from the beginning of the
calculation.
Used: Displays the used credits.
Rem: Displays the remaining credits, the first value is the available
remaining credits and the second value is the number of overbooked
credits.
6. Select the option AUTOMATICALLY REDUCE OVERBOOKING to automatically reduce the
overbooking credits when credits are removed from an attendant.
7. Select the method of room assignment:
Fill attendants to maxcredits: each active attendant is assigned their defined number of
credits, until all rooms are assigned.
Balance all equally: the total credits will be divided as equally as possible among the active
attendants.
One attendant per section: each active attendant is assigned all the rooms in a single
section.
8. If clean rooms are to be included in the room assignment select the check box INCLUDE
CLEAN ROOMS.
9. If only clean rooms which are assigned for arrivals are to be included in the room
assignment then select the check box ONLY ASSIGNED FOR ARRIVALS.
Attendants
61
10. If out of order rooms are to be included in the room assignment then select the check
box INCLUDE OOO ROOMS.
11. If clean and/or out of order rooms are to be listed in the Not assigned rooms section
select the check box LIST CLEAN / OOO IN NOT ASSIGNED ROOMS. This option is only
available if INCLUDE CLEAN ROOMS and/or INCLUDE OOO ROOMS have been selected.
12. Click CALCULATE, the attendant listing is displayed with as near as possible the same
number of credits assigned to each attendant.
If LIST CLEAN / OOO IN NOT ASSIGNED ROOMS was selected then all rooms with
the status CLEAN and OUT OF ORDER will be listed on the right hand side
under Not assigned rooms.
Note: Drag & drop functionality can be used to add rooms to the
room attendant listing from the not assigned rooms list. Selecting
rooms in the attendant listing and pressing delete removes the rooms
from the attendants list and moves them to the Not assigned list. The
keyboard number keys can be used to navigate the room number list,
for example, pressing 6 will jump to the first room number which
begins with the number 6.
Assigning rooms using the defined attendants listing
To assign rooms using the defined attendants listing
1. Click the ROOMS MANAGEMENT menu and select ATTENDANTS.
2. To create a room assignment plan for a date other than today's date select ATTENDANT
PLAN DATE and select the required date.
3. Select the ALLOW AUTO-EXTEND MAXCREDITS check box to allow the allocation of
unassigned rooms to an attendant even if that attendant has already been allocated
the maximum number of credits.
The maximum credits of an attendant automatically increase if more rooms
are moved to the attendant than originally planned (overbooking).
The display of an attendant will display 5 values: Cap: 220 (200) / Used:
220 / Rem: 0 (-20).
Cap: Displays the capacity of the attendant, the first value is the actual
credit and the second one is the original value from the beginning of the
calculation.
Used: Displays the used credits.
Rem: Displays the remaining credits, the first value is the available
remaining credits and the second value is the number of overbooked
credits.
3. Select the option AUTOMATICALLY REDUCE OVERBOOKING to automatically reduce the
overbooking credits when credits are removed from an attendant.
4. Click the USE DEFINED ATTENDANTS option button.
5. In the TYPE box select the type of attendant group required.
6. Select the method of room assignment:
62
Attendants
Fill attendants to maxcredits: each active attendant is assigned their defined number of
credits, until all rooms are assigned.
Balance all equally: the total credits will be divided as equally as possible among the active
attendants.
One attendant per section: each active attendant is assigned all the rooms in a single
section.
7. If clean rooms are to be included in the room assignment select the checkbox INCLUDE
CLEAN ROOMS.
8. If out of order rooms are to be included in the room assignment select the checkbox
INCLUDE OOO ROOMS.
9. If clean and/or out of order rooms are to be listed in the Not assigned rooms section
select the checkbox LIST CLEAN / OOO IN NOT ASSIGNED ROOMS. This option is only
available if INCLUDE CLEAN ROOMS and/or INCLUDE OOO ROOMS have been selected.
10. Click CALCULATE, the attendant listing is displayed with as near as possible the same
number of credits assigned to each active attendant.
If LIST CLEAN / OOO IN NOT ASSIGNED ROOMS was selected then all rooms with
the status CLEAN and OUT OF ORDER will be listed on the right hand side
under Not assigned rooms.
Note: Drag & drop functionality can be used to add rooms to the
room attendant listing from the not assigned rooms list.
Assigning rooms using pre-defined attendants and defined rooms
To assign rooms using pre-defined attendants and pre-defined rooms
1. Click the ROOMS MANAGEMENT menu and select ATTENDANTS.
2. To create a room assignment plan for a date other than today's date select ATTENDANT
PLAN DATE and select the required date.
3. Select the ALLOW AUTO-EXTEND MAXCREDITS check box to allow the allocation of
unassigned rooms to an attendant even if that attendant has already been allocated
the maximum number of credits.
The maximum credits of an attendant automatically increase if more rooms
are moved to the attendant than originally planned (overbooking).
The display of an attendant will display 5 values: Cap: 220 (200) / Used:
220 / Rem: 0 (-20).
Cap: Displays the capacity of the attendant, the first value is the actual
credit and the second one is the original value from the beginning of the
calculation.
Used: Displays the used credits.
Rem: Displays the remaining credits, the first value is the available
remaining credits and the second value is the number of overbooked
credits.
Attendants
63
3. Select the option AUTOMATICALLY REDUCE OVERBOOKING to automatically reduce the
overbooking credits when credits are removed from an attendant.
4. Click the USE DEFINED ATTENDANTS option button.
5. Click USE ATTENDANT CONFIG to allocate rooms according to the permanent room →
maid allocation. In this case the credits will be ignored.
The method of room assignment is not applicable as credits are ignored
when the option USE ATTENDANT CONFIG is selected.
6. If clean rooms are to be included in the room assignment select the check box INCLUDE
CLEAN ROOMS.
7. If out of order rooms are to be included in the room assignment select the check box
INCLUDE OOO ROOMS.
8. If clean and/or out of order rooms are to be listed in the Not assigned rooms section
select the check box LIST CLEAN / OOO IN NOT ASSIGNED ROOMS. This option is only
available if INCLUDE CLEAN ROOMS and/or INCLUDE OOO ROOMS have been selected.
9. Click CALCULATE the attendant listing is displayed according to the pre-defined room
allocation.
If LIST CLEAN / OOO IN NOT ASSIGNED ROOMS was selected then all rooms with
the status CLEAN and OUT OF ORDER will be listed on the right hand side
under Not assigned rooms.
Note: Drag & drop functionality can be used to add rooms to the
room attendant listing from the not assigned rooms list.
Adding a new attendant to the listing
To add a new attendant to the listing
1. Click the ROOMS MANAGEMENT menu and select ATTENDANTS.
2. Click SETUP, the Attendant Setup dialog box is displayed.
3. Click NEW, the Attendant dialog box is displayed.
4. Type in the attendant Name.
5. Select the GROUP that this attendant belongs to, for example, Turndown Service,
Room Maid or Housekeeping Assistant.
64
Attendants
6. If the attendant has been defined with a user then select the USER name.
7. Type in the maximum number of credits to be allocated to this attendant.
8. Mark the ACTIVE check box if this attendant is currently active.
9. Click OK.
Adding a note to an attendant
Once the room attendant listing has been calculated then a note can be added to a specific
room attendant or to multiple room attendants. Notes can be added, edited or deleted
and are automatically removed when the room attendant listing is recalculated. Notes are
printed on the attendant list and are displayed in a hint when the mouse is hovered over
an attendant name in the attendant listing.
How to add a note to multiple attendants
1. Click the ROOMS MANAGEMENT menu and select ATTENDANTS.
2. Assign the rooms by either specifying the number of available attendants or by using
the active pre-defined attendants list.
3. Click CALCULATE, the attendant listing is displayed with as near as possible the same
number of credits assigned to each active attendant.
4. Click the ATTENDANT NOTES button, the Edit Attendant Notes screen is displayed
with a list of the attendant names.
5. In the SELECT ATTENDANTS column select the attendant or attendants to which the
note applies. Multiple attendants can be selected from the list using the Ctrl button
and left mouse click.
6. In the ENTER NOTE HERE column enter the note, click the ASSIGN NOTE button.
Attendant names with a note assigned are displayed in green.
7. Click OK to close the Edit Attendant Notes screen.
Attendants
65
How to add/edit a note to a single attendant
1. Click the ROOMS MANAGEMENT menu and select ATTENDANTS.
2. Assign the rooms by either specifying the number of available attendants or by using
the active pre-defined attendants list.
3. Click CALCULATE, the attendant listing is displayed with as near as possible the same
number of credits assigned to each active attendant.
4. Right-click on the attendant listing to display the short-cut menu.
5. Select ADD NOTES TO ATTENDANT; a listing of the attendant names is displayed.
6. Select the name of the attendant to which a note is being added or edited; the
Attendant Notes dialog box is displayed.
7. Enter the attendant note or edit an existing note and click OK.
How to delete notes from multiple attendants
1. Click the ROOMS MANAGEMENT menu and select ATTENDANTS.
2. Calculate and display the attendant listing
3. Click the ATTENDANT NOTES button, the Edit Attendant Notes screen is displayed
with a list of the attendant names.
Attendant names with a note already assigned are displayed in green.
4. In the SELECT ATTENDANTS column select the required attendant or attendants.
Multiple attendants can be selected from the list using the Ctrl button and left mouse
click.
5. Click the CLEAR NOTE button.
A confirmation message is displayed.
6. Click YES to remove the attendant note.
7. Click OK to close the Edit Attendant Notes screen.
How to delete an attendant note
1. Click the ROOMS MANAGEMENT menu and select ATTENDANTS.
2. Calculate and display the attendant listing.
66
Attendants
3. Right-click on the attendant listing to display the short-cut menu.
4. Select ADD NOTES TO ATTENDANT; a listing of the attendant names is displayed.
5. Select the name of the required attendant; the Attendant Notes dialog box is
displayed.
6. Clear the note text and click OK.
Editing a reservation
How to edit a reservation from the attendant listing
1. Click the ROOMS MANAGEMENT menu and select ATTENDANTS.
2. Assign the rooms by either specifying the number of available attendants or by using
the active pre-defined attendants list.
3. Click CALCULATE, the attendant listing is displayed with as near as possible the same
number of credits assigned to each active attendant.
4. Select the required rooms and right-click on the attendant listing to display the shortcut menu.
5. Select EDIT RESERVATION; if multiple rooms were selected then a listing of reservation
names is displayed.
6. Select the name of the reservation to be edited.
The reservation edit screen is displayed; the options available are
according to the reservation status and user rights.
7. Make any changes required and click OK or click CANCEL to close the reservation edit
screen and return to the attendants listing.
Printing the Attendant Assignments
The attendants report lists the room number, room category, status, number of persons in
the room, guest name (if still in-house), arrival and departure dates of guest and VIP
code. In addition, there is a summary of rooms and credits for each attendant.
How to print the attendants report
1. In the Attendants screen, click the PRINT button.
2. The Printing Records dialog box appears indicating that the report is being printed.
3. To cancel the report, click the CANCEL PRINTING button.
How to save the attendants report
The room assignment report can be saved so that it can be reprinted without having to be
recalculated.
Attendants
67
1. In the Attendants screen, click SAVE, the save plan confirmation appears.
2. Click OK.
3. If a room attendant plan has been previously saved today then you are asked if you
should delete the existing plan.
4. Click YES to delete the existing plan, the new plan is saved.
How to load a saved attendants report
In the Attendants screen, click LOAD to display the previously saved plan.
Note: Only a plan which was saved today can be loaded, it is not
possible to load a plan from a previous day.
The report to be used for the room attendants is defined via the option
DEFAULT REPORT FOR ATTENDANTS under Setup → Configuration → Global
Settings → Reports → Reports 1 tab. The default number of copies to be
printed is defined in the report setup under the option Miscellaneous →
Reports.
The report printed when the calculation is by attendant group is the REPORT
defined for the selected attendant group under Setup → Configuration →
Reservations → Attendant Groups. If no report is defined then the
attendants report defined via the option DEFAULT REPORT FOR ATTENDANTS
under Setup → Configuration → Global Settings → Reports → Report Tab is
used as the default.
Note: During the update process the group type MAID is marked as
the default and all configured attendants are assigned to this group.
68
Attendants
7
Overbooking
Fidelio Suite8 allows you to overbook in accordance with the set overbooking levels. Most
hotels use overbooking levels during peak periods in order to reach 100% occupancy.
Overbooking functionality is controlled by the user right OVERBOOKING under
Setup → Configuration → Users → User Definition → Rights → Overbooking.
Access the overbooking screen
Click the ROOMS MANAGEMENT menu and select OVERBOOKING. The overbooking dialog
box appears.
Changing the dates on the overbooking screen
You can change the view of the overbooking screen by changing the from and until dates.
To change the dates on the overbooking screen
1. Type the start date for the overbooking grid in the From Date box or click the dropdown arrow and select a date from the calendar.
2. Type the end date in the Until Date field box or click the drop-down arrow and select
a date from the calendar.
3. Click the REFRESH button, the overbooking grid is updated.
Overbooking
69
House Overbooking
House overbooking allows you to overbook the hotel with any room type.
To overbook the hotel
1. Click the ROOMS MANAGEMENT menu and select OVERBOOKING.
2. Select the HOUSE option button.
3. Select the square or squares on the grid that represents the day(s) to be overbooked.
4. Type the number of rooms to overbook by in the Rooms box or click the up and down
arrow to choose the number of rooms.
5. Click SET, the overbooking grid is updated with the overbooking amount specified.
To set overbooking for a range of dates
1. Click the ROOMS MANAGEMENT menu and select OVERBOOKING.
2. Select the HOUSE option button.
3. Click the RANGE button. The Date Ranges dialog box opens.
4. Type the starting date for the overbooking period in the Start Date field or click the
drop-down arrow and select a date from the calendar.
5. Type the end date of the overbooking period in the End Date field box or click the
drop-down arrow and select a date from the calendar.
6. To assign a different overbooking amount for each day in the overbooking period,
type the amount in the field corresponding to the day.
Note: Clicking the large up and down arrows increases or decreases
the number of rooms to overbook by for all days in the selected range.
7. Click OK, the Overbooking grid is updated with the overbooking amount specified.
70
Overbooking
Overbooking by room type
Fidelio Suite8 lets you select specific room types for overbooking.
To overbook specific room types
1. Select the ROOM radio button. The room types are displayed in the overbooking grid.
2. Click the RANGE button. The Date Ranges dialog box is displayed.
3. Type the starting date for the overbooking period in the Start Date box or click the
drop-down arrow and select a date from the calendar.
4. Type the end date of the overbooking period in the End Date field box or click the
drop-down arrow and select a date from the calendar.
5. In the Rooms field, click on the down arrow to open the drop-down list, and select the
room types on which to set overbooking levels. A check mark is added next to the
selected room types.
6. To assign a different overbooking amount for each day in the overbooking period,
type the amount in the field corresponding to the day.
7. Click OK, the Overbooking grid is updated with the overbooking amounts specified.
Setting both house and room type overbooking
You can set both house overbooking and room type overbooking at the same time. For
example, if you allow the hotel to be overbooked by 20 rooms, you can set the house
overbooking to 20 rooms and then set room type overbooking levels for specific room
types. This will ensure that you are not overbooked by 20 rooms on one particular room
type. This is especially useful if you have just one or two of a particular room type.
Alternatively, if you set the Room Type overbooking to allow overbooking by 10 rooms
on each of three room types, you can set the House Overbooking to 20, so that the system
will restrict any new reservations after the total house availability has reached 20 even
though some room types have not yet reached the overbooking limit.
Deleting overbooking levels
You can delete the house overbooking for a particular day. You can also delete the
overbooking of a specific room type for a particular day. When you delete a selected
overbooking, the entry disappears from the overbooking screen.
To delete an overbooking level
1. Display the overbooking grid with or without room types displayed by selecting
either the HOUSE or ROOM option button.
2. Select an overbooking item from the Overbooking grid.
3. Click CLEAR, the selected overbooking entry is deleted.
Overbooking
71
Customising Overbooking Levels
The colour for the font and the background on overbooking levels set by the property and
coming from external systems such as Ideas or Top Line Profit can be customized.
Click CUSTOMIZE on the Overbooking screen, the Overbooking Grid Customization
dialog box is displayed.
Overbooking Grid Customization dialog box
Field
Description
Selected Item
Defines the colour for a selected item.
Hotel
Defines the colour for overbooking set by the property.
Top Line Profit
Defines the colour for overbooking coming from Top
Line Profit
Note: Only available if the yield system is installed.
IDEAS /XML
Defines the colour for overbooking coming from IDEAS
/ XML.
Note: Only available if the yield system is installed.
The overriding of the overbooking levels sent via the XML Interface or an
external system is controlled by the user right ALLOW OVERRIDE EXTERNAL
under Setup → Configuration → Users → User Definition → Rights →
Overbooking.
72
Overbooking
8
Maintenance
Maintenance The Guest Service Center may be used to record and trace service requests
for rooms, function spaces and public areas. The maintenance tool guest service center
can be accessed via the option MAINTENANCE on the ROOMS MANAGEMENT menu. GUEST
SERVICE CENTER on the MISCELLANEOUS menu. Users can enter new maintenance guest
service tasks and edit existing maintenance guest service tasks. The Maintenance tool
guest service center allows users to search by locality, task status, the type of task and the
responsible employees.
Maintenance Guest Service types configured as out of order will automatically give the
option to place the room out of order. If a room is assigned to a reservation which has a
maintenance guest service record, an indicator on the edit reservation screen shows
MAINTENANCE, the maintenance guest service record can be accessed by clicking the
maintenance indicator.
When a new maintenance guest service task is entered the appropriate employee can be
chosen from the list of SKILLED employees and assigned as the responsible employee. If
the employee has a mobile phone or email defined on their user profile then SMS and
email notifications can be sent to the employee to advise or remind them of the task as per
the setup for this maintenance guest service task type.
The guest profile can be access directly from the task HTML display for guest originated
maintenance guest service tasks where the guest is still in house.
Automatic maintenance guest service tasks can be created upon certain conditions; see
Automatic Trace - Maintenance Guest Service Tasks.
The maintenance guest service selection criteria can be stored per user and the filter
automatically loaded when the user accesses the maintenance guest service search screen;
the default filter can be loaded as and when required.
Attributes can be attached to maintenance guest service tasks.
Additional details may be provided by linking a picture to a task; either by scanning an
image or by selecting an existing picture. If a picture is linked to a maintenance task then
when editing the maintenance task the picture is quickly accessible via the PICTURES tab.
The maintenance option is controlled by the parameter HOTEL MAINTENANCE
under Setup → Configuration → Global Settings → Generic → Generic 3 tab.
The guest service center option is controlled by the parameters HOTEL
MAINTENANCE and GUEST SERVICE CENTER under Setup → Configuration →
Global Settings → Generic → Generic 3 tab.
Maintenance Guest Service search functionality is controlled by the user
right VIEW under Setup → Configuration → Users → User Definition → Rights
→ Hotel MaintenanceGuest Service Center → Maintenance Guest Service
Center Search.
Maintenance Guest Service edit functionality is controlled by the user rights
NEW, EDIT, DELETE and RESOLVE under Setup → Configuration → Users →
User Definition → Rights → Hotel MaintenanceGuest Service Center →
Maintenance Guest Service Edit.
Maintenance
73
The screen refresh interval is defined via the option GENERIC SCREEN REFRESH
INTERVAL IN SECONDS under Setup → Configuration → Global Settings →
Miscellaneous → Visual Appearance 4 tab. The default refresh time is 5
minutes and the TIME TO THE NEXT UPDATE is displayed; however the screen
can be refreshed immediately by clicking the SEARCH button.
Maintenance Guest Service reminder and overdue functionality requires
that the service MAINTENANCE REMINDER is running in Fidelio Server.
The order of the Maintenance Guest Service type entry fields on the
maintenance guest service search screen and on the new entry/edit
screens is controlled by the parameter REVERSE ORDER MAINTENANCE TYPE
TREE IN SCREENS under Setup → Configuration → Global Settings → Generic →
Hotel Maintenance Guest Service Center 7 tab. If activated, the order is
Responsible Department, Group, Type, otherwise the order is Type, Group,
Responsible Department.
SMS Sending functionality is controlled by the parameter ENABLE SMS
SENDING under Setup → Configuration → Global Settings → Interfaces →
Misc. Interface 5 tab.
The parameters for short message sending for maintenance guest service
tasks are defined via the section Maintenance Guest Service Center SMS
Report under Setup → Configuration → Global Settings → Generic → Hotel
Maintenance Guest Service Center 7 tab.
The possibility to select attributes on a maintenance guest service task is
controlled by the parameter ACTIVATE Maintenance Guest Service SUB
ATTRIBUTES under Setup → Configuration → Global Settings → Generic →
Hotel Maintenance Guest Service Center 7 tab.
Access maintenance guest service
Click the ROOMS MANAGEMENT menu or the MEETING PLANNER menu and select
MAINTENANCE.
Click the MISCELLANEOUS menu and select GUEST SERVICE CENTER.
The Maintenance Guest Service dialog box is displayed; all the NOT RESOLVED
maintenance guest service records are listed by default. The result count for the
current search is displayed in the status bar.
74
Maintenance
Maintenance Guest Service Search Criteria
Fill in this field
With this information
Entered On - Until
Enter the dates from which the search should start and end for
when the task was entered.
If no end date is entered then the search displays all entries
from the date entered up until today.
Due On - Until
Enter the dates from which the search should start and end for
when the task is due.
If no end date is entered then the search displays all entries
from the date entered up until today.
Resolved On - Until
Enter the dates from which the search should start and end for
when the task was resolved.
If no end date is entered then the search displays all entries
from the date entered up until today.
Locality Type
The type of location, for example, guest rooms, public places
or function spaces.
Locality
The specific location, for example if function spaces is selected
as the locality type then a specific function space can be
selected here.
Type
The type of maintenance guest service issue.
Group
The maintenance guest service group, for example, general,
plumbing or IT.
Resp. Department
Select the responsible department from the list.
Origin
The origin of the maintenance guest service issue.
Resp. Employee
Select the responsible employee from the list.
Req. Employee
Select the requested employee from the list.
Maintenance
75
Fill in this field
With this information
Status Level
The status of the task, for example, not yet started, in progress
or complete.
Notes
Text contained in the maintenance guest service notes field.
Task ID
The task identification number.
View
All
Displays all maintenance guest service tasks regardless of
status.
Resolved
Displays resolved maintenance guest service tasks.
Not Resolved
Displays not resolved maintenance guest service tasks.
Priority
All
Displays all maintenance guest service tasks regardless of
priority.
Low
Displays maintenance guest service tasks with the low
priority.
Normal
Displays maintenance guest service tasks with the normal
priority.
High
Displays maintenance guest service tasks with the high
priority.
How to save default settings
1. Click the ROOMS MANAGEMENT menu or the MEETING PLANNER menu and select
MAINTENANCE.
2. Click the MISCELLANEOUS menu and select GUEST SERVICE CENTER.
The Maintenance Guest Service dialog box is displayed; all the NOT RESOLVED
maintenance guest service records are listed by default.
2. Complete the search criteria by typing information or selecting information from the
drop-down lists.
3. Click
to display a pop-up menu.
4. Select SAVE FILTER.
A confirmation message is displayed.
76
Maintenance
5. Select YES to save current filter settings as the default for the logged in user.
Entering a new maintenance guest service task
1. Click the ROOMS MANAGEMENT menu or the MEETING PLANNER menu and select
MAINTENANCE.
2. Click the MISCELLANEOUS menu and select GUEST SERVICE CENTER.
3. Click NEW to enter a new maintenance guest service task.
Maintenance
77
78
Maintenance
3. In the LOCALITY TYPE box click the drop-down arrow and select the location type,
Room, Function Space, Location, or Public Place
4. In the LOCALITY box click the drop-down arrow and select the location of the
maintenance guest service task.
5. In the DESCRIPTION box click the drop-down arrow and select the description. The
descriptions are dependant on the locality selected.
Maintenance
79
6. In the TYPE box click the drop-down arrow and select the type of maintenance guest
service task. If the number of minutes needed to complete this task have been defined
then the DUE DATE and time are automatically completed.
6. In the NOTES box enter a description of the maintenance guest service task, if required.
7. Next to the RESPONSIBLE EMPLOYEE box click the button to select an employee from
the Select Employee screen.
8. If the task is not guest generated then next to the REQUESTING EMPLOYEE box click the
button to select the employee requesting the task.
9. Type the due date for the task in the DUE DATE box or click the drop-down arrow and
select a date from the calendar. If the number of minutes needed to complete this task
have been defined then the DUE DATE and time are automatically completed.
10. In the STATUS LEVEL box select the current status level of this task; the status level can
be updated at any time.
11. In the ORIGIN box select where the task originated from, this could be a guest
generated task or from housekeeping or the front desk.
12. If the task originated from a guest then the name of the guest can be entered in the
GUEST box. If the locality selected is an occupied room then the guest profile is
automatically completed, if there is more than one guest occupying the room then the
corresponding profile can be selected.
13. If available select the MAINTENANCE ATTRIBUTES tab and select any attributes required
for this task.
14. Click OK to save the maintenance guest service task record.
15. If the maintenance guest service type selected is configured as OUT OF ORDER then a
message is displayed asking if the room should be placed out of order.
16. Select YES to place the room out of order.
17. The out of order dialog box is automatically displayed when confirming the out of
order message; see setting a room status to OOO or OOS.
80
Maintenance
Maintenance Guest Service task dialog box
Field
Definition
Locality Type
Select the location type of the maintenance task
Locality
Room
Function Space
Location
Public Place
The locality selection is dependant on the locality type selected:
Rooms - choose a room number from the list of available rooms.
Function Space - choose a function space from the list of available
function spaces.
Location - choose from a list of defined locations.
Public Place - a place is not required to be selected.
Type
Defines the maintenance guest service issue, select a type from
the list of defined maintenance guest service types.
Group
The group that the maintenance task belongs to, such as,
electrical, plumbing or general maintenance
Responsible
Department
The department responsible for the maintenance task.
Notes
Additional description about the defect can be entered in this box.
Resolve Note
Details can be entered describing how the maintenance issue was
resolved.
Responsible
Employee
Select the responsible employee from the profile search screen.
Requesting
Employee
Select the requesting employee from the profile search screen.
Estimated
Duration
Enter the estimated number of minutes it is expected to take to
complete the task.
Due Date
The date and time the task is due to be completed. This is
completed automatically if the number of minutes needed to
complete the selected task has been defined in the configuration.
Entered
The date and time the defect was entered.
Date/ Time
resolved
The date and time the defect was resolved.
Status Level
The current status of this task, for example, not yet, started, in
progress or completed.
Origin
The origin of the task; for example, this could be guest generated
or from a department within the hotel.
Guest
The name of the guest if the origin of the task was guest
generated.
Maintenance
81
Note: Locations which have been set to inactive cannot be selected
when entering a new maintenance guest service task, however it is
possible to search for these locations on the maintenance guest service
dialog box.
Note: Depending on the setting of the parameter REVERSE ORDER
MAINTENANCE TYPE TREE IN SCREENS the order of the entry fields TYPE,
GROUP and RESPONSIBLE DEPARTMENT may be reversed.
Resolving a maintenance guest service task
1. Click the ROOMS MANAGEMENT menu or the MEETING PLANNER menu and select
MAINTENANCE.
2. Click the MISCELLANEOUS menu and select GUEST SERVICE CENTER.
3. Select the task to be resolved.
4. Click RESOLVE NOW, the task is now marked as resolved.
5. The STATUS LEVEL is automatically updated with the status level defined as FOR
RESOLVE.
If it is mandatory to enter a resolve note then the Maintenance Resolve
dialog box is displayed.
5. The default resolve status level is selected automatically but may be changed as
required.
6. Enter the resolve note.
7. Click OK.
Maintenance Notes
Maintenance Guest service notes may be stored in history in order to keep a record of
what has been changed in the maintenance guest service task. If the functionality to keep
notes in history is active then a note cannot be deleted and any changes are stored by
date, time and user.
82
Maintenance
How to view maintenance notes
1. Click the ROOMS MANAGEMENT menu or the MEETING PLANNER menu and select
MAINTENANCE.
2. Click the MISCELLANEOUS menu and select GUEST SERVICE CENTER.
3. Select the required task, and then click the EDIT button.
4. Update the note as required and then click OK.
Once a note has been updated for the first time the NOTES HISTORY button is
then active.
5. Click EDIT, and then click NOTES HISTORY to display the Maintenance Notes.
6. The original notes and all changes made to the note are listed with the time, date and
user who made the change.
The keeping of Maintenance Guest Service notes in history is controlled by
the parameter KEEP MAINTENANCE NOTES under Setup → Configuration →
Global Settings → Generic → Hotel Maintenance Guest Service Center 7
tab. If activated then the notes cannot be updated or deleted.
Linking a picture to a task
Additional details may be provided by linking a picture to a task; either by scanning an
image or by selecting an existing picture.
The following options are available:
Scan - to scan an image
Maintenance
83
Linked Pic - to select from already linked pictures
Browse - to select an image from a directory
A picture can also be linked from Windows Explorer using drag and drop functionality.
If a picture is linked to a maintenance task then when editing the maintenance task the
picture is quickly accessible via the Pictures tab.
How to link a picture
1. Click the ROOMS MANAGEMENT menu or the MEETING PLANNER menu and select
MAINTENANCE.
2. Click the MISCELLANEOUS menu and select GUEST SERVICE CENTER.
3. Select the task to which a picture is to be linked.
4. Click LINK PICTURES, the Task Pictures dialog box is displayed.
To link a picture via DRAG & DROP
4. Drag the file from Windows Explorer to the Task Pictures dialog box.
To link a picture via LINKED PIC or BROWSE
5. Click NEW to display the Task Image dialog box.
84
Maintenance
6. Click LINKED PIC and select the required picture; click SELECT.
or
7. Click BROWSE and select the required file; click OPEN.
7. Click OK to close the Task Image dialog box.
8. Click SAVE to close the Task Pictures dialog box.
How to scan and link a picture
1. Click the ROOMS MANAGEMENT menu or the MEETING PLANNER menu and select
MAINTENANCE.
2. Click the MISCELLANEOUS menu and select GUEST SERVICE CENTER.
Maintenance
85
3. Select the task to which a picture is to be linked.
4. Click LINK PICTURES, the Task Pictures dialog box is displayed.
5. Click NEW to display the Task Image dialog box.
6. Click SCAN, the select source dialog box is displayed.
6. Select the source and click SELECT to open the scanner application.
7. Scan the image.
8. Enter a DESCRIPTION for the scanned picture.
9. Click OK to close the Task Image dialog box.
10. Click SAVE to close the Task Pictures dialog box.
Setting a room status to OOO or OOS
1. Click the ROOMS MANAGEMENT menu or the MEETING PLANNER menu and select
MAINTENANCE.
2. Click the MISCELLANEOUS menu and select GUEST SERVICE CENTER.
3. Select the task to be placed out of order; only maintenance guest service tasks which
have been configured as out of order can be selected.
86
Maintenance
4. Click OUT OF ORDER; the out of order dialog box is displayed with the room number
automatically completed.
4. Type the starting date for the out of order block in the DATE RANGE box or click the
drop-down arrow and select a date from the calendar.
5. Type the end date in the TO box or click the drop-down arrow and select a date from
the calendar.
6. In the STATUS box, click on the down arrow to open the drop-down list, and select the
room blocking status.
7. In the REASON box, click on the down arrow to open the drop-down list, and select the
reason for blocking the room.
8. In the REMARKS box, you can enter relevant comments.
9. In the RETURN STATUS box, select the status to which you want the room to revert
when the Out of Order status is removed.
10. Click OK to save the out of order record.
The out of order record can be viewed via the option OUT OF ORDER on the
ROOMS MANAGEMENT menu.
Marking a resolved maintenance guest service task as unresolved
1. Click the ROOMS MANAGEMENT menu or the MEETING PLANNER menu and select
MAINTENANCE.
2. Click the MISCELLANEOUS menu and select GUEST SERVICE CENTER.
3. Select the task to be unresolved and click CLEAR RESOLVE.
A message is displayed asking if you want to unresolve the task.
Maintenance
87
3. Click YES.
If a resolve note was entered when this task was resolved then a message
is displayed asking if you want to clear the resolve note.
4. Click YES.
The task is now marked as not resolved; a message is displayed asking
you to check the status level as it has been set to the default.
5. Click OK.
Deleting a maintenance guest service task
1. Click the ROOMS MANAGEMENT menu or the MEETING PLANNER menu and select
MAINTENANCE.
2. Click the MISCELLANEOUS menu and select GUEST SERVICE CENTER.
3. Select the task to be deleted.
4. Click DELETE, the task is deleted.
Print, Email, SMS or Fax a maintenance guest service task
This option may be used to print a maintenance guest service task; the task can be faxed,
sent by SMS or sent via email or as an email attachment.
How to print a maintenance guest service task
1. Click the ROOMS MANAGEMENT menu or the MEETING PLANNER menu and select
MAINTENANCE.
88
Maintenance
2. Click the MISCELLANEOUS menu and select GUEST SERVICE CENTER.
The Maintenance Guest Service dialog box is displayed; all the NOT RESOLVED
maintenance guest service records are listed by default.
2. Select the maintenance guest service task to be printed and click the PRINT button.
The Print Maintenance Task dialog box is displayed.
3. In the TEMPLATES box click the drop-down arrow and select the template to be used.
4. In the LANGUAGE box click the drop-down arrow and select the language, if no
language is selected, the default language from the language configuration will be
used.
5. Click PRINT, the maintenance guest service task is displayed in preview mode.
6. Click the print button
dialog button
to print the maintenance guest service task or click the close
to return to the maintenance guest service screen.
How to email a maintenance guest service task
1. Click the ROOMS MANAGEMENT menu or the MEETING PLANNER menu and select
MAINTENANCE.
2. Click the MISCELLANEOUS menu and select GUEST SERVICE CENTER.
The Maintenance Guest Service dialog box is displayed; all the NOT RESOLVED
maintenance guest service records are listed by default.
2. Select the maintenance guest service task to be sent by email and click the PRINT
button.
The Print Maintenance Task dialog box is displayed.
3. In the TEMPLATES box click the drop-down arrow and select the template to be used.
4. In the LANGUAGE box click the drop-down arrow and select the language, if no
language is selected, the default language from the language configuration will be
used.
5. Click EMAIL, the document is generated and the Email Report dialog box displayed.
Maintenance
89
6. The TO box is automatically completed with the email address from the profile, this
can be changed by clicking the drop-down arrow and selecting the email address to
which this email should be sent or by selecting the required email addresses from the
list of available in the panel on the upper right-hand side and clicking the TO button.
Click the SELECT ALL button and then the TO button to select all the available email
addresses.
7. In the CC box click the drop-down arrow and select the email address which should
be copied on this email or select the required email addresses from the list of available
in the panel on the upper right-hand side and click the CC button. Click the SELECT
ALL button and then the CC button to select all the available email addresses.
8. In the BCC box click the drop-down arrow and select the email address which should
be blind copied on this email or select the required email addresses from the list of
available in the panel on the upper right-hand side and click the BCC button. Click the
SELECT ALL button and then the BCC button to select all the available email addresses.
9. Enter the topic of the email in the SUBJECT box.
10. In the BODY box, make sure that all the entered information is correct; any necessary
changes can be made at this time.
11. Click SEND, the document is generated and the email sent.
90
Maintenance
How to email a maintenance guest service task as an attachment
1. Click the ROOMS MANAGEMENT menu or the MEETING PLANNER menu and select
MAINTENANCE.
2. Click the MISCELLANEOUS menu and select GUEST SERVICE CENTER.
The Maintenance Guest Service dialog box is displayed; all the NOT RESOLVED
maintenance guest service records are listed by default.
2. Select the maintenance guest service task to be sent by email and click the PRINT
button.
The Print Maintenance Task dialog box is displayed.
3. In the TEMPLATES box click the drop-down arrow and select the template to be used.
4. In the LANGUAGE box click the drop-down arrow and select the language, if no
language is selected, the default language from the language configuration will be
used.
5. Click EMAIL, the document is generated and the Email Report dialog box displayed.
Maintenance
91
6. The TO box is automatically completed with the email address from the profile, this
can be changed by clicking the drop-down arrow and selecting the email address to
which this email should be sent or by selecting the required email addresses from the
list of available in the panel on the upper right-hand side and clicking the TO button.
Click the SELECT ALL button and then the TO button to select all the available email
addresses.
7. In the CC box click the drop-down arrow and select the email address which should
be copied on this email or select the required email addresses from the list of available
in the panel on the upper right-hand side and click the CC button. Click the SELECT
ALL button and then the CC button to select all the available email addresses.
8. In the BCC box click the drop-down arrow and select the email address which should
be blind copied on this email or select the required email addresses from the list of
available in the panel on the upper right-hand side and click the BCC button. Click the
SELECT ALL button and then the BCC button to select all the available email addresses.
9. Enter the topic of the email in the SUBJECT box.
10. Select the SEND AS ATTACHMENT check box if the document should be sent as an
attachment rather than in the body of the email.
11. To edit the document click the EDIT ATTACH. button, the document is generated and
displayed on the screen. Depending on the setup of your system either MS Word or
the Fidelio Internal editor application will be used to display the document.
12. In the FORMAT box select the format for the attachment.
13. In the BODY box enter the text which should be included in the body of the email.
14. Click SEND, the document is generated and the email sent.
Note: Attachments sent in PDF format are automatically password
protected so that no changes can be made to the original PDF.
How to email a maintenance guest service task with an attachment
1. Click the ROOMS MANAGEMENT menu or the MEETING PLANNER menu and select
MAINTENANCE.
2. Click the MISCELLANEOUS menu and select GUEST SERVICE CENTER.
The Maintenance Guest Service dialog box is displayed; all the NOT RESOLVED
maintenance guest service records are listed by default.
2. Select the maintenance guest service task to be sent by email and click the PRINT
button.
The Print Maintenance Task dialog box is displayed.
3. In the TEMPLATES box click the drop-down arrow and select the template to be used.
4. In the LANGUAGE box click the drop-down arrow and select the language, if no
language is selected, the default language from the language configuration will be
used.
5. Click EMAIL, the document is generated and the Email Report dialog box displayed.
92
Maintenance
6. The TO box is automatically completed with the email address from the profile, this
can be changed by clicking the drop-down arrow and selecting the email address to
which this email should be sent or by selecting the required email addresses from the
list of available in the panel on the upper right-hand side and clicking the TO button.
Click the SELECT ALL button and then the TO button to select all the available email
addresses.
7. In the CC box click the drop-down arrow and select the email address which should
be copied on this email or select the required email addresses from the list of available
in the panel on the upper right-hand side and click the CC button. Click the SELECT
ALL button and then the CC button to select all the available email addresses.
8. In the BCC box click the drop-down arrow and select the email address which should
be blind copied on this email or select the required email addresses from the list of
available in the panel on the upper right-hand side and click the BCC button. Click the
SELECT ALL button and then the BCC button to select all the available email addresses.
9. Enter the topic of the email in the SUBJECT box.
10. Click ADD, the Attach documents dialog box is displayed.
Maintenance
93
11. In the DOCUMENT GROUPS list, select the document group required.
12. In the ALLOWED DIRECTORIES list, select the allowed directory required.
13. Click BROWSE to display the list of documents.
14. Select the required document and click OPEN, the Document Name field is filled.
15. To attach the document, click ATTACH, the document is shown as a linked attachment
on the email report dialog box.
94
Maintenance
16. In the BODY box, make sure that all the entered information is correct; any necessary
changes can be made at this time.
17. Click SEND, the document is generated and the email sent.
How to SMS a maintenance guest service task
1. Click the ROOMS MANAGEMENT menu or the MEETING PLANNER menu and select
MAINTENANCE.
2. Click the MISCELLANEOUS menu and select GUEST SERVICE CENTER.
The Maintenance Guest Service dialog box is displayed; all the NOT RESOLVED
maintenance guest service records are listed by default.
2. Select the maintenance guest service task to be printed and click the PRINT button.
The Print Maintenance Task dialog box is displayed.
3. In the TEMPLATES box click the drop-down arrow and select the template to be used.
4. In the LANGUAGE box click the drop-down arrow and select the language, if no
language is selected, the default language from the language configuration will be
used.
5. Click SMS, the Send SMS dialog box is displayed.
Maintenance
95
6. The TO box is automatically completed with the mobile phone number for the
employee responsible for this task, this can be changed by clicking the drop-down
arrow and selecting the mobile phone number to which this SMS should be sent or by
selecting the required mobile phone numbers from the list of available in the panel on
the upper right-hand side and clicking the TO button.
7. In the SMS box, make sure that all the entered information is correct; any necessary
changes can be made at this time.
8. Click SEND to send the SMS.
How to fax a maintenance guest service task
1. Click the ROOMS MANAGEMENT menu or the MEETING PLANNER menu and select
MAINTENANCE.
2. Click the MISCELLANEOUS menu and select GUEST SERVICE CENTER.
The Maintenance Guest Service dialog box is displayed; all the NOT RESOLVED
maintenance guest service records are listed by default.
2. Select the maintenance guest service task to be printed and click the PRINT button.
The Print Maintenance Task dialog box is displayed.
3. In the TEMPLATES box click the drop-down arrow and select the template to be used.
4. In the LANGUAGE box click the drop-down arrow and select the language, if no
language is selected, the default language from the language configuration will be
used.
5. Click FAX, the Send Fax dialog box displayed.
96
Maintenance
6. The TO box is automatically completed with the fax number for the employee
responsible for this task, this can be changed by clicking the drop-down arrow and
selecting the fax number to which this fax should be sent.
7. To edit the fax click EDIT, the maintenance task is generated and displayed on the
screen. Depending on the setup of your system either MS Word or the Fidelio Internal
editor application will be used to display the maintenance task.
8. Make sure that all the entered information is correct; any necessary changes can be
made at this time.
9. To schedule the time the fax should be sent, click ADVANCED, the Fax Scheduler
dialog box is displayed.
10. Select when to SEND THE FAX, the default is NOW, to specify a specific date and time
select a SPECIFIC TIME IN THE DAY and enter the date and time to send the fax.
11. Select the FAX PRIORITY, the default is Normal.
12. Click OK.
13. Click SEND, the maintenance task is generated and the fax sent.
SMS Sending functionality is controlled by the parameter ENABLE SMS
SENDING under Setup → Configuration → Global Settings → Interfaces →
Misc. Interface 5 tab.
Maintenance
97
The parameters for short message sending for maintenance guest service
tasks are defined via the section MAINTENANCE GUEST SERVICE CENTER SMS
REPORT under Setup → Configuration → Global Settings → Generic → Hotel
Maintenance Guest Service Center 7 tab.
SMS Log
This option may be used to display the SMS log and is accessible via the option
MAINTENANCE on the ROOMS MANAGEMENT menu and on the MEETING PLANNER menu.
GUEST SERVICE on the MISCELLANEOUS menu.
The SMS log lists details regarding the SMS's which have been sent regarding
maintenance guest service tasks.
How to view the SMS log
1. Click the ROOMS MANAGEMENT menu or the MEETING PLANNER menu and select
MAINTENANCE.
2. Click the MISCELLANEOUS menu and select GUEST SERVICE CENTER.
3. Select the maintenance guest service task required and click the SMS LOG button.
The SMS log screen is displayed.
The upper part of the screen consists of search criteria.
The lower part of the screen displays the search results in grid format.
3. Complete the search criteria and click the SEARCH button.
All SMS's meeting the search criteria entered are displayed.
98
Maintenance
4. Select the required SMS and click the DETAILS button to display the SMS Report
screen.
5. Click SEND AGAIN to re-send the SMS or click CANCEL to exit the SMS report screen.
6. Click CLOSE to exit the SMS log.
SMS Log search criteria
Fill in this field
With this information
Phone
The phone number to which the SMS was sent.
Sent
From
Select a date from the calendar from which to list log entries.
To
Select a date from the calendar until which to list log entries.
Successfully
Select this option to view SMS's which were sent successfully.
Maintenance
99
Fill in this field
With this information
Failed
Select this option to view SMS' which were not sent successfully.
Email Log
This option may be used to display the email log and is accessible via the option
MAINTENANCE on the ROOMS MANAGEMENT menu and on the MEETING PLANNER menu.
GUEST SERVICE on the MISCELLANEOUS menu.
The email log lists details regarding the emails which have been sent for maintenance
guest service tasks. If an email has been saved as a draft then this is indicated in the email
log file with an 'X' in the Draft column.
How to view the email log
1. Click the ROOMS MANAGEMENT menu or the MEETING PLANNER menu and select
MAINTENANCE.
2. Click the MISCELLANEOUS menu and select GUEST SERVICE CENTER.
3. Select EMAIL LOG.
The Email log screen is displayed.
The upper part of the screen consists of search criteria.
The lower part of the screen displays the search results in grid format.
3. Complete the search criteria and click the SEARCH button.
All emails meeting the search criteria entered are displayed.
4. Select the required email and click the DETAILS button to display the Email Report
screen.
5. Click SEND AGAIN to re-send the email, click PRINT to print the email or click CANCEL
to exit the email report screen.
6. Click CLOSE to exit the email log.
100
Maintenance
Email Log search criteria
Fill in this
field
With this information
Subject
The text that was entered in subject of the email.
Email
The email address to which the email was sent.
Draft
Select this option to include or exclude draft emails in the search.
Sent
From
Set by default to today's date, but can be changed as required.
To
Set by default to one week later than today's date, but can be
changed as required.
Successfully
Select this option to view emails which were sent successfully.
Failed
Select this option to view emails which were not sent successfully.
User Log
This option may be used to view the changes made to a maintenance guest service record
and is accessible via the Maintenance Guest Service Center search screen and the
Maintenance Guest Service Edit dialog box.
How to display the user log
1. Click the ROOMS MANAGEMENT menu or the MEETING PLANNER menu and select
MAINTENANCE.
2. Click the MISCELLANEOUS menu and select GUEST SERVICE CENTER.
3. Select the maintenance guest service task required and click the USER LOG button.
The User Log is displayed split into 2 sections:
The upper section displays the name of the user log.
The lower section displayed information about the changes to this maintenance
guest service task.
Maintenance
101
3. Once all changes have been viewed, click OK to close the user log.
User Log Display Options
Heading
Gives this information
Date
The date and time the change was made. This is the system
date of the computer on which the change was made.
Text
A short description about the changes that were made.
User
The name of the user who made the change.
Workstation
The Computer Name on which the change was made.
The maintenance guest service changes that should be tracked are defined
via the option Hotel MaintenanceGuest Service Center under Setup →
Configuration → Users → User Log.
102
Maintenance
Maintenance
103
9
Kiosk Room Management
Kiosk Room Management
Kiosk room management may be used to manage the rooms which are available for Kiosk
check-in.
Key Points
Rooms available via the kiosk are assigned per date.
Drag & drop functionality can be used to add rooms to the ASSIGNED ROOMS list from the
AVAILABLE ROOMS list.
If specific rooms are assigned then only the rooms listed as assigned may be used by the kiosk
for a check-in or walk-in reservation.
If no specific rooms are assigned then all rooms are available via the kiosk.
If the option ONLY THESE ROOMS is selected then no additional rooms will be taken from the
available rooms after all the assigned rooms have been used.
The kiosk can be marked as out of order by selecting the option KIOSK IS OUT OF ORDER on the
Kiosk State tab.
Note: If the kiosk is defined as out of order then the Suite8 Kiosk
prompts the message: 'The Kiosk is currently Out of Order. Please
contact the reception'.
Kiosk Room Management
105
Kiosk State Tab
Suite8 Kiosk functionality is controlled by the license SUITE 8 KIOSK and in
addition requires that the license SUITE 8 HOMEPAGE is also active. Both
licenses are located under Setup → Miscellaneous → License → V8
Sublicenses → Software Interfaces.
Kiosk interface functionality is controlled by the license KIOSK INTERFACE
under Setup → Miscellaneous → License → V8 Sublicenses → Software
Interfaces.
106
Kiosk Room Management
10
Blue drill down arrow ........................... 12
placing a room out of order using copy
feature ............................................. 47
room information viewing ................. 36
room statistics viewing ..................... 37
search definitions............................. 33
HTML
Change the HTML display ............... 12
Collapse HTML Tree ....................... 12
Expand HTML Tree ......................... 12
View HTML display .......................... 12
HTML View ......................................... 12
C
I
Changing a room status to OOO or OOS
........................................................ 86
Changing the date
Typing a new date ........................... 16
Using the calendar........................... 16
Invoice viewing ................................... 51
D
Main menu ............................................ 7
Date Box
Changing a date using the calendar 16
Typing a new date ........................... 16
Maintenance ....................................... 73
Changing a room status to OOO or
OOS ................................................ 86
Deleting a maintenance task............ 88
Entering a maintenance task ........... 77
Marking a resolved maintenance task
as unresolved .................................. 87
Resolving a maintenance task ......... 82
A
Accelerator keys ................................... 9
Attendants .......................................... 59
adding a new attendant ................... 64
allocating room assignments ........... 61
assigning rooms using the pre-defined
attendants list .................................. 62
printing the attendant assignments .. 67
B
Deleting a maintenance task ............... 88
Discrepant Rooms .............................. 41
Clearing ........................................... 42
Viewing ............................................ 42
E
Entering a maintenance task............... 77
G
Guest history viewing .......................... 51
H
House Status
end of day revenue terms ................ 53
end of day terms .............................. 53
housekeeping total terms ................. 53
movement total terms ...................... 53
total terms........................................ 53
Housekeeping ..................................... 29
assigning/unassigning rooms........... 40
Changing room status...................... 34
deleting out of order records ............ 48
editing out of order records .............. 47
out of order viewing ......................... 38
Index
Index
L
Logging In ............................................. 7
M
Marking a resolved maintenance task as
unresolved ....................................... 87
N
Navigation keys
Accelerator keys ................................ 9
Quick keys ....................................... 10
Shortcut keys..................................... 9
O
Out of Order........................................ 45
deleting OOO records ...................... 48
modifying OOO records ................... 47
placing a room OOO ........................ 45
placing a room OOO using copy ...... 47
Out of order viewing ............................ 38
Overbooking ....................................... 69
attendant assignments..................... 67
changing the dates on the overbooking
screen ............................................. 69
107
Deleting overbooking levels ............. 71
house overbooking levels ................ 70
overbooking for a range of dates ..... 70
Room type overbooking ................... 71
Setting both house and room type
overbooking ..................................... 71
Displaying ........................................ 51
editing out of order records .............. 47
housekeeping viewing ..................... 37
out order viewing ............................. 38
placing rooms out of order using copy
feature ............................................. 47
Reprinting invoices .......................... 51
room information viewing ................. 36
Setting room type overbooking ........ 71
statistics viewing .............................. 37
using search criteria ........................ 31
using to display rooms ..................... 31
viewing all rooms ............................. 30
Viewing guest history ....................... 51
viewing guest profiles ...................... 52
Viewing invoices .............................. 51
viewing specific rooms ..................... 31
Q
Quick Action........................................ 34
Quick keys .......................................... 10
R
Resolving a maintenance task ............ 82
Room Assignment
Assigning a room assignment .......... 40
Removing a room assignment ......... 41
Room Discrepancies ........................... 41
Clearing ........................................... 42
Viewing ............................................ 42
Room History
changing room status ...................... 34
deleting out of order records ............ 48
Deleting overbooking levels ............. 71
108
Room information viewing ................... 36
S
Search Definition
Adding ............................................. 32
Changing ......................................... 33
Shortcut keys ........................................ 9
Index