1
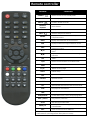
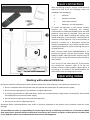
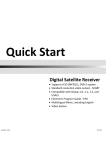
Quick Start
Digital Satellite Receiver
• Support of SD / HD (MPEG2 / MPEG4
H.264), DVB-S, DVB-S2 system
• PVR Ready - possibility to record on
external USB drive
• Time Shift (video pausing, rewinding)
• HDMI video output
• Low power consumption in Stand-by
mode, below 1W
• Automatic Stand-By
• Compatible with Diseqc 1.0 and 1.1
• Electronic Program Guide - EPG
• Multilingual Menu, including English
• Video Games
ModelID: HD S60
03/2012
Remote controller
Button
POWER MODE
MUTE Numeric
buttons
FAV
LAST MENU
Function
Switch receiver on from standby mode.
Switch display mode of receiver.
Enable or disable the audio.
Select channel.
Display favourite channel list.
Switch to the previous channel.
Display the Main Menu on the screen, or return to
the previous menu.
INFO
Display information bar of current service.
EPG
Display the Electronic Program Guide on screen.
EXIT
Cancel the user selection and return to the viewing
mode from a menu.
Change channel or move cursor up or down in the
menu.
Adjust volume level or move cursor left or right in
the menu.
Display channel list on screen. Select an item in
menu.
▲/▼
◄/►
OK
TV/R
Switch receiver between TV and Radio mode.
FIND
Enables to find channel from channel list.
P+/P-
Moves cursor by pages
SUB-T
Subtitle setup.
LIST
Optional function
STATUS
Optional function
AUDIO
Audio channels setup.
TXT
Show teletext information of the current channel.
PVR
Run player of recorded files.
USB
Run player of multimedia files.
PLAY/PAUSE
Enable TMS function, starts / stops playing video.
SKIP- / SKIP+
Play previous / next item.
STOP
REW / FF
REC
Stop playing recorded video.
Rewind / fast forward during timeshift / playing
recorded video.
Record actual channel to USB drive.
RED, YELLOW, BLACK, GREEN, BLUE, WHITE
Colour buttons. (according function descriptions on screen)
Basic connection
After purchasing receiver, unpack it and check to
make sure that all of the following items are
included in the packaging:
•
Receiver
•
Remote controller
•
Quick Start manual
•
Batteries - 2x AAA (optional)
To install the batteries in the remote control,
remove the flap protecting the battery
compartment If inside the chamber there are used
batteries, they must be removed. Then put new
batteries inside. When installing the battery, pay
special attention on the polarity - the direction of
insertion of both batteries. The correct polarity of
batteries is drawn on a description inside the
battery compartment in the remote control. After
installing the batteries, place protecting flap on its
original position.
Next, connect cable from LNB/ANTENNA (1 on
picture) to receiver’s (3) SAT IN connector. Using
HDMI or SCART cable (4) connect receiver with TV
Set (2). Finally, at the end connect main cord (5) to
main socket.
Turn on the TV Set. After while on TV Set screen
You should see receiver’s OSD. If TV Set not
display receiver’s OSD, probably signal source is
set wrong in TV. Check TV Set documentation for
information how to change signal source.
Operating notes
Working with external USB drive
During the selection and operation with USB drive (hard drive, flash memory), user should pay attention on:
• Drive is compliant with USB 2.0 and have the appropriate parameters of read and write speed,
• Drive contain single partition, formatted in a supported format,
• If necessary (especially for USB hard drives, which are characterized by a high power consumption), drive should
be supplied from an external power supply,
• Do not disconnect during a write/read data operation,
• Do not use very full or fragmented drive,
Mismatch above recommendations may result in incorrect operation of the devices and in extreme cases can cause
damage.
The manufacturer takes no responsibility for any damages directly or indirectly caused by loss of recorded or edited
data stored on an external USB drive which was connected to the receiver, and gives no warranty for any other data
on the USB drive when case of abnormal function receiver will happened.
Automatic Power Down
In accordance with actual European Union requirements, Your receiver is equipped with function "Automatic Power
Off". It works by switching the receiver into standby mode after a period of 3 hours after the last active use. In practice
this means that if during this time the receiver will not be given any command by using the remote control or keypad
on the front panel, the receiver turns off. Turning off the receiver will be preceded (2 minutes previous) by a relevant
message appears on the TV screen. Please also note that this feature is enabled by default in software versions
dedicated for European Union countries, but at Your own request, You can disable it using the appropriate functions in
the receiver menu.
Easy installation
Generally, once the receiver is switched on, it is ready to play channels from default channel list.
If after turning on You can see only receiver’s menu, and when You try to push MENU or EXIT button, “No channels!”
information appears, it means that channel list has been erased. There are two ways to create new channel list:
• Restore default channel list, or
• Scan Your own channel list
Restore default channel list
To restore default channel list, explore the menu with ▲/▼ buttons, and select Tools menu. Press OK to enter. You
may be asked about password (default is 0000 – enter using numeric buttons). Using ▲/▼ buttons select Factory
Setting option and press OK. Use ◄/►buttons to move cursor to “Yes“ and again confirm by OK button. After a while,
reboot receiver using POWER button.
If after above settings, channels are still not played, only “No Signal!” information appears on screen, go to next
chapter, where You can find how to configure Your satellite installation.
Configure Your satellite installation
To configure satellite installation, explore the menu with ▲/▼ buttons, and select Installation menu. Press OK to
enter. You may be asked about password (default is 0000 – enter using numeric buttons). Using ▲/▼ buttons select
Satellite List and press OK. In this menu, using ▲/▼ and OK buttons You can define which satellites are available in
Your installation. Next, press MENU to back to Installation.
If Your installation receive signal from more than one satellite, use ▲/▼ buttons to select Antenna Setup and press
OK. In satellite function use ◄/► buttons to choose satellite and in DiSEqC1.0 or DiSEqC1.1 function You can assign
selected satellite to corresponding DiSEqC switch input. Use MENU to back to Installation. Now Your satellite
installation should be finally configured and ready to receive connected signal.
Scan Your own channel list
After satellite installation configure, You can create Your own channel list.
If You want to erase all currently existing channels, explore the menu with ▲/▼ buttons, and select Edit Channel
menu. Press OK to enter. You may be asked about password (default is 0000 – enter using numeric buttons). Using
▲/▼ buttons select Delete All and press OK. Use ◄/►buttons to move cursor to “Yes“ and again confirm by OK
button. After a while, channel list will be empty.
Now, explore the menu with ▲/▼ buttons, and select Installation menu. Press OK to enter. You may be asked about
password (default is 0000 – enter using numeric buttons). Using ▲/▼ buttons select Multi Satellite Search and press
OK. Next, using ▲/▼ buttons select Search and press OK. Receiver start scanning all selected previously in Satellite
List function satellites. Please, be noted that this procedure may takes few minutes.
If after above procedures, Your receiver still cannot play channels, it is highly recommended to contact with Your local
professional installer or seller.
Menu structure and functions description
Menu/Submenu
Edit Channel
TV Channel List
Radio Channel List
Delete All
Save as Default
Installation
Satellite List
Antenna Setup
Single Satellite Search
Multi Satellite Search
TP List
System Setup
Language
TV System
Display Setting
Local Time Settings
Timer Setting
Parental Lock
OSD Setting
Favourite
Other
Tools
Information
Factory Settings
S/W Upgrade by OTA
Upgrade By USB
Save to USB
USB
Remove USB device safely
Game
REC
Record Manager
Storage Information
DVR Configuration
Jump
Function
This menu enables to manage channels on channel lists.
Manage list of TV channels.
Manage list of Radio channels.
Delete all channels from all channel lists.
Saves actual channel list, TP list and satellite list as default.
This menu enables to scan channels and setup antenna.
Enables to choose satellites from list for scanning issues.
Enables to configure antenna / LNB parameters.
Scan channels of one satellite (selected from Satellite List).
Scan channels of all satellites selected in Satellite List.
Manage list of transponders for every satellite, enables to scan channels
from desired transponders.
This menu enables to set up receiver’s user interface functions.
Change language of OSD and audio tracks.
Change screen settings - resolution, screen aspects.
Change settings of displayed picture.
Change time settings – time zone, manually set time.
Enables to plan events in future - wake up receiver on specified channel
or remind by message display.
Lock access to menu and specified channels.
Change transparency of OSD, choose subtitle mode.
Enables to rename favourite channels groups.
Setup all other settings – power for LNB, channel play type, beeper
(Beeper enables sound in Antenna Setup menu very helpful for
installation issues), sleep, automatic power down..
This menu enables to manage receiver’s software.
Display information about hardware and software version of receiver.
Recall standard settings of all receiver’s functions, delete old channels.
Enables to upgrade receiver’s software using software from satellite
stream data (optional).
Enables to upgrade receiver’s software using software archive stored on
USB drive
Create software backup on USB drive
Enables to view files (not all filetypes supported) and directories stored
on USB drive.
Enables to unmount USB device from receiver file system.
This menu contain games.
This menu enables to manage timeshift function, recording and playing
recorded movies.
Enables to view recorded before videos.
Displays information about connected USB drive.
Enables to set-up recording and timeshift functions.
Defines time period of jump function used to navigate during playing
video and using timeshift.
Troubleshooting
Look through the trouble shooting information. Some simple checks or minor adjustment of the unit on your part may
help resolve the problems. If the problems prove to be beyond your capability, you had better hand it over to a
professional qualified technician.
Troubles
Possible Causes
Suggested Solutions
The power cord has not been well
connected
Plug the power cord into the outlet tightly
and turn on the power; if no power still, turn
off the power again, and turn it on in 5-10
minutes.
The antenna is not adjusted well
Adjust the antenna
Parameter input incorrectly
Input Satellite, Frequency, SR, Polarization
parameter correctly
Output cord connect incorrectly
Connect the output cord correctly
The video output mode of the unit is
different from the mode of monitor
Reset the working mode
Output cord connect incorrectly
Connect the output cord correctly
The video output system of the unit is
different from the mode of monitor
Reset the working system
Batteries incorrectly installed
Install the battery correctly
Batteries exhausted
Replace the battery
Beyond the effective operation range
Operate within a normal range
The remote sensor is pointed to by bright
light
Place the unit elsewhere for a change
Has not chosen the right sound channel
Press the Audio button to shift the channel
The unit is in a mute status
Cancel the mute
Volume set at a too low level
Augment the volume
Cable connected incorrectly
Connect the cable correctly
No sound by
chance
There might be a short circuit
Correct the output-cable connection, and
turn on it.
Serious distortion
or cannot receive
signal normally
Too much interferential signal
Adjust the antenna.
No power
Cannot scan
programs
No picture
No color
The remote
control fails to
work
Audio sound and
subtitle language
are not the
chosen items
No sound at all
CAUTION:
Safety precautions
Warning: The lightning flash with arrowhead symbol, within an equilateral triangle, is intended to
alert the user to "dangerous voltage" and to prevent from a risk of electric shock.
Warning: To reduce the risk of electric shock, don't open the cabinet. Refer servicing to qualified
personnel only.
Warning: The exclamation point within an equilateral triangle is intended to alert the user to
important operating and maintenance (servicing).
Warning: Do not use this STB where contact with or immersion in water is a possibility. Do not use near flower vase,
washbowls, kitchen sinks, laundry tubs, swimming pools, etc.
Warning: Do not put the candle or lamp stand on the cabinet; otherwise, there is the danger of fire.
Warning: The unit should be connected to a power supply only of the type described in the operating instructions or as
marked on the unit. If you are not sure of the type of power supply (for example, 120 or 230 V) to your home, consult
your local dealer or local power company.
Warning: This product install diodes. Do not open the cabinet or touch any parts in the inner mechanism. Consult your
local dealer for technical service if the opening is required.
Note: To ensure proper use of this product, please read this User manual carefully and retain for further reference.
Note: This product install diodes. Do not open the cabinet to avoid the unit direct exposure to radiation.
Unit Cleaning: After the unit power is turned off, you can clean the cabinet, panel and remote control with a soft cloth
lightly moistened with a mild detergent solution.
Attachments: Never add any attachments and/or equipment without the manufacturer consent; as such additions may
result in the risk of fire, electric shock, or other personal injury.
Locating: Slots and openings in the cabinet are provided for ventilation to protect it from overheating. Do not block
these openings or allow them to be blocked by placing the STB on a bed, sofa, or other similar surface, nor should it be
placed over a radiator or heat register.
Power-Cord Protection: Place the power-supply cord out of the way, where it will not be walked on. Please take special
attentions to cords at plugs, convenience receptacles, and the point where they exit from the unit.
Object and Liquid Entry: Never put objects of any kind into this STB through openings, as they may touch dangerous
voltage points or short-out parts that could result in a fire or electric shock. Never spill any liquid on the STB.
Note: Moisture may be formed on the lens when the unit is suddenly moved from a cold environment or an aircondition room to a warm place or immediately after a heater has been turned on or in a steamy or very humid room.
If the moisture forms inside the unit, it may not operate properly. To correct this problem, turn on the power and wait
about two hours for the moisture to evaporate.
Parts Replacement: When the unit parts need to be replaced, user should make sure the service technician use the
replacement parts specified by the manufacturer or having the same characteristics as the original part. Unauthorized
replacement may put the unit In the risk of fire, electric shock or other hazards.
Safety Check: After all the maintenances and repairs are done, user is required to request the service technician to
conduct the overall safety check to ensure the machine is In the proper condition.
Environment protection
Attention!
Your product Is marked with this symbol. It means that used electrical and electronic products
should not be mixed with general household waste. There is a separate collection system for these
products.
Information on Disposal for Users (private households) in the European Union. Used electrical and
electronic equipment must be treated separately and In accordance with legislation that requires
proper treatment, recovery and recycling of used electrical and electronic equipment.
Following the implementation by member states, private households within the EU states may return their used
electrical and electronic equipment to designated collection facilities free of charge*. In some countries* your local
retailer may also take back your old product free of charge if you purchase a similar new one. *) Please contact your
local authority for further details.
If your used electrical or electronic equipment has batteries or accumulators, please dispose of these separately
beforehand according to local requirements.
By disposing of this product correctly you will help ensure that the waste undergoes the necessary treatment, recovery
and recycling and thus prevent potential negative effects on the environment and human health which could otherwise
arise due to inappropriate waste handling.
Information on Disposal for Business Users
In the European Union. If the product is used for business purposes and you want to discard It: Please contact your
dealer who will inform you about the take-back of the product. You might be charged for the costs arising from takeback and recycling Small products (and small amounts) might be taken back by your local collection facilities,
In other Countries outside the EU. If you wish to discard of this product, please contact your local authorities and ask
for the correct method of disposal.
Technical specification
Input frequency range:
RF Input connector:
Input impedance:
Waveform:
950-2150MHz
IEC169-24, Female
75Ω
QPSK(DVB-S), QPSK/ 8PSK/
H8PSK/ 16APSK (DVB-S2)
Video decoding:
MPEG2
,(M P@ M L)
AVC/H.264([email protected])
Video resolution:
480, 576, 720, 1080
Audio decoding:
MPEG-1, 2 Layer 1 & 2
Video/Audio connector: HDMI, SACRT, Audio R&L,
Coaxial digital audio
Other connectors:
USB
Rated voltage:
~ 230V
,50Hz
Rated consumption:
7W
Standby consumption: < 1 W
Operating temperature: 5-40℃
Operating humidity:
<95%
Net weight:
~0,3 kg
Receiver measurements: 180 mm × 110 mm × 35 mm
Weight and dimensions are not absolutely exact
values. Specifications are subject to change (by
manufacturer) without notice.