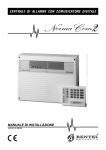
1
Picture PerfectTM 2.0
Administration
Guide
GE Interlogix, CASI Division
791 Park of Commerce Boulevard
Suite 100
Boca Raton, Florida 33487
(561) 998-6100
Part Number: 460202006B
September 2003
This publication may contain examples of data reports used in daily business operations.
Examples include fictitious names of individuals and companies for illustration only; any
similarity to names and addresses of actual business enterprises and persons is entirely
coincidental.
This document is distributed on an as is basis, without warranty either expressed or
implied. Successful implementation depends solely upon the customer’s ability to
integrate each product into the total inventory of “in-house” products. While each offering
has been reviewed for its compatibility and maintainability, no assurance of successful
installation can be given.
The customer accepts full maintenance responsibility. (A full scope of software and
hardware maintenance contracts are available to the customer.)
Copyright 2003 GE Interlogix
All Rights Reserved
Printed in the USA
Picture Perfect is a trademark of GE Interlogix.
AIX, AIX Windows, IBM, IBM Multiport Adapter, IBM 7855 Modem Model 10, RS/6000,
and Token-Ring are registered trademarks of International Business Machines
Corporation.
Ethernet is a registered trademark of Xerox Corporation.
Informix is a registered trademark of Informix Software, Inc.
Linux is registered trademark of Linus Torvalds
Motif is a registered trademark of Open Software Foundation.
NCD Terminal is a registered trademark of Network Computing Devices Inc.
PC-Xware is a registered trademark of NCD Software.
X Window System, X, XII are registered trademarks of Massachusetts Institute of
Technology.
Contents
Contents
1. Using This Manual .................................... 1.1
Contents
Purpose ........................................................................... 1.1
Who Should Read this Manual ................................... 1.1
Terminology................................................................... 1.1
Click........................................................................... 1.1
Select ......................................................................... 1.1
Press .......................................................................... 1.2
Command................................................................. 1.2
Toggle........................................................................ 1.2
Notational and Typographical Conventions............. 1.3
Related Documentation................................................ 1.4
2. System Overview ...................................... 2.1
Introduction ................................................................... 2.1
Operating Features........................................................ 2.2
Optional Features .......................................................... 2.4
Support Services............................................................ 2.5
What’s New.................................................................... 2.5
3. Getting Started.......................................... 3.1
Overview ........................................................................ 3.1
System Startup............................................................... 3.1
Log In .............................................................................. 3.1
Log Out ........................................................................... 3.3
Using the Common Desktop Environment............... 3.3
Main Menu and Submenus.......................................... 3.4
Forms .............................................................................. 3.6
Text Boxes................................................................. 3.6
Toggle Buttons......................................................... 3.7
Radio Buttons........................................................... 3.7
Selection Buttons and Picklists.............................. 3.7
Using Function Buttons................................................ 3.9
Adding or Changing Data ......................................... 3.14
Using a Mouse ............................................................. 3.14
Using a Window.......................................................... 3.15
The Title Bar ........................................................... 3.15
The Window Frame .............................................. 3.16
The Scroll Bars ....................................................... 3.17
Using the Window Menu........................................... 3.18
Using the Workspace Menu ...................................... 3.19
Using the Programs Menu......................................... 3.19
Using the Clients Menu.............................................. 3.20
Picture Perfect 2.0 Administration Guide
iii
Contents
Stopping Picture Perfect..............................................3.21
Starting Picture Perfect................................................3.21
Verify that Picture Perfect is Stopped or
Running .....................................................................3.22
Shutting Down the Entire System .............................3.24
Frequently Used Unix Commands............................3.25
System Setup Procedures............................................3.26
4. Initial Setup................................................ 4.1
Overview.........................................................................4.1
Prerequisites ...................................................................4.1
What You Will Be Doing...............................................4.1
Terminals.........................................................................4.2
Setup ..........................................................................4.2
The Terminals Form ................................................4.2
Modems ...........................................................................4.4
Setup ..........................................................................4.5
The Modems Form...................................................4.5
Ports ...............................................................................4.10
Setup........................................................................4.11
The Ports Form .......................................................4.11
The Network Micro Ports Form...........................4.16
Setup ........................................................................4.16
The Network Ports Form ......................................4.16
Printers ..........................................................................4.18
Setup ........................................................................4.18
The Printers Form ..................................................4.18
Email ..............................................................................4.19
Setup ........................................................................4.19
The Email Form ......................................................4.20
Routings ........................................................................4.21
Setup ........................................................................4.21
The Routings Form ................................................4.21
Badge Formats ..............................................................4.24
Setup ........................................................................4.25
The Badge Formats Form......................................4.26
Parameters.....................................................................4.27
Setup ........................................................................4.27
The Parameters Form ............................................4.27
Departments .................................................................4.37
Setup ........................................................................4.37
The Departments Form .........................................4.37
Personnel Type .............................................................4.39
Setup ........................................................................4.39
The Personnel Type Form.....................................4.39
iv
Picture Perfect 2.0 Administration Guide
Contents
5. Facilities and Facility Profiles ................. 5.1
Contents
Overview ........................................................................ 5.1
What You Will Be Doing.............................................. 5.2
Facilities .......................................................................... 5.2
The Facility Form .................................................... 5.3
How to Add or Delete a Facility ........................... 5.3
Facility Profiles .............................................................. 5.5
The Facility Profiles Form ...................................... 5.6
How to Add a Facility Profile................................ 5.9
Facility Set Manager.................................................... 5.11
How to Change the Active Facility..................... 5.11
Linking Facilities, Facility Profiles,
Permissions, and Operators ................................... 5.12
How to Link Facilities, Facility Profiles,
Permissions, and Operators........................... 5.13
6. Permissions and Operators..................... 6.1
Overview ........................................................................ 6.1
What You Will Be Doing.............................................. 6.1
Permission Groups........................................................ 6.1
Setup.......................................................................... 6.2
The Permission Group Form ................................. 6.3
Permissions .................................................................... 6.4
Setup.......................................................................... 6.4
The Permissions Form ............................................ 6.5
Operators........................................................................ 6.9
Setup.......................................................................... 6.9
The Operators Form................................................ 6.9
7. Alarm/Activity Monitor Routing............... 7.1
Overview ........................................................................ 7.1
Prerequisites................................................................... 7.1
What You Will Be Doing.............................................. 7.2
Route Definitions........................................................... 7.3
Setup ......................................................................... 7.3
The Route Definitions Form .................................. 7.3
Route Points ................................................................... 7.4
Setup.......................................................................... 7.4
The Route Points Form........................................... 7.5
Route Point Rules and Restrictions ...................... 7.8
Other Applications........................................................ 7.9
Picture Perfect 2.0 Administration Guide
v
Contents
8. Alarm Activity Messages and Alarms ..... 8.1
Overview.........................................................................8.1
Prerequisites ...................................................................8.1
What You Will Be Doing...............................................8.2
Alarm Instructions .........................................................8.2
Setup ..........................................................................8.2
The Messages Form .................................................8.3
Alarm Responses............................................................8.4
Setup ..........................................................................8.4
The Responses Form................................................8.4
Alarms .............................................................................8.5
Setup ..........................................................................8.5
The Alarms Form .....................................................8.6
Alarm Color, Processing State....................................8.11
Setup........................................................................8.11
The Alarm Color Form ..........................................8.12
9. Input and Output Groups ......................... 9.1
Overview.........................................................................9.1
Prerequisites ...................................................................9.1
What You Will Be Doing...............................................9.1
Output Groups ...............................................................9.1
Setup ..........................................................................9.2
The Outgroups Form ...............................................9.2
Input Groups ..................................................................9.3
Setup ..........................................................................9.4
The Input Groups Form ..........................................9.4
10. Micros..................................................... 10.1
Overview.......................................................................10.1
Prerequisites .................................................................10.1
What You Will Be Doing.............................................10.2
Configuring Micro Communications........................10.3
Ports .........................................................................10.3
Direct Communications Micro.............................10.3
Dial-up Micros........................................................10.5
Network Micros .....................................................10.7
Associating Micro Alarms and Output Groups
with Input Groups..................................................10.10
Creating Micro Alarms........................................10.10
Create Input Groups for Micro Error
Conditions.......................................................10.10
Associate Outputs with Micro Error
Condition Input Groups ...............................10.11
Adding or Change a Micro.......................................10.11
vi
Picture Perfect 2.0 Administration Guide
Contents
Adding Micros..................................................... 10.11
Changing Micros ................................................. 10.14
The Micros Form ................................................. 10.18
Dynamic Configuration............................................ 10.26
Data Encryption......................................................... 10.27
Setup...................................................................... 10.27
The Keys Form..................................................... 10.28
Contents
11. Flashing Micros .................................... 11.1
Overview ...................................................................... 11.1
Prerequisites................................................................. 11.2
What You Will Be Doing............................................ 11.2
Flash Download Utility .............................................. 11.2
Features................................................................... 11.2
Limitations ............................................................. 11.2
Operation................................................................ 11.3
MicTool ......................................................................... 11.6
Features................................................................... 11.6
Limitations ............................................................. 11.6
Operation................................................................ 11.6
eFlash ............................................................................ 11.8
Features................................................................... 11.8
Limitations ............................................................. 11.8
Operation................................................................ 11.8
The eFlash Configuration File ........................... 11.13
Network Micro Parameter Block Configuration .. 11.15
Menu Options ...................................................... 11.15
Parameters............................................................ 11.16
12. Inputs and Outputs............................... 12.1
Overview ...................................................................... 12.1
Prerequisites................................................................. 12.1
What You Will Be Doing............................................ 12.1
Outputs ......................................................................... 12.2
Setup........................................................................ 12.2
The Outputs Form................................................. 12.3
Inputs ............................................................................ 12.9
Setup........................................................................ 12.9
The Inputs Form .................................................... 12.9
Picture Perfect 2.0 Administration Guide
vii
Contents
13. Categories, Areas, Readers,
and Doors................................................ 13.1
Overview.......................................................................13.1
Prerequisites .................................................................13.1
What You Will Be Doing.............................................13.1
How Categories and Areas Work..............................13.2
Identify Areas .........................................................13.3
Identify Categories.................................................13.4
Assigning Categories to Badges, Areas, and
Area Events .......................................................13.5
Categories......................................................................13.6
Setup ........................................................................13.6
The Categories Form .............................................13.7
Managing Category Assignment.........................13.8
Areas ............................................................................13.13
Setup ......................................................................13.13
The Areas Form ....................................................13.14
Readers ........................................................................13.21
Setup ......................................................................13.22
The Readers Form ................................................13.22
Doors............................................................................13.30
Setup ......................................................................13.31
The Doors Form....................................................13.35
14. Badges ................................................... 14.1
Overview.......................................................................14.1
Prerequisites .................................................................14.1
What You Will Be Doing.............................................14.1
Issuing a Permanent Badge – Four Methods ...........14.2
Console-Reader Method .......................................14.2
Manual Method......................................................14.2
Auto-Generate Method .........................................14.3
Seed Counter Method............................................14.4
Issuing a Temporary Badge........................................14.4
Changing a Badge ........................................................14.5
Changing a Badge Status to Deleted .........................14.6
Removing Badge Records ...........................................14.7
Badge Removal Command Line Tool .......................14.9
Requirements..........................................................14.9
Options ....................................................................14.9
The Badges Form........................................................14.10
viii
Picture Perfect 2.0 Administration Guide
Contents
15. Generator............................................... 15.1
Overview ...................................................................... 15.1
What You Will Be Doing............................................ 15.1
Creating Master Records...................................... 15.2
The Generator Form.................................................... 15.3
Generating Records............................................... 15.7
16. Schedules and Modes .......................... 16.1
Picture Perfect 2.0 Administration Guide
Contents
Overview ...................................................................... 16.1
Prerequisites................................................................. 16.2
What You Will Be Doing............................................ 16.2
Creating Modes ........................................................... 16.2
Normal Mode......................................................... 16.2
Emergency Modes................................................. 16.3
Holiday Modes ...................................................... 16.4
Setup........................................................................ 16.5
The Mode Creation Form..................................... 16.5
Changing Modes ......................................................... 16.7
How to Change Mode by Command ................. 16.7
The Mode Command Form ................................. 16.7
How to Change Mode by Schedule.................... 16.8
The Mode Events Form ........................................ 16.9
Scheduling Events..................................................... 16.11
Runtime Events ................................................... 16.11
Start/End Events................................................. 16.12
Area Events ................................................................ 16.14
Setup...................................................................... 16.14
The Area Events Form........................................ 16.16
Reader Events ............................................................ 16.25
Setup...................................................................... 16.25
The Reader Events Form .................................... 16.26
Door Events................................................................ 16.30
Setup...................................................................... 16.30
The Door Events Form ....................................... 16.31
Alarm Events ............................................................. 16.33
Setup...................................................................... 16.33
The Alarm Events Form ..................................... 16.34
InGroup Events ......................................................... 16.37
Setup...................................................................... 16.37
The InGroups Events Form................................ 16.38
Output Groups Events ............................................. 16.41
Setup...................................................................... 16.41
The OutGroups Events Form ............................ 16.42
Reporting.................................................................... 16.44
catsup .................................................................... 16.44
ix
Contents
17. Access/Secure Operations................... 17.1
Overview.......................................................................17.1
Prerequisites .................................................................17.2
What You Will Be Doing.............................................17.2
Access/Secure Operations..........................................17.2
Setup ........................................................................17.2
Sample Access/Secure Window..........................17.5
18. Backup and Restore ............................. 18.1
Overview.......................................................................18.1
What You Will Be Doing.............................................18.1
Backup Options ............................................................18.1
Performing an Archive................................................18.2
Performing Backups ....................................................18.5
Using the Picture Perfect Backup Function........18.5
Using the Command Line Backup
Option cba .........................................................18.7
Scheduling Backups...............................................18.8
Restoring the Database..............................................18.10
Using the Picture Perfect Restore Function......18.10
Using the Command Line Option cbr...............18.11
Recovering the Entire System ..................................18.13
19. History Reports ..................................... 19.1
Overview.......................................................................19.1
What You Will Be Doing.............................................19.1
Controlling Which Activities Go to History ............19.1
The History Form.........................................................19.2
The Report Menu ...................................................19.2
The Type Menu ......................................................19.5
The Source Menu ...................................................19.5
The Format Menu...................................................19.6
The Execution Menu............................................19.13
The Font Menu .....................................................19.13
The Home Icon Button ..............................................19.13
Up/Down Buttons .....................................................19.13
Viewing a History Report .........................................19.14
Printing a History Report .........................................19.16
Saving a History Report............................................19.16
Scheduling a History Report ....................................19.16
Setup ......................................................................19.17
The Report Events Form .....................................19.17
x
Picture Perfect 2.0 Administration Guide
Contents
20. SQL Reports.......................................... 20.1
Contents
Overview ...................................................................... 20.1
Prerequisites................................................................. 20.1
What You Will Be Doing............................................ 20.1
Structured Query Language ...................................... 20.1
The SQL Form.............................................................. 20.2
The Reports Menu................................................. 20.4
The SQL Syntax Menu.......................................... 20.8
Using a Pre-loaded Report................................... 20.9
Creating a Badge Report .......................................... 20.10
SQL Clauses ............................................................... 20.14
Logical Operators...................................................... 20.16
Relational Operators ................................................. 20.17
SQL Variables ............................................................ 20.18
Break Variables.......................................................... 20.19
LINEBREAK......................................................... 20.19
PAGEBREAK ....................................................... 20.20
Using Pagebreak <column number> within
SQL to the X-Window .................................. 20.20
Using Pagebreak <column number> within
SQL to the printer.......................................... 20.21
Badge Table Values................................................... 20.21
Flags Column Values................................................ 20.21
Scheduling an SQL Report....................................... 20.23
Setup...................................................................... 20.23
The History Report Form................................... 20.25
21. Two Man Rule and Modified
Two Man Rule ......................................... 21.1
Overview ...................................................................... 21.1
Prerequisites................................................................. 21.1
Occupancy Control ..................................................... 21.2
How to set up Occupancy Control ..................... 21.2
Two Man Rule (2MR) ................................................. 21.4
Modified Two Man Rule (M2MR) ............................ 21.4
M2MR Category Type .......................................... 21.4
Modified Two Man Rule without
Door Control .................................................... 21.5
Modified Two Man Rule with
Door Control .................................................... 21.5
How to Set Up a Two Man Rule (2MR)
Controlled Space...................................................... 21.6
How to Set Up a Modified Two Man Rule
(M2MR) Controlled Space with Door Control .... 21.7
How to Set Up a Modified Two Man Rule (M2MR)
Controlled Space without Door Control ............ 21.10
Picture Perfect 2.0 Administration Guide
xi
Contents
22. Elevator Control .................................... 22.1
Overview.......................................................................22.1
System Configuration Standards...............................22.1
Elevator Access.............................................................22.2
Duration Time for Elevator Access .....................22.6
Elevator Access for All Categories ......................22.6
Free Access Floors..................................................22.6
Elevator Control Setup ................................................22.7
Defining the Number of Floors............................22.8
Defining Micros......................................................22.8
Defining Readers....................................................22.9
Defining Outputs ...................................................22.9
Defining Inputs ....................................................22.11
The Elevators Form..............................................22.13
The Category Floors Form ..................................22.20
Scheduling Elevator Free Access .............................22.21
Floor Tracking ............................................................22.22
23. Keypad Alarm Response...................... 23.1
Overview.......................................................................23.1
Keypad Alarm Response Function............................23.1
Violation Notification..................................................23.2
Keypad Response.........................................................23.2
Operator Response.......................................................23.3
Condition.................................................................23.3
Process State............................................................23.3
Multiple Access Violations .........................................23.4
Door Operation While Violation is Active ...............23.4
Keypad Alarm Response Configuration ..................23.4
Defining the Alarm-Response Code ...................23.5
Defining a Reader ..................................................23.5
Enabling Keypad Alarm Response......................23.6
Enabling a Badge....................................................23.6
Disabling Keypad Alarm Response ..........................23.7
24. Pre-Alarm Notification .......................... 24.1
Overview.......................................................................24.1
Pre-Alarm Function .....................................................24.1
Pre-Alarm Notification Methods ...............................24.1
Disabling Pre-Alarm....................................................24.1
Pre-Alarm Configuration............................................24.3
25. Badge Trace........................................... 25.1
Overview.......................................................................25.1
Badge Trace Configuration.........................................25.1
Tracing a Badge ............................................................25.1
xii
Picture Perfect 2.0 Administration Guide
Contents
26. Double-Badge Transaction .................. 26.1
Overview ...................................................................... 26.1
Double-Badge Function.............................................. 26.1
Double-Badge Reporting............................................ 26.2
Double-Badge Configuration .................................... 26.3
27. Monitoring Alarms ................................ 27.1
Contents
Overview ...................................................................... 27.1
Prerequisites................................................................. 27.1
What You Will Be Doing............................................ 27.2
The Alarm Monitor ..................................................... 27.2
Notification of Alarms................................................ 27.2
Responding to An Alarm ........................................... 27.4
Removing A Single Alarm ......................................... 27.6
Purging A Single Alarm............................................. 27.7
Removing All Alarms................................................. 27.7
Controlling Alarm Outputs ....................................... 27.8
28. Monitoring Activity ............................... 28.1
Overview ...................................................................... 28.1
Prerequisites................................................................. 28.1
What You Will Be Doing............................................ 28.1
Badge Monitor ............................................................. 28.2
Operator Monitor ........................................................ 28.5
Swipe and Show Monitor........................................... 28.6
29. Controlling Outputs.............................. 29.1
Overview ...................................................................... 29.1
Prerequisites................................................................. 29.1
What You Will Be Doing............................................ 29.1
Controlling an Output from an Input Group.......... 29.2
Controlling an Output from an Output Group ...... 29.3
Controlling an Individual Output ............................ 29.4
30. Viewing Status ...................................... 30.1
Overview ...................................................................... 30.1
Prerequisites................................................................. 30.1
What You Will Be Doing............................................ 30.1
Viewing Status By Micro............................................ 30.2
Viewing Status By Area.............................................. 30.3
Viewing Status by Door ............................................. 30.4
Picture Perfect 2.0 Administration Guide
xiii
Contents
31. User Customization .............................. 31.1
Overview.......................................................................31.1
Invocation......................................................................31.3
User Interface................................................................31.4
Main Window.........................................................31.4
Language Selection Dialog ...................................31.5
Table Selection Dialog ...........................................31.6
Change Field Dialog ..............................................31.8
32. National Language Support ................. 32.1
Overview.......................................................................32.1
Limitations ....................................................................32.1
Installation ....................................................................32.2
Language Translation..................................................32.5
Locale .......................................................................32.6
Preparing for Translation......................................32.7
Translating Text .....................................................32.8
Installing Translations...............................................32.12
buildlang ...............................................................32.12
buildmeaning........................................................32.12
upddb.....................................................................32.13
avlang ....................................................................32.13
Translation Installation Example.......................32.13
Modifying Translations.............................................32.14
Selecting An Operator Language ............................32.14
Selecting The Primary Language.............................32.15
Selecting Login Screen Language ............................32.15
Error and Warning Messages...................................32.16
Customizing Badge and Department Screens .......32.16
33. In Case of Problems.............................. 33.1
Overview.......................................................................33.1
What You Will Be Doing.............................................33.1
Conventions ..................................................................33.2
Using the CMENU Utility ..........................................33.2
Diagnostics Subsystem................................................33.2
Process Control Diagnostics .................................33.3
Check .....................................................................33.13
Set ...........................................................................33.14
Clear .......................................................................33.16
WatchLog ..............................................................33.17
Micro Utilities .............................................................33.17
State........................................................................33.18
Offline ....................................................................33.18
Online ....................................................................33.18
xiv
Picture Perfect 2.0 Administration Guide
Contents
Contents
Reset ...................................................................... 33.18
Status Information from Micros.............................. 33.18
Alarms................................................................... 33.19
Areas ..................................................................... 33.19
Badges ................................................................... 33.19
Inputs .................................................................... 33.19
Input Groups........................................................ 33.19
Mode ..................................................................... 33.20
Outputs ................................................................. 33.20
Output Group ...................................................... 33.20
Outputs ................................................................. 33.20
Readers ................................................................. 33.20
Doors ..................................................................... 33.21
Printer Utilities .......................................................... 33.21
Status..................................................................... 33.21
Kill ......................................................................... 33.21
Stop........................................................................ 33.22
Clean ..................................................................... 33.22
Start ....................................................................... 33.22
Troubleshooting Guide ............................................ 33.22
Appendix A: Changing the Picture
Perfect System Host Name ..................... A.1
Rules and Restrictions ................................................. A.1
Changing the Host Name ........................................... A.2
Files and Database Tables ........................................... A.3
Standalone............................................................... A.3
Network Host ......................................................... A.3
Network Subhost.................................................... A.4
Redundant............................................................... A.4
Appendix B: TPS Alarms ............................. B.1
Overview ........................................................................ B.1
Configuration Files .......................................................B.2
/cas/db/text/tps.cfg.............................................. B.2
/cas/db/text/tps.cfg.sample................................ B.3
/cas/bin/tps_cfg.sh ............................................... B.3
Appendix C: Firewall Configuration............ C.1
Setting a Fixed Port for the
Client Server Task .............................................C.2
Changing the Fixed Port Used by
the License Manager Task................................C.2
Web Browser Security ............................................C.3
Picture Perfect 2.0 Administration Guide
xv
Contents
Appendix D: Advanced Configuration ........ D.1
Overview....................................................................... D.1
Multiple Tape Support ................................................ D.1
Port Throttling .............................................................. D.2
Disk File Backup/Archive Configuration ................ D.3
File System Monitor..................................................... D.4
Database Space Monitor.............................................. D.6
Resend List State .......................................................... D.7
Configuration ......................................................... D.7
Log Messages.......................................................... D.8
Alarm Save State .......................................................... D.9
Configuration ......................................................... D.9
Log Messages........................................................ D.11
Auto-Logout (xidle) ................................................... D.11
Files ........................................................................ D.12
Restrictions............................................................ D.13
Appendix E: Using the vi Editor .................. E.1
Overview........................................................................ E.1
Modes ....................................................................... E.1
Changing Modes ..................................................... E.1
Command Mode Functions................................... E.2
Ex Mode Functions ................................................. E.3
Editing the /etc/hosts File .......................................... E.3
Appendix F: Alarm Routing and Bumping
Using Picture Perfect
Web Browser ............................................ F.1
Overview........................................................................ F.1
Appendix G: Micro Facility
Assignment Tool ......................................G.1
Overview........................................................................G.1
Running the Tool ..........................................................G.1
Appendix H: Flow Diagrams ........................ H.1
Picture Perfect System Flow Diagram ...................... H.1
Picture Perfect Valid Badge Read Flow Diagram ... H.2
Example of a Communications Failure
Detected by a Micro ................................................. H.3
Example of a Bad Badge Detected by an Area ........ H.3
Example of a Door Forced Condition
Detected by a Door................................................... H.4
xvi
Picture Perfect 2.0 Administration Guide
Contents
Contents
Example of a Problem Condition
Detected by a Sensor (DI) and Triggering
Both an Alarm and a Physical Output (DO)......... H.4
Example of a DI Used to Trigger a
Physical Output (DO) .............................................. H.5
Example of the Door Exit DI and Sense DI Set-Up
Using Supervised Inputs to a 2SRP or 20DI ......... H.6
Alarms Initiated by Micros ......................................... H.7
Alarms Initiated by Areas........................................... H.7
Alarms Initiated by Doors .......................................... H.7
Glossary ..................................................... GL.1
Index ..................................................... Index -1
Customer Survey
Software Defect Report
Picture Perfect 2.0 Administration Guide
xvii
Contents
xviii
Picture Perfect 2.0 Administration Guide
List of Figures
List of Figures
Login Screen.............................................................3.1
Front Panel ...............................................................3.3
Main Menu and Submenus.......................................3.5
Example of a Form ...................................................3.6
Example of a Picklist.................................................3.8
Function Buttons on a Form .....................................3.9
View Window ..........................................................3.11
Columns Picklist .....................................................3.12
Sort Window ...........................................................3.12
Search Window.......................................................3.13
Title Bar and Buttons ..............................................3.15
Terminals Form.........................................................4.2
Modems Form (Top) .................................................4.6
Modems Form (Bottom)............................................4.8
Sample AIX Connection Diagram for Micros Setup 4.10
Ports Form ..............................................................4.12
Network Micro Ports Form ......................................4.16
Printers Form ..........................................................4.18
Email Form with Facility Picklist..............................4.20
Routings Form ........................................................4.21
Printer Routing........................................................4.23
E-Mail Routing ........................................................4.24
Badge Formats Form..............................................4.26
Parameters Form (Top) ..........................................4.28
Parameters Form (Top Middle)...............................4.30
Parameters Form (Bottom Middle) .........................4.31
Parameters Form (Bottom) .....................................4.35
Departments Form..................................................4.37
Personnel Type Form .............................................4.39
Facility/Facility Profile Overview ...............................5.1
Facility Form .............................................................5.3
Delete Facility Window .............................................5.4
Facility Profile Form ..................................................5.6
Facility Set Manager ...............................................5.11
Clients Menu - Change Active Facility Set..............5.11
Facility X .................................................................5.14
Facility Y .................................................................5.14
Facility Z .................................................................5.14
Update Badge Facility Profile .................................5.15
View Operator Facility Profile .................................5.16
Facility Window.......................................................5.17
Facility Profile Window............................................5.17
Current Profile Column ...........................................5.18
Permissions Form...................................................5.18
Operator Permission Window .................................5.19
Picture Perfect 2.0 Administration Guide
Figures
Figure 3-1.
Figure 3-2.
Figure 3-3.
Figure 3-4.
Figure 3-5.
Figure 3-6.
Figure 3-7.
Figure 3-8.
Figure 3-9.
Figure 3-10.
Figure 3-11.
Figure 4-1.
Figure 4-2.
Figure 4-3.
Figure 4-4.
Figure 4-5.
Figure 4-6.
Figure 4-7.
Figure 4-8.
Figure 4-9.
Figure 4-10.
Figure 4-11.
Figure 4-12.
Figure 4-13.
Figure 4-14.
Figure 4-15.
Figure 4-16.
Figure 4-17.
Figure 4-18.
Figure 5-1.
Figure 5-2.
Figure 5-3.
Figure 5-4.
Figure 5-5.
Figure 5-6.
Figure 5-7.
Figure 5-8.
Figure 5-9.
Figure 5-10.
Figure 5-11.
Figure 5-12.
Figure 5-13.
Figure 5-14.
Figure 5-15.
Figure 5-16.
xvii
List of Figures
Figure 5-17.
Figure 5-18.
Figure 5-19.
Figure 5-20.
Figure 6-1.
Figure 6-2.
Figure 6-3.
Figure 6-4.
Figure 6-5.
Figure 6-6.
Figure 6-7.
Figure 6-8.
Figure 6-9.
Figure 7-1.
Figure 7-2.
Figure 8-1.
Figure 8-2.
Figure 8-3.
Figure 8-4.
Figure 8-5.
Figure 9-1.
Figure 9-2.
Figure 9-3.
Figure 9-4.
Figure 10-1.
Figure 10-2.
Figure 10-3.
Figure 10-4.
Figure 10-5.
Figure 10-6.
Figure 10-7.
Figure 10-8.
Figure 10-9.
Figure 10-10.
Figure 10-11.
Figure 10-12.
Figure 11-1.
Figure 11-2.
Figure 11-3.
Figure 11-4.
Figure 11-5.
Figure 11-6.
Figure 11-7.
Figure 12-1.
xviii
Operator Form ........................................................ 5.20
Example: Facility Y Menu Options.......................... 5.20
Example: Global Facility Menu Options.................. 5.20
Example: All Facilities Menu Options ..................... 5.21
Relationship Between Permissions and
Permission Groups ................................................... 6.2
Perm Group Form .................................................... 6.3
Permissions Form .................................................... 6.5
Permissions Form with Picklist for Badge
Admin - Plant ............................................................ 6.7
Faclity Profile Picklist................................................ 6.8
Operators Form ........................................................ 6.9
Country Picklist....................................................... 6.10
Permission Picklist ................................................. 6.11
Change Password Window .................................... 6.11
Route Definitions Form............................................. 7.3
Route Points Form ................................................... 7.5
Messages Form........................................................ 8.3
Responses Form ...................................................... 8.4
Alarms Form ............................................................. 8.6
Alarms Form with Color Palette, Alarm Instructions,
and Alarm Routing Picklist ..................................... 8.10
Alarm Color Window............................................... 8.12
OutGroups Form ...................................................... 9.2
InGroups Form ......................................................... 9.5
Example of a Parent Input Group ........................... 9.10
Input Groups Form with Picklists ............................ 9.11
Common Micro Setup............................................. 10.2
Example of Direct Communication - Uni-directional
Micros ..................................................................... 10.4
Example of Direct Communication - Bi-directional
Micros ..................................................................... 10.4
Example of Dial-Up Communication....................... 10.5
Sample Ethernet Configuration .............................. 10.8
Sample Token Ring Configuration ......................... 10.9
Micro Configuration .............................................. 10.17
Micros Form (Top - Left)....................................... 10.18
Micros Form (Bottom)........................................... 10.20
Dial-Up Window.................................................... 10.22
Micros Form (Right) Times in Seconds ................ 10.25
The Keys Form ..................................................... 10.28
Micro Flash EPROM Upgrade Menu ...................... 11.3
Begin Flash Download ........................................... 11.4
Available Hex Files ................................................. 11.5
MicTool - FlashTool Main Screen........................... 11.7
eFlash..................................................................... 11.9
Network eFlash File Popup .................................. 11.10
Default eFlash File Popup .................................... 11.11
Outputs Form ......................................................... 12.3
Picture Perfect 2.0 Administration Guide
List of Figures
Picture Perfect 2.0 Administration Guide
Figures
Figure 12-2. 32DI/DO Board Addressing Scheme ......................12.6
Figure 12-3. Outputs Form with Micro and Output Group
Picklists...................................................................12.8
Figure 12-4. Inputs Form...........................................................12.10
Figure 12-5. Inputs Form with Picklists .....................................12.15
Figure 13-1. Site Map with Access Control Areas.......................13.3
Figure 13-2. Categories Form .....................................................13.7
Figure 13-3. Categories List Box.................................................13.8
Figure 13-4. Category Manager Window ....................................13.9
Figure 13-5. Areas Form - Top..................................................13.14
Figure 13-6. Areas Form - Bottom ............................................13.17
Figure 13-7. Common Reader Setup
..............................................................................13.21
Figure 13-8. In/Out Reader Setup with Single Door..................13.21
Figure 13-9. Readers Form (Top) .............................................13.22
Figure 13-10. Readers Form (Bottom Right)...............................13.25
Figure 13-11. Common Door Setup ............................................13.31
Figure 13-12. Supervised Door DI and Exit DI Setup .................13.32
Figure 13-13. Doors Form, Top...................................................13.35
Figure 13-14. Doors Form, Bottom Left ......................................13.36
Figure 13-15. Doors Form, Bottom Right ....................................13.39
Figure 14-1. Badge Removal Popup...........................................14.8
Figure 14-2. Remove Record Popup ..........................................14.8
Figure 14-3. Badges Form - Top Left........................................14.11
Figure 14-4. Badges Form (Top Right) .....................................14.12
Figure 14-5. Badges Form (Top Middle - with Seed Counter
enabled)................................................................14.13
Figure 14-6. Badge Encode Format Window ............................14.16
Figure 14-7. Badges Form (Bottom Right) ................................14.17
Figure 14-8. Badges Form (Bottom Left) ..................................14.19
Figure 14-9. Temporary Categories Form.................................14.21
Figure 14-10. Badge Form - Advanced Scheduling ....................14.22
Figure 14-11. Badges Form (Bottom Middle)..............................14.24
Figure 15-1. Master Records Window.........................................15.3
Figure 15-2. Generator Form ......................................................15.4
Figure 16-1. Mode Creation Form...............................................16.6
Figure 16-2. Mode Command Form............................................16.7
Figure 16-3. Mode Events Form ...............................................16.10
Figure 16-4. Runtime Portion of an Events Form......................16.12
Figure 16-5. Start/End Portion of an Events Form ....................16.13
Figure 16-6. Area Events Form (Top) .......................................16.16
Figure 16-7. Area Events Form (Middle)...................................16.17
Figure 16-8. Areas Form, Categories Window..........................16.20
Figure 16-9. Area Events Form, View Window .........................16.20
Figure 16-10. Examples: Areas Form, Categories Window ........16.21
Figure 16-11. Area Events Form (Bottom) ..................................16.22
Figure 16-12. Reader Events Form - Top ...................................16.26
Figure 16-13. Reader Events Form - Bottom ..............................16.27
Figure 16-14. Door Events Form.................................................16.31
xix
List of Figures
Figure 16-15.
Figure 16-16.
Figure 16-17.
Figure 17-1.
Figure 17-2.
Figure 17-3.
Figure 18-1.
Figure 18-2.
Figure 18-3.
Figure 18-4.
Figure 18-5.
Figure 18-6.
Figure 19-1.
Figure 19-2.
Figure 19-3.
Figure 19-4.
Figure 19-5.
Figure 19-6.
Figure 19-7.
Figure 19-8.
Figure 19-9.
Figure 19-10.
Figure 19-11.
Figure 20-1.
Figure 20-2.
Figure 20-3.
Figure 20-4.
Figure 20-5.
Figure 20-6.
Figure 20-7.
Figure 20-8.
Figure 20-9.
Figure 20-10.
Figure 20-11.
Figure 20-12.
Figure 20-13.
Figure 22-1.
Figure 22-2.
Figure 22-3.
Figure 22-4.
Figure 22-5.
Figure 22-6.
Figure 22-7.
Figure 22-8.
Figure 22-9.
Figure 22-10.
Figure 22-11.
xx
Alarm Events Form............................................... 16.34
InGroups Events Form ......................................... 16.38
OutGroups Events Form ...................................... 16.42
Facility Profile Window ........................................... 17.3
Operations Pop-Up Menu....................................... 17.4
Access/Secure List Example - Input Groups .......... 17.5
History Dates Window ............................................ 18.3
Archive Dates Window ........................................... 18.4
Archive Backup Window......................................... 18.5
Table Backup Window............................................ 18.6
Backup Events Form .............................................. 18.9
Restore Window with Media Pop-up .................... 18.11
History Form ........................................................... 19.2
Open Report Picklist - History ................................ 19.3
Save Report As Window ........................................ 19.4
Print Options Window ............................................. 19.4
Delete Report Picklist - History............................... 19.5
Badge Query Window ............................................ 19.7
Format Columns Window ....................................... 19.8
Format Page Window ............................................. 19.9
Format Summary Window .................................... 19.11
Variables Picklist .................................................. 19.12
Report Events Form - History ............................... 19.17
SQL Form ............................................................... 20.2
Open Report Picklist - SQL .................................... 20.4
Save Report Query As Window.............................. 20.5
Delete Report Picklist - SQL................................... 20.6
Page Setup Window - SQL .................................... 20.6
Print Report Window .............................................. 20.7
SQL Names Picklist................................................ 20.8
Table Names and Column Names Picklists ........... 20.9
Example of a Pre-Loaded SQL Report................. 20.10
SQL Syntax for Embedded Variables................... 20.18
Example of Linebreak........................................... 20.19
Example of Pagebreak ......................................... 20.20
Report Events Form - History ............................... 20.25
Example of Elevator Control - Method 1................. 22.3
Example of Elevator Control - Method 2................. 22.5
Number of Floors Field on Parameters Form ......... 22.8
Type Field on Micros Form..................................... 22.8
Type Field on Readers Form.................................. 22.9
Outputs Form Configured for Elevator-Floor
Button ................................................................... 22.10
Inputs Form Configured for Elevator-Floor
Button ................................................................... 22.12
Elevator Form ....................................................... 22.13
Floor Description Window..................................... 22.14
Example of Increment Floors ............................... 22.15
Example of Decrement Floors .............................. 22.16
Picture Perfect 2.0 Administration Guide
List of Figures
Figure 27-6.
Figure 27-7.
Figure 27-8.
Figure 27-9.
Figure 28-1.
Figure 28-2.
Figure 28-3.
Figure 28-4.
Figure 29-1.
Figure 29-2.
Figure 30-1.
Figure 30-2.
Figure 30-3.
Figure 30-4.
Figure 31-1.
Figure 31-2.
Figure 31-3.
Figure 31-4.
Figure 31-5.
Figure 31-6.
Figure 31-7.
Figure 33-1.
Micro/DO Config ...................................................22.17
Reader/DO Config ................................................22.18
Reader/DI/DO Config............................................22.19
Category Floors Form...........................................22.20
Select Floors Form ...............................................22.21
Doors Form Configured for Elevator Door ............22.22
Badge Query Window...........................................22.23
Alarm-Response Code Field on Micros Form.........23.5
Badge and Keypad Field on Readers Form ...........23.5
Keypad Alarm Response Field on Doors Form ......23.6
Keypad Alarm Response Field on Badges Form....23.7
Pre-Alarm Fields on Top of Doors Form.................24.3
Pre-Alarm Field on Bottom of Doors Form .............24.4
Badge-Trace Routing Portion of Parameters Form 25.1
Control Portion of Badges Form .............................25.2
Reader-Control Portion of Readers Form...............26.3
Interval-Time Portion of Readers Form ..................26.3
Reader Portion of Reader Events Form .................26.3
Alarm Monitor Window............................................27.2
Alarm Alert Window ................................................27.3
Alarm Response Window .......................................27.3
Alarm Response Window with Responses Picklist.27.4
Alarm Response Window with Response Too
Long Warning .........................................................27.5
Alarm Response Window with Logged and New
Responses..............................................................27.6
Alarm Response Window with Remove Function
Disabled..................................................................27.7
Purge All Alarms Window .......................................27.8
Control Outputs Window.........................................27.8
Activity Monitor Window with Monitor Control
Picklist.....................................................................28.4
Example of a Badge Activity Message ...................28.4
Example of an Operator Activity Message..............28.5
Example of a Swipe and Show Activity Message ...28.7
Control Outputs Form .............................................29.2
Progression of Windows in Control Outputs Form..29.4
Status Form ............................................................30.2
Progression of Windows for Status by Micro ..........30.2
Progression of Windows for Status by Area ...........30.3
Sample Door Status................................................30.4
Badge Holder Customization ..................................31.1
User Fields Window from Badges Form .................31.2
User Fields in Departments Form...........................31.3
User Customization Window...................................31.4
Language Selection Dialog.....................................31.6
Table Selection Dialog............................................31.7
Change Field Dialog ...............................................31.8
Utilities Menu ..........................................................33.2
Picture Perfect 2.0 Administration Guide
Figures
Figure 22-12.
Figure 22-13.
Figure 22-14.
Figure 22-15.
Figure 22-16.
Figure 22-17.
Figure 22-18.
Figure 23-1.
Figure 23-2.
Figure 23-3.
Figure 23-4.
Figure 24-1.
Figure 24-2.
Figure 25-1.
Figure 25-2.
Figure 26-1.
Figure 26-2.
Figure 26-3.
Figure 27-1.
Figure 27-2.
Figure 27-3.
Figure 27-4.
Figure 27-5.
xxi
List of Figures
Figure 33-2.
Figure 33-3.
Figure 33-4.
Figure 33-5.
Figure 33-6.
Figure 33-7.
Figure 33-8.
Figure 33-9.
Figure 33-10.
Figure 33-11.
Figure 33-12.
Figure 33-13.
Figure 33-14.
Figure 33-15.
Figure D-1.
Figure D-2.
Figure H-1.
Figure H-2.
Figure H-3.
Figure H-4.
Figure H-5.
Figure H-6.
Figure H-7.
Figure H-8.
Figure H-9.
Figure H-10.
Figure H-11.
xxii
Diagnostics Subsystem Menu ................................ 33.3
Dump PC Main Utilities Menu................................. 33.4
Queues, Memory, Communications Screen........... 33.4
Alarms, Flags, Devices, Counts ............................. 33.7
Micro Map............................................................... 33.8
Micro Status ......................................................... 33.10
Port Records ........................................................ 33.12
Host Records........................................................ 33.13
Check Current Diagnostic Levels ......................... 33.13
Set Diagnostic Levels Menu ................................. 33.14
Clear Diagnostic Levels Menu.............................. 33.17
Micro Utilities Menu .............................................. 33.17
Status Information From Micros Menu ................. 33.18
Printer Utilities Menu ............................................ 33.21
File System Monitor Notification Message .............. D.4
Database System Monitor Notification Message..... D.6
System Flow Diagram ............................................. H.1
Valid Badge Read Flow Diagram ............................ H.2
Comm Failure Detected by Micro ............................ H.3
Bad Badge Detected by Area .................................. H.3
Door Forced Condition Detected by Door ............... H.4
Problem Condition Detected by Sensor (DI) ........... H.4
DI Used to Trigger DO............................................. H.5
Door Exit DI and Sense DI Setup ............................ H.6
Alarms Initiated by Micros ....................................... H.7
Alarms Initiated by Areas ........................................ H.7
Alarms Initiated by Doors ........................................ H.7
Picture Perfect 2.0 Administration Guide
Using This Manual
Chapter
1
Purpose
This manual provides instructions for initial setup and configuration of
the system and for configuration changes to an existing system. It also
contains information for operating the system once it is installed.
Who Should Read this Manual
This manual is intended for system administrators who are responsible for
the planning and implementation of the system design, and who perform
system configuration and setup using Picture PerfectTM forms that are
accessible only to the master-level operator.
Operators using the system should read the chapters which relate to their
duties.
The material in this manual has been prepared for persons responsible for,
and familiar with the security needs of the customer facility.
NOTE
If you have a previous version of this manual, you may notice changes since the last
publication, marked by a change bar which is a vertical line in the margin that
visually identifies significant new or revised information.
Terminology
Click
Using this Manual
To “click” means to press and release a mouse button while the pointer is
on a designated area of the screen in order to display a window or select
an option. The press-and-release makes a clicking sound.
The term “double-click” means to press and release a mouse button twice
in rapid succession. “Left-click” and “right-click” mean to click the button
on the left or right side of the mouse.
Select
The word “select” indicates that you choose an item from the current
menu, submenu, form, or picklist displayed on the screen. Use the mouse
Picture Perfect 2.0 Administration Guide
1.1
Terminology
or the cursor keys to select the item. For example: Select Devices, then
Terminals.
The statement above tells you to select a certain menu (Devices) and then
to select a certain submenu that will appear (Terminals). If you make the
selections with a mouse, you will point to the Devices icon and click the
left mouse button. When the submenu icons appear, you will point and
click on the Terminals icon to select this submenu.
If you make the selections with a keyboard, you will use the cursor keys
instead of a mouse pointer, and the Enter key instead of the left mouse
button.
Press
The phrase “press the _____ button” means to use the mouse (or the
keyboard) to “press” a designated button on the screen. To press a button
with the mouse, point then click the left button. To press a button with the
keyboard, use the Tab key and press Enter or Spacebar .
Command
The word “command” indicates a command which should be typed as
specified.
Toggle
The word “toggle” indicates that user should turn an option on or off. The
state of the toggle button determines whether or not the option is turned
on or off. If the toggle button is pushed in (darkened), the option which it
represents is turned on. If the toggle button is not pushed in (lightened), it
is off.
1.2
Picture Perfect 2.0 Administration Guide
Using This Manual
1
Notational and Typographical Conventions
This manual uses certain notational and typographical conventions to
make it easier for you to identify important information.
Item
Example
Titles, Menu
Items, Field
Names, Forms
Administration
Keys
Keyboard keys appear as graphics. For example, Enter denotes the key labeled
“Enter” or “Return”. F1 , F2 , etc., indicate the function keys across the top of the
keyboard.
Keys that display on the screen as push buttons appear in bold such as, Save, Ok,
Close.
Operating
Systems
Picture Perfect 2.0 runs on two operating systems: IBM’s AIX and Red Hat Linux.
When the documentation differs depending on the operating system in use, the
appropriate information is given for each. The following symbols designate information
particular to an operating system:
Information for an AIX system follows this symbol.
AIX
Linux
Information for a Linux system follows this symbol.
Default Entries
During the installation of the software, you will be prompted with questions. Following
the question, a default answer may be shown in brackets, for example: [y]
To accept the default answer, you may either press Enter or you may type y and
press Enter . For clarity, in this manual we will instruct you to type y Enter .
Text you enter
Examples of commands show the exact spacing and upper- or lower-case letters for
you to type. For example:
rc.pperf -k
If an example ends with Enter , type the command then press Enter . For example:
rc.pperf -k Enter
Using this Manual
To reduce the confusion between similar numbers and letters, namely the number 1
and the lowercase letter l along with the number 0 and the letter O, refer to the
following list:
1234567890
ABCDEFGHIJKLMNOPQRSTUVWXYZ
abcdefghijklmnopqrstuvwxyz
Notes
Provides additional information. The following graphic is displayed on the left side of
the page:
Picture Perfect 2.0 Administration Guide
1.3
Related Documentation
Item
Example
Caution
Provides information you should know to avoid potential problems, before continuing.
The following graphic is displayed on the left side of the page:
Warnings
Provides information you MUST know to avoid consequences of a disastrous nature,
before continuing. The following graphic is displayed on the left side of the page:
Instructions
Provides instructional information in a step-by-step format.
Related Documentation
1.4
•
Picture Perfect 2.0 AIX Edition Installation Guide
This manual is a step-by-step guide to help the system administrator
connect hardware (HFT subsystem, serial port adaptors, ASCII
terminals, modems, printers, tape drives, X Terminals,
microcontrollers, etc.); boot/install AIX®; configure AIX for the
network, micro communication lines, printers, and X Terminals; install
the Picture Perfect software and set up X Terminals.
•
Picture Perfect 2.0 Linux Edition Installation Guide
This manual is a step-by-step guide to help the system administrator
connect hardware (PCs, serial port adapters, modems, printers, tape
drives, X Terminals, micros); boot/install Linux®; configure Linux for
the network, micro communication lines, printers and X Terminals;
install Picture Perfect software and set up X Terminals.
•
Picture Perfect Enterprise System Administration Guide
This document includes information regarding the installation and
configuration of the network Picture Perfect host and subhosts, as well
as management of the networked system.
•
Picture Perfect Redundant System Administration Guide
This manual provides instructions for the software installation,
configuration, and operation of the Picture Perfect Redundant System
(PPRS) software.
Picture Perfect 2.0 Administration Guide
System Overview
Chapter
2
System Overview
Introduction
The Picture Perfect system is an integrated, computer-based security
system that provides access control to designated areas within a site or
facility. This system uses the IBM RISC System/6000® or Intel Pentium®
based servers, configured to meet the exact needs of the user.
Picture Perfect uses industry leading products such as the Linux®
operating system, Informix® Dynamic Server, and X-windows, IBM's
graphical interface. The Picture Perfect operator interface is
picture/icon-based.
The Picture Perfect platform functions in large measure as a database
server. The majority of access, alarm, and time-of-day decisions are made
locally by intelligent microcontrollers. Data necessary to make these
intelligent decisions is downloaded from the host to the micro as required.
Since the micros are making the majority of these decisions, the host is free
to concentrate on operator functions such as data entry, database queries
(requests for data), and report generation.
The system controls access readers using either magnetic-stripe, barium
ferrite, Wiegand, bar code, or proximity technologies. Readers with
keypads for user-defined PIN entry are also accommodated.
The smallest system will monitor thousands of badge records, transaction
history records, digital inputs (alarm contacts), and digital outputs.
Capacity limits depend on system resources. The system supports
multiple operator work stations and printers.
Scheduling features allow time allocations for use of readers and alarms.
Micro/5's have the capability to perform the majority of scheduling tasks.
This provides the user with full scheduling capabilities, even when a
communication problem has caused the micro and host to temporarily
stop talking to each other.
The user interface is image-driven and user-friendly. Small images, called
icons, are used to visually show the operator what is being selected. These
icons provide the operator with various options which lead to input
screens, providing the ability to add, change or delete information. By
assigning operator levels to individuals, operators can be restricted in
their control of the system. They can be denied the authority to change
Picture Perfect 2.0 Administration Guide
2.1
Operating Features
previously set parameters, and may be able to view information on a
screen, but may not be permitted to modify or print out the information.
All conditions sensed by the system can be assigned unique messages,
which can be displayed on the computer screen and made available to the
operator. A sensor on a door can be coded within the system, not only to
activate an alarm if the door is opened, but to notify the operator, using
the screen, where the breach occurred and what action to take. Alarms can
be given priorities for action in the event that multiple alarms occur. All
alarms are provided with an audio display tone to alert security personnel
of severe conditions.
The system maintains a history file of all occurrences reported by its
Micro/5’s (access attempts, alarms, etc.). Management reports are
available to provide the System Manager with the activities within the
system any time, on demand.
The program is personalized by the customer to his specific requirements
and configuration by simple, pop-up windows and menus. An operator
can change the size and position of a screen.
The system uses a state-of-the-art relational database management system
(RDBMS) which allows the operator to query the database using menu
driven forms. These forms allow the operator to specify data fields
requested, logical relationships between the fields, and the order in which
the fields are to be selected. Once the request for data is made and the data
is found, the operator can then scroll through data backwards and
forwards. If desired, the operator can print the requested data by selecting
the appropriate option.
The system architecture uses a distributed approach, comprised of
Micro/5s, and the host processor.
AIX
On an AIX system, all terminals are graphics terminals except the host
console which could be a character-based terminal.
Linux
On a Linux system, all terminals (including the host console) are graphics
terminals.
Operating Features
2.2
•
UNIX-like Operating System (AIX or Linux) provides multitasking,
multi-user capabilities. Multiple tasks can be performed by multiple
users simultaneously. An operator can view several windows at once.
•
Host System architecture is powerful enough to support the operating
system and relational database management systems.
•
Graphical Menu-Driven Operator Interface almost completely frees
you from the keyboard. Color menus and pop-up windows provide
various options which lead to input forms (screens) where you can
Picture Perfect 2.0 Administration Guide
System Overview
2
add, change, or delete information. Menus use icons (symbolic
pictures) rather than text so you can point and click with a mouse to
select a task or operation.
Pop-Up Window Alarm Messages appear on whatever form (screen)
is currently displayed. You can continue with the current form or exit
to an alarm response form.
•
Online Help (HTML-based). Click the Help button to display a popup help window for any form or picklist. Help constitutes an on-line
reference manual that explains every window and field in each form.
•
Powerful Query Function. Picture Perfect uses Informix Dynamic
Server, a relational database management system (RDBMS) with a
query function that reduces the need for printed reports. The RDBMS
frees you from canned search criteria. Use the Find and View
functions to query and display data. As an alternative to printing a
report, you can display the report on screen and scroll back and forth
through data. The RDBMS allows you to define direct relationships
between separate database tables so that a single report joins multiple
tables. The report function also lets you customize reports with
Structured Query Language (SQL) so you can pinpoint just the data
you need.
•
Real-Time Monitoring. Badge activity displays in real time on a
scrolling window, where you can scroll backward and forward
through the transaction data or perform a transaction search.
•
Database Protection. The system database is protected from
unauthorized use by the Operator Permissions feature which controls
(using a login ID and password) each operator’s authorization to
display or update each system screen and to print reports.
•
User-Defined Schedules. The system provides an interface for userdefined schedules. For example, an area can be scheduled for general
employee access during business hours, but restricted to selected
employees after hours. All schedules can be manually overridden
from the operator’s console. If the host and Micros stop
communicating, Micro/5s continue processing all resident schedule
changes.
•
Operator Input Validation. All system forms (screens) and menus
provide extensive data-entry error checking. The system will reject a
form if fields do not contain acceptable data; therefore, bad data
cannot corrupt the database.
•
Operator Activity Monitoring. The activity of all system operators can
be saved on the hard disk.
•
User-Defined Alarms. Alarms may be assigned priorities to control
processing in the event of simultaneous alarms. Multiple-action
Picture Perfect 2.0 Administration Guide
System
Overview
System
Overview
•
2.3
Optional Features
messages may be configured to notify the operator when and where
the alarm is occurring and what actions to take.
•
Digital Outputs to Operate Output Devices. Inputs (digital or logical)
trigger digital outputs which can operate output devices (door locks,
lights, bells, sirens).
•
Transaction History Processing. The standard system stores history
records online, including badge, alarm, and operator activity
transactions which can be archived to diskette or streaming tape. A
larger hard disk can be configured to store more history records
online.
•
User-Defined Reports. The reports feature provides an SQL
(Structured Query Language) interface to the online Picture Perfect
database so that you can use ANSI standard SQL select statements to
query the database and generate reports. (Pre-loaded SQL reports
satisfy standard administration requirements.) The query function
allows unlimited selection criteria and up to eight sort criteria. The
relational database allows an SQL statement to join multiple database
tables in one report, sorting the result by any selected field.
•
Micro/5, Micro/5-PX, Micro/5-PXN, Micro/PX-2000, Micro/PXN-2000
Support for Readers, Alarms, Scheduler. During normal operation
these micros use their resident databases to make local access-control
decisions. In the event of communication failure with the host, these
Micros control and store reader and alarm activity and also implement
scheduler events.
•
Global Antipassback Supported. Any reader on any Micro/5,
Micro/5-PX, Micro/5-PXN, Micro/PX-2000, Micro/PXN-2000 (except
a dial-up Micro) can be configured as an antipassback reader.
•
Keypad Reader Support for PIN Entry. Keypad reader support is
provided to enhance security.
Optional Features
2.4
•
The fully integrated Alarm Graphics System allows you to develop
alarm maps that display (in real time) when an alarm occurs.
•
The Import/Export program enables the transfer of Picture Perfect
database information to and from external databases (such as a
personnel database). The import/export utility allows other
applications to interface with the Picture Perfect database.
•
The Redundant System option allows two host systems (primary and
backup) to operate in a fault-tolerant configuration.
•
The Imaging option allows a picture of the badgeholder to be
displayed on screen, as well as Swipe and Show.
Picture Perfect 2.0 Administration Guide
System Overview
•
The Enterprise option allows several hosts to operate together in a
network environment.
•
The Guard Tours option allows you to monitor the progress of a
security officer as he or she tours the facility premises at specified
intervals, and to obtain hardcopy reports that show a tour history.
2
Support Services
System
Overview
System
Overview
GE Interlogix and its Business Partners offer a full range of customer
support services, including site surveys, installation supervision, systems
acceptance, and training, with total turnkey installation capabilities.
Services are options at the discretion of the customer.
Training is extensive and all-inclusive. It provides for the needs of
customer personnel at all levels—management, technical, and system
operations. Classes are conducted by expert training personnel and
provide extensive hands-on experience.
GE Interlogix offers a Protection Plan that provides a full range of
maintenance options after the one-year factory warranty (or the 90-day
software warranty) expires.
The Protection Plan provides customers with all program updates and
provides an emergency hotline for ongoing system support.
What’s New
Red Hat® Linux® 7.3 Operating System
Red Hat Linux 7.3 delivers cutting edge technologies, new features and
updated core components while improving ease of use and maintenance.
Red Hat Linux is a flexible, versatile solution for several types of
deployments, from secure Web serving to personal productivity
workstations.
AIX 5.1L Operating System
As an open UNIX solution, AIX 5L allows you to run the applications you
want on the hardware you want, scaled to the size you need—bringing
you new levels of flexibility.
Informix Dynamic Server IDS 2000 9.3
IBM Informix® Dynamic Server ™ combines the robustness, high
performance, and scalability of the Informix relational database manager
system, RDMS, with the advanced object-relational technology to store,
retrieve, and manage rich data intelligently and efficiently. IBM IDS is
built on IBM Informix Dynamic Scalable Architecture™ (DSA) - the goal
of which is to provide the most effective parallel database arhcitecture
Picture Perfect 2.0 Administration Guide
2.5
What’s New
available, to help manage increasingly large and complex databases while
substantially improving overall system performance and scalability.
Increased Categories
This new option, which can be selected at installation, increases the former
limitation of 32 categories per badge to 96, and the former limitation of 10
categories per area to 32. A minimum firmware level of 2.0 is required.
For more information on this new feature, refer to Chapter 13 - Categories,
Areas, Readers, and Doors.
eFlash
A new method of downloading micro firmware which does not require
the micro to be in maintenance mode. For more information on this new
feature, see Chapter 11 - Flashing Micros.
Partitioning
Picture Perfect 2.0 has incorporated the database partitioning formerly
available only through Secure Area Manager (SAM) and Access Vision,
through the addition of Facilities, Facility Profiles, and field level
permissions. For more information on this new feature, see Chapter 5 Facilities and Facility Profiles.
E-Mail Alarm Routing
The e-mail interface provides an alternative routing system for Picture
Perfect alarm messages. Picture Perfect alarm information can now be
routed to an external e-mail address, alphanumeric pager, or message
capable cellular phone. For more information on this new feature, see
Chapter 7 - Alarm/Activity Monitor Routing.
Seed Counter
Badge production capabilities have been enhanced to provide support for
a seed counter . This new feature provides a way to automatically generate
a unique Id number for each badge. For more information on this new
feature, refer to the following:
•
Chapter 14 - Badges
•
Picture Perfect Installation Guide, Chapter 6 and Appendix G.
Documentation
2.6
•
The Picture Perfect 2.0 Administration Guide can be viewed in its
entirety using the Xpdf Viewer.
•
Other related Picture Perfect manuals are available in .pdf format on
the Picture Perfect 2.0 CD.
Picture Perfect 2.0 Administration Guide
System Overview
2
HTML Help
Picture Perfect 2.0 delivers a browser independent HTML-based help with
a sophisticated easy-to-use user interface that includes a table of contents,
index, related topics, and full-text search.
System
Overview
System
Overview
Picture Perfect 2.0 Administration Guide
2.7
What’s New
NOTES
2.8
Picture Perfect 2.0 Administration Guide
Getting Started
Chapter
3
Overview
This chapter familiarizes you with the techniques required to interact with
the Picture Perfect system. This includes information on using the mouse
and using the various icons and windows, as well as system startup,
shutdown, and login procedures.
In addition, this chapter lists the preferred order of tasks required for
setting up your Picture Perfect system.
System Startup
To start Picture Perfect, power-on your system. Follow the power-on
procedures outlined in your owner’s manual. Wait for the Picture Perfect
login screen (Figure 3-1) to appear on the terminal.
Getting Started
Figure 3-1.
Login Screen
Log In
To operate the system, you need to log in. Your login ID, combined with
your password, tells the system who you are and which functions you are
authorized to perform (based on your operator permissions).
Picture Perfect 2.0 Administration Guide
3.1
Log In
CAUTION Both of these fields are case sensitive, so enter the information appropriately. For
instance, if your login ID is ‘dennis’, but you type ‘Dennis’ or ‘DENNIS’, the system
will not recognize you.
The login ID consists of up-to-eight alphanumeric characters. Spaces
should not be used as part of the ID, and it is recommended that all alpha
characters be entered in lower case. The login ID typically incorporates the
operator’s name and may include an initial or a number, such as davidm
or janet32.
The password is a security measure that keeps unauthorized personnel
from logging onto the system. Unlike the login ID, the password does not
display on the screen as you type it. It is very important that your
password remain confidential.
Care should be taken when selecting a password so that it cannot be easily
guessed by anyone. It can be up-to-eight alphanumeric characters long,
and can use any combination of numbers and upper- and lower-case
letters. Spaces should not be used.
Select a password that you can easily remember (because it should not be
written down anywhere), but one which is not likely to be guessed. Be
creative in your selection. Some examples of good passwords are
NewtToe2, bliPPer9, z3EggLeg. Some examples of bad passwords are
your own name (in any form); the name of your pet, spouse, children;
your license-plate number; your address; etc.
To set your password, or to change it if you think it is no longer secure,
use the Operators form. See “Change Password” on page 3.21 and page
6.11. Or, you may left-click your mouse to display the Client menu and
select Change Password.
! To log in:
1. Type your login ID after the prompt and press
2. Type your password after the prompt and press
password does not display.)
Enter
Enter
.
. (The
After the system loads, the Main Menu appears. The icons that appear in
the Main Menu represent the Picture Perfect functions you are authorized
to use. See Figure 3-3. Main Menu and Submenus on page 3.5.
3.2
Picture Perfect 2.0 Administration Guide
Getting Started
3
Log Out
CAUTION
It is important to log out of the system when you leave your workstation. This
protects the system from unauthorized use, and also requires the next operator to
log in.
If you are not familiar with mouse functions such as point, click, and drag,
see “Using a Mouse” on page 3.14. If you are not familiar with the root
window, see “Using a Window” on page 3.15. You can also use the AutoLogout feature (Appendix D - Advanced Configuration).
! To log out:
1. Close all open forms by clicking on the Quit button for that form.
2. Click and hold down the right mouse button in the Workspace
window (the background area of the screen).
3. Select the logout function. (Point-and-drag mouse pointer to select Log
out.)
Getting Started
4. To exit the Picture Perfect Logout Confirmation window, you must
quit the Window Manager. Select Continue Logout or click Exit on
the Front Panel as shown in the next figure.
Using the Common Desktop Environment
Figure 3-2.
Front Panel
! To display the Picture Perfect Main menu (as shown in See Figure 3-3.
Main Menu and Submenus on page 3.5.):
Click on the
icon as shown in Figure 3-2 above. When Picture Perfect
is not running, the icon background turns red.
! To display the Terminal Emulator:
Click on the
icon as shown in Figure 3-2 above. A terminal emulator
is an application that displays a window that allows you to use Unix-like
commands (AIX or Linux) to cut and paste text within or between
terminal emulation windows. The command-line prompt is a special
character that is displayed in your dtterm window after you press Return .
It can be a %, <, $, or other special character. A small box or bar, called a
Picture Perfect 2.0 Administration Guide
3.3
Main Menu and Submenus
cursor, shows where characters will appear in the window when you type
something on the keyboard.
! To obtain Picture Perfect Help:
Find and click on the arrow above the General Help icon
as shown
above in Figure 3-2 above. Then left-click on Picture Perfect Help which
will appear in a pull-up menu.
! To access various submenus:
Press CTRL and right-click the mouse button.
! To log out:
Click the
button for Logout Confirmation as shown in Figure 3-2
above. You may select Continue logout or Cancel logout.
For more information on using other options on the Front Panel, refer to
the Front Panel Help
.
Main Menu and Submenus
The Main Menu appears as a vertical window frame containing several
icons (Figure 3-3). Each of the icons represents a separate submenu. To
bring more icons into view, click on the scroll bar or stretch the window
frame. “Using a Mouse” on page 3.14 and “Using a Window” on page 3.15
for more information.
! To display a submenu:
Click on an icon. The icons of the submenu appear inside another
window. When you click on a submenu icon, a form appears and the
submenu disappears.
3.4
Picture Perfect 2.0 Administration Guide
Getting Started
3
Getting Started
*Graphics,and Tours appear only
if you have those optional
packages installed.
*
**Network Backup appears only if
you have the netlan package
installed.
*
Figure 3-3.
Main Menu and Submenus
Picture Perfect 2.0 Administration Guide
3.5
Forms
Forms
Forms (Figure 3-4) are used to enter (type in) and display data. A form
consists of text boxes (where you type data; also referred to as “fields”),
square toggle buttons (to select multiple options), round-shaped radio
buttons (to make “either/or” selections), and selection buttons (which you
click to display a picklist).
Status Line
Text Box
Toggle Bu ttons
Radio Buttons
Selection Button
Figure 3-4.
Example of a Form
Text Boxes
To use a text box, point to the box and click to make it active. You can then
type data in that field. You may use the Tab key to move to the next text
box, or Shift Tab to move to the previous text box.
3.6
Picture Perfect 2.0 Administration Guide
Getting Started
3
Toggle Buttons
Toggle buttons are square, and appear beside one or more options. When
several options are grouped together, toggle buttons indicate that more
than one of these options can be selected.
Click on the button to toggle it on or off. When the button looks like it is
pushed in (darkened), it is on. When it looks like it is popped out
(lightened), it is off.
Radio Buttons
Radio buttons are round-shaped, and appear beside one or more options.
When several options are grouped together, radio buttons indicate that
only one of these options can be selected. As soon as another option is
selected, the previously selected button is automatically de-selected.
Click on the button to select the option. When the button looks like it is
pushed in (darkened), it is active. When it looks like it is popped out
(lightened), it is inactive.
Getting Started
Selection Buttons and Picklists
Selection buttons are rectangular and labeled to indicate what type of
picklist they will display when clicked. For example, a button labeled
Micros will display a picklist of defined micros; a button labeled Routing
will display a picklist of routing destinations. The contents of a picklist
consist of items you added using other forms. For example, if you have
not added your micros yet (using the Micros form), the Micros picklist
will be empty when you try to assign a micro to a reader (using the Select
Micro button on the Readers form).
A picklist (Figure 3-5) is a separate window that displays a scrolling list of
options for that button’s feature. You may be able to select several or only
one of the options on the list, depending on the feature in use.
Picture Perfect 2.0 Administration Guide
3.7
Forms
Figure 3-5. Example of a Picklist
When the picklist appears, click on an item to select it. Selecting an item
highlights it. To assist in the location of an item or series of items, use the
Filter field. Simply enter a search criteria in the Filter field and click on the
Refresh button or press Enter . The search criteria entered in this field can
be a specific match, such as 000-0-09 CPU DO GROUP, or a pattern, such
as 002*.
If only one item is allowed, the first one selected will be de-selected when
you click on another. If several items are allowed, you can highlight more
than one. To de-select an item, click on it again.
Click the Ok or Close button on the picklist window to accept the
selections and dismiss the picklist. Your selections will then display on the
form by that button.
Buttons on the picklist window have the following functions:
Ok
Accepts the selections and dismisses the window. Some picklists use
Close instead of Ok.
Close
Accepts the selections and dismisses the window. Some picklists use
Ok instead of Close.
3.8
Picture Perfect 2.0 Administration Guide
Getting Started
3
Cancel
Clears all selections made.
Refresh
Updates the contents of the picklist if additions or deletions have been
made to the options since the form was displayed. For example, if you
are selecting a permission from a picklist and see the one you want is
not displayed, you can open the Permissions form, add and save the
one you need, then click Refresh on the picklist window to reflect the
additional option.
Help
Displays on-screen information regarding the use of the picklist.
Using Function Buttons
There are function buttons at the top of each form, as shown in Figure 3-6.
Your operator permission determines which function buttons display for
you, just as it controls which Main Menu icons you can see. Point and
click with the mouse to click a function button.
Getting Started
Figure 3-6. Function Buttons on a Form
The purpose of each function button is listed below:
Quit (F1)
Exits the form. If needed, be sure to save the form before you exit.
Save (F2)
Saves the data record currently displayed. If you have created a new
record, it will be added to the database. If you displayed an existing
record and made changes to it, this new version will replace the old
record in the database.
Find (F3)
Locates specific data records based on selection criteria entered into
any of the fields. This is useful if you want to change the data of an
existing record. If you click Find without entering any search criteria,
the system will find all of the data records in that table (such as all the
badge records if you are using the Badges form). The number of
Picture Perfect 2.0 Administration Guide
3.9
Using Function Buttons
records found for the search will be displayed below the function
buttons. Use the Prev and Next buttons to view the individual records.
If the Prev button is grayed out, that means you are currently viewing
the first record. If the Next button is grayed out, that means you are
currently viewing the last record.
Symbols can be used to help delimit the search. For instance, the
asterisk can expand the search in either direction around a string of
characters:
•
If you type Son*, the system will find records such as Sonesta,
Sonya, Sonny.
•
If you type *son, the system will find records such as Robinson,
Jackson, Nelson.
•
If you type *son*, the system will find records such as Masonry,
Seasonal, Johnson.
Other symbols and their functions include the following:
!
>
<
*
?
&
|
>=
<=
Equal to (no symbol required)
Not equal to
Greater than
Less than
Match string
Match a single character
Logical and
Logical or
Greater than or equal to
Less than or equal to
For example, to find all records greater than A and less than L, type
>A&<L. The system will find records Aa to Kz.
Delete (F4)
Deletes the record currently displayed from the database.
NOTE
3.10
On the Badges form, this button is labeled Remove. It is used to completely
remove badge records from the database. See “Removing Badge Records” on
page 14.7.
Picture Perfect 2.0 Administration Guide
Getting Started
3
View (F5)
Views the record currently selected from the database.
NOTE
If there is no Delete option, then View is F4, New is F5, and Help is F6. If there
is a Delete option, then View becomes F5, New becomes F6 and Help
becomes F7.
! To view the records located by the Find function:
1. Click View. It may take a few moments for the system to prepare the
data.
2. The data found appears on the View window (Figure 3-7) and
includes all columns (fields) for those records. Resize the window to
view more columns.
Getting Started
Figure 3-7.
View Window
! To limit the number of columns displayed in the View window:
1. Click the Columns button. A picklist of columns will appear (Figure 38).
2. Select the columns you want to display, and de-select those you do not
want, then click Ok. The View window will display the new
information.
Picture Perfect 2.0 Administration Guide
3.11
Using Function Buttons
Figure 3-8. Columns Picklist
To control the order in which the information on the View window is
sorted, click the Sort button. This will display the Sort window (Figure
3-9), which includes a picklist of columns. Select the one column you
want to sort by, click a radio button to specify whether it should be in
Ascending or Descending order, then click Ok. The View window
will display the re-organized information.
Figure 3-9.
Sort Window
Search
Used to locate a certain record within a window of listed data.
3.12
Picture Perfect 2.0 Administration Guide
Getting Started
3
! To search for a record:
1. Click the Search button to display the Search window (Figure 3-10),
which includes a picklist of columns.
2. Select the one column you want to search by (such as “Last Name”),
type search text (a full or partial name, such as “Peterson” or “Pet”) in
the text box.
3. Click Ok. The system will locate the first record meeting this
description and position it at the top of the data window.
Getting Started
Figure 3-10.
Search Window
New (F5)
Clears the form so you can add data for a new record.
NOTE
If there is no Delete option, then View is F4, New is F5, and Help is F6. If there
is a Delete option, then View becomes F5, New becomes F6 and Help becomes
F7.
On some forms, you will be given the option to Clear or Copy the data
currently displayed. If you want all the fields to be blank, select Clear.
If you want to re-use much of the information already displayed, select
Copy. This is useful when you are adding data records that are similar
Picture Perfect 2.0 Administration Guide
3.13
Adding or Changing Data
to others, as it minimizes the time required for data entry. Not all the
fields will copy, however. Critical fields will be cleared, requiring new
input.
Freeze/Resume
Used on windows with scrolling, real-time data. Click Freeze to
temporarily halt the output of new data so you can review the
information currently on the screen. When this button is selected, it
changes to Resume. Click Resume to continue the scrolling action.
Help (F6)
See Note on page 3.11 under View.
Provides on-screen information about the current form and its fields.
Adding or Changing Data
Similar procedures are used when adding or changing data records. The
same forms are used, and the same access procedures are used.
When you add a record, you fill in a blank form and click Save.
When you change a record, you must first locate the one you want. This is
done by entering your search criteria in the appropriate fields on the form,
then clicking the Find button. If more than one record was found, use the
Prev and Next buttons to locate the record you want or enter a record
number in the record field and press Enter . When the desired record is
displayed, change the appropriate fields and click Save.
Whether you are adding or changing data, you must click Save; otherwise,
the new information will be discarded.
Using a Mouse
A mouse is a hand-operated device used to move the pointer or cursor on
the screen and select items, display windows, position windows on the
screen, size windows, and iconify windows.
The mouse has two or more buttons that you push, and a ball that rolls
when you move the mouse along a flat surface—such as a table or a pad.
There are several mouse operations:
3.14
Picture Perfect 2.0 Administration Guide
Getting Started
3
Table 3-1: Mouse Operations
Mouse Term
Description
Point
Move the mouse to position the screen pointer at a certain spot.
Press
Push and hold down a button.
Release
Release a pressed button.
Click
Push and release a button without moving the mouse.
Drag
Move the mouse while pressing a mouse button.
Double-click
Click a mouse button twice in rapid succession without moving the mouse.
Point-and-click
Move the pointer to a screen object and click to select that object.
Point-and-drag
Point at an object (usually a window), press and drag until the pointer
reaches the desired location, then release the button. Use this method to
resize a window, reposition an object or window, or to make a menu
selection from a pop-up window.
Using a Window
Getting Started
A window consists of several elements which have different features.
These features are used to manipulate the window.
The Title Bar
The Title Bar (Figure 3-11) runs across the top of the window. It displays
the name of the window and contains three buttons.
Figure 3-11. Title Bar and Buttons
One button is on the left, the other two are on the right. The buttons
perform these functions:
Picture Perfect 2.0 Administration Guide
3.15
Using a Window
Table 3-2: Title Bar and Buttons
Button
Location
Description
Window Menu
Left side
Opens the Window Menu.
Minimize
Second from right
Reduces the window to an icon on the taskbar.
Maximize
Far right
Enlarges the window to full-screen size. Press
again to return window to previous size.
See “Using the Window Menu” on page 3.18 for details on menu
functions.
! To move the window and to shuffle (send) the window to the front or
back:
1. Press (hold down) the left mouse button anywhere on the title bar
(except on the buttons),
2. Drag the window (displayed now as a wire frame) to the desired
location, then release the button.
! To shuffle (send) the window to the front:
Click the left mouse button on the title bar.
! To shuffle (send) the window to the back:
Click the right mouse button on the title bar.
The Window Frame
The window frame is the narrow border on all four sides of the window.
This area can be used to resize the window, or to shuffle the window to
the front or back.
! To resize a window:
1. Press (hold down) the left mouse button anywhere on the frame.
2. Drag the frame edge either left/right or up/down (depending on
which side of the frame you are using), then release the button. If you
put the mouse pointer on a corner of the frame, you can resize both the
height and width of the window simultaneously.
3.16
Picture Perfect 2.0 Administration Guide
Getting Started
3
! To shuffle (send) the window to the front:
Click the left mouse button on the frame.
! To shuffle (send) the window to the back:
Click the right mouse button on the frame.
The Scroll Bars
Scroll bars appear when the contents of the window are too large for the
window frame. If the contents are wider than the window, a scroll bar will
appear at the bottom. If the contents are longer than the window, a scroll
bar will appear at the side.
! To scroll the window, you may use the scroll bars in the following ways:
1. Click on the arrow in the direction you want to scroll (up, down, left,
or right) for an incremental movement.
3. Click on the empty space between the arrows to jump to a certain spot.
Picture Perfect 2.0 Administration Guide
3.17
Getting Started
2. Drag the bar between the arrows in either direction for a slower, more
controlled movement.
Using the Window Menu
Using the Window Menu
Click on the left title-bar button or on an “iconified” window (window
reduced to an icon) to display the Window menu. Drag and release the
pointer on the selected function:
Restore
Re-opens an iconified window.
Move
Changes the window to a wire frame. Drag the mouse to reposition the
window.
Size
Allows you to resize the window. Move the mouse to the desired
location on the screen, then click to set the size at that point.
Minimize
Minimizes the window, and displays the icon at the bottom of the
screen.
Maximize
Enlarges the window to full screen size.
Occupy Workspace
Based on the number of workspaces established, in the CDE (Cmmon
Desktop Environment) Front Panel, you may use this to assign an
active menu or application to one or more workspaces.
Occupy All Workspaces
Allows you to assign an active menu or application to all established
workspaces.
Unoccupy Workspace
Allows you to remove an active menu or application from an
established workspace.
Lower
Shuffles (moves) the window down under all other open windows.
Close
Exits the window. (Does not minimize the window.)
3.18
Picture Perfect 2.0 Administration Guide
Getting Started
3
Using the Workspace Menu
Click the right mouse button on the root window (the background area
of the screen) to display the Control menu. Drag and release the pointer
on the selected function:
Show Graphical Workspace Manager
Displays in a graphical format the applications running in each
workspace. You may drag and drop an application from one
workspace to another.
Application List
Displays a list of all applications on all workspaces of the desktop.
Shuffle Up
Shuffles (moves) one of the lower windows to the top.
Shuffle Down
Shuffles (moves) the top window to the bottom.
Refresh
Getting Started
Redraws the entire screen.
Minimize/Restore Front Panel
Minimizes and restores the Front Panel of the CDE (Common Desktop
Environment).
Restart Workspace Manager
Restarts the window manager and re-reads configuration files.
Logout
Closes all windows, re-initializes the window software, and displays
the Login screen.
Using the Programs Menu
Click the middle mouse button on the root window (the background area
of the screen) to display the Program menu. Drag and release the pointer
on the selected function:
CMenu
Starts the CMenu program.
Picture Perfect 2.0 Administration Guide
3.19
Using the Clients Menu
DPC
Starts the utility which monitors status, such as the flags set on a
micro.
Format Diskette
Formats a diskette.
Tail Current Log
Displays the last ten transactions logged in the system log and
continues to scroll new entries as they are logged to the file.
Archive Dates
Displays the number of records that have rolled over from the history
files (badge, operator, and alarm) into the temporary files. The earliest
and latest dates and times of each are also displayed.
History Dates
Displays the number of records in each history table (badge, operator
and alarm) along with the earliest and latest dates and times of each
current history table.
Using the Clients Menu
Click the left mouse button on the root window (the background area of
the screen) to display the Client menu. Drag and release the pointer on the
selected function:
New Window
Opens a system window if your operator permission allows it.
Change Active Facility Set
Displays the Facility Set Manager from which you may change or
select facilities for the session.
Calculator
Displays the calculator.
Digital Clock
Displays the digital clock. (On an X-Terminal, use Alt + F4 to close the
clock.)
Analog Clock
Displays the analog clock. (On an X-Terminal, use Alt + F4 to close the
clock.)
3.20
Picture Perfect 2.0 Administration Guide
Getting Started
3
Change Password
Displays the Password form used to change your password.
NOTE
Operators without System Administration permissions use the password function
on the Client menu because the Operators icon does not appear on their
Control menu. (The Operators form has the Change Password function, which
is only available to operators with System Administration permissions.)
Reload Menu
Displays the Main Menu. Use the reload function if the Main Menu is
closed.
Stopping Picture Perfect
! To shut down the Picture Perfect application.
1. Log in as root at the console terminal.
3. Type rc.pperf -k
Getting Started
2. Make sure no one is logged on as an operator. You can do this by
typing who -H Enter .
Enter
4. Verify that Picture Perfect is stopped. See “Verify that Picture Perfect
is Stopped or Running” on page 3.22.
Starting Picture Perfect
Use the following command sequence to start the Picture Perfect
application. The third step, which is a command to stop Picture Perfect, is
used to verify that Picture Perfect is not running so that you do not start
another process for Picture Perfect.
! To start Picture Perfect:
1. Log in as root at the console terminal.
2. Make sure no one is logged on as an operator.
3. Type rc.pperf -k
4. Verify that Picture Perfect has stopped. See “Verify that Picture Perfect
is Stopped or Running” on page 3.22.
Picture Perfect 2.0 Administration Guide
3.21
Verify that Picture Perfect is Stopped or Running
5. Type rc.pperf
6. Verify that Picture Perfect is running. See “Verify that Picture Perfect
is Stopped or Running” on page 3.22.
Verify that Picture Perfect is Stopped or Running
•
NOTE
Verify that Picture Perfect has stopped or started by typing: ipcs
If INFORMIX and TPS are running, the output would appear similar
to the following (first AIX is shown, followed by Linux):
TPS is recognized by the KEY ending in 400 for shared memory and 401 for
semaphore. For example: 0x00000400 and 0x00000401.
AIX
IPC status from /dev/mem as of Tue Mar 25 13:47:29 EST 1997
T
ID
KEY
MODE
OWNER
GROUP
-Rrw-rw-rw-Rrw-rw-rw--rw-rw-rw--rw-rw-rw-Rrw-rw-rw-Rrw-rw-rw--rw-rw-rw--rw-rw-rw-Rrw-rw-rw-Rrw-rw-rw-Rrw-rw-rw-Rrw-rw-rw--rw-rw-rw-Rrw-rw-rw--rw-rw-rw-Rrw-rw-rw-Rrw-rw-rw-Rrw-rw----
root
root
root
root
root
root
root
root
root
root
root
root
root
root
root
root
root
root
system
system
system
system
system
system
system
system
system
system
system
system
system
system
system
system
system
printq
--rw-rw-----rw-rw-rw--rw-rw-rw--rw-rw-rw-
informix
root
root
root
informix
system
system
system
--ra-ra-ra--ra-ra-----ra-r--r---ra-ra----
root
informix
root
informix
system
informix
system
informix
Message Queues:
q 24576 0x00000401
q 24577 0x00000402
q 24578 0x00000403
q 24579 0x00000404
q 24580 0x00000405
q 24581 0x00000406
q 24582 0x00000407
q 24583 0x0000040a
q 24584 0x0000040b
q 24585 0x0000040c
q 24586 0x0000040d
q 24587 0x0000040e
q 24588 0x0000040f
q 24589 0x00000410
q 24590 0x00000411
q 24591 0x00000412
q 24592 0x00000413
q 16401 0x4107001c
Shared Memory:
m 28672 0x52564801
m 24577 0x00000400
m 2
0x0d05f0fd
m 57347 0x00abacab
Semaphores:
s 0
0x710588c6
s 32769 0x52564801
s 2
0x6205f0b0
s 28675 0x52564802
3.22
Picture Perfect 2.0 Administration Guide
3
Getting Started
s
s
s
s
s
s
s
s
s
28676 0x52564803
24581 0x00000401
6
0x0105f042
7
0x03141592
3031120x00abacab
57353 0x00abacac
57354 0x00abacad
57355 0x00abacae
57356 0x00abacaf
--ra-ra-----ra-ra-ra--ra--------ra-ra-----ra-ra-ra--ra-ra-ra--ra-ra-ra--ra-ra-ra--ra-ra-ra-
informix
root
root
root
root
root
root
root
root
informix
system
system
system
system
system
system
system
system
Linux
------------ Shared Memory Segments -------shmid
owner perms bytes
0x00000000
0x00000000
0x00000000
0x00000000
0x52564801
0x52564802
0x52564803
0x52564804
0x52564805
0x52564806
0x00000000
0x00000400
0
7110657
7143426
131075
6881284
6914053
6946822
6979591
7012360
7045129
6848522
7077899
root 600
root 600
root 600
apache600
root 660
root 660
root 660
root 660
root 660
root 660
root 666
root 666
nattch
1056768
520192
33554432
46084
33554432
33554432
33554432
30400512
33554432
33554432
16384000
16384000
9
9
9
9
6
6
6
6
6
6
1
25
status
dest
dest
dest
dest
dest
------ Semaphore Arrays -------key
semid
owner
perms
nsems
0x00000000
0x00000000
0x00000401
327680
262145
294914
apache
root
root
600
660
666
1
7
18
status
------ Message Queues -------key
messages
msqid
owner
perms used-bytes
0x00000401
0x00000402
0x00000403
0x00000404
0x00000405
0x00000406
0x00000407
0x0000040a
0x0000040b
0x0000040c
0x0000040d
0x0000040e
0x0000040f
0x00000410
1245184
1277953
1310722
1343491
1376260
1409029
1441798
1474567
1507336
1540105
1572874
1605643
1638412
1671181
root
root
root
root
root
root
root
root
root
root
root
root
root
root
666
666
666
666
666
666
666
666
666
666
666
666
666
666
0
0
0
0
0
0
0
0
0
0
0
0
0
0
Picture Perfect 2.0 Administration Guide
0
0
0
0
0
0
0
0
0
0
0
0
0
0
3.23
Getting Started
key
Shutting Down the Entire System
0x00000411
0x00000411
0x00000413
0x00000414
0x00000415
1703950
1736719
1769488
1802257
1835026
root
root
root
root
root
666
666
666
666
666
0
0
0
0
0
0
0
0
0
0
When Picture Perfect is not running there should be no Message Queues,
Shared Memory, and Semaphores for TPS or INFORMIX. If there are
entries, then Shared Memory is corrupted.
Shutting Down the Entire System
Software or hardware maintenance on the Picture Perfect system may
require a complete system shutdown. If this is necessary, perform the
following command sequence.
! To shut down the entire system:
1. Log in as root at the console terminal.
2. Make sure no one is logged on as an operator.
AIX
Linux
NOTE
3. Type: shutdown -Fh now or
4. Type: shutdown -h now
Type shutdown -h to halt the system; type shutdown -r to reboot the system.
The shutdown command also stops Picture Perfect before shutting down the system.
Wait until the **halt completed** (AIX)or Power Down (Linux)
message appears and then power down the computer.
3.24
Picture Perfect 2.0 Administration Guide
Getting Started
3
Frequently Used Unix Commands
The following commands are frequently used in both AIX and Linux:
Present working directory
who
Who is logged on
ps -e
Processor status
ipcs
Shared memory status
rm
Remove file
mv
Move or rename file
more
Page contents of a file
cd
Change directory
ls -l
List contents of current directory
cat
Type contents of file
|
Pipe (Connects two programs)
df
Shows used and free space of file systems
plevel
Shows patch level of Picture Perfect packages
Picture Perfect 2.0 Administration Guide
Getting Started
pwd
3.25
System Setup Procedures
System Setup Procedures
Because the Picture Perfect forms build off of one another, it is important
that the setup procedures follow a logical flow. The steps below are listed
in the preferred order to make the setup of your system a smooth one.
Table 3-3: System Setup Procedures
#
Task
Menu/Form
Information
1 Terminals
Devices/Terminals
See Chapter 4 - Initial Setup.
2 Modems
Devices/Modems
See Chapter 4 - Initial Setup.
3 Serial Ports
Devices/Ports
See Chapter 4 - Initial Setup.
4 Network Ports
Devices/Network Ports
See Chapter 4 - Initial Setup.
5 Printers
Devices/Printers
See Chapter 4 - Initial Setup.
6 Email
Control/Email
See Chapter 4 - Initial Setup.
7 Routings
Control/Routings
See Chapter 4 - Initial Setup.
8 Badge Formats
Access/Badge Formats
See Chapter 4 - Initial Setup.
9 Parameters
Control/Parameters
See Chapter 4 - Initial Setup.
10 Departments
Access/Departments
See Chapter 4 - Initial Setup.
11 Personnel Type
Access/Personnel Type
See Chapter 4 - Initial Setup.
12 Facility
Access/Facility
See Chapter 5 - Facilities and Facility Profiles.
13 Facility Profile
Control/Facility Profile
See Chapter 5 - Facilities and Facility Profiles.
14 Permission Groups
Control/PermGroup
See Chapter 6 - Permissions and Operators.
15 Permissions
Control/Permissions
See Chapter 6 - Permissions and Operators.
16 Operators
Control/Operators
See Chapter 6 - Permissions and Operators.
17 Route Definitions
Control/Route Definitions
See Chapter 7 - Alarm/Activity Monitor Routing.
18 Route Points
Control/Route Points
See Chapter 7 - Alarm/Activity Monitor Routing.
19 Alarm Instructions
Messages/Messages
See Chapter 8 - Alarm Activity Messages and Alarms.
20 Alarm Responses
Messages/Responses
See Chapter 8 - Alarm Activity Messages and Alarms.
21 Alarms
Devices/Alarms
See Chapter 8 - Alarm Activity Messages and Alarms.
22 Alarm Color
Control/Alarm Color
See Chapter 8 - Alarm Activity Messages and Alarms.
23 Output Groups
Devices/OutGroups
See Chapter 9 - Input and Output Groups.
24 Input Groups
Devices/InGroups
See Chapter 9 - Input and Output Groups.
3.26
Picture Perfect 2.0 Administration Guide
Getting Started
#
Task
Menu/Form
3
Information
Devices/Micros
See Chapter 10 - Micros.
26 Data Encryption
Control/Keys
See Chapter 10 - Micros.
27 Flashing Micros
eFlash, MicTool, or
Micro Flash Utility
See Chapter 11 - Flashing Micros.
28 Outputs
Devices/Outputs
See Chapter 12 - Inputs and Outputs.
29 Inputs
Devices/Inputs
See Chapter 12 - Inputs and Outputs.
30 Categories
Access/Categories
See Chapter 13 - Categories, Areas, Readers, and
Doors.
31 Areas
Access/Areas
See Chapter 13 - Categories, Areas, Readers, and
Doors.
32 Readers
Devices/Readers
See Chapter 13 - Categories, Areas, Readers, and
Doors.
33 Doors
Devices/Doors
See Chapter 13 - Categories, Areas, Readers, and
Doors.
34 Badges
Access/Badges
See Chapter 14 - Badges.
35 Data Generator
Control/Generator
See Chapter 15 - Generator.
36 Mode Creation
Schedule/Mode
Creation
See Chapter 16 - Schedules and Modes.
37 Mode Command
Control/Mode
Command
See Chapter 16 - Schedules and Modes.
38 Mode Events
Schedule/Mode Events
See Chapter 16 - Schedules and Modes.
39 Area Events
Schedule/Area Events
See Chapter 16 - Schedules and Modes.
40 Reader Events
Schedule/Reader
Events
See Chapter 16 - Schedules and Modes.
41 Door Events
Schedule/Door Events
See Chapter 16 - Schedules and Modes.
42 Alarm Events
Schedule/Alarm Events
See Chapter 16 - Schedules and Modes.
43 Input-Group
Events
Schedule/InGroups
Events
See Chapter 16 - Schedules and Modes.
44 Output-Group
Schedule/OutGroups
Events
See Chapter 16 - Schedules and Modes.
45 Backup Events
Schedule/Backup Events
See Chapter 18 - Backup and Restore.
46 Report Events
Schedule/Reports Events
See Chapter 19 - History Reports.
Events
47 User Customization User Cutomization Utility
Getting Started
25 Micros
See Chapter 31 - User Customization.
Picture Perfect 2.0 Administration Guide
3.27
System Setup Procedures
NOTES
3.28
Picture Perfect 2.0 Administration Guide
Initial Setup
Chapter
4
Overview
Initial setup defines the system hardware configuration, as well as
message routing and department information.
Your installation may include direct, dial-up, and/or network micros.
Ports for direct communication and ports for dial-up communication are
user-defined and configured on the Ports form. Ports for network
communication are user-defined and configured on the Network Micro
Ports form. The port on the host used for dial-up micros requires an
attached modem and a phone number. The dial-up micro requires an
attached modem, user-defined on the Modems form. Direct and network
micros require a port assignment (see Chapter 10 - Micros).
Printer ports have already been configured in the Picture Perfect
installation procedure. The user must set up the printer queue on the
Printers form.
Prerequisites
Your installer completes the initial hardware and software installation.
The Picture Perfect software provides forms that you fill out to fit your
configuration. Some of the forms contain default information that you can
change as required.
What You Will Be Doing
This chapter shows you how to define modems, ports, network ports,
printers, routings, terminals, system parameters, departments, and micro
communication lines.
Initial Setup
A physical printer was configured (with an adapter and port specified)
during the Picture Perfect installation, so all you need to provide is a
printer description and printer queue. For example, the adapter for a
parallel printer is a Standard I/O Parallel Port Adapter. The adapter port
for a serial printer may be one of two standard serial ports or one of the
ports on the multi-port adapter.
Many of the port characteristics for micro communication lines are already
configured at the time of installation, so all you need to provide is a port
description, tty number, and line settings. If the port supports dial-up
micros, you specify a phone number and modem type. If your system uses
Picture Perfect 2.0 Administration Guide
4.1
Terminals
dial-up communications, see “Modems” on page 4.4 for configuring
modem types for assignment to host and micro ports. If this is a network
port, you will need to complete the Network Micro Ports form. See
“Ports” on page 4.10 for more information.
Terminals
The aa utility can be used to configure each workstation with a unique
name and Internet address, such as:
192.9.200.10
ws1
Use the Terminals form (Figure 4-1) to configure all workstations used by
Picture Perfect.
Setup
! To define a terminal record:
1. Select Devices, then Terminals.
2. Complete the Terminals form. For a description of each field, see
Figure 4-1.
3. Click Save.
The Terminals Form
Figure 4-1.
4.2
Terminals Form
Picture Perfect 2.0 Administration Guide
Initial Setup
4
Description
Type any alphanumeric combination (1 to 30 alphanumeric characters)
for Description. For example, Command Center Workstation.
Server
In the Server field, type the hostname defined during installation in
the file /etc/hosts and append it with “:0” (zero, not the letter O).
The hostname can be a maximum of eight alphanumeric characters.
For example, if cmd_ctr is the workstation’s name in /etc/hosts,
the Server field would read “cmd_ctr:0”. The Server field must be
typed in lower-case characters.
NOTE
If using a graphical terminal attached to the server, in the Server field type:
unix:0
Receive Alarm Alert
Use the radio buttons to specify whether or not this terminal is to
receive Alarm Alert messages.
Receive Reset Alarm Alert
Use the radio buttons to specify whether or not this terminal is to
receive Reset Alarm Alert messages.
Receive Archive Notice
Use the radio buttons to specify whether or not this terminal is to
receive Archive Notice messages.
Optional Package
Initial Setup
If you have optional packages installed, such as Guard Tours or Client
Workstation (for example, an Access Vision client), use the applicable
radio buttons to specify whether or not this terminal is to receive
messages relating to that package.
Set Facility
Click the Facility button to display the facilities picklist. Selecting a
facility will allow the administrator to restrict operator access to those
records in a specific facility. For more information, see Chapter 5 Facilities and Facility Profiles.
Picture Perfect 2.0 Administration Guide
4.3
Modems
Modems
Use the Modems form to describe each modem type that you intend to use
for dial-up communications. Modem types that you define using the
Modems form appear in a picklist for assignment to a micro (on the
Micros form) and a port (on the Ports form). A micro can dial up the host
on any available port that is compatible (meaning the modem type
matches). The micro recognizes the Hayes SmartModem 9600 baud or a
100% Hayes SmartModem-compatible modem. Only compatible modem
types can establish a connection.
NOTE
The Micro/5-P supports 2400 baud only and the Micro/5-PX supports 9600 baud
only.
A dial-up micro uses standard modem communications and standard
telephone lines to dial up and respond to the host. Each dial-up micro has
a dedicated phone line and a modem for communication with the host.
The modem connects using RS-232 cable at the micro’s host port (RS-232
serial port).
Set the micro switches for modem type to Hayes compatible and baud to
2400 or 9600 depending on the micro type (refer to your micro manual for
the switch block settings).
For a Micro/5, we recommend that the phone number be configured
(“hard-coded”) into the modem so that a dial-up micro has a number for
dialing the host after the micro resets. For the Micro/5-PX, use the Flash
utility, which is part of the Micro Installation Tool (MICTOOL), Version
1.103 or higher, to enter the phone number into the micro’s parameter
block.
The host has a list of user-definable phone numbers available for calling
any dial-up micro in the system; likewise, all dial-up micros have a list of
user-definable phone numbers available for dialing the host. In addition,
each dial-up micro has the option of a hard-coded phone number in the
attached modem or parameter block. To allow for micros located in a PBX
or in another country, there is a user-definable dial-out prefix assigned to
the micro.
For details about the events that may initiate micro-to-host and host-tomicro calls, see “Example of Direct Communication - Bi-directional
Micros” on page 10.4.
4.4
Picture Perfect 2.0 Administration Guide
Initial Setup
NOTE
4
Each time a micro makes a call, it chooses a different number from this list, which
reduces competition between micros trying to call the host at the same number.
The host can also download the micro’s local badge database which reduces the
number of micro-to-host calls required for learning a badge. The maximum connect
time is one hour on an initial reset.
Setup
! To add a modem to the host machine:
1. Select Devices, then Modems.
2. Complete the Modems form. For details on each field, see “The
Modems Form” below. To determine the required operating
parameters for a modem, refer to the user manual published by the
manufacturer or associated documentation provided by GE Interlogix.
NOTE
There are completed Modems forms for the Hayes 1200, 2400 and 9600
modems, Cardinal 28.8 V.34 modem, and STAR Comm 144F.1 modem supplied.
3. Click Save.
The Modems Form
The Modems form supports dynamic configuration. This means that you
can configure modems without having to restart the Picture Perfect
system.
Refer to Figure 4-2 and Figure 4-3 for the Modems form.
Picture Perfect 2.0 Administration Guide
Initial Setup
The following is a list of fields that may require additional information for
you to complete. The list is in the order that the fields appear on the form.
There is no required sequence for you to follow. An asterisk (*) in front of
a field indicates that you must refer to your modem manual for the
required command string, message, or value. If a default value appears in
a field, you can accept that value if the modem type is Hayes-compatible.
4.5
Modems
Figure 4-2.
Modems Form (Top)
Description
Type a modem description up to 30 alphanumeric characters long that
specifies the modem type. For example, Hayes 2400. This modem
description will appear in a picklist on the Micros form and the Ports
form so that you can assign a modem type to micros and ports.
*Attention Command
Enter the wake-up string (0 to 30 alphanumeric characters) required
for the modem to put it into command mode, so that it can receive
other configuration commands (and eventually the hang-up
command).
*Initialization Command
Enter the command string (0 to 30 alphanumeric characters) used
when preparing to dial out or answer.
4.6
Picture Perfect 2.0 Administration Guide
Initial Setup
4
*Deinitialization Command
Enter the command string (0 to 30 alphanumeric characters) used to
de-initialize the modem when hanging up.
*Autodialer Prefix
Enter the command string (0 to 30 alphanumeric characters) used to
tell the modem to dial the number that follows.
*Dial Stored Prefix
Enter the command string (0 to 30 alphanumeric characters) that tells
the modem to dial the phone number stored in the modem’s nonvolatile memory.
NOTE
Some modems can store phone numbers at multiple memory locations. On your
modem, location 0 is not available for stored phone numbers because it is
reserved for the host phone number.
*Hangup Command
Enter the command string (0 to 30 alphanumeric characters) used to
disconnect or hang up the modem.
*EOL ASCII Value
Enter the character (expressed in ASCII value) that terminates every
command string.
*Attention Response
Enter the string (0 to 30 alphanumeric characters) that the modem
returns to indicate that it received the attention command.
*Initialization Response
Initial Setup
Enter the string (0 to 30 alphanumeric characters) that the modem
returns to indicate that it received the initialization command.
*Deinitialization Response
Enter the string (0 to 30 alphanumeric characters) that the modem
returns to indicate that it received the de-initialization command.
*Low Speed Baud
For multi-speed modems, enter the lowest baud rate that this modem
can use for a connection. The line speed can downgrade to this lower
baud rate to accommodate older modems or poor line quality.
Picture Perfect 2.0 Administration Guide
4.7
Modems
Figure 4-3.
Modems Form (Bottom)
*Lo-speed Connect Msg
Enter the message (0 to 30 alphanumeric characters) that the modem
returns when it connects using its low-speed baud rate.
*High Speed Baud
For multi-speed modems, enter the highest baud rate that this modem
can use for a connection. The modem uses its highest baud rate when
it first tries to connect. If it does not receive a carrier using the highspeed baud rate, it steps down to lower baud rates until the connection
occurs.
*Hi-speed Connect Msg
Enter the message (0 to 30 alphanumeric characters) that this modem
returns when it connects using its high-speed baud rate.
*No Carrier Msg
Enter the message (0 to 30 alphanumeric characters) that this modem
gives when it fails to connect; this message differentiates between No
Carrier, No Answer, and Busy.
4.8
Picture Perfect 2.0 Administration Guide
Initial Setup
4
*No Answer Message
Enter the message (0 to 30 alphanumeric characters) that this modem
gives when it fails to connect; this message differentiates between No
Carrier and No Answer.
*Error Message
Enter the message (0 to 30 alphanumeric characters) that this modem
gives when it rejects an invalid command.
*Busy Msg
Enter the message (0 to 30 alphanumeric characters) that this modem
gives when it fails to connect; this message differentiates between No
Carrier and Busy.
Select One Facility
Facility
Click the Facility button to display the facilities picklist. Selecting a
facility will allow the administrator to restrict operator access to those
records in a specific facility. For more information, see Chapter 5 Facilities and Facility Profiles.
Initial Setup
Picture Perfect 2.0 Administration Guide
4.9
Ports
Ports
Use the Ports form to define a serial port and the Network Micro Ports
form to define a network port. The system then allows you to assign the
device port (line) to a micro.
Uni-directional direct-connection micros require only a primary port;
bi-directional direct-connection micros require both a primary and a
secondary port. Dial-up micros do not require a port assignment, but do
require a Ports form as designated below. Network micros require only a
network primary port.
See “Configuring Micro Communications” on page 10.3 of Chapter 10 Micros. Refer to Figure 4-4 below for micro connections.
HOST
1
2
Unidirectional:
Unidirectional: Primary
Primary
Port
Port
/dev/tty2;
Secondary
Secondary
Port None
Port: None
/dev/tty2;
/dev/tty2
0
up down
1
host
1
up down
0
2
2
up down
1
none
/dev/tty3
5
up down
host
6
up
5
6
down
7
7
up down
6
8
Bidirectional:
Primary
Port
Secondary Port
/dev/tty3;Secondary
/dev/tty4
Bidirectional:
Primary
Port
/dev/tty3;
Port:
/dev/tty4
3
4
10
down up
host
9
/dev/tty4
Hayes
Smart
Modem
/dev/tty5
9
down
10
up
8
Hayes
Smart
Modem
8
down up
9
7
M/4 or 5
up down
host none
Dial-Up:
Primary
Port None;
Port NonePort, None
Dial-Up:
Primary
Port, Secondary
None; Secondary
192.9.200.13
11
up down
host
12
12
up down
11
13
13
up down
12 none
Network:
Port192.9.200.13;
192.9.200.13;
Secondary
Port: None
Network:Primary
Primary Port
Secondary
Port None
Figure 4-4.
4.10
Sample AIX Connection Diagram for Micros Setup
Picture Perfect 2.0 Administration Guide
Initial Setup
4
Setup
! To set up a serial micro communication line:
Perform the following steps to configure a communication line. To change
an existing configuration, display the desired record, then follow the same
steps to select new settings in the configuration screen.
1. Select Devices, then Ports.
2. Use the Ports form to configure each port. Unless your installation has
dial-up micros, select None for Modem Type and do not enter a phone
number. See “The Ports Form” on page 4.11 for a description of each
field.
3. Click Save.
! To set up a network micro communication line:
Perform the following steps to configure a communication line. To change
an existing configuration, display the desired record, then follow the same
steps to select new settings in the configuration screen.
1. Select Devices, then Network Micro Ports.
2. Use the Network Micro Ports form to configure each port. Simply
enter a description for the port and either the IP address or the host
name of the network micro. See “The Network Micro Ports Form” on
page 4.16 for a description of each field.
3. Click Save.
The Ports Form
The Ports form supports dynamic configuration for all fields on this form
except tty. Dynamic configuration means that you can configure ports
without having to restart the Picture Perfect system. If you change the tty
name, you must restart Picture Perfect.
Initial Setup
Refer to Figure 4-5 for the Ports form.
The following is a list of fields that may require additional information for
you to complete. The list is in the order that the fields appear on the form.
There is no required sequence to follow.
NOTE
An asterisk (*) indicates fields required only for dial-up communications.
Picture Perfect 2.0 Administration Guide
4.11
Ports
Figure 4-5.
Ports Form
Description
Type a port description. The ports that you define appear in a picklist
on the Micros form so that you can assign a serial port to directcommunication micros (unidirectional or bidirectional). (None
appears in the picklist so that you can indicate no secondary port for a
unidirectional micro and no primary or secondary port for a dial-up
micro.)
A typical description of a host port includes the line number and the
port number; for example, Line 1 Port 1 tty2. There are two
serial ports on the host, and additional serial ports are available if a
multi-port adapter is attached.
NOTE
Serial port (S1) on the RISC/6000 is used by the system console in the case of a
non-graphical console.
A line of unidirectional micros requires one communications channel
and one tty (RS-232) port at the host. A line of bidirectional micros
requires two channels (a primary communications line and a
4.12
Picture Perfect 2.0 Administration Guide
Initial Setup
4
secondary communications line) and two tty (RS-232) host ports
(primary and secondary).
tty
AIX
Linux
For RS/6000 systems, type the full path name of the port as defined in
AIX, such as /dev/ttyN, where N=line number. This must be typed
in lower-case characters, and must not be the port assigned to the
operator’s console. (Typically, tty0 is assigned to an ASCII console.)
For Linux systems, refer to Table 4-1 through Table 4-3 for Port
Device Names for Linux systems.
Table 4-1: COM Port Device Names for Linux Systems
Type
com port
Port
Direct and Dial-up Name
com1
/dev/ttyS0
com2
/dev/ttyS1
Table 4-2: PCI 8 Port Serial Port Adapter Port Device Names for Linux Systems
Type
PCI
8 port Digi board
Direct and Dial-up Name
1
/dev/ttyD000
2
/dev/ttyD001
3
/dev/ttyD002
4
/dev/ttyD003
5
/dev/ttyD004
6
/dev/ttyD005
7
/dev/ttyD006
8
/dev/ttyD007
Picture Perfect 2.0 Administration Guide
Initial Setup
Port
4.13
Ports
Table 4-3: PCI 16 Port Serial Port Adapter Port Device Names for Linux Systems
Type
Port
Direct and Dial-up Name
PCI
16 port Digi board
1
/dev/ttyD000
2
/dev/ttyD001
For additional Digi
boards, continue with
device names as
follows:
3
/dev/ttyD002
4
/dev/ttyD003
5
/dev/ttyD004
Board 2:
/dev/tty/D016 to
/dev/tty/D031
6
/dev/ttyD005
7
/dev/ttyD006
8
/dev/ttyD007
9
/dev/ttyD008
10
/dev/ttyD009
11
/dev/ttyD010
12
/dev/ttyD011
13
/dev/ttyD012
14
/dev/ttyD013
15
/dev/ttyD014
16
/dev/ttyD015
Board 3:
/dev/tty/D032 to
/dev/tty/D047
Board 4:
/dev/tty/D048 to
/dev/tty/D063
*Phone
The dial-up (micro-to-host) telephone number. Include the area code
but not the PBX prefix or country code. A dial-up micro can use this
number to dial the host.
A dial-up micro uses a dynamic list of phone numbers to call the host
on any compatible port that is available. When the port is assigned the
same modem type as the micro, that port becomes compatible.
A port used for direct-communication micros does not require a phone
number. (Leave this field blank for direct-connection micros.) The port
used for dial-up communications requires a phone number.
4.14
Picture Perfect 2.0 Administration Guide
Initial Setup
NOTE
4
If you are configuring a modem port in a Redundant System, please refer to the
Picture Perfect Redundant System Administration Guide for more information.
Line Settings
Baud Rate:
For direct-communication micros, select the baud rate the desired
baud rate. For dial-up micros, 2400 is the required line setting for the
Micro/5 and 9600 is the required line setting for the Micro/5-PX.
Data Bits:
The required line setting is 8.
Stop Bits:
The required line setting is 1 unless a Star COMM modem is attached
to this port. Consult the CASI documentation associated with the Star
COMM modem for its setting.
Parity:
The required line setting is None.
*Modem Type
A port used for direct-communication micros does not require a
modem type (select None). None is the default selection. If modems
are connected, click the Modem Type button to display a picklist of
modems. Select the modem type that matches your modem, then click
Close. For information on setting up modems, see “Modems” on
page 4.4. For information on DIP switch settings, see the appropriate
Installation Guide.
Facility
Picture Perfect 2.0 Administration Guide
Initial Setup
Click the Facility button to display the facilities picklist. Selecting a
facility will allow the administrator to restrict operator access to those
records in a specific facility. For more information, see Chapter 5 Facilities and Facility Profiles.
4.15
Ports
The Network Micro Ports Form
The Network Micro Ports form supports dynamic configuration. This
means that you can configure network micros without having to restart
the Picture Perfect system.
Refer to Figure 4-6 for the Network Micro Ports form.
Setup
! To define a network ports record:
1. Select Devices, then Network Ports.
2. Complete the Network Ports form. For a description of each field, see
“The Network Ports Form” on page 4.16.
3. Click Save.
The Network Ports Form
The following is a list of fields that may require additional information for
you to complete. The list is in the order that the fields appear on the form.
There is no required sequence for you to follow.
Figure 4-6.
Network Micro Ports Form
Description
Type a port description. The ports that you define here will appear in a
picklist on the Micros form so that you can assign a network port to
network micros. (None will automatically appear in the picklist so that
you can indicate no secondary port.)
4.16
Picture Perfect 2.0 Administration Guide
Initial Setup
4
A typical description of a network micro port should allow an
operator to identify it on the ports picklist on the Micros form. It
should also allow the operator to distinguish it from a serial port; for
example, Network Micro 0 Port.
Host Name
Type the host name of the network micro. The host name of the
network micro must be resolved by (listed in) the /etc/hosts file or
a Domain Name Server (DNS). This can be either the IP address or the
name.
Set Facility
Click the Facility button to display the facilities picklist. Selecting a
facility will allow the administrator to restrict operator access to those
records in a specific facility. For more information, see Chapter 5 Facilities and Facility Profiles.
NOTE
FOR FIREWALL USERS: If your installation requires ANY micro and its corresponding host
to communicate through a firewall, the firewall must be configured to allow for connections
through the following range of ports: 6767-7800. See also Appendix C - Firewall
Configuration
Currently the following ports have been designated for use:
Table 4-4: Firewall Port Configuration
Port
Name
Description
6767
Application
Normal operation data port between micro and host.
6768
Key
Port for exchanging DES key information.
6868
Reserved
Future use port. See Appendix C - Firewall Configuration.
7777
Reserved
Future use port. See Appendix C - Firewall Configuration.
Initial Setup
The following products use these ports: Mictool, Picture Perfect and
M/5PX-Network.
Picture Perfect 2.0 Administration Guide
4.17
Printers
Printers
Use the Printers form (Figure 4-7) to add each printer configured during
installation.
Setup
! To define a printer record:
1. Select Devices, then Printers.
2. Complete the Printers form. For a description of each field, see “The
Routings Form” on page 4.21.
3. Click Save.
The Printers Form
Figure 4-7.
Printers Form
Queue
This is the print queue specified when printers were configured
during the installation of Picture Perfect or anytime a printer is added.
Description
A description of the printer, including type, quality, location, etc. as
required (up to 30 alphanumeric characters).
Set Facility
Click the Facility button to display the facilities picklist. Selecting a
facility will allow the administrator to restrict operator access to those
4.18
Picture Perfect 2.0 Administration Guide
Initial Setup
4
records in a specific facility. For more information, see Chapter 5 Facilities and Facility Profiles.
Email
Use the Email form (Figure 4-8) to add e-mail addresses within the system
for the routing of alarms.
When an alarm is generated, a message will be e-mailed to the address
listed in the Email Address field. Each time an alarm is set or reset,
another message will be sent.
NOTE
In order for the Email feature to work properly, the Sendmail subsystem must be
properly configured. See your System Administrator or your IS department for
assistance.
Setup
! To define an Email record:
1. Select Control, then Email.
2. Complete the Email form. For a description of each field, see “The
Routings Form” on page 4.21.
3. Click Save.
! To set up an alias:
1. Open a new terminal window.
2. Change to the root user by typing: su
Enter
3. Using an editor, such as vi, add the new alias to the /etc/aliases
file. Each alias must be unique and must start on a new line. Aliases
are in the form:
Initial Setup
alias: [email protected], [email protected]
For more information, at the command prompt, type: man aliases
Picture Perfect 2.0 Administration Guide
4.19
Email
The Email Form
Figure 4-8.
Email Form with Facility Picklist
Description
The name of the person to whom the e-mail is to be sent, or a
description of the group, if using an alias (up to 30 alphanumeric
characters).
Email Address
The e-mail address to which the alarm is to be sent. If you want the
alarm message to go to multiple addressees, enter a valid e-mail alias.
An alias is used if you wish to have an alarm message go to multiple
addressees. Any alarm messages sent to this address will be handled
by the Sendmail subsystem and routed to the appropriate e-mail
addresses in the e-mail alias.
Phone number
The phone number of the person specified by the e-mail address.
Facility
The facility associated with the person specified by the e-mail address.
Select Facility
Press the Select Facility button to display a picklist of facilities.
4.20
Picture Perfect 2.0 Administration Guide
Initial Setup
4
Routings
Use the Routings form (Figure 4-9) to define a routing. There are eight
predefined routings already entered. The system lets you use these
routings to send messages to a printer, history log, monitor, and/or to
e-mail addresses. The routings you create make up a picklist and are
assigned to various aspects of the system.
Setup
! To define a routing:
1. Select Control, then Routings.
2. Complete the Routings form. For a description of each field, see “The
Routings Form” on page 4.21.
3. Click Save.
The Routings Form
Initial Setup
Figure 4-9.
Routings Form
Description
Describe the type of messages that will be routed. For example, Badge
Activity.
Picture Perfect 2.0 Administration Guide
4.21
Routings
Facility
Click the Facility button to display the facilities picklist. Selecting a
facility will allow the administrator to restrict operator access to those
records in a specific facility. For more information, see Chapter 5 Facilities and Facility Profiles.
Route To
One or more Route To destinations may be selected. A single routing
Description can include multiple routing Destinations as shown in
Table 4-5.
Table 4-5: Routing Descriptions and Destinations
Description
Destination
ALL
Printer
History Log
Monitor
Email
BADGE ACTIVITY
History Log
Monitor
OPERATOR MESSAGES
History Log
DAYTIME ALARM MESSAGES
History Log
Monitor
OVERNIGHT MESSAGES
Printer
History Log
Monitor
Printer
Select Printer to route messages to a printer. Click the Select Printer
button (at bottom of screen) to display the available printers. Select the
desired printers from the picklist, then click Ok.
4.22
Picture Perfect 2.0 Administration Guide
Initial Setup
Figure 4-10.
4
Printer Routing
History Log
Select History Log to route messages to a history log file.
Monitor
Select Monitor to route messages to the Alarm or Activity Monitor.
When the Monitor routing is selected, the Email button is enabled.
Email
Select Email to route message to an e-mail address or alias. Click the
Select Email Address button to display all of the e-mail addresses
currently defined in the system. Select the desired addresses from the
picklist, then click Ok.
Initial Setup
Picture Perfect 2.0 Administration Guide
4.23
Badge Formats
Figure 4-11.
E-Mail Routing
Badge Formats
The format of the encoded badge is identified by a special character
sequence that optionally starts with constant data and always ends with
variable data. It must include a percent sign (%) to mark the beginning of
the variable data and a lower-case “s” to mark the end. The entire Badge
ID must be between 1 and 16 alphanumeric characters long.
Constant data (such as a facility code) is data common to all badges, and
will be entered in front of the % in this field. (Constant data does not
appear in the Badge Encode Number field of the Badges form.)
Variable data identifies the length of the character string required in the
Badge Encode Number field on the Badges form. For example, Badge ID
format 002%7s starts with a three-digit facility code, and its variable string
indicates seven alphanumeric characters; therefore, its entire character
total is 10. Table 4-6 shows other examples.
4.24
Picture Perfect 2.0 Administration Guide
Initial Setup
4
Table 4-6: Badge ID Formats
Badge ID
Format
NOTE
Explanation
Entire
Length
%10s
10-character string of variable data.
10
00%8s
2-character facility code (00) and
8-character string of variable data.
10
0340%8s
4-character facility code (0340) and
8-character string of variable data.
12
1005%6s
4-character facility code (1005) and
6-character string of variable data.
10
%4s
Keypad only.
4
RECOMMENDED: To ensure that the Auto Generate function produces a unique
badge ID number, the variable portion of the Badge ID format must be at least 10
digits.
The system comes with one pre-loaded format, %10s, which is the format
for 10-digit badges. If additional formats are needed, they can be added on
the Badge Formats form (Figure 4-12).
Setup
! To define badge formats:
1. Select Access, then Badge Formats.
2. Complete the Badge Formats form. For a description of each field, see
“The Badge Formats Form” on page 4.26.
3. Click Save.
Initial Setup
Picture Perfect 2.0 Administration Guide
4.25
Badge Formats
The Badge Formats Form
Figure 4-12.
Badge Formats Form
Description
A unique description that identifies the badge format.
This field generates a picklist of badge formats that is used in the
Parameters and Badges forms.
Badge Format
A special character sequence that optionally starts with constant data
and always ends with variable data. It must include a percent sign (%)
to mark the beginning of the variable data and a lower-case “s” to
mark the end. For example: %4s
This field generates a picklist of badge formats that is used in the
Parameters and Badges forms.
Set Facility
Click the Facility button to display the facilities picklist. Selecting a
facility will allow the administrator to restrict operator access to those
records in a specific facility. For more information, see
Chapter 5 - Facilities and Facility Profiles.
4.26
Picture Perfect 2.0 Administration Guide
Initial Setup
4
Parameters
The Parameters form is used to assign system parameters that will be used
by the system during the setup procedures. The first eight fields of the
Parameters form (Node Name to Operator History Size) are already set,
based on the system-installation settings. These should not be changed
unless you are directed to do so by your support representative.
Refer to Figure 4-13 for the top portion of the Parameters form.
Setup
! To define system parameters:
1. Select Control, then Parameters.
2. Complete the Parameters form. For a description of each field, see
“The Parameters Form” on page 4.27.
3. Click Save.
To implement the system parameters you have changed, perform
shutdown and restart procedures using the command line (see “Shutting
Down the Entire System” and “Starting Picture Perfect” on page 3.21).
The Parameters Form
The following is a list of fields that may require additional information for
you to complete. The list is in the order that the fields appear on the form.
There is no required sequence for you to follow.
NOTE
Fields marked with an asterisk (*) are parameters that should only be changed as
directed by your support representative.
Initial Setup
Picture Perfect 2.0 Administration Guide
4.27
Parameters
Figure 4-13.
Parameters Form (Top)
*Node Name
Node name of the host (normally set to NODE 1).
*Xon Threshold
The number of queued messages that control TPS message buffering.
Xon must be smaller than Xoff.
*Xoff Threshold
The number of queued messages that control TPS message buffering.
Xoff must be larger than Xon.
*Shared Memory Size
The size (KBytes) of shared memory used.
*Diagnostic Buffer Size
The size (KBytes) of the diagnostic buffer.
4.28
Picture Perfect 2.0 Administration Guide
Initial Setup
4
Alarm/Badge/Operator History Size
The number of transaction records (alarm, badge, or operator) that can
be stored in the history table or backup table. This value is set
according to the amount of alarm, badge, or operator activity
expected, considering the desired archive frequency. These three fields
are grayed out which means that they are read-only fields. These fields
are set during installation.
Alarm Monitors
This field is reserved for future use. Default is 2 for the current version.
Diagnostic Monitors
This field is reserved for future use. Default is 1 for the current version.
Event Monitors
This field is reserved for future use. Default is 2 for the current version.
Operator Routing
Define an Operator Routing for operator activity. Click the Operator
Routing button to display a picklist of routings. Select the desired
routing, then click Close.
Default Routing
Define a Default Routing to ensure that all messages (alarm and
activity) are routed somewhere. Whenever the routing of a function is
unassigned, the system will use this setting as the default. Click the
Default Routing button to display a picklist of routings. Select the
desired routing, then click Close.
Card Trace Routing
Initial Setup
Define a routing for traced badges. Click the Card Trace Routing
button to display a picklist of routings. Select the desired routing, then
click Close. (See Chapter 25 - Badge Trace for details on this feature.)
Refer to Figure 4-14 for the top middle portion of the Parameters form.
Picture Perfect 2.0 Administration Guide
4.29
Parameters
Figure 4-14.
Parameters Form (Top Middle)
Display Flags
These radio buttons are used to display or hide the Auto Generate
button on the Badges form.
If your system uses magnetic-stripe readers and you want to use this
method to issue badges, select the option to display the Auto Generate
button. Otherwise, select the option to hide this button. See “Position
for Auto-Generate” on page 4.32.
Date Format
Specify the date format of Month (MM), Day (DD), and Year (YY or
YYYY) that the system will use.
Click a radio button to select one system date format. For example, the
date January 02, 2002 can display in any one of the following formats:
MMDDYY
MM/DD/YY
MM/DD/YYYY
DD/MM/YY
DD/MM/YYYY
4.30
010202
01/02/02
01/02/2002
02/01/02
02/01/2002
YYYYMMDD
20020102
YYYY MM DD
2002 01 02
Picture Perfect 2.0 Administration Guide
Initial Setup
YYMMDD
YY-MM-DD
4
020102
02-01-02
Time Format
Specify the way the hour, minutes, and seconds appear in the time of
day (HH:MM:SS or HHMMSS). Time displays in military (24-hour)
format.
Click a radio button to select the system time format. For example,
thirty minutes and 20 seconds after 5 PM can display two different
ways:
17:30:20
173020
Even though the system will display time in one format or the other, it
should be noted that a time value can be entered in either format. It
should also be noted that time values can be entered in abbreviated
format. The only abbreviated formats supported for data entry are the
following:
SS
MMSS
HH:MM
Refer to Figure 4-15 for the bottom middle portion of the Parameters form.
Initial Setup
Figure 4-15.
Parameters Form (Bottom Middle)
Picture Perfect 2.0 Administration Guide
4.31
Parameters
Default Badge Encode Format
This is a required field that represents the default badge encode setting
for the system. Click the Default Badge Encode Format button and
choose a Badge Encode Format from the picklist. If the operator does
not set a badge encode format on the Badges form, this default setting
is used.
Duress Code
Enter the PIN number used to signal duress situations.
Position for Auto-Generate
Enter a number between 59 and 62, which represents the User Field
position (between 1 and 4) that will be used for Auto-Generation on
the Badges form. This number is normally set to 59, which represents
User Field 1. This means that the information entered into User Field 1
on the Badges form will be used to generate the Badge Encode
Number.
For details on using the Auto Generate feature, see “Auto-Generate
Method” on page 14.3.
Image Front End Program
This field will only appear if the optional Image package is installed.
Enter the name of the program and the parameters that are used to
extract a specific image from the photo database used with imaging,
such as Swipe and Show.
Max View Recs
Enter the maximum number of records the system will have the ability
to find and view. This is usually set to 500. This field controls the
number of records shown in a picklist.
CAUTION
This figure is dependent on system memory and number of users. Do not
change this field to a higher number unless authorized to do so by your support
representative. If set too high, the system will use excessive memory and may
slow down and become non-responsive.
Number of Floors
Enter the number of floors (0 to 64) serviced by an elevator associated
with the Elevator Control feature. See Chapter 22 - Elevator Control.
Number of Temporary Categories
The number of category slots available for use for temporary
categories on the Badges form (default is 8). Temporary category slots
4.32
Picture Perfect 2.0 Administration Guide
Initial Setup
4
occupy the highest-numbered category slots. For example, on a system
where the Increased Categories feature is enabled, if the Number Of
Temporary Categories is set to 8, slots 89 through 96 are assigned for
temporary categories. This means that these slots can be used for
either permanent categories or temporary categories. This field is readonly, and is set during installation.
Temporary categories are set (on the Badges form) to be enabled at a
certain date and time, and expire at a certain date and time.
Temporary Category Interval
The temporary category scheduling interval, in minutes. This field is
read-only, and is set during installation. Temporary categories are
scheduled on the hour, then after each interval specified by this value.
For example, if this field is set to 30 minutes (the default value),
temporary categories are scheduled on the hour and on the half-hour.
Temporary Category Offset
This field indicates the time that temporary category scheduling will
begin. For example, if this field is set to 5 minutes (the default value),
temporary category scheduling will begin 5 minutes prior to each
Temporary Category Interval time. This field is read-only, and is set
during installation.
Alarm Monitor Color Scheme
Select one of the two radio buttons, depending on how you want to
implement alarm color.
Processing State
Initial Setup
Select this button if you want all alarms of one state to be of the same
color. The Processing States are Active, Bumped, Notified, Remote,
Pending, and Completed. For example, if you want all Active alarms
to be white text on a red background and all Completed alarms to be
white text on a green background, select this button. See “Alarm
Color, Processing State” on page 8.11.
Alarm Description
Select this button if you want to select text and background colors on
an individual alarm basis. If you choose this option, the Alarm Color
window will be displayed on the Alarms form. See “Alarm Colors” on
page 8.9.
Picture Perfect 2.0 Administration Guide
4.33
Parameters
Record Remove Maximum
Specifies the maximum number of badge records that can be removed
during the Record Remove Interval. It is not required to restart
Picture Perfect or the Badges form when changing this setting.
Record Remove Interval
Specifies a period of time (in minutes) during which a group of badge
records may be removed. The system removes badge records for this
period of time, or until the number of badge records set under Record
Remove Maximum has been reached, whichever comes first. If more
badges are to be removed, the system waits until the beginning of the
next interval, then automatically reinitiates the badge removal process.
This process is repeated until all listed badges have been removed. The
minimum setting is one minute. It is not required to restart Picture
Perfect or the Badges form when changing this setting.
NOTE
The badge removal process is initiated by clicking The Remove function button
on the Badges form. See “Removing Badge Records” on page 14.7.
Number of User Fields
This field displays the number of User Fields that will appear on the
Badges form. User Fields are used for detailed badgeholder
identification. This field is read-only and is set during installation.
Refer to Figure 4-16 for the bottom portion of the Parameters form.
4.34
Picture Perfect 2.0 Administration Guide
Initial Setup
Figure 4-16.
4
Parameters Form (Bottom)
Schedule Updates Database
When a micro runs a schedule, a SUP (Schedule UPdate) message is
sent to the host. This SUP message gets logged in the
/cas/log/sup.mmdd log file where mm is the current month and
dd the day. If this value is set to Yes (recommended), then the
database is updated to reflect the value changed by the schedule.
Remove Alarm Only if Reset
Picture Perfect 2.0 Administration Guide
Initial Setup
This field will alter the operation of the Remove button in the Alarm
Response window. If the No button is selected, the Remove button
will operate normally, that is, it will always be available. If Yes is
selected (recommended), the Remove button will be grayed out unless
the alarm is in reset state. This means that the operator will be unable
to remove the alarm until it has been reset. The exception is alarms
with the Immediate Reset Input control option set. Because these
alarms move instantly into reset state, the Remove button will always
be available.
4.35
Parameters
Enforce Report Permissions
These radio buttons are used if you want to restrict report access to
certain permission groups. By default, report permissions will be
disabled. Select Yes to enable this option.
Number of Badge Categories
This field is read-only and is set during installation. If the Increased
Category feature was selected during installation, 96 categories are
available for assignment to a badge. Otherwise, 32 categories are
available for assignment to a badge. To access an area, a badge must
match at least one category that is assigned to that area.
Number of Area Categories
This field is read-only and is set during installation. If the Increased
Category feature was selected during installation, 32 categories are
available for assignment to an area or an area event. Otherwise, 10
categories are available for assignment to an area or an area event. To
access an area, a badge must match at least one category that is
assigned to that area.
Alarm Filter
Micro
If this radio button is selected, the alarm will be assigned the same
facility as the micro record from which it originated.
Input
If this radio button is selected, the alarm will be assigned the same
facility as the input record with which it is associated.
Input Group
If this radio button is selected, the alarm will be assigned the same
facility as the input group record with which it is associated.
Alarm
If this radio button is selected, the alarm will be assigned the same
facility as the alarm record with which it is associated.
Location
The Location column in the Access Vision Alarm Monitor displays
the name of the door, reader, input, or micro that the alarm originated
from. If this radio button is selected, the alarm will be assigned the
facility of the door, reader, input, or micro displayed in the Location
column.
4.36
Picture Perfect 2.0 Administration Guide
Initial Setup
4
Departments
Use the Departments form (Figure 4-17) to define a department. The
department names entered here form a picklist that will be used on the
Badges form to assign a department to each badge.
Setup
! To define a department record:
1. Select Access, then Departments.
2. Complete the Departments form. For a description of each field, see
“The Departments Form” on page 4.37.
3. Click Save.
The Departments Form
Initial Setup
Figure 4-17.
Departments Form
Description
Enter the identification name of the department to be added (up to 30
alphanumeric characters).
Division
Enter the division of the company to which the department reports.
Picture Perfect 2.0 Administration Guide
4.37
Departments
Location
Enter the physical location of the department, such as Building A.
Manager
Enter the name of the department manager.
User Fields
The User1 and User2 field names can be changed using the User
Customization Tool described in Chapter 31 - User Customization.
Set Facility
Click the Facility button to display the facilities picklist. Selecting a
facility will allow the administrator to restrict operator access to those
records in a specific facility. For more information, see
Chapter 5 - Facilities and Facility Profiles.
4.38
Picture Perfect 2.0 Administration Guide
Initial Setup
4
Personnel Type
Use the Personnel Type form (Figure 4-18) to define different types of
personnel. These entries form a picklist that will be used on the Badges
form to assign a personnel type to each badge. Four personnel types are
already entered into the system: Permanent, Temporary, Contractor, and
Visitor. Additional types can be entered as described below.
Setup
! To define a personnel type record:
1. Select Access, then Personnel Type.
2. Complete the Personnel Type form. For a description of each field, see
“The Personnel Type Form” on page 4.39.
3. Click Save.
The Personnel Type Form
Figure 4-18.
Personnel Type Form
Initial Setup
Description
Enter the identification name of the personnel type to be added (up to
30 alphanumeric characters).
Set Facility
Click the Facility button to display the facilities picklist. Selecting a
facility will allow the administrator to restrict operator access to those
records in a specific facility. For more information, see
Chapter 5 - Facilities and Facility Profiles.
Picture Perfect 2.0 Administration Guide
4.39
Personnel Type
NOTES
4.40
Picture Perfect 2.0 Administration Guide
Facilities and
Facility Profiles
Chapter
5
Facilities
Overview
The Picture Perfect system allows you to group your system database
records according to facilities. A facility can be records associated with a
group of buildings in a city, a building, a floor in a building, a tenant, or a
room on a particular floor in a building.
Facility records are text descriptions of these places. Database records can
be grouped together by assigning them to a common facility. At
installation, a facility, Global, is created and, by default, all database
records are assigned to it.
A Facility Profile is a way of defining the record and field level access
permissions. A default profile is created at installation, called the Global
facility profile. This profile gives full access permission to all forms.
Once a facility profile is defined, it can be associated with a facility and
assigned to a permission. This permission is then assigned to an operator
and determines what records the operator is allowed to access and what
they are allowed to do with them, based on the facility of the particular
record. For example, when the Global facility is paired with the Global
facility profile and assigned to an operator, that operator has full access to
the database records associated with the Global facility.
The following diagram depicts the relationship of the Picture Perfect
tables when setting up facilities in your system. All of the records stored in
the Picture Perfect database are assigned a facility, either Global or
another facility in your system. To determine the records that an operator
can access, facilities are paired with a profile defining the level of access,
and are then assigned to the operator’s permission.
∞
1
1
∞
1
∞
1
1
1. A facility consists of
database records.
2. A permission consists of
profiles paired with
facilities.
3. When an operator is
assigned a permission, their
access to database records
is determined.
Database
records
Figure 5-1.
Facility/Facility Profile Overview
Picture Perfect 2.0 Administration Guide
5.1
What You Will Be Doing
What You Will Be Doing
This chapter describes the following forms and shows you how to link
them to your operators and permissions when using facilities in your
system:
" Facilities
" Facility Profile
" Facility Set Manager
" Linking Facilities, Facility Profiles, Permissions, and Operators
Facilities
Facilities can be assigned to certain records to restrict access to those
records. Each operator can have a unique set of permissions assigned to
him per facility; this is the operator’s Facility Profile. All Picture Perfect
forms support facilities. A facility field is displayed on each form with the
following exceptions:
•
The Alarm Monitor, Activity Monitor, and the Status form, Although
these forms do not have a Facility field, incoming messages are
filtered by facility.
•
Although the following forms do not have a Facility field, access to
them is governed by Facility Profiles:
Parameters
Backup
Restore
Alarm Color
Keys
History
Sql
A default facility is created at installation time, Global, and is assigned to
the default facility profile, Global Facility Profile. If an existing Picture
Perfect system is being upgraded, all existing database records will be
assigned to this facility, unless they are already associated with a facility.
5.2
Picture Perfect 2.0 Administration Guide
Facilities and Facility Profiles
5
The Facility Form
Use the Facility form to create and delete facility records.
Facilities
Figure 5-2.
Facility Form
Description
Enter a text description that defines a logical grouping, such as a
group of buildings, a building, a floor in a building, or a room on a
particular floor in a building.
How to Add or Delete a Facility
! To add a facility:
In addition to the default facility, Global, which is created at installation
time, other facilities may be created to allow an operator access to only
those records in a particular facility.
1. Select Access, then Facility.
2. In the Description field, enter a unique text description to decribe the
facility. For example, Headquarters.
3. Click Save.
! To delete a facility:
Before deleting a facility, you should ask yourself two questions:
What do you want to do with the records that have the facility assigned to them?
You will be given the opportunity to re-assign the facility for those related
records to Global or to change them to an existing facility. If you choose to
re-assign them to an existing facility, you should keep in mind who has
Picture Perfect 2.0 Administration Guide
5.3
Facilities
access to that facility because that operator will now have access to those
records using their existing facility profile.
What operators are already using that facility?
When a facility is deleted, it will remove the facility-to-facility profile
relationships for any operator using that facility. The facility record is
deleted but the facility profile record is left intact. This means you may
need to re-assign the facility profile to a new facility for each operator that
may have been using the deleted facility. Deleting an existing facility will
effectively remove an operator’s access to that facility.
1. Select Access, then Facility.
2. From the toolbar, click Find. Navigate to the facility that you wish to
delete.
3. From the toolbar, click Delete.
Result: The Delete Facility window will display.
Figure 5-3.
Delete Facility Window
4. Select either:
! Change Related Records to Global (-1)
Changes the records in the badge, micro, reader, door, input, input
groups, output, and output group tables, that are using the facility
to be deleted, to the Global Facility ID of -1.
!
Select New Facility for Related Records
Allows the operator to pick a new facility for the records, in the
badge, micro, reader, door, input, input groups, output, and
output group tables, that are currently using the facility to be
deleted. Selecting this option will cause a picklist to display,
allowing you to choose a new facility for those related records.
5. Click Ok.
5.4
Picture Perfect 2.0 Administration Guide
Facilities and Facility Profiles
5
Facility Profiles
A facility profile is a way of defining an operator’s record and field level
access permissions for the Picture Perfect forms. This feature allows an
administrator to grant an operator a different level of permission for each
set of records (Facility) to which he has access. For example, an operator
may be assigned the facility profile, Global, at the one facility which allows
full access to all forms, and the facility profile, Update: Badges, at another
facility which restricts access to updating records on the Badges form.
Facilities
The default facility profile, Global, is created during installation and,
when paired with a facility, gives an operator full access to the associated
database records. Full access is defined as being able to view, update,
insert, and delete at the record level on all Picture Perfect forms. Full
access also grants view and update permission at the field level on the
Badges form and the ability to lock and unlock doors on the Doors form.
NOTE
When the Global facility profile is assigned to the Global facility and assigned
to an operator, the operator has access to all database records in the Global
facility only. The term “Global” defines a default facility or profile; it does not
encompass other facilities.
Picture Perfect 2.0 Administration Guide
5.5
Facility Profiles
The Facility Profiles Form
Use the Facility Profiles form to create and delete facility profiles.
Figure 5-4.
Facility Profile Form
Description
Enter a description (up to 30 characters). This description will appear
in the Facility list box of the Permission form
Menu
The button on the right side of the Menu label lets you select a menu
corresponding to the Picture Perfect Main Menu icons. The Access,
Monitors, Devices , Status, Control, Schedule, Reports, and
Messages buttons, on the right side of the Menu label, control which
Main Menu buttons will display for an operator assigned a
permission with this facility profile. (If you have an optional package
installed, such as Alarm Graphics, an additional button will be
displayed for it.) Each button displays a corresponding list of the
forms that an operator with this permission can be permitted to use. If
no forms are selected from the list, the icon will not be available from
the Picture Perfect Main Menu.
5.6
Picture Perfect 2.0 Administration Guide
Facilities and Facility Profiles
5
Form
The forms displayed are the forms corresponding to the sub-menu
items for the menu displayed on the right side of the Menu label.
Select the one you currently want to work with, for example, Badges.
Select the appropriate View, Update, Insert, or Delete radio button for
each form. If none of the buttons is selected, the form will not be
available to the operator.
Facilities
Form Permission
This section is used to set up the record level permissions for the
selected form. The four toggle buttons allow you to determine the
level of permission of the operator assigned to this facility profile.
Some of these buttons affect the Field Permission columns, on those
forms that use field-level permissions, such as Badges and Doors. For
example if the Form Permission for Update is toggled off, the Field
Permission: Update column will be cleared and unavailable for
selection.
View
Used to determine if the operator will be allowed to view a record
associated with the selected form.
If toggled On, the Field Permission: View column will be
activated on those forms that use field-level permissions.
View is automatically toggled On when the Update, Insert, or
Delete buttons are toggled On.
If View is toggled Off, the Update, Insert, and Delete buttons are
automatically toggled Off.
Update
Used to determine if the operator will be allowed to update a
record associated with the selected form.
If toggled On, the Field Permission: View and Update columns
will be activated on forms that use field-level permissions.
If toggled Off, the Field Permission: Update column buttons are
automatically toggled Off and the column is unavailable on forms
that use field-level permissions. Use this to clear all the toggle
buttons in this column to Off.
Insert
Used to determine if the operator will be allowed to insert or add a
record using the selected form.
Picture Perfect 2.0 Administration Guide
5.7
Facility Profiles
If toggled On, the Field Permission: View and Update columns
will be activated on forms that use field-level permissions.
If toggled Off, and Update and Delete are also toggled Off. On
forms that use field-level permissions, the Field Permission:
Update column buttons are automatically toggled Off and the
column is unavailable. If Update or Delete is toggled On, the Field
Permission: Update column will remain activated.
Delete
Used to determine if the operator will be allowed to delete a record
associated with the selected form.
If toggled On, the Field Permission: View and Update columns
will be activated on forms that use field-level permissions.
If toggled Off, and Update and Insert are also toggled Off. On
forms that use field-level permissions, the Field Permission:
Update column buttons are automatically toggled Off and the
column is unavailable. If Update or Insert is toggled On, the Field
Permission: Update column will remain activated.
Field Permission
This section is used to set up the field level permissions for the Badges
and/or Doors forms. This window becomes active with data when
either Badges or Doors has been selected from the Menu/Form
section.
The data in the Field Permission window is shown in three columns:
Field, View, and Update. This window should be used to set the field
level permissions for the selected form by setting the toggle buttons to
On or Off in the View and Update columns.
Field
This column contains the field description of each of the fields that
can be toggled. The description labels will appear unavailable or
grayed out if neither the Field Permission: View or Update
columns are activated. These can be activated through the Record
Permission toggle buttons. See “Form Permission” on page 5.7.
View
This column contains the toggle buttons that determine if the field
is allowed to be viewed or not from the selected Badges or Doors
form. The Record Permission: View button must be toggled On
for this column to be active.
Toggling a button Off in this column will automatically toggle Off
the associated Update button next to it, if it is On.
5.8
Picture Perfect 2.0 Administration Guide
Facilities and Facility Profiles
5
Update
This column contains the toggle buttons that determine if the field
can be edited or not from the selected Badges or Doors form. The
Form Permission: Update button must be toggled On for this
column to be active.
Toggle On, View column
Facilities
This button will cause all of the buttons in the View column to be
turned On. The View column must be activated for this to take affect.
This means the Record Permission: View button must be toggled On.
Toggle On, View and Update column
This button will cause all of the buttons in the View and Update
columns to be turned On. The View and Update columns must be
activated for this to take affect. This means the Record Permission:
View button, in combination with the Update, Insert, or Delete
buttons, must be toggled On.
NOTE
To toggle Off all the buttons in the View or Update column, use the Record
Permission: View or Update button. Toggling Off the Record Permission:
View button will reset all buttons to Off in the Field Permission: View column
and the Update column, if appicable, since Update implies View. You must
save the record before any changes become permanent.
How to Add a Facility Profile
NOTE
Once created, a facility profile can not be deleted. You can modify the facility
profile record and rename it if desired. The changes are automatically reflected
in any associated records.
! To add a facility profile:
The default facility profile, Global, is created at installation time. Other
facility profiles may be created to limit the way an operator may access
records in a particular facility.
NOTE
Since there are numerous relationships between the different sections of this
form, we recommend you follow the sequence of steps below when completing
the form.
1. Select Control, then Facility Profile.
Picture Perfect 2.0 Administration Guide
5.9
Facility Profiles
2. From the toolbar, click New.
3. In the Description field, enter a unique text description to decribe the
facility profile. For example, Update: Badges.
4. Click the box next to the label, Menu.
Result: A list of menu items will display. These menu items
correspond to the Main Menu icons of Picture Perfect, for example:
Access, Monitors, Devices and so on.
5. Select a Menu item.
Result: In the box below, a list of forms will display. These forms
correspond to the icons displayed when you click the selected Main
Menu icon of Picture Perfect. For example, if you selected Access as the
menu item, the resulting forms would be Areas, Badges, Categories, and
so on.
6. Select the form with which you wish to work.
7. Set the desired Record permissions, View, Update, Insert, or Delete.
8. If the form selected in step 6 was Badges, or Doors, set the desired
Field permissions, View or Update.
9. Repeat step 6 through step 8 for each form in the selected Menu item.
10. Repeat step 5 through step 8 for each Menu item.
11. Click Save.
5.10
Picture Perfect 2.0 Administration Guide
Facilities and Facility Profiles
5
Facility Set Manager
After successfully logging in to Picture Perfect, a list of the facilities
available for selection based on the operator’s facility profiles will display.
If an operator has access to only one facility, it will be automatically
enabled at login.
Facilities
Figure 5-5.
Facility Set Manager
How to Change the Active Facility
! To change the active facility set:
1. If you want to change the active facility in a session, left click on your
desktop to access the Clients menu and select Change Active Facility
Set. The change will not affect forms that are already open.
Figure 5-6.
Clients Menu - Change Active Facility Set
2. Click on a facility to select or deselect it. Or click on Select All or
Deselect All to select or deselect all of the available facility sets.
Picture Perfect 2.0 Administration Guide
5.11
Linking Facilities, Facility Profiles, Permissions, and Operators
3. Click Close. The operator will have access to the records in the
selected facilities, as defined in the facility profiles assigned to them.
Linking Facilities, Facility Profiles,
Permissions, and Operators
When you launch Picture Perfect 2.0, the system is configured by default
with one default facility record, Global, one default facility profile record,
Global, and a permission record, System Administrator. The System
Administrator permission record is by default assigned to the facility
Global.
As you add operators to your system, in order to add or modify records in
a different facility (other than Global), the System Administrator
permission record must be assigned to that specific facility.
Table 5-1: Examples of how Facility Profiles work
Operator
install
John Smith
Jane Doe
5.12
Permission
Record
System Administrator
(responsible for the
system administrative
functions for the entire
system)
Site Administrator
(responsible for the
system administrative
functions for Facility X)
Badge Administrator
Facility Profile
Facility
Result
Global
(allows full access on
all forms)
Global
This combination allows operator, install, to perform all functions on all
records assigned to the Global Facility on all forms.
Global
(allows full access on
all forms)
Facility X
This combination allows operator, install, to perform all functions on all
records assigned to Facility X on all forms.
Global
(allows full access on
all forms)
Facility Y
This combination allows operator, install, to perform all functions on all
records assigned to Facility Y on all forms.
Global
(allows full access on
all forms)
Facility Z
This combination allows operator, install, to perform all functions on all
records assigned to Facility Z on all forms.
Update
(allows update access
on all forms)
Faciltiy X
This combination allows operator, John Smith, to perform update functions
on all records assigned to Facility X on all forms.
View
(allows View only
access on all forms)
Global
This combination allows operator, John Smith, to view all records assigned
to the Global facility on all forms.
Update Badges
(allows update access
to records on the
Badges form)
Facility Y
This combination allows operator, Jane Doe, to update all records
assigned to Facility Y on the Badges form.
View Operator
(allows view access to
records on the
Operator form)
Global
This combination allows operator, Jane Doe, to view all records assigned
to the Global Facility on the Operator form.
Picture Perfect 2.0 Administration Guide
Facilities and Facility Profiles
5
How to Link Facilities, Facility Profiles,
Permissions, and Operators
Perform the following steps to link the facilities, facility profiles,
permissions, and operators.
1. Define the facilities in your system, using the Facility form to describe
the group of records. For example, Facility X, Facility Y, and Facility Z.
Facilities
NOTE
If your system consists of a single facility, you do not need to create additional
facility records.
2. Define facility profiles, using the Facility Profile form to describe the
level of access the operator will have. For example, Full access, View only,
Insert only, or Monitor.
3. Define the permission records required, using the Permissions form to
describe what function the operator will perform. For example, System
Administrator, Site Administrator, Badge Administrator, or Guard.
Then, assign a facility profile to the permission for each facility
required. You can assign the same facility profile to multiple facilities
and permission records. For example, you could assign the Monitor facility
profile to a Guard permission in Facility X and Facility Y as well as to a
Badge Admnistrator in Facility Z.
4. Assign the permission to an operator, using the Operator form. For
example, an operator may be assigned as a Guard at Facility X with a
Monitor profile and at Facility Y with a Full access profile.
On the following pages we will perform the steps necessary to achieve the
result for the operator, Jane Doe, from Table 5-1, “Examples of how
Facility Profiles work,” on page 12.
Jane Doe
Badge Administrator
Update Badges
(allows update access
to records on the
Badges form)
Facility Y
This combination allows operator, Jane Doe, to update all records
assigned to Facility Y on the Badges form.
View Operator
(allows view access to
records on the
Operator form)
Global
This combination allows operator, Jane Doe, to view all records assigned
to the Global Facility on the Operator form.
Picture Perfect 2.0 Administration Guide
5.13
Linking Facilities, Facility Profiles, Permissions, and Operators
Step 1. Defining Facilities
1. Select Access, then Facility.
2. In the Description field, enter a unique text description. For example,
Facility X.
3. Click Save.
4. Repeat step 2 and step 3 for Facility Y and Facility Z.
Result: The Facility records will look similar to the following.
5.14
Figure 5-7.
Facility X
Figure 5-8.
Facility Y
Figure 5-9.
Facility Z
Picture Perfect 2.0 Administration Guide
Facilities and Facility Profiles
5
Step 2. Defining Facility Profiles
! To create the Update: Badges facility profile
1. Select Control, then Facility Profile.
2. In the Description field, type: Update: Badges.
3. Click the box next to the label, Menu.
Facilities
Result: A list of menu items will display.
4. Select as a Menu item: Access
Result: In the box below, a list of forms will display.
5. From the list of forms, select: Badges.
6. For Record permissions, select: Update.
7. To set the desired Field permissions, click: Toggle On, View and Update
column
8. Click Save.
Result: The Update: Badges facility profile record will look similar to the
following.
Figure 5-10.
Update Badge Facility Profile
Picture Perfect 2.0 Administration Guide
5.15
Linking Facilities, Facility Profiles, Permissions, and Operators
! To create the View: Operator facility profile
1. Select Control, then Facility Profile.
2. In the Description field, type: View: Operator.
3. Click the box next to the label, Menu.
Result: A list of menu items will display.
4. Select as a Menu item: Control
Result: In the box below, a list of forms will display.
5. From the list of forms, select: Operator.
6. For Record permissions, select: View.
7. Click Save.
Result: The View: Opeator facility profile record will look similar to the
following.
Figure 5-11.
5.16
View Operator Facility Profile
Picture Perfect 2.0 Administration Guide
Facilities and Facility Profiles
5
Step 3. Defining Permissions and Assigning a Facility Profile
1. Select Control, then Permissions.
2. In the Description field, type: Badge Administrator
3. Click the Facility button and select: Global
4. In the Facility window, double-click on Facility Y.
Facilities
Figure 5-12.
Facility Window
Result: A Facility Profile window will display a list of the defined
facility profile records.
Figure 5-13.
Facility Profile Window
5. From the list, select: Update: Badges
6. Click Ok.
7. Repeat step 4 through step 6, substituting Global in step 4 and View:
Operator in step 5.
Result: In the Facility window, the Current Profile column will reflect
the newly selected profile. In our example, the Facility window will
now look like this:
Picture Perfect 2.0 Administration Guide
5.17
Linking Facilities, Facility Profiles, Permissions, and Operators
Figure 5-14.
Current Profile Column
8. Click Save.
Result: The Badge Administrator record will look similar to the
following.
Figure 5-15.
5.18
Permissions Form
Picture Perfect 2.0 Administration Guide
Facilities and Facility Profiles
5
Step 4. Assign the Permission to an Operator
1. Select Control, Operator.
2. In the User Name field, type: Jane Doe
3. In the Employee ID field, type: 33333
Facilities
4. In the Login Id field, type: jdoe
5. Click the Country button and select: English in US
6. Click the Permission button and select: Badge Administrator<GLOBAL>
Figure 5-16.
Operator Permission Window
7. Click Close to return to the Operators form.
8. Click the Facility button and select: Global
9. Click Close to return to the Operators form.
10. Click Save.
Result: The operator, Jane Doe, has the permission of Badge
Administrator, which allows her to update all badge records assigned
to Facility Y and to view all operator records assigned to the Global
facility.
Picture Perfect 2.0 Administration Guide
5.19
Linking Facilities, Facility Profiles, Permissions, and Operators
The facility <Global>
here is a reference to the
where these records are
stored. It has no bearing
on the facilities this
operator can access
when assigned this
permission.
Figure 5-17.
Operator Form
When Jane Doe logs into Picture Perfect:
•
If she selects Facility Y from the Facilty Manager, her menu options
will look like this:
Figure 5-18.
•
If she selects Global from the Facility Manager, her menu options will
look like this:
Figure 5-19.
5.20
Example: Facility Y Menu Options
Example: Global Facility Menu Options
Picture Perfect 2.0 Administration Guide
Facilities and Facility Profiles
•
5
If she clicks Select All, her menu options will look like this:
Facilities
Figure 5-20.
Example: All Facilities Menu Options
Picture Perfect 2.0 Administration Guide
5.21
Linking Facilities, Facility Profiles, Permissions, and Operators
NOTES
5.22
Picture Perfect 2.0 Administration Guide
Permissions and Operators
Chapter
6
Overview
The Picture Perfect system allows you to manage the system capabilities of
each operator by assigning them certain permissions. For example:
Use Permissions to control:
Which facility profiles are assigned to an operator.
•
Which functions (find, update, and delete) an operator is permitted to
use in each menu.
•
Which categories an operator is permitted to assign to areas and
badges.
•
Which areas an operator is permitted to assign to readers and doors.
•
Which reports an operator is permitted to access.
Permissions and
Operators
•
What You Will Be Doing
This chapter shows you how to create Permission Groups, set up
Permissions, and authorize individual operators to log in and use the
functions associated with their Operator Permission.
Permission Groups
There are two types of permission groups: Area/Category and Report.
An Area/Category permission group defines the categories and areas that
an operator is permitted to assign. The system requires at least one
permission group in addition to the default permission group (All Groups
Allowed). The All Groups Allowed permission group gives an operator
full access to all Category groups and all Area groups. Each permission
group created with the Area/Category type, will appear on both the Area
permission group and Category permission group picklists of the
Permissions form along with the default All Groups Allowed.
A Report permission group can be assigned to reports if the Enforce
Report permissions option is enabled through the Control/Parameters
form. This offers the capability to assign reports to report permission
groups and to restrict operator report access to only those reports that the
operator permission record specifies. The All Groups Allowed
permission group gives an operator full access to all Report groups. Each
permission group created with the Report type will appear on the Report
Picture Perfect 2.0 Administration Guide
6.1
Permission Groups
permission group picklist of the Permissions form along with the default
All Groups Allowed.
CATEGORY AND AREA
CATEGORY AND
AREA
PERMISSION
GROUPS
PERMISSIONS
PERMISSION
GROUPS
REPORT
PERMISSION
GROUPS
REPORT
Figure 6-1.
OPERATOR
Relationship Between Permissions and Permission Groups
If you want to divide responsibilities among operators, create several
different permission groups (a separate permission group for each group
of categories and/or areas). For example: Building 1, Building 2,
Building 3. Then remove the special permission group All Groups
Allowed and assign one or more of the newly created permission groups.
An operator can have permission to assign up to 20 Category and Area
groups and, if enabled, five Report groups.
Refer to Figure 6-2 for the Perm Group form.
Setup
! To define Permission Group records:
1. Select Control, then Perm Group.
2. Complete the Permission Groups form. For a description of each field,
see “The Permission Group Form” on page 6.3.
3. Click Save.
6.2
Picture Perfect 2.0 Administration Guide
Permissions and Operators
6
The Permission Group Form
Figure 6-2.
Perm Group Form
Description
Permissions and
Operators
Type any alphanumeric combination (1 to 30 alphanumeric characters)
for Description. For example, System Administrator
Select One Facility
Click the Facility button to display the facilities picklist. Selecting a
facility will allow the administrator to restrict operator access to those
records in a specific facility. For more information, see Chapter 5 Facilities and Facility Profiles.
Permission Group Type
Area/Category
An Area/Category permission group defines the categories and areas
that an operator is permitted to assign.
Reports
A Report permission group can be assigned to reports if the Enforce
Report permissions option is enabled through the Control/Parameters
form. This offers the capability to assign reports to report permission
groups and to restrict operator report access to only those reports that
the operator permission record specifies.
Picture Perfect 2.0 Administration Guide
6.3
Permissions
Permissions
Use the Permissions form (Figure 6-3) to define the functions that each
operator level is permitted to perform, such as System Administrator,
Badge Administrator, or Alarm Operator. Then that permission can be
assigned to individual operators using a picklist.
Assign the System Administrator permission (a default) to one or more
operators who have total responsibility for the Picture Perfect system and
therefore require all functions.
NOTE
Once an operator is assigned System Permissions, it cannot be altered. To remove the
system permissions, the operator will have to be deleted from Picture Perfect and the
operating system and then added back into the system by creating a new operator record with
the correct permissions.
Setup
! To define permission records:
1. Select Control, then Permissions.
2. Complete the Permission form. For a description of each field, see
“The Permissions Form” on page 6.5.
3. Click Save.
6.4
Picture Perfect 2.0 Administration Guide
Permissions and Operators
6
The Permissions Form
Permissions and
Operators
Figure 6-3.
Permissions Form
Description
Enter the identification name of the permission to be added (up to 30
alphanumeric characters).
Facility
Click the Facility button to display the facilities picklist. Selecting a
facility will allow the administrator to restrict operator access to those
records in a specific facility. For more information, see Chapter 5 Facilities and Facility Profiles.
Permissions
Occupancy Control
Set the Occupancy Control toggle button to on to allow the number of
persons in a controlled space to be monitored, as well as activation of
Two Man Rule enforcement. The standard Two Man Rule (2MR),
when enabled, requires that at least two authorized badge holders
occupy a controlled space at the same time. the Modified Two Man
Picture Perfect 2.0 Administration Guide
6.5
Permissions
Rule (M2MR) further restricts access to controlled space based on
specific M2MR category types.
Enable Remote Login
Set the Enable Remote Login toggle button on to have the ability to
log in through the Picture Perfect Web Browser application from a
remote terminal.
System Permissions
Set the System Permissions toggle button to On to permit an operator
to use the operating system. There are three system permission
functions available.
-
First, this operator has the ability to bring up additional windows
and log on to the system console.
-
Second, this operator has, in addition to the Workspace menu
(accessed by clicking the right mouse button on the root window)
and the Clients menu (accessed by clicking the left mouse button
on the root window), access to the Programs menu which is
accessed by clicking the middle mouse button on the root window.
-
Third, this operator has the use of a Purge button on the alarm
monitor.
Toggle the System Permissions button to Off to restrict access.
Normally, operators should not have access to the operating system.
PPSQL
Set the PPSQL toggle button On to have the ability to create new SQL
reports or modify existing ones. If this button is set to Off, the operator
will only be able to view pre-defined SQL reports.
Permission Groups
Category Permission Group
Click Category Permission Group to display the Perm Group picklist.
Select the permission groups that designate categories this operator
permission is allowed to assign to areas and badges, then click Ok.
You can select up to 20 Category permission groups, or All Groups
Allowed.
Area Permission Group
Click Area Permission Group to display the Perm Group picklist.
Select the permission groups that designate areas for which this
operator permission is allowed to assign readers and doors, then click
Ok. You can select up to 20 Area permission groups, or All Groups
Allowed.
6.6
Picture Perfect 2.0 Administration Guide
Permissions and Operators
6
Report Permission Group
If enforcement of report permissions is enabled, the Report permission
group button is available. Click this button to display the Perm Group
picklist. Select the permission groups that designate reports this
operator permission is allowed to access, then click Ok. You can select
up to five Report permission groups.
The assigned Area permission groups and Category permission
groups restrict an operator’s badge-issue functions. For example, in
Figure 6-4, the Badge Admin - Plant operator permission is permitted
to issue badges to Plant Building 1 and Plant Building 2 areas and
categories; no permission is granted to issue badges for the
Engineering Perm Group, the Purchasing Perm Group, etc. The Badge
Admin - Plant permission allows the operator to issue badges only to
plant employees.
Permissions and
Operators
Figure 6-4.
Permissions Form with Picklist for Badge Admin - Plant
If your site does not require the kind of operator restrictions shown in
Figure 6-4, use the default permission group All Groups Allowed. For
example, a Badge Administrator can be assigned the permission group
All Groups Allowed which gives this operator the permission to issue
badges to all area and category permission groups without
restrictions.
Picture Perfect 2.0 Administration Guide
6.7
Permissions
Facility Profile Window
This window displays the active facilities, currently defined. If the
facility has not been associated with a facility profile, it will appear
with the word <BLANK> after it. If the facility has an associated
profile, that profile description will appear after it. Select a facility and
click on it to display a facility profile picklist.
Figure 6-5.
Faclity Profile Picklist
If you want to assign a facility profile to this facility, select a profile
from the list, and click OK.
6.8
Picture Perfect 2.0 Administration Guide
Permissions and Operators
6
Operators
Use the Operators form (Figure 6-6) to assign Operator permissions to
individual operators and to give them login capabilities on the system.
NOTE
Always have more than one operator with System Administrator permissions. Deleting an
operator only deletes that operator from the Picture Perfect system and not from the
operating system.
Setup
! To define an operator record:
1. Select Control, then Operators.
2. Complete the Operators form. For a description of each field, see “The
Operators Form” on page 6.9.
NOTE
When adding a new operator in Linux, you must enter a password before saving the
record.
Permissions and
Operators
3. Click Save.
The Operators Form
Figure 6-6.
Operators Form
Picture Perfect 2.0 Administration Guide
6.9
Operators
User Name
The name of the operator.
Employee ID
The Employee ID must be the same as Employee ID on the badge.
Login ID
The login ID is case sensitive, and must contain no spaces. Lower case
is recommended. Each operator must have a unique Login ID.
Country
Click the Country button to display the Country picklist. If you have
the National Language Support (NLS) option, the country selected
determines the language displayed on your screen. The picklist is
created at system installation according to available languages.
Figure 6-7.
Country Picklist
Permission
Click the Permission button to display the Permission picklist
(Figure 6-8). The permissions displayed were created using the
Permissions form. See “The Permissions Form” on page 6.5. Select the
desired permission for this operator, then click Close.
6.10
Picture Perfect 2.0 Administration Guide
Permissions and Operators
Figure 6-8.
6
Permission Picklist
Change Password
Figure 6-9.
NOTE
NOTE
Permissions and
Operators
Click the Change Password button to display the Password pop-up
window (Figure 6-9). Type in the new password, then click Ok. When
prompted, re-enter the password for verification, then click Ok. Notice
that the # character displays as you type; the actual password is not
visible. If you are changing an existing password, you will have to
enter the old password before being prompted to enter the new one.
Change Password Window
When adding a new operator in Linux, you must enter a password before saving the
record.
Foreign language characters (for example, á, ê, etc.) cannot be used within
passwords.
Picture Perfect 2.0 Administration Guide
6.11
Operators
Set Facility
Click the Facility button to display the facilities picklist. Selecting a
facility will allow the administrator to restrict operator access to those
records in a specific facility. For more information, see Chapter 5 Facilities and Facility Profiles.
6.12
Picture Perfect 2.0 Administration Guide
Alarm/Activity Monitor
Routing
Chapter
7
Overview
This chapter describes the Alarm/Activity Monitor Routing feature and
applies only to X-Terminal and X-emulation workstations and not to Web
browser workstations. The Picture Perfect administrator may configure
the system such that one set of alarms and activity is routed to a given
terminal while another set of alarms and activity is routed to a different
terminal. This allows Picture Perfect operators to monitor alarms and
activity that affect their own areas.
For example, assume a Picture Perfect site consist of two buildings:
Building A and Building B. In each of these buildings there is a terminal at
an alarm monitoring station: Terminal A and Terminal B. During the day,
two operators monitor the site; one operator in Building A, and one
operator in Building B. At night, only one operator monitors the site from
Building A.
One possible configuration could be that the daytime operators monitor
alarms and activity that occur in their respective building, and the
nighttime operator would monitor alarms and activity that occur in both
buildings. This configuration could be extended such that, during the day,
if an operator did not respond to an alarm in his building, the alarm
would be “bumped” to the terminal in the other building.
Alarm Activity Monitor
Routing
The Alarm/Activity Monitor Routing feature allows for this type of
configuration. It should be noted that Alarm/Activity Monitor Routing
configuration is required only if you wish to restrict the displaying of the
alarms and activity on a terminal. In other words, if you want all alarms
and activity to be displayed on all terminals, you do not need to configure
this feature. It should also be noted that activity routing is restricted to
badge activity and digital input (DI) activity. Other activity, such as
operator activity, cannot be routed to a specific terminal.
Prerequisites
The following Picture Perfect forms are prerequisites:
Forms
TERMINALS
Purpose
To define the terminal displays throughout
the system.
Picture Perfect 2.0 Administration Guide
7.1
What You Will Be Doing
What You Will Be Doing
This chapter shows you how to configure the Alarm/Activity Monitor
Routing feature. To get ready to configure Alarm/Activity Monitor
Routing using Picture Perfect forms, first plan your alarms on paper. Use
your worksheets to document alarm locations (inputs), input groups,
output devices, and alarm priorities. From this information, you should
partition your site into sections that represent the various sets of alarms
and activity.
Configuring Alarm/Activity Monitor Routing requires three steps:
1. Enter route definitions on the Route Definitions form.
2. Set up terminals to which alarms will be routed on the Route Points
form.
3. Set a route definition for each alarm on the Alarms form.
See Chapter 8 - Alarm Activity Messages and Alarms.
7.2
Picture Perfect 2.0 Administration Guide
Alarm/Activity Monitor Routing
7
Route Definitions
Creating route definitions is the first step in configuring Alarm/Activity
Monitor Routing. In general, a route definition corresponds to one section
of your Picture Perfect site. In our example in “Overview” on page 7.1, we
partitioned the site into two sections: Building A and Building B.
Refer to Figure 7-1 for the Route Definitions form.
Setup
! To create a route definition record:
1. Select Control, then Route Definitions.
2. Click New.
3. Complete the Route Definitions form. For a description of each field,
see “The Route Definitions Form” on page 7.3.
4. Click Save.
5. Click New to add another route definition.
The Route Definitions Form
Alarm Activity Monitor
Routing
Figure 7-1.
Route Definitions Form
Picture Perfect 2.0 Administration Guide
7.3
Route Points
Description
Type the route definition that will be used for alarm and activity
routing (up to 30 alphanumeric characters). These entries create a
Route Definitions picklist that will be used in the Route Points form,
the Alarms form, the Inputs form, and the Areas form.
Select Facility
Click the Facility button to display the facilities picklist. Selecting a
facility will allow the administrator to restrict operator access to those
records in a specific facility. For more information, see
Chapter 5 - Facilities and Facility Profiles.
Route Points
Creating route points is the next step in configuring Alarm/Activity
Monitor Routing. A route point indicates to which terminals alarms and
activity are routed and when they are routed. A route point also indicates
which alarms are bumped and when they are bumped. A route point
belongs to only one route definition; but several route points can belong to
the same route definition.
In the example in “Overview” on page 7.1, there are three route points: (1)
alarms/activity that occur in Building A, (2) alarms/activity that occur in
Building B during the day, and (3) alarms/activity that occur in Building B
at night.
Refer to Figure 7-2 for the Route Points form.
Setup
! To create a route point record:
1. Select Control, then Route Points.
2. Complete the Route Points form. For details on completing each field,
see “The Route Points Form” on page 7.5.
3. Click Save.
4. Click New to add another Route Point.
7.4
Picture Perfect 2.0 Administration Guide
Alarm/Activity Monitor Routing
7
The Route Points Form
The following is a list of fields that may require additional information for
you to complete. The list is in the order that the fields appear on the form.
There is no required sequence for you to follow.
Alarm Activity Monitor
Routing
Figure 7-2.
Route Points Form
Route Definition
This field identifies the current route point’s route definition. Click the
Route Definition button to display a picklist. Select the desired Route
Picture Perfect 2.0 Administration Guide
7.5
Route Points
Definition, then click Ok. This is a required field. In our example, one
route definition is Building A.
Facility
Click the Facility button to display the facilities picklist. Selecting a
facility will allow the administrator to restrict operator access to those
records in a specific facility. For more information, see
Chapter 5 - Facilities and Facility Profiles.
Route To Terminals
This field identifies which terminals are affected by this route point.
The number of terminals selected is displayed. Click the Route To
Terminals button to display a picklist of terminals. One or more
terminals may be selected for this route point. A maximum of 32
terminals may be selected for a route point. As terminals are selected
or unselected from the picklist, the Route To Terminals item count is
updated. Click the Close button when you have finished selecting the
terminals. This is not a required field; if no terminals are selected,
alarms and activity with this route point’s route definition will not be
routed to a terminal.
Route to Email
This field identifies which e-mail addresses are associated with the
route point. Click the Route to Email button to display a picklist of
e-mail addresses. One or more addresses may be selected. Click the
Close button when you have finished selecting the addresses. This is
not a required field; if no addresses are selected, alarms and activity
with this route point’s route definition will not be routed to an e-mail
address. If an e-mail address is selected, the system will not route the
alarm to any terminals.
Start Time
This field identifies when a scheduled route point becomes enabled.
The format of the value entered should conform to the time format in
system configuration. If this value is blank, it defaults to zero which
represents midnight. This field is required only if you want to use
scheduled route points that begin at times other than zero.
Stop Time
This field identifies when a scheduled route point becomes disabled.
The format of the value entered should conform to the time format in
system configuration. If this value is blank, it defaults to midnight.
This field is required only if you want to use scheduled route points
that end at times other than midnight.
7.6
Picture Perfect 2.0 Administration Guide
Alarm/Activity Monitor Routing
7
Sun - Sat
These toggle buttons indicate what days of the week this route point
should be enabled. Select the desired days of the week by clicking the
appropriate toggle button. If no days are selected, alarms and activity
with this route point’s route definition will not be routed.
Bump To Terminals
This field identifies the route point’s bump terminals. The number of
terminals selected is displayed. Click the Bump To Terminals button
to display a picklist of terminals. One or more terminals (up to 32) may
be selected as a bump terminal. As terminals are selected or unselected
from the picklist, the Bump To Terminals item count is updated. Click
the Close button when you have finished selecting the bump
terminals. This is not a required field; if no terminals are selected,
alarms with this route point will not be bumped. This field should be
ignored if you are creating a route point that is used only for Activity
Monitor Routing.
Bump to Email
This field identifies which e-mail addresses are associated with the
route point. Click the Bump to Email button to display a picklist of
e-mail addresses. One or more addresses may be selected. Click the
Close button when you have finished selecting the addresses. This is
not a required field; if no addresses are selected, alarms with this route
point will not be bumped to an e-mail address. If an e-mail address is
selected, the system will not bump the alarm to any terminals.
Bump Time
Alarm Activity Monitor
Routing
The value in this field must be in seconds, and must be greater than
zero. The operator has this number of seconds to respond to the alarm
before the alarm is bumped to the terminals selected in Bump To
Terminals. This field should be ignored if you are creating a route
point that is used only for Activity Monitor Routing. The default
value in this field is blank, meaning that there is no bump time.
Mode
This field identifies the system mode under which this route point is
valid. Click the Mode button to display the Mode picklist. Select the
desired mode, then click Ok. This is not a required field. If this field is
blank, the route point is valid for all system modes.
Picture Perfect 2.0 Administration Guide
7.7
Route Points
If you are following the setup sequence recommended in Chapter 3, the Mode
picklist will only show the default Normal and Holiday modes. See “Creating
Modes” on page 16.2 to create your own custom modes; then return to this
procedure to assign routing points for that mode.
NOTE
Route Point Rules and Restrictions
There may be times when you question whether an alarm should or
should not appear on the Alarm Monitor. Since a system configured for
Alarm /Activity Monitor Routing may consist of many route points, it is
possible for two route points to have conflicting route terminals. For
example, assume that Route Point A and Route Point B belong to Route
Definition A. Route Point A explicitly routes all alarms to no terminals,
whereas Route Point B explicitly routes all alarms to all terminals. In this
case, Route Point B has precedence. Because of the many possible
combinations of terminals, start times, stop times, bump terminals, bump
times, and modes, it may be confusing as to where an alarm or activity
should be routed. The following lists some rules and restrictions that may
be used to configure or troubleshoot Alarm/Activity Monitor Routing.
7.8
•
If there is a terminal route conflict between two route points, the route
point that displays the alarm has precedence.
•
If an alarm is supposed to be bumped to a given terminal and two
different bump times are given in two different route points for the
alarm’s route definition, the shortest length of time determines when
the alarm is bumped.
•
Once an alarm is displayed on a terminal, only the operator can
remove it. The disabling of a scheduled route point will not remove an
existing alarm from the Alarm Monitor.
•
When a scheduled route point is enabled, affected terminals are
updated immediately. This event may cause alarms that were already
in the system to appear on the Alarm Monitor.
•
Alarms and activity with no route definitions are displayed on all
Alarm/Activity Monitors.
•
If a route definition consists of scheduled route points, every time slot
throughout the day and week must be accounted for by a scheduled
route point. Times that are not accounted for will default to all
terminals in the system. This means that if a route definition has a
scheduled route point from 8:00:00 to 17:00:00, then alarms and
activity with that route point’s route definition will be routed to only
those terminals listed in the route point during that time period. But
there are two other time periods for which there are no route points:
Picture Perfect 2.0 Administration Guide
Alarm/Activity Monitor Routing
7
23:59:00 to 8:00:00 and 17:00:00 to 23:59:00. During these two time
periods, alarms and activity with this route definition will be routed to
all terminals in the system.
•
The Alarm Monitor will reflect any changes made to the Alarm
Monitor Routing configuration. Database updates will, however, only
add entries to the Alarm Monitor; they cannot remove entries.
Other Applications
The Alarm Monitor Routing feature not only affects the Alarm Monitor;
it also affects other programs that use the Alarm Monitor Buffer. These
programs include the Alarm Alerts pop-up and the Alarm Graphics
Monitor program. The same rules that apply to the Alarm Monitor also
apply to these two applications. The Alarm Alert program will display
only if alarms can be viewed on the Alarm Monitor. The Alarm Graphics
Monitor will not flash an object unless it can be viewed on the Alarm
Monitor.
Alarm Activity Monitor
Routing
Picture Perfect 2.0 Administration Guide
7.9
Other Applications
NOTES
7.10
Picture Perfect 2.0 Administration Guide
Alarm Activity Messages and
Alarms
Chapter
8
Alarm Activity Messages
and Alarms
Overview
The Picture Perfect system monitors digital inputs (DIs) for sensors or
contacts and drives digital outputs (DOs) for alarms and output devices.
The system notifies the operator of alarms using pop-up windows, and in
a scrolling window called the Alarm Monitor.
When an alarm occurs, the system beeps and displays a pop-up window
on each terminal configured to receive that alarm, and thereby notifies the
operator. The operator then displays alarm instructions by selecting the
alarm from a scrolling list on the Alarm Monitor. The operator records a
response to an alarm either by selecting a pre-written alarm response from
the Alarm Response window or by typing a response.
Each alarm can be configured to notify the operator as to what caused the
alarm, what actions are required, and what alarm responses the operator
can select to describe actions taken. Each alarm’s priority can be defined so
that if alarms occur simultaneously, they display on the Alarm Monitor in
the order of their importance. Priorities range from 1 (highest) to 500
(lowest). Alarms that have the same priority show the alarm that occurred
latest at the top.
For information on how to configure a terminal to receive alarms, see
“Terminals” on page 4.2.
Prerequisites
The following Picture Perfect forms are prerequisites:
Form
Purpose
PRINTER
ROUTINGS
To log alarms to a printer and to display on the
Alarm Monitor.
INPUT GROUPS
INPUTS
To allow inputs to activate (as groups) when
an alarm condition occurs.
ROUTE DEFINITIONS
ROUTE POINTS
To allow area activity monitor routing for
individual alarms.
Picture Perfect 2.0 Administration Guide
8.1
What You Will Be Doing
What You Will Be Doing
This chapter shows you how to write instructions and responses for an
alarm using the Messages and Responses forms, and how to set up an
alarm.
To get ready to configure alarms using Picture Perfect forms, first plan
your alarms on paper. Use your worksheets to document alarm locations
(inputs), input groups, output devices, and alarm priorities.
Alarm Instructions
Use the Messages form (Figure 8-1) to write alarm instructions that will
display when the various alarms occur, and when they reset. Keep in
mind that the same alarm may occur at different times of the day or week.
Your instructions (who to call, who to dispatch) may change depending
on the shift. These alarm messages appear in a picklist that is used in the
Alarms form.
Setup
! To create alarm instructions:
1. Select Messages, then Messages.
2. Click New.
3. Complete the Messages form. For a description of each field, see “The
Messages Form” on page 8.3.
4. Click Save.
5. Click New to create another alarm instruction.
8.2
Picture Perfect 2.0 Administration Guide
Alarm Activity Messages and Alarms
8
The Messages Form
Alarm Activity Messages
and Alarms
Figure 8-1.
Messages Form
Alarm Message
Type an alarm instruction for the operator to follow (up to 60
alphanumeric characters). You can assign up to five messages to each
alarm. Write generic messages that are common to most of your
alarms. For example, a forced-door alarm on a perimeter door should
use a generic alarm instruction such as FORCED DOOR - SEND
SECURITY GUARD, and a response message such as GUARD
DISPATCHED.
Facility
Click the Facility button to display the facilities picklist. Selecting a
facility will allow the administrator to restrict operator access to those
records in a specific facility. For more information, see
Chapter 5 - Facilities and Facility Profiles.
Picture Perfect 2.0 Administration Guide
8.3
Alarm Responses
Alarm Responses
Use the Responses form (Figure 8-2) to write alarm responses that the
operator can select when responding to an alarm. The system allows the
operator to enter multiple responses to each alarm.
Create at least one response message that is appropriate for all alarms. For
example, ALARM ACKNOWLEDGED.
Setup
! To create alarm responses:
1. Select Messages, then Responses.
2. Click New.
3. Complete the Responses form. For a description of each field, see “The
Responses Form” on page 8.4.
4. Click Save.
5. Click New to create another alarm response.
The Responses Form
Figure 8-2.
Responses Form
Alarm Response
Type an alarm response for the operator to use (up to 60 alphanumeric
characters). These alarm responses appear in a picklist that is used
8.4
Picture Perfect 2.0 Administration Guide
Alarm Activity Messages and Alarms
8
when the operator responds to an alarm. When the operator selects a
response, the response and the alarm event automatically route to the
log. Pre-written responses save time, but if none of the responses on
the picklist are appropriate, the operator can type a unique alarm
response.
Facility
Alarm Activity Messages
and Alarms
Click the Facility button to display the facilities picklist. Selecting a
facility will allow the administrator to restrict operator access to those
records in a specific facility. For more information, see
Chapter 5 - Facilities and Facility Profiles.
Alarms
Use the Alarms form to define each alarm—both physical alarms (such as
door forced open) and logical alarms (such as invalid badge). Define the
alarm priority, whether or not it can be scheduled, how the alarm inputs
and outputs reset, where it is routed, and which alarm instructions display
when the alarm occurs. These entries form a picklist that is used in the
Input Groups form, where alarms are assigned to a specific input group.
(See “The Input Groups Form” on page 9.4.)
Setup
! To define an alarm:
1. Select Devices, then Alarms.
2. Click New.
3. Complete the Alarms form. For details on completing each field, see
“The Alarms Form” on page 8.6.
4. Click Save.
5. Click New to add another alarm.
Picture Perfect 2.0 Administration Guide
8.5
Alarms
The Alarms Form
The following is a list of fields that may require additional information for
you to complete. The list is in the order that the fields appear on the form.
There is no required sequence for you to follow.
Refer to Figure 8-3 for the Alarms form.
Figure 8-3.
Alarms Form
Description
Type a description for this alarm (up to 30 alphanumeric characters).
Priority
Select an alarm priority so that when several alarms occur
simultaneously, this alarm displays in order of priority. Highest
priority is 1 and lowest is 500. Slide the scroll bar until the number you
want to select appears. You may also use the up arrow/down arrow
keys to increase or decrease the priority level.
8.6
Picture Perfect 2.0 Administration Guide
Alarm Activity Messages and Alarms
NOTE
8
One strategy is to leave gaps between the priority numbers so that when you
add alarms later, you will not have to re-assign priorities among the existing
alarms. The same priority number can be assigned to more than one alarm.
Controls
Alarm Activity Messages
and Alarms
This box contains two lists. The first list has toggle buttons that allow
multiple selections. Select any or all of the following options:
Alarm Online
Toggle this button On if you want this alarm to occur when an
associated Input Group is activated.
NOTE
Do not click this button until the alarm is ready to be brought online.
Inhibit Schedule Changes
Toggle this button On if you want to inhibit schedule changes for this
alarm. Otherwise, the system implements alarm schedules created
using the Alarm Events form.
You may want to inhibit schedule changes for an alarm if no schedules
yet exist for alarms, or if you are not ready to implement the schedules
you have created.
Immediate Reset Input
Toggle this button On if you want the system to reset this alarm as
soon as an associated input group triggers this alarm.
Only “Logical” alarms, such as invalid, suspended, unknown, or lost
badges, must have this button On, as there is no reset condition for
this type of alarm.
Immediate reset allows the operator to remove (clear) an alarm
without waiting for the reset condition.
Immediate Dial Required
This button is used for dial-up micros only. Toggle this button On if
you want the associated micro to dial the host immediately when this
alarm condition occurs. See “Example of Direct Communication - Unidirectional Micros” on page 10.4 of Chapter 10 - Micros for
information on configuring micros for this ability. If you toggle this
button On for a direct connect micro, it will ignored.
The second Controls list has radio buttons that allow only one selection.
Select one button to define how associated outputs reset.
Picture Perfect 2.0 Administration Guide
8.7
Alarms
Auto Reset Outputs
Click this button to allow the system to automatically reset any output
groups associated with this alarm (when the input resets). The system
resets any devices (lights, sirens, etc.) operated by outputs in an output
group.
For example, you may decide to use an auto reset for an output device
(such as a camera) that requires toggling on or off.
NOTE
See “Outputs Form with Micro and Output Group Picklists” on page 12.8 and
“Reset on Input” on page 12.8.
Manual Reset Outputs
Click this button to require an operator to manually reset any outputs
associated with this alarm. The system resets any devices associated
with the alarm. Any devices (lights, sirens, etc.) operated by outputs
stay on until manually reset.
For example, you may decide to use a manual reset for a motion sensor
that activates floodlights in a parking lot. The manual reset requires
the operator to turn the output off using the Output button on the
Alarm Response window.
Duration Reset Outputs
Click this button to allow the system to reset any outputs associated
with this alarm when the output duration time elapses. Any devices
(lights, sirens, etc.) operated by outputs stay on for the duration time
(set on the Outputs form).
For example, you may use a duration reset for an alarm that triggers
flood lights to go on. The time duration can be set for the maximum
amount of time required to implement the alarm instructions.
NOTE
See “Outputs Form with Micro and Output Group Picklists” on page 12.8 and
“Reset on Input” on page 12.8.
Both the Alarms form and the Outputs form define reset methods for
outputs. Output resets can be overridden as follows:
8.8
•
A Manual Reset of an output overrides any other reset method that is
defined for that output. For example, if the Outputs form specifies
Reset On Duration for an output, but the Alarms form assigns it
Manual Reset, the Manual Reset overrides.
•
A Duration Reset overrides an Auto Reset defined for an output. For
example, if the Alarms form specifies Auto Reset for an output, but
Picture Perfect 2.0 Administration Guide
Alarm Activity Messages and Alarms
8
the Outputs form assigns it Reset On Duration, the Duration Reset
overrides.
•
A Duration Reset overrides a Reset On Input for an output. If the
Outputs form defines a Reset On Input for an output, but the Alarms
form assigns it Duration Reset, the Duration Reset overrides.
Route Definition
Alarm Activity Messages
and Alarms
The selected monitor routing is displayed here. Click the Route
Definition button to display the Route Definitions picklist. This
picklist allows the operator to specify a route definition from the
Route Definitions form to route alarms to specific monitors. If this
field is left blank, this alarm will be routed to all terminals.
Facility
Click the Facility button to display the facilities picklist. Selecting a
facility will allow the administrator to restrict operator access to those
records in a specific facility. For more information, see Chapter 5 Facilities and Facility Profiles.
Alarm Instructions
The selected Alarm Instructions for this alarm are displayed here. The
selected messages will appear as instructions to the operator on the
Alarm Monitor when this alarm is activated.
Click the Set Alarm Instructions button to display a picklist. Select up
to five alarm instructions, then click Ok. See Figure 8-4. Alarms Form
with Color Palette, Alarm Instructions, and Alarm Routing Picklist on
page 8.10.
Alarm Routing
The selected alarm routing is displayed in the Alarm Routing picklist
(Figure 8-4).
Click the Set Alarm Routing button to display the picklist. Select one
alarm routing, then click Ok.
NOTE
The Monitor should always be included in the routing choice of an alarm. If an
alarm is not routed to the Monitor, the operator cannot respond to the alarm.
Alarm Colors
The Alarm Color box of the Alarm form will appear only if you have
selected Alarm Description in the Alarm Monitor Color Scheme box
Picture Perfect 2.0 Administration Guide
8.9
Alarms
of the Parameters form. This box contains the Foreground Index and
Background Index buttons. Refer to Figure 8-4 for the color palette.
Foreground Index
Click the Foreground Index button to display a palette of colors. Select
the desired color for the text of the alarm message that will be
displayed on the Alarm Monitor.
Background Index
Click the Background Index button to display a palette of colors.
Select the desired color for the background of the alarm message that
will be displayed on the Alarm Monitor.
When finished using the palette, click Ok.
After you have made your selections, the Alarm Color field will
display the colors you have chosen for this alarm.
Figure 8-4.
8.10
Alarms Form with Color Palette, Alarm Instructions,
and Alarm Routing Picklist
Picture Perfect 2.0 Administration Guide
Alarm Activity Messages and Alarms
8
Alarm Color, Processing State
It is possible to define the colors that will be used in the Alarm Monitor so
that the color scheme reflects the alarm state. Each alarm in the Alarm
Monitor will have a foreground and background color based on its
processing state and logical state. This option will be used if Processing
State is selected in the Alarm Monitor Color Scheme box of the
Parameters form.
Alarm Activity Messages
and Alarms
Setup
! To set Processing State colors:
1. Select Control, then Alarm Color.
2. Use the color palette or type a numeric value in each box to indicate
the color desired. Numeric values range from 0 to 127. The same color
palette shown in Figure 8-4 is used for this setting.
3. Click the Save function button to save the settings.
4. Click the Quit function button to close the Alarm Color window.
Once these changes are made, the next alarm that comes in will have the
new colors.
Picture Perfect 2.0 Administration Guide
8.11
Alarm Color, Processing State
The Alarm Color Form
Figure 8-5.
Alarm Color Window
The Alarm Color window is used to set foreground and background
colors for each possible combination of alarm logical and processing
states. The logical states are: Set, Reset, and Tamper. The processing states
are: Active, Bumped, Notified, Remote, Pending, and Completed and are
defined as follows:
Active
Alarms that are not yet acknowledged.
Bumped
Alarms received by the alarm monitor (a specific terminal) that are not
acknowledged in a defined amount of time, and are sent to another
terminal defined by the user.
Notified
Used by NAN (Network Alarm Notification) alarms that are received
by the alarm monitor (on a subhost), but are not acknowledged in a
8.12
Picture Perfect 2.0 Administration Guide
Alarm Activity Messages and Alarms
8
defined amount of time, and are forwarded (through a pop-up login
screen) to a pre-defined terminal.
Remote
Used by RAN (Remote Alarm Notification) alarms that are received by
the alarm monitor, but are not acknowledged in a defined amount of
time, and are forwarded to a configured remote non-Picture Perfect
system.
Alarm Activity Messages
and Alarms
Pending
Alarms that are acknowledged but not removed.
Completed
Alarms that are removed (still displayed on the monitor), waiting for a
physical reset.
Picture Perfect 2.0 Administration Guide
8.13
Alarm Color, Processing State
NOTES
8.14
Picture Perfect 2.0 Administration Guide
Input and Output Groups
Chapter
9
Overview
The Picture Perfect system monitors digital inputs (DIs) for contacts and
drives digital outputs (DOs) for controlling output devices.
Outputs are triggered when associated inputs activate an input group.
Outputs can operate devices such as door strikes, bells, and lights.
Input groups trigger output groups when the system detects the inputs as
“true”. Inputs may be physical connections to a microcontroller (micro) or
logical events such as a transaction buffer overflow or an invalid access
attempt.
Prerequisites
The following Picture Perfect forms are prerequisites:
Input and Output Groups
Forms
Purpose
ALARMS
To allow Input Groups to be assigned to alarms.
ROUTE DEFINITIONS
ROUTE POINTS
To allow area activity monitor routing for DIs.
What You Will Be Doing
This chapter shows you how to add (or change) output groups and input
groups.
Output groups and input groups include description fields that describe
the function or effect of the record. The description becomes part of the
transaction message, telling the monitoring operator what happened and
where. One part of this description may include non-technical language
for operator information, and the other part may include a wiring location.
Output Groups
Before you define individual outputs, you must create output groups to
which individual outputs can be assigned. When an output group
triggers, all outputs assigned to the group activate. (An input group
triggers one or more output groups.) Link selected outputs together by
assigning the same output group to each output (on the Outputs form).
Picture Perfect 2.0 Administration Guide
9.1
Output Groups
NOTE
An output cannot belong to more than one output group; but more than one output
can be assigned to one output group.
Refer to Figure 9-1 for the Outgroups form.
Setup
! To add an output group record:
1. Select Devices, then Outgroups.
2. Click New.
3. Complete the Outgroups form. For a description of each field, see
“The Outgroups Form” on page 9.2.
4. Click Save.
The Outgroups Form
Figure 9-1.
OutGroups Form
Description
Type a description for each output group (up to 30 alphanumeric
characters). You can write descriptions for output group names to
reflect how the outputs in the group function. For example:
001-0-01 FIRE OUTPUT DEVICE
9.2
Picture Perfect 2.0 Administration Guide
Input and Output Groups
9
001-0-02 PERIMETER SURVEILLANCE DEVICE
Facility
Click the Facility button to display the facilities picklist. By default, the
output group record will be assigned the same facility as the micro to
which the door is assigned however, you do have the ability to
manually re-assign an output group’s facility. This might be desirable
in a case where one micro controls more than one facility, for instance
two companies occupying the same building that use separate doors
for entry/exit. For more information, see Chapter 5 - Facilities and
Facility Profiles.
Enabled
Select Yes to allow this output group to activate when triggered by an
input group,
Select No to prevent the outputs in this output group from activating
when triggered by an input group.
Input Groups
Input and Output Groups
Before defining individual inputs, you must create input groups to which
individual inputs can be assigned. Input groups trigger output groups
when all or any of the inputs assigned to the group are detected. Input
groups are needed for physical inputs such as readers and sensors and for
logical events determined by the system or micro.
Logical Input Events for a micro are:
•
Badge History Overflow
•
Alarm History Overflow
•
Upstream Communication Failure
•
Downstream Communication Failure
•
Reader Communication Failure
Logical Input Events for an area are:
•
Invalid Badge
•
Unknown Badge
•
Lost Badge
•
Suspended Badge
•
Antipassback Violation
•
Duress
Picture Perfect 2.0 Administration Guide
9.3
Input Groups
Logical Input Events for a door are:
•
Door Held Open
•
Door Forced Open
•
Door Pre-alarm
Setup
! To add an input group:
1. Select Devices, then Ingroups.
2. Complete the Ingroups form for each input. Define how the input
group activates--whether a single input in the group activates the
group or if all inputs in the group must activate to trigger the group.
For additional information on each field, display the online Help form
or see “The Input Groups Form” on page 9.4.
3. Click Save.
4. Click New to add another input group.
The Input Groups Form
The following is a list of fields on the Input Groups (Ingroups) form. The
list is in the order that the fields appear. There is no required sequence to
follow.
Refer to Figure 9-2 for the Ingroups form.
9.4
Picture Perfect 2.0 Administration Guide
Input and Output Groups
Input and Output Groups
Figure 9-2.
9
InGroups Form
Description
Type a Description of the Input Group, usually including a wiring
address.
Delay Time
Type the number of seconds an input must be true (On State or
Change State) before the input group is true. This delay helps avoid
false input detections.
NOTE
The Off To On Delay Time and On To Off Delay Time set on the Inputs form
overrides the Delay Time set on the Ingroups form.
Set Delay Time to zero for any input group assigned to an exit pushbutton
Boolean Type
Boolean refers to an any or an all condition. If the specified any or all
condition occurs, an input group will change its state.
In the any scenario, an input group will change its state if any of its
inputs are activated. This one is very flexible. In the all scenario, an
Picture Perfect 2.0 Administration Guide
9.5
Input Groups
input group will change its state only if all of its inputs are active at the
same time. This one is very rigid.
For example, a building contains three smoke detectors (one on each
floor), and all three of these inputs go to one Fire Emergency input
group. A fire breaks out on the ground floor. If this input group is set
up with the any condition, the input group will change state and
activate the alarm as soon as the first floor’s smoke detector is
activated. If this input group is set up with the all condition, the input
group will change state and activate the alarm only after all three
smoke detectors have been activated. This input group will activate an
alarm, and will trigger an output group, which will activate a siren
and warning lights.
A non-boolean input group is also available. This is an individual
input group that activates each time one of its inputs changes state. To
the system, this input group is transparent, because the message sent by
this input group actually reflects the description of the input itself, not
the input group. Logical alarms must always use a non-boolean input
group.
NOTE
In both single input groups and in a hierarchy of input groups, all inputs in any
given group or hierarchy must be associated with the same micro.
Only Trigger on Input (Individual) input groups which are non-boolean appear
on the Input Group picklists of the Readers, Areas, Doors, and Micros forms.
Select one of the following radio buttons:
Trigger on Any
Click this radio button if you want the Input Group to change state
when any of its inputs are activated (Boolean).
Trigger on All
Click this radio button if you want the Input Group to change state
only when all of its inputs are activated (Boolean).
Trigger on Input
Click this radio button if you want the Input Group to pass along
information that one of its inputs has changed state. Logical alarms
must always use Trigger On Input (Non-Boolean).
Input Group Control
Specify the settings for each of the following:
Input Group State
Select Enabled to allow this input group to activate. Select Disabled if
this input group should not activate.
9.6
Picture Perfect 2.0 Administration Guide
Input and Output Groups
9
Open Condition
Select Detected to allow this input group to trigger associated outputs
when the input group detects an open-condition state change. This
field is for supervised input. Select Ignored if this is not a supervised
input.
Short Condition
Select Detected to allow this input group to activate associated
outputs when the input group detects a short-condition state change.
This field is for supervised input. Select Ignored if this is not a
supervised input.
Broadcast State Changes
Select Yes to broadcast any input state changes in this input group to
all micros on the system. Only select Yes if you want the inputs in this
input group to trigger outputs on other micros. Normally this is set to
No.
Alarm
Displays a description of the selected alarm (if any) associated with
this input group.
Input and Output Groups
Click the Alarm button to display the Alarm picklist (Figure 9-4).
Select the desired alarm, then click Ok. When this input group
activates, the selected alarm triggers.
Facility
Click the Facility button to display the facilities picklist. By default, the
input group record will be assigned the same facility as the micro to
which it is assigned however, you do have the ability to manually reassign an input group’s facility. This might be desirable in a case
where one micro controls more than one facility, for instance two
companies occupying the same building that use separate doors for
entry/exit. For more information, see Chapter 5 - Facilities and Facility
Profiles.
Parent Input Group
Displays a description of the selected parent input groups (if any)
associated with this (child) input group. Click a Parent Input Group
button to display the Parent Input Group picklist, which is a list of
input groups (Figure 9-4), and select an input group to be the parent
for this child. You can select up to three parent input groups for a
(child) input group.
An input group that is connected to a parent input group becomes, in
essence, an input of that parent input group, and is subject to the
Picture Perfect 2.0 Administration Guide
9.7
Input Groups
parent’s boolean or non-boolean settings. (See “Boolean Type” on
page 9.5.)
Each input group can have up to three input groups as its parents, and
each input group can be the parent of any number of input groups. An
input group cannot be its own parent.
A tree-like hierarchy of input groups can be built, with each input
group propagating its state changes on to its parent input group. Do
not create a circular hierarchy, such as A is a parent of B, and B is a
parent of A.
NOTE
In both single input groups and in a hierarchy of input groups, all inputs in any
given group or hierarchy must be associated with the same micro.
An input group’s alarm and output groups are not affected by its
association with a parent. They will all work independently.
Example of a Parent Input Group: A high-security vault is equipped
with three motion detectors, yet a security guard is required to patrol
the vault periodically. Any one of the motion detectors must be able to
activate an alarm, but the alarm must be disabled during the patrol.
This scenario can be resolved as follows (refer to figure 9-3 on
page 9.10):
9.8
•
Have the three motion detectors (inputs 1, 2, and 3) go into a
Motion input group. This input group would have a boolean type
of any, so any single motion detector could activate this group.
•
Assign Motion the Parent Input Group of Vault. No alarms or
outputs will be associated directly with Motion.
•
Assign Vault the appropriate alarm and Output Groups desired for
motion being detected in the vault area, and assign it a boolean
type of all.
•
Associate a toggle reader (see “Toggle” on page 13.28 of
Chapter 13 - Categories, Areas, Readers, and Doors) with an input
group called Control. The toggle reader will be the only input in
this group. Control will be a Trigger on Input (Individual) input
group which is non-boolean, so a badge swipe through this reader
will toggle the Input Group’s state on or off.
•
Assign Control the Parent Input Group of Vault. No alarms or
outputs will be associated directly with Control.
•
Vault’s only inputs are its child input groups, Motion and Control.
Both of these must be activated in order to trigger the alarm, since
Vault’s boolean type is all.
Picture Perfect 2.0 Administration Guide
Input and Output Groups
9
•
When the vault is unpatrolled, the toggle reader is used to toggleon Control, meaning that this input group is activated. If any of the
three motion detectors should activate, the Motion input group will
be triggered (since its boolean type is any). The Vault input group
will then receive the activated state change of Motion. When that
happens, the all condition of Vault has been met, and the
associated alarm and output groups will be triggered.
•
To deactivate the motion-detector alarm during a routine patrol,
the security guard simply swipes their authorized badge through
the toggle reader. Control’s input is deactivated; therefore, the
Vault input group cannot trigger an alarm, even though the motion
detectors will activate the Motion input group while the guard is in
the area. When the patrol of the vault is finished, the guard swipes
their badge through the toggle reader again, this time to activate it.
Output Groups
Displays a description of the selected output group associated with
this input group.
Picture Perfect 2.0 Administration Guide
Input and Output Groups
Click an Output Group button to display the Output Groups picklist
(Figure 9-4). Select up to five output groups (one for each button), then
click Close. When this input group activates, all of the selected output
groups trigger.
9.9
Input Groups
vault
INPUT 1
OUTPUT
GROUP
motion detector
INPUT
INPUT 2
GROUP
ANY
PARENT
INPUT
ALARM
GROUP
ALL
motion detector
motion input group
vault
INPUT 3
motion detector
INPUT
GROUP
TOGGLE READER
Individual
(non-boolean)
on/off
control
Figure 9-3.
9.10
Example of a Parent Input Group
Picture Perfect 2.0 Administration Guide
vault
Input and Output Groups
Input and Output Groups
Figure 9-4.
9
Input Groups Form with Picklists
Picture Perfect 2.0 Administration Guide
9.11
Input Groups
NOTES
9.12
Picture Perfect 2.0 Administration Guide
Micros
Chapter
10
Overview
Each microcontroller (micro) controls specific input and output devices,
such as readers, doors, and alarms. For the micro to work correctly, you
must define communication-port characteristics such as communication
retries, polling interval, port assignment, and micro address. (The micro
address set in the software must match the micro address in the
hardware.) Several Picture Perfect forms are used in these configurations.
Picture Perfect supports Dynamic Configuration; that is, micros can be
configured without having to restart the Picture Perfect system or the
micro. However, there are some rules that must be met which will be
discussed later in this chapter.
Prerequisites
The following Picture Perfect forms are prerequisites:
Forms
Purpose
MODEMS
To allow modems to be associated with micros.
PORTS
To allow a serial-port to be assigned to a micro.
NETWORK PORTS
To allow a network-port to be assigned to a micro.
ALARMS
To allow alarms to be associated with a micro’s input groups.
INPUT GROUPS
To allow input groups to be associated with each micro error condition
so that these conditions can trigger an alarm and/or output groups.
Micros
Picture Perfect 2.0 Administration Guide
10.1
What You Will Be Doing
What You Will Be Doing
This chapter shows you how to:
" Configure the micro for dial-up and network communications, using
the Ports form and the Network Micro Ports form.
" Associate micro error conditions with input groups and link them to
the micro, using the:
•
Alarms form to configure the micro alarm that you want to appear
in the picklist in the Ingroups form.
•
Outgroups form to configure the output group you want activated
when the alarm occurs.
•
Ingroups form to configure the input group so that it is available
in a picklist on the Micros form. Also, use the Ingroups form to
assign an alarm or an output group to the input group.
" Adding or changing the micro, using the Micro form.
A block diagram of the forms necessary to complete the Micros form is
shown in Figure 10-1.
ALARM
INSTRUCTIONS
ALARMS
ROUTING
INPUT GROUPS
PORTS
Badge History Overflow
Primary
Secondary
Alarm History Overflow
MICROS
Upstream Comm Failure
Downstream Comm
Failure
MODEMS
Reader Comm Failure
Figure 10-1.
10.2
Common Micro Setup
Picture Perfect 2.0 Administration Guide
Micros
10
Configuring Micro Communications
Picture Perfect supports three kinds of micro communications: direct, dialup and network. All three types of communications can be combined on a
single host. The following sections discuss:
•
How to configure the ports required to connect the micros to the host.
•
How to configure micros using direct communication.
•
How to configure micros using dial-up communication.
•
How to configure micros using network communication.
Ports
See “The Ports Form” on page 4.11 for a description of how to configure
ports for direct (uni-directional and bi-directional) micro communications
or for dial-up micro communications. Ports configured using the Ports
form are then available on a Ports picklist for assignment to micros.
See “The Network Micro Ports Form” on page 4.16 for a description of
how to configure ports for network micro and firewall communications.
Ports configured using the Network Ports form are then available on a
Ports picklist for assignment to micros.
Direct Communications Micro
A direct communications micro requires direct connection to the host.
Communication can be uni-directional as in Figure 10-2 or bi-directional
as in Figure 10-3.
NOTE
Micro/2s are not supported downstream from a Micro/5-P.
Micros
Picture Perfect 2.0 Administration Guide
10.3
Configuring Micro Communications
In uni-directional communication, each line of micros is connected to the host from a unique
port (For example, Micro 0 through 3 are connected to tty1; Micro 4 through 5 are connected
to tty2). If communication is lost between downstream micros, the host continues to
communicate only with those micros upstream from the break. An alarm is generated,
indicating the loss of communication. For example, if a break occurs between Micro 1 and 2,
the host will only have communication with Micro 0 and 1 from tty1, and it will maintain
communication with Micro 4 and 5 from tty2. Communication with Micro 2 and 3 is lost.
Figure 10-2.
Example of Direct Communication - Uni-directional Micros
In bi-directional communication, the micros are connected to the host using a primary port at one
end (tty1) and an alternate port at the other end (tty2). If communication is lost between any
micros, the host will communicate from the primary port to all micros upstream from the break
and from the alternate port in the opposite direction, to all micros upstream from the break.
Using this method, communication with all micros is maintained. For example, if a break occurs
between Micro 1 and 2, the host will communicate with Micro 0 and 1 from tty1, and it will
communicate with Micro 3 and 2 from tty2. No communication is lost.
Figure 10-3.
10.4
Example of Direct Communication - Bi-directional Micros
Picture Perfect 2.0 Administration Guide
10
Micros
Dial-up Micros
A dial-up micro requires an attached modem, a dedicated phone line, and
one or more compatible modems attached to the host ports.
There is only one possible configuration for dial-up communication: unidirectional which is detailed in Figure 10-4. “Example of Dial-Up
Communication” .
HOST
tty 1
M
M
M/4
up down
host none
M/2
up
reader
M/2
down
8RP
tty 2
Figure 10-4.
M
M
down
up
M/5
up
down
host none
Example of Dial-Up Communication
The table below shows the micros that are supported downstream from
dial-up micros.
Table 10-1: Dial-up Micro Downstream Support
Dial-up
Micro
Downstream Support
Micro/4
Micro/5-P
Micro/5-PX
Micro/5-PX
Network
Micro/4-P
Yes
No
No
No
No
Micro/5-P
No
No
No
No
No
Micro/5-PX
Yesa
No
No
Yes
No
Micro/5-PX
Network with
dial-up
optionb
Yes
No
No
Yes
No
Micros
Micro/2
a. Once you put a Micro/2 on this line, all micros downstream from this Micro/2 MUST be Micro/2s.
b. If the network connection fails and the micro has the dial-up option, it will behave as a dial-up Micro/5PX after it connects to the host for the first time.
Picture Perfect 2.0 Administration Guide
10.5
Configuring Micro Communications
There are events that cause the micro to automatically dial up the host and
there are events (usually operator activities such as updates or commands)
that cause the host to automatically dial up the micro.
Events Requiring Micro-to-Host Calls:
Power-on Reset
After a power-on reset, the micro reads its DIP switch settings to
determine its attached modem type and the required baud rate for
communication to the modem, assumes that the modem is
connected to the host port, and then tries to dial the host (using the
modem’s hard-coded phone number).
Alarm
The micro immediately dials the host when a priority micro alarm
activates. Immediate Dial-Up is user-defined. See “Immediate Dial
Required” on page 8.7.
Alarm and Badge Threshold
The micro dials the host when the micro’s alarm or badge history
buffer reaches its threshold (user-defined) and requires uploading
to the host.
Badge Table Request
The micro dials the host when there is no micro database record
for a badge just presented to a reader. The micro’s resident
database reduces the requirement for micro-to-host calls for badge
records.
Events Requiring Host-to-Micro Calls:
Database Updates
The host dials out to send database updates to micros. Whether the
host does this automatically, never, or on request is user-defined
for each individual micro. For micros that do not require
immediate updates, the host stores the updates until the next hostto-micro or micro-to-host call occurs and then downloads the new
records.
Outputs and Output Group Commands
The host dials the micro immediately whenever the operator
changes the state of an output or output group on that micro.
10.6
Picture Perfect 2.0 Administration Guide
Micros
NOTE
10
For details that show how an operator can command state changes and control
outputs using input groups, output groups, or selected outputs, see Chapter 29 Controlling Outputs.
Operator-generated Commands
The host allows the operator to dial any micro in the system to
check the status. See Chapter 30 - Viewing Status.
Micro Reset Request Command
The host dials the micro to send a reset command when an update
to the system database requires major updates to one or more
micro configurations.
The host dials the micro to send a reset request when an operator
uses CMENU to reset a micro.
NOTE
Before the reset sequence starts, the micro terminates the call and disconnects
to free the communications line; after reset, the micro dials the host to request its
database and configuration
Micro Poll
The host can poll micros that have not communicated with the host
for a user-defined time period. A zero Polling Interval setting tells
the host that no polling is required. See “Polling Interval” on
page 10.26.
Network Micros
Picture Perfect 2.0 Administration Guide
Micros
A network micro requires an ethernet or token ring connection to the host.
A network micro with the optional dial-up backup feature also requires a
PCMCIA modem card in the other available slot, a dedicated phone line,
and one or more compatible modems attached to the host port in addition
to the network lines.
10.7
Configuring Micro Communications
Ethernet
M/5-PX
Network
down none
M/5-PX
Network
up
down
host none
up host
HOST
tty 1
down none
M/5-PX
Ethernet
Gateway
up micro
WAN
LAN
down micro
Ethernet
tty 2
M/5-PX
up micro
up host
M/5-PX
Network
down
M
micro
M
(Refers to modem PCMCIA)
Figure 10-5.
10.8
Sample Ethernet Configuration
Picture Perfect 2.0 Administration Guide
down micro
M/5-PX
up
micro
Micros
10
HOST
Host
Ring
Token
Router
WAN
Router
Frame
Relay
Mesh
Router
Micro/5
Ring
Figure 10-6.
M/5-PX
Network
down
micro
M/5-P
up
micro
Sample Token Ring Configuration
Micros
Picture Perfect 2.0 Administration Guide
10.9
Associating Micro Alarms and Output Groups with Input Groups
Associating Micro Alarms and Output Groups
with Input Groups
When a micro error condition occurs, an alarm message is generated. Each
error condition alarm should be associated with an input group which can
then trigger an associated output. For example, if communication is lost
between two micros, a micro alarm is generated and the associated input
group can activate an LED or a beep to alert the operator that
communication is down.
The following sections will explain:
•
How to define the micro error conditions as micro alarms.
•
How to assign input groups to each micro error condition.
•
How to have the input group trigger an output.
Creating Micro Alarms
Use the Alarms form to define each micro alarm used to notify you when
micro-to-micro or host-to-micro communication problems occur. Define
the alarm priority, how the alarm resets, where it is routed, and what
alarm instructions display when the alarm occurs.
Each micro that has a downstream micro attached to it needs a unique
micro-to-micro alarm.
One host-to-micro alarm can be used for each line of micros.
•
Create the micro alarm messages. Select Messages, then Messages and
complete the form. See “Alarm Instructions” on page 8.2 for details on
how to complete this form.
•
Create the micro alarm responses. Select Messages, then Responses
and complete the form. See “Alarm Responses” on page 8.4 for details
on how to complete this form.
•
Create the micro alarms. Select Devices, then Alarms and complete
the form. See “Alarms” on page 8.5 and “The Alarms Form” on
page 8.6 for details on how to complete this form.
Create Input Groups for Micro Error Conditions
The Input Groups buttons on the Micros form are used to assign input
groups to each micro error condition. The input groups for each micro’s
error conditions must first be defined on the Ingroups form. See “The
Input Groups Form” on page 9.4 for details on how to complete this form.
If any of these micro error conditions should trigger alarms, assign an
alarm to that input group using the Alarms picklist on the Ingroups form.
10.10
Picture Perfect 2.0 Administration Guide
Micros
10
If the alarm that you want is not configured on the Alarms form, it will not
appear in the picklist.
Associate Outputs with Micro Error Condition
Input Groups
To associate outputs with a micro error condition, use the Outgroups
picklist on the Ingroups form. For example, if you select an output that
operates an LED at a guard station, and link it to the micro’s Upstream
Communication Failure Input Group, then even if no alarm displays
when upstream communication fails, the LED will still activate.
Adding or Change a Micro
Do not add or change a micro until you have configured the input groups
that you need for the micro (to select from picklists in the Micros form)
and until you have configured the alarm and output groups that you want
to have associated with the selected input groups. See “Associating Micro
Alarms and Output Groups with Input Groups” on page 10.10.
A micro can be configured in one of five ways:
•
non-existent
•
direct connect
•
dial-up
•
downstream dial-up
•
network
•
network dial-up
All of these options are explained in the sections that follow. However,
each one can be configured as a nonexistent micro which means the micro
does not need to be on the system to configure it.
Adding Micros
Non-existent Micros
Micros
To configure a micro as non-existent, the Configure field on the Micro
form should have Non-existent selected.
Direct Connect Micros
For direct connect micros, ports must be configured before adding or
changing a micro.
Picture Perfect 2.0 Administration Guide
10.11
Adding or Change a Micro
! To add a direct connect micro:
1. Select Devices, then Micros.
2. Complete the Micros form with special attention to the items below.
See “The Micros Form” on page 10.18 for details on completing this
form. The following fields must be set to the given value.
•
For the primary port, you must select a direct port.
•
For bi-directional micros, you must also select a secondary port
which must be a direct port.
•
Click on the Dial Up button and select a modem type of None.
Leave the remaining fields on this Dial Up screen blank.
3. Click Save.
4. To add another micro, click New or Quit to exit.
Dial-up Micros
For dial-up communication micros, modems and ports must be
configured before adding or changing a micro.
! To add a dial-up micro:
1. Select Devices, then Micros.
2. Complete the Micros form with special attention to the items below.
See “The Micros Form” on page 10.18 for details on completing this
form. The following fields must be set to the given value.
•
Specify None for port assignment (primary and secondary), since
dial-up micros call the host on any available port that is compatible
(same modem type).
•
Click Dial Up and select the modem type of the host’s modem.
Complete the remainder of the Dial Up screen.
3. Click Save.
4. To add another micro, click New or Quit to exit.
Micros Downstream from Dial-up Micros
For micros downstream from dial-up communication micros, Ports must
be configured before adding or changing a micro and the head-end dialup micro must be configured.
Refer to Table 10-1 for a list of the type of micros that can be downstream.
10.12
Picture Perfect 2.0 Administration Guide
Micros
10
! To add a configuration for a micro that is downstream from a dial-up
micro:
1. Select Devices, then Micros.
2. Complete the Micros form and review the items that directly relate to
direct connect micros. See “The Micros Form” on page 10.18 for details
on completing this form. The following fields must be set to the given
value.
•
Click Dial Up and select None on the Callback field. Then for the
modem type, select Downstream Dialup.
3. Click Save.
4. To add another micro, click New or Quit to exit.
Network Micros
For network micros, network micro ports must be configured before
adding or changing a micro.
! To add a network micro:
1. Select Devices, then Micros.
2. Complete the Micros form for each micro. See “The Micros Form” on
page 10.18 for details on completing this form. The following fields
must be set to the given value.
•
For the primary port, you must select a network micro port.
•
For the secondary port, you must select None.
•
Click on the Dial Up button and select a modem type of None.
Leave the remaining fields on this Dial Up screen blank.
3. Click Save.
Micros
4. To add another micro, click New or Quit to exit.
! To add a dial-up network micro:
1. Select Devices, then Micros.
2. Complete the Micros form for each micro. See “The Micros Form” on
page 10.18 for details on completing this form.
•
For the primary port, you must select a network micro port.
Picture Perfect 2.0 Administration Guide
10.13
Adding or Change a Micro
•
For the secondary port, you must select None.
•
Click Dial Up and select the modem type of the host’s modem.
Complete the remainder of the Dial Up screen.
3. Click Save.
4. Click New to add another micro or Quit to exit.
Changing Micros
Changing a micro is simply locating the record and changing the
necessary fields. Keep in mind that if you change the port or modem
setting, you may be changing the type of communications that this micro
is using.
! To change a micro configuration:
1. Select Devices, then Micros.
2. Click Find to retrieve all the micro records or enter specific search
criteria to limit the search and then click Find. Refer to page 3.9 for
more information on using the Find button.
You may want to review the section “What Type of Micro are You
Changing?” on page 10.14, before you modify any of the information.
3. Change the information in the fields, as needed.
4. Click Save.
5. Click New to add another micro.
What Type of Micro are You Changing?
Before you modify a micro’s configuration, you may want to check the
initial settings. There are five fields on the Micro form that determine the
type of micro communications being used: Primary Port, Secondary Port,
Upstream, Downstream and Modem Type.
The table below shows what each field would contain according to the
type of communications the micro is using. Also refer to Figure 10-7 on
page 10.17.
10.14
Picture Perfect 2.0 Administration Guide
Micros
10
Table 10-2: Determining the Type of Micro Communications
Type of Micro
Communications
Direct
Unidirectional
Bi-directional
Dial-up
Primary
Port
Secondary
Port
Direct
Port
NONE
Direct
Port
NONE
Direct Port
NONE
Upstream
Downstream
If a head of
line micro:
HOST
If an end of
line micro:
NONE
Otherwise:
anything but
HOST
Otherwise:
anything but
NONE or
HOST
If a head of
line micro:
HOST
If an end of
line micro:
HOST
Otherwise:
anything but
HOST
Otherwise:
anything but
NONE or
HOST
If a head of
line micro:
HOST
If an end of
line micro:
NONE
Otherwise:
anything but
NONE or
HOST
Otherwise:
anything but
NONE or
HOST
Modem Type
NONE
NONE
Anything but
NONE or
DOWNSTREAM
DIALUP
Micros
Picture Perfect 2.0 Administration Guide
10.15
Adding or Change a Micro
Table 10-2: Determining the Type of Micro Communications (Continued)
Type of Micro
Communications
Primary
Port
Downstream from Dialup
Secondary
Port
NONE
Upstream
Anything but
NONE or
HOST
Downstream
If an end of
line micro:
NONE
Modem Type
DOWNSTREAM
DIALUP and the
Callback field is
set to NONE
Otherwise:
anything but
NONE or
HOST
(Refer to
Table 10-1,
“Dial-up Micro
Downstream
Support,” on
page“Dial-up
Micro
Downstream
Support” on
page 10.5.)
Network
Network Dial-up
10.16
Network
Port
Network
Port
NONE
NONE
If a head of
line micro:
HOST
If an end of
line micro:
NONE
Otherwise:
anything but
HOST or
NONE
Otherwise:
anything but
NONE or
HOST
If a head of
line micro:
HOST
If an end of
line micro:
NONE
Otherwise:
anything but
HOST or
NONE
Otherwise:
anything but
NONE or
HOST
Picture Perfect 2.0 Administration Guide
NONE
If a head of line
micro: Anything
but NONE or
DOWNSTREAM
DIALUP
Otherwise:
DOWNSTREAM
DIALUP
Micros
10
Di rect-wired Micros (No Bi -directional )
0
Pri mary Port
Secondary Port
Upstream
Downstream
Modem
1
TTY#
None
Host
1
None
2
Primar y Por t
Secondary Port
Upstr eam
Downstream
Modem
TTY#
None
0
2
None
Primary Port
Secondary Port
Upstream
Downstream
Modem
TTY#
None
1
None
None
Dial-up Mi cro with Micros Downstream
0
Primary Port
Secondary Port
Upstream
Downstr eam
Modem
1
None
None
Host
1
Cardinal
Primar y Por t
Secondary Port
Upstr eam
Downstream
Modem
2
Primar y Por t
Secondary Port
Upstr eam
Downstream
Modem
None
None
0
2
Downstream
Dial-up +
Callback None
None
None
1
None
Downstream
Dial-up +
Callback
None
Network Mi cro wi thout Fallback Dial-up
0
Pr imary Port
Secondary Port
Upstream
Downstream
Modem
1
NetPort
None
Host
1
None
2
Primary Port
Secondar y Por t
Upstream
Dow nstream
Modem
NetPort
None
0
2
None
Primary Port
Secondary Port
Upstream
Downstream
Modem
NetPort
None
1
None
None
0
Primary Port
Secondary Port
Upstream
Downstream
Modem
1
NetPort
None
Host
1
Cardinal
2
Primary Port
NetPort
Secondary Port
None
Upstream
0
Downstr eam
2
Modem
Downstream
Dial-up +
Callback
None
Figure 10-7.
Micros
Network Micro with Fallback Dial -up
Pr imary Port
Secondary Port
Upstream
Downstream
Modem
NetPort
None
1
None
Downstream
Dial -up +
Callback None
Micro Configuration
Picture Perfect 2.0 Administration Guide
10.17
Adding or Change a Micro
The Micros Form
Use the Micros form to identify the micro’s address, modem, port, and
upstream and downstream equipment, and to define how each micro
operates and communicates.
The following is a list of fields that may require additional information for
you to complete. The list is in the order that the fields appear on the form.
There is no required sequence for you to follow. Refer to Figure 10-8 below
for the top portion of the Micros form.
Figure 10-8.
Micros Form (Top - Left)
Description
Type a micro description up to 30 alphanumeric characters long;
for example, Building 1 Micro 0. This micro description appears in
a Micros picklist for selection on the Inputs, Outputs, Readers,
and Generator forms.
Micro Address
Type a number from 0 to 4095, which identifies the address of this
micro as set in the micro’s hardware-address switches. Once a
micro’s address is set, it cannot be changed.
10.18
Picture Perfect 2.0 Administration Guide
Micros
10
Time Zone Correction
Optional: Currently, this field is used only by Access Vision. This
field enables Access Vision workstations to display badge and
alarm activity in the micro’s local time by entering a time zone
correction. The time zone correction is the number of hours the
micro’s time is different from the host’s time. If the micro is west of
the host, the time zone correction number must be preceded by a
hyphen (-). If the micro is east of the host, the time zone correction
number must be preceded by a plus sign (+). For example, if your
host is in New York and the micro is in California, enter a -3 in this
field. If the host is in Austin, Texas and the micro is in Boca Raton,
Florida, enter a +1.
Facility Code
Type a facility number (1-to-5 digits long). If the 8RP board loses
communication with the micro’s CPU board, access can still be
granted to all badges with a facility code that matches this field. If
this field is left empty, the 8RP will grant access to all badges while
in this degraded mode. This applies only for 8RP boards in a
Micro/2 or Micro/4.
Shunt Code
Optional: Type a shunt code (1 to 10 digits long). With Shunting
Enabled on the Area and Reader forms, this code entered on a
keypad allows a badgeholder to prop a door open (for the time
specified on the Doors form) without triggering a door-held-open
alarm.
Alarm Response Code
Optional: Type an Alarm Response Code (1 to 10 digits long).
With Keypad Alarm Response Enabled on the Doors form, this
code entered on a keypad allows an authorized badgeholder to
respond to and reset an active alarm. This Alarm Response Code
must be different from the Shunt Code on the Micros form.
See Chapter 23 - Keypad Alarm Response.
Type the percentage at which the micro triggers the Badge History
Overflow input group to notify the host that its Badge
Transaction table has reached this percentage of capacity.
Alarm History Threshold
Type the percentage at which the micro triggers the Alarm History
Overflow input group to notify the host that its Alarm
Transaction table has reached this percentage of capacity.
Picture Perfect 2.0 Administration Guide
10.19
Micros
Badge History Threshold
Adding or Change a Micro
Configure Online/Offline/Non-existent
Select whether the micro is being configured Online, Offline or
Non-existent. If neither are selected, the micro is configured as
non-existent, that is, not on the system.
Select Online to bring a micro online that was either configured
offline or non-existent. The micro will be automatically reset when
configured online.
Select Offline to allow this installed and connected micro to be
configured before it goes online. This allows normal operations to
continue without interruption by a flood of unexpected error
messages related to this micro.
Select Non-existent to configure a micro that is not yet installed
(physically connected). Once the micro is installed, bring up this
form and select Online to put the micro online.
Type Normal/Elevator
Select whether this is a Normal micro, or an Elevator micro type.
Only a Micro/5 can be used with Elevator Control. See Chapter 22
- Elevator Control for more details on this feature.
NOTE
An Elevator micro configured with multiple readers, uses Reader 1 to control the
elevator.
Refer to Figure 10-9. “Micros Form (Bottom)” for the bottom
portion of the Micros form.
Figure 10-9.
10.20
Micros Form (Bottom)
Picture Perfect 2.0 Administration Guide
Micros
10
Facility
You must assign a facility to a micro. Other devices, such as
readers and inputs, that are connected to the micro will default to
this facilty, unless they are specifically assigned to another facility.
Primary Port
Displays the selected primary port for micro communications.
Click the Primary Port button to display the Ports picklist. Select
the primary port to which this micro is wired, then click Close.
Uni-directional micros require a primary port assignment (and
None specified for the secondary port). Bi-directional micros
require both a primary and a secondary port assignment. Dial-up
micros do not require a port assignment (assign None to both the
primary and secondary port).
Secondary Port
Displays the selected secondary port for micro communications.
Click the Secondary Port button to display the Ports picklist. Select
the secondary port that will be activated if communication is lost
on the primary line, then click Close.
Upstream Micro
Displays the selected upstream micro.
Click the Upstream Micro button to display the Micros picklist.
Select the micro or host that is upstream from this micro, then click
Close.
Downstream Micro
Displays the selected downstream micro.
Click the Downstream Micro button to display the Micros picklist.
Select the micro or host (or None) that is downstream from this
micro, then click Close.
Micros
Dial Up
Click the Dial Up button to display the Dial Up pop-up window
containing fields for dial-up communications (Figure 10-10).
Picture Perfect 2.0 Administration Guide
10.21
Adding or Change a Micro
Figure 10-10.
Dial-Up Window
Modem Type
Displays the selected modem type.
Click the Modem Type button to display the Modems picklist.
Select the type of modem to connect to at the host, then click Close.
•
For direct communication micros, select None.
•
For network micros, without Dial-Up, select None.
•
For network micros, with Dial-Up, select the host modem type.
The modem type selected for the micro must match the modem
type (and baud rate) indicated by the micro’s DIP switch settings
on Switch Bank 2. See the appropriate Installation Guide for
information on DIP switch settings. The modems in this list are
created using the Modems form. See “Modems” on page 4.4 for
information on setting up modems.
Idle Time
Enter the number of days, hours, minutes and/or seconds that the
line must be idle before the line is dropped. This field must be
greater than [(Host-micro retries) x (Host-micro retry interval)+1].
Maximum Connect Time
Enter the maximum number of days, hours, minutes and/or
seconds (0 to 65536) that the micro and host may be connected.
10.22
Picture Perfect 2.0 Administration Guide
Micros
10
After a reset to allow for badge download, the default maximum
connect time is one hour.
Micro Phone Number
Enter the phone number of this dial-up micro, including area code.
(This does not include PBX prefix or country code.)
Micro Dialout Prefix
Enter the PBX prefix, area code or country code (or other prefix)
required with the Host phone number.
Dial on Updates
Specifies when the host should dial the micro with record changes:
Always
The host always dials the micro for any record changes that affect
it.
Never
The host will not dial the micro for any record changes. Updates
are made during the next communications session.
Ask Operator
The host will prompt the operator to see if it should dial the micro
for each record change.
Dial Host On Schedule Update
Specify whether the micro should dial the host whenever changes
occur due to a micro schedule.
Always
The micro always dials the host for any schedule updates that affect it.
Never
The micro will not dial the host for any schedule updates. Updates are
made during the next communications session.
Dial On Startup
Specify whether the host should dial the micros whenever the
system is started.
Never
The host will not dial the micro immediately whenever the system is
started. Rather, it will wait a random amount of time, no greater than the
polling period, before it dials the micro.
Callback
Specify whether a callback is required from the host, the micro, or
neither. In a callback situation, the host or micro receiving the call
flags the sender for a callback, then disconnects without a data
transaction taking place. This strategy prevents a foreign system
from communicating with the host or micro. This strategy may
Picture Perfect 2.0 Administration Guide
10.23
Micros
Always
The host always dials the micro whenever the system is started.
Adding or Change a Micro
also be cost effective if host-to-micro calls are less expensive than
micro-to host calls, or vice versa.
Host
The host will call back the micro.
Micro
The micro will call back the host.
NOTE
A Micro/5 configured as Micro Callback cannot be flashed with upgraded
application code. If you need to update the application code, set Callback to
None prior to running the flash program. Upon completion, set it back to Micro.
None
No callbacks are required.
Input Groups
Select the appropriate input group for each error condition listed
on the buttons: Badge History Overflow, Alarm History
Overflow, Upstream Comm Failure, Downstream Comm Failure,
and Reader Comm Failure.
Click each button to display a picklist of input groups. Select the
desired input group for each, then click Close.
NOTE
10.24
Only Trigger on Input (Individual) input groups which are non-boolean are
displayed in the picklist. See “Boolean Type” on page 9.5.
Picture Perfect 2.0 Administration Guide
Micros
Figure 10-11.
10
Micros Form (Right) Times in Seconds
Upstream Retries
Enter the number of times the micro will try to contact its upstream
micro before triggering the Upstream Communications Failure
input group (normally set to 3). See “Create Input Groups for
Micro Error Conditions” on page 10.10.
Micros
Upstream Retry Interval
Enter the number of seconds between each upstream retry
(normally set to 2 seconds).
Downstream Retries
Enter the number of times the micro will try to contact its
downstream micro before triggering the Downstream
Communications Failure input group (normally set to 3). See
“Create Input Groups for Micro Error Conditions” on page 10.10.
Picture Perfect 2.0 Administration Guide
10.25
Dynamic Configuration
Downstream Retry Interval
Enter the number of seconds between each downstream retry
(normally set to 2).
Host-Micro Retries
Enter the number of times the host will try to contact this micro
before triggering the Upstream Communications Failure input
group (normally set to 3). See “Create Input Groups for Micro
Error Conditions” on page 10.10.
Host-Micro Retry Interval
Enter the number of seconds between each host-to-micro retry
(normally set to 2 seconds for direct connect micros and 8 seconds
for dialup micros).
Polling Interval
Enter the number of days, hours, minutes and/or seconds that
must elapse without communication to the host before the host
polls this micro to verify that it is still capable of communicating
(normally set to 60 seconds).
Dynamic Configuration
Micros (firmware 2.0 or later required) can be configured dynamically,
meaning the Picture Perfect system does not have to be restarted for the
changes to take effect. However, there are some rules that must be met. If
these rules are not met, an error message will display and none of the
changes will be made until that rule is satisfied.
NOTE
10.26
All of the fields on the Micros form support dynamic configuration, except for the
Micro ID. Once a micro’s ID is set, it cannot be changed.
Rule
1:
Every micro must have a head (or upstream) micro.
Rule
2:
Every micro must have a tail (or downstream) micro.
Rule
3:
A micro can be upstream from at most one micro.
Rule
4:
A micro can be downstream from at most one micro.
Rule
5:
The primary port must be the same for a micro and its downstream micro.
Rule
6:
The secondary port must be the same for a micro and its downstream micro.
Rule
7:
An upstream micro must have a matching downstream micro.
Rule
8:
A downstream micro must have a matching upstream micro.
Picture Perfect 2.0 Administration Guide
Micros
Rule
9:
Rule
10:
Two head micros cannot have the same primary port.
Rule
11:
Two tail micros cannot have the same secondary port.
Rule
12:
A network dial-up micro must have a matching downstream micro.
Rule
13:
A network micro must have a matching downstream micro.
10
The last micro in a bi-directional line must have a Host downstream.
Data Encryption
In order to secure transmission between the host and the network micro,
the data is encrypted using DES (Data Encryption Standard). This is
accomplished by means of a key to create the encryption pattern for
transmission.
Setup
! To manage the DES keys used:
1. From the Main Menu, select Control, then Keys.
2. Select Find (shows all configured micros). The user can enter the micro
ID and then select Find to edit the record.
NOTE
You cannot enter and save data from a blank screen. You must edit existing records
by performing a search and editing the record as necessary.
3. Due to the sensitive information presented on the screen, you will be
prompted for root’s password if you attempt to perform any
operations with the keys.
Micros
Picture Perfect 2.0 Administration Guide
10.27
Data Encryption
The Keys Form
Figure 10-12.
The Keys Form
The following required fields are user definable according to the
parameters described.
Encryption
This is a required field which defines the type of encryption to be
used. It can be set to one of three values:
•
None is the default. In order to activate this feature, one of the
following must be selected.
NOTE
10.28
None - No encryption is used; the original or plain text is
transmitted.
•
DES - Both sender and receiver use a single key (Key 1) to encrypt
and decrypt data.
•
Triple DES - Both sender and receiver use three keys (Key 1, Key 2,
and Key 3) to encrypt and decrypt data.
Picture Perfect 2.0 Administration Guide
Micros
10
Key 1
The length of this field must be eight alphanumeric characters.
This key is used for a single DES algorithm as well as the first key
used in the Triple DES algorithm.
Key 2
The length of this field must be eight alphanumeric characters.
This is the second key used in the Triple DES algorithm.
Key 3
The length of this field must be alphanumeric characters. This is
the third key used in the Triple DES algorithm.
Micros
Picture Perfect 2.0 Administration Guide
10.29
Data Encryption
NOTES
10.30
Picture Perfect 2.0 Administration Guide
Flashing Micros
Chapter
11
When the micro is powered up, you may need to flash download the
Picture Perfect application code into the micro (Micro/5 and Micro/PX2000 series only). You can use the Micro Flash Utility, the Micro
Installation (MICTOOL) Utility, or if you are running Picture Perfect 2.0 or
later, eFlash.
In the /cas/flash directory, there is a separate directory for each type
of micro’s firmware (hex file). For example, the directory m5p200o
contains the hex file for the direct-connect Micro/5-PX.
The following is a list of all Picture Perfect 2.0 firmware file directories and
what type of hex file each contains.
total 336
drwxr-xr-x 8
root
sys
512
Mar 31
16:34
./
drwxr-xr-x 16 root
sys
512
Mar 27
09:14
../
-rw-r--r-- 1
root
sys
133276 Mar 31
16:33
flash.dat
drwxr-xr-x 2
root
sys
512
Mar 13
16:43
m5o200s/
Micro/5-PXN operatng system code
drwxr-xr-x 2
root
sys
512
Mar 14
11:02
m5p200o/
Micro/5-PX Direct
drwxr-xr-x 2
root
sys
512
Mar 14
18:32
m5p200p/
Micro/5-PX Dial Up
drwxr-xr-x 2
root
sys
512
Mar 19
15:44
m5p200s/
Micro/5-PXN application code
-rw-r--r-- 1
root
sys
556
Mar 28
17:33
tty7.log
-rw-r--r-- 1
root
sys
312087 Mar 28
17:33
-rw-r--r-- 1
root
sys
140881 Mar 28
17:33
eflash/m5pe200.efl
eflash/m5npe200.efl
Micro/5-PX Direct
eFlash code
Micro/5-PXN eFlash
code
Picture Perfect 2.0 Administration Guide
11.1
Flashing Micros
Overview
Prerequisites
Prerequisites
•
If the micro is configured for Micro Callback, the Callback feature
must be disabled (the Callback field on the Micro form must be set to
None) in order to perform a flash download. Upon completion of the
download, the feature can be enabled (the Callback field can be set
back to Micro).
•
If this is a dial-up micro, it must be disconnected from the host before
attempting to flash.
•
A micro must already be flashed with firmware 1.70 or later to make
use of the eFlash feature.
What You Will Be Doing
This chapter includes instructions for flashing your micros using three
methods:
Refer to the section, “Flash Download Utility” on page 11.2, if you are
running a version of Picture Perfect earlier than Picture Perfect 2.0.
Refer to the section , “MicTool” on page 11.6, if you are using MicTool to
flash your micros.
Refer to the section “eFlash” on page 11.8, if you are running Picture
Perfect 2.0 or later.
Flash Download Utility
This download procedure can be used with Picture Perfect version 1.3
host systems or later. The flash download program to upgrade the
EPROMs of a Micro/5, a Micro/PX-2000 or Micro/PXN-2000 is accessed
through the flash utility of Picture Perfect using the command line.
Features
•
Flashes Micro/5-PXN, Micro/5-PX, MicroProx, and Micro/5-P micros
•
Flashes downstream micros
Limitations
11.2
•
Cannot edit micro parameter settings such as phone numbers or a
micro IP address
•
Does not provide online help
•
Micro must be in maintenance mode during the flash download
Picture Perfect 2.0 Administration Guide
Flashing Micros
11
Operation
! To flash a micro using the Picture Perfect Flash Download Utility:
1. Log in as root at the console.
2. To access the Micro Flash EPROM Upgrade menu, at the command
line prompt, type: flash Enter
Flashing Micros
Figure 11-1.
Micro Flash EPROM Upgrade Menu
3. Insert a diskette containing the firmware hex files into the disk drive.
4. From the Micro Flash EPROM Upgrade menu, select Extract to
transfer new EPROM data from the diskette to the hard drive.
Result: The floppy-drive device path will be displayed.
5. Press Enter to start the extract. The new EPROM information will be
transferred to the hard drive.
Result: When the extract is complete, a summary of the information
appears, similar to the following:
Floppy drive
Directory............/cas/flash/m5p140
Version Info.........M/5P Ver 1.40 Direct
Optimized............454784 bytes
Non-Optimized........620099 bytes
Picture Perfect 2.0 Administration Guide
11.3
Flash Download Utility
6. Press any key to return to the Micro Flash EPROM Upgrade menu.
7. Once the new EPROM information is transferred to the hard drive,
select Start from the Micro Flash EPROM Upgrade menu. The Start
option allows the new EPROM files to be flash-downloaded to any or
all of the Micro/5s, Micro/PX-2000s, or Micro/PXN-2000s on the
system, regardless of whether the micros are dial-up, direct, or
network.
Result: The Begin Flash Download form appears. All system micros
(Micro/4 , Micro/5, and Micro/PX-2000 series) are displayed under
the Micro Map column and all micro types can be selected, however,
the flash download will only execute on Micro/5s, Micro/PX-2000s, or
Micro/PXN-2000s. Selecting Micro/4s will not affect the downloading
process to the selected Micro/5s, Micro/PX-2000s, or Micro/PXN2000s.
Figure 11-2.
Begin Flash Download
8. Use the arrow keys to move to the desired micros for flash download.
9. Press F2 or T to select or deselect a micro. All micros in a micro line
must be selected individually (use the left and right arrows to reach
them).
Result: When a micro is selected, it appears in boldface. The system
determines whether the micro is direct, dial-up or network, so no
communication specification needs to be made.
11.4
Picture Perfect 2.0 Administration Guide
Flashing Micros
10. When all desired micros have been selected, press
listing of hex files available for download.
Esc
11
to display a
Flashing Micros
Figure 11-3.
Available Hex Files
11. Cursor to the desired hex file, then press Enter to select it and start the
download. If you need to manually enter the hex file and path name,
do not select a file from the list. Instead, press Esc again, type the path
name, then press Enter to start the download.
Result: The download will begin and progress will be displayed.
•
The Status column indicates the action taking place on the highlighted
micro of each micro line selected. The status messages include maint,
polling, erase, sending, connecting, connect, restore, and
ignoring. An asterisk (*) beside the sending status message
indicates that the file being downloaded is the optimized version of
the hex file (determined by the micro’s boot prom), and will complete
its download more quickly (in approximately 10 minutes).
•
The Frames column indicates the number of data blocks downloaded
to the highlighted micro.
•
The % column indicates the percentage of the download completed to
the highlighted micro.
When the download for a micro is complete, that micro will no longer
appear in boldface. If the download for a micro is unsuccessful, that micro
will remain in boldface. At this point, it takes about 60 seconds for the
flash program to terminate. If the micros were defined as online in the
database, the micros will reset and receive their database and come online.
Picture Perfect 2.0 Administration Guide
11.5
MicTool
MicTool
Although Micro Installation Tool - FlashTool will work with old and new
micros (all new micros contain SmartBoot), some functions are available
only if the micro has SmartBoot installed. SmartBoot is distributed with
the tool for the Micro/5-PX and the Micro/5-PXN. SmartBoot allows the
tool to do the following:
•
Extract and show the firmware revision (such as Picture Perfect 1.6).
•
Alert the user if the firmware in the micro is not the latest released
code.
•
Alert the user if the network micro has an OS (operating system)
application mismatch.
Features
•
Automatically recognizes any CASI micro (M5/PX, M5/PXN,
MicroProx, Micro/PX-2000, Micro/PXN-2000, M5/E, or M5/P).
•
Error checking of the parameter block entries, such as the network IP
addresses and phone number.
•
Option of acquiring new firmware through the Internet or diskette
with the firmware automatically installed in the correct directory.
•
Online Help
Limitations
•
Micro must be in maintenance mode during the flash download
Operation
! To flash a micro using MicTool:
1. Launch the Micro Installation Tool - FlashTool by choosing one of the
following:
a. Running or setting up a shortcut to flash.exe in your FlashTool
directory.
b. Clicking the flash icon
while running MICTOOL Test.
Result: The MicTool, FlashTool main screen will display.
11.6
Picture Perfect 2.0 Administration Guide
Flashing Micros
Flashing Micros
Figure 11-4.
11
MicTool - FlashTool Main Screen
2. The automatic flash buttons allow you to flash a micro with the latest
release of firmware that is present on your PC.
To flash an older version of firmware or to flash boot code, you will
need to click
to access a picklist.
3. For detailed information on how to use FlashTool, click Help to access
the online help table of contents, or press F1 to display contextsensitive help.
Picture Perfect 2.0 Administration Guide
11.7
eFlash
eFlash
This download procedure can be used with Picture Perfect version 2.0
host systems or later. The eFlash download program is installed as part of
the base Picture Perfect 2.0 product and can be run on stand-alone
systems, network subhosts, and on the primary host of a redundant
system.
On a networked system, eFlash should not be installed on the network
host, since it can not be run there. It can run on all subhosts
simultaneously and is capable of flashing the micros connected to each
subhost.
Features
•
eFlash is a new flash method which does not require the micro to be in
maintenance mode while the flash code is being downloaded.
•
Flashes Micro/5-PX, Micro/5-PXN, M/PX-2000, and M/PXN-2000
micros.
•
All communication is handled by the host.
Limitations
•
Micros must already have been flashed with Picture Perfect micro
firmware version 2.0 or later.
Operation
eFlash can be run either from a Graphical User Interface (the default) or
from the unix command line.
Operating eFlash in a Graphical Mode
! To flash a micro using the eFlash GUI:
1. Log in as root and open a terminal window.
2. At the command prompt, launch eFlash by typing eflash
Enter
.
Result: The eFlash main screen will display.
NOTE
Only one instance of eFlash can be run on a system. When eFlash begins, it
creates a lock file: /tmp/.eflash.lock
If the lock file exists, indicating that the program is running, when you attempt to
launch eFlash, an error message will display and the program will exit.
11.8
Picture Perfect 2.0 Administration Guide
Flashing Micros
NOTE
11
The eFlash graphical user interface will terminate and generate an error
message if both an Alarm Graphics form and a Badges form, displaying an
image, are open.
Flashing Micros
Select to access
online help.
Select a micro number
or a page number to
move to another page.
Figure 11-5.
eFlash
3. Select the micro you want to update.
To select a single micro, click on the micro:
Result: A green check mark will appear over the micro you selected.
Picture Perfect 2.0 Administration Guide
11.9
eFlash
To select a line of micros, click on the line icon to the left of the micros..
Result: Green check marks will appear on all the micros in the selected
line.
4. To select the firmware hex files to use to update the micro, click on the
File menu.
5. Select either Direct Micro File or Network Micro File according to the
type of micro you will be flashing.
NOTE
Any micro that is downline from a Network micro, is considered a Direct micro.
Result: A window similar to the following will display.
eFlash file names reflect the micro type
and firmware version number and have
a file extention of .efl for example:
m5npe indicates a network Micro/5
190 indicates the firmware version
.efl indicates an eFlash file
Figure 11-6.
Network eFlash File Popup
6. Under Files, select the firmware hex file to be used for flashing.
Result: The path and filename will display in the Selection window.
11.10
Picture Perfect 2.0 Administration Guide
Flashing Micros
11
7. Click OK to return to the main eFlash window.
8. Click the Flash button at the bottom of the window, to begin the flash
procedure.
Result: A dialog similar to the following will display the default files
that will be used for Direct or Network. If you specified a different
file, it will be displayed.
Flashing Micros
Figure 11-7.
Default eFlash File Popup
9. Click OK.
Result: The flash procedure will begin and the micros being flashed
will be highlighted in yellow.
10. Wait until the flash is complete. You will not be able to flash another
micro until the current selections are complete.
Result: When the flash procedure is complete, the highlight around
the micros being flashed, will change to green.
If the flash process failed or if communication with the micro cannot
be re-established, the highlight will be red.
Picture Perfect 2.0 Administration Guide
11.11
eFlash
Operating eFlash from the Command Line
The following command line arguments are available:
-c
Command line selection option
-p<directory>
Specifies the source directory to search for flash files. This replaces
the default directory of /cas/flash/eflash.
-f<filename>
Specifies a flash file to use for the 5PX micro, instead of the default
flash.
-n<filename>
Specifies a flash file to use for the 5PXN micro, instead of the
default flash.
-x<number>
Specifies the maximum number of micros that can be flashed at
one time.
-h
Starts the HTML based online help.
-u or -?
Prints out the usage message.
-m<micro selection>
Specifies the micro to be flashed. This option can be repeated
multiple times.
•
To flash all active micros in the Picture Perfect database, use:
eflash -m a Enter
•
To flash a specific micro, use:
eflash -m <microid> Enter
where <microid> is the ID of any micro on the line. eFlash
adds all other micros on the line to the flash list in the correct
order.
•
To flash a line of micros, use:
eflash -l <microid> Enter
where <microid> is the ID of a micro, such as 0001 that is
on the line you wish to flash.
11.12
Picture Perfect 2.0 Administration Guide
Flashing Micros
11
! To flash a micro using eFlash from the command line:
1. Log in as root and open a terminal window.
2. At the command prompt, enter a command using the following
parameters:
eflash -c -m01 -p /cas/flash/eflash -f mspe170.dfl
Enter
Flashing Micros
where mspe170.dfl is the micro id.
Result: After the flashing has completed, one of the following
messages will be displayed:
Flashing is successful
or
Flashing is unsuccessful. See the log file<filename> for
details.
The eFlash Configuration File
This is an optional file, .eflashrc, that resides on the host in the root
user’s home directory. The purpose of the file is to allow a Picture Perfect
operator to define flashing requirements for the entire system once, and
then use part or all of the definition to flash or reflash micros as needed.
This file can be used for scheduling unattended flashing.
This file can contain a combination of comand line arguments, processing
rules, and comments.
Command Line Arguments
All of the following command line options can be included, either one per
line or you may concatenate many options per line.
-p<directory>
Specifies the source directory to search for flash files. This replaces
the default directory of /cas/flash/eflash.
-f<filename>
Specifies a flash file to use instead of the default flash used for
direct connect type micros (PX).
-n<filename>
Specifies a flash file to use instead of the default flash used for
network type micros (PXN).
-m<micro id>
Specifies the micro or micros to be flashed.
Picture Perfect 2.0 Administration Guide
11.13
eFlash
-m a
Specifies that all active micros in the Picture Perfect database be
flashed.
-l<micro id>
Specifies a micro in a line of micros, where the entire line is to be
flashed.
If options are repeated, only the last value read from the file is used. The
exceptions are the -m and -l options, which use all specified micros.
Processing Rules
Parameters that control the flashing of the micros during the current
execution of eFlash may be included. The following two parameters may
be included:
flashwait=value(in seconds)
Sets the time that eFlash waits for the micro to actually flash the
EPROM. The flash of a micro is considered a failure if the flash
times out. The default is 90 seconds.
maxflash=value(in seconds)
Sets the maximum number of micros that can be flashed
simultaneously. The actual number of micros that is being
currently flashed will always be less than or equal to this value and
may be considerably less than this value due to restrictions on
flashing multiple micros in the same line. The default is 5.
Comments
The eFlash configuration file may contain comments. A comment is a line
that begins with the pound sign (#). The pound sign and all characters up
through the next carriage return are ignored.
11.14
Picture Perfect 2.0 Administration Guide
Flashing Micros
11
Network Micro Parameter Block Configuration
The ppnwmcfg command allows the root user to configure a network
micro’s parameter block from the host by connecting to the network
micro. Once connected, the ppnwmcfg utility will put the network micro
in maintenance mode and display the current settings.
! To display the ppnwmcfg utility:
Flashing Micros
1. Log in to Picture Perfect as root and type:
ppnwmcfg [ -v] microid micro_hostname
A flag that turns on verbose
output.This is useful when
troubleshooting connection
problems.
The Id of the network micro.
Enter
The host of the micro.
Result: The ppnwncfg utility will display.
Menu Options
The ppnwmcfg utility displays the following menu options:
S - - - - Show parameter block
Displays the contents of the network micro’s parameter block
C - - - - Clear parameter
Clears a specific value
U - - - - Update parameter block
Writes the current values to the parameter block
1 - n - - Modify parameter
Selecting a number will prompt you for a new value
E - - - - Edit all
Prompts you for each parameter block value
Q - - - - Quit
Exits out of ppnwmcfg. Once you have quit the ppnwmcfg utility,
the network micro will require about 30 seconds of idle
communication before it resets.
Picture Perfect 2.0 Administration Guide
11.15
Network Micro Parameter Block Configuration
Parameters
The fields shown below may vary depending on your firmware version.
address
The micro ID which is not necessary unless you are configuring a
network dialup micro
phone1
Primary host number for a network dial-up micro to call
phone2
Secondary host number for a network dial-up micro to call
mmdmm_init
Modem initialization string
mdmm_dinit
Modem de-initialization string
rx_idle_time
The minimum number of characters (20 - 254) to process a buffer
hop_count
The number of hops (network boards that must be crossed)
between the network micro and host
ring_speed
Specifies ring speed for token ring networks only
source_ip
The network micro’s IP address.
destination_ip
The Picture Perfect host’s IP address
NOTE
The network micro will accept connections only from the host defined in this field.
If this field is updated incorrectly, the network micro can only be configured from
a laptop computer.
alternate_ip
The backup machine’s IP address in a Picture Perfect redundant
system
11.16
Picture Perfect 2.0 Administration Guide
Flashing Micros
11
gateway_ip
The network micro’s gateway IP address to reach the
destination_ip
subnet_ip_mask
The network micro’s subnet mask
alt_gateway_ip
Picture Perfect 2.0 Administration Guide
11.17
Flashing Micros
The network micro’s gateway IP address to reach the alternate_ip.
Network Micro Parameter Block Configuration
NOTES
11.18
Picture Perfect 2.0 Administration Guide
Inputs and Outputs
Chapter
12
Overview
The Picture Perfect system monitors digital inputs (DIs) for contacts and
digital outputs (DOs) for controlling output devices.
Outputs are triggered when associated inputs activate. Outputs can
operate devices such as door strikes, bells, and lights. Inputs may be
physical connections to a microcontroller or logical events such as a
transaction buffer overflow or an invalid access attempt.
Prerequisites
The following Picture Perfect forms are prerequisites:
Forms
Purpose
To direct messages generated by input and output activity to the
printer in addition to history and monitor displays.
INPUT GROUPS
OUTPUT GROUPS
To allow door inputs and door outputs to activate.
MICROS
To assign inputs or outputs to specific micros.
ROUTE DEFINITIONS
ROUTE POINTS
To allow area activity monitor routing for DIs.
Inputs and Outputs
PRINTER
ROUTINGS
What You Will Be Doing
This chapter shows you how to add (or change) individual outputs and
individual inputs.
Outputs and inputs include description fields that describe the function or
effect of the record. The description becomes part of the transaction
message, telling the monitoring operator what happened and where. One
part of this description may include non-technical language for operator
information, and the other part may include a wiring location.
For example, you may write the following description for an output that
controls a light indicating the back door is open:
BACK DOOR OPEN 002-00-07
Picture Perfect 2.0 Administration Guide
12.1
Outputs
In this example, the first part of the description indicates the purpose of
the output; the second part indicates that the output is connected to DO
point 07 on CPU board 00 of Micro ID 002. How you write output
descriptions is entirely an administrative decision, but this way of writing
descriptions makes the system messages easier to use. To make reports
easier to read, you may want to write the number description first so that
the language description lines up with other records:
002-00-07 BACK DOOR OPEN
002-00-08 SHIPPING DOOR OPEN
Outputs
Outputs that operate devices such as door strikes, lights, or sirens must be
described to the system. Use the Outputs form to define where this output
point is connected, how it is wired to activate, how long it remains on
when activated, how it resets, and what output group is associated with it.
Use the Outputs form (Figure 12-1) to define the characteristics of each
output point.
Setup
! To add an output record:
1. Select Devices, then Outputs.
2. Click New.
3. Complete the Outputs form. For a description of each field, see “The
Outputs Form” on page 12.3.
4. Click Save.
12.2
Picture Perfect 2.0 Administration Guide
Inputs and Outputs
12
The Outputs Form
The following is a list of fields that may require additional information for
you to complete. The list is in the order that the fields appear on the form.
There is no required sequence to follow.
Inputs and Outputs
Figure 12-1.
Outputs Form
Description
Type a description of the output, usually including a micro board
address and a text description.
Picture Perfect 2.0 Administration Guide
12.3
Outputs
Board
Type a board number from 0 to 8. The microcontroller’s power/comm
board is always board 0.
NOTE
Use the Micro Wiring Charts for the Micro/4 and Micro/5 to find the board
number and address where an output point is located. Refer to Table 12-1 and
Table 12-2. Verify the board number with your installer.
Address
Type a number from 0 to 47 (for the Micro/4) or 0, 1, 8, 9, 16 to 31 (for
the Micro/5) for the digital output address where the output is wired
to the connector on the board.
Duration
Type the number of seconds this output remains on when activated, if
this output is allowed to reset when the duration time expires. The
maximum value is 32,767. If 0 is selected, the output will not reset but
will remain activated continuously. See “Outputs Form with Micro
and Output Group Picklists” on page 12.8 and “Reset on Input” on
page 12.8.
Micro
Displays a description of the selected micro where this output is
connected.
Click the Select Micro button (Figure 12-3) to display the Micros
picklist. Select the desired micro, then click Ok.
Output Group
Displays a description of the selected output group to link this output
point with a group of outputs.
Click the Select Output Group button (Figure 12-3) to display the
Output Groups picklist. Select the desired output group, then click
Ok.
12.4
Picture Perfect 2.0 Administration Guide
Inputs and Outputs
12
Table 12-1: Micro/4 Wiring Chart - Outputs
Element
Board Number
DO
Address
Reader
Address
0
0 - 15
--
(DIP Switch
Address) +1
0 - 15
0-7
1st 32DO Board
Same as 8RP or
Micro/2
16 - 47
--
2nd 32DO Board
(1st DO Board) +1
16 - 47
--
3rd 32DO Board
(1st DO Board) +2
16 - 47
--
4th 32DO Board
(1st DO Board) +3
16 - 47
--
CPU
8RP Board
Micro/2
NOTE
1: 8RP and Micro/2 board numbers are 1 to 8. To calculate the board number,
add 1 to the DIP switch address, which is a number from 0 to 7.
3: Every 32DO board after the first one takes an available 8RP or Micro/2 slot.
4: Strike DOs are 0 to 7; Aux DOs are 8 to 15; Normal DOs are 16 to 47.
5: Refer to Figure 12-2 on page 12.6 for the 32DI/DO board addressing scheme
Picture Perfect 2.0 Administration Guide
12.5
Inputs and Outputs
2: Up to four 32DO boards can be connected to a Micro/2 or 8RP. Each output
on the first 32DO board has the same board number as the Micro/2 or 8RP
where it is connected. Each subsequent 32DO board uses the next sequential
board number.
Outputs
LINE 1
• Maximum of 8 32DI/DO boards per line
Board #0
• Maximum of 4 32DI/DO boards per 8RP
M/4
CPU Only
ADDR 0
ADDR 2
ADDR 1
Board # 1
Board # 2
Board # 3
Board #0
32DI
32DO
32DI
32DI
8RP
S1-1 On
S1-1 On
S1-2 On
S1-3 On
ADDR 3
ADDR 4
ADDR 5
Board # 4
Board # 5
Board # 6
Board # 7
ADDR 6
Board #0
32DO
32DO
32DO
32DO
8RP
S1-1 On
S1-2 On
S1-3 On
S1-4 On
Figure 12-2.
32DI/DO Board Addressing Scheme
Table 12-2: Micro/5 Wiring Chart - Outputs
Element
Board
Number
Door DO
Address
Reader
Address
Aux. DO
Address
--
--
--
--
2RP Board
1-4
0-1
0-1
8-9
16DO/DOR Board
1-4
--
--
16 - 31
CPU
12.6
Picture Perfect 2.0 Administration Guide
Inputs and Outputs
NOTE
12
Optional boards include four 20DI boards (20 supervised input points), four
16DO boards (16 output points), and two 2RP boards (2-reader board).
The Micro/5 cabinet has a seven-slot capacity. Two slots are used by the
mandatory Power/Communications and CPU boards. The remaining five slots
may be configured to meet your site requirements with any combination of
boards, within the limits listed above.
Strike DOs are 0 to 1; Aux DOs are 8 to 9; Digital Output Board DOs are 16 to
31.
Facility
Click the Facility button to display the facilities picklist. By default, the
output record will be assigned the same facility as the micro to which
the output is assigned however, you do have the ability to manually
re-assign an output’s facility. This might be desirable in a case where
one micro controls more than one facility, for instance two companies
occupying the same building that use separate doors for entry/exit.
For more information, see Chapter 5 - Facilities and Facility Profiles.
Inputs and Outputs
Enable Output
Toggle the button On if this output is to be activated when its output
group triggers.
Normally Open
The inactive state of an output is either normally open or normally
closed. Toggle this button On if it is normally open.
NOTE
Ask your installer how the output point is wired. Door DOs are usually wired
“normally open.”
Picture Perfect 2.0 Administration Guide
12.7
Outputs
Figure 12-3.
Outputs Form with Micro and Output Group Picklists
Reset on Duration
Select this button if the output should reset after the number of
seconds specified in the Duration field. (There is a possible alarm
override for a duration reset. See Chapter 8 - Alarm Activity Messages
and Alarms.) For example, you may want an output to reset on
duration if the output device is a door strike and you want it to stay on
for a limited duration of time.
Reset on Input
Select this button if the output should reset as soon as the input resets.
NOTE
12.8
If neither Reset On Duration nor Reset On Input is selected, the output stays
on. If Reset On Input is selected, the door does not unlock with a valid badge
read.
Picture Perfect 2.0 Administration Guide
Inputs and Outputs
12
Inputs
Physical inputs such as sensors or detectors must be described to the
system. Use the Inputs form to define where each input point is
connected, how it is wired to activate, what kind of state changes activate
it, how long it remains detected before it activates, which input group is
associated with it, and where messages about this input are routed.
Use the Inputs form (Figure 12-4) to define the characteristics of each
physical input point.
Setup
! To add an input:
1. Select Devices, then Inputs.
2. Click New.
3. Complete the Inputs form. For a description of each field, see “The
Inputs Form” on page 12.9.
Inputs and Outputs
4. Click Save.
The Inputs Form
The following is a list of fields that may require additional information for
you to complete. The list is in the order that the fields appear on the form.
There is no required sequence to follow.
Picture Perfect 2.0 Administration Guide
12.9
Inputs
Figure 12-4.
Inputs Form
Description
Type a description of the input, usually including a wiring address
and a written description.
Micro Input Setup
Current Micro ID
Displays the selected micro where this input point is located.
Click the Set Micro Id button to display the Micros picklist (Figure 125). Select the desired micro, then click Ok.
Board
Type a board number from 0 to 8. The microcontroller’s power/comm
board is always board 0.
12.10
Picture Perfect 2.0 Administration Guide
Inputs and Outputs
NOTE
12
Use the Micro Wiring Charts for the Micro/4 and Micro/5 to find the board number
and address where this input point is located. Refer to Table 12-3 and Table 124. Verify the board number with your installer.
Address
The Address field indicates what digital input point on the board this
input is using. Type a number from 0 to 47 (for the Micro/4) or 0, 1, 8
to 9, or 16 to 35 (for the Micro/5). The address depends on how the
input is wired to the connector on the board. Ask your installer.
Table 12-3: Micro/4 Wiring Chart - Inputs
Element
DI
Address
Reader
Address
Exit
DI
0
0 - 31
--
--
(DIP Switch
Address) +1
0-7
0-7
8 - 15
1st 32DI Board
Same as 8RP or
Micro/2
16 - 47
--
--
2nd 32DI Board
(1st DI Board) +1
16 - 47
--
--
3rd 32DI Board
(1st DI Board) +2
16 - 47
--
--
4th 32DI Board
(1st DI Board) +3
16 - 47
--
--
CPU
8RP Board
Micro/2
NOTE
Inputs and Outputs
Board Number
1: 8RP and Micro/2 board numbers are 1 to 8. To calculate the board number, add
1 to the DIP switch address, which is a number from 0 to 7.
2: Up to four 32DI boards can be connected to a Micro/2 or 8RP. Each input on the
first 32DI board has the same board number as the Micro/2 or 8RP where it is
connected. Each subsequent 32DI board uses the next sequential board number.
3: Every 32DI board after the first one takes an available 8RP or Micro/2 slot.
4: On a Micro/4, the Tamper and AC Power Fail inputs may be wired to any
available DI points.
Picture Perfect 2.0 Administration Guide
12.11
Inputs
Table 12-4: Micro/5 Wiring Chart - Inputs
Element
Board
Number
DI
Address
Reader
Address
Exit
DI
--
--
--
--
2RP Board
1-4
0-1
0-1
8-9
20DI Board
1-4
16 - 35
--
--
CPU
NOTE
1: Optional boards include four 20DI boards (20 supervised input points), four
16DO boards (16 output points), four 2RP boards (2-reader board), and one 8RP
board (8-reader board).
2: The Micro/5 cabinet has a seven-slot capacity. Two slots are used by the
mandatory Power/Communications and CPU boards. The remaining five slots may
be configured to meet your site requirements with any combination of boards,
within the limitations listed above.
3: On a Micro/5, the Tamper and AC Power Fail inputs must be wired to connector
6 on the Power/Communications board. The AC Power Fail input will always be
defined as Board 0, Address 0; the Tamper input will always be defined as Board
0, Address 1.
Off To On Delay Time
The Off To On Delay Time delays the effect of the input described on
this form when it changes state from Off to On. This delay helps avoid
false input detections. Type the number of seconds (0 to 65535)
required for the delay. Leaving this field blank or typing a 0 (zero)
causes no delay. Set this delay to 0 for an Exit DI.
This field overrides the Delay Time set on the Input Groups form. See
“Delay Time” on page 9.5.
On To Off Delay Time
The On To Off Delay Time delays the effect of the input described on
this form when it changes state from On to Off. This delay helps avoid
false input detections. Type the number of seconds (0 to 65535)
required for the delay. Leaving this field blank or typing a 0 (zero)
causes no delay. Set this delay to 0 for an Exit DI.
This field overrides the Delay Time set on the Input Groups form.
Input Control Setup
Select one or both of the following toggle buttons:
12.12
Picture Perfect 2.0 Administration Guide
Inputs and Outputs
12
Normally Closed
The inactive state of an input is either normally open or normally
closed. If it is Normally Open, toggle this button Off by deselecting it.
If it is Normally Closed, toggle it to On by selecting it.
NOTE
Ask your installer how the input point is wired. Door DIs are usually wired
“normally closed” and exit request DIs are usually wired “normally open.”
Input Enabled
Toggle this button On by selecting it, to allow this input to activate.
NOTE
If an input is to be used as an Exit Button input in an area designated as M2MR
with Door Control, the Normally Closed and Input Enabled buttons must be
deselected (the default).
Routing
Displays the selected routing where messages about this input are
displayed.
Inputs and Outputs
Click the Routing button to display the Routings picklist (Figure 125). Select the desired routing, then click Close. The typical routing is
None which means that it is not routed.
Input Group
Displays the selected input group for this input.
Click the input group button to display the Ingroups picklist (Figure
12-5). Select the desired Input Group, then click Close.
NOTE
In both single input groups and in a hierarchy of input groups, all inputs in any
given group or hierarchy must be associated with the same micro.
See Chapter 13 - Categories, Areas, Readers, and Doors, where the
“Forced Open” and “Open Too Long” door input groups are
explained. Use the Doors form to assign a door DI.
NOTE
1: Assign a door exit button to the same input group as the reader for that door.
2: Do not assign a door DI to an input group.
Picture Perfect 2.0 Administration Guide
12.13
Inputs
Input
Input Point
Toggle this button On to configure this input as a standard input
point.
Elevator Point
Toggle this button On to configure this input as an elevator input. For
more information, see Chapter 22 - Elevator Control.
Route Definition
Displays the selected route definition for this input. This route
definition is used for Activity Monitor routing.
Click the Route Definition button to display the Route Definition
picklist. Select the desired route definition, then click Close.
If this field is left blank, this input’s activity will be routed to all
terminals.
NOTE
If an input group is unselected from an input and a new input group is assigned
to the input, the micro has to be reset.
Facility
Click Facility to display the facilities picklist. By default, the input
record will be assigned the same facility as the micro to which the
input is assigned, however, you do have the ability to manually reassign an input’s facility. This might be desirable in a case where one
micro controls more than one facility, for instance two companies
occupying the same building that use separate doors for entry/exit.
For more information, see Chapter 5 - Facilities and Facility Profiles.
12.14
Picture Perfect 2.0 Administration Guide
Inputs and Outputs
12
Inputs and Outputs
Figure 12-5.
Inputs Form with Picklists
Picture Perfect 2.0 Administration Guide
12.15
Inputs
NOTES
12.16
Picture Perfect 2.0 Administration Guide
Categories, Areas, Readers,
and Doors
Chapter
13
Overview
The Picture Perfect system supports readers that control access to doors
and areas. An area contains a group of one or more readers and doors.
Categories assigned to the area act as locks. A badge used with a reader
acts as a key to a door if one of the categories on the badge matches one of
the categories in the area.
Prerequisites
The following Picture Perfect forms are prerequisites:
Forms
Purpose
PRINTER
ROUTINGS
TERMINALS
To log alarms to a printer and display on a console.
PERMISSION GROUPS
PERMISSIONS
OPERATORS
To authorize operators to respond to alarms, assign
categories to areas, and areas to readers and doors.
INPUTS
INGROUPS
OUTPUTS
OUTGROUPS
To allow door inputs and door outputs to activate.
ROUTE DEFINITIONS
ROUTE POINTS
To allow area activity monitor routing for
badge activity.
Categories, Areas,
Readers, and Doors
What You Will Be Doing
This chapter shows you how to create areas of access control, how to
assign categories that “lock” an area, how to group readers into different
areas, and how to assign categories to badges that “unlock” an area.
Picture Perfect 2.0 Administration Guide
13.1
How Categories and Areas Work
How Categories and Areas Work
Categories are both the locks and the keys of the Picture Perfect system. A
category assigned to an area can act as a lock on the doors in that area.
When you assign that same category to a badge, the category functions as
the badgeholder’s key to those doors. If the Increased Category feature
was selected during installation, 96 categories are available for assignment
to a badge, and 32 categories for assignment to an area or an area event.
Otherwise, 32 categories are available for assignment to a badge, and 10
categories are available for assignment to an area or an area event.
NOTE
To System Administrator:
Plan your system using floor plans that locate the readers and areas controlled by
the Picture Perfect system, as in Figure 13-1.
13.2
•
Identify the logical areas of access control.
•
Determine the categories of access that will allow badges into each area.
Picture Perfect 2.0 Administration Guide
13
Categories, Areas, Readers, and Doors
CAFETERIA
PURCHASING
1
9 10 11
2
MEETING ROOM
EXECUTIVE
OFFICES
2
ELEVATOR
MAINT
ELEVATOR SUPPLIES
COMPUTER
ROOM
8
7 8 9 10
BATHROOM
2
7 8 9 10
BATHROOM
9 10
STAIRS
1
EMERGENCY
EXIT
4 5 9 10
6 9 10
1
EDUCATION
LAB
LEGEND
LOBBY
HUMAN
RESOURCES
1
= Reader
#
= Category
Site Map with Access Control Areas
Categories, Areas,
Readers, and Doors
Figure 13-1.
Identify Areas
An area is a group of one or more readers. Identify functions within the
facility that require the same kind of access control and give descriptive
names to these areas. For example:
Accounting
MIS
R&D
Lobby
Stairwells
Cafeteria
Picture Perfect 2.0 Administration Guide
13.3
How Categories and Areas Work
Identify Categories
Identify each group of people who use the facility and assign a category to
each group. For example, categories describe the users by type, title,
group, or shift:
Temporary
Lab Technicians
Chief Engineer
Engineering
Accounting
Computer Room 08:00-17:00
Computer Room 24 Hrs.
Computer Room 16:00 - 04:00
To restrict area access to specific badges within defined time ranges, create
a category that includes a timeframe. Assign this category to each badge
required to access this area during the timeframe described in the
category. Then create an Area Event to schedule the category to be
assigned to the area during the specified time frame.
Example 1: If the badgeholder is a cost accountant required to access the
accounting department and the computer room (8 AM - 5 PM), assign the
following two categories to this badge, and make sure that the same
categories are assigned to the respective areas during the specified time
frame:
Accounting
Computer Rm. 08:00-17:00
Example 2: If the badgeholder is a contractor required to clean the
building from 5 PM to midnight, but required to clean the Computer Room
and other high-security places only from 5 PM to 6 PM, assign the following
two categories to the badge:
General Areas Cleaning 17:00-23:59
High Security Cleaning 17:00-18:00
The names should be descriptive of the area for which access is to be
given—the “lock” or “key” it represents. For example, if you plan to
schedule areas to change categories at various times during the day, use a
category name that indicates when the category is valid for the area.
Use any descriptive name for a category. It may be easier to use a name
that indicates the kinds of locks and keys the category represents. For
example, BLDG 4 - High Security is more meaningful than 1234-3.
Here are some examples of categories and how they may be used:
Exterior Access . . . . . . . . . . . . . . . . . . Used for all areas that control exterior access
and the majority of badgeholders who use
the outer doors.
Bldg 1 Lobbies 7x24 . . . . . . . . . . . . . . Used for lobby access at a specific building
seven days a week, 24 hours a day.
13.4
Picture Perfect 2.0 Administration Guide
Categories, Areas, Readers, and Doors
13
Bldg 1 Lobbies 07:00-19:00 M-F . . . . . Used for the same building but scheduled to
be valid on that area only from 07:00 to 19:00
Monday through Friday. In this case, the
description indicates how this category is
used. See “Area Events” on page 16.14 of
Chapter 16 - Schedules and Modes.
Tape Vault . . . . . . . . . . . . . . . . . . . . . . Used to designate a high security area and
assigned to only those badges with
permission to enter this restricted area.
Assigning Categories to Badges, Areas, and Area
Events
There are various strategies for assigning categories, and the system is
flexible enough to allow you to use several different methods at the same
time. Here are some examples.
Example 1: If an area that you have named HIGH RISK includes the
Computer Room, the Archive Tape Room, and the MIS Equipment Room,
you may decide to assign the following categories, based on job titles:
MIS Director
Comptroller
CEO
To provide each of the above categories of people access to the area, assign
each badge (using the Badges form) at least one of the categories
associated with that area, and assign the area (using the Area form) all
three of the above category names.
Example 2: Instead of using separate categories based on job titles, assign
all top-level people to a category named HIGH RISK. To provide top-level
people access to this area, just assign the HIGH RISK category to each of
their badges.
Example 3: Another way of assigning categories is by shift:
Categories, Areas,
Readers, and Doors
MIS All Hrs
MIS 8-5
Accounting 24 Hrs
Accounting 8-5
Contractor 7-10
If you assign some categories according to shift, you can schedule areas to
have the categories only during certain hours and days of the week.
See “Chapter 16 - Schedules and Modes” for more ways to use categories.
For example, scheduling categories on areas to control when badgeholders
can access an area, or scheduling how long a contractor is allowed access
to each area to control where and when the job starts and ends.
Picture Perfect 2.0 Administration Guide
13.5
Categories
Categories are position sensitive; if you plan to schedule categories, assign
categories in a consistent order. See “Area Events” on page 16.14 of
Chapter 16 - Schedules and Modes.
Categories
Use the Categories form (see Figure 13-2) to create descriptions of each
group of people who use the facility. Categories describe users by type,
title, group, or shift. Then associate each category with one Permission
Group. The categories form a picklist that is used on the Areas, Badges,
Generator, and Area Events forms.
NOTE
A facility map helps identify categories of people who require access.
The permission assigned to an operator determines what categories that operator can assign.
See Chapter 6 - Permissions and Operators.
Setup
! To create a category record:
1. Select Access, then Category.
2. Click New.
3. Complete the Category form. For a description of each field, see “The
Categories Form” on page 13.7.
4. Click Save.
5. Click New to add another category.
13.6
Picture Perfect 2.0 Administration Guide
Categories, Areas, Readers, and Doors
13
The Categories Form
Figure 13-2.
Categories Form
Category
Enter a category description up to 30 alphanumeric characters long
Category Permission
Permission Group
Click the Permission Group button to display a picklist of Permission
Groups. Select the desired Permission Group for this category, then
click Close.
Modified Two-man Rule Type (M2MR)
Categories, Areas,
Readers, and Doors
These buttons identify M2MR category types and will only be
available to operators with Occupancy Control permission granted.
See “Occupancy Control” on page 13.17. The M2MR category type
defines different levels of access to M2MR controlled areas as
indicated below. Entry to an M2MR controlled area is restricted by the
M2MR category type of the categories on the badge and the area.
None
Access to an M2MR controlled area is not permitted while M2MR control is
enabled.
Guest
A Guest is not allowed entry to an M2MR controlled area unless two (2) team
members are already present in the area.
Picture Perfect 2.0 Administration Guide
13.7
Categories
Team Member
If the M2MR controlled area is empty, a Team member is allowed entry only
with a second Team member. Additional team members can enter
individually after the initial two (2) team members are present in the M2MR
controlled area. Additionally, the final two (2) team members will not be
permitted to exit until no Guests remain.
Managing Category Assignment
Use the Areas, Badges, Generator, and Area Events forms to assign new
categories or to change or remove categories already assigned.
Each of these forms contain a Categories list box, that display the active
categories assigned to the selected badge, area, or area event.
Figure 13-3.
Categories List Box
Click the Manage button to display the Category Manager window,
Figure 13-4, from which you may add or remove a category in a slot. You
may also apply a filter to limit the number of categories, displayed in the
Category Manager’s category list.
13.8
Picture Perfect 2.0 Administration Guide
Categories, Areas, Readers, and Doors
13
Assigned permanent slot
Assigned Category
Un-assigned Category
Available permanent slot
Assigned temporary slot
Available temporary slot
Figure 13-4.
Category Manager Window
Slots
Categories, Areas,
Readers, and Doors
This grid contains all the category slots. Permanent category slots
which have been assigned a category, and are therefore no longer
available for selection, are highlighted in red. Available permanent
category slots are shown in white.
Temporary category slots that are currently assigned a temporary
category schedule, are highlighted in yellow. Available temporary
category slots are shown in off-white. These slots should not be used
for permanent assignments.
Categories
This is a list of all available categories in alphabetical order. Categories
which have already been assigned, have their slot number indicated to
their left. Active categories, assigned to a temporary category
schedule, have a letter T after their slot number.
Picture Perfect 2.0 Administration Guide
13.9
Categories
Filter
Enter a search criteria in the Filter field and click on the Refresh
button or press Enter . The search criteria entered in this field can be a
specific match, such as West Lobby, or a pattern, such as Parking
Lot*.
Add
Click on this button to add a permanent category to a slot. The
category list on the Badges form will be refreshed and will display the
new category. This button is enabled when an available category and
an empty slot number are selected. By default, the next empty slot
number is selected when you select an available category.
Remove
Click on this button to remove a permanent category from a slot. The
category list on the Badges form will be refreshed will no longer
display the removed category slot number. This button is enabled if an
active category or the corresponding slot number is selected.
Close
Click this button to close the Category Manager window.
Refresh
Click this button to update the category list display after adding
categories from the Category form.
Help
Click this button to display the HTML help screen for the Category
Manager window.
! To add a permanent category to the next available slot:
1. Click the Manage button to display the Category Manager window.
Result: A list of all available categories, in alphabetical order, will
display. If a category has been assigned a slot, the slot number will be
displayed beside it.
2. Select the desired category.
Result: The next available slot will be highlighted.
13.10
Picture Perfect 2.0 Administration Guide
Categories, Areas, Readers, and Doors
13
3. Click Add.
Result: The category list on the main form will be refreshed and will
display the new category and the slot number to which it was
assigned.
4. Click Close to return to the main form.
! To add a permanent category to a specific available slot:
1. Click the Manage button to display the Category Manager window.
Result: A list of all available categories, in alphabetical order, will
display. If a category has been assigned a slot, the slot number will be
displayed beside it.
2. Select the desired category.
Result: The next available slot will be highlighted.
3. Select the slot to which you want to assign it.
Result: The highlight will move to the new slot.
4. Click Add.
Result: The category list on the Areas form will be refreshed and will
display the new category and the slot number to which it was
assigned.
5. Click Close to return to the Areas form.
! To remove a category from a slot:
1. Click the Manage button to display the Category Manager window.
display. If a category has been assigned a slot, the slot number will be
displayed beside it.
2. Select the category or slot you wish to remove.
Result: The slot to which the category is assigned, or the category to
which the slot is assigned, will be highlighted.
Picture Perfect 2.0 Administration Guide
13.11
Categories, Areas,
Readers, and Doors
Result: A list of all available categories, in alphabetical order, will
Categories
3. Click Remove.
Result: The category list on the Category Manager window will be
refreshed and the category will be displayed with no slot number
beside it.
Result: The category list on the main form will be refreshed and the
category will no longer be displayed.
4. Click Close to return to the main form.
! To replace an existing category:
1. Click the Manage button to display the Category Manager window.
Result: A list of all available categories, in alphabetical order, will
display. If a category has been assigned a slot, the slot number will be
displayed beside it.
2. Select the category you wish to change.
Result: The slot to which the category is assigned will be highlighted.
3. Click Remove.
Result: The category list on the Category Manager window will be
refreshed and the category will be displayed with no slot number
beside it. The category list on the main form will also be refreshed and
the category will no longer be displayed.
4. Select the category and the new slot to which you want to assign it.
5. Click Add.
Result: The category list on the main form will be refreshed and will
display the category and the new slot number to which it was
assigned.
6. Click Close to return to the main form.
13.12
Picture Perfect 2.0 Administration Guide
Categories, Areas, Readers, and Doors
13
Areas
A single area may be assigned to multiple readers and doors. For example,
the Accounting Management Area may be assigned to a reader using the
Area button on the Readers form. The same area may be assigned to a
door using the Area button on the Doors form. Additional readers and
doors may be assigned to the same area, but an individual reader or door
can only belong to one area.
The permission assigned to an operator determines which areas that
operator can assign to readers and doors. See Chapter 6 - Permissions and
Operators.
When you assign an area to a door or a reader, the categories (and
controls) defined for the area become valid for all doors and readers that
belong to that area.
Some of the controls on the Areas form are also available on the Doors
form and the Readers form. In some cases, this may allow an individual
door or reader to have controls that differ from the assigned area. Table
13-1 lists the controls that Areas, Readers, and Doors have in common.
Table 13-1: Common Control Fields of the Areas, Readers, and Doors
Areas
NOTE
Readers
Scheduling
Scheduling
Shunting
Shunting
Physical State
Physical State
Logical State
Logical State
Doors
Scheduling
A setting of Disabled in any of these fields on any of these forms overrides a setting
of Enabled in the same field on another form. For example, if Shunting is Enabled
for an area, but a reader in that area has Shunting Disabled, the Shunting feature
will not work for that reader. Shunting must be set to Enabled on both the Areas
and Readers forms in order for it to work.
Categories, Areas,
Readers, and Doors
Setup
! To create an area:
1. Select Access, then Areas.
2. Complete the Areas form. For details on each field, see “The Areas
Form” on page 13.14.
3. Click Save.
4. Click New to add another Area.
Picture Perfect 2.0 Administration Guide
13.13
Areas
The Areas Form
The following is a list of fields that may require additional information for
you to complete. There is no required sequence for you to follow.
Divide your site into areas that require access control. Assign an area to
each reader that protects that area. Before assigning categories to areas,
read the “lock and key” discussion in “How Categories and Areas Work”
on page 13.2.
Figure 13-5.
Areas Form - Top
Description
Type an area Description up to 30 alphanumeric characters long; for
example, Lobby. The lobby area may include more than one location if
the facility has multiple entrances or buildings.
An area may be one contiguous physical space (such as the Computer
Room) or it may be a number of separate but related spaces (such as
Computer Room, MIS Lab, Computer Vault, MIS Equipment Room)
that require the same level of access control.
Area Control
Use the radio buttons to specify the Area Control setting for each of
the following items:
Physical State
Enabled indicates that the system allows readers in this area to read
badges. Disabled indicates that the system does not allow the area’s
readers to operate.
13.14
Picture Perfect 2.0 Administration Guide
Categories, Areas, Readers, and Doors
13
Logical State
Online indicates that the readers in this area operate in normal mode.
Offline indicates that the readers are not allowed to unlock doors, but
are allowed to read badges, pass badge data, route and archive access
messages, and activate associated alarms.
Shunting
Enabled indicates that the system allows use of keypad override of
shunt time on doors and readers in this area. Disabled indicates that
shunting is not allowed.
This has no effect on Door Held Open or Door Forced Open. See
“Held Open Sensing” on page 13.37 (the Doors form) and “Shunting”
on page 13.28 (the Reader form).
Scheduling
Enabled indicates that the system recognizes scheduled changes
associated with this area. Disabled indicates that the system ignores
scheduled changes.
Antipassback Enforcement
If antipassback is set to Normal for this area, it works in conjunction
with the antipassback status setting on each badge used to access this
area. If set to Passive, antipassback will not be enforced in this area
which means that access will be granted regardless of the antipassback
status. However, violations will still be reported.
See “Antipassback Status” on page 14.23 (the Badges form).
Facility
Click the Facility button to display the facilities picklist. Selecting a
facility will allow the administrator to restrict operator access to those
records in a specific facility. For more information, see Chapter 5 Facilities and Facility Profiles.
Set Input Groups
NOTE
Only Trigger on Input (non-boolean) input groups are displayed in the picklists.
See “Boolean Type” on page 9.5 of Chapter 9 - Input and Output Groups.
Invalid Grp
The input group to trigger when an invalid badge error condition
occurs:
Picture Perfect 2.0 Administration Guide
13.15
Categories, Areas,
Readers, and Doors
Select one Input Group for each error condition. These Input Groups
will activate an associated alarm when the error condition occurs.
Areas
Deleted - The badge presented has been deleted from the Picture
Perfect database.
Invalid PIN number - The PIN number entered in the keypad reader
does not match the PIN number in the badge record.
Category mismatch - The category identified in the badge record does
not match the area category where the badge read occurred.
Click the Invalid Grp button to display the Ingroups picklist. Select
the desired Input Group, then click Close.
Suspended Grp
The input group to trigger when a suspended badge read occurs. A
suspended badge is one that has been identified in its badge record as
suspended.
Click the Suspended Grp button to display the Ingroups picklist.
Select the desired Input Group for a suspended badge read, then click
Close.
Lost Grp
The input group to trigger when a lost badge read occurs. A lost badge
is one that has been reported and identified in its badge record as lost.
Click the Lost Grp button to display the Ingroups picklist. Select the
desired Input Group for a lost badge violation, then click Close.
Unknown Grp
The input group to trigger when an unknown badge read occurs. An
unknown badge is one whose BID (The hidden number that uniquely
identifies each badge) is not recorded in the Badges table of the Picture
Perfect database and therefore is not recognized by the system.
Click the Unknown Grp button to display the Ingroups picklist. Select
the desired Input Group for an unknown badge violation, then click
Close.
Antipassback Grp
The input group to trigger when an antipassback violation occurs.
When used in conjunction with antipassback readers, the antipassback
status (In, Out, or Privileged) of a badge plus a category match,
regulate its ability to open a door. For example, if a badgeholder starts
to enter an antipassback area by swiping his badge, then allows the
door to close without entering, he will not be able to re-enter that area
because the system has already registered him as In.
13.16
Picture Perfect 2.0 Administration Guide
Categories, Areas, Readers, and Doors
13
Click the Antipassback Grp button to display the Ingroups picklist.
Select the desired Input Group for an antipassback violation, then
click Close.
Duress Grp
The input group to trigger when a valid duress-code badge read
occurs. Duress codes can be used with Badge and Keypad or Keypad
readers to alert the system that a valid badge read was made under
forced conditions or duress.
Click the Duress Grp button to display the Ingroups picklist. Select
the desired Input Group for a duress-code entry, then click Close.
NOTE
Do not assign a reader’s valid input group to one of the above groups. This will result
in an unlocked door.
Categories, Areas,
Readers, and Doors
Figure 13-6.
Areas Form - Bottom
Occupancy Control
Occupancy Counting
The ability to control occupancy counting is available only if the
operator has Occupancy Control permission granted. When enabled,
Picture Perfect 2.0 Administration Guide
13.17
Areas
it allows the number of persons in a controlled space to be monitored.
The occupancy count is reset to zero and the two-man rule radio
buttons are enabled. When disabled, the two-man rule mode is forced
to Disabled and the two-man rule radio buttons are grayed out and
not selectable. Picture Perfect updates the occupancy count when a
valid entry or exit to/from the area occurs. The default setting for
Occupancy Counting is disabled.
Occupancy Count
The value in this field shows the current occupancy count for the area.
Reset
This button is enabled only if the operator has Occupancy Control
permission granted and occupancy counting has been enabled. It
allows the occupancy count for an area to be reset to zero.
Two-Man Rule Control
These radio buttons are enabled only if the operator has Occupancy
Control permission granted and Occupancy Counting has been
enabled. Two-man rule (2MR) or modified two-man rule (M2MR) can
only be enabled if the Occupancy Count is zero. If the operator
violates this rule, an error message will appear in the status line
(see Figure 3-4. Example of a Form on page 3.6.) The record cannot be
saved unless the count is reset to zero or two-man rule mode is set to
Disabled.
Disabled
Select this radio button to deactivate two-man rule mode if it is
currently enabled.
Standard
Select this radio button to activate the standard two-man rule mode.
This ensures that at least two badge holders occupy a given controlled
space.
Modified with Door Control
Select this radio button to activate the modified two-man rule mode
which restricts access to a controlled area based on the M2MR
Category Type. The first two badge holders to enter a controlled space
must be of the Team Member personnel type and at least two team
members must be present in the controlled space until all Guests have
exited. Additionally, a team member within the controlled space must
press a door release button in order to allow entry to any subsequent
badge holders. The door release button must be pressed within the
time specified in the Door Release Timeout field or the door will not
be unlocked.
13.18
Picture Perfect 2.0 Administration Guide
Categories, Areas, Readers, and Doors
13
Modified without Door Control
Select this radio button to activate the two-man rule mode which
restricts access to a controlled area based on the M2MR Category
Type. The first two badge holders to enter a controlled space must be
of the M2MR Type and at least two Team members must be present in
the controlled space until all Guests have exited.
Door Release Timeout
This field is enabled only if the operator has Occupancy Control
permission granted. Valid values range from 0 (no timeout) to 32,767
seconds.
Set Routings
Select routings for the following types of conditions:
Valid Routing
Click the Valid Routing button to display the Routings picklist. Select
the desired routing for a valid badge read, then click Close.
Invalid Routing
Click the Invalid Routing button to display the Routings picklist.
Select the desired routing for an invalid badge read, then click Close.
Suspended Routing
Click the Suspended Routing button to display the Routings picklist.
Select the desired routing for a suspended badge read, then click
Close.
Lost Routing
Click the Lost Routing button to display the Routings picklist. Select
the desired routing for a lost-badge read, then click Close.
Unknown Routing
Click the Unknown Routing button to display the Routings picklist.
Select the desired routing for an unknown badge read, then click
Close.
Route Definition
Click the Route Definition button to display the Route Definitions
picklist. Select the desired Route Definition for this area, then click
Close. This Route Definition is used for Activity Monitor routing. If
this field is left blank, this area’s activity will be routed to all terminals.
Picture Perfect 2.0 Administration Guide
13.19
Categories, Areas,
Readers, and Doors
Antipassback Routing
Click the Antipassback Routing button to display the Routings
picklist. Select the desired routing for a valid antipassback transaction,
then click Close.
Areas
Categories
If the Increased Category feature was selected during installation, 32
categories can be assigned to an area or an area event. Otherwise, only
10 categories can be assigned. This list box contains the active
categories, ordered by slot number. To access an area, a badge must
match at least one category that is assigned to that area.
NOTE
This field is position sensitive when used in conjunction with area category
schedules.
Manage
Click the Manage button to display the Category Manager window,
Figure 13-4, from which you may add, remove, or replace a category in
a slot. For more information on Category Management, see “Managing
Category Assignment” on page 13.8.
13.20
Picture Perfect 2.0 Administration Guide
Categories, Areas, Readers, and Doors
13
Readers
Use the Readers form to define how each reader operates and to associate
the reader with an area, a micro, and input group so that the system can
process reader activity.
NOTE
Readers may also be set up using the Data Generator. See Chapter 15 - Generator.
Badge in here
Strike
VALID INPUT
GROUP
READER
OUTPUT
GROUP
OUTPUT
Green LED
INVALID
INPUT
GROUP
OUTPUT
GROUP
OUTPUT
OPTIONAL
Optional
Red LED
Figure 13-7.
Common Reader Setup
Badge In Here
IN
READER
Strike
VALID
INPUT
GROUP
OUTPUT
GROUP
OUTPUT
Green LED
Badge Out Here
Categories, Areas,
Readers, and Doors
OUT
READER
DOOR
AREA
Figure 13-8.
NOTE: Set up the door
as per Figure 13-11:
Common Door Setup
on page 13.31.
Connect both green
reader LEDs to the
same DO on the micro.
In/Out Reader Setup with Single Door
Picture Perfect 2.0 Administration Guide
13.21
Readers
Setup
! To define a reader:
1. Select Devices, then Readers.
2. Click New.
3. Complete the Readers form. For details on each field, see “The Readers
Form” on page 13.22.
4. Click Save.
5. Click New to add another reader.
The Readers Form
The following is a list of fields that may require additional information for you
to complete. The list is in the order that the fields appear on the form. There is
no required sequence for you to follow. Refer to Figure 13-9 for the top lefthand portion of the Readers form.
Description
Type a reader Description up to 30 alphanumeric characters long; for
example,
00-1-00 LOBBY DOOR.
Figure 13-9.
13.22
Readers Form (Top)
Picture Perfect 2.0 Administration Guide
Categories, Areas, Readers, and Doors
13
Board
Type the board number of the reader board where this reader is
connected. See Table 12-3, “Micro/4 Wiring Chart - Inputs,” on
page 12.11 and Table 12-4, “Micro/5 Wiring Chart - Inputs,” on
page 12.12 of Chapter 12 - Inputs and Outputs.
Address
Type the physical address of this reader on its reader board. See
Table 12-3, “Micro/4 Wiring Chart - Inputs,” on page 12.11 and
Table 12-4, “Micro/5 Wiring Chart - Inputs,” on page 12.12 of
Chapter 12 - Inputs and Outputs.
Interval Time
Type the maximum number of seconds allowed to elapse between
stages of a transaction, such as entering a PIN number in a keypad
reader after a badge swipe, and/or between separate badge
transactions on a double-badge reader. (See Chapter 26 - DoubleBadge Transaction for details on this feature.) The time starts after the
first transaction.
Set Micro
Click the Select Micro button to display the Micros picklist. Select the
micro where this reader is wired, then click Ok. The selected micro is
displayed under Set Micro.
Facility
Click the Facility button to display the facility picklist. The facility set
determines which facility will be able to view the associated badge and
trace activity on the Activity Monitor if the Badge and Trace options
are selected.
Area
Click the Area button to display the Areas picklist. Select the area that
this reader protects, then click Close. The area that you select should
have categories and controls appropriate for this reader.
Picture Perfect 2.0 Administration Guide
13.23
Categories, Areas,
Readers, and Doors
By default, the reader record will be assigned the same facility as the
micro to which the reader is assigned however, you do have the ability
to manually re-assign a reader’s facility. This might be desirable in a
case where one micro controls more than one facility, for instance two
companies occupying the same building that use separate doors for
entry/exit. For more information, see Chapter 5 - Facilities and Facility
Profiles.
Readers
Terminal
If this reader functions as a badge-issue reader, select a terminal,
otherwise leave blank. Note that a terminal can only be assigned to
one reader. Click the Terminal button to display the Terminals
picklist. Select the desired terminal, then click Close. A reader can only
be assigned to one terminal.
Valid InGroup
Select an input group to be triggered when a valid badge is swiped
through this reader. Click the Valid Ingroup button to display the
Ingroups picklist. Select the desired input group, then click Close.
NOTE
Only Trigger on Input (Individual) which are non-boolean input groups are
displayed in the picklist. See “Boolean Type” on page 9.5.
To allow doors to open for valid badges, be sure to assign an input
group that is associated with the output group that controls the
appropriate door strike output.
Invalid InGroup
Select an input group to be triggered when an invalid badge is swiped
through this reader. Click the Invalid Ingroup button to display the
Ingroups picklist. Select the desired Input Group, then click Close.
Two Man Rule
Click 2MR Output to open a list box from which you may optionally
select an output to associate with an indicator such as a blinking light.
The indicator device is activated when the first of two valid badge
reads for entry or exit from a two-man ruled enabled area has occurred
at the reader. When the indicator device is activated, the second
person should present their badge at the reader before the timeout
period expires in order to unlock the door to permit entry or exit from
the area. The indicator is deactivated when a timeout or second valid
badge read or invalid badge read occurs at the reader. The Two Man
Rule Output is a digital output (DO) point configured to control the
indicator device. The value in the drop-down list may only be changed
by an operator with Occupancy Control permission granted.
13.24
Picture Perfect 2.0 Administration Guide
Categories, Areas, Readers, and Doors
Figure 13-10.
13
Readers Form (Bottom Right)
Logical Reader Function
Select the desired Logical Reader Function for this reader:
Normal
Used to grant access into an area.
Anti-Passback In
Used to log a badgeholder “in” when entering.
Anti-Passback Out
Used to log a badgeholder “out” when exiting.
Time and Attendance In
Used to log a badgeholder “in” at the start of a work shift.
Time and Attendance Out
Used to log a badgeholder “out” at the end of a work shift.
APB Type
If the Logical Reader Function is set to APB In or APB Out, select the
desired APB Type for this reader:
Picture Perfect 2.0 Administration Guide
13.25
Categories, Areas,
Readers, and Doors
Time and Attendance In/Out
Used to log a badgeholder “in” and “out” using the same reader (such
as the Model 100 Weigand reader) by swiping the card the normal way
for “in” and reversing the card or turning the card backwards for
“out”.
Readers
Global APB
Used as the default, this allows the reader to function as a normal APB
reader.
Timed APB
Used to designate the reader as a Timed APB reader in which a
badgeholder’s APB status will be set to In or Out and will return to
Neutral after a defined period of time. A Timed APB reader is useful
in a site where a badgeholder may enter a site by going through an
APB In reader but is not required to exit the site by going through an
APB Out reader. If this option is selected, a Timed APB Duration
must also be defined. A Timed APB status is local to the micro.
Reset Timed APB Immediately
Used to reset the Timed APB status back to Neutral immediately
following a badge swipe.
Timed APB Duration
Enter a value to represent how long a badgeholder’s Timed APB
status will be set when his badge is used on the reader. The Timed
APB Duration cannot exceed one day. A duration of 0 allows the
micro to reset the status to Neutral immediately, producing the same
effect as Reset Timed APB Immediately.
Swipe and Show Control
This feature is only visible when the optional Image package is
installed. See page 28.6 for more details on Swipe and Show.
Swipe and Show
Select Enabled to enable Swipe and Show on this reader. Select
Disabled to disable Swipe and Show on this reader.
NOTE
A reader cannot be defined as Toggle when Swipe and Show is Enabled. See
“Toggle” on page 13.28.
Authorization Required
Select Yes to designate a reader that will display a photo in a popup
window beside the Activity Monitor (see Figure 28-1) and require an
operator to unlock a door. Select No to designate a reader that will
display a photo in a popup window beside the Activity Monitor (see
Figure 28-1) and will unlock a door without operator intervention.
NOTE
13.26
The Yes and No buttons are not available unless Swipe and Show is Enabled.
Access cannot be granted through readers defined as Authorization Required
while communications to the micro are down.
Picture Perfect 2.0 Administration Guide
Categories, Areas, Readers, and Doors
13
Physical Reader Type
Select the desired physical reader type for this reader:
Badge Only
A reader used only to read badges using a badge swipe.
Keypad Only
A reader used only as a keypad, where, in lieu of a badge swipe, the
badge encode number must be entered using the keypad. Press * or +,
enter the badge encode number, then press # .
Badge and Keypad
A badge reader used in conjunction with a keypad, where a PIN, a
duress code, a shunt override code, or an alarm response code can be
entered in addition to the badge swipe. See the procedures for each
type of code below:
•
•
•
PIN or Duress Code
1.
Swipe the Badge.
2.
Press * or + , enter the PIN or Duress Code, then press # .
Shunt Override Code
1.
Press * or +, enter the Shunt Code, then press # .
2.
Swipe the Badge.
3.
Press * or +, enter the PIN or Duress Code, then press # .
Alarm Response Code
1.
Press * or +, enter the Alarm-Response Code, then press # .
2.
Swipe the Badge.
3.
Press * or +, enter the PIN or Duress Code, then press # .
Reader Control
Use the radio buttons to specify the reader control setting for each of
the following items:
Picture Perfect 2.0 Administration Guide
13.27
Categories, Areas,
Readers, and Doors
Badge or Keypad
The reader can be used either as a badge reader or a keypad. If Badge
is selected, then the reader is used only to read badges using a badge
swipe. If Keypad is selected, the badge encode number is entered
using the keypad in lieu of a badge swipe. Press * or +, enter the badge
encode number, then press # .
Readers
Physical State
Enabled means this reader is allowed to read badges. Disabled means
the reader cannot read badges.
NOTE
If a reader is not operational, set physical state to Disabled.
Logical State
Online permits the normal operating mode for this reader. Offline
means the reader is allowed to read badges, pass badge data, route
and archive access messages, and activate associated alarms—but is
not allowed to unlock associated doors.
Shunting
Enabled means this reader allows the use of keypad override of shunt
time. Disabled means the reader will not allow shunting. When
enabled, the Alarm Shunting feature allows a valid badgeholder to
keep a door open (for the time specified, in minutes, in the Keypad
Shunt Time field of the Doors form) without getting a Door Held
Open alarm. The badgeholder enters the shunt code (defined on the
Micros form) using the reader keypad, then presents his badge, then
enters his PIN number
Scheduling
Enabled means established schedule changes will control this reader.
Disabled means established schedule changes will not affect this
reader.
Number of Badges
Single means the reader requires only one valid badge read to open
the door. Double means the reader requires two separate valid badge
reads to open the door.
Toggle
A reader used in special applications only, in which a badge swipe
toggles the reader’s valid input group (non-boolean) On (yes) or Off
(no), such as to arm/disarm a burglar alarm system. Toggle readers
are not intended for door control, but can be used that way with some
limitations. To do this, the door must be configured without a sensor,
and the doorstrike output must be configured to reset with an input
rather than on duration. With this configuration, the reader can toggle
the door between locked and unlocked, but since there is no sensor,
there can be no detection of the door being forced open or held open
too long.
13.28
Picture Perfect 2.0 Administration Guide
Categories, Areas, Readers, and Doors
13
For an example of toggle-reader use, see “The Input Groups Form” on
page 9.4 of Chapter 9 - Input and Output Groups.
NOTE
If Toggle is set to Yes and Authorization Required is set to Yes, photos are
displayed for invalid transactions, but not valid transactions. See “Swipe and
Show Control” on page 13.26.
Limited Usage
Selecting Enabled defines the reader as a limited usage reader, which
will only grant access to a badgeholder for the number of times
specified in the Usage Count field of the Badges form. There is no
limit to the number of readers that can be defined as limited usage
readers. See Chapter 14 - Badges for related information. The count
must be manually reset.
Elevator Reader
Selecting Yes defines the reader as an elevator reader. A maximum of
16 readers on a micro can be configured as elevator readers. See
Chapter 22 - Elevator Control for related information.
Categories, Areas,
Readers, and Doors
Picture Perfect 2.0 Administration Guide
13.29
Doors
Doors
Use the Doors form to define how each door operates. Depending on the
features that it should have, you may want to associate the door with an
area and with inputs, input groups, and outputs--so that the system can
process door status information and operate optional door hardware or
alarm devices.
The Doors form links all access and control features of the physical door.
The Doors form fields required for activation of particular features are
listed with those features below.
NOTE
13.30
To ensure proper operation when the micro runs offline, the door sensor, reader,
door strike, and exit button must be wired to the same micro.
Picture Perfect 2.0 Administration Guide
13
Categories, Areas, Readers, and Doors
Setup
Badge in here
Strike
VALID
INPUT
GROUP
READER
OUTPUT
GROUP
OUTPUT
Exit Button
INPUT
DOOR
STRIKE OUTPUT
EXIT BUTTON
AREA
INPUT
DOOR SENSOR
PRE-ALARM
Door Sensor
(non-supervised)
HELD OPEN
FORCED OPEN
ALARM
INPUT
GROUP
ALARM
INPUT
GROUP
ALARM
FORCED OPEN
HELD OPEN
*
*
PRE-ALARM
Categories, Areas,
Readers, and Doors
*
INPUT
GROUP
*
NOTE: A single input group and alarm can be used for multiple doors.
Figure 13-11.
Common Door Setup
Picture Perfect 2.0 Administration Guide
13.31
Doors
• Ground condition detected
• Short condition detected
Strike
VALID
INPUT
GROUP
INPUT
OUTPUT
GROUP
OUTPUT
Exit
Button
DOOR
TAMPER
ALARM
TAMPER
INPUT
GROUP
INPUT
Door
Sensor
• Ground condition detected
• Short condition detected
Figure 13-12.
Supervised Door DI and Exit DI Setup
! To define a door record:
1. Select Devices, then Doors.
2. Click New.
3. Complete the Doors form. For details on each field, see “The Doors
Form” on page 13.35.
4. Click Save.
5. Click New to add another door.
13.32
Picture Perfect 2.0 Administration Guide
Categories, Areas, Readers, and Doors
13
Adding or Changing a Door Sensor
A door contact functions as a sensor for two door-open conditions: “door
open too long” and/or “door forced open.”
If you are using the alarm shunting function on a door, when a valid
badge unlocks the door strike and the badgeholder opens the door, the
system begins to count the number of seconds of Allowable Open Time.
If the door is still open when this time elapses, an associated alarm can
occur. (For details on how to associate an alarm with Allowable Open
Time, see Chapter 9 - Input and Output Groups and Chapter 8 - Alarm
Activity Messages and Alarms.)
If you are using the monitoring function on a door, when a door is forced
open, an associated alarm can occur immediately.
NOTE
You must define this sensor input (on the Inputs form) before you can select the
appropriate door sensor input (on the Doors form).
! To define a door sensor:
1. Select Devices, then Doors.
2. Complete the following fields of the Doors form. (For details on each
field, see “The Doors Form” on page 13.35.)
Description
•
Forced Open Shunt Time
•
Allowable Open Time
•
Keypad Shunt Time (optional—so the badgeholder can use a code
to override the Allowable Open Time).
•
Held-Open Sensing
•
Forced-Open Monitoring
•
Input Groups (Forced Open/Held Open/Pre-Alarm)
•
Inputs, Door Sensor (associated with a DI point wired to the door
sensor)
Picture Perfect 2.0 Administration Guide
13.33
Categories, Areas,
Readers, and Doors
•
Doors
Adding or Changing a Door Strike Setting
A door strike associated with a reader (and/or an exit device) releases to
unlock a door when a valid badge read occurs (or when an exit device is
pushed).
When the door strike releases, the system starts counting the Unlock Time
set for the door strike and then closes the door strike when the time
elapses. The badgeholder opens the door during the Unlock Time.
! To define a door strike setting:
1. Select Devices, then Doors.
2. Complete the following fields of the Doors form. (For details on each
field, see “The Doors Form” on page 13.35.)
•
Description
•
Unlock Time
•
Strike Output - DO (digital output) point wired to the door strike
Adding or Changing an Exit Device
An exit device releases the door strike on a door. Exit devices are often
used on lobby doors. The exit button is associated with a door strike so
that the latch unlocks (and the sensor is shunted) when the exit button is
pushed. You can enable the exit button and define how long the latch
remains unlocked using the Doors form.
! To define an exit device:
1. Select Devices, then Doors.
2. Complete the following fields of the Doors form. (For details on each
field, see “The Doors Form” on page 13.35.)
13.34
•
Description
•
Unlock Time
•
Exit Button Asserts Strike - Enabled
•
Strike Output - DO (digital output) point wired to the door strike
•
Inputs, Exit Button
Picture Perfect 2.0 Administration Guide
Categories, Areas, Readers, and Doors
13
The Doors Form
The following is a list of fields that may require additional information for
you to complete. The list is in the order that the fields appear on the form.
There is no required sequence to follow.
Refer to Figure 13-13 for the top portion of the Doors form.
NOTE
Depending on the features required for each door, all fields may or may not be
applicable.
Figure 13-13.
Doors Form, Top
Door Values
Define the door and the times allowed before alarms are enabled.
Unlock Time (secs)
Enter the number of seconds that this door may remain unlocked due
to a valid badge read or an exit button being pushed. This field
controls how long the door strike is unlocked for the badgeholder to
open the door. After that, the Allowable Open Time controls how
long the badgeholder may keep the door open while the badgeholder
is passing through.
Picture Perfect 2.0 Administration Guide
13.35
Categories, Areas,
Readers, and Doors
Description
Type a door description up to 30 alphanumeric characters long.
Doors
Forced Open Shunt Time (secs)
Enter the number of seconds that the Door Forced Open alarm will be
shunted before an alarm is generated. When the shunt time expires,
the Door Forced Open alarm is enabled.
The number of seconds set here must be greater than the Unlock
Time. This field controls how long a door strike will remain unlocked
after the Unlock Time expires so a badgeholder can open the door and
not get a Door Forced Open alarm.
Allowable Open Time (secs)
Enter the number of seconds that this door may be open (due to a valid
badge read) before an alarm condition exists. Be sure to set the Held
Open Sensing button to Detected (in the Door Control box) to
activate this feature.
Keypad Shunt Time (mins)
Enter the number of minutes that this door may remain open due to a
badgeholder entering an override code into a keypad reader. For
example, Shipping and Receiving may use the override time to keep a
shipping door open beyond the Allowable Open Time.
Refer to Figure 13-14 for the bottom left-hand portion of the Doors form.
Figure 13-14.
Doors Form, Bottom Left
Door Control
Use the radio buttons to specify the Door Control setting for each of
the following items:
13.36
Picture Perfect 2.0 Administration Guide
Categories, Areas, Readers, and Doors
13
Door State
Indicate whether you want the door currently Locked (pending a valid
badge read or other event) or Unlocked.
Scheduling
Select Enabled to allow scheduled changes set for this door to take
place. Select Disabled to prevent scheduled changes set for this door
from taking place.
Held Open Sensing
Select Detected to allow an alarm condition to occur on this door
when the door remains open (with a valid badge reader or exit button)
for too long, based on the Allowable Open Time (set in the Door
Values box). Select Ignored if the sensing function on this door is not
used.
Forced Open Monitoring
Select Detected to allow an alarm condition on this door to occur
immediately when the door is forced open without a valid badge read
or exit device. Select Ignored if the Monitoring function on this door is
not used.
Exit Button Asserts Strike
Select Enabled to allow an exit button to unlock this door for the
number of seconds in the Unlock Time field and remain open for the
number of seconds in the Allowable Open Time field (both set in the
Door Values box). Be sure to make a selection in the Exit Button field
in the Inputs box. Select Disabled if an exit button is not allowed to
unlock this door but will shunt the door DI.
Pre-Alarm
Select Enabled to allow the Pre-alarm Notification feature to activate.
See Chapter 24 - Pre-Alarm Notification for details on this feature.
Select Disabled if the Pre-alarm Notification feature is not used.
NOTE
Keypad Alarm Response
Select Enabled to allow the Keypad Alarm Response feature to
activate. See Chapter 23 - Keypad Alarm Response for details on this
feature. Select Disabled if the Keypad Alarm Response feature is not
used.
Picture Perfect 2.0 Administration Guide
13.37
Categories, Areas,
Readers, and Doors
Input groups for the above can be generic, that is, one input group and alarm can
be used by all doors for forced, held and pre-alarm.
Doors
Forced Relock
If enabled, this feature provides further security by locking a door if a
second person presents a badge to the reader before the first person
opens the door. For example, if a person badges into a reader but does
not open the door, and a second person badges into the same reader
before the first person’s Unlock Time expires, the door will
immediately lock. This will show on the Activity Monitor as two
2ND BDG DOOR LOCK transactions (one for each person).
Door Strike Relock
Door Strike Relock provides additional security by incorporating the
ability to relock the door upon a door opening or closing, or after a
specified period of time.
On Door Open
When the door is opened, the door strike will relock. Do not use this
option if you are using magnetic locks with built-in door open sensors.
On Door Closed
When the door is closed (after being open), the door strike will
immediately relock.
On Door Unlock Duration
The door strike will relock after the Unlock Time (set in the Door
Values box) has expired.
Input Groups
Select one input group for each door-error condition. This input group
will activate and the associated alarm will be triggered when the
associated door-error condition occurs.
NOTE
Only Trigger on Input (non-boolean) input groups are displayed in the picklists.
See “Boolean Type” on page 9.5 of Chapter 9 - Input and Output Groups.
Input groups for the following can be generic, that is, one input group and alarm
can be used by all doors for forced held and pre-alarm.
Forced Open
Click the Forced Open button to display the Ingroups picklist. Select
the desired input group, then click Close. (Be sure the Forced Open
Monitoring field of the Door Control box is set to Detected.)
13.38
Picture Perfect 2.0 Administration Guide
Categories, Areas, Readers, and Doors
13
Held Open
Click the Held Open button to display the Ingroups picklist. Select the
desired input group, then click Close. (Be sure the Held Open Sensing
field of the Door Control box is set to Detected.)
Pre-Alarm
Click the Pre-Alarm button to display the Ingroups picklist. Select the
desired input group, then click Close. (Be sure the Pre-Alarm field of
the Door Control box is set to Enabled.)
Refer to Figure 13-15 for the bottom right-hand portion of the Doors form.
Figure 13-15.
Doors Form, Bottom Right
Door’s Area
Strike Output
Click the Strike Output button to display the Outputs picklist. Select
the desired door strike output associated with this door, then click
Close. The door output is a digital output (DO) point associated with
Picture Perfect 2.0 Administration Guide
13.39
Categories, Areas,
Readers, and Doors
Click the Door’s Area button to display the Areas picklist. Select the
desired area for this door, then click Close. If a reader is associated
with this door, select the same area that is assigned to the reader.
Doors
the door strike.
NOTE
Select a door strike output that is wired to the same micro as the associated door
sensor input. The system displays a popup message to the operator if an output
point is selected on the wrong micro.
Facility
Click the Facility button to display the facilities picklist. By default, the
door record will be assigned the same facility as the micro to which the
door is assigned however, you do have the ability to manually reassign a door’s facility. This might be desirable in a case where one
micro controls more than one facility, for instance two companies
occupying the same building that use separate doors for entry/exit.
For more information, see Chapter 5 - Facilities and Facility Profiles.
M2MR Output
Click the M2MR Output button to display a list box from which you
may optionally select an output to associate with a warning device
such as a horn or strobe light. The device is used by Modified Twoman Rule with Door Control to notify the team members in an area
that a person desiring access has presented a badge at the reader. The
M2MR output is a digital output (DO) point configured to control the
warning device. The value in the drop-down list may only be changed
by an operator with Occupancy Control permission granted. When
the warning device is triggered, team members in the area should
press the button connected to the Exit button input before the door
timeout has elapsed (at which point the warning will terminate) to
cause the door to unlock and allow entry to the area. The M2MR
output must be physically located on the same micro as the strike
output.
Inputs
Door Sensor
Click the Door Sensor button to display the Inputs picklist. Select the
desired input for this door sensor, then click Close. A door sensor is
associated with a digital input (DI) point connected to a door sensor.
NOTE
13.40
Select a door sensor input that is wired to the same micro as the associated
door strike output. The system displays a popup message to the operator if an
input point is selected on the wrong micro. Do not attach an input group to the
input unless the input is a supervised input.
Picture Perfect 2.0 Administration Guide
Categories, Areas, Readers, and Doors
13
Exit Button
Click the Exit button to display the Inputs picklist. Select the desired
input for this exit button, then click Close. Be sure the Exit Button
Asserts Strike field (in the Door Control box) is set to Enabled.
NOTE
Select an exit button input that is wired to the same micro as the associated door
strike output. The system displays a popup message to the operator if an input
point is selected on the wrong micro. Make sure the exit input is tied to the
reader’s valid input group.
Categories, Areas,
Readers, and Doors
Picture Perfect 2.0 Administration Guide
13.41
Doors
NOTES
13.42
Picture Perfect 2.0 Administration Guide
Badges
Chapter
14
Badges
Overview
Categories assigned to the badge allow the badgeholder access to areas
that have the same categories assigned.
When the badgeholder attempts to access an area and at least one category
on the badge matches at least one category of that area, the system grants
access; if the badgeholder attempts to access an area and no categories on
the badge match any categories of that area, the system denies access.
Information on the Badges form identifies the badgeholder by name,
employee number, address, and badge ID, and also controls the function
and capabilities of the badge.
Prerequisites
The following Picture Perfect forms are prerequisites:
Forms
Purpose
PERMISSION GROUPS
PERMISSIONS
OPERATORS
To authorize operators to issue badges and
assign certain categories to badges.
DEPARTMENTS
CATEGORIES
PERSONNEL TYPE
To allow departments, categories, and
personnel to be available for selection from
picklists on the BADGES form.
What You Will Be Doing
This chapter shows you how to:
" Issue permanent badges.
See “Issuing a Permanent Badge – Four Methods” on page 14.2.
" Issue temporary badges.
See “Issuing a Temporary Badge” on page 14.4.
" Change badges.
See “Changing a Badge” on page 14.5.
" Change a badge status to deleted.
See “Changing a Badge Status to Deleted” on page 14.6.
Picture Perfect 2.0 Administration Guide
14.1
Issuing a Permanent Badge – Four Methods
" Remove badges.
See “Removing Badge Records” on page 14.7 and “Badge Removal
Command Line Tool” on page 14.9.
" Complete the Badges form.
See “The Badges Form” on page 14.10.
Issuing a Permanent Badge – Four Methods
There are four ways to issue a badge using the Badges form: (1) Using a
console reader, (2) using the keyboard (manual), (3) using the AutoGenerate function, or (4) using the Seed Counter function. Depending on
the Badge Encode permissions selected on the Permissions form, an
operator may or may not have access to the Reader Issue button and/or a
display of the badge ID number (see “Permissions” on page 6.4).
Console-Reader Method
! To issue a badge using the Console-Reader method:
1. Select Access, then Badges.
2. Click New.
3. Click the Reader Issue button.
4. Swipe the badge in the console reader assigned to the terminal. The
badge ID number will appear in the Badge Encode Number box.
5. Complete the Badges form. For details on completing each field, see
“The Badges Form” on page 14.10.
6. Click Save.
Manual Method
You can approach the manual badge issue method in three different ways:
(1) using a badge that is already encoded (and you type the encode
number), (2) assigning an encode number to an unencoded badge (and
then encoding the badge with the assigned encode number), and (3) using
wedge readers.
! To issue a badge using the manual method:
1. Select Access, then Badges.
14.2
Picture Perfect 2.0 Administration Guide
Badges
14
2. Click New.
3. Type the badge encode number into the Badge Encode Number box.
4. Complete the Badges form. For details on completing each field, see
“The Badges Form” on page 14.10.
5. Click Save.
Badges
Auto-Generate Method
(Site-encodable badges only.)
The system uses unique information in a designated user field on the
Badges form to generate a Badge Encode Number using a hidden
algorithm. The designation of which user field controls this is made in the
Position for Auto-Generate field on the Parameters form.
Prerequisite: “Display Flags” on page 4.30 (Parameters form) must be set
to display the Auto Generate button (on the Badges form).
! To issue a badge using the Auto-Generate method:
1. Select Access, then Badges.
2. Click New.
3. Click the User Fields button to display the user fields. The number of
user fields displayed is determined during installation.
4. Type a unique value in the user field represented by the number set in
“Position for Auto-Generate” on page 4.32 (usually User Field 1). The
default value for this field is 27.
5. Click the Auto Generate button. The badge number will appear in the
Badge Encode Number box.
6. Complete the Badges form. For details on completing each field, see
“The Badges Form” on page 14.10.
7. Click Save.
Picture Perfect 2.0 Administration Guide
14.3
Issuing a Temporary Badge
Seed Counter Method
This method will usually only be used if you are using Access Vision and
Access Vision Imaging to issue your badges. The seed counter option
provides a way to:
1. Automatically generate a unique Id number for each badge
2. Automatically generate the badge Id (BID) number for each badge
(optional)
3. If using Access Vision, keep count of the number of times a person’s
badge has been re-issued.
4. If using Access Vision Imaging, keep count of the number of times a
person’s badge has been printed.
In order to use this feature, the seed counter must be selected at the time of
base installation. The base installation will ask you a series of questions to
help you set up the seed counter options. The setup can only be done at
installation. Refer to Appendix G in the Picture Perfect 2.0 Installation Guide
for more information.
If enabled, three new fields will appear on the Badges form: Reissue
Count, Reprint Count, and Unique Id. Refer to the section, “The Badges
Form” on page 14.10 for a complete explanation of these fields.
Issuing a Temporary Badge
You may replace a permanent badge with a temporary badge,when an
employee forgets or misplaces their permanent badge. The permanent
badge will be suspended, the categories and employee details will be
copied to the temporary badge and the temporary badge will be activated.
A pool of badges can be used for temporary reissues.
! To create a pool of temporary badges:
1. Select Access, then Badges.
2. Complete the Badges form. Under Control, Temporary Badge, click
the Yes radio button.
3. Press Save.
! To issue a temporary badge:
1. Select Access, then Badges.
14.4
Picture Perfect 2.0 Administration Guide
Badges
14
2. Click Find to search for the permanent badge record for which you are
issuing a temporary replacement badge.
3. Click the Temp button on the toolbar.
Result: The Issue Temporary Badge window will display.
Badges
4. In the Temporary BID field, enter the BID of the temporary badge.
This number may be entered manually or by swiping a badge through
a Wedge reader.
5. In the Number of Hours field, enter the number of hours that the
temporary badge will be valid.
6. Click Issue.
Changing a Badge
! To change a badge:
1. Select Access, then Badges.
2. Find the desired badge record in one of two ways:
NOTE
•
When the Badges form appears, click Reader Issue. Swipe the badge in a
console reader, then click Find to display the existing badgeholder data;
or:
•
When the Badges form appears, enter search criteria in one or more fields
and click Find. Click Prev or Next until the correct badge profile appears.
A search (FIND) using “indexed” fields improves the time required to find the records.
Some examples of indexed fields on the Badges form include: Last Name,
Employee ID, and Badge Encode Number
3. Complete the Badges form for the fields that require updating. For
details on completing each field, see “The Badges Form” on
page 14.10.
4. Click Save.
Picture Perfect 2.0 Administration Guide
14.5
Changing a Badge Status to Deleted
Changing a Badge Status to Deleted
When you delete a badge, the badge record remains in the database (since
it might still be referenced in badge history), but it no longer grants access.
This section shows you how to give the badge deleted status, not how to
remove the badge record from the database. To remove the badge record
from the database, see “Removing Badge Records” below. The badge
must be changed to deleted status using this procedure before the badge
record can be removed from the database.
! To change a badge status to deleted:
1. Select Access, then Badges.
2. When the Badges form appears, enter search criteria in one or more
fields to locate the badge you want to delete.
3. Click Find. If more than one badge is found, click Prev or Next until
the correct badge profile appears.
4. Click Deleted in the Badge Status box. Although the badge no longer
grants access, the badge record remains in the database.
5. Click Save.
14.6
Picture Perfect 2.0 Administration Guide
Badges
14
Removing Badge Records
CAUTION
This procedure removes badge records from the database. Since it is possible to
remove badge records that should be retained, you should back up your database
before running this procedure.
Before any badge can be removed, it must have a badge status of Deleted. To
assign the Deleted status, see “Changing a Badge Status to Deleted” above.
All badge removal activity is recorded in the operator history table.
! To remove a badge:
1. Select Access, then Badges.
2. When the Badges form appears, enter a search criteria in one or more
fields to locate the badge or badges you want to remove. A single badge or
group of badges can be removed. For example, you can search for all
badges in a department by identifying that department in your search
criteria. Select Deleted in the Badge Status box as part of the criteria when
using the Find button to select a range of records.
3. Click Find. Click Prev or Next until the correct badge profile appears. The
number of badges found is displayed on the top of the Badges form.
4. Click the Remove function button. The Badge Removal popup asks if you
want to remove only the current record or all records. If you select
Remove Current Record, only the record displayed in the Badge Holder
Information box will be removed. If you select Remove All Records, the
number of records shown in parentheses on the Badge Removal popup
will be removed, provided they all have a status of Deleted.
Picture Perfect 2.0 Administration Guide
14.7
Badges
The Remove function button will be on the top of the Badges form if the
correct Remove permissions have been set on the Permissions form for the
present operator. (See Figure 6-3 on page 6.5.) The Remove function button is
used to permanently remove badge records from the Picture Perfect database.
This process also removes the badge records from all micros that have learned
the badges and have the badge records in their database.
Removing Badge Records
Figure 14-1.
Badge Removal Popup
5. Select one choice on the Badge Removal popup and click Ok to
confirm your intention to remove the badge records. If you do not
want to proceed with the removal process, click Cancel. If the Image
package has been installed, there will be an additional toggle selection
Remove Associated Images in the Badge Removal popup. Select this
in addition to Remove Current Record or Remove All Records to
remove associated photo images for the badges to be removed.
6. If you chose to Remove Current Record, the selected record is
removed immediately.
CAUTION
The next step will remove all badge records selected on the Badges form.
7. If you chose to Remove All Records, the Remove Record popup
provides another level of confirmation. This popup also shows the
range of badge records to be removed. Click Ok again if you are sure
you want to proceed; otherwise, click Cancel.
Figure 14-2.
Remove Record Popup
8. The Remove Record pop-up appears, providing an opportunity to
stop the removal process before it has been completed. This pop-up
14.8
Picture Perfect 2.0 Administration Guide
Badges
14
shows the progress of the removal process. The message bar on the
Badges form shows the range of records currently being removed.
During the Remove process, no other Badges form operations will be
allowed. The Badges form will be cleared when the Remove process is
completed or has been aborted. If the process is aborted before
completion, the badge records that were removed before the abort are
lost.
Badges
NOTE
If you are removing a large number of badges, the system removes badges in
increments according to the Record Remove Maximum and Record Remove
Interval set on the Parameters form. See “The Parameters Form” on page 4.27.
Badge Removal Command Line Tool
A command line tool, rmbadge, is available in Picture Perfect to allow the
removal of badges from the micro and Picture Perfect database tables. The
rmbadge tool allows you to remove a single badge or all badges.
Previously, badges could only be removed one at a time. Badges are
required to have a status of Deleted before they can be removed. Any
badge that is removed is recorded to operator history. Operators must
have the correct permissions to remove badges.
Requirements
The following requirements must be satisfied before any badges can be
removed.
•
TPS must be running.
•
The Picture Perfect database must be up.
•
Badges to be removed must have status of Deleted.
•
The operator must have permission to remove badges. (This is set on
the Permissions form.)
Options
The rmbadge tool takes three command line options, -a, -i and -p, as
described below.
CAUTION
The badge removal command line tool, rmbadge, does not use the Record
Remove Maximum and Record Remove Interval set on the Parameters form.
Picture Perfect 2.0 Administration Guide
14.9
The Badges Form
NOTE
Removing a large number of badges using this tool should be done during hours of
low activity, since it has the potential to queue up a large number of requests to the
micros.
Removing All Badges
To remove all badges, use the -a option. For example:
rmbadge -a
When removing more than 50 badges, you will see an update message
on the screen to indicate the progress every 50 badges that are
removed.
Removing Single Badges
To remove a single badge, use the -i option followed by the badge
encode number for that badge. The format of the badge encode
number must match that used on the Badges form. This means leading
zeroes are significant. For example:
rmbadge -i 0000012345
Removing Associated Photo Images
If the Image package has been installed, you may wish to remove the
photo images in addition to removing the badges. Use the -p option
in addition to the -i or -a option to remove associated photo
images. For example:
rmbadge -p -i 0000012345
The Badges Form
The following is a list of fields that might require additional information
for you to complete. Several of the fields are required:
•
First Name
•
Last Name
•
Initials
•
Employee ID
•
Badge Status
•
Badge Encode Number
•
Personnel Type.
The list is in the order that the fields appear on the form. There is no
required sequence for you to follow.
14.10
Picture Perfect 2.0 Administration Guide
Badges
NOTE
14
A search (FIND) using “indexed” fields improves the time required to find the
records. Some examples of indexed fields on the Badges form include: Last Name,
Employee ID, and Badge Encode Number
Refer to Figure 14-3 for the top left-hand portion of the Badges form.
Badges
Figure 14-3.
Badges Form - Top Left
Badge Holder Information
First Name
Type the badgeholder’s first name (up to 20 characters).
Last Name
Type the badgeholder’s last name (up to 30 characters).
Initials
Type the badgeholder’s initials (up to 5 characters).
NOTE
The initials (not the first name) display on the Activity Monitor in front of the last
name of the badgeholder. Therefore, use initials to distinguish between
badgeholders who have the same last name.
Picture Perfect 2.0 Administration Guide
14.11
The Badges Form
Employee ID
Type an alphanumeric employee ID 1 to 12 characters long; for
example, social security number.
Address 1 through Address 5
Type the badgeholder’s address (up to 40 alphanumeric characters per
field). The Address 1 through Address 5 field names can be changed
using the User Customization tool. See Chapter 31 - User
Customization.
Phone
Type the badgeholder’s phone number (up to 16 characters). You may
type dashes or spaces between digits in the Phone field.
Refer to Figure 14-4 for the top middle portion of the Badges form.
Figure 14-4.
Badges Form (Top Right)
Badge Encode Number
This field contains the unique encoded number of the badge. See
“Issuing a Permanent Badge – Four Methods” on page 14.2 for details
on this procedure.
This field is View Only when the Seed Counter feature and the Copy
to BID option are enabled as shown in Figure 14-5.
14.12
Picture Perfect 2.0 Administration Guide
Badges
14
Badges
Figure 14-5.
Badges Form (Top Middle - with Seed Counter enabled)
Pin
Type a personal identification number 1 to 10 digits long for the
badgeholder to use with a badge-and-keypad reader.
Reissue Count
This view-only field is visible if the seed counter option is enabled
during installation. This is the number of times the badge has been
reissued using Access Vision. A new badge will set the Reissue Count
to 00. Subsequent reissues of the badge will increment the number,
storing it to the badge. Reissued records re-use the same Unique Id
number to tell that the badge belongs to the same person. The
maximum number of times a badge may be reissued is 99. If the
maximum is exceeded, a new Unique Id is created for the badge and
the Reissue Count is reset to 00.
Picture Perfect 2.0 Administration Guide
14.13
The Badges Form
Reprint Count
This view-only field is visible if the seed counter option is enabled
during installation. This is the number of times the badge has been
printed, using the Access Vision Imaging package. A new badge will
set the Reprint Count to 00. Anytime the badge is printed or
previewed, the badge will increment the number, storing it to the
badge. The maximum number of times a badge may be reprinted is 99.
If the maximum is exceeded, a new Unique Id is created for the badge
and the Reprint Count is reset to 00.
Unique Id
This view-only field is visible if the seed counter option is enabled
during installation. The seed counter assigns a unique number to each
badge. This unique number consists of two parts: the Workstation Id
and the Sequential Counter.
Workstation Id
The Workstation Id is a number containing one to four digits. It is
used to uniquely identify the workstation that created the badge, and
to generate the Unique Id number. The Picture Perfect host or web
browsers will use a Workstation Id of 0. All Access Vision client
workstations that create badges offline, have a unique Workstation Id.
The Workstation Id is automatically set up for you when you create
the Terminal record for the Access Vision client workstations in
Picture Perfect.
NOTE
When creating the terminal record for an Access Vision client workstation, the Server field in
the Terminal form must be filled in with the exact computer name of the client workstation in
order for Access Vision to retrieve the correct Workstation Id.
Sequential Counter
The Sequential Counter is a global counter that is incremented each
time a new badge is created or reissued. The range is determined by
the number of digits allocated to the counter.
Reader Issue
Click the Reader Issue button to allow the Badge Encode Number to
be entered by swiping a badge in a local console reader assigned to the
terminal used to issue the badge. A prompt advises you when to swipe
the badge. The badge encode number will appear in the Badge Encode
Number box.
This field is disabled when the Seed Counter feature and the Copy to
BID option are enabled. For more information on this feature, see
“Seed Counter Method” on page 14.4
14.14
Picture Perfect 2.0 Administration Guide
Badges
NOTE
14
When Reader Issue is used, the Badge Encode Format field will have no
effect on the badge encode number (BID) displayed. The BID displayed will
always be the actual full BID read from the badge. If Save is clicked, then the
BID entered will be checked against the badge encode format to ensure it
satisfies its specifications. If the number of digits in the BID does not match the
BID format selected, a mismatch will occur and the record will not be saved. If
the BID matches, then the field will be updated and the record saved.
Clicking the Auto Generate button generates a badge encode number
automatically.
Prerequisites: (1) The Display Auto Generate radio button in the
Display Flags field of the Parameters form must be set to On; (2) a
number must be entered in the Position For Auto-generate box on the
Parameters form; and (3) user information must be entered in the
corresponding user field on the Badges form. See “Auto-Generate
Method” on page 14.3.
Department
Click the Department button to display the Departments picklist.
Select the desired department for this badgeholder, then click Close.
Personnel Type
Click the Personnel Type button to display the Personnel Types
picklist. Select the desired type, then click Close.
Badge Encode Format
Click the Badge Encode Format button to display the Badge Encode
Format window (Figure 14-6). Select the desired format, then click
Close. This is not necessary unless the system has more than one
badge encode format.
NOTE
When the Seed Counter feature and the Copy to BID option are enabled:
•
The Badge Encode Format selection button can be used when performing
a search, by selecting a format and then clicking Find. Once the search
results are returned, the button is disabled.
•
When creating a new record, no matter what format you select, when the
record is saved, the Seed Counter defined format will be used and the field
will be grayed out.
Picture Perfect 2.0 Administration Guide
14.15
Badges
Auto Generate
The Badges Form
Figure 14-6.
Badge Encode Format Window
Facility
Click the Facility button to display the facilities picklist. Selecting a
facility will allow the administrator to restrict operator access to those
records in a specific facility. For more information, see Chapter 5 Facilities and Facility Profiles.
Badge Status
Select one of the four badge status descriptions. There is one type of
Valid badge status (Active) and three types of Invalid badge statuses
(Suspended, Lost, Deleted).
You should update the badge status as needed. For example, if a valid
badge is lost, this status change should be indicated in the Badge
Status box. Then, if the lost badge is later tried in a reader, the system
will deny access and should generate a lost badge alarm.
14.16
Picture Perfect 2.0 Administration Guide
Badges
14
Refer to Figure 14-7 for the top right-hand portion of the Badges form.
Badges
Figure 14-7.
Badges Form (Bottom Right)
Control
Card Trace
Use this field only when you want to trace the activity of a particular
badge. Select Enabled to allow the Card Trace feature to track this
badge. The letter “T” is inserted in front of the transaction when it
appears on the Activity Monitor. Select Disabled when you no longer
need to trace the badge. See Chapter 25 - Badge Trace for details on
this feature. Card trace routing is defined on the Parameters form.
Keypad Response
Select Enabled to give this badgeholder the ability to respond to
special alarms requiring keypad input. Select Disabled if this feature
is not required. Normally, this feature is disabled. See Chapter 23 Keypad Alarm Response for details on this feature.
Download Upon Save
Select the Yes or No radio button. If you select Yes, any time a badge
record is saved, it is downloaded to all micros, subject to the following
conditions:
New Records: New records that are created by copying an existing
record that has this field set to Yes will be automatically changed
so that this field is set to No. This prevents accidental downloads
to all micros when using the Copy feature of the New button. You
must manually set this field to Yes.
Updated Records: Updated records are only downloaded to all
micros if the previous setting was saved as No. The next time a
badge record field is changed for a badge record that previously
Picture Perfect 2.0 Administration Guide
14.17
The Badges Form
had this field set to Yes, the record will only be sent to those micros
that have learned this badge. To resend an updated badge record
to all micros, perform the following steps:
1.
Set the Download Upon Save field to No.
2.
Save the record.
3.
Make any other field changes if needed.
4.
Set the Download Upon Save field to Yes.
5.
Save the record.
If you select No, any time a badge record is saved, it is only sent to
those micros that have learned this badge record, which is the normal
method of operation. This is the default for any new record, including
those that were copied from an existing record.
NOTE
When a record is changed, only the changes are sent down to the micro and not
the whole record. If a situation arises where a change never gets to a micro, then
do the following:
1
Undo the changes (reverse the change)
2
Save the record
3
Make the changes again
4
Save the record
Dial-up micros are handled according to the dial up settings on the
Micros form.
Temporary Badge
Select the Yes radio button if this badge record is to be used as a
temporary badge. A pool of badges can be created and used
repeatedly for this purpose. A temporary badge must be expired in
order to be reissued.
Limited Badge Usage
Select this feature to allow entry to Limited Usage readers. Type a
specific number in the Usage Count field. Each time the badge is used
in a Limited Usage reader, the usage count is decremented by 1. When
the count is 0, the badge will no longer grant access into a Limited
Usage reader. See Chapter 13 - Categories, Areas, Readers, and Doors
for related information.
14.18
Picture Perfect 2.0 Administration Guide
Badges
14
Refer to Figure 14-8 for the bottom left-hand portion of the Badges form.
Badges
Figure 14-8.
Badges Form (Bottom Left)
Dates & Times
Issue Date
Type the date the badge was issued. If this field is left blank, the
system will automatically enter the current date. Type the slashes (/) if
the system date format requires them.
Issue Time
Type the time the badge was issued. If this field is left blank, the
system will automatically enter the current time. Type the colons (:) if
the system time format requires them.
Expiration Date
Type the date when the badge should expire. The system invalidates
the badge when the expiration date and time occur. Type the slashes
(/) if the system date format requires them. If you enter an expiration
date, an expiration time must also be entered. For no expiration date,
leave blank.
Expiration Time
Type the time when the badge should expire on its expiration date.
The system invalidates the badge when the expiration date and time
occur. Type the colons (:) if the system time format requires them. For
no expiration time, leave blank.
Return Date
If the badge is being returned, enter the date when the badge is
returned. Type the slashes (/) if the system date format requires them.
Picture Perfect 2.0 Administration Guide
14.19
The Badges Form
Return Time
If the badge is being returned, type the time when the badge is
returned. Type the colons (:) if the system time format requires them.
Access Date/Access Time
Indicates the date and time that the last access was granted to this
badge. The system supplies this data. Do not over-type data in this
field. For no access date/time, leave blank.
Last Access
The system tracks the badge and displays information about when it
was last used. This reflects information captured as of the moment the
badge record was displayed.
Reader
Indicates which reader last granted access to this badge. The system
supplies this data. Do not over-type data in this field.
NOTE
Unless the door is actually opened, this field is not updated.
User Fields
User 1 through User 40
Type information (up to 40 alphanumeric characters) in one or more
user fields to identify the badgeholder (for example, license tag
number). The number of user fields that appear on the Badges form is
determined during installation, and is shown on the Parameters form.
The names of the user fields can be changed using the User
Customization tool. See Chapter 31 - User Customization.
NOTE
When the Display Auto Generate button is enabled on the Parameters form,
the system uses the user field designated in the Position For Auto-generate
field on the Parameters form to generate a unique Badge Encode Number.
See “Auto-Generate Method” on page 14.3.
Temporary Categories
Temporary categories are set to be enabled during certain times of day
and will expire on a certain date and time. They are selected and set on
an individual-badge basis.
14.20
Picture Perfect 2.0 Administration Guide
Badges
NOTE
14
Micros must be properly installed before Temporary Categories become
active. In addition, for this feature to work, communications must be present
between the host and micro.
Badges
Click the Temporary Categories button to display the Temporary
Categories form (Figure 14-9). The number of Temp Cat buttons
displayed is determined during installation, and is shown on the
Parameters form.
Click the desired Temp Cat button to display the Categories picklist.
Select the desired category, then click Close. If a Temp Cat button is
grayed out, this indicates that a regular category already holds that
slot.
Figure 14-9.
Temporary Categories Form
For each temporary category selected, enter the appropriate
information in the following fields:
Start Date
Type the date on which the temporary category is to be enabled. Use
the format of your system date as set on the Parameters form.
Stop Date
Type the date on which the temporary category is to expire. Use the
format of your system date as set on the Parameters form.
Start Time
Type the time at which the temporary category is to be enabled each
day for a Daily schedule type), using the interval set at installation
time. For example, if you selected the 30-minute default scheduling
interval, select start times that occur on the hour or half hour. Use the
format of your system time as set on the Parameters form.
Picture Perfect 2.0 Administration Guide
14.21
The Badges Form
Stop Time
Type the Stop Time (the time at which the temporary category is to be
disabled each day for a Daily schedule type), using the interval set at
installation time. For example, if you selected the 30-minute default
scheduling interval, select stop times that occur on the hour or half
hour. Use the format of your system time as set on the Parameters
form.
If a temporary category is currently enabled, its category name will
appear on the Badges form with its Temp Cat button grayed out. If a
temporary category is currently disabled, its category name will not be
displayed, but its Temp Cat button will still be grayed out.
Once a temporary category reaches its expiration date, the category
will be dropped from the badge record altogether and its category slot
will be empty. That temporary-category record will remain in the
temp_category table of the database for one week after expiration.
The enabling and disabling of temporary categories is logged under
the operator ID of tcmgr in operator history.
Clicking the Advanced button opens a new window as follows.
Figure 14-10.
14.22
Badge Form - Advanced Scheduling
Picture Perfect 2.0 Administration Guide
Badges
14
Schedule Type
From the Advanced window, you can choose a schedule type of Daily
or Continuous. A Daily schedule type means that the category will be
enabled each day at the Start Time and disabled each day at the Stop
Time. A Continuous schedule type means that the category will be
enabled at the Start Time of the Start Date and disabled at the Stop
Time of the Stop Date. The default schedule type is Daily.
Holding down the
schedule types.
Shift
Badges
NOTE
key and selecting a schedule type will set all the
Week Days
From the Advanced window, you can restrict the days of the week
that a temporary category will be enabled. A week day that is selected
means that the schedule can run on that day. A week day that is not
selected prevents the schedule from running on that day. By default,
all days of the week are selected.
NOTE
Holding down the
Saturday-Sunday
Shift
key, and selecting a day, sets Monday-Friday or
Antipassback Status
When used in conjunction with antipassback readers, the
Antipassback status of a badge (plus a category match) regulate its
ability to open a door. For example, if a badgeholder enters an
antipassback area without using his own badge (such as by following
someone else through the open door), that person will not be able to
exit that area with his own badge, because the system never registered
him as having entered that area. Likewise, if a person exits an
antipassback area without using his badge, he cannot re-enter that area,
since the system has not registered his exit.
Antipassback status is global, meaning the system will register
whether someone is in or out, but it does not regulate the status on a
per-reader basis. For example, someone can badge in at an
antipassback reader in one room, follow someone out of that room and
into another antipassback-controlled room without using his own
badge, and then be able to badge out of the second room. The system
registered him globally as in (without regard to reader location);
therefore, he can badge out of any room. If he followed someone out of
the first room and then tried to badge in at the second room, however,
Picture Perfect 2.0 Administration Guide
14.23
The Badges Form
he would not be given access, because the system has him already
registered as in.
If the badgeholder is required to use an antipassback reader, assign the
badge an antipassback status of neutral; otherwise, leave these buttons
unselected.
Neutral
Indicates an unknown user state (In/Out). The next time the badge is
used in an antipassback reader, the system will set the appropriate In/
Out state. Use this setting when creating a new badge, or when a
badgeholder gets locked in or out of an antipassback area.
In or Out
Indicates whether the last use of this badge logged the badgeholder In
or Out of the antipassback reader’s area. This reflects information
captured as of the moment the badge record was displayed, but the
information will not be updated automatically while it is on the screen.
It can be changed manually if necessary.
Privileged
Indicates that whenever this badge is read by an antipassback reader,
the system ignores the antipassback status. Access is granted if
categories match the area, regardless of whether the badgeholder was
logged into or out of the area. Assign this status to a badgeholder who
has to use antipassback readers, but is not to be governed by them.
Reset Timed APB Status
This button sends a message to the micro to reset the Timed APB
status back to Neutral.
Refer to Figure 14-11 for the bottom middle portion of the Badges form.
Figure 14-11.
14.24
Badges Form (Bottom Middle)
Picture Perfect 2.0 Administration Guide
Badges
14
Categories
If the Increased Category feature was selected during installation, 96
categories of users are available for assignment to a badge. Otherwise,
32 categories of users are available for assignment. This list box
contains the active badge categories, ordered by slot number. To
access an area, a badge must match at least one category that is
assigned to that area.
Click the Manage button to display the Category Manager window,
Figure 13-4, from which you may add, remove, or replace a category in
a slot. You may also apply filters to the categories that are displayed in
the categories list box. For more information on Category
Management, see “Managing Category Assignment” on page 13.8.
Picture Perfect 2.0 Administration Guide
14.25
Badges
Manage
The Badges Form
NOTES
14.26
Picture Perfect 2.0 Administration Guide
Generator
Chapter
15
Overview
The Generator can be used to add new readers, doors, and areas to your
system. The Generator uses specially-chosen existing records as templates
to generate new records, saving the operator time and making it easier to
set up a reader and door in the system. The Generator form allows you to
select an existing micro and add new reader records to it, with all
necessary records associated with the reader automatically being created
and properly linked.
What You Will Be Doing
This chapter shows you how to configure the master records that will be
used when you are working with the Generator form to create new
records. Master records (forms) will be configured for the following:
Areas
•
Inputs
•
Input Groups
•
Outputs
•
Readers
•
Doors
Generator
NOTE
•
An Output Group record is also generated, but it is assigned the name that you
type in the Description box. No other operator action is needed.
Picture Perfect 2.0 Administration Guide
15.1
What You Will Be Doing
Creating Master Records
The Master Records function button on the Generator form brings up the
Master Records window. Before you can use the Generator form, you
must assign a master record for each of the items on the Master Records
window. The Master Records window has six Description buttons, one
for each type of master record. When you click one of the Description
buttons, a picklist appears that allows you to select one record from the
group of previously-created records.
Once master records are created, they are used to generate readers and
doors for your system. Since most generated records are similar, the
Generator can be used to copy the values from the master record into a
newly-generated record. Copying a set of values from the master record
saves you from having to configure and save each record.
The Master Records table is required to be set up only once, but it can be
changed at any time. The changes only affect records generated after the
change; no previously-generated records are affected. If records are
created from a defective master record, the created records must be
corrected individually; there is no “Master Records Corrections” facility.
! To create Master Records:
1. Select Control, then Generator.
2. Click the Master Records function button at the top of the Generator
form. The Master Records window appears (Figure 15-1).
3. Click the Description button for each of the master records and choose
the description that you want to use for a template. Click Close to exit
the Description window.
4. Click Ok to save the master records and return to the Generator
window.
15.2
Picture Perfect 2.0 Administration Guide
Generator
15
5. Click the Quit function button to exit the Generator window.
Figure 15-1.
Master Records Window
The Generator Form
Generator
Use the Generator form to create new records for output groups, input
groups, outputs, areas, readers, and doors and to then insert the records
into the database.
To place the new records into the database, click the Execute Gen function
button on the top of the form.
To generate another record, click the New function button on the top of
the form. You will be presented with the option of clearing the present
form or copying the current data for a new reader. Clear will not clear
your master records.
To exit from the Generator form, click the Quit function button on the top
of the form.
Picture Perfect 2.0 Administration Guide
15.3
The Generator Form
Figure 15-2.
Generator Form
Description
Type a description for the record that will be generated (30
alphanumeric characters maximum). There is no required naming
convention, but if you type a name that already exists in the database,
an error message will inform you that this name is already in use. The
description format MMM-B-AA is recommended, where: MMM =
micro, B = board, and AA = address.
Micro
This is a picklist of micros defined on the Micros form. Click the
Description button, select a micro from the picklist, and click Close.
The selected micro that will be used for the generated records is shown
beside the Description button.
15.4
Picture Perfect 2.0 Administration Guide
Generator
15
Facility
This is a picklist of facilities defined on the Facilities form. By default,
the generated records are created with the facility that is assigned to
the micro for which these records are being added. You can override
this behavior and have these records created with the facility of your
choosing.
Click the Description button, select a facility from the picklist, and
click Close. The selected facility that will be used for the generated
records is shown beside the Description button.
For more information, see Chapter 5 - Facilities and Facility Profiles.
Board
This is the board number that the reader is connected to in the selected
micro. Enter one board number from the range 1 through 8.
Reader Port Address
This is the reader port address as set on the reader board. Enter one
port address number from the range 0 through 7.
Generator
Generate Door
This tells the generator whether to generate a new door for the reader.
Select the Yes or No toggle button. If you select Yes, an input record is
generated if Held Open Sensing or Forced Open Monitoring are set
to Detected on the Doors form. If you select No, a door record is not
generated.
Generate New Area (using Master)
This tells the generator whether to create a new area record using the
values from the master Record. If you select Yes, a new area record is
created from the master record entries, and you must select an Area
Permission Group and an Area Category from picklists. If you select
No, you will select an existing area record, complete with its Area
Permission Group and Area Category.
Area
This is a picklist of areas defined on the Areas form. The selected area
will be assigned to the generated records for the reader and door. If an
area is chosen here, there will be no area record generated, since the
operator is choosing to assign an existing area.
The Area picklist becomes available for selection and is required when
the Generate New Area (using Master) No option is selected. If the
Picture Perfect 2.0 Administration Guide
15.5
The Generator Form
Yes option is selected, there is no need to select an existing area and
this picklist will become “Grayed Out” making it unselectable.
Area Permission Group
This is a picklist of Area/Category type permission groups defined on
the Perm Group form. The selected permission group will be used for
the newly generated area record.
The Perm Group picklist becomes available for selection and is
required when the Generate New Area (using Master) Yes option is
selected. If the No option is selected, there is no need to select an
existing permission group, and this picklist will become “Grayed Out”
making it unselectable.
Area Categories
If the Increased Category feature was selected during installation, 32
area categories may be assigned to an area record. Otherwise, 10 area
categories may be assigned to an area record.
The Category window becomes available for selection and is required
when the Generate New Area (using Master) Yes option is selected. If
the No option is selected, there is no need to select categories, since
they already have been selected for the existing areas. This field will
become “grayed out” making it unselectable.
Manage
Click Manage to display the Category Manager window, from which
you may add, remove, or replace a category in a slot. The selected
categories will be used for the newly generated area record.
For more information on category management, see “Managing
Category Assignment” on page 13.8.
15.6
Picture Perfect 2.0 Administration Guide
Generator
15
Generating Records
You have the option of generating area records from the master records
information or from existing information entered on other forms,
depending on your answer to the Generate New Area (using Master)
question. If the answer is Yes, the Generator form is used to enter the
required information, and a new area is generated and assigned to the
reader.
If the answer is No, you must click the Description button in the Area box
and choose an existing area description from the Areas picklist. This
existing area is assigned to the reader.
! To generate records:
1. Select Control, then Generator.
2. Complete the Generator form (Figure 15-2) for each record.
3. Click the Execute Gen function button to place the records into the
database.
Picture Perfect 2.0 Administration Guide
Generator
4. Click New to generate another reader record.
15.7
The Generator Form
NOTES
15.8
Picture Perfect 2.0 Administration Guide
Schedules and Modes
Chapter
16
Overview
Schedules allow you to change a variety of operational characteristics
based on mode, day of week, and time of day. Using the Schedule feature,
you can specify when you want a particular type of change to occur. That
change will remain in effect until overridden by another schedule or mode
event, or manually changed by an operator.
The Picture Perfect system supports multiple modes of operation, such as
Normal, Holiday, and Emergency. When you initially set up the system,
make sure that all the values and schedules that you define (for readers,
doors, areas, etc.) are associated with your normal operating mode.
Weekdays and weekends occur within your normal operating mode, so
the system does not need a unique “weekend mode.” An “evening mode”
is not required either, as the normal mode can contain schedules for
multiple shifts and weekends.
To operate the system in a different mode during holidays (or other
special events based on the calendar), you must create a mode, re-define
the schedules to occur during that mode, and then schedule the mode to
become active on a selected date and time.
Administrative procedures can also be scheduled, such as performing
backups and running reports. For details on these procedures, see the
“Scheduling” sections of Chapter 18 - Backup and Restore, Chapter 19 History Reports, and Chapter 20 - SQL Reports.
Picture Perfect 2.0 Administration Guide
16.1
Schedules and Modes
When a mode becomes active, it remains active until changed by an
operator (by Mode Command) or by another scheduled Mode Event. A
Mode Event is a scheduled change to one or more of the operating
characteristics. Events can occur when a mode starts, when a mode ends,
or at a given time of day and day of week within the mode. Typical events
are locking and unlocking lobby doors for general access, turning on
motion detectors after hours, and changing categories on areas to control
access for shift workers.
Prerequisites
Prerequisites
The following Picture Perfect forms are prerequisites:
Forms
Purpose
DOORS
READERS
AREAS
ALARMS
So individual events can be scheduled.
INPUTS
INGROUPS
OUTPUTS
OUTGROUPS
To allow inputs and outputs to activate,
and to schedule input group and output
group events.
Before creating a schedule, refer to the appropriate chapter to make sure
you have completed the prerequisites. For example, if you want to create a
schedule for a lobby door, first complete the Doors form for this lobby
door and complete all the prerequisites for doors.
What You Will Be Doing
This chapter shows you how to create modes, how to change your system
to a different operating mode (by schedule or command), and how to
schedule events within a mode.
Creating Modes
The Normal operating mode is already entered into the system. You can
create additional modes as necessary, using the Mode Creation form.
These modes and those that you create will appear on the Mode picklist
for the various Events forms.
Modes must contain scheduled events, either Runtime (see “Runtime
Events” on page 16.11) or Start/End (see “Start/End Events” on
page 16.12). Only the events scheduled for a mode will occur while in that
mode, so it is important to make sure all necessary events are scheduled.
Modes can be changed either by command, using Mode Command, or by
schedule, using Mode Event (See “Changing Modes” on page 16.7).
Normal Mode
Your Normal mode usually does not require any start/end events to be
scheduled. A start/end event is something you schedule to happen once-not subject to weekly or 24-hour cycles.
Use runtime events to schedule the necessary cycles. You do not need
“weekend” or “evening” modes, since the runtime events in a single mode
16.2
Picture Perfect 2.0 Administration Guide
Schedules and Modes
16
allow you to set different operating characteristics for all days of the week
and all times of the day.
Emergency Modes
Create Emergency modes to handle situations such as fires, accidents, or
other work disruptions. Define these modes on the Mode Creation form
using descriptions such as Emergency and Fire.
Emergency modes are usually activated by the operator using Mode
Command, and typically use start/end events. Remember that most
mode-start events require parallel mode-end events. Unless there are
events that need to cycle during the emergency mode, you do not need to
set up runtime events.
Table 16-1 and Table 16-2 give examples of start/end events that you
might set up for emergencies such as a security alert (Restricted-Mode) or
a fire (Fire-Mode).
Table 16-1: Example of Restricted-Mode Settings
Event
Form
Start Limited Access
Schedule
Area Events
At Mode Start
End Limited Access
Area Events
At Mode End
Lock Exterior Doors
Door Events
At Mode Start
Keypad Lobby Reader
Reader Events
At Mode Start
Reader Events
At Mode End
(Removes all categories from an area and
assigns one category that permits access to
selected badgeholders only.)
(Activates the keypad on the lobby reader to
require badgeholders to enter a PIN as well as a
badge.)
Picture Perfect 2.0 Administration Guide
Schedules and Modes
Normal Lobby Reader
16.3
Creating Modes
Table 16-2: Example of Fire-Mode Settings
Event
Form
Schedule
Turn Siren On
Outgroup Events
Time
Unlock All Doors
Area Events
At Mode Start
Lock All Doors
Area Events
At Mode End
Turn Lights On
Outgroup Events
Time
Holiday Modes
Create Holiday modes to handle access-requirement changes during
scheduled holidays. Define the mode on the Mode Creation form using a
description such as Holiday or Vacation.
Holiday modes are usually activated automatically by scheduling them
using Mode Events, and typically use start/end events. Remember that
most mode-start events require parallel mode-end events.
Be sure to schedule the start of a Holiday mode so that its events are timed
properly in regard to events of the normal operating mode.
For example, a setting of Holiday mode may be to leave the lobby doors
locked. Normal mode, however, always unlocks the lobby doors at 7 AM.
If Holiday mode starts on Monday morning at 8 AM, and no schedule has
been created to lock the doors when the Holiday mode starts, the lobby
doors will already have been unlocked by Normal mode an hour before;
therefore, the lobby doors will remain in an unlocked state throughout the
Holiday mode.
One way to keep the doors locked is to schedule Holiday mode to start
when the doors are still in a locked state (prior to 7 AM). Another option is
to make a mode-start event that locks the doors when Holiday mode goes
into effect.
When you set up a Holiday mode, you do not need to set up runtime
events unless you want weekly and daily cycles to occur. If you want any
of the runtime events in your normal operating mode to occur during
your holiday mode, you must duplicate those runtime events within
Holiday mode.
Table 16-3 gives examples of start/end and runtime events that you might
set up for a holiday. Notice that the chart does not show a parallel modeend event for each mode-start event that locks a lobby door. The modeend event is unnecessary because the doors will unlock and lock on
schedule when the system returns to normal operating mode.
16.4
Picture Perfect 2.0 Administration Guide
Schedules and Modes
16
Table 16-3: Example of Holiday-Mode Settings
Event
Form
Schedule
Holiday Lights On
Outgroup Events
Time
Lock Lobby Door 1
Door Events
At Mode Start
Lock Lobby Door 2
Door Events
At Mode Start
Allow Maintenance Crew
(Assign a category to this area that allows access to a maintenance
crew starting at 8 AM Mon-Fri during the holiday.)
Area Events
08:00 MTWTF
Deny Maintenance Crew
(Remove the maintenance category from the area at 5 PM Mon-Fri.)
Area Events
17:00 MTWTF
Setup
! To create a mode:
1. Select Schedule, then Mode Creation.
2. Click New.
3. Complete the Mode Creation form. For a description of each field, see
Figure 16-1.
4. Click Save.
The Mode Creation Form
Use the Mode Creation form (Figure 16-1) to define each system operating
mode. Operating modes are an administrative decision, as each facility
has unique requirements.
Schedules and Modes
Examples of scheduled operating modes are Normal mode and Holiday
mode. Examples of command operating modes are Emergency mode or
Fire mode, which can be initiated by the operator at any time. (See
“Changing Modes” on page 16.7.) A mode that you can design to provide
tighter security in case working conditions change from the routine is
Restricted-access mode, which can be scheduled or commanded.
After a mode is created on the Mode Creation form, you will define its
characteristics by using the various Events forms.
Picture Perfect 2.0 Administration Guide
16.5
Creating Modes
Figure 16-1.
Mode Creation Form
Description
Type any alphanumeric combination (1 to 30 alphanumeric characters)
for Description. For example, Fire Drill.
Facility
Click the Facility button to display the facilities picklist. Selecting a
facility will allow the administrator to restrict operator access to those
records in a specific facility. For more information, see Chapter 5 Facilities and Facility Profiles.
16.6
Picture Perfect 2.0 Administration Guide
Schedules and Modes
16
Changing Modes
How to Change Mode by Command
! To change the mode by command:
1. Select Control, then Mode Command.
2. Click New.
3. Complete the Mode Command form. For a description of each field,
see Figure 16-2.
4. Click Save.
The Mode Command Form
Use the Mode Command form (Figure 16-2) to change your system
operating mode immediately. For example, emergency events (such as
fire, accident, or work disruption) require an immediate change to a
different operating strategy. Mode Command lets you do this.
Schedules and Modes
Figure 16-2.
Mode Command Form
Facility
Click the Facility button to display the facilities picklist. Selecting a
facility will allow the administrator to restrict operator access to those
records in a specific facility. For more information, see Chapter 5 Facilities and Facility Profiles.
Picture Perfect 2.0 Administration Guide
16.7
Changing Modes
Mode
Click the Select Mode button to display the Modes picklist. Select the
desired operating mode, then click Ok.
Permit scheduled mode changes:
Select Yes or No, to indicate whether you want the system to allow
future mode changes to occur as scheduled. You can change this
option even if you don’t change the mode itself.
Yes
Yes allows scheduled mode changes to occur.
No
No allows you to override scheduled mode changes in an emergency.
For example, if you change to an emergency mode on the day before a
scheduled holiday and you permit scheduled mode changes to occur,
the system will switch to holiday mode as scheduled. If you do not
permit scheduled changes to occur, the system will stay in the
emergency mode until you use the Mode Command form to change
the mode again.
Exit
Click Exit to close the Mode Command form.
Change Mode
Click Change Mode to tell the system to change to the selected mode
and/or to allow or disallow scheduled mode changes.
How to Change Mode by Schedule
To have the system return to normal operations when the mode event is
over, schedule another mode event that activates Normal mode. For
example, the Christmas Holiday mode could be triggered by a Start
Christmas mode event scheduled at 5 PM on Christmas Eve, then returned
to Normal mode by an End Christmas mode event scheduled at 7 AM on
the day after Christmas.
When the system enters a new mode, it does not execute events for the
new mode that are scheduled to occur before the new mode starts. For
example, if an event scheduled for 7 AM in normal operating mode
unlocks the lobby doors, but the system does not return to normal mode
until 8 AM, then the lobby doors will remain locked until the next day at 7
AM.
16.8
Picture Perfect 2.0 Administration Guide
Schedules and Modes
NOTE
16
EXCEPTION: If communication with the micro is lost, when the micro resets it will
go back to midnight and execute all events scheduled to begin from midnight until
the current time. If the event that was in progress, when the micro reset, was
scheduled to start before midnight, the micro will not recognize it and will default
to the normal mode. To ensure that a schedule is restored when a micro resets,
schedule events to begin after midnight, for example 00:01.
If you schedule or command the system to return to normal operating
mode after the time when scheduled runtime events for normal mode are
supposed to occur, it is a good idea to schedule start/end events such as
unlocking (or locking) the lobby doors. See “Start/End Events” on
page 16.12.
It is important to note that if there are three or more modes in the system,
activating an event at mode end does not determine the mode to which
the system is switching. For example, assume the following three modes
are in the system, Normal, Holiday, and Emergency. If the system is
currently in Holiday mode, at the end of Holiday mode , the system could
switch to either Normal or Emergency mode. Therefore, it is
recommended that you activate an event at mode start, if there are three or
more modes in the system.
! To change a mode by schedule:
1. Select Schedule, then Mode Creation.
2. Click New.
3. Complete the Mode Creation form. For a description of each field, see
Figure 16-1.
4. Click Save.
The Mode Events Form
Picture Perfect 2.0 Administration Guide
Schedules and Modes
Use the Mode Events form (Figure 16-3) to assign the starting date and
time to a mode that goes into effect on a specific calendar date. This is
known as a Mode Event. For example, mode events are used to schedule
the various holidays (assigning each the Holiday Mode).
16.9
Changing Modes
Figure 16-3.
Mode Events Form
Description
Type any alphanumeric combination (1 to 30 alphanumeric characters)
for Description. For example, Normal to Thanksgiving.
Facility
Click the Facility button to display the facilities picklist. Selecting a
facility will allow the administrator to restrict operator access to those
records in a specific facility. For more information, see Chapter 5 Facilities and Facility Profiles.
New Mode Date
Type the date this mode event begins.
New Mode Time
Type the time this mode event begins.
New Mode
Click the New Mode button to display the Modes picklist. Select the
mode that is to go into effect during this mode event, then click Close
to close the picklist.
16.10
Picture Perfect 2.0 Administration Guide
Schedules and Modes
16
Scheduling Events
Use the Events forms to define and schedule the desired characteristics for
Area Events, Reader Events, Door Events, Alarm Events, Ingroups
Events, Outgroups Events, Backup Events, or Report Events, and assign
the appropriate mode to each of them.
Two types of event scheduling options are available: Runtime and Start/
End.
NOTE
•
Runtime lets you schedule an event to cycle within a mode, and can
occur at a particular time on any days of the week.
•
Start/End schedules the event to take place only once, either at mode
start or at mode end.
Schedules that run on the micros can update the database. This is configurable
on the Parameters form using the field Schedules Update Database. With this
feature enabled, as long as there is communication with the micro, the host will
reflect the scheduled state of the device (For example, if a door is scheduled to
unlock at 8 AM, the host record will be updated to reflect the change.) If this
feature is disabled, the host record will only reflect the host database
information.
Runtime Events
Runtime Events are events scheduled to occur in weekly cycles for
selected areas, readers, doors, alarms, input groups, and output groups. A
runtime event can occur on one or more days per week at the start time
that you select. Runtime events are frequently used for the normal
operating mode.
Runtime events must be created in “pairs,” so that the entire cycle of
events can be completed. Therefore, you need to create two events for each
cycle and make sure both events are assigned to the same mode.
Runtime events can be used to allow certain people access to an area at
certain times, such as with multiple shifts of workers. You can assign an
area certain categories from 8 AM to 5 PM, and other categories for later
shifts or for weekends. (Each shift must have its own category, which
must be on the appropriate badges.) To do this, set up a series of Area
Events that change categories. After you set the days and the time for each
Picture Perfect 2.0 Administration Guide
16.11
Schedules and Modes
For example, an “unlock door at 8 AM” event is paired with a “lock door
at 5 PM” event to define a 24-hour cycle for that door. Both events are
scheduled for weekdays only. The door does not require a runtime
schedule for weekends, because the door locks at 5 PM on Friday and
remains locked until Monday at 8 AM when the “unlock door” event
occurs (unless someone manually unlocks the door).
Scheduling Events
event (category change) to occur, the events continue to occur on a weekly
cycle.
The fields that control runtime events appear on each of the events
scheduling forms: Area Events, Reader Events, Door Events, Alarm
Events, Ingroups Events, Outgroups Events, Backup Events, or Report
Events. Refer to Figure 16-4 for the runtime portion of the Events form
.
Figure 16-4.
Runtime Portion of an Events Form
! To set up a runtime event:
1. Select Schedule, then the Events form that you want to define.
2. Specify the parameters for this event. (Each form is detailed in this
chapter.)
3. Assign a weekly cycle time to this event. Click on Time to activate the
day-of-the-week buttons, then click the button of each day on which
you want this event to occur.
4. Type the time that this event should begin (on all specified days) in the
Time box. If you do not want this event to happen at the same time on
each selected day, then you must define additional event schedules for
those days that are different (and assign them all to the same mode).
For example, if you want lobby doors to lock at 7 PM on weekdays and
at 5 PM on weekends, two separate events would have to be created.
5. Click Save.
6. Click New to create another event.
Start/End Events
Start/end events occur only once during the mode, either at mode start or
at mode end. Start/end events are frequently used for Emergency and
Holiday modes.
A mode-start event may require a parallel mode-end event to “undo” the
change. This may not be necessary, however, since the next normal mode
change may accomplish the desired change.
For example, a Fire Mode could be set up using mode-start and mode-end
events. When the operator uses the Mode Command form to select Fire
16.12
Picture Perfect 2.0 Administration Guide
Schedules and Modes
16
Mode, all the events associated with this mode will immediately activate,
such as triggering a continuous siren and unlocking all doors so people
can exit or enter the building without badges.
The fields that control start/end events appear on each of the Events
forms. Refer to Figure 16-5 for the start/end portion of the Events form
.
Figure 16-5.
Start/End Portion of an Events Form
! To set up a Start/End event:
1. Select Schedule, then the Events form that you want to define.
2. Specify the parameters for this event. (Each form is detailed in this
chapter.)
3. Click on At Mode Start if you want the event to activate at the start of
the mode.
4. Click on At Mode End if you want the event to activate at the end of
the mode.
5. Click Save.
6. Click New to create another event.
Schedules and Modes
Picture Perfect 2.0 Administration Guide
16.13
Area Events
Area Events
To schedule changes for all the readers, doors, and routings in an area, use
an area event. An event can also put the entire area online or offline.
Use the Area Events form (Figure 16-6, Figure 16-7 and Figure 16-11) to
define area events for each mode. You can create events that affect all
doors and readers in an area. Defining an event requires you to select a
mode, set the time of the event, select an area, and specify one or more
changes to the area, readers, or doors.
Do not set up the Area Events form to match the fields on the Area form. Fields
that do not need to be scheduled should not be selected, for example, if the
area is already online, do not select Online on the Area Event schedule.
NOTE
Setup
! To create an area event:
1. Select Schedule, then Area Events.
2. Enter a description for this event.
3. Set the time for this event to occur, by selecting days of the week and
typing a time, or by selecting At Mode Start or At Mode End.
4. Click the Select Mode button to display the Modes picklist. Select the
desired mode for this event, then click Ok.
5. Click the Select Area button to display the Areas picklist. Select the
area where this event should occur, then click Ok.
6. Specify whether the area selected is to be Online or Offline. If online,
readers assigned to the area may open doors.
7. If any message destinations should change during this event, change
the routing specifications for Valid, Invalid, Suspended, Lost,
Unknown, or Antipassback. Click the appropriate Routing button to
display the Routings picklist. Select the new routing, then click Close.
Any Routing button left blank will retain its current routing
destination.
8. To change the area’s categories during this event, click the Manage
button. For more information on Category Management, see
“Managing Category Assignment” on page 13.8.
16.14
Picture Perfect 2.0 Administration Guide
Schedules and Modes
16
9. Select the category you wish to change.
Result: The slot to which the category is assigned will be highlighted.
10. Click Remove.
Result: The category list on the Category Manager window will be
refreshed and the category will be displayed with no slot number
beside it.
11. Select the category and the new slot to which you want to assign it.
12. Click Add.
13. Click Close to return to the Area Events form.
Result: The category list on the Area Events form will be refreshed and
will display the category and the new slot number to which it was
assigned.
14. In the Reader box, change the fields that describe how readers in this
area will operate after this event occurs. See Figure 13-10, “Readers
Form (Bottom Right),” on page 13.25 for information on changing
these fields. Unchanged fields retain the previously existing values.
(These values are subject to other events that may change the values
for single readers.)
15. In the Door box, change the fields that describe how doors in this area
will operate after this event occurs. Unchanged fields retain the
previously existing values. (These values are subject to other events
that may change the values for single doors.) Also, specify any new
routing destinations for Door Held Open and Door Forced Open
alarms.
16. Click Save.
17. Click New to add another area event, or Quit to exit the Area Events
form.
Schedules and Modes
Picture Perfect 2.0 Administration Guide
16.15
Area Events
The Area Events Form
Figure 16-6.
Area Events Form (Top)
Description
Type an area Description up to 30 alphanumeric characters long; for
example, General Access. This event may include more than one
location if the facility has multiple entrances or buildings.
Mode
Select the mode in which the area event will occur. An event will not
take place, if it is not assigned to a mode and it will only occur in those
modes to which it is assigned.
Days of the Week
If the event is a Run Time event, select the days of the week that the
event will occur.
Time
If the event is a Run Time event, select the time of day that the event
will start. Remember to schedule another event as the pair of this one
to return to the previous state.
At mode start
If this is a Start/End event, click At mode start if you want the event to
activate at the start of the mode.
16.16
Picture Perfect 2.0 Administration Guide
Schedules and Modes
16
At mode end
If this is a Start/End event, click At mode end if you want the event to
activate at the end of the mode.
Facility
Click the Facility button to display the facilities picklist. Selecting a
facility will allow the administrator to restrict operator access to those
records in a specific facility. For more information, see Chapter 5 Facilities and Facility Profiles.
Area
Select the area in which the event will occur.
Figure 16-7.
Area Events Form (Middle)
Area Online/Offline
Routings
Routings for selected badge activities (valid, invalid, suspended, lost,
unknown, antipassback) in an area can be routed to one or all
destinations: log, monitor, printers. For example:
•
For after hours in a high security area, you can set up an area event
that routes all badge activity to the Activity Monitor; or
•
You can set up an area event to route selected activities to a printer
or to online history files to be examined later.
Picture Perfect 2.0 Administration Guide
16.17
Schedules and Modes
Use an area event if you want all readers in the area to operate offline:
not able to unlock doors, but able to read badges, pass badge data,
route and archive access messages, and activate associated alarms.
Area Events
Two Man Rule
These radio buttons are enabled only if the operator has Occupancy
Control permission granted. To leave Two Man Rule unaffected,
when the event is triggered, none of the radio buttons should be
selected.
NOTE
If the micro is unable to activate a scheduled Two Man Rule event, an alarm,
Schedule did not run, will be sent to the Alarm Monitor. This could occur if the
area configuration changed since the schedule was set up. For example, if the
Logical Reader Function of a reader in the area was inadvertently changed to
Normal, the micro would be unable to activate the schedule.
Disabled
Select this radio button to deactivate Two Man Rule mode.
Standard
Select this radio button to activate the standard Two Man Rule mode
which ensures that at least two badge holders occupy a given
controlled space.
Modified with Door Control
Select this radio button to activate the Modified Two Man Rule mode
which restricts badge holder access to a controlled area based on their
M2MR category type. The first two badge holders to enter a controlled
area must be team members. At least two team members must be
present in the controlled space until all Guests have exited.
Additionally, a team member within the controlled space must press a
door release button to allow entry to any subsequent badge holders.
The door release button must be pressed within the time specified in
the Door Release Timeout field or the door will not be unlocked.
Modified Without Door Control
Select this radio button to activate the Modified Two Man Rule mode
which restricts badge holder access to a controlled area based on their
M2MR category type. The first two badge holders to enter a controlled
space must be team members. At least two team members must be
present in the controlled space until all Guests have exited.
Categories
If the Increased Category feature was selected during installation, 32
categories are available for assignment to an area or an area event.
Otherwise, 10 categories are available for assignment. This list box
contains the active badge categories, ordered by slot number. To
access an area, a badge must match at least one category that is
assigned to that area.
16.18
Picture Perfect 2.0 Administration Guide
Schedules and Modes
16
Manage
Click the Manage button to display the Category Manager window,
Figure 13-4 on page 13.9, from which you may add, remove, or replace
a category in a slot. You may also apply filters to the categories that are
displayed in the categories list box. For more information on Category
Management, see “Managing Category Assignment” on page 13.8.
You can assign categories to an area and then schedule Area Events to
change the categories depending on access requirements. Categories
are position-sensitive, so be careful not to overwrite categories that
should remain intact. For example:
•
An area event can change the categories on an area for a specific
time to control which badge holders have access to the area during
that time. If you assign a different category to each computeroperator shift, then you can control when certain staff members
can access the computer room. Set up area events that add and
change the categories from the area.
•
A series of area events that add and change a single category can
control the time frame in which a contractor’s job is performed. For
example, one area event adds a category to the R&D Lab at 4:00 PM
to allow the cleaning crew access; another area event replaces the
category at 4:30 PM to restrict the time spent in this area. You can
use the same strategy to restrict access to a computer vault where
daily backups are stored. The categories on an area control who
can enter the area, when they can enter, and how long they can
remain.
An area event can change the categories of an area at a specific time.
For example, two MIS shifts need to access the computer room during
separate times, but the MIS Manager needs access 24 hours a day. The
two shifts also require a 30-minute overlap during shift changes.
First, create three categories, using the Categories form, MIS 24Hour, MIS Shift 1 and MIS Shift 2.
•
To provide 24-hour access for the MIS manager, assign the MIS 24Hour category on the Areas form. (Do not overwrite this category
with an area event.)
Picture Perfect 2.0 Administration Guide
16.19
Schedules and Modes
•
Area Events
Only badges with the
MIS 24Hour category
will have access to
this area.
Figure 16-8.
•
Areas Form, Categories Window
To provide access to the two shifts, create separate categories, MIS
Shift 1 and MIS Shift 2 to an area event using the Area Events
form. Use the category, NO ACCESS (use w/sched only) to end
the event. When you assign the area events to a slot, remember
that the MIS 24Hour category was placed in the first position (slot)
on the Areas form; since categories are position sensitive, when
you add a category, do not overwrite an existing category. Notice
that categories entered on previous forms do not display on the
current Events form, so you must be familiar with what is already
in place.
Four area
events are
defined: one to
start Shift 1 at
07:45, one to
end it at 17:15,
one to start
Shift 2 at
16:45, and one
to end it at
01:15.
Figure 16-9.
•
16.20
Area Events Form, View Window
When the area events occur, the Areas form will reflect the new
categories.
Picture Perfect 2.0 Administration Guide
Schedules and Modes
16
At 07:45, badges with MIS
24Hour and MIS Shift 1
categories will have
access to this area.
At 16:45, badges with MIS
24Hour, MIS Shift 1, and MIS
Shift 2 categories will have
access to this area.
At 17:15, when Shift 1
ends, badges with MIS
24Hour and MIS Shift 2
categories will have
access to this area, but
MIS Shift 1 will have NO
ACCESS.
At 01:15, badges with the
MIS 24Hour category will
have access to this area ,
but MIS Shift 1 and MIS
Shift 2 will have NO
ACCESS.
Schedules and Modes
Figure 16-10.
Examples: Areas Form, Categories Window
Picture Perfect 2.0 Administration Guide
16.21
Area Events
Figure 16-11.
Area Events Form (Bottom)
Reader
Reader Online/Offline
Use an area event if you want all readers in the area to operate offline:
not able to unlock doors, but able to read badges, pass badge data,
route and archive access messages, and activate associated alarms.
Number of Badges
There are two badge controls available: Single and Double. Single
means only one valid badge is required. Double means that two
complete, valid, and distinct transactions are required.
Physical Reader Type
There are four ways to define the physical reader type of a reader:
Badge Only, Badge And Keypad, Keypad Only, and Badge Or
Keypad. A reader’s physical type may be changed with a reader event.
16.22
Picture Perfect 2.0 Administration Guide
Schedules and Modes
16
For example: To provide higher security at certain hours, you can
define a badge-and-keypad reader as a badge-only reader from 8 AM
to 5 PM and a badge-and-keypad reader from 5 PM to 8 AM. To gain
access after 5 PM, a badgeholder must swipe his badge and also use the
keypad to enter a unique PIN code.
Logical Reader Function
To change the way the reader functions, schedule a reader event that
changes the logical reader function: Normal, Anti-passback In, Antipassback Out, Time & Attendance In, Time & Attendance Out, or
Time & Attendance In/out.
For example: To provide higher security after hours, you can set up
certain readers as anti-passback-in readers and others as antipassback-out readers;
or
To provide data about shifts that badge in and out of an area, you can
set up a reader event that changes a normal reader to a Time &
Attendance In (or Out) reader.
APB Type
To change the way the anti-passback feature functions, schedule an
area event that changes the APB Type of all readers in the area: Global
APB or Timed APB.
Swipe and Show Control
This feature is only visible if you have the Image package installed.
You can schedule a specific time period for any of the following
functions to be active:
Swipe and Show
Select Enabled to enable Swipe And Show on this reader. Select
Disabled to disable Swipe And Show on this reader.
Picture Perfect 2.0 Administration Guide
16.23
Schedules and Modes
Used as the default, Global APB allows the reader to function as a
normal APB reader;
or
Used to designate the reader as a Timed APB reader, a badgeholder’s
APB status will be set to In or Out and will return to Neutral after a
defined period of time. A Timed APB reader is useful in a site where a
badgeholder may enter a site by going through an APB In reader but
is not required to exit the site by going through an APB Out reader. If
this option is selected, a Timed APB Duration must also be defined. A
Timed APB status is local to the micro.
Area Events
NOTE
A reader cannot be defined as Toggle when Swipe And Show is Enabled. See
“Toggle” on page 13.28. If Toggle is set to Yes and either Authorization Required
or Authorization Not Required is turned on, photos will be displayed for invalid
transactions, but not valid transactions.
Authorization Required
Select Yes to designate a reader that will display a photo on the
Activity Monitor and require an operator to unlock a door. Select No
to designate a reader that will display a photo on the Activity Monitor
and will unlock a door without operator intervention.
NOTE
The Yes and No buttons are not available unless Swipe And Show Enabled is
selected.
Access cannot be granted through readers defined as Authorization Required
while communications to the micro are down.
Door
Door State: Unlocked/Locked
You can set up area events to open all doors in an area during normal
business hours--for example, lobby doors or common interior doors
such as hallways.
Held Open Sensing: Detected/Ignored
You can set up area events to ignore doors that are held open. For
example, lobby doors or common interior doors such as hallways that
are held open in an area during peak business hours.
Forced Open Monitoring: Detected/Ignored
You can set up area events to ignore doors that are forced open in an
area. For example, to keep a loading dock door open indefinitely
during business hours without an alarm occurring.
16.24
Picture Perfect 2.0 Administration Guide
Schedules and Modes
16
Reader Events
If you want to change the characteristics of a single reader (rather than a
group of readers in an area), use a reader event instead of an area event.
Use the Reader Events form (Figure 16-12) to define reader events for each
mode. Defining an event requires you to select a mode, set the time of the
event, select a reader, and specify one or more changes to the reader.
NOTE
Do not set up the Reader Events form to match the fields on the Reader form. Fields
that do not need to be scheduled should not be selected, that is, if the reader is
already online, do not select Online on the Reader Event schedule.
Setup
! To create a reader event:
1. Select Schedule, then Reader Events.
2. Enter a description for this event.
3. Set the time for this event to occur, either by selecting days of the week
and typing a time or by selecting At Mode Start or At Mode End.
4. Click the Select Mode button to display the Modes picklist. Select the
desired mode for this event, then click Ok.
5. Click the Select Reader button to display the Readers picklist. Select
the reader at which this event should occur, then click Ok.
6. Specify whether the reader selected is to be Online or Offline. If
Online, readers assigned to the area may open doors.
7. In the Reader section, change the fields that describe how the reader is
to operate after this event occurs. Unchanged fields retain the
previously existing values.
Schedules and Modes
8. Click Save.
9. Click New to add another reader event, or Quit to exit the Reader
Events form.
Picture Perfect 2.0 Administration Guide
16.25
Reader Events
The Reader Events Form
Figure 16-12.
Reader Events Form - Top
Description
Type a reader Description up to 30 alphanumeric characters long; for
example, Lobby Door.
Mode
Select the mode in which the reader event will occur. An event will not
take place, if it is not assigned to a mode and it will only occur in those
modes to which it is assigned.
Days of the Week
If the event is a Run Time event, select the days of the week that the
event will occur.
Time
If the event is a Run Time event, select the time of day that the event
will start. Remember to schedule another event as the pair of this one.
For example, if something is turned on every day at 8 AM, it must be
turned off at some time later that day.
At mode start
If this is a Start/End event, click At mode start if you want the event to
activate at the start of the mode.
16.26
Picture Perfect 2.0 Administration Guide
Schedules and Modes
16
At mode end
If this is a Start/End event, click At mode end if you want the event to
activate at the end of the mode.
Facility
Click the Facility button to display the facilities picklist. Selecting a
facility will allow the administrator to restrict operator access to those
records in a specific facility. For more information, see Chapter 5 Facilities and Facility Profiles.
Reader
Select the reader where the event will occur.
Schedules and Modes
Figure 16-13.
Reader Events Form - Bottom
Reader Online/Offline
Readers that have a physical state of Enabled on the Readers form
(allowed to read badges) can be set Online or Offline.
Picture Perfect 2.0 Administration Guide
16.27
Reader Events
For example: To prevent all access to a room, yet record all access
attempts, use a reader event to set that room’s reader Offline.
Number of Badges
There are two badge controls available: Single and Double. Single
means only one valid badge is required. Double means that two
complete, valid, and distinct transactions are required.
Physical Reader Type
There are four ways to define the physical reader type of a reader:
Badge Only, Badge And Keypad, Keypad Only, and Badge Or
Keypad. A reader’s physical type may be changed with a reader event.
For example: To provide higher security at certain hours, you can
define a Badge-and-Keypad reader as a Badge-only reader from 8 AM
to 5 PM and a Badge-and-Keypad reader from 5 PM to 8 AM. To gain
access after 5 PM, a badgeholder must swipe his badge and use the
keypad to enter a unique PIN code.
Logical Reader Function
To change the way the reader functions, schedule a reader event that
changes the logical reader function: Normal, Anti-passback In, Antipassback Out, Time & Attendance In/out, Time & Attendance In, or
Time & Attendance Out.
For example: To provide higher security after hours, you can set up
certain readers as Anti-passback-In readers and others as Antipassback-Out readers;
or
To provide data about shifts that badge in and out of an area, you can
set up a reader event that changes a normal reader to a Time &
Attendance In (or out) reader.
APB Type
To change the way the Anti-passback feature functions, schedule a
reader event that changes the APB Type: Global APB or Timed APB.
Used as the default, Global APB allows the reader to function as a
normal APB reader;
or
Used to designate the reader as a Timed APB reader, a badgeholder’s
APB status will be set to In or Out and will return to Neutral after a
defined period of time. A Timed APB reader is useful in a site where a
badgeholder may enter a site by going through an APB In reader but
is not required to exit the site by going through an APB Out reader. If
16.28
Picture Perfect 2.0 Administration Guide
Schedules and Modes
16
this option is selected, a Timed APB Duration must also be defined. A
Timed APB status is local to the micro.
Swipe and Show Control
This feature is only visible if you have the Image package installed.
You can schedule a specific time period for any of the following
functions to be active:
•
NOTE
A reader cannot be defined as Toggle when Swipe And Show is Enabled. See
“Toggle” on page 13.28. If Toggle is set to Yes and either Authorization
Required or Authorization Not Required is turned on, photos will be displayed
for invalid transactions, but not valid transactions.
•
NOTE
Swipe and Show: Select Enabled to enable Swipe and Show on
this reader. Select Disabled to disable Swipe and Show on this
reader.
Authorization Required: Select Yes to designate a reader that will
display a photo on the Activity Monitor and require an operator to
unlock a door. Select No to designate a reader that will display a
photo on the Activity Monitor and will unlock a door without
operator intervention.
The Yes and No buttons are not available unless Swipe And Show Enabled is
selected.
Access cannot be granted through readers defined as Authorization Required
while communications to the micro are down.
Schedules and Modes
Picture Perfect 2.0 Administration Guide
16.29
Door Events
Door Events
When you want to change the characteristics of a single door (rather than
a group of doors in an area) use a door event instead of an area event.
Use the Door Events form (Figure 16-14) to define door events for each
mode. Defining an event requires you to select a mode, set the time of the
event, specify a door, and change one or more of the operating
characteristics of the door.
NOTE
Do not set up the Door Events form to match the fields on the Door form. Fields
that do not need to be scheduled should not be selected, that is, if the door is
already unlocked, do not select Unlocked on the door schedule.
Setup
! To create a door event:
1. Select Schedule, then Door Events.
2. Enter a description for this event.
3. Set the time for this event to occur, either by selecting days of the week
and typing a time or by selecting At Mode Start or At Mode End.
4. Click the Select Mode button to display the Modes picklist. Select the
desired mode for this event, then click Ok.
5. Click the Select Door button to display the Doors picklist. Select the
door at which this event should occur, then click Ok.
6. In the Door section, change the fields that describe how the door is to
operate after this event occurs. Unchanged fields retain the previously
existing values.
7. Click Save.
8. Click New to add another door event, or Quit to exit the Door Events
form.
16.30
Picture Perfect 2.0 Administration Guide
Schedules and Modes
16
The Door Events Form
Figure 16-14.
Door Events Form
Description
Type a door Description up to 30 alphanumeric characters long; for
example, Lobby Door.
Select the mode in which the door event will occur. An event will not
take place, if it is not assigned to a mode and it will only occur in those
modes to which it is assigned.
Days of the Week
If the event is a Run Time event, select the days of the week that the
event will occur.
Picture Perfect 2.0 Administration Guide
16.31
Schedules and Modes
Mode
Door Events
Time
If the event is a Run Time event, select the time of day that the event
will start. Remember to schedule another event as the pair of this one.
For example, if something is unlocked every day at 8 AM, it must be
unlocked at some time later that day.
At mode start
If this is a Start/End event, click At mode start if you want the event to
activate at the start of the mode.
At mode end
If this is a Start/End event, click At mode end if you want the event to
activate at the end of the mode.
Facility
Click the Facility button to display the facilities picklist. Selecting a
facility will allow the administrator to restrict operator access to those
records in a specific facility. For more information, see Chapter 5 Facilities and Facility Profiles.
Select Door
Select the door where the event will occur.
Door State
To schedule an individual door in an area to unlock at the same time
each day, use a door event that sets the Door State field to Unlocked.
NOTE
An area event that locks all area doors and occurs after this door event will also lock
this individual door.
Held Open Sensing
To allow shipping and receiving to keep a loading dock door open
indefinitely during business hours without an alarm occurring, set
Held-open Sensing to Ignored. This event overrides the Detected
setting for the same function on the Doors form.
Forced Open Monitoring
Select Detected to allow an alarm condition on this door to occur
immediately when the door is forced open without a valid badge read
or exit device. Select Ignored if the monitoring function on this door is
not used (this may be advisable during the day when people
frequently hold the door open).
16.32
Picture Perfect 2.0 Administration Guide
Schedules and Modes
16
Alarm Events
When you want to change the characteristics of a single alarm (without
changing the input group or output group assigned to the alarm), use an
alarm event.
Use the Alarm Events form (Figure 16-15) to define alarm events for each
mode. Defining an event requires you to select a mode, set the time of the
event, select an alarm, and specify one or more changes to the alarm.
Setup
! To create an alarm event:
1. Select Schedule, then Alarm Events.
2. Enter a description for this event.
3. Set the time for this event to occur, either by selecting days of the week
and typing a time or by selecting At Mode Start or At Mode End.
4. Click the Select Mode button to display the Modes picklist. Select the
desired mode for this event, then click Ok.
5. Click the Select Alarm button to display the Alarms picklist. Select the
alarm that this event should control, then click Ok.
6. Specify whether the alarm should be Online or Offline.
7. If the message destination of this alarm should be changed by this
event, click the Routing button to display the Routings picklist. Select
the desired routing, then click Close.
8. Click Save.
9. Click New to add another alarm event, or Quit to exit the Alarm
Events form.
Schedules and Modes
Picture Perfect 2.0 Administration Guide
16.33
Alarm Events
The Alarm Events Form
Figure 16-15.
Alarm Events Form
Description
Type an alarm event Description up to 30 alphanumeric characters
long; for example, Door Held Offline 08:00 M-F.
Mode
Select the mode in which the alarm event will occur. An event will not
take place, if it is not assigned to a mode and it will only occur in those
modes to which it is assigned.
Days of the Week
If the event is a Run Time event, select the days of the week that the
event will occur.
16.34
Picture Perfect 2.0 Administration Guide
Schedules and Modes
16
Time
If the event is a Run Time event, select the time of day that the event
will start. Remember to schedule another event as the pair of this one.
For example, if something is turned on every day at 8 AM, it must be
turned off at some time later that day.
At mode start
If this is a Start/End event, click At mode start if you want the event to
activate at the start of the mode.
At mode end
If this is a Start/End event, click At mode end if you want the event to
activate at the end of the mode.
Facility
Click the Facility button to display the facilities picklist. Selecting a
facility will allow the administrator to restrict operator access to those
records in a specific facility. For more information, see Chapter 5 Facilities and Facility Profiles.
Alarm Being Scheduled
Select the alarm where the event will occur.
Online/Offline
To ensure that normal daytime activity does not trigger an alarm, use a
runtime alarm event to put this alarm offline during the day.
For example, use an alarm event to set this alarm offline before the
business day starts (MTWTF at 07:30). Use a parallel alarm event to set
this alarm online after hours (MTWTF at 17:00). During the weekend
(between Friday at 5 P.M. and Monday at 7:30 A.M.), this alarm is
online and does not cycle daily.
NOTE
You may need to schedule a parallel mode-end alarm event (in case the system
does not return to normal operating mode) for other scheduled events to occur.
However, the preferred way is to schedule the input group offline/online. This way
no input activity (ISC) is sent to the host. See “InGroup Events” on page 16.37.
Picture Perfect 2.0 Administration Guide
16.35
Schedules and Modes
To set an alarm online when the facility is closed for a holiday, use an
alarm event that does not cycle daily. Use a mode-start alarm event
associated with your holiday mode. When the system starts to operate
in holiday mode, events that cycle during normal operating mode stop
cycling. Set this alarm to remain online until the system switches back
to normal operating mode.
Alarm Events
Routing
To send an alarm to a different routing at certain times, schedule an
alarm event that specifies the new routing and time. You can send the
alarm message to the alarm monitor, a printer, the history log, or to a
combination of the three.
For example, if you want invalid-badge alarms to route to the log and
monitor during the business day but to the monitor and a printer after
hours, set an alarm event for MTWT at 17:00 to start routing invalidbadge alarms to the alarm monitor and to a selected printer. Set a
parallel alarm event to occur on MTWTF at 08:00 to start routing the
alarm to the history log and monitor. If no one watches the alarm
monitor on weekends, another alarm event (F at 17:00) can start
routing this alarm to the log and to the printer. On Monday, scheduled
alarm events begin to repeat the cycle.
16.36
Picture Perfect 2.0 Administration Guide
Schedules and Modes
16
InGroup Events
You can use an input group event to place an input group online or offline
and to control what output groups or alarms trigger when this input
group activates.
Use the Ingroups Events form (Figure 16-16) to define input group events
for each mode. Defining an event requires that you select a mode, set the
time of the event, and specify one or more changes to the input group.
Setup
! To create an input group event:
1. Select Schedule, then Ingroups Events.
2. Enter a description for this event.
3. Set the time for this event to occur, either by selecting a time, by
selecting days of the week and typing a time, or by selecting At Mode
Start or At Mode End.
4. Click the Select Mode button to display the Modes picklist. Select the
desired mode for this event, then click Ok.
5. Click the Input Group button to display the Ingroups picklist. Select
the input group that this event should control, then click Ok.
6. Specify whether the input group should be Online or Offline.
7. Click one or more of the five Output Group buttons (First, Second,
etc.) to add or change an output group for this input group event.
Remember that output groups are position-sensitive, so be careful not
to overwrite an output group that you want to keep activated.
8. Click Save.
9. Click New to add another input-group event, or Quit to exit the
Ingroups Events form.
Schedules and Modes
Picture Perfect 2.0 Administration Guide
16.37
InGroup Events
The InGroups Events Form
Figure 16-16.
InGroups Events Form
Description
Type an input group Description up to 30 alphanumeric characters
long; for example, Lobby AC Fail Off 17:00 M-F.
Mode
Select the mode in which the input group event will occur. An event
will not take place, if it is not assigned to a mode and it will only occur
in those modes to which it is assigned.
16.38
Picture Perfect 2.0 Administration Guide
Schedules and Modes
16
Days of the Week
If the event is a Run Time event, select the days of the week that the
event will occur.
Time
If the event is a Run Time event, select the time of day that the event
will start. Remember to schedule another event as the pair of this one.
For example, if something is activated every day at 8 AM, it must be
deactivated at some time later that day.
At mode start
If this is a Start/End event, click At mode start if you want the event to
activate at the start of the mode.
At mode end
If this is a Start/End event, click At mode end if you want the event to
activate at the end of the mode.
Facility
Click the Facility button to display the facilities picklist. Selecting a
facility will allow the administrator to restrict operator access to those
records in a specific facility. For more information, see Chapter 5 Facilities and Facility Profiles.
Input Group
Select the input group that will be triggered by the event.
Online/Offline
For example: For use with Fire mode, you could create an event that
sets the fire-detector input group to offline, so that Open Condition
and/or Short Condition state changes do not continue to be detected.
This input group event prevents the system from receiving a flood of
alarms when a fire occurs. Remember that a mode-start event requires
a parallel mode-end event.
Picture Perfect 2.0 Administration Guide
16.39
Schedules and Modes
To prevent an associated alarm and/or output group from triggering
if the input is triggered, use an input group event to place an input
group offline. For example, this event can place an input group offline
at a scheduled time on a daily/weekly cycle within the normal
operating mode; or this event can be set to occur At Mode Start and to
continue (with no daily or weekly cycles) until a parallel At Mode End
event occurs to reverse the change.
InGroup Events
You could also schedule an event to place a Motion Detector input
group offline during the day and online at night, if after-hours activity
in this area indicates a security violation. Or, to conserve electricity
after hours, schedule the input group for hallway motion detectors to
trigger lights to turn on for a duration--to provide lighting only when
required.
Output Groups
NOTE
If scheduling outputs, they must reside on the same micro.
An input group event can change the output groups associated with
an input group. Output groups are position sensitive and follow the
same scheduling rules as categories on the Area Events form. (See
“Area Events” on page 16.14.) It is possible to overwrite an existing
output group, depending on which output group slot is changed, so
familiarize yourself with the existing output groups associated with
the input group being changed.
•
NOTE
When you add this new output group, make sure you don’t overwrite something,
such as the existing “door unlock” output group.
•
NOTE
16.40
To have security lights turn on when someone opens an exterior
door at night (using a badge or using force), schedule an input
group event to occur at sundown. Select the output group that
operates the security lights. When an exterior door opens, this
output group triggers the outdoor security lights.
To have an alarm sound when someone uses an invalid badge
between the hours of 5 PM and 8 AM, schedule an input group
event. Select the output group that operates a siren. When the
reader detects an invalid badge, the reader’s Invalid Input Group
activates, the associated output group triggers, and associated
output devices operate--in this case, a siren.
Remember to define the duration of the output using the Outputs form.
Picture Perfect 2.0 Administration Guide
Schedules and Modes
16
Output Groups Events
An output-group event can enable or disable a specific output group,
and/or change its state to off or on for the period of time entered in the
Time field of the Output form associated with this output group.
Use the Outgroups Events form (Figure 16-17) to define output group
events for each mode. Defining an event requires you to select a mode, set
the time of the event, select an output group, and specify one or more
changes to the output group.
Setup
! To create an output group event:
1. Select Schedule, then Outgroups Events.
2. Enter a description for this event.
3. Set the time for this event to occur, by selecting a time, by selecting
days of the week and typing a time, or by selecting At Mode Start or
At Mode End.
4. Click the Select Mode button to display the Modes picklist. Select the
desired mode for this event, then click Ok.
5. Click the Select Output Group button to display the Outgroups
picklist. Select the output group that this event should control, then
click Ok.
6. Specify whether the output group should be Enabled.
7. Specify whether the output state of this output group should be On or
Off.
8. Click Save.
9. Click New to add another output group event, or Quit to exit the
Outgroups Events form.
Schedules and Modes
10. If the schedule does not work, query the mode status on the micro to
see if it is in Normal mode.
Picture Perfect 2.0 Administration Guide
16.41
Output Groups Events
The OutGroups Events Form
Figure 16-17.
OutGroups Events Form
Description
Type an output group Description up to 30 alphanumeric characters
long; for example, Parking Lot Lights On 18:00 M-F.
Mode
Select the mode in which the output group event will occur. An event
will not take place, if it is not assigned to a mode and it will only occur
in those modes to which it is assigned.
Days of the Week
If the event is a Run Time event, select the days of the week that the
event will occur.
Time
If the event is a Run Time event, select the time of day that the event
will start. Remember to schedule another event as the pair of this one.
16.42
Picture Perfect 2.0 Administration Guide
Schedules and Modes
16
For example, if something is activated every day at 8 AM, it must be
deactivated at some time later that day.
At mode start
If this is a Start/End event, click At mode start if you want the event to
activate at the start of the mode.
At mode end
If this is a Start/End event, click At mode end if you want the event to
activate at the end of the mode.
Facility
Click the Facility button to display the facilities picklist. Selecting a
facility will allow the administrator to restrict operator access to those
records in a specific facility. For more information, see Chapter 5 Facilities and Facility Profiles.
Output Group
Select the output group that will be triggered by the event.
Enabled
Output groups such as lights or perimeter cameras can be enabled to
operate as required at scheduled times.
For example: Define output group events to have parking-lot lights
enabled only during the night.
State
The outputs in the output group, such as emergency lights or sirens,
can be turned on or off. A duration of zero turns on the output
indefinitely.
Picture Perfect 2.0 Administration Guide
16.43
Schedules and Modes
For example: Define an output group event for Emergency mode that
turns on sirens and emergency lights for the duration of Time;
or
Define output group events for normal mode to turn on lights late at
night and turn them off in the morning.
Reporting
Reporting
catsup
This is a command line tool that lists in a report format all the schedules
that have been executed up to the current time and date by all micros. Use
the following to get the report in a default format:
catsup /cas/log/sup.mmdd
where mm is the month and dd is the day. Example: sup.0302=March 2nd
To get a listing of all the options available, type at the command line:
catsup -help
16.44
Picture Perfect 2.0 Administration Guide
Access/Secure Operations
Chapter
17
Access/Secure
Operations
Overview
Devices, such as inputs, input groups or doors, normally exist in an
Access state in which they are disabled or unlocked, or in a Secure state in
which they are enabled or locked. These states are reflected on the
appropriate device form.
Device
Secure State
Access State
Inputs
Enabled
Disabled
Input Groups
Enabled
Disabled
Doors
Locked
Unlocked
It may be desirable to change this state back and forth to allow for
unscheduled conditions, such as heightened security levels or
unscheduled peak access times. This feature can be used, in lieu of
scheduling an event, to accommodate situations that require operator
control. It allows state changes for multiple devices rather than applying
the change to each device individually through the applicable form. For
example, you may want all doors to be opened when the security guard
arrives at his post rather than at a scheduled time.
This option will not appear unless it has been enabled through the
Permissions screen.
Picture Perfect 2.0 Administration Guide
17.1
Prerequisites
Prerequisites
The following Picture Perfect forms are prerequisites:
Forms
Purpose
PRINTER
ROUTINGS
TERMINALS
To log activity to a printer and display on a
console.
PERMISSION GROUPS
PERMISSIONS
OPERATORS
To enable the option and authorize
operator use.
INPUT GROUPS
INPUTS
DOORS
To view, print and change states of a
device.
What You Will Be Doing
This chapter shows you how to view, print and change states (Access/Secure)
of inputs, input groups and doors.
Access/Secure Operations
Setup
! To enable Access/Secure Operations:
1. Select Control, then Facility Profile.
2. Click the Find button to locate the Facility Profile record to alter, or use
the existing form to create a new Facility Profile record.
3. Click the button next to the Menu label and from the resulting Forms list,
select Access/Secure.
17.2
Picture Perfect 2.0 Administration Guide
Access/Secure Operations
17
Access/Secure
Operations
Figure 17-1.
Facility Profile Window
4. Click Update to enable this option. If this option is not enabled, the
Access/Secure Operations icon will not be available on the Control
submenu.
5. Click Save to save your changes.
6. Click Quit to close the form.
Picture Perfect 2.0 Administration Guide
17.3
Access/Secure Operations
! To display the Access/Secure form
1. Select Control, Access/Secure Operations to display the following
pop-up menu:
Figure 17-2.
Operations Pop-Up Menu
2. Click the appropriate button (Inputs, Input Groups, or Doors). The
applicable window will display (See “Sample Access/Secure
Window” on page 17.5).
3. From one of the lists displayed, select the item whose state you wish to
change by highlighting it. Multiple selections may be made. An item
can be deselected by clicking on it a second time.
4. Click on the appropriate Change State arrow button.
Result: A confirmation box will pop up.
5. Select Yes to continue or No to cancel the operation.
Result: Yes will cause the system to update the database for the
selected records, reflect the change in state on the appropriate form,
inform the micros of the change, and refresh the two list boxes to
reflect the new changes.
6. Click on the Close button.
7. Click Quit in the Access/Secure Operations pop-up menu to exit and
close any open windows.
17.4
Picture Perfect 2.0 Administration Guide
Access/Secure Operations
17
Sample Access/Secure Window
Below is an example of an Access/Secure window and an explanation of
each component:
Access/Secure
Operations
Figure 17-3.
Access/Secure List Example - Input Groups
Current State: Access
This list box displays a list of the selected devices, such as Input
Groups, that are in Access state (enabled; for example, door
unlocked).
Current State: Secure
This list box displays a list of the selected devices, such as Input
Groups, that are in Secure state (disabled; for example, door locked).
Change State to Access
This arrow button will be activated when a selection is made from the
Current State: Secure list box. When clicked, a confirmation box will
appear.
Change State to Secure
This arrow button will be activated when a selection is made from the
Current State: Access list box. When clicked, a confirmation box will
appear.
Filter
A pattern can be entered and used to restrict the items displayed.
Picture Perfect 2.0 Administration Guide
17.5
Access/Secure Operations
Refresh
This button can be used whenever there is a change in the database;
for example: after entering/changing a filter to rescan the database
and list the updated items.
Cancel
Click this button to cancel any selections made.
Print
Click this button to send the list to the terminal’s assigned printer.
Close
This button is used to close the appropriate window.
Help
Click this button to display online help about the use of the buttons on
this screen.
17.6
Picture Perfect 2.0 Administration Guide
Backup and Restore
Chapter
18
Overview
A backup of your access-control database should be performed
periodically. The system allows you to back up the database to diskette,
tape, or disk file. If your system has the optional packages installed, use
separate diskettes or tapes to back up each database, because each backup
initializes the diskette or tape.
Recommended: During initial system setup, perform a daily backup.
Every day during initial setup, new inputs, outputs, and alarms are
configured and new badge data is entered. Regular backups will protect
this setup process.
NOTE
Backup and Restore
The system stores badge transactions, alarm events, and operator activity
in online history tables. When the online history table for an activity is
almost full, the system displays an Archive Alert pop-up window with a
message to archive the records of that particular table. If you prefer to
archive data on a regular schedule, a Force-Rollover option can be used
instead. This lets you archive a table even if it hasn’t reached its threshold
point.
An operator must remove the tape or diskette after the backup to prevent it from
being overwritten.
What You Will Be Doing
This chapter shows you how to perform an archive, back up the database,
restore the database, and recover the entire system.
Backup Options
Diskettes may be appropriate for installations with small databases.
Another option for backing up large amounts of data storage is tape.
While slow, because data is read and written sequentially, tape can hold
20-40GB (gigabytes) of storage. If your network configuration provides
storage on a physical drive that is accessible using the network, this may
also be an option, providing its storage capacity is large enough for your
requirements. It is also a good idea to check with your network
administrator before moving backup data across the network.
Picture Perfect 2.0 Administration Guide
18.1
Performing an Archive
Performing an Archive
The system prompts you (using a pop-up window) to perform a specific
archiving function for Badge History, Alarm History, or Operator History
when the primary table for that history is full. At that time, the system takes
the records stored in that primary history table and transfers them to a
temporary history table. When an archive is performed for a particular
history, it uses the information in its temporary table--that way, the primary
table is free to start collecting new information right away.
If an archive is not performed before the primary table is filled again, the data
in the temporary table will be overwritten, and the original archive data lost.
So it is important to perform the indicated archive when the system notifies
you.
Since the time needed to reach a history threshold varies with activity levels,
it’s hard to predict when a particular threshold will be reached. A ForceRollover option exists, therefore, which allows you to archive data on a
regular schedule, such as once a week. This task can then be incorporated into
your normal backup procedure. The Force-Rollover option takes data in the
primary table and transfers it to the temporary table even if the primary table
is not full.
The Force-Rollover option will only be displayed on the Backup window if
the data currently in the temporary table has already been archived. This
prevents unarchived data from being destroyed when new data overwrites it.
(This data will, however, be overwritten when the primary table becomes
full.)
18.2
Picture Perfect 2.0 Administration Guide
Backup and Restore
18
! To review the primary tables:
1. Click the middle mouse on the root window (background area of the
screen) to display the Programs menu.
2. Select the option History Dates.
Backup and Restore
Figure 18-1.
History Dates Window
! To review the temporary tables:
1. Click the middle mouse on the root window (background area of the
screen) to display the Programs menu.
2. Select the option Archive Dates.
Picture Perfect 2.0 Administration Guide
18.3
Performing an Archive
Figure 18-2.
Archive Dates Window
! To perform an Archive:
1. Select Control, then Backup.
2. When the Backup window appears (Figure 18-3), select the Archive
radio button to display the Archive options.
3. Select one of the history options: Badge, Alarm, or Operator.
4. If an archive of the data in the temporary table has already been
performed, the Force Rollover option will be displayed beside that
history option. Toggle this button On if you want to force a rollover of
information and archive that data.
5. If you want to generate an onscreen verification report, leave the
Generate Verification Report button On.
6. Use the appropriate radio button before you start a backup to
Diskette, Tape, or Disk File. (If backing up to diskette, make sure you
have formatted diskettes available before you start the backup.)
NOTE
18.4
When Disk File is selected, clicking the Execute button will display a list from
which you can select the destination file for the backup/archive. See
See Appendix D - Advanced Configuration for detailed information on configuring
this option.
Picture Perfect 2.0 Administration Guide
Backup and Restore
18
7. Click Execute to start the archive.
Archive Backup Window
Backup and Restore
Figure 18-3.
Performing Backups
There are two methods of backing up your database:
•
The Backup feature in Picture Perfect
•
The command line option, cba
Using the Picture Perfect Backup Function
The backup function allows you to back up your access-control database
(badge table, reader table, operator table, etc.) and the databases of any
optional Picture Perfect packages you may have installed.
If backing up to diskette, make sure you have formatted diskettes
available before you start the backup.
! To perform a backup:
1. Select Control, then Backup.
2. When the Backup window appears (Figure 18-4), select the Backup
radio button to display the various tables buttons.
3. Select one or more of the tables options: Badge, Base, History, or an
optional package.
Picture Perfect 2.0 Administration Guide
18.5
Performing Backups
4. If you want to see exactly which tables are included in your selection,
you may click the Show Tables button. This displays the Database
Tables window with a listing of all the tables in the database. The
tables included in your selection will be toggled On.
CAUTION
Do not toggle any of the individual table buttons in the Database Tables
window unless instructed to do so by your support representative.
5. If you want to generate an onscreen verification report, leave the
Generate Verification Report checkbox selected.
6. Use the appropriate radio button to start a backup to Diskette, Tape,
or Disk File. (Make sure you have formatted diskettes available before
you start the backup.)
NOTE
When Disk File is selected, clicking the Execute button will display a list from
which you can select the destination file for the backup/archive. See the
Installation Guide for detailed information on configuring this option.
7. Click Execute to start the backup.
Figure 18-4.
18.6
Table Backup Window
Picture Perfect 2.0 Administration Guide
Backup and Restore
18
Using the Command Line Backup Option cba
Configuration File
The command line version of backup uses a configuration file
backup.cfg located in /cas/db/text. This file contains the flat files to
be backed up. You can edit this file if you have additional files you would
like to back up.
The syntax of the contents of the backup.cfg file is:
package name
base:
base:
base:
directory or file to back up
/cas/forms
/cas/lists
/home/install/.profile
Options
The cba command line options are:
character mode
-b
backup
-a
archive
-r
force rollover on history (archive only)
-rt {#}
retry rollover {#} of times (default is 100)
-d {file}
write to the specified disk file
-t
tape - write to /dev/pptape
-f
floppy - write to /dev/fd0
-v
verify that data was written successfully
-np
do not prompt for tapes if specified with -c
-nb
run from netback
Backup and Restore
-c
Tables
The following tables can be backed up (b) or archived (a):
-badge
ba
badge table / badge history
-base
b
basic database
-hist
ba
all three history tables
-image
b
badge photos and related files
-graph
b
alarm graphics (if installed)
-tour
b
guard tours
-thist
ba
tour history (if installed)
(if installed)
-visitor b
visitor tables (if installed)
-vhist
ba
visitor history (if installed)
-alarm
a
alarm history
-oper
a
operator history
Picture Perfect 2.0 Administration Guide
18.7
Performing Backups
Perform Backup
! To launch the cba backup option:
1. Open a Terminal window.
2. Type a command, including options; for example to backup and verify
the base Picture Perfect package to a disk file, type:
cba -c -b -v -d /tmp/basebackup -base -badge
Enter
Result: The cba backup option will back up the files contained in the
backup.cfg file.
NOTE
Be sure to include options when using the command line cba option. If you fail to do
so (if you type cba Enter ), the system will try to launch the Picture Perfect
graphical Backup feature.
Scheduling Backups
The Schedule Backup feature allows you to schedule a system backup to
pre-selected media. The backup will then run automatically at the day and
time settings specified on the Backup Events form. The backup can go to
either tape, diskette, or disk file and can include one or more of the
following backup types: badge table, base system, history tables, and any
optional packages, such as Alarm Graphics tables.
NOTE
The scheduled backup will not span multiple diskettes or tapes, and there will be no
prompt for inserting the backup media. Before the backup is to take place, an
operator must make sure that the correct media is properly inserted.
All error messages and completion messages generated as a result of the
scheduled backup process will be written to a log file in the /cas/log
directory called bak.mmdd where mmdd= system date (example:
bak.0302=March 2nd). You must check the bak log file for messages
after the scheduled backup process has executed, since there are no popup window messages associated with this feature.
Archives of Badge, Alarm, or Operator History cannot be scheduled.
Refer to Figure 18-5 for the Backup Events form.
18.8
Picture Perfect 2.0 Administration Guide
Backup and Restore
Backup and Restore
Figure 18-5.
18
Backup Events Form
! To schedule a System Backup:
1. Select Schedule, then Backup Events to display the Backup Events
form.
2. Type in the description of this backup.
3. Enter the time (according to the format on the Control/Parameters
form) this report is to run, and select the days on which it is to run.
4. Click the Facility button to display the facilities picklist. Selecting a
facility will allow the administrator to restrict operator access to those
records in a specific facility. For more information, see Chapter 5 Facilities and Facility Profiles.
5. Use the radio buttons to specify whether the backup media is Tape,
Diskette, or Disk File.
Picture Perfect 2.0 Administration Guide
18.9
Restoring the Database
6. Use the toggle buttons to select one or more of the backup types:
Badge, Base, History, or any option shown on the form and then click
Save.
NOTE
When the Disk File option is selected, the file name is required. If the file name
does not specify the path, the default location for the file is the /cas/log directory.
A scheduled backup event overwrites existing files of the same name.
Restoring the Database
There are two methods of restoring your database:
•
The Restore feature in Picture Perfect
•
The command line option, cbr
Using the Picture Perfect Restore Function
The Restore function allows you to restore the database tables from tape,
diskette, or disk file.
NOTE
The Restore function does not overwrite existing data. To clear your tables, refer to
your Technical Reference manual or contact your support representative.
Before you restore the database, perform a database initialization. For instructions,
refer to your Technical Reference manual or contact your support representative.
The Restore function does not restore regular files. Use the command line database
restore option, cbr, or the database restore utility, restore.sh, to restore
regular files.
! To perform a restore:
1. Select Control, then Restore.
2. On the Restore window (Figure 18-6), use the radio buttons to specify
whether to Restore From Diskette, Restore From Tape, or Restore
from Disk File.
3. Click Ok.
4. When the Media pop-up window appears, insert the tape or diskette.
5. Click OK to start the restore.
18.10
Picture Perfect 2.0 Administration Guide
Backup and Restore
Figure 18-6.
18
Restore Window with Media Pop-up
Using the Command Line Option cbr
Configuration File
The command line version of restore uses a configuration file
restore.cfg located in /cas/db/text. This file contains the flat files
to be restored. You can edit this file if you want to add or delete files to be
restored.
Backup and Restore
The syntax of the contents of the restore.cfg file is:
/cas/forms
/cas/lists
/home/install/.profile
Options
The cbr command line options are:
-c
- use character-based interface
-a
- restore all tables
-d
- from disk file
-f
- from floppy
-o
- output file
-t
- from streaming tape
-v
- verify afterwards
Picture Perfect 2.0 Administration Guide
18.11
Restoring the Database
Perform Restore
! To launch the cbr restore option:
1. Open a Terminal window.
2. Type a command, including options; for example to restore and verify
the base Picture Perfect package from a disk file, type:
cbr -c -a -v -d /tmp/basebackup
NOTE
Enter
Be sure to include options when using the command line cbr option. If you fail to do
so (if you type cbr Enter ), the system will try to launch the Picture Perfect
graphical Restore feature.
Result: The cbr restore option will restore the files contained in the
restore.cfg file. Messages similar to the following will display.
.
.
.
restoring ‘regular files’...
After the database records are restored and if your backup included
flat files, you will receive messages similar to the following:
This program edits the configuration file, /cas/db/text/
restore.cfg before running the backup or restore programs.
For backups, you must also precede each file or directory name
with a package name followed by a colon and a space (or tab).
This will cause the specified files to be backed up only when
the associated package is backed up.
For restores, DO NOT precede each file or directory name with a
package name, colon or space. Simply supply the file or
directory you wish to be restored from the media.
P - Print Current List
A - Add Item to List
18.12
Picture Perfect 2.0 Administration Guide
Backup and Restore
18
E - Edit Item on List
D - Delete Item from List
Q - Quit and Save File
Enter Function (P/A/E/D/Q): p
3. Type the letter p to print the list of files to be restored.
Result: A list, similar to the following, of the files contained in the
restore.cfg files will be displayed.
Current File List
1.
2.
3.
4.
/cas/forms/*
/cas/lists/*
/photo/photo/*
/photo/designs/*
Result: Your flat files will be restored.
Recovering the Entire System
1. To recover the entire system, perform the Installation procedures. For
the complete installation procedures for Picture Perfect and the
operating system, refer to the appropriate Picture Perfect Installation
Guide.
2. When you reach the Database Restore utility during installation,
select option 3 (Restore Customer’s Database from Tape), option 4
(Restore Customer’s Database from Diskette), or option 5 (Restore
Customer’s Database from Disk File), depending on your media
type, and reload your database backup rather than the minimum or
sample database.
Picture Perfect 2.0 Administration Guide
18.13
Backup and Restore
4. If these are the files you wish to restore, press Q to quit and save the
file. If you wish to edit the list, press A, E, or D, as appropriate. When
you have completed your edits, press Q to quit and save the file.
Recovering the Entire System
NOTES
18.14
Picture Perfect 2.0 Administration Guide
History Reports
Chapter
19
Overview
The Picture Perfect system captures history information for alarms,
badges, and operator activity. This information can then be manipulated
into various reports that can be viewed on screen or sent to a printer.
Alarm History includes acknowledged alarms. Badge History includes
access attempts by valid, invalid, lost, and suspended badges, plus Swipe
and Show transactions on readers. Operator History includes database
changes, logins, control outputs, alarm graphics, and Swipe-and-Show
record changes to output state.
What You Will Be Doing
This chapter shows you how to control which activities go to history, how
to view history, how to format reports, how to use selection criteria, how
to save reports, how to print reports, and how to schedule reports.
Controlling Which Activities Go to History
The History Log is online history, and is one of the destinations specified
by routing instructions used throughout the system. You can set up
routing-control information to direct selected operator activity and badge
activity to selected destinations (Printer, Monitor, or History Log). See
“Routings” on page 4.21 of Chapter 4 - Initial Setup for details on this.
Picture Perfect 2.0 Administration Guide
History Reports
The routings that you define on the Routings form appear in the Routings
picklist on the Areas, Doors, and Alarms forms. If the current routing on a
form includes the History Log, the activities defined on that form are
captured in history. If there is no current routing assigned, the activity
routes to the default routing as defined on the Parameters form. If the
default routing does not include the History Log in its setting, the activity
will not be captured in history. The Routings picklist on the Inputs form
is for diagnostics only.
19.1
The History Form
The History Form
The History form is a workspace for specifying and displaying various
history reports.
Select Reports, then History. The Badge History - New Report form (Figure
19-1) appears.
The menu bar on the History form has six pull-down menus (plus a Help
menu). To display a menu, click on the menu name and hold down the mouse
button. To select an option, drag the mouse pointer to the desired option and
release the button. Use the Help menu for on-screen information about each
of the features.
Figure 19-1.
History Form
The next section explains the six pull-down menus and the three command
buttons (beneath the menu bar).
NOTE
The phrase “current report” means the report that is currently displayed on your
screen.
The Report Menu
The pull-down Report menu has seven selections. Each selection is explained
below.
NOTE
19.2
On picklists, the Ok button applies the specified function to the report and closes the
picklist window; other buttons, such as Open, Save As, and Delete apply their
functions to the report, but leave the picklist window open.
Picture Perfect 2.0 Administration Guide
History Reports
19
New
Clears the form so you can create a new report. You are provided with the
Open Template picklist from which you can open an existing report to
use as a template. Select the desired report, then click Open. Clicking Ok
without selecting a report creates a blank report.
Open
Displays the Open Report picklist (Figure 19-2) from which you can open
a predefined report. Select the desired report, then click Open or Ok.
Figure 19-2.
Open Report Picklist - History
Save
Saves the current report with the existing title and current changes.
Save As
Picture Perfect 2.0 Administration Guide
19.3
History Reports
Allows you to save the current report under a different name, with the
original report still existing under the previous name. The Save Report As
window (Figure 19-3) will appear. Type a new name for the current
report, then click Save As or Ok.
The History Form
Figure 19-3.
Save Report As Window
Print
Allows you to print the entire report or a range of pages within that report.
The Print Options window (Figure 19-4) will appear for specifications. When
you are ready to print, click Ok.
Figure 19-4.
Print Options Window
Page Range
Select either All or a range. If printing a range, type the Start Page number
and the End Page number.
Copies
Type the number of copies to be printed.
Print Only to File
Toggle this button On and type a file name if you want to save it as a file
rather than send it to a printer. Use a full pathname, such as
/tmp/badgerpt.0407.
19.4
Picture Perfect 2.0 Administration Guide
History Reports
19
Printers
Select the printer to which this report should be sent.
Delete
Displays the Delete Report picklist (Figure 19-5) so you can delete an
existing report. Select the desired report, then click Delete or Ok.
Figure 19-5.
Delete Report Picklist - History
Quit
Exits the History form.
The Type Menu
There are three basic selections (plus optional reports) in the Type menu.
Select one of these to specify the type of history you want:
Alarm
Badge
Operator
(or optional)
The Source Menu
There are three selections in the Source menu. Select one of these to specify
the data source of the history:
Picture Perfect 2.0 Administration Guide
19.5
History Reports
The selection of history type is critical in using the History application, as it
determines which reports are displayed on the New and Open picklists of the
Report menu, which Query form appears using the Format menu, as well as
other screens. This is the starting point for using this program.
The History Form
Data Base
Diskette
Tape
The Format Menu
The selections in the Format menu let you design a report to your
specifications using one of several methods. You can also control the page
design and include headers and footers using this menu.
Query
This option displays the Query window (Figure 19-6), which is used to
designate specific selection criteria for a report. This is useful in limiting
the search of data to a very narrow scope, such as badges used in a specific
reader during a certain day, or Invalid Floor elevator access attempts.
NOTE
For more information on generating reports on floor access, see “Floor Tracking”
on page 22.22.
The window consists of radio buttons, toggle buttons, text fields, and
picklist buttons for various aspects of data you may wish to include in the
report. When you have specified your data, click Ok.
Depending on the history type currently selected in the Type menu
(alarm, badge, or operator), the Query window will vary. Use the Help
button on each of the windows for information on the various fields.
19.6
Picture Perfect 2.0 Administration Guide
History Reports
Figure 19-6.
19
Badge Query Window
Column
This option displays the Format Columns window (Figure 19-7), which is
used to designate specific columns (fields of information) to be included in
a report. After the desired columns have been selected from a picklist for
display in the report, you then specify which columns are to control the
sorting order of the data found, and whether that should be done in
ascending or descending order. You can also control the width of each
column on the report.
When you have specified your report information, click Ok.
History Reports
Depending on the history type currently selected in the Type menu
(alarm, badge, or operator), the All Columns picklist of the Columns
window will vary. Use the Help button on the window for additional
information on the various fields.
Picture Perfect 2.0 Administration Guide
19.7
The History Form
Figure 19-7.
Format Columns Window
All Columns
This picklist displays all fields of information in the History table for the
type (alarm, badge, or operator) of report being created. Select the desired
columns one at a time, and move them into the Display list by clicking the
Display button. Multiple selections can be made by holding the left mouse
button down and dragging.
Deselect All
If one or more undesired columns were selected in the All Columns list,
click Deselect All to clear them.
Display Button
After selecting one or more column names from the All Columns list, click
this button to move them into the Display list.
Display List
The Display box displays the columns that have been selected for the
report and controls the left-to-right order of their appearance. (The
column listed at the top will be at the far left of the report, and the column
listed at the bottom will be at the far right.)
Sort List
The Sort box displays the columns that will control the sorting order of the
data. In the All Columns list, select the column that is to control the
sorting order of the data, then click either the Sort Ascending or the Sort
Descending button. That column will then be listed in the Sort list. (The
sorting column does not have to be one of the displayed columns.) Repeat
this procedure with another column if you want a secondary sort, a
tertiary sort, etc. The order in which the columns are listed in this field
determines the sort priority of each (the first listed is the primary sort, the
second listed is the secondary sort, etc.).
19.8
Picture Perfect 2.0 Administration Guide
History Reports
19
Sort Ascending Button
Click this button to include a selected column on the All Columns list in
the sort, with data listed in ascending order (such as A through Z).
Sort Descending Button
Click this button to include a selected column on the All Columns list in
the sort, with data listed in descending order (such as Z through A).
Remove Buttons
Click this button to delete selected columns from the section above it.
Width/Header
These fields display the width and name of the column selected in the
Display list. If you want to change the width of a column on the report,
select that column in the Display list, then overtype the data in the Width
field. If you want to change the name of a column on the report, select that
column in the Display list, then overtype the data in the Header field.
Page
This option displays the Format Page window (Figure 19-8), which lets
you apply headers, footers, and spacing commands to the current report,
and control the use of detail and summary lines. After you have formatted
your page, click Ok.
History Reports
Figure 19-8.
Format Page Window
Header Blocks
The three text blocks across the top of the window represent three
different header sections on the report, as designated by the graphic
Picture Perfect 2.0 Administration Guide
19.9
The History Form
symbol above each. The first block is for flush-left text, the second is for
centered text, and the third is for flush-right text. Type text in each block,
or leave it blank. The header will appear on the report with the proper
justification.
Footer Blocks
The three text blocks across the bottom of the window represent three
different footer sections on the report, as designated by the graphic
symbol above each. The first block is for flush-left text, the second is for
centered text, and the third is for flush-right text. Type text in each block,
or leave it blank. The footer will appear on the report with the proper
justification.
Margins
Use the four text boxes in this area to specify the left, right, top, and
bottom margin settings of the report. The numbers used for the left and
right settings indicate number of characters, while the top and bottom
settings indicate number of lines.
Paper Width
Use the radio buttons in this area to specify both paper width and
compression of type. Select a paper width of either 80 or 132 characters
(based on the printer). Select whether the type will be Normal or
Compressed.
Detail Lines
The Detail Lines are the rows of data that are found for the report. Select
whether the report should Show or Hide these lines. If you want the
report condensed to only show the Summary Lines, set Detail Lines to
Hide and Summary Lines to Show.
Summary Lines
The Summary Lines are printed before or after related information on the
report. Select whether the report should Show or Hide these lines. If you
want the report condensed to only show the Summary Lines, set
Summary Lines to Show and Detail Lines to Hide.
NOTE
If both the Detail Lines and Summary Lines are set to Hide, the report will
appear blank.
Row Spacing
This controls the spacing of lines between the rows of data. If you want the
report single-spaced, set this to 0. If you want the report double-spaced,
set this to 1.
19.10
Picture Perfect 2.0 Administration Guide
History Reports
19
Column Spacing
This controls the spacing between the columns of data. Set this to the
number of blank characters you want to have dividing the columns.
Page Length
This field controls the number of lines allowed per page. Enter the desired
number.
1st Page #
This controls the beginning page number of the report when used with the
page-number variable command. Enter the desired number.
Summary
The Format Summary window (Figure 19-9) is only available if the history
Source is set to Database and at least one sort field is specified in the
Format Column window. It lets you select which sort fields to summarize
and how they should be formatted. When you have completed this
window, click Ok.
Figure 19-9.
Format Summary Window
The text blocks across the top and bottom of the window represent six
different placements for summary text on the report relative to the detail
lines, as designated by the graphic symbol above each. The three blocks
across the top will place the summary text above the detail lines, with the
first block using flush-left text, the second using centered text, and the
third using flush-right text. The three blocks across the bottom will place
the summary text below the detail lines, with the first block using flushleft text, the second using centered text, and the third using flush-right
Picture Perfect 2.0 Administration Guide
19.11
History Reports
Text Blocks
The History Form
text. Type text in each block, or leave it blank. The summary text will
appear on the report with the proper justification.
Summary By
A toggle button is assigned to each sort column of the report (up to eight).
Set this to On for each sort field that should have a summary created.
Repeat Column Headers
Toggle this button On if you want the column headers to be repeated just
before the summary lines (this is for summary lines above-detail only).
Detail Indent
Specify the number of characters the detail lines should indent from the
left margin of the report.
Summary Indent
Specify the number of characters the summary lines should indent from
the left margin of the report. (Applies only to flush-left summary text.)
Variables
The Variables picklist (Figure 19-10) displays variable fields that can be
pasted into the various text blocks of the Format windows, such as the
header and footer fields. These variables automatically calculate and
update specific information, such as page number, number of detail lines,
date, and time.
Figure 19-10.
Variables Picklist
To paste a variable command into a text block, open the desired window
and place the cursor in the desired text block. Open the Variables picklist
and select the desired variable. The variable will appear in the text block
where the cursor is located.
The variables can be combined with text. For example, to display “Page
Number X” (where X = the running page number of the report), you would
select the desired header or footer text block and type Page Number
{Page}, pasting in the {Page} variable command. You may also type
19.12
Picture Perfect 2.0 Administration Guide
History Reports
19
(rather than paste) the variable commands if you know the exact context of
the command you want. Remember to enclose it within braces: { }.
The Execution Menu
There are two selections in the Execution menu: Automatic or Manual. If you
select Automatic execution, each time you click the Apply or Ok button, the
report is run immediately and the changes are displayed. If you select Manual
execution, the report is not run until you click the Home icon button.
Use the Manual selection if you prefer to view the report after selecting all the
format and sort criteria.
The Font Menu
The Font menu has six Courier font sizes (8, 10, 12, 14, 18, and 24 points) to
select from for the onscreen display.
The Home Icon Button
The Home icon button executes the query and includes any database changes
made since the last query execution.
Example: At 10:00 AM, you load a daily badge report (formatted to include
daily transactions between 08:00 and 17:00). The query automatically executes
when you load the report and includes transactions between 08:00 and 10:00
AM.
You view the report using the page up/down buttons. Meanwhile, other
transactions occur. These will not appear in your report until you click the
Home button to re-execute the query and capture transactions that occurred
after the last query execution.
Up/Down Buttons
The Page Up and Page Down buttons are only available when they are not
“grayed out”. If the Page Down button is gray, this means you are currently
looking at the last page (you’re at the end). If the Page Up button is gray, this
means you are currently looking at the first page (you’re at the beginning).
Picture Perfect 2.0 Administration Guide
19.13
History Reports
The Page Up and Page Down buttons page forward or backward in the report
window one page (65 lines default) at a time.
Viewing a History Report
Viewing a History Report
! To view a History Report:
1. Select Reports, then History. The Badge History - New Report form
(Figure 19-1) appears.
2. Select the history type (Alarm, Badge, or Operator) from the radio button
list on the pull-down Type menu. The current form displays the default
selections for history type (badge) and for report function (new).
3. To define a new report, select New from the pull-down Report menu. To
open an existing report, select Open from the Report menu.
NOTE
If you open an existing report, the report is already formatted, so you can skip
the following formatting steps and just view the report. Or, you can reformat the
report (using the Format menu options), apply the new format criteria, and then
save the report under the existing name or a new name.
4. Select the history source (Database, Diskette, or Tape) from the radio
button list on the pull-down Source menu.
Use the Format forms to define and save selection criteria and layout. Use
either the Ok or the Apply button (in each Format form) to save your
changes. (The Ok button closes the window.)
5. Select the Query function from the Format menu and define the report
parameters. The query date and time ranges can be set for either a daily
range (time range each day) or a continuous range (24 hours a day). A
daily range repeats each day of the selected date range and runs between a
daily start and end time. A continuous range continues from the start
date/time through the end date/time and runs 24 hours a day.
NOTE
Click either Ok or Apply to save your selection criteria.
To enter a variable such as {Date}, {Date-n}, {Time}, or {Time-n}, first position
the cursor in the text entry field, then select a variable from the Variables
picklist (Format menu), and highlight a variable from the picklist. The selected
variable will appear in the text field.
6. Select the Column function from the Format menu and select column
headers from a picklist. Each selection criterion in the Query form is
available as a column header.
Selected column headers appear in the Display box. To change the default
19.14
Picture Perfect 2.0 Administration Guide
History Reports
19
width and the header name for a column header, select (highlight) the
column header and then use the text cursor to change the defaults in the
Width and Header fields. To erase a selected column, first highlight it and
then click Remove. Click either Ok or Apply to save your changes.
7. Optional: select up to eight sort criteria from the Columns picklist (Format
Columns). First, highlight a selection in the All Columns picklist, then
click Sort Ascending or Sort Descending, and your sort criterion appears
in the Sort window. Specify ascending or descending order for each sort
criterion that you select. For example, you can sort by descending date
and time and by ascending last name. Click either Ok or Apply to save
your sort criteria. A report Summary is available on reports that include
one or more sort fields.
8. Select the Page function from the Format menu, type header/footer lines
in three available page positions (left, center, and right), and select to show
or hide summary and detail lines. To create a blank line between the
headers and the detail lines, position the text cursor at the end of the last
line and press Enter . The text cursor appears on the next line. Click either
Ok or Apply to save your page format.
9. Optional: Select the Summary function from the Format menu, select one
or more summary fields from an option menu (which includes all selected
sort fields), and then define summary and detail-line indentions. Data
may appear as nested summaries. You can select variables for summary
lines.
NOTE
Select the Variables function (Format menu) to apply a variable to a summary line.
First position the cursor on the summary line and then select a variable from the picklist.
The {Summary Count} variable works only as a footer, not as a header. The
{Summary Field} variable is the value of the selected summary field at each step.
11. To save a new report, click Save As on the Query menu and type a report
name. To save an existing report that you have reformatted, click Save. To
save a reformatted report under a new name, click Save As and type the
new name. (The old report still exists.)
To view the remainder of the page, use the scroll bar. To page forward, press
the Page Down button. To re-execute the report and return to the first page,
press the Home button.
Picture Perfect 2.0 Administration Guide
19.15
History Reports
10. Optional: Select the Font menu and select a Courier font size (8, 10, 12, 14,
18, or 24 points) for viewing the on-screen report. (This is not a print
function.)
Printing a History Report
Printing a History Report
! To Print a History Report:
1. Select Reports, then History. The Badge History - New Report form
(Figure 19-1) appears.
2. Select the history type (Alarm, Badge, or Operator) from the radio button
list on the pull-down Type menu. The current form displays the default
selections for history type (badge) and for report function (new).
3. To print an existing report, select Open from the Report menu, select the
report name from a picklist, and then select Print. To print a new report
that you are currently viewing, select Print.
NOTE
You can print a new report without saving the report.
To save time when printing a long report, set Execution to Manual before
opening the report. This setting is also preferred when reading data from a tape.
Saving a History Report
To save a new report, select Save As on the Report menu and type a report
name. To save an existing report that you have reformatted, click Save. To
save a reformatted report under a new name, click Save As and type the new
name (the old report still exists with its old name).
The Save functions on the Report menu do not save the selected format
criteria unless the criteria is already applied using the Ok or Apply functions
on each Format form.
Scheduling a History Report
If there are certain history reports that you want to run at specific times, you
can use the scheduling feature to run these automatically. The scheduled
report will follow the day and time settings specified on the Report Events
form (Figure 19-11).
All error messages and completion messages generated as a result of the
scheduled report process are written to a log file in the /cas/log directory
called log.mmdd where mmdd = system date (example: log.0302=March
2nd). You must check the log file for messages after the scheduled report
process has executed, since there are no pop-up window messages associated
with this feature.
This scheduling feature can be used for both History and SQL reports, and
they can be run together or separately. Each report type will have a prefix in
the log file to indicate its execution. History reports will have a prefix of hist,
and SQL reports will have a prefix of ppsql.
19.16
Picture Perfect 2.0 Administration Guide
History Reports
19
Setup
! To schedule a History Report:
1. Define your query and report format through the History form (Figure 191), and save it under the desired name.
2. Select Schedule, then Report Events to display the Report Events form.
3. Type the description of this report.
4. Enter the time this report is to run, and select the days on which it is to
run.
5. Click the History Report button to display a picklist of history reports.
Select the desired report, then click Close.
The Report Events Form
History Reports
Figure 19-11.
Report Events Form - History
Picture Perfect 2.0 Administration Guide
19.17
Scheduling a History Report
Definition
Type the description of this report.
Time
Enter the time this report is to run, and select the days on which it is to
run.
Facility
Click the Facility button to display the facilities picklist. Selecting a facility
will allow the administrator to restrict operator access to those records in a
specific facility. For more information, see Chapter 5 - Facilities and
Facility Profiles.
Report Type
If Enforcement of Report Permission is enabled through the Control/
Parameters form, only those reports that the operator has permission to
access will be displayed.
Ppsql Report
Displays a picklist of SQL reports.
History Report
Displays a picklist of history reports.
Printer
Click to display a picklist of printers.
19.18
Picture Perfect 2.0 Administration Guide
SQL Reports
Chapter
20
SQL Reports
Overview
This chapter introduces you to Structured Query Language (SQL) and
describes the SQL form’s pull-down menus, scrolling windows, pop-up
picklists, and buttons.
This chapter shows you how to generate a typical badge report using the
SQL form and SQL statements. To get acquainted with SQL statements,
read “SQL Clauses” on page 20.14 in this chapter.
If you are not familiar with SQL, use an SQL reference book or select one
of the pre-loaded reports. You can open one of the pre-loaded reports and
examine the SQL statements so that you can build your own SQL
statement for a report. Or, you can open an existing report, save it under a
new title, and modify the SQL statement to build a new report.
Prerequisites
Use an SQL reference book to create your SQL statements. Use standard
ANSI syntax:
SELECT column_name, column_name FROM table_name
The following Picture Perfect forms are prerequisites:
Forms
Purpose
PRINTER
To produce hard copy of report statements or report results.
PERMISSIONS
To give operator permission to create, update or delete a report from the
database.
What You Will Be Doing
This chapter shows you how to use the SQL form to open, save, delete,
and print report data selected and sorted using SQL statements, and how
to schedule SQL reports.
Structured Query Language
The SQL form provides an interface to the online Picture Perfect database,
so you can use ANSI standard SQL select statements to query the database
Picture Perfect 2.0 Administration Guide
20.1
The SQL Form
and generate reports. The SQL query function allows unlimited selection
criteria and up to eight sort criteria, whereas the query function in the History
form allows selected data to be sorted on a maximum of eight selection
criteria. The relational database allows a query to join separate database tables
into one report.
To optimize complex queries used for reporting and decision making, Picture
Perfect uses IBM’s Informix Dynamic Server, a Relational Database
Management System (RDBMS) designed to run on a wide range of Unix-like
operating systems in stand-alone or networked environments. Informix
optimizes the processing of large databases that are shared by many
concurrent users. Some advantages of Informix file management are:
•
The operating system does not limit the number of tables used at one time.
For example, the SQL form lets you select data from all Picture Perfect
database tables for a single report.
•
The size of a database table is not limited, except by disk size.
Use any SQL reference book to learn how to create SQL statements. This
chapter shows you one example of a SELECT clause, a FROM clause, a
WHERE clause, and an ORDER BY clause used to generate a typical badge
report. See “Creating a Badge Report” on page 20.10.
The SQL Form
The SQL form (Figure 20-1) is a workspace for specifying and displaying
various reports. Select Reports, then SQL to display the SQL form.
Figure 20-1.
20.2
SQL Form
Picture Perfect 2.0 Administration Guide
SQL Reports
20
At the top of the SQL form is a menu bar with pull-down menus for
Reports and SQL Syntax, as well as a menu for on-screen Help. Below the
menu bar is a scrolling text window where you type the SQL statements.
Below that window is another scrolling window where the report will
display if sent to the screen.
SQL Reports
When you finish creating the SQL statements, you can either print the
report immediately or you can view the report before you print it. To print
the report, select Print from the pull-down Reports menu. To view the
selected data in the report window, click the Execute Select button.
Execute Select
Click this button to generate the report, which will then appear in the
scrolling window at the bottom of the form.
There is no limit on the amount of data returned by the select
statement, and the bottom right of the window shows how many data
records are in the report. When there are more than 1000 rows, it also
shows you the current page and the total number of pages. If there are
more than 1000 rows found, the first 1000 can be viewed using the
scroll bars; press the Next Page button to see more. To view the
previous 1000 rows, press Prev Page. Press the Go to Page button to
access a particular page.
Report Permission Group
Click this button to display all of the defined report permission groups
that the operator may associate to the report. The current report
permission group that the report is assigned to will be displayed next
to the button. These two items will be displayed only if enforcement of
report permissions is enabled through the Control/Parameters form.
Otherwise the report will be assigned to the special report permission
group, No Report Perm Group.
NOTE
By default, all reports existing prior to Picture Perfect 1.7 are assigned the
permission group No Report Perm Group. Only operators with All Groups
Allowed report permission will be able to access these reports and assign new
report permission groups to them.
To display a pull-down menu of the menu bar, left-click on the menu
name and hold down the mouse button. To select an option, drag the
mouse to the desired option and then release the button. The next section
Picture Perfect 2.0 Administration Guide
20.3
The SQL Form
explains the two pull-down menus
.
NOTE
The phrase “current report” means the report that is currently displayed on your
screen.
The Reports Menu
The pull-down Reports menu has ten selections. Each selection is
explained below.
New
Clears the form so you can create a new report.
Open
Displays the Open Report picklist (Figure 20-2) from which you can
open a predefined report. Select the desired report, then click Apply.
Click Ok to exit the window.
Figure 20-2.
NOTE
Open Report Picklist - SQL
If report permissions are enabled, only the reports that the operator has access
to will be displayed.
Save
Saves the current report with the existing title and current changes.
20.4
Picture Perfect 2.0 Administration Guide
SQL Reports
20
Save As
Allows you to save the current report under a different name, with the
original report still existing under the previous name. The Save
Report Query As window (Figure 20-3) will appear. Type a new name
for the current report, then click Ok to save it and exit the window.
SQL Reports
Figure 20-3.
Save Report Query As Window
Delete
Displays the Delete Report picklist (Figure 20-4) so you can delete an
existing report. Select the desired report, then click Delete. Click Ok to
exit the window. This option appears only if you have operator
permission to delete.
NOTE
If report permissions are enabled, only the reports that the operator has access
to will be displayed.
Picture Perfect 2.0 Administration Guide
20.5
The SQL Form
Figure 20-4.
Delete Report Picklist - SQL
Page Setup
Displays the Page Setup window (Figure 20-5) to specify a unique title
and an optional header and/or footer. If you want to save this report, a
title is required. The optional header prints at the top right; the footer
prints in front of the page number at the bottom. Click Ok.
Figure 20-5.
Page Setup Window - SQL
Print
Allows you to print the entire report. The Print Report window
(Figure 20-6) will appear for specifications. When you are ready to
print, click Print. To view the report before you print it, click Execute
Select on the SQL window.
20.6
Picture Perfect 2.0 Administration Guide
SQL Reports
SQL Reports
Figure 20-6.
20
Print Report Window
Paper Width
Use the radio buttons in this area to specify both paper width and type
compression. Select a paper width of either 80 or 132 characters (based
on the printer). Select whether the type will be normal or compressed.
Select A Printer
Select the printer to which this report should be sent.
Print Only to File
Toggle this button On and type a file name if you want to save it as a
file rather than send it to a printer. Use a full pathname, such as
/tmp/readers.0407.
Print SQL
Allows you to print only the SQL statement that currently appears in
the SQL window. The Print SQL Statement window (which looks just
like the Print Report window) will appear for specifications. When
you are ready to print, click Print.
Paper Width
Use the radio buttons in this area to specify both paper width and type
compression. Select a paper width of either 80 or 132 characters (based
on the printer). Select whether the type will be normal or compressed.
Select A Printer
Select the printer to which this report should be sent.
Print Only to File
Toggle this button On and type a file name if you want to save it as a
file rather than send it to a printer. Use a full pathname, such as
/tmp/foo.sql
Picture Perfect 2.0 Administration Guide
20.7
The SQL Form
Quit
Exits the SQL form.
The SQL Syntax Menu
This pull-down menu is used to build SQL query statements by selecting
and applying SQL names, database table names, and column names inside
the SQL window. The pull-down SQL Syntax menu has three selections.
SQL Names
This option displays the SQL Names picklist of SQL reserve words
(Figure 20-7), relational operators, and logical operators which you
select and apply to an SQL statement. When you select a name and
click Apply, the name appears wherever your cursor is located in the
SQL window.
Figure 20-7.
SQL Names Picklist
Table Names
This option displays the Table Names picklist (Figure 20-8). Select and
apply table names to SQL statements after FROM. This picklist
includes all the table names in the Picture Perfect database, and each
contains different types of data that you may want to include in your
report. When you select a table name and click Apply, the name
appears wherever your cursor is located in the SQL window.
Column Names
When you select a table name from the Table Names picklist and then
click the Columns button, the Column Names picklist (Figure 20-8)
20.8
Picture Perfect 2.0 Administration Guide
SQL Reports
20
appears with all the column names included in that database table.
When you select a column name and click Apply, the name appears
wherever your cursor is located in the SQL window.
For details on using the Columns picklist to create an SQL select
statement, see “SQL Clauses” on page 20.14.
SQL Reports
Figure 20-8.
Table Names and Column Names Picklists
Using a Pre-loaded Report
Instead of building a custom report, you can execute a “pre-loaded” report
that is already defined. Figure 20-9 shows an example of a pre-loaded SQL
report.
Picture Perfect 2.0 Administration Guide
20.9
Creating a Badge Report
Figure 20-9.
Example of a Pre-Loaded SQL Report
! To execute a pre-loaded report:
1. Select Reports, then SQL.
2. Select Open from the pull-down Reports menu.
3. Select the desired report title in the Open Report picklist, then click
Ok.
4. Click Execute Select to execute the query statement that appears in the
SQL window and display the data on screen.
5. To print the report, select Print from the Reports menu, choose a
printer from the picklist, then click Ok to print the report.
Creating a Badge Report
Although the following directions are specific to the badge table, a user
who is unfamiliar with how to write SQL statements can learn how to use
the SQL form to write a typical SQL select statement, save the report, and
print the report.
See “The SQL Syntax Menu” on page 20.8 for information on displaying
the Table Names and Columns picklists, and how to apply these to an SQL
statement.
20.10
Picture Perfect 2.0 Administration Guide
SQL Reports
20
! To generate a badge report:
1. Select Reports, then SQL.
2. Select New from the pull-down Reports menu to clear the SQL form.
SQL Reports
3. Enter the following SQL reserved words in the SQL window to form
the beginning of each SQL clause. Use all caps to differentiate the
reserved words from the rest of the clause. Only the SELECT clause
and the FROM clause are required. WHERE and ORDER BY are
optional.
SELECT
FROM
WHERE
ORDER BY
Instead of typing these names, you can use SQL Names (on the SQL
Syntax menu) for a picklist from which you can select and apply
words to the SQL statement window.
For a brief explanation of each of the SQL reserved words, read “SQL
Clauses” on page 20.14.
4. Select and apply column names from the badge table and department
table to create the following SELECT clause. Follow the three steps
listed below. When joining multiple tables, use table indicators for
column names. In the following SQL statement, “department.”
indicates that description comes from the department table. The
statement does not include table indicators for column names from the
badge table.
SELECT last_name, first_name,
department.description, issue_date
•
Select badge from the Table Names picklist, then click the
Columns button. Select and apply last_name, first_name,
issue_date from the Badge Column Names picklist, and type a
comma after each column name except the last name in the clause.
•
Select department from the Table Names picklist, then click the
Columns button. Select and apply description from the
Department Column Names picklist, inserting it in front of
issue_date with a comma after it.
•
Type department. in front of description to indicate the
database table, because you are joining multiple tables. Column
names selected from the first table (listed under FROM) do not
Picture Perfect 2.0 Administration Guide
20.11
Creating a Badge Report
require a table indicator unless an identical column name appears
in a table that you are joining.
When you click Apply in the Columns picklist, the selected name
appears after the text cursor in the SQL window. Type a comma after
the applied column name before you select and apply another column
name; do not type a comma after the last column name in the clause.
One or more spaces inserted before and after the comma do not affect
the SQL statement.
5. The FROM clause specifies the tables where the selected column
names are located. Type a comma to separate the table names. Select
and apply badge and department from the Table Names picklist to
create the following FROM clause:
FROM badge, department
6. The WHERE clause limits the search of data to certain criteria within
the specified tables and columns. Select and apply the appropriate
table and column names from the picklists to create the following
WHERE clause:
WHERE badge.dept = department.id AND
department.description = "Test Department"
This WHERE clause retrieves only that badge data belonging to the
Test Department.
The WHERE clause sets conditions on the select statement and uses
logical and relational operators to limit the range of data. See “Logical
Operators” on page 20.16 and “Relational Operators” on page 20.17
for information on using operators (such as the equal sign =, the quote
sign ", the connector AND) in an SQL statement.
7. The ORDER BY clause specifies how the report sorts and sequences
the selected data. Select and apply column names from the
Department Column Names picklist to create the following ORDER
BY clause:
ORDER BY last_name
This report sorts the rows by last name. Ascending alphabetical order
is the default. To specify descending, use DESC, a reserve SQL name.
NOTE
20.12
SQL syntax does not accept DESC as an abbreviation for DESCRIPTION
because it is one of the reserve SQL names. Remember this rule when you are
customizing the column headings for the report title bar, next.
Picture Perfect 2.0 Administration Guide
SQL Reports
20
8. To customize the column headings, modify the SELECT clause in the
SQL window. Before you change the headings, your SELECT clause is:
SELECT last_name, first_name,
department.description, issue_date
This SELECT statement makes the following headings in the report
title bar:
FIRST_NAME
DESCRIPTION
ISSUE_DATE
To change a column heading, insert a space and the new column name
(no spaces) after the SQL name. Use an underscore instead of a space
between words; for example, type Dept_Description after
description.
SELECT last_name, first_name,
department.description Dept_Description, issue_date
Click Execute Select. The new heading appears in the report title bar,
and the selected data appears under the corresponding column
headings:
LAST_NAME
FIRST_NAME
DEPT_DESCRIPTIONISSUE_DATE
9. Select Save As from the pull-down Reports menu, type the name of
the report, and click Ok.
Picture Perfect 2.0 Administration Guide
20.13
SQL Reports
LAST_NAME
SQL Clauses
SQL Clauses
In an SQL select statement, only the SELECT clause and the FROM clause
are required. The other clauses are optional.
SQL is case sensitive. For example, if you specify %Door%, the query finds
anything with the word Door in initial caps, but does not find the word
DOOR in all caps. To include both:
WHERE description = "%Door%" OR "%DOOR%"
The SQL database stores information in tables. A table is a collection of
information organized into columns and rows. Each table contains one or
more columns. A column contains one specific type of information, such
as last_name. Each row contains all the data about one of the records the
table describes. A row contains one or more columns. In your SQL select
statement, the SELECT clause limits the columns and the WHERE clause
limits the rows.
You can create direct relationships between tables when you query a
database to generate a report. The report displays data from several
different tables as if the data belongs to a single table.
See “Logical Operators” on page 20.16 and “Relational Operators” on
page 20.17 for information on describing relations between two values.
SELECT
Use the SELECT clause to find data from selected columns in a table.
The report retrieves columns of data and lists the data under each
column heading in the report. The sequence of column names in the
SELECT clause determines the sequence of column headings on the
report title bar.
FROM
Use the FROM clause to name the tables where the selected data is
located. You can include (join) multiple database tables.
For example, the following (unfinished) SQL select statement retrieves
data from the category, badge, and department tables. Notice that each
column name in the SELECT clause has a table indicator. If there is
more than one table, identify each column name with the table name,
since identical column names that belong to different tables cause an
ambiguous error.
SELECT badge.last_name, category.description,
department.description FROM badge, department, category
The above SQL statement is unfinished because it requires a WHERE
clause. The WHERE clause is discussed next.
20.14
Picture Perfect 2.0 Administration Guide
SQL Reports
NOTE
20
When selecting columns with the same name from multiple tables, make sure to
specify the display label. For example:
SELECT reader.description reader, area.description area FROM reader, area
WHERE
When your search conditions include a column name, a relational
operator, and a value, enclose character values in quotation marks.
For example, the following SQL select statement retrieves reader
descriptions from the reader table that match only the Cafeteria Reader
description:
SELECT description FROM reader WHERE
description = "Cafeteria Reader"
ORDER BY
Use the ORDER BY clause to sort the ROWS FOUND (data records
returned). The report can sort by any column name; however, it is
faster to order by columns that are indexed, such as last_name and
description.
If the SQL statement does not specify the sorting order, Informix-Sql
creates an index in ascending order: that is: A to Z for character fields;
low to high for number and money fields; from earlier to later in time
and date fields; and from smallest time span to largest time span for
interval fields.
For example, the following SQL select statement retrieves data from
the reader table that matches all reader descriptions, which appear in
ascending alphabetical order.
SELECT description FROM reader ORDER BY description
LIKE
Use LIKE after a column name to specify a value or pattern that data
must match in order to be found.
Characters typically used in a LIKE string are:
Picture Perfect 2.0 Administration Guide
20.15
SQL Reports
Use the WHERE clause to set conditions on the select statement so that
the query finds only selected (not all) rows in a table. The WHERE
clause describes acceptable values for one or more columns. Use
relational operators after the WHERE keyword, followed by search
conditions or descriptions of the rows you want to find. See
“Relational Operators” on page 20.17.
Logical Operators
%
A percent character matches zero or more characters.
_
An underscore character matches any single character.
The following SQL select statement retrieves a list of reader
descriptions from the reader table where the reader description starts
with the characters Lob and ends with zero or more unspecified
characters.
SELECT description FROM reader WHERE description LIKE "Lob%"
The following SQL select statement retrieves a list of reader
descriptions from the reader table where the reader description
contains the word Door or DOOR anywhere in the description.
SELECT description FROM reader WHERE description LIKE "%Door%"
OR "%DOOR%"
Logical Operators
Use AND, OR, and NOT to connect one or more search conditions that
create a comparison condition.
AND
Use AND to retrieve data that matches both of the values connected by
AND.
The following SQL comparison statement retrieves each reader
described as Engineering Reader and also has a set interval time of less
than 5 seconds.
SELECT description FROM reader WHERE description =
"Engineering Reader" AND Interval_Time < 5
OR
Use OR to retrieve data that matches either one of the values
connected by OR.
The following SQL comparison statement retrieves reader descriptions
that match either Lobby Reader or Cafeteria Reader:
SELECT description FROM reader WHERE description = “Lobby
Reader” OR description = “Cafeteria Reader”
NOT IN
Use NOT IN to screen out data that you do not want in the report.
20.16
Picture Perfect 2.0 Administration Guide
SQL Reports
20
For example, the following SQL comparison statement retrieves all
reader descriptions except those described as Engineering or
Antipassback.
SELECT description FROM reader WHERE description NOT IN
(“Engineering”, “Antipassback Reader”)
Relational Operators
NOTE
=
Equal to
< >
Not equal to
!=
Not equal to
>
Greater than
<
Less than
>=
Greater than or equal to
<=
Less than or equal to
SQL Reports
Relational operators describe a relationship between two values. Use the
following characters as relational operators in a WHERE clause:
Do not use the “pipe” symbol (|) in an SQL statement.
For example, the following SQL select statement retrieves data for
employees with last names that start with the letter A or above and also
start with letters below G; in other words, last names that start with the
letters A through F:
SELECT last_name, employee, FROM badge WHERE last_name >= “A”
AND last_name < “G”
Table 20-1: Data Type Relational Operators
Data Type
Greater Than (>)
Means
Less Than (<)
Means
DATE
Later in date
Earlier in date
TIME
Later in time
Earlier in time
INTERVAL
Longer span of time
Shorter span of time
CHAR
Later in the alphabet
Earlier in the alphabet
Picture Perfect 2.0 Administration Guide
20.17
SQL Variables
SQL Variables
Variables may be embedded directly into the SQL syntax by enclosing the
variable inside brackets { }. It is up to the operator to put double quotes
outside the variable as needed for character fields. The variable will be
detected when the operator clicks the Execute Select button, and the
Variable window will pop up. When the operator fills in the desired value
and clicks Ok, the report is executed. The value is then substituted in place
of the variable. SQL supports a maximum of ten variables in the SQL
select statement. If there are no variables detected, the Report Variables
window will not pop up.
Figure 20-10 shows the SQL syntax for embedded variables.
NOTE
Multiple words with spaces for substitution variables cannot be supported for
column descriptions. SQL leaves it up to the operator to make the decision
regarding the choice of variables and their textual descriptions.
The Schedule Reports feature will not support variables. An audit routine
that detects variables in the Schedule Reports form prevents reports from
being scheduled if they contain variables.
Figure 20-10.
20.18
SQL Syntax for Embedded Variables
Picture Perfect 2.0 Administration Guide
SQL Reports
20
Break Variables
A break causes SQL to perform some action such as printing a blank line
or performing a page eject. There are two variables that can be used to
activate this feature. They should be placed at the end of the SQL Select
statement.
The syntax is as follows:
LINEBREAK <column number in the select statement>
This causes a break, which is a blank line, to be printed each time there is a
change in the value of the column identified by the <column number in
the select statement>. You should always use ORDER BY <column
number in the select statement> before issuing a linebreak. This will make
the linebreaks occur at meaningful places. Figure 20-11 shows an example
of a linebreak.
Figure 20-11.
Example of Linebreak
Picture Perfect 2.0 Administration Guide
20.19
SQL Reports
LINEBREAK
Break Variables
PAGEBREAK
The syntax is as follows:
PAGEBREAK <column number in the select statement>
This causes a page break, which is a page eject, to be issued each time
there is a change in the value of the column identified by the <column
number in the select statement>. You should always use ORDER BY
<column number in the select statement> before issuing a pagebreak. This
will make the pagebreaks occur at meaningful places. Figure 20-12 shows
an example of a pagebreak.
Figure 20-12.
Example of Pagebreak
Using Pagebreak <column number> within SQL to
the X-Window
This will simulate a page eject by printing
data........
---page--data......
20.20
Picture Perfect 2.0 Administration Guide
SQL Reports
20
within the SQL X Window list.
Using Pagebreak <column number> within SQL to
the printer
This will issue a full page eject when there is a change in the value of the
column.
SQL Reports
Badge Table Values
The badge table contains status and antipassback values represented by
numbers (Table 20-2). The report data for these values appears in
numbers, not text, in the report window.
Table 20-2: Badge Table Values
Value
Badge Status
Value
Antipassback Status
1
Permanent
1
Neutral
2
Temporary
2
In
3
Out
4
Privileged
Flags Column Values
In a database table, each column name with a name flag has a different
meaning based on the value of the Flags column (Table 20-3). The report
Picture Perfect 2.0 Administration Guide
20.21
Flags Column Values
data for these meanings appear in numbers, not text, in the report
window.
Table 20-3: Flags Column Values
Table
20.22
Flag Column
Value
Meaning
Alarm
0x01
0x02
0x04
0x08
0x10
0x20
0x40
Monitor the Alarm
Alarm Online
Ignore Schedule Changes
Auto Reset of Outputs
Manual Reset of Outputs
Duration Reset of Outputs
Immediate Reset of Input
Area
0x01
0x02
0x04
0x08
0x10
0x20
Online
Area Enabled
Enable Shunting
Inhibit Schedule Changes
APB Enforcement - Passive
Two Man Rule
Door
0x01
0x02
0x04
0x08
0x10
0x20
0x40
Unlock Door
Schedule Inhibit
Sensing Enabled
Monitoring Enabled
Exit Button Enabled
Pre-Alarm Enabled
Keypad Alarm Response
Enabled
Inputs
0x01
0x02
0x04
0x10
0x20
0x40
Normally Closed
Input Enabled
Elevator input
Notify on Any State Change
Notify Only when Off to On
Notify Only when On to Off
Input Group
0x00
0x01
0x02
0x04
0x08
0x10
Trigger on any Input
Trigger on all Inputs
Enable Input Group
Ground Condition Action
Short Condition Action
Broadcast Input State Changes
Picture Perfect 2.0 Administration Guide
SQL Reports
20
Table 20-3: Flags Column Values (Continued)
Table
Flag Column
Value
Meaning
0x01
0x02
0x04
0x08
Normally Open
Enable Output
Reset On Duration
Reset On Input
Reader
0x01
0x02
0x04
0x08
0x10
0x20
0x40
Reader Online
Enable Reader
Enable Shunting
Inhibit Schedule Changes
Toggle Reader
Limited Usage
Elevator Reader
SQL Reports
Output
Scheduling an SQL Report
If there are certain SQL reports that you want to run at specific times, you
can use the scheduling feature to run these automatically. The scheduled
report will follow the day and time settings specified on the Report Events
form (Figure 20-13).
NOTE
A report that contains variables cannot be scheduled.
All error messages and completion messages generated as a result of the
scheduled report process will be written to a log file in the /cas/log
directory called log.mmdd where mmdd = system date (example:
log.0302=March 2nd). You must check the log file for messages after the
scheduled report process has executed, since there are no pop-up window
messages associated with this feature.
This scheduling feature can be used for both History and SQL reports,
and they can be run together or separately. Each report type will have a
prefix in the log file to indicate its execution. History reports will have a
prefix of hist, and SQL reports will have a prefix of ppsql.
Setup
! To schedule an SQL Report:
1. Define your report through the SQL form, and save it under the
desired name.
Picture Perfect 2.0 Administration Guide
20.23
Scheduling an SQL Report
2. Select Schedule, then Report Events to display the Report Events
form.
3. Type the description of this report.
4. Enter the time this report is to run, and select the days on which it is to
run.
5. Click the Ppsql button to display a picklist of SQL Reports. If
Enforcement of Report Permission is enabled through the Control/
Parameters form, only those reports that the operator has permission
to access will be displayed. Select the desired report, then click Close.
NOTE
A History report may also be selected to run at the same time and to the same
printer.
6. Click the Printer button to display a picklist of printers. Select the
printer where this report should print, then click Close. (Remember to
consider the width specifications of the report when choosing a
printer.)
7. Click Save.
20.24
Picture Perfect 2.0 Administration Guide
SQL Reports
20
The History Report Form
SQL Reports
Figure 20-13.
Report Events Form - History
Definition
Type the description of this report.
Time
Enter the time this report is to run, and select the days on which it is to
run.
Facility
Click the Facility button to display the facilities picklist. Selecting a
facility will allow the administrator to restrict operator access to those
records in a specific facility. For more information, see Chapter 5 Facilities and Facility Profiles.
Picture Perfect 2.0 Administration Guide
20.25
Scheduling an SQL Report
Report Type
If Enforcement of Report Permission is enabled through the Control/
Parameters form, only those reports that the operator has permission
to access will be displayed.
Ppsql Report
Displays a picklist of SQL reports.
History Report
Displays a picklist of history reports.
Printer
Click to display a picklist of printers.
20.26
Picture Perfect 2.0 Administration Guide
Two Man Rule and Modified
Two Man Rule
Chapter
21
Overview
Some high security areas, such as banks, may require that a minimum of
two people occupy an area. Picture Perfect has the ability to control
occupancy in an area by placing the area in Two Man Rule (2MR) or
Modified Two Man Rule (M2MR) mode and then monitoring the count
of badge holders that enter and exit the area. This type of area control can
be set up through the Areas form or an area event can be scheduled for a
specific time through the Area Events form.
Prerequisites
The following Picture Perfect forms are prerequisites:
Forms
Purpose
PERMISSIONS
To assign Occupancy Control Permission
READERS
To set up the area’s readers
DOORS
To set up the area’s doors
AREAS
• To enable Occupancy Counting
• To select the type of Two Man Rule
enforcement to be used
• (M2MR only) To assign an M2MR
category to the area.
CATEGORIES
(M2MR only)
To define M2MR Category Types
BADGES
(M2MR only)
To assign M2MR Category Types
Picture Perfect 2.0 Administration Guide
21.1
Two Man Rule and
Modified Two Man Rule
The standard Two Man Rule (2MR), when enabled, requires that at least
two authorized badge holders occupy a controlled space at the same time.
The Modified Two Man Rule (M2MR), when enabled, further restricts
access to controlled areas based on specific M2MR category types. See
Table 21-1, “Badge Transactions for Occupancy Counting and Two Man
Rule Features at the end of this chapter.
Occupancy Control
Occupancy Control
Picture Perfect allows the number of persons in a controlled space to be
monitored by enabling Occupancy Control through the Areas form. This
option is used when the number of people in an area must be controlled,
for example fire code enforcement regulations or when Two Man Rule is
enforced. The occupancy count is set to zero and Picture Perfect updates
the occupancy count when a valid entry or exit to/from the area occurs.
When using Occupancy Control with the Two Man Rule feature, the
following restrictions apply:
NOTE
•
Occupancy Count must be enabled and the count must be zero in
order to enable Two Man Rule.
•
If Two Man Rule is enabled, Occupancy Count cannot be disabled.
An error message will display and you will not be allowed to save the
record.
•
If Standard Two Man Rule or Modified Two Man Rule is enabled
and the occupancy count is greater than zero, Two Man Rule can be
disabled, but you cannot switch to another Two Man Rule state. For
example, if the area is set up as 2MR and the occupancy count is 2, you
cannot change the area to M2MR with Door Control. Instead you
must disable 2MR, reset the occupancy count to zero, and then enable
M2MR with Door Control.
Areas with Occupancy Counting enabled cannot span micros. All readers and
doors must be physically connected to the same micro.
How to set up Occupancy Control
! To set up the area readers:
1. From the Main menu, select Devices, Readers.
2. From the toolbar, click on Find to locate the reader record you wish to
set up.
3. Under Logical Reader Function, enable the appropriate radio button:
APB In, APB Out, T&A In, or T&A Out.
21.2
Picture Perfect 2.0 Administration Guide
Two Man Rule and Modified Two Man Rule
NOTE
21
In an area with Occupancy Control enabled:
• All readers in the area must be assigned one of these logical functions: APB In,
APB Out, T&A In, or T&A Out.
• APB readers must be set to Global. Timed APB is not allowed.
• The logical reader function T&A In/Out is NOT allowed for any reader.
4. Under Set Micro, verify that all readers in the area are assigned to the
same micro.
5. Under Reader Control, Number of Badges, verify that all readers are
set to Single.
6. Save and exit the Readers form.
! To set up the area doors:
NOTE
Two Man Rule and
Modified Two Man Rule
The door sensor input and the door output must be physically connected to the
same micro.
1. From the Main menu, select Devices, Doors.
2. From the toolbar, click on Find the door record you wish to set up.
3. Under Inputs, click on Door Sensor.
4. Select the appropriate input from the list displayed.
5. Save and exit the Doors form.
Picture Perfect 2.0 Administration Guide
21.3
Two Man Rule (2MR)
! To enable Occupancy Counting for the Area:
NOTE
In order to perform this function, you must have Occupancy Control permission.
1. From the Main menu, select Access, Areas.
2. From the toolbar, click on Find to locate the area record you wish to set
up.
3. Under Occupancy Control, enable the Occupancy Counting radio
button.
4. Save and exit the Areas form.
Two Man Rule (2MR)
The standard two man rule requires that at least two authorized badge
holders occupy a controlled space at the same time. Two man rule can
only be enabled if the operator has been granted Occupancy Control
permission through the Permissions form, and Occupancy Counting has
been enabled through the Areas form.
If desired, a digital output (DO) such as a blinking light can be activated
on the reader following the first badge swipe, to alert the badge holder
that a second badge swipe is required before access will be granted. This is
an optional feature available by selecting 2MR Output from the Readers
form.
Modified Two Man Rule (M2MR)
The modified two man rule further restricts access to a controlled area
based on the badge holders M2MR Category Type. Additionally, a Door
Control option can be enforced which, after access has been granted to the
first two badge holders, requires a door release button to be pressed before
access is granted to any subsequent badge holders.
M2MR Category Type
There are three M2MR Category Types assigned through the Categories
form:
•
21.4
None
Access to an M2MR controlled area will not be permitted while
Picture Perfect 2.0 Administration Guide
Two Man Rule and Modified Two Man Rule
21
M2MR control is enabled. By default, any existing or new categories
are assigned this category type.
•
Guest
A Guest is not allowed entry to an M2MR controlled area unless two
(2) Team Members are already present in the area.
•
Team Member
If the M2MR controlled area is empty, a Team Member is allowed
entry only with a second Team Member. Additional Team Members
can enter individually after the initial two (2) Team Members are
present in the M2MR controlled area. Furthermore, at least two (2)
Team Members must be present until all Guests have exited.
CAUTION If the micro controlling an M2MR area resets, it will automatically reset the
occupancy count to zero. Therefore, in the unlikely event that this occurs while
the area is occupied, the system administrator must disable Two Man Rule,
evacuate the area, and then reinstate M2MR.
Modified Two Man Rule without Door Control
Two Man Rule and
Modified Two Man Rule
The first two badge holders to enter a controlled space must be Team
Members and at least two Team Members must be present in the
controlled space until all Guests have exited.
Modified Two Man Rule with Door Control
The first two badge holders to enter a controlled space must be Team
Members and at least two Team Members must be present in the
controlled space until all Guests have exited. Additionally, before any
subsequent badge holders are allowed entry, a Team Member within the
controlled space must press a door release button. The door release button
must be pressed within the time specified in the Door Release Timeout
field on the Areas form or the door will not be unlocked.
A warning device, such as a horn or a strobe light, can be activated to
notify the team members in an area that a person desiring access has
presented a valid badge at the reader and is awaiting entry. A digital
output (DO) point is configured to control the warning device through the
Doors form, by selecting an M2MR output. When the warning device is
triggered, team members in the area press the door release button before
the door timeout has elapsed to cause the door to unlock and allow entry
to the area.
Picture Perfect 2.0 Administration Guide
21.5
How to Set Up a Two Man Rule (2MR) Controlled Space
How to Set Up a Two Man Rule (2MR) Controlled
Space
! To set up the area readers:
1. From the Main menu, select Devices, Readers.
2. From the toolbar, click on Find to locate the reader record you wish to
set up.
3. Under Logical Reader Function, enable the appropriate radio button:
APB In, APB Out, T&A In, or T&A Out.
NOTE
In an area with Occupancy Control enabled:
• All readers in the area must be assigned one of these logical functions: APB In,
APB Out, T&A In, or T&A Out.
• APB readers must be set to Global. Timed APB is not allowed.
• The logical reader function T&A In/Out is NOT allowed for any reader.
4. Under Set Micro, verify that all readers in the area are assigned to the
same micro.
5. Under Reader Control, Number of Badges, verify that all area readers
are set to Single.
6. Optional: If you want to activate a DO (such as a blinking light)
between the first and second required badge swipes, under Two Man
Rule, click the 2MR Output button and select the output to be
triggered.
7. Save and exit the Readers form.
! To set up the area doors:
1. From the Main menu, select Devices, Doors.
2. From the toolbar, click on Find to locate the door record you wish to
set up.
3. Under Inputs, click on Door Sensor.
21.6
Picture Perfect 2.0 Administration Guide
Two Man Rule and Modified Two Man Rule
NOTE
21
The door sensor input and the door output must be physically connected to the
same micro.
4. Select the appropriate input from the list displayed.
5. Save and exit the Doors form.
! To enable Standard Two Man Rule for the Area
NOTE
In order to perform this function, you must have Occupancy Control permission.
1. From the Main menu, select Access, Areas.
2. From the toolbar, click on Find to locate the area record you wish to set
up.
Two Man Rule and
Modified Two Man Rule
3. Under Occupancy Control, enable the Occupancy Counting radio
button.
4. Under Two Man Rule Control, enable the radio button labeled
Standard.
5. Save and exit the Areas form.
How to Set Up a Modified Two Man Rule (M2MR)
Controlled Space with Door Control
! To set up the area readers:
1. From the Main menu, select Devices, Readers.
2. From the toolbar, click on Find to locate the reader record you wish to
set up.
3. Under Logical Reader Function, enable the appropriate radio button:
APB In, APB Out, T&A In, or T&A Out.
Picture Perfect 2.0 Administration Guide
21.7
How to Set Up a Modified Two Man Rule (M2MR) Controlled Space with Door Control
NOTE
In an area with Occupancy Control enabled:
• All readers in the area must be assigned one of these logical functions: APB In,
APB Out, T&A In, or T&A Out.
• APB readers must be set to Global. Timed APB is not allowed.
• The logical reader function T&A In/Out is NOT allowed for any reader.
4. Under Set Micro, verify that all readers in the area are assigned to the
same micro.
5. Under Reader Control, Number of Badges, verify that all area readers
are set to Single.
6. Optional: If you want to activate a DO (such as a blinking light)
between the first and second required badge swipes, under Two Man
Rule, click the 2MR Output button and select the output to be
triggered.
7. Save and exit the Readers form.
! To set up the area doors:
NOTE
Each door sensor input, exit button input, M2MR output, and door strike output in
the area must be unique and they all must be physically connected to the same
micro.
1. From the Main menu, select Devices, Doors.
2. From the toolbar, click on Find to locate the door record you wish to
set up.
3. Under Inputs, click on Door Sensor and select the appropriate input
from the list displayed.
4. Define an M2MR output on each door to the area that will be used for
entry (APB IN or T&A IN). Under Two Man Rule, click the M2MR
Output button and select an output to associate with a warning
device, such as a horn or strobe light.
5. Define an input as the exit button. Under Inputs, click Exit Button and
select an input to associate with the exit button.
21.8
Picture Perfect 2.0 Administration Guide
Two Man Rule and Modified Two Man Rule
21
6. Under Door Control, click Exit Button, Asserts Strike Enabled.
NOTE
The input selected as the Exit Button input must be set to the following:
On the Inputs form, under Input Control Setup, the Input Enabled button must
be deselected (the default).
7. Save and exit the Doors form.
! To enable M2MR with Door Control for the Area:
NOTE
In order to perform this function, you must have Occupancy Control permission.
1. From the Main menu, select Access, Areas.
2. From the toolbar, click on Find to locate the area record you wish to set
up.
Two Man Rule and
Modified Two Man Rule
3. Under Occupancy Control, enable the Occupancy Counting radio
button.
4. Under Two Man Rule Control, enable the radio button labeled
Modified Two Man Rule with Door Control.
5. Save and exit the Areas form.
! To define Categories for M2MR Category Types
1. From the Main menu, select Access, Categories.
2. Define one or more categories (groups of people) who will access the
controlled area and, under Modified Two Man Rule Type, enable the
appropriate radio button, None, Guest, or Team Member.
3. Save and exit the Categories form.
! To assign M2MR Categories to Areas and Badges
1. From the Main menu, select Access, Areas.
Picture Perfect 2.0 Administration Guide
21.9
How to Set Up a Modified Two Man Rule (M2MR) Controlled Space without Door Control
2. From the toolbar, click on Find to locate the area records to be
controlled.
3. Under Categories, click a Cat# button to assign an M2MR category to
the area.
4. Save and exit the Areas form.
5. From the Main menu, select Access, Badges.
6. From the toolbar, click on Find to locate the badge records requiring
access to the controlled area.
7. Under Badge Categories, click a Cat# button to assign a M2MR
category to the badge.
8. Save and exit the Badges form.
How to Set Up a Modified Two Man Rule (M2MR)
Controlled Space without Door Control
! To set up the area readers:
1. From the Main menu, select Devices, Readers.
2. From the toolbar, click on Find to locate the reader record you wish to
set up.
3. Under Logical Reader Function, enable the appropriate radio button:
APB In, APB Out, T&A In, or T&A Out.
NOTE
In an area with Occupancy Control enabled:
• All readers in the area must be assigned one of these logical functions: APB In,
APB Out, T&A In, or T&A Out.
• APB readers must be set to Global. Timed APB is not allowed.
• The logical reader function T&A In/Out is NOT allowed for any reader.
4. Under Set Micro, verify that all readers in the area are assigned to the
same micro.
21.10
Picture Perfect 2.0 Administration Guide
Two Man Rule and Modified Two Man Rule
21
5. Under Reader Control, Number of Badges, verify that all area readers
are set to Single.
6. Optional: If you want to activate a DO (such as a blinking light)
between the first and second required badge swipes, under Two Man
Rule, click the 2MR Output button and select the output to be
triggered.
7. Save and exit the Readers form.
! To set up the area doors:
1. From the Main menu, select Devices, Doors.
2. From the toolbar, click on Find to locate the door record you wish to
set up.
3. Under Inputs, click on Door Sensor and select the appropriate input
from the list displayed.
NOTE
Two Man Rule and
Modified Two Man Rule
The door sensor input and the door output must be physically connected to the
same micro.
4. Save and exit the Doors form.
! To enable M2MR without Door Control for the Area
NOTE
In order to perform this function, you must have Occupancy Control permission.
1. From the Main menu, select Access, Areas.
2. From the toolbar, click on Find to locate the area record you wish to set
up.
3. Under Occupancy Control, enable the Occupancy Counting radio
button.
4. Under Two Man Rule Control, enable the radio button labeled
Modified Two Man Rule without Door Control.
5. Save and exit the Areas form.
Picture Perfect 2.0 Administration Guide
21.11
How to Set Up a Modified Two Man Rule (M2MR) Controlled Space without Door Control
! To define Categories for M2MR Category Types
1. From the Main menu, select Access, Categories.
2. Define one or more categories (groups of people) who will access the
controlled area and, under Modified Two Man Rule Type, enable the
appropriate radio button, None, Guest, or Team Member.
3. Save and exit the Categories form.
! To assign M2MR Categories to Areas and Badges
1. From the Main menu, select Access, Areas.
2. From the toolbar, click on Find to locate the area records to be
controlled.
3. Under Categories, click a Cat# button to assign an M2MR category to
the area.
4. Save and exit the Areas form.
5. From the Main menu, select Access, Badges.
6. From the toolbar, click on Find to locate the badge records requiring
access to the controlled area.
7. Under Badge Categories, click a Cat# button to assign an M2MR
category to the badge.
8. Save and exit the Badges form.
21.12
Picture Perfect 2.0 Administration Guide
Two Man Rule and Modified Two Man Rule
21
Table 21-1: Badge Transactions for Occupancy Counting and Two Man Rule
Features
2MR Mode
Badge Event Description
Badge Transaction Generated
DISABLED
(Occupancy
Counting is
enabled)
Invalid badge swipe
Invalid badge
Unknown badge swipe
Badge Unknown
Valid badge swipe on IN reader; door NOT
opened
Valid no passage
Valid badge swipe on IN reader; door IS
opened
APB/T&A IN, occupancy count
incremented by one
Valid badge swipe on OUT reader; door
NOT opened
Valid no passage
Valid badge swipe on OUT reader; door IS
opened
APB/T&A OUT, occupancy count
decremented by one
Invalid badge swipe
Invalid badge
Unknown badge swipe
Badge Unknown
STANDARD
2MR
Two Man Rule and
Modified Two Man Rule
Picture Perfect 2.0 Administration Guide
21.13
How to Set Up a Modified Two Man Rule (M2MR) Controlled Space without Door Control
Table 21-1: Badge Transactions for Occupancy Counting and Two Man Rule
Features
2MR Mode
21.14
Badge Event Description
Badge Transaction Generated
Two valid badge swipes on IN reader
when room is empty, within specified
reader interval time; door NOT opened
Valid no passage
Two valid badge swipes on IN reader
when room is empty, within specified
reader interval time; door IS opened
Two APB/T&A IN, occupancy count
incremented by two (to two)
Two badge swipes on IN reader when
room is empty, but second swipe is not
within specified reader interval time
NO Transaction
Two badge swipes on IN reader when
room is empty, but second badge is invalid
Valid door locked
Two badge swipes on IN reader when
room is empty, but second badge does not
have a valid category
Valid Door Locked and No Categ Match
Two badge swipes on IN reader when
room is empty, but first badge does not
have a valid category and second badge
is valid
No Categ Match and Not Validated
One valid badge swipe on IN reader when
occupancy count is at least two, door NOT
opened
Valid no passage
One valid badge swipe on IN reader when
occupancy count is at least two, door IS
opened
One APB/T&A IN, occupancy count
incremented by one
One valid badge swipe on OUT reader
when occupancy count is at least three;
door NOT opened
Valid no passage
One valid badge swipe on OUT reader
when occupancy count is at least three;
door IS opened
One APB/T&A OUT, occupancy count
decremented by one
Two valid badge swipes on OUT reader
when occupancy count is two, within
specified reader interval time; door NOT
opened
Valid no passage
Picture Perfect 2.0 Administration Guide
Two Man Rule and Modified Two Man Rule
21
Table 21-1: Badge Transactions for Occupancy Counting and Two Man Rule
Features
2MR Mode
Badge Transaction Generated
Two valid badge swipes on OUT reader
when occupancy count is two, within
specified reader interval time; door IS
opened
Two APB/T&A OUT, occupancy count
decremented by two (to zero)
Two valid badge swipes on OUT reader
when occupancy count is two, but second
swipe is not within specified reader
interval time
NO Transaction
MODIFIED
2MR
Invalid badge swipe
Invalid badge
Unknown badge swipe
Badge Unknown
Note: Door
Two valid badge swipes on IN reader
when room is empty, within specified
reader interval time, M2MR category type
NOT Team Member and is Valid GUEST
Two Valid door locked
Two badge swipes on IN reader when
room is empty, within specified reader
interval time, but second badge category
type id NOT valid (not on area).
Valid door locked and No Categ Match
Two badge swipes on IN reader when
room is empty, within specified reader
interval time, but first badge category type
id NOT valid (not on area).
No Categ Match and Not Validated
Two valid badge swipes on IN reader
when room is empty, within specified
reader interval time, M2MR category type
NOT Team Member and IS valid GUEST.
Two Valid door locked
Two valid badge swipes on IN reader
when room is empty, within specified
reader interval time, M2MR category type
IS Team Member; door NOT opened
Valid no passage
NOT opened
case includes
door release
not pressed
within
specified time
interval.
Picture Perfect 2.0 Administration Guide
Two Man Rule and
Modified Two Man Rule
Badge Event Description
21.15
How to Set Up a Modified Two Man Rule (M2MR) Controlled Space without Door Control
Table 21-1: Badge Transactions for Occupancy Counting and Two Man Rule
Features
2MR Mode
21.16
Badge Event Description
Badge Transaction Generated
Two valid badge swipes on IN reader
when room is empty, within specified
reader interval time, M2MR category type
IS Team Member; door IS opened
Two APB/T&A IN, occupancy count
incremented by two (to two)
Two valid badge swipes on IN reader
when room is empty, but second swipe is
not within specified interval time, M2MR
category type IS Team Member
NO Transaction
One valid badge swipe on IN reader when
occupancy count is at least two, M2MR
category type NOT None; door NOT
opened
Valid no passage
One valid badge swipe on IN reader when
occupancy count is at least two, M2MR
category type NOT None; door IS opened
One APB/T&A IN, occupancy count
incremented by one
One valid badge swipe on IN reader when
occupancy count is at least two, M2MR
category type IS None but valid (on area
Valid door locked
One valid badge swipe on IN reader when
occupancy count is at least two, M2MR
category type IS None and category not
on area
No Categ Match
One valid badge swipe on OUT reader
when occupancy count is at least three
and there would NOT be two Team
Members left in the room
Valid door locked
One valid badge swipe on OUT reader
when occupancy count is at least three
and there would be two Team Members
left in the room; door NOT opened
Valid no passage
One valid badge swipe on OUT reader
when occupancy count is at least three
and there would be two Team Members
left in the room; door IS opened
One APB/T&A OUT, occupancy count
decremented by one
Two valid badge swipes on OUT reader
when occupancy count is two, within
specified reader interval time; door NOT
opened
Valid no passage
Picture Perfect 2.0 Administration Guide
Two Man Rule and Modified Two Man Rule
21
Table 21-1: Badge Transactions for Occupancy Counting and Two Man Rule
Features
2MR Mode
Badge Event Description
Badge Transaction Generated
Two valid badge swipes on OUT reader
when occupancy count is two, within
specified reader interval time; door IS
opened
Two APB/T&A OUT, occupancy count
decremented by two (to zero)
Two valid badge swipes on OUT reader
when occupancy count is two, but second
swipe is not within specified reader
interval time
NO Transaction
Two Man Rule and
Modified Two Man Rule
Picture Perfect 2.0 Administration Guide
21.17
How to Set Up a Modified Two Man Rule (M2MR) Controlled Space without Door Control
NOTES
21.18
Picture Perfect 2.0 Administration Guide
Elevator Control
Chapter
22
Overview
Elevator Control allows you to control access to floors serviced by an
elevator. This feature works only with the Micro/5, Micro MPX/2000, and
Micro MPXN2000 microcontrollers. It allows the micro to control multiple
elevator readers, DI’s and DO’s. This chapter shows how to implement the
Elevator Control feature using any one of the following methods:
1. Elevator Micro/DO Configuration
2. Elevator Reader/DO Configuration
3. Elevator Reader/DI/DO Configuration
System Configuration Standards
Elevator Control is a part of the BASE Picture Perfect software
package.
•
Elevator Control is implemented on Micro/5, Micro MPX/2000, or
Micro MPXN2000 configurations only.
•
A maximum of 64 floors can be serviced by one elevator.
•
128 separate, user-configurable elevator categories are supported per
elevator.
•
The elevator buttons are enabled for a length of time (duration)
defined on the Devices/Outputs form. All the buttons (outputs)
should be set to the same duration.
•
Badges must be authorized for an elevator reader in order to gain
access to an assigned floor.
•
Picture Perfect can address up to 4096 micros with each micro having
up to a maximum of 16 elevator readers. The recommended limit is
based on memory and disk capacity of the Picture Perfect host system.
Picture Perfect 2.0 Administration Guide
22.1
Elevator Control
•
Elevator Access
Elevator Access
There are two ways to grant access to an elevator floor. Both require a
valid badge swipe to an elevator configured reader and a valid category
match between the badge and a floor or floors. Depending on the elevator
control configuration, one of the following methods will then activate the
elevator floors.
Method 1
This is the default and is available on all configurations.
Following a valid badge swipe, the badge is checked for category
floors for this elevator. For each badge category that matches the
elevator’s categories, access is granted to the set of floors denoted by
the matched category. Therefore, the set of accessible floors will be the
combined set of matched category floors.
For example, a badgeholder has General Access and Computer
Department as categories on his badge. The elevator allows floors 1, 2,
and 5 for General Access, and floors 3 and 4 for Computer
Department. Therefore, when this badgeholder enters the elevator,
floors 1 through 5 will be activated. Refer to Figure 22-1.
For a double-badge transaction configuration, each badge must first
have access to the reader, then the same access validation as above
takes place. The difference is that the final set of accessible floors will
be denoted by the union of the two badges’ matched categories (which
correspond to floors). In other words, if the elevator category matches
a category found on either badge, access is granted. See Chapter 26 Double-Badge Transaction.
22.2
Picture Perfect 2.0 Administration Guide
Elevator Control
22
Since this badge has categories
1 and 5, this badge holder is
granted access to floors 1
through 5 because each floor
contains category 1 or 5.
Category: 3
FLOOR 6
Category: 1
FLOOR 5
Category: 2, 4, 5
FLOOR 4
When the badge is
read, the buttons
for floors 1 through
5 light up.
Category: 2, 4, 5
FLOOR 3
Category: 1
FLOOR 2
Category: 1
FLOOR 1
1
4
2
3
5
6
BADGE
contains categories 1
and 5.
LEGEND:
Category 1 = General Access
Category 2 = Accounting
Category 3 = Administration
Category 4 = Marketing
Category 5 = Computer Dept.
Figure 22-1.
Example of Elevator Control - Method 1
Elevator Control
Picture Perfect 2.0 Administration Guide
22.3
Elevator Access
Method 2
When enabled, this method is available on the following elevator
configurations:
•
Reader/DI/DO - See “To Set Up Example 2 in a Reader/DI/DO
Configuration:” on page 22.19
Following a valid badge swipe, a floor button (DI) is used to enter a
floor number. A category match must exist between the floor selected
and the badge before the DO (digital output) is fired to activate the
elevator. This method will generate a floor transaction, valid or
invalid, which is stored, along with the floor selected, and can be used
for history and reporting purposes.
For example, a badgeholder has General Access as the sole category on
his badge. The elevator allows floors 1, 2, and 5 for General Access,
and floors 3 and 4 for Computer Department. Therefore, when this
badgeholder enters the elevator and pushes floor buttons 1, 2 or 5, the
elevator will be activated and a Valid floor transaction will be
generated. Entering numbers 3 or 4 would return an Invalid floor
transaction and no access would be granted. Refer to Figure 22-2.
For a double-badge transaction configuration, each badge must first
have access to the reader, then the same access validation as above
takes place. The difference is that the final set of accessible floors will
be denoted by the union of the two badges’ matched categories (which
correspond to floors). In other words, if the elevator category matches
a category found on either badge, access is granted. See Chapter 26 Double-Badge Transaction.
22.4
Picture Perfect 2.0 Administration Guide
Elevator Control
22
Since this badge has category 1
this badge holder is granted
access to floors 1, 2, or 5
because those floors contain
category 1.
Category: 3
FLOOR 6
Category: 1
FLOOR 5
Category: 2, 4, 5
FLOOR 4
When one of the buttons
for floors 1, 2, or 5 is
pressed, an output is
triggered to activate the
elevator to go to that floor.
Category: 2, 4, 5
FLOOR 3
Category: 1
FLOOR 2
Category: 1
FLOOR 1
1
4
2
3
5
6
BADGE contains
category 1.
LEGEND:
Category 1 = General Access
Category 2 = Accounting
Category 3 = Administration
Category 4 = Marketing
Category 5 = Computer Dept.
Figure 22-2.
Example of Elevator Control - Method 2
Elevator Control
Picture Perfect 2.0 Administration Guide
22.5
Elevator Access
Duration Time for Elevator Access
Method 1
During the period of time when the elevator’s digital outputs are
active (buttons are lit), any number of those buttons may be selected.
The amount of time that the elevator buttons are active, after a valid
badge swipe, is set using the Devices/Outputs form. The same
duration time should be used for all digital outputs assigned to floors.
See Figure 22-6. Outputs Form Configured for Elevator-Floor Button
on page 22.10.
Method 2
During a set period of time, a button may be selected. This amount of
time in which the entry is accepted, after a valid badge swipe, is set
using the Devices/Outputs form. The same duration time should be
used for all digital outputs. See Figure 22-6. Outputs Form Configured
for Elevator-Floor Button on page 22.10.
Elevator Access for All Categories
A badge that has the All Categories category assigned to it will be allowed
access to all floors defined for the elevator, regardless of whether the All
Categories category is present on the area.
Free Access Floors
There are two methods of allowing free access to particular elevator floors.
One method requires a badge swipe; the other does not need a badge at
all.
Free Access for All Badges
Free access for all badges allows any badge that has access to the elevator
reader to have free access to designated floors. The “wild-card” category is
used as an elevator category on the Category Floors form to designate
which floors are free access.
To set up a wild-card category, you must select All Categories from the
Category picklist, and assign the free-access floors to it. See Figure 22-16.
Select Floors Form on page 22.21 This allows a badgeholder to gain access
to the free-access floors, as long as the badge is authorized for the elevator
reader.
22.6
Picture Perfect 2.0 Administration Guide
Elevator Control
22
Free Access Without a Badge
The free access without a badge method allows anyone to walk onto an
elevator and have free access to designated floors (without using a badge
in any way). For this method to work, you must configure a Door State of
“unlocked” for the door to each floor you want included, then associate a
digital output to the door. See Figure 22-17. Doors Form Configured for
Elevator Door on page 22.22
When this is in place, the free-access floor buttons will always be lit,
regardless of a badge swipe. When a badge is swiped, access is given to all
floors for which the badge is valid, along with the free-access floors. Free
access without a badge can be scheduled as described in “Scheduling
Elevator Free Access” on page 22.21.
Elevator Control Setup
! To implement Elevator Control, follow these steps for each access-
controlled elevator in the system:
1. Define the maximum number of floors you want to control using the
Control/Parameters form. Depending on the configuration, this
number is based on either per elevator micro or is divided between all
elevator readers on a micro.
2. Depending on the configuration, define a Micro/5 as an elevator micro
on the Devices/Micros form, or define a Micro/5 as a normal micro
and a reader on that micro as an elevator reader on the Devices/
Readers form.
3. Define an output for each floor on the Devices/Outputs form.
4. For a Reader/DI/DO configuration, define an input for each floor on
the Devices/Inputs form.
6. Define sets of floors for categories on the Devices/Category Floors
form.
Picture Perfect 2.0 Administration Guide
22.7
Elevator Control
5. Define the type of elevator configuration, the number of floors for the
elevator and assign an output (and an input in the case of a Reader/DI/
DO configuration) to each floor on the Devices/Elevator form.
Elevator Control Setup
Defining the Number of Floors
Use the Control/Parameters form to specify the maximum number of
elevator floors on a micro(Figure 22-3). This number could be per elevator
(Micro/DO configuration) or it could be distributed between up to 16
elevators (Reader/DO or Reader/DI/DO configurations). This number
will then be used as the default on the Elevator form, and will apply to all
the elevators defined in the system. The maximum number of floors
serviced by a micro (elevator) is 64. See “The Parameters Form” on
page 4.27.
Figure 22-3.
Number of Floors Field on Parameters Form
Defining Micros
Required for:
Micro/DO Configuration Only
Use the Devices/Micros form to define the micro type as an Elevator for
each micro used with an elevator in the Picture Perfect system (Figure 224). Only a Micro/5 should be designated as an elevator micro. See “The
Micros Form” on page 10.18.
Figure 22-4.
22.8
Type Field on Micros Form
Picture Perfect 2.0 Administration Guide
Elevator Control
22
Defining Readers
Required for:
Reader/DO Configuration
Reader/DI/DO Configuration
Use the Devices/Readers form to define the reader type as an Elevator for
each reader used with an elevator in the Picture Perfect system (Figure 225). See “The Readers Form” on page 13.22.
Figure 22-5.
Type Field on Readers Form
Defining Outputs
Use the Devices/Outputs form to define a digital output for each elevator
floor button (Figure 22-6). This output will light and activate the button for
a floor to which access is allowed. For more information, see “The Outputs
Form” on page 12.3.
Elevator Control
Picture Perfect 2.0 Administration Guide
22.9
Elevator Control Setup
Figure 22-6.
22.10
Outputs Form Configured for Elevator-Floor Button
Picture Perfect 2.0 Administration Guide
Elevator Control
22
Keep the following in mind when defining elevator floor outputs:
NOTE
•
At least one 16-digital-output (16 DO/DOR) board must be configured
with an elevator micro.
•
The elevator digital-output addresses must be in the 16 to 31 range for
each 16 DO/DOR board used.
•
For a maximum configuration (64 floors), four 16 DO/DOR boards
must be installed in a Micro/5.
•
The duration time should be the same for all elevator digital outputs.
In a Reader/DI/DO configuration, make sure the Reader Interval Time does not exceed
the Output (DO) Duration.
•
Elevator digital outputs do not require output groups to be associated
with them.
Defining Inputs
Required for:
Reader/DI/DO Configuration
Use the Devices/Inputs form to define a digital input for each elevator
floor button (Figure 22-6). When this input is received by the micro, it
performs a category match and if successful, activates the associated
output for a floor to which access is allowed. For more information, see
“The Inputs Form” on page 12.9.
Elevator Control
Picture Perfect 2.0 Administration Guide
22.11
Elevator Control Setup
Figure 22-7.
Inputs Form Configured for Elevator-Floor Button
Keep the following in mind when defining elevator floor inputs:
22.12
•
Toggle the Elevator Point button to On to make this input an elevator
input.
•
At least one 20DI board must be configured with an elevator
configured to have the Reader/DI/DO configuration.
•
For a maximum configuration (39 floors), an 8RP reader configured to
be an elevator reader, two 20DI boards and two 16DO boards must be
installed in a Micro/5.
•
Elevator DI’s do not require an input group to be associated with
them.
Picture Perfect 2.0 Administration Guide
Elevator Control
22
The Elevators Form
Use the Elevators form (Figure 22-8) to select the type of elevator
configuration, define the number of floors, assign the elevator to a
previously defined elevator micro or reader and then tie previously
defined outputs (and inputs in the case of Reader/DI/DO configurations)
to the corresponding floors. Perform this setup for each of the accesscontrolled elevators in your facility.
Figure 22-8.
Elevator Form
Description
Define Floors
Click the Define Floors button to specify the number of floors and the
floor labels (names), which in turn will determine how many floor
buttons will display for that elevator on the configuration screen.
Picture Perfect 2.0 Administration Guide
22.13
Elevator Control
Type the name of the elevator in the Description box (for example,
Lobby, East Wing 1, West Wing 3).
Elevator Control Setup
Figure 22-9.
Floor Description Window
Number of Floors
An entry is required in this field for the input and output buttons to be
displayed on the configuration screens. If no entry is made an error
message will display when the record is saved. If an invalid entry is
made, the default will be used. The default number of floors is the
maximum number set in the Control/Parameters form.
Floor Labels
The default floor labels are Floor 1 through Floor x, where x=the
maximum number of floors. There are two ways to edit the floor
labels:
1. Type directly in the text box.
2. Click the Increment Floors or Decrement Floors button to display
a form allowing you to specify a Starting Floor Number and either
an Increment Value or Decrement Value in order to change a
range of floor labels. See the following examples.
22.14
Picture Perfect 2.0 Administration Guide
Elevator Control
22
Example 1: To set up an elevator that will only access floors 20 through 40,
and the name of floor 20 is Lobby 2:.
1. Type in description:
Lobby 2
3. Enter Starting Floor
Number: 2
4. Enter Increment Value: 19
This will result in Floor 2
displaying a description of
Floor 21 (19 + 2).
Note that these floor numbers
did not change because they
are outside the range of defined
floors (20).
2. Press on Increment
Floors button.
Elevator Control
Figure 22-10.
Example of Increment Floors
! To reset the default floor labels (Floor 1....Floor n, corresponding to
floors 1...n):
1. Click the Increment Floors or Decrement Floors button.
2. Enter “1” as the Starting Floor Number.
3. Enter “0” or blank as the Increment or Decrement value.
Picture Perfect 2.0 Administration Guide
22.15
Elevator Control Setup
4. Press Enter .
Example 2: To set up an elevator that will access 64 floors described as
Basement, Parking, Lobby and Floor 2 through Floor 62:
1.Type in descriptions:
Basement, Parking, Lobby
3.Enter Starti ng Floor
Number as “4”.
4. Enter Decrement Value
as “2”.
This will r esult in Floor 4
displaying a description
of Floor 2 (4 - 2).
2. Press on Decrement
Floors button.
Figure 22-11.
Example of Decrement Floors
Configuration Type
Select one of the following types:
22.16
•
Micro/DO - See “To Set Up Example 2 in a Micro/DO Configuration” on
page 22.17.
•
Reader/DO - See “To Set Up Example 2 Reader/DO Configuration” on
page 22.18.
•
Reader/DI/DO - See “To Set Up Example 2 in a Reader/DI/DO
Configuration:” on page 22.19.
Picture Perfect 2.0 Administration Guide
Elevator Control
22
! To Set Up Example 2 in a Micro/DO Configuration
1. In Configuration Type, select Micro/DO.
2. Click the Micro/DO Config button to display the following window.
Figure 22-12.
Micro/DO Config
3. Click the Micro button and select a micro from the picklist. If multiple
readers are configured on an elevator micro, the first reader controls
the elevator.
4. For each floor, click the appropriate button and select an output from
the picklist. this type of configuration supports up to 64 floors per
micro. Click the Refresh Floor Defs button to update the floor labels if
changes have been made since the Config window was displayed.
Elevator Control
Picture Perfect 2.0 Administration Guide
22.17
Elevator Control Setup
! To Set Up Example 2 Reader/DO Configuration
1. In Configuration Type, select Reader/DO.
2. Click the Reader/DO Config button to display the following window.
Figure 22-13.
Reader/DO Config
3. Click the Reader button and select a reader from the picklist. The
reader should be defined as an elevator reader.
4. For each floor, click the appropriate button and select an output from
the picklist. This type of configuration supports up to 64 floors per
micro. Click the Refresh Floor Defs button to update the floor labels if
changes have been made since the Config window was displayed.
22.18
Picture Perfect 2.0 Administration Guide
Elevator Control
22
! To Set Up Example 2 in a Reader/DI/DO Configuration:
1. In Configuration Type, select Reader/DI/DO.
2. Click the Reader/DI/DO Config button to display the following
window.
Figure 22-14.
Reader/DI/DO Config
3. Select the Fire DO after Floor Selection button to enable Elevator
Access Method 2 in which, after a valid badge read, a floor has to be
selected and if it is an accessible floor, the DO will be activated. See
page 22.4 for more information on this method of elevator access.
Otherwise the default Method 1 in which, after a valid badge read, the
DOs for all accessible floors are activated, will be employed. See
page 22.2 for more information on this method of elevator access.
5. For each floor, click the appropriate button and select an input and
output from the picklists. To appear in the picklist, the input must be
defined as an elevator input. Every input chosen must have a
corresponding output chosen. This type of configuration supports up
to 39 floors per micro. Click the Refresh Floor Defs button to update
the floor labels if changes have been made since the Config window
was displayed.
Picture Perfect 2.0 Administration Guide
22.19
Elevator Control
4. Click the Reader button and select a reader from the picklist. The
reader should be defined as an elevator reader.
Elevator Control Setup
Select One Facility
Click the Facility button to display the facilities picklist. Selecting a
facility will allow the administrator to restrict operator access to those
records in a specific facility. For more information, see Chapter 5 Facilities and Facility Profiles.
The Category Floors Form
Use the Category Floors form (Figure 22-15) to assign a category to certain
floors of each elevator. This category is used to establish a match between
the badge and the floor when granting access. The number of categories
assigned to each elevator must not be greater than 128. The number of
floors displayed on this form is determined by the Number Of Floors field
defined on the Elevator form.
Figure 22-15.
Category Floors Form
Facility
Click the Facility button to display the facilities picklist. Selecting a
facility will allow the administrator to restrict operator access to those
records in a specific facility. For more information, see Chapter 5 Facilities and Facility Profiles.
Elevator
Click the Elevator button to display a picklist of elevators. Select the
elevator to which you want to assign Category Floors, then click
Close.
Category
Click the Category button to display a picklist of categories. Select the
category to which you want to assign floors for this elevator, then click
Close.
22.20
Picture Perfect 2.0 Administration Guide
Elevator Control
22
Select Floors
This button is available only after an elevator is selected. Click the
Select Floors button to display toggle buttons for each floor defined
for that elevator. Toggle the buttons on for each floor that is to be
assigned this category.
Figure 22-16.
Select Floors Form
Scheduling Elevator Free Access
In order to schedule elevator free access, a door must be defined on the
Doors form (Figure 22-17) and a digital output corresponding to a floor
number must be assigned to the Door Strike Output field. By using this
setup, a door can be scheduled to Lock or Unlock through the Schedule,
Door Events form. When the door is scheduled to unlock, the digital
output is triggered and the associated floor’s button is activated.
See “The Doors Form” on page 13.35 and “Door Events” on page 16.30.
If a door is unlocked by a Door Event, a badge is not required to activate
the digital output corresponding to that floor. This button may be selected
by anyone, not necessarily an authorized badgeholder.
The digital output can be deactivated in the same manner by scheduling a
door to lock using the Door Events form. The button will not be lit, and a
valid badge will be required to access the elevator’s floors.
Picture Perfect 2.0 Administration Guide
22.21
Elevator Control
For each floor requiring a scheduled free access, its digital output must be
associated with a door, and each door must then be scheduled for a
specific action.
Floor Tracking
Figure 22-17.
Doors Form Configured for Elevator Door
Floor Tracking
When Method 2 is employed for Elevator Access, floor transactions are
generated and stored along with the floor selected. This data can then be
used for history and reporting purposes.
! To generate a Floor Tracking report follow the steps below:
1. From the Main Menu, select Reports, then History. The Badge
History-New Report form appears.
22.22
Picture Perfect 2.0 Administration Guide
Elevator Control
22
2. From the menu bar, select Format, then Query. The Badge Query form
appears.
Figure 22-18.
Badge Query Window
3. In the Floor Number field, enter the relative floor number as opposed
to the actual floor number. The relative floor number is a number in
the range 1...64. For example, for an elevator with floors labeled 31
through 80, the relative floor numbers would be 1 through 50. To
obtain an access report for floor 40, the relative floor number 10 must
be entered.
Elevator Control
Picture Perfect 2.0 Administration Guide
22.23
Floor Tracking
NOTES
22.24
Picture Perfect 2.0 Administration Guide
Keypad Alarm Response
Chapter
23
Keypad Alarm
Responses
Overview
Keypad Alarm Response allows alarms to be cleared only after an input
has been physically reset (such as closing a door that has been forced
open), and an authorized badge has been swiped, and a keypad code
entered. The use of this feature is intended for strict controlled resets by
authorized card holders only.
This feature requires a response to access violations at both the host and
reader levels. The alarm response consists of two actions: a response at the
host or sub-host and a response badge swipe and keypad code at the
reader. The badge must be specially authorized for Keypad Alarm
Response.
This chapter shows how to configure a Picture Perfect system to
implement the Keypad Alarm Response feature.
Keypad Alarm Response Function
The Keypad Alarm Response function starts with an access violation: the
door is forced open or is held open too long. The violation activates one of
the door’s input groups, which then triggers the alarm and outputs
associated with that input group. Forcing the door open activates the
door’s forced-open input group, and holding the door open for too long
activates the door’s open-too-long input group. The input group and its
associated outputs are not reset until the door is closed and a valid keypad
response and badge swipe are made on the reader associated with the
door.
Without the Keypad Alarm Response feature, the access violation would
end when the door closes. With Keypad Alarm Response, the violation
ends when a valid keypad response is entered after the door closes. When
the violation ends, the violation’s input group along with the associated
alarm and outputs are reset.
NOTE
Ending the violation is not the same as completely responding to the violation’s
alarm. The alarm response is not complete until the violation is ended by a keypad
response and the operator has fully responded to the alarm on the Alarm Monitor.
Picture Perfect 2.0 Administration Guide
23.1
Violation Notification
Violation Notification
When a violation starts, the host displays an alarm on the Alarm Monitor.
The Condition field on the Alarm Monitor indicates “alarm”. When the
violation ends, the alarm changes to “reset” state. The access violation
alarms must be routed to the Alarm Monitor for Keypad Alarm Response
to function properly.
Keypad Response
Alarm response at the Badge-and-Keypad reader requires an alarmresponse code, a badge swipe, and a PIN or duress code. The alarmresponse code is entered on the keypad as the first activity. The required
order of activity is outlined below:
1. Press * or + , enter the Alarm-Response Code, then press # .
2. Swipe the badge.
3. Press * or , + enter the PIN or Duress Code, then press # .
When the reader is configured for double-transaction, the first and/or
second component transaction may enter an alarm-response code.
See Chapter 26 - Double-Badge Transaction.
Keypad response only affects an active access violation on a door to which
the reader is associated. It cannot affect any other door. The following
situations must exist for the keypad response to be valid:
•
The door must be closed before the keypad response.
•
The badge must be authorized for keypad response.
•
The entire reader transaction must be granted access. For example, an
invalid PIN or a category mismatch will invalidate the keypad
response.
Valid keypad alarm response does not unlock the door. Keypad alarm response
is essentially an acknowledgment that the door is secure, so it makes no
sense to unlock the door for the keypad response. Since the door does not
open, keypad response is independent from antipassback. This means that
keypad response cannot fail due to the badge’s antipassback status. It also
means that keypad response cannot change the badge’s antipassback
status.
As with all other reader activity, keypad response is reported in the host’s
activity monitor and/or badge history. The transaction explicitly reports
that it is keypad response. When keypad response is valid, a report is
made that the transaction was valid but did not gain access. Invalid
23.2
Picture Perfect 2.0 Administration Guide
Keypad Alarm Response
23
keypad responses report the reason for failure. In addition to usual failure
reports, the keypad response feature also reports the following:
•
Invalid alarm-response code.
•
Badge is not authorized for keypad response.
•
Door is not secured (the door is physically open).
Keypad Alarm
Responses
Operator Response
Operators respond to alarms requiring keypad alarm response in the same
manner as any alarm associated with a physical input. The only difference
is that the keypad alarm response resets the alarm rather than a physical
change in an input.
The vehicle for operator response is the Alarm Monitor. Its operation is
not changed by keypad alarm response. The Alarm Monitor presents
information to the operator on each alarm that is routed to it. The
information includes the alarm’s Condition and Process State.
Condition
•
Alarm - Alarm is logically on.
•
Reset - Alarm is logically off.
When the violation first occurs, its Condition is “alarm” and its Process
State is “active”. When a valid keypad response occurs, the violation’s
Condition goes to “reset”.
Process State
•
Active - No alarm response has been made.
•
Pending - Partial alarm response has been made.
•
Complete - Final alarm response has been made.
Selecting the alarm on the Alarm Monitor pops up a window which
displays the alarm’s instructions and allows the operator to enter a
response. The instructions are the only means of notifying the operator
that keypad alarm response is required. The ways in which the operator
can exit the pop-up are listed below:
•
Cancel - Response is ignored and the Process State stays the same.
•
OK - Response is saved and the Process State goes to “pending”. The
alarm remains on the Alarm Monitor.
•
Remove - Response is saved and the Process State goes to “complete”.
When the alarm’s Condition is “reset”, the alarm is removed from the
Alarm Monitor. When the alarm’s Condition is “alarm”, the alarm
remains on the Alarm Monitor.
Picture Perfect 2.0 Administration Guide
23.3
Multiple Access Violations
Multiple Access Violations
It is possible for the same access violation to occur more than once during
a keypad alarm response. For instance, a door can be forced open, then
closed, and then forced open again all before the keypad alarm response is
completed for the first violation. In this situation, only one alarm appears
in the Alarm Monitor. The alarm first appears with a count of one, and is
incremented by each subsequent violation.
A single valid keypad response resets all occurrences of the violation and
the operator responds to all occurrences using the single alarm.
It is also possible for a door to be forced open and open too long during a
single keypad alarm response. For instance, the door can be held open for
too long, then closed, and then forced open all before a valid keypad
response is made for the sensing violation. In this situation, the violations
appear as separate alarms on the Alarm Monitor.
A single valid keypad response resets both alarms. Each alarm is
separately removed from the Alarm Monitor when the response is
completed.
Door Operation While Violation is Active
The door will continue to operate normally while the keypad alarm
response is active. This makes it possible for someone to gain access
through the door even though the response to the violation has not been
completed.
Keypad Alarm Response Configuration
! Follow these steps to set up a Keypad Alarm Response (details on each
step are given below):
1. Define the Alarm-Response Code (maximum of 10 digits) on the
Devices/Micros form.
2. Define a reader as a Badge-and-Keypad reader on the Readers form.
3. Enable the Keypad Alarm Response on the Devices/Doors form.
4. Enable a badge to be used as the Keypad Alarm Response badge on
the Access/Badges form.
23.4
Picture Perfect 2.0 Administration Guide
Keypad Alarm Response
23
Defining the Alarm-Response Code
Use the Devices/Micros form (Figure 23-1) to define an alarm-response
code (up to 10 digits) for each micro on which Keypad Alarm Response
will be implemented. When an authorized badgeholder responds to an
access violation on a door using this feature, he will enter this code (for
reader keypads on this micro).
Keypad Alarm
Responses
The same code can be used on any number of the system’s micros, or you
can configure different codes for different micros. The alarm-response
code must be different from the shunt code assigned to that micro. Failure
to define an alarm-response code prevents Keypad Alarm Response from
working on any of the micro’s doors.
See “The Micros Form” on page 10.18 of Chapter 10 - Micros.
Figure 23-1.
Alarm-Response Code Field on Micros Form
Defining a Reader
Use the Devices/Readers form (Figure 23-2) to define a reader as a
Badge-and-Keypad reader. Keypad Alarm Response only works with
doors associated with Badge-and-Keypad readers. Once the reader is
defined, you then associate it with a door that has Keypad Alarm
Response enabled.
See “The Readers Form” on page 13.22 of Chapter 13 - Categories, Areas,
Readers, and Doors.
Figure 23-2.
Badge and Keypad Field on Readers Form
Picture Perfect 2.0 Administration Guide
23.5
Keypad Alarm Response Configuration
Enabling Keypad Alarm Response
Use the Devices/Doors form (Figure 23-3) to enable Keypad Alarm
Response. This feature can be enabled or disabled for individual doors,
and status requests on doors will show this. The door must be associated
with a Badge-and-Keypad reader. You will be warned if the door is not
associated with at least one Badge-and-Keypad reader connected to a
micro with an alarm-response code. You may save the door information
anyway, or make the necessary associations before saving the door again,
but Keypad Alarm Response does not function correctly unless those
associations are made.
While it is possible to configure a Picture Perfect system to have more than
one reader associated with one door, and for one reader to be connected to
more than one doorstrike output, Keypad Alarm Response does not
support this configuration.
Keypad Alarm Response can be incorporated into scheduling. For
instance, if a reader is scheduled to change between being a Badge-Only
reader and a Badge-and-Keypad reader for a door with Keypad Alarm
Response enabled, alarms occurring during the badge-only state will not
require a keypad alarm response, while those occurring during the badgeand-keypad state will require it. If an alarm occurs during the badge-andkeypad state, but has not yet been responded to when the schedule change
goes into effect, the reader will remain in the Keypad Alarm Response
mode until proper response is made, then the reader will change to the
badge-only mode.
See “The Doors Form” on page 13.35, and also see Chapter 16 - Schedules
and Modes.
Figure 23-3.
Keypad Alarm Response Field on Doors Form
Enabling a Badge
Use the Access/Badges form (Figure 23-4) to enable a badge for Keypad
Alarm Response. Status requests on badges show whether or not a badge
is authorized for keypad response. Keypad response authorization is
independent of badge status (such as permanent, contractor, etc.), but it
must be an active badge.
See “The Badges Form” on page 14.10 of Chapter 14 - Badges.
23.6
Picture Perfect 2.0 Administration Guide
Keypad Alarm Response
Keypad Alarm
Responses
Figure 23-4.
23
Keypad Alarm Response Field on Badges Form
Disabling Keypad Alarm Response
Keypad Alarm Response can be disabled in the following ways:
•
Disable Keypad Alarm Response on the Devices/Doors form. This
prevents Keypad Alarm Response for both types of access violations
on that door.
•
The following situations inhibit an access violation completely. The
violation is not reported to the host and Keypad Alarm Response
does not function.
•
Access Violation input group not configured.
•
Access Violation input group disabled.
•
Access Violation input group not associated with an alarm.
•
Disabled alarm associated with the Access Violation input group.
Disabling or enabling Keypad Alarm Response does not affect an active
access violation. Therefore, enabling Keypad Alarm Response while a
door is forced open does not change the fact that the violation resets as
soon as the door closes. The change has no effect until the current
violation ends.
Picture Perfect 2.0 Administration Guide
23.7
Disabling Keypad Alarm Response
NOTES
23.8
Picture Perfect 2.0 Administration Guide
Pre-Alarm Notification
Chapter
24
Overview
Pre-alarm Notification informs users that a sensing violation is about to
occur. The warning notification method can vary. It can be set to trigger an
output, such as a horn or a light, and/or send a signal to the Alarm
Monitor.
Pre-Alarm Function
Pre-alarm is activated one minute before a sensing violation occurs on an
open door, and will not function if the Allowable Open Time for that
door is less than one minute. The length of the Pre-alarm interval will
always be one minute since it is not user configurable.
Pre-Alarm Notification
Pre-alarm can be reset by a valid reader transaction or by closing the door.
Otherwise, it resets when the sensing violation occurs.
Activating the Pre-alarm means activating the Pre-alarm input group.
Resetting the Pre-alarm means resetting the Pre-alarm input group.
When a valid reader transaction occurs while waiting for the Pre-alarm to
activate, its timing is restarted. During the one-minute interval between
the Pre-alarm and the sensing violation, a valid reader transaction will
restart the timing and reset the Pre-alarm. When the one-minute Prealarm interval expires, the Pre-alarm resets and the sensing violation
activates. Typically, the sensing violation is reset by closing the door.
Pre-Alarm Notification Methods
There are three methods of Pre-alarm notification:
•
An alarm can be sent to the host which, if routed, will be displayed on
the Alarm Monitor.
•
An audible warning signal can be activated.
•
A combination of the above (an alarm and an audible warning signal).
Disabling Pre-Alarm
Pre-alarm can be disabled in the following ways:
•
Do not configure a Pre-alarm input group for a door.
Picture Perfect 2.0 Administration Guide
24.1
Disabling Pre-Alarm
•
Disable Pre-alarm on the Devices/Doors form.
•
Configure the door with an Allowable Open Time less than or equal
to one minute.
•
Disable the Pre-alarm input group. This entirely disables the Prealarm by preventing the Pre-alarm input group and its associated
alarm and outputs from changing state.
•
Disable the Pre-alarm input group’s alarm. This only disables Prealarm notification. It does not affect the outputs associated with the
Pre-alarm input group.
•
Disable the Pre-alarm input group’s associated output groups and/or
outputs. This only disables the Pre-alarm outputs; it does not affect
Pre-alarm notification. When a Pre-alarm is associated with more than
one output, they can be individually disabled using the separate
outputs and output groups.
Disabling a door’s ability to detect a sensing violation will not cancel the
door’s current timer.
Enabling or disabling Pre-alarm using the radio button has no effect on an
on-going timing process. If Pre-alarm is disabled when the door opens, it
stays disabled until the door closes. If Pre-alarm is enabled when the door
opens, it stays enabled until the door closes.
Creating a Pre-alarm input group during a timing process will not affect
the Pre-alarm ; it continues to behave as if it were enabled. Removing a
Pre-alarm input group during the timing process will have different
effects based on when it is removed. Removing it before Pre-alarm
activates will prevent activation. Removing it after activation will prevent
Pre-alarm from resetting. By removing the input group, the door loses its
pointer to the input group and its associated alarm and outputs.
Changing the door’s Allowable Open Time also has different effects,
based on when it is changed and the value to which it is changed. The
rules below are listed in priority order. In other words, the second rule has
no effect when the first rule overrides it.
24.2
•
Changing the Allowable Open Time after Pre-alarm activates has no
effect.
•
When the old Allowable Open Time prevents Pre-alarm from
activating and it is changed after the door is opened, the change has no
effect.
•
Pre-alarm will not activate when the new Allowable Open Time
prevents it from doing so (60 seconds or less).
•
When Pre-alarm can activate and the Allowable Open Time is
changed to a value which means Pre-alarm should already have
activated, it immediately does so.
Picture Perfect 2.0 Administration Guide
Pre-Alarm Notification
•
24
When Pre-alarm can activate and the Allowable Open Time is
extended, the timing continues uninterrupted. Pre-alarm activates
when the door has been opened for the new Allowable Open Time
minus one minute.
Pre-Alarm Configuration
Use the Devices/Doors form (Figure 24-1 and Figure 24-2) to configure
Pre-Alarm for an individual door.
Pre-Alarm Notification
Figure 24-1.
Pre-Alarm Fields on Top of Doors Form
Picture Perfect 2.0 Administration Guide
24.3
Pre-Alarm Configuration
Figure 24-2.
Pre-Alarm Field on Bottom of Doors Form
Enable this feature using the Pre-alarm radio button. In order for Prealarm to generate a warning signal, an input group must be defined. The
associated outputs operate any type of physical device that can be
connected to a micro, including devices that produce audible warning
signals.
The Pre-alarm feature is not designed to associate inputs with the Prealarm input group. Pre-alarm uses the Alarm routing defined on the
Devices/Alarms form, and the Door Status will display the door’s Prealarm input group and whether the door is disabled or enabled for Prealarm.
The Allowable Open Time on the Doors form must be greater than 60
seconds in order to use Pre-alarm, as the Pre-alarm input group will be
triggered 60 seconds before a sensing violation is detected and reported.
Keypad Shunt Time can be used to extend the allowable open time on a
door. In this case, the Pre-alarm warning signal will be triggered one
minute before the Held Open Too Long violation is issued.
! Follow these steps to set up Pre-alarm Notification:
1. Select Devices, then Doors.
2. Use the radio button to enable Pre-alarm.
3. Click the Pre-alarm button to display a picklist of Input Groups. Select
the desired Input Group, then click Close.
• If a warning signal is required at the host, an alarm must be
associated with that Input Group.
•
If an audible warning signal is required, an Output Group
containing at least one digital output must be associated with that
Input Group.
See “The Doors Form” on page 13.35 of Chapter 13 - Categories, Areas,
Readers, and Doors.
24.4
Picture Perfect 2.0 Administration Guide
Badge Trace
Chapter
25
Overview
This feature allows an operator to trace an individual badge and route its
activity to a specific routing location--regardless of the routing definition
for each of the area’s input groups. When the traced badge is swiped
through a reader, a record of the transaction is sent to the Badge Trace
routing destination (usually to the Activity Monitor and the History Log).
The routing for Badge Trace transactions is set up on the Parameters form.
Specific badges are that are to be traced are identified on the Badges form.
If Badge Trace is routed to the Activity Monitor, a T is displayed in front
of the badge to indicate that the badge is being traced.
If the Badge Trace is routed to the History Log, it is logged as an existing
badge transaction, such as Open or Invalid.
Badge Trace Configuration
To configure the Badge Trace feature, select a routing for traced badges
using the Card Trace Routing field of the Parameters form (Figure 25-1).
(See Chapter 4 - Initial Setup for details on completing this form.)
Badge Trace
Figure 25-1.
Badge-Trace Routing Portion of Parameters Form
Tracing a Badge
When you want to trace a particular badge, you must enable it for Card
Trace on the Badges form (Figure 25-2). When you no longer want to trace
it, you must disable Card Trace.
! To enable or disable Card Trace:
1. Bring up the Access, Badges form.
Picture Perfect 2.0 Administration Guide
25.1
Tracing a Badge
2. Use the Find feature to display the desired badge record.
3. Select Enabled for the Card Trace field in the Control box to trace a
badge, or select Disabled for this field to discontinue the Badge Trace.
4. Click Save.
Figure 25-2.
25.2
Control Portion of Badges Form
Picture Perfect 2.0 Administration Guide
Double-Badge Transaction
Chapter
26
Double-Badge
Transaction
Overview
This feature provides double-badge control for access to high security
areas. Operator-defined readers will require two badges or two badges
with PINs to be presented before a door strike is activated.
Double-Badge Function
Access through double-transaction readers is only granted when two
complete, valid, and distinct transactions are presented to the reader.
“Complete” means that both transactions have all necessary information.
“Valid” means that both transactions are recognized by the reader.
“Distinct” means that both transactions are individually distinguishable (a
single badge cannot be used twice to complete a double-badge
transaction).
NOTE
•
Badge-only readers need two distinct badges.
•
Keypad-only readers need two distinct badge-encode numbers.
•
Badge-and-keypad readers need two complete badge-and-keypad
transactions. The first reader activity may be a shunt code or an alarm
response code entered on the keypad. This first activity is optional.
Next must come the presentation of a badge to the reader. Following
that, a PIN or duress code must be entered on the keypad. The two
transactions must have different badges, but they may use the same
PIN or duress code. The required order for a badge-and-keypad reader
transaction is outlined below:
1.
Shunt or Alarm Response code.
2.
Badge swipe.
3.
PIN or Duress code.
On badge-and-keypad readers, shunt codes, duress codes, and alarm
responses may be entered by either or both transactions. For example, the first
transaction may shunt the reader’s door while the second transaction responds
to an alarm on that door.
Picture Perfect 2.0 Administration Guide
26.1
Double-Badge Reporting
The separate transactions comprising a double transaction may use the
same or different categories while gaining access through the reader.
Each double-badge reader must have an Interval Time defined on the
Devices/Readers form. This specifies the number of seconds allowed
between stages of the transaction. If, during the processing of a
transaction, there is no reader activity for the specified interval-time
period, the transaction “times out” and is considered at an end. The next
reader activity will be considered as the start of a new transaction. “Time
outs” are not reported to users.
Double-Badge Reporting
All reader transactions are tracked by two separate reports, one for each
component transaction. These reports are presented in the Activity
Monitor and/or Badge History.
Each transaction reports whether it is the first or second activity on a
single- or double-transaction reader. When both transactions are valid,
each transaction reports that access was granted. When both transactions
fail, each transaction reports its individual reason for failure. When only
one transaction fails, it reports its reason for failure while the other reports
that it was valid but did not gain access. It is possible to detect the one
component transaction’s failure before the other component transaction
has been completely validated. In this case, the other component
transaction will report that it was not completely validated.
All transaction reports include a time stamp. It shows the time at which
the access decision was made, not when the transaction started. Since a
double-transaction’s access decision is made when both component
transactions are complete, both transactions will report the same time
stamp.
26.2
Picture Perfect 2.0 Administration Guide
Double-Badge Transaction
26
Double-Badge Configuration
To configure a reader for double-badge function, set the Number Of
Badges field on the Devices/Readers form to Double (Figure 26-1). All
readers can be configured to require one or two transactions for granting
access. In addition, the Interval Time field on this form (Figure 26-2) must
be completed. The interval time specifies the number of seconds allowed
between stages of the transaction. (See Chapter 13 - Categories, Areas,
Readers, and Doors for details on the Readers form.)
Double-Badge
Transaction
Figure 26-1.
Figure 26-2.
Reader-Control Portion of Readers Form
Interval-Time Portion of Readers Form
The double-badge configuration can also be changed by scheduling. This
is done by setting the Num Of Badges field on the Schedule/Reader
Events form (Figure 26-3). (See Chapter 16 - Schedules and Modes for
details on the Reader Events form.)
Figure 26-3.
Reader Portion of Reader Events Form
Picture Perfect 2.0 Administration Guide
26.3
Double-Badge Configuration
A change to the definition will be reflected in a micro’s local database. The
only micro affected by any change to a reader’s Number-of-Badges
definition is the one which is physically connected to the reader.
A change in the micro’s local database does not affect any on-going reader
activity. In other words, changing a reader from double-transaction to
single-transaction while the micro is processing the reader’s activity does
not affect that process; two complete valid transactions are still needed
before access may be granted. After the two transactions are processed,
the micro will grant or deny access based on a single transaction.
A reader’s Number-of-Badges definition is not limited by the reader’s
physical or logical type. For example, it is possible to define a doubletransaction, badge-and-keypad, antipassback-in reader.
Reader status requests will display the reader’s current Number-ofBadges definition.
26.4
Picture Perfect 2.0 Administration Guide
Monitoring Alarms
Chapter
27
Overview
The Alarm Monitor displays incoming alarms and their priority, count,
status, and time of occurrence. Alarms display on the Alarm Monitor in
order of their priority.
When an alarm occurs, the system beeps and displays a pop-up window
to notify the operator. The operator displays instructions for the alarm by
selecting the alarm from a list on the Alarm Monitor. The operator records
a response to an alarm either by selecting pre-written alarm responses
from the Alarm Response window or by typing a response.
Monitoring Alarms
If your system has the optional Network Alarm Notification feature, the
network alarm notification window displays on a designated terminal
(usually one of the host consoles) when an alarm with network priority
goes beyond the allowed operator response time.
Prerequisites
The following Picture Perfect forms are prerequisites:
Forms
Purpose
PRINTER
ROUTINGS
TERMINALS
To log alarms to a printer and display on a console.
PERMISSION GROUPS
PERMISSIONS
OPERATORS
To authorize operators to respond to alarms.
INPUT GROUPS
INPUTS
To allow inputs to activate when an alarm condition
occurs.
OUTPUT GROUPS
OUTPUTS
To allow outputs to trigger when associated inputs
activate.
MESSAGES
RESPONSES
ALARMS
To facilitate notification of and response to alarms.
Picture Perfect 2.0 Administration Guide
27.1
What You Will Be Doing
What You Will Be Doing
This chapter shows you how to view, respond to, and remove alarms, and
how to control alarms that require manual reset.
The Alarm Monitor
Select Monitors, then Alarm to display the Alarm Monitor window
(Figure 27-1). Use the Alarm Monitor window to view and select any
alarms that occur: active, pending, or completed. Alarms that are not yet
acknowledged are active; alarms that are acknowledged but not removed
are pending; and alarms that are removed but not yet reset are completed.
Figure 27-1.
Alarm Monitor Window
The first and second columns of the Alarm Monitor display the Priority
and Description that you defined for the alarm using the Alarms form.
The third column displays the alarm Location (defined using the
description field of forms such as Inputs, Readers, Micros, and Input
Group, and could also include an 8RP board number). The next columns
are: Condition (alarm, reset, tamper), Input State (open, closed, N/A,
short, or ground), Date, Time, Process State (active, pending, completed,
bumped or notify), and Count (number of times the alarm has set and
reset).
To see all the columns on the Alarm Monitor, stretch the window frame or
use the scroll bar.
Notification of Alarms
When an alarm occurs, a pop-up Alarm Alert window (Figure 27-2)
appears on every terminal in the system that is configured to receive
alarms. The window beeps and displays the number of new alarms, the
number of unanswered alarms, and the highest priority alarm that is
pending.
27.2
Picture Perfect 2.0 Administration Guide
Monitoring Alarms
Figure 27-2.
27
Alarm Alert Window
When you click on the Silence button, the beeping stops and the button
changes to Stand By. If another alarm occurs, the beeping will resume and
the information displayed will be updated.
Open the Alarm Monitor window and select the alarm to display the
Alarm Response window (Figure 27-3). The instructions for this alarm
will be listed. The alarm type is displayed in the title bar of the window.
Monitoring Alarms
Figure 27-3.
Alarm Response Window
Picture Perfect 2.0 Administration Guide
27.3
Responding to An Alarm
Responding to An Alarm
The system allows the operator to respond to (acknowledge) alarms and
to manually reset alarm outputs (if manual reset was selected using the
Alarms form).
Pre-written alarm responses appear in the Responses picklist (Figure 274). When you select a response and clear the alarm, the system will archive
the alarm record and the response. The pre-written response saves time. If
none of the responses on the selection list are appropriate, the operator
can type a unique response.
! To respond to an alarm:
1. Silence the alarm by clicking the Silence button on the Alarm Alert
window.
2. Select Monitors, then Alarm.
3. Select the alarm. The Alarm Response window appears.
4. Optional: Click the Outputs button to toggle associated outputs on or
off. See “Controlling Alarm Outputs” on page 27.8.
Figure 27-4.
27.4
Alarm Response Window with Responses Picklist
Picture Perfect 2.0 Administration Guide
Monitoring Alarms
27
5. Optional: Enter a response--either click the RSVP button to select from
a list of alarm responses, or type a new response. When you click Ok
in the Response picklist, the selected response appears in the Enter
New Response box. The maximum length of a response is 255
characters. If the responses selected from the Responses picklist
exceed this limit, a warning will pop-up indicating this (Figure 27-5)
and the response will be truncated down to the maximum length. The
response may then be edited in the Enter New Response: box to make
the truncated response more presentable.
Monitoring Alarms
Figure 27-5.
Alarm Response Window with Response Too Long Warning
6. Log the response.
• To log the response without clearing the alarm, click Ok. You can
continue to select this alarm again to enter new responses. The
previous responses appear in the Responses To Date box (Figure
27-6).
•
To log the response and clear the alarm, click Remove on the
Alarm Response window. See “Removing A Single Alarm” on
page 27.6 and “Removing All Alarms” on page 27.7.
7. Optional: Click Cancel to close (exit) the window without altering the
state of the alarm.
Picture Perfect 2.0 Administration Guide
27.5
Removing A Single Alarm
Figure 27-6.
Alarm Response Window with Logged and New Responses
Removing A Single Alarm
To clear a single alarm that is in a reset condition, click the Remove button
in the Alarm Response window. The system logs the alarm (and its
responses) and deletes it from the Alarm Monitor.
NOTE
27.6
The Alarm Response window may now be configured to have the Remove function
button unavailable unless the alarm is in reset state or has the alarm control
Immediate Reset Input set (done on the Devices/Alarm form). The configuration is
determined by the Remove Alarm Only If Reset parameter in the Control/
Parameters form. The default is No, indicating the Remove function button is
always available. When set to Yes, the Remove function button will be grayed out
when unavailable.
Picture Perfect 2.0 Administration Guide
Monitoring Alarms
Figure 27-7.
27
Alarm Response Window with Remove Function Disabled
Purging A Single Alarm
Monitoring Alarms
To clear a single alarm that is NOT in a reset condition, click the Purge
button in the Alarm Response window, if available. The system logs the
alarm (and its responses) and deletes it from the Alarm Monitor.
Removing All Alarms
If you are having hardware problems and need to clear alarms that will
not reset, use the Purge button in the Alarm Monitor. The system logs the
alarms and deletes them all from the monitor, even if they are not reset.
NOTE
An operator must have system permission to have access to the Alarm Monitor
Purge button.
! To remove all alarms from the Alarm Monitor:
1. Click the Purge button located on the Alarm Monitor (not the Alarm
Response window). The Purge All Alarms window appears (Figure
27-8).
2. Type the reason for clearing all alarms (for log records).
3. Click the Ok button in the Purge All Alarms window.
Picture Perfect 2.0 Administration Guide
27.7
Controlling Alarm Outputs
.
Figure 27-8.
Purge All Alarms Window
Controlling Alarm Outputs
An alarm may have associated outputs that require manual reset. You can
turn the entire output group on or off, or turn each individual output on
or off. See “Chapter 29 - Controlling Outputs” for details on using the
Control Outputs window.
! To control alarm outputs:
1. Click the Outputs button on the Alarm Response window to display
the Control Outputs window (Figure 27-9).
2. Options:
• Click a radio button to turn the entire output group on or off, then
click Ok.
•
Or, to turn individual outputs on or off, click the Output Group
button to display a listing of that group’s individual outputs. Each
output has its own on/off radio buttons for your selection. If no
selection is made, the outputs will retain their current settings.
When the desired changes have been made, click Ok. Click Ok on
the Control Outputs window to close it when you are done.
Figure 27-9.
27.8
Control Outputs Window
Picture Perfect 2.0 Administration Guide
Monitoring Activity
Chapter
28
Overview
Real-time activity displays in a scrolling window called the Activity
Monitor. The queue of messages on the Activity Monitor scrolls upwards
as new messages appear at the bottom. You can select whether you want
to monitor badge, operator, tour, or swipe and show activity, or any
combination of activities.
To temporarily stop the Activity Monitor from scrolling, click the Freeze
button. The system continues to queue activity messages and will resume
scrolling the stored information when you click the Unfreeze button.
To print the information that appears on the Activity Monitor, click the
Print button.
To see all the columns on the Activity Monitor, stretch the window frame
(use the point-and-drag method).
Prerequisites
The following Picture Perfect forms are prerequisites:
Forms
Purpose
To log activity to a printer and display on a
console.
PERMISSION GROUPS
PERMISSIONS
OPERATORS
To authorize operators to monitor activity.
Monitoring Activity
PRINTER
ROUTINGS
TERMINALS
What You Will Be Doing
This chapter shows you how to use the Activity Monitor to view badge,
operator, tour, or swipe and show activity and to control what kinds of
activities the Activity Monitor will display.
Picture Perfect 2.0 Administration Guide
28.1
Badge Monitor
Badge Monitor
The Activity Monitor displays badge activity by default. Types of badge
activities include the following:
VALID TRANSACTIONS
APB IN
A valid read occurred in an Antipassback In reader.
APB OUT
A valid read occurred in an Antipassback Out reader.
DEGRADED OPEN
A read occurred when an 8RP board was offline from
the Micro/4 CPU.
OPEN
A valid read occurred in a Normal reader or a Keypad
reader and the door was opened.
DURESS
A valid read occurred in a Keypad reader but was
followed by a duress code. The door was opened.
OPEN SHUNT
The door was opened as part of an alarm shunting
process.
PASSIVE APB IN
A badgeholder was granted access in two successive
APB IN readers.
PASSIVE APB OUT
A badgeholder was granted access in two successive
APB OUT readers.
SWIPE AND SHOW
A valid read occurred on a reader configured for
Swipe-and-Show. This will be followed by another
valid transaction, indicating how the transaction
ended.
T & A IN
A valid read occurred in a Time & Attendance In
reader.
T & A OUT
A valid read occurred in a Time & Attendance Out
reader.
VALID DOOR LOCKED In a Double Badge reader, the first badge read was
valid but will not open the door until the second is
validated.
28.2
VALID NO PASSAGE
A valid read occurred but the door was not opened
VALID TOGGLE
A valid read occurred in a Toggle reader which
reversed the current state of the Input Group.
VALID FLOOR
A valid floor number was selected with Elevator
Reader/DI/DO configuration.
Picture Perfect 2.0 Administration Guide
Monitoring Activity
28
INVALID TRANSACTIONS
The area was selected as offline.
BADGE DELETED
A deleted badge was used in a reader.
BADGE EXPIRED
An expired badge was used in a reader.
BADGE LOST
A lost badge was used in a reader.
BADGE SUSPENDED
A suspended badge was used in a reader.
BADGE UNKNOWN
An unknown badge was used in a reader.
INVALID APB IN
An invalid read occurred in an APB IN reader.
INVALID APB OUT
An invalid read occurred in an APB OUT reader.
INVALID CODE
The number entered was not a valid code for a Shunt
or Keypad reader.
INVALID KR BDG
The badge used in a Keypad reader was not a keypad
response badge.
INVALID PIN
The pin entered at the Keypad reader was invalid.
INVALID SHUNT
The shunt value was entered on a reader not enabled
as a Shunt reader.
INVALID T & A IN
An invalid read occurred in a T & A IN reader.
INVALID T & A OUT
An invalid read occurred in a T & A OUT reader.
KR INVLD OPEN DR
A keypad response was given while the door was still
open.
KR NOT ENABLED
A keypad response was given on a reader not enabled
as a Keypad reader.
LEARN TIMEOUT
A badge was not learned by the micro within the set
amount of time of 5 seconds.
NO CATEG MATCH
An invalid badge read occurred because the
badgeholder’s categories did not match one of the
area’s categories.
NOT VALIDATED
In a Double-Badge reader, the second badge read was
not validated because the first was invalid.
READER OFFLINE
A read took place in an offline reader.
USAGE EXHAUSTED
The badgeholder’s usage count for limited usage
readers has been exhausted.
Monitoring Activity
AREA OFFLINE
2ND BDG DOOR LOCK A second valid read occurred before the door was
opened for the first valid read. The door then locks.
INVALID FLOOR
An invalid floor number was selected with Elevator/
Reader/DI/DO configuration.
Picture Perfect 2.0 Administration Guide
28.3
Badge Monitor
! To view badge activity:
1. Select Monitors, then Activity.
2. Click the Outputs button to display the Monitor Control pop-up
window (Figure 28-1).
3. If not already selected, select Badge Monitor from the Monitor
Control pop-up window.
4. Click Ok. Figure 28-2 shows an example of a badge activity message.
Figure 28-1.
Activity Monitor Window with Monitor Control Picklist
Figure 28-2.
Example of a Badge Activity Message
The following is a description of each part of the activity message above:
B
Indicates badge activity
BADGE EXPIRED
The badge status.
01/28/93 09:10
Date and time the badge was read.
28.4
Picture Perfect 2.0 Administration Guide
Monitoring Activity
28
EMP:4
The badgeholder’s employee ID.
A Smith
The badgeholder’s initials and last name.
RDR: 1-1-009 2E LOBBY DOOR 2-1
The description of the reader that read this badge.
AREA: BLD 1,2,3 LOBBIES
The description of the area where the reader is located.
Operator Monitor
The system records operator activities, such as an operator changing the
database or commanding the mode to change. The system can log this
activity and the operator’s ID. See “Display Flags” on page 4.30 of
Chapter 4 - Initial Setup.
! To view operator activity:
1. Select Monitors, then Activity.
2. Click the Outputs button to display the Monitor Control pop-up
window.
3. Select Operator Monitor from the Monitor Control pop-up window.
4. Click Ok. Figure 28-3 shows an example of an operator activity
message.
Monitoring Activity
Figure 28-3.
Example of an Operator Activity Message
The following is a description of each part of the above activity message:
O
Indicates operator activity.
02/05/93 16:02
The date and time this record was updated or viewed.
Picture Perfect 2.0 Administration Guide
28.5
Swipe and Show Monitor
OPR_EMP# 0003
The operator employee number of the person who updated or viewed
this record.
LOGIN ID:jeffm
The login name of the operator (jeffm) who updated or viewed this record.
ACTION:Update
Description of the activity performed by the operator. In this case, it
was an Update.
TABLE: badge
The onscreen form (or table) that was viewed or updated. In this case,
it was the Badges form.
RECORD DESC:Roger,Falconbridge
The description of the record viewed or updated. In this case, it was
Roger Falconbridge’s badge record.
FIELD: state
The field name (state) of the record that was changed on the form.
VALUE:FL
The change (FL) which was made in the field.
Swipe and Show Monitor
To enable the Swipe And Show function, the reader must be designated
as Authorization Required or Authorization Not Required on the
Readers form. The Swipe And Show button must be selected on the
Monitor Control window from the Activity Monitor form (Outputs
function button). The Swipe And Show button is visible on the Monitor
Control window only when the Image package is installed in the system.
When properly configured, the Activity Monitor displays a photo when a
valid badge read is received from a reader. The photo is imported from the
photo database. For double badge transactions, the photo is displayed
when the first swipe is detected, and the door is allowed to be unlocked
when the second swipe is detected.
If Authorization Required is active, a dialog allows the operator to unlock
the door or advises the operator why the door cannot be unlocked. If the
door is allowed to be unlocked, the dialog includes an Ok button and a
Cancel button. The Ok button unlocks the door and dismisses the dialog.
The Cancel button dismisses the dialog, but does not unlock the door. If
28.6
Picture Perfect 2.0 Administration Guide
Monitoring Activity
28
the door is not allowed to be unlocked, the dialog only shows a Close
button, which dismisses the dialog.
If the operator clicks the Ok button to unlock the door, the door strike
output command event is recorded in operator history. Any invalid
transaction denies the operator the option of unlocking the door.
The monitor is frozen while the photo is being displayed to allow the
operator to read the text description of the transaction. The text
description includes the name of the badge holder and the name of the
reader where the transaction originated. If a photo cannot be displayed, a
dialog advises the operator of the reason. This dialog includes a Close
button to dismiss the dialog and free the Activity Monitor.
The Save, Search, and Print function buttons affect the contents of the
window, but not the photo. The New function button clears the monitor
window, but does not dismiss the photo. The Freeze function button
freezes the monitor, but will not free the monitor while it is frozen by a
photo. The monitor returns to normal when the operator dismisses the
photo by clicking the Close box.
If Authorization Not Required is active, the photo will appear and the
door will automatically unlock if this was a valid badge read.
If the Auto Image Replace option is enabled, the operator is not required
to acknowledge each photo prior to displaying the next one.
! To view swipe and show activity:
1. Select Monitors, then Activity.
2. Click the Outputs button to display a pop-up window of Monitor
Controls.
3. Select Swipe And Show Monitor from the Monitor Control window.
Figure 28-4.
Monitoring Activity
4. Click Ok. Figure 28-4 shows an example of a swipe and show activity
message.
Example of a Swipe and Show Activity Message
The following is a description of each part of the activity message above:
Picture Perfect 2.0 Administration Guide
28.7
Swipe and Show Monitor
B
Indicates badge activity
SWIPE AND SHOW
Indicates a Swipe-and-Show transaction.
01/28/93 09:10
Date and time the badge was read.
EMP:4
The badgeholder’s employee ID.
A Smith
The badgeholder’s initials and last name.
RDR: 1-1-009 2E LOBBY DOOR 2-1
The description of the reader which read this badge.
AREA: BLD 1,2,3 LOBBIES
The description of the area where the reader is located.
! To enable and use the Auto Image Replace option:
1. Change to the /cas/db/text directory by typing:
cd /cas/db/text
2. Edit the file auto_image_replace.cfg located in the directory,
changing the value of the two configuration values in the file. The
values should be set according to the user's requirements:
- WantPhotoReplaced
Indicates whether or not you want to use the auto-image
replacement feature.
0 - The default case. Indicates that you do NOT want to use the feature.
1 - Indicates that you DO want to use the auto-image replacement feature.
-
MinMilliSecsImageDisplay
Indicates the minimum delay period for the image to display, in
milli-seconds, when the image is being piped into the showimage
program from stdin. When used with auto-image replacement on
Swipe-and-Show, 500 milli-seconds is recommended, to ensure the
image is seen before the next one replaces it, in a high badging rate
scenario. This setting may need to be adjusted depending on the
capabilities of the computer.
To use the feature, the recommended settings are as follows:
28.8
Picture Perfect 2.0 Administration Guide
Monitoring Activity
28
WantPhotoReplaced
1
MinMilliSecsImageDisplay 500
3. Save the file, with the new settings.
4. To begin using the feature:
- If the Activity Monitor was already opened, it will need to be
closed, and a new copy opened, so that the configuration file can
be re-read.
-
If the Activity Monitor is not already opened, open a copy from
the Picture Perfect Main Menu.
5. Select the Swipe and Show Monitor option from the Outputs menu
on the Activity Monitor, and the auto-image replace functionality
should now be enabled, as badges are swiped on the designated
Swipe-and-Show reader.
Monitoring Activity
Picture Perfect 2.0 Administration Guide
28.9
Swipe and Show Monitor
NOTES
28.10
Picture Perfect 2.0 Administration Guide
Controlling Outputs
Chapter
29
Controlling Outputs
Overview
Outputs are devices that can turn on or off due to an input condition or
operator intervention. An authorized operator can turn outputs on or off
using the Control Outputs function for the duration of Time entered on
the Output form.
Prerequisites
The following Picture Perfect forms are prerequisites:
Form
Purpose
INPUT GROUPS
INPUTS
To allow inputs to activate (in groups)
when an alarm condition occurs.
OUTPUT GROUPS
OUTPUTS
To allow outputs to trigger (in groups)
when associated inputs activate.
What You Will Be Doing
This chapter shows you how to select the outputs you want to control
through input groups, output groups, or individual outputs.
If you select Input Groups, Output Groups or Outputs from the Control
Outputs form (Figure 29-1), a picklist appears where you select a single
input group, output group or output. Clicking on the corresponding icon
brings up the associated output group or output with radio buttons for
turning all outputs in the group on or off. If you want to turn single
outputs in the group on or off, click the Group button to display a picklist
where you can use radio buttons to turn individual outputs on or off.
Picture Perfect 2.0 Administration Guide
29.1
Controlling an Output from an Input Group
Figure 29-1.
Control Outputs Form
If you select Outputs from the Control Outputs form, a picklist appears
where you can select an individual output to turn on or off.
NOTE
Each transaction is recorded in operator history.
Controlling an Output from an Input Group
When you select an input group and click the Input Group button, a
window displaying all associated output groups will appear. You can then
trigger all the outputs associated with each output group displayed, or
you can trigger individual outputs associated with a selected output
group. (This does not generate an alarm.) See Figure 29-2. "Progression of
Windows in Control Outputs Form" on page 29.4.
! To control an Output from an Input Group:
1. Log in as an operator with permission to control outputs.
2. Select Control, then Outputs.
3. Click the Input Group button to display a picklist of input groups.
Select the desired input group, then click Close.
4. Click the Input Groups icon.
5. A window displaying buttons of each output group associated with
that input group will appear. Beside each Output Group button are
on/off radio buttons.
• Use the appropriate radio button for each output group to either
turn on or off all of the outputs in that group, then click Ok.
29.2
Picture Perfect 2.0 Administration Guide
Controlling Outputs
•
29
To turn individual outputs in a selected output group on or off,
click the button displaying the name of the desired output group
to display another window. This window lists the outputs of that
group individually, with separate on/off radio buttons for each.
Use the appropriate radio button for each output, then click Ok.
Controlling an Output from an Output Group
NOTE
Controlling Outputs
When you select an output group and click the Output Groups button,
a window displaying that output group appears. You can then trigger
all the outputs associated with that output group, or you can trigger
individual outputs associated with it. (This does not generate an
alarm.) Figure 29-2 shows the progression of windows from the
Control Outputs form.
The output is turned on for the time specified in the output’s duration field.
! To control an Output from an Input Group:
1. Log in as an operator with permission to control outputs.
2. Select Control, then Outputs.
3. Click the Output Group button to display a picklist of output groups.
Select the desired output group, then click Close.
4. Click the Output Groups icon.
5. A window displaying buttons for that output group appears. Selecting
the Output Group button will display all associated outputs. Beside
each Output button are on/off radio buttons.
•
Use the appropriate radio button to either turn on or off all of the
outputs in that group, then click Ok.
•
To turn individual outputs in a selected output group on or off,
click the button displaying the name of the output group to display
another window. This window lists the outputs of that group
individually, with separate on/off radio buttons for each. Use the
appropriate radio button for each output, then click Ok.
Picture Perfect 2.0 Administration Guide
29.3
Controlling an Individual Output
Figure 29-2.
Progression of Windows in Control Outputs Form
Controlling an Individual Output
When you turn an output on or off, this triggers the individual output.
NOTE
The output is turned on/off for the time specified in the output’s duration field.
! To control an individual Output:
1. Log on as an operator with permission to control outputs.
2. Select Control, then Outputs.
3.
29.4
Click the Output button to display a picklist of outputs.
Picture Perfect 2.0 Administration Guide
Controlling Outputs
4.
29
Select an individual Output from the picklist and click Close. Click
the Outputs icon. A window appears with on/off radio buttons next
to the output name.
5. Turn the individual output on or off and click Ok. Or, if you have
selected the wrong output, click Cancel.
Controlling Outputs
Picture Perfect 2.0 Administration Guide
29.5
Controlling an Individual Output
NOTES
29.6
Picture Perfect 2.0 Administration Guide
Viewing Status
Chapter
30
Overview
The Status function lets you see a micro’s current operating characteristics
(status) for its areas, categories, readers, doors, inputs, input groups,
outputs, output groups, alarms, modes, elevators, category floors and/or
version. You can also view the status of an area’s readers and/or doors.
Scheduled events change the micro database and can also be used to
update the host database. The Status function allows the operator to see
the database in the Micro in real time to see any changes the scheduler has
made.
Prerequisites
The following Picture Perfect forms are prerequisites:
Viewing Status
Form
Purpose
MICROS
Micros must be defined, online, and operating.
AREAS
Areas must be defined and enabled.
READERS
Readers must be defined, enabled, and online.
DOORS
Doors must be defined, with either sensing or monitoring
enabled, a door sensor input assigned, and an area assigned.
What You Will Be Doing
You will use the Status form to specify an Activity Monitor to view the
operating status of selected components (such as readers, doors, areas, or
inputs). You must first select to view by micro or by area.
Picture Perfect 2.0 Administration Guide
30.1
Viewing Status By Micro
Viewing Status By Micro
! To View Status by Micro:
1.
Select Status, then Status. The Status form (Figure 30-1) appears.
Figure 30-1.
Status Form
2. Click the Status By Micro button to display a picklist of micros. Select
a micro, then click Ok. A Status window (Figure 30-2) appears.
Figure 30-2.
Progression of Windows for Status by Micro
3. Select one or more of the items in the Status window, then click Ok. A
message appears in a Status Request pop-up window informing you
that your status requests have been sent.
30.2
Picture Perfect 2.0 Administration Guide
Viewing Status
30
4. Click Ok on the Status Request pop-up and wait for the Activity
Monitor to appear displaying the selected data, which begins to scroll.
Click the Freeze button to stop the scrolling action, and use the scroll
bar to view data that has scrolled off the window.
Viewing Status By Area
! To view Status by Area:
1. Select Status, then Status. The Status form appears.
2. Click the Status By Area button to display a picklist of areas. Select an
area, then click Ok. A Status window (Figure 30-3) appears.
Viewing Status
Figure 30-3.
Progression of Windows for Status by Area
3. Select one or more of the items in the Status window, then click Ok. A
message appears in a Status Request pop-up window informing you
that your status requests have been sent.
4. Click Ok on the Status Request pop-up and wait for the Activity
Monitor to appear displaying the selected data, which begins to scroll.
Click the Freeze button to stop the scrolling action, and use the scroll
bar to view data that has scrolled off the window.
Picture Perfect 2.0 Administration Guide
30.3
Viewing Status by Door
NOTE
You can also receive status information by selecting Status from the cmenu or
from the command line by typing statuscmd. The command statuscmd is the
only option where badge status information can be viewed.
Viewing Status by Door
! To View Door Status:
1. Select Status, then Status.
2. Select Status By Micro.
3. Select the desired micro from the picklist.
4. Select the desired door.
The following is a sample of the door status reported by the micro.
Figure 30-4.
Sample Door Status
The following is an explanation of the information provided by the Door
Status.
30.4
Picture Perfect 2.0 Administration Guide
Viewing Status
30
1. Description
Description of the door found in the database.
2. Door’s Area
Area to which the door belongs.
3. Door Sensor
The input associated with the door sensor for this door.
4. Exit Button
The input associated with the exit button for this door.
5. Strike Output
The output associated with the strike output for this door.
6. Forced Open
The input group associated with the forced open input group for this
door.
7. Held Open
Viewing Status
The input group associated with the held open input group for this
door.
8. Pre-Alarm
The input group associated with the pre-alarm input group for this
door.
9. Forced Open
Not Applicable.
10. Held Open
Not Applicable.
11. Keypad Shunt Time (mins)
The keypad shunt time associated with this door.
12. Unlock Time (secs)
The unlock time associated with this door.
13. Forced Open Shunt Time (secs)
The forced open shunt time associated with this door.
14. Allowable Open Time (secs)
The allowable open time associated with this door.
Picture Perfect 2.0 Administration Guide
30.5
Viewing Status by Door
15. Door State
The door state associated with this door.
16. Scheduling
States whether the Scheduling field is enabled on the Doors form.
17. Held Open Sensing
States whether the Held Open Sensing field is selected on the Doors
form.
18. Forced Open Monitoring
States whether the Forced Open Monitoring field is selected on the
Doors form.
19. Exit Button Asserts Strike
States whether the Exit Button Asserts Strike field is enabled on the
Doors form.
20. Pre-Alarm
States whether the Pre-Alarm field is enabled on the Doors form.
21. Keypad Alarm Response
States whether the Keypad Alarm Response field is enabled on the
Doors form.
22. Forced Relock
States whether the Forced Relock field is enabled on the Doors form.
23. On Door Open
States whether the On Door Open field is enabled on the Doors form.
24. On Door Close
States whether the On Door Close is enabled on the Doors form.
25. On Door Unlock Duration
States whether the On Door Unlock Duration is enabled on the Doors
form.
26. Current State
There are two values in this field. The first is the current state of the
door which in Figure 30-4 is Locked. The second value is the current
state of the door DI which is Closed in Figure 30-4.
30.6
Picture Perfect 2.0 Administration Guide
User Customization
Chapter
31
Overview
The User Customization Tool provides a Motif-based user interface for
customizing Badge and Department table fields. These fields are used in
the Access/Badges and Access/Departments screens. Not all badge and
department fields can be customized; only those whose database names
start with “User” or “Address”.
Application points of this feature are shown in Figure 31-1, Figure 31-2,
and Figure 31-3.
Street
City
User Customization
State
Zip
Figure 31-1.
Badge Holder Customization
Picture Perfect 2.0 Administration Guide
31.1
Overview
Figure 31-2.
31.2
User Fields Window from Badges Form
Picture Perfect 2.0 Administration Guide
User Customization
Figure 31-3.
31
User Fields in Departments Form
When the fields are customized, they are immediately updated in the
database so they can be viewed the next time the screen is activated. The
customizations are also written to the language’s meaning.dat file. This
file is located in a subdirectory of /cas/nls/src which has the same
name as the language’s locale. Writing the changes to meaning.dat
ensures that they will be preserved during patches and upgrades.
Invocation
NOTE
You must have root permission to use this tool.
User Customization
! To invoke the User Customization Tool:
1. Bring up a new window.
2. If you did not login as root, change to root permission by typing:
su root
3. Type: . /cas/bin/profile
4. To invoke the tool, type: usrcst
Note that usrcst does not take any arguments.
Picture Perfect 2.0 Administration Guide
31.3
User Interface
User Interface
Main Window
The main User Customization window (Figure 31-4) is the focal point of
user activity. Its components are described below.
Menu Bar
The menu bar contains three buttons: Exit, Save, and Help.
Exit Button
Select this button to exit the application. When unsaved customizations
exist, a dialog is activated which prompts the user as to whether or not the
changes should be saved. The user can select Yes to save the changes and
exit, select No to exit without saving the changes, or select Cancel to
cancel the attempt to exit.
Figure 31-4.
User Customization Window
Save Button
Select this button to save customizations. If the save fails, an error
dialog will be activated describing the error.
Help Button
Select this button to view on-line help information describing the tool.
31.4
Picture Perfect 2.0 Administration Guide
User Customization
31
Language Button and Box
Select the Language button to change the current language. Selecting the
button activates the Language Selection dialog which controls the actual
changing of the language.
If you have made changes to this screen and then select another language,
a window will appear asking you whether to save the changes made
before changing the language. Selecting Yes will save the changes and
then change the language, selecting No will cancel the changes and then
change the language and selecting Cancel will cancel the change to
another language.
The box adjacent to the language button displays the current language.
Table Button and Box
Select the Table button to change the current table. Selecting the button
activates the Table Selection dialog which controls the actual changing of
the table.
If you have made changes to this screen and then select another language,
a window will appear asking you whether to save the changes made
before changing tables. Selecting Yes will save the changes and then
change tables, selecting No will cancel the changes and then change tables
and selecting Cancel will cancel the change to another table.
The box adjacent to the table button displays the current table.
Fields List
The Fields list displays the fields that can be customized for the current
language and table. Double clicking on any item in the list activates the
Field Edit dialog which controls the customization of the field. The items
in the list are presented in alphabetical order.
Language Selection Dialog
Picture Perfect 2.0 Administration Guide
User Customization
The Language Selection dialog shown in Figure 31-5 controls changes to
the current language. The list contains only those languages that are
installed on a system and for which the user has write permission to the
language’s meaning.dat file.
31.5
User Interface
Figure 31-5.
Language Selection Dialog
! To select a language:
1. Either click on it in the list or typing its name in the Selection box.
2. Select Ok to change the current language to the selection. This also
deactivates the dialog.
3. Select Apply to change the current language to the selection. This
leaves the dialog active.
4. Select Cancel to exit the dialog without changing the current language.
5. Select Help to view on-line help about the dialog.
Table Selection Dialog
The Table Selection dialog shown in Figure 31-6 controls changes to the
current table. The list contains only those tables that can be customized.
31.6
Picture Perfect 2.0 Administration Guide
User Customization
Figure 31-6.
31
Table Selection Dialog
! To select a table:
1. Either clicking on it in the list or typing its name in the Selection box.
2. Select Ok to change the current table to the selection. This also
deactivates the dialog.
3. Select Apply to change the current table to the selection. This leaves
the dialog active.
4. Select Cancel to exit the dialog without changing the current table.
5. Select Help to view on-line help about the dialog.
User Customization
Picture Perfect 2.0 Administration Guide
31.7
User Interface
Change Field Dialog
The Change Field dialog shown in Figure 31-7 controls customization of
the current field.
Figure 31-7.
Change Field Dialog
The Database Name box contains the current field’s name as it appears in
the database. This name does not change.
The Old Name box contains the current field’s present name.
The New Name box allows the user to edit the name.
1. Select Ok to change the field name to the string in New Name box.
This also deactivates the dialog.
2. Select Apply to change the field name to the string in the New Name
box. This does not deactivate the dialog. Selecting another field in the
User Fields list will load the Old Name and New Name boxes with
that field’s name and allow customization of that field without having
to activate the dialog again.
3. Select Cancel to exit the dialog without changing the current field.
4. Select Help to view on-line help about the dialog.
31.8
Picture Perfect 2.0 Administration Guide
National Language Support
Chapter
32
National Language
Support
Overview
This chapter describes Picture Perfect’s National Language Support
(NLS) which allows operators to view text and enter data in their native
language.
Picture Perfect supports multiple languages at a single installation. Each
operator is restricted to a single language, but different operators can use
different languages. For example, one operator can work in English while
another works in Spanish, and yet another works in French. Each operator
is restricted to a single language at a time, but they can change languages.
For example, the English operator can switch to Spanish.
Limitations
Picture Perfect supports English, French, Spanish, Danish, German,
Finnish, Icelandic, Italian, Dutch, Norwegian, Portuguese, Swedish, and
Italian. Of these languages, only English, French, Spanish, Portuguese,
and Italian text are provided by GE Interlogix, CASI. Users must translate
the English text into another supported language before that language can
be used.
All items available from the main Picture Perfect menu support NLS. Not
all Picture Perfect utilities support NLS; some facilities intended for
system administrators are restricted to English. Examples of English-only
utilities are ppinstall, dpc, cmenu, eFlash and the log files.
Picture Perfect uses a single language for alarm notification, and archive
notification. This language is called the primary language and can be
selected by the system administrator. An operator using a language
different from the primary language will view the notifications in the
primary language.
Picture Perfect does not translate data entered by operators. For example,
an alarm description entered in French is viewed by all other operators in
French, regardless of what language they are working with. The text
contained in default database records provided by GE Interlogix, CASI
can be translated. An example is the All Categories category record.
Picture Perfect 2.0 Administration Guide
32.1
Installation
Installation
During installation, NLS support is automatically installed for the Base,
Tours, Image, and Alarm Graphics packages. When installation is
complete, the primary language is English (the default language), and the
install operator (default System Administrator ID) is defined to work in
English.
To enable usage of any of the other provided languages (Spanish, French,
Portuguese or Italian), they must be installed as follows:
1. Insert the Picture Perfect CD-ROM drive.
2. Log in as root.
3. From a command prompt, open a terminal window.
Result: You should see a # prompt.
4. Type the following to shut down Picture Perfect:
. /cas/bin/profile
rc.pperf –k
Enter
Enter
5. Mount the CD-ROM by typing the following:
AIX
mntCD
Enter
or
mount –v cdrfs –o ro /dev/cd0 /mnt
Linux
mount /dev/cdrom
Enter
Enter
6. Start the installation by typing the following:
AIX
Linux
/mnt/INSTALL –l (the letter “l”, not the numeral “1”)
/mnt/cdrom/INSTALL –l (the letter “l”, not the numeral “1”)
Result: Messages similar to the following, followed by a list of the
available language packages, will appear on the screen:
Picture Perfect CD-ROM Installation - 1.16 2/7/02
Copyright (C) 2000-2002 CASI-RUSCO
32.2
Picture Perfect 2.0 Administration Guide
32
National Language Support
The following LANGUAGE_EXT product(s) are available:
Prod #
------
Name and Descriptions
---------------------
0
1
2
3
french
italian
portuguese
spanish
French in France Language Extension
Italian in Italy Language Extension
Portuguese in Brazil Language Extension
Spanish in Spain Language Extension
to
National Language
Support
Enter product number(s), separated by ',' to select, 'q'
quit:
7. Type the numbers of the language products to be installed, separated
by a comma.
Result: Your package selection will be displayed, and you will be
asked to confirm:
You have selected the following product(s):
3
spanish
Spanish in Spain Language Extension
Is this correct (y/n)? [y]
8. To make a different selection, type n, and you will be returned to step
6 of the installation, where you will be prompted again for your
language selections. To continue the installation, press Enter to accept
the default (y).
Result: The installation will begin, and messages similar to the
following will appear on the screen:
Installing spanish...
Picture Perfect Multi-package Installation - 1.14 2/7/02
Copyright (C) 1991 thru 2002
CASI-RUSCO
Installing from image in /mnt/pp ...
200 blocks
Do you want to install the Picture Perfect SPANISH Package (y/
n)? [y]
Picture Perfect 2.0 Administration Guide
32.3
Installation
9. To continue the installation, press
Enter
to accept the default (y).
Result: You will see messages similar to the following, as the selected
language is installed:
Installing spanish...
Picture Perfect Multi-package Installation - 1.14 2/7/02
Copyright (C) 1991 thru 2002 CASI-RUSCO
Installing from image in /AIX17CD/pp ...
200 blocks
Do you want to install the Picture Perfect SPANISH Package (y/
n)? [y]
Checking if need to save nls or help files...
Picture Perfect NLS Text Save - 1.16 1/19/01
Copyright (C) 1994-2001 CASI-RUSCO
Tue Mar 19 17:08:21 EST 2002
Saving
Saving
Saving
Saving
Saving
Saving
nls files ...
nls files in /cas/nls/src/en_US ...
nls files in /cas/nls/src/en_US/.devel ...
help files ...
help files in /cas/help/en_US ...
help files in /cas/help/en_US/.devel ...
NLS Text Save Finished
Picture Perfect SPANISH Installation - Version 2.0 2/4/02
Copyright (C) 2001-2002 CASI-RUSCO, Inc
Making directories which are not present
making //cas/help/es_ES
making //cas/help/es_ES/index
making //cas/nls/cat/es_ES
making //cas/nls/src/es_ES
making //cas/app-defaults/es_ES
All es_ES directories are present
Record has correct availability.
Reading spanish files from media. Please wait...
Extracting files from media...
18600 blocks
The files have been read from the media.
Shutting down the Informix database. Done.
The 'SPANISH.INST' installation has completed successfully.
Checking if need to update nls files...
Picture Perfect NLS Check - 2.0 1/19/01
32.4
Picture Perfect 2.0 Administration Guide
National Language Support
32
Copyright (C) 1997-2001 CASI-RUSCO
Tue Mar 19 17:09:21 EST 2002
Updating nls files...
Picture Perfect NLS Text Update - 1.32 2/5/02
Copyright (C) 1994-2001 CASI-RUSCO
Tue Mar 19 17:09:22 EST 2002
National Language
Support
Comparing nls files in /cas/nls/src/en_US/.devel ...
Updating nls files in /cas/nls/src/en_US ...
Comparing nls files in /cas/nls/src/es_ES ...
Updating nls files in /cas/nls/src/es_ES ...
Comparing help files in /cas/help/en_US/.devel ...
Updating help files in /cas/help/en_US ...
Comparing help files in /cas/help/es_ES ...
Updating help files in /cas/help/es_ES ...
Building en_US ...
Building es_ES ...
Loading meaning table ...
NLS Text Update Finished
Running /cas/bin/fixperm on /tmp/spanish.perm file...
No errors detected
/cas/bin/fixperm finished.
Installing LANGUAGE_EXT product(s) was successful.
The INSTALLation has completed.
The system needs to be rebooted for the changes to take effect.
Reboot the system (y/n)? [y]
10. Remove your installation media before pressing
Enter
(defaults to y).
Additional languages can be made available. The primary language and
the install operator’s language can be changed. However, before any of
these changes can be made, any languages, other than the provided ones
(Spanish, French, Portuguese, and Italian) must be translated.
Language Translation
The English text provided by GE Interlogix, CASI can be translated into
any of the supported languages. The English, French, Spanish,
Portuguese, and Italian text can be modified as well. This means that an
installation can translate GE Interlogix, CASI’s English terminology into
its own English terminology.
Picture Perfect 2.0 Administration Guide
32.5
Language Translation
The steps to language translations are:
1. Create text that can be translated.
2. Translate the text.
3. Install the translations.
4. Make the text available for operators.
Subsequent changes to a language’s translation only requires steps 2 and
3. Make the change in the translated text and then re-install the
translations.
Locale
Locale is defined as a language and the location in which it is used. All
languages in Picture Perfect are defined in terms of locale. Each language
has a unique locale identifier. Picture Perfect uses the locale identifiers
defined by the vendor supplied operating system. The supported locales
and their identifiers are defined in the following table:
Table 32-1: Language Locale Names
Language Description
32.6
Locale Name
AA=”Arabic Area”
ar_AA
English in United States.
en_US
French in France.
fr_FR
Spanish in Spain.
es_ES
Danish in Denmark
da_DK
German in Switzerland
de_CH
German in Germany
de_DE
English in Great Britain
en_GB
Finnish in Finland
fi_FI
French in Belgium
fr_BE
French in Canada
fr_CA
French in Switzerland
fr_CH
Picture Perfect 2.0 Administration Guide
National Language Support
32
Table 32-1: Language Locale Names (Continued)
Language Description
Icelandic in Iceland
is_IS
Italian in Italy
it_IT
Dutch in Belgium
nl_BE
Dutch in Netherlands
nl_NL
Norwegian in Norway
no_NO
Portuguese in Brazil
pt_BR
Portuguese in Portugal
pt_PT
Swedish in Sweden
sv_SE
Hebrew in Israel
iw_IL
Korean in Korea
ko_KR
National Language
Support
NOTE
Locale Name
Remember to use the proper locale name for the operating system installed at your site.
Preparing for Translation
Each language stores its text in unique subdirectories under /cas/nls/
src and /cas/help. The subdirectory names are the same as the
language’s locale identifier. For example, in an AIX environment, English
text is in
/cas/nls/src/en_US and /cas/help/en_US; French text is in
/cas/nls/src/fr_FR and /cas/help/fr_FR.
English, French, Spanish, Portuguese, and Italian subdirectories contain a
subdirectory called .devel. This subdirectory holds the text as provided
by GE Interlogix, CASI. Do not change the .devel subdirectory or its
contents. Doing so will make it impossible for a patch or upgrade to
correctly modify text. Translations should only be made in the language’s
base directory. Also, do not add a .devel directory to any language
directory not provided by GE Interlogix, CASI.
The createlang command creates language subdirectories and copies
English text into the subdirectories. Note that it copies the English text
provided by GE Interlogix, CASI; it does not copy any local modifications
that may have been made to English. Invoking createlang requires
root permission. Its calling convention is:
createlang locale orientation
Picture Perfect 2.0 Administration Guide
32.7
Language Translation
where:
locale is the locale identifier of the language being created.
orientation is the direction from which the language is
read. It is left for left-to-right languages such as English. To
create text for
Swedish translation, enter:
createlang sv_SE left
Do not use createlang with locales that have already been created.
Doing so will replace that language’s source text files with English. This
could result in the loss of translated text. Only the locale for English in US
(en_US), is created during base package installation.
Translating Text
Picture Perfect text is divided into four types: help information, database
synonyms, default database, and catalogs. A crucial concern in translating
text is the code page used in the translation. The code page specifies the
character encoding. All translations should be made with the ISO8859-1
code page which is used by Picture Perfect. The only other acceptable code
page is the IBM-850, which is normally found on personal computers.
Translations made in IBM-850 can be converted to ISO8859-1 with the AIX
iconv utility.
Database Synonyms
Database Synonyms are synonyms for database tables, fields, and values
used to describe the database to operators. They are also called meanings.
The synonyms for a particular language are stored in a file named
meaning.dat in /cas/nls/src/LOCALE where LOCALE is the
language’s locale identifier. Each line in meaning.dat defines a distinct
synonym. The lines are separated into three to four fields (as numbered in
the example below) separated by bars (|). The third field is the actual
synonym and is the only field that can be changed; changing the first and
second fields will corrupt the database. The third field must not contain
more than 60 alphanumeric characters. The fourth field is optional. When
present, it will always contain a capital T. Its presence indicates that the
field needs translation. This field should be removed when the record is
translated. Only “T|” is removed; the records must always end with a bar.
An example of a meaning.dat synonym definition is:
1 2
3
4
33|2|Alarm Monitors|T|
Only the words “Alarm Monitors” can be changed, and the translation
must not exceed 60 alphanumeric characters. The french translation is:
33|2|Moniteur d’alarmes|
32.8
Picture Perfect 2.0 Administration Guide
National Language Support
32
Help Information
Help information aids operators in understanding the system.
Help information for a particular language is stored in files located in
/cas/help/LOCALE where LOCALE is the language’s locale identifier.
The help files are in HTML format and cannot be translated.
Default Database Text
National Language
Support
Default Database Text is text contained in records within the minimum
database.
The default database text for a particular language is stored in files named
base_ddb.dat and tour_ddb.dat located in /cas/nls/src/LOCALE
where LOCALE is the language’s locale identifier. The file base_ddb.dat
contains default database text for the Base package and will be present on
all installations. The file tour_ddb.dat contains default database text for
the Tour package and will only be present when the Tour package is
installed.
Each line in the files defines text for a minimum database record. The lines
are divided into six to seven fields separated by bars (|). Only the fifth and
sixth fields are of interest to translators. The fifth field contains the actual
text which is translated. The sixth field contains the maximum number of
alphanumeric characters that the fifth field may contain. Only the fifth
field can be changed; changing the first through fourth fields will corrupt
the database. The seventh field is optional. When present, it will always
contain a capital “T”. Its presence indicates that the field needs translation.
The seventh field should be removed when the record is translated. Only
“T|” is removed; the records must always end with a bar.
An example of a default database text file line is:
1
2
3
4
5
6 7
alarm|id|-1|description|MICRO PLACED OFFLINE|30|T|
The only portion of the line that can be changed are the words “MICRO
PLACED OFFLINE” and the change must not exceed 30 alphanumeric
characters. A Spanish translation is:
alarm|id|-1|description|MICRO FUERA DE LINEA|30|
Catalogs
Catalogs contain all text that is not database synonyms, help information,
or default database text.
Catalog text for a particular language is defined in six catalog source files
located in /cas/nls/src/LOCALE where LOCALE is the language’s
locale identifier. Each catalog source file holds a different type of catalog
text.
•
pp_phr.src contains phrases.
Picture Perfect 2.0 Administration Guide
32.9
Language Translation
•
pp_err.src contains error messages.
•
pp_wrn.src contains warning messages.
•
pp_inf.src contains informational messages.
•
pp_mnu.src contains menu labels.
•
pp_font.src contains font definitions.
All six catalog source files have a similar format, and their translation
must obey the following rules. Failure to obey the rules makes it
impossible to install the translations.
1. Do not change any line that starts with a dollar sign ($). Examples are:
$ Error Message Catalog
$ name ERROR
$len 245
$quote “
$set SYM_SET_ERR
2. Do not change any words which start with “SYM_”. These are called
symbols.
3. Only change text found between quotes. This text is called a message
and is only defined on lines that begin with a symbol. Messages are the
only part of a catalog that can be changed. An example is:
SYM_ERR_COULD_NOT_OPEN “Cannot open %1$s”
The message is “Cannot open %1$s.” and it is the only part of the
line that can be changed. A French translation is:
SYM_ERR_COULD_NOT_OPEN “Impossible d’ouvrir %1$s”
4. Do not add quotes.
5. Messages must not exceed the catalog’s text limit. The limits are:
• 40 alphanumeric characters for pp_phr.src and pp_mnu.src;
•
245 alphanumeric characters for pp_err.src, pp_wrn.src, and
pp_inf.src; and
•
255 alphanumeric characters for pp_font.src.
6. Do not split messages into separate lines. Each catalog source line
defines a distinct message, and splitting a message will corrupt the
file. When a message needs to be displayed across multiple lines, the
“\n” character combination indicates where a line break is desired.
Line breaks can only be used in pp_err.src, pp_wrn.src, and
pp_inf.src. Translators can move line breaks within a message and
32.10
Picture Perfect 2.0 Administration Guide
National Language Support
32
can add or remove line breaks as long as there are no more than 4 lines
per message and no more than 72 alphanumeric characters on a line.
An example of a message that spans 4 lines is given below:
SYM_WRN_EXAMPLE “Line 1\nLine 2\nLine 3\nLine 4\n”
SYM_INF_EXAMPLE “The %1$s jumped over the %2$s.”
A translation can change the sentence structure as follows:
SYM_INF_EXAMPLE “The %2$s was jumped over by the %1$s.”
The substitution variables were moved to accommodate the new
structure. Since they identify which variable is substituted, the correct
substitution will take place even with the structure change.
Substitution variables can be moved but must not be altered in any
other way.
8. pp_mnu.src defines menu labels that contain mnemonic
alphanumeric characters that are used in menus as hot-keys.
pp_mnu.src is divided into sets identified by lines that start with
“$set”. Each set defines the menu labels for a distinct menu. The
mnemonic character for a label is the character following a caret (^).
When the label is translated, the mnemonic character must match a
character in the label preceding the caret and must not match any
other mnemonic alphanumeric characters in the set. An example is:
$set SYM_SET_HIST_TYPE
SYM_HIST_TYPE_ALARM “Alarm^A”
SYM_HIST_TYPE_BADGE “Badge^B”
SYM_HIST_TYPE_OPER “Operator^O”
SYM_HIST_TYPE_TOUR “Tour^T”
$set SYM_SET_HIST_SOURCE
The lines between “$set SYM_SET_HIST_TYPE” and “$set
SYM_SET_HIST_SOURCE” define a single menu. The first label is
“Alarm” and its mnemonic character is “A”. None of the labels within
the set have the same mnemonic character. Note that other sets can
define the same mnemonic alphanumeric characters.
Picture Perfect 2.0 Administration Guide
32.11
National Language
Support
7. Some catalog messages contain special character combinations called
substitution variables. These define how dynamic information such
as strings and numbers will be substituted into the message during
system execution. All substitution variables start with the “%#$”
character combination and end with the next blank character. The “#”
is a number that indicates which variable is inserted. As messages are
translated, the substitution variables can be moved as the sentence
structure changes. An example is:
Installing Translations
9. The messages with pp_font.src define the fonts used by a
language. The messages can contain font aliases or full X Logical Font
Descriptions (XFLD). Each font must define a code set which supports
the language. Since ISO8859-1 supports Western European languages,
the English font descriptions can be used for all supported languages.
10. Messages that need translation will end with |T|. The |T| should be
removed when the message is translated.
SYM_ERR_COULD_NOT_OPEN “Cannot open %1$s”|T|
becomes
SYM_ERR_COULD_NOT_OPEN “Impossible d’ouvrir %1$s”
Installing Translations
Translations must be installed before an operator can use them. The
following commands install translations. They are used after a language is
first translated and after the translations are modified. Only operators
with root permission can use the commands. Note that only English is
installed during Picture Perfect base or language package installation.
buildlang
The buildlang command is used to build a language’s catalog files and
the resource files that use catalog messages. Any user with root
permission can invoke this tool by typing the following at the command
line:
buildlang locale
where
locale is the locale identifier of the language being built.
The following example builds the catalogs and resource files for Spanish.
. /cas/bin/profile
buildlang es_ES
buildmeaning
The buildmeaning command builds the database meaning table with
the database synonyms defined for all languages on the system. It uses the
meaning.dat file found in every subdirectory of /cas/nls/src. Any
user with root permission can invoke this tool by typing the following at
the command line:
. /cas/bin/profile
buildmeaning
The command has no arguments.
32.12
Picture Perfect 2.0 Administration Guide
National Language Support
32
upddb
The upddb command updates the database with a language’s default
database text. It can only be run from /cas/db/default. Any user with
root permission can invoke this tool by typing the following at the
command line:
upddb locale
National Language
Support
where locale is the locale identifier of the language whose
translations will be loaded.
The following example loads Spanish default database translations:
cd /cas/db/default
./upddb es_ES
avlang
The avlang command makes a language available or unavailable for
operators. All language’s except English must be made available before
any operator can use them. Any user with root permission can invoke this
tool by typing the following at the command line:
avlang locale availability
where
locale is the locale identifier of the language whose
availability is being changed, and
availability indicates whether the language is being made
available or unavailable. A value of A makes the language available; a
value of U makes the language unavailable.
The following example makes Spanish available.
avlang es_ES A
Translation Installation Example
The following commands make Spanish available to operators and make
the default database use Spanish. They are entered only after installing the
Spanish package.
buildlang es_ES
buildmeaning
upddb es_ES
avlang es_ES A
Picture Perfect 2.0 Administration Guide
32.13
Modifying Translations
Only use the upddb command when the default database language is
being changed. In the above example, the upddb command is not
included unless the default database is being changed to Spanish.
Modifying Translations
At times a language’s translations will need to be modified to correct
spelling or to make meanings clearer. Modify the source text files
following the rules defined in “Installing Translations” on page 32.12.
Then re-install the language using the commands defined in the Installing
Translations section. Not all of the commands need to be used:
•
buildlang is only needed when catalog text has been modified,
•
buildmeaning is only needed when database synonyms have been
modified,
•
upddb is only needed when default database text has been modified,
and
•
avlang does not need to be entered again since the language has
already been made available.
Selecting An Operator Language
All operators are associated with a single language. This is the language in
which the operator works. The language is first defined when the operator
is created, and it can be changed at any time. The actual change does not
take effect until the next time the operator logs into the system.
To define an operator’s language, follow these steps:
1. Select Control, then Operators from the Main menu.
2. Define a new operator as described in Chapter 6 - Permissions and
Operators or use the Find button to find an existing operator
definition.
3. Click the Country button and select a language from the list of
available languages displayed.
4. Click the Save button to save the operator record.
32.14
Picture Perfect 2.0 Administration Guide
National Language Support
32
Selecting The Primary Language
The following command changes the primary language. The primary
language must be an available language Any user with root permission
can invoke this tool by typing the following at the command line:
chprlang locale
where
locale is the new primary language’s locale identifier.
chprlang fr_FR
Selecting Login Screen Language
On installation, the Picture Perfect Login screen is set to English. The
chxdmlang command changes the language used by the screen. It should
only be run after the buildlang command is used to install the
language’s catalogs and resource files. The system must be rebooted for
the change to take effect. Any user with root permission can invoke this
tool by typing the following at the command line:
chxdmlang locale
where
locale is the locale identifier of the language the login
screen uses.
The following example changes the login screen to French:
chxdmlang fr_FR
Subsequent modifications to the text used in the screen require that the
command be run again. As before, buildlang must be run before
chxdmlang.
Picture Perfect 2.0 Administration Guide
32.15
National Language
Support
The following example sets the primary language to French.
Error and Warning Messages
Error and Warning Messages
All error and warning messages are displayed with a type indicator
followed by a message number. The type indicators are E for error
messages and W for warning messages. Examples are:
E00123 - Error message number 123
W00123 - Warning message number 123
The ppmsgnbr facility provides the ability to view a warning or error
message in a selected language. The command’s calling convention is:
ppmsgnbr type number [locale]
where
type is message type; E or W,
number is message number, and
locale is locale identifier of the language in which
message will be displayed. The argument is optional, with
English as its default value.
Customizing Badge and Department Screens
Both the Badge and Department screens include fields which users may
wish to customize. The Badge screen defines fields Address 1 to
Address 5 and User 1 to User 40 to hold any data desired by the user.
The Department screen defines fields User 1 and User 2 to hold any
data desired by the user. Use the User Customization Tool to customize
the Address and User field names as they are presented on the Badges
and Departments forms. The customization may be made in all available
languages. See “Chapter 31 - User Customization” for information on how
to use the tool.
32.16
Picture Perfect 2.0 Administration Guide
In Case of Problems
Chapter
33
Overview
The CMENU program is targeted towards support personnel and Picture
Perfect users with system-level responsibility. CMENU is a menu-driven
consolidation of various commands and programs used to administer the
Picture Perfect system.
NOTE
The CMENU program provides raw diagnostic data to technical support personnel. This
chapter does not equip users with all of the information and background required to
perform troubleshooting. Instead, this chapter shows users how to use CMENU functions
to capture diagnostic data. The support representative then uses this raw data to
troubleshoot the problem and provide a solution.
In Case of Problems
If you are familiar with Picture Perfect or the operating system, you can
execute most of the functions provided by CMENU from the command
line. Also, many of the functions are duplicated by the XWindows/Motifbased software. This character-based system provides remote support
(since Picture Perfect does not currently support dial-up terminals).
CMENU is not all-inclusive. If a function that you require does not appear
on one of the menus, there is still a possibility that the function or program
exists elsewhere on the system in some other format.
The Watchlog function in the Diagnostics subsystem menu displays error
(and information) messages from the transaction processing system (TPS).
See the error messages chart for a list of the most common error messages
and what they mean.
Use the Diagnostic and the Status functions to troubleshoot problems that
may occur. See the troubleshooting chart for problems and possible
solutions.
Press F1 to obtain Help for the currently highlighted selection in any of
the menus or submenus.
What You Will Be Doing
This chapter shows you how to use the CMENU utility, how to handle
error conditions, and how to troubleshoot problems.
Picture Perfect 2.0 Administration Guide
33.1
Conventions
Conventions
Terms such as SYN, ACK, ENQ appear in all caps in this chapter, just as
they appear in the Watchlog. See the Glossary for a definition of these
terms.
The term TPS (Transaction Processing System) appears without the article
“the”.
Terms such as “ACK”, “daemon”, and “packet” are followed with a short
definition in parentheses. A more detailed definition appears in the
Glossary.
Using the CMENU Utility
The Picture Perfect Utilities Menu (Figure 33-1) is the menu for all the
system diagnostic utilities in the CMENU program. To display the
Utilities Menu, type cmenu at the command-line prompt and press Enter
or click the middle mouse button and select Cmenu from the Programs
Menu. Press F1 to obtain onscreen Help for the currently highlighted
selection in any of the menus or submenus.
Figure 33-1.
Utilities Menu
Diagnostics Subsystem
The Diagnostic subsystem menu (Figure 33-2) has many diagnostics
available for troubleshooting TPS. Use the following menu selections to
view, set, or clear individual diagnostics.
33.2
Picture Perfect 2.0 Administration Guide
In Case of Problems
Figure 33-2.
Diagnostics Subsystem Menu
•
Process: Use Process control diagnostics to view the status of message
queues, memory, and communications, and to view information for
alarms, micros, ports, and terminals.
•
Check: Use Check current diagnostic levels to view the on/off
diagnostic status for TPS managers and drivers.
•
Set: Use the Set and Clear diagnostic levels functions to set
diagnostics on and off for TPS managers and drivers.
•
Watchlog: Use Watch diagnostic log to view TPS manager and driver
transactions in a scrolling window.
In Case of Problems
NOTE
33
Set diagnostics for a short duration of time, because the diagnostic writes a large
volume of detailed information to the TPS log.
System performance is degraded while diagnostics are set. Diagnostics usually
are not set during normal operations.
Process Control Diagnostics
This selection allows the operator to look at the data structures contained
in the process control block (PCB). The PCB is the “nerve center” of TPS
and runs only when TPS is running. Otherwise, the appropriate message
displays and the program terminates.
NOTE
This utility can also be run by itself from the command line by typing at the # prompt:
dpc
Enter
Select Process to display the Dump PC Main Utilities Menu (Figure 33-3).
Picture Perfect 2.0 Administration Guide
33.3
Diagnostics Subsystem
Figure 33-3.
Dump PC Main Utilities Menu
Queues
Select Queues, Memory, Communications on the Dump PC Main
Utilities Menu to display shared memory usage, communications
flow control flags, and the number of messages on each message
queue (Figure 33-4). The display is updated every second. To exit the
display, press ESC .
Figure 33-4.
Queues, Memory, Communications Screen
Messages
The processes pass data to each other using message queues. The total
number of messages allowable on one message queue is equal to the
total number of messages allowable system wide, and is set to 800
when the system is installed.
Each process continuously reads its own queue, looking for messages
addressed to it. When a message is found, the process performs an
action based on the type of message and the data within the message.
In some cases, this results in another message being created and
passed to a different process, while in other cases, the process handles
the message itself.
33.4
Picture Perfect 2.0 Administration Guide
In Case of Problems
33
An example of the former is the Receive Manager in receipt of a badge
transaction message. Since the Receive Manager is responsible for
interpreting and routing all types of messages sent by the micros, it
doesn’t have time to perform all the tasks necessary to complete each
transaction. Instead, it routes the message to the appropriate manager
task for further processing by essentially duplicating the message and
placing it on that manager’s queue. An example of the latter is the
Badge Manager in receipt of a badge history transaction. Here, the
message type is a badge (BDG) message, containing the type of
transaction, along with the badge ID and other information. The badge
manager gets enough information to complete the transaction,
updating the badge holder’s record in the badge table and adding a
new record to the badge history table.
The message queue display shows each manager’s or driver’s queue
and the number of messages currently on them. In an efficient system,
the numbers should all remain at zero, since each process tries to
empty its queue as quickly as possible.
In Case of Problems
Memory Management
The TPS contains its own Memory Management system specially
designed for interprocess communications. At system startup, a
shared memory segment is initialized. This segment contains the
process control block and associated data structures. The remainder of
this segment is made available to all processes for use as needed. The
main use of shared memory is for passing the text portions of
messages.
One limitation of message queues is the total amount of memory the
messages in the queue system can occupy. Although it is possible to
place entire messages on the queue and to allow the receiving
processes to read them directly, two factors make this impractical.
First, each time a message is to be forwarded to another process, a
whole new message would have to be created and a memory copy
performed. This is rather inefficient, since much of the CPU time
would be spent copying data. Second, it would be possible to exceed
the maximum amount of memory allowable on message queues,
depending on the size and number of messages on all queues.
To overcome this, memory for the message is allocated within the
shared memory segment, and the pointer to this message is passed as
the data (text) portion of the message. When the recipient process
receives a message, it actually receives the address of the data portion
of the message. With this address, it can perform whatever operations
are necessary without copying the data into the process’ local data
segment.
Picture Perfect 2.0 Administration Guide
33.5
Diagnostics Subsystem
The Memory Management display shows the number of shared
memory blocks currently allocated, the number of bytes of shared
memory currently in use, and the number of bytes currently available.
Also shown is the system-wide message count, the resend
transmission window size, the current outbound message serial
number, and the total number of messages processed since the system
was started.
If the system-wide message count exceeds 75% of the system’s
capacity, the message count is displayed in red. If the amount of
shared memory used is greater than 50% of the total bytes in the
shared data segment, the shared memory is displayed in red.
Communications
Under normal circumstances, the COMM XON flag is ON (Y) and the
COMM XOFF flag is OFF (N). When the total number of messages on
all queues exceeds the XOFF Threshold specified in the system
configuration record, these flags’ values are reversed and the host
micros accepts no more messages from the micros. This allows the
system to process the messages on the queues well before the system
becomes overridden with traffic. No messages are lost, since the
micros continuously resend their traffic until messages are accepted
again.
NOTE
The system exceeds the transaction threshold only in extreme circumstances.
Note (and closely monitor) each occurrence.
Chronic message overrun may be caused by:
•
XON/XOFF threshold that is too low. Set the transaction on/off
thresholds using the Parameters screen (obtained from the Control
icon on the Picture Perfect Main menu). For the RISC System/6000
host, settings are 1750/2000.
•
Malfunctioning printer or print spooler.
•
Extreme lack of memory.
Alarms, Flags, Devices, Counts
The Alarms, Flags, Devices, Counts screen (Figure 33-5) shows
information that is less likely to change over a period of time. The
display is updated every second.
33.6
Picture Perfect 2.0 Administration Guide
In Case of Problems
Figure 33-5.
33
Alarms, Flags, Devices, Counts
Alarms
The Alarms block shows the ID of the last input tied to an alarm, the
ID of the last alarm, the number of active alarms, and the number of
pending alarms.
In Case of Problems
Flags
Two sets of flags are monitored on this display: History flags and
Diagnostics flags. History flags are set briefly while full history tables
are swapped with empty tables. The flags are used to prevent the
various managers from writing to them until the exchange has been
completed. Diagnostics flags indicate which process diagnostics are
being currently routed to the diagnostic monitor and diagnostic log. If
the log routing flag is on (Y), any diagnostics sent to the diagnostic
monitor are also sent to the log.
Use diagnostics only when required, since diagnostics degrade the
performance of the system, occupy shared memory, and consume disk
space.
The status manager diagnostics turn on automatically when you
request status from a micro, and turn off (flag clears) when you exit
the status monitor. This is normal, and does not indicate a problem.
Configured Devices
The Configured Devices display shows the numbers of various
configured devices. Once the system is started, these numbers do not
change. The key items to note are the number of hosts, micros, ports,
printers, and operators. The current version of CMENU does not
display device information about tape drives and floppy drives.
Picture Perfect 2.0 Administration Guide
33.7
Diagnostics Subsystem
History Counts
The History Counts display shows the number of transactions for
alarms, badges, and operator activity. These numbers reflect changes
to the counts while the screen is displayed.
Micro Map
The Micro Map screen (Figure 33-6) provides a visual display of all the
micros on the system and their relative position on their respective
serial lines. Each page on the display shows up to 10 serial lines. A line
of micros is represented by a serial (tty) line, followed by all the micro
addresses on that line. Between the host and the first micro and
between each micro is a hyphen (-). The absence of a hyphen indicates
that the communications path is broken somewhere in that segment. If
a micro has been configured or placed offline by the host, the micro’s
ID is displayed in normal intensity. Micros that are in true online,
pending online, or pending offline state are displayed in high
intensity.
Figure 33-6.
Micro Map
Context-Sensitive Help
There are several options available when viewing the Micro Map
screen. Press F1 or ? for a list of these options.
33.8
Picture Perfect 2.0 Administration Guide
In Case of Problems
33
Multiple Pages
If your system is configured with more than 10 serial lines, additional
pages of lines can be accessed by pressing Page Down or f to display
the next page of information. To move back to a previous page, press
Page Up or b.
Moving About the Screen
To view the detailed communications status or to run a full
communications trace on a micro, you must first select the micro. The
arrow keys can be used to move the cursor to the micro whose status
or communications trace you want to view. After the cursor is located
at the micro, press F2 or t to start tracing packets to and from the
micro, or press F3 or s to view the detailed status of the micro. The
detailed status of all micros on the same serial line is available using
this method. This is described in more detail in the “Micro Status”
paragraph below.
In Case of Problems
Dialup Micros
Unconnected dialup micros are not represented on the Micro Map
screen. When a micro dials in, it is shown on the serial line to which it
is attached. To view the detailed status of an unconnected dialup
micro, press F4 or m. You will be prompted to enter the micro’s ID.
After entering the ID and pressing Enter , the detailed status of that
micro is displayed.
Micro Status
The Micro Status screen displays information about each micro
configured. The display is updated every second. See Figure 33-7.
Picture Perfect 2.0 Administration Guide
33.9
Diagnostics Subsystem
Figure 33-7.
Micro Status
Each page of this screen lists information for up to three Micro IDs, in
three columns. Each column uses these fields:
Micro ID: Displays the micro’s identification number.
Next in line: Displays the ID number of the downstream micro.
Pri Port: Displays the primary port of the micro.
Sec Port: Displays the secondary port of the micro.
Last comms: In the case of a downstream micro, this field shows the
last time a non-ACK packet was received from the micro. In the case of
a port-group leader (first micro in the port group--the micro
responsible for acknowledging messages for all other micros on the
line), this field shows the last time any packet was received, including
ACK packets (an acknowledgment that the last message was received).
The reason for the difference is that the port-group leader
acknowledges packets bound for other group members, so it cannot be
assumed that since the packet was acknowledged that the destination
micro is responding.
If that micro port is not initialized, the string ????????? appears in
the port name field to alert the operator. For example, modem ports
are not initialized, but information for modem ports also displays on
this screen.
33.10
Picture Perfect 2.0 Administration Guide
In Case of Problems
33
Flag Fields: The last 10 fields are yes/no (Y/N) flag fields that reflect
the current settings and conditions of the micro.
If the micro requests a mandatory reset (during power-up) or if the
host initiates a mandatory reset command (using operator request),
the micro “resetting” flag is set until the mreset process resets the
micro and the micro sends a final SYN (synchronization) message to
indicate that it is online.
Micro port group leaders responsible for ACKing messages will have
their “ACK Pending” flag set to N. This is a brief condition, and
under normal circumstances, the flag will not appear to change. A flag
that changes to Y indicates an unresponsive micro and a problem that
requires troubleshooting.
If a packet is not acknowledged after the number of attempts specified
in the micro record, the micro is considered to be in an “error”
condition. This is a temporary condition that exists until an alarm
message can be created and sent to the alarm manager. After this, the
“error” flag is cleared and the micro’s state becomes “alarm” until a
valid ACK or data packet is received from the micro. Once this occurs,
all flags are cleared including the “offline” flag if it is set.
Check the Port Records display (Figure 33-8) to ensure that the
selected port settings have not changed.
The Port Records display shows information that normally should not
change after TPS has been loaded. The Speed (baud rate), Parity,
number of Data Bits, and number of Stop Bits should be checked,
however, to ensure that the port is running at the recommended
settings: 19200 baud, NONE (no) parity, 8 data bits, and 1 stop bit. It is
possible for these settings to become changed after the transaction
processor is loaded, which can result in a host-to-micro
communications error. Check this display to ensure that the port
settings are correct.
If the Idle field is Y or the port is not initialized, not opened for
sending, or not opened for receiving, and a port group exists for it, a
problem exists. Flags display (in reverse video) to alert the operator
that the condition is abnormal.
Picture Perfect 2.0 Administration Guide
33.11
In Case of Problems
Port Records
Diagnostics Subsystem
Figure 33-8.
Port Records
Terminal Records
The Terminal Records screen displays information about terminals
that are currently logged on. CMENU supports up to three Picture
Perfect terminals logged on at one time. The Terminal/Host field
shows the Internet host name (display), the Logon field shows the
number of times the terminal has been used for logon since the Epoch
(the last TPS start/restart), and the Alarm Alert field indicates (Y or N)
whether an alarm alert is currently running on the display.
Host Records
The Host Records screen (Figure 33-9) displays information about the
system hosts. This includes the Host ID, Host Name, IP Address, Last
Communications time, and yes/no flags for Online status, ACK
Pending, Timeout, Communications Alarm, and Connected.
33.12
Picture Perfect 2.0 Administration Guide
In Case of Problems
Figure 33-9.
33
Host Records
The Check Current Diagnostic Levels function on the Diagnostics
Subsystem Menu (Figure 33-10) shows the current diagnostic level for the
TPS. Each manager or driver task uses a flag which is either On or Off.
Figure 33-10.
Check Current Diagnostic Levels
By default, the diagnostic log is located in the /cas/log directory and is
named log.MMDD where MM is substituted with a zero-padded month
number and DD is substituted with a zero-padded day. For example, the
log for April 5 of any year is named log.0405. The log automatically
rolls over to a new log prior to the first log entry after midnight (23:59)
local time. A new log is not created until a log entry is necessary. The
Picture Perfect 2.0 Administration Guide
33.13
In Case of Problems
Check
Diagnostics Subsystem
system keeps logs for 7 days before it begins automatic erasure of the
oldest day.
The Diagnostic Monitor is a user program used to view diagnostics from
within the Picture Perfect X-windows environment. It consists of a set of
internal buffers updated by whichever processes currently have
diagnostics set.
Set
The Set diagnostic levels selection displays a menu of diagnostics that
you can set (Figure 33-11). The items on the menu are a subset of the
fifteen diagnostics levels available. (Future releases of CMENU may
include additional selections.)
Figure 33-11.
Set Diagnostic Levels Menu
When you Set diagnostics on one or more processes, system performance
is degraded. If you route diagnostics to the log, the system uses more disk
space.
Main
The Main daemon is the transaction processor’s process group leader.
It is responsible for initializing the various queues, semaphores,
shared data segments, and spawning each of the tasks that make up
the transaction processing system. If a task abends (abnormally ends)
for any reason, the Main daemon determines which task it was, checks
the integrity of the message queues, sleeps 5 seconds, and respawns
the task that failed. Most of output from the Main daemon is logged
regardless of the diagnostics level, due to the importance of this task.
RcvDrv
The receive driver is the only task for which more than a single
instance of itself can exist. Each port attached to a micro has a
33.14
Picture Perfect 2.0 Administration Guide
In Case of Problems
33
dedicated receive driver. This eliminates the need for polling and
software multiplexing.
The receive driver diagnostic shows an acronym for the message type
and a hexadecimal dump of each message. The entry is made
immediately after packet decryption. On a busy system, this
represents an enormous amount of data; therefore, this diagnostic
should be used sparingly.
Each receive driver process passes its messages to a single receive
manager queue for further routing.
SndDrv
The send driver writes messages to specific ports (based on micro
addresses) by matching up the destination micro with its port. Like the
receive driver, the diagnostic shows an acronym for the message type,
followed by a hexadecimal dump of the message itself.
RcvMgr
In Case of Problems
The receive manager routes messages passed to it from the receive
driver to the appropriate manager task. Messages are routed to the
badge manager (bdgmgr), database manager (dbmgr), alarm
manager (almmgr), send manager (sndmgr), and status manager
(stsmgr). During normal operation, the only log entries made by the
receive manager are an acronym representing the message type
received. Entries are also made for database calls that fail. In such
cases, the SQL error code can be used to determine the cause of the
failure.
A micro coming out of “alarm” state sends a message that becomes a
log entry:
micro “n” is now responding.
SndMgr
Programs needing to send messages to micros do so by passing their
messages to the send manager. The send manager translates these
messages into data packets recognized by the micro. After the message
has been translated, it is passed to the send driver, which does the
actual writes to the ports. The send manager is also responsible for
expanding broadcast messages into separate messages for each port.
Only one broadcast message per port to which at least one micro is
attached is sent. Only one broadcast message is sent to each port
where a micro is configured.
Picture Perfect 2.0 Administration Guide
33.15
Diagnostics Subsystem
Like the receive manager, only an acronym showing the message type
being sent is logged during normal operation. If a port is known to be
malfunctioning, or the destination micro is offline, the message is not
sent and an entry is made to this effect. Entries are also made for each
instance of an invalid micro address such as an address that has not
been loaded by TPS.
Badge
The badge manager receives all badge (BDG) messages from the
receive manager for purposes of logging them to the history tables.
The receive manager passes all badge swipes except those generated
by a console reader when the badge program is waiting for a badge
swipe from that reader. The badge manager diagnostics show the
badge ID and the type of badge transaction.
Resend
The resend manager resends all non-ACK packets until the
destination micro responds or is placed offline through use of the
mstate command. The resend manager also generates SYN and ENQ
messages which act together to help determine whether a micro is still
running. Since a SYN message is ACKed by the port group leader, it
alone is not enough to make this determination. A SYN message
immediately followed by an ENQ message serves two purposes: (1) to
synchronize the micro’s clock, and (2) to cause the destination micro to
originate a SYN message with its address when it receives the ENQ
message. See the Glossary for a definition of SYN and ENQ messages.
When the resend manager diagnostics is set, each attempt to
communicate with a micro is logged. The entry contains the message
sequence number, the retry attempt number, and the packet type.
Clear
When diagnostics are no longer needed, they should be cleared. To
determine which diagnostics need to be cleared, use the Check function
on the Diagnostic Subsystem Menu (Figure 33-12) to check current
diagnostic levels. As in Set diagnostic levels, the menu selections are a
limited subset of the entire set of diagnostics available.
33.16
Picture Perfect 2.0 Administration Guide
In Case of Problems
Figure 33-12.
33
Clear Diagnostic Levels Menu
WatchLog
The Watch diagnostic log selection allows the operator to monitor the
diagnostic log. Any diagnostics written to the log are displayed in realtime. To stop viewing the diagnostic log, press ESC .
If the system is working correctly, more information messages may appear
when operators log in (addelo) and the system adds displays (addisp).
Micro Utilities
The Micro Utilities Menu (Figure 33-13) provides access to utilities that
enable the operator to view and change the logical state of any attached
micros. The “logical state” is the state of the micro that TPS currently
identifies.
Figure 33-13.
Micro Utilities Menu
Picture Perfect 2.0 Administration Guide
33.17
In Case of Problems
For example, when you power up the system after initial setup, use the
Watchlog utility to view messages that verify whether the system loaded
properly. After the TPS messages display, they “spawn” the TPS
“managers” such as the badge manager (bdgmgr) and the operator
manager (oprmgr). About 20 seconds after TPS starts, the first polling loop
starts. If the system has loaded correctly, the polling message is the last
TPS (or TPS manager) message that displays.
Status Information from Micros
State
The Current logical state selection prompts the user for a micro ID. Enter
a valid micro ID or the letter a (for all) and press Enter to display a
detailed description of all states that apply, and also any messages on the
resend list for the selected micro.
Offline
The Set micro state to offline selection places a micro offline. The
transaction processor does not attempt to send messages to an offline
micro. Setting the micro offline also prevents these messages from being
stored on the resend list. If a micro is going to be out of service for a long
time, take the micro offline to preserve shared memory.
Online
The Set micro state to online selection forces the micro to the online state.
Any messages accumulated on the resend list are removed and a
mandatory reset (RST) message is sent.
Reset
The Reset micro selection sends a mandatory reset message to the
specified micro.
Status Information from Micros
The Status Information From Micros menu (Figure 33-14) allows the
operator to obtain current area, badge, and door records from a selected
micro.
Figure 33-14.
33.18
Status Information From Micros Menu
Picture Perfect 2.0 Administration Guide
In Case of Problems
33
Alarms
The Alarms on Micro selection allows you to send an alarm-status request
to a specific micro. When the system prompts you, enter the micro ID
where the alarm request is sent, press Enter , and wait about 30 seconds for
the screen to display information. If the screen scrolls too rapidly, press
-S to suspend and
-Q to restart the output. Press ESC to quit and
return to the previous menu.
CTRL
CTRL
Areas
The Areas on Micro selection allows you to send an area-status request to
a specific micro. When the system prompts you, enter the micro ID where
the area request is sent, press Enter , and wait about 30 seconds for the
screen to display information. If the screen scrolls too rapidly, press
-S
to suspend and
-Q to restart the output. Press ESC to quit and return to
the previous menu.
CTRL
CTRL
Badges
CTRL
CTRL
Inputs
The Inputs on Micro selection allows you to send an input-status request
to a specific micro. When the system prompts you, enter the micro ID
where the input request is sent, press Enter , and wait about 30 seconds for
the screen to display information. If the screen scrolls too rapidly, press
-S to suspend and
-Q to restart the output. Press ESC to quit and
return to the previous menu.
CTRL
CTRL
Input Groups
The Input Groups on Micro selection allows you to send an input groupstatus request to a specific micro. When the system prompts you, enter the
micro ID where the input group request is sent, press Enter , and wait
about 30 seconds for the screen to display information. If the screen scrolls
too rapidly, press
-S to suspend and
-Q to restart the output. Press
ESC to quit and return to the previous menu.
CTRL
CTRL
Picture Perfect 2.0 Administration Guide
33.19
In Case of Problems
The Badges on Micro selection allows you to send a badge-status request
to a specific micro. When the system prompts you, enter the badge ID (full
10 digits) and the micro ID, press Enter , and wait about ten seconds for the
screen to display information. If the screen scrolls too rapidly, press
-S
to suspend and
-Q to restart the output. Press ESC to quit and return to
the previous menu.
Status Information from Micros
Mode
The Mode on Micro selection allows you to send an mode-status request
to a specific micro. When the system prompts you, enter the micro ID
where the mode request is sent, press Enter , and wait about 30 seconds for
the screen to display information. If the screen scrolls too rapidly, press
-S to suspend and
-Q to restart the output. Press ESC to quit and
return to the previous menu.
CTRL
CTRL
Outputs
The Outputs on Micro selection allows you to send an output-status
request to a specific micro. When the system prompts you, enter the micro
ID where the output request is sent, press Enter , and wait about 30
seconds for the screen to display information. If the screen scrolls too
rapidly, press
-S to suspend and
-Q to restart the output. Press ESC
to quit and return to the previous menu.
CTRL
CTRL
Output Group
The Output Group on Micro selection allows you to send an output
group-status request to a specific micro. When the system prompts you,
enter the micro ID where the output group request is sent, press Enter , and
wait about 30 seconds for the screen to display information. If the screen
scrolls too rapidly, press
-S to suspend and
-Q to restart the output.
Press ESC to quit and return to the previous menu.
CTRL
CTRL
Outputs
The Outputs on Micro selection allows you to send an output-status
request to a specific micro. When the system prompts you, enter the micro
ID where the output request is sent, press Enter , and wait about 30
seconds for the screen to display information. If the screen scrolls too
rapidly, press
-S to suspend and
-Q to restart the output. Press ESC
to quit and return to the previous menu.
CTRL
CTRL
Readers
The Readers on Micro selection allows you to send a reader-status request
to a specific micro. When the system prompts you, enter the micro ID
where the reader request is sent, press Enter , and wait about 30 seconds
for the screen to display information. If the screen scrolls too rapidly, press
-S to suspend and
-Q to restart the output. Press ESC to quit and
return to the previous menu.
CTRL
33.20
CTRL
Picture Perfect 2.0 Administration Guide
In Case of Problems
33
Doors
The Doors on micro selection allows you to send a door-status request to a
specific micro. When the system prompts you, enter the micro ID where
your door-status request is sent, press Enter , and wait about 20 seconds for
the screen to display information. If the screen scrolls too rapidly, press
-S to suspend and
-Q to restart the output. Press ESC to quit and
return to the previous menu.
CTRL
CTRL
Printer Utilities
The Printer Utilities Menu (Figure 33-15) allows the operator to view and
cancel print requests. Print requests originated by other users can only be
cancelled if the operator has an effective user ID of superuser (root).
Printer Utilities Menu
Status
The Printer queue status selection displays information about all printer
queues, including the name of the print queue, the status of the queue, the
name of the job, and the percentage of the file printed so far.
Kill
The Kill a print job selection is not fully menu-driven. After the printer
status displays, a prompt asks you to note which print request you want to
kill. When you press Enter , the system prompts you for the request
number and then removes that request from the queue.
NOTE
The KILL request does not stop a print job that has already started.
Picture Perfect 2.0 Administration Guide
33.21
In Case of Problems
Figure 33-15.
Troubleshooting Guide
Stop
If the printer spooler is malfunctioning, the Stop a printer queue selection
can be used to temporarily stop it. From this point, requests can be
removed and the spooler restarted.
Clean
The Clean out a print queue selection is used to stop the spooler, remove
all requests, and restart it. Any jobs previously submitted are completely
removed from the system, including the one currently printing.
Start
The Start the print spooler selection restarts the print spooler.
Troubleshooting Guide
The following chart (Table 33-1) lists problems you might experience and
possible solutions. Use this guide to perform troubleshooting procedures.
If you are not successful, contact your Picture Perfect support
representative for assistance.
Table 33-1: Troubleshooting Chart
Problem
Action
Reader: A reader is not working.
- Verify that the reader is online and enabled.
- Watch 2RP/8RP lights for badge read.
- Watch the Activity Monitor for transaction messages.
Reader: When a badge is swiped,
the reader light changes from
green to red.
- Verify the Normally Closed/Open state of the door strike output
assigned to the reader.
- Watch the Activity Monitor for transaction messages.
Reader/Door: When a valid badge
is swiped through the reader, the
door does not unlock.
- Verify that the badge is valid for the area where the reader is
assigned.
- Verify that the reader is online.
- Verify that the micro is working.
- Verify that the door information is correct.
- Verify input group and outputs for the door and reader.
Badge Error conditions are not
being logged to the monitor/log.
- Verify the badge routing information for the area where readers
are used.
- Verify that badge messages are enabled for the Monitor.
Badge does not work for a
specific area.
- Verify that the area is properly set up.
- Verify that the badge is assigned a category that matches a
category assigned to the area.
33.22
Picture Perfect 2.0 Administration Guide
In Case of Problems
33
Table 33-1: Troubleshooting Chart (Continued)
Problem
Action
An operator cannot assign
categories to an area/badge
because the categories do not
appear in the picklist.
- Verify the Permission Group for the “missing” category.
- Verify the Categories Permission Group assigned to the operator.
Cannot log on to Picture Perfect.
- Verify that you typed your Logon ID correctly.*
- Verify that you typed your password correctly.*
- Verify that the operator table has only one entry for your
Login ID.
*Login ID and Password are case sensitive.
- If the micro was newly configured, restart Picture Perfect.
Immediately run logtail to trace to the log file. Check the log file to
see if the line is set up properly.
- Verify micro communication using the CMENU utility.
- Verify host-to-micro communications.
- Verify the power to the micro.
- Verify with micro indicators that the micro is functioning. (See the
Micro/4-P and/or Micro/5 Manual.)
- Request Status from the micro.
- Watch the Activity Monitor for transaction messages.
Alarms: An alarm condition is
occurring but the alarm is not
being reported in the Alarm
Monitor.
- Verify that an alarm is assigned to the input group for the input
point that detects the condition.
- Verify that the alarm is routed to the Monitor.
- Verify that alarm messages are enabled.
- Verify that the terminal is in the terminal table.*
In Case of Problems
Micro is not working.
*Changes to the terminal may require TPS restart (or system
database reset).
Reader: A reader works but the
associated exit pushbutton does
not work.
- Verify that the Exit DI Input is assigned to the same input group as
the reader.
- Verify that the input group Delay Time is set to 0 seconds.
- Verify that the exit button is enabled (using the DOORS form).
- Verify that the exit button DI is selected (using the DOORS form).
Main Menu: An operator has
missing items on the Picture
Perfect program.
- Verify the operator’s Permission.
- Verify that the Permission has the appropriate menu items
enabled (FIND, VIEW, UPDATE).
Alarm: Multiple DIs on the same
micro trigger, but only one input
gives an alarm.
- Verify the input group assigned to each input.
- Verify that each input has its own input group in order to report
separately.
Picture Perfect 2.0 Administration Guide
33.23
Troubleshooting Guide
Table 33-1: Troubleshooting Chart (Continued)
Problem
Action
Printer: Cannot select the printer
to print.
- Verify that the printer is set up/defined in the operating system.
- Verify that the printer is known to Picture Perfect.
- Verify that the printer is cabled, powered, and online.
Workstation: The screen is black.
- Move the mouse pointer to awaken the terminal if it is in
hibernation (screen-saver function).
- Verify that the terminal is cabled, terminated, powered, and
booted.
Form: Cannot save the record;
there is no SAVE button.
- Operator Permission is FIND only for this form.
33.24
Picture Perfect 2.0 Administration Guide
Changing the Picture Perfect
System Host Name
Appendix
A
Although it is not recommended to change the host name or IP address of
a Picture Perfect system, the steps detailed in this section must be followed
in order to do so. These steps apply to Picture Perfect standalone systems,
Picture Perfect Enterprise host/subhost systems, and Picture Perfect
Redundant systems. Before beginning, review the rules and restrictions
listed below.
Rules and Restrictions
•
(All Systems) The chhostname program must be run as root.
•
(All Systems) If your Picture Perfect System uses a name server, then
the network administrator will have to update the name server.
•
(All Systems) Picture Perfect must not be running when the
chhostname program is invoked.
•
(Enterprise Network Host and Subhost Systems) Picture Perfect must
be running on each remote machine. If you want chhostname to
update the remote files, add the “hostname” of the machine whose
name is being changed to /.rhosts file on all remote machines. Or,
you can choose to update the remote files manually. See the Picture
Perfect Enterprise System Guide for more details on verifying the host
names and IP addresses in the system.
•
(Redundant Systems) Picture Perfect must be running on the other
machine. If the other machine is not up, then it will have to be updated
manually. See the Picture Perfect Redundant System Administration Guide
for more details on verifying the host names and IP addresses in the
system.
Changing the Picture
Perfect System Host Name
Picture Perfect 2.0 Administration Guide
A.1
Changing the Host Name
Changing the Host Name
1. Log in to the console as root.
2. Make sure Picture Perfect is not running.
#. /cas/bin/profile
Enter
3. Run the program to change the host name and/or IP address by
typing at the # prompt:
chhostname
Enter
The following shows an example of how to change the host name on a
subhost in a Picture Perfect Network System. All text in italics
represents text that was typed in.
# chhostname
Enter
chhostname (Version 1.2)
Starting up informix..OK
This is a STANDALONE system
Host Name..........: triton
IP Address.........: 192.9.200.70
Network Interface..: en0
Enter new host name
[triton
]: tritonhost
Enter new IP address [192.9.200.70 ]:
Enter
Are these values correct (y/n) [n]? y
Enter
Enter
Changing triton to tritonhost
IP address is unchanged
Updating my /cas/db/etc/onconfig
Updating my /cas/db/eh/sqlhosts
Updating my /etc/hosts
Upating my /eh/services
4. Reboot the system.
5. If the machine is part of a Picture Perfect enterprise system or a Picture
Perfect redundant system, then all of the other machines in the Picture
Perfect system will have to be rebooted.
A.2
Picture Perfect 2.0 Administration Guide
A
Files and Database Tables
The chhostname program affects the following files and database tables.
Unless otherwise specified, files are common to both AIX and Linux
platforms.
Standalone
•
/etc/hosts
•
/etc/services
•
/etc/sysconfig/network (Linux-specific)
•
/etc/sysconfig/network-scripts/ifcfg-eth0 (Linuxspecific)
•
/cas/db/etc/onconfig
•
/cas/db/etc/sqlhosts
•
/usr/lib/X11/ncd/configs/ncd-std (if the NCD package is
installed)
Network Host
/etc/hosts on all machines
•
/etc/services/ on all machines
•
/etc/sysconfig/network (Linux-specific)
•
/etc/sysconfig/network-scripts/ifcfg-eth0 (Linux-specific)
•
/etc/hosti.equiv on all subhosts
•
/cas/db/etc/onconfig on local machine
•
/cas/db/etc/sqlhosts on all machines
•
/.rhosti on all subhosts
Changing the Picture
Perfect System Host Name
•
For Linux, the above line should read: /root/.rhosti (on all subhosts)
•
/home/<loginid>/.rhosts of System Administration operators
•
host table on all machines
•
/usr/lib/X11/ncd/configs/ncd-std (if the NCD package is
installed)
Picture Perfect 2.0 Administration Guide
A.3
Files and Database Tables
Network Subhost
•
/.rhosti on network host
For Linux, the above line should read: /root/.rhosti (on all subhosts)
•
/etc/hosti.equiv on network host
•
/etc/hosts on all machines
•
/etc/sysconfig/network (Linux-specific)
•
/etc/sysconfig/network-scripts/ifcfg-eth0 (Linux-specific)
•
/etc/services on all machines
•
/cas/db/etc/onconfig on local machine
•
/cas/db/etc/sqlhosts on all machines
•
host table on all machines
•
/usr/lib/X11/ncd/configs/ncd-std (if the NCD package is
installed)
Redundant
•
/etc/hosts
•
/etc/services on both machines
•
/etc/sysconfig/network (Linux-specific)
•
/etc/sysconfig/network-scripts/ifcfg-eth0 (Linux-specific)
•
/etc/sysconfig/network-scripts/ifcfg-eth1 (Linux-specific)
•
/cas/db/etc/onconfig
•
/cas/db/etc/sqlhosts on both machines
•
/.rhosts on other host
For Linux, the above line should read: /root/.rhosts (on all subhosts)
•
/etc/hosts.equiv on other host
•
host table on both machines
•
/usr/lib/X11/ncd/configs/hexfiles need to be regenerated
(if the NCD package is installed)
A.4
•
/cas/bin/profile on other host (RMACH)
•
/cas/db/text/fpp*
Picture Perfect 2.0 Administration Guide
TPS Alarms
Appendix
B
Overview
TPS Alarms
TPS Alarms are a feature that allow a Picture Perfect system to indicate
that there is a problem with one or more of the TPS processes. By default,
TPS generates an alarm every time a TPS process respawns.
The following TPS processes trigger an alarm when respawned:
•
almmgr
•
bdgmgr
•
dbmgr
•
oprmgr
•
prmgr
•
rcvmgr
•
rsndmgr
•
schmgr
•
sndmgr
•
stsmgr
•
evtmgr
•
maamgr
TPS expects these processes to run without exiting until TPS is shut down.
If one of these TPS processes respawns, then the administrator should
investigate the problem. The log files should contain an entry indicating
that a TPS process respawned. The alarm generated serves as an
additional warning that there is a problem with the system.
There are other TPS processes that respawn under normal operation:
•
snddrv
•
rcvdrv
•
moddrv
•
dialer
Picture Perfect 2.0 Administration Guide
B.1
Configuration Files
•
nwmdrv
•
cfgmgr
The base package installation program inserts a single alarm, TPS
RESPAWNED, into the alarm table when Picture Perfect is installed. The
base package installation program also creates an input group for each
TPS process that is not supposed to respawn.
NOTE
Some system problems, such as shared memory corruption or almmgr crashes, can
prevent TPS alarms from being generated.
Configuration Files
/cas/db/text/tps.cfg
A configuration file, /cas/db/text/tps.cfg, stores the input group
associated with each TPS process. It also stores two other configuration
parameters. The two parameters specify a respawn threshold and a
failover threshold.
The respawn threshold indicates how many times a TPS process must
respawn before an alarm is generated. By default, this value is set to 1.
The failover threshold indicates how many times a TPS process must
respawn before a primary machine in a redundant configuration fails over
to the backup. The backup machine also uses this value to shut itself down
and disable failover if a TPS process has exceeded the failover threshold.
The default value is 3, but in a non-redundant system, TPS ignores this
value.
The following format is used in the TPS Alarm Process configuration file:
B.2
Picture Perfect 2.0 Administration Guide
B
One of your standard TPS processes
(rsndmgr, almmgr, etc.)
Number of times a process can
respawn before an alarm is
generated; a value of 0 means that
no alarm will be generated
generated.
no
tps_proc input_group_id respawn_threshold failover_threshold
TPS Alarms
Input
InputGroup
GroupIdIdfor
foraahost
host
generatedalarm)
alarm
generated
Number of times a process can
respawn before a failover occurs on a
redundant system; a value of 0
means that no failover will occur.
/cas/db/text/tps.cfg.sample
This is an un-initialized sample configuration file containing the TPS
processes that are not designed to respawn. Processes, such as nwmdrv,
snddrv, etc., are designed to respawn and therefore will not be included
in this file.
/cas/bin/tps_cfg.sh
This shell script will create a TPS alarm and input groups for the TPS
processes listed in the sample configuration file. This program can only
run if the /cas/db/text/tps.cfg file does not exist.
Picture Perfect 2.0 Administration Guide
B.3
Configuration Files
NOTES
B.4
Picture Perfect 2.0 Administration Guide
Firewall Configuration
Appendix
C
This appendix describes the ports used by the Picture Perfect system, and
how to configure your system for use through a firewall.
In order to establish communications through a firewall, it is necessary to
allow for the appropriate protocols to pass through the firewall on the
appropriate ports. Listed below are the ports used by the various
components of the Picture Perfect system. Depending on the Picture
Perfect components you have implemented, you will have to configure the
appropriate ports. To ensure that the security of your firewall is not
compromised, only open those ports needed for your specific system
configuration.
Table C-1: Task Descriptions and Port Number Assignments
Protocol
Firewall Configuration
Task Description
Port Number Assignment
Access Vision Picture Perfect host client
server task rpc.pcsrvd
TCP
Dynamically assigned by the vendor
operating system, portmapper task, but
must be set to a fixed value to penetrate a
firewall (see “Setting a Fixed Port for the
Client Server Task” on page C.2).
Access Vision Picture Perfect host license
manager server task Imgrd
TCP
Fixed value of ‘6769’ but can be changed
at customer site (see “Changing the Fixed
Port Used by the License Manager Task”
on page C.2).
Picture Perfect Host vendor operating
system portmapper task
UDP/TCP
Fixed value of ‘111’ that cannot be
changed.
Standard Picture Perfect Web Browser
HTTP
Usually set to a value of ‘3144’ (see “Web
Browser Security” on page C.3).
Picture Perfect SSL (Secure Socket
Layer) Web Browser
HTTP
Usually set to a value of ‘5307’ (see “Web
Browser Security” on page C.3).
Micro/5 PXN Communications
TCP
Fixed value of ‘6767’.
Micro/5 PXN DES key exchange
TCP
Fixed value of ‘6768’.
Micro/5 Flash Download
TCP
Fixed value of ‘7777’.
Picture Perfect 2.0 Administration Guide
C.1
Setting a Fixed Port for the Client Server Task
The customer security group must choose a fixed port number (typically
between 5000 and 8000) for this communication path. For the purposes of
explaining the procedure let us assume that port 5555 was chosen. Follow
this procedure to set a fixed port for the client server task:
1. Log onto the host Picture Perfect system as the root user and shut
down Picture Perfect by entering:
rc.pperf
-k
2. Edit the /etc/services file with any editor such as vi or emacs.
3. Go to the bottom of the file and enter the following line:
pcsrv 5555/tcp where 5555 is the chosen port number. The line
should look similar to the others in that file.
4. Exit the editor saving the changes.
5. Reboot the system.
Changing the Fixed Port Used by the License
Manager Task
The customer security can use the existing fixed port value of 6769 for
access through the firewall. If that value is not acceptable a different value
can be used by following the procedure below. For purposes of explaining
the procedure let us assume that port 8888 was chosen.
1. Log onto the host Picture Perfect system as the root user while
Picture Perfect is running.
2. Enter the command query tps_daemons to locate the entry that
starts the client server task. The entry should look like this:
181
/etc/lmgr/lmgrd
R
A
19990908
142026
The first number on the line (181 in this example) is the record id that will be
used in the next step.
3. Enter this command:
/cas/bin/sqlstmt “UPDATE tps_daemons SET pathname=’/etc/lmgr/
lmgrd –p 8888’ where id=181”
C.2
Picture Perfect 2.0 Administration Guide
C
where 8888 is the chosen port number and 181 is the record id obtained from
the previous step.
4. Shut down Picture Perfect by entering:
rc.pperf
-k
5. Restart Picture Perfect by entering:
rc.pperf
Perform a Picture Perfect database backup as soon as possible to save the
change made to the tps_daemons database table. This procedure may
have to be repeated whenever an Access Vision server patch is installed on
the Picture Perfect host system or if the Access Vision software is
completely removed and then re-installed.
Web Browser Security
Picture Perfect 2.0 Administration Guide
Firewall Configuration
It is recommended that SSL be used when firewall traversal is required. In
this case the SSL port (usually 5307) should be opened, as well as the ports
necessary for HTTP traffic (usually port 80). For more information on port
number assignments using the Picture Perfect Web Browser, consult
Chapter 5 of the Picture Perfect Web Browser Interface Operator’s Guide.
C.3
NOTES
C.4
Picture Perfect 2.0 Administration Guide
Advanced Configuration
Appendix
D
Overview
This chapter provides information on advanced options that may be
configured at the time of installation. Some of these options are already
configured by default, but you may wish to modify the settings. Other
options are not configured, but you may wish to implement them. Each of
the options will be discussed in more detail in the following sections.
Multiple Tape Support
This option enables your Picture Perfect system to support multiple tape
devices. During installation of the Picture Perfect base package, a shell
script, pptapesetup, is run which creates links to two tape devices. By
default, the rewind device is /dev/pptape and the no rewind device is
/dev/pptapenr. If your system has only one tape device, do not change
these default settings. If more than one tape device is detected by the shell
script, an ASCII text configuration file, /cas/db/text/tape.cfg, is
created which contains a tape definition for each tape device on the
system. The shell script, pptapesetup, can be run at any time to
reconfigure the tape devices on your Picture Perfect system.
If multiple tape devices are present on the system, the default will depend
upon the application accessing the tape device. When an application
attempts to access a tape device, the application searches for a tape.cfg
file. If it does not find the file, the default tape devices /dev/pptape
and /dev/pptapenr are used. If a tape.cfg file is found, the file is
read and you will be prompted for one of the tape devices found in the
file.
Advanced Configuration
Picture Perfect 2.0 Administration Guide
D.1
Port Throttling
Function Call
looks for
tape.cfg
Application
If no tape.cfg
exists, the default /
dev/pptape
and /dev/pptapenr
will be used.
If tape.cfg exists,
the file is read and the
user is prompted for
one of the tape
devices found in the
file.
For each tape device on the system, tape.cfg contains a description of
the tape device, the rewind device name, the no-rewind device name and
the application types that will use this device as the default. Each
application will use one of the following as its default type: INSTALL,
ARCHIVE, HISTORY, BACKUP, or RESTORE. If no tape device is
configured in the tape.cfg file as the default for a particular
application type, the system defaults /dev/pptape and /dev/
pptapenr will be used.
Port Throttling
When bringing Picture Perfect up, sites with a large number of micros, or
micros that have accumulated an unusual amount of history, can overload
the host if they are all brought online simultaneously. Port throttling is an
activity performed by TPS, the microcontroller communication program,
when the system starts up. Before enabling a port, TPS checks the system
activity and determines if the system is too busy to bring more ports
online. By gradually bringing the ports online, TPS prevents a flood of
information coming in from the micros which could potentially cause the
host to back up and go into an XOFF communication state.
The configuration file, throttle.cfg, for port throttling is found in
/cas/db/text and the parameters are:
D.2
Picture Perfect 2.0 Administration Guide
D
Table D-1: Port Throttling Parameters
THROTTLE_DELAY
The number of seconds before enabling a port. For
example, THROTTLE_DELAY=5
THROTTLE_MAX
The maximum number of messages on queues allowed
in order to throttle on the next port. Any number of
messages greater than this value will prevent the next
port from being enabled. For example,
THROTTLE_MAX=100
To find the total number of ports that have not been enabled, use the
following command:
smutl -p -1|grep THROTTLE
Once all ports are throttled on, they cannot be throttled off.
Disk File Backup/Archive Configuration
Although they cannot replace tape backups and archives, disk file
backups offer a fast way to backup/restore database tables and run
history reports.
Table D-2: Disk File Backup Configuration
Specifies the default directory that stores history
archives. This directory must exist and should be set up
to have sufficient space to hold archive files.
For example: ARCHIVE_DIR=/cas/archive
ARCHIVE_EXT
Specifies the default file extension that the file selection
dialog matches for archive files.
For example: ARCHIVE_EXT=.arc
BACKUP_DIR
Specifies the default directory that stores backups. This
directory must exist and should be set up to have
sufficient space to hold backup files.
For example: BACKUP_DIR=/cas/backup
BACKUP_EXT
Specifies the defaults file extension that the file selection
dialog matches for backup files.
For example: BACKUP_EXT=.bak
Picture Perfect 2.0 Administration Guide
Advanced Configuration
ARCHIVE_DIR
D.3
File System Monitor
File System Monitor
The File System Monitor detects when a file system reaches a maximum
usage level. When it reaches this level the Monitor notifies the operators
on the system using a popup message similar to the one below and an
alarm is generated. Once the operator is notified, the system administrator
will need to take the necessary steps to resolve the problem.
Figure D-1.
File System Monitor Notification Message
By default, the File System Monitor is configured to check the
/cas/log file system every 10 minutes. If the /cas/log file system
reaches 90% usage, a popup message will be displayed on all terminals in
the terminal table. The following files are used in the configuration of this
feature:
/cas/bin/chkfs.sh
A shell script that determines if any file systems exceed a given usage
percentage. The output is written to /cas/log/chkfs.log.
To run this script, log in as root and type chkfs.sh followed by the
filesystem names. If no file system is specified, it will check /cas/db/
text/chkfs.cfg. If no file system is specified in chkfs.cfg, the
default will be to check all file systems.
/cas/db/text/chkfs.cfg
A configuration file containing the following parameters:
D.4
Picture Perfect 2.0 Administration Guide
D
Table D-3: File System Monitor Configuration
MAXUSAGE
A global usage percentage which a file system must exceed
For example: MAXUSAGE=90
FS
A list of file systems that are checked
For example: FS=/cas/log/tmp
MSG
A message displayed in the popup
For example: MSG=Your file system has exceeded
90% utilization.
INGRP
An input group record id for an alarm generated (set up by default)
For example: INGRP=20
/cas/bin/infopopup
A binary file that extracts the message to be displayed on the popup.
/cas/db/text/cron.tab
Runs chkfs.sh every 10 minutes.
/cas/bin/almsim
A binary file that generates the alarm for chkfs.sh.
/cas/bin/terminalpopup
A shell script that determines which terminals are defined in the
database and calls infopopup for each of these terminals.
Advanced Configuration
Picture Perfect 2.0 Administration Guide
D.5
Database Space Monitor
Database Space Monitor
The Database Space Monitor detects when a database space reaches a
maximum usage level. When it reaches this level the Monitor notifies the
operators on the system using a popup message similar to the one below
and an alarm is generated. Once the operator is notified, the system
administrator will need to take the necessary steps to resolve the problem.
Figure D-2. Database System Monitor Notification Message
By default, the Database Space Monitor is configured to check all of the
database spaces on the system once an hour at 5 minutes past the hour. If a
database space reaches 90% usage, a popup message will be displayed on
all terminals in the terminal table. The following files are used in the
configuration of this feature:
/cas/bin/chkdbspace.sh
A shell script that determines if any database space exceeds a given
usage percentage. The output is written to /cas/log/
chkdbspace.log.
To run this script, log in and type chkdbspace.sh followed by the
database space names. If no database space is specified, it will check
/cas/db/text/chkdbspace.cfg. If no database space is specified
in chkdbspace.cfg, the default will be to check all database spaces.
/cas/db/text/chkdbspace.cfg
A configuration file containing the following parameters:
D.6
Picture Perfect 2.0 Administration Guide
D
Table D-4: Database System Monitor Configuration
MAXUSAGE
A global usage percentage which a database space must exceed
For example: MAXUSAGE=90
DBSPACE
A list of database spaces that are checked
For example: DBSPACE=rootdbs basedbs ucsdbs
MSG
A message displayed in the popup
For example: MSG=Your database space has
exceeded 90% utilization.
INGRP
An input group record id for an alarm generated (set up by default)
For example: INGRP=20
/cas/bin/infopopup
A binary file that extracts the message to be displayed on the popup.
/cas/db/text/cron.tab
Runs chkdbspace.sh every hour at 5 minutes past the hour.
/cas/bin/almsim
A binary file that generates the alarm for chkdbspace.sh.
/cas/bin/terminalpopup
A shell script that determines which terminals are defined in the
database and calls infopopup for each of these terminals.
Resend List State
In order to avoid lost messages from the host to micros when the system is
taken down, this feature preserves the state of the resend list. Before using
this option, review the following restrictions:
This feature is only supported in stand-alone and subhost systems.
•
Only messages with valid micro destinations will be saved and
restored. Messages sent to hosts will not be saved.
•
Micros which are configured for offline will not have their messages
restored.
Advanced Configuration
•
Configuration
The Resend List State feature can be configured in the /cas/db/text/
resend.cfg file using the following options:
Picture Perfect 2.0 Administration Guide
D.7
Resend List State
saveresend
This option can be set to auto or manual.
•
auto
The resend list will be saved automatically when Picture Perfect is
brought down.
•
manual
The resend list will be saved only if the -r parameter is used with the
command rc.pperf.
For example: rc.pperf -k -r
restoreresend
This option can be set to auto or manual.
•
auto
The resend list will be restored automatically when Picture Perfect is
brought up.
•
manual
The resend list will be restored only if the -r parameter is used with the
command rc.pperf.
For example: rc.pperf -s -r
resendfile
This option can be used to override the default file,
/cas/log/tps.resend, which stores the resend list. One reason for
overriding the default would be to eliminate problems associated with
disk space. If there is not enough free disk space to write out the
resend list, its contents will be lost.
ignore
By default, the following message types will not be saved or restored:
OUT, STS, MNT, SYN, ENQ. These messages are not saved or
restored because they do not update the micro’s database. The
ignore option can be used to override the default list of ignored
messages. The list of messages must be separated by spaces and can be
in text or numeric form. Knowledge of the Picture Perfect message
types is required to use this option.
Log Messages
The following messages may be displayed in the file /cas/log/
log.MMDD:
failed to save resend list
This message will be displayed if the entire resend list could not be
written to the file; the resend list file will subsequently be removed.
D.8
Picture Perfect 2.0 Administration Guide
D
resend list (n messages saved, m ignored)
This message will be displayed if the entire resend list was
successfully written out to the disk.
resend list (n messages restored, m ignored)
This message will be displayed if the resend list is restored when TPS
starts.
Alarm Save State
In order to avoid lost alarm messages stored in the alarm buffer when the
system is taken down, this feature preserves the state of the alarm buffer.
Before using this option, review the following restrictions:
•
This feature will only run on the primary host in a redundant system,
a subhost, or a standalone host.
•
Restored alarms are not checked for validity, and may need to be
manually purged if the state of the system has changed, for example if
a subhost has been added or deleted.
Configuration
The Alarm Save State feature can be configured in the
/cas/db/text/almsave.cfg file using the following options:
savealarms
This option can be set to auto or manual.
•
auto
The alarms in the alarm buffer will be saved automatically when Picture
Perfect is brought down.
•
manual
The alarms in the alarm buffer will be saved only if the file
/cas/log/tps.almsave.manual exists.
Advanced Configuration
To create this file type: touch /cas/log/tps.almsave.manual.
This must be done before Picture Perfect is stopped, or alarms will not be
saved.
NOTE
The file /cas/log/tps.almsave.manual will be removed after any
save or restore of the alarm buffer.
Picture Perfect 2.0 Administration Guide
D.9
Alarm Save State
restorealarms
This option can be set to auto or manual.
•
auto
The alarms in the alarm buffer will be restored automatically when
Picture Perfect is brought down.
•
manual
The alarms in the alarm buffer will be restored only if the file
/cas/log/tps.almsave.manual exists.
To create this file type: touch /cas/log/tps.almsave.manual
This must be done before Picture Perfect is restarted, or alarms will not be
restored.
NOTE
The file /cas/log/tps.almsave.manual will be removed after any save or restore of
the alarm buffer.
alarmsfile
This option can be used to override the default file,
/cas/log/tps.alarms, which stores the buffered alarm messages.
One reason for overriding the default would be to eliminate problems
associated with disk space. If there is not enough free disk space to
write out the list of buffered alarm messages, its contents will be lost.
D.10
Picture Perfect 2.0 Administration Guide
D
Log Messages
The following messages may be displayed in the file /cas/log/
log.MMDD:
saved <n> alarms to file <filename>
This message will be displayed if the entire list of buffered alarm
messages was successfully written out to the disk.
Cannot open file <filename> to save alarms
This message will be displayed if the entire list of buffered alarms
could not be written to the file; the almsave file will subsequently be
removed.
Error saving alarms to file <filename>
This message will be displayed if the entire list of buffered alarms
could not be successfully written to the file; the almsave file will
subsequently be removed.
alarm buffer(<n> alarms restored)
This message will be displayed if the list of buffered alarm messages is
restored when TPS starts.
alarm buffer(<file> was corrupt; 0 alarms restored)
This message will be displayed if the list of buffered alarm messages
could not be restored when TPS starts.
Auto-Logout (xidle)
This feature provides a mechanism for logging operators off of their
X Terminals if there is an extended period of inactivity. Operator activity
can be achieved by any of the following three events:
Mouse movements
•
Button clicks
•
Keystrokes
By default, the auto-logout feature is disabled. The auto-logout feature
will have to be configured before it can be used. The required
configuration can apply to all Picture Perfect operators (global), or it can
apply to individual operators. If an X Terminal has been idle for a given
amount of time, then the xidle program will close the current login session.
The xidle program can be configured to warn the operator before actually
terminating the session. The warning comes in the form of an audible bell
and a popup window.
Picture Perfect 2.0 Administration Guide
D.11
Advanced Configuration
•
Auto-Logout (xidle)
Files
/cas/bin/xidle
This program implements the auto-logout feature. It runs every time an
operator logs in and is controlled by the following X resource values:
•
logout
This value can be either True or False. If it is set to False (default), then
the auto-logout feature is disabled. If it is set to True, then the xidle
program uses the following resource values: maxIdle and maxWarn.
•
maxIdle
This value specifies the number or seconds of inactivity on an X
Terminal before the operator is logged out. If this value is not
specified, then it defaults to 10 minutes.
•
maxWarn
This value specified the number of seconds that an operator will be
warned before auto-logout occurs. If this value is not specified, then it
defaults to 30 seconds.
/usr/lib/X11/app-defaults/XIdle
This file is used to control the auto-logout on a global basis. This file must
be created with the resource values set correctly in order to affect all
Picture Perfect operators. The following lists the entries from a sample file:
xidle.logout: True
xidle.maxIdle: 600
xidle.maxWarn: 30
$HOME/.Xdefaults
The file is used to control the auto-logout on an individual basis. This file
must be created in an operator’s home directory ($HOME) with the
resource values set correctly. It should be noted that the values found in
this file will override the values found in the xidle resource file. The
following lists the entries from a sample file for an operator who has been
given a longer idle time:
xidle.logout: True
xidle.maxIdle: 1200
xisle.maxWarn: 30
D.12
Picture Perfect 2.0 Administration Guide
D
Restrictions
It should be emphasized that the xidle program detects activity based
upon mouse and keyboard events. Therefore, the following activities may
be inadvertently terminated due to the potential for idle time:
•
Monitoring alarms/activity
•
Running reports
•
Performing backups/restores
It is recommended that operators who perform these actions either disable
auto-logout or increase the individual’s idle resource value.
Also, the xidle program only supports the capability to log an operator off
of an X Terminal. It does not support the capability to lock the screen and
then prompt the user for a password to gain access to the X Terminal.
Advanced Configuration
Picture Perfect 2.0 Administration Guide
D.13
Auto-Logout (xidle)
NOTES
D.14
Picture Perfect 2.0 Administration Guide
Using the vi Editor
Appendix
E
Advanced Configuration
Overview
The vi editor is a full-screen editor. While there are several editors
available in a Unix environment, vi is a standard editor available on every
Unix system.
Modes
The vi editor has 3 modes: Command, Insert, and Ex.
•
Command: When you enter the vi editor you are in Command
mode. Command mode allows you to move around the document.
•
Insert: Allows you to insert text.
•
Ex: Used for special operations, such as saving a file and exiting.
Changing Modes
The following table provides a quick reference to the key strokes required
to change from one mode to another.
Table E-1: Mode Change Key Strokes
FROM
Mode
Key Stroke
TO Mode
Explanation
Command
i
Insert
Allows you to enter text at
the cursor
Command
a
Insert
Allows you to enter text after
the cursor
Command
o
Insert
Adds a blank line below the
current line
Command
O
Insert
Adds a blank line above the
current line
Insert
ESC
Command
Allows you to enter
command mode
Picture Perfect 2.0 Administration Guide
E.1
Overview
Table E-1: Mode Change Key Strokes
FROM
Mode
Command
Key Stroke
:
TO Mode
Ex
Explanation
Allows you to enter an Ex
command.
Command Mode Functions
The following tables lists some of the functions available when in
Command mode.
Table E-2: Command Mode Functions
Function
Insert text in front of cursor
i
Append text after cursor
a
Move down one cursor position
j
Move up one cursor position
k
Move left one cursor position
h
Move right one cursor position
l
Undo last change
u
Undo all changes to current line
U
Save file and exit
ZZ
Go to beginning of next line
+
Go to beginning of current line
0
Go to beginning of file
1G
Go to end of file
G
Scroll Forward one page
Ctrl
-f
Scroll back one page
Ctrl
-b
Delete current line
E.2
Key Stroke
Picture Perfect 2.0 Administration Guide
dd
E
Ex Mode Functions
The following tables lists some of the functions available when in Ex
mode.
Table E-3: Ex Mode Functions
Function
Key Stroke
q!
Save and Quit
wq
Advanced Configuration
Quit without saving
Editing the /etc/hosts File
Follow the steps below to add the internet addresses of the Host machine
and one for the Workstation.
1. At the system console, login as root.
2. To open the /etc/hosts file using vi, type: vi /etc/hosts
Result: The beginning of the file will display. You can enter the
address anywhere in the file but to make the file understandable, add
the address in order.
3. To move forward one screen at a time, press Ctrl and f . Continue
f
pressing Ctrl
until you have reached the correct section.
4. Move to the line where you would like to enter the address. You can
enter the address above or below this line.
5. To insert a blank line …
ABOVE, press
Shift
BELOW, press
o
o
6. At the blank line enter the name and address (or address and name
depending on the current format of your file).
7. Press the
Esc
key to move from Insert mode to Command mode.
8. Repeat steps 4. to 7. for each address you need to enter. Remember:
you need one address for the Host and one for each Workstation.
When you have completed entering all addresses, type: ZZ
Enter
Result: This will save the changes to the file and exit the vi editor.
Picture Perfect 2.0 Administration Guide
E.3
Editing the /etc/hosts File
NOTES
E.4
Picture Perfect 2.0 Administration Guide
Alarm Routing and Bumping
Using Picture Perfect
Web Browser
Appendix
F
Overview
The Picture Perfect alarm monitor routing feature allows administrators to
specify, per alarm, which X-terminals receive the alarm notification.
With the introduction of Picture Perfect Web browser, terminal definitions
became virtual Web clients (called unix:10, unix:11, and so on) and are not
assigned to a specific PC workstation, but rather to an operator session.
Each time an operator logs in, the next available virtual terminal is
assigned to that operator for that session. The concept of virtual terminals
is what makes it possible to log in to Picture Perfect using a Web browser
from any PC on the network. As a result of this change in terminal
definitions, routing alarms to specific terminals was no longer meaningful
because there was no way to know which operator is using which virtual
terminal at any given time.
Alarm Routing and
Bumping-Picture Perfect
Web Browser
The Picture Perfect 2.0 Web Browser Version 1.4 allows you to control
which virtual terminal is assigned to each operator, and therefore route
Picture Perfect alarms to specific operators.
The following example shows a Picture Perfect system with three
terminals:
The terminal setup using traditional X-emulation terminals:
1.Description:
Johns PC.
Server: johnpc:0
2.Description:
Marys PC.
Server: mary:0
3.Description:
Susans PC.
Server: ssmith:0
The same system using Web browser terminals:
1.Description:
Web Client 1.
Server: unix:10
2.Description:
Web Client 2.
Server: unix:11
3.Description:
Web Client 3.
Server: unix:12
Picture Perfect 2.0 Administration Guide
F.1
Overview
NOTE
For a Picture Perfect Enterprise Host, primary or backup Redundant Host, you
define the terminal to use the host name of the server. For example, if the Picture
Perfect server name is pphost, you should define the terminals as pphost:10,
pphost:11, pphost:12.
With the latest version of the Picture Perfect Web Browser, you can assign
an operator to a virtual terminal, and therefore route Picture Perfect
alarms to specific operators.
Continuing from the previous example, the terminal definitions now
look like this:
1. Description: Johns Web Client.
Server: unix:20
2. Description: Marys Web Client.
Server: unix:21
3. Description: Susans Web Client. Server: unix:22
NOTE
For a Picture Perfect Enterprise Host, primary or backup Redundant Host, you
define the terminal to use the host name of the server. For example, if the Picture
Perfect server name is pphost, you should define the terminals as pphost:20,
pphost:21, pphost:22.
For this example, let’s assume that John’s Picture Perfect login ID is jdoe.
The next step is configuring the system to consistently assign the
appropriate virtual terminal port number to each operator as follows:
1. As the root operator, from the command prompt on the Picture
Perfect host, change to the appropriate directory by entering:
cd /opt/tarantella/bin/
2. Create an object for the operator by entering:
./tarantella object new_person --name o=organization/cn=jdoe
--surname doe --user jdoe
Where jdoe is the login ID of the Picture Perfect operator.
F.2
Picture Perfect 2.0 Administration Guide
F
3. Enter the following command to assign the operator to the virtual
terminal port number:
./tarantella object edit --name o=organization/cn=jdoe
--scottamindisplay xx --scottamaxdisplay xx
Where jdoe is the login ID of the Picture Perfect operator, and xx is the
port number derived from the terminal record. In this example, you
would enter 20 for John’s Terminal.
Now, every time John logs into Picture Perfect he is assigned unix:20,
and will see alarms routed to that terminal. Repeat these steps for each
operator to whom you route alarms. Make sure you do not specify the
same terminal port number to more than one operator.
NOTE
If you need to remove a terminal assignment from an operator, use the following
command:
./tarantella object delete --name o=organization/cn=jdoe
Alarm Routing and
Bumping-Picture Perfect
Web Browser
You can have a combination of user-specific terminals and unassigned
terminals that do not require routing or bumping assignments. If you are
configuring your system to use a mix of user-specific and unassigned
terminals, you must allow for an adequate number of unassigned ports,
and specify user-specific port numbers above the number of unassigned
ports.
For example, if you need 10 unassigned terminals and three user-specific
terminals, you must define the user-specific terminals, at a minimum, as
:20, :21 and :22, and leave :10 through :19 as unassigned
terminals. Not leaving enough ports available for unassigned terminals
will cause the user-specific port numbers to be used for unassigned
terminals, which will result in denied access for the operators with userspecific terminals.
Picture Perfect 2.0 Administration Guide
F.3
Overview
NOTES
F.4
Picture Perfect 2.0 Administration Guide
Micro Facility
Assignment Tool
Appendix
G
Overview
The Micro Facility Assignment Tool allows you to change the facility a
micro is assigned along with the inputs, input groups, outputs, output
groups, readers and doors for that micro.
NOTE
Do not use this utilty if your micro spans multiple facilities.
Running the Tool
! Follow the steps below to run the tool.
1. Log on as root and open a terminal window.
2. Type: /cas/bin/micfac.sh
Enter
Micro Facility Assignment Tool - Version 1.6 7/17/96
Micros: 0 100 1 101 31 32 152 153 154 75
Type a list of micros belonging to 'GLOBAL'
(or press <ENTER> to skip)
31 32 152
Micro Facility
Assignment Tool
3. Enter the number of the micro(s) you would like assigned to the
facility Global. If you plan to enter more than one, separate the micro
numbers by a space and press Enter .
For example, if you wanted to assign micros 31, 32, and 152 to the
Global facility, you would type:
Enter
Result: You will be asked to verify your choice of micros.
For example, to continue with the example started above, this step
would result in the following prompt.
Micros: 31, 32, 152 -- is this correct? (y/n)
Picture Perfect 2.0 Administration Guide
G.1
Running the Tool
4. Press:
Y
Result: The inputs, input groups, outputs, output groups, readers, and
doors associated with all the micros you assigned to the Global facility
will also be assigned to the Global facility.
NOTE
All records in Picture Perfect 2.0 are assigned a facility, however, this utility only
updates the records of the corresponding devices, such as inputs, input groups,
outputs, output groups, readers, and doors. Area and alarm records will have to
be updated manually.
For example, since 31 was the first micro in our previous example, this
step would result in the following messages.
This may take a long time -- please be patient.
Updating micro 31 with GLOBAL...
Updating inputs...
Updating output...
Updating reader...
Updating door...
Updating micro 31's bdghis_ingrp...
Updating micro 31's almhis_ingrp...
Updating micro 31's upstrm_comm_ingrp...
Updating micro 31's dnstrm_comm_ingrp...
Updating micro 31's reader_comm_ingrp...
This process would be repeated for each micro that you assigned to the
Global facility.
5. Upon completion, the remaining micros would be listed and you
would be prompted to assign those to the next facility.
6. When all micros have been assigned a facility, the installation is
complete. The following messages will display.
No micros left to assign. This utility will now exit.
You may use this tool at any time by typing (as root):
/cas/bin/micfac.sh
NOTE
G.2
Do not use this utilty if your micro spans multiple facilities.
Picture Perfect 2.0 Administration Guide
Flow Diagrams
Appendix
H
Figure H-1.
Flow Diagrams
Picture Perfect System Flow Diagram
System Flow Diagram
Picture Perfect 2.0 Administration Guide
H.1
Picture Perfect Valid Badge Read Flow Diagram
Picture Perfect Valid Badge Read Flow Diagram
Figure H-2. Valid Badge Read Flow Diagram
H.2
Picture Perfect 2.0 Administration Guide
H
Example of a Communications Failure
Detected by a Micro
Flow Diagrams
Figure H-3. Comm Failure Detected by Micro
Example of a Bad Badge Detected by an Area
Figure H-4. Bad Badge Detected by Area
Picture Perfect 2.0 Administration Guide
H.3
Example of a Door Forced Condition Detected by a Door
Example of a Door Forced Condition
Detected by a Door
NOTE:
•
An Input Group is not selected on the Input form.
•
The use of an Exit Device is recommended.
•
The special situation of Supervised Inputs on a 2SRP or
20DI board is covered in the section oon Input Groups.
Figure H-5. Door Forced Condition Detected by Door
Example of a Problem Condition
Detected by a Sensor (DI) and Triggering
Both an Alarm and a Physical Output (DO)
Figure H-6. Problem Condition Detected by Sensor (DI)
H.4
Picture Perfect 2.0 Administration Guide
H
Example of a DI Used to Trigger a
Physical Output (DO)
Flow Diagrams
NOTE: A type of schedule called an Output Group Event
could also control the parking lot lights in the example above.
Figure H-7. DI Used to Trigger DO
Picture Perfect 2.0 Administration Guide
H.5
Example of the Door Exit DI and Sense DI Set-Up Using Supervised Inputs to a 2SRP or 20DI
Figure H-8. Door Exit DI and Sense DI Setup
H.6
Picture Perfect 2.0 Administration Guide
A valid badge read or exit request opens the door without triggering the alrarm.
Tampering with either DI triggers the tamper alarm without opening the door.
•
•
NOTE:When the Picture Perfect software detects a SHORT and OPEN condition on the Input Group:
Example of the Door Exit DI and Sense DI Set-Up
Using Supervised Inputs to a 2SRP or 20DI
H
Alarms Initiated by Micros
Flow Diagrams
Figure H-9. Alarms Initiated by Micros
Alarms Initiated by Areas
Figure H-10. Alarms Initiated by Areas
Alarms Initiated by Doors
Figure H-11. Alarms Initiated by Doors
Picture Perfect 2.0 Administration Guide
H.7
Alarms Initiated by Doors
H.8
Picture Perfect 2.0 Administration Guide
Glossary
Glossary
Access: The ability to enter or pass through, such as to enter a building by going
through a door. See Access Control.
Access Control: A security system that controls an individual’s ability to enter an
area (building, parking lot, room). Typically, readers protect doors or gates.
Badges used in the readers permit or deny access based on a person’s
authorization.
ACK: Acknowledgment. See ACK Packet.
ACK Packet: A message sent between computers to acknowledge that the
preceding message was received correctly.
Active Window: The window with the input focus, in which what you type
appears. Only one window is active at a time.
AIX: Advanced Interactive Executive; the UNIX-based operating system
developed by IBM; used for Picture Perfect.
Alarm Notification Message: An alarm alert message that displays on the
Alarm Notification Window on Picture Perfect X Terminals when an alarm
occurs.
Allowable Open: The length of time a door can remain open before an alarm
occurs.
Archive: To copy history transactions from the database to diskette or magnetic
tape. Some fields are expanded from IDs to descriptions. Archives are used for
later examination of transactions; archives cannot be restored.
Area: A logical grouping of readers and doors; used to control access.
Available Language: A language that can be used by Picture Perfect operators.
A language must be supported by Picture Perfect and translated before it can be
made available.
BID: The hidden number that uniquely identifies each badge.
Background Window: A window behind another window. The background
window does not have the input focus.
Backup: To copy tables from the database to diskette or magnetic tape. A backup
can be used to restore the system to a previous state or to recover from a failure.
Badge: A plastic card issued to each person who uses the facility. The system
reads the information on the badge to determine whether or not to grant access to
a person.
Badge Encode Number: The hidden number that uniquely identifies each badge.
Picture Perfect 2.0 Administration Guide
GL.1
Glossary
Alarm State: When an alarm sensor detects an alarm condition (such as an open
door), its contacts open or close (depending on the type of sensor and how it is
wired to the system), and the sensor is said to be in alarm state.
Glossary
Badge-Issue Permission: Permission to create a new badge record; the toggle
button labeled “Badge Issue” on the Permissions form.
Badge-Issue Reader: A reader assigned to a workstation used to issue a badge.
Badge Learn: Occurs when a micro checks with the host on an unknown badge
and stores that badge information in its database. The next time the badge is
presented to a reader connected to that micro, it will have the needed badge
information.
Badge Reader: A device, usually located near a door, used to read badges. When
a badge is presented to a badge reader, the system reads it and determines
whether or not to unlock the door.
Badge Status: Indicates either the intended use of a badge (such as permanent or
temporary) or its current condition (such as active or lost).
Button: A button on a mouse pointing device; a graphical control button on a
window frame or in a menu or picklist that works by “clicking” it. See Mouse
Button, Function Button, Radio Button, Select Button, Toggle Button.
Category: A “lock” and “key” that controls access. Each area and badge has one
or more assigned categories. If a category on a badge matches any of the
categories on an area, the badge works as a “key” in readers assigned to that area.
A category assigned to an area functions as a lock; a category assigned to a badge
functions as a key.
Click: The rapid press-and-release of a mouse button (without moving the
mouse) that makes a “click” sound.
Client: An application program for the X Window System. In Picture Perfect, a
menu displays when you click the left mouse button in the root window.
Client Area: The area (within the borders of a primary window’s frame) that is
controlled by an application.
Close: A selection on some menus (or dialog boxes) that closes the window
associated with the menu.
CMENU: A diagnostic program that runs on the console in order to monitor and
control microcontrollers and X Terminals; can also be used to monitor database
activity and configuration in the host or micro.
Code Set: A collection of character codes that express one or more languages.
Picture Perfect only supports code sets defined by the International Standards
Organization (ISO). Western European languages use the ISO8859-1 code set;
Hebrew uses the ISO8859-8 code set.
Control Panel: An area of a window that contains pushbuttons and other
graphical controls.
Console: The host computer used for administrative functions (also called host
console).
Cursor: A graphical symbol--usually a pipe (|) or block--that indicates your
current input location on a screen. A mouse cursor shows where (to what
GL.2
Picture Perfect 2.0 Administration Guide
Glossary
selection) the mouse is pointing. A text cursor shows where the next character to
be typed will appear on the screen.
Daemon: A continually running background process that is not controlled by a
terminal. See Process.
Database: Picture Perfect configuration, transaction, and historical data stored on
the hard disk of the host computer or the resident memory of a microcontroller.
See Distributed Database and Relational Database.
Date Format: The order that the system requires for month, day, and year.
Devices: Physical peripherals such as disks, tapes, printers, networks, and serial
port adapters for modems and lines of microcontrollers. Use the Devices menu to
configure printers, ports, and communication lines.
Digital Input: A physical sensing device used to monitor an electronic contact
connected to a microcontroller. Also called a DI.
Digital Output: A physical control device used to turn on/off an electronic
contact connected to a microcontroller. Also called a DO.
Distributed Database: Resident database downloaded to a microcontroller that
allows independent decision-making and faster response time.
Door: A database record that links the logical functions of a door with the door
strike output, exit button, and door sensor inputs.
Door Open Too Long: A logical alarm caused when a door (unlocked by a valid
badge read) remains open longer than the Allowable Open Time (a shunt time
that starts when the door contact reports the door-open state).
Double Click: To click a mouse button twice in rapid succession without moving
the mouse. See Click.
Downstream: A relative position on a communication line originating at a host
computer; for example, the second micro on a line is “downstream” from the first
micro. See Micro.
Drag: To press and hold a mouse button while moving the mouse pointer.
Duress Code: A special PIN number used (on a keypad reader) to signal
emergency situations. See the Parameters form.
Enabled Reader: A condition in which a reader is enabled to read badges. An
enabled reader can be online or offline. See Online Reader and Offline Reader.
Encryption: The encoding of data for security purposes by converting standard
data code into a proprietary code.
ENQ: An inquiry message to poll a micro to see if it is responding.
Facility: A facility is a partitioning of the records of the database of the security
system.
Picture Perfect 2.0 Administration Guide
GL.3
Glossary
Door Forced Open: A logical alarm caused when the door opens without a valid
badge read and the door contact reports the door-open state.
Glossary
Facility Profile: A facility profile is a permission set that an operator can access.
assigned to a facility.
ENQ: An inquiry message to poll a micro to see if it is responding.
Firewall. A firewall is a set of related programs, located at a network gateway
server, that protects the resources of a private network from users from other
networks.
Foreground Window: A window in front of another window.
Form: An electronic data-entry worksheet used to enter, find, view, or update
data. A form may have input fields, pop-up picklists, and pushbuttons for various
functions.
Frame: The border surrounding a window, consisting of a resize border, a
window menu button, a title bar, and window control buttons.
Function Button: Icon-based buttons at the top of a form that are used for various
functions, such as save, find, delete, view, or quit. See Radio Button, Select Button,
Toggle Button.
Function Key: Keys on a computer’s keyboard labelled F1 through F12 that may
perform unique functions within a system.
Highlight: A graphic technique that provides a visual cue to the current selection
or the current location of the input focus. Reverse video is typically used to
“highlight” a selection.
Host. A host is generally a device or program that provides services to some
smaller or less capable device or program.
Host Console: The host computer terminal used for AIX functions.
I-Beam: A graphic symbol that indicates the location of the mouse pointer in a
text entry box. See Text Cursor.
Icon: A graphic symbol that represents a function or an iconified window.
Iconify: To minimize a window. An icon represents the window. See Restore.
Inactive Window: A window that does not have the input focus.
Informix: The relational database management system (RDBMS) used by the
Picture Perfect system. See Relational Database.
Input: A digital input (DI) or a logical condition detected by the microcontroller.
An input is assigned to an input group.
Input Field: An area of the screen where an operator can type in information.
Input Group: A group of one or more digital inputs (or logical inputs) that can
cause an alarm (and/or trigger output groups) when any (or all) inputs in the
group are detected as true.
Insertion Point: A point (marked by a cursor) where the text that you enter will
appear.
GL.4
Picture Perfect 2.0 Administration Guide
Glossary
Keyboard: The device that the operator uses to interact with the system by typing
inputs or responses.
Keypad Override Code: See Shunt.
LAN: A Local Area Network. X Terminals are connected to the host computer
using an Ethernet or Token-ring LAN.
Linux. Linux (often pronounced LIH-nuhks with a short “i”) is a Unix-like
operating system that was designed to provide personal computer users a free or
very low-cost operating system comparable to traditional and usually more
expensive UNIX systems. Linux has a reputation as a very efficient and fastperforming system. Linux is a remarkably complete operating system, including a
graphical user interface, an X Window System, TCP/IP, the Emacs editor, and
other components usually found in a comprehensive UNIX system. Linux is
publicly open and extendible by contributors. Because it conforms to the Portable
Operating System Interface standard user and programming interfaces,
developers can write programs that can be ported to other operating systems.
List Box: A scrollable list of options from which to select. Also called a picklist. See
Picklist.
Location Cursor: A graphic symbol that marks the current location of the
keyboard input focus for selection. Typically, this symbol is a box that surrounds
the current object. The location cursor is sometimes known as the “selections
cursor”.
Login: The procedure used by operators to identify themselves to the system. To
use the system, an operator must “log in” with a Login Id and Password. The
Login Id is associated with a Permissions level that defines the functions an
operator can perform. A Password provides secondary validation for that
operator.
Logout: A security procedure that protects the system from unauthorized use.
When an operator logs out, the system displays the Login screen and requires the
next operator to log in.
Maximize: To enlarge a window to full screen size.
Menu: A list of choices, often indicated by a group of icon buttons. The Main
Menu lists major functions of the system. A Main Menu option may lead to a
submenu or to a form. See Pull-down Menu, Pop-up Menu, Submenu, and Form.
Message: Transaction information that the system displays. See also Alarm
Message.
Micro: See Microcontroller.
Microcontroller (micro): The metal box containing the circuitry that controls the
opening and closing of doors. Badge readers, alarm points, and digital output
points are wired to micros, and micros are connected to the host computer. The
Picture Perfect 2.0 Administration Guide
GL.5
Glossary
Locale: A language and the location in which it is used. All languages in Picture
Perfect are defined in terms of locale. Each language has a unique locale identifier.
Picture Perfect uses the locale identifiers defined by AIX. Refer to Chapter 32 National Language Support for a list of locale identifiers.
Glossary
Micro/4-P or Micro/5-P is the first microcontroller on a communication line from
the host. Micro/2s are configured in Picture Perfect as if they were physically part
of the closest upstream Micro/4-P. See Upstream and Downstream.
Mode: A set of schedules that defines how the system operates and specifies the
characteristics of readers, areas, doors, and other system components. See
Operating Mode.
Modem: Hardware device used to communicate between computer systems over
telephone or other communications lines.
Monitoring: See Door Forced Open and Shunt.
Mouse Button: One of two or three buttons on a pointing device, usually referred
to as “left mouse button”, “middle mouse button”, and “right mouse button”. See
Click, Drag, Double-Click, for ways to use a mouse button.
Offline: A condition in which the micro is not communicating with the host
computer.
Offline Reader: A condition in which a reader is not enabled to release the
doorstrike when a valid badge read occurs. Access attempts at an offline reader
can be routed to the Activity Monitor and to printers and online history.
Online: A micro is communicating with the host.
Online Reader: A reader is enabled to release the doorstrike when a valid badge
read occurs. Access attempts at an online reader can be routed to the Activity
Monitor, printers and online history.
Open: To display a window.
Open Too Long: See Door Open Too Long.
Operating Mode: The mode associated with a set of schedules that defines
system operating specifications.
Option: A selection on a menu.
Output: A physical digital output (DO) that actuates devices such as a siren, a
doorstrike, or lights, which can be triggered by an output group.
Output Group: A group of one or more outputs that can be triggered when
activated by an associated input group.
Packet: See ACK Packet.
Password: A special code, used during login, that determines if an operator is
authorized to log into the system.
Permissions: A level of operator permission to perform system functions. Each
group of operators functions is a “permission group” that can be assigned to an
operator authorized to perform those functions. See Login and Password.
Picklist: A window that displays a scrolling list of options for a certain category.
You may be able to select several or only one of the options on the list, depending
on the feature in use.
GL.6
Picture Perfect 2.0 Administration Guide
Glossary
PIN # : A Personal Identification Number that identifies a person. If a facility uses
both a keypad and badge reader, employees present their badge to the reader,
then enter their PIN on the reader keypad.
Pointer: A graphic symbol in a window that indicates the current position of the
mouse and the activity state of the window: ready or busy.
Pop-up Menu: A menu that “pops up” when you click a button.
Port Group: A single line of microcontrollers connected to a port.
Port Group Leader: The first microcontroller in the port group. See Port Group.
Primary Language: Language used by Picture Perfect for alarm notification,
archive notification, describing alarms in the Alarm Monitor, and describing
badge, input, and status activity in the Activity Monitor. These are always
described in the primary language, even when viewed by operators working in a
different language.
Priority: A number used to indicate the response priority of an alarm. The lower
the priority number, the more serious the alarm.
Process: One of many independent programs running at the same time in the
computer.
Protected Field: An area of a screen where an operator cannot type in or change
information.
Radio Button: A diamond-shaped button that allows only a single choice from a
list of choices. See Toggle Button.
Readers: Badge readers are devices connected to the system that read the
encoded badge numbers. They are usually located near doors or gates, or in
elevators that the system controls.
Relational Database: A database that uses a table structure to store data.
Relationships among tables are logically specified at the time of user access into
the database; they are not built into the data structures themselves.
Response: Text that the operator selects or types when answering an alarm.
Restore: To re-display an iconified window.
Root Window: The background behind all Picture Perfect windows; sometimes
called the “desktop” or “workspace” area, where all the windows in your
environment display. To display the Control menu, click the left mouse button on
the root window; drag to highlight a selection. To display the Client menu, click
the right mouse button on the root window; drag to highlight a selection.
SSL. SSL (Secure Sockets Layer) is a commonly-used protocol for managing the
security of a message transmission on the Internet. SSL uses a program layer
located between the Internet's Hypertext Transfer Protocol (HTTP) and Transport
Control Protocol (TCP) layers.
Picture Perfect 2.0 Administration Guide
GL.7
Glossary
Provided Language: A language whose translations are provided by CASIRUSCO. All provided languages are available at installation. English and French
are the only provided languages.
Glossary
Schedule Event: A time-dependent change to a mode, area, reader, door, alarm,
input group, or output group. See Operating Mode.
Screen: The video-display portion of a computer terminal or workstation.
Scroll Bar: A graphical device used to move the contents of a window up, down,
left, or right inside the frame. A scroll bar consists of a slider, scroll arrows, and a
scroll area. To scroll, click on the scroll arrows or the scroll area or drag the slider.
Select: To choose an object to be acted upon or an action to be performed.
Select Button: The mouse button used to make a selection. In Picture Perfect, this
is the left button.
Semaphore. In programming, especially in UNIX-based systems, semaphores are
a technique for coordinating or synchronizing activities in which multiple process
compete for the same operating system resources. A semaphore is a value in a
designated place in operating system (or kernel) storage that each process can
check and then change
Server. Generally, a server is a computer program that provides services to other
computer programs in the same or other computers. In the client/server
programming model, a server is a program that awaits and fulfills requests from
client programs in the same or other computers.
Shuffle: To move a window to the screen foreground or background.
Shunt: Override an alarm on a door contact that detects an open state on the door.
A digital input device monitors the door state. If the door opens with a valid read
(or exit device), the input device (a door contact) detects a state change but does
not report the change until a shunt time elapses. The shunt time allows the
badgeholder enough time to get through the door. See Door Forced Open and
Door Open Too Long.
To override a door sensor for a longer time, enter a keypad override code (a
microcontroller-dependent code set on the Micros screen).
Shutdown: To stop running the application and the operating system.
Status: The current condition of something, such as a badge or a micro. The
Status form is used for viewing a micro’s current database to verify configuration
and scheduling.
Submenu: A series of icon buttons that appear when you click one of the Main
Menu buttons. A submenu contains options for selection.
Supported Language: A language that can be used in Picture Perfect. All
languages other than English and French must be translated and made available
before they can be used.
SYN: A message from the host that synchronizes the micro’s clock.
System Administrator: A full-function operator; an operator permission without
any function restrictions.
GL.8
Picture Perfect 2.0 Administration Guide
Glossary
Text Box: An area of the screen used for text entry. A text cursor appears in the
box.
Text Orientation: The direction in which a language is read, either left or right.
Latin-based languages are read left-to-right, so their Text Orientation is left.
Hebrew is read right-to-left, so its Text Orientation is right.
Toggle Button: A square button that appears with each item on a list where you
can make multiple selections.
TPS: Transaction Processing System; the program that communicates with
microcontrollers.
Transaction: Microcontroller activity.
TTY. In Unix-based operating systems, any terminal at all; sometimes used to
refer to the particular terminal controlling a given job. Also the name of a Unix
command which outputs the name of the current controlling terminal.
Unlock Time: The length of time a door latch is to remain unlocked after a valid
badge read (or after an exit button activates). This time allows the badgeholder to
open and pass through the door.
Upstream: A relative position on a communication line originating at a host
computer. For example, the second micro on a line is “upstream” from the third
micro, because the second micro is relatively closer to the host.
Window Frame: See Frame.
Window Manager: A program that controls the size, placement, and operation of
windows on the workspace. The window manager includes the functional
window frames that surround each window object, and may include a separate
menu for the workspace.
Window Menu: The menu that displays when the window menu button is
clicked. The window menu typically contains selections for restoring, moving,
sizing, minimizing, maximizing, and closing the window.
Workstation: An X Terminal that displays the forms that the operator uses to
interact with the system; connected to the host computer using an Ethernet or
Token-ring LAN (Local Area Network). See LAN.
xdm: The login utility used to allow an operator to log in on an X Terminal. The
operator uses an xdm window to enter a Login ID and a Password. The X
Window Display Manager (xdm) is the program that controls workstation
windows.
X Terminal: The computer monitor that displays the screens that the operator
uses to interact with the system. Also called a workstation.
X Window System: A portable network-transparent window system that handles
graphics and multiple fonts in a hierarchy of windows on a wide variety of bitmapped display devices.
Picture Perfect 2.0 Administration Guide
GL.9
Glossary
Window: A framed display that contains all or part of a menu, submenu, form,
picklist, monitor, or message. See Background Window.
Glossary
NOTES
GL.10 Picture Perfect 2.0 Administration Guide
Index
A
Access 17.1
Access/Secure Operations 17.2
Activity Monitor 28.1
Activity Monitor Window 28.4
Activity Monitoring 2.3
AIX 2.2
Alarm Alert Window 27.3
Alarm Color 4.33, 8.12
Alarm Events 16.33
Alarm Events Form 16.34
Alarm Graphics 2.4
Alarm History Size 4.29
Alarm Instructions 8.2
Alarm Messages 2.3
Alarm Monitor 27.2
Alarm Monitor Window 27.2
Alarm Response Window 27.3
Alarm Responses 8.4
Alarm/Activity Monitor 8.1
Alarm/Activity Monitor Routing 7.1
Alarms 2.3
Alarms Form 8.6
Antipassback 2.4
Anti-Passback Status 14.23
Archive 18.2
Archive Backup Window 18.5
Area Events 16.14
Area Events Form 16.16
Areas 13.13
Areas Form 13.15
Auto-Generate 14.3
B
Backup Events Form 18.9
Badge Activity Message 28.4
Badge Categories 14.25
Badge Encode Format Window 14.16
Badge Formats 4.24
Badge Formats Form 4.26
Badge History Size 4.29
Badge Holder Customization 31.1
Badge Limited Usage 14.18
Badge Monitor 28.2
Badge Removal 14.9
Badge Removal Popup 14.8
Badge Report 20.10
Badge Table Values 20.21
Badges Form 14.11
Break Variables 20.19
Bump to Email 7.7
C
Card Trace 25.1
Card Trace Routing 4.29
Categories 13.6
Categories Form 13.7
Category Assignment 13.8
Category Floors Form 22.21
Category Manager 13.8
Change Field 31.8
Changing a Badge 14.5
Check Current Diagnostic Levels 33.13
Clear Diagnostic Levels Menu 33.17
Client Menu 3.20
CMENU 33.1
CMENU Utility 33.2
Color, Alarm 8.12
Colors, Alarm 4.33
COM Port Device Names for Linux 4.13
Communications 10.3
Control Menu 3.19
Control Outputs Form 29.2, 29.4
Controlling an Individual Output 29.4
Controlling an Output 29.2
Customization 14.12
Customizing Badge and Department
Screens 32.16
D
Database Protection 2.3
Database Synonyms 32.8
Date Format 4.30
Delete 3.10
Delete Report Picklist 19.5, 20.6
Deleting a Badge 14.6
DES 10.27
Diagnostics Subsystem 33.2
Diagnostics Subsystem Menu 33.3
Dial-Up Window 10.22
Digital Outputs 2.4
Disabling Keypad Alarm Response 23.7
Disabling Pre-Alarm 24.1
Door Events 16.30
Door Events Form 16.31
Doors 13.30
Doors Form 13.35
Doors Form Configured for Elevator
Door 22.22
Double-Badge Reporting 26.2
Download Upon Save 14.17
Dump PC Main Utilities Menu 33.4
Duration Time for Elevator Access 22.6
Duress Code 4.32
E
eFlash 11.8
Elevator Access 22.6
Elevator Control Configuration 22.7
Embedded Variables 20.18
Emergency Modes 16.3
Encryption 10.28
Error and Warning Messages 32.16
Events 16.2
Execution Menu 19.13
F
Facilities 15.5
Facility 4.38, 6.3, 6.5, 6.12, 7.4, 7.6, 8.3, 8.5, 8.9,
9.3, 9.7, 12.7, 12.14, 13.15, 13.23,
Picture Perfect 2.0 Administration Guide
Index -1
13.40, 14.16, 16.6, 16.7, 16.10, 16.17,
16.27, 16.32, 16.35, 16.39, 16.43, 18.9,
19.18, 20.25, 22.20
Facility Profile 6.1, 6.8
Find 3.9
FIREWALL 4.17
firewall 10.3
Flags Column Values 20.21
Flash Download Utility 11.3
FlashTool 11.6
Font Menu 19.13
Force Download
See Download Upon Save 14.17
Format Columns Window 19.8
Format Menu 19.6
Format Page Window 19.9
Format Summary Window 19.11
Forms 3.6
Alarm Events 16.34
Alarms 8.6
Area Events 16.16
Areas 13.14
Backup Events 18.9
Badge Formats 4.26
Badges 14.11
Badges, Card Trace Setup 25.2
Badges, Customization 31.1
Badges, Keypad Alarm Response 23.7
Badges, User Fields 31.2
Categories 13.7
Category Floors 22.21
Control Outputs 29.2, 29.4
Departments 4.37
Departments, User Fields 31.3
Door Events 16.31
Doors 13.35
Doors, Elevator Setup 22.22
Doors, Keypad Alarm Response 23.6
Doors, Pre-Alarm Setup 24.3, 24.4
Generator 15.4
History 19.2
Input Groups 9.5
Input Groups Events 16.38
Inputs 12.10
Messages 8.3
Micros 10.18
Micros, Alarm Response Setup 23.5
Micros, Elevator Setup 22.8
Mode Command 16.7
Mode Creation 16.6
Mode Events 16.10
Modems 4.6, 4.8
Operators 6.9
Output Groups 9.2
Output Groups Events 16.42
Outputs, Elevator Setup 22.10
Parameters 4.28
Parameters, Badge-Trace Routing 25.1
Parameters, Elevator Floors 22.8
Permission Group 6.3
Permissions 6.5
Personnel Type 4.39
Ports 4.12
Index -2
Ports, Network 4.16
Printers 4.18, 4.20
Readers 13.22
Readers, Badge and Keypad Setup 23.5
Readers, Double-Badge Setup 26.3
Report Events 19.17, 20.25
Responses 8.4
Route Definitions 7.3
Route Points 7.5
Routings 4.21
Status 30.2
Structured Query Language (SQL) 20.2
Temporary Categories 14.21
Terminals 4.2
Free Access Floors 22.6
Freeze 3.14
Function Buttons 3.9
G
Generating Records 15.7
Generator Form 15.4
Glossary GL.1
Guard 2.5
H
Help 2.3
History Form 19.2
Holiday Mode 16.4
Home Icon Button 19.13
Host Records 33.12
I
Import/Export 2.4
Increased Category 4.36, 13.2, 13.20, 14.25,
15.6, 16.18
InGroups Events 16.37
InGroups Events Form 16.38
Input Groups 9.3
Input Groups Form 9.5
Inputs 12.9
Inputs Form 12.10
K
Keypad Response 23.2
Keys Form 10.28
L
Language 32.14, 32.15
Language Selection 31.5
Language Translation 32.5
Limited Usage 13.29, 14.18
Linux 2.1, GL.5
Locale 32.6
Log In 3.1
Log Out 3.3
Logical Operators 20.16
M
Main Menu 3.3, 3.4
Master Records 15.2
Master Records Window 15.3
Menu 3.3, 3.4
Picture Perfect 2.0 Administration Guide
Messages Form 8.3
Micro Alarms 10.10
Micro Communications 10.3
Micro Map 33.8
Micro Status 33.9
Micro Utilities 33.17
Micro Utilities Menu 33.17
Micros Form 10.18
MicTool 11.6
Mode Command Form 16.7
Mode Creation Form 16.6
Mode Events Form 16.10
Modems 4.4
Modes 16.2
Monitor Control Picklist 28.4
Multiple Access Violations 23.4
N
Networking option 2.5
New 3.13
Normal Mode 16.2
O
Open Report Picklist 19.3, 20.4
Operating System 2.2
Operator Activity Message 28.5
Operator History Size 4.29
Operator Interface 2.2
Operator Monitor 28.5
Operator Response 23.3
Operators 6.9
Operators Form 6.9
OutGroups Events 16.41
OutGroups Events Form 16.42
Output Group Picklist 12.8
Output Groups 9.1
Output Groups Form 9.2
Outputs 12.2
Outputs Form 12.3
P
Page Setup Window 20.6
Parent Input Group 9.7
Password 3.2, 6.11
Permission Group Form 6.3
Permission Groups 6.1
Permissions 6.4
Permissions Form 6.5
Photo-Imaging option 2.4
Picklists 3.7
PIN Entry 2.4, 14.13
Port Records 33.12
Ports 4.10
Ports Form 4.12
Pre-Alarm Fields 24.3
Pre-loaded Report 20.9
Print Options Window 19.4
Print Report Window 20.7
Printer Utilities 33.21
Printer Utilities Menu 33.21
Printers 4.18
Printers Form 4.18
Printing a History Report 19.16
Process Control Diagnostics 33.3
Protection Plan 2.5
Q
Query 2.3
Quit 3.9
R
Radio Buttons 3.7
Reader Events 16.25
Readers 13.21
Readers Form 13.22
Real-Time Monitoring 2.3
Recovering the Entire System 18.13
Red Hat Linux 7.2 Operating System 2.5
Redundant-System option 2.4
Related Documentation 1.1
Relational Operators 20.17
Remove Record Popup 14.8
Removing A Single Alarm 27.6
Removing Badge Records 14.7
Report Events Form 19.17, 20.25
Report Menu 19.2
Reports 2.4
Reports Menu 20.4
Responding to An Alarm 27.3
Responses Form 8.4
Responses Picklist 27.4
Restore Window 18.11
Restoring the Database 18.10
Resume 3.14
Route Definitions 7.3
Route Definitions Form 7.3
Route Points 7.4
Route Points Form 7.5
Route to Email 7.6
Routing, Card Trace 4.29
Routings Form 4.21
Runtime Events 16.11
S
Save 3.9
Save Report As Window 19.4
Save Report Query As Window 20.5
Saving a History Report 19.16
Schedules 2.3
Scheduling a History Report 19.16
Scheduling an SQL Report 20.23
Scheduling Backups 18.8
Scheduling Elevator Free Access 22.21
Scroll Bars 3.17
Secure 17.1
Selection Buttons 3.7
Set Diagnostic Levels Menu 33.14
Setup Procedures 3.26
Shutting Down 3.24
Source Menu 19.5
SQL Clauses 20.14
SQL Form 20.2
SQL Names Picklist 20.8
SQL Syntax 20.18
Picture Perfect 2.0 Administration Guide
Index -3
SQL Syntax Menu 20.8
SQL Variables 20.18
Start/End Events 16.12
Starting Picture Perfect 3.21
Status By Area 30.3
Status by Micro 30.2
Status Form 30.2
Status Information from Micros 33.18
Stopping Picture Perfect 3.21
Structured Query Language 20.1
Submenu 3.3, 3.4
Support Services 2.5
Swipe and Show 19.1, 28.1, 28.2, 28.7, 28.8
Swipe and Show Activity Message 28.7
Swipe and Show Control 13.26, 16.29
Swipe and Show Monitor 28.6
System Configuration Standards 22.7
System Startup 3.1
T
Table Backup Window 18.6
Table Selection 31.6
Temporary Categories Form 14.21
Terminal Records 33.12
Terminals 4.2
Terminals Form 4.2
Text Boxes 3.6
Time Format 4.31
Title Bar 3.15
Toggle Buttons 3.7
Trace, Card or Badge 25.1
Tracing a Badge or Card 4.29, 14.17, 25.1
Transaction History Processing 2.4
Translating Text 32.8
Translations 32.12, 32.14
Troubleshooting Guide 33.22
Type Menu 19.5
U
UnixWare 2.2
Up/Down Buttons 19.13
Usage Count 13.29, 14.18
User Customization Window 31.4
User Fields in Departments Form 31.3
User Fields Window 31.2
Using a Mouse 3.14
Using a Window 3.15
Utilities Menu 33.2
V
Variables Picklist 19.12
vi Editor E.1
View 3.11
Viewing a History Report 19.14
Viewing Status By Area 30.3
Violation Notification 23.2
W
WatchLog 33.17
Window Frame 3.16
Window Menu 3.18
Index -4
Picture Perfect 2.0 Administration Guide
Customer Survey
Title of this book: Picture Perfect 2.0 Administration Guide
My overall rating of this book:
"
"
"
"
"
"
Excellent
Very good
Good
Satisfactory
Fair
Poor
What I liked most about this book:
What I would change, add, delete, etc. in future editions of this book:
Please return this form to:
Attn: Technical Writing
GE Interlogix
791 Park of Commerce Blvd.
Boca Raton, FL 33487
or e-mail your comments to:
[email protected]
Despite rigorous product testing, some problems cannot be detected in advance. Please let us know if you discover any defects in our software. We value your feedback and want to ensure that our software meets your expectations.
Software Defect Report
Date:_________________
First Name:__________________________ Last Name:_______________________________________
Company Name:_______________________________________________________________________
Phone:_________-____________________ e-mail:___________________________________________
CASI-RUSCO Business Partner:__________________________________________________________
Contact:______________________________________________________________________________
Application Software:__________________________________________ Version:_________________
HW Model:_______________________________________OS Version:___________________________
Hardware Platform:
Operating System:
Severity:
Replication:
" Intel PC
" RS/6000
" Windows
" UnixWare
" AIX
" Linux
" Cosmetic
" Inconvenience
" Function Loss
" System Crash
" Data Loss
" Every Time
" Frequently
" Intermittent
" Rarely
" One Time Only
Problem Description:
(Please be as specific as possible, and explain what you were doing when the problem occurred.)
Please fax this form to:
GE Interlogix Customer Support
(561) 998-6233