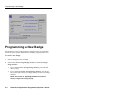
1
CASI-RUSCO...Security Solutions for the 21st Century
Smart Card
Applications
Programmer
Version 1.0
Operator’s Guide
CASI
RUSCO
1155 Broken Sound Parkway NW
Boca Raton, Florida 33487
(561) 998-6100
Part Number 460356001 Rev. A
May 1998
The information in this manual is revised periodically. Revisions will be
provided to the user in the form of addenda.
This publication may contain examples of data reports used in daily
business operations. Examples include fictitious names of individuals
and companies for illustration only; any similarity to names and
addresses of actual business enterprises and persons is entirely
coincidental.
This document is distributed on an as is basis, without warranty either
expressed or implied. Successful implementation depends solely upon
the customer’s ability to integrate each program into the total inventory
of “in-house” programs. While each offering has been reviewed for its
transferability and maintainability, no assurance of successful installation
can be given.
The customer accepts full maintenance responsibility. (A full scope of
software and hardware maintenance contracts are available to the
customer.)
Copyright 1998 CASI-RUSCO
All Rights Reserved
Printed in the USA
Smart Card Programmer is a registered trademark of CASI-RUSCO
GCR400 is a registered trademark of GEMPLUS
Contents
Contents
Chapter 1: Using This Manual ................. 1.1
Purpose ....................................................1.1
Who Should Read this Manual ............1.1
Related Documentation.........................1.1
Notational Standards.............................1.2
Special Keys .......................................1.2
Commands .........................................1.2
Typeface Standards................................1.2
Menu Titles.........................................1.2
Push Buttons ......................................1.3
Terminology............................................1.3
Click.....................................................1.3
Select....................................................1.3
Press ....................................................1.4
Command...........................................1.4
Chapter 2: System Overview ................... 2.1
Introduction ............................................2.1
Hardware Requirements.......................2.2
Software Requirements .........................2.2
Chapter 3: Installation and Removal....... 3.1
Installation...............................................3.1
Installing Smart Card Applications
Programmer on Windows 3.x .......3.1
Installing Smart Card Applications
Programmer on
Windows 95/NT .............................3.2
Removal...................................................3.3
Smart Card Applications Programmer Operator’s Guide
i
Contents
Chapter 4: System Administrator ............4.1
Configuration and Setup...................... 4.1
Getting Started....................................... 4.1
Passwords............................................... 4.3
Console Password ............................ 4.3
System Administrator Password ... 4.4
Change the Encrypted Console
Password ......................................... 4.6
Create a Setup Card .............................. 4.7
Change the Issuer Key.......................... 4.8
Update the Master P.I.N....................... 4.9
Change the Starting Badge
Number .............................................. 4.10
Chapter 5: Security Personnel .................5.1
Using the Smart Card Programmer.... 5.1
Getting Started....................................... 5.1
Logging On ............................................ 5.3
Programming a New Badge ................ 5.4
Resetting/Changing a P.I.N. ............... 5.5
Exiting the Program .............................. 5.7
ii
Smart Card Applications Programmer Operator’s Guide
CHAPTER
1
Using This Manual
Purpose
This manual provides instructions for installation of the SMART CARD
APPLICATIONS PROGRAMMER, initial setup and configuration. Information
for operating the system once it is installed is also included.
Who Should Read this Manual
This manual is intended for system administrators who are
responsible for the planning and implementation of the system
design, and who perform system configuration and setup.
Operators using the system should read the chapters which relate to
their duties.
The material in this manual has been prepared for persons
responsible for, and familiar with the security needs of the customer
facility.
Related Documentation
•
MODELS 820/825 SMART CARD READER INSTALLATION GUIDE
This manual provides information for the system administrator
to set up, configure, and manage the CASI-RUSCO Models 820
and 825 Smart Card Readers.
Smart Card Applications Programmer Operator’s Guide
1.1
Notational Standards
Notational Standards
Special Keys
Keyboard keys appear as graphics. For example, Enter denotes the
key labeled “Enter” or “Return”. F1 , F2 , etc., indicate the function
keys across the top of the keyboard.
Keys that display on the screen as push buttons appear in small caps,
italics. For example, QUIT, SAVE, VIEW, NEW, FIND, OK, CLOSE.
Commands
Examples of commands show the exact spacing and upper- or
lower-case letter for you to type. For example:
rc.pperf -K
If an example ends with
For example:
rc.pperf -K
Enter
, type the command then press
Enter
.
Enter
Typeface Standards
Menu Titles
The titles of menus, submenus, forms, form boxes, picklists, and
pop-ups appear in bold, italics. For example, the Site Config form, the
Communications Options picklist.
1.2
Smart Card Applications Programmer Operator’s Guide
Using This Manual
CHAPTER
1
Push Buttons
The names of push-buttons on forms and picklists appear in small
caps, italics. For example, QUIT, SAVE, VIEW, NEW, FIND, OK, CLOSE.
Terminology
Click
To “click” means to press and release a mouse button while the
pointer is on a designated area of the screen in order to display a
window or select an option. The press-and-release makes a clicking
sound.
The term “double-click” means to press and release a mouse button
twice in rapid succession. “Left-click” and “right-click” mean to click
the button on the left or right side of the mouse.
Select
The word “select” indicates that you choose an item from the current
menu, submenu, form, or picklist displayed on the screen. Use the
mouse or the cursor keys to select the item. For example:
Select Next 11 Digit Badge Number, then select a P.I.N.
The statement above tells you to select a certain submenu and then to
select a certain item from that submenu. If you make the selections
with a mouse, you will point to the main menu and click the left
mouse button. When the submenu appear, you will point and click
the desired item to select it.
If you make the selections with a keyboard, you will use the cursor
keys instead of a mouse pointer, and the Enter key instead of the left
mouse button.
Smart Card Applications Programmer Operator’s Guide
1.3
Terminology
Press
The phrase “press the _____ button” means to use the mouse (or the
keyboard) to “press” a designated button on the screen. To press a
button with the mouse, point then click the left button. To press a
button with the keyboard, use the Tab key and press Enter or
Spacebar .
Command
The word “command” indicates a command which would be typed
as specified.
1.4
Smart Card Applications Programmer Operator’s Guide
CHAPTER
2
System Overview
Introduction
The SMART CARD APPLICATIONS PROGRAMMER is designed to program
badges used with the CASI-RUSCO Model 820/825 Smart Card
Readers. This program allows the system administrator to easily
control badge security by means of passwords, an Issuer Key and a
Setup Card.
Your SMART CARD APPLICATIONS PROGRAMMER package includes:
•
a GCR400 Reader and related hardware
•
a Setup diskette to install the software on your PC
The SMART CARD APPLICATIONS PROGRAMMER supports operations in a
Windows 3.x, 95 or NT environment where the PC is connected to the
GCR400 Reader by means of an RS-232 cable. This allows the physical
connection of the GCR400 Reader to the host PC.
Smart Card Applications Programmer Operator’s Guide
2.1
Hardware Requirements
Hardware Requirements
For the Smart Card Programmer System:
•
a Windows compatible PC
•
a GCR400 Reader
Refer to Figure 1, below, for an overview of the hardware
connections between the SMART CARD APPLICATIONS PROGRAMMER host
PC and the GCR400 Reader.
FIGURE 1: Overview of the Host PC and the GCR400 Reader
To Host PC
Software Requirements
•
SMART CARD APPLICATIONS PROGRAMMER Model 82P Version 1.0
•
Windows 3.x, Windows 95, or Windows NT operating system
2.2
Smart Card Applications Programmer Operator’s Guide
CHAPTER
3
Installation and
Removal
Installation
The SMART CARD APPLICATIONS PROGRAMMER package can be
installed at the same time the Smart Card Reader is installed or any
time thereafter. If installing the Programmer at the same time that the
Smart Card Reader is being installed, follow the installation
instructions in the MODELS 820/825 SMART CARD READER
INSTALLATION GUIDE to install the reader and then refer to this
document for Programmer installation. SMART CARD APPLICATIONS
PROGRAMMER is supplied on a diskette.
Installing Smart Card Applications
Programmer on Windows 3.x
1.
If you are not currently in Windows, type: WIN
Result: The Program Manager window appears.
2.
Insert the SMART CARD APPLICATIONS PROGRAMMER Model 82P
Disk 1 of 1 into drive A.
3.
In Program Manager, select File, then Run.
Result: The Run window appears.
4.
In the Command Line box, type a:\setup and press OK.
Result: The Installation window appears.
Smart Card Applications Programmer Operator’s Guide
3.1
Installation
5.
Follow the installation prompts. Accept the defaults or customize
as desired.
Result: Files are copied from the diskette to your hard drive and
the program is installed. A program group named CASI-RUSCO
Model 82P will appear on your desktop.
Installing Smart Card Applications
Programmer on Windows 95/NT
To install the Smart Card Applications Programmer Software on a
Windows 95 or NT operating system:
1.
Insert the SMART CARD APPLICATIONS PROGRAMMER Model 82P
Disk 1 of 1 into drive A:
2.
Click on START, then Run.
Result: The Run window appears.
3.
In the Open box, type a:\setup and press OK.
Result: The Installation window appears.
4.
Follow the installation prompts. Accept the defaults or customize
as desired.
Result: Files are copied from the diskette to your hard drive and
the program is installed. A program group named CASI-RUSCO
Model 82P will appear under Start/Programs.
3.2
Smart Card Applications Programmer Operator’s Guide
Installation and Removal
CHAPTER
3
Removal
To Remove the Smart Card Applications Programmer Software:
1.
From the CASI-RUSCO Model 82P Program group, select the
Uninstall option.
Result: An Open window appears.
2.
Verify that the install.log file is highlighted in this
window. Click on OK.
Result: The Select Uninstall Method window appears.
3.
Select Automatic for the default uninstall options and click NEXT
to continue.
Result: The Perform Uninstall window appears.
4.
Click FINISH to remove the program.
Smart Card Applications Programmer Operator’s Guide
3.3
Removal
NOTES
3.4
Smart Card Applications Programmer Operator’s Guide
CHAPTER
4
System
Administrator
Configuration and Setup
The SMART CARD APPLICATIONS PROGRAMMER system allows the
System Administrator to manage and control the security of Smart
Card badges. Prior to using the system, the following setup and
configuration is required:
•
Set up the System Administrator’s Password
•
Change the encrypted Console Password
•
Create a Setup Card
•
Change the Issuer Key
•
Update the Master P.I.N.
•
Change the Starting Badge Number
These items are detailed in the following sections.
Getting Started
To launch the Smart Card Application Programmer:
1.
Depending on the operating system you are using, select one of
the following methods.
•
•
Windows 3.x: Double-click on the Casi-Rusco Model 82P
icon on your desktop.
Windows 95/NT: Click on START, Programs, Casi-Rusco
Model 82P, then Sap.
Smart Card Applications Programmer Operator’s Guide
4.1
Getting Started
2.
Press START.
Result: The selection window below appears.
3.
4.2
Press GEM PLUS MPCOS-3DES to continue or EXIT to exit the
program.
Smart Card Applications Programmer Operator’s Guide
System Administrator
CHAPTER
4
Passwords
CASI-RUSCO designed the SMART CARD APPLICATIONS PROGRAMMER
software to be as secure as the Models 820/825 Smart Card Readers.
Security starts at the console; therefore, all passwords are stored on
your hard drive as encrypted files using the United States
Government Standard for Encryption (DES) along with the ABA’s
Standard for encryption (MAC). The System Administrator has the
ability to change the console passwords.
Console Password
To enter the Console Password:
1.
Enter the Console Password provided with your system.
CASI-SAP is the default. All characters entered are echoed back
in the form of an * character to prevent anyone from seeing
what you are typing.
NOTE: All passwords are 1 - 8 digits. They are not case sensitive.
2.
Click OK or press the
Enter
key.
Result: If the password was wrong, you will be prompted to enter
it again. All attempts (correct or incorrect) are recorded in a log
file. If the password was correct, the following window will
appear.
Smart Card Applications Programmer Operator’s Guide
4.3
Passwords
3.
Press SYSADMIN to continue or EXIT to exit the program.
Result: If you elected to continue, the following screen will
appear.
System Administrator Password
To enter the System Administrator password:
1.
Enter the SysAdmin password provided with your system.
sapit is the default. All characters entered are echoed back in
the form of an * character to prevent anyone from seeing what
you are typing.
NOTE: All passwords are 1 - 8 digits.
2.
Click OK or press the
Enter
key.
Result: If the password was wrong, you will be prompted to enter
it again. All attempts (correct or incorrect) are recorded in a log
file. If the password was correct, the System Administrator
window will appear.
4.4
Smart Card Applications Programmer Operator’s Guide
System Administrator
CHAPTER
4
To change the System Administrator Password:
1.
Type the default or current password.
2.
Click CHANGE PASSWORD, then press
be prompted for a New Password.
3.
Enter your new password and press
Enter
Enter
or click OK. You will
or click OK.
NOTE: All passwords are 1 - 8 digits.
Result: The following screen will appear:
Smart Card Applications Programmer Operator’s Guide
4.5
Passwords
Change the Encrypted Console
Password
The System Administrator has the capability of changing the
encrypted Console Password from the System Administrator screen
shown on page 4.5
1.
Access the System Administrator screen.
NOTE: If this is the initial setup of the system, you will need to
complete the section, “System Administrator Password” on page
4.4 prior to continuing.
2.
Click the CON.PAS button and the following window will display.
3.
Type the default or current Console Password.
4.
Click CHANGE PASSWORD, then press
be prompted for a New Password.
5.
Type in your new password and press
Enter
Enter
or click OK. You will
or click OK.
NOTE: If you forget the Console Password once you change it, you
must reinstall the program in order to restore the default password.
Any existing data files will not be affected.
4.6
Smart Card Applications Programmer Operator’s Guide
System Administrator
CHAPTER
4
Create a Setup Card
The Smart Card Readers require a single Setup Card to be inserted at
the time of installation. The Setup Card transports an encrypted key
to the internal processor located inside the Reader(s). Once the
encrypted key is installed, the processor will decrypt the encrypted
key and check the validity of the Setup Card being used to update the
Reader(s). If found to be an invalid Setup Card (the key does not
match that of the reader), the transported key will be destroyed and
the reader will go into an error mode. If the Setup Card validates, the
now decrypted key is stored in a protected bank of EEPROM internal
to the processor. If the reader is ever tampered with, the key will be
destroyed, thus taking that reader out of service.
To create a Setup Card:
1.
Insert a blank GEM PLUS MPCOS-3DES Smart Card into the
GCR400.
2.
Click the CHANGE button. The Issuer key has now been changed
on this Setup Card and is reflected in the Current Issuer Key box.
3.
Select your Communication options and then click the CREATE
button.
4.
Remove the now programmed Setup Card from the GCR400 and
store in a secure location.
NOTE: All badges created after this session should be created
using the same Issuer Key that was just installed into the Setup
Card. See “Change the Issuer Key” on page 4.8
Smart Card Applications Programmer Operator’s Guide
4.7
Change the Issuer Key
Change the Issuer Key
When GEM PLUS MPCOS-3DES Smart Cards are shipped from GEM
PLUS, they carry an Issuer Key that was installed at GEM PLUS. This
must be changed to match the Issuer Key in the Reader. The SMART
CARD APPLICATIONS PROGRAMMER provides methods to change the
Issuer Key or update the badges to match your existing Issuer Key.
The process described below must be performed for all badges when
they are received from GEMPLUS. If you attempt to program a badge
whose issuer key does not match that of the reader, you will receive
an error message similar to the following:
Warning! Key does not match issuer key.
To change the Issuer Key in Hex format:
1.
Click Hex to display Hex format.
2.
Position your mouse to the far left of the New Issuer Key display
box and click.
3.
Using the
4.
Enter two new digits.
5.
Use the Tab key to move right to the next two digits and repeat
steps 2 through 4 until finished.
Delete
key, delete the first two digits.
To change the Issuer Key in ASCII format:
1.
Click ASCII to display in normal characters.
2.
Position your mouse in the New Issuer Key display box and
highlight the character(s) to be changed. Type the new
information. This field is restricted to 8 numeric characters and
cannot end with a space.
4.8
Smart Card Applications Programmer Operator’s Guide
System Administrator
CHAPTER
4
Update the Master P.I.N.
The master P.I.N. should only be changed one time. This Personal
Identification Number will be used by the SMART CARD APPLICATIONS
PROGRAMMER to allow Security Officers to perform normal P.I.N.
changes as well as to change the P.I.N. codes in badges that have been
blocked.
To change the P.I.N.:
1.
Point your mouse to the far left of the Master P.I.N. display box
and click.
2.
Using the
3.
Enter your new Master P.I.N. consisting of four new numbers.
Delete
key, delete all four numbers.
NOTE: The above field requires all four digits.
4.
Click on the EXIT button to save your change.
NOTE: All changes will be saved by clicking on the Exit button.
Smart Card Applications Programmer Operator’s Guide
4.9
Change the Starting Badge Number
Change the Starting Badge
Number
To change the Starting Badge Number:
1.
Click in the Starting Badge # : display box.
2.
Using the
3.
Enter your new Starting Badge # consisting of eleven new
numbers.
Delete
key, delete all eleven digits.
NOTE: the above field requires all eleven digits.
4.
Press the EXIT button.
NOTE: All changes will be saved by clicking on the Exit button.
4.10
Smart Card Applications Programmer Operator’s Guide
CHAPTER
5
Security Personnel
Using the Smart Card
Programmer
The SMART CARD APPLICATIONS PROGRAMMER system allows Security
Personnel to program badges and Personal Identification Numbers
(P.I.N.).
Getting Started
To launch the Smart Card Application Programmer:
1.
Depending on the operating system you are using, select one of
the following methods.
•
•
Windows 3.x: Double-click on the Casi-Rusco Model 82P
icon on your desktop.
Windows 95/NT: Click on START, Programs, Casi-Rusco
Model 82P, then Sap.
Smart Card Applications Programmer Operator’s Guide
5.1
Getting Started
2.
Press START.
Result: The selection window below appears.
3.
5.2
Press GEM PLUS MPCOS-3DES to continue or EXIT to exit the
program.
Smart Card Applications Programmer Operator’s Guide
Security Personnel
CHAPTER
5
Logging On
To enter the Console Password:
1.
Enter the Console Password provided by your System
Administrator. All characters entered are echoed back in the form
of an * character to prevent anyone from seeing what you are
typing.
NOTE: All passwords are 1 - 8 digits. They are not case-sensitive.
2.
Click OK or press the
Enter
key.
Result: If the password was wrong, you will be prompted to enter
it again. All attempts (correct or incorrect) are recorded in a log
file. If the password was correct, the following window will
appear.
3.
Press SECPERSONNEL to continue or EXIT to exit the program.
Result: If you elected to continue, the following screen will
appear.
Smart Card Applications Programmer Operator’s Guide
5.3
Programming a New Badge
Programming a New Badge
Programming a new badge requires a badge that has an Issuer Key
chosen by your System Administrator already programmed into it.
To create a new badge:
1.
Insert a badge into the GCR400.
2.
Select either Next 11 Digit Badge Number or Custom 11 Digit
Badge Number.
•
•
If you selected Next 11 Digit Badge Number, proceed with
the next step.
If you selected Custom 11 Digit Badge Number, click in the
box on the right. Enter an 11 digit number for the new badge
number.
NOTE: The Custom 11 digit Badge Number field requires
exactly 11 digits in the range of (0-9).
5.4
Smart Card Applications Programmer Operator’s Guide
Security Personnel
3.
CHAPTER
5
Select either Custom 4 Digit P.I.N. or Random 4 Digit P.I.N.
•
If you selected Custom 4 Digit P.I.N., click in the box on the
right. Enter a 4 digit number for the new P.I.N.
NOTE: The custom P.I.N. field requires exactly 4 digits in the
range of (0-9).
•
If you selected Random 4 Digit P.I.N., a 4 digit P.I.N. will
appear in the display box.
4.
Type the badge holder’s name in the Badge Holder’s Name
display box.
5.
Click the PROG button. The results will be displayed in the
Menu/Results display box in the lower section of your window.
NOTE: Badges can only be programmed once.
Resetting/Changing a P.I.N.
This feature is used by Security Personnel to change the P.I.N. or
un-block a badge that has been blocked by the Model 825 Reader. A
new P.I.N. number may be required when an unauthorized person
has gained access to the number. A badge can be blocked when
multiple access attempts have been made using an incorrect P.I.N..
After verifying the badgeholder’s access rights, to unblock the badge
you may either reset the old P.I.N. number or change it to a new
number.
To reset or change a P.I.N.:
1.
Insert the badge into the GCR400 and click the PIN button.
Result: The following screen appears:
Smart Card Applications Programmer Operator’s Guide
5.5
Resetting/Changing a P.I.N.
2.
To reset the original P.I.N. number, select Custom 4 Digit P.I.N.,
click in the box on the right and enter the original 4 digit P.I.N.
number.
3.
To change the P.I.N. to a new number, choose one of the
following methods:
•
•
5.6
If you select Custom 4 digit P.I.N. Code, click in the box on
the right. Enter a 4 digit number for the new P.I.N.
If you select Random 4 Digit P.I.N. Code, a 4 digit P.I.N. will
appear in the Random 4 Digit display box.
Smart Card Applications Programmer Operator’s Guide
Security Personnel
CHAPTER
5
4.
Click the OK button located in the upper left of your window.
You will see the results in the Menu/Results display box located
at the bottom of the window.
5.
Once the P.I.N. has been changed, remove the badge from the
GCR400.
Exiting the Program
Click on EXIT to exit the program.
Smart Card Applications Programmer Operator’s Guide
5.7
Exiting the Program
NOTES
5.8
Smart Card Applications Programmer Operator’s Guide
Security Personnel
CHAPTER
5
NOTES
Smart Card Applications Programmer Operator’s Guide
5.9
Exiting the Program
NOTES
5.10
Smart Card Applications Programmer Operator’s Guide