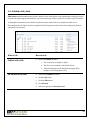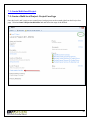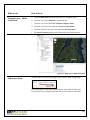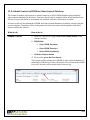
1
2011 Version User Manual EKO-System is a registered trademark of Paladin Data Systems Corporation, a privately held corporation. ©2010 Paladin Data Systems Corporation TABLE OF CONTENTS INTRODUCTION ................................................................................................................................................................... vi SCOPE OF DOCUMENTATION ........................................................................................................................................... 1 KEY DEFINITIONS ................................................................................................................................................................ 2 SECTION 1: GETTING STARTED ...................................................................................................................................... 3 1-1: Sign In ..................................................................................................................................................................................... 5 1-2: Change your Password .................................................................................................................................................... 6 1-3: Edit Profile ............................................................................................................................................................................ 7 1-4: EKO-System Navigation................................................................................................................................................... 8 1-5: Recently Updated ............................................................................................................................................................... 9 SECTION 2: SETTINGS .......................................................................................................................................................10 2-1: Site Profile ........................................................................................................................................................................... 11 2-2: Home Page .......................................................................................................................................................................... 12 2-3: Map Settings ....................................................................................................................................................................... 14 2-4: Users ...................................................................................................................................................................................... 15 2-5: Other Settings .................................................................................................................................................................... 19 SECTION 3: DATA CONFIGURATION ............................................................................................................................20 3-1: Projects ................................................................................................................................................................................. 22 3-2: Contracts .............................................................................................................................................................................. 23 3-3: Control Areas ..................................................................................................................................................................... 24 3-4: Files ........................................................................................................................................................................................ 25 3-5: People and Organizations ............................................................................................................................................. 26 3-6: Codes/Measurements .................................................................................................................................................... 28 SECTION 4: FILE MANAGER MODULE ..........................................................................................................................30 4-1: File Categories ................................................................................................................................................................... 31 4-2: Add Files and Links ......................................................................................................................................................... 32 4-3: Publish a File/Link........................................................................................................................................................... 34 4-4: Search for File .................................................................................................................................................................... 35 SECTION 5: PROJECT MANAGER MODULE .................................................................................................................36 5-1: Create a Project ................................................................................................................................................................. 38 5-2: Enter Project Information (no template) ............................................................................................................... 44 5-3:Project Attributes .............................................................................................................................................................. 44 5-4: View Project Information (Standard) ...................................................................................................................... 61 5-5: Publish Projects ................................................................................................................................................................ 62 ii 5-6: Project Templates ............................................................................................................................................................ 63 SECTION 6: PROJECT MAP ...............................................................................................................................................64 6-1: Project Map Feature (s) ................................................................................................................................................. 65 6-2: Modify Existing Map Feature ...................................................................................................................................... 67 6-3: Feature Display Properties .......................................................................................................................................... 68 6-4: Feature Labels ................................................................................................................................................................... 70 6-5: Map Annotation ................................................................................................................................................................ 71 6-6: Add External Layers to Map......................................................................................................................................... 72 6-7: Save Map to Project Face page.................................................................................................................................... 73 6-8: Attach/Detach Control Area to Project ................................................................................................................... 74 SECTION 7: MULTI-LEVEL HIERARCHY ......................................................................................................................75 7-1: Create Multi-level Project ............................................................................................................................................. 76 7-2: Create a Multi-level Project - Project Face Page .................................................................................................. 76 7-3: Editing Multi-level Hierarchy ...................................................................................................................................... 77 7-4: View Project Information.............................................................................................................................................. 78 SECTION 8: SEARCH FOR AND VIEW PROJECTS ......................................................................................................79 8-1: Search Projects .................................................................................................................................................................. 80 8-2: Project Information Views ........................................................................................................................................... 81 SECTION 9: PROJECT REPORTS .....................................................................................................................................83 9-1: Project Report.................................................................................................................................................................... 84 9-2: Custom Reports................................................................................................................................................................. 86 9-3: Change List Settings ........................................................................................................................................................ 87 9-4: Change List Filter ............................................................................................................................................................. 87 SECTION 10: MAP MODULE ............................................................................................................................................88 10-1: Change Map Settings .................................................................................................................................................... 89 10-2: Map Layers ....................................................................................................................................................................... 91 SECTION 11: CONTROL AREAS ......................................................................................................................................96 11- 1 Control Area Categories .............................................................................................................................................. 97 11- 2 Control Areas ................................................................................................................................................................... 98 11- 3 Edit/Delete a Control Area ........................................................................................................................................ 99 11- 4 Map a Control Area .................................................................................................................................................... 100 iii SECTION 12: CONTRACTS............................................................................................................................................. 102 12-1: Create Contract ............................................................................................................................................................ 103 12-2: Enter Contract Attributes........................................................................................................................................ 107 12-4: View Contract Information ..................................................................................................................................... 117 12-5: Contract Activity Log................................................................................................................................................ 118 12-6: Associate Contract with Project .......................................................................................................................... 120 12-7: Display Project Attributes on Contract Face page ....................................................................................... 122 12-8: Submit Contract to PRISM or Other External Database ............................................................................. 124 12-9: Lock Contract ............................................................................................................................................................... 126 12-10: Contract Print View................................................................................................................................................. 127 12-11: Save Contract as Copy ............................................................................................................................................ 128 12-12: Delete Contract ......................................................................................................................................................... 129 iv v INTRODUCTION Paladin Data Systems is pleased to present EKO-System. EKO-System is a robust data and project management system designed specifically and customized accordingly for use by natural resource professionals. In addition to this user training manual Paladin Data Systems offers support via the Service Desk Monday Friday 9am-5pm PST (PDT). Email: [email protected] Phone: 360-394-5995 The goal of this user manual is to familiarize the user with the various capabilities that EKO-System has to offer. It will provide the necessary information to navigate around and manage the different modules. Each chapter will include instruction and several screenshots of administrator-level pages to yield a more comprehensive view and understanding of EKO-System. NOTE: Your organization will determine what functions are most applicable. The modules that will be covered are as follows: Projects Will demonstrate how to create projects and project templates. It will also provide examples on mapping projects and sharing project information. Files Will discuss storing and sharing documents, photos, and URL's. Maps Will show a broad range of options for mapping, storing, uploading, downloading and sharing information related to projects, and control areas. Control Areas Will explain how this feature allows users to share geographic features and use them to organize and report on project information. Settings Will discuss how an organizations site settings and user permission is handled. Configuration Will demonstrate how the local data configuration is established and maintained. Contracts Will show how the Contract Module is applied to track and report on the contracts and grants that fund projects. vi SCOPE OF DOCUMENTATION This document is intended to provide project sponsors and datasite administrators the basic information necessary to leverage the core functions of EKO-System. The sections contained within this document will provide users with the ability to enter project information, create reports, and map projects. Upon completion of this manual, users will be able to perform the following tasks: Create a Project with complete attribution Use Reporting Codes to populate project attributes and quantify Goals and Objectives Create custom Project Maps Create, modify, save, and share custom reports on Project information Prerequisites: The minimum requirements are basic computer skills and familiarity with Internet browsers. 1 KEY DEFINITIONS Name Definition Datasite A Data Site is an online repository of information that is used for the storage and distribution of project data and documents. EKO-System configuration typically takes place at this level GeoRegion A GeoRegion is a polygon feature with a defined geographical area that projects, and other georeferencable data, are located within the boundaries of. GIS A Geographic Information System (GIS) is a system of hardware and software used for storage, manipulation, creation, retrieval, mapping, display, and analysis of geographically referenced data. EKO-Systems Map Browser retrieves, maps, and displays geographic data, however it cannot perform analysis. Group Datasite A Group Datasite is an aggregation of EKO-System datasites used to display, analyze, and report on project features across several datasites. Level 1 Category A Level 1 Category is the highest level that information is stored at in the Project Hierarchy. These folders help to organize project information at the strategic level. People and Organization Roles Personal and organizational roles in projects are defined in this section to help organize the roles people and organization play in project. Primary Status The Primary Status of a project is a defined list of valid statuses for projects in a datasite. In HWS, the Primary Project status is defined as Conceptual, Proposed, Active, and Completed. Project Category Project Categories are a defined list of categories used to organize projects. Project Hierarchy The project hierarchy is tool used to organize projects at different levels according using the project's scale and the organization’s strategies. The organization of the project hierarchy is adaptable and may be changed by the client after configuration. Reporting Code Reporting Codes are used to measure, identify, organize, and report on project elements. Reporting Code Category Reporting Code Categories are used to organize reporting codes within different themes. Secondary Status The Secondary Status or a project is used to identify project status as substatuses below the primary status level. 2 SECTION 1: GETTING STARTED System Requirements Sign In Edit Profile Navigation This section consists of the following information: What hardware and configuration is required to operate EKO-System from the user's workstation. How to login for the first time and change the password. How to navigate throughout the various modules of EKO-System. The System Administrator role. 3 EKO-System Requirements In order to use EKO-System effectively, the user’s machine must operate using the following: EKO-System can be used with the following web browsers: Internet Explorer Firefox Chrome Safari Opera To use the EKO-System map, Microsoft Silverlight 4.0 plug-in must be installed. 4 1-1: Sign In What to do: How to do it: Sign In a. In your web browser go to your EKO-System implementation Public Portal b. Click Sign in (button in the upper right hand corner) c. Enter Username (provided) d. Enter Password (provided for first login) e. Click Log In or hit Enter on the keyboard NOTE: After a period of inactivity the system will timeout and prompt the user to Login. 5 1-2: Change your Password What to do: How to do it: Change Password If needed, users can change their password using the following instructions. a. Click Change Password in the upper right hand corner b. Enter your Old Password c. Enter your New Password Password cannot contain username 7-16 characters Alpha/numeric characters, case sensitive d. Enter your New Password again to verify e. Click Change Password 6 1-3: Edit Profile Users have the ability to maintain personal information and set the default datasite. The email address stored here is the email address that is used for the forgotten password/forgotten username tool. What to do: How to do it: Basic Information a. Click Edit Profile in the upper right hand corner b. Update Basic Information Organization Email address Phone Number c. Click Save Changes Your Sites a. Click Set as Default next to the appropriate site 7 1-4: EKO-System Navigation Hyperlinks and buttons have been setup throughout EKO-System to ease transition from one module to the next. Click the hyperlink to quickly navigate to the main functions of the system; e.g. Map, Files, Projects, or Contracts. 8 1-5: Recently Updated Recently updated Projects, Contracts, documents, and photos are displayed on the right hand side of EKOSystem’s home page. Photos Photos recently uploaded to a Project or the Files module will be displayed at the top section on the screen. The nine most recently uploaded photos are displayed. Users can view the Project or File attributes page by clicking on the image. The order of display for these photos cannot be changed. Recent Activity Recently Updated Documents Documents recently uploaded to the Files module will be displayed beneath the Documents heading in the Activity section on the right hand side. The five most recent documents will be listed. The name displayed in this list is the document title. If a user hovers over the document name, a tool-tip will appear to inform you who uploaded the document and on what day. Click on the document to open it. Recently Updated Projects Projects recently created or saved will be displayed beneath the Projects heading in the Activity section on the right hand side. The five most recently created or updated Projects will be listed. The name displayed in this list is the Project name. If a user hovers over the Project name, a tool-tip will appear to inform you who created or updated the Project and on what day. Click on the Project to open it. Recently Updated Contracts Contracts recently created or saved will be displayed beneath the Contracts heading in the Activity section on the right hand side. The five most recently created or updated Contracts will be listed. The name displayed in this list is the Contract name. If a user hovers over the Contract name, a tool-tip will appear to inform you who created or updated the Contract and on what day. Click on the Contract to open it. 9 SECTION 2: SETTINGS Site Profile Information Home Page Settings Map Settings User Permission and Access Other Settings The Settings module allows the Data Administrator to control site settings and user permissions. Only users with the Data Administrator role have access to this module. Security Administrators will have the Settings button in left toolbar. This section will discuss the following topics: Organization address and contact information Home Page settings including description and photo Map settings Setting user permission and access to information in the datasite Show project names to read-only users Show funding summary on project view page Email site contact when projects are created 10 2-1: Site Profile Organization contact information is controlled on the Site Profile page. Here, the organization’s address, website address, point of contact, and email are stored. What to do: How to do it: Change Organization Contact Information The Site Profile Page allows the Security Manager to control the basic contact information about the organization. This information includes the following: Address Website Point of Contact Name Point of Contact Email Address To modify any of this information, type the updated text into the fields and click the Save Changes button to save. 11 2-2: Home Page From the Home Page tab in the Setting Module, Security Administrators can change the datasite Home Page Content and Site Photo. To change this information, follow the instructions below. 12 What to do: How to do it: Upload New Site Photo a. Click the Change Site Photo button b. Click the Select button c. Select an image from your machine or network d. Click the Continue button Change Organization Description To enter a description into the Home Page Content, simply type or paste text into the textbox. The Home Page Content description is the text that will be displayed on the Home Page screen internally and will be the Organization description on the Public Portal. This description can be up to 4000 characters, not including HTML formatting. Using the Content control bar, text can be made bold, italic, placed into list, or indented. Hyperlinks can be created using URLS. Any text entered into this box can also be spelled checked. NOTE: Text copied from a website, Microsoft Word, or other technologies that support other rich text format should be stripped of all formatting using the Strip All Formatting option from the Strip drop-down menu. 13 2-3: Map Settings The Map Settings menu allows the Security Administrator to control the Map Module defaults, including latitude, longitude, basemap, and scale. To edit each of these settings, follow the instructions below: What to do: How to do it: Default Map Location a. Enter the default latitude b. Enter the default longitude c. Click the Save Changes button Default Basemap The default basemap is the layer that project locations, control areas, and other Map layers will be drawn on top of. Basemap layers examples include aerial photography, topography, or a street map and will vary depending upon your configuration. a. From the Map Settings page, click the Default map drop-down menu b. Select the desired default from the menu c. Press the Save Changes button Default Map Scale The default scale will determine what scale or zoom level the Map Module will open in. a. From the Map Settings page, click the Scale (zoom level) drop-down menu b. Select the appropriate scale from the menu 14 2-4: Users During the initial setup of EKO-System, users were created by a System Administrator at Paladin Data Systems. The System Administrator creates new accounts, sets users’ data access, and ensures users are assigned to the applicable database (s). User access and permission can be controlled by users at the datasite level by users assigned the Security Administrator role. NOTE: Users can only be created by the Paladin Data Systems System Administrator. The Security Administrator has control over all user access to the designated database through the Users tab in the Settings Module. To control users' data access, click the Settings button on the left navigation bar and the Users tab. To control an individual user’s permission, click on the user's name or the user icon from the user list. To remove a user from the datasite, click the Remove User button next to the user. Following any changes to user access, click the Save Changes button. 15 User Profile - Roles Assigning roles to specific users allows a greater degree of control over who has access to what data stored in the datasite. To control a user’s roles, click on their name from the user list and click the checkbox next to that role from the user's security profile page. Each of the four Security Roles is listed below: Data Administrator Access to the Configuration Menu within EKO-System Ability to configure datasite Code/Measurement, Project Categories, Contact, and Contracts All edit capabilities Security Administrator Access to the Settings Module Ability to change roles and user access level Project Task Leader Adds users name to the Project Task Leader Look-up List Searchable field GIS Editor Access to the Mapping Module - GIS Browser Allows users to map projects 16 User Profile - Data Access Rights Data Access Rights are determined on a attribute by attribute basis. These rights grant users permission to view, create/modify, and run reports on Files, Control Area, Contracts, Projects, and Private Attributes. Each organization will decide what level access will be granted to each individual user based on need. To control a user’s Data Access Right, click on their name from the user list and click rights checkboxes as need: View Ability to view all or some of the following: File repository, Control Areas, Contracts, Projects and Private project attributes Create/Modify Ability to view all or some of the following: File repository, Control Areas, Contracts, Projects and Private project attributes Run Reports Ability to run reports on Projects 17 Data Access Security Level The Security level determines the files, projects, and general information available to the user. EKO-System utilizes a hierarchy of security levels, listed in ascending order from least access to most; Group, Partner, Internal, and Internal Restricted. A user with a security level at Internal, will have access to all data set at Internal or below (Group and Partner), but not data set at the Internal Restricted level. To control a user’s Data Access Right, click on their name from the user list and click rights checkboxes as need: Group The lowest level of the security hierarchy, that only has access to the data set at the Public and Group levels. Partner User has access to the data set at the Public, Group, and Partner levels. Internal User has access to the data set at the Public, Group, Partner, and Internal levels. Internal Restricted The highest level of the security hierarchy and has access to all data. 18 2-5: Other Settings Other site settings are configured from this page. These settings include the following: Show project names to read-only users Check to display the names of projects to read only users. Show funding summary on project view page Check to display funding information on the project view page Email site contact when projects are created Check to email the person listed as the site contract on the Site Profile tab when projects are created 19 SECTION 3: DATA CONFIGURATION Contract Configuration Control Areas Configuration File Configuration People and Organization Configuration Project Data Reporting Codes/Measurement Configuration The Configuration module allows Data Administrators to configure EKO-System to track project, contract, and other information in specialized ways to meet their organizations unique requirements. Only users with the Data Administrator role have access to this module. Data Administrators will have the Configuration button in left toolbar. This section will discuss the following topics: Contract Categories/Folders Contract Templates Control Area Categories/Folders File Folders/Categories People and Organization Roles People and Organizations Project Folders/Categories Project Secondary Status Reporting Code/Measurement Categories Reporting Codes/Measurements 20 The Data Configuration menu is located in the on the main pages of the each of the applications modules. The Data Configuration menu is only available to users assigned the role of Data Administrator. Codes and Contacts to track information pertinent to projects will be entered via the Configuration Module. Once the data in entered it will populate lookup list and drop down menus throughout EKO-System. EKO-System can be configured for multiple organizations at the System Configuration level. Only System Administrators at Paladin Data Systems can modify the System Configuration. All data configuration discussed in this section is at the datasite level and should be used in addition to the nation-wide configuration. 21 3-1: Projects Project Categories organize the various types of projects into groups. Project Categories can be configured at either the Level 3 or Level 1 Project levels. What to do: How to do it: Project Categories a. From the Configuration main page, click the Folders/Categories link under the Projects heading b. Click the Add Category button c. Enter the Project Category name d. Provide a Description (optional) e. Select applicable project level (s) - The system defaults to Level 3 f. Secondary Project Status Click the Save and Close button a. From the Configuration main page, click Secondary Status Codes b. Click the Add Secondary Status Code button c. Enter the name of the Status Code d. Click the Save and Close button 22 3-2: Contracts Contract Categories, like Project Categories, help organize contracts into groups of similar contracts. What to do: How to do it: Contract Categories a. From the Configuration main page, click the Folders/Categories link under the Contracts header b. Click the Add Category button c. Enter a Contract Category name d. Enter a Description e. Click the Save and Close button 23 3-3: Control Areas Control Area Categories group Control Areas together in thematic groups. All Control Areas stored in a Category must have the same geometry type (point, line, or polygon). What to do: How to do it: Create Control Area Category a. From the Configuration main page, click the Folders/Categories link under the Control Areas header b. Click the Add Category button c. Enter a Category name d. Select a Feature Type (Point, Line, or Polygon). All Control Areas in the Category must be the same geometry type. e. Check the Hide from lookup lists check box if applicable (optional). f. Click Save and Close 24 3-4: Files File Categories organize files into functional or thematic groups to assist with organization. File Categories are displayed as folders in the right navigation bar in the Files Module. What to do: How to do it: Create File Category a. From the Configuration main page, click the Folders/Categories link under the Files header. b. Click the Add Category button c. Enter a Category name d. Click Save and Close button to finish 25 3-5: People and Organizations In EKO-System a person or organization may serve more than one purpose. For example, a certain organization may be the funder, property owner, and partner. Setting up the roles will allow the user to assign as many roles as necessary. The People and Organizations menu contains the Contacts module. Contacts are created, edited and deleted in this module. Once the contact is created one or more roles can be associated with the contact all from this module. What to do: How to do it: Create People and Organization Role a. From the Configuration main page, click Roles b. Click the Add Role button c. Enter the Role Name d. Mark checkboxes accordingly: Check the Summarize the contacts box, if the contact is to be incorporated across the multi-level hierarchy projects Check the Prompt users to select box, to display a link on the Project Face page prompting the user to update the field e. Click the Save and Close button to finish Create Contact a. From the Configuration main page, click the People and Organizations link b. Click the Add Contact button c. Contact tab Enter the People and Organizations' Name Select a Type of contact Enter contact information (address, phone, email, etc.) 26 d. Roles tab Select from Available Roles Click Right arrow to add Role Click Left arrow to remove Role e. Secondary Point of Contact tab f. Enter contact information (address, phone, email, etc.) Privacy tab Hide this contact from read-only user Hide contact from lookup lists g. Property tab Enter information if available h. Agreement tab f. Check the box to show there is an active agreement tied to contact Save and Close 27 3-6: Codes/Measurements The Reporting Code Categories Menu allows data administrators to group Reporting Codes together into topical categories or groups. Reporting Code Categories are created, edited and deleted in this module. Once the Reporting Code Category is created, Reporting Codes can be entered into this category. The Reporting Code Category feature is designed to help organize codes, filter searches, and create reports. Assigning reporting codes to projects allows the user to then generate reports and track expenses. What to do: How to do it: Create Reporting Code Category a. From the Configuration main page click on the Codes/Measurement Categories link b. Click the Add Category button c. Enter a name in the Reporting Code Category field d. Enter a Description (Optional) e. Click the check boxes as appropriate f. Check the Hide from look-up lists…box to keep the Category hidden during searches Check the Summarize these codes… box to summarize Reporting Codes across multi-level hierarchy projects Check the Prompt users to select…box to display a link on the Project Face page prompting the user to update the field Click Save and Close button to finish 28 What to do: How to do it: Create Reporting Code a. From the Configuration main page, click the Codes/Measurements link b. Click the Add Reporting Code button c. Enter a Name d. Select a Code/Measurement Category from the lookup window e. Enter a Description (optional - 1000 characters) f. Select an Entry type Basic Code (Present or not present) Code with Numeric Value (Quantity, measurement, or amount) Yes/No Selection g. Hide from lookup list (when applicable) h. Click the Save and Close button 29 SECTION 4: FILE MANAGER MODULE File Categories Adding Files Searching Files Publishing Files The File Manager allows the user to upload, store and share documents, photos (jpeg/gif/png), and URLs without associating them with a particular project. It also stores copies of Project Files if the Add to File Repository option was used. Grouping files together in File Categories/Folders will enable quicker and more efficient searches in the future and provides an organizational structure for files published to the Public Portal. This section consists of the following information: Creating categories to organize files Adding files to the File Repository Searching for files using various methods such as keywords and timelines Publishing Files to the Public Portal 30 4-1: File Categories What to do: How to do it: Create a File Category a. Launch the File Manager module by click on the Files button on the left navigation bar b. Click the Add Folder button on the right navigation bar c. The new File Category will now be displayed in the right navigation bar d. Enter the name of the File Category by clicking on the text next to the folder icon e. Enter the name of the File Category 31 4-2: Add Files and Links What to do: How to do it: Add a file a. Click the Add File button on the toolbar b. Click the Select button to add a file c. Select a file using the File Browser d. Click the OK button e. Click the Continue button f. If the title is incorrect, enter a name in the Title field g. If the author is incorrect, enter a name in the Author field h. If the File Date is incorrect, press the edit button next to the date and enter the correct date. i. Optional Information j. Enter Search Tags Set the File Security Level by clicking on the Who can view this file? Button and selecting the appropriate file security. k. To publish the file, click the Publish checkbox 32 What to do: How to do it: Add a Link a. Click the Add Link button on the toolbar b. Paste or enter a webpage address c. Click the Continue button If the title is incorrect, enter a name in the Title field If the author is incorrect, enter a name in the Author field If the Link Date is incorrect, press the edit button next to the date and enter the correct date. d. Optional Information Enter Search Tags Set the Link Security Level by clicking on the Who can view this file? Button and selecting the appropriate file security e. To publish the file, click the Publish checkbox 33 4-3: Publish a File/Link EKO-System implementations may include a Public Portal, which allows each organization to display projects and provide supporting documentation to the local community, funders, sponsors, and other types of entities. To display documentation on the Public Portal, the security level needs to be updated to Public level. Files published to the Public Portal are organized in File Categories and sorted in descending order by date (newest first, oldest last). What to do: How to do it: Publish a file/link a. Select the Publish checkbox Un-Publish a file/link The security level changes to public The file is now available on the Public Portal A link also displays on the database homepage (files display in descending date order) a. Deselect the Publish checkbox b. Click the File name c. Click the Edit button d. Click Security e. Select the appropriate Security Level 34 4-4: Search for File What to do: How to do it: Search for a file a. Click the Files tab on the search box located in the upper right hand corner b. Enter search text; press Enter or click magnifying glass to search 35 SECTION 5: PROJECT MANAGER MODULE Create a New Project Edit Projects Create a Project Template Publish Projects Project Reports In this section, we learn about a core function of EKO-System, storing and reporting on project information. Information entered at the project level is used for tracking, management, reporting, and display in every section of the system. Using Reporting Codes and quantifying Goals and Objectives assists with all of the functions listed above. Understand how to create a project, and what role project information plays in your datasite, will help you understand other core functions of EKO-System. This section consists of the following: Creating a new project Entering project attributes Assigning People and Organizations Using Report Codes Creating Budget, Funding, and Expense entries Creating and assigning Tasks 36 Examine Projects Before projects are added to a datasite, a brainstorming session should occur within the user's organization. Some of the topics that need to be discussed are project names, categories, what are our reports, who maintains the data, and so on. Once the groundwork is laid, data entry can begin. If you received the Getting Started guide and provided information to Paladin Data Systems, much of this information may already be setup in the database as part of the initial configuration. If not, at a minimum, you will need to enter the following information in order to create projects in the EKO-System: Project Categories People and Organization Roles People and Organizations Contracts Reporting Code Categories Reporting Codes Secondary Status Codes NOTE: Projects are populated using various lookup lists throughout the system so lists of project related data, such as funding information, contact names, reporting codes and categories MUST be created via the Configuration module BEFORE these data elements can be added to projects. 37 5-1: Create a Project This section will discuss the methods for creating a project in EKO-System. There are two types of projects: Standard project - a standalone project not associated with another project Multi-level project - a project that is associated with another project by selecting the appropriate folder EKO-System provides a Project Wizard to help the user create both types of projects. To reach the Project Wizard enter the Projects module and click the Add Project button. There are two options for creating the project: Empty projects are projects created from scratch. All information will need to be added. Project templates (once created) can be used to create projects that have similar information (e.g. objectives, tasks, and reporting codes) NOTE: To create a project template an empty project needs to be created then the Save Copy as Template option needs to be selected. See Create a Template. 38 What to do: How to do it: Create a Multi-level Project – Project Wizard Step 1 - Select Project Type a. Click the Add Project button b. Toggle to the Create a project in the multi-level hierarchy radio button Click the Project Folder field Select a Project in the Multi-level Hierarchy to make the new project a child of this Project Select a Level 1 Category to create a Level 1 Project Select a Level 1 Project to create a Level 2 Project Select a Level 2 Project to create a Level 3 Project c. Click Next 39 Step 2 - Template Option a. Toggle to the Start with an empty project radio button b. Click Next NOTE: To create a project with a template, an empty project needs to be created, then the Save Copy as Template option needs to be selected. See Create a Template. Step 3 - Select a Project Category a. Select a Project Category from the lookup list b. Click Next NOTE: Project Categories are not assigned to Level 1 or 2 Projects Step 4 - Identify the Project a. Enter a Project ID Assign a project ID that is intuitive to the organization Alpha/numeric combination Symbols permitted 13 characters maximum b. Enter a Project Name Assign a Project Name that is descriptive of the project Can be an alpha/numeric combination Symbols permitted 80 characters maximum 40 c. Click Next Step 5 - Review a. Click Change to make any edits before creating the project b. Click Next to create the project c. Click Cancel to exit without creating a project NOTE: Once created it is time to Enter the Project Information. 41 Create a Multi-level Project – From Project Face page Once the Level 1 and 2 projects are created lower level projects can be created right from the Project face page. Click the Create a Project in this folder link and follow the steps of the Wizard similar to the preceding sections. Attach a Standard (Level 3) Project to the Multi-level Hierarchy Once a standard project has been created it can be attached to a Level 2 which converts the standard project to a Level 3 project and places it in the hierarchy. a. Open the Project b. Click the Options button from the toolbar c. Click Edit Project Attributes d. Click the No Project Folder Selected link at the top of the page e. Expand the Project Category folder list f. Click the Select link next to the appropriate Project you want the project you are editing to reside in g. Click Save and Close 42 Detach a Standard (Level 3) Project from the Multi-level Hierarchy Once a standard project has been attached to a Level 2 it becomes a Level 3 project. To remove that level 3 project from the Multi-level hierarchy folder; the level 3 project needs to be converted back to a standard project. a. Select the Project b. Click the Options button on the toolbar c. Click Edit Project Attributes d. Click the red X next to the folder icon to remove the project from this folder. e. A warning displays, click OK 43 5-2: Enter Project Information (no template) Once all the steps of the wizard are complete the attributes page displays; information pertinent to the project can now be added. To access this page from the Project face page, click the Options menu and select Edit Attributes from the menu. 5-3: Project Attributes Project attributes can be entered from two data entry pages, the Project Face page and the Project Attributes page. Attributes can be entered from either of these pages; however the following sections will explain the process beginning from the Project Attributes page. To edit any data from the project face page, simply click the blue Edit hyperlink next to the data element you wish to edit. Project attributes are displayed based upon the Project Category Level. Because of the roll up option featured in EKO-System, most project attributes are maintained at the Level 3 or standard project level. Project Attributes are as follows: Description Notes People and Organizations Goals and Objectives Budget, Funds and Expenses Photos and Documents Task Schedule Property References Reporting Codes/Measurements External Data References 44 What to do: How to do it: Project Attributes Page a. Click Options on the Project View Screen Click Edit Project Attributes Edit any of the fields or click a hyperlink NOTE: The Project Wizard will display this page by default Project Face Page a. From the Project Attributes Pages, click Save and Close b. Click Edit under the applicable section on the Project View Screen c. Make appropriate changes d. Click Save and Close e. Click Close to exit without saving changes 45 Project Description Enter pertinent information about the project. The screen allows up to 4000 characters. This attribute is available on all three levels. What to do: How to do it: Enter Project Description a. Click the Description hyperlink or the Edit Description link from the Project face page. b. Enter the Description c. Click Save and Close 46 Goals and Objectives Use the description field of goals and objectives to relay information about the intent of the project. The progress and outcome can be entered in text form in the results field. The user may also use charts and graphs to track goals and objective if the goal is quantifiable. This attribute is available on all three levels. What to do: Create Goals and Objectives How to do it: a. Click the Create Goal/Objective hyperlink b. Click the Add Goal/Objective button c. Enter a Description d. Enter Results description e. Press Save and Close Edit Goal/Objective Once goal has been saved click the Edit link to make changes to the goal and objective. 47 Quantify Goals and Objectives Goals and Objectives can be quantified in two ways; manually or automatically using reporting codes. Automatically quantifying your project’s Goals and Objectives using a Reporting Code ensures that the information you enter can be rolled up to higher level projects in the multi-level hierarchy. Steps to quantify Goals and Objectives using both approaches are below. What to do: How to do it: Quantify Results (Manually) a. Check the Quantify Result box b. Select a Quantify Mode c. Click Manual to quantify the Goal manually (does not roll-up in multi-level hierarchy) Enter Unit of measure (e.g. trees) Format Numeric Type (count, money, decimal) Enter Decimal Digits Enter Goal Enter Actual value d. Check the applicable box(es) to Show in Project View e. Click Save and Close f. Click Close to exit without saving changes 48 Quantify Results (Reporting Codes) a. Check the Quantify Result box b. Select a Quantify Mode c. Click Automatic to quantify the Goal using a Reporting Code (does not roll-up in multi-level hierarchy) a. Select a Reporting code from the drop down list b. Enter Goal c. Actual Value computed automatically from reporting code (s) updates within project (s) d. Click Save and Close e. Click Close to exit without saving changes 49 Notes Use the Notes field to enter additional data about the project. This information can be shown to read only users via the project face page by selecting the checkbox. What to do: How to do it: Create Notes a. Click the Notes hyperlink b. Enter information in the Notes field c. Check the Publish Notes button if desired d. Click Save and Close NOTE: This attribute is available on all three levels. 50 Photos, Documents and Links Click the Files hyperlink on the project edit screen to attach documents, photos, reference materials and any other information useful in managing the project. There is an option to save a copy of the file in the File Manager by checking Add to File Repository. What to do: How to do it: Add a Project File or Photo a. From the Project Attributes Screen, click the Photos and Documents link b. Click the Add File button c. Click Select button to open the File Browser d. Double-click the file or select it and click the Open button e. Press the Continue button f. Enter a file Date (use the file date to determine the display order of files - descending sort) g. Enter a Description h. Click Save and Close 51 What to do: How to do it: Add a Project Link a. From the Project Attributes Screen, click the Photos and Documents link b. Click the Add Link button c. Paste or type a web address into the textbox d. Press the Continue button e. Enter a file Date (use the file date to determine the display order of files - descending sort) f. Enter a Description g. Click Save and Close 52 What to do: How to do it: Add Project File or Link to File Repository a. After adding a file to a Project, check the Add to File Repository box b. Enter Author (s) name c. Select a File Folder (File categories are created in the File Manager Module) d. Set the Access Level e. Enter Tags (s) to aid in searches f. Publish File on Project Face Page Click Save and Close a. From the Project Attributes Page, click the Photos and Documents link b. Click the Publish checkbox next to the File, Photo, or link you want to publish to the Project Face page 53 People and Organizations A project may contain several different contacts. All contact information is stored in People and Organizations. Contacts are added to Level 3 and standard projects only and then rolled-up to projects at higher levels in the hierarchy. NOTE: This attribute is only available on Level 3 and Standard Projects. What to do: How to do it: Assign Contact to the Project a. From the Project Attributes screen, click People and Organizations hyperlink b. Click the Add Contact button c. Filter the search by Selecting a Role d. Select one or more contacts from list by clicking the e. Click Apply 54 What to do: How to do it: Remove Contact from a Project a. From the Project Attributes Screen, Click People and Organizations hyperlink b. Click the red X next to the contact NOTE: After the contact is added it displays on the People and Organizations page. To delete, click the X in front of the contact. 55 Reporting Codes and Measurements Reporting codes are assigned to projects and project tasks (basic and subtask only) to describe project activities and information. These codes are used to generate project reports and quantify results for project Goals and Objectives. Reporting codes are also search-able when looking for project information and can be summarized throughout the Multi-level Hierarchy. NOTE: This attribute is only available on Level 3 and Standard Projects. What to do: How to do it: Add a Reporting Code/Measurement a. From the project attributes screen, click the Reporting Codes/Measurements hyperlink b. Click the Add Code/measurements link c. Click the Add Code button d. Filter search by clicking the Select by Category drop-down menu and selecting a Reporting Code Category e. Select individual Reporting Codes by clicking the checkbox or click the Select All checkbox f. Click Apply 56 Remove a Reporting Code/Measurement a. From the Project Attributes Screen, click the Reporting Codes/Measurements hyperlink b. Click the red X next to the reporting code Edit a Reporting Code/Measurement a. From the Project Attributes screen, click the Reporting Codes/Measurements hyperlink b. Click the Edit button next to the reporting code to enter numeric value c. Click the Yes/No checkbox to indicate the Yes value d. Click the Close button 57 Budget, Funds, and Expenses Project budget, funding, expenses, and contracts can be tracked throughout the life of a project. To create funding entries click the Budget, Funds, and Expenses hyperlink from the Project Attributes Screen. NOTE: This link is only available on Level 3 and Standard Projects. What to do: How to do it: Assign Project Budget a. From the Project Attributes Screen, click the Budget, funds and expenses hyperlink b. Enter amount (numbers only) in Project Budget field c. Click the Save button 58 What to do: How to do it: Add a Funding Entry a. From the Project Funding Screen, click the Enter Funding button b. Enter Entry Date (defaults to today) c. Select a Funding Source from lookup list (if no funding source has been assigned click the Add funder link to add a funding source. d. Select a Contract (optional) if a Contract is tied to the funding source. e. Enter an Amount (do not enter $) f. Enter Description (optional) g. Enter Reference info (optional) h. Click Save and Close i. Click Close to exit without saving changes 59 What to do: How to do it: Add Expense Entry a. From the Project Funding Screen, click the Enter Expense button b. Enter the expense entry Date (Defaults to today) c. Select Funding Source from lookup list d. Enter Amount (do not enter $ sign) e. Select a Reporting Code (if applicable) f. Enter Reporting Code Units (if applicable) Enter a Description (optional) g. Enter Reference Info (optional) h. Click Save and Close i. Click Close to exit without saving changes 60 5-4: View Project Information (Standard) Once all information has been entered on the project attributes page, click Save and Close. EKO-System defaults to the Project View Screen with a project security level of Region/Guest. From this screen, users can view all attributes of the Project. The fields highlighted on the project face page are the same as the fields Options >Edit Attributes. 61 5-5: Publish Projects EKO-System may include a Public Portal which allows the organization to relay project information to the community, funders, sponsors, and other types of entities. To display a project on the portal the security level of the projects needs to be updated to the proper access level. What to do: How to do it: Publish Project a. Launch the Project Face Page (Project View Screen) b. Click the Who Can See this Project button c. Select Anyone (Public Access) d. Click Save and Close 62 5-6: Project Templates Project Templates help to standardize and expedite project data entry. Project templates are created using existing projects and duplicate objectives, tasks, reporting codes, contracts, and contacts. Using Project Templates is a great way to speed-up data entry for multiple projects that have similar attributes. What to do: How to do it: Create a Template a. Create an empty project or b. Select an existing project from the list c. Click Options on the Project View Screen d. Click Save a Copy as a Template e. Enter Template Name f. Click Save and Close Create a Standard or Level 3 Project from Template Project Wizard Use the Select a Project Template option in the Project Wizard. Once all the steps of the wizard are complete the Project Edit page displays. All project information can now be added. Enter Project Information (template) Project templates can be used to save time if there are many projects of the same type or with similar information. See enter Required Items See enter Project Attributes Edit Template Attributes Users can edit the attributes that a template stores as data entry requirements change. a. Open the Projects module b. Click on Project Templates in the right navigation c. Click on a Template from the template list d. Edit Template Attributes, same as Editing Project Attributes 63 SECTION 6: PROJECT MAP Map Projects Create Geographic Features Load Shapefiles Create Annotation Attached Control Area to Project Once projects have been created, the location can be mapped. Creating a project map helps to communicate the project’s spatial context and is critical to generating reports using the GeoRegion feature. The EKO-System GIS Browser allows users to create maps, save them in their project, or download them as images. Maps can be created using points, lines, and polygons to display to position of project features. Map Settings can be adjusted to meet the needs of the user. This section consists of the following exercises: Creating a project map Creating geographic features (points, lines, and polygons) Creating features from existing shapefiles Creating map annotation Attaching Control Area to a Project Saving your map 64 6-1: Project Map Feature (s) What to do: How to do it: Create a Project Location a. From the Project Face page, click Options>Create/Edit Project Map or click Edit map in the Project Map section. b. Right-click Project Locations>Create Location or click the Create Location button and select the feature type If the Create Location option is chosen, simply sketch the feature on the map c. The new Location will now be in the Details box. The user may now map the location. d. Right-click on the Location in the Details box and click Edit Location e. Enter a Name in field f. Enter a Description g. Add Geographic Region (optional) h. Enter Map Information (optional) i. Enter Reference Information (optional) j. Check the Hide box if applicable k. Click Save and Close NOTE: If Set Automatically is checked the geographic information will auto-populate once the location is created on the map. 65 What to do: How to do it: Create a Map Feature Object Right-click the Location Name to reach the shortcut window a. Edit location - displays the Project Location page b. Choose Feature Type Create Point or Create Line or Create Polygon or Copy Feature c. Draw directly on the map or Enter Coordinates of vertices a. Copy Feature: To copy a feature from Shapefile or service, you will need to load or display a feature on the map first, select the Copy Feature option in step two, and then click on the feature you wish to copy. d. Right-click the map or click Done on the drawing editor box 66 6-2: Modify Existing Map Feature What to do: How to do it: Edit a Location Information a. Right-click the Location in the Details box to reach the shortcut window b. Click Edit Location to display the Location Information screen c. Edit the information( Name, Description, GeoRegions, Map Reference) d. Click Save and Close Edit a Location Object a. Select the object on the map b. Right-click the object to reach the shortcut window c. Click Edit Object to display object vertices Move Vertex: Click on a vertex and drag it to the correct location or enter coordinates Insert Vertex: Click on an vertex near the desired location of a new one and click Insert on the Drawing Editor Remove Vertex: Select a vertex and click Remove on the Drawing Editor d. Click OK when finished editing Delete a Map Feature Object a. From the Map Details box, right-click the Location Name to access the Feature Menu b. Click Remove Object Delete a Project Location a. From the Map Details box, right-click the Location Name to access the Feature Menu b. Click Edit Location c. From the Feature Information window, click the Delete button 67 6-3: Feature Display Properties Feature settings can be configured to display locations in different ways and create thematic maps. What to do: How to do it: Edit Feature Menu a. Right-click the Location in the Details box to reach the shortcut window b. Click Properties Edit Point Feature Properties Point features can be edited to display different point color, transparency, size, and style. a. From the Object Properties window Point tab, click on any of the drop-down menus to set the Object properties b. Click OK to apply settings 68 What to do: How to do it: Edit Line Feature Properties a. From the Object Properties window Line tab, click on any of the drop-down menus to set the properties b. From the Line Separators tab, click on any of the drop-down menus to change the separator c. Click OK to apply settings Edit Polygon Features Properties a. From the Object Properties window; click the Line tab b. Click on any of the drop-down menus to set the polygon border properties c. From the Line Separators tab, click on any of the drop-down menus to change the separator d. From the Fill tab, click on the options to change the fill settings e. Click OK to apply settings 69 6-4: Feature Labels Map features can be labeled to provide easier identification. Labels can be modified in a number of ways, as described in the following sections. What to do: How to do it: Show Feature Label a. Right-click the Location in the Details box to reach the shortcut window b. Click Show Label Edit Label Text Style a. Right-click the Location in the Details box to reach the shortcut window b. Click Properties c. Click on the Text Tab d. Select any of the options from this page. Edit Label Location a. Right-click the Location in the Details box to reach the shortcut window b. Click Show Label c. Right-click on the Label on the Map to display the shortcut menu d. Click Edit Label e. Click on the label, hold down, and move it to the desired location. f. Rotate Label Click OK when finished a. Right-click the Location in the Details box to reach the shortcut window b. Click Show Label c. Right-click on the Label on the Map to display the shortcut menu d. Click Edit Label e. Click Rotate on the Drawing Editor window f. Rotate the label g. Click OK when finished 70 6-5: Map Annotation Map annotation can be added to label features or create call-out pointers. What to do: How to do it: Create Annotation Text a. Right-click Annotation to reach the short cut menu b. Click Create Annotation Text Create Annotation Line Click on the Map Enter the Text into the textbox Click Done a. Right-click Annotation to reach the short cut menu b. Click Create Annotation Line Create Annotation Polygon Click the Starting Point on the Map Drag to End location Right-click to accept changes or click Done a. Right-click Annotation to reach the short cut menu b. Click Create Annotation Polygon Click the Starting Point on the Map Right-click or click Done when shape is created 71 6-6: Add External Layers to Map GIS layers can be brought into the Project Map from ArcGIS Server services or from shapefiles you load in. These features can be copied to create a project location from an existing feature. What to do: How to do it: Add Layers to Map from Service a. Click the + to expand the My Layers section in the layers menu b. Click the checkbox next to the layer to display it on the map Add Shapefile a. Right-click on My Layers b. Click Load c. Using the file browser, locate the shapefile (consists of files with extensions.shx, .dbf, .shp, & .prj) d. Select the four files that EKO-System uses from the shapefile e. Presss Open 72 6-7: Save Map to Project Face page What to do: How to do it: Display Project Map a. From the project map, click the Options drop down menu b. Select Save or Print Map c. To have an image only on the Project Face page, check the Image Only box, or enter a Map Title o If image only, set the image size in pixels d. Press OK e. From the Print Preview screen, click the Save Icon on the toolbar Change/Remove Project Map To replace the map image click the Edit button update the map then follow the steps above. The new map will replace the old one. To remove the map image click the Remove hyperlink above the map image on the project view page. 73 6-8: Attach/Detach Control Area to Project Control Areas allow users to associate project with geographic features to aid with reporting. Control Areas are flexible features created by users. What to do: How to do it: Attach Project to Control Area a. Open the Project Map b. Click the + to expand the Control Areas section c. Select the appropriate Control Area Layer d. Select the Control Area Name in the Details window or select the Control Area Location on the map e. Right-click to reach the short cut menu f. Detach Project from Control Area Click Attach to Project a. Open the Project Map b. Click on the Associated Control Areas checkbox c. Select the Control Area Name in the Details window or select the Control Area Location on the map d. Right-click to reach the short cut menu e. Click Remove from Project 74 SECTION 7: MULTI-LEVEL HIERARCHY Create Multi-Level Project Reassign Project in Hierarchy The Multi-level hierarchy feature helps organizations communicate how on-the-ground actions relate and rollup to larger initiatives. By using ‘Goals and Objectives” that are automatically quantified using ‘Reporting Codes” implementation reporting from Level 3 projects can be summarized in higher level projects. This section consists of the following exercises: Creating a multi-level project Attach/Detach existing project to Multi-level hierarchy 75 7-1: Create Multi-level Project 7-2: Create a Multi-level Project - Project Face Page Once the Level 1 and 2 projects are created Lower level projects can be created right from the Project face page. Click the Create a Project in this folder link and follow the steps of the Wizard. 76 7-3: Editing Multi-level Hierarchy Once a standard project has been created it can be attached to a Level 2 which converts the standard project to a Level 3 project and places it in the hierarchy. What to do: How to do it: Attach Standard Project to Multi-level Hierarchy a. Open the Project b. Click Options c. Click Edit Project Attributes d. Click the No Project Folder Selected link e. Expand the Project Category folder list f. Select a Level 2 project g. Click Save and Close Detach Level 3 Project from Multi-level Hierarchy Once a standard project has been attached to a Level 2 it becomes a Level 3 project. To remove that level 3 project from the Multi-level hierarchy folder; the level 3 project needs to be converted back to a standard project. a. Open the Project b. Click Options c. Click Edit Project Attributes d. Click the Remove Project from this link 77 7-4: View Project Information Once all information has been entered on the project attributes page, click Save and Close. EKO-System defaults to the Project View Screen with a project security level of Region/Guest. From this screen, users can view all attributes of the Project. The fields highlighted on the Project Face page are the same as the fields Options >Edit Attributes 78 SECTION 8: SEARCH FOR AND VIEW PROJECTS Simple Project Search Advanced Project Search View Projects EKO-System allows users to search and view projects using different criteria to help users identify specific projects. Similarly, users can view projects in multiple contexts to assist with project This section consists of the following exercises: Simple and Advanced Search View Projects in Different Contexts 79 8-1: Search Projects Searching for projects or project information does not require exact information. Searches can be conducted with only partial information and can be facilitated using the search filter. What to do: How to do it: Simple Search Simple searches can be completed to search for projects, contracts, and files by name or part of the name. a. Click on the Search box in the upper right hand corner b. Enter the Name or part of the Name c. Click on the magnifying glass or press enter Advanced Search Advanced searches can be completed to filter projects, contracts by attributes that are used. a. Select the information type you want to search for (Projects, Contracts, or Files) b. Click the Advanced Search link c. Filter the search by criteria d. Click Apply 80 8-2: Project Information Views Summary View Project Manager defaults to a display that shows all projects in the 'Project Summary by Category' view; however this view can be manipulated in many different ways. The view can be changed to display only a particular status (e.g. Active Projects) in the Category by selecting that status from the drop down menu. The Project Status Summary window keeps a count of how many projects are in each status regardless of Category. Click the Status to see a list of the projects that meet the criteria. Once the list is displayed it can be sorted by clicking the header. Multi-Level View Another option for viewing projects is the Multi-level view. The projects are established in a hierarchy broken out by category. Click the folder to display Level 1, 2, and 3 projects. The Toolbar allows the user to view projects by status and add projects. 81 Recently Added View The Recently Added projects view allows users to see the projects that were recently added to the system. Project List View The Project List View displays all Level 3 or standard projects. Click the Headers to sort by, Project ID, Project Name or Project Category. All Projects View The All Projects View lists all the Level 1-3 Projects in the datasite. Task List View Projects can also be viewed via the task list. NOTE: Only Active projects with tasks assigned are listed in this view. Two views are available: All Tasks - All assigned tasks display My Tasks - Only tasks assigned to the user who is logged in display NOTE: The list can be sorted by clicking the header names with the exception of status. 82 SECTION 9: PROJECT REPORTS Create Project Report Save and Share Reports Create Custom Reports Customize Report Layouts After an EKO-System datasite has been populated with project data, reports can be generated based on this information. Every EKO-System implementation comes with a number of pre-configured project reports, which can be customized to generate reports on specific project attributes or appear in a specific format. This section consists of the following activities: Create a report using the Quick Report Wizard Modify the appearance of a report Use pre-configured reports Create a custom report from an existing report Save and share your custom reports 83 9-1: Project Report Reports are accessed via the Projects module and only users with the Data Access Right-Run Reports have the ability to use this tool. What to do: How to do it: Create a Report a. Enter the Projects module b. Click the Reports Tab c. Click the appropriate report Change Report Settings a. Click the Options drop-down menu b. Select Change Report Settings Modify the applicable settings. c. Press Apply 84 Change Report Filter a. Click the Options drop-down menu b. Select Change Report Filter c. Add applicable filter(s) d. Click Apply Save as Custom Report a. Click the Options drop-down menu b. Select Save as Custom Report c. Click OK 85 9-2: Custom Reports Custom reports are created by making changes to existing reports. What to do: How to do it: Add Report to Summary View a. Click Add to Summary View to save a Custom Report to your Summary view page Remove Report from Summary Page a. From the summary view page, click the red Remove icon(x) Delete a Custom Report a. Enter the Project Manager module b. Click Reports c. Click the red Remove icon (x) to delete the report d. Click OK 86 What to do: How to do it: 9-3: Change List Settings a. Click on a Project List b. Click on the Options drop-down menu c. Select Change List Settings d. Change List Settings e. Press Save f. List will refresh with your settings applied a. Print Version Print a copy of the chart b. Download Create an Excel copy of the report information c. Send 9-4: Change List Filter Email a report a. Click on a Project List b. Click on the Options drop-down menu c. Select Change List Filter d. Change List Filter e. Press Save List will refresh with your filter applied a. Print Version Print a copy of the chart b. Download Create an Excel copy of the report information 87 SECTION 10: MAP MODULE Browser Setting Points of Interest Layers Project Layers Control Area Layers Shape Files This section will discuss the following: Adjusting the settings of the map on the user's computer Manipulating layers and various options for viewing data on the map Uploading Shapefiles Saving Personal Maps 88 10-1: Change Map Settings The Map is a dynamic tool. Projects, Control Areas, and custom GIS Layers can be displayed in here to view information in its spatial context. Layers can be turned on and off and manipulated to suit communication and decision making. The Map settings can be adjusted to provide a map that is most conducive to viewing the data displayed. 89 What to do: How to do it: Adjust Map Settings a. Click the Options menu in the upper right hand corner of the map b. Select Change Map Settings from the drop-down menu c. Adjust Map Settings listed below as needed d. Press the OK button to save Map Projection Projections system used by map Zone State Plane System Zone Unit Display Decimal Degrees Degrees Minutes Degrees Minutes Seconds Meters Feet Scale Display Kilometers/Meters Miles/Yards Lighten Color Select a color Map fades to the selected color Easier to view objects Check for object updates when editing System displays last update to mapped object Show animation while zooming Select/Deselect to turn zoom animation on/off 90 10-2: Map Layers The Map module integrates features and base maps. Map layers allow the user to display features and base maps in customized views. Feature datasets can be displayed as points, lines, or polygons. The Map module interacts with other modules allowing user to filter and display data using attributes from Projects, Contracts, and Control Areas. Users may display feature data from external sources including shapefiles, ArcGIS Server, and other Geographic Consortium Standards (GCS) data sources. This section will give examples to help understand the options that available. Figure 20 - Map Layers-Standard View What to do: How to do it: Map Feature Options a. Click the check box in front of the word Projects to display all projects in all categories as points on the map or Click + to expand the Project categories Check to display projects by category Points will display on the map Details will populate in the Details window below the map Right click Project name in Details box to: View Project Facepage Center Project Location Right-click the Category name in the left navigation to reach the shortcut menu Right click on the Category name to: Show Labels Show all Project Locations (points, lines, polygons) assigned to the category l 91 What to do: How to do it: Projects Layer - MultiLevel View a. Click the Multi-Level checkbox above the left navigation pane b. Click the + in front of Projects to expand the list c. Click the + in front of the Level 1 Project Category Name d. Click the + in front of the applicable Level 1 Project Name e. Click the check box in front of the applicable Level 2 project f. The Level 3 projects display on the map and in the Details window Figure 21 - Map Layers - Multi-Level View Full Screen View Click the Full Screen link in the upper right corner to view a larger map Full screen mode is view only; edits cannot be made while in full screen. Press the ESC on your keyboard to leave full screen and enter edit mode 92 What to do: How to do it: Display Project Locations as Points, Lines, or Polygons a. Click the check box in front of the word Projects to display projects in all categories as points on the map or b. Click + to expand and display categories c. Select which category to display d. Right-click the Category to reach the shortcut menu e. Select Show all Project Locations When the location is selected on the map the corresponding detail line is auto selected Spatial Attributes and Object Data displays Right-click the highlighted project to reach the shortcut menu: o Center Object - centers the object on the map o Show Label - displays the label on the map 93 Users can display feature data on the map from shapefile or web services. The ESRI shapefile is a geospatial vector data format for GIS software. It is developed and regulated by ESRI as a (mostly) open specification for data interoperability among ESRI and other software products. Web services are published from ArcGIS Server and connected to display on the map Shapefiles A 'shapefile' commonly refers to a collection of files with extensions “.shp”, “.shx,” “.dbf”, and “.prj” on a common prefix filename (i.e., 'lakes.*'). The actual 'shape file' relates specifically to files with the '.shp' extension; however this file alone is incomplete for distribution, as it depends on the other supporting files. 'shapefiles' spatially describe points, polygons, and polylines. These, for example, could represent water wells, lakes and rivers, respectively. Each item may also have attributes that describe the items, such as the name or temperature. What to do: How to do it: Load - upload shapefile stored on the user's computer. a. Right-click My Layers b. Select Load c. Read Tip; click OK d. Select files from your computer (“.shp”, “.shx,” “.dbf”, and “.prj”) e. Press OK on the file browser 94 Web Service Features Users can connect to pre-configured web services to display feature data on the Map. What to do: How to do it: Display Web Service Features a. Click My Layers b. Click the + in front of a group feature dataset c. Click the check box to display a feature dataset 95 SECTION 11: CONTROL AREAS Control Area Categories Control Area Associate Project with Control Area The Control Areas module allows users to associate projects with geographic features for reporting and display purposes. This section will discuss the following topics: Creating a Control Area Storing Control Areas in Control Are Categories Associating a Project with a Control Area 96 11- 1 Control Area Categories The Control Area Module allows the user to create and maintain Control Areas used in identifying and monitoring affected geographical areas. Control Areas are assigned to projects, used for project reports, and can be used as search criteria when looking for project information. Organizing control areas is best done by creating categories. What to do: How to do it: Create a Control Area Category a. Click Configuration (role based) b. Click the Folders/Categories link under Control Areas c. Click Add Category d. Enter Category Name e. Select Map Feature Type (Point, Line, Polygon) f. Hide from lookup list (if applicable) g. Save and Close 97 11- 2 Control Areas What to do: How to do it: Create a New Control Area a. Launch the Control Areas module b. Click the Add Control Area button c. Click in the Control Area Category field to select from the list d. Enter the Name of the new Control Area e. Click Next f. Enter Description and notes (Optional) g. Save and Close 98 11- 3 Edit/Delete a Control Area If the Control Area is not been attached to a project it can be deleted from the system. What to do: How to do it: Edit a Control Area a. Launch the Control Areas module b. Select the Control Area c. Expand the Options drop down list d. Click Edit Attributes to make changes e. Save and Close Delete a Control Area a. Launch the Control Areas module b. Select the Control Area c. Expand the Options drop down list d. Click Delete Control Area NOTE: An error will be received if Control Area is attached to a project. 99 11- 4 Map a Control Area What to do: How to do it: Create Object a. Launch the Control Areas module b. Select the Control Area c. Expand the Options drop down list d. Click Create/Edit Maps or click the Edit Map link e. Right-click the Control Area Name in the details window f. Click Create Object or Copy Feature (see NOTE) g. Click on map to create a location or enter coordinates in drawing editor dialogue box h. Right-click object on the map or click Ok in the dialogue box i. Click Save and Close NOTE: Load a layer to use the copy feature 100 Attach Control Area to a project a. Open the Control Area map b. Click the + to expand the Projects Layer c. Select the applicable Project Category Layer d. Select the Project Name in the Details window or select the Project on the map e. Right-click to reach the short cut menu f. Detach Project from Control Area Click Attach to Control Area a. Open the Control Area Map b. Click on the Associated Control Areas checkbox c. Select the Control Area Name in the Details window or select the Control Area Location on the map d. Right-click to reach the short cut menu g. Click Remove from Project 101 SECTION 12: CONTRACTS Create Contract Associate Contract with Project Edit Contract Attributes Submit Contract to PRISM The Contracts module allows users to create contracts to track funding vehicle information against a project(s) or stand alone. Contracts can be grants, landowner agreements, or other types of contracts. Contracts can be submitted to Washington’s Recreation and Conservation Office and other external databases. By using and Contract template, users can track standardized Contract Attributes. Only users with permission to the Contracts module will be able to access it. Users with permission will have a Contracts button in the left toolbar. This section will cover the following topics: Creating a contract Associating a contract or contracts with a project or projects Completing and Editing Contract Attributes Sending Project attributes to associated contract Submitting contract to PRISM or other external databases 102 12-1: Create Contract What to do: How to do it: Create a Standard Contract From the main page, click the Contracts link; click the Add Contract button to start the wizard a. Step 1 - Start Create a Standard Project (default) Create a contract based on template to submit to PRISM or other external database, select PRISM template from list Click Next 103 b. Step 2 - Contract Name Enter Contract Category (Optional) Enter Contract Name Enter Contract Number Update Start and End date (Defaults to current date) Click Next c. Step 3 - Summary Enter Summary Click Next 104 d. Step 4 - Contract Funding Enter Funding Source or click in the field to search Update Entry date (Defaults to current date) Update Fiscal Year (Defaults to current year) Enter Amount Enter Description (Optional) Click Next e. Step 5 - Contract Final (Review) Click Change next to the applicable field to edit data Click Next to Save and Create Contract 105 What to do: How to do it: Create a Contract to Submit to PRISM or other External Database To submit a contract to PRISM or another external database, users must create a contract based on a template. The PRISM template will be in the available template list for HWS users. From the main page, click the Contracts link; click the Add Contract button to start the wizard a. Step 1 - Start Create a contract based on template to submit to PRISM or other external database Select PRISM template from list Click Next b. Step 2 – Follow remaining steps for a standard contract from previous section 106 12-2: Enter Contract Attributes From the Contract Attributes screen pictured below, users can enter the contract specific information needed including a description, funding, and other attributes. 107 What to do: How to do it: Enter Contract Summary The Contract summary is intended to be a brief description of your Contract and is limited to 1000 characters. Longer descriptions can be entered into the Detailed description, which allows 4000 characters. a. Place cursor in Summary field b. Append the summary that was entered when creating the contract c. Save and Close 108 What to do: How to do it: Enter Contract Description The Contract Detailed Description is designed to accommodate a more detailed description of your Contract than the Contract Summary. The field contains a 4000 character maximum. a. From the Contracts Attributes screen, click Detailed Description b. Enter a description c. Click Save and Close from the toolbar 109 What to do: How to do it: Add Contract Funding When creating a contract, a funding source is identified by the user. To add funding to the Contract from the funding source, follow the steps below. a. From the Contracts Attributes screen, click Contract Funding b. Click Add Funding c. Enter an Entry Date d. Select the Fiscal Year e. Enter the Funding Amount f. Enter a Funding Entry Description g. Click Save and Close from the toolbar 110 What to do: How to do it: Enter Contract Attributes Contract Attributes are determined by the Contract template configuration. These attributes can be configured to track a wide variety of data types. Contracts using the PRISM 2011 Submit template will have four required attributes: Project Type, Primary Sponsor, Lead Entity, and Grant Amount. To enter Contract attributes, follow the directions below: a. From the Contract Attributes screen, click on the Contract attributes hyperlink b. Select values from the drop down menus or enter them in the text boxes c. Click Save and Close from the toolbar 111 What to do: How to do it: Validate Contract Attributes Contract Attributes can be validated against rules establish in the template configuration. To learn about how to validate the Contract, follow the instructions below: a. From the Contract Face Page, click on the Validate button b. If the Contract fails validation, click on the Edit Attributes hyperlink on the resulting page c. Complete the Required Attributes d. Click Save and Close from the toolbar 112 What to do: Change Contract Category How to do it: a. From the Contract Face page, Move to Contract drop-down menu from the Contract Toolbar b. Select the Contract Category you would like to move the Contract to 113 12-3: Attach Documents and Photos What to do: How to do it: Add File a. From the Contracts Attributes screen, click on the Documents, attachments and photos hyperlink b. Click on the Add File drop-down menu on the toolbar c. Select Add File from the drop-down menu d. Click on the Select button to launch the file browser e. Locate a file on your machine or network f. Select the file and press Open g. Click the Continue button h. Enter a Title i. Enter a Description j. Check Publish to display file on Contract Face page and allow the public to see the file k. Press Save and Close 114 What to do: How to do it: Add Link Users can add a link to a webpage to their contract by using the Add Link feature. Follow the instructions below to learn about this. a. From the Contracts Attributes screen, click on the Documents, attachments and photos hyperlink b. Click on the Add Link button on the toolbar c. Paste in or enter a webpage address (url) d. Click the Continue button e. Enter a Title f. Enter a Description g. Check Publish to display file on Contract Face page and allow the public to see the file h. Press Save and Close 115 What to do: How to do it: Add Project File Once a project is associated to a Contract those files can be shared. a. From the Contracts Attributes screen, click on the Documents, attachments and photos hyperlink b. Click on the Add File drop-down menu on the toolbar c. Select Add Project File from the drop-down menu d. Select Project e. Select the File(s) f. Press Save and Close g. Press Close to return to the Contract Attributes screen 116 12-4: View Contract Information Once all information has been entered on the Contract attributes page, click Save and Close. EKO-System defaults to the Contract Face page. From this screen, users can view all attributes of the Project. The fields highlighted on the project face page are the same as the fields on the Project Attributes screen. 117 12-5: Contract Activity Log The Contract Activity Log tracks activity on the Contract. Information such as when the Contract is created, submitted to an external database, and change of status is automatically written to the Contract Activity Log. Users can add their own entries to the Contract Activity Log to track any events that they want to track on the Contract. What to do: How to do it: Add Activity Log Entry a. From the Contract Attributes screen, click on the Contract Activity Log b. Click the Add Log Entry button c. Select an Entry Date d. Select an Log Entry Type from the drop-down menu e. Enter a Description of the Contract Activity Log Entry f. Click the Save and Close 118 What to do: How to do it: Delete Activity Log Entry a. From the Contract Attributes screen, click on the Contract Activity Log hyperlink b. Click on a Log Entry c. Select an Entry Date d. Click on Delete button from the toolbar 119 12-6: Associate Contract with Project After creating a Contract, users can associate the Contract with one or many Projects to better track funding of the Project(s), add files from the Project, and display Project attributes on the Contract Face page. Users will associate the Contract with a Project by creating a Funding Entry against the Project using the Contract as the Funding Source. To learn more about creating a Funding Entry against a project click here. What to do: How to do it: Associate Contract with Project To associate a Contract with a project, user must enter the Projects module. Then, add the Contract to the Project as a Funding Source by creating a Funding Entry against the Project. a. In the Projects module, locate the Project you want to associate with the Contract b. Open the Project c. Add the same funding source as your Contract to the Project by clicking edit beneath the Funding Source heading and searching for the Funding Source used by the Contract d. Open the Budget/Funding Summary by clicking Edit Funding e. Click the Enter Funding button from the Project Funding and Expense toolbar f. From the Project Funding screen, use the Contract Funding Source as the Funder g. Select the Contract from the Contract drop-down menu h. Enter in the Contract Funding amount i. Enter a Funding Description j. Enter a Reference Identifier k. Press Save and Close The Project and Contract are now associated. From the Project Face page, you will now see a link to your Contract in the Budget/Funding Summary section of the screen. 120 What to do: How to do it: Detach a Contract from Project To detach a Contract from a Project, user must enter the Projects module. Then, remove the Contract from the Project as a Funding Source. a. From the Contract Face page, click on the Project you want to detach from the Contract b. From the Project Face page, Open the Budget/Funding Summary by clicking Edit Funding c. Click on the Funding Entry that was made using the Contract as the Funding Source d. Click the Delete Button 121 12-7: Display Project Attributes on Contract Face page Project attributes can be displayed on the Contract Face page. To display Project attributes on the Contract Face page, users will need to create expense entries on the associated project(s) using the Contract as the Funding Source for those expenses. What to do: How to do it: Display Project Attributes on Contract Face page a. From the Contract Face page, click on a Project in the Funding Projects section (if you have already associated the Contract with a Project) to open the associated Project. b. From the Project Face page, click on the Edit Funding hyperlink c. Click the Enter Expense button d. Select an Entry Date e. Use the Contract as the Expense funding source f. Enter an Expense amount g. Select a Reporting Code/Measurement, Numeric or Basic If numeric, enter units h. Enter an Expense Description i. Enter and Reference Identifier j. Press Save and Close NOTE: The Reporting Code/Measurement will now be displayed on the Contract Face page in the Codes and Measures section. 122 What to do: How to do it: Remove Project Attributes from Contract Face page a. From the Contract Face page, click on a Project in the Funding Projects section (if you have already associated the Contract with a Project) to open the associated Project. b. From the Project Face page, click on the Edit Funding hyperlink c. Click the Expense Entry you want to remove d. Click the Delete button on the Project Expense toolbar The Reporting Code/Measurement will no longer displayed on the Contract Face page in the Codes and Measures section. 123 12-8: Submit Contract to PRISM or Other External Database The Contracts module allows users to submit Contracts to RCO’s PRISM database and potentially other external databases in the future. Contracts should only be submitted after all the attributes are filled in, Projects are linked to, documents are attached, and other information is added. A Contract will only be submitted to PRISM and other external databases if initially created using the correct template. Templates will be clearly named so that users know which templates will allow them to submit the contract. What to do: How to do it: Submit Contract a. From the Contract Face page, click on the Submit button on the Contract toolbar b. PRISM Only: Enter PRISM Username Enter PRISM Password Select PRISM Lead Entity c. Click the Continue button d. If successful, press the Close button The Contract will be submitted to PRISM or other external database. If submitted to PRISM, the Contract ID will be over-written with a PRISM Project ID. An entry will be made in the Contract Log 124 What to do: How to do it: View PRISM Submit Project Snapshot Contracts submitted to RCO’s PRISM database can be viewed by calling the PRISM Project Snapshot. This Snapshot page will allow users to easily see PRISM Project information associated with HWS Contracts and Projects. To call the PRISM Snapshot page, follow the instructions below: a. From the Contract Face page, click on the View in PRISM button b. PRISM Snapshot will open in another window. 125 12-9: Lock Contract Contracts can be locked to prevent accidental edits. Users can unlock Contracts if they need to make edits to it. Any user that can edit the Contract can unlock it. What to do: How to do it: Lock Contract a. From the Contract Face page, click on the Options drop-down menu b. Select Lock Contract What to do: How to do it: Unlock Contract a. From the Contract Face page, click on the Options drop-down menu b. Select Unlock Contract 126 12-10: Contract Print View Contract Print View allows users to view the Contract Face page in a cleaner layout for printing purposes. What to do: How to do it: Print View a. From the Contract Face page, click on the Options drop-down menu b. Select Print View c. Print View opens in new tab d. Close new tab to return to Contract Face page 127 12-11: Save Contract as Copy The Save Contract as Copy feature allows users to create a new Contract by making a copy of an existing Contract. This feature speeds up data entry, enabling users to start with copy of an existing Contract. What to do: How to do it: Save as Copy a. From the Contract Face page, click on the Options drop-down menu b. Select Save as Copy c. Contract Copy Opens d. Rename Contract Copy 128 12-12: Delete Contract What to do: How to do it: Delete Contract a. From the Contract Face page, click on the Options drop-down menu b. Delete Contract NOTE: The Contract cannot be retrieved after it is deleted. 129