1
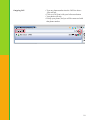
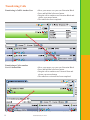
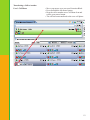
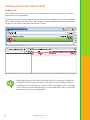
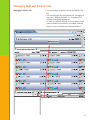
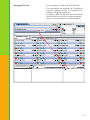
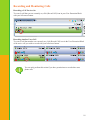
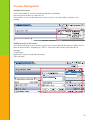
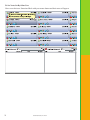
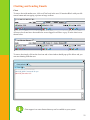
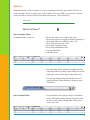
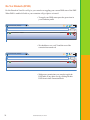
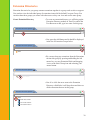
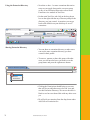
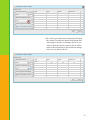
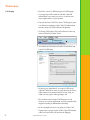
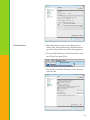
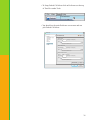
Table of Contents
What is XactView……………………………………………………………
Changing Layouts …………………………………………………………
Initiating Calls………………………………………………………………
Transfering Calls……………………………………………………………
Parking and Placing Calls On Hold………………………………………
Managing Held and Parked Calls…………………………………………
Recording and Monitoring Calls …………………………………………
Presence Management ………………………………………………………
Chat Settings, Chatting, and Sending Emails……………………………
Conference Rooms…………………………………………………………
Queues………………………………………………………………………
Do Not Disturb………………………………………………………………
Extension Directories………………………………………………………
Preferences …………………………………………………………………
5
6
9
11
13
14
18
20
22
24
26
29
30
33
3
What is XactView?
XactView is a desktop application that allows you to interact with your phone system. With a click
of your mouse, you have complete control over your phone calls. You have the ability to see which
coworkers are on the phone and who they are speaking with. Need to transfer a call? Simply drag
the caller to a different extension tab and the call is transferred.
If you are in a call center environment, you now have complete control of your call queuing system.
You can see each caller in you queue and how long they have been holding. You can interactively
login to different queues to accept calls.
Company managers have complete access to all calls in their organization. With capabilities such
as call barging, call monitoring, and recording live calls, managers have more tools than ever to
improve customer service and company communication.
XactView allows you to easily see who is in the office and who is out to lunch or on vacation.
Individual users set their presence and other people in the organization can see where they are.
This information also links in with the presence management of the phone and the Magic Button,
allowing you to use a variety of applications to set and retrieve information about where a particular
user is.
5
© Schmooze Com, Inc. 2012
USER GUIDE
Changing Layout
Everything in XactView is modular. We currently have the following modules
•My Extensions
•Call History
•Voicemail
•Extension Directory
•Extensions
•Held Calls
•Conference Rooms
•Parked Calls
•Queues
Adding or Removing Modules
•You can close any module you are not using by clicking the X next to the module
Parked Calls (default)
•To bring back a module that has been closed click on View at the top then on Profile Navigator
File
View
Tools Help
Administration
Parked Profile
Calls (default)
Navigator
Lock/Unlock Perspective
•This should open a new tab/module in XactView as seen below
Profile Navigator
default
6
•With your mouse left click on the little arrow icon to the left of the Profile name which in this example
is the word default. We will now see a list of all modules. You can now double click with your
mouse’s left button on any module to open the module back up.
Profile Navigator
default
Call History
Conferense Rooms
Held Calls
My Extensions
Parked Calls
Queues
Voicemail
Changing the Layout of Modules
Conference Rooms (Schm
•Modules can be inside their own container such as below
Parked Calls (Schmooze)
Held Calls (Schmooze)
Lot
CID
Parked By
71
437-0123
Dick Johnson
Note
CID
Note
Queues (Schmooze)
Duration
Sales
Calls: 0
00:00:15
•You can also group modules into tabs with each other in a shared container.
Conference Rooms (default)
Lot
7
Duration
CID
Parked Calls (default)
Lot
CIDParked By
Held Calls (default)
Parked By
Queues (default)
Note Note
Duration
Duration
© Schmooze Com, Inc. 2012
•To move a module inside another container press and hold the left mouse button on the top of the tab of the module you would like to move and drag it inside another container’s header and release your mouse. In this example we will drag the held calls into the same tab as the Extensions module is in.
Extensions (default)
Parked Calls (default)
Lot
CID
CIDParked By
Parked By
•We can also make any module into its own container by dragging it to the side of another tab. In our example we will make the held calls be its own tab to the right of the extensions tab. You will notice as you drag it to the right side it will outline in grey dotted lines the size of the new tab it will be creating.
Extensions (default)
Lot
Parked Calls (default)
CID
Lot
CIDParked By
Parked By
Note Note
Duration
Duration
•We now can see that Held Calls is in its own container to the right of the Extensions container.
Extensions (default)
Lot
Search:
Parked Calls (Schmooze)
Sort:
Name
Reverse:
Directory:
Lot
Everyone
Tom
Caine
Chuck
Lewis<7010>
<7003>
[Available]
[Available]
Sam Korth <7008>
[Available]
Larry Muller <9000>
[Available]
Fred
Sampson
<7002>
Chuck
Lewis <7003>
[Available]
[Available]
Russ Smith <4001>
[Available]
Karen Ludwig <4009>
[Available]
Lori Gilson <7005>
[Available]
Rick Simons <7004>
[Available]
Kelly Long <5000>
[Available]
Paul Otter <4013>
[Available]
Charles King <4005>
[Available]
Mark Nadler <7009>
[Available]
Carol Kohl <4002>
[Available]
Bill Hamerson <5003>
[Available]]
Scott Williams <7006>
[Available]
CID
Parked By
Note
Duration
•By moving modules into containers and creating new tabs you can customize your own layout to suit your needs.
8
No
Initiating Calls
Calling Other Extensions
•Locate the Extension Block for the user you would like to call.
•Click the Extension Block for the user with your left mouse button.
•Your phone will ring
•Pick up your phone, and you will be connected with
the other user
Calling a User’s Mobile Phone
•Click on (Cell Phone Icon) inside the user’s Extension Block with your left mouse button.
•Your phone will ring
•Pick up your phone, and you will be connected with
the user’s cell phone
9
© Schmooze Com, Inc. 2012
Outgoing Call
•Type any phone number into the Call Line above your user tab.
•Click on (Call Icon) with your left mouse button
•Your phone will ring
•Pickup your phone, and you will be connected with
that phone number
10
Transferring Calls
Transferring A Call To Another User
•Move your mouse over your user Extension Block.
•Press and hold the left mouse button.
•Drag the call to another users Extension Block and release your mouse button.
•The transfer has been completed.
Transferring a Call to another
User’s Voicemail Box
•Move your mouse over your user Extension Block.
•Press and hold the left mouse button.
•Drag the call to another users Voicemail Icon and
release your mouse button.
•The transfer-to-voicemail has been completed
11
© Schmooze Com, Inc. 2012
Transferring a Call to Another
User’s Cell Phone
•Move your mouse over your user Extension Block.
•Press and hold the left mouse button.
•Drag the call to another users Cell Phone Icon and
release your mouse button.
•The call has been transferred to the users cell phone
12
Parking and Placing Calls On Hold
Parking a Call
Call Parking allows you to put a call on “hold” and pickup that call from any phone or XactView
application in your organization.
To park a call you are currently connected with, click on (Park Call Button) in your user Extension
Block with your left mouse button. The call will then be automatically transferred into the parking
lot and you can see the parked call in the Parked Calls tab
13
When either placing a call on hold or parking a call you can then go into the Held
Call/Parked Calls Tab and add notes for each caller to easily remember who they
are holding for. The only difference between held calls and parked calls is that held
calls can only be viewed and picked up by you and parked calls can be viewed and
answered by anyone in your organization.
© Schmooze Com, Inc. 2012
Managing Held and Parked Calls
Managing Parked Calls
•You can manage all parked calls in the Parked Calls
tab.
•You can add notes for each parked call. Examples of
notes are: “Holding for Mike” or “Company XYZ
holding for shipping department”
•To retrieve a parked call, left click your mouse on the
parked call that you would like to connect with and
drag it to your or another users Extension Block.
14
15
If a caller has been parked for a long time and nobody is available to speak with that
caller, you can also drag that call to a users voicemail or cell phone icon.
© Schmooze Com, Inc. 2012
Managing Held Calls
•You can manage all calls in the Held Calls tab.
•You can add notes for each held call. Examples of
notes are: “Holding for Mike” or “Company XYZ
holding for shipping department”
•To retrieve a held call, left click your mouse on the
held call that you would like to connect with and
drag it to your or another users Extension Block.
16
17
Held calls are only visible to the user that put that call on hold. If a caller has been
on hold for a long time and nobody is available to speak with that caller, you can also drag that call to a user’s voicemail or cell phone icon.
© Schmooze Com, Inc. 2012
Recording and Monitoring Calls
Recording a Call You Are On
To record a call that you are currently on, click (Record Call) icon in your User Extension Block
with your left mouse button.
Recording Another Users Call
To record a call that another user currently on, click (Record Call) icon in the User Extension Block
of the active call you wish to record with your left mouse button.
You can only perform this action if you have permissions to record other users
phone calls
18
Barging Into Another User’s Call
Call barging allows you to listen to a conversation secretly. You do not need to worry about putting
your phone on mute, as your side of the conversation will be automatically muted by the system.
To barge into an active call:
Click on (Barge Call) in the user Extension Block of the active conversation with the left mouse
button.
Your phone will ring.
Pick up your phone and you will be hearing that conversation.
While you are automatically muted upon barging into a call, you can un-mute yourself by clicking
on the (Mute Icon) with your left mouse button.
19
You can only barge into conversations if you have permissions to barge into other
users calls
© Schmooze Com, Inc. 2012
Presence Management
Setting Your Presence
Click on the header of your local extension and select Availability
Select the presence that you want to be set.
Your presence is now set and other users can see if you are out of the office, at lunch, or in a
meeting.
Adding Notes To Your Presence
You can also add notes to your presence to give user’s a more detailed description of where you are.
Ideas for notes include: “Returning at 1 PM” or “Out of the office for the reset of the day in
meetings”
To add a note:
Right click on your user tab and select notes.
Type your note.
20
To See Notes Set By Other User
Hover over their user Extension Block with your mouse button and their notes will appear.
21
© Schmooze Com, Inc. 2012
Chatting and Sending Emails
Chats
To start a chat with another user, click on (Chat Icon) in the user’s Extension Block with your left
mouse button and start typing a private message to them.
All users who do not have chat enabled or are not logged in will have a grey X in the chat icon as
shown below.
To start a chat simply click on the chat icon and a chat window should pop up like below and you
can start chatting with that user.
Chat (default)
Tom
New Conversation Jul 5, 2012 9:41:22 AM
(09:41:29) 4002: I have a call for you
(09:41:56) Tom: who is it?
Chat support is an extra feature that may not be enabled on your system
22
Emailing Another User
To send an email to a user, click on (Email Icon) in the users Extension Block with your left mouse
button. Your default email client (for example Outlook) will open up a new message window and
automatically fill in the users email address in the To: field for you.
23
© Schmooze Com, Inc. 2012
Conference Rooms
You have complete control over your conference rooms with the ability to transfer callers into the
conference room and then mute or kick participants of the Conference Room.
Mute
To mute a user in the conference room, right click on the user and select the Mute option
Kick
To kick a user from the conference room, right click on the user and select the Kick option
24
Transferring a Call or User into the Conference Room
To transfer a call into the conference room: •Move your mouse button over your user Extension Block or another users
•Press and hold the left mouse button
•Drag the selection to the conference room of your choice
• That call or user will now be in the conference room
Joining a Conference Room
•To join a conference room, left click on the
conference room you would like to join.
•Your phone will ring.
•Pick up your phone and you will be connected to the
conference room
25
© Schmooze Com, Inc. 2012
Queues
Within the queues section at a glance we can see information about the queues that XactView is
setup to manage. When creating queues in the Admin GUI of your PBX you can decide on which
queues XactView can report on by checking the box that say “Add to XactView”
XactView
Add to XactView
Queue Snapshot Mode
In snapshot mode we can see: Held Calls (default)
Conference Rooms (default)
Parked Calls (default)
• How many callers are waiting in the queue
• How many agents are logged in and the percentage of those agents that are available to take a call
•How many agents are on a Call
•How many Completed Calls
•How many Abandonded Calls
•Average Hold Time
•and other items
Queues (default)
Name
Calls
Agents
On Call
Completed
Abandoned
Avg. Hold Time
SC-Emergency
0
9 (90%)
1 (11.1%)
21 (84%)
4 (16%)
00:00:06
FS-Admin
0
4 (100%)
1 (25%)
20 (74.1%)
7 (25.9%)
00:00:07
SC-Support
0
9 (90%)
1 (11.1%)
52 (88.1%)
7 (11.9%)
00:00:10
Test
0
1 (100%)
0 (0%)
0 (0%)
0 (0%)
00:00:00
SC-Sales
0
6 (100%)
1 (16.7%)
34 (97.1%)
1 (2.9%)
00:00:13
FS-Support
0
8 (88.9%)
1 (12.5%)
39 (86.7%)
6 (13.3%)
00:00:40
HCHT
• You can change which columns are displayed in the snap shot mode by clicking on the setting icon on the right upper corner of the queues snap shot screen. • You can also change things like the font size, row height and other styling settings of the queue snap
shot tables.
Queues (default)
Queue Indepth Mode
Held Calls (default)
Conference Rooms (default)
• You can double click with your mouse’s left button
on any individual queue inside the Snap Shot mode to have it open a more indepth table of that queue inside a new tab.
Parked Calls (default)
Queues (default)
Name
Calls
Agents
On Call
Completed
Abandoned
Avg. Hold Time
SC-Emergency
0
9 (90%)
1 (11.1%)
21 (84%)
4 (16%)
00:00:06
FS-Admin
0
4 (100%)
1 (25%)
20 (74.1%)
7 (25.9%)
00:00:07
SC-Support
0
9 (90%)
1 (11.1%)
52 (88.1%)
7 (11.9%)
00:00:10
Test
0
1 (100%)
0 (0%)
0 (0%)
0 (0%)
00:00:00
SC-Sales
0
6 (100%)
1 (16.7%)
34 (97.1%)
1 (2.9%)
00:00:13
FS-Support
0
8 (88.9%)
1 (12.5%)
39 (86.7%)
6 (13.3%)
00:00:40
HCHT
26
• Inside this screen we can see each agent and who they are talking with and a list of call callers waiting in the queue with their caller ID information.
SC-Emergency Queue (default)
A
Statistics
Calls 0/*
Completed: 21 (84%)
Position
Name
Number
Hold Time
Abandoned: 4 (16%)
1
Mike Smith
(920) 886-8130
00:00:32
Service Lvl.:
60 (95.2%)
Agents 9/10 (90%)
Name
Extension
Agent Name
Agent Status
Calls Taken
Bryan Wa
4003
Bryan Walters
Talking To...
Available
0/21 (0%)
Luke Duq
4006
Luke Duquaine
Available
0/21 (0%)
Tony Lew
4002
Tony Lewis
Available
0/21 (0%)
Provision
4028
Provision Room
Available
0/21 (0%)
Matt Scha
4005
Matt Schadt
In Use
0/21 (0%)
Moshe 91
2004
Moshe 9143i
Available
0/21 (0%)
Bryan Wa
2112
Bryan Walters
Available
0/21 (0%)
Luke Duq
2301
Luke Duquaine
Available
0/21 (0%)
Moshe Br
4004
Moshe Brevda
Unavailable
0/21 (0%)
Tony Lew
2203
Tony Lewis M3
Available
0/21 (0%)
John Doe
Talking To (...
Talk Time
(920) 886-8132 00:14:56
Last Call Ti...
Idle Time
Actions
• In this mode you can steal a call out of queue and drag it to any extension including yourself. Simply press and hold the left button of your mouse on the caller you want to steal and then drag it to any extension on XactView just like you would for a normal drag and transfer.
Agent Login and Logout
• Right from XactView you can log agents in and out of any queues. To do so we will right click on the blue Agent icon in our Extension Block with the mouse.
Local Extensions (Schmooze)
Call
Dick Johnson <7007>
[Available]
• Hover your mouse over the Queues option and a drop down of all queues should display. You can then pick any queue you would like to log in or out of.
Local Extensions (Schmooze)
Call
Dick Johnson <7007>
[Available]
Queues
FS-Admin
Pause
FS-Support
Penalty
SC-Emergency
SC-Sales
27
SC-Support
© Schmooze Com, Inc. 2012
Test
Any queue that you are logged into will have a check mark next to it. Any
queue that you are not logged into will be blank where the check mark usually
is. If you try and log out of a queue but it still shows you are logged in, then you
are logged into that queue as a static agent which means you can not log out of that
queue. Agent types can be either static or dynamic with dynamic meaning you can log in and out
of queues and this is set in the PBX Admin settings of your phone system under queues and would
need to be changed there.
Agent Pause and UnPause
• Any agent regardless if they are static or dynamic agent can pause or unpause themselves in a queue. While paused you are still logged into the queue but will not receive any calls until you unpause your self.
• To toggle your pause status right click on the blue Agent icon in our Extension Block with your mouse.
Local Extensions (Schmooze)
Call
Dick Johnson <7007>
[Available]
• Hover your mouse over the Pause option and a drop down of all queues that you are logged into will appear. You can then pick an individual queue at a time to pause or unpause yourself in. You can also pick the Pause All or Unpause All option to have it pause or Unpause you in all queues.
Local Extensions (Schmooze)
Call
Dick Johnson <7007>
[Available]
Queues
Pause
Pause All
Penalty
Unpause All
FS-Admin
FS-Support
SC-Emergency
SC-Sales
SC-Support
Test
• Any queue that you are paused in will have a check mark when you hoover over that queue and any queue that you are unpause in will not have a check mark next to it.
28
Do Not Disturb (DND)
Do Not Disturb in XactView will give you control over toggling your current DND state of the PBX.
When DND is enabled all calls to your extension will go right to voicemail.
•To toggle your DND status press the green icon in your extension profile
My Extensions (default)
Call
Dick Johnson <7007>
[Available]
•We should now see a red X and the text of the extension has turned red.
My Extensions (default)
Call
Dick Johnson <7007>
29
[Available]
•With proper permissions you can also toggle the DND state of any other user by clicking on their
DND icon in their Extension Block.
© Schmooze Com, Inc. 2012
Extension Directories
Extension directories let you group common extensions together in a group such as sales or support.
You can then view the individual group of extensions instead of the default Everyone Group. You
can also share these groups you create with other users so they can view and use the same group.
Create Extension Directory
• To create an extension directory we will bring up the Extension Directory module in XactView and in the Text Box next to add, type in a name for this group.
Extension Directories (default)
Add
• Now press the Add button and it should be displayed in the list of Extension Groups below.
Extension Directories (default)
Add
Sales
• We can now drag any extensions from the Extensions tab into this group by pressing and holding the left mouse key over any Extension Block and dragging it over to the Sales Group icon and releasing your mouse button.
Extension Directories (default)
Add
Sales
Sales
Adam Doe <1234>
• Now if we click the arrow next to the Extension Directory called Sales it will drop down and show us all the extensions that are in this group
Extension Directories (default)
Add
Sales
Adam Doe <1234>
Tom Jones <5678>
John Smith <9101>
30
Using the Extension Directory
•Now that we have 1 or more extensions directories setup we can toggle between the everyone group
or any of our Extension Directories on our main Extension view module in XactView.
• On the main XactView tab click on the drop down box on the right side that says Directory and pick the directory you just created. At anytime you can go back to the default everyone directory to see all extensions.
Extensions (Default)
Search:
Sort:
Tom
Caine
Chuck
Lewis<7010>
<7003>
Sharing Extension Directory
Name
Reverse:
[Available]
[Available]
Sam Korth <7008>
Directory:
Sales
[Available]
•You can share an extension directory so other users can use the same extension directory you have created in their profile.
•To remove, rename or share this group with other users you will need to hover you mouse over the group name and press the right mouse button.
Extension Directories (default)
Add
Sales
Remove
Adam Doe <1234>
Rename
Tom
Jones <5678>
Permissions
John Smith <9101>
31
• Clicking the Permissions should bring up a screen that will let you add other users who can view and use this Extension Directory. We can see the table is blank so we have not shared this with any other users yet.
• We will pick an extension from the drop down under Add User to Permission Set.
© Schmooze Com, Inc. 2012
Permissions for Directory Sales
Owner: 4002
User
Set Directory Owner
4002
Admin
Add Ext.
Remove Ext.
Set
Add User to Permission Set
1000
Add
Remove Selected Permissions
Remove Selected Permissions
Save
Cancel
• We can now give them more advanced permissions like can they become the admin which means they can manage it just like you manage the list or you can give them permission to just be able to add or remove other extensions to the list but not manage who can view and use the list.
Permissions for Directory Sales
Owner: 4002
User
Set Directory Owner
4002
Set
Admin
Add Ext.
Remove Ext.
4001
Add User to Permission Set
4001
Add
Remove Selected Permissions
Remove Selected Permissions
Save
Cancel
32
Preferences
Call Popup •XactView can do 2 different types of Call Popups. It can pop up a little window with the Caller ID information every time you recieve a call on your lower right corner of your monitor.
• You can also have XactView do a Call Popup to open a web browser and pass it the Caller ID information into the string for CRM software integration.
•To Setup Call Popups click on Preference in the top menu of XactView under Tools.
File
View
Tools
Help
Preferences
Parked Calls (default)
•You should see the main Preference screen now and can pick Call Popup
Preferences
type filter text
General
Administration Login
Advanced
Call Popup
Chat
Extension
Parked Call Alerts
Profiles
Call Popup
Caller Id Popup
Enabled
Leave popup open for 5
second(s).
Call Popup
Never
On Ringing
On Answer
On Click
Open on calls from office extensions
Use %CID_NAME% to insert the caller’s name.
Use %CID_NUMBER% to insert the caller’s number.
URL
...
Application
Arguments
Restore Defaults
OK
33
Apply
Cancel
•At the top we can define if we want a Call Pop up with the Caller ID to come up each time on our lower right corner of our monitor and if so how long we want it to stay up for when getting a call.
•We can then setup external Call Popup to a web browser or even an application on your computer that supports sending it information externally.
•In our example below we are going to set the Call Popup to do a google search of the Caller ID Number when we Answer the call and not on Ringing.
© Schmooze Com, Inc. 2012
Preferences
type filter text
Call Popup
General
Administration Login
Advanced
Call Popup
Chat
Extension
Parked Call Alerts
Profiles
Caller Id Popup
Enabled
Leave popup open for 5
second(s).
Call Popup
Never
On Ringing
On Answer
On Click
Open on calls from office extensions
Use %CID_NAME% to insert the caller’s name.
Use %CID_NUMBER% to insert the caller’s number.
URL
www.google.com/%CID_NUMBER%
...
Application
Arguments
Apply
Restore Defaults
OK
Chat Preferences
Cancel
•With chat preferences you can set things such as when to play tones and what type of notifications to get of new chats and the size of the chat popup box.
•To Setup Chat Preferences click on Preference at the top of XactView under Tools.
File
View
Tools
Help
Preferences
Parked Calls (default)
•You should see the main Preference screen now and can pick Chat.
Preferences
type filter text
General
Chat
Administration Login
Advanced
Call Popup
Play Sound When messages are sent
Chat
Flash task bar icon on new message.
Extension
Parked Call Alerts
Profiles
Flash tray icon on new message.
Flash user chat session tab on new message.
Flash chat window tab on new message.
Display domain name in the user tab.
Popup incoming message notification if window is minimized or in tray.
Popup incoming message notification if window open.
Show previous chat session.
Popup width(0 = auto)
0
Popup height(0 = auto)
0
Popup font size(0 = default)
0
Incoming chat notification popup duration(0 = unlimited).
5
Restore Defaults
OK
Apply
Cancel
34
Extension Settings
•Extension settings let you change some default settings as they relate to your profile.
• To Setup Extension Setting Preferences click on Preferences at the top of XactView under Tools.
File
View
Tools
Help
Preferences
Parked Calls (default)
• You should see the main Preferences screen now and can pick Extension.
You can now change the following settings: • Default Transfer Mode
Blind- When you drag and drop to transfer a call, as soon as you drag the caller to a new extension it will hang up your portion of the call.
Assisted- When you drag and drop to transfer a call, you will be connected to the person you are transferring the call to. You can talk with the person and when you hang up, the call that you are transferring will be transferred. While you are talking with the person you are transferring to, the caller will hear Music on Hold.
Ask- In this mode each time you do a transfer it will prompt you with a popup on which mode you want to use for that transfer.
Parked Call Alerts
35
• Box Size for the Extensions module. This is the size each extension block should be in the Extension module of XactView.
• Park Call Alerts lets you manage your Park Call Alert settings on how you want to be notified of waiting
parked calls that you parked and how often you want to
be notified.
© Schmooze Com, Inc. 2012
• To Setup Parked Call Alerts click on Preferences at the top of XactView under Tools.
File
View
Tools
Help
Preferences
Parked Calls (default)
• You should see the main Preference screen now and can pick Parked Call Alerts.
Preferences
type filter text
General
Administration Login
Advanced
Call Popup
Chat
Extension
Parked Call Alerts
Profiles
Parked Call Alerts
Parked Call Alert
Popup Delay: 5
seconds.(0 = Leave open)
...
Sound:
Leave blank for default sound.
Parked Call Note Alert
Popup Delay: 5
seconds.(0 = Leave open)
...
Sound:
Leave blank for default sound.
Parked Call Hold Time Alert
Interval:
60
Popup Delay: 5
seconds.
seconds.(0 = Leave open)
...
Sound:
Leave blank for default sound.
Restore Defaults
OK
Apply
Cancel
36
NOTES
37
The Wave of Future Business Phone Systems
www.schmoozecom.com
Toll Free: 866-834-0996
38